If you plan to keep your existing on-prem exchange server then it can be used / utilized as a SMTP Relay server. Else, if you plan to decommission the exchange server for good, you can utilize Office365 as a SMTP Relay server to relay the emails.
There are three ways to setup SMTP Relay in Office 365:
- SMTP Auth client Submission
- Direct Send
- Office 365 SMTP Relay
I recommend using either Office 365 SMTP Relay method or Direct Send method to configure SMTP Relay in Office 365. Please refer to the section Direct Send vs Office 365 SMTP Relay which will help you decide which one to use for your organization.
Below are some suggestions which can help you choose between Office 365 SMTP Relay and Direct Send method.
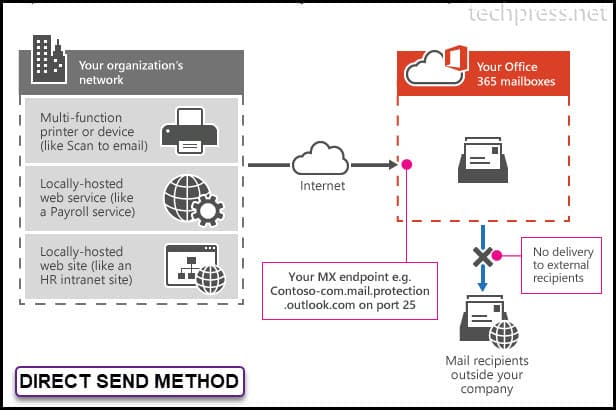
📌 Direct Send Method does not work if you want to send the email to External recipients for example any Gmail, Yahoo, Hotmail email address. Direct End method can send an email to External recipients if the External Organization is also using Office 365 to host the mailboxes.
📌If your requirement is to send emails to Internal and any External domain recipients then choose Office 365 SMTP Relay Method.
1. SMTP Auth client Submission Method
Below are the Pre-requisites for using SMTP Auth client submission method to configure SMTP relay in Office365:
- A Licensed Office365 User Mailbox is required.
- SMTP AUTH must be enabled for Mailbox which will be used to send the emails.
- Device must support TLS 1.2 or above (Please check the vendor documentation to confirm this).
If your authentication policy disables basic authentication for SMTP, clients cannot use the SMTP AUTH protocol. Microsoft will disable Basic authentication for all new and existing tenants starting from 1st Oct 2022. Therefore, this is my least recommended option for configuration of SMTP relay in Office 365.
Direct Send vs Office 365 SMTP Relay
Direct Send method and Office 365 SMTP Relay method both use MX Endpoint of your domain to configure SMTP Relay. Both can be used when your environment has SMTP AUTH disabled.
Use Direct Send when you need to send messages to recipients in your own organization who have mailboxes in Office 365. Direct send will not work if you want to send email to External email address (Gmail, yahoo, hotmail etc.). However, If the external recipient mailboxes are also hosted on Office 365, it will work fine.
Direct Send does not require your device or application to have a static IP address to configure it. However, Static IP address is recommended so that an SPF record can be created for your domain. The SPF record helps avoid your messages being flagged as spam.
Direct Send and Office 365 Relay both does not require your device to Support TLS.
| Featues | Direct Send | Office 365 SMTP Relay |
|---|---|---|
| Send to Internal Users | Yes | Yes |
| Send to External Users | No (Yes, for external recipients having Office365 Mailboxes) | Yes |
| Network Port Requirement | Port 25 | Port 25 |
| TLS Requirement | Optional | Optional |
| Requires Authentication | None | Device / Printer / Application must have Static IP address assigned. |
2. Configure SMTP Relay in Office 365 using Direct Send method
In the previous section of this blog post, I have explianed the difference between Direct Send and Office 365 SMTP Relay method. If Direct Send meets your requirements and you do not have any requirements for sending an email to External recipients like Gmail, yahoo, hotmail etc. You can follow below steps to configure it.
1. Find MX Endpoint of your Domain
To find the MX Endpoint of your domain, You need to follow below steps:
- Login on Microsoft 365 admin center.
- Go to Settings and click on Domains.
- Click on your organization domain name. For example: techpress.net.
- Click on DNS records Tab.
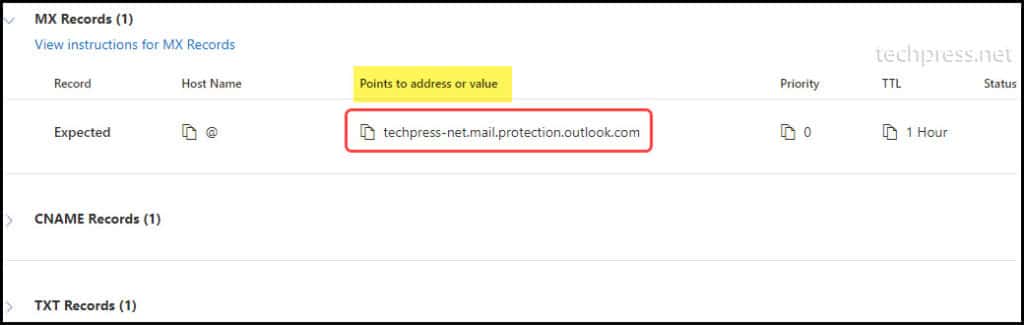
- You can find MX Endpoint on DNS records tab. Click on it to Open.
You will find the MX Endpoint under Points to address or value column. Click on it to copy it on a notepad.
The format of the MX Endpoint is yourdomain-com.mail.protection.outlook.com
2. Find the Static IP Address of the Device or Application [Optional]
As Microsoft Recommends to use Static IP Address for Direct Send Method but its not mandatory. If your Device or Application is not using a static IP address, make sure you assign a static IP address and then note down the IP Address of the device on a notepad. We will add static IP address of the device in your domain’s SPF record.
3. Update SPF Record [Optional]
This is also an optional step but highly recommended by Microsoft. Updating SPF record with Static IP Address of your Device or Application will help to avoid your emails being marked as SPAM. SPF records identifies which servers are allowed to send emails on behalf of the your domain.
Example:
- Device / Printer IP Address: 10.20.1.56
- Currently configured SPF record:
v=spf1 include:spf.protection.outlook.com -all
Add your Device / Application IP Address in the SPF record as below:
v=spf1 ip4:10.20.1.56 include:spf.protection.outlook.com -all
4. Configure your Device / Application for Direct Send SMTP Relay
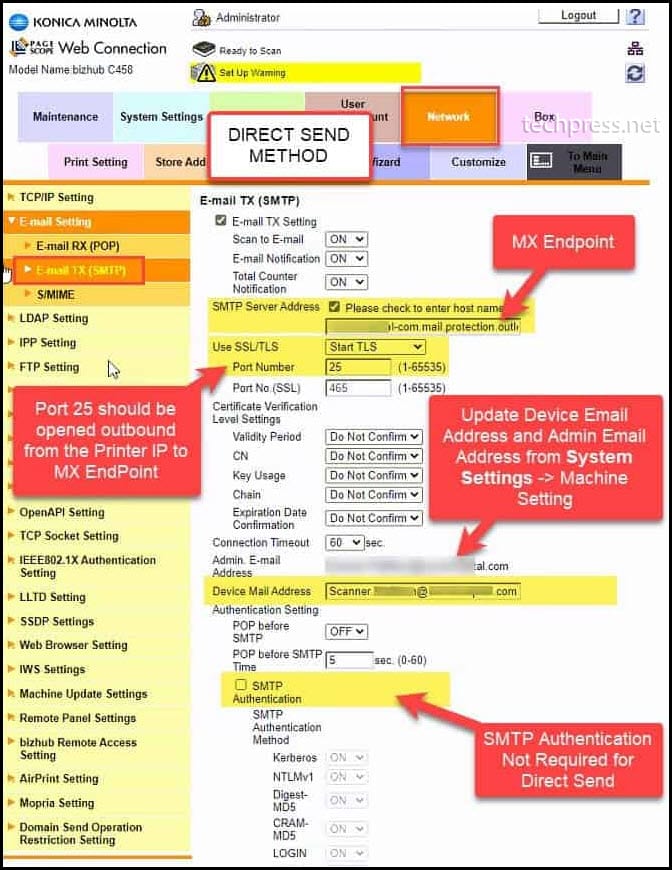
Last and final step is to configure your Device / Application and add SMTP relay details so that Device / Application can send emails using the Direct Send SMTP Relay. In our Example, we will be using a Printer to configure Direct Send. Let’s see which SMTP settings needs to be configured on the Printer.
If you want to configure SMTP Relay for a device other than your printer, You can still use below SMTP details to configure it.
| SMTP Server | Port | TLS | UserName | Password |
|---|---|---|---|---|
| MX Endpoint For Example: <yourdomain>-<domain extension.mail.protection.outlook.com | 25 | Not Required (Recommendation is to enable if this option is available) | Any Email Address of your domain. This user does not require a mailbox. For example: myscanner@techpress.net | Not required (you can turn off SMTP Authentication) |
Example:
I have captured a screenshot of one of my Printers to show you how to configure Direct Send. You can use the same settings to configure Direct Send on any other device as well. This screenshot is just for your reference:
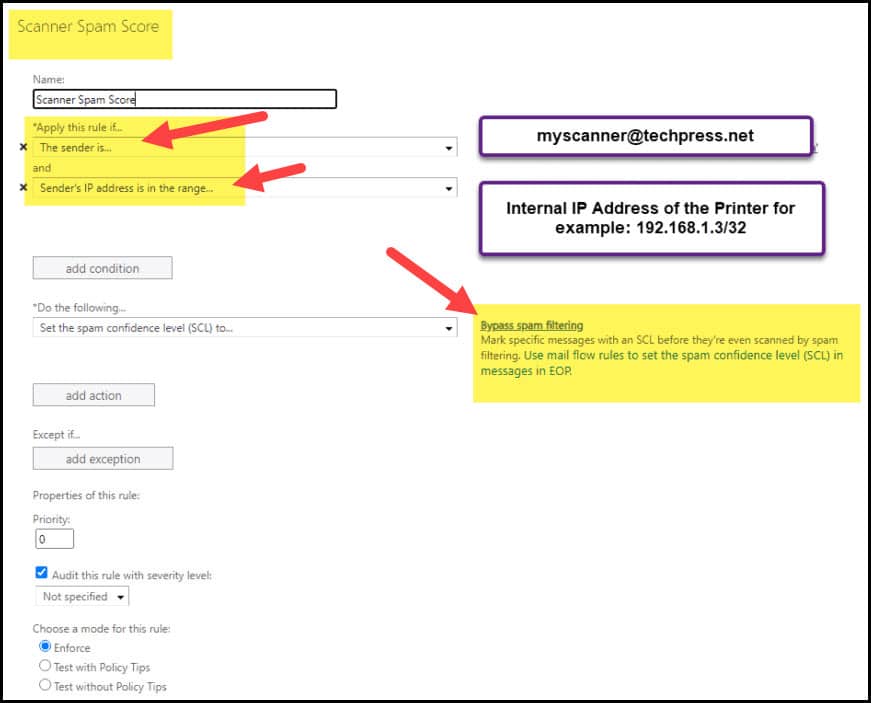
5. Create Bypass Spam Filtering Rule [Optional]
This step is optional and you do not need to create a bypass SPAM Filtering rule in Exchange Online. You have updated SPF record with your device IP address which should avoid the emails sent from your device to be marked as SPAM.
If your emails are still going into the SPAM folder. You can create a SPAM Bypass rule in office365 for the email ID which you have used to send the email from on the device.
- Login to Exchange online management portal
- Click on Mail flow -> Rule -> Create a Rule.
3. Configure using Office 365 SMTP Relay Method
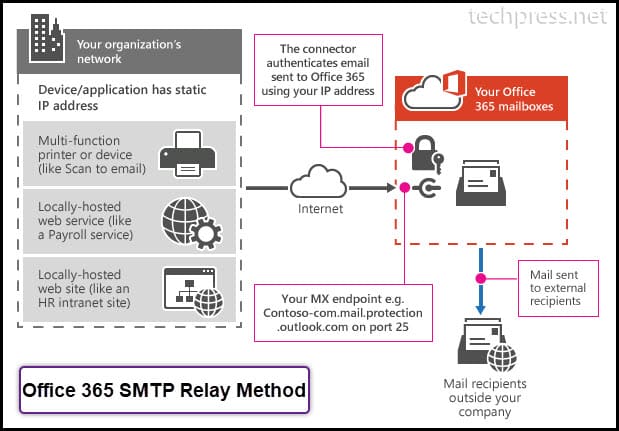
Direct Send method has limitations of sending the emails to external recipients. However, Office 365 SMTP Relay does not have that kind of limitation in place. You can use Office 365 SMTP Relay Method to send the email to any External recipient. Let’s check the steps to configure Office 365 Relay on your Device.
1. Find Public IP Address of the Device or Application
First thing you need to do is to find the public IP address of the Device or Application. If your device is not assigned with a Public IP and is using Dynamic IP address, Please update it to use Static IP Address. Copy the IP address in a notepad. We will need this IP Address while configuring a Connector in Exchange Online.
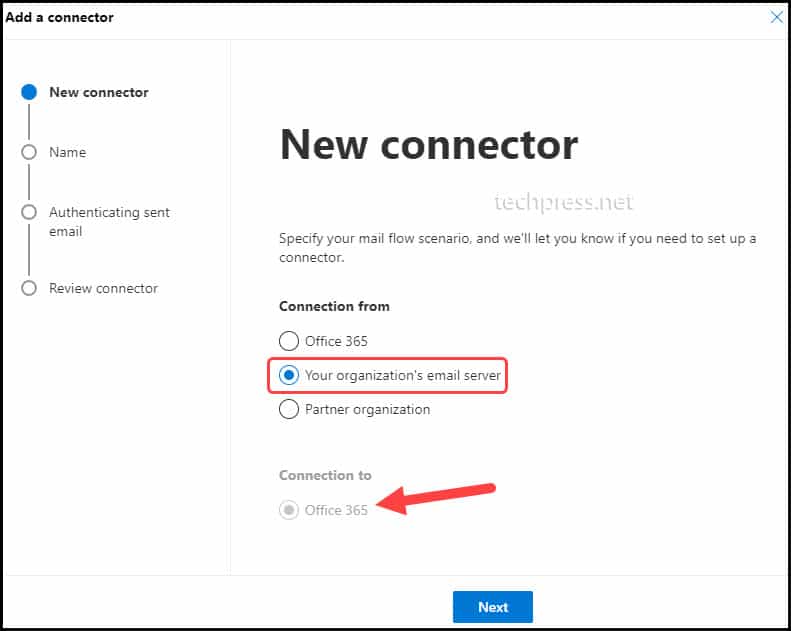
2. Create a Connector on Exchange Admin Center
Next step is to create a connector on Exchange Admin Center. Please follow below steps to create a connector:
- Login on Microsoft Exchange Admin Center
- Click on Mail Flow and then Connectors
- Click on + Add a connector
- On Add a Connector Page. Select Connection from Your organization’s email server and Connection to Office 365 and click on Next to proceed.
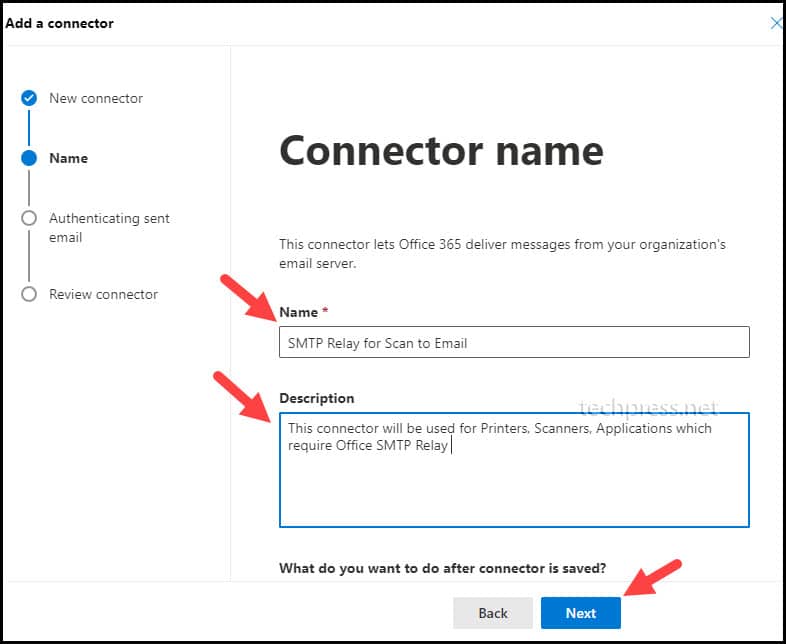
- Provide a Connector Name and Description. Click on Next to Proceed.
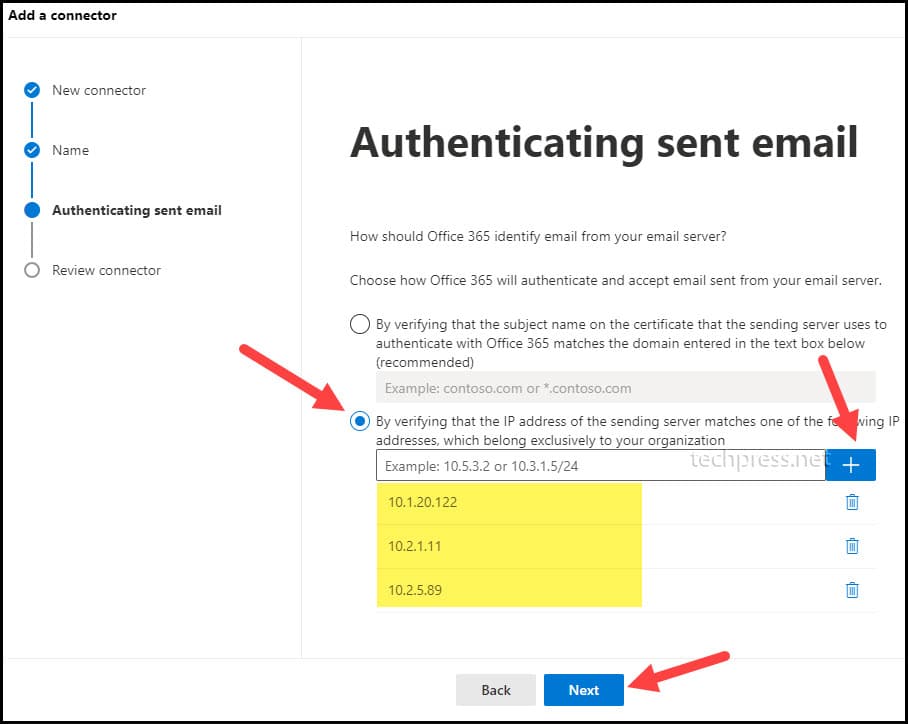
- On Authenticating sent email page. Select the option “By verifying that the IP address of the sending server matches one of the following addresses, which belongs exclusively to your organization“.
Add your Device / Application IP Addresses into the list. Add all Device’s IP addresses which you want to configure for Office 365 SMTP Relay. For example, In my organization I have 3 Printers which I want to configure for SMTP Relay. Therefore I have added the IP addresses of those 3 printers here.
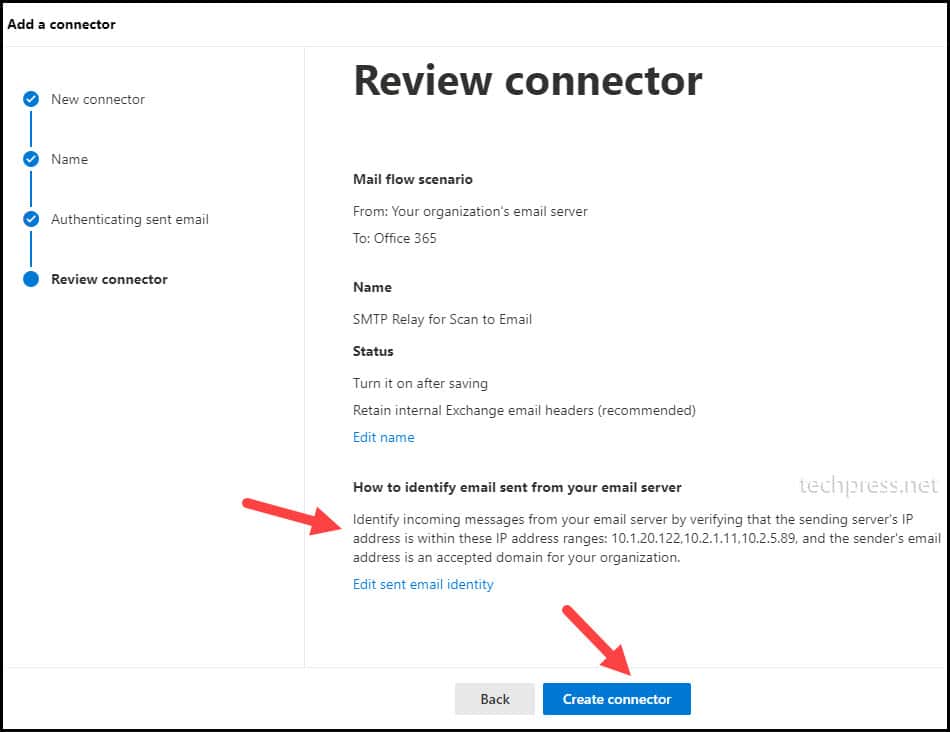
- On Review connector page, you can review the connector configuration and click on Create connector to create this Connector.
3. Update SPF Record
Now you need to update the SPF record and add all the Device IP’s in the SPF record which you added in the connector created on Exchange Admin Center.
Example:
- Device / Printer IP Addresses: 10.1.20.122, 10.2.1.11 and 10.2.5.89.
- Currently configured SPF record:
v=spf1 include:spf.protection.outlook.com -all
Add your Device / Application IP Addresses in the SPF record as below:
v=spf1 ip4:10.1.20.122 ip4:10.2.1.11 ipv4:10.2.5.89 include:spf.protection.outlook.com -all
4. Find MX Endpoint of your Domain
To find the MX Endpoint of your domain, You need to follow below steps:
- Login on Microsoft 365 admin center.
- Go to Settings and click on Domains.
- Click on your organization domain name. For example: techpress.net.
- Click on DNS records Tab.
- You can find MX Endpoint on DNS records pag. Click on it to Open.
You will find the MX Record under Points to address or value column. Click on it to copy it on a notepad.
The format of the MX Endpoint is yourdomain-com.mail.protection.outlook.com
5. Configure your Device / Application for Office 365 SMTP Relay
Last and final step is to configure your Device / Application and add SMTP relay details so that Device / Application can send emails using the Office 365 SMTP Relay.
| SMTP Server | Port | TLS | UserName | Password |
|---|---|---|---|---|
| MX Endpoint For Example: <yourdomain>-<domain extension.mail.protection.outlook.com | 25 | Not Required (Recommendation is to enable if this option is available) | Any Email Address of your domain. This user does not require a mailbox. For example: myscanner@techpress.net | Not required (you can turn off SMTP Authentication) |
6. Create SPAM Bypass rule [Optional]
Please refer to the section of Configuration of SMTP Relay using Direct Send method where the steps to create SPAM bypass rule is given. This is an optional troubleshooting step and can be used in case the emails are being marked as SPAM.
Troubleshooting Office 365 SMTP Relay
Now we have setup Office 365 SMTP Relay. In case of any issues in email delivery, you can use below steps to troubleshoot.
Check SMTP AUTH at organization level
You can use below command to check SMTP AUTH at organization level. As we are not using SMTP client submission method, SMTP AUTH should be disabled.
Get-TransportConfig | Format-List SmtpClientAuthenticationDisabledCopy
Check SMTP AUTH at Mailbox level
Get-CASMailbox "Sonia Neil " | fl SmtpClientAuthenticationDisabledCopy
If you see the output of the command as SmtpClientAuthenticationDisabled: That means this setting is controlled by the corresponding SmtpClientAuthenticationDisabled parameter on the Set-TransportConfig cmdlet for the whole organization.
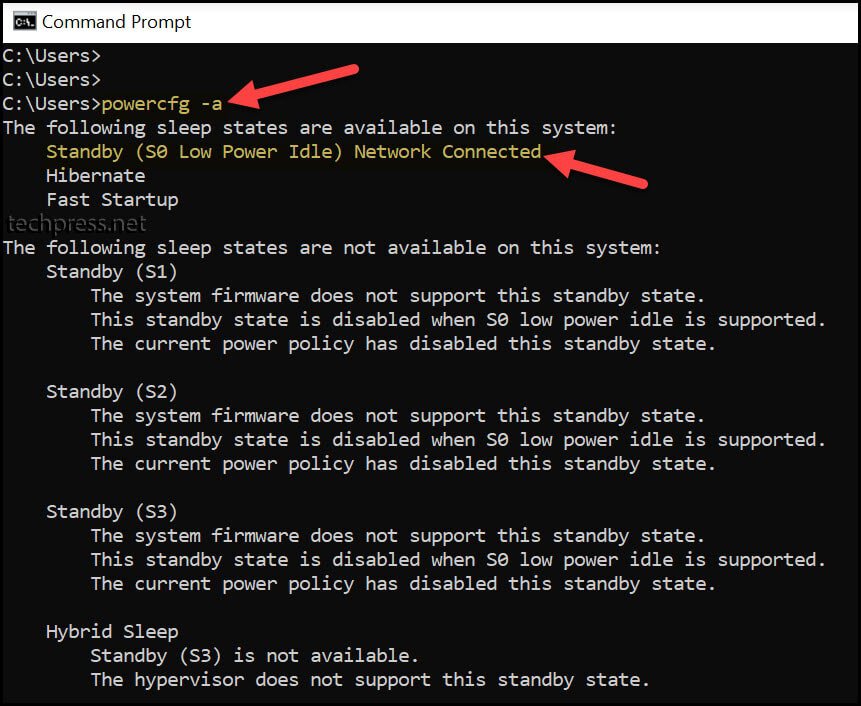
Test Port 25 using Telnet
If you are facing any issues in email delivery then you can verify if Port 25 is opened or blocked on the Firewall. If Port 25 is blocked then you may need to ask the Network admin to open it for the device IP which is sending emails. You can follow below steps to test Port 25 via Telnet.
- Launch Command Prompt on a PC (IP of the PC should be in the same subnet as Device / Printer / Application)
- Type Command telnet <MX EndPoint> 25 and press Enter.
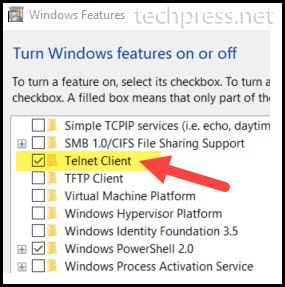
(If telnet command is not recognized on the Windows 10 or Windows 11 PC. The Please first Install Telnet Client by going to Start menu -> Type “Turn Windows featured on or off” and find Telnet Client, Select it and click OK).
- Once Telnet is installed on your Windows device. You can open a command prompt and type below command to test if Port 25 is opened or not.
Telnet <your MX endpoint> 25

Once you enter on the above command, you should get a response from the server. Which means that Port 25 is opened.

Send a Test email using Telnet
If you want to check the email delivery then you can use the Telnet command and send a test email. This test can confirm if there are any issues in email delivery. You can follow below steps to test a test email using telnet.
- Login on a computer in the same subnet as the Device / Printer / Application.
- Open Command prompt as administrator.
- Type command
Telnet <your MX endpoint> 25.

- You will get a response back after press enter on the Telnet command. On Telnet Console Type below commands:
ehlo
mail from – Type from email address
rcpt to – Type recipient email address to send a test email.
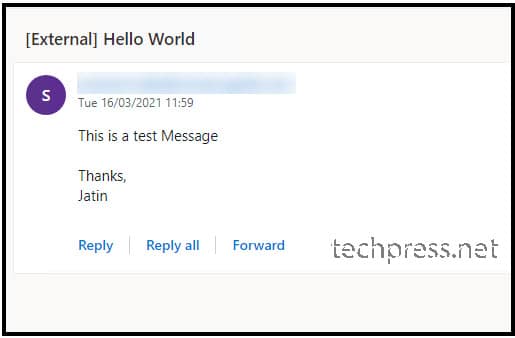
If the recipient receives this test email then there is no issue witth email delivery.
ehlo
MAIL FROM:<myscanner@techpress.net>
250 2.1.0 Sender OK
RCPT TO:<internal email ID>
250 2.1.5 Recipient OK
DATA
354 Start mail input; end with <CRLF>.<CRLF>
SUBJECT:Hello World

This is a test message

Thanks,
John A.

. <Dot to end the email>
Copy
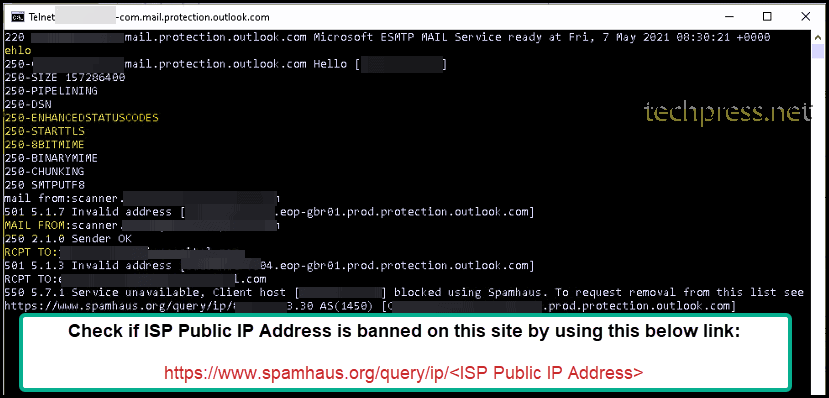
Check if ISP Public IP Address is banned
When you are sending an email using Telnet and if you get a message saying that your sending IP is banned. Then you need to unblock / remove your IP from banned list so that Devices on your network can send email.

To remove your ISP Public IP Address from banned list, you need to login on https://senders.office.com and type your email ID and ISP Public IP Address of your organization. Follow the instuctions on the site to get your IP De-listed. This may take from 30 minutes to couple of hours to unblock your IP.
After you get your IP De-listed from https://senders.office.com. Try to send an email using Telnet again. This time if your IP is successfully de-listed, the recipient should receive the email.

Test email has been received successfully.
Delisting / Unblock of ISP Public IP on Spamhaus.org
When you are sending an email using Telnet and if you get a message saying that service unavailable, Client host <your ISP Public IP address> blocked using Spamhaus. You need to visit the URL https://www.spamhaus.org/query/ip/<ISP Public IP Address> to get your IP De-listed.
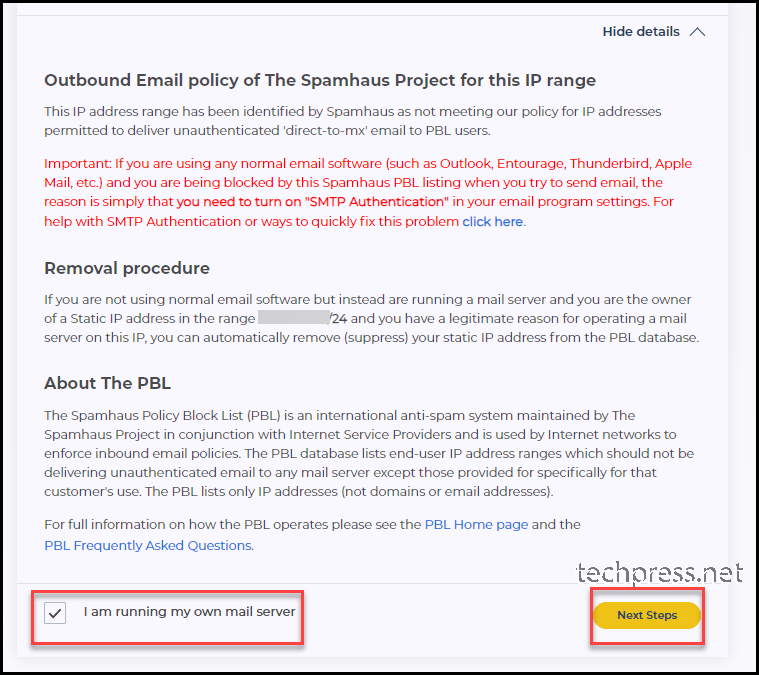
How to unblock your ISP Public IP on spamhaus.org
Please follow below steps to unblock your ISP Public IP from spamhaus.org.
- Once you land on https://www.spamhaus.org/query/ip/<ISP Public IP Address> site. Click on Show details and then click on “I am running my own mail server“.

- Select I am running my own mail server and clicon on Next steps.
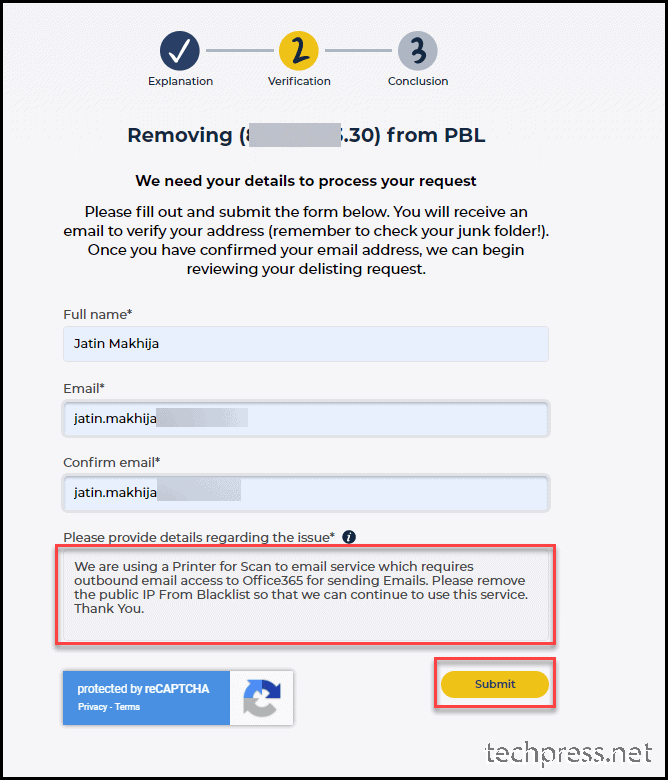
- Complete the form for unblocking your ISP Public IP. Provide a Name, Email Address and Provide details regarding the issue. Once you complete this form. click on Submit button.
- Form has been submitted. You can now wait for email verification link from Spamhaus.org.

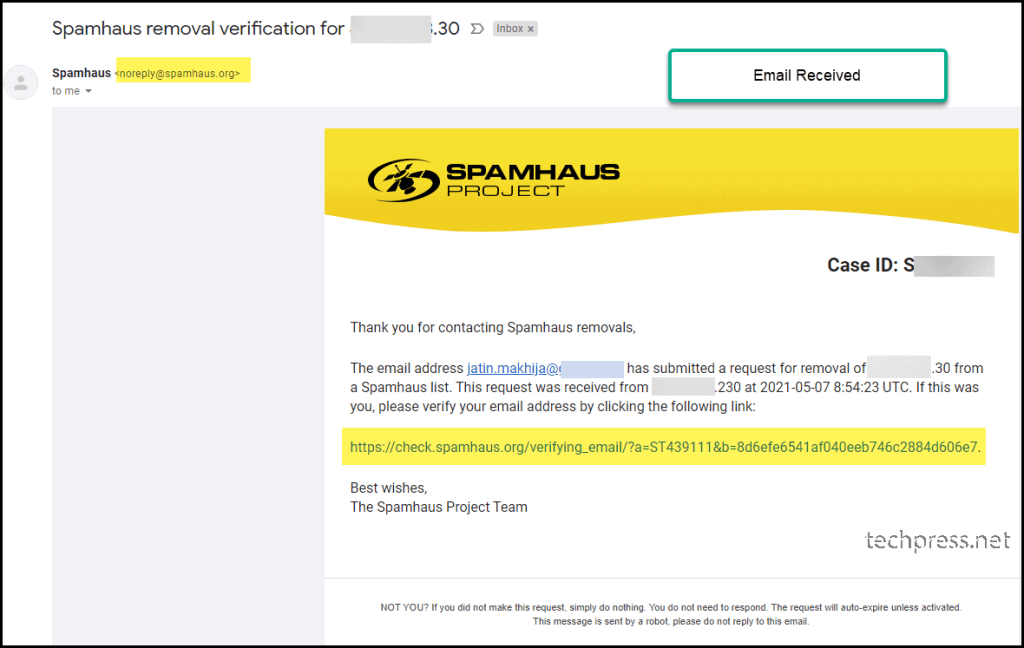
- Below is the email I received to verify my email address. Click on the link in the email for Email Verification.
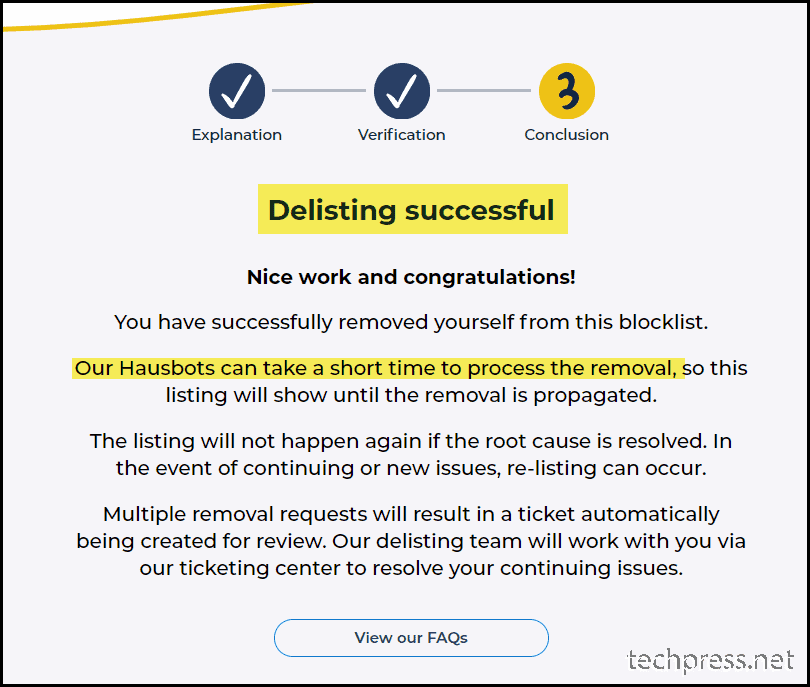
- Delisting has been successful. You can now try to use Telnet to send a test email to confirm email delivery issue has been rectifed. You can also check the Device / Printer / application to confirm if its able to send the email now.
Conclusion
In this blog post, we have seem how to setup SMTP Relay in Office 365. There are three ways to configure it. But the most recommended option is Office 365 SMTP Relay Method. Second best method is Direct Send method which can be used if you do not have the requirements to send the emails to External recipients like gmail, yahoo etc.
Third method which is least recommended is SMTP Auth Submisson method. As It requires a licensed mailbox and SMTP AUTH to be enabled for that mailbox. There is a cost associated with licensed mailbox and Microsoft does not recommend SMTP AUTH to be enabled.
We have also see the troubleshooting steps in case of email delivery issues. These troubleshooting steps helped me fixed issues while working on Office 365 relay for Multiple clients.
Source :
https://techpress.net/office-365-smtp-relay-setup-and-configuration/


 A confirmation message appears.
 If you cannot find the PSID, contact the disk manufacturer.