WordPress 6.5.5 Security Release – What You Need to Know

Alex Thomas
June 25, 2024

Did you know Wordfence runs a Bug Bounty Program for all WordPress plugin and themes at no cost to vendors? Researchers can earn up to $10,400for all in-scope vulnerabilities submitted to our Bug Bounty Program! Find a vulnerability, submit the details directly to us, and we handle all the rest. For a limited time, all high risk issues are in-scope for all researchers!


WordPress Core 6.5.5 was released yesterday, on June 24, 2023. Contained within this release are three security fixes addressing two Cross-Site Scripting (XSS) vulnerabilities and one Windows-specific Directory Traversal vulnerability. Despite these vulnerabilities being medium-severity, the worst of them (specifically, the XSS vulnerabilities) can allow for site takeover by an authenticated, contributor-level user if successfully exploited.

The Directory Traversal vulnerability has been backported to every version of WordPress since 4.1, with the XSS vulnerabilities being backported to the major version in which the functionality was released. WordPress has supported automatic core updates for security releases since WordPress 3.7, and the vast majority of WordPress sites should receive a patch for their major version of WordPress automatically over the next 24 hours. We recommend verifying that your site has been automatically updated to one of the patched versions. Patched versions are available for every major version of WordPress since 4.1, so you can update without risking compatibility issues.

The Wordfence Threat Intelligence Team released a new firewall rule the same day to protect Wordfence PremiumWordfence Care, and Wordfence Response customers for one of the XSS vulnerabilities that didn’t have adequate protection.This rule will be available to free Wordfence users in 30 days, on July 24th, 2024. All Wordfence users have protection for the remaining two vulnerabilities.

If your site has not been updated automatically we strongly recommend updating manually as soon as possible, as two of the vulnerabilities patched in this release can be used by an attacker with a low-privileged contributor-level account to take over a site.

Technical Analysis and Overview

As with every WordPress core release containing security fixes, the Wordfence Threat Intelligence team analyzed the code changes in detail to evaluate the impact of these vulnerabilities on our customers, and to ensure our customers remain protected.

Contributor+ Stored Cross-Site Scripting in the HTML API

Description: WordPress Core < 6.5.5 – Authenticated (Contributor+) Stored Cross-Site Scripting via HTML API
Affected Versions: WordPress Core < 6.5.5
Researcher/s: Alex Concha (WordPress Security Team)Dennis Snell (WordPress Core Team)Grzegorz Ziółkowski (WordPress Security Team)Aaron Jorbin
CVE ID: Pending
CVSS Score: 6.4 (Medium)
CVSS Vector: CVSS:3.1/AV:N/AC:L/PR:L/UI:N/S:C/C:L/I:L/A:N
Fully Patched Version: 6.5.5
Link to Commit 1
Link to Commit 2

WordPress Core is vulnerable to Stored Cross-Site Scripting via the HTML API in various versions up to 6.5.5 due to insufficient input sanitization and output escaping on URLs. This makes it possible for authenticated attackers, with contributor-level access and above, to inject arbitrary web scripts in pages that will execute whenever a user accesses an injected page.

The changeset in WordPress 6.5.5 adds additional protections in the set_attribute() function of the HTML API to further escape URL attributes. Additionally, this changeset adds additional improvements.

Contributor+ Stored Cross-Site Scripting in the Template Part Block

Description: WordPress Core < 6.5.5 – Authenticated (Contributor+) Stored Cross-Site Scripting via Template Part Block
Affected Versions: WordPress Core < 6.5.5
Researcher/s: Rafie Muhammad (Patchstack)
CVE ID: Pending
CVSS Score: 6.4 (Medium)
CVSS Vector: CVSS:3.1/AV:N/AC:L/PR:L/UI:N/S:C/C:L/I:L/A:N
Fully Patched Version: 6.5.5
Link to Commit

WordPress Core is vulnerable to Stored Cross-Site Scripting via the Template Part block in various versions up to 6.5.5 due to insufficient input sanitization and output escaping on the ‘tagName’ attributes. This makes it possible for authenticated attackers, with contributor-level access and above, to inject arbitrary web scripts in pages that will execute whenever a user accesses an injected page.

The changeset for WordPress 6.5.5 adds additional sanitization to the Template Part block’s ‘tagName’ attribute. The Template Part block is available to contributor-level users. However, exploitation is only possible where the site’s theme uses this particular block.

Windows-only Directory Traversal

Description: WordPress Core < 6.5.5 – Authenticated (Contributor+) Directory Traversal
Affected Versions: WordPress Core < 6.5.5
Researcher/s: apple502jRafie Muhammad (Patchstack)Edouard L David Fifieldx89mishre
CVE ID: Pending
CVSS Score: 4.3 (Medium)
CVSS Vector: CVSS:3.1/AV:N/AC:L/PR:L/UI:N/S:U/C:N/I:L/A:N
Fully Patched Version: 6.5.5
Link to Commit

WordPress Core is vulnerable to Directory Traversal in various versions up to 6.5.5 via the Template Part block. This makes it possible for authenticated attackers, with contributor-level access and above, to include arbitrary HTML Files on sites running Windows.

Similar to the previous vulnerability, this Directory Traversal vulnerability is exploitable via the Template Part block. The changeset for WordPress 6.5.5 shows the addition of a path normalization function within the validate_file() function.

Conclusion

WordPress 6.5.5 includes patches for 3 medium-severity vulnerabilities. Two of these vulnerabilities are trivial to exploit as an authenticated, contributor+ user, and we recommend updating immediately if your site has not yet automatically done so.

We have released one new firewall rule to protect Wordfence PremiumWordfence Care, and Wordfence Response customers. This rule will be available to free Wordfence users in 30 days, on July 24th, 2024.

If you know someone who uses WordPress and isn’t keeping it automatically updated, we recommend sharing this advisory with them to ensure their site remains secure, as several of these vulnerabilities pose a significant risk.

For security researchers looking to disclose vulnerabilities responsibly and obtain a CVE ID, you can submit your findings to Wordfence Intelligence Bug Bounty Program and earn up to $10,400 for your submission.

Special thanks to István Márton, a Wordfence Vulnerability Researcher, for his assistance on reverse engineering the patches and ensuring Wordfence users have adequate coverage. 

Did you enjoy this post? Share it!

Source :
https://www.wordfence.com/blog/2024/06/wordpress-6-5-5-security-release-what-you-need-to-know/

How to Disable TLS 1.0 and TLS 1.1 on Windows Server?

Arun KL
February 13, 2024
11 minutes

Growing trends in cyber attacks made system administrators implement more secure communication protocols to protect their assets and network from attacks. TLS plays a vital role in the implementation stack. TLS is a critical security protocol that is used to encrypt communications between clients and servers. TLS 1.2 and TLS 1.3 are the two latest versions of the Transport Layer Security (TLS) protocol and offer many advantages over their previous versions. TLS 1.2 is the most widely used version of the TLS protocol, but TLS 1.3 is gaining popularity because of its efficiency and speed. As a system administrator, you should enable TLS 1.2 and TLS 1.3 on your Windows Server to enhance the security of your infrastructure, but wait, that’s not enough. You should disable TLS 1.0 and TLS 1.1 on Windows Server as they are deprecated for their weak security.

Before learning how to disable TLS 1.0 and TLS 1.1 on your Windows Server, let’s see about TLS 1.0 and TLS 1.1 and why you should disable TLS 1.0 and TLS 1.1 on your Windows Server

A Short Note About TLS 1.0 and TLS 1.1:

The Transport Layer Security (TLS) protocols are cryptographic protocols that provide communication security over the Internet. TLS 1.0 and TLS 1.1 are the two previous versions of the TLS protocol.

TLS 1.0 was first defined in 1999, and TLS 1.1 was published as an update to TLS 1.0 in 2006. TLS 1.0 and TLS 1.1 are now considered to be obsolete, and they are no longer considered secure.

Why You Should Disable TLS 1.0 and TLS 1.1 on Windows Server?

There are a few reasons why you should disable TLS 1.0 and TLS 1.1 on Windows Server:

  1. TLS 1.0 and TLS 1.1 are no longer considered secure, due to the fact that they are vulnerable to various attacks, such as the POODLE attack.
  2. Disabling TLS 1.0 and TLS 1.1 on your server will force clients to use a more secure protocol (TLS 1.2), which is less vulnerable to attack.
  3. Some government agencies, such as the US National Security Agency (NSA), have recommended that TLS 1.0 and TLS 1.1 be disabled.
  4. Microsoft will no longer provide security updates for Windows Server running TLS 1.0 and TLS 1.1.
  5. Many major software vendors are phasing out support for TLS 1.0 and TLS 1.1. This includes Google, Microsoft, Mozilla, and Apple.

Attacks TLS 1.0 and TLS 1.1 are vulnerable to:

There are a number of known vulnerabilities in TLS 1.0 and TLS 1.1 that can be exploited by attackers. These include:

  1. POODLE (Padding Oracle On Downgraded Legacy Encryption)
  2. BEAST (Browser Exploit Against SSL/TLS)
  3. CRIME (Compression Ratio Info-leak Made Easy)
  4. FREAK (Factoring Attack on RSA-EXPORT Keys)
  5. LOGJAM (Diffie-Hellman Key Exchange Weakness)

These vulnerabilities allow attackers to perform man-in-the-middle attacks, decrypt sensitive information, and hijack user sessions. By disabling TLS 1.0 and TLS 1.1 on your Windows server, you can protect yourself from these attacks.

What is the Alternate to TLS 1.0 and TLS 1.1?

The current version of the TLS protocol is TLS 1.3. TLS 1.3 was first defined in 2018, and it includes a number of security improvements over previous versions of the TLS protocol. We suggest you to enable TLS 1.2 and TLS 1.3 on your Windows Server instead of TLS 1.0 and TLS 1.1.

TLS 1.2 improves upon TLS 1.1 by adding support for Elliptic Curve Cryptography (ECC) and introducing new cryptographic suites that offer better security than the suites used in TLS 1.1. TLS 1.3 improves upon TLS 1.2 by simplifying the handshake process and making it more resistant to man-in-the-middle attacks. In addition, TLS 1.3 introduces new cryptographic suites that offer better security than the suites used in TLS 1.2.

TLS 1.2 and TLS 1.3 are both backward compatible with TLS 1.1 and earlier versions of the protocol. This means that a client that supports TLS 1.2 can communicate with a server that supports TLS 1.1 and vice versa. However, TLS 1.2 and TLS 1.3 are not compatible with each other. A client that supports TLS 1.2 cannot communicate with a server that supports TLS 1.3, and vice versa.

TLS 1.2 is the most widely used version of the TLS protocol, but TLS 1.3 is gaining in popularity. Many major web browsers, including Google Chrome, Mozilla Firefox, and Microsoft Edge, now support TLS 1.3. In addition, major Internet services providers, such as Cloudflare and Akamai, have started to support TLS 1.3 on their servers. Please visit this page if you want to deeply review the comparison of TLS implementations across different supported servers and clients.

Please visit these posts to learn more about TLS 1.2 and TLS 1.3:

  1. What Is SSL/TLS? How SSL, TLS 1.2, And TLS 1.3 Differ From Each Other?
  2. Decoding TLS v1.2 protocol Handshake with Wireshark
  3. Decoding TLS 1.3 Protocol Handshake With Wireshark
  4. How to Enable TLS 1.3 in Standard Web Browsers?
  5. How to Enable TLS 1.3 on Popular Web Servers?
  6. How to Enable TLS 1.2 and TLS 1.3 on Windows Server
  7. How to Disable TLS 1.0 and TLS 1.1 on Your Apache Server?
  8. How to Disable TLS 1.0 and TLS 1.1 on Your Nginx Server?

How to Disable TLS 1.0 and TLS 1.1 on Windows Server?

We have covered 3 different ways to disable TLS 1.0 and TLS 1.1 on your Windows Server in this post. You can choose any one of the three ways to disable TLS 1.0 and TLS 1.1 on your Windows Server depending on your technical and automation skills.

  1. Disable TLS 1.0 and TLS 1.1 manually using Registry
  2. Disable TLS 1.0 and TLS 1.1 using Powershell Commands
  3. Disable TLS 1.0 and TLS 1.1 using CMD

Note: Microsoft clearly said that it doesn’t support TLS 1.0 and TLS 1.1 on Windows operating systems. No patches will be provided for TLS 1.0 and TLS 1.1 from Microsoft. You can refer to the below table that shows the Microsoft Schannel Provider support of TLS protocol versions.

TLS Protocols Supported by Windows Operating Systems:

Windows OSTLS 1.0 ClientTLS 1.0 ServerTLS 1.1 ClientTLS 1.1 ServerTLS 1.2 ClientTLS 1.2 ServerTLS 1.3 ClientTLS 1.3 Server
Windows Vista/Windows Server 2008EnabledEnabledNot supportedNot supportedNot supportedNot supportedNot supportedNot supported
Windows Server 2008 with Service Pack 2 (SP2)EnabledEnabledDisabledDisabledDisabledDisabledNot supportedNot supported
Windows 7/Windows Server 2008 R2EnabledEnabledDisabledDisabledDisabledDisabledNot supportedNot supported
Windows 8/Windows Server 2012EnabledEnabledEnabledEnabledEnabledEnabledNot supportedNot supported
Windows 8.1/Windows Server 2012 R2EnabledEnabledEnabledEnabledEnabledEnabledNot supportedNot supported
Windows 10, version 1507EnabledEnabledEnabledEnabledEnabledEnabledNot supportedNot supported
Windows 10, version 1511EnabledEnabledEnabledEnabledEnabledEnabledNot supportedNot supported
Windows 10, version 1607/Windows Server 2016 StandardEnabledEnabledEnabledEnabledEnabledEnabledNot supportedNot supported
Windows 10, version 1703EnabledEnabledEnabledEnabledEnabledEnabledNot supportedNot supported
Windows 10, version 1709EnabledEnabledEnabledEnabledEnabledEnabledNot supportedNot supported
Windows 10, version 1803EnabledEnabledEnabledEnabledEnabledEnabledNot supportedNot supported
Windows 10, version 1809//Windows Server 2019EnabledEnabledEnabledEnabledEnabledEnabledNot supportedNot supported
Windows 10, version 1903EnabledEnabledEnabledEnabledEnabledEnabledNot supportedNot supported
Windows 10, version 1909EnabledEnabledEnabledEnabledEnabledEnabledNot supportedNot supported
Windows 10, version 2004EnabledEnabledEnabledEnabledEnabledEnabledNot supportedNot supported
Windows 10, version 20H2EnabledEnabledEnabledEnabledEnabledEnabledNot SupportedNot Supported
Windows 10, version 21H1EnabledEnabledEnabledEnabledEnabledEnabledNot SupportedNot Supported
Windows 10, version 21H2EnabledEnabledEnabledEnabledEnabledEnabledNot SupportedNot Supported
Windows Server 2022EnabledEnabledEnabledEnabledEnabledEnabledEnabledEnabled
Windows 11EnabledEnabledEnabledEnabledEnabledEnabledEnabledEnabled

Method 1: Disable TLS 1.0 and TLS 1.1 manually using Registry

Let’s begin learning how to disable TLS 1.0 and TLS 1.1 manually using Windows Registry.

Step 1: Open the regedit utility

Open ‘Run‘, type ‘regedit’, and click ‘OK’.

Open Regedit Utility On Windows 1
Step 2: Create a New Key

In Registry Editor, navigate to the path: Computer\HKEY_LOCAL_MACHINE\SYSTEM\CurrentControlSet\Control\SecurityProviders\SCHANNEL\Protocols.
Create a new key by Right click on ‘Protocols‘ –> New –> Key.

Create New Key On Windows 1
Step 3: Rename the Registry Key ‘TLS 1.0’

Name key as ‘TLS 1.0‘Rename the registry key as ‘TLS 1.0‘.

Rename The Registry Key Tls 1 0
Step 4 Create One More Registry Key ‘Client’ underneath ‘TLS 1.0’

As smiler to the above step, create another key as ‘Client‘ underneath ‘TLS 1.0‘ as shone in this picture.

Create One More Registry Key Client Underneath Tls 1 0
Step 5: Create New Item ‘DWORD (32-bit) Value’ Underneath ‘Client’

Create a new item by right-clicking on ‘Client‘, and selecting ‘New’ –> DWORD (32-bit) Value.

Create New Item Dword 32 Bit Value Underneath Client
Step 6: Rename the Item ‘DWORD (32-bit) Value’ to ‘Enable’

We Name the item ‘Enabled‘ with a Hexadecimal value of ‘0‘.

Rename The Item Dword 32 Bit Value To Enable
Step 7: Create another item, ‘DisabledByDefault’ Underneath TLS 1.0

Similarly, create another item, ‘DisabledByDefault‘, with a Hexadecimal value of ‘1‘.

Create Another Item Disabledbydefault Underneath Tls 1 0
Step 8: Create ‘Server’ and corresponding Keys as in the case of ‘Client’

Similar to the above steps, create a key ‘Server‘ under ‘Protocols‘ and create registry items ‘DWORD (32-bit)’ and ‘Enabled’ as shown below.

Step 9: Disable TLS 1.1 on the Windows Server

Similar to the above steps, create a key ‘TLS 1.1’ under ‘Protocols‘ and below keys and items to Disable ‘TLS 1.1’


> HKEY_LOCAL_MACHINE\SYSTEM\CurrentControlSet\Control\SecurityProviders\SCHANNEL\Protocols\TLS 1.1\Client\Enabled with Hexadecimal value as ‘0’> HKEY_LOCAL_MACHINE\SYSTEM\CurrentControlSet\Control\SecurityProviders\SCHANNEL\Protocols\TLS 1.1\Client\DisabledByDefault with Hexadecimal value as ‘1’


> HKEY_LOCAL_MACHINE\SYSTEM\CurrentControlSet\Control\SecurityProviders\SCHANNEL\Protocols\TLS 1.1\Server\Enabled with Hexadecimal value as ‘0’> HKEY_LOCAL_MACHINE\SYSTEM\CurrentControlSet\Control\SecurityProviders\SCHANNEL\Protocols\TLS 1.1\Server\DisabledByDefault with Hexadecimal value as ‘1’

Create Server And Corresponding Keys As In The Case Of Client 1 1

Method 2: Disable TLS 1.0 and TLS 1.1 using Powershell commands

Follow this simple procedure to enable TLS 1.2 and TLS 1.2 using Powershell commands.

  1. Open Powershell as Administrator
Open Powershell As Administrator 1

2. Run the below commands to create Registry entries

- New-Item 'HKLM:\SYSTEM\CurrentControlSet\Control\SecurityProviders\SCHANNEL\Protocols\TLS 1.0\Server' -Force
- New-ItemProperty -Path 'HKLM:\SYSTEM\CurrentControlSet\Control\SecurityProviders\SCHANNEL\Protocols\TLS 1.0\Server' –PropertyType 'DWORD' -Name 'Enabled' -Value '0' 
- New-ItemProperty -Path 'HKLM:\SYSTEM\CurrentControlSet\Control\SecurityProviders\SCHANNEL\Protocols\TLS 1.0\Server' –PropertyType 'DWORD' -Name 'DisabledByDefault' -Value '1' 

- New-Item 'HKLM:\SYSTEM\CurrentControlSet\Control\SecurityProviders\SCHANNEL\Protocols\TLS 1.0\Client' -Force
- New-ItemProperty -Path 'HKLM:\SYSTEM\CurrentControlSet\Control\SecurityProviders\SCHANNEL\Protocols\TLS 1.0\Client' -PropertyType 'DWORD' -Name 'Enabled' -Value '0'
- New-ItemProperty -Path 'HKLM:\SYSTEM\CurrentControlSet\Control\SecurityProviders\SCHANNEL\Protocols\TLS 1.0\Client' –PropertyType 'DWORD' -Name 'DisabledByDefault' -Value '1' 


- New-Item 'HKLM:\SYSTEM\CurrentControlSet\Control\SecurityProviders\SCHANNEL\Protocols\TLS 1.1\Server' -Force
- New-ItemProperty -Path 'HKLM:\SYSTEM\CurrentControlSet\Control\SecurityProviders\SCHANNEL\Protocols\TLS 1.1\Server' –PropertyType 'DWORD' -Name 'Enabled' -Value '0' 
- New-ItemProperty -Path 'HKLM:\SYSTEM\CurrentControlSet\Control\SecurityProviders\SCHANNEL\Protocols\TLS 1.1\Server' –PropertyType 'DWORD' -Name 'DisabledByDefault' -Value '1' 

- New-Item 'HKLM:\SYSTEM\CurrentControlSet\Control\SecurityProviders\SCHANNEL\Protocols\TLS 1.1\Client' -Force
- New-ItemProperty -Path 'HKLM:\SYSTEM\CurrentControlSet\Control\SecurityProviders\SCHANNEL\Protocols\TLS 1.1\Client' -PropertyType 'DWORD' -Name 'Enabled' -Value '0'
- New-ItemProperty -Path 'HKLM:\SYSTEM\CurrentControlSet\Control\SecurityProviders\SCHANNEL\Protocols\TLS 1.1\Client' –PropertyType 'DWORD' -Name 'DisabledByDefault' -Value '1'

Before running the commands, you can see no items exist underneath Protocol.

No Items Were Exist Underneath Protocol 1

After running the commands you can see there are two keys created ‘TLS 1.0’ & ‘TLS 1.1’, Underneath each protocol there are ‘Client’ &’ Server’ Keys inside them there are two items ‘DisableByDefault’ & ‘Enabled’.

List Of Item Created Underneath Client And Server Using Powershell Commands

Method 3: Disable TLS 1.0 and TLS 1.1 on Windows Server using CMD

Follow this simple procedure to disable TLS 1.0 and TLS 1.1 using CMD comments.

  1. Open ‘Command Prompt’ as Administrator
Open Command Prompt As Administrator On The Windows Server 1

2. Run the below commands to create Registry entries.

reg add "HKEY_LOCAL_MACHINE\SYSTEM\CurrentControlSet\Control\SecurityProviders\SCHANNEL\Protocols\TLS 1.0\Server" /v Enabled /t REG_DWORD /d 0 /f 

reg add "HKEY_LOCAL_MACHINE\SYSTEM\CurrentControlSet\Control\SecurityProviders\SCHANNEL\Protocols\TLS 1.0\Server" /v DisabledByDefault /t REG_DWORD /d 1 /f

reg add "HKEY_LOCAL_MACHINE\SYSTEM\CurrentControlSet\Control\SecurityProviders\SCHANNEL\Protocols\TLS 1.0\Client" /v Enabled /t REG_DWORD /d 0 /f 

reg add "HKEY_LOCAL_MACHINE\SYSTEM\CurrentControlSet\Control\SecurityProviders\SCHANNEL\Protocols\TLS 1.0\Client" /v DisabledByDefault /t REG_DWORD /d 1 /f


reg add "HKEY_LOCAL_MACHINE\SYSTEM\CurrentControlSet\Control\SecurityProviders\SCHANNEL\Protocols\TLS 1.1\Server" /v Enabled /t REG_DWORD /d 0 /f 

reg add "HKEY_LOCAL_MACHINE\SYSTEM\CurrentControlSet\Control\SecurityProviders\SCHANNEL\Protocols\TLS 1.1\Server" /v DisabledByDefault /t REG_DWORD /d 1 /f

reg add "HKEY_LOCAL_MACHINE\SYSTEM\CurrentControlSet\Control\SecurityProviders\SCHANNEL\Protocols\TLS 1.1\Client" /v Enabled /t REG_DWORD /d 0 /f 

reg add "HKEY_LOCAL_MACHINE\SYSTEM\CurrentControlSet\Control\SecurityProviders\SCHANNEL\Protocols\TLS 1.1\Client" /v DisabledByDefault /t REG_DWORD /d 1 /f

We hope this post will help you know how to disable TLS 1.0 and TLS 1.1 on your Windows Server as they are deprecated for their weak security. Please share this post if you find this interested. Visit our social media page on FacebookLinkedInTwitterTelegramTumblrMedium & Instagram, and subscribe to receive updates like this.

Source :
https://thesecmaster.com/blog/how-to-disable-tls-1-0-and-tls-1-1-on-windows-server

How to Enable TLS 1.2 and TLS 1.3 on Windows Server?

Arun KL
November 14, 2023
8minutes

Growing trends in cyber attacks made system administrators implement more secured communication protocols to protect their assets and network from attacks. TLS plays a vital role in the implementation stack. TLS is a critical security protocol that is used to encrypt communications between clients and servers. TLS 1.3 is the latest version of the Transport Layer Security (TLS) protocol and offers many advantages over their previous versions. TLS 1.2 is the most widely used version of the TLS protocol, but TLS 1.3 is gaining popularity. As a system administrator, you should enable TLS 1.2 and TLS 1.3 on your Windows Server to enhance the security of your infrastructure.

Why Should You Enable TLS 1.2 and TLS 1.3 on Windows Server?

As a windows administrator, it is not just your duty to take care the system’s health. But, it is also your responsibility to create a secure environment to protect your Windows from internal and external threats. TLS 1.2 and TLS 1.3 are the new and most secure transport layer security protocols. As a system administrator, you should enable TLS 1.2 and TLS 1.3 on your Windows Server for the following reasons:

  1. Both TLS 1.2 and TLS 1.3 introduces new cryptographic suites that offer better security than the suites used in older TLS and SSL protocols.
  2. Both TLS 1.2 and TLS 1.3 are more resistant to man-in-the-middle attacks and simplify the handshake process, which makes it more difficult for attackers to eavesdrop on communications.
  3. TLS 1.3 simplifies the handshake process and removes unnecessary cryptographic overhead, which results in a faster connection time.

How to Enable TLS 1.2 and TLS 1.3 on Windows Server?

We have covered 3 different ways to enable TLS 1.2 and TLS 1.3 on your Windows Server in this post. You can choose any one of the three ways to enable TLS 1.2 and TLS 1.3 on your Windows Server depending on your technical and automation skills.

  1. Enable TLS 1.2 and TLS 1.3 manually using Registry
  2. Enable TLS 1.2 and TLS 1.3 using Powershell Commands
  3. Enable TLS 1.2 and TLS 1.3 using CMD

Microsoft clearly said that it supports TLS 1.3 only on Windows 10 (version 1903 later), Windows 11, Windows Server 2022, and above operating systems. No support will be provided for TLS 1.3 below Windows 10 22H2 and Windows Server 2022. You can refer to the below table that shows the Microsoft Schannel Provider support of TLS protocol versions.

Note: Windows 2019 does not support TLS 1.3.

TLS Protocols Supported by Windows Operating Systems:

Windows OSTLS 1.0 ClientTLS 1.0 ServerTLS 1.1 ClientTLS 1.1 ServerTLS 1.2 ClientTLS 1.2 ServerTLS 1.3 ClientTLS 1.3 Server
Windows Vista/Windows Server 2008EnabledEnabledNot supportedNot supportedNot supportedNot supportedNot supportedNot supported
Windows Server 2008 with Service Pack 2 (SP2)EnabledEnabledDisabledDisabledDisabledDisabledNot supportedNot supported
Windows 7/Windows Server 2008 R2EnabledEnabledDisabledDisabledDisabledDisabledNot supportedNot supported
Windows 8/Windows Server 2012EnabledEnabledEnabledEnabledEnabledEnabledNot supportedNot supported
Windows 8.1/Windows Server 2012 R2EnabledEnabledEnabledEnabledEnabledEnabledNot supportedNot supported
Windows 10, version 1507EnabledEnabledEnabledEnabledEnabledEnabledNot supportedNot supported
Windows 10, version 1511EnabledEnabledEnabledEnabledEnabledEnabledNot supportedNot supported
Windows 10, version 1607/Windows Server 2016 StandardEnabledEnabledEnabledEnabledEnabledEnabledNot supportedNot supported
Windows 10, version 1703EnabledEnabledEnabledEnabledEnabledEnabledNot supportedNot supported
Windows 10, version 1709EnabledEnabledEnabledEnabledEnabledEnabledNot supportedNot supported
Windows 10, version 1803EnabledEnabledEnabledEnabledEnabledEnabledNot supportedNot supported
Windows 10, version 1809//Windows Server 2019EnabledEnabledEnabledEnabledEnabledEnabledNot supportedNot supported
Windows 10, version 1903EnabledEnabledEnabledEnabledEnabledEnabledNot supportedNot supported
Windows 10, version 1909EnabledEnabledEnabledEnabledEnabledEnabledNot supportedNot supported
Windows 10, version 2004EnabledEnabledEnabledEnabledEnabledEnabledNot supportedNot supported
Windows 10, version 20H2EnabledEnabledEnabledEnabledEnabledEnabledNot SupportedNot Supported
Windows 10, version 21H1EnabledEnabledEnabledEnabledEnabledEnabledNot SupportedNot Supported
Windows 10, version 21H2EnabledEnabledEnabledEnabledEnabledEnabledNot SupportedNot Supported
Windows Server 2022EnabledEnabledEnabledEnabledEnabledEnabledEnabledEnabled
Windows 11EnabledEnabledEnabledEnabledEnabledEnabledEnabledEnabled

Method 1 : Enable TLS 1.2 and TLS 1.3 manually using Registry

Let’s begin learning how to enable TLS 1.2 and TLS 1.3 manually using Windows Registry.

Method 1 : Enable TLS 1.2 and TLS 1.3 manually using Registry

Step 1. Open regedit utility

Open ‘Run‘, type ‘regedit‘ and click ‘OK‘.

Open Regedit Utility On Windows 1
Step 2. Create New Key

In Registry Editor, navigate to the path : HKEY_LOCAL_MACHINE\SYSTEM\CurrentControlSet\Control\SecurityProviders\SCHANNEL\Protocols
Create a new key by Right click on ‘Protocols‘ –> New –> Key

Create New Key On Windows 1
Step 3. Rename the Registry Key ‘TLS 1.2’

Rename the  registry key as ‘TLS 1.2‘.

Rename The Registry Key Tls 1 2
Step 4. Create One More Registry Key ‘Client’ underneath ‘TLS 1.2’

As smiler to the above step, create another key as ‘Client‘ underneath ‘TLS 1.2‘ as shone in this picture.

Create One More Registry Key Client Underneath Tls 1 2
Step 5. Create New Item ‘DWORD (32-bit) Value’ Underneath ‘Client’, select ‘New’

Create new  item by right click on ‘Client‘, select ‘New’ –> DWORD (32-bit) Value.

Create New Item Dword 32 Bit Value Underneath Client Select New
Step 6. Rename the Item ‘DWORD (32-bit) Value’ to ‘DisabledByDefault’

Name the item as ‘DisabledBy Default’ with Hexadecimal value as ‘0’.

Rename The Item Dword 32 Bit Value To Disableby Default
Step 7. Create another item, ‘Enabled’ Underneath TLS 1.2

Similarly create another item, ‘Enabled‘ with Hexadecimal value as ‘1‘.

Create Another Item Enabled Underneath Tls 1 2
Step 8. List of Item Created underneath ‘Client’

After registry item creations underneath ‘Client’, it looks as below.

List Of Item Created Underneath Client
Step 9. Create ‘Server’ and corresponding Keys as in the case of ‘Client’

Similar to above steps, create a key ‘Server’ under ‘Protocols’ and create ‘DWORD (32-bit)’ and ‘Enabled’ as shown below.
– HKEY_LOCAL_MACHINE\SYSTEM\CurrentControlSet\Control\SecurityProviders\SCHANNEL\Protocols\TLS 1.2\Server\Enabled with Hexadecimal value as ‘1’– HKEY_LOCAL_MACHINE\SYSTEM\CurrentControlSet\Control\SecurityProviders\SCHANNEL\Protocols\TLS 1.2\Server\DisabledByDefault with Hexadecimal value as ‘0’

Create Server And Corresponding Keys As In The Case Of Client
Step 10. Enable TLS 1.3 on the Windows Server

Similar to above steps, create a ‘DWORD (32-bit)’ and ‘Enabled’ items in the below path to enable TLS 1.3
Note: TLS 1.3 is supported in Windows 11 & Windows server 2022 onwards.
– HKEY_LOCAL_MACHINE\SYSTEM\CurrentControlSet\Services\HTTP\Parameters\EnableHTTP3 with Hexadecimal value as ‘1’

Enable Tls 1 3 On The Windows Server

Method 2 : Enable TLS 1.2 and TLS 1.3 on Windows Server using Powershell Commends

Follow this simple procedure to enable TLS 1.2 and TLS 1.2 using Powershell comments.

Step 1. Open Powershell as Administrator
Open Powershell As Administrator 1
Step 2. Run below commands to create Registry entry
TLS 1.2
- New-Item 'HKLM:\SYSTEM\CurrentControlSet\Control\SecurityProviders\SCHANNEL\Protocols\TLS 1.2\Client' -Force

- New-ItemProperty -Path 'HKLM:\SYSTEM\CurrentControlSet\Control\SecurityProviders\SCHANNEL\Protocols\TLS 1.2\Client' –PropertyType 'DWORD' -Name 'DisabledByDefault' -Value '0'

- New-ItemProperty -Path 'HKLM:\SYSTEM\CurrentControlSet\Control\SecurityProviders\SCHANNEL\Protocols\TLS 1.2\Client' -PropertyType 'DWORD' -Name 'Enabled' -Value '1'


- New-Item 'HKLM:\SYSTEM\CurrentControlSet\Control\SecurityProviders\SCHANNEL\Protocols\TLS 1.2\Server' -Force

- New-ItemProperty -Path 'HKLM:\SYSTEM\CurrentControlSet\Control\SecurityProviders\SCHANNEL\Protocols\TLS 1.2\Server' –PropertyType 'DWORD' -Name 'DisabledByDefault' -Value '0'

- New-ItemProperty -Path 'HKLM:\SYSTEM\CurrentControlSet\Control\SecurityProviders\SCHANNEL\Protocols\TLS 1.2\Server' –PropertyType 'DWORD' -Name 'Enabled' -Value '1'


TLS 1.3 (Supports in Windows 11 & Windows Server 2022) 
- New-ItemProperty -Path 'HKLM:\SYSTEM\CurrentControlSet\services\HTTP\Parameters' -PropertyType 'DWORD' -Name 'EnableHttp3' -Value '1'

Before running the commands you can see no items were exist underneath Protocol.

No Items Were Exist Underneath Protocol

After running the commands you can see there are two keys created ‘TLS 1.2’ & ‘TLS 1.3’, Underneath each protocols there are ‘Client’ &’Server’ Keys inside them ther are two items ‘DisableByDefault’ & ‘Enabled’.

List Of Item Created Underneath Client Using Powershell Commends
List Of Item Created Underneath Server Using Powershell Commends
Enable Tls 1 3 On The Windows Server

Method 3: Enable TLS 1.2 and TLS 1.3 on Windows Server using native CMD

Follow this simple procedure to enable TLS 1.2 and TLS 1.2 using CMD comments.

Step 1. Open ‘Command Prompt’ as Administrator
Open Command Prompt As Administrator On The Windows Server 1
Step 2. Run below commands to create Registry entry.
TLS 1.2
- reg add "HKEY_LOCAL_MACHINE\SYSTEM\CurrentControlSet\Control\SecurityProviders\SCHANNEL\Protocols\TLS 1.2\Client" /v DisabledByDefault /t REG_DWORD /d 0 /f

- reg add "HKEY_LOCAL_MACHINE\SYSTEM\CurrentControlSet\Control\SecurityProviders\SCHANNEL\Protocols\TLS 1.2\Client" /v Enabled /t REG_DWORD /d 1 /f


- reg add "HKEY_LOCAL_MACHINE\SYSTEM\CurrentControlSet\Control\SecurityProviders\SCHANNEL\Protocols\TLS 1.2\Server" /v DisabledByDefault /t REG_DWORD /d 0 /f

- reg add "HKEY_LOCAL_MACHINE\SYSTEM\CurrentControlSet\Control\SecurityProviders\SCHANNEL\Protocols\TLS 1.2\Server" /v Enabled /t REG_DWORD /d 1 /f


TLS 1.3 (Supports in Windows 11 & Windows Server 2022)
- reg add "HKEY_LOCAL_MACHINE\SYSTEM\CurrentControlSet\services\HTTP\Parameters" /v EnableHttp3 /t REG_DWORD /d 1 /f

We hope this post will help you know how to enable TLS 1.2 and TLS 1.3 on your Windows Server to enhance the security of your infrastructure. Please share this post if you find this interesting. Visit our social media page on FacebookLinkedInTwitterTelegramTumblrMedium & Instagram, and subscribe to receive updates like this.

Source :
https://thesecmaster.com/blog/how-to-enable-tls-1-2-and-tls-1-3-on-windows-server

How to Make Your Employees Your First Line of Cyber Defense

May 01, 2024
The Hacker News

There’s a natural human desire to avoid threatening scenarios. The irony, of course, is if you hope to attain any semblance of security, you’ve got to remain prepared to confront those very same threats.

As a decision-maker for your organization, you know this well. But no matter how many experts or trusted cybersecurity tools your organization has a standing guard, you’re only as secure as your weakest link. There’s still one group that can inadvertently open the gates to unwanted threat actors—your own people.

Security must be second nature for your first line of defense #

For your organization to thrive, you need capable employees. After all, they’re your source for great ideas, innovation, and ingenuity. However, they’re also human. And humans are fallible. Hackers understand no one is perfect, and that’s precisely what they seek to exploit.

This is why your people must become your first line of defense against cyber threats. But to do so, they need to learn how to defend themselves against the treachery of hackers. That’s where security awareness training (SAT) comes in.

What is Security Awareness Training (SAT)? #

The overall objective of an SAT program is to keep your employees and organization secure. The underlying benefit, however, is demonstrating compliance. While content may differ from program to program, most are generally similar, requiring your employees to watch scripted videos, study generic presentations, and take tests on cyber “hygiene.” At their core, SAT programs are designed to help you:

  • Educate your employees on recognizing cybersecurity risks such as phishing and ransomware
  • Minimize your organization’s exposure to cyber threats
  • Maintain regulatory compliance with cyber insurance stipulations

These are all worthwhile goals in helping your organization thrive amidst ever-evolving cyber threats. However, attaining these outcomes can feel like a pipe dream. That’s because of one unfortunate truth about most SAT programs: they don’t work.

Age-Old Challenges of Old-School SATs#

Traditional SAT programs have long been scrutinized for their inability to drive meaningful behavioral changes. In fact, 69% of employees admit to “intentionally bypassing” their enterprise’s cybersecurity guidance.

If you oversee cybersecurity for an organization, then you’re likely familiar with the pain that comes with implementing one, managing it, and encouraging its usage. Given their complexities, traditional SAT solutions practically force non-technical employees to become full-on technologists.

Challenges for AdministratorsChallenges for EmployeesChallenges for Your Organization
Complex, ongoing management is frustrating. Plus, through it all they just find poor results.They’re bored. Unengaging content is detrimental, as it doesn’t lead to knowledge retention. Boring, unengaging content doesn’t help with knowledge retention.Most SATs aren’t effective because they’re created by generalists, not real cybersecurity experts And many are designed with little reporting capabilities, leading to limited visibility into success rates

Because most SAT programs are complex to manage, they’re usually dismissed as a means to an end. Just check a box for compliance and move on. But when done right, SAT can be a potent tool to help your employees make more intelligent, more instinctive, security-conscious decisions.

Ask the Right Questions Before Choosing Your SAT Solution#

When it comes to choosing the right solution for your organization, there are some questions you should first ask yourself. By assessing the following, you’ll be better equipped to select the option that best fits your specific needs.

Learning-Based Questions

  • Are the topics covered in this SAT relevant to my organization’s security and compliance concerns?
  • Are episodes updated regularly to reflect current threats and scenarios?
  • Does this SAT engage users in a unique, meaningful manner?
  • Is this SAT built and supported by cybersecurity practitioners?
  • Is the teaching methodology proven to increase knowledge retention?

Management-Based Questions

  • Can someone outside of my organization manage the SAT for me?
  • Can it be deployed quickly?
  • Does it automatically enroll new users and automate management?
  • Is it smart enough to skip non-human identities so I don’t assign training to, say, our copy machine?
  • Is it simple and intuitive enough for anyone across my organization to use?

Your ideal SAT will allow you to answer a resounding “Yes” to all of the above.

Essential Features of an Effective SAT#

A SAT solution that’s easy to deploy, manage, and use can have a substantial positive impact. That’s because a solution that delivers “ease” has considered all of your organization’s cybersecurity needs in advance. In other words, an effective SAT does all the heavy lifting on your behalf, as it features:

Relevant topics
…based on real threats you might encounter.
What to look for:

To avoid canned, outdated training, choose a SAT solution that’s backed by experts. Cybersecurity practitioners should be the ones regularly creating and updating episodes based on the latest trends they see hackers leveraging in the wild. Additionally, every episode should cover a unique cybersecurity topic that reflects the most recent real-world tradecraft.
Full management by real experts
…so you don’t have to waste time creating, managing, and assigning training.
What to look for:

Ideally, you want a SAT solution that can manage all necessary tasks for you. Seek a SAT solution that’s backed by real cybersecurity experts who can create, curate, and deploy your learning programs and phishing scenarios on your behalf.
Memorable episodes
…with fun, story-driven lessons that are relatable and easy to comprehend.
What to look for:

Strive for a SAT solution that features character-based narratives. This indicates the SAT is carefully designed to engage learners of all attention spans. Remember, if the episodes are intentionally entertaining and whimsical, you’re more likely to find your employees conversing about inside jokes, recurring characters, and, of course, what they’ve learned. As a result, these ongoing discussions only serve to fortify your culture of security.
Continual enhancements …so episodes are updated regularly in response to real-world threats.
What to look for:
Seek out a SAT solution that provides monthly episodes, as this will keep your learners up to date. Regular encounters with simulated cybersecurity scenarios can help enhance their abilities to spot and defend against risks, such as phishing attempts. These simulations should also be dispersed at unpredictable time intervals (i.e. morning, night, weekends, early in the month, later in the month, etc.), keeping learners on their toes and allowing them to put their security knowledge into practice.
Minimal time commitment
…so you don’t have to invest countless hours managing it all.
What to look for:
For your learners, choose a SAT solution that doesn’t feel like an arduous chore. Look for solutions that specialize in engaging episodes that are designed to be completed in shorter periods of time.
For your own administrative needs, select a SAT that can sync regularly with your most popular platforms, such as Microsoft 365, Google, Okta, or Slack. It should also sync your employee directories with ease, so whenever you activate or deactivate users, it’ll automatically update the information. Finally, make sure it’s intelligent enough to decipher between human and non-human identities, so you’re only charged for accounts linked to real individuals.
Real results …through episodes that instill meaningful security-focused behaviors and habits.
What to look for:
An impactful SAT should deliver monthly training that’s rooted in science-backed teaching methodologies proven to help your employees internalize and retain lessons better. Your SAT should feature engaging videos, text, and short quizzes that showcase realistic cyber threats you and your employees are likely to encounter in the wild, such as:PhishingSocial engineeringPhysical device securityand more
Measurable data …with easy-to-read reports on usage and success rates.
What to look for:
An impactful SAT program should provide robust reporting. Comprehensible summaries should highlight those learners who haven’t taken their training or those whom a phishing simulation has compromised. Additionally, detailed reports should give you all the data you need to help prove business, insurance, and regulatory compliance.
Easy adoption
….that makes it easy to deploy and easy to scale with your organization.
What to look for:
Choose a SAT solution that’s specially built to accommodate organizations with limited time and resources. A solution that’s easy to implement can be deployed across your organization in a matter of minutes.
Compliance …with a range of standards and regulations
What to look for:
While compliance is the bare minimum of what a SAT should offer your organization, it shouldn’t be understated. Whether to meet insurance check boxes or critical industry regulations, every business has its own compliance demands. At the very least, your SAT solution should cover the requirements of:
Health Insurance Portability and Accountability Act (HIPAA)Payment Card Industry Data Security Standard (PCI)Service Organization Control Type 2 (SOC 2)EU General Data Protection Regulation (GDPR)

The Threat Landscape is Changing. Your SAT Should Change With It. #

Cybercriminals think they’re smart, maliciously targeting individuals across organizations like yours. That’s why you need to ensure your employees are smarter. If they’re aware of the ever-changing tactics hackers employ, they can stand as your first line of defense. But first, you need to deploy a training solution you can trust, backed by real cybersecurity experts who understand emerging real-world threats.

Huntress Security Awareness Training is an easy, effective, and enjoyable solution that helps:

  • Minimize time-consuming maintenance and management tasks
  • Improve knowledge retention through neuroscience-based learning principles
  • Update you and your employees on the current threat landscape
  • Establish a culture that values cybersecurity
  • Inspire meaningful behavioral habits to improve security awareness
  • Engage you and your employees in a creative, impactful manner
  • Assure regulatory compliance
  • Keep cyber criminals out of your organization

Discover how a fully managed SAT can free up your time and resources, all while empowering your employees with smarter habits that better protect your organization from cyber threats.

Say goodbye to ineffective, outdated training. Say hello to Huntress SAT.

Start your free trial of Huntress SAT today.

Found this article interesting? This article is a contributed piece from one of our valued partners. Follow us on Twitter  and LinkedIn to read more exclusive content we post.

Source :
https://thehackernews.com/2024/05/everyones-expert-how-to-empower-your.html

Empowering Cybersecurity with AI: The Future of Cisco XDR

May 7, 2024
Siddhant Dash

In 2007, there was a study from the University of Maryland proving that internet-connected systems were attacked every 39 seconds on average. Today, that number has grown more than 60%. Cisco sees 64 attempts to connect to ransomware infrastructure every second. The world is becoming digitized, and hybrid, which creates an environment that criminals target with increasing sophistication. It’s too much for human-scale, and so a hybrid world requires a hybrid approach that sits between humans and machines.

Envision an AI Assistant that serves as a reliable partner for incident responders, offering precise, real-time guidance on the subsequent steps to take, tailored to the specific state of the incident at hand and allowing SOC (Security Operations Center) teams to respond faster and do more with less. I am pleased to announce the launch of the AI Assistant in XDR as a part of our Breach Protection Suite.

In our RSAC 2023 announcement, we introduced a vision of our Cisco SOC Assistant, designed to expedite threat detection and response. Today, this vision is realized and available in private preview. It enhances our Breach Protection Suite which is powered by Cisco XDR’s capabilities. It significantly speeds up investigations and responses, enabling security teams to safeguard their environments more efficiently and cost-effectively.

Assist with Information Discovery

In 2024, the global shortfall of 3.5 million security professionals, as reported by ISC2, underscores the importance of retaining and recruiting skilled personnel to counter increasingly sophisticated cyber threats and safeguard enterprises. Moreover, the lack of appropriate tools often leads to ineffective cyber risk management and professional burnout, adversely affecting staff retention and the SOC’s capacity to thwart attacks.

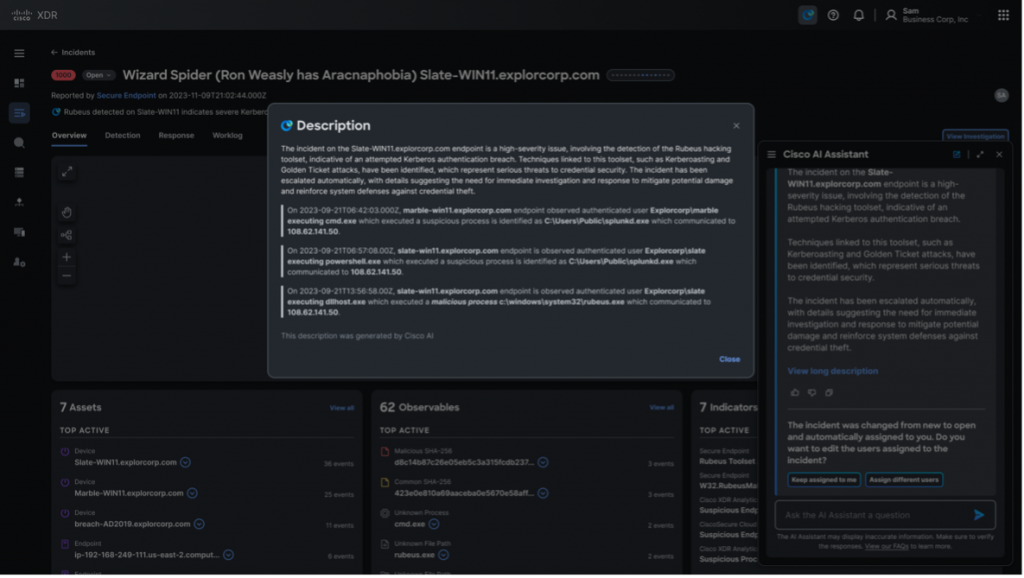
The AI Assistant in XDR acts as a potent enhancer, empowering SOC teams to maximize their efficiency and effectively close the personnel and skill gap. When an incident occurs, the assistant will contextualize events across email, the web, endpoints, and the network to tell the SOC analyst exactly what happened and its impact on their environment. It presents a short description of the incident that quickly answers what, when and how an incident happened. It also provides a long description of the incident which explains the timeline of events that have happened in this active incident.

Figure 1: Short Description of Incident Details generated by the AI Assistant
Figure 2: Long Description of Incident Details and Events Timeline

Moreover, our AI Assistant utilizes XDR’s patented ability to prioritize critical incidents, reducing alert fatigue for the SOC team and enhancing their efficiency in handling active incidents.

Figure 3: Targeted Prioritization of Incidents by AI Assistant that Need Immediate Attention

Augment and Elevate SOC Teams with Best Practice Recommendations

Today’s SOCs often struggle with a fragmented technology stack, making it difficult to respond effectively to cyber threats. Alert fatigue is a major hurdle for modern SOC teams, hindering proactive threat hunting and leading to overlooked alerts and burnout. The Cisco AI Assistant comes to the rescue and jumpstarts the incident response process for a modern SOC team.

Our AI Assistant, powered by Cisco XDR the platform for Cisco’s Breach Protection Suite, synthesizes data from email, web, processes, endpoints, cloud, and network domains, offering precise action recommendations to effectively contain ongoing cyber-attacks. It works at machine scale to identify patterns and potential attacks that humans might miss because of alert fatigue, if a defender is only looking at one domain in isolation, or while trying to manually correlate data. The AI Assistant is context aware, meaning it tracks the state of the incident in real-time and generates tailored recommendations specific to that incident.

Figure 4: Tailored Recommendations for an Incident by the AI Assistant

Mean Time to Detection (MTTD) and Mean Time to Respond (MTTR) are two primary metrics that SOC teams want to optimize for. Cisco XDR with our AI Assistant enables security teams to reduce these metrics by jumpstarting investigations and incident response by providing tailored recommendations for that specific incident.

Enable Seamless Collaboration Across Security Teams

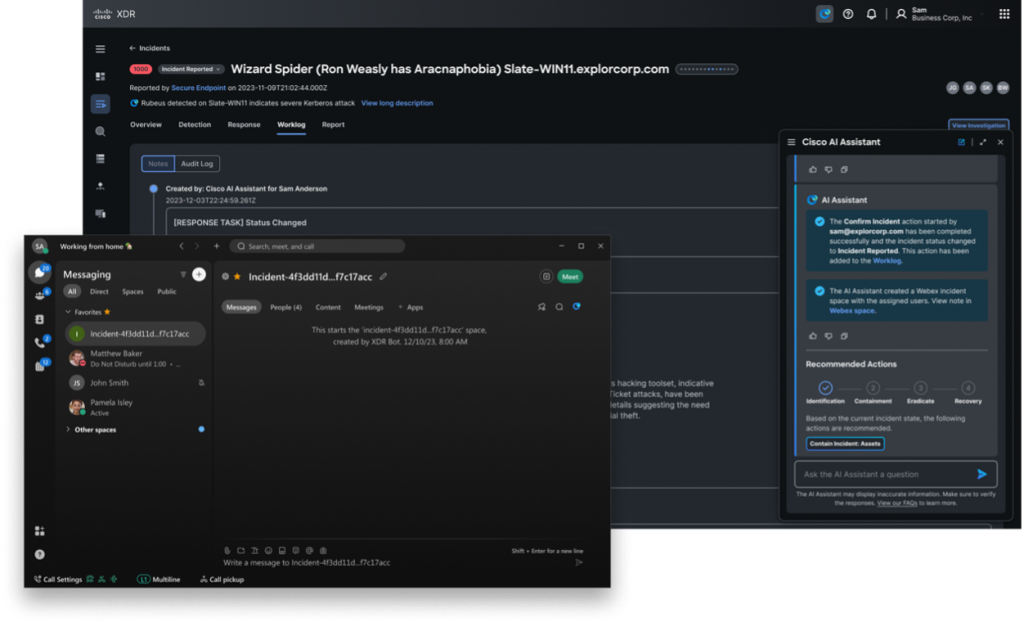
The Cisco AI Assistant, embedded within XDR, facilitates team collaboration using Webex, Teams, or Slack. This empowers security teams to swiftly assemble the right experts for an active incident, thereby speeding up the MTTR. The AI Assistant unifies the team by setting up WAR rooms, summarizing messages, and logging them in XDR for instant audit-readiness.

Figure 5: AI Assistant creates a Webex WAR Room and brings the right experts together for Incident Response

Automate Workflows to Neutralize Threats Across the Enterprise

Today’s SOCs often lack a cohesive technology stack to respond to cyber threats efficiently and consistently. As the IT environment grows beyond the on-premises data center to cloud, hybrid-cloud and multi-cloud country specific data centers, organizations accumulate point solutions to monitor and protect pieces of the environment. As a result, SOC analysts must do a lot of the heavy lifting required to detect and respond to an attack. This includes logging into different tools to execute workflows that contain an attack.

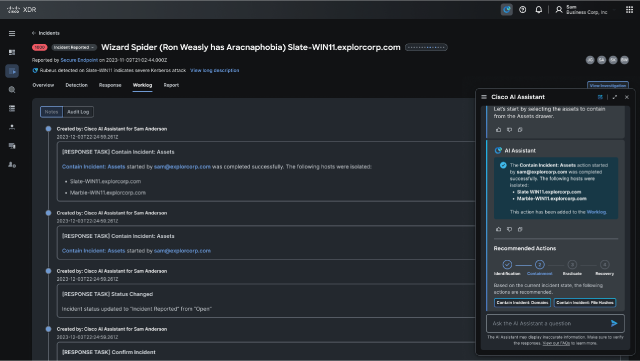
Our AI Assistant taps into advanced workflows and atomics with Cisco XDR’s 90+ integrations. Our AI assistant enables the execution of workflows at a single click, guided by the AI Assistant’s personalized recommendations that consider the incident’s playbook and current state in real-time.

Figure 6: Execution of Automated Workflows by the AI Assistant to Contain an Incident

Gone are the days when security teams had to juggle multiple isolated products and execute workflows in each to mitigate an attack. With Cisco Breach Protection Suite, billions of security events can be correlated and recommended actions can be generated and executed all in one place. This is the transformative power of the Cisco XDR combined with Cisco’s AI Assistant revolutionizing enterprise security.

Conclusion

By leveraging comprehensive telemetry data from various sources in Cisco XDR and combining that with our AI Assistant, we enable SOC teams to rapidly respond to active incidents and fortify defenses against complex threats. The AI Assistant amplifies the SOC’s existing knowledge, streamlines routine tasks, and empowers analysts to focus on strategic initiatives. This boosts analyst productivity and job satisfaction, leading to improved staff retention and SOC effectiveness, ultimately resulting in precise, consistent, and accurate security outcomes.

Learn how Cisco Breach Protection SuiteCisco XDR and our AI Assistant can simplify your security operations.


We’d love to hear what you think. Ask a Question, Comment Below, and Stay Connected with Cisco Security on social!

Cisco Security Social Channels

Instagram
Facebook
Twitter
LinkedIn

Source :
https://blogs.cisco.com/security/empowering-cybersecurity-with-ai-the-future-of-cisco-xdr

How to Rename an Active Directory Domain

written by Cyril Kardashevsky
February 8, 2024

Changing the name of an Active Directory domain is something few AD administrators have ever done. The domain renaming process itself is fairly straightforward, but needs to be carefully planned so as not to break the entire corporate infrastructure.

The need to change an AD domain name usually arises in the context of a corporate acquisition, rebranding, M&A consolidation of multiple business units.

Preparation for an AD Domain Rename

Before you proceed to change your domain name, check the basic requirements:

  • AD schema version at least Windows Server 2003;
  • If the domain Certificate Authority (CA) is deployed in domain, make sure it is properly prepared (Prepare certification authorities for domain rename);
  • Domains with on-premises Exchange Server (except 2003 versions) are incompatible with domain renaming. Migrating your users, groups, and computers to a new AD forest with Exchange using ADMT is the only solution in this case;
  • There are some other Microsoft and non-Microsoft applications that do not support domain renaming renames (check your application’s documentation);
  • You need to create a primary DNS zone for the new domain name in your AD;
  • If your DFS namespaces, redirected folders, roaming user profiles, etc. are implemented in your infrastructure, gather all the relevant information for them and schedule a migration immediately after the domain name change.

In this post, we will rename an existing contoso.com domain with AD controllers running Windows Server 2019 to theitbros.com.

Note. Be sure to backup your AD before you start renaming your domain.

The first step is to create a primary DNS zone for the new domain on your DNS server:

  1. Connect to DC and open the DNS Manager console (dnsmgmt.msc);
  2. Expand the Forward Lookup Zones node;
  3. Select New zone;
    change domain name active directory
  4. Create a new primary AD-integrated zone called theitbros.com with enabled Allow only secure dynamic updates option. Wait for the new zone to replicate all the DNS servers in the forest.
    active directory change domain name

Renaming AD Domain Using RenDom Tool

In order to change the AD domain name, you must use the rendom console tool, which is available on any domain controller. The C:\Windows\System32\rendom.exe command allows you to perform all the necessary actions for a domain renaming operation.

Sign-in to the DC and open the command prompt as an administrator.

Run the following command to generate an XML file containing your domain configuration:

rendom /list

Open the Domainlist.xml with notepad:

notepad Domainlist.xml
rename active directory domain

Use the Edit > Replace option to find the old domain name in the file and replace it with the new one. Manually change the value in the NetBiosName field.

change active directory domain name

Save the changes to the Domainlist.xml file.

Verify the new configuration (command makes no changes yet):

rendom /showforest
change ad domain name

Upload a new configuration file to the DC running the Domain Naming Operations Master FSMO role:

rendom /upload

Wait for the file containing the domain renaming instructions to be replicated to all other domain controllers in the forest. You can force the synchronization of changes made on the Domain Naming Master to all DCs:

repadmin.exe /syncall /d /e /P /q DomainNamingMaster_DC_HostName

This creates a DCclist.xml file that is used to track the progress and status of each domain controller in the forest for the domain rename operation. At this point, the Rendom freezes your Active Directory forest from making any changes to its configuration (such as adding/removing DCs, configuring domain trusts, etc.).

Check if the domain is ready to accept changes (checks the availability of all DCs):

rendom /prepare

If this command returns no errors, you can run the rename operation:

rendom /execute

This command automatically reboots all domain controllers.

All the domain-joined workstations and member servers must be rebooted twice for the changes to take effect. The first reboot allows the domain member to detect the domain change and change the full computer name. The second is used to register the new computer name in the new DNS zone.

Note. If there are any remote computers that connect to your domain via VPN, you will need to unjoin them from the old domain and rejoin the new domain.

Now your users can log on to computers using their old usernames and passwords.

After that, you need to manually rename all domain controllers (they won’t automatically change their names to reflect the new domain).

Use the following command to rename each DC:

netdom computername DC01.contoso.com /add:DC01.theitbros.com

netdom computername DC01.contoso.com /makeprimary:DC01.theitbros.com

Reboot the domain controller to apply the changes.

how to change domain name in active directory

Now you need to rebind the Group Policy Objects to the new domain name:

gpfixup /olddns:contoso.com /newdns:theitbros.com

Then run the command to fix the NetBIOS name of the domain in the GPOs:

gpfixup /oldnb:CONTOSO /newnb:THEITBROS

Remove links to the old domain:

rendom /clean

You can now complete the domain rename and unfreeze the AD forest:

rendom /end

Make sure that the rename was successful. Check if all Active Directory domain controllers can be contacted, users can sign in to the new domain; check if applications work correctly, and check AD replication and errors on DCs.

Now change paths in DFS namespaces, roaming profiles, redirected folders, etc. if used.

Source :
https://theitbros.com/how-to-rename-active-directory-domain/

NIST Launches Cybersecurity Framework (CSF) 2.0

By: Shannon Murphy, Greg Young
March 20, 2024
Read time: 2 min (589 words)

On February 26, 2024, the National Institute of Standards and Technology (NIST) released the official 2.0 version of the Cyber Security Framework (CSF).

What is the NIST CSF?

The NIST CSF is a series of guidelines and best practices to reduce cyber risk and improve security posture. The framework is divided into pillars or “functions” and each function is subdivided into “categories” which outline specific outcomes.

As titled, it is a framework. Although it was published by a standards body, it is not a technical standard.

https://www.nist.gov/cyberframework

What Is the CSF Really Used For?

Unlike some very prescriptive NIST standards (for example, crypto standards like FIPS-140-2), the CSF framework is similar to the ISO 27001 certification guidance. It aims to set out general requirements to inventory security risk, design and implement compensating controls, and adopt an overarching process to ensure continuous improvement to meet shifting security needs.

It’s a high-level map for security leaders to identify categories of protection that are not being serviced well. Think of the CSF as a series of buckets with labels. You metaphorically put all the actions, technology deployments, and processes you do in cybersecurity into these buckets, and then look for buckets with too little activity in them or have too much activity — or repetitive activity — and not enough of other requirements in them.

The CSF hierarchy is that Functions contain many Categories — or in other words, there are big buckets that contain smaller buckets.

What Is New in CSF 2.0?

The most noteworthy change is the introduction of Governance as a sixth pillar in the CSF Framework. This shift sees governance being given significantly more importance from just a mention within the previous five Categories to now being its owna separate Function.

According to NIST the Govern function refers to how an organization’s, “cybersecurity risk management strategy, expectations, and policy are established, communicated, and monitored.”  This is a positive and needed evolution, as when governance is weak, it often isn’t restricted to a single function (e.g. IAM) and can be systemic.

Governance aligns to a broader paradigm shift where we see cybersecurity becoming highly relevant within the business context as an operational risk. The Govern expectation is cybersecurity is integrated into the broader enterprise risk management strategy and requires dedicated accountability and oversight.

There are some other reassignments and minor changes in the remaining five Categories. CSF version 1.0 was published in 2014, and 1.1 in 2018. A lot has changed in security since then. The 2.0 update acknowledges that a review has been conducted.

As a framework, the CISO domain has not radically changed. Yes, the technology has radically evolved, but the greatest evolution in the CISO role really has been around governance: greater interaction with C-suite and board, while some activities have been handed off to operations.

NIST Cybersecurity Framework

So How Will This Impact Me in the Short Term?

The update to the NIST CSF provides a fresh opportunity to security leaders to start or reopen conversations with business leaders on evolving needs.

  • The greatest impact will be to auditors and consultants who will need to make formatting changes to their templates and work products to align with version 2.0.
  • CISOs and security leaders will have to make some similar changes to how they track and report compliance.
  • But overall, the greatest impact (aside from some extra billable cybersecurity consulting fees) will be a boost of relevance to the CSF that could attract new adherents both through security leaders choosing to look at themselves through the CSF lens and management asking the same of CISOs.
Category

Source :
https://www.trendmicro.com/it_it/research/24/c/nist-cybersecurity-framework-2024.html

Setting up a Multi-Server CrowdSec Security Engine Installation

MARCH 28, 2024
15 MIN. READ
WRITTEN BY Manuel Sabban

This article was originally published on 30 April 2021 in the Linux Journal.

Updated: 14 March 2024

With the launch of Security Engine 1.0.x, we enabled the Security Engine to function as an HTTP REST API, allowing it to gather signals from other Security Engines.

In this guide, I will guide you through the steps to set up the CrowdSec Security Engine across multiple servers, where one server will serve as the parent and two additional machines will forward alerts to it.

To learn about the three different ways to achieve secure TLS communications between your CrowdSec Security Engines in this multi-server setup, check out the second part of this series: Secure A Multi-Server CrowdSec Security Engine Installation With HTTPS.

Benefits

Sharing cybersecurity incidents across machines using the CrowdSec Security Engine is a highly effective strategy to enhance collective security defenses. By leveraging CrowdSec’s capability to distribute remediations among connected machines, each machine benefits from real-time updates about new threats detected elsewhere in the network.

Architecture

In the diagram above, the parent Security Engine, designated as server-1, will be set up as the HTTP REST API, commonly known as the LAPI (Local API). This engine will be in charge of storing and distributing the gathered signals. Remediation is managed through the Remediation Components, which depend on the LAPI offered by server-1. It’s crucial to understand that mitigation can occur independently from detection.

Server-2 and server-3 are designated as internet-facing machines that will host services available to the public and will be known as the child Log Processors. On these servers, we will install CrowdSec Security Engine and Remediation Components, which will interact with the server-1 LAPI. 

Note: The phrase “child Log Processors” refers to a CrowdSec Security Engine that operates with its LAPI turned off. For more information on this, consult our Taxonomy Update Article

We strongly encourage you to explore the CrowdSec Hub to learn about the extensive range of services the Security Engine can protect. This platform showcases the diverse capabilities of the Engine in securing everything from web applications to databases against cyber threats.

Architecture Decisions

I chose a postgresql backend for the server-1 LAPI to achieve greater stability in database read and write operations. Nevertheless, depending on your operational scale, you might discover that the default SQLite with WAL (Write-Ahead Logging) enabled meets your needs, if so you can skip section 1b.

Prerequisites

To follow this tutorial, you will need the following:

  • Two internet-facing Ubuntu 22.04 machines hosting services.
  • One Ubuntu 22.04 machine.
  • A local network connection between the Parent and Child machines.

Step 1: Setup and Configure Parent LAPI server-1

Step 1a: Install CrowdSec Security Engine

Let’s install the Security Engine, following the installation guide.

https://youtube.com/watch?v=VwXiMLUhdXQ%3Fenablejsapi%3D1%26origin%3Dhttps%3A


curl -s https://packagecloud.io/install/repositories/crowdsec/crowdsec/script.deb.sh | sudo bash
sudo apt install crowdsec

Step 1b (Optional): Using postgresql on Parent server-1 

Install the PostgreSQL package using the apt package manager.


sudo apt install postgresql

Next, transition to the postgres Linux user and then connect by executing the psql command.


sudo -i -u postgres
psql

You can set up the database and create an authorized user using the commands below. Replace  with a password you select, you must keep it within the single quotes.


postgres=# CREATE DATABASE crowdsec;
CREATE DATABASE
postgres=# CREATE USER crowdsec WITH PASSWORD ‘[PASSWORD]’; CREATE ROLE
postgres=# GRANT ALL PRIVILEGES ON DATABASE crowdsec TO crowdsec;
GRANT

Now, we’ll set up the Security Engine to utilize this newly created database as its backend. This requires updating the db_config section in the /etc/crowdsec/config.yaml file.


db_config:
  log_level: info
  type:	postgres
  user: crowdsec
  password: ""
  db_name: crowdsec
  host: 127.0.0.1
  port: 5432
  

During the installation of the Security Engine, the local machine was configured to use the SQLite database. To switch to the newly set up postgres database, you will need to regenerate the credentials and then proceed to restart the Security Engine.


sudo cscli machines add -a –force
sudo systemctl restart crowdsec

Step 1c: Expose LAPI port

To enable communication between the LAPI and the child Log Processors/Remediation Components, it is necessary to adjust the LAPI’s settings to accept connections from external sources, since its default configuration binds it to the machine’s loopback address (127.0.0.1). This adjustment can be made by editing the /etc/crowdsec/config.yaml configuration file and changing the specified settings.


api:
  server:
    listen_uri: 10.0.0.1:8080
    

In the mentioned setup, we adjust the settings to listen on the 10.0.0.1 interface on port 8080. Should you wish to listen on several interfaces, you can change this to 0.0.0.0 and implement firewall rules to permit specific connections.

Step 2: Setup and Configure Child Log Processors

Step 2a: Install CrowdSec Security Engine

Let’s install the Security Engine, following the installation guide.

https://youtube.com/watch?v=VwXiMLUhdXQ%3Fenablejsapi%3D1%26origin%3Dhttps%3A


curl -s https://packagecloud.io/install/repositories/crowdsec/crowdsec/script.deb.sh | sudo bash
sudo apt install crowdsec

Step 2b: Configure to use LAPI server

First, lets register the Log Processor to the LAPI server using the following command


sudo cscli lapi register -u http://10.0.0.1:8080

Ensure you adjust the -u flag to suit your network. Utilize the IP address if it’s static, or opt for the hostname if your network allows it.

Next, we’ll turn off the local API on the Security Engine, turning it into a Log Processor. This action is taken because the API won’t be utilized, which will conserve system resources and avoid occupying a TCP port unnecessarily.

To achieve this, we can disable the API in the configuration with:


api:
  server:
    enable: false
    

Step 2c: Validate the registration request on LAPI

Since we used the cscli lapi register on the child Log Processor we must validate the request on server-1 via the following commands:


sudo cscli machines list
--------------------------------------------------------------------------------------------------------------------------------------------------------------------
  NAME                                              IP ADDRESS      LAST UPDATE           STATUS  VERSION                                                            
  --------------------------------------------------------------------------------------------------------------------------------------------------------------------
  dc6f34b3a4994700a2e333df43728701D0iARTSQ6dxiwyMR  10.0.0.1  2021-04-13T12:16:11Z  ✔️  v1.0.9-4-debian-pragmatic-a8b16a66b110ebe03bb330cda2600226a3a862d7
  9f3602d1c9244f02b0d6fd2e92933e75zLVg8zSRkyANxHbC  10.0.0.3   2021-04-13T12:24:12Z  🚫
--------------------------------------------------------------------------------------------------------------------------------------------------------------------

From this output, it’s evident there’s a new machine that hasn’t been validated yet by the 🚫 within the status column. We need to manually validate this machine to ensure the LAPI recognizes which machines are authorized to transmit signals.

Note: If you don’t see a new machine marked with a 🚫 in the status column, make sure you are executing the command on the LAPI server.


sudo cscli machines validate 9f3602d1c9244f02b0d6fd2e92933e75zLVg8zSRkyANxHbC

Make sure to change the argument following validate to correspond with the new machine name displayed in the list output.

Step 2d: Restart the child Log Processor service

On the child Log Processor machine you can run the following command to restart the service:


sudo systemctl restart crowdsec

Then, for each machine you wish to connect, repeat step 2. In our case, we will perform this action twice, once for each Ubuntu machine.

Step 3: Setting up Remediation

Now, it’s important to configure remediation measures for your internet-facing servers since merely running the Log Processor does not implement enforcement actions. In this article, we’ll focus on setting up the Linux firewall Remediation Component. For additional remediation options, be sure to explore the extensive list available in the CrowdSec Documentation.

Step 3a: Generating API key on LAPI

First, we’ll create API token on the LAPI server by executing the following command:


sudo cscli bouncers add server-2-firewall
Api key for 'server-2-firewall':

    02954e85c72cf442a4dee357f0ca5a7c
    
Please keep this key since you will not be able to retrieve it!

I used server-2-firewall as the name for the key, but you can choose any name you prefer. It’s crucial to select a descriptive name for the key to facilitate future management, especially if you need to revoke a key due to a token compromise.

Step 3b: Install the Remediation Component

IPtables firewall is among the most commonly used on Linux, so we’ll proceed to install the Component that interacts with it, using the apt package manager.


sudo apt install cs-firewall-bouncer-iptables

Once the Component is installed, we will edit the configuration under /etc/crowdsec/bouncers/crowdsec-firewall-bouncer.yaml to point towards the LAPI


api_url: http://10.0.0.1:8080/
api_key: 02954e85c72cf442a4dee357f0ca5a7c

Ensure you modify the api_url to align with your LAPI address and update the api_key to the one generated by the previous command. Remember, you can use either the IP address or the hostname.

Once you have altered the configuration, let’s restart the firewall Remediation Component.


sudo systemctl restart crowdsec-firewall-bouncer

Then, for each Remediation Component you wish to connect, repeat step 3. In our case, we will perform this action twice, once for each firewall on the Ubuntu machines. Make sure to alter the naming scheme of the API key.

A few closing thoughts

This guide illustrated the process for establishing a multi-server Security Engine setup. While this example utilized three servers, the architecture allows for easy expansion. The resource consumption on server-2 and server-3 remains minimal since the majority of operations are directed towards server-1, facilitating straightforward scalability of the system:

  • Register and validate additional Security Engines on the LAPI server
  • Add any additional Remediation Components

As previously stated, there’s no requirement for the Remediation Components and Security Engines to be installed on the same server. This implies that the Security Engine should be installed at the location where logs are produced, whereas the Remediation Component can be deployed at any desired location.

It’s important to note that this configuration comes with certain limitations:

  • The communication between Security Engines occurs via unencrypted HTTP, which is suitable for a local network but not secure for internet use. However, the CrowdSec Security Engine supports the use of HTTPS for these interactions.
  • This article does not delve into monitoring or alerting. Nonetheless, the Security Engine supports comprehensive monitoring capabilities via Prometheus, and you can find more detailed information about it in this article.
  • Having both the CrowdSec LAPI and PostgreSQL on server-1 creates a single point of failure, potentially leading to delays in threat response should any issues arise with the server.

Now you may be wondering — how do I build a highly available multi-server CrowdSec setup? We will have a dedicated article on that in the coming weeks, so stay tuned! 

We are always more than happy to receive your feedback! Don’t hesitate to reach out to us on our community platforms on Discord and Discourse.

Source :
https://www.crowdsec.net/blog/multi-server-setup

Secure A Multi-Server CrowdSec Security Engine Installation With HTTPS

MARCH 28, 2024
10 MIN. READ
WRITTEN BY Manuel Sabban

This article was originally published on 31 August 2021 in the Linux Journal.

Updated: 14 March 2024

Welcome to the second part of our tutorial on how to set up and secure a multi-server CrowdSec Security Engine installation. In the first part, I walked you through the setup of CrowdSec Security Engines across multiple servers, with one server serving as the parent and two additional machines forwarding alerts to it.

In this part, I will address security issues posed by clear HTTP communication in the previous multi-server Security Engine installation. To solve this, I propose establishing the communication between Security Engines over encrypted channels. This solution allows server-2 or server-3 to trust the server-1 identity and avoid man-in-the-middle attacks.

Using self-signed certificates

Create the certificate

First, you need to create a certificate. This can be achieved with the following one-liner.


openssl req -x509 -newkey rsa:4096 -keyout encrypted-key.pem -out cert.pem -days 365 -addext "subjectAltName = IP:172.31.100.242

For now, the Security Engine is not able to ask for the passphrase of the private key when starting. So, you have the choice to decipher the private key by hand each time you start or reload the Security Engine or store the key unencrypted. In any way, to strip the passphrase, you can use the following:


openssl rsa -in encrypted-key.pem -out key.pem

Then, the unencrypted key file can be safely deleted after the Security Engine is started.

Configure the Security Engine to use a self-signed certificate

On server-1 you need to configure the Security Engine to use the generated certificate. As seen below, the  tls.cert_file and tls.key_file option in the api.server section of the following /etc/crowdec/config.yaml excerpt is set to the generated certificate file.


api:

  server:

    log_level: info
    listen_uri: 10.0.0.1:8080
    profiles_path: /etc/crowdsec/profiles.yaml
    online_client: # Crowdsec API credentials (to push signals and receive bad 

    tls:
      cert_file: /etc/crowdsec/ssl/cert.pem
      key_file: /etc/crowdsec/ssl/key.pem
      

On the client side, configuration changes happen in two files. First, modify /etc/crowdec/config.yaml to accept self-signed certificates by setting the insecure_skip_verify to true.

You also need to change HTTP for HTTPS in the /etc/crowdsec/local_api_credentials.yaml file in order to reflect the changes. This small change has to be done on all three servers (server-1server-2 andserver-3).

Note: Please keep in mind that this LAPI configuration has to be done on server-1 as well if it’s used as a log processor too.


url: https://10.0.0.1:8080/
login: [login]
password: [password]

Side note: Obviously using self-signed certificates doesn’t provide any confidence over ownership on the LAPI server. Servers using the service (server-2 or server-3 in this setup) are still vulnerable to man-in-the-middle attacks, but at least this setup provides encrypted communications. That’s the reason why the InsecureSkipVerify option is needed.

Using a Certificate Authority-issued certificate

Let’s Encrypt, or services like Amazon ACM, can be leveraged to workaround the InsecureSkipVerify, by issuing a certificate for a fully qualified domain name that can be added to /etc/hosts or to a local DNS server.  /etc/crowdsec/local_api_credentials.yaml can then be filled with this specified fully qualified domain name.

This indeed works and prevents the InsecureSkipVerify option from being set. This ensures that communication between client and server can’t be tampered with as long as the DNS configuration can be trusted, but should still be considered as a workaround.

Using a PKI

The process of configuring and managing an SSL Public Key Infrastructure (PKI) falls outside the scope of this tutorial, but I highly recommend you take a look at the official OpenSSL documentation. The simple PKI scenario is enough for this Security Engine setup.

Following the OpenSSL documentation, there are a few things worth mentioning.

To be usable in our CrowdSec TLS scenario, the certificate requests have to be issued with a subject alternative name corresponding to the IP of the Crowdsec LAPI server. This can be done by positioning the SAN environment variable when invoking OpenSSL for the certificate request (see step 3.3 in the OpenSSL simple PKI scenario).


SAN=IP:10.0.0.1 openssl req -new -config etc/server.conf -out certs/crowdsec.csr -keyout certs/crowdsec.key

The public part of the root and the signing certificates (bundle file created at step 4.5 in the OpenSSL simple PKI scenario) have to be added to the local certificate store before starting the CrowdSec Security Engine. In this setup, this is required to connect to the LAPI server. There’re many ways to do so, golang sources specify where certificates are expected, or you can use the SSL_CERT_FILE environment variable in the systemd service file to specify where to find the certificate when launching the Security Engine.

Updated note on CrowdSec and TLS authentication

After the first publication of this article, we added a new feature to the Security Engine you are now able not only to secure communication over TLS but also ensure authentication with certificate. In the official documentation you can find a great example that shows how TLS authentication can be done using certificates between Security Engines or between Security Engine and Remediation Component.

Conclusion

This article gives some highlights on how to secure communications between different CrowdSec Security Engine installations. The considered use case is Security Engine installations in a private network, but this can also be deployed on a public network with communication over the internet. In such a case, a third-party certificate would easily do the trick.

Depending on the needs, I proposed three different ways to achieve secure TLS communications between your Security Engines — using self-signed certificates, using certificates issued by a Certificate Authority, and using an SSL Public Key Infrastructure.

The first scenario, with self-signed certificates, only applies if you want to ensure encrypted communication with no need for authentication. The second scenario proposed may only be considered as a workaround when you have the possibility to modify local DNS resolutions. The third proposed scenario is the most complicated but would fit in most use cases and may be the way to go when security concerns are high.

I hope this tutorial comes in handy. Thanks for reading and stay tuned! 

If you have any questions or feedback, don’t hesitate to reach out to us on our community platforms on Discord and Discourse.

Source :
https://www.crowdsec.net/blog/secure-a-multi-server-installation-with-https

New Surge in VMware Workspace ONE Vulnerability CVE-2022-22954 Exploit Attempts Detected

MARCH 19, 2024
10 MIN. READ
WRITTEN BY Emanuel Seemann

Among the 29,000 vulnerabilities published as a CVE in 2022, CVE-2022-22954 is one of the more dangerous vulnerabilities, with a CVSS base score of 9.8. Recently there has been a significant uptick in exploitation attempts detected by the CrowdSec Network from bad actors located in China. To swiftly remediate this issue, we added the exploit as a rule for The CrowdSec AppSec Component.

This article serves as a reminder for security professionals to patch your VMware workspaces. Here I will also share some insights into the new attackers using this vulnerability.

The exploit

Since its introduction in 1999 there have been over 200,000 vulnerabilities published in the Common Vulnerabilities and Exposures (CVE) framework. As the number of vulnerabilities published each day grows, cyber security professionals are overwhelmed with figuring out whether a given vulnerability is actually at risk of being exploited. By leveraging CrowdSec’s large threat intelligence network, we know that most of these vulnerabilities very rarely lead to widespread adoption by threat actors. We suspect that this is mostly because proof-of-concept attacks are rarely published, which means that attackers don’t know a priori how difficult it will be to exploit the vulnerability in practice.

In the case of CVE-2022-22954, however, the exploit, as explained very succinctly by the Rapid7 team back in 2022, is simple and small enough to fit into a tweet. The Rapid7 team also showed that this vulnerability could be chained with other vulnerabilities of VMware products to gain a root shell for remote code execution. This showed that the exploit was both easy to use and significantly powerful in practice, which gave it a very high CVSS score.

The exploit itself is a classic case of Server-Side Template Injection (SSTI). Templating engines are systems used to insert user data into static HTML websites. For example, the web developer can write the template: 

And for the user John Doe, it will then show up as:

In an SSTI, the user is able to get the server to render a user-submitted template. The templating engine used by VMware, Apache FreeMarker, allows a developer to execute system commands within the template using the freemarker.template.utility.Execute function. This function call is, therefore, often used in template injection attacks. In the specific case of CVE-2022-22954, templates could be injected into the deviceUdid parameter of the /catalog-portal/ui/oauth/verify endpoint. 

To detect this, the CrowdSec Security Engine looks for calls to the utility.Execute function at this endpoint. Note that modern versions of FreeMarker allow sandboxing of the Execute function to prevent template injections from being easily exploitable.

A new surge in exploit attempts of the CVE-2022-22954

Usually, high CVSS scores cause defenders to patch their systems quickly and attacks to fall off as the attack surface rapidly decreases. This has been the case with log4shell as well. After a while, the real attacks drop away and, in turn, are replaced by a vast number of security scanners. This means that it’s not unusual to still see signals for old outdated vulnerabilities. To avoid such scanners polluting our threat intelligence, we maintain curated filters for the addresses of most scanner companies. 

The following chart depicts the number of unique IPs reported for CVE-2022-22954 each day over the past 3 months:

Unique IPs Reported for CVE-2022-22954

The chart is split into two phases. A stable phase for 2 months, followed by a growth phase starting on the 19th of February 2024. The first phase is the baseline noise generated by vulnerability scanners. The second phase is the new surge in attacks. The same trend can be seen in the number of signals and the number of unique Security Engines reporting attacks.

Signals and Security Engines Reporting CVE-2022-22954

Most of the attackers participating in this new attack wave have previously not been seen by the CrowdSec network. A good 40% of them come from Chinese IP addresses. Overlap analysis also reveals that the attackers attempt multiple similar attacks. Of note here should be the http-probing scenario which detects attackers that get served a significant number of 404/403 responses in a short time span. 

Combined with the fact that most of these IPs were previously unseen, we suspect that this might be an attempt to build a new botnet using very common vulnerabilities, not all of which we currently have detection scenarios for. 

Scenario Overlap

We provide the following top 3 Indicators of Compromise (IoC) for this new wave of attacks:


180[.]184[.]92[.]67
101[.]37[.]172[.]117
175[.]6[.]99[.]204

Response

In response to this new wave of attacks, we have added detection for this exploit to our Web Application Firewall (WAF) using a rule in the CrowdSec AppSec Component. CrowdSec WAF users are now protected against future attempts by these attackers. If you are not using the CrowdSec WAF solution yet, make sure to activate the AppSec Component in your Security Engine. You can find more information in the CrowdSec documentation.

In addition to the new AppSec Component rule, about 30% of the malicious IPs performing CVE-2022-22954 exploitation attempts are by now part of the CrowdSec Intelligence Blocklist, and considering the ramping intensity of these attackers, more will be added in the coming days. 

Want to stay ahead of the curve? Proactively block these IPs and don’t take any chances with the IPs massively exploiting the CVE-2022-22954 vulnerability potentially reaching your systems.

Source :
https://www.crowdsec.net/blog/new-surge-in-vmware-cve-2022-22954-exploit-attempts

Exit mobile version