NTFS vs. ReFS – How to Decide Which to Use

By now, you’ve likely heard of Microsoft’s relatively recent file system “ReFS”. Introduced with Windows Server 2012, it seeks to exceed NTFS in stability and scalability. Since we typically store the VHDXs for multiple virtual machines in the same volume, it seems as though it pairs well with ReFS. Unfortunately, it did not… in the beginning. Microsoft has continued to improve ReFS in the intervening years. It has gained several features that distanced it from NTFS. With its maturation, should you start using it for Hyper-V? You have much to consider before making that determination.

What is ReFS?

The moniker “ReFS” means “resilient file system”. It includes built-in features to aid against data corruption. Microsoft’s docs site provides a detailed explanation of ReFS and its features. A brief recap:

  • Integrity streams: ReFS uses checksums to check for file corruption.
  • Automatic repair: When ReFS detects problems in a file, it will automatically enact corrective action.
  • Performance improvements: In a few particular conditions, ReFS provides performance benefits over NTFS.
  • Very large volume and file support: ReFS’s upper limits exceed NTFS’s without incurring the same performance hits.
  • Mirror-accelerated parityMirror-accelerated parity uses a lot of raw storage space, but it’s very fast and very resilient.
  • Integration with Storage Spaces: Many of ReFS’s features only work to their fullest in conjunction with Storage Spaces.

Before you get excited about some of the earlier points, I need to emphasize one thing: except for capacity limits, ReFS requires Storage Spaces in order to do its best work.

ReFS Benefits for Hyper-V

ReFS has features that accelerate some virtual machine activities.

  • Block cloning: By my reading, block cloning is essentially a form of de-duplication. But, it doesn’t operate as a file system filter or scanner. It doesn’t passively wait for arbitrary data writes or periodically scan the file system for duplicates. Something must actively invoke it against a specific file. Microsoft specifically indicates that it can greatly speed checkpoint merges.
  • Sparse VDL (valid data length): All file systems record the amount of space allocated to a file. ReFS uses VDL to indicate how much of that file has data. So, when you instruct Hyper-V to create a new fixed VHDX on ReFS, it can create the entire file in about the same amount of time as creating a dynamically-expanding VHDX. It will similarly benefit expansion operations on dynamically-expanding VHDXs.

Take a little bit of time to go over these features. Think through their total applications.

ReFS vs. NTFS for Hyper-V: Technical Comparison

With the general explanation out of the way, now you can make a better assessment of the differences. First, check the comparison tables on Microsoft’s ReFS overview page. For typical Hyper-V deployments, most of the differences mean very little. For instance, you probably don’t need quotas on your Hyper-V storage locations. Let’s make a table of our own, scoped more appropriately for Hyper-V:

  • ReFS wins: Really large storage locations and really large VHDXs
  • ReFS wins: Environments with excessively high incidences of created, checkpointed, or merged VHDXs
  • ReFS wins: Storage Space and Storage Spaces Direct deployments
  • NTFS wins: Single-volume deployments
  • NTFS wins (potentially): Mixed-purpose deployments

I think most of these things speak for themselves. The last two probably need a bit more explanation.

Single-Volume Deployments Require NTFS

In this context, I intend “single-volume deployment” to mean installations where you have Hyper-V (including its management operating system) and all VMs on the same volume. You cannot format a boot volume with ReFS, nor can you place a page file on ReFS. Such an installation also does not allow for Storage Spaces or Storage Spaces Direct, so it would miss out on most of ReFS’s capabilities anyway.

Mixed-Purpose Deployments Might Require NTFS

Some of us have the luck to deploy nothing but virtual machines on dedicated storage locations. Not everyone has that. If your Hyper-V storage volume also hosts files for other purposes, you might need to continue with NTFS. Go over the last table near the bottom of the overview page. It shows the properties that you can only find in NTFS. For standard file sharing scenarios, you lose quotas. You may have legacy applications that require NTFS’s extended properties, or short names. In these situations, only NTFS will do.

Note: If you have any alternative, do not use the same host to run non-Hyper-V roles alongside Hyper-V. Microsoft does not support mixing. Similarly, separate Hyper-V VMs onto volumes apart from volumes that hold other file types.

Unexpected ReFS Behavior

The official content goes to some lengths to describe the benefits of ReFS’s integrity streams. It uses checksums to detect file corruption. If it finds problems, it engages in corrective action. On a Storage Spaces volume that uses protective schemes, it has an opportunity to fix the problem. It does that with the volume online, providing a seamless experience. But, what happens when ReFS can’t correct the problem? That’s where you need to pay real attention.

On the overview page, the documentation uses exceptionally vague wording: “ReFS removes the corrupt data from the namespace”. The integrity streams page does worse: “If the attempt is unsuccessful, ReFS will return an error.” While researching this article, I was told of a more troubling activity: ReFS deletes files that it deems unfixable. The comment section at the bottom of that page includes a corroborating report. If you follow that comment thread through, you’ll find an entry from a Microsoft program manager that states:

ReFS deletes files in two scenarios:

  1. ReFS detects Metadata corruption AND there is no way to fix it. Meaning ReFS is not on a Storage Spaces redundant volume where it can fix the corrupted copy.
  2. ReFS detects data corruption AND Integrity Stream is enabled AND there is no way to fix it. Meaning if Integrity Stream is not enabled, the file will be accessible whether data is corrupted or not. If ReFS is running on a mirrored volume using Storage Spaces, the corrupted copy will be automatically fixed.

The upshot: If ReFS decides that a VHDX has sustained unrecoverable damage, it will delete it. It will not ask, nor will it give you any opportunity to try to salvage what you can. If ReFS isn’t backed by Storage Spaces’s redundancy, then it has no way to perform a repair. So, from one perspective, that makes ReFS on non-Storage Spaces look like a very high risk approach. But…

Mind Your Backups!

You should not overlook the severity of the previous section. However, you should not let it scare you away, either. I certainly understand that you might prefer a partially readable VHDX to a deleted one. To that end, you could simply disable integrity streams on your VMs’ files. I also have another suggestion.

Do not neglect your backups! If ReFS deletes a file, retrieve it from backup. If a VHDX goes corrupt on NTFS, retrieve it from backup. With ReFS, at least you know that you have a problem. With NTFS, problems can lurk much longer. No matter your configuration, the only thing you can depend on to protect your data is a solid backup solution.

When to Choose NTFS for Hyper-V

You now have enough information to make an informed decision. These conditions indicate a good condition for NTFS:

  • Configurations that do not use Storage Spaces, such as single-disk or manufacturer RAID. This alone does not make an airtight point; please read the “Mind Your Backups!” section above.
  • Single-volume systems (your host only has a C: volume)
  • Mixed-purpose systems (please reconfigure to separate roles)
  • Storage on hosts older than 2016 — ReFS was not as mature on previous versions. This alone is not an airtight point.
  • Your backup application vendor does not support ReFS
  • If you’re uncertain about ReFS

As time goes on, NTFS will lose favorability over ReFS in Hyper-V deployments. But, that does not mean that NTFS has reached its end. ReFS has staggeringly higher limits, but very few systems use more than a fraction of what NTFS can offer. ReFS does have impressive resilience features, but NTFS also has self-healing powers and you have access to RAID technologies to defend against data corruption.

Microsoft will continue to develop ReFS. They may eventually position it as NTFS’s successor. As of today, they have not done so. It doesn’t look like they’ll do it tomorrow, either. Do not feel pressured to move to ReFS ahead of your comfort level.

When to Choose ReFS for Hyper-V

Some situations make ReFS the clear choice for storing Hyper-V data:

  • Storage Spaces (and Storage Spaces Direct) environments
  • Extremely large volumes
  • Extremely large VHDXs

You might make an additional performance-based argument for ReFS in an environment with a very high churn of VHDX files. However, do not overestimate the impact of those performance enhancements. The most striking difference appears when you create fixed VHDXs. For all other operations, you need to upgrade your hardware to achieve meaningful improvement.

However, I do not want to gloss over the benefit of ReFS for very large volumes. If you have storage volume of a few terabytes and VHDXs of even a few hundred gigabytes, then ReFS will rarely beat NTFS significantly. When you start thinking in terms of hundreds of terabytes, NTFS will likely show bottlenecks. If you need to push higher, then ReFS becomes your only choice.

ReFS really shines when you combine it with Storage Spaces Direct. Its ability to automatically perform a non-disruptive online repair is truly impressive. On the one hand, the odds of disruptive data corruption on modern systems constitute a statistical anomaly. On the other, no one that has suffered through such an event really cares how unlikely it was.

ReFS vs NTFS on Hyper-V Guest File Systems

All of the above deals only with Hyper-V’s storage of virtual machines. What about ReFS in guest operating systems?

To answer that question, we need to go back to ReFS’s strengths. So far, we’ve only thought about it in terms of Hyper-V. Guests have their own conditions and needs. Let’s start by reviewing Microsoft’s ReFS overview. Specifically the following:

“Microsoft has developed NTFS specifically for general-purpose use with a wide range of configurations and workloads, however for customers specially requiring the availability, resiliency, and/or scale that ReFS provides, Microsoft supports ReFS for use under the following configurations and scenarios…”

I added emphasis on the part that I want you to consider. The sentence itself makes you think that they’ll go on to list some usages, but they only list one: “backup target”. The other items on their list only talk about the storage configuration. So, we need to dig back into the sentence and pull out those three descriptors to help us decide: “availability”, “resiliency”, and “scale”. You can toss out the first two right away — you should not focus on storage availability and resiliency inside a VM. That leaves us with “scale”. So, really big volumes and really big files. Remember, that means hundreds of terabytes and up.

For a more accurate decision, read through the feature comparisons. If any application that you want to use inside a guest needs features only found on NTFS, use NTFS. Personally, I still use NTFS inside guests almost exclusively. ReFS needs Storage Spaces to do its best work, and Storage Spaces does its best work at the physical layer.

Combining ReFS with NTFS across Hyper-V Host and Guests

Keep in mind that the file system inside a guest has no bearing on the host’s file system, and vice versa. As far as Hyper-V knows, VHDXs attached to virtual machines are nothing other than a bundle of data blocks. You can use any combination that works.


Source :
https://www.altaro.com/hyper-v/ntfs-vs-refs/

Can Windows Server Standard Really Only Run 2 Hyper-V VMs?

Q. Can Windows Server Standard Edition really only run 2 Hyper-V virtual machines?

A. No. Standard Edition can run just as many virtual machines as Datacenter Edition.

I see and field this particular question quite frequently. A misunderstanding of licensing terminology and a lot of tribal knowledge has created an image of an artificial limitation with standard edition. The two editions have licensing differences. Their Hyper-V related functional differences:

Otherwise, the two editions share functionality.

The True Limitation

The correct statement behind the misconception: a physical host with the minimum Windows Standard Edition license can operate two virtualized instances of Windows Server Standard Edition, as long as the physically-installed instance only operates the virtual machines. That’s a lot to say. But, anything less does not tell the complete story. Despite that, people try anyway. Unfortunately, they shorten it all the way down to, “you can only run two virtual machines,” which is not true.

Virtual Machines Versus Instances

First part: a “virtual machine” and an “operating system instance” are not the same thing. When you use Hyper-V Manager or Failover Cluster Manager or PowerShell to create a new virtual machine, that’s a VM. That empty, non-functional thing that you just built. Hyper-V has a hard limit of 1,024 running virtual machines. I have no idea how many total VMs it will allow. Realistically, you will run out of hardware resources long before you hit any of the stated limits. Up to this point, everything applies equally to Windows Server Standard Edition and Windows Server Datacenter Edition (and Hyper-V Server, as well).

The previous paragraph refers to functional limits. The misstatement that got us here sources from licensing limits. Licenses are legal things. You give money to Microsoft, they allow you to run their product. For this discussion, their operating system products concern us. The licenses in question allow us to run instances of Windows Server. Each distinct, active Windows kernel requires sufficient licensing.

Explaining the “Two”

The “two” is the most truthful part of the misconception. One Windows Server Standard Edition license pack allows for two virtualized instances of Windows Server. You need a certain number of license packs to reach a minimum level (see our eBook on the subject for more information). As a quick synopsis, the minimum license purchase applies to a single host and grants:

  • One physically-installed instance of Windows Server Standard Edition
  • Two virtualized instances of Windows Server Standard Edition

This does not explain everything — only enough to get through this article. Read the linked eBook for more details. Consult your license reseller. Insufficient licensing can cost you a great deal in fines. Take this seriously and talk to trained counsel.

What if I Need More Than Two Virtual Machines on Windows Server Standard Edition?

If you need to run three or more virtual instances of Windows Server, then you buy more licenses for the host. Each time you satisfy the licensing requirements, you have the legal right to run another two Windows Server Standard instances. Due to the per-core licensing model introduced with Windows Server 2016, the minimums vary based on the total number of cores in a system. See the previously-linked eBook for more information.

What About Other Operating Systems?

If you need to run Linux or BSD instances, then you run them (some distributions do have paid licensing requirements; the distribution manufacturer makes the rules). Linux and BSD instances do not count against the Windows Server instances in any way. If you need to run instances of desktop Windows, then you need one Windows license per instance at the very leastI do not like to discuss licensing desktop Windows as it has complications and nuances. Definitely consult a licensing expert about those situations. In any case, the two virtualized instances granted by a Windows Server Standard license can only apply to Windows Server Standard.

What About Datacenter Edition?

Mostly, people choose Datacenter Edition for the features. If you need Storage Spaces Direct, then only Datacenter Edition can help you. However, Datacenter Edition allows for an unlimited number of running Windows Server instances. If you run enough on a single host, then the cost for Windows Server Standard eventually meets or exceeds the cost of Datacenter Edition. The exact point depends on the discounts you qualify for. You can expect to break even somewhere around ten to twelve virtual instances.

What About Failover Clustering?

Both Standard and Datacenter Edition can participate as full members in a failover cluster. Each physical host must have sufficient licenses to operate the maximum number of virtual machines it might ever run simultaneously. Consult with your license reseller for more information.


Source :
https://www.altaro.com/hyper-v/windows-server-standard-edition/

How to Request SSL Certificates from a Windows Certificate Server

I will use this article to show you how to perform the most common day-to-day operations: requesting certificates from a Windows Certification Authority.

I used “SSL” in the title because most people associate that label with certificates. For the rest of the article, I will use the more apt “PKI” label.

The PKI Certificate Request and Issuance Process

Fundamentally, the process of requesting and issuing PKI certificates does not depend on any particular vendor technology. It follows this pattern:

  1. A public and private key is generated to represent the identity.
  2. “Certificate Signing Request” (CSR) is generated using the public key and some information about the identity.
  3. The certification authority uses information from the CSR, its own public key, authorization information, and a “signature” generated by its private key to issue a certificate.

The PKI Certificate Request and Issuance Process

The particulars of these steps vary among implementations. You might have some experience generating CSRs to send to third-party signers. You might also have some experience using web or MMC interfaces. All the real magic happens during the signing process, though. Implementations also vary on that, but they all create essentially the same final product.

I want you to focus on the issuance portion. You do not need to know in-depth details unless you intend to become a security expert. However, you do need to understand that certificate issuance follows a process. Sometimes, an issuer might automate that process. You may have encountered one while signing up for a commercial web certificate. Let’s Encrypt provides a high degree of automation. At the other end, “Extended Validation” certificates require a higher level of interaction. At the most extreme, one commercial issuer used to require face-to-face contact before issuing a certificate. Regardless of the degree, every authority defines and follows a process that determines whether or not it will issue.

In your own environment, you can utilize varying levels of automation. More automation means more convenience, but also greater chances for abuse. Less automation requires greater user and administrative effort but might increase security. I lean toward more automation, myself, but will help you to find your own suitable solutions.

Auto-Enroll Method

I am a devoted fan of auto-enrollment for certificates. You only need to set up a basic group policy object, tie it to the right places, and everything takes care of itself.

If you recall from the previous article on certificate templates, you control who has the ability to auto-enroll a certificate by setting security on the template. You use group policy to set the scope of who will attempt to enroll a certificate.

Auto-Enroll Method - SSL Certificates

In the above graphic, the template’s policy allows all members of the default security group named “Domain Computers” to auto-enroll. Only the example “Certified Computers” OU links a group policy that allows auto-enrollment. Therefore, only members of the Certified Computers OU will receive the certificate. However, if Auto-Enroll is ever enabled for any other OU that contains members of the “Domain Computers” group, those members will receive certificates as well.

In summary, in order for auto-enroll to work, an object must:

  • Have the Autoenroll security permission on the certificate template
  • Fall within the scope of a group policy that enables it to auto-enroll certificates

You saw how to set certificate template security permissions in the previous article. We’ll go to the auto-enrollment policies next.

Auto-Enrollment Group Policies

The necessary policies exist at Computer or User ConfigurationPoliciesWindows SettingsSecurity SettingsPublic Key Policies. I am concerned with two policies: Certificate Services Client – Auto-Enrollment Settings and Certificate Services Client – Certificate Enrollment Policy.

First, Certificate Services Client – Auto-Enrollment Settings. To get going, you only need to set Configuration Model to Enabled. The default enrollment policy uses Windows Authentication to pull certificate information from Active Directory. If you’ve followed my directions, then you have an Active-Directory-integrated certification authority and this will all simply work. You will need to perform additional configuration if you need other enrollment options (such as requesting certificates from non-domain accounts).

certificate services client enrollment

Second, Certificate Services Client – Certificate Enrollment Policy. You only need to set Configuration Model to Enabled. Choose other options as desired.

auto-enroll

I think the first option explains itself. The second, Update certificates that use certificate templates, allow the certificate bearer to automatically request a replacement certificate when the certificate has updates. I showed you how to do that in the previous article.

Auto-Enrollment Security Implications

In general, you should not have many concerns with automatic certificate issuance. As followed so far, my directions keep everything under Active Directory’s control. However, you can enable auto-enrollment using other techniques, such as simple user/password verification via a URI. Anyone with local administrative powers can set local policies. Certificate templates can allow the requester to specify certificate subject names. Furthermore, some systems, like network access controls, sometimes simply require a particular certificate.

Think through who can request a certificate and who will accept them when configuring auto-enrollment scopes.

MMC Enrollment Procedure

MMC enrollment provides a great deal of flexibility. You can request certificates for you, your computer, or another entity entirely. It works on every single version of Windows and Windows Server in support, as long as they have a GUI. Since you can connect the console to another computer, you can overcome the need for a GUI. The procedure takes some effort to explain, but don’t let that deter. Once you have the hang of it, you can get through the process quickly.

First, you need to access the necessary console.

Accessing Certificate MMCs on Recent Windows Versions

On Windows 10 or Windows Server 2016+, just open up the Start menu and start typing “certificate”. At some point, Cortana will figure out what you want and show you these options:

encryption certificates

These options will work only for the local computer and the current user. If you want to target another computer, you can follow the upcoming steps.

Note: If you will use the console to request a certificate on behalf of another entity, it does not matter which console you start. The certificate template must allow exporting the private key for this mode to have any real use.

Accessing Specific Certificate MMCs Directly

On any version of Windows, you can quickly access the local computer and user certificates by calling their console snap-ins. You can begin from the Start menu, a Run dialog, or a command prompt. For the local computer, you must run the console using elevated credentials. Just enter the desired snap-in name and press Enter:

  • certlm.msc: Local machine certificates
  • certmgr.msc: Current user certificates

Note: If you will use the console to request a certificate on behalf of another entity, it does not matter which console you start. The certificate template must allow exporting the private key for this mode to have any real use.

Manually Add Specific Certificate Targets in MMC

You can manually add the necessary snap-in(s) from an empty MMC console.

  1. From the Start menu, any Run dialog, or a command prompt (elevated, if you need to use a different account to access the desired target), run mmc.exe.
  2. From the File menu, select Add/Remove Snap-in…
    console root
  3. Highlight Certificates and click Add:
    add or remove snap-ins
  4. Choose the object type to certify. In this context, My user account means the account currently running MMC. If you pick My user account, the wizard finishes here.
    certificates snap-in
  5. If you picked Service account or Computer account in step 4, the wizard switches to the computer selection screen. If you choose any computer other than local, you will view that computer’s certificate stores and changes will save to those stores. If you choose Computer account, the wizard finishes here.
    snap-in local computer
  6. If you selected Service account in step 4, you will now have a list of service accounts to choose from.
  7. If you want, you can repeat the above steps to connect one console to multiple targets:
  8. Once you have the target(s) that you like, click OK on the Add or Remove Snap-ins window. You will return to the console and your target(s) will appear in the left pane’s tree view.

Using the Certificates MMC Snap-In to Request Certificates

Regardless of how you got here, certificate requests all work the same way. We operate in the Personal branch, which translates to the My store in other tools.

Requesting a Certificate Using Template Defaults

You can quickly enroll a certificate template with template defaults. This is essentially the manual corollary to auto-enroll. You could use this method to perform enrollment on behalf of another entity, provided that you the template allows you to override the subject name. For that, you must have selected a console that matches the basic certificate type (a user console can only request user certificates and a computer console can only request computer certificates). You must also use an account with Enroll permissions on the desired template. I recommend that you only use this method to request certificates for the local computer or your current user. Skip to the next section for a better way to request certificates for another entity.

To request a certificate using a template’s defaults:

  1. Right-click Certificates and click Request New Certificate.
  2. The first screen is informational. The next screen asks you for a certificate enrollment policy. Thus far, we only have the default policy. You would use the Configured by you policy if you needed to connect without Active Directory. Click Next.
    certificate enrollment policy
  3. You will see certificate templates that you have Enroll permissions for and that match the scope of the console. In this screenshot, I used a computer selection, so it has computer certificates. If you expand Details, it will show some of the current options set in the certificate. If you click Properties, you can access property sheets to control various aspects of the certificate. I will go over some of those options in the next section. Remember that the certificate template to manually supply subject name information or it will ignore any such settings in your requests. Click Enroll when you are ready. The certificate will appear in the list.
    request certificates

Once you have a certificate in your list, double-click it or right-click it and click Open. Verify that the certificate looks as expected. If you requested the certificate for another entity, you will find the Export wizard on the certificate’s All Tasks context menu.

Creating an Advanced Certificate Request

You can use MMC to create an advanced certificate request. Most importantly, this process works offline by creating a standard certificate signing request file (CSR). Since it does not check your permissions in real time, you have much greater flexibility. I recommend that you use this method when requesting certificates on behalf of another entity. Follow these steps:

  1. Right-click Certificates, go to All Tasks, then Advanced Operations, and click Create Custom Request.
  2. The first screen is informational only. Click Next. On the next screen, choose your enrollment policy. If you’ve followed my guide, you only have two (real) choices: the default Active Directory policy or a completely custom policy. You could also choose to create a new local policy, which I will not cover. If you pick the Active Directory policy, it will allow you to pick from all of its known templates, which you can customize if needed. If you choose to Proceed without enrollment policy, you will start with an empty template and need to provide almost every detail. Make your selection and click Next.
  3. I took this screenshot after choosing the Active Directory enrollment policy. I then selected one base template. You can see that you also have options for the CSR format to use. If you chose to proceed without a policy, your Template options are No template (CNG key) or No template (Legacy key). CNG (Certificate Next Generation) creates v3 certificates while the Legacy option generates v2 certificates. Practically, they mostly deal with how the private key is stored and accessed. Common Microsoft apps (like IIS) work with CNG. Legacy works with almost everything, so choose that if you need to guess.
    custom request certificate enrollment
  4. On the Certificate Information screen, you will either see the template name that you chose or Custom request if you did not select an enrollment policy. To the right of that, near the edge of the dialog, click the down-pointing triangle next to Details. If you selected a policy, that will show the defaults. If you did not, it will show empty information. Click the Properties button to access property sheets where you can specify certificate options. Look at the screenshot in step 3 in the previous section. I will show the details dialog in the next section. Click Next when you have completed this screen.
  5. Choose the output file name and format. Most CAs will work with either type. Most prefer the default of Base64.
  6. You can now process the request on your Certification Authority.

Configuring Advanced Certificate Options in a Request

As mentioned step 3 in the above directions on using MMC to request a default template and in step 4 of the advanced request, you can use the Properties button on the Details section to modify parts of the certificate request prior to submitting it to the CA. If you selected a template that requires you to supply information, you will see an additional link that opens this dialog. You should always take care to inspect such a certificate after issuance to ensure that the CA honored the changes.

I will not cover every single detail. We will look at a few common items.

  • General: These fields are cosmetic. They appear when you see the certificate in the list.
    certificate properties
  • Subject: This busy tab contains identity information about the certificate holder. If the template only allows Active Directory information, then the CA will not accept anything that you enter here. For each type on the left, you can add multiple values. Make certain that you Add items so that they move to the right panes! Some of the more important parts:
    • Subject Name group: The fields in this group appear all combine to describe the certificate holder.
      • Common name: The primary identity of the certificate. Use a fully-qualified domain name for a computer or a full name for a user. Modern browsers no longer accept the value in the common name for authentication. Other tools still expect it. Always provide a value for this field to ensure the completeness of the subject group.
      • Country, Locality, Organization, etc.: Public CAs often require several of these other identity fields.
    • Alternative Name group: The fields in this group appear in the “Subject Alternate Name” (SAN) section of a certification. Browsers and some other tools will match entries in the SAN fields with the URL or other access points
      • DNS: Use this field to designate fully-qualified and short names that clients might use to access the certificate holder. Since web browsers no longer use the common name, enter all names that the owner might present during communications, including what you entered as the common name. Only use short names with LAN-scoped certificates. For instance, I might have a certificate with a common name of “internalweb.sironic.life” and give it an alternative DNS entry of “internalweb”. For load-balanced servers in a farm, I might have multiple DNS entries like “webserver1.sironic.life”, “webserver2.sironic.life”, etc.
      • IP Address (v4 and v6): If clients will access the certified system by IP address, you might want to add those IPs in these fields.

  • Extensions: The extensions govern how the bearer can use the issued certificate. Especially take note of the Extended Key Usage options.
  • Private Key: You don’t have a huge amount of private key options. In particular, you may wish to make the private key exportable.

The wizard will contain your options in the certificate request. The CA may choose to issue the certificate without accepting all of them.

Handling Certificate Signing Requests from a Linux System on a Microsoft Certification Authority

You can use a utility on a non-Windows system to create certificate requests. Linux systems frequently employ OpenSSL. These non-Microsoft tools generally do not know anything about templates, which the Windows Certification Authority requires. You could use the MMC tool on a Windows system to request a certificate on behalf of another. But, if you have a certificate signing request file, you can use the certreq.exe tool on a Windows system to specify a template during the request.

You can use OpenSSL to create CSRs fairly easily. Most of the one-line instructions that you will find today still generate basic requests that identify the system with the Common Name field. Modern browsers will reject such a certificate. So, generating a usable CSR takes a bit more work.

  1. Locate openssl.cnf on your Linux system (some potential locations: /etc/pki/tls, /etc/ssl). I recommend creating a backup copy. Open it in the text editor of your choice.
  2. Locate the [ req ] section. Find the following line, and remove the # that comments it out (or add it if it is not present):
    1 req_extensions = v3_req
  3. Locate the section named [ v3_req ]. Create one if you cannot find it. Add the following line:
    1 subjectAltName = @alt_names
  4. Create a section named [ alt_names ]. Use it to add at least the system’s Common Name. You can use it to add as many names as you like. It will also accept IP addresses. If you will host the system on an internal network, you can use short names as well. Remember that most public CAs will reject CSRs with single-level alternative names because it looks like you are trying to make a certificate for a top-level domain.
    1 2 3 4 5 6 [ alt_names ] DNS.1 = pkidemo.sironic.life DNS.2 = pkidemo   # only works internally DNS.3 = load-balanced-pkidemo.sironic.life IP.1 = 192.168.20.47 IP.2 = 10.10.60.3
  5. Make any other changes that you like. Remember that if the CA has a preset value for a setting, it will override. Save the file and exit your editor.
  6. Make sure that you’re in a directory that your current user account can write in and that you can transfer files out of. You could:
    1 2 mkdir ~/csr cd ~/csr
  7. Execute the following (feel free to research these options and change any to fit your needs):
    1 openssl req -new -newkey rsa:2048 -keyout demo.key -out demo.csr -nodes
  8. You will receive prompts for multiple identifier fields. If you explicitly set them in openssl.cnf, then it will present them as defaults and you can press Enter to accept them. I recommend skipping the option to create a challenge password. That does not passphrase-protect the key. To do that, you first need to run openssl with the genpkey command, then pass the generated key file to the openssl req command using the key parameter instead of newkey/keyoutA ServerFault respondent explains the challenge password and key passphrase well, and includes an example.
  9. Move the key file to a properly secured location and set permissions accordingly. Remember that if anyone ever accesses this file, then your key, and therefore any certificate generated for it, is considered compromised. Do not transfer it off of its originating system! Example location: /etc/pki/tls/private.
  10. Transfer the CSR file to a Windows system using the tool of your choice.
  11. On the Windows system, ensure that you have logged on with an account that has Enroll permissions for the template that you wish to use.
  12. Discover the Name of the template. Do not use the Display Name (which is usually the Name, with spaces). You can uncover the name with PowerShell if you have the ADCSAdministration module loaded. Use Get-CATemplate:

    Alternatively, open up the Certification Authority snap-in and access template management. Find the template you want to use and open its properties sheet. Check the Template name field.
  13. On the Windows system where you transferred the file, run the following, substituting your file name and template name:
    1 certreq -submit -attrib “CertificateTemplate:SironicWebServerManual”
  14. The utility will ask you to browse to the request file. You may need to change the filter to select all files.
  15. You will next need to select the certification authority.
  16. The utility will show the CA’s response to your request. If it issues a certificate, it will prompt you to save it. Be aware that even though you can choose any extension you like, it will always create an x509 encoded certificate file.

At this point, you have your certificate and the request/signing process is complete. However, in the interest of convenience, follow these steps to convert the x509 certificate into PEM format (which most tools in Linux will prefer):

  1. Transfer the certificate file back to the Linux system.
  2. Run the following:
    1 openssl x509 -in pkidemo.crt -outform PEM -out pkidemo.pem
  3. Move the created file to its final location (such as /etc/pki/tls/certs).

This procedure has multiple variants. Check the documentation or help output for the commands.

Deprecated Web Enrollment Method

Once upon a time, Microsoft built an ASP page to facilitate certificate requests. They have not updated it for quite some time, and as I understand it, have no plans to update it in the future. It does still work, though, with some effort. One thing to be aware of: it can only provide v2 (legacy) certificates. It was not updated to work with v3 (CNG). If a certificate template specifies the newer cryptography provider, web enrollment will not present it as an enrollable option. Certificates must use the Legacy Cryptographic Service Provider.

web server properties

First, you must issue it a certificate. It responds on 80 and 443, but some features behave oddly on a port 80 connection. Installation of the Web Enrollment role creates the web site and enables it for 443, but leaves it without a certificate.

Follow the steps in the previous article to set up a web server certificate (requires Server Authentication extended key usage). Once you finish that, use one of the MMC methods above to request a certificate for the site. Remember to use its FQDN and optionally its NetBIOS names as DNS fields on the Subject tab. Then, follow these steps to assign it to the certificate server’s web site:

  1. Open Internet Information Services (IIS) Manager on the system running the Web Enrollment service or on any system that can connect to it.
  2. Highlight the server in the left pane. In the right pane, under IIS, double-click Server Certificates.
    internet information services manager
  3. The newly-issued certificate should appear here. Highlight it and click Enable automatic rebind of renewed certificate in the right pane. If it does not appear here, verify that it appears in MMC and reload this page. If it still does not appear, then you made a mistake during the certificate request or issuance process.
  4. In the left pane, drill down from the server name to Sites, then Default Web Site. Right-click Default web site and click Edit Bindings. You can also find a Bindings link in the far right pane.
  5. Double-click the https line or highlight it and click Edit… at the right.
    site bindings
  6. Under SSL certificate, choose the newly-issued certificate. Click OK, then Close to return to IIS Manager.
  7. Drill down under Default web site and click on CertSrv. In the center pane, double-click Authentication.
  8. In the center pane, highlight Windows Authentication. It should already be Enabled. In the right pane, click Providers.
  9. NTLM should appear in the provider list. If it does not, use the drop-down to select it, then Add to put it in the list. Use the Up button to move NTLM to the top of the list. Ensure that your dialog looks like the following screenshot, then click OK.
    providers

You can now access the site via https://yourcertserver.domain.tld/certsrv. You will need to supply valid credentials. It will display the start screen, where you can begin your journey.

Because of the v2 certificate limitation, I neither use nor recommend this site for certificate requests. However, it does provide a convenient access point for your domain’s certificate chain and CRL.

Alternative Request Methods

The methods that I displayed above are the easiest and most universally-applicable ways to request certificates. However, anything that generates a CSR may suffice. Some tools have interfaces that can communicate directly with your certificate server. Some examples:

  • certreq.exe: Microsoft provides a built-in command-line based tool for requesting certificates. You can use it to automate bulk requests without involving auto-enroll. Read up on its usage on docs.microsoft.com.
  • IIS Manager
  • Exchange Management Console

Other tools exist.

What’s Next

At this point, you can create PKI certificate templates and request them. With an Active Directory-integrated certificate system, all should work easily for you. However, if you were following the directions for the custom request, you ended up with a CSR. Passing a CSR to the certification authority requires different tools. In the next article, I will show how to perform routine operations from the Certification Authority side, such as accepting CSRs and revoking certificates.


Source :
https://www.altaro.com/hyper-v/request-ssl-windows-certificate-server/

10 things to know about Android 10

Android 10 is here! With this release, we focused on making your everyday life easier with features powered by on-device machine learning, as well as supporting new technologies like Foldables and 5G. At the same time, with almost 50 changes related to privacy and security, Android 10 gives you greater protection, transparency, and control over your data. This builds on top of our ongoing commitment to provide industry-leading security and privacy protections on Android. We also built new tools that empower people of all abilities, and help you find the right balance with technology.

Here are the 10 things you should know, centered on innovation, security and privacy and digital wellbeing:

Simpler, smarter, and more helpful

1. Smart Reply now suggests actions. So when someone sends you a message with an address or a YouTube video, you can open and navigate in Google Maps or open up the video in YouTube—no copying and pasting required. And Smart Reply now works across all your favorite messaging apps.

2. Come to the dark side… with Dark Theme. You can enable Dark Theme for your entire phone or for specific apps like Photos and Calendar. It’s easier on your eyes, and your phone battery too.

3. Take advantage of larger, edge-to-edge screens with the new gesture navigation. With simple swipes, you can go backwards, pull up the homescreen, and fluidly move between tasks. After switching, you won’t want to go back to visible buttons.

4. With a single tap, Live Caption will automatically caption videos, podcasts and audio messages across any app—even stuff you record yourself. Live Caption will become available this fall, starting with Pixel.

New privacy and security features put you in control

5. You can choose to only share location data with apps while you’re using them. You’ll also receive reminders when an app that you are not actively using is accessing your location, so you can decide whether or not to continue sharing.

6. In a new Privacy section under Settings, you’ll find important controls like Web & App Activity and Ad Settings in one place.

7. With Google Play system updates, important security and privacy fixes can now be sent to your phone from Google Play, in the same way your apps update. So you get these fixes as soon as they’re available, without having to wait for a full OS update.

Find the right balance with technology for you and your family

8. You have greater control over where and when notifications will alert you. Mark notifications as “Silent” and they won’t make noise or appear on your lockscreen, so you’re only alerted by notifications when you want to be.

9. Now Family Link is part of every device running Android 10, right in settings under Digital Wellbeing. Parents can use these tools to set digital ground rules like daily screen time limits, device bedtime, time limits on specific apps, and more. They can also review the apps children install on their devices, as well as their usage.

10. Want to be in the zone but not off the grid? Digital Wellbeing now brings you Focus mode. Select the apps you find distracting—such as email or the news—and silence them until you come out of Focus mode. Sign up for the Beta to try it.

There’s lots more in Android 10, including a new enterprise feature that lets you use different keyboards for your personal and work profiles, app timers for specific websites so you can balance your time on the web, new gender-inclusive emoji, and support for direct audio streaming to hearing aid devices.

Android 10 begins rolling out to Pixel phones today, and we’re working with our partners to launch and upgrade devices to Android 10 this year. Learn more at android.com/10.


Source :
https://www.blog.google/products/android/android-10/

4 ways to create a new website for your small business

Being online is crucial – after all, people in the UK are the biggest online spenders. So whether you’re starting a new business, getting an existing business online for the first time or launching a replacement site for your existing online business, building the right website is crucial.

But if you’ve never created a website before, or don’t think of yourself as “technically minded” the number of options available to you can feel overwhelming.

In this guide, we’ll look at four difference options for creating a small business website and the pros and cons of each approach.

Option 1 – Using a web designer to build your small business website

This is the option you’re most likely to be familiar with already. There are scores of reputable web designers out there, just waiting to create your ideal site.

If you’re looking to create a large, powerful website packed with features, then this is likely to be the option you go for.

However, if you’re only looking to create a small brochure type site, you may find there are cheaper options that meet your needs just as well.

You also need to be sure that you hire a reputable web designer, who is capable of delivering what you need for a price you can afford. Look at examples of a designer’s previous work, and all reputable designers should be keen to put you in touch with past clients so you can get a true idea of their ability.

If you’re struggling to find a good web designer, then check out GoDaddy’s directory of local web designers.

In the negative column, along with the potentially high cost of hiring a web designer, you also need to think about future updates to your website. If you’ll need to make regular updates to your site, then make sure the designer factors this in when creating it. (Or use one of the other methods outlined in this guide.) You don’t want to be left in a situation where you have to contact your web designer to make even the smallest of changes to your site.

Option 2 – Using a website builder

If you want to create a website quickly and easily at a low cost (usually a small monthly fee), then opting for a website builder package may be right for you.

You won’t be able to create a large, complex site using this method, but then a lot of online businesses won’t need a large, complex site.

So if you’re looking to create a website focused on providing customers with information – such as a portfolio or restaurant website, or a website aimed at lead generation, then this is a great option for you.

Another huge advantage of using a website builder is that it allows you to create your own website without having to learn to code. By using templates and a drag and drop interface, you can create a site that suits your business down to the ground, and then easily update it whenever you need to.

Why not take a look at GoDaddy’s Website Builder to see if it meets your needs?

And if you do want to sell products online, but need a low-cost solution to do so, then take a look at Online Store from GoDaddy. It allows you to add up to 1,500 products to your store, while still providing you with the flexibility of a website builder.

Plus, with the launch of GoDaddy Websites + Marketing, you’ll find it easier than ever before to promote your website if you create it with Website Builder.

There’s a whole host of integrated marketing tools covering things like search engine optimization, social media and email.

Option 3 – Use a CMS like WordPress

WordPress is a content management system (CMS) that lets you create any kind of website you need.

In some ways it’s similar to a website builder – you can pick from a huge number of themes which dictate what your website will look like. It’s also relatively straightforward to add new content to your website.

However, WordPress is a little bit more complex than using a website builder, so you will need some technical skills if you’re going to make the most of it. It is possible to reduce the amount of technical know-how needed to create and maintain a WordPress site by opting for a managed WordPress hosting package, like the one offered by GoDaddy.  If you do this, things like updates to the WordPress CMS will be handled automatically, so you don’t have to worry about them.

An even simpler option is GoDaddy WordPress Websites, which provides you with a drag and drop interface, making it easier for you to build a site you love.

Of course, you can always hire a professional to create a WordPress site for you, and then update it yourself, but you’ll need a budget to pay a web designer.

You can even get GoDaddy to design and build a WordPress website for you – so you can get the website you want, while benefiting from GoDaddy’s best-in-class customer service.

This blog post explains more about why WordPress is a good choice for small businesses.

Option 4 – Build your own website from scratch

The big one. Learning to build your own website from scratch is possible, but you need to be realistic about what you can achieve and how quickly you can achieve it.

Web designers spend years learning their craft, so don’t expect that you’ll be able to build a large, complex website with just a few weeks of an online course under your belt.

That said, with persistence and dedication, there’s no reason why you can’t learn to build websites that any business would be proud to call their own.

However, if you need a site quickly then this probably isn’t the option for you unless you only need a small, simple site for your business.

That said we really don’t want to put off budding web designers – so if learning to build quality websites is on your bucket list, but you’re not ready to create your own business site just yet, why not opt for one of the three options above while you hone your skills?

If you do decide to go down the DIY path, Codecademy offer a make a website course, focused on coding.

And if you need some pointers on designing your site, check out this guide on how to avoid web design mistakes that could sabotage your business.

However you decide to get your business online, GoDaddy will be here to help you succeed.


Source :
https://uk.godaddy.com/blog/4-ways-create-new-website-small-business/

SonicWall Firewall Certified via NetSecOPEN Laboratory Testing, Earns Perfect Security Effectiveness Score Against Private CVE Attacks

Security-conscious customers face tough choices when evaluating security vendors and their next-generation firewall offerings.

To simplify this process and improve transparency in the cybersecurity market, NetSecOPEN announces SonicWall is one of only four security vendors to be certified in its 2020 NetSecOPEN Test Report.

Tested with 465 combined Public and Private Common Vulnerability and Exposure (CVE) vulnerabilities at the InterOperability Laboratory of the University of New Hampshire, the SonicWall NSa 4650 firewall achieved 100% security effectiveness against all private CVEs used in the test — CVEs unknown to NGFW vendors. Overall, SonicWall rated 99% when factoring in the results of the public CVE test.

“This apples-to-apples comparison provides security buyers with validation of real-world performance and security effectiveness of next-generation firewalls when fully configured for realistic conditions,” said Atul Dhablania, Senior Vice President and Chief Operating Officer, SonicWall, in the official announcement.

Testing firewalls in real-world conditions

The NetSecOPEN open standard is designed to simulate various permutations of real-world test conditions, specifically to address the challenges faced by security professionals when measuring and determining if the tested firewall is performing the way vendors had promised. The value of this service is maximized when test findings help you make clear and conclusive product decisions based on incontrovertible evidence.

SonicWall is among the first to excelled in one of the industry’s most comprehensive, rigorous benchmark tests ever created for NGFW. In summary, the NetSecOPEN Test Report reveals that the SonicWall NSa 4650 NFGW:

  • Demonstrated one of the highest security effectiveness ratings in the industry
  • Blocked 100% of attacks against all private vulnerabilities used in the test
  • Blocked 99% overall all attacks, private and public
  • Proved fast performance measured by NetSecOPEN at 3.5 Gbps of threat protection and up to 1.95 Gbps SSL decryption and inspection throughput
  • Affirmed its extremely high-performing and scalable enterprise security platform can meet the security and massive data and capacity demands of the largest of data centers
   

Firewall testing methodologies, metrics

Key performance indications (KPI), such as throughput, latency and other (see below) metrics, are important in determining products’ acceptability. These KPIs were recorded during NetSecOPEN testing using standard recommended firewall configurations and security features typically used in a real-world use case condition.

KPIMEANINGINTERPRETATION
CPSTCP Connections Per SecondMeasures the average established TCP connections per second in the sustaining period. For “TCP/HTTP(S) Connection Per Second” benchmarking test scenario, the KPI is measured average established and terminated TCP connections per second simultaneously.
TPUTThroughputMeasures the average Layer 2 throughput within the sustaining period as well as average packets per seconds within the same period. The value of throughput is expressed in Kbit/s.
TPSApplication Transactions Per SecondMeasures the average successfully completed application transactions per second in the sustaining period.
TTFBTime to First ByteMeasure the minimum, maximum and average time to first byte. TTFB is the elapsed time between sending the SYN packet from the client and receiving the first byte of application date from the DUT/SUT. TTFB SHOULD be expressed in millisecond.
TTLBTime to Last ByteMeasures the minimum, maximum and average per URL response time in the sustaining period. The latency is measured at Client and in this case would be the time duration between sending a GET request from Client and the receival of the complete response from the server.
CCConcurrent TCP ConnectionsMeasures the average concurrent open TCP connections in the sustaining period.

Importance of transparent testing of cybersecurity products

Before making an important business-critical purchase decision that is central to the cyber-defense of an organization, decision-makers likely spent countless days exercising due diligence. This may include conducting extensive vendor research, catching up on analyst opinions and insights, going through various online forums and communities, seeking peer recommendations and, more importantly, finding that one trustworthy third-party review that can help guide your purchase decision.

Unfortunately, locating such reviews can be a bewildering exercise as most third-party testing vendors and their methodologies are not well-defined nor do they follow established open standards and criteria for testing and benchmarking NGFW performance.

Recognizing the fact that customers often rely on third-party reviews to validate vendors’ claims, SonicWall joined NetSecOPEN in December 2018, the first industry organization focused on the creation of open, transparent network security performance testing standards adopted by the Internet Engineering Task Force (IETF), as one of its first founding member.

SonicWall recognizes NetSecOPEN for its reputation as an independent and unbiased product test and validation organization. We endorse its IETF initiative, open standards and benchmarking methodology for network security device performance.

As a contributing member, SonicWall actively works with NetSecOPEN and other members to help define, refine and establish repeatable and consistent testing procedures, parameters, configurations, measurements and KPIs to produce what NetSecOPEN declares as a fair and reasonable comparison across all network security functions. This should give organizations total transparency about cybersecurity vendors and their products’ performance.


Source :
https://blog.sonicwall.com/en-us/2020/02/sonicwall-firewall-certified-via-netsecopen-lab-testing-earns-perfect-score/

AV-TEST Places Cisco Umbrella First in Security Efficacy

When it comes to rating the effectiveness of security solutions, efficacy is king. Why? All it takes is one malicious request slipping through the net for a damaging breach to take place.

Lots of network security providers claim they are the best at threat detection and prevention. But can they prove it? Brand new third-party research from AV-TEST reveals that Cisco Umbrella is the industry leader in security efficacy, according to the 2020 DNS-Layer Protection and Secure Web Gateway Security Efficacy report.

Overview

AV-TEST is the leading independent research institute for IT security in Germany. For more than 15 years, the cybersecurity experts from Magdeburg have delivered quality-assuring comparison and individual tests of virtually all internationally relevant IT security products.

In November and December 2019, AV-TEST performed a review of Cisco Umbrella alongside comparable offerings from Akamai, Infoblox, Palo Alto Networks, Symantec and Zscaler.

In order to ensure a fair review, the research participants did not supply any samples (such as URLs or metadata) and did not influence or have any prior knowledge of the samples being tested. All products were configured to provide the highest level of protection, utilizing all security-related features available at the time.

The test focused on the detection rate of links pointing directly to PE malware (e.g. EXE files), links pointing to other forms of malicious files (e.g. HTML, JavaScript) as well as phishing URLs. A total of 3,668 samples were included in the testing.

DNS-Layer Protection Test

In the first part of this study, DNS-layer protection was tested. DNS-layer protection uses the internet’s infrastructure to block malicious and unwanted domains, IP addresses, and cloud applications before a connection is ever established as part of recursive DNS resolution. DNS-layer protection stops malware earlier and prevents callbacks to attackers if infected machines connect to your network.

An ideal use case for DNS-layer protection is guest wifi networks. With guest wifi it is usually not possible to install a trusted certificate on the guests’ devices, so HTTPS inspection is not possible. The study however shows that DNS-layer protection without a selective proxy still provides a good base layer of security.

DNS-layer protection with selective cloud proxy redirects only risky domain requests for deeper inspection of web content, and does so transparently through the DNS response. A common use case for selective proxy is corporate owned devices where there is a need to inspect risky traffic including HTTPS, but for privacy considerations, certain content categories such as financial or healthcare can be excluded from HTTPS inspection in the selective proxy.

For the DNS-layer protection testing, the products achieved the following blocking rates:

AV-TEST DNS-Layer Protection Test Result Graph Cisco Umbrella Blog

Cisco Umbrella performed significantly better than other vendors with a 51% detection rate for DNS-layer protection. Cisco Umbrella’s selective proxy makes a big difference in effective threat detection and increased the blocking rate to 72%.

Secure Web Gateway Test

In the second part of the study, the web gateway solutions were tested. A secure web gateway is based on a full web proxy that sees and inspects all web connections. Unlike DNS-layer protection which only analyzes domain names and IP addresses, a web proxy sees all files and the full URLs enabling more granular inspection and control.

Organizations adopt secure web gateways when they are looking for more flexibility and control. Common use cases for a secure web gateway include: needing full visibility of web activity, inspection of granular app controls, the ability to block specific file types and inspection of all HTTPS content with the ability to exclude specific content.

For secure web gateway testing, the products achieved the following blocking rates:

AV-TEST Secure Web Gateway Test Result Graph Cisco Umbrella Blog

In this test scenario, Cisco Umbrella outperformed the other vendors’ offerings in terms of security efficacy.

Conclusion

In both test scenarios, the Cisco Umbrella detection rate outperformed the offerings from other vendors.

These test results demonstrate several key takeaways. Organizations should adopt a layered approach to security. DNS-layer protection is simple and adds to the overall security efficacy. In use cases where deploying a selective proxy is possible , the security efficacy and blocking rates improve significantly. As seen in the test results, a secure web gateway full proxy solution provides the highest level of protection.

For more information on specific configurations and the detailed test results, click here to read the full report by AV-TEST.


Source :
https://umbrella.cisco.com/blog/2020/02/18/av-test-places-cisco-umbrella-first-in-security-efficacy/

How to convert OST to PST in Microsoft Outlook 2019/2016/2013/2010

To convert OST to PST in Outlook 2019/2016/2013/2010 a lot of users search for a perfect way. Numerous reasons are here that initiate users to convert OST to PST; the main is, PST files are easy to port and accessible. Here, by this blog, we will understand know-how to convert OST to PST in Outlook 2019/2016/2013/2010.

OST stands for Offline Storage Tables. The OST is a format that records Exchange Server mailbox organizers and folders in the disconnected zone or when web accessibility isn’t available. The OST format offers to execute the Outlook mailbox usefulness in the disconnected mode i.e., without interfacing with the Server. Despite the fact that Offline Storage Table records can’t be efficacy through external aggravations or some other disturbance, that makes it more best and impressive for standard business tasks.

Notwithstanding the Outlook version, regardless of whether it is Microsoft Outlook 2019, 2016, 2013, 2010, 2007 or any more seasoned ANSI release, inaccessible OST format file requires troubleshooting so as to recapture access to the information put away inside in the system. The most effortless approach to fix a wide range of OST issues, irrespective of harm or misfortune is to change over the OST record to Outlook PST document.

There are numerous strategies to execute the conversion process of OST data to PST file format; however, some strategies are harder while some are the most secure approaches to convert OST to PST in Outlook 2019/2016/2013/2010.

Know before Convert OST to PST in Outlook 2019/2010/2013/2010

You can’t extract information from the OST document to a PST legitimately. That implies you should sign in with the first profile so as to export the OST document information to PST. So, you’ll get a strategy given beneath.

OST file format is a duplicate copy of your Exchange mailbox; you can reproduce it by re-syncing with the mailbox.

There is no real way to change over an OST file format to a PST file format by utilizing Microsoft devices. If your unique email account isn’t accessible or if your OST file format deprives. For this situation, there’s just a single way you can change over the OST record to PST—by utilizing a professional third-party tool.

No. 1 Strategy: Utilize Outlook Archive feature

The first strategy to duplicate or move mailbox things into PST is based on the utilization of the Archive option given in Outlook. The option of Outlook offers to copy entire data of OST file into PST file format; however, it will not copy contact of OST file.

To get the copy of the OST file format, go with beneath commands.

  • Open Outlook profile that has that particular OST file.
  • Then, Click on the File tab, then, click on Info, and after that Click on the Clean-up Tools button.
  • Next, choose Archive from the choices
  • In the Archive comment box that shows up, guarantee that Archive this organizer and all subfolders alternative is chosen (it is chosen by default)
  • Next, choose the organizer that you have to export to PST (e.g.: Outbox)
  • In the Archive things more established than a box, give a date. Entire things that sent before till the predefined date will archive
  • Under Archive file: choice, provide the path destination to save the new PST
  • Finally, Click on the OK button to complete the execution of exportation.

No.2 Strategy: Drag and Drop Mailbox Items

Surely, drag and drop of Mailbox items are one of the best ways to relocate the OST file format into PST file format. To do the relocation through Drag and Drop mailbox items process, you need to Open a blank PST file in the Microsoft Outlook interface and then choose and drag the required mailbox from OST data into the PST blank page.

Although, with the drag and drop items technique, there are a few constraints too. This is time taking process. It will need to repeat the procedure for every OST file item that required to be relocated in the PST file format. This expects tender loving care as the procedure is tedious; thusly, a solitary slip-up will prompt a superfluous redundancy of the procedure.

Also, the organizer hierarchy, just as the default organizers, for example, Calendars, Contacts, Inbox, and so forth., can’t be legitimately moved and you have to make another PST document to deal with the whole information in an organized way.

No. 3 Strategy: Outlook Import & Export Wizard

Microsoft Outlook Import and Export wizard is a compelling method to change over OST information to PST file format in Outlook 2010 and different variants. With the procedure, you can move OST information to Excel and CSV documents. Although, you would need to be cautious while executing the means as this is a manual technique.

Additionally, you should be in fact capable to execute the built-in import/export technique. Any misstep may result in loss of access to your important information So, it is prescribed to back up the OST document before beginning the exporting procedure with the goal that you can reestablish the information if the need is while execution.

No.4 Strategy: Use Shoviv OST to PST Converter

As, there are many reasons as well strategies to save your OST data into PST file format; however, I’ve told you three strategies to convert OST file format to PST format. Although, those manual strategies have few risks of failure and take a lot of time of the client with tediousness. So, this tactic is for professionals, who just want to do their OST conversion with no time and misfortune.

Use Shoviv OST to PST Converter to do conversion hassle-free and efficient. The prominent OST to PST Converter tool gives a programmed utility to export numerous OST documents to Outlook PSTs, also extract entire mailbox items unblemished. The software additionally split and compact the PST documents to enable you to oversee them in a progressively organized way. Furthermore, it additionally straightforwardly export the OST file information to Office 365, which enormously assists on the off chance that you’re relocating your mailboxes to the cloud environment. Consequently, Microsoft MVPs suggest the product based OST transformation technique.

Professionally Convert OST to PST in Outlook 2019/2016/2013/2010:

Step 1: Download Shoviv OST to PST to Converter and Install and launch it on your system.

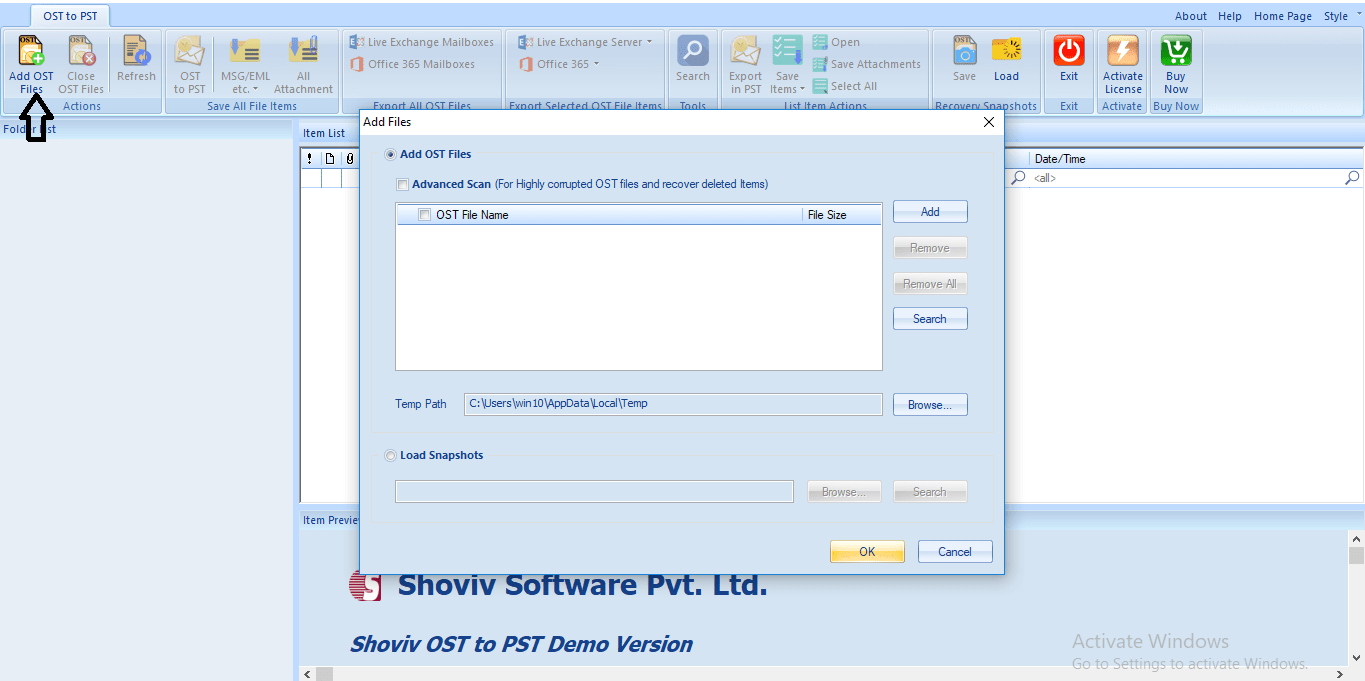
Step 2: Click on the Add OST Files button of Ribbon bar.

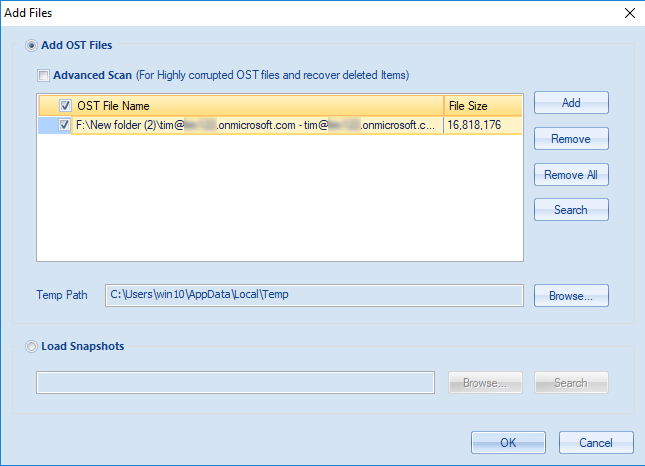
Step3: Using Add, Remove, Remove All and Search button, add required OST files and check them. Also, browse the temp path.

Note: If your OST file is highly corrupted or you want to recover the deleted items from your OST file go for the ‘Advance Scan’ option. Commonly it takes time to examine a document relies on the volume of information it incorporates. You can likewise abort the scan process by using the given Stop button in the interface.

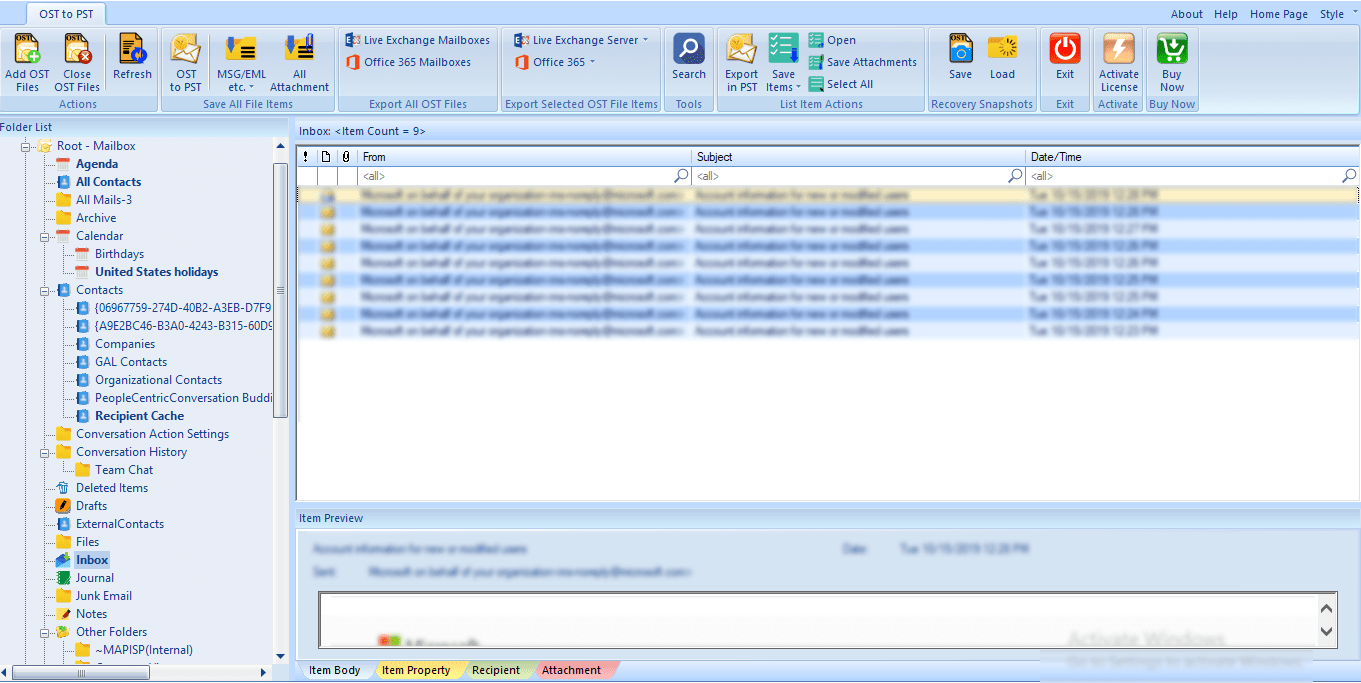
Step 4: Now users can view the selected files in the folder list; the user can also expand the folder by making a right-click and can see the content of it.


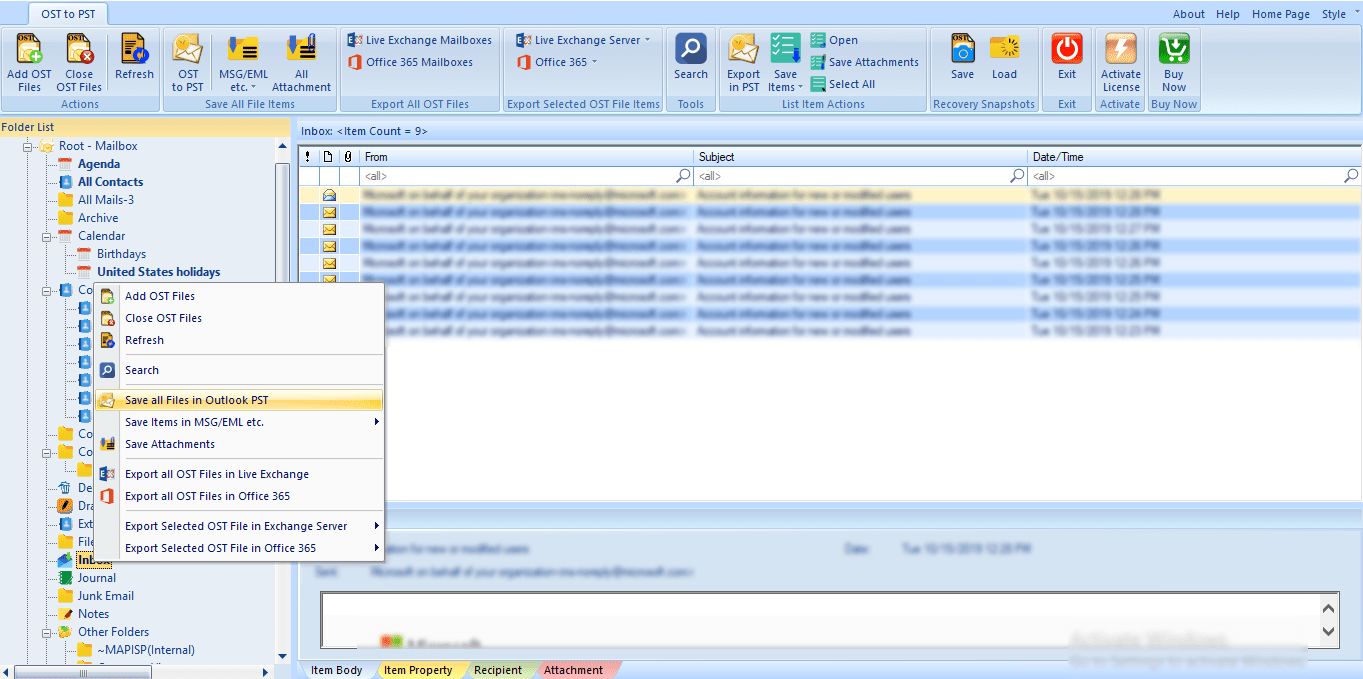
Step 5: Make a right-click on selected files or click the OST to PST button of the ribbon bar and go with the “Save all Files in Outlook PST” option.

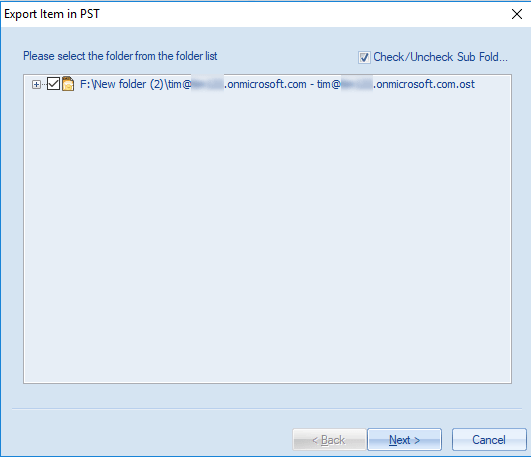
Step6: Check/Uncheck Subfolders option will appear, check the subfolder and proceed by clicking the Next.

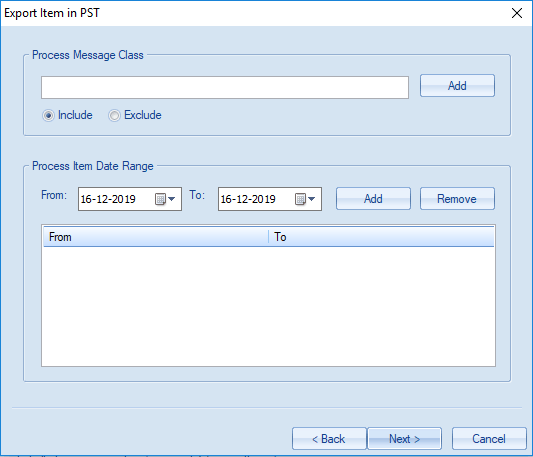
Step 7: Now, you will be prompted to Filter page. apply the filter using Process Message Class and Process Item Date Range. Click the Next Button.

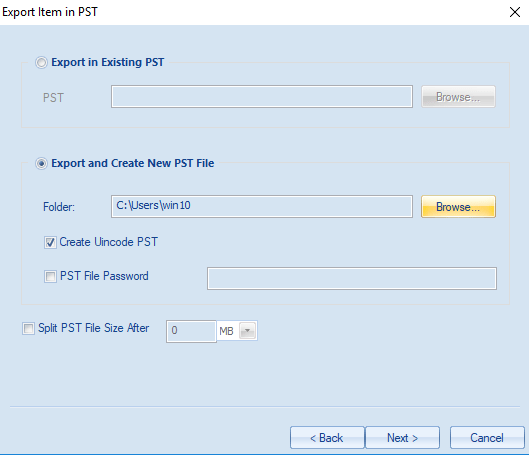
Step 8: In this page, users have the option to choose if a user wants to migrate in an existing PST or wants to create new PST and want to migrate in it. Here, user can also set size for the PST file, after given size resultant PST file will split. Provide the priority and click on the Next button.

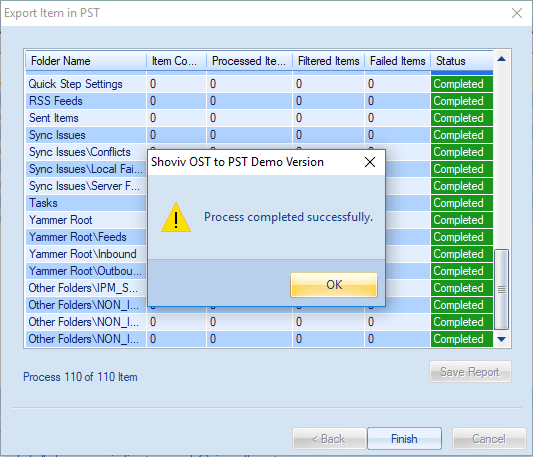
Step 9: The conversion of OST to PST proceeds now, after successful conversion, a message “Process Completed Successfully” will appear, click Ok. Option to save the report is also given. Click on the Save Report button for this. Click Finish when all is done.

At variance with sparing Exchange OST mailboxes to Outlook PST file format, Convert OST to PST tool from Shoviv permits changing over the Offline records to numerous document arrangements including MSG, HTML, EML, and RTF.


Source :
https://www.shoviv.com/blog/convert-ost-to-pst-in-outlook-2007-2010-2013-2016/

U.S. Charges Huawei with Stealing Trade Secrets from 6 Companies

The US Department of Justice (DoJ) and the Federal Bureau of Investigation (FBI) charged Huawei with racketeering and conspiring to steal trade secrets from six US firms, in a significant escalation of a lawsuit against the Chinese telecom giant that began last year.

Accusing Huawei and its affiliates of “using fraud and deception to misappropriate sophisticated technology from US counterparts,” the new charges allege the company of offering bonuses to employees who obtained “confidential information” from its competitors.

The indictment adds to a list of two other charges filed by the US government last year, including violating US sanctions on Iran and stealing technology from T-Mobile — called Tappy — that’s used to test smartphone durability.

The development is the latest salvo fired by the Trump administration in its year-long fight against the networking equipment maker, which it deems a threat to national security.

“The misappropriated intellectual property included trade secret information and copyrighted works, such as source code and user manuals for internet routers, antenna technology, and robot testing technology,” the unsealed federal indictment alleged.

The alleged theft enabled Huawei illegally obtain nonpublic technology relating to internet router source code, cellular antenna technology, and robotics, giving the company an unfair competitive advantage, prosecutors said.

Although the six US firms are unnamed in the indictment, it’s suspected that the companies in question are Cisco Systems, Motorola Solutions, Fujitsu, Quintel Technology, T-Mobile, and CNEX Labs.

The report further accuses Huawei of engaging in business with countries subject to US, EU, and UN sanctions, including Iran and North Korea, as well as for trying to conceal its involvement. Huawei is alleged to have used code names for these countries, such as “A2” for Iran, and “A9” for North Korea.

Huawei, for its part, has denied all the charges. “This new indictment is part of the Justice Department’s attempt to irrevocably damage Huawei’s reputation and its business for reasons related to competition rather than law enforcement,” the company was quoted as saying to the BBC.

The fresh charges against Huawei also come days after The Wall Street Journal reported that US officials had evidence of the company employing “back doors” that allowed it to secretly access sensitive and personal information.

The company, however, fired back against the allegations of spying, stating that the US itself has a long history of spying on its allies and adversaries, referencing a report by The Washington Post that detailed how the Central Investigative Agency (CIA) bought a company called Crypto AG and used it to intercept foreign governments’ communications for decades.

The ongoing tussle against Huawei, which is also seen as a battle for tech supremacy between the US and China, has ensnared many countries, with the Trump administration actively dissuading its partners such as the UK from using Huawei’s technology for 5G wireless networks.

In spite of the mounting pressure, the UK last month announced it would continue using Huawei’s equipment but limiting its role to building peripheral parts of the 5G and full-fiber network. France, likewise, has said it won’t exclude the firm from supplying equipment for 5G networks in the country.


Source :
https://thehackernews.com/2020/02/united-states-china-huawei.html

Microsoft Active Directory How to Create a Group Policy Central Store

Group Policy is used in Active Directory (AD) domain environments to centrally manage Windows Server and client configuration settings. By default, when using Group Policy management tools, like the Group Policy Management Console (GPMC), the Group Policy settings you see available are taken from a set of Group Policy template files found in the local %systemroot%PolicyDefinitions folder.

Group Policy templates are language-neutral XML files with an .admx file extension. The descriptions for each policy setting are stored separately in .adml files. There is one .adml file for each language corresponding to the respective .admx Group Policy template. Bear in mind that .admx files are just templates and the actual settings applied to Windows are stored in registry.pol files. Before Windows Vista Service Pack 1, Group Policy templates used a different file format and file extension (.adm).

Some applications, like Google Chrome, Microsoft Office, and the new version of Microsoft Edge, come with their own Group Policy templates that you can download and add to PolicyDefinitions. But adding or modifying templates in the local PolicyDefinitions folder means that you will only see the new or changed settings in GPMC on the device where the Group Policy template was added or changed.

Create a central Group Policy store

So that all Group Policy administrators see the same settings in GPMC, regardless of which device they are using, you can create a PolicyDefinitions folder in your domain’s SYSVOL folder. This is sometimes referred to as a Group Policy central store. GPMC will then use this domain network location to retrieve templates instead of using the local PolicyDefinitions folder. SYSVOL, and any child folders, is automatically replicated to all domain controllers in your AD domain.

To create a PolicyDefinitions folder in your domain, log in to a domain controller as a domain administrator. Then create a folder called PolicyDefinitions in the Policies folder in the UNC path shown below. You will need to replace ad.contoso.com with the Fully Qualified Domain Name (FQDN) of your AD domain.

\ad.contoso.comSYSVOLad.contoso.comPolicies

How to Create a Group Policy Central Store (Image Credit: Russell Smith)

Adding Group Policy templates to the central store

Once the folder has been created as shown in the screenshot above, all that’s left to do is populate it with Group Policy templates and .adml language files. There are two ways you can do this. You can copy the contents of the C:WindowsPolicyDefinitions folder on a Windows 8.1 or Windows 10 computer to the domain SYSVOL PolicyDefinitions folder.

Alternatively, Microsoft makes Group Policy templates, for each supported version of Windows and Windows Server, available on its website here. Download the contents of the required template CAB and copy the extracted files to the domain SYSVOL PolicyDefinitions folder.

How to Create a Group Policy Central Store (Image Credit: Russell Smith)

Next time you open GPMC, it will check for a SYSVOL PolicyDefinitions folder. If it exists, it will use the templates from the domain folder instead of the local version of the templates. When you expand Administrative Templates in GPMC, you’ll see Policy definitions (ADMX files) retrieved from the central store written to the left if GPMC was able to detect a central store. If nothing additional is written, the templates are being retrieved from the PCs local store.

How to Create a Group Policy Central Store (Image Credit: Russell Smith)

For more information on how to use GPMC to create Group Policy objects, see How to Create and Link a Group Policy Object in Active Directory on Petri.

There can only be one central Group Policy store

The central Group Policy store is a good idea in principle. But you can only have one central store, and you need to back it up and update it when Windows is patched or upgraded. If you are managing different versions of Windows in your environment, using one central Group Policy store can lead to issues. Especially now that there are so many supported versions of Windows 10 that you could potentially have in your environment at once.

In principle, Group Policy templates for the latest version of Windows are backwards compatible with previous versions of the operating system. But sometimes Microsoft changes Group Policy setting names and drops settings that might still be required in older versions of Windows. This can lead to errors parsing Group Policy on your systems if a central store is used.

To avoid this issue, you can dedicate a PC or virtual machine for the management of Group Policy for a specific version of Windows, without using a central Group Policy store. It might not be as convenient from a management perspective, but it does ensure separation of Group Policy templates for each version of Windows and that you are using the latest versions of the templates. And it is more likely to ensure that policy settings are applied as expected.


Source :
https://www.petri.com/how-to-create-a-group-policy-central-store
Exit mobile version