Site structure: the ultimate guide

3 May 2023

Your site needs to have a defined structure because, without it, it’ll just be a random collection of pages and blog posts. Your users need this structure to navigate on your site, to click from one page to another. Google also uses the structure of your site to determine what content is important and what is less relevant. This guide tells you everything you need to know about site structure.

Table of contents

What is site structure, and why is it important?

Site structure refers to organizing and arranging a website’s pages and content. It defines the information hierarchy within the site and serves as a roadmap for search engine crawlers. A well-structured site facilitates easy navigation, enhances user experience, and helps search engines like Google understand and effectively index the site’s content. This, in turn, can improve the site’s performance by making it easier for users to find and engage with the content. Ultimately, an optimized site structure helps achieve higher rankings, more traffic, and better conversion rates.

Importance for usability

The structure of your website significantly impacts the experience for your visitors (UX). If visitors can’t find the products and information they’re looking for, they’ll not likely become regular visitors or customers. In other words, you should help them navigate your site. A good site structure will help with this.

Navigating should be easy. You need to categorize and link your posts and products so they are easy to find. New visitors should be able to grasp what you’re writing about or selling instantly.

Importance of your site structure for SEO

A solid site structure vastly improves your chances of ranking in search engines. There are three main reasons for this:

a. It helps Google ‘understand’ your site

The way you structure your site will give Google vital clues about where to find the most valuable content on your site. It helps search engines understand what your site is mainly about or what you’re selling. A decent site structure also enables search engines to find and index content quickly. A good structure should, therefore, lead to a higher ranking in Google.

b. It prevents you from competing with yourself

On your site, you might have blog posts that are quite similar. If, for example, you write a lot about SEO, you could have multiple blog posts about site structure, each covering a different aspect. Consequently, Google won’t be able to tell which of these pages is the most important, so you’ll be competing with your content for high rankings. You should let Google know which page you think is most important. You need a good internal linking and taxonomy structure to do this, so all those pages can work for you instead of against you.

c. It deals with changes on your website

The products you sell in your shop will likely evolve. So does the content you’re writing. You probably add new product lines as old stock sells out. Or you write new articles that make old ones redundant. You don’t want Google to show outdated products or deleted blog posts, so you need to deal with these kinds of changes in the structure of your site.

Are you struggling with setting up your site’s structure? Don’t know the best strategy to link from one post to another? Check out our Site structure training, part of the Yoast SEO academy. Access to Yoast SEO academy is included in the price of Yoast SEO Premium. Before you know it, you’ll be able to improve your rankings by creating the best structure for your site!

How to set up the structure of your site

So, how do you construct a solid site structure? First, we’ll look at an ideal site structure and then explain how to achieve this for your site.

What’s an ideal site structure?

Let’s start by looking at an ideal situation: How should you organize your site if you’re starting from scratch? We think a well-organized website looks like a pyramid with several levels:

  1. Homepage
  2. Categories (or sections)
  3. Subcategories (only for larger sites)
  4. Individual pages and posts

The homepage should be at the top. Then, you have some sections or category pages beneath it. You should be able to file your content under one of these categories. You can divide these sections or categories into subcategories if your site is larger. Beneath your categories or subcategories are your pages and posts.
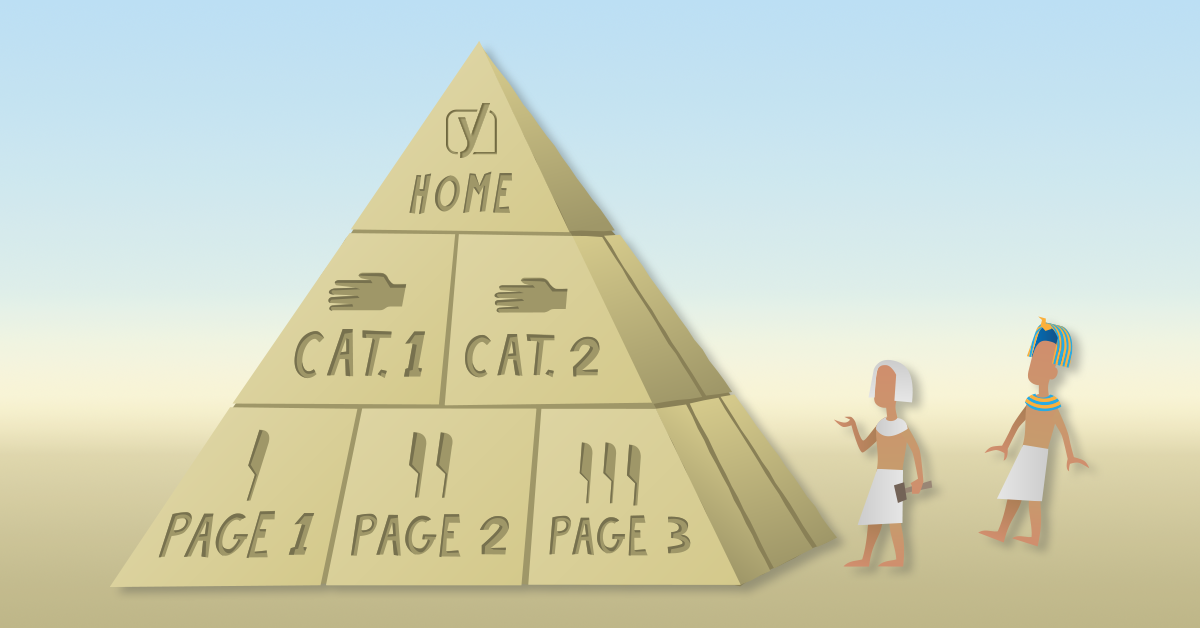
ideal site structure
An ideal site structure looks like a pyramid. On top, you’ll find the homepage and, right below, the main sections or categories, possibly followed by subcategories. On the ground, you’ll find all the individual posts and pages.

Your homepage

On top of the pyramid is the homepage. Your homepage should act as a navigation hub for your visitors. This means, amongst others, that you should link to your most important pages from your homepage. By doing this:

  1. Your visitors are more likely to end up on the pages you want them to end up on;
  2. You show Google that these pages are important.

Further down this article, we’ll help you determine which pages are essential to your business.

Beware not to link too many pages from your homepage, which will cause clutter. And a cluttered homepage doesn’t guide your visitors anywhere. If you want to optimize your homepage further, you can do many other things. Read our article on homepage SEO to find out what.

In addition to having a well-structured homepage, it’s also important to create a clear navigation path on your site. Your site-wide navigation consists of two main elements: the menu and the breadcrumbs.

The menu

First, let’s take a look at the menu. The website menu is the most common aid for navigation on your website, and you want to make the best possible use of it. Visitors use your menu to find things on your website. It helps them understand the structure of your website. That’s why the main categories on your site should all have a place in the menu on your homepage.

Furthermore, putting everything in just one menu is not always necessary. If you have a big site with lots of categories, this may clutter your website and makes your main menu a poor reflection of the rest of your site. Where it makes sense, creating a second menu is perfectly fine.

For instance, eBay has one menu at the top of the page – also called the top bar menu – and, in addition to that, a main menu. This top bar menu links to important pages that aren’t categories in the shop, like pages that relate to the visitor’s account on the site. The main menu reflects the most important product categories on eBay.

ebay's top menu with a colorful logo, links to various sections on the site and a big search bar
eBay has multiple ways to start navigating from the homepage

Finally, just like on your homepage, you shouldn’t add too many links to your menu. They will become less valuable for your users and search engines if you do.

Read about optimizing your website’s menu here, or enroll in our site structure training that includes many examples!

Adding breadcrumbs to your pages can make your site’s structure even clearer. Breadcrumbs are clickable links, usually at the top of a page or post. Breadcrumbs reflect the structure of your site. They help visitors determine where they are on your site. They improve your site’s user experience and SEO, as you can read in our guide on breadcrumbs.

You can use one of the many breadcrumb plugins for your WordPress site. You can also use our Yoast SEO plugin, as we’ve implemented a breadcrumb functionality in our plugin as well.

Taxonomies

WordPress uses so-called taxonomies to group content; other CMSs have similar systems. The word ‘taxonomy’ is a fancy term for a group of things — website pages, in this case — that have something in common. This is convenient because people looking for more information on the same topic can find similar articles more easily. You can group content in different ways. The default taxonomies in WordPress are categories and tags.

Categories

You should divide your site’s blog posts or products into several categories. If these categories grow too big, you should divide these categories into subcategories to clear things up again. For example, if you have a clothing store and sell shoes, you can divide this category into subcategories: ‘boots’, ‘heels’, and ‘flats’. These subcategories contain products, in this case, shoes, of that specific type.

Adding this hierarchy and categorizing your pages helps your user and Google make sense of every page you write. Add your main categories to your site’s menu when implementing your category structure.

Read more: Using category and tag pages for SEO »

Tags

Your site’s structure will also benefit from adding tags. The difference between a category and a tag mostly concerns structure. Categories are hierarchical: you can have subcategories and even sub-subcategories. Tags, however, don’t have that hierarchy. Tags say: “Hey, this article or product has a certain property that might interest a visitor.” Think of it like this: categories are the table of contents of your website, and tags are the index. A tag for the online clothing store mentioned above could be a brand, for instance, Timberlands.

Keep reading: What is the difference between tags and categories? »

Try not to create too many tags. You’re not structuring anything if you add a new unique tag to every post or article. Ensure each tag is used at least twice, and your tags group articles that genuinely belong together.

Some WordPress themes display tags with each post, but some don’t. Ensure your tags are available to visitors somewhere, preferably at the bottom of your article or in the sidebar. Google isn’t the only one that likes tags: they are useful for visitors wanting to read more about the same topic.

Read on: Tagging post properly for users and SEO »

Contextual internal linking

Site structure is all about grouping and linking the content on your site. Until now, we mostly discussed so-called classifying links: links on your homepage, navigation, and taxonomies. On the other hand, contextual links are internal links within the copy on your pages that refer to other pages within your site. For a link to be contextual, the page you link to should be relevant for someone reading the current page. If you look at the previous paragraph, for instance, we link to a post about tagging, so people can learn more about it if they’re interested.

Your most important pages are often very relevant to mention on several pages across your site, so you’ll link to them most often. Just remember that not only the page you’re linking to is relevant, the context of the link is important as well.

Google uses the context of your links to gather information about the page you’re linking to. It always uses the anchor text (or link text) to understand what the page you’re linking to is about. But the anchor text isn’t the only thing Google looks at. Nowadays, it also considers the content around the link to gather extra information. Google is becoming better at recognizing related words and concepts. Adding links from a meaningful context allows Google to value and rank your pages properly. Yoast SEO Premium makes internal linking a breeze by automatically suggesting relevant content from your site to link to.

Contextual linking for blogs

For blogs, you should write extensively on the topics you want to rank for. You should write some main articles — your cornerstone articles — and write various posts about subtopics of that topic. Then link from these related posts to your cornerstone articles and from the cornerstone articles back to related posts. In this way, you’ll ensure that your most important pages have both the most and most relevant links.

The following metaphor might help you understand this principle:

Imagine you’re looking at a map of a state or country. You’ll probably see many small towns and some bigger cities. All towns and cities will be interconnected somehow. You’ll notice that small towns often have roads leading to the big cities. Those cities are your cornerstones, receiving the most links. The small towns are your posts on more specific topics. Some roads (links) lead to these smaller towns, but not as much as the big cities.

internal links metaphor roads

Keep on reading: Internal linking why and how »

Contextual linking opportunities for online shops

Contextual internal linking works differently on an online store with very few to no pages that are exclusively meant to inform. You don’t explore a specific topic on your product pages: you’re selling a product. Therefore, on product pages, you mostly want to keep people on a page and convince them to buy the product. Consequently, contextual linking is far less prominent in this context. You generally shouldn’t add contextual links to your product descriptions because it could lead to people clicking away from the page.

There are just a couple of meaningful ways of adding contextual links to the product pages for your ecommerce SEO:

  1. link from a product bundle page to the individual products
  2. a ‘related items’ or ‘compare with similar items’ section
  3. a ‘customers also bought’ section
  4. a ‘product bundles’ or ‘frequently bought together’ section.

Learn all about setting up a great (internal linking) structure for your online store with our Site structure training, part of our Yoast SEO academy training subscription. We’ve included lots of examples from real websites!

Landing pages

Landing pages are the pages you want your audience to find when they search for specific keywords you’ve optimized for. For instance, we want people who search for ‘free SEO training’ to end up on the page about our free training called ‘SEO for beginners’. You need to approach the content of your most important landing pages differently than your regular pages.

Here, we’ll discuss two types of landing pages: cornerstone pages and product landing pages. They’re both pages you’d like people to land on from the search engines, but they require quite a different approach. But first, we’ll shortly go into search intent because you have to know what your audience is really looking for.

Search intent

When setting up your site structure, you must consider search intent. It’s about what you think people are looking for when they enter a query into a search engine. What do people want to find? And: what do they expect to find?

Consider different possibilities in search intent, as you might want to cater to different types on your site. Are people just looking for an answer to a question or a definition? Are they comparing products before purchase? Or are they intending to buy something right away? This is often reflected in the type of query they make. You can also use Google’s search results to create great content that fits someone’s needs.

When you have an idea of the search intent, ensuring your landing page fits your audience’s search intent is essential. Pages can answer multiple search intents, but you need a clear view of at least your most important pages.

Read all about search intent and why it’s important for SEO.

Cornerstone content pages

Cornerstone articles are the most important informational articles on your website. Their focus is to provide the best and most complete information on a particular topic; their main goal is not to sell products.

Because of this focus, we usually think of blogs when discussing cornerstone content. Of course, that doesn’t mean it can only be a blog post. All different kinds of websites have cornerstone articles! Rule of thumb: if an article brings everything you know about a broad topic together, it’s a cornerstone content article.

This article explains what cornerstone content is and how to create it. Want to set up your cornerstone content strategy? Our Internal linking SEO workout makes the cornerstone content approach easy to implement!

Product landing pages

Product landing pages significantly differ from cornerstone articles. The latter are lengthy, whereas product landing pages shouldn’t be that long. Rather than complete articles, they should be focused. These pages only need to show what your visitors need to know to be convinced. They don’t need to hold all the information.

You want to rank with these pages, meaning they need content. Enough content for Google to understand what the page is about and what keyword it should rank for. Where cornerstone articles could be made up of thousands of words, a couple of hundred could be enough for product landing pages. The main focus of the content should be on your products.

Michiel listed all the essentials of your product landing page here.

Maintaining your site structure

Structuring or restructuring your content doesn’t always have high priority in everything you have to do. Especially when you blog a lot or add other content regularly, it might feel like a chore. Although it isn’t always fun, you must do it, or your website might become messy. To prevent that from happening, you need to fix your site structure and keep an eye on it while adding new content. Site structure should be part of your long-term SEO strategy.

When your business goal or website changes, your menu must also change. Planning things visually will pay off when you start thinking about restructuring your site. Make a flowchart.

Start with your new menu one or two levels deep and see if you can fit in more pages you have created over the years. You’ll find that some pages are still valid but don’t seem relevant to your menu anymore. No problem, just be sure to link to them on related pages and in your sitemaps so that Google and your visitors can still find these pages. The flowchart will also show you any gaps in the site structure.

Read more: Optimizing your website menu »

Rethink your taxonomy

Creating an overview of your categories, subcategories, and products or posts will also help you to rethink your site’s taxonomy. This could be a simple spreadsheet, but you can use more visual tools like LucidChart or MindNode.

Do your product categories and subcategories provide a logical overview of your product range or your posts and pages? Perhaps you’ve noticed somewhere down the line that one category has been far more successful than others, or you wrote many blog posts on one subject and very few on others.

If one category grows much larger than others, your site’s pyramid could be thrown off balance. Think about splitting this category into different categories. But, if some product lines end up much smaller than others, you might want to merge them. Don’t forget to redirect the ones you delete.

If you have built your HTML sitemap manually, update that sitemap after changing your site structure. In the far more likely event you have an XML sitemapre-submit it to Google Search Console.

Keep reading: The structure of a growing blog »

Clean up outdated content

You might be able to update and republish some outdated articles to make them relevant again. If an article is outdated, but no one reads it anyway, you might delete it. This could clean up your site nicely.

What you should know, in that case, is that you should never delete a page or article without thinking. If Google cannot find the page, it serves your user a 404 error page. Both the search engine and your visitor will see this error message saying the page doesn’t exist, and that is a bad experience and, thus, bad for your SEO.

Be smart about this! You need to redirect the URL of the page you’re deleting properly so your user (and Google) lands on a different page that is relevant to them. That could even improve your SEO!

Got some old content to clean up on your site? Sort out hidden pages and dead ends in four easy steps with our orphaned content SEO workout, available in Yoast SEO Premium.

Avoid keyword cannibalization

Your website is about a specific topic, which could be quite broad or rather specific. While adding content, you should be aware of keyword cannibalization. If you optimize your articles for keywords that are all too similar, you’ll be devouring your chances of ranking in Google. If you optimize different articles for similar key terms, you’ll be competing with yourself, making both pages rank lower.

You’ll have some work to do if you suffer from keyword cannibalization. In short, you should research the performance of your content and probably merge and redirect some of it. When merging posts, we recommend creating a new draft by cloning one of the original posts with the free Yoast Duplicate Post plugin. This allows you to work on your merged post without making these changes to a live post. Read the guide by Joost to learn more about keyword cannibalization and how to fix it.

Feeling a bit overwhelmed by all this advice? Yoast SEO has some handy tools to make internal linking so much easier.

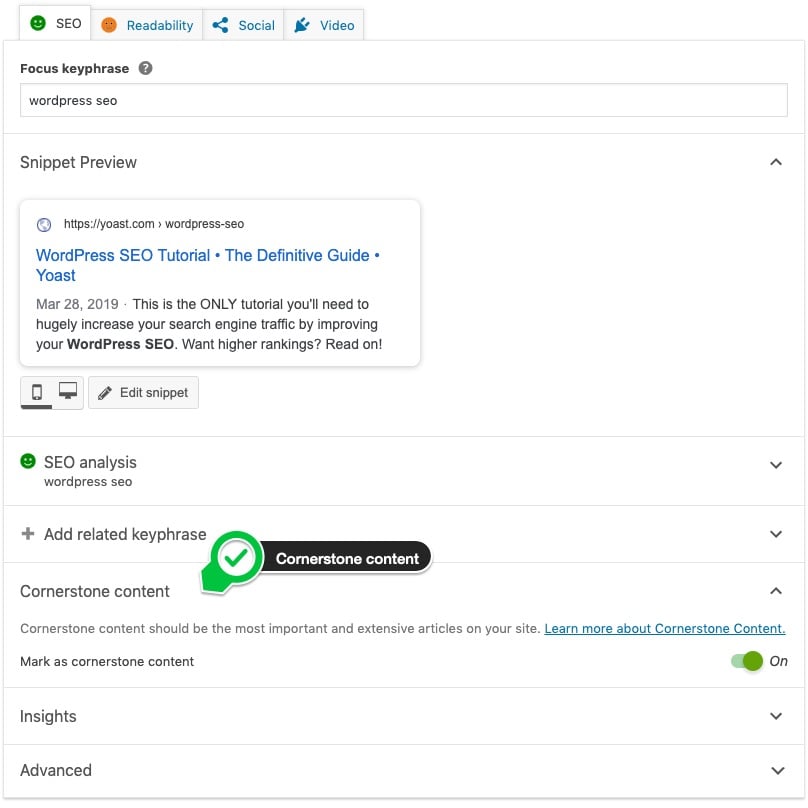
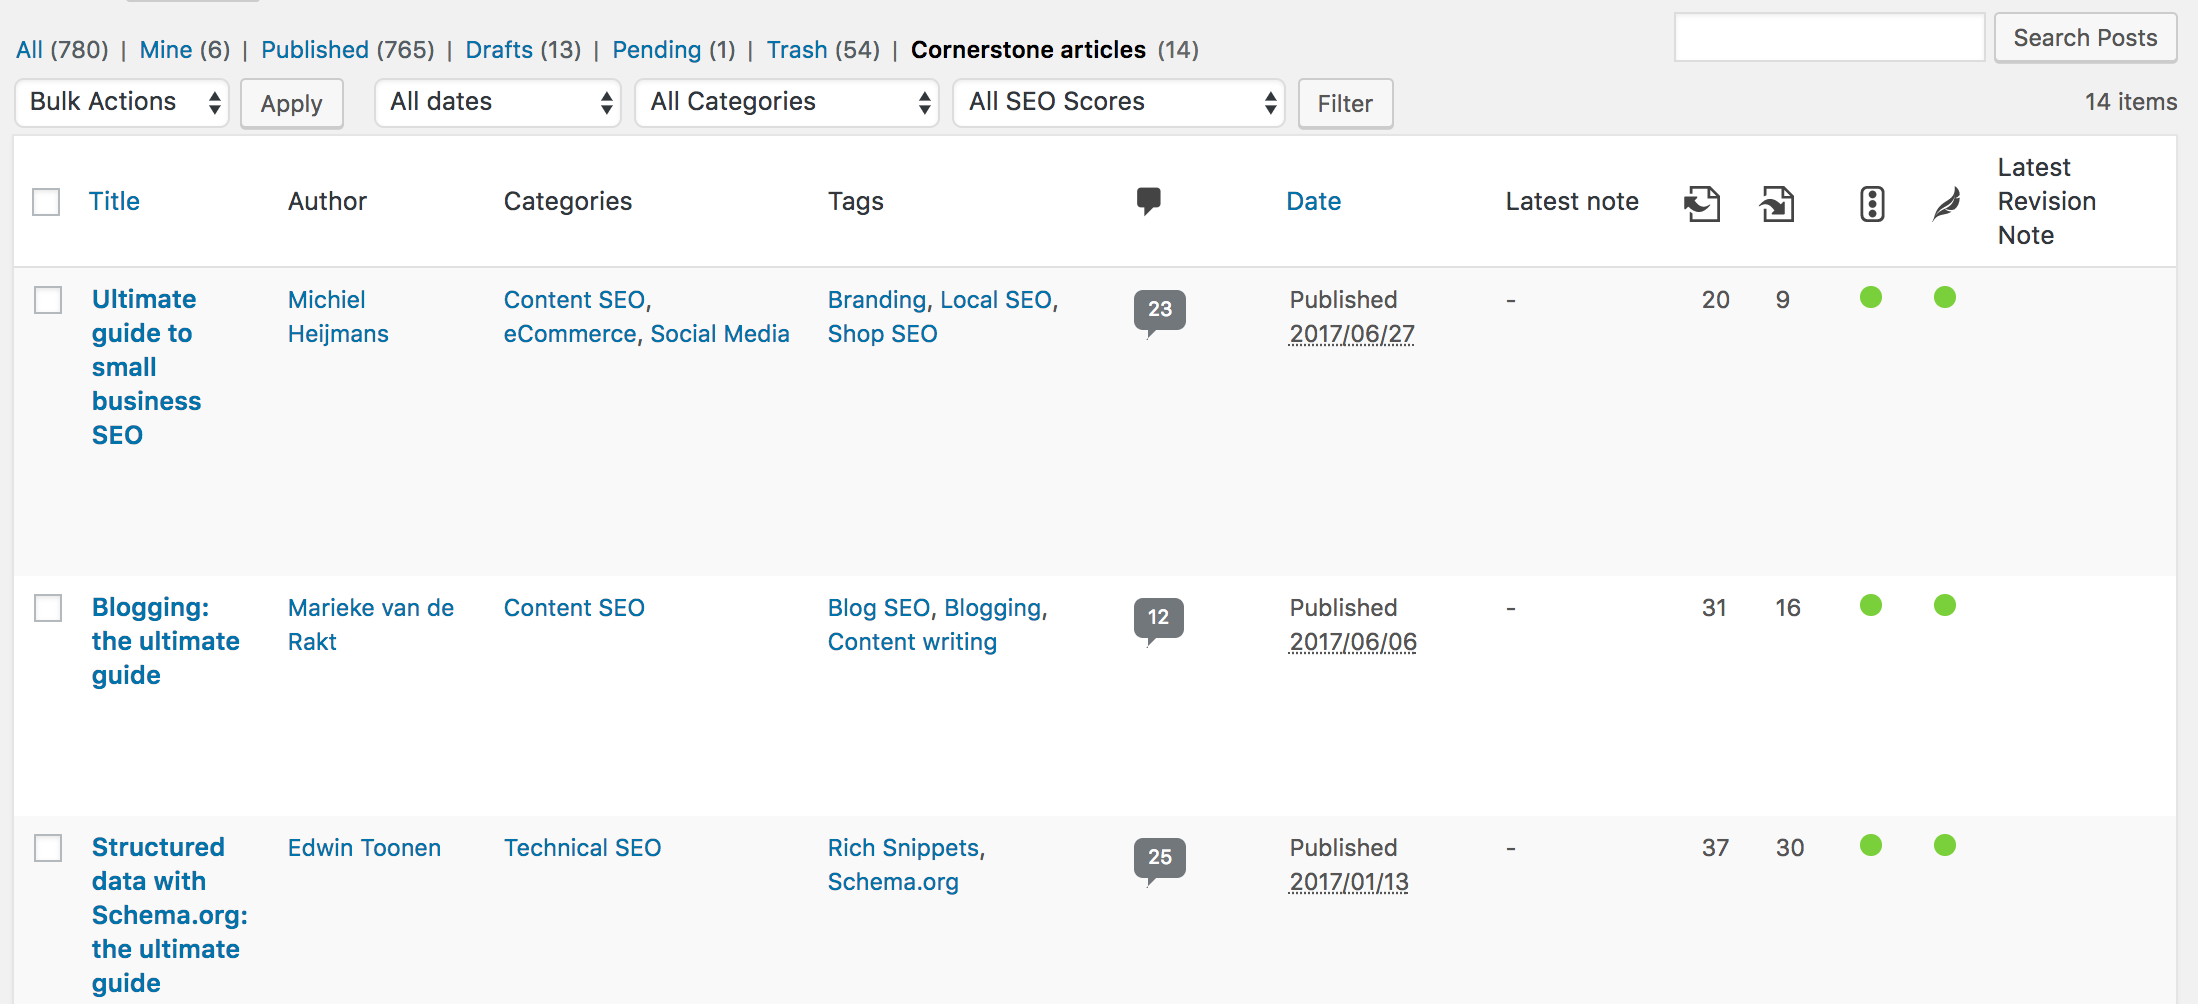
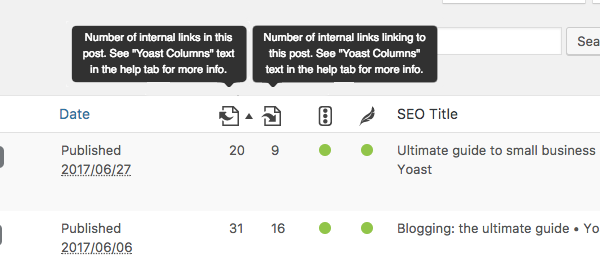
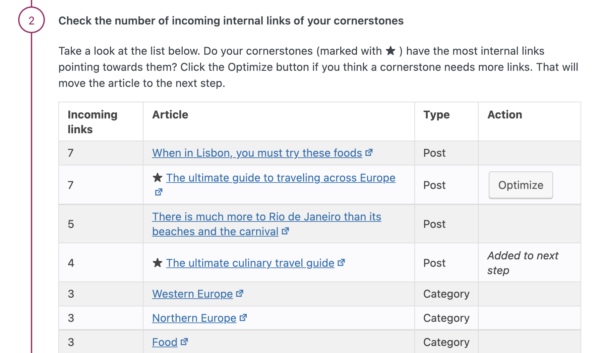
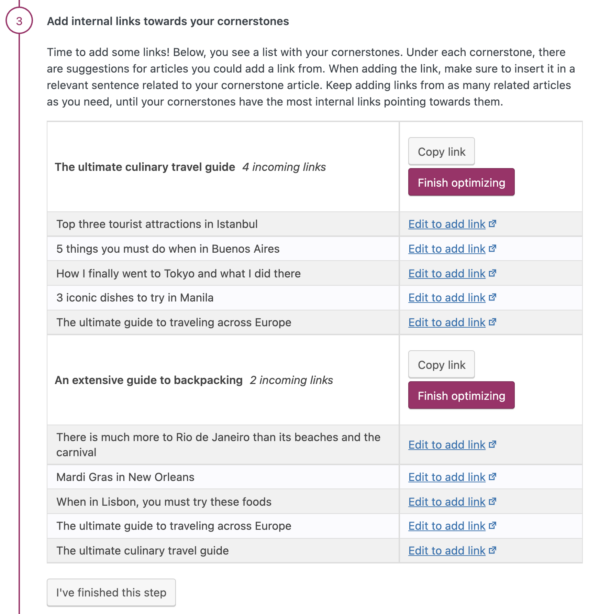
Yoast SEO’s text link counter visualizes your links so you can optimize them. It shows the internal links in a post and the internal links to a post. This tool can enhance your site structure by improving the links between your related posts. Make sure your cornerstones get the most (relevant) links! You can identify your cornerstones by finding them in the column with the pyramid icon.

Quickly see which posts have internal links pointing to them with the text link counter in Yoast SEO

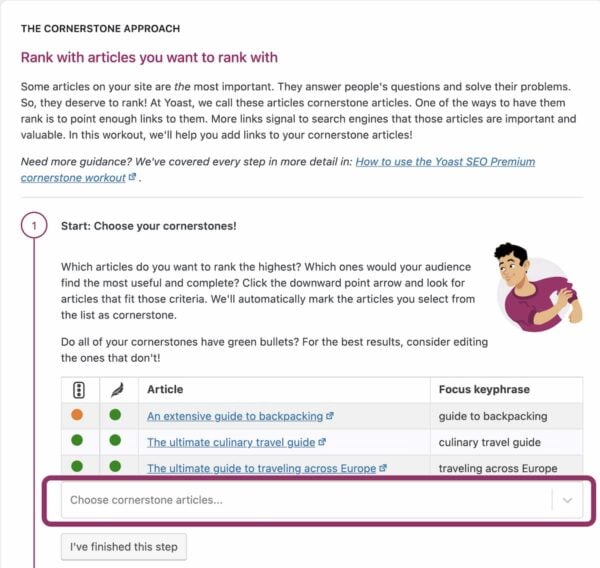
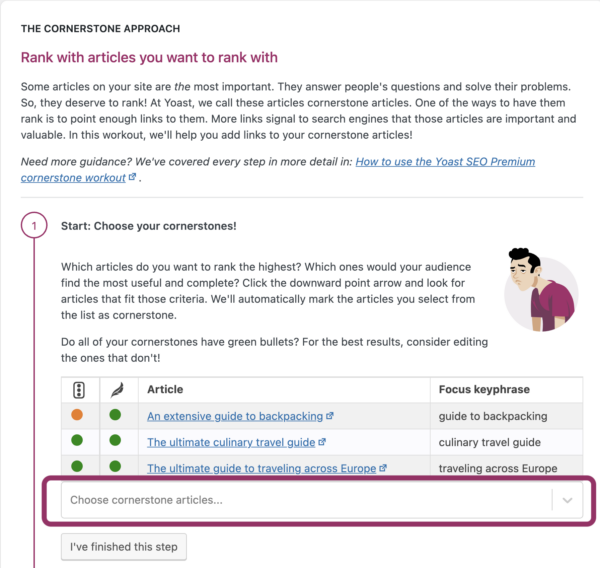
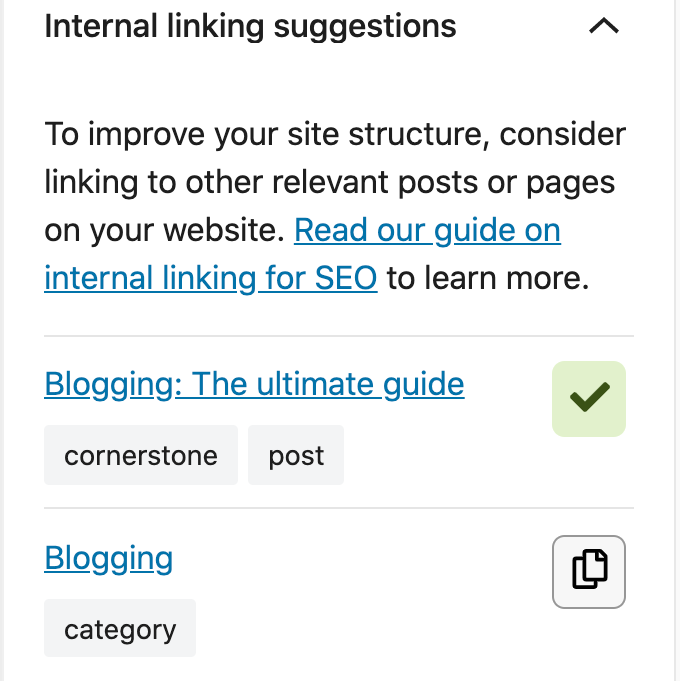
Yoast SEO Premium helps you with your internal linking as well. Our internal linking suggestions tool will show you which articles are related to the one you’re writing, so you can easily link to them: just by dragging the link into your editor!

internal linking suggestions in Yoast SEO sidebar
The internal linking suggestions even include other content types

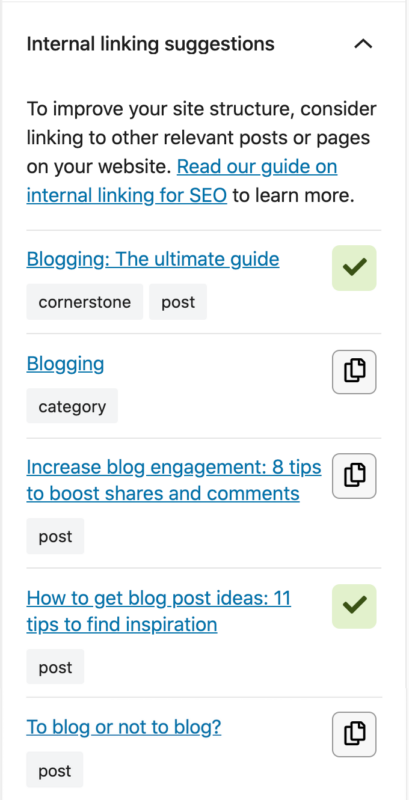
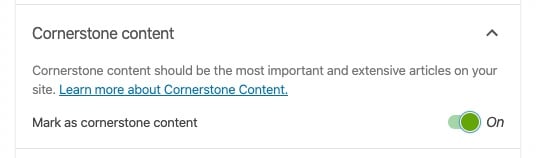
Moreover, our tool allows you to indicate which articles you consider cornerstone content on your site. Those articles will be shown at the top of the internal linking suggestions. You’ll never forget to link to them again.

Read on: How to use Yoast SEO for your cornerstone content strategy »

The importance of site structure

As we have seen, there are several reasons why site structure is important. A good site structure helps both your visitors and Google navigate your site. It makes it easier to implement changes and prevents competing with your content. So use the tips and pointers in this guide to check and improve your site structure. That way, you’ll stay on top and keep your website from growing out of control!

Want to improve your site structure but don’t know where to start? Get Yoast SEO Premium and get loads of helpful tools and guidance, including free access to Yoast SEO Academy, our Site structure training, and our SEO workouts!

Keep on reading: WordPress SEO: The definitive guide to higher rankings for WordPress sites »

Marieke van de Rakt

Marieke was head of strategy and former CEO at Yoast. After the sale of Yoast to Newfold Digital in 2021 she is no longer active at Yoast in 2023. Marieke, together with her husband Joost, actively invests in and advises several startups through their company Emilia Capital.

Source :
https://yoast.com/site-structure-the-ultimate-guide/

What is on-page SEO?

28 June 2023

In SEO, there are on-page factors and off-page factors. On-page SEO factors are aspects of your website that you can optimize for better search rankings. It’s about improving things like your technical set-up, your content, and how user-friendly your site is. In this post, we’ll explain all about on-page SEO and how it differs from off-page SEO, and we’ll talk about some on-page optimizations that can help you to rank better.

On-page and off-page SEO: what’s the difference?

Every SEO strategy is focused on ranking as high as possible in the search engines. To do this, we all try to design and develop a website that Google’s algorithm — and people! — will love. That’s basically what SEO is about. The factors in Google’s algorithm can be divided into two categories that will determine the ranking of your website: on-page factors and off-page factors.

On-page SEO factors all have to do with elements on your website. For instance, things you work on to improve your E-E-A-T also fall in this category. Some of the most important on-page SEO factors are:

  • Your site set-up and technical features, site speed in particular
  • The quality of your content and use of keywords
  • How do you use additional media, such as images and videos
  • Your site structure and internal linking
  • Structured data and search appearance
  • Your URL structure
  • User experience

Meanwhile, off-page SEO looks at what happens away from your website. Some off-page SEO factors include:

  • Relevant links from other websites leading to your site
  • Social media activity
  • Business and map listings
  • External marketing activities

Pro tip: Find out more about on-page SEO with our front-end SEO inspector! You can use the front-end inspector tool in Yoast SEO Premium to explore the SEO data, metadata and schema output for pages on your site. It’s a great way to get to grips with your on-page SEO.

Importance of on-page SEO

On-page SEO consists of all the elements of SEO that you have control over. If you own a website, you can control the technical issues and the quality of your content. We believe you should be able to tackle all of these factors as they’re in your own hands. Remember: if you create an excellent website, it will start ranking.

Focusing on on-page SEO will also increase the chance that your off-page SEO strategy will be successful. Link building with a crappy site is very tough. Nobody wants to link to poorly written articles or sites that don’t work correctly.

How to optimize on-page SEO factors

1. Make sure search engines can crawl and index your site

If you’re unfamiliar with crawlability and indexing, here’s a quick explanation of what it is and what it has to do with Google. To show your page in the search results, Google must first know about that page. It has to be indexed by Google, meaning that this page has been stored in their index. And for that to be possible, you must ensure you’re not blocking Google from indexing your post or your whole site. So check if you’re not unintentionally doing that (we still see this happening!), and ensure your site is indexed.

Although this isn’t technically a ranking factor, getting your site into the search results requires it, so we thought it should be included here.

2. Invest time in creating quality content based on solid keyword research

Why do you think people visit your site? Most likely because it contains the information they’re looking for. Therefore it’s essential to write excellent content that corresponds with their needs. Search engines like Google also read your text. Which site ranks highest for a specific search term is primarily based on a website’s content. That’s why your content should be informative, easy to read, and focused on the right keywords that your audience uses.

Aside from creating quality content, you must remove or remedy low-quality pages. So-called thin content can harm your SEO. Take time to find these pages and do something with them occasionally to keep your content in good shape.

Learn about writing high-quality content in our Ultimate guide to SEO copywriting, or take our SEO copywriting training course.

3. Improve your site speed

A significant on-page ranking factor is site speed. Users don’t want to wait for pages to load, so Google tends to rank fast-loading sites higher. If you’re unsure how fast (or slow) your site is, check out your Core Web Vital scores using the report in Google Search Console. This helpful tool will point out areas where your site speed can be improved so you know what to work on.

If you’re tech-savvy, you can probably handle this on your own. If you’re unsure where to start, our Technical SEO training can help you.

4. Get your site structure and internal linking right

A good site structure helps Google (and users) understand your site and navigate your content. And when it comes to making that site structure, internal linking is the way to do it. Firstly, you must channel many internal links to your most important content. We call those pages cornerstone content. Secondly, you should tidy up pages that aren’t getting many (if any) internal links. Those pages are what we refer to as orphaned content. It would be best if you decided whether to improve those pages and add more internal links pointing to them or remove them altogether.

Yoast SEO Premium has two SEO workouts to help you improve your site structure and internal linking. Using the workouts can help you to make big improvements quickly, so give them a go!

5. Optimize your use of images and videos

You’ll want to include images on your site to make it attractive, and maybe some videos too. Doing that wrong can harm your SEO, but doing it correctly comes with some SEO benefits.

High-quality images are usually large files that can slow your site down, and that’s a problem. Using smaller image files and giving them descriptive names, captions, and alt tags will favor your SEO. Plus, there are additional benefits. For one, you’ll make your site more accessible, so it’s helpful for a wider audience. And for another thing, you’ll have a chance of your images ranking in the Google Image search results. Read more about these topics in our posts about image SEO and alt tags.

Adding videos to your site is a bit more complicated than images. And ranking your videos on Google (or YouTube) comes with its own set of challenges. We’ve got a great series of posts all about video SEO, if you’d like to learn more about optimizing in this area. There’s also a dedicated Yoast Video SEO plugin, if you’re serious about getting your videos ranking.

6. Create a persuasive search appearance

How your site looks in the search results is vital for SEO. While the search results aren’t part of your site, the things you do to optimize your search appearance are. Therefore, we consider SEO titles, meta descriptions, and structured data part of on-page SEO.

Optimize your SEO title and meta description, and then add structured data for results that stand out

Optimizing the text for your search snippets is fairly straightforward. Adding structured data can be trickier. Good to know: Yoast SEO can help with all these tasks. With checks and previews to help you, getting your SEO titles and meta descriptions right couldn’t be easier. And when it comes to structured data, Yoast does all the hard work for you — all you need to do is select the content type and fill in the blanks.

7. Make your URLs SEO-friendly

A well-crafted URL structure helps your on-page SEO — it’s like giving your web pages a good road map. Think of it as a friendly address that guides search engines and invites users to explore your content. Creating SEO-friendly URLs makes it easier for humans and search engines to understand what your page is all about. Opt for concise and descriptive URLs that include relevant keywords, as they provide a clear signpost. A clean and organized URL structure enhances navigation, making it easier for everyone to understand your website. Don’t forget to keep it short and readable.

8. Design an excellent user experience

The last thing we want to mention is user experience. Simply put, users need to understand your website easily. They should be able to find what they want in a heartbeat. They should know where to click and how to navigate through your site. And your site should be fast! A beautifully designed website is nice, but you should make it your top priority to create a user-friendly website first.

If you want to learn more about combining SEO and UX to get more people to your site, we’d advise you to look at our other articles on user experience. Or check out our all-around SEO training course.

To conclude

We’ve talked about the most important on-page SEO factors. First, ensure that your website works correctly and that your technical SEO is up to par. Secondly, create content that is user-centered and focused on the right keywords. Thirdly, work on the usability and speed of your site to help users and search engines around your website.

As these factors are all a part of your site, you can work on them to ensure your on-page SEO is top-notch! That being said, do remember to also work on your off-page SEO. Although you may not have total control over these factors, you can still put some effort into creating that exposure on other sites too!

Read more: What is off-page SEO? »

Edwin Toonen

Edwin is a strategic content specialist. Before joining Yoast, he spent years honing his skill at The Netherlands’ leading web design magazine.

Source :
https://yoast.com/what-is-onpage-seo/

What is cornerstone content?

This post explains everything you need to know about cornerstone content – or evergreen content, as it’s also known. You’ll learn what it is, why it’s important for SEO, how to write this kind of content and how you should link from your posts to your cornerstone articles.

What is cornerstone content?

Cornerstone content is the core of your website. It consists of the best, most important articles on your site; the pages or posts you want to rank highest in the search engines. Cornerstone articles are usually relatively long, informative articles, combining insights from different blog posts and covering everything that’s important about a certain topic.

Their focus is to provide the best and most complete information on a particular topic, rather than to sell products. Still, they should reflect your business or communicate your mission perfectly.

Cornerstone content can be either a blog post or a page. But whichever they are, you should make sure they’re very well written, update them often, and aim to get them to rank for your most competitive keywords.

Why are cornerstone articles so important for SEO?

Cornerstone content plays a significant role in any SEO strategy. It can be hard to rank for search terms that are very popular, but a cornerstone approach can help you tackle those competitive search terms. If you write a lot of pages on similar subjects, you need to tell Google which of them is the most important. If you don’t, you’ll be eating away your own chances to rank well in the search results. Providing the correct internal link structure between your posts tells Google which article is the most important.

Cornerstone articles should have a prominent place on your website. Ideally, someone should be able to click straight from your homepage to your cornerstone articles. Also, all your other posts about similar topics should link back to their corresponding cornerstone article, so its importance is clear from your site structure. As your site develops, you will write tons of new blog posts approaching that topic from other angles, each one linking back to your cornerstone article. This internal linking structure will increase the chance of your cornerstone content pages ranking in Google searches.

The following metaphor might help you understand this principle: imagine you’re looking at a map of a state or country. Small towns and big cities will all be interconnected somehow. But the big cities will have many more roads leading towards them than the small towns. Those cities are your cornerstones, receiving the most links. The small towns are your posts on more specific topics. There are some roads (links) leading to them, but not as many as to the big cities.

A more concrete example: at Yoast, we write a lot of different posts about SEO copywriting, each looking at a different aspect of SEO copywriting. The cornerstone article for this topic is the ultimate guide to SEO Copywriting, and whenever we write a new post on SEO copywriting, we add a link to that cornerstone article. In doing so, I’ll make clear to Google that the ultimate guide is the most important article about SEO Copywriting on our site, thereby increasing its chances to rank.

Which articles are my cornerstones?

Choose your cornerstones carefully. Think of the four or five pages you would like someone to read when they first visit your website. These articles should be the cornerstones of your site. Which articles are most important to you? Which are the most complete and authoritative? Do these target the keywords you most want to rank for?

It might be tempting to think of your homepage as a cornerstone article, but that’s not really what your homepage does. Although it does have lots of links leading back to it, content-wise it doesn’t really do what a cornerstone should do. A cornerstone article should target a specific topic, with lots of in-depth content talking about that topic. Your homepage will be much more general than this, so it doesn’t give you the same opportunity to rank for your target keywords. That being said, of course, it is important to spend time optimizing your homepage.

If your website is enormous, you’ll have more cornerstones than if your website is small. You’ll probably write about more than one topic, so be sure to choose a cornerstone article from each category.

Give your cornerstones extra attention

The concept of cornerstone content is so important, that our Yoast SEO for WordPress plugins and Yoast SEO for Shopify app include an option to indicate whether or not a page is cornerstone content. If you mark pages as cornerstone content, Yoast SEO helps you write kick-ass content and build a solid internal linking structure.

In the classic editor, the Yoast meta box has a Cornerstone content toggle. The block editor has one in the sidebar

Marking your cornerstone articles means you can create a list of them in your post overview, so you can easily work on improving them. And, most importantly, the link suggestion tool in Yoast SEO Premium will give priority to the articles that you mark as cornerstone content, so you’ll never forget to link to your best article on a certain topic if you write about something related.

Optimizing your cornerstones with Yoast SEO

Yoast SEO offers a specific cornerstone content analysis that helps you optimize your cornerstone content. Yoast SEO for WordPress also includes a text link counter, and – in Premium – even internal linking suggestions, in which cornerstone articles get priority over other posts.

Read more: Set up cornerstone content and get it ranking in 6 steps »

Cornerstone analysis

If you really want to make your cornerstone articles great, you need specific content analysis for cornerstones. Content marked as cornerstone will be judged more strictly than usual on SEO and readability in the content analysis, as you want this article to be longer, have excellent content, keep the reader’s attention and rank high. Read how this analysis helps you optimize your cornerstones in Yoast SEO for WordPress and Yoast SEO for Shopify.

With Yoast SEO for WordPress you can filter your cornerstone articles in the post overview to see how many internal links a post has pointing to it and how many posts it links to. This text link counter is extremely useful because you can see at a glance if your cornerstone content has enough links from other, related posts:

Cornerstone articles

Internal linking suggestions

Yoast SEO Premium has an internal linking feature. We analyze what you write and use the most prominent words in your text to determine which articles are related – and therefore which you should link to. Cornerstone articles are treated differently in our calculation of internal linking suggestions because they are more important and have a higher value. To give these articles more prominence, we place the cornerstone articles at the top of the list of the internal linking suggestions. That makes it much easier for you to link to your critical articles.

internal linking suggestions in Yoast SEO sidebar

5 steps to a killer cornerstone approach

Ideally, you should do extensive keyword research, which will help you to produce really awesome, long, informative and beautifully written cornerstone articles. But what if you don’t have that much time? And what if you’ve already written tons of articles? Follow these five steps to make killer cornerstone content.

Step 1: Think about your keywords

You have to decide on the essential keywords you want to rank for. Your cornerstone articles should be optimized for the ‘head’ or most competitive keywords, so be sure to carry out some keyword research.

Step 2: Choose the best post

Go through the posts that are optimized for keywords surrounding the most important keywords. Which post do you think is the best? That’ll be your cornerstone from now on!

Step 3: Rewrite it

Rewrite your cornerstone article. Make it awesome and SEO-friendly. As cornerstone articles are usually lengthy, pay extra attention to readability. Make sure you use plenty of headings. An index at the beginning of a long cornerstone article is also a great idea. Expand your article and make sure it’s totally up to date. And don’t forget to rewrite and update that article regularly.

The other blog posts about similar topics as your cornerstone article should be optimized for long tail variants of the ‘head’ keyword you’re attacking in your cornerstone article.

Step 5: Linking from tail to head

You have to tell Google that your new cornerstone article is the most important article on that topic on your site. Don’t forget to link from all the long tail articles to your cornerstone article!

Quick wins!

In real life, perhaps you do not have the time to develop such an elaborate structure. Still, writing an article about a specific topic often leads to inspiration to write an article about a similar topic. You should then try to optimize this second post for a slightly different focus keyword and link these posts internally.

Every time you write a post, you should think about similar posts you have written and link to these. Do you already have an important article about this, even though it is not entirely awesome yet? If you use Yoast SEO Premium, keep an eye on the internal linking tool to see what comes up.

Also, make sure you set up the right linking structure. This does not take a lot of your time and could really help to rank your most important article. Take a look at all the posts on the topic you have already written about and add links to your most important article from all of your (less awesome) posts about that specific topic. You can use the Yoast text link counter to regularly check if there are enough internal links to your important articles.

Do our SEO workout: the cornerstone content approach

Want to build a fantastic cornerstone content strategy in WordPress? Do our SEO workout: the cornerstone content approach to quickly power up your internal linking. With the workout, you’ll get all the guidance you need to make sure that your most important articles have enough internal links pointing to them. You can find the tools you need right there in the workout — all you need to do is follow the steps. Give it a go!

choose cornerstone articles in first step Yoast SEO workout
The first step in the cornerstone content SEO workout in Yoast SEO Premium

Yoast’s plans for cornerstone content

Site structure is important for SEO. Having a solid site structure means both search engines and visitors can easily navigate your site to find what they want. To help you achieve this, we are continually working on many more features in Yoast SEO that’ll improve the structure of your website.

Keep reading: SEO Copywriting: the complete guide »

Source :
https://yoast.com/what-is-cornerstone-content/

Set up cornerstone content and get it ranking in 6 steps

On your site, you’ll probably have a few articles that are most dear to your heart. Articles you desperately want people to read. Articles you want people to find in Google. At Yoast, we call these articles your cornerstone articles. How does the Yoast SEO plugin help you set up a cornerstone content strategy? We’ll tell you all about that in this blog post. Plus, find out how our new SEO workout can make the whole process much easier!

What is a cornerstone content strategy?

Cornerstone content consists of those articles that you’re most proud of, that are most important to you. The posts that make people come back to your site or buy your stuff. The articles that reflect the mission of your company perfectly, and the ones you definitely want to rank highest. In general, cornerstone articles are lengthy, and they tend to be informative.

In a nutshell, a cornerstone content strategy means choosing your best content and channeling the most internal links towards it from other relevant pages on your site.

What does Yoast SEO do with cornerstone content?

There are three aspects to a successful cornerstone content approach:

  • Cornerstone content should be lengthy, well-written, and well-optimized.
  • Cornerstone articles should have a prominent place in your site’s structure.
  • You should keep your cornerstones fresh and up to date.

With the free version of Yoast SEO, you can make use of the cornerstone content toggle, the text link counter, and the cornerstone content analysis to optimize your content and count the number of incoming internal links.

Upgrade to Yoast SEO Premium and you’ll get all of the above, as well as access to our amazing internal linking suggestions tool, the stale cornerstone content filter and our brand-new Internal linking SEO workout!

Why do you need cornerstone content?

Without a doubt, the most common question we are asked is: “how do I make my site rank for keyword X?”. What most people don’t realize, is that they’re asking the wrong question. You see, sites don’t rank: individual pages rank. If you want to rank for a particular keyword, you’ll need to determine which specific page you want to rank for that keyword.

Adding a keyword to the title of every page is not helpful; you should use a focus keyphrase only once. What also won’t work is writing 200 articles around variations of a keyphrase without giving these a proper linking structure. You need one page that is the center of the content about that topic – a “hub” page if you will. That’s where cornerstone content comes in. But how do you make sure your cornerstone content articles start ranking in the search engines?

To rank with these articles, you need to make sure they’re the best articles you can write. You also need a kickass internal linking structure. Luckily, Yoast is there to help! In this post, we’ll explain just what cornerstone content is and how to rank with these articles. Are you struggling with implementing cornerstone content? Check out our Internal linking SEO workout: the cornerstone approach!

How to set up a cornerstone content strategy with Yoast SEO

Step 1: Choose which pages will be your cornerstones

Your cornerstone content pages will need to be 100% awesome in every way. You need to think about keyword research, headlines, first-class content and more. This article just covers what to do with those pages once they’re created, so if your pages aren’t ready, go and make some now! Not sure where to begin? Check out our detailed post on what type of articles should be your cornerstone content.

Which keywords to target with cornerstone articles?

Your cornerstone articles should be optimized for your most ‘head’ or most competitive keywords. Of course, you should still be realistic when determining these head keywords. But, your internal linking structure will help your cornerstone pages rank (more on that below), which is why these articles should aim to rank for your most competitive keywords.

Positioning that new cornerstone content on your site

Now let’s talk about where to place that content on your site. Important content deserves a place within your core site structure, not a news item or blog post drifting around somewhere. It should be easily found in a few clicks.
This also means you should not create other pages within your site that target the exact same keyword! And you really don’t have to, as there are many ways to use keyword variations for these other pages and use these in your site structure.

Step 2: Mark those pages as cornerstone content using the toggle button

Once you’ve put together a list of the pages that will be your cornerstone content, you need to go to each of those pages and make sure this button is toggled to ‘On’:

Alternatively, you can head straight over to our SEO workout: the cornerstone content approach and take a look at the overview in the first step. If there are any missing that you want to add, just look them up using the search box and click to add them to the list.

Our SEO analysis will help you optimize your blog post for the search engines. For cornerstone content, you have to go the extra mile, so indicating that an article is cornerstone content will make the SEO analysis and the readability analysis a bit more strict. For example, if a post is cornerstone content, we urge you to write at least 900 words, instead of the 300 words for a normal post.

Make sure you use your focus keyphrase enough, mention it in a few headings, and optimize your images. Readability is equally important, though. Our readability analysis helps you to, for instance, use enough headings and to write in short, easy-to-read sentences and paragraphs.

Read more: How our cornerstone analysis helps you create your best articles »

Step 3: Check that all your cornerstone content pages are marked

You’ll want to make sure all of your chosen pages are marked as cornerstone content at this point (otherwise you might need to double back later and redo some steps). It can help you to keep track if you make a note next to each page on your list once you’ve toggled the cornerstone content button to ‘On’.

If you’re a Yoast SEO Premium user you can access our new Internal linking SEO workout and quickly check which pages are marked as ‘cornerstone content’ in the overview provided:

Again, if anything is missing from this overview, you can easily add it using the search box below the list.

You have to link to your cornerstone articles to make them rank high in the search engines. By linking to your favorite articles the most often, you’ll tell Google that these are the ones that are most important. Think of it as a map: big cities have considerably more roads leading towards them than small towns. Those cities are your cornerstones. They should receive the most links. The small towns are your posts on more specific topics. If you build your site structure like this, you won’t be competing with your own content for a place in the search engines.

The text link counter allows you to see all the internal links you’ve put in a post and all internal links to a post from your other pages. This tool provides you with a clear overview of the distribution of your internal links. Make sure to check (and keep checking) if your cornerstone articles receive enough internal links!

text links counter

If you’re using the Premium Internal linking SEO workout to set up your cornerstone content strategy, you can see all the incoming links of your posts and pages in one simple overview, instead. If any are lacking enough internal links, you can click to add them to the next step of the workout where you will add more.

When you’re adding links to your cornerstones, use the keyword you’re targeting as the anchor text for that link, if possible. But most importantly, link from within the content. Don’t just add some site-wide sidebar/footer links. The reason for this is simple: links from within content are way more valuable than links from sidebars.

In addition to that, you need to make sure that you’re linking to your cornerstones from pages that actually are about related topics. Contextual links are the ones that’ll help you rank. Adding hand-picked, relevant links that are useful for someone visiting your website is the best way of achieving this. Automation will not give you quality results. That means that building a decent linking strategy can be a lot of work, especially if your site is large.

If you use our Premium plugin, you can use our internal linking tool. This tool will make linking suggestions for other posts based on the words you’re using in your post. The posts you’ve marked as cornerstone content articles – as described previously – will always appear on top of our list of suggestions. That way, whenever you’re writing about a specific topic, you’ll find the right cornerstone article to link to.

internal linking suggestions in Yoast SEO sidebar

Using our internal linking tool will remind you to link to your cornerstones whenever you’re writing a new post. As a result, your cornerstones will stay on top of your linking structure. And that’s what they need to get ranking!

Read more: How to use the Yoast SEO internal linking tool »

Once again, the Internal linking SEO workout can make this step a whole lot easier. We’ve added a tool that shows you your cornerstone articles (with a link you can copy) as well as relevant pages from your site that you can visit to add that link right away!

This means you can manage the whole thing from one page — plus you can immediately see whether you’ve added enough links or not. If you still need more after you’ve added all the relevant suggested links, just refresh the SEO workout and you’ll get more suggestions to add!

Step 6: Monitor and maintain!

Don’t start neglecting your cornerstone content strategy once everything is set up — as you add more pages to your website, you’ll need to keep making sure your cornerstone content is getting enough links. You probably don’t need to check this weekly, but if you leave it for more than a year then your website could change a lot in that time. Keep on top of your links to keep your cornerstone content strategy healthy and effective.

Regularly updating your cornerstone content is important for your cornerstone strategy, too. After all, your cornerstones should be timeless, and therefore, always contain the latest insights. If you have Yoast SEO Premium installed, you’ll have an additional feature to help you keep your cornerstones up to date. The stale cornerstone content filter allows you to see at a glance which of your cornerstones need updating. It works in both your post overview, and your pages overview. Neat, right?

Of course, at Yoast, we practice what we preach, so you’ll find no stale content here 😉

Don’t forget to promote your cornerstone content

If well-written, your cornerstone content should be something to be proud of! Something that others willingly share and thereby also something that will attract links. Don’t be afraid to reach out to other people who have written about related topics: show them what you have created and that it might be worthwhile for their visitors to see. You might even want to offer to write a guest post for them on the topic, linking back to your article.

Cornerstone content strategy made simple with Yoast SEO

The cornerstone content approach is a powerful strategy that channels your internal links toward the content that matters. Your cornerstone articles deserve special attention. They need to be written carefully, to be the most complete and authoritative. They should also be easy to find on your site! Cornerstones need many contextual links pointing towards them to make Google see that they are the most important articles. That’ll make them rank in the search engines. That’ll get them the traffic they’re worthy of!

Our Yoast SEO plugin comes with an array of tools to help you set up and maintain your cornerstone content and your internal links. Upgrade to Yoast SEO Premium and the benefits get even better. Try our Internal linking SEO workout today and give your cornerstone content the treatment it deserves!

Keep reading: Why you should buy Yoast SEO Premium »


Source :
https://yoast.com/how-to-set-up-a-cornerstone-content-strategy-with-yoast-seo/

Ubiquiti Unifi reset to Factory Defaults

Updated on 27 giu 2023

A factory reset is useful for a creating fresh setup of a UniFi Console, or device that was already configured in a managed state.

Restoring with the Reset Button

All UniFi devices have a Reset button. You can return a device to a factory-default state by holding this for 5-10 seconds (depending on the device), or until the LEDs indicate the restore has begun. Your device must remain powered during this process.

UniFi PoE Adapters also have a Reset button that can be used if the actual device is mounted and out of reach. 

Example: The diagram below illustrates how to locate this button on the UDM Pro.

udm-pro-topology.png

Restoring From Your UniFi Application

UniFi Devices

All UniFi devices can be restored to their factory defaults via their respective web or mobile applications. This is located in the Manage section of a device’s settings. Depending on the application, this may be referred to as Forget (UniFi Network) or Unmanage (UniFi Protect).

Selecting this option will unmanage the device from your UniFi Console and restore the device to a factory default state.

UniFi Consoles

A UniFi Console admin with Owner privileges has the ability to restore their console using the “Factory Reset” button located in the UniFi OS System settings. 

Frequently Asked Questions

Why does my device still appear in my application after I restored it using the physical Reset button?

Why does my device say “Managed by Other”?

This will occur if the device was managed by another instance of a UniFi application. This includes cases where the UniFi Console (e.g., Dream Machine Pro, or Cloud Key) was factory restored, because the UniFi device still considers itself as being managed by the ‘old’ application console, prior to restoration.

There are several options to resolve this:

  • Restore the UniFi Console from a backup in which the device was already managed.
  • Factory restore the UniFi device and then re-adopt it.
  • Reassign the device using the UniFi Network mobile app.
    Note: This can only be done by the account owner and requires them to have previously signed into the mobile app while the device was managed.

Note: If you are self-hosting the Network application, you should only ever download the UniFi software on a single machine which will act as the UniFi Console. Some users mistakenly download this multiple times because they believe it is a requirement to manage their Network Application from other devices, but this is actually creating a completely new instance. To manage your network from another device, you can type in the IP address of the UniFi Console while connected to the same local network. Alternatively, you can enable Remote Access to manage your network anywhere. See Connecting to UniFi to learn more.

Why is my UniFi Device not factory restoring?

Ensure that your device remains powered on during the restoration process, otherwise it will not occur. 

It is also possible that you held the button for too short of a time (resulting in a reboot), or too long of a time (resulting in entering TFTP Recovery Mode). Refer to our UniFi Device LED Status guide for more information.


Source:
https://help.ubnt.com/hc/en-us/articles/205143490-UniFi-How-to-Reset-the-UniFi-Access-Point-to-Factory-Defaults

Turning a Fast Network into a Smart Network with Autopilot

At Fastly we often highlight our powerful POPs and modern architecture when asked how we’re different, and better than the competition. Today we’re excited to give you another peek under the hood at the kind of innovation we can achieve on a modern network that is fully software-defined.

This past February, Fastly delivered a new record of 81.9 Tbps of traffic during the Super Bowl, and absolutely no one had to do anything with egress policies to manage that traffic over the course of the event thanks to Autopilot. Autopilot is our new zero-touch egress traffic engineering automation system, and because it was running, no manual interventions were required even for this record-breaking day of service. This means that for the first time ever at Fastly we set a new traffic record for the Fastly network while reducing the number of people who were needed to manage it. (And we notably reduced that number all the way to zero.) It took a lot of people across different Fastly teams, working incredibly hard, to improve the self-managing capabilities of our network, and the result is a network with complete automation that can react quickly and more frequently to failures, congestion, and performance degradation with zero manual intervention. 

Autopilot brings many benefits to Fastly, but it is even better for our customers who can now be even more confident in our ability to manage events like network provider failures or DDoS attacks and unexpected traffic spikes — all while maintaining a seamless and unimpacted experience for their end users. Let’s look at how we got here, and just how well Autopilot works. (Oh, but if you’re not a customer yet, get in touch or get started with our free tier. This is the network you want to be on.)

Getting to this result required a lot of effort over several years. Exactly three years ago, we shared how we managed the traffic during the 2020 Super Bowl. At that time, an earlier generation of our traffic engineering automation would route traffic around common capacity bottlenecks while requiring operators to deal with only the most complex cases. That approach served us well for the traffic and network footprint we had three years ago, but it still limited our ability to scale our traffic and network footprint because, while we had reduced human involvement, people were still required to deal reactively with capacity. This translates to hiring and onboarding becoming a bottleneck of its own as we would need to scale the number of network operators at least at the same rate of the expansion of our network. On top of that, while we can prepare and be effective during a planned event like a Super Bowl, human neurophysiology is not always at its peak performance when woken up in the middle of the night to deal with unexpected internet weather events.

Achieving Complete automation with Autopilot and Precision Path

The only way forward was to remove humans from the picture entirely. This single improvement allows us to scale easily while also greatly improving our handling of capacity and performance issues. Manual interventions have a cost. They require a human to reason about the problem at hand and make a decision. This cannot be performed infinite times, so that requires us to preserve energy and only act when the problem is large enough to impact customer performance. It also means that when a human-driven action is taken, it normally moves a larger amount of traffic to avoid having to deal with the same issue again soon, and to minimize the amount of human interventions needed. 

A modern CDN gives you huge improvements in caching, SEO, performance, conversions, & more.

Modern CDN ebook

Learn more

With complete automation the cost of making an action is virtually 0, allowing very frequent micro-optimizations whenever small issues occur, or are about to occur. The additional precision and reactivity provided by full automation makes it possible to safely run links at higher utilization and rapidly move traffic around as necessary.

Smartest Network blog image 1

Figure: Egress interface traffic demand over capacity. Multiple interfaces had a demand that exceeded three times the physical capacity available during the Super Bowl, triggering automated traffic engineering overrides, which enabled continued efficient delivery without negative consequences to the network.

The graph above shows an example where Autopilot detected traffic demand exceeding physical link capacity. During the Super Bowl this demand exceeded 3 times the available capacity in some cases. Without Autopilot the peaks in traffic demand would have overwhelmed those links, requiring a lot of human intervention to prevent failure, but then to manage all of the downstream impacts of those interventions in order to get the network operating at top efficiency again. With Autopilot the network deflected traffic onto secondary paths automatically and we were able to deliver the excess demand without any performance degradation.

This post sheds light on the systems we built to scale handling large traffic events without any operator intervention.

Technical problem

Smartest Network Blog image 2

Figure – Fastly POP is interconnected to the Internet via multiple peers and transit providers

The Fastly network of Points of Presence (POPs) is distributed across the world. Each POP is “multihomed”, i.e., it is interconnected to the Internet via a number of different networks, which are either peers or transit providers, for capacity and reliability purposes. With multiple routing options available, the challenge is how to select the best available path. We need to ensure that we pick the best performing route (in any given moment), and quickly move traffic away from paths experiencing failures or congestion.

Network providers use a protocol called Border Gateway Protocol (BGP) to exchange information about the reachability of Internet destinations. Fastly consumes BGP updates from its neighbors, and learns which neighbor can be used to deliver traffic to a given destination. However, BGP has several limitations. First, it is not capacity or performance aware: it can only be used to communicate whether an Internet destination can be reached or not, but not whether there is enough capacity to deliver the desired amount of traffic or what the throughput or latency would be for that delivery. Second, BGP is slow at reacting to remote failures: if a failure on a remote path occurs, it typically takes minutes for updates to be propagated, during which time blackholes and loops may occur.

Solving these problems without creating new ones is challenging, especially when operating at the scale of tens of Terabits per second (Tbps) of traffic. In fact, while it is desirable to rapidly route around failures, we need to be careful in those processes as well because rerouting large amounts of traffic erroneously can move traffic away from a well performing path onto a worse performing one and create congestion downstream as a result of our action, resulting in poor user experience. In other words, if decisions are not made carefully, some actions that are taken to reduce congestion will actually increase it instead – sometimes significantly.

Fastly’s solution to the problem is to use two different control systems that operate at different timescales to ensure we rapidly route around failures while keeping traffic on most performing paths.

The first system, which operates at a timescale of tens of milliseconds (to make a few round trips), monitors the performance of each TCP connection between Fastly and end users. If the connection fails to make forward progress for a few round trip times it reroutes that individual connection onto alternate paths until it resumes progress. This is the system underlying our Precision Path product for protecting connections between Fastly and end users, and it makes sure we rapidly react to network failures by surgically rerouting individual flows that are experiencing issues on these smaller timescales.

The second system, internally named Autopilot, operates over a longer timescale. Every minute it estimates the residual capacity of our links and the performance of network paths collected via network measurements. It uses that information to ensure traffic is allocated to links in order to optimize performance and prevent links from becoming congested. This system has a slower reaction time, but makes a more informed decision based on several minutes of high resolution network telemetry data. Autopilot ensures that large amounts of traffic can be moved confidently without downstream negative effects.

These two systems working together, make it possible to rapidly reroute struggling flows onto working paths and periodically adjust our overall routing configuration with enough data to make safe decisions. These systems operate 24/7 but had a particularly prominent role during the Super Bowl where they rerouted respectively 300 Gbps and 9 Tbps of traffic which would have otherwise been delivered over faulty, congested or underperforming paths.

This approach to egress traffic engineering using systems operating at different timescales to balance reactivity, accuracy, and safety of routing decisions is the first of its type in the industry to the best of our knowledge. In the remainder of this blog post, we are going to cover how both systems work but we’ll need to first make a small digression to explain how we route traffic out of our POPs, which is unusual and another approach where we’re also industry leaders.

Smartest Network blog image 3
Smartest Network blog image 4

Figure – Amount of traffic (absolute and percentage of total traffic) delivered by Precision Path and Autopilot respectively during the Super Bowl

Fastly network architecture

Smartest Network blog image 5

Figure – Fastly POP architecture

A typical Fastly POP comprises a layer of servers that are interconnected with all peers and transit providers via a tier of network switches. The typical approach to build an edge cloud POP consists in using network routers, which have a large enough memory to store the entire Internet routing table. In contrast, Fastly started designing a routing architecture that pushed all routes to end hosts in order to build a more cost-effective network, but we quickly realized and embraced the powerful capabilities that this architecture made possible. Endpoints that have visibility into the performance of flows now also have the means to influence their routing. This is one of the key reasons Fastly’s networking capabilities, programmability, flexibility, and ease of use continue to exceed the competition.

Here’s how our routing architecture works: Both switches and servers run routing daemons, which are instances of the BIRD Internet Routing Daemon with some proprietary patches applied to it. The daemons running on switches learn all routes advertised by our transits and peers. However, instead of injecting those routes in the routing table of the switches, they propagate them down to the servers which will then inject them into their routing tables. To make it possible for servers to then route traffic to the desired transit or peer, we use the Multiprotocol Label Switching (MPLS) protocol. We populate each switch with an entry in their MPLS lookup table (Label Forwarding Information Base [LFIB]) per each egress port and we tag all BGP route announcements propagated down to the servers with a community encoding the MPLS label that is used to route that traffic. The servers use this information to populate their routing table and use the appropriate label to route traffic out of the POP. We discuss this more at length in a scientific paper we published at USENIX NSDI ‘21.

Quickly routing around failures with Precision Path

Our approach of pushing all routes to the servers, giving endpoints the ability to reroute based on transport and application-layer metrics, made it possible to build Precision Path. Precision Path works on a timeframe of tens of milliseconds to reroute individual flows in cases of path failures and severe congestion. It’s great at quickly routing away from failures happening right in the moment, but it’s not aware or able to make decisions about proactively selecting the best path. Precision Path is good at steering away from trouble, but not zooming out and getting a better overall picture to select an optimized new route. The technology behind our precision path product is discussed in this blog post and, more extensively in this peer-reviewed scientific paper, but here’s a brief explanation.

Smarted Network blog image 6

Figure – Precision path rerouting decision logic for connections being established (left) and connections already established (right).

This system is a Linux kernel patch that monitors the health status of individual TCP connections. When a connection fails to make forward progress for some Round Trip Time (RTT), indicating a potential path failure, it is rerouted onto a randomly chosen alternate path until it resumes forward progress. Being able to make per-flow rerouting decisions is made possible by our host-based routing architecture where servers select routes of outgoing traffic by applying MPLS labels. End hosts can move traffic rapidly on a per-flow granularity because they have both visibility into the progress of connections, and the means to change network route selection. This system is remarkably effective at rapidly addressing short-lived failures and performance degradation that operators or any other telemetry-driven traffic engineering would be too slow to address. The downside is that this system only reacts to severe performance degradations that are already visible in the data plane and moves traffic onto randomly selected alternate paths, just to select non-failing paths, but they might not be the best and most optimal paths.

Making more informed long-term routing decision with Autopilot

Autopilot complements the limitations of Precision Path because it’s not great at responding as quickly, but it makes more informed decisions based on knowledge of which paths are able to perform better, or are currently less congested. Rather than just moving traffic away from a failed path (like Precision Path), it moves larger amounts of traffic *toward* better parts of a network. Autopilot has not been presented before today, and we are excited to detail it extensively in this post. 

Autopilot is a controller that receives network telemetry signals from our network such as packet samples, link capacity, RTT, packet loss measurements, and availability of routes for each given destination. Every minute, the Autopilot controller collects network telemetry, uses it to project per-egress interface traffic demand without override paths, and makes decisions to reroute traffic onto alternate paths if one or more links are about to reach full capacity or if the currently used path for a given destination is underperforming its alternatives.

smartest network blog image 7

Figure – Autopilot architecture diagram

Autopilot’s architecture is comprised of three components (shown above):

  1. A route manager, which peers with each switch within a POP and receives all route updates the switch received from its neighbors over a BGP peering session. The route manager provides an API that allows consumers to know what routes are available for a given destination prefix. The route manager also offers the ability to inject route overrides via its API. This is executed by announcing a BGP route update to the switch with a higher local preference value than routes learned from other peers and transit providers. This new route announcement will win the BGP tie-breaking mechanism and be inserted into servers’ routing tables and used to route traffic.
  2. A telemetry collector, which receives sFlow packet samples from all the switches of a POP which allow an estimation of the volume of traffic broken down by destination interface and destination prefix as well as latency and packet loss measurements for all the traffic between Fastly POPs over all available providers from servers.
  3. A controller, which consumes (every minute) the latest telemetry data (traffic volumes and performance) as well as all routes available for the prefixes currently served by the POP, and then computes whether to inject a BGP route override to steer traffic over alternate paths.

Making Precision Path and Autopilot work together

One challenge of having multiple control systems operating on the same inputs and outputs is having them work collaboratively to select the overall best options rather than compete with each other. Trying to select the best option from the limited vantage point of each separate optimization process could actually lead to additional disruption and do more harm than good. To the best of our knowledge, we are the first in the industry using this multi-timescale approach to traffic engineering.

The key challenge here is that once a flow is being rerouted by Precision Path, it no longer responds to BGP routing changes, including those triggered by Autopilot. As a result, Autopilot needs to account for the amount of traffic currently controlled by Precision Path in its decisions. We addressed this problem in two ways: first we tuned Precision Path to minimize the amount of traffic it reroutes, and by making that traffic observable by Autopilot so that it can be factored into Autopilot decisions.

When we first deployed Precision Path, we fine-tuned its configuration to minimize false positives. False positives would result in traffic being rerouted away from an optimal path that is temporarily experiencing a small hiccup, and onto longer paths with worse performance, which could in turn lead to a worse degradation by impacting the performance of affected TCP connections. We reported extensively on our tuning experiments in this paper. However, this is not enough, because even if we make the right decision at the time of rerouting a connection, the originally preferred path may recover a few minutes after the reroute, and this is typically what happens when BGP eventually catches up with the failure and withdraws routes through the failed path. To make sure we reroute connections back onto the preferred path when recovered, Precision Path probes the original path every five minutes after the first reroute, and if the preferred path is functional, it moves the connection back onto it. This mechanism is particularly helpful for long-lived connections, such as video streaming, which would otherwise be stuck on a backup path for their entire lifetime. This also minimizes the amount of traffic that Autopilot cannot control, giving it more room to maneuver.

The problem of making the amount of traffic routed by Precision Path visible to Autopilot is trickier. As we discuss earlier in this post, Autopilot learns the volume of traffic sent over each interface from sFlow packet samples emitted by switches. These samples report, among other things, over what interface the packets were sent to and which MPLS label it carried but do not report any information about how that MPLS label was applied. Our solution was to create a new set of alternate MPLS labels for our egress ports and allocate them for exclusive usage by Precision Path. This way, by looking up an MPLS label in our IP address management database, we can quickly find out if that packet was routed according to BGP path selection or according to Precision Path rerouting. We expose this information to the Autopilot controller which treats Precision Path as “uncontrollable”, i.e., traffic that will not move away from its current path even if the preferred route for its destination prefix is updated.

Making automation safe

Customers trust us with their business to occupy a position as a middleman between their services and their users, and we take that responsibility very seriously. While automating network operations allows for a more seamless experience for our customers, we also want to provide assurances to its reliability.  We design all our automation with safety and operability at its core. Our systems fail gracefully when issues occur and are built so that network operators can always step in and override their behaviors using routing policy adjustments. The last aspect is particularly important because it allows operators to use tools and techniques learned in environments without automation and apply them here. Minimizing cognitive overhead by successfully automating more and more of the problem is particularly important to reduce the amount of time needed to solve problems when operating under duress. These are some of the approaches we used to make our automation safe and operable:

Standard operator tooling: both Precision Path and Autopilot can be controlled using standard network operator tools and techniques.

Precision Path can be disabled on individual routes by injecting a specific BGP community on an individual route announcement, which is a very common task that network engineers typically perform for a variety of reasons. Precision Path can also be disabled on an individual TCP session by setting a specific forwarding mark on the socket, which makes it possible to run active measurements without Precision Path kicking in and polluting results.

Autopilot route reselection is based on BGP best path selection, i.e., it will try to reroute traffic onto the second best path according to BGP best path selection. As a result, operators can influence which path Autopilot will fail over to by applying BGP policy changes such as altering MED or local pref values, and this is also a very common technique.

Finally, data about whether connections were routed on paths selected by precision path or autopilot is collected by our network telemetry systems, which allows us to reconstruct what happens

Data quality auditing: We audit the quality of data fed into our automation and have configured our systems to avoid executing any change if input data is inconsistent. In the case of Autopilot, for example, we compare egress flow estimation collected via packet samples against an estimation collected via interface counters, and if they diverge beyond a given threshold it means at least one of the estimations must be wrong, and we do not apply any change. The graph below shows the difference between those two estimations during the Super Bowl on one North American POP.

smartest network blog image 8

Figure – Difference between link utilization estimates obtained via interface counters and packet samples. The +/- 5% thresholds represent the acceptable margins of error

What-if analysis and control groups: in addition to monitoring input data we also audit the decisions made by systems and step in to correct them if they misbehave. Precision Path uses treatment and control groups. We randomly select a small percentage of connections to be part of a control group for which Precision Path is disabled and then monitor their performance compared to the others where precision path is enabled. If control connections perform better than treatment connections our engineering team is alerted, and steps in to investigate and remediate. Similarly, in Autopilot, before deploying a configuration change to our algorithm, we run it in “shadow” mode where the new algorithm makes decisions, but they are not applied to the network. The new algorithm will only be deployed if it performs at least as well as the one that is currently running.

Fail-static: when a failure occurs at any component of our systems, rather than failing close or open, they fail static, i.e., leave the network in the last known working configuration and alert our engineering team to investigate the problem.

Conclusions

This blog post is a view into how Fastly automates egress traffic engineering to make sure our customers’ traffic reaches their end users reliably. We continue to innovate and push the boundaries of what is possible while maintaining a focus on performance that is unrivaled. If you are thinking that you want your traffic to be handled by people who are not only experts, but also care this much, now is a great time to get in touch. Or if you’re thinking you want to be a part of innovation like this, check out our open listings here: https://www.fastly.com/about/careers/current-openings.

Open Source Software

The automation built into our network was made possible by open source technology. Open source is a part of Fastly’s heritage — we’re built on it, contribute to it, and open source our own projects whenever we can. What’s more, we’ve committed $50 million in free services to Fast Forward, to give back to the projects that make the internet, and our products, work. To make our large network automation possible, we used: 

  • Kafka – distributed event streaming platform
  • pmacct – sFlow collector
  • goBGP – BGP routing daemon library, used to build the Autopilot route collector/injector
  • BIRD – BGP routing daemon running on our switches and servers.

We did our best to contribute back to the community by submitting to their maintainers improvements and bug fixes that we implemented as part of our work. We are sending our deepest gratitude to the people that created these projects. If you’re an open source maintainer or contributor and would like to explore joining Fast Forward, reach out here

Lorenzo Saino

Director of Engineering

Lorenzo Saino is a director of engineering at Fastly, where he leads the teams responsible for building the systems that control and optimize Fastly’s network infrastructure. During his tenure at Fastly, he built systems solving problems related to load balancing, distributed health checking, routing resilience, traffic engineering and network telemetry. Before joining Fastly he received a PhD from University College London. His thesis investigated design issues in networked caching systems.

lorenzosaino

Jeremiah Millay

Principal Network Engineer

Jeremiah Millay is a Principal Engineer on the Network Systems team at Fastly where he spends most of his time focused on network automation and writing software with the goal of improving network operations at Fastly. Prior to Fastly he spent a number of years as a Network Engineer for various regional internet service providers.

Paolo Alvarado

Senior Manager of Technical Operations

Paolo Alvarado is a Senior Manager of Technical Operations at Fastly. Paolo has over 10 years of experience working with content delivery networks in customer-facing and behind-the-scenes roles. Paolo joined Fastly to help build out the Fastly Tokyo office before moving into network operations. Currently, he manages a team of Network and System Operation engineers to meet the challenges of building and running a large scale network.

Hossein Lotfi

VP of Engineering leading Network Systems Organization

Hossein Lotfi is VP of Engineering leading Network Systems Organization at Fastly. Hossein has over 20 years of experience building networks and large-scale systems ranging from startups to hyper-scale cloud infrastructure. He has scaled multiple engineering organizations geared towards rapid, novel innovation development and innovations that are informed and inspired by deep involvement with the operational challenges of global scale systems. At Fastly, Hossein is responsible for building reliable, cost-effective, and low-latency systems to connect Fastly with end-users and customer infrastructures. The Network Systems Organization teams include Kernel, DataPath (XDP), L7 Load Balancing, TLS Termination, DDoS Defence, Network Architecture, Network Modeling and Provisioning Systems, Traffic Engineering, Network Telemetry, DNS, Hardware Engineering, Pre-Production Testing and Fastly’s Edge Delivery platform.

Source :
https://www.fastly.com/blog/turning-a-fast-network-into-a-smart-network-with-autopilot

Wordfence 7.10.0 Released!

Mark Maunder
June 21, 2023

Wordfence remains the number one security plugin of choice for website owners serious about protecting their investment and their customers. Our Threat Intelligence team and engineering team stay abreast of the newest threats and ensure that Wordfence is able to protect against them. But keeping a product like Wordfence ahead of the pack requires that we maintain and improve many other aspects of the product including performance, internationalization, the user interface, and that we continue to add improvements and bug fixes as they’re discovered.

Wordfence 7.10.0 has just been released and incorporates many of those ongoing improvements like improving the ability to internationalize Wordfence messages that are customer facing, clarifying messages around plugins that have been removed from the repository and even recognizing the Prespa Accord which resolved a decades long dispute over the name of the Republic of North Macedonia.

A huge thanks and congrats to the entire engineering team at Wordfence for this latest release, Wordfence 7.10.0. I think you’ll find many features you’ve been asking for, or looking forward to, are included in Wordfence 7.10.0. You can find the details of what is included in this release, below.

Wordfence 7.10.0 Changes

Several improvements were made for translations:

  • Improvement: Added translation support for strings from login security plugin
  • Improvement: Added translator notes regarding word order and hidden text
  • Improvement: Added translation support for additional strings
  • Change: Moved translation file from .po to .pot

These changes implement the translation of strings for the Login Security module which could not be translated previously, add more context for translators in several areas, and allow translation of the remaining text that was not translatable before. Some text in scan results or in error messages sent from the Wordfence servers may still appear in English, but all text that is visible by your site’s visitors and nearly all text for admins should be translatable. Please contact our support team if you have any issues translating additional strings.

Improvement: Updated scan result text to clarify meaning of plugins removed from wordpress.org

We clarified the text of scan results that show when a plugin was removed from wordpress.org, since people sometimes thought this meant that a plugin was removed from their sites.

Improvement: Prevented scans from failing if unreadable directories are encountered

On some hosts, the Wordfence scan could fail if it found a private directory inside the site’s public files, if reading the directory was blocked by a method other than file permissions. This issue no longer occurs.

Fix: Corrected IPv6 address expansion

Manually blocking IPv6 address ranges could previously cause a str_repeat() error on PHP 8 and above.

Fix: Ensured long request payloads for malicious requests are recorded in live traffic

Certain blocked hits for large requests would sometimes not appear in Live Traffic. These blocked hits should now appear.

Change: Moved detection for old TimThumb files to malware signature

Finding a vulnerability in TimThumb lead to the creation of Wordfence. Detection for vulnerable TimThumb files had been built into the plugin since that time, and detection has now been moved to the same method used for detecting malware and other dangerous files. This change prevents a false positive result on sites where PHP’s “opcache” is stored inside the document root.

Fix: Prevented rare JSON encoding issues from breaking free license registration

We found a few cases in our logs where a site could not register for a free key due to an improperly encoded URL or other data, and added a method to handle such cases.

Additional minor changes:

  • Improvement: Added help link to IPv4 scan option
  • Improvement: Made “Increased Attack Rate” emails actionable
  • Improvement: Updated JavaScript libraries
  • Improvement: Updated GeoIP database
  • Fix: Prevented “commands out of sync” database error messages when the database connection has failed
  • Fix: Prevented PHP notice from being logged when request parameter is missing
  • Fix: Prevented deprecation warning in PHP 8.1
  • Change: Renamed “Macedonia” to “North Macedonia, Republic of”

The above list includes text changes, prevention of unnecessary log messages, and some updates to libraries and data used by Wordfence.

We hope you enjoy Wordfence 7.10.0 as much as we enjoyed creating it!

~The Wordfence Team

Did you enjoy this post? Share it!

Source :
https://www.wordfence.com/blog/2023/06/wordfence-7-10-0-released-changes/

Change the owner of computer objects in Active Directory

Wolfgang Sommergut Thu, Jun 15 2023

When a user joins a computer to an AD domain, they automatically become the owner of the corresponding AD object. This is why standard users should not have the domain join permission. If they still own computer objects, it is recommended for security reasons to replace them with a service account.

As a best practice, Microsoft recommends revoking the domain join permission from regular users. Instead, it is advised to delegate this task to service accounts whose permissions are tailored to this purpose. By doing so, a known attack vector is eliminated.

Easily deploy and centrally manage your phone system in your Windows network

Download 3CX now for free!Ad

If the domain join is delegated to specific accounts after end users have already added numerous computers to the domain, it is recommended that the owner of these computer objects be changed.

This also applies if a domain admin has been used for this purpose until now.

Active Directory Users and Computers

To view the permissions and the owner of a computer object in AD Users and Computers (ADUC), open the properties of the computer object, switch to the Security tab, and click Advanced.

Edit the owner of a computer object in Active Directory with AD Users and Computers

If necessary, you can enter a new owner by clicking the Change link in that section.

In ADUC, you can only edit the permissions of individual objects. If you select multiple objects, the Properties dialog will not display the Security tab.

Display owner with PowerShell

For bulk operations, it is therefore recommended to use PowerShell. If you first want to get an overview of multiple objects’ ownership, there are several options available.

One approach is to generate a list of computer names and owners by expanding the nTSecurityDescriptor attribute using Select-Object:

Get-ADComputer –Filter * -properties ntSecurityDescriptor -PipelineVariable p |

select -ExpandProperty ntSecurityDescriptor |

select @{n=”Computer”;e={ $p.name }}, @{n=”Owner”;e={ $_.owner }}

Display all domain computers and their owners with PowerShell

Alternatively, you can use Get-ACL to retrieve the owner for each computer individually. When outputting the results using Format-List, you can use Trimstart() to remove the leading “CN=” from PSChildName:

Get-ADComputer –Filter * |

foreach{Get-Acl -Path “AD:$($_.DistinguishedName)“} |

Format-List @{n=”Name”;e={$_.PSChildName.Trimstart(“CN=”)}}, @{n=”Owner”;e={$_.owner}}

This variant has the advantage of generating the necessary ACL objects, which are required if you want to change the owner. The following script accomplishes this task:

$user = new-object system.security.principal.ntaccount(“contoso\djoin”)

Get-ADComputer –filter ‘name -like “win11*”‘ |

foreach{

$acl = Get-Acl -Path “AD:$($_.DistinguishedName)

$acl.SetOwner($user)

Set-Acl -Path “AD:$($_.DistinguishedName)$acl

}

In this example, all computers whose names begin with “Win11” are assigned contoso\djoin as the new owner.

Assign a new owner to computer objects with Set Acl

It is worth mentioning that to use the SetOwner method, you need to provide a system.security.principal.ntaccount object. However, Get-ADuser returns objects of the type Microsoft.ActiveDirectory.Management.ADUser. If you want to retrieve the principal using this cmdlet, then you need to call it as follows:

$user = New-Object System.Security.Principal.SecurityIdentifier (Get-ADUser -Identity “myuser”)

Summary

For security reasons, it is not recommended to let users join PCs to an AD domain. However, if you have allowed this in the past, it is advisable to assign new owners to the computer objects.

Source :
https://4sysops.com/archives/change-the-owner-of-computer-objects-in-active-directory/

Complete Solidworks Clean Uninstall Guide

ARTICLE BY GOENGINEER ON DEC 23, 2022

If you need to uninstall SOLIDWORKS, this guide walks through the entire process including preparing your machine and uninstalling Windows items, SOLIDWORKS items, SOLIDWORKS prerequisites, and more. Let’s get started.

*Disclaimer: This document assumes that SOLIDWORKS was originally installed using the default locations. If our installation location for SOLIDWORKS differs, please adjust the procedure below accordingly. The procedure in the following document requires access and edits to the Windows registry. Any such edits are done at your own risk and should only be attempted under the advisement of your IT professional. If you are uncomfortable with following the procedure below, please seek assistance. It is advised to backup your registry and any valued data before making any changes to the system registry. GoEngineer assumes no responsibility for any consequences, unintended or otherwise resulting from changes made to the system registry.

Preparing your machine


Confirm and create backup
Copy Settings Wizard iconCopy Settings Wizard (CSW) or Manual Registry Export

  • If the machine has multiple users. Run it for each user while they are logged in and setup a file naming convention like “SWSettings_UserName_Date.sldreg”.
  • If the machine just has one user, then you can just create one file to hold all settings for example “SWSettings_Date.sldreg”
  • For Manual Registry Export, go to the search bar and type in regedit.exe then press Enter. Depending on how your IT department has your permissions setup you may have to get one of them involved for this step.
  • Once in the registry editor, navigate to the following keys, right-click on them and select Export. Then name them according to the file name suggested under each one.
    • HKEY_CURRENT_USER\Software\SolidWorks
      •  HKCU_SWX_UserName.reg
    • HKEY_LOCAL_MACHINE\SOFTWARE\SolidWorks
      • HKLM_SWX_UserName.reg
    • HKEY_LOCAL_MACHINE\SOFTWARE\Wow6432Node\SolidWorks
      • HKLM_6432_SWX_UserName.reg
  • Backup all customizations like document templates, sheet formats, toolbox databases, weldment profiles, design library, etc.
    • You can go to System Options | File Locations within SOLIDWORKS to verify the locations of any customizations. Note: Any files in custom locations will not be removed during uninstallation, but ones in any of the default folders will so make sure and double check this step. 
  • Create a restore point and/or backup of your system.

Items needed

  • Obtain Software either via download from the customer portal or DVD. It is recommended that you obtain the latest service pack for the version you are planning to install.
  • Local Admin rights/permissions on the machine. Domain admin will not suffice.
  • For SA licenses you will need the serial number(s). For SNL you will need the serial number and license server name in this format “25734@ServerName”.

Uninstalling

Windows Items

  • Disable UAC (User Account Control) by moving the slider to the lowest setting.
  • Disable any Anti-Viral or Malware software if permitted. You may have to get IT involved in this step.

SOLIDWORKS Items

  • Transfer License (For SA only, and only if you are moving machines or upgrading to a different major version)

While in SOLIDWORKS, go to the Help menu and select “Deactivate License”. This will bring up the SOLIDWORKS Product Activation dialog.

SOLIDWORKS Product Activation screen

Then click the “Select All” button and click Next. Finally, you will see a completion dialog showing the activations were transferred successfully.

  • Uninstall SOLIDWORKS via these steps below.
    1. Go to Start -> Control Panel -> Programs and Features. Select SOLIDWORKS 20XX SPX and then click Uninstall at the top of the list.
    2. This will open the SOLIDWORKS Installation Manager to the Summary page. Then select “Change” to the right of the Advanced Options section.

      How to uninstall solidworks
    3. In the dialog that comes up select the boxes for the items you want to have removed from the system. If you have multiple versions installed and you are not uninstalling the latest version some boxes will not be available.

      Advanced options uninstalling solidworks
    4. Click “Back to Summary”, then click “Remove Items” to start the uninstallation process.
      Note: This process will not remove any SOLIDWORKS Parts, assemblies, or drawings.

SOLIDWORKS Prerequisites

  • Manually remove prerequisites. ** Not all may be installed on your machine depending on the SOLIDWORKS version. **
    Bonjour
    Microsoft .Net Framework 3.5 (Use Windows Components to Uninstall)
    Microsoft .Net Framework 4.0
    Microsoft .Net Framework 4.5
    Microsoft Office Web Components 11
    Remove all instances of C++ Runtimes
    Note: Do not remove all if you have any programming or other CAD software installed. Contact us for the exact current list of runtimes to remove.
    Microsoft Visual Studio 2005 Tools for Applications
    Microsoft Visual Studio 2005 Remote Debugger Light
    VBA 7.1
    • For SOLIDWORKS 2013 and higher, please follow these steps to uninstall VBA.
    • Open Command Prompt (Start | All Programs | Accessories then right-click on Command Prompt and select “Run as Administrator”).
    • Then type: msiexec.exe /X{90120064-0070-0000-0000-4000000FF1CE} and press Enter.

Manual System Cleaning Steps

  • Manually clean remaining folders and registry.
    • Registry: (**Please use caution when Windows Start Menu > type “regedit” > press Enter) editing the Windows Registry, Deletions cannot be undone. **
      • HKEY_CURRENT_USER\SOFTWARE
        • \eDrawings
        • ** If you have PDM installed, DO NOT DELETE. Delete only the IM & \SolidWorks SOLIDWORKS [version] subkeys. **
        • \SOLIDWORKS 20XX
        • \SolidWorks BackOffice
        • \SRAC
        • \Microsoft\VSTAHOST
        • \Microsoft\VSTAHostConfig
      • HKEY_LOCAL_MACHINE\SOFTWARE **Wow6432Node keys on 64 bit machines only**
        • \eDrawings
        • \SolidWorks the IM & SOLIDWORKS [version] subkeys. **
        • \SolidWorks Corporation
        • \SRAC
        •  ** If you have PDM Pro & Stnd installed, DO NOT \Wow6432Node\SolidWorks DELETE. Delete only the IM & SOLIDWORKS [version] subkeys. **
        • \Wow6432Node\SolidWorks Corporation
        • \Wow6432Node\Microsoft\VSTAHOST
        • \Wow6432Node\Microsoft\VSTAHostConfig
    • SOLIDWORKS Directories: ()
      • C:\Program Files\SolidWorks Corp\
      • C:\Program Files\Common Files\eDrawings
      • C:\Program Files\Common Files\eDrawings<year>
      • C:\Program Files\Common Files\SolidWorks Installation Manager
      • C:\Program Files\Common Files\SolidWorks Shared
      • 64-bit Operating System Below Only
        • C:\Program Files (x86)\Common Files\eDrawings
        • C:\Program Files (x86)\Common Files\SolidWorks Installation Manager
        • C:\Program Files (x86)\Common Files\SolidWorks Shared
        • C:\Program Files (x86)\SolidWorks Shared

Note: The “ProgramData” folder is hidden by default. Go to the Control Panel and select Folder Options. Open the View tab and select “Show hidden files, folders and drives” from the list and click OK.

    • C:\ProgramData\COSMOS Applications\
    • C:\ProgramData\SolidWorks
    • C:\ProgramData\SolidWorks Electrical
    • C:\ProgramData\SolidWorks Flow Simulation
    • C:\SolidWorks Data – Note: delete all duplicates like (2) C:\SolidWorks Data (2)
    • C:\Users\%username%\Documents\SolidWorks Downloads\SolidWorks [version]
    • C:\Users\%username%\AppData\Local\Microsoft\VSTAHost\SolidWorks_VSTA
    • C:\Users\%username%\AppData\Local\Temp\Solidworks
    • C:\Users\%username%\AppData\Local\SolidWorks
    • C:\Users\%username%\AppData\Local\TempSWBackupDirectory
    • C:\Users\%username%\AppData\Roaming\SolidWorks
    • C:\Users\%username%\AppData\Roaming\Microsoft\VSTAHost\SolidWorks_VSTA

Contact GoEngineer

Please contact us if you have any questions or issues with the steps above via one of the following methods.

SOLIDWORKS TRAINING

Expand your SOLIDWORKS skillset and enroll in a professional SOLIDWORKS training course. Choose how you want to learn, (online self paced or virtual classroom or in-person classroom or onsite) and the select your level of training. 

Editor’s Note: This article was originally published in August 2017 and has been updated for accuracy and comprehensiveness.

Source :
https://www.goengineer.com/blog/complete-solidworks-clean-uninstall-guide

Qnap QuTS hero h5.1.0 | Release Notes

QuTS hero h5.1.0
2023-05-29

QuTS hero h5.1.0 brings many important new features to further enhance security, improve performance, and boost productivity for your QNAP NAS. You can now log in with more secure verification methods, delegate administrative tasks to general users, and centrally manage NAS devices via AMIZ Cloud. You can also benefit from smarter disk migration, smoother file browsing and search in File Station, more powerful SMB signing and file sharing, more convenient storage pool expansion, and much more. See What’s New to learn about main features and Other Changes to learn about other features, enhancements, and changes.

We also include fixes for reported issues and provide information about known issues. For details, see Fixed and Known Issues. You should also see Important Notes before updating QuTS hero.

What’s New

Storage pool expansion by adding disks to an existing RAID group

Users can now expand a storage pool by adding disks to expand an existing RAID group within the pool. When expanding the RAID group, users can also migrate the RAID group to a different RAID type.

To use this function, go to Storage & Snapshots > Storage > Storage/Snapshots, select a storage pool, click Manage > Storage Pool > Action > Expand Pool to open the Expand Storage Pool Wizard, and then select Add new disk(s) to an existing RAID group.

Support for SMB multichannel

Users can now allow SMB 3.x clients to establish multiple network connections simultaneously to an SMB file share. Multichannel can increase the network performance by aggregating network bandwidth over multiple NICs and mitigating network disruption by increasing network fault tolerance.

To enable SMB multichannel, go to Control Panel > Network & File Services > Win/Mac/NFS/WebDAV > Microsoft Networking, and then select Enable SMB Multichannel.

SMB multichannel is only supported on the following clients using SMB 3.0 or later:

  • Windows 8.1 and later
  • Windows Server 2012 and later
  • macOS Big Sur 11.3.1 and later

AES-128-GMAC algorithm support for SMB signing

QuTS hero h5.1.0 now supports the Advanced Encryption Standard (AES) Galois Message Authentication Code (GMAC) cipher suite for SMB signing. SMB signing can use this algorithm to encode and decode using 128-bit keys and can automatically negotiate this method when connecting to a client device that also supports the same algorithm standard.

To enable SMB signing, go to Control Panel > Network & File Services > Win/Mac/NFS/WebDAV > Microsoft Networking > Advanced Settings, and then configure the SMB signing settings. Make sure that you select the highest SMB version as SMB 3.

Delegated Administration for better organization flexibility and productivity

In modern organizations, IT administrators are often overwhelmed by a sheer number of tasks and responsibilities. QuTS hero h5.1.0 now supports Delegated Administration, which allows administrators to delegate various roles to general users, so that they can perform routine tasks, control their data, manage system resources, and monitor device status even when IT administrators are not available. You can choose from a wide range of roles, including System Management, Application Management, Backup Management, Shared Folder Management, and many more. To ensure system security, we recommend only granting permissions that are essential for performing required tasks.

This feature not only helps reduce the workloads of administrators but also greatly enhances productivity and flexibility for your organization. You can also easily view the roles currently assigned to each user and change their roles anytime according to your needs. To configure these settings, go to Control Panel > Privilege > Delegated Administration. To learn more about Delegated Administration, check QuTS hero h5.1.0 User Guide.

2-step verification and passwordless login for enhanced account security

QuTS hero now supports passwordless login, which replaces your password with a more secure verification method. Instead of entering a password, you can scan a QR code or approve a login request with your mobile device to verify your identify. QuTS hero now also supports more verification methods for 2-step verification. In addition to a security code (TOTP), you can also choose to scan a QR code, approve a login request, or enter an online verification code to add an extra layer of security to protect your NAS account.

To configure these settings, go to the NAS desktop, click your username on the taskbar, and then select Login and Security. You can download and install QNAP Authenticator from App Store or Google Play and pair this mobile app with your NAS to secure your NAS account. Note that you cannot use 2-step verification and passwordless login at the same time.

Centralized NAS management with AMIZ Cloud

You can now add the NAS to an organization when setting up the myQNAPcloud service for your NAS. This allows organization administrators to remotely access, manage, and monitor various system resources on the NAS via AMIZ Cloud, a central cloud management platform designed for QNAP devices.

To manage the NAS via AMIZ Cloud, you must enable AMIZ Cloud Agent in myQNAPcloud. This utility communicates with AMIZ Cloud and collects the data of various resources on your device for analytics purposes without any identifiable person information.

Automatic disk replacement with Predictive Migration before potential failure

Predictive Migration is a major improvement over the original Predictive S.M.A.R.T. Migration feature in Storage & Snapshots. This upgrade now allows users to specify multiple trigger events that prompt the system to automatically replace a disk before it fails.

Besides S.M.A.R.T. warnings, users can also specify trigger events from other monitoring systems such as Western Digital Device Analytics (WDDA), IronWolf Health Management (IHM), DA Drive Analyzer, and SSD estimated remaining life. When a specified trigger event occurs—for example, a disk ‘s Galois WDDA status changes to “Warning” or the SSD estimated remaining life reaches 3%—the system automatically replaces the disk and migrates all its data to a spare disk. This process protects your data better and is safer than manually initiating a full RAID rebuild after the disk fails.

To configure Predictive Migration, go to Storage & Snapshots > Global Settings > Disk Health.

Lists of recent files in File Station for easier file browsing

With the new Recent Files feature in File Station, you can now easily locate files that were recently uploaded, opened, or deleted. These three folders are conveniently grouped together under the Recent File folder at the upper left portion of File Station.

File content search in File Station with Qsirch integration

The original search function in File Station could only search for file names of a specific file type. With the integration of Qsirch into File Station, you can now search for file content using keywords, and also search for multiple file types using these keywords at the same time. To use this feature, you need to install Qsirch, an app that can index the files on your device and greatly facilitate your file search.

Other Changes

Control Panel

  • Users can now configure an individual folder to inherit permissions from its parent folder or to remove the inherited permissions anytime. Users can also make a folder extend its permissions to all its subfolders and files. To configure permission inheritance on a folder, go to Control Panel > Privilege > Shared Folders, and then click the Edit Shared Folder Permissions icon under Action.
  • Added additional specification information for memory slots in Control Panel > System Status > Hardware Information.
  • Changed the behavior and the description of certain permission settings as we do not recommend using the default administrator account “admin”.
  • Optimized the process of restoring the LDAP database.
  • The “Network Recycle Bin” feature has been renamed to “Recycle Bin” in Network & File Services.
  • The automatic firmware update settings have been streamlined with the following changes: – The selectable options for automatic firmware updates have been greatly simplified. Users now select one of three firmware types to automatically update their system with: quality updates, critical updates, or latest updates. – “Security updates” are now “critical updates”. Critical updates include security fixes as well as critical system issue fixes. – “Quality updates” now include security fixes and critical issue fixes in addition to bug fixes.- “Feature updates” are now “latest updates” and include quality and critical updates in addition to new features, enhancements, and bug fixes. – Update notifications no longer need to be enabled separately for each firmware type. Notifications are now either enabled or disabled for all firmware types.
  • The time interval for observing successive failed login attempts can now be configured to be between 0 and 600 minutes. Moreover, a time interval of 0 minutes means that failed login attempts are never reset.
  • You can now include more information from account profiles when importing and exporting user accounts.
  • You can now select the direction to append the custom header for the reverse proxy rule.
  • Users can now edit and enable or disable existing power schedules in Control Panel > System > Power > Power Schedule. Previously, users could only add or remove power schedules.
  • The “Network Recycle Bin” feature has been renamed to “Recycle Bin” in Network & File Services.

Desktop & Login

  • You can now log out of your account on all devices, browsers, and applications at once. To use this feature, go to the desktop, click your username on the taskbar, and then go to Login and Security > Password.
  • Added an icon on the top-right corner of the desktop to indicate whether the device has enabled myQNAPcloud and been associated with a QNAP ID or whether the device has joined AMIZ Cloud.
  • Users can now save their QuTS Hero login credentials in their web browser. To enhance the security of your QuTS Hero user account, we recommend enabling 2-step verification.

App Center

  • Users can now configure a schedule for automatic installations of app updates.

File Station

  • Added prompt banners to remind users to turn on related browsing functions for multimedia files.
  • Enhanced the Background Tasks display UI.
  • Improved File Station performance and enhanced file browsing experience.

Help Center

  • Redesigned the user interface of Help Center for a better user experience.

Initialization

  • You can now purchase licenses during QuTScloud installation.

iSCSI & Fibre Channel

  • Added a new settings page for managing default iSCSI CHAP authentication settings, which you can use for multiple iSCSI targets. You can find these settings in iSCSI & Fibre Channel > Global Settings > Default iSCSI CHAP. When creating or editing a target, you can choose to use the default CHAP settings or configure unique settings for the target.
  • Added the client umask feature to assign default permissions for existing and new files and folders.
  • When creating an iSCSI target, you can now select the network interfaces that an iSCSI target will use for data transmission. Previously, users could only do so after the target was created.

Network & Virtual Switch

  • Network & Virtual Switch can now record event logs when the system identifies conflicting IP addresses between the local device and another device on the same network.
  • Users can now configure the MAC address when creating or modifying a virtual switch.
  • When selecting the system default gateway automatically, you can now configure the checking target by specifying the domain name or IP address.

NFS

  • NFS service now supports both NFSv4 and NFSv4.1 protocols.
  • Users can now set the rcpbind to assign fixed ports to RPC services. Make sure that you configure the firewall rules accordingly to allow connections only on the fixed ports.

PHP System Module

  • Updated the built-in PHP version to 8.2.0.

Resource Monitor

  • Resource Monitor now displays the space used by files created from Qsync file versioning.

SAMBA

  • Updated Samba to version 4.15.
  • You can now aggregate up to 50 shared folders on a Windows network.

Storage & Snapshots

  • Added support for disk failure prediction from ULINK’s DA Drive Analyzer. Registered users of DA Drive Analyzer can now also monitor disk failure prediction statuses in Storage & Snapshots > Storage > Disks/VJBOD > Disks.
  • Added support for Seagate dual-actuator disks. These disks appear with a “Seagate DA” tag in Storage & Snapshots > Storage > Disks/VJBOD > Disks.
  • Added support for Western Digital Device Analytics (WDDA) for Western Digital (WD) disks. To view WDDA information, go to Storage & Snapshots > Storage > Disks/VJBOD > Disks, select a WD disk, and click Health > View Details.
  • Improved the “Enable Read Acceleration” feature so that it not only improves the read performance of new files added to a shared folder (starting in QuTS hero h5.0.1), but also improves the read performance of existing files (starting in QuTS hero h5.1.0). This feature can be enabled for shared folders after upgrading from QuTS hero h5.0.0 or earlier to QuTS hero h5.0.1 or later.
  • Increased the maximum number of disks in RAID-TP from 16 to 24.
  • Redesigned the presentation of disk information into tabular format for enhanced user experience, now viewable in Storage & Snapshots > Storage > Disks/VJBOD > Disks.
  • Renamed the function “Replace & Detach” to “Replace” and added the option for users to choose whether to designate the replaced disk as a spare disk or to detach it from the system.
  • You can now select up to 24 disks for a single RAID-TP group.
  • Encrypted LUNs are now supported in VJBOD, SnapSync, Snapshot Replica, and snapshot import/export operations.
  • Improved the user interface on various snapshot-related screens.
  • Users can now change the destination IP address in Snapshot Replica jobs.
  • Added a new window that automatically appears when you insert new disks and helps you decide what to do with them. You can also access this window any time by going to Storage & Snapshots > Storage > Disks/VJBOD > Disks > More > Manage Free Disks.
  • After rebuilding a RAID group with a spare disk, the failed disk’s slot becomes reserved for a spare disk. To free up this slot for other purposes, go to Storage & Snapshots > Storage > Disks/VJBOD > Disks, select the disk slot, and click Action > Free Up Spare Disk Slot.
  • Users can now enable and disable QNAP SSD Antiwear Leveling (QSAL) on an existing SSD storage pool any time. Richer information is also available for QSAL-enabled pools, including replacement priority recommendation and charts showing the remaining capacity and life of the SSDs in the pool. To configure QSAL or view QSAL information, go to Storage & Snapshots > Storage > Storage/Snapshots, click an SSD storage pool, and then click Manage > QSAL.

System

  • You now need to enter a verification code when resetting your password if you forgot your password. This extra step helps enhance your account security.

Important Note

  • In QuTS Hero h5.0.1 or earlier, users can no longer create new VJBOD disks from a remote NAS if the remote NAS is running QuTS Hero h5.1.0 or later. If there are existing VJBOD disks connections to the remote NAS before it is updated to QuTS Hero h5.1.0 or later, these VJBOD disks are unaffected and remain operational after the update. In QuTS Hero h5.1.0 or later, users can still create VJBOD disks from a remote NAS running QuTS Hero h5.0.1 or earlier.
  • Removed support for CO Video.


Source :
https://www.qnap.com/en/release-notes/quts_hero/overview/h5.1.0

Exit mobile version