7 Best Firewall Solutions for Enterprises in 2023

BY AMINU ABDULLAHI MAY 26, 2023

Enterprise firewall software is an essential component of network security infrastructure for organizations. These firewalls are designed to provide high availability and scalability to meet the needs of large and complex networks because they can handle high traffic volumes and accommodate the growth of network infrastructure.

By exploring the following top firewall solutions, enterprises can make an informed decision to fortify their network defenses and safeguard critical assets from ever-evolving cyber threats.

Best firewall solutions for enterprises: Comparison chart

Best for DLP capabilityURL filteringReportingIntegration with third party solutionDNS filteringStarting price
Palo Alto NetworksOverallAvailable on request
Check Point QuantumConnected devicesAvailable on request
Fortinet FortiGateFlexibility and scalabilityAvailable on request
Juniper NetworksLogging and reporting capabilityAvailable on request
Cisco Secure FirewallCentralized managementAvailable on request
ZscalerBusinesses with cloud network infrastructure$72 per user per year
pfSenseOpen source$0.01 per hour

Jump to:

Palo Alto Networks icon

Palo Alto Networks

Best overall enterprise firewall

Palo Alto is a leading network security provider of advanced firewall solutions and a wide range of network security services.

The company offers various firewall solutions for various enterprise use cases, including cloud next generation firewalls, virtual machine series for public and private clouds, container series for Kubernetes and container engines like Docker, and its PA-series appliances designed for data centers, network edge, service providers, remote branches and retail locations, and harsh industrial sites.

These firewalls provide enhanced visibility, control, and threat prevention capabilities to protect networks from various cyber threats, including malware, viruses, intrusions, and advanced persistent threats (APTs).

Pricing

Palo Alto doesn’t advertise its product pricing on its website. Our research found that the Palo Alto PA-series price range from $2,900 to $200,000 (more or less). To get the actual rates for your enterprise, contact the company’s sales team for custom quotes.

Standout features

  • Advanced threat prevention.
  • Advanced URL filtering.
  • Domain name service (DNS) security.
  • Medical IoT security.
  • Enterprise data loss prevention (DLP).
  • Up to 245 million IPv4 OR IPv6 sessions.

Pros

  • Provides visibility across IoT and other connected devices.
  • Provides visibility across ​​physical, virtualized, containerized and cloud environments.
  • Offers a variety of products for different business sizes, from small businesses to large enterprises.
  • Easy-to-navigate dashboard and management console.

Cons

  • Complex initial setup.
  • Some users reported that the Palo Alto license is pricey.
Check Point icon

Check Point Quantum

Best for connected devices

Check Point is an Israeli multinational company that develops and sells software and hardware products related to network, endpoint, cloud, and data security.

Check Point Quantum is designed to protect against advanced cyber threats, targeting Gen V cyber attacks. This solution encompasses various components to safeguard networks, cloud environments, data centers, IoT devices, and remote users.

Check Point’s SandBlast technology employs advanced threat intelligence, sandboxing, and real-time threat emulation to detect and prevent sophisticated attacks, including zero-day exploits, ransomware, and advanced persistent threats.

Pricing

Check Point does not publicly post pricing information on its website. Data from resellers shows that Check Point products can range from around $62 for a basic solution to over $50,000 for an enterprise-level solution. Contact the Check Point sales team for your actual quotes.

Standout features

  • URL filtering.
  • DLP.
  • Full active-active redundancy.
  • Zero-trust protection for IoT devices.
  • Check Point Quantum protects against GenV attacks.
  • Advanced threat protection.

Pros

  • 24/7 customer service and support.
  • Easy to setup and use.
  • Management platform with automation features.
  • Sandblast protection for testing malware.

Cons

  • Users reported that the Check Point firewall is expensive.
  • Documentation can be improved.
Fortinet icon

Fortinet FortiGate

Best for flexibility and scalability

Fortinet offers various firewall products for different organization sizes, from home offices to large enterprises.

The FortiGate 7000 series (FG-7121F, FG-7081F, FG-7081F-2, FIM-7921F, FIM-7941F, and FPM-7620F) is an enterprise firewall product that provides high-performance network security. It is designed for organizations with high network traffic volumes and that have to manage large network infrastructures.

This firewall series is powered by a Security Processing Unit (SPU) of up to 520Gbps and also includes the latest NP7 (Network Processor 7) and CP9 (Content Processor 9).

Pricing

Fortinet’s FortiGate firewall tool pricing is available upon request. Pricing will depend on various factors, including the size of the network, the number of users, and the types of security features needed. Contact a Fortinet representative for pricing and product information.

Standout features

  • Protects IT, IIoT, and OT devices against vulnerability and device-based attack tactics.
  • FortiGate 7000F series provides NGFW, segmentation, secure SD-WAN, and mobile security for 4G, 5G, and IoT.
  • Offers various types of firewalls, including container firewalls, virtual firewalls and hardware firewall appliances.
  • Zero Touch Integration with Fortinet’s Security Fabric Single Pane of Glass Management.

Pros

  • Integrations with over 500 third-party services.
  • AI-powered capabilities.
  • Users reported that the tool is user-friendly.

Cons

  • Support can be improved.
  • Its reporting feature can be improved.
Juniper Networks icon

Juniper Networks

Best for logging and reporting capability

Juniper Networks’ firewall helps enterprises protect their network edge, data center, and cloud applications.

The company is also known for its Junos operating system (OS), a scalable network OS that powers Juniper Networks devices. Junos provides advanced routing, switching, and security capabilities and allows for seamless integration with third-party software and applications.

Juniper Networks vSRX virtual firewall provides enhanced security for Amazon Web Services (AWS), Microsoft Azure, Google Cloud Platform, IBM Cloud, and Oracle Cloud environments, while its cSRX Container Firewall offers advanced security services to secure applications running in containers and microservices. The company’s SRX firewalls series is designed for various organization sizes, from small to large enterprises.

Pricing

Juniper Network pricing is available on request. However, they offer different license methods, including Pay-As-You-Go (PAYG) and Bring-Your-Own-License (BYOL) options for public clouds. Contact the company’s sales team for custom quotes.

Standout features

  • Juniper Network has various types of firewalls, including container firewalls, virtual firewalls and hardware firewall appliances.
  • Public cloud workload protection, including AWS, Microsoft Azure, and Google Cloud Platform.
  • Logging and reporting capability.
  • Supports VMware ESXi, NSX, and KVM (Centos, Ubuntu).

Pros

  • Advanced threat prevention capability.
  • Deployable on-premises and cloud environments.

Cons

  • Support can be improved.
  • Users report that some Juniper Networks firewall products are expensive.
Cisco icon

Cisco Secure Firewall

Best for centralized management

Cisco Secure Firewall combines firewall capabilities with advanced security features to protect networks from various threats, including unauthorized access, malware, and data breaches.

Cisco Secure Firewall integrates with Cisco Talos, a threat intelligence research team. This collaboration enables the firewall to receive real-time threat intelligence updates, enhancing its ability to identify and block emerging threats.

Cisco Secure Firewall can be centrally managed through Cisco Firepower Management Center (FMC). This management console provides a unified interface for configuration, monitoring, and reporting, simplifying the administration of multiple firewalls across the network.

Pricing

Contact Cisco’s sales team for custom quotes.

Standout features

  • IPS to protect against known threats.
  • Web filtering.
  • Network segmentation.
  • Centralized management.

Pros

  • Provides comprehensive visibility and control.
  • Efficient support team.
  • Highly scalable tool.

Cons

  • Support can be improved.
  • Complex initial setup.
Zscaler icon

Zscaler

Best for businesses with cloud network infrastructure

The Zscaler firewall provides cloud-based security for web and non-web traffic for all users and devices. Zscaler inspects all user traffic, including SSL encrypted traffic, with elastically scaling services to handle high volumes of long-lived connections.

One of the key advantages of Zscaler’s cloud-based approach is that it eliminates the need for on-premises hardware or software installations. Instead, organizations can leverage Zscaler’s infrastructure and services by redirecting their internet traffic to the Zscaler cloud. This makes scaling and managing security easier across distributed networks and remote users.

Pricing

Zscaler doesn’t advertise its rates on its website. However, data from resellers shows that its pricing starts from about $72 per user per year. For your actual rate, contact the Zscaler sales team for quotes.

Standout features

  • Centralized policy management.
  • Fully-integrated security services.
  • Real-time granular control, logging, and visibility.
  • User-aware and app-aware threat protection.
  • Adaptive IPS security and control.
  • File transfer protocol (FTP) control and network address translation (NAT) support.

Pros

  • Easy to use and manage.
  • AI-powered cyberthreat and data protection services.
  • Always-on cloud intrusion prevention system (IPS).
  • AI-powered phishing and C2 detection.

Cons

  • Complex initial setup.
  • Documentation can be improved.
pfSense icon

pfSense

Best open-source firewall

pfSense is an open-source firewall and routing platform based on FreeBSD, an open-source Unix-like OS. It is designed to provide advanced networking and security features for small and large networks.

pfSense can be deployed as a physical appliance or as a virtual machine. pfSense offers many capabilities, including firewalling, VPN connectivity, traffic shaping, load balancing, DNS and DHCP services, and more.

Pricing

For pfSense cloud:

  • pfSense on AWS: Pricing starts from $0.01 per hour to $0.40 per hour.
  • pfSense on Azure: Pricing starts from $0.08 per hour to $0.24 per hour.

For pfSense software:

  • pfSense CE: Open source version available to download for free.
  • pfSense+ Home or Lab: Available at no cost for evaluation purposes only.
  • pfSense+ W/TAC LITE: Currently available at no charge, but the vendor may increase the rate to $129 per year in the future. 
  • pfSense+ W/TAC PRO: $399 per year.
  • pfSense+ W/TAC ENT: $799 per year.

pfSense offers three hardware appliances tailored to the needs of large enterprises.

  • Netgate 8200: Cost $1,395. It has 18.55 Gbps IPERF3 and 5.1 Gbps IMIX traffic speed.
  • Netgate 1537: Cost $2,199. It has 18.62 Gbps(10k ACLs) IPERF3 and 10.24 Gbps (10k ACLs) IMIX traffic speed.
  • Netgate 1541: Cost $2,899. It has 18.64 Gbps(10k ACLs) IPERF3 and 12.30 Gbps(10k ACLs) IMIX traffic speed.

Standout features

  • NAT mapping (inbound/outbound).
  • Captive portal guest network.
  • Stateful packet inspection (SPI).

Pros

  • Free open-source version.
  • Community support.
  • Anti-spoofing capability.

Cons

  • Steep learning curve for administrators with limited experience.
  • GUI is old-fashioned and could be simplified.

Key features of enterprise firewall software

There’s a wide variety of capabilities that enterprise firewall software can provide, but some of the key features to look for include packet filtering, stateful inspection, application awareness, logging and reporting capabilities, and integration with your existing security ecosystem.

Packet filtering

Firewall software examines incoming and outgoing network packets based on predefined rules and policies. It filters packets based on criteria such as source/destination IP addresses, ports, protocols, and packet attributes. This feature enables the firewall to block or allow network traffic based on the configured rules.

Stateful inspection

Enterprise firewalls employ stateful inspection to monitor network connections’ state and analyze traffic flow context. By maintaining information about the state of each connection, the firewall can make more informed decisions about which packets to allow or block.

Application awareness 

Modern firewall software often includes application awareness capabilities. It can identify specific applications or protocols within network traffic, allowing organizations to enforce granular policies based on the application or service used. This feature is handy for managing and securing web applications and controlling the use of specific services or applications.

Logging and reporting

Firewall software logs network events, including connection attempts, rule matches, and other security-related activities. Detailed logging enables organizations to analyze and investigate security incidents, track network usage, and ensure compliance with regulatory requirements. Reporting capabilities help generate comprehensive reports for auditing, security analysis, and compliance purposes.

Integration with the security ecosystem

Firewall software is typically part of a broader security ecosystem within an organization. Integration with other security tools and technologies, such as antivirus software, threat intelligence platforms, Security Information and Event Management (SIEM) systems, and network access control (NAC) solutions, allows for a more comprehensive and coordinated approach to network security.

Benefits of working with enterprise firewalls

Key advantages of enterprise firewall solutions include enhanced network security, threat mitigation, and access control, as well as traffic analytics data.

  • Network security: Firewalls act as a protective barrier against external threats such as unauthorized access attempts, malware, and other malicious activity. Enforcing access control policies and modifying network traffic helps prevent unauthorized access and protect critical data.
  • Threat mitigation: By combining intrusion prevention techniques, deep packet monitoring, and threat intelligence, a firewall can detect and block suspicious traffic, reducing the risk there that the network will be corrupted and damaged so
  • Access control: Firewall software allows administrators to restrict or allow access to network resources, applications, and services based on specific user roles, departments, or needs. This ensures that only authorized people or systems can access the screen and its accessories.
  • Traffic data and analytics: In addition to protecting your network, firewalls can also provide granular information about traffic and activity passing through your network, as well as its overall performance.

How do I choose the best enterprise firewall solution for my business?

When choosing the best enterprise firewall software for your business, consider the following factors.

  • Security: Assess your organization’s specific security needs and requirements.
  • Features: Evaluate the features and capabilities of firewall solutions, such as packet filtering, application awareness, intrusion prevention, VPN support, centralized management, and scalability. Consider the vendor’s reputation, expertise, and support services.
  • Compatibility: Ensure compatibility with your existing network infrastructure and other security tools.
  • Hands-on tests: Conduct a thorough evaluation of different firewall solutions through demos, trials, or proofs of concept to assess their performance, ease of use, and effectiveness in meeting your organization’s security goals.
  • Total cost of ownership (TCO): Consider the cost, licensing models, and ongoing support and maintenance requirements.

By considering these factors, you can make an informed decision and select the best enterprise firewall software that aligns with your business needs and provides robust network security.

Frequently Asked Questions (FAQ)

Is an enterprise firewall different from a normal firewall?

Although they share many characteristics, an enterprise firewall is not the same as a consumer-grade firewall. Enterprise firewalls are designed to meet large organizations’ security needs and network infrastructure challenges. They are robust, scalable, and can handle high network traffic volumes and sophisticated threats, compared to generic firewalls for home or small office environments.

What is the strongest type of firewall?

A firewall’s strength depends on various factors, and no universally dependable firewall exists. A firewall’s effectiveness depends on its materials, configuration, and how well it fits into the organization’s security needs. 

That said, next-generation firewalls (NGFWs) provide improved security capabilities and are often considered the ideal firewall solution in today’s enterprise. NGFWs combine traditional firewall features with additional functionality such as application awareness, intrusion prevention, deep packet monitoring, and user-based policies. They provide advanced protection against modern threats with greater visibility and control over network traffic.

How do you set up an enterprise firewall?

Setting up an enterprise firewall involves several steps:

  1. Determine your network topology.
  2. Define security policies.
  3. Plan firewall placement.
  4. Configure firewall rules.
  5. Implement VPN and remote access.
  6. Test and monitor firewall performance.
  7. Perform regular updates and maintenance.

We recommend engaging network security experts or reviewing vendor documentation and support materials for specific guidance in installing and configuring your enterprise firewall.

Methodology

The firewall solutions mentioned in this guide were selected based on extensive research and industry analysis. Factors such as industry reputation, customer reviews, infrastructure, and customer support were considered.

We also assessed the features and capabilities of the firewall solutions, including packet filtering, application awareness, intrusion prevention, DLP, centralized management, scalability, and integration with other security tools.

Also see

If you’re not sure one of the firewalls included here is right for your business, we also determined the best firewalls for SMBs, as well as the best software-based firewalls.

And once your firewall is in place, don’t neglect its maintenance. Here are the best firewall audit tools to keep an eye on its performance.

Source :
https://www.enterprisenetworkingplanet.com/security/enterprise-firewalls/
A Step-by-Step Guide to Export Office 365 Mailbox to PST

April 26, 2023 Thiraviam

As an organization admin, you may encounter situations such as users leaving their position or migrating to another mail service, etc. In such circumstances, you need to export Office 365 mailbox to PST and store them offline for investigation purposes. You can accomplish this in Office 365 without depending on any external third-party tools. You can export individual mailboxes or entire exchange mailboxes as an eDiscovery admin through the Microsoft Purview compliance portal. 

This guide will walk you through the steps to export Office 365 mailboxes to PST format using eDiscovery and PowerShell.  

Why Do We Need to Export Exchange Online Mailbox to PST?

PST stands for Personal Storage Table file format used by Microsoft Outlook to store email messages, contacts and calendar entries. When you back up your email mailbox to a PST file, that will be saved on your computer. 

Here are some reasons why PST files are commonly used for exporting Office 365 mailbox data: 

Compatibility: PST files can be opened and accessed by a variety of email clients, including Outlook and some third-party email clients. This makes it easy to share data with others or to access your data from different devices. 

Portability: PST files are small in size and can be easily transferred to a different location, such as a hard drive, USB drive, or cloud storage. This makes it easy to create backups of your mailbox data or to move your data to a different computer. 

Offline Access: PST files can be accessed even when you are not connected to the internet, making it easy to access your email messages and other data when you are on the go. 

Organization: PST files allow you to organize your email messages, contacts, and other data into folders, making it easy to find and retrieve specific items. 

Steps to Export Office 365 Mailbox to PST

As an Office 365 admin you can get the Exchange Online mailboxes and their details by exporting them to PST with eDiscovery admin permission. You need to follow the steps listed below. 

  1. Assign eDiscovery administrator 
  2. Content search to export Office 365 mailbox 
  3. Export Office 365 mailbox to PST 
  4. Download exported PST file from Office 365 mailbox

Assign eDiscovery Administrator 

To export Office 365 mailboxes, you must be an eDiscovery Administrator. By default, this role is not assigned to a global administrator. Follow the steps to assign user(s) to eDiscovery admin role.  

  1. Login to the Microsoft Purview compliance portal with your global administrator account. 
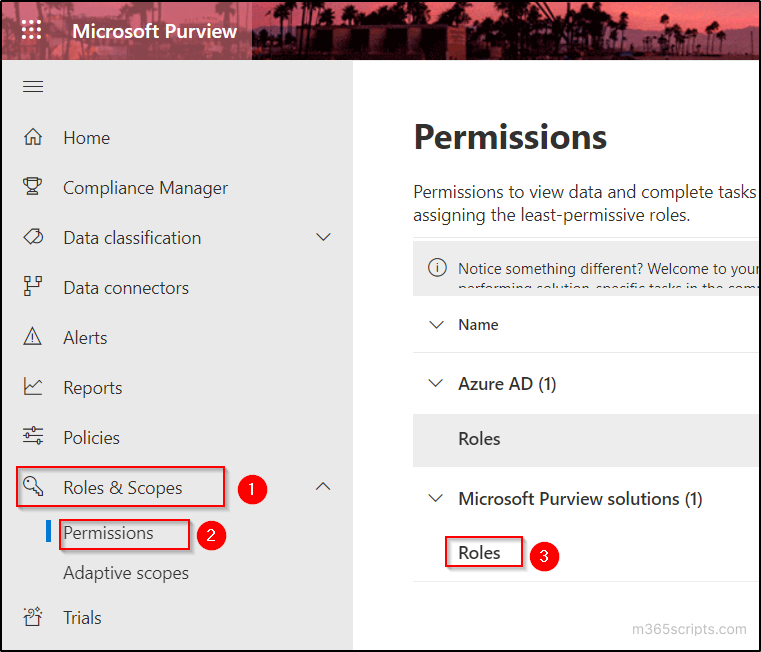
  2. Navigate to ‘Roles & Scopes’ tab and select ‘Permissions’ option. 
  3. Select ‘Roles’ under ‘Microsoft Purview Solutions’ category.                                                                                                                                                                                                                  Assign Permissions eDiscovery Admin
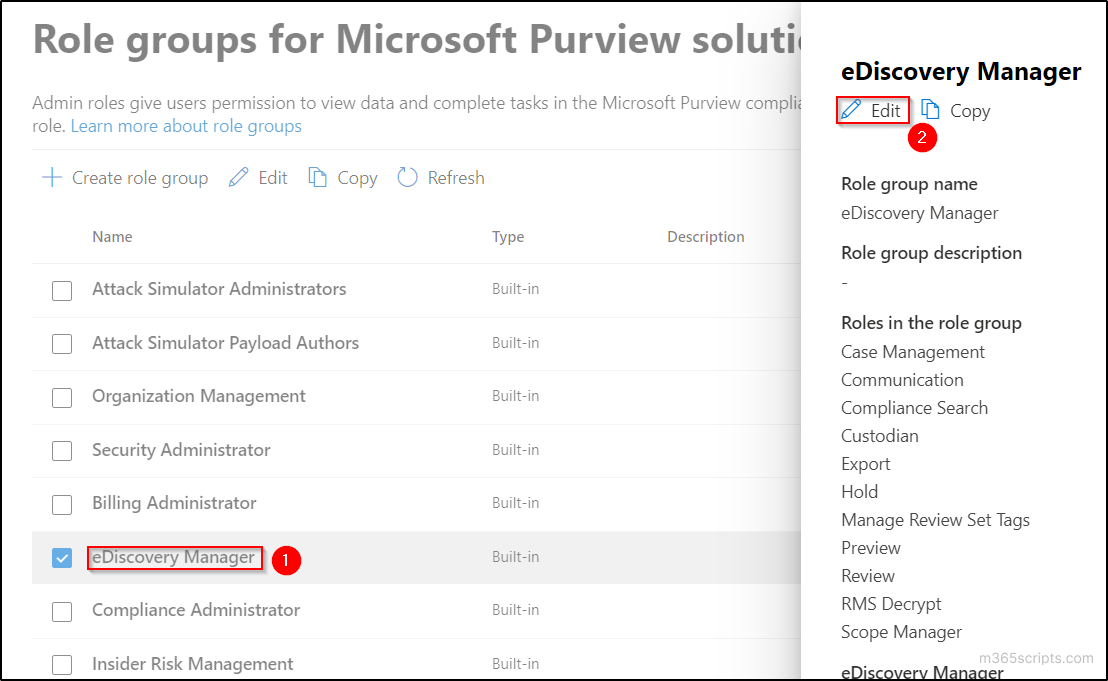
  4. Click on ‘eDiscovery Manager’ role and select ‘Edit’ option in the popup window.                                                                                                 eDiscovery Role Management
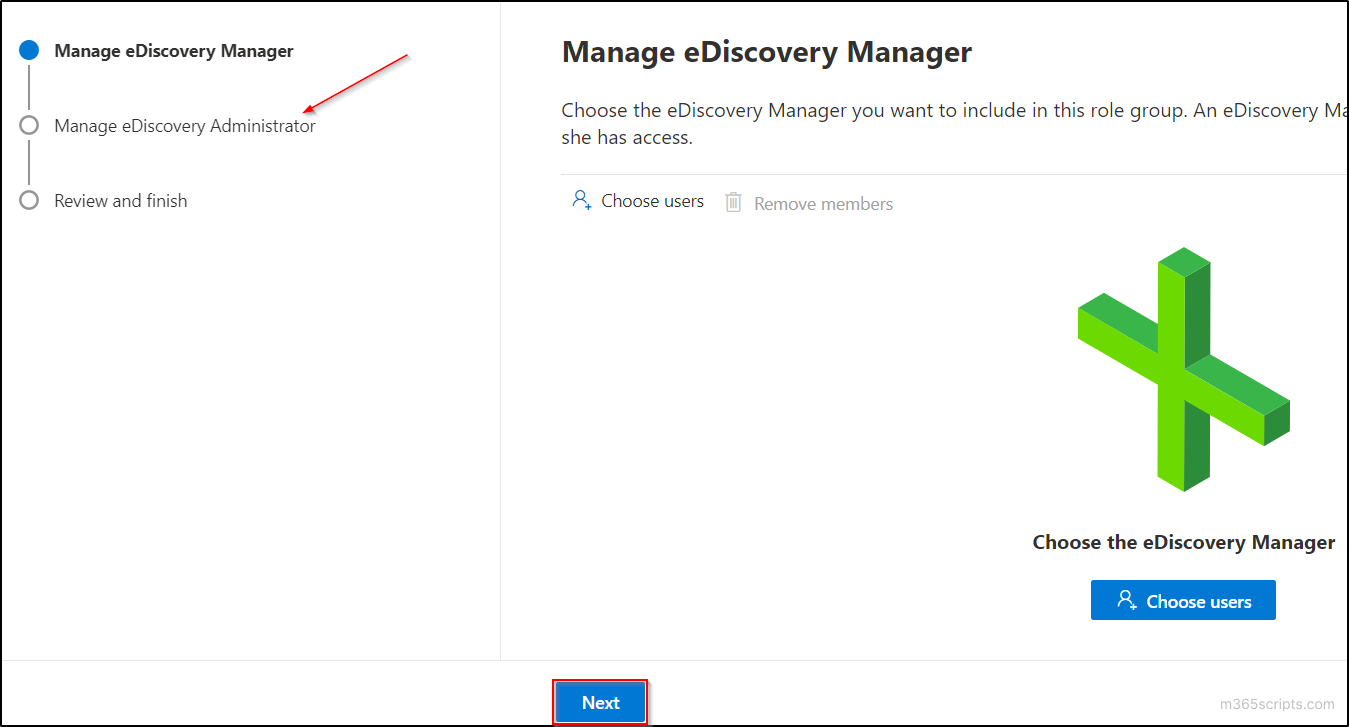
  5. Navigate to ‘Manage eDiscovery Administrator’ page by clicking on ‘Next’ button.                                                                                               Manage eDiscovery Manager
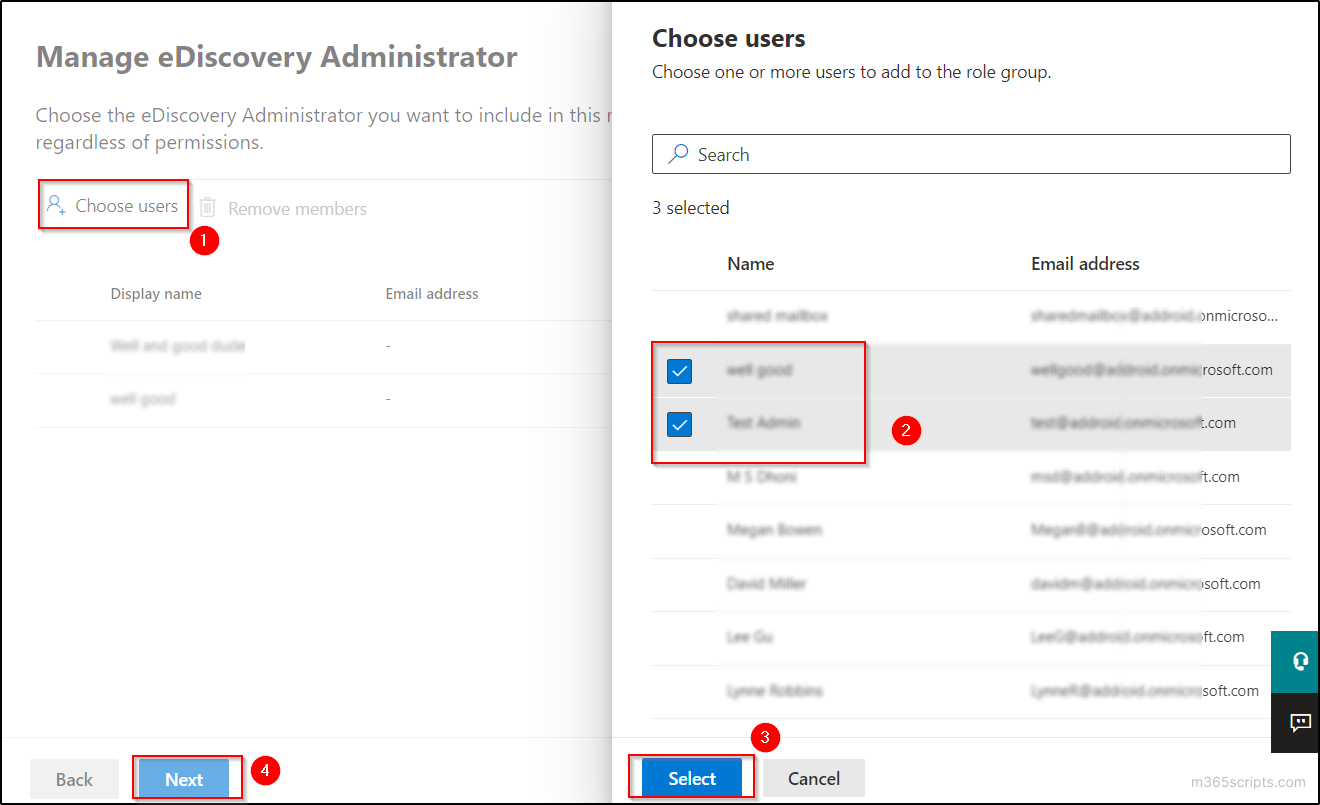
  6. Select ‘Choose users’ and select the user(s) who you want to make as eDiscovery admin. Then click on the ‘Select’ button in the popup and select ‘Next’ button.                                                                                                                                                                                           Manage eDiscovery Administrator
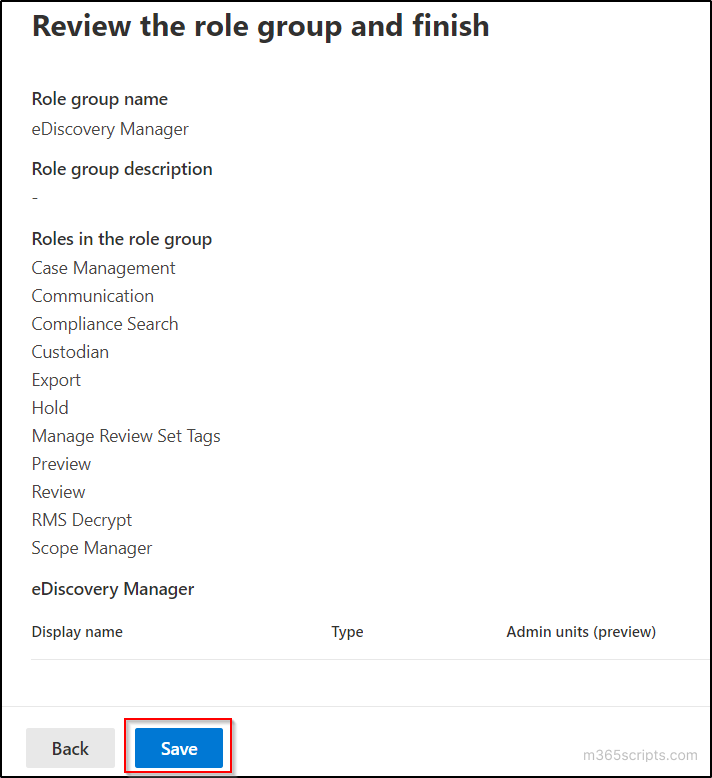
  7. Finally, click ‘Save’ on the ‘Review and finish’ page.                                                                                                                                                     eDiscovery Admin Review and Finish Page

In Office 365, before exporting a mailbox, it’s necessary to perform a content search that collects all the mail of the specified user(s) or all the contents of a mailbox. Once you complete the search, you can use the Export option to export the results to a PST file.

Note: An informational alert will trigger, and you will receive mail when an eDiscovery search started or exported. 

  1. Login to the Microsoft Purview compliance portal with the user account with which you have assigned an eDiscovery Administrator role.  
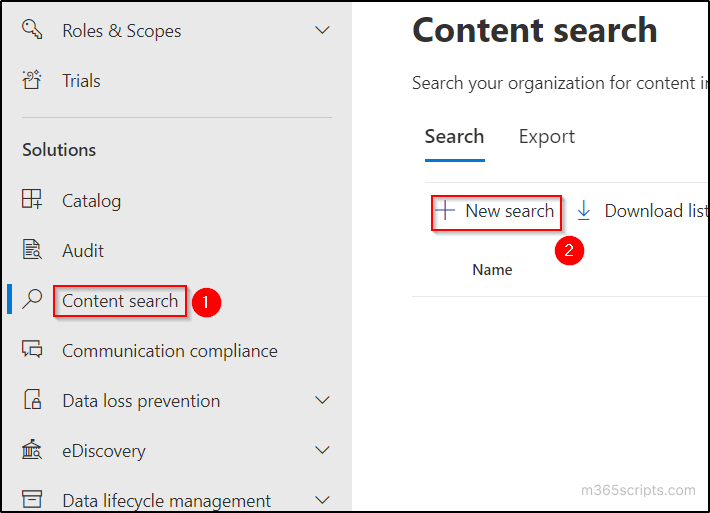
  2. Go to ‘Content search’ tab in the solutions menu and click on ‘New Search’ option.                                                                                      Content Search to Export Office365 Mailbox to PST
  3. Type the preferred name and description in the ‘Name and description’ page and click on ‘Next’.
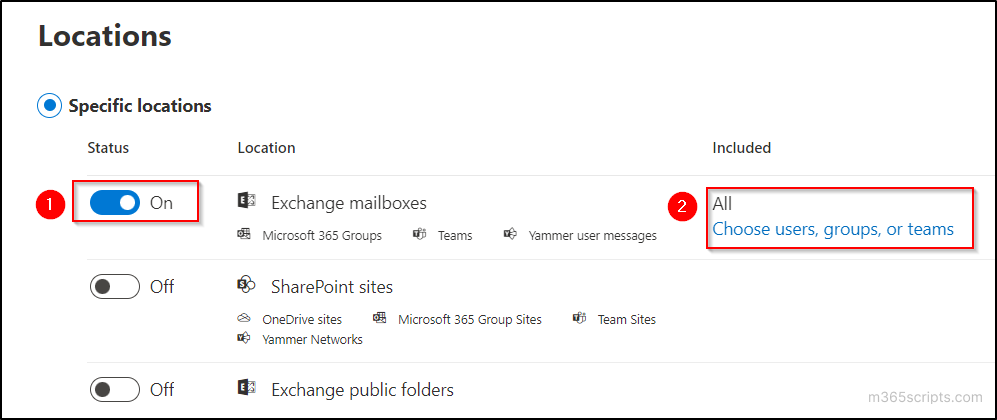
  4. Turn ‘Exchange mailboxes’ on and click on ‘Choose users, groups, or Teams’ to select the users from the list.                                                                                                                                                                                                       Choose Users, Groups, or Teams for Content Search
  5. Select the required users whose mailbox is to be exported or leave this option to export all user’s mailboxes and click on the ‘Next’ button. 
  6. Leave the conditions empty if you want to export the complete mailbox and click on ‘Next’. You can also define your conditions if you want filtered results.   
  7. Check the details in ‘Review your search’ page and click on ‘Submit’. 
  8. A message ‘New search created. Soon you will be able to review estimates and preview results for your search’ will show in the portal.
  9. Click on ‘Done’ and wait for the status to change to ‘Completed’ in the content search page.                                                                                                                                                                                                                                                                                             Content Search Status

Note: The waiting time may differ with respect to the size of the mailboxes you have performed a content search. 

You can also perform Content search using the PowerShell with ‘New-ComplianceSearch cmdlet. First, connect to the compliance center ‘Connect-IPPSSession‘ cmdlet. 

Connect-IPPSSession

Now run the cmdlet below by providing the name for the content search and Exchange location that you want to do content search. 

New-ComplianceSearch <SearchName> -ExchangeLocation <UPN>| Start-ComplianceSearch

Export Office 365 Mailbox to PST 

Once you have successfully created a mailbox content search, the next step is to export the search results. To do this, simply follow the steps below, which will guide you through the process.  

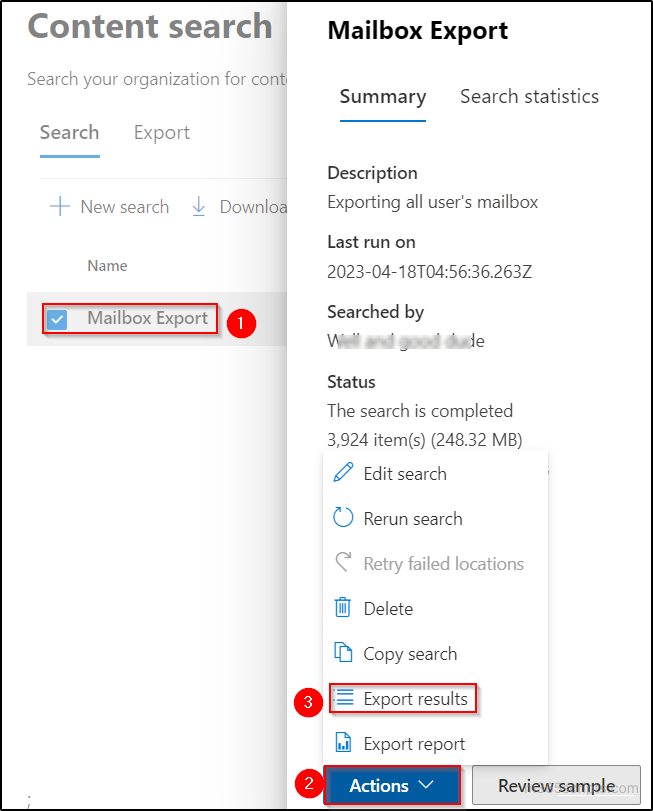
  1. Click on the content search ‘Mailbox Export’ that you have created in the previous steps. 
  2. Select ‘Actions’ and choose ‘Export results’.                                                                                                                                                                               Export Office 365 Mailbox to PST
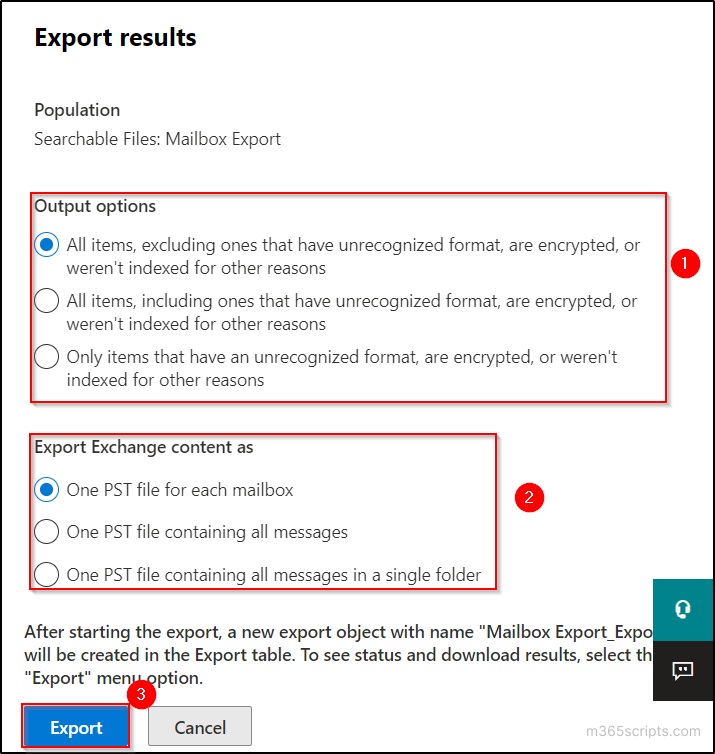
  3. Select the appropriate ‘Output options’ and the ‘Export Exchange Content as’ options. Then click on ‘Export’. If you are not sure about the options, leave it as default.                                                                                                                                                                        PST Export Results Options
  4.  A message box with a message “A job has been created” is displayed. Click on ‘OK’. It will take some time to complete the export. 

You can also perform export using the PowerShell with ‘New-ComplianceSearchAction cmdlet. 

Run the below cmdlet with the content search name to export the mailbox. 

New-ComplianceSearchAction <SearchName> -Export -Format Fxstream
Content Search Using PowerShell

 You can also get the properties related to the export by using the following cmdlet. 

Get-ComplianceSearchAction "<SearchName>_export" -IncludeCredential | FL 

Download Exported PST File From Office 365 Mailbox  

With the help of Microsoft Office 365 eDiscovery Export Tool, you can download the exported mailbox results as a PST file. 

Note:  It’s important to note that this can only be done using the Microsoft Edge browser.

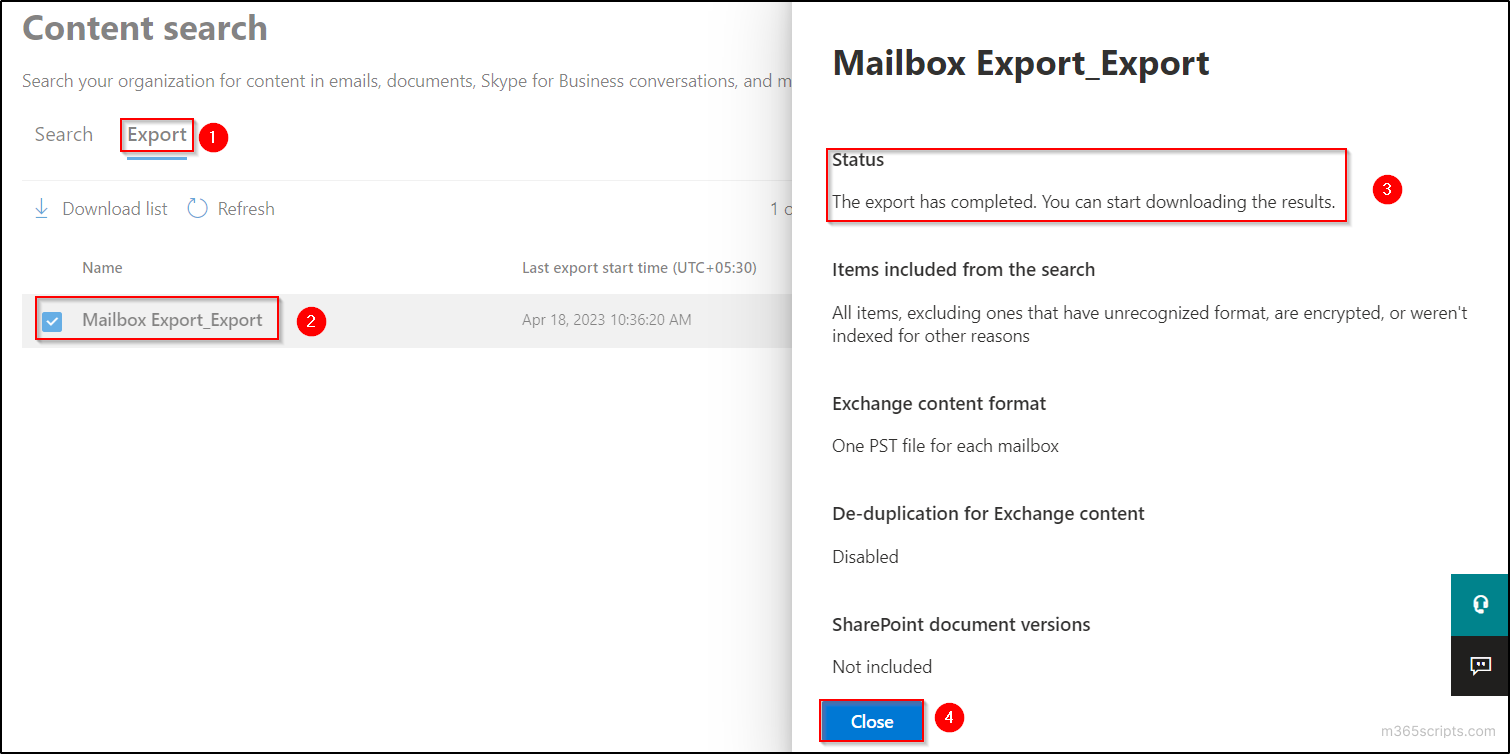
  1. Make sure that the status of the export is completed by clicking on the export job name in the ‘Export’ tab.                                                                                                                                                                                                                                                                  Mailbox Export Status Check
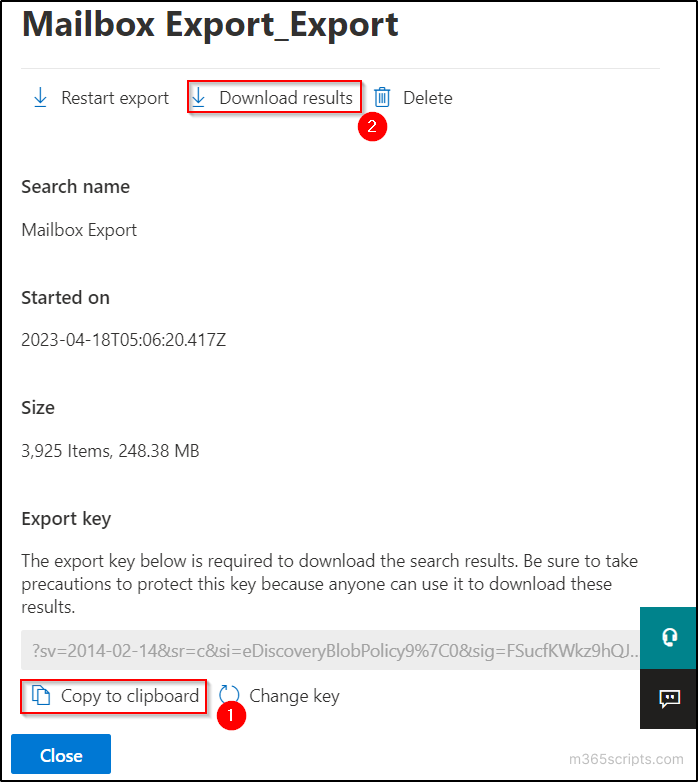
  2. Copy the ‘Export key’ by clicking on the ‘Copy to clipboard’ option and click on the ‘Download results’ option.                                                                                                                                                                                                                                                         Download Exported Results
  3. If this is the first time you are downloading a .pst file, you are prompted to install Microsoft Office 365 eDiscovery Export Tool. If you have already installed, skip this step and go to the next step. 
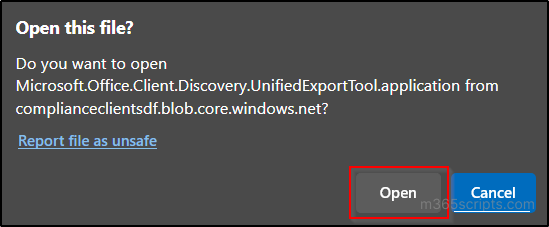
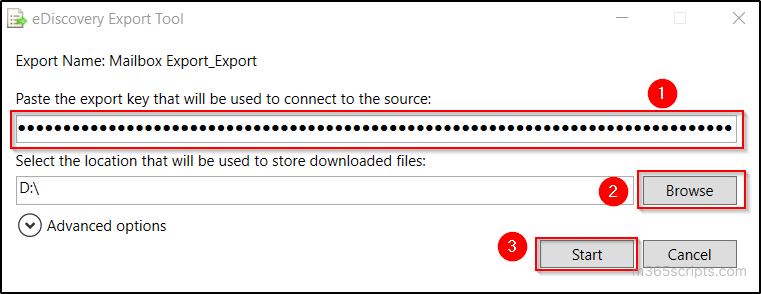
  4. Click ‘Open’ button in the upcoming popup and paste the export key.                                                                                                                    Permission to Open the Exported PST File
  5. Select the required location to store the download file by clicking on the ‘Browse’ button and click ‘Start’.                                                                                                                                                                                                                                                                                                  eDiscovery Export Tool
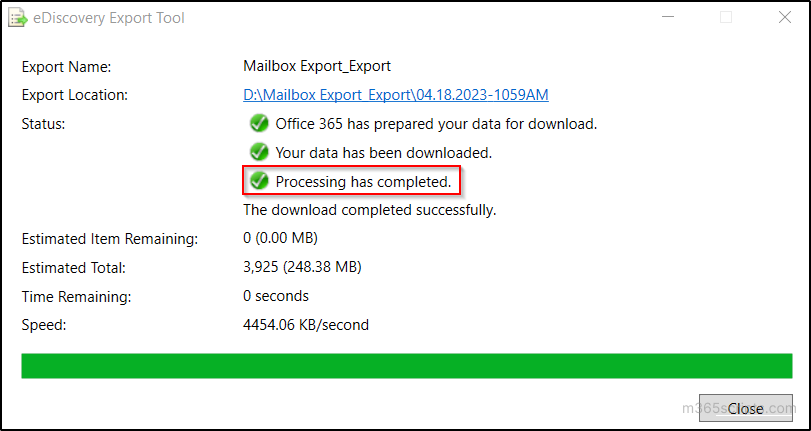
  6. You can be able to see the “Processing has completed” message after the download. Go to the specified location in your PC to view the downloaded PST file(s).                                                                                                                                                                                       Download Exported PST file from Office 365 Mailbox 

Office 365 Export PST File Size Limit 

When exporting PST files, the default file size limit is 10 GB. However, you have the ability to change this limit depending on your specific needs by increasing or decreasing the file size. Additionally, if the exported mailbox exceeds the PST size limit, the tool will automatically split the PST file into sequentially numbered files to accommodate the larger size.  

The main reason to do this is so PST files can fit on removable media, such a DVD, a compact disc, or a USB drive. You can adhere to the following steps to change the PST export file size limit. 

  • Before proceeding, make sure to check whether the eDiscovery Export tool is open, and if so, be sure to close it before continuing.
  • Type the following text in a notepad and save the following text to a filename suffix of .reg. For example, Pst.reg.   
Windows Registry Editor Version 5.00 
[HKEY_LOCAL_MACHINE\SOFTWARE\Microsoft\Exchange\Client\eDiscovery\ExportTool] 
"PstSizeLimitInBytes"="1073741824"

In the example above, the PstSizeLimitInBytes value is set to 1,073,741,824 bytes or approximately 1 GB. However, if you need to change this limit, you can easily do so by replacing the existing value with your desired limit in bytes.

  • Once you have created the .reg file by following the previous steps, it’s time to open it and proceed with the next steps.
  • In the User Access Control window, choose ‘Yes’ to grant permission to the Registry Editor to make the change. 
  • When asked to confirm, select ‘Yes’.                                                                                                                                                                               
Registry entry

The Registry editor will then display a confirmation message indicating that the “keys and values was successfully added to the registry”. 

Limitations in Exporting PST File in Office 365 

When exporting an Office 365 mailbox to a PST file, it is important to be aware of the limitations involved. Here is a list of the limitations you may encounter during the export process.

  • Browser Restrictions: You need to use Microsoft Edge browser. It’s not possible to export mailboxes to PST using other browsers without any extensions. 
  • File Corruption Issues: Increasing the default size of PST files larger than 10 GB might have corruption issues. 
  • Mailbox count limitation: You cannot download more than 100,000 mailboxes for search results using the eDiscovery Export Tool. 
  • Export Data Size Constraint: An organization can export 2TB data per day through content search. 
  • Output Display Restriction: Only 1,000 exports or reports will be displayed in Content search. 

Thus, exporting Office 365 mailbox to PST is a simple process that can be done in a few clicks. You can have a clear understanding of how to complete this task efficiently by following the above steps. Feel free to leave a comment below if you encounter any difficulties or need any assistance.

Source :
https://m365scripts.com/microsoft365/a-step-by-step-guide-to-export-office-365-mailbox-to-pst/

Group Policy Assignments Using Microsoft Teams PowerShell

May 30, 2023 Shan

Unmanaged devices, external file-sharing, and email integration impose a big question mark on the security posture of Microsoft Teams. In order to secure and manage Microsoft Teams, policies are used under various sections like messaging, meetings, calling, conferencing, and many more. Usually, these Teams policies for users, groups, and batches are managed in the Microsoft Teams admin center or using the Teams PowerShell Module (TPM). But now Microsoft extends the managing capability of additional Office 365 group policies using the Teams PowerShell Module as per MC557818.    

According to this latest update, group policy assignments for Microsoft 365 groups, distribution lists, mail-enabled security groups, and security groups support additional policies in the Teams PowerShell Module. Apart from action control, policy assignments also set way for security controls like restricting anonymous access in meetings. 

Let us see how to assign group policies using Microsoft Teams PowerShell Module and their functionalities under this blog. 

What are Group Policy Assignments? 

As the name suggests, assigning a policy to a particular group of users is known as a group policy assignment. The groups can be managed in Microsoft 365 admin center whereas group policies can be managed under the single roof of the Teams PowerShell Module.  

Policy assignments are applied only to the direct members of a group and not to the nested group. That too, they are applied according to the precedence rules. And at the time of addition or deletion of users from a group, the policy assignments are updated which is also applicable when a policy is unassigned. Before jumping into group policy assignments, let us look through the precedence rules and ranking of policies.

What are Microsoft Teams Policy Precedence Rules?

Policy precedence determines the user’s effective policy when a user is assigned two or more of the same policy types. The precedence rules of policies are listed below for deeper insights into how an assigned policy will be deployed according to these rules. 

  • If a user is directly assigned a policy, the same type of policy can’t be inherited from the group. Therefore, the directly assigned policy takes precedence over the same policy type defined by the group. 
  • Also, if a user doesn’t contain a directly assigned policy, the user inherits the highest-ranking policy from the same type of policies applied by two or more groups. 
  • Finally, if the user is not assigned a policy directly or by group, then the global (organization-wide) policy takes precedence


The user policy is updated under the following circumstances. 

  • Especially when a user is added or removed from the policy assigned group. 
  • And when a group policy is unassigned.
  • At last, if a directly assigned policy is removed from a user.

What is Group Policy Assignment Rank in Teams?

As an admin, you are asked to define the rank of policy while assigning the policy. Primarily this ranking weighs the priority of the same type of policies assigned from two or more groups for a common user. Finally, the highest-ranking group policy is assigned as the effective policy to the end user after weighing the priority. Because a policy type can be assigned to a maximum number of 64 groups in Office 365.  

NOTE: If the rank value is undefined, then the lowest ranking is given to the policy assignment. 

How to Assign Policy to a Group in Teams Admin Center? 

Follow the below steps to configure group policies in the Teams admin center where it majorly supports Teams calling policy, Teams call park policy, Teams policy, Teams live events policy, Teams meeting policy, and Teams messaging policy. 

  1. Navigate using the path below.  

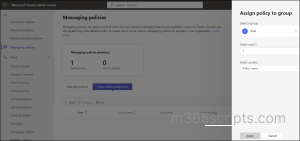
Microsoft Teams admin center 🡢 Messaging Policies (Select the desired policy type page) 🡢 Group policy assignment 🡢 Add group 🡢 Assign policy to group  

Group Policy Assignments in the Teams admin center

2. Then, select a group to which you want to assign a policy.
3. Set the ranking value for the group policy assignment through the select rank option. 
4. After that, select a policy from the available policy types in the drop-down list and click Apply

Unfortunately, all policy types can’t be managed under the Microsoft Teams admin center since it supports only certain policy types. Without a second thought, PowerShell is the go-to solution! Yes, managing policies using PowerShell is easy and efficient as it is the primary automation tool that ensures the deployment of objects in multiple tenants. Also, it is a place where error handling and logging are more flexible compared to the native admin center. Thus, let us deeply look through the next section of the blog to manage group policy assignments using Microsoft Teams PowerShell.  

Manage Group Policy Assignments Using Teams PowerShell Module 

As per the new update, Teams PowerShell Module now helps to manage group policies of Microsoft 365 groups, mail-enabled security groups, distribution lists, and security groups including Teams-related policies. Thus, create & manage groups in Microsoft 365 admin center and manage their policies in Teams PowerShell. Before getting started with PowerShell cmdlets, make sure to connect to the Teams PowerShell Module.  

  1. Assign Policy to Group Using Teams PowerShell Module 
  2. Get Group Policy Assignments Using MS Teams PowerShell 
  3. Remove Policy Assignment from a Group Using TPM 
  4. Modify Group Policy Assignment Using Teams PowerShell Module


Assign Policy to Group Using Teams PowerShell Module

By defining group policies, you can control user-specific actions like allowing them to schedule meetings, edit sent messages, etc. You can assign the available policies or create and assign custom policies depending on your requirements.
Execute the following cmdlet after replacing the unique group identifier, policy type, policy name, and expected rank to assign a new policy for a group.  

New-CsGroupPolicyAssignment -GroupId d8ebfa45-0f28-4d2d-9bcc-b158a49e2d17 -PolicyType TeamsMeetingPolicy -PolicyName AllOn -Rank 1 

This “New-CsGroupPolicyAssignment” cmdlet is basically used to create new policy assignments for security groups and distribution lists. In which the group ID, policy type, policy name, and rank must be mentioned as mandatory parameters. Here with the rank value as one, the ‘AllOn’ policy under TeamsMeetingPolicy type is created for the given group. 

The rank of the policy must be defined to determine the precedence. The recommended group membership size is 50,000 users per group while assigning a group policy. Also, it takes 24 hours or more to propagate the policy to all members of the larger groups.


Get Group Policy Assignments Using MS Teams PowerShell

Knowing all the available policy assignments allows you to understand the working conditions and their precedence levels better. Using this you can remove unnecessary policies, alter the desired ranking for policies and efficiently manage teams & groups around your Office environment. 

The “Get-CsGroupPolicyAssignment” cmdlet primarily returns all the group policy assignments with some optional parameters to filter the results.    

  1. Primarily, list all the policy-assigned groups by running the following command. 
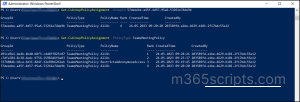
Get-CsGroupPolicyAssignment 
Group Policy Assignments Using Microsoft Teams PowerShell

2. However, you can also retrieve all the policies assigned to a particular group using the below cmdlet. 

Get-CsGroupPolicyAssignment -GroupId e050ce51-54bc-45b7-b3e6-c00343d31274 

Here the cmdlet is mentioned with group ID so that retrieving only the policy assignments of that particular group. 

3.Also, you can list the groups based on their policy type by executing the below command.   

Get-CsGroupPolicyAssignment -PolicyType TeamsMeetingPolicy 

In this case, the policy type is mentioned as TeamsMeetingPolicy. Hence this cmdlet returns only the groups assigned with this policy.

Get Group Policy Assignments Using Microsoft Teams PowerShell Module


Remove Policy Assignment from a Group Using TPM

Remove the unnecessary policies found in your organization that are interrupting the ranking and slowing down the work progress. Most importantly, the removal of policies will update the ranking value of the same type policies where the policies in the list will be ranked consecutively after the removal. 

Run the following cmdlet to remove a specific group policy assignment in Microsoft 365 environment. 

Remove-CsGroupPolicyAssignment -PolicyType TeamsMeetingPolicy -GroupId f985e013-0826-40bb-8c94-e5f367076044 

The” Remove-CsGroupPolicyAssignment” cmdlet removes the given policy type in mentioned group ID.  

Remove Group Policy Assignment Using Teams PowerShell Module


Modify Group Policy Assignment Using Teams PowerShell Module

Directly altering the policy assignment ranking value is not possible in the Teams admin center. The policy assignments should be removed and newly assigned again with a new rank value to change the ranking. To take away this hassle, PowerShell lends you a hand with a simple and reusable cmdlet which is described below.   

Set-CsGroupPolicyAssignment -GroupId 566b8d39-5c5c-4aaa-bc07-4f36278a1b38 -PolicyType TeamsMeetingPolicy -PolicyName SupportCallPark -Rank 3 

The “Set-CsGroupPolicyAssignment” cmdlet can be used to make the following alterations in group policy assignments based on the given attributes. 

  1. Change policy assignment ranking. 
  2. Change the policy under the existing policy type. 
  3. Change policy assignment ranking value and policy of a given policy type. 

In this example, the policy is changed to ‘SupportCallPark’ policy, and the rank value is assigned to 3. 

NOTE: The “Set-CsGroupPolicyAssignment” cmdlet is currently not released for use. So, for now, you need to remove policies and add new policies to change the policy or ranking. But you can easily alter the policy settings once after the availability of this cmdlet.
 

New Group Policy Assignment Support in Teams PowerShell Module 

Microsoft rolls out group policy assignment support for additional policies in Teams PowerShell Module as a new update. So that admins can manage their groups in the M365 admin center and group policies in Teams PowerShell with a breeze. This feature will allow you to configure custom policies to groups for all Microsoft commercial licenses. With this update, dependency on global or direct policy assignments through manual methods is eliminated. In addition to the core policies such as meeting policies, calling policies, and messaging policies, the following policies are now expected to be available in Teams PowerShell by late May 2023.    

  • Application Access Policy 
  • Call Hold Policy 
  • Carrier Emergency Call Routing Policy 
  • Cortana Policy 
  • Dial Out Policy 
  • Education Assignments App Policy 
  • Emergency Calling Policy 
  • Enhanced Encryption Policy 
  • Events Policy 
  • External Access Policy 
  • Feedback Policy 
  • Files Policy 
  • IPPhone Policy 
  • Media Logging Policy 
  • Meeting Branding Policy 
  • Meeting Template Permission Policy 
  • Mobility Policy 
  • Notification And Feeds Policy 
  • Room Video Tele Conferencing Policy 
  • Synthetic Automated Call Policy 
  • Teams Branch Survivability Policy 
  • Template Permission Policy 
  •  VDI Policy 
  • Video Interop Service Policy 
  • Voice Routing Policy 
  • Voicemail Policy 

In conclusion, ultimately manage all group policies including Teams using PowerShell cmdlets. Take charge of the user-specific actions and security controls through this group policy assignment. Not only policies, you can also manage your Teams using PowerShell for effective administration. Rather than performing numerous repetitive tasks in the Teams admin center, automate them with just a few cmdlets in PowerShell.  

I hope that this blog provides you with deeper insights into group policy assignments using Teams PowerShell. For any clarifications feel free to reach us through comments. 

Source :
https://m365scripts.com/microsoft365/group-policy-assignments-using-microsoft-teams-powershell/

Exit mobile version