Last Updated: July 20, 2023 by Robert Allen
Do you need to give the helpdesk staff permissions to reset passwords and unlock user accounts?
Do you want to allow specific users to modify group membership?
No problem.
In this guide, you will learn how to use the delegation control wizard in Active Directory to grant users very specific permissions.
It is important to know how to correctly use the delegation of control in Active Directory to avoid giving users more rights than they need. Whatever you do, do not add users into highly privileged groups like Domain Admins.
Table of Contents:
- Delegation of Control Best Practices
- Delegate Password Reset and Unlock Permissions
- Delegate Permissions to Modify Telephone Number
- Delegate Permissions to Modify Group Membership
- Delegate Control to Delete Computer Accounts
- How to Audit Active Directory (ACL) Permissions
Delegation of Control Best Practices
Here are my recommendations and tips for delegating permissions in Active Directory.
Good OU Design
Delegating permissions in Active Directory is done by using organizational units (OU), so it is critical to have a good OU design. The OU design will be different for every organization, but a simple design is to put all similar resources into their own OU.
- Computer OU – All computers go here
- Users OU – All user accounts go here
- Servers OU – All server accounts go here
- Groups – All groups go here.
You can then create sub-OUs to further organize your resources.
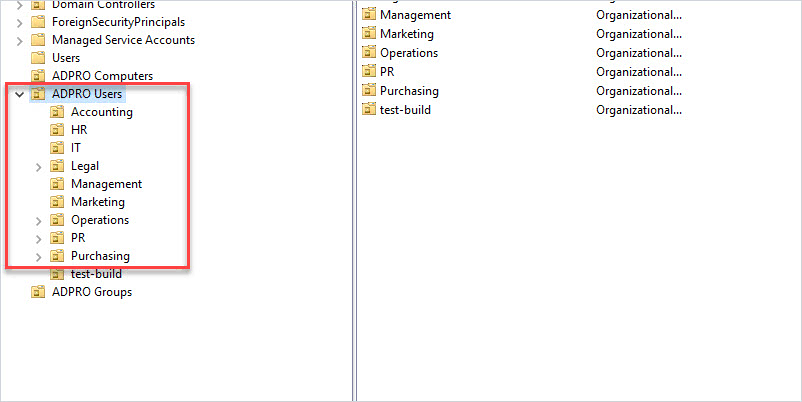
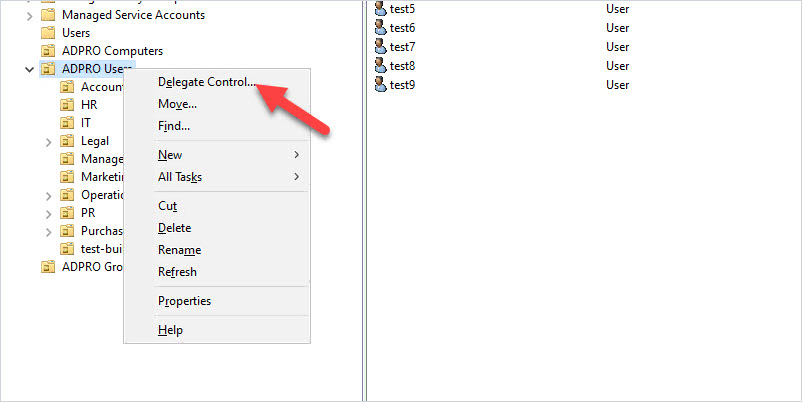
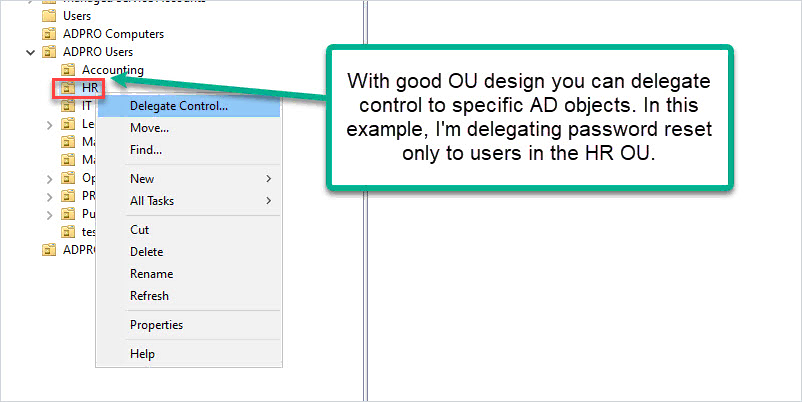
In the above screenshot, I have the “ADPRO Users” OU for all my user accounts. I then created sub-OUs for each department to further organize the user accounts. With this design, I can easily delegate control to all resources or resources in a specific sub-OU. For example, HR hired their own IT support person and they want to reset passwords for all HR users. I can delegate the password reset permissions to just the HR OU.
You can structure the sub-OUs any way that you like. For example, you could make them based on geographic locations, or by user type such as regular, privileged, and so on.
With a good OU design, it makes delegating permissions easy and helps to avoid delegating more permissions than needed.
To read more on OU design see the Microsoft guide Designing OU structures that work.
Don’t use Built-in Security Groups
When delegating control it is best to create new security groups rather than using built-in AD groups. For example, don’t use “Account Operators” or Backup Operators” when delegating permissions. These built-in AD groups have special permissions that can give users more rights than needed.
Delegate Control to Groups, NOT USERS
Do not delegate control to a user account. This will become a security nightmare as it will be very difficult to audit and manage. Assigning permissions to groups makes it easy to add and remove permissions.
Use Descriptive Group Names
Have you come across a group in Active Directory and have no idea what it is for? This happens a lot and drives me bonkers. Creating a descriptive name will make it easy for you and other admins to identify its use.
For example, if the helpdesk wants to reset user passwords I would create a group like this:
Helpdesk_password_reset
If a group of users needs to modify a specific AD attribute such as the telephone field I would create a group like this:
IT_modify_telephone
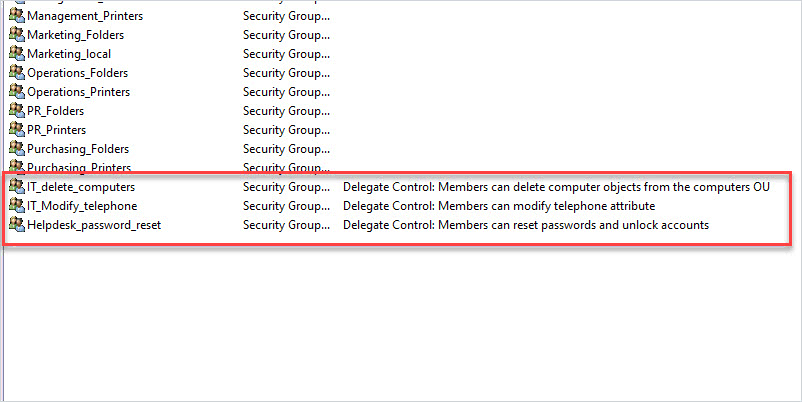
You can see that in the screenshot above, the group name and description make it easy for anyone to identify what the group is used for.
Tip: I also put details into the group description. I can then use PowerShell to search for all of the groups that have “delegate control” in the description.
get-adgroup -Properties * -filter {Description -like 'Delegate*'} | select name, descriptionAudit AD Delegated Controls Yearly
You should review the Active Directory ACL permissions each year. AD permissions can easily get out of control and the only true way to know who has what rights is to audit the ACL permissions.
See the last section in this guide for details on auditing Active Directory Permissions.
Don’t Over Delegate Control (Use lease Privilege)
Only delegate control to what is needed.
If another department wants to reset their own passwords don’t grant them this permission to all user objects, but instead to just their group or department.
If the helpdesk needs the rights to delete computer accounts, don’t grant this permission to all computer objects, but instead to just the ones the helpdesk manages (hint… not the servers).
Over delegating control can easily be avoided by having a good OU design.
Now let’s check out some examples on how to delegate permissions.
Delegate Password Reset and Unlock Permissions
In this example, I’ll use the delegation control wizard to give helpdesk users permissions to reset passwords and unlock user accounts. I’ll also demonstrate how to limit this to a specific group of users (department).
Step 1: Create a New Active Directory Group
I’m going to create a new group and name it “Helpdesk_password_reset”. Use whatever naming convention makes sense to you, I just recommend it to be descriptive. I also recommend using the description field to provide exact details on what the group is used for. With a descriptive name and the description filled out, there should be no confusion about what this group is used for, this will help you and other System Admins.
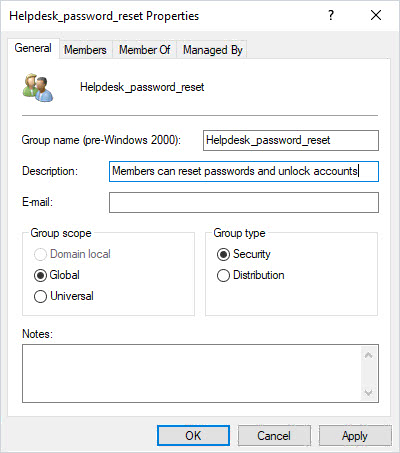
Next, I’ll add the helpdesk staff to this group. When the delegation is complete you can easily add or remove rights by changing the membership of this group.
Step 2: Use Delegation of Control Wizard
This is where good OU design is important. I want to grant this group permission to change the password for all users in the domain, and since I have all users in the “ADPro Users” OU this can easily be done. The delegated rights will apply to the root and all sub-OUs.
Right-click on the OU and select “Delegate Control”.
Click “Next”
Select the group you want to delegate control to.
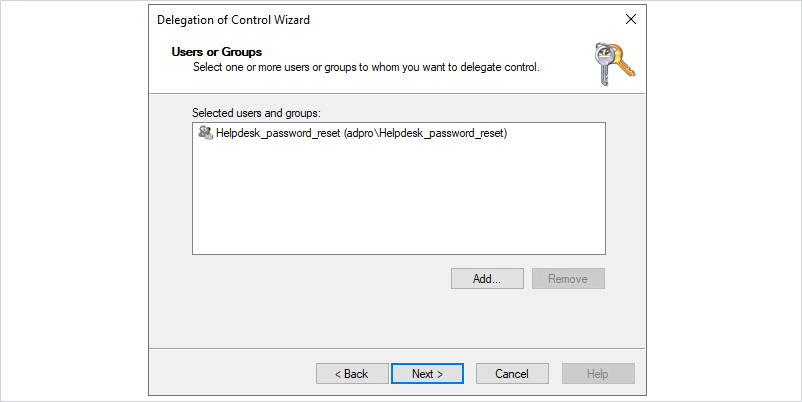
Click “Next”
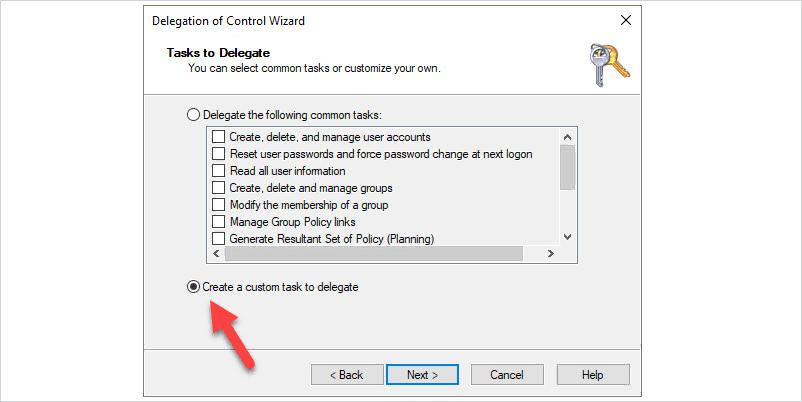
Select “Create a custom task to delegate”
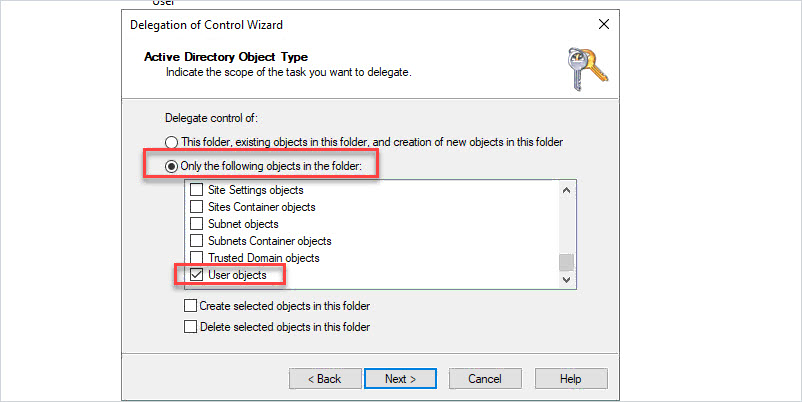
Select “Only the following objects in the folder” then select “User objects”
Click “Next”
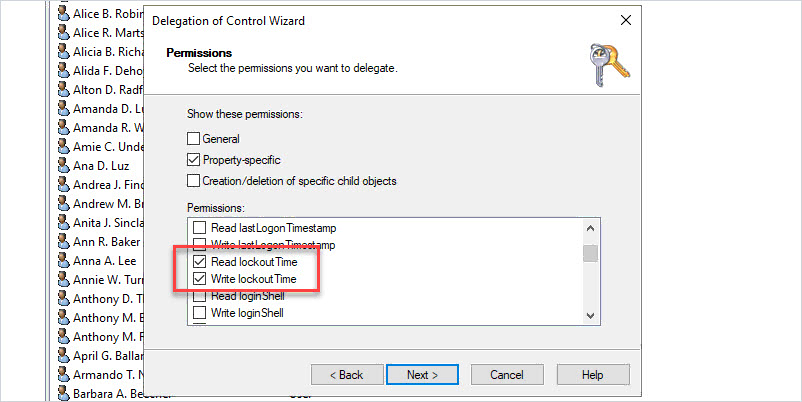
Select “General” and “Property-specific”
Then enable the following permissions:
- Change password
- Reset password
- Read lockoutTime
- Write lockoutTime
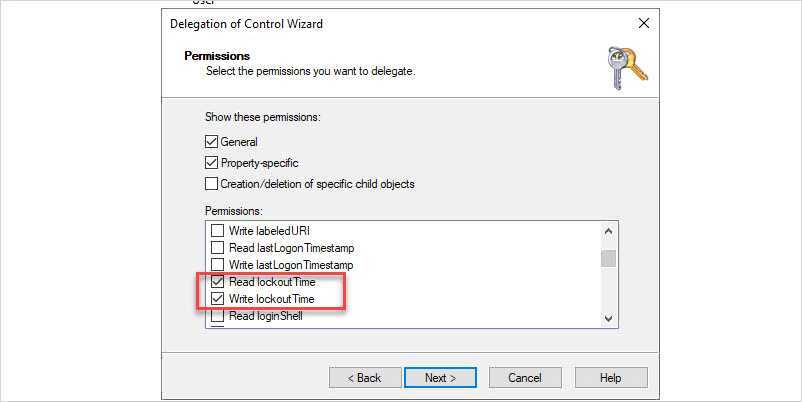
Click “Next”
Click “Finish”
Now any member of the “Helpdesk_password_reset” group can change/reset passwords and unlock user accounts for all users in the “ADPRO Users” OU.
What if you had a department that wanted to reset/unlock their own accounts? For example, the HR department wants to reset/unlock their own accounts without having to call IT support.
Here are the steps: (The steps are basically the same as above you just run the delegation control on a specific OU)
- Create a new group for the HR users (example, HR_password_reset).
- Use the delegation control wizard on the HR OU.
- Select the HR group (example, HR_password_reset).
- Set permissions (change password, reset password, read lockoutTime, write lockoutTime). See the above screenshots for more details.
If you delegated control to the entire domain or an OU with all users then you gave HR staff more permissions than they need. They could reset/unlock users for the entire domain, you want to avoid this.
Delegate Permissions to Modify Telephone Number
In this example, I want to give a group of users permission to only modify the Telephone number in Active Directory. You will see in the delegation of control wizard you can grant permissions to other user fields (address, zip, state, and so on).
Step 1: Create a group.
I created a group called “IT_Modify_Telephone”.
Step 2: Run delegation Control Wizard.
Run the delegation control wizard on the target OU.
Select the group.
Select “create a custom task to delegate”
Select “Only the following objects in the folder” then select “User Object”
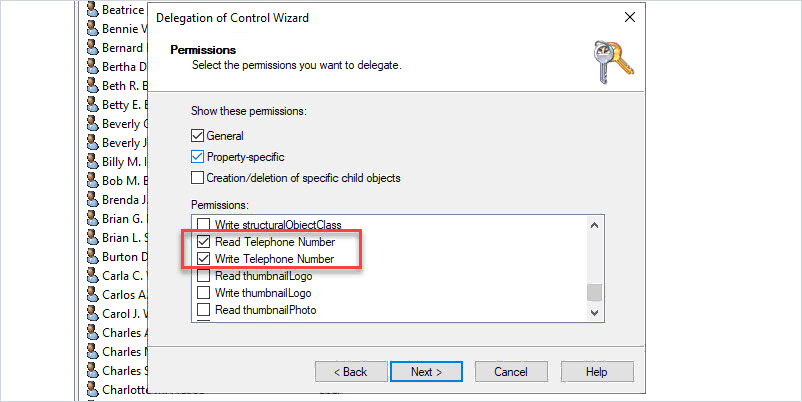
Select “Property-specific”
Enable “Read Telephone Number” and “Write Telephone Number”
Click “Next” then “Finish” to complete.
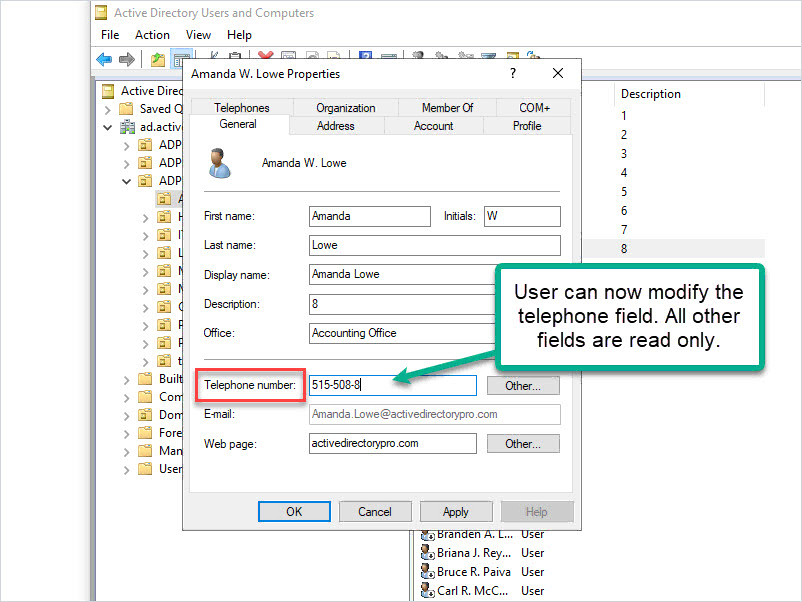
Now any member of the group can modify the “Telephone Number” field in Active Directory. All other fields are read-only.
Delegate Permissions to Modify Group Membership
In this example, I will give a group of users permission to modify group membership (add/remove users to groups).
This one is easier than previous examples as Microsoft has a common task for it.
Step 1: Create AD Group
Step 2: Run Delegation Control Wizard
If you have all groups in a specific OU then run the delegation wizard on the OU. For example, all of my groups are in an OU called “ADPRO Groups”.
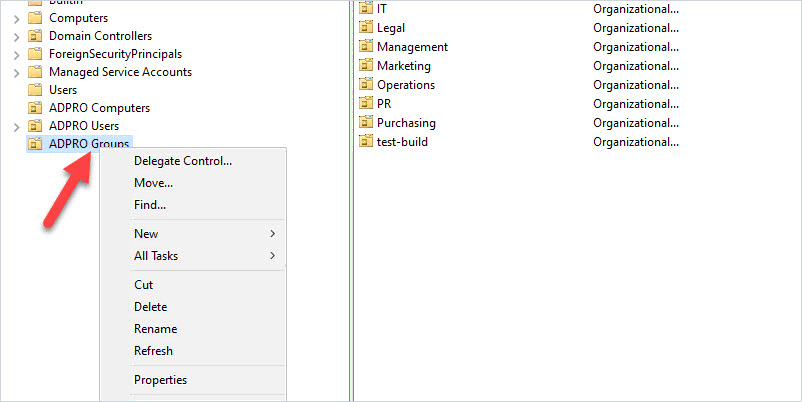
Select the group you want to delegate control to.
Click “Next”
Select “Modify the group membership of a group”
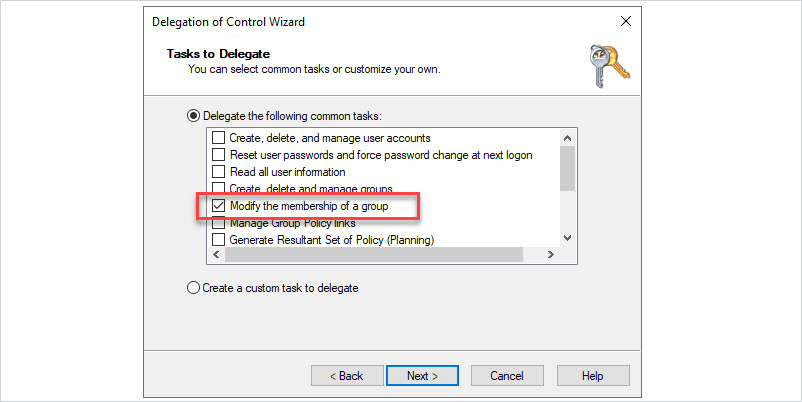
Click “Next” and click “Finish”.
Delegate Control to Delete Computer Accounts
Helpdesk or other IT staff will often need rights to delete computer accounts in Active Directory. Here is how to delegate those rights.
Step 1: Create AD Group
For example “IT_delete_computers”.
Step 2: Run delegation control wizard on OU.
Make sure you run the wizard on the OU that contains the computer objects.
Select the group to delegate control
Click “Next”
Select “Create a custom task to delegate”
Select “This folder, existing objects in this folder, and creation of new objects in this folder”.
Click “Next”
Select “creation/deletion of specific child objects”
Then select “Delete Computer objects”
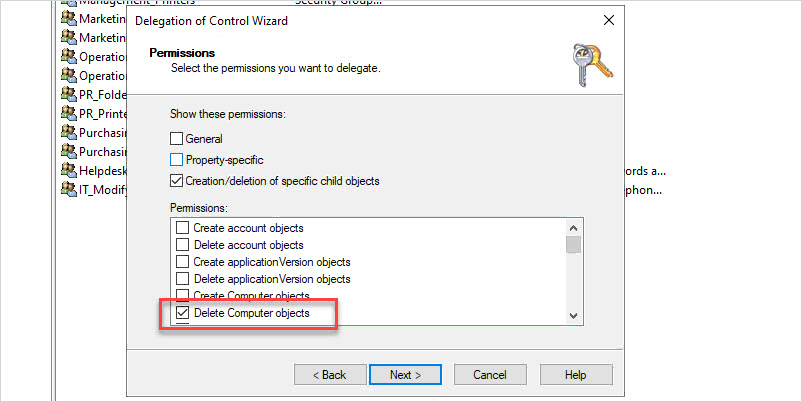
Now members of the selected group can delete computer objects.
How to Audit Active Directory (ACL) Permissions
Over time Active Directory permissions can easily spiral out of control. It is recommended to audit your AD permissions at least once a year. How else are you going to know if someone gave unnecessary rights to a user or group?
Maybe someone used the delegation of control wizard and accidentally gave helpdesk the rights to delete servers. The only way to determine this, is to check the ACL permissions in Active Directory.
You can view the ACL on an OU by right-clicking the OU selecting properties and the Security tab. But this would take too long if you had a lot of OUs.
The best option I have found is the AD ACL Scanner PowerShell tool. This tool lets you choose what to scan and creates an easy-to-read report on Active Directory permissions.
In this example, I’m going to scan my ADPRO Users OU, and scan each Sub-OU.
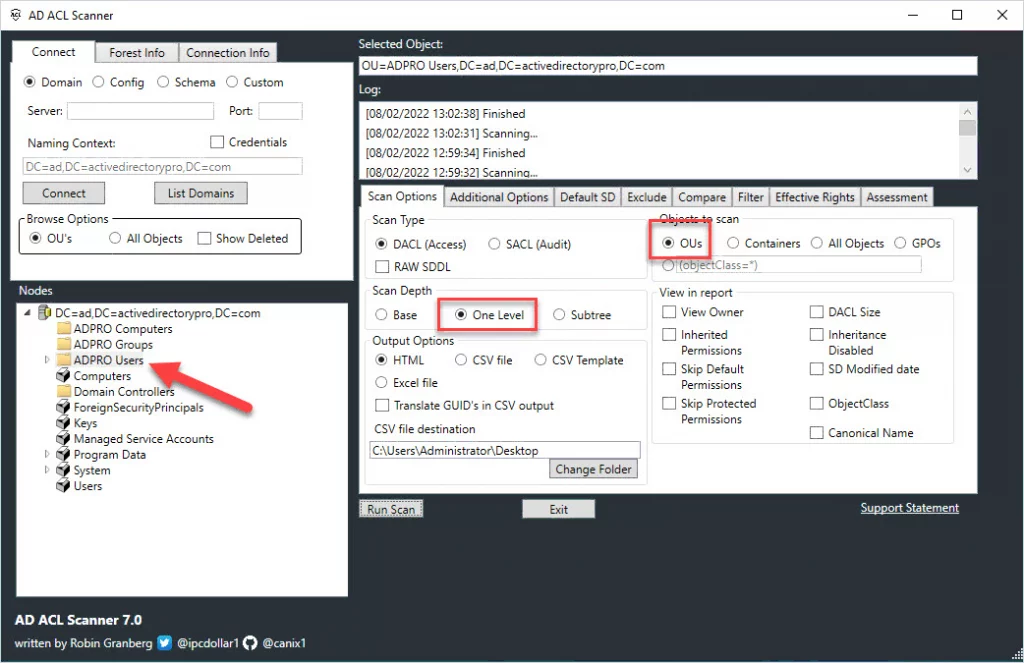
When the tool is done scanning you will get a report like below.
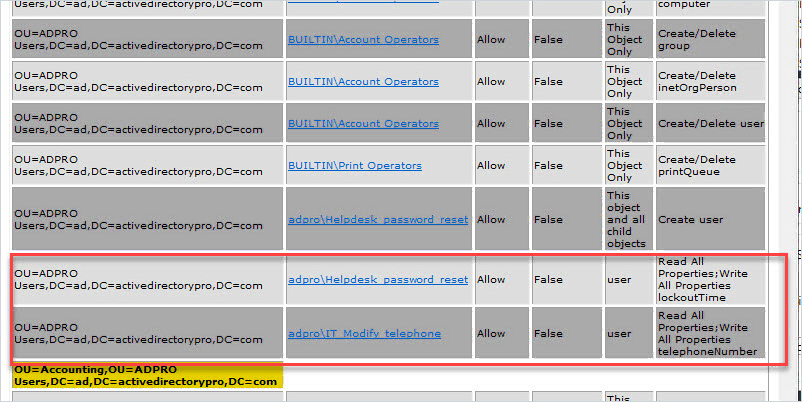
In the report, I can see the AD groups that I delegated control to and what permissions they have. Very easy to use and saves a ton of time.
Summary
In this guide, I walked you through several examples of delegating control in Active Directory. The delegation of Control Wizard can be confusing as it’s not always clear where to find specific permissions. It’s best to use groups for delegating control and set very specific permissions. Lastly, I showed you how to audit Active Directory ACL permissions using the AD ACL scanner tool. Don’t forget to audit the ACL permissions at least once a year.
Recommended: Active Directory Permissions Reporting Tool
The ARM Permissions Reporting Tool helps you monitor, analyze, and report on the permissions assigned to users, groups, computers, and organizational units in your Active Directory
You can easily identify who has what permissions, where they came from, and when they were granted or revoked. You can also generate compliance-ready reports for various standards and regulations, such as HIPAA, PCI DSS, SOX, and GDPR
Try the Permissions Reporting Tool today and take control of your permissions management
Download Free Trial
Source :
https://activedirectorypro.com/delegate-control-in-active-directory/


