Microsoft Office 365 URLs and IP address ranges

  • Article
  • 06/29/2023

In this article

  1. Exchange Online
  2. SharePoint Online and OneDrive for Business
  3. Skype for Business Online and Microsoft Teams
  4. Microsoft 365 Common and Office Online
  5. Related Topics

Office 365 requires connectivity to the Internet. The endpoints below should be reachable for customers using Office 365 plans, including Government Community Cloud (GCC).

Office 365 Worldwide (+GCC) | Office 365 operated by 21 Vianet | Office 365 U.S. Government DoD | Office 365 U.S. Government GCC High |

NotesDownloadUse
Last updated: 06/29/2023 – RSS. Change Log subscriptionDownload: all required and optional destinations in one JSON formatted list.Use: our proxy PAC files

Start with Managing Office 365 endpoints to understand our recommendations for managing network connectivity using this data. Endpoints data is updated as needed at the beginning of each month with new IP Addresses and URLs published 30 days in advance of being active. This cadence allows for customers who don’t yet have automated updates to complete their processes before new connectivity is required. Endpoints may also be updated during the month if needed to address support escalations, security incidents, or other immediate operational requirements. The data shown on this page below is all generated from the REST-based web services. If you’re using a script or a network device to access this data, you should go to the Web service directly.

Endpoint data below lists requirements for connectivity from a user’s machine to Office 365. For detail on IP addresses used for network connections from Microsoft into a customer network, sometimes called hybrid or inbound network connections, see Additional endpoints for more information.

The endpoints are grouped into four service areas representing the three primary workloads and a set of common resources. The groups may be used to associate traffic flows with a particular application, however given that features often consume endpoints across multiple workloads, these groups can’t effectively be used to restrict access.

Data columns shown are:

  • ID: The ID number of the row, also known as an endpoint set. This ID is the same as is returned by the web service for the endpoint set.
  • Category: Shows whether the endpoint set is categorized as OptimizeAllow, or Default. This column also lists which endpoint sets are required to have network connectivity. For endpoint sets that aren’t required to have network connectivity, we provide notes in this field to indicate what functionality would be missing if the endpoint set is blocked. If you’re excluding an entire service area, the endpoint sets listed as required don’t require connectivity.You can read about these categories and guidance for their management in New Office 365 endpoint categories.
  • ER: This is Yes if the endpoint set is supported over Azure ExpressRoute with Office 365 route prefixes. The BGP community that includes the route prefixes shown aligns with the service area listed. When ER is No, this means that ExpressRoute is not supported for this endpoint set.Some routes may be advertised in more than one BGP community, making it possible for endpoints within a given IP range to traverse the ER circuit, but still be unsupported. In all cases, the value of a given endpoint set’s ER column should be respected.
  • Addresses: Lists the FQDNs or wildcard domain names and IP address ranges for the endpoint set. Note that an IP address range is in CIDR format and may include many individual IP addresses in the specified network.
  • Ports: Lists the TCP or UDP ports that are combined with listed IP addresses to form the network endpoint. You may notice some duplication in IP address ranges where there are different ports listed.

 Note

Microsoft has begun a long-term transition to providing services from the cloud.microsoft namespace to simplify the endpoints managed by our customers. If you are following existing guidance for allowing access to required endpoints as listed below, there’s no further action required from you.

Exchange Online

IDCategoryERAddressesPorts
1Optimize
Required
Yesoutlook.office.com, outlook.office365.com
13.107.6.152/31, 13.107.18.10/31, 13.107.128.0/22, 23.103.160.0/20, 40.96.0.0/13, 40.104.0.0/15, 52.96.0.0/14, 131.253.33.215/32, 132.245.0.0/16, 150.171.32.0/22, 204.79.197.215/32, 2603:1006::/40, 2603:1016::/36, 2603:1026::/36, 2603:1036::/36, 2603:1046::/36, 2603:1056::/36, 2620:1ec:4::152/128, 2620:1ec:4::153/128, 2620:1ec:c::10/128, 2620:1ec:c::11/128, 2620:1ec:d::10/128, 2620:1ec:d::11/128, 2620:1ec:8f0::/46, 2620:1ec:900::/46, 2620:1ec:a92::152/128, 2620:1ec:a92::153/128
TCP: 443, 80
UDP: 443
2Allow
Optional
Notes: POP3, IMAP4, SMTP Client traffic
Yes*.outlook.office.com, outlook.office365.com, smtp.office365.com
13.107.6.152/31, 13.107.18.10/31, 13.107.128.0/22, 23.103.160.0/20, 40.96.0.0/13, 40.104.0.0/15, 52.96.0.0/14, 131.253.33.215/32, 132.245.0.0/16, 150.171.32.0/22, 204.79.197.215/32, 2603:1006::/40, 2603:1016::/36, 2603:1026::/36, 2603:1036::/36, 2603:1046::/36, 2603:1056::/36, 2620:1ec:4::152/128, 2620:1ec:4::153/128, 2620:1ec:c::10/128, 2620:1ec:c::11/128, 2620:1ec:d::10/128, 2620:1ec:d::11/128, 2620:1ec:8f0::/46, 2620:1ec:900::/46, 2620:1ec:a92::152/128, 2620:1ec:a92::153/128
TCP: 587, 993, 995, 143
8Default
Required
No*.outlook.com, autodiscover.<tenant>.onmicrosoft.comTCP: 443, 80
9Allow
Required
Yes*.protection.outlook.com
40.92.0.0/15, 40.107.0.0/16, 52.100.0.0/14, 52.238.78.88/32, 104.47.0.0/17, 2a01:111:f400::/48, 2a01:111:f403::/48
TCP: 443
10Allow
Required
Yes*.mail.protection.outlook.com
40.92.0.0/15, 40.107.0.0/16, 52.100.0.0/14, 104.47.0.0/17, 2a01:111:f400::/48, 2a01:111:f403::/48
TCP: 25

SharePoint Online and OneDrive for Business

IDCategoryERAddressesPorts
31Optimize
Required
Yes*.sharepoint.com
13.107.136.0/22, 40.108.128.0/17, 52.104.0.0/14, 104.146.128.0/17, 150.171.40.0/22, 2603:1061:1300::/40, 2620:1ec:8f8::/46, 2620:1ec:908::/46, 2a01:111:f402::/48
TCP: 443, 80
32Default
Optional
Notes: OneDrive for Business: supportability, telemetry, APIs, and embedded email links
Nossw.live.com, storage.live.comTCP: 443
33Default
Optional
Notes: SharePoint Hybrid Search – Endpoint to SearchContentService where the hybrid crawler feeds documents
No*.search.production.apac.trafficmanager.net, *.search.production.emea.trafficmanager.net, *.search.production.us.trafficmanager.netTCP: 443
35Default
Required
No*.wns.windows.com, admin.onedrive.com, officeclient.microsoft.comTCP: 443, 80
36Default
Required
Nog.live.com, oneclient.sfx.msTCP: 443, 80
37Default
Required
No*.sharepointonline.com, spoprod-a.akamaihd.netTCP: 443, 80
39Default
Required
No*.svc.msTCP: 443, 80

Skype for Business Online and Microsoft Teams

IDCategoryERAddressesPorts
11Optimize
Required
Yes13.107.64.0/18, 52.112.0.0/14, 52.122.0.0/15, 2603:1063::/39UDP: 3478, 3479, 3480, 3481
12Allow
Required
Yes*.lync.com, *.teams.microsoft.com, teams.microsoft.com
13.107.64.0/18, 52.112.0.0/14, 52.122.0.0/15, 52.238.119.141/32, 52.244.160.207/32, 2603:1027::/48, 2603:1037::/48, 2603:1047::/48, 2603:1057::/48, 2603:1063::/39, 2620:1ec:6::/48, 2620:1ec:40::/42
TCP: 443, 80
13Allow
Required
Yes*.broadcast.skype.com, broadcast.skype.com
13.107.64.0/18, 52.112.0.0/14, 52.122.0.0/15, 52.238.119.141/32, 52.244.160.207/32, 2603:1027::/48, 2603:1037::/48, 2603:1047::/48, 2603:1057::/48, 2603:1063::/39, 2620:1ec:6::/48, 2620:1ec:40::/42
TCP: 443
15Default
Required
No*.sfbassets.comTCP: 443, 80
16Default
Required
No*.keydelivery.mediaservices.windows.net, *.streaming.mediaservices.windows.net, mlccdn.blob.core.windows.netTCP: 443
17Default
Required
Noaka.msTCP: 443
18Default
Optional
Notes: Federation with Skype and public IM connectivity: Contact picture retrieval
No*.users.storage.live.comTCP: 443
19Default
Optional
Notes: Applies only to those who deploy the Conference Room Systems
Noadl.windows.comTCP: 443, 80
22Allow
Optional
Notes: Teams: Messaging interop with Skype for Business
Yes*.skypeforbusiness.com
13.107.64.0/18, 52.112.0.0/14, 52.122.0.0/15, 52.238.119.141/32, 52.244.160.207/32, 2603:1027::/48, 2603:1037::/48, 2603:1047::/48, 2603:1057::/48, 2603:1063::/39, 2620:1ec:6::/48, 2620:1ec:40::/42
TCP: 443
27Default
Required
No*.mstea.ms, *.secure.skypeassets.com, mlccdnprod.azureedge.netTCP: 443
127Default
Required
No*.skype.comTCP: 443, 80
167Default
Required
No*.ecdn.microsoft.comTCP: 443
180Default
Required
Nocompass-ssl.microsoft.comTCP: 443

Microsoft 365 Common and Office Online

IDCategoryERAddressesPorts
41Default
Optional
Notes: Microsoft Stream
No*.microsoftstream.comTCP: 443
43Default
Optional
Notes: Microsoft Stream 3rd party integration (including CDNs)
Nonps.onyx.azure.netTCP: 443
44Default
Optional
Notes: Microsoft Stream – unauthenticated
No*.azureedge.net, *.media.azure.net, *.streaming.mediaservices.windows.netTCP: 443
45Default
Optional
Notes: Microsoft Stream
No*.keydelivery.mediaservices.windows.netTCP: 443
46Allow
Required
Yes*.officeapps.live.com, *.online.office.com, office.live.com
13.107.6.171/32, 13.107.18.15/32, 13.107.140.6/32, 52.108.0.0/14, 52.244.37.168/32, 2603:1063:2000::/38, 2620:1ec:c::15/128, 2620:1ec:8fc::6/128, 2620:1ec:a92::171/128, 2a01:111:f100:2000::a83e:3019/128, 2a01:111:f100:2002::8975:2d79/128, 2a01:111:f100:2002::8975:2da8/128, 2a01:111:f100:7000::6fdd:6cd5/128, 2a01:111:f100:a004::bfeb:88cf/128
TCP: 443, 80
47Default
Required
No*.office.netTCP: 443, 80
49Default
Required
No*.onenote.comTCP: 443
50Default
Optional
Notes: OneNote notebooks (wildcards)
No*.microsoft.comTCP: 443
51Default
Required
No*cdn.onenote.netTCP: 443
53Default
Required
Noajax.aspnetcdn.com, apis.live.net, officeapps.live.com, www.onedrive.comTCP: 443
56Allow
Required
Yes*.auth.microsoft.com, *.msftidentity.com, *.msidentity.com, account.activedirectory.windowsazure.com, accounts.accesscontrol.windows.net, adminwebservice.microsoftonline.com, api.passwordreset.microsoftonline.com, autologon.microsoftazuread-sso.com, becws.microsoftonline.com, ccs.login.microsoftonline.com, clientconfig.microsoftonline-p.net, companymanager.microsoftonline.com, device.login.microsoftonline.com, graph.microsoft.com, graph.windows.net, login.microsoft.com, login.microsoftonline.com, login.microsoftonline-p.com, login.windows.net, logincert.microsoftonline.com, loginex.microsoftonline.com, login-us.microsoftonline.com, nexus.microsoftonline-p.com, passwordreset.microsoftonline.com, provisioningapi.microsoftonline.com
20.20.32.0/19, 20.190.128.0/18, 20.231.128.0/19, 40.126.0.0/18, 2603:1006:2000::/48, 2603:1007:200::/48, 2603:1016:1400::/48, 2603:1017::/48, 2603:1026:3000::/48, 2603:1027:1::/48, 2603:1036:3000::/48, 2603:1037:1::/48, 2603:1046:2000::/48, 2603:1047:1::/48, 2603:1056:2000::/48, 2603:1057:2::/48
TCP: 443, 80
59Default
Required
No*.hip.live.com, *.microsoftonline.com, *.microsoftonline-p.com, *.msauth.net, *.msauthimages.net, *.msecnd.net, *.msftauth.net, *.msftauthimages.net, *.phonefactor.net, enterpriseregistration.windows.net, policykeyservice.dc.ad.msft.netTCP: 443, 80
64Allow
Required
Yes*.compliance.microsoft.com, *.protection.office.com, *.security.microsoft.com, compliance.microsoft.com, defender.microsoft.com, protection.office.com, security.microsoft.com
13.107.6.192/32, 13.107.9.192/32, 52.108.0.0/14, 2620:1ec:4::192/128, 2620:1ec:a92::192/128
TCP: 443
66Default
Required
No*.portal.cloudappsecurity.comTCP: 443
67Default
Optional
Notes: Security and Compliance Center eDiscovery export
No*.blob.core.windows.netTCP: 443
68Default
Optional
Notes: Portal and shared: 3rd party office integration. (including CDNs)
Nofirstpartyapps.oaspapps.com, prod.firstpartyapps.oaspapps.com.akadns.net, telemetryservice.firstpartyapps.oaspapps.com, wus-firstpartyapps.oaspapps.comTCP: 443
69Default
Required
No*.aria.microsoft.com, *.events.data.microsoft.comTCP: 443
70Default
Required
No*.o365weve.com, amp.azure.net, appsforoffice.microsoft.com, assets.onestore.ms, auth.gfx.ms, c1.microsoft.com, dgps.support.microsoft.com, docs.microsoft.com, msdn.microsoft.com, platform.linkedin.com, prod.msocdn.com, shellprod.msocdn.com, support.microsoft.com, technet.microsoft.comTCP: 443
71Default
Required
No*.office365.comTCP: 443, 80
72Default
Optional
Notes: Azure Rights Management (RMS) with Office 2010 clients
No*.cloudapp.netTCP: 443
73Default
Required
No*.aadrm.com, *.azurerms.com, *.informationprotection.azure.com, ecn.dev.virtualearth.net, informationprotection.hosting.portal.azure.netTCP: 443
75Default
Optional
Notes: Graph.windows.net, Office 365 Management Pack for Operations Manager, SecureScore, Azure AD Device Registration, Forms, StaffHub, Application Insights, captcha services
No*.sharepointonline.com, dc.services.visualstudio.com, mem.gfx.ms, staffhub.msTCP: 443
78Default
Optional
Notes: Some Office 365 features require endpoints within these domains (including CDNs). Many specific FQDNs within these wildcards have been published recently as we work to either remove or better explain our guidance relating to these wildcards.
No*.microsoft.com, *.msocdn.com, *.onmicrosoft.comTCP: 443, 80
79Default
Required
Noo15.officeredir.microsoft.com, officepreviewredir.microsoft.com, officeredir.microsoft.com, r.office.microsoft.comTCP: 443, 80
83Default
Required
Noactivation.sls.microsoft.comTCP: 443
84Default
Required
Nocrl.microsoft.comTCP: 443, 80
86Default
Required
Nooffice15client.microsoft.com, officeclient.microsoft.comTCP: 443
89Default
Required
Nogo.microsoft.comTCP: 443, 80
91Default
Required
Noajax.aspnetcdn.com, cdn.odc.officeapps.live.comTCP: 443, 80
92Default
Required
Noofficecdn.microsoft.com, officecdn.microsoft.com.edgesuite.netTCP: 443, 80
93Default
Optional
Notes: ProPlus: auxiliary URLs
No*.virtualearth.net, c.bing.net, excelbingmap.firstpartyapps.oaspapps.com, ocos-office365-s2s.msedge.net, peoplegraph.firstpartyapps.oaspapps.com, tse1.mm.bing.net, wikipedia.firstpartyapps.oaspapps.com, www.bing.comTCP: 443, 80
95Default
Optional
Notes: Outlook for Android and iOS
No*.acompli.net, *.outlookmobile.comTCP: 443
96Default
Optional
Notes: Outlook for Android and iOS: Authentication
Nologin.windows-ppe.netTCP: 443
97Default
Optional
Notes: Outlook for Android and iOS: Consumer Outlook.com and OneDrive integration
Noaccount.live.com, login.live.comTCP: 443
105Default
Optional
Notes: Outlook for Android and iOS: Outlook Privacy
Nowww.acompli.comTCP: 443
114Default
Optional
Notes: Office Mobile URLs
No*.appex.bing.com, *.appex-rf.msn.com, c.bing.com, c.live.com, d.docs.live.net, directory.services.live.com, docs.live.net, partnerservices.getmicrosoftkey.com, signup.live.comTCP: 443, 80
116Default
Optional
Notes: Office for iPad URLs
Noaccount.live.com, auth.gfx.ms, login.live.comTCP: 443, 80
117Default
Optional
Notes: Yammer
No*.yammer.com, *.yammerusercontent.comTCP: 443
118Default
Optional
Notes: Yammer CDN
No*.assets-yammer.comTCP: 443
121Default
Optional
Notes: Planner: auxiliary URLs
Nowww.outlook.comTCP: 443, 80
122Default
Optional
Notes: Sway CDNs
Noeus-www.sway-cdn.com, eus-www.sway-extensions.com, wus-www.sway-cdn.com, wus-www.sway-extensions.comTCP: 443
124Default
Optional
Notes: Sway
Nosway.com, www.sway.comTCP: 443
125Default
Required
No*.entrust.net, *.geotrust.com, *.omniroot.com, *.public-trust.com, *.symcb.com, *.symcd.com, *.verisign.com, *.verisign.net, apps.identrust.com, cacerts.digicert.com, cert.int-x3.letsencrypt.org, crl.globalsign.com, crl.globalsign.net, crl.identrust.com, crl3.digicert.com, crl4.digicert.com, isrg.trustid.ocsp.identrust.com, mscrl.microsoft.com, ocsp.digicert.com, ocsp.globalsign.com, ocsp.msocsp.com, ocsp2.globalsign.com, ocspx.digicert.com, secure.globalsign.com, www.digicert.com, www.microsoft.comTCP: 443, 80
126Default
Optional
Notes: Connection to the speech service is required for Office Dictation features. If connectivity is not allowed, Dictation will be disabled.
Noofficespeech.platform.bing.comTCP: 443
147Default
Required
No*.office.com, www.microsoft365.comTCP: 443, 80
152Default
Optional
Notes: These endpoints enables the Office Scripts functionality in Office clients available through the Automate tab. This feature can also be disabled through the Office 365 Admin portal.
No*.microsoftusercontent.comTCP: 443
153Default
Required
No*.azure-apim.net, *.flow.microsoft.com, *.powerapps.com, *.powerautomate.comTCP: 443
156Default
Required
No*.activity.windows.com, activity.windows.comTCP: 443
158Default
Required
No*.cortana.aiTCP: 443
159Default
Required
Noadmin.microsoft.comTCP: 443, 80
160Default
Required
Nocdn.odc.officeapps.live.com, cdn.uci.officeapps.live.comTCP: 443, 80
184Default
Required
No*.cloud.microsoft, *.static.microsoftTCP: 443, 80

 Note

For recommendations on Yammer IP addresses and URLs, see Using hard-coded IP addresses for Yammer is not recommended on the Yammer blog.

Additional endpoints not included in the Office 365 IP Address and URL Web service

Managing Office 365 endpoints

General Microsoft Stream endpoints

Monitor Microsoft 365 connectivity

Root CA and the Intermediate CA bundle on the third-party application system

Client connectivity

Content delivery networks

Microsoft Azure IP Ranges and Service Tags – Public Cloud

Microsoft Azure IP Ranges and Service Tags – US Government Cloud

Microsoft Azure IP Ranges and Service Tags – China Cloud

Microsoft Public IP Space

Service Name and Transport Protocol Port Number Registry

Source :
https://docs.microsoft.com/en-us/office365/enterprise/urls-and-ip-address-ranges

All about the TeamViewer company profile

By JeanK

Last Updated: 

A TeamViewer company profile allows the ability within the TeamViewer Management Console to manage user permissions and access centrally.

Company admins can add existing users to the license and create new TeamViewer accounts. Both will allow users to log into any TeamViewer application and license the device so they may make connections.

Before starting

It is highly recommended to utilize a Master Account for a company profile, which will be the account that manages all licenses and users.

Please see the following article: Using a Master Account for the TeamViewer Management Console

This article applies to TeamViewer customers with a Premium, Corporate, or Tensor plan.

Benefits of a company profile

Managing users as the company administrator of a company profile also gives access to:

Licensing

Each company profile must have one TeamViewer Core multi-user license activated; this license can be combined with other licenses of the TeamViewer product family (e.g., Assist AR, Remote Management, IoT, etc. ), but cannot be combined with another TeamViewer Core license.

📌Note: If a company admin attempts to activate a second TeamViewer license, they will need to choose between keeping the existing license or replacing it with the new license.

image.png

📌Note: In some cases (with older company profiles and an active perpetual license), multiple core TeamViewer licenses may be activated to one company profile. One subscription license may be added to an existing perpetual license for such company profiles.

License management

Through the TeamViewer Management Console, company admins can manage the licensing of their users directly, including:

  • Assign/un-assign the license to various members of the company profile.
  • Reserve one or more channels for specific teams or persons via Channel Groups.

💡Hint: To ensure the license on your company profile best matches your use case, we highly recommend reaching out to our TeamViewer licensing experts. You may find local numbers here.


How to create a company profile

To create a company profile, please follow the instructions below:

  1. Log into the Management Console
  2. On the left-hand side, under the Company header, select User management
  3. In the text box provided, enter the desired company name and click Create.
    • 📌Note: The name of a company profile must be unique and cannot be re-used. If another company profile already uses a name, an error will appear, requesting another name be used instead. 
  4. Once the company profile is created, User management will load with the user that created the company profile as a company administrator.

How to add a new user

To add a new user, please follow the instructions below:

  1. Under User management, click the icon of a person with a + sign. Click on Add user.
  2. On the General tab, add the user’s name and email address and enter a password for the user and click Add user.
    • 💡Hint: Other settings for the user can be adjusted under Advanced, Licenses, and Permissions.
  3. The user will now appear under the User management tab. An email is sent to the user with instructions on activating their account.
    • 📌Note: If the user does not activate their account via email, they will receive an error that the account has not yet been activated when trying to sign in.

How to add an existing user

Users that already have an existing TeamViewer account can request to join a company profile using a few simple steps:

  1. Under User management, click the icon of a person with a + sign. Select Add existing account.
  2. A pop-up will appear, including a URL. Please send this URL to the user you want to add: https://login.teamviewer.com/cmd/joincompany
  3. Once the user opens the link within a browser, they must sign in with their TeamViewer account. Once logged in, they will be prompted to enter the email address of the company administrator. Once completed, they must tick the box I allow to transfer my account and click Join Company.
  4. The company admin will receive a join request via email. The user will appear in user management, where the company admin can approve or decline the addition of the user to the company profile

📌Notes:

  • Every user that joins a company profile will be informed that the company admin will take over full management of their account, including the ability to connect to and control all their devices. It is recommended never to join a company profile the user does not know or fully trust.
  • A user can only be part of one company profile.

How to set user permissions

Users of a company profile have multiple options that can be set by the current company admin, including promoting other users to administrator or company administrator. Permissions are set for each user individually. To access user permissions:

  1. In the User management tab, hovering the cursor over the desired user’s account will produce a three-dots menu (⋮) to the far right of the account. Click this menu and select Edit user from the drop-down.
  2. Once in Edit user, select the Permissions tab. Overall permissions for the account can be changed using the drop-down under the Role header.
image.png

Four options are available:

  • Company administrator: Can make changes to company settings, other administrator accounts, and user accounts.
  • User administrator: Can make changes to other user accounts but cannot change company settings or company administrator accounts.
  • Member: Cannot change the company profile or other users.
  • Customized permissions: The company admin sets permissions for each aspect of the account.

Once the appropriate role is selected, click Save in the window’s upper-left corner.

📌Note: Changes to user permissions are automatic once saved.

How to remove/deactivate/delete users

Along with adding new or existing accounts, company admins can remove, deactivate, or even delete users from the company profile.

📌Note: A current company admin of that license can only remove a TeamViewer account currently connected to a company profile. TeamViewer Customer Support is unable to remove any account from a company profile.

To remove, deactivate or delete an account, please follow the instructions below:

  1. In the User management tab, hovering the cursor over the desired user’s account will produce a three-dots menu (⋮) to the far right of the account. In the drop-down menu that appears are the three options
  2. Select Delete accountRemove user or Deactivate user.
image.png

Consequences of deleting an account

When an account is deleted, the account is not only removed from the company profile but deleted from TeamViewer altogether. The user can no longer use the account or access any information associated with it as it no longer exists.

📌Note: When an account is deleted, the email address associated with the account can be re-used to create a new TeamViewer account.

image.png

When a TeamViewer account is deleted from a company profile:

  • Connection reports, custom modules, and TeamViewer/Remote management policies will be transferred to the current company admin.
  • Web API Tokens for the deleted user are logged out, and their company functionality is removed
  • License activations are removed from the deleted user’s account
  • Shared groups from the deleted user’s account are deleted.

Once the company admin checks the box to confirm that this process cannot be undone, the Delete account button becomes available. Once pressed, the account is deleted.

📌Note: Deletion of any TeamViewer account deletion is irreversible. Only a new account can be created after deletion. All user data will be lost.

Remove user

When an account is removed, the account is removed from the company profile and reverted to a free TeamViewer account. The account is reverted to a free account, and the user is still able to log in with the account. All information associated with the account is still accessible.

When an account is removed from a company profile:

  • Connection reports, custom modules, and TeamViewer /Remote management policies will be transferred to the current company admin.
  • Contacts in the contact book are transferred to the current company admin
  • Web API Tokens for the user’s account are logged out and their company functionality is removed
  • License activations are removed from the user’s account

📌Note: Groups & devices in the Computers & Contacts of the removed user’s account are not affected. Any groups shared also will remain shared.

Once the company admin checks the box to confirm that this process cannot be undone, the Remove user button becomes available. Once pressed, the account is removed from the company profile and reverted to a free TeamViewer account.

📌Note: Once a user account is removed from the current company profile, it can request to join another company profile.

Deactivate user

When an account is deactivated, the account is reverted to inactive. The deactivated account is still associated with the company profile but cannot be used to log into TeamViewer on a free or licensed device. The account is rendered completely unusable.

📌Note: When an account is deactivated, the email address associated with the account cannot be used to create a new free TeamViewer account.

💡Hint: To view inactivated users within the company profile, select the drop-down menu under User Status and check the box for Inactive. All inactive users will now appear in user management.

How to reactivate inactive users

When Deactivate user is selected, the account disappears from user management. They are, however, still a part of the Company Profile and can be reactivated back to the license instantly at any time.

image.png
  1. To view inactivated users within the company profile, select the menu under User Status and check the box for Inactive. All inactive users will now appear in user management.
  2. Once the user is located, hover the cursor over the account. Select the three-dots menu (⋮) to the right of the user’s account and select Activate user
  3. The user’s original permissions status is reverted, and the account can again be used with any TeamViewer device.
image.png

Troubleshooting

Below you will find answers to some common issues encountered when interacting with a company profile.

▹User(s) on a company profile show a free license

In some cases, older users on a company profile may appear as ‘free’ users, especially after upgrading or changing a license. The company admin can resolve this:

  1. Log in to the TeamViewer Management Console under https://login.teamviewer.com
  2. Click Company administration on the left-hand side:
  3. Select the Licenses tab and locate the license. Hovering the cursor over the license will produce a three-dots menu (⋮). Click the menu and select Assign from the drop-down.
  4. The users who show ‘free’ will appear in Unassigned. Select the desired users and click the Add button at the bottom of the page.
image.png

📌Note: Affected users should log out and then back in to see the licensing changes.

▹Your account is already associated with a company 

If a user who is already associated with one company profile attempts to join another company profile, the following pop-up will appear:

image.png

The user’s account must be removed from the current company profile to resolve this. The steps required vary depending on whether it is their active or expired company profile or if they are associated with a company profile created by another account.

SCENARIO 1: As company administrator of an active company profile

If a user who created a company profile wishes to delete the company profile associated with their account, they will need to perform the following steps:

  1. Log in to the TeamViewer Management Console under https://login.teamviewer.com
  2. Click User Management in the upper left corner 
  3. Remove all other accounts: Before deleting a company profile, the company admin must remove all other accounts. Perform these steps for each user on the company profile
  4. Remove the company admin account: Once all other accounts have been removed, the company admin will remove their account. This will delete the company profile altogether
  5. The user is immediately logged out and can now follow the process to add their account to an existing company profile

SCENARIO 2: As company administrator of an expired company profile

In some cases, the user may have created a company profile on an older license that is no longer used or active. In such cases, the company profile will appear as expired in the Management Console.

In such cases, it is still possible to delete the company profile:

  1. Log in to the TeamViewer Management Console under https://login.teamviewer.com
  2. Click Company administration on the left-hand side.
  3. On the General tab, select Delete company.
  4. A pop-up will appear confirming the request to delete the company profile. Check the box at the bottom to validate, and select Delete company.

SCENARIO 3: The account is a member of a company profile

📌Note: Only a company administrator can remove a user from their company profile – not even TeamViewer can remove a user from a company profile, regardless of the request’s origin.

If the user is a member of another company profile, they will need to contact the company admin of that license to request removal.

Once removed, they can then request to join the correct company profile.

Source :
https://community.teamviewer.com/English/kb/articles/3573-all-about-the-teamviewer-company-profile

Teamviewer Block and allowlist

By .Carol.fg.

Last Updated: 

You have the possibility to restrict remote access to your device by using the Block and Allowlist feature in the TeamViewer full version and the TeamViewer Host.

You can find the feature easily by clicking in your TeamViewer full version on the Gear icon (⚙) in the upper right corner of the TeamViewer (Classic) application, then Security ➜ Block and Allowlist.

Let´s begin with the difference between a blocklist and an allowlist.

This article applies to all TeamViewer (Classic) users.

What is a Blocklist?

The Blocklist generally lets you prevent certain partners or devices from establishing a connection to your computer. TeamViewer accounts or TeamViewer IDs on the blocklist cannot connect to your computer.

📌Note: You will still be able to set up outgoing TeamViewer sessions with partners on the blocklist.

What is an Allowlist?

If you add TeamViewer accounts to the Allowlist, only these accounts will be able to connect to your computer. The possibility of a connection to your computer through other TeamViewer accounts or TeamViewer IDs will be denied

If you have joined a company profile with your TeamViewer account, you can also place the entire company profile on the Allowlist. Thus only the TeamViewer accounts that are part of the company profile can access this device.

📌Note: To work with a company profile you will need a TeamViewer Premium or Corporate license


How to set up a Blocklist?

If you would like to deny remote access to your device to specific persons or TeamViewer IDs, we recommend setting up a Blocklist.

You can find the feature easily by clicking in your TeamViewer full version on the Gear icon (⚙) in the upper right corner of the TeamViewer (Classic) application, then Security ➜ Block and Allowlist ➜ Click on Configure…

A new window will open. Activate the first option Deny access for the following partners and click on Add 

Blocklist_01.png

📌Note: If you activate the Also apply for meetings check box, these settings will also be applied to meetings. Contacts from your blocklist are excluded from being able to join your meetings.

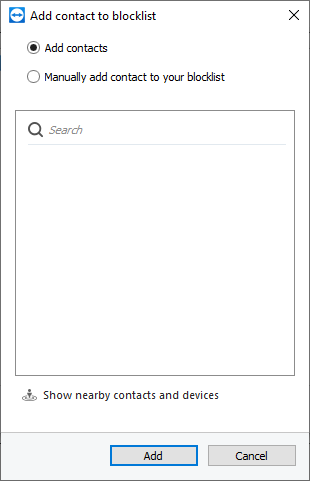
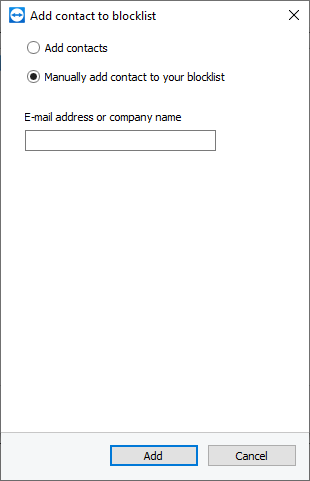
After clicking on Add, you can either choose partners saved on your Computers & Contacts list or add TeamViewer IDs/contacts manually to your blocklist.

Blocklist_02.png
Blocklist_03.PNG

How to set up an Allowlist?

If you would like to allow only specific TeamViewer accounts or TeamViewer IDs remote access to your device, we recommend setting up an Allowlist.

You can find the feature easily by clicking in your TeamViewer full version on the Gear icon (⚙) in the upper right corner of the TeamViewer (Classic) application, then Security ➜ Block and Allowlist ➜ Click on Configure…

A new window will open. Activate the second option Allow access only for the following partners and click on Add 

image.png

📌Note: If you activate the Also apply for meetings check box, these settings will also be applied to meetings. Only contacts from your allowlist will then be able to join your meetings.

After clicking on Add, you can either choose partners saved on your Computers & Contacts list, add TeamViewer IDs/contacts manually to your blocklist, or add the whole company you are part of (only visible if you are part of a company profile). 

image.png
image.png
image.png


How to delete blocklisted/allowlisted partners?

If you no longer wish to have certain partners block or allowlisted, you can easily remove them from the list.

To do so navigate in your TeamViewer full version to the Gear icon (⚙) in the upper right corner of the TeamViewer (Classic) application, then Security ➜ Block and Allowlist ➜ Click on Configure… and choose whether you would like to remove partners from the Blocklist or from the Allowlist by choosing either Deny access for the following partners (Blocklist) or Allow access only for the following partner (Allowlist). Now click on the partners you would like to remove and finally click Remove  OK

image.png

📌Note: You can choose multiple partners at once by pressing CTRG when clicking on the different partners.

Learn more about how you can benefit from a Master Allowlist: Why Master Allowlists are So Effective to Secure Customers

Source :
https://community.teamviewer.com/English/kb/articles/29739-block-and-allowlist

Teamviewer Two-Factor Authentication for connections

By .Carol.fg.

Last Updated: 

This article provides a step-by-step guide to activating Two-factor authentication for connections (also known as TFA for connections). This feature enables you to allow or deny connections via push notifications on a mobile device.

This article applies to all Windows users using TeamViewer (Classic) 15.17 (and newer) and macOS and Linux users in version 15.22 (and newer).

What is Two-factor authentication for connections?

TFA for connections offers an extra layer of protection to desktop computers.

When enabled, connections to that computer need to be approved using a push notification sent to specific mobile devices. 

Enabling Two-factor authentication for connections and adding approval devices

Windows and Linux:

1. In the TeamViewer (Classic) application, click the gear icon at the top right menu.

2. Click on the Security tab on the left.

3. You will find the Two-factor authentication for connections section at the bottom.

4. Click on Configure… to open the list of approval devices.

5. To add a new mobile device to receive the push notifications, click Add.

6. You will now see a QR code that needs to be scanned by your mobile device.

Below please find a step-by-step gif for Windows, Linux, and macOS:

Windows

TFA for connections.gif

Linux

Linux add new device.gif

macOS

MAC1_community.gif

7. On the mobile device, download and install the TeamViewer Remote Control app:

a. Android

📌Note: This feature is only available on Android 6.0 or higher.

b. iOS

8. In the TeamViewer Remote Control app, go to Settings → TFA for connections.

9. You will see a short explanation and the option to open the camera to scan the QR code.

image.png

10. Tap on Scan QR code and you will be asked to give the TeamViewer app permission to access the camera.

11. After permission is given, the camera will open. Point the camera at the QR code on the desktop computer (see Step 6 above).

12. The activation will happen automatically, and a success message will be displayed. 

image.png

13. The new device is now included in the list of approval devices.

image.png

14. From now on, any connection to this desktop computer will need to be approved using a push notification.

📌 Note: TFA for connections cannot be remotely disabled if the approval device is not accessible. Due to this, we recommend setting up an additional approval device as a backup.

Removing approval devices

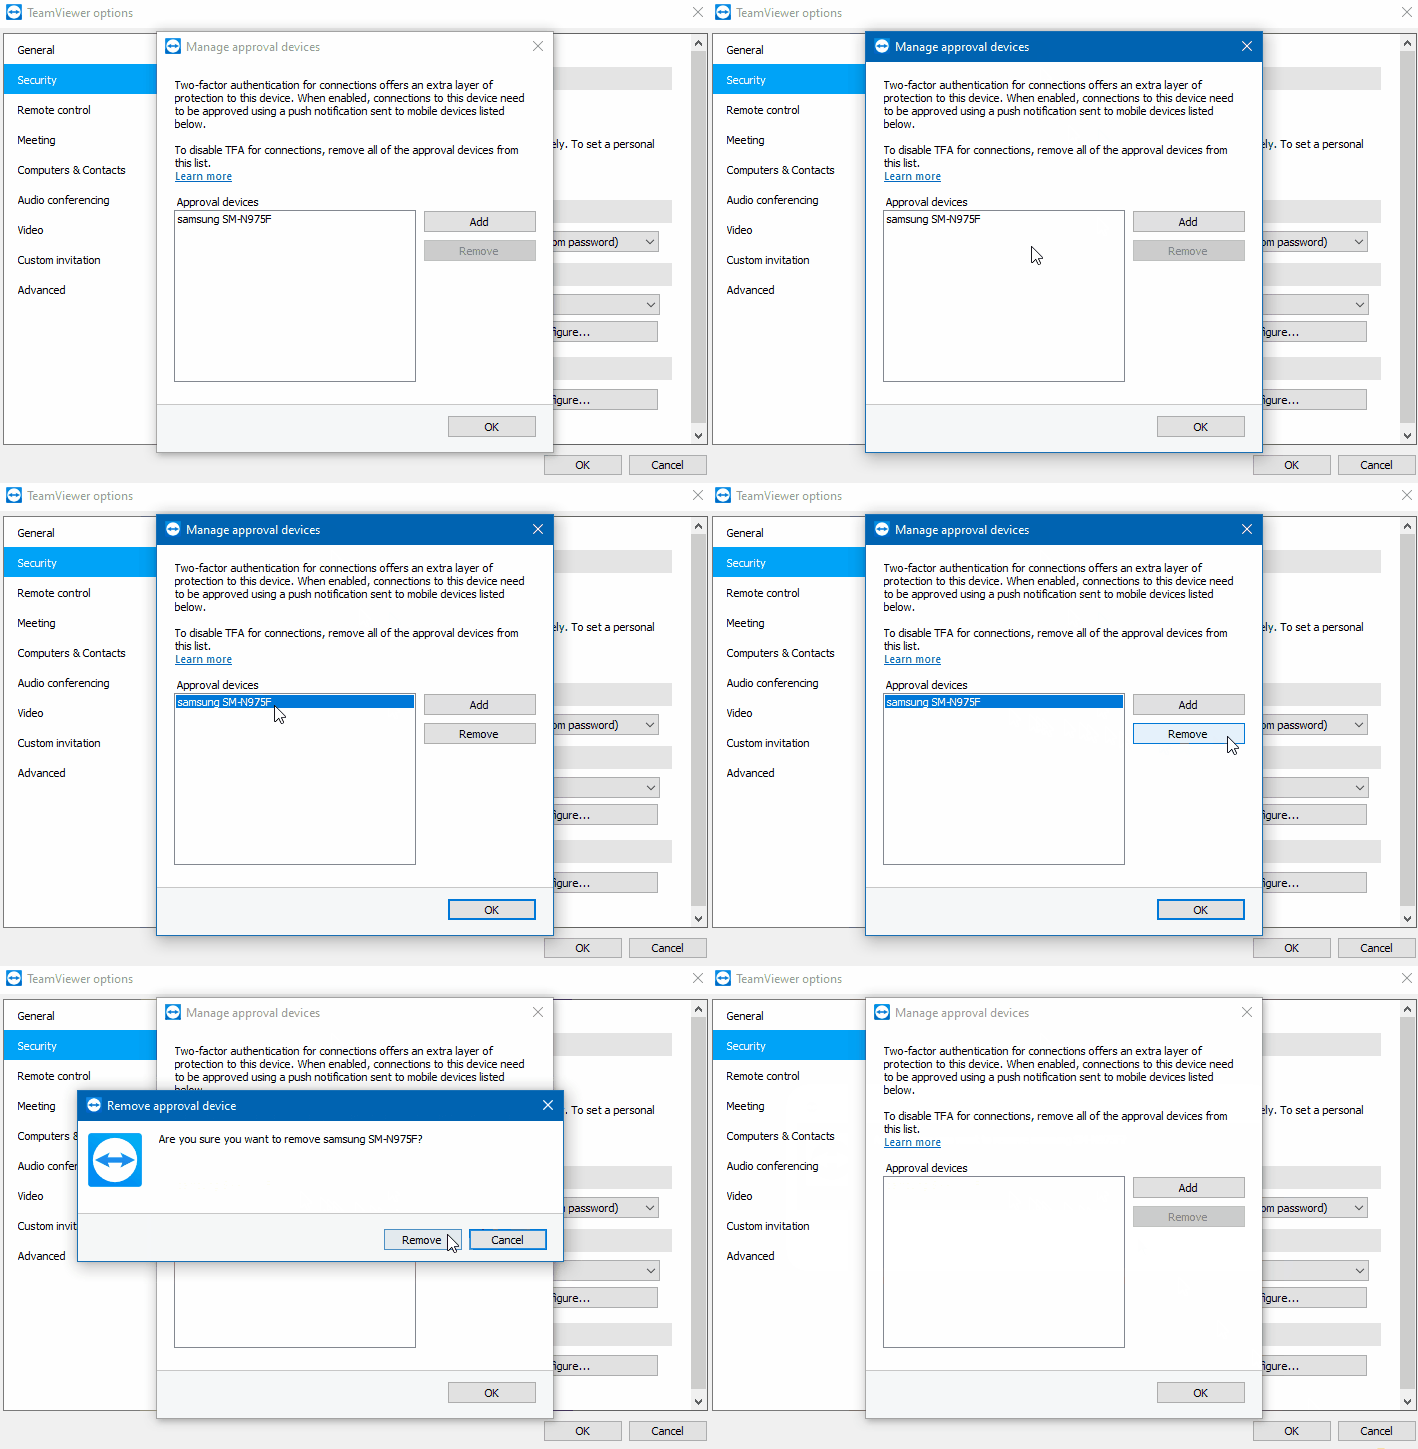
1. Select an approval device from the list and click Remove or the X.

2. You will be asked to confirm the action.

3. By clicking Remove again, the mobile device will be removed from the list of approval devices and won’t receive any further push notifications.

4. If the Approval devices list is empty, Two-factor authentication for connections will be completely disabled.

Below please find a step by step gif for Windows, Linux and macOS:

▹ Windows:

Removing approval devices[1).gif

▹ Linux:

linux remove device.gif

▹ macOS:

MAC2_community.gif

Remote connections when Two-factor authentication for connections is enabled

TFA for connections does not replace any existing authentication method. When enabled, it adds an extra security layer against unauthorized access.

When connecting to a desktop computer protected by TFA for connections, a push notification will be sent to all of the approval devices.

You can either:

  • accept/deny the connection request via the system notification:
image.png
  • accept/deny the connection request by tapping the TeamViewer notification. It will lead to you the following screen within the TeamViewer application to accept/deny the connection:
image.png

Multiple approval devices

All approval devices in the list will receive a push notification. 

The first notification that is answered on any of the devices will be used to allow or deny the connection.

Source :
https://community.teamviewer.com/English/kb/articles/108791-two-factor-authentication-for-connections

Teamviewer Zero Knowledge Account Recovery

By .Carol.fg.

Last Updated: 

TeamViewer offers the possibility to activate Account Recovery based on the zero-trust principle.  

This is a major security enhancement for your TeamViewer account and a unique offering on the market. 

This article applies to all users.

What is Zero Knowledge Account Recovery 

In cases where you cannot remember your TeamViewer Account credentials, you click on I forgot my password, which triggers an email with a clickable link that leads you to the option of resetting your password.  

The regular reset process leads you to a page where you can set a new password for your account.

The Zero Knowledge Account Recovery acts as another layer of security for this process as the reset process requires you to enter the unique 64 characters Zero Knowledge Account Recovery Code for your account to prove your identity. Important to note is that this happens without any intervention and knowledge of the TeamViewer infrastructure. 

Activate Zero Knowledge Account Recover

To activate Zero Knowledge Account Recovery please follow the steps below: 

1. Log in with your TeamViewer account at login.teamviewer.com

2. Click Edit profile under your profile name (upper right corner). 

3. Go to Security in the left menu 

4. Click the Activate Zero knowledge account recovery button

image.png

📌 Note: The password recovery code is a unique 64 characters code that allows you to regain access if you forgot your password. It is absolutely essential that you print/download your recovery code and keep this in a secure place.

⚠ IMPORTANT: Without the recovery code you won’t be able to recover your account. Access to your account will be irreversibly lost. The data is encrypted with the key and you are the only owner of this key. TeamViewer has no access to it.

5. A PopUp window appears sharing the above information. Click on Generate Recovery Code to proceed. 

6. The Recovery Code is shown. You have to download or print the code as well as you tick the check box confirming that you acknowledge and understand that if you lose your zero knowledge account recovery code, you won’t be able to recover your password and you will lose access to your account forever

image.png

⚠ Do not tick the box unless you understand the meaning.

7. Once you either downloaded or printed the recovery code and ticked the acknowledge box, you can activate the Zero knowledge account recovery by clicking Activate.

Deactivate Zero Knowledge Account Recovery 

To deactivate Zero Knowledge Account Recovery please follow the steps below: 

1. Log in with your TeamViewer account at login.teamviewer.com

2. Click Edit profile under your profile name (upper right corner). 

3. Go to Security in the left menu 

4. Click the Deactivate Zero knowledge account recovery button

image.png

5. A PopUp appears. You have to tick the check box confirming that you acknowledge and understand that if you will be deactivating your zero knowledge account recovery

image.png

6. Click Deactivate to deactivate the Zero Knowledge Account recovery for your TeamViewer Account.

Reset your password

To reset your password for your TeamViewer account, please follow the steps below: (More info here: Reset account password)

1. Go to https://login.teamviewer.com/LogOn#lost-password 

2. Type in your email to the form, confirm you´re not a robot and click Change password

image.png

3. You´ll get the following notification:

image.png

4. Check your email inbox for an email from TeamViewer and click the button within the email

5. You´ll get to a page where you are asked to fill in your Zero Knowledge Account Recovery Code and a new password:

image.png

6. Confirm the chosen password by inserting it again and finish the process by clicking OK

Source :
https://community.teamviewer.com/English/kb/articles/108862-zero-knowledge-account-recovery

Ports used by TeamViewer

By Ying_Q

Last Updated: 

TeamViewer is designed to connect easily to remote computers without any special firewall configurations being necessary.

This article applies to all users in all licenses.

In the vast majority of cases, TeamViewer will always work if surfing on the internet is possible. TeamViewer makes outbound connections to the internet, which are usually not blocked by firewalls.

However, in some situations, for example in a corporate environment with strict security policies, a firewall might be set up to block all unknown outbound connections, and in this case, you will need to configure the firewall to allow TeamViewer to connect out through it.

TeamViewer ‘s Ports

These are the ports that TeamViewer needs to use.

TCP/UDP Port 5938

TeamViewer prefers to make outbound TCP and UDP connections over port 5938 – this is the primary port it uses, and TeamViewer performs best using this port. Your firewall should allow this at a minimum.

TCP Port 443

If TeamViewer can’t connect over port 5938, it will next try to connect over TCP port 443.

However, our mobile apps running on iOS and Windows Mobile don’t use port 443.

📌Note: port 443 is also used by our custom modules which are created in the Management Console. If you’re deploying a custom module, eg. through Group Policy, then you need to ensure that port 443 is open on the computers to which you’re deploying. Port 443 is also used for a few other things, including TeamViewer (Classic) update checks.

TCP Port 80

If TeamViewer can’t connect over port 5938 or 443, then it will try on TCP port 80. The connection speed over this port is slower and less reliable than ports 5938 or 443, due to the additional overhead it uses, and there is no automatic reconnection if the connection is temporarily lost. For this reason port 80 is only used as a last resort.

Our mobile apps running on Windows Mobile don’t use port 80. However, our iOS and Android apps can use port 80 if necessary.

Windows Mobile

Our mobile apps running on Windows Mobile can only connect out over port 5938. If the TeamViewer app on your mobile device won’t connect and tells you to “check your internet connection”, it’s probably because this port is being blocked by your mobile data provider or your WiFi router/firewall.

Destination IP addresses

The TeamViewer software makes connections to our master servers located around the world. These servers use a number of different IP address ranges, which are also frequently changing. As such, we are unable to provide a list of our server IPs. However, all of our IP addresses have PTR records that resolve to *.teamviewer.com. You can use this to restrict the destination IP addresses that you allow through your firewall or proxy server.

 Having said that, from a security point-of-view this should not really be necessary – TeamViewer only ever initiates outgoing data connections through a firewall, so it is sufficient to simply block all incoming connections on your firewall and only allow outgoing connections over port 5938, regardless of the destination IP address.

Ports Used per Operating System

image.png

Source :
https://community.teamviewer.com/English/kb/articles/4139-ports-used-by-teamviewer

Exit mobile version