Ubiquiti UniFi Network – Troubleshooting Wireless Uplinks

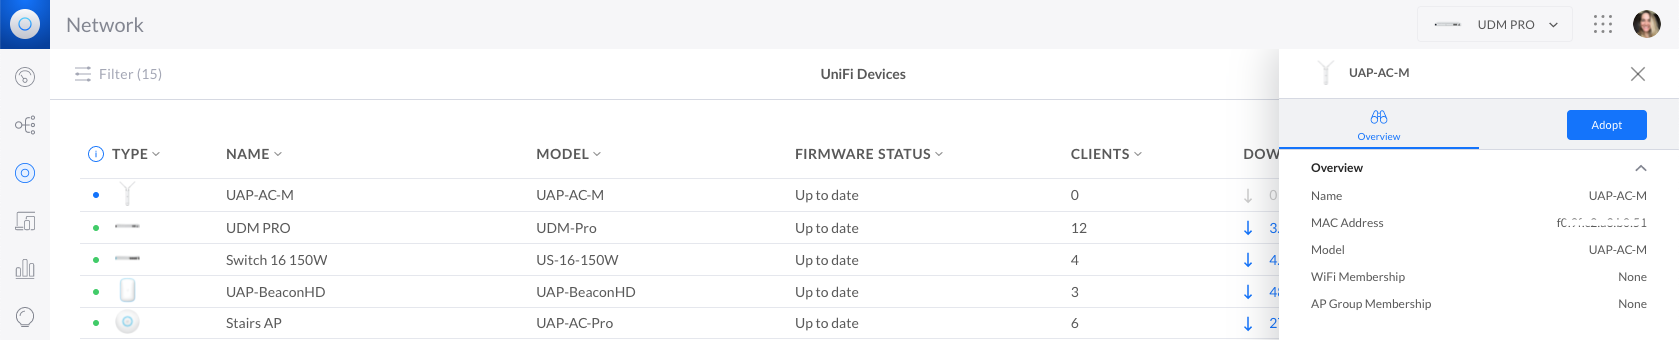
You can wirelessly adopt access points to your UniFi Network. This allows you to extend your coverage without adding cabling in hard-to-reach areas. When within range of your already-adopted access points, simply connect a new access point to power and it will appear as ready for adoption in the Network application.

General troubleshooting

Wireless UAP does not appear for adoption

1. Verify that the UAP is powering properly and is ready for adoption (steady white LED).

2. Connect it via Ethernet cable to your network and wait for it to appear for adoption. If it still won’t appear while connected, please see our general adoption troubleshooting steps.

3. Update to the current firmware version if an upgrade is available.

4. Once the UAP is adopted and running the newest version available, disconnect it from the wired LAN, and wait a few minutes while it connects wirelessly. After that, you may disconnect it from power to move it to its final position. Once it powers up again, the UniFi Network application will recognize it and start broadcasting the network’s WiFi through your wireless UAP.

The UAP is adopted but it will not work when moved to wireless networks

1. Verify that the UAP is receiving enough power from the PoE injector. The LED must be a steady blue. Take a look at the UAP’s datasheet to verify power requirements.

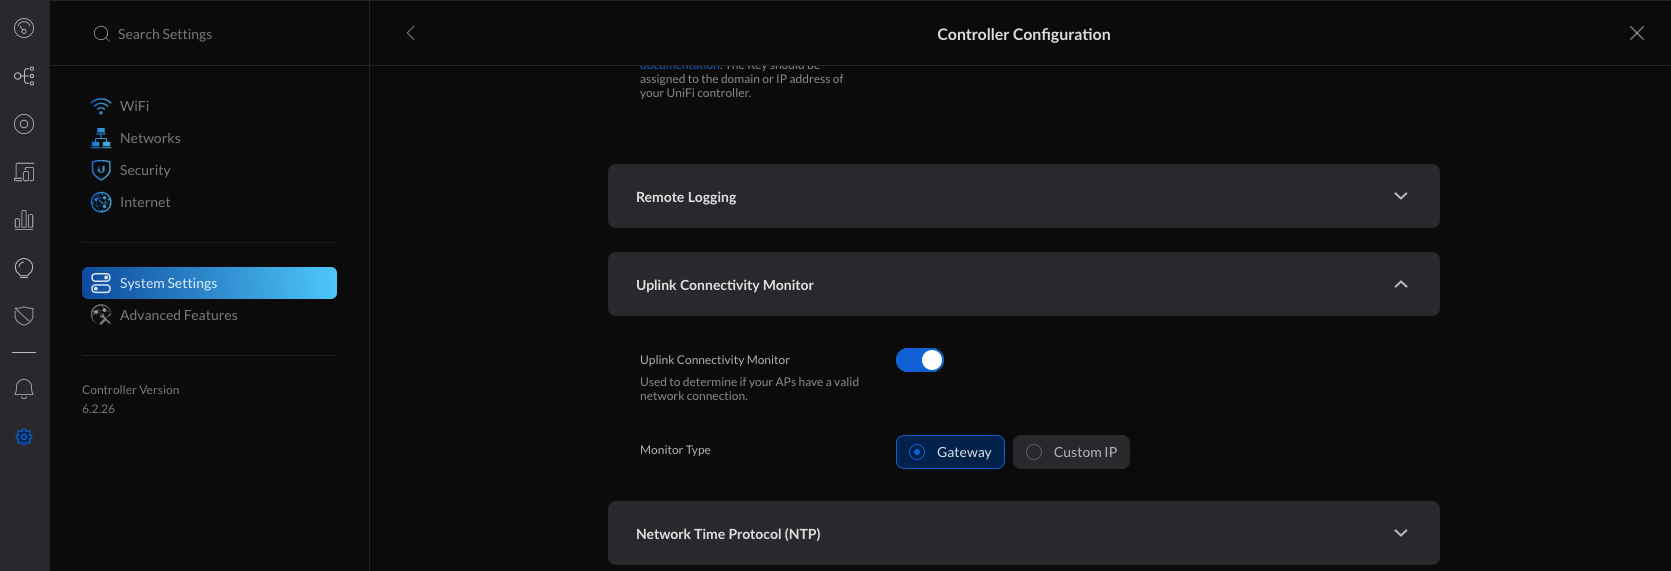
2. Verify that the Uplink Connectivity Monitor is enabled within Settings > System Settings > Controller Configuration > Uplink Connectivity Monitor.

uplink-connectivity-monitor.png

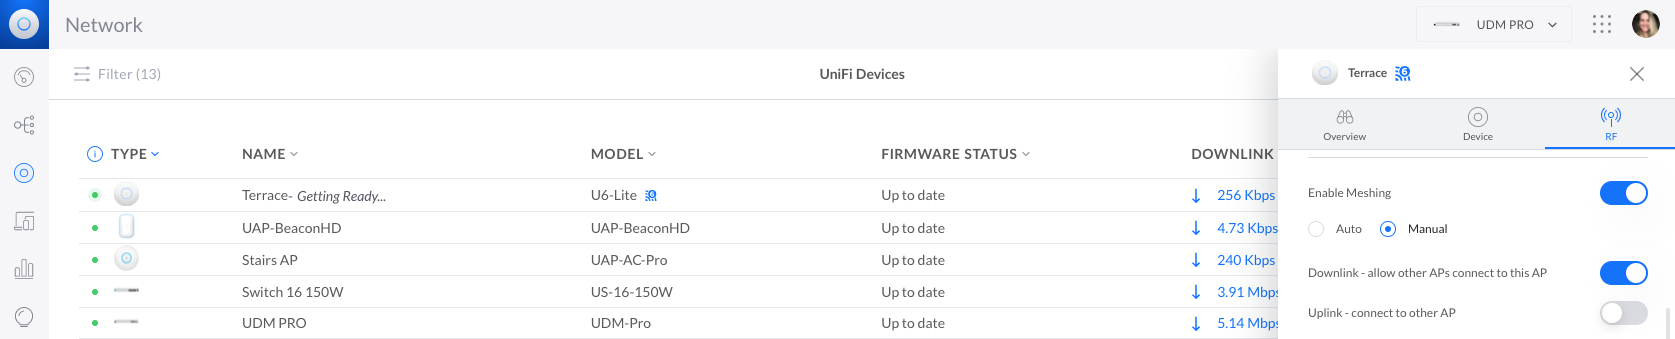
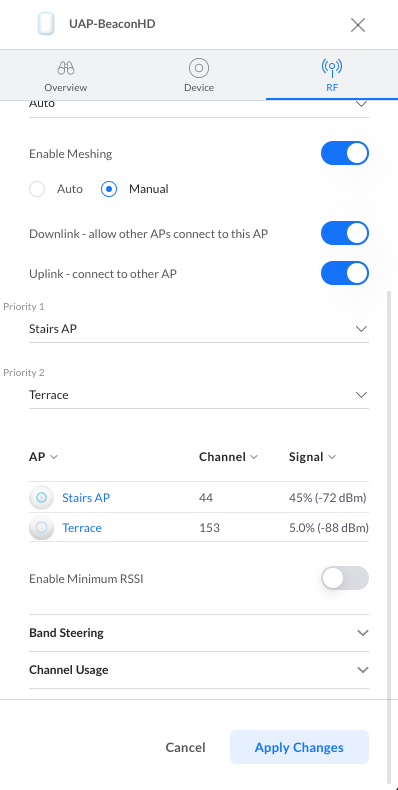
3. Verify that there is at least one wired UAP to act as an uplink and that Enable Meshing is turned on within the UAP’s properties panel > RF > Enable Meshing. And that the meshing configuration is set to Auto; or if set to Manual, that Downlink is enabled.

manual-meshing.downlink-enabled.png

Wireless uplink requirements

  • At least one wired access point to serve as the uplink UAP
  • A power source (i.e PoE injector) for the wireless UAP (downlink UAP)
  • (Recommended) Newest firmware and Network application versions.

Note: The wireless adoption process takes longer than the wired one; expect to wait a little longer for access point detection and for the adoption process to complete.

Modifying existing wireless uplink connections

You can design the topology to your liking by configuring how the wirelessly connected UAPs are linked. To change a UAP’s uplink:

  1. Select the UAP from the UniFi Devices section to open its properties panel.
  2. Go to the RF tab and select Manual under the Enable Meshing toggle. If the Enable Meshing option is not turned on, do so now to expose the wireless uplink settings.
  3. Select which UAP your wireless UAP will connect to (uplink).

Additionally, you can stipulate the uplink priority to define to which uplink your UAP will connect to if there is service degradation or if its current uplink goes offline. Use the Priority dropdown menus to select from the available uplinks.

pp.rf.manual-meshing.png

Frequently Asked Questions

Can a wireless UAP be the uplink to another wireless UAP?

Yes. This is known as a multi-hop wireless uplink and is supported by UniFi, as long as there is one wired access point to provide the first “hop”. Keep in mind that each wireless uplink will suffer service degradation, so this should only be done when necessary.

Can I connect older UAPs wirelessly?

Yes, you just need to make sure to configure them correctly. Some older UAPs only broadcast on a single band (2.4GHz) and will not work the same as newer models. The following older generation UAPs do support wireless uplink on the band they operate on and do not support multi-hop: UAP, UAP-LR, UAP-PRO, UAP-Outdoor, UAP-Outdoor+, UAP-Outdoor5, UAP-IW.

UAP-AC and UAP-AC-Outdoor do not support wireless uplink or multi-hop.

If you have a UAP that does support wireless uplinking and it is still not working, make sure to take the following into account:

Dual band uplink UAP to dual band downlink UAP: will uplink on 5GHz.
Dual band uplink UAP to single band downlink UAP: will uplink on the supported frequency of the single band model.
Single band uplink UAP to single band downlink UAP: will uplink, as long as the same band is supported on both sides of the link.
Single band (2.4GHz only models) uplink UAP to dual band downlink AP will not be able to uplink.

If you have several wired UAPs, these should have assigned channels that are different and do not overlap with other UAP channels to minimize interference.

  • If using all dual band UAPs
    • Set the wired UAP (uplink UAP) to static on 5GHz and to a static on 2.4GHz (1, 6 or 11 making sure it’s not a band also set for any of the other UAPs). Leave the wireless UAP (downlink UAP) set to Auto on the 5GHz radio and set a static channel on 2.4GHz not shared by others.
  • If using all single band UAPs
    • Set the wired UAP (uplink UAP) to a static channel on 2.4GHz. Leave the wireless UAP (downlink UAP) set to Auto on 2.4GHz. 
  • If using a dual band UAP as the uplink and single band UAP as the downlink
    • Set the wired UAP (uplink) to a static channel on 2.4GHz. Leave the wireless UAP (downlink) set to Auto.

      Source :
      https://help.ui.com/hc/en-us/articles/115002262328-UniFi-Network-Troubleshooting-Wireless-Uplinks

Ubiquiti UniFi – USG/UDM: Port Forwarding Configuration and Troubleshooting

With UniFi Network you can forward UDP and TCP ports to an internal LAN device using the Port Forwarding feature on the Dream Machine (UDM and UDM Pro) and USG models.

Requirements

  • Applicable to the latest firmware on all UDM and USG models.
  • The Port Forwarding feature is designed to only work on WAN1 on the USG models, but it can use both WAN1 and WAN2 on the UDM-Pro.
  • It is necessary to manually configure a Destination NAT (DNAT) + WAN firewall rule(s) to forward ports on the WAN2 interface on the USG models, see the section below.

Frequently Asked Questions (FAQ)

Do I need to manually create firewall rules for Port Forwarding?Can I forward ports on the WAN2 interface of the UDM/USG?How does the Port Forwarding feature interact with UPnP?Do I need to manually configure Hairpin NAT?Can I limit which remote devices are allowed to use the forwarded ports? My Port Forwarding rule does not work, what should I do?

Configuring a Port Forwarding Rule

1. Navigate to Settings > Advanced Features > Advanced Gateway Settings and create new port forwarding.

2. Fill in the settings:

  • Name: webserver
  • Enable Forward Rule: turn this on when ready to activate this rule
  • Interface: WAN / WAN2 / Both (UDM Pro only)
  • From: Anywhere or Limited
  • Port: 443
  • Forward IP: 192.168.1.10
  • Forward Port: 443
  • Protocol: TCP
  • Logging: Optional
From:The clients on the Internet that are allowed to use the Port Forwarding rule. Set to Anywhere by default, meaning all hosts. It is possible to limit the allowed hosts by specifying an IP address (for example 198.51.100.1) or subnet range (for example 198.51.100.0/24). 
Port:The WAN port that the clients on the Internet connect to, for example 443. This does not need to match the port used on the internal LAN host. You can forward TCP port 10443 to TCP port 443, for example.
Forward IP:The IP address used by the internal LAN host, for example 192.168.1.10.
Forward Port:The port used by the internal LAN host, for example TCP port 443.
port-forwarding.wan.png

3. Apply the changes.

Note: On the USG models, it is necessary to manually configure a Destination NAT (DNAT) + WAN firewall rule to forward ports on the WAN2 interface, see the section below.

4. The firewall rule(s) needed for the new Port Forwarding rule you created are automatically added.

5. You can verify the automatically created rules in the Settings > Security > Internet Threat Management > Firewall > Internet section.

firewall.internet.automatic.rule.png

USG/USG-Pro: Forwarding Ports on WAN2 using Destination NAT

ATTENTION: This is an advanced configuration that requires creating and modifying the config.gateway.json file. See the UniFi – USG/USG-Pro: Advanced Configuration Using JSON article for more information on using the JSON file.

Follow the steps below to forward ports on the WAN2 interface of the USG models. It is necessary to manually create a Destination NAT (DNAT) rule using the Command Line Interface (CLI) and a custom Firewall Rule using the UniFi Network application. Afterwards, the config.gateway.json file needs to be created or updated to incorporate the custom configuration into UniFi Network.

1. Begin by creating a new custom Firewall Rule within  Settings > Security > Internet Threat Management > Firewall > Internet section.

2. Create a new Firewall Port Group by clicking Create New Group.

firewall.internet.png

3. Fill in the information and specify the port that needs to be allowed through the firewall (443 in this example) and apply changes.

  • Name: https
  • Type: Port Group
  • Port: 443
firewall.create-new-group.png

4. Navigate to    Settings > Security > Internet Threat Management > Firewall > Internet and create new rule.

5. Fill in the information, selecting the previously created Port Group and apply changes.

  • General
    • Type: Internet In
    • Description: webserver
    • Enabled: turned on when ready to take this rule live
    • Rule Applied: After (after predefined rules)
    • Action: Accept
    • IPv4 Protocol: TCP
    • Match all protocols except for this: disabled
  • Source: Optional
  • Destination
    • Destination Type: Address/Port Group
    • IPv4 Address Group: Any
    • Port Group: https (select from any previously created firewall port groups)
  • Advanced: Optional
firewall.create-new-rule.png

6. The next step is to access the USG using the Command Line Interface (CLI) and add a custom Destination NAT (DNAT) rule. SSH access to your devices must be enabled within    Settings > System Settings > Controller Configuration > Device SSH Authentication.

7. Connect to the USG via SSH.SSH using WindowsSSH using macOS

8. Verify that the WAN2 interface is UP and that it is assigned an IP address by running the following command: 

show interfaces ; sudo ipset list ADDRv4_eth2

Click to copy

unifiadmin@usg:~$ show interfaces 
Codes: S - State, L - Link, u - Up, D - Down, A - Admin Down
Interface    IP Address                        S/L  Description                 
---------    ----------                        ---  -----------                 
eth0         203.0.113.1/24                    u/u  WAN                         
eth1         192.168.1.1/24                    u/u  LAN                         
eth2         192.0.2.1/24                      u/u  WAN2                           
lo           127.0.0.1/8                       u/u                              
             ::1/128                          
unifiadmin@usg:~$ sudo ipset list ADDRv4_eth2
Name: ADDRv4_eth2
Type: hash:net
Revision: 3
Header: family inet hashsize 1024 maxelem 65536
Size in memory: 16792
References: 1
Members:
192.0.2.1

NOTE: The ADDRv4_eth2 is a special address group that automatically uses the IP address that is assigned to the eth2 interface. On the USG-Pro, the WAN2 interface uses eth3 instead and thus the address group will be ADDRv4_eth3.

9. Enter configuration mode by typing configure and hitting enter.

10. Add the Destination NAT rule for the WAN2 interface of the USG/USG-Pro (replace eth2 with eth3 for the USG-Pro):

set service nat rule 4001 description 'webserver'
set service nat rule 4001 destination group address-group ADDRv4_eth2
set service nat rule 4001 destination port 443
set service nat rule 4001 inbound-interface eth2
set service nat rule 4001 inside-address address 192.168.1.10
set service nat rule 4001 inside-address port 443
set service nat rule 4001 protocol tcp
set service nat rule 4001 type destination

Click to copy

11. Commit the changes and exit back to operational mode by typing commit ; exit and hitting enter.

This is an example of the process:

custom-dnat-rule.gif

12. Use the mca-ctrl -t dump-cfg command to display the entire config in JSON format:

mca-ctrl -t dump-cfg

Click to copy

13. The Destination NAT section of the configuration in JSON format can then be used in the config.gateway.json file.

{
       "service": {
                "nat": {
                        "rule": {
                                "4001": {
                                        "description": "webserver",
                                        "destination": {
                                                "group": {
                                                        "address-group": "ADDRv4_eth2"
                                                },
                                                "port": "443"
                                        },
                                        "inbound-interface": "eth2",
                                        "inside-address": {
                                                "address": "192.168.1.10",
                                                "port": "443"
                                        },
                                        "protocol": "tcp",
                                        "type": "destination"
                                }
                        }
                }
       }
}

Click to copy

14. See the UniFi – USG/USG-Pro: Advanced Configuration Using JSON article for more information on how to create and modify the config.gateway.json file.

Troubleshooting Port Forwarding Issues

Refer to the troubleshooting steps below if the Port Forwarding or custom Destination NAT rule is not working. Either of the following options can be the cause:   Possible Cause #1 – The USG/UDM is located behind NAT and does not have a public IP address.   Possible Cause #2 – The UDM/USG is already forwarding the port to another device or has UPnP enabled.   Possible Cause #3 – The traffic from the Internet clients is not reaching the WAN interface of the UDM/USG.  Possible Cause #4 – The LAN host is not allowing the port through the local firewall or does not have the correct route configured. 

Source :
https://help.ui.com/hc/en-us/articles/235723207-UniFi-USG-UDM-Port-Forwarding-Configuration-and-Troubleshooting

Ubiquiti UniFi – Layer 3 Adoption for Remote UniFi Network Applications

Layer 3 adoption is the process of adopting a UniFi device to a remote UniFi Network application.

You might use Layer 3 adoption for applications located in the cloud (e.g. on Amazon EC2) or NOC.

For regular device adoption, see UniFi – Device adoption.

Overview

In many deployments where it’s not possible to have the UniFi Network host running on-premise, you can run the UniFi Network application in the Cloud or your NOC. For example, for a large-scale project with many devices there are a few possible methods for the adoption of devices:

  • Take a laptop to the device’s site to perform adoption via Chrome browser (easiest method).
  • When you’re at the site, open a browser and navigate to Cloud: either the UniFi Remote Access Portal or the UniFi Network application (when launched using Cloud).
  • Create a virtual application instance on Amazon EC2.
  • Either configure the DHCP server or DNS server.

Initial setup

Please make sure you’re familiar with how a regular L2 adoption on UniFi works (where the devices and UniFi Network application are on the same network) before attempting L3 (remote) adoption. Also, remember that in order to adopt, the following conditions must be true in order to have internet access and also have access to the router from within the network (locally):

1. WAN port connected to the Internet.
2. LAN port connected locally to access management features on the router (USG or third party).

UniFi APs have a default inform URL http://unifi:8080/inform. Thus, the purpose of using DHCP option 43 or DNS is to allow the AP to know the IP of the UniFi Network application host.

If you encounter discovery issues please use the UniFi – Troubleshooting Device Adoption article to help you troubleshoot the issue.

After installing the Discovery tool plugin (freely available in Chrome Web Store) on a computer running Chrome browser, any locally-available, unmanaged UniFi Devices (i.e., same L2 network as your computer) will appear as “Pending Adoption” in the UniFi Cloud Access Portal as well as your UniFi Network application itself (in the Devices section in both cases). To access the application remotely Remote Access will have to be enabled.

Via UniFi OS

1. Go to https://unifi.ui.com and login with your Ubiquiti SSO credentials.

2. Navigate to the Devices section.

3. The device to be adopted will appear as ready to be adopted. Click Adopt.

unifi-devices.wireless.adoption.png

Via the UniFi Remote Access Portal

1. Go to https://network.unifi.ui.com/ and log in with your Ubiquiti SSO credentials.

2. Go to the Devices section and locate the model with the Pending Adoption status. Click ADOPT.

3. In the Adopt window that will appear, select the UniFi Network host and the site that will be adopting the device (for multi-site hosts) and click Adopt.

Via the UniFi Network application

1. Launch UniFi Network, go to the Devices section, find the device that is to be adopted with the status “Pending Adoption” and click Adopt under Actions.

DNS

You’ll need to configure your DNS server to resolve ‘unifi’ to your UniFi Network host’s IP address. Make sure that the device can resolve the UniFi Network domain name. For example, if you are setting http://XYZ:8080/inform, then ping from the device to determine if XYZ is resolvable/reachable. Or you may also use FQDN for the application inform URL: http://FQDN:8080/inform

Troubleshooting: Device (with static IP) fails to connect to the L3 UniFi Network application

  • When configuring a device from DHCP to static in the UniFi Network application, make sure you have put the IP of DNS. If not, then the device cannot contact DNS to resolve UniFi Network’s domain name.
  • If the device has been reset, make sure that you have “informed” the device twice (using the Discovery Utility) about the UniFi Network application’s location. See steps in the section above.

DHCP Option 43

If using Ubiquiti’s EdgeMAX routers, then DHCP option 43 can be done by just entering the IP address of the UniFi Network host in the “unifi” field on the DHCP-server.NOTE: The UniFi Security Gateway (USG) will not use DHCP option 43 to add the UniFi Network application location when obtaining a DHCP lease on the WAN interface.

To use DHCP option 43 you’ll need to configure your DHCP Server. We provide some third party examples below, but please refer to the manufacturer’s support documentation for up to date instructions. For example:

Linux’s ISC DHCP server: dhcpd.conf

# ...
option space ubnt;
option ubnt.unifi-address code 1 = ip-address;

class "ubnt" {
        match if substring (option vendor-class-identifier, 0, 4) = "ubnt";
        option vendor-class-identifier "ubnt";
        vendor-option-space ubnt;
}

subnet 10.10.10.0 netmask 255.255.255.0 {
        range 10.10.10.100 10.10.10.160;
        option ubnt.unifi-address 201.10.7.31;  ### UniFi Network host IP ###
        option routers 10.10.10.2;
        option broadcast-address 10.10.10.255;
        option domain-name-servers 168.95.1.1, 8.8.8.8;
        # ...
}

Cisco CLI

# assuming your UniFi is at 192.168.3.10
ip dhcp pool <pool name>
network <ip network> <netmask>
default-router <default-router IP address>
dns-server <dns server IP address>
option 43 hex 0104C0A8030A # 192.168.3.10 -> CO A8 03 0A

# Why 0104C0A8030A ?
#
# 01: suboption
# 04: length of the payload (must be 4)
# C0A8030A: 192.168.3.10

Mikrotik CLI

/ip dhcp-server option add code=43 name=unifi value=0x0104C0A8030A
/ip dhcp-server network set 0 dhcp-option=unifi

# Why 0104C0A8030A ?
#
# 01: suboption
# 04: length of the payload (must be 4)
# C0A8030A: 192.168.3.10

User Tip: Find more DHCP Option 43 instructions in the User Notes & Tips section.

SSH

If you can SSH into the device, it’s possible to do L3 adoption via CLI command:

1. Make sure the device is running updated firmware. See this guide: UniFi – Changing the Firmware of a UniFi Device.

2. Make sure the device is in the factory default state. If it’s not, run the following command:

sudo syswrapper.sh restore-default

3. SSH into the device and type the following and hit enter, substituting “ip-of-host” with the IP address of the host of the UniFi Network application:

set-inform http://ip-of-host:8080/inform

4. After issuing the set-inform, the UniFi device will show up for adoption in the Devices section of UniFi Network. Once you click Adopt, the device will appear to go offline or have the status of “Adopting” then proceed to “Provision” and “Connected”.

Source :
https://help.ui.com/hc/en-us/articles/204909754-UniFi-Layer-3-Adoption-for-Remote-UniFi-Network-Applications

Ubiquiti UniFi – How to Create and Restore a Backup

This article describes how to generate a backup of the UniFi Network application as well as how to restore it. This article does not cover the Auto Backup feature. You may see this article for more information on that subject: UniFi – How to Configure Auto Backup.

Note: This article is applicable to current UniFi Network application versions. Instructions on backups for older versions can be found at the bottom of this page in the “Method 3: Restoring from the /data Directory” section. As always, we suggest you update to the newest software and firmware available.

Introduction

The UniFi backup file has an extension of .unifi and contains the settings and the database for the UniFi Network application. The database is not included in a “settings only” backup. The backup also includes the config.propertiessystem.properties and config.gateway.json advanced configuration files, maps, and any customized files in a site’s portal folder. You can download a backup at any time from the Network application following the steps below.

Generate a New Backup

To generate a new UniFi backup file (.unifi), on your UniFi OS Console:

  1. Access and log into your UniFi OS Console at unifi.ui.com or locally via its IP address.
  2. Go to System Settings Advanced and enable the Back up Device toggle if disabled.
  3. Click Download to download your backup file. 

You can also use the Backup Scheduler to schedule creating a backup at a certain occurrence and time. 

Screenshot_2021-05-05_at_14.13.24.png

Restore a Backup

Method 1: Restore in the UniFi Network application

To restore a backup you have previously generated:

  1. Access and log into your UniFi OS Console at unifi.ui.com or locally via its IP address.
  2. Go to System Settings > Advanced and click the Restore in the “Restore Device” section.
  3. Select the necessary settings in the Restore Backup pop-up window:
    1. Select the device on the Device Selection drop-down field which you will restore from a backup.
    2. Confirm that you will restore your device either to the latest backup or select another backup from a list by clicking on the here text button.
    3. Enter your SSO account password and click Restore to begin the restoring process. 

Once you confirm, the backup restoration will begin. This process takes a few minutes. Do not disconnect while the application is working on this. Once the new backup is restored, the application will restart.

Method 2: Restore in the UniFi Startup Wizard

If beginning a new installation, it will be easier to just use the option of restore from a previous backup as soon as the UniFi Startup Wizard launches, and select your .unf file.

Method 3: Restore from the /data Directory

Note: This method is for older Network application versions and is not recommended. For security reasons, we suggest always upgrading to the newest release available. If you still wish to use this method, click on the link below.

Click here to display Method 3: Restoring from the /data Directory.

Change the Inform Address for All Devices in the Network application

ATTENTION:Use this method with caution. After completing these steps the devices will be setting the inform address to the new IP address or FQDN specified.  

It may be desired to change the IP address or FQDN that the UniFi devices on multiple sites are reporting to after an application restore. This process is typically used when migrating from one functional UniFi OS Console to a new install.

  1. Download a backup file from the current UniFi OS Console.
  2. Install the Network application on the new UniFi OS Console. 
  3. Restore the backup that came from step 1 and let the upload process finish.
  4. Log into the new UniFi OS Console. 
  5. On the old UniFi OS Console’s Network application, go to Settings > System > Other Configuration and enable the Override Inform Host toggle.
  6. Type in the new UniFi OS Console’s Hostname or IP Address field. 
  7. Select Apply Changes.

After the changes are applied the old UniFi OS Console will send the configuration to adopted and currently connected devices stating the inform host is now what was input in the Hostname or IP Address field.

If this was performed correctly, the devices should start appearing in the new UniFi OS Console. This should not take longer than 5 minutes but can be longer depending on the number of devices, the physical proximity of the devices, and new UniFi OS Console’s technical specification.

Source :
https://help.ui.com/hc/en-us/articles/204952144-UniFi-How-to-Create-and-Restore-a-Backup

How Will You Connect? A Guide for Choosing the Right Ubiquiti UniFi Access Point


Our selection of UniFi access points vary by functionality and design. Each model is thoughtfully engineered to meet precise user needs and optimize performance within specific environments. Together, they offer an ideal solution for everyone — whether you prioritize performance, design, aesthetics, or network simplicity.

Because each access point is so unique, it’s important to choose a model that best suits your needs.

A Best-in-Class Wireless Experience

Our line of UniFi 6 access points, beginning with the recently introduced U6 Lite and U6 Long-Range, mark our introduction of WiFi 6 technology to UniFi. With these and future U6 models, your network can support over 300 concurrent devices and deliver a reliably smooth wireless experience to each of them with OFDMA technology, which transfers high volumes of data more tactically across multiple devices to improve upload and download speeds.

While the U6 access points represent the future, tried-and-true models like the UniFi HD and nanoHD remain favorites for a wide variety of users, not just because of their speed and range but also their ability to provide a consistently strong signal to a large number of devices, which is crucial in our digital world.

These access points expand signal coverage with an integrated, directional antenna while only consuming a small amount of power. When mounted to the ceiling, these UniFi access points widen their coverage zones even further to ensure fast, stable connections across high-traffic environments.

You can also give your access points a bit of flair and align them with your space’s look and feel. For instance, you can change the color of your U6 access point’s LED ring or change the exterior of certain models with a variety of skins including wood, black fabric, and camouflage.

Extend Your WiFi and Connect More People

If you’re looking to extend your WiFi signal easily and without cumbersome equipment, a mesh access point could be the right device for you. Although all of our access points can link with the other access points in your office or home to enhance your signal’s reach and prevent dead zones, our mesh access points are specifically designed to do so. As such, mesh access points are often a go-to solution for hotels, museums, and other high-traffic areas.

Many mesh access points are also very compact and easily deployable. They can be mounted to a wall or ceiling, placed on a tabletop, or attached to a pole outdoors to improve connection quality throughout your property. 

WiFi extenders are also designed to improve the reach of your wireless signal by doubling your coverage area. These models are the definition of  plug-and-play; just plug them into a standard US wall outlet and instantly improve your WiFi experience! However you choose to extend your network, you’ll have a device that can support hundreds of concurrent connections with minimal power consumption.

Wireless Excellence for Thousands

What if you need to provide high-speed internet access to a lot of people—like, a LOT of people. Maybe it’s a concert hall packed with people livestreaming the headline act, or a stadium filled with thousands using their mobile devices simultaneously at halftime?

To give the people what they want, you’ll need a really powerful, high-capacity access point. As always, UniFi is ready for you with the WiFi BaseStation XG, one of the world’s best large-venue WiFi installations because of its ability to support up to 1,500 concurrent device connections. The BaseStation can dynamically filter and evenly distribute traffic to avoid channel congestion, as well as maximize coverage with its directional beamforming antenna.

Maybe you’re not just dealing with one location, though. What if you need to bridge the networks of two buildings in a downtown commercial district or industrial park? To help with these types of large networking projects, we offer point-to-point bridges that create multi-gigabit wireless links between two locations up to 500 meters apart. These bridging devices are designed to be highly adaptive to the layout of the area you’re looking to connect, sporting directional antennas that ensure strong, unobstructed links regardless of area zoning or building positioning.


Robust and Versatile Wireless Delivery

No matter how large or unique your network is, there’s a UniFi access point that can enhance your wireless experience, support your devices, and simplify your traffic management. 

To see the different UniFi access points in action, check out Which AP is Right for Me?, and for more detailed model information, head to the Ubiquiti Store. Also, remember to keep it tuned here and on our revamped YouTube channel for brand-new UniFi content, including how-to videos, unboxings, and more to help you build your network!

Source :
https://blog.ui.com/2021/02/19/how-will-you-connect-a-guide-for-choosing-the-right-unifi-access-point/

Intel Adds Hardware-Enabled Ransomware Detection to 11th Gen vPro Chips

Intel and Cybereason have partnered to build anti-ransomware defenses into the chipmaker’s newly announced 11th generation Core vPro business-class processors.

The hardware-based security enhancements are baked into Intel’s vPro platform via its Hardware Shield and Threat Detection Technology (TDT), enabling profiling and detection of ransomware and other threats that have an impact on the CPU performance.

“The joint solution represents the first instance where PC hardware plays a direct role in ransomware defenses to better protect enterprise endpoints from costly attacks,” Cybereason said.

Exclusive to vPro, Intel Hardware Shield provides protections against firmware-level attacks targeting the BIOS, thereby ensuring that the operating system (OS) runs on legitimate hardware as well as minimizing the risk of malicious code injection by locking down memory in the BIOS when the software is running to help prevent planted malware from compromising the OS.

Intel TDT, on the other hand, leverages a combination of CPU telemetry data and machine learning-based heuristics to identify anomalous attack behavior — including polymorphic malware, file-less scripts, crypto mining, and ransomware infections — in real-time.

“The Intel [CPU performance monitoring unit] sits beneath applications, the OS, and virtualization layers on the system and delivers a more accurate representation of active threats, system-wide,” Intel said. “As threats are detected in real-time, Intel TDT sends a high-fidelity signal that can trigger remediation workflows in the security vendor’s code.”

The development comes as ransomware attacks exploded in number last year, fueled in part by the COVID-19 pandemic, with average payout increasing from about $84,000 in 2019 to about $233,000 last year.

The ransomware infections have also led to a spike in “double extortion,” where cybercriminals steal sensitive data before deploying the ransomware and hold it hostage in hopes that the victims will pay up rather than risk having their information made public — thus completely undermining the practice of recovering from data backups and avoid paying ransoms.

What’s more, malware operators are increasingly extending their focus beyond the operating system of the device to lower layers to potentially deploy bootkits and take complete control of an infected system.

Last month, researchers detailed a new “TrickBoot” feature in TrickBot that can allow attackers to inject malicious code in the UEFI/BIOS firmware of a device to achieve persistence, avoid detection and carry out destructive or espionage-focused campaigns.

Viewed in that light, the collaboration between Intel and Cybereason is a step in the right direction, making it easier to detect and eradicate malware from the chip-level all the way to the endpoint.

“Cybereason’s multi-layered protection, in collaboration with Intel Threat Detection Technology, will enable full-stack visibility to swiftly detect and block ransomware attacks before the data can be encrypted or exfiltrated,” the companies said.

How to Use Password Length to Set Best Password Expiration Policy

One of the many features of an Active Directory Password Policy is the maximum password age. Traditional Active Directory environments have long using password aging as a means to bolster password security. Native password aging in the default Active Directory Password Policy is relatively limited in configuration settings.

Let’s take a look at a few best practices that have changed in regards to password aging. What controls can you enforce in regards to password aging using the default Active Directory Password Policy? Are there better tools that organizations can use regarding controlling the maximum password age for Active Directory user accounts?

What password aging best practices have changed?

Password aging for Active Directory user accounts has long been a controversial topic in security best practices.

While many organizations still apply more traditional password aging rules, noted security organizations have provided updated password aging guidance. Microsoft has said that they are dropping the password-expiration policies from the Security baseline for Windows 10 v1903 and Windows Server v1903. The National Institute of Standards and Technology (NIST) has long offered a cybersecurity framework and security best practice recommendations.

As updated in SP 800-63B Section 5.1.1.2 of the Digital Identity Guidelines – Authentication and Lifecycle Management, note the following guidance:

“Verifiers SHOULD NOT require memorized secrets to be changed arbitrarily (e.g., periodically). However, verifiers SHALL force a change if there is evidence of compromise of the authenticator.” NIST helps to explain the guidance change in their FAQ page covering the Digital Identity Guidelines.

It states: “Users tend to choose weaker memorized secrets when they know that they will have to change them in the near future. When those changes do occur, they often select a secret that is similar to their old memorized secret by applying a set of common transformations such as increasing a number in the password. This practice provides a false sense of security if any of the previous secrets has been compromised since attackers can apply these same common transformations. But if there is evidence that the memorized secret has been compromised, such as by a breach of the verifier’s hashed password database or observed fraudulent activity, subscribers should be required to change their memorized secrets. However, this event-based change should occur rarely, so that they are less motivated to choose a weak secret with the knowledge that it will only be used for a limited period of time.”

With the new guidance from the above organizations and many others, security experts acknowledge that password aging, at least in itself, is not necessarily a good strategy to prevent the compromise of passwords in the environment.

The recent changes in password aging guidance also apply to traditional Microsoft Active Directory Password Policies.

Active Directory Password Policy Password Aging

The capabilities of the password change policies in default Active Directory Password Policies are limited. You can configure the maximum password age, and that is all. By default, Active Directory includes the following Password Policy settings:

  • Enforce password history
  • Maximum password age
  • Minimum password age
  • Minimum password length
  • Minimum password length audit
  • Password must meet complexity requirements
  • Store passwords using reversible encryption

When you double click the maximum password age, you can configure the maximum number of days a user can use the same password.

When you look at the explanation given for the password age, you will see the following in the Group Policy setting:

“This security setting determines the period of time (in days) that a password can be used before the system requires the user to change it. You can set passwords to expire after a number of days between 1 and 999, or you can specify that passwords never expire by setting the number of days to 0. If the maximum password age is between 1 and 999 days, the minimum password age must be less than the maximum password age. If the maximum password age is set to 0, the minimum password age can be any value between 0 and 998 days.”

Defining the maximum password age with Active Directory Password Policy

With the default policy setting, you really can either turn the policy on or off and then set the number of days before the user password expires. What if you had further options to control the maximum password age and set different values based on the password complexity?

Specops Length Based Password Policy

As mentioned, recent guidance from many cybersecurity best practice authorities recommends against forced password changes and details the reasons for this change. However, many organizations may still leverage password aging as a part of their overall password security strategy to protect against user passwords falling into the wrong hands. What if IT admins had features in addition to what is provided by Active Directory?

Specops Password Policy provides many additional features when compared to the default Active Directory Password Policy settings, including password expiration. One of the options contained in the Specops Password Policy is called “Length based password aging.

Using this setting, organizations can define different “levels” of password expiration based on the user password’s length. It allows much more granularity in how organizations configure password aging in an Active Directory environment compared to using the default Active Directory Password Policy configuration settings.

It also allows targeting the weakest passwords in the environment and forcing these to age out the quickest. You will note in the screenshot. The length-based password aging in Specops Password Policy is highly configurable.

It includes the following settings:

  • Number of expiration levels – Enter how many expiration levels there will be. An expiration level determines how many extra days the user will have until their password expires and they are required to change it. This depends on how long the user’s password is. To increase the number of levels, move the slider to the right. The maximum number of expiration levels that can exist is 5.
  • Characters per level – The number of additional characters per level that define the extra days in password expiration
  • Extra days per level – How many additional expiration days each level is worth.
  • Disable expiration for the last level – Passwords that meet the requirements for the final expiration level in the list will not expire.
Configuring the Length based password policy in Specops Password Policy

Specops allows easily notifying end-users when their password is close to expiring. It will inform end-users at login or by way of sending an email notification. You can configure the days before expiration value for each of these settings.

Configuring password expiration notifications in Specops Password Policy

Organizations define the minimum and maximum password length configurations in the Password Rules area of the Specops Password Policy configuration. If you change the minimum and maximum password length configuration, the password length values in each level of the length-based password expiration will change as well.

Configuring the minimum and maximum password length

Combined with other Specops Password Policy features, such as breached password protection, the length-based password expiration strengthens enterprise password policies for both on-premises and remote workers.

Wrapping Up

Password aging has long been a feature of Active Directory Password Policies in most enterprise environments. However, as attackers get better at compromising passwords, new security best practice guidance is no longer recommending organizations make use of standard password aging.

Specops Password Policy provides compelling password aging capabilities that allow extending password aging features compared to default Active Directory Password Policies. By adding expiration levels, Specops Password Policy allows effectively targeting weak passwords in the environment by quickly aging these passwords out. End-users can use strong passwords much longer.

Organizations can even decide never to expire specific passwords that meet the defined password length. Using Specops Password Policy features, including length-based password expiration, helps to ensure more robust password security in the environment. Click here to learn more.

Securing Wireless Networks

In today’s connected world, almost everyone has at least one internet-connected device. With the number of these devices on the rise, it is important to implement a security strategy to minimize their potential for exploitation (see Securing the Internet of Things). Internet-connected devices may be used by nefarious entities to collect personal information, steal identities, compromise financial data, and silently listen to—or watch—users. Taking a few precautions in the configuration and use of your devices can help prevent this type of activity.

What are the risks to your wireless network?

Whether it’s a home or business network, the risks to an unsecured wireless network are the same. Some of the risks include:

Piggybacking

If you fail to secure your wireless network, anyone with a wireless-enabled computer in range of your access point can use your connection. The typical indoor broadcast range of an access point is 150–300 feet. Outdoors, this range may extend as far as 1,000 feet. So, if your neighborhood is closely settled, or if you live in an apartment or condominium, failure to secure your wireless network could open your internet connection to many unintended users. These users may be able to conduct illegal activity, monitor and capture your web traffic, or steal personal files.

Wardriving

Wardriving is a specific kind of piggybacking. The broadcast range of a wireless access point can make internet connections available outside your home, even as far away as your street. Savvy computer users know this, and some have made a hobby out of driving through cities and neighborhoods with a wireless-equipped computer—sometimes with a powerful antenna—searching for unsecured wireless networks. This practice is known as “wardriving.”

Evil Twin Attacks

In an evil twin attack, an adversary gathers information about a public network access point, then sets up their system to impersonate it. The adversary uses a broadcast signal stronger than the one generated by the legitimate access point; then, unsuspecting users connect using the stronger signal. Because the victim is connecting to the internet through the attacker’s system, it’s easy for the attacker to use specialized tools to read any data the victim sends over the internet. This data may include credit card numbers, username and password combinations, and other personal information. Always confirm the name and password of a public Wi-Fi hotspot prior to use. This will ensure you are connecting to a trusted access point.

Wireless Sniffing

Many public access points are not secured and the traffic they carry is not encrypted. This can put your sensitive communications or transactions at risk. Because your connection is being transmitted “in the clear,” malicious actors could use sniffing tools to obtain sensitive information such as passwords or credit card numbers. Ensure that all the access points you connect to use at least WPA2 encryption.

Unauthorized Computer Access

An unsecured public wireless network combined with unsecured file sharing could allow a malicious user to access any directories and files you have unintentionally made available for sharing. Ensure that when you connect your devices to public networks, you deny sharing files and folders. Only allow sharing on recognized home networks and only while it is necessary to share items. When not needed, ensure that file sharing is disabled. This will help prevent an unknown attacker from accessing your device’s files.

Shoulder Surfing

In public areas malicious actors can simply glance over your shoulder as you type. By simply watching you, they can steal sensitive or personal information. Screen protectors that prevent shoulder-surfers from seeing your device screen can be purchased for little money. For smaller devices, such as phones, be cognizant of your surroundings while viewing sensitive information or entering passwords.

Theft of Mobile Devices

Not all attackers rely on gaining access to your data via wireless means. By physically stealing your device, attackers could have unrestricted access to all of its data, as well as any connected cloud accounts. Taking measures to protect your devices from loss or theft is important, but should the worst happen, a little preparation may protect the data inside. Most mobile devices, including laptop computers, now have the ability to fully encrypt their stored data—making devices useless to attackers who cannot provide the proper password or personal identification number (PIN). In addition to encrypting device content, it is also advisable to configure your device’s applications to request login information before allowing access to any cloud-based information. Last, individually encrypt or password-protect files that contain personal or sensitive information. This will afford yet another layer of protection in the event an attacker is able to gain access to your device.

What can you do to minimize the risks to your wireless network?

  1. Change default passwords. Most network devices, including wireless access points, are pre-configured with default administrator passwords to simplify setup. These default passwords are easily available to obtain online, and so provide only marginal protection. Changing default passwords makes it harder for attackers to access a device. Use and periodic changing of complex passwords is your first line of defense in protecting your device. (See Choosing and Protecting Passwords.)
  2. Restrict access. Only allow authorized users to access your network. Each piece of hardware connected to a network has a media access control (MAC) address. You can restrict access to your network by filtering these MAC addresses. Consult your user documentation for specific information about enabling these features. You can also utilize the “guest” account, which is a widely used feature on many wireless routers. This feature allows you to grant wireless access to guests on a separate wireless channel with a separate password, while maintaining the privacy of your primary credentials.
  3. Encrypt the data on your network. Encrypting your wireless data prevents anyone who might be able to access your network from viewing it. There are several encryption protocols available to provide this protection. Wi-Fi Protected Access (WPA), WPA2, and WPA3 encrypt information being transmitted between wireless routers and wireless devices. WPA3 is currently the strongest encryption. WPA and WPA2 are still available; however, it is advisable to use equipment that specifically supports WPA3, as using the other protocols could leave your network open to exploitation.  
  4. Protect your Service Set Identifier (SSID). To prevent outsiders from easily accessing your network, avoid publicizing your SSID. All Wi-Fi routers allow users to protect their device’s SSID, which makes it more difficult for attackers to find a network. At the very least, change your SSID to something unique. Leaving it as the manufacturer’s default could allow a potential attacker to identify the type of router and possibly exploit any known vulnerabilities.
  5. Install a firewall. Consider installing a firewall directly on your wireless devices (a host-based firewall), as well as on your home network (a router- or modem-based firewall). Attackers who can directly tap into your wireless network may be able to circumvent your network firewall—a host-based firewall will add a layer of protection to the data on your computer (see Understanding Firewalls for Home and Small Office Use).
  6. Maintain antivirus software. Install antivirus software and keep your virus definitions up to date. Many antivirus programs also have additional features that detect or protect against spyware and adware (see Protecting Against Malicious Code and What is Cybersecurity?).
  7. Use file sharing with caution. File sharing between devices should be disabled when not needed. You should always choose to only allow file sharing over home or work networks, never on public networks. You may want to consider creating a dedicated directory for file sharing and restrict access to all other directories. In addition, you should password protect anything you share. Never open an entire hard drive for file sharing (see Choosing and Protecting Passwords).
  8. Keep your access point software patched and up to date. The manufacturer of your wireless access point will periodically release updates to and patches for a device’s software and firmware. Be sure to check the manufacturer’s website regularly for any updates or patches for your device.
  9. Check your internet provider’s or router manufacturer’s wireless security options. Your internet service provider and router manufacturer may provide information or resources to assist in securing your wireless network. Check the customer support area of their websites for specific suggestions or instructions.
  10. Connect using a Virtual Private Network (VPN). Many companies and organizations have a VPN. VPNs allow employees to connect securely to their network when away from the office. VPNs encrypt connections at the sending and receiving ends and keep out traffic that is not properly encrypted. If a VPN is available to you, make sure you log onto it any time you need to use a public wireless access point.

Authors

CISA

Source :
https://us-cert.cisa.gov/ncas/tips/ST05-003

WiFi Protection in Public Places

WiFi Internet has added much convenience to our daily lives, with its easy accessibility in public places such as restaurants, hotels, and cafes; malls, parks, and even in airplanes, where we can connect online for faster transactions and communication. Like any online technology, however, it’s vulnerable to hacker abuse, posing potential threats to you and your mobile devices.

Public WiFi hotspots in particular are unsecure, easily hacked by cybercriminals. Some ways you can be hacked when connected to public WiFi include (MUO, Bates, 10/3/16):

  • The hacker can get between you and the WiFi hotspot when hooked to the network, to perform man-in-the-middle attacks and spy on your connection.
  • The hacker can “spoof” the legitimate WiFi, creating an “evil twin” that you log onto without noticing it’s a fake—which again, lets them spy on your data in transit.
  • A hacker can “sniff” the packets on the unencrypted network you’re attached to, reading it with software like WireShark, for identity clues they can analyze and use against you later.
  • They can also “hijack” a session in real-time, reading the cookies sent to your device during a session, to gain access to private accounts you’re logged into. This is typically known as “sidejacking.”
  • Finally, they can “shoulder-surf,” simply watching you over your shoulder, to view your screens and track your keystrokes. In crowded places, it’s easy for hackers to “eavesdrop” on your connection.

Ways you can protect yourself when using public WiFi include (Wired, Nield, 8/5/18):

  • Connect only to more trusted public networks, like Starbucks, rather than any random public WiFi that shows up in your WiFi connection settings, as in a shopping mall or park.
  • Connect only to websites that show HTTPS, not just HTTP, which means the data transmission between the site and you is encrypted.
  • Don’t provide too much personal data, such as email addresses and phone numbers, if the WiFi network requires it to connect. Better to not connect than risk unwanted ads or even identity theft.
  • Don’t do public file or print sharing over public WiFi networks. This is even more true of financial transactions: banking on unsecured WiFi networks is an invitation to hackers to steal your data in transit.
  • Use a Virtual Private Network (VPN) on your mobile device, so you can be certain your data is encrypted to and from your mobile device.

The last piece of advice should probably be your first line of defense. Trend Micro WiFi Protection, for example, protects your devices from online threats by providing just such a VPN. It safeguards your private information when using public hotspots by automatically turning on when the device connects to an unsecured WiFi network. This ensures total anonymity from public servers and hides your data from hacker inspection by encrypting your data over the network. Trend Micro WiFi Protection also includes built-in web threat protection that protects you from online frauds and scams that can come your way via malicious links—and notifies you if there are any WiFi security issues on the network itself. You’ll be happy to also know that Trend Micro WiFi Protection does not affect your WiFi speed as it connects to its local or regional secured server.

Stay safe on public WiFi! Trend Micro WiFi Protection is available for PCMacAndroid and iOSdevices.


Source
https://blog.trendmicro.com/wifi-protection-in-public-places/

Ubiquiti Telnet Commands

telnet/ssh commands

UniFi Command Line Interface – Ubiquiti Networks info                      display AP information
set-default               restore to factory default
set-inform <inform_url>   attempt inform URL (e.g. set-inform http://192.168.0.8:8080/inform)
upgrade <firmware_url>    upgrade firmware (e.g. upgrade http://192.168.0.8/unifi_fw.bin)
reboot                    reboot the AP source:
https://community.ubnt.com/t5/UniFi-Wireless/Telnet-commands/td-p/1338536

Exit mobile version