SonicOS API provides an alternative to the SonicOS Command Line Interface (CLI) for configuring selected functions. SonicOS API is disabled by default in SonicOS.
To use the SonicOS API, you must enable it, either through the SonicOS Management Interface or from the CLI. SonicOS API is supported on all platforms on GEN7 and running SonicOS 6.5.4 and higher for GEN6.
Resolution
Resolution for SonicOS 7.X
This release includes significant user interface changes and many new features that are different from the SonicOS 6.5 and earlier firmware. The below resolution is for customers using SonicOS 7.X firmware.
ENABLING THE API MODULE ON THE FIREWALL UI.Login to the SonicWall management UI. Navigate to Device | Settings | Administration | Audit/SonicOS API section. Enable the option ‘Enable SonicOS API’ and ‘Enable RFC-2617 HTTP Basic Access authentication’ options.
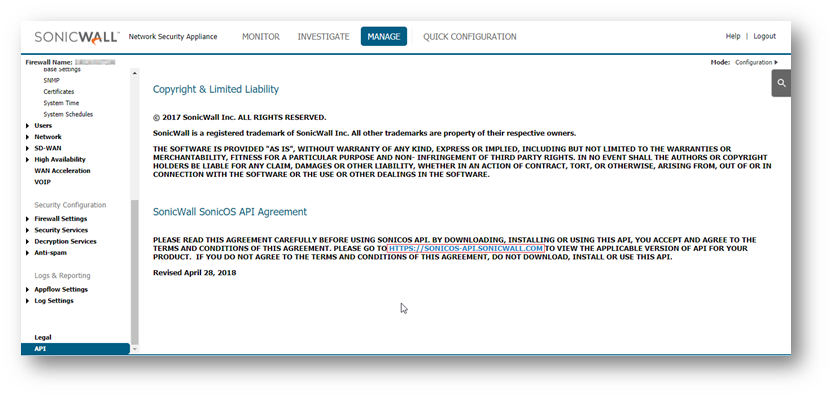
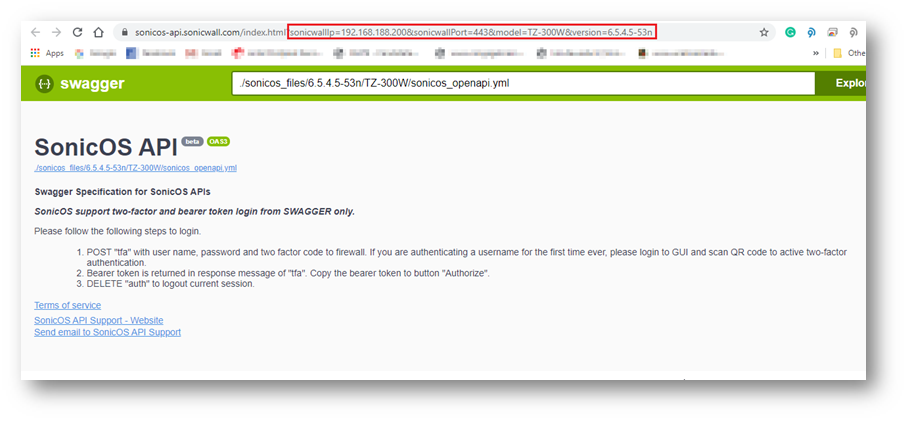
LIST OF APPLICABLE APIS:Navigate to MANAGE | API and click on the link https://SonicOS-api.sonicwall.com. Swagger will prepopulate your SonicWalls’s IP, MGMT Port, and Firmware so it can give you a list of applicable APIs.
LOGIN TO THE FIREWALL USING POSTMANThe following 3 steps need to be performed for every API request in Gen7 devices.
NOTE: https://IP-address:port/– Replace this with your SonicWall’s Public or private IP address with the right management port number (If the management port is 443, you can directly use https:// followed by the IP address without the port number too).
a) The HTTP method should be POST and we need to use the URL: https://192.168.168.168/api/sonicos/auth Under the authorization tab, select Basic Auth and mention the correct admin credentials.
b) Under the settings tab, turn OFF the Enable SSL certificate verification if the firewall uses a self-signed certificate for management.
c) Under the headers tab, include application/Json as the value for keys Accept and Content-type.
d) The Gen 7 devices are token-driven. Use the {“override” : true} under the body to override any older tokens. This is used only during login. After this, click on the Send button and then you can see the response in the section below. The response should contain a message: “success”.
e) After this, click on the Send button and then you can see the response in the section below. The response should contain a message: “success”.
cURL code: curl --location --request POST 'https://192.168.168.168/api/sonicos/auth' \--header 'Accept: application/Json' \--header 'Content-Type: application/Json' \--header 'Authorization: Basic YWRtaW46cGFzc3dvcmQ= --data-raw '{"override" : true}' Command Output should contain a string: “success”: true
Restart command Restart can be pushed in 2 ways: now or later. There is nothing in the body of the API call as you will notice in the screenshot below.
Restart in ___ minutes/hours/days/ If the plan is to restart after some time, you can schedule that. Please ensure you log out after the command since there is a waiting period. You can make other configurational changes, but it should be noted that you ‘commit’ the changes as a restart can clear off the pending configuration if not saved.
You may change the URL to suit your requirement. The number that you use should be an unsigned integer (UINT32) with values ranging from 0 to 4,294,967,295. For example, it can be made ../restart/in/2/days ../restart/in/24/hours
This release includes significant user interface changes and many new features that are different from the SonicOS 6.2 and earlier firmware. The below resolution is for customers using SonicOS 6.5 firmware.
Enabling the API Module on the firewall UI Login to the SonicWall management UI. Navigate to MANAGE | Appliance | Base Settings and scroll down to SonicOS API section. Enable the option ‘Enable SonicOS API’ and ‘Enable RFC-2617 HTTP Basic Access authentication’ options.
List of applicable APIs Navigate to MANAGE | API and click on the link https://SonicOS-api.sonicwall.com. Swagger will prepopulate your SonicWalls’s IP, MGMT Port, Firmware so it can give you a list of applicable APIs. TIP: You are free to choose Swagger, Postman, Git bash, or any application that allows API calls, if you are using a Linux based operating system you can execute cURL from the terminal. For this article I am using Git bash on Windows.
LOGIN TO THE FIREWALL USING POSTMANThe following 3 steps need to be performed for every API request in Gen7 devices.
NOTE: https://IP-address:port/– Replace this with your SonicWall’s Public or private IP address with the right management port number (If the management port is 443, you can directly use https:// followed by the IP address without the port number too).
a) The HTTP method should be POST and we need to use the URL: https://192.168.168.168/api/sonicos/auth Under the authorization tab, select Basic Auth and mention the correct admin credentials.
b) Under the settings tab, turn OFF the Enable SSL certificate verification if the firewall is using a self-signed certificate for management.
c) Under the headers tab, include application/Json as the value for keys Accept and Content-type.
d) The Gen 7 devices are token-driven. Use the {“override” : true} under the body to override any older tokens. This is used only during login. After this, click on the Send button and then you can see the response in the section below. The response should contain a message: “success”.
e) After this, click on the Send button and then you can see the response in the section below. The response should contain a message: “success”.
cURL code: curl --location --request POST 'https://192.168.168.168/api/sonicos/auth' \--header 'Accept: application/Json' \--header 'Content-Type: application/Json' \--header 'Authorization: Basic YWRtaW46cGFzc3dvcmQ= --data-raw '{"override" : true}' Command Output should contain a string: “success”: true
Restart command Restart can be pushed in 2 ways: now or later. There is nothing in the body of the API call as you will notice in the screenshot below.
Restart in ___ minutes/hours/days/ If the plan is to restart after some time, you can schedule that. Please ensure you log out after the command, if there is a waiting period. You can make other configurational changes, but it should be noted that you ‘commit’ the changes as a restart can clear off the pending configuration if not saved.
You may change the URL to suit your requirement. The number that you use should be an unsigned integer (UINT32) with values ranging from 0 to 4,294,967,295. For example, it can be made ../restart/in/2/days ../restart/in/24/hours
If you want to improve your network security and performance, learning how to set up a VLAN properly is all you need. Virtual LANs are powerful networking tools that allow you to segment your network into logical groups and isolate traffic between them.
In this post, we will go through the steps required to set up a VLAN in your network. We will configure two switches along with their interfaces and VLANs, respectively.
So, let’s dive in and learn how to set up VLANs and take your network to the next level.
Table of Contents
What is a VLAN?
Preparing for VLAN configuration
Our Lab
Network Diagram
How to set up a VLAN on a Switch?
Let’s connect to the Switch
Configure VLANs
Assign switch ports to VLANs
Configure trunk ports
Extra Configuration to Consider
What is a VLAN?
Before we go deep into learning how to set up a VLAN and provide examples, let’s understand the foundations of VLANs (or Virtual Local Area Networks).
In a nutshell, VLANs are logical groupings of devices that rely on Layer 2 addresses (MAC) for communication. VLANs are implemented to segment a physical network (or large Layer two broadcast domains) into multiple smaller logical networks (isolated broadcast domains).
Each VLAN behaves as a separate network with its own broadcast domain. VLANs help prevent broadcast storms (extreme amounts of broadcast traffic). They also help control traffic and overall improve network security and performance.
Preparing for VLAN configuration
Although VLANs are usually left for Layer 2 switches, in reality, any device (including routers and L3 switches) with switching capabilities and support of VLAN configuration should be an excellent fit for VLANs. In addition, VLANs are supported by different vendors, and since each vendor has a different OS and code, the way the VLANs are configured may slightly change.
Furthermore, you can also use specific software such as network diagramming and simulation to help you create network diagrams and test your configuration.
Our Lab
We will configure a popular Cisco (IOS-based) switch for demonstration purposes. We will use Boson NetSim (a network simulator for Cisco networking hardware and software) to run Cisco IOS simulated commands. This simulation is like you were configuring an actual Cisco switch or router.
Network Diagram
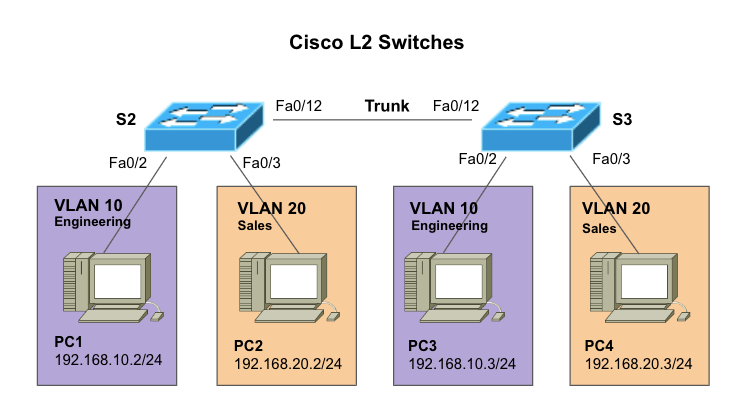
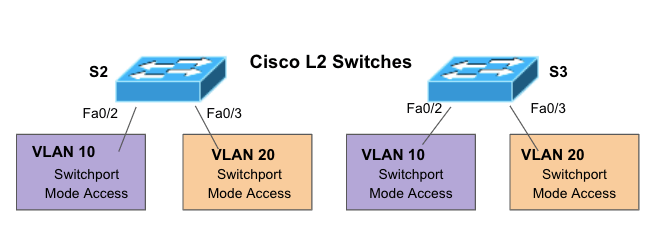
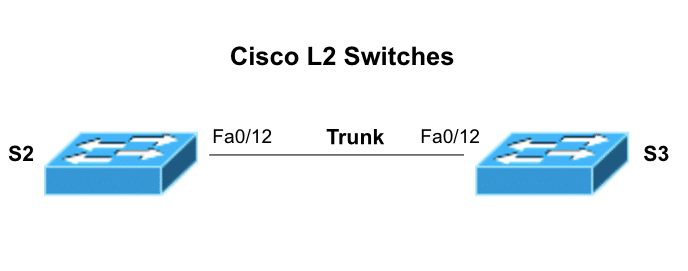
To further illustrate how to set up a VLAN, we will work on the following network diagram. We will configure two VLANs in two different switches. We will then configure each port on the switches connected to a PC. We will then proceed to configure the trunk port, which is vital for VLAN traffic.
Network diagram details
S2 and S3 (Switch 2 and Switch 3) – Two Cisco L2 Switches connecting PCs at different VLANs (VLAN 10 and VLAN 20) via Fast Ethernet interfaces.
VLANs 10 and VLAN20. These VLANs configured in L2 switches (S2 and S3) create a logical grouping of PCs within the network. In addition, each VLAN gets a name, VLAN 10 (Engineering) and VLAN 20 (Sales).
PCs. PC1, PC2, PC3, and PC4 are each connected to a specific L2 switch.
How to set up a VLAN on a Switch?
So now that you know the VLAN configuration we will be using, including the number of switches, VLAN ID, VLAN name, and the devices or ports that will be part of the configuration, let’s start setting up the VLANs.
Note:VLAN configuration is just a piece of the puzzle. Switches also need proper interface configuration, authentication, access, etc. To learn how to correctly connect and configure everything else, follow the step-by-step guide on how to configure a Cisco Switch.
a. Let’s connect to the switch
Inspect your hardware and find the console port. This port is usually located on the back of your Cisco switch. You can connect to the switch’s “console port” using a console cable (or rollover). Connect one end of the console cable to the switch’s console port and the other to your computer’s serial port.
Note: Obviously, not all modern computers have serial ports. Some modern switches come with a Mini USB port or AUX port to help with this. But if your hardware doesn’t have these ports, you can also connect to the switch port using special cables like an RJ-45 rollover cable, a Serial DB9-to-RJ-45 console cable, or a serial-to-USB adapter.
Depending on your switch’s model, you can configure it via Command Line Interface (CLI) or Graphical User Interface (GUI). We will connect to the most popular user interface: The IOS-based CLI.
To connect to your switch’s IOS-based CLI, you must use a terminal emulator on your computer, such as PuTTY or SecureCRT.
You’ll need to configure the terminal emulator to use the correct serial port and set the baud rate to 9600. Learn how to properly set these parameters in the Cisco switching configuration guide.
In the terminal emulator, press Enter to activate the console session. The Cisco switch should display a prompt asking for a username and password.
Enter your username and password to log in to the switch.
b. Configure VLANs
According to our previously shown network diagram, we will need two VLANs; VLAN 10 and VLAN 20.
To configure Layer 2 switches, you need to enter the privileged EXEC mode by typing “enable” and entering the password (if necessary).
Enter the configuration mode by typing “configure terminal.”
Create the VLAN with “vlan <vlan ID>” (e.g., “vlan 10”).
Name the VLAN by typing “name <vlan name>” (e.g., “name Sales”).
Repeat these two steps for each VLAN you want to create.
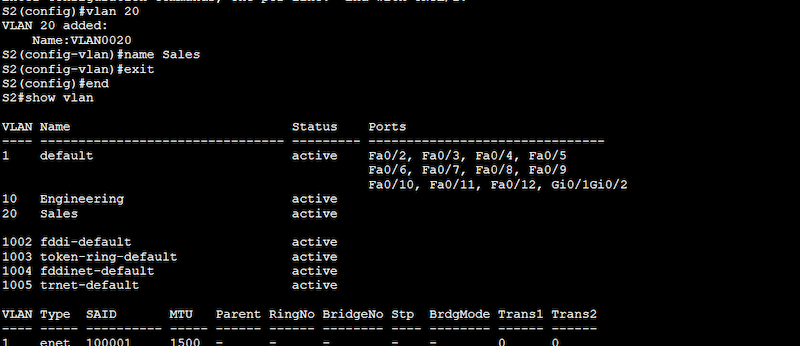
Configuration on Switch 2 (S2)
S2# configure terminal
S2(config)# vlan 10
S2(config-vlan)# name Engineering
S2(config-vlan)# end
S2# configure terminal
S2(config)# vlan 20
S2(config-vlan)# name Sales
S2(config-vlan)# end
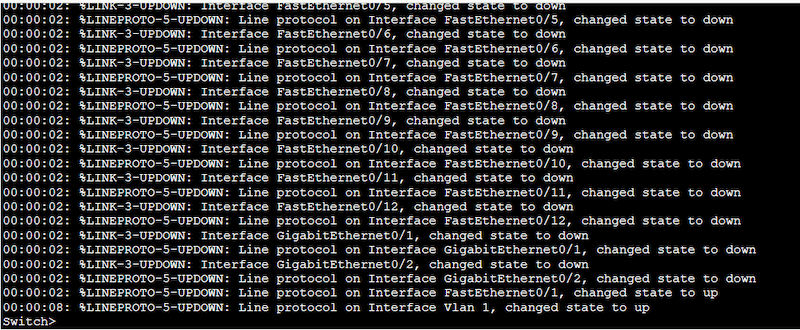
Use the “show vlan” command to see the configured VLANs. From the output below, you’ll notice that the two new VLANs 10 (Engineering) and 20 (Sales) are indeed configured and active but not yet assigned to any port.
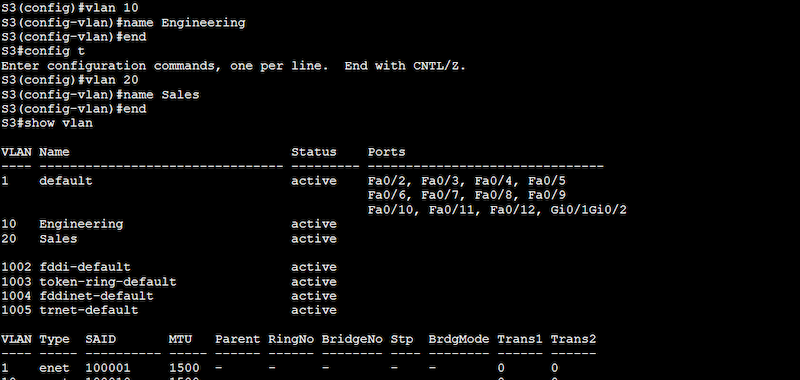
Configuration on Switch 3 (S3)
S3# configure terminal
S3(config)# vlan 10
S3(config-vlan)# name Engineering
S3(config-vlan)# end
S3# configure terminal
S3(config)# vlan 20
S3(config-vlan)# name Sales
S3(config-vlan)# end
Note: From the output above, you might have noticed VLAN 1 (default), which is currently active and is assigned to all the ports in the switch. This VLAN, also known as native VLAN, is the default VLAN on most Cisco switches. It is used for untagged traffic on a trunk port. This means that all traffic that is not explicitly tagged with VLAN information will be sent to this default VLAN.
Now, let’s remove those VLAN 1 tags from interfaces Fa0/2 and Fa0/3. Or in simple words let’s assign the ports to our newly created VLANs.
c. Assign switch ports to VLANs
In the previous section, we created our VLANs; now, we must assign the appropriate switch ports to the correct VLANs. The proper steps to assign switch ports to VLANs are as follows:
Enter configuration mode. Remember to run these commands under the configuration mode (configure terminal).
Assign ports to the VLANs by typing “interface <interface ID>” (e.g., “interface GigabitEthernet0/1”).
Configure the port as an access port by typing “switchport mode access”
Assign the port to a VLAN by typing “switchport access vlan <vlan ID>” (e.g., “switchport access vlan 10”).
Repeat these steps for each port you want to assign to a VLAN.
Let’s refer to a section of our network diagram
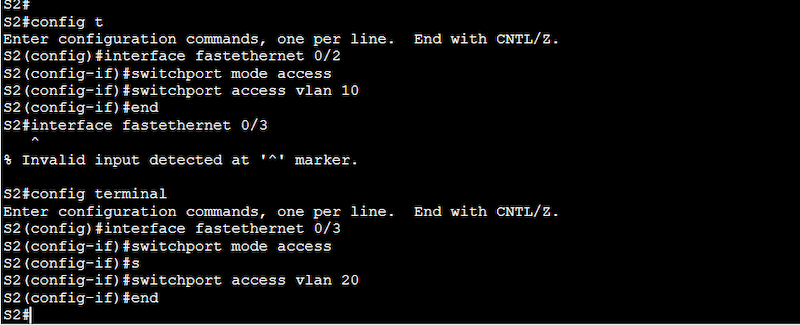
Configuration on Switch 2 (S2)
S2(config)# interface fastethernet 0/2
S2(config-if)# switchport mode access
S2(config-if)# switchport access vlan 10
S2(config)# interface fastethernet 0/3
S2(config-if)# switchport mode access
S2(config-if)# switchport access vlan 20
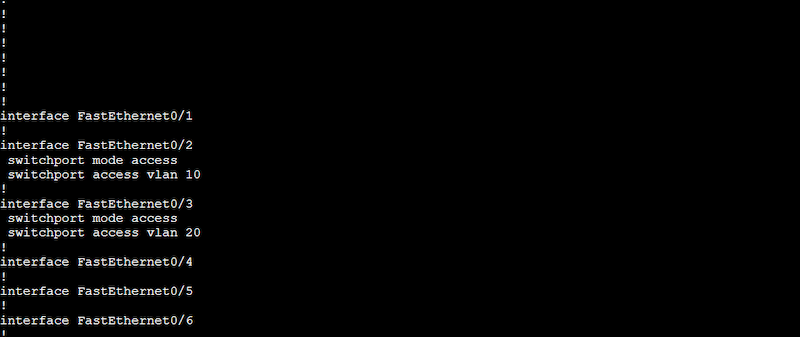
Use the “show running-configuration” to see the new configuration taking effect on the interfaces.
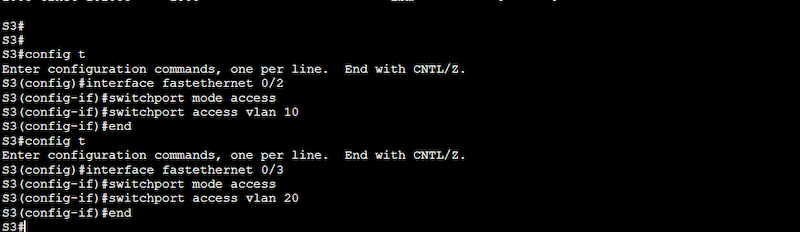
Configuration on Switch 3 (S3)
S3(config)# interface fastethernet 0/2
S3(config-if)# switchport mode access
S3(config-if)# switchport access vlan 10
S3(config)# interface fastethernet 0/3
S3(config-if)# switchport mode access
S3(config-if)# switchport access vlan 20
A “show running-configuration” can show you our configuration results.
d. Configure trunk ports
Trunk ports are a type of switch port mode (just like access) that perform essential tasks like carrying traffic for multiple VLANs between switches, tagging VLAN traffic, supporting VLAN management, increasing bandwidth efficiency, and allowing inter-VLAN routing.
If we didn’t configure trunk ports between our switches, the PCs couldn’t talk to each other on different switches, even if they were on the same VLAN.
Here’s a step by step to configuring trunk ports
Configure a trunk port to carry traffic between VLANs by typing “interface <interface ID>” (e.g., “interface FastEthernet0/12”).
Set the trunk encapsulation method (dot1q). The IEEE 802.1Q (dot1q) trunk encapsulation method is the standard tagging Ethernet frames with VLAN information.
Configure the port as a trunk port by typing “switchport mode trunk”.
Repeat the steps for each trunk port you want to configure.
Note (on redundant trunk links): To keep our article simple, we will configure one trunk link. However, keep in mind that any good network design (including trunk links) would need redundancy. One trunk link between switches is not an optimal redundant solution for networks on production. To add redundancy, we recommend using EtherChannel to bundle physical links together and configure the logical link as a trunk port. You can also use Spanning Tree Protocol (STP) by using the “spanning-tree portfast trunk” command.
Note: You can use different types of trunk encapsulation such as dot1q and ISL, just make sure both ends match the type of encapsulation.
Extra Configuration to Consider
Once you finish with VLAN and trunk configuration, remember to test VLAN connectivity between PCs, you can do this by configuring the proper IP addressing and doing a simple ping. Below are other key configurations related to your new VLANs that you might want to consider.
a. Ensure all your interfaces are up and running
To ensure that your interfaces are not administratively down, issue a “no shutdown” (or ‘no shut’) command on all those newly configured interfaces. Additionally, you can also use the “show interfaces” to see the status of all the interfaces.
b. (Optional) enable inter-VLAN
VLANs, as discussed earlier, separate broadcast domains (Layer 2) — they do not know how to route IP traffic because Layer 2 devices like switches can’t accept IP address configuration on their interfaces. To allow inter-VLAN communication (PCs on one VLAN communicate with PCs on another VLAN), you would need to use a Layer 3 device (a router or L3 switch) to route traffic.
There are three ways to implement inter-VLAN routing: an L3 router with multiple Ethernet interfaces, an L3 router with one router interface using subinterfaces (known as Router-On-a-Stick), and an L3 switch with SVI.
We will show a step-by-step on how to configure Router-On-a-Stick for inter-VLAN communications.
Connect the router to one switch via a trunk port.
Configure subinterfaces on the router for each VLAN (10 and 20 in our example). To configure subinterfaces, use the “interface” command followed by the VLAN number with a period and a subinterface number (e.g., “interface FastEthernet0/0.10” for VLAN 10). For example, to configure subinterfaces for VLANs 10 and 20, you would use the following commands:
> router(config-subif)# ip address 192.168.20.1 255.255.255.0
Configure a default route on the router using the “ip route” command. This is a default route to the Internet through a gateway at IP address 192.168.1.1. For example:
> router(config)# ip route 0.0.0.0 0.0.0.0 192.168.1.1
c. Configure DHCP Server
To automatically assign IP addresses to devices inside the VLANs, you will need to configure a DHCP server. Follow these steps:
The DHCP server should also be connected to the VLAN.
Configure the DHCP server to provide IP addresses to devices in the VLAN.
Configure the router to forward DHCP requests to the DHCP server by typing “ip helper-address <ip address>” (e.g., “ip helper-address 192.168.10.2”).
Final Words
By following the steps outlined in this post, you can easily set up a VLAN on your switch and effectively segment your network. Keep in mind to thoroughly test your VLAN configuration and consider additional configuration options to optimize your network for your specific needs.
With proper setup and configuration, VLANs can greatly enhance your network’s capabilities and 10x increase its performance and security.
The realm of Network Monitoring Tools, Software, and Vendors is Huge, to say the least. New software, tools, and utilities are being launched almost every year to compete in an ever-changing marketplace of IT monitoring, server monitoring, and system monitoring software.
I’ve test-driven, played with and implemented dozens during my career and this guide rounds up the best ones in an easy-to-read format and highlighted their main strengths and why I think they are in the top class of tools to use in your IT infrastructure and business.
Some of the features I am looking for are device discovery, uptime/downtime indicators, along with robust and thorough alerting systems (via email/SMS), NetFlow and SNMP Integration as well as considerations that are important with any software purchase such as ease of use and value for money.
The features from above were all major points of interest when evaluating software suites for this article and I’ll try to keep this article as updated as possible with new feature sets and improvements as they are released.
Here is our list of the top network monitoring tools:
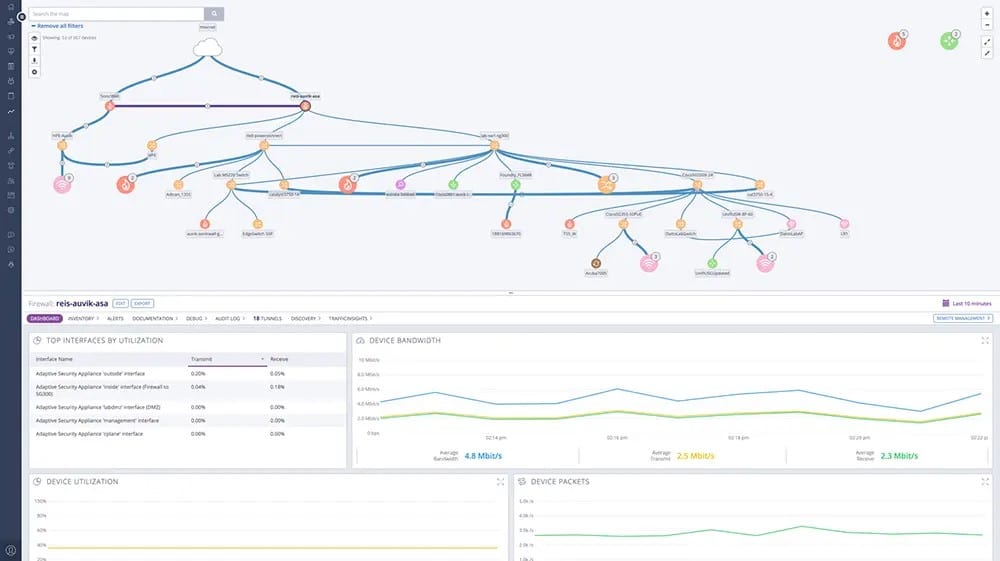
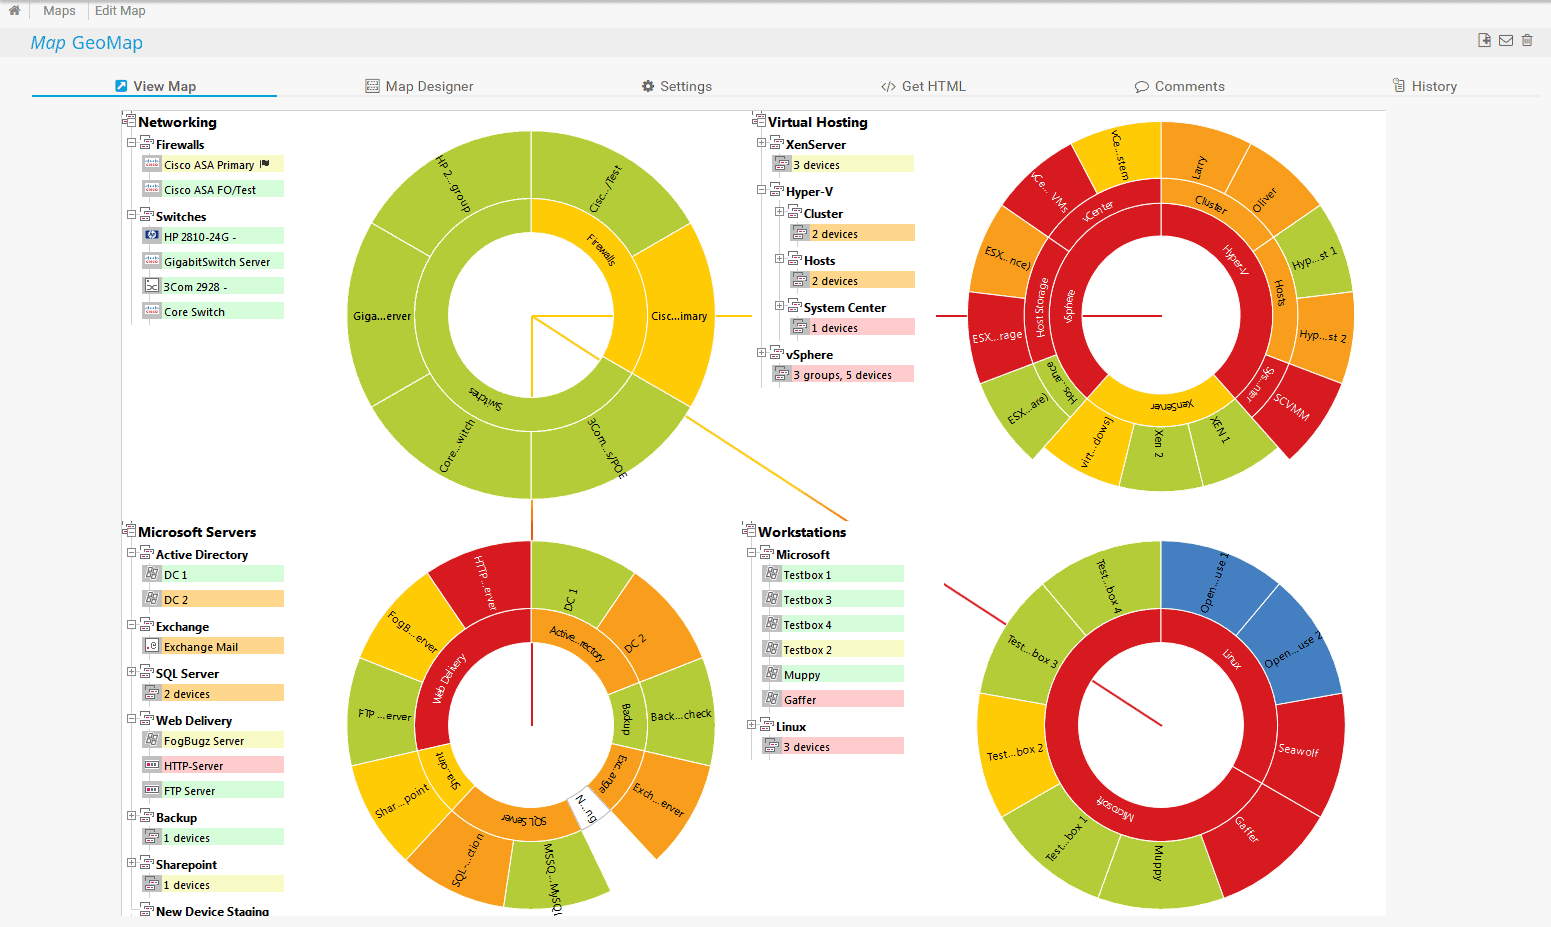
Auvik – EDITOR’S CHOICE This cloud platform provides modules for LAN monitoring, Wi-Fi monitoring, and SaaS system monitoring. The network monitoring package discovers all devices, maps the network, and then implements automated performance tracking. Get a 14-day free trial.
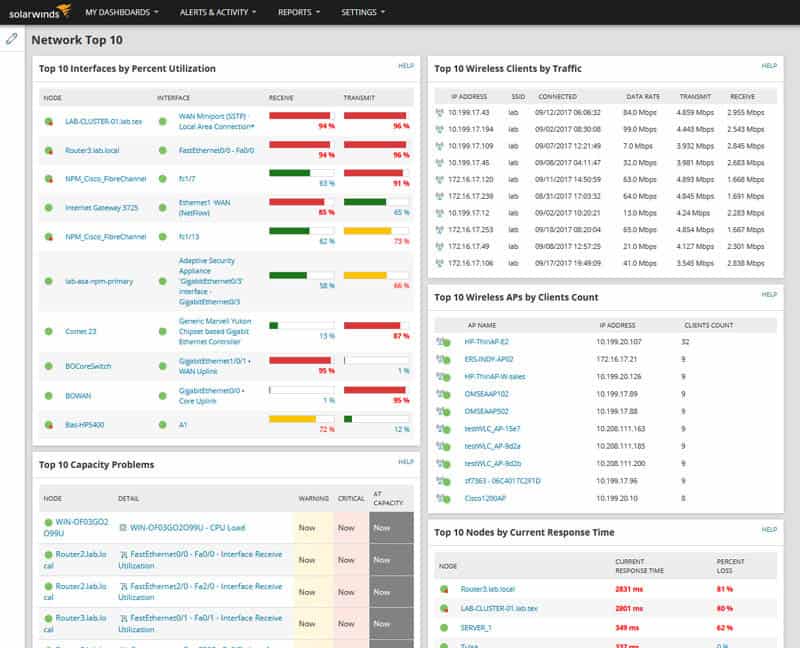
SolarWinds Network Performance Monitor – FREE TRIAL The leading network monitoring system that uses SNMP to check on network device statuses. This monitoring tool includes autodiscovery that compiles an asset inventory and automatically draws up a network topology map. Runs on Windows Server. Start 30-day free trial.
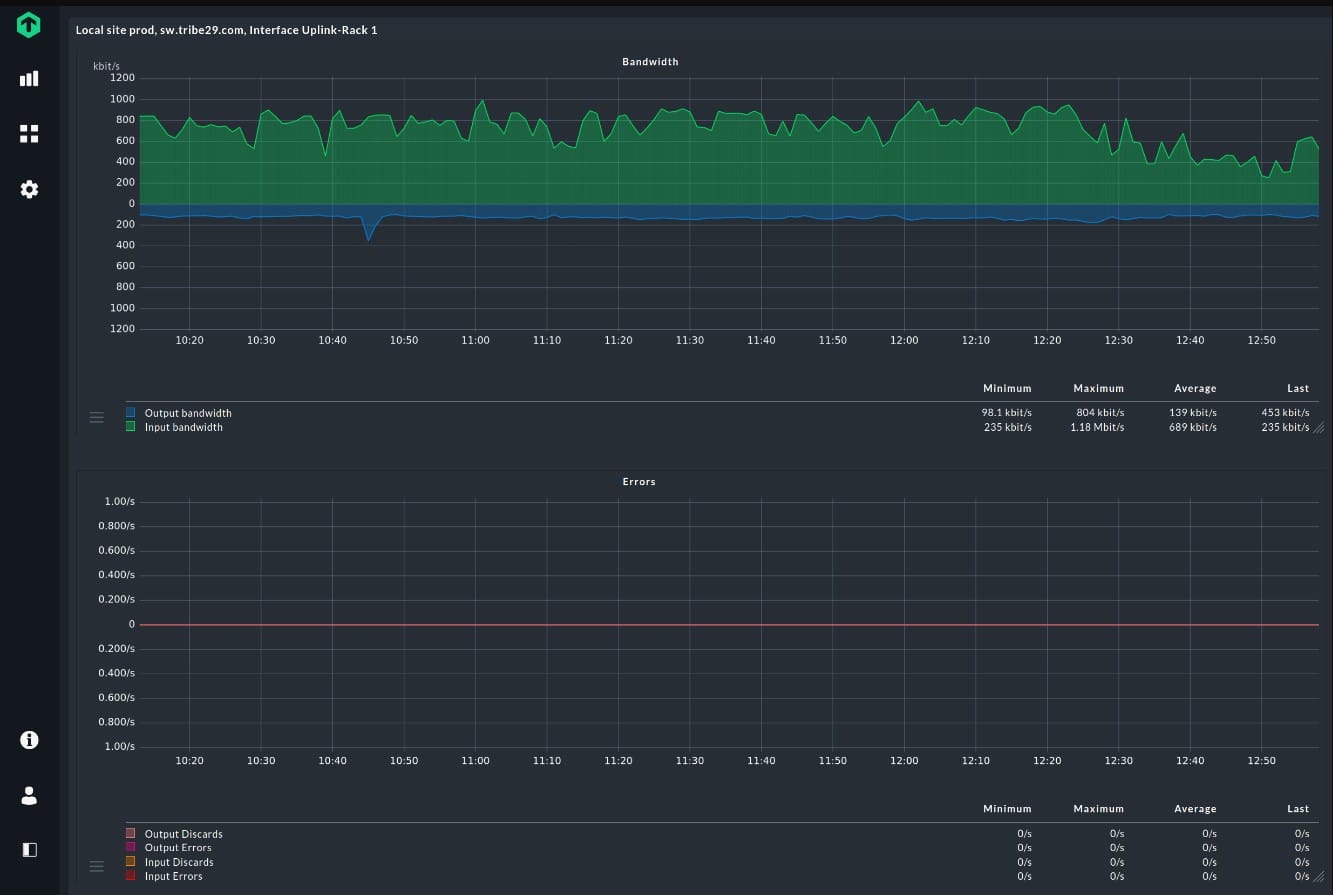
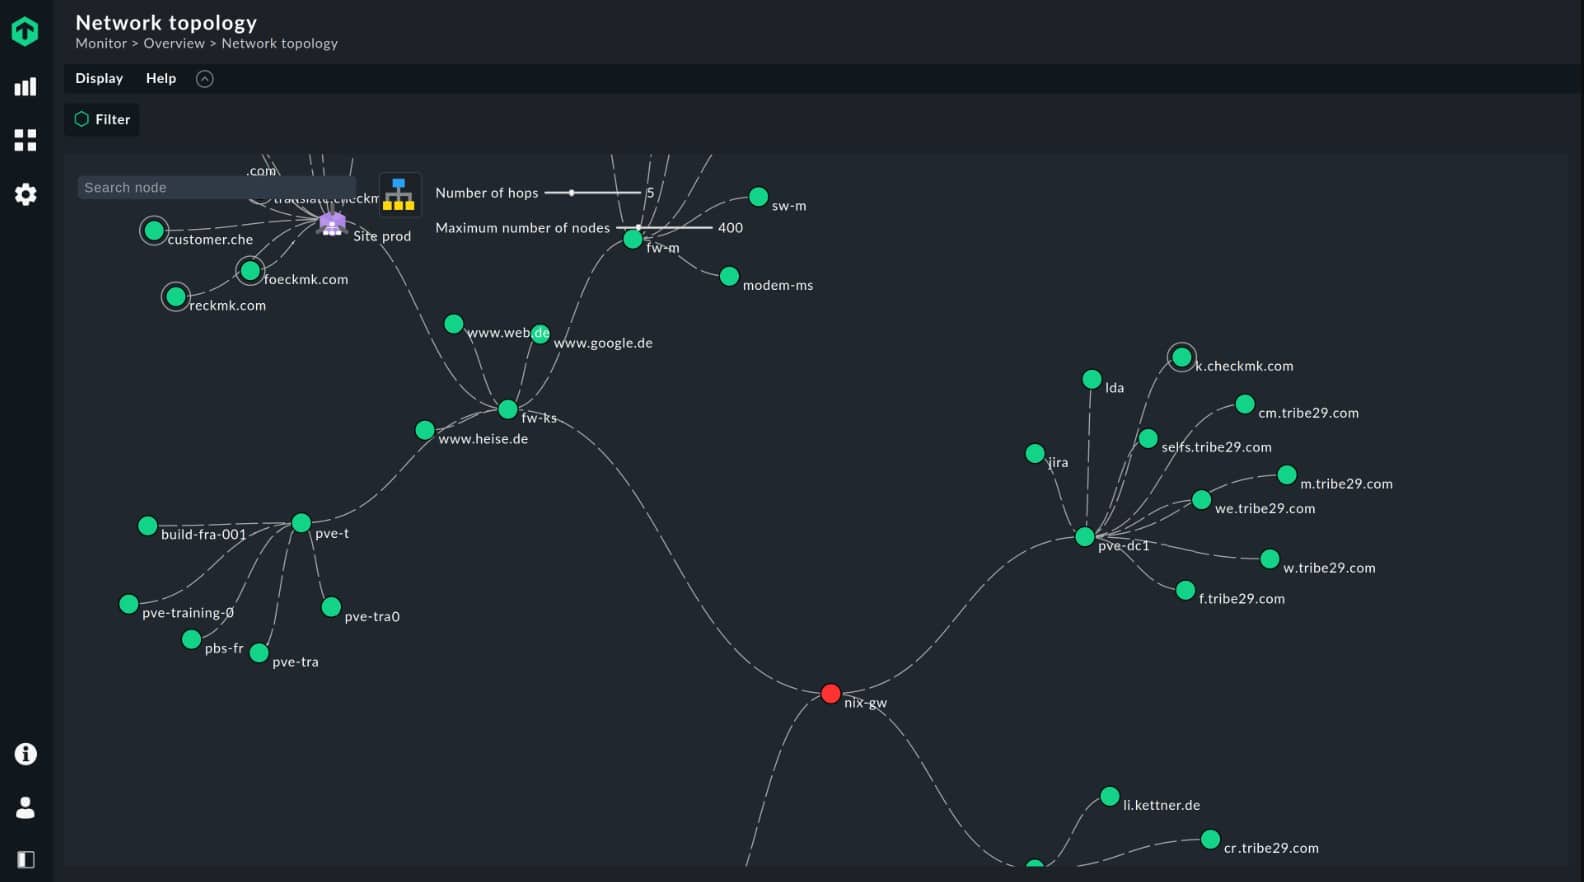
Checkmk – FREE TRIAL This hybrid IT infrastructure monitoring package includes a comprehensive network monitor that provides device status tracking and traffic analysis functions via the integration with ntop. Available as a Linux install package, Docker package, appliance and cloud application available in cloud marketplaces. Get a 30-day free trial.
Datadog Network Monitoring – FREE TRIAL Provides good visibility over each of the components of your network and the connections between them – be it cloud, on-premises or hybrid environment. Troubleshoot infrastructure, apps and DNS issues effortlessly.
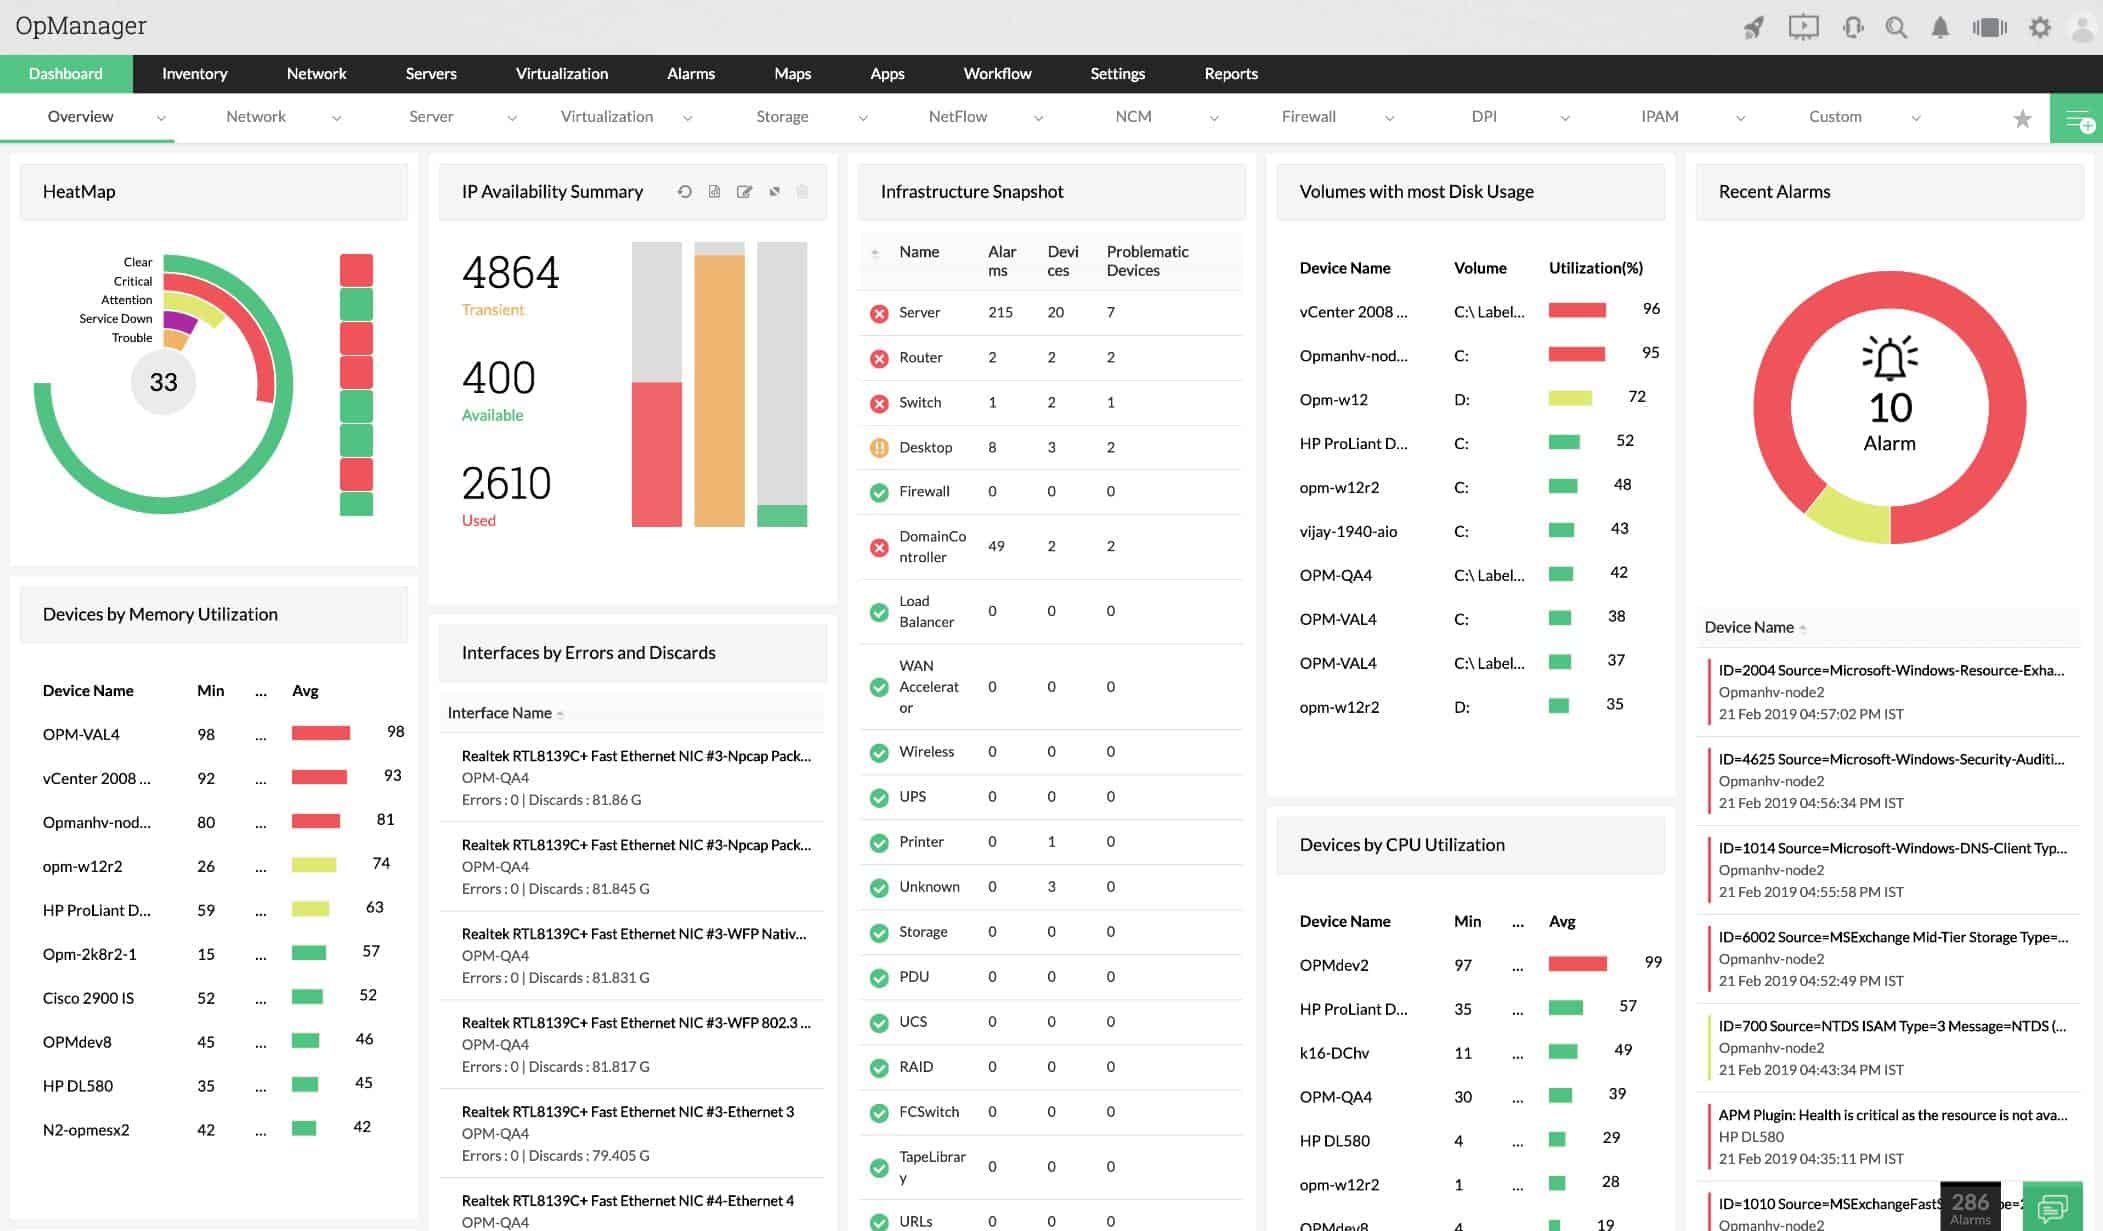
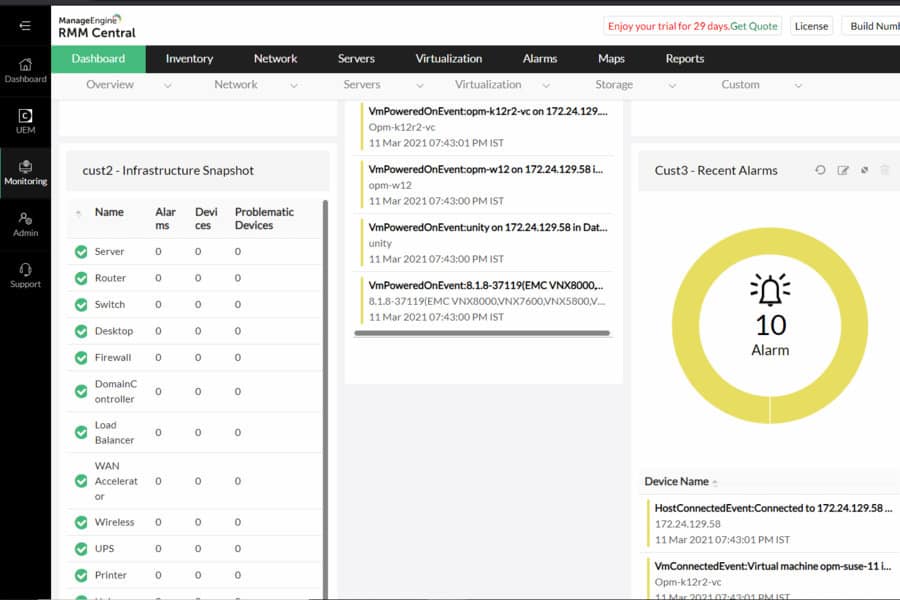
ManageEngine OpManager – FREE TRIAL An SNMP-based network monitor that has great network topology layout options, all based on an autodiscovery process. Installs on Windows Server and Linux.
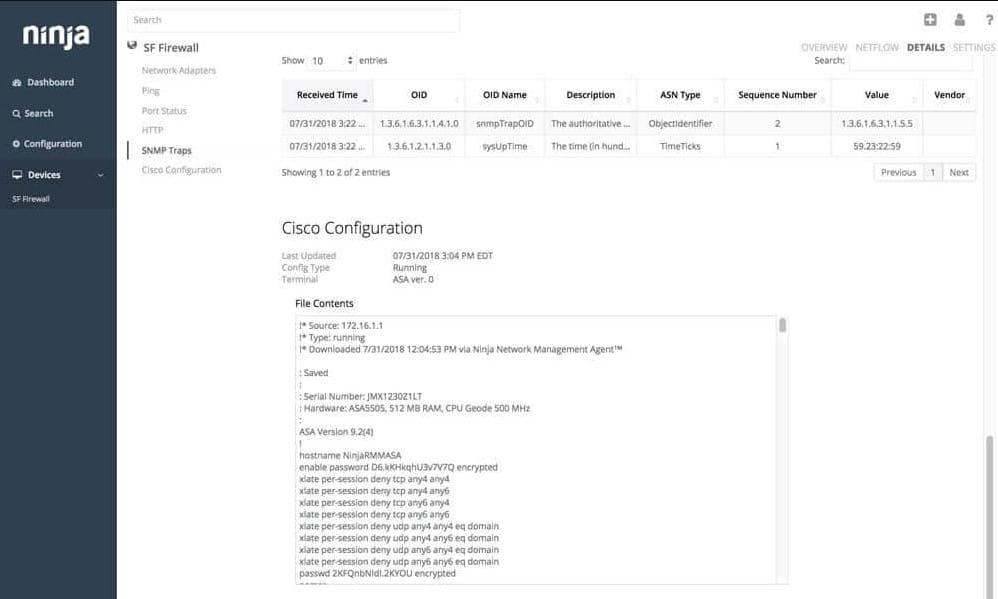
NinjaOne RMM – FREE TRIAL This cloud-based system provides remote monitoring and management for managed service providers covering the systems of their clients.
Site24x7 Network Monitoring – FREE TRIAL A cloud-based monitoring system for networks, servers, and applications. This tool monitors both physical and virtual resources.
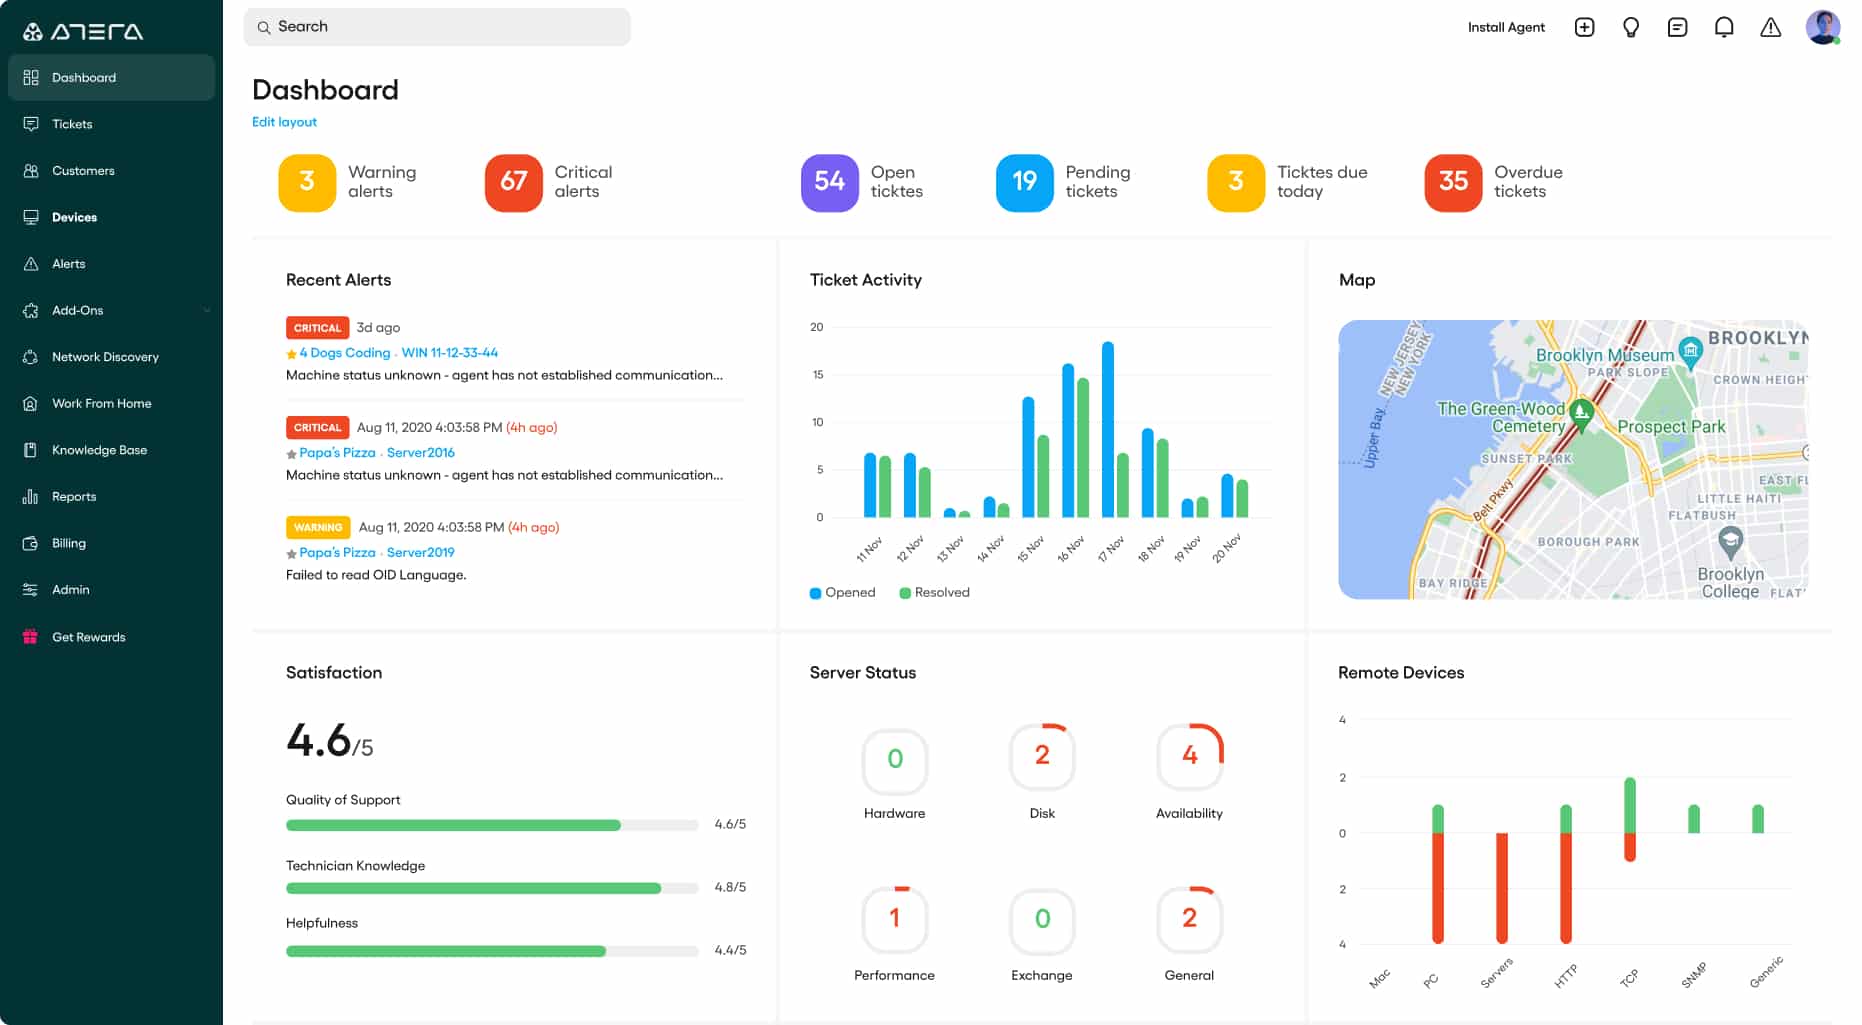
Atera – FREE TRIAL A cloud-based package of remote monitoring and management tools that include automated network monitoring and a network mapping utility.
Below you’ll find an updated list of the Latest Tools & Software to ensure your network is continuously tracked and monitored at all times of the day to ensure the highest up-times possible. Most of them have free Downloads or Trials to get you started for 15 to 30 days to ensure it meets your requirements.
What should you look for in network monitoring tools?
We reviewed the market for network monitoring software and analyzed the tools based on the following criteria:
An automated service that can perform network monitoring unattended
A device discovery routine that automatically creates an asset inventory
A network mapping service that shows live statuses of all devices
Alerts for when problems arise
The ability to communicate with network devices through SNMP
A free trial or a demo for a no-cost assessment
Value for money in a package that provides monitoring for all network devices at a reasonable price
With these selection criteria in mind, we have defined a shortlist of suitable network monitoring tools for all operating systems.
Auvik is a SaaS platform that offers a network discovery and mapping system that automates enrolment and then continues to operate in order to spot changes in network infrastructure. This system is able to centralize and unify the monitoring of multiple sites.
Key Features:
A SaaS package that includes processing power and storage space for system logs as well as the monitoring software
Centralizes the monitoring of networks on multiple sites
Watches over network device statuses
Offers two plans: Essential and Performance
Network traffic analysis included in the higher plan
Monitors virtual LANs as well as physical networks
Autodiscovery service
Network mapping
Alerts for automated monitoring
Integrations with third-party complimentary systems
Why do we recommend it?
Auvik is a cloud-based network monitoring system. It reaches into your network, identifies all connected devices, and then creates a map. While SolarWinds Network Performance Monitor also performs those tasks, Auvik is a much lighter tool that you don’t have to host yourself and you don’t need deep technical knowledge to watch over a network with this automated system.
Auvik’s network monitoring system is automated, thanks to its system of thresholds. The service includes out-of-the-box thresholds that are placed on most of the metrics that the network monitor tracks. It is also possible to create custom thresholds.
Once the monitoring service is operating, if any of the thresholds are crossed, the system raises an alert. This mechanism allows technicians to get on with other tasks, knowing that the thresholds give them time to avert system performance problems that would be noticeable to users.
Network management tools that are included in the Auvik package include configuration management to standardize the settings of network devices and prevent unauthorized changes.
The processing power for Auvik is provided by the service’s cloud servers. However, the system requires collectors to be installed on each monitored site. This software runs on Windows Server and Ubuntu Linux. It is also possible to run the collector on a VM. Wherever the collector is located, the system manager still accesses the service’s console, which is based on the Auvik server, through any standard Web browser.
Who is it recommended for?
Smaller businesses that don’t have a team to support IT would benefit from Auvik. It needs no software maintenance and the system provides automated alerts when issues arise, so your few IT staff can get on with supporting other resources while Auvik looks after the network.
PROS:
A specialized network monitoring tool
Additional network management utilities
Configuration management included
A cloud-based service that is accessible from anywhere through any standard Web browser
Data collectors for Windows Server and Ubuntu Linux
CONS:
The system isn’t expandable with any other Auvik modules
Auvik doesn’t publish its prices by you can access a 14-day free trial.
EDITOR’S CHOICE
Auvik is our top pick for a network monitoring tool because it is a hosted SaaS package that provides all of your network monitoring needs without you needing to maintain the software. The Auvik platform installs an agent on your site and then sets itself up by scanning the network and identifying all devices. The inventory that this system generates gives you details of all of your equipment and provides a basis for network topology maps. Repeated checks on the network gather performance statistics and if any metric crosses a threshold, the tool will generate an alert. You can centralize the monitoring of multiple sites with this service.
PRTG Network Monitor software is commonly known for its advanced infrastructure management capabilities. All devices, systems, traffic, and applications in your network can be easily displayed in a hierarchical view that summarizes performance and alerts. PRTG monitors the entire IT infrastructure using technology such as SNMP, WMI, SSH, Flows/Packet Sniffing, HTTP requests, REST APIs, Pings, SQL, and a lot more.
Key Features:
Autodiscovery that creates and maintains a device inventory
Live network topology maps are available in a range of formats
Monitoring for wireless networks as well as LANs
Multi-site monitoring capabilities
SNMP sensors to gather device health information
Ping to check on device availability
Optional extra sensors to monitor servers and applications
System-wide status overviews and drill-down paths for individual device details
A protocol analyzer to identify high-traffic applications
A packet sniffer to collect packet headers for analysis
Color-coded graphs of live data in the system dashboard
Capacity planning support
Alerts on device problems, resource shortages, and performance issues
Notifications generated from alerts that can be sent out by email or SMS
Available for installation on Windows Server or as a hosted cloud service
Why do we recommend it?
Paessler PRTG Network Monitor is a very flexible package. Not only does it monitor networks, but it can also monitor endpoints and applications. The PRTG system will discover and map your network, creating a network inventory, which is the basis for automated monitoring. You put together your ideal monitoring system by choosing which sensors to turn on. You pay for an allowance of sensors.
It is one of the best choices for organizations with low experience in network monitoring software. The user interface is really powerful and very easy to use.
A very particular feature of PRTG is its ability to monitor devices in the data center with a mobile app. A QR code that corresponds to the sensor is printed out and attached to the physical hardware. The mobile app is used to scan the code and a summary of the device is displayed on the mobile screen.
In summary, Paessler PRTG is a flexible package of sensors that you can tailor to your own needs by deciding which monitors to activate. The SNMP-based network performance monitoring routines include an autodiscovery system that generates a network asset inventory and topology maps. You can also activate traffic monitoring features that can communicate with switches through NetFlow, sFlow, J-Flow, and IPFIX. QoS and NBAR features enable you to keep your time-sensitive applications working properly.
Who is it recommended for?
PRTG is available in a Free edition, which is limited to 100 sensors. This is probably enough to support a small network. Mid-sized and large organizations should be interested in paying for larger allowances of sensors. The tool can even monitor multiple sites from one location.
PROS:
Uses a combination of packet sniffing, WMI, and SNMP to report network performance data
Fully customizable dashboard is great for both lone administrators as well as NOC teams
Drag and drop editor makes it easy to build custom views and reports
Supports a wide range of alert mediums such as SMS, email, and third-party integrations into platforms like Slack
Each sensor is specifically designed to monitor each application, for example, there are prebuilt sensors whose specific purpose is to capture and monitor VoIP activity
Supports a freeware version
CONS:
Is a very comprehensive platform with many features and moving parts that require time to learn
PRTG has a very flexible pricing plan, to get an idea visit their official pricing webpage below. It is free to use for up to 50 sensors. Beyond that you get a 30-day free trial to figure out your network requirements.
SolarWinds Network Performance Monitor is easy to setup and can be ready in no time. The tool automatically discovers network devices and deploys within an hour. Its simple approach to oversee an entire network makes it one of the easiest to use and most intuitive user interfaces.
Key Features:
Automatically Network Discovery and Scanning for Wired and Wifi Computers and Devices
Support for Wide Array of OEM Vendors
Forecast and Capacity Planning
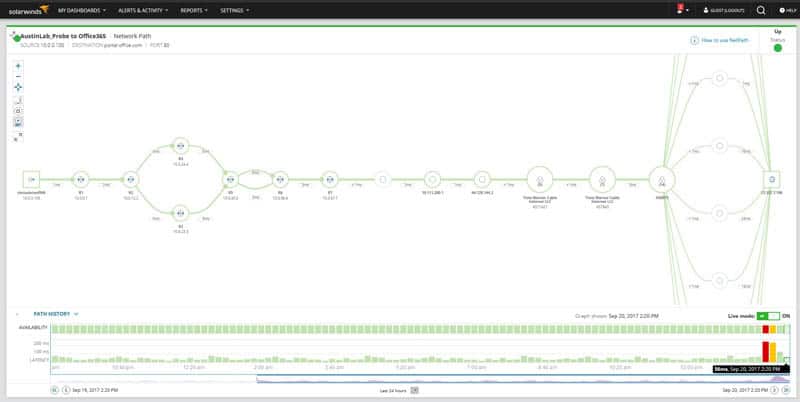
Quickly Pinpoint Issues with Network Performance with NetPath™ Critical Path visualization feature
Easy to Use Performance Dashboard to Analyze Critical Data points and paths across your network
Robust Alerting System with options for Simple/Complex Triggers
Monitor Hardware Health of all Servers, Firewalls, Routers, Switches, Desktops, laptops and more
Real-Time Network and Netflow Monitoring for Critical Network Components and Devices
Why do we recommend it?
SolarWinds Network Performance Monitor is the leading network monitoring tool in the world and this is the system that the other monitor providers are chasing. Like many other network monitors, this system uses the Simple Network Management Protocol (SNMP) to gather reports on network devices. The strength of SolarWinds lies in the deep technical knowledge of its support advisors, which many other providers lack.
The product is highly customizable and the interface is easy to manage and change very quickly. You can customize the web-based performance dashboards, charts, and views. You can design a tailored topology for your entire network infrastructure. You can also create customized dependency-aware intelligent alerts and much more.
The software is sold by separate modules based on what you use. SolarWinds Network Performance Monitor Price starts from $1,995 and is a one-time license including 1st-year maintenance.
SolarWinds NPM has an Extensive Feature list that make it One of the Best Choices for Network Monitoring Solutions
SolarWinds NPM is able to track the performance of networks autonomously through the use of SNMP procedures, producing alerts when problems arise. Alerts are generated if performance dips and also in response to emergency notifications sent out by device agents. This system means that technicians don’t have to watch the monitoring screen all the time because they know that they will be drawn back to fix problems by an email or SMS notification.
NetPath Screenshot
Who is it recommended for?
SolarWinds Network Performance Monitor is an extensive network monitoring system and it is probably over-engineered for use by a small business. Mid-sized and large companies would benefit from using this tool.
PROS:
Supports auto-discovery that builds network topology maps and inventory lists in real-time based on devices that enter the network
Has some of the best alerting features that balance effectiveness with ease of use
Supports both SNMP monitoring as well as packet analysis, giving you more control over monitoring than similar tools
Uses drag and drop widgets to customize the look and feel of the dashboard
Tons of pre-configured templates, reports, and dashboard views
CONS:
This is a feature-rich enterprise tool designed for sysadmin, non-technical users may some features overwhelming
Checkmk is an IT asset monitoring package that has the ability to watch over networks, servers, services, and applications. The network monitoring facilities in this package provide both network device status tracking and network traffic monitoring.
Features of this package include:
Device discovery that cycles continuously, spotting new devices and removing retired equipment
Creation of a network inventory
Registration of switches, routers, firewalls, and other network devices
Creation of a network topology map
Continuous device status monitoring with SNMP
SNMP feature report focus for small businesses
Performance thresholds with alerts
Wireless network monitoring
Protocol analysis
Traffic throughput statistics per link
Switch port monitoring
Gateway transmission speed tracking
Network traffic data extracted with ntop
Can monitor a multi-vendor environment
Why do we recommend it?
The Checkmk combination of network device monitoring and traffic monitoring in one tool is rare. Most network monitoring service creators split those two functions so that you have to buy two separate packages. The Checkmk system also gives you application and server monitoring along with the network monitoring service.
The Checkmk system is easy to set up, thanks to its autodiscovery mechanism. This is based on SNMP. The program will act as an SNMP Manager, send out a broadcast requesting reports from device agents, and then compile the results into an inventory. The agent is the Checkmk package itself if you choose to install the Linux version or it is embedded on a device if you go for the hardware option. If you choose the Checkmk Cloud SaaS option, that platform will install an agent on one of your computers.
The SNMP Manager constantly re-polls for device reports and the values in these appear in the Checkmk device monitoring screen. The platform also updates its network inventory according to the data sent back by device agents in each request/response round. The dashboard also generates a network topology map from information in the inventory. So, that map updates whenever the inventory changes.
While gathering information through SNMP, the tool also scans the headings of passing packets on the network to compile traffic statistics. Basically, the tool provides a packet count which enables it to quickly calculate a traffic throughput rate. Data can also be segmented per protocol, according to the TCP port number in each header.
Who is it recommended for?
Checkmk has a very wide appeal because of its three editions. Checkmk Raw is free and will appeal to small businesses. This is an adaptation of Nagios Core. The paid version of the system is called Checkmk Enterprise and that is designed for mid-sized and large businesses. Checkmk Cloud is a SaaS option.
PROS:
Provides both network device monitoring and traffic tracking
Automatically discovers devices and creates a network inventory
Free version available
Options for on-premises or SaaS delivery
Monitors wireless networks as well as LANs
Available for installation on Linux or as an appliance
Datadog Network Monitoring supervises the performance of network devices. The service is a cloud-based system that is able to explore a network and detect all connected devices. With the information from this research, the network monitor will create an asset inventory and draw up a network topology map. This procedure means that the system performs its own setup routines.
Features of this package include:
Monitors networks anywhere, including remote sites
Joins together on-premises and cloud-based resource monitoring
Integrates with other Datadog modules, such as log management
Offers an overview of all network performance and drill-down details of each device
Facilitates troubleshooting by identifying performance dependencies
Includes DNS server monitoring
Gathers SNMP device reports
Blends performance data from many information sources
Includes data flow monitoring
Offers tag-based packet analysis utilities in the dashboard
Integrates protocol analyzers
Performance threshold baselining based on machine learning
Alerts for warnings over evolving performance issues
Datadog Network Monitoring services are split into two modules that are part of a cloud platform of many system monitoring and management tools. These two packages are called Network Performance Monitoring and Network Device Monitoring, which are both subscription services. While the device monitoring package works through SNMP, the performance monitor measures network traffic levels.
The autodiscovery process is ongoing, so it spots any changes you make to your network and instantly updates the inventory and the topology map. The service can also identify virtual systems and extend monitoring of links out to cloud resources.
Datadog Network Monitoring provides end-to-end visibility of all connections, which are also correlated with performance issues highlighted in log messages. The dashboard for the system is resident in the cloud and accessed through any standard browser. This centralizes network performance data from many sources and covers the entire network, link by link and end to end.
You can create custom graphs, metrics, and alerts in an instant, and the software can adjust them dynamically based on different conditions. Datadog prices start from free (up to five hosts), Pro $15/per host, per month and Enterprise $23 /per host, per month.
Who is it recommended for?
The two Datadog network monitoring packages are very easy to sign up for. They work well together to get a complete view of network activities. The pair will discover all of the devices on your network and map them, then startup automated monitoring. These are very easy-to-use systems that are suitable for use by any size of business.
PROS:
Has one of the most intuitive interfaces among other network monitoring tools
Cloud-based SaaS product allows monitoring with no server deployments or onboarding costs
Can monitor both internally and externally giving network admins a holistic view of network performance and accessibility
Supports auto-discovery that builds network topology maps on the fly
Changes made to the network are reflected in near real-time
Allows businesses to scale their monitoring efforts reliably through flexible pricing options
CONS:
Would like to see a longer trial period for testing
At its core, ManageEngine OpManager is infrastructure management, network monitoring, and application performance management “APM” (with APM plug-in) software.
Key Features:
Includes server monitoring as well as network monitoring
Autodiscovery function for automatic network inventory assembly
Constant checks on device availability
A range of network topology map options
Automated network mapping
Performs an SNMP manager role, constantly polling for device health statuses
Receives SNMP Traps and generates alerts when device problems arise
Implements performance thresholds and identifies system problems
Watches over resource availability
Customizable dashboard with color-coded dials and graphs of live data
Forwards alerts to individuals by email or SMS
Available for Windows Server and Linux
Can be enhanced by an application performance monitor to create a full stack supervisory system
Free version available
Distributed version to supervise multiple sites from one central location
Why do we recommend it?
ManageEngine OpManager is probably the biggest threat to SolarWind’s leading position. This package monitors servers as well as networks. This makes it a great system for monitoring virtualizations.
When it comes to network management tools, this product is well balanced when it comes to monitoring and analysis features.
The solution can manage your network, servers, network configuration, and fault & performance; It can also analyze your network traffic. To run Manage Engine OpManager, it must be installed on-premises.
A highlight of this product is that it comes with pre-configured network monitor device templates. These contain pre-defined monitoring parameters and intervals for specific device types. The essential edition product can be purchased for $595 which allows up to 25 devices.
Who is it recommended for?
A nice feature of OpManager is that it is available for Linux as well as Windows Server for on-premises installation and it can also be used as a service on AWS or Azure for businesses that don’t want to run their own servers. The pricing for this package is very accessible for mid-sized and large businesses. Small enterprises with simple networks should use the Free edition, which is limited to covering a network with three connected devices.
PROS:
Designed to work right away, features over 200 customizable widgets to build unique dashboards and reports
Leverages autodiscovery to find, inventory, and map new devices
Uses intelligent alerting to reduce false positives and eliminate alert fatigue across larger networks
Supports email, SMS, and webhook for numerous alerting channels
Integrates well in the ManageEngine ecosystem with their other products
CONS:
Is a feature-rich tool that will require a time investment to properly learn
NinjaOne is a remote monitoring and management (RMM) package for managed service providers (MSPs). The system reaches out to each remote network through the installation of an agent on one of its endpoints. The agent acts as an SNMP Manager.
Key Features:
Based on the Simple Network Management Protocol
SNMP v1, 2, and 3
Device discovery and inventory creation
Continuous status polling for network devices and endpoints
Live traffic data with NetFlow, IPFIX, J-Flow, and sFlow
Traffic throughput graphs
Customizable detail display
Performance graphs
Switch port mapper
Device availability checks
Syslog processing for device status reports
Customizable alerts
Notifications by SMS or email
Related endpoint monitoring and management
Why do we recommend it?
NinjaOne RMM enables each technician to support multiple networks simultaneously. The alerting mechanism in the network monitoring service means that you can assume that everything is working fine on a client’s system unless you receive a notification otherwise. The network tracking service sets itself up automatically with a discovery routine.
The full NinjaOne RMM package provides a full suite of tools for administering a client’s system. The network monitoring service is part of that bundle along with endpoint monitoring and patch management.
The Ninja One system onboards a new client site automatically through a discovery service that creates both hardware and software inventories. The data for each client is kept separate in a subaccount. Technicians that need access to that client’s system for investigation need to be set up with credentials.
The network monitoring system provides both device status tracking and network traffic analysis. The service provides notifications if a dive goes offline or throughput drops.
Who is it recommended for?
This service is built with a multi-tenant architecture for use by managed service providers. However, IT departments can also use the system to manage their own networks and endpoints. The service is particularly suitable for simultaneously monitoring multiple sites. The console for the RMM is based in the cloud and accessed through any standard Web browser.
PROS:
A cloud-based package that onboards sites through the installation of an agent
Auto discovery for network devices and endpoints
Network device status monitoring
Network traffic analysis
Syslog message scanning
CONS:
No price list
NinjaOne doesn’t publish a price list so you start your buyer’s journey by accessing a 14-day free trial.
Site24x7 is a monitoring service that covers networks, servers, and applications. The network monitoring service in this package starts off by exploring the network for connected devices. IT logs its findings in a network inventory and draws up a network topology map.
Key Features:
A hosted cloud-based service that includes CPU time and performance data storage space
Can unify the monitoring of networks on site all over the world
Uses SNMP to check on device health statuses
Gives alerts on resource shortages, performance issues, and device problems
Generates notifications to forward alerts by email or SMS
Root cause analysis features
Autodiscovery for a constantly updated network device inventory
Automatic network topology mapping
Includes internet performance monitoring for utilities such as VPNs
Specialized monitoring routines for storage clusters
Monitors boundary and edge services, such as load balancers
Offers overview and detail screens showing the performance of the entire network and also individual devices
Includes network traffic flow monitoring
Facilities for capacity planning and bottleneck identification
Integrates with application monitoring services to create a full stack service
Why do we recommend it?
Site24x7 Network Monitoring is part of a platform that is very similar to Datadog. A difference lies in the number of modules that Site24x7 offers – it has far fewer than Datadog. Site24x7 bundles its modules into packages with almost all plans providing monitoring for networks, servers, services, applications, and websites. Site24x7 was originally developed to be a SaaS plan for ManageEngine but then was split out into a separate brand, so there is very solid expertise behind this platform.
The Network Monitor uses procedures from the Simple Network Management Protocol (SNMP) to poll devices every minute for status reports. Any changes in the network infrastructure that are revealed by these responses update the inventory and topology map.
The results of the device responses are interpreted into live data in the dashboard of the monitor. The dashboard is accessed through any standard browser and its screens can be customized by the user.
The SNMP system empowers device agents to send out a warning without waiting for a request if it detects a problem with the device that it is monitoring. Site24x7 Infrastructure catches these messages, which are called Traps, and generates an alert. This alert can be forwarded to technicians by SMS, email, voice call, or instant messaging post.
The Network Monitor also has a traffic analysis function. This extracts throughput figures from switches and routers and displays data flow information in the system dashboard. This data can also be used for capacity planning.
Who is it recommended for?
The plans for Site24x7 are very reasonably priced, which makes them accessible to businesses of all sizes. Setup for the system is automated and much of the ongoing monitoring processes are carried out without any manual intervention.
PROS:
One of the most holistic monitoring tools available, supporting networks, infrastructure, and real user monitoring in a single platform
Uses real-time data to discover devices and build charts, network maps, and inventory reports
Is one of the most user-friendly network monitoring tools available
User monitoring can help bridge the gap between technical issues, user behavior, and business metrics
Supports a freeware version for testing
CONS:
Is a very detailed platform that will require time to fully learn all of its features and options
Site24x7 costs $9 per month when paid annually. It is available for a free trial.
Atera is a package software that was built for managed service providers. It is a SaaS platform and it includes professional service automation (PSA) and remote monitoring and management (RMM) systems.
Why do we recommend it?
Atera is a package of tools for managed service providers (MSPs). Alongside remote network monitoring capabilities, this package provides automated monitoring services for all IT operations. The package also includes some system management tools, such as a patch manager. Finally, the Atera platform offers Professional Services Automation (PSA) tools to help the managers of MSPs to run their businesses.
The network monitoring system operates remotely through an agent that installs on Windows Server. The agent enables the service to scour the network and identify all of the network devices that run it. This is performed using SNMP, with the agent acting as the SNMP Manager.
The SNMP system enables the agent to spot Traps, which warn of device problems. These are sent to the Atera network monitoring dashboard, where they appear as alerts. Atera offers an automated topology mapping service, but this is an add-on to the main subscription packages.
Who is it recommended for?
Atera charges for its platform per technician, so it is very affordable for MSPs of all sizes. This extends to sole technicians operating on a contract basis and possibly fielding many small business clients.
ManageEngine RMM Central provides sysadmins with everything they need to support their network. Automated asset discovery makes deployment simple, allowing you to collect all devices on your network by the end of the day.
Key Features
Automated network monitoring and asset discovery
Built-in remote access with various troubleshooting tools
Flexible alert integrations
With network and asset metrics collected, administrators can quickly see critical insights automatically generated by the platform. With over 100 automated reports it’s easy to see exactly where your bottlenecks are and what endpoints are having trouble.
Administrators can configure their own SLAs with various automated alert options and even pair those alerts with other automation that integrate into their helpdesk workflow.
PROS:
Uses a combination of packet sniffing, WMI, and SNMP to report network performance data
Fully customizable dashboard is great for both lone administrators as well as NOC teams
Drag and drop editor makes it easy to build custom views and reports
Supports a wide range of alert mediums such as SMS, email, and third-party integrations into platforms like Slack
CONS:
Is a very comprehensive platform with many features and moving parts that require time to learn
You can run commands on one or hundreds of computers with a single PowerShell command. Windows PowerShell supports remote computing using various technologies, including WMI, RPC, and WS-Management.
PowerShell supports WMI, WS-Management, and SSH remoting. In PowerShell 7 and higher, RPC is supported only on Windows.
For more information about remoting in PowerShell, see the following articles:
Many Windows PowerShell cmdlets have the ComputerName parameter that enables you to collect data and change settings on one or more remote computers. These cmdlets use varying communication protocols and work on all Windows operating systems without any special configuration.
Typically, cmdlets that support remoting without special configuration have the ComputerName parameter and don’t have the Session parameter. To find these cmdlets in your session, type:
Using the WS-Management protocol, Windows PowerShell remoting lets you run any Windows PowerShell command on one or more remote computers. You can establish persistent connections, start interactive sessions, and run scripts on remote computers.
To use Windows PowerShell remoting, the remote computer must be configured for remote management. For more information, including instructions, see About Remote Requirements.
Once you have configured Windows PowerShell remoting, many remoting strategies are available to you. This article lists just a few of them. For more information, see About Remote.
Start an interactive session
To start an interactive session with a single remote computer, use the Enter-PSSession cmdlet. For example, to start an interactive session with the Server01 remote computer, type:
PowerShellCopy
Enter-PSSession Server01
The command prompt changes to display the name of the remote computer. Any commands that you type at the prompt run on the remote computer and the results are displayed on the local computer.
To end the interactive session, type:
PowerShellCopy
Exit-PSSession
For more information about the Enter-PSSession and Exit-PSSession cmdlets, see:
To run a command on one or more computers, use the Invoke-Command cmdlet. For example, to run a Get-UICulture command on the Server01 and Server02 remote computers, type:
LCID    Name     DisplayName               PSComputerName
----    ----     -----------               --------------
1033    en-US    English (United States)   server01.corp.fabrikam.com
1033    en-US    English (United States)   server02.corp.fabrikam.com
Run a Script
To run a script on one or many remote computers, use the FilePath parameter of the Invoke-Command cmdlet. The script must be on or accessible to your local computer. The results are returned to your local computer.
For example, the following command runs the DiskCollect.ps1 script on the remote computers, Server01 and Server02.
Use the New-PSSession cmdlet to create a persistent session on a remote computer. The following example creates remote sessions on Server01 and Server02. The session objects are stored in the $s variable.
Now that the sessions are established, you can run any command in them. And because the sessions are persistent, you can collect data from one command and use it in another command.
For example, the following command runs a Get-HotFix command in the sessions in the $s variable and it saves the results in the $h variable. The $h variable is created in each of the sessions in $s, but it doesn’t exist in the local session.
PowerShellCopy
Invoke-Command -Session $s {$h = Get-HotFix}
Now you can use the data in the $h variable with other commands in the same session. The results are displayed on the local computer. For example:
PowerShellCopy
Invoke-Command -Session $s {$h | where {$_.InstalledBy -ne "NT AUTHORITY\SYSTEM"}}
Advanced Remoting
PowerShell includes cmdlets that allow you to:
Configure and create remote sessions both from the local and remote ends
Create customized and restricted sessions
Import commands from a remote session that actually run implicitly on the remote session
Configure the security of a remote session
PowerShell on Windows includes a WSMan provider. The provider creates a WSMAN: drive that lets you navigate through a hierarchy of configuration settings on the local computer and remote computers.
When you update a computer running Windows 10, version 1703 or 1709, you might see provisioned apps that you previously removed post-update. This can happen if the computer was offline when you removed the apps. Windows 10, version 1803 has fixed this issue.
Note
This issue only occurs after a feature update (from one version to the next), not monthly updates or security-related updates.
This only applies to first-party apps that shipped with Windows 10. This doesn’t apply to third-party apps, Microsoft Store apps, or LOB apps.
This issue can occur whether you removed the app using Remove-appxprovisionedpackage or Get-AppxPackage -allusers | Remove-AppxPackage -Allusers.
To remove a provisioned app, you need to remove the provisioning package. The apps might reappear if you removed the packages in one of the following ways:
If you removed the packages while the wim file was mounted when the device was offline.
If you removed the packages by running a PowerShell cmdlet on the device while Windows was online. Although the apps won’t appear for new users, you’ll still see the apps for the user account you signed in as.
When you remove a provisioned app, we create a registry key that tells Windows not to reinstall or update that app the next time Windows is updated. If the computer isn’t online when you deprovision the app, then we don’t create that registry key. (This behavior is fixed in Windows 10, version 1803. If you’re running Windows 10, version 1709, apply the latest security update to fix it.)
Note
If you remove a provisioned app while Windows is online, it’s only removed for new users—the user that you signed in as will still have that provisioned app. That’s because the registry key created when you deprovision the app only applies to new users created after the key is created. This doesn’t happen if you remove the provisioned app while Windows is offline.
To prevent these apps from reappearing at the next update, manually create a registry key for each app, then update the computer.
Create registry keys for deprovisioned apps
Use the following steps to create a registry key:
Identify any provisioned apps you want removed. Record the package name for each app.
Paste the list of registry keys into Notepad (or a text editor).
Remove the registry keys belonging to the apps you want to keep. For example, if you want to keep the Bing Weather app, delete this registry key:YAMLCopyHKEY_LOCAL_MACHINE\SOFTWARE\Microsoft\Windows\CurrentVersion\Appx\A ppxAllUserStore\Deprovisioned\Microsoft.BingWeather_8wekyb3d8bbwe]
Save the file with a .txt extension, then right-click the file and change the extension to .reg.
Double-click the .reg file to create the registry keys. You can see the new keys in HKLM\path-to-reg-keys.
You’re now ready to update your computer. After the update, check the list of apps in the computer to confirm the removed apps are still gone.
Package names for apps provisioned in Windows 10, version 1709
Windows 11 comes with OneDrive pre-installed, but you don’t have to live with it if you don’t want to.
In newer versions of Windows, Microsoft added OneDrive to its “out-of-box experience,” meaning you get the app on your system from day one. OneDrive is a great tool for keeping your files stored in the cloud, but some users have their own preferred cloud storage app or want to keep everything on local storage.
If you feel that OneDrive serves no useful purpose to you, it is possible to disable the app. This post will discuss the methods to disable the app on your system. In addition, you will learn multiple ways to completely remove it.
Why Should You Disable OneDrive?
You may not want to keep a cloud backup of sensitive files related to work or personal use cases. One another issue is that OneDrive runs as soon as you boot your system. It continues to run in the background and consumes system and network resources in the process.
If you have a low-spec system or metered network connection, you can relate to this issue. So, it would be a good idea to disable or remove the app from your system in these circumstances.
Does Microsoft OneDrive Impact PC Performance?
OneDrive launches as soon as your system boots up. It tries to sync your documents to the cloud and runs in the background. Systems that have bare minimum compute resources can struggle with performance.
As such, if your PC isn’t the fastest out there, disabling OneDrive or getting rid of it entirely can help squeeze some precious processing power out of your system for other tasks.
How to Disable OneDrive on Windows 11
There are multiple ways to disable OneDrive on your system. You can disable the service from running at startup, disable it via the Group Policy Editor, or you can unlink your account from it.
1. How to Stop OneDrive From Launching at Startup
To disable OneDrive from launching at startup, do as follows:
Go to the system tray icon area and click on the arrow icon. Then click on the OneDrive system tray icon to reveal the settings.
Click on the gear icon and then select settings from the context menu.
Switch to the Settings tab. Uncheck the Start OneDrive automatically when I sign in to the Windows option under the General section.
Close the window. Now OneDrive won’t start automatically when you boot your PC up.
2. How to Unlink Your OneDrive Account
If you unlink your OneDrive account, the app won’t be able to sync your files anymore. To unlink your account, repeat the following steps.
Open the OneDrive app from the system tray icon. Click on the gear icon and then click on the Settings option.
Find the Unlink this PC option present under the Accounts tab.
Follow the on-screen prompts to unlink your account and close the Window.
3. How to Disable OneDrive Using the Group Policy Editor
Windows users who own an Enterprise or Professional copy can use the Group Policy Editor to disable OneDrive. If you’re not on either of those versions, you’ll need to learn how to access the Group Policy Editor on Windows Home before you try these steps.
Press Win + R to launch the Runcommand box on your system. Input gpedit.msc and press the Enter key.
Group Policy Editor will launch.
Navigate to Computer Configuration > Administrative Templates > Windows Components > OneDrive.
Once you are inside the OneDrive folder, find the Prevent the usage of OneDrive for file storage policy.
Double-click on it to edit the policy. A new window with detailed settings will pop up.
Click on the Disabled radio button and then click the Apply button.
Click on the OK button and exit the Group Policy Editor.
How to Remove OneDrive From Windows 11
If you’d rather just get rid of the app entirely, here are a few methods to remove OneDrive from your computer.
1. How to Uninstall OneDrive Using the Settings App
To remove OneDrive using the Settings app, do as follows:
Press Win + I to launch the Settingsapp. Then navigate to the left-hand side menu and click on Apps.
Then click on the Installed apps option in the Apps section.
Scroll down and locate Microsoft OneDrive app in the list.
Click on the three dots and select the Uninstall option.
Confirm your action and click on the Uninstall button again.
Now, follows the on-screen prompts to remove the app from your system.
2. How to Uninstall OneDrive Using the Command Prompt
To remove OneDrive using the command prompt, do as follows:
Press the Win key and search command prompt. Right-click on the first result and select the Run as administrator option.
The command prompt will launch. Now, input the following command in the terminal: TASKKILL /f /im OneDrive.exe
Once the command finishes executing, enter the uninstallation command: %systemroot%\SysWOW64\OneDriveSetup.exe /uninstall
Wait for the execution to complete. CMD will not display any message about the uninstallation command.
Exit the command prompt window. OneDrive won’t bother you anymore.
3. How to Uninstall OneDrive Using the PowerShell
To remove OneDrive using PowerShell, do as follows:
Press the Win key and search for PowerShell. Right-click on the first search result and click on the Run as administrator option.
PowerShell will launch. Now input the following command: winget uninstall onedrive
Press the Enter key to execute the command. You will see a successfully uninstalled message if the command executes without any error.
Now, exit the PowerShell window.
4. How to Uninstall OneDrive Using a Batch Script
The above-mentioned processes uninstall the app but do not delete the remaining traces of the OneDrive app. However, there is a batch script that you can use to uninstall the app as well as remove all the traces of OneDrive from your system.
To remove OneDrive using a batch script, do as follows:
Press the Win key and search for Notepad on your system. Click on the first result to launch the notepad app.
Now, copy the following code into the notepad app window. Make sure to recheck the document for missing lines of code, if any.@echo off cls
set x86="%SYSTEMROOT%\System32\OneDriveSetup.exe" set x64="%SYSTEMROOT%\SysWOW64\OneDriveSetup.exe"
echo Removing OneDrive from the Explorer Side Panel. echo. REG DELETE "HKEY_CLASSES_ROOT\CLSID\{018D5C66-4533-4307-9B53-224DE2ED1FE6}" /f > NUL 2>&1 REG DELETE "HKEY_CLASSES_ROOT\Wow6432Node\CLSID\{018D5C66-4533-4307-9B53-224DE2ED1FE6}" /f > NUL 2>&1 pause
Now, navigate to the top area and click on the File option. Select the Save as option from the dropdown menu.
Choose the save location as desktop so that it is easier to find the file.
Input a name that reflects the use case of the .bat file. For example, OneDriveRemovalTool.
Now, click on the Save as type option and select All files from the drop-down list.
Click on the Save button to save your .bat file.
Go to the desktop and right-click on the newly created .bat file. Select the Run as administrator option.
Let it finish execution and restart your computer. OneDrive won’t bug you anymore.
5. How to Uninstall OneDrive Using a Third-party Uninstaller Program
Uninstalling OneDrive using the Windows uninstaller leaves a lot of files and folders behind. In such cases, you can try a third-party uninstaller tool that will clean up everything related to OneDrive.
Download the free version and install it on your system.
Launch Revo uninstaller. Find OneDrive from the list of installed programs.
Right-click on OneDrive and select the Uninstall option from the context menu.
Uninstall window will pop up. Click on the continue button to proceed.
After the uninstall completes, select the advanced option to search for files and folders associated with OneDrive.
Follow the on-screen prompts and delete everything. Restart your system for changes to take effect. You won’t find OneDrive anywhere on your system.
OneDrive Won’t Bother You Anymore
These were the steps to disable or remove OneDrive on your Windows machine. If you plan on reusing OneDrive someday, stick with the disabling methods. But if you want to remove it from your system, you can try out any of the uninstallation methods mentioned above.
Configuring “WinRM Quickconfig” on remote computers can be a little difficult at times, especially if this is your first time using the Windows Remote Management service.
There are several ways to go about enabling winrm quickconfig on remote computers, many admins like to push the task to a GPO and others like to do it through powershell or 3rd Party programs.
We’ll highlight 3 different methods we’ve used in the past to get Windows Remote Management service enabled, along with avoiding the dreaded “WINRM QUICKCONFIG ACCESS DENIED” error that many people get when going through this process.
3 Ways to Remotely Enable WinRM on Windows Clients/Servers:
Download and Run this Free Utility from Solarwinds to activate it on Remote Machines
Setup new Group Policy Object to enable the WinRM Service and Firewall Rules
Use PSEXEC to Remotely Enable on Client Machines
1. Free Utility for Remote Activation
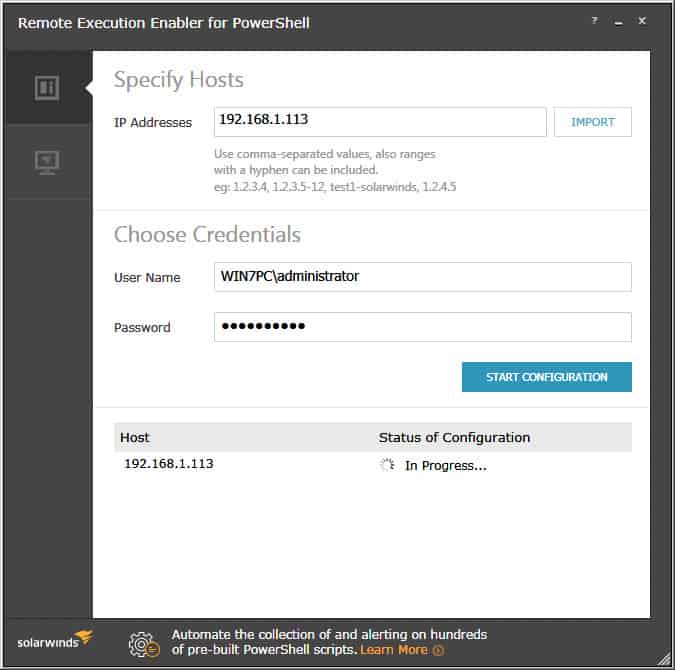
This is by far the easiest way if you’ve already configured the Windows Firewall in your network. Solarwinds has a nifty free tool called “Remote Execution Enabler for PowerShell” that has the functionality to enable and configure WinRm on local and remote hosts within your network.
Its as easy as entering in the IP Address(es) or IP Address Range of all the computers your targeting, than enter credentials that have Administrative Rights to that PC (usually accounts in the Domain Administrators Group will do the trick) and click the “START CONFIGURATION” button:
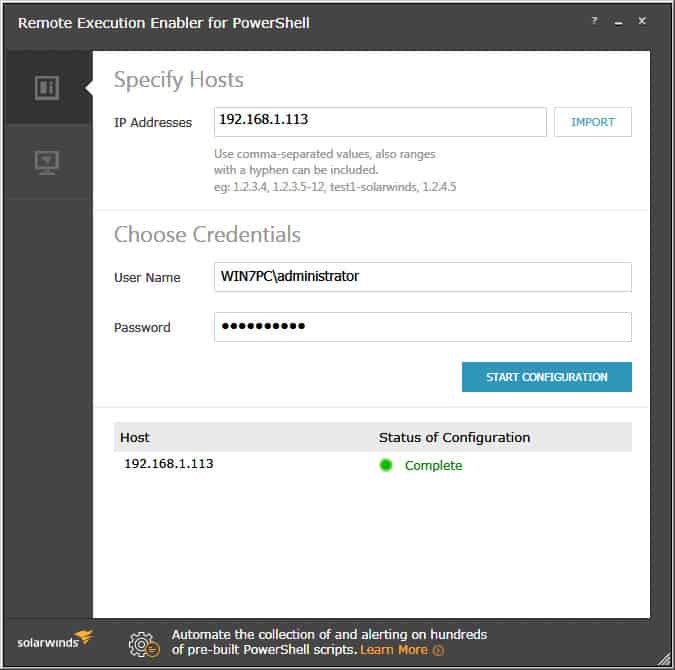
When the utility is finished starting the Windows Remote Management services on all IP Addresses or Ranges specified, you will see a green dot with a “Complete” status, as seen below:
Grab the little utility from below and give it a go:
If the above solution didn’t work for you, then setting up a GPO to do all the configuration is the next best thing, as you can assign it to any given computer or OU if necessary. Below are instructions for Windows 2012 R2 Server GPO setup.
Open Group Policy Management from within Administrative Tools folder.
Right-click on the desired OU that you want to create a Group Policy Object for and click on “Create a GPO in this Domain, and Link it here…“
Rename the GPO to whatever you would like, “Enable WinRM via GPO” or something along those lines then click OK.
Now that the new GPO has been created, right-click on the Newly created GPO and click “EDIT“.
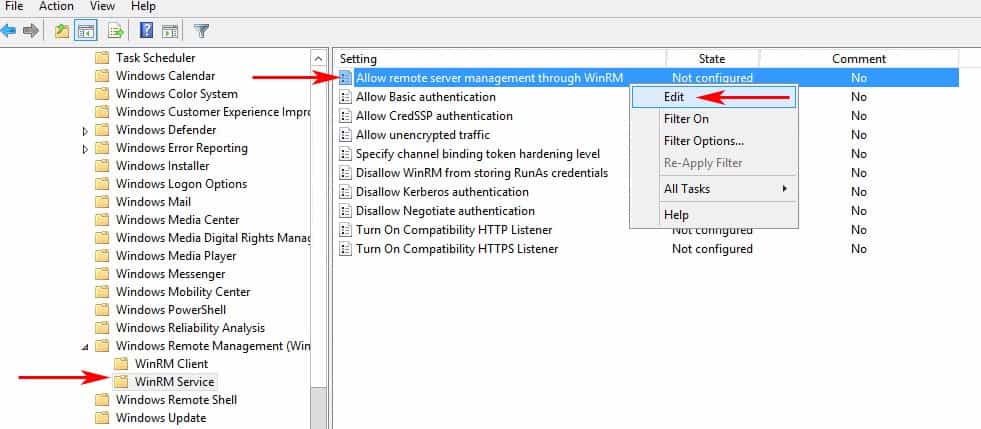
Expand the Menu tree as follows: Computer Configuration > Policies > Administrative Templates: Policy definitions > Windows Components > Windows Remote Management (WinRM) > WinRM Service.
Find the setting that says “Allow remote server management through WinRM” and right-click and click “EDIT” to configure the settings. (see image below)
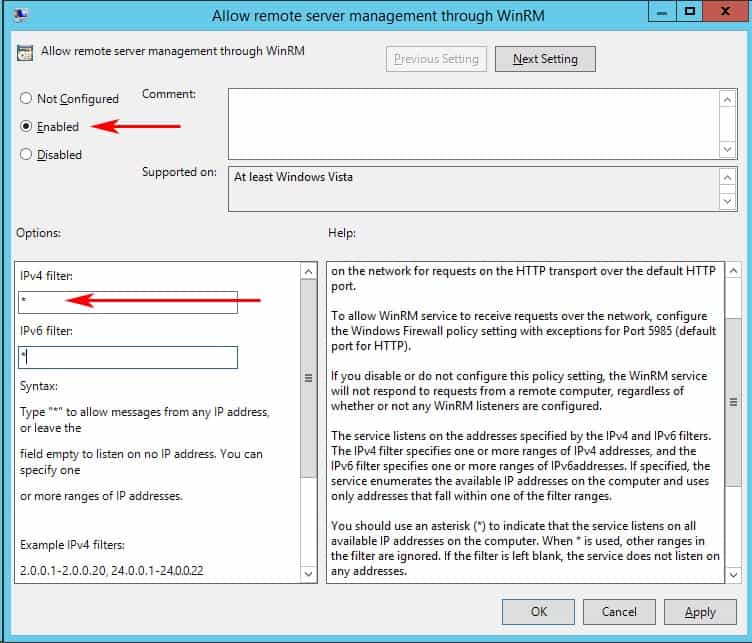
When the dialog box opens up, click “Enabled” and under the options section, either specify an IP Address range or put an Asterisk “*” to allow all IP addresses to remotely manage the PC. (We recommend specifying an IP Address to reduce any risk of a security compromise of your systems/network).
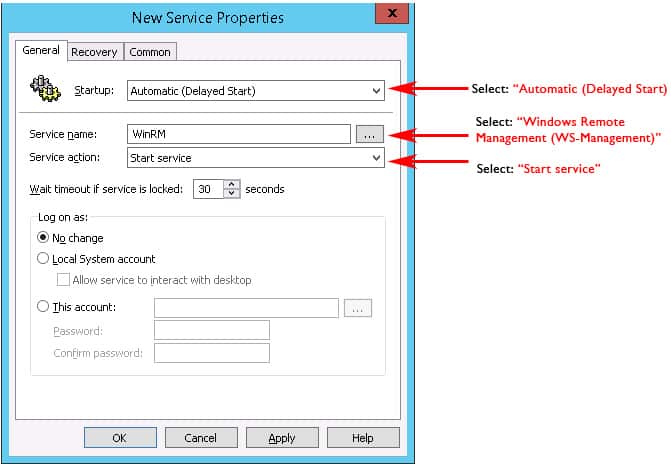
Now lets enable the Windows Remote Mangement (WS-Management) Service to start automatically. Go to Computer Configuration > Preferences > Control Panel Settings > Services and right-click and select “NEW” and the select “Service“.
A New Service Properties window will come up and you will need to change Startup to “Automatic (Delayed Start)” and then in the Service Name dialog box, click the box with the 3 dots in it to the right of the Service name box and select “Windows Remote Management (WS-Management)” and click the Select button.
Once you’ve selected the Service, under the “Service action:” pull down, we’ll want to click “Start service“.
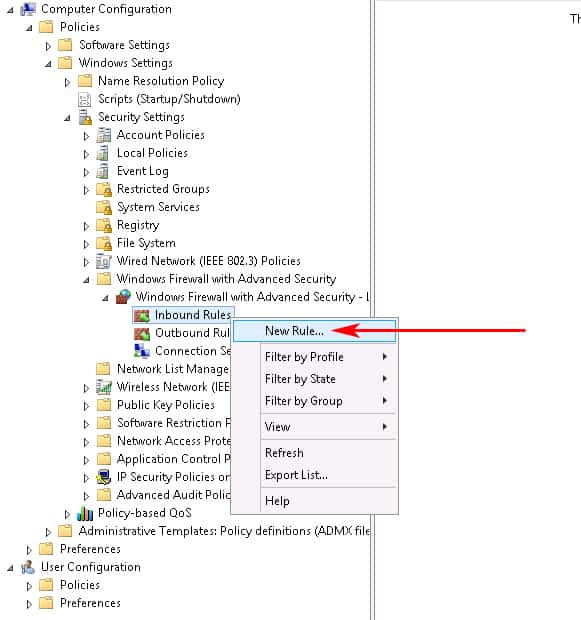
Last Step of this Process is to configure the Windows Firewall to Allow the proper ports inbound.Go to Computer Configuration > expand Policies > expand Windows Settings > expand Security Settings > expand Windows Firewall with Advanced Security > expand Windows Firewall with Advanced Security > expand InboundRules.Right-click the Inbound Rules node and choose New Rule. (see screenshot below)
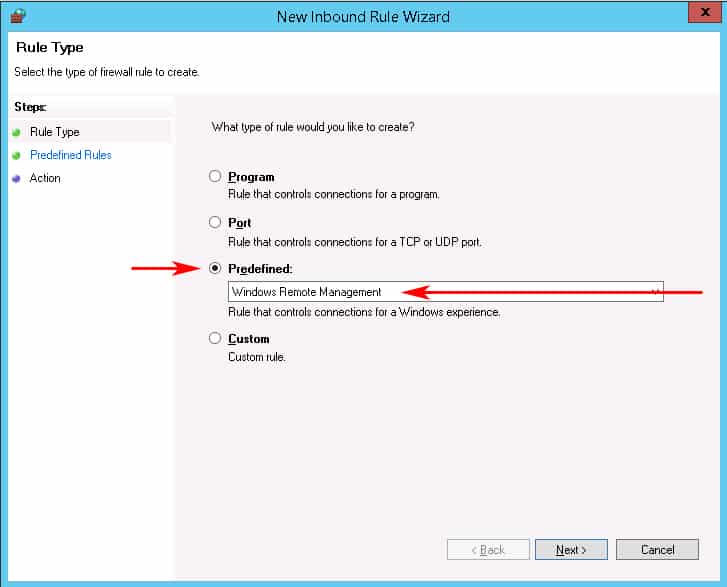
When the New Inbound Rule wizard box opens, click on the “Predefined” radio button and scroll down to “Windows Remote Management” and click on it. (see screenshot below)
Next we’ll click on the Left Sidebar menu item that says “Predefined Rules” in order to not Allow the Firewall to open this Port to the Public network.When the window opens, uncheck the box that says Public profile next to it, as seen in the image below. This ensures that we only allow WinRM access to the Private and Domain networks.Then Click the Next button:
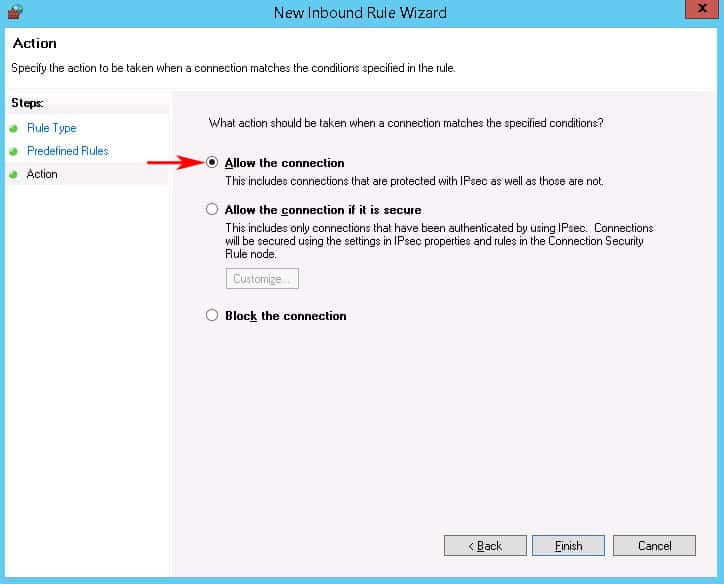
The Last screen of the New Inbound Firewall Wizard will just ask whether to Allow The Connection or block it.Make sure the that “Allow the connection” radio box is checked and click Finish.
At this point, you’ve successfully finished the GPO and you’ll need to wait for the GPO to propagate throughout your network.
3. PSEXEC for WinRM Activation
If either of the two options above don’t work for you, using PSEXEC to remotely enable the service is another option, if you prefer. Here are the relevant commands you will need in order to execute “winrm quickconfig” using PSexec command line utility.
Make sure you have PSEXEC installed on your machine and the proper “PATH” setup within your system variables – this should be automatically added when you install PSEXEC.If you dont have PSEXEC installed yet, grab the download from here (its part of the PSTOOLS package) and install it.
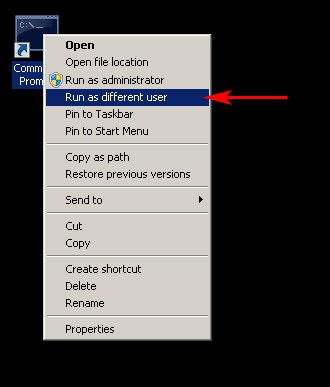
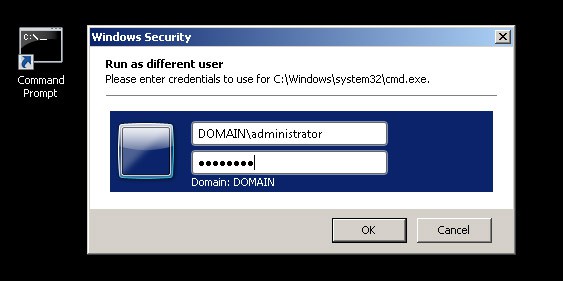
Launch the an elevated “Command Prompt” window using your local/domain administrator account as the user of the target machine/s, to ensure that you have the necessary permissions to configure WinRM remotely on machines in your network.To run “Command Prompt” as a different user, hold the Shift Key down and right-click on the Command Prompt link and click on “Run as Different User” and then enter in a user account that has Administrator Privileges on all computers your targeting.
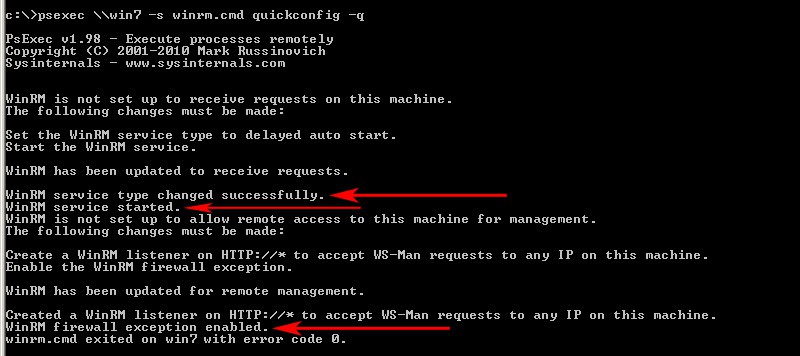
Run one of the following commands below:psexec \\ComputerName -s winrm.cmd quickconfig -qor create a text file with all the computer names you want to target and save them on your C:\ drive and run the command below to enable on all PC’s in the specified text file we just created.Now you can run any one of the commands below depending on what you want to accomplishpsexec @c:\ALLComputerNames.txt -s winrm.cmd quickconfig -q
If all goes well, you’ll see a screen like the one below that confirms everything has been configured properly for WinRM on the remote machine/s.
WinRM FAQs
is WinRM the same as RDP?
WinRM and RDP are two different systems but they can be used for the same purpose, which is to get remote access to a computer and execute commands. WinRM is a text-based system but RDP shows the Desktop of the remote computer.
Is WinRM a security risk?
WinRM uses HTTP by default and that isn’t secure. However, you can configure the system to use HTTPS for connections and that makes WinRM secure.
Does WinRM use TLS?
WinRM will use Transport Layer Security (TLS) if you specify that it should run its connections with HTTPS.
How does WinRM QuickConfig configure the firewall on the remote computer?
WinRM QuickConfig configures the firewall on the remote computer by adding a rule to allow incoming traffic on the WinRM port (default is 5985).
Is WinRM QuickConfig secure?
WinRM QuickConfig uses the HTTPS protocol to encrypt communication between the remote and local computers, making it secure for remote management.
What are the prerequisites for using WinRM QuickConfig on a remote computer?
The prerequisites for using WinRM QuickConfig on a remote computer include having administrative privileges on both the local and remote computers and having network connectivity between the computers.
How can I verify that WinRM is configured correctly on a remote computer?
To verify that WinRM is configured correctly on a remote computer, you can use the “WinRM Id” command to retrieve information about the remote computer and the WinRM configuration. If the command returns information about the remote computer and the WinRM configuration, it means that WinRM is configured correctly.
The “License of HA Pair doesn’t match” or “HA License Sync Error” log message will repeat every 15 minutes if licensing of the Primary and Backup firewalls is not equivalent. This message is intended to alert the firewall administrator that not all services configured on the Primary will be active on the Backup firewall.
For example: The error message may occur if the number of Network Anti-Virus licenses are different on the Primary and Backup appliances, or, if the Primary has Content Filtering Service (CFS) but the Backup does not, there will be no CFS functionality if the Backup becomes the active firewall.
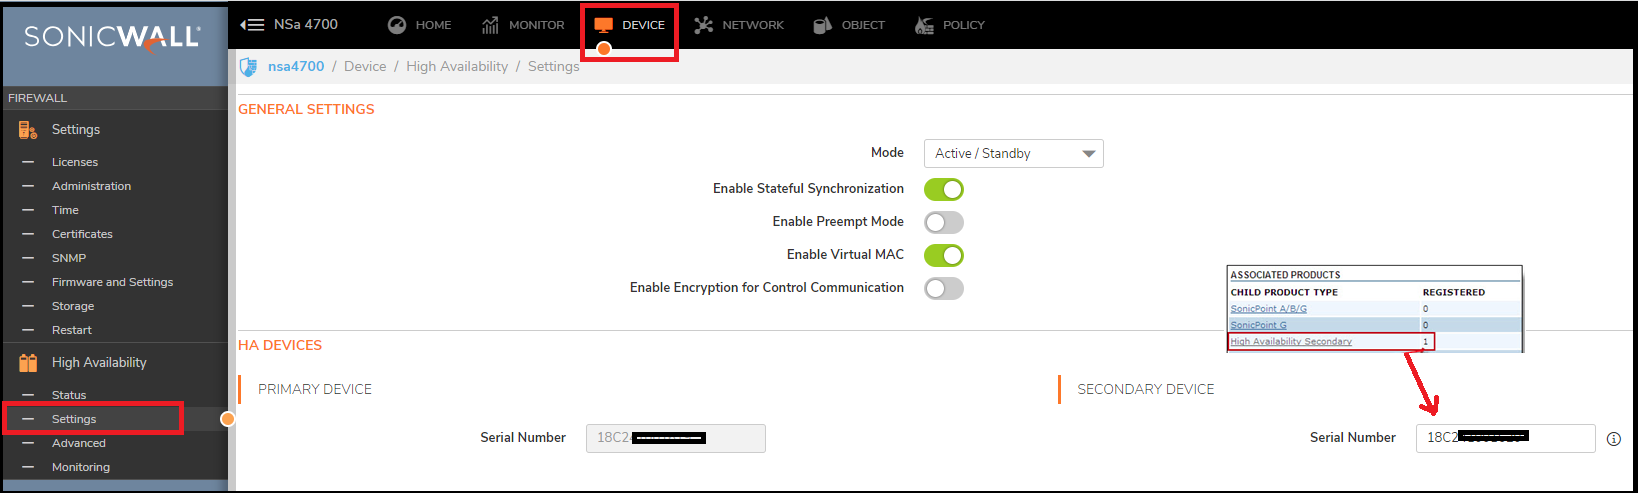
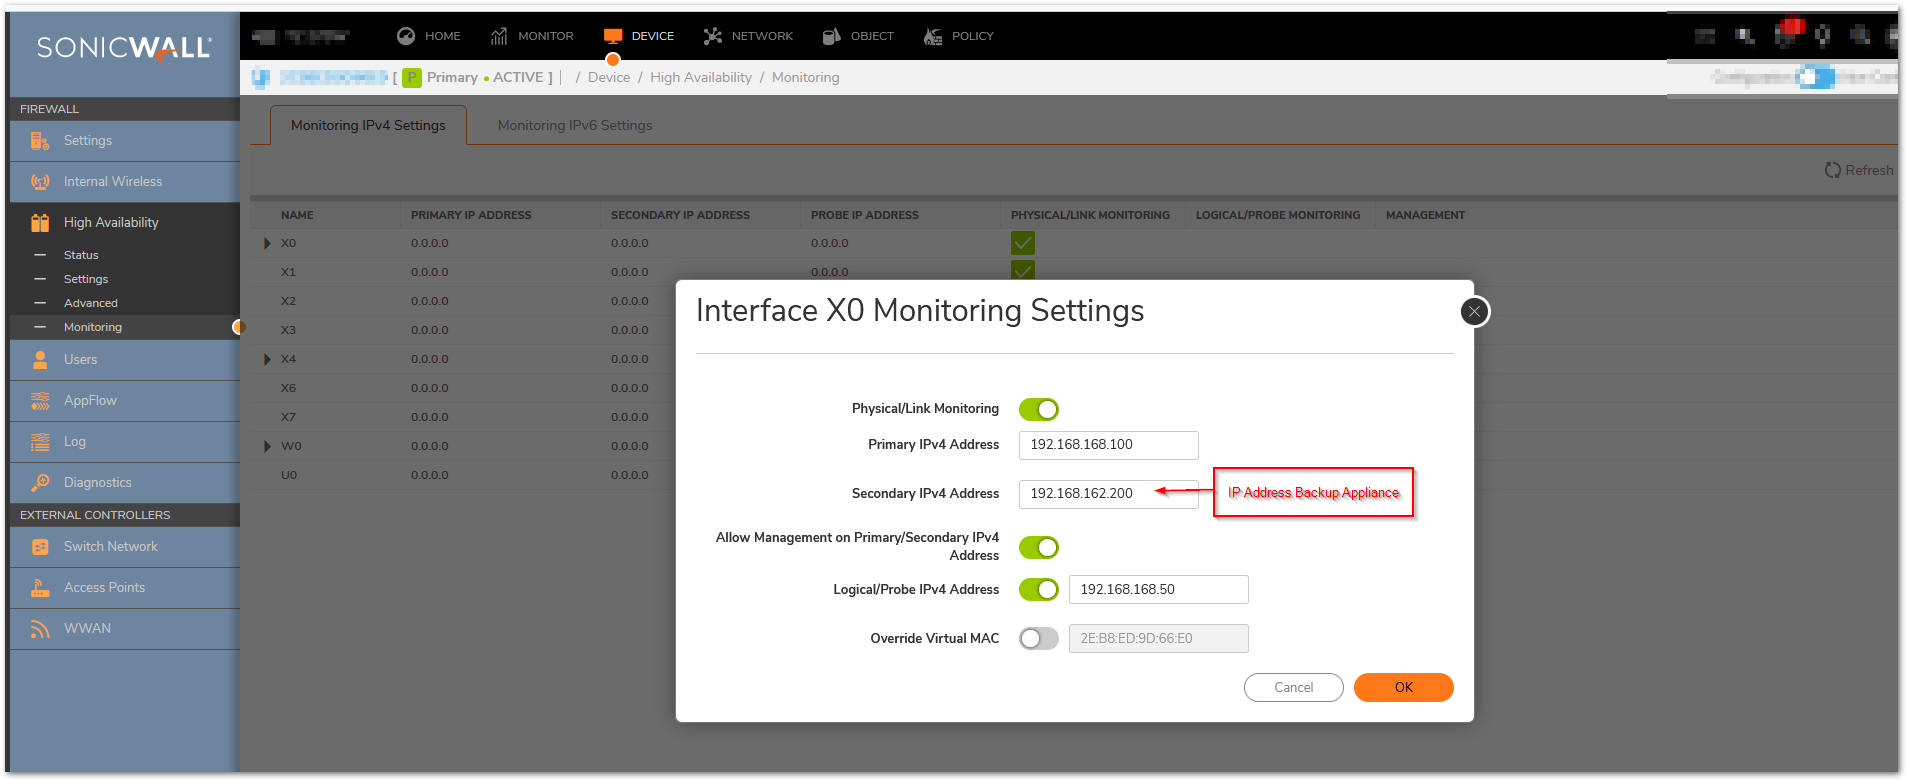
Resolution for SonicOS 7.X
This release includes significant user interface changes and many new features that are different from the SonicOS 6.5 and earlier firmware. The below resolution is for customers using SonicOS 7.X firmware.
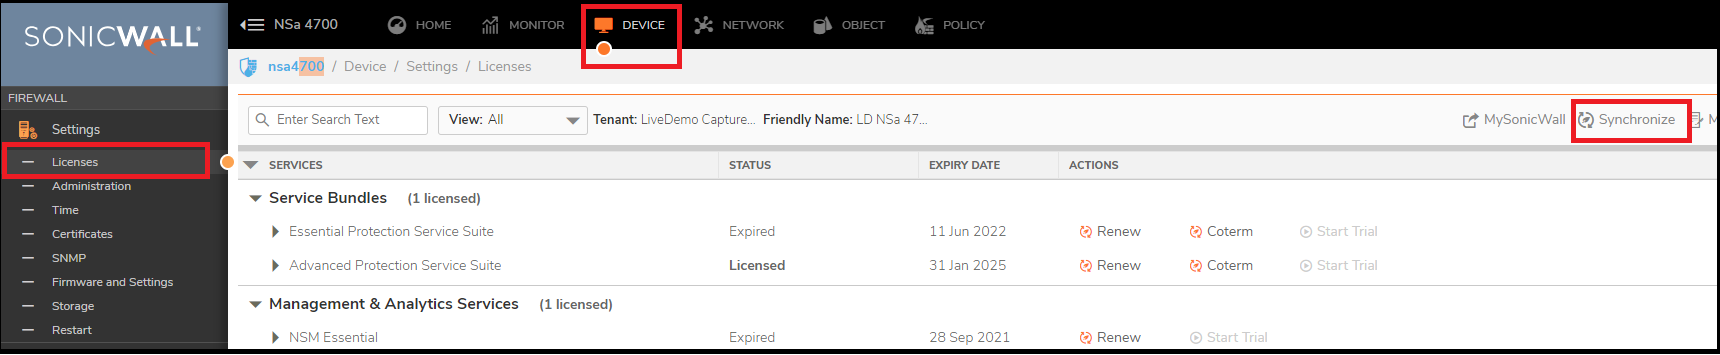
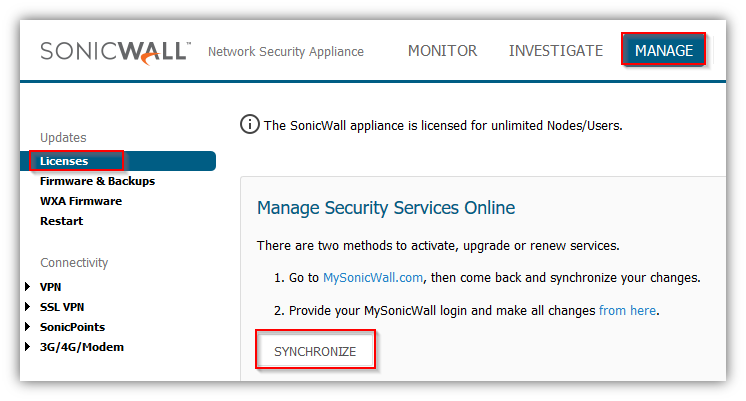
Step 1: Synchronize the licenses on both the devices.
Log into the Backup SonicWall’s unique LAN IP address. The management interface should now display Logged Into: Secondary Device in the upper left corner. If all licenses are not already synchronized with the Primary unit, follow these steps:
Navigate to the Device | Settings | Licenses page and click Synchronize in the upper right corner.
From the Device | Diagnostics | DNS Name Lookup page, use the “Lookup Name or IP” option to see if the DNS servers listed in the SonicWall WAN Interface are resolving the license manager URL “licensemanager.SonicWall.com” on both units. TIP: If the DNS servers are not resolving, try changing the DNS IP addresses on the SonicWall WAN Interface and then try to synchronize the licenses.
If the backup unit is not registered, navigate to the Device | Settings | Licenses page and register the SonicWall security appliance on mySonicWall.com. This allows the SonicWall licensing server to synchronize the licenses.
Step 2: Verify the licenses on www.mySonicWall.com
To use the High Availability feature, you must register both the SonicWall appliances on mySonicWall.com as Associated Products.
Both appliances must be the same SonicWall model,
Must be registered under the same mySonicWall.com user account,
And must be separately licensed for SonicOS Enhanced.
NOTE: The SonicOS Enhanced license is not shareable between the primary and the backup appliances. Both appliances must be licensed separately.
Verify the HA Secondary device on mySonicWall.com account:
Click on the Primary UTM appliance (e.g. TZ 670) and scroll down to Associated Products section.
Click on High Availability Secondary and ensure that the Serial number of device matches with the Backup SonicWall entry on the Devices | High Availability | Settings page of your Primary SonicWall appliance.
Please Note that the backup appliance of your high availability pair is referred to as the HA Secondary unit on mySonicWall.com. After the appliances are associated as an HA Pair, they can share licenses.
Step 3: Adding secondary UTM appliance under the HA pair on mySonicWall.com
If you have not registered/Associated the HA Secondary device on the mySonicWall.com, follow these steps:
Registering the Secondary/Backup UTM appliance from the SonicWall Management Interface
Important: After registering new SonicWall appliances on mySonicWall.com, you must also register the backup appliance from the SonicOS management interface while logged into its individual management IP address. This allows the backup unit to synchronize with the SonicWall license server (licensemanager.SonicWall.com) and share licenses with the associated primary appliance.
Step 4: Accessing the Secondary UTM appliance and Synchronizing the Licenses
On the Device |High Availability | Monitoring page, you can configure unique management IP addresses for both units in the HA Pair which allows you to log in to each unit independently for management purposes. See also Configuring High Availability Monitoring settings
Also you can configure Logical/Probe IP addressfor SonicWall to monitor a reliable device on one or more of the connected networks. Failure to periodically communicate with the device by the Active unit in the HA Pair will trigger a failover to the Idle unit. If neither unit in the HA Pair can connect to the device, no action will be taken.
NOTE: The Primary IP Address and Backup IP Address fields must be configured with independent IP addresses on a LAN interface, such as X0, (or a WAN interface, such as X1, for probing on the WAN) to allow logical probing to function correctly.
In the Logical Probe IP Address field, enter the IP address of a downstream device on the LAN network that should be monitored for connectivity. Typically, this should be a downstream router or server. (If probing is desired on the WAN side, an upstream device should be used.) The Primary and Backup appliances will regularly ping this probe IP address. If both can successfully ping the target, no failover occurs. If neither can successfully ping the target, no failover occurs, because it is assumed that the problem is with the target, and not the SonicWall appliances. But, if one appliance can ping the target but the other appliance cannot, failover will occur to the appliance that can ping the target.
Step 5: Try to synchronize the licenses again on both the devices.
Step 6: You may also try to upgrade the firmware to the latest version and try to synchronize the licenses again.
This release includes significant user interface changes and many new features that are different from the SonicOS 6.2 and earlier firmware. The below resolution is for customers using SonicOS 6.5 firmware.
Step 1: Synchronize the licenses on both the devices.
Log into the Backup SonicWall’s unique LAN IP address. The management interface should now display Logged Into: Backup SonicWall Status: (green ball) Active in the upper right corner. If all licenses are not already synchronized with the Primary unit, follow these steps:
Navigate to the Manage | Licenses page and click Synchronize.
From the Investigate | Tools | System Diagnostics page, use the “DNS Name Lookup” option under Diagnostic Tool drop down menu to see if the DNS servers listed in the SonicWall WAN Interface are resolving the license manager URL “licensemanager.SonicWall.com” on both units. TIP: If the DNS servers are not resolving, try changing the DNS IP addresses on the SonicWall WAN Interface and then try to synchronize the licenses.
If the backup unit is not registered, navigate to the Manage | Licenses page and register the SonicWall security appliance on mySonicWall.com. This allows the SonicWall licensing server to synchronize the licenses.
Step 2: Verify the licenses on www.mySonicWall.com
To use the High Availability feature, you must register both the SonicWall appliances on mySonicWall.com as Associated Products.
Both appliances must be the same SonicWall model,
Must be registered under the same mySonicWall.com user account,
And must be separately licensed for SonicOS Enhanced.
NOTE: The SonicOS Enhanced license is not shareable between the primary and the backup appliances. Both appliances must be licensed separately.
Verify the HA Secondary device on mySonicWall.com account:
Click on the Primary UTM appliance (e.g. TZ 600) and scroll down to Associated Products section.
Click on High Availability Secondary and ensure that the Serial number of device matches with the Backup SonicWall entry on the Manage | High Availability | Base Setup | HA Devices page of your Primary SonicWall appliance.
Please Note that the backup appliance of your high availability pair is referred to as the HA Secondary unit on mySonicWall.com. After the appliances are associated as an HA Pair, they can share licenses.
Step 3: Adding secondary UTM appliance under the HA pair on mySonicWall.com
If you have not registered/Associated the HA Secondary device on the mySonicWall.com, follow these steps:
Registering the Secondary/Backup UTM appliance from the SonicWall Management Interface
Important: After registering new SonicWall appliances on mySonicWall.com, you must also register the backup appliance from the SonicOS management interface while logged into its individual management IP address. This allows the backup unit to synchronize with the SonicWall license server (licensemanager.SonicWall.com) and share licenses with the associated primary appliance.
Step 4: Accessing the Secondary UTM appliance and Synchronizing the Licenses
On the Manage |HighAvailability | Monitoring Settings page, you can configure unique management IP addresses for both units in the HA Pair which allows you to log in to each unit independently for management purposes. See also Configuring High Availability Monitoring settings.
Also you can configure Logical/Probe IP address for SonicWall to monitor a reliable device on one or more of the connected networks. Failure to periodically communicate with the device by the Active unit in the HA Pair will trigger a failover to the Idle unit. If neither unit in the HA Pair can connect to the device, no action will be taken.
NOTE: The Primary IP Address and Backup IP Address fields must be configured with independent IP addresses on a LAN interface, such as X0, (or a WAN interface, such as X1, for probing on the WAN) to allow logical probing to function correctly.
In the Logical Probe IP Address field, enter the IP address of a downstream device on the LAN network that should be monitored for connectivity. Typically, this should be a downstream router or server. (If probing is desired on the WAN side, an upstream device should be used.) The Primary and Backup appliances will regularly ping this probe IP address. If both can successfully ping the target, no failover occurs. If neither can successfully ping the target, no failover occurs, because it is assumed that the problem is with the target, and not the SonicWall appliances. But, if one appliance can ping the target but the other appliance cannot, failover will occur to the appliance that can ping the target.
Step 5: Try to synchronize the licenses again on both the devices.
Step 6: You may also try to upgrade the firmware to the latest version and try to synchronize the licenses again.
On the High Availability | Monitoring page, you can configure both physical and logical interface monitoring. By enabling physical interface monitoring, you enable link detection for the designated HA interfaces. The link is sensed at the physical layer to determine link viability. Logical monitoring involves configuring the SonicWall to monitor a reliable device on one or more of the connected networks. Failure to periodically communicate with the device by the Active unit in the HA Pair will trigger a Failover to the Idle unit. If neither unit in the HA Pair can connect to the device, no action will be taken.
The Primary and Backup IP addresses configured on this page are used for multiple purposes.
As independent management addresses for each unit (supported on all physical interfaces).
To allow synchronization of licenses between the Idle unit and the SonicWall licensing server .
As the source IP addresses for the probe pings sent out during logical monitoring.
When using logical monitoring, the HA Pair will ping the specified Logical Probe IP address target from the Primary as well as from the Backup SonicWall. The IP address set in the Primary IP Address or Backup IP Address field is used as the source IP address for the ping. If both units can successfully ping the target, no Failover occurs. If both cannot successfully ping the target, no Failover occurs, as the SonicWalls will assume that the problem is with the target, and not the SonicWalls. But, if one SonicWall can ping the target but the other SonicWall cannot, the HA Pair will Failover to the SonicWall that can ping the target.
Resolution for SonicOS 7.X
This release includes significant user interface changes and many new features that are different from the SonicOS 6.5 and earlier firmware. The below resolution is for customers using SonicOS 7.X firmware.
The configuration tasks on the High Availability |Monitoring page are performed on the Primary unit and then are automatically synchronized to the Backup.
Login as an administrator to the SonicOS user interface on the Primary SonicWall.
Go to Device In top menu , navigate to High Availability | Monitoring Settings .
Click Configure icon for an interface on the LAN, such as X0.
To enable link detection between the designated HA interfaces on the Primary and Backup units, leave the Enable Physical / Link Monitoring checkbox selected.
In the Primary IP Address field, enter the unique LAN management IP address of the Primary unit.
In the Backup IP Address field, enter the unique LAN management IP address of the Backup unit.
Configuring unique management IP addresses for both units in the HA Pair allows you to log in to each unit independently for management purposes. Note that non-management traffic is ignored if it is sent to one of these IP addresses. The Primary and Backup SonicWall security appliances’ unique LAN IP addresses cannot act as an active gateway; all systems connected to the internal LAN will need to use the virtual LAN IP address as their gateway.
The management IP address of the Backup/Idle unit is used to allow license synchronization with the SonicWall licensing server, which handles licensing on a per-appliance basis (not per-HA Pair). Even if the Backup unit was already registered on MySonicWall before creating the HA association, you must use the link on the Device | Settings | Licenses page to connect to the SonicWall server while accessing the Backup appliance through its management IP address.
Select the Allow Management on Primary/Backup IP Address checkbox. When this option is enabled for an interface, a green icon appears in the interface’s management column in the Monitoring Settings table on the High Availability | Monitoring page. Management is only allowed on an interface when this option is enabled.
In the Logical Probe IP Address field, enter the IP address of a downstream device on the LAN network that should be monitored for connectivity.Typically, this should be a downstream router or server. (If probing is desired on the WAN side, an upstream device should be used.) The Primary and Backup appliances will regularly ping this probe IP address. If both can successfully ping the target, no failover occurs. If neither can successfully ping the target, no failover occurs, because it is assumed that the problem is with the target, and not the SonicWall appliances. But, if one appliance can ping the target but the other appliance cannot, failover will occur to the appliance that can ping the target.
NOTE: The Primary IP Address and Backup IP Address fields must be configured with independent IP addresses on a LAN interface, such as X0, (or a WAN interface, such as X1, for probing on the WAN) to allow logical probing to function correctly.
Optionally, to manually specify the virtual MAC address for the interface, select Override Virtual MAC and enter the MAC address in the field. The format for the MAC address is six pairs of hexadecimal numbers separated by colons, such as A1:B2:C3:d4:e5:f6. Care must be taken when choosing the Virtual MAC address to prevent configuration errors.
Note:There is a design change on Gen7 in the way MAC Addresses are handled for the HA native vs. monitoring. GEN7 uses the Virtual MAC for all interface IPs, both the Virtual IPs and Primary / Secondary Monitoring IPs, Hence the MAC addresses of the X0 Interface IP(Or any VLAN under X0), will have the same MAC address as of the Primary firewall X0 monitoring IP, the same applies for all the interfaces X1, X2, wherever monitoring IPs will be configured.
To configure monitoring on any of the other interfaces, repeat the above steps.
When finished with all High Availability configuration, click Accept. All settings will be synchronized to the Idle unit automatically.
Resolution for SonicOS 6.5
This release includes significant user interface changes and many new features that are different from the SonicOS 6.2 and earlier firmware. The below resolution is for customers using SonicOS 6.5 firmware.
The configuration tasks on the High Availability |Monitoring page are performed on the Primary unit and then are automatically synchronized to the Backup.
Login as an administrator to the SonicOS user interface on the Primary SonicWall.
Go to Manage In top menu , navigate to High Availability | Monitoring Settings .
Click Configure icon for an interface on the LAN, such as X0.
To enable link detection between the designated HA interfaces on the Primary and Backup units, leave the Enable Physical / Link Monitoring checkbox selected.
In the Primary IP Address field, enter the unique LAN management IP address of the Primary unit.
In the Backup IP Address field, enter the unique LAN management IP address of the Backup unit.
Configuring unique management IP addresses for both units in the HA Pair allows you to log in to each unit independently for management purposes. Note that non-management traffic is ignored if it is sent to one of these IP addresses. The Primary and Backup SonicWall security appliances’ unique LAN IP addresses cannot act as an active gateway; all systems connected to the internal LAN will need to use the virtual LAN IP address as their gateway.
The management IP address of the Backup/Idle unit is used to allow license synchronization with the SonicWall licensing server, which handles licensing on a per-appliance basis (not per-HA Pair). Even if the Backup unit was already registered on MySonicWall before creating the HA association, you must use the link on the System | Licenses page to connect to the SonicWall server while accessing the Backup appliance through its management IP address.
Select the Allow Management on Primary/Backup IP Address checkbox. When this option is enabled for an interface, a green icon appears in the interface’s management column in the Monitoring Settings table on the High Availability | Monitoring page. Management is only allowed on an interface when this option is enabled.
In the Logical Probe IP Address field, enter the IP address of a downstream device on the LAN network that should be monitored for connectivity.Typically, this should be a downstream router or server. (If probing is desired on the WAN side, an upstream device should be used.) The Primary and Backup appliances will regularly ping this probe IP address. If both can successfully ping the target, no failover occurs. If neither can successfully ping the target, no failover occurs, because it is assumed that the problem is with the target, and not the SonicWall appliances. But, if one appliance can ping the target but the other appliance cannot, failover will occur to the appliance that can ping the target.
NOTE: The Primary IP Address and Backup IP Address fields must be configured with independent IP addresses on a LAN interface, such as X0, (or a WAN interface, such as X1, for probing on the WAN) to allow logical probing to function correctly.
Optionally, to manually specify the virtual MAC address for the interface, select Override Virtual MAC and enter the MAC address in the field. The format for the MAC address is six pairs of hexadecimal numbers separated by colons, such as A1:B2:C3:d4:e5:f6. Care must be taken when choosing the Virtual MAC address to prevent configuration errors.When the Enable Virtual MAC checkbox is selected on the Manage |High Availability| Base Setup page, the SonicOS firmware automatically generates a Virtual MAC address for all interfaces. Allowing the SonicOS firmware to generate the Virtual MAC address eliminates the possibility of configuration errors and ensures the uniqueness of the Virtual MAC address, which prevents possible conflicts.
To configure monitoring on any of the other interfaces, repeat the above steps.
When finished with all High Availability configuration, click Accept. All settings will be synchronized to the Idle unit automatically.
Resolution for SonicOS 6.2 and Below
The below resolution is for customers using SonicOS 6.2 and earlier firmware. For firewalls that are generation 6 and newer we suggest to upgrade to the latest general release of SonicOS 6.5 firmware.
The configuration tasks on the High Availability |Monitoring page are performed on the Primary unit and then are automatically synchronized to the Backup.
Login as an administrator to the SonicOS user interface on the Primary SonicWall.
In the left navigation pane, navigate to High Availability | Monitoring.
Click Configure icon for an interface on the LAN, such as X0.
To enable link detection between the designated HA interfaces on the Primary and Backup units, leave the Enable Physical Interface Monitoring checkbox selected.
In the Primary IP Address field, enter the unique LAN management IP address of the Primary unit.
In the Backup IP Address field, enter the unique LAN management IP address of the Backup unit.
Configuring unique management IP addresses for both units in the HA Pair allows you to log in to each unit independently for management purposes. Note that non-management traffic is ignored if it is sent to one of these IP addresses. The Primary and Backup SonicWall security appliances’ unique LAN IP addresses cannot act as an active gateway; all systems connected to the internal LAN will need to use the virtual LAN IP address as their gateway.
The management IP address of the Backup/Idle unit is used to allow license synchronization with the SonicWall licensing server, which handles licensing on a per-appliance basis (not per-HA Pair). Even if the Backup unit was already registered on MySonicWall before creating the HA association, you must use the link on the System | Licenses page to connect to the SonicWall server while accessing the Backup appliance through its management IP address.
Select the Allow Management on Primary/Backup IP Address checkbox. When this option is enabled for an interface, a green icon appears in the interface’s Management column in the Monitoring Settings table on the High Availability | Monitoring page. Management is only allowed on an interface when this option is enabled.
In the Logical Probe IP Address field, enter the IP address of a downstream device on the LAN network that should be monitored for connectivity.Typically, this should be a downstream router or server. (If probing is desired on the WAN side, an upstream device should be used.) The Primary and Backup appliances will regularly ping this probe IP address. If both can successfully ping the target, no failover occurs. If neither can successfully ping the target, no failover occurs, because it is assumed that the problem is with the target, and not the SonicWall appliances. But, if one appliance can ping the target but the other appliance cannot, failover will occur to the appliance that can ping the target.
NOTE:The Primary IP Address and Backup IP Address fields must be configured with independent IP addresses on a LAN interface, such as X0, (or a WAN interface, such as X1, for probing on the WAN) to allow logical probing to function correctly.
Optionally, to manually specify the virtual MAC address for the interface, select Override Virtual MAC and enter the MAC address in the field. The format for the MAC address is six pairs of hexadecimal numbers separated by colons, such as A1:B2:C3:d4:e5:f6. Care must be taken when choosing the Virtual MAC address to prevent configuration errors.When the Enable Virtual MAC checkbox is selected on the High Availability| Advanced page, the SonicOS firmware automatically generates a Virtual MAC address for all interfaces. Allowing the SonicOS firmware to generate the Virtual MAC address eliminates the possibility of configuration errors and ensures the uniqueness of the Virtual MAC address, which prevents possible conflicts.
Click OK.
To configure monitoring on any of the other interfaces, repeat the above steps.
When finished with all High Availability configuration, click Accept. All settings will be synchronized to the Idle unit automatically.
In the first post in this series, we covered common PHP encoding techniques and how they’re used by malware to hide from security analysts and scanners. In today’s post, we’re going to dive a little bit deeper into other obfuscation techniques that make use of other features available in PHP.
Obfuscation Redux
In the first post in this series, we defined Obfuscation as the process of concealing the purpose or functionality of code or data so that it evades detection and is more difficult for a human or security software to analyze, but still fulfills its intended purpose. One of the main contributing factors to the popularity of PHP is its ease of use, but the same functionality that makes it easy to use also makes it easy to abuse, often in ways that were never intended.
The techniques covered in this post are often simpler and “hackier” than the ones listed in the previous article, and most of them are less reliable as indicators of malicious activity individually, as several of them typically need to be combined in order to achieve sufficient obfuscation. These techniques are also often easier for a human analyst to spot, but they are also more difficult to detect using scanning tools due to the wide variety of permutations available. Such simpler obfuscation methods can also be creatively combined with encoding techniques, granting malware authors a formidable array of tactics to avoid detection.
While it is not practical to cover every possible technique in active use, this article will detail the more commonly found methods, and help illustrate the wide range of possibilities when decoding obfuscated malware. Several of the methods we will cover today, such as comment abuse, can be combined into almost infinite variations with minute changes, thus rendering them completely undetectable to traditional hash-based malware scanning and even partially slowing down regular expression-based scanning of the type used by Wordfence.
Fortunately, while these methods do make analysis more difficult, and can slow down scanning, their presence in certain combinations is a strong signal of malicious activity, and the malware detection signatures used by the Wordfence plugin and Wordfence CLI are tuned to detect these combinations with astoundingly few false positives. Wordfence CLI in particular is useful in these cases, as it is highly performant and can run multithreaded jobs, compensating for any speed penalties imposed by these techniques.
Comment Abuse
PHP has several methods of adding code comments that you may already be familiar with. Well-commented code is considered a best practice, as it makes it much easier to maintain software and pay off technical debt, but comments can also be used for illicit purposes.
PHP uses three styles of comments:
//, denoting a single line comment that ends on the next line.
#, likewise a single line comment that ends on the next line, though this is less common than ‘//’.
/*, the beginning of a multiline comment, which can only closed with */.
Multiline comments are particularly useful to malware authors because they are ignored by PHP, and do not have to extend over multiple lines. This means that an attacker can “break up” their code to evade scanners using comments. For instance, the following code block prints “Hello, World!”:
1234
<?phpecho/*blah*/"Hello, World!"/*blah*/;
While this is a very basic example, more complicated examples can be found in real malware, such as the following snippet, which makes use of several additional obfuscation techniques, including octal escape sequences and invisible null bytes:
While we’re not going to fully analyze this malware today, it already presents problems for many scanners. For instance, a scanner searching for the very first line of code, function ed_ixpn() would fail to find it because of the comments. While detection using regular expressions, such as the ones used by the Wordfence Plugin scanner and Wordfence CLI are capable of detecting malware of this type, it still imposes a performance penalty on detection due to the enormous number of possible variations.
Concatenation Catastrophe
PHP makes string concatenation very simple via the dot . operator. This allows programmers to join two separate strings with minimal hassle. For instance, the following code outputs “Hello, World!”:
1
<?php echo“He”.”llo,”.”wor”.”ld”;
There are a large number of legitimate use cases for string concatenation, so it’s generally only an indicator of malicious activity when combined with several other obfuscation techniques. The malware sample we shared earlier provides a good example of this, with octal encoding concatenated with the return values of various functions, which we’ll get to in a later section.
Index Fun
PHP, like most languages, stores text strings as arrays of characters, each with a defined position or index. This makes it possible to assemble arbitrary commands and data from a string containing the required characters, using the array index of each character and the concatenation operator. For instance, the following code prints “Hello, World!”:
1234
<?php$string="Wow, what a cool Helpful research device!";echo$string[17].$string[18].$string[19].$string[19].$string[1].$string[3].$string[4].$string[0].$string[1].$string[25].$string[15].$string[34].$string[40];
PHP arrays start with an index of 0, meaning that $string[0] in the example above would be “W”, the first letter of “Wow, what a cool Helpful research device!”. By concatenating letters from different parts of that text string, it’s possible to assemble an entirely different text string.
This method can be very helpful for hiding the underlying text being assembled from human researchers and security scan tools alike, and though it does have the occasional legitimate use in selecting chunks of text, when used extensively it is a strong indicator of malicious activity, though it typically needs to be combined with additional techniques such as evaluating the resulting string or passing it to a function.
Math, Not Even Once
PHP allows mathematical operations within other functionality. One of the interesting features in the malware snippet – $disdcrxh_(564-452) – demonstrates this, with it turning out as $disdcrxh_112 due to the subtraction of 564 and 452 in the parenthesis. This functionality can likewise be combined with the string index technique mentioned above. For example, the following code prints out “Hello, World!”:
123
<?php$string="Wow, what a cool Helpful research device!";echo$string[(15+2)].$string[(20-2)].$string[(10+9)].$string[(29-10)].$string[(5-4)].$string[(1+2)].$string[(2+2)].$string[(5-5)].$string[(12-11)].$string[(5*5)].$string[(5*3)].$string[34].$string[(160/4)];
This adds an additional obfuscation layer that can make it even more difficult to determine the code’s functionality without executing it. However, it is incredibly rare for this type of code to be used legitimately, so the presence of this technique is typically an indicator of malicious activity.
String Reversals
One of the most basic functions in PHP’s text string manipulation libraries is strrev, which is used to reverse strings of text. For instance, the following code snippet prints out “Hello, World!”:
1
<?php echostrrev("!dlroW ,olleH");
While not particularly effective at obfuscation on its own, it can be combined with the techniques in this article as well as nearly all of the techniques in our previous article on encoding to make it even more difficult to decode malicious functionality. While it has a number of legitimate use cases, the presence of strrev alongside two or more additional encoding or obfuscation techniques is often a reliable indicator of compromise.
Variable, Dynamic, and Anonymous Functions
PHP has the ability to use variables to store function names as variables and then invoke those functions using the variable. This is widely used by legitimate software, but can also be combined with several other techniques, such as string concatenation, in which case it is often an indicator of malicious activity. For instance, the following code snippet prints out “Hello, World!”:
This can also be combined with dynamic function invocation using methods such as call_user_func, which accepts a function for its first parameter and any arguments to be passed to that function in subsequent parameters. As with variable function names, this is widely used in legitimate code, but it can still make analysis more difficult, especially for automated tools looking primarily for more basic function call syntax. For example, the following code snippet prints out “Hello, World!”:
Finally, PHP also allows for anonymous functions, which are exactly what they sound like – functions without a name. These can be combined with variable assignment as shown:
While anonymous functions are widely used in legitimate code, it is possible to use them in combination with other features to make it more difficult for automated scanning tools or human analysts to keep track of code flow and as such are useful for obfuscation.
We’ve begun to combine obfuscation layers in our examples to provide a better picture of the type of obfuscation often found in the wild, and there’s still more to come.
GOTO Labels
One of the oldest and most basic code functions is the goto statement. While some legitimate software still uses GOTO statements, the functionality is considered poor coding practice and is not widely used, though it reflects how the code operates at a fundamental level far more accurately than more modern syntax. Its primary use in obfuscation is similar to comment abuse in that it breaks up the code so that it is more difficult to determine the control flow.
For example, the following code snippet prints out “Hello, World!” if and only if $_GET['input'] is present and set to ‘hello’, otherwise it prints “Sorry”:
PHP uses the include and require functions to include and execute code located in a separate file. This is almost universally used, and occasionally the .inc extension is used instead of PHP for files to be included. However, one particular feature that is ripe for abuse is that PHP will include files with any extension and execute them as code. This allows attackers to upload the bulk of their malicious code as a file with an allowed extension, often an image extension such as .ico or .png, and then simply include that file from a loader file with a PHP extension. Inclusion of files without a .php or .inc extension is thus almost always an indicator of malicious activity.
For instance, take the following set of files:
loader.php:
1
<?php include('hello.ico');
hello.ico:
1
<?php echo"Hello, World!";
This will print out “Hello, World” when loader.php is executed, even though hello.ico does not have a PHP extension and would not run as PHP if accessed directly.
Putting it All Together
Here’s an example that makes use of everything we’ve learned today apart from including files:
1234567891011121314151617181920
<?php$string=/*blah*/"Wow, what a cool Helpful research device!"/*blah*/;$mashed=$string[(160/4)]./*blah*/$string[34]./*blah*/$string[(5*3)]/*blah*/.$string[(5*5)]/*blah*/.$string[(12-11)]./*blah*/$string[(5-5)]./*blah*//*blah*/$string[(2+2)]./*blah*/$string[(1+2)]./*blah*/$string[(5-4)]/*blah*/.$string[(29-10)]./*blah*/$string[(10+9)]./*blah*/$string[(20-2)]/*blah*/.$string[(15+2)];function/*blah*/echostring(/*blah*/$str/*blah*/){echo/*blah*/$str;return/*blah*/;}$rev/*blah*/=/*blah*/function($str){return/*blah*/strrev($str);};goto/*blah*/dostuff;echo/*blah*/"That didn't work!";dostuff/*blah*/:call_user_func(/*blah*/'echostring',/*blah*/$rev(/*blah*/$mashed));
It begins with comments breaking up the code as well as the concatenation and string indexing techniques we covered earlier, which assigns “Hello, World!” in reverse, or “!dlroW ,olleH” to the $mashed variable.
A quick glance at the code might lead you to believe that it outputs “That didn’t work!” but thanks to the goto statement that line of code is skipped – such misleading uses are par for the course with malware that uses goto statements.
In the dostuff section, we use call_user_func to call the echostring function, which really just does the same thing as echo but serves as an additional layer of obfuscation to untangle, especially if the function were to be given a less friendly name. The echostring function is fed the output of the anonymous function assigned to the $rev variable, which again simply performs a str_rev on the input. The result is that $mashed is reversed and echoed out as “Hello, World!”. While we have kept the function and variable names relatively relevant for this example, there’s nothing preventing a malware author from naming these functions whatever they want, and indeed, misleading or nonsensical function names are more common than meaningful or useful function names in PHP malware.
Conclusion
In today’s post, we covered a number of the more creative, or “hacky” malware obfuscation techniques in widespread use, and showed examples of how they can be combined to make it difficult to analyze code functionality. All of these techniques can also be combined with the techniques in our previous post on malware obfuscation to make life even more difficult for analysts and security scanners. These two posts cover the most popular obfuscation methods used by PHP malware, but there are even more advanced and sophisticated techniques, including genuine encryption, which we will cover in our next article, alongside less commonly-used functionality.
PHP malware is constantly evolving, and our malware analysts release dozens of detection signatures every month, which can be used by the Wordfence scanner as well as by Wordfence CLI. While the vast majority of new signatures will only be made available to Wordfence Premium, Wordfence Care, Wordfence Response, and the Paid Wordfence CLI Tiers, the free version of Wordfence and Wordfence CLI still offer excellent detection capabilities, and include our broadest signature set, which in our testing detects at least one indicator of compromise on more than 90% of infected sites. We also plan to periodically update our free signature set with signatures that detect the most widespread malware from our full signature set.
Once again, we encourage readers who want to learn more about this to experiment with the various code snippets we have presented. As always, be sure to be careful with any actual malware samples you find and only execute them in a hardened virtual environment, as even PHP malware can be used for local privilege escalation on vulnerable machines.
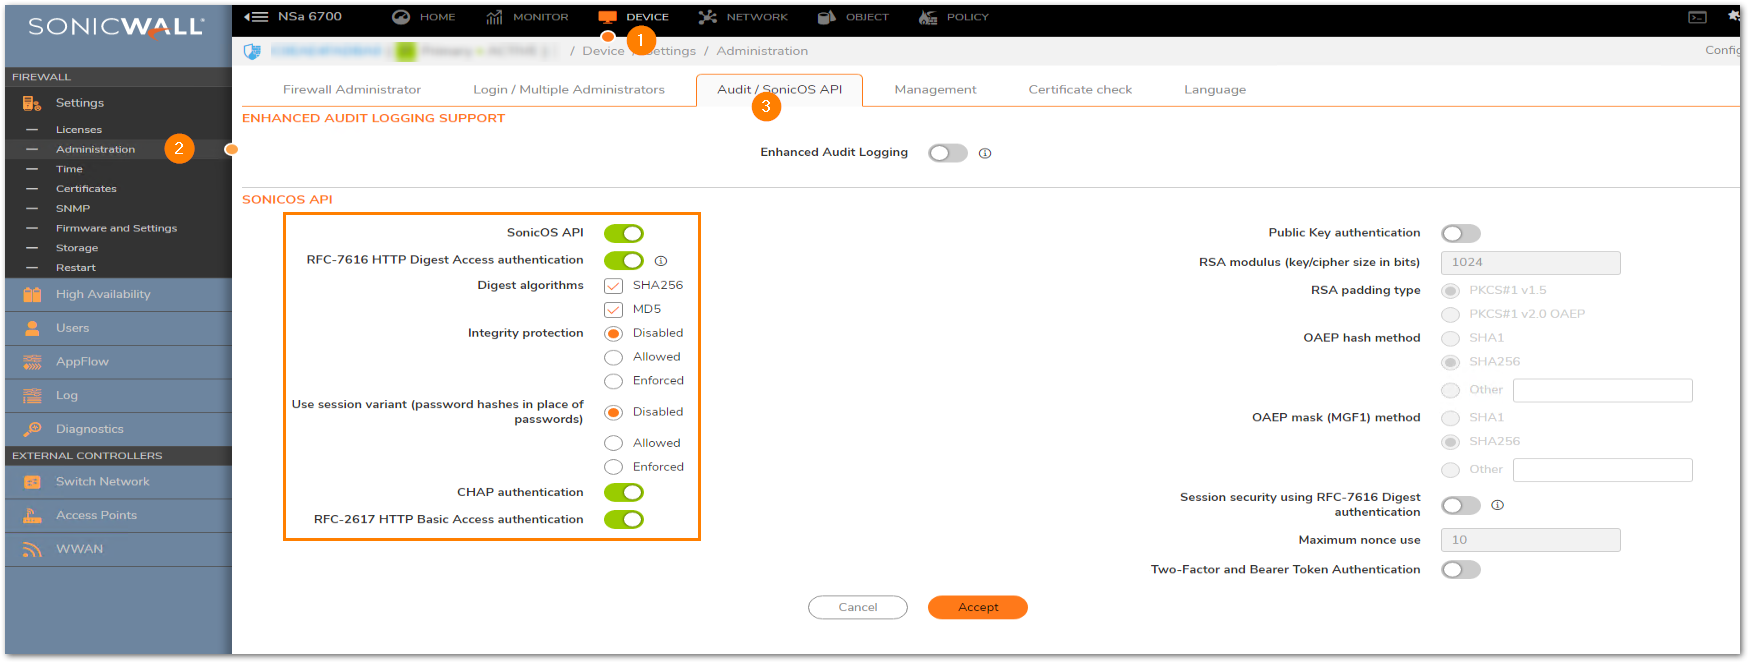

 NOTE: https://IP-address:port/– Replace this with your SonicWall’s Public or private IP address with the right management port number (If the management port is 443, you can directly use https:// followed by the IP address without the port number too).
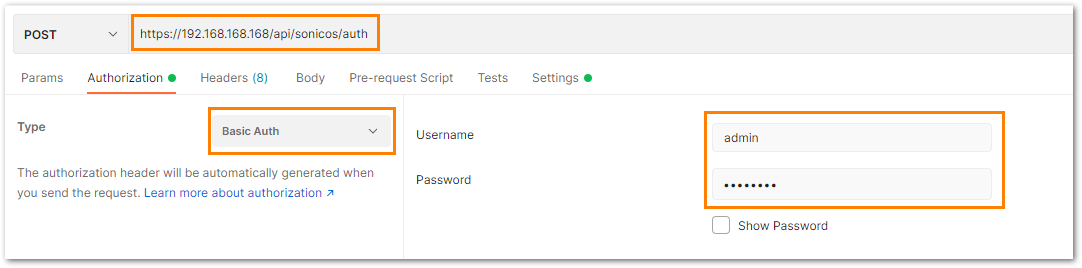
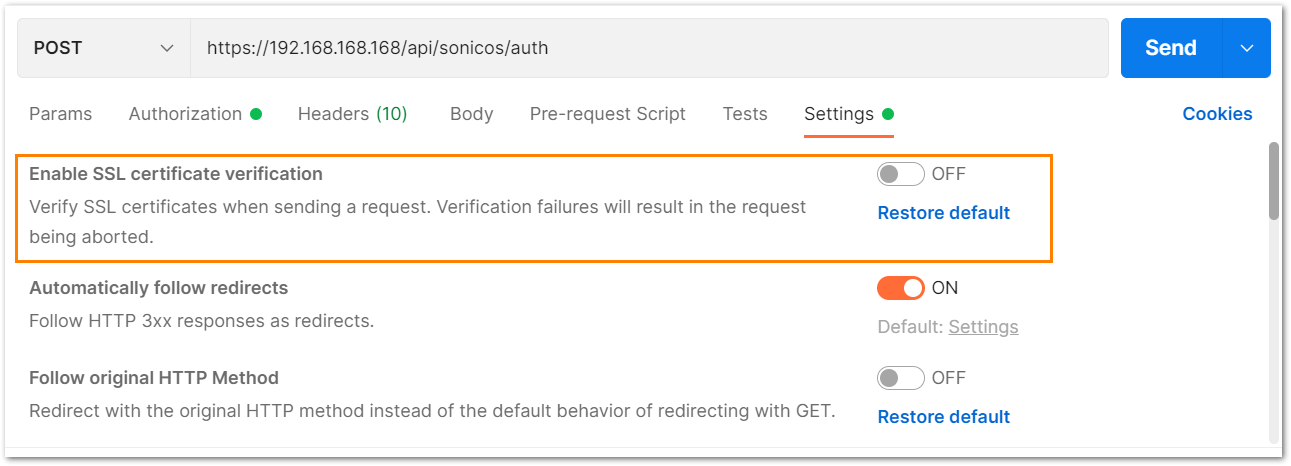
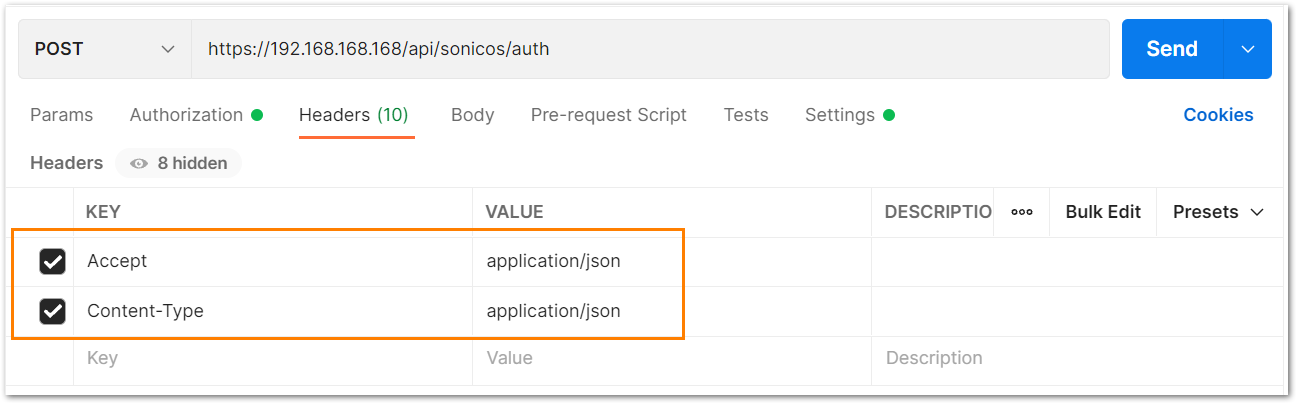
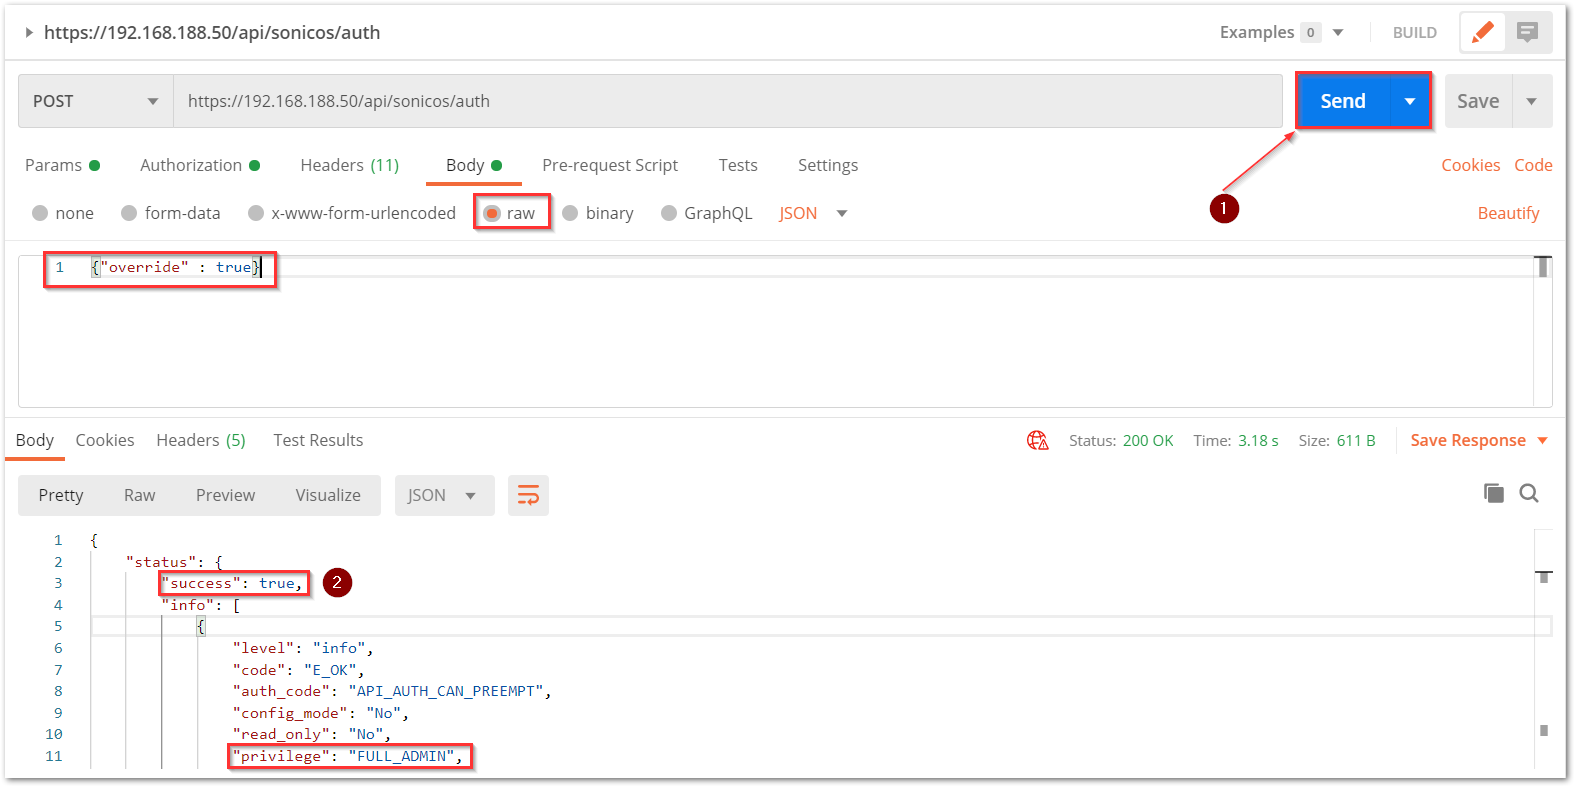
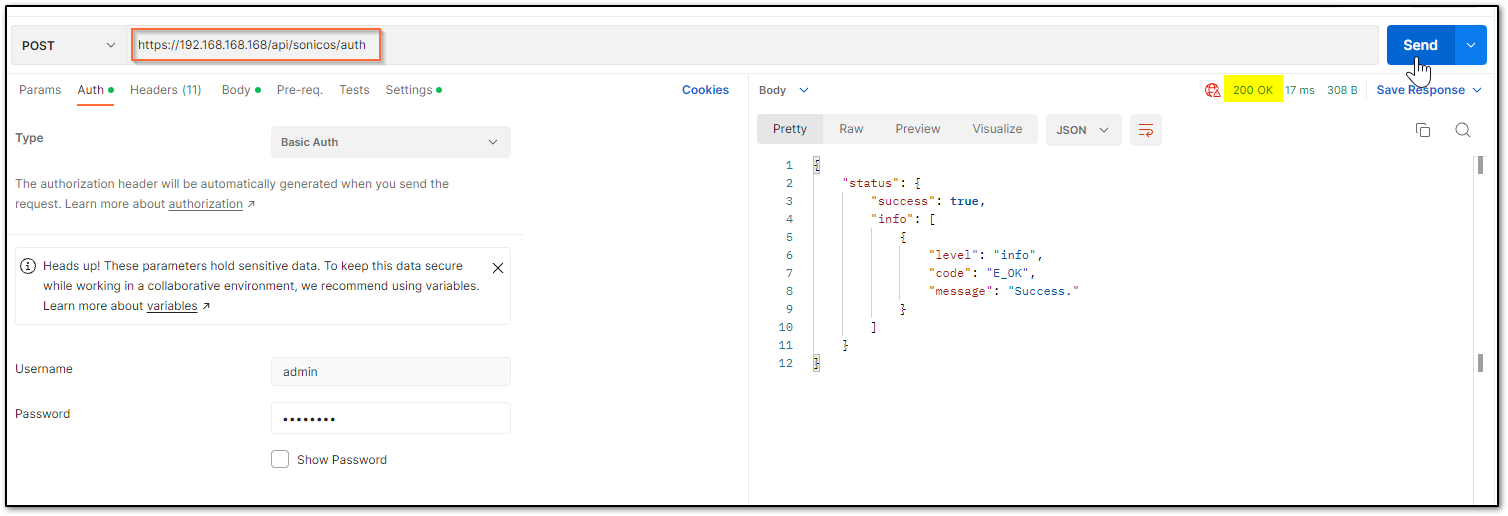
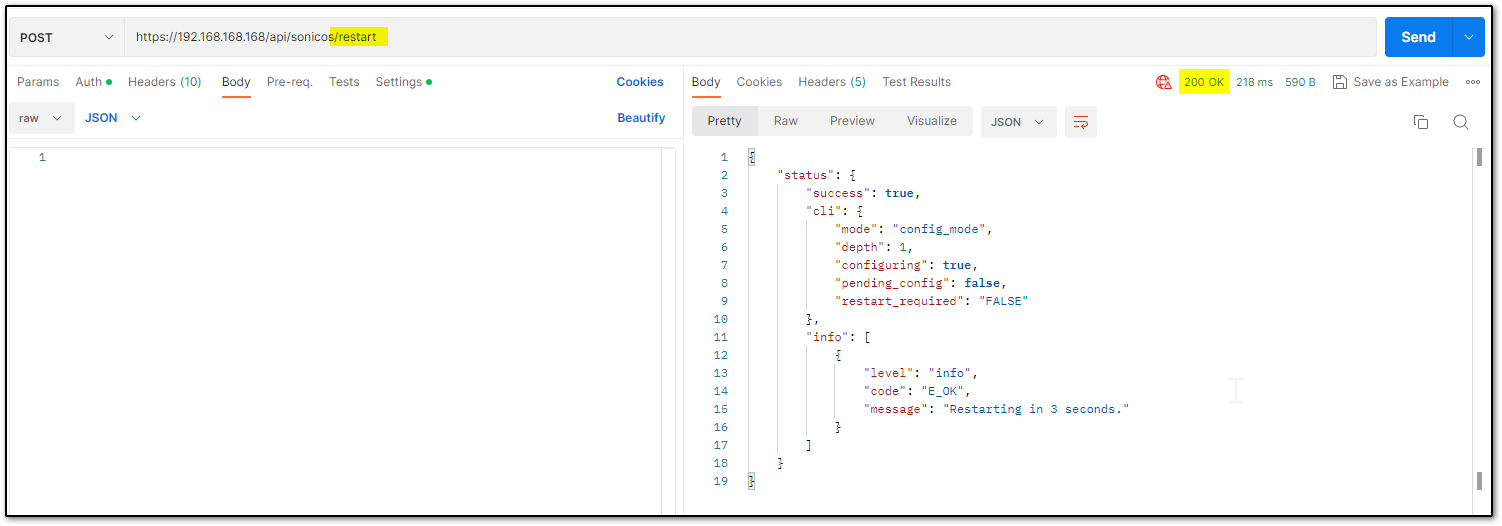
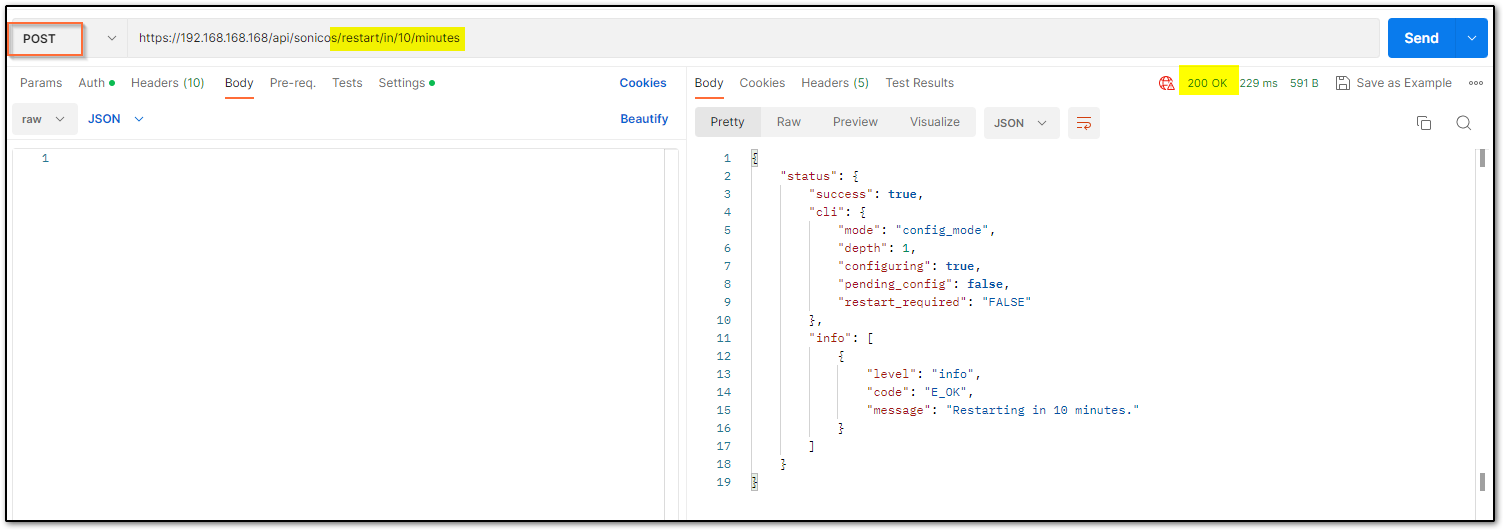
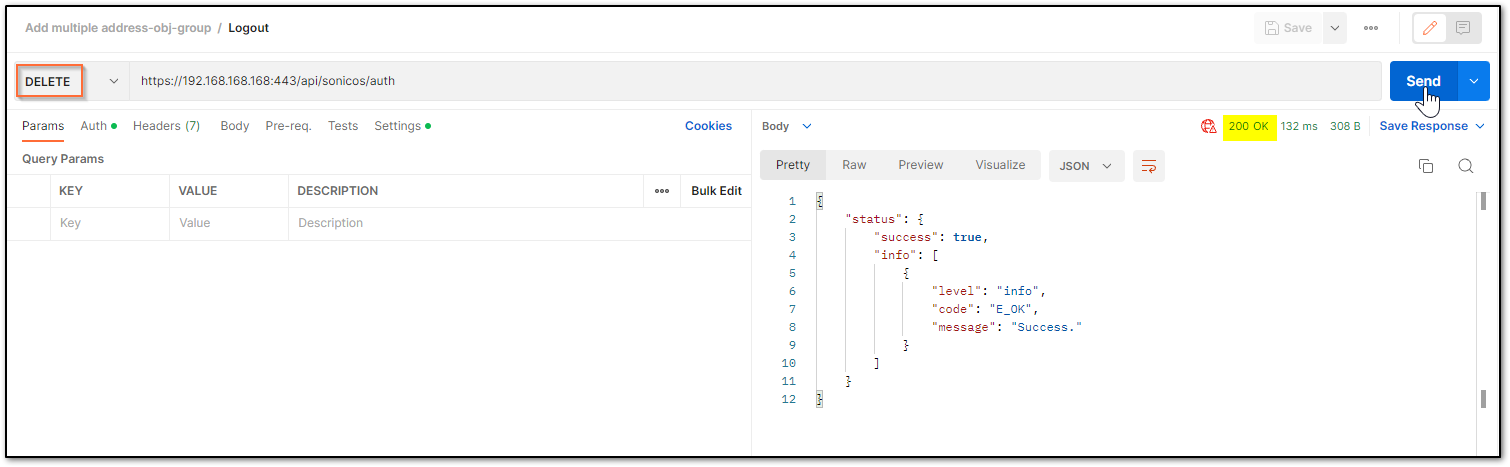
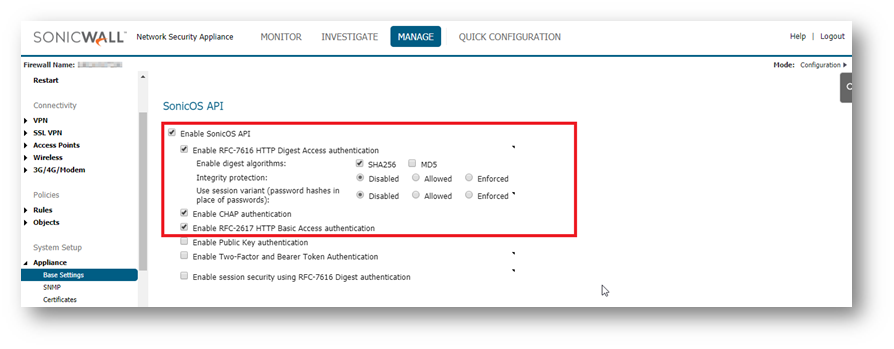
 TIP: You are free to choose Swagger, Postman, Git bash, or any application that allows API calls, if you are using a Linux based operating system you can execute cURL from the terminal. For this article I am using Git bash on Windows.