Over 45,000 VMware ESXi servers inventoried by Lansweeper just reached end-of-life (EOL), with VMware no longer providing software and security updates unless companies purchase an extended support contract.
Lansweeper develops asset management and discovery software that allows customers to track what hardware and software they are running on their network.
As of October 15, 2022, VMware ESXi 6.5 and VMware ESXi 6.7 reached end-of-life and will only receive technical support but no security updates, putting the software at risk of vulnerabilities.
The company analyzed data from 6,000 customers and found 79,000 installed VMware ESXi servers.
Of those servers, 36.5% (28,835) run version 6.7.0, released in April 2018, and 21.3% (16,830) are on version 6.5.0, released in November 2016. In total, there are 45,654 VMware ESXi servers reaching End of Life as of today
The findings of Lansweeper are alarming because apart from the 57% that enter a period of elevated risk, there are also another 15.8% installations that run even older versions, ranging from 3.5.0 to 5.5.0, which reached EOL quite some time ago.
In summary, right now, only about one out of four ESXi servers (26.4%) inventoried by Lansweeper are still supported and will continue to receive regular security updates until April 02, 2025.
However, in reality, the number of VMware servers reaching EOL today, is likely far greater, as this report is based only on Lansweeper’s customers.
VMWare versions detected on net scans(Lansweeper)
The technical guidance for ESXi 6.5 and 6.7 will carry on until November 15, 2023, but this concerns implementation issues, not including security risk mitigation.
The only way to ensure you can continue to use older versions securely is to apply for the two-year extended support, which needs to be purchased separately. However, this does not include updates for third-party software packages.
For more details about EOL dates on all VMware software products, check out this webpage.
What does this mean?
When a software product reaches the end-of-life date, it stops receiving regular security updates. This means that admins should have already planned ahead and upgraded all deployments to a newer release.
While it’s not unlikely that VMware will still offer some critical security patches for these older versions, it’s not guaranteed and certainly won’t release patches for all new vulnerabilities that are discovered.
Once an unsupported ESXi server has carried on for long enough without patches, it will have accumulated so many security vulnerabilities that attackers would have multiple ways to breach it.
Due to ESXi hosting virtual machines, attacking the server can potentially cause severe and wide-scale disruption to business operations, which is why ransomware gangs are so focused on targeting it.
More recently, Mandiant discovered that hackers found a new method to establish persistence on VMware ESXi hypervisors that lets them control the server and hosted VMs without being detected.
All that said, ESXi already enjoys ample attention from threat actors, so running outdated and vulnerable versions of the software would no doubt be a terrible idea.
The WordPress 6.0.3 Security Update contains patches for a large number of vulnerabilities, most of which are low in severity or require a highly privileged user account or additional vulnerable code in order to exploit.
As with every WordPress core release containing security fixes, the Wordfence Threat Intelligence team analyzed the code changes in detail to evaluate the impact of these vulnerabilities on our customers, and to ensure our customers remain protected.
The Wordfence Firewall provides protection from the majority of these vulnerabilities, and most sites should have been updated to the patched version automatically. Nonetheless, we strongly recommend updating your site as soon as possible, if it has not automatically been updated.
Vulnerability Analysis
We have determined that these vulnerabilities are unlikely to be seen as mass exploits but several of them could offer a way for skilled attackers to exploit high-value sites using targeted attacks.
WordPress allows any user that can edit posts, such as Contributors, to add a block linking to an RSS feed. While the contents of any feed imported this way are escaped, errors in retrieving the feed would be displayed on the page containing the feed. These included the error status code and content-type header. This means that a contributor-level attacker could create a page on a site they controlled that returned an error code and a malicious script in the Content-Type response header. They could then add a post containing an RSS block linking to their malicious “feed” and submit it for review. When an administrator previewed the post, the malicious script in the Content-Type header would be executed in their browser.
Unfortunately it is not possible to write a firewall rule to protect against this vulnerability as it could potentially be exploited without sending any requests to the victim site. A motivated attacker could look for existing RSS feeds on a site and attempt to compromise one of the sites those feeds were generated from. Such an attacker could potentially take over multiple sites using a single malicious RSS feed.
It is possible for users that can edit posts to inject malicious JavaScript via the Search Block’s Text color and Background color attributes. Doing so requires bypassing the filtering provided by the safecss_filter_attr function and is not trivial.
It is possible for users that can edit posts to inject malicious JavaScript via the Featured Image block. Doing so requires bypassing the filtering provided by the safecss_filter_attr function and is not trivial. A similar issue also appears to have been patched in the Navigation block, though it was not announced and may not be exploitable.
It is possible for administrator-level users to inject malicious JavaScript via the Widget Group title attribute. This is unlikely to be exploited as administrator-level users typically have a number of other ways to add arbitrary scripts to a website.
In WordPress, site owners have the ability to create posts by sending emails to the target WordPress site. These requests are processed through the /wp-mail.php file which uses wp_insert_post to add the emailed post to the target website. This functionality didn’t check what level the user was sending the request and therefore did not perform any sanitization on the submitted post data. This meant that users without the unfiltered_html capability, with access to submitting posts via email, could inject malicious JavaScript into posts that would execute whenever someone accessed the post. WordPress now sets any user submitting a post via email to the user ID of 0 which will ensure that all posts pass through wp_kses. This feature is disabled by default, so most installations likely are not vulnerable.
It is possible for administrator-level users to add malicious JavaScript to the Blog Name via the Customizer that will execute in the browser of any site visitor. This is unlikely to be exploited as administrator-level users typically have a number of other ways to add arbitrary scripts to a website.
It is possible for users with the unfiltered_html capability, including administrators and editors, to add malicious JavaScript to existing comments using the comment editor. This is unlikely to be exploited as administrator-level users typically have a number of other ways to add arbitrary scripts to a website.
It is possible to craft a search query via the media library that results in a malicious JavaScript being echoed out onto the page. As it is possible to generate a link to the media library with the search query pre-populated via the s parameter, this can be used to perform a reflected Cross-Site Scripting(XSS) attack. While this would require social engineering to exploit and crafting an appropriate payload is nontrivial, the attacker does not need to be authenticated, making this potentially the most exploitable vulnerability patched in this release. We may update our assessment if a proof of concept becomes available.
The sanitize_query function used in the WP_Date_Query class failed to sanitize all relations where it was expecting “AND” or “OR” in the query. It is possible that a third-party plugin or theme might perform a date query in an unsafe way that resulted in SQL injection, though WordPress core is not vulnerable itself. This is similar to the fixes released back in version 5.8.3.
Similar to the above XSS via wp-mail.php, the Trackback functionality of WordPress did not explicitly state the intended user identity which means that any request to wp-trackback.php would assume the identity of the user whose cookies are sent with the request. This would make it possible for an unauthenticated user to trigger a trackback assuming the identity of another user, granted they could trick that other user into performing the action. In new versions of WordPress, the identity will always be a non-existent user with the ID of 0, which represents an unauthenticated user.
This fix appears to have been necessary to safely use the wp_set_current_user( 0 ); method to patch the previously mentioned XSS and CSRF in wp-mail.php and wp-trackback.php vulnerabilities. The previous functionality may have resulted in third party plugins or themes using the wp_set_current_user function in a way that could lead to privilege escalation and users being able to perform more actions than originally intended. We may update our assessment if a proof of concept becomes available.
The post by email functionality has the ability to enable logging. This can contain a post author’s email address which can be considered sensitive information and has the potential to be publicly accessible. This feature is disabled by default, so most installations likely are not vulnerable.
The REST API endpoint for terms and tags did not perform enough validation on the user requesting information about terms and tags for a given post. This made it possible for users with access to terms and tags, such as a contributor, to determine those details on all posts not belonging to them, even when in a private status. This does not reveal critical information, and as such it is not likely to be exploited.
In cases where wp-mail was used to send multiple emails or multi-part emails within a single request, the email altBody (frequently used to provide a text alternative to HTML-formatted emails) was not cleared between messages, which could result in users receiving message contents intended for other recipients. While this would require a plugin configured to send multiple messages with altBody text and would be almost impossible to exploit on purpose, it could still lead to exposure of highly sensitive information.
It was possible to generate a link with an invalid nonce and the _wp_http_referer query string parameter set to an external site. If an attacker was able to trick a logged-in user into clicking on the crafted link, they would be redirected to the external site.
Conclusion
The WordPress 6.0.3 Security update contains a much larger number of security patches than usual. Most of these are not easy to exploit without an existing proof of concept and require an authenticated user. Additionally, the Wordfence firewall should protect all Wordfence users, including Wordfence Free, Wordfence Premium, Wordfence Care, and Wordfence Response, against most of these vulnerabilities. We urge you to verify that your site has been updated to a patched version immediately as there are vulnerabilities in this update that the Wordfence firewall cannot practically block. These vulnerabilities should be taken seriously as a skilled and lucky attacker could potentially use several of them for site takeover.
Special thanks to Wordfence Threat Intelligence Lead Chloe Chamberland for collaborating on this article. Props to Toshitsugu Yoneyama, devrayn, Ben Bidner, Simon Scannell, Marc Montpas, Alex Concha, Than Taintor, Thomas Kräftner, and Michael Mazzolini for discovering and responsibly disclosing these vulnerabilities.
Welcome to the most complete guide on WordPress speed optimization!
This is my attempt to sum up WordPress speed + core web vitals in 1 post (it’s loooong).
I’ve constantly updated it to reflect new changes ever since I first published this 10 years ago. You have updates to things like core web vitals, plugin changelogs, and Cloudflare Enterprise happening every day. While site speed has gotten complex, the basics have stayed the same: use lightweight themes/plugins on fast servers (ideally with a performant cache plugin/CDN).
Why this tutorial is different:
First, my recommendations on tools/plugins/services are arguably better than what other people tell you to use. I’m very transparent about SiteGround’s slow TTFB and cache plugin, Kinsta’s overpriced service + lack of resources, NitroPack being blackhat, RocketCDN’s poor performance, and Elementor/Divi being slow. I’ve also written extensive reviews/tutorials on nearly every major host, cache plugin, CDN, and core web vital you can find in my nav menu.
Which is the 2nd reason it’s different: configuration guides! I have tons of them. Need help configuring FlyingPress, LiteSpeed Cache, or Perfmatters? Want to improve TTFB or LCP? Or maybe you’re wondering which Cloudflare settings to use. I have detailed guides on all those.
If you have suggestions on making this tutorial better (or you have a question), drop me a comment. I’m all ears. I’m not for hire because I spend so much time writing these guides 🙂
Chrome Dev Tools – the coverage report shows your largest CSS/JS files and where they’re loaded from (plugins + third-party code are common culprits). So many parts of speed and web vitals are related to CSS/JS and it’s best to tackle it at the source. Removing things you don’t need is better than trying to optimize it.
KeyCDN Performance Test – measure TTFB in 10 global locations. This is mainly improved with better hosting and using a performant CDN with full page caching (like APO or FlyingProxy). It also shows DNS lookup times and TLS which can be improved with a fast DNS (i.e. Cloudflare) and configuring their SSL/TLS settings.
PageSpeed Insights – most items come down to reducing or optimizing CSS, JS, fonts, images, TTFB, and above the fold content. For example, preload your LCP image and exclude it from lazy load, then move large plugins/elements below the fold so they can be delayed. Focus on recommendations in PSI’s opportunities + diagnostics sections, and monitor your core web vitals report in Search Console.
CLS Debugger – see your website’s layout shifts (CLS) on mobile/desktop in a GIF.
WP Hive – Chrome extension that lets you search the WordPress plugin repository and see whether a plugin impacts memory usage and PageSpeed scores, but only measures “out of the box settings” and not when content is added to the frontend.
Wordfence Live Traffic Report – see bots hitting your site in real-time. AhrefsBot, SemrushBot, compute.amazonaws.com and other bots can be blocked if you’re using their service. Since most bot protection services don’t block these service’s bots, you’ll need to do this manually with something like Cloudflare firewall rules.
WP-Optimize – see which plugins add database overhead and remove old tables left behind by plugins/themes you deleted. Does a better than job cache plugins with scheduled cleanups because it can keep a certain number of post revisions while removing junk (cache plugins delete them all, leaving you with no backups).
cdnperf.com + dnsperf.com – you can these as baseline for choosing a DNS/CDN provider, but it doesn’t include StackPath’s CDN (removed from cdnperf and used by RocketCDN), QUIC.cloud’s CDN or CDN (used on LiteSpeed), and other services.
Waterfall Charts – testing “scores” isn’t nearly as effective as measuring things in a Waterfall chart. Google’s video on optimizing LCP is a great resource and shows you the basics. You can find one in WebPageTest, Chrome Dev Tools, and GTmetrix.
Diagnostic Plugins – the speed plugins section lists all plugins mentioned in the guide. It includes diagnostic plugins like Query Monitor (this is probably best for finding bottlenecks), WP Server Stats, WP Hosting Benchmark, and WP Crontrol.
2. DNS
A slow DNS causes latency which is part of TTFB (and TTFB is part of LCP).
Whoever you registered your domain through is who you’re using for a DNS. GoDaddy, NameCheap, and even Amazon Route 53 (used on Kinsta) don’t perform well on dnsperf.com. Better options include Cloudflare, QUIC.cloud, or Google (if using Google Domains). I usually recommend Cloudflare since it’s free and can be used on any setup by changing nameservers.
3. Hosting
Rocket.net with their free Cloudflare Enterprise will outperform any “mainstream host” since you get 32 CPU cores + 128GB RAM, NVMe storage, Redis, and Cloudflare’s full page caching + Argo Smart Routing. I use them and average a <150ms global TTFB (or click through my posts).
Combining a good host/CDN is arguably the best way to improve TTFB (using a host with improved specs on top of Cloudflare Enterprise hits 2 birds with 1 stone).
Mainstream hosts (like SiteGround, Hostinger, and WPX) don’t have a lot of CPU/RAM, use slower SATA SSDs, and are shared hosting with strict CPU limits which force you to upgrade plans. Cloud hosting is faster, but Kinsta still uses SATA SSDs with low CPU/RAM, PHP workers, and monthly visits (Redis also costs $100/month). Cloudways Vultr HF is who I previously used, but again, they start with only 1 CPU + 1GB RAM on slower Apache servers, PHP-FPM, and GZIP.
Here are Rocket.net’s:
All plans use 32 CPU cores + 128GB RAM with NVMe (faster than SATA), Redis (better than memcached), LiteSpeed’s PHP, and Brotli (smaller compression than GZIP). They have no PHP worker limits since only about 10% of traffic hits your origin due to their Cloudflare Enterprise.
SiteGround
Hostinger
Kinsta
Cloudways Vultr HF
Rocket.net
Hosting type
Shared
Shared
Cloud
Cloud
Private cloud
Storage
SATA
SATA
SATA
NVMe
NVMe
CPU cores
Not listed
1-2
12
1
32
RAM (GB)
Not listed
.768 – 1.536
8
1
128
Object cache
Memcached
x
Redis ($100/mo)
Redis (Pro)
Redis
Server
Nginx
LiteSpeed
Nginx
Apache
Nginx
PHP processing
FastCGI
LiteSpeed
FastCGI
FPM
LiteSpeed
Compression
Brotli
Brotli
Brotli
GZIP
Brotli
CPU limits
Very common
Low memory
Low PHP workers
Average
None
Why you need Cloudflare Enterprise
Because you get Enterprise features like 270+ PoPs, prioritized routing, full page caching, HTTP/3, WAF, and image optimization. 3 problems with most CDNs are their small network (PoPs) and no full page caching or image optimization. For example, WP Rocket’s RocketCDN uses StackPath which was removed from cdnperf.com and doesn’t include image optimization with a mediocre Tbps speed of 65+. SiteGround’s CDN only has 14 PoPs. QUIC.cloud CDN (for LiteSpeed) and BunnyCDN are good, but they still don’t beat Cloudflare Enterprise. Sure, you can pay $5/mo for Cloudflare’s APO, but you’re still missing out on all other Enterprise features.
3 popular hosts with Cloudflare Enterprise
Rocket.net’s Cloudflare Enterprise is free, setup automatically, and uses full page caching (unlike Cloudways). And unlike Kinsta’s, Rocket.net has Argo Smart Routing (specifically good for WooCommerce sites), load balancing, and image optimization. Rocket.net CEO Ben Gabler also used to be StackPath’s Chief Product Officer and went as far as building Rocket.net’s data centers in the same locations as Cloudflare’s. And unlike both hosts, Rocket.net doesn’t limit PHP workers (there’s no CPU limits) and monthly visit limits are 10-25 times more than Kinsta’s.
Cloudflare Enterprise (Kinsta)
Cloudflare Enterprise (Cloudways)
Cloudflare Enterprise (Rocket.net)
CDN PoPs
270
270
270
Prioritized routing
✓
✓
✓
Full page caching
✓
x
✓
HTTP/3
✓
✓
✓
WAF
✓
✓
✓
Argo smart routing
x
✓
✓
Load balancing
x
✓
✓
Image optimization
x
✓
✓
Automatic configuration
x
x
✓
Price
Free
$5/mo (1 domain)
Free
Problems with mainstream hosts
I’ve written some pretty bad reviews about SiteGround’s slow TTFB, CPU limits, and why SG Optimizer does a poor job with core web vitals (they also control several Facebook Groups and threaten to sue people who write bad reviews). Hostinger writes fake reviews and is only cheap because you get less resources like CPU/RAM. Kinsta and WP Engine are way too expensive for how many resources, PHP workers, and monthly visits you get. Along with major incidents like WPX’s worldwide outage and SiteGround’s DNS getting blocked by Google for 4 days (both WPX and SiteGround denied responsibility). One thing is clear: most mainstream hosts appear to be more interested in profits than performance. Please do your own research before getting advice.
Getting started on Rocket.net
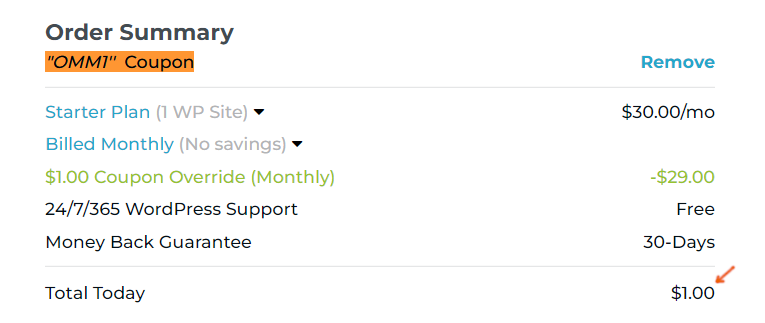
Step 1: Create a Rocket.net account and you’ll be prompted to add a coupon. Sign up with coupon OMM1 to get your first month for $1 (renews at $30/mo or $25/mo when paying yearly). If you sign up with my coupon or affiliate links, I get a commission which I seriously appreciate.
Step 2: Request a free migration. They did this the same day and let me review my website before it was launched with no downtime. For the record, their support is better than Kinsta’s and you can reach out to Ben Gabler or his team (via phone/chat/email) if you have questions.
Step 3: Upgrade to PHP 8.1 and ask support to install Redis (they use Redis Object Cache). These are the only things I did since Cloudflare Enterprise and backups are both automatic.
Step 4: Retest your TTFB in SpeedVitals and click through your pages to see the difference. You can also search their TrustPilot profile for people mentioning “TTFB” where they’re rated 4.9/5.
I was previously on Cloudways Vultr HF which was great, but their Cloudflare Enterprise doesn’t use full page caching (yet) and is $5/mo with annoying challenge pages. Even if their Cloudflare Enterprise was identical, Rocket.net still outperforms them with better specs like more CPU/RAM, Brotli, and LiteSpeed’s PHP (plus better support, easier to use, and usually pricing). While Cloudways is a big improvement than most hosts, you’re already spending $18/mo for Vultr HF’s lowest 1 CPU plan with Cloudflare Enterprise. At that point, the extra $7/mo you’d be spending at Rocket.net is worth it. Rocket.net’s dashboard is also much easier.
For small sites on a budget, NameHero’s Turbo Cloud plan is similar to Hostinger between LiteSpeed, cPanel, and pricing. However, NameHero’s Turbo Cloud plan has about 1.5x more resources (3 CPU + 3GB RAM) with NVMe storage. NameHero’s support/uptimes are also better shown in TrustPilot reviews. This is one the fastest setups on a budget… you get a LiteSpeed server + LiteSpeed Cache + QUIC.cloud CDN, and email hosting. The main con is their data centers are only in the US and Netherlands. If these aren’t close to your visitors, make sure to setup QUIC.cloud’s CDN which has HTML caching (ideally the paid plan which uses all 70 PoPs).
4. Page Builders
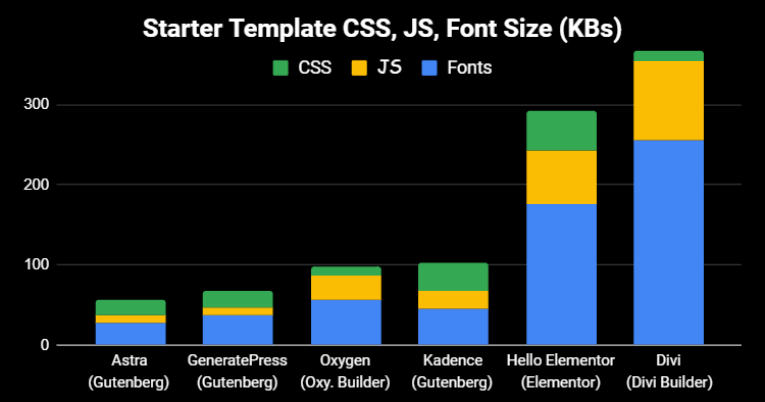
Elementor/Divi are slower than Gutenberg/Oxygen.
Since multiple PSI items are related to CSS/JS/fonts, many people are replacing them with lightweight alternatives. The last thing you want to do is use a slow page builder then install a bunch of “extra functionality plugins” which add even more CSS/JS. Don’t fall into this trap. If you don’t want to ditch your page builder completely, there are still ways you can optimize it.
Divi/Elementor add extra CSS/JS/fonts to your site.
Adding more page builder plugins can slow it down more.
GeneratePress (what I use), Kadence, Blocksy, Oxygen are faster.
If using Elementor, try the settings under Elementor → Experiments.
Same thing with Divi (Divi → Theme Options → General → Performance).
If using Astra Starter Sites, use a template built in Gutenberg (not Elementor).
Use CSS for your header/footer/sidebar (instead of bloated page builder code).
Elementor has a theme customizer setting to host fonts locally + preload them.
If you don’t use Elementor font icons, disable them or use custom icons instead.
If you don’t use elementor-dialog.js for popups, disable it (i.e. using Perfmatters).
Many page builder plugins are module-based, so disable modules you don’t use.
Simplify your design by using less widgets/columns (here’s a YouTube video on it).
If you preload critical images in FlyingPress or Perfmatters, this excludes above the fold images from lazy load and preloads them to improve LCP. However, it doesn’t work with Elementor image widgets (go through your page builder + cache plugin documentation).
Background images aren’t lazy loaded by default because they’re loaded from a separate CSS file. Some cache plugins support a lazy-bg class you can use to lazy load backgrounds.
A performant CDN with HTML caching (and other CDN features) can be the difference maker. While cdnperf.com is a good baseline, there are other things to consider.
Start by looking at their network page (you’ll see BunnyCDN’s network has more PoPs and faster a Tbps than StackPath). Also look at the features (for example, RocketCDN only serves files from the CDN and nothing else while other CDNs do a lot more than just “serving files.” Cloudflare’s dashboard has hundreds of optimizations to improve speed, security, and CPU usage. Aside from choosing a good CDN, make sure to also take advantage of everything it offers. Or just use a service like FlyingProxy/Rocket.net that integrates Cloudflare Enterprise.
Cloudflare – it’s hard to beat Cloudflare with 270+ data centers and all the robust features. Open your Cloudflare dashboard and use the recommendations below to configure settings.
Free Cloudflare Features I Recommend Using
CDN – in your DNS settings, find your domain and change the proxy status to Proxied (orange cloud). This is needed for several Cloudflare features to work.
TLS version – set minimum TLS version to 1.2 and make sure TLS 1.3 is enabled.
Firewall rules – often used to block access to wp-login, XML-RPC, and “hacky” countries. Firewalls block attacks along with unwanted requests to the server.
Bot protection – block spammy bots from hitting your server. I would also check your Wordfence live traffic report to see bots hitting your website in real time and manually block bots like AhrefsBot + SemrushBot if you don’t use them. Bot fight mode can add a JS file to your site (invisible.js) and cause PSI errors (so test this).
Brotli – this only works if your host supports Brotli, otherwise GZIP will be used.
Early hints – while the server is waiting for a response, preload/preconnect hints are sent to the browser so resources load sooner, reducing your server think time.
Browser cache TTL – 1 year is good for static sites (my blog is mostly static so this is what I use) or use 1 month for dynamic sites. This is recommended by Google and can fix serve static assets with an efficient cache policy in PageSpeed Insights.
Crawler hints – helps search engines efficiently time crawling and save resources.
Cache reserve – improves cache hit ratio by making sure specific content is being served from Cloudflare even when the content hasn’t been requested for months.
Workers – deploy code on Cloudflare’s edge servers (try the playground). Workers are serverless with automatic scaling + load balancing. Obviously involves coding knowledge and can reduce LCP by 80%. It can also be used for external cron jobs.
Cache everything page rule – most common page rule which caches HTML and improves TTFB, but I recommend APO or Super Page Cache for Cloudflare instead.
HTTP/3 – not true HTTP/3 but still a nice feature (test your site using HTTP/3 test).
0-RTT connection resumption – good for repeat visitors, latency, mobile speed.
Hotlink protection – saves bandwidth by stopping people from copying your images and using them on their own website while they’re hosted on your server.
Zaraz – offload third-party scripts to Cloudflare like Google Analytics, Facebook Pixel, chatbots, and custom HTML. But test your results against delaying these.
Monitor bandwidth/analytics – the more bandwidth you offload to Cloudflare the better. This should lighten the load on your server while reducing CPU usage.
Paid Cloudflare Features
APO – caches HTML which can improve TTFB in multiple global locations.
WAF – block unwanted requests, improve security, and reduce CPU usage.
Argo + Tiered Cache – route traffic using efficient paths with Tiered Cache.
Image optimizations – I prefer these over plugins. Between all 3 (image resizing, Mirage, Polish), you don’t have to use a bloated image optimization plugin and they usually do a better job. You have features like compression/WebP and they also have mobile optimizations like serving smaller images to reduce mobile LCP.
Signed Exchanges – improves LCP when people click links in Google’s search results via prefetching which Google says can lead to a substantial improvement.
Load Balancing – creates a failover so your traffic is re-routed from unhealthy origins to healthy origins. Can reduce things like latency, TLS, and general errors.
Cloudflare Enterprise – majors benefits include prioritized routing, more PoPs, Argo + Tiered Cache, full page caching, image optimization, and other features depending where you get it from. The easiest/cheapest way is to use a host with Cloudflare Enterprise or FlyingProxy (I recommend Rocket.net’s who even built their data centers in the same locations as Cloudflare). It’s just more thought out than Cloudways/Kinsta. You could also consider using Cloudflare Pro which has some of these features. It requires more configuration but gives you more control.
Take advantage of different caching layers your host offers
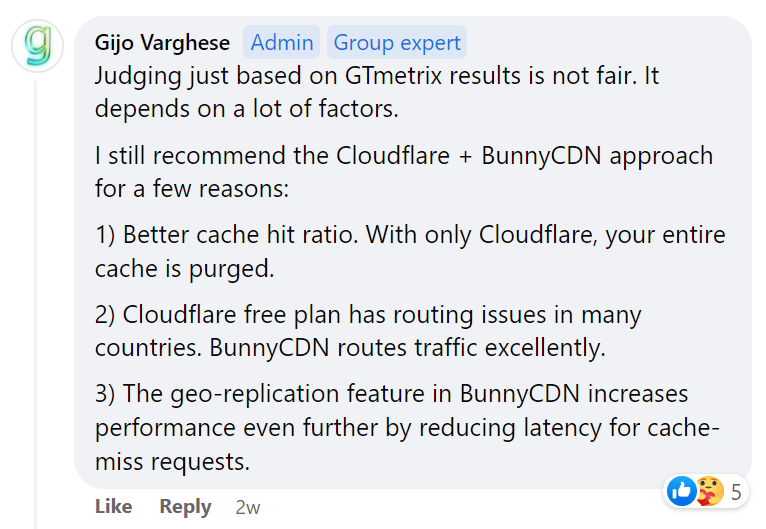
BunnyCDN – Gijo suggests Cloudflare + BunnyCDN which is what I’ve used for a long time. If you’re using FlyingPress, FlyingCDN is powered by BunnyCDN with Bunny Optimizer + geo-replication. It’s also cheaper than buying these directly through BunnyCDN and easy to setup.
QUIC.cloud – use this if you’re on LiteSpeed. You’ll want to use the standard (paid) plan since the free plan only uses 6 PoPs and doesn’t have DDoS protection. It has HTML caching which is similar to Cloudflare’s full page caching and is also needed for LSC’s image/page optimizations.
RocketCDN – uses StackPath which was removed from cdnsperf.com and has less PoPs, slower Tbps, no image optimization, no HTML caching, and no other features besides serving files from a CDN. Also isn’t “unlimited” like WP Rocket advertises since they will cut you off at some point.
SiteGround CDN – not a lot of PoPs/features and you have to use their DNS to use it (which if you remember, was blocked by Google for 4 days). I personally wouldn’t trust this with my site.
6. Cache Plugins
Let’s summarize 5 popular cache plugins in 10 lines or less.
FlyingPress – optimizes for core web vitals and real-world browsing better than the last 3. When a new core web vital update comes out (like fetchpriority resource hints), Gijo is almost always first to add it. Awesome features not found in most cache plugins: preloading critical images lets you set the number of images usually shown above the fold to exclude them from lazy load while preloading them. FlyingPress can also lazy render HTML elements, self-host YouTube placeholders, and it has a lazy-bg helper class for lazy loading background images. FlyingCDN uses BunnyCDN with Bunny Optimizer + geo-replication (great choice). The remove unused CSS feature is faster than WP Rocket’s since it loads used CSS in a separate file (instead of inline) which Perfmatters agrees is faster for visitors. Really, the main thing it doesn’t have is server-level caching. I moved from WP Rocket to FlyingPress and saw a big difference in speed.
SG Optimizer
WP Rocket
FlyingPress
Server-side caching
✓
x
x
Delay JavaScript
x
✓
✓
Remove unused CSS
x
Inline
Separate file
Critical CSS
x
✓
✓
Preload critical images
x
x
By number
Exclude above the fold images
By class
By URL
By number
Lazy load background images
x
Inline
Helper class
Fetchpriority resource hint
x
x
✓
Lazy render HTML elements
x
x
✓
Add missing image dimensions
x
✓
✓
YouTube iframe preview image
x
✓
✓
Self-host YouTube placeholder
x
x
✓
Host fonts locally
x
x
✓
Font-display: swap
x
✓
✓
Preload links
x
✓
✓
CDN (beyond Cloudflare)
SiteGround CDN
StackPath
BunnyCDN
CDN PoPs
14
60
93
CDN Tbps
N/A
65
80
Dynamic caching
✓
x
x
CDN geo-replication
x
x
✓
CDN image optimization
✓
x
✓
CDN image resizing for mobile
x
x
✓
Documented APO compatibility
x
x
✓
LiteSpeed Cache – also does a great job optimizing for web vitals and real users, but different than FlyingPress. Mainly because it should only be used on LiteSpeed, it’s free, and it has faster server-side caching. However, the settings can be complicated. While some settings are similar to FlyingPress like loading used CSS in a separate file and lazy loading HTML elements, it has its own unique features such as localizing third-party resources, ESI, guest mode, LQIP, and HTML caching through QUIC. Use LSC if you’re on a LiteSpeed host. Anything else, I’d use FlyingPress.
WP Rocket – removing unused CSS is slower for visitors and RocketCDN isn’t a good CDN. WP Rocket doesn’t self-host fonts (or even recommend it) or video placeholders. Excluding above the fold images from lazy load and preloading them individually is tedious. Still no image optimization or documented APO compatibility. While Gijo releases many new features and updates FlyingPress to address core web vital updates, it seems WP Rocket has fallen behind. Two good things about WP Rocket are automatic delaying of JavaScript and documentation.
SiteGround Optimizer – great for caching, not for web vitals. Lacks way too many features and has a history of compatibility issues the developers blame on third-party plugins/themes if you check support threads. My advice is to only use it for caching, disable everything else, then use FlyingPress or WP Rocket (just make sure page caching is only enabled in 1 plugin and disabled in the other). Of course, SiteGround will glorify their cache plugin even when it’s clearly inferior.
NitroPack – don’t use this! The only reason you get better “scores” is because it moves elements off the main-thread so they can’t be detected in speed testing tools. This leads to great (but false) scores and it doesn’t actually do a good job making your website load faster compared to other plugins. Google “NitroPack blackhat” and you’ll find plenty of articles on it.
7. Other Caching
Cache plugins are just 1 layer.
Check whether your host supports object cache (Redis/memcached), OPcache, and HTTP accelerators like Varnish/FastCGI. Most do but they need to be enabled or set up manually.
You also have CDN caching which is its own layer. All these are meant for different things and you should ideally use most (if not all) them. People get scared they’re using too much caching, but as long as you’re only using 1 type of layer (not both Redis + memcached), it’s a good thing.
OPcache – enable in your host (can help reduce CPU usage).
Browser cache – enable in your cache plugin (stores files in browsers).
HTTP accelerators – enable in your host (probably Varnish or FastCGI).
Object cache – Redis generally uses memory more efficiently than memcached and is good for large/eCommerce sites. Once it’s enabled in your host, you’ll connect it your site using a plugin (i.e. LiteSpeed Cache, W3 Total Cache, SG Optimizer, WP Redis). Check your host’s documentation/support on which plugin is best. For example, Rocket.net requires you to install the WP Redis plugin while Cloudways requires you to install the Redis addon.
CDN cache – APO is not the same as a cache everything page rule or the Super Page Cache plugin. QUIC also does HTML caching, then there are services that include Cloudflare’s full page cache like Rocket.net’s Cloudflare Enterprise, FlyingProxy, and SiteGround Optimizer. The key thing is that you’re caching HTML somewhere as it can significantly improve TTFB.
Take advantage of different caching layers your host offers
8. Plugins
Watch out for plugins that:
Add CSS/JS to the frontend – use the Chrome Dev Tools coverage report to see which plugins add CSS and JS. This includes plugins that inject third-party JavaScript or fonts.
Increase CPU usage – common with plugins that collect “statistics” like Wordfence’s live traffic report, Query Monitor, and Broken Link Checker. But can really be from any plugin. WP Hive tells you if a plugin increases memory usage when browsing the WP plugin repo.
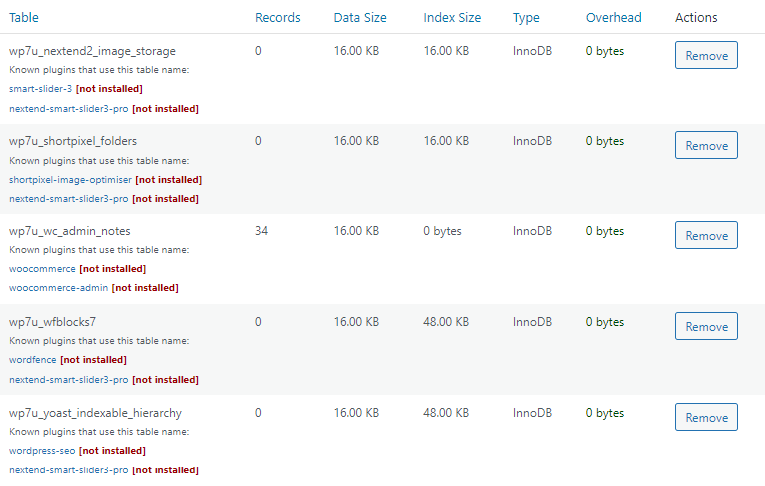
Add database bloat – use WP-Optimize to see which plugins (or specific plugin modules) add the most database overhead. This is explained more in this guide’s database section.
Load above the fold – slow plugins are bad enough, but loading them above the fold is even worse. When plugins load below the fold, you can delay them (i.e. comment plugins).
Use jQuery – Perfmatters has a script manager setting to show dependencies. Once it’s enabled, head to the script manager → jQuery and it shows you all plugins using jQuery. Felix Arntz wrote an article on how removing jQuery can reduce JavaScript by up to 80%.
Security – no security plugin (Cloudflare, firewall, etc).
Sliders – Soliloquy or MetaSlider (but ideally no sliders).
Analytics – call me crazy but I only use Google Search Console.
SEO – Rank Math or SEOPress (but most SEO plugins use jQuery).
CSS – need custom styling or even a table of contents? Just use CSS.
Backups – hosting backups or a lightweight alternative like UpdraftPlus.
In Query Monitor, the “queries by component” section shows your slow plugins. You can also use my list of 75+ common slow plugins. Finally, delete all plugins you’re not using (as well as their database tables in WP-Optimize), and disable plugin features/modules you’re not using.
Plugin
Category
Memory Impact
PageSpeed Impact
All In One SEO
SEO
x
x
Broken Link Checker
SEO
x
✓
Disqus
Comments
✓
x
Divi Builder
Page Builder
x
x
Elementor
Page Builder
x
x
Elementor Premium Addons
Page Builder
✓
x
Elementor Pro
Page Builder
x
x
Elementor Ultimate Addons
Page Builder
✓
x
JetElements
Page Builder
x
x
Jetpack
Security
x
x
NextGEN Gallery
Gallery
x
x
Popup Builder
Popup
x
x
Site Kit by Google
Analytics
x
✓
Slider Revolution
Slider
x
x
Social Media Share Buttons
Social Sharing
✓
x
WooCommerce
WooCommerce
x
x
Wordfence
Security
x
✓
wpDiscuz
Comments
x
x
WPML
Translate
x
x
Yoast SEO
SEO
x
✓
9. CSS + JavaScript
Probably the #1 reason for poor core web vitals.
New Optimizations
Remove unused CSS – WP Rocket’s method of loading used CSS inline is slower for visitors but better for scores. You should ideally use FlyingPress, LiteSpeed Cache, or Perfmatters for this which loads used CSS in a separate file so it can be cached and doesn’t increase HTML size. You should only be using 1 plugin for this. If you’re not using an optimization plugin that does this, try DeBloat or PurifyCSS.
Remove Gutenberg CSS – if you don’t use Gutenberg’s block library (i.e. you’re using classic editor), you can remove Gutenberg’s CSS which is loaded by default.
Asset unloading plugins – remove CSS/JS (or entire plugins) from specific pages/posts where they don’t need to load. Common examples are only loading contact forms on the contact page, only loading social sharing plugins on posts, and disabling WooCommerce plugins where they’re not used. You can also disable specific files like jQuery and elementor-dialog if you don’t use them. I recommend Perfmatters especially if you’re using WP Rocket or SiteGround Optimizer because it has many optimizations not found in these plugins. Be sure to use test mode and dependencies in your script manager settings. For a free plugin, try Asset CleanUp.
Critical CSS – loads above the fold CSS immediately which improves LCP. Most cache plugins do this while others (like SG Optimizer) don’t. If you make changes to stylesheets or custom CSS, regenerate critical CSS so it’s current with your site.
Load CSS/JS non render-blocking – both deferring JavaScript and critical CSS help serve resources non render-blocking. Make sure they work in your cache plugin and exclude files from defer if they break your site. Or try Async JavaScript.
Don’t combine – should almost always be off especially on big sites or on HTTP/2.
Optimizations Covered In Other Sections
Page builders – Elementor/Divi add extra CSS/JS which can be optimized with their built-in performance settings, coding your header/footer/sidebar in CSS, disabling Elementor fonts/dialog, lazy loading background images in CSS, etc.
Plugins – just look at the screenshot below (plugins are obviously a major factor).
Third-party code – hosting files locally, delaying JavaScript, and using a smaller GA tracking code can reduce its size or delay so it doesn’t impact initial load times.
Font Icons – disable these if you don’t use them or use Elementor’s custom icons.
WooCommerce – disable scripts/styles on non-eCommerce content and disable Woo plugins where they don’t need to load (many load across the entire website).
This is anything on your site that has to pull info from a third-party domain (like Google Fonts, Google Analytics tracking code, or an embedded YouTube video). It’s a common reason for JS-related errors in PSI. Luckily, most of it can be optimized especially if it’s shown below the fold.
Step 1: Host files locally – some third-party code can be hosted locally (see the table below). LiteSpeed Cache can localize resources, FlyingPress can host fonts/YouTube thumbnails locally, Perfmatters does fonts and analytics, and WP Rocket does nothing.
Third-Party Code
URL(s)
Plugins To Host It Locally
Google Fonts
fonts.gstatic.com
Most optimization plugins, Elementor, OMGF
Google Analytics
google-analytics.com
Flying Analytics, Perfmatters
Gravatars
gravatar.com
Simple Local Avatar
YouTube Thumbnails
i.ytimg.com
FlyingPress, WP YouTube Lyte
Step 2: Delay JavaScript – for third-party code that can’t be hosted locally, delay its JavaScript if it’s loading below the fold (you can also delay plugins loading below the fold). WP Rocket does this automatically while other cache plugins make you add files manually. If your cache plugin doesn’t support this, use Perfmatters or Flying Scripts. In these, you’ll set a timeout period and can increase this if you’re not seeing good results. You can try offloading third-party code to Cloudflare Zaraz, but I prefer delaying its JS.
Step 3: Prefetch or preconnect everything else – for all third-party code that can’t be hosted locally or delayed, add a DNS prefetch resource hint. Preconnect is usually only used for CDN URLs (not needed for Cloudflare), and third-party fonts (should be hosted locally). Or YouTube if you can’t eliminate requests using video optimizations in step #13.
Google Analytics – Perfmatters + Flying Analytics can use a minimal analytics tracking code that’s just 1.5 KB. Perfmatters can also prevent a Doubleclick request by disabling display features, but both these should only be used if you don’t need certain data in GA.
Avoid overtracking – one of the most common “mistakes” I see is sites using too many tracking tools: Analytics, Tag Manager, Heatmaps, Pixel, etc. Do you really need them all?
11. Fonts
Probably your largest files after CSS/JS.
Your GTmetrix Waterfall chart shows font load times, number of requests, and whether they’re served locally or from a third-party domain like fonts.gstatic.com or use.fontawesome.com. Be sure to keep tabs on your Waterfall chart as you make optimizations. Fonts can also cause FOIT and FOUT which cause layout shifts. A few simple tweaks can make your fonts load much faster.
Reduce font families, weights, icons – try to only use 1 font family and only load the weights you actually use. Disable Font Awesome and Eicons if you don’t use them (Elementor has a tutorial on this). Some fonts also have larger file sizes than others.
Use WOFF2 – the most lightweight/universal format which is faster than .ttf and .otf.
Host locally – if your fonts are being served from fonts.gstatic.com, host them locally.
Preload – fonts should be preloaded when they load above the fold or used in CSS files. Most cache/optimization plugins require you to manually add font files (and if there’s a crossorigin option like in Perfmatters, it should be used for fonts). Elementor hosts fonts locally and preloads them under Theme Customizer → Performance. PSI used to tell you which fonts to preload in “preload key requests” but I don’t think they do this anymore.
Add font-display: optional – if you need to “ensure text remains visible during webfont load,” add font-display: optional to your font’s CSS. This is recommended by Google for the fastest performance while preventing layout shifts. It delays loading text up to 100ms. As of writing this, most plugins only support swap found in Elementor, Perfmatters, and most cache plugins. To use optional, you need to add it manually to your font’s CSS, use WP Foft Loader, or use swap until your optimization plugin supports optional. Preloading fonts that use font-display: optional completely eliminates layout shifts (FOIT) from fonts.
System fonts – system fonts generate 0 requests and are obviously best for speed, but even for someone who obsesses over performance, I’d rather have a better looking font.
Use custom Icons for Elementor – replace Font Awesome and Eicons with custom icons.
Serve Google Fonts from Cloudflare Workers – I’ll leave this here if you want to dive in.
12. Images
There are 7 PSI items related to image optimization, and that doesn’t even cover everything.
Preload critical images and exclude them from lazy load – above the fold content should load immediately which is a big factor of LCP. Instead of delaying images with lazy load, you want the browser to download them immediately by using preload. The easiest way to do this (by far) is “preload critical images” in FlyingPress or Perfmatters. Instead of manually excluding/preloading above the fold images on every single page/post (because they’re usually different), you will set the number of images usually shown above the fold. In my case, it’s 3. This will preload your top 3 images while excluding them from lazy load. Currently, FlyingPress is the only cache plugin I know that supports fetchpriority which is recommended by Google to set things like your LCP image to “high priority.” Props to Gijo.
Exclude above the fold images from lazy load and preload them
LCP image – your most important image to optimize for lower LCP (shown in PSI).
Background images – page builders serve background images in their CSS and won’t be lazy loaded, leading to ‘defer offscreen images’ errors. Some cache plugins have a lazy-bg helper class, Perfmatters has a CSS background images setting, and WP Rocket makes you move them to inline HTML. Check the documentation in your cache/image optimization plugin on how to lazy load them. You can also use Optimal or add a helper class yourself.
Image CDNs – I use Cloudflare for image optimization but Bunny Optimizer and QUIC are good too. They usually do a better job than plugins (and it’s 1 less plugin on your website).
Resize images for mobile – make sure your image optimization plugin (or image CDN) serves smaller images to mobile which should also improve your LCP on mobile. This is the “image resizing” feature in Cloudflare, or you could use ShortPixel Adaptive Images.
Properly size images – resize large images to be smaller. My blog is 765px width so I crop/resize blog images to that size (the Zoom Chrome Extension is handy for getting the perfect dimensions when taking screenshots). I always recommend creating an “image dimensions cheat sheet” so you know the size of your blog, featured, sidebar images, etc.
WebP – faster than JPEG/PNG and most image optimization plugins or CDNs can do this.
Compression – Lighthouse test images at 85% so that’s usually a good compression level.
CSS sprites – combines multiple small/decorative images into 1 image so it only creates 1 request. My old homepage used a CSS sprite and it was very fast. You can do it for sections like “featured on” where you show a bunch of logos. You would use a CSS sprite generator.
Specify dimensions – most cache plugins can “add missing dimensions” otherwise you would need to add a width/height to the image’s HTML or CSS. This prevents layout shifts.
Downgrade quality on slow connections – services like Cloudflare Mirage + Optimole serve low quality images on slow connections until a faster connection can be accessed.
Hotlink protection – stops people from using your images when they’re hosted on your server and saves bandwidth. Common with sites using high quality images or if people copy your content. Can be enabled in your host or by using Cloudflare’s hotlink protection.
Low quality images placeholders (LQIP) – if you’re using QUIC.cloud on LiteSpeed, these can prevent layout shifts but you need to make sure you’re doing it right or it will look bad.
13. Videos
Unless videos are optimized, they will probably be the slowest thing on a page.
While most cache plugins lazy load videos and replace iframes with a preview image, FlyingPress and WP YouTube Lyte are some of the only plugins that optimize placeholders.
Lazy load videos – done in cache plugins, Perfmatters, or try WP YouTube Lyte.
Replace YouTube iframes with preview images – the iframe (which is the heaviest element of the video) is only loaded once your visitors actually click the play button.
Self-host YouTube placeholders – FlyingPress and WP YouTube Lyte can self-host placeholders to prevent i.ytimg.com requests shown in your “third-party code” report.
Preconnect – if you’re not able to make the optimizations above and you still have third-party domains loading from YouTube, you can preconnect domains from youtube.com, i.ytimg.com, and Roboto which is currently being used as the font in the YouTube player.
View your “longest main-threads tasks” report in PageSpeed Insights and optimize those files. LCP includes 4 sub-parts and Google’s YouTube video is a nice resource for optimizing each one.
Most LCP recommendations are scattered in this guide, so I’ll just go over them briefly.
Exclude above the fold images from lazy load – you should never lazy load, delay, or defer anything that loads above the fold because this content should load immediately, which is why you should also use preload hints to help browsers download them faster.
Prioritize above the fold images – preload above the fold images (or use fetchpriority). PSI shows your largest contentful paint image which is the most important to optimize.
Reduce CSS, JS, font sizes – a big part of reducing load time is reducing their file sizes.
Reduce TTFB – 40% of LCP can usually be improved with a better hosting + CDN setup.
Eliminate render-blocking CSS/JS – render-blocking resources add delay (see video).
Use font-display: optional – if fonts aren’t loaded properly, they can also add delay.
Lazy render HTML elements – allows browsers to focus on the above the fold content.
Preload, preconnect, prefetch – hints browsers to download specific resources faster.
Increase cache expiration – also mentioned by Google (Cloudflare browser cache TTL).
Choose the right cache plugin/settings – some have better optimizations than others.
Enable Signed Exchanges (SXGs) – this is found in Cloudflare (Speed → Optimization).
Use Cloudflare Workers – Google Engineer used Workers to improve LCP by about 80%.
Move plugin content, ads, animations below the fold – that way, they can be delayed.
16. CLS
Layout shifts happen when things jump around while the page is loading.
You can use Google’s layout shift debugger to see these in a GIF. PSI also has an “avoid large layout shifts” item showing you which sections on your website contribute the most to CLS. Even with these recommendations, it’s hard to know why the section is causing a layout shift.
Change font-display to swap or optional – do this if you see “ensure text remains visible during webfont load.” As shown in section #11, font-display: optional is the best method.
Problems with loading CSS asynchronously – this is a setting in cache plugins that can add layout shifts caused by FOUC (flash of unstyled content). Ideally use the “remove unused CSS” method instead. If this breaks your site and you default back to loading CSS asynchronously, make sure you exclude problematic files causing FOUC, ensure critical CSS is working, and always regenerate critical CSS after updating stylesheets/custom CSS.
Preload fonts – preloading fonts eliminates layout shifts when they use display: optional.
Specify dimensions of images, videos, iframes, ads – the first 3 are easy (make sure a width and height are specified in images). Ads and other dynamic content should have reserved space by placing it in a div code. The width/height should be the ad’s largest size.
Use CSS transform in animations – not a fan of animations but here’s documentation.
Use separate mobile cache (when it makes sense) – if your mobile site is different than desktop and you’re not using a separate mobile cache, it can cause layout shifts. However, you’ll need to check your cache plugin’s documentation on when to use (and not use) this.
Change cookie notice plugin – search your plugin’s support thread. It’s been reported some cookie plugins cause layout shifts. I recommend Gijo’s solution or this Cookie plugin.
17. Preload, Prefetch, Preconnect
These help browsers download high priority resources faster.
They prioritize above the fold content (preload + fetchpriority). Preload is also used in Cloudflare’s Early Hints and for downloading internal pages in the background so they load faster when visitors click them (link preloading + Flying Pages). Prefetch + preconnect help establish early connections to third-party domains if resources aren’t already being delayed.
Preload – commonly used for above the fold images (this can also be a WebP image) but can also be used for CSS/JS (i.e. the block library), videos, audio, Cloudflare workers, and other files.
Fetchpriority – similar to preload only assigns a priority (low, high, auto). For example, if you have a large LCP image, you would assign that image’s priority to “high.” But if you have an image carousel that’s loading above the fold, you could assign the images with a low priority. FlyingPress is the only plugin I know currently supporting fetchpriority shown in the changelog.
<img src="lcp-image.webp" fetchpriority="high">
Link preloading – there’s 2 main types: preloading links in the viewport so internal links in the immediate content load faster when clicked (supported by Flying Pages and FlyingPress). And “link preloading” where users hover over any internal link (or touch it on mobile), and the page will download in the background so by the time they actually click it, it appears to load instantly (found in cache plugins like WP Rocket). While neither improves scores, both improve perceived load time. Just be careful… preloading too many pages in the background will increase CPU usage especially if you have something like a WooCommerce store with internal links in images. If visitors are hovering over product images, this will cause lots of pages to download. Not good!
DNS Prefetch – this helps browsers anticipate third-party domains by performing a DNS lookup, but usually not needed since third-party domains should be hosted locally or delayed.
Preconnect – establishes early connections to important third-party domains. Common with CDN URLs and third-party fonts like fonts.gstatic.com, use.fontawesome.com, and use.typekit. Most cache plugins add preconnect automatically when you add a CDN URL or when enabling “Google Font Optimization” (or a similar setting), but you’ll want to check their documentation.
You can use Perfmatters or Pre* Party if your optimization plugin doesn’t support a specific resource hint
18. Database
There’s usually 3 problems with using your cache plugin to clean your database:
It can’t take database backups.
It can’t remove database tables left behind by old plugins.
It deletes all post revisions, but you may want to keep a few.
That’s why I recommend WP Optimize for database cleanups. Go through your database tables and look for tables that are not installed or inactive. You can delete these if you don’t plan on using the plugin (or theme) again since they will usually store info in the database for future use.
Certain plugin modules/features can also add lots of overhead especially if they collect data. Rank Math’s Google Analytics module adds lots of overhead, so consider disabling this Rank Math module and getting your analytics data directly from the Google Analytics website instead.
For ongoing database cleanup, WP-Optimize removes everything most cache plugins do, but it lets you keep a certain amount of post revisions so you have backups (I recommend 5-10). You can also connect UpdraftPlus which takes a database backup before scheduled optimizations.
19. Background Tasks
Background tasks can bog down your server and increase CPU usage.
These are common with cache plugins (preloading + automatic cache clearing), plugins that collect stats or create autoloads, and even WordPress core (Heartbeat, autosaves, pingbacks). Many of these can be disabled, limited, or scheduled during non-peak hours using a cron job.
Control Preloading – the preloading in cache plugins is infamous for increasing CPU usage (WP Rocket’s preloading, LSC crawler, SG Optimizer’s preheat cache, etc). The first step is changing settings to only preload important sitemap URLs (i.e. page-sitemap.com + post-sitemap.com) instead of the full sitemap. Next, you can increase the preload interval.
Only preload important sitemap URLs (not the full sitemap)
Automatic cache clearing – there are specific actions that trigger your entire cache to be cleared (and when the cache lifespan expires). Instead of constantly clearing cache with these actions, disable automatic cache clearing and use a cron job to clear it at a specific time (once at night). It’s best to use a cron job for both cache clearing + cache preloading.
Disable WP-Cron – using an external cron to schedule tasks like the 2 items above helps reduce CPU usage. The first step is to add the code below your wp-config.php file. Next, setup a real cron job in your host, Cloudflare, or using a third-party service like EasyCron. Some hosts have specific instructions for adding a cron job, so check their documentation.
Scheduling tasks using cron jobs for 5-10 minutes can reduce CPU usage
Remove unused CSS – decrease WP Rocket’s batch size and increase the cron interval.
Link preloading – some cache plugins can “preload links” which sounds like a good idea because when users hover over a link, that page downloads in the background to make it load faster by the time users actually click it. But if your website has lots of links (such as a WooCommerce store with links in the product images), you’ll want to leave this setting off.
Plugins – think of Query Monitor, Wordfence’s live traffic report, and backup/statistic plugins (they all run background tasks). You might be able schedule these, disable specific features in plugins, or delete the plugin completely. Plugins/themes can also leave behind autoloaded data when you delete them which can be cleaned up in the wp_options table.
Autosaves – when you’re editing a post, WordPress autosaves a draft every minute. You can use a simple line of code (or Perfmatters) to increase this to something like 5 minutes.
define('AUTOSAVE_INTERVAL', 300); // seconds
Heartbeat – called every 15s and can usually be disabled in the frontend/backend, then limited in the post editor since you probably want to keep features there (like autosaves).
Pingbacks – disable pingbacks since you don’t want a notification every time you add an internal link. You may want to leave trackbacks on to help notify blogs you linked to them.
Post revisions – stored every time you hit save, publish, or update and accumulate over time. You can limit revisions in some optimization plugins, manually with code, or use WP-Optimize to run scheduled database cleanups while keeping a certain number of revisions.
define( 'WP_POST_REVISIONS', 10 );
Plugin data sharing – disable in plugins to save a little resources, sorry plugin developers!
Bots – blocking spam bots and using Cloudflare’s crawler hints saves resources from bots.
Comment spam – I use Antispam Bee and blacklist these words in the Discussion settings.
Hosting features – WP Johnny has nice tips on disabling unused services in your hosting account like the DNS, email, FTP/SFTP, proxies, or other services if you’re not using them.
Bloat removal plugins – using plugins like Unbloater + Disable WooCommerce Bloat help.
20. Mobile
Poor mobile scores in PSI is a common issue. Most desktop optimizations transfer over to mobile so start with “general optimizations” first. Otherwise, here are mobile-specific tips.
Resize images for mobile – image CDNs and adaptive image plugins do this.
Reduce latency – use a faster DNS, faster TLS versions, and Cloudflare’s 0-RTT.
Replace sliders/galleries with static images – use responsive editing to do this.
Remove unused CSS/JS – Perfmatters can disable unused CSS/JS by device type.
Don’t use AMP – lots of challenges and most WordPress users agree not to use it.
Fix mobile layout shifts – Google’s layout shift debugger tests mobile layout shifts.
Use mobile caching – enable this in your cache plugin or use one that supports this.
Know when to use separate mobile cache – check your cache plugin documentation.
Downgrade image quality on slow connections – try Cloudflare Mirage or Optimole.
Check your responsiveness – even if you use a responsive theme, check this manually.
Add a “load more comments” button on mobile – helps if you have lots of comments.
Most image CDNs serve smaller images to mobile (but not RocketCDN)Disable specific files/plugins from loading on mobile in Perfmatters
21. WooCommerce
WooCommerce sites often have more plugins, scripts, styles, and are more resource-hungry than static sites. You will need to optimize your website even more if you want good results.
Hosting – wphostingbenchmarks.com ran tests for multiple WooCommerce hosts, although I think there are much better options than the ones tested (I would personally lean towards something like Rocket.net, GridPane, RunCloud). Obviously very important.
Remove WooCommerce admin bloat – Disable WooCommerce Bloat is good for this.
Cloudflare Argo + Tiered Cache – specifically good for speeding up dynamic requests.
Redis – also specifically good for WooCommerce (especially Redis Object Cache Pro).
Go easy on WooCommerce Extensions – just like other plugins, be minimal with these.
Unload WooCommerce plugins – Woo plugins are infamously bad with loading across your entire site. Use your asset unloading plugin to disable them where they’re not used.
Use Cloudflare firewall rules (i.e. only access wp-login from your IP).
Disable file editing to prevent hackers from editing theme/plugin files.
Follow security-related social media accounts like Cloudflare/Wordfence.
Check for known vulnerabilities before updating things (especially plugins).
23. PHP Version
Only 7% of websites use PHP 8.
Come on y’all, you already know higher PHP versions are faster and more secure. Google “update PHP version [your host]” and you’ll find instructions. If updating breaks your site, just revert back to your older version (or remove incompatible plugins that aren’t maintained well).
PHP version used by WordPress sites (source: WordPress stats)
24. Make Sure Optimizations Are Working
You set things up, but are they working? Make sure they are.
Caching – cache plugins should have documentation to check if the caching is working.
Redis/memcached – LiteSpeed Cache’s connection test and most Redis plugins tell you.
Confirm Redis is working (screenshot is in LiteSpeed Cache)
CDN Analytics – how many requests are you blocking from bots, hotlink protection, and WAF? What is your cache hit ratio (hopefully around 90%)? CDN analytics are very useful.
Dr. Flare – Chrome Extension to view tons of Cloudflare stats like your cache hit ratio, uncached requests, non-Cloudflare requests, how much % was reduced by Polish/Minify.
CDN rewrites – are your files actually being served from your CDN? Check your CDN Analytics, Dr. Flare, or view your source code to make sure files are being served from the CDN when using a CDN URL, like this: cdn.mywebsite.com/wp-content/uploads/logo.png. If you’re using BunnyCDN, you may be able to serve more files from BunnyCDN by adding your CDN URL to your cache plugin on top of using BunnyCDN’s plugin. It worked for me.
APO – verify Cloudflare’s APO is working by testing your website in uptrends.com then making sure headers exactly match with what Cloudflare shows in the documentation.
Confirm APO is working by checking headers
Asynchronous CSS – if you’re using this, cache plugins should also have documentation.
External cron jobs – check the logs in your hosting account to make sure these are firing.
Waterfall charts – after each optimization, you should ideally check its impact using a Waterfall chart (better than running another PageSpeed Insights test and testing scores).
Clear cache – you may need to clear cache or regenerate critical CSS to see your changes.
Obviously you don’t need all these especially if you’re using a cache/optimization plugin that already does some of these, Cloudflare image optimizations, or you can code things manually.
Plugins like Perfmatters have great documentation.
Gijo Varghese and WP Johnny also put on quality articles.
My other articles (if you liked this one, I have plenty more).
Hire Help
BDKamol – Pronaya mainly works with Gutenberg, WooCommerce, and Genesis. He’s been helping me for over 10 years even when I launched my first website and had no visitors. He points me in the right direction and was a key part in launching my new blog, helping me with things like custom coding, CSS styling, theme/plugin recommendations, etc. Pronaya lives in Bangladesh and his communication (and my trust in him) are 100%.
WP Johnny – he’s a busy guy but you can try hiring him and his team. I was lucky enough to have him help me remove my page builder (which I regret using in the first place and should have known better). While the work is great, it can take awhile to get things done.
WP Fix It – hired them once to improve issues related to core web vitals. While I was very happy with the work, they closed my tickets without notice saying the project was done, even when I told them I would pay more since truly fixing the issues required more work.
27. My Setup
This will cost about $500/year.
It assumes you already have a lightweight theme (i.e. GeneratePress/Kadence) and pay yearly for Rocket.net since you get 2 months free. It also assumes you’re using Rocket.net’s lower $25/mo plan (I pay $50/mo for the Business plan). For my site, this is the best setup I’ve found.
My blog costs around $800/year which is a lot cheaper than I was paying (mainly because hosting gets expensive as you scale). Scaling on Rocket.net is reasonable since monthly visits and RAM are both 10x Kinsta’s and there’s no PHP worker limits since only about 10% of traffic hits the origin (due to Ben Gabler’s Cloudflare Enterprise setup who I suggest reaching out to).
LiteSpeed is also solid and can be cheaper since LiteSpeed Cache is free and email hosting is often included. Check out NameHero, ChemiCloud, and Scala (they seem to have good specs and TrustPilot reviews). RunCloud, GridPane, and JohnnyVPS are probably best for larger sites.
Cloudways is who I was using. I still think they’re better than most hosts but it gets expensive with all the add-ons, they use Apache servers, and Cloudflare Enterprise + Breeze need work.
This is flagged when you have a short cache expiration for images, fonts, media, scripts, and stylesheets. Google fails the audit if the cache expiration is under 180 days (259200 minutes). This simply means you need to adjust your cache expiration for those files to 180 days or over.
In most cases, you will login to your hosting account and adjust the static cache expiry (or similar) to 180 days. However, this can be quite a long time that visitors won’t see an updated version of those files. If you change these files frequently, a longer cache lifespan may not be best and you may want to make it shorter (even if it’s flagged). Google warns you about this.
I’ll cover a few other ways to serve static assets with an efficient cache policy in WordPress specifically for Cloudflare, other CDNs, Google Analytics, WP Rocket, and third-party scripts.
Login to Cloudflare and go to Caching → Browser Cache TTL, then set it for “6 months.”
3. Other CDNs
Most other CDNs let you change the browser cache expiration.
For example, in BunnyCDN, go to Pullzone → Your Website → Cache → Browser Cache Expiration. In this case, there is no option for 180 days. You can either set it for 1 year or “match server cache expiration.” You’ll need to make sure your server uses the correct cache expiration.
4. WP Rocket
WP Rocket has documentation on how their browser caching works.
This code is automatically added to your .htaccess file when you activate WP Rocket. But you will notice the browser cache expiration for images, fonts, and other files is 4 months (about 2 months short of Google’s 180 day requirement). It means you’ll need to change it to 180 days.
# Expires headers (for better cache control)

ExpiresActive on
    ExpiresDefault                              "access plus 1 month"
    # cache.appcache needs re-requests in FF 3.6 (~Introducing HTML5)
    ExpiresByType text/cache-manifest           "access plus 0 seconds"
    # Your document html
    ExpiresByType text/html                     "access plus 0 seconds"
    # Data
    ExpiresByType text/xml                      "access plus 0 seconds"
    ExpiresByType application/xml               "access plus 0 seconds"
    ExpiresByType application/json              "access plus 0 seconds"
    # Feed
    ExpiresByType application/rss+xml           "access plus 1 hour"
    ExpiresByType application/atom+xml          "access plus 1 hour"
    # Favicon (cannot be renamed)
    ExpiresByType image/x-icon                  "access plus 1 week"
    # Media: images, video, audio
    ExpiresByType image/gif                     "access plus 4 months"
    ExpiresByType image/png                     "access plus 4 months"
    ExpiresByType image/jpeg                    "access plus 4 months"
    ExpiresByType image/webp                    "access plus 4 months"
    ExpiresByType video/ogg                     "access plus 4 months"
    ExpiresByType audio/ogg                     "access plus 4 months"
    ExpiresByType video/mp4                     "access plus 4 months"
    ExpiresByType video/webm                    "access plus 4 months"
    # HTC files  (css3pie)
    ExpiresByType text/x-component              "access plus 1 month"
    # Webfonts
    ExpiresByType font/ttf    "access plus 4 months"
    ExpiresByType font/otf    "access plus 4 months"
    ExpiresByType font/woff   "access plus 4 months"
    ExpiresByType font/woff2  "access plus 4 months"
    ExpiresByType image/svg+xml                 "access plus 1 month"
    ExpiresByType application/vnd.ms-fontobject "access plus 1 month"
    # CSS and JavaScript
    ExpiresByType text/css                      "access plus 1 year"
    ExpiresByType application/javascript        "access plus 1 year"
Edit your .htaccess (you can use Htaccess File Editor if you don’t know how). Change the expiration from 4 months to 180 days. You may only want to do this for file types being flagged.
WP Rocket also suggests to check with your host to make sure they don’t block WP Rocket’s rules and that Mod_expires is enabled.
5. LiteSpeed Cache
To serve statics assets with an efficient cache policy using LiteSpeed Cache, go to LiteSpeed Cache Settings > Browser. Enable browser cache and the browser cache TTL should be left as default (31557600 seconds). If you still see errors, check if your host or CDN is overriding this.
6. W3 Total Cache
If you need to serve static assets with an efficient cache policy in W3 Total Cache, go your Browser Cache settings and change the Expires header lifetime to at least 15552000s (180 days). Make sure the cache expiration in your hosting and CDN settings aren’t overriding this.
7. Google Analytics
Google Analytics can also cause errors when serving static assets with an efficient cache policy.
If Google Analytics is appearing in PageSpeed Insights for this recommendation, CAOS Analytics lets you host analytics locally and adjust the cookie expiration period. WP Rocket’s Google Tracking Addon hosts it locally but doesn’t give you other options for the tracking code.
Install the CAOS Analytics plugin.
Go to Settings → Optimize Google Analytics → Advanced Settings → Cookie Expiry Period.
Set it to 180 days.
I recommend checking out other features in the CAOS Analytics plugin. Using a minimal analytics tracking code and serving it from your CDN can be beneficial for WordPress speed.
8. Google Fonts
Just like you hosted Google Analytics locally to control the cache lifespan, you can do the same thing with Google Fonts.
But they need to be hosted locally on your server (not pulling from fonts.gtstatic.com). You can do this by downloading your fonts directly from the Google Fonts website (remember to be minimal with font families and weights), converting them to WOFF2 format using a tool like Transfonter, then adding them to your CSS. Alternatively, you can also try the the OMGF plugin.
Once fonts are hosting locally, follow step #4 to set the cache expiration to 180 days for fonts.
9. Third-Party Scripts
Third-party code isn’t hosted on your server, so you can’t optimize it.
Google Analytics and fonts are an exception since they can be hosted locally, and therefore, you can control the cache expiration. But serving static assets with an efficient cache policy is not possible for AdSense, YouTube, Google Maps, and other third-party scripts that you might be getting errors for. Although, there may be other ways to optimize them like delaying JavaScript.
10. Purge Files And Retest
Once you’re done changing your cache expiration, remember to purge files and retest your WordPress site. Ideally you’ll have 100% for serve static assets with an efficient cache policy.
Frequently Asked Questions
How do I serve static assets with an efficient cache policy in WordPress?
Change your browser cache expiration to 180 days (or 259200 minutes). This is typically done in your hosting account, cache plugin, or CDN.
How do I serve static assets with an efficient cache policy using WP Rocket?
Edit your. htaccess file and locate the browser cache expiration code added by WP Rocket. Change the expiration from 4 months to 6 months for files flagged in Lighthouse, which are usually images or fonts.
How do I serve static assets with an efficient cache policy using Cloudflare?
Login to Cloudflare and go to Caching > Browser Cache TTL and change it to 6 months.
How do I serve static assets with an efficient cache policy using W3 Total Cache?
In your W3 Total Cache settings, go to Browser Cache and change Expires header lifetime to 180 days (15552000 seconds). Check your server and CDN to make sure they’re not overriding this setting.
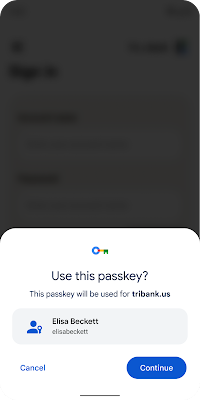
Posted by Diego Zavala, Product Manager (Android), Christiaan Brand, Product Manager (Account Security), Ali Naddaf, Software Engineer (Identity Ecosystems), Ken Buchanan, Software Engineer (Chrome)
Explore passkeys on Android & Chrome starting today
Starting today, Google is bringing passkey support to both Android and Chrome.
Passkeys are a significantly safer replacement for passwords and other phishable authentication factors. They cannot be reused, don’t leak in server breaches, and protect users from phishing attacks. Passkeys are built on industry standards and work across different operating systems and browser ecosystems, and can be used for both websites and apps.
Passkeys follow already familiar UX patterns, and build on the existing experience of password autofill. For end-users, using one is similar to using a saved password today, where they simply confirm with their existing device screen lock such as their fingerprint. Passkeys on users’ phones and computers are backed up and synced through the cloud to prevent lockouts in the case of device loss. Additionally, users can use passkeys stored on their phone to sign in to apps and websites on other nearby devices.
Today’s announcement is a major milestone in our work with passkeys, and enables two key capabilities:
Developers can build passkey support on their sites for end-users using Chrome via the WebAuthn API, on Android and other supported platforms.
To try this today, developers can enroll in the Google Play Services beta and use Chrome Canary. Both features will be generally available on stable channels later this year.
Our next milestone in 2022 will be an API for native Android apps. Passkeys created through the web API will work seamlessly with apps affiliated with the same domain, and vice versa. The native API will give apps a unified way to let the user pick either a passkey or a saved password. Seamless, familiar UX for both passwords and passkeys helps users and developers gradually transition to passkeys.
Signing in to a website on an Android device with a passkey
For the end-user, creating a passkey requires just two steps: (1) confirm the passkey account information, and (2) present their fingerprint, face, or screen lock when prompted.
Signing in is just as simple: (1) The user selects the account they want to sign in to, and (2) presents their fingerprint, face, or screen lock when prompted.
Signing in to a website on a nearby computer with a passkey on an Android device
A passkey on a phone can also be used to sign in on a nearby device. For example, an Android user can now sign in to a passkey-enabled website using Safari on a Mac. Similarly, passkey support in Chrome means that a Chrome user, for example on Windows, can do the same using a passkey stored on their iOS device.
Since passkeys are built on industry standards, this works across different platforms and browsers – including Windows, macOS and iOS, and ChromeOS, with a uniform user experience.
We will continue to do our part for a passwordless future
We have worked with others in the industry, including Apple and Microsoft, and members within the FIDO Alliance and the W3C to drive secure authentication standards for years. We have shipped support for W3C Webauthn and FIDO standards since their inception.
Today is another important milestone, but our work is not done. Google remains committed to a world where users can choose where their passwords, and now passkeys, are stored. Please stay tuned for more updates from us in the next year as we introduce changes to Android, enabling third party credential managers to support passkeys for their users.
Microsoft says the Windows 11 2022 Update is breaking provisioning, leaving Windows 11 enterprise endpoints partially configured and failing to finish installing.
According to Microsoft, this known issue most likely affects provisioning packages (.PPKG files used to configure new endpoints on enterprise or school networks without imaging) during the initial setup phase.
“Using provisioning packages on Windows 11, version 22H2 (also called Windows 11 2022 Update) might not work as expected,” Redmond explained.
“Windows might only be partially configured, and the Out Of Box Experience might not finish or might restart unexpectedly.”
Microsoft added that this issue would not impact IT administrators provisioning Windows devices on their network. The list of unaffected devices also includes Windows systems used in home or small office networks.
Windows admins have been experiencing provisioning problems for more than a week, as confirmed by multiple reports on Microsoft’s Q&A platform.
“Sadly that is true, packages working fine on 21H2 but fail miserably on 22H2 with error 0x800700b7,” one report reads.
“Seems that the package gets indeed installed, just not processed and then errors out for whatever reason.”
Installing Windows 11 provisioning packages (Microsoft)
Workaround available
Microsoft says it’s currently investigating this newly acknowledged issue and will provide an update with an upcoming release.
Until an official fix for these provisioning problems is available, Redmond suggests provisioning end-user devices before the Windows 11 22H2 upgrade.
“If you can provision the Windows device before upgrading to Windows 11, version 22H2, this will prevent the issue,” Microsoft said.
The company is also investigating user reports of issues with Remote Desktop after installing the Windows 11 22H2 update, causing Remote Desktop clients not to connect, randomly disconnect, or freeze without warning.
Microsoft has also added compatibility holds to block the Windows 11 2022 Update on some systems due to printer issues or blue screens.
Since Tuesday, October 4, Windows 11 22H2 has entered a new deployment phase as it is now available to all seekers on eligible devices.
Actions to Help Protect Against APT Cyber Activity:
• Enforce multifactor authentication (MFA) on all user accounts. • Implement network segmentation to separate network segments based on role and functionality. • Update software, including operating systems, applications, and firmware, on network assets. • Audit account usage.
From November 2021 through January 2022, the Cybersecurity and Infrastructure Security Agency (CISA) responded to advanced persistent threat (APT) activity on a Defense Industrial Base (DIB) Sector organization’s enterprise network. During incident response activities, CISA uncovered that likely multiple APT groups compromised the organization’s network, and some APT actors had long-term access to the environment. APT actors used an open-source toolkit called Impacket to gain their foothold within the environment and further compromise the network, and also used a custom data exfiltration tool, CovalentStealer, to steal the victim’s sensitive data.
This joint Cybersecurity Advisory (CSA) provides APT actors tactics, techniques, and procedures (TTPs) and indicators of compromise (IOCs) identified during the incident response activities by CISA and a third-party incident response organization. The CSA includes detection and mitigation actions to help organizations detect and prevent related APT activity. CISA, the Federal Bureau of Investigation (FBI), and the National Security Agency (NSA) recommend DIB sector and other critical infrastructure organizations implement the mitigations in this CSA to ensure they are managing and reducing the impact of cyber threats to their networks.
Download the PDF version of this report: pdf, 692 KB
For a downloadable copy of IOCs, see the following files:
Note: This advisory uses the MITRE ATT&CK® for Enterprise framework, version 11. See the MITRE ATT&CK Tactics and Techniques section for a table of the APT cyber activity mapped to MITRE ATT&CK for Enterprise framework.
From November 2021 through January 2022, CISA conducted an incident response engagement on a DIB Sector organization’s enterprise network. The victim organization also engaged a third-party incident response organization for assistance. During incident response activities, CISA and the trusted –third-party identified APT activity on the victim’s network.
Some APT actors gained initial access to the organization’s Microsoft Exchange Server as early as mid-January 2021. The initial access vector is unknown. Based on log analysis, the actors gathered information about the exchange environment and performed mailbox searches within a four-hour period after gaining access. In the same period, these actors used a compromised administrator account (“Admin 1”) to access the EWS Application Programming Interface (API). In early February 2021, the actors returned to the network and used Admin 1 to access EWS API again. In both instances, the actors used a virtual private network (VPN).
Four days later, the APT actors used Windows Command Shell over a three-day period to interact with the victim’s network. The actors used Command Shell to learn about the organization’s environment and to collect sensitive data, including sensitive contract-related information from shared drives, for eventual exfiltration. The actors manually collected files using the command-line tool, WinRAR. These files were split into approximately 3MB chunks located on the Microsoft Exchange server within the CU2\he\debug directory. See Appendix: Windows Command Shell Activity for additional information, including specific commands used.
During the same period, APT actors implanted Impacket, a Python toolkit for programmatically constructing and manipulating network protocols, on another system. The actors used Impacket to attempt to move laterally to another system.
In early March 2021, APT actors exploited CVE-2021-26855, CVE-2021-26857, CVE-2021-26858, and CVE-2021-27065 to install 17 China Chopper webshells on the Exchange Server. Later in March, APT actors installed HyperBro on the Exchange Server and two other systems. For more information on the HyperBro and webshell samples, see CISA MAR-10365227-2 and -3.
In April 2021, APT actors used Impacket for network exploitation activities. See the Use of Impacket section for additional information. From late July through mid-October 2021, APT actors employed a custom exfiltration tool, CovalentStealer, to exfiltrate the remaining sensitive files. See the Use of Custom Exfiltration Tool: CovalentStealer section for additional information.
APT actors maintained access through mid-January 2022, likely by relying on legitimate credentials.
Use of Impacket
CISA discovered activity indicating the use of two Impacket tools: wmiexec.py and smbexec.py. These tools use Windows Management Instrumentation (WMI) and Server Message Block (SMB) protocol, respectively, for creating a semi-interactive shell with the target device. Through the Command Shell, an Impacket user with credentials can run commands on the remote device using the Windows management protocols required to support an enterprise network.
The APT cyber actors used existing, compromised credentials with Impacket to access a higher privileged service account used by the organization’s multifunctional devices. The threat actors first used the service account to remotely access the organization’s Microsoft Exchange server via Outlook Web Access (OWA) from multiple external IP addresses; shortly afterwards, the actors assigned the Application Impersonation role to the service account by running the following PowerShell command for managing Exchange:
This command gave the service account the ability to access other users’ mailboxes.
The APT cyber actors used virtual private network (VPN) and virtual private server (VPS) providers, M247 and SurfShark, as part of their techniques to remotely access the Microsoft Exchange server. Use of these hosting providers, which serves to conceal interaction with victim networks, are common for these threat actors. According to CISA’s analysis of the victim’s Microsoft Exchange server Internet Information Services (IIS) logs, the actors used the account of a former employee to access the EWS. EWS enables access to mailbox items such as email messages, meetings, and contacts. The source IP address for these connections is mostly from the VPS hosting provider, M247.
Use of Custom Exfiltration Tool: CovalentStealer
The threat actors employed a custom exfiltration tool, CovalentStealer, to exfiltrate sensitive files.
CovalentStealer is designed to identify file shares on a system, categorize the files, and upload the files to a remote server. CovalentStealer includes two configurations that specifically target the victim’s documents using predetermined files paths and user credentials. CovalentStealer stores the collected files on a Microsoft OneDrive cloud folder, includes a configuration file to specify the types of files to collect at specified times and uses a 256-bit AES key for encryption. See CISA MAR-10365227-1 for additional technical details, including IOCs and detection signatures.
MITRE ATT&CK Tactics and Techniques
MITRE ATT&CK is a globally accessible knowledge base of adversary tactics and techniques based on real-world observations. CISA uses the ATT&CK Framework as a foundation for the development of specific threat models and methodologies. Table 1 lists the ATT&CK techniques employed by the APT actors.
Actors obtained and abused credentials of existing accounts as a means of gaining Initial Access, Persistence, Privilege Escalation, or Defense Evasion. In this case, they exploited an organization’s multifunctional device domain account used to access the organization’s Microsoft Exchange server via OWA.
Actors abused PowerShell commands and scripts to map shared drives by specifying a path to one location and retrieving the items from another. See Appendix: Windows Command Shell Activity for additional information.
Command and Scripting Interpreter: Windows Command Shell
Actors abused the Windows Command Shell to learn about the organization’s environment and to collect sensitive data. See Appendix: Windows Command Shell Activity for additional information, including specific commands used.The actors used Impacket tools, which enable a user with credentials to run commands on the remote device through the Command Shell.
Actors executed malicious payloads via loading shared modules. The Windows module loader can be instructed to load DLLs from arbitrary local paths and arbitrary Universal Naming Convention (UNC) network paths.
Actors obtained and abused credentials of existing accounts as a means of gaining Initial Access, Persistence, Privilege Escalation, or Defense Evasion.
Actors obtained and abused credentials of existing accounts as a means of gaining Initial Access, Persistence, Privilege Escalation, or Defense Evasion. In this case, they exploited an organization’s multifunctional device domain account used to access the organization’s Microsoft Exchange server via OWA.
Actors obtained and abused credentials of existing accounts as a means of gaining Initial Access, Persistence, Privilege Escalation, or Defense Evasion. In this case, they exploited an organization’s multifunctional device domain account used to access the organization’s Microsoft Exchange server via OWA.
Actors used Windows command shell commands to detect and avoid virtualization and analysis environments. See Appendix: Windows Command Shell Activity for additional information.
Actors used the taskkill command to probably disable security features. CISA was unable to determine which application was associated with the Process ID.
Actors used the systeminfo command to look for details about the network configurations and settings and determine if the system was a VMware virtual machine.The threat actor used route print to display the entries in the local IP routing table.
System Network Configuration Discovery: Internet Connection Discovery
Actors checked for internet connectivity on compromised systems. This may be performed during automated discovery and can be accomplished in numerous ways.
Actors attempted to identify the primary user, currently logged in user, set of users that commonly use a system, or whether a user is actively using the system.
Actors used the tasklist command to get information about running processes on a system and determine if the system was a VMware virtual machine.The actors used tasklist.exe and find.exe to display a list of applications and services with their PIDs for all tasks running on the computer matching the string “powers.”
Actors used the ipconfig command to get detailed information about the operating system and hardware and determine if the system was a VMware virtual machine.
Actors likely used net share command to display information about shared resources on the local computer and decide which directories to exploit, the powershell dircommand to map shared drives to a specified path and retrieve items from another, and the ntfsinfo command to search network shares on computers they have compromised to find files of interest.The actors used dir.exe to display a list of a directory’s files and subdirectories matching a certain text string.
Actors used a non-application layer protocol for communication between host and Command and Control (C2) server or among infected hosts within a network.
Actors used the certutil command with three switches to test if they could download files from the internet.The actors employed CovalentStealer to exfiltrate the files.
Actors scheduled data exfiltration to be performed only at certain times of day or at certain intervals and blend traffic patterns with normal activity.
Exfiltration Over Web Service: Exfiltration to Cloud Storage
The actor’s CovalentStealer tool stores collected files on a Microsoft OneDrive cloud folder.
DETECTION
Given the actors’ demonstrated capability to maintain persistent, long-term access in compromised enterprise environments, CISA, FBI, and NSA encourage organizations to:
Monitor logs for connections from unusual VPSs and VPNs. Examine connection logs for access from unexpected ranges, particularly from machines hosted by SurfShark and M247.
Monitor for suspicious account use (e.g., inappropriate or unauthorized use of administrator accounts, service accounts, or third-party accounts). To detect use of compromised credentials in combination with a VPS, follow the steps below:
Review logs for “impossible logins,” such as logins with changing username, user agent strings, and IP address combinations or logins where IP addresses do not align to the expected user’s geographic location.
Search for “impossible travel,” which occurs when a user logs in from multiple IP addresses that are a significant geographic distance apart (i.e., a person could not realistically travel between the geographic locations of the two IP addresses in the time between logins). Note: This detection opportunity can result in false positives if legitimate users apply VPN solutions before connecting to networks.
Search for one IP used across multiple accounts, excluding expected logins.
Take note of any M247-associated IP addresses used along with VPN providers (e.g., SurfShark). Look for successful remote logins (e.g., VPN, OWA) for IPs coming from M247- or using SurfShark-registered IP addresses.
Identify suspicious privileged account use after resetting passwords or applying user account mitigations.
Search for unusual activity in typically dormant accounts.
Search for unusual user agent strings, such as strings not typically associated with normal user activity, which may indicate bot activity.
Review the YARA rules provided in MAR-10365227-1 to assist in determining whether malicious activity has been observed.
Monitor for the installation of unauthorized software, including Remote Server Administration Tools (e.g., psexec, RdClient, VNC, and ScreenConnect).
Monitor for anomalous and known malicious command-line use. See Appendix: Windows Command Shell Activity for commands used by the actors to interact with the victim’s environment.
Monitor for unauthorized changes to user accounts (e.g., creation, permission changes, and enabling a previously disabled account).
CONTAINMENT AND REMEDIATION
Organizations affected by active or recently active threat actors in their environment can take the following initial steps to aid in eviction efforts and prevent re-entry:
Report the incident. Report the incident to U.S. Government authorities and follow your organization’s incident response plan.
Report incidents to CISA via CISA’s 24/7 Operations Center (report@cisa.gov or 888-282-0870).
For DIB incident reporting, contact the Defense Cyber Crime Center (DC3) via DIBNET at dibnet.dod.mil/portal/intranet or (410) 981 0104.
Reset all login accounts. Reset all accounts used for authentication since it is possible that the threat actors have additional stolen credentials. Password resets should also include accounts outside of Microsoft Active Directory, such as network infrastructure devices and other non-domain joined devices (e.g., IoT devices).
Monitor SIEM logs and build detections. Create signatures based on the threat actor TTPs and use these signatures to monitor security logs for any signs of threat actor re-entry.
Enforce MFA on all user accounts. Enforce phishing-resistant MFA on all accounts without exception to the greatest extent possible.
Audit accounts and permissions. Audit all accounts to ensure all unused accounts are disabled or removed and active accounts do not have excessive privileges. Monitor SIEM logs for any changes to accounts, such as permission changes or enabling a previously disabled account, as this might indicate a threat actor using these accounts.
Mitigation recommendations are usually longer-term efforts that take place before a compromise as part of risk management efforts, or after the threat actors have been evicted from the environment and the immediate response actions are complete. While some may be tailored to the TTPs used by the threat actor, recovery recommendations are largely general best practices and industry standards aimed at bolstering overall cybersecurity posture.
Segment Networks Based on Function
Implement network segmentation to separate network segments based on role and functionality. Proper network segmentation significantly reduces the ability for ransomware and other threat actor lateral movement by controlling traffic flows between—and access to—various subnetworks. (See CISA’s Infographic on Layering Network Security Through Segmentation and NSA’s Segment Networks and Deploy Application-Aware Defenses.)
Isolate similar systems and implement micro-segmentation with granular access and policy restrictions to modernize cybersecurity and adopt Zero Trust (ZT) principles for both network perimeter and internal devices. Logical and physical segmentation are critical to limiting and preventing lateral movement, privilege escalation, and exfiltration.
Manage Vulnerabilities and Configurations
Update software, including operating systems, applications, and firmware, on network assets. Prioritize patching known exploited vulnerabilities and critical and high vulnerabilities that allow for remote code execution or denial-of-service on internet-facing equipment.
Implement a configuration change control process that securely creates device configuration backups to detect unauthorized modifications. When a configuration change is needed, document the change, and include the authorization, purpose, and mission justification. Periodically verify that modifications have not been applied by comparing current device configurations with the most recent backups. If suspicious changes are observed, verify the change was authorized.
Search for Anomalous Behavior
Use cybersecurity visibility and analytics tools to improve detection of anomalous behavior and enable dynamic changes to policy and other response actions. Visibility tools include network monitoring tools and host-based logs and monitoring tools, such as an endpoint detection and response (EDR) tool. EDR tools are particularly useful for detecting lateral connections as they have insight into common and uncommon network connections for each host.
Monitor the use of scripting languages (e.g., Python, Powershell) by authorized and unauthorized users. Anomalous use by either group may be indicative of malicious activity, intentional or otherwise.
Restrict and Secure Use of Remote Admin Tools
Limit the number of remote access tools as well as who and what can be accessed using them. Reducing the number of remote admin tools and their allowed access will increase visibility of unauthorized use of these tools.
Use encrypted services to protect network communications and disable all clear text administration services(e.g., Telnet, HTTP, FTP, SNMP 1/2c). This ensures that sensitive information cannot be easily obtained by a threat actor capturing network traffic.
Implement a Mandatory Access Control Model
Implement stringent access controls to sensitive data and resources. Access should be restricted to those users who require access and to the minimal level of access needed.
Audit Account Usage
Monitor VPN logins to look for suspicious access (e.g., logins from unusual geo locations, remote logins from accounts not normally used for remote access, concurrent logins for the same account from different locations, unusual times of the day).
Closely monitor the use of administrative accounts. Admin accounts should be used sparingly and only when necessary, such as installing new software or patches. Any use of admin accounts should be reviewed to determine if the activity is legitimate.
Ensure standard user accounts do not have elevated privileges Any attempt to increase permissions on standard user accounts should be investigated as a potential compromise.
VALIDATE SECURITY CONTROLS
In addition to applying mitigations, CISA, FBI, and NSA recommend exercising, testing, and validating your organization’s security program against threat behaviors mapped to the MITRE ATT&CK for Enterprise framework in this advisory. CISA, FBI, and NSA recommend testing your existing security controls inventory to assess how they perform against the ATT&CK techniques described in this advisory.
To get started:
Select an ATT&CK technique described in this advisory (see Table 1).
Align your security technologies against the technique.
Test your technologies against the technique.
Analyze the performance of your detection and prevention technologies.
Repeat the process for all security technologies to obtain a set of comprehensive performance data.
Tune your security program, including people, processes, and technologies, based on the data generated by this process.
CISA, FBI, and NSA recommend continually testing your security program, at scale, in a production environment to ensure optimal performance against the MITRE ATT&CK techniques identified in this advisory.
RESOURCES
CISA offers several no-cost scanning and testing services to help organizations reduce their exposure to threats by taking a proactive approach to mitigating attack vectors. See cisa.gov/cyber-hygiene-services.
U.S. DIB sector organizations may consider signing up for the NSA Cybersecurity Collaboration Center’s DIB Cybersecurity Service Offerings, including Protective Domain Name System (PDNS) services, vulnerability scanning, and threat intelligence collaboration for eligible organizations. For more information on how to enroll in these services, email dib_defense@cyber.nsa.gov.
ACKNOWLEDGEMENTS
CISA, FBI, and NSA acknowledge Mandiant for its contributions to this CSA.
APPENDIX: WINDOWS COMMAND SHELL ACTIVITY
Over a three-day period in February 2021, APT cyber actors used Windows Command Shell to interact with the victim’s environment. When interacting with the victim’s system and executing commands, the threat actors used /q and /c parameters to turn the echo off, carry out the command specified by a string, and stop its execution once completed.
On the first day, the threat actors consecutively executed many commands within the Windows Command Shell to learn about the organization’s environment and to collect sensitive data for eventual exfiltration (see Table 2).
Command
Description / Use
net share
Used to create, configure, and delete network shares from the command-line.[1] The threat actor likely used this command to display information about shared resources on the local computer and decide which directories to exploit.
powershell dir
An alias (shorthand) for the PowerShell Get-ChildItem cmdlet. This command maps shared drives by specifying a path to one location and retrieving the items from another.[2] The threat actor added additional switches (aka options, parameters, or flags) to form a “one liner,” an expression to describe commonly used commands used in exploitation: powershell dir -recurse -path e:\<redacted>|select fullname,length|export-csv c:\windows\temp\temp.txt. This particular command lists subdirectories of the target environment when.
systeminfo
Displays detailed configuration information [3], tasklist – lists currently running processes [4], and ipconfig – displays all current Transmission Control Protocol (TCP)/IP network configuration values and refreshes Dynamic Host Configuration Protocol (DHCP) and Domain Name System (DNS) settings, respectively [5]. The threat actor used these commands with specific switches to determine if the system was a VMware virtual machine: systeminfo > vmware & date /T, tasklist /v > vmware & date /T, and ipconfig /all >> vmware & date /.
route print
Used to display and modify the entries in the local IP routing table. [6] The threat actor used this command to display the entries in the local IP routing table.
netstat
Used to display active TCP connections, ports on which the computer is listening, Ethernet statistics, the IP routing table, IPv4 statistics, and IPv6 statistics.[7] The threat actor used this command with three switches to display TCP connections, prevent hostname determination of foreign IP addresses, and specify the protocol for TCP: netstat -anp tcp.
certutil
Used to dump and display certification authority (CA) configuration information, configure Certificate Services, backup and restore CA components, and verify certificates, key pairs, and certificate chains.[8] The threat actor used this command with three switches to test if they could download files from the internet: certutil -urlcache -split -f https://microsoft.com temp.html.
ping
Sends Internet Control Message Protocol (ICMP) echoes to verify connectivity to another TCP/IP computer.[9] The threat actor used ping -n 2 apple.com to either test their internet connection or to detect and avoid virtualization and analysis environments or network restrictions.
taskkill
Used to end tasks or processes.[10] The threat actor used taskkill /F /PID 8952 to probably disable security features. CISA was unable to determine what this process was as the process identifier (PID) numbers are dynamic.
PowerShell Compress-Archive cmdlet
Used to create a compressed archive or to zip files from specified files and directories.[11] The threat actor used parameters indicating shared drives as file and folder sources and the destination archive as zipped files. Specifically, they collected sensitive contract-related information from the shared drives.
On the second day, the APT cyber actors executed the commands in Table 3 to perform discovery as well as collect and archive data.
Command
Description / Use
ntfsinfo.exe
Used to obtain volume information from the New Technology File System (NTFS) and to print it along with a directory dump of NTFS meta-data files.[12]
WinRAR.exe
Used to compress files and subsequently masqueraded WinRAR.exe by renaming it VMware.exe.[13]
On the third day, the APT cyber actors returned to the organization’s network and executed the commands in Table 4.
Command
Description / Use
powershell -ep bypass import-module .\vmware.ps1;export-mft -volume e
Threat actors ran a PowerShell command with parameters to change the execution mode and bypass the Execution Policy to run the script from PowerShell and add a module to the current section: powershell -ep bypass import-module .\vmware.ps1;export-mft -volume e. This module appears to acquire and export the Master File Table (MFT) for volume E for further analysis by the cyber actor.[14]
set.exe
Used to display the current environment variable settings.[15] (An environment variable is a dynamic value pointing to system or user environments (folders) of the system. System environment variables are defined by the system and used globally by all users, while user environment variables are only used by the user who declared that variable and they override the system environment variables (even if the variables are named the same).
dir.exe
Used to display a list of a directory’s files and subdirectories matching the eagx* text string, likely to confirm the existence of such file.
tasklist.exe and find.exe
Used to display a list of applications and services with their PIDs for all tasks running on the computer matching the string “powers”.[16][17][18]
ping.exe
Used to send two ICMP echos to amazon.com. This could have been to detect or avoid virtualization and analysis environments, circumvent network restrictions, or test their internet connection.[19]
del.exe with the /f parameter
Used to force the deletion of read-only files with the *.rar and tempg* wildcards.[20]
VBA macros are a common way for malicious actors to gain access to deploy malware and ransomware. Therefore, to help improve security in Office, we’re changing the default behavior of Office applications to block macros in files from the internet.
With this change, when users open a file that came from the internet, such as an email attachment, and that file contains macros, the following message will be displayed:
The Learn More button goes to an article for end users and information workers that contains information about the security risk of bad actors using macros, safe practices to prevent phishing and malware, and instructions on how to enable these macros (if absolutely needed).
In some cases, users will also see the message if the file is from a location within your intranet that’s not identified as being trusted. For example, if users are accessing files on a network share by using the share’s IP address. For more information, see Files centrally located on a network share or trusted website.
Important
Even before this change we’re introducing, organizations could use the Block macros from running in Office files from the Internet policy to prevent users from inadvertently opening files from the internet that contain macros. We recommend enabling this policy as part of the security baseline for Microsoft 365 Apps for enterprise. If you do configure the policy, your organization won’t be affected by this default change.
To prepare for this change, we recommend that you work with the business units in your organization that use macros in Office files that are opened from locations such as intranet network shares or intranet websites. You’ll want to identify those macros and determine what steps to take to keep using those macros. You’ll also want to work with independent software vendors (ISVs) that provide macros in Office files from those locations. For example, to see if they can digitally sign their code and you can treat them as a trusted publisher.
Also, review the following information:
Preparation action
More information
Understand which versions and which update channels have this change (as we roll out this change)
Steps to take to allow VBA macros to run in files that you trust
How you allow VBA macros to run in files that you trust depends on where those files are located or the type of file.
The following table list different common scenarios and possible approaches to take to unblock VBA macros and allow them to run. You don’t have to do all possible approaches for a given scenario. In the cases where we have listed multiple approaches, pick the one that best suits your organization.
Scenario
Possible approaches to take
Individual files
• Select the Unblock checkbox on the General tab of the Properties dialog for the file • Use the Unblock-File cmdlet in PowerShell
Files centrally located on a network share or trusted website
Unblock the file using an approach listed under “Individual files.”
If there isn’t an Unblock checkbox and you want to trust all files in that network location: • Designate the location as a Trusted site • Add the location to the Local intranet zone
Files stored on OneDrive or SharePoint, including a site used by a Teams channel
• Have users directly open the file by using the Open in Desktop App option • If users download the file locally before opening it, remove Mark of the Web from the local copy of the file (see the approaches under “Individual files”) • Designate the location as a Trusted site
Macro-enabled template files for Word, PowerPoint, and Excel
If the template file is stored on the user’s device: • Remove Mark of the Web from the template file (see the approaches under “Individual files”) • Save the template file to a Trusted Location
If the template file is stored on a network location: • Use a digital signature and trust the publisher • Trust the template file (see the approaches under “Files centrally located on a network share or trusted website”)
• [recommended] Deploy the public code-signing certificate for the trusted publisher to your users and prevent your users from adding trusted publishers themselves. • Remove Mark of the Web from the file, and have the user add the publisher of the macro as a trusted publisher.
This change only affects Office on devices running Windows and only affects the following applications: Access, Excel, PowerPoint, Visio, and Word.
The change began rolling out in Version 2203, starting with Current Channel (Preview) in early April 2022. Later, the change will be available in the other update channels, such as Monthly Enterprise Channel and Semi-Annual Enterprise Channel.
The following table shows the forecasted schedule of when this change will be available in each update channel. Information in italics is subject to change.
Update channel
Version
Date
Current Channel (Preview)
Version 2203
Started rolling out on April 12, 2022
Current Channel
Version 2206
Started rolling out on July 27, 2022
Monthly Enterprise Channel
Version 2208
October 11, 2022
Semi-Annual Enterprise Channel (Preview)
Version 2208
October 11, 2022
Semi-Annual Enterprise Channel
Version 2208
January 10, 2023
Note
As we roll out this change to Current Channel over the next few weeks, not all customers will see the change right away.
The change doesn’t affect Office on a Mac, Office on Android or iOS devices, or Office on the web.
How Office determines whether to run macros in files from the internet
The following flowchart graphic shows how Office determines whether to run macros in a file from the internet.
The following steps explain the information in the flowchart graphic, except for Excel Add-in files. For more information about those files, see Macro-enabled add-in files for PowerPoint and Excel. Also, if a file is located on a network share that isn’t in the Local intranet zone or isn’t a trusted site, macros will be blocked in that file.
A user opens an Office file containing macros obtained from the internet. For example, an email attachment. The file has Mark of the Web (MOTW).
Note
Mark of the Web is added by Windows to files from an untrusted location, such as the internet or Restricted Zone. For example, browser downloads or email attachments. For more information, see Mark of the Web and zones.
Mark of the Web only applies to files saved on an NTFS file system, not files saved to FAT32 formatted devices.
If the file is from a Trusted Location, the file is opened with the macros enabled. If the file isn’t from a Trusted Location, the evaluation continues.
If the macros are digitally signed and the matching Trusted Publisher certificate is installed on the device, the file is opened with the macros enabled. If not, then the evaluation continues.
Policies are checked to see if macros are allowed or blocked. If the policies are set to Not Configured, the evaluation continues to Step 6.
(a) If macros are blocked by policy, the macros are blocked. (b) If the macros are enabled by policy, the macros are enabled.
If the user had previously opened the file, before this change in default behavior, and had selected Enable content from the Trust Bar, then the macros are enabled because the file is considered trusted.
For perpetual versions of Office, such as Office LTSC 2021 or Office 2019, this step occurs after Step 3 and before Step 4, and isn’t affected by the change coming to Current Channel.
This step is where the change to the default behavior of Office takes effect. With this change, macros in files from the internet are blocked and users will see the Security Risk banner when they open the file.
Note
Previously, before this change in default behavior, the app would check to see if the VBA Macro Notification Settings policy was enabled and how it was configured.
If the policy was set to Disabled or Not Configured, then the app would check the settings under File > Options > Trust Center > Trust Center Settings… > Macro Settings. The default is set to “Disable all macros with notification,” which allows users to enable content in the Trust Bar.
Guidance on allowing VBA macros to run in files you trust
Remove Mark of the Web from a file
For an individual file, such as a file downloaded from an internet location or an email attachment the user has saved to their local device, the simplest way to unblock macros is to remove Mark of the Web. To remove, right-click on the file, choose Properties, and then select the Unblock checkbox on the General tab.
Even if the Unblock checkbox is available for a file on a network share, selecting the checkbox won’t have any effect if the share is considered to be in the Internet zone. For more information, see Mark of the Web and zones.
You can also use the Unblock-File cmdlet in PowerShell to remove the ZoneId value from the file. Removing the ZoneId value will allow VBA macros to run by default. Using the cmdlet does the same thing as selecting the Unblock checkbox on the General tab of the Properties dialog for the file. For more information about the ZoneId value, see Mark of the Web and zones.
Files centrally located on a network share or trusted website
If you have your users access files from a trusted website or an internal file server, you can do either of the following steps so that macros from those locations won’t be blocked.
Designate the location as a Trusted site
If the network location is on the intranet, add the location to the Local intranet zone
Note
If you add something as a trusted site, you’re also giving the entire site elevated permissions for scenarios not related to Office.
For the Local intranet zone approach, we recommend you save the files to a location that’s already considered part of the Local intranet zone, instead of adding new locations to that zone.
In general, we recommend that you use trusted sites, because they have some additional security compared to the Local intranet zone.
For example, if users are accessing a network share by using its IP address, macros in those files will be blocked unless the file share is in the Trusted sites or the Local intranet zone.
Tip
To see a list of trusted sites or what’s in the Local intranet zone, go to Control Panel > Internet Options > Change security settings on a Windows device.
To check if an individual file is from a trusted site or local intranet location, see Mark of the Web and zones.
For example, you could add a file server or network share as a trusted site, by adding its FQDN or IP address to the list of trusted sites.
If you want to add URLs that begin with http:// or network shares, clear the Require server verification (https:) for all sites in this zone checkbox.
Important
Because macros aren’t blocked in files from these locations, you should manage these locations carefully. Be sure you control who is allowed to save files to these locations.
You can use Group Policy and the “Site to Zone Assignment List” policy to add locations as trusted sites or to the Local intranet zone for Windows devices in your organization. This policy is found under Windows Components\Internet Explorer\Internet Control Panel\Security Page in the Group Policy Management Console. It’s available under both Computer Configuration\Policies\Administrative Templates and User Configuration\Policies\Administrative Templates.
Files on OneDrive or SharePoint
If a user downloads a file on OneDrive or SharePoint by using a web browser, the configuration of the Windows internet security zone (Control Panel > Internet Options > Security) will determine whether the browser sets Mark of the Web. For example, Microsoft Edge sets Mark of the Web on a file if it’s determined to be from the Internet zone.
If a user selects Open in Desktop App in a file opened from the OneDrive website or from a SharePoint site (including a site used by a Teams channel), then the file won’t have Mark of the Web.
If a user has the OneDrive sync client running and the sync client downloads a file, then the file won’t have Mark of the Web.
Files that are in Windows known folders (Desktop, Documents, Pictures, Screenshots, and Camera Roll), and are synced to OneDrive, don’t have Mark of the Web.
If you have a group of users, such as the Finance department, that need to use files from OneDrive or SharePoint without macros being blocked, here are some possible options:
Have them open the file by using the Open in Desktop App option
Set the Windows internet security zone assignment for OneDrive or SharePoint domains to Trusted Sites. Admins can use the “Site to Zone Assignment List” policy and configure the policy to place https://{your-domain-name}.sharepoint.com (for SharePoint) or https://{your-domain-name}-my.sharepoint.com (for OneDrive) into the Trusted Sites zone.
This policy is found under Windows Components\Internet Explorer\Internet Control Panel\Security Page in the Group Policy Management Console. It’s available under both Computer Configuration\Policies\Administrative Templates and User Configuration\Policies\Administrative Templates.
SharePoint permissions and OneDrive sharing aren’t changed by adding these locations to Trusted Sites. Maintaining access control is important. Anyone with permissions to add files to SharePoint could add files with active content, such as macros. Users who download files from domains in the Trusted Sites zone will bypass the default to block macros.
Macro-enabled template files for Word, PowerPoint, and Excel
Macro-enabled template files for Word, PowerPoint, and Excel that are downloaded from the internet will have Mark of the Web. For example, template files with the following extensions:
.dot
.dotm
.pot
.potm
.xlt
.xltm
When the user opens the macro-enabled template file, the user will be blocked from running the macros in the template file. If the user trusts the source of the template file, they can remove Mark of the Web from the template file, and then reopen the template file in the Office app.
If you have a group of users that need to use macro-enabled templates without macros being blocked, you can take either of the following actions:
Use a digital signature and trust the publisher.
If you’re not using digital signatures, you can save the template file to a Trusted Location and have users get the template file from that location.
Macro-enabled add-in files for PowerPoint and Excel
Macro-enabled Add-in files for PowerPoint and Excel that are downloaded from the internet will have Mark of the Web. For example, Add-in files with the following extensions:
.ppa
.ppam
.xla
.xlam
When the user tries to install the macro-enabled Add-in, by using File > Options > Add-ins or by using the Developer ribbon, the Add-in will be loaded in a disabled state and the user will be blocked from using the Add-in. If the user trusts the source of the Add-in file, they can remove Mark of the Web from the Add-in file, and then reopen PowerPoint or Excel to use the Add-in.
If you have a group of users that need to use macro-enabled Add-in files without macros being blocked, you can take the following actions.
For PowerPoint Add-in files:
Remove Mark of the Web from the .ppa or .ppam file.
Use a digital signature and trust the publisher.
Save the Add-in file to a Trusted Location for users to retrieve.
For Excel Add-in files:
Remove Mark of the Web from the .xla or .xlam file.
Save the Add-in file to a Trusted Location for users to retrieve.
Note
Using a digital signature and trusting the publisher doesn’t work for Excel Add-in files that have Mark of the Web. This behavior isn’t new for Excel Add-in files that have Mark of the Web. It’s worked this way since 2016, as a result of a previous security hardening effort (related to Microsoft Security Bulletin MS16-088).
Macros that are signed by a trusted publisher
If the macro is signed and you’ve validated the certificate and trust the source, you can make that source a trusted publisher. We recommend, if possible, that you manage trusted publishers for your users. For more information, see Trusted publishers for Office files.
All macros validly signed with the same certificate are recognized as coming from a trusted publisher and are run.
Adding a trusted publisher could affect scenarios beyond those related to Office, because a trusted publisher is a Windows-wide setting, not just an Office-specific setting.
Trusted Locations
Saving files from the internet to a Trusted Location on a user’s device ignores the check for Mark of the Web and opens with VBA macros enabled. For example, a line of business application could send reports with macros on a recurring basis. If files with macros are saved to a Trusted Location, users won’t need to go to the Properties for the file, and select Unblock to allow the macros to run.
Because macros aren’t blocked in files saved to a Trusted Location, you should manage Trusted Locations carefully and use them sparingly. Network locations can also be set as a Trusted Location, but it’s not recommended. For more information, see Trusted Locations for Office files.
Additional information about Mark of the Web
Mark of the Web and Trusted Documents
When a file is downloaded to a device running Windows, Mark of the Web is added to the file, identifying its source as being from the internet. Currently, when a user opens a file with Mark of the Web, a SECURITY WARNING banner appears, with an Enable content button. If the user selects Enable content, the file is considered a Trusted Document, and macros are allowed to run. The macros will continue to run even after the change of default behavior to block macros in files from the internet is implemented, because the file is still considered a Trusted Document.
After the change of default behavior to block macros in files from the internet, users will see a different banner the first time they open a file with macros from the internet. This SECURITY RISK banner doesn’t have the option to Enable content. But users will be able to go to the Properties dialog for the file, and select Unblock, which will remove Mark of the Web from the file and allow the macros to run, as long as no policy or Trust Center setting is blocking.
Mark of the Web and zones
By default, Mark of the Web is added to files only from the Internet or Restricted sites zones.
Tip
To see these zones on a Windows device, go to Control Panel > Internet Options > Change security settings.
You can view the ZoneId value for a file by running the following command at a command prompt, and replacing {name of file} with your file name.
ConsoleCopy
notepad {name of file}:Zone.Identifier
When you run this command, Notepad will open and display the ZoneId under the [ZoneTransfer] section.
Here’s a list of ZoneId values and what zone they map to.
0 = My Computer
1 = Local intranet
2 = Trusted sites
3 = Internet
4 = Restricted sites
For example, if the ZoneId is 2, VBA macros in that file won’t be blocked by default. But if the ZoneId is 3, macros in that file will be blocked by default.
You can use the Unblock-File cmdlet in PowerShell to remove the ZoneId value from the file. Removing the ZoneId value will allow VBA macros to run by default. Using the cmdlet does the same thing as selecting the Unblock checkbox on the General tab of the Properties dialog for the file.
Use the Readiness Toolkit to identify files with VBA macros that might be blocked
To identify files that have VBA macros that might be blocked from running, you can use the Readiness Toolkit for Office add-ins and VBA, which is a free download from Microsoft.
The Readiness Toolkit includes a standalone executable that can be run from a command line or from within a script. You can run the Readiness Toolkit on a user’s device to look at files on the user’s device. Or you can run it from your device to look at files on a network share.
When you run the standalone executable version of the Readiness Toolkit, a JSON file is created with the information collected. You’ll want to save the JSON files in a central location, such as a network share. Then you’ll run the Readiness Report Creator, which is a UI wizard version of the Readiness Toolkit. This wizard will consolidate the information in the separate JSON files into a single report in the form of an Excel file.
To identify files that might be impacted by using the Readiness Toolkit, follow these basic steps:
Download the most current version of the Readiness Toolkit from the Microsoft Download Center. Make sure you’re using at least Version 1.2.22161, which was released on June 14, 2022.
Install the Readiness Toolkit.
From a command prompt, go to the folder where you installed the Readiness Toolkit and run the ReadinessReportCreator.exe command with the blockinternetscan option.For example, if you want to scan files in the c:\officefiles folder (and all its subfolders) on a device and save the JSON file with the results to the Finance share on Server01, you can run the following command.
After you’ve done all your scans, run the Readiness Report Creator.
On the Create a readiness report page, select Previous readiness results saved together in a local folder or network share, and then specify the location where you saved all the files for the scans.
On the Report settings page, select Excel report, and then specify a location to save the report.
When you open the report in Excel, go to the VBA Results worksheet.
In the Guideline column, look for Blocked VBA file from Internet.
You can only use policies if you’re using Microsoft 365 Apps for enterprise. Policies aren’t available for Microsoft 365 Apps for business.
Block macros from running in Office files from the Internet
This policy prevents users from inadvertently opening files containing macros from the internet. When a file is downloaded to a device running Windows, or opened from a network share location, Mark of the Web is added to the file identifying it was sourced from the internet.
We recommend enabling this policy as part of the security baseline for Microsoft 365 Apps for enterprise. You should enable this policy for most users and only make exceptions for certain users as needed.
There’s a separate policy for each of the five applications. The following table shows where each policy can be found in the Group Policy Management Console under User Configuration\Policies\Administrative Templates:
Application
Policy location
Access
Microsoft Access 2016\Application Settings\Security\Trust Center
Excel
Microsoft Excel 2016\Excel Options\Security\Trust Center
PowerPoint
Microsoft PowerPoint 2016\PowerPoint Options\Security\Trust Center
Visio
Microsoft Visio 2016\Visio Options\Security\Trust Center
Word
Microsoft Word 2016\Word Options\Security\Trust Center
Which state you choose for the policy determines the level of protection you’re providing. The following table shows the current level of protection you get with each state, before the change in default behavior is implemented.
Icon
Protection level
Policy state
Description
Protected [recommended]
Enabled
Users will be blocked from running macros in files obtained from the internet.
Part of the Microsoft recommended security baseline.
Not protected
Disabled
Will respect the settings configured under File > Options > Trust Center > Trust Center Settings… > Macro Settings.
Not protected
Not Configured
Will respect the settings configured under File > Options > Trust Center > Trust Center Settings… > Macro Settings.
Note
If you set this policy to Disabled, users will see, by default, a security warning when they open a file with a macro. That warning will let users know that macros have been disabled, but will allow them to run the macros by choosing the Enable content button.
This warning is the same warning users have been shown previously, prior to this recent change we’re implementing to block macros.
We don’t recommend setting this policy to Disabled permanently. But in some cases, it might be practical to do so temporarily as you test out how the new macro blocking behavior affects your organization and as you develop a solution for allowing safe usage of macros.
After we implement the change to the default behavior, the level of protection changes when the policy is set to Not Configured.
Icon
Protection level
Policy state
Description
Protected
Not Configured
Users will be blocked from running macros in files obtained from the internet.
Users will see the Security Risk banner with a Learn More button
VBA Macro Notification Settings
If you don’t use the “Block macros from running in Office files from the Internet” policy, you can use the “VBA Macro Notification Settings” policy to manage how macros are handled by Office.
This policy prevents users from being lured into enabling malicious macros. By default, Office is configured to block files that contain VBA macros and display a Trust Bar with a warning that macros are present and have been disabled. Users can inspect and edit the files if appropriate, but can’t use any disabled functionality until they select Enable Content on the Trust Bar. If the user selects Enable Content, then the file is added as a Trusted Document and macros are allowed to run.
There’s a separate policy for each of the five applications. The following table shows where each policy can be found in the Group Policy Management Console under User Configuration\Policies\Administrative Templates:
Application
Policy location
Access
Microsoft Access 2016\Application Settings\Security\Trust Center
Excel [1]
Microsoft Excel 2016\Excel Options\Security\Trust Center
PowerPoint
Microsoft PowerPoint 2016\PowerPoint Options\Security\Trust Center
Visio
Microsoft Visio 2016\Visio Options\Security\Trust Center
Word
Microsoft Word 2016\Word Options\Security\Trust Center
Note
[1] For Excel, the policy is named Macro Notification Settings.
The “VBA Macro Notification Settings” policy is also available for Project and Publisher.
Which state you choose for the policy determines the level of protection you’re providing. The following table shows the level of protection you get with each state.
Icon
Protection level
Policy state
Policy value
Protected [recommended]
Enabled
Disable all except digitally signed macros (and select “Require macros to be signed by a trusted publisher”)
Protected
Enabled
Disable all without notification
Partially protected
Enabled
Disable all with notification
Partially protected
Disabled
(Same behavior as “Disable all with notification”)
Not protected
Enabled
Enable all macros (not recommended)
Important
Securing macros is important. For users that don’t need macros, turn off all macros by choosing “Disable all without notification.”
Our security baseline recommendation is that you should do the following:
Enable the “VBA Macro Notification Settings” policy.
For users that need macros, choose “Disable all except digitally signed macros” and then select “Require macros to be signed by a trusted publisher.” The certificate needs to be installed as a Trusted Publisher on users’ devices.
If you don’t configure the policy, users can configure macro protection settings under File > Options > Trust Center > Trust Center Settings… > Macro Settings.
The following table shows the choices users can make under Macro Settings and the level of protection each setting provides.
Icon
Protection level
Setting chosen
Protected
Disable all macros except digitally signed macros
Protected
Disable all macros without notification
Partially protected
Disable all macros with notification (default)
Not protected
Enable all macros (not recommended; potentially dangerous code can run)
Note
In the policy setting values and the product UI for Excel, the word “all” is replaced by “VBA.” For example, “Disable VBA macros without notification.”
Tools available to manage policies
There are several tools available to you to configure and deploy policy settings to users in your organization.
You can use Cloud Policy to configure and deploy policy settings to devices in your organization, even if the device isn’t domain joined. Cloud Policy is a web-based tool and is found in the Microsoft 365 Apps admin center.
In Cloud Policy, you create a policy configuration, assign it to a group, and then select policies to be included in the policy configuration. To select a policy to include, you can search by the name of the policy. Cloud Policy also shows which policies are part of the Microsoft recommended security baseline. The policies available in Cloud Policy are the same User Configuration policies that are available in the Group Policy Management Console.
In the Microsoft Endpoint Manager admin center, you can use either the Settings catalog (preview) or Administrative Templates to configure and deploy policy settings to your users for devices running Windows 10 or later.
To get started, go to Devices > Configuration profiles > Create profile. For Platform, choose Windows 10 and later and then choose the profile type.
If you have Windows Server and Active Directory Domain Services (AD DS) deployed in your organization, you can configure policies by using Group Policy. To use Group Policy, download the most current Administrative Template files (ADMX/ADML) for Office, which include the policy settings for Microsoft 365 Apps for enterprise. After you copy the Administrative Template files to AD DS, you can use the Group Policy Management Console to create Group Policy Objects (GPOs) that include policy settings for your users, and for domain joined devices.
Wordfence 7.7.0 has just been released and as usual, it includes several awesome enhancements and updates for our security conscious WordPress publishers and e-commerce websites. This post goes into a little more detail on each change we’ve included. We don’t usually post additional detail like this, and we thought we’d give it a try, and make it a routine if the community approves.
This is based on the official Wordfence 7.7.0 changelog, which is included below. The format I’ve used here is the changelog entry as a heading and some detail on what the entry means and some background where applicable.
Improvement: Added configurable scan resume functionality to prevent scan failures on sites with intermittent connectivity issues
We’ve added “scan resume” functionality which is configurable and will prevent security scan failures on sites that might have intermittent connectivity issues. As you know Wordfence runs on over 4 million websites on over 12,000 unique networks, and to say that we run in a range of environments and configurations is an understatement. Our quality assurance team has an oversized influence on the product, and this is one more way they have made Wordfence even more robust in version 7.7.0.
Improvement: Added new scan result for vulnerabilities found in plugins that do not have patched versions available via WordPress.org
This adds a scan result for plugins that have a vulnerability and are still present in the official WordPress plugin repository, and where there is no fix available. The usual course of action is that the plugin team will disable a plugin in the repository that has a known vulnerability, where the vulnerability has not been fixed yet. In some cases, this doesn’t happen, and this scan result is designed to deal with this unusual case. This change will also allow plugins that are not provided through wordpress.org to be flagged as vulnerable if there is no update available.
Improvement: Implemented stand-alone MMDB reader for IP address lookups to prevent plugin conflicts and support additional PHP versions
We use the Maxmind database internally for location lookups. Our code was using the Maxmind PHP library to perform these lookups. Maxmind stopped supporting older PHP versions a while ago, but many of our customers are still on those old versions. We have also found that other WordPress plugins may use a different version of the Maxmind library, which can lead to conflicts. So we’ve rolled our own stand-alone MMDB reader to resolve both of these issues. We now support older PHP versions than the official Maxmind library, and you won’t see any conflicts if another plugin is using the Maxmind library.
Improvement: Added option to disable looking up IP address locations via the Wordfence API
By default Wordfence contacts our servers to perform an IP address location lookup. This is just the way the plugin was originally engineered (by me actually) to try to move as much processing to our own servers and reduce resource usage on our customer websites. Some of our customers prefer that lookup to happen locally, so we’ve provided that option. The default is still to do the lookup on our servers, but you have the option to enable local lookups. The one downside of enabling this feature is that you’ll only get country-level lookups.
Improvement: Prevented successful logins from resetting brute force counters
Another design decision I made early on is that a successful login on a WordPress website would reset our brute-force login counters to zero. This made sense because if a real user makes multiple login failures and then succeeds, clearly they’re the real user and we should reset our counters so that their next failure doesn’t lock them out. Well, an unintended side effect of this is that a threat actor can register an account on WordPress websites with open registration, and sign in, and that would reset brute force counters to zero, so they can keep trying to guess that admin account’s password. We’ve fixed this by removing the reset that occurs on successful login.
Improvement: Clarified IPv6 diagnostic
We found that a message on our diagnostics page caused users to think they need to fix something related to IPv6. So we clarified the message to prevent our customers from going on wild goose chases trying to fix something that doesn’t need fixing.
Improvement: Included maximum number of days in live traffic option text
This is also a clarification. The maximum amount of data in live traffic that we store is 30 days. This wasn’t clear and some users would enter a larger number of days, expecting to see more than 30 days of data. We’ve fixed this user interface issue to make it clear.
Fix: Made timezones consistent on firewall page
When the page showing firewall activity loaded more results, they’d be in UTC time instead of your correct timezone. Oops! We fixed that little issue.
Fix: Added “Use only IPv4 to start scans” option to search
We have the ability to search your Wordfence options page which is super useful. This option was not included in the search, so we fixed that.
Fix: Prevented deprecation notices on PHP 8.1 when emailing the activity log
PHP 8.1 provides notices that a function has been deprecated if a developer (like us) is using an older function call. We were in this case, and PHP 8.1 was rightfully complaining about it. So we switched to a more modern version of the same code.
Fix: Prevented warning on PHP 8 related to process owner diagnostic
On our diagnostics page, if a hosting provider has restricted an account from seeing its own username, our customers would see a warning that you can’t access an array offset on a boolean. We fixed that.
Fix: Prevented PHP Code Sniffer false positive related to T_BAD_CHARACTER
We use PHP code sniffer to look for things that are incompatible between versions. We were getting a false positive when using this internal tool, so we fixed that. This change is really for the benefit of our engineering team.
Fix: Removed unsupported beta feed option
A long time ago when there was fire in the sky and the seas were boiling, we launched the first version of the Wordfence firewall. Because we wanted to test out new rules, and some of our users were brave enough to try the new stuff, we included this option. We would release beta firewall rules and malware signatures, and our brave testing community would try them out first by enabling this option. We do all our testing internally now and the firewall code and rule syntax has become extremely robust, so we don’t do these kinds of releases anymore. So we removed this configuration option.
Below I’ve included the short version of the changelog that you’ll see on WordPress.org. You’re most welcome to post your comments and questions below. Keep in mind that support questions are best posted via our official support channels, but if you’d like to chat about this post, comment below and a member of the team or I will reply if needed.
Regards,
Mark Maunder – Wordfence Founder & CEO
Wordfence 7.7.0 – OCTOBER 3, 2022
Improvement: Added configurable scan resume functionality to prevent scan failures on sites with intermittent connectivity issues
Improvement: Added new scan result for vulnerabilities found in plugins that do not have patched versions available via WordPress.org
Improvement: Implemented stand-alone MMDB reader for IP address lookups to prevent plugin conflicts and support additional PHP versions
Improvement: Added option to disable looking up IP address locations via the Wordfence API
Improvement: Prevented successful logins from resetting brute force counters
Improvement: Clarified IPv6 diagnostic
Improvement: Included maximum number of days in live traffic option text
Fix: Made timezones consistent on firewall page
Fix: Added “Use only IPv4 to start scans” option to search
Fix: Prevented deprecation notices on PHP 8.1 when emailing the activity log
Fix: Prevented warning on PHP 8 related to process owner diagnostic
Fix: Prevented PHP Code Sniffer false positive related to T_BAD_CHARACTER
If your website’s PHP version Because PHP is not the same as the PHP version in your backup, it may cause issues with the proper operation of your website and with some applications. This is more common when migrating from PHP 5 to PHP 7.
We recommend that users regularly backup their WordPress sites or network of sites. You can also use the All-in-One WP Migration plugin extensions to set up automatic backups. Make sure your plugin version is always up to date. In most cases, the PHP update will have no effect on WordPress or popular plugins or themes. However, it is possible that some plugins, themes, or other functionalities will cease to function.
Set the WP_DEBUG constant to true in your wp-config.php file to see all errors, warnings, and notes generated by the website during execution. This will assist you in locating any problems.
If your install is stuck at “restoring X% files,” “restoring database,” or “activating mu-plugins”
1. Leave the plugin running for another 15 minutes while it is on “Restoring database.” 2. After 15 minutes, open another tab and attempt to login to wp-admin using the exported site’s WP Admin username and password. 3. Save the permalinks structure twice by going to settings -> permalinks. Your website should now be successfully migrated.
If it isn’t and you receive a 500 error, please edit your wp-config.php file and set WP_DEBUG to true, then refresh the page to see an error. This may assist you in determining the problem, or you can share the error with the Servmask support team for assistance.
Could it be my server settings?
Memory limit needs to be at 256M, max_execution_time to 500, and mysql.connect_timeout to 400. You can find these settings by uploading this file. (https://www.dropbox.com/s/ize8t2k4nww5iq7/phpinfo.php?dl=0) in wp-content of your imported site and then open http://YOURDOMAINNAME.COM/wp-content/phpinfo.php. (tip – use Ctr F search the data that you get)
.png)