6 Best Ways to Disable Cortana in Windows 11

This article explains how you can disable Cortana in Windows 11 using different methods. You can disable the Cortana in Windows 11 or even uninstall it if you don’t use it.

Cortana in a cloud-based assistant by Microsoft that assists users with voice commands. Cortana in Windows has a chat-based UI that gives you the ability to interact using typed or spoken natural language queries.

In the latest update to Cortana in Windows, you can search for documents and compose quick emails. You can also invoke the app using the wake word “Cortana.” Cortana can also launch Alexa app on Windows 10 (if it’s already installed).

Note that you must sign in with your Microsoft account to use Cortana app. To learn about Cortana in detail, refer to the Microsoft documentation on Cortana.

Table of Contents

What can you do with Cortana in Windows 11?

Here are some of the things you can do with Cortana in Windows 11:

  • Calendar and Schedule Assistance – Check your calendar, know the meeting schedule etc.
  • Meeting Help – Join Teams meetings, find what’s the next meeting is and with whom, book a meeting with your colleague in the organization etc.
  • Find out about people in your organization – Cortana can help you learn about people in your organization
  • Make lists and set reminders and alarms – You can ask Cortana to create a new list or add something to a list you already have
  • Launch Apps – With voice commands, the Cortana can launch the apps installed on your Windows. For example, you can launch Word app, Calculator etc.
  • Get definitions and quick answers
  • Get weather and news updates – You can get the weather information and new updates using Cortana. This is very similar to news and interests widget that offers a quick overview of key headlines and weather information relevant to you.
Cortana App in Windows 11

Why Disable Cortana in Windows 11?

If Cortana is so useful, then why disable it? The answer is not all the Windows users like Cortana because it’s not accurate all the time and the app consumes a lot of system resources.

In addition, most users can simply work without using Cortana in daily routine. If you open Microsoft Store and read the Cortana app reviews, the users have expressed concerns about this app. The Cortana app in Microsoft Store has an overall rating of 1.8/5 which doesn’t seem good.

Plus Cortana collects your personal information, search history, email information and stores it on cloud which for some users is not ok.

In Windows 11, Cortana is still present, but it’s no longer part of the first boot experience. However, in Windows 11, you can turn off Cortana if you don’t like it or even uninstall it completely.

There are multiple ways to disable Cortana in Windows 11. This article covers different methods to temporarily or permanently disable Cortana as well as fully uninstall Cortana from Windows 11.

To summarize, we will use the following methods to disable the Cortana in Windows 11:

  1. Using Windows 11 Settings
  2. Using Task Manager in Windows 11
  3. Disable Cortana using Group Policy
  4. Use PowerShell commands to disable Cortana
  5. Intune or Microsoft Endpoint Manager
  6. Configuration Manager

Method 1 – Turn off Cortana from Windows 11 Settings

You can turn off the Cortana from Windows 11 settings with following steps. Click Start and launch the Windows 11 Settings app. You can use the shortcut command Win+I to directly launch the settings app.

From the list of settings, select Apps and then select Apps & Features.

Turn off Cortana from Windows 11 Settings

On the Apps & Features window, you should find all the apps installed on Windows 11. From the App list, search for Cortana app. Once the Cortana app appears in the listing, click on the vertical dots and select Advanced Options.

Turn off Cortana from Windows 11 Settings

The advanced options for Cortana displays additional settings to manage the app. Under Runs at log-in, turn off the Cortana. By moving the slider to off, you disable Cortana in Windows 11.

Note that the above step temporarily disables the Cortana app in Windows 11. The user can manually turn on the Cortana app whenever required.

Turn off Cortana from Windows 11 Settings

Method 2 – Disable Cortana using Task Manager on Windows 11

In Windows 11, you can quickly disable Cortana using the task manager:

  • On Windows 11, use the shortcut keys Ctrl+Shift+Esc to launch the task manager.
  • When the task manager opens, click the Startup tab.
  • From the list of start up apps, click the Cortana app and select Disable button.
  • You may also right-click Cortana and choose the Disable option.
Disable Cortana using Task Manager on Windows 11

Method 3 – Disable the Cortana from Registry Editor

You can permanently disable Cortana in Windows 11 by editing the registry. Before you modify the registry, either create a system restore point or backup the entire registry.

Launch the Registry editor on Windows 11 by running the command regedit. Once the registry editor opens, go to the following registry path.

Computer\HKEY_LOCAL_MACHINE\SOFTWARE\Policies\Microsoft\Windows\Windows Search

If you don’t find the Windows Search key, you must create a new key. Let’s start by creating a new key under Windows and name it as Windows Search.

Right click Windows Search key and select New > DWORD (32-bit) Value.

Disable the Cortana from Registry Editor
Disable Cortana in Windows 11 from Registry Editor

Enter the value name as AllowCortana and the value data is 0. By setting the AllowCortana value to 0, you disable Cortana in Windows 11. Click OK to save the changes.

Disable Cortana from Registry Editor
Disable Cortana in Windows 11 from Registry Editor

After making the above changes to registry, restart Windows 11 PC. Log in to Windows 11 PC and launch the Cortana app. You should see the following message “Cortana is disabled. To use Cortana you need to get permission from your administrator“. This confirms the Cortana app is disabled on Windows 11.

Cortana is disabled
Cortana is disabled

Method 4 – Disable Cortana using Group Policy (GPO)

You can disable Cortana permanently in Windows 11 using Group Policy. The Group Policy method is useful when you want to disable the Cortana access on domain joined Windows 11 PCs.

When you want to disable Cortana on multiple Windows 11 computers that are joined to an Active Directory domain, the group policy is the best option.

Before you create a GPO to disable Cortana, have few devices for testing purpose. It is not recommended deploying a GPO directly to production servers and workstations.

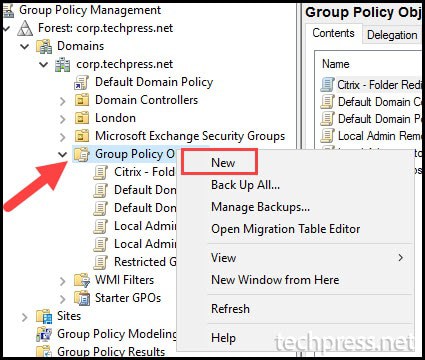
Let’s create a new GPO to disable Cortana in Windows 11. Log in to a domain controller or a member server installed with GPMC. Launch the Group Policy Management Tools from Server Manager > Tools.

Once the Group Policy Management console is launched, expand the domain and right-click Group Policy Objects and select New.

Note: We are going to create a new GPO which should then be linked to an OU later.

Disable Cortana in Windows 11 using Group Policy

Specify the GPO name as Disable Cortana or something similar and click OK.

Disable Cortana in Windows 11 using Group Policy

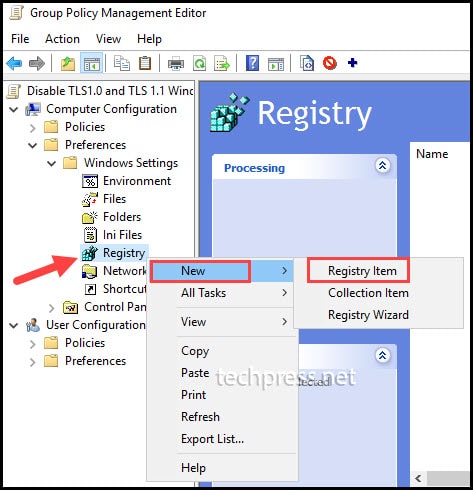
In the Group Policy Management editor, navigate to following settings Computer Configuration > Administrative Templates > Windows Components > Search.

From the list of policy settings, right-click the setting named “Allow Cortana” and select Edit. The Allow Cortana policy settings include:

  • This policy setting specifies whether Cortana is allowed on the device.
  •  If you enable or don’t configure this setting, Cortana will be allowed on the device. If you disable this setting, Cortana will be turned off.
  •  When Cortana is off, users will still be able to use search to find things on the device.

Set Allow Cortana to Disabled. With the selected setting, you disable the Cortana on Windows 11. Click Apply and OK.

Disable Cortana in Windows 11 using Group Policy

After following the above steps, in the GPMC console, right-click the OU that you want to target the GPO and select Link an existing GPO and select the Disable Cortana GPO.

Once you have linked the GPO to a OU or to an entire domain, the computers will download the policy based on the Group Policy refresh interval. The Group Policy refresh interval for computers policy lets you specify how much the actual update interval varies.

Read: How to modify the Group Policy Refresh Interval

After the Disable Cortana GPO is successfully applied to the domain computers, the access to Cortana app will be disabled for Windows 11.

Method 5 – Uninstall Cortana in Windows 11 using PowerShell

If you have decided to uninstall Cortana from Windows 11, you can do it using PowerShell:

  • On Windows 11 PC, launch the PowerShell as administrator.
  • Paste the following command in the PowerShell window and press Enter key.
  • Get-AppxPackage -AllUsers Microsoft.549981C3F5F10 | Remove-AppPackage.
  • The above PowerShell cmd uninstalls the Cortana from Windows 11 for all users.
Uninstall Cortana in Windows 11 using PowerShell

Note: You don’t have to reboot the computer after uninstalling Cortana.

Method 6 – Disable Cortana using Intune (MEM)

Using Intune, you can easily disable Cortana on Windows 11 managed PCs using Configuration Profiles. The Intune Catalog settings lets you define the settings to disable the Cortana access on Windows 10 and Windows 11 devices.

Let’s see how to disable Cortana using Intune. First sign-in to the Intune Portal (Microsoft Endpoint Manager admin center). Go to Devices > Windows > Configuration Profiles. Select Create Profile.

Disable Cortana using Intune - Create Configuration Profile
Disable Cortana using Intune – Create Configuration Profile

When you create a profile in Intune, you specify the Platform and Profile Type. In this example, select the Platform as Windows 10 and later and Profile Type as Settings Catalog. Click Create.

Disable Cortana using Intune - Create Configuration Profile
Disable Cortana using Intune – Create Configuration Profile

On Create Profile Basics tab in Intune portal, enter the name of the profile to “Disable Cortana Access” or “Turn off Cortana“. Enter a brief description about the profile and click Next.

Create Profile - Name
Create Profile – Name

On the Configuration Settings tab, we will use settings catalog in Intune to define the settings to turn off Cortana. Select +Add Settings.

Create Profile - Configuration Settings
Create Profile – Configuration Settings

The Settings picker window gives you an option to search for the correct keywords or terms related to settings. Enter the search term as “Cortana” and click Search button.

From the list of search results, click the Experience category and now select the Setting name – Allow Cortana.

Settings Picker - Cortana Experience
Settings Picker – Cortana Experience
  • Allow Cortana – Specifies whether Cortana is allowed on the device. If you enable or don’t configure this setting, Cortana is allowed on the device. If you disable this setting, Cortana is turned off. When Cortana is off, users will still be able to use search to find items on the device.

By default, the Allow Cortana setting is set to “Allow“. To disable the Cortana on Windows 10 and Windows 11 devices, set the Allow Cortana setting to “Block“. By setting the Allow Cortana to Block, you disable the Cortana on endpoints.

Click Next to continue.

Disable Cortana using Intune

On the Assignments tab, click Add Groups to include the group of devices on which you want to disable Cortana. Click Next to continue.

Turn Off Cortana Access - Assignments
Turn Off Cortana Access – Assignments

Scope tags are optional, but you may define them if required. I am going to skip and click Next.

Turn Off Cortana Access - Scope Tags
Turn Off Cortana Access – Scope Tags

On the Review + Create tab, take a final look at the settings that you defined so far. If it’s all good, click Create.

Turn Off Cortana Access - Review and Create
Turn Off Cortana Access – Review and Create

After you create the policy, a notification will appear automatically in the top right-hand corner with a message. Policy Created – “Disable Configure Access” created successfully. The policy is also shown in the Configuration profiles list along with other profiles.

After you deploy the policy, the assigned groups will receive the profile settings once the devices check-in with the Intune service.

To monitor the Intune policy assignment, from the list of Configuration Profiles, select the policy and here you can check the device and user check in status. If you click View Report, additional details are displayed.

Monitor Intune Policy Assignment

Once the devices receive the policy settings from Intune, log in to one of the devices and launch Cortana. Now you should see Cortana is disabled message. This confirms that you can disable the Cortana access using Intune on your Windows devices.

Cortana is disabled
Cortana is disabled

How To Reinstall Cortana App in Windows 11

If you have uninstalled Cortana app from Windows 11 using any of the above methods and want to reinstall it, the process is simple.

To reinstall the Cortana app, launch the Microsoft Store app in Windows 11. Search for Cortana app in Microsoft Store and click Get. The latest Cortana app will be downloaded and installed on the Windows 11 PC.

How To Reinstall Cortana App in Windows 11

Conclusion

Disabling the Cortana from Windows 11 is optional. If you are not going to use Cortana app, you can easily disable it with any of the methods covered in this post.

Source :
https://www.prajwaldesai.com/best-ways-to-disable-cortana-in-windows-11/

How to Disable Cortana in Windows 10

Microsoft doesn’t want you to disable Cortana. You used to be able to turn off Cortana in Windows 10, but Microsoft removed that easy toggle switch in the Anniversary Update. But you can still disable Cortana via a registry hack or group policy setting. This transforms the Cortana box into a “Search Windows” tool for local application and file searches.

Cortana has become increasingly restrictive since Windows 10’s release. It was previously updated to ignore your default web browser. Cortana now always launches the Microsoft Edge browser and only uses Bing when you search. If that sounds like something you wouldn’t want to use, here’s how to turn it off.

Home Users: Disable Cortana via the Registry

If you have Windows 10 Home, you’ll have to edit the Windows Registry to make these changes. You can also do it this way if you have Windows 10 Professional or Enterprise, but just feel more comfortable working in the Registry as opposed to Group Policy Editor. (If you have Pro or Enterprise, though, we recommend using the easier Group Policy Editor, as described in the next section.

Standard warning: Registry Editor is a powerful tool and misusing it can render your system unstable or even inoperable. This is a pretty simple hack and as long as you stick to the instructions, you shouldn’t have any problems. That said, if you’ve never worked with it before, consider reading about how to use the Registry Editor before you get started. And definitely back up the Registry (and your computer!) before making changes.

RELATED: How to Backup and Restore the Windows Registry

You should also make a System Restore point before continuing. Windows will probably do this automatically when you install the Anniversary Update, but it couldn’t hurt to make one manually–that way, if something goes wrong, you can always roll back.

Then, open the Registry Editor by pressing Windows+R on your keyboard, typing “regedit” into the box, and pressing Enter.

Navigate to the following key in the left sidebar:

HKEY_LOCAL_MACHINE\SOFTWARE\Policies\Microsoft\Windows\Windows Search

If you don’t see a “Windows Search” key (folder) below the Windows folder, right-click the Windows folder and select New > Key. Name it “Windows Search”.

Right-click the “Windows Search” key (folder) in the left pane and select New > DWORD (32-bit) Value.

Name the value “AllowCortana”. Double-click it and set the value to “0”.

You can now close the registry editor. You’ll have to sign out and sign back in or restart your computer before the change takes effect.

To undo your change and restore Cortana in the future, you can just return here, locate the “AllowCortana” value, and delete it or set it to “1”.

Download Our One-Click Registry Hack

Rather than editing the registry yourself, you can download our Disable Cortana registry hack. Just open the downloaded .zip file, double-click the “Disable Cortana.reg” file, and agree to add the information to your registry. We’ve also included an “Enable Cortana.reg” file if you’d like to undo the change and re-enable Cortana later.

You’ll have to sign out and sign back in–or restart your computer–before the change will take effect.

These .reg files just change the same registry settings we outlined above. If you’d like to see what this or any other .reg file will do before you run it, you can right-click the file .reg and select “Edit” to open it in Notepad. You can easily make your own Registry hacks.

Pro and Enterprise Users: Disable Cortana via Group Policy

RELATED: Using Group Policy Editor to Tweak Your PC

If you’re using Windows 10 Professional or Enterprise, the easiest way to disable Cortana is by using the Local Group Policy Editor. It’s a pretty powerful tool, so if you’ve never used it before, it’s worth taking some time to learn what it can do. Also, if you’re on a company network, do everyone a favor and check with your admin first. If your work computer is part of a domain, it’s also likely that it’s part of a domain group policy that will supersede the local group policy, anyway.

You should also make a System Restore point before continuing. Windows will probably do this automatically when you install the Anniversary Update, but it couldn’t hurt to make one manually–that way, if something goes wrong, you can always roll back.

First, launch the group policy editor by pressing Windows + R, typing “gpedit.msc” into the box, and pressing Enter.

Navigate to Computer Configuration > Administrative Templates > Windows Components > Search.

Locate the “Allow Cortana” setting in the right pane and double-click it.

Set the Allow Cortana option to “Disabled” and then click “OK”.

You can now close the group policy editor. You’ll have to sign out and sign back in–or restart your PC–for this change to take effect.

To re-enable Cortana, return here, double-click the “Enable Cortana” setting, and change it to “Not Configured” or “Enabled”.

Source :
https://www.howtogeek.com/265027/how-to-disable-cortana-in-windows-10/

Allow RDP Access to Domain Controller for Non-admin Users

By default, only members of the Domain Admins group have the remote RDP access to the Active Directory domain controllers‘ desktop. In this article we’ll show how to grant RDP access to domain controllers for non-admin user accounts without granting administrative privileges.

Many of you can quite reasonably ask: why would ordinary domain users should have access to the DC desktop? Indeed, in small or middle size infrastructures, when several administrators with the privileges of domain admins maintain them, you’ll hardly need this. In most cases, delegating some administrative permissions in Active Directory or using PowerShell Just Enough Administration (JEA) is sufficient.

However, in large corporate networks maintained by many administrators, it may become necessary to grant RDP access to the DC (usually to branch office DC’s or RODC) for different server admin groups, monitoring team, on-duty administrators, or other technical staffs. Also, from time to time some of the third-party services, not managed by the domain administrators, are deployed on the DC, and there’s a need to maintain these services.

Contents:

Tip. Microsoft doesn’t recommend to install the Active Directory Domain Services and Remote Desktop Service role (terminal server) on a single server. If there is only one physical server, on which you want to deploy both DC and RDS, you’d better use virtualization, since Microsoft virtualization licensing policy allows you to run two virtual servers under the same Windows Server Standard license.

To Sign in Remotely, You Need the Rights to Sign in through Remote Desktop Services

After the server has been promoted to the domain controller, you cannot manage local users and groups from the Computer Management mmc snap-in. When you try to open Local Users and Groups (lusrmgr.msc) console, the following error appears:

The computer xxx is a domain controller. This snip-in cannot be used on a domain controller. Domain accounts are managed with the Active Directory Users and Computers snap-in.

As you can see, there are no local groups on the domain controller. Instead of the local group Remote Desktop Users, the DC uses the built-in domain group Remote Desktop Users (located in the Builtin container). You can manage this group from the ADUC console or from the command prompt on the DC.

Display the members of the domain group Remote Desktop Users on the domain controller using the command:

net localgroup "Remote Desktop Users"

As you can see, it is empty. Add a domain user it-pro to it (in our example, it-pro is a regular domain user without administrative privileges):

net localgroup "Remote Desktop Users" /add corp\it-pro

Make sure that the user is added to this group:

net localgroup "Remote Desktop Users"

net localgroup "Remote Desktop Users"

You can also verify that the user is now a member of the Remote Desktop Users domain group using the ADUC (dsa.msc) snap-in.

domain builtin group Remote Desktop Users

However, even after that, a user still cannot connect to the DC via Remote Desktop with the error:

To sign in remotely, you need the right to sign in through Remote Desktop Services. By default members of the Administrators group have this right. If the group you’re in does not have the right, or if the right has been removed from the Administrators group, you need to be granted the right manually.

you need remote desktop services rights

Group Policy: Allow Log on through Remote Desktop Services

To allow a domain user or group a remote RDP connection to Windows, you must grant it the SeRemoteInteractiveLogonRight privileges. By default, only members of the Administrators group have this right. You can grant this permission using the Allow log on through Remote Desktop Services policy.

In Windows 2003 and older this policy is called Allow log on through terminal services.

To allow remote connection to the domain controllers for members of the Remote Desktop Users group you need to change the settings of this policy on your domain controller:

  1. Launch the Local Group Policy Editor (gpedit.msc);
  2. Go to the GPO section Computer Configuration -> Windows settings -> Security Settings -> Local policies -> User Rights Assignment;
  3. Find the policy Allow log on through Remote Desktop Services;After the server is promoted to the DC, only the Administrators group (these are Domain Admins) remains in this local policy.
  4. Edit the policy, add the domain group Remote Desktop Users (like this: domainname\Remote Desktop Users), or directly the domain user, or a group (domain\CA_Server_Admins) to it;
  5. Update the Local Group Policy settings on the DC using the command: gpupdate /force

Note that the group that you added to the Allow log on through Remote Desktop Services policy should not be present in the “Deny log on through Remote Desktop Services” policy , because it has a higher priority (check the article Restricting Network Access under local accounts). In addition, if you are restricting the list of computers on which users can log on, you need to add the DC name to the properties of the AD account (LogonWorkstations user attribute).

Note. To allow a user to log on to the DC locally (via the server console), you must add the account or group to the policy “Allow log on locally”. By default, this permission is allowed for the following domain groups:

  • Backup Operators
  • Administrators
  • Print Operators
  • Server Operators
  • Account Operators

It is better to create a new security group in the domain, for example, AllowLogonDC and add user accounts to it that need remote access to the DC. If you want to allow access to all AD domain controllers at once, instead of editing of the Local Policy on each DC, it’s better to add a the user group to the Default Domain Controllers Policy using the GPMC.msc console (change the policy settings in the same section: Computer Configuration\Windows Settings\Security Settings\Local Policies\User Rights Assignment -> Allow log on through Remote Desktop Services).

Warning. If you change the Default Domain Controllers Policy, don’t forget to add the domain/enterprise administrator groups to the policy Allow log on through Remote Desktop Services, otherwise they will lose remote access to the DCs.

default domain controller policy: allow logon over rdp

Now the users (groups) you added to the policy will be able to connect to the AD domain controllers via RDP.

If you need to grant non-administrator users the permissions to start/stop certain services on a DC, use the following guide.

The Requested RDP Session Access is Denied

In some cases, when connecting via RDP to a domain controller, an error may appear:

The requested session access is denied.
the requested rdp session access is denied

If you are connecting to the DC under a non-admin user account, this could be due to two problems:

  • You are trying to connect to the server console (using the mstsc /admin mode). This connection mode is only allowed for administrators. Try to connect to the server using mstsc.exe client in normal RDP mode (without /admin option);
  • The server may already have two active RDP sessions (by default, you can’t use more than two simultaneously RDP sessions on Windows Server without RDS role). You cannot log off other users without administrator permissions. You need to wait for the administrators to release one of the sessions.


Source :
http://woshub.com/allow-non-administrators-rdp-access-to-domain-controller/

How to setup SMTP Relay in Office 365

If you plan to keep your existing on-prem exchange server then it can be used / utilized as a SMTP Relay server. Else, if you plan to decommission the exchange server for good, you can utilize Office365 as a SMTP Relay server to relay the emails.

There are three ways to setup SMTP Relay in Office 365:

  • SMTP Auth client Submission
  • Direct Send
  • Office 365 SMTP Relay

I recommend using either Office 365 SMTP Relay method or Direct Send method to configure SMTP Relay in Office 365. Please refer to the section Direct Send vs Office 365 SMTP Relay which will help you decide which one to use for your organization.

Below are some suggestions which can help you choose between Office 365 SMTP Relay and Direct Send method.

📌 Direct Send Method does not work if you want to send the email to External recipients for example any Gmail, Yahoo, Hotmail email address. Direct End method can send an email to External recipients if the External Organization is also using Office 365 to host the mailboxes.

📌If your requirement is to send emails to Internal and any External domain recipients then choose Office 365 SMTP Relay Method.

1. SMTP Auth client Submission Method

Below are the Pre-requisites for using SMTP Auth client submission method to configure SMTP relay in Office365:

  • Licensed Office365 User Mailbox is required.
  • SMTP AUTH must be enabled for Mailbox which will be used to send the emails.
  • Device must support TLS 1.2 or above (Please check the vendor documentation to confirm this).

If your authentication policy disables basic authentication for SMTP, clients cannot use the SMTP AUTH protocol. Microsoft will disable Basic authentication for all new and existing tenants starting from 1st Oct 2022. Therefore, this is my least recommended option for configuration of SMTP relay in Office 365.

Direct Send vs Office 365 SMTP Relay

Direct Send method and Office 365 SMTP Relay method both use MX Endpoint of your domain to configure SMTP Relay. Both can be used when your environment has SMTP AUTH disabled.

Use Direct Send when you need to send messages to recipients in your own organization who have mailboxes in Office 365. Direct send will not work if you want to send email to External email address (Gmail, yahoo, hotmail etc.). However, If the external recipient mailboxes are also hosted on Office 365, it will work fine.

Direct Send does not require your device or application to have a static IP address to configure it. However, Static IP address is recommended so that an SPF record can be created for your domain. The SPF record helps avoid your messages being flagged as spam.

Direct Send and Office 365 Relay both does not require your device to Support TLS.

Direct Send method Office 365 SMTP Relay
Source:Microsoft. How Direct Send Works ?
FeatuesDirect SendOffice 365 SMTP Relay
Send to Internal UsersYesYes
Send to External UsersNo (Yes, for external recipients having Office365 Mailboxes)Yes
Network Port RequirementPort 25Port 25
TLS RequirementOptionalOptional
Requires AuthenticationNoneDevice / Printer / Application must have Static IP address assigned.

2. Configure SMTP Relay in Office 365 using Direct Send method

In the previous section of this blog post, I have explianed the difference between Direct Send and Office 365 SMTP Relay method. If Direct Send meets your requirements and you do not have any requirements for sending an email to External recipients like Gmail, yahoo, hotmail etc. You can follow below steps to configure it.

1. Find MX Endpoint of your Domain

To find the MX Endpoint of your domain, You need to follow below steps:

  1. Login on Microsoft 365 admin center.
  2. Go to Settings and click on Domains.
  3. Click on your organization domain name. For example: techpress.net.
  4. Click on DNS records Tab.
  5. You can find MX Endpoint on DNS records tab. Click on it to Open.

You will find the MX Endpoint under Points to address or value column. Click on it to copy it on a notepad.

The format of the MX Endpoint is yourdomain-com.mail.protection.outlook.com

Locate MX Endpoint of your domain from Microsoft 365 admin center

2. Find the Static IP Address of the Device or Application [Optional]

As Microsoft Recommends to use Static IP Address for Direct Send Method but its not mandatory. If your Device or Application is not using a static IP address, make sure you assign a static IP address and then note down the IP Address of the device on a notepad. We will add static IP address of the device in your domain’s SPF record.

3. Update SPF Record [Optional]

This is also an optional step but highly recommended by Microsoft. Updating SPF record with Static IP Address of your Device or Application will help to avoid your emails being marked as SPAM. SPF records identifies which servers are allowed to send emails on behalf of the your domain.

Example:

  • Device / Printer IP Address: 10.20.1.56
  • Currently configured SPF recordv=spf1 include:spf.protection.outlook.com -all

Add your Device / Application IP Address in the SPF record as below:

v=spf1 ip4:10.20.1.56 include:spf.protection.outlook.com -all

4. Configure your Device / Application for Direct Send SMTP Relay

Last and final step is to configure your Device / Application and add SMTP relay details so that Device / Application can send emails using the Direct Send SMTP Relay. In our Example, we will be using a Printer to configure Direct Send. Let’s see which SMTP settings needs to be configured on the Printer.

If you want to configure SMTP Relay for a device other than your printer, You can still use below SMTP details to configure it.

SMTP ServerPortTLSUserNamePassword
MX Endpoint

For Example:
<yourdomain>-<domain extension.mail.protection.outlook.com
25Not Required (Recommendation is to enable if this option is available)Any Email Address of your domain. This user does not require a mailbox.
For example: myscanner@techpress.net
Not required (you can turn off SMTP Authentication)

Example:

I have captured a screenshot of one of my Printers to show you how to configure Direct Send. You can use the same settings to configure Direct Send on any other device as well. This screenshot is just for your reference:

Office 365 SMTP Relay Direct Send method Configuration on Konika Minolta printer

5. Create Bypass Spam Filtering Rule [Optional]

This step is optional and you do not need to create a bypass SPAM Filtering rule in Exchange Online. You have updated SPF record with your device IP address which should avoid the emails sent from your device to be marked as SPAM.

If your emails are still going into the SPAM folder. You can create a SPAM Bypass rule in office365 for the email ID which you have used to send the email from on the device. 

  • Login to Exchange online management portal
  • Click on Mail flow -> Rule -> Create a Rule.
Create SPAM Bypass rule for the Device IP on Exchange Admin Center

3. Configure using Office 365 SMTP Relay Method

Office 365 SMTP Relay Method - How it Works?
Source: Microsoft. Office 365 SMTP Relay Method – How it Works?

Direct Send method has limitations of sending the emails to external recipients. However, Office 365 SMTP Relay does not have that kind of limitation in place. You can use Office 365 SMTP Relay Method to send the email to any External recipient. Let’s check the steps to configure Office 365 Relay on your Device.

1. Find Public IP Address of the Device or Application

First thing you need to do is to find the public IP address of the Device or Application. If your device is not assigned with a Public IP and is using Dynamic IP address, Please update it to use Static IP Address. Copy the IP address in a notepad. We will need this IP Address while configuring a Connector in Exchange Online.

2. Create a Connector on Exchange Admin Center

Next step is to create a connector on Exchange Admin Center. Please follow below steps to create a connector:

  1. Login on Microsoft Exchange Admin Center
  2. Click on Mail Flow and then Connectors
  3. Click on + Add a connector
  4. On Add a Connector Page. Select Connection from Your organization’s email server and Connection to Office 365 and click on Next to proceed.
Create a new connector on Exchange Admin Center for configuration of SMTP Relay
  1. Provide a Connector Name and Description. Click on Next to Proceed.
Provide a Name and Description of the Connector
  1. On Authenticating sent email page. Select the option “By verifying that the IP address of the sending server matches one of the following addresses, which belongs exclusively to your organization“.

Add your Device / Application IP Addresses into the list. Add all Device’s IP addresses which you want to configure for Office 365 SMTP Relay. For example, In my organization I have 3 Printers which I want to configure for SMTP Relay. Therefore I have added the IP addresses of those 3 printers here.

Add Printer IP Addresses in Authenticating sent email
  1. On Review connector page, you can review the connector configuration and click on Create connector to create this Connector.
Review Connector page on Exchange Admin Center

3. Update SPF Record

Now you need to update the SPF record and add all the Device IP’s in the SPF record which you added in the connector created on Exchange Admin Center.

Example:

  • Device / Printer IP Addresses: 10.1.20.122, 10.2.1.11 and 10.2.5.89.
  • Currently configured SPF recordv=spf1 include:spf.protection.outlook.com -all

Add your Device / Application IP Addresses in the SPF record as below:

v=spf1 ip4:10.1.20.122 ip4:10.2.1.11 ipv4:10.2.5.89 include:spf.protection.outlook.com -all

4. Find MX Endpoint of your Domain

To find the MX Endpoint of your domain, You need to follow below steps:

  1. Login on Microsoft 365 admin center.
  2. Go to Settings and click on Domains.
  3. Click on your organization domain name. For example: techpress.net.
  4. Click on DNS records Tab.
  5. You can find MX Endpoint on DNS records pag. Click on it to Open.

You will find the MX Record under Points to address or value column. Click on it to copy it on a notepad.

The format of the MX Endpoint is yourdomain-com.mail.protection.outlook.com

Locate MX Endpoint of your domain from Microsoft 365 admin center

5. Configure your Device / Application for Office 365 SMTP Relay

Last and final step is to configure your Device / Application and add SMTP relay details so that Device / Application can send emails using the Office 365 SMTP Relay.

SMTP ServerPortTLSUserNamePassword
MX Endpoint

For Example:
<yourdomain>-<domain extension.mail.protection.outlook.com
25Not Required (Recommendation is to enable if this option is available)Any Email Address of your domain. This user does not require a mailbox.
For example: myscanner@techpress.net
Not required (you can turn off SMTP Authentication)

6. Create SPAM Bypass rule [Optional]

Please refer to the section of Configuration of SMTP Relay using Direct Send method where the steps to create SPAM bypass rule is given. This is an optional troubleshooting step and can be used in case the emails are being marked as SPAM.

Troubleshooting Office 365 SMTP Relay

Now we have setup Office 365 SMTP Relay. In case of any issues in email delivery, you can use below steps to troubleshoot.

Check SMTP AUTH at organization level

You can use below command to check SMTP AUTH at organization level. As we are not using SMTP client submission method, SMTP AUTH should be disabled.

Get-TransportConfig | Format-List SmtpClientAuthenticationDisabled

Copy

Check SMTP AUTH at Mailbox level

Get-CASMailbox "Sonia Neil " | fl SmtpClientAuthenticationDisabled

Copy

If you see the output of the command as SmtpClientAuthenticationDisabled: That means this setting is controlled by the corresponding SmtpClientAuthenticationDisabled parameter on the Set-TransportConfig cmdlet for the whole organization.

Test Port 25 using Telnet

If you are facing any issues in email delivery then you can verify if Port 25 is opened or blocked on the Firewall. If Port 25 is blocked then you may need to ask the Network admin to open it for the device IP which is sending emails. You can follow below steps to test Port 25 via Telnet.

  1. Launch Command Prompt on a PC (IP of the PC should be in the same subnet as Device / Printer / Application)
  2. Type Command telnet <MX EndPoint> 25 and press Enter.

(If telnet command is not recognized on the Windows 10 or Windows 11 PC. The Please first Install Telnet Client by going to Start menu -> Type “Turn Windows featured on or off” and find Telnet Client, Select it and click OK).

Install Telnet Client on Windows
  1. Once Telnet is installed on your Windows device. You can open a command prompt and type below command to test if Port 25 is opened or not.

Telnet <your MX endpoint> 25

Test Port 25 using Telnet

Once you enter on the above command, you should get a response from the server. Which means that Port 25 is opened.

Test Port 25 using Telnet

Send a Test email using Telnet

If you want to check the email delivery then you can use the Telnet command and send a test email. This test can confirm if there are any issues in email delivery. You can follow below steps to test a test email using telnet.

  1. Login on a computer in the same subnet as the Device / Printer / Application.
  2. Open Command prompt as administrator.
  3. Type command Telnet <your MX endpoint> 25.
Send a Test email using Telnet
  1. You will get a response back after press enter on the Telnet command. On Telnet Console Type below commands:

ehlo

mail from – Type from email address

rcpt to – Type recipient email address to send a test email.

If the recipient receives this test email then there is no issue witth email delivery.

ehlo
MAIL FROM:<myscanner@techpress.net>
250 2.1.0 Sender OK
RCPT TO:<internal email ID>
250 2.1.5 Recipient OK
DATA
354 Start mail input; end with <CRLF>.<CRLF>
SUBJECT:Hello World

This is a test message

Thanks,
John A.

. <Dot to end the email>

Copy

Check if ISP Public IP Address is banned

When you are sending an email using Telnet and if you get a message saying that your sending IP is banned. Then you need to unblock / remove your IP from banned list so that Devices on your network can send email.

Check if ISP Public IP Address is banned using Telnet

To remove your ISP Public IP Address from banned list, you need to login on https://senders.office.com and type your email ID and ISP Public IP Address of your organization. Follow the instuctions on the site to get your IP De-listed. This may take from 30 minutes to couple of hours to unblock your IP.

After you get your IP De-listed from https://senders.office.com. Try to send an email using Telnet again. This time if your IP is successfully de-listed, the recipient should receive the email.

Check if ISP Public IP Address is banned using Telnet

Test email has been received successfully.

Test email received using Telnet

Delisting / Unblock of ISP Public IP on Spamhaus.org

When you are sending an email using Telnet and if you get a message saying that service unavailable, Client host <your ISP Public IP address> blocked using Spamhaus. You need to visit the URL https://www.spamhaus.org/query/ip/<ISP Public IP Address> to get your IP De-listed.

Delisting / Unblock of ISP Public IP on Spamhaus.org

How to unblock your ISP Public IP on spamhaus.org

Please follow below steps to unblock your ISP Public IP from spamhaus.org.

  1. Once you land on https://www.spamhaus.org/query/ip/<ISP Public IP Address> site. Click on Show details and then click on “I am running my own mail server“.
Delisting / Unblock of ISP Public IP on Spamhaus.org
  1. Select I am running my own mail server and clicon on Next steps.
Delisting / Unblock of ISP Public IP on Spamhaus.org
  1. Complete the form for unblocking your ISP Public IP. Provide a NameEmail Address and Provide details regarding the issue. Once you complete this form. click on Submit button.
Delisting / Unblock of ISP Public IP on Spamhaus.org
  1. Form has been submitted. You can now wait for email verification link from Spamhaus.org.
Delisting / Unblock of ISP Public IP on Spamhaus.org
  1. Below is the email I received to verify my email address. Click on the link in the email for Email Verification.
Delisting / Unblock of ISP Public IP on Spamhaus.org
  1. Delisting has been successful. You can now try to use Telnet to send a test email to confirm email delivery issue has been rectifed. You can also check the Device / Printer / application to confirm if its able to send the email now.
Delisting / Unblock of ISP Public IP on Spamhaus.org

Conclusion

In this blog post, we have seem how to setup SMTP Relay in Office 365. There are three ways to configure it. But the most recommended option is Office 365 SMTP Relay Method. Second best method is Direct Send method which can be used if you do not have the requirements to send the emails to External recipients like gmail, yahoo etc.

Third method which is least recommended is SMTP Auth Submisson method. As It requires a licensed mailbox and SMTP AUTH to be enabled for that mailbox. There is a cost associated with licensed mailbox and Microsoft does not recommend SMTP AUTH to be enabled.

We have also see the troubleshooting steps in case of email delivery issues. These troubleshooting steps helped me fixed issues while working on Office 365 relay for Multiple clients.

Source :
https://techpress.net/office-365-smtp-relay-setup-and-configuration/

How to disable TLS 1.0 and TLS 1.1 on Windows servers

Transport Layer Security (TLS)  – TLS protocol is used to provide privacy and data integrity between two communicating applications. SSL and TLS are both cryptographic protocols but because SSL protocols does not providers sufficient level of security compared to TLS, SSL 2.0 and SSL 3.0 have been deprecated. TLS 1.0 was released in 1999, TLS 1.1 was released in 2006, TLS 1.2 was released in 2008 and TLS 1.3 was released in 2018.

Most of the companies and Internet Browsers are now moving to TLS 1.2 which is having better security algorithms than TLS 1.0 and TLS 1.1. TLS is more secure than SSL. Mozilla Firefox, Google Chrome, Apple and Microsoft are all ending support for TLS 1.0/1.1 in 2020, so its better to plan ahead of time and test all the applications and create Policies to disable TLS 1.0 and TLS 1.1 on Windows devices.

If you are interested in learning more about these protocols, differences between these protocols and security improvements – you can check Protocols RFC’s (Request for Comments) at these links TLS1.0 RFCTLS 1.1 RFCTLS 1.2 RFC and TLS 1.3 RFC. 

Similar other Blog posts:

Create a GPO in Active Directory to disable TLS 1.0 and TLS 1.1

We will be creating a Group policy object in Active directory to disable TLS 1.0 and TLS 1.1. You will need to create given registry keys and registry entries to control TLS protocols. Please find below steps to disable TLS 1.0 and TLS 1.1 on windows servers.

How to create a GPO in Active Directory to disable TLS 1.0 and TLS 1.1

  1. Login on a domain controller as a domain administrator.
  2. Open Group policy management console (Go to Start -> Run and type gpmc.msc and press Enter)
  3. Expand Group Policy Objects Folder. Right-click on it and Select New.
  1. Provide a Name of the GPO. For Example: Disable TLS 1.0 and TLS 1.1 Windows servers
  2. Right click on the Group policy “Disable TLS 1.0 and TLS 1.1 Windows Servers” and click on Edit.
  3. Go to Computer Configuration -> Preferences -> Windows settings -> Registry.
  4. Right click on Registry -> click on New -> click on Registry Item.
  1. In the next step, we will create registry keys and registry entries to Disable TLS 1.0 and TLS 1.1. Its recommended to disable SSL 2.0 and SSL 3.0 as well. Most of the newer Windows operating systems have TLS 1.2 enabled by default. However, If you want to control TLS 1.2 and TLS 1.3 then you can use the given registry keys for TLS 1.2 and TLS 1.3.

Registry Keys to disable TLS 1.0

[HKEY_LOCAL_MACHINE\SYSTEM\CurrentControlSet\Control\SecurityProviders\SCHANNEL\Protocols\TLS 1.0\Server] "Enabled"=dword:00000000
[HKEY_LOCAL_MACHINE\SYSTEM\CurrentControlSet\Control\SecurityProviders\SCHANNEL\Protocols\TLS 1.0\Server] "DisabledByDefault"=dword:00000001
[HKEY_LOCAL_MACHINE\SYSTEM\CurrentControlSet\Control\SecurityProviders\SCHANNEL\Protocols\TLS 1.0\Client] "Enabled"=dword:00000000
[HKEY_LOCAL_MACHINE\SYSTEM\CurrentControlSet\Control\SecurityProviders\SCHANNEL\Protocols\TLS 1.0\Client] "DisabledByDefault"=dword:00000001

Copy

Registry Keys to disable TLS 1.1

[HKEY_LOCAL_MACHINE\SYSTEM\CurrentControlSet\Control\SecurityProviders\SCHANNEL\Protocols\TLS 1.1\Server] "Enabled"=dword:00000001
[HKEY_LOCAL_MACHINE\SYSTEM\CurrentControlSet\Control\SecurityProviders\SCHANNEL\Protocols\TLS 1.1\Server] "DisabledByDefault"=dword:00000000
[HKEY_LOCAL_MACHINE\SYSTEM\CurrentControlSet\Control\SecurityProviders\SCHANNEL\Protocols\TLS 1.1\Client] "Enabled"=dword:00000001
[HKEY_LOCAL_MACHINE\SYSTEM\CurrentControlSet\Control\SecurityProviders\SCHANNEL\Protocols\TLS 1.1\Client] "DisabledByDefault"=dword:00000000

Copy

[HKEY_LOCAL_MACHINE\SYSTEM\CurrentControlSet\Control\SecurityProviders\SCHANNEL\Protocols\SSL 2.0\Server] "Enabled"=dword:00000000
[HKEY_LOCAL_MACHINE\SYSTEM\CurrentControlSet\Control\SecurityProviders\SCHANNEL\Protocols\SSL 2.0\Server] "DisabledByDefault"=dword:00000001
[HKEY_LOCAL_MACHINE\SYSTEM\CurrentControlSet\Control\SecurityProviders\SCHANNEL\Protocols\SSL 2.0\Client] "Enabled"=dword:00000000
[HKEY_LOCAL_MACHINE\SYSTEM\CurrentControlSet\Control\SecurityProviders\SCHANNEL\Protocols\SSL 2.0\Client] "DisabledByDefault"=dword:00000001

Copy

[HKEY_LOCAL_MACHINE\SYSTEM\CurrentControlSet\Control\SecurityProviders\SCHANNEL\Protocols\SSL 3.0\Server] "Enabled"=dword:00000000
[HKEY_LOCAL_MACHINE\SYSTEM\CurrentControlSet\Control\SecurityProviders\SCHANNEL\Protocols\SSL 3.0\Server] "DisabledByDefault"=dword:00000001
[HKEY_LOCAL_MACHINE\SYSTEM\CurrentControlSet\Control\SecurityProviders\SCHANNEL\Protocols\SSL 3.0\Client] "Enabled"=dword:00000000
[HKEY_LOCAL_MACHINE\SYSTEM\CurrentControlSet\Control\SecurityProviders\SCHANNEL\Protocols\SSL 3.0\Client] "DisabledByDefault"=dword:00000001

Copy

Registry Keys to Enable TLS 1.2 [Recommended]

[HKEY_LOCAL_MACHINE\SYSTEM\CurrentControlSet\Control\SecurityProviders\SCHANNEL\Protocols\TLS 1.2\Server] "Enabled"=dword:00000001
[HKEY_LOCAL_MACHINE\SYSTEM\CurrentControlSet\Control\SecurityProviders\SCHANNEL\Protocols\TLS 1.2\Server] "DisabledByDefault"=dword:00000000
[HKEY_LOCAL_MACHINE\SYSTEM\CurrentControlSet\Control\SecurityProviders\SCHANNEL\Protocols\TLS 1.2\Client] "Enabled"=dword:00000001
[HKEY_LOCAL_MACHINE\SYSTEM\CurrentControlSet\Control\SecurityProviders\SCHANNEL\Protocols\TLS 1.2\Client] "DisabledByDefault"=dword:00000000

Copy

Registry Keys to Enable TLS 1.3 [Optional]

[HKEY_LOCAL_MACHINE\SYSTEM\CurrentControlSet\Control\SecurityProviders\SCHANNEL\Protocols\TLS 1.3\Server] "Enabled"=dword:00000001
[HKEY_LOCAL_MACHINE\SYSTEM\CurrentControlSet\Control\SecurityProviders\SCHANNEL\Protocols\TLS 1.3\Server] "DisabledByDefault"=dword:00000000
[HKEY_LOCAL_MACHINE\SYSTEM\CurrentControlSet\Control\SecurityProviders\SCHANNEL\Protocols\TLS 1.3\Client] "Enabled"=dword:00000001
[HKEY_LOCAL_MACHINE\SYSTEM\CurrentControlSet\Control\SecurityProviders\SCHANNEL\Protocols\TLS 1.3\Client] "DisabledByDefault"=dword:00000000

Copy

After you click on Registry Item, A window will show where you can enter Information about the registry Item which you want to create. You need to provide below information about the registry Item:

  • Action: Select Update from the drop-down. Selecting Update will create the registry keys and registry entries if its not found on end users devices.
  • Hive: Select HKEY_LOCAL_MACHINE
  • Key Path: You can either browse to the registry path or provide a registry key to create / update.
  • Value Name: We will be creating two registry entries for each protocol. DisabledbyDefault and Enabled.
  • Value type: Select REG_DWORD.
  • Value type: Select 1 to Enable an 0 to disable.

Go through the process of creating an entry for each registry Item. Below screenshot shows that we have Disabled TLS 1.0, TLS 1.1 protocols and Enabled TLS 1.2 and TLS 1.3.

  1. Once you create all the registry Items in the Group policy management console for Disable TLS 1.0 and TLS 1.1 Windows Servers GPO. You can link the GPO to the Organization Unit (OU) containing windows servers.
  2. Please note that as this group policy object contains settings in Computer configuration which will target the Devices. A restart of the computer will be required so that registry entries can be created.

Disable TLS 1.0 and TLS 1.1 using IIS Crypto Tool

If your windows servers are not domain joined or you do not want to create group policy object in Active directory to disable deprecated SSL and TLS protocols. You can download and Install IIS Crypto tool on Windows server and manually select the checkboxes to Disable / Enable SSL / TLS protocols.

Please follow below steps to disable TLS 1.0 and TLS 1.1 using IIS Crypto Tool:

  1. Login on Windows Server using administrator credentials.
  2. Download IIS Crypto GUI tool.
  3. Launch IIS Crypto tool as an administrator.
  4. Uncheck SSL 2.0, SSL 3.0, TLS 1.0 and TLS 1.1 from Server Protocols.
  5. Uncheck SSL 2.0, SSL 3.0, TLS 1.0 and TLS 1.1 from Client Protocols.
  6. Reboot the server.
  7. Repeat Steps 1 to 6 on each server where you want to disable deprecated SSL and TLS protocols.
Disable deprecated SSL and TLS protocols using IIS Crypto Tool

Conclusion

In this blog post, we have seen how to disable TLS 1.0 and TLS 1.1 on windows servers. Its highly recommended to disable SSL 2.0 and SSL 3.0 as well. Newer Windows server operting systems have TLS 1.2 and TLS 1.3 enabled but you can still control these protocols using the given registry keys.

If you have only couple of servers and you do not want to create the Active directory group policy or your windows servers are standalone servers and not domain joined. You can use IIS Crypto tool to disable deprecated SSL and TLS protocols.

Source :
https://techpress.net/how-to-disable-tls-1-0-and-tls-1-1-on-windows-servers/

How to disable TLS 1.0 and TLS 1.1 using Powershell on Windows 11

Transport Layer Security (TLS)  – TLS protocol is used to provide privacy and data integrity between two communicating applications. SSL and TLS are both cryptographic protocols but because SSL protocols does not providers sufficient level of security compared to TLS, SSL 2.0 and SSL 3.0 have been deprecated. TLS 1.0 was released in 1999, TLS 1.1 was released in 2006, TLS 1.2 was released in 2008 and TLS 1.3 was released in 2018.

Most of the companies and Internet Browsers are now moving to TLS 1.2 which is having better security algorithms than TLS 1.0 and TLS 1.1. TLS is more secure than SSL. Mozilla Firefox, Google Chrome, Apple and Microsoft are all ending support for TLS 1.0/1.1 in 2020, so its better to plan ahead of time and test all the applications and create Policies to disable TLS 1.0 and TLS 1.1 on Windows machines.

If you are interested in learning more about these protocols, differences between these protocols and security improvements – you can check Protocols RFC’s (Request for Comments) at these links TLS1.0 RFCTLS 1.1 RFCTLS 1.2 RFC and TLS 1.3 RFC. 

Similar other Blog posts:

Disable SSL 2.0, SSL 3.0, TLS 1.0 and TLS 1.1 using Powershell

We can easily disable TLS 1.0 and TLS 1.1 using Powershell. However its recommended to also disable SSL 2.0, SSL 3.0 as well. We will be using below powershell code to create registry keys and registry entries. Once the registry keys are created, a reboot of that device will be required to complete the change.

Please note below Powershell Code needs to be run as an administrator as it needs to perform changes in Windows registry.

To run Powershell code on Windows 11 computer. Please use below steps:

  • Login on a Windows 11 PC as administrator.
  • Open Powershell Console as an administrator.
  • Run below piece of powershell code to enable / disable SSL / TLS Protocols.

Powershell code to disable SSL 2.0

 New-Item 'HKLM:\SYSTEM\CurrentControlSet\Control\SecurityProviders\SCHANNEL\Protocols\SSL 2.0\Client' -Force
 New-Item 'HKLM:\SYSTEM\CurrentControlSet\Control\SecurityProviders\SCHANNEL\Protocols\SSL 2.0\Server' -Force    
 Set-ItemProperty -Path 'HKLM:\SYSTEM\CurrentControlSet\Control\SecurityProviders\SCHANNEL\Protocols\SSL 2.0\Client' -Name 'Enabled'           -Value '0' -Type 'DWORD'
 Set-ItemProperty -Path 'HKLM:\SYSTEM\CurrentControlSet\Control\SecurityProviders\SCHANNEL\Protocols\SSL 2.0\Client' -Name 'DisabledByDefault' -value '1' -Type 'DWORD'
 Set-ItemProperty -Path 'HKLM:\SYSTEM\CurrentControlSet\Control\SecurityProviders\SCHANNEL\Protocols\SSL 2.0\Server' -name 'Enabled'           -value '0' –Type 'DWORD'
 Set-ItemProperty -Path 'HKLM:\SYSTEM\CurrentControlSet\Control\SecurityProviders\SCHANNEL\Protocols\SSL 2.0\Server' -name 'DisabledByDefault' -value '1' –Type 'DWORD'

Copy

Powershell code to disable SSL 3.0

New-Item 'HKLM:\SYSTEM\CurrentControlSet\Control\SecurityProviders\SCHANNEL\Protocols\SSL 3.0\Client' -Force
New-Item 'HKLM:\SYSTEM\CurrentControlSet\Control\SecurityProviders\SCHANNEL\Protocols\SSL 3.0\Server' -Force  
Set-ItemProperty -Path 'HKLM:\SYSTEM\CurrentControlSet\Control\SecurityProviders\SCHANNEL\Protocols\SSL 3.0\Client' -name 'Enabled'           -value '0' –Type 'DWORD'
Set-ItemProperty -Path 'HKLM:\SYSTEM\CurrentControlSet\Control\SecurityProviders\SCHANNEL\Protocols\SSL 3.0\Client' -name 'DisabledByDefault' -value '1' –Type 'DWORD'
Set-ItemProperty -Path 'HKLM:\SYSTEM\CurrentControlSet\Control\SecurityProviders\SCHANNEL\Protocols\SSL 3.0\Server' -name 'Enabled'           -value '0' –Type 'DWORD'
Set-ItemProperty -Path 'HKLM:\SYSTEM\CurrentControlSet\Control\SecurityProviders\SCHANNEL\Protocols\SSL 3.0\Server' -name 'DisabledByDefault' -value '1' –Type 'DWORD'  

Copy

Powershell code to disable TLS 1.0

New-Item 'HKLM:\SYSTEM\CurrentControlSet\Control\SecurityProviders\SCHANNEL\Protocols\TLS 1.0\Client' -Force
New-Item 'HKLM:\SYSTEM\CurrentControlSet\Control\SecurityProviders\SCHANNEL\Protocols\TLS 1.0\Server' -Force                                                                                                                                                            
Set-ItemProperty -Path 'HKLM:\SYSTEM\CurrentControlSet\Control\SecurityProviders\SCHANNEL\Protocols\TLS 1.0\Client' -name 'Enabled'           -value '0' –Type 'DWORD'
Set-ItemProperty -Path 'HKLM:\SYSTEM\CurrentControlSet\Control\SecurityProviders\SCHANNEL\Protocols\TLS 1.0\Client' -name 'DisabledByDefault' -value '1' –Type 'DWORD'
Set-ItemProperty -Path 'HKLM:\SYSTEM\CurrentControlSet\Control\SecurityProviders\SCHANNEL\Protocols\TLS 1.0\Server' -name 'Enabled'           -value '0' –Type 'DWORD'
Set-ItemProperty -Path 'HKLM:\SYSTEM\CurrentControlSet\Control\SecurityProviders\SCHANNEL\Protocols\TLS 1.0\Server' -name 'DisabledByDefault' -value '1' –Type 'DWORD'

Copy

Powershell code to disable TLS 1.1

New-Item 'HKLM:\SYSTEM\CurrentControlSet\Control\SecurityProviders\SCHANNEL\Protocols\TLS 1.1\Client' -Force
New-Item 'HKLM:\SYSTEM\CurrentControlSet\Control\SecurityProviders\SCHANNEL\Protocols\TLS 1.1\Server' -Force                                                                                                                                                                                 
Set-ItemProperty -Path 'HKLM:\SYSTEM\CurrentControlSet\Control\SecurityProviders\SCHANNEL\Protocols\TLS 1.1\Client' -name 'Enabled'           -value '0' –Type 'DWORD'
Set-ItemProperty -Path 'HKLM:\SYSTEM\CurrentControlSet\Control\SecurityProviders\SCHANNEL\Protocols\TLS 1.1\Client' -name 'DisabledByDefault' -value '1' –Type 'DWORD'
Set-ItemProperty -Path 'HKLM:\SYSTEM\CurrentControlSet\Control\SecurityProviders\SCHANNEL\Protocols\TLS 1.1\Server' -name 'Enabled'           -value '0' –Type 'DWORD'
Set-ItemProperty -Path 'HKLM:\SYSTEM\CurrentControlSet\Control\SecurityProviders\SCHANNEL\Protocols\TLS 1.1\Server' -name 'DisabledByDefault' -value '1' –Type 'DWORD'

Copy

Powershell code to Enable TLS 1.2

New-Item 'HKLM:\SYSTEM\CurrentControlSet\Control\SecurityProviders\SCHANNEL\Protocols\TLS 1.2\Client' -Force  
New-Item 'HKLM:\SYSTEM\CurrentControlSet\Control\SecurityProviders\SCHANNEL\Protocols\TLS 1.2\Server' -Force                                       
Set-ItemProperty -Path 'HKLM:\SYSTEM\CurrentControlSet\Control\SecurityProviders\SCHANNEL\Protocols\TLS 1.2\Client' -name 'Enabled'           -value '1' –Type 'DWORD'
Set-ItemProperty -Path 'HKLM:\SYSTEM\CurrentControlSet\Control\SecurityProviders\SCHANNEL\Protocols\TLS 1.2\Client' -name 'DisabledByDefault' -value '0' –Type 'DWORD'
Set-ItemProperty -Path 'HKLM:\SYSTEM\CurrentControlSet\Control\SecurityProviders\SCHANNEL\Protocols\TLS 1.2\Server' -name 'Enabled'           -value '1' –Type 'DWORD'
Set-ItemProperty -Path 'HKLM:\SYSTEM\CurrentControlSet\Control\SecurityProviders\SCHANNEL\Protocols\TLS 1.2\Server' -name 'DisabledByDefault' -value '0' –Type 'DWORD'    

Copy

Powershell code to Enable TLS 1.3

New-Item 'HKLM:\SYSTEM\CurrentControlSet\Control\SecurityProviders\SCHANNEL\Protocols\TLS 1.3\Client' -Force
New-Item 'HKLM:\SYSTEM\CurrentControlSet\Control\SecurityProviders\SCHANNEL\Protocols\TLS 1.3\Server' -Force
Set-ItemProperty -Path 'HKLM:\SYSTEM\CurrentControlSet\Control\SecurityProviders\SCHANNEL\Protocols\TLS 1.3\Client' -name 'Enabled'           -value '1' –Type 'DWORD'
Set-ItemProperty -Path 'HKLM:\SYSTEM\CurrentControlSet\Control\SecurityProviders\SCHANNEL\Protocols\TLS 1.3\Client' -name 'DisabledByDefault' -value '0' –Type 'DWORD'
Set-ItemProperty -Path 'HKLM:\SYSTEM\CurrentControlSet\Control\SecurityProviders\SCHANNEL\Protocols\TLS 1.3\Server'-name 'Enabled'            -value '1' –Type 'DWORD'
Set-ItemProperty -Path 'HKLM:\SYSTEM\CurrentControlSet\Control\SecurityProviders\SCHANNEL\Protocols\TLS 1.3\Server' -name 'DisabledByDefault' -value '0' –Type 'DWORD'

Copy

How to verify if TLS 1.0 and TLS 1.1 has been disabled on Windows 11

Please follow below steps to verify if SSL / TLS protocols are disabled or enabled.

  1. Login on Windows 11 PC as an administrator.
  2. Click on Windows Icon / Start Menu -> Search for Registry Editor.
  3. Launch Registry Editor.
  4. Browse to HKEY_LOCAL_MACHINE\SYSTEM\ControlSet001\Control\SecurityProviders\SCHANNEL\Protocols

You should find below registry keys / registry entries:

Disable TLS 1.0 and TLS 1.1 registry key
HKEY_LOCAL_MACHINE\SYSTEM\ControlSet001\Control\SecurityProviders\SCHANNEL\Protocols

Registry Keys to check if SSL 2.0 is disabled

[HKEY_LOCAL_MACHINE\SYSTEM\CurrentControlSet\Control\SecurityProviders\SCHANNEL\Protocols\SSL 2.0\Server] "Enabled"=dword:00000000
[HKEY_LOCAL_MACHINE\SYSTEM\CurrentControlSet\Control\SecurityProviders\SCHANNEL\Protocols\SSL 2.0\Server] "DisabledByDefault"=dword:00000001
[HKEY_LOCAL_MACHINE\SYSTEM\CurrentControlSet\Control\SecurityProviders\SCHANNEL\Protocols\SSL 2.0\Client] "Enabled"=dword:00000000
[HKEY_LOCAL_MACHINE\SYSTEM\CurrentControlSet\Control\SecurityProviders\SCHANNEL\Protocols\SSL 2.0\Client] "DisabledByDefault"=dword:00000001

Copy

Registry Keys to check if SSL 3.0 is disabled

[HKEY_LOCAL_MACHINE\SYSTEM\CurrentControlSet\Control\SecurityProviders\SCHANNEL\Protocols\SSL 3.0\Server] "Enabled"=dword:00000000
[HKEY_LOCAL_MACHINE\SYSTEM\CurrentControlSet\Control\SecurityProviders\SCHANNEL\Protocols\SSL 3.0\Server] "DisabledByDefault"=dword:00000001
[HKEY_LOCAL_MACHINE\SYSTEM\CurrentControlSet\Control\SecurityProviders\SCHANNEL\Protocols\SSL 3.0\Client] "Enabled"=dword:00000000
[HKEY_LOCAL_MACHINE\SYSTEM\CurrentControlSet\Control\SecurityProviders\SCHANNEL\Protocols\SSL 3.0\Client] "DisabledByDefault"=dword:00000001

Copy

Registry Keys to check if TLS 1.0 is disabled

[HKEY_LOCAL_MACHINE\SYSTEM\CurrentControlSet\Control\SecurityProviders\SCHANNEL\Protocols\TLS 1.0\Server] "Enabled"=dword:00000000
[HKEY_LOCAL_MACHINE\SYSTEM\CurrentControlSet\Control\SecurityProviders\SCHANNEL\Protocols\TLS 1.0\Server] "DisabledByDefault"=dword:00000001
[HKEY_LOCAL_MACHINE\SYSTEM\CurrentControlSet\Control\SecurityProviders\SCHANNEL\Protocols\TLS 1.0\Client] "Enabled"=dword:00000000
[HKEY_LOCAL_MACHINE\SYSTEM\CurrentControlSet\Control\SecurityProviders\SCHANNEL\Protocols\TLS 1.0\Client] "DisabledByDefault"=dword:00000001

Copy

Registry Keys to check if TLS 1.1 is disabled

[HKEY_LOCAL_MACHINE\SYSTEM\CurrentControlSet\Control\SecurityProviders\SCHANNEL\Protocols\TLS 1.1\Server] "Enabled"=dword:00000001
[HKEY_LOCAL_MACHINE\SYSTEM\CurrentControlSet\Control\SecurityProviders\SCHANNEL\Protocols\TLS 1.1\Server] "DisabledByDefault"=dword:00000000
[HKEY_LOCAL_MACHINE\SYSTEM\CurrentControlSet\Control\SecurityProviders\SCHANNEL\Protocols\TLS 1.1\Client] "Enabled"=dword:00000001
[HKEY_LOCAL_MACHINE\SYSTEM\CurrentControlSet\Control\SecurityProviders\SCHANNEL\Protocols\TLS 1.1\Client] "DisabledByDefault"=dword:00000000

Copy

Registry Keys to check if TLS 1.2 is Enabled

[HKEY_LOCAL_MACHINE\SYSTEM\CurrentControlSet\Control\SecurityProviders\SCHANNEL\Protocols\TLS 1.2\Server] "Enabled"=dword:00000001
[HKEY_LOCAL_MACHINE\SYSTEM\CurrentControlSet\Control\SecurityProviders\SCHANNEL\Protocols\TLS 1.2\Server] "DisabledByDefault"=dword:00000000
[HKEY_LOCAL_MACHINE\SYSTEM\CurrentControlSet\Control\SecurityProviders\SCHANNEL\Protocols\TLS 1.2\Client] "Enabled"=dword:00000001
[HKEY_LOCAL_MACHINE\SYSTEM\CurrentControlSet\Control\SecurityProviders\SCHANNEL\Protocols\TLS 1.2\Client] "DisabledByDefault"=dword:00000000

Copy

Registry Keys to check if TLS 1.3 is Enabled

[HKEY_LOCAL_MACHINE\SYSTEM\CurrentControlSet\Control\SecurityProviders\SCHANNEL\Protocols\TLS 1.3\Server] "Enabled"=dword:00000001
[HKEY_LOCAL_MACHINE\SYSTEM\CurrentControlSet\Control\SecurityProviders\SCHANNEL\Protocols\TLS 1.3\Server] "DisabledByDefault"=dword:00000000
[HKEY_LOCAL_MACHINE\SYSTEM\CurrentControlSet\Control\SecurityProviders\SCHANNEL\Protocols\TLS 1.3\Client] "Enabled"=dword:00000001
[HKEY_LOCAL_MACHINE\SYSTEM\CurrentControlSet\Control\SecurityProviders\SCHANNEL\Protocols\TLS 1.3\Client] "DisabledByDefault"=dword:00000000

Copy

Conclusion

In this blog post, we have checked the powershell codes to disable SSL 2.0, SSL 3.0, TLS 1.0 and TLS 1.1. We have checked the Powershell code to enable TLS 1.2 and TLS 1.3. Its highly recommended to disable old unsupported protocols to reduce the security risk on your computer.

Source :
https://techpress.net/how-to-disable-tls-1-0-and-tls-1-1-using-powershell-on-windows-11/

How to disable TLS 1.0 and TLS 1.1 using Powershell on Windows 10

Transport Layer Security (TLS)  – TLS protocol is used to provide privacy and data integrity between two communicating applications. SSL and TLS are both cryptographic protocols but because SSL protocols does not providers sufficient level of security compared to TLS, SSL 2.0 and SSL 3.0 have been deprecated. TLS 1.0 was released in 1999, TLS 1.1 was released in 2006, TLS 1.2 was released in 2008 and TLS 1.3 was released in 2018.

Most of the companies and Internet Browsers are now moving to TLS 1.2 which is having better security algorithms than TLS 1.0 and TLS 1.1. TLS is more secure than SSL. Mozilla Firefox, Google Chrome, Apple and Microsoft are all ending support for TLS 1.0/1.1 in 2020, so its better to plan ahead of time and test all the applications and create Policies to disable TLS 1.0 and TLS 1.1 on Windows machines.

If you are interested in learning more about these protocols, differences between these protocols and security improvements – you can check Protocols RFC’s (Request for Comments) at these links TLS1.0 RFCTLS 1.1 RFCTLS 1.2 RFC and TLS 1.3 RFC. 

Similar other Blog posts:

Disable SSL 2.0, SSL 3.0, TLS 1.0 and TLS 1.1 using Powershell

We can easily disable TLS 1.0 and TLS 1.1 using Powershell. However its recommended to also disable SSL 2.0, SSL 3.0 as well. We will be using below powershell code to create registry keys and registry entries. Once the registry keys are created, a reboot of that device will be required to complete the change.

Please note below Powershell Code needs to be run as an administrator as it needs to perform changes in Windows registry.

To run Powershell code on Windows 10 computer. Please use below steps:

  • Login on a Windows 10 PC as administrator.
  • Open Powershell Console as an administrator.
  • Run below piece of powershell code to enable / disable SSL / TLS Protocols.

Powershell code to disable SSL 2.0

 New-Item 'HKLM:\SYSTEM\CurrentControlSet\Control\SecurityProviders\SCHANNEL\Protocols\SSL 2.0\Client' -Force
 New-Item 'HKLM:\SYSTEM\CurrentControlSet\Control\SecurityProviders\SCHANNEL\Protocols\SSL 2.0\Server' -Force    
 Set-ItemProperty -Path 'HKLM:\SYSTEM\CurrentControlSet\Control\SecurityProviders\SCHANNEL\Protocols\SSL 2.0\Client' -Name 'Enabled'           -Value '0' -Type 'DWORD'
 Set-ItemProperty -Path 'HKLM:\SYSTEM\CurrentControlSet\Control\SecurityProviders\SCHANNEL\Protocols\SSL 2.0\Client' -Name 'DisabledByDefault' -value '1' -Type 'DWORD'
 Set-ItemProperty -Path 'HKLM:\SYSTEM\CurrentControlSet\Control\SecurityProviders\SCHANNEL\Protocols\SSL 2.0\Server' -name 'Enabled'           -value '0' –Type 'DWORD'
 Set-ItemProperty -Path 'HKLM:\SYSTEM\CurrentControlSet\Control\SecurityProviders\SCHANNEL\Protocols\SSL 2.0\Server' -name 'DisabledByDefault' -value '1' –Type 'DWORD'

Copy

Powershell code to disable SSL 3.0

New-Item 'HKLM:\SYSTEM\CurrentControlSet\Control\SecurityProviders\SCHANNEL\Protocols\SSL 3.0\Client' -Force
New-Item 'HKLM:\SYSTEM\CurrentControlSet\Control\SecurityProviders\SCHANNEL\Protocols\SSL 3.0\Server' -Force  
Set-ItemProperty -Path 'HKLM:\SYSTEM\CurrentControlSet\Control\SecurityProviders\SCHANNEL\Protocols\SSL 3.0\Client' -name 'Enabled'           -value '0' –Type 'DWORD'
Set-ItemProperty -Path 'HKLM:\SYSTEM\CurrentControlSet\Control\SecurityProviders\SCHANNEL\Protocols\SSL 3.0\Client' -name 'DisabledByDefault' -value '1' –Type 'DWORD'
Set-ItemProperty -Path 'HKLM:\SYSTEM\CurrentControlSet\Control\SecurityProviders\SCHANNEL\Protocols\SSL 3.0\Server' -name 'Enabled'           -value '0' –Type 'DWORD'
Set-ItemProperty -Path 'HKLM:\SYSTEM\CurrentControlSet\Control\SecurityProviders\SCHANNEL\Protocols\SSL 3.0\Server' -name 'DisabledByDefault' -value '1' –Type 'DWORD'  

Copy

Powershell code to disable TLS 1.0

New-Item 'HKLM:\SYSTEM\CurrentControlSet\Control\SecurityProviders\SCHANNEL\Protocols\TLS 1.0\Client' -Force
New-Item 'HKLM:\SYSTEM\CurrentControlSet\Control\SecurityProviders\SCHANNEL\Protocols\TLS 1.0\Server' -Force                                                                                                                                                            
Set-ItemProperty -Path 'HKLM:\SYSTEM\CurrentControlSet\Control\SecurityProviders\SCHANNEL\Protocols\TLS 1.0\Client' -name 'Enabled'           -value '0' –Type 'DWORD'
Set-ItemProperty -Path 'HKLM:\SYSTEM\CurrentControlSet\Control\SecurityProviders\SCHANNEL\Protocols\TLS 1.0\Client' -name 'DisabledByDefault' -value '1' –Type 'DWORD'
Set-ItemProperty -Path 'HKLM:\SYSTEM\CurrentControlSet\Control\SecurityProviders\SCHANNEL\Protocols\TLS 1.0\Server' -name 'Enabled'           -value '0' –Type 'DWORD'
Set-ItemProperty -Path 'HKLM:\SYSTEM\CurrentControlSet\Control\SecurityProviders\SCHANNEL\Protocols\TLS 1.0\Server' -name 'DisabledByDefault' -value '1' –Type 'DWORD'

Copy

Powershell code to disable TLS 1.1

New-Item 'HKLM:\SYSTEM\CurrentControlSet\Control\SecurityProviders\SCHANNEL\Protocols\TLS 1.1\Client' -Force
New-Item 'HKLM:\SYSTEM\CurrentControlSet\Control\SecurityProviders\SCHANNEL\Protocols\TLS 1.1\Server' -Force                                                                                                                                                                                 
Set-ItemProperty -Path 'HKLM:\SYSTEM\CurrentControlSet\Control\SecurityProviders\SCHANNEL\Protocols\TLS 1.1\Client' -name 'Enabled'           -value '0' –Type 'DWORD'
Set-ItemProperty -Path 'HKLM:\SYSTEM\CurrentControlSet\Control\SecurityProviders\SCHANNEL\Protocols\TLS 1.1\Client' -name 'DisabledByDefault' -value '1' –Type 'DWORD'
Set-ItemProperty -Path 'HKLM:\SYSTEM\CurrentControlSet\Control\SecurityProviders\SCHANNEL\Protocols\TLS 1.1\Server' -name 'Enabled'           -value '0' –Type 'DWORD'
Set-ItemProperty -Path 'HKLM:\SYSTEM\CurrentControlSet\Control\SecurityProviders\SCHANNEL\Protocols\TLS 1.1\Server' -name 'DisabledByDefault' -value '1' –Type 'DWORD'

Copy

Powershell code to Enable TLS 1.2

New-Item 'HKLM:\SYSTEM\CurrentControlSet\Control\SecurityProviders\SCHANNEL\Protocols\TLS 1.2\Client' -Force  
New-Item 'HKLM:\SYSTEM\CurrentControlSet\Control\SecurityProviders\SCHANNEL\Protocols\TLS 1.2\Server' -Force                                       
Set-ItemProperty -Path 'HKLM:\SYSTEM\CurrentControlSet\Control\SecurityProviders\SCHANNEL\Protocols\TLS 1.2\Client' -name 'Enabled'           -value '1' –Type 'DWORD'
Set-ItemProperty -Path 'HKLM:\SYSTEM\CurrentControlSet\Control\SecurityProviders\SCHANNEL\Protocols\TLS 1.2\Client' -name 'DisabledByDefault' -value '0' –Type 'DWORD'
Set-ItemProperty -Path 'HKLM:\SYSTEM\CurrentControlSet\Control\SecurityProviders\SCHANNEL\Protocols\TLS 1.2\Server' -name 'Enabled'           -value '1' –Type 'DWORD'
Set-ItemProperty -Path 'HKLM:\SYSTEM\CurrentControlSet\Control\SecurityProviders\SCHANNEL\Protocols\TLS 1.2\Server' -name 'DisabledByDefault' -value '0' –Type 'DWORD'    

Copy

Powershell code to Enable TLS 1.3

New-Item 'HKLM:\SYSTEM\CurrentControlSet\Control\SecurityProviders\SCHANNEL\Protocols\TLS 1.3\Client' -Force
New-Item 'HKLM:\SYSTEM\CurrentControlSet\Control\SecurityProviders\SCHANNEL\Protocols\TLS 1.3\Server' -Force
Set-ItemProperty -Path 'HKLM:\SYSTEM\CurrentControlSet\Control\SecurityProviders\SCHANNEL\Protocols\TLS 1.3\Client' -name 'Enabled'           -value '1' –Type 'DWORD'
Set-ItemProperty -Path 'HKLM:\SYSTEM\CurrentControlSet\Control\SecurityProviders\SCHANNEL\Protocols\TLS 1.3\Client' -name 'DisabledByDefault' -value '0' –Type 'DWORD'
Set-ItemProperty -Path 'HKLM:\SYSTEM\CurrentControlSet\Control\SecurityProviders\SCHANNEL\Protocols\TLS 1.3\Server'-name 'Enabled'            -value '1' –Type 'DWORD'
Set-ItemProperty -Path 'HKLM:\SYSTEM\CurrentControlSet\Control\SecurityProviders\SCHANNEL\Protocols\TLS 1.3\Server' -name 'DisabledByDefault' -value '0' –Type 'DWORD'

Copy

How to verify if TLS 1.0 and TLS 1.1 has been disabled on Windows 10

Please follow below steps to verify if SSL / TLS protocols are disabled or enabled.

  1. Login on Windows 10 PC as an administrator.
  2. Click on Windows Icon / Start Menu -> Search for Registry Editor.
  3. Launch Registry Editor.
  4. Browse to HKEY_LOCAL_MACHINE\SYSTEM\ControlSet001\Control\SecurityProviders\SCHANNEL\Protocols

You should find below registry keys / registry entries:

Disable TLS 1.0 and TLS 1.1 registry key
HKEY_LOCAL_MACHINE\SYSTEM\ControlSet001\Control\SecurityProviders\SCHANNEL\Protocols

Registry Keys to check if SSL 2.0 is disabled

[HKEY_LOCAL_MACHINE\SYSTEM\CurrentControlSet\Control\SecurityProviders\SCHANNEL\Protocols\SSL 2.0\Server] "Enabled"=dword:00000000
[HKEY_LOCAL_MACHINE\SYSTEM\CurrentControlSet\Control\SecurityProviders\SCHANNEL\Protocols\SSL 2.0\Server] "DisabledByDefault"=dword:00000001
[HKEY_LOCAL_MACHINE\SYSTEM\CurrentControlSet\Control\SecurityProviders\SCHANNEL\Protocols\SSL 2.0\Client] "Enabled"=dword:00000000
[HKEY_LOCAL_MACHINE\SYSTEM\CurrentControlSet\Control\SecurityProviders\SCHANNEL\Protocols\SSL 2.0\Client] "DisabledByDefault"=dword:00000001

Copy

Registry Keys to check if SSL 3.0 is disabled

[HKEY_LOCAL_MACHINE\SYSTEM\CurrentControlSet\Control\SecurityProviders\SCHANNEL\Protocols\SSL 3.0\Server] "Enabled"=dword:00000000
[HKEY_LOCAL_MACHINE\SYSTEM\CurrentControlSet\Control\SecurityProviders\SCHANNEL\Protocols\SSL 3.0\Server] "DisabledByDefault"=dword:00000001
[HKEY_LOCAL_MACHINE\SYSTEM\CurrentControlSet\Control\SecurityProviders\SCHANNEL\Protocols\SSL 3.0\Client] "Enabled"=dword:00000000
[HKEY_LOCAL_MACHINE\SYSTEM\CurrentControlSet\Control\SecurityProviders\SCHANNEL\Protocols\SSL 3.0\Client] "DisabledByDefault"=dword:00000001

Copy

Registry Keys to check if TLS 1.0 is disabled

[HKEY_LOCAL_MACHINE\SYSTEM\CurrentControlSet\Control\SecurityProviders\SCHANNEL\Protocols\TLS 1.0\Server] "Enabled"=dword:00000000
[HKEY_LOCAL_MACHINE\SYSTEM\CurrentControlSet\Control\SecurityProviders\SCHANNEL\Protocols\TLS 1.0\Server] "DisabledByDefault"=dword:00000001
[HKEY_LOCAL_MACHINE\SYSTEM\CurrentControlSet\Control\SecurityProviders\SCHANNEL\Protocols\TLS 1.0\Client] "Enabled"=dword:00000000
[HKEY_LOCAL_MACHINE\SYSTEM\CurrentControlSet\Control\SecurityProviders\SCHANNEL\Protocols\TLS 1.0\Client] "DisabledByDefault"=dword:00000001

Copy

Registry Keys to check if TLS 1.1 is disabled

[HKEY_LOCAL_MACHINE\SYSTEM\CurrentControlSet\Control\SecurityProviders\SCHANNEL\Protocols\TLS 1.1\Server] "Enabled"=dword:00000001
[HKEY_LOCAL_MACHINE\SYSTEM\CurrentControlSet\Control\SecurityProviders\SCHANNEL\Protocols\TLS 1.1\Server] "DisabledByDefault"=dword:00000000
[HKEY_LOCAL_MACHINE\SYSTEM\CurrentControlSet\Control\SecurityProviders\SCHANNEL\Protocols\TLS 1.1\Client] "Enabled"=dword:00000001
[HKEY_LOCAL_MACHINE\SYSTEM\CurrentControlSet\Control\SecurityProviders\SCHANNEL\Protocols\TLS 1.1\Client] "DisabledByDefault"=dword:00000000

Copy

Registry Keys to check if TLS 1.2 is Enabled

[HKEY_LOCAL_MACHINE\SYSTEM\CurrentControlSet\Control\SecurityProviders\SCHANNEL\Protocols\TLS 1.2\Server] "Enabled"=dword:00000001
[HKEY_LOCAL_MACHINE\SYSTEM\CurrentControlSet\Control\SecurityProviders\SCHANNEL\Protocols\TLS 1.2\Server] "DisabledByDefault"=dword:00000000
[HKEY_LOCAL_MACHINE\SYSTEM\CurrentControlSet\Control\SecurityProviders\SCHANNEL\Protocols\TLS 1.2\Client] "Enabled"=dword:00000001
[HKEY_LOCAL_MACHINE\SYSTEM\CurrentControlSet\Control\SecurityProviders\SCHANNEL\Protocols\TLS 1.2\Client] "DisabledByDefault"=dword:00000000

Copy

Registry Keys to check if TLS 1.3 is Enabled

[HKEY_LOCAL_MACHINE\SYSTEM\CurrentControlSet\Control\SecurityProviders\SCHANNEL\Protocols\TLS 1.3\Server] "Enabled"=dword:00000001
[HKEY_LOCAL_MACHINE\SYSTEM\CurrentControlSet\Control\SecurityProviders\SCHANNEL\Protocols\TLS 1.3\Server] "DisabledByDefault"=dword:00000000
[HKEY_LOCAL_MACHINE\SYSTEM\CurrentControlSet\Control\SecurityProviders\SCHANNEL\Protocols\TLS 1.3\Client] "Enabled"=dword:00000001
[HKEY_LOCAL_MACHINE\SYSTEM\CurrentControlSet\Control\SecurityProviders\SCHANNEL\Protocols\TLS 1.3\Client] "DisabledByDefault"=dword:00000000

Copy

Conclusion

In this blog post, we have checked the powershell codes to disable SSL 2.0, SSL 3.0, TLS 1.0 and TLS 1.1. We have checked the Powershell code to enable TLS 1.2 and TLS 1.3. It’s highly recommended to disable old unsupported protocols to reduce the security risk on your computer.

Source :
https://techpress.net/how-to-disable-tls-1-0-and-tls-1-1-using-powershell-on-windows-10/

Disable Modern Standby in Windows 10

There are two power models in Windows 10, S3 and S0 Low Power idle (Modern Standby). Modern Standby in Windows 10 provides Instant On/Off Experience like smartphones.

Modern Standby enables S0 low power idle power plan which keeps your laptop or desktop in lowest power mode and also allow apps to receive the latest content such as incoming email, VoIP calls, Windows updates etc.

The system will enter Modern Standby when the user take any of below actions:

  • Presses the system power button.
  • Closes the lid of the laptop / desktop / tablet.
  • Selects Sleep from the power button from the Windows Start menu.
  • Waits for the system to idle and enter sleep automatically, according to the Power and sleep settings.

The amount of battery saving in Modern Standby is calculated by knowing how much time the system was in DRIPS (Deepest run-time idle platform state). DRIPS occurs when the system is consuming the lowest amount of power possible. If there is any background task (like receiving of email, windows update etc.) consumes power, the system is not considered to be in DRIPS mode.

Total Modern Standby session time = DRIPS time + non-DRIPS time

How to disable Modern Standby in Windows 10

There could be a scenario where you do not want to enable Modern Standby on windows 10 and want to use another available and supported power plan for example S3. In that case, you can simply disable Modern standby by following below steps. The steps given requires changes in the registry of the system which will require administrator rights.

  1. Login on the Windows 10 device.
  2. Click on Start and search for Registry Editor.
  3. Navigate to HKEY_LOCAL_MACHINE\SYSTEM\CurrentControlSet\Control\Power
  4. Right click on the right hand side pane and click on New -> DWORD (32-bit) Value
Create DWORD Reg Key modern standby
  1. Provide the name of registry entry PlatformAoAcOverride and set its value to 0.
  2. As this registry change is in HKEY_LOCAL_MACHINE, A restart of the PC would be required.
PlatformAoAcOverride registry entry to disable Modern Standby

Disable Modern Standby on Windows 10 using Command line

In the previous section we have seen how to disable Modern standby using GUI Interface of registry editor. If you do not prefer GUI and want to use a command to disable Modern Standby then you can follow below steps:

  1. Login on Windows 10 device.
  2. Go to Start and search for Command prompt.
  3. Right-click on Command prompt and click Run as administrator.
  4. Type below command and press enter.
  5. After this command is executed successfully, Restart your device.

reg add HKLM\System\CurrentControlSet\Control\Power /v PlatformAoAcOverride /t REG_DWORD /d 0​

Disable Modern Standby on Windows 10 using Command line

How to check If Modern Standby is supported in Windows 10

Not all devices support Modern standby but the number of systems which support Modern standby are increasing. I have been using Microsoft Surface Pro 4 laptop which supports Modern standby. Here’s how you can check if your device supports Modern Standby.

  1. Login on Windows 10 device.
  2. Click on Start and search for Command Prompt.
  3. Launch Command Prompt.
  4. Type command powercfg -a to check if Modern standby is supported.

Powercfg -a lists the sleep states available on your computer.

In below screenshot, you can see that this Windows 10 device is on Standby (S0 Low Power Idle) Network Connected State which means that Modern Standby is supported and enabled on this device.

If you run powercfg -a command on your system and it shows that S0 Low power idle is not supported then this could be a a limitaton by system’s hardware to support Modern standby. There is nothing you can do to enable it. The alternative is to keep using Standby S3 or any other supported power plan.

powercfg -a to check if modern standby is supported

Modern Standby (S0 Low power idle) can be in Network Connected mode or Network Disconnected mode.

  • Standby (S0 Low Power Idle) Network Connected: This means that Modern standby with network connectivity in sleep mode.
  • Standby (S0 Low Power Idle) Network Disconnected: This means that Modern standby without network connectivity while in sleep mode and the system spends most of the time in DRIPS.

FAQs on Modern Standby

Below are some of the frequently asked questions on Modern Standby:

1. Which versions of Windows supports Modern Standby ?

Windows 10 for desktop editions (Home, Pro, Enterprise, and Education) and Windows 11 Operating system.

2. How to Re-enable Modern Standby after creating PlatformAoAcOverride reg entry ?

If your device supports Modern Standby and you have created PlatformAoAcOverride reg entry under HKLM\System\CurrentControlSet\Control\Power reg key. Simply delete this registry entry and restart your device to enable Modern Standby again.

You can delete PlatformAoAcOverride registry entry manually by using registry editor or launch powershell console as an administrator and run below command to delete it.

Remove-ItemProperty 'HKLM:\System\CurrentControlSet\Control\Power' -Name PlatformAoAcOverride

3. Does my computer support Modern Standby ?

You can easily check this by running a command powercfg -a on the command prompt. If it says Standby (S0 Low Power Idle) Network Connected or Standby (S0 Low Power Idle) Network Disconnected then Modern Standby is supported and Enabled.

4. How to Identify and diagnose issues during a Modern Standby session ?

You can Identify and diagnose any issues related to Modern standby by running Powercfg /sleepstudy command on an elevated command prompt. You can then analyse the report which will be generated and saved at C:\WINDOWS\system32\sleepstudy-report.html location.

Please make sure to open command prompt as an administrator and then run powercfg /sleepstudy

powercfg /sleepstudy

5. How to find all the switches of powercfg command ?

To check the switches of powercfg command, you can run powercfg /? on the command prompt. This will list all available options with detailed information. I have run this command on my device which lists all the switches which can be used with powercfg command:

powercfg /?

C:\WINDOWS\system32>powercfg /?

POWERCFG /COMMAND [ARGUMENTS]

Description:
  Enables users to control power settings on a local system.

  For detailed command and option information, run "POWERCFG /? <COMMAND>"

Command List:
  /LIST, /L          Lists all power schemes.

  /QUERY, /Q         Displays the contents of a power scheme.

  /CHANGE, /X        Modifies a setting value in the current power scheme.

  /CHANGENAME        Modifies the name and description of a power scheme.

  /DUPLICATESCHEME   Duplicates a power scheme.

  /DELETE, /D        Deletes a power scheme.

  /DELETESETTING     Deletes a power setting.

  /SETACTIVE, /S     Makes a power scheme active on the system.

  /GETACTIVESCHEME   Retrieves the currently active power scheme.

  /SETACVALUEINDEX   Sets the value associated with a power setting
                     while the system is powered by AC power.

  /SETDCVALUEINDEX   Sets the value associated with a power setting
                     while the system is powered by DC power.

  /IMPORT            Imports all power settings from a file.

  /EXPORT            Exports a power scheme to a file.

  /ALIASES           Displays all aliases and their corresponding GUIDs.

  /GETSECURITYDESCRIPTOR
                     Gets a security descriptor associated with a specified
                     power setting, power scheme, or action.

  /SETSECURITYDESCRIPTOR
                     Sets a security descriptor associated with a
                     power setting, power scheme, or action.

  /HIBERNATE, /H     Enables and disables the hibernate feature.

  /AVAILABLESLEEPSTATES, /A
                     Reports the sleep states available on the system.

  /DEVICEQUERY       Returns a list of devices that meet specified criteria.

  /DEVICEENABLEWAKE  Enables a device to wake the system from a sleep state.

  /DEVICEDISABLEWAKE Disables a device from waking the system from a sleep
                     state.

  /LASTWAKE          Reports information about what woke the system from the
                     last sleep transition.

  /WAKETIMERS        Enumerates active wake timers.

  /REQUESTS          Enumerates application and driver Power Requests.

  /REQUESTSOVERRIDE  Sets a Power Request override for a particular Process,
                     Service, or Driver.

  /ENERGY            Analyzes the system for common energy-efficiency and
                     battery life problems.

  /BATTERYREPORT     Generates a report of battery usage.

  /SLEEPSTUDY        Generates a diagnostic system power transition report.

  /SRUMUTIL          Dumps Energy Estimation data from System Resource Usage
                     Monitor (SRUM).

  /SYSTEMSLEEPDIAGNOSTICS
                     The system sleep diagnostics report has been deprecated and
                     replaced with the system power report. Please use the command
                     "powercfg /systempowerreport" instead.

  /SYSTEMPOWERREPORT Generates a diagnostic system power transition report.

  /POWERTHROTTLING   Control power throttling for an application.

  /PROVISIONINGXML, /PXML    Generate an XML file containing power setting overrides.

Copy

Conclusion

Modern standby saves your laptop’s or desktop’s battery and keep your device active for longer. If you use your device intermittently or away from your device a lot then this can save a lot of energy. However, there could be a scenario where you do not want to enable Modern standby. In that case you can use the steps given in this blog post to create a registry entry and disable Modern standby.

Source :
https://techpress.net/disable-modern-standby-in-windows-10/

SSL/TLS connection issue fix: out-of-band update status and affected applications (Oct. 21, 2022)

[German]As of October 17, 2022, Microsoft has released several unscheduled updates for Windows. These updates fix a connection problem that can occur with SSL and TLS connections. Affected by this problem are probably all Windows client and server. Below I have listed all available updates and also give some hints where problems occur without these updates.


Advertising


Out-of-band updates with TLS fix

Microsoft made a mistake with the last updates for Windows (preview updates from September, security updates from October). As a result, various problems with SSL and TLS connections can occur. Microsoft has therefore released some : out-of-band updates on October 17, 2022 to fix the problem.

I had reportedthat  in the blog post Out-of-band updates for Windows fixes SSL-/TLS connection issues (also with Citrix) – October 17, 2022. However, Microsoft had not linked all the updates in its status pages (thanks to EP for pointing out the links), so that I could complete the list of updates for the affected Windows versions below:

The out-of-band updates KB5020439 and KB5020440 were added on October 18th.  These updates are only available for download in the Microsoft Update Catalog and have to be installed manually (just search for the KB numbers). Details about these updates can be found in the linked KB articles.

So only Windows 11 22H2 is missing the corresponding fix update. EP writes here that this fix will be added with the upcoming update KB5018496. This is currently released in the Windows Insider program as a pre-release version in the Release Preview channel (see).

Problems fixed with the updates

People have asked in comments which applications are actually affected by the TLS bugs. I don’t have a complete list, but would like to give some hints below as to what has come to my attention as a fix. Thanks to blog readers for the pointers.


Advertising


Citrix connectivity issue

With the October 2022 updates, administrators found that Citrix clients could no longer communicate with Citrix netscalers. I had reported on this in the blog postCitrix connections broken after Windows update KB5018410 (October 2022) (TLS problem). Affected people who installed the above updates reported that this fixed the connection problem.

KB5020387 fixes TLS 1.3 problem on Windows 10

On Windows, there was also the issue that there TLS 1.3 implementation was buggy on Windows 10 (it only works in Windows 11). I had raised a conflict case in the blog post Bug: Outlook no longer connects to the mail server (October 2022). Microsoft suggested disabling TLS 1.3 via registry intervention as a workaround. In this comment, someone suggests uninstalling updates KB5018410 (Windows 10) and KB5018427 (Windows 11).

Blog reader Harvester asked here, whether TLS 1.3 works with Windows 10 after installing the special updates, and then followed up with the results of his own tests.

Self-reply after tests : Schannel is working properly after having applied KB5020387 on a LTSC 2021 IoT Enterprise image (21H2), where Schannel was previously broken (on build 19044.2130, from October 11 2022)

We initially guessed that the IoT Enterprise SKU wasn’t supporting TLS 1.3, but now we confirmed that we hit the bug mentioned in the post.

“Fun” fact : while it as initially reported that TLS 1.3 was available starting from Windows 10 1903, the Schannel documentation was changed recently, and now state that only Windows 11 and Server 2022 support TLS 1.3: Protocols in TLS/SSL (Schannel SSP)

VPN and WebEx Meetings App

Within this German comment blog reader Marten reported, that the WebEx Meetings App could no longer connect to the WebEx Server (OnPrem) via VPN. The issue has been fixed via update.

Quest Migration Manager for Exchange

On Twitter, enno0815de has sent the following tweet, which refers to my message about the out-of-band updates with TLS fix. It says, anyone planning a domain migration using Quest Migration Manager for Exchange should also install the updates. Otherwise, the account will be locked out for the migration.


In a follow up tweet he adds: By some circumstance the Atelia class (Quest component) is deleted from the registry. Without the TLS fix, you lock the user out of AD completely.

Similar article:
Windows 10: Beware of a possible TLS disaster on October 2022 patchday
Citrix connections broken after Windows update KB5018410 (October 2022) (TLS problem)
Bug: Outlook no longer connects to the mail server (October 2022)
Out-of-band updates for Windows fixes SSL-/TLS connection issues (also with Citrix) – October 17, 2022

Source :
https://borncity.com/win/2022/10/22/fix-des-ssl-tls-verbindungsproblems-stand-der-sonderupdates-und-betroffene-anwendungen-21-10-2022/

Confirmed: Metro Group victim of cyber attack

[German]Since Monday, October 17, 2022, many Metro stores worldwide have been struggling with severe IT problems. I had already suspected a cyber attack on the Metro Group in a post and I had reports from Austria, from France as well as comments from German Metro customers as well as employees. However, a cyber attack remained unconfirmed so far. Now Metro AG has confirmed such an attack to heise – and on its website.


Advertising


Metro Group with IT problems

I had already reported about the IT problems at Metro Group in the blog post Cyber attack on Metro AG or just a IT break down? Austria, France, German (and more countries?) affected. Since Monday, October 17, 2022, Metro wholesales stores have been struggling with massive IT problems. No invoices or daily passes could be issued and online orders had also disappeared, Metro customers reported. A blog reader had provided me with the following photo of a Metro notice board.

IT-Störung bei Metro
Notification about IT disruption at a Metro wholesale store

The suspicion of a cyber attack has not been confirmed by company spokespersons till today (October 21, 2022). But I have had reports from German blog readers, reporting IT issues since days and some people told me, it’s a cyber attack as a root cause.

Not only Austria and France are affected, but Metro AG worldwide. In Germany, too, the same problem has existed since last Monday. No more stock or prices can be updated or checked in the store. The checkout system is still working but also sluggishly, resulting in long lines. If you want to reserve something digitally, that doesn’t work either.

One reader noted that from what he observed, the IT problems have been going on since Friday afternoon (October 14, 2022). A reader informed me on Facebook that their email systems had delivered a 442 connection Failed-Error when communicating with the Metro mail system last Monday. By the afternoon of October 19, 2022, communication with the Metro Group email system was working again – so something is happening.


Advertising


Metro confirms cyber attack

First a speaker from Metro AG confired to German IT magazine heise a cyber attack on it’s IT systems. After searching the Metro AG site today, I finally found the following statement. It says (translated in English):

Metro cyber attack confirmation
Metro cyber attack confirmation (addenum: here is an English version)

T-Security Incident at METRO

METRO/MAKRO is currently experiencing a partial IT infrastructure outage for several technical services. METRO’s IT team, together with external experts, immediately launched a thorough investigation to determine the cause of the service disruption. The latest results of the analysis confirm a cyber attack on METRO systems as the cause of the IT infrastructure outage. METRO AG has informed all relevant authorities about the incident and will of course cooperate with them in every possible way.

During the operation of METRO stores and the regular availability of services, disruptions and delays may occur. The teams in the stores have quickly set up offline systems to process payments. Online orders via the web app and online store are being processed, but there may be individual delays here as well.

We will continue to analyze and monitor the situation intensively and provide updates if necessary.
METRO sincerely apologizes for any inconvenience this incident may cause to customers and business partners.

So they confirmed just a cyber attack, but stay tight lipped about the details. No information, whether it’s a ransomware infection nor about a possible attack vector.

Metro AG is a listed group of wholesale companies (for purchases in the gastronomy sector). Headquartered in Düsseldorf, the group employs more than 95,000 people in 681 stores worldwide, most of them in Germany. In Germany, the company mainly operates the Metro wholesale stores. Sales are 24.8 billion euros (2020).

Similar articles:
Cyber attack on Metro AG or just a IT break down? Austria, France, German (and more countries?) affected
Ransomware Attack on electronic retail markets of Media Markt/Saturn
Media Markt/Saturn: Ransomware attack by hive gang, $240 million US ransom demand

Source :
https://borncity.com/win/2022/10/21/metro-gruppe-doch-opfer-eines-cyberangriffs/

Exit mobile version