In a large organization, its very quite common to have many domain and child domain names. While performing task automation for set of computers in domain, its best practice to get domain name of a computer.
In this article, I will explain how to get domain name using PowerShell script and command line (CMD)
Get-WmiObject class in PowerShell management library find the domain name for computer and wmic command-line utility to get domain name using command line (cmd)
Let’s understand how to get domain name in PowerShell and command line with below examples.
In the above PowerShell script, Get-WmiObject gets the WMI classes in the root\cimv2 namespace of computer and uses Win32_ComputerSystem to get computer system information.
Second command select Name and Domain name of a computer.
Output of above command to get domain name of a computer as below
PowerShell Get Domain Name
Using Get-AdDomainController to get domain name
PowerShell Get-AdDomainController cmdlet in Active Directory get one or more domain controllers based on search criteria.
You can get domain name of a computer in active directory using PowerShell Get-AdDomainController cmdlet as below
The latest version of SonicOS firmware provides support for a wide variety of USB and Hotspot devices and wireless service providers as listed below.
Resolution
Broadband Devices
USA & Canada
Gen7
5G/4G/LTE
SonicOS 7.0
CARD REGION
OPERATOR
NAME
GENERATION
TYPE
SONICOS VERSION
SONICWAVE
USA
AT&T
Nighthawk 5G Mobile Hotspot Pro MR 5100
5G
Hotspot
7.0.1
No
USA
AT&T
NightHawk LTE MR1100
4G/LTE
Hotspot
7.0.0
No
USA
AT&T
Global Modem USB800
4G/LTE
USB
7.0.1
Yes
USA
AT&T
iPhone 11 Pro
4G/LTE
Hotspot
7.0.0
No
USA
AT&T
iPhone 12 Pro
4G/LTE
Hotspot
7.0.1
No
USA
Verizon
M2100
5G
Hotspot
7.0.1
Yes
USA
Verizon
M1000
5G
Hotspot
7.0.0
Yes
USA
Verizon
Orbic Speed
4G/LTE
Hotspot
7.0.0
No
USA
Verizon
MiFi Global U620L
4G/LTE
USB
7.0.0
Yes
USA
Sprint
Netstick
4G/LTE
USB
7.0.0
No
USA
Sprint
Franklin U772
4G/LTE
USB
7.0.0
No
USA
T-Mobile
M2000
4G/LTE
Hotspot
7.0.1
No
USA
T-Mobile
Link Zone2
4G/LTE
Hotspot
7.0.0
Yes
Gen6/Gen6.5
4G/LTE
SonicOS 6.x
CARD REGION
OPERATOR
NAME
GENERATION
TYPE
SONICOS VERSION
SONICWAVE
USA
AT&T
Global Modem USB800
4G/LTE
USB
6.5.4.5
Yes
USA
AT&T
Velocity (ZTE MF861)
4G/LTE
USB
6.5.3.1
Yes
USA
AT&T
Beam (Netgear AC340U)²
4G/LTE
USB
5.9.0.1
Yes
USA
AT&T
Momentum (Sierra Wireless 313U)
4G/LTE
USB
5.9.0.0
Yes
USA
Verizon
MiFi Global U620L
4G/LTE
USB
6.5.0.0
Yes
USA
Verizon
Novatel 551L
4G/LTE
USB
6.2.4.2
Yes
USA
Verizon
Pantech UML290
4G/LTE
USB
5.9.0.0
No
USA
Sprint
Franklin U772
4G/LTE
USB
6.5.3.1
No
USA
Sprint
Netgear 341U
4G/LTE
USB
6.2.2.0
Yes
Canada
Rogers
AirCard (Sierra Wireless 330U)
4G/LTE
USB
5.9.0.0
No
Gen5
3G
SonicOS 5.x
USA
AT&T
Velocity (Option GI0461)
3G
USB
5.8.1.1
No
USA
AT&T
Mercury (Sierra Wireless C885)
3G
USB
5.3.0.1
No
USA
Verizon
Pantech UMW190
3G
USB
5.9.0.0
No
USA
Verizon
Novatel USB760
3G
USB
5.3.0.1
No
USA
Verizon
Novatel 727
3G
USB
5.3.0.1
No
USA
Sprint
Novatel U760
3G
USB
5.3.0.1
No
USA
Sprint
Novatel 727U
3G
USB
5.3.0.1
No
USA
Sprint
Sierra Wireless 598U
3G
USB
5.8.1.1
No
USA
T-Mobile
Rocket 3.0 (ZTE MF683)
3G
USB
5.9.0.0
Yes
Canada
Bell
Novatel 760
3G
USB
5.3.1.0
No
International
Gen7
5G/4G/LTE
SonicOS 7.0
CARD REGION
Manufacturer
NAME
GENERATION
TYPE
SONICOS VERSION
SONICWAVE
Worldwide
Huawei
E6878-870
5G
Hotspot
7.0.0
No
Worldwide
Huawei
E8372H**
4G/LTE
USB
7.0.0
No
Worldwide
Huawei
E8201
4G/LTE
USB
7.0.0
No
Worldwide
Huawei
E3372
4G/LTE
USB
7.0.0
No
Worldwide
ZTE
MF833U
4G/LTE
USB
7.0.0
Yes
Worldwide
ZTE
MF825C
4G/LTE
USB
7.0.0
Yes
Worldwide
ZTE
MF79S
4G/LTE
USB
7.0.0
Yes
Gen6/Gen6.5
4G/LTE
SonicOS 6.x
CARD REGION
Manufacturer
NAME
GENERATION
TYPE
SONICOS VERSION
SONICWAVE
Worldwide
Huawei
E8372 (Telstra 4GX)
4G/LTE
USB
6.5.3.1
Yes
Worldwide
Huawei
E3372
4G/LTE
USB
6.5.3.1
Yes
Worldwide
Huawei
E3372h (-608 variant) 6
4G/LTE
USB
6.5.3.1
Yes
Worldwide
Huawei
E3372s (-608 variant) 6
4G/LTE
USB
6.5.3.1
Yes
Worldwide
Huawei
E398 (Kyocera 5005)
4G/LTE
USB
5.9.0.2
Yes
Worldwide
Huawei
E3276s
4G/LTE
USB
No
Yes
Worldwide
D-Link
DWM-221
4G/LTE
USB
6.5.3.1
Yes
Worldwide
D-Link
DWM-222 A1
4G/LTE
USB
6.5.3.1
Yes
Worldwide
ZTE
MF825
4G/LTE
USB
6.5.3.1
Yes
Worldwide
ZTE
MF832G
4G/LTE
USB
No
Yes
Worldwide
ZTE
MF79S
4G/LTE
USB
No
Yes
Gen5
3G
SonicOS 5.x
Worldwide
Huawei
E353 7
3G
USB
5.9.0.2
Yes
Worldwide
Huawei
K4605
3G
USB
5.9.0.2
Yes
Worldwide
Huawei
EC169C
3G
USB
5.9.0.7
No
Worldwide
Huawei
E180
3G
USB
5.9.0.1
No
Worldwide
Huawei
E182
3G
USB
5.9.0.0
No
Worldwide
Huawei
K3715
3G
USB
5.9.0.0
No
Worldwide
Huawei
E1750
3G
USB
5.8.0.2
No
Worldwide
Huawei
E176G
3G
USB
5.3.0.1
No
Worldwide
Huawei
E220
3G
USB
5.3.0.1
No
Worldwide
Huawei
EC122
3G
USB
5.9.0.0
No
LTE Cellular Extender
SonicOS 6.x
Worldwide
Accelerated
6300-CX LTE router
4G/LTE
SIM
6.5.0.0
No
¹ Cellular network operators around the world are announcing their plans to discontinue 3G services starting as early as December 2020. Therefore LTE or 5G WWAN devices should be used for new deployments. Existing deployments with 3G should be upgraded soon to LTE or 5G in preparation for the imminent discontinuation of 3G services. ² Refer to AT&T 340U article for more info ³ Multiple variations of the Huawei card: E8371h-153, E8372h-155, & E8372h-510 ⁴ Huawei Modem 3372h and 3372s have been released by Huawei in multiple variants (i.e. -608, -153, -607, -517, -511) and with different protocols. At the moment, SonicOS does not support Huawei Proprietary protocol so all the variants using a non-standard or proprietary protocol are not supported or require the ISP to provide a PPP APN Type. ⁵ Huawei Modem E353 is not compatible with SOHO 250. Also note that it is not an LTE card 6 For customers outside of the 90-day warranty support period, an active SonicWall 8×5 or 24×7 Dynamic Support agreement allows you to keep your network security up-to-date by providing access to the latest firmware updates. You can manage all services including Dynamic Support and firmware downloads on any of your registered appliances at mysonicwall.com.
My Hyper-V host is Server 2012 R2. I have a virtual machine (Server 2012 R2) with a checkpoint. When I right click on the checkpoint, there is no “Delete checkpoint… ” option. I need to delete this checkpoint so that it is merged with the parent VHDX. What is the best method for doing this?
– Question from social.technet.microsoft.com
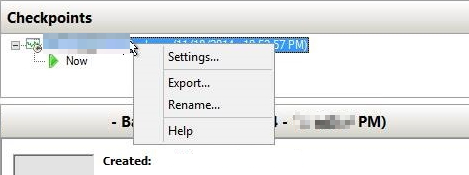
Have you ever encountered the situation where your Hyper-V cannot delete checkpoint because of “Delete” option missing? Right-clicking on the Hyper-V checkpoint, there are only “Settings”, “Export”, “Rename” and “Help” options left, why would this happen?
There are many reasons may cause Hyper-V snapshot delete option not available, such as connection error with the host, or a backup toolfailure. The most likely scenario is that the checkpoint created by a third-party tool was not deleted properly by the same tool.
More specifically, the checkpoints and associated .AVHDX files should be merged and deleted at the end of a backup – only the newer .AVHDX files should be kept. However, sometimes the checkpoints may be corrupted because the VM is in a locked or backed up state, or some other reason is preventing the deletion and merging. In this case, you may find the delete option missing, and Hyper-V cannot delete this checkpoint.
How to fix this? I will provide you 3 proven solutions, you can try them one by one. *They also work for cleaning up after a failed Hyper-V checkpoint.
How to solve Hyper-V cannot delete checkpoint (3 solutions)
When you are unable to delete checkpoint in Hyper-V, you can first try some regular troubleshooting means. If they cannot solve this issue, don’t worry, there are still some alternatives can help you delete Hyper-V checkpoint properly. I will cover all of them below.
Solution 1. Troubleshooting steps that you should try first
Before taking other measures, you can try some simple ways in Hyper-V Manager to see if you can make snapshot removal work. That is:
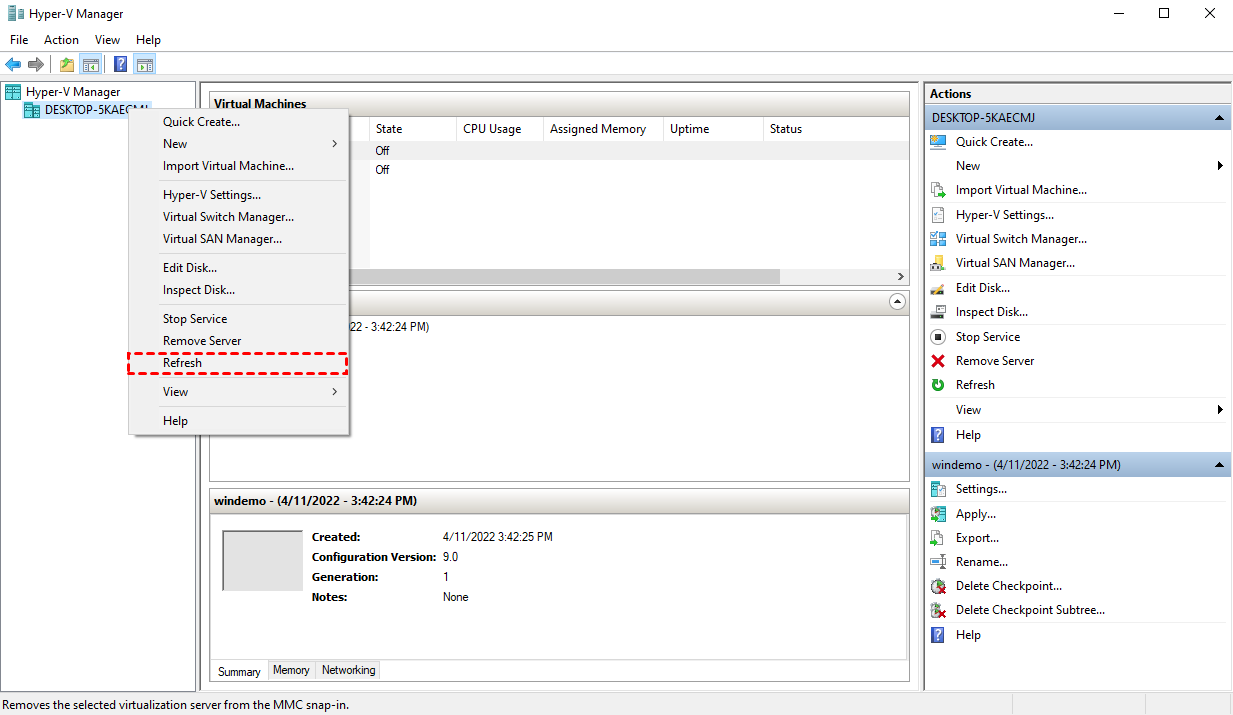
Right-click on the host name in Hyper-V Manager and select Refresh.
Close and restart the Hyper-V Manager.
Highlight the target checkpoint and use the [Delete] key on the keyboard. It should pop up a window confirming whether to delete the checkpoint or not.
If none of these ways can help, then you may need to try delete checkpoint Hyper-V with PowerShell.
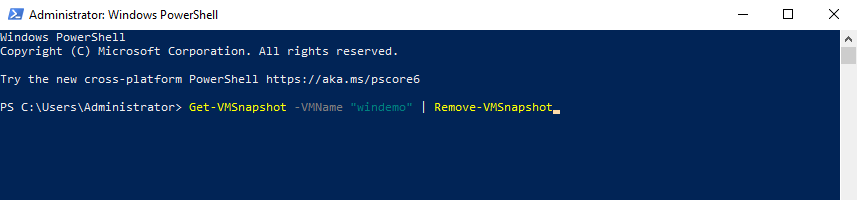
Solution 2. Properly delete Hyper-V checkpoint with PowerShell
Hyper-V PowerShell module is a bundle of cmdlets for creating, configuring and managing Microsoft Hyper-V hosts and virtual machines. It can be more a time efficient method than using GUI. You can use it remove any Hyper-V checkpoint that has no delete option.
Launch Windows PowerShell as administrator on the Hyper-V host, input and execute the following command to delete the checkpoint:
Once the command succeeded, you can see the merge progress for the particular VM. It may take some time depending on the snapshot size. After that, you should be able to modify the virtual machine configuration again.
If this method still cannot delete your Hyper-V checkpoint, turn to the next one.
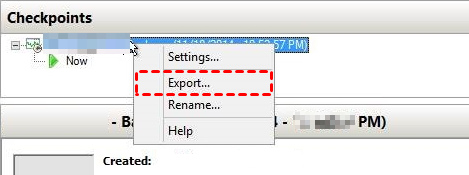
Solution 3. Export and import Hyper-V VM to resolve checkpoint cannot delete
You can try Hyper-V export VM and import as suggested by some other users, which are also said can be used to solve the problem.
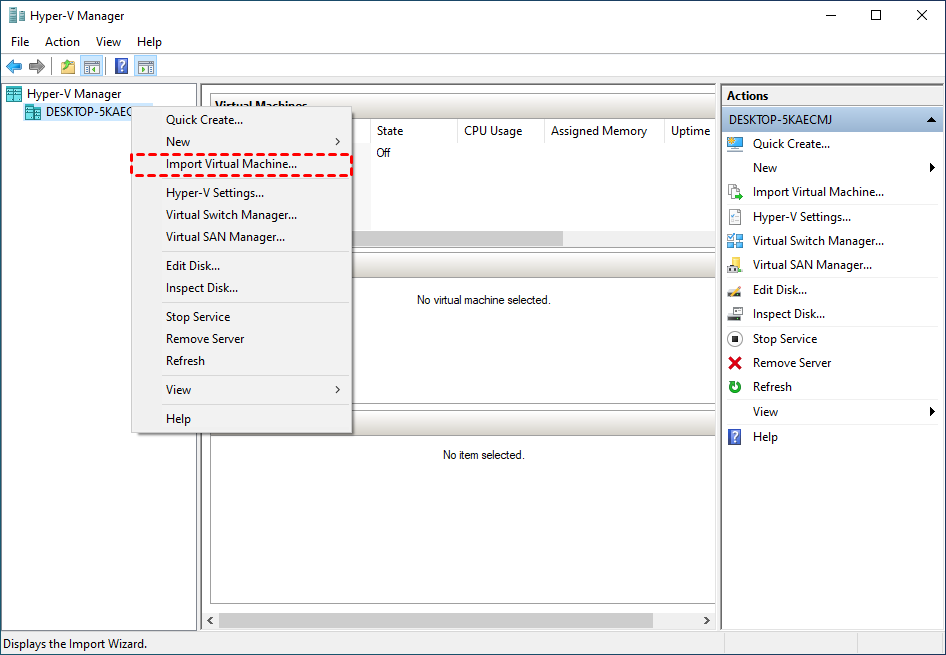
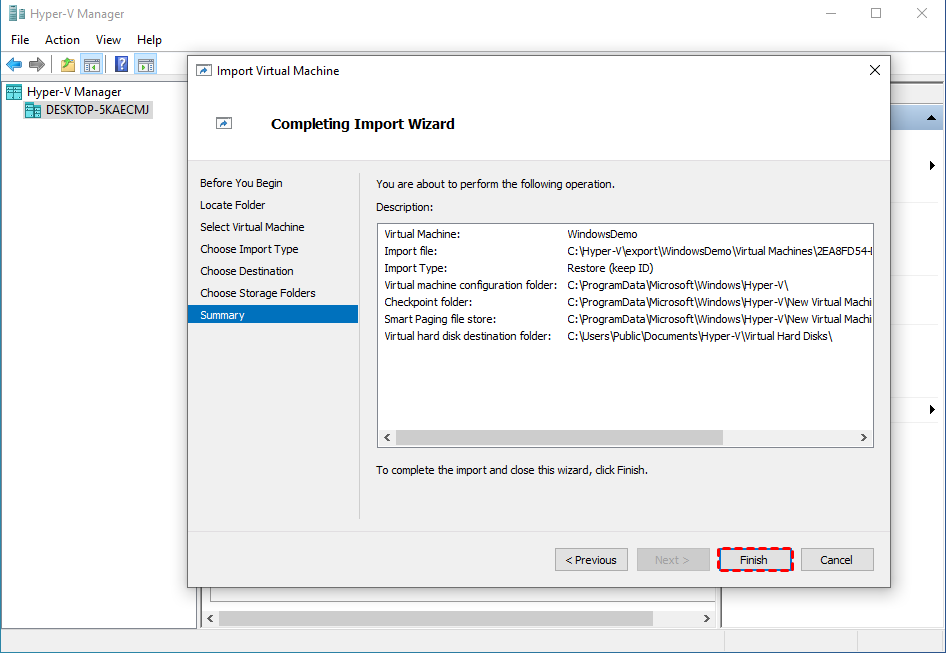
1. Launch Hyper-V Manager. Right-click on the name of the target checkpoint, and select Export…
2. In the pop-up window, click Browse to specify a network share as the storage destination to the exported files. And then click Export.
3. Right-click on the host name and select Import Virtual Machine… Click Next on the pop-up wizard.
4. On Locate Folder page, click Browse… to specify the folder containing the exported VM files. Click Next to continue.
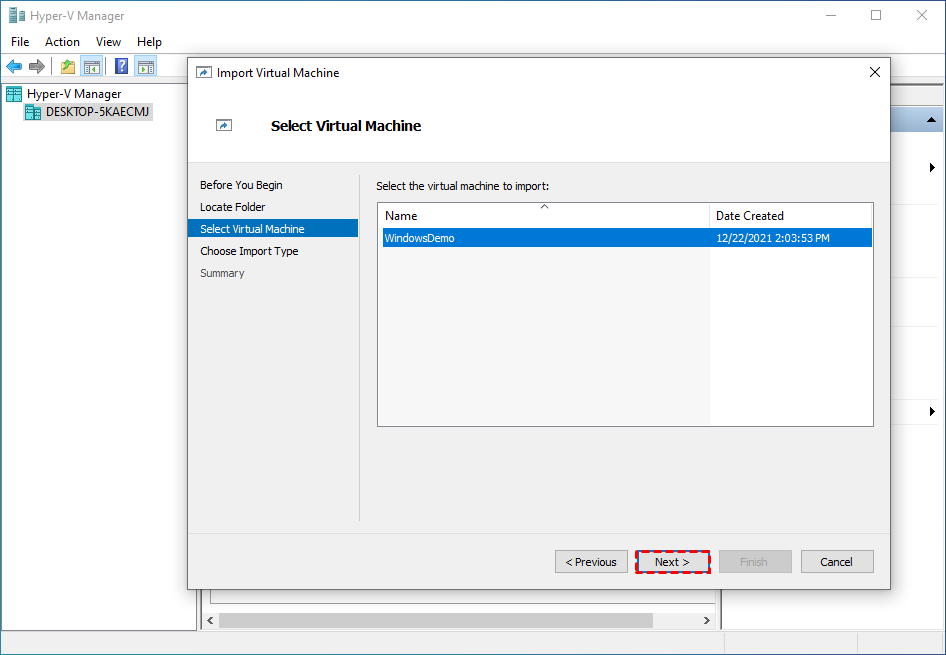
5. On Select Virtual Machine page, select the virtual machine to import, then click Next.
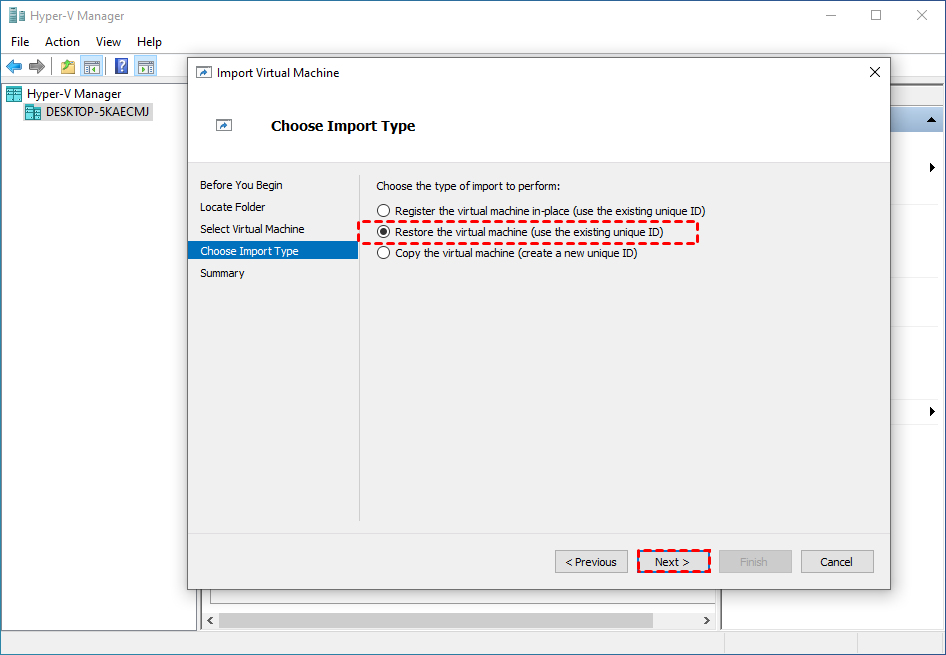
4. On Choose Import Type page, choose the type of import to perform:
Register the virtual machine in-place (use the existing unique ID): use the exported files in-place, and when the import has completed, the export files become the running state files and can’t be removed. The ID will be the same as the exported one.
Restore the virtual machine (use the existing unique ID): restore the VM to the specified or default location, with the same ID as the exported one. When the import has completed, the exported files remain intact and can be removed or imported again.
Copy the virtual machine (create a new unique ID): restore the VM to the specified or default location, and create a new unique ID. Which means the exported files remain intact and can be removed or imported again, and you can import the VM to the same host multiple times.
Click Next to continue.
5. Choose the second or the third option, the wizard will add 2 more pages for selecting storage.
On Choose Destination page, you can check Store the virtual machine in a different location option, and click Browse… to specify Virtual machine configuration folder, Checkpoint store, and Smart paging folder. Leave the option unchecked the wizard will import the files to default Hyper-V folders. Then click Next.
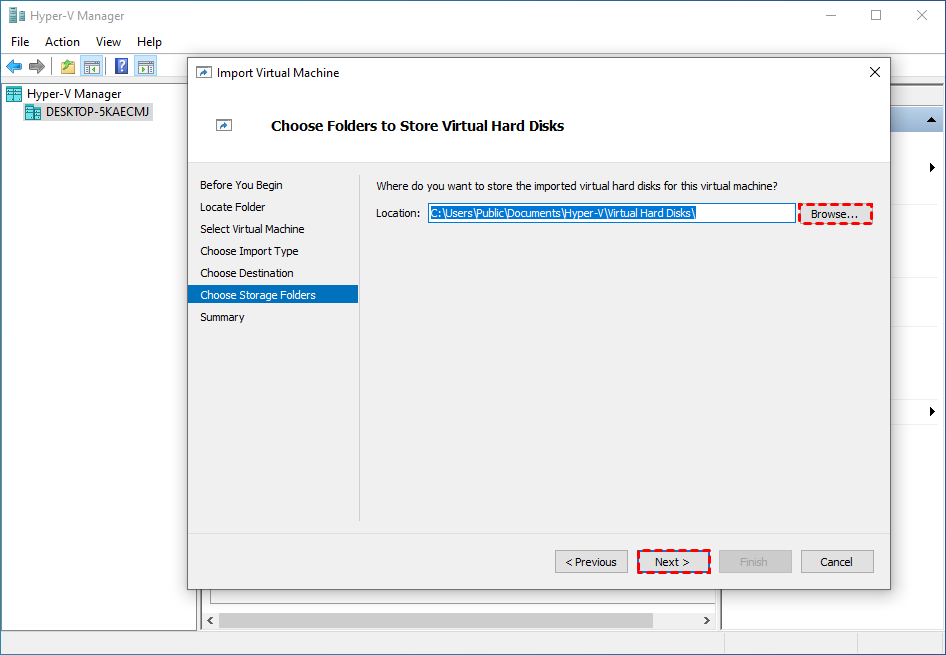
6. On Choose Storage Folders page, you can click Browse… to specify where you want to store the imported virtual hard disks for this VM, or leave the default location unchanged. Then click Next.
7. On Summary page, review the settings and click Finish to start restore.
Furthere reading: FAQ about Hyper-V delete checkpoint
The above describes how to solve the problem that the delete option disappears and the hyper-v checkpoint cannot be deleted. Besides, many users may have some other confusion about checkpoints. I have compiled some common questions and their answers here.
Q: Where are checkpoints stored on a Hyper-V host?
In general, the default location for storing checkpoint configuration files is:
And the default locations for storing AVHDX files (checkpoint storages) are:
Windows Server 2012R2 / Windows 8.1: C:UsersPublicDocumentsHyper-VVirtual Hard Disks
Windows Server 2012 / Windows 8: C:ProgramDataMicrosoftWindowsHyper-VNew Virtual MachineVirtual Hard Disks
Q: Can you directly delete checkpoint files (.avhdx)?
Whenever a checkpoint is deleted, Hyper-V merges the .vhdx and .avhdx files automatically, and the .avhdx files should be removed from the disk after the Hyper-V checkpoint merging process is complete. So a proper checkpoint deletion does not result in data loss.
It’s not a good idea to delete the .avhdx file in VM folder directly, because it may cause the checkpoint tree to fail.
The normal steps to delete a checkpoint is:
Open the Hyper-V Manager -> Select the virtual machine for which you need to remove checkpoints -> Locate the Checkpoints tab -> Right-click on the desired checkpoint -> click “Delete Checkpoint”. If asked to confirm the action, make sure the checkpoint is correct and click “Delete” again.
Note if you need to delete all subsequent checkpoints, right-click the earliest checkpoint and click “Delete Checkpoint Subtree”.
If you find some orphaned Hyper-V AVHDX files in the VM folder, but no snapshots on that VM, this may be because incomplete deletion or merging, you can refer to: delete Hyper-V AVHDX file without checkpoints.
Q: Hyper-V checkpoint delete vs merge
A checkpoint is any new change or save between the old state and the present, it stops writing to the actual disk and writes to the change disk.
Once you are satisfied and delete the checkpoint, the changes are written back/merged to the actual disk and are write enabled again. Therefore, deleting a checkpoint and merging a checkpoint are actuallythe same thing.
If you don’t want the changes, you just need to revert them and any changes since the checkpoint will be deleted.
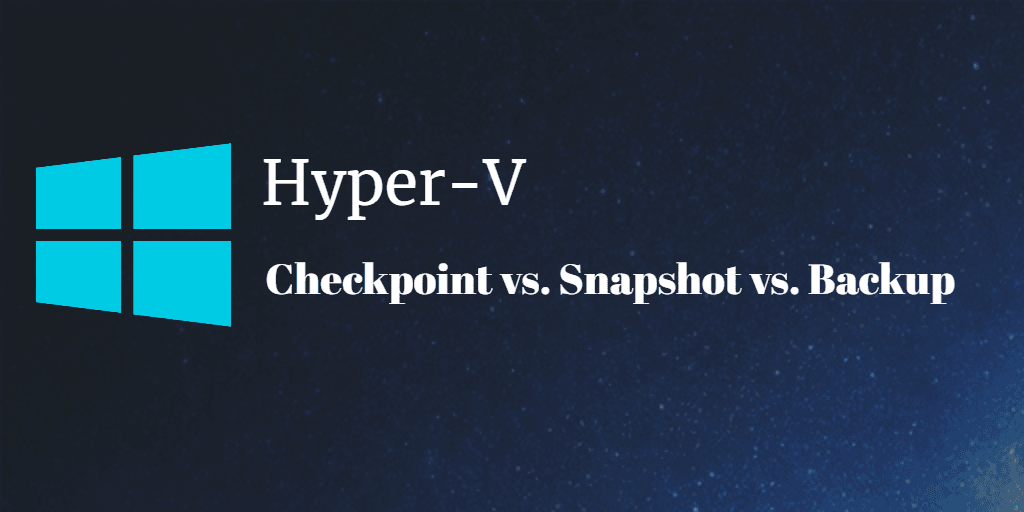
Q: Can Hyper-V checkpoints be used as regular backup means?
The answer is NO. VM snapshot and backup are different from each other. Microsoft’s Hyper-V checkpoint is not a replacement of backup.
When you create a backup, you are creating a copy of your virtual machine. It stores complete data of VM. Backups in Hyper-V can be used to restore a whole VM and do not affect the performance.
When you create a checkpoint, you are creating a differencing disk based on the original virtual machine hard disk. If the original disk is damaged, the child disk is easy to be lost or damaged as well. All changes made after the checkpoint are re-directed to the child disk and leaves the original virtual machine disk read-only.
Meanwhile, checkpoints are running out of the memory of disk with a rapid speed, which will gradually to the poor performance of your virtual machines.
In short, Hyper-V checkpoint is just a secure “undo” button. If you want to test something quickly and restore the VM to a stable state, checkpoint in Hyper-V is convenient and fast to execute the process. But, if you want long-term and independent protection for VMs, you still need to find effective Hyper-V backup solution.
Better option for long-term protection: Image-based VM backup
As mentioned above, if you are looking for long-term data protection and the ability to quickly restore VMs to a usable state in the event of a disaster, then you are more suited to an image-based VM backup solution.
Here I’d like to introduce you AOMEI Cyber Backup, this free Hyper-V backup solution is designed to protect virtual machines from any data threats, whether you are using Hyper-V in Microsoft Windows Server 2022 / 2019 / 2016 / 2012 R2, Microsoft Windows 11 / 10 / 8 / 8.1 or Hyper-V Server 2019 / 2016 / 2012 R2.
You can use the software to simplify Hyper-V backup and management. If offers you the following benefits:
Easy-to-use: User-friendly interface to complete backup and restore process based on several clicks. Perpetual Free: No time limit for AOMEI Cyber Backup Free Edition to protect up to multiple virtual machines. Auto Backup Schedule: Schedule backups for multiple VMs at once and auto run it without powering off VMs. Centralized Management: Create and manage Hyper-V VM backups from the central console without installing Agent on each VM. Flexible Backup Strategy: Flexibly tracking data and store backups to different storages. Role Assignment: allows one administrator to create sub-accounts with limited privileges.
Please hit the button below to download and use AOMEI Cyber Backup for free:
*You can choose to install this VM backup software on either Windows or Linux system.
3 easy steps to perform free VM backup:
1. Open AOMEI Cyber Backup web client, and access to Source Device >> Hyper-V >> Add Hyper-V to bind your Hyper-V host, then enter the required information and click Confirm.
2. Access to Backup Task >> Create New Task to configure your Hyper-V backup task. In the opened wizard, you can select Hyper-V virtual machines to back up, the storages to save the backups.
Also, you can configure Schedule to select backup method as full / incremental backup, and specify the backup frequency on basis of daily / weekly / monthly to automatically run the Hyper-V backup task.
3. Start Backup: click Start Backup and select Add the schedule and start backup now, or Add the schedule only.
When completing the Hyper-V backup solution, you can monitor the backing up process on the main interface, and you can also check the Backup Log to see if there are any errors that result in your backup failure.
When you want to Restore a VM from the backup, you can select any backup version from the history, and Restore to original location easily.
✍While the Free Edition covers most of the VM backup needs, you can also upgrade to enjoy:
Backup Cleanup: Specify retention policy to delete old VM backups automatically, thus saving storage space.
Restore to new location: Make a clone of a virtual machine in the same or another datastore/host, without reinstalling or configuring a new VM.
Summary
If you find your Hyper-V snapshot no delete option, I summarized several ways to solve the problem Hyper-V cannot delete checkpoint in this article. Hope it could be helpful to you.
Besides this, you may encounter some other issues, such as Hyper-V VM running slow, stuck at restoring or saved state, Hyper-V VM no internet, failed to change state, etc. To prevent your virtual machines from getting all kinds of errors and eventual crashes, it’s always recommended to back up your VMs that are loaded with important data.
Threat actors continue to adapt to the latest technologies, practices, and even data privacy laws—and it’s up to organizations to stay one step ahead by implementing strong cybersecurity measures and programs.
Here’s a look at how cybercrime will evolve in 2023 and what you can do to secure and protect your organization in the year ahead.
With the rapid modernization and digitization of supply chains come new security risks. Gartner predicts that by 2025, 45% of organizations worldwide will have experienced attacks on their software supply chains—this is a three-fold increase from 2021. Previously, these types of attacks weren’t even likely to happen because supply chains weren’t connected to the internet. But now that they are, supply chains need to be secured properly.
The introduction of new technology around software supply chains means there are likely security holes that have yet to be identified, but are essential to uncover in order to protect your organization in 2023.
If you’ve introduced new software supply chains to your technology stack, or plan to do so sometime in the next year, then you must integrate updated cybersecurity configurations. Employ people and processes that have experience with digital supply chains to ensure that security measures are implemented correctly.
It should come as no surprise that with the increased use of smartphones in the workplace, mobile devices are becoming a greater target for cyber-attack. In fact, cyber-crimes involving mobile devices have increased by 22% in the last year, according to the Verizon Mobile Security Index (MSI) 2022 with no signs of slowing down in advance of the new year.
As hackers hone in on mobile devices, SMS-based authentication has inevitably become less secure. Even the seemingly most secure companies can be vulnerable to mobile device hacks. Case in point, several major companies, including Uber and Okta were impacted by security breaches involving one-time passcodes in the past year alone.
This calls for the need to move away from relying on SMS-based authentication, and instead to multifactor authentication (MFA) that is more secure. This could include an authenticator app that uses time-sensitive tokens, or more direct authenticators that are hardware or device-based.
Organizations need to take extra precautions to prevent attacks that begin with the frontline by implementing software that helps verify user identity. According to the World Economic Forum’s 2022 Global Risks Report, 95% of cybersecurity incidents are due to human error. This fact alone emphasizes the need for a software procedure that decreases the chance of human error when it comes to verification. Implementing a tool like Specops’ Secure Service Desk helps reduce vulnerabilities from socially engineered attacks that are targeting the help desk, enabling a secure user verification at the service desk without the risk of human error.
As more companies opt for cloud-based activities, cloud security—any technology, policy, or service that protects information stored in the cloud—should be a top priority in 2023 and beyond. Cyber criminals become more sophisticated and evolve their tactics as technologies evolve, which means cloud security is essential as you rely on it more frequently in your organization.
The most reliable safeguard against cloud-based cybercrime is a zero trust philosophy. The main principle behind zero trust is to automatically verify everything—and essentially not trust anyone without some type of authorization or inspection. This security measure is critical when it comes to protecting data and infrastructure stored in the cloud from threats.
Ransomware attacks continue to increase at an alarming rate. Data from Verizon discovered a 13% increase in ransomware breaches year-over-year. Ransomware attacks have also become increasingly targeted — sectors such as healthcare and food and agriculture are just the latest industries to be victims, according to the FBI.
With the rise in ransomware threats comes the increased use of Ransomware-as-a-Service (RaaS). This growing phenomenon is when ransomware criminals lease out their infrastructure to other cybercriminals or groups. RaaS kits make it even easier for threat actors to deploy their attacks quickly and affordably, which is a dangerous combination to combat for anyone leading the cybersecurity protocols and procedures. To increase protection against threat actors who use RaaS, enlist the help of your end-users.
End-users are your organization’s frontline against ransomware attacks, but they need the proper training to ensure they’re protected. Make sure your cybersecurity procedures are clearly documented and regularly practiced so users can stay aware and vigilant against security breaches. Employing backup measures like password policy software, MFA whenever possible, and email-security tools in your organization can also mitigate the onus on end-user cybersecurity.
Data privacy laws are getting stricter—get ready #
We can’t talk about cybersecurity in 2023 without mentioning data privacy laws. With new data privacy laws set to go into effect in several states over the next year, now is the time to assess your current procedures and systems to make sure they comply. These new state-specific laws are just the beginning; companies would be wise to review their compliance as more states are likely to develop new privacy laws in the years to come.
Data privacy laws often require changes to how companies store and processing data, and implementing these new changes might open you up to additional risk if they are not implemented carefully. Ensure your organization is in adherence to proper cyber security protocols, including zero trust, as mentioned above.
Microsoft announced today that a future Microsoft Edge update would permanently disable the Internet Explorer 11 desktop web browser on some Windows 10 systems in February.
This comes after a previous warning from June 15, the day Internet Explorer reached its end of support, when the company told customers that the legacy web browser would get disabled via a Windows update.
“The out-of-support Internet Explorer 11 (IE11) desktop application is scheduled to be permanently disabled on certain versions of Windows 10 devices on February 14, 2023, through a Microsoft Edge update, not a Windows update as previously communicated,” Redmond said on Friday.
“All remaining devices that have not already been redirected from IE11 to Microsoft Edge are scheduled to be redirected with the Microsoft Edge update scheduled for February 14, 2023.”
Enterprise admins are advised to transition from IE11 to Microsoft Edge with IE mode and remove IE visual references from the Start Menu and the Windows taskbar with the Disable IE policy before February 14 to avoid “business disruption at scale when users lose access to IE11-dependent applications.”
Next year’s May non-security preview release and the June Windows monthly security update are also designed to remove them in environments where admins will not act before IE11 gets permanently disabled.
BleepingComputer previously reported that Internet Explorer would redirect users to the new Chromium-based Microsoft Edge when launching the Internet Explorer 11 desktop applications.
Starting in October 2020, IE11 has been automatically launching Microsoft Edge when visiting incompatible sites. The list of incompatible sites (managed by Microsoft) contains 7,562 domains belonging to a long list of high-profile online platforms and services, including Facebook, Instagram, Google Drive, Microsoft Teams, Twitter, and many others.
During the redirection process, users’ data (including settings, passwords, and favorites) will be imported into Microsoft Edge to make the switch easier.
Internet Explorer still around for some time
Even though officially retired from multiple Windows 10 versions on the semi-annual channel (SAC) servicing channel and not shipping with Windows 11, IE11 will still be available on Windows 7 ESU, Windows 8.1, and versions of Windows 10 LTSC client, IoT, and Server.
The web browser will continue receiving technical support and security updates on systems running these Windows versions for the lifecycle of the Windows version it runs on.
Microsoft has been urging customers to switch to Microsoft Edge with IE mode for years as it enables backward compatibility and will be supported through at least 2029—you can learn more about IE mode and how to make the switch in this getting started guide.
To enable IE mode in Microsoft Edge, you have to go to edge://settings/defaultbrowser, toggle on the ‘Allow sites to be reloaded in Internet Explorer‘ option, and restart the browser.
In this tutorial, we will dive into how to secure a Microsoft Exchange mail server with the CrowdSec collaborative firewall! Installing CrowdSec on a Microsoft Exchange server will allow you to protect against common attacks but also new threats.
A good example is the security breach ProxyNotShell which made headlines in October 2022: CrowdSec can detect exploit attempts and block malicious IP addresses, thanks to the fact that it contains a collection for IIS and attacks based on HTTP/HTTPS protocols. Other examples are more classic cases: brute force attacks on the Exchange webmail interface.
Due to how it functions, an Exchange server will be exposed to the Internet depending on the architecture of your IS (for example, the presence or absence of a reverse proxy). However, it must be able to communicate outward and also be reachable from the outside to send and receive emails to your users’ mailboxes.
This same server is also reachable through Webmail which allows users to check their emails from a browser. This implies the presence of an IIS web server that hosts both Webmail and Exchange Admin Center. Furthermore, when an Exchange server is compromised by a cyberattack, this mainly involves HTTP/HTTPS access: hence the interest in protecting yourself.
This article is a continuation of my first article on installing an Exchange Server 2019 server. For the installation of the Microsoft Exchange Server itself, I invite you to read my previous tutorial.
I already wrote about how to install CrowdSec on Windows in a previous article, but that was the Alpha version. Now, the CrowdSec agent for Windows is available in a stable version, which means that it is ready to be implemented in production.
Note: if you have previously installed the alpha version on your server, you must uninstall it before installing this new CrowdSec version.
Register the CrowdSec instance with the Central API
Register the CrowdSec service within Windows (automatic start)
Once done, begin the installation. Just follow the steps without making any changes. Then, allow about 2 minutes for the Agent to fully install.
As soon as the CrowdSec Agent is in place, we have access to the “cscli” command line which allows you to manage your CrowdSec instance from it.
To list current collections:
cscli collections list
To list the current bouncers (none by default):
cscli bouncers list
B. Installing the ISS Collection
On Windows, CrowdSec natively sets up the “crowdsecurity/windows“, but it is not enough to protect your Exchange server. We will need to add the IIS collection, which will also add two more collections to detect web attacks.
This collection is installed from this command:
cscli collections install crowdsecurity/iis
In just a few seconds after adding, we can list the installed collections to see the presence of the new collections.
To justify what I said in the introduction about the ProxyNotShell vulnerability, we can look at the details of the “crowdsecurity/http-cve” collection. Here, we can see the presence of a detection scenario named “crowdsecurity/CVE-2022-41082” corresponding to this vulnerability.
The installation is done in only a few clicks: just follow the wizard.
Once done, the command below will make it possible to see the presence of the bouncer.
cscli bouncers list
Let’s go to the next step.
D. Add IIS log support
For CrowdSec to focus on the logs generated by IIS, and by extension, corresponding to the access to the OWA and ECP portals of Exchange, we must indicate to it the paths to the log files it will analyze.
You can see the presence of a “dynamic” path which is characterized by the presence of the wildcard character: “C:\inetpub\logs\LogFiles\*\*.log “. This value will allow CrowdSec to find and read log files located in the tree “C:\inetpub\logs\LogFiles\
In addition to the path to the log files, this configuration block we just added contains a parameter named use_time_machine. It is important because IIS does not write logs in real-time in the log file, but it writes new events in blocks, every minute. Thanks to this parameter, CrowdSec will read the date and time of each line to find its way and process the events chronologically, this avoids false positives.
However, if you are not using the log files, but the event viewer, you should use this piece of code and not the one mentioned above:
Finally, we need to restart CrowdSec. This operation is done in PowerShell with this command:
Restart-Service crowdsec
CrowdSec setup is complete! Now let’s test it!
III. Is the Exchange server protected?
A. Brute force on OWA – Webmail Exchange
There are several possible methods to perform a brute force attack on OWA. Of course, you could do this manually for testing, but you could also use something a bit more automated to simulate a brute-force attack. As for us, we will use a Bash script named “OWA BRUTE” that executes Hydra (an offensive tool compatible with many protocols to test a service’s authentication, equipment, etc. ) with specific parameters corresponding to Outlook Web Access.
First, we need to install Hydra and Git. The first one is a prerequisite to use the script and perform our attack, while the second one will be used to clone the GitHub repository to get the Bash script (you can also copy and paste the script in a file…).
sudo apt-get update
sudo apt-get install hydra git
Once this is done, we clone the GitHub project in “/home/florian”:
cd /home/florian/
git clone
Then, we create a file “users.txt” in which we indicate some names of users. You can also recover a list on the Internet.
nano /home/florian/owabrute/users.txt
In the same sense, we create a file “passwords.txt” with the passwords to test.
nano /home/florian/owabrute/passwords.txt
Then, we move to the OWA BRUTE directory to add the execution rights on the Bash script.
cd /home/florian/owabrute/
chmod +x owabrute.sh
All that remains is to launch the attack by targeting “mail.domaine.fr” and then using our previously created files.
We can see that the script will test each combination. At the end, it will indicate if it has succeeded or not in finding a valid combination. However, CrowdSec will intervene…
Indeed, if I look at my Exchange server, I can see that there is a new IP address blocked because of brute force (“crowdsecurity/windows-bf”). The CrowdSec agent has correctly blocked the IP address that caused this attack.
Since we are here to test, we can unblock our IP address manually:
cscli decisions delete –ip X.X.X.X
Let’s move on to a second test.
B. Scan Web on OWA
In the case where someone tries to scan your Web server, when IIS is used by Exchange, they can rely on various tools including Nikto which is used to analyze the security level of a Web server. For this example, OWA will be scanned with the Nikto tool: we will see if CrowdSec detects what is happening on the IIS server…
First of all, let’s install this tool:
sudo apt-get update
sudo apt-get install nikto
Then, we launch the scan to webmail:
nikto -h https://mail.domaine.fr/owa
The analysis will take several minutes…
…Except that after a while, CrowdSec will realize that this web client is performing suspicious actions and it will decide to block it. In the example below, we can see the reason “http-sensitive-files” which means that the client tried to access sensitive files.
In this second example, where we performed a completely different action compared to the first attempt, CrowdSec also managed to detect our malicious actions.
IV. Conclusion
We have just seen how to set up the CrowdSec agent on Windows to protect a Microsoft Exchange mail server! Here, I took the example of Exchange Server 2019, but it also applies to previous versions. With these two quick, but concrete examples, we could see the efficiency of CrowdSec!
I’ll also take this moment to remind you of the existence of the CrowdSec Console which allows you to follow the alerts raised by one or more CrowdSec Agents from a web-based console. To learn more about the implementation and all the functionalities, you can visit the Console page.
Reverse-engineering reveals close similarities to BlackMatter ransomware, with some improvements
A postmortem analysis of multiple incidents in which attackers eventually launched the latest version of LockBit ransomware (known variously as LockBit 3.0 or ‘LockBit Black’), revealed the tooling used by at least one affiliate. Sophos’ Managed Detection and Response (MDR) team has observed both ransomware affiliates and legitimate penetration testers use the same collection of tooling over the past 3 months.
Leaked data about LockBit that showed the backend controls for the ransomware also seems to indicate that the creators have begun experimenting with the use of scripting that would allow the malware to “self-spread” using Windows Group Policy Objects (GPO) or the tool PSExec, potentially making it easier for the malware to laterally move and infect computers without the need for affiliates to know how to take advantage of these features for themselves, potentially speeding up the time it takes them to deploy the ransomware and encrypt targets.
A reverse-engineering analysis of the LockBit functionality shows that the ransomware has carried over most of its functionality from LockBit 2.0 and adopted new behaviors that make it more difficult to analyze by researchers. For instance, in some cases it now requires the affiliate to use a 32-character ‘password’ in the command line of the ransomware binary when launched, or else it won’t run, though not all the samples we looked at required the password.
We also observed that the ransomware runs with LocalServiceNetworkRestricted permissions, so it does not need full Administrator-level access to do its damage (supporting observations of the malware made by other researchers).
Most notably, we’ve observed (along with other researchers) that many LockBit 3.0 features and subroutines appear to have been lifted directly from BlackMatter ransomware.
Is LockBit 3.0 just ‘improved’ BlackMatter?
Other researchers previously noted that LockBit 3.0 appears to have adopted (or heavily borrowed) several concepts and techniques from the BlackMatter ransomware family.
We dug into this ourselves, and found a number of similarities which strongly suggest that LockBit 3.0 reuses code from BlackMatter.
Anti-debugging trick
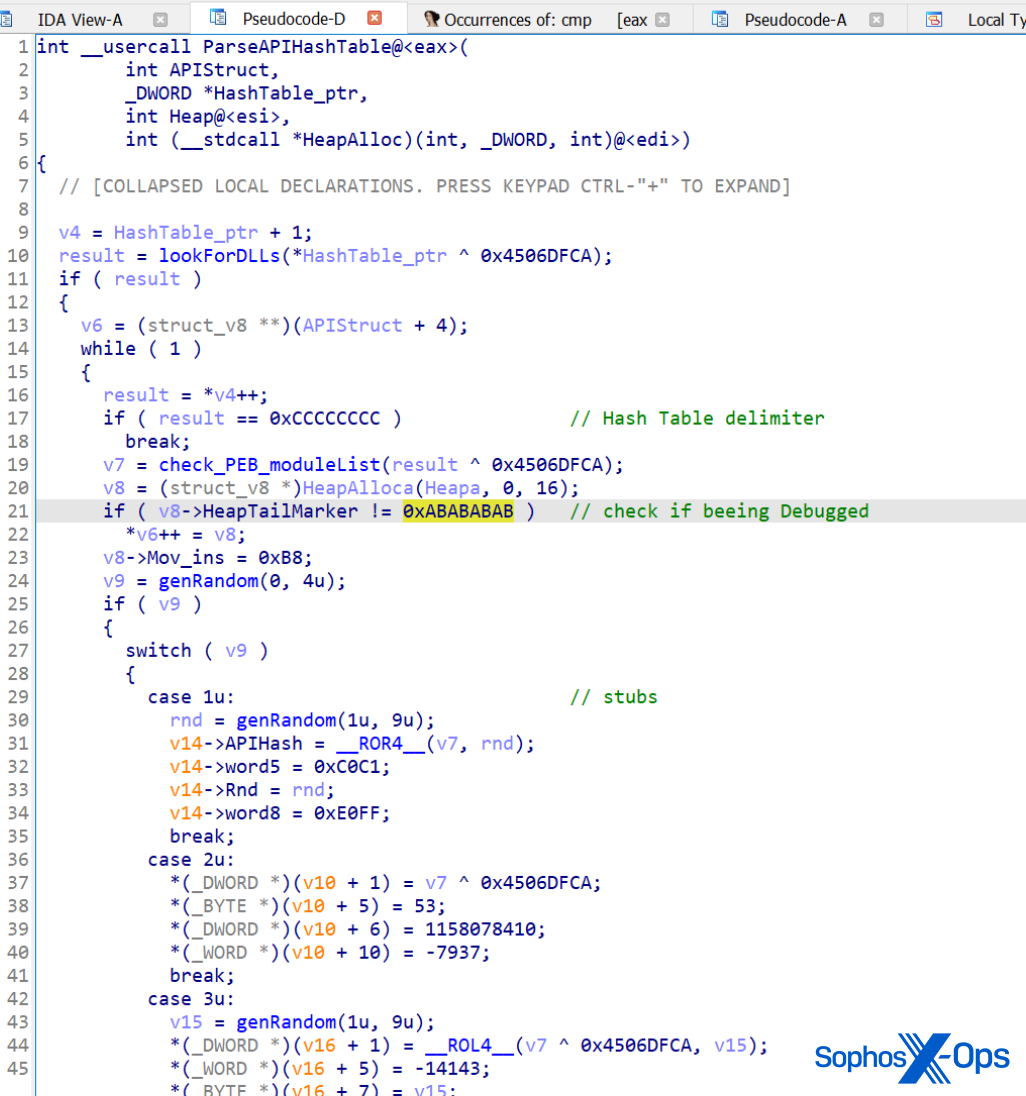
Blackmatter and Lockbit 3.0 use a specific trick to conceal their internal functions calls from researchers. In both cases, the ransomware loads/resolves a Windows DLL from its hash tables, which are based on ROT13.
It will try to get pointers from the functions it needs by searching the PEB (Process Environment Block) of the module. It will then look for a specific binary data marker in the code (0xABABABAB) at the end of the heap; if it finds this marker, it means someone is debugging the code, and it doesn’t save the pointer, so the ransomware quits.
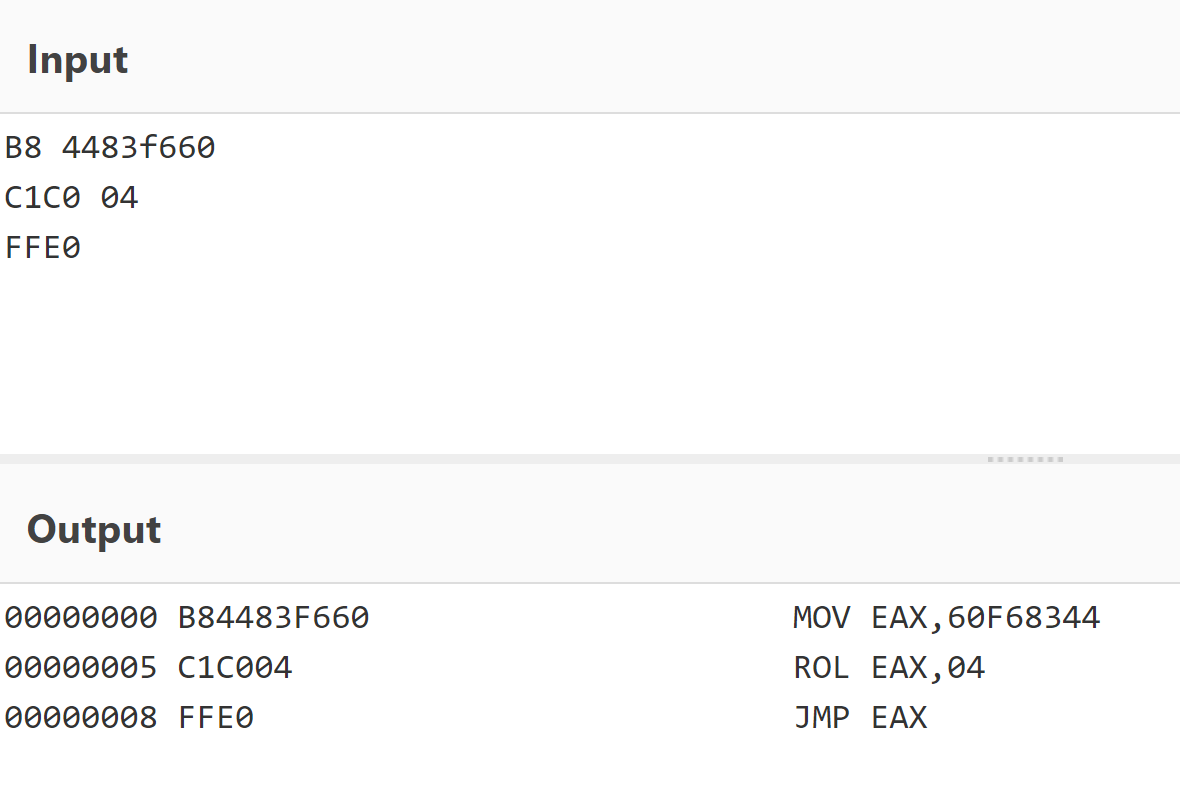
After these checks, it will create a special stub for each API it requires. There are five different types of stubs that can be created (randomly). Each stub is a small piece of shellcode that performs API hash resolution on the fly and jumps to the API address in memory. This adds some difficulties while reversing using a debugger.
The first stub, as an example (decoded with CyberChef)
Obfuscation of strings
Many strings in both LockBit 3.0 and BlackMatter are obfuscated, resolved during runtime by pushing the obfuscated strings on to the stack and decrypting with an XOR function. In both LockBit and BlackMatter, the code to achieve this is very similar.
Georgia Tech student Chuong Dong analyzed BlackMatter and showed this feature on his blog, with the screenshot above.
LockBit’s string obfuscation, in comparison
By comparison, LockBit 3.0 has adopted a string obfuscation method that looks and works in a very similar fashion to BlackMatter’s function.
API resolution
LockBit uses exactly the same implementation as BlackMatter to resolve API calls, with one exception: LockBit adds an extra step in an attempt to conceal the function from debuggers.
BlackMatter’s dynamic API resolution (image credit: Chuong Dong)
The array of calls performs precisely the same function in LockBit 3.0.
LockBit’s dynamic API resolution
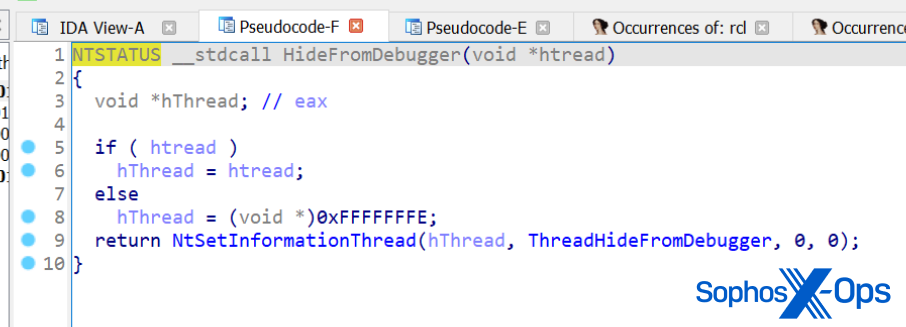
Hiding threads
Both LockBit and BlackMatter hide threads using the NtSetInformationThread function, with the parameter ThreadHideFromDebugger. As you probably can guess, this means that the debugger doesn’t receive events related to this thread.
LockBit employs the same ThreadHideFromDebugger feature as an evasion technique
Printing
LockBit, like BlackMatter, sends ransom notes to available printers.
LockBit can send its ransom notes directly to printers, as BlackMatter can do
Deletion of shadow copies
Both ransomware will sabotage the infected computer’s ability to recover from file encryption by deleting the Volume Shadow Copy files.
LockBit calls the IWbemLocator::ConnectServer method to connect with the local ROOT\CIMV2 namespace and obtain the pointer to an IWbemServices object that eventually calls IWbemServices::ExecQuery to execute the WQL query.
BlackMatter code for deleting shadow copies (image credit: Chuong Dong)
LockBit’s method of doing this is identical to BlackMatter’s implementation, except that it adds a bit of string obfuscation to the subroutine.
LockBit’s deletion of shadow copies
Enumerating DNS hostnames
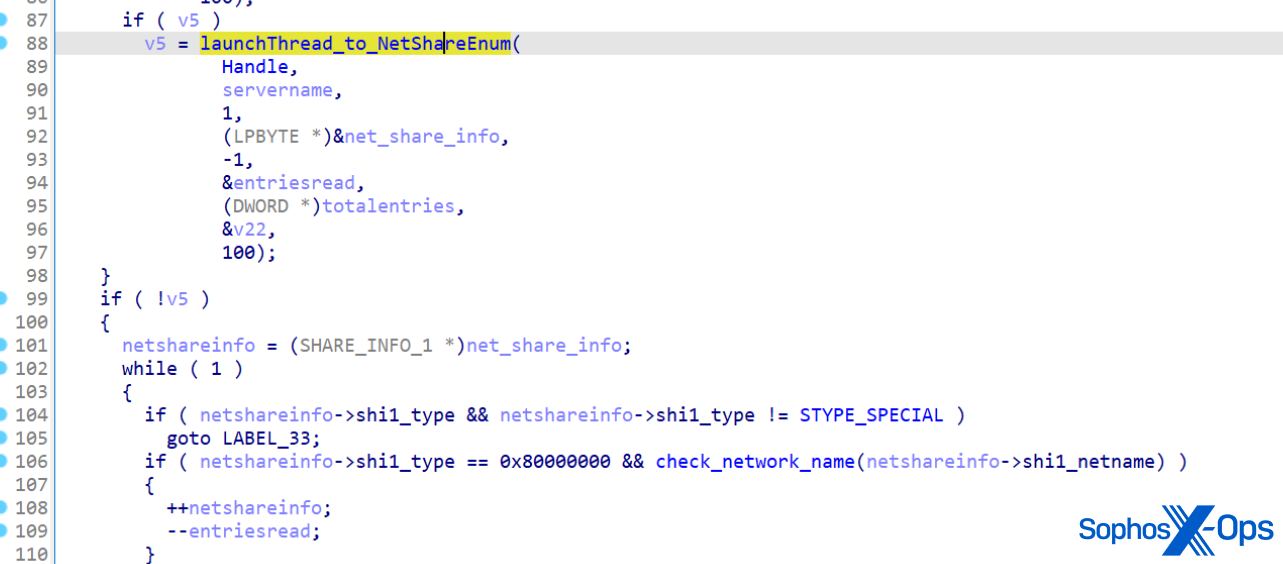
Both LockBit and BlackMatter enumerate hostnames on the network by calling NetShareEnum.
BlackMatter calls NetShareEnum() to enumerate hostnames… (image credit: Chuong Dong)
In the source code for LockBit, the function looks like it has been copied, verbatim, from BlackMatter.
…as does LockBit
Determining the operating system version
Both ransomware strains use identical code to check the OS version – even using the same return codes (although this is a natural choice, since the return codes are hexadecimal representations of the version number).
BlackMatter’s code for checking the OS version (image credit: Chuong Dong)LockBit’s OS enumeration routine
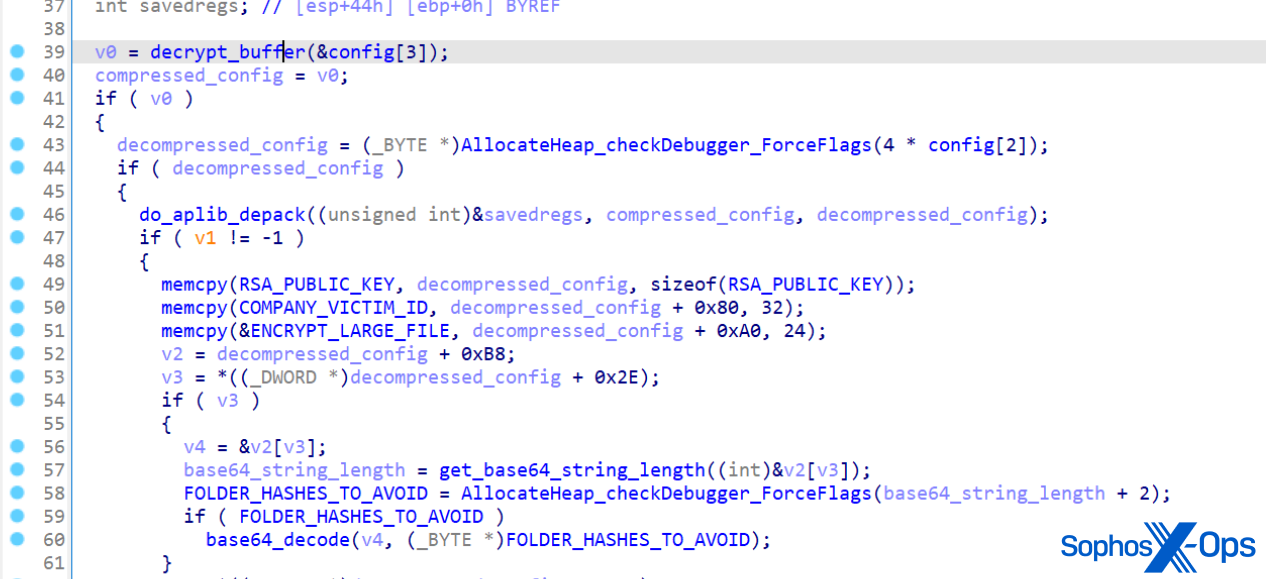
Configuration
Both ransomware contain embedded configuration data inside their binary executables. We noted that LockBit decodes its config in a similar way to BlackMatter, albeit with some small differences.
For instance, BlackMatter saves its configuration in the .rsrc section, whereas LockBit stores it in .pdata.
And LockBit uses a different linear congruential generator (LCG) algorithm for decoding.
LockBit’s config decryption routine
Some researchers have speculated that the close relationship between the LockBit and BlackMatter code indicates that one or more of BlackMatter’s coders were recruited by LockBit; that LockBit bought the BlackMatter codebase; or a collaboration between developers. As we noted in our white paper on multiple attackers earlier this year, it’s not uncommon for ransomware groups to interact, either inadvertently or deliberately.
Either way, these findings are further evidence that the ransomware ecosystem is complex, and fluid. Groups reuse, borrow, or steal each other’s ideas, code, and tactics as it suits them. And, as the LockBit 3.0 leak site (containing, among other things, a bug bounty and a reward for “brilliant ideas”) suggests, that gang in particular is not averse to paying for innovation.
LockBit tooling mimics what legitimate pentesters would use
Another aspect of the way LockBit 3.0’s affiliates are deploying the ransomware shows that they’re becoming very difficult to distinguish from the work of a legitimate penetration tester – aside from the fact that legitimate penetration testers, of course, have been contracted by the targeted company beforehand, and are legally allowed to perform the pentest.
The tooling we observed the attackers using included a package from GitHub called Backstab. The primary function of Backstab is, as the name implies, to sabotage the tooling that analysts in security operations centers use to monitor for suspicious activity in real time. The utility uses Microsoft’s own Process Explorer driver (signed by Microsoft) to terminate protected anti-malware processes and disable EDR utilities. Both Sophos and other researchers have observed LockBit attackers using Cobalt Strike, which has become a nearly ubiquitous attack tool among ransomware threat actors, and directly manipulating Windows Defender to evade detection.
Further complicating the parentage of LockBit 3.0 is the fact that we also encountered attackers using a password-locked variant of the ransomware, called lbb_pass.exe , which has also been used by attackers that deploy REvil ransomware. This may suggest that there are threat actors affiliated with both groups, or that threat actors not affiliated with LockBit have taken advantage of the leaked LockBit 3.0 builder. At least one group, BlooDy, has reportedly used the builder, and if history is anything to go by, more may follow suit.
LockBit 3.0 attackers also used a number of publicly-available tools and utilities that are now commonplace among ransomware threat actors, including the anti-hooking utility GMER, a tool called AV Remover published by antimalware company ESET, and a number of PowerShell scripts designed to remove Sophos products from computers where Tamper Protection has either never been enabled, or has been disabled by the attackers after they obtained the credentials to the organization’s management console.
We also saw evidence the attackers used a tool called Netscan to probe the target’s network, and of course, the ubiquitous password-sniffer Mimikatz.
Incident response makes no distinction
Because these utilities are in widespread use, MDR and Rapid Response treats them all equally – as though an attack is underway – and immediately alerts the targets when they’re detected.
We found the attackers took advantage of less-than-ideal security measures in place on the targeted networks. As we mentioned in our Active Adversaries Report on multiple ransomware attackers, the lack of multifactor authentication (MFA) on critical internal logins (such as management consoles) permits an intruder to use tooling that can sniff or keystroke-capture administrators’ passwords and then gain access to that management console.
It’s safe to assume that experienced threat actors are at least as familiar with Sophos Central and other console tools as the legitimate users of those consoles, and they know exactly where to go to weaken or disable the endpoint protection software. In fact, in at least one incident involving a LockBit threat actor, we observed them downloading files which, from their names, appeared to be intended to remove Sophos protection: sophoscentralremoval-master.zip and sophos-removal-tool-master.zip. So protecting those admin logins is among the most critically important steps admins can take to defend their networks.
For a list of IOCs associated with LockBit 3.0, please see our GitHub.
Acknowledgments
Sophos X-Ops acknowledges the collaboration of Colin Cowie, Gabor Szappanos, Alex Vermaning, and Steeve Gaudreault in producing this report.
Summary: Dell EMC PowerScale OneFS remediation is available for multiple vulnerabilities that may potentially be exploited by malicious users to compromise the affected system.
Article Content
Impact
Critical
Overview
Proprietary Code CVEs
Description
CVSS Base Score
CVSS Vector String
CVE-2022-24411
Dell PowerScale OneFS 8.2.2 and later contain an elevation of privilege vulnerability. A local attacker with ISI_PRIV_LOGIN_SSH and/or ISI_PRIV_LOGIN_CONSOLE may potentially exploit this vulnerability, leading to elevation of privilege. This may potentially allow users to circumvent PowerScale Compliance Mode guarantees.
7.8
CVSS:3.1/AV:L/AC:L/PR:L/UI:N/S:U/C:H/I:H/A:H
CVE-2022-24412
Dell EMC PowerScale OneFS 8.2.x – 9.3.0.x contain an improper handling of value vulnerability. An unauthenticated remote attacker may potentially exploit this vulnerability, leading to denial-of-service.
7.5
CVSS:3.1/AV:N/AC:L/PR:N/UI:N/S:U/C:N/I:N/A:H
CVE-2022-23161
Dell PowerScale OneFS versions 8.2.x – 9.3.0.x contain a denial-of-service vulnerability in SmartConnect. An unprivileged network attacker may potentially exploit this vulnerability, leading to denial-of-service.
7.5
CVSS:3.1/AV:N/AC:L/PR:N/UI:N/S:U/C:N/I:N/A:H
CVE-2022-23160
Dell PowerScale OneFS 8.2.x – 9.3.0 contain an Improper Handling of Insufficient Permissions vulnerability. An remote malicious user may potentially exploit this vulnerability, leading to gaining write permissions on read-only files.
5.4
CVSS:3.1/AV:N/AC:L/PR:L/UI:N/S:U/C:N/I:L/A:L
CVE-2022-23159
Dell PowerScale OneFS 8.2.x – 9.3.0.x contain a missing release of memory after effective lifetime vulnerability. An authenticated user with ISI_PRIV_LOGIN_SSH and/or ISI_PRIV_LOGIN_CONSOLE and ISI_PRIV_AUTH_PROVIDERS privileges may potentially exploit this vulnerability, leading to a Denial-Of-Service. This can also impact a cluster in Compliance mode. Dell recommends to update at the earliest opportunity.
4.8
CVSS:3.1/AV:N/AC:H/PR:L/UI:R/S:U/C:N/I:N/A:H
CVE-2022-23163
Dell PowerScale OneFS 8.2.x – 9.3.0.x contain a denial of service vulnerability. A local attacker with minimal privileges may potentially exploit this vulnerability, leading to denial of service/data unavailability.
4.7
CVSS:3.1/AV:L/AC:H/PR:L/UI:N/S:U/C:N/I:N/A:H
CVE-2022-24413
Dell PowerScale OneFS 8.2.2-9.3.x contain a time-of-check-to-time-of-use vulnerability. A local user with access to the filesystem may potentially exploit this vulnerability, leading to data loss.
Dell Technologies recommends all customers consider both the CVSS base score and any relevant temporal and environmental scores that may impact the potential severity associated with a particular security vulnerability.
Disable netbios support if enabled (default setting: disabled):Open an SSH connection on any node in the cluster and log on using the “root” account.Run the following command:#isi smb settings global modify –support-netbios noTo verify that the service is disabled, run the following command:#isi smb settings global view | grep NetBIOSIf the service is disabled, the following output is displayed:#Support NetBIOS: No
CVE-2022-23161
Configure a valid FQDN in the SmartConnect service name field for every SmartConnect subnet on the cluster:#isi network subnets modify <subnet> –sc-service-name cluster-sc.example.com
CVE-2017-12613
none
CVE-2022-23160
Configure SMB share permissions of any SyncIQ target directory to prevent writes.
The information in this Dell Technologies Security Advisory should be read and used to assist in avoiding situations that may arise from the problems described herein. Dell Technologies distributes Security Advisories to bring important security information to the attention of users of the affected product(s). Dell Technologies assesses the risk based on an average of risks across a diverse set of installed systems and may not represent the actual risk to your local installation and individual environment. It is recommended that all users determine the applicability of this information to their individual environments and take appropriate actions. The information set forth herein is provided “as is” without warranty of any kind. Dell Technologies expressly disclaims all warranties, either express or implied, including the warranties of merchantability, fitness for a particular purpose, title and non-infringement. In no event shall Dell Technologies, its affiliates or suppliers, be liable for any damages whatsoever arising from or related to the information contained herein or actions that you decide to take based thereon, including any direct, indirect, incidental, consequential, loss of business profits or special damages, even if Dell Technologies, its affiliates or suppliers have been advised of the possibility of such damages. Some states do not allow the exclusion or limitation of liability for consequential or incidental damages, so the foregoing limitation shall apply to the extent permissible under law.
In this final installation of our three-part blog series, we lay out countermeasures that enterprises can do to protect their machines. We’ll also discuss our responsible disclosure as well as the feedback we got from the vendors we evaluated.
Countermeasures
We found that only two of the four vendors analyzed support authentication. Neither of them has authentication enabled by default, which leaves the machines vulnerable to attacks by malicious users. Enabling authentication is essential for protecting Industry 4.0 features from abuse.
Resource access control systems are important for reducing the impact of attacks. Many technologies allow access to all a controller’s resources, which can be dangerous. A correct approach is to adopt resource access control systems that grant limited access. This will help to ensure that only authorized users have access to the controller’s resources and that these resources are protected from unauthorized access.
When it comes to integrators and end users, we suggest these countermeasures:
Context-aware industrial intrusion prevention and detection systems (IPS/IDSs): These devices, which have recently seen a surge in popularity in the catalogues of security vendors, are equipped with network engines that can capture real-time traffic associated with industrial protocols to detect attacks.
Network segmentation: Correct network architecting is of great importance. As our research has revealed, all the tested machines expose interfaces that could be abused by miscreants.
Correct patching: Modern CNC machines are equipped with full-fledged operating systems and complex software, which might inevitably contain security vulnerabilities. This was indeed the case with the machines that we tested.
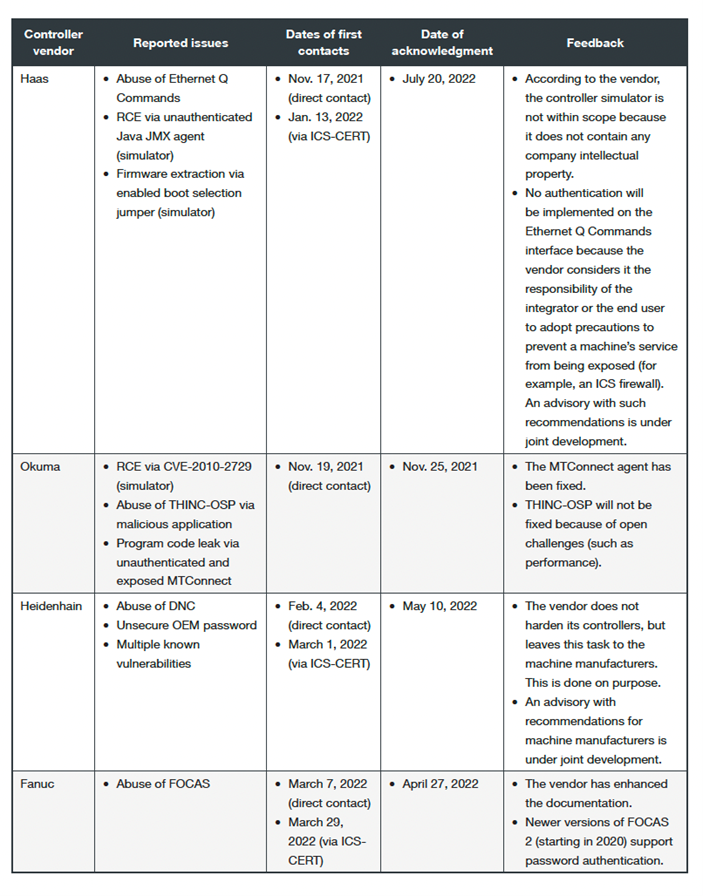
Responsible Disclosure
We contacted the affected vendors while tackling controllers sequentially, with our first contact in November 2021 and the last one in March 2022. The Industrial Control Systems Cyber Emergency Response Team (ICS CERT) at Cybersecurity & Infrastructure Security Agency extended invaluable help during the discussion which we are grateful for.
Table 1. A summary of our responsible disclosure process
As of this writing, all four vendors have replied to our concerns and most of them have addressed, to varying degrees, our findings in a reasonable time frame. More importantly, all of them have expressed interest in our research and have decided to improve either their documentation or their communication efforts with their machine manufacturers, with the final effort of offering end users more secure solutions.
In part one, we discussed what numerical control machines do and their basic concepts. These concepts are important to understand the machines better, offering a wider view of their operations. We also laid out how we evaluated the chosen vendors for our research.
For this blog, we will continue discussing our evaluated vendors and highlighting findings that we discovered during our research.
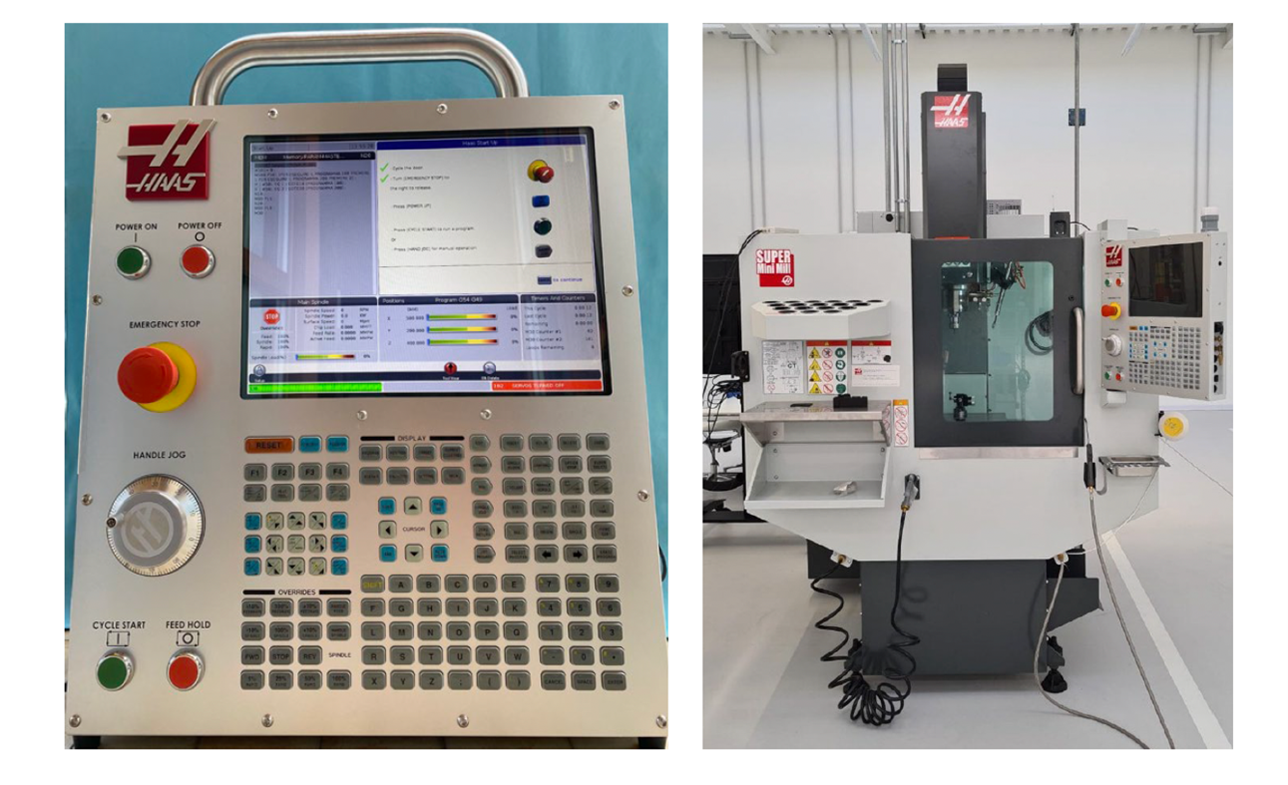
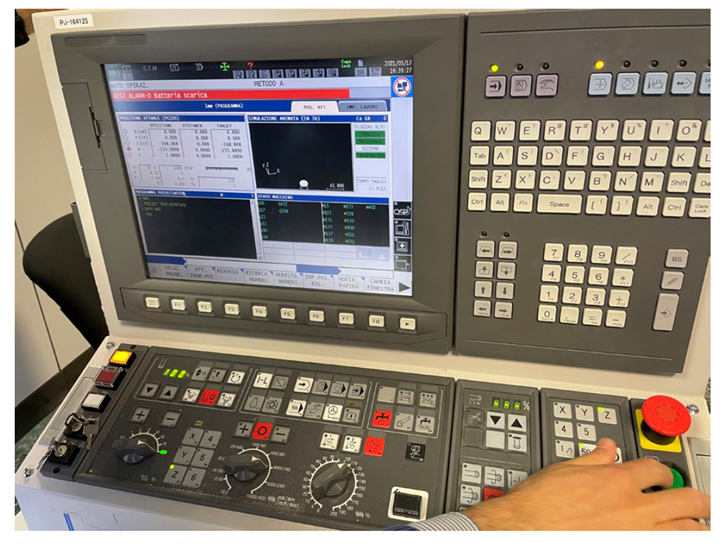
Haas
Figure 1. The Haas simulator we used for preliminary testing (left) and the Haas CNC machine (Super Mini Mill 2) by Celada we used for verification (right)
Haas was the first vendor we focused on because of the fast availability of its controller. We began our analysis by conducting port scanning on the controller simulator and identifying the protocols exposed by the controller. After that, we evaluated the options with which an attacker could abuse the protocols to perform attacks aimed at the security of the machine and verified these attacks in practice on a real-world machine installation.
Okuma
Figure 2. The Okuma simulator we used for the development of the malicious application and during the initial testing
Okuma stands out in the market of CNC controllers for one interesting feature: the modularity of its controller. While the vendor offers in the device’s simplest form a tiny controller, it also provides a mechanism, called THINC API, to highly customize the functionalities of the controller. With this technology, any developer can implement a program that, once installed, runs in the context of the controller, in the form of an extension. This approach is very similar to how a mobile application, once installed, can extend a smartphone’s functionalities.
Heidenhain
Figure 3. The Hartford 5A-65E machine, running on a Heidenhain TNC 640 controller, that we used in our experiments at Celada
In the spirit of the Industry 4.0 paradigm, Heidenhain offers the Heidenhain DNC interface to integrate machines on modern, digital shop floors. Among the many scenarios, Heidenhain DNC enables the automatic exchange of data with machine and production data acquisition (MDA/PDA) systems, higher level enterprise resource planning (ERP) and manufacturing execution systems (MESs), inventory management systems, computer-aided design and manufacturing (CAD/CAM) systems, production activity control systems, simulation tools, and tool management systems
In our evaluation, we had access to the library provided by Heidenhain to the integrators to develop interfaces for the controller. The manufacturer provides this library, called RemoTools SDK,35 to selected partners only.
Fanuc
Figure 4. The Yasuda YMC 430 + RT10 machine, running on a Fanuc controller, that we used in our experiments at the Polytechnic University of Milan
Like Heidenhain, Fanuc offers an interface, called FOCAS,36 for the integration of CNC machines in smart network environments. Even though this technology offers a restricted set of remote-call possibilities compared with the other vendors’ (that is, a limited number of management features), our experiments showed that a miscreant could potentially conduct attacks like damage, DoS, and hijacking.
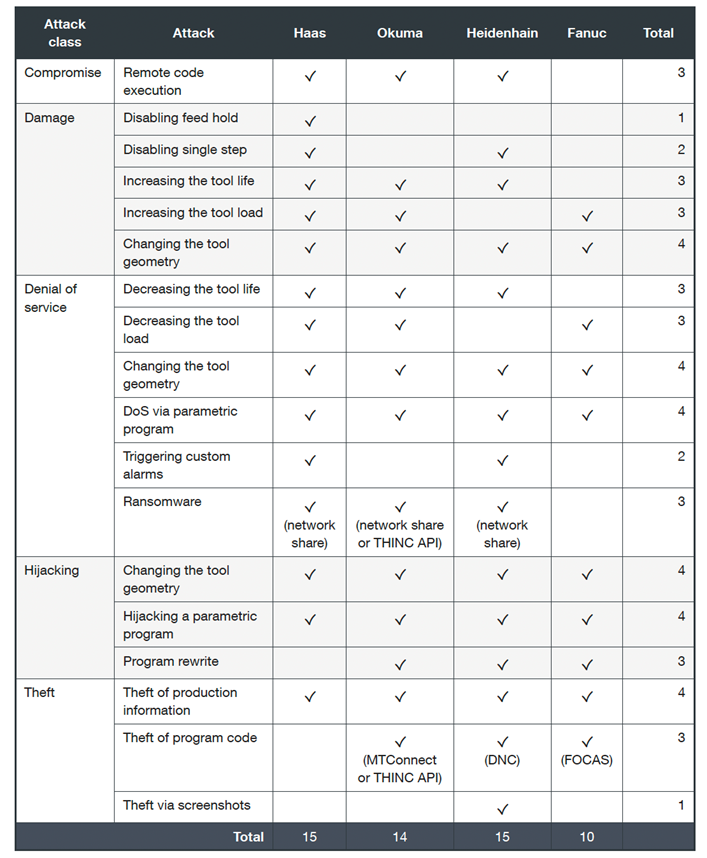
What we found
As our evaluation identified 18 different attacks (or variations), we grouped them into five classes: compromise, damage, and denial of service (DoS):
Table 1. A summary of the attacks we identified in our research
Controller manufacturers like Haas, Okuma, and Heidenhain have been found to have a similar number of issues, around 15. Fanuc had 10 confirmed attacks. Unfortunately, our research shows that this domain lacks awareness concerning security and privacy. This creates serious and compelling problems.
The need for automation-facing features like remote configuration of tool geometry or parametric programming with values determined by networked resources is becoming more common in manufacturing.
With these findings, we determined countermeasures that enterprises can do to mitigate such risks, which we’ll discuss in our final installation. In the last part, we’ll also discuss our responsible disclosure process.