Just in time for Data Privacy Day 2024 on January 28, the EU Commission is calling for evidence to understand how the EU’s General Data Protection Regulation (GDPR) has been functioning now that we’re nearing the 6th anniversary of the regulation coming into force.
We’re so glad they asked, because we have some thoughts. And what better way to celebrate privacy day than by discussing whether the application of the GDPR has actually done anything to improve people’s privacy?
The answer is, mostly yes, but in a couple of significant ways – no.
Overall, the GDPR is rightly seen as the global gold standard for privacy protection. It has served as a model for what data protection practices should look like globally, it enshrines data subject rights that have been copied across jurisdictions, and when it took effect, it created a standard for the kinds of privacy protections people worldwide should be able to expect and demand from the entities that handle their personal data. On balance, the GDPR has definitely moved the needle in the right direction for giving people more control over their personal data and in protecting their privacy.
In a couple of key areas, however, we believe the way the GDPR has been applied to data flowing across the Internet has done nothing for privacy and in fact may even jeopardize the protection of personal data. The first area where we see this is with respect to cross-border data transfers. Location has become a proxy for privacy in the minds of many EU data protection regulators, and we think that is the wrong result. The second area is an overly broad interpretation of what constitutes “personal data” by some regulators with respect to Internet Protocol or “IP” addresses. We contend that IP addresses should not always count as personal data, especially when the entities handling IP addresses have no ability on their own to tie those IP addresses to individuals. This is important because the ability to implement a number of industry-leading cybersecurity measures relies on the ability to do threat intelligence on Internet traffic metadata, including IP addresses.
Location should not be a proxy for privacy
Fundamentally, good data security and privacy practices should be able to protect personal data regardless of where that processing or storage occurs. Nevertheless, the GDPR is based on the idea that legal protections should attach to personal data based on the location of the data – where it is generated, processed, or stored. Articles 44 to 49 establish the conditions that must be in place in order for data to be transferred to a jurisdiction outside the EU, with the idea that even if the data is in a different location, the privacy protections established by the GDPR should follow the data. No doubt this approach was influenced by political developments around government surveillance practices, such as the revelations in 2013 of secret documents describing the relationship between the US NSA (and its Five Eyes partners) and large Internet companies, and that intelligence agencies were scooping up data from choke points on the Internet. And once the GDPR took effect, many data regulators in the EU were of the view that as a result of the GDPR’s restrictions on cross-border data transfers, European personal data simply could not be processed in the United States in a way that would be consistent with the GDPR.
This issue came to a head in July 2020, when the European Court of Justice (CJEU), in its “Schrems II” decision1, invalidated the EU-US Privacy Shield adequacy standard and questioned the suitability of the EU standard contractual clauses (a mechanism entities can use to ensure that GDPR protections are applied to EU personal data even if it is processed outside the EU). The ruling in some respects left data protection regulators with little room to maneuver on questions of transatlantic data flows. But while some regulators were able to view the Schrems II ruling in a way that would still allow for EU personal data to be processed in the United States, other data protection regulators saw the decision as an opportunity to double down on their view that EU personal data cannot be processed in the US consistent with the GDPR, therefore promoting the misconception that data localization should be a proxy for data protection.
In fact, we would argue that the opposite is the case. From our own experience and according to recent research2, we know that data localization threatens an organization’s ability to achieve integrated management of cybersecurity risk and limits an entity’s ability to employ state-of-the-art cybersecurity measures that rely on cross-border data transfers to make them as effective as possible. For example, Cloudflare’s Bot Management product only increases in accuracy with continued use on the global network: it detects and blocks traffic coming from likely bots before feeding back learnings to the models backing the product. A diversity of signal and scale of data on a global platform is critical to help us continue to evolve our bot detection tools. If the Internet were fragmented – preventing data from one jurisdiction being used in another – more and more signals would be missed. We wouldn’t be able to apply learnings from bot trends in Asia to bot mitigation efforts in Europe, for example. And if the ability to identify bot traffic is hampered, so is the ability to block those harmful bots from services that process personal data.
The need for industry-leading cybersecurity measures is self-evident, and it is not as if data protection authorities don’t realize this. If you look at any enforcement action brought against an entity that suffered a data breach, you see data protection regulators insisting that the impacted entities implement ever more robust cybersecurity measures in line with the obligation GDPR Article 32 places on data controllers and processors to “develop appropriate technical and organizational measures to ensure a level of security appropriate to the risk”, “taking into account the state of the art”. In addition, data localization undermines information sharing within industry and with government agencies for cybersecurity purposes, which is generally recognized as vital to effective cybersecurity.
In this way, while the GDPR itself lays out a solid framework for securing personal data to ensure its privacy, the application of the GDPR’s cross-border data transfer provisions has twisted and contorted the purpose of the GDPR. It’s a classic example of not being able to see the forest for the trees. If the GDPR is applied in such a way as to elevate the priority of data localization over the priority of keeping data private and secure, then the protection of ordinary people’s data suffers.
Applying data transfer rules to IP addresses could lead to balkanization of the Internet
The other key way in which the application of the GDPR has been detrimental to the actual privacy of personal data is related to the way the term “personal data” has been defined in the Internet context – specifically with respect to Internet Protocol or “IP” addresses. A world where IP addresses are always treated as personal data and therefore subject to the GDPR’s data transfer rules is a world that could come perilously close to requiring a walled-off European Internet. And as noted above, this could have serious consequences for data privacy, not to mention that it likely would cut the EU off from any number of global marketplaces, information exchanges, and social media platforms.
This is a bit of a complicated argument, so let’s break it down. As most of us know, IP addresses are the addressing system for the Internet. When you send a request to a website, send an email, or communicate online in any way, IP addresses connect your request to the destination you’re trying to access. These IP addresses are the key to making sure Internet traffic gets delivered to where it needs to go. As the Internet is a global network, this means it’s entirely possible that Internet traffic – which necessarily contains IP addresses – will cross national borders. Indeed, the destination you are trying to access may well be located in a different jurisdiction altogether. That’s just the way the global Internet works. So far, so good.
But if IP addresses are considered personal data, then they are subject to data transfer restrictions under the GDPR. And with the way those provisions have been applied in recent years, some data regulators were getting perilously close to saying that IP addresses cannot transit jurisdictional boundaries if it meant the data might go to the US. The EU’s recent approval of the EU-US Data Privacy Framework established adequacy for US entities that certify to the framework, so these cross-border data transfers are not currently an issue. But if the Data Privacy Framework were to be invalidated as the EU-US Privacy Shield was in the Schrems II decision, then we could find ourselves in a place where the GDPR is applied to mean that IP addresses ostensibly linked to EU residents can’t be processed in the US, or potentially not even leave the EU.
If this were the case, then providers would have to start developing Europe-only networks to ensure IP addresses never cross jurisdictional boundaries. But how would people in the EU and US communicate if EU IP addresses can’t go to the US? Would EU citizens be restricted from accessing content stored in the US? It’s an application of the GDPR that would lead to the absurd result – one surely not intended by its drafters. And yet, in light of the Schrems II case and the way the GDPR has been applied, here we are.
A possible solution would be to consider that IP addresses are not always “personal data” subject to the GDPR. In 2016 – even before the GDPR took effect – the Court of Justice of the European Union (CJEU) established the view in Breyer v. Bundesrepublik Deutschland that even dynamic IP addresses, which change with every new connection to the Internet, constituted personal data if an entity processing the IP address could link the IP addresses to an individual. While the court’s decision did not say that dynamic IP addresses are always personal data under European data protection law, that’s exactly what EU data regulators took from the decision, without considering whether an entity actually has a way to tie the IP address to a real person3.
The question of when an identifier qualifies as “personal data” is again before the CJEU: In April 2023, the lower EU General Court ruled in SRB v EDPS4 that transmitted data can be considered anonymised and therefore not personal data if the data recipient does not have any additional information reasonably likely to allow it to re-identify the data subjects and has no legal means available to access such information. The appellant – the European Data Protection Supervisor (EDPS) – disagrees. The EDPS, who mainly oversees the privacy compliance of EU institutions and bodies, is appealing the decision and arguing that a unique identifier should qualify as personal data if that identifier could ever be linked to an individual, regardless of whether the entity holding the identifier actually had the means to make such a link.
If the lower court’s common-sense ruling holds, one could argue that IP addresses are not personal data when those IP addresses are processed by entities like Cloudflare, which have no means of connecting an IP address to an individual. If IP addresses are then not always personal data, then IP addresses will not always be subject to the GDPR’s rules on cross-border data transfers.
Although it may seem counterintuitive, having a standard whereby an IP address is not necessarily “personal data” would actually be a positive development for privacy. If IP addresses can flow freely across the Internet, then entities in the EU can use non-EU cybersecurity providers to help them secure their personal data. Advanced Machine Learning/predictive AI techniques that look at IP addresses to protect against DDoS attacks, prevent bots, or otherwise guard against personal data breaches will be able to draw on attack patterns and threat intelligence from around the world to the benefit of EU entities and residents. But none of these benefits can be realized in a world where IP addresses are always personal data under the GDPR and where the GDPR’s data transfer rules are interpreted to mean IP addresses linked to EU residents can never flow to the United States.
Keeping privacy in focus
On this Data Privacy Day, we urge EU policy makers to look closely at how the GDPR is working in practice, and to take note of the instances where the GDPR is applied in ways that place privacy protections above all other considerations – even appropriate security measures mandated by the GDPR’s Article 32 that take into account the state of the art of technology. When this happens, it can actually be detrimental to privacy. If taken to the extreme, this formulaic approach would not only negatively impact cybersecurity and data protection, but even put into question the functioning of the global Internet infrastructure as a whole, which depends on cross-border data flows. So what can be done to avert this?
First, we believe EU policymakers could adopt guidelines (if not legal clarification) for regulators that IP addresses should not be considered personal data when they cannot be linked by an entity to a real person. Second, policymakers should clarify that the GDPR’s application should be considered with the cybersecurity benefits of data processing in mind. Building on the GDPR’s existing recital 49, which rightly recognizes cybersecurity as a legitimate interest for processing, personal data that needs to be processed outside the EU for cybersecurity purposes should be exempted from GDPR restrictions to international data transfers. This would avoid some of the worst effects of the mindset that currently views data localization as a proxy for data privacy. Such a shift would be a truly pro-privacy application of the GDPR.
Visit 1.1.1.1 from any device to get started with our free app that makes your Internet faster and safer.
To learn more about our mission to help build a better Internet, start here. If you’re looking for a new career direction, check out our open positions.
01/02/2024 Matthew Prince John Graham-Cumming Grant Bourzikas
11 min read
On Thanksgiving Day, November 23, 2023, Cloudflare detected a threat actor on our self-hosted Atlassian server. Our security team immediately began an investigation, cut off the threat actor’s access, and on Sunday, November 26, we brought in CrowdStrike’s Forensic team to perform their own independent analysis.
Yesterday, CrowdStrike completed its investigation, and we are publishing this blog post to talk about the details of this security incident.
We want to emphasize to our customers that no Cloudflare customer data or systems were impacted by this event. Because of our access controls, firewall rules, and use of hard security keys enforced using our own Zero Trust tools, the threat actor’s ability to move laterally was limited. No services were implicated, and no changes were made to our global network systems or configuration. This is the promise of a Zero Trust architecture: it’s like bulkheads in a ship where a compromise in one system is limited from compromising the whole organization.
From November 14 to 17, a threat actor did reconnaissance and then accessed our internal wiki (which uses Atlassian Confluence) and our bug database (Atlassian Jira). On November 20 and 21, we saw additional access indicating they may have come back to test access to ensure they had connectivity.
They then returned on November 22 and established persistent access to our Atlassian server using ScriptRunner for Jira, gained access to our source code management system (which uses Atlassian Bitbucket), and tried, unsuccessfully, to access a console server that had access to the data center that Cloudflare had not yet put into production in São Paulo, Brazil.
They did this by using one access token and three service account credentials that had been taken, and that we failed to rotate, after the Okta compromise of October 2023. All threat actor access and connections were terminated on November 24 and CrowdStrike has confirmed that the last evidence of threat activity was on November 24 at 10:44.
(Throughout this blog post all dates and times are UTC.)
Even though we understand the operational impact of the incident to be extremely limited, we took this incident very seriously because a threat actor had used stolen credentials to get access to our Atlassian server and accessed some documentation and a limited amount of source code. Based on our collaboration with colleagues in the industry and government, we believe that this attack was performed by a nation state attacker with the goal of obtaining persistent and widespread access to Cloudflare’s global network.
“Code Red” Remediation and Hardening Effort
On November 24, after the threat actor was removed from our environment, our security team pulled in all the people they needed across the company to investigate the intrusion and ensure that the threat actor had been completely denied access to our systems, and to ensure we understood the full extent of what they accessed or tried to access.
Then, from November 27, we redirected the efforts of a large part of the Cloudflare technical staff (inside and outside the security team) to work on a single project dubbed “Code Red”. The focus was strengthening, validating, and remediating any control in our environment to ensure we are secure against future intrusion and to validate that the threat actor could not gain access to our environment. Additionally, we continued to investigate every system, account and log to make sure the threat actor did not have persistent access and that we fully understood what systems they had touched and which they had attempted to access.
CrowdStrike performed an independent assessment of the scope and extent of the threat actor’s activity, including a search for any evidence that they still persisted in our systems. CrowdStrike’s investigation provided helpful corroboration and support for our investigation, but did not bring to light any activities that we had missed. This blog post outlines in detail everything we and CrowdStrike uncovered about the activity of the threat actor.
The only production systems the threat actor could access using the stolen credentials was our Atlassian environment. Analyzing the wiki pages they accessed, bug database issues, and source code repositories, it appears they were looking for information about the architecture, security, and management of our global network; no doubt with an eye on gaining a deeper foothold. Because of that, we decided a huge effort was needed to further harden our security protocols to prevent the threat actor from being able to get that foothold had we overlooked something from our log files.
Our aim was to prevent the attacker from using the technical information about the operations of our network as a way to get back in. Even though we believed, and later confirmed, the attacker had limited access, we undertook a comprehensive effort to rotate every production credential (more than 5,000 individual credentials), physically segment test and staging systems, performed forensic triages on 4,893 systems, reimaged and rebooted every machine in our global network including all the systems the threat actor accessed and all Atlassian products (Jira, Confluence, and Bitbucket).
The threat actor also attempted to access a console server in our new, and not yet in production, data center in São Paulo. All attempts to gain access were unsuccessful. To ensure these systems are 100% secure, equipment in the Brazil data center was returned to the manufacturers. The manufacturers’ forensic teams examined all of our systems to ensure that no access or persistence was gained. Nothing was found, but we replaced the hardware anyway.
We also looked for software packages that hadn’t been updated, user accounts that might have been created, and unused active employee accounts; we went searching for secrets that might have been left in Jira tickets or source code, examined and deleted all HAR files uploaded to the wiki in case they contained tokens of any sort. Whenever in doubt, we assumed the worst and made changes to ensure anything the threat actor was able to access would no longer be in use and therefore no longer be valuable to them.
Every member of the team was encouraged to point out areas the threat actor might have touched, so we could examine log files and determine the extent of the threat actor’s access. By including such a large number of people across the company, we aimed to leave no stone unturned looking for evidence of access or changes that needed to be made to improve security.
The immediate “Code Red” effort ended on January 5, but work continues across the company around credential management, software hardening, vulnerability management, additional alerting, and more.
Attack timeline
The attack started in October with the compromise of Okta, but the threat actor only began targeting our systems using those credentials from the Okta compromise in mid-November.
The following timeline shows the major events:
October 18 – Okta compromise
We’ve written about this before but, in summary, we were (for the second time) the victim of a compromise of Okta’s systems which resulted in a threat actor gaining access to a set of credentials. These credentials were meant to all be rotated.
Unfortunately, we failed to rotate one service token and three service accounts (out of thousands) of credentials that were leaked during the Okta compromise.
One was a Moveworks service token that granted remote access into our Atlassian system. The second credential was a service account used by the SaaS-based Smartsheet application that had administrative access to our Atlassian Jira instance, the third account was a Bitbucket service account which was used to access our source code management system, and the fourth was an AWS environment that had no access to the global network and no customer or sensitive data.
The one service token and three accounts were not rotated because mistakenly it was believed they were unused. This was incorrect and was how the threat actor first got into our systems and gained persistence to our Atlassian products. Note that this was in no way an error on the part of Atlassian, AWS, Moveworks or Smartsheet. These were merely credentials which we failed to rotate.
November 14 09:22:49 – threat actor starts probing
Our logs show that the threat actor started probing and performing reconnaissance of our systems beginning on November 14, looking for a way to use the credentials and what systems were accessible. They attempted to log into our Okta instance and were denied access. They attempted access to the Cloudflare Dashboard and were denied access.
Additionally, the threat actor accessed an AWS environment that is used to power the Cloudflare Apps marketplace. This environment was segmented with no access to global network or customer data. The service account to access this environment was revoked, and we validated the integrity of the environment.
November 15 16:28:38 – threat actor gains access to Atlassian services
The threat actor successfully accessed Atlassian Jira and Confluence on November 15 using the Moveworks service token to authenticate through our gateway, and then they used the Smartsheet service account to gain access to the Atlassian suite. The next day they began looking for information about the configuration and management of our global network, and accessed various Jira tickets.
The threat actor searched the wiki for things like remote access, secret, client-secret, openconnect, cloudflared, and token. They accessed 36 Jira tickets (out of a total of 2,059,357 tickets) and 202 wiki pages (out of a total of 194,100 pages).
The threat actor accessed Jira tickets about vulnerability management, secret rotation, MFA bypass, network access, and even our response to the Okta incident itself.
The wiki searches and pages accessed suggest the threat actor was very interested in all aspects of access to our systems: password resets, remote access, configuration, our use of Salt, but they did not target customer data or customer configurations.
November 16 14:36:37 – threat actor creates an Atlassian user account
The threat actor used the Smartsheet credential to create an Atlassian account that looked like a normal Cloudflare user. They added this user to a number of groups within Atlassian so that they’d have persistent access to the Atlassian environment should the Smartsheet service account be removed.
November 17 14:33:52 to November 20 09:26:53 – threat actor takes a break from accessing Cloudflare systems
During this period, the attacker took a break from accessing our systems (apart from apparently briefly testing that they still had access) and returned just before Thanksgiving.
November 22 14:18:22 – threat actor gains persistence
Since the Smartsheet service account had administrative access to Atlassian Jira, the threat actor was able to install the Sliver Adversary Emulation Framework, which is a widely used tool and framework that red teams and attackers use to enable “C2” (command and control), connectivity gaining persistent and stealthy access to a computer on which it is installed. Sliver was installed using the ScriptRunner for Jira plugin.
This allowed them continuous access to the Atlassian server, and they used this to attempt lateral movement. With this access the Threat Actor attempted to gain access to a non-production console server in our São Paulo, Brazil data center due to a non-enforced ACL. The access was denied, and they were not able to access any of the global network.
Over the next day, the threat actor viewed 120 code repositories (out of a total of 11,904 repositories). Of the 120, the threat actor used the Atlassian Bitbucket git archive feature on 76 repositories to download them to the Atlassian server, and even though we were not able to confirm whether or not they had been exfiltrated, we decided to treat them as having been exfiltrated.
The 76 source code repositories were almost all related to how backups work, how the global network is configured and managed, how identity works at Cloudflare, remote access, and our use of Terraform and Kubernetes. A small number of the repositories contained encrypted secrets which were rotated immediately even though they were strongly encrypted themselves.
We focused particularly on these 76 source code repositories to look for embedded secrets, (secrets stored in the code were rotated), vulnerabilities and ways in which an attacker could use them to mount a subsequent attack. This work was done as a priority by engineering teams across the company as part of “Code Red”.
As a SaaS company, we’ve long believed that our source code itself is not as precious as the source code of software companies that distribute software to end users. In fact, we’ve open sourced a large amount of our source code and speak openly through our blog about algorithms and techniques we use. So our focus was not on someone having access to the source code, but whether that source code contained embedded secrets (such as a key or token) and vulnerabilities.
November 23 – Discovery and threat actor access termination begins
Our security team was alerted to the threat actor’s presence at 16:00 and deactivated the Smartsheet service account 35 minutes later. 48 minutes later the user account created by the threat actor was found and deactivated. Here’s the detailed timeline for the major actions taken to block the threat actor once the first alert was raised.
15:58 – The threat actor adds the Smartsheet service account to an administrator group. 16:00 – Automated alert about the change at 15:58 to our security team. 16:12 – Cloudflare SOC starts investigating the alert. 16:35 – Smartsheet service account deactivated by Cloudflare SOC. 17:23 – The threat actor-created Atlassian user account is found and deactivated. 17:43 – Internal Cloudflare incident declared. 21:31 – Firewall rules put in place to block the threat actor’s known IP addresses.
November 24 – Sliver removed; all threat actor access terminated
10:44 – Last known threat actor activity. 11:59 – Sliver removed.
Throughout this timeline, the threat actor tried to access a myriad of other systems at Cloudflare but failed because of our access controls, firewall rules, and use of hard security keys enforced using our own Zero Trust tools.
To be clear, we saw no evidence whatsoever that the threat actor got access to our global network, data centers, SSL keys, customer databases or configuration information, Cloudflare Workers deployed by us or customers, AI models, network infrastructure, or any of our datastores like Workers KV, R2 or Quicksilver. Their access was limited to the Atlassian suite and the server on which our Atlassian runs.
A large part of our “Code Red” effort was understanding what the threat actor got access to and what they tried to access. By looking at logging across systems we were able to track attempted access to our internal metrics, network configuration, build system, alerting systems, and release management system. Based on our review, none of their attempts to access these systems were successful. Independently, CrowdStrike performed an assessment of the scope and extent of the threat actor’s activity, which did not bring to light activities that we had missed and concluded that the last evidence of threat activity was on November 24 at 10:44.
We are confident that between our investigation and CrowdStrike’s, we fully understand the threat actor’s actions and that they were limited to the systems on which we saw their activity.
Conclusion
This was a security incident involving a sophisticated actor, likely a nation-state, who operated in a thoughtful and methodical manner. The efforts we have taken ensure that the ongoing impact of the incident was limited and that we are well-prepared to fend off any sophisticated attacks in the future. This required the efforts of a significant number of Cloudflare’s engineering staff, and, for over a month, this was the highest priority at Cloudflare. The entire Cloudflare team worked to ensure that our systems were secure, the threat actor’s access was understood, to remediate immediate priorities (such as mass credential rotation), and to build a plan of long-running work to improve our overall security based on areas for improvement discovered during this process.
We are incredibly grateful to everyone at Cloudflare who responded quickly over the Thanksgiving holiday to conduct an initial analysis and lock out the threat actor, and all those who contributed to this effort. It would be impossible to name everyone involved, but their long hours and dedicated work made it possible to undertake an essential review and change of Cloudflare’s security while keeping our global network running and our customers’ service running.
We are grateful to CrowdStrike for having been available immediately to conduct an independent assessment. Now that their final report is complete, we are confident in our internal analysis and remediation of the intrusion and are making this blog post available.
IOCs Below are the Indications of Compromise (IOCs) that we saw from this threat actor. We are publishing them so that other organizations, and especially those that may have been impacted by the Okta breach, can search their logs to confirm the same threat actor did not access their systems.
Indicator
Indicator Type
SHA256
Description
193.142.58[.]126
IPv4
N/A
Primary threat actor Infrastructure, owned by M247 Europe SRL (Bucharest, Romania)
198.244.174[.]214
IPv4
N/A
Sliver C2 server, owned by OVH SAS (London, England)
Visit 1.1.1.1 from any device to get started with our free app that makes your Internet faster and safer.
To learn more about our mission to help build a better Internet, start here. If you’re looking for a new career direction, check out our open positions.
AnyDesk confirmed today that it suffered a recent cyberattack that allowed hackers to gain access to the company’s production systems. BleepingComputer has learned that source code and private code signing keys were stolen during the attack.
AnyDesk is a remote access solution that allows users to remotely access computers over a network or the internet. The program is very popular with the enterprise, which use it for remote support or to access colocated servers.
The company reports having 170,000 customers, including 7-Eleven, Comcast, Samsung, MIT, NVIDIA, SIEMENS, and the United Nations.
AnyDesk hacked
In a statement shared with BleepingComputer late Friday afternoon, AnyDesk says they first learned of the attack after detecting indications of an incident on their production servers.
After conducting a security audit, they determined their systems were compromised and activated a response plan with the help of cybersecurity firm CrowdStrike.
AnyDesk did not share details on whether data was stolen during the attack. However, BleepingComputer has learned that the threat actors stole source code and code signing certificates.
The company also confirmed ransomware was not involved but didn’t share too much information about the attack other than saying their servers were breached, with the advisory mainly focusing on how they responded to the incident.
As part of their response, AnyDesk says they have revoked security-related certificates and remediated or replaced systems as necessary. They also reassured customers that AnyDesk was safe to use and that there was no evidence of end-user devices being affected by the incident.
“We can confirm that the situation is under control and it is safe to use AnyDesk. Please ensure that you are using the latest version, with the new code signing certificate,” AnyDesk said in a public statement.
While the company says that no authentication tokens were stolen, out of caution, AnyDesk is revoking all passwords to their web portal and suggests changing the password if it’s used on other sites.
“AnyDesk is designed in a way which session authentication tokens cannot be stolen. They only exist on the end user’s device and are associated with the device fingerprint. These tokens never touch our systems, “AnyDesk told BleepingComputer in response to our questions about the attack.
“We have no indication of session hijacking as to our knowledge this is not possible.”
The company has already begun replacing stolen code signing certificates, with Günter Born of BornCity first reporting that they are using a new certificate in AnyDesk version 8.0.8, released on January 29th. The only listed change in the new version is that the company switched to a new code signing certificate and will revoke the old one soon.
BleepingComputer looked at previous versions of the software, and the older executables were signed under the name ‘philandro Software GmbH’ with serial number 0dbf152deaf0b981a8a938d53f769db8. The new version is now signed under ‘AnyDesk Software GmbH,’ with a serial number of 0a8177fcd8936a91b5e0eddf995b0ba5, as shown below.
Signed AnyDesk 8.0.6 (left) vs AnyDesk 8.0.8 (right) Source: BleepingComputer
Certificates are usually not invalidated unless they have been compromised, such as being stolen in attacks or publicly exposed.
While AnyDesk had not shared when the breach occurred, Born reported that AnyDesk suffered a four-day outage starting on January 29th, during which the company disabled the ability to log in to the AnyDesk client.
“my.anydesk II is currently undergoing maintenance, which is expected to last for the next 48 hours or less,” reads the AnyDesk status message page.
“You can still access and use your account normally. Logging in to the AnyDesk client will be restored once the maintenance is complete.”
Yesterday, access was restored, allowing users to log in to their accounts, but AnyDesk did not provide any reason for the maintenance in the status updates.
However, AnyDesk has confirmed to BleepingComputer that this maintenance is related to the cybersecurity incident.
It is strongly recommended that all users switch to the new version of the software, as the old code signing certificate will soon be revoked.
Furthermore, while AnyDesk says that passwords were not stolen in the attack, the threat actors did gain access to production systems, so it is strongly advised that all AnyDesk users change their passwords. Furthermore, if they use their AnyDesk password at other sites, they should be changed there as well.
Every week, it feels like we learn of a new breach against well-known companies.
When having trouble getting a good performance from your wireless router or access point, the first settings that people usually change is the WiFi channel. And it makes sense considering that it may be just a bit ‘too crowded’, so change the number, save and the WiFi speed should come back to life, right?
It is possible to see an increase in throughput, but you should never change the settings blindly, hoping that something may stick. I admit that I am guilty of doing just that some time ago, but the concept behind the WiFi channels doesn’t need to be mystifying. So let’s have a look at what they are, their relationship with the channel bandwidth and which should be the suitable settings for your network.
I am sure that most of you are familiar with the 2.4GHz and the 5GHz radio band, but you need to understand that they’re not some fixed frequency points, instead, they’re more like a spectrum of frequencies. The 2.4GHz has a range of frequencies from 2,402MHz to 2,483MHz and, when you tune to a specific frequency within this spectrum, you essentially are selecting a WiFi channel for your data transmission.
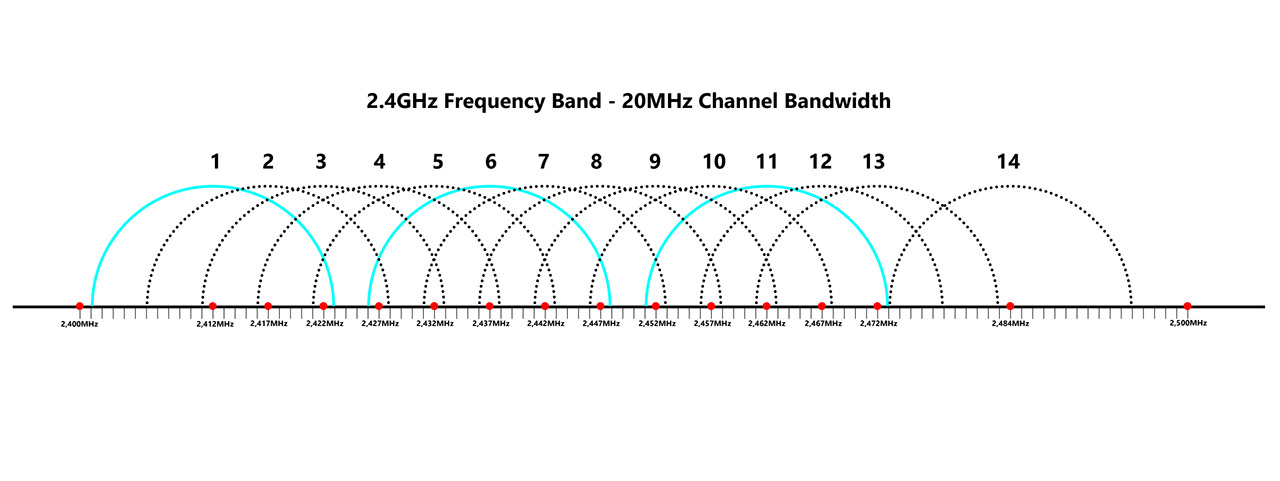
2.4GHz Channels – 20MHz channel bandwidth.
For example, the channel 1 is associated with the 2,412MHz (the range is between 2,401 to 2,423MHz), the channel two is 2,417MHz (2,406 to 2,428MHz range), channel 7 is 2,442MHz (2,431 to 2,453MHz range) and the channel 14 is 2,484MHz (2,473 to 2,495MHz range). As you can see, there is some overlapping in the frequency range between certain channels, but we’ll talk more about it in a minute. The range of 5GHz radio band spans between 5.035MHz and 5.980MHz.
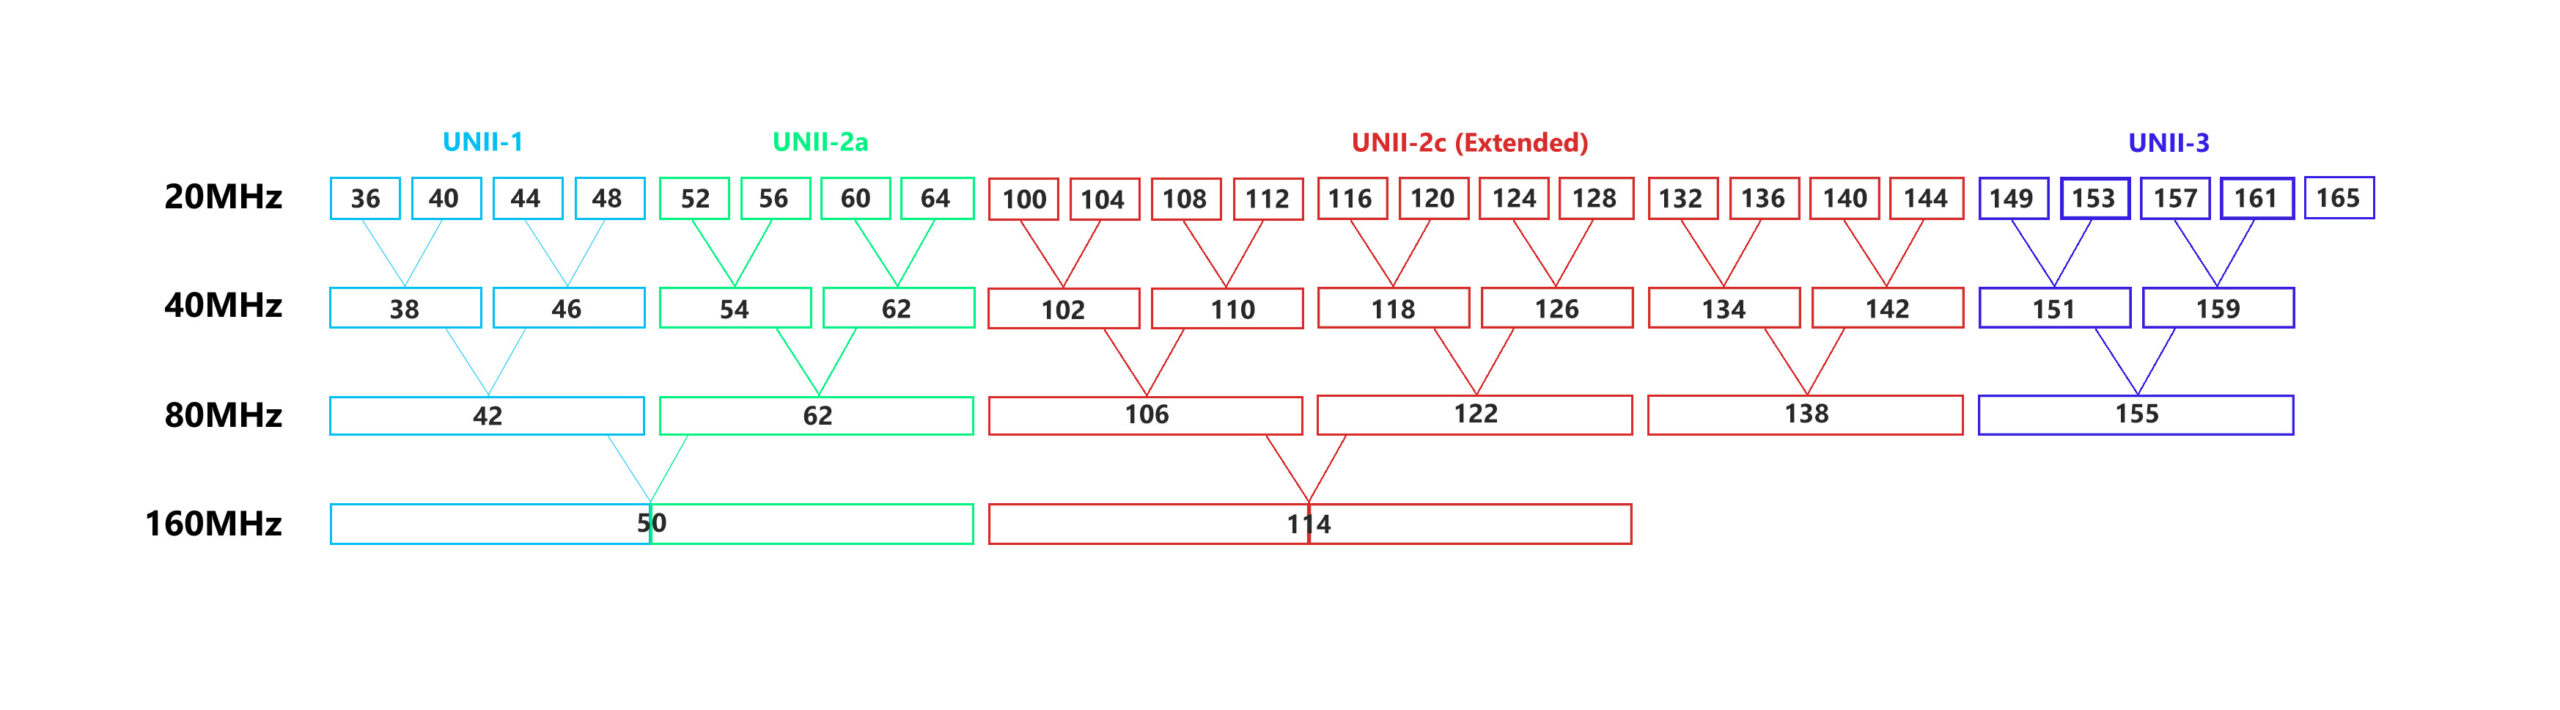
This means that the channel 36 is associated with the 5,180MHz (the range between 5,170 and 5,190MHz), the channel 40 is 5,200MHz (between 5,190 and 5,210MHz) and channel 44 can be associated with the 5,220MHz frequency (the range between 5,210 and 5,230MHz). Now, let’s talk about overlapping and non-overlapping channels.
Overlapping vs non-overlapping channels
If you had a look at the channel representation that I put together for the 2.4GHz frequency band using the 20MHz WiFi channel bandwidth, you can see that three channels are different from the others. The channels 1, 6 and 11 are non-overlapping and you can see from the graph that if your APs are using these channels, then they’re far less prone to interference.
5GHz – Channel allocation.
To get an even better idea is to have a look at the graph representing the 5GHz channels and the way they’re grouped to create a larger channel bandwidth. We have talked about the two main types of interference, the co-channel and the adjacent channel interference when we analyzed the best channel bandwidth to use for the 5GHz band. And the idea is that when using the same channel, the devices will be forced to take turns, therefore slowing down the network.
But it’s also possible that the adjacent channels may bleed into each other, adding noise to the data, rendering the WiFi connection unusable. That’s why most people suggest to keep a less wide channel bandwidth and use non-overlapping channels if there are lots of APs in the area (which are not properly adjusted by a system admin).
Changing the channel, but not the channel bandwidth
We already know that changing the channel bandwidth will have a significant impact on the WiFi performance because 20MHz or 40MHz will deliver a far more stable throughput on the 5GHz frequency band (although not that high) in a crowded environment.
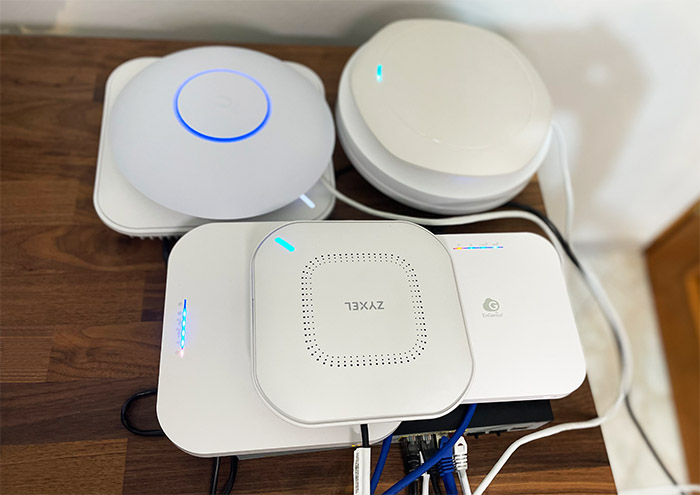
Multiple wireless access points.
But what happens when we change the WiFi channel, while keeping the same channel bandwidth? Again, it depends if you’re switching from overlapping to non-overlapping channels because doing so, you may see a noticeable increase in performance (just keep an eye on the available channels because the wider the channel bandwidth, the less the non-overlapping channels will be available for you to use). Now, in the ideal scenario, where there is no interference, when moving from one channel to the other within the same bandwidth shouldn’t really make that much of a difference in terms of data transfer rate.
Auto or manual WiFi channel selection?
The wireless routers and access points usually have the WiFi channel selection set to auto, which means that you may see that your neighbors change theirs annoyingly often. That’s because every time they restart the router/AP or there’s a power outage, the channel may be changed, so that it’s the least crowded available.
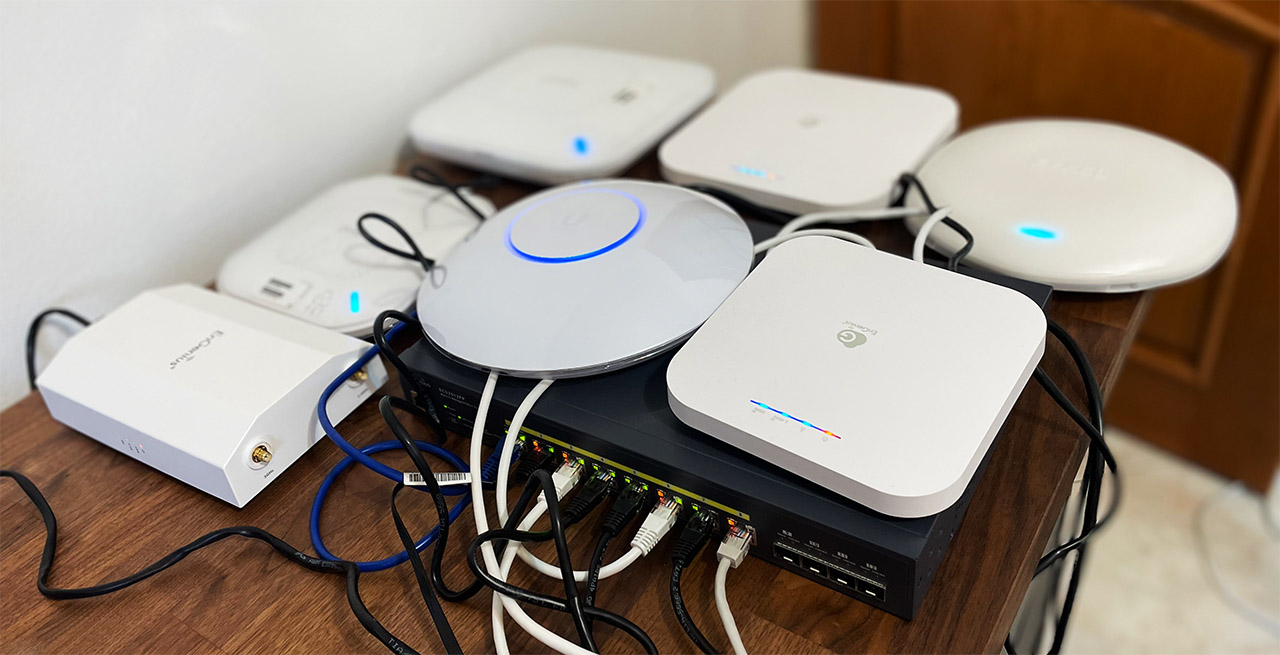
Abundance of Wireless Access Points.
If you choose yours manually, you will have to keep up with the changes to your neighboring WiFi networks, which is why it’s a good idea to keep the WiFi channel on your AP on auto as well. If we’re talking about an office or some large enterprise network, it’s obviously better to have full control on how the network behaves, so the manual selection is better.
When you should use DFS channels?
DFS stands for Dynamic Frequency Selection and it refers to those frequencies that are usually limited for military use or for radars (such as weather devices or airport equipment), which means that they can differ from country to country. So make sure to check whether you’re allowed to use certain channels (especially if you got the wireless router or AP from abroad), before you get a knock on your door. Also, it’s pretty much obvious that you won’t be able to use these channels if you live near an airport.
Engenius EWS850AP access point.
That being said, the main benefit to using DFS channels is that you are no longer impacted by interference from your neighbors WiFi. But do be aware that, depending on the router, there is a high chance that in case it detects a near-by radar using the same frequency, then it will switch to another WiFi channel automatically.
Also, there is another problem that I have often encountered. Not that many client devices will actually connect to a WiFi network that uses DFS channels, so you may find out that while your PC and smartphone continue to have access to the Internet, pretty much every other smart or IoT device will drop the connection.
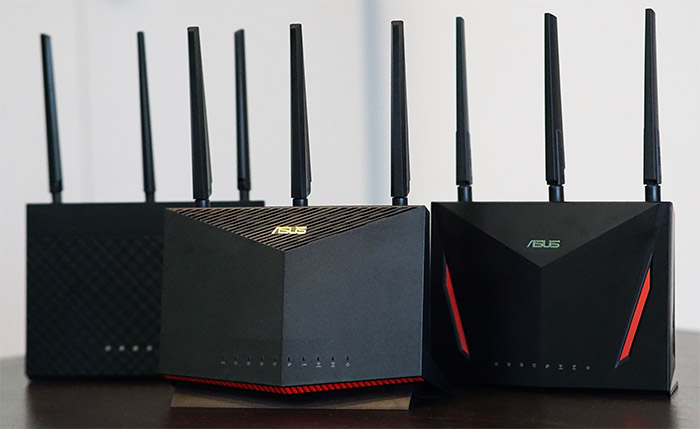
I do get the question of whether the WiFi 6 routers have better range from time to time and my answer is that some do have a better range than the WiFi 5 router, while some don’t. It’s only normal that an expensive new piece of technology will behave better than an old, battle-scarred router. But, in general, are the WiFi 6 routers able to cover more space than the devices from the older WiFi generation?
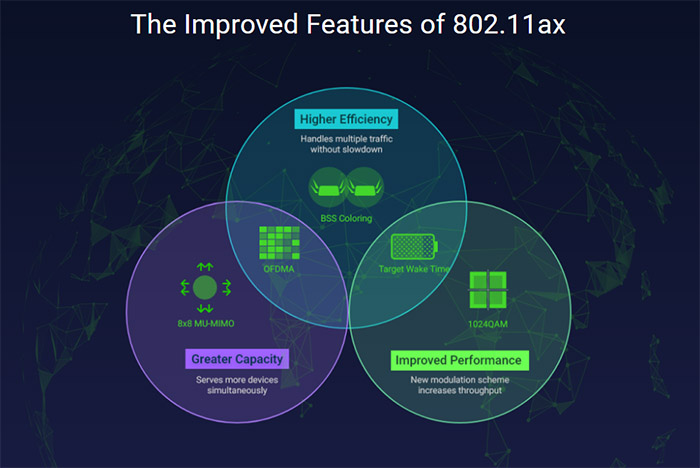
Especially since we are promised that the OFDMA will just make everything way better, so just go and buy the new stuff, throw away the old! The idea behind the WiFi 6 standard (IEEE 802.11ax) was not really about speed or increased coverage, it was about handling a denser network, with a lot of very diverse client devices in an environment prone to lots of interference.
Abundance of Wireless Access Points.
As a consequence, you may see some benefits in regard to coverage and throughput, despite not really being the main aim. It’s clear that those that stand to get the most benefit are SMBs and especially the enterprise market, so why do Asus, Netgear, TP-Link and other home-network-based manufacturers keep on pushing WiFi 6 routers forward? The tempting response is money, which is true, but only partially.
We have started to get more denser networks even in our homes (smart and IoT devices) and living in a city means your neighbors will also add to the creation of denser networks, so WiFi 6 could make sense, right? With the correct client devices, yes and you may also see a better range. So, let’s do a slightly deeper dive into the subject and understand whether WiFi 6 routers have a better range in real-life conditions.
The main factors that can determine the range of a router can be considered the transmit power, the antenna gain and the interference in the area where the signal needs to travel. The SoC will also play an important role on the WiFi performance of the router.
1. The Transmit Power
I have covered this topic a bit in a separate article, where I discussed whether the user should adjust the transmit power to their access point or leave the default values. And the conclusion was that the default values are usually wrong and yes, you should adjust them in a manner as to get a more efficient network, even if it may seem that the coverage will suffer. But before that know that there are legal limitations to the transmit power.
The FCC says that the maximum transmitter output power that goes towards the antenna can go up to 1 Watt (30dBm), but the EIRP caps that limit to 36dBm. The EIRP is the sum between the maximum output power that goes towards the antenna and the antenna gain.
This means that the manufacturer is free to try different variations between the power output and the antenna gain as to better reach the client devices, while keeping that limit in mind. This factor has not changed from the previous WiFi standard, so, the WiFi 6 has the same limit put in place as the WiFi 5 (and the previous wireless standards). The advice is to still lower the transmit gain as much as possible for the 2.4GHz radio and to increase it to the maximum for the 5GHz radio. That’s because the former radiates a lot better through objects, while the latter does not, but it provides far better speeds.
2. The Antenna Gain
This ties in nicely with the previous section since, just like the output power, the antenna gain needs to be adjusted by the manufacturer within the limits dictated by the FCC. And there is an interesting thing that I noticed with the newer WiFi 6 routers, something that was not common with the previous gen routers. The antennas can’t be removed on most routers, only on the most expensive models.
This means that in most cases, you can’t upgrade the antennas, potentially having a better range. Before, you could take an older router, push the transmit power to the maximum (you could also push it past its hardware limits with DDWRT or some other third-party software) and then add some high-gain antennas.
Old TP-Link router.
This way, the range could have been better, but could you actually go past the allowed limit? The chipset inside the router most likely kept everything within the allowed limit, but you could still get closer to that limit. Would you see any benefit though? That’s another story because years ago, when there were way fewer wireless devices around, pushing everything to the maximum made sense due to the less amount of interference.
Nowadays, you’re just going to annoy your neighbors, while also making a mess of your WiFi clients connection. Sure, you will connect to a faraway client device, but will it be able to transfer data at a good speed? Doubt it, so it will just hog the entire network. The WiFi 6 standard does help alleviate this problem a bit, but we’ll talk more about it in a minute.
3. The WiFi Interference
This factor comes in different flavors. It can be from other devices that use the same channel, other access points that broadcast the signal through your house over the same channels or it can even be from your microwave. Ideally, you want to keep your WiFi inside your home, so that it doesn’t interfere with the WiFi signal from other routers or dedicated access points. Which is why the 5GHz radio has become the default option for connecting smartphones, laptops, TVs or PCs, while the 2.4GHz is usually left for the IoT devices.
Interesting antenna patterns to limit interference. Left: Zyxel WAX630S. Right Zyxel WAX650S.
At least this has been true for the WiFi 5 routers because the WiFi6 routers can use OFDMA on the 2.4GHz band and help push the throughput to spectacular levels (where it would actually be if there were little to no interference, it’s not an actual boost in speed). For example, the Asus RT-AX86U can reach up to 310Mbps at 5 feet (40MHz channel bandwidth), but very few routers implement it on both radios due to the cost constraints.
For example, the Ubiquiti U6-LR only uses OFDMA on the 5GHz radio band, further showing the tendency to leave the 2.4GHz for the IoT devices. Now let’s talk about the walls. There are two main behaviors that you need to keep in mind. First, there’s the obstacle aspect which is obvious since you can see that when you move your client device in another room than your router, the signal drops a bit. Moving it farther will add more attenuation and the speed will drop even more.
For example, I have an office that’s split into two by a very thick wall so, on paper, one router positioned in the middle should suffice for both sides, right? Not quite because this wall is very thick and made of concrete, so it works as a phenomenal signal blocker.
Asus AiMesh.
That’s why I needed two routers in the middle of the office to cover both sides effectively. The other aspect is signal reflection. What this means is that if you broadcast the signal in the open, it will reach let’s say up to 70 feet, but, if you broadcast it in a long hallway, you can get a great signal at the end of the hallway (could be double the distance than in the open field). But this also means that you may see some very weird, inconsistent coverage with your client devices.
What about the client devices?
This is a very important factor that is often overlooked when people talk about WiFi range and it’s incredibly important to understand the role of the network adapter especially in regard to the WiFi 6 client devices. First of all, understand that not all client devices are the same, some have a great receiver which can see the WiFi signal from very far away, others are very shy and want to be closer to the router. Then, there’s the specific features compatibility.
MU-MIMO, Beamforming and now the OFDMA have become a standard with newer routers, but, if the wireless client devices don’t support these features, it doesn’t really matter if they’re implemented or not. And this is one of the reasons why you may have noticed (even in my router tests) that a WiFi 5 client will most likely yield similar results when connected to a WiFi 5 router as well as when it’s connected to a WiFi 6 router. So, if you want to see improvements when using WiFi 6 routers, make sure that you have compatible adapters installed in your main client devices. Otherwise, there is no actual point to upgrading.
WiFi 6 adapter.
How can OFDMA improve range?
Yes, yes, I know OFDMA was not designed to improve the speed, nor the range of the network, but even so, the consequences of its optimizations are exactly these. A better throughput and a perceived far better range. The Orthogonal Frequency-Division Multiple Access breaks the channel frequency into smaller subcarriers, and it assigns them to individual clients.
So, while before, one client would start transmitting and every other client device had to wait until it was done, now, it’s possible to get multiple simultaneous data transmissions, greatly improving the efficiency of the network and significantly lowering the latency (which is excellent news for online gaming). I have talked about how a far-away client device can hog the network when I analyzed the best settings for the transmit power – that was because it would connect to the AP or router and transmit at a very low data speed rate.
Using OFDMA, in this type of scenario, it can improve the network behavior and, even if the range itself isn’t changed, due to the way the networks are so much denser nowadays, you’ll get a more efficient network behavior for both close and far away client devices. So yes, better range and more speed.
BSS Coloring to tame the interference
I already mentioned that the interference from other APs or wireless routers will have a major impact on the perceived range of your network.
And one of the reasons is the co-channel interference which occurs when multiple access points use the same channel and are therefore constrained to share it between them. As a consequence, you get a slower network because if there are lots of connected clients, they’ll easily fill up the available space. The BSS coloring assigns a color code to each client device which is then assigned to its closest access point.
This way, the signal broadcast is reduced from the client side as to not interfere with the other APs or client devices in the proximity. Obviously, the power output is still high enough to ensure a proper communication with the AP. And I know you haven’t seen this feature advertised as much on the boxes of APs or routers, which is due to cost constraints. I have seen it on the EnGenius EWS850AP, a WiFi 6 outdoors access point which is a device suitable for some very specific applications, but not on many other WiFi 6 networking devices.
Besides cost, the reason why it’s not that common especially on consumer-type WiFi 6 routers is that it’s not yet that useful. I say that because unless all the clients in the area are equipped with WiFi 6 adapters, the WiFi 5 (and lower) client devices will still broadcast their signal as far away as they can, interfering with the other WiFi devices.
Do WiFi 6 routers actually have a better range?
In an ideal, lab environment, most likely not, since as I said, the idea is to handle denser networks and not to push the WiFi range farther.
But in real-life conditions, you should see a far better perceived range if the right conditions are met. And almost everything revolves around using WiFi 6 client devices that can actually take advantage of these awesome features. It’s also wise to adjust the settings of your router or AP accordingly since the default values are very rarely good. Ideally, so should your neighbors since only this way, you will see a proper improvement in both range and network performance. Otherwise, there is barely any reason to upgrade from the WiFi 5 equipment.
At the same time, it’s worth checking out the WiFi 6E which adds a new frequency band, the 6GHz, which can actually increase the throughput in a spectacular manner since the radio is subjected to far less interference (the range doesn’t seem changed though). I have recently tested the EnGenius ECW336 which uses this new standard and yes, it’s a bit pricy, but Zyxel has released a new WiFi 6E AP that is a bit cheaper, and I will be testing it soon.
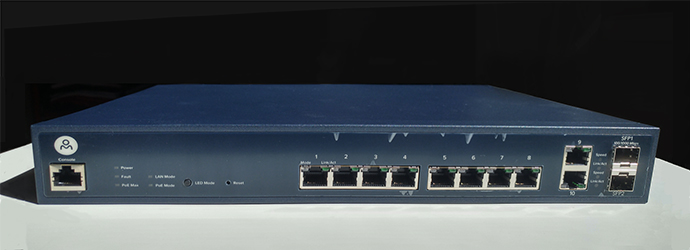
In light of the current global price hikes for energy, you’re very much justified in worrying about how many Watts your PoE switch actually uses. And, unless you have solar panels to enable your ‘lavish’ lifestyle, you’re going to have a bad time running too many networking devices at the same time, especially if they’re old and inefficient. But there’s the dilemma of features. For example, if we were to put two TVs together, an older one and a newer, it would be obvious that the latter would consume less power.
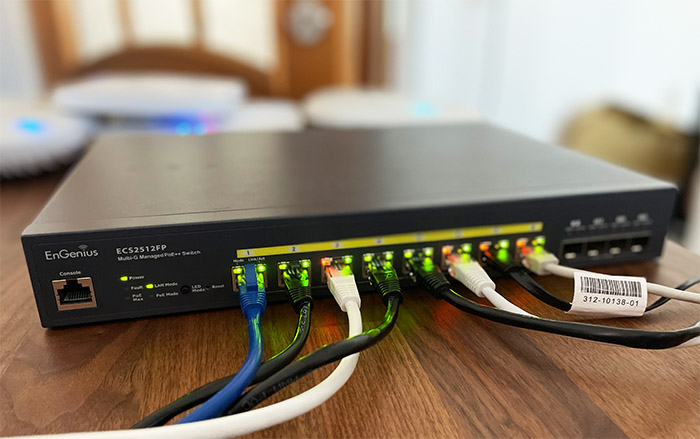
EnGenius ECS2512FP Switch with lots of Ethernet cables.
But, after adding all the new features and technologies which do require more power to be drawn, plus the higher price tag and it becomes clear that it’s less of an investment than we initially thought. Still, the manufacturers are clearly pushing the users towards the use of PoE instead of the power adapter – the newer Ubiquiti access points only have a PoE Ethernet port.
And it makes sense considering that they’re easier to install, without worrying about being close to a power source, no more used outlets and the possibility to have centralized control via a PoE switch. But, for some people, all these advantages may fall short if the power consumption of such a setup exceeds the acceptable threshold, so, for those of you conflicted about whether you should give PoE Ethernet switches a try, let’s see how much Watts they actually consume.
The PoE standard started being implemented into network switches about two decades ago and it became a bit more common for SMBs about 10 years ago. The first PoE switch that I tested was from Open Mesh (the S8) and it supported the IEEE 802.3at/af.
Open Mesh S8 Ethernet Switch.
This meant that the power output per port was 30 Watts, so it can’t really be considered an old switch (unless you take into account that Open Mesh doesn’t exist anymore). But I wanted to mention this switch because while the total power budget was 150 Watts, it did need to rely on a fan to keep the case cool. Very recently I tested the EnGenius ECS2512FP which offers almost double the PoE budget, 2.5GbE ports and it relies on passive cooling.
So, even if it may not seem so at first, even in the last five years, there have been significant advancements in regard to power efficiency. Indeed, a very old Ethernet switch that supports only the PoE 802.11af standard (15.4W limit per port) most likely needed to be cooled by fans and was not really built with the power efficiency aspect in mind. Before I get an angry mob to scream that the EEE from the IEEE stands for Energy-Efficient Ethernet, so adhering to the 802.3af standard should already ensure that the switch doesn’t consume that much power, I had another standard in mind.
Multiple wireless access points.
It’s the Green Ethernet from the 802.3az standard that made the difference with network switches that had lots of Ethernet ports. And this is an important technology because it makes sure that if a host has not been active for a long time, then the port to which is connected enters a sort of stand-by mode, where the power consumption is significantly reduced.
The port will become active again once there is activity from the client side, so the switch does ping the device from time to time (what I want to say is that the power is not completely turned off). So, if the network switch is older, it may not have this technology which means that you may lose a few dollars a month for this reason alone.
How many Watts does a PoE switch use by itself?
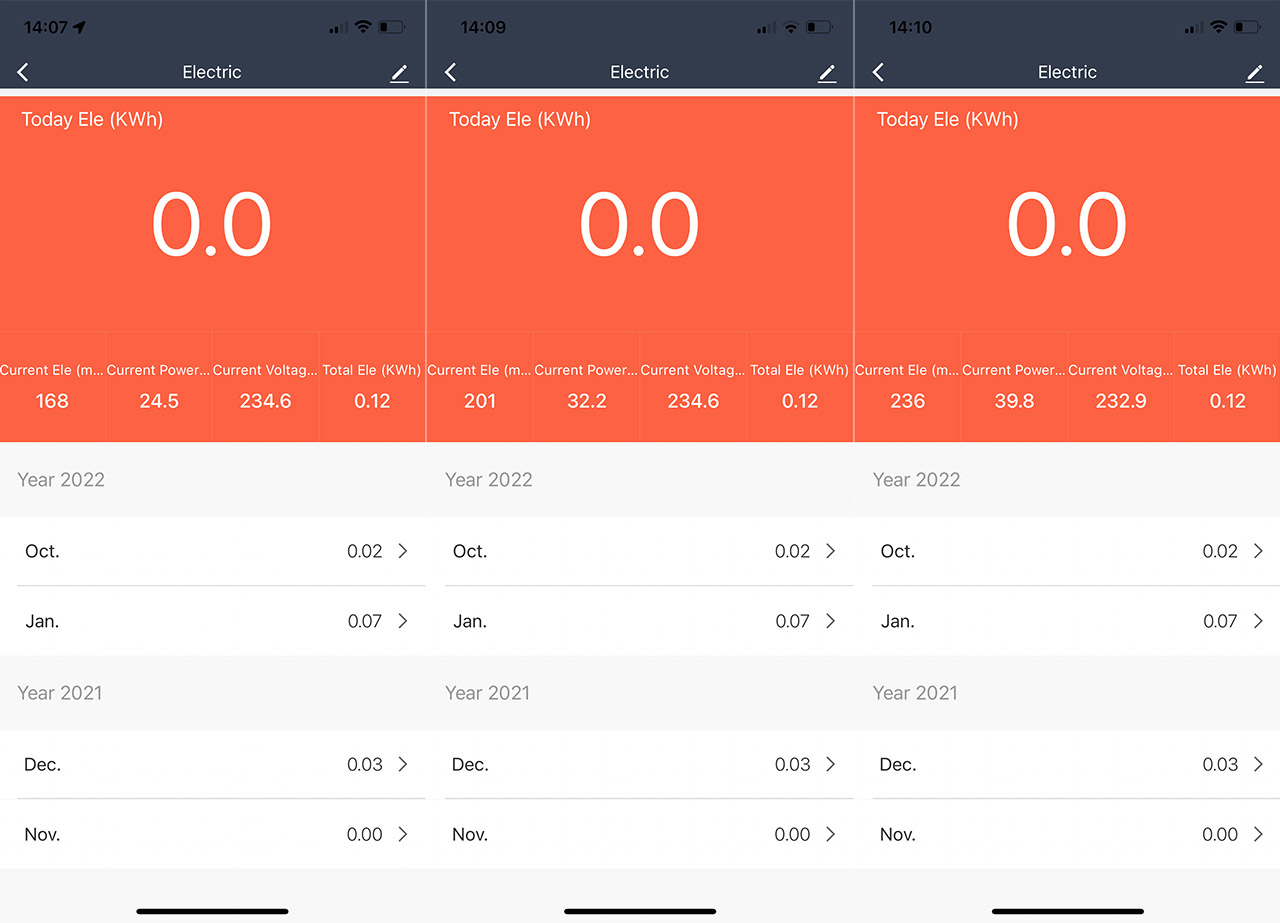
It depends on the PoE switch that you’re using. A 48-port switch that has three fans which run at full speed all the time is going to consume far more power than the 8-port unmanaged switch. You don’t have to believe me, let’s just check the numbers. I was lucky enough to still have the FS S3400-48T4SP around (it supports the 802.3af/at and has a maximum PoE budget of 370W), so I connected it to a power source and checked how many Watts it eats up when no device is connected to any of the 48 PoE ports.
FS S3400-48T4SP – 1st: no devices connected. 2nd: TP-Link EAP660 HD connected. 3rd: Both the EAP660 HD and the EAP670 connected.
It was 24.5 Watts which is surprisingly efficient considering the size of the switch and the four fans that run all the time. The manufacturer says that the maximum power consumption can be 400W, so the approx. 25W without any PoE device falls within the advertised amount. Next, I checked the power consumption of the Zyxel XS1930-12HP.
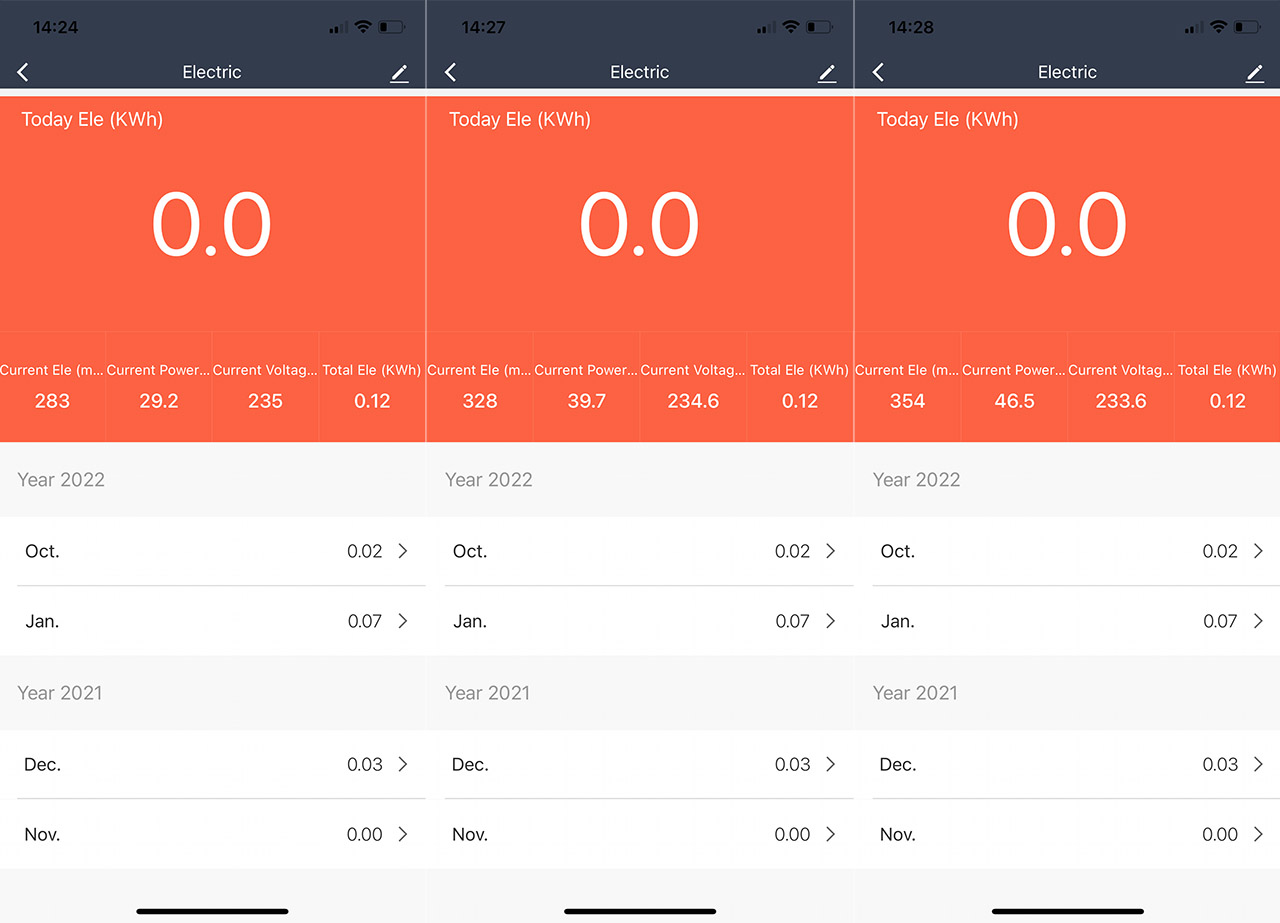
This switch is very particular because it has eight 10Gbps Ethernet ports and it supports the PoE++ standard (IEEE 802.3bt) which means that each port can offer up to 60W of PoE budget per device. At the same time, the maximum PoE budget is 375 Watts and, while no device was connected to any port, the Ethernet switch drew an average of 29 Watts (the switch does have two fans).
Zyxel XS1930-12HP – 1st: no devices connected. 2nd: TP-Link EAP660 HD connected. 3rd: Both the EAP660 HD and the EAP670 connected.
Yes, it’s more than the 48-port from FS, so it’s not always the case that having more ports means that there is a higher power consumption – obviously, more PoE devices will raise the overall power consumption.
Unmanaged vs Managed switches
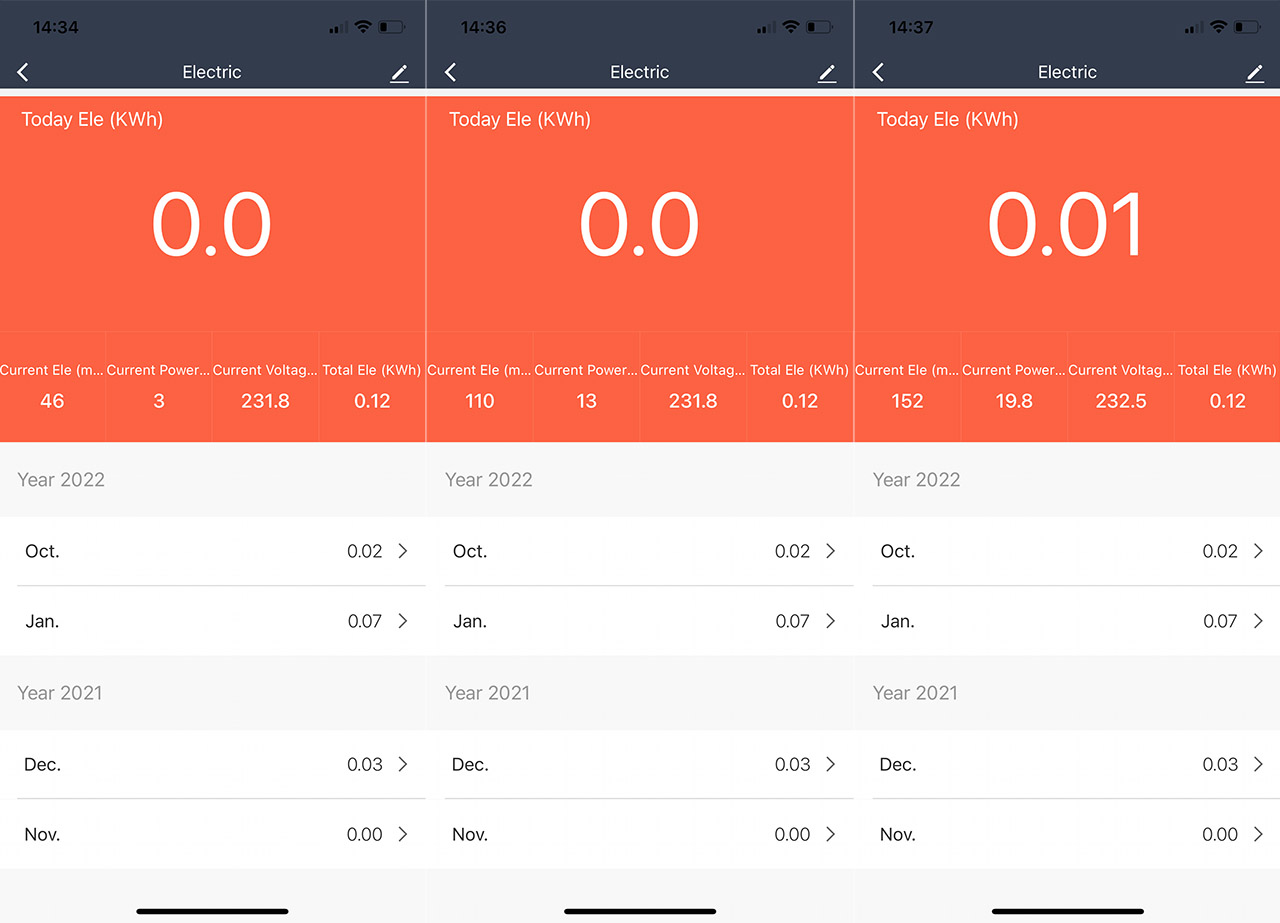
Lastly, I checked out the power consumption of an unmanaged switch, the TRENDnet TPE-LG80 which has eight PoE ports, with a maximum budget of 65W. The PoE standards that are supported are the IEEE 802.3af and the IEEE 802.3at, so it can go up to 30W per port. That being said, the actual power consumption when there was no device connected was 3 Watts.
TRENDnet TPE-LG80 – 1st: no devices connected. 2nd: TP-Link EAP660 HD connected. 3rd: Both the EAP660 HD and the EAP670 connected.
Quite the difference when compared to the other two switches, but it was to be expected for a small unmanaged Gigabit PoE switch.
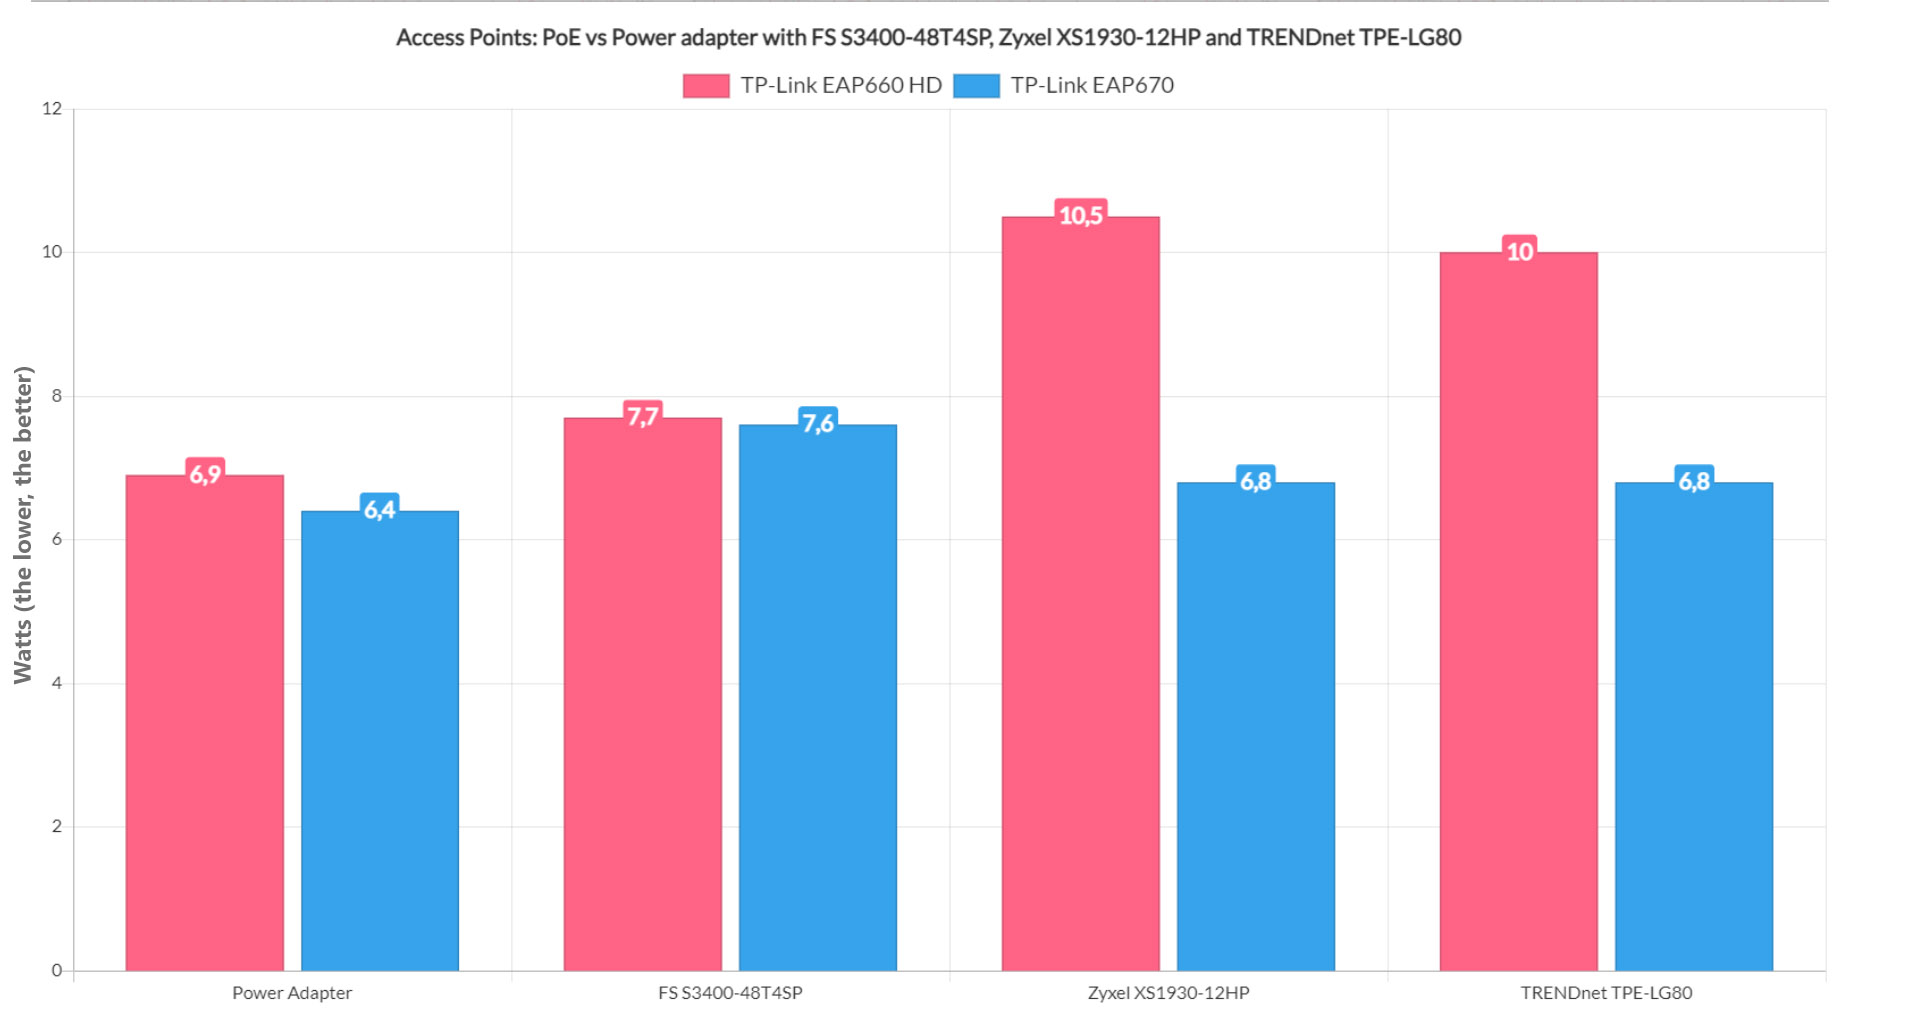
Access Points: PoE vs Power adapter
I am not going to bore you with details. You know what an access point is, and you also know that some have a power adapter, while some don’t. So, I took the TP-Link EAP660 HD and the EAP670 (because I had them left on the desk after testing them) and I checked if the power consumption differs between PoE and using the provided adapter. Also, I connected the APs to the three switches mentioned above to see if there’s a difference in PoE use between brands and between managed and unmanaged switches.
The TP-Link EAP660-HD draws an average of 6.9 Watts when connected to the socket via the power adapter. The EAP670 needs a bit less, since the average was 6.4 Watts. When connected to the 48-port FS S3400-48T4SP, the EAP660 HD needed 7.7W from the PoE budget, while the EAP670 added 7.6W, so, overall, the power consumption is more elevated. Moving on to the PoE++ Zyxel XS1930-12HP switch, I saw that adding the TP-Link EAP660HD, it required 10.5W and, connecting the EAP670 meant that an additional 6.8W which is quite the difference.
Comparison Access Points: PoE vs Power adapter.
Obviously, neither access points were connected to any client device, so there should be no extra overhead. In any case, we see that the PoE consumption is once again slightly more elevated than using the power adapters. Lastly, after connecting the EAP660 HD to the unmanaged TRENDnet TPE-LG80, the power consumption rose by 10 Watts, which is in line with the previous network switch. Adding the EAP670, it showed that an extra 6.8W were drawn, which is again, the same value as on the previous switch.
As a conclusion, we can see objectively that using the power adapter means less power consumption and that’s without taking into account the power needed to keep the switch itself alive.
Does the standard matter?
I won’t really extrapolate on all the available PoE switches on the market, but in my experience, it does seem that the PoE++ switches (those that support the 802.3at standard) do consume more power than the 802.3af/at switches, so yes, the standards do matter. Is it a significant difference?
The switches and the access points that I just tested.
Well, it can add up if you have lots of switches for lots of access points but bear in mind that most APs will work just fine with the 30W limitation in place, so, unless you need something very particular, I’m not sure that the PoE++ is mandatory. For now, since it’s going to become more widespread and efficient in time.
Passive cooled PoE switches vs Fans
This one is pretty obvious. Yes, fans do need more power than a passive cooling system, so, at least in the first minutes or hours, the advantage goes to the passive cooling. But things do change when the power supply and the components start to build heat which makes the entire system less efficient than the fan-cooling systems.
UniFi Network Application 8.0.7 adds support for Radio Manager, WireGuard VPN Client, and Site Overview, and improves the Port Manager section by adding an overview of all ports and the VLAN Viewer.
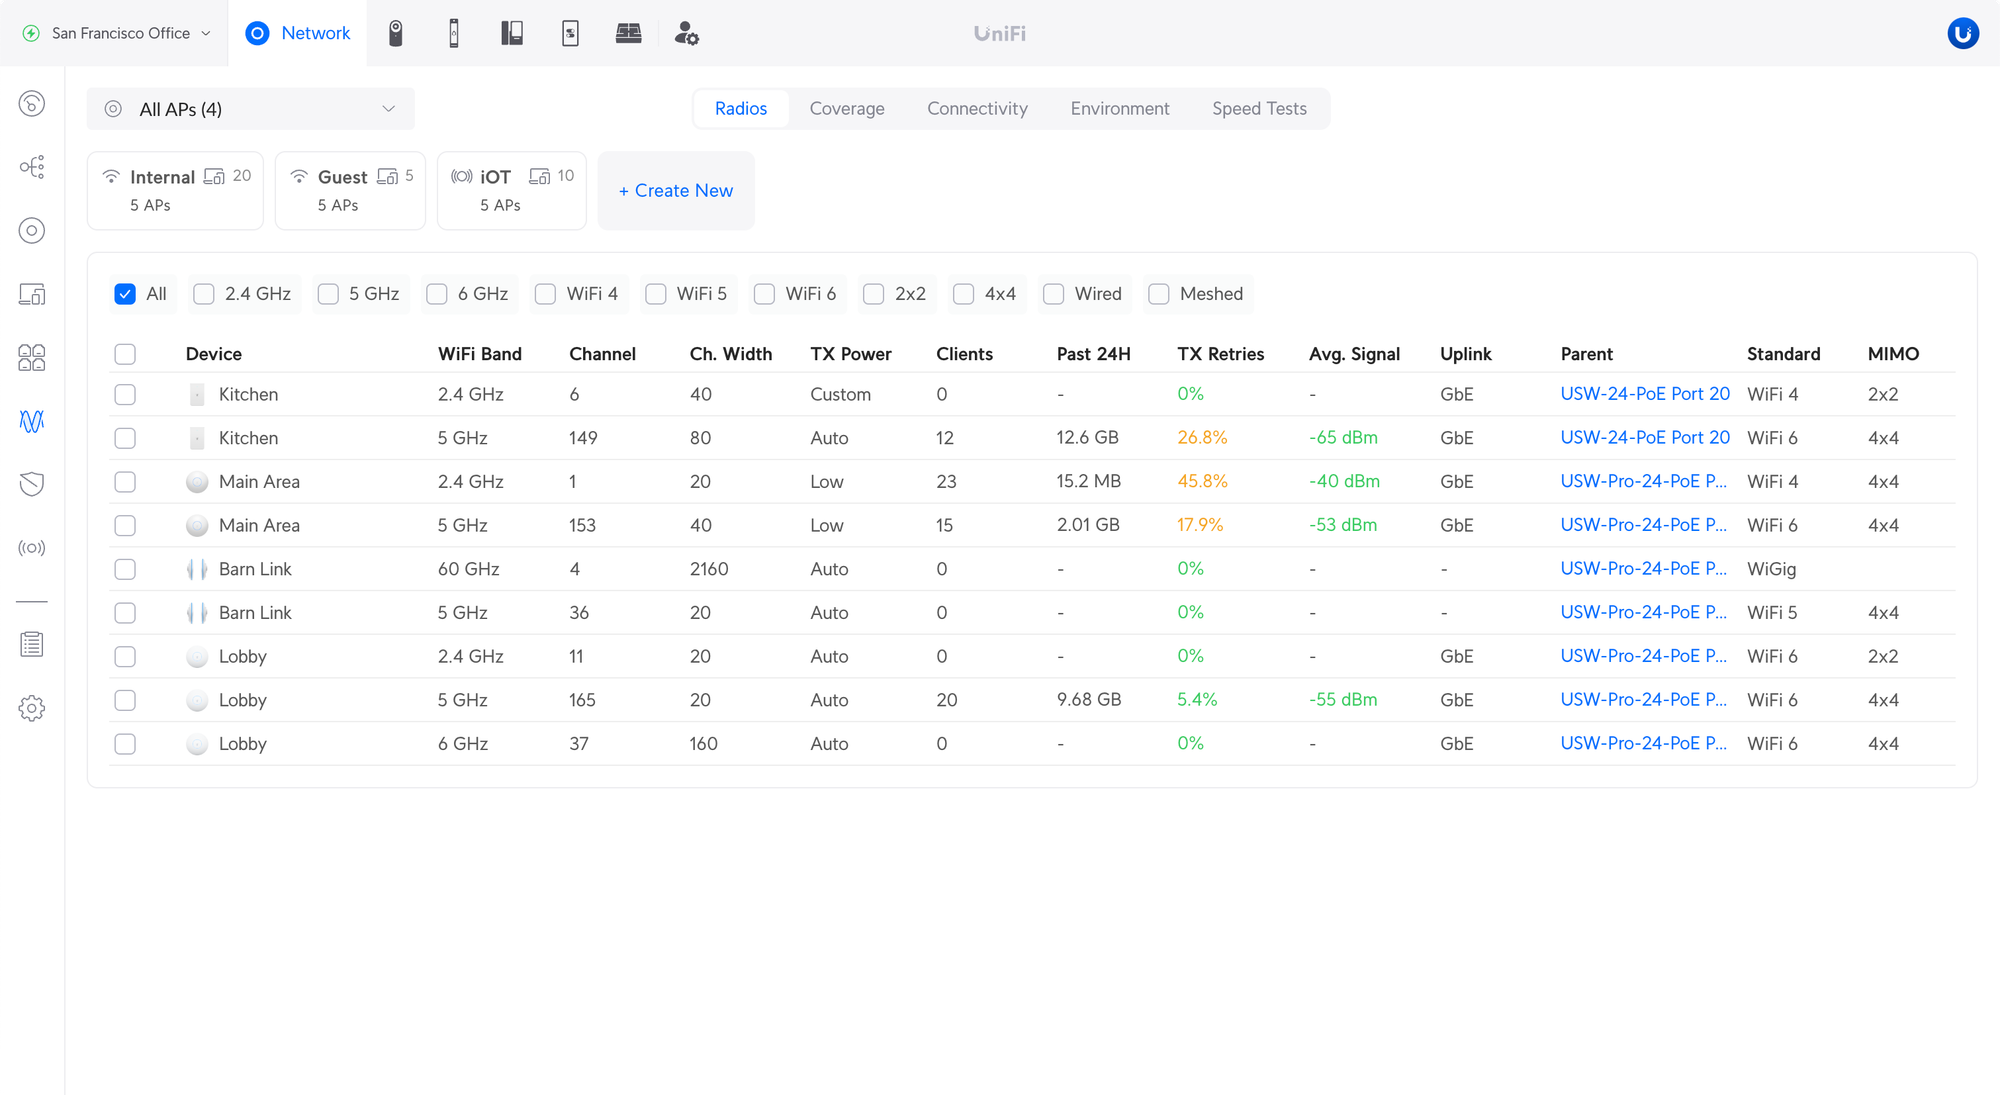
Radio Manager
The new Radios page provides an overview of the Access Point radios and their configuration, statistics, and performance.
Filter Devices – Show all APs or only specific devices.
Filter Bands – Use the filters to display only certain bands or MIMO, e.g. 5 GHz or 3×3.
Bulk Edit – Change the radio configuration on multiple APs at the same time.
Improved Port Manager
The new Ports page provides an overview of all ports across your devices.
Filter Ports – Use the filters to display only certain ports, e.g. only PoE or SFP ports.
Filter Devices – Show all ports or only ports on a specific device.
Insights – View and compare statistics between ports on the same device.
The VLAN port management has been redesigned to improve UX when managing VLANs.
Native VLAN / Network – Used for untagged traffic, i.e. not tagged with a VLAN ID. Previously this option was called ‘Primary Network’.
Tagged VLAN Management – Used for traffic tagged with a VLAN ID. Previously this option was called ‘Traffic Restriction’.
Allow All – Configured VLANs are automatically tagged (allowed) on the port.
Block All – All tagged VLANs are blocked (not allowed) on the port.
Custom – Specify which VLANs are tagged (allowed) on the port. Any VLAN that is not specified is blocked.
When adding a new VLAN, it is automatically tagged (allowed) on the port when using ‘Allow All’. If ‘Custom’ is used, the new VLAN needs to be manually added to the port.
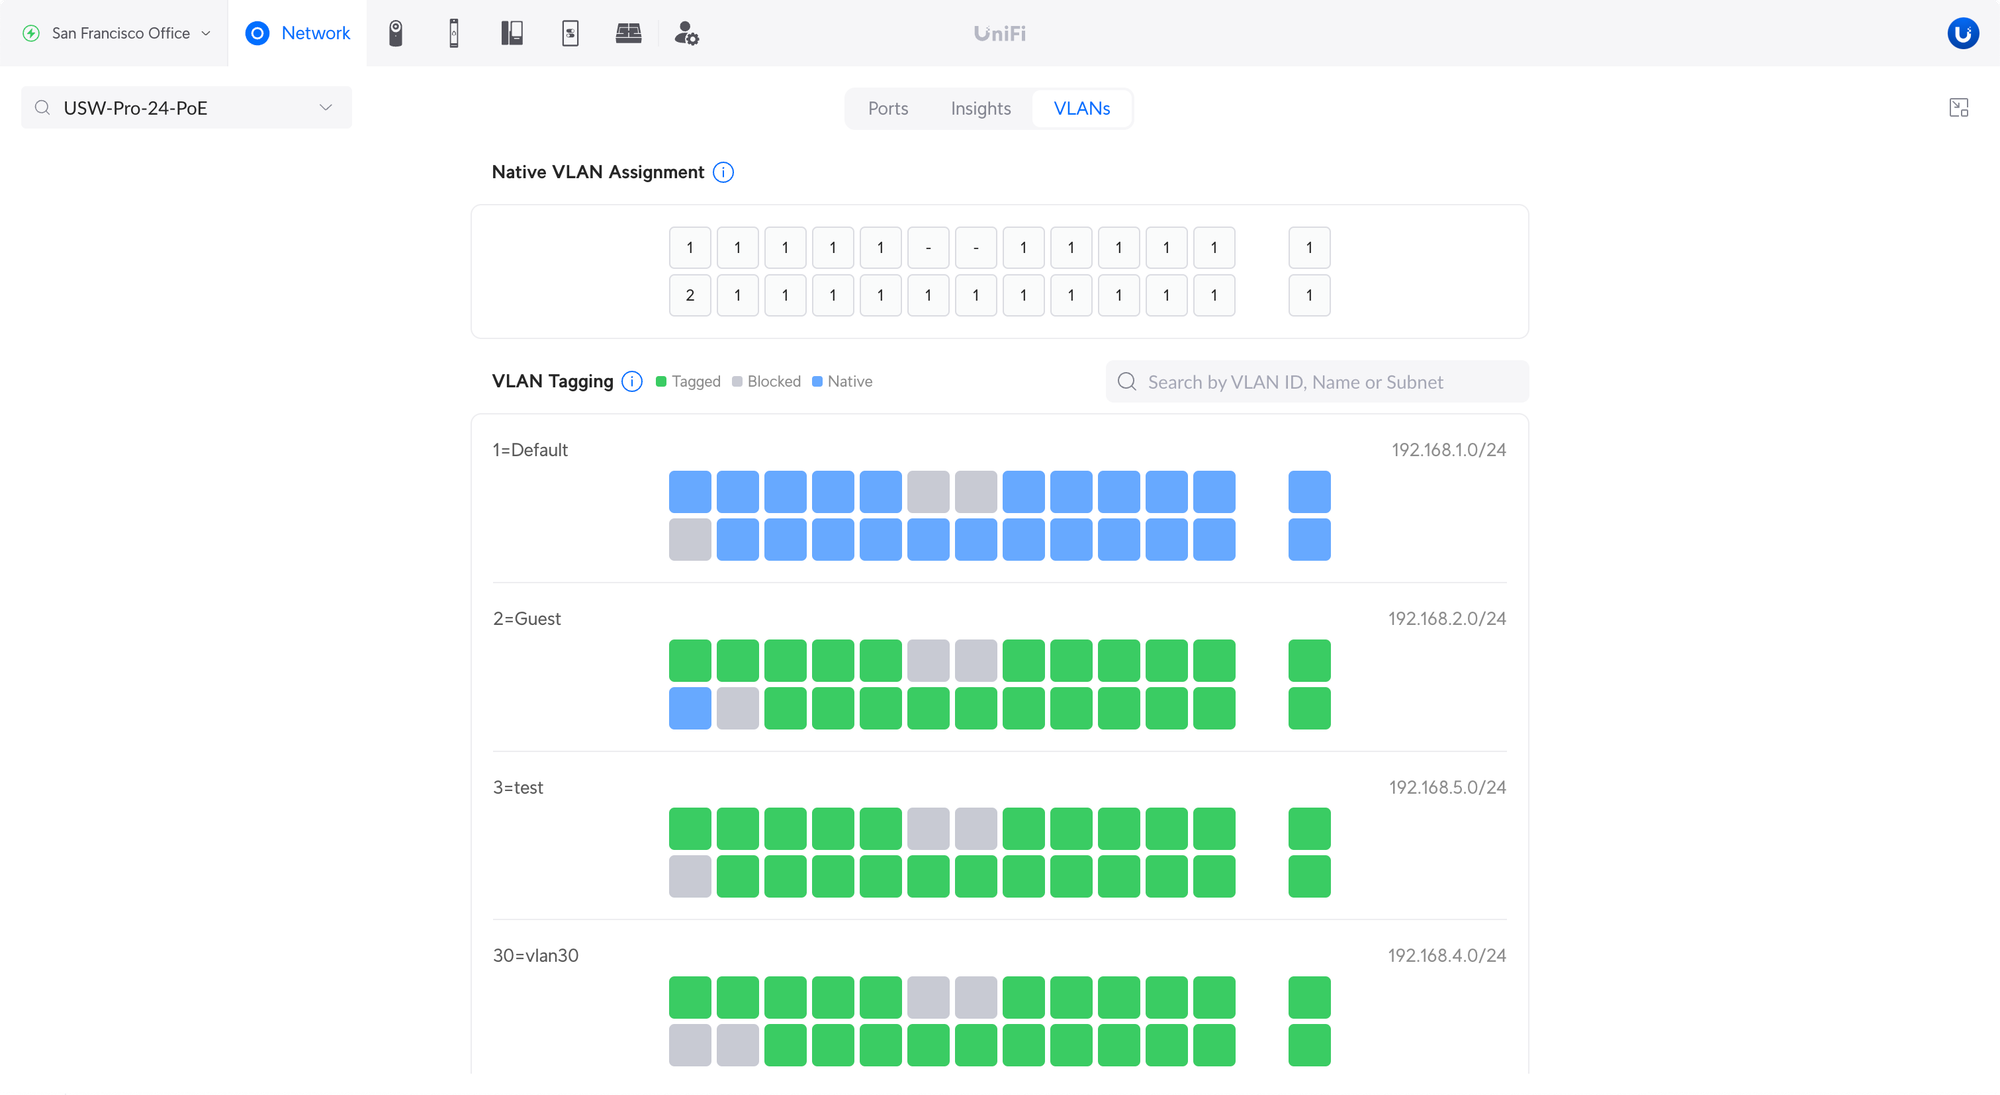
VLAN Viewer
Provides an easy way to see Native and Tagged VLANs across your devices.
Native VLAN Assignment – This shows which VLAN ID is set as native.
VLAN Tagging – Shows which VLANs are tagged, blocked, or native.
Search for VLANs using the VLAN name, ID, or subnet.
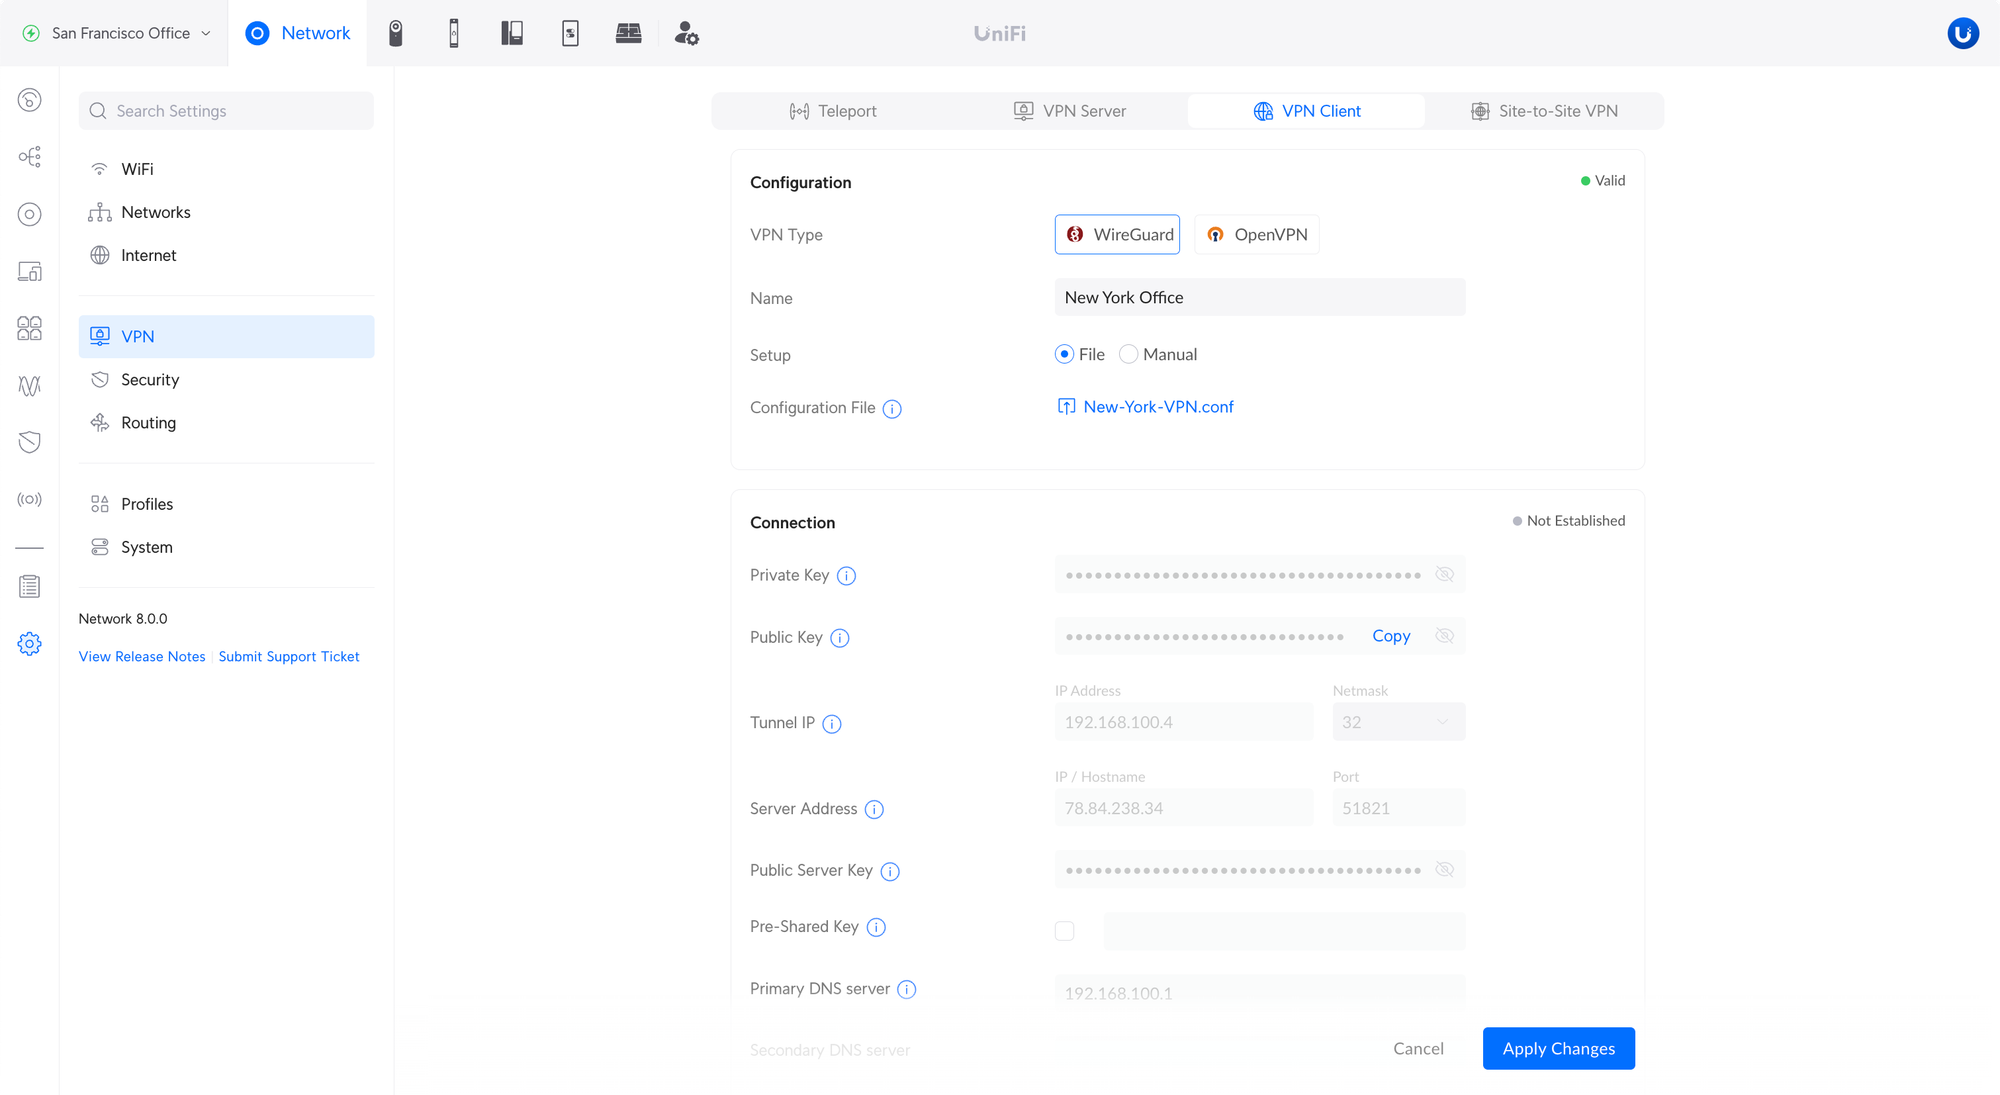
WireGuard VPN Client
Allows you to connect your UniFi Gateway to a VPN service provider and send internet traffic from devices over the VPN. Uploading a file and manual configuration are both supported.
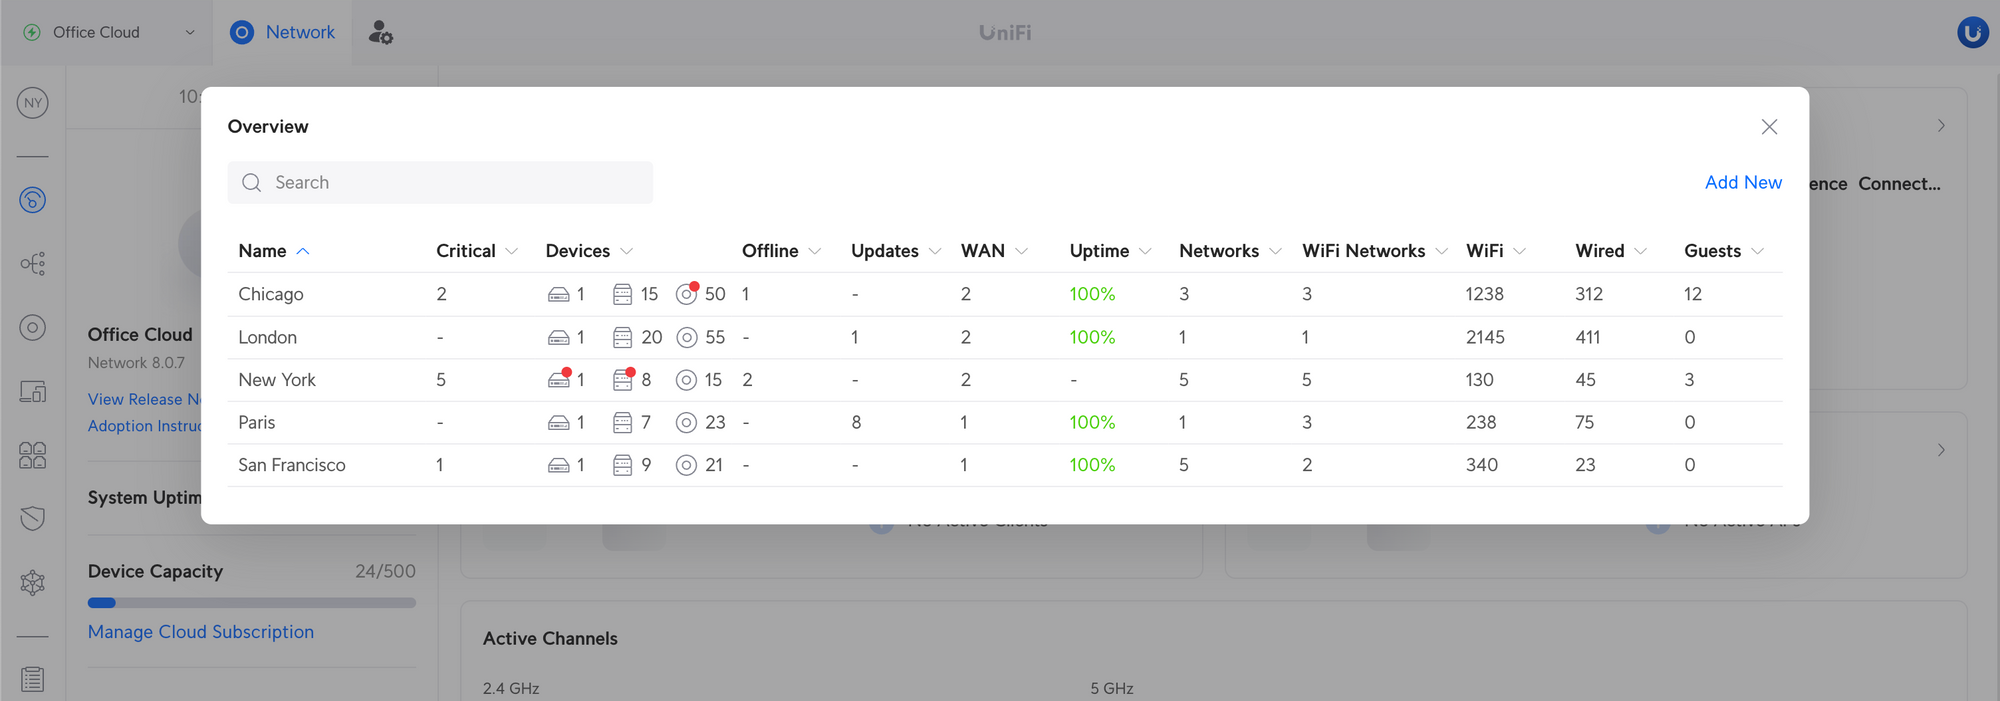
Site Overview
Provides an overview of all sites used on UniFi Network Applications managing multiple sites.
UniFi Devices – See how many devices are connected to each site.
Client Devices – See how many WiFi/wired clients and guests are connected to each site.
Insight – See which sites have offline devices and critical notifications.
Client Connections
The System Log now provides much more details on client connections such as the connection time and data usage.
Improvements
Improved Port Manager.
Added all ports overview.
Added VLAN Viewer.
Improved VLAN port management UX.
Added Site Overview.
Added ability to select which networks Suspicious Activity is enabled on.
Added sorting feature for IP Groups.
Added ability to allow opening predefined firewall rules.
Improved validation for Prefix ID in Virtual Network settings.
Improved empty MAC whitelist validation in Port Manager.
Improved validation for DHCP options.
Improved DHCP Server TFTP Server field validation.
Improved Traffic Rule IP Address validation.
Improved Firewall Rules UX.
Improved Security Settings UX.
Improved Global Network Settings UX.
Enabled auto upgrade for UXG-Pro after the adoption is completed.
Remove LTE Failover WAN from IPTV Options.
Show the local language in the Language dropdown.
Prevent provisioning more Layer 3 static routes than UniFi switches can support.
Routes that are over the limit at the time of upgrade will be marked as Paused.
This does not mean that total static route support on Layer 3 UniFi switches is decreased, instead, UX is improved to prevent configuration of routes that are not functional.
VPN
Added WireGuard VPN Client.
Added messaging to create traffic routes after creating VPN Clients. This applies to the VPN Client feature, not adding clients to VPN Servers.
Added validation in VPN Server settings when the port overlaps with a Port Forwarding rule.
Added IP/Hostname override option for OpenVPN and WireGuard VPN Servers.
This adds a custom hostname or IP address to the configuration file used by clients.
This option is useful if the UniFi Gateway is behind NAT or is using a dynamically assigned IP address.
Added validation for Local IP in IPsec Site-to-Site VPN settings.
Automatically remove Site-to-Site Auto IPsec configuration if the adopted gateway doesn’t support it.
Improved Site-to-Site VPN validations.
Improved configuration file generation time for OpenVPN Servers.
Increased OpenVPN and WireGuard VPN Client limit from 5 to 8. This applies to the VPN Client feature, not VPN users connecting to VPN Servers.
Remove the PPTP Server if the adopted gateway doesn’t support it.
Clients and Devices
Added PoE power cycle option to the device side panel.
Added confirmation message when configuring Network Overrides.
Improved UniFi Devices page performance on larger setups.
Improved System Logs for client connections.
Locked the first column for Devices/Clients pages when scrolling horizontally.
Client hostnames (if present) are now shown in the side panel overview.
Moved filters to the left side in the Device and Client pages.
WiFi
Added Radio Manager.
Added ability to enable Professional installer toggle for Consoles.
Improved adding clients to MAC Address Filters.
Improved actionable feedback when Outdoor Mode is enabled.
Removed Global AP Settings, you can now use Radio Manager for bulk editing.
Collapse RF Scan tab by default in the AP device panel.
Changed WiFi Experience to TX retries for APs in their device panel.
Enhanced voucher printing options.
Bugfixes
Fixed an issue where some UniFi devices were incorrectly shown on the Client Devices page or not shown at all.
As a result of this fix, unmanaged non-network UniFi devices (e.g. UniFi Protect camera) may appear again as offline devices.
These offline devices will be removed automatically based on the Data Retention settings.
Automatic removal is an automated, periodic process that will run for several minutes after updating. Manual removal is also possible.
Fixed an issue where blocked clients couldn’t connect if they were removed until the next AP provision.
Fixed incorrect channel width for BeaconHD/U6-Extender.
Fixed an issue where Virtual Network usable hosts were incorrectly calculated.
Fixed missing ISP names in internet-related notifications.
Fixed rare gateway adoption issues via Layer 3.
Fixed an issue where WiFiman speed test results were not shown.
Fixed issue where WAN configuration is not populated when moving a gateway device to a new site.
Fixed an issue where CGNAT IP addresses were incorrectly marked as public IPs for Site Magic.
Fixed invalid connected client count for In-Wall APs.
Fixed unmanaged Network devices not shown on Client and Device pages in rare cases.
Fixed an issue where the Console would appear offline in rare cases.
Fixed sorting when there are multiple pages.
Fixed an issue where Voice VLAN settings are not effective when all VLANs are auto-allowed on switch ports.
Fixed an issue where Lock to AP is not disabled when removing an AP.
Fixed an issue where RADIUS profiles couldn’t be disabled when using a WireGuard VPN Server.
Fixed rare gateway configuration error.
Additional information
Create a backup before upgrading your UniFi Network Application in the event any issues are encountered.
See the UniFi Network Server Help Center article for more information on self-hosting a server.
UniFi Network Application 7.5 and newer requires MongoDB 3.6 (up to 4.4) and Java 17.
UniFi Network Native Application for UniFi OS
A specific application version that is only compatible with the UDM and UDR (running UniFi OS 3.1.6 or newer).
The UniFi OS update uses the application version that is required for your console.
The manual update process via SSH requires you to use the compatible package. Incompatible packages will be rejected on installation.
Older UniFi OS versions (before UniFi OS 3.1.6) on the UDM and UDR still use regular UniFi Network Application for UniFi OS.
Dirk Schrader Published: November 14, 2023 Updated: November 24, 2023
In the wake of escalating cyber-attacks and data breaches, the ubiquitous advice of “don’t share your password” is no longer enough. Passwords remain the primary keys to our most important digital assets, so following password security best practices is more critical than ever. Whether you’re securing email, networks, or individual user accounts, following password best practices can help protect your sensitive information from cyber threats.
Read this guide to explore password best practices that should be implemented in every organization — and learn how to protect vulnerable information while adhering to better security strategies.
The Secrets of Strong Passwords
A strong password is your first line of defense when it comes to protecting your accounts and networks. Implement these standard password creation best practices when thinking about a new password:
Complexity: Ensure your passwords contain a mix of uppercase and lowercase letters, numbers, and special characters. It should be noted that composition rules, such as lowercase, symbols, etc. are no longer recommended by NIST — so use at your own discretion.
Length: Longer passwords are generally stronger — and usually, length trumps complexity. Aim for at least 6-8 characters.
Unpredictability: Avoid using common phrases or patterns. Avoid using easily guessable information like birthdays or names. Instead, create unique strings that are difficult for hackers to guess.
Combining these factors makes passwords harder to guess. For instance, if a password is 8 characters long and includes uppercase letters, lowercase letters, numbers and special characters, the total possible combinations would be (26 + 26 + 10 + 30)^8. This astronomical number of possibilities makes it exceedingly difficult for an attacker to guess the password.
Of course, given NIST’s updated guidance on passwords, the best approach to effective password security is using a password manager — this solution will not only help create and store your passwords, but it will automatically reject common, easy-to-guess passwords (those included in password dumps). Password managers greatly increase security against the following attack types.
Password-Guessing Attacks
Understanding the techniques that adversaries use to guess user passwords is essential for password security. Here are some of the key attacks to know about:
Brute-Force Attack
In a brute-force attack, an attacker systematically tries every possible combination of characters until the correct password is found. This method is time-consuming but can be effective if the password is weak.
Strong passwords help thwart brute force attacks because they increase the number of possible combinations an attacker must try, making it unlikely they can guess the password within a reasonable timeframe.
Dictionary Attack
A dictionary attack is a type of brute-force attack in which an adversary uses a list of common words, phrases and commonly used passwords to try to gain access.
Unique passwords are essential to thwarting dictionary attacks because attackers rely on common words and phrases. Using a password that isn’t a dictionary word or a known pattern significantly reduces the likelihood of being guessed. For example, the string “Xc78dW34aa12!” is not in the dictionary or on the list of commonly used passwords, making it much more secure than something generic like “password.”
Dictionary Attack with Character Variations
In some dictionary attacks, adversaries also use standard words but also try common character substitutions, such as replacing ‘a’ with ‘@’ or ‘e’ with ‘3’. For example, in addition to trying to log on using the word “password”, they might also try the variant “p@ssw0rd”.
Choosing complex and unpredictable passwords is necessary to thwart these attacks. By using unique combinations and avoiding easily guessable patterns, you make it challenging for attackers to guess your password.
How Password Managers Enhance Security
Password managers are indispensable for securely storing and organizing your passwords. These tools offer several key benefits:
Security: Password managers store passwords and enter them for you, eliminating the need for users to remember them all. All users need to remember is the master password for their password manager tool. Therefore, users can use long, complex passwords as recommended by best practices without worrying about forgetting their passwords or resorting to insecure practices like writing passwords down or reusing the same password for multiple sites or applications.
Password generation: Password managers can generate a strong and unique password for user accounts, eliminating the need for individuals to come up with them.
Encryption: Password managers encrypt password vaults, ensuring the safety of data — even if it is compromised.
Convenience: Password managers enable users to easily access passwords across multiple devices.
When selecting a password manager, it’s important to consider your organization’s specific needs, such as support for the platforms you use, price, ease of use and vendor breach history. Conduct research and read reviews to identify the one that best aligns with your organization’s requirements. Some noteworthy options include Netwrix Password Secure, LastPass, Dashlane, 1Password and Bitwarden.
How Multifactor Authentication (MFA) Adds an Extra Layer of Security
Multifactor authentication strengthens security by requiring two or more forms of verification before granting access. Specifically, you need to provide at least two of the following authentication factors:
Something you know: The classic example is your password.
Something you have: Usually this is a physical device like a smartphone or security token.
Something you are: This is biometric data like a fingerprint or facial recognition.
MFA renders a stolen password worthless, so implement it wherever possible.
Password Expiration Management
Password expiration policies play a crucial role in maintaining strong password security. Using a password manager that creates strong passwords also has an influence on password expiration. If you do not use a password manager yet, implement a strategy to check all passwords within your organization; with a rise in data breaches, password lists (like the known rockyou.txt and its variations) used in brute-force attacks are constantly growing. The website haveibeenpawned.com offers a service to check whether a certain password has been exposed. Here’s what users should know about password security best practices related to password expiration:
Follow policy guidelines: Adhere to your organization’s password expiration policy. This includes changing your password when prompted and selecting a new, strong password that meets the policy’s requirements.
Set reminders: If your organization doesn’t enforce password expiration via notifications, set your own reminders to change your password when it’s due. Regularly check your email or system notifications for prompts.
Avoid obvious patterns: When changing your password, refrain from using variations of the previous one or predictable patterns like “Password1,” “Password2” and so on.
Report suspicious activity: If you notice any suspicious account activity or unauthorized password change requests, report them immediately to your organization’s IT support service or helpdesk.
Be cautious with password reset emails: Best practice for good password security means being aware of scams. If you receive an unexpected email prompting you to reset your password, verify its authenticity. Phishing emails often impersonate legitimate organizations to steal your login credentials.
Password Security and Compliance
Compliance standards require password security and password management best practices as a means to safeguard data, maintain privacy and prevent unauthorized access. Here are a few of the laws that require password security:
HIPAA (Health Insurance Portability and Accountability Act): HIPAA mandates that healthcare organizations implement safeguards to protect electronic protected health information (ePHI), which includes secure password practices.
PCI DSS (Payment Card Industry Data Security Standard): PCI DSS requires organizations that handle payment card data on their website to implement strong access controls, including password security, to protect cardholder data.
GDPR (General Data Protection Regulation): GDPR requires organizations that store or process the data of EU residents to implement appropriate security measures to protect personal data. Password security is a fundamental aspect of data protection under GDPR.
FERPA (Family Educational Rights and Privacy Act): FERPA governs the privacy of student education records. It includes requirements for securing access to these records, which involves password security.
Organizations subject to these compliance standards need to implement robust password policies and password security best practices. Failure to do so can result in steep fines and other penalties.
There are also voluntary frameworks that help organizations establish strong password policies. Two of the most well known are the following:
NIST Cybersecurity Framework: The National Institute of Standards and Technology (NIST) provides guidelines and recommendations, including password best practices, to enhance cybersecurity.
ISO 27001: ISO 27001 is an international standard for information security management systems (ISMSs). It includes requirements related to password management as part of its broader security framework.
Password Best Practices in Action
Now, let’s put these password security best practices into action with an example:
Suppose your name is John Doe and your birthday is December 10, 1985. Instead of using “JohnDoe121085” as your password (which is easily guessable), follow these good password practices:
Create a long, unique (and unguessable) password, such as: “M3an85DJ121!”
If you are looking to strengthen your security, follow these password best practices:
Remove hints or knowledge-based authentication: NIST recommends not using knowledge-based authentication (KBA), such as questions like “What town were you born in?” but instead, using something more secure, like two-factor authentication.
Encrypt passwords: Protect passwords with encryption both when they are stored and when they are transmitted over networks. This makes them useless to any hacker who manages to steal them.
Avoid clear text and reversible forms: Users and applications should never store passwords in clear text or any form that could easily be transformed into clear text. Ensure your password management routine does not use clear text (like in an XLS file).
Choose unique passwords for different accounts: Don’t use the same, or even variations, of the same passwords for different accounts. Try to come up with unique passwords for different accounts.
Use a password management: This can help select new passwords that meet security requirements, send reminders of upcoming password expiration, and help update passwords through a user-friendly interface.
Enforce strong password policies: Implement and enforce strong password policies that include minimum length and complexity requirements, along with a password history rule to prevent the reuse of previous passwords.
Update passwords when needed: You should be checking and – if the results indicate so – updating your passwords to minimize the risk of unauthorized access, especially after data breaches.
Monitor for suspicious activity: Continuously monitor your accounts for suspicious activity, including multiple failed login attempts, and implement account lockouts and alerts to mitigate threats.
Educate users: Conduct or partake in regular security awareness training to learn about password best practices, phishing threats, and the importance of maintaining strong, unique passwords for each account.
Implement password expiration policies: Enforce password expiration policies that require password changes at defined circumstances to enhance security.
How Netwrix Can Help
Adhering to password best practices is vital to safeguarding sensitive information and preventing unauthorized access.
Netwrix Password Secure provides advanced capabilities for monitoring password policies, detecting and responding to suspicious activity and ensuring compliance with industry regulations. With features such as real-time alerts, comprehensive reporting and a user-friendly interface, it empowers organizations to proactively identify and address password-related risks, enforce strong password policies, and maintain strong security across their IT environment.
Conclusion
In a world where cyber threats are constantly evolving, adhering to password management best practices is essential to safeguard your digital presence. First and foremost, create a strong and unique password for each system or application — remember that using a password manager makes it much easier to adhere to this critical best practice. In addition, implement multifactor authentication whenever possible to thwart any attacker who manages to steal your password. By following the guidelines, you can enjoy a safer online experience and protect your valuable digital assets.
Dirk Schrader is a Resident CISO (EMEA) and VP of Security Research at Netwrix. A 25-year veteran in IT security with certifications as CISSP (ISC²) and CISM (ISACA), he works to advance cyber resilience as a modern approach to tackling cyber threats. Dirk has worked on cybersecurity projects around the globe, starting in technical and support roles at the beginning of his career and then moving into sales, marketing and product management positions at both large multinational corporations and small startups. He has published numerous articles about the need to address change and vulnerability management to achieve cyber resilience.
If you want to improve your network security and performance, learning how to set up a VLAN properly is all you need. Virtual LANs are powerful networking tools that allow you to segment your network into logical groups and isolate traffic between them.
In this post, we will go through the steps required to set up a VLAN in your network. We will configure two switches along with their interfaces and VLANs, respectively.
So, let’s dive in and learn how to set up VLANs and take your network to the next level.
Table of Contents
What is a VLAN?
Preparing for VLAN configuration
Our Lab
Network Diagram
How to set up a VLAN on a Switch?
Let’s connect to the Switch
Configure VLANs
Assign switch ports to VLANs
Configure trunk ports
Extra Configuration to Consider
What is a VLAN?
Before we go deep into learning how to set up a VLAN and provide examples, let’s understand the foundations of VLANs (or Virtual Local Area Networks).
In a nutshell, VLANs are logical groupings of devices that rely on Layer 2 addresses (MAC) for communication. VLANs are implemented to segment a physical network (or large Layer two broadcast domains) into multiple smaller logical networks (isolated broadcast domains).
Each VLAN behaves as a separate network with its own broadcast domain. VLANs help prevent broadcast storms (extreme amounts of broadcast traffic). They also help control traffic and overall improve network security and performance.
Preparing for VLAN configuration
Although VLANs are usually left for Layer 2 switches, in reality, any device (including routers and L3 switches) with switching capabilities and support of VLAN configuration should be an excellent fit for VLANs. In addition, VLANs are supported by different vendors, and since each vendor has a different OS and code, the way the VLANs are configured may slightly change.
Furthermore, you can also use specific software such as network diagramming and simulation to help you create network diagrams and test your configuration.
Our Lab
We will configure a popular Cisco (IOS-based) switch for demonstration purposes. We will use Boson NetSim (a network simulator for Cisco networking hardware and software) to run Cisco IOS simulated commands. This simulation is like you were configuring an actual Cisco switch or router.
Network Diagram
To further illustrate how to set up a VLAN, we will work on the following network diagram. We will configure two VLANs in two different switches. We will then configure each port on the switches connected to a PC. We will then proceed to configure the trunk port, which is vital for VLAN traffic.
Network diagram details
S2 and S3 (Switch 2 and Switch 3) – Two Cisco L2 Switches connecting PCs at different VLANs (VLAN 10 and VLAN 20) via Fast Ethernet interfaces.
VLANs 10 and VLAN20. These VLANs configured in L2 switches (S2 and S3) create a logical grouping of PCs within the network. In addition, each VLAN gets a name, VLAN 10 (Engineering) and VLAN 20 (Sales).
PCs. PC1, PC2, PC3, and PC4 are each connected to a specific L2 switch.
How to set up a VLAN on a Switch?
So now that you know the VLAN configuration we will be using, including the number of switches, VLAN ID, VLAN name, and the devices or ports that will be part of the configuration, let’s start setting up the VLANs.
Note:VLAN configuration is just a piece of the puzzle. Switches also need proper interface configuration, authentication, access, etc. To learn how to correctly connect and configure everything else, follow the step-by-step guide on how to configure a Cisco Switch.
a. Let’s connect to the switch
Inspect your hardware and find the console port. This port is usually located on the back of your Cisco switch. You can connect to the switch’s “console port” using a console cable (or rollover). Connect one end of the console cable to the switch’s console port and the other to your computer’s serial port.
Note: Obviously, not all modern computers have serial ports. Some modern switches come with a Mini USB port or AUX port to help with this. But if your hardware doesn’t have these ports, you can also connect to the switch port using special cables like an RJ-45 rollover cable, a Serial DB9-to-RJ-45 console cable, or a serial-to-USB adapter.
Depending on your switch’s model, you can configure it via Command Line Interface (CLI) or Graphical User Interface (GUI). We will connect to the most popular user interface: The IOS-based CLI.
To connect to your switch’s IOS-based CLI, you must use a terminal emulator on your computer, such as PuTTY or SecureCRT.
You’ll need to configure the terminal emulator to use the correct serial port and set the baud rate to 9600. Learn how to properly set these parameters in the Cisco switching configuration guide.
In the terminal emulator, press Enter to activate the console session. The Cisco switch should display a prompt asking for a username and password.
Enter your username and password to log in to the switch.
b. Configure VLANs
According to our previously shown network diagram, we will need two VLANs; VLAN 10 and VLAN 20.
To configure Layer 2 switches, you need to enter the privileged EXEC mode by typing “enable” and entering the password (if necessary).
Enter the configuration mode by typing “configure terminal.”
Create the VLAN with “vlan <vlan ID>” (e.g., “vlan 10”).
Name the VLAN by typing “name <vlan name>” (e.g., “name Sales”).
Repeat these two steps for each VLAN you want to create.
Configuration on Switch 2 (S2)
S2# configure terminal
S2(config)# vlan 10
S2(config-vlan)# name Engineering
S2(config-vlan)# end
S2# configure terminal
S2(config)# vlan 20
S2(config-vlan)# name Sales
S2(config-vlan)# end
Use the “show vlan” command to see the configured VLANs. From the output below, you’ll notice that the two new VLANs 10 (Engineering) and 20 (Sales) are indeed configured and active but not yet assigned to any port.
Configuration on Switch 3 (S3)
S3# configure terminal
S3(config)# vlan 10
S3(config-vlan)# name Engineering
S3(config-vlan)# end
S3# configure terminal
S3(config)# vlan 20
S3(config-vlan)# name Sales
S3(config-vlan)# end
Note: From the output above, you might have noticed VLAN 1 (default), which is currently active and is assigned to all the ports in the switch. This VLAN, also known as native VLAN, is the default VLAN on most Cisco switches. It is used for untagged traffic on a trunk port. This means that all traffic that is not explicitly tagged with VLAN information will be sent to this default VLAN.
Now, let’s remove those VLAN 1 tags from interfaces Fa0/2 and Fa0/3. Or in simple words let’s assign the ports to our newly created VLANs.
c. Assign switch ports to VLANs
In the previous section, we created our VLANs; now, we must assign the appropriate switch ports to the correct VLANs. The proper steps to assign switch ports to VLANs are as follows:
Enter configuration mode. Remember to run these commands under the configuration mode (configure terminal).
Assign ports to the VLANs by typing “interface <interface ID>” (e.g., “interface GigabitEthernet0/1”).
Configure the port as an access port by typing “switchport mode access”
Assign the port to a VLAN by typing “switchport access vlan <vlan ID>” (e.g., “switchport access vlan 10”).
Repeat these steps for each port you want to assign to a VLAN.
Let’s refer to a section of our network diagram
Configuration on Switch 2 (S2)
S2(config)# interface fastethernet 0/2
S2(config-if)# switchport mode access
S2(config-if)# switchport access vlan 10
S2(config)# interface fastethernet 0/3
S2(config-if)# switchport mode access
S2(config-if)# switchport access vlan 20
Use the “show running-configuration” to see the new configuration taking effect on the interfaces.
Configuration on Switch 3 (S3)
S3(config)# interface fastethernet 0/2
S3(config-if)# switchport mode access
S3(config-if)# switchport access vlan 10
S3(config)# interface fastethernet 0/3
S3(config-if)# switchport mode access
S3(config-if)# switchport access vlan 20
A “show running-configuration” can show you our configuration results.
d. Configure trunk ports
Trunk ports are a type of switch port mode (just like access) that perform essential tasks like carrying traffic for multiple VLANs between switches, tagging VLAN traffic, supporting VLAN management, increasing bandwidth efficiency, and allowing inter-VLAN routing.
If we didn’t configure trunk ports between our switches, the PCs couldn’t talk to each other on different switches, even if they were on the same VLAN.
Here’s a step by step to configuring trunk ports
Configure a trunk port to carry traffic between VLANs by typing “interface <interface ID>” (e.g., “interface FastEthernet0/12”).
Set the trunk encapsulation method (dot1q). The IEEE 802.1Q (dot1q) trunk encapsulation method is the standard tagging Ethernet frames with VLAN information.
Configure the port as a trunk port by typing “switchport mode trunk”.
Repeat the steps for each trunk port you want to configure.
Note (on redundant trunk links): To keep our article simple, we will configure one trunk link. However, keep in mind that any good network design (including trunk links) would need redundancy. One trunk link between switches is not an optimal redundant solution for networks on production. To add redundancy, we recommend using EtherChannel to bundle physical links together and configure the logical link as a trunk port. You can also use Spanning Tree Protocol (STP) by using the “spanning-tree portfast trunk” command.
Note: You can use different types of trunk encapsulation such as dot1q and ISL, just make sure both ends match the type of encapsulation.
Extra Configuration to Consider
Once you finish with VLAN and trunk configuration, remember to test VLAN connectivity between PCs, you can do this by configuring the proper IP addressing and doing a simple ping. Below are other key configurations related to your new VLANs that you might want to consider.
a. Ensure all your interfaces are up and running
To ensure that your interfaces are not administratively down, issue a “no shutdown” (or ‘no shut’) command on all those newly configured interfaces. Additionally, you can also use the “show interfaces” to see the status of all the interfaces.
b. (Optional) enable inter-VLAN
VLANs, as discussed earlier, separate broadcast domains (Layer 2) — they do not know how to route IP traffic because Layer 2 devices like switches can’t accept IP address configuration on their interfaces. To allow inter-VLAN communication (PCs on one VLAN communicate with PCs on another VLAN), you would need to use a Layer 3 device (a router or L3 switch) to route traffic.
There are three ways to implement inter-VLAN routing: an L3 router with multiple Ethernet interfaces, an L3 router with one router interface using subinterfaces (known as Router-On-a-Stick), and an L3 switch with SVI.
We will show a step-by-step on how to configure Router-On-a-Stick for inter-VLAN communications.
Connect the router to one switch via a trunk port.
Configure subinterfaces on the router for each VLAN (10 and 20 in our example). To configure subinterfaces, use the “interface” command followed by the VLAN number with a period and a subinterface number (e.g., “interface FastEthernet0/0.10” for VLAN 10). For example, to configure subinterfaces for VLANs 10 and 20, you would use the following commands:
> router(config-subif)# ip address 192.168.20.1 255.255.255.0
Configure a default route on the router using the “ip route” command. This is a default route to the Internet through a gateway at IP address 192.168.1.1. For example:
> router(config)# ip route 0.0.0.0 0.0.0.0 192.168.1.1
c. Configure DHCP Server
To automatically assign IP addresses to devices inside the VLANs, you will need to configure a DHCP server. Follow these steps:
The DHCP server should also be connected to the VLAN.
Configure the DHCP server to provide IP addresses to devices in the VLAN.
Configure the router to forward DHCP requests to the DHCP server by typing “ip helper-address <ip address>” (e.g., “ip helper-address 192.168.10.2”).
Final Words
By following the steps outlined in this post, you can easily set up a VLAN on your switch and effectively segment your network. Keep in mind to thoroughly test your VLAN configuration and consider additional configuration options to optimize your network for your specific needs.
With proper setup and configuration, VLANs can greatly enhance your network’s capabilities and 10x increase its performance and security.
A plea for network defenders and software manufacturers to fix common problems.
EXECUTIVE SUMMARY
The National Security Agency (NSA) and Cybersecurity and Infrastructure Security Agency (CISA) are releasing this joint cybersecurity advisory (CSA) to highlight the most common cybersecurity misconfigurations in large organizations, and detail the tactics, techniques, and procedures (TTPs) actors use to exploit these misconfigurations.
Through NSA and CISA Red and Blue team assessments, as well as through the activities of NSA and CISA Hunt and Incident Response teams, the agencies identified the following 10 most common network misconfigurations:
Default configurations of software and applications
Improper separation of user/administrator privilege
Insufficient internal network monitoring
Lack of network segmentation
Poor patch management
Bypass of system access controls
Weak or misconfigured multifactor authentication (MFA) methods
Insufficient access control lists (ACLs) on network shares and services
Poor credential hygiene
Unrestricted code execution
These misconfigurations illustrate (1) a trend of systemic weaknesses in many large organizations, including those with mature cyber postures, and (2) the importance of software manufacturers embracing secure-by-design principles to reduce the burden on network defenders:
Properly trained, staffed, and funded network security teams can implement the known mitigations for these weaknesses.
Software manufacturers must reduce the prevalence of these misconfigurations—thus strengthening the security posture for customers—by incorporating secure-by-design and -default principles and tactics into their software development practices.[1]
NSA and CISA encourage network defenders to implement the recommendations found within the Mitigations section of this advisory—including the following—to reduce the risk of malicious actors exploiting the identified misconfigurations.
Remove default credentials and harden configurations.
Disable unused services and implement access controls.
Reduce, restrict, audit, and monitor administrative accounts and privileges.
NSA and CISA urge software manufacturers to take ownership of improving security outcomes of their customers by embracing secure-by-design and-default tactics, including:
Embedding security controls into product architecture from the start of development and throughout the entire software development lifecycle (SDLC).
Eliminating default passwords.
Providing high-quality audit logs to customers at no extra charge.
Mandating MFA, ideally phishing-resistant, for privileged users and making MFA a default rather than opt-in feature.[3]
Download the PDF version of this report: PDF, 660 KB
TECHNICAL DETAILS
Note: This advisory uses the MITRE ATT&CK® for Enterprise framework, version 13, and the MITRE D3FEND™ cybersecurity countermeasures framework.[4],[5] See the Appendix: MITRE ATT&CK tactics and techniques section for tables summarizing the threat actors’ activity mapped to MITRE ATT&CK tactics and techniques, and the Mitigations section for MITRE D3FEND countermeasures.
Over the years, the following NSA and CISA teams have assessed the security posture of many network enclaves across the Department of Defense (DoD); Federal Civilian Executive Branch (FCEB); state, local, tribal, and territorial (SLTT) governments; and the private sector:
Depending on the needs of the assessment, NSA Defensive Network Operations (DNO) teams feature capabilities from Red Team (adversary emulation), Blue Team (strategic vulnerability assessment), Hunt (targeted hunt), and/or Tailored Mitigations (defensive countermeasure development).
CISA Vulnerability Management (VM) teams have assessed the security posture of over 1,000 network enclaves. CISA VM teams include Risk and Vulnerability Assessment (RVA) and CISA Red Team Assessments (RTA).[8] The RVA team conducts remote and onsite assessment services, including penetration testing and configuration review. RTA emulates cyber threat actors in coordination with an organization to assess the organization’s cyber detection and response capabilities.
CISA Hunt and Incident Response teams conduct proactive and reactive engagements, respectively, on organization networks to identify and detect cyber threats to U.S. infrastructure.
During these assessments, NSA and CISA identified the 10 most common network misconfigurations, which are detailed below. These misconfigurations (non-prioritized) are systemic weaknesses across many networks.
Many of the assessments were of Microsoft® Windows® and Active Directory® environments. This advisory provides details about, and mitigations for, specific issues found during these assessments, and so mostly focuses on these products. However, it should be noted that many other environments contain similar misconfigurations. Network owners and operators should examine their networks for similar misconfigurations even when running other software not specifically mentioned below.
1. Default Configurations of Software and Applications
Default configurations of systems, services, and applications can permit unauthorized access or other malicious activity. Common default configurations include:
Default credentials
Default service permissions and configurations settings
Default Credentials
Many software manufacturers release commercial off-the-shelf (COTS) network devices —which provide user access via applications or web portals—containing predefined default credentials for their built-in administrative accounts.[9] Malicious actors and assessment teams regularly abuse default credentials by:
Finding credentials with a simple web search [T1589.001] and using them [T1078.001] to gain authenticated access to a device.
Resetting built-in administrative accounts [T1098] via predictable forgotten passwords questions.
Leveraging publicly available setup information to identify built-in administrative credentials for web applications and gaining access to the application and its underlying database.
Leveraging default credentials on software deployment tools [T1072] for code execution and lateral movement.
In addition to devices that provide network access, printers, scanners, security cameras, conference room audiovisual (AV) equipment, voice over internet protocol (VoIP) phones, and internet of things (IoT) devices commonly contain default credentials that can be used for easy unauthorized access to these devices as well. Further compounding this problem, printers and scanners may have privileged domain accounts loaded so that users can easily scan documents and upload them to a shared drive or email them. Malicious actors who gain access to a printer or scanner using default credentials can use the loaded privileged domain accounts to move laterally from the device and compromise the domain [T1078.002].
Default Service Permissions and Configuration Settings
Certain services may have overly permissive access controls or vulnerable configurations by default. Additionally, even if the providers do not enable these services by default, malicious actors can easily abuse these services if users or administrators enable them.
Assessment teams regularly find the following:
Insecure Active Directory Certificate Services
Insecure legacy protocols/services
Insecure Server Message Block (SMB) service
Insecure Active Directory Certificate Services
Active Directory Certificate Services (ADCS) is a feature used to manage Public Key Infrastructure (PKI) certificates, keys, and encryption inside of Active Directory (AD) environments. ADCS templates are used to build certificates for different types of servers and other entities on an organization’s network.
Malicious actors can exploit ADCS and/or ADCS template misconfigurations to manipulate the certificate infrastructure into issuing fraudulent certificates and/or escalate user privileges to domain administrator privileges. These certificates and domain escalation paths may grant actors unauthorized, persistent access to systems and critical data, the ability to impersonate legitimate entities, and the ability to bypass security measures.
Assessment teams have observed organizations with the following misconfigurations:
ADCS servers running with web-enrollment enabled. If web-enrollment is enabled, unauthenticated actors can coerce a server to authenticate to an actor-controlled computer, which can relay the authentication to the ADCS web-enrollment service and obtain a certificate [T1649] for the server’s account. These fraudulent, trusted certificates enable actors to use adversary-in-the-middle techniques [T1557] to masquerade as trusted entities on the network. The actors can also use the certificate for AD authentication to obtain a Kerberos Ticket Granting Ticket (TGT) [T1558.001], which they can use to compromise the server and usually the entire domain.
ADCS templates where low-privileged users have enrollment rights, and the enrollee supplies a subject alternative name. Misconfiguring various elements of ADCS templates can result in domain escalation by unauthorized users (e.g., granting low-privileged users certificate enrollment rights, allowing requesters to specify a subjectAltName in the certificate signing request [CSR], not requiring authorized signatures for CSRs, granting FullControl or WriteDacl permissions to users). Malicious actors can use a low-privileged user account to request a certificate with a particular Subject Alternative Name (SAN) and gain a certificate where the SAN matches the User Principal Name (UPN) of a privileged account.
Many vulnerable network services are enabled by default, and assessment teams have observed them enabled in production environments. Specifically, assessment teams have observed Link-Local Multicast Name Resolution (LLMNR) and NetBIOS Name Service (NBT-NS), which are Microsoft Windows components that serve as alternate methods of host identification. If these services are enabled in a network, actors can use spoofing, poisoning, and relay techniques [T1557.001] to obtain domain hashes, system access, and potential administrative system sessions. Malicious actors frequently exploit these protocols to compromise entire Windows’ environments.
Malicious actors can spoof an authoritative source for name resolution on a target network by responding to passing traffic, effectively poisoning the service so that target computers will communicate with an actor-controlled system instead of the intended one. If the requested system requires identification/authentication, the target computer will send the user’s username and hash to the actor-controlled system. The actors then collect the hash and crack it offline to obtain the plain text password [T1110.002].
Insecure Server Message Block (SMB) service
The Server Message Block service is a Windows component primarily for file sharing. Its default configuration, including in the latest version of Windows, does not require signing network messages to ensure authenticity and integrity. If SMB servers do not enforce SMB signing, malicious actors can use machine-in-the-middle techniques, such as NTLM relay. Further, malicious actors can combine a lack of SMB signing with the name resolution poisoning issue (see above) to gain access to remote systems [T1021.002] without needing to capture and crack any hashes.
2. Improper Separation of User/Administrator Privilege
Administrators often assign multiple roles to one account. These accounts have access to a wide range of devices and services, allowing malicious actors to move through a network quickly with one compromised account without triggering lateral movement and/or privilege escalation detection measures.
Assessment teams have observed the following common account separation misconfigurations:
Excessive account privileges
Elevated service account permissions
Non-essential use of elevated accounts
Excessive Account Privileges
Account privileges are intended to control user access to host or application resources to limit access to sensitive information or enforce a least-privilege security model. When account privileges are overly permissive, users can see and/or do things they should not be able to, which becomes a security issue as it increases risk exposure and attack surface.
Expanding organizations can undergo numerous changes in account management, personnel, and access requirements. These changes commonly lead to privilege creep—the granting of excessive access and unnecessary account privileges. Through the analysis of topical and nested AD groups, a malicious actor can find a user account [T1078] that has been granted account privileges that exceed their need-to-know or least-privilege function. Extraneous access can lead to easy avenues for unauthorized access to data and resources and escalation of privileges in the targeted domain.
Elevated Service Account Permissions
Applications often operate using user accounts to access resources. These user accounts, which are known as service accounts, often require elevated privileges. When a malicious actor compromises an application or service using a service account, they will have the same privileges and access as the service account.
Malicious actors can exploit elevated service permissions within a domain to gain unauthorized access and control over critical systems. Service accounts are enticing targets for malicious actors because such accounts are often granted elevated permissions within the domain due to the nature of the service, and because access to use the service can be requested by any valid domain user. Due to these factors, kerberoasting—a form of credential access achieved by cracking service account credentials—is a common technique used to gain control over service account targets [T1558.003].
Non-Essential Use of Elevated Accounts
IT personnel use domain administrator and other administrator accounts for system and network management due to their inherent elevated privileges. When an administrator account is logged into a compromised host, a malicious actor can steal and use the account’s credentials and an AD-generated authentication token [T1528] to move, using the elevated permissions, throughout the domain [T1550.001]. Using an elevated account for normal day-to-day, non-administrative tasks increases the account’s exposure and, therefore, its risk of compromise and its risk to the network.
Malicious actors prioritize obtaining valid domain credentials upon gaining access to a network. Authentication using valid domain credentials allows the execution of secondary enumeration techniques to gain visibility into the target domain and AD structure, including discovery of elevated accounts and where the elevated accounts are used [T1087].
Targeting elevated accounts (such as domain administrator or system administrators) performing day-to-day activities provides the most direct path to achieve domain escalation. Systems or applications accessed by the targeted elevated accounts significantly increase the attack surface available to adversaries, providing additional paths and escalation options.
After obtaining initial access via an account with administrative permissions, an assessment team compromised a domain in under a business day. The team first gained initial access to the system through phishing [T1566], by which they enticed the end user to download [T1204] and execute malicious payloads. The targeted end-user account had administrative permissions, enabling the team to quickly compromise the entire domain.
3. Insufficient Internal Network Monitoring
Some organizations do not optimally configure host and network sensors for traffic collection and end-host logging. These insufficient configurations could lead to undetected adversarial compromise. Additionally, improper sensor configurations limit the traffic collection capability needed for enhanced baseline development and detract from timely detection of anomalous activity.
Assessment teams have exploited insufficient monitoring to gain access to assessed networks. For example:
An assessment team observed an organization with host-based monitoring, but no network monitoring. Host-based monitoring informs defensive teams about adverse activities on singular hosts and network monitoring informs about adverse activities traversing hosts [TA0008]. In this example, the organization could identify infected hosts but could not identify where the infection was coming from, and thus could not stop future lateral movement and infections.
An assessment team gained persistent deep access to a large organization with a mature cyber posture. The organization did not detect the assessment team’s lateral movement, persistence, and command and control (C2) activity, including when the team attempted noisy activities to trigger a security response. For more information on this activity, see CSA CISA Red Team Shares Key Findings to Improve Monitoring and Hardening of Networks.[13]
4. Lack of Network Segmentation
Network segmentation separates portions of the network with security boundaries. Lack of network segmentation leaves no security boundaries between the user, production, and critical system networks. Insufficient network segmentation allows an actor who has compromised a resource on the network to move laterally across a variety of systems uncontested. Lack of network segregation additionally leaves organizations significantly more vulnerable to potential ransomware attacks and post-exploitation techniques.
Lack of segmentation between IT and operational technology (OT) environments places OT environments at risk. For example, assessment teams have often gained access to OT networks—despite prior assurance that the networks were fully air gapped, with no possible connection to the IT network—by finding special purpose, forgotten, or even accidental network connections [T1199].
5. Poor Patch Management
Vendors release patches and updates to address security vulnerabilities. Poor patch management and network hygiene practices often enable adversaries to discover open attack vectors and exploit critical vulnerabilities. Poor patch management includes:
Lack of regular patching
Use of unsupported operating systems (OSs) and outdated firmware
Lack of Regular Patching
Failure to apply the latest patches can leave a system open to compromise from publicly available exploits. Due to their ease of discovery—via vulnerability scanning [T1595.002] and open source research [T1592]—and exploitation, these systems are immediate targets for adversaries. Allowing critical vulnerabilities to remain on production systems without applying their corresponding patches significantly increases the attack surface. Organizations should prioritize patching known exploited vulnerabilities in their environments.[2]
Assessment teams have observed threat actors exploiting many CVEs in public-facing applications [T1190], including:
CVE-2019-18935 in an unpatched instance of Telerik® UI for ASP.NET running on a Microsoft IIS server.[14]
CVE-2021-44228 (Log4Shell) in an unpatched VMware® Horizon server.[15]
CVE-2022-24682, CVE-2022-27924, and CVE-2022-27925 chained with CVE-2022-37042, or CVE-2022-30333 in an unpatched Zimbra® Collaboration Suite.[16]
Use of Unsupported OSs and Outdated Firmware
Using software or hardware that is no longer supported by the vendor poses a significant security risk because new and existing vulnerabilities are no longer patched. Malicious actors can exploit vulnerabilities in these systems to gain unauthorized access, compromise sensitive data, and disrupt operations [T1210].
Assessment teams frequently observe organizations using unsupported Windows operating systems without updates MS17-010 and MS08-67. These updates, released years ago, address critical remote code execution vulnerabilities.[17],[18]
6. Bypass of System Access Controls
A malicious actor can bypass system access controls by compromising alternate authentication methods in an environment. If a malicious actor can collect hashes in a network, they can use the hashes to authenticate using non-standard means, such as pass-the-hash (PtH) [T1550.002]. By mimicking accounts without the clear-text password, an actor can expand and fortify their access without detection. Kerberoasting is also one of the most time-efficient ways to elevate privileges and move laterally throughout an organization’s network.
7. Weak or Misconfigured MFA Methods
Misconfigured Smart Cards or Tokens
Some networks (generally government or DoD networks) require accounts to use smart cards or tokens. Multifactor requirements can be misconfigured so the password hashes for accounts never change. Even though the password itself is no longer used—because the smart card or token is required instead—there is still a password hash for the account that can be used as an alternative credential for authentication. If the password hash never changes, once a malicious actor has an account’s password hash [T1111], the actor can use it indefinitely, via the PtH technique for as long as that account exists.
Lack of Phishing-Resistant MFA
Some forms of MFA are vulnerable to phishing, “push bombing” [T1621], exploitation of Signaling System 7 (SS7) protocol vulnerabilities, and/or “SIM swap” techniques. These attempts, if successful, may allow a threat actor to gain access to MFA authentication credentials or bypass MFA and access the MFA-protected systems. (See CISA’s Fact Sheet Implementing Phishing-Resistant MFA for more information.)[3]
For example, assessment teams have used voice phishing to convince users to provide missing MFA information [T1598]. In one instance, an assessment team knew a user’s main credentials, but their login attempts were blocked by MFA requirements. The team then masqueraded as IT staff and convinced the user to provide the MFA code over the phone, allowing the team to complete their login attempt and gain access to the user’s email and other organizational resources.
8. Insufficient ACLs on Network Shares and Services
Data shares and repositories are primary targets for malicious actors. Network administrators may improperly configure ACLs to allow for unauthorized users to access sensitive or administrative data on shared drives.
Actors can use commands, open source tools, or custom malware to look for shared folders and drives [T1135].
In one compromise, a team observed actors use the net share command—which displays information about shared resources on the local computer—and the ntfsinfo command to search network shares on compromised computers. In the same compromise, the actors used a custom tool, CovalentStealer, which is designed to identify file shares on a system, categorize the files [T1083], and upload the files to a remote server [TA0010].[19],[20]
Ransomware actors have used the SoftPerfect® Network Scanner, netscan.exe—which can ping computers [T1018], scan ports [T1046], and discover shared folders—and SharpShares to enumerate accessible network shares in a domain.[21],[22]
Malicious actors can then collect and exfiltrate the data from the shared drives and folders. They can then use the data for a variety of purposes, such as extortion of the organization or as intelligence when formulating intrusion plans for further network compromise. Assessment teams routinely find sensitive information on network shares [T1039] that could facilitate follow-on activity or provide opportunities for extortion. Teams regularly find drives containing cleartext credentials [T1552] for service accounts, web applications, and even domain administrators.
Even when further access is not directly obtained from credentials in file shares, there can be a treasure trove of information for improving situational awareness of the target network, including the network’s topology, service tickets, or vulnerability scan data. In addition, teams regularly identify sensitive data and PII on shared drives (e.g., scanned documents, social security numbers, and tax returns) that could be used for extortion or social engineering of the organization or individuals.
9. Poor Credential Hygiene
Poor credential hygiene facilitates threat actors in obtaining credentials for initial access, persistence, lateral movement, and other follow-on activity, especially if phishing-resistant MFA is not enabled. Poor credential hygiene includes:
Easily crackable passwords
Cleartext password disclosure
Easily Crackable Passwords
Easily crackable passwords are passwords that a malicious actor can guess within a short time using relatively inexpensive computing resources. The presence of easily crackable passwords on a network generally stems from a lack of password length (i.e., shorter than 15 characters) and randomness (i.e., is not unique or can be guessed). This is often due to lax requirements for passwords in organizational policies and user training. A policy that only requires short and simple passwords leaves user passwords susceptible to password cracking. Organizations should provide or allow employee use of password managers to enable the generation and easy use of secure, random passwords for each account.
Often, when a credential is obtained, it is a hash (one-way encryption) of the password and not the password itself. Although some hashes can be used directly with PtH techniques, many hashes need to be cracked to obtain usable credentials. The cracking process takes the captured hash of the user’s plaintext password and leverages dictionary wordlists and rulesets, often using a database of billions of previously compromised passwords, in an attempt to find the matching plaintext password [T1110.002].
One of the primary ways to crack passwords is with the open source tool, Hashcat, combined with password lists obtained from publicly released password breaches. Once a malicious actor has access to a plaintext password, they are usually limited only by the account’s permissions. In some cases, the actor may be restricted or detected by advanced defense-in-depth and zero trust implementations as well, but this has been a rare finding in assessments thus far.
Assessment teams have cracked password hashes for NTLM users, Kerberos service account tickets, NetNTLMv2, and PFX stores [T1555], enabling the team to elevate privileges and move laterally within networks. In 12 hours, one team cracked over 80% of all users’ passwords in an Active Directory, resulting in hundreds of valid credentials.
Cleartext Password Disclosure
Storing passwords in cleartext is a serious security risk. A malicious actor with access to files containing cleartext passwords [T1552.001] could use these credentials to log into the affected applications or systems under the guise of a legitimate user. Accountability is lost in this situation as any system logs would record valid user accounts accessing applications or systems.
Malicious actors search for text files, spreadsheets, documents, and configuration files in hopes of obtaining cleartext passwords. Assessment teams frequently discover cleartext passwords, allowing them to quickly escalate the emulated intrusion from the compromise of a regular domain user account to that of a privileged account, such as a Domain or Enterprise Administrator. A common tool used for locating cleartext passwords is the open source tool, Snaffler.[23]
10. Unrestricted Code Execution
If unverified programs are allowed to execute on hosts, a threat actor can run arbitrary, malicious payloads within a network.
Malicious actors often execute code after gaining initial access to a system. For example, after a user falls for a phishing scam, the actor usually convinces the victim to run code on their workstation to gain remote access to the internal network. This code is usually an unverified program that has no legitimate purpose or business reason for running on the network.
Assessment teams and malicious actors frequently leverage unrestricted code execution in the form of executables, dynamic link libraries (DLLs), HTML applications, and macros (scripts used in office automation documents) [T1059.005] to establish initial access, persistence, and lateral movement. In addition, actors often use scripting languages [T1059] to obscure their actions [T1027.010] and bypass allowlisting—where organizations restrict applications and other forms of code by default and only allow those that are known and trusted. Further, actors may load vulnerable drivers and then exploit the drivers’ known vulnerabilities to execute code in the kernel with the highest level of system privileges to completely compromise the device [T1068].
MITIGATIONS
Network Defenders
NSA and CISA recommend network defenders implement the recommendations that follow to mitigate the issues identified in this advisory. These mitigations align with the Cross-Sector Cybersecurity Performance Goals (CPGs) developed by CISA and the National Institute of Standards and Technology (NIST) as well as with the MITRE ATT&CK Enterprise Mitigations and MITRE D3FEND frameworks.
The CPGs provide a minimum set of practices and protections that CISA and NIST recommend all organizations implement. CISA and NIST based the CPGs on existing cybersecurity frameworks and guidance to protect against the most common and impactful threats, tactics, techniques, and procedures. Visit CISA’s Cross-Sector Cybersecurity Performance Goals for more information on the CPGs, including additional recommended baseline protections.[24]
Mitigate Default Configurations of Software and Applications
Misconfiguration
Recommendations for Network Defenders
Default configurations of software and applications
Modify the default configuration of applications and appliances before deployment in a production environment [M1013],[D3-ACH]. Refer to hardening guidelines provided by the vendor and related cybersecurity guidance (e.g., DISA’s Security Technical Implementation Guides (STIGs) and configuration guides).[25],[26],[27]
Default configurations of software and applications: Default Credentials
Change or disable vendor-supplied default usernames and passwords of services, software, and equipment when installing or commissioning [CPG 2.A]. When resetting passwords, enforce the use of “strong” passwords (i.e., passwords that are more than 15 characters and random [CPG 2.B]) and follow hardening guidelines provided by the vendor, STIGs, NSA, and/or NIST [M1027],[D3-SPP].[25],[26],[28],[29]
Default service permissions and configuration settings: Insecure Active Directory Certificate Services
Ensure the secure configuration of ADCS implementations. Regularly update and patch the controlling infrastructure (e.g., for CVE-2021-36942), employ monitoring and auditing mechanisms, and implement strong access controls to protect the infrastructure.If not needed, disable web-enrollment in ADCS servers. See Microsoft: Uninstall-AdcsWebEnrollment (ADCSDeployment) for guidance.[30]If web enrollment is needed on ADCS servers:Enable Extended Protection for Authentication (EPA) for Client Authority Web Enrollment. This is done by choosing the “Required” option. For guidance, see Microsoft: KB5021989: Extended Protection for Authentication.[31]Enable “Require SSL” on the ADCS server.Disable NTLM on all ADCS servers. For guidance, see Microsoft: Network security Restrict NTLM in this domain – Windows Security | Microsoft Learn and Network security Restrict NTLM Incoming NTLM traffic – Windows Security.[32],[33]Disable SAN for UPN Mapping. For guidance see, Microsoft: How to disable the SAN for UPN mapping – Windows Server. Instead, smart card authentication can use the altSecurityIdentities attribute for explicit mapping of certificates to accounts more securely.[34]Review all permissions on the ADCS templates on applicable servers. Restrict enrollment rights to only those users or groups that require it. Disable the CT_FLAG_ENROLLEE_SUPPLIES_SUBJECT flag from templates to prevent users from supplying and editing sensitive security settings within these templates. Enforce manager approval for requested certificates. Remove FullControl, WriteDacl, and Write property permissions from low-privileged groups, such as domain users, to certificate template objects.
Default service permissions and configuration settings: Insecure legacy protocols/services
Determine if LLMNR and NetBIOS are required for essential business operations.If not required, disable LLMNR and NetBIOS in local computer security settings or by group policy.
Default service permissions and configuration settings: Insecure SMB service
Require SMB signing for both SMB client and server on all systems.[25] This should prevent certain adversary-in-the-middle and pass-the-hash techniques. For more information on SMB signing, see Microsoft: Overview of Server Message Block Signing. [35] Note: Beginning in Microsoft Windows 11 Insider Preview Build 25381, Windows requires SMB signing for all communications.[36]
Mitigate Improper Separation of User/Administrator Privilege
Misconfiguration
Recommendations for Network Defenders
Improper separation of user/administrator privilege:Excessive account privileges,Elevated service account permissions, andNon-essential use of elevated accounts
Implement authentication, authorization, and accounting (AAA) systems [M1018] to limit actions users can perform, and review logs of user actions to detect unauthorized use and abuse. Apply least privilege principles to user accounts and groups allowing only the performance of authorized actions.Audit user accounts and remove those that are inactive or unnecessary on a routine basis [CPG 2.D]. Limit the ability for user accounts to create additional accounts.Restrict use of privileged accounts to perform general tasks, such as accessing emails and browsing the Internet [CPG 2.E],[D3-UAP]. See NSA Cybersecurity Information Sheet (CSI) Defend Privileges and Accounts for more information.[37]Limit the number of users within the organization with an identity and access management (IAM) role that has administrator privileges. Strive to reduce all permanent privileged role assignments, and conduct periodic entitlement reviews on IAM users, roles, and policies.Implement time-based access for privileged accounts. For example, the just-in-time access method provisions privileged access when needed and can support enforcement of the principle of least privilege (as well as the Zero Trust model) by setting network-wide policy to automatically disable admin accounts at the Active Directory level. As needed, individual users can submit requests through an automated process that enables access to a system for a set timeframe. In cloud environments, just-in-time elevation is also appropriate and may be implemented using per-session federated claims or privileged access management tools.Restrict domain users from being in the local administrator group on multiple systems.Run daemonized applications (services) with non-administrator accounts when possible.Only configure service accounts with the permissions necessary for the services they control to operate.Disable unused services and implement ACLs to protect services.
Mitigate Insufficient Internal Network Monitoring
Misconfiguration
Recommendations for Network Defenders
Insufficient internal network monitoring
Establish a baseline of applications and services, and routinely audit their access and use, especially for administrative activity [D3-ANAA]. For instance, administrators should routinely audit the access lists and permissions for of all web applications and services [CPG 2.O],[M1047]. Look for suspicious accounts, investigate them, and remove accounts and credentials, as appropriate, such as accounts of former staff.[39]Establish a baseline that represents an organization’s normal traffic activity, network performance, host application activity, and user behavior; investigate any deviations from that baseline [D3-NTCD],[D3-CSPP],[D3-UBA].[40]Use auditing tools capable of detecting privilege and service abuse opportunities on systems within an enterprise and correct them [M1047].Implement a security information and event management (SIEM) system to provide log aggregation, correlation, querying, visualization, and alerting from network endpoints, logging systems, endpoint and detection response (EDR) systems and intrusion detection systems (IDS) [CPG 2.T],[D3-NTA].
Mitigate Lack of Network Segmentation
Misconfiguration
Recommendations for Network Defenders
Lack of network segmentation
Implement next-generation firewalls to perform deep packet filtering, stateful inspection, and application-level packet inspection [D3-NTF]. Deny or drop improperly formatted traffic that is incongruent with application-specific traffic permitted on the network. This practice limits an actor’s ability to abuse allowed application protocols. The practice of allowlisting network applications does not rely on generic ports as filtering criteria, enhancing filtering fidelity. For more information on application-aware defenses, see NSA CSI Segment Networks and Deploy Application-Aware Defenses.[41]Engineer network segments to isolate critical systems, functions, and resources [CPG 2.F],[D3-NI]. Establish physical and logical segmentation controls, such as virtual local area network (VLAN) configurations and properly configured access control lists (ACLs) on infrastructure devices [M1030]. These devices should be baselined and audited to prevent access to potentially sensitive systems and information. Leverage properly configured Demilitarized Zones (DMZs) to reduce service exposure to the Internet.[42],[43],[44]Implement separate Virtual Private Cloud (VPC) instances to isolate essential cloud systems. Where possible, implement Virtual Machines (VM) and Network Function Virtualization (NFV) to enable micro-segmentation of networks in virtualized environments and cloud data centers. Employ secure VM firewall configurations in tandem with macro segmentation.
Mitigate Poor Patch Management
Misconfiguration
Recommendations for Network Defenders
Poor patch management: Lack of regular patching
Ensure organizations implement and maintain an efficient patch management process that enforces the use of up-to-date, stable versions of OSs, browsers, and software [M1051],[D3-SU].[45]Update software regularly by employing patch management for externally exposed applications, internal enterprise endpoints, and servers. Prioritize patching known exploited vulnerabilities.[2]Automate the update process as much as possible and use vendor-provided updates. Consider using automated patch management tools and software update tools.Where patching is not possible due to limitations, segment networks to limit exposure of the vulnerable system or host.
Poor patch management: Use of unsupported OSs and outdated firmware
Evaluate the use of unsupported hardware and software and discontinue use as soon as possible. If discontinuing is not possible, implement additional network protections to mitigate the risk.[45]Patch the Basic Input/Output System (BIOS) and other firmware to prevent exploitation of known vulnerabilities.
Mitigate Bypass of System Access Controls
Misconfiguration
Recommendations for Network Defenders
Bypass of system access controls
Limit credential overlap across systems to prevent credential compromise and reduce a malicious actor’s ability to move laterally between systems [M1026],[D3-CH]. Implement a method for monitoring non-standard logon events through host log monitoring [CPG 2.G].Implement an effective and routine patch management process. Mitigate PtH techniques by applying patch KB2871997 to Windows 7 and newer versions to limit default access of accounts in the local administrator group [M1051],[D3-SU].[46]Enable the PtH mitigations to apply User Account Control (UAC) restrictions to local accounts upon network logon [M1052],[D3-UAP].Deny domain users the ability to be in the local administrator group on multiple systems [M1018],[D3-UAP].Limit workstation-to-workstation communications. All workstation communications should occur through a server to prevent lateral movement [M1018],[D3-UAP].Use privileged accounts only on systems requiring those privileges [M1018],[D3-UAP]. Consider using dedicated Privileged Access Workstations for privileged accounts to better isolate and protect them.[37]
Mitigate Weak or Misconfigured MFA Methods
Misconfiguration
Recommendations for Network Defenders
Weak or misconfigured MFA methods: Misconfigured smart cards or tokens
In Windows environments:Disable the use of New Technology LAN Manager (NTLM) and other legacy authentication protocols that are susceptible to PtH due to their use of password hashes [M1032],[D3-MFA]. For guidance, see Microsoft: Network security Restrict NTLM in this domain – Windows Security | Microsoft Learn and Network security Restrict NTLM Incoming NTLM traffic – Windows Security.[32],[33]Use built-in functionality via Windows Hello for Business or Group Policy Objects (GPOs) to regularly re-randomize password hashes associated with smartcard-required accounts. Ensure that the hashes are changed at least as often as organizational policy requires passwords to be changed [M1027],[D3-CRO]. Prioritize upgrading any environments that cannot utilize this built-in functionality.As a longer-term effort, implement cloud-primary authentication solution using modern open standards. See CISA’s Secure Cloud Business Applications (SCuBA) Hybrid Identity Solutions Architecture for more information.[47] Note: this document is part of CISA’s Secure Cloud Business Applications (SCuBA) project, which provides guidance for FCEB agencies to secure their cloud business application environments and to protect federal information that is created, accessed, shared, and stored in those environments. Although tailored to FCEB agencies, the project’s guidance is applicable to all organizations.[48]
Weak or misconfigured MFA methods: Lack of phishing-resistant MFA
Enforce phishing-resistant MFA universally for access to sensitive data and on as many other resources and services as possible [CPG 2.H].[3],[49]
Mitigate Insufficient ACLs on Network Shares and Services
Misconfiguration
Recommendations for Network Defenders
Insufficient ACLs on network shares and services
Implement secure configurations for all storage devices and network shares that grant access to authorized users only.Apply the principal of least privilege to important information resources to reduce risk of unauthorized data access and manipulation.Apply restrictive permissions to files and directories, and prevent adversaries from modifying ACLs [M1022],[D3-LFP].Set restrictive permissions on files and folders containing sensitive private keys to prevent unintended access [M1022],[D3-LFP].Enable the Windows Group Policy security setting, “Do Not Allow Anonymous Enumeration of Security Account Manager (SAM) Accounts and Shares,” to limit users who can enumerate network shares.
Follow National Institute of Standards and Technologies (NIST) guidelines when creating password policies to enforce use of “strong” passwords that cannot be cracked [M1027],[D3-SPP].[29] Consider using password managers to generate and store passwords.Do not reuse local administrator account passwords across systems. Ensure that passwords are “strong” and unique [CPG 2.B],[M1027],[D3-SPP].Use “strong” passphrases for private keys to make cracking resource intensive. Do not store credentials within the registry in Windows systems. Establish an organizational policy that prohibits password storage in files.Ensure adequate password length (ideally 25+ characters) and complexity requirements for Windows service accounts and implement passwords with periodic expiration on these accounts [CPG 2.B],[M1027],[D3-SPP]. Use Managed Service Accounts, when possible, to manage service account passwords automatically.
Implement a review process for files and systems to look for cleartext account credentials. When credentials are found, remove, change, or encrypt them [D3-FE]. Conduct periodic scans of server machines using automated tools to determine whether sensitive data (e.g., personally identifiable information, protected health information) or credentials are stored. Weigh the risk of storing credentials in password stores and web browsers. If system, software, or web browser credential disclosure is of significant concern, technical controls, policy, and user training may prevent storage of credentials in improper locations.Store hashed passwords using Committee on National Security Systems Policy (CNSSP)-15 and Commercial National Security Algorithm Suite (CNSA) approved algorithms.[50],[51]Consider using group Managed Service Accounts (gMSAs) or third-party software to implement secure password-storage applications.
Mitigate Unrestricted Code Execution
Misconfiguration
Recommendations for Network Defenders
Unrestricted code execution
Enable system settings that prevent the ability to run applications downloaded from untrusted sources.[52]Use application control tools that restrict program execution by default, also known as allowlisting [D3-EAL]. Ensure that the tools examine digital signatures and other key attributes, rather than just relying on filenames, especially since malware often attempts to masquerade as common Operating System (OS) utilities [M1038]. Explicitly allow certain .exe files to run, while blocking all others by default.Block or prevent the execution of known vulnerable drivers that adversaries may exploit to execute code in kernel mode. Validate driver block rules in audit mode to ensure stability prior to production deployment [D3-OSM].Constrain scripting languages to prevent malicious activities, audit script logs, and restrict scripting languages that are not used in the environment [D3-SEA]. See joint Cybersecurity Information Sheet: Keeping PowerShell: Security Measures to Use and Embrace.[53]Use read-only containers and minimal images, when possible, to prevent the running of commands.Regularly analyze border and host-level protections, including spam-filtering capabilities, to ensure their continued effectiveness in blocking the delivery and execution of malware [D3-MA]. Assess whether HTML Application (HTA) files are used for business purposes in your environment; if HTAs are not used, remap the default program for opening them from mshta.exe to notepad.exe.
Software Manufacturers
NSA and CISA recommend software manufacturers implement the recommendations in Table 11 to reduce the prevalence of misconfigurations identified in this advisory. These mitigations align with tactics provided in joint guide Shifting the Balance of Cybersecurity Risk: Principles and Approaches for Security-by-Design and -Default. NSA and CISA strongly encourage software manufacturers apply these recommendations to ensure their products are secure “out of the box” and do not require customers to spend additional resources making configuration changes, performing monitoring, and conducting routine updates to keep their systems secure.[1]
Misconfiguration
Recommendations for Software Manufacturers
Default configurations of software and applications
Embed security controls into product architecture from the start of development and throughout the entire SDLC by following best practices in NIST’s Secure Software Development Framework (SSDF), SP 800-218.[54]Provide software with security features enabled “out of the box” and accompanied with “loosening” guides instead of hardening guides. “Loosening” guides should explain the business risk of decisions in plain, understandable language.
Default configurations of software and applications: Default credentials
Eliminate default passwords: Do not provide software with default passwords that are universally shared. To eliminate default passwords, require administrators to set a “strong” password [CPG 2.B] during installation and configuration.
Default configurations of software and applications: Default service permissions and configuration settings
Consider the user experience consequences of security settings: Each new setting increases the cognitive burden on end users and should be assessed in conjunction with the business benefit it derives. Ideally, a setting should not exist; instead, the most secure setting should be integrated into the product by default. When configuration is necessary, the default option should be broadly secure against common threats.
Improper separation of user/administrator privilege:Excessive account privileges,Elevated service account permissions, andNon-essential use of elevated accounts
Design products so that the compromise of a single security control does not result in compromise of the entire system. For example, ensuring that user privileges are narrowly provisioned by default and ACLs are employed can reduce the impact of a compromised account. Also, software sandboxing techniques can quarantine a vulnerability to limit compromise of an entire application.Automatically generate reports for:Administrators of inactive accounts. Prompt administrators to set a maximum inactive time and automatically suspend accounts that exceed that threshold.Administrators of accounts with administrator privileges and suggest ways to reduce privilege sprawl.Automatically alert administrators of infrequently used services and provide recommendations for disabling them or implementing ACLs.
Insufficient internal network monitoring
Provide high-quality audit logs to customers at no extra charge. Audit logs are crucial for detecting and escalating potential security incidents. They are also crucial during an investigation of a suspected or confirmed security incident. Consider best practices such as providing easy integration with a security information and event management (SIEM) system with application programming interface (API) access that uses coordinated universal time (UTC), standard time zone formatting, and robust documentation techniques.
Lack of network segmentation
Ensure products are compatible with and tested in segmented network environments.
Poor patch management: Lack of regular patching
Take steps to eliminate entire classes of vulnerabilities by embedding security controls into product architecture from the start of development and throughout the SDLC by following best practices in NIST’s SSDF, SP 800-218.[54] Pay special attention to:Following secure coding practices [SSDF PW 5.1]. Use memory-safe programming languages where possible, parametrized queries, and web template languages.Conducting code reviews [SSDF PW 7.2, RV 1.2] against peer coding standards, checking for backdoors, malicious content, and logic flaws.Testing code to identify vulnerabilities and verify compliance with security requirements [SSDF PW 8.2].Ensure that published CVEs include root cause or common weakness enumeration (CWE) to enable industry-wide analysis of software security design flaws.
Poor patch management: Use of unsupported operating OSs and outdated firmware
Communicate the business risk of using unsupported OSs and firmware in plain, understandable language.
Bypass of system access controls
Provide sufficient detail in audit records to detect bypass of system controls and queries to monitor audit logs for traces of such suspicious activity (e.g., for when an essential step of an authentication or authorization flow is missing).
Weak or Misconfigured MFA Methods: Misconfigured Smart Cards or Tokens
Fully support MFA for all users, making MFA the default rather than an opt-in feature. Utilize threat modeling for authentication assertions and alternate credentials to examine how they could be abused to bypass MFA requirements.
Weak or Misconfigured MFA Methods: Lack of phishing-resistant MFA
Mandate MFA, ideally phishing-resistant, for privileged users and make MFA a default rather than an opt-in feature.[3]
Insufficient ACL on network shares and services
Enforce use of ACLs with default ACLs only allowing the minimum access needed, along with easy-to-use tools to regularly audit and adjust ACLs to the minimum access needed.
Allow administrators to configure a password policy consistent with NIST’s guidelines—do not require counterproductive restrictions such as enforcing character types or the periodic rotation of passwords.[29]Allow users to use password managers to effortlessly generate and use secure, random passwords within products.
Salt and hash passwords using a secure hashing algorithm with high computational cost to make brute force cracking more difficult.
Unrestricted code execution
Support execution controls within operating systems and applications “out of the box” by default at no extra charge for all customers, to limit malicious actors’ ability to abuse functionality or launch unusual applications without administrator or informed user approval.
VALIDATE SECURITY CONTROLS
In addition to applying mitigations, NSA and CISA recommend exercising, testing, and validating your organization’s security program against the threat behaviors mapped to the MITRE ATT&CK for Enterprise framework in this advisory. NSA and CISA recommend testing your existing security controls inventory to assess how they perform against the ATT&CK techniques described in this advisory.
To get started:
Select an ATT&CK technique described in this advisory (see Table 12–Table 21).
Align your security technologies against the technique.
Test your technologies against the technique.
Analyze your detection and prevention technologies’ performance.
Repeat the process for all security technologies to obtain a set of comprehensive performance data.
Tune your security program, including people, processes, and technologies, based on the data generated by this process.
CISA and NSA recommend continually testing your security program, at scale, in a production environment to ensure optimal performance against the MITRE ATT&CK techniques identified in this advisory.
LEARN FROM HISTORY
The misconfigurations described above are all too common in assessments and the techniques listed are standard ones leveraged by multiple malicious actors, resulting in numerous real network compromises. Learn from the weaknesses of others and implement the mitigations above properly to protect the network, its sensitive information, and critical missions.
The information and opinions contained in this document are provided “as is” and without any warranties or guarantees. Reference herein to any specific commercial products, process, or service by trade name, trademark, manufacturer, or otherwise, does not constitute or imply its endorsement, recommendation, or favoring by the United States Government, and this guidance shall not be used for advertising or product endorsement purposes.
Trademarks
Active Directory, Microsoft, and Windows are registered trademarks of Microsoft Corporation. MITRE ATT&CK is registered trademark and MITRE D3FEND is a trademark of The MITRE Corporation. SoftPerfect is a registered trademark of SoftPerfect Proprietary Limited Company. Telerik is a registered trademark of Progress Software Corporation. VMware is a registered trademark of VMWare, Inc. Zimbra is a registered trademark of Synacor, Inc.
Purpose
This document was developed in furtherance of the authoring cybersecurity organizations’ missions, including their responsibilities to identify and disseminate threats, and to develop and issue cybersecurity specifications and mitigations. This information may be shared broadly to reach all appropriate stakeholders.
To report suspicious activity contact CISA’s 24/7 Operations Center at report@cisa.gov or (888) 282-0870. When available, please include the following information regarding the incident: date, time, and location of the incident; type of activity; number of people affected; type of equipment used for the activity; the name of the submitting company or organization; and a designated point of contact.
Appendix: MITRE ATT&CK Tactics and Techniques
See Table 12–Table 21 for all referenced threat actor tactics and techniques in this advisory.
Malicious actors masquerade as IT staff and convince a target user to provide their MFA code over the phone to gain access to email and other organizational resources.
Malicious actors gain authenticated access to devices by finding default credentials through searching the web.Malicious actors use default credentials for VPN access to internal networks, and default administrative credentials to gain access to web applications and databases.
Malicious actors exploit CVEs in Telerik UI, VM Horizon, Zimbra Collaboration Suite, and other applications for initial access to victim organizations.
Malicious actors gain access to OT networks despite prior assurance that the networks were fully air gapped, with no possible connection to the IT network, by finding special purpose, forgotten, or even accidental network connections.
Malicious actors gain initial access to systems by phishing to entice end users to download and execute malicious payloads or to run code on their workstations.
Malicious actors load vulnerable drivers and then exploit their known vulnerabilities to execute code in the kernel with the highest level of system privileges to completely compromise the device.
Technique Title
ID
Use
Obfuscated Files or Information: Command Obfuscation
Malicious actors execute spoofing, poisoning, and relay techniques if Link-Local Multicast Name Resolution (LLMNR), NetBIOS Name Service (NBT-NS), and Server Message Block (SMB) services are enabled in a network.
Malicious actors use “push bombing” against non-phishing resistant MFA to induce “MFA fatigue” in victims, gaining access to MFA authentication credentials or bypassing MFA, and accessing the MFA-protected system.
Malicious actors can steal administrator account credentials and the authentication token generated by Active Directory when the account is logged into a compromised host.
Unauthenticated malicious actors coerce an ADCS server to authenticate to an actor-controlled server, and then relay that authentication to the web certificate enrollment application to obtain a trusted illegitimate certificate.
Malicious actors use commands, such as net share, open source tools, such as SoftPerfect Network Scanner, or custom malware, such as CovalentStealer to discover and categorize files.Malicious actors search for text files, spreadsheets, documents, and configuration files in hopes of obtaining desired information, such as cleartext passwords.
Malicious actors use commands, such as net share, open source tools, such as SoftPerfect Network Scanner, or custom malware, such as CovalentStealer, to look for shared folders and drives.
Malicious actors with stolen administrator account credentials and AD authentication tokens can use them to operate with elevated permissions throughout the domain.
Use Alternate Authentication Material: Pass the Hash