Apple Releases Security Patches for all Devices Fixing Dozens of New Vulnerabilities

Apple on Wednesday rolled out software fixes for iOS, iPadOS, macOS, tvOS, and watchOS to address a number of security flaws affecting its platforms.

This includes at least 37 flaws spanning different components in iOS and macOS that range from privilege escalation to arbitrary code execution and from information disclosure to denial-of-service (DoS).

Chief among them is CVE-2022-2294, a memory corruption flaw in the WebRTC component that Google disclosed earlier this month as having been exploited in real-world attacks aimed at users of the Chrome browser. There is, however, no evidence of in-the-wild zero-day exploitation of the flaw targeting iOS, macOS, and Safari.

Besides CVE-2022-2294, the updates also address several arbitrary code execution flaws impacting Apple Neural Engine (CVE-2022-32810, CVE-2022-32829, and CVE-2022-32840), Audio (CVE-2022-32820), GPU Drivers (CVE-2022-32821), ImageIO (CVE-2022-32802), IOMobileFrameBuffer (CVE-2022-26768), Kernel (CVE-2022-32813 and CVE-2022-32815), and WebKit (CVE-2022-32792).

Also patched is a Pointer Authentication bypass affecting the Kernel (CVE-2022-32844), a DoS bug in the ImageIO component (CVE-2022-32785), and two privilege escalation flaws in AppleMobileFileIntegrity and File System Events (CVE-2022-32819 and CVE-2022-32826).

What’s more, the latest version of macOS resolves five security vulnerabilities in the SMB module that could be potentially exploited by a malicious app to gain elevated privileges, leak sensitive information, and execute arbitrary code with kernel privileges.

Users of Apple devices are recommended to update to iOS 15.6, iPadOS 15.6, macOS Monterey 12.5 (Big Sur 11.6.8 or 2022-005 Catalina for older generation Macs), tvOS 15.6, and watchOS 8.7 to obtain the latest security protections.

Source :
https://thehackernews.com/2022/07/apple-releases-security-patches-for-all.html

DNS-over-HTTP/3 in Android

Posted by Matthew Maurer and Mike Yu, Android team

To help keep Android users’ DNS queries private, Android supports encrypted DNS. In addition to existing support for DNS-over-TLS, Android now supports DNS-over-HTTP/3 which has a number of improvements over DNS-over-TLS.

Most network connections begin with a DNS lookup. While transport security may be applied to the connection itself, that DNS lookup has traditionally not been private by default: the base DNS protocol is raw UDP with no encryption. While the internet has migrated to TLS over time, DNS has a bootstrapping problem. Certificate verification relies on the domain of the other party, which requires either DNS itself, or moves the problem to DHCP (which may be maliciously controlled). This issue is mitigated by central resolvers like Google, Cloudflare, OpenDNS and Quad9, which allow devices to configure a single DNS resolver locally for every network, overriding what is offered through DHCP.

In Android 9.0, we announced the Private DNS feature, which uses DNS-over-TLS (DoT) to protect DNS queries when enabled and supported by the server. Unfortunately, DoT incurs overhead for every DNS request. An alternative encrypted DNS protocol, DNS-over-HTTPS (DoH), is rapidly gaining traction within the industry as DoH has already been deployed by most public DNS operators, including the Cloudflare Resolver and Google Public DNS. While using HTTPS alone will not reduce the overhead significantly, HTTP/3 uses QUIC, a transport that efficiently multiplexes multiple streams over UDP using a single TLS session with session resumption. All of these features are crucial to efficient operation on mobile devices.

DNS-over-HTTP/3 (DoH3) support was released as part of a Google Play system update, so by the time you’re reading this, Android devices from Android 11 onwards1 will use DoH3 instead of DoT for well-known2 DNS servers which support it. Which DNS service you are using is unaffected by this change; only the transport will be upgraded. In the future, we aim to support DDR which will allow us to dynamically select the correct configuration for any server. This feature should decrease the performance impact of encrypted DNS.

Performance

DNS-over-HTTP/3 avoids several problems that can occur with DNS-over-TLS operation:

  • As DoT operates on a single stream of requests and responses, many server implementations suffer from head-of-line blocking3. This means that if the request at the front of the line takes a while to resolve (possibly because a recursive resolution is necessary), responses for subsequent requests that would have otherwise been resolved quickly are blocked waiting on that first request. DoH3 by comparison runs each request over a separate logical stream, which means implementations will resolve requests out-of-order by default.
  • Mobile devices change networks frequently as the user moves around. With DoT, these events require a full renegotiation of the connection. By contrast, the QUIC transport HTTP/3 is based on can resume a suspended connection in a single RTT.
  • DoT intends for many queries to use the same connection to amortize the cost of TCP and TLS handshakes at the start. Unfortunately, in practice several factors (such as network disconnects or server TCP connection management) make these connections less long-lived than we might like. Once a connection is closed, establishing the connection again requires at least 1 RTT.In unreliable networks, DoH3 may even outperform traditional DNS. While unintuitive, this is because the flow control mechanisms in QUIC can alert either party that packets weren’t received. In traditional DNS, the timeout for a query needs to be based on expected time for the entire query, not just for the resolver to receive the packet.

Field measurements during the initial limited rollout of this feature show that DoH3 significantly improves on DoT’s performance. For successful queries, our studies showed that replacing DoT with DoH3 reduces median query time by 24%, and 95th percentile query time by 44%. While it might seem suspect that the reported data is conditioned on successful queries, both DoT and DoH3 resolve 97% of queries successfully, so their metrics are directly comparable. UDP resolves only 83% of queries successfully. As a result, UDP latency is not directly comparable to TLS/HTTP3 latency because non-connection-oriented protocols have a different notion of what a “query” is. We have still included it for rough comparison.

Memory Safety

The DNS resolver processes input that could potentially be controlled by an attacker, both from the network and from apps on the device. To reduce the risk of security vulnerabilities, we chose to use a memory safe language for the implementation.

Fortunately, we’ve been adding Rust support to the Android platform. This effort is intended exactly for cases like this — system level features which need to be performant or low level (both in this case) and which would carry risk to implement in C++. While we’ve previously launched Keystore 2.0, this represents our first foray into Rust in Mainline Modules. Cloudflare maintains an HTTP/3 library called quiche, which fits our use case well, as it has a memory-safe implementation, few dependencies, and a small code size. Quiche also supports use directly from C++. We considered this, but even the request dispatching service had sufficient complexity that we chose to implement that portion in Rust as well.

We built the query engine using the Tokio async framework to simultaneously handle new requests, incoming packet events, control signals, and timers. In C++, this would likely have required multiple threads or a carefully crafted event loop. By leveraging asynchronous in Rust, this occurs on a single thread with minimal locking4. The DoH3 implementation is 1,640 lines and uses a single runtime thread. By comparison, DoT takes 1,680 lines while managing less and using up to 4 threads per DoT server in use.

Safety and Performance — Together at Last

With the introduction of Rust, we are able to improve both security and the performance at the same time. Likewise, QUIC allows us to improve network performance and privacy simultaneously. Finally, Mainline ensures that such improvements are able to make their way to more Android users sooner.

Acknowledgements

Special thanks to Luke Huang who greatly contributed to the development of this feature, and Lorenzo Colitti for his in-depth review of the technical aspects of this post.


  1. Some Android 10 devices which adopted Google Play system updates early will also receive this feature. 
  2. Google DNS and Cloudflare DNS at launch, others may be added in the future. 
  3. DoT can be implemented in a way that avoids this problem, as the client must accept server responses out of order. However, in practice most servers do not implement this reordering. 
  4. There is a lock used for the SSL context which is accessed once per DNS server, and another on the FFI when issuing a request. The FFI lock could be removed with changes to the C++ side, but has remained because it is low contention. 

    Source :
    https://security.googleblog.com/2022/07/dns-over-http3-in-android.html

Microsoft starts blocking Office macros by default, once again

Microsoft announced today that it resumed the rollout of VBA macro auto-blocking in downloaded Office documents after temporarily rolling it back earlier this month following user feedback.

The change comes after the company improved its user and admin support documentation to make it easier to understand the available options when a macro is blocked.

“Based on our review of customer feedback, we’ve made updates to both our end user and our admin documentation to make clearer what options you have for different scenarios,” Microsoft explained in a new update in the Microsoft 365 message center.

“For example, what to do if your users have files on SharePoint or files on a network share.”

End users can find more information on the next steps after macros are blocked in a downloaded Office document on the A potentially dangerous macro has been blocked support page. IT admins can find dedicated documentation on the Macros from the Internet will be blocked by default in Office page.

“If you ever enabled or disabled the Block macros from running in Office files from the Internet policy, your organization will not be affected by this change,” Microsoft added.

Microsoft Office users who want automatic Office macro auto-blocking enabled and don’t want to wait for the rollout to reach their systems can read our easy-to-follow tutorial on how to auto-block macros in Microsoft Office docs from the Internet using group policies.

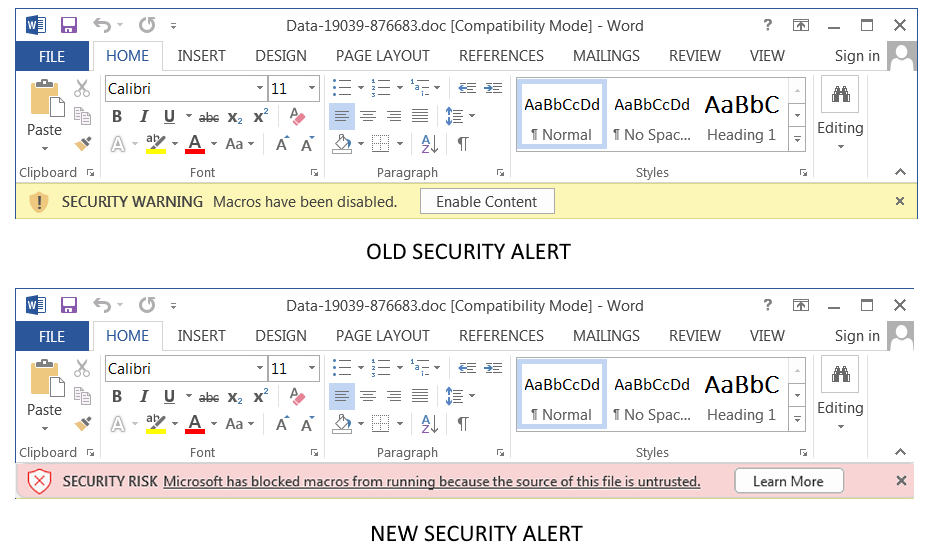
Mockup of new Office macros security alert
Mockup of new Office macros security alert (BleepingComputer)

Rolled back due to negative user feedback

This announcement comes after Redmond backtracked on a decision made earlier this year to make it harder to enable Office VBA macros in docs downloaded from the Internet in several Microsoft Office apps (Access, Excel, PowerPoint, Visio, and Word) for customers in the Current Channel (Preview).

The new feature meant that a popular distribution method for malware would effectively be killed since VBA macros embedded in malicious Office documents have been, for a very long time, one of the easiest methods for threat actors to push various malware families in phishing attacks.

The company announced in February 2022 that Microsoft Office would automatically block VBA macros in all downloaded documents after a rollout stage between April and June.

However, as BleepingComputer first reported in early July, soon after the new feature went live for customers last month, Microsoft suddenly and without any real explanation said that this change would be rolled back.

While Microsoft revealed alerted admins in an M365 message center update, it didn’t make a public announcement and updated the original notification several days later to say it was just a temporary rollback.

Redmond pinned this rollback on negative user feedback. Although Microsoft didn’t share more info, users have reported they didn’t know how to re-enable macros after they were automatically blocked because they couldn’t find the Unblock button. In contrast, others found it burdensome to unblock each downloaded Office document multiple times daily.

Source :
https://www.bleepingcomputer.com/news/microsoft/microsoft-starts-blocking-office-macros-by-default-once-again/

Microsoft Teams outage also takes down Microsoft 365 services

What initially started like a minor Microsoft Teams outage has also taken down multiple Microsoft 365 services with Teams integration, including Exchange Online, Windows 365, and Office Online.

“We’ve received reports of users being unable to access Microsoft Teams or leverage any features,” the company revealed on its official Microsoft 365 Status Twitter account more than 8 hours ago.

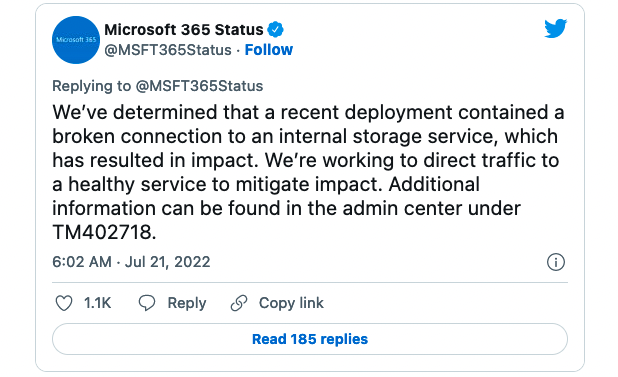
Two hours later, Redmond said the issue causing the connection problems was a recent deployment that featured a broken connection to an internal storage service.

However, Teams was not the only product impacted by the outage since users also began reporting failures to connect to various Microsoft 365 services.

Microsoft confirmed the issues saying that the subsequent Microsoft 365 outage only affected services that came with Teams integration.

“We’ve identified downstream impact to multiple Microsoft 365 services with Teams integration, such as Microsoft Word, Office Online and SharePoint Online,” Microsoft explained.

Microsoft Teams outage tweet

As the company further detailed on its Microsoft 365 Service health status page, affected customers experienced issues with one or more of the following services:

  • Microsoft Teams (Access, chat, and meetings)
  • Exchange Online (Delays sending mail)
  • Microsoft 365 Admin center (Inability to access)
  • Microsoft Word within multiple services (Inability to load)
  • Microsoft Forms (Inability to use via Teams)
  • Microsoft Graph API (Any service relying on this API may be affected)
  • Office Online (Microsoft Word access issues)
  • SharePoint Online (Microsoft Word access issues)
  • Project Online (Inability to access)
  • PowerPlatform and PowerAutomate (Inability to create an environment with a database)
  • Autopatches within Microsoft Managed Desktop
  • Yammer (Impact to Yammer experiments)
  • Windows 365 (Unable to provision Cloud PCs)

After redirecting traffic to a healthy service to mitigate the impact, Redmond said its telemetry indicates that Microsoft Teams functionality started to recover.

“Service availability has mostly recovered with only a few service features still requiring attention,” Microsoft added on the service health status page and on Twitter two hours ago, at 4 AM EST.

“We’ll continue to monitor the service as new regions enter business hours to ensure the service health does not fluctuate while the remaining actions are completed.”

Source :
https://www.bleepingcomputer.com/news/microsoft/microsoft-teams-outage-also-takes-down-microsoft-365-services/

Windows 11 now blocks RDP brute-force attacks by default

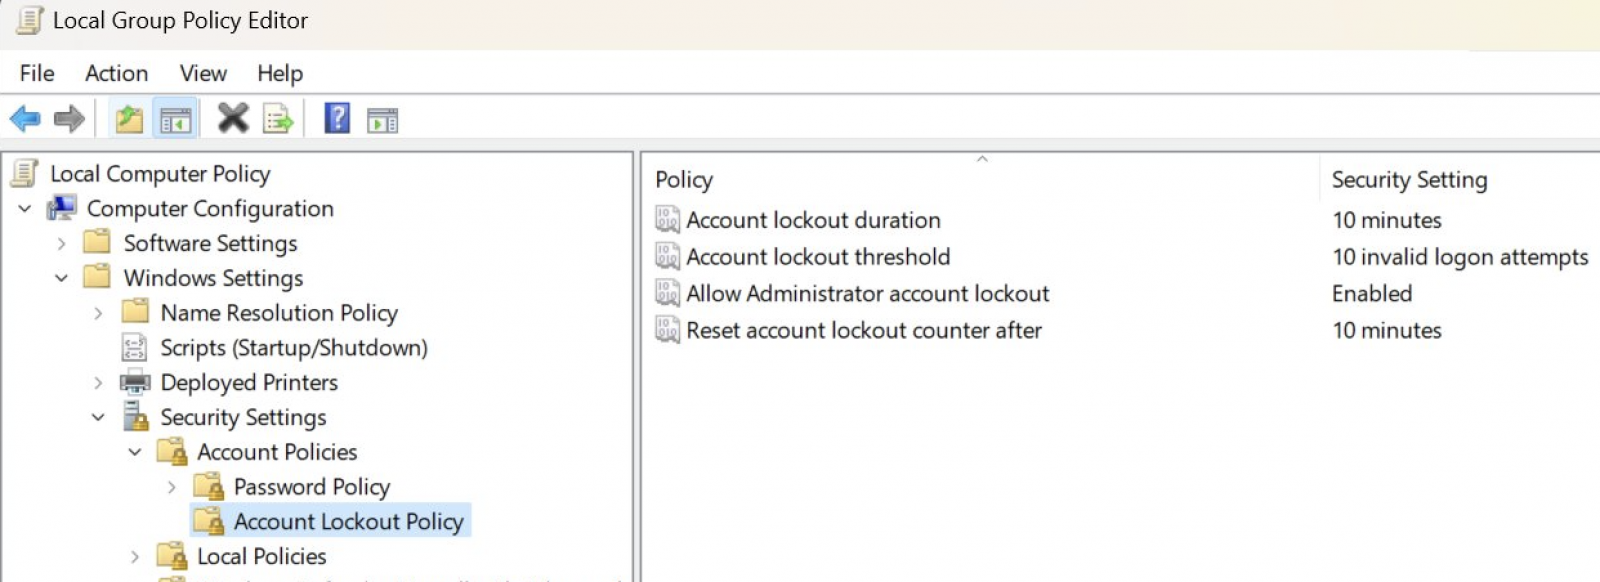
Recent Windows 11 builds come with the Account Lockout Policy policy enabled by default which will automatically lock user accounts (including Administrator accounts) after 10 failed sign-in attempts for 10 minutes.

The account brute forcing process commonly requires guessing the passwords using automated tools. This tactic is now blocked by default on the latest Windows 11 builds (Insider Preview 22528.1000 and newer) after failing to enter the correct password 10 times in a row.

“Win11 builds now have a DEFAULT account lockout policy to mitigate RDP and other brute force password vectors,” David Weston, Microsoft’s VP for Enterprise and OS Security, tweeted Thursday.

“This technique is very commonly used in Human Operated Ransomware and other attacks – this control will make brute forcing much harder which is awesome!”

As Weston also said, brute forcing credentials is a popular tactic among threat actors to breach Windows systems via Remote Desktop Protocol (RDP) when they don’t know the account passwords.

The use of Windows Remote Desktop Services to breach enterprise networks is so prevalent among cybercriminals that the FBI said RDP is responsible for roughly 70-80% of all network breaches leading to ransomware attacks.

Windows 11 Account Lockout Policy
Windows 11 Account Lockout Policy (David Weston)

Slowly blocking the most popular attack vectors

Coupled with other security-focused changes Microsoft has recently announced, including auto-blocking Office macros in downloaded documents and enforcing multi-factor authentication (MFA) in Azure AD, the company is slowly closing all entry vectors used by ransomware operators to breach Windows networks and systems.

The Account Lockout Policy is also available on Windows 10 systems. However, unfortunately, it’s not enabled by default, allowing attackers to brute force their way into Windows systems with exposed Remote Desktop Protocol (RDP) services.

Admins can configure this policy on Windows 10 in the Group Policy Management Console from Computer Configuration\Policies\Windows Settings\Security Settings\Account Policies\Account Lockout Policy.

This is a crucial security improvement since many RDP servers, especially those used to help teleworkers access corporate assets, are directly exposed to the Internet, exposing the organizations’ network to attacks when poorly configured.

To put things in perspective, attacks targeting RDP services have seen a sharp increase since at least mid-late 2016, starting with the rise in popularity of dark web marketplaces that sell RDP access to compromised networks, per an FBI IC3 report from 2018.

One notable mention is UAS, the largest hacker marketplace for stolen RDP credentials at one point, which leaked login names and passwords for 1.3 million current and historically compromised Windows Remote Desktop servers.

Source :
https://www.bleepingcomputer.com/news/microsoft/windows-11-now-blocks-rdp-brute-force-attacks-by-default/

How to set up proxy server on Windows 11

On Windows 11, you can set up a proxy server quite easily. A proxy server is a service that works as a man-in-the-middle between the computer and the internet. When using this feature, the requests you make to websites and other services will be handled by the proxy instead.

Usually, you’d see a proxy configuration in organizations and schools, but anyone can set up a proxy server because of its benefits. Using a proxy helps save data usage and reduce bandwidth use because web requests are cached in the server and then served again when the user requests the same content.

It can increase your privacy by hiding the IP address of the client making an internet request. It can improve security by blocking malicious traffic and logging users’ activities. It can also block sites, by using rules, a company can stop users from accessing social networks and other websites, and much more.

In this guide, you will learn three ways to set up a proxy server on your Windows 11 device without the need for third-party tools. (Just to be clear, in this guide, we’re setting proxy settings to connect to a server, not to set up the actual proxy server.)

Configure proxy server on Windows 11

The following instructions will apply to Ethernet and Wi-Fi network connections, but these settings won’t work during a VPN session.

To enable automatic configuration for proxy server on Windows 11, use these steps:

  1. Open Settings on Windows 11.
  2. Click on Network & Internet.
  3. Click the Proxy tab.
  4. Turn on the Automatically detect settings toggle switch to set up a proxy server on Windows 11.Enable automatic proxy detection

Once you complete the steps, Windows 11 will automatically detect the settings using the Web Proxy Auto-Discovery Protocol (WPAD). Organizations and schools typically use this option to automatically configure or change the proxy settings to computers connected to their networks.

If you do not want the computer to detect settings automatically, or you are trying to set up a proxy server manually, you need to turn off the Automatically detect settings toggle switch.

Configure proxy through script on Windows 11

It is also possible to configure a proxy server automatically using the setup script option on Windows 11.

To configure a proxy server using a script, use these steps:

  1. Open Settings.
  2. Click on Network & Internet.
  3. Click the Proxy tab.
  4. Under the “Automatic proxy setup” section, click the “Set up” button for the “Use setup script” setting.Windows 11 use setup script
  5. Turn on the Use setup script toggle switch.
  6. Confirm the address of the script (or .pac file).Proxy script address
  7. Click the Save button.

After you complete the steps, Windows 11 will load the proxy configuration from the specified file.

Configure automatic proxy with manual configuration on Windows 11

To set up proxy server settings manually on Windows 11, use these steps:

  1. Open Settings.
  2. Click on Network & Internet.
  3. Click the Proxy tab.
  4. Under the “Manual proxy setup” section, click the “Set up” button for the “Use a proxy server” setting.Windows 11 setup proxy server manually
  5. Turn on the “Use a proxy server” toggle switch.
  6. In the “Proxy IP address” setting, confirm the address that connects to the proxy server.Proxy manual configuration
  7. In the “Port” setting, confirm the port number required for the proxy to work.
  8. Check the “Don’t use the proxy server for local (intranet) addresses” option.
  9. (Optional) Confirm the addresses that will bypass the proxy in the available section.Quick note: You need to specify these addresses using a semicolon (;) to separate each entry. You can use an asterisk as a wildcard if you have multiple addresses from the same domain. For example, *.website.com will match all the addresses in the asterisk part, including forums.website.comdocs.website.com, etc.
  10. Click the Save button.

Once you complete the steps, the proxy will be configured and the network traffic will automatically pass through the proxy server. However, it is also possible to specify a list of addresses that will not use the proxy.

Source :
https://pureinfotech.com/setup-proxy-server-windows-11/

Juniper Releases Patches for Critical Flaws in Junos OS and Contrail Networking

Juniper Networks has pushed security updates to address several vulnerabilities affecting multiple products, some of which could be exploited to seize control of affected systems.

The most critical of the flaws affect Junos Space and Contrail Networking, with the tech company urging customers to release versions 22.1R1 and 21.4.0, respectively.

Chief among them is a collection of 31 bugs in the Junos Space network management software, including CVE-2021-23017 (CVSS score: 9.4) that could result in a crash of vulnerable devices or even achieve arbitrary code execution.

“A security issue in nginx resolver was identified, which might allow an attacker who is able to forge UDP packets from the DNS server to cause 1-byte memory overwrite, resulting in worker process crash or potential other impact,” the company said.

The same security vulnerability has also been remediated in Northstar Controller in versions 5.1.0 Service Pack 6 and 6.2.2.

Additionally, the networking equipment maker cautioned of multiple known issues exist in CentOS 6.8 that’s shipped with Junos Space Policy Enforcer before version 22.1R1. As mitigations, the version of CentOS packed with the Policy Enforcer component has been upgraded to 7.9.

Also listed are 166 security vulnerabilities impacting its Contrail Networking product that impact all versions prior to 21.4.0 and have been collectively given the maximum CVSS score of 10.0.

“Multiple vulnerabilities in third party software used in Juniper Networks Contrail Networking have been resolved in release 21.4.0 by upgrading the Open Container Initiative (OCI)-compliant Red Hat Universal Base Image (UBI) container image from Red Hat Enterprise Linux 7 to Red Hat Enterprise Linux 8,” it noted in an advisory.

Source :
https://thehackernews.com/2022/07/juniper-releases-patches-for-critical.html

Install updates manually on Windows 11 in six different ways

On Windows 11, a cumulative update (or quality update) is a service patch that Microsoft rolls out proactively to fix bugs, enhance security, and improve system performance. Although updates download automatically through Windows Update, sometimes it may still be necessary to install a specific patch manually.

For instance, after a new installation of Windows 11 or if the computer hasn’t been connected to the internet for some time. If Windows Update isn’t working, it might be necessary to install an update manually to fix the problem. A specific driver needs an update, or you want to upgrade to a newer version of Windows.

Regardless of the reason, Windows 11 has at least four ways to update the system using the Windows Update settings, manual download, Command Prompt, and PowerShell.

Microsoft offers three main types of updates (quality, optional, and feature updates). “Quality updates” are available every month with security and non-security fixes, improvements, and features (occasionally). “Optional updates” are not critical but necessary, and they include drivers and product updates. Finally, “feature updates” are meant to upgrade the device to a newer version (for example, Windows 11 22H2).

In this guide, you will learn six ways to install updates on Windows 11.

Install updates on Windows 11 with Windows Update

To install Windows 11 updates manually with Windows Update, use these steps:

  1. Open Settings on Windows 11.
  2. Click on Windows Update.
  3. Click the Check for updates button.Windows 11 check and install updates
  4. (Optional) Click the Download and install option to apply a preview of an upcoming update of Windows 11.Quick note: Optional updates usually include non-security changes that Microsoft plans to release in the next Patch Tuesday rollout.
  5. Click the Restart now button.

Once you complete the steps, if an update is available, it will download and install automatically on Windows 11.

Install updates on Windows 11 with Microsoft Update Catalog

To download and install an update manually on Windows 11, use these steps:

  1. Open Microsoft Update Catalog website.
  2. Search for the knowledge base number of the update – for example, KB5015814.Quick tip: If you do not know the latest update reference number, you can check the update history tracker.
  3. Click the Download button for the update to install on Windows 11.Microsoft Update Catalog downloadQuick note: The page usually lists two versions, including ARM64 and x64. Unless you have an ARM-based device, you need to download the x64 version of the cumulative update.
  4. Click the link to download the .msu package to your computer.
  5. Click the Close button.
  6. Double-click the .msu file to launch the installer.
  7. Click the Yes button to install the update on Windows 11.
  8. Click the Restart now button.

After you complete the steps, the cumulative update will apply to Windows 11.

Install updates on Windows 11 with Command Prompt

Windows 11 doesn’t have a Command Prompt tool to check and download updates. However, you can use commands to install update packages manually.

To install Windows 11 updates with Command Prompt, use these steps:

  1. Open Microsoft Update Catalog website.
  2. Search for the knowledge base number of the update – for example, KB5015814.
  3. Click the Download button for the cumulative update you want to install.Microsoft Update Catalog download
  4. Click the link to download the .msu package.
  5. Click the Close button.
  6. Open Start.
  7. Search for Command Prompt, right-click the top result, and select the Run as administrator option.
  8. Type the following command to install a new update on Windows 11 and press Enter:wusa c:\PATH\TO\UPDATE.msu /quiet /norestartIn the command, update the path with the location and name of the .msu update package. This example installs the KB5015814 update:wusa c:\Users\USERACCOUNT\Downloads\windows10.0-kb5015814-x64.msu /quiet /norestartCommand Prompt install Windows 11 update
  9. Type the following command to confirm the update was installed correctly and press Enter:wmic qfe list brief /format:table
  10. Type the following command to restart the device and press Enter:shutdown /r /t 00

After you complete the steps, the quality update will install quietly, and the computer will restart to finish applying the changes on Windows 11.

Install updates on Windows 11 with PowerShell

Alternatively, you can also install a PowerShell module to download and install updates on Windows 11.

To install Windows 11 updates with PowerShell, use these steps:

  1. Open Start.
  2. Search for PowerShell, right-click the top result, and select the Run as administrator option.
  3. Type the following command to install the PowerShell module to update Windows 11 and press Enter:Install-Module PSWindowsUpdatePowerShell install PSWindowUpdate
  4. Type Y to accept and press Enter.
  5. Type A to accept and install the module and press Enter.
  6. Type the following command to allow scripts to run on PowerShell and press Enter:Set-ExecutionPolicy RemoteSigned
  7. Type the following command to import the installed module and press Enter:Import-Module PSWindowsUpdatePowerShell import module
  8. Type the following command to check for Windows 11 updates with PowerShell and press Enter:Get-WindowsUpdate
  9. Type the following command to select, download, and install a specific update and press Enter:Install-WindowsUpdate -KBArticleID KBNUMBERIn the command, make sure to replace KBNUMBER with the update number you want to install. This example downloads and applies the KB5015814 update for Microsoft Defender:Install-WindowsUpdate -KBArticleID KB5015814 PowerShell install Windows 11 updates
  10. Type A to confirm the installation and press Enter.
  11. (Optional) Type the following command to download and install all available updates and press Enter:Install-WindowsUpdateQuick note: When using this command, you will be applying system updates as well as optional updates that may include driver updates.
  12. Type A to confirm the installation and press Enter.
  13. Type Y to confirm the restart and press Enter (if applicable).
  14. (Optional) Type the following command to view a list of previously installed updates and press Enter:Get-WUHistory

Once you complete the steps, the Windows 11 updates will download and install on your device.

Install optional updates on Windows 11

On Windows 11, optional updates are not critical, but they may be necessary for other functionalities. Typically, these updates are available for Microsoft and other products, feature updates, and third-party drivers (such as printers, cameras, network adapters, graphics cards, and Bluetooth peripherals).

To install optional updates on Windows 11, use these steps:

  1. Open Settings.
  2. Click on Windows Update.
  3. Click the Advanced options tab.
  4. Under the “Additional options” section, click the Optional updates setting.Optional updates
  5. Click the category to see the optional updates – for example, Driver updates.
  6. Check the optional updates to install on Windows 11.Windows 11 install optional updates
  7. Click the Download and install button.

After you complete the steps, Windows Update will install the packages on your computer.

Install feature updates on Windows 11

Feature updates refer to new versions of Windows 11 that bring new changes and features. These updates are optional, and you must install them manually unless the current release of Windows 11 is reaching the end of service, in which case the feature update will install automatically.

To install a feature update on Windows 11, use these steps:

  1. Open Settings.
  2. Click on Windows Update.
  3. Click on Check for updates button (if applicable).
  4. Click the Download and Install now button.Windows 11 install feature update
  5. Click the Restart now button.

In addition to Windows Update, you can also install feature updates using the Installation Assistant or the official ISO file to perform an in-place upgrade.

Source :
https://pureinfotech.com/install-updates-manually-windows-11/

How to install ChromeOS Flex on any laptop

ChromeOS Flex is a lightweight operating system from Google, which you can install on Windows, Mac, and Linux computers with older hardware, such as an old laptop or desktop computer. The operating system is based on Linux which uses web apps and the Chrome browser as the main interface.

The operating system also gives you security protection from threats such as malware and ransomware, and users will get a fast and modern work environment with background updates reducing downtime while boosting productivity.

Although Google offers many Chromebooks from different manufacturers that come preloaded with ChromeOS, the company now provides the ChromeOS Flex variant to give old computers a second life, especially for devices not compatible with Windows 11.

This guide will teach you the steps to install ChromeOS Flex on an old Windows-based computer.

ChromeOS Flex system requirements

Although Google only supports specific devices, you can still install the operating system on virtually any hardware as long as it meets the minimum requirements:

  • Processor: Intel or AMD x86-64-bit.
  • Memory: 4GB.
  • Storage: 16GB.

The requirements to run ChromeOS Flex are minimal, but Google says that processors and graphics made before 2010 may result in a poor user experience.

Aside from system requirements, you will also need a USB flash drive of at least 8GB to create the installation media.

Create ChromeOS Flex USB flash media

To create a ChromeOS Flex installation media, connect a USB flash drive of 8GB, and use these steps:

  1. Open Chromebook Recovery Utility page on Chrome.
  2. Click the Add to Chrome button.
  3. Click the Add extension button.
  4. Click the Extension button and select the Chromebook Recovery Utility extension.Chrome Recovery Utility
  5. Click the Get started button.
  6. Select the Google ChromeOS Flex option.
  7. Select the ChromeOS Flex option.
  8. Click the Continue button.
  9. Select the USB flash media from the list.Select USB create Chrome OS Flex media
  10. Click the Continue button.
  11. Click the Create now button.Create Chrome OS Flex media
  12. Click the Done button.

Once you complete the steps, you can proceed with the clean installation of ChromeOS Flex.

Install ChromeOS Flex

To install ChromeOS Flex on a Windows device, use these steps:

  1. Start the laptop with the ChromeOS Flex USB.Quick note: If the computer can’t boot from USB, you may need to update the BIOS/UEFI settings. This process usually requires pressing one of the function keys (F1, F2, F3, F10, or F12), the ESC, or the Delete key. For more accurate instructions, visit your PC manufacturer’s support website.
  2. Click the Get Started button.Chrome OS Flex get started
  3. Select the “Try it first” option.Chrome OS Flex install setupQuick note: In this guide, we’ll use the “Try it first” option, but if you plan to dedicate the device to the operating system, select the “Install CloudReady 2.0” option.
  4. Click the Next button.
  5. Select the wireless network.
  6. Confirm the Wi-Fi password.Chrome OS Flex connect to W-Fi
  7. Click the Connect button.
  8. Click the Accept and continue button.
  9. Select the You option to create an account.CChrome OS Flex create account
  10. Click the Next button.
  11. Confirm your Gmail account.Confirm Gmail account
  12. Click the Next button.
  13. Confirm the account password.
  14. Click the Next button.
  15. Complete the account verification.
  16. Click the Next button.
  17. Click the Accept and continue button.Chrome OS Flex sync settings

After you complete the steps, the operating system will install on the computer.

If you are ready for Windows again, you can use these steps to reinstall Windows 11 or Windows 10.

Source :
https://pureinfotech.com/install-chrome-os-flex/

How to reset Windows Update components on Windows 10

Windows Update is an essential component of Windows 10, as it provides the ability to download and install the latest updates with bug fixes, security patches, and drivers. Also, it is the mechanism to download new feature updates and preview builds. However, there will be times when your device may not download or install updates because of a specific error message, Windows Update not connecting to the Microsoft servers and other problems.

Typically, users may encounter this type of problem when the Windows Update agent-related services stop working, Windows 10 has an issue with the update cache, or some components get corrupted. You can reset Windows Update on Windows 10 to fix most problems in these situations.

In this guide, you will learn the steps to reset the Windows Update components using the “Windows Update Troubleshooter” utility. Also, you will learn the instructions to use Command Prompt to fix Windows Update manually to get security patches, drivers, and features downloading again on your computer. However, before using the Command Prompt option, make sure to use the instructions to install the most recent update manually, Service Stack Update (SSU), and repair system files first. 

How to reset Windows Update using Troubleshooter tool

To reset Windows Update using the troubleshooter, use these steps:

  1. Download the Windows Update Troubleshooter from Microsoft.
  2. Double-click the WindowsUpdateDiagnostic.diagcab file to run the troubleshooter.
  3. Select the Windows Update option.
  4. Click the Next button.Windows Update TroubleshooterWindows Update Troubleshooter
  5. Click the Try troubleshooting as an administrator option (if applicable). Re-select the option and click the Next button again.
  6. Click the Close button.
  7. Open Windows Update Troubleshooter again.
  8. Select the Windows Networking Diagnostics option to resolve any networking issues preventing updates from downloading.
  9. Click the Next button.
  10. Click the Close button.
  11. Restart the computer.

Once the computer restarts, try to update Windows 10 one more time, and now it should work as expected.

How to fix Windows Update installing latest update manually

To install an update manually, which can help to fix problems with Windows Update on Windows 10, use these steps:

  1. Open the Windows 10 update history website.
  2. In the left pane, browse the latest update for your version of Windows 10 and note the update’s KB number.Quick tip: You can check your current version on Settings > System > About, and under the “Windows Specifications” section, confirm the version information.
  3. Open the Microsoft Update Catalog website.
  4. Search for the knowledge base (KB) number of the update.Download Windows Update manuallyDownload Windows Update manually
  5. Download the update for the version of Windows 10 that you have (32-bit (x86) or 64-bit (x64)).
  6. Double-click the file to install the update.
  7. Restart the computer.

Once you complete the steps, the device should have the latest update installed. The update should have also fixed the problem with Windows Update. You can check by clicking the Check for updates button on the Windows Update settings page.

How to fix Windows Update installing latest Servicing Stack Update (SSU)

To make sure the computer has the most recent Servicing Stack Update to fix Windows Update problems, use these steps:

  1. Open Settings.
  2. Click on System.
  3. Click on About.
  4. Under the “System type” section, check whether you have the 32-bit or 64-bit version of Windows 10.Windows 10 architecture settingsWindows 10 architecture settings
  5. Open the Microsoft Update Catalog website.
  6. Download the most recent Servicing Stack Update for the version you have (32-bit (x86) or 64-bit (x64)).
  7. Double-click the file to install the update.
  8. Restart your computer.

After you restart the computer, you should now be able to download and install the update using the Settings app.

How to fix Windows Update repairing corrupted system files

To repair system files using the Deployment Image Servicing and Management (DISM) and System File Checker (SFC) tools to fix Windows Update problems, use these steps:

  1. Open Start.
  2. Search for Command Prompt, right-click the top result, and select the Run as administrator option.
  3. Type the following DISM command to repair corrupted system files and press Enter:dism.exe /Online /Cleanup-image /Restorehealth
  4. Type the following SFC command to repair system files and press Enter:sfc /scannowWindows Update dism and sfc repairWindows Update dism and sfc repair

After you complete the steps, the Windows Update components should start working again, and you can check for updates again to verify.

How to reset Windows Update using Command Prompt

To reset Windows Update manually using Command Prompt on Windows 10, use these steps:

  1. Open Start.
  2. Search for Command Prompt, right-click the top result, and select the Run as administrator option.
  3. Type the following commands to stop the Background Intelligent Transfer Service (BITS), Windows Update service, and Cryptographic service, and press Enter on each line:net stop bits net stop wuauserv net stop appidsvc net stop cryptsvcStop Windows Update servicesStop Windows Update servicesQuick tip: You may need to run the command more than once until you see the message that the service has stopped successfully.
  4. Type the following command to delete all the qmgr*.dat files created by BITS from your PC. and press Enter:Del “%ALLUSERSPROFILE%\Application Data\Microsoft\Network\Downloader\*.*”Reset Windows Update commandsReset Windows Update commands
  5. Type Y to confirm the deletion.
  6. Type the following commands to clear the Windows Update cache to allow Windows 10 to re-download the updates, instead of using the files already downloaded on the system that might be damaged and press Enter on each line:rmdir %systemroot%\SoftwareDistribution /S /Q rmdir %systemroot%\system32\catroot2 /S /QQuick tip: We use the remove directory rmdir command with the /S option to delete the specified directory and all subdirectories within the main folder, and the /Q option deletes directories quietly without confirmation. If you get the message “The process cannot access the file because it is being used by another process,” then repeat step No. 1 and try again, as one of the services might have restarted unexpectedly.
  7. Type the following commands to reset the BITS and Windows Update services to their default security descriptor, and press Enter on each line:sc.exe sdset bits D:(A;;CCLCSWRPWPDTLOCRRC;;;SY)(A;;CCDCLCSWRPWPDTLOCRSDRCWDWO;;;BA)(A;;CCLCSWLOCRRC;;;AU)(A;;CCLCSWRPWPDTLOCRRC;;;PU) sc.exe sdset wuauserv D:(A;;CCLCSWRPWPDTLOCRRC;;;SY)(A;;CCDCLCSWRPWPDTLOCRSDRCWDWO;;;BA)(A;;CCLCSWLOCRRC;;;AU)(A;;CCLCSWRPWPDTLOCRRC;;;PU)
  8. Type the following command to move to the System32 folder and press Enter:cd /d %windir%\system32
  9. Type the following commands to register all the corresponding BITS and Windows Update DLL files on the Registry and press Enter on each line:regsvr32.exe /s atl.dll regsvr32.exe /s urlmon.dll regsvr32.exe /s mshtml.dll regsvr32.exe /s shdocvw.dll regsvr32.exe /s browseui.dll regsvr32.exe /s jscript.dll regsvr32.exe /s vbscript.dll regsvr32.exe /s scrrun.dll regsvr32.exe /s msxml.dll regsvr32.exe /s msxml3.dll regsvr32.exe /s msxml6.dll regsvr32.exe /s actxprxy.dll regsvr32.exe /s softpub.dll regsvr32.exe /s wintrust.dll regsvr32.exe /s dssenh.dll regsvr32.exe /s rsaenh.dll regsvr32.exe /s gpkcsp.dll regsvr32.exe /s sccbase.dll regsvr32.exe /s slbcsp.dll regsvr32.exe /s cryptdlg.dll regsvr32.exe /s oleaut32.dll regsvr32.exe /s ole32.dll regsvr32.exe /s shell32.dll regsvr32.exe /s initpki.dll regsvr32.exe /s wuapi.dll regsvr32.exe /s wuaueng.dll regsvr32.exe /s wuaueng1.dll regsvr32.exe /s wucltui.dll regsvr32.exe /s wups.dll regsvr32.exe /s wups2.dll regsvr32.exe /s wuweb.dll regsvr32.exe /s qmgr.dll regsvr32.exe /s qmgrprxy.dll regsvr32.exe /s wucltux.dll regsvr32.exe /s muweb.dll regsvr32.exe /s wuwebv.dllQuick note: The regsvr32 helps to register “.DLL” files as command components in the Registry, and we use the /S option to specify the tool to run the command silently without prompting additional messages.
  10. Type the following commands to reset the network configurations that might be part of the problem (but do not restart your computer just yet), and press Enter on each line:netsh winsock reset netsh winsock reset proxyReset network adapter on Windows 10Reset network adapter on Windows 10
  11. Type the following commands to restart the BITS, Windows Update, and Cryptographic services, and press Enter on each line:net start bits net start wuauserv net start appidsvc net start cryptsvc
  12. Restart the computer.

Once you complete the steps, Windows Update should have reset, and it should be working again on your Windows 10 device.

You can also use the above instructions to fix the update problems when Surface Pro 8, Pro 7, Laptop 4, Studio, or any other Surface cannot seem to download a new firmware update.

Source :
https://pureinfotech.com/reset-windows-update-windows-10-fix-downloads-installs/