Adobe Commerce Unauthorized XXE Vulnerability

By Security News
July 8, 2024

Overview

The SonicWall Capture Labs threat research team became aware of an XML External Entity Reference vulnerability affecting Adobe Commerce and Magento Open Source. It is identified as CVE-2024-34102 and given a critical CVSSv3 score of 9.8. Labeled as an Improper Restriction of XML External Entity Reference (‘XXE’) vulnerability and categorized as CWE-611, this vulnerability allows an attacker unauthorized access to private files, such as those containing passwords. Successful exploitation could lead to arbitrary code execution, security feature bypass, and privilege escalation.

A proof of concept is publicly available on GitHub. Adobe Commerce versions 2.4.7, 2.4.6-p5, 2.4.5-p7, 2.4.4-p8, and earlier and Magento Open-Source versions 2.4.7, 2.4.6-p5, 2.4.5-p7, 2.4.4-p8, and earlier are vulnerable. Although Magento Open Source is popular mainly for dev environments, according to Shodan and FOFA, up to 50k exposed Adobe Commerce with Magento template are running.

Technical Overview

Magento (Adobe Commerce) is a built-in PHP platform that helps programmers create eCommerce websites and sell online. It is an HTTP PHP server application. Such applications usually have two global entry points: the User Interface and the API. Magento uses REST API, GraphQL, and SOAP.

Attackers can leverage this vulnerability to gain unauthorized admin access to REST API, GraphQL API, or SOAP API, leading to the disclosure of confidential data, denial of service, server-side request forgery (SSRF), port scanning from the perspective of the machine where the parser is located, and complete compromise of affected systems. This vulnerability poses a significant risk due to its ability to exfiltrate sensitive files, such as app/etc/env.php, containing cryptographic keys used for authentication, as shown in Figure 1. This key is generated during Magento 2 installation process. Unauthenticated actors can utilize this key to forge administrator tokens and manipulate Magento’s APIs as privileged users.

Figure 1: app/etc/env.php

The vulnerability is due to improper handling of nested deserialization in Adobe Commerce and Magento. This allows attackers to exploit XML External Entities (XXE) during deserialization, potentially allowing remote code execution. Unauthorized attackers can craft malicious JSON payloads that represent objects with unintended properties or behaviors when deserialized by the application.

Triggering the Vulnerability

XML External Entities (XXE) attack technique takes advantage of XML’s feature of dynamically building documents during processing. An XML message can provide data explicitly or point to a URI where the data exists. In the attack technique, external entities may replace the entity value with malicious data, alternate referrals, or compromise the security of the data the server/XML application has access to.

In the example below, the attacker takes advantage of an XML Parser’s local server access privileges to compromise local data:

  • The sample application expects XML input with a parameter called “username.” This parameter is later embedded in the application’s output.
  • The application typically invokes an XML parser to parse the XML input.
  • The XML parser expands the entity “test” into its full text from the entity definition provided in the URL. Here, the actual attack takes place.
  • The application embeds the input (parameter “username,” which contains the file) in the web service response.
  • The web service echoes back the data.

Attackers may also use External Entities to have the web services server download malicious code or content to the server for use in secondary or follow-on attacks. Other examples wherein sensitive files can be disclosed are shown in Figure 2.

Figure 2: Disclosing targeted files.

Exploiting the Vulnerability

A crafted POST request to a vulnerable Adobe instance with an enabled Magento template is the necessary and sufficient condition to exploit the issue. An attacker only needs to be able to access the instance remotely, which could be over the Internet or a local network. A working PoC with a crafted POST query aids in exploiting this vulnerability. Figure 4 shows a demonstration of exploitation leveraging the publicly available PoC.

Exploiting CVE-2024-34102, steps are enumerated below, which will exfiltrate the contents of the system’s password file from the target server.

  • Create a DTD file (dtd.xml) on the attacker’s machine. This file includes entities that will read and encode the system’s password file, then send it to your endpoint.
  • Host the dtd.xml file on the attacker’s machine, accessible via HTTP on a random port.
  • Send the malicious payload via a sample curl request to the vulnerable Magento instance, as shown in Figure 3. The payload includes a specially crafted XML payload referencing the DTD file hosted on the attacker’s machine.
  • The XML parser in Magento will process the DTD file, triggering the exfiltration of the system’s password file as shown in Figure 4.
  • Lastly, observe your endpoint to capture and decode the exfiltrated data.

Figure 3: CVE-2024-34102 attack request

00:00

00:15

Figure 4: CVE-2024-34102 Exploitation

Out of the 50k exposed Magento instances in the wild, multiple events were observed wherein attackers leveraged this vulnerability, as only 25% of instances have been updated since the vulnerability was exploited in the wild. According to Sansec analysis, CVE-2024-34102 can be chained with other vulnerabilities, such as the PHP filter chains exploit (CVE-2024-2961), leading to remote code execution (RCE).

SonicWall Protections

To ensure SonicWall customers are prepared for any exploitation that may occur due to this vulnerability, the following signatures have been released:

  • IPS: 4462 – Adobe Commerce XXE Injection

Remediation Recommendations

Considering the severe consequences of this vulnerability and the trend of nefarious activists trying to leverage the exploit in the wild, users are strongly encouraged to upgrade their instances, according to Adobe advisory, to address the vulnerability.

Relevant Links

Source :
https://blog.sonicwall.com/en-us/2024/07/adobe-commerce-unauthorized-xxe-vulnerability/

The Top 10 AI Security Risks Every Business Should Know

By: Trend Micro
July 08, 2024
Read time: 4 min (1104 words)

With every week bringing news of another AI advance, it’s becoming increasingly important for organizations to understand the risks before adopting AI tools. This look at 10 key areas of concern identified by the Open Worldwide Application Security Project (OWASP) flags risks enterprises should keep in mind through the back half of the year.

For more than 20 years, Open Worldwide Application Security Project (OWASP) top 10 risk lists has have been go-to references in the fight to make software more secure. In 2023, OWASP brought forward a new addition: a rundown of risks specific to AI. Two draft versions of the AI risk list were published in spring/summer of that year, with a formal version 1 released in October.

Since then, LLMs have only become more entrenched as business productivity tools. Most companies are either using or exploring the use of AI, and while some liabilities are well known—such as the need to always check an LLM’s work—others remain under the radar.

We did some analysis and found the vulnerabilities identified by OWASP fall broadly into three categories:

  1. Access risks associated with exploited privileges and unauthorized actions.
  2. Data risks such as data manipulation or loss of services.
  3. Reputational and business risks resulting from bad AI outputs or actions.

In this blog, we take a closer look at the specific risks in each case and offer some suggestions about how to handle them.

1. Access risks with AI

Of the 10 vulnerabilities listed by OWASP, three are specific to access and misuse of privileges: insecure plugin design, insecure output handling, and excessive agency.

According to OWASP, an LLM using that uses insecure could lose access control, opening them up to malicious requests or the execution of unauthorized remote code. On the flipside, plugins or applications that handle large language model outputs insecurely—without evaluating them—could expose backend systems be susceptible to XSS, CSRF, and SSRF attacks that execute unwanted actions, and to unauthorized privilege escalations, and remote code execution.

And because AI chatbots are ‘actors’ able to make and implement decisions, it matters how much free reign (i.e., agency) they’re given. As OWASP explains, “Excessive Agency is the vulnerability that enables damaging actions to be performed in response to unexpected/ambiguous outputs from an LLM (regardless of what is causing the LLM to malfunction; be it hallucination/confabulation, direct/indirect prompt injection, malicious plugin, poorly-engineered benign prompts, or just a poorly-performing model).”

For example, a personal mail reader assistant with message-sending capabilitiess could be exploited by a malicious email to propagate spam from a user’s account.

In all these cases, the large language model becomes a conduit for bad actors to infiltrate systems.

2. AI and data risks

Poisoned training datasupply chain vulnerabilitiessensitive information disclosuresprompt injection vulnerabilities , and denials of service are all data-specific AI risks.

Data can be poisoned deliberately by bad actors and inadvertently when an AI system learns from unreliable or unvetted sources. Both types of poisoning can occur within an active AI chatbot application or emerge from the LLM supply chain, where reliance on pre-trained models, crowdsourced data, and insecure plugin extensions may produce biased data outputs, security breaches, or system failures.

Poisoned data and the supply chain are input concerns. Allowing private, confidential, personally identifying information and the like into model training data can also result in unwanted disclosures of sensitive information.

With prompt injections, ill-meaning inputs may cause a large language model AI chatbot to expose data that should be kept private or perform other actions that lead to data compromises.

AI denial of service attacks are similar to classic DOS attacks. They may aim to overwhelm a large language model and deprive users of access to data and apps, or—because many AI chatbots rely on pay-as-you-go IT infrastructure—force the system to consume excessive resources and rack up massive costs.

3. Reputational and business risks associated with AI

The final two OWASP vulnerabilities relate to model theft and overreliance on AI. The first applies when an organization has its own proprietary LLM model. If that model is accessed, copied, or exfiltrated by unauthorized users, it could be exploited to harm the performance of a business, disadvantage it competitively, and potentially cause a leak of sensitive information.

Overreliance on AI is already having consequences around the world today. There’s no shortage of stories about large language models generating false or inappropriate outputs from fabricated citations and legal precedents to racist and sexist language.

OWASP points out that depending on AI chatbots without proper oversight can make organizations vulnerable to publishing misinformation or offensive content that results in reputational damage or even legal action.


Given all these various risks, the question becomes, “What can we do about it?” Fortunately, there are some protective steps organizations can take. 

What enterprises can do about AI vulnerabilities

From our perspective at Trend Micro, defending against AI access risks requires a zero-trust security stance with disciplined separation of systems (sandboxing). Even though generative AI can challenge zero-trust defenses in ways that other IT systems don’t—because it can mimic trusted entities—a zero-trust posture still adds checks and balances that make it easier to identify and contain unwanted activity. OWASP also advises that large language models “should not self-police” and calls for controls to be embedded in application programming interfaces (APIs).

Sandboxing is also key to protecting data privacy and integrity: keeping confidential information fully separated from shareable data and making it inaccessible to AI chatbots and other public-facing systems.

Good separation of data prevents large language models from including private or personally identifiable information in public outputs, and from being publicly prompted to interact with secure applications such as payment systems in inappropriate ways.

On the reputational front, the simplest remedies are to not rely solely on AI-generated content or code, and to never publish or use AI outputs without first verifying they are true, accurate, and reliable.

Many of these defensive measures can—and should—be embedded in corporate policies. Once an appropriate policy foundation is in place, security technologies such as endpoint detection and response (EDR), extended detection and response (XDR), and security information and event management (SIEM) can be used for enforcement and to monitor for potentially harmful activity.

Large language model AI chatbots are here to stay

OWASP’s catalogue of AI risks proves that concerns about the rush to embrace AI are well justified. At the same time, AI clearly isn’t going anywhere, so understanding the risks and taking responsible steps to mitigate them is critically important.

Setting up the right policies to manage AI use and implementing those policies with the help of cybersecurity solutions is a good first step. So is staying informed. The way we see it at Trend Micro, OWASP’s top 10 AI risk list is bound to become as much of an annual must-read as its original application security list has been since 2003.

Source :
https://www.trendmicro.com/en_us/research/24/g/top-ai-security-risks.html

The Potential Impact of the OpenSSH Vulnerabilities CVE-2024–6387 and CVE-2024-6409

By: Jagir Shastri
July 17, 2024
Read time: 5 min (1331 words)

We check the OpenSSH vulnerabilities CVE-2024–6387 and CVE-2024-6409, examining their potential real-world impact and the possibility of exploitation for CVE-2024–6387 in x64 systems.

Introduction

CVE-2024–6387, also known as “regreSSHion,” is a vulnerability that exists in OpenSSH, a widely-used suite of secure networking utilities based on the SSH protocol. This vulnerability, which was discovered in July 2024, allows for remote unauthenticated code execution, potentially providing attackers root privileges on affected systems. The Common Vulnerability Scoring System (CVSS) has rated this vulnerability with a score of 9.8

The OpenSSH vendor advisory mentions that the successful exploitation of CVE-2024-6387 has been demonstrated on 32-bit Linux and GNU C Library systems with (ASLR). It also mentions that exploitation on 64-bit systems might be possible but this has not been demonstrated at the time of publishing.

On July 8, another similar vulnerability, the signal handler race condition CVE-2024-6409 was discovered. This flaw occurs when a client fails to authenticate within the LoginGraceTime period, which is 120 seconds by default, and 600 seconds in older OpenSSH versions. Consequently, this can lead to a signal handler race condition in the cleanup_exit() function within the child process of the SSHD server.

Figure 1. How the exploit works

The “regreSSHion” vulnerability arises from the unsafe handling of the SIGALRM signal during SSH authentication. When the LoginGraceTime expires, the SIGALRM signal is raised, and the corresponding handler performs certain actions, including calling non-async-signal-safe functions like syslog(). This can create a race condition, where the timing of operations could lead to memory corruption or other unexpected behaviors.

SIGALRM
SIGALRM is a signal in Unix-like operating systems that indicates an alarm or timer expiration. When a process sets and a function triggers, it schedules a SIGALRM signal to be sent to the process after a specified number of seconds. This signal is commonly used for timing operations, such as implementing timeouts for network requests or scheduling periodic tasks. Processes can define custom signal handlers to respond to SIGALRM, allowing them to perform actions such as terminating processes, resetting timers, or managing execution time limits. Overall, SIGALRM facilitates time-sensitive operations within Unix processes by providing a mechanism to handle scheduled alarms and timing events.

Exploiting CVE-2024–6387 requires an attacker to initiate thousands of connection attempts to trigger the race condition accurately. The process involves repeatedly setting and resetting LoginGraceTime, causing the server to invoke the SIGALRM signal handler. This requires precise timing and proper inputs to manipulate the server’s memory layout, leading to heap corruption and code execution.

Signal handlers
Signal handlers are special functions that get called in response to specific signals sent to a program. These signals can be generated, either by the operating system or by the program itself. However, not all functions are safe to call from within a signal handler since they may not be reentrant, therefore cannot safely be interrupted and called again (“async-signal-safe”). For instance, syslog() is a function used to log messages to the system logger and is not considered async-signal-safe.

Researchers have found that approximately 10,000 attempts are needed to successfully exploit this vulnerability. While the exploit could take days to complete, it is still not guaranteed that the attempt would be successful . The presence of modern security mechanisms such as Address Space Layout Randomization (ASLR) and No-eXecute (NX) bits further complicate the exploitation process but do not entirely mitigate the risk.

CVE-2024-6409 technical details

Like CVE-2024-6387, this vulnerability occurs when the SSHD’s SIGALRM handler is called asynchronously, which in turn calls various functions that are not async-signal-safe.

The race condition in grace_alarm_handler() calls cleanup_exit() from the privsep child process. However, cleanup_exit() is not designed to be called from a signal handler, potentially invoking unsafe functions. Cleanup function calls can be interrupted by signals, causing unsafe state changes and potential remote code execution (RCE).

As a privsep child process run’s with reduced privileges, there is less reason to worry about the vulnerability. In addition, working exploits for the CVE-2024-6409 have not been yet discovered, therefore proof of its actual exploitation has not been established at the time of publishing.

Exploitability of CVE-2024-6387 in x64 Systems

The OpenSSH vendor advisory mentions that the successful exploitation of CVE-2024-6387 has been demonstrated on 32-bit Linux and GNU C Library (glibc) systems with (ASLR). It also mentions that exploitation on 64-bit systems might be possible. However, certain characteristics of X64 systems make this exploitation much more difficult, which we’ll expound on in this section.

In x64 systems, ASLR plays a crucial role by randomizing memory addresses, including those of the GNU C Library (glibc), with each program execution. This randomness makes it very difficult for attackers to predict the location of the glibc base address, thus mitigating exploits that depend on precise memory targeting. The x64 architecture’s expansive address space further complicates exploitation, as attackers have to guess an exponentially greater amount of addresses. Combined with security measures such as stack canaries and NX bits, exploiting vulnerabilities such as CVE-2024-6387 becomes highly impractical on x64 systems.

While theoretically possible under specific conditions, the effective implementation of ASLR and the inherent complexities of the x64 environment significantly reduce real-world exploitability, highlighting the robust security benefits of these architectural safeguards.

Potential impact

Our As per our internal telemetry we did not notice any trend change for CVE-2024–6387, which could be considered a known exploited vulnerability (KEV)that is being exploited in wild. .

While CVE-2024–6387 presents a critical security risk, its real-world impact is mitigated by several factors. The technical complexity of the exploit and the extensive time required to execute it make large-scale attacks impractical. Each attack attempt resets the login timer, requiring precise timing and substantial effort from the attacker.

Moreover, the vulnerability affects specific versions of OpenSSH (up to 4.4p1 and 8.5p1 to 9.7p1) running on Linux systems using the GNU C Library. Systems with additional protections against brute force attacks and distributed denial-of-service (DDoS) are less likely to be successfully exploited. Therefore, while targeted attacks are possible, mass exploitation is unlikely due to the unavailability of working exploits and the time required to exploit these vulnerabilities.

Mitigation

To mitigate the risks associated with CVE-2024–6387, administrators should immediately update OpenSSH to version 9.8 or later. If immediate updating is not feasible, reducing the LoginGraceTime can provide temporary mitigation against this vulnerability.

Additionally, organizations can consider implementing the following best practices for general vulnerability exploit protection:

Patch management
Regularly updating and patching software, operating systems, and applications is the most straightforward method for organizations to avoid the exploitation of vulnerabilities within their systems.

Network segmentation
Separating critical network segments from the larger network can minimize the impact of a potential vulnerability exploitation.

Regular security audits
Performing security audits and vulnerability assessments can identify and remediate potential weaknesses within the infrastructure before they can be exploited.

Security awareness training
Educating employees about the common tactics used by attackers can help them avoid falling victim to social engineering attacks that might precede vulnerability exploitation.

Incident response plan
Developing, testing, and maintaining an incident response plan can help organizations quickly and effectively respond to security breaches and vulnerability exploitations.

Additionally, employing network-based access controls, intrusion prevention systems such as Trend Vision One™, and regular vulnerability scanning can further enhance security.
For Trend customers, the following IPS smart rules can detect the attack on a surface level:

  • 1003593 Detected SSH Server Traffic (ATT&CK T1021.004)
  • 1005748 Multiple SSH Connection Detected (ATT&CK T1499.002, T1110)

Conclusion

According to other researchers, there could be non-functional exploits in circulation that claim to be working proofs-of-concept (POCs) for CVE-2024-6387. These fake exploits contain payloads that download files from remote servers and establish persistence on the systems of security researchers. Assuming they are testing a legitimate POC for the vulnerability, the security features of their systems might be disabled, making them vulnerable to malicious activities.

Overall, while CVE-2024–6387 and CVE-2024-6409 is a critical vulnerability, it does not pose a widespread threat to the internet due to its exploitation complexity and existing mitigations. However, administrators should remain vigilant, apply patches promptly, and implement recommended security practices to protect their systems.

Source :
https://www.trendmicro.com/en_us/research/24/g/cve-2024-6387-and-cve-2024-6409.html

WordPress 6.5.5 Security Release – What You Need to Know

Alex Thomas
June 25, 2024

Did you know Wordfence runs a Bug Bounty Program for all WordPress plugin and themes at no cost to vendors? Researchers can earn up to $10,400for all in-scope vulnerabilities submitted to our Bug Bounty Program! Find a vulnerability, submit the details directly to us, and we handle all the rest. For a limited time, all high risk issues are in-scope for all researchers!


WordPress Core 6.5.5 was released yesterday, on June 24, 2023. Contained within this release are three security fixes addressing two Cross-Site Scripting (XSS) vulnerabilities and one Windows-specific Directory Traversal vulnerability. Despite these vulnerabilities being medium-severity, the worst of them (specifically, the XSS vulnerabilities) can allow for site takeover by an authenticated, contributor-level user if successfully exploited.

The Directory Traversal vulnerability has been backported to every version of WordPress since 4.1, with the XSS vulnerabilities being backported to the major version in which the functionality was released. WordPress has supported automatic core updates for security releases since WordPress 3.7, and the vast majority of WordPress sites should receive a patch for their major version of WordPress automatically over the next 24 hours. We recommend verifying that your site has been automatically updated to one of the patched versions. Patched versions are available for every major version of WordPress since 4.1, so you can update without risking compatibility issues.

The Wordfence Threat Intelligence Team released a new firewall rule the same day to protect Wordfence PremiumWordfence Care, and Wordfence Response customers for one of the XSS vulnerabilities that didn’t have adequate protection.This rule will be available to free Wordfence users in 30 days, on July 24th, 2024. All Wordfence users have protection for the remaining two vulnerabilities.

If your site has not been updated automatically we strongly recommend updating manually as soon as possible, as two of the vulnerabilities patched in this release can be used by an attacker with a low-privileged contributor-level account to take over a site.

Technical Analysis and Overview

As with every WordPress core release containing security fixes, the Wordfence Threat Intelligence team analyzed the code changes in detail to evaluate the impact of these vulnerabilities on our customers, and to ensure our customers remain protected.

Contributor+ Stored Cross-Site Scripting in the HTML API

Description: WordPress Core < 6.5.5 – Authenticated (Contributor+) Stored Cross-Site Scripting via HTML API
Affected Versions: WordPress Core < 6.5.5
Researcher/s: Alex Concha (WordPress Security Team)Dennis Snell (WordPress Core Team)Grzegorz Ziółkowski (WordPress Security Team)Aaron Jorbin
CVE ID: Pending
CVSS Score: 6.4 (Medium)
CVSS Vector: CVSS:3.1/AV:N/AC:L/PR:L/UI:N/S:C/C:L/I:L/A:N
Fully Patched Version: 6.5.5
Link to Commit 1
Link to Commit 2

WordPress Core is vulnerable to Stored Cross-Site Scripting via the HTML API in various versions up to 6.5.5 due to insufficient input sanitization and output escaping on URLs. This makes it possible for authenticated attackers, with contributor-level access and above, to inject arbitrary web scripts in pages that will execute whenever a user accesses an injected page.

The changeset in WordPress 6.5.5 adds additional protections in the set_attribute() function of the HTML API to further escape URL attributes. Additionally, this changeset adds additional improvements.

Contributor+ Stored Cross-Site Scripting in the Template Part Block

Description: WordPress Core < 6.5.5 – Authenticated (Contributor+) Stored Cross-Site Scripting via Template Part Block
Affected Versions: WordPress Core < 6.5.5
Researcher/s: Rafie Muhammad (Patchstack)
CVE ID: Pending
CVSS Score: 6.4 (Medium)
CVSS Vector: CVSS:3.1/AV:N/AC:L/PR:L/UI:N/S:C/C:L/I:L/A:N
Fully Patched Version: 6.5.5
Link to Commit

WordPress Core is vulnerable to Stored Cross-Site Scripting via the Template Part block in various versions up to 6.5.5 due to insufficient input sanitization and output escaping on the ‘tagName’ attributes. This makes it possible for authenticated attackers, with contributor-level access and above, to inject arbitrary web scripts in pages that will execute whenever a user accesses an injected page.

The changeset for WordPress 6.5.5 adds additional sanitization to the Template Part block’s ‘tagName’ attribute. The Template Part block is available to contributor-level users. However, exploitation is only possible where the site’s theme uses this particular block.

Windows-only Directory Traversal

Description: WordPress Core < 6.5.5 – Authenticated (Contributor+) Directory Traversal
Affected Versions: WordPress Core < 6.5.5
Researcher/s: apple502jRafie Muhammad (Patchstack)Edouard L David Fifieldx89mishre
CVE ID: Pending
CVSS Score: 4.3 (Medium)
CVSS Vector: CVSS:3.1/AV:N/AC:L/PR:L/UI:N/S:U/C:N/I:L/A:N
Fully Patched Version: 6.5.5
Link to Commit

WordPress Core is vulnerable to Directory Traversal in various versions up to 6.5.5 via the Template Part block. This makes it possible for authenticated attackers, with contributor-level access and above, to include arbitrary HTML Files on sites running Windows.

Similar to the previous vulnerability, this Directory Traversal vulnerability is exploitable via the Template Part block. The changeset for WordPress 6.5.5 shows the addition of a path normalization function within the validate_file() function.

Conclusion

WordPress 6.5.5 includes patches for 3 medium-severity vulnerabilities. Two of these vulnerabilities are trivial to exploit as an authenticated, contributor+ user, and we recommend updating immediately if your site has not yet automatically done so.

We have released one new firewall rule to protect Wordfence PremiumWordfence Care, and Wordfence Response customers. This rule will be available to free Wordfence users in 30 days, on July 24th, 2024.

If you know someone who uses WordPress and isn’t keeping it automatically updated, we recommend sharing this advisory with them to ensure their site remains secure, as several of these vulnerabilities pose a significant risk.

For security researchers looking to disclose vulnerabilities responsibly and obtain a CVE ID, you can submit your findings to Wordfence Intelligence Bug Bounty Program and earn up to $10,400 for your submission.

Special thanks to István Márton, a Wordfence Vulnerability Researcher, for his assistance on reverse engineering the patches and ensuring Wordfence users have adequate coverage. 

Did you enjoy this post? Share it!

Source :
https://www.wordfence.com/blog/2024/06/wordpress-6-5-5-security-release-what-you-need-to-know/

How to Disable TLS 1.0 and TLS 1.1 on Windows Server?

Arun KL
February 13, 2024
11 minutes

Growing trends in cyber attacks made system administrators implement more secure communication protocols to protect their assets and network from attacks. TLS plays a vital role in the implementation stack. TLS is a critical security protocol that is used to encrypt communications between clients and servers. TLS 1.2 and TLS 1.3 are the two latest versions of the Transport Layer Security (TLS) protocol and offer many advantages over their previous versions. TLS 1.2 is the most widely used version of the TLS protocol, but TLS 1.3 is gaining popularity because of its efficiency and speed. As a system administrator, you should enable TLS 1.2 and TLS 1.3 on your Windows Server to enhance the security of your infrastructure, but wait, that’s not enough. You should disable TLS 1.0 and TLS 1.1 on Windows Server as they are deprecated for their weak security.

Before learning how to disable TLS 1.0 and TLS 1.1 on your Windows Server, let’s see about TLS 1.0 and TLS 1.1 and why you should disable TLS 1.0 and TLS 1.1 on your Windows Server

A Short Note About TLS 1.0 and TLS 1.1:

The Transport Layer Security (TLS) protocols are cryptographic protocols that provide communication security over the Internet. TLS 1.0 and TLS 1.1 are the two previous versions of the TLS protocol.

TLS 1.0 was first defined in 1999, and TLS 1.1 was published as an update to TLS 1.0 in 2006. TLS 1.0 and TLS 1.1 are now considered to be obsolete, and they are no longer considered secure.

Why You Should Disable TLS 1.0 and TLS 1.1 on Windows Server?

There are a few reasons why you should disable TLS 1.0 and TLS 1.1 on Windows Server:

  1. TLS 1.0 and TLS 1.1 are no longer considered secure, due to the fact that they are vulnerable to various attacks, such as the POODLE attack.
  2. Disabling TLS 1.0 and TLS 1.1 on your server will force clients to use a more secure protocol (TLS 1.2), which is less vulnerable to attack.
  3. Some government agencies, such as the US National Security Agency (NSA), have recommended that TLS 1.0 and TLS 1.1 be disabled.
  4. Microsoft will no longer provide security updates for Windows Server running TLS 1.0 and TLS 1.1.
  5. Many major software vendors are phasing out support for TLS 1.0 and TLS 1.1. This includes Google, Microsoft, Mozilla, and Apple.

Attacks TLS 1.0 and TLS 1.1 are vulnerable to:

There are a number of known vulnerabilities in TLS 1.0 and TLS 1.1 that can be exploited by attackers. These include:

  1. POODLE (Padding Oracle On Downgraded Legacy Encryption)
  2. BEAST (Browser Exploit Against SSL/TLS)
  3. CRIME (Compression Ratio Info-leak Made Easy)
  4. FREAK (Factoring Attack on RSA-EXPORT Keys)
  5. LOGJAM (Diffie-Hellman Key Exchange Weakness)

These vulnerabilities allow attackers to perform man-in-the-middle attacks, decrypt sensitive information, and hijack user sessions. By disabling TLS 1.0 and TLS 1.1 on your Windows server, you can protect yourself from these attacks.

What is the Alternate to TLS 1.0 and TLS 1.1?

The current version of the TLS protocol is TLS 1.3. TLS 1.3 was first defined in 2018, and it includes a number of security improvements over previous versions of the TLS protocol. We suggest you to enable TLS 1.2 and TLS 1.3 on your Windows Server instead of TLS 1.0 and TLS 1.1.

TLS 1.2 improves upon TLS 1.1 by adding support for Elliptic Curve Cryptography (ECC) and introducing new cryptographic suites that offer better security than the suites used in TLS 1.1. TLS 1.3 improves upon TLS 1.2 by simplifying the handshake process and making it more resistant to man-in-the-middle attacks. In addition, TLS 1.3 introduces new cryptographic suites that offer better security than the suites used in TLS 1.2.

TLS 1.2 and TLS 1.3 are both backward compatible with TLS 1.1 and earlier versions of the protocol. This means that a client that supports TLS 1.2 can communicate with a server that supports TLS 1.1 and vice versa. However, TLS 1.2 and TLS 1.3 are not compatible with each other. A client that supports TLS 1.2 cannot communicate with a server that supports TLS 1.3, and vice versa.

TLS 1.2 is the most widely used version of the TLS protocol, but TLS 1.3 is gaining in popularity. Many major web browsers, including Google Chrome, Mozilla Firefox, and Microsoft Edge, now support TLS 1.3. In addition, major Internet services providers, such as Cloudflare and Akamai, have started to support TLS 1.3 on their servers. Please visit this page if you want to deeply review the comparison of TLS implementations across different supported servers and clients.

Please visit these posts to learn more about TLS 1.2 and TLS 1.3:

  1. What Is SSL/TLS? How SSL, TLS 1.2, And TLS 1.3 Differ From Each Other?
  2. Decoding TLS v1.2 protocol Handshake with Wireshark
  3. Decoding TLS 1.3 Protocol Handshake With Wireshark
  4. How to Enable TLS 1.3 in Standard Web Browsers?
  5. How to Enable TLS 1.3 on Popular Web Servers?
  6. How to Enable TLS 1.2 and TLS 1.3 on Windows Server
  7. How to Disable TLS 1.0 and TLS 1.1 on Your Apache Server?
  8. How to Disable TLS 1.0 and TLS 1.1 on Your Nginx Server?

How to Disable TLS 1.0 and TLS 1.1 on Windows Server?

We have covered 3 different ways to disable TLS 1.0 and TLS 1.1 on your Windows Server in this post. You can choose any one of the three ways to disable TLS 1.0 and TLS 1.1 on your Windows Server depending on your technical and automation skills.

  1. Disable TLS 1.0 and TLS 1.1 manually using Registry
  2. Disable TLS 1.0 and TLS 1.1 using Powershell Commands
  3. Disable TLS 1.0 and TLS 1.1 using CMD

Note: Microsoft clearly said that it doesn’t support TLS 1.0 and TLS 1.1 on Windows operating systems. No patches will be provided for TLS 1.0 and TLS 1.1 from Microsoft. You can refer to the below table that shows the Microsoft Schannel Provider support of TLS protocol versions.

TLS Protocols Supported by Windows Operating Systems:

Windows OSTLS 1.0 ClientTLS 1.0 ServerTLS 1.1 ClientTLS 1.1 ServerTLS 1.2 ClientTLS 1.2 ServerTLS 1.3 ClientTLS 1.3 Server
Windows Vista/Windows Server 2008EnabledEnabledNot supportedNot supportedNot supportedNot supportedNot supportedNot supported
Windows Server 2008 with Service Pack 2 (SP2)EnabledEnabledDisabledDisabledDisabledDisabledNot supportedNot supported
Windows 7/Windows Server 2008 R2EnabledEnabledDisabledDisabledDisabledDisabledNot supportedNot supported
Windows 8/Windows Server 2012EnabledEnabledEnabledEnabledEnabledEnabledNot supportedNot supported
Windows 8.1/Windows Server 2012 R2EnabledEnabledEnabledEnabledEnabledEnabledNot supportedNot supported
Windows 10, version 1507EnabledEnabledEnabledEnabledEnabledEnabledNot supportedNot supported
Windows 10, version 1511EnabledEnabledEnabledEnabledEnabledEnabledNot supportedNot supported
Windows 10, version 1607/Windows Server 2016 StandardEnabledEnabledEnabledEnabledEnabledEnabledNot supportedNot supported
Windows 10, version 1703EnabledEnabledEnabledEnabledEnabledEnabledNot supportedNot supported
Windows 10, version 1709EnabledEnabledEnabledEnabledEnabledEnabledNot supportedNot supported
Windows 10, version 1803EnabledEnabledEnabledEnabledEnabledEnabledNot supportedNot supported
Windows 10, version 1809//Windows Server 2019EnabledEnabledEnabledEnabledEnabledEnabledNot supportedNot supported
Windows 10, version 1903EnabledEnabledEnabledEnabledEnabledEnabledNot supportedNot supported
Windows 10, version 1909EnabledEnabledEnabledEnabledEnabledEnabledNot supportedNot supported
Windows 10, version 2004EnabledEnabledEnabledEnabledEnabledEnabledNot supportedNot supported
Windows 10, version 20H2EnabledEnabledEnabledEnabledEnabledEnabledNot SupportedNot Supported
Windows 10, version 21H1EnabledEnabledEnabledEnabledEnabledEnabledNot SupportedNot Supported
Windows 10, version 21H2EnabledEnabledEnabledEnabledEnabledEnabledNot SupportedNot Supported
Windows Server 2022EnabledEnabledEnabledEnabledEnabledEnabledEnabledEnabled
Windows 11EnabledEnabledEnabledEnabledEnabledEnabledEnabledEnabled

Method 1: Disable TLS 1.0 and TLS 1.1 manually using Registry

Let’s begin learning how to disable TLS 1.0 and TLS 1.1 manually using Windows Registry.

Step 1: Open the regedit utility

Open ‘Run‘, type ‘regedit’, and click ‘OK’.

Open Regedit Utility On Windows 1
Step 2: Create a New Key

In Registry Editor, navigate to the path: Computer\HKEY_LOCAL_MACHINE\SYSTEM\CurrentControlSet\Control\SecurityProviders\SCHANNEL\Protocols.
Create a new key by Right click on ‘Protocols‘ –> New –> Key.

Create New Key On Windows 1
Step 3: Rename the Registry Key ‘TLS 1.0’

Name key as ‘TLS 1.0‘Rename the registry key as ‘TLS 1.0‘.

Rename The Registry Key Tls 1 0
Step 4 Create One More Registry Key ‘Client’ underneath ‘TLS 1.0’

As smiler to the above step, create another key as ‘Client‘ underneath ‘TLS 1.0‘ as shone in this picture.

Create One More Registry Key Client Underneath Tls 1 0
Step 5: Create New Item ‘DWORD (32-bit) Value’ Underneath ‘Client’

Create a new item by right-clicking on ‘Client‘, and selecting ‘New’ –> DWORD (32-bit) Value.

Create New Item Dword 32 Bit Value Underneath Client
Step 6: Rename the Item ‘DWORD (32-bit) Value’ to ‘Enable’

We Name the item ‘Enabled‘ with a Hexadecimal value of ‘0‘.

Rename The Item Dword 32 Bit Value To Enable
Step 7: Create another item, ‘DisabledByDefault’ Underneath TLS 1.0

Similarly, create another item, ‘DisabledByDefault‘, with a Hexadecimal value of ‘1‘.

Create Another Item Disabledbydefault Underneath Tls 1 0
Step 8: Create ‘Server’ and corresponding Keys as in the case of ‘Client’

Similar to the above steps, create a key ‘Server‘ under ‘Protocols‘ and create registry items ‘DWORD (32-bit)’ and ‘Enabled’ as shown below.

Step 9: Disable TLS 1.1 on the Windows Server

Similar to the above steps, create a key ‘TLS 1.1’ under ‘Protocols‘ and below keys and items to Disable ‘TLS 1.1’


> HKEY_LOCAL_MACHINE\SYSTEM\CurrentControlSet\Control\SecurityProviders\SCHANNEL\Protocols\TLS 1.1\Client\Enabled with Hexadecimal value as ‘0’> HKEY_LOCAL_MACHINE\SYSTEM\CurrentControlSet\Control\SecurityProviders\SCHANNEL\Protocols\TLS 1.1\Client\DisabledByDefault with Hexadecimal value as ‘1’


> HKEY_LOCAL_MACHINE\SYSTEM\CurrentControlSet\Control\SecurityProviders\SCHANNEL\Protocols\TLS 1.1\Server\Enabled with Hexadecimal value as ‘0’> HKEY_LOCAL_MACHINE\SYSTEM\CurrentControlSet\Control\SecurityProviders\SCHANNEL\Protocols\TLS 1.1\Server\DisabledByDefault with Hexadecimal value as ‘1’

Create Server And Corresponding Keys As In The Case Of Client 1 1

Method 2: Disable TLS 1.0 and TLS 1.1 using Powershell commands

Follow this simple procedure to enable TLS 1.2 and TLS 1.2 using Powershell commands.

  1. Open Powershell as Administrator
Open Powershell As Administrator 1

2. Run the below commands to create Registry entries

- New-Item 'HKLM:\SYSTEM\CurrentControlSet\Control\SecurityProviders\SCHANNEL\Protocols\TLS 1.0\Server' -Force
- New-ItemProperty -Path 'HKLM:\SYSTEM\CurrentControlSet\Control\SecurityProviders\SCHANNEL\Protocols\TLS 1.0\Server' –PropertyType 'DWORD' -Name 'Enabled' -Value '0' 
- New-ItemProperty -Path 'HKLM:\SYSTEM\CurrentControlSet\Control\SecurityProviders\SCHANNEL\Protocols\TLS 1.0\Server' –PropertyType 'DWORD' -Name 'DisabledByDefault' -Value '1' 

- New-Item 'HKLM:\SYSTEM\CurrentControlSet\Control\SecurityProviders\SCHANNEL\Protocols\TLS 1.0\Client' -Force
- New-ItemProperty -Path 'HKLM:\SYSTEM\CurrentControlSet\Control\SecurityProviders\SCHANNEL\Protocols\TLS 1.0\Client' -PropertyType 'DWORD' -Name 'Enabled' -Value '0'
- New-ItemProperty -Path 'HKLM:\SYSTEM\CurrentControlSet\Control\SecurityProviders\SCHANNEL\Protocols\TLS 1.0\Client' –PropertyType 'DWORD' -Name 'DisabledByDefault' -Value '1' 


- New-Item 'HKLM:\SYSTEM\CurrentControlSet\Control\SecurityProviders\SCHANNEL\Protocols\TLS 1.1\Server' -Force
- New-ItemProperty -Path 'HKLM:\SYSTEM\CurrentControlSet\Control\SecurityProviders\SCHANNEL\Protocols\TLS 1.1\Server' –PropertyType 'DWORD' -Name 'Enabled' -Value '0' 
- New-ItemProperty -Path 'HKLM:\SYSTEM\CurrentControlSet\Control\SecurityProviders\SCHANNEL\Protocols\TLS 1.1\Server' –PropertyType 'DWORD' -Name 'DisabledByDefault' -Value '1' 

- New-Item 'HKLM:\SYSTEM\CurrentControlSet\Control\SecurityProviders\SCHANNEL\Protocols\TLS 1.1\Client' -Force
- New-ItemProperty -Path 'HKLM:\SYSTEM\CurrentControlSet\Control\SecurityProviders\SCHANNEL\Protocols\TLS 1.1\Client' -PropertyType 'DWORD' -Name 'Enabled' -Value '0'
- New-ItemProperty -Path 'HKLM:\SYSTEM\CurrentControlSet\Control\SecurityProviders\SCHANNEL\Protocols\TLS 1.1\Client' –PropertyType 'DWORD' -Name 'DisabledByDefault' -Value '1'

Before running the commands, you can see no items exist underneath Protocol.

No Items Were Exist Underneath Protocol 1

After running the commands you can see there are two keys created ‘TLS 1.0’ & ‘TLS 1.1’, Underneath each protocol there are ‘Client’ &’ Server’ Keys inside them there are two items ‘DisableByDefault’ & ‘Enabled’.

List Of Item Created Underneath Client And Server Using Powershell Commands

Method 3: Disable TLS 1.0 and TLS 1.1 on Windows Server using CMD

Follow this simple procedure to disable TLS 1.0 and TLS 1.1 using CMD comments.

  1. Open ‘Command Prompt’ as Administrator
Open Command Prompt As Administrator On The Windows Server 1

2. Run the below commands to create Registry entries.

reg add "HKEY_LOCAL_MACHINE\SYSTEM\CurrentControlSet\Control\SecurityProviders\SCHANNEL\Protocols\TLS 1.0\Server" /v Enabled /t REG_DWORD /d 0 /f 

reg add "HKEY_LOCAL_MACHINE\SYSTEM\CurrentControlSet\Control\SecurityProviders\SCHANNEL\Protocols\TLS 1.0\Server" /v DisabledByDefault /t REG_DWORD /d 1 /f

reg add "HKEY_LOCAL_MACHINE\SYSTEM\CurrentControlSet\Control\SecurityProviders\SCHANNEL\Protocols\TLS 1.0\Client" /v Enabled /t REG_DWORD /d 0 /f 

reg add "HKEY_LOCAL_MACHINE\SYSTEM\CurrentControlSet\Control\SecurityProviders\SCHANNEL\Protocols\TLS 1.0\Client" /v DisabledByDefault /t REG_DWORD /d 1 /f


reg add "HKEY_LOCAL_MACHINE\SYSTEM\CurrentControlSet\Control\SecurityProviders\SCHANNEL\Protocols\TLS 1.1\Server" /v Enabled /t REG_DWORD /d 0 /f 

reg add "HKEY_LOCAL_MACHINE\SYSTEM\CurrentControlSet\Control\SecurityProviders\SCHANNEL\Protocols\TLS 1.1\Server" /v DisabledByDefault /t REG_DWORD /d 1 /f

reg add "HKEY_LOCAL_MACHINE\SYSTEM\CurrentControlSet\Control\SecurityProviders\SCHANNEL\Protocols\TLS 1.1\Client" /v Enabled /t REG_DWORD /d 0 /f 

reg add "HKEY_LOCAL_MACHINE\SYSTEM\CurrentControlSet\Control\SecurityProviders\SCHANNEL\Protocols\TLS 1.1\Client" /v DisabledByDefault /t REG_DWORD /d 1 /f

We hope this post will help you know how to disable TLS 1.0 and TLS 1.1 on your Windows Server as they are deprecated for their weak security. Please share this post if you find this interested. Visit our social media page on FacebookLinkedInTwitterTelegramTumblrMedium & Instagram, and subscribe to receive updates like this.

Source :
https://thesecmaster.com/blog/how-to-disable-tls-1-0-and-tls-1-1-on-windows-server

How to Enable TLS 1.2 and TLS 1.3 on Windows Server?

Arun KL
November 14, 2023
8minutes

Growing trends in cyber attacks made system administrators implement more secured communication protocols to protect their assets and network from attacks. TLS plays a vital role in the implementation stack. TLS is a critical security protocol that is used to encrypt communications between clients and servers. TLS 1.3 is the latest version of the Transport Layer Security (TLS) protocol and offers many advantages over their previous versions. TLS 1.2 is the most widely used version of the TLS protocol, but TLS 1.3 is gaining popularity. As a system administrator, you should enable TLS 1.2 and TLS 1.3 on your Windows Server to enhance the security of your infrastructure.

Why Should You Enable TLS 1.2 and TLS 1.3 on Windows Server?

As a windows administrator, it is not just your duty to take care the system’s health. But, it is also your responsibility to create a secure environment to protect your Windows from internal and external threats. TLS 1.2 and TLS 1.3 are the new and most secure transport layer security protocols. As a system administrator, you should enable TLS 1.2 and TLS 1.3 on your Windows Server for the following reasons:

  1. Both TLS 1.2 and TLS 1.3 introduces new cryptographic suites that offer better security than the suites used in older TLS and SSL protocols.
  2. Both TLS 1.2 and TLS 1.3 are more resistant to man-in-the-middle attacks and simplify the handshake process, which makes it more difficult for attackers to eavesdrop on communications.
  3. TLS 1.3 simplifies the handshake process and removes unnecessary cryptographic overhead, which results in a faster connection time.

How to Enable TLS 1.2 and TLS 1.3 on Windows Server?

We have covered 3 different ways to enable TLS 1.2 and TLS 1.3 on your Windows Server in this post. You can choose any one of the three ways to enable TLS 1.2 and TLS 1.3 on your Windows Server depending on your technical and automation skills.

  1. Enable TLS 1.2 and TLS 1.3 manually using Registry
  2. Enable TLS 1.2 and TLS 1.3 using Powershell Commands
  3. Enable TLS 1.2 and TLS 1.3 using CMD

Microsoft clearly said that it supports TLS 1.3 only on Windows 10 (version 1903 later), Windows 11, Windows Server 2022, and above operating systems. No support will be provided for TLS 1.3 below Windows 10 22H2 and Windows Server 2022. You can refer to the below table that shows the Microsoft Schannel Provider support of TLS protocol versions.

Note: Windows 2019 does not support TLS 1.3.

TLS Protocols Supported by Windows Operating Systems:

Windows OSTLS 1.0 ClientTLS 1.0 ServerTLS 1.1 ClientTLS 1.1 ServerTLS 1.2 ClientTLS 1.2 ServerTLS 1.3 ClientTLS 1.3 Server
Windows Vista/Windows Server 2008EnabledEnabledNot supportedNot supportedNot supportedNot supportedNot supportedNot supported
Windows Server 2008 with Service Pack 2 (SP2)EnabledEnabledDisabledDisabledDisabledDisabledNot supportedNot supported
Windows 7/Windows Server 2008 R2EnabledEnabledDisabledDisabledDisabledDisabledNot supportedNot supported
Windows 8/Windows Server 2012EnabledEnabledEnabledEnabledEnabledEnabledNot supportedNot supported
Windows 8.1/Windows Server 2012 R2EnabledEnabledEnabledEnabledEnabledEnabledNot supportedNot supported
Windows 10, version 1507EnabledEnabledEnabledEnabledEnabledEnabledNot supportedNot supported
Windows 10, version 1511EnabledEnabledEnabledEnabledEnabledEnabledNot supportedNot supported
Windows 10, version 1607/Windows Server 2016 StandardEnabledEnabledEnabledEnabledEnabledEnabledNot supportedNot supported
Windows 10, version 1703EnabledEnabledEnabledEnabledEnabledEnabledNot supportedNot supported
Windows 10, version 1709EnabledEnabledEnabledEnabledEnabledEnabledNot supportedNot supported
Windows 10, version 1803EnabledEnabledEnabledEnabledEnabledEnabledNot supportedNot supported
Windows 10, version 1809//Windows Server 2019EnabledEnabledEnabledEnabledEnabledEnabledNot supportedNot supported
Windows 10, version 1903EnabledEnabledEnabledEnabledEnabledEnabledNot supportedNot supported
Windows 10, version 1909EnabledEnabledEnabledEnabledEnabledEnabledNot supportedNot supported
Windows 10, version 2004EnabledEnabledEnabledEnabledEnabledEnabledNot supportedNot supported
Windows 10, version 20H2EnabledEnabledEnabledEnabledEnabledEnabledNot SupportedNot Supported
Windows 10, version 21H1EnabledEnabledEnabledEnabledEnabledEnabledNot SupportedNot Supported
Windows 10, version 21H2EnabledEnabledEnabledEnabledEnabledEnabledNot SupportedNot Supported
Windows Server 2022EnabledEnabledEnabledEnabledEnabledEnabledEnabledEnabled
Windows 11EnabledEnabledEnabledEnabledEnabledEnabledEnabledEnabled

Method 1 : Enable TLS 1.2 and TLS 1.3 manually using Registry

Let’s begin learning how to enable TLS 1.2 and TLS 1.3 manually using Windows Registry.

Method 1 : Enable TLS 1.2 and TLS 1.3 manually using Registry

Step 1. Open regedit utility

Open ‘Run‘, type ‘regedit‘ and click ‘OK‘.

Open Regedit Utility On Windows 1
Step 2. Create New Key

In Registry Editor, navigate to the path : HKEY_LOCAL_MACHINE\SYSTEM\CurrentControlSet\Control\SecurityProviders\SCHANNEL\Protocols
Create a new key by Right click on ‘Protocols‘ –> New –> Key

Create New Key On Windows 1
Step 3. Rename the Registry Key ‘TLS 1.2’

Rename the  registry key as ‘TLS 1.2‘.

Rename The Registry Key Tls 1 2
Step 4. Create One More Registry Key ‘Client’ underneath ‘TLS 1.2’

As smiler to the above step, create another key as ‘Client‘ underneath ‘TLS 1.2‘ as shone in this picture.

Create One More Registry Key Client Underneath Tls 1 2
Step 5. Create New Item ‘DWORD (32-bit) Value’ Underneath ‘Client’, select ‘New’

Create new  item by right click on ‘Client‘, select ‘New’ –> DWORD (32-bit) Value.

Create New Item Dword 32 Bit Value Underneath Client Select New
Step 6. Rename the Item ‘DWORD (32-bit) Value’ to ‘DisabledByDefault’

Name the item as ‘DisabledBy Default’ with Hexadecimal value as ‘0’.

Rename The Item Dword 32 Bit Value To Disableby Default
Step 7. Create another item, ‘Enabled’ Underneath TLS 1.2

Similarly create another item, ‘Enabled‘ with Hexadecimal value as ‘1‘.

Create Another Item Enabled Underneath Tls 1 2
Step 8. List of Item Created underneath ‘Client’

After registry item creations underneath ‘Client’, it looks as below.

List Of Item Created Underneath Client
Step 9. Create ‘Server’ and corresponding Keys as in the case of ‘Client’

Similar to above steps, create a key ‘Server’ under ‘Protocols’ and create ‘DWORD (32-bit)’ and ‘Enabled’ as shown below.
– HKEY_LOCAL_MACHINE\SYSTEM\CurrentControlSet\Control\SecurityProviders\SCHANNEL\Protocols\TLS 1.2\Server\Enabled with Hexadecimal value as ‘1’– HKEY_LOCAL_MACHINE\SYSTEM\CurrentControlSet\Control\SecurityProviders\SCHANNEL\Protocols\TLS 1.2\Server\DisabledByDefault with Hexadecimal value as ‘0’

Create Server And Corresponding Keys As In The Case Of Client
Step 10. Enable TLS 1.3 on the Windows Server

Similar to above steps, create a ‘DWORD (32-bit)’ and ‘Enabled’ items in the below path to enable TLS 1.3
Note: TLS 1.3 is supported in Windows 11 & Windows server 2022 onwards.
– HKEY_LOCAL_MACHINE\SYSTEM\CurrentControlSet\Services\HTTP\Parameters\EnableHTTP3 with Hexadecimal value as ‘1’

Enable Tls 1 3 On The Windows Server

Method 2 : Enable TLS 1.2 and TLS 1.3 on Windows Server using Powershell Commends

Follow this simple procedure to enable TLS 1.2 and TLS 1.2 using Powershell comments.

Step 1. Open Powershell as Administrator
Open Powershell As Administrator 1
Step 2. Run below commands to create Registry entry
TLS 1.2
- New-Item 'HKLM:\SYSTEM\CurrentControlSet\Control\SecurityProviders\SCHANNEL\Protocols\TLS 1.2\Client' -Force

- New-ItemProperty -Path 'HKLM:\SYSTEM\CurrentControlSet\Control\SecurityProviders\SCHANNEL\Protocols\TLS 1.2\Client' –PropertyType 'DWORD' -Name 'DisabledByDefault' -Value '0'

- New-ItemProperty -Path 'HKLM:\SYSTEM\CurrentControlSet\Control\SecurityProviders\SCHANNEL\Protocols\TLS 1.2\Client' -PropertyType 'DWORD' -Name 'Enabled' -Value '1'


- New-Item 'HKLM:\SYSTEM\CurrentControlSet\Control\SecurityProviders\SCHANNEL\Protocols\TLS 1.2\Server' -Force

- New-ItemProperty -Path 'HKLM:\SYSTEM\CurrentControlSet\Control\SecurityProviders\SCHANNEL\Protocols\TLS 1.2\Server' –PropertyType 'DWORD' -Name 'DisabledByDefault' -Value '0'

- New-ItemProperty -Path 'HKLM:\SYSTEM\CurrentControlSet\Control\SecurityProviders\SCHANNEL\Protocols\TLS 1.2\Server' –PropertyType 'DWORD' -Name 'Enabled' -Value '1'


TLS 1.3 (Supports in Windows 11 & Windows Server 2022) 
- New-ItemProperty -Path 'HKLM:\SYSTEM\CurrentControlSet\services\HTTP\Parameters' -PropertyType 'DWORD' -Name 'EnableHttp3' -Value '1'

Before running the commands you can see no items were exist underneath Protocol.

No Items Were Exist Underneath Protocol

After running the commands you can see there are two keys created ‘TLS 1.2’ & ‘TLS 1.3’, Underneath each protocols there are ‘Client’ &’Server’ Keys inside them ther are two items ‘DisableByDefault’ & ‘Enabled’.

List Of Item Created Underneath Client Using Powershell Commends
List Of Item Created Underneath Server Using Powershell Commends
Enable Tls 1 3 On The Windows Server

Method 3: Enable TLS 1.2 and TLS 1.3 on Windows Server using native CMD

Follow this simple procedure to enable TLS 1.2 and TLS 1.2 using CMD comments.

Step 1. Open ‘Command Prompt’ as Administrator
Open Command Prompt As Administrator On The Windows Server 1
Step 2. Run below commands to create Registry entry.
TLS 1.2
- reg add "HKEY_LOCAL_MACHINE\SYSTEM\CurrentControlSet\Control\SecurityProviders\SCHANNEL\Protocols\TLS 1.2\Client" /v DisabledByDefault /t REG_DWORD /d 0 /f

- reg add "HKEY_LOCAL_MACHINE\SYSTEM\CurrentControlSet\Control\SecurityProviders\SCHANNEL\Protocols\TLS 1.2\Client" /v Enabled /t REG_DWORD /d 1 /f


- reg add "HKEY_LOCAL_MACHINE\SYSTEM\CurrentControlSet\Control\SecurityProviders\SCHANNEL\Protocols\TLS 1.2\Server" /v DisabledByDefault /t REG_DWORD /d 0 /f

- reg add "HKEY_LOCAL_MACHINE\SYSTEM\CurrentControlSet\Control\SecurityProviders\SCHANNEL\Protocols\TLS 1.2\Server" /v Enabled /t REG_DWORD /d 1 /f


TLS 1.3 (Supports in Windows 11 & Windows Server 2022)
- reg add "HKEY_LOCAL_MACHINE\SYSTEM\CurrentControlSet\services\HTTP\Parameters" /v EnableHttp3 /t REG_DWORD /d 1 /f

We hope this post will help you know how to enable TLS 1.2 and TLS 1.3 on your Windows Server to enhance the security of your infrastructure. Please share this post if you find this interesting. Visit our social media page on FacebookLinkedInTwitterTelegramTumblrMedium & Instagram, and subscribe to receive updates like this.

Source :
https://thesecmaster.com/blog/how-to-enable-tls-1-2-and-tls-1-3-on-windows-server

How to Make Your Employees Your First Line of Cyber Defense

May 01, 2024
The Hacker News

There’s a natural human desire to avoid threatening scenarios. The irony, of course, is if you hope to attain any semblance of security, you’ve got to remain prepared to confront those very same threats.

As a decision-maker for your organization, you know this well. But no matter how many experts or trusted cybersecurity tools your organization has a standing guard, you’re only as secure as your weakest link. There’s still one group that can inadvertently open the gates to unwanted threat actors—your own people.

Security must be second nature for your first line of defense #

For your organization to thrive, you need capable employees. After all, they’re your source for great ideas, innovation, and ingenuity. However, they’re also human. And humans are fallible. Hackers understand no one is perfect, and that’s precisely what they seek to exploit.

This is why your people must become your first line of defense against cyber threats. But to do so, they need to learn how to defend themselves against the treachery of hackers. That’s where security awareness training (SAT) comes in.

What is Security Awareness Training (SAT)? #

The overall objective of an SAT program is to keep your employees and organization secure. The underlying benefit, however, is demonstrating compliance. While content may differ from program to program, most are generally similar, requiring your employees to watch scripted videos, study generic presentations, and take tests on cyber “hygiene.” At their core, SAT programs are designed to help you:

  • Educate your employees on recognizing cybersecurity risks such as phishing and ransomware
  • Minimize your organization’s exposure to cyber threats
  • Maintain regulatory compliance with cyber insurance stipulations

These are all worthwhile goals in helping your organization thrive amidst ever-evolving cyber threats. However, attaining these outcomes can feel like a pipe dream. That’s because of one unfortunate truth about most SAT programs: they don’t work.

Age-Old Challenges of Old-School SATs#

Traditional SAT programs have long been scrutinized for their inability to drive meaningful behavioral changes. In fact, 69% of employees admit to “intentionally bypassing” their enterprise’s cybersecurity guidance.

If you oversee cybersecurity for an organization, then you’re likely familiar with the pain that comes with implementing one, managing it, and encouraging its usage. Given their complexities, traditional SAT solutions practically force non-technical employees to become full-on technologists.

Challenges for AdministratorsChallenges for EmployeesChallenges for Your Organization
Complex, ongoing management is frustrating. Plus, through it all they just find poor results.They’re bored. Unengaging content is detrimental, as it doesn’t lead to knowledge retention. Boring, unengaging content doesn’t help with knowledge retention.Most SATs aren’t effective because they’re created by generalists, not real cybersecurity experts And many are designed with little reporting capabilities, leading to limited visibility into success rates

Because most SAT programs are complex to manage, they’re usually dismissed as a means to an end. Just check a box for compliance and move on. But when done right, SAT can be a potent tool to help your employees make more intelligent, more instinctive, security-conscious decisions.

Ask the Right Questions Before Choosing Your SAT Solution#

When it comes to choosing the right solution for your organization, there are some questions you should first ask yourself. By assessing the following, you’ll be better equipped to select the option that best fits your specific needs.

Learning-Based Questions

  • Are the topics covered in this SAT relevant to my organization’s security and compliance concerns?
  • Are episodes updated regularly to reflect current threats and scenarios?
  • Does this SAT engage users in a unique, meaningful manner?
  • Is this SAT built and supported by cybersecurity practitioners?
  • Is the teaching methodology proven to increase knowledge retention?

Management-Based Questions

  • Can someone outside of my organization manage the SAT for me?
  • Can it be deployed quickly?
  • Does it automatically enroll new users and automate management?
  • Is it smart enough to skip non-human identities so I don’t assign training to, say, our copy machine?
  • Is it simple and intuitive enough for anyone across my organization to use?

Your ideal SAT will allow you to answer a resounding “Yes” to all of the above.

Essential Features of an Effective SAT#

A SAT solution that’s easy to deploy, manage, and use can have a substantial positive impact. That’s because a solution that delivers “ease” has considered all of your organization’s cybersecurity needs in advance. In other words, an effective SAT does all the heavy lifting on your behalf, as it features:

Relevant topics
…based on real threats you might encounter.
What to look for:

To avoid canned, outdated training, choose a SAT solution that’s backed by experts. Cybersecurity practitioners should be the ones regularly creating and updating episodes based on the latest trends they see hackers leveraging in the wild. Additionally, every episode should cover a unique cybersecurity topic that reflects the most recent real-world tradecraft.
Full management by real experts
…so you don’t have to waste time creating, managing, and assigning training.
What to look for:

Ideally, you want a SAT solution that can manage all necessary tasks for you. Seek a SAT solution that’s backed by real cybersecurity experts who can create, curate, and deploy your learning programs and phishing scenarios on your behalf.
Memorable episodes
…with fun, story-driven lessons that are relatable and easy to comprehend.
What to look for:

Strive for a SAT solution that features character-based narratives. This indicates the SAT is carefully designed to engage learners of all attention spans. Remember, if the episodes are intentionally entertaining and whimsical, you’re more likely to find your employees conversing about inside jokes, recurring characters, and, of course, what they’ve learned. As a result, these ongoing discussions only serve to fortify your culture of security.
Continual enhancements …so episodes are updated regularly in response to real-world threats.
What to look for:
Seek out a SAT solution that provides monthly episodes, as this will keep your learners up to date. Regular encounters with simulated cybersecurity scenarios can help enhance their abilities to spot and defend against risks, such as phishing attempts. These simulations should also be dispersed at unpredictable time intervals (i.e. morning, night, weekends, early in the month, later in the month, etc.), keeping learners on their toes and allowing them to put their security knowledge into practice.
Minimal time commitment
…so you don’t have to invest countless hours managing it all.
What to look for:
For your learners, choose a SAT solution that doesn’t feel like an arduous chore. Look for solutions that specialize in engaging episodes that are designed to be completed in shorter periods of time.
For your own administrative needs, select a SAT that can sync regularly with your most popular platforms, such as Microsoft 365, Google, Okta, or Slack. It should also sync your employee directories with ease, so whenever you activate or deactivate users, it’ll automatically update the information. Finally, make sure it’s intelligent enough to decipher between human and non-human identities, so you’re only charged for accounts linked to real individuals.
Real results …through episodes that instill meaningful security-focused behaviors and habits.
What to look for:
An impactful SAT should deliver monthly training that’s rooted in science-backed teaching methodologies proven to help your employees internalize and retain lessons better. Your SAT should feature engaging videos, text, and short quizzes that showcase realistic cyber threats you and your employees are likely to encounter in the wild, such as:PhishingSocial engineeringPhysical device securityand more
Measurable data …with easy-to-read reports on usage and success rates.
What to look for:
An impactful SAT program should provide robust reporting. Comprehensible summaries should highlight those learners who haven’t taken their training or those whom a phishing simulation has compromised. Additionally, detailed reports should give you all the data you need to help prove business, insurance, and regulatory compliance.
Easy adoption
….that makes it easy to deploy and easy to scale with your organization.
What to look for:
Choose a SAT solution that’s specially built to accommodate organizations with limited time and resources. A solution that’s easy to implement can be deployed across your organization in a matter of minutes.
Compliance …with a range of standards and regulations
What to look for:
While compliance is the bare minimum of what a SAT should offer your organization, it shouldn’t be understated. Whether to meet insurance check boxes or critical industry regulations, every business has its own compliance demands. At the very least, your SAT solution should cover the requirements of:
Health Insurance Portability and Accountability Act (HIPAA)Payment Card Industry Data Security Standard (PCI)Service Organization Control Type 2 (SOC 2)EU General Data Protection Regulation (GDPR)

The Threat Landscape is Changing. Your SAT Should Change With It. #

Cybercriminals think they’re smart, maliciously targeting individuals across organizations like yours. That’s why you need to ensure your employees are smarter. If they’re aware of the ever-changing tactics hackers employ, they can stand as your first line of defense. But first, you need to deploy a training solution you can trust, backed by real cybersecurity experts who understand emerging real-world threats.

Huntress Security Awareness Training is an easy, effective, and enjoyable solution that helps:

  • Minimize time-consuming maintenance and management tasks
  • Improve knowledge retention through neuroscience-based learning principles
  • Update you and your employees on the current threat landscape
  • Establish a culture that values cybersecurity
  • Inspire meaningful behavioral habits to improve security awareness
  • Engage you and your employees in a creative, impactful manner
  • Assure regulatory compliance
  • Keep cyber criminals out of your organization

Discover how a fully managed SAT can free up your time and resources, all while empowering your employees with smarter habits that better protect your organization from cyber threats.

Say goodbye to ineffective, outdated training. Say hello to Huntress SAT.

Start your free trial of Huntress SAT today.

Found this article interesting? This article is a contributed piece from one of our valued partners. Follow us on Twitter  and LinkedIn to read more exclusive content we post.

Source :
https://thehackernews.com/2024/05/everyones-expert-how-to-empower-your.html

Empowering Cybersecurity with AI: The Future of Cisco XDR

May 7, 2024
Siddhant Dash

In 2007, there was a study from the University of Maryland proving that internet-connected systems were attacked every 39 seconds on average. Today, that number has grown more than 60%. Cisco sees 64 attempts to connect to ransomware infrastructure every second. The world is becoming digitized, and hybrid, which creates an environment that criminals target with increasing sophistication. It’s too much for human-scale, and so a hybrid world requires a hybrid approach that sits between humans and machines.

Envision an AI Assistant that serves as a reliable partner for incident responders, offering precise, real-time guidance on the subsequent steps to take, tailored to the specific state of the incident at hand and allowing SOC (Security Operations Center) teams to respond faster and do more with less. I am pleased to announce the launch of the AI Assistant in XDR as a part of our Breach Protection Suite.

In our RSAC 2023 announcement, we introduced a vision of our Cisco SOC Assistant, designed to expedite threat detection and response. Today, this vision is realized and available in private preview. It enhances our Breach Protection Suite which is powered by Cisco XDR’s capabilities. It significantly speeds up investigations and responses, enabling security teams to safeguard their environments more efficiently and cost-effectively.

Assist with Information Discovery

In 2024, the global shortfall of 3.5 million security professionals, as reported by ISC2, underscores the importance of retaining and recruiting skilled personnel to counter increasingly sophisticated cyber threats and safeguard enterprises. Moreover, the lack of appropriate tools often leads to ineffective cyber risk management and professional burnout, adversely affecting staff retention and the SOC’s capacity to thwart attacks.

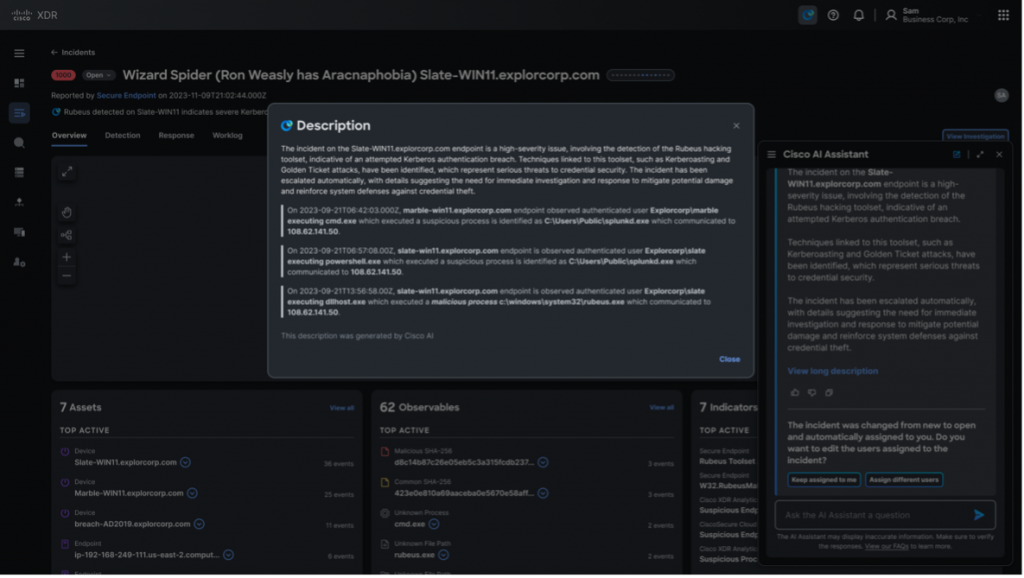
The AI Assistant in XDR acts as a potent enhancer, empowering SOC teams to maximize their efficiency and effectively close the personnel and skill gap. When an incident occurs, the assistant will contextualize events across email, the web, endpoints, and the network to tell the SOC analyst exactly what happened and its impact on their environment. It presents a short description of the incident that quickly answers what, when and how an incident happened. It also provides a long description of the incident which explains the timeline of events that have happened in this active incident.

Figure 1: Short Description of Incident Details generated by the AI Assistant
Figure 2: Long Description of Incident Details and Events Timeline

Moreover, our AI Assistant utilizes XDR’s patented ability to prioritize critical incidents, reducing alert fatigue for the SOC team and enhancing their efficiency in handling active incidents.

Figure 3: Targeted Prioritization of Incidents by AI Assistant that Need Immediate Attention

Augment and Elevate SOC Teams with Best Practice Recommendations

Today’s SOCs often struggle with a fragmented technology stack, making it difficult to respond effectively to cyber threats. Alert fatigue is a major hurdle for modern SOC teams, hindering proactive threat hunting and leading to overlooked alerts and burnout. The Cisco AI Assistant comes to the rescue and jumpstarts the incident response process for a modern SOC team.

Our AI Assistant, powered by Cisco XDR the platform for Cisco’s Breach Protection Suite, synthesizes data from email, web, processes, endpoints, cloud, and network domains, offering precise action recommendations to effectively contain ongoing cyber-attacks. It works at machine scale to identify patterns and potential attacks that humans might miss because of alert fatigue, if a defender is only looking at one domain in isolation, or while trying to manually correlate data. The AI Assistant is context aware, meaning it tracks the state of the incident in real-time and generates tailored recommendations specific to that incident.

Figure 4: Tailored Recommendations for an Incident by the AI Assistant

Mean Time to Detection (MTTD) and Mean Time to Respond (MTTR) are two primary metrics that SOC teams want to optimize for. Cisco XDR with our AI Assistant enables security teams to reduce these metrics by jumpstarting investigations and incident response by providing tailored recommendations for that specific incident.

Enable Seamless Collaboration Across Security Teams

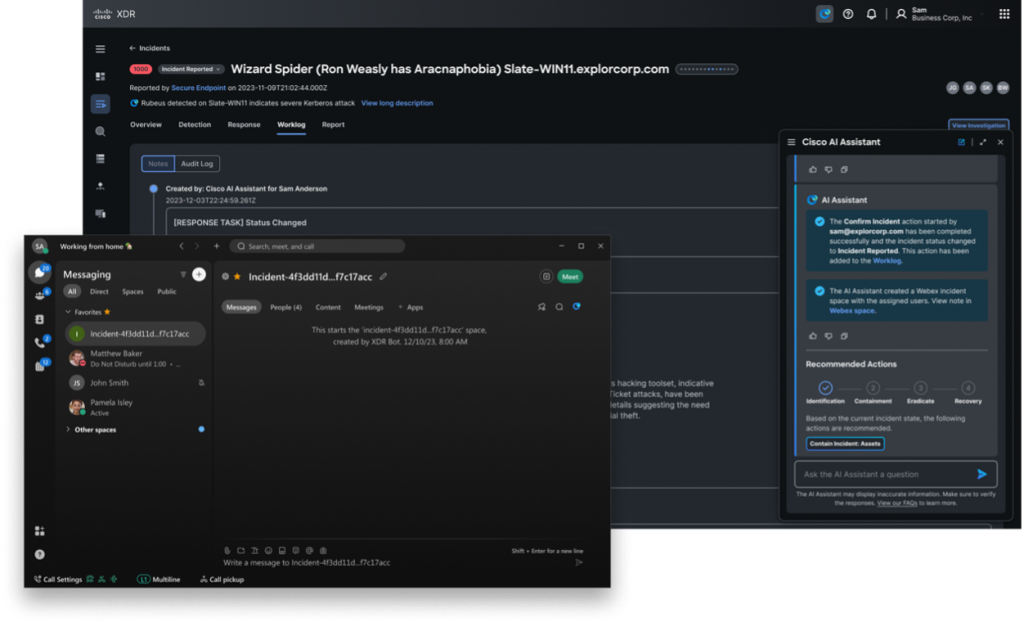
The Cisco AI Assistant, embedded within XDR, facilitates team collaboration using Webex, Teams, or Slack. This empowers security teams to swiftly assemble the right experts for an active incident, thereby speeding up the MTTR. The AI Assistant unifies the team by setting up WAR rooms, summarizing messages, and logging them in XDR for instant audit-readiness.

Figure 5: AI Assistant creates a Webex WAR Room and brings the right experts together for Incident Response

Automate Workflows to Neutralize Threats Across the Enterprise

Today’s SOCs often lack a cohesive technology stack to respond to cyber threats efficiently and consistently. As the IT environment grows beyond the on-premises data center to cloud, hybrid-cloud and multi-cloud country specific data centers, organizations accumulate point solutions to monitor and protect pieces of the environment. As a result, SOC analysts must do a lot of the heavy lifting required to detect and respond to an attack. This includes logging into different tools to execute workflows that contain an attack.

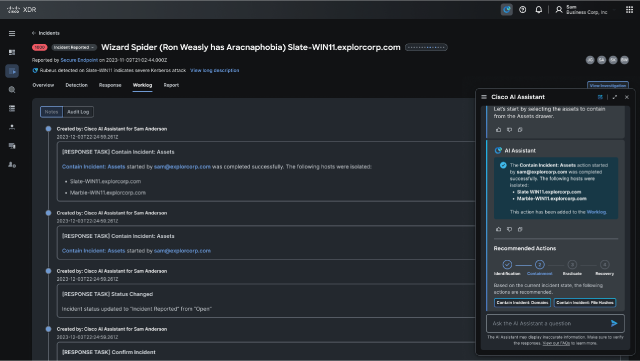
Our AI Assistant taps into advanced workflows and atomics with Cisco XDR’s 90+ integrations. Our AI assistant enables the execution of workflows at a single click, guided by the AI Assistant’s personalized recommendations that consider the incident’s playbook and current state in real-time.

Figure 6: Execution of Automated Workflows by the AI Assistant to Contain an Incident

Gone are the days when security teams had to juggle multiple isolated products and execute workflows in each to mitigate an attack. With Cisco Breach Protection Suite, billions of security events can be correlated and recommended actions can be generated and executed all in one place. This is the transformative power of the Cisco XDR combined with Cisco’s AI Assistant revolutionizing enterprise security.

Conclusion

By leveraging comprehensive telemetry data from various sources in Cisco XDR and combining that with our AI Assistant, we enable SOC teams to rapidly respond to active incidents and fortify defenses against complex threats. The AI Assistant amplifies the SOC’s existing knowledge, streamlines routine tasks, and empowers analysts to focus on strategic initiatives. This boosts analyst productivity and job satisfaction, leading to improved staff retention and SOC effectiveness, ultimately resulting in precise, consistent, and accurate security outcomes.

Learn how Cisco Breach Protection SuiteCisco XDR and our AI Assistant can simplify your security operations.


We’d love to hear what you think. Ask a Question, Comment Below, and Stay Connected with Cisco Security on social!

Cisco Security Social Channels

Instagram
Facebook
Twitter
LinkedIn

Source :
https://blogs.cisco.com/security/empowering-cybersecurity-with-ai-the-future-of-cisco-xdr

How to Sync Client Time with Domain Controller on Windows

written by Cyril Kardashevsky
January 18, 2024

In order for Windows computers to function properly in Active Directory, they must have their time in sync with the domain. In the AD environment, domain controllers act as the time source for client devices. Kerberos AD authentication will fail if the clock offset between the client and the domain controller (KDC) is greater than 5 minutes.

Understanding the Time Hierarchy in the Active Directory Domain

There is a strict hierarchy to time synchronization in an Active Directory domain:

  1. The domain controller with the PDC emulator FSMO role is the main source of time in the domain. This DC synchronizes the time with an external time source or NTP server;
  2. Other domain controllers synchronize their time with the PDC domain controller;
  3. The domain workstations and the Windows member servers synchronize their time with the domain controller that is closest to them (in accordance with AD sites and subnets configuration);
sync time with domain controller

Hint. Learn more about time syncing in an Active Directory domain using the GPO.

Sync Time with DC on the Domain-Joined Machine

The AD domain controller should be used as the time source on the workstation after you have joined it to the domain. On Windows 10 or 11, go to Settings > Time and Language and make sure your DC is used as the last time sync source.

windows server sync time with domain controller

You can also get the NTP source on your computer by using the command:

w32tm /query /source

The command should return the name of one of the domain controllers in your AD domain.

windows sync time with domain controller

List details of the status of time synchronization on the client device:

w32tm /query /status
how to sync time with domain controller

The command returns the following useful information:

  • Leap Indicator (time sync status)
  • Last Successful Sync Time
  • Source (your DC)
  • Poll Interval (1024 seconds by default)

Get a list of the AD domain controllers which can be used to synchronize time:

w32tm /monitor

In this example, there are three domain controllers available for the client to synchronize time with.

sync time ad server

To re-enable time synchronization with a DC for computers in an Active Directory domain, use the following commands:

w32tm /config /syncfromflags:domhier /update

net stop w32time && net start w32time

If the domain computer is configured to synchronize its time following to the AD DS Time hierarchy, the value of the Type parameter in the HKLM\SYSTEM\CurrentControlSet\Services\W32Time\Parameters registry key should be NT5DS.

sync time with domain controller cmd

If the Windows client fails to synchronize time with the AD domain controller, you must to reset the Windows Time service configuration. To do this, open a command prompt as an administrator and run the following commands:

  • The first command unregisters the w32time service and removes the settings from the registry:w32tm /unregister
  • Then register w32tm service and restore the default time settings:w32tm /register
  • Set AD as the time sync source for the client (by changing the Type registry parameter to NT5DS):REG add HKEY_LOCAL_MACHINE\SYSTEM\CurrentControlSet\Services\W32Time\Parameters /v Type /d NT5DS
  • Restart the service:net stop w32time && net start w32time
  • Update settings:w32tm /config /update
  • Synchronize the time:w32tm /resync
  • Check your current sync settings:w32tm /query /status

The screenshot below shows that Windows is now synchronizing with DC (Source).

w32tm sync with domain controller

Time Sync Issues on Windows Domain Joined Computers

The Windows Time Service (W32Time) is responsible for time synchronization. First, ensure that this service is running on a Windows client computer:

Get-Service W32Time | Select-Object name,status
time sync with domain controller

UDP port 123 is used for time synchronization on Windows. If this port is not available on the DC, the client computer won’t be able to synchronize the time.

You may get an error when you try to synchronize the time with the w32tm /resync command:

Sending resync command to local computer
The computer did not resync because no time data was available.

sync time to domain controller

Check that the w32time service is running on the DC and listening on UDP port 123:

netstat -an | find "UDP" | find ":123"
sync time with dc

Then check that the UDP inbound rule named Active Directory Domain Controller – W32Time (NTP-UDP-In) is enabled in Windows Defender Firewall (Control Panel > Windows Firewall > Advanced settings > Inbound rules).

sync server time with domain controller

You can check Windows Defender Firewall rule status with PowerShell:

Get-NetFirewallrule -DisplayName 'Active Directory Domain Controller - W32Time (NTP-UDP-In)'|select Enabled
active directory time sync

If the rule is disabled, you must enable it:

Get-NetFirewallrule -DisplayName 'Active Directory Domain Controller - W32Time (NTP-UDP-In)'|Enable-NetFirewallrule

It is also possible to force a client to manually synchronize its time with another domain controller.

net time \\ny-dc01 /set /y
w32tm sync to domain controller

Configuring the NTP Client Time Sync on Windows Using GPO

In most cases, time sync with a domain on Windows client doesn’t require administrator intervention. However, if you find that time synchronization is not working properly on clients in your domain, you can centrally configure client NTP settings on Windows devices using Group Policy.

  1. Use the gpedit.msc console if you want to change Group Policy settings on a single computer (this is the best solution if you need to solve synchronization problems on a single computer or test new NTP client settings). To set up a GPO for multiple domain computers, use the Group Policy Management Console (gpmc.msc);
  2. Expand the following node in GPO editor: Computer Configuration > Administrative Templates > System > Windows Time Service;
  3. Enable the Enable Windows NTP Client policy;sync time with ad
  4. Then enable the Configure NTP Client policy and set the following settings in the Options panel:
    NTPServer: your domain name (preferred) or FQDN name of the domain controller with the PDC Emulator role (you can find it with the command: netdom.exe query fsmo)
    Type: NT5DS
    CrossSiteSyncFlags: 2
    ResolvePeerBackoffMinutes: 15
    ResolvePeerBackoffMaxTimes: 7
    SpecialPollInterval: 64
    EventLogFlags: 0
  5. Restart your computer to apply the new GPO client time settings.

Source :
https://theitbros.com/sync-client-time-with-domain-controller/

NIST Launches Cybersecurity Framework (CSF) 2.0

By: Shannon Murphy, Greg Young
March 20, 2024
Read time: 2 min (589 words)

On February 26, 2024, the National Institute of Standards and Technology (NIST) released the official 2.0 version of the Cyber Security Framework (CSF).

What is the NIST CSF?

The NIST CSF is a series of guidelines and best practices to reduce cyber risk and improve security posture. The framework is divided into pillars or “functions” and each function is subdivided into “categories” which outline specific outcomes.

As titled, it is a framework. Although it was published by a standards body, it is not a technical standard.

https://www.nist.gov/cyberframework

What Is the CSF Really Used For?

Unlike some very prescriptive NIST standards (for example, crypto standards like FIPS-140-2), the CSF framework is similar to the ISO 27001 certification guidance. It aims to set out general requirements to inventory security risk, design and implement compensating controls, and adopt an overarching process to ensure continuous improvement to meet shifting security needs.

It’s a high-level map for security leaders to identify categories of protection that are not being serviced well. Think of the CSF as a series of buckets with labels. You metaphorically put all the actions, technology deployments, and processes you do in cybersecurity into these buckets, and then look for buckets with too little activity in them or have too much activity — or repetitive activity — and not enough of other requirements in them.

The CSF hierarchy is that Functions contain many Categories — or in other words, there are big buckets that contain smaller buckets.

What Is New in CSF 2.0?

The most noteworthy change is the introduction of Governance as a sixth pillar in the CSF Framework. This shift sees governance being given significantly more importance from just a mention within the previous five Categories to now being its owna separate Function.

According to NIST the Govern function refers to how an organization’s, “cybersecurity risk management strategy, expectations, and policy are established, communicated, and monitored.”  This is a positive and needed evolution, as when governance is weak, it often isn’t restricted to a single function (e.g. IAM) and can be systemic.

Governance aligns to a broader paradigm shift where we see cybersecurity becoming highly relevant within the business context as an operational risk. The Govern expectation is cybersecurity is integrated into the broader enterprise risk management strategy and requires dedicated accountability and oversight.

There are some other reassignments and minor changes in the remaining five Categories. CSF version 1.0 was published in 2014, and 1.1 in 2018. A lot has changed in security since then. The 2.0 update acknowledges that a review has been conducted.

As a framework, the CISO domain has not radically changed. Yes, the technology has radically evolved, but the greatest evolution in the CISO role really has been around governance: greater interaction with C-suite and board, while some activities have been handed off to operations.

NIST Cybersecurity Framework

So How Will This Impact Me in the Short Term?

The update to the NIST CSF provides a fresh opportunity to security leaders to start or reopen conversations with business leaders on evolving needs.

  • The greatest impact will be to auditors and consultants who will need to make formatting changes to their templates and work products to align with version 2.0.
  • CISOs and security leaders will have to make some similar changes to how they track and report compliance.
  • But overall, the greatest impact (aside from some extra billable cybersecurity consulting fees) will be a boost of relevance to the CSF that could attract new adherents both through security leaders choosing to look at themselves through the CSF lens and management asking the same of CISOs.
Category

Source :
https://www.trendmicro.com/it_it/research/24/c/nist-cybersecurity-framework-2024.html