Cisco Umbrella Enhances Support of DNS Encryption With DNS Over HTTPS

In December 2011, Cisco Umbrella – then going by the name OpenDNS – became the first public DNS resolver to announce support for DNS encryption. Now, a decade later, we’re proud to announce that we’ve added support for DNS over HTTPS (DoH) directly to our core Umbrella resolvers. In addition, we’ve also added support for Discovery of Designated Resolvers (DDR). These moves allow us to provide our customers with the low-latency and high availability DNS service they expect while also enhancing their security and privacy.

In this blog, we unpack what this latest DNS over HTTPS update means for Cisco Umbrella customers and discuss how they can configure DoH in their network. For more information on the DNS security offered by Cisco Umbrella, register for our on-demand demo of Cisco Umbrella today!

Our History With DNS Encryption

More than a decade ago, we became the first public resolver to announce support for DNSCrypt: a made-for-DNS solution to securing one of the most fundamental parts of internet communication. To this day, Cisco Umbrella continues to be at the forefront of DNS encryption, using DNSCrypt in the default configurations of our endpoint clients and DNS forwarders.

While we still believe that DNSCrypt has a critical place in our infrastructure, the lack of an Internet Engineering Task Force (IETF) standard for DNSCrypt has prevented widespread adoption. Recently, developments in encrypted DNS have focused on two different encryption protocols: DNS over HTTPS (DoH) and DNS over TLS (DoT).

Using DNS over HTTPS (DoH) With Cisco Umbrella

Unlike DNSCrypt, DoH is an IETF standard for performing DNS queries over a secure, encrypted channel. While it serves a similar purpose to our long-time friend DNSCrypt, its status as an IETF standard makes DNS over HTTPS more common amongst major browsers and operating systems.

Cisco Umbrella first announced support for DoH in May 2020. At that time, we wanted to support our users looking to take advantage of browser-based DNS initiatives. To keep our ability to adapt quickly, we launched DNS over HTTPS support using a set of dedicated resolvers (‘doh.umbrella.com’ and ‘doh.opendns.com’) with their own anycast IPs (146.112.41.5 and 146.112.41.2).

Since that release, the popularity of DoH has picked up steam. Apple added support in September 2020, and Microsoft recently announced that upcoming versions of Windows will support this form of DNS encryption. We’ve seen the result of this popularity on the Cisco Umbrella network, which has prompted our team to add support for DNS over HTTPS directly to Umbrella core resolvers.

Enabling DoH on Cisco Umbrella

Because we support DNS over HTTPS with our core resolvers, Cisco Umbrella customers will continue to experience the low-latency and high availability DNS service for which Umbrella is known. In addition, users can now configure DoH for Cisco Umbrella and OpenDNS on our well-known anycast addresses:

ResolverIPv4IPv6DoH
Umbrella/OpenDNS208.67.222.222
208.67.220.220
2620:119:35::35
2620:119:53::53
https://dns.opendns.com/dns-query
https://dns.umbrella.com/dns-query
FamilyShield208.67.222.123
208.67.220.123
2620:119:35::123
2620:119:53::123
https://familyshield.opendns.com/dns-query
Sandbox208.67.222.2
208.67.220.2
2620:0:ccc::2
2620:0:ccd::2
https://sandbox.opendns.com/dns-query

Additionally, we’ve moved the dedicated DNS over HTTPS hostnames and IPs onto the same core resolvers. This means they will provide the same service as our well-known IPs. And since we’ll continue to support those hostnames and IPs into the future, our existing users need not make any changes.

Using DNS over TLS (DoT) With Cisco Umbrella

While adding support for DNS over HTTPS directly to our core resolvers enabled our users to take advantage of DNS encryption better, it also provides an additional benefit.  We can now handle TLS connections and support DNS over TLS natively in the core resolvers. We’re thrilled to announce that, as of January 28, 2022, support for DoT is live on all Umbrella resolvers globally.

Like DoH, DoT is an IETF standard for performing DNS queries over a secure, encrypted channel. Unlike DoH, however, DoT uses a dedicated port (TCP/853) for its connections. Clients that support DoT will check if their DNS server supports DoT. If it doesn’t, clients will fall back to regular unencrypted DNS (sometimes called Do53). Thus, configuration for DoT is typically just a matter of enabling it in a supported client.

Discovery of Designated Resolvers (DDR)

With all of these new methods for DNS encryption, clients need an automated means to discover what encryption methods their chosen DNS resolver supports. Tasked with this goal, the Adaptive DNS Discovery (ADD) working group at the IETF has proposed a standard called Discovery of Designated Resolvers (DDR).

The basics of DDR are simple. When a DNS client first finds out its DNS server, it will send a DNS query for a special use domain name, ‘_dns.resolver.arpa’, using a special DNS query type (type 64, or ‘SVCB’). The DNS server will respond with the different types of encryption it supports, and any configuration information the client needs. The client can pick the kind of encryption it prefers, verify that all the information is secure, and then start encrypting DNS.

Cisco Umbrella is very proud to be the first public resolver to announce support for DDR. We developed it in close collaboration with Microsoft to ensure that encrypted resolver selection works smoothly end to end. We look forward to DDR support being added to more clients and operating systems in the future.

Our DNS over HTTPS and DNS over TLS services are now discoverable via DDR, and any supported client can start using it now.

Enhance Your DNS Security Today

Just as with our decade of support for DNSCrypt, Cisco Umbrella views encryption of DNS queries in transit as a core component of DNS security, along with the use of DNSSEC for securing the data in the queries itself. We’ve been pleased to see the industry and client begin to add direct support for DNS encryption, and we can’t wait to see standards like DoH, DoT, and DDR take off and become more widely adopted.

If you want to learn more about the DNS security that Cisco Umbrella provides, view our on-demand demo today!

Source :
https://umbrella.cisco.com/blog/enhancing-support-dns-encryption-with-dns-over-https

100 Million Samsung Galaxy Phones Affected with Flawed Hardware Encryption Feature

A group of academics from Tel Aviv University have disclosed details of now-patched “severe” design flaws affecting about 100 million Android-based Samsung smartphones that could have resulted in the extraction of secret cryptographic keys.

The shortcomings are the result of an analysis of the cryptographic design and implementation of Android’s hardware-backed Keystore in Samsung’s Galaxy S8, S9, S10, S20, and S21 flagship devices, researchers Alon Shakevsky, Eyal Ronen, and Avishai Wool said.

Trusted Execution Environments (TEEs) are a secure zone that provide an isolated environment for the execution of Trusted Applications (TAs) to carry out security critical tasks to ensure confidentiality and integrity.

On Android, the hardware-backed Keystore is a system that facilitates the creation and storage of cryptographic keys within the TEE, making them more difficult to be extracted from the device in a manner that prevents the underlying operating system from having direct access.

Instead, the Android Keystore exposes APIs in the form of Keymaster TA (trusted application) to perform cryptographic operations within this environment, including secure key generation, storage, and its usage for digital signing and encryption. On Samsung mobile devices, the Keymaster TA runs in an ARM TrustZone-based TEE.

However, security flaws uncovered in Samsung’s implementation meant that they could provide an adversary with root privileges a workable path to recover the hardware-protected private keys from the secure element. The list of issues identified is as below –

  • Initialization Vector (IV) reuse in Keymaster TA (CVE-2021-25444) – An IV reuse vulnerability in Keymaster prior to SMR AUG-2021 Release 1 allows decryption of custom keyblob with privileged process. (Impacts Galaxy S9, J3 Top, J7 Top, J7 Duo, TabS4, Tab-A-S-Lite, A6 Plus, and A9S)
  • Downgrade attack in Keymaster TA (CVE-2021-25490) – A keyblob downgrade attack in Keymaster prior to SMR Oct-2021 Release 1 allows [an] attacker to trigger IV reuse vulnerability with privileged process. (Impacts Galaxy S10, S20, and S21)

In a nutshell, successful exploitation of the flaws against the Keymaster TA could achieve unauthorized access to hardware-protected keys and data secured by the TEE. Implications of such an attack could range from an authentication bypass to advanced attacks that can break fundamental security guarantees offered by cryptographic systems.

Following responsible disclosure in May and July 2021, the issues were addressed via security updates shipped in August and October 2021 for the affected devices. The findings are expected to be presented at the USENIX Security Symposium later this August.

“Vendors including Samsung and Qualcomm maintain secrecy around their implementation and design of [TrustZone operating systems] and Tas,” the researchers said. “The design and implementation details should be well audited and reviewed by independent researchers and should not rely on the difficulty of reverse engineering proprietary systems.”

Source :
https://thehackernews.com/2022/02/100-million-samsung-galaxy-phones.html

Deploying WPA2 WiFi profile (including Pre-Shared key) using Group Policy

Problem

Whilst there is a setting in Group Policy Preferences to deploy WiFi settings, this does not include the WiFi Pre-Shared Key (PSK).

The following method will allow you to also push out the Pre-Shared Key:

Solution

From a PC that already has the WiFi profile installed:

Open command prompt (as admin) and run the following command. Make a note of the name of the profile you want to export:

netsh wlan show profiles

Run the following command, replacing the profile name with the one you wish to export, and path to an existing folder where an XML file will be created

netsh wlan export profile name="MyWiFiSSID" folder=C:\WLAN key=clear

Note that the key=clear is vital for this to work.

Copy that XML file to a network share that is accessible from the computer accounts. Do bear in mind the WiFi key is visible in plain text within this file, so consideration must be taken as where/how to store it.

The following command is used to install the profile:

netsh wlan add profile filename="\\servername\share\Wi-Fi-MyWiFiSSID.xml" user=all

… however, this will reinstall and reconnect the WiFi each time.

From my experience, the best method is to create a Computer Startup script GPO that will only run once. This one does the trick:

IF EXIST C:\WiFi.txt GOTO END

netsh wlan add profile filename="\\servername\share\Wi-Fi-MyWiFiSSID.xml" user=all >> C:\WiFi.txt

Source :
https://goddamnpc.com/deploying-wpa2-wifi-profile-including-pre-shared-key-using-group-policy/

Hackers Backdoor Unpatched Microsoft SQL Database Servers with Cobalt Strike

Vulnerable internet-facing Microsoft SQL (MS SQL) Servers are being targeted by threat actors as part of a new campaign to deploy the Cobalt Strike adversary simulation tool on compromised hosts.

“Attacks that target MS SQL servers include attacks to the environment where its vulnerability has not been patched, brute forcing, and dictionary attack against poorly managed servers,” South Korean cybersecurity company AhnLab Security Emergency Response Center (ASEC) said in a report published Monday.

Cobalt Strike is a commercial, full-featured penetration testing framework that allows an attacker to deploy an agent named “Beacon” on the victim machine, granting the operator remote access to the system. Although billed as a red team threat simulation platform, cracked versions of the software have been actively used by a wide range of threat actors.

Intrusions observed by ASEC involve the unidentified actor scanning port 1433 to check for exposed MS SQL servers to perform brute force or dictionary attacks against the system administrator account, i.e., “sa” account, to attempt a log in.

Microsoft SQL Database Servers

That’s not to say that servers not left accessible over the internet aren’t vulnerable, what with the threat actor behind LemonDuck malware scanning the same port to laterally move across the network.

“Managing admin account credentials so that they’re vulnerable to brute forcing and dictionary attacks as above or failing to change the credentials periodically may make the MS-SQL server the main target of attackers,” the researchers said.

Upon successfully gaining a foothold, the next phase of the attack works by spawning a Windows command shell via the MS SQL “sqlservr.exe” process to download the next-stage payload that houses the encoded Cobalt Strike binary on to the system.

The attacks ultimately culminate with the malware decoding the Cobalt Strike executable, followed by injecting it into the legitimate Microsoft Build Engine (MSBuild) process, which has been previously abused by malicious actors to filelessly deliver remote access trojans and password-stealing malware on targeted Windows systems.

Furthermore, the Cobalt Strike that’s executed in MSBuild.exe comes with additional configurations to evade detection of security software. It achieves this by loading “wwanmm.dll,” a Windows library for WWan Media Manager, then writing and running the Beacon in the memory area of the DLL.

“As the beacon that receives the attacker’s command and performs the malicious behavior does not exist in a suspicious memory area and instead operates in the normal module wwanmm.dll, it can bypass memory-based detection,” the researchers noted.

Source :
https://thehackernews.com/2022/02/hackers-backdoor-unpatched-microsoft.html

New Wiper Malware Targeting Ukraine Amid Russia’s Military Operation

Cybersecurity firms ESET and Broadcom’s Symantec said they discovered a new data wiper malware used in fresh attacks against hundreds of machines in Ukraine, as Russian forces formally launched a full-scale military operation against the country.

The Slovak company dubbed the wiper “HermeticWiper” (aka KillDisk.NCV), with one of the malware samples compiled on December 28, 2021, implying that preparations for the attacks may have been underway for nearly two months.

“The wiper binary is signed using a code signing certificate issued to Hermetica Digital Ltd,” ESET said in a series of tweets. “The wiper abuses legitimate drivers from the EaseUS Partition Master software in order to corrupt data. As a final step the wiper reboots [the] computer.”

Specifically, HermeticWiper is delivered via the benign but signed EaseUS partition management driver that then proceeds to impair the first 512 bytes, the Master Boot Record (MBR) for every physical drive, before initiating a system shutdown and effectively rendering the machine inoperable.

“After a week of defacements and increasing DDoS attacks, the proliferation of sabotage operations through wiper malware is an expected and regrettable escalation,” SentinelOne’s principal threat researcher Juan Andres Guerrero-Saade said in a report analyzing the new malware.

At least one of the intrusions involved deploying the malware directly from the Windows domain controller, indicating that the attackers had taken control of the target network.

The scale and the impact of the data-wiping attacks remains unknown as yet, as is the identity of the threat actor behind the infections. But the development marks the second time this year that a destructive malware has been deployed on Ukrainian computer systems after the WhisperGate operation in mid-January.

The wiper attacks also follow a third “massive” wave of distributed denial-of-service (DDoS) attacks that hit several Ukrainian government and banking institutions on Wednesday, knocking out online portals for the Ministry of Foreign Affairs, Cabinet of Ministers, and Rada, the country’s parliament.

Wiper Malware

Last week, two of the largest Ukrainian banks, PrivatBank and Oschadbank, as well as the websites of the Ukrainian Ministry of Defense and the Armed Forces suffered outages as a result of a DDoS attack from unknown actors, prompting the U.K. and U.S. governments to point the fingers at the Russian Main Intelligence Directorate (GRU), an allegation the Kremlin has denied.

Wiper Malware

Campaigns that use DDoS attacks deliver torrents of junk traffic that are intended to overwhelm targets with the goal of rendering them inaccessible. A subsequent analysis of the February 15 incidents by the CERT-UA found that they were carried out using botnets such as Mirai and Mēris by leveraging compromised MikroTik routers and other IoT devices.

What’s more, information systems belonging to Ukraine’s state institutions are said to have been unsuccessfully targeted in as many as 121 cyber attacks in January 2022 alone.

That’s not all. Cybercriminals on the dark web are looking to capitalize on the ongoing political tensions by advertising databases and network accesses containing information on Ukrainian citizens and critical infra entities on RaidForums and Free Civilian marketplaces in “hopes of gaining high profits,” according to a report published by Accenture earlier this week.

The continuous onslaught of disruptive malicious cyber acts since the start of the year has also led the Ukrainian law enforcement authority to paint the attacks as an effort to spread anxiety, undermine confidence in the state’s ability to defend its citizens, and destabilize its unity.

“Ukraine is facing attempts to systematically sow panic, spread fake information and distort the real state of affairs,” the Security Service of Ukraine (SSU) said on February 14. “All this combined is nothing more than another massive wave of hybrid warfare.”

Source :
https://thehackernews.com/2022/02/new-wiper-malware-targeting-ukraine.html

Back up your Documents, Pictures, and Desktop folders with Microsoft OneDrive

You can back up your important folders (your Desktop, Documents, and Pictures folders) on your Windows PC with OneDrive PC folder backup, so they’re protected and available on other devices. If you haven’t already set up OneDrive on your computer, see Sync files with OneDrive in Windows. There’s no extra cost for PC folder backup (up to 5 GB of files without a subscription). See OneDrive plans.

Note: If you’re surprised that your files are saving to OneDrive, see Files save to OneDrive by default in Windows 10.https://www.microsoft.com/en-us/videoplayer/embed/RE2PM4G?pid=ocpVideo0-innerdiv-oneplayer&jsapi=true&postJsllMsg=true&maskLevel=20&market=en-us

Set up PC folder backup

  1. If you’re prompted to back up your important folders (Desktop, Documents, and Pictures), select the prompt to start the folder backup wizard.If you didn’t see the prompt or you already closed the wizard, select the white or blue cloud icon in the Windows notification area, and then select Help & Settings > Settings, then Backup > Manage backup.Backup tab in desktop settings for OneDrive
  2. In the Back up your folders dialog, make sure the folders that you want to back up are selected.Screenshot of the Set up protection of important folders dialog box in OneDrive
  3. Select Start backup.
  4. You can close the dialog box while your files sync to OneDrive. Or, to watch your files sync, select View upload progress. If you already closed the dialog, to open the OneDrive activity center, select the white or blue cloud in the notification area.

Access your backed up folders on any device

When your files finish syncing to OneDrive, they’re backed up and you can access them from anywhere in Documents, Desktop, or Pictures. When you back up your Desktop folder, the items on your desktop roam with you to your other PC desktops where you’re running OneDrive.

You can back up a maximum of 5 GB of files in OneDrive for free, or up to 1 TB with a Microsoft 365 subscription.

Try Microsoft 365 for free

If you’re signed in to the OneDrive sync app on your computer, you can use File Explorer to access your OneDrive. You can also use the OneDrive mobile app to access your folders on any device.

Manage or stop PC folder backup

To stop or start backing up your folders in OneDrive, update your folder selections in OneDrive Settings. 

  1. Open OneDrive settings (select the white or blue cloud icon in your notification area, and then select Help & Settings > Settings.)Screenshot of getting to OneDrive Settings
  2. In Settings, select Backup > Manage backup.
  3. To start backing up a folder, select any folder that doesn’t say Files backed up, and then select Start backup.
  4. To stop backing up a folder, select Stop backup, and confirm your request.  See important notes below.
Screenshot of when you stop protecting folders in OneDrive
  • When you stop backing up a folder, the files that were already backed up by OneDrive stay in the OneDrive folder, and will no longer appear in your device folder. 
  • In the folder that you stopped backing up, you’ll see an icon titled Where are my files that’s a shortcut to your folders in OneDrive. To access your files, select the icon to open the folder in OneDrive. 
  • If you want those files back in your device folder and not in OneDrive, move them manually from the OneDrive folder back to your device folder. Note that any new files you add to that folder on your device won’t be backed up by OneDrive after you stop the backup.
  • To move the files. select Where are my files to open the folder in OneDrive, then select the files that you want to move to your device folder, and drag them to that location.
Icon shows where are my files?

Fix problems with PC folder backup

Here are a list of errors you might see when you set up PC folder backup and how to resolve them:

  • The following file type can’t be protected: Outlook database files (.pst).
  • Folder protection is unavailable: A common reason for this error is that important folders on PCs that are connected to a domain can’t be protected in a personal OneDrive account (when you’re signed in with a Microsoft account). For info about data protection solutions, contact your IT administrator. You shouldn’t have this issue with a work or school account.
  • File exceeds the maximum path length: Make sure the entire file path, including the file name, contains fewer than 260 characters. An example of a file path is:
    C:\Users\<UserName>\Pictures\Saved\2017\December\Holiday\NewYears\Family…
    To resolve this, shorten the name of your file or the name of subfolders in OneDrive, or select a sub-folder that’s closer to the top-level folder.
  • File exceeds the maximum file size: OneDrive can’t sync files over 250GB. Remove these files from the folder you want to protect and then try again.
  • The file name isn’t allowed in OneDrive: File names can’t start with a space or include any of these characters: \ : / * ? < > ” |. Please move or rename the file to continue.
  • The folder isn’t selected for syncing: The folder with the error is not syncing to your PC. To resolve this error, open OneDrive Settings (right-click the white or blue cloud icon in your notification area, and select Settings), select Choose Folders, and then make sure the folder you want to protect is selected. If Pictures is showing this error, make sure that Pictures, Screenshots, and Camera Roll are all selected (or don’t exist). It’s also possible that the OneDrive folder has a different name from the Windows important folder.
  • Important folders aren’t in the default locations: The folder with the error contains another important folder and can’t be protected until the contained folder is moved. Important folders that may be contained within the folder include: Documents, Desktop, Pictures, Screenshots, Camera Roll, or the OneDrive folder.
  • An unknown error occurred, with error code 0x80070005: If you receive error code 0x80070005, the “Prohibit User from manually redirecting Profile Folders” group policy is enabled. You may find that the files from the folders you selected were moved to identically named folders in your OneDrive folder, and the original locations are empty. Move the folder contents back to the original locations and ask your administrator whether the policy can be changed.
  • Folder contains a reparse point (junction point or symlink): The folder you want to protect contains a special file type that links parts of the file system together. These items can’t be protected. To protect the folder, remove the file causing the issue. 
  • Post PC folder backup: OneDrive tries to automatically re-open notebooks that were previously open. In rare cases, some notebooks may not be automatically loaded in the OneNote desktop app after PC folder backup. Workaround for this issue is to reopen the notebooks in the OneNote app using File > Open.Caution: Some applications may depend on these links to function properly. Remove only the links that you know are safe to modify.

    Source :
    https://support.microsoft.com/en-us/office/back-up-your-documents-pictures-and-desktop-folders-with-onedrive-d61a7930-a6fb-4b95-b28a-6552e77c3057

Microsoft Office 365 to stop data theft by disabling external forwarding

Microsoft is planning to put a stop to enterprise data theft via email forwarding by disabling Office 365’s email forwarding to external recipients by default.

The company also wants to add improved external email forwarding controls which will allow Office 365 admins to enable the feature only to select employees in their organizations.

“External forwarding of email is a tactic used by attackers to exfiltrate data out of an organization and controlling that process is difficult,” Microsoft explains on the new feature’s Microsoft 365 roadmap entry.

“With this new feature, we are adding support for more granular controls that allow the Office 365 administrators to easily enable external forwarding for the right people in the organization through the outbound spam policy.”

The new feature is planned to be generally available and start to roll out to all environments with an Office 365 Advanced Threat Protection (ATP) plans starting with the fourth quarter of 2020.

How to stop auto-forwarding for emails

Until external email forwarding will be disabled by default, Microsoft provides step by step instructions on how to stop it manually to prevent hackers from stealing proprietary information by exfiltrating it to outside email addresses under their control.

To do this, you will have to create a custom mail flow rule by following these steps:• Go to the Exchange admin center, select Exchangemail flow, and on the rules tab, select the plus sign and choose to create a new rule.
• Select More options. Name your new rule.
• Then open the drop-down to apply this rule if, select the sender and then is external internal.
• Select Inside the organization, and then OK.
• Choose to add condition, open the drop-down, select The message properties, then include the message type.
• Open the select message type drop-down, choose Auto-forward, then OK.
• Open the Do the following drop-down, select Block the message, then reject the message and include an explanation.
• Enter the message text for your explanation, then select OK.
• Scroll to the bottom and select Save.

Once the rule has been created, attackers will no longer be able to enable auto-forwarding for that user’s mailbox.

A video tutorial for this entire procedure is also embedded below.

Increase your org’s security

Redmond also has a list of ten measures you can take to boost your organization’s data security for both Microsoft 365 Business Standard and Microsoft 365 Business Premium service plans.

The list of tasks you need to go through to increase the security of your organization:1. Set up multi-factor authentication (MFA) to prevent hackers from taking over accounts if they know the password.
2. Train your users to use strong passwords, protect their devices, and enable security features on Windows 10 and Mac PCs.
3. Use dedicated admin accounts.
4. Raise the level of protection against malware in mail (guidance on how to do that is available in this training video).
5. Protect against ransomware by blocking file extensions commonly used for ransomware using mail flow rules.
6. Stop auto-forwarding for email.
7. Use Office Message Encryption.
8. Protect your email from phishing attacks using an ATP anti-phishing policy.
9. Protect against malicious attachments and files with ATP safe attachment policies.
10. Protect against phishing attacks with ATP Safe Links.

Part of a broader push to secure Office 365

This new Office 365 ATP feature is part of a larger effort to make the cloud-based email filtering service secure by default as Microsoft also wants to include a new feature that will block email sender domains automatically if they fail DMARC authentication.

Redmond is also working on including automated malicious content blocking in Office 365 regardless of admin or user custom configurations unless manually overridden.

Once this new feature will be enabled, Office 365 will honor EOP/ATP malware analysis (detonation) verdicts to automatically block known malicious files and URLs.

In October 2019, Microsoft also enabled Authenticated Received Chain (ARC) for all hosted mailboxes to improve anti-spoofing detection. The ARC protocol supplements the DKIM and DMARC email authentication protocols as part of Internet Mail Handlers’ effort to combat email spoofing especially when dealing with forwarded messages.

Source :
https://www.bleepingcomputer.com/news/security/office-365-to-stop-data-theft-by-disabling-external-forwarding/

How to set up the ultimate Ubiquiti UniFi home network in 2022

If you’re in the market for a new Wi-Fi 6 router, the best deliver reliable coverage to all corners of your home at little cost to get started. If you need extensibility, mesh routers allow you to add additional nodes. But if you want extensive configuration options and an all-in-one solution to cover routing, switching, and home security, consider Ubiquiti’s portfolio. Its UniFi brand covers switches and routers aimed at small businesses, but it turned its attention to the consumer category over the last two years with a decent selection of products. Ubiquiti offers a range of security cameras and video doorbells under UniFi Protect, can easily integrate into an UniFi network. The best part about Ubiquiti’s home security products is they record footage locally and don’t send data to a cloud service, providing better privacy without paying a monthly license to access all the security camera and video doorbell features. So if you’re looking to overhaul your home network, here’s what Ubiquiti has to offer.

All-in-one solution: UniFi Dream Router

Ubiquiti UniFi Dream Machine reviewSource: Harish Jonnalagadda / Android Central

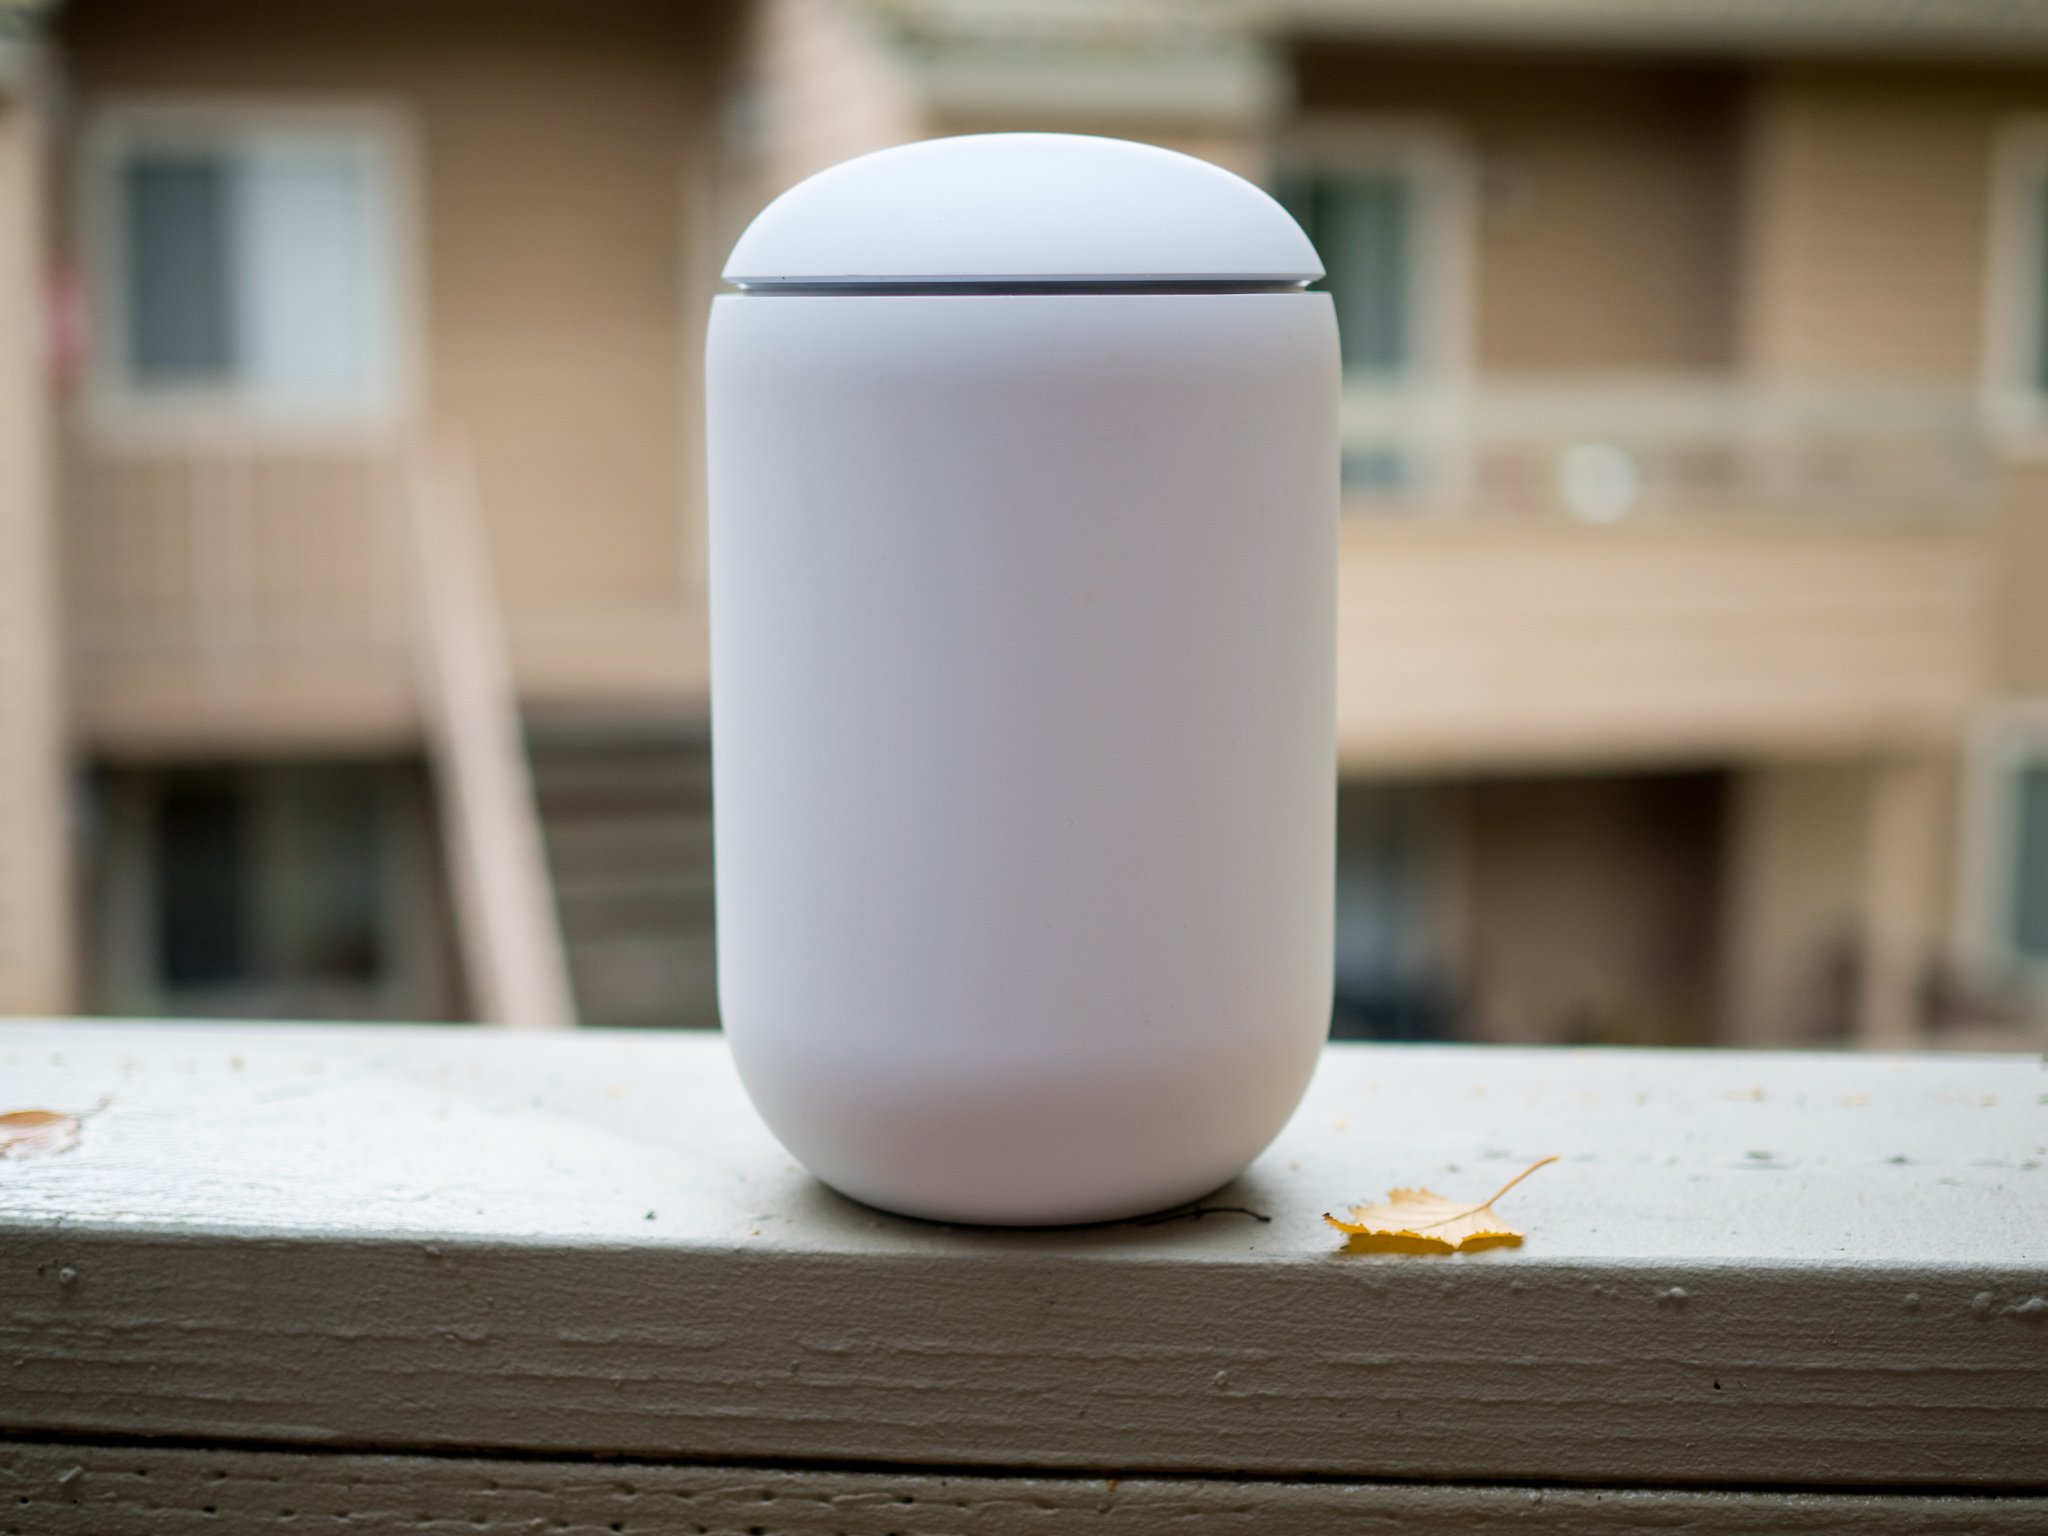
If you don’t want to get a standalone wired router, switch over and add wireless access points, then you’ll want to take a look at Ubiquiti’s unified solutions. The latest offering is the UniFi Dream Router, and it goes up against the best Wi-Fi 6 routers. It’s the second all-in-one device in the UniFi range — after the Wi-Fi 5-based UniFi Dream Machine — and the feature-set you get here is astounding when you consider what it costs.

But first, a rundown of the hardware: the Dream Router has a cylindrical design similar to the Dream Machine, but a tiny screen at the front shows real-time network statistics. The router has 4×4 MIMO and goes up to 2.4Gbps with Wi-Fi 6, and it utilizes 160MHz channels. There’s a dual-core CPU, 128GB of storage, an SD card slot, 2GB of RAM, and four Ethernet ports with two offering PoE.

Because it is an UniFi product, the Dream Router has an exhaustive set of configuration options that far exceed most consumer routers. For example, it lets you connect and manage Ubiquiti’s security cameras and video doorbells. It is relatively straightforward to set up from your phone, and if you don’t want to tweak every setting, that’s fine. The options are there should you need them.

Now, there are a few caveats. First, the Dream Router is still in testing and isn’t finalized, and as such, you can only buy it from Ubiquiti’s Early Access store. You’ll have to make a free account to access the store, and while it’s sold out, it’s being restocked regularly. The Dream Router sells out periodically because of its price: $79.

For under $100, there isn’t another router that delivers anywhere close to the same set of features as the Dream Router, and with the router estimated to debut for a lot more once it hits the regular sales channel, now is the best time to pick it up.

UniFi Dream Router

With 4×4 MIMO and 2.4Gbps bandwidth over Wi-Fi 6, four Gigabit Ethernet ports with two PoE ports, and a screen at the front for monitoring real-time traffic, the Dream Router is the ultimate value.

Routing: UniFi Dream Machine Pro

Ubiquiti UniFi Dream Machine Pro reviewSource: Harish Jonnalagadda / Android Central

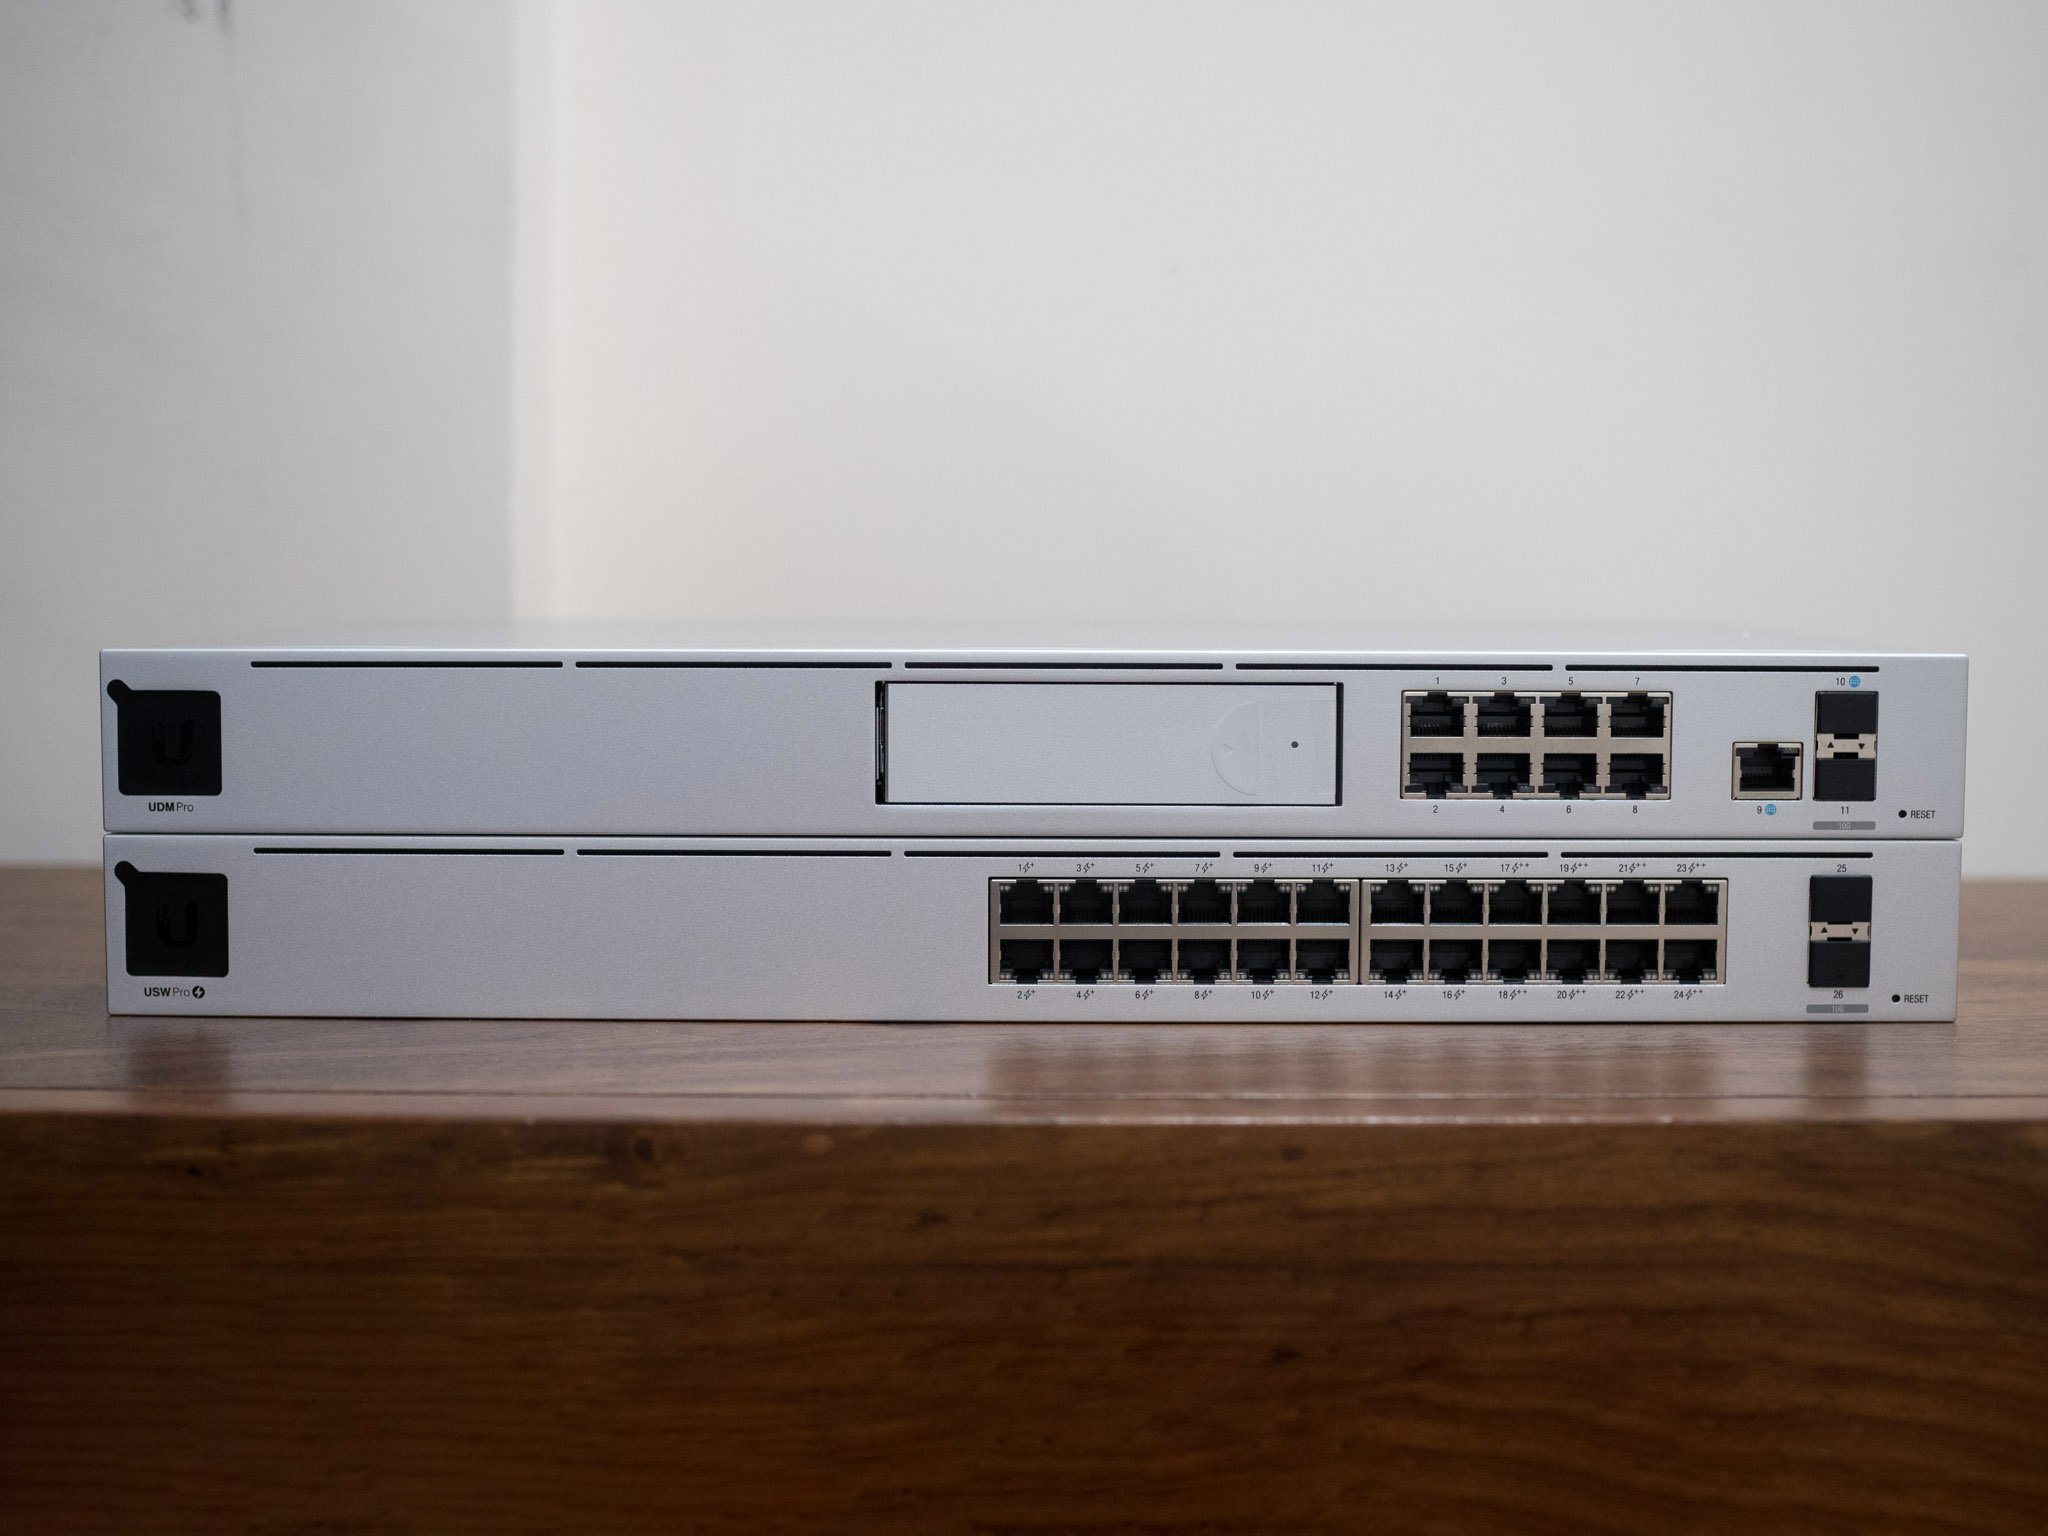
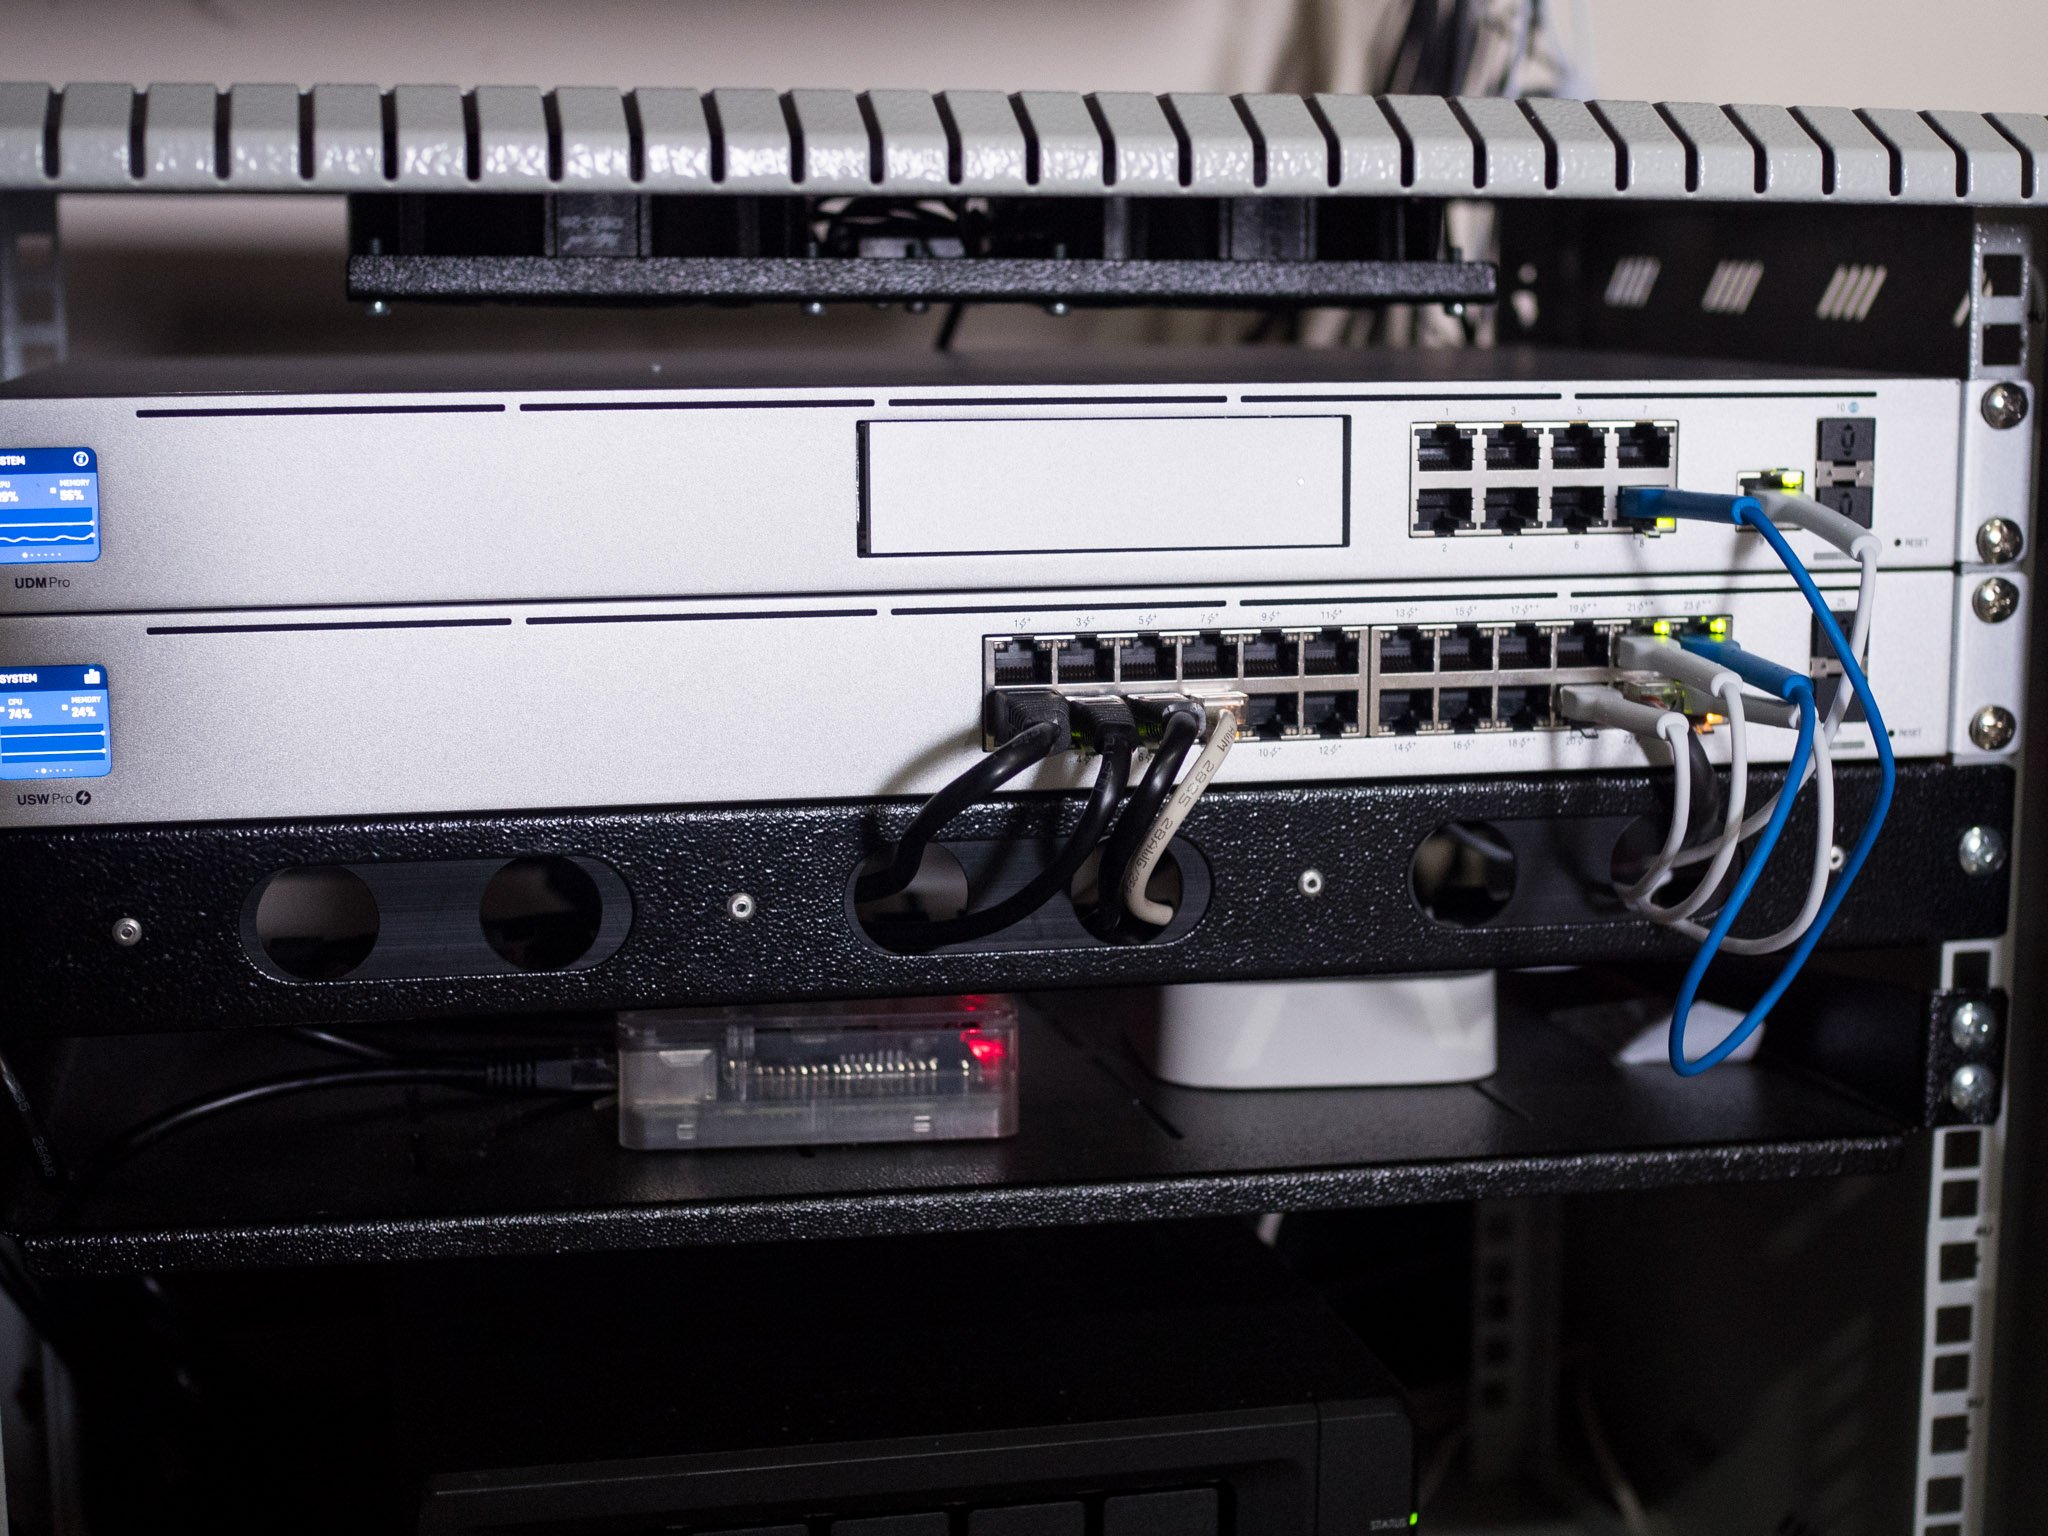
If you want to use a standalone router for managing your home network, you should take a look at the UniFi Dream Machine Pro (UDM Pro). I switched to the UDM Pro last year, and it has been a revelation. However, unlike the Dream Machine or Dream Router, the UDM Pro is a 1U rack-mounted solution, so you will need a rack server if you want to go down this route.

The UDM Pro is designed to be a wired router, so you’ll have to buy a switch and a wireless AP to connect your wireless devices like phones, tablets, and notebooks. Now, the standout feature with the UDM Pro is that it has a 3.5-inch HDD slot to facilitate network video recording (NVR), so if you want to add Ubiquiti’s security cameras to your network, this is the ideal way to go. In addition, you can slot in a 4TB drive in the UDM Pro and access locally-stored recordings going back weeks and months.

As for hardware, the UDM Pro has a built-in switch with eight Gigabit ports with a 1GbE backplane, 10Gbps SFP+ ports, and a quad-core CPU with Cortex-A57 cores. It includes the full suite of UniFi OS applications, including UniFi Network for switching, UniFi Protect for security cameras, UniFi Talk for VoIP, and UniFi Access for managing door access in a small office environment. The UDM Pro also offers intrusion detection and prevention features that block access to malicious websites.

Having used the UDM Pro extensively for the last year, the only downside I can think of is that it lacks built-in PoE ports. So when you’re connecting Ubiquiti’s wireless access points, you will need to buy an additional PoE injector.

UniFi Dream Machine Pro

The UDM Pro sits at the heart of a prosumer UniFi install. The rack-mounted router comes with an 8-port switch and 10G SFP+ ports, a 3.5-inch drive tray to use as a network video recorder, and class-leading threat management features.

Switching: UniFi Switch 24 PoE

Ubiquiti UniFi Dream Machine Pro reviewSource: Harish Jonnalagadda / Android Central

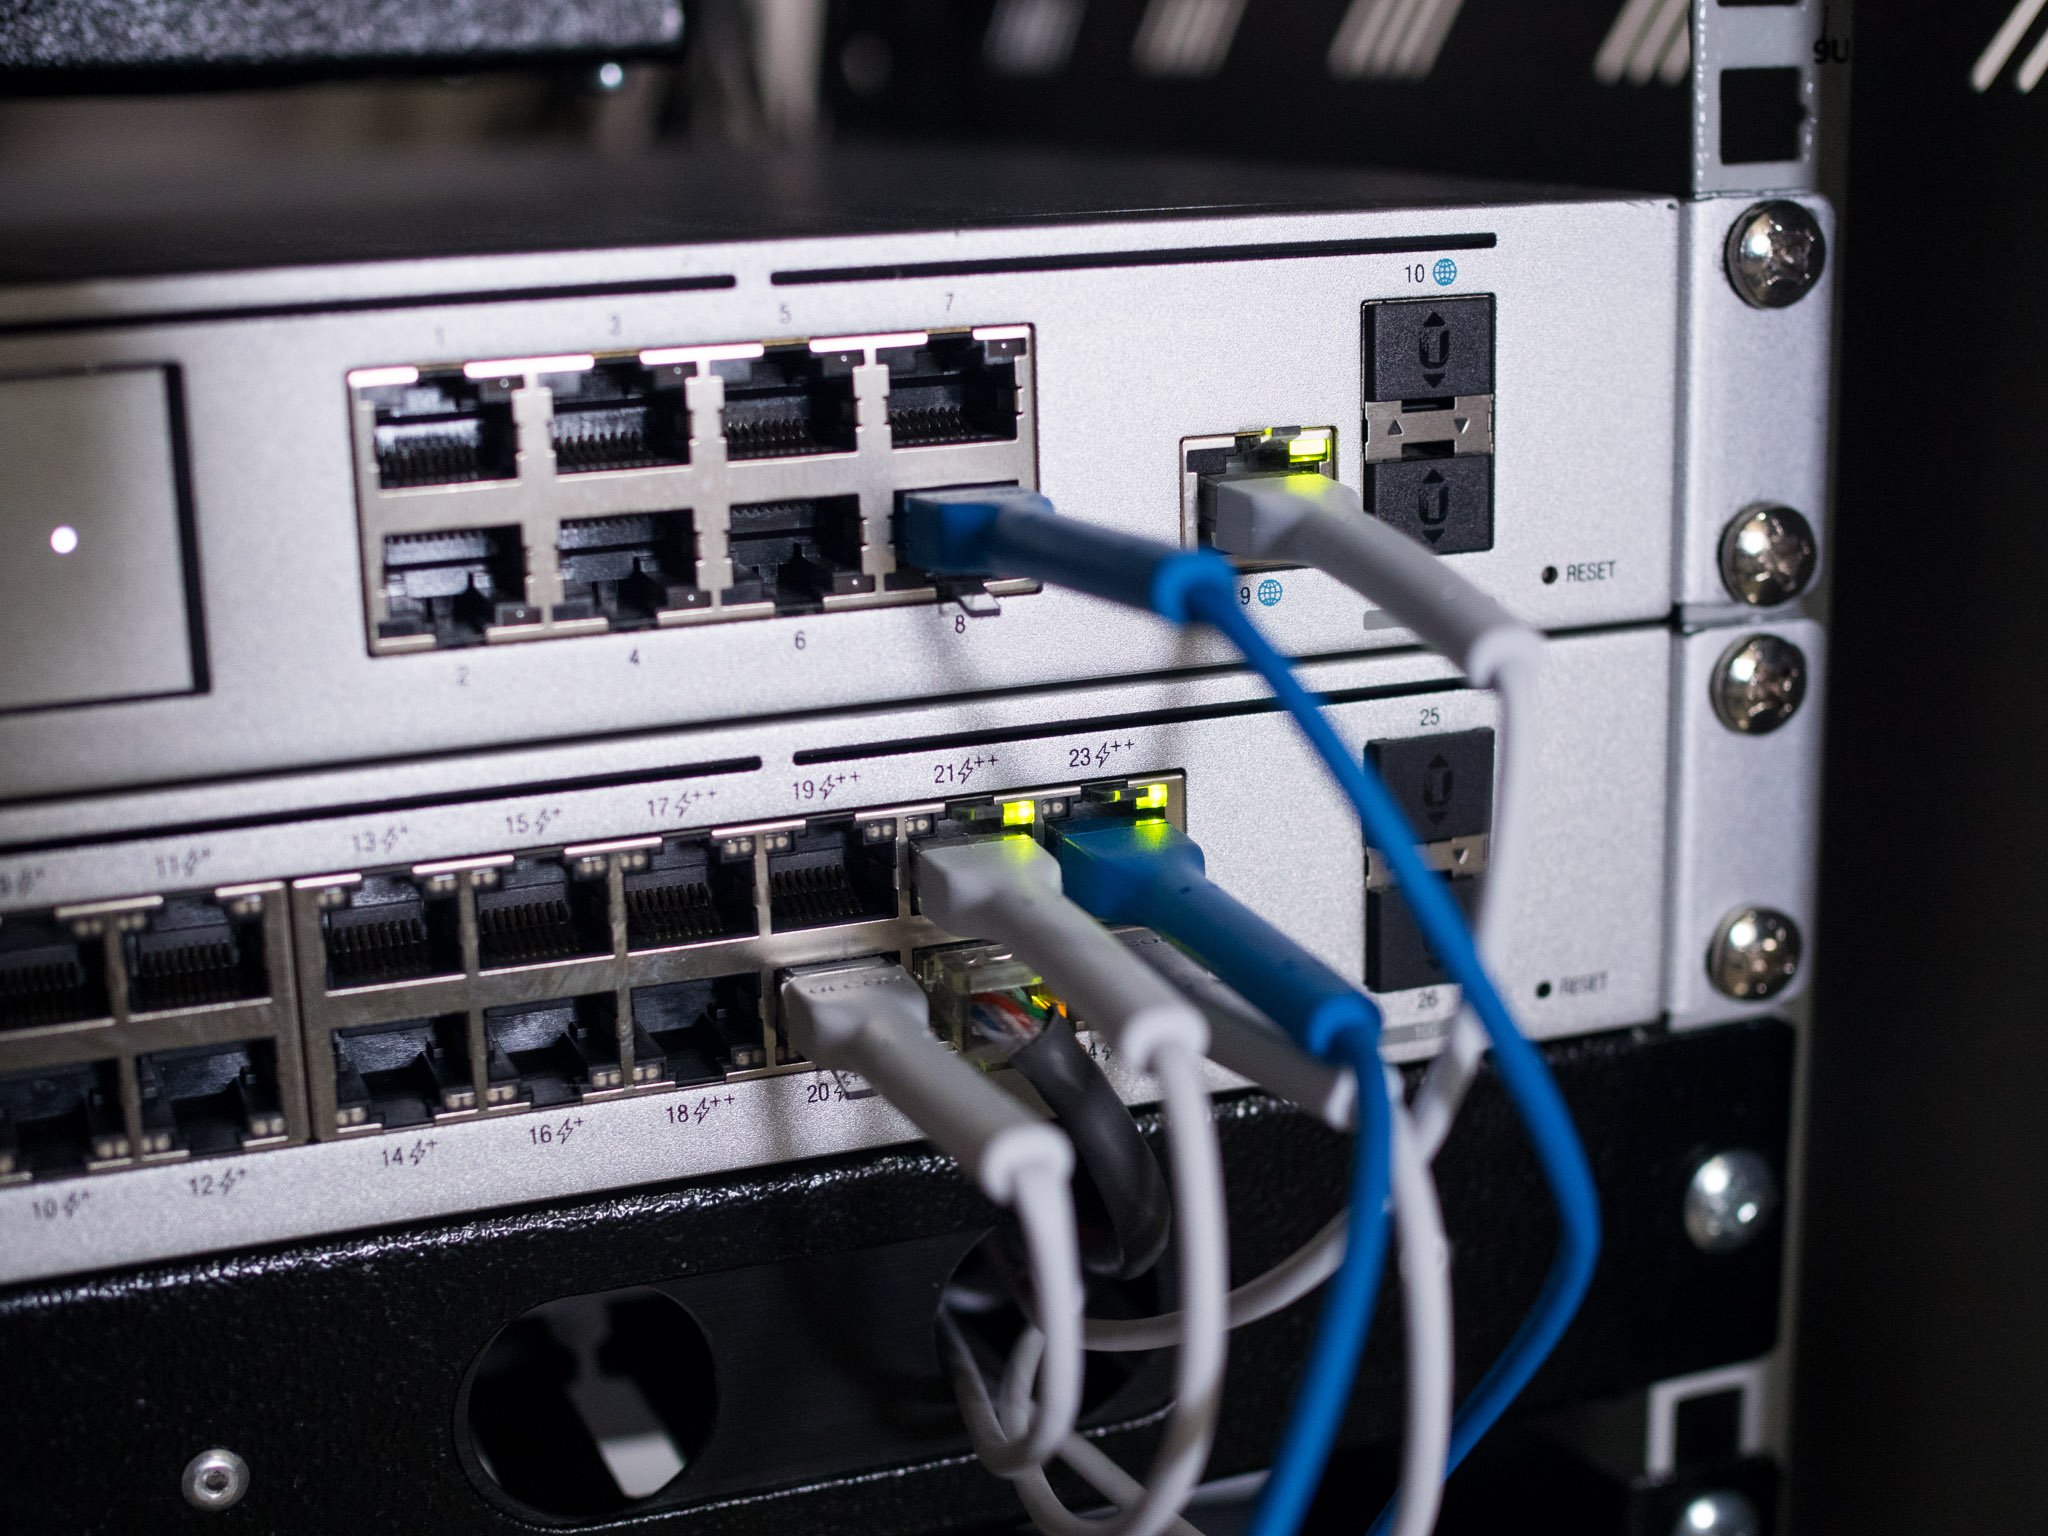
While I have over 30 devices connected to the wireless access points in my home at any given time, I use wired connectivity for the devices that I use the most, including the work machines, TVs, and the PS5. So while the UDM Pro has an eight-port switch, I find that a 24-port option is the best way to go, particularly if you’re going to connect a lot of security cameras. For context, I’m currently using over a dozen ports on my Switch Pro 24 PoE.

As for the switch, the Switch Pro 24 PoE is a fantastic choice, but at $699, it is also very costly. My recommendation would be the standard Switch 24 PoE; it is a 24-port switch with 16 Gigabit PoE+ ports with a total power budget of 95W alongside eight Gigabit ports. Like the UDM Pro, it is a 1U rack-mountable solution, and you get a small screen on the left for viewing real-time statistics.

The 95W power budget is more than adequate for the wireless access points and security cameras, and at $379, the Switch 24 PoE costs nearly half as much as the Pro version, and while you miss out on 10Gbps SFP+ ports, it has most of the essentials covered. If you don’t want a rack-mounted solution, you should look at the Switch Lite 16 PoE, a 16-port switch with eight PoE+ ports.

UniFi Switch 24 PoE

If you need more ports for wired connections, the Switch 24 PoE is the ideal option. It has 16 802.3at PoE ports with a cumulative power budget of 95W and can easily accommodate a slate of wireless access points and security cameras.

Wireless: UniFi Access Point Wi-Fi 6 Lite

UniFi Access Point Wi-Fi 6Source: Ubiquiti

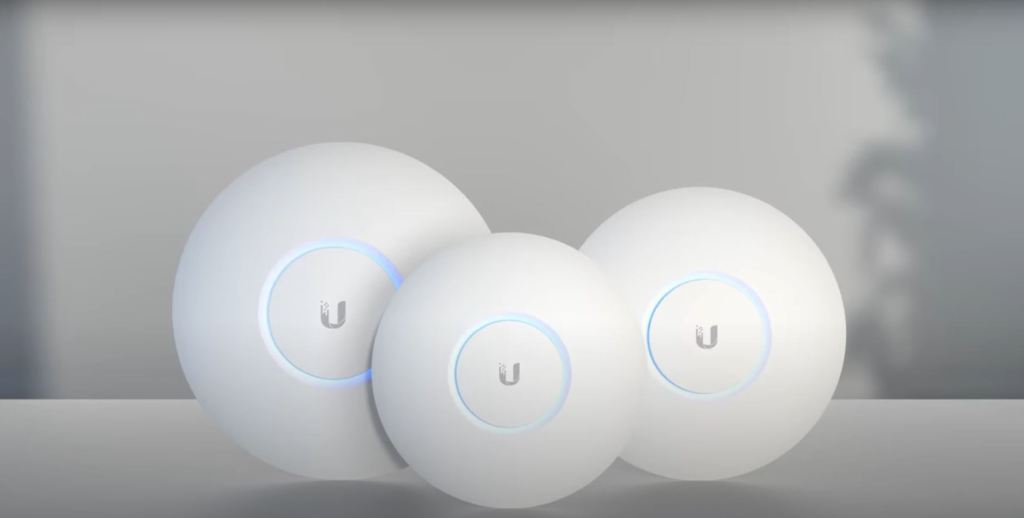
With a wired router and switch sorted out, you’ll need a wireless access point so wireless devices like phones and tablets can connect to your home network. Ubiquiti has three options in this area: Wi-Fi 6 Lite, 6 Pro, and 6 Long Range. As the name suggests, all three are based on Wi-Fi 6, and they share a similar design.

These APs work best when mounted on the ceiling or the wall as the antennae are positioned sideways. The $99 Wi-Fi 6 Lite has 2×2 MIMO and goes up to 1.2Gbps on the 5GHz band, with a gain of 3dBi. The $149 Wi-Fi 6 Pro and $179 Wi-Fi 6 Long Range have IP54 ratings, draw power using the 802.3at PoE+ standard, and are designed for indoor and outdoor use.

The Wi-Fi 6 Pro is the newer offering and comes with higher-gain antennae that go up to 6dBi, with maximum 5GHz throughput of 4.8Gbps, with the Long Range going up to 5.5dBi and 2.4Gbps over 5GHz. The Wi-Fi 6 Pro also is the only access point in Ubiquiti’s portfolio that offers the 160MHz channel.

I use a Wi-Fi 6 Long Range and Wi-Fi 6 Lite in my home, but if you’re starting from scratch, a good bet would be to get a Wi-Fi 6 Lite and Wi-Fi 6 Pro to get going and add more as needed. These access points seamlessly integrate into the UniFi network and can be configured with the UDM Pro.

UniFi Access Point Wi-Fi 6 Lite

The Wi-Fi 6 Lite access point has 2×2 MIMO and 1.2Gbps throughput over 5GHz, and it does a good job delivering reliable Wi-Fi 6 signal to all corners of your home.

UniFi Access Point Wi-Fi 6 Pro

Ubiquiti’s latest wireless access point has it all: 160MHz channels over Wi-Fi 6, 4×4 MIMO with a 4.8Gbps throughput at 5GHz, and the ability to connect to up to 300 clients.

Security camera and doorbell: G4 series

UniFi Protect seriesSource: Ubiquiti

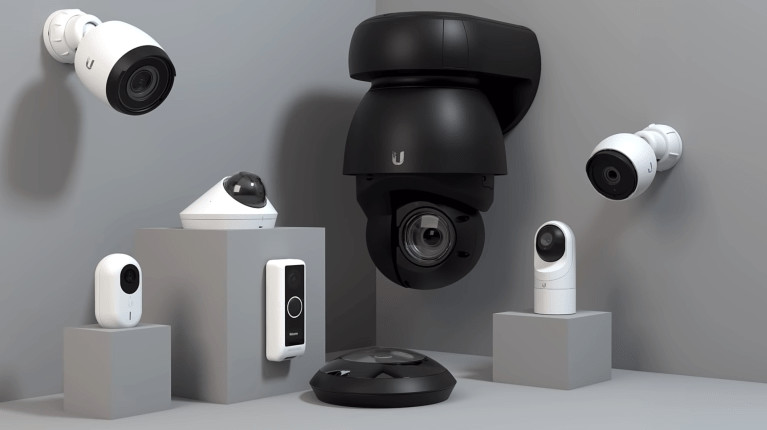
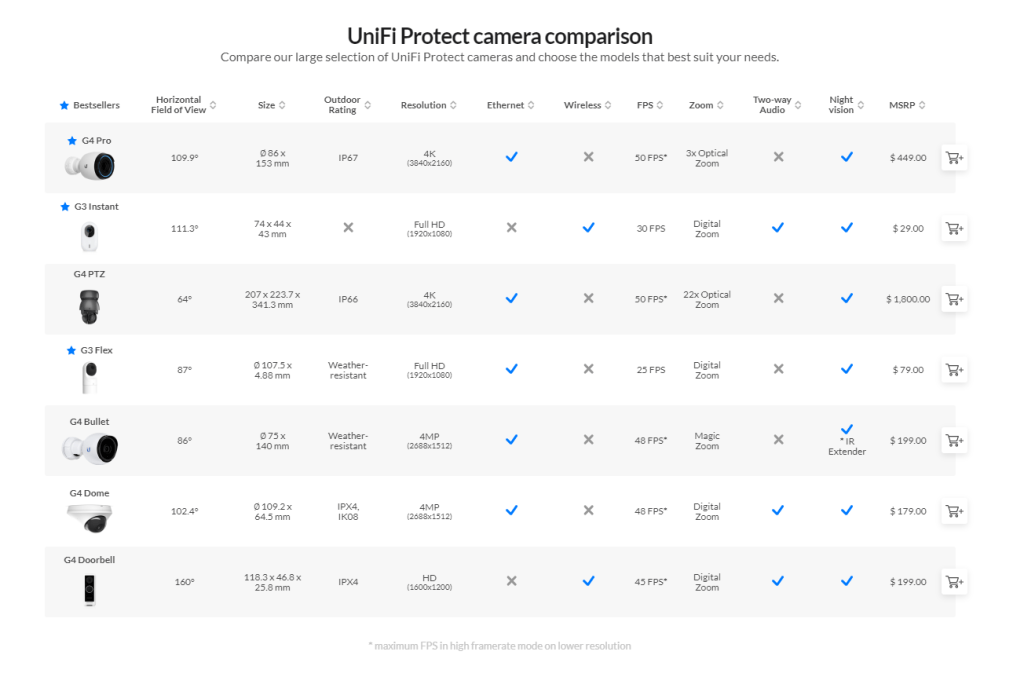
Security cameras are a big part of the UniFi Protect portfolio, and Ubiquiti offers a dozen products in this area. I use a combination of the G3 Flex, G4 Bullet, and the G4 Dome inside (and outside) my home, and they’re pretty good at what they do. Ubiquiti’s cameras draw power over PoE and let you record 1080p footage, plus you get weather resistance with the G4 series.

In my use case, I found the G3 Flex to be ideal as an indoor camera as it can be positioned just about anywhere inside the house, with the G4 Bullet and G4 Dome suited for outdoor use. The G3 Flex starts at $79, and you can pick up a pack of three for $229

The G4 Bullet offers 1440p recording that sells for $199, and if you want 4K video, 3x zoom lens, and IP67, you will need to get the $449 G4 Pro. Several users had issues with condensation on the G4 Bullet last year, but that hasn’t been a drawback for me. I haven’t used Ubiquiti’s doorbells just yet. Still, the G4 Doorbell offers a similar set of features as other smart video doorbells, including two-way audio, motion detection, and Wi-Fi connectivity. Here’s a breakdown of the feature-set that each security camera offers:

UniFi Protect seriesSource: Ubiquiti

You can pair the security cameras and doorbells to any UniFi routing solution with UniFi Protect. As for managing the security devices, you can install the UniFi Protect app on your phone and configure motion detection areas, privacy zones where the cameras won’t record footage, and smart detection for faces and vehicles.

You get a decent number of options for notifications, including the ability to set custom schedules and receive information at a set time. The cameras do a good job with motion detection and notification alerts, and UniFi Protect has a good UI that lets you view events and see recorded footage with ease. The best part is that all footage is stored locally, so you don’t have to pay a license fee to access all the features on offer. Unfortunately, there’s no active monitoring like you get with Arlo or Ring, but UniFi Protect gets a lot right for a self-hosted solution.

UniFi Camera G3 Flex

The G3 Flex is a great indoor camera, thanks to its versatile design. You get 1080p video recording, integrated IR LEDs for motion detection at night, and a built-in mic.

UniFi Camera G4 Bullet

The G4 Bullet has 1440p recording, a weather-sealed design, a built-in mic, a 110-degree angle of view, and LEDs for recording at night.

Building your UniFi network

Ubiquiti UniFi Dream Machine Pro reviewSource: Harish Jonnalagadda / Android Central

Ubiquiti has significantly expanded its consumer offerings in the last two years, and if you’re interested in getting started with an UniFi home network, you have a lot of choices. The UDM Pro is ideally suited as a routing solution because of the hardware on offer and the extensive feature-set and configuration. You can pair it with a multitude of switches and wireless access points.

The reason why I switched to UniFi was the extensibility. I started with the UDM Pro, Switch Pro 24 PoE, and the Wi-Fi 6 Long Range and Wi-Fi 6 Lite for wireless access. As for security cameras, I have three units of the G3 Flex for indoor use and a G4 Bullet located outside.

I’m now eyeing the Wi-Fi 6 Pro for the balcony as that’s the one area where I don’t get adequate coverage, and the G4 Doorbell as the video doorbell. I’ve deliberated getting a Nest Doorbell, but considering I have an UniFi Protect system set up anyway, I figured the G4 Doorbell would be a better alternative.

The biggest issue with Ubiquiti products is availability. The security cameras, in particular, are constantly sold out, so you will have to wait for a restock to get your hands on the G4 Bullet or even the Dream Router. Then you’ll need to factor in cabling as most of these devices connect over Ethernet. I’m fortunate that my home has internal Cat5 cabling, but you will need to consider that if you’re looking to make the switch.

The sheer amount of features in UniFi Network, the ease-of-use of UniFi Protect, and the fact that you have complete control over the recorded footage make Ubiquiti’s products an excellent choice for prosumers. Of course, building out the entire network is a sizeable investment if you’re picking up a UDM Pro, Switch 24 PoE, two APs, and a few security cameras, but at the end of the day, you get a scalable network that will serve you well for several years.

Source :
https://www.androidcentral.com/how-set-ultimate-ubiquiti-unifi-home-network-2022

CISA warns admins to patch maximum severity SAP vulnerability

The US Cybersecurity and Infrastructure Security Agency (CISA) has warned admins to patch a set of severe security flaws dubbed ICMAD (Internet Communication Manager Advanced Desync) and impacting SAP business apps using Internet Communication Manager (ICM).

CISA added that failing to patch these vulnerabilities exposes organizations with vulnerable servers to data theft, financial fraud risks, disruptions of mission-critical business processes, ransomware attacks, and a halt of all operations.

ICMAD bugs affect most SAP products

Yesterday, Onapsis Research Labs who found and reported CVE-2022-22536, one of the three ICMAD bugs and the one rated as a maximum severity issue, also cautioned SAP customers to patch them immediately (the other two are tracked as CVE-2022-22532, and CVE-2022-22533).

The SAP Product Security Response Team (PSRT) worked with Onapsis to create security patches to address these vulnerabilities and released them on February 8, during this month’s Patch Tuesday.

If successfully exploited, the ICMAD bugs allow attackers to target SAP users, business information, and processes, and steal credentials, trigger denials of service, execute code remotely and, ultimately, fully compromise any unpatched SAP applications.

“The ICM is one of the most important components of an SAP NetWeaver application server: It is present in most SAP products and is a critical part of the overall SAP technology stack, connecting SAP applications with the Internet,” Onapsis explained.

“Malicious actors can easily leverage the most critical vulnerability (CVSSv3 10.0) in unprotected systems; the exploit is simple, requires no previous authentication, no preconditions are necessary, and the payload can be sent through HTTP(S), the most widely used network service to access SAP applications.”

No SAP customers breached using ICMAD exploits so far

SAP’s Director of Security Response Vic Chung said they’re currently not aware of any customers’ networks breached using exploits targeting these vulnerabilities and “strongly” advised all impacted organizations to immediately apply patches “as soon as possible.”

SAP customers can use this open-source tool developed by Onapsis security researchers to help scan systems for ICMAD vulnerabilities.

The German business software developer also patched other maximum severity vulnerabilities associated with the Apache Log4j 2 component used in SAP Commerce, SAP Data Intelligence 3 (on-premise), SAP Dynamic Authorization Management, Internet of Things Edge Platform, SAP Customer Checkout.

All of them allow remote threat actors to execute code on systems running unpatched software following successful exploitation.

Source :
https://www.bleepingcomputer.com/news/security/cisa-warns-admins-to-patch-maximum-severity-sap-vulnerability/

Use an eSIM to get a cellular data connection on your Windows PC

Windows 10 and Windows 11
An eSIM lets you connect to the Internet over a cellular data connection. With an eSIM, you don’t need to get a SIM card from your mobile operator, and you can quickly switch between mobile operators and data plans.

For example, you might have one cellular data plan for work, and a different plan with another mobile operator for personal use. If you travel, you can get connected in more places by finding mobile operators with plans in that area.

Here’s what you’ll need:

  • A PC running Windows 10, Version 1703 or later. To see which version of Windows 10 your device uses, select the Start  button, then select Settings  > System  > About .
  • A PC with an eSIM in it. Here’s how you can tell if your PC has an eSIM:
    1. Select the Start  button, then select Settings  > Network & Internet  > Cellular .
    2. On the Cellular screen, look for a link near the bottom of the page that says Manage eSIM profiles. If that link appears, your PC has an eSIM.

      Manage eSIM profiles

Note: Some devices have both an eSIM and physical SIM card. If you don’t see Manage eSIM profiles but you do see Use this SIM for cellular data at the top of the Cellular settings screen, select the other SIM from the drop-down box, and then see if the Manage eSIM profiles link appears.

To add an eSIM profile

You’ll need to add an eSIM profile to get an Internet connection using cellular data.

If you have a PC from your organization, an eSIM profile might already be added to your PC. If you select Manage eSIM profiles and see an eSIM profile for a mobile operator you expect to find, you can skip this procedure and go to the next one to get connected.

  1. Select the Start  button, then select Settings  > Network & Internet  > Cellular Manage eSIM profiles.
  2. Under eSIM profiles, select Add a new profile.
  3. To search for available profiles or use an activation code you have from your mobile operator, do one of the following:
    • Search for available profiles
      1. Select Search for available profiles > Next.
      2. When a profile you want to use is found, select Download.
      3. Enter the confirmation code from your mobile operator in the corresponding box, then select Download.
      4. After the profile is downloaded and installed, select Continue to find other profiles you might want and then repeat the previous steps.
      5. Select Close when you have downloaded the profiles you want.
    • Use an activation code you have from your mobile operator
      1. Select Let me enter an activation code I have from my mobile operator > Next.
      2. If you have a QR code to scan for the activation code, choose which camera to use on your PC, and then scan the QR code.
      3. The activation code should appear in the corresponding Activation code box. Select Next.
      4. For the dialog box that asks Do you want to download this profile?, enter the confirmation code from your mobile operator into the corresponding box, and then select Download.
      5. Select Close.
  4. Optional: To give the profile a friendly name (for example, Work or Personal) to help you remember it, select the profile, select Edit name, type a name you’ll remember, and then select Save.

To connect to cellular data using an eSIM profile

  1. Select the Start  button, then select Settings  > Network & Internet  > Cellular  > Manage eSIM profiles.
  2. Under eSIM profiles, select the profile you want, and then select Use.
  3. Select Yes for This will use cellular data from your data plan and may incur charges. Do you want to continue?
    You’ll be connected to a cellular data network and ready to go.

To switch between profiles

If you have more than one profile installed on your PC, you can switch between profiles to use a different mobile operator and data plan.

  1. Select the Start  button, then select Settings  > Network & Internet  > Cellular  > Manage eSIM profiles.
  2. Under eSIM profiles, select the profile you want to stop using, and then select Stop using.
  3. Select Yes for You’ll be disconnected from this cellular network. Continue?
  4. Select the different profile you want to use, then select Use.

To delete a profile

If you don’t want to use a profile anymore, you can delete it from your PC. If you delete the profile and want to add it again later, you’ll need to download the profile again and might need to contact your mobile operator.

  1. Select the Start  button, then select Settings  > Network & Internet  > Cellular  > Manage eSIM profiles.
  2. Under eSIM profiles, select the profile to delete, and then select Delete.
  3. At the prompt that warns you that the profile will be permanently deleted, select Yes.

Note: If you have a PC from your organization, you might not be able to delete an eSIM profile because of a policy that’s set by your organization.

Source :
https://support.microsoft.com/en-us/windows/use-an-esim-to-get-a-cellular-data-connection-on-your-windows-pc-0e255714-f8be-b9ef-9e84-f75b05ed98a3#WindowsVersion=Windows_10