Did you know Wordfence runs a Bug Bounty Program for all WordPress plugin and themes at no cost to vendors? Researchers can earn up to $10,400, for all in-scope vulnerabilities submitted to our Bug Bounty Program! Find a vulnerability, submit the details directly to us, and we handle all the rest. For a limited time, all high risk issues are in-scope for all researchers!
WordPress Core 6.5.5 was released yesterday, on June 24, 2023. Contained within this release are three security fixes addressing two Cross-Site Scripting (XSS) vulnerabilities and one Windows-specific Directory Traversal vulnerability. Despite these vulnerabilities being medium-severity, the worst of them (specifically, the XSS vulnerabilities) can allow for site takeover by an authenticated, contributor-level user if successfully exploited.
The Directory Traversal vulnerability has been backported to every version of WordPress since 4.1, with the XSS vulnerabilities being backported to the major version in which the functionality was released. WordPress has supported automatic core updates for security releases since WordPress 3.7, and the vast majority of WordPress sites should receive a patch for their major version of WordPress automatically over the next 24 hours. We recommend verifying that your site has been automatically updated to one of the patched versions. Patched versions are available for every major version of WordPress since 4.1, so you can update without risking compatibility issues.
The Wordfence Threat Intelligence Team released a new firewall rule the same day to protect Wordfence Premium, Wordfence Care, and Wordfence Response customers for one of the XSS vulnerabilities that didn’t have adequate protection.This rule will be available to free Wordfence users in 30 days, on July 24th, 2024. All Wordfence users have protection for the remaining two vulnerabilities.
If your site has not been updated automatically we strongly recommend updating manually as soon as possible, as two of the vulnerabilities patched in this release can be used by an attacker with a low-privileged contributor-level account to take over a site.
Technical Analysis and Overview
As with every WordPress core release containing security fixes, the Wordfence Threat Intelligence team analyzed the code changes in detail to evaluate the impact of these vulnerabilities on our customers, and to ensure our customers remain protected.
Contributor+ Stored Cross-Site Scripting in the HTML API
WordPress Core is vulnerable to Stored Cross-Site Scripting via the HTML API in various versions up to 6.5.5 due to insufficient input sanitization and output escaping on URLs. This makes it possible for authenticated attackers, with contributor-level access and above, to inject arbitrary web scripts in pages that will execute whenever a user accesses an injected page.
The changeset in WordPress 6.5.5 adds additional protections in the set_attribute() function of the HTML API to further escape URL attributes. Additionally, this changeset adds additional improvements.
Contributor+ Stored Cross-Site Scripting in the Template Part Block
WordPress Core is vulnerable to Stored Cross-Site Scripting via the Template Part block in various versions up to 6.5.5 due to insufficient input sanitization and output escaping on the ‘tagName’ attributes. This makes it possible for authenticated attackers, with contributor-level access and above, to inject arbitrary web scripts in pages that will execute whenever a user accesses an injected page.
The changeset for WordPress 6.5.5 adds additional sanitization to the Template Part block’s ‘tagName’ attribute. The Template Part block is available to contributor-level users. However, exploitation is only possible where the site’s theme uses this particular block.
WordPress Core is vulnerable to Directory Traversal in various versions up to 6.5.5 via the Template Part block. This makes it possible for authenticated attackers, with contributor-level access and above, to include arbitrary HTML Files on sites running Windows.
Similar to the previous vulnerability, this Directory Traversal vulnerability is exploitable via the Template Part block. The changeset for WordPress 6.5.5 shows the addition of a path normalization function within the validate_file() function.
Conclusion
WordPress 6.5.5 includes patches for 3 medium-severity vulnerabilities. Two of these vulnerabilities are trivial to exploit as an authenticated, contributor+ user, and we recommend updating immediately if your site has not yet automatically done so.
We have released one new firewall rule to protect Wordfence Premium, Wordfence Care, and Wordfence Response customers. This rule will be available to free Wordfence users in 30 days, on July 24th, 2024.
If you know someone who uses WordPress and isn’t keeping it automatically updated, we recommend sharing this advisory with them to ensure their site remains secure, as several of these vulnerabilities pose a significant risk.
For security researchers looking to disclose vulnerabilities responsibly and obtain a CVE ID, you can submit your findings to Wordfence Intelligence Bug Bounty Program and earn up to $10,400 for your submission.
Special thanks to István Márton, a Wordfence Vulnerability Researcher, for his assistance on reverse engineering the patches and ensuring Wordfence users have adequate coverage.
MARCH 28, 2024 15 MIN. READ WRITTEN BY Manuel Sabban
This article was originally published on 30 April 2021 in the Linux Journal.
Updated: 14 March 2024
With the launch of Security Engine 1.0.x, we enabled the Security Engine to function as an HTTP REST API, allowing it to gather signals from other Security Engines.
In this guide, I will guide you through the steps to set up the CrowdSec Security Engine across multiple servers, where one server will serve as the parent and two additional machines will forward alerts to it.
Sharing cybersecurity incidents across machines using the CrowdSec Security Engine is a highly effective strategy to enhance collective security defenses. By leveraging CrowdSec’s capability to distribute remediations among connected machines, each machine benefits from real-time updates about new threats detected elsewhere in the network.
Architecture
In the diagram above, the parent Security Engine, designated as server-1, will be set up as the HTTP REST API, commonly known as the LAPI (Local API). This engine will be in charge of storing and distributing the gathered signals. Remediation is managed through the Remediation Components, which depend on the LAPI offered by server-1. It’s crucial to understand that mitigation can occur independently from detection.
Server-2 and server-3 are designated as internet-facing machines that will host services available to the public and will be known as the child Log Processors. On these servers, we will install CrowdSec Security Engine and Remediation Components, which will interact with the server-1 LAPI.
Note: The phrase “child Log Processors” refers to a CrowdSec Security Engine that operates with its LAPI turned off. For more information on this, consult our Taxonomy Update Article.
We strongly encourage you to explore the CrowdSec Hub to learn about the extensive range of services the Security Engine can protect. This platform showcases the diverse capabilities of the Engine in securing everything from web applications to databases against cyber threats.
Architecture Decisions
I chose a postgresql backend for the server-1 LAPI to achieve greater stability in database read and write operations. Nevertheless, depending on your operational scale, you might discover that the default SQLite with WAL (Write-Ahead Logging) enabled meets your needs, if so you can skip section 1b.
Prerequisites
To follow this tutorial, you will need the following:
Two internet-facing Ubuntu 22.04 machines hosting services.
One Ubuntu 22.04 machine.
A local network connection between the Parent and Child machines.
Step 1b (Optional): Using postgresql on Parent server-1
Install the PostgreSQL package using the apt package manager.
sudo apt install postgresql
Next, transition to the postgres Linux user and then connect by executing the psql command.
sudo -i -u postgres
psql
You can set up the database and create an authorized user using the commands below. Replace with a password you select, you must keep it within the single quotes.
postgres=# CREATE DATABASE crowdsec;
CREATE DATABASE
postgres=# CREATE USER crowdsec WITH PASSWORD ‘[PASSWORD]’; CREATE ROLE
postgres=# GRANT ALL PRIVILEGES ON DATABASE crowdsec TO crowdsec;
GRANT
Now, we’ll set up the Security Engine to utilize this newly created database as its backend. This requires updating the db_config section in the /etc/crowdsec/config.yaml file.
During the installation of the Security Engine, the local machine was configured to use the SQLite database. To switch to the newly set up postgres database, you will need to regenerate the credentials and then proceed to restart the Security Engine.
sudo cscli machines add -a –force
sudo systemctl restart crowdsec
Step 1c: Expose LAPI port
To enable communication between the LAPI and the child Log Processors/Remediation Components, it is necessary to adjust the LAPI’s settings to accept connections from external sources, since its default configuration binds it to the machine’s loopback address (127.0.0.1). This adjustment can be made by editing the /etc/crowdsec/config.yaml configuration file and changing the specified settings.
api:
  server:
    listen_uri: 10.0.0.1:8080
In the mentioned setup, we adjust the settings to listen on the 10.0.0.1 interface on port 8080. Should you wish to listen on several interfaces, you can change this to 0.0.0.0 and implement firewall rules to permit specific connections.
First, lets register the Log Processor to the LAPI server using the following command
sudo cscli lapi register -u http://10.0.0.1:8080
Ensure you adjust the -u flag to suit your network. Utilize the IP address if it’s static, or opt for the hostname if your network allows it.
Next, we’ll turn off the local API on the Security Engine, turning it into a Log Processor. This action is taken because the API won’t be utilized, which will conserve system resources and avoid occupying a TCP port unnecessarily.
To achieve this, we can disable the API in the configuration with:
api:
  server:
    enable: false
Step 2c: Validate the registration request on LAPI
Since we used the cscli lapi register on the child Log Processor we must validate the request on server-1 via the following commands:
sudo cscli machines list
--------------------------------------------------------------------------------------------------------------------------------------------------------------------
  NAME                                              IP ADDRESS      LAST UPDATE           STATUS  VERSION
  --------------------------------------------------------------------------------------------------------------------------------------------------------------------
  dc6f34b3a4994700a2e333df43728701D0iARTSQ6dxiwyMR  10.0.0.1  2021-04-13T12:16:11Z  ✔️  v1.0.9-4-debian-pragmatic-a8b16a66b110ebe03bb330cda2600226a3a862d7
  9f3602d1c9244f02b0d6fd2e92933e75zLVg8zSRkyANxHbC  10.0.0.3   2021-04-13T12:24:12Z  🚫
--------------------------------------------------------------------------------------------------------------------------------------------------------------------
From this output, it’s evident there’s a new machine that hasn’t been validated yet by the 🚫 within the status column. We need to manually validate this machine to ensure the LAPI recognizes which machines are authorized to transmit signals.
Note: If you don’t see a new machine marked with a 🚫 in the status column, make sure you are executing the command on the LAPI server.
Make sure to change the argument following validate to correspond with the new machine name displayed in the list output.
Step 2d: Restart the child Log Processor service
On the child Log Processor machine you can run the following command to restart the service:
sudo systemctl restart crowdsec
Then, for each machine you wish to connect, repeat step 2. In our case, we will perform this action twice, once for each Ubuntu machine.
Step 3: Setting up Remediation
Now, it’s important to configure remediation measures for your internet-facing servers since merely running the Log Processor does not implement enforcement actions. In this article, we’ll focus on setting up the Linux firewall Remediation Component. For additional remediation options, be sure to explore the extensive list available in the CrowdSec Documentation.
Step 3a: Generating API key on LAPI
First, we’ll create API token on the LAPI server by executing the following command:
sudo cscli bouncers add server-2-firewall
Api key for 'server-2-firewall':

    02954e85c72cf442a4dee357f0ca5a7c

Please keep this key since you will not be able to retrieve it!
I used server-2-firewall as the name for the key, but you can choose any name you prefer. It’s crucial to select a descriptive name for the key to facilitate future management, especially if you need to revoke a key due to a token compromise.
Step 3b: Install the Remediation Component
IPtables firewall is among the most commonly used on Linux, so we’ll proceed to install the Component that interacts with it, using the apt package manager.
sudo apt install cs-firewall-bouncer-iptables
Once the Component is installed, we will edit the configuration under /etc/crowdsec/bouncers/crowdsec-firewall-bouncer.yaml to point towards the LAPI
Ensure you modify the api_url to align with your LAPI address and update the api_key to the one generated by the previous command. Remember, you can use either the IP address or the hostname.
Once you have altered the configuration, let’s restart the firewall Remediation Component.
sudo systemctl restart crowdsec-firewall-bouncer
Then, for each Remediation Component you wish to connect, repeat step 3. In our case, we will perform this action twice, once for each firewall on the Ubuntu machines. Make sure to alter the naming scheme of the API key.
A few closing thoughts
This guide illustrated the process for establishing a multi-server Security Engine setup. While this example utilized three servers, the architecture allows for easy expansion. The resource consumption on server-2 and server-3 remains minimal since the majority of operations are directed towards server-1, facilitating straightforward scalability of the system:
Register and validate additional Security Engines on the LAPI server
Add any additional Remediation Components
As previously stated, there’s no requirement for the Remediation Components and Security Engines to be installed on the same server. This implies that the Security Engine should be installed at the location where logs are produced, whereas the Remediation Component can be deployed at any desired location.
It’s important to note that this configuration comes with certain limitations:
The communication between Security Engines occurs via unencrypted HTTP, which is suitable for a local network but not secure for internet use. However, the CrowdSec Security Engine supports the use of HTTPS for these interactions.
This article does not delve into monitoring or alerting. Nonetheless, the Security Engine supports comprehensive monitoring capabilities via Prometheus, and you can find more detailed information about it in this article.
Having both the CrowdSec LAPI and PostgreSQL on server-1 creates a single point of failure, potentially leading to delays in threat response should any issues arise with the server.
Now you may be wondering — how do I build a highly available multi-server CrowdSec setup? We will have a dedicated article on that in the coming weeks, so stay tuned!
We are always more than happy to receive your feedback! Don’t hesitate to reach out to us on our community platforms on Discord and Discourse.
MARCH 28, 2024 10 MIN. READ WRITTEN BY Manuel Sabban
This article was originally published on 31 August 2021 in the Linux Journal.
Updated: 14 March 2024
Welcome to the second part of our tutorial on how to set up and secure a multi-server CrowdSec Security Engine installation. In the first part, I walked you through the setup of CrowdSec Security Engines across multiple servers, with one server serving as the parent and two additional machines forwarding alerts to it.
In this part, I will address security issues posed by clear HTTP communication in the previous multi-server Security Engine installation. To solve this, I propose establishing the communication between Security Engines over encrypted channels. This solution allows server-2 or server-3 to trust the server-1 identity and avoid man-in-the-middle attacks.
Using self-signed certificates
Create the certificate
First, you need to create a certificate. This can be achieved with the following one-liner.
For now, the Security Engine is not able to ask for the passphrase of the private key when starting. So, you have the choice to decipher the private key by hand each time you start or reload the Security Engine or store the key unencrypted. In any way, to strip the passphrase, you can use the following:
openssl rsa -in encrypted-key.pem -out key.pem
Then, the unencrypted key file can be safely deleted after the Security Engine is started.
Configure the Security Engine to use a self-signed certificate
On server-1 you need to configure the Security Engine to use the generated certificate. As seen below, the tls.cert_file and tls.key_file option in the api.server section of the following /etc/crowdec/config.yaml excerpt is set to the generated certificate file.
api:

  server:

    log_level: info
    listen_uri: 10.0.0.1:8080
    profiles_path: /etc/crowdsec/profiles.yaml
    online_client: # Crowdsec API credentials (to push signals and receive bad

    tls:
      cert_file: /etc/crowdsec/ssl/cert.pem
      key_file: /etc/crowdsec/ssl/key.pem
On the client side, configuration changes happen in two files. First, modify /etc/crowdec/config.yaml to accept self-signed certificates by setting the insecure_skip_verify to true.
You also need to change HTTP for HTTPS in the /etc/crowdsec/local_api_credentials.yaml file in order to reflect the changes. This small change has to be done on all three servers (server-1, server-2 andserver-3).
Note: Please keep in mind that this LAPI configuration has to be done on server-1 as well if it’s used as a log processor too.
Side note: Obviously using self-signed certificates doesn’t provide any confidence over ownership on the LAPI server. Servers using the service (server-2 or server-3 in this setup) are still vulnerable to man-in-the-middle attacks, but at least this setup provides encrypted communications. That’s the reason why the InsecureSkipVerify option is needed.
Using a Certificate Authority-issued certificate
Let’s Encrypt, or services like Amazon ACM, can be leveraged to workaround the InsecureSkipVerify, by issuing a certificate for a fully qualified domain name that can be added to /etc/hosts or to a local DNS server. /etc/crowdsec/local_api_credentials.yaml can then be filled with this specified fully qualified domain name.
This indeed works and prevents the InsecureSkipVerify option from being set. This ensures that communication between client and server can’t be tampered with as long as the DNS configuration can be trusted, but should still be considered as a workaround.
Using a PKI
The process of configuring and managing an SSL Public Key Infrastructure (PKI) falls outside the scope of this tutorial, but I highly recommend you take a look at the official OpenSSL documentation. The simple PKI scenario is enough for this Security Engine setup.
Following the OpenSSL documentation, there are a few things worth mentioning.
To be usable in our CrowdSec TLS scenario, the certificate requests have to be issued with a subject alternative name corresponding to the IP of the Crowdsec LAPI server. This can be done by positioning the SAN environment variable when invoking OpenSSL for the certificate request (see step 3.3 in the OpenSSL simple PKI scenario).
The public part of the root and the signing certificates (bundle file created at step 4.5 in the OpenSSL simple PKI scenario) have to be added to the local certificate store before starting the CrowdSec Security Engine. In this setup, this is required to connect to the LAPI server. There’re many ways to do so, golang sources specify where certificates are expected, or you can use the SSL_CERT_FILE environment variable in the systemd service file to specify where to find the certificate when launching the Security Engine.
Updated note on CrowdSec and TLS authentication
After the first publication of this article, we added a new feature to the Security Engine you are now able not only to secure communication over TLS but also ensure authentication with certificate. In the official documentation you can find a great example that shows how TLS authentication can be done using certificates between Security Engines or between Security Engine and Remediation Component.
Conclusion
This article gives some highlights on how to secure communications between different CrowdSec Security Engine installations. The considered use case is Security Engine installations in a private network, but this can also be deployed on a public network with communication over the internet. In such a case, a third-party certificate would easily do the trick.
Depending on the needs, I proposed three different ways to achieve secure TLS communications between your Security Engines — using self-signed certificates, using certificates issued by a Certificate Authority, and using an SSL Public Key Infrastructure.
The first scenario, with self-signed certificates, only applies if you want to ensure encrypted communication with no need for authentication. The second scenario proposed may only be considered as a workaround when you have the possibility to modify local DNS resolutions. The third proposed scenario is the most complicated but would fit in most use cases and may be the way to go when security concerns are high.
I hope this tutorial comes in handy. Thanks for reading and stay tuned!
If you have any questions or feedback, don’t hesitate to reach out to us on our community platforms on Discord and Discourse.
MARCH 19, 2024 10 MIN. READ WRITTEN BY Emanuel Seemann
Among the 29,000 vulnerabilities published as a CVE in 2022, CVE-2022-22954 is one of the more dangerous vulnerabilities, with a CVSS base score of 9.8. Recently there has been a significant uptick in exploitation attempts detected by the CrowdSec Network from bad actors located in China. To swiftly remediate this issue, we added the exploit as a rule for The CrowdSec AppSec Component.
This article serves as a reminder for security professionals to patch your VMware workspaces. Here I will also share some insights into the new attackers using this vulnerability.
The exploit
Since its introduction in 1999 there have been over 200,000 vulnerabilities published in the Common Vulnerabilities and Exposures (CVE) framework. As the number of vulnerabilities published each day grows, cyber security professionals are overwhelmed with figuring out whether a given vulnerability is actually at risk of being exploited. By leveraging CrowdSec’s large threat intelligence network, we know that most of these vulnerabilities very rarely lead to widespread adoption by threat actors. We suspect that this is mostly because proof-of-concept attacks are rarely published, which means that attackers don’t know a priori how difficult it will be to exploit the vulnerability in practice.
In the case of CVE-2022-22954, however, the exploit, as explained very succinctly by the Rapid7 team back in 2022, is simple and small enough to fit into a tweet. The Rapid7 team also showed that this vulnerability could be chained with other vulnerabilities of VMware products to gain a root shell for remote code execution. This showed that the exploit was both easy to use and significantly powerful in practice, which gave it a very high CVSS score.
The exploit itself is a classic case of Server-Side Template Injection (SSTI). Templating engines are systems used to insert user data into static HTML websites. For example, the web developer can write the template:
And for the user John Doe, it will then show up as:
In an SSTI, the user is able to get the server to render a user-submitted template. The templating engine used by VMware, Apache FreeMarker, allows a developer to execute system commands within the template using the freemarker.template.utility.Execute function. This function call is, therefore, often used in template injection attacks. In the specific case of CVE-2022-22954, templates could be injected into the deviceUdid parameter of the /catalog-portal/ui/oauth/verify endpoint.
To detect this, the CrowdSec Security Engine looks for calls to the utility.Execute function at this endpoint. Note that modern versions of FreeMarker allow sandboxing of the Execute function to prevent template injections from being easily exploitable.
A new surge in exploit attempts of the CVE-2022-22954
Usually, high CVSS scores cause defenders to patch their systems quickly and attacks to fall off as the attack surface rapidly decreases. This has been the case with log4shell as well. After a while, the real attacks drop away and, in turn, are replaced by a vast number of security scanners. This means that it’s not unusual to still see signals for old outdated vulnerabilities. To avoid such scanners polluting our threat intelligence, we maintain curated filters for the addresses of most scanner companies.
The following chart depicts the number of unique IPs reported for CVE-2022-22954 each day over the past 3 months:
Unique IPs Reported for CVE-2022-22954
The chart is split into two phases. A stable phase for 2 months, followed by a growth phase starting on the 19th of February 2024. The first phase is the baseline noise generated by vulnerability scanners. The second phase is the new surge in attacks. The same trend can be seen in the number of signals and the number of unique Security Engines reporting attacks.
Signals and Security Engines Reporting CVE-2022-22954
Most of the attackers participating in this new attack wave have previously not been seen by the CrowdSec network. A good 40% of them come from Chinese IP addresses. Overlap analysis also reveals that the attackers attempt multiple similar attacks. Of note here should be the http-probing scenario which detects attackers that get served a significant number of 404/403 responses in a short time span.
Combined with the fact that most of these IPs were previously unseen, we suspect that this might be an attempt to build a new botnet using very common vulnerabilities, not all of which we currently have detection scenarios for.
Scenario Overlap
We provide the following top 3 Indicators of Compromise (IoC) for this new wave of attacks:
In response to this new wave of attacks, we have added detection for this exploit to our Web Application Firewall (WAF) using a rule in the CrowdSec AppSec Component. CrowdSec WAF users are now protected against future attempts by these attackers. If you are not using the CrowdSec WAF solution yet, make sure to activate the AppSec Component in your Security Engine. You can find more information in the CrowdSec documentation.
In addition to the new AppSec Component rule, about 30% of the malicious IPs performing CVE-2022-22954 exploitation attempts are by now part of the CrowdSec Intelligence Blocklist, and considering the ramping intensity of these attackers, more will be added in the coming days.
Want to stay ahead of the curve? Proactively block these IPs and don’t take any chances with the IPs massively exploiting the CVE-2022-22954 vulnerability potentially reaching your systems.
MARCH 7, 2024 15 MIN. READ WRITTEN BY Emanuel Seemann
One of the big lessons we learned from collecting and analyzing huge amounts of data at CrowdSec is that cyberattacks are not distributed equally over the internet.
There are Autonomous Systems (AS) — think internet service providers or hosters — and IP ranges that harbor significantly more criminal activity than others. This insight prompted us to aggregate the signals we receive not only by IP address but also by IP range and Autonomous System.
In this article we provide an example of what this looks like in practice and how these new aggregations are used by us internally to improve our blocklist offerings. However, we first need to explore a crime scene to understand these insights.
Capturing petty criminals
The following table presents a sample of IPs that recently participated in http-path-traversal-probing attacks. These attacks are quite simplistic. They aim to get a web server to reveal files outside of the sitemap by trying to escape paths and walking backward along the file tree using ../.
While most modern web servers are not vulnerable to such attacks, the attackers show up directly in the log even on failed attempts which makes this a good Indicator of Compromise (IoC) for the Crowdsec Security Engine to investigate.
Now, good detectives will have already noticed something afoot here. But in case you didn’t notice, the table below draws your attention to certain IPs.
While some IPs in this table seem to come from all over the internet, the IPs highlighted all share the first 3 sections of their IP address. What this means is that these IP addresses originate from the same neighborhood or IP range of the internet. To further explore this strange coincidence, we need to learn a little bit about how the internet works.
IP ranges — The neighborhoods of the internet
At the core, an IP address is a representation of a 32-digit binary number. Wikipedia has a nice graphic to show how each of the 4 numbers of the dot-decimal notation corresponds to an 8-digit binary part of the IP address.
Usually, these IP addresses are not owned by individuals but by internet service providers and big technology companies, which then assign them to their customers and servers. To simplify the who-owns-what question, the service providers are not given lists of single IPs but so-called IP ranges.
IP ranges are blocks of consecutive IP addresses. They are specified by the number of digits of the binary address that they have in common. So, a /31 range for a given address includes all IPs that have the same 31 first bits as this address. As an IP address is only 32 bits long that means that a `/31` range contains exactly two IPs.
Generally, the lower the number on the range, the higher the number of IPs in it. At CrowdSec, we mainly consider range /24 neighborhoods, which are all the IPs that share the same 24 first bits. This is a convenient range size as it is still fairly small at 256 IPs per range, but also because the boundary falls right on one of the decimals in dot-decimal notation. So, the range 172.16.254.0/24 contains all the IPs from 172.16.254.0 to 172.16.254.256. This makes /24 an extremely useful range to look at.
Fighting organized crime
With the crash course in internet protocol and IP ranges finished, let’s turn our attention back to the matter at hand and recall the table of petty criminals seen earlier.
With your newly gained knowledge of the internet protocol, you can now identify that some of the criminals seen in the table operate from the same neighborhood of the internet.
So, it’s not difficult to realize that we might not be dealing with petty criminals who do some path traversal on the side here, but we are facing an organized crime network operating from the XXX.234.140.0/24 neighborhood of the internet.
Properly detecting such bad neighborhoods and taking the appropriate measures against these perpetrators is vital to our goal of always providing our users with blocklists that contain verified malicious IPs to help them proactively protect their systems from cyberattacks.
Block Mass Exploitation Attempts
Get immediate protection against active malicious IPs with CrowdSec’s actionable and real-time Blocklists.Get started
To generate the CrowdSec Intelligence Blocklist, we have built a fairly sophisticated system of rules that evaluate an IP on a diverse set of metrics to ultimately decide whether it gets added to the blocklist. This system is called the Expert System. The best way to understand the functionality of the Expert System is to imagine a judge ruling in a court.
Every IP is put to a trial with evidence supporting the case. The judge (Expert System) has a code of law (CrowdSec ruleset) within which it has to decide whether to convict the suspect. For validation, we have a lawmakers’ convention (internal meeting) every week where we inspect the rulings and change the laws if needed.
Staying within this law analogy, we face similar issues as real courts when fighting organized crime. Each individual IP in this range might not be criminal enough on its own to get convicted for a big sentence, but as an organization, it is clear that there is significant abuse coming from this range. Similar to real courts, we can keep playing whack-a-mole and jail abusers who cross the line for petty crimes, but to put a real dent into the criminal organization, we need a bigger mallet. In the real world, this big mallet is called the RICO Act — in the CrowdSec cybersecurity court, it is the Range Reputation System.
Introducing the IP Range Reputation System
The IP Range Reputation System is an aggregation of stats on individual IPs at the level of their /24 range. That means that for every /24 range, we track the following:
The number of IPs from this range we have seen in reports from Security Engines
The number of IPs from this range that landed in the CrowdSec Intelligence Blocklist
The average duration of any given IP remaining in our data lake
The trust score of the Security Engines reporting this IP
The behaviors identified for IPs in this range
The CrowdSec Data
Explore CrowdSec’s fail-proof approach to tactical intelligence and learn how CrowdSec guarantees unmatched data curation.Learn more
We then use this information to build an organized crime case. The case is built on two components.
Neighborhood reputation: This is based on how many other IPs have already been reported and how many of them have landed in the CrowdSec Intelligence Blocklist.
Attacker behavior: How the behavior of this specific attacker compares to the other IPs in its range. The analogy for this is that while a pickpocket and a bike thief might operate in the same neighborhood, as long as they do their separate things, there is no reason to suspect that they are part of the same organized crime unit.
These two components are then weighted, scored, and fed to the Expert System as additional evidence. If an IP is convicted of operating within a criminal network, it gets into the CrowdSec Intelligence Blocklist significantly faster, turning this simple system into an effective large mallet to bleed cybercriminals of their most valuable resource — fresh IP addresses.
The Range Reputation System we built alongside this feature powers our insights in the Majority Report and allows us to act on emerging threats with confidence even when there is little primary information to go on.
Get your hands on the IP Range Reputation feature
The IP Range Reputation feature is now available in our CTI API to help incident response teams and threat researchers gain improved visibility in low-information environments and act fast and decisively against threats, even in situations where the defenders are outnumbered.
To use the IP Range Reputation feature today, simply sign in to your CrowdSec Console account or sign up for free if you don’t have an account yet. Then navigate to the Settings page to generate a CTI API key.
Equipped with your API key, you can get started by querying the API using curl or any other tool. If you don’t have any interesting IP addresses at hand, you can always find an interesting selection under https://app.crowdsec.net/cti.
Similar to our ratings of individual IPs, the range reputation comes as both a score ranging from 0 to 5 and as a single label of either malicious, suspicious, or known. For further information on our CTI API, including exhaustive documentation and a swagger portal, check out our CTI API documentation.
The CrowdSec team is working on expanding and improving the capabilities of the IP Range Reputation feature, so stay tuned as we’ll be sharing more updates on this soon!
Running a WooCommerce store demands more than just listing your products and waiting for sales to happen. It requires a proactive approach to maintenance, optimization, and engagement to ensure that every aspect of your store functions smoothly and efficiently. From the careful crafting of product attributes to secure checkout processes, each element plays a critical role in the overall success of your online business.
With a plethora of tools at your disposal, it can be overwhelming to navigate the options and identify what will best support your store’s unique needs. As we dive into the various tools and strategies to keep your WooCommerce store running smoothly, remember that the goal is not just to maintain but to excel.
Enhancing store performance
A well-performing WooCommerce store is the cornerstone of a successful eCommerce business. As your store grows, so does the complexity of managing its performance. Here, we’ll explore key tools and practices to enhance your store’s speed, efficiency, and overall performance, ensuring a seamless experience for your customers.
Database optimization
One of the most critical yet overlooked aspects of maintaining a high-performing WooCommerce store is database optimization. Over time, your store’s database can become cluttered with old product revisions, outdated orders, and unnecessary data, leading to slower loading times and a sluggish site experience. Tools like WP-Optimize provide an easy-to-use solution for database cleanup and optimization. By regularly clearing out this digital detritus, you can ensure your store operates at peak efficiency, maintaining swift navigation and quick access to product information for your customers.
Image optimization tools
Visuals play a crucial role in eCommerce, but high-quality images often come at the cost of file size, which can significantly slow down your site. Leveraging tools to optimize WordPress images is essential for balancing quality and performance. Plugins like Smush or SEO Image Optimizer automatically optimize product images without degrading quality, ensuring your site remains fast and visually appealing. This not only enhances the user experience but also positively impacts your store’s SEO, as page load speed is a key ranking factor for search engines.
Streamlining order processing and delivery
Efficient order processing and timely delivery are pivotal in ensuring customer satisfaction and loyalty in eCommerce. This section delves into tools and plugins that can significantly streamline these aspects of your WooCommerce store, from the moment an order is placed to when it reaches the customer’s doorstep.
Automated order printing
In the bustling environment of an eCommerce business, automating mundane tasks can save valuable time and reduce the risk of errors. For WooCommerce store owners, automatically printing orders as they come in can be a game-changer, ensuring that every order is promptly prepared for shipping and enhancing operational efficiency and customer satisfaction. This automation allows store managers to focus on more strategic tasks rather than getting bogged down with manual order processing.
Delivery date plugins
Giving customers the power to choose their preferred delivery date not only enhances the shopping experience but also helps in managing logistics more effectively. Delivery date plugins for WooCommerce enable customers to select dates that work best for them at checkout. This level of customization improves the likelihood of successful first-time delivery, thereby reducing the costs and hassles associated with missed deliveries. Moreover, it allows businesses to plan their dispatch schedules better, ensuring that peak times are managed more efficiently and resources are allocated appropriately.
Boosting conversions and sales
Improving your WooCommerce store’s conversion rate can be achieved through various means, from simplifying the checkout process to using upselling and cross-selling techniques. Tools like Checkout Field Editor allow you to customize the checkout experience, removing unnecessary fields to streamline the process and make it as quick and painless as possible for customers. Additionally, integrating plugins that suggest related products or offer last-minute deals can tempt customers to add more to their carts, increasing the average order value.
An effective email marketing strategy can also boost conversions. For example, when promoting a webinar with an email sequence, crafting a well-timed sequence of emails can nurture leads and gently guide them toward registration. Starting with an announcement email, followed by reminder emails that add value and build anticipation, can increase engagement and conversion rates. Tools like Mailchimp integrate seamlessly with WooCommerce, enabling you to automate these sequences and tailor your messaging based on customer behavior and preferences, thereby enhancing the chances of conversion.
Enhancing user experience
The success of an eCommerce store largely hinges on the user experience (UX) it provides. A seamless, engaging, and intuitive UX can significantly boost customer satisfaction, repeat business, and word-of-mouth recommendations. In this section, we’ll cover tools and practices that can enhance the UX of your WooCommerce store, from collaborative content creation to managing contact form inquiries efficiently.
Content collaboration
High-quality, compelling content is crucial for attracting and retaining customers. Tools like MultiCollab offer a WordPress plugin that facilitates content collaboration directly within the Gutenberg editor, allowing teams to work together more efficiently on product descriptions, blog posts, and other content. This not only improves the quality of your store’s content but also ensures it’s consistently updated and relevant, enhancing the overall user experience by providing valuable information and engaging narratives that guide customers through your store.
Managing spam
Effective communication channels are vital for customer service and feedback, but spam can significantly hinder these processes. Implementing robust spam filters and captchas for your contact forms can streamline customer inquiries, ensuring that genuine messages are promptly addressed while keeping the nuisance of spam at bay.
Improving searchability
A critical aspect of optimizing user experience in your WooCommerce store is making it easy for customers to find exactly what they’re looking for. Clear navigation and efficient product search mechanisms can significantly reduce bounce rates and increase conversions. Carefully defined product attributes play a vital role in enhancing product discoverability. Attributes such as size, color, brand, and material not only help in organizing your inventory but also improve the shopping experience for customers. By using a plugin to implement filters based on these attributes, you enable customers to quickly narrow down their search to find their desired products effortlessly.
Security and maintenance
Maintaining the security and proper functioning of your WooCommerce store is not just about protecting your data and assets; it’s about safeguarding your customers’ trust. A secure and smoothly running store enhances user confidence and encourages repeat business. This section will cover essential practices and tools for ensuring your WooCommerce store remains secure and operates without hitches, focusing on malware removal and the importance of regular maintenance.
Malware removal tools
The threat of malware and cyber-attacks is a constant concern for online businesses. Malware can compromise customer information, disrupt transactions, and tarnish your store’s reputation. Utilizing robust malware removal tools is critical for detecting and eliminating threats before they cause harm. Plugins can provide comprehensive security solutions, offering firewall protection, malware scan, and threat removal features specifically designed for WordPress sites. Regularly scanning your WooCommerce store for vulnerabilities and ensuring all security patches are up-to-date can prevent potential breaches and keep your business and customers safe.
Regular maintenance checks
An ounce of prevention is worth a pound of cure, especially when it comes to eCommerce. Regular maintenance checks are essential for identifying and addressing issues before they escalate into serious problems. This includes updating WordPress and WooCommerce to the latest versions, ensuring all plugins are compatible and current, and checking for broken links or outdated content. Establishing a routine maintenance schedule helps in preempting issues that could disrupt your store’s operations, ensuring a smooth and reliable shopping experience for your customers.
Conclusion
Overall, the journey to a well-maintained WooCommerce store is multifaceted, involving everything from database optimization and image compression to malware protection and content collaboration. By leveraging the tools and strategies discussed, store owners can address the myriad challenges that come with running an online business.
Remember, the goal is not just to maintain your store but to continuously improve it. The eCommerce landscape is ever-evolving, and staying ahead requires an adaptable approach and a willingness to embrace new technologies and methodologies. Engaging with your customers, understanding their needs, and providing them with a seamless shopping experience will set your WooCommerce store apart in a crowded marketplace.
As you implement these tools and strategies, monitor their impact on your store’s performance and customer satisfaction closely. This data-driven approach will help you refine your tactics, ensuring your store not only runs smoothly but thrives. With dedication and the right tools at your disposal, your WooCommerce store can achieve remarkable success, grow its customer base, and secure a prominent place in the digital marketplace.
Are you concerned about the security of your WordPress website? Do you want to restrict login access to only trusted IP addresses? Whitelisting IP addresses is an effective way to enhance the security of your WordPress login page. In this article, we’ll be taking a closer look at whitelisting within Shield Security PRO, exploring its dual applications:
Whitelisting your entire site to ensure exclusive access for approved users.
Whitelisting users from Shield Security Pro’s Bad Bot detection system to ensure that specific IP addresses are recognized as legitimate, reducing false positives and preventing these users from being blocked from the site.
While shielding against bad bots protects site access for legitimate users, full-site whitelisting takes security even further. Full-site whitelisting, set up through Shield Security PRO’s full-site lockdown feature, ensures that your site won’t load at all for non-whitelisted users. This is an intense security measure that may serve a vital role for businesses with strict security and access requirements.
We’ll walk you through the pros and cons of both whitelisting approaches and how to set them up, while helping you decide whether they’re necessary and practical for your business.
Let’s get started!
Understanding full-site IP whitelisting and its importance in WordPress security
Although it is too restrictive for public-facing platforms, full-site IP whitelisting is great for contexts where stringent access control is vital. Industries like finance, government, and healthcare, dealing with Sensitive Personal Information (SPI) or Private Personal Information (PPI), benefit from this heightened security. However, these are far from the only sites that can benefit from full-site whitelisting
For instance, although an eCommerce site catering to the public will find full-site IP whitelisting impractical, it could make sense for a wholesale retailer that only works with pre-approved buyers. It can also be useful for corporate intranets, which are limited to employee access only, or websites used to manage private security systems.
The decision to implement a full-site whitelist shouldn’t be taken lightly. Site owners must carefully weigh the pros and cons and remember that the extreme nature of IP whitelisting makes it fully incompatible for general public facing businesses and platforms.
Benefits and drawbacks of full-site whitelisting in WordPress
There are many benefits and drawbacks to full-site whitelisting that users should consider before setting this up on their site. For example, some benefits include that this gives you strict access control, ensuring that only approved users can interact with the site. It’s a highly effective security measure that can easily safeguard sensitive and confidential information.
It’s a great tool for building a secure environment that provides a safe and secure place for authorised individuals to access sensitive data. It’s a good way to balance security and accessibility when working with highly sensitive information, such as for financial transactions or healthcare.
One major drawback to consider, however, is that it’s time-consuming and resource-intensive to get a full-site whitelist set up. It also needs continuous attention and maintenance. It can be inconvenient for users, since it restricts them to a specific computer and location. There are workarounds like virtual machines, but they introduce additional complexities as well.
Lastly, no single measure, even whitelisting your whole site, is a foolproof solution against cyber attacks, as it does not provide complete protection. For example, you still have basic cybersecurity measures to keep in mind, such as the risks associated with remote workers logging in on shared family devices. However, the whitelisting itself can lull users into a false sense of security, which may lead to lapses in other vital security practices.
Step-by-Step guide to implementing full-site lockdown in WordPress
Shield Security PRO provides an advanced Site Lockdown feature that transforms your website into a whitelist-only accessible domain. When activated, this setting renders your site inaccessible to everyone except those IP addresses listed on your site’s bypass/whitelist list.
🚨Warning! Before enabling this feature, it’s crucial to add your own IP address to the bypass list to prevent locking yourself out.
Understanding the Site Lockdown Feature
In Shield Security PRO, the Site Lockdown feature simplifies the process of creating a whitelist-only site. It is also a useful solution to deploy during attacks, helping to limit access t the site until the situation can be fully assessed.
Shield Security Pro streamlines the process by doing all the heavy lifting for you, leaving little room for error. To enable the Site Lockdown feature, you need to:
Access your WordPress dashboard.
Navigate to ShieldPRO from the left-hand menu.
Go to Tools → SiteLockdown.
Check the box to whitelist your own IP address, if you haven’t already done so. Do not skip this – otherwise you will be locked out of your own site.
Review and confirm you understand the warnings and risks associated with this process.
Select “Lockdown The Site”
With this setting turned on, your site will only be accessible to users you have whitelisted using Shield Security PRO IP bypass rules, referenced earlier in the article.
Although the Shield Security PRO Site Lockdown feature makes full-site whitelisting a breeze, you can alternatively restrict access to your website by supplying access rules within your .htaccess file (for Apache servers). This method is totally different from Shield Security PRO’s Lockdown capability and requires technical expertise. So, if you’re in any doubt, we recommend hiring a developer to help with the manual approach.
Here is how to manually restrict access to your WordPress site:
Use a plugin like UpdraftPlus or your hosting control panel to back up files and databases.
Accessing the .htaccess file:
Connect to the server using an FTP client (like FileZilla) or through the hosting control panel.
Navigate to the root directory (usually public_html, www, htdocs, etc.).
Modify the.htaccessfile:
Locate and download the.htaccessfile.
Open it in a text editor.
Add the following lines at the top to restrict access to specific IP addresses:
Order deny,allow
Deny from all
# whitelist Your First IP address
Allow from xxx.xxx.xxx.xxx
# whitelist Your Second IP address (if any)
Allow from xxx.xxx.xxx.xxx
📝Note on code: Replace xxx.xxx.xxx.xxx with the actual IP addresses.
If you are using Apache 2.4 or newer, it’s recommended to use the new Require directive for access control, which is more flexible and straightforward.
# whitelist Your First IP address Require ip xxx.xxx.xxx.xxx # whitelist Your Second IP address Require ip xxx.xxx.xxx.xxx
📝Note on code: Replace xxx.xxx.xxx.xxx with the actual IP addresses. The Require directive is part of Apache’s authorisation features, allowing you to specify which users or systems can access your site.
Once you have done this, the changes should be saved and uploaded again to the server (replacing the old .htaccessfile).
Whitelisting IP addresses in the Shield Security PRO plugin
When using Shield Security PRO, safeguarding your website involves understanding and managing the ADE, which detects bad bot signals, defending your site from malicious entities.
However, this system, while effective, can occasionally result in false positives – legitimate users being mistakenly flagged as bots.
To prevent the accidental blocking of known users, you can whitelist IP addresses with Shield Security PRO. By adding these trusted users to the IP Bypass list, you ensure uninterrupted access while maintaining a robust defence against malicious bots. Here’s how to do this:
Identify the IP address of the user you want to whitelist. Online tools, like Shield Security PRO’s IP address finder, can help users find this information.
Go to your WordPress dashboard and select ShieldPRO from the left-hand menu to open the Shield Security PRO dashboard.
Within Shield Security Pro’s dashboard, go to IP Rules and select the gear icon in the top right-hand corner.
Choose Create new IP rule to initiate the whitelisting process.
Enter the IP address or range you want to whitelist.
Provide a clear and memorable label, such as “Whitelist”, for easy identification.
Select Add to bypass list to confirm the whitelisting.
Once an IP address is whitelisted, the ADE will bypass it completely. However, exercising caution is important as this practice may pose security risks, particularly if the whitelisted IP address becomes compromised. It’s wise to periodically review your IP whitelists and remove any entries that are no longer required.
Maintaining your whitelist: Regular reviews and updates
One of the most important things to remember is that whitelisted addresses, once approved, are never blocked, regardless of their onsite activity.
Unlike Shield’s Automatic IP Blocking system which keeps your IP rules list lean for performance purposes, there is no automated pruning of whitelisted IP addresses.
The potential risks associated with outdated whitelist entries shouldn’t be overlooked.
Unauthorised access through excessive permissions could pose significant security threats. That’s why due diligence in the form of regular security audits are crucial to ensure authorised users retain the necessary access and unauthorised entities are promptly removed.
Here is our recommended approach to whitelist maintenance:
Review: Periodically review the existing whitelist to identify any outdated or unnecessary entries. Always verify the legitimacy of each whitelisted IP address.
Periodic checks: Conduct periodic checks, aligning with your usual website security audit schedule. Ensure that the whitelist aligns with the current needs of your website.
Secure your WordPress site with Site Lockdown today
While Site Lockdown may not suit every website, it’s invaluable for security sensitive industries like finance, government, and healthcare, where stringent cybersecurity measures are vital.
IP whitelisting helps streamline access for some users, and it can be complex without a plugin to manage it for you, but Shield Security PRO simplifies the process.
WordPress is one of the most popular content management systems (CMS) in the world, powering millions of websites. However, its popularity makes it a target for hackers. One common vulnerability that hackers exploit is the TimThumb vulnerability.
In this post, we will discuss what the TimThumb hack is, how it affects your WordPress site, and provide a step-by-step guide on how to rectify the hack yourself.
Understanding the TimThumb vulnerability in WordPress
TimThumb was a PHP code snippet used in WordPress themes and plugins to dynamically resize images to predefined dimensions to simplify the process of generating thumbnails on the fly. Before WordPress introduced this functionality into Core, TimThumb was an extremely popular script and included with many WordPress themes. Unfortunately, this script became a focal point for a significant cybersecurity concern within the WordPress community.
In 2011, a significant security incident unfolded as hackers exploited a vulnerability in TimThumb, a widely-used script at the time for dynamic image resizing in WordPress. This issue became particularly widespread due to several unique circumstances:
Lack of dynamic image resizing in WordPress
Early versions of WordPress couldn’t resize images dynamically on its own. But when mobile-responsive design gained popularity in the early 2010s, TimThumb came to the rescue. It allowed users to upload an image once and automatically get properly sized images for different screen sizes, even on mobile devices. As a result, TimThumb became a widely used solution in themes.
Prevalence in paid themes
Many premium WordPress themes incorporated TimThumb, bundling the script with their designs. Given that automatic theme updates were not yet widely adopted, users were required to manually update their themes. This posed a challenge as users often neglected updates, leaving vulnerable versions of TimThumb in use for extended periods.
Delayed awareness and remediation
The security issue with TimThumb allowed hackers to upload malicious PHP files, injecting harmful code into websites. Due to the lack of awareness, delayed updates, and the absence of automated security solutions like Shield (which wasn’t available in 2011!), the impact of the hack persisted for years, affecting a substantial number of WordPress sites.
Improved automatic updates
Notably, such a widespread and prolonged vulnerability would be less likely to occur in the present day. Modern WordPress versions benefit from improved automatic update mechanisms. If a security issue were to arise, updates are promptly issued, enabling site owners to quickly secure their websites.
The widespread effect was enhanced by the lack of updates made by website owners. This vulnerability shows us the importance of robust cybersecurity measures for the broader WordPress user base.
Though modern cybersecurity measures have substantially mitigated the TimThumb vulnerability’s impact, it remains an active threat. In fact, at least 56,606 websites are still using TimThumb to this day, including government websites.
💭Did you know? The most exploited plugin on this list, responsible for a huge 36% of WordPress hacks, was Contact Form 7.
The TimThumb script is no longer officially maintained or supported. Yet, it continues to persist on users’ sites, especially if they use outdated plugins and themes. This poses a threat, as TimThumb might unknowingly find its way onto your page, leaving you vulnerable.
Why did this happen in the first place?
Bugs are found in code all the time. When Ben Gillbanks, who initially wrote the TimTumb script, became aware of it, a fix was issued. This is, generally speaking, normal. The issue was that the update didn’t reach end-users because of how developers distributed WordPress themes at the time (as there were no automatic updates), so un-updated sites are still around now.
Ben told us:
When TimThumb was developed, WordPress lacked image thumbnails, prompting its creation to enhance website aesthetics, initially intended for premium WordPress themes. Unexpectedly, its popularity grew as other theme shops adopted the image resizing script.
The first indication that something was wrong was when my own site was defaced. Someone had changed my footer to link somewhere else. Unsure of the cause, I reverted it and ensured everything was up to date. Fortunately, this was before hackers started introducing backdoors, so it didn’t happen again.
A couple of days later, reports emerged that TimThumb was hacked, and my heart sank. I felt super guilty and spent a lot of time over the next few days trying to make it more secure.
Ben hosted TimThumb on Google Code, as GitHub wasn’t an option at the time. TimThumb was open source, and WordPress co-founder Matt Mullenweg got personally involved, introducing Ben and developer Mark Maunder. A fixed version was released, but without automatic updates in WordPress, it didn’t reach end-users with the scale as you’d see now.
Ben shared some insight into the root of the issue:
The vulnerability arose from a few different factors:
I had allowed resizing of external images, which meant files from other websites could be loaded.
I enabled data caching for those external files without performing any file type checks to ensure they were images, not code.
Detecting the hack: Tools and techniques
The TimThumb exploit from 2011 is still an issue today. As discussed above, over 50,000 sites still use the script. One can assume that a smaller share of these are using the vulnerable version, but with TimThumb no longer maintained and WordPress offering dynamic image resizing, there’s little need for using it in 2024 or beyond.
For those with older websites or looking for absolute certainty about their site’s security, certain steps can be taken to assess and address any lingering use of TimThumb:
Access files.
Use your FTP client, Secure Shell, or your hosting provider to access your website’s files.
Backup.
Before proceeding, create a backup of your site files to avoid data loss.
Search for TimThumb files.
Thoroughly check every file in your root directory. Look specifically for files labelled timthumb.php or thumb.php.
📝Please note: Manual file inspection is time-consuming and liable to human error. We recommend exploring alternative methods, such as using vulnerability scanner plugins.
While there are several plugin options on the market, Shield Security PRO is a great choice due to its extensive suite of customisable features, particularly the Anti-Bot Detection Engine.
Using Shield Security PRO for early detection and prevention
Using Shield Security PRO is a great way to detect and prevent TimThumb hacks on WordPress sites. It has a vulnerability scanner that identifies known vulnerabilities, including the TimThumb script, allowing users to remove potential threats. The scan is also powered by artificial intelligence and machine learning. Dubbed MAL{ai}, the scanner can identify threats it’s never even seen before with 80-90% accuracy.
Automatic file scanning is a key feature that compares your website to the default WordPress install to pinpoint files that shouldn’t be present. Shield Security PRO also takes charge of updating themes and plugins while flagging any out-of-date plugins, ensuring your site stays fortified against potential exploits.
The faster vulnerabilities – like the use of the TimThumb script – are detected, the less opportunity hackers have to exploit and insert malicious code. Shield Security PRO provides a defence mechanism, enhancing your website’s resilience against emerging threats.
Steps to recover your WordPress site post-hack
Discovering a TimThumb vulnerability – or worse, an exploit – can be stressful. To help you with recovery, follow these steps:
Assessing the damage
Compare your site files and databases to the original versions to identify any discrepancies. Use tools like Shield Security PRO’s Malware Scanner to detect malicious code. Look for signs of unauthorised access, unexpected content changes, or alterations to your website’s structure.
Here’s how to scan on Shield Security PRO:
Go to your WordPress dashboard and press ShieldPRO.
Click Scans.
Click the settings icon in the right-hand corner.
Press Run Manual Scan.
Press Run Scans Now.
From here, you will be notified if anything suspicious is occurring.
Cleaning up the infection
Change all passwords associated with your WordPress site, including admin, FTP, and database passwords. This helps secure your site and prevent further unauthorised access.
Ensure all elements of your WordPress site are up-to-date. This includes the core software, themes, and plugins. Regular updates patch security vulnerabilities, reducing the risk of future attacks.
Remove malicious injections from your databases and files. While technical details can be complex, it’s crucial to ensure your site is entirely free from compromised code. Note that manual cleanup may be risky for non-technical users; consider using specialised tools for a safer and more efficient cleanup.
If available, restore your WordPress site from a clean backup. It is vital to regularly back up your site as a precautionary measure. There are a variety of WordPress backup plugins available to automate this process.
Communicating the incident
If user data might have been compromised, inform your site users about the breach. We recommend creating a draft communication statement in advance to save time and minimise stress. Include information like the type of attack, compromised data, impact on performance, and assurances about resolving the issue.
🔎 An example email for communicating a breach:
⚠️ You may want to consult legal professionals when drafting and releasing such communications, to ensure compliance with laws like GDPR.
Subject: Important notice regarding recent security incident on [Your Website Name]
Dear [Website Users],
I hope this message finds you well. We are writing to inform you about a recent security incident that has come to our attention. Your trust in our website’s security is of utmost importance to us, and we want to be transparent about the steps we are taking to address the situation.
What happened? Our website recently experienced a security breach, and we believe it is our responsibility to notify you. The breach involved [brief description of the type of attack, e.g., unauthorised access or a specific vulnerability]. We want to assure you that we are taking immediate action to rectify the situation.
Was there any compromised data? While we are still conducting a thorough investigation, it is possible that some user data may have been compromised. This may include [specify the type of data that might have been affected, e.g., usernames, email addresses, etc.]. We want to be transparent with you about the extent of the incident and assure you that we are doing everything in our power to safeguard your information.
Will this impact performance? We understand the importance of secure data. The breach may have had some impact on the performance of our website. We are actively working to address any performance issues and enhance our security measures to prevent future incidents. We want to assure you that our team is working diligently to resolve the issue. We have taken immediate steps to secure our website and are implementing additional security measures to prevent similar incidents in the future. Your security and privacy are our top priorities.
What can you do? As a precautionary measure, we recommend changing your password on our website. Additionally, if you use the same password on other sites, consider updating it there as well – and to avoid using the same password across multiple sites in the future. We also advise monitoring your accounts for any suspicious activity.
We are committed to keeping you informed about the progress of our investigation and the actions we are taking. If you have any questions or concerns, please do not hesitate to contact us at [provide a contact email or phone number].
We sincerely apologise for any inconvenience this incident may have caused. Your understanding and cooperation during this time are greatly appreciated.
Thank you for being a valued member of our community.
After the recovery, take time to analyse how the hack occurred. Understanding the vulnerability can help you prevent future attacks.
Securing your WordPress website against TimThumb and other vulnerability attacks
While TimThumb is no longer actively used in WordPress themes or plugins, it could be lingering in out-of-date sections of your site’s code. Regularly updating and removing previous instances of TimThumb in your WordPress site significantly reduces the risk of its exploits.
Paul Goodchild, creator of Shield Security PRO, says, “If you’re performing regular maintenance on your WordPress sites, the likelihood that you’ll be susceptible to a vulnerability is slim-to-almost-none. You’ll have updated the affected plugin or theme, so you’re already protected.”
Recognising that technology evolves, relying on the right protection is important. A cybersecurity plugin like Shield Security PRO offers security with vulnerability detection, malware scanning, and bad-bot blocking.
Much like a well-oiled machine, your WordPress requires regular maintenance to ensure peak performance and security. Without it, you can end up with a disorganised and bloated database, which can affect your site’s speed and leave it vulnerable to online threats.
But fear not! The solution lies in a simple yet often overlooked aspect of website management – database cleanup and optimisation.
In this comprehensive guide, we’ll show you how a little housekeeping can not only give your site the speed boost it desperately needs, but also strengthen its security against lurking threats. From manual tweaks to security plugins like Shield Security Pro, you’ll learn how to cleanse your digital space efficiently!
Understanding WordPress database health: Why it matters
Over time, a WordPress database accumulates old and unused data. Think of this as digital clutter – rows upon rows of data that are no longer in use but still take up space. This includes old post revisions, trashed items, spam comments, and data left by uninstalled plugins.
This clutter doesn’t just take up digital space. Every time your website performs a task, your server has to sift through everything. This creates an unnecessary workload that slows down your site, affecting user experience and potentially harming your SEO rankings.
Regular database maintenance ensures seamless website performance and significantly lowers the risk of malware infection. Since malware often hides in the clutter, a clean and optimised database is less vulnerable to attacks.
Here’s what to do to make sure your database is well-maintained:
Regular backups: Before any cleanup, ensure you have a recent backup. It’s your safety net in case something goes wrong.
Routine scanning for malware: Use reliable tools like the Shield Security Pro plugin for regular scans. Catching and removing malware early can prevent more significant issues down the line.
Removing unused themes and plugins: Inactive themes and plugins are not just dead weight; they’re potential security risks. Regularly clean them out.
Spam comment cleanup: Spam comments bloat your database and can harm your site’s credibility. Regularly purging them is crucial.
Optimising database tables
Table optimisation, or defragmentation, is about removing excess data from your site’s data tables. Think of it like organising a messy bookshelf so you can find books faster. It rearranges the data to use space more efficiently, improving performance. This process is important for larger websites, where data operations can become significantly slower over time.
Popular plugins like WP-Optimize, WP-DBManager, and Advanced Database Cleaner offer a user-friendly way to handle database optimisation without needing deep technical expertise. They help automate the cleanup process, ensuring your WordPress site remains speedy and efficient.
Backing up your site before initiating cleanup
Before you dive into the nitty-gritty of database cleanup, you must always back up your site first.
While database cleanup aims to remove only redundant data, the process isn’t infallible. There’s always a risk, however small, that something might go wrong. In such cases, a backup is your quick ticket to recovery, allowing you to restore your site to its pre-cleanup state with minimal fuss.
Here are some scenarios where backups save the day:
User error: Sometimes, the biggest threat to your website can be accidental mishaps, like deleting important files or making erroneous changes.
Platform and plugin updates: Updates are essential for security and performance, but they can occasionally lead to compatibility issues or data loss.
Security breaches: In the unfortunate event of a hack or malware infection, a backup can be vital in restoring your site to a secure state.
The good news is that backing up your WordPress site can be made easy via backup plugins like WP-Staging, UpdraftPlus, BackupBuddy, and VaultPress (Jetpack Backup). These tools automate the process, ensuring that your site is regularly backed up without requiring manual intervention every time.
How often should you back up?
The frequency of backups should reflect how often your site is updated. For a dynamic site with daily changes, a daily backup is ideal. However, for smaller sites with less frequent updates, weekly or even monthly backups might suffice.
The key is to never skip backups altogether. It’s a small effort that can save a lot of time and stress in the long run.
Manual cleanup vs. plugin-assisted optimisation
When it comes to optimising your WordPress database, you have two primary approaches: manual cleanup or using plugins. While manual cleanup requires more technical know-how, it also gives you more precise control over the optimisation process.
Manual cleanup
Before any changes, ensure you have a recent backup of your WordPress site, including the database. This step is non-negotiable and serves as your safety net.
Log in to your database using phpMyAdmin, which is typically available through your web hosting control panel.
In phpMyAdmin, select your WordPress database from the list on the left.
You’ll see a list of all the tables in your database. Check the tables you want to optimise (or select all).
From the drop-down menu, select Optimize table. This will defragment the selected tables and can improve performance.
Navigate to the SQL tab.
WordPress saves every change you make in the posts as revisions. This can lead to a bloated database. To delete these post revisions, run this command:
DELETEFROM wp_posts WHERE post_type = "revision";
Make sure to change the wp_ table prefix to the prefix you or your hosting provider set up during installation.
To delete spam comments, run the following SQL command:
DELETEFROM wp_comments WHERE comment_approved = 'spam';
In WordPress, ‘trash’ is a post status used for content that has been moved to the trash but not yet permanently deleted. To empty the trash and permanently delete what’s in it, run this query:
DELETEFROM wp_posts WHERE post_status = 'trash';
Transients are used to speed up WordPress by caching data that is expensive to compute or retrieve. They are typically temporary and can be safely removed:
DELETEFROM wp_options WHERE option_name LIKE ('%\_transient\_%');
Unused tags can be removed with a query like:
DELETEFROM wp_terms wt INNERJOIN wp_term_taxonomy wtt ON wt.term_id = wtt.term_id WHERE wtt.taxonomy = 'post_tag' AND wtt.count = 0;
This command deletes all tags (from both wp_terms and wp_term_taxonomy tables) that are not assigned to any posts on your WordPress website.
After cleaning up, it’s a good idea to check the database for any errors. Select your database and use the Check table or Repair table options if needed.
You might have tables from old plugins that are no longer used – many will leave tables behind even when the plugin itself have been removed from the site. Review these tables and delete them if they’re not needed. Be very careful with this step, as deleting the wrong table can cause issues with your site. If you’re in doubt, you can always reach out to the plugin developers to ensure you’re deleting the right items.
For plugin-assisted optimisation
For WordPress users who prefer a more straightforward, less technical approach to database optimisation, plugin-assisted methods are a game-changer. These tools offer:
Ease of use: Plugins provide a simple interface for tasks that would otherwise require technical expertise. They’re designed to be intuitive and accessible, even for those with minimal technical background.
Automation: Many WordPress plugins can operate in the background, performing routine cleanups and optimisations without your constant oversight. This automation saves time and ensures regular maintenance is carried out.
Less technical involvement: By automating database optimisation, you free up valuable time and resources to focus on other areas of your business, like content creation, marketing, and customer engagement.
Among the most notable plugins for database optimisation include:
WP-Optimize: This popular plugin cleans your database, compresses images, and caches your site, making it a comprehensive tool for site optimisation.
WP-DBManager: Known for its database backup, repair, and optimisation features, WP-DBManager is a solid choice for those looking to maintain their database’s health.
WP-DBManger download page
Advanced Database Cleaner: If you’re looking for a plugin that goes beyond basic cleanup, this tool helps you get rid of orphaned items and old revisions with ease.
Setting up and using database optimisation plugins
For the sake of this tutorial, we’re going to be using the WP-Optimize plugin:
From your WordPress admin dashboard, go to Plugins > Add New Plugin.
Search for the WP-Optimize plugin and click on Install Now, then Active.
A new icon for WP-Optimize will appear in your WordPress left-hand side menu. Click on it and go through the plugin settings to configure the optimisation tasks you want to automate, like spam comment cleanup, post-revision removal, and database table optimisation.
Many plugins offer the option to schedule regular cleanups. Setting this up ensures your database remains optimised without manual intervention.
Choosing the right plugin
When selecting a plugin, especially those designed to modify or remove data, it’s necessary to pick one that is well-reviewed and regularly updated. Check the plugin’s ratings, user reviews, and update history to ensure reliability and compatibility with your version of WordPress.
By choosing the right plugin, you can significantly reduce the effort required in database maintenance, ensuring your WordPress site remains optimised, fast, and secure with minimal hassle.
Using Shield Security Pro for malware removal
When it comes to safeguarding your WordPress site against malware, Shield Security PRO stands out as a robust solution. Its advanced malware scanning and removal tool is specifically designed to protect your website by detecting and eliminating malicious code.
Features of Shield Security PRO’s malware scanner
Comprehensive scanning: The malware scanner in Shield Security PRO thoroughly examines your files, looking for patterns that indicate malware infiltration. This proactive approach ensures that even the most cunningly hidden malware is identified.
Detailed reporting: When it detects malware, the plugin creates a detailed report alerting you to the affected files. This feature allows you to download and inspect these files closely, giving you a clear understanding of the nature and extent of the malware.
Automatic repair option: For those seeking a hands-off approach, Shield Security PRO offers an automatic repair feature. This functionality enables the plugin to edit and remove suspicious code autonomously, saving you the time and effort of manual intervention.
Customisable repair settings: You have the flexibility to set automatic repairs for core files, plugin files, theme files, or all three, depending on your preference and website structure.
While automatic repair is a convenient feature, it’s essential to use it wisely, especially if you regularly modify your WordPress files. In such cases, automatic repairs might unintentionally alter your customisations. Therefore, if you often tweak your WordPress code, manual inspection and repair might be more suitable.
Regardless of whether you choose automatic repairs or prefer to handle file fixes manually, the key advantage of Shield Security PRO’s malware scanning lies in its prompt detection. Fast identification of malicious data is crucial in preventing it from causing significant damage to your site.
Enhance your WordPress site’s performance & security with Shield Security PRO
Regular WordPress database cleanups and optimisations are necessary for maintaining a high-performing, secure website.
While manual database maintenance is certainly an option, it can be time-consuming and requires a certain level of technical expertise. This is where plugins come into play, offering a simpler, more efficient solution. By automating key aspects of the maintenance process, these tools significantly reduce the workload on website owners.
Shield Security PRO is designed to address both the performance and security needs of your WordPress site. It features advanced vulnerability and malware scanning capabilities, which play a vital role in identifying and removing unused data and potentially dangerous elements from your site.
Don’t let the health and security of your WordPress site take a backseat. With Shield Security PRO, you have a powerful tool at your disposal to keep your site running smoothly and securely.
On February 15th, 2024, during our second Bug Bounty Extravaganza, we received a submission for an authenticated SQL Injection vulnerability in Tutor LMS, a WordPress plugin with more than 80,000+ active installations. This vulnerability can be leveraged to extract sensitive data from the database, such as password hashes.
Props to Muhammad Hassham Nagori who discovered and responsibly reported this vulnerability through the Wordfence Bug Bounty Program. This researcher earned a bounty of $625.00 for this discovery during our Bug Bounty Program Extravaganza. Our mission is to Secure the Web, which is why we are investing in quality vulnerability research and collaborating with researchers of this caliber through our Bug Bounty Program. We are committed to making the WordPress ecosystem more secure, which ultimately makes the entire web more secure.
All Wordfence Premium, Wordfence Care, and Wordfence Response customers, as well as those using the free version of our plugin, are protected against any exploits targeting this vulnerability by the Wordfence firewall’s built-in SQL Injection protection.
We contacted Themeum on February 22, 2024, and received a response on February 23, 2024. After providing full disclosure details, the developer released a patch on March 11, 2024. We would like to commend Themeum for their prompt response and timely patch.
We urge users to update their sites with the latest patched version of Tutor LMS, which is version 2.6.2, as soon as possible.
The Tutor LMS – eLearning and online course solution plugin for WordPress is vulnerable to time-based SQL Injection via the question_id parameter in all versions up to, and including, 2.6.1 due to insufficient escaping on the user supplied parameter and lack of sufficient preparation on the existing SQL query. This makes it possible for authenticated attackers, with subscriber/student access or higher, to append additional SQL queries into already existing queries that can be used to extract sensitive information from the database.
Technical Analysis
Tutor LMS is a WordPress plugin which includes many features, such as a course builder, quiz and assignment types, dashboard, payment and WooCommerce integration, and a lot of other add-ons.
Unfortunately, insecure implementation of the plugin’s Q&A questions query functionality allows for SQL injection. Examining the code reveals that the plugin uses the get_qa_questions() function in the Utils class to query Q&A questions, where the id can be specified with the ‘question_id’ parameter.
This function is called in several view files. In some cases, the ‘question_id’ GET input value is sanitized in the view file:
However, there are also cases where it is not sanitized:
1
$question_id= Input::get( 'question_id');
The get_qa_questions() function contains the following code:
4451
$question_clause= $question_id? ' AND _question.comment_ID='. $question_id: '';
Here we can see that no sanitization function is being used on the question id in the get_qa_questions() function although this id is always meant to be an integer.
Typically, the prepare() function would parameterize and escape the SQL query for safe execution in WordPress, thereby providing protection against SQL injection attacks. But, in this instance, the $question_clause value is not used as a parameter, it is just appended to the query as a string. This means that prepare() will not actually escape the data being passed to the SQL query, thus making it possible to break out of the current SQL query and inject new queries to extract data.
Union-Based SQL injection is not possible due to the structure of the query, which means an attacker would need to use a Time-Based blind approach to extract information from the database. This means that they would need to use SQL CASE statements along with the SLEEP() command while observing the response time of each request to steal information from the database. This is an intricate, yet frequently successful method to obtain information from a database when exploiting SQL Injection vulnerabilities.
Wordfence Firewall
The following graphic demonstrates the steps to exploitation an attacker might take and at which point the Wordfence firewall would block an attacker from successfully exploiting the vulnerability.
The Wordfence firewall rule detects the malicious SQL query and blocks the request.
Disclosure Timeline
February 15, 2024 – We receive the submission of the SQL Injection vulnerability in Tutor LMS via the Wordfence Bug Bounty Program. February 22, 2024 – We validate the report and confirm the proof-of-concept exploit. February 22, 2024 – We initiate contact with the plugin vendor asking that they confirm the inbox for handling the discussion. February 23, 2024 – The vendor confirms the inbox for handling the discussion. February 24, 2024 – We send over the full disclosure details. The vendor acknowledges the report and begins working on a fix. March 11, 2024 – The fully patched version of the plugin, 2.6.2, is released.
Conclusion
In this blog post, we detailed a SQL Injection vulnerability within the Tutor LMS plugin affecting versions 2.6.1 and earlier. This vulnerability allows authenticated threat actors to inject malicious SQL queries to steal sensitive information from the database. The vulnerability has been fully addressed in version 2.6.2 of the plugin.
We encourage WordPress users to verify that their sites are updated to the latest patched version of Tutor LMS.
All Wordfence users, including those running Wordfence Premium, Wordfence Care, and Wordfence Response, as well as sites running the free version of Wordfence, are fully protected against this vulnerability.
If you know someone who uses this plugin on their site, we recommend sharing this advisory with them to ensure their site remains secure, as this vulnerability poses a significant risk.


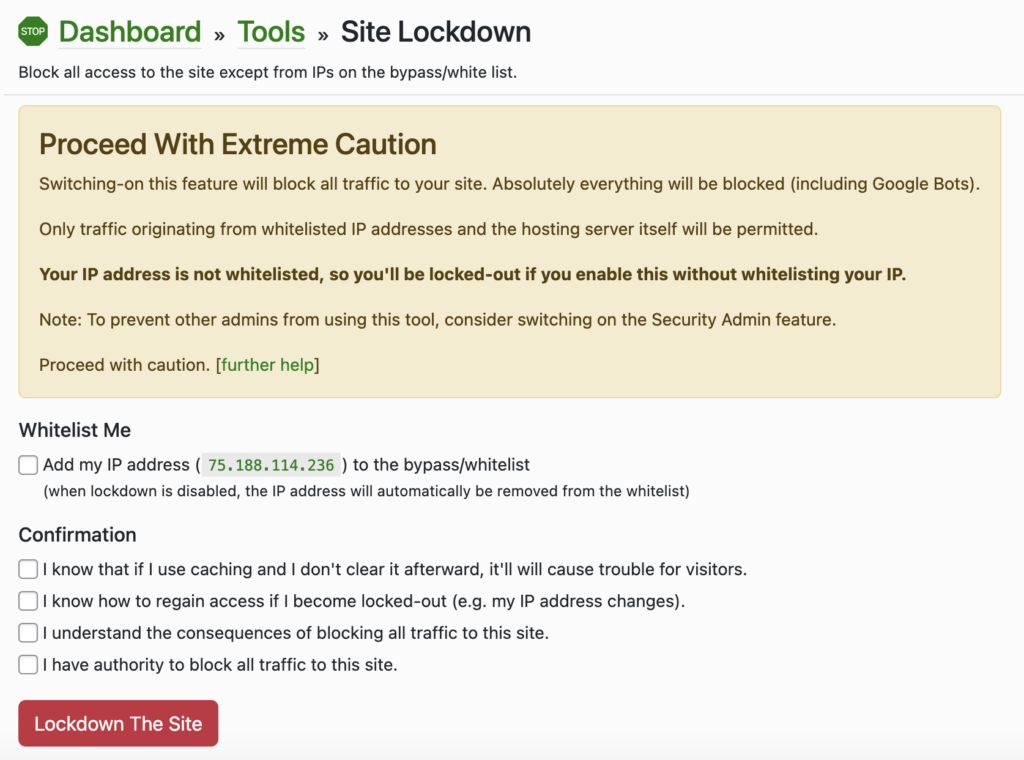
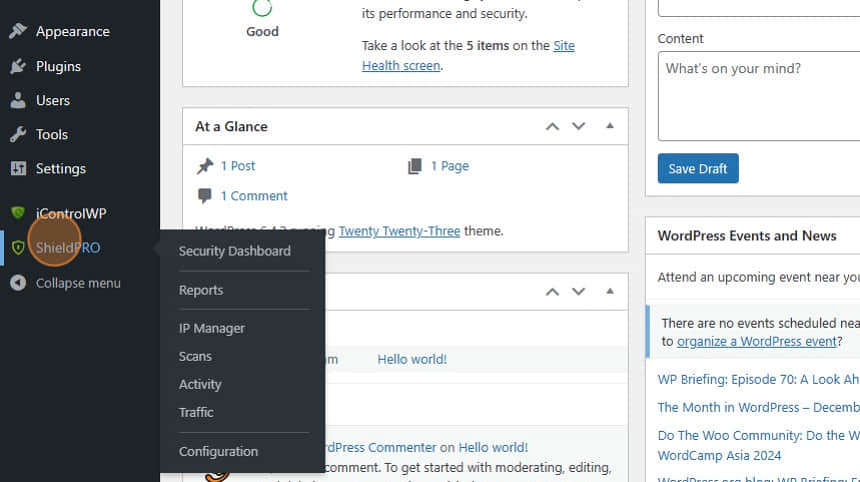
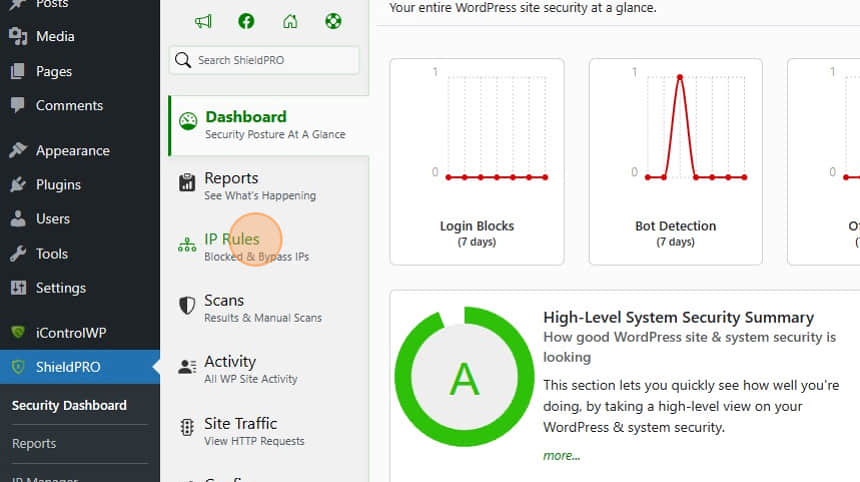
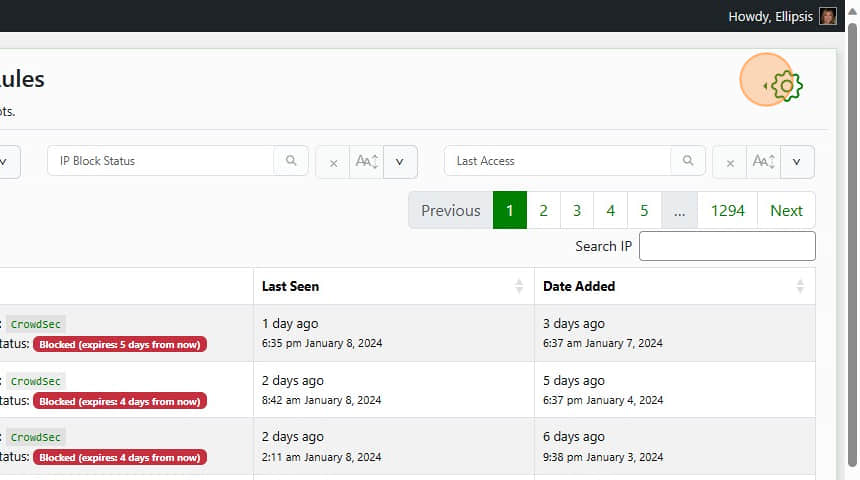
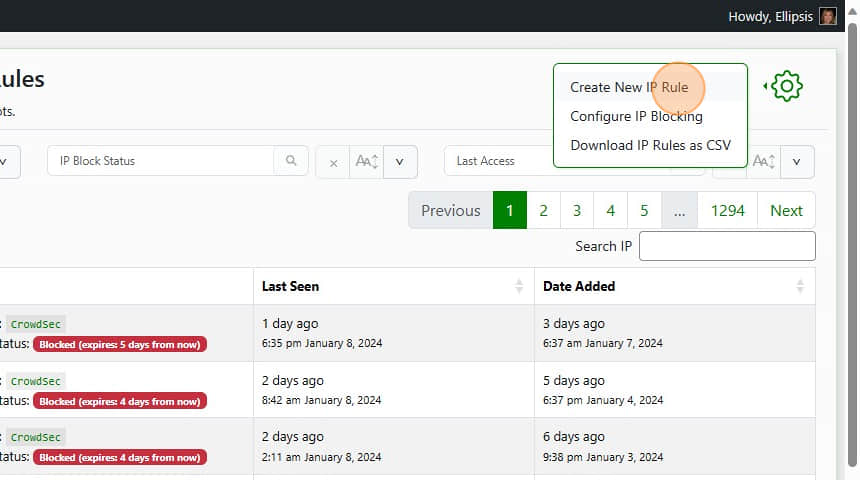
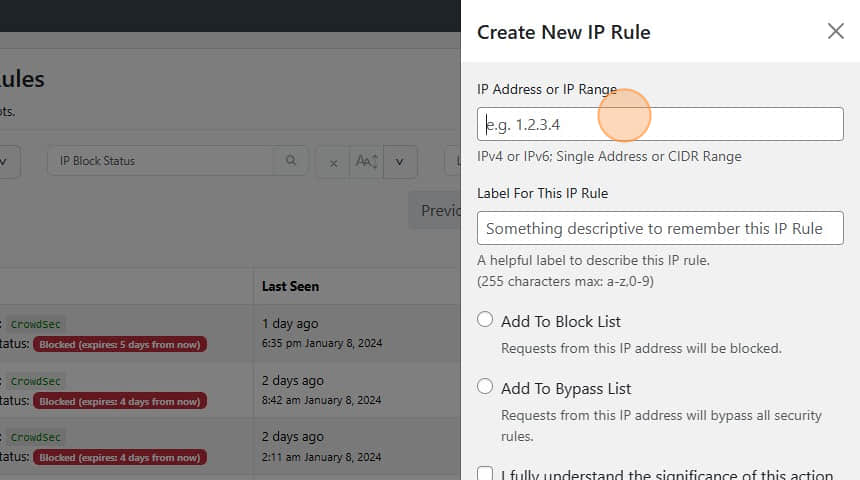

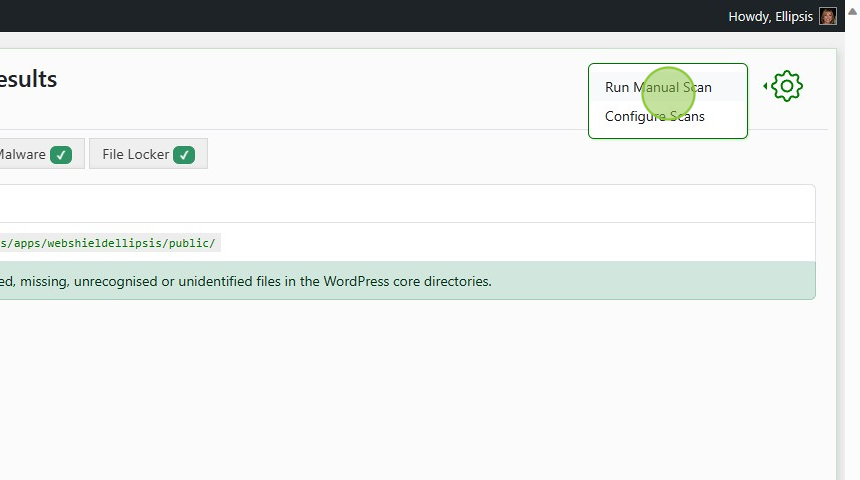
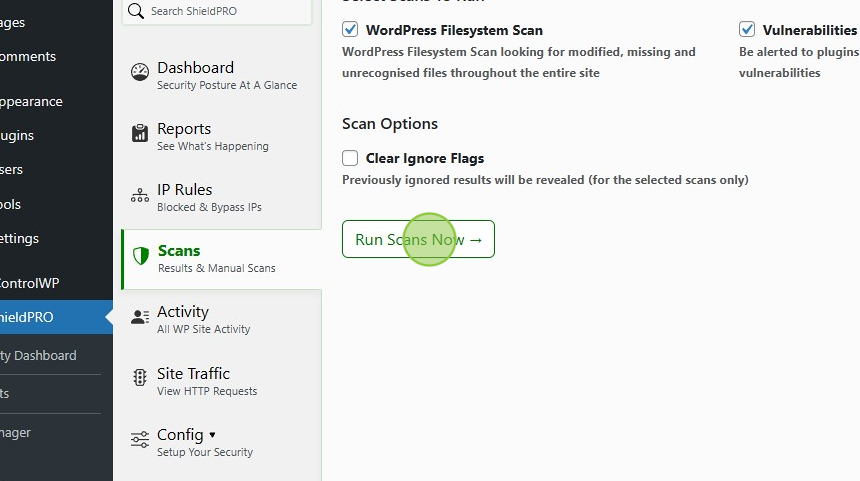
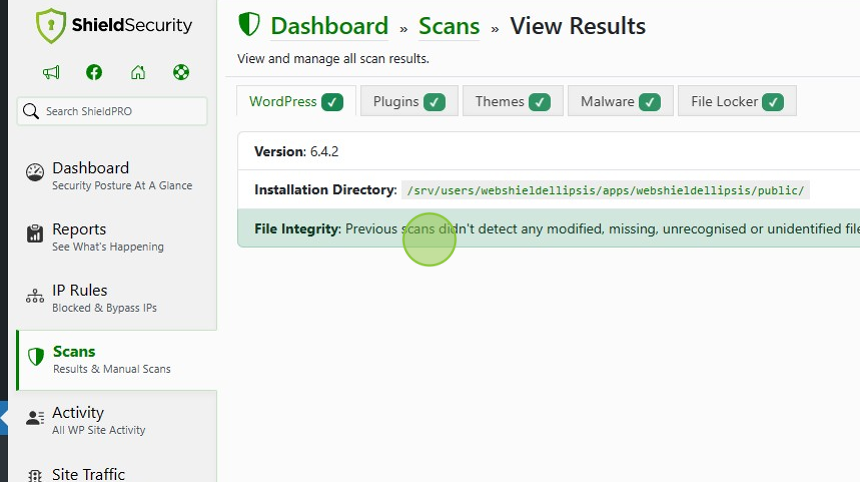
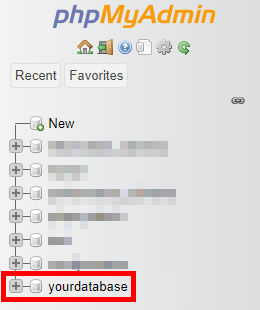
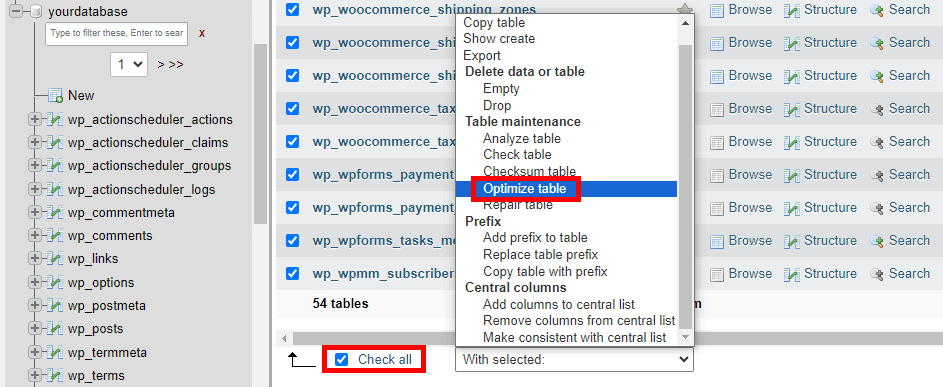
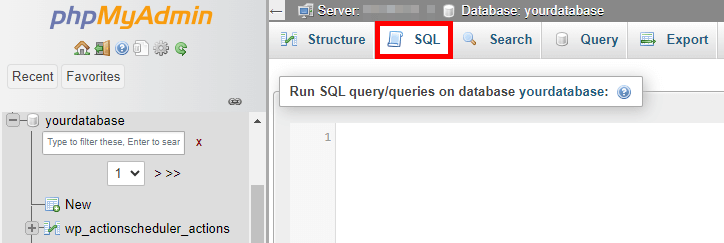
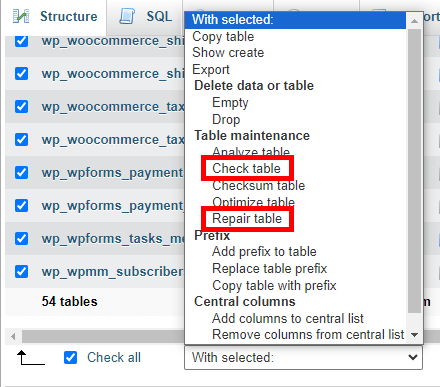


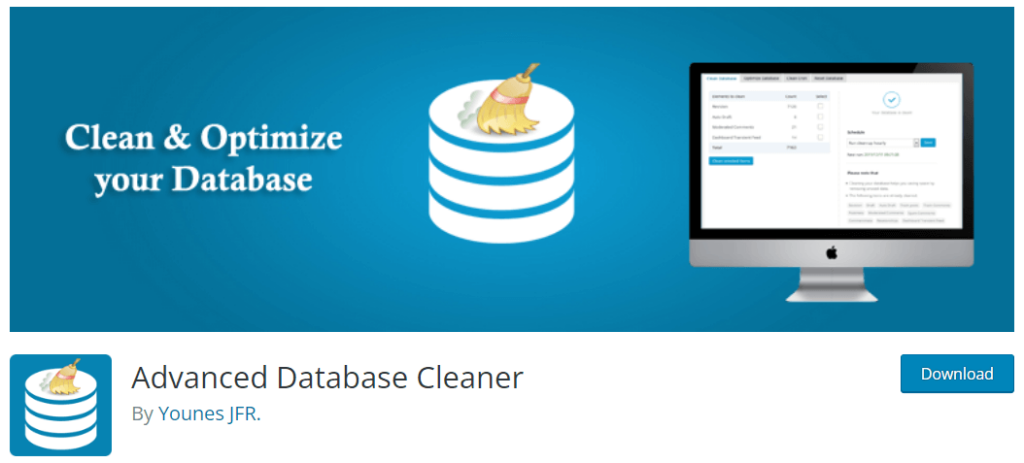
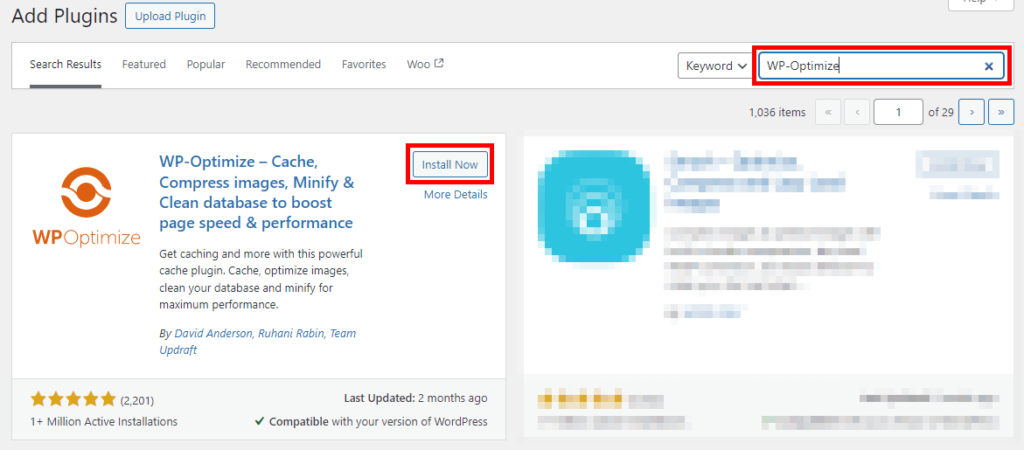
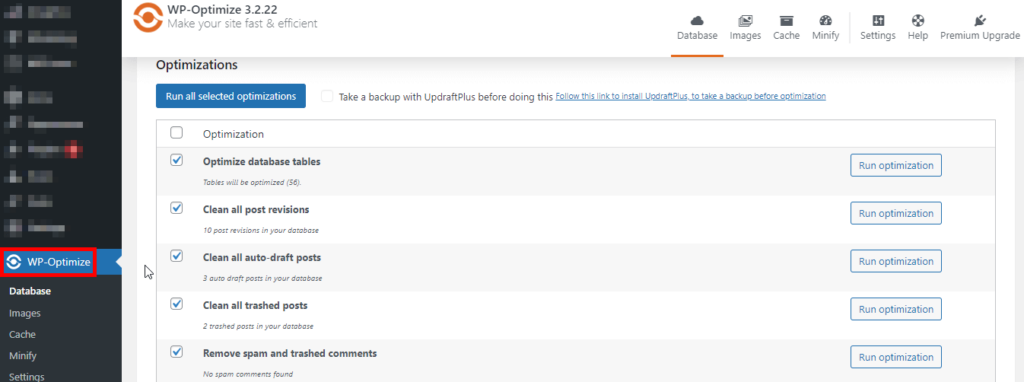
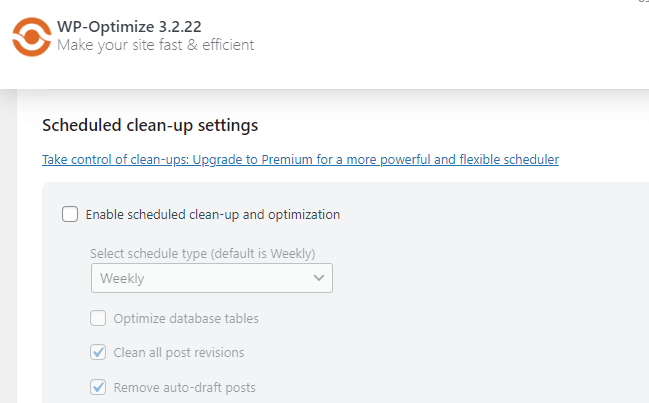
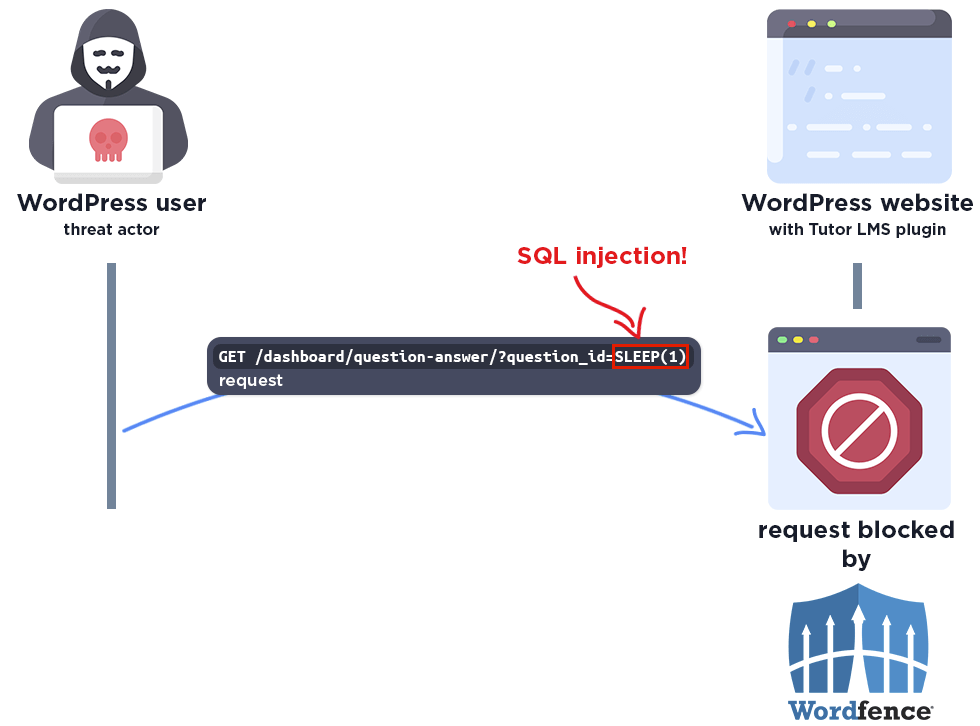