Changing the name of an Active Directory domain is something few AD administrators have ever done. The domain renaming process itself is fairly straightforward, but needs to be carefully planned so as not to break the entire corporate infrastructure.
The need to change an AD domain name usually arises in the context of a corporate acquisition, rebranding, M&A consolidation of multiple business units.
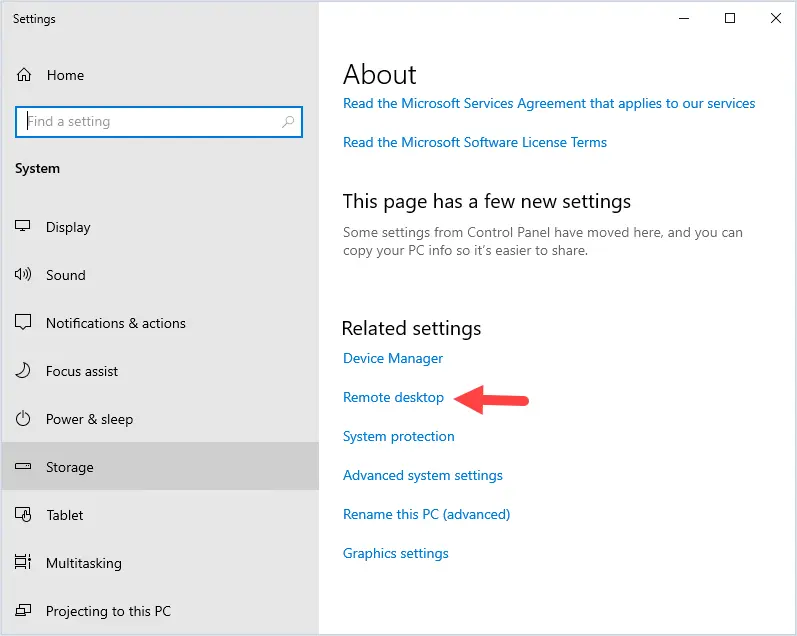
Preparation for an AD Domain Rename
Before you proceed to change your domain name, check the basic requirements:
Domains with on-premises Exchange Server (except 2003 versions) are incompatible with domain renaming. Migrating your users, groups, and computers to a new AD forest with Exchange using ADMT is the only solution in this case;
There are some other Microsoft and non-Microsoft applications that do not support domain renaming renames (check your application’s documentation);
You need to create a primary DNS zone for the new domain name in your AD;
If your DFS namespaces, redirected folders, roaming user profiles, etc. are implemented in your infrastructure, gather all the relevant information for them and schedule a migration immediately after the domain name change.
In this post, we will rename an existing contoso.com domain with AD controllers running Windows Server 2019 to theitbros.com.
Note. Be sure to backup your AD before you start renaming your domain.
The first step is to create a primary DNS zone for the new domain on your DNS server:
Connect to DC and open the DNS Manager console (dnsmgmt.msc);
Expand the Forward Lookup Zones node;
Select New zone;
Create a new primary AD-integrated zone called theitbros.com with enabled Allow only secure dynamic updates option. Wait for the new zone to replicate all the DNS servers in the forest.
Renaming AD Domain Using RenDom Tool
In order to change the AD domain name, you must use the rendom console tool, which is available on any domain controller. The C:\Windows\System32\rendom.exe command allows you to perform all the necessary actions for a domain renaming operation.
Sign-in to the DC and open the command prompt as an administrator.
Run the following command to generate an XML file containing your domain configuration:
rendom /list
Open the Domainlist.xml with notepad:
notepad Domainlist.xml
Use the Edit > Replace option to find the old domain name in the file and replace it with the new one. Manually change the value in the NetBiosName field.
Save the changes to the Domainlist.xml file.
Verify the new configuration (command makes no changes yet):
rendom /showforest
Upload a new configuration file to the DC running the Domain Naming Operations Master FSMO role:
rendom /upload
Wait for the file containing the domain renaming instructions to be replicated to all other domain controllers in the forest. You can force the synchronization of changes made on the Domain Naming Master to all DCs:
This creates a DCclist.xml file that is used to track the progress and status of each domain controller in the forest for the domain rename operation. At this point, the Rendom freezes your Active Directory forest from making any changes to its configuration (such as adding/removing DCs, configuring domain trusts, etc.).
Check if the domain is ready to accept changes (checks the availability of all DCs):
rendom /prepare
If this command returns no errors, you can run the rename operation:
rendom /execute
This command automatically reboots all domain controllers.
All the domain-joined workstations and member servers must be rebooted twice for the changes to take effect. The first reboot allows the domain member to detect the domain change and change the full computer name. The second is used to register the new computer name in the new DNS zone.
Note. If there are any remote computers that connect to your domain via VPN, you will need to unjoin them from the old domain and rejoin the new domain.
Now your users can log on to computers using their old usernames and passwords.
After that, you need to manually rename all domain controllers (they won’t automatically change their names to reflect the new domain).
Reboot the domain controller to apply the changes.
Now you need to rebind the Group Policy Objects to the new domain name:
gpfixup /olddns:contoso.com /newdns:theitbros.com
Then run the command to fix the NetBIOS name of the domain in the GPOs:
gpfixup /oldnb:CONTOSO /newnb:THEITBROS
Remove links to the old domain:
rendom /clean
You can now complete the domain rename and unfreeze the AD forest:
rendom /end
Make sure that the rename was successful. Check if all Active Directory domain controllers can be contacted, users can sign in to the new domain; check if applications work correctly, and check AD replication and errors on DCs.
Now change paths in DFS namespaces, roaming profiles, redirected folders, etc. if used.
In order for Windows computers to function properly in Active Directory, they must have their time in sync with the domain. In the AD environment, domain controllers act as the time source for client devices. Kerberos AD authentication will fail if the clock offset between the client and the domain controller (KDC) is greater than 5 minutes.
Understanding the Time Hierarchy in the Active Directory Domain
There is a strict hierarchy to time synchronization in an Active Directory domain:
The domain controller with the PDC emulator FSMO role is the main source of time in the domain. This DC synchronizes the time with an external time source or NTP server;
Other domain controllers synchronize their time with the PDC domain controller;
The domain workstations and the Windows member servers synchronize their time with the domain controller that is closest to them (in accordance with AD sites and subnets configuration);
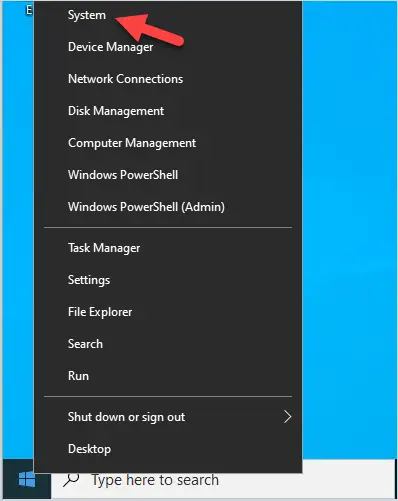
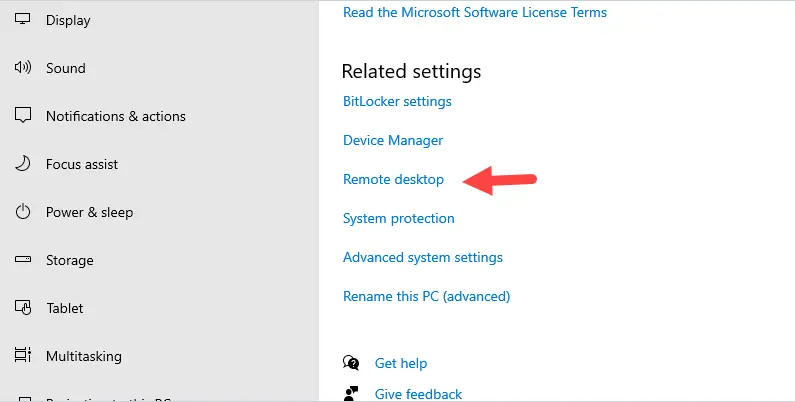
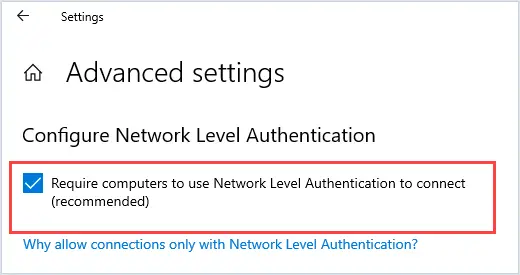
The AD domain controller should be used as the time source on the workstation after you have joined it to the domain. On Windows 10 or 11, go to Settings > Time and Language and make sure your DC is used as the last time sync source.
You can also get the NTP source on your computer by using the command:
w32tm /query /source
The command should return the name of one of the domain controllers in your AD domain.
List details of the status of time synchronization on the client device:
w32tm /query /status
The command returns the following useful information:
Leap Indicator (time sync status)
Last Successful Sync Time
Source (your DC)
Poll Interval (1024 seconds by default)
Get a list of the AD domain controllers which can be used to synchronize time:
w32tm /monitor
In this example, there are three domain controllers available for the client to synchronize time with.
To re-enable time synchronization with a DC for computers in an Active Directory domain, use the following commands:
w32tm /config /syncfromflags:domhier /update

net stop w32time && net start w32time
If the domain computer is configured to synchronize its time following to the AD DS Time hierarchy, the value of the Type parameter in the HKLM\SYSTEM\CurrentControlSet\Services\W32Time\Parameters registry key should be NT5DS.
If the Windows client fails to synchronize time with the AD domain controller, you must to reset the Windows Time service configuration. To do this, open a command prompt as an administrator and run the following commands:
The first command unregisters the w32time service and removes the settings from the registry:w32tm /unregister
Then register w32tm service and restore the default time settings:w32tm /register
Set AD as the time sync source for the client (by changing the Type registry parameter to NT5DS):REG add HKEY_LOCAL_MACHINE\SYSTEM\CurrentControlSet\Services\W32Time\Parameters /v Type /d NT5DS
Restart the service:net stop w32time && net start w32time
Update settings:w32tm /config /update
Synchronize the time:w32tm /resync
Check your current sync settings:w32tm /query /status
The screenshot below shows that Windows is now synchronizing with DC (Source).
Time Sync Issues on Windows Domain Joined Computers
The Windows Time Service (W32Time) is responsible for time synchronization. First, ensure that this service is running on a Windows client computer:
UDP port 123 is used for time synchronization on Windows. If this port is not available on the DC, the client computer won’t be able to synchronize the time.
You may get an error when you try to synchronize the time with the w32tm /resync command:
Sending resync command to local computer The computer did not resync because no time data was available.
Check that the w32time service is running on the DC and listening on UDP port 123:
netstat -an | find "UDP" | find ":123"
Then check that the UDP inbound rule named Active Directory Domain Controller – W32Time (NTP-UDP-In) is enabled in Windows Defender Firewall (Control Panel > Windows Firewall > Advanced settings > Inbound rules).
You can check Windows Defender Firewall rule status with PowerShell:
It is also possible to force a client to manually synchronize its time with another domain controller.
net time \\ny-dc01 /set /y
Configuring the NTP Client Time Sync on Windows Using GPO
In most cases, time sync with a domain on Windows client doesn’t require administrator intervention. However, if you find that time synchronization is not working properly on clients in your domain, you can centrally configure client NTP settings on Windows devices using Group Policy.
Use the gpedit.msc console if you want to change Group Policy settings on a single computer (this is the best solution if you need to solve synchronization problems on a single computer or test new NTP client settings). To set up a GPO for multiple domain computers, use the Group Policy Management Console (gpmc.msc);
Expand the following node in GPO editor: Computer Configuration > Administrative Templates > System > Windows Time Service;
Enable the Enable Windows NTP Client policy;
Then enable the Configure NTP Client policy and set the following settings in the Options panel: NTPServer: your domain name (preferred) or FQDN name of the domain controller with the PDC Emulator role (you can find it with the command: netdom.exe query fsmo) Type: NT5DS CrossSiteSyncFlags: 2 ResolvePeerBackoffMinutes: 15 ResolvePeerBackoffMaxTimes: 7 SpecialPollInterval: 64 EventLogFlags: 0
Restart your computer to apply the new GPO client time settings.
By: Shannon Murphy, Greg Young March 20, 2024 Read time: 2 min (589 words)
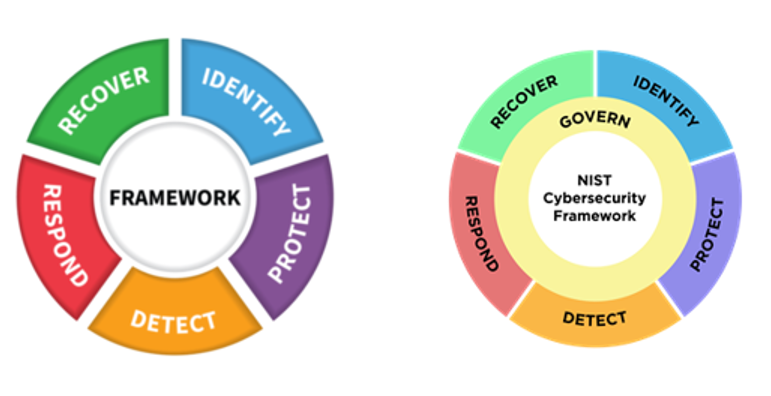
On February 26, 2024, the National Institute of Standards and Technology (NIST) released the official 2.0 version of the Cyber Security Framework (CSF).
What is the NIST CSF?
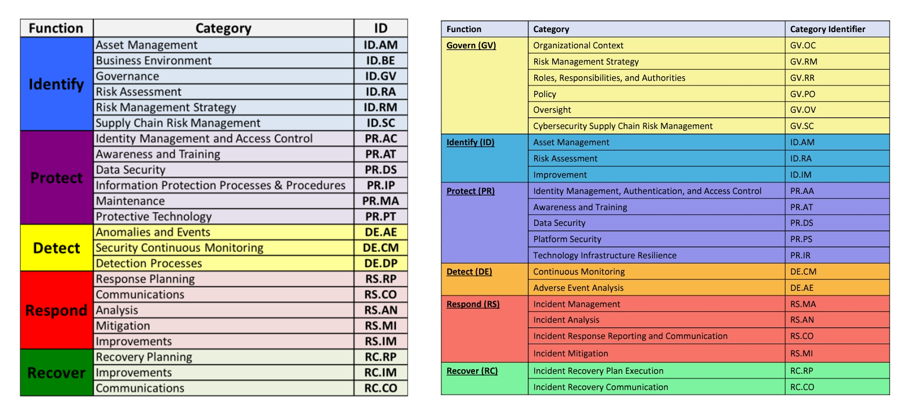
The NIST CSF is a series of guidelines and best practices to reduce cyber risk and improve security posture. The framework is divided into pillars or “functions” and each function is subdivided into “categories” which outline specific outcomes.
As titled, it is a framework. Although it was published by a standards body, it is not a technical standard.
https://www.nist.gov/cyberframework
What Is the CSF Really Used For?
Unlike some very prescriptive NIST standards (for example, crypto standards like FIPS-140-2), the CSF framework is similar to the ISO 27001 certification guidance. It aims to set out general requirements to inventory security risk, design and implement compensating controls, and adopt an overarching process to ensure continuous improvement to meet shifting security needs.
It’s a high-level map for security leaders to identify categories of protection that are not being serviced well. Think of the CSF as a series of buckets with labels. You metaphorically put all the actions, technology deployments, and processes you do in cybersecurity into these buckets, and then look for buckets with too little activity in them or have too much activity — or repetitive activity — and not enough of other requirements in them.
The CSF hierarchy is that Functions contain many Categories — or in other words, there are big buckets that contain smaller buckets.
What Is New in CSF 2.0?
The most noteworthy change is the introduction of Governance as a sixth pillar in the CSF Framework. This shift sees governance being given significantly more importance from just a mention within the previous five Categories to now being its owna separate Function.
According to NIST the Govern function refers to how an organization’s, “cybersecurity risk management strategy, expectations, and policy are established, communicated, and monitored.” This is a positive and needed evolution, as when governance is weak, it often isn’t restricted to a single function (e.g. IAM) and can be systemic.
Governance aligns to a broader paradigm shift where we see cybersecurity becoming highly relevant within the business context as an operational risk. The Govern expectation is cybersecurity is integrated into the broader enterprise risk management strategy and requires dedicated accountability and oversight.
There are some other reassignments and minor changes in the remaining five Categories. CSF version 1.0 was published in 2014, and 1.1 in 2018. A lot has changed in security since then. The 2.0 update acknowledges that a review has been conducted.
As a framework, the CISO domain has not radically changed. Yes, the technology has radically evolved, but the greatest evolution in the CISO role really has been around governance: greater interaction with C-suite and board, while some activities have been handed off to operations.
So How Will This Impact Me in the Short Term?
The update to the NIST CSF provides a fresh opportunity to security leaders to start or reopen conversations with business leaders on evolving needs.
The greatest impact will be to auditors and consultants who will need to make formatting changes to their templates and work products to align with version 2.0.
CISOs and security leaders will have to make some similar changes to how they track and report compliance.
But overall, the greatest impact (aside from some extra billable cybersecurity consulting fees) will be a boost of relevance to the CSF that could attract new adherents both through security leaders choosing to look at themselves through the CSF lens and management asking the same of CISOs.
Hornetsecurity is implementing an update to enhance email security by enforcing checks on the “Header-From” value in emails, as per RFC 5322 standards. This initiative is driven by several key reasons:
Preventing Email Delivery Issues: Historically, not enforcing the validity of the originator email address has led to emails being accepted by our system but ultimately rejected by the final destination, especially with most customers now using cloud email service providers that enforce stricter validation.
Enhanced Protection Against Spoofed Emails: By strictly validating the “Header-From” value, we aim to significantly reduce the risk of email spoofing.
Enhance Email Authentication for DKIM/DMARC Alignment: By enforcing RFC 5322 compliance in the “Header-From” field, we can ensure better alignment with DKIM and DMARC standards, thereby significantly improving the security and authenticity of email communications.
The cause of malformed “From” headers often stems from incorrect email server configurations by the sender or from bugs in scripts or other applications. Our new protocol aims to rectify these issues, ensuring that all emails passing through our system are fully compliant with established standards, thus improving the overall security and reliability of email communications.
Implementation Timeline
Stage 1 (Starting 4 March 2024): 1-5% of invalid emails will be rejected.
Stage 2 (Second week): 30% rejection rate.
Stage 3 (Third week): 60% rejection rate.
Final Stage (By the end of the fourth week): 100% rejection rate.
Impact Assessment
Extensive testing over the past six months indicates that the impact on legitimate email delivery is expected to be minimal. However, email administrators should be prepared for potential queries from users experiencing email rejections.
Handling Rejections
When an email is rejected due to a malformed “Header-From”, the sender will receive a bounce-back message with the error “510 5.1.7 malformed Header-From according to RFC 5322”. This message indicates that the email did not meet the necessary header standards.
Identifying Affected Emails
Email administrators can identify affected emails in the Hornetsecurity Control Panel (https://cp.hornetsecurity.com) using the following steps:
Navigate to ELT in the Hornetsecurity Control Panel.
Select your tenant in the top right field.
Choose a date range for your search. A shorter range will yield quicker results.
Click in the “Search” text box, select the “Msg ID” parameter, and type in “hfromfailed” (exact string).
Press ENTER to perform the search.
When email administrators identify emails affected by the “Header-From” checks in the Email Live Tracking (ELT) system, immediate and appropriate actions are necessary to verify if the email application or server settings are correctly configured to comply with RFC 5322 standards. This will help maintain email flow integrity.
Defining Exceptions
In implementing the new “Header-From” checks, Hornetsecurity recognizes the need for flexibility in certain cases. Therefore, we have provisioned for the definition of exceptions to these checks.
This section details how to set up these exceptions and the timeline for their deprecation:
Creating Exception Rules: Within the Compliance Filter, you can create rules that define exceptions to the “Header-From” checks. This should be based on the envelop sender address.
Applying the Exceptions: Once defined, these exceptions will allow certain emails to bypass the strict “Header-From” checks.
Timeline for Deprecation of Exceptions applied to the new Header-From checks
Initial Implementation: The ability to define exceptions is available as part of the initial rollout of the “Header-From” checks.
Deprecation Date: These exception provisions are set to be deprecated by the end of June 2024.
The provision for exceptions is intended as a temporary measure to facilitate a smoother transition to the new protocol. By June 2024, it is expected that all email senders would have had sufficient time to align their email systems with RFC 5322 standards. Deprecating the exceptions is a step towards ensuring full compliance and maximizing the security benefits of the “Header-From” checks.
Conclusion
The enhancement of our RFC-compliance is a significant step toward securing email communications. Adherence to these standards will collectively reduce risks associated with email. For further assistance or clarification, please reach out to our support team at support@hornetsecurity.com.
Invalid “Header From” Examples:
Header From
Reason
From: <>
Blank addresses are problematic as they cause issues in scenarios requiring a valid email address, such as allow and deny lists.
From: John Doe john.doe@hornetsecurity.com
Non-compliant with RFC standards. The email address must be enclosed in angle brackets (< and >) when accompanied by a display name.
While technically RFC-compliant, such formats are often rejected by M365 unless explicit exceptions are configured. We do accept certain email addresses with comments.
From: John, Doe <john.doe@hornetsecurity.com>
Non-compliant with RFC standards. A display name containing a comma must be enclosed in double quotes.
From: “John Doe <john.doe@hornetsecurity.com>”
Non-compliant with RFC standards. The entire ‘From’ value is incorrectly enclosed in double quotation marks, which is not allowed.
From: “John Doe <john.doe@hornetsecurity.com>” john.doe@hornetsecurity.com
Non-compliant with RFC standards. The display name is present, but the email address is not correctly enclosed in angle brackets.
From: “John Doe”<john.doe@hornetsecurity.com>
Non-compliant with RFC standards due to the absence of white-space between the display name and the email address.
First published on TechNet on Jul 16, 2009 Ned-san here again. Customers frequently call us about configuring their servers to listen over specific network ports. This is usually to satisfy firewall rules – more on this later. A port in TCP/IP is simply an endpoint to communication between computers. Some are reserved, some are well-known, and the rest are simply available to any application to use. Today I will explain the network communication done through all facets of DFSR operation and administration. Even if you don’t care about firewalls and ports, this should shed some light on DFSR networking in general, and may save you skull sweat someday.
DFSR and RPC
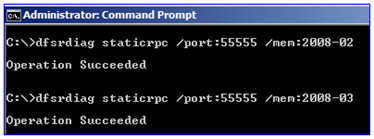
Plenty of Windows components support hard-coding to exclusive ports, and at a glance, DFSR is no exception. By running the DFSRDIAG STATICRPC command against the DFSR servers you force them to listen on whatever port you like for file replication:
Many Windows RPC applications use the Endpoint Mapper (EPM) component for these types of client-server operations. It’s not a requirement though; an RPC application is free to declare its own port and only listen on that one, with a client that is hard-coded to contact that port only. This range of ports is 1025-5000 in Windows Server 2003 and older, and 49152-65535 in Vista and … DFSR uses EPM.
Update 3/3/2011 (nice catch Walter)
As you have probably found, we later noticed a bug in DFSR on Win2008 and Win2008 R2 DCs (only – not member servers) where the service would always send-receive on port 5722. This article was done before that and doesn’t reflect it. Read more on this here:
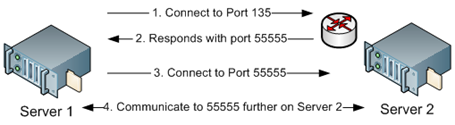
By setting the port, you are telling EPM to always respond with the same port instead of one within the dynamic range. So when DFSR contacted the other server, it would only need to use two ports:
So with a Netmon 3.3 capture, it will look something like this when the DFSR service starts up:
1. The local computer opens a dynamic client port and connects to EPM on the remote computer, asking for connectivity to DFSR.
2. That remote computer responds with a port that the local computer can connect to for DFSR communication. Because I have statically assigned port 55555, the remote computer will always respond with this port.
3. The local computer then opens a new client port and binds to that RPC port on the remote server, where the DFSR service is actually listening. At this point two DFSR servers can replicate files between each other.
The Rest of the Story
If it’s that easy, why the blog post? Because there’s much more DFSR than just the RPC replication port. To start, your DFSR servers need to be able to contact DC’s. To do that, they need name resolution. And they will need to use Kerberos. And the management tools will need DRS API connectivity to the DC’s. There will also need to be SMB connectivity to create replicated folders and communicate with the Service Control Manager to manipulate DFSR. And all of the above also need the dynamic client ports available outbound through the firewall to allow that communication. So now that’s:
EPM port 135 (inbound on remote DFSR servers and DC’s)
DFSR port X (inbound on remote DFSR servers)
SMB port 445 (inbound on remote DFSR servers)
DNS port 53 (inbound on remote DNS servers)
LDAP port 389 (inbound on remote DC’s)
Kerberos port 88 (inbound on remote DC’s)
Ports 1025-5000 or 49152-65535 (outbound, Win2003 and Win2008 respectively – and inbound on remote DC’s).
Let’s see this in action. Here I gathered a Netmon 3.3 capture of configuring a new replication group:
Server-01 – IP 10.10.0.101 – DC/DNS
Server-02 – IP 10.10.0.102 – DFSR
Server-03 – IP 10.10.0.103 – DFSR
Server-04 – IP 10.10.0.104 – Computer running the DFSMGMT.MSC snap-in
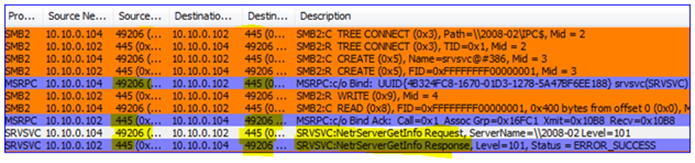
1. First the snap-in gets name resolution for the DC from my management computer (local port 51562 to remote port 53):
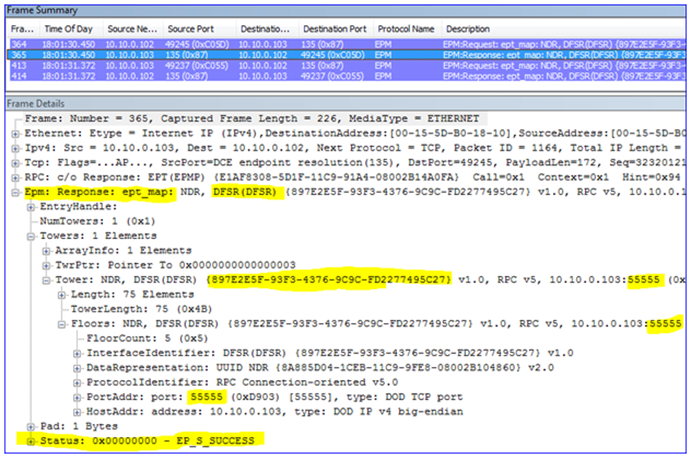
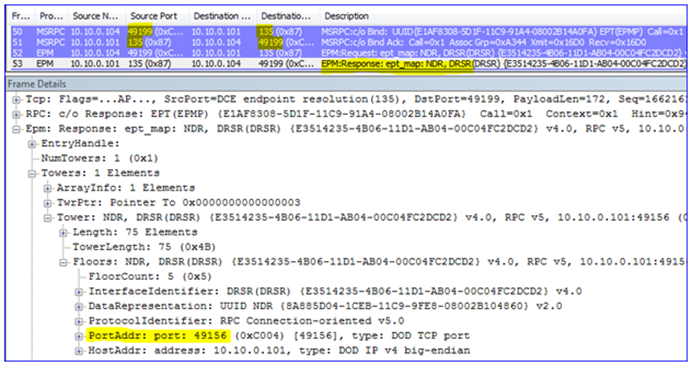
2. Then it contacts the DC – the EPM is bound (local port 49199 to remote port 135) and a dynamic port is negotiated so that the client knows which port on which to talk to the DC (port 49156).
3. Having connected to the DC through RPC to DRS (a management API), it then returns information about the domain and other things needed by the snap-in.
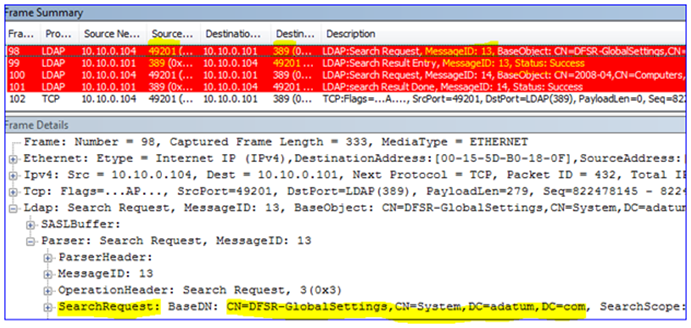
4. The snap-in then performs an LDAP query to the DC to locate the DFSR-GlobalSettings container in that domain o that it can read in any new Replication Groups (local port 49201 to remote port 389).
5. The snap-performs LDAP and DNS queries to get the names of the computers being selected for replication:
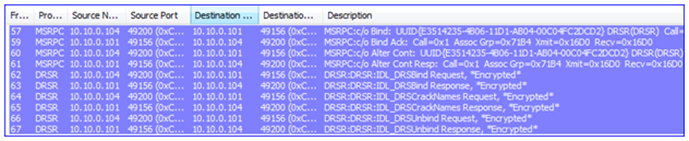
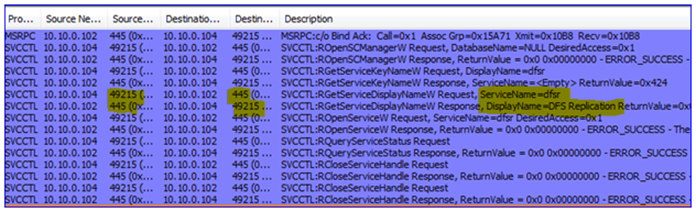
6. The DFSR service must be verified (is it installed? Is it running?) This requires a Kerberos CIFS (SMB) request to the DC as well as an SMB connection to the DFSR servers – this is actually a ‘named pipe’ operation over remote port 445, where RPC uses SMB as a transport:
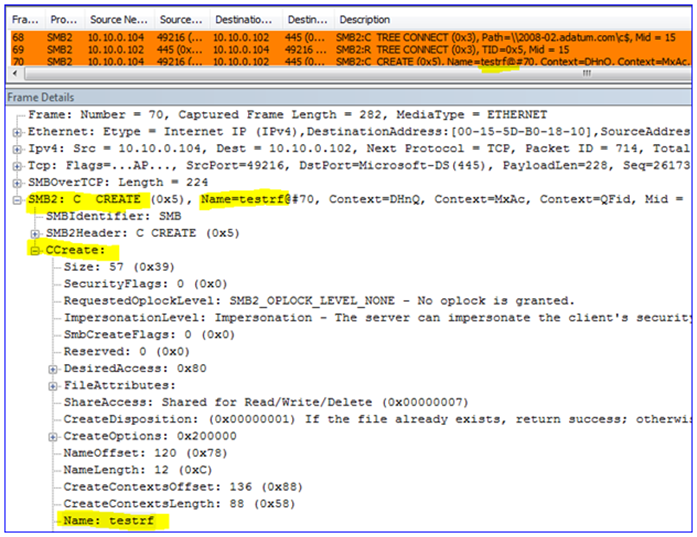
7. The Replicated Folders are created (or verified to exist) on the DFSR servers – I called mine ‘testrf’. This uses SMB again from the snap-in computer to the DFSR server, over remote port 445:
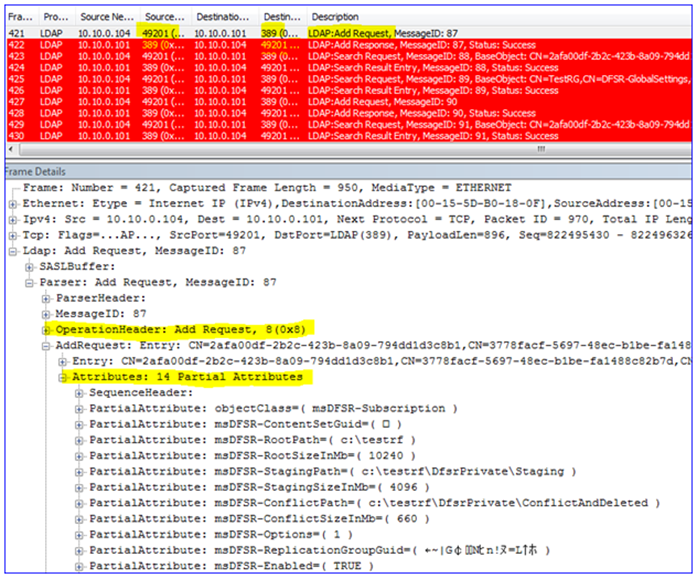
8. The snap-in will write all the configuration data through LDAP over remote port 389 against the DC. This creates all the AD objects and attributes, creates the topology, writes to each DFSR computer object, etc. There are quite a few frames here so I will just highlight a bit of it:
9. If you wait for AD replication to complete and the DFSR servers to poll for changes, you will see the DFSR servers request configuration info through LDAP, and then start working normally on their static RPC port 55555 – just like I showed at the beginning of this post above.
DCOM and WMI
All of the things I’ve discussed are guaranteed needs in order to use DFSR. For the most part you don’t have to have too many remote ports open on the DFSR server itself. However, if you want to use tools like DFSRDIAG.EXE and WMIC.EXE remotely against a DFSR server, or have a remote DFSR server generate ‘Diagnostic Health Reports’, there is more to do.
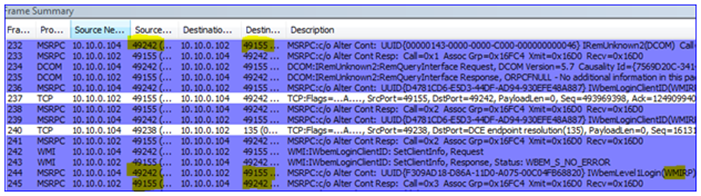
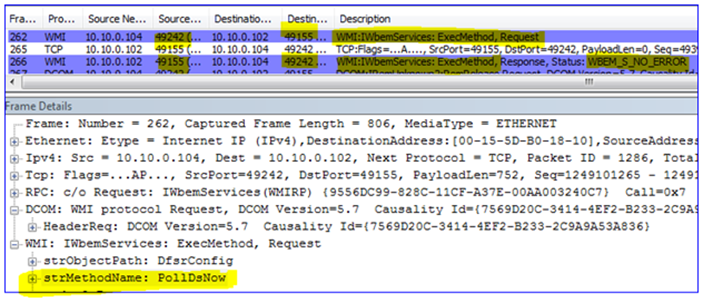
DFSR utilizes Windows Management Instrumentation as its ‘quasi-API’. When tools like DFS Management are run to generate health reports, or DFSRDIAG POLLAD is targeted against a remote server, you are actually using DCOM and WMI to tell the targeted server to perform actions on your behalf.
There is no mechanism to control which RPC DCOM/WMI will listen on as there is for DFSR and other services. At service startup DCOM/WMI will pick the next available dynamic RPC port. This means in theory that you would have to have open the entire range of dynamic ports for the target OS, 1025-5000 (Win2003) or 49152-65535 (Win2008)
For example, here I am running DFSRDIAG POLLAD /MEM:2008-02 to force that server to poll its DC for configuration changes. Note the listening port that I am talking to on the DFSR server (hint – it’s not 55555):
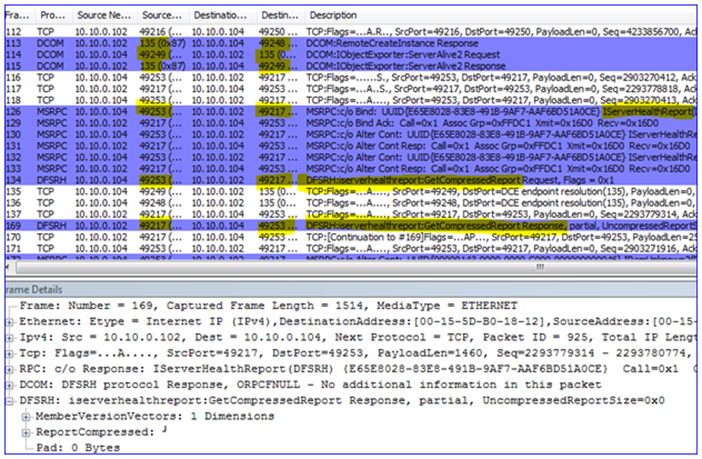
And in my final example, here I am running the DFS Management snap-in and requesting a diagnostic health report. Note again how we use DCOM/WMI/RPC and do not connect directly to the DFSR service; again this requires that we have all those inbound dynamic ports open on the DFSR server:
Wrap Up
So is it worth it to try and use a static replication port? Maybe. If you don’t plan on directly administering a DFSR server and just need it talking to its DC, its DNS server, and its replication partners, can definitely keep the number of ports used quite low. But if you ever want to communicate directly with it as an administrator, you will need quite a few holes punched through your firewall.
File shares are used in organizations to allow users to access and exchange files. If the number of file shares is large, it may be difficult to manage them because mapping many shared resources to each user’s computer takes time and effort. If the configuration of one file share changes, you need to update shared drive mappings for all users using this share. In this case, DFS can help you optimize the hierarchy of shared folders to streamline administration and the use of shared resources.
This blog post explains DFS configuration and how to set up DFS replication in Windows Server 2019.
NAKIVO for Windows Backup
Fast backup of Windows servers and workstations to onsite, offiste and cloud. Recovery of full machines and objects in minutes for low RTOs and maximum uptime.
A Distributed File System (DFS) is a logical organization that transparently groups existing file shares on multiple servers into a structured hierarchy. This hierarchy can be accessed using a single share on a DFS server. A DFS file share can be replicated across multiple file servers in different locations to optimize server load and increase access speed to shared files. In this case, a user can access a file share on a server that is closest to them. DFS is intended to simplify access to shared files.
DFS uses the Server Message Block (SMB) protocol, which is also known as the Common Internet File System (CIFS). Microsoft’s implementation of DFS doesn’t work with other file sharing protocols like NFS or HDFS. However, you can connect multiple SMB shares configured on NAS devices and Linux machines using Samba to your DFS server running on Windows Server. DFS consists of server and client components.
You can configure one DFS share that includes multiple file shares and connect users to this single file share using a unified namespace. When users connect to this file share using a single path, they see a tree structure of shared folders (as they are subfolders of the main share) and can access all needed file shares transparently. Underlying physical file servers hosting file shares are abstracted from the namespace used to access shares. DFS namespaces and DFS replication are the two main components used for DFS functioning.
What is a DFS namespace?
A DFS namespace is a virtual folder that contains links to shared folders stored on different file servers. DFS namespaces can be organized in different ways depending on business needs. They can be organized by geographical location, organization units, a combination of multiple parameters, etc. You can configure multiple namespaces on a DFS server. A DFS namespace can be standalone or domain-based.
A standalone DFS namespace stores configuration information and metadata locally on a root server in the system registry. A path to access the root namespace is started with the root server name. A standalone DFS namespace is located only on one server and is not fault-tolerant. If a root server is unavailable, the entire DFS namespace is unavailable. You can use this option if you don’t have an Active Directory domain configured (when using a Workgroup).
A domain-based DFS namespace stores configuration in Active Directory. A path to access a root namespace starts with the domain name. You can store a domain-based DFS namespace on multiple servers to increase the namespace availability. This approach allows you to provide fault tolerance and load balancing across servers. Using domain-based DFS namespaces is recommended.
A namespace consists of the root, links (folders), and folder targets.
A namespace root is a starting point of a DFS namespace tree. Depending on the type, a namespace can look like this:
\\ServerName\RootName (a standalone namespace)
\\DomainName\RootName (a domain-based namespace)
A namespace server is a physical server (or a VM) that hosts a DFS namespace. A namespace server can be a regular server with the DFS role installed or a domain controller.
A folder is a link in a DFS namespace that points to a target folder containing content for user access. There are also folders without targets used for organizing the structure.
A folder target is a link to a shared file resource located on a particular file server and available via the UNC path (Universal Naming Convention). A folder target is associated with the folder in a DFS namespace, for example, \\FS2\TestShare on the FS2 server. A folder target is what users need to access files.
One folder target can be a link to a single folder or multiple folders (if these folders are located on two different servers and are synchronized/replicated with each other). For example, a user needs to access \\DFS-server01\TestShare\Doc but depending on the user’s location, the user is redirected to a shared folder \\FS01\Doc or \\FS02\Doc.
The DFS tree structure includes the following components:
DFS root, which is a DFS server on which the DFS service is running
DFS links, which are links pointing to network shares used in DFS
DFS targets, which are real network shares to which DFS links point
What is DFS replication?
DFS replication is a feature used to duplicate existing data by replicating copies of that data to multiple locations. Physical file shares can be synchronized with each other at two or more locations.
An important feature of DFS replication is that the replication of a file starts only after that file has been closed. For this reason, DFS replication is not suitable for replicating databases, given that databases have files opened during the operation of a database management system. DFS replication supports multi-master replication technology, and any member of a replication group can change data that is then replicated.
A DFS replication group is a group of servers participating in the replication of one or multiple replication folders. A replicated folder is synchronized between all members of the replication group.
DFS replication uses a special Remote Differential Compression algorithm that allows DFS to detect changes and copy only changed blocks of files instead of copying all data. This approach allows you to save time and reduce replication traffic over the network.
DFS replication is performed asynchronously. There can be a delay between writing changes to the source location and replicating those changes to the target location.
DFS Replication topologies
There are two main DFS replication topologies:
Hub and spoke. This topology requires at least three replication members: one which acts as a hub and two others act as spokes. This technique is useful if you have a central source originating data (hub) and you need to replicate this data to multiple locations (spokes).
Full mesh. Each member of a replication group replicates data to each group member. Use this technique if you have 10 members or less in a replication group.
What are the requirements for DFS?
The main requirement is using Windows Server 2008 DataCenter or Enterprise editions, Windows Server 2012, or a newer Windows Server version. It is better to use Windows Server 2016 or Windows Server 2019 nowadays.
NTFS must be a file system to store shared files on Windows Server hosts.
If you use domain-based namespaces, all servers of a DFS replication group must belong to one Active Directory forest.
How to Set Up DFS in Your Windows Environment
You need to prepare at least two servers. In this example, we use two machines running Windows Server 2019, one of which is an Active Directory domain controller:
Server01-dc.domain1.local is a domain controller.
Server02.domain1.local is a domain member.
This is because configuring DFS in a domain environment has advantages compared to Workgroup, as explained above. The domain name is domain1.local in our case. If you use a domain, don’t forget to configure Active Directory backup.
Enable the DFS roles
First of all, you need to enable the DFS roles in Windows Server 2019.
Open Server Manager.
Click Add Roles and Features in Server Manager.
Select Role-based or featured-based installation in the Installation type screen of the Add Roles and Features wizard.
In the Server Selection screen, make sure your current server (which is a domain controller in our case) is selected. Click Next at each step of the wizard to continue.
Select server roles. Select DFS Namespaces and DFS Replication, as explained in the screenshot below.
In the Features screen, you can leave settings as is.
Check your configuration in the confirmation screen and if everything is correct, click Install.
Wait for a while until the installation process is finished and then close the window.
DFS Namespace Setup
Create at least one shared folder on any server that is a domain member. In this example, we create a shared folder on our domain controller. The folder name is shared01 (D:\DATA\shared01).
Creating a shared folder
Right-click a folder and, in the context menu, hit Properties.
On the Sharing tab of the folder properties window, click Share.
Share the folder with Domain users and set permissions. We use Read/Write permissions in this example.
Click Share to finish. Then you can close the network sharing options window.
Now the share is available at this address:
\\server01-dc\shared01
Creating a DFS namespace
Let’s create a DFS namespace to link shared folders in a namespace.
Press Win+R and run dfsmgmt.msc to open the DFS Management window. You can also run this command in the Windows command line (CMD).
As an alternative, you can click Start > Windows Administrative Tools > DFS Management.
In the DFS Management section, click New Namespace.
The New Namespace Wizard opens in a new window.
Namespace Server. Enter a server name. If you are not sure that the name is correct, click Browse, enter a server name and click Check Names. In this example, we enter the name of our domain controller (server01-dc). Click Next at each step of the wizard to continue.
Namespace Name and Settings. Enter a name for a namespace, for example, DFS-01. Click Edit Settings.
Pay attention to the local path of a shared folder. Change this path if needed. We use the default path in our example (C:\DFSRoots\DFS-01).
You need to configure access permissions for network users. Click Use custom permissions and hit Customize.
We grant all permissions for domain users (Full Control). Click Add, select Domain Users, select the appropriate checkboxes, and hit OK to save settings.
Namespace type. Select the type of namespace to create. We select Domain-based namespace and select the Enable Windows Server 2008 mode checkbox. Select this checkbox if the functional level of your domain is Windows Server 2008 when you use Windows Server 2016 or Windows Server 2019 for better compatibility.
It is recommended that you use a Domain-based namespace due to advantages such as high DFS namespace availability by using multiple namespace servers and transferring namespaces to other servers.
Review Settings. Review settings and, if everything is correct, click Create.
Confirmation. The window view in case of success is displayed in the screenshot below. The namespace creation has finished. Click Close.
Adding a new folder to a namespace
Now we need to add a new folder into the existing namespace. We are adding a folder on the same server, which is a domain controller, but this method is applicable for all servers within a domain.
Open the DFS management window by running dfsmgmt.msc as we did before. Perform the following actions in the DFS management window.
In the left pane, expand a namespace tree and select a namespace (\\domain1.local\DFS-01\ in our case).
In the right pane (the Actions pane), click New Folder.
In the New Folder window, enter a folder name, for example, Test-Folder to link the DFS folder and a shared folder created before. Click Add.
Enter the path to the existing folder. We use \\server01-dc\shared01 in this example. You can click Browse and select a folder. Click OK to save the path to the folder target.
The folder target has been added.
Click OK to save settings and close the New Folder window.
Now you can access the shared folder by entering the network address in the address bar of Windows Explorer:
\\server01-dc\dfs-01\Test-Folder
You should enter a path in the format:
\\DomainName\DFS-NameSpace\
How to Configure DFS Replication
We need to configure the second server to replicate data. The name of the second server is Server02 and this server is added to the domain1.local domain in this example. Add your second server to a domain if you have not done this operation before. Install the DFS roles, as we did for the first server. As an alternative method, you can use PowerShell instead of the Add Roles wizard. Run these two commands in PowerShell to install DFS replication and DFS namespace roles.
First of all, we need to install the DFS Replication role on the second server.
Create a folder for replicated data, for example, D:\Replication
We are going to use this folder to replicate data from the first folder created on the first server before.
Share this folder (D:\Replication) on the second server and configure access permissions the same way as for the previous shared folder. In this example, we share the folder with Domain Users and grant Read/Write permissions.
The network path is \\server02\replication in this example after sharing this folder. To check the network path to the folder, you can right-click the folder name and open the Sharing tab.
Let’s go back to the domain controller (server01-dc) and open the DFS Management window.
In the left pane of the DFS Management window, expand the tree and select the namespace created before (Test-Folder in this case).
Click Add Folder Target in the Actions pane located in the top right corner of the window.
The New Folder Target window appears. Enter the network path of the folder that was created on the second server before:
\\Server02\Replication
Click OK to save settings and close the window.
A notification message is displayed:
A replication group can be used to keep these folder targets synchronized. Do you want to create a replication group?
Click Yes.
Wait until the configuration process is finished.
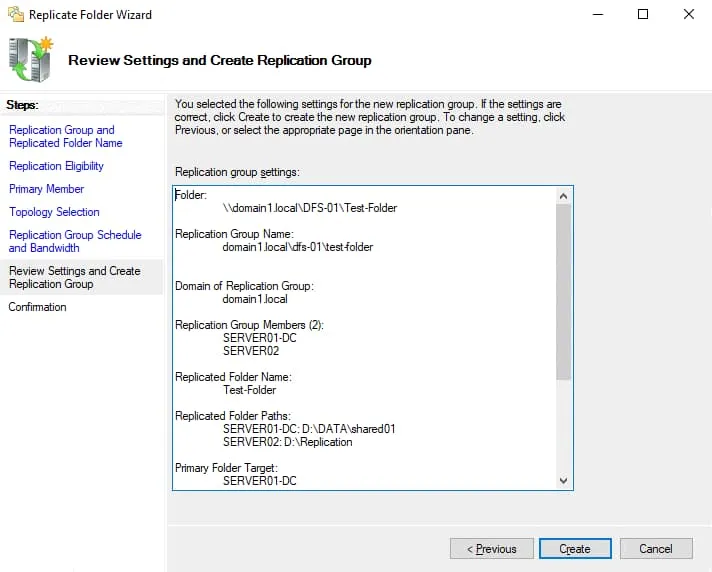
As a result, you should see the Replicate Folder Wizard window. Perform the next steps in the wizard window.
Check the replication group name and replicated folder name. Click Next to continue.
Check folder paths in the Replication Eligibility screen.
Select the primary member from the drop-down list. In this example, the primary member is Server01-dc. Data from the primary member is replicated to other folders that are a part of the DFS namespace.
Select the topology of connections for replication.
Full mesh is the recommended option when using a DFS replication group with less than ten servers. We use Full mesh to replicate changes made on one server to other servers.
The No Topology option can be used if you want to create a custom topology after finishing the wizard.
The Hub and spoke option is inactive (grayed out) because we use less than three servers.
Configure replication group schedule and bandwidth. There are two options:
Replicate continuously using the specified bandwidth. Replication is performed as soon as possible. You can allocate bandwidth. Continuous replication of data that changes extensively can consume a lot of network bandwidth. To avoid a negative impact on other processes using the network, you can limit bandwidth for DFS replication. Keep in mind that hard disk load can be high.
Replicate during the specified days and times. You can configure the schedule to perform DFS replication at the custom date and time. You can use this option if you don’t need to always have the last version of replicated data in target folders.
We select the first option in our example.
Review settings for your DFS replication group. If everything is correct, click Create.
View the DFS replication configuration status on the Confirmation screen. You should see the Success status for all tasks as displayed on the screenshot below. Click Close to close the wizard window.
A notification message about the replication delay is displayed. Read the message and hit OK.
DFS replication has been configured. Open a shared folder from which data must be replicated initially. Write a file to that network folder and check whether the new data is replicated to the second folder on another server. Don’t forget that opened files are not replicated until they are closed after saving changes to a disk. In a few moments, you should see a file-replica in the target folder.
Using filters for DFS Replication
Use file filters to select the file types you don’t want to replicate. Some applications can create temporary files and replicating them wastes network bandwidth, loads hard disk drives, consumes additional storage space in the target folder, and increases overall time to replicate data. You can exclude the appropriate file types from DFS replication by using filters.
To configure filters, perform the following steps in the DFS Management window:
Expand the Replication tree in the navigation pane and select the needed DFS replication group folder name (domain1.local\dfs-01\Test-folder in our case).
Select the Replicated Folders tab.
Select the needed folder, right-click the folder name and hit Properties. Alternatively, you can select the folder and click Properties in the Actions pane.
Set the filtered file types by using masks in the folder properties window. In this example, files matching the rule are excluded from replication:
~*, *.bak, *.tmp
You can also filter subfolders, for example, exclude Temp subfolders from DFS replication.
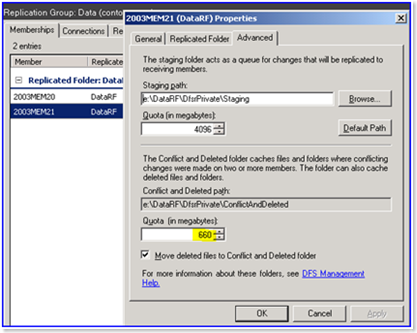
Staging location
There can be a conflict when two or more users save changes to a file before these changes are replicated. The most recent changes have precedence for replication. Older versions of changed files are moved to the Conflict or Deleted folder. This issue can happen when replication speed is low and the file size is large (amount of changes is high) when the amount of time to transfer changed data is lower than the interval between writing changes to the file by users.
Staging folders act as a cache for new and changed files that are ready to be replicated from source folders to target folders. The staging location is intended for files that exceed a certain file size. Staging is used as a queue to store files that must be replicated and ensure that changes can be replicated without worrying about changes to them during the transfer process.
Another aspect of configuring staging folders is performance optimization. DFS replication can consume additional CPU and disk resources, slow down and even stop if the staging quota is too small for your tasks. The recommended size of the staging quota is equal to the size of the 32 largest files in the replication folder.
You can edit staging folder properties for DFS Replication in the DFS Management window:
Select a replication group in the left pane of the DFS Management window.
Select the Memberships tab.
Select the needed replication folder, right-click the folder, and hit Properties.
Select the Staging tab in the Properties window.
Edit the staging path and quota according to your needs.
Saved changes are not applied immediately. New staging settings must be replicated across all DFS servers within a domain. Time depends on Active Directory Domain Services replication latency and the polling interval of servers (5 minutes or more). Server reboot is not required.
DFS Replication vs. Backup
Don’t confuse DFS Replication of data in shared folders and data backup. DFS replication makes copies of data on different servers, but if unwanted changes are written to a file on one server, these changes are replicated to other servers. As a result, you don’t have a recovery point because the file has been overwritten with unwanted changes on all servers and you can use it for recovery in case of failure. This threat is present in case of a ransomware attack.
Use NAKIVO Backup & Replication to protect data stored on your physical Windows Server machines including data stored in shared folders. The product also supports Hyper-V VM backup and VMware VM backup at the host level for effective protection.
1 Year of Free Data Protection: NAKIVO Backup & Replication
Deploy in 2 minutes and protect virtual, cloud, physical and SaaS data. Backup, replication, instant recovery options.
Distributed File System (DFS) can significantly simplify shared resources management for administrators and make accessing shared folders more convenient for end-users. DFS makes transparent links to shared folders located on different servers.
DFS namespaces and DFS replication are two main features that you can configure in the DFS Management window after installing the appropriate Windows server roles. Opt for configuring DFS in a domain environment rather than in a Workgroup environment because there are many advantages, such as high availability and flexibility in an Active Directory domain.
First published on TechNet on Oct 06, 2008 Ned here again. Today I’m going to talk about a couple of scenarios we run into with the ConflictAndDeleted folder in DFSR. These are real quick and dirty, but they may save you a call to us someday.
Scenario 1: We need to empty out the ConflictAndDeleted folder in a controlled manner as part of regular administration (i.e. we just lowered quota and we want to reclaim that space).
Scenario 2: The ConflictAndDeleted folder quota is not being honored due to an error condition and the folder is filling the drive.
Let’s walk through these now.
Emptying the folder normally
It’s possible to clean up the ConflictAndDeleted folder through the DFSMGMT.MSC and SERVICES.EXE snap-ins, but it’s disruptive and kind of gross (you could lower the quota, wait for AD replication, wait for DFSR polling, and then restart the DFSR service). A much faster and slicker way is to call the WMI method CleanupConflictDirectory from the command-line or a script:
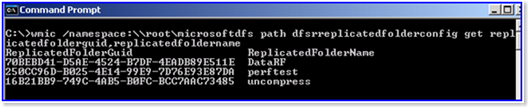
1. Open a CMD prompt as an administrator on the DFSR server. 2. Get the GUID of the Replicated Folder you want to clean:
WMIC.EXE /namespace:\\root\microsoftdfs path dfsrreplicatedfolderconfig get replicatedfolderguid,replicatedfoldername
(This is all one line, wrapped)
Example output:
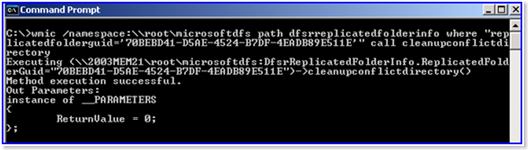
3. Then call the CleanupConflictDirectory method:
WMIC.EXE /namespace:\\root\microsoftdfs path dfsrreplicatedfolderinfo where “replicatedfolderguid='<RF GUID>'” call cleanupconflictdirectory
Example output with a sample GUID:
WMIC.EXE /namespace:\\root\microsoftdfs path dfsrreplicatedfolderinfo where “replicatedfolderguid=’70bebd41-d5ae-4524-b7df-4eadb89e511e'” call cleanupconflictdirectory
4. At this point the ConflictAndDeleted folder will be empty and the ConflictAndDeletedManifest.xml will be deleted.
Emptying the ConflictAndDeleted folder when in an error state
We’ve also seen a few cases where the ConflictAndDeleted quota was not being honored at all. In every single one of those cases, the customer had recently had hardware problems (specifically with their disk system) where files had become corrupt and the disk was unstable – even after repairing the disk (at least to the best of their knowledge), the ConflictAndDeleted folder quota was not being honored by DFSR.
Here’s where quota is set:
Usually when we see this problem, the ConflictAndDeletedManifest.XML file has grown to hundreds of MB in size. When you try to open the file in an XML parser or in Internet Explorer, you will receive an error like “The XML page cannot be displayed” or that there is an error at line X . This is because the file is invalid at some section (with a damaged element, scrambled data, etc).
To fix this issue:
Follow steps 1-4 from above. This may clean the folder as well as update DFSR to say that cleaning has occurred. We always want to try doing things the ‘right’ way before we start hacking.
Stop the DFSR service.
Delete the contents of the ConflictAndDeleted folder manually (with explorer.exe or DEL).
Delete the ConflictAndDeletedManifest.xml file.
Start the DFSR service back up.
For a bit more info on conflict and deletion handling in DFSR, take a look at:
A plea for network defenders and software manufacturers to fix common problems.
EXECUTIVE SUMMARY
The National Security Agency (NSA) and Cybersecurity and Infrastructure Security Agency (CISA) are releasing this joint cybersecurity advisory (CSA) to highlight the most common cybersecurity misconfigurations in large organizations, and detail the tactics, techniques, and procedures (TTPs) actors use to exploit these misconfigurations.
Through NSA and CISA Red and Blue team assessments, as well as through the activities of NSA and CISA Hunt and Incident Response teams, the agencies identified the following 10 most common network misconfigurations:
Default configurations of software and applications
Improper separation of user/administrator privilege
Insufficient internal network monitoring
Lack of network segmentation
Poor patch management
Bypass of system access controls
Weak or misconfigured multifactor authentication (MFA) methods
Insufficient access control lists (ACLs) on network shares and services
Poor credential hygiene
Unrestricted code execution
These misconfigurations illustrate (1) a trend of systemic weaknesses in many large organizations, including those with mature cyber postures, and (2) the importance of software manufacturers embracing secure-by-design principles to reduce the burden on network defenders:
Properly trained, staffed, and funded network security teams can implement the known mitigations for these weaknesses.
Software manufacturers must reduce the prevalence of these misconfigurations—thus strengthening the security posture for customers—by incorporating secure-by-design and -default principles and tactics into their software development practices.[1]
NSA and CISA encourage network defenders to implement the recommendations found within the Mitigations section of this advisory—including the following—to reduce the risk of malicious actors exploiting the identified misconfigurations.
Remove default credentials and harden configurations.
Disable unused services and implement access controls.
Reduce, restrict, audit, and monitor administrative accounts and privileges.
NSA and CISA urge software manufacturers to take ownership of improving security outcomes of their customers by embracing secure-by-design and-default tactics, including:
Embedding security controls into product architecture from the start of development and throughout the entire software development lifecycle (SDLC).
Eliminating default passwords.
Providing high-quality audit logs to customers at no extra charge.
Mandating MFA, ideally phishing-resistant, for privileged users and making MFA a default rather than opt-in feature.[3]
Download the PDF version of this report: PDF, 660 KB
TECHNICAL DETAILS
Note: This advisory uses the MITRE ATT&CK® for Enterprise framework, version 13, and the MITRE D3FEND™ cybersecurity countermeasures framework.[4],[5] See the Appendix: MITRE ATT&CK tactics and techniques section for tables summarizing the threat actors’ activity mapped to MITRE ATT&CK tactics and techniques, and the Mitigations section for MITRE D3FEND countermeasures.
Over the years, the following NSA and CISA teams have assessed the security posture of many network enclaves across the Department of Defense (DoD); Federal Civilian Executive Branch (FCEB); state, local, tribal, and territorial (SLTT) governments; and the private sector:
Depending on the needs of the assessment, NSA Defensive Network Operations (DNO) teams feature capabilities from Red Team (adversary emulation), Blue Team (strategic vulnerability assessment), Hunt (targeted hunt), and/or Tailored Mitigations (defensive countermeasure development).
CISA Vulnerability Management (VM) teams have assessed the security posture of over 1,000 network enclaves. CISA VM teams include Risk and Vulnerability Assessment (RVA) and CISA Red Team Assessments (RTA).[8] The RVA team conducts remote and onsite assessment services, including penetration testing and configuration review. RTA emulates cyber threat actors in coordination with an organization to assess the organization’s cyber detection and response capabilities.
CISA Hunt and Incident Response teams conduct proactive and reactive engagements, respectively, on organization networks to identify and detect cyber threats to U.S. infrastructure.
During these assessments, NSA and CISA identified the 10 most common network misconfigurations, which are detailed below. These misconfigurations (non-prioritized) are systemic weaknesses across many networks.
Many of the assessments were of Microsoft® Windows® and Active Directory® environments. This advisory provides details about, and mitigations for, specific issues found during these assessments, and so mostly focuses on these products. However, it should be noted that many other environments contain similar misconfigurations. Network owners and operators should examine their networks for similar misconfigurations even when running other software not specifically mentioned below.
1. Default Configurations of Software and Applications
Default configurations of systems, services, and applications can permit unauthorized access or other malicious activity. Common default configurations include:
Default credentials
Default service permissions and configurations settings
Default Credentials
Many software manufacturers release commercial off-the-shelf (COTS) network devices —which provide user access via applications or web portals—containing predefined default credentials for their built-in administrative accounts.[9] Malicious actors and assessment teams regularly abuse default credentials by:
Finding credentials with a simple web search [T1589.001] and using them [T1078.001] to gain authenticated access to a device.
Resetting built-in administrative accounts [T1098] via predictable forgotten passwords questions.
Leveraging publicly available setup information to identify built-in administrative credentials for web applications and gaining access to the application and its underlying database.
Leveraging default credentials on software deployment tools [T1072] for code execution and lateral movement.
In addition to devices that provide network access, printers, scanners, security cameras, conference room audiovisual (AV) equipment, voice over internet protocol (VoIP) phones, and internet of things (IoT) devices commonly contain default credentials that can be used for easy unauthorized access to these devices as well. Further compounding this problem, printers and scanners may have privileged domain accounts loaded so that users can easily scan documents and upload them to a shared drive or email them. Malicious actors who gain access to a printer or scanner using default credentials can use the loaded privileged domain accounts to move laterally from the device and compromise the domain [T1078.002].
Default Service Permissions and Configuration Settings
Certain services may have overly permissive access controls or vulnerable configurations by default. Additionally, even if the providers do not enable these services by default, malicious actors can easily abuse these services if users or administrators enable them.
Assessment teams regularly find the following:
Insecure Active Directory Certificate Services
Insecure legacy protocols/services
Insecure Server Message Block (SMB) service
Insecure Active Directory Certificate Services
Active Directory Certificate Services (ADCS) is a feature used to manage Public Key Infrastructure (PKI) certificates, keys, and encryption inside of Active Directory (AD) environments. ADCS templates are used to build certificates for different types of servers and other entities on an organization’s network.
Malicious actors can exploit ADCS and/or ADCS template misconfigurations to manipulate the certificate infrastructure into issuing fraudulent certificates and/or escalate user privileges to domain administrator privileges. These certificates and domain escalation paths may grant actors unauthorized, persistent access to systems and critical data, the ability to impersonate legitimate entities, and the ability to bypass security measures.
Assessment teams have observed organizations with the following misconfigurations:
ADCS servers running with web-enrollment enabled. If web-enrollment is enabled, unauthenticated actors can coerce a server to authenticate to an actor-controlled computer, which can relay the authentication to the ADCS web-enrollment service and obtain a certificate [T1649] for the server’s account. These fraudulent, trusted certificates enable actors to use adversary-in-the-middle techniques [T1557] to masquerade as trusted entities on the network. The actors can also use the certificate for AD authentication to obtain a Kerberos Ticket Granting Ticket (TGT) [T1558.001], which they can use to compromise the server and usually the entire domain.
ADCS templates where low-privileged users have enrollment rights, and the enrollee supplies a subject alternative name. Misconfiguring various elements of ADCS templates can result in domain escalation by unauthorized users (e.g., granting low-privileged users certificate enrollment rights, allowing requesters to specify a subjectAltName in the certificate signing request [CSR], not requiring authorized signatures for CSRs, granting FullControl or WriteDacl permissions to users). Malicious actors can use a low-privileged user account to request a certificate with a particular Subject Alternative Name (SAN) and gain a certificate where the SAN matches the User Principal Name (UPN) of a privileged account.
Many vulnerable network services are enabled by default, and assessment teams have observed them enabled in production environments. Specifically, assessment teams have observed Link-Local Multicast Name Resolution (LLMNR) and NetBIOS Name Service (NBT-NS), which are Microsoft Windows components that serve as alternate methods of host identification. If these services are enabled in a network, actors can use spoofing, poisoning, and relay techniques [T1557.001] to obtain domain hashes, system access, and potential administrative system sessions. Malicious actors frequently exploit these protocols to compromise entire Windows’ environments.
Malicious actors can spoof an authoritative source for name resolution on a target network by responding to passing traffic, effectively poisoning the service so that target computers will communicate with an actor-controlled system instead of the intended one. If the requested system requires identification/authentication, the target computer will send the user’s username and hash to the actor-controlled system. The actors then collect the hash and crack it offline to obtain the plain text password [T1110.002].
Insecure Server Message Block (SMB) service
The Server Message Block service is a Windows component primarily for file sharing. Its default configuration, including in the latest version of Windows, does not require signing network messages to ensure authenticity and integrity. If SMB servers do not enforce SMB signing, malicious actors can use machine-in-the-middle techniques, such as NTLM relay. Further, malicious actors can combine a lack of SMB signing with the name resolution poisoning issue (see above) to gain access to remote systems [T1021.002] without needing to capture and crack any hashes.
2. Improper Separation of User/Administrator Privilege
Administrators often assign multiple roles to one account. These accounts have access to a wide range of devices and services, allowing malicious actors to move through a network quickly with one compromised account without triggering lateral movement and/or privilege escalation detection measures.
Assessment teams have observed the following common account separation misconfigurations:
Excessive account privileges
Elevated service account permissions
Non-essential use of elevated accounts
Excessive Account Privileges
Account privileges are intended to control user access to host or application resources to limit access to sensitive information or enforce a least-privilege security model. When account privileges are overly permissive, users can see and/or do things they should not be able to, which becomes a security issue as it increases risk exposure and attack surface.
Expanding organizations can undergo numerous changes in account management, personnel, and access requirements. These changes commonly lead to privilege creep—the granting of excessive access and unnecessary account privileges. Through the analysis of topical and nested AD groups, a malicious actor can find a user account [T1078] that has been granted account privileges that exceed their need-to-know or least-privilege function. Extraneous access can lead to easy avenues for unauthorized access to data and resources and escalation of privileges in the targeted domain.
Elevated Service Account Permissions
Applications often operate using user accounts to access resources. These user accounts, which are known as service accounts, often require elevated privileges. When a malicious actor compromises an application or service using a service account, they will have the same privileges and access as the service account.
Malicious actors can exploit elevated service permissions within a domain to gain unauthorized access and control over critical systems. Service accounts are enticing targets for malicious actors because such accounts are often granted elevated permissions within the domain due to the nature of the service, and because access to use the service can be requested by any valid domain user. Due to these factors, kerberoasting—a form of credential access achieved by cracking service account credentials—is a common technique used to gain control over service account targets [T1558.003].
Non-Essential Use of Elevated Accounts
IT personnel use domain administrator and other administrator accounts for system and network management due to their inherent elevated privileges. When an administrator account is logged into a compromised host, a malicious actor can steal and use the account’s credentials and an AD-generated authentication token [T1528] to move, using the elevated permissions, throughout the domain [T1550.001]. Using an elevated account for normal day-to-day, non-administrative tasks increases the account’s exposure and, therefore, its risk of compromise and its risk to the network.
Malicious actors prioritize obtaining valid domain credentials upon gaining access to a network. Authentication using valid domain credentials allows the execution of secondary enumeration techniques to gain visibility into the target domain and AD structure, including discovery of elevated accounts and where the elevated accounts are used [T1087].
Targeting elevated accounts (such as domain administrator or system administrators) performing day-to-day activities provides the most direct path to achieve domain escalation. Systems or applications accessed by the targeted elevated accounts significantly increase the attack surface available to adversaries, providing additional paths and escalation options.
After obtaining initial access via an account with administrative permissions, an assessment team compromised a domain in under a business day. The team first gained initial access to the system through phishing [T1566], by which they enticed the end user to download [T1204] and execute malicious payloads. The targeted end-user account had administrative permissions, enabling the team to quickly compromise the entire domain.
3. Insufficient Internal Network Monitoring
Some organizations do not optimally configure host and network sensors for traffic collection and end-host logging. These insufficient configurations could lead to undetected adversarial compromise. Additionally, improper sensor configurations limit the traffic collection capability needed for enhanced baseline development and detract from timely detection of anomalous activity.
Assessment teams have exploited insufficient monitoring to gain access to assessed networks. For example:
An assessment team observed an organization with host-based monitoring, but no network monitoring. Host-based monitoring informs defensive teams about adverse activities on singular hosts and network monitoring informs about adverse activities traversing hosts [TA0008]. In this example, the organization could identify infected hosts but could not identify where the infection was coming from, and thus could not stop future lateral movement and infections.
An assessment team gained persistent deep access to a large organization with a mature cyber posture. The organization did not detect the assessment team’s lateral movement, persistence, and command and control (C2) activity, including when the team attempted noisy activities to trigger a security response. For more information on this activity, see CSA CISA Red Team Shares Key Findings to Improve Monitoring and Hardening of Networks.[13]
4. Lack of Network Segmentation
Network segmentation separates portions of the network with security boundaries. Lack of network segmentation leaves no security boundaries between the user, production, and critical system networks. Insufficient network segmentation allows an actor who has compromised a resource on the network to move laterally across a variety of systems uncontested. Lack of network segregation additionally leaves organizations significantly more vulnerable to potential ransomware attacks and post-exploitation techniques.
Lack of segmentation between IT and operational technology (OT) environments places OT environments at risk. For example, assessment teams have often gained access to OT networks—despite prior assurance that the networks were fully air gapped, with no possible connection to the IT network—by finding special purpose, forgotten, or even accidental network connections [T1199].
5. Poor Patch Management
Vendors release patches and updates to address security vulnerabilities. Poor patch management and network hygiene practices often enable adversaries to discover open attack vectors and exploit critical vulnerabilities. Poor patch management includes:
Lack of regular patching
Use of unsupported operating systems (OSs) and outdated firmware
Lack of Regular Patching
Failure to apply the latest patches can leave a system open to compromise from publicly available exploits. Due to their ease of discovery—via vulnerability scanning [T1595.002] and open source research [T1592]—and exploitation, these systems are immediate targets for adversaries. Allowing critical vulnerabilities to remain on production systems without applying their corresponding patches significantly increases the attack surface. Organizations should prioritize patching known exploited vulnerabilities in their environments.[2]
Assessment teams have observed threat actors exploiting many CVEs in public-facing applications [T1190], including:
CVE-2019-18935 in an unpatched instance of Telerik® UI for ASP.NET running on a Microsoft IIS server.[14]
CVE-2021-44228 (Log4Shell) in an unpatched VMware® Horizon server.[15]
CVE-2022-24682, CVE-2022-27924, and CVE-2022-27925 chained with CVE-2022-37042, or CVE-2022-30333 in an unpatched Zimbra® Collaboration Suite.[16]
Use of Unsupported OSs and Outdated Firmware
Using software or hardware that is no longer supported by the vendor poses a significant security risk because new and existing vulnerabilities are no longer patched. Malicious actors can exploit vulnerabilities in these systems to gain unauthorized access, compromise sensitive data, and disrupt operations [T1210].
Assessment teams frequently observe organizations using unsupported Windows operating systems without updates MS17-010 and MS08-67. These updates, released years ago, address critical remote code execution vulnerabilities.[17],[18]
6. Bypass of System Access Controls
A malicious actor can bypass system access controls by compromising alternate authentication methods in an environment. If a malicious actor can collect hashes in a network, they can use the hashes to authenticate using non-standard means, such as pass-the-hash (PtH) [T1550.002]. By mimicking accounts without the clear-text password, an actor can expand and fortify their access without detection. Kerberoasting is also one of the most time-efficient ways to elevate privileges and move laterally throughout an organization’s network.
7. Weak or Misconfigured MFA Methods
Misconfigured Smart Cards or Tokens
Some networks (generally government or DoD networks) require accounts to use smart cards or tokens. Multifactor requirements can be misconfigured so the password hashes for accounts never change. Even though the password itself is no longer used—because the smart card or token is required instead—there is still a password hash for the account that can be used as an alternative credential for authentication. If the password hash never changes, once a malicious actor has an account’s password hash [T1111], the actor can use it indefinitely, via the PtH technique for as long as that account exists.
Lack of Phishing-Resistant MFA
Some forms of MFA are vulnerable to phishing, “push bombing” [T1621], exploitation of Signaling System 7 (SS7) protocol vulnerabilities, and/or “SIM swap” techniques. These attempts, if successful, may allow a threat actor to gain access to MFA authentication credentials or bypass MFA and access the MFA-protected systems. (See CISA’s Fact Sheet Implementing Phishing-Resistant MFA for more information.)[3]
For example, assessment teams have used voice phishing to convince users to provide missing MFA information [T1598]. In one instance, an assessment team knew a user’s main credentials, but their login attempts were blocked by MFA requirements. The team then masqueraded as IT staff and convinced the user to provide the MFA code over the phone, allowing the team to complete their login attempt and gain access to the user’s email and other organizational resources.
8. Insufficient ACLs on Network Shares and Services
Data shares and repositories are primary targets for malicious actors. Network administrators may improperly configure ACLs to allow for unauthorized users to access sensitive or administrative data on shared drives.
Actors can use commands, open source tools, or custom malware to look for shared folders and drives [T1135].
In one compromise, a team observed actors use the net share command—which displays information about shared resources on the local computer—and the ntfsinfo command to search network shares on compromised computers. In the same compromise, the actors used a custom tool, CovalentStealer, which is designed to identify file shares on a system, categorize the files [T1083], and upload the files to a remote server [TA0010].[19],[20]
Ransomware actors have used the SoftPerfect® Network Scanner, netscan.exe—which can ping computers [T1018], scan ports [T1046], and discover shared folders—and SharpShares to enumerate accessible network shares in a domain.[21],[22]
Malicious actors can then collect and exfiltrate the data from the shared drives and folders. They can then use the data for a variety of purposes, such as extortion of the organization or as intelligence when formulating intrusion plans for further network compromise. Assessment teams routinely find sensitive information on network shares [T1039] that could facilitate follow-on activity or provide opportunities for extortion. Teams regularly find drives containing cleartext credentials [T1552] for service accounts, web applications, and even domain administrators.
Even when further access is not directly obtained from credentials in file shares, there can be a treasure trove of information for improving situational awareness of the target network, including the network’s topology, service tickets, or vulnerability scan data. In addition, teams regularly identify sensitive data and PII on shared drives (e.g., scanned documents, social security numbers, and tax returns) that could be used for extortion or social engineering of the organization or individuals.
9. Poor Credential Hygiene
Poor credential hygiene facilitates threat actors in obtaining credentials for initial access, persistence, lateral movement, and other follow-on activity, especially if phishing-resistant MFA is not enabled. Poor credential hygiene includes:
Easily crackable passwords
Cleartext password disclosure
Easily Crackable Passwords
Easily crackable passwords are passwords that a malicious actor can guess within a short time using relatively inexpensive computing resources. The presence of easily crackable passwords on a network generally stems from a lack of password length (i.e., shorter than 15 characters) and randomness (i.e., is not unique or can be guessed). This is often due to lax requirements for passwords in organizational policies and user training. A policy that only requires short and simple passwords leaves user passwords susceptible to password cracking. Organizations should provide or allow employee use of password managers to enable the generation and easy use of secure, random passwords for each account.
Often, when a credential is obtained, it is a hash (one-way encryption) of the password and not the password itself. Although some hashes can be used directly with PtH techniques, many hashes need to be cracked to obtain usable credentials. The cracking process takes the captured hash of the user’s plaintext password and leverages dictionary wordlists and rulesets, often using a database of billions of previously compromised passwords, in an attempt to find the matching plaintext password [T1110.002].
One of the primary ways to crack passwords is with the open source tool, Hashcat, combined with password lists obtained from publicly released password breaches. Once a malicious actor has access to a plaintext password, they are usually limited only by the account’s permissions. In some cases, the actor may be restricted or detected by advanced defense-in-depth and zero trust implementations as well, but this has been a rare finding in assessments thus far.
Assessment teams have cracked password hashes for NTLM users, Kerberos service account tickets, NetNTLMv2, and PFX stores [T1555], enabling the team to elevate privileges and move laterally within networks. In 12 hours, one team cracked over 80% of all users’ passwords in an Active Directory, resulting in hundreds of valid credentials.
Cleartext Password Disclosure
Storing passwords in cleartext is a serious security risk. A malicious actor with access to files containing cleartext passwords [T1552.001] could use these credentials to log into the affected applications or systems under the guise of a legitimate user. Accountability is lost in this situation as any system logs would record valid user accounts accessing applications or systems.
Malicious actors search for text files, spreadsheets, documents, and configuration files in hopes of obtaining cleartext passwords. Assessment teams frequently discover cleartext passwords, allowing them to quickly escalate the emulated intrusion from the compromise of a regular domain user account to that of a privileged account, such as a Domain or Enterprise Administrator. A common tool used for locating cleartext passwords is the open source tool, Snaffler.[23]
10. Unrestricted Code Execution
If unverified programs are allowed to execute on hosts, a threat actor can run arbitrary, malicious payloads within a network.
Malicious actors often execute code after gaining initial access to a system. For example, after a user falls for a phishing scam, the actor usually convinces the victim to run code on their workstation to gain remote access to the internal network. This code is usually an unverified program that has no legitimate purpose or business reason for running on the network.
Assessment teams and malicious actors frequently leverage unrestricted code execution in the form of executables, dynamic link libraries (DLLs), HTML applications, and macros (scripts used in office automation documents) [T1059.005] to establish initial access, persistence, and lateral movement. In addition, actors often use scripting languages [T1059] to obscure their actions [T1027.010] and bypass allowlisting—where organizations restrict applications and other forms of code by default and only allow those that are known and trusted. Further, actors may load vulnerable drivers and then exploit the drivers’ known vulnerabilities to execute code in the kernel with the highest level of system privileges to completely compromise the device [T1068].
MITIGATIONS
Network Defenders
NSA and CISA recommend network defenders implement the recommendations that follow to mitigate the issues identified in this advisory. These mitigations align with the Cross-Sector Cybersecurity Performance Goals (CPGs) developed by CISA and the National Institute of Standards and Technology (NIST) as well as with the MITRE ATT&CK Enterprise Mitigations and MITRE D3FEND frameworks.
The CPGs provide a minimum set of practices and protections that CISA and NIST recommend all organizations implement. CISA and NIST based the CPGs on existing cybersecurity frameworks and guidance to protect against the most common and impactful threats, tactics, techniques, and procedures. Visit CISA’s Cross-Sector Cybersecurity Performance Goals for more information on the CPGs, including additional recommended baseline protections.[24]
Mitigate Default Configurations of Software and Applications
Misconfiguration
Recommendations for Network Defenders
Default configurations of software and applications
Modify the default configuration of applications and appliances before deployment in a production environment [M1013],[D3-ACH]. Refer to hardening guidelines provided by the vendor and related cybersecurity guidance (e.g., DISA’s Security Technical Implementation Guides (STIGs) and configuration guides).[25],[26],[27]
Default configurations of software and applications: Default Credentials
Change or disable vendor-supplied default usernames and passwords of services, software, and equipment when installing or commissioning [CPG 2.A]. When resetting passwords, enforce the use of “strong” passwords (i.e., passwords that are more than 15 characters and random [CPG 2.B]) and follow hardening guidelines provided by the vendor, STIGs, NSA, and/or NIST [M1027],[D3-SPP].[25],[26],[28],[29]
Default service permissions and configuration settings: Insecure Active Directory Certificate Services
Ensure the secure configuration of ADCS implementations. Regularly update and patch the controlling infrastructure (e.g., for CVE-2021-36942), employ monitoring and auditing mechanisms, and implement strong access controls to protect the infrastructure.If not needed, disable web-enrollment in ADCS servers. See Microsoft: Uninstall-AdcsWebEnrollment (ADCSDeployment) for guidance.[30]If web enrollment is needed on ADCS servers:Enable Extended Protection for Authentication (EPA) for Client Authority Web Enrollment. This is done by choosing the “Required” option. For guidance, see Microsoft: KB5021989: Extended Protection for Authentication.[31]Enable “Require SSL” on the ADCS server.Disable NTLM on all ADCS servers. For guidance, see Microsoft: Network security Restrict NTLM in this domain – Windows Security | Microsoft Learn and Network security Restrict NTLM Incoming NTLM traffic – Windows Security.[32],[33]Disable SAN for UPN Mapping. For guidance see, Microsoft: How to disable the SAN for UPN mapping – Windows Server. Instead, smart card authentication can use the altSecurityIdentities attribute for explicit mapping of certificates to accounts more securely.[34]Review all permissions on the ADCS templates on applicable servers. Restrict enrollment rights to only those users or groups that require it. Disable the CT_FLAG_ENROLLEE_SUPPLIES_SUBJECT flag from templates to prevent users from supplying and editing sensitive security settings within these templates. Enforce manager approval for requested certificates. Remove FullControl, WriteDacl, and Write property permissions from low-privileged groups, such as domain users, to certificate template objects.
Default service permissions and configuration settings: Insecure legacy protocols/services
Determine if LLMNR and NetBIOS are required for essential business operations.If not required, disable LLMNR and NetBIOS in local computer security settings or by group policy.
Default service permissions and configuration settings: Insecure SMB service
Require SMB signing for both SMB client and server on all systems.[25] This should prevent certain adversary-in-the-middle and pass-the-hash techniques. For more information on SMB signing, see Microsoft: Overview of Server Message Block Signing. [35] Note: Beginning in Microsoft Windows 11 Insider Preview Build 25381, Windows requires SMB signing for all communications.[36]
Mitigate Improper Separation of User/Administrator Privilege
Misconfiguration
Recommendations for Network Defenders
Improper separation of user/administrator privilege:Excessive account privileges,Elevated service account permissions, andNon-essential use of elevated accounts
Implement authentication, authorization, and accounting (AAA) systems [M1018] to limit actions users can perform, and review logs of user actions to detect unauthorized use and abuse. Apply least privilege principles to user accounts and groups allowing only the performance of authorized actions.Audit user accounts and remove those that are inactive or unnecessary on a routine basis [CPG 2.D]. Limit the ability for user accounts to create additional accounts.Restrict use of privileged accounts to perform general tasks, such as accessing emails and browsing the Internet [CPG 2.E],[D3-UAP]. See NSA Cybersecurity Information Sheet (CSI) Defend Privileges and Accounts for more information.[37]Limit the number of users within the organization with an identity and access management (IAM) role that has administrator privileges. Strive to reduce all permanent privileged role assignments, and conduct periodic entitlement reviews on IAM users, roles, and policies.Implement time-based access for privileged accounts. For example, the just-in-time access method provisions privileged access when needed and can support enforcement of the principle of least privilege (as well as the Zero Trust model) by setting network-wide policy to automatically disable admin accounts at the Active Directory level. As needed, individual users can submit requests through an automated process that enables access to a system for a set timeframe. In cloud environments, just-in-time elevation is also appropriate and may be implemented using per-session federated claims or privileged access management tools.Restrict domain users from being in the local administrator group on multiple systems.Run daemonized applications (services) with non-administrator accounts when possible.Only configure service accounts with the permissions necessary for the services they control to operate.Disable unused services and implement ACLs to protect services.
Mitigate Insufficient Internal Network Monitoring
Misconfiguration
Recommendations for Network Defenders
Insufficient internal network monitoring
Establish a baseline of applications and services, and routinely audit their access and use, especially for administrative activity [D3-ANAA]. For instance, administrators should routinely audit the access lists and permissions for of all web applications and services [CPG 2.O],[M1047]. Look for suspicious accounts, investigate them, and remove accounts and credentials, as appropriate, such as accounts of former staff.[39]Establish a baseline that represents an organization’s normal traffic activity, network performance, host application activity, and user behavior; investigate any deviations from that baseline [D3-NTCD],[D3-CSPP],[D3-UBA].[40]Use auditing tools capable of detecting privilege and service abuse opportunities on systems within an enterprise and correct them [M1047].Implement a security information and event management (SIEM) system to provide log aggregation, correlation, querying, visualization, and alerting from network endpoints, logging systems, endpoint and detection response (EDR) systems and intrusion detection systems (IDS) [CPG 2.T],[D3-NTA].
Mitigate Lack of Network Segmentation
Misconfiguration
Recommendations for Network Defenders
Lack of network segmentation
Implement next-generation firewalls to perform deep packet filtering, stateful inspection, and application-level packet inspection [D3-NTF]. Deny or drop improperly formatted traffic that is incongruent with application-specific traffic permitted on the network. This practice limits an actor’s ability to abuse allowed application protocols. The practice of allowlisting network applications does not rely on generic ports as filtering criteria, enhancing filtering fidelity. For more information on application-aware defenses, see NSA CSI Segment Networks and Deploy Application-Aware Defenses.[41]Engineer network segments to isolate critical systems, functions, and resources [CPG 2.F],[D3-NI]. Establish physical and logical segmentation controls, such as virtual local area network (VLAN) configurations and properly configured access control lists (ACLs) on infrastructure devices [M1030]. These devices should be baselined and audited to prevent access to potentially sensitive systems and information. Leverage properly configured Demilitarized Zones (DMZs) to reduce service exposure to the Internet.[42],[43],[44]Implement separate Virtual Private Cloud (VPC) instances to isolate essential cloud systems. Where possible, implement Virtual Machines (VM) and Network Function Virtualization (NFV) to enable micro-segmentation of networks in virtualized environments and cloud data centers. Employ secure VM firewall configurations in tandem with macro segmentation.
Mitigate Poor Patch Management
Misconfiguration
Recommendations for Network Defenders
Poor patch management: Lack of regular patching
Ensure organizations implement and maintain an efficient patch management process that enforces the use of up-to-date, stable versions of OSs, browsers, and software [M1051],[D3-SU].[45]Update software regularly by employing patch management for externally exposed applications, internal enterprise endpoints, and servers. Prioritize patching known exploited vulnerabilities.[2]Automate the update process as much as possible and use vendor-provided updates. Consider using automated patch management tools and software update tools.Where patching is not possible due to limitations, segment networks to limit exposure of the vulnerable system or host.
Poor patch management: Use of unsupported OSs and outdated firmware
Evaluate the use of unsupported hardware and software and discontinue use as soon as possible. If discontinuing is not possible, implement additional network protections to mitigate the risk.[45]Patch the Basic Input/Output System (BIOS) and other firmware to prevent exploitation of known vulnerabilities.
Mitigate Bypass of System Access Controls
Misconfiguration
Recommendations for Network Defenders
Bypass of system access controls
Limit credential overlap across systems to prevent credential compromise and reduce a malicious actor’s ability to move laterally between systems [M1026],[D3-CH]. Implement a method for monitoring non-standard logon events through host log monitoring [CPG 2.G].Implement an effective and routine patch management process. Mitigate PtH techniques by applying patch KB2871997 to Windows 7 and newer versions to limit default access of accounts in the local administrator group [M1051],[D3-SU].[46]Enable the PtH mitigations to apply User Account Control (UAC) restrictions to local accounts upon network logon [M1052],[D3-UAP].Deny domain users the ability to be in the local administrator group on multiple systems [M1018],[D3-UAP].Limit workstation-to-workstation communications. All workstation communications should occur through a server to prevent lateral movement [M1018],[D3-UAP].Use privileged accounts only on systems requiring those privileges [M1018],[D3-UAP]. Consider using dedicated Privileged Access Workstations for privileged accounts to better isolate and protect them.[37]
Mitigate Weak or Misconfigured MFA Methods
Misconfiguration
Recommendations for Network Defenders
Weak or misconfigured MFA methods: Misconfigured smart cards or tokens
In Windows environments:Disable the use of New Technology LAN Manager (NTLM) and other legacy authentication protocols that are susceptible to PtH due to their use of password hashes [M1032],[D3-MFA]. For guidance, see Microsoft: Network security Restrict NTLM in this domain – Windows Security | Microsoft Learn and Network security Restrict NTLM Incoming NTLM traffic – Windows Security.[32],[33]Use built-in functionality via Windows Hello for Business or Group Policy Objects (GPOs) to regularly re-randomize password hashes associated with smartcard-required accounts. Ensure that the hashes are changed at least as often as organizational policy requires passwords to be changed [M1027],[D3-CRO]. Prioritize upgrading any environments that cannot utilize this built-in functionality.As a longer-term effort, implement cloud-primary authentication solution using modern open standards. See CISA’s Secure Cloud Business Applications (SCuBA) Hybrid Identity Solutions Architecture for more information.[47] Note: this document is part of CISA’s Secure Cloud Business Applications (SCuBA) project, which provides guidance for FCEB agencies to secure their cloud business application environments and to protect federal information that is created, accessed, shared, and stored in those environments. Although tailored to FCEB agencies, the project’s guidance is applicable to all organizations.[48]
Weak or misconfigured MFA methods: Lack of phishing-resistant MFA
Enforce phishing-resistant MFA universally for access to sensitive data and on as many other resources and services as possible [CPG 2.H].[3],[49]
Mitigate Insufficient ACLs on Network Shares and Services
Misconfiguration
Recommendations for Network Defenders
Insufficient ACLs on network shares and services
Implement secure configurations for all storage devices and network shares that grant access to authorized users only.Apply the principal of least privilege to important information resources to reduce risk of unauthorized data access and manipulation.Apply restrictive permissions to files and directories, and prevent adversaries from modifying ACLs [M1022],[D3-LFP].Set restrictive permissions on files and folders containing sensitive private keys to prevent unintended access [M1022],[D3-LFP].Enable the Windows Group Policy security setting, “Do Not Allow Anonymous Enumeration of Security Account Manager (SAM) Accounts and Shares,” to limit users who can enumerate network shares.
Follow National Institute of Standards and Technologies (NIST) guidelines when creating password policies to enforce use of “strong” passwords that cannot be cracked [M1027],[D3-SPP].[29] Consider using password managers to generate and store passwords.Do not reuse local administrator account passwords across systems. Ensure that passwords are “strong” and unique [CPG 2.B],[M1027],[D3-SPP].Use “strong” passphrases for private keys to make cracking resource intensive. Do not store credentials within the registry in Windows systems. Establish an organizational policy that prohibits password storage in files.Ensure adequate password length (ideally 25+ characters) and complexity requirements for Windows service accounts and implement passwords with periodic expiration on these accounts [CPG 2.B],[M1027],[D3-SPP]. Use Managed Service Accounts, when possible, to manage service account passwords automatically.
Implement a review process for files and systems to look for cleartext account credentials. When credentials are found, remove, change, or encrypt them [D3-FE]. Conduct periodic scans of server machines using automated tools to determine whether sensitive data (e.g., personally identifiable information, protected health information) or credentials are stored. Weigh the risk of storing credentials in password stores and web browsers. If system, software, or web browser credential disclosure is of significant concern, technical controls, policy, and user training may prevent storage of credentials in improper locations.Store hashed passwords using Committee on National Security Systems Policy (CNSSP)-15 and Commercial National Security Algorithm Suite (CNSA) approved algorithms.[50],[51]Consider using group Managed Service Accounts (gMSAs) or third-party software to implement secure password-storage applications.
Mitigate Unrestricted Code Execution
Misconfiguration
Recommendations for Network Defenders
Unrestricted code execution
Enable system settings that prevent the ability to run applications downloaded from untrusted sources.[52]Use application control tools that restrict program execution by default, also known as allowlisting [D3-EAL]. Ensure that the tools examine digital signatures and other key attributes, rather than just relying on filenames, especially since malware often attempts to masquerade as common Operating System (OS) utilities [M1038]. Explicitly allow certain .exe files to run, while blocking all others by default.Block or prevent the execution of known vulnerable drivers that adversaries may exploit to execute code in kernel mode. Validate driver block rules in audit mode to ensure stability prior to production deployment [D3-OSM].Constrain scripting languages to prevent malicious activities, audit script logs, and restrict scripting languages that are not used in the environment [D3-SEA]. See joint Cybersecurity Information Sheet: Keeping PowerShell: Security Measures to Use and Embrace.[53]Use read-only containers and minimal images, when possible, to prevent the running of commands.Regularly analyze border and host-level protections, including spam-filtering capabilities, to ensure their continued effectiveness in blocking the delivery and execution of malware [D3-MA]. Assess whether HTML Application (HTA) files are used for business purposes in your environment; if HTAs are not used, remap the default program for opening them from mshta.exe to notepad.exe.
Software Manufacturers
NSA and CISA recommend software manufacturers implement the recommendations in Table 11 to reduce the prevalence of misconfigurations identified in this advisory. These mitigations align with tactics provided in joint guide Shifting the Balance of Cybersecurity Risk: Principles and Approaches for Security-by-Design and -Default. NSA and CISA strongly encourage software manufacturers apply these recommendations to ensure their products are secure “out of the box” and do not require customers to spend additional resources making configuration changes, performing monitoring, and conducting routine updates to keep their systems secure.[1]
Misconfiguration
Recommendations for Software Manufacturers
Default configurations of software and applications
Embed security controls into product architecture from the start of development and throughout the entire SDLC by following best practices in NIST’s Secure Software Development Framework (SSDF), SP 800-218.[54]Provide software with security features enabled “out of the box” and accompanied with “loosening” guides instead of hardening guides. “Loosening” guides should explain the business risk of decisions in plain, understandable language.
Default configurations of software and applications: Default credentials
Eliminate default passwords: Do not provide software with default passwords that are universally shared. To eliminate default passwords, require administrators to set a “strong” password [CPG 2.B] during installation and configuration.
Default configurations of software and applications: Default service permissions and configuration settings
Consider the user experience consequences of security settings: Each new setting increases the cognitive burden on end users and should be assessed in conjunction with the business benefit it derives. Ideally, a setting should not exist; instead, the most secure setting should be integrated into the product by default. When configuration is necessary, the default option should be broadly secure against common threats.
Improper separation of user/administrator privilege:Excessive account privileges,Elevated service account permissions, andNon-essential use of elevated accounts
Design products so that the compromise of a single security control does not result in compromise of the entire system. For example, ensuring that user privileges are narrowly provisioned by default and ACLs are employed can reduce the impact of a compromised account. Also, software sandboxing techniques can quarantine a vulnerability to limit compromise of an entire application.Automatically generate reports for:Administrators of inactive accounts. Prompt administrators to set a maximum inactive time and automatically suspend accounts that exceed that threshold.Administrators of accounts with administrator privileges and suggest ways to reduce privilege sprawl.Automatically alert administrators of infrequently used services and provide recommendations for disabling them or implementing ACLs.
Insufficient internal network monitoring
Provide high-quality audit logs to customers at no extra charge. Audit logs are crucial for detecting and escalating potential security incidents. They are also crucial during an investigation of a suspected or confirmed security incident. Consider best practices such as providing easy integration with a security information and event management (SIEM) system with application programming interface (API) access that uses coordinated universal time (UTC), standard time zone formatting, and robust documentation techniques.
Lack of network segmentation
Ensure products are compatible with and tested in segmented network environments.
Poor patch management: Lack of regular patching
Take steps to eliminate entire classes of vulnerabilities by embedding security controls into product architecture from the start of development and throughout the SDLC by following best practices in NIST’s SSDF, SP 800-218.[54] Pay special attention to:Following secure coding practices [SSDF PW 5.1]. Use memory-safe programming languages where possible, parametrized queries, and web template languages.Conducting code reviews [SSDF PW 7.2, RV 1.2] against peer coding standards, checking for backdoors, malicious content, and logic flaws.Testing code to identify vulnerabilities and verify compliance with security requirements [SSDF PW 8.2].Ensure that published CVEs include root cause or common weakness enumeration (CWE) to enable industry-wide analysis of software security design flaws.
Poor patch management: Use of unsupported operating OSs and outdated firmware
Communicate the business risk of using unsupported OSs and firmware in plain, understandable language.
Bypass of system access controls
Provide sufficient detail in audit records to detect bypass of system controls and queries to monitor audit logs for traces of such suspicious activity (e.g., for when an essential step of an authentication or authorization flow is missing).
Weak or Misconfigured MFA Methods: Misconfigured Smart Cards or Tokens
Fully support MFA for all users, making MFA the default rather than an opt-in feature. Utilize threat modeling for authentication assertions and alternate credentials to examine how they could be abused to bypass MFA requirements.
Weak or Misconfigured MFA Methods: Lack of phishing-resistant MFA
Mandate MFA, ideally phishing-resistant, for privileged users and make MFA a default rather than an opt-in feature.[3]
Insufficient ACL on network shares and services
Enforce use of ACLs with default ACLs only allowing the minimum access needed, along with easy-to-use tools to regularly audit and adjust ACLs to the minimum access needed.
Allow administrators to configure a password policy consistent with NIST’s guidelines—do not require counterproductive restrictions such as enforcing character types or the periodic rotation of passwords.[29]Allow users to use password managers to effortlessly generate and use secure, random passwords within products.
Salt and hash passwords using a secure hashing algorithm with high computational cost to make brute force cracking more difficult.
Unrestricted code execution
Support execution controls within operating systems and applications “out of the box” by default at no extra charge for all customers, to limit malicious actors’ ability to abuse functionality or launch unusual applications without administrator or informed user approval.
VALIDATE SECURITY CONTROLS
In addition to applying mitigations, NSA and CISA recommend exercising, testing, and validating your organization’s security program against the threat behaviors mapped to the MITRE ATT&CK for Enterprise framework in this advisory. NSA and CISA recommend testing your existing security controls inventory to assess how they perform against the ATT&CK techniques described in this advisory.
To get started:
Select an ATT&CK technique described in this advisory (see Table 12–Table 21).
Align your security technologies against the technique.
Test your technologies against the technique.
Analyze your detection and prevention technologies’ performance.
Repeat the process for all security technologies to obtain a set of comprehensive performance data.
Tune your security program, including people, processes, and technologies, based on the data generated by this process.
CISA and NSA recommend continually testing your security program, at scale, in a production environment to ensure optimal performance against the MITRE ATT&CK techniques identified in this advisory.
LEARN FROM HISTORY
The misconfigurations described above are all too common in assessments and the techniques listed are standard ones leveraged by multiple malicious actors, resulting in numerous real network compromises. Learn from the weaknesses of others and implement the mitigations above properly to protect the network, its sensitive information, and critical missions.
The information and opinions contained in this document are provided “as is” and without any warranties or guarantees. Reference herein to any specific commercial products, process, or service by trade name, trademark, manufacturer, or otherwise, does not constitute or imply its endorsement, recommendation, or favoring by the United States Government, and this guidance shall not be used for advertising or product endorsement purposes.
Trademarks
Active Directory, Microsoft, and Windows are registered trademarks of Microsoft Corporation. MITRE ATT&CK is registered trademark and MITRE D3FEND is a trademark of The MITRE Corporation. SoftPerfect is a registered trademark of SoftPerfect Proprietary Limited Company. Telerik is a registered trademark of Progress Software Corporation. VMware is a registered trademark of VMWare, Inc. Zimbra is a registered trademark of Synacor, Inc.
Purpose
This document was developed in furtherance of the authoring cybersecurity organizations’ missions, including their responsibilities to identify and disseminate threats, and to develop and issue cybersecurity specifications and mitigations. This information may be shared broadly to reach all appropriate stakeholders.
To report suspicious activity contact CISA’s 24/7 Operations Center at report@cisa.gov or (888) 282-0870. When available, please include the following information regarding the incident: date, time, and location of the incident; type of activity; number of people affected; type of equipment used for the activity; the name of the submitting company or organization; and a designated point of contact.
Appendix: MITRE ATT&CK Tactics and Techniques
See Table 12–Table 21 for all referenced threat actor tactics and techniques in this advisory.
Malicious actors masquerade as IT staff and convince a target user to provide their MFA code over the phone to gain access to email and other organizational resources.
Malicious actors gain authenticated access to devices by finding default credentials through searching the web.Malicious actors use default credentials for VPN access to internal networks, and default administrative credentials to gain access to web applications and databases.
Malicious actors exploit CVEs in Telerik UI, VM Horizon, Zimbra Collaboration Suite, and other applications for initial access to victim organizations.
Malicious actors gain access to OT networks despite prior assurance that the networks were fully air gapped, with no possible connection to the IT network, by finding special purpose, forgotten, or even accidental network connections.
Malicious actors gain initial access to systems by phishing to entice end users to download and execute malicious payloads or to run code on their workstations.
Malicious actors load vulnerable drivers and then exploit their known vulnerabilities to execute code in the kernel with the highest level of system privileges to completely compromise the device.
Technique Title
ID
Use
Obfuscated Files or Information: Command Obfuscation
Malicious actors execute spoofing, poisoning, and relay techniques if Link-Local Multicast Name Resolution (LLMNR), NetBIOS Name Service (NBT-NS), and Server Message Block (SMB) services are enabled in a network.
Malicious actors use “push bombing” against non-phishing resistant MFA to induce “MFA fatigue” in victims, gaining access to MFA authentication credentials or bypassing MFA, and accessing the MFA-protected system.
Malicious actors can steal administrator account credentials and the authentication token generated by Active Directory when the account is logged into a compromised host.
Unauthenticated malicious actors coerce an ADCS server to authenticate to an actor-controlled server, and then relay that authentication to the web certificate enrollment application to obtain a trusted illegitimate certificate.
Malicious actors use commands, such as net share, open source tools, such as SoftPerfect Network Scanner, or custom malware, such as CovalentStealer to discover and categorize files.Malicious actors search for text files, spreadsheets, documents, and configuration files in hopes of obtaining desired information, such as cleartext passwords.
Malicious actors use commands, such as net share, open source tools, such as SoftPerfect Network Scanner, or custom malware, such as CovalentStealer, to look for shared folders and drives.
Malicious actors with stolen administrator account credentials and AD authentication tokens can use them to operate with elevated permissions throughout the domain.
Use Alternate Authentication Material: Pass the Hash
The operations of DSM services require specific ports to be opened to ensure normal functionality. In this article, you can find the network ports and protocols required by DSM services for operations.
In this guide, you will learn how to enable Remote Desktop on Windows 10, 11, and Windows Server. I’ll also show you on to enable RDP using PowerShell and group policy.
Tip: Use a remote desktop connection manager to manage multiple remote desktop connections. You can organize your desktops and servers into groups for easy access.
In the diagram below, my admin workstation is PC1. I’m going to enable RDP on PC2, PC3, and Server1 so that I can remotely connect to them. RDP uses port TCP 3389. You can change the RDP listening port by modifying the registry.
Enable Remote Desktop on Windows 10
In this example, I’m going to enable remote desktop on PC2 that is running windows 10.
Step 1. Enable Remote Desktop
Right click the start menu and select system.
Under related settings click on Remote desktop.
Click the slider button to enable remote desktop.
You will get a popup to confirm that you want to enable Remote desktop. Click confirm.
Next, Click on Advanced Settings.
Make sure “Require computers to use Network Level Authentication to connect” is selected.
This setting will force the user to authenticate before it will start a remote desktop session. This setting will enable a layer of security and prevent unauthorized remote connections.
Step 2. Select Users Accounts
The next step is to ensure only specific accounts can use RDP.
By default, only members of the local administrators group will be allowed to connect using remote desktop.
To add or remove user accounts click on “select users that can remotely access this PC”.
To add a user click the Add button and search for the username.
In this example, I’m going to add a user Adam A. Anderson.
Tip. I recommend creating a domain group to allow RDP access. This will make it easier to manage and audit RDP access.
That was the last step, remote desktop is now enabled.
Let’s test the connection.
From PC1 I open Remote Desktop Connection and enter PC2.
I am prompted to enter credentials.
Success!
I now have a remote desktop connection to PC2.
In the screenshot below you can see I’m connected via console to PC1 and I have a remote desktop connection open to PC2.
Damware Mini Remote Control
Multiple monitor support. Reboot and wake sleeping computers remotely.
Remote access to Windows, Linux, and Mac OS X operating systems. In session chat, remote screenshot, file transfer, and more.
You can use the below PowerShell command to check if remote desktop is enabled.
if ((Get-ItemProperty "hklm:\System\CurrentControlSet\Control\Terminal Server").fDenyTSConnections -eq 0) { write-host "RDP is Enabled" } else { write-host "RDP is NOT enabled" }
To enable remote desktop remotely you can use the invoke-command. This requires PS remoting to be enabled, check out my article on remote powershell for more details.
In this example, I’ll enable remote desktop on the remote computer PC2.
Enable the policy setting -> Allow users to connect remotely by using Remote Desktop Services
That is the only policy setting that needs to be enabled to allow remote desktop
Step 2. Update Computer GPO
The GPO policies will auto refresh on remote computers every 90 minutes.
To manually update GPO on a computer run the gpupdate command.
When remote desktop is managed with group policy the settings will be greyed out. This will allow you to have consistent settings across all your computers. It will also prevent users or the helpdesk from modifying the settings.
That’s a wrap.
I just showed you several ways to enable remote desktop on Windows computers. If you are using Active Directory with domain joined computers then enabling RDP via group policy is the best option.
Recommended: Active Directory Permissions Reporting Tool
The ARM Permissions Reporting Tool helps you monitor, analyze, and report on the permissions assigned to users, groups, computers, and organizational units in your Active Directory
You can easily identify who has what permissions, where they came from, and when they were granted or revoked. You can also generate compliance-ready reports for various standards and regulations, such as HIPAA, PCI DSS, SOX, and GDPR
Get instant visibility into user and group permissions.