Adobe Commerce Unauthorized XXE Vulnerability

By Security News
July 8, 2024

Overview

The SonicWall Capture Labs threat research team became aware of an XML External Entity Reference vulnerability affecting Adobe Commerce and Magento Open Source. It is identified as CVE-2024-34102 and given a critical CVSSv3 score of 9.8. Labeled as an Improper Restriction of XML External Entity Reference (‘XXE’) vulnerability and categorized as CWE-611, this vulnerability allows an attacker unauthorized access to private files, such as those containing passwords. Successful exploitation could lead to arbitrary code execution, security feature bypass, and privilege escalation.

A proof of concept is publicly available on GitHub. Adobe Commerce versions 2.4.7, 2.4.6-p5, 2.4.5-p7, 2.4.4-p8, and earlier and Magento Open-Source versions 2.4.7, 2.4.6-p5, 2.4.5-p7, 2.4.4-p8, and earlier are vulnerable. Although Magento Open Source is popular mainly for dev environments, according to Shodan and FOFA, up to 50k exposed Adobe Commerce with Magento template are running.

Technical Overview

Magento (Adobe Commerce) is a built-in PHP platform that helps programmers create eCommerce websites and sell online. It is an HTTP PHP server application. Such applications usually have two global entry points: the User Interface and the API. Magento uses REST API, GraphQL, and SOAP.

Attackers can leverage this vulnerability to gain unauthorized admin access to REST API, GraphQL API, or SOAP API, leading to the disclosure of confidential data, denial of service, server-side request forgery (SSRF), port scanning from the perspective of the machine where the parser is located, and complete compromise of affected systems. This vulnerability poses a significant risk due to its ability to exfiltrate sensitive files, such as app/etc/env.php, containing cryptographic keys used for authentication, as shown in Figure 1. This key is generated during Magento 2 installation process. Unauthenticated actors can utilize this key to forge administrator tokens and manipulate Magento’s APIs as privileged users.

Figure 1: app/etc/env.php

The vulnerability is due to improper handling of nested deserialization in Adobe Commerce and Magento. This allows attackers to exploit XML External Entities (XXE) during deserialization, potentially allowing remote code execution. Unauthorized attackers can craft malicious JSON payloads that represent objects with unintended properties or behaviors when deserialized by the application.

Triggering the Vulnerability

XML External Entities (XXE) attack technique takes advantage of XML’s feature of dynamically building documents during processing. An XML message can provide data explicitly or point to a URI where the data exists. In the attack technique, external entities may replace the entity value with malicious data, alternate referrals, or compromise the security of the data the server/XML application has access to.

In the example below, the attacker takes advantage of an XML Parser’s local server access privileges to compromise local data:

  • The sample application expects XML input with a parameter called “username.” This parameter is later embedded in the application’s output.
  • The application typically invokes an XML parser to parse the XML input.
  • The XML parser expands the entity “test” into its full text from the entity definition provided in the URL. Here, the actual attack takes place.
  • The application embeds the input (parameter “username,” which contains the file) in the web service response.
  • The web service echoes back the data.

Attackers may also use External Entities to have the web services server download malicious code or content to the server for use in secondary or follow-on attacks. Other examples wherein sensitive files can be disclosed are shown in Figure 2.

Figure 2: Disclosing targeted files.

Exploiting the Vulnerability

A crafted POST request to a vulnerable Adobe instance with an enabled Magento template is the necessary and sufficient condition to exploit the issue. An attacker only needs to be able to access the instance remotely, which could be over the Internet or a local network. A working PoC with a crafted POST query aids in exploiting this vulnerability. Figure 4 shows a demonstration of exploitation leveraging the publicly available PoC.

Exploiting CVE-2024-34102, steps are enumerated below, which will exfiltrate the contents of the system’s password file from the target server.

  • Create a DTD file (dtd.xml) on the attacker’s machine. This file includes entities that will read and encode the system’s password file, then send it to your endpoint.
  • Host the dtd.xml file on the attacker’s machine, accessible via HTTP on a random port.
  • Send the malicious payload via a sample curl request to the vulnerable Magento instance, as shown in Figure 3. The payload includes a specially crafted XML payload referencing the DTD file hosted on the attacker’s machine.
  • The XML parser in Magento will process the DTD file, triggering the exfiltration of the system’s password file as shown in Figure 4.
  • Lastly, observe your endpoint to capture and decode the exfiltrated data.

Figure 3: CVE-2024-34102 attack request

00:00

00:15

Figure 4: CVE-2024-34102 Exploitation

Out of the 50k exposed Magento instances in the wild, multiple events were observed wherein attackers leveraged this vulnerability, as only 25% of instances have been updated since the vulnerability was exploited in the wild. According to Sansec analysis, CVE-2024-34102 can be chained with other vulnerabilities, such as the PHP filter chains exploit (CVE-2024-2961), leading to remote code execution (RCE).

SonicWall Protections

To ensure SonicWall customers are prepared for any exploitation that may occur due to this vulnerability, the following signatures have been released:

  • IPS: 4462 – Adobe Commerce XXE Injection

Remediation Recommendations

Considering the severe consequences of this vulnerability and the trend of nefarious activists trying to leverage the exploit in the wild, users are strongly encouraged to upgrade their instances, according to Adobe advisory, to address the vulnerability.

Relevant Links

Source :
https://blog.sonicwall.com/en-us/2024/07/adobe-commerce-unauthorized-xxe-vulnerability/

The Potential Impact of the OpenSSH Vulnerabilities CVE-2024–6387 and CVE-2024-6409

By: Jagir Shastri
July 17, 2024
Read time: 5 min (1331 words)

We check the OpenSSH vulnerabilities CVE-2024–6387 and CVE-2024-6409, examining their potential real-world impact and the possibility of exploitation for CVE-2024–6387 in x64 systems.

Introduction

CVE-2024–6387, also known as “regreSSHion,” is a vulnerability that exists in OpenSSH, a widely-used suite of secure networking utilities based on the SSH protocol. This vulnerability, which was discovered in July 2024, allows for remote unauthenticated code execution, potentially providing attackers root privileges on affected systems. The Common Vulnerability Scoring System (CVSS) has rated this vulnerability with a score of 9.8

The OpenSSH vendor advisory mentions that the successful exploitation of CVE-2024-6387 has been demonstrated on 32-bit Linux and GNU C Library systems with (ASLR). It also mentions that exploitation on 64-bit systems might be possible but this has not been demonstrated at the time of publishing.

On July 8, another similar vulnerability, the signal handler race condition CVE-2024-6409 was discovered. This flaw occurs when a client fails to authenticate within the LoginGraceTime period, which is 120 seconds by default, and 600 seconds in older OpenSSH versions. Consequently, this can lead to a signal handler race condition in the cleanup_exit() function within the child process of the SSHD server.

Figure 1. How the exploit works

The “regreSSHion” vulnerability arises from the unsafe handling of the SIGALRM signal during SSH authentication. When the LoginGraceTime expires, the SIGALRM signal is raised, and the corresponding handler performs certain actions, including calling non-async-signal-safe functions like syslog(). This can create a race condition, where the timing of operations could lead to memory corruption or other unexpected behaviors.

SIGALRM
SIGALRM is a signal in Unix-like operating systems that indicates an alarm or timer expiration. When a process sets and a function triggers, it schedules a SIGALRM signal to be sent to the process after a specified number of seconds. This signal is commonly used for timing operations, such as implementing timeouts for network requests or scheduling periodic tasks. Processes can define custom signal handlers to respond to SIGALRM, allowing them to perform actions such as terminating processes, resetting timers, or managing execution time limits. Overall, SIGALRM facilitates time-sensitive operations within Unix processes by providing a mechanism to handle scheduled alarms and timing events.

Exploiting CVE-2024–6387 requires an attacker to initiate thousands of connection attempts to trigger the race condition accurately. The process involves repeatedly setting and resetting LoginGraceTime, causing the server to invoke the SIGALRM signal handler. This requires precise timing and proper inputs to manipulate the server’s memory layout, leading to heap corruption and code execution.

Signal handlers
Signal handlers are special functions that get called in response to specific signals sent to a program. These signals can be generated, either by the operating system or by the program itself. However, not all functions are safe to call from within a signal handler since they may not be reentrant, therefore cannot safely be interrupted and called again (“async-signal-safe”). For instance, syslog() is a function used to log messages to the system logger and is not considered async-signal-safe.

Researchers have found that approximately 10,000 attempts are needed to successfully exploit this vulnerability. While the exploit could take days to complete, it is still not guaranteed that the attempt would be successful . The presence of modern security mechanisms such as Address Space Layout Randomization (ASLR) and No-eXecute (NX) bits further complicate the exploitation process but do not entirely mitigate the risk.

CVE-2024-6409 technical details

Like CVE-2024-6387, this vulnerability occurs when the SSHD’s SIGALRM handler is called asynchronously, which in turn calls various functions that are not async-signal-safe.

The race condition in grace_alarm_handler() calls cleanup_exit() from the privsep child process. However, cleanup_exit() is not designed to be called from a signal handler, potentially invoking unsafe functions. Cleanup function calls can be interrupted by signals, causing unsafe state changes and potential remote code execution (RCE).

As a privsep child process run’s with reduced privileges, there is less reason to worry about the vulnerability. In addition, working exploits for the CVE-2024-6409 have not been yet discovered, therefore proof of its actual exploitation has not been established at the time of publishing.

Exploitability of CVE-2024-6387 in x64 Systems

The OpenSSH vendor advisory mentions that the successful exploitation of CVE-2024-6387 has been demonstrated on 32-bit Linux and GNU C Library (glibc) systems with (ASLR). It also mentions that exploitation on 64-bit systems might be possible. However, certain characteristics of X64 systems make this exploitation much more difficult, which we’ll expound on in this section.

In x64 systems, ASLR plays a crucial role by randomizing memory addresses, including those of the GNU C Library (glibc), with each program execution. This randomness makes it very difficult for attackers to predict the location of the glibc base address, thus mitigating exploits that depend on precise memory targeting. The x64 architecture’s expansive address space further complicates exploitation, as attackers have to guess an exponentially greater amount of addresses. Combined with security measures such as stack canaries and NX bits, exploiting vulnerabilities such as CVE-2024-6387 becomes highly impractical on x64 systems.

While theoretically possible under specific conditions, the effective implementation of ASLR and the inherent complexities of the x64 environment significantly reduce real-world exploitability, highlighting the robust security benefits of these architectural safeguards.

Potential impact

Our As per our internal telemetry we did not notice any trend change for CVE-2024–6387, which could be considered a known exploited vulnerability (KEV)that is being exploited in wild. .

While CVE-2024–6387 presents a critical security risk, its real-world impact is mitigated by several factors. The technical complexity of the exploit and the extensive time required to execute it make large-scale attacks impractical. Each attack attempt resets the login timer, requiring precise timing and substantial effort from the attacker.

Moreover, the vulnerability affects specific versions of OpenSSH (up to 4.4p1 and 8.5p1 to 9.7p1) running on Linux systems using the GNU C Library. Systems with additional protections against brute force attacks and distributed denial-of-service (DDoS) are less likely to be successfully exploited. Therefore, while targeted attacks are possible, mass exploitation is unlikely due to the unavailability of working exploits and the time required to exploit these vulnerabilities.

Mitigation

To mitigate the risks associated with CVE-2024–6387, administrators should immediately update OpenSSH to version 9.8 or later. If immediate updating is not feasible, reducing the LoginGraceTime can provide temporary mitigation against this vulnerability.

Additionally, organizations can consider implementing the following best practices for general vulnerability exploit protection:

Patch management
Regularly updating and patching software, operating systems, and applications is the most straightforward method for organizations to avoid the exploitation of vulnerabilities within their systems.

Network segmentation
Separating critical network segments from the larger network can minimize the impact of a potential vulnerability exploitation.

Regular security audits
Performing security audits and vulnerability assessments can identify and remediate potential weaknesses within the infrastructure before they can be exploited.

Security awareness training
Educating employees about the common tactics used by attackers can help them avoid falling victim to social engineering attacks that might precede vulnerability exploitation.

Incident response plan
Developing, testing, and maintaining an incident response plan can help organizations quickly and effectively respond to security breaches and vulnerability exploitations.

Additionally, employing network-based access controls, intrusion prevention systems such as Trend Vision One™, and regular vulnerability scanning can further enhance security.
For Trend customers, the following IPS smart rules can detect the attack on a surface level:

  • 1003593 Detected SSH Server Traffic (ATT&CK T1021.004)
  • 1005748 Multiple SSH Connection Detected (ATT&CK T1499.002, T1110)

Conclusion

According to other researchers, there could be non-functional exploits in circulation that claim to be working proofs-of-concept (POCs) for CVE-2024-6387. These fake exploits contain payloads that download files from remote servers and establish persistence on the systems of security researchers. Assuming they are testing a legitimate POC for the vulnerability, the security features of their systems might be disabled, making them vulnerable to malicious activities.

Overall, while CVE-2024–6387 and CVE-2024-6409 is a critical vulnerability, it does not pose a widespread threat to the internet due to its exploitation complexity and existing mitigations. However, administrators should remain vigilant, apply patches promptly, and implement recommended security practices to protect their systems.

Source :
https://www.trendmicro.com/en_us/research/24/g/cve-2024-6387-and-cve-2024-6409.html

How to Disable TLS 1.0 and TLS 1.1 on Windows Server?

Arun KL
February 13, 2024
11 minutes

Growing trends in cyber attacks made system administrators implement more secure communication protocols to protect their assets and network from attacks. TLS plays a vital role in the implementation stack. TLS is a critical security protocol that is used to encrypt communications between clients and servers. TLS 1.2 and TLS 1.3 are the two latest versions of the Transport Layer Security (TLS) protocol and offer many advantages over their previous versions. TLS 1.2 is the most widely used version of the TLS protocol, but TLS 1.3 is gaining popularity because of its efficiency and speed. As a system administrator, you should enable TLS 1.2 and TLS 1.3 on your Windows Server to enhance the security of your infrastructure, but wait, that’s not enough. You should disable TLS 1.0 and TLS 1.1 on Windows Server as they are deprecated for their weak security.

Before learning how to disable TLS 1.0 and TLS 1.1 on your Windows Server, let’s see about TLS 1.0 and TLS 1.1 and why you should disable TLS 1.0 and TLS 1.1 on your Windows Server

A Short Note About TLS 1.0 and TLS 1.1:

The Transport Layer Security (TLS) protocols are cryptographic protocols that provide communication security over the Internet. TLS 1.0 and TLS 1.1 are the two previous versions of the TLS protocol.

TLS 1.0 was first defined in 1999, and TLS 1.1 was published as an update to TLS 1.0 in 2006. TLS 1.0 and TLS 1.1 are now considered to be obsolete, and they are no longer considered secure.

Why You Should Disable TLS 1.0 and TLS 1.1 on Windows Server?

There are a few reasons why you should disable TLS 1.0 and TLS 1.1 on Windows Server:

  1. TLS 1.0 and TLS 1.1 are no longer considered secure, due to the fact that they are vulnerable to various attacks, such as the POODLE attack.
  2. Disabling TLS 1.0 and TLS 1.1 on your server will force clients to use a more secure protocol (TLS 1.2), which is less vulnerable to attack.
  3. Some government agencies, such as the US National Security Agency (NSA), have recommended that TLS 1.0 and TLS 1.1 be disabled.
  4. Microsoft will no longer provide security updates for Windows Server running TLS 1.0 and TLS 1.1.
  5. Many major software vendors are phasing out support for TLS 1.0 and TLS 1.1. This includes Google, Microsoft, Mozilla, and Apple.

Attacks TLS 1.0 and TLS 1.1 are vulnerable to:

There are a number of known vulnerabilities in TLS 1.0 and TLS 1.1 that can be exploited by attackers. These include:

  1. POODLE (Padding Oracle On Downgraded Legacy Encryption)
  2. BEAST (Browser Exploit Against SSL/TLS)
  3. CRIME (Compression Ratio Info-leak Made Easy)
  4. FREAK (Factoring Attack on RSA-EXPORT Keys)
  5. LOGJAM (Diffie-Hellman Key Exchange Weakness)

These vulnerabilities allow attackers to perform man-in-the-middle attacks, decrypt sensitive information, and hijack user sessions. By disabling TLS 1.0 and TLS 1.1 on your Windows server, you can protect yourself from these attacks.

What is the Alternate to TLS 1.0 and TLS 1.1?

The current version of the TLS protocol is TLS 1.3. TLS 1.3 was first defined in 2018, and it includes a number of security improvements over previous versions of the TLS protocol. We suggest you to enable TLS 1.2 and TLS 1.3 on your Windows Server instead of TLS 1.0 and TLS 1.1.

TLS 1.2 improves upon TLS 1.1 by adding support for Elliptic Curve Cryptography (ECC) and introducing new cryptographic suites that offer better security than the suites used in TLS 1.1. TLS 1.3 improves upon TLS 1.2 by simplifying the handshake process and making it more resistant to man-in-the-middle attacks. In addition, TLS 1.3 introduces new cryptographic suites that offer better security than the suites used in TLS 1.2.

TLS 1.2 and TLS 1.3 are both backward compatible with TLS 1.1 and earlier versions of the protocol. This means that a client that supports TLS 1.2 can communicate with a server that supports TLS 1.1 and vice versa. However, TLS 1.2 and TLS 1.3 are not compatible with each other. A client that supports TLS 1.2 cannot communicate with a server that supports TLS 1.3, and vice versa.

TLS 1.2 is the most widely used version of the TLS protocol, but TLS 1.3 is gaining in popularity. Many major web browsers, including Google Chrome, Mozilla Firefox, and Microsoft Edge, now support TLS 1.3. In addition, major Internet services providers, such as Cloudflare and Akamai, have started to support TLS 1.3 on their servers. Please visit this page if you want to deeply review the comparison of TLS implementations across different supported servers and clients.

Please visit these posts to learn more about TLS 1.2 and TLS 1.3:

  1. What Is SSL/TLS? How SSL, TLS 1.2, And TLS 1.3 Differ From Each Other?
  2. Decoding TLS v1.2 protocol Handshake with Wireshark
  3. Decoding TLS 1.3 Protocol Handshake With Wireshark
  4. How to Enable TLS 1.3 in Standard Web Browsers?
  5. How to Enable TLS 1.3 on Popular Web Servers?
  6. How to Enable TLS 1.2 and TLS 1.3 on Windows Server
  7. How to Disable TLS 1.0 and TLS 1.1 on Your Apache Server?
  8. How to Disable TLS 1.0 and TLS 1.1 on Your Nginx Server?

How to Disable TLS 1.0 and TLS 1.1 on Windows Server?

We have covered 3 different ways to disable TLS 1.0 and TLS 1.1 on your Windows Server in this post. You can choose any one of the three ways to disable TLS 1.0 and TLS 1.1 on your Windows Server depending on your technical and automation skills.

  1. Disable TLS 1.0 and TLS 1.1 manually using Registry
  2. Disable TLS 1.0 and TLS 1.1 using Powershell Commands
  3. Disable TLS 1.0 and TLS 1.1 using CMD

Note: Microsoft clearly said that it doesn’t support TLS 1.0 and TLS 1.1 on Windows operating systems. No patches will be provided for TLS 1.0 and TLS 1.1 from Microsoft. You can refer to the below table that shows the Microsoft Schannel Provider support of TLS protocol versions.

TLS Protocols Supported by Windows Operating Systems:

Windows OSTLS 1.0 ClientTLS 1.0 ServerTLS 1.1 ClientTLS 1.1 ServerTLS 1.2 ClientTLS 1.2 ServerTLS 1.3 ClientTLS 1.3 Server
Windows Vista/Windows Server 2008EnabledEnabledNot supportedNot supportedNot supportedNot supportedNot supportedNot supported
Windows Server 2008 with Service Pack 2 (SP2)EnabledEnabledDisabledDisabledDisabledDisabledNot supportedNot supported
Windows 7/Windows Server 2008 R2EnabledEnabledDisabledDisabledDisabledDisabledNot supportedNot supported
Windows 8/Windows Server 2012EnabledEnabledEnabledEnabledEnabledEnabledNot supportedNot supported
Windows 8.1/Windows Server 2012 R2EnabledEnabledEnabledEnabledEnabledEnabledNot supportedNot supported
Windows 10, version 1507EnabledEnabledEnabledEnabledEnabledEnabledNot supportedNot supported
Windows 10, version 1511EnabledEnabledEnabledEnabledEnabledEnabledNot supportedNot supported
Windows 10, version 1607/Windows Server 2016 StandardEnabledEnabledEnabledEnabledEnabledEnabledNot supportedNot supported
Windows 10, version 1703EnabledEnabledEnabledEnabledEnabledEnabledNot supportedNot supported
Windows 10, version 1709EnabledEnabledEnabledEnabledEnabledEnabledNot supportedNot supported
Windows 10, version 1803EnabledEnabledEnabledEnabledEnabledEnabledNot supportedNot supported
Windows 10, version 1809//Windows Server 2019EnabledEnabledEnabledEnabledEnabledEnabledNot supportedNot supported
Windows 10, version 1903EnabledEnabledEnabledEnabledEnabledEnabledNot supportedNot supported
Windows 10, version 1909EnabledEnabledEnabledEnabledEnabledEnabledNot supportedNot supported
Windows 10, version 2004EnabledEnabledEnabledEnabledEnabledEnabledNot supportedNot supported
Windows 10, version 20H2EnabledEnabledEnabledEnabledEnabledEnabledNot SupportedNot Supported
Windows 10, version 21H1EnabledEnabledEnabledEnabledEnabledEnabledNot SupportedNot Supported
Windows 10, version 21H2EnabledEnabledEnabledEnabledEnabledEnabledNot SupportedNot Supported
Windows Server 2022EnabledEnabledEnabledEnabledEnabledEnabledEnabledEnabled
Windows 11EnabledEnabledEnabledEnabledEnabledEnabledEnabledEnabled

Method 1: Disable TLS 1.0 and TLS 1.1 manually using Registry

Let’s begin learning how to disable TLS 1.0 and TLS 1.1 manually using Windows Registry.

Step 1: Open the regedit utility

Open ‘Run‘, type ‘regedit’, and click ‘OK’.

Open Regedit Utility On Windows 1
Step 2: Create a New Key

In Registry Editor, navigate to the path: Computer\HKEY_LOCAL_MACHINE\SYSTEM\CurrentControlSet\Control\SecurityProviders\SCHANNEL\Protocols.
Create a new key by Right click on ‘Protocols‘ –> New –> Key.

Create New Key On Windows 1
Step 3: Rename the Registry Key ‘TLS 1.0’

Name key as ‘TLS 1.0‘Rename the registry key as ‘TLS 1.0‘.

Rename The Registry Key Tls 1 0
Step 4 Create One More Registry Key ‘Client’ underneath ‘TLS 1.0’

As smiler to the above step, create another key as ‘Client‘ underneath ‘TLS 1.0‘ as shone in this picture.

Create One More Registry Key Client Underneath Tls 1 0
Step 5: Create New Item ‘DWORD (32-bit) Value’ Underneath ‘Client’

Create a new item by right-clicking on ‘Client‘, and selecting ‘New’ –> DWORD (32-bit) Value.

Create New Item Dword 32 Bit Value Underneath Client
Step 6: Rename the Item ‘DWORD (32-bit) Value’ to ‘Enable’

We Name the item ‘Enabled‘ with a Hexadecimal value of ‘0‘.

Rename The Item Dword 32 Bit Value To Enable
Step 7: Create another item, ‘DisabledByDefault’ Underneath TLS 1.0

Similarly, create another item, ‘DisabledByDefault‘, with a Hexadecimal value of ‘1‘.

Create Another Item Disabledbydefault Underneath Tls 1 0
Step 8: Create ‘Server’ and corresponding Keys as in the case of ‘Client’

Similar to the above steps, create a key ‘Server‘ under ‘Protocols‘ and create registry items ‘DWORD (32-bit)’ and ‘Enabled’ as shown below.

Step 9: Disable TLS 1.1 on the Windows Server

Similar to the above steps, create a key ‘TLS 1.1’ under ‘Protocols‘ and below keys and items to Disable ‘TLS 1.1’


> HKEY_LOCAL_MACHINE\SYSTEM\CurrentControlSet\Control\SecurityProviders\SCHANNEL\Protocols\TLS 1.1\Client\Enabled with Hexadecimal value as ‘0’> HKEY_LOCAL_MACHINE\SYSTEM\CurrentControlSet\Control\SecurityProviders\SCHANNEL\Protocols\TLS 1.1\Client\DisabledByDefault with Hexadecimal value as ‘1’


> HKEY_LOCAL_MACHINE\SYSTEM\CurrentControlSet\Control\SecurityProviders\SCHANNEL\Protocols\TLS 1.1\Server\Enabled with Hexadecimal value as ‘0’> HKEY_LOCAL_MACHINE\SYSTEM\CurrentControlSet\Control\SecurityProviders\SCHANNEL\Protocols\TLS 1.1\Server\DisabledByDefault with Hexadecimal value as ‘1’

Create Server And Corresponding Keys As In The Case Of Client 1 1

Method 2: Disable TLS 1.0 and TLS 1.1 using Powershell commands

Follow this simple procedure to enable TLS 1.2 and TLS 1.2 using Powershell commands.

  1. Open Powershell as Administrator
Open Powershell As Administrator 1

2. Run the below commands to create Registry entries

- New-Item 'HKLM:\SYSTEM\CurrentControlSet\Control\SecurityProviders\SCHANNEL\Protocols\TLS 1.0\Server' -Force
- New-ItemProperty -Path 'HKLM:\SYSTEM\CurrentControlSet\Control\SecurityProviders\SCHANNEL\Protocols\TLS 1.0\Server' –PropertyType 'DWORD' -Name 'Enabled' -Value '0' 
- New-ItemProperty -Path 'HKLM:\SYSTEM\CurrentControlSet\Control\SecurityProviders\SCHANNEL\Protocols\TLS 1.0\Server' –PropertyType 'DWORD' -Name 'DisabledByDefault' -Value '1' 

- New-Item 'HKLM:\SYSTEM\CurrentControlSet\Control\SecurityProviders\SCHANNEL\Protocols\TLS 1.0\Client' -Force
- New-ItemProperty -Path 'HKLM:\SYSTEM\CurrentControlSet\Control\SecurityProviders\SCHANNEL\Protocols\TLS 1.0\Client' -PropertyType 'DWORD' -Name 'Enabled' -Value '0'
- New-ItemProperty -Path 'HKLM:\SYSTEM\CurrentControlSet\Control\SecurityProviders\SCHANNEL\Protocols\TLS 1.0\Client' –PropertyType 'DWORD' -Name 'DisabledByDefault' -Value '1' 


- New-Item 'HKLM:\SYSTEM\CurrentControlSet\Control\SecurityProviders\SCHANNEL\Protocols\TLS 1.1\Server' -Force
- New-ItemProperty -Path 'HKLM:\SYSTEM\CurrentControlSet\Control\SecurityProviders\SCHANNEL\Protocols\TLS 1.1\Server' –PropertyType 'DWORD' -Name 'Enabled' -Value '0' 
- New-ItemProperty -Path 'HKLM:\SYSTEM\CurrentControlSet\Control\SecurityProviders\SCHANNEL\Protocols\TLS 1.1\Server' –PropertyType 'DWORD' -Name 'DisabledByDefault' -Value '1' 

- New-Item 'HKLM:\SYSTEM\CurrentControlSet\Control\SecurityProviders\SCHANNEL\Protocols\TLS 1.1\Client' -Force
- New-ItemProperty -Path 'HKLM:\SYSTEM\CurrentControlSet\Control\SecurityProviders\SCHANNEL\Protocols\TLS 1.1\Client' -PropertyType 'DWORD' -Name 'Enabled' -Value '0'
- New-ItemProperty -Path 'HKLM:\SYSTEM\CurrentControlSet\Control\SecurityProviders\SCHANNEL\Protocols\TLS 1.1\Client' –PropertyType 'DWORD' -Name 'DisabledByDefault' -Value '1'

Before running the commands, you can see no items exist underneath Protocol.

No Items Were Exist Underneath Protocol 1

After running the commands you can see there are two keys created ‘TLS 1.0’ & ‘TLS 1.1’, Underneath each protocol there are ‘Client’ &’ Server’ Keys inside them there are two items ‘DisableByDefault’ & ‘Enabled’.

List Of Item Created Underneath Client And Server Using Powershell Commands

Method 3: Disable TLS 1.0 and TLS 1.1 on Windows Server using CMD

Follow this simple procedure to disable TLS 1.0 and TLS 1.1 using CMD comments.

  1. Open ‘Command Prompt’ as Administrator
Open Command Prompt As Administrator On The Windows Server 1

2. Run the below commands to create Registry entries.

reg add "HKEY_LOCAL_MACHINE\SYSTEM\CurrentControlSet\Control\SecurityProviders\SCHANNEL\Protocols\TLS 1.0\Server" /v Enabled /t REG_DWORD /d 0 /f 

reg add "HKEY_LOCAL_MACHINE\SYSTEM\CurrentControlSet\Control\SecurityProviders\SCHANNEL\Protocols\TLS 1.0\Server" /v DisabledByDefault /t REG_DWORD /d 1 /f

reg add "HKEY_LOCAL_MACHINE\SYSTEM\CurrentControlSet\Control\SecurityProviders\SCHANNEL\Protocols\TLS 1.0\Client" /v Enabled /t REG_DWORD /d 0 /f 

reg add "HKEY_LOCAL_MACHINE\SYSTEM\CurrentControlSet\Control\SecurityProviders\SCHANNEL\Protocols\TLS 1.0\Client" /v DisabledByDefault /t REG_DWORD /d 1 /f


reg add "HKEY_LOCAL_MACHINE\SYSTEM\CurrentControlSet\Control\SecurityProviders\SCHANNEL\Protocols\TLS 1.1\Server" /v Enabled /t REG_DWORD /d 0 /f 

reg add "HKEY_LOCAL_MACHINE\SYSTEM\CurrentControlSet\Control\SecurityProviders\SCHANNEL\Protocols\TLS 1.1\Server" /v DisabledByDefault /t REG_DWORD /d 1 /f

reg add "HKEY_LOCAL_MACHINE\SYSTEM\CurrentControlSet\Control\SecurityProviders\SCHANNEL\Protocols\TLS 1.1\Client" /v Enabled /t REG_DWORD /d 0 /f 

reg add "HKEY_LOCAL_MACHINE\SYSTEM\CurrentControlSet\Control\SecurityProviders\SCHANNEL\Protocols\TLS 1.1\Client" /v DisabledByDefault /t REG_DWORD /d 1 /f

We hope this post will help you know how to disable TLS 1.0 and TLS 1.1 on your Windows Server as they are deprecated for their weak security. Please share this post if you find this interested. Visit our social media page on FacebookLinkedInTwitterTelegramTumblrMedium & Instagram, and subscribe to receive updates like this.

Source :
https://thesecmaster.com/blog/how-to-disable-tls-1-0-and-tls-1-1-on-windows-server

How to Enable TLS 1.2 and TLS 1.3 on Windows Server?

Arun KL
November 14, 2023
8minutes

Growing trends in cyber attacks made system administrators implement more secured communication protocols to protect their assets and network from attacks. TLS plays a vital role in the implementation stack. TLS is a critical security protocol that is used to encrypt communications between clients and servers. TLS 1.3 is the latest version of the Transport Layer Security (TLS) protocol and offers many advantages over their previous versions. TLS 1.2 is the most widely used version of the TLS protocol, but TLS 1.3 is gaining popularity. As a system administrator, you should enable TLS 1.2 and TLS 1.3 on your Windows Server to enhance the security of your infrastructure.

Why Should You Enable TLS 1.2 and TLS 1.3 on Windows Server?

As a windows administrator, it is not just your duty to take care the system’s health. But, it is also your responsibility to create a secure environment to protect your Windows from internal and external threats. TLS 1.2 and TLS 1.3 are the new and most secure transport layer security protocols. As a system administrator, you should enable TLS 1.2 and TLS 1.3 on your Windows Server for the following reasons:

  1. Both TLS 1.2 and TLS 1.3 introduces new cryptographic suites that offer better security than the suites used in older TLS and SSL protocols.
  2. Both TLS 1.2 and TLS 1.3 are more resistant to man-in-the-middle attacks and simplify the handshake process, which makes it more difficult for attackers to eavesdrop on communications.
  3. TLS 1.3 simplifies the handshake process and removes unnecessary cryptographic overhead, which results in a faster connection time.

How to Enable TLS 1.2 and TLS 1.3 on Windows Server?

We have covered 3 different ways to enable TLS 1.2 and TLS 1.3 on your Windows Server in this post. You can choose any one of the three ways to enable TLS 1.2 and TLS 1.3 on your Windows Server depending on your technical and automation skills.

  1. Enable TLS 1.2 and TLS 1.3 manually using Registry
  2. Enable TLS 1.2 and TLS 1.3 using Powershell Commands
  3. Enable TLS 1.2 and TLS 1.3 using CMD

Microsoft clearly said that it supports TLS 1.3 only on Windows 10 (version 1903 later), Windows 11, Windows Server 2022, and above operating systems. No support will be provided for TLS 1.3 below Windows 10 22H2 and Windows Server 2022. You can refer to the below table that shows the Microsoft Schannel Provider support of TLS protocol versions.

Note: Windows 2019 does not support TLS 1.3.

TLS Protocols Supported by Windows Operating Systems:

Windows OSTLS 1.0 ClientTLS 1.0 ServerTLS 1.1 ClientTLS 1.1 ServerTLS 1.2 ClientTLS 1.2 ServerTLS 1.3 ClientTLS 1.3 Server
Windows Vista/Windows Server 2008EnabledEnabledNot supportedNot supportedNot supportedNot supportedNot supportedNot supported
Windows Server 2008 with Service Pack 2 (SP2)EnabledEnabledDisabledDisabledDisabledDisabledNot supportedNot supported
Windows 7/Windows Server 2008 R2EnabledEnabledDisabledDisabledDisabledDisabledNot supportedNot supported
Windows 8/Windows Server 2012EnabledEnabledEnabledEnabledEnabledEnabledNot supportedNot supported
Windows 8.1/Windows Server 2012 R2EnabledEnabledEnabledEnabledEnabledEnabledNot supportedNot supported
Windows 10, version 1507EnabledEnabledEnabledEnabledEnabledEnabledNot supportedNot supported
Windows 10, version 1511EnabledEnabledEnabledEnabledEnabledEnabledNot supportedNot supported
Windows 10, version 1607/Windows Server 2016 StandardEnabledEnabledEnabledEnabledEnabledEnabledNot supportedNot supported
Windows 10, version 1703EnabledEnabledEnabledEnabledEnabledEnabledNot supportedNot supported
Windows 10, version 1709EnabledEnabledEnabledEnabledEnabledEnabledNot supportedNot supported
Windows 10, version 1803EnabledEnabledEnabledEnabledEnabledEnabledNot supportedNot supported
Windows 10, version 1809//Windows Server 2019EnabledEnabledEnabledEnabledEnabledEnabledNot supportedNot supported
Windows 10, version 1903EnabledEnabledEnabledEnabledEnabledEnabledNot supportedNot supported
Windows 10, version 1909EnabledEnabledEnabledEnabledEnabledEnabledNot supportedNot supported
Windows 10, version 2004EnabledEnabledEnabledEnabledEnabledEnabledNot supportedNot supported
Windows 10, version 20H2EnabledEnabledEnabledEnabledEnabledEnabledNot SupportedNot Supported
Windows 10, version 21H1EnabledEnabledEnabledEnabledEnabledEnabledNot SupportedNot Supported
Windows 10, version 21H2EnabledEnabledEnabledEnabledEnabledEnabledNot SupportedNot Supported
Windows Server 2022EnabledEnabledEnabledEnabledEnabledEnabledEnabledEnabled
Windows 11EnabledEnabledEnabledEnabledEnabledEnabledEnabledEnabled

Method 1 : Enable TLS 1.2 and TLS 1.3 manually using Registry

Let’s begin learning how to enable TLS 1.2 and TLS 1.3 manually using Windows Registry.

Method 1 : Enable TLS 1.2 and TLS 1.3 manually using Registry

Step 1. Open regedit utility

Open ‘Run‘, type ‘regedit‘ and click ‘OK‘.

Open Regedit Utility On Windows 1
Step 2. Create New Key

In Registry Editor, navigate to the path : HKEY_LOCAL_MACHINE\SYSTEM\CurrentControlSet\Control\SecurityProviders\SCHANNEL\Protocols
Create a new key by Right click on ‘Protocols‘ –> New –> Key

Create New Key On Windows 1
Step 3. Rename the Registry Key ‘TLS 1.2’

Rename the  registry key as ‘TLS 1.2‘.

Rename The Registry Key Tls 1 2
Step 4. Create One More Registry Key ‘Client’ underneath ‘TLS 1.2’

As smiler to the above step, create another key as ‘Client‘ underneath ‘TLS 1.2‘ as shone in this picture.

Create One More Registry Key Client Underneath Tls 1 2
Step 5. Create New Item ‘DWORD (32-bit) Value’ Underneath ‘Client’, select ‘New’

Create new  item by right click on ‘Client‘, select ‘New’ –> DWORD (32-bit) Value.

Create New Item Dword 32 Bit Value Underneath Client Select New
Step 6. Rename the Item ‘DWORD (32-bit) Value’ to ‘DisabledByDefault’

Name the item as ‘DisabledBy Default’ with Hexadecimal value as ‘0’.

Rename The Item Dword 32 Bit Value To Disableby Default
Step 7. Create another item, ‘Enabled’ Underneath TLS 1.2

Similarly create another item, ‘Enabled‘ with Hexadecimal value as ‘1‘.

Create Another Item Enabled Underneath Tls 1 2
Step 8. List of Item Created underneath ‘Client’

After registry item creations underneath ‘Client’, it looks as below.

List Of Item Created Underneath Client
Step 9. Create ‘Server’ and corresponding Keys as in the case of ‘Client’

Similar to above steps, create a key ‘Server’ under ‘Protocols’ and create ‘DWORD (32-bit)’ and ‘Enabled’ as shown below.
– HKEY_LOCAL_MACHINE\SYSTEM\CurrentControlSet\Control\SecurityProviders\SCHANNEL\Protocols\TLS 1.2\Server\Enabled with Hexadecimal value as ‘1’– HKEY_LOCAL_MACHINE\SYSTEM\CurrentControlSet\Control\SecurityProviders\SCHANNEL\Protocols\TLS 1.2\Server\DisabledByDefault with Hexadecimal value as ‘0’

Create Server And Corresponding Keys As In The Case Of Client
Step 10. Enable TLS 1.3 on the Windows Server

Similar to above steps, create a ‘DWORD (32-bit)’ and ‘Enabled’ items in the below path to enable TLS 1.3
Note: TLS 1.3 is supported in Windows 11 & Windows server 2022 onwards.
– HKEY_LOCAL_MACHINE\SYSTEM\CurrentControlSet\Services\HTTP\Parameters\EnableHTTP3 with Hexadecimal value as ‘1’

Enable Tls 1 3 On The Windows Server

Method 2 : Enable TLS 1.2 and TLS 1.3 on Windows Server using Powershell Commends

Follow this simple procedure to enable TLS 1.2 and TLS 1.2 using Powershell comments.

Step 1. Open Powershell as Administrator
Open Powershell As Administrator 1
Step 2. Run below commands to create Registry entry
TLS 1.2
- New-Item 'HKLM:\SYSTEM\CurrentControlSet\Control\SecurityProviders\SCHANNEL\Protocols\TLS 1.2\Client' -Force

- New-ItemProperty -Path 'HKLM:\SYSTEM\CurrentControlSet\Control\SecurityProviders\SCHANNEL\Protocols\TLS 1.2\Client' –PropertyType 'DWORD' -Name 'DisabledByDefault' -Value '0'

- New-ItemProperty -Path 'HKLM:\SYSTEM\CurrentControlSet\Control\SecurityProviders\SCHANNEL\Protocols\TLS 1.2\Client' -PropertyType 'DWORD' -Name 'Enabled' -Value '1'


- New-Item 'HKLM:\SYSTEM\CurrentControlSet\Control\SecurityProviders\SCHANNEL\Protocols\TLS 1.2\Server' -Force

- New-ItemProperty -Path 'HKLM:\SYSTEM\CurrentControlSet\Control\SecurityProviders\SCHANNEL\Protocols\TLS 1.2\Server' –PropertyType 'DWORD' -Name 'DisabledByDefault' -Value '0'

- New-ItemProperty -Path 'HKLM:\SYSTEM\CurrentControlSet\Control\SecurityProviders\SCHANNEL\Protocols\TLS 1.2\Server' –PropertyType 'DWORD' -Name 'Enabled' -Value '1'


TLS 1.3 (Supports in Windows 11 & Windows Server 2022) 
- New-ItemProperty -Path 'HKLM:\SYSTEM\CurrentControlSet\services\HTTP\Parameters' -PropertyType 'DWORD' -Name 'EnableHttp3' -Value '1'

Before running the commands you can see no items were exist underneath Protocol.

No Items Were Exist Underneath Protocol

After running the commands you can see there are two keys created ‘TLS 1.2’ & ‘TLS 1.3’, Underneath each protocols there are ‘Client’ &’Server’ Keys inside them ther are two items ‘DisableByDefault’ & ‘Enabled’.

List Of Item Created Underneath Client Using Powershell Commends
List Of Item Created Underneath Server Using Powershell Commends
Enable Tls 1 3 On The Windows Server

Method 3: Enable TLS 1.2 and TLS 1.3 on Windows Server using native CMD

Follow this simple procedure to enable TLS 1.2 and TLS 1.2 using CMD comments.

Step 1. Open ‘Command Prompt’ as Administrator
Open Command Prompt As Administrator On The Windows Server 1
Step 2. Run below commands to create Registry entry.
TLS 1.2
- reg add "HKEY_LOCAL_MACHINE\SYSTEM\CurrentControlSet\Control\SecurityProviders\SCHANNEL\Protocols\TLS 1.2\Client" /v DisabledByDefault /t REG_DWORD /d 0 /f

- reg add "HKEY_LOCAL_MACHINE\SYSTEM\CurrentControlSet\Control\SecurityProviders\SCHANNEL\Protocols\TLS 1.2\Client" /v Enabled /t REG_DWORD /d 1 /f


- reg add "HKEY_LOCAL_MACHINE\SYSTEM\CurrentControlSet\Control\SecurityProviders\SCHANNEL\Protocols\TLS 1.2\Server" /v DisabledByDefault /t REG_DWORD /d 0 /f

- reg add "HKEY_LOCAL_MACHINE\SYSTEM\CurrentControlSet\Control\SecurityProviders\SCHANNEL\Protocols\TLS 1.2\Server" /v Enabled /t REG_DWORD /d 1 /f


TLS 1.3 (Supports in Windows 11 & Windows Server 2022)
- reg add "HKEY_LOCAL_MACHINE\SYSTEM\CurrentControlSet\services\HTTP\Parameters" /v EnableHttp3 /t REG_DWORD /d 1 /f

We hope this post will help you know how to enable TLS 1.2 and TLS 1.3 on your Windows Server to enhance the security of your infrastructure. Please share this post if you find this interesting. Visit our social media page on FacebookLinkedInTwitterTelegramTumblrMedium & Instagram, and subscribe to receive updates like this.

Source :
https://thesecmaster.com/blog/how-to-enable-tls-1-2-and-tls-1-3-on-windows-server

SANS’s 2024 Threat-Hunting Survey Review

By: Trend Micro
June 04, 2024
Read time: 3 min (709 words)

In its ninth year, the annual SANS Threat Hunting Survey delves into global organizational practices in threat hunting, shedding light on the challenges and adaptations in the landscape over the past year.

The 2024 survey highlights a growing maturity in threat-hunting methodologies, with a significant increase in organizations adopting formal processes.

This marks a shift towards a more standardized approach in cybersecurity strategies despite challenges such as skill shortages and tool limitations. Additionally, the survey reveals evolving practices in sourcing intelligence and an increase in outsourcing threat hunting, raising questions about the efficiency and alignment with organizational goals. This summary encapsulates the essential findings and trends, emphasizing the critical role of threat hunting in contemporary cybersecurity frameworks.

Participants

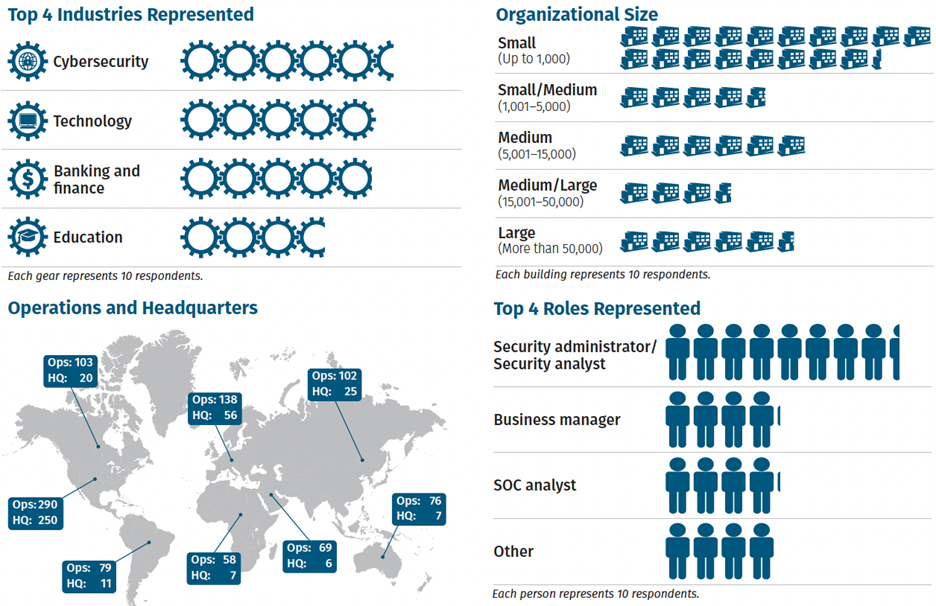
survey demographics
Figure 1: Survey demographics

This year’s survey attracted participants from a wide array of industries, with cybersecurity leading at 15% and 9% of respondents from the manufacturing sector, which has recently faced significant challenges from ransomware attacks. The survey participants varied in organization size, too, ranging from those working in small entities with less than 100 employees (24%) to large corporations with over 100,000 employees (9%).

The respondents play diverse roles within their organizations, highlighting the multidisciplinary nature of threat hunting. Twenty-two percent are security administrators or analysts, while 11% hold business manager positions, showcasing a balance between technical, financial, and personnel perspectives in threat-hunting practices.

However, the survey does note a geographical bias, with 65% of participants coming from organizations based in the United States, which could influence the findings related to staffing and organizational practices, though it’s believed not to affect the technical aspects of threat hunting.

Significant findings and implications

The survey examines the dynamic landscape of cyber threats and the strategies deployed by threat hunters to identify and counteract these risks. Notably, it sheds light on the prevalent types of attacks encountered:

  • Business email compromise (BEC): BEC emerges as the foremost concern, with approximately 68% of respondents reporting its detection. BEC involves malicious actors infiltrating legitimate email accounts to coerce individuals into transferring funds through social engineering tactics.
  • Ransomware: Following closely behind is ransomware, detected by 64% of participants. Ransomware operations encrypt data and demand payment for decryption, constituting a significant threat in the cybersecurity landscape.
  • Tactics, techniques, and procedures (TTPs): The survey found that TTPS are employed in different attack scenarios. In ransomware incidents, threat actors often deploy custom malware, target specific data for exfiltration, utilize off-the-shelf tools like Cobalt Strike, attempt to delete traces, and sometimes resort to physical intrusion into target companies.

Evolving threat-hunting practices

SANS also found that organizations have significantly evolved their threat-hunting practices, with changes in methodologies occurring as needed, monthly, quarterly, or annually.

Outsourced threat hunting is now used by 37% of organizations, and over half have adopted clearly defined methodologies for threat hunting, marking a notable advancement.

Additionally, 64% of organizations formally evaluate the effectiveness of their threat-hunting efforts, showing a decrease in those without formal methodologies from 7% to 2%. The selection of methods is increasingly influenced by available human resources, recognized by 47% of organizations.

The chief information security officer (CISO) plays a key role in developing threat-hunting methodologies, with significant involvement in 40% of cases.

Benefits of better threat-hunting efforts

Significant benefits from threat hunting include improved attack surface and endpoint security, more accurate detections with fewer false positives, and reduced remediation resources.

About 30% of organizations use vendor information as supplemental threat intelligence, with 14% depending solely on it. Incident response teams’ involvement in developing threat-hunting methodologies rose to 33% in 2024, indicating better integration within security functions.

Challenges such as data quality and standardization issues are increasing, underscoring the complexities of managing expanding cybersecurity data.

Final thoughts

The SANS 2024 Threat Hunting Survey highlights the cybersecurity industry’s evolution and focuses on improving cyber defense capabilities. Organizations aim to enhance threat hunting with better contextual awareness and data tools, with 51% looking to improve response to nuanced threats.

Nearly half (47%) plan to implement AI and ML to tackle the increasing complexity and volume of threats. There’s a significant planned investment in both staff and tools, with some organizations intending to increase their investment by over 10% or even 25% in the next 24 months, emphasizing threat hunting’s strategic importance.

However, a small minority anticipate reducing their investment, hinting at a potential shift in security strategy.

Source :
https://www.trendmicro.com/en_us/research/24/f/sans-2024-threat-hunting-survey-review.html

Not Just Another 100% Score: MITRE ENGENUITY ATT&CK

By: Trend Micro
June 18, 2024
Read time: 4 min (1135 words)

The latest MITRE Engenuity ATT&CK Evaluations pitted leading managed detection and response (MDR) services against threats modeled on the menuPass and BlackCat/AlphV adversary groups. Trend Micro achieved 100% detection across all 15 major attack steps with an 86% actionable rate for those steps— balancing detections and business priorities including operational continuity and minimized disruption.

Trend took part in the MITRE Engenuity ATT&CK Evaluations for managed detection and response (MDR) services—building on a history of strong performance in other MITRE Engenuity tests. Key to that ongoing success is our platform approach, which provides high-fidelity detection of early- and mid-chain tactics, techniques, and procedures (TTPs) enabling quick and decisive counteractions before exfiltration or encryption can occur. Of course, we know real-world outcomes matter more than lab results. That’s why we’re proud to support thousands of customers worldwide with MDR that brings the most native extended detection and response (XDR) telemetry, leading threat intelligence from Trend™ Research and our Trend Micro™ Zero-Day Initiative™ (ZDI) under a single service to bridge real-time threat protection and cyber risk management. 

The evaluation focused on our Trend Service One™ offering, powered by Trend Vision One, which included XDR, endpoint and network security capabilities. The results proved Trend Micro MDR is a great alternative to managed services that rely on open XDR platforms or managed SIEM platforms.

Our detection of adversarial activity early in the attack chain combined with our platform’s deeply integrated native response capabilities enables rapid mean-time-to-detect (MTTD) and mean-time-to-respond (MTTR). At the same time, comprehensive visibility and protection gives security teams greater confidence.

MITRE ENGENUITY ATTACK EVALUATIONS Managed Services Badge

Full detection across all major steps

This most recent MITRE Engenuity ATT&CK Evaluations for Managed Services featured attacks modeled on the real-world adversaries menuPass and BlackCat/AlphV. These took the form of advanced persistent threats (APTs) designed to dwell in the network post-breach and execute harmful activity over time.

Trend MDR achieved full detection coverage, reflecting and reinforcing our achievements in cybersecurity:

  • 100% across all  major attack steps
  • 100% for enriched detail on TTPs
  • 86% actionable rate for major steps

How Trend MDR delivers

To put its MDR evaluation in context, MITRE Engenuity conducted a survey prior to testing, gaining insights into market perceptions and expectations of managed cybersecurity services. More than half (58%) of respondents said they rely on managed services either to complement their in-house SOC or as their main line of defense. For companies with fewer than 5,000 employees, that tally increased to 68%.

Our MDR service at Trend helps meet those needs by combining AI techniques with human threat expertise and analysis. We correlate data and detect threats that might otherwise slip by as lower severity alerts. Our experts prioritize threats by severity, determine the root cause of attacks, and develop detailed response plans.

XDR is a key technology to achieve these security outcomes, extending visibility beyond endpoints to other parts of the environment where threats can otherwise go undetected: servers, email, identities, mobile devices, cloud workloads, networks, and operational technologies (OT). 

Integrated with native XDR insights is deep, global threat intelligence. Native telemetry enables high-fidelity detections, strong correlations and rich context; global threat intelligence brings highly relevant context to detect threats faster and more precisely. Combined with a broad third-party integration ecosystem and response automation across vectors, Trend Vision One introduces a full-spectrum SOC platform for security teams to speed up investigations and frees up time to focus on high-value, proactive security work including threat hunting and detection engineering. In some cases, smaller teams rely on our MDR service completely for their security operations.

With Trend Vision One, teams have access to a continuously updated and growing library of detection models—with the ability to build custom detection models to fit their unique threat models.

Proven strength in delivering higher-confidence alerts

Security and security operations center (SOC) teams are inundated with detection alerts and noise. Our visibility and analytics performance achieves a finely tuned balance between providing early alerts of critical adversarial tactics and techniques and managing alert fatigue to improve the analyst experience. Our MDR operations team takes advantage of the platform advantage and knows only to alert customers when critical.

In each simulation during the MITRE Engenuity ATT&CK Evaluations, there was no scenario where menuPass and BlackCat/AlphV attack attempts successfully breached the environment without being detected or disrupted.

It’s important to note that MITRE Engenuity doesn’t rank products or solutions. It provides objective measures but no scores. Instead, since every service and solution functions differently, the evaluation reveals areas of strength and opportunities for improvement within each offering. 

About the attacks

The menuPass threat group has been active since at least 2006. Some of its members have been associated with the Tianjin State Security Bureau of the Chinese Ministry of State Security and with the Huaying Haitai Science and Technology Development Company. It has targeted healthcare, defense, aerospace, finance, maritime, biotechnology, energy, and government targets—and in 2016–17 went after managed IT service providers. BlackCat is Rust-based ransomware offered as a service and first observed in November 2021. It has been used to target organizations across Africa, the Americas, Asia, Australia, and Europe in a range of sectors. 

Putting our service to the test

In cybersecurity, actions speak louder than words. Our significant investment in research and development extend to our MDR service offering to support thousands of enterprises around the world.

We’re dedicated to continuous iteration and improvement to equip security teams with cutting-edge solutions to keep their organizations safe. As we evolve our solutions, MITRE Engenuity continues to evolve its evaluation approach as well. The category of “actionability” was new in this evaluation, determining if each alert provided enough context for the security analyst to act on. The actionability testing category is an area we’re investing in heavily from a process and technology standpoint to ensure contextual awareness, prioritization, and intelligent guidance are included while maintaining manageable communication cadences and minimizing false positive alerts.

Overall, areas for improvement surfaced through the test scenarios have been resourced with dedicated engineering and development efforts to match the high standard we hold ourselves to-and that our users expect. We are pleased to see our MDR service demonstrated a strong balance of detection capabilities across the entire attack chain, both within the service itself and embedded in the underlying Trend Vision One platform.

We invite all our MDR customers to take a look at the MITRE Engenuity ATT&CK Evaluations for Managed Services to better understand the strength of their defensive posture, and to come to us with any questions or thoughts.

Next steps

For more on Trend MDR, XDR, and other related topics, check out these additional resources:

Forward vision

At Trend, we are dedicated to continuous iteration and improvement to equip security teams with cutting-edge solutions to keep their organizations safe. These relevant areas of improvement surfaced through the scenarios have been resourced with dedicated engineering and development efforts to match the high standard we hold ourselves to and which our users expect.

Source :
https://www.trendmicro.com/en_us/research/24/f/mitre-enginuity-attack-evaluations.html

How to Make Your Employees Your First Line of Cyber Defense

May 01, 2024
The Hacker News

There’s a natural human desire to avoid threatening scenarios. The irony, of course, is if you hope to attain any semblance of security, you’ve got to remain prepared to confront those very same threats.

As a decision-maker for your organization, you know this well. But no matter how many experts or trusted cybersecurity tools your organization has a standing guard, you’re only as secure as your weakest link. There’s still one group that can inadvertently open the gates to unwanted threat actors—your own people.

Security must be second nature for your first line of defense #

For your organization to thrive, you need capable employees. After all, they’re your source for great ideas, innovation, and ingenuity. However, they’re also human. And humans are fallible. Hackers understand no one is perfect, and that’s precisely what they seek to exploit.

This is why your people must become your first line of defense against cyber threats. But to do so, they need to learn how to defend themselves against the treachery of hackers. That’s where security awareness training (SAT) comes in.

What is Security Awareness Training (SAT)? #

The overall objective of an SAT program is to keep your employees and organization secure. The underlying benefit, however, is demonstrating compliance. While content may differ from program to program, most are generally similar, requiring your employees to watch scripted videos, study generic presentations, and take tests on cyber “hygiene.” At their core, SAT programs are designed to help you:

  • Educate your employees on recognizing cybersecurity risks such as phishing and ransomware
  • Minimize your organization’s exposure to cyber threats
  • Maintain regulatory compliance with cyber insurance stipulations

These are all worthwhile goals in helping your organization thrive amidst ever-evolving cyber threats. However, attaining these outcomes can feel like a pipe dream. That’s because of one unfortunate truth about most SAT programs: they don’t work.

Age-Old Challenges of Old-School SATs#

Traditional SAT programs have long been scrutinized for their inability to drive meaningful behavioral changes. In fact, 69% of employees admit to “intentionally bypassing” their enterprise’s cybersecurity guidance.

If you oversee cybersecurity for an organization, then you’re likely familiar with the pain that comes with implementing one, managing it, and encouraging its usage. Given their complexities, traditional SAT solutions practically force non-technical employees to become full-on technologists.

Challenges for AdministratorsChallenges for EmployeesChallenges for Your Organization
Complex, ongoing management is frustrating. Plus, through it all they just find poor results.They’re bored. Unengaging content is detrimental, as it doesn’t lead to knowledge retention. Boring, unengaging content doesn’t help with knowledge retention.Most SATs aren’t effective because they’re created by generalists, not real cybersecurity experts And many are designed with little reporting capabilities, leading to limited visibility into success rates

Because most SAT programs are complex to manage, they’re usually dismissed as a means to an end. Just check a box for compliance and move on. But when done right, SAT can be a potent tool to help your employees make more intelligent, more instinctive, security-conscious decisions.

Ask the Right Questions Before Choosing Your SAT Solution#

When it comes to choosing the right solution for your organization, there are some questions you should first ask yourself. By assessing the following, you’ll be better equipped to select the option that best fits your specific needs.

Learning-Based Questions

  • Are the topics covered in this SAT relevant to my organization’s security and compliance concerns?
  • Are episodes updated regularly to reflect current threats and scenarios?
  • Does this SAT engage users in a unique, meaningful manner?
  • Is this SAT built and supported by cybersecurity practitioners?
  • Is the teaching methodology proven to increase knowledge retention?

Management-Based Questions

  • Can someone outside of my organization manage the SAT for me?
  • Can it be deployed quickly?
  • Does it automatically enroll new users and automate management?
  • Is it smart enough to skip non-human identities so I don’t assign training to, say, our copy machine?
  • Is it simple and intuitive enough for anyone across my organization to use?

Your ideal SAT will allow you to answer a resounding “Yes” to all of the above.

Essential Features of an Effective SAT#

A SAT solution that’s easy to deploy, manage, and use can have a substantial positive impact. That’s because a solution that delivers “ease” has considered all of your organization’s cybersecurity needs in advance. In other words, an effective SAT does all the heavy lifting on your behalf, as it features:

Relevant topics
…based on real threats you might encounter.
What to look for:

To avoid canned, outdated training, choose a SAT solution that’s backed by experts. Cybersecurity practitioners should be the ones regularly creating and updating episodes based on the latest trends they see hackers leveraging in the wild. Additionally, every episode should cover a unique cybersecurity topic that reflects the most recent real-world tradecraft.
Full management by real experts
…so you don’t have to waste time creating, managing, and assigning training.
What to look for:

Ideally, you want a SAT solution that can manage all necessary tasks for you. Seek a SAT solution that’s backed by real cybersecurity experts who can create, curate, and deploy your learning programs and phishing scenarios on your behalf.
Memorable episodes
…with fun, story-driven lessons that are relatable and easy to comprehend.
What to look for:

Strive for a SAT solution that features character-based narratives. This indicates the SAT is carefully designed to engage learners of all attention spans. Remember, if the episodes are intentionally entertaining and whimsical, you’re more likely to find your employees conversing about inside jokes, recurring characters, and, of course, what they’ve learned. As a result, these ongoing discussions only serve to fortify your culture of security.
Continual enhancements …so episodes are updated regularly in response to real-world threats.
What to look for:
Seek out a SAT solution that provides monthly episodes, as this will keep your learners up to date. Regular encounters with simulated cybersecurity scenarios can help enhance their abilities to spot and defend against risks, such as phishing attempts. These simulations should also be dispersed at unpredictable time intervals (i.e. morning, night, weekends, early in the month, later in the month, etc.), keeping learners on their toes and allowing them to put their security knowledge into practice.
Minimal time commitment
…so you don’t have to invest countless hours managing it all.
What to look for:
For your learners, choose a SAT solution that doesn’t feel like an arduous chore. Look for solutions that specialize in engaging episodes that are designed to be completed in shorter periods of time.
For your own administrative needs, select a SAT that can sync regularly with your most popular platforms, such as Microsoft 365, Google, Okta, or Slack. It should also sync your employee directories with ease, so whenever you activate or deactivate users, it’ll automatically update the information. Finally, make sure it’s intelligent enough to decipher between human and non-human identities, so you’re only charged for accounts linked to real individuals.
Real results …through episodes that instill meaningful security-focused behaviors and habits.
What to look for:
An impactful SAT should deliver monthly training that’s rooted in science-backed teaching methodologies proven to help your employees internalize and retain lessons better. Your SAT should feature engaging videos, text, and short quizzes that showcase realistic cyber threats you and your employees are likely to encounter in the wild, such as:PhishingSocial engineeringPhysical device securityand more
Measurable data …with easy-to-read reports on usage and success rates.
What to look for:
An impactful SAT program should provide robust reporting. Comprehensible summaries should highlight those learners who haven’t taken their training or those whom a phishing simulation has compromised. Additionally, detailed reports should give you all the data you need to help prove business, insurance, and regulatory compliance.
Easy adoption
….that makes it easy to deploy and easy to scale with your organization.
What to look for:
Choose a SAT solution that’s specially built to accommodate organizations with limited time and resources. A solution that’s easy to implement can be deployed across your organization in a matter of minutes.
Compliance …with a range of standards and regulations
What to look for:
While compliance is the bare minimum of what a SAT should offer your organization, it shouldn’t be understated. Whether to meet insurance check boxes or critical industry regulations, every business has its own compliance demands. At the very least, your SAT solution should cover the requirements of:
Health Insurance Portability and Accountability Act (HIPAA)Payment Card Industry Data Security Standard (PCI)Service Organization Control Type 2 (SOC 2)EU General Data Protection Regulation (GDPR)

The Threat Landscape is Changing. Your SAT Should Change With It. #

Cybercriminals think they’re smart, maliciously targeting individuals across organizations like yours. That’s why you need to ensure your employees are smarter. If they’re aware of the ever-changing tactics hackers employ, they can stand as your first line of defense. But first, you need to deploy a training solution you can trust, backed by real cybersecurity experts who understand emerging real-world threats.

Huntress Security Awareness Training is an easy, effective, and enjoyable solution that helps:

  • Minimize time-consuming maintenance and management tasks
  • Improve knowledge retention through neuroscience-based learning principles
  • Update you and your employees on the current threat landscape
  • Establish a culture that values cybersecurity
  • Inspire meaningful behavioral habits to improve security awareness
  • Engage you and your employees in a creative, impactful manner
  • Assure regulatory compliance
  • Keep cyber criminals out of your organization

Discover how a fully managed SAT can free up your time and resources, all while empowering your employees with smarter habits that better protect your organization from cyber threats.

Say goodbye to ineffective, outdated training. Say hello to Huntress SAT.

Start your free trial of Huntress SAT today.

Found this article interesting? This article is a contributed piece from one of our valued partners. Follow us on Twitter  and LinkedIn to read more exclusive content we post.

Source :
https://thehackernews.com/2024/05/everyones-expert-how-to-empower-your.html

Empowering Cybersecurity with AI: The Future of Cisco XDR

May 7, 2024
Siddhant Dash

In 2007, there was a study from the University of Maryland proving that internet-connected systems were attacked every 39 seconds on average. Today, that number has grown more than 60%. Cisco sees 64 attempts to connect to ransomware infrastructure every second. The world is becoming digitized, and hybrid, which creates an environment that criminals target with increasing sophistication. It’s too much for human-scale, and so a hybrid world requires a hybrid approach that sits between humans and machines.

Envision an AI Assistant that serves as a reliable partner for incident responders, offering precise, real-time guidance on the subsequent steps to take, tailored to the specific state of the incident at hand and allowing SOC (Security Operations Center) teams to respond faster and do more with less. I am pleased to announce the launch of the AI Assistant in XDR as a part of our Breach Protection Suite.

In our RSAC 2023 announcement, we introduced a vision of our Cisco SOC Assistant, designed to expedite threat detection and response. Today, this vision is realized and available in private preview. It enhances our Breach Protection Suite which is powered by Cisco XDR’s capabilities. It significantly speeds up investigations and responses, enabling security teams to safeguard their environments more efficiently and cost-effectively.

Assist with Information Discovery

In 2024, the global shortfall of 3.5 million security professionals, as reported by ISC2, underscores the importance of retaining and recruiting skilled personnel to counter increasingly sophisticated cyber threats and safeguard enterprises. Moreover, the lack of appropriate tools often leads to ineffective cyber risk management and professional burnout, adversely affecting staff retention and the SOC’s capacity to thwart attacks.

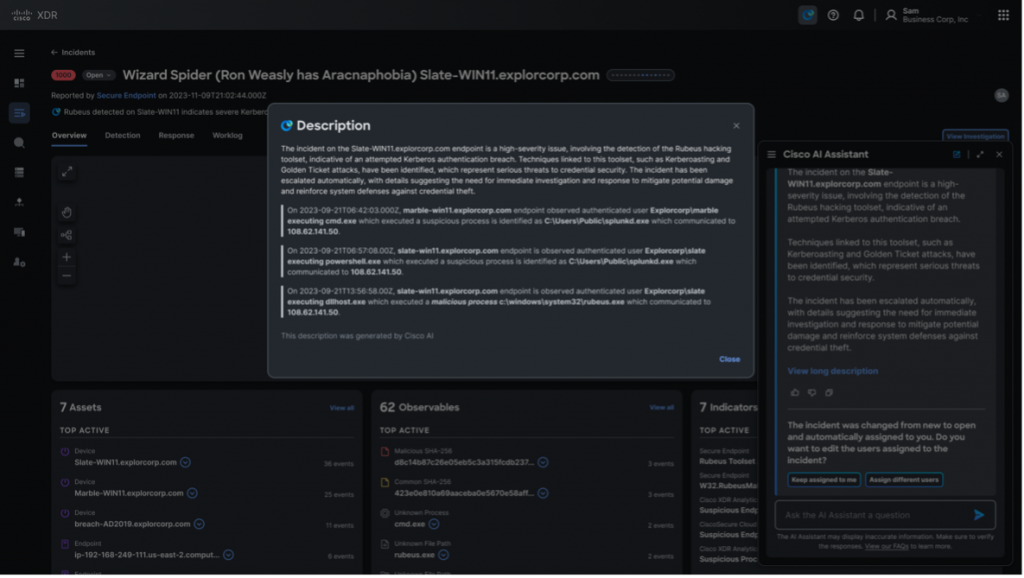
The AI Assistant in XDR acts as a potent enhancer, empowering SOC teams to maximize their efficiency and effectively close the personnel and skill gap. When an incident occurs, the assistant will contextualize events across email, the web, endpoints, and the network to tell the SOC analyst exactly what happened and its impact on their environment. It presents a short description of the incident that quickly answers what, when and how an incident happened. It also provides a long description of the incident which explains the timeline of events that have happened in this active incident.

Figure 1: Short Description of Incident Details generated by the AI Assistant
Figure 2: Long Description of Incident Details and Events Timeline

Moreover, our AI Assistant utilizes XDR’s patented ability to prioritize critical incidents, reducing alert fatigue for the SOC team and enhancing their efficiency in handling active incidents.

Figure 3: Targeted Prioritization of Incidents by AI Assistant that Need Immediate Attention

Augment and Elevate SOC Teams with Best Practice Recommendations

Today’s SOCs often struggle with a fragmented technology stack, making it difficult to respond effectively to cyber threats. Alert fatigue is a major hurdle for modern SOC teams, hindering proactive threat hunting and leading to overlooked alerts and burnout. The Cisco AI Assistant comes to the rescue and jumpstarts the incident response process for a modern SOC team.

Our AI Assistant, powered by Cisco XDR the platform for Cisco’s Breach Protection Suite, synthesizes data from email, web, processes, endpoints, cloud, and network domains, offering precise action recommendations to effectively contain ongoing cyber-attacks. It works at machine scale to identify patterns and potential attacks that humans might miss because of alert fatigue, if a defender is only looking at one domain in isolation, or while trying to manually correlate data. The AI Assistant is context aware, meaning it tracks the state of the incident in real-time and generates tailored recommendations specific to that incident.

Figure 4: Tailored Recommendations for an Incident by the AI Assistant

Mean Time to Detection (MTTD) and Mean Time to Respond (MTTR) are two primary metrics that SOC teams want to optimize for. Cisco XDR with our AI Assistant enables security teams to reduce these metrics by jumpstarting investigations and incident response by providing tailored recommendations for that specific incident.

Enable Seamless Collaboration Across Security Teams

The Cisco AI Assistant, embedded within XDR, facilitates team collaboration using Webex, Teams, or Slack. This empowers security teams to swiftly assemble the right experts for an active incident, thereby speeding up the MTTR. The AI Assistant unifies the team by setting up WAR rooms, summarizing messages, and logging them in XDR for instant audit-readiness.

Figure 5: AI Assistant creates a Webex WAR Room and brings the right experts together for Incident Response

Automate Workflows to Neutralize Threats Across the Enterprise

Today’s SOCs often lack a cohesive technology stack to respond to cyber threats efficiently and consistently. As the IT environment grows beyond the on-premises data center to cloud, hybrid-cloud and multi-cloud country specific data centers, organizations accumulate point solutions to monitor and protect pieces of the environment. As a result, SOC analysts must do a lot of the heavy lifting required to detect and respond to an attack. This includes logging into different tools to execute workflows that contain an attack.

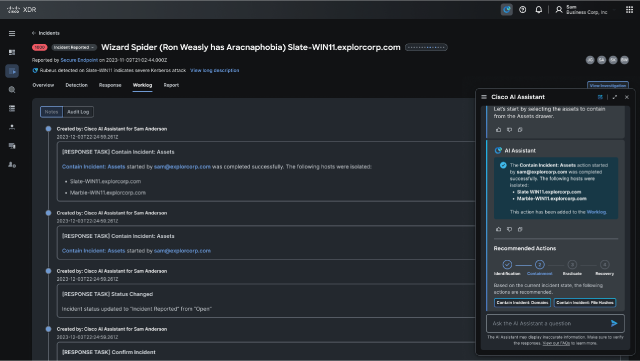
Our AI Assistant taps into advanced workflows and atomics with Cisco XDR’s 90+ integrations. Our AI assistant enables the execution of workflows at a single click, guided by the AI Assistant’s personalized recommendations that consider the incident’s playbook and current state in real-time.

Figure 6: Execution of Automated Workflows by the AI Assistant to Contain an Incident

Gone are the days when security teams had to juggle multiple isolated products and execute workflows in each to mitigate an attack. With Cisco Breach Protection Suite, billions of security events can be correlated and recommended actions can be generated and executed all in one place. This is the transformative power of the Cisco XDR combined with Cisco’s AI Assistant revolutionizing enterprise security.

Conclusion

By leveraging comprehensive telemetry data from various sources in Cisco XDR and combining that with our AI Assistant, we enable SOC teams to rapidly respond to active incidents and fortify defenses against complex threats. The AI Assistant amplifies the SOC’s existing knowledge, streamlines routine tasks, and empowers analysts to focus on strategic initiatives. This boosts analyst productivity and job satisfaction, leading to improved staff retention and SOC effectiveness, ultimately resulting in precise, consistent, and accurate security outcomes.

Learn how Cisco Breach Protection SuiteCisco XDR and our AI Assistant can simplify your security operations.


We’d love to hear what you think. Ask a Question, Comment Below, and Stay Connected with Cisco Security on social!

Cisco Security Social Channels

Instagram
Facebook
Twitter
LinkedIn

Source :
https://blogs.cisco.com/security/empowering-cybersecurity-with-ai-the-future-of-cisco-xdr

How to Rename an Active Directory Domain

written by Cyril Kardashevsky
February 8, 2024

Changing the name of an Active Directory domain is something few AD administrators have ever done. The domain renaming process itself is fairly straightforward, but needs to be carefully planned so as not to break the entire corporate infrastructure.

The need to change an AD domain name usually arises in the context of a corporate acquisition, rebranding, M&A consolidation of multiple business units.

Preparation for an AD Domain Rename

Before you proceed to change your domain name, check the basic requirements:

  • AD schema version at least Windows Server 2003;
  • If the domain Certificate Authority (CA) is deployed in domain, make sure it is properly prepared (Prepare certification authorities for domain rename);
  • Domains with on-premises Exchange Server (except 2003 versions) are incompatible with domain renaming. Migrating your users, groups, and computers to a new AD forest with Exchange using ADMT is the only solution in this case;
  • There are some other Microsoft and non-Microsoft applications that do not support domain renaming renames (check your application’s documentation);
  • You need to create a primary DNS zone for the new domain name in your AD;
  • If your DFS namespaces, redirected folders, roaming user profiles, etc. are implemented in your infrastructure, gather all the relevant information for them and schedule a migration immediately after the domain name change.

In this post, we will rename an existing contoso.com domain with AD controllers running Windows Server 2019 to theitbros.com.

Note. Be sure to backup your AD before you start renaming your domain.

The first step is to create a primary DNS zone for the new domain on your DNS server:

  1. Connect to DC and open the DNS Manager console (dnsmgmt.msc);
  2. Expand the Forward Lookup Zones node;
  3. Select New zone;
    change domain name active directory
  4. Create a new primary AD-integrated zone called theitbros.com with enabled Allow only secure dynamic updates option. Wait for the new zone to replicate all the DNS servers in the forest.
    active directory change domain name

Renaming AD Domain Using RenDom Tool

In order to change the AD domain name, you must use the rendom console tool, which is available on any domain controller. The C:\Windows\System32\rendom.exe command allows you to perform all the necessary actions for a domain renaming operation.

Sign-in to the DC and open the command prompt as an administrator.

Run the following command to generate an XML file containing your domain configuration:

rendom /list

Open the Domainlist.xml with notepad:

notepad Domainlist.xml
rename active directory domain

Use the Edit > Replace option to find the old domain name in the file and replace it with the new one. Manually change the value in the NetBiosName field.

change active directory domain name

Save the changes to the Domainlist.xml file.

Verify the new configuration (command makes no changes yet):

rendom /showforest
change ad domain name

Upload a new configuration file to the DC running the Domain Naming Operations Master FSMO role:

rendom /upload

Wait for the file containing the domain renaming instructions to be replicated to all other domain controllers in the forest. You can force the synchronization of changes made on the Domain Naming Master to all DCs:

repadmin.exe /syncall /d /e /P /q DomainNamingMaster_DC_HostName

This creates a DCclist.xml file that is used to track the progress and status of each domain controller in the forest for the domain rename operation. At this point, the Rendom freezes your Active Directory forest from making any changes to its configuration (such as adding/removing DCs, configuring domain trusts, etc.).

Check if the domain is ready to accept changes (checks the availability of all DCs):

rendom /prepare

If this command returns no errors, you can run the rename operation:

rendom /execute

This command automatically reboots all domain controllers.

All the domain-joined workstations and member servers must be rebooted twice for the changes to take effect. The first reboot allows the domain member to detect the domain change and change the full computer name. The second is used to register the new computer name in the new DNS zone.

Note. If there are any remote computers that connect to your domain via VPN, you will need to unjoin them from the old domain and rejoin the new domain.

Now your users can log on to computers using their old usernames and passwords.

After that, you need to manually rename all domain controllers (they won’t automatically change their names to reflect the new domain).

Use the following command to rename each DC:

netdom computername DC01.contoso.com /add:DC01.theitbros.com

netdom computername DC01.contoso.com /makeprimary:DC01.theitbros.com

Reboot the domain controller to apply the changes.

how to change domain name in active directory

Now you need to rebind the Group Policy Objects to the new domain name:

gpfixup /olddns:contoso.com /newdns:theitbros.com

Then run the command to fix the NetBIOS name of the domain in the GPOs:

gpfixup /oldnb:CONTOSO /newnb:THEITBROS

Remove links to the old domain:

rendom /clean

You can now complete the domain rename and unfreeze the AD forest:

rendom /end

Make sure that the rename was successful. Check if all Active Directory domain controllers can be contacted, users can sign in to the new domain; check if applications work correctly, and check AD replication and errors on DCs.

Now change paths in DFS namespaces, roaming profiles, redirected folders, etc. if used.

Source :
https://theitbros.com/how-to-rename-active-directory-domain/

How to Sync Client Time with Domain Controller on Windows

written by Cyril Kardashevsky
January 18, 2024

In order for Windows computers to function properly in Active Directory, they must have their time in sync with the domain. In the AD environment, domain controllers act as the time source for client devices. Kerberos AD authentication will fail if the clock offset between the client and the domain controller (KDC) is greater than 5 minutes.

Understanding the Time Hierarchy in the Active Directory Domain

There is a strict hierarchy to time synchronization in an Active Directory domain:

  1. The domain controller with the PDC emulator FSMO role is the main source of time in the domain. This DC synchronizes the time with an external time source or NTP server;
  2. Other domain controllers synchronize their time with the PDC domain controller;
  3. The domain workstations and the Windows member servers synchronize their time with the domain controller that is closest to them (in accordance with AD sites and subnets configuration);
sync time with domain controller

Hint. Learn more about time syncing in an Active Directory domain using the GPO.

Sync Time with DC on the Domain-Joined Machine

The AD domain controller should be used as the time source on the workstation after you have joined it to the domain. On Windows 10 or 11, go to Settings > Time and Language and make sure your DC is used as the last time sync source.

windows server sync time with domain controller

You can also get the NTP source on your computer by using the command:

w32tm /query /source

The command should return the name of one of the domain controllers in your AD domain.

windows sync time with domain controller

List details of the status of time synchronization on the client device:

w32tm /query /status
how to sync time with domain controller

The command returns the following useful information:

  • Leap Indicator (time sync status)
  • Last Successful Sync Time
  • Source (your DC)
  • Poll Interval (1024 seconds by default)

Get a list of the AD domain controllers which can be used to synchronize time:

w32tm /monitor

In this example, there are three domain controllers available for the client to synchronize time with.

sync time ad server

To re-enable time synchronization with a DC for computers in an Active Directory domain, use the following commands:

w32tm /config /syncfromflags:domhier /update

net stop w32time && net start w32time

If the domain computer is configured to synchronize its time following to the AD DS Time hierarchy, the value of the Type parameter in the HKLM\SYSTEM\CurrentControlSet\Services\W32Time\Parameters registry key should be NT5DS.

sync time with domain controller cmd

If the Windows client fails to synchronize time with the AD domain controller, you must to reset the Windows Time service configuration. To do this, open a command prompt as an administrator and run the following commands:

  • The first command unregisters the w32time service and removes the settings from the registry:w32tm /unregister
  • Then register w32tm service and restore the default time settings:w32tm /register
  • Set AD as the time sync source for the client (by changing the Type registry parameter to NT5DS):REG add HKEY_LOCAL_MACHINE\SYSTEM\CurrentControlSet\Services\W32Time\Parameters /v Type /d NT5DS
  • Restart the service:net stop w32time && net start w32time
  • Update settings:w32tm /config /update
  • Synchronize the time:w32tm /resync
  • Check your current sync settings:w32tm /query /status

The screenshot below shows that Windows is now synchronizing with DC (Source).

w32tm sync with domain controller

Time Sync Issues on Windows Domain Joined Computers

The Windows Time Service (W32Time) is responsible for time synchronization. First, ensure that this service is running on a Windows client computer:

Get-Service W32Time | Select-Object name,status
time sync with domain controller

UDP port 123 is used for time synchronization on Windows. If this port is not available on the DC, the client computer won’t be able to synchronize the time.

You may get an error when you try to synchronize the time with the w32tm /resync command:

Sending resync command to local computer
The computer did not resync because no time data was available.

sync time to domain controller

Check that the w32time service is running on the DC and listening on UDP port 123:

netstat -an | find "UDP" | find ":123"
sync time with dc

Then check that the UDP inbound rule named Active Directory Domain Controller – W32Time (NTP-UDP-In) is enabled in Windows Defender Firewall (Control Panel > Windows Firewall > Advanced settings > Inbound rules).

sync server time with domain controller
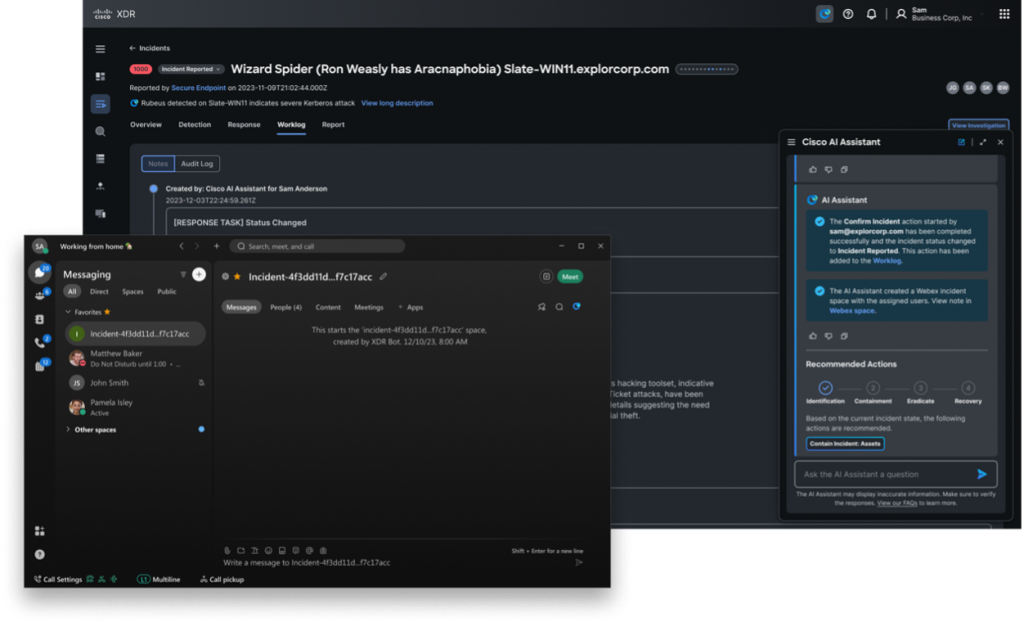
You can check Windows Defender Firewall rule status with PowerShell:

Get-NetFirewallrule -DisplayName 'Active Directory Domain Controller - W32Time (NTP-UDP-In)'|select Enabled
active directory time sync

If the rule is disabled, you must enable it:

Get-NetFirewallrule -DisplayName 'Active Directory Domain Controller - W32Time (NTP-UDP-In)'|Enable-NetFirewallrule

It is also possible to force a client to manually synchronize its time with another domain controller.

net time \\ny-dc01 /set /y
w32tm sync to domain controller

Configuring the NTP Client Time Sync on Windows Using GPO

In most cases, time sync with a domain on Windows client doesn’t require administrator intervention. However, if you find that time synchronization is not working properly on clients in your domain, you can centrally configure client NTP settings on Windows devices using Group Policy.

  1. Use the gpedit.msc console if you want to change Group Policy settings on a single computer (this is the best solution if you need to solve synchronization problems on a single computer or test new NTP client settings). To set up a GPO for multiple domain computers, use the Group Policy Management Console (gpmc.msc);
  2. Expand the following node in GPO editor: Computer Configuration > Administrative Templates > System > Windows Time Service;
  3. Enable the Enable Windows NTP Client policy;sync time with ad
  4. Then enable the Configure NTP Client policy and set the following settings in the Options panel:
    NTPServer: your domain name (preferred) or FQDN name of the domain controller with the PDC Emulator role (you can find it with the command: netdom.exe query fsmo)
    Type: NT5DS
    CrossSiteSyncFlags: 2
    ResolvePeerBackoffMinutes: 15
    ResolvePeerBackoffMaxTimes: 7
    SpecialPollInterval: 64
    EventLogFlags: 0
  5. Restart your computer to apply the new GPO client time settings.

Source :
https://theitbros.com/sync-client-time-with-domain-controller/