You can run commands on one or hundreds of computers with a single PowerShell command. Windows PowerShell supports remote computing using various technologies, including WMI, RPC, and WS-Management.
PowerShell supports WMI, WS-Management, and SSH remoting. In PowerShell 7 and higher, RPC is supported only on Windows.
For more information about remoting in PowerShell, see the following articles:
Many Windows PowerShell cmdlets have the ComputerName parameter that enables you to collect data and change settings on one or more remote computers. These cmdlets use varying communication protocols and work on all Windows operating systems without any special configuration.
Typically, cmdlets that support remoting without special configuration have the ComputerName parameter and don’t have the Session parameter. To find these cmdlets in your session, type:
Using the WS-Management protocol, Windows PowerShell remoting lets you run any Windows PowerShell command on one or more remote computers. You can establish persistent connections, start interactive sessions, and run scripts on remote computers.
To use Windows PowerShell remoting, the remote computer must be configured for remote management. For more information, including instructions, see About Remote Requirements.
Once you have configured Windows PowerShell remoting, many remoting strategies are available to you. This article lists just a few of them. For more information, see About Remote.
Start an interactive session
To start an interactive session with a single remote computer, use the Enter-PSSession cmdlet. For example, to start an interactive session with the Server01 remote computer, type:
PowerShellCopy
Enter-PSSession Server01
The command prompt changes to display the name of the remote computer. Any commands that you type at the prompt run on the remote computer and the results are displayed on the local computer.
To end the interactive session, type:
PowerShellCopy
Exit-PSSession
For more information about the Enter-PSSession and Exit-PSSession cmdlets, see:
To run a command on one or more computers, use the Invoke-Command cmdlet. For example, to run a Get-UICulture command on the Server01 and Server02 remote computers, type:
LCID    Name     DisplayName               PSComputerName
----    ----     -----------               --------------
1033    en-US    English (United States)   server01.corp.fabrikam.com
1033    en-US    English (United States)   server02.corp.fabrikam.com
Run a Script
To run a script on one or many remote computers, use the FilePath parameter of the Invoke-Command cmdlet. The script must be on or accessible to your local computer. The results are returned to your local computer.
For example, the following command runs the DiskCollect.ps1 script on the remote computers, Server01 and Server02.
Use the New-PSSession cmdlet to create a persistent session on a remote computer. The following example creates remote sessions on Server01 and Server02. The session objects are stored in the $s variable.
Now that the sessions are established, you can run any command in them. And because the sessions are persistent, you can collect data from one command and use it in another command.
For example, the following command runs a Get-HotFix command in the sessions in the $s variable and it saves the results in the $h variable. The $h variable is created in each of the sessions in $s, but it doesn’t exist in the local session.
PowerShellCopy
Invoke-Command -Session $s {$h = Get-HotFix}
Now you can use the data in the $h variable with other commands in the same session. The results are displayed on the local computer. For example:
PowerShellCopy
Invoke-Command -Session $s {$h | where {$_.InstalledBy -ne "NT AUTHORITY\SYSTEM"}}
Advanced Remoting
PowerShell includes cmdlets that allow you to:
Configure and create remote sessions both from the local and remote ends
Create customized and restricted sessions
Import commands from a remote session that actually run implicitly on the remote session
Configure the security of a remote session
PowerShell on Windows includes a WSMan provider. The provider creates a WSMAN: drive that lets you navigate through a hierarchy of configuration settings on the local computer and remote computers.
When you update a computer running Windows 10, version 1703 or 1709, you might see provisioned apps that you previously removed post-update. This can happen if the computer was offline when you removed the apps. Windows 10, version 1803 has fixed this issue.
Note
This issue only occurs after a feature update (from one version to the next), not monthly updates or security-related updates.
This only applies to first-party apps that shipped with Windows 10. This doesn’t apply to third-party apps, Microsoft Store apps, or LOB apps.
This issue can occur whether you removed the app using Remove-appxprovisionedpackage or Get-AppxPackage -allusers | Remove-AppxPackage -Allusers.
To remove a provisioned app, you need to remove the provisioning package. The apps might reappear if you removed the packages in one of the following ways:
If you removed the packages while the wim file was mounted when the device was offline.
If you removed the packages by running a PowerShell cmdlet on the device while Windows was online. Although the apps won’t appear for new users, you’ll still see the apps for the user account you signed in as.
When you remove a provisioned app, we create a registry key that tells Windows not to reinstall or update that app the next time Windows is updated. If the computer isn’t online when you deprovision the app, then we don’t create that registry key. (This behavior is fixed in Windows 10, version 1803. If you’re running Windows 10, version 1709, apply the latest security update to fix it.)
Note
If you remove a provisioned app while Windows is online, it’s only removed for new users—the user that you signed in as will still have that provisioned app. That’s because the registry key created when you deprovision the app only applies to new users created after the key is created. This doesn’t happen if you remove the provisioned app while Windows is offline.
To prevent these apps from reappearing at the next update, manually create a registry key for each app, then update the computer.
Create registry keys for deprovisioned apps
Use the following steps to create a registry key:
Identify any provisioned apps you want removed. Record the package name for each app.
Paste the list of registry keys into Notepad (or a text editor).
Remove the registry keys belonging to the apps you want to keep. For example, if you want to keep the Bing Weather app, delete this registry key:YAMLCopyHKEY_LOCAL_MACHINE\SOFTWARE\Microsoft\Windows\CurrentVersion\Appx\A ppxAllUserStore\Deprovisioned\Microsoft.BingWeather_8wekyb3d8bbwe]
Save the file with a .txt extension, then right-click the file and change the extension to .reg.
Double-click the .reg file to create the registry keys. You can see the new keys in HKLM\path-to-reg-keys.
You’re now ready to update your computer. After the update, check the list of apps in the computer to confirm the removed apps are still gone.
Package names for apps provisioned in Windows 10, version 1709
Windows 11 comes with OneDrive pre-installed, but you don’t have to live with it if you don’t want to.
In newer versions of Windows, Microsoft added OneDrive to its “out-of-box experience,” meaning you get the app on your system from day one. OneDrive is a great tool for keeping your files stored in the cloud, but some users have their own preferred cloud storage app or want to keep everything on local storage.
If you feel that OneDrive serves no useful purpose to you, it is possible to disable the app. This post will discuss the methods to disable the app on your system. In addition, you will learn multiple ways to completely remove it.
Why Should You Disable OneDrive?
You may not want to keep a cloud backup of sensitive files related to work or personal use cases. One another issue is that OneDrive runs as soon as you boot your system. It continues to run in the background and consumes system and network resources in the process.
If you have a low-spec system or metered network connection, you can relate to this issue. So, it would be a good idea to disable or remove the app from your system in these circumstances.
Does Microsoft OneDrive Impact PC Performance?
OneDrive launches as soon as your system boots up. It tries to sync your documents to the cloud and runs in the background. Systems that have bare minimum compute resources can struggle with performance.
As such, if your PC isn’t the fastest out there, disabling OneDrive or getting rid of it entirely can help squeeze some precious processing power out of your system for other tasks.
How to Disable OneDrive on Windows 11
There are multiple ways to disable OneDrive on your system. You can disable the service from running at startup, disable it via the Group Policy Editor, or you can unlink your account from it.
1. How to Stop OneDrive From Launching at Startup
To disable OneDrive from launching at startup, do as follows:
Go to the system tray icon area and click on the arrow icon. Then click on the OneDrive system tray icon to reveal the settings.
Click on the gear icon and then select settings from the context menu.
Switch to the Settings tab. Uncheck the Start OneDrive automatically when I sign in to the Windows option under the General section.
Close the window. Now OneDrive won’t start automatically when you boot your PC up.
2. How to Unlink Your OneDrive Account
If you unlink your OneDrive account, the app won’t be able to sync your files anymore. To unlink your account, repeat the following steps.
Open the OneDrive app from the system tray icon. Click on the gear icon and then click on the Settings option.
Find the Unlink this PC option present under the Accounts tab.
Follow the on-screen prompts to unlink your account and close the Window.
3. How to Disable OneDrive Using the Group Policy Editor
Windows users who own an Enterprise or Professional copy can use the Group Policy Editor to disable OneDrive. If you’re not on either of those versions, you’ll need to learn how to access the Group Policy Editor on Windows Home before you try these steps.
Press Win + R to launch the Runcommand box on your system. Input gpedit.msc and press the Enter key.
Group Policy Editor will launch.
Navigate to Computer Configuration > Administrative Templates > Windows Components > OneDrive.
Once you are inside the OneDrive folder, find the Prevent the usage of OneDrive for file storage policy.
Double-click on it to edit the policy. A new window with detailed settings will pop up.
Click on the Disabled radio button and then click the Apply button.
Click on the OK button and exit the Group Policy Editor.
How to Remove OneDrive From Windows 11
If you’d rather just get rid of the app entirely, here are a few methods to remove OneDrive from your computer.
1. How to Uninstall OneDrive Using the Settings App
To remove OneDrive using the Settings app, do as follows:
Press Win + I to launch the Settingsapp. Then navigate to the left-hand side menu and click on Apps.
Then click on the Installed apps option in the Apps section.
Scroll down and locate Microsoft OneDrive app in the list.
Click on the three dots and select the Uninstall option.
Confirm your action and click on the Uninstall button again.
Now, follows the on-screen prompts to remove the app from your system.
2. How to Uninstall OneDrive Using the Command Prompt
To remove OneDrive using the command prompt, do as follows:
Press the Win key and search command prompt. Right-click on the first result and select the Run as administrator option.
The command prompt will launch. Now, input the following command in the terminal: TASKKILL /f /im OneDrive.exe
Once the command finishes executing, enter the uninstallation command: %systemroot%\SysWOW64\OneDriveSetup.exe /uninstall
Wait for the execution to complete. CMD will not display any message about the uninstallation command.
Exit the command prompt window. OneDrive won’t bother you anymore.
3. How to Uninstall OneDrive Using the PowerShell
To remove OneDrive using PowerShell, do as follows:
Press the Win key and search for PowerShell. Right-click on the first search result and click on the Run as administrator option.
PowerShell will launch. Now input the following command: winget uninstall onedrive
Press the Enter key to execute the command. You will see a successfully uninstalled message if the command executes without any error.
Now, exit the PowerShell window.
4. How to Uninstall OneDrive Using a Batch Script
The above-mentioned processes uninstall the app but do not delete the remaining traces of the OneDrive app. However, there is a batch script that you can use to uninstall the app as well as remove all the traces of OneDrive from your system.
To remove OneDrive using a batch script, do as follows:
Press the Win key and search for Notepad on your system. Click on the first result to launch the notepad app.
Now, copy the following code into the notepad app window. Make sure to recheck the document for missing lines of code, if any.@echo off cls
set x86="%SYSTEMROOT%\System32\OneDriveSetup.exe" set x64="%SYSTEMROOT%\SysWOW64\OneDriveSetup.exe"
echo Removing OneDrive from the Explorer Side Panel. echo. REG DELETE "HKEY_CLASSES_ROOT\CLSID\{018D5C66-4533-4307-9B53-224DE2ED1FE6}" /f > NUL 2>&1 REG DELETE "HKEY_CLASSES_ROOT\Wow6432Node\CLSID\{018D5C66-4533-4307-9B53-224DE2ED1FE6}" /f > NUL 2>&1 pause
Now, navigate to the top area and click on the File option. Select the Save as option from the dropdown menu.
Choose the save location as desktop so that it is easier to find the file.
Input a name that reflects the use case of the .bat file. For example, OneDriveRemovalTool.
Now, click on the Save as type option and select All files from the drop-down list.
Click on the Save button to save your .bat file.
Go to the desktop and right-click on the newly created .bat file. Select the Run as administrator option.
Let it finish execution and restart your computer. OneDrive won’t bug you anymore.
5. How to Uninstall OneDrive Using a Third-party Uninstaller Program
Uninstalling OneDrive using the Windows uninstaller leaves a lot of files and folders behind. In such cases, you can try a third-party uninstaller tool that will clean up everything related to OneDrive.
Download the free version and install it on your system.
Launch Revo uninstaller. Find OneDrive from the list of installed programs.
Right-click on OneDrive and select the Uninstall option from the context menu.
Uninstall window will pop up. Click on the continue button to proceed.
After the uninstall completes, select the advanced option to search for files and folders associated with OneDrive.
Follow the on-screen prompts and delete everything. Restart your system for changes to take effect. You won’t find OneDrive anywhere on your system.
OneDrive Won’t Bother You Anymore
These were the steps to disable or remove OneDrive on your Windows machine. If you plan on reusing OneDrive someday, stick with the disabling methods. But if you want to remove it from your system, you can try out any of the uninstallation methods mentioned above.
Configuring “WinRM Quickconfig” on remote computers can be a little difficult at times, especially if this is your first time using the Windows Remote Management service.
There are several ways to go about enabling winrm quickconfig on remote computers, many admins like to push the task to a GPO and others like to do it through powershell or 3rd Party programs.
We’ll highlight 3 different methods we’ve used in the past to get Windows Remote Management service enabled, along with avoiding the dreaded “WINRM QUICKCONFIG ACCESS DENIED” error that many people get when going through this process.
3 Ways to Remotely Enable WinRM on Windows Clients/Servers:
Download and Run this Free Utility from Solarwinds to activate it on Remote Machines
Setup new Group Policy Object to enable the WinRM Service and Firewall Rules
Use PSEXEC to Remotely Enable on Client Machines
1. Free Utility for Remote Activation
This is by far the easiest way if you’ve already configured the Windows Firewall in your network. Solarwinds has a nifty free tool called “Remote Execution Enabler for PowerShell” that has the functionality to enable and configure WinRm on local and remote hosts within your network.
Its as easy as entering in the IP Address(es) or IP Address Range of all the computers your targeting, than enter credentials that have Administrative Rights to that PC (usually accounts in the Domain Administrators Group will do the trick) and click the “START CONFIGURATION” button:
When the utility is finished starting the Windows Remote Management services on all IP Addresses or Ranges specified, you will see a green dot with a “Complete” status, as seen below:
Grab the little utility from below and give it a go:
If the above solution didn’t work for you, then setting up a GPO to do all the configuration is the next best thing, as you can assign it to any given computer or OU if necessary. Below are instructions for Windows 2012 R2 Server GPO setup.
Open Group Policy Management from within Administrative Tools folder.
Right-click on the desired OU that you want to create a Group Policy Object for and click on “Create a GPO in this Domain, and Link it here…“
Rename the GPO to whatever you would like, “Enable WinRM via GPO” or something along those lines then click OK.
Now that the new GPO has been created, right-click on the Newly created GPO and click “EDIT“.
Expand the Menu tree as follows: Computer Configuration > Policies > Administrative Templates: Policy definitions > Windows Components > Windows Remote Management (WinRM) > WinRM Service.
Find the setting that says “Allow remote server management through WinRM” and right-click and click “EDIT” to configure the settings. (see image below)
When the dialog box opens up, click “Enabled” and under the options section, either specify an IP Address range or put an Asterisk “*” to allow all IP addresses to remotely manage the PC. (We recommend specifying an IP Address to reduce any risk of a security compromise of your systems/network).
Now lets enable the Windows Remote Mangement (WS-Management) Service to start automatically. Go to Computer Configuration > Preferences > Control Panel Settings > Services and right-click and select “NEW” and the select “Service“.
A New Service Properties window will come up and you will need to change Startup to “Automatic (Delayed Start)” and then in the Service Name dialog box, click the box with the 3 dots in it to the right of the Service name box and select “Windows Remote Management (WS-Management)” and click the Select button.
Once you’ve selected the Service, under the “Service action:” pull down, we’ll want to click “Start service“.
Last Step of this Process is to configure the Windows Firewall to Allow the proper ports inbound.Go to Computer Configuration > expand Policies > expand Windows Settings > expand Security Settings > expand Windows Firewall with Advanced Security > expand Windows Firewall with Advanced Security > expand InboundRules.Right-click the Inbound Rules node and choose New Rule. (see screenshot below)
When the New Inbound Rule wizard box opens, click on the “Predefined” radio button and scroll down to “Windows Remote Management” and click on it. (see screenshot below)
Next we’ll click on the Left Sidebar menu item that says “Predefined Rules” in order to not Allow the Firewall to open this Port to the Public network.When the window opens, uncheck the box that says Public profile next to it, as seen in the image below. This ensures that we only allow WinRM access to the Private and Domain networks.Then Click the Next button:
The Last screen of the New Inbound Firewall Wizard will just ask whether to Allow The Connection or block it.Make sure the that “Allow the connection” radio box is checked and click Finish.
At this point, you’ve successfully finished the GPO and you’ll need to wait for the GPO to propagate throughout your network.
3. PSEXEC for WinRM Activation
If either of the two options above don’t work for you, using PSEXEC to remotely enable the service is another option, if you prefer. Here are the relevant commands you will need in order to execute “winrm quickconfig” using PSexec command line utility.
Make sure you have PSEXEC installed on your machine and the proper “PATH” setup within your system variables – this should be automatically added when you install PSEXEC.If you dont have PSEXEC installed yet, grab the download from here (its part of the PSTOOLS package) and install it.
Launch the an elevated “Command Prompt” window using your local/domain administrator account as the user of the target machine/s, to ensure that you have the necessary permissions to configure WinRM remotely on machines in your network.To run “Command Prompt” as a different user, hold the Shift Key down and right-click on the Command Prompt link and click on “Run as Different User” and then enter in a user account that has Administrator Privileges on all computers your targeting.
Run one of the following commands below:psexec \\ComputerName -s winrm.cmd quickconfig -qor create a text file with all the computer names you want to target and save them on your C:\ drive and run the command below to enable on all PC’s in the specified text file we just created.Now you can run any one of the commands below depending on what you want to accomplishpsexec @c:\ALLComputerNames.txt -s winrm.cmd quickconfig -q
If all goes well, you’ll see a screen like the one below that confirms everything has been configured properly for WinRM on the remote machine/s.
WinRM FAQs
is WinRM the same as RDP?
WinRM and RDP are two different systems but they can be used for the same purpose, which is to get remote access to a computer and execute commands. WinRM is a text-based system but RDP shows the Desktop of the remote computer.
Is WinRM a security risk?
WinRM uses HTTP by default and that isn’t secure. However, you can configure the system to use HTTPS for connections and that makes WinRM secure.
Does WinRM use TLS?
WinRM will use Transport Layer Security (TLS) if you specify that it should run its connections with HTTPS.
How does WinRM QuickConfig configure the firewall on the remote computer?
WinRM QuickConfig configures the firewall on the remote computer by adding a rule to allow incoming traffic on the WinRM port (default is 5985).
Is WinRM QuickConfig secure?
WinRM QuickConfig uses the HTTPS protocol to encrypt communication between the remote and local computers, making it secure for remote management.
What are the prerequisites for using WinRM QuickConfig on a remote computer?
The prerequisites for using WinRM QuickConfig on a remote computer include having administrative privileges on both the local and remote computers and having network connectivity between the computers.
How can I verify that WinRM is configured correctly on a remote computer?
To verify that WinRM is configured correctly on a remote computer, you can use the “WinRM Id” command to retrieve information about the remote computer and the WinRM configuration. If the command returns information about the remote computer and the WinRM configuration, it means that WinRM is configured correctly.
In the first post in this series, we covered common PHP encoding techniques and how they’re used by malware to hide from security analysts and scanners. In today’s post, we’re going to dive a little bit deeper into other obfuscation techniques that make use of other features available in PHP.
Obfuscation Redux
In the first post in this series, we defined Obfuscation as the process of concealing the purpose or functionality of code or data so that it evades detection and is more difficult for a human or security software to analyze, but still fulfills its intended purpose. One of the main contributing factors to the popularity of PHP is its ease of use, but the same functionality that makes it easy to use also makes it easy to abuse, often in ways that were never intended.
The techniques covered in this post are often simpler and “hackier” than the ones listed in the previous article, and most of them are less reliable as indicators of malicious activity individually, as several of them typically need to be combined in order to achieve sufficient obfuscation. These techniques are also often easier for a human analyst to spot, but they are also more difficult to detect using scanning tools due to the wide variety of permutations available. Such simpler obfuscation methods can also be creatively combined with encoding techniques, granting malware authors a formidable array of tactics to avoid detection.
While it is not practical to cover every possible technique in active use, this article will detail the more commonly found methods, and help illustrate the wide range of possibilities when decoding obfuscated malware. Several of the methods we will cover today, such as comment abuse, can be combined into almost infinite variations with minute changes, thus rendering them completely undetectable to traditional hash-based malware scanning and even partially slowing down regular expression-based scanning of the type used by Wordfence.
Fortunately, while these methods do make analysis more difficult, and can slow down scanning, their presence in certain combinations is a strong signal of malicious activity, and the malware detection signatures used by the Wordfence plugin and Wordfence CLI are tuned to detect these combinations with astoundingly few false positives. Wordfence CLI in particular is useful in these cases, as it is highly performant and can run multithreaded jobs, compensating for any speed penalties imposed by these techniques.
Comment Abuse
PHP has several methods of adding code comments that you may already be familiar with. Well-commented code is considered a best practice, as it makes it much easier to maintain software and pay off technical debt, but comments can also be used for illicit purposes.
PHP uses three styles of comments:
//, denoting a single line comment that ends on the next line.
#, likewise a single line comment that ends on the next line, though this is less common than ‘//’.
/*, the beginning of a multiline comment, which can only closed with */.
Multiline comments are particularly useful to malware authors because they are ignored by PHP, and do not have to extend over multiple lines. This means that an attacker can “break up” their code to evade scanners using comments. For instance, the following code block prints “Hello, World!”:
1234
<?phpecho/*blah*/"Hello, World!"/*blah*/;
While this is a very basic example, more complicated examples can be found in real malware, such as the following snippet, which makes use of several additional obfuscation techniques, including octal escape sequences and invisible null bytes:
While we’re not going to fully analyze this malware today, it already presents problems for many scanners. For instance, a scanner searching for the very first line of code, function ed_ixpn() would fail to find it because of the comments. While detection using regular expressions, such as the ones used by the Wordfence Plugin scanner and Wordfence CLI are capable of detecting malware of this type, it still imposes a performance penalty on detection due to the enormous number of possible variations.
Concatenation Catastrophe
PHP makes string concatenation very simple via the dot . operator. This allows programmers to join two separate strings with minimal hassle. For instance, the following code outputs “Hello, World!”:
1
<?php echo“He”.”llo,”.”wor”.”ld”;
There are a large number of legitimate use cases for string concatenation, so it’s generally only an indicator of malicious activity when combined with several other obfuscation techniques. The malware sample we shared earlier provides a good example of this, with octal encoding concatenated with the return values of various functions, which we’ll get to in a later section.
Index Fun
PHP, like most languages, stores text strings as arrays of characters, each with a defined position or index. This makes it possible to assemble arbitrary commands and data from a string containing the required characters, using the array index of each character and the concatenation operator. For instance, the following code prints “Hello, World!”:
1234
<?php$string="Wow, what a cool Helpful research device!";echo$string[17].$string[18].$string[19].$string[19].$string[1].$string[3].$string[4].$string[0].$string[1].$string[25].$string[15].$string[34].$string[40];
PHP arrays start with an index of 0, meaning that $string[0] in the example above would be “W”, the first letter of “Wow, what a cool Helpful research device!”. By concatenating letters from different parts of that text string, it’s possible to assemble an entirely different text string.
This method can be very helpful for hiding the underlying text being assembled from human researchers and security scan tools alike, and though it does have the occasional legitimate use in selecting chunks of text, when used extensively it is a strong indicator of malicious activity, though it typically needs to be combined with additional techniques such as evaluating the resulting string or passing it to a function.
Math, Not Even Once
PHP allows mathematical operations within other functionality. One of the interesting features in the malware snippet – $disdcrxh_(564-452) – demonstrates this, with it turning out as $disdcrxh_112 due to the subtraction of 564 and 452 in the parenthesis. This functionality can likewise be combined with the string index technique mentioned above. For example, the following code prints out “Hello, World!”:
123
<?php$string="Wow, what a cool Helpful research device!";echo$string[(15+2)].$string[(20-2)].$string[(10+9)].$string[(29-10)].$string[(5-4)].$string[(1+2)].$string[(2+2)].$string[(5-5)].$string[(12-11)].$string[(5*5)].$string[(5*3)].$string[34].$string[(160/4)];
This adds an additional obfuscation layer that can make it even more difficult to determine the code’s functionality without executing it. However, it is incredibly rare for this type of code to be used legitimately, so the presence of this technique is typically an indicator of malicious activity.
String Reversals
One of the most basic functions in PHP’s text string manipulation libraries is strrev, which is used to reverse strings of text. For instance, the following code snippet prints out “Hello, World!”:
1
<?php echostrrev("!dlroW ,olleH");
While not particularly effective at obfuscation on its own, it can be combined with the techniques in this article as well as nearly all of the techniques in our previous article on encoding to make it even more difficult to decode malicious functionality. While it has a number of legitimate use cases, the presence of strrev alongside two or more additional encoding or obfuscation techniques is often a reliable indicator of compromise.
Variable, Dynamic, and Anonymous Functions
PHP has the ability to use variables to store function names as variables and then invoke those functions using the variable. This is widely used by legitimate software, but can also be combined with several other techniques, such as string concatenation, in which case it is often an indicator of malicious activity. For instance, the following code snippet prints out “Hello, World!”:
This can also be combined with dynamic function invocation using methods such as call_user_func, which accepts a function for its first parameter and any arguments to be passed to that function in subsequent parameters. As with variable function names, this is widely used in legitimate code, but it can still make analysis more difficult, especially for automated tools looking primarily for more basic function call syntax. For example, the following code snippet prints out “Hello, World!”:
Finally, PHP also allows for anonymous functions, which are exactly what they sound like – functions without a name. These can be combined with variable assignment as shown:
While anonymous functions are widely used in legitimate code, it is possible to use them in combination with other features to make it more difficult for automated scanning tools or human analysts to keep track of code flow and as such are useful for obfuscation.
We’ve begun to combine obfuscation layers in our examples to provide a better picture of the type of obfuscation often found in the wild, and there’s still more to come.
GOTO Labels
One of the oldest and most basic code functions is the goto statement. While some legitimate software still uses GOTO statements, the functionality is considered poor coding practice and is not widely used, though it reflects how the code operates at a fundamental level far more accurately than more modern syntax. Its primary use in obfuscation is similar to comment abuse in that it breaks up the code so that it is more difficult to determine the control flow.
For example, the following code snippet prints out “Hello, World!” if and only if $_GET['input'] is present and set to ‘hello’, otherwise it prints “Sorry”:
PHP uses the include and require functions to include and execute code located in a separate file. This is almost universally used, and occasionally the .inc extension is used instead of PHP for files to be included. However, one particular feature that is ripe for abuse is that PHP will include files with any extension and execute them as code. This allows attackers to upload the bulk of their malicious code as a file with an allowed extension, often an image extension such as .ico or .png, and then simply include that file from a loader file with a PHP extension. Inclusion of files without a .php or .inc extension is thus almost always an indicator of malicious activity.
For instance, take the following set of files:
loader.php:
1
<?php include('hello.ico');
hello.ico:
1
<?php echo"Hello, World!";
This will print out “Hello, World” when loader.php is executed, even though hello.ico does not have a PHP extension and would not run as PHP if accessed directly.
Putting it All Together
Here’s an example that makes use of everything we’ve learned today apart from including files:
1234567891011121314151617181920
<?php$string=/*blah*/"Wow, what a cool Helpful research device!"/*blah*/;$mashed=$string[(160/4)]./*blah*/$string[34]./*blah*/$string[(5*3)]/*blah*/.$string[(5*5)]/*blah*/.$string[(12-11)]./*blah*/$string[(5-5)]./*blah*//*blah*/$string[(2+2)]./*blah*/$string[(1+2)]./*blah*/$string[(5-4)]/*blah*/.$string[(29-10)]./*blah*/$string[(10+9)]./*blah*/$string[(20-2)]/*blah*/.$string[(15+2)];function/*blah*/echostring(/*blah*/$str/*blah*/){echo/*blah*/$str;return/*blah*/;}$rev/*blah*/=/*blah*/function($str){return/*blah*/strrev($str);};goto/*blah*/dostuff;echo/*blah*/"That didn't work!";dostuff/*blah*/:call_user_func(/*blah*/'echostring',/*blah*/$rev(/*blah*/$mashed));
It begins with comments breaking up the code as well as the concatenation and string indexing techniques we covered earlier, which assigns “Hello, World!” in reverse, or “!dlroW ,olleH” to the $mashed variable.
A quick glance at the code might lead you to believe that it outputs “That didn’t work!” but thanks to the goto statement that line of code is skipped – such misleading uses are par for the course with malware that uses goto statements.
In the dostuff section, we use call_user_func to call the echostring function, which really just does the same thing as echo but serves as an additional layer of obfuscation to untangle, especially if the function were to be given a less friendly name. The echostring function is fed the output of the anonymous function assigned to the $rev variable, which again simply performs a str_rev on the input. The result is that $mashed is reversed and echoed out as “Hello, World!”. While we have kept the function and variable names relatively relevant for this example, there’s nothing preventing a malware author from naming these functions whatever they want, and indeed, misleading or nonsensical function names are more common than meaningful or useful function names in PHP malware.
Conclusion
In today’s post, we covered a number of the more creative, or “hacky” malware obfuscation techniques in widespread use, and showed examples of how they can be combined to make it difficult to analyze code functionality. All of these techniques can also be combined with the techniques in our previous post on malware obfuscation to make life even more difficult for analysts and security scanners. These two posts cover the most popular obfuscation methods used by PHP malware, but there are even more advanced and sophisticated techniques, including genuine encryption, which we will cover in our next article, alongside less commonly-used functionality.
PHP malware is constantly evolving, and our malware analysts release dozens of detection signatures every month, which can be used by the Wordfence scanner as well as by Wordfence CLI. While the vast majority of new signatures will only be made available to Wordfence Premium, Wordfence Care, Wordfence Response, and the Paid Wordfence CLI Tiers, the free version of Wordfence and Wordfence CLI still offer excellent detection capabilities, and include our broadest signature set, which in our testing detects at least one indicator of compromise on more than 90% of infected sites. We also plan to periodically update our free signature set with signatures that detect the most widespread malware from our full signature set.
Once again, we encourage readers who want to learn more about this to experiment with the various code snippets we have presented. As always, be sure to be careful with any actual malware samples you find and only execute them in a hardened virtual environment, as even PHP malware can be used for local privilege escalation on vulnerable machines.
On September 28, 2023, the Wordfence Threat Intelligence team initiated the responsible disclosure process for multiple vulnerabilities in AI ChatBot, a WordPress plugin with over 4,000 active installations.
After making our initial contact attempt on September 28th, 2023, we received a response on September 29, 2023 and sent over our full disclosure details. Receipt of the disclosure by the vendor was acknowledged the same day and a fully patched version of the plugin was released on October 19, 2023.
We issued a firewall rule to protect Wordfence Premium, Wordfence Care, and Wordfence Response customers on September 29, 2023. Sites still running the free version of Wordfence will receive the same protection on October 29, 2023.
Please note that these vulnerabilities were originally fixed in 4.9.1 (released October 10, 2023). However, some of them were reintroduced in 4.9.2 and then subsequently patched again in 4.9.3. We recommend that all Wordfence users update to version 4.9.3 or higher immediately.
A complete list of the vulnerabilities we reported is below. Links to Wordfence Intelligence are included where you can find full details:
In this post we will focus on the most impactful vulnerabilities.
Vulnerability Details and Technical Analysis
The AI ChatBot plugin provides website owners with a plug and play chat solution that can be expanded upon with customizable FAQs and custom text responses. It provides website users with an interface that allows them to look up order information, leave contact information for later callbacks and can be integrated with OpenAI’s ChatGPT or Google’s DialogFlow.
A lot of the interactions with the chatbot happen via AJAX actions. Many of these actions were made available to unauthenticated users in order to allow them to interact with the chatbot. Other actions required at least subscriber-level access.
One of the many vulnerabilities we discovered was an unauthenticated SQL Injection. The following two AJAX actions are used for searches during interactions with the chatbot:
The wp_ajax_nopriv_wpbo_search_response AJAX action can be used by users who are not authenticated to WordPress due to the hook utilizing ‘nopriv’. On the other hand, the standard wp_ajax_wpbo_search_response AJAX action can only be used by authenticated users due to the inherent functionality of AJAX actions.
function qc_wpbo_search_response (shortened for brevity)
The qc_wpbo_search_response function hooked by the aforementioned AJAX actions is used to search within the database for responses containing certain keywords. If the $_POST[‘strid’] parameter is set, a record is retrieved from the wpbot_response table by ID. The $strid variable supplied by the POST parameter can be leveraged for SQL Injection, despite being sanitized using the sanitize_text_field function.
According to the WordPress Developer Resources, the sanitize_text_field function checks for invalid UTF-8; converts single < characters to entities; strips all tags; removes line breaks, tabs, and extra whitespace; strips percent-encoded characters. This does not provide sufficient protection against SQL Injection attempts, and is only intended for Cross-Site Scripting protection. Furthermore, the get_results function used in the above function call does not perform any preparation, nor is there any escaping of the user supplied input passed to the SQL Query. We always recommend the use of the prepare function on SQL queries as it provides adequate escaping on the user-supplied values, which prevents SQL injection from being successful. In addition, ensuring that the $strid is an integer would help prevent a SQL Injection attack from being successful.
The lack of a UNION operation in the above SQL query makes exploiting this vulnerability more difficult, but a time-based blind injection approach using the SLEEP() function and CASE statements can still be used to extract information from the database by observing the duration of individual queries. While tedious, this technique can be used to extract sensitive information from the database. This includes hashed passwords.
The plugin offers the ability to upload training files to OpenAI. An arbitrary file deletion vulnerability existed in the qcld_openai_delete_training_file function invoked via the following AJAX action:
This vulnerable function accepts a file path via the $_POST[‘file’] parameter and checks whether the file exists. If it does, the function adjusts permissions on the file in such a way that it can be removed and proceeds to delete it. This function misses a capability check to ensure that the user performing the action has proper privileges, as well as a nonce check to ensure that the action is performed intentionally. and is thus vulnerable to Missing Authorization and Cross-Site Request Forgery.
Furthermore, no check is performed ensuring that the file is an OpenAI training file and that it resides in a location or directory where training files are expected to be located. This could allow an authenticated attacker with subscriber-level privileges or higher to remove the wp-config.php file of an affected site, which would invoke the WordPress installation script on the next site visit and could lead to a complete site takeover.
The file path passed via the $_POST[‘file’] parameter could also point to a file outside of the affected website, thus enabling the deletion of wp-config.php files of other sites in shared hosting environments. Deleting wp-config.php forces the site into a setup state, at which point an attacker can take over the site by pointing it to a database under their control. Of course, attackers are not limited to deleting PHP files either as long as the web server can change file permissions and delete the file.
Version 4.9.1 removed this function as well as the corresponding AJAX action. Version 4.9.2 reintroduced the vulnerable function and action hook, which were both again removed in version 4.9.3.
Directory Traversal to Arbitrary File Write – CVE-2023-5241
We also discovered an arbitrary file write vulnerability which exists in the qcld_openai_upload_pagetraining_file function. The entire function is rather long which is why we won’t display it here in its entirety.
function qcld_openai_upload_pagetraining_file (shortened for brevity)
The function expects a filename to be passed as a $_POST[‘filename’] parameter, which is sanitized using the sanitize_text_field function. The $file variable is used to determine the location of a file in the wp-content/uploads/qcldopenai_site_training/ directory. If the file exists, the function proceeds to declare a variable called $split_file, creates a file handle $qcld_openai_json_file and opens the file in append mode. This means that the file is not overwritten but anything written to the file is instead appended.
It is not immediately clear what the purpose of this part of the function is since it simply appends the contents that are already in the file to the end of the file until the length of the content that is added exceeds $this->wpaicg_max_file_size or the entire file has been duplicated.
The corresponding if-statement that determines when to terminate writing to the file looks as follows:
In a default installation $this->wpaicg_max_file_size is not defined and therefore NULL. Hence, in such scenarios the function adds the first line of the file specified by the user to the end of the file. Since NULL is interpreted as zero in a comparison statement like this, any positive file size will suffice to break out of this part of the function.
Unfortunately, this code is vulnerable to Directory Traversal via the filename parameter. If the filename that is passed is a relative path to wp-config.php, the file handle will ultimately point to the site’s wp-config.php file. An authenticated attacker with subscriber-privileges or higher could utilize this fact to append the first line of its content to the file wp-config.php, which would be <?php.
While an attacker does not have any influence on the data that is written, in most cases a <?php could be written to the end of a targeted PHP file, which can lead to catastrophic consequences as the added PHP tag may result in an error such as
Parse error: syntax error, unexpected token "<", expecting end of file
This prevents the site from loading properly and can be used to append to any PHP file (or other files) including those in shared hosting environments leading to Denial of Service (DoS). One way to prevent Directory Traversal is to use the sanitize_file_name function, which removes special characters including slashes and leading dots from the file name.
Version 4.9.1 removed this function as well as the corresponding AJAX action. Version 4.9.2 reintroduced the vulnerable function and action hook, which were both again removed in version 4.9.3.
Numerous Other Missing Authorization and Cross-Site Request Forgery Vulnerabilities
In addition to the vulnerabilities outlined above, we discovered several AJAX actions without proper capability checks, which made it possible for authenticated attackers with minimal access, such as subscribers, to invoke those actions. Several of the functions were also missing nonce verification, which would make it possible for attackers to forge requests on behalf of a site administrator, or any other authenticated user considering capability checks were also missing.
However, these vulnerabilities had minimal impact and led to the exposure of information such as user order details and user names, the download and extraction of a zip used by the plugin (not arbitrary zip files), cache deletion, as well as starting and stopping of search indexing jobs to name a few. The severity of those actions is lower than the ones we detailed above.
Timeline
September 25-28, 2023 – The Wordfence Threat Intelligence team discovers several vulnerabilities in the AI ChatBot plugin. September 28, 2023 – We initiate contact with the plugin developer. September 29, 2023 – We release a firewall rule to protect Wordfence Premium, Wordfence Care, and Wordfence Response customers and send the full disclosure to the plugin developer. Receipt of the disclosure is acknowledged. October 10, 2023 – A fixed version (4.9.1) of the plugin that patches all reported vulnerabilities is released. October 18, 2023 – Several of the vulnerabilities are reintroduced in version 4.9.2. We inform the vendor about this. October 19, 2023 – Version 4.9.3 patches the vulnerabilities again. October 29, 2023 – The firewall rule becomes available to free Wordfence users
Conclusion
In this blog post we covered an Unauthenticated SQL Injection vulnerability (affecting versions <= 4.8.9), as well as an Arbitrary File Write vulnerability and an Arbitrary File Deletion vulnerability (affecting versions <= 4.8.9 and 4.9.2). The SQL Injection vulnerability allows unauthenticated attackers to extract sensitive information from the database using a time-based blind injection approach, which could ultimately lead to exposure of admin credentials and site takeover.
The Arbitrary File Write vulnerability can be utilized by authenticated attackers to append opening PHP tags (in default configurations) to any file including the wp-config.php file, which can lead to Denial of Service (DoS). The Arbitrary File Deletion vulnerability can be used by authenticated attackers to delete any file on the web server offering the possibility of complete site takeovers.
All Wordfence running Wordfence Premium, Wordfence Care, and Wordfence Response, have been protected against these vulnerabilities as of September 29, 2023. Users still using the free version of Wordfence will receive the same protection on October 29, 2023.
If you know someone who uses this plugin on their site, we recommend sharing this advisory with them to ensure their site remains secure, as these vulnerabilities pose a significant risk.
By: Salim S.I. September 20, 2023 Read time: 8 min (2105 words)
Crafted packets from cellular devices such as mobile phones can exploit faulty state machines in the 5G core to attack cellular infrastructure. Smart devices that critical industries such as defense, utilities, and the medical sectors use for their daily operations depend on the speed, efficiency, and productivity brought by 5G. This entry describes CVE-2021-45462 as a potential use case to deploy a denial-of-service (DoS) attack to private 5G networks.
5G unlocks unprecedented applications previously unreachable with conventional wireless connectivity to help enterprises accelerate digital transformation, reduce operational costs, and maximize productivity for the best return on investments. To achieve its goals, 5G relies on key service categories: massive machine-type communications (mMTC), enhanced mobile broadband (eMBB), and ultra-reliable low-latency communication (uRLLC).
With the growing spectrum for commercial use, usage and popularization of private 5G networks are on the rise. The manufacturing, defense, ports, energy, logistics, and mining industries are just some of the earliest adopters of these private networks, especially for companies rapidly leaning on the internet of things (IoT) for digitizing production systems and supply chains. Unlike public grids, the cellular infrastructure equipment in private 5G might be owned and operated by the user-enterprise themselves, system integrators, or by carriers. However, given the growing study and exploration of the use of 5G for the development of various technologies, cybercriminals are also looking into exploiting the threats and risks that can be used to intrude into the systems and networks of both users and organizations via this new communication standard. This entry explores how normal user devices can be abused in relation to 5G’s network infrastructure and use cases.
5G topology
In an end-to-end 5G cellular system, user equipment (aka UE, such as mobile phones and internet-of-things [IoT] devices), connect to a base station via radio waves. The base station is connected to the 5G core through a wired IP network.
Functionally, the 5G core can be split into two: the control plane and the user plane. In the network, the control plane carries the signals and facilitates the traffic based on how it is exchanged from one endpoint to another. Meanwhile, the user plane functions to connect and process the user data that comes over the radio area network (RAN).
The base station sends control signals related to device attachment and establishes the connection to the control plane via NGAP (Next-Generation Application Protocol). The user traffic from devices is sent to the user plane using GTP-U (GPRS tunneling protocol user plane). From the user plane, the data traffic is routed to the external network.
Figure 1. The basic 5G network infrastructure
The UE subnet and infrastructure network are separate and isolated from each other; user equipment is not allowed to access infrastructure components. This isolation helps protect the 5G core from CT (Cellular Technology) protocol attacks generated from users’ equipment.
Is there a way to get past this isolation and attack the 5G core? The next sections elaborate on the how cybercriminals could abuse components of the 5G infrastructure, particularly the GTP-U.
GTP-U
GTP-U is a tunneling protocol that exists between the base station and 5G user plane using port 2152. The following is the structure of a user data packet encapsulated in GTP-U.
Figure 2. GTP-U data packet
A GTP-U tunnel packet is created by attaching a header to the original data packet. The added header consists of a UDP (User Datagram Protocol) transport header plus a GTP-U specific header. The GTP-U header consists of the following fields:
Flags: This contains the version and other information (such as an indication of whether optional header fields are present, among others).
Message type: For GTP-U packet carrying user data, the message type is 0xFF.
Length: This is the length in bytes of everything that comes after the Tunnel Endpoint Identifier (TEID) field.
TEID: Unique value for a tunnel that maps the tunnel to user devices
The GTP-U header is added by the GTP-U nodes (the base station and User Plane Function or UPF). However, the user cannot see the header on the user interface of the device. Therefore, user devices cannot manipulate the header fields.
Although GTP-U is a standard tunneling technique, its use is mostly restricted to CT environments between the base station and the UPF or between UPFs. Assuming the best scenario, the backhaul between the base station and the UPF is encrypted, protected by a firewall, and closed to outside access. Here is a breakdown of the ideal scenario: GSMArecommends IP security (IPsec) between the base station and the UPF. In such a scenario, packets going to the GTP-U nodes come from authorized devices only. If these devices follow specifications and implement them well, none of them will send anomalous packets. Besides, robust systems are expected to have strong sanity checks to handle received anomalies, especially obvious ones such as invalid lengths, types, and extensions, among others.
In reality, however, the scenario could often be different and would require a different analysis altogether. Operators are reluctant to deploy IPsec on the N3 interface because it is CPU-intensive and reduces the throughput of user traffic. Also, since the user data is perceived to be protected at the application layer (with additional protocols such as TLS or Transport Layer Security), some consider IP security redundant. One might think that for as long as the base station and packet-core conform to the specific, there will be no anomalies. Besides, one might also think that for all robust systems require sanity checks to catch any obvious anomalies. However, previous studies have shown that many N3 nodes (such as UPF) around the world, although they should not be, are exposed to the internet. This is shown in the following sections.
Figure 3. Exposed UPF interfaces due to misconfigurations or lack of firewalls; screenshot taken from Shodan and used in a previously published research
We discuss two concepts that can exploit the GTP-U using CVE-2021-45462. In Open5GS, a C-language open-source implementation for 5G Core and Evolved Packet Core (EPC), sending a zero-length, type=255 GTP-U packet from the user device resulted in a denial of service (DoS) of the UPF. This is CVE-2021-45462, a security gap in the packet core that can crash the UPF (in 5G) or Serving Gateway User Plane Function (SGW-U in 4G/LTE) via an anomalous GTP-U packet crafted from the UE and by sending this anomalous GTP-U packet in the GTP-U. Given that the exploit affects a critical component of the infrastructure and cannot be resolved as easily, the vulnerability has received a Medium to High severity rating.
GTP-U nodes: Base station and UPF
GTP-U nodes are endpoints that encapsulate and decapsulate GTP-U packets. The base station is the GTP-U node on the user device side. As the base station receives user data from the UE, it converts the data to IP packets and encapsulates it in the GTP-U tunnel.
The UPF is the GTP-U node on the 5G core (5GC) side. When it receives a GTP-U packet from the base station, the UPF decapsulates the outer GTP-U header and takes out the inner packet. The UPF looks up the destination IP address in a routing table (also maintained by the UPF) without checking the content of the inner packet, after which the packet is sent on its way.
GTP-U in GTP-U
What if a user device crafts an anomalous GTP-U packet and sends it to a packet core?
Figure 4. A specially crafted anomalous GTP-U packetFigure 5. Sending an anomalous GTP-U packet from the user device
As intended, the base station will tunnel this packet inside its GTP-U tunnel and send to the UPF. This results in a GTP-U in the GTP-U packet arriving at the UPF. There are now two GTP-U packets in the UPF: The outer GTP-U packet header is created by the base station to encapsulate the data packet from the user device. This outer GTP-U packet has 0xFF as its message type and a length of 44. This header is normal. The inner GTP-U header is crafted and sent by the user device as a data packet. Like the outer one, this inner GTP-U has 0xFF as message type, but a length of 0 is not normal.
The source IP address of the inner packet belongs to the user device, while the source IP address of the outer packet belongs to the base station. Both inner and outer packets have the same destination IP address: that of the UPF.
The UPF decapsulates the outer GTP-U and passes the functional checks. The inner GTP-U packet’s destination is again the same UPF. What happens next is implementation-specific:
Some implementations maintain a state machine for packet traversal. Improper implementation of the state machine might result in processing this inner GTP-U packet. This packet might have passed the checks phase already since it shares the same packet-context with the outer packet. This leads to having an anomalous packet inside the system, past sanity checks.
Since the inner packet’s destination is the IP address of UPF itself, the packet might get sent to the UPF. In this case, the packet is likely to hit the functional checks and therefore becomes less problematic than the previous case.
Attack vector
Some 5G core vendors leverage Open5GS code. For example, NextEPC (4G system, rebranded as Open5GS in 2019 to add 5G, with remaining products from the old brand) has an enterprise offer for LTE/5G, which draws from Open5GS’ code. No attacks or indications of threats in the wild have been observed, but our tests indicate potential risks using the identified scenarios.
The importance of the attack is in the attack vector: the cellular infrastructure attacks from the UE. The exploit only requires a mobile phone (or a computer connected via a cellular dongle) and a few lines of Python code to abuse the opening and mount this class of attack. The GTP-U in GTP-U attacks is a well-knowntechnique, and backhaul IP security and encryption do not prevent this attack. In fact, these security measures might hinder the firewall from inspecting the content.
Remediation and insights
Critical industries such as the medical and utility sectors are just some of the early adopters of private 5G systems, and its breadth and depth of popular use are only expected to grow further. Reliability for continuous, uninterrupted operations is critical for these industries as there are lives and real-world implications at stake. The foundational function of these sectors are the reason that they choose to use a private 5G system over Wi-Fi. It is imperative that private 5G systems offer unfailing connectivity as a successful attack on any 5G infrastructure could bring the entire network down.
In this entry, the abuse of CVE-2021-45462 can result in a DoS attack. The root cause of CVE-2021-45462 (and most GTP-U-in-GTP-U attacks) is the improper error checking and error handling in the packet core. While GTP-U-in-GTP-U itself is harmless, the proper fix for the gap has to come from the packet-core vendor, and infrastructure admins must use the latest versions of the software.
A GTP-U-in-GTP-U attack can also be used to leak sensitive information such as the IP addresses of infrastructure nodes. GTP-U peers should therefore be prepared to handle GTP-U-in-GTP-U packets. In CT environments, they should use an intrusion prevention system (IPS) or firewalls that can understand CT protocols. Since GTP-U is not normal user traffic, especially in private 5G, security teams can prioritize and drop GTP-U-in-GTP-U traffic.
As a general rule, the registration and use of SIM cards must be strictly regulated and managed. An attacker with a stolen SIM card could insert it to an attacker’s device to connect to a network for malicious deployments. Moreover, the responsibility of security might be ambiguous to some in a shared operating model, such as end-devices and the edge of the infrastructure chain owned by the enterprise. Meanwhile, the cellular infrastructure is owned by the integrator or carrier. This presents a hard task for security operation centers (SOCs) to bring relevant information together from different domains and solutions.
In addition, due to the downtime and tests required, updating critical infrastructure software regularly to keep up with vendor’s patches is not easy, nor will it ever be. Virtual patching with IPS or layered firewalls is thus strongly recommended. Fortunately, GTP-in-GTP is rarely used in real-world applications, so it might be safe to completely block all GTP-in-GTP traffic. We recommend using layered security solutions that combine IT and communications technology (CT) security and visibility. Implementing zero-trust solutions, such as Trend Micro™ Mobile Network Security, powered by CTOne, adds another security layer for enterprises and critical industries to prevent the unauthorized use of their respective private networks for a continuous and undisrupted industrial ecosystem, and by ensuring that the SIM is used only from an authorized device. Mobile Network Security also brings CT and IT security into a unified visibility and management console.
In some cases, you may receive the error ‘Windows cannot access sharename. The network path was not found. Error code: 0x80070035‘ when you try to open a shared network folder on a Windows computer, Samba share, or NAS device. In this article, we’ll look at how to fix this shared folder error on Windows 10 and 11.
Network Error Windows cannot access \\sharedNAS Check the spelling of the name. Otherwise, there might be a problem with your network. To try identify and resolve network problems, click Diagnose. Error code: 0x80070035. The network path was not found.
At the same time, you can easily open this shared folder from other computers (running older versions of Windows 10, 8.1 or 7), smartphones, and other devices.
Disable Legacy SMB Versions of File Shares
In most cases, the ‘0x80070035: The network path not found‘ error indicates that the target shared folder on the remote computer only supports SMBv1 connections or SMBv2 guest access. These are legacy and insecure versions of the Server Message Block (SMB, CIFS) file-sharing protocol. Enabling these protocols on your client will probably solve the problem, but it will reduce the security of your Windows device. So reconfiguring the remote file server device to support at least SMBv2 with authentication, or ideally SMBv3, is the first thing to try. This is the most correct and secure method.
Change your file server’s SMB configuration:
NAS device – disable SMBv1, enable authenticated SMBv2 access (depending on NAS vendor);
Samba server on Linux – disable guest access in smb.config file under [global] section:map to guest = never restrict anonymous = 2Specify the minimum SMB version supported:server min protocol = SMB2_10 client max protocol = SMB3 client min protocol = SMB2_10 encrypt passwords = trueDisable anonymous access in the configuration of each shared folder:guest ok = no
On the Windows file server, disable the SMBv1 and SMBv2 protocols (described in a separate section of the article). Enable the Turn on password protected sharing option (navigate to Control Panel -> All Control Panel Items -> Network and Sharing Center -> Advanced sharing settings -> All networks, or run the command control.exe /name Microsoft.NetworkAndSharingCenter /page Advanced ).
Check the Windows SMB Client Settings
Perform the following simple checks on your Windows client. These steps can help you resolve the “Network Path Not Found” error without compromising the security of your computer:
Check that you have entered the correct file server name. Try opening the network folder not by name (\\FS01\Public), but by IP address (\\192.168.3.111\Public);
In the properties of the shared network folder (both at the NTFS file system permissions and the shared folder level), check that your user has permission to read the contents of the folder;
Reset the DNS cache on both computers: ipconfig /flushdns
If you simultaneously have two active network interfaces on your device (Wi-Fi and Ethernet), try temporarily disabling one of them and check access to your local network resources;
Check that the following services are running on your computer (open the services.msc console). Start these services and change the startup type to Automatic Delayed Start:Function Discovery Provider Host – fdPHost Function Discovery Resource Publication – FDResPub SSDP Discovery – SSDPSRV UPnP Device Host – upnphost DNS Client (dnscache)
Try temporarily disabling your anti-virus and/or firewall application and see if the problem persists when you access network resources;
Try to disable the IPv6 protocol in the properties of your network adapter in the Control Panel. Check that the following protocols are enabled for your network adapter: Client for Microsoft Network and File and Printer Sharing for Microsoft Networks;
If you are using a Windows workgroup network, make sure that NetBIOS protocol support is not disabled in the TCP/IPv4 properties of your network adapter. Next, open the Local Security Policy Settings (secpol.msc), go to Local Policies -> Security Options -> Network security: LAN Manager authentication level and select Send LM & NTLM — use NTLMv2 session security if negotiated (this is an unsafe option!!).
Allow SMBv2 Insecure Guest Logons on Windows
If you are using anonymous shared folder access to NAS storage or other computers (without entering a username and password), you will need to enable the insecure guest logon policy on the client computer. By default, modern versions of Windows don’t allow anonymous (guest) access to shared network folders using the SMB 2.0 protocol.
If you try to connect to the shared folder as an anonymous (guest) user, an event with Event ID 31017 will appear in the Event Viewer log.Source: Microsoft-Windows-SMBClient Date: Date/Time Event ID: 31017 Task Category: None Level: Error Keywords: (128) User: NETWORK SERVICE Computer: fs01.woshub.com Description: Rejected an insecure guest logon. User name: Ned Server name: ServerName
To allow SMBv2 guest logons (this is an unsafe option and should only be used when it is absolutely necessary!), open the Local Group Policy editor (gpedit.msc), and turn on the Enable insecure guest logons policy (Computer Configuration -> Administrative templates -> Network -> Lanman Workstation).
Or you can enable insecure SMB shared folder access under guest account via the registry using the command:
You must enable the SMB1Protocol-Client component on the client computer if your network device (file storage) only supports the SMB 1.0 file-sharing protocol (although this is not recommended for security reasons).
The SMB v1.0 protocol is disabled by default in modern versions of Windows 10/11 and Windows Server 2019/2022. This is because SMB 1.0 is a legacy and vulnerable protocol for file and folder sharing on Windows. When you try to connect from Windows 10/11 to an SMBv1-only file share (for example, an old version of NAS storage, a computer running Windows XP/Windows Server 2003) and list the remote device’s shared network folders (by the UMC path, such as \\FileStorageNetworkName), you will receive an error ‘Network path not found‘.
You can use the DISM command to check if the SMBv1 protocol is enabled in Windows:
As you can see, in this case the SMB1Protocol-Client feature is disabled.SMB1Protocol | Disabled SMB1Protocol-Client | Disabled SMB1Protocol-Server | Disabled SMB1Protocol-Deprecation | Disabled
You can enable the SMB v1 client protocol to access legacy shared folders from the Turn Windows features on or off panel ( optionalfeatures.exe -> SMB 1.0 / CIFS File Sharing Support -> SMB 1.0 / CIFS Client).
Or you can enable the SMB 1.0 client with the DISM command:
After installing the SMBv1 client, restart your computer and check that the shared network folder can now be opened.
On Windows Server 2019/2022, you can enable SMBv1 with the command
Install-WindowsFeature FS-SMB1
Important! If you have enabled the SMB1 client, remember that this protocol is vulnerable and has a large number of remote exploitation vulnerabilities. If you don’t need the SMB v1 protocol for legacy device access, be sure to disable it.
In Windows 10/11, the SMBv1 client is automatically disabled if it has not been used for more than 15 days.
Disable SMB 1.0 and SMB 2.0 Protocols on Windows Clients
If only modern devices that support SMB v3 are used on your network (Windows 8.1/Windows Server 2012 R2 and later, see the table of SMB versions in Windows), you can fix the 0x80070035 error by completely disabling SMB1 and SMB2 on all clients. The fact is that your computer may try to use the SMB 2.0 protocol to access shared folders that only accept SMB 3.0 connections
First, disable the SMB 1.0 protocol using the Turn Windows features on or off panel (optionalfeatures.exe) or with commands:
In the Network and Sharing Center section of the Control Panel on both computers, check that the Privatenetwork profile is set as the current profile (Private: Current profile). Make sure that the following options are enabled:
Turn on network discovery + Turn on automatic setup of network connected devices;
Turn on file and printer sharing.
In the All Networks section, enable the following options:
Turn off password Protect Sharing;
Turn on sharing.
Add Windows Credentials to access NAS or Samba Shares
If the problem only occurs when accessing the NAS share or Samba server on Linux, you can try saving the connection credentials (username and password used to connect to the SMB share) to the Windows Credential Manager(Control Panel\All Control Panel Items\Credential Manager\Windows Credential or run the command control.exe keymgr.dll).
Click Add a Windows credential and specify the SMB file server hostname (or IP) and the connection credentials.
Then go to Network and Sharing Center and enable the option Use user accounts and passwords to connect to other computers in the Advanced sharing settings.
Windows automatically uses the saved credentials to access the specified file server resources.
I hope that my article will be useful to you and that you will be able to restore access to your shared folders on LAN.
Single Sign-On (SSO) allows an authenticated (signed-on) user to access other domain services without having to re-authenticate (re-entering a password) and without using saved credentials (including RDP). SSO can be used when connecting to Remote Desktop Services (terminal) servers. This prevents a user logged on to a domain computer from entering their account name and password multiple times in the RDP client window when connecting to different RDS hosts or running published RemoteApps.
This article shows how to configure transparent SSO (Single Sign-On) for users of RDS servers running Windows Server 2022/2019/2016.
The Connection Broker server and all RDS hosts must be running Windows Server 2012 or newer;
You can use Windows 11,10,8.1 with Pro/Enterprise editions as client workstations.
SSO works only in the domain environment: Active Directory user accounts must be used, the RDS servers and user’s workstations must be joined to the same AD domain;
The RDP 8.0 or later must be used on the RDP clients;
SSO works only with password authentication (smart cards are not supported);
The RDP Security Layer in the connection settings should be set to Negotiate or SSL (TLS 1.0), and the encryption mode to High or FIPS Compliant.
The single sign-on setup process consists of the following steps:
You need to issue and assign an SSL certificate on RD Gateway, RD Web, and RD Connection Broker servers;
Web SSO has to be enabled on the RDWeb server;
Configure credential delegation group policy;
Add the RDS certificate thumbprint to the trusted .rdp publishers using GPO.
Enable SSO Authentication on RDS Host with Windows Server 2022/2019/2016
The certificate is assigned in the Certificates section of RDS Deployment properties.
Then, on all servers with the RD Web Access role, enable Windows Authentication for the IIS RDWeb directory and disable Anonymous Authentication.
After you have saved the changes, restart the IIS:
iisreset /noforce
If Remote Desktop Gateway is used, ensure that it is not used to connect internal clients (the Bypass RD Gateway server for local address option should be checked).
Now you need to obtain the SSL certificate thumbprint of the RD Connection Broker and add it to the list of trusted RDP publishers. For that, run the following PowerShell command on the RDS Connection Broker host:
Get-Childitem CERT:\LocalMachine\My
Copy the value of the certificate’s thumbprint and add it to the Specify SHA1 thumbprints of certificates representing RDP publishers policy (Computer Configuration -> Administrative Templates -> Windows Desktop Services -> Remote Desktop Connection Client).
Configure Remote Desktop Single Sign-on on Windows Clients
The next step is to configure the credential delegation policy for user computers.
Create a new domain GPO and link it to an OU with users (computers) that need to be allowed to use SSO to access the RDS server;
Enable the policy Allow delegation defaults credential under Computer Configuration -> Administrative Templates -> System -> Credential Delegation
Add the names of RDS hosts to which the client can automatically send user credentials to perform SSO authentication. Use the following format for RDS hosts: TERMSRV/rd.contoso.com (all TERMSRV characters must be in upper case). If you need to allow credentials to be sent to all terminals in the domain (less secure), you can use this construction: TERMSRV/*.contoso.com .
The above policy will work if you are using Kerberos authentication. If the NTLM authentication protocol is not disabled in the domain, you must configure the Allow delegation default credentials with NTLM-only server authentication policy in the same way.
Then, to prevent a window warning that the remote application publisher is untrusted, add the address of the server running the RD Connection Broker role to the trusted zone on the client computers using the policy “Site to Zone Assignment List” (similar to the article How to disable Open File security warning on Windows 10):
Go to the GPO section User/Computer Configuration -> Administrative Tools -> Windows Components -> Internet Explorer -> Internet Control Panel -> Security Page.
Enable the policy Site to Zone Assignment List
Specify the FQDN of the RD Connection Broker hostname and set Zone 2 (Trusted sites).
Next, you need to enable the Logon options policy under User/Computer Configuration -> Administrative Tools -> Windows Components -> Internet Explorer -> Internet Control Panel -> Security -> Trusted Sites Zone. Select ‘Automatic logon with current username and password’ from the dropdown list.
Then navigate to the Computer Configuration -> Policies -> Administrative Templates ->Windows Components ->Remote Desktop Services ->Remote Desktop Connection Client and disable the policy Prompt for credentials on the client computer.
After updating the Group Policy settings on the client, open the mstsc.exe (Remote Desktop Connection) client and specify the FQDN of the RDS host. The UserName field automatically displays your name in the format user@domain.com:
Your Windows logon credentials will be used to connect.
Now, when you start a RemoteApp or connect directly to a Remote Desktop Services host, you will not be prompted for your password.
To use the RD Gateway with SSO, enable the policy Set RD Gateway Authentication Method User Configuration -> Policies -> Administrative Templates -> Windows Components -> Remote Desktop Services -> RD Gateway) and set its value to Use Locally Logged-On Credentials.
To use Web SSO on RD Web Access, please note that it is recommended to use Internet Explorer with enabled Active X component named Microsoft Remote Desktop Services Web Access Control (MsRdpClientShell, MsRdpWebAccess.dll).
On modern versions of Windows, Internet Explorer is disabled by default and you will need to use Microsoft Edge instead. You must open this URL in Microsoft Edge in compatibility mode to use RD Web with SSO (Edge won’t run Active-X components without compatibility mode).
In order for all the client computers to be able to open RDWeb in compatibility mode, you will need to install the MS Edge Administrative Templates GPO and configure policy settings under Computer Configuration -> Administrative Templates -> Microsoft:
Configure Internet Explorer Integrations = Internet Explorer Mode;
In our case, RDP SSO stopped working on an RDS farm with User Profile Disks profiles after installing security updates KB5018410 (Windows 10) or KB5018418 (Windows 11) in Autumn 2022. To solve the problem, edit the *.rdp connection file and change the following line:use redirection server name:i:1
If you have not added the SSL thumbprint of the RDCB certificate to the Trusted RDP Publishers, a warning will appear when trying to connect:Do you trust the publisher of this RemoteApp program?
An authentication error has occured (Code: 0x607)Check that you have assigned the correct certificate to the RDS roles.
When configuring a new RDS farm node on Windows Server 2022/2019/2016/2012 R2, you may see the following tray warning pop-up:Licensing mode for the Remote Desktop Session Host is not configured. Remote Desktop Service will stop working in 104 days. On the RD Connection Broker server, use Server Manager to specify the Remote Desktop licensing mode and the license server.
At the same time, there will be warnings with an Event ID 18 in the Event Viewer:Log Name: System Source: Microsoft-Windows-TerminalServices-Licensing Level: Warning Description: The Remote Desktop license server UK-RDS01 has not been activated and therefore will only issue temporary licenses. To issue permanent licenses, the Remote Desktop license server must be activated.
These errors are an indication that your RDS is running in the License grace period mode. You can use Remote Desktop Session Host for 120 days without activating RDS licenses during the grace period. When the grace period expires, users won’t be able to connect to RDSH with an error:Remote Desktop Services will stop working because this computer is past grace period and has not contacted at least a valid Windows Server 2012 license server. Click this message to open RD Session Host Server Configuration to use Licensing Diagnosis.
The number of days remaining before the RDS grace period expires can be displayed using the command:
wmic /namespace:\\root\CIMV2\TerminalServices PATH Win32_TerminalServiceSetting WHERE (__CLASS !="") CALL GetGracePeriodDays
Check the Licensing Settings on the Remote Desktop Server
To diagnose the problem, run the Remote Desktop Licensing Diagnoser tool (lsdiag.msc, or Administrative Tools -> Remote Desktop Services ->RD Licensing Diagnoser). The tool should display the following error:Licenses are not available for the Remote Desktop Session Host server, and RD Licensing Diagnoser has identified licensing problem for the RD Session Host server. Licensing mode for the Remote Desktop Session Host is not configured. Number of licenses available for clients: 0 Set the licensing mode on the Remote Desktop Session Host server to either Per User or Per Device. Use RD Licensing Manager to install the corresponding licenses on the license server The Remote Desktop Session Host server is within its grace period, but the Session Host server has not been configured with any license server.
As you can see, there are no licenses available to Clients on the RDS Host because the Licensing Mode is not set.
The most likely problem is that the administrator has not set the RDS Licensing Server and/or the licensing mode. This should be done even if the license type was already specified when the RDS Host was deployed (Configure the deployment -> RD Licensing -> Select the Remote Desktop licensing mode).
Configuring the RDS Licensing Mode on Windows Server
There are several ways to configure host RDS licensing settings:
On a standalone RDSH host (in a domain and workgroup), it’s easiest to use local policy. Go to Computer Configuration -> Administrative Templates -> Windows Components -> Remote Desktop Services -> Remote Desktop Session Host -> Licensing.
We need two GPO options:
Use the specified Remote Desktop license servers – enable the policy and specify the RDS license server addresses. If the RD license server is running on the same host, type 127.0.0.1You can specify the addresses of multiple hosts with the RDS Licensing role separated by commas;
Set the Remote Desktop licensing mode – select the licensing mode. In our case, it is Per User.
If you have deployed an RDS host without an AD domain (in a workgroup), you can only use Per Device RDS CALs. Otherwise, a message is displayed when a user logs in to the RDSH server in the workgroup:Remote Desktop Issue.There is a problem with your Remote Desktop license, and your session will be disconnected in 60 minutes. Contact your system administrator to fix the problem.
Set RDS licensing mode from the PowerShell prompt
Open a PowerShell console and check that the RDS licensing server address is configured on your RDSH:
You can also set the licensing mode (4 — Per User, or 2 — Per Device):
$obj.ChangeMode(4)
You can use the Get-ADObject cmdlet from the ActiveDirectory PowerShell module to list servers with the RDS Licensing role in an Active Directory domain:
Get-ADObject -Filter {objectClass -eq 'serviceConnectionPoint' -and Name -eq 'TermServLicensing'}
You can also configure the licensing parameters of the RDS host via a host with the RD Connection Broker role:
Configuring RDS licensing settings via the registry
In the HKLM\SYSTEM\CurrentControlSet\Control\Terminal Server\RCM\Licensing Core key, you will need to change the DWORD value of the parameter LicensingMode from a value of 5 (license mode not set):
# Specify the RDS licensing mode: 2 - Per Device CAL, 4 - Per User CAL
$RDSCALMode = 2
# RDS Licensing hostname
$RDSlicServer = "uk-rdslic1.woshub.com"
# Set the server name and licensing mode in the registry
New-Item "HKLM:\SYSTEM\CurrentControlSet\Services\TermService\Parameters\LicenseServers"
New-ItemProperty "HKLM:\SYSTEM\CurrentControlSet\Services\TermService\Parameters\LicenseServers" -Name SpecifiedLicenseServers -Value $RDSlicServer -PropertyType "MultiString"
Set-ItemProperty "HKLM:\SYSTEM\CurrentControlSet\Control\Terminal Server\RCM\Licensing Core\" -Name "LicensingMode" -Value $RDSCALMode
Once you have made the changes, restart your RDSH server. Then open the RDS Licensing Diagnoser console. If you have configured everything correctly, you should see the number of licenses available for clients and the licensing mode you have set (Licensing mode: Per device).RD Licensing Diagnoser did not identify any licensing problems for the Remote Desktop Session Host.
If a firewall is used on your network, you must open the following ports from the RDSH host to the RDS licensing server – TCP:135, UDP:137, UDP:138, TCP:139, TCP:445, TCP:49152–65535 (RPC range).
Also note that if the RD Licensing Server has, for example, Windows Server 2016 OS and CALs for RDS 2016 installed, you will not be able to install RDS CAL licenses for Windows Server 2019 or 2022. The 'Remote Desktop Licensing mode is not configured'error persists even when you specify the correct license type and RDS license server name. Older versions of Windows Server simply don’t support RDS CALs for newer versions of WS.
In this case, the following message will be displayed in the RD License Diagnoser window:The Remote Desktop Session Host is in Per User licensing mode and no Redirector Mode, but license server does not have any installed license with the following attributes: Product version: Windows Server 2016 Use RD Licensing Manager to install the appropriate licenses on the license server.
You must first upgrade the version of Windows Server on the license server or deploy a new RD License host. A newer version of Windows Server (for example, WS 2022) has support for RDS CALs for all previous versions of Windows Server.
Note. Licensing report not generated if RDS host is in a workgroup. Although the terminal RDS licenses themselves are correctly issued to clients/devices. You will need to keep track of the number of RDS CALs you have left. You must monitor the number of RDS CALs remaining.
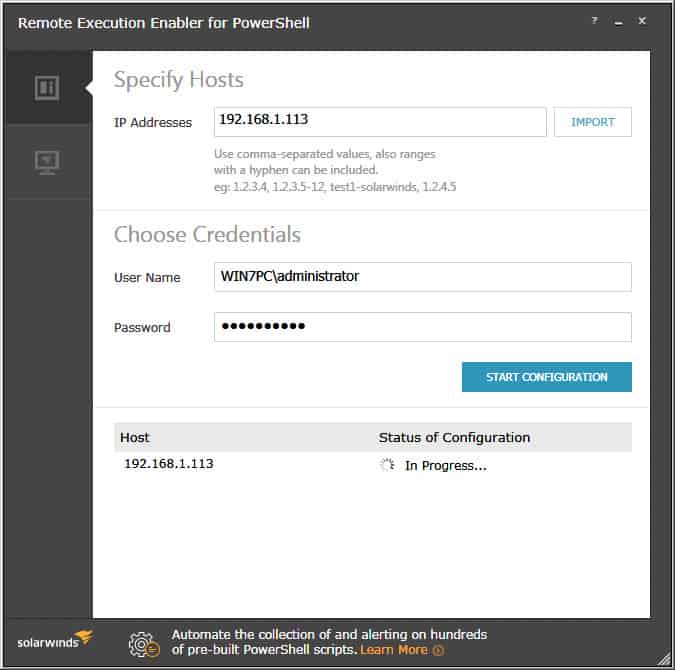
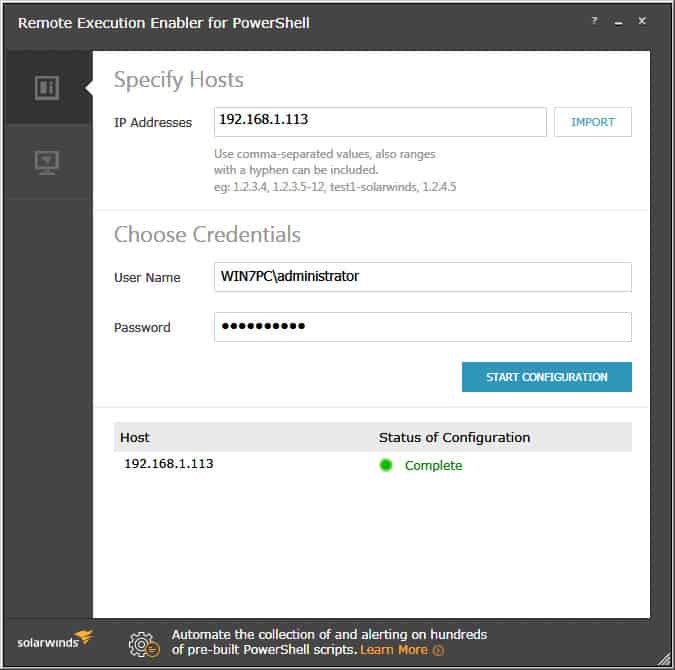
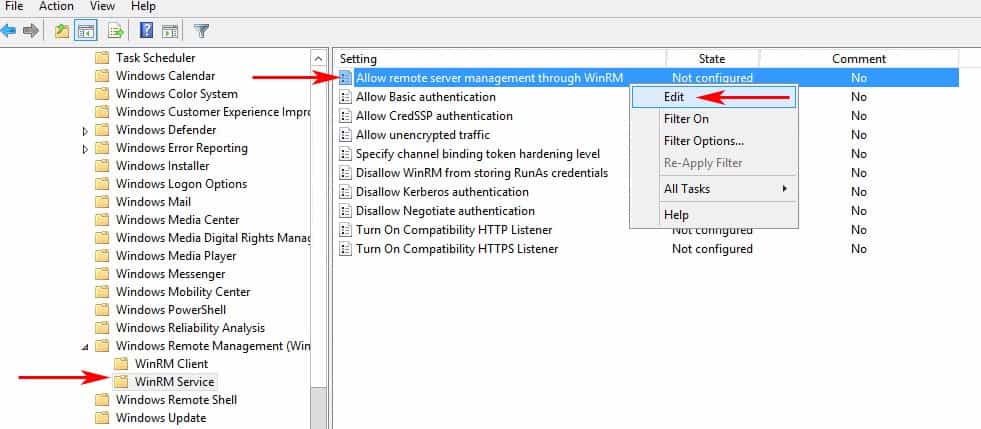
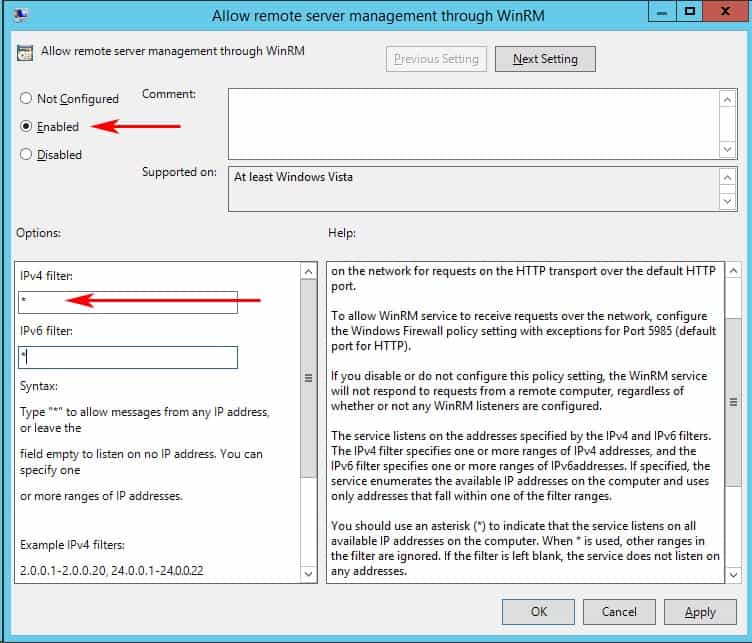
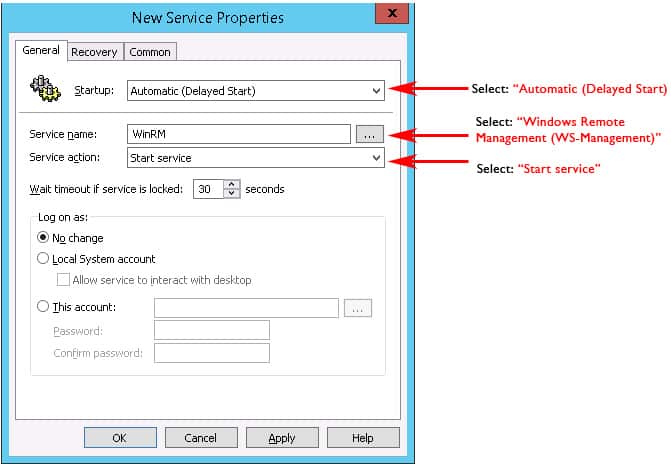
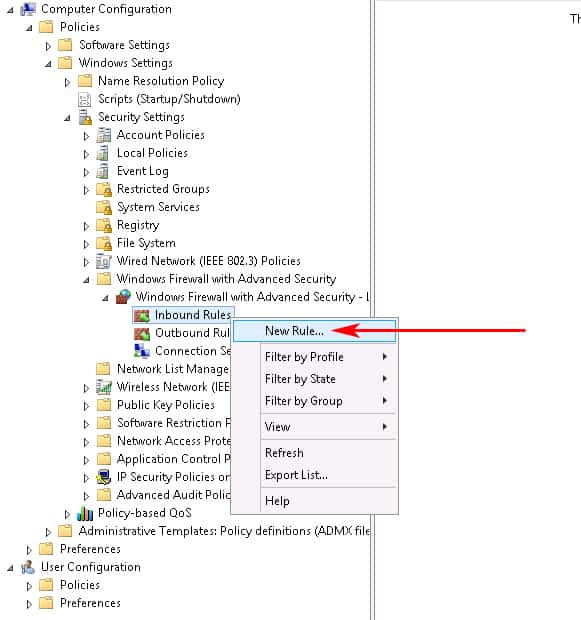
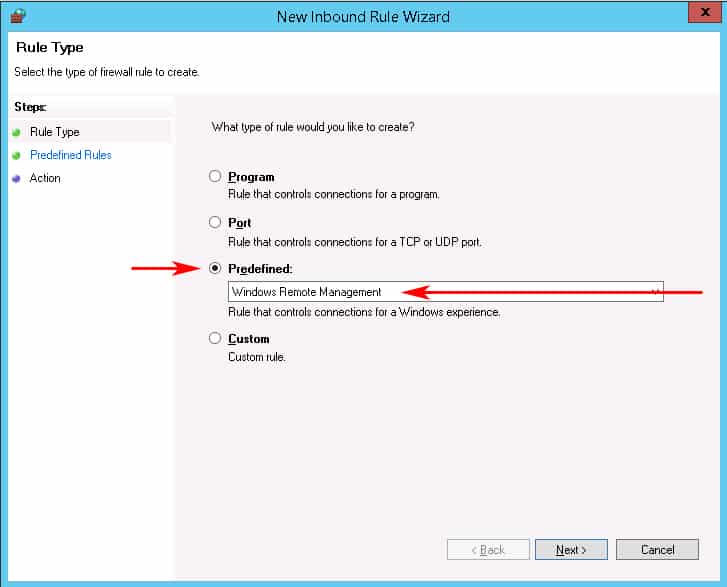

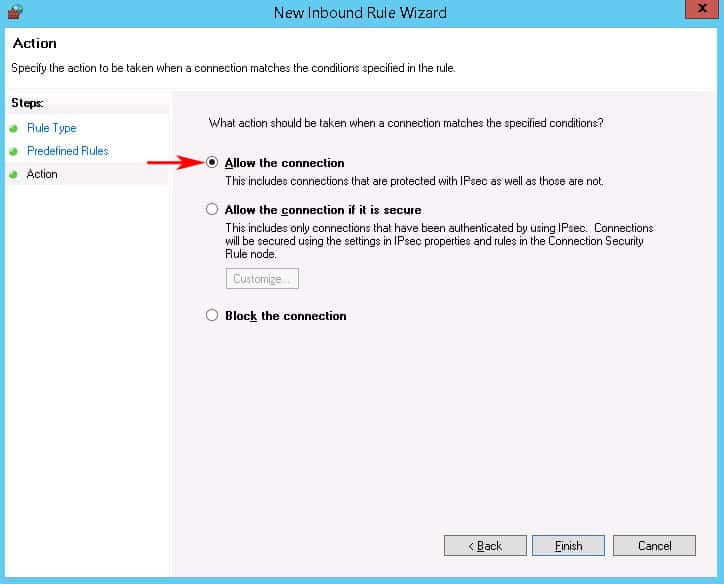
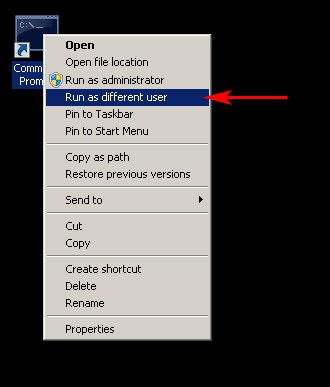
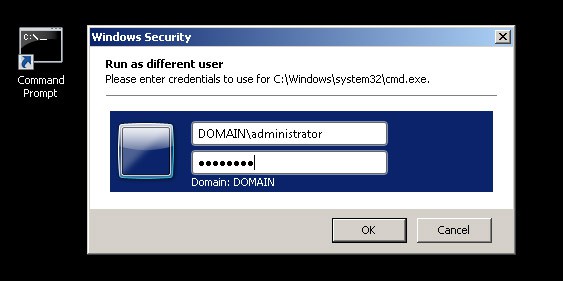
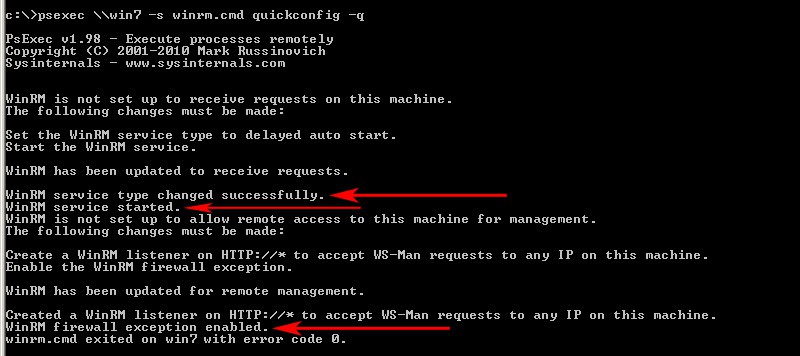
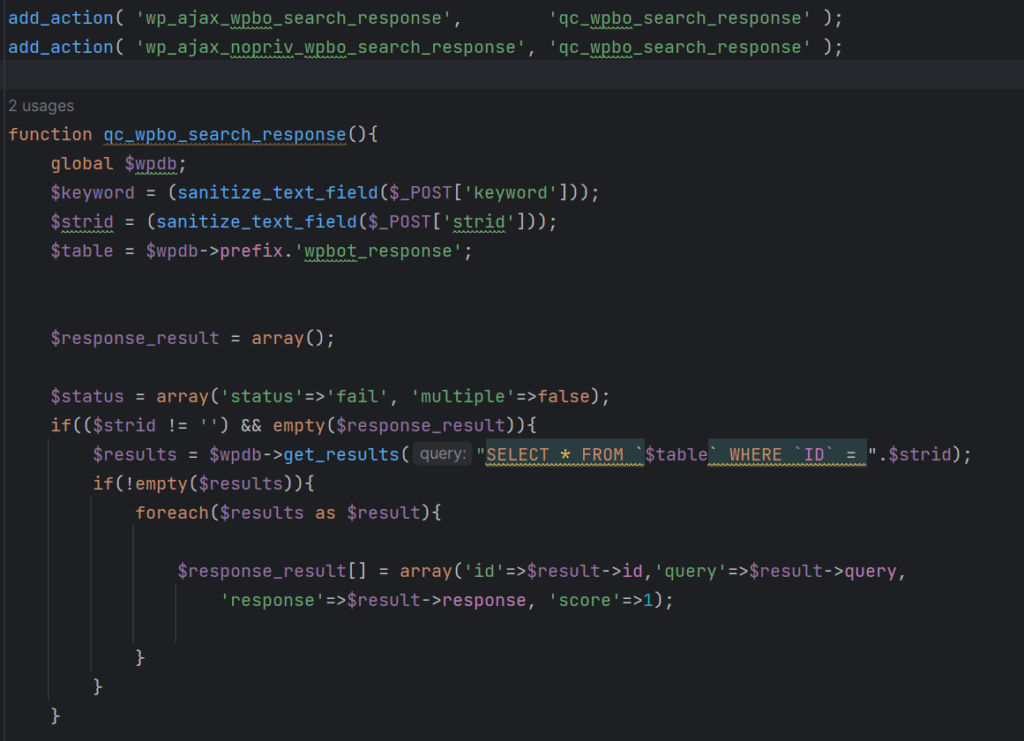
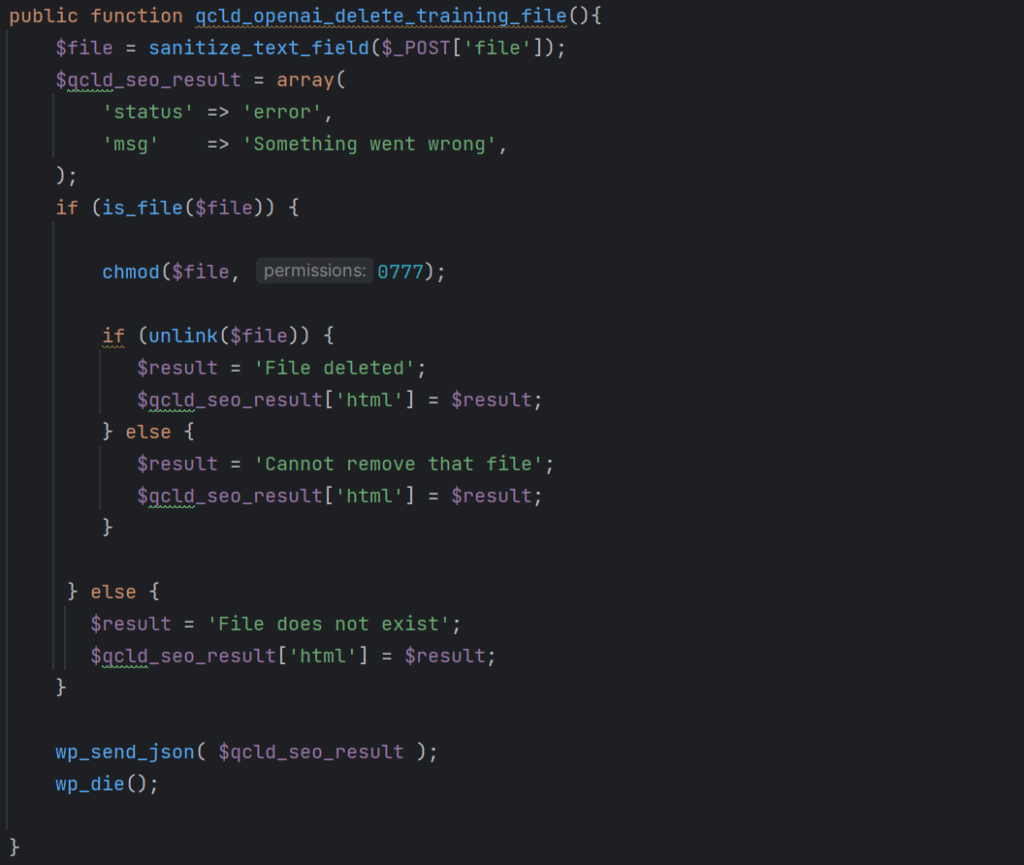

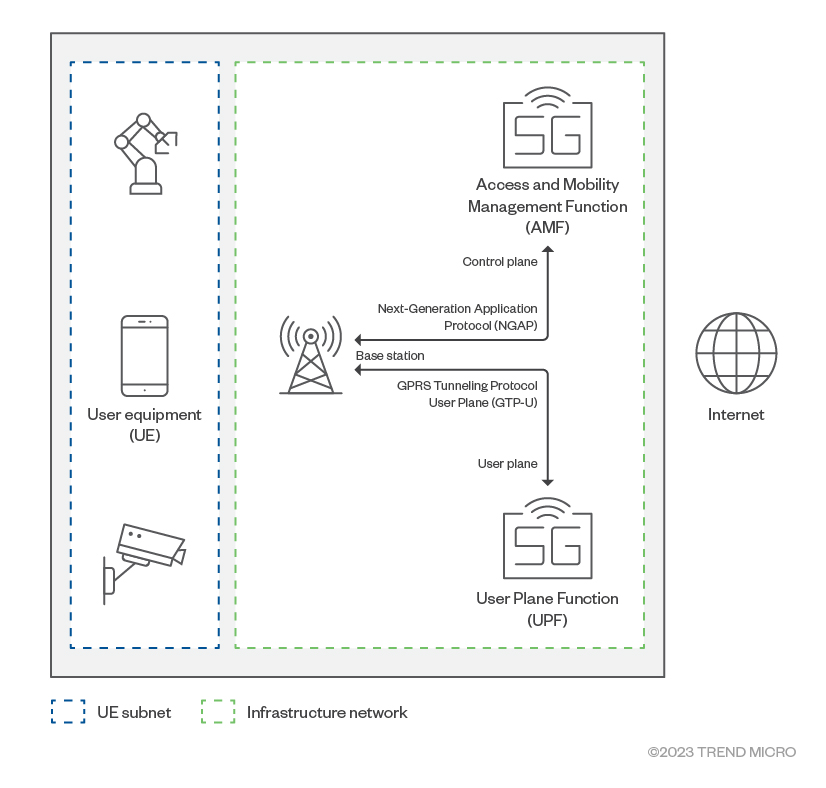
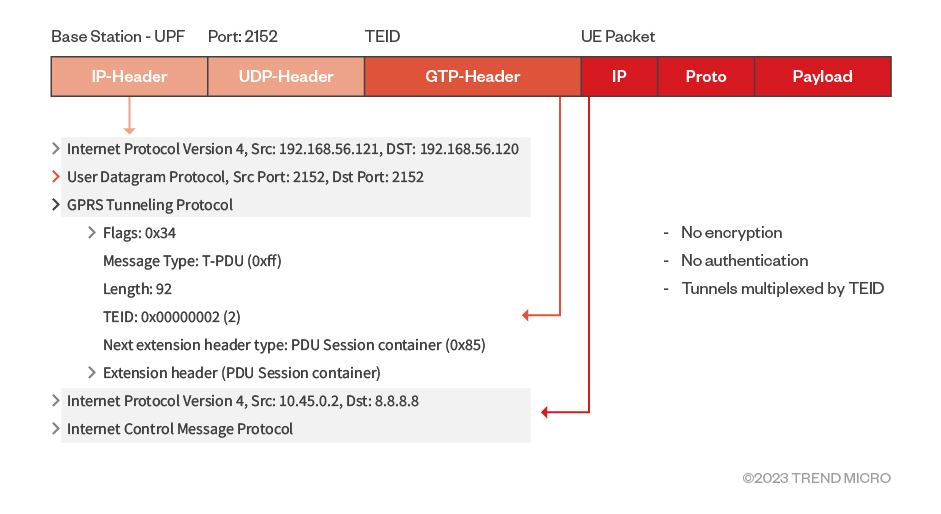
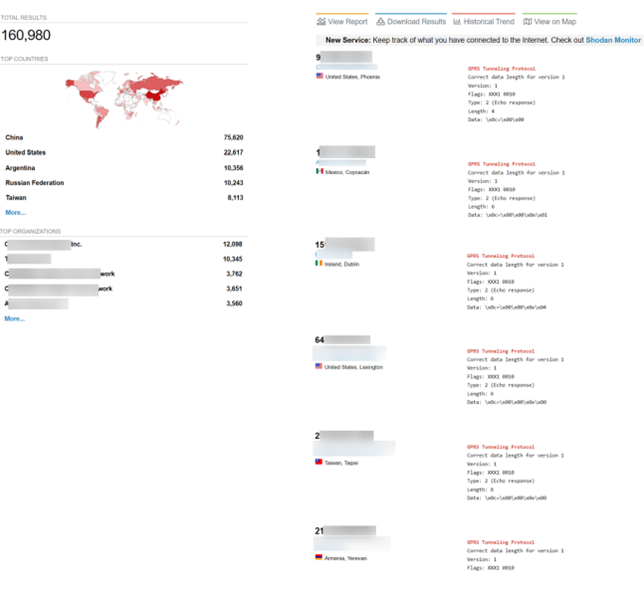
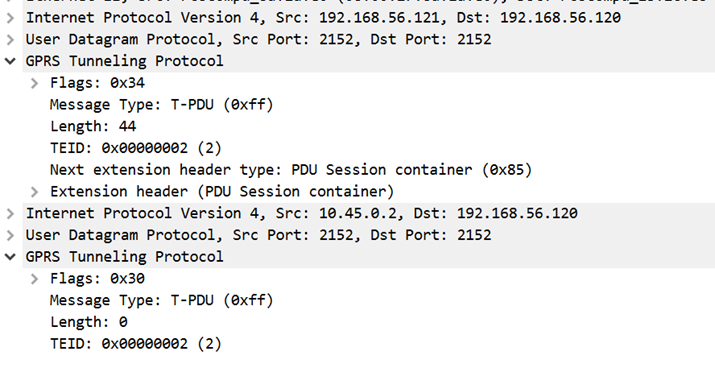
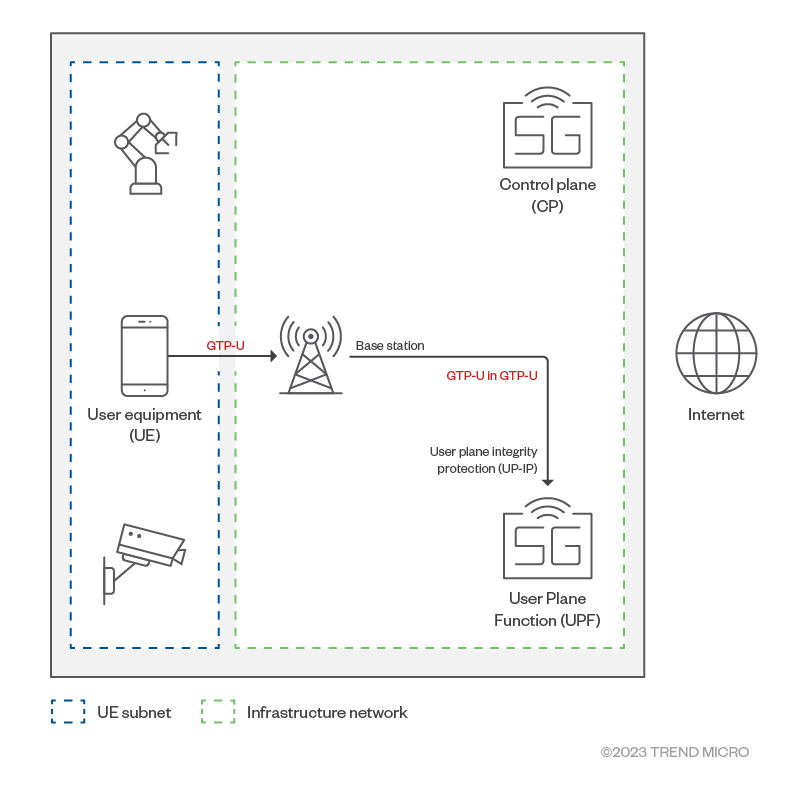
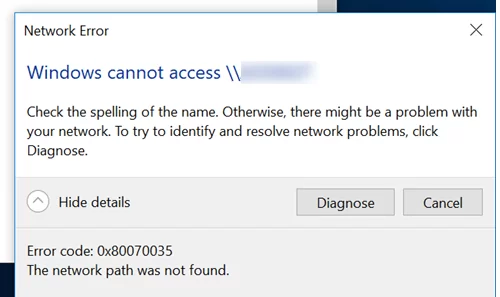
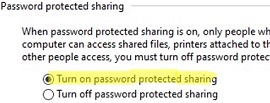
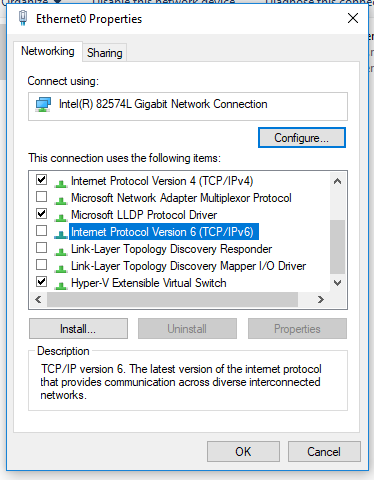
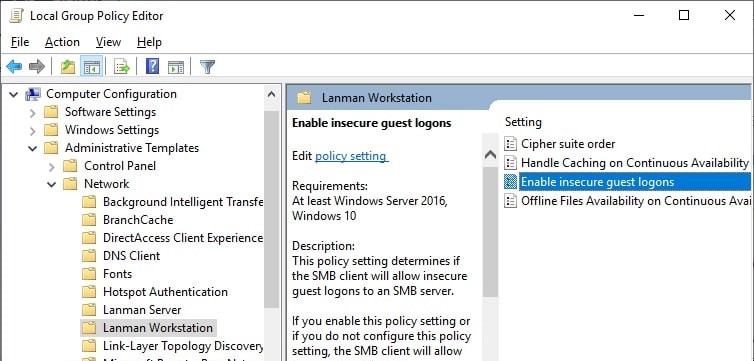

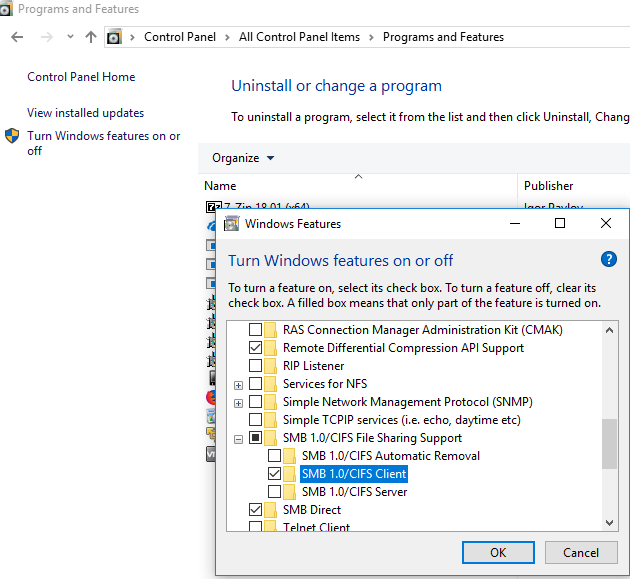
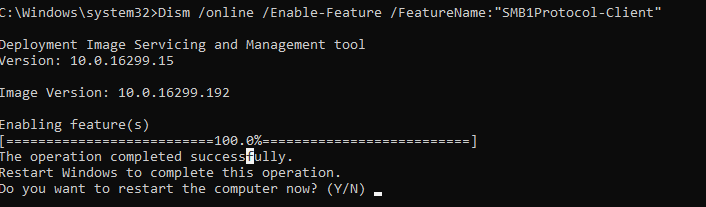

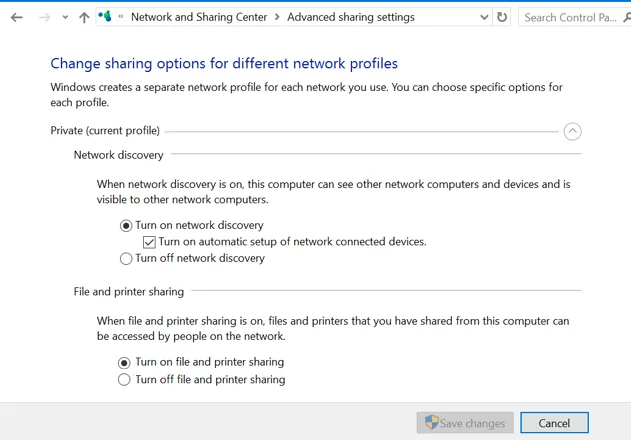
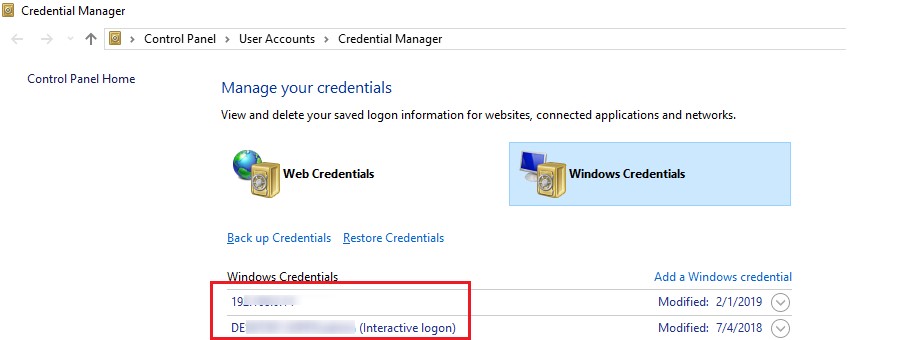
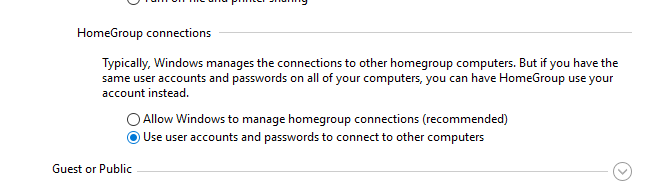
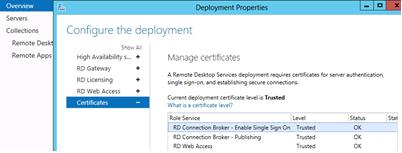
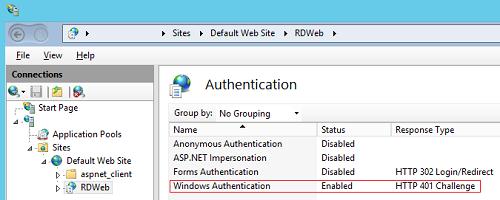
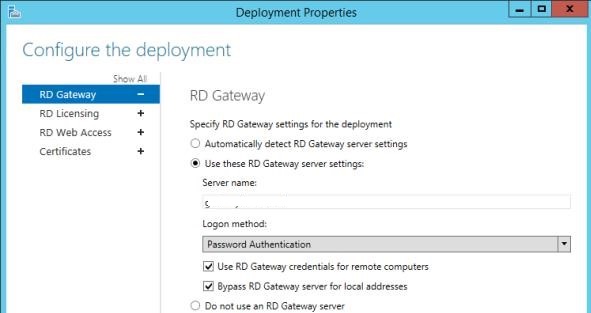

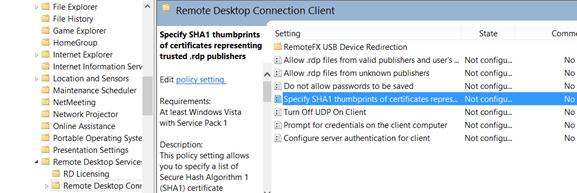
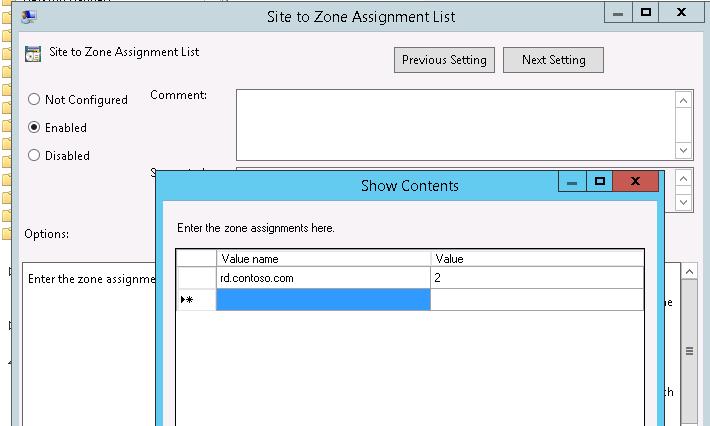
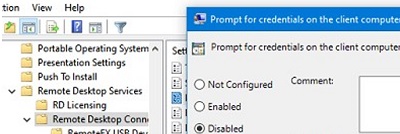
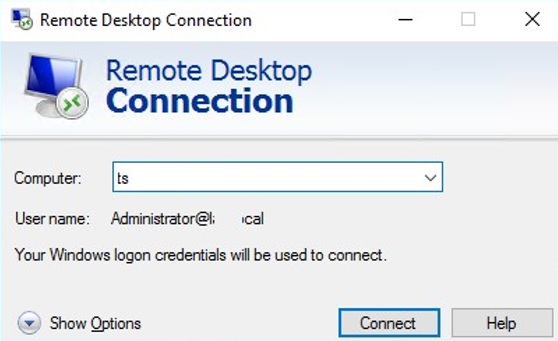
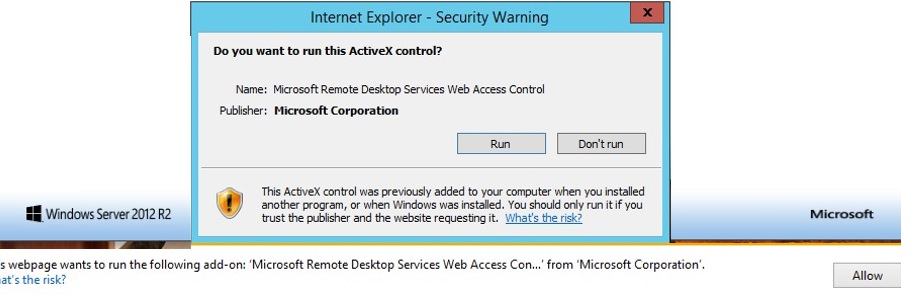

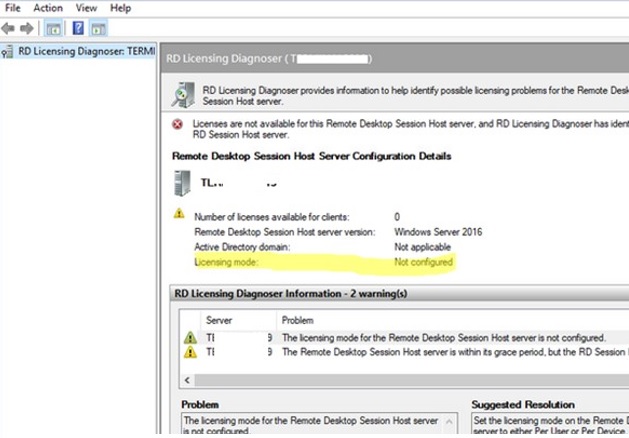
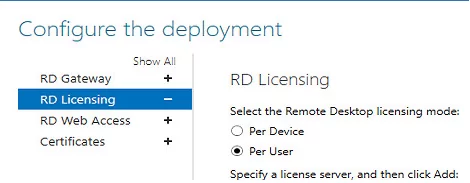
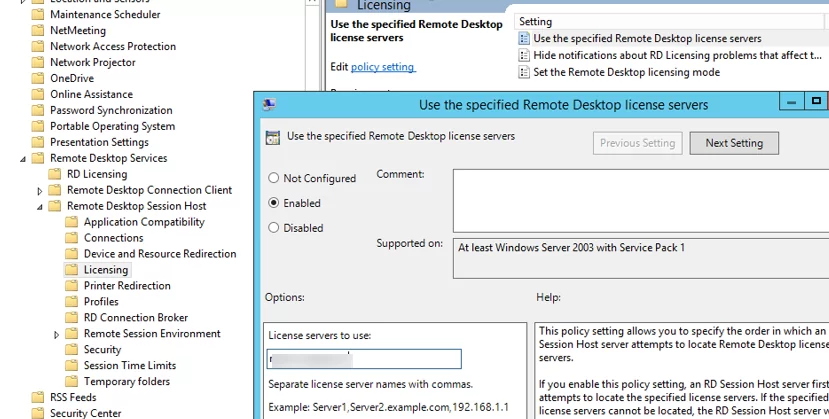
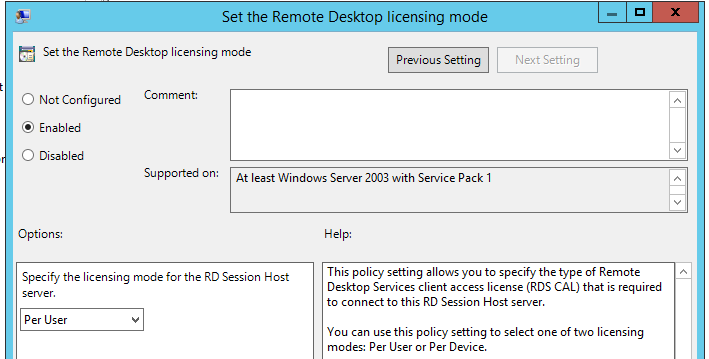
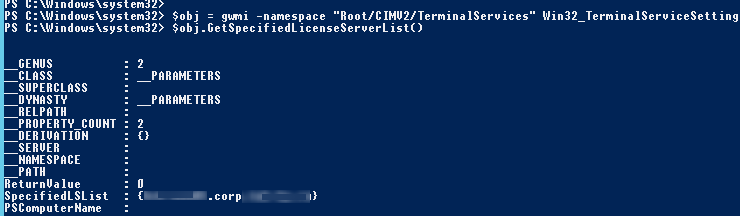
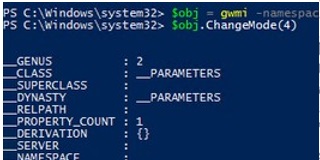
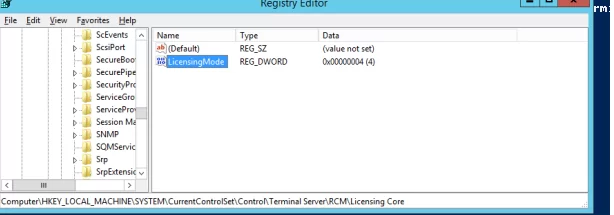
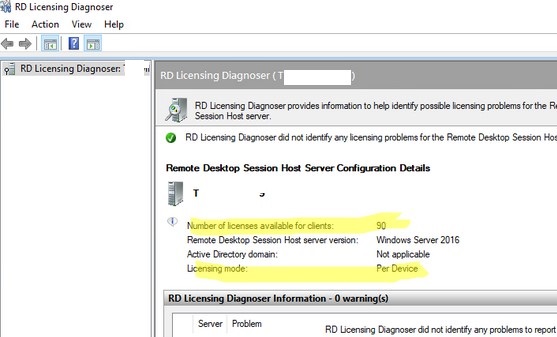
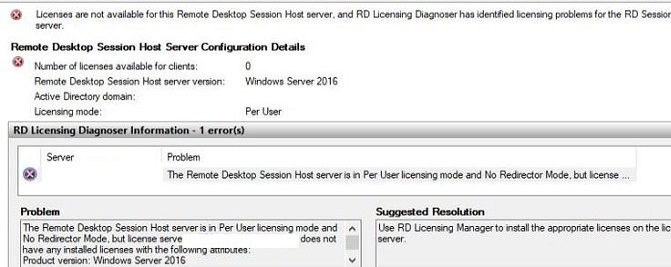
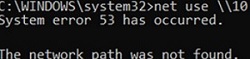
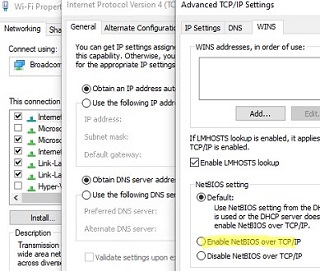
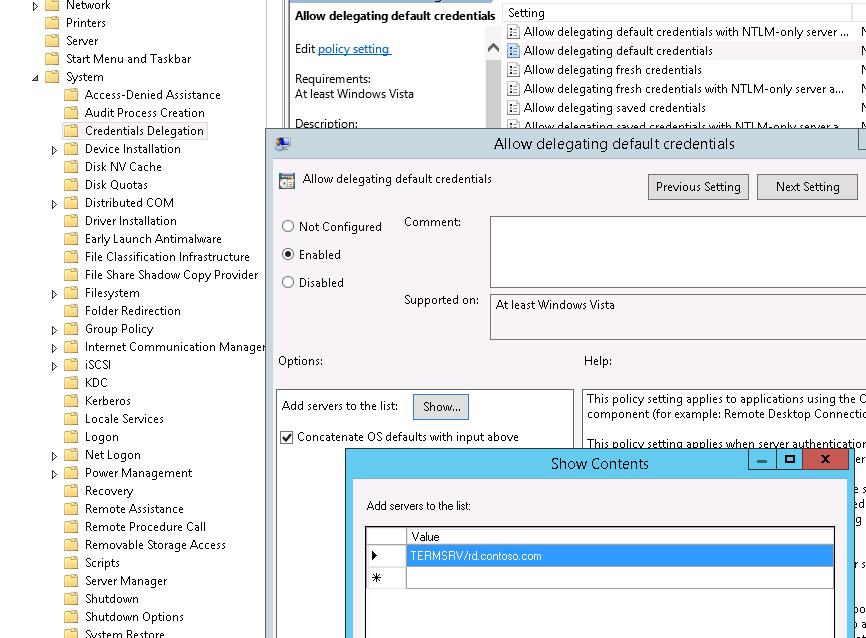
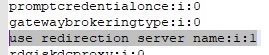
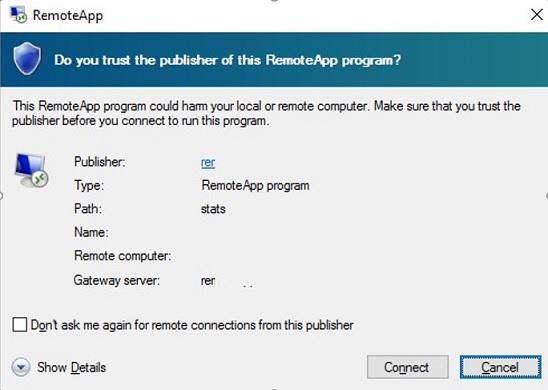