PowerShell – Hyper-V Cmdlets

Check out: PowerShell VaultPowerShell CategoryAzure CmdletsSCCM CmdletsPowerShell CmdletsAD Cmdlets

Add-VMDvdDriveAdds a DVD drive to a virtual machine.
Add-VMFibreChannelHbaAdds a virtual Fibre Channel host bus adapter to a virtual machine.
Add-VMGroupMemberAdds group members to a virtual machine group.
Add-VMHardDiskDriveAdds a hard disk drive to a virtual machine.
Add-VMMigrationNetworkAdds a network for virtual machine migration on one or more virtual machine hosts.
Add-VMNetworkAdapterAdds a virtual network adapter to a virtual machine.
Add-VMNetworkAdapterAclCreates an ACL to apply to the traffic through a virtual machine network adapter.
Add-VMNetworkAdapterExtendedAclCreates an extended ACL for a virtual network adapter.
Add-VMRemoteFx3dVideoAdapterAdds a RemoteFX video adapter in a virtual machine.
Add-VMScsiControllerAdds a SCSI controller in a virtual machine.
Add-VMStoragePathAdds a path to a storage resource pool.
Add-VMSwitchAdds a virtual switch to an Ethernet resource pool.
Add-VMSwitchExtensionPortFeatureAdds a feature to a virtual network adapter.
Add-VMSwitchExtensionSwitchFeatureAdds a feature to a virtual switch.
Add-VMSwitchTeamMemberAdds members to a virtual switch team.
Add-VmNetworkAdapterRoutingDomainMappingAdds a routing domain and virtual subnets to a virtual network adapter.
Checkpoint-VMCreates a checkpoint of a virtual machine.
Compare-VMCompares a virtual machine and a virtual machine host for compatibility, returning a compatibility report.
Complete-VMFailoverCompletes a virtual machine’s failover process on the Replica server.
Connect-VMNetworkAdapterConnects a virtual network adapter to a virtual switch.
Connect-VMSanAssociates a host bus adapter with a virtual storage area network (SAN).
Convert-VHDConverts the format, version type, and block size of a virtual hard disk file.
Copy-VMFileCopies a file to a virtual machine.
Debug-VMDebugs a virtual machine.
Disable-VMConsoleSupportDisables keyboard, video, and mouse for virtual machines.
Disable-VMEventingDisables virtual machine eventing.
Disable-VMIntegrationServiceDisables an integration service on a virtual machine.
Disable-VMMigrationDisables migration on one or more virtual machine hosts.
Disable-VMRemoteFXPhysicalVideoAdapterDisables one or more RemoteFX physical video adapters from use with RemoteFX-enabled virtual machines.
Disable-VMResourceMeteringDisables collection of resource utilization data for a virtual machine or resource pool.
Disable-VMSwitchExtensionDisables one or more extensions on one or more virtual switches.
Disable-VMTPMDisables TPM functionality on a virtual machine.
Disconnect-VMNetworkAdapterDisconnects a virtual network adapter from a virtual switch or Ethernet resource pool.
Disconnect-VMSanRemoves a host bus adapter from a virtual storage area network (SAN).
Dismount-VHDDismounts a virtual hard disk.
Enable-VMConsoleSupportEnables keyboard, video, and mouse for virtual machines.
Enable-VMEventingEnables virtual machine eventing.
Enable-VMIntegrationServiceEnables an integration service on a virtual machine.
Enable-VMMigrationEnables migration on one or more virtual machine hosts.
Enable-VMRemoteFXPhysicalVideoAdapterEnables one or more RemoteFX physical video adapters for use with RemoteFX-enabled virtual machines.
Enable-VMReplicationEnables replication of a virtual machine.
Enable-VMResourceMeteringCollects resource utilization data for a virtual machine or resource pool.
Enable-VMSwitchExtensionEnables one or more extensions on one or more switches.
Enable-VMTPMEnables TPM functionality on a virtual machine.
Export-VMExports a virtual machine to disk.
Export-VMSnapshotExports a virtual machine checkpoint to disk.
Get-VHDGets the virtual hard disk object associated with a virtual hard disk.
Get-VHDSetGets information about a VHD set.
Get-VHDSnapshotGets information about a checkpoint in a VHD set.
Get-VMGets the virtual machines from one or more Hyper-V hosts.
Get-VMBiosGets the BIOS of a virtual machine or snapshot.
Get-VMComPortGets the COM ports of a virtual machine or snapshot.
Get-VMConnectAccessGets entries showing users and the virtual machines to which they can connect on one or more Hyper-V hosts.
Get-VMDvdDriveGets the DVD drives attached to a virtual machine or snapshot.
Get-VMFibreChannelHbaGets the Fibre Channel host bus adapters associated with one or more virtual machines.
Get-VMFirmwareGets the firmware configuration of a virtual machine.
Get-VMFloppyDiskDriveGets the floppy disk drives of a virtual machine or snapshot.
Get-VMGroupGets virtual machine groups.
Get-VMHardDiskDriveGets the virtual hard disk drives attached to one or more virtual machines.
Get-VMHostGets a Hyper-V host.
Get-VMHostClusterGets virtual machine host clusters.
Get-VMHostNumaNodeGets the NUMA topology of a virtual machine host.
Get-VMHostNumaNodeStatusGets the status of the virtual machines on the non-uniform memory access (NUMA) nodes of a virtual machine host or hosts.
Get-VMHostSupportedVersionReturns a list of virtual machine configuration versions that are supported on a host.
Get-VMIdeControllerGets the IDE controllers of a virtual machine or snapshot.
Get-VMIntegrationServiceGets the integration services of a virtual machine or snapshot.
Get-VMKeyProtectorRetrieves a key protector for a virtual machine.
Get-VMMemoryGets the memory of a virtual machine or snapshot.
Get-VMMigrationNetworkGets the networks added for migration to one or more virtual machine hosts.
Get-VMNetworkAdapterGets the virtual network adapters of a virtual machine, snapshot, management operating system, or of a virtual machine and management operating system.
Get-VMNetworkAdapterAclGets the ACLs configured for a virtual machine network adapter.
Get-VMNetworkAdapterExtendedAclGets extended ACLs configured for a virtual network adapter.
Get-VMNetworkAdapterFailoverConfigurationGets the IP address of a virtual network adapter configured to be used when a virtual machine fails over.
Get-VMNetworkAdapterRoutingDomainMappingGets members of a routing domain.
Get-VMNetworkAdapterTeamMapping
Get-VMNetworkAdapterVlanGets the virtual LAN settings configured on a virtual network adapter.
Get-VMProcessorGets the processor of a virtual machine or snapshot.
Get-VMRemoteFXPhysicalVideoAdapterGets the RemoteFX physical graphics adapters on one or more Hyper-V hosts.
Get-VMRemoteFx3dVideoAdapterGets the RemoteFX video adapter of a virtual machine or snapshot.
Get-VMReplicationGets the replication settings for a virtual machine.
Get-VMReplicationAuthorizationEntryGets the authorization entries of a Replica server.
Get-VMReplicationServerGets the replication and authentication settings of a Replica server.
Get-VMResourcePoolGets the resource pools on one or more virtual machine hosts.
Get-VMSanGets the available virtual machine storage area networks on a Hyper-V host or hosts.
Get-VMScsiControllerGets the SCSI controllers of a virtual machine or snapshot.
Get-VMSecurityGets security information about a virtual machine.
Get-VMSnapshotGets the checkpoints associated with a virtual machine or checkpoint.
Get-VMStoragePathGets the storage paths in a storage resource pool.
Get-VMSwitchGets virtual switches from one or more virtual Hyper-V hosts.
Get-VMSwitchExtensionGets the extensions on one or more virtual switches.
Get-VMSwitchExtensionPortDataRetrieves the status of a virtual switch extension feature applied to a virtual network adapter.
Get-VMSwitchExtensionPortFeatureGets the features configured on a virtual network adapter.
Get-VMSwitchExtensionSwitchDataGets the status of a virtual switch extension feature applied on a virtual switch.
Get-VMSwitchExtensionSwitchFeatureGets the features configured on a virtual switch.
Get-VMSwitchTeamGets virtual switch teams from Hyper-V hosts.
Get-VMSystemSwitchExtensionGets the switch extensions installed on a virtual machine host.
Get-VMSystemSwitchExtensionPortFeatureGets the port-level features supported by virtual switch extensions on one or more Hyper-V hosts.
Get-VMSystemSwitchExtensionSwitchFeatureGets the switch-level features on one or more Hyper-V hosts.
Get-VMVideoGets video settings for virtual machines.
Get-VmNetworkAdapterIsolationGets isolation settings for a virtual network adapter.
Grant-VMConnectAccessGrants a user or users access to connect to a virtual machine or machines.
Import-VMImports a virtual machine from a file.
Import-VMInitialReplicationImports initial replication files for a Replica virtual machine to complete the initial replication when using external media as the source.
Measure-VMReports resource utilization data for one or more virtual machines.
Measure-VMReplicationGets replication statistics and information associated with a virtual machine.
Measure-VMResourcePoolReports resource utilization data for one or more resource pools.
Merge-VHDMerges virtual hard disks.
Mount-VHDMounts one or more virtual hard disks.
Move-VMMoves a virtual machine to a new Hyper-V host.
Move-VMStorageMoves the storage of a virtual machine.
New-VFDCreates a virtual floppy disk.
New-VHDCreates one or more new virtual hard disks.
New-VMCreates a new virtual machine.
New-VMGroupCreates a virtual machine group.
New-VMReplicationAuthorizationEntryCreates a new authorization entry that allows one or more primary servers to replicate data to a specified Replica server.
New-VMResourcePoolCreates a resource pool.
New-VMSanCreates a new virtual storage area network (SAN) on a Hyper-V host.
New-VMSwitchCreates a new virtual switch on one or more virtual machine hosts.
Optimize-VHDOptimizes the allocation of space used by virtual hard disk files, except for fixed virtual hard disks.
Optimize-VHDSetOptimizes VHD set files.
Remove-VHDSnapshotRemoves a checkpoint from a VHD set file.
Remove-VMDeletes a virtual machine.
Remove-VMDvdDriveDeletes a DVD drive from a virtual machine.
Remove-VMFibreChannelHbaRemoves a Fibre Channel host bus adapter from a virtual machine.
Remove-VMGroupRemoves a virtual machine group.
Remove-VMGroupMemberRemoves members from a virtual machine group.
Remove-VMHardDiskDriveDeletes a hard disk drive from a virtual machine.
Remove-VMMigrationNetworkRemoves a network from use with migration.
Remove-VMNetworkAdapterRemoves one or more virtual network adapters from a virtual machine.
Remove-VMNetworkAdapterAclRemoves an ACL applied to the traffic through a virtual network adapter.
Remove-VMNetworkAdapterExtendedAclRemoves an extended ACL for a virtual network adapter.
Remove-VMNetworkAdapterRoutingDomainMappingRemoves a routing domain from a virtual network adapter.
Remove-VMNetworkAdapterTeamMapping
Remove-VMRemoteFx3dVideoAdapterRemoves a RemoteFX 3D video adapter from a virtual machine.
Remove-VMReplicationRemoves the replication relationship of a virtual machine.
Remove-VMReplicationAuthorizationEntryRemoves an authorization entry from a Replica server.
Remove-VMResourcePoolDeletes a resource pool from one or more virtual machine hosts.
Remove-VMSanRemoves a virtual storage area network (SAN) from a Hyper-V host.
Remove-VMSavedStateDeletes the saved state of a saved virtual machine.
Remove-VMScsiControllerRemoves a SCSI controller from a virtual machine.
Remove-VMSnapshotDeletes a virtual machine checkpoint.
Remove-VMStoragePathRemoves a path from a storage resource pool.
Remove-VMSwitchDeletes a virtual switch.
Remove-VMSwitchExtensionPortFeatureRemoves a feature from a virtual network adapter.
Remove-VMSwitchExtensionSwitchFeatureRemoves a feature from a virtual switch.
Remove-VMSwitchTeamMemberRemoves a member from a virtual machine switch team.
Rename-VMRenames a virtual machine.
Rename-VMGroupRenames virtual machine groups.
Rename-VMNetworkAdapterRenames a virtual network adapter on a virtual machine or on the management operating system.
Rename-VMResourcePoolRenames a resource pool on one or more Hyper-V hosts.
Rename-VMSanRenames a virtual storage area network (SAN).
Rename-VMSnapshotRenames a virtual machine checkpoint.
Rename-VMSwitchRenames a virtual switch.
Repair-VMRepairs one or more virtual machines.
Reset-VMReplicationStatisticsResets the replication statistics of a virtual machine.
Reset-VMResourceMeteringResets the resource utilization data collected by Hyper-V resource metering.
Resize-VHDResizes a virtual hard disk.
Restart-VMRestarts a virtual machine.
Restore-VMSnapshotRestores a virtual machine checkpoint.
Resume-VMResumes a suspended (paused) virtual machine.
Resume-VMReplicationResumes a virtual machine replication that is in a state of Paused, Error, Resynchronization Required, or Suspended.
Revoke-VMConnectAccessRevokes access for one or more users to connect to a one or more virtual machines.
Save-VMSaves a virtual machine.
Set-VHDSets properties associated with a virtual hard disk.
Set-VMConfigures a virtual machine.
Set-VMBiosConfigures the BIOS of a Generation 1 virtual machine.
Set-VMComPortConfigures the COM port of a virtual machine.
Set-VMDvdDriveConfigures a virtual DVD drive.
Set-VMFibreChannelHbaConfigures a Fibre Channel host bus adapter on a virtual machine.
Set-VMFirmwareSets the firmware configuration of a virtual machine.
Set-VMFloppyDiskDriveConfigures a virtual floppy disk drive.
Set-VMHardDiskDriveConfigures a virtual hard disk.
Set-VMHostConfigures a Hyper-V host.
Set-VMHostClusterConfigures a virtual machine host cluster.
Set-VMKeyProtectorConfigures a key protector for a virtual machine.
Set-VMMemoryConfigures the memory of a virtual machine.
Set-VMMigrationNetworkSets the subnet, subnet mask, and/or priority of a migration network.
Set-VMNetworkAdapterConfigures features of the virtual network adapter in a virtual machine or the management operating system.
Set-VMNetworkAdapterFailoverConfigurationConfigures the IP address of a virtual network adapter to be used when a virtual machine fails over.
Set-VMNetworkAdapterTeamMapping
Set-VMNetworkAdapterVlanConfigures the virtual LAN settings for the traffic through a virtual network adapter.
Set-VMProcessorConfigures one or more processors of a virtual machine.
Set-VMRemoteFx3dVideoAdapterConfigures the RemoteFX 3D video adapter of a virtual machine.
Set-VMReplicationModifies the replication settings of a virtual machine.
Set-VMReplicationAuthorizationEntryModifies an authorization entry on a Replica server.
Set-VMReplicationServerConfigures a host as a Replica server.
Set-VMResourcePoolSets the parent resource pool for a selected resource pool.
Set-VMSanConfigures a virtual storage area network (SAN) on one or more Hyper-V hosts.
Set-VMSecurityConfigures security settings for a virtual machine.
Set-VMSecurityPolicyConfigures the security policy for a virtual machine.
Set-VMSwitchConfigures a virtual switch.
Set-VMSwitchExtensionPortFeatureConfigures a feature on a virtual network adapter.
Set-VMSwitchExtensionSwitchFeatureConfigures a feature on a virtual switch.
Set-VMSwitchTeamConfigures a virtual switch team.
Set-VMVideoConfigures video settings for virtual machines.
Set-VmNetworkAdapterIsolationModifies isolation settings for a virtual network adapter.
Set-VmNetworkAdapterRoutingDomainMappingSets virtual subnets on a routing domain.
Start-VMStarts a virtual machine.
Start-VMFailoverStarts failover on a virtual machine.
Start-VMInitialReplicationStarts replication of a virtual machine.
Start-VMTraceStarts tracing to a file.
Stop-VMShuts down, turns off, or saves a virtual machine.
Stop-VMFailoverStops failover of a virtual machine.
Stop-VMInitialReplicationStops an ongoing initial replication.
Stop-VMReplicationCancels an ongoing virtual machine resynchronization.
Stop-VMTraceStops tracing to file.
Suspend-VMSuspends, or pauses, a virtual machine.
Suspend-VMReplicationSuspends replication of a virtual machine.
Test-VHDTests a virtual hard disk for any problems that would make it unusable.
Test-VMNetworkAdapterTests connectivity between virtual machines.
Test-VMReplicationConnectionTests the connection between a primary server and a Replica server.
Update-VMVersionUpdates the version of virtual machines.

Source :
https://eddiejackson.net/wp/?page_id=26483

Basic Authentication Deprecation in Exchange Online – September 2022 Update

One month from today, we’re going to start to turn off basic auth for specific protocols in Exchange Online for customers who use them.

Since our first announcement nearly three years ago, we’ve seen millions of users move away from basic auth, and we’ve disabled it in millions of tenants to proactively protect them.

We’re not done yet though, and unfortunately usage isn’t yet at zero. Despite that, we will start to turn off basic auth for several protocols for tenants not previously disabled.

Starting October 1st, we will start to randomly select tenants and disable basic authentication access for MAPI, RPC, Offline Address Book (OAB), Exchange Web Services (EWS), POP, IMAP, Exchange ActiveSync (EAS), and Remote PowerShell. We will post a message to the Message Center 7 days prior, and we will post Service Health Dashboard notifications to each tenant on the day of the change.

We will not be disabling or changing any settings for SMTP AUTH.

If you have removed your dependency on basic auth, this will not affect your tenant or users. If you have not (or are not sure), check the Message Center for the latest data contained in the monthly usage reports we have been sending monthly since October 2021. The data for August 2022 will be sent within the first few days of September.

What If You Are Not Ready for This Change?

We recognize that unfortunately there are still many tenants unprepared for this change. Despite multiple blog posts, Message Center posts, interruptions of service, and coverage via tweets, videos, conference presentations and more, some customers are still unaware this change is coming. There are also many customers aware of the deadline who simply haven’t done the necessary work to avoid an outage.

Our goal with this effort has only ever been to protect your data and accounts from the increasing number of attacks we see that are leveraging basic auth.

However, we understand that email is a mission-critical service for many of our customers and turning off basic auth for many of them could potentially be very impactful.

One-Time Re-Enablement

Today we are announcing an update to our plan to offer customers who are unaware or are not ready for this change.

When we turn off basic auth after October 1st, all customers will be able to use the self-service diagnostic to re-enable basic auth for any protocols they need, once per protocol. Details on this process are below.

Once this diagnostic is run, basic auth will be re-enabled for those protocol(s). Selected protocol(s) will stay enabled for basic auth use until end of December 2022. During the first week of calendar year 2023, those protocols will be disabled for basic auth use permanently, and there will be no possibility of using basic auth after that.

Avoiding Disruption

If you already know you need more time and wish to avoid the disruption of having basic auth disabled you can run the diagnostics during the month of September, and when October comes, we will not disable basic for protocol(s) you specify. We will disable basic for any non-opted-out protocols, but you will be able to re-enable them (until the end of the year) by following the steps below if you later decide you need those too.

In other words – if you do not want basic for a specific protocol or protocols disabled in October, you can use the same self-service diagnostic in the month of September. Details on this process below.

Diagnostic Options

Thousands of customers have already used the self-service diagnostic we discussed in earlier blog posts (here and here) to re-enable basic auth for a protocol that had been turned off, or to tell us not to include them in our proactive protection expansion program. We’re using this same diagnostic again, but the workflow is changing a little.

Today, we have archived all prior re-enable and opt-out requests. If you have previously opted out or re-enabled basic for some protocol, you’ll need to follow the steps below during the month of September to indicate you want us to leave something enabled for basic auth after Oct 1.

To invoke the self-service diagnostic, you can go directly to the basic auth self-help diagnostic by simply clicking on this button (it’ll bring up the diagnostic in the Microsoft 365 admin center if you’re a tenant Global Admin):

thumbnail image 1 of blog post titled 


							Basic Authentication Deprecation in Exchange Online – September 2022 Update

Or you can open the Microsoft 365 admin center and click the green Help & support button in the lower right-hand corner of the screen.

thumbnail image 2 of blog post titled 


							Basic Authentication Deprecation in Exchange Online – September 2022 Update
thumbnail image 3 of blog post titled 


							Basic Authentication Deprecation in Exchange Online – September 2022 Update

When you click the button, you enter our self-help system. Here you can enter the phrase “Diag: Enable Basic Auth in EXO

Customers with tenants in the Government Community Cloud (GCC) are unable to use the self-service diagnostic covered here. Those tenants may opt out by following the process contained in the Message Center post sent to their tenant today. If GCC customers need to re-enable a protocol following the Oct 1st deadline they will need to open a support ticket.

Opting Out

During the month of September 2022, the diagnostic will offer only the option to opt-out. By submitting your opt-out request during September, you are telling us that you do not want us to disable basic for a protocol or protocols during October.  Please understand we will be disabling basic auth for all tenants permanently in January 2023, regardless of their opt-out status.

The diagnostic will show a version of the dialog below, and you can re-run it for multiple protocols. It might look a bit different if some protocols have already been disabled. Note too that protocols are not removed from the list as you opt-out but rest assured (unless you receive an error) we will receive the request.

thumbnail image 4 of blog post titled 


							Basic Authentication Deprecation in Exchange Online – September 2022 Update

Re-Enabling Basic for protocols

Starting October 1, the diagnostic will only allow you to re-enable basic auth for a protocol that it was disabled for.

If you did not opt-out during September, and we disabled basic for a protocol you later realize you need, you can use this to re-enable it.

thumbnail image 5 of blog post titled 


							Basic Authentication Deprecation in Exchange Online – September 2022 Update

Within an hour (usually much sooner) after you run the diagnostics and ask us to re-enable basic for a protocol, basic auth will start to work again.

At this point, we have to remind you that by re-enabling basic for a protocol, you are leaving your users and data vulnerable to security risks, and that we have customers suffering from basic auth-based attacks every single day (but you know that already).

Starting January 1, 2023, the self-serve diagnostic will no longer be available, and basic auth will soon thereafter be disabled for all protocols.

Summary of timelines and actions

Please see the following flow chart to help illustrate the changes and actions that you might need to take:

thumbnail image 6 of blog post titled 


							Basic Authentication Deprecation in Exchange Online – September 2022 Update

Blocking Basic Authentication Yourself

If you re-enable basic for a protocol because you need some extra time and then afterward no longer need basic auth you can block it yourself instead of waiting for us to do it in January 2023. The quickest and most effective way to do this is to use Authentication Policies which block basic auth connections at the first point of contact to Exchange Online.

Just go into the Microsoft 365 admin center, navigate to SettingsOrg SettingsModern Authentication and uncheck the boxes to block basic for all protocols you no longer need (these checkboxes will do nothing once we block basic for a protocol permanently, and we’ll remove them some time after January 2023).

thumbnail image 7 of blog post titled 


							Basic Authentication Deprecation in Exchange Online – September 2022 Update

Reporting Web Service Endpoint

For those of you using the Reporting Web Service REST endpoint to get access to Message Tracking Logs and more, we’re also announcing today that this service will continue to have basic auth enabled until Dec 31st for all customers, no opt-out or re-enablement is required. And, we’re pleased to be able to provide the long-awaited guidance for this too right here

EOP/SCC PowerShell

Basic authentication will remain enabled until Dec 31st, 2022. Customers need to migrate to certificate based authentication. Follow the Instructions here: App-only authentication

One Other Basic Authentication Related Update

We’re adding a new capability to Microsoft 365 to help our customers avoid the risks posed by basic authentication. This new feature changes the default behavior of Office applications to block sign-in prompts using basic authentication. With this change, if users try to open Office files on servers that only use basic authentication, they won’t see any basic authentication sign-in prompts. Instead, they’ll see a message that the file has been blocked because it uses a sign-in method that may be insecure.

You can read more about this great new feature here: Basic authentication sign-in prompts are blocked by default in Microsoft 365 Apps.

Office Team is looking for customers to opt-in to their Private Preview Program for this feature. Please send them an email if you are interested in signing up: basicauthdeprmailer@microsoft.com.

Summary

This effort has taken three years from initial communication until now, and even that has not been enough time to ensure that all customers know about this change and take all necessary steps. IT and change can be hard, and the pandemic changed priorities for many of us, but everyone wants the same thing: better security for their users and data.

Our customers are important to us, and we do not want to see them breached, or disrupted. It’s a fine balance but we hope this final option will allow the remaining customers using Basic auth to finally get rid of it.

The end of 2022 will see us collectively reach that goal, to Improve Security – Together.

The Exchange Team

Source :
https://techcommunity.microsoft.com/t5/exchange-team-blog/basic-authentication-deprecation-in-exchange-online-september/ba-p/3609437

We can’t install this printer right now, Error 740 on Windows 11/10

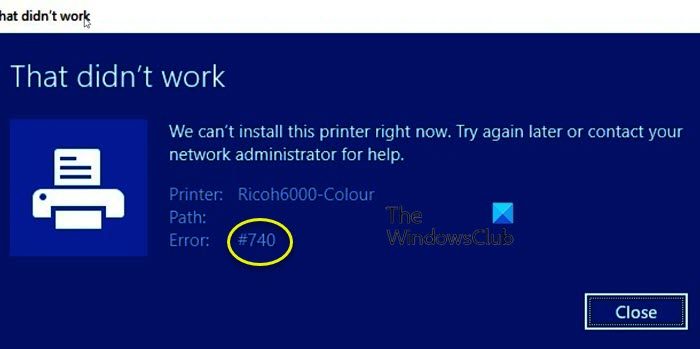
In this article, we are going to talk about this and see what you can do to resolve the Error 740 Printer install error with some simple solutions. Some users are unable to add a Printer to their computer. When they try to do the same, they see the following error message.

That  didn’t work
We can’t install this printer right now. Try again later or contact your network administrator for help.
Error: #740

We can't install this printer right now, Error 740 on Windows 11/10

Can’t install this printer right now #740?

Error message, Can’t install this printer right now, comes with error code: 740. The issue, sometimes, can be nothing more than a glitch. Windows is notorious for having glitches, and this can be one of them. However, as reports from other victims and from our own probing of this error code, we found the Printer wizard is unable to get installed on your system. The most common reason for this peculiar behavior is lack of administrative privilege, which is a bit weird as more often than not, the issue has been reported on an administrator system. We have mentioned all the solutions you need to resolve the issue later in this guide.

Do Check: Download Printer Drivers and Software for Windows 11/10 

We can’t install this printer right now, Error 740

You can fix Error #740, We can’t install this printer right now on Windows 11/10 by following these suggestions:

  1. Remove the Printer and restart your computer
  2. Run Printer Wizard as an administrator
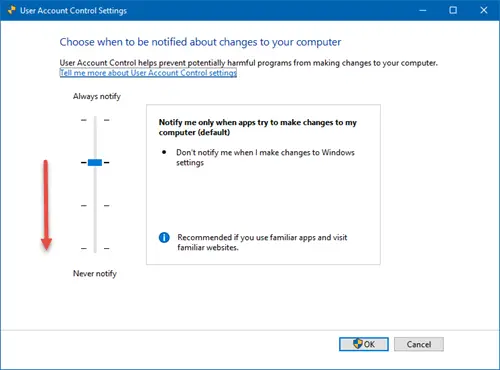
  3. Disable UAC or User Account Control
  4. Run Printer Troubleshooter
  5. Create a new Administrator Account

Let us talk about them in detail.

1] Remove the Printer and restart your computer

Maybe the issue is nothing more than a glitch. This glitch can be resolved by just restarting the process. So, first up, try removing your printer, turn off your device and detach all the cables. Now, see if the issue is resolved. If the issue persists, try restarting your system. Make sure to not, click on the Restart button, instead, click on Shutdown and then reopen your system. Hopefully, this will do the job for you.

2] Run Printer Wizard as an administrator

If the issue was not a glitch, then this is the solution you need. After studying the error code for a while we stumbled upon a solution that worked for a lot of users. According to them, all you have to do to add the Printer is manually install the wizard with administrative privileges. So, open Command Prompt as an administrator and run the following command.

rundll32 printui.dll,PrintUIEntry /il

This should do the job for you.

3] Disable UAC or User Account Control

This app can't open, App can't open while User Account Control is turned off

UAC or User Account Control helps in preventing malware from attacking and damaging your computer. Even though it is a good thing to have, sometimes, it can the reason for your issue, as in this case. You should try and disable UAC temporarily and see if it helps. Follow the given steps to do the same.

  1. Open Run by Win + R.
  2. Type useraccountcontrolsettings and click Ok.
  3. Select Never and press OK.

Finally, retry adding your Printer. Hopefully, it will be added without any hassle.

4] Run Printer Troubleshooter

Printer Troubleshooter

Next up, we are going to give put some load on your Operating System to resolve the issue. The Printer Troubleshooter is a utility that not only looks for the problem but also resolves it. We are going to deploy it and see if it helps.

Windows 11

  • Open Settings from the Start Menu.
  • Click System > Troubleshoot > Other troubleshooters.
  • Look for the Printer troubleshooter, and click on the Run button.

Windows 10

  • Open Settings.
  • Go to Update & Security > Additional troubleshooter.
  • Click Printer > Run the troubleshooter.

Let the troubleshooter do its job and then see if the issue persists. Hopefully, the troubleshooter will resolve the issue for you.

5] Create a new Administrator Account

Maybe there is an issue with your account. The issue can sometimes be a glitch, and sometimes, a misconfiguration. What you have to do is create a new account and retry adding your Printer. Follow the prescribed steps to do the same.

  1. Launch Settings.
  2. Go to Accounts and then to Family and other users.
  3. Click on Add account from the Other users section.
  4. Click on I don’t have this person’s sign-in information.
  5. Select Add a user without a Microsoft account.
  6. Enter the username you want and Security questions.
  7. Finally, a user account will be created.
  8. Now, click on Change account type.
  9. Select Administrator > Ok.

Now, log out from your current account and log in to the newly created one.

SimilarError 740, The requested operation requires elevation

How do I fix Error 740 on Windows 10?

There are two Error 740s that users are facing. One of them is, We can’t install this printer right now. Try again later or contact your network administrator for help, we have mentioned all the required solutions for this error in this post, but if you are looking for solutions for The requested operation requires elevation, then check our post.

That’s it!

Source :
https://www.thewindowsclub.com/fix-error-740-printer-install-error

A CISO’s Ultimate Security Validation Checklist

If you’re heading out of the office on a well-deserved vacation, are you certain the security controls you have in place will let you rest easy while you’re away? More importantly – do you have the right action plan in place for a seamless return?

Whether you’re on the way out of – or back to – the office, our Security Validation Checklist can help make sure your security posture is in good shape.

1. Check the logs and security events of your key critical systems. Stay up-to-date on recent activities. Check for changes – and attempted changes – and any potential indicators of compromise. Planning to be gone for longer than a week? Designate a team member to perform a weekly review in your absence, reducing the chances of a critical event going undetected.

2. Check for any new security vulnerabilities that were identified on your vacation. Use your preferred scanning tool or check one of the regularly updated databases, such as CVE Details.

3. Investigate failures of critical components and the reasons behind them. If remediation is needed, create an action plan to address the immediate issues and prevent repeated failures in the future.

4. Review whether there were any key changes to your products and their corresponding security controls. While now isn’t the time to implement major changes to your EDR, SIEM system, or other corresponding solutions, do make sure you’re aware of any updates that were made in your absence. Once you’re back – and able to monitor the impact on your overall security posture – you can make larger-scale changes to your controls.

5. Check with HR for any relevant changes. Did any new employees join the company and therefore need access to specific systems? Conversely, did any employees leave and need their credentials revoked? Were there any other incidents or red flags that require your attention?

6. Be aware of new business orientations. Did the organization introduce any new services or products that expanded the potential attack surface? For instance, did a new website or mobile app go live, or was a new version of a software product rolled out? Make sure your team is up to speed on the latest changes.

7. Check your password policies. Password policies shouldn’t be dependent on your vacation status, but as you work through this security checklist, take the opportunity to make sure policies are appropriately protecting the organization. Consider reviewing length, complexity, and special character requirements, as well as expiration and re-use policies.

8. Review firewall configurations . With many security experts recommending a review of firewall configurations every three to six months, now is an opportune time for an audit. Review network traffic filtering rules, configuration parameters, and authorized administrators – among other configurations – to make sure you’re using the appropriate configurations

There are plenty of tools that can help work through this checklist – but do you have all the resources needed to make sure everything will be addressed?

If you need help automating and standardizing your processes – or making sure critical vulnerabilities aren’t slipping through the cracks – Automated Security Validation can help. With real-time visibility, complete attack surface management, and actual exploitation measures – not just simulations – it provides what you need to rest easy while you’re away. And when you get back? Risk-based remediation plans help you create your roadmap for keeping your organization protected.

When you’re back, we’ve got your back. To learn more about protecting your security posture with Automated Security Validation, request a demo of the Pentera platform.

Source :
https://thehackernews.com/2022/08/a-cisos-ultimate-security-validation.html

Use this Identity Checklist to secure your M365 tenant

Securing a Microsoft 365 tenant must start with identity.

Protecting identities is a fundamental part of Zero Trust and it’s the first “target” that most attackers look for. We used to say that attackers hack their way in, now we say they log in, using bought, found or stolen/phished credentials. This article will show you why MFA is so important and how to implement advanced security features in Azure AD such as PIM, Password protection, Conditional Access policies (also a strong part of Zero Trust), auditing and more.

Below is the first chapter from our free Microsoft 365 Security Checklist eBook. The Microsoft 365 Security Checklist shows you all the security settings and configurations you need to know for each M365 license to properly secure your environment. Download the full eBook and checklist spreadsheet.

Multi-Factor Authentication

It should be no surprise that we start with identity, it’s the new security perimeter or the new firewall and having a strong identity equals strong security. The first step to take here is implementing Multi Factor Authentication (MFA). It’s free for all Office / Microsoft tenants. If you want to use Conditional Access (CA) to enforce it (rather than just enabling users “in bulk”), you need Azure AD Premium P1+ licensing. A username and a simple password are no longer adequate (it never was, we just never had a simple, affordable, easy to use alternative) to protect your business.

Hand-in-hand with MFA you need user training. If your business is relying on users doing the right thing when they get the prompt on their phone – they MUST also know that if they get a prompt when they’re NOT logging in anywhere, they must click Block / No / Reject.

To enable MFA on a per-user basis, go to aad.portal.azure.com, login as an administrator, click Azure Active Directory – Security – MFA and click on the blue link “Additional cloud-based MFA settings”.

Additional MFA settings

Additional MFA settings

There are two parts (tabs) on this page, “service settings” where you should disable app passwords (a workaround for legacy clients that don’t support MFA, shouldn’t be necessary in 2022), add trusted public IP addresses (so that users aren’t prompted when they’re in the corporate office – we and Microsoft recommend not using this setting), disabling Call and Text message to phone and remember MFA on trusted devices setting (1-365 days), Microsoft recommends either using CA policies to manage Sign-In frequency or setting this to 90 days. Phone call / text message MFA are not strong authentication methods and should not be used unless there’s no other choice.

On the user’s tab you can enable MFA for individual users or click bulk update and upload a CSV file with user accounts.

If you have AAD Premium P1, it’s better to use a CA policy to enforce MFA, it’s more flexible and the MFA settings page will eventually be retired.

Enforcing MFA with a Conditional Access Policy

Enforcing MFA with a Conditional Access Policy

A few words of caution, enabling MFA for all your administrators is a given today. Seriously, if you aren’t requiring every privileged account to use MFA (or 2FA / passwordless, see below), stop reading and go and do that right now. Yes, it’s an extra step and yes, you’ll get push back but there’s just no excuse – it’s simply unprofessional and you don’t belong in IT if you’re not using it. For what it is worth, I’ve been using Azure MFA for over seven years and require it for administrators at my clients – no exceptions.

Enabling MFA for all users is also incredibly important but takes some planning. You may have some users who refuse to run the Microsoft Authenticator app on their personal phone – ask for it to be put in their hiring contract. You need to train them as to why MFA is being deployed, what to do, both for authentic logins and malicious ones. Furthermore, you need to have a smooth process for enrolling new users and offboarding people who are leaving.

You should also strongly consider creating separate (cloud only) accounts for administrators. They don’t require a license and it separates the day-to-day work of a person who only performs administrative actions in your tenant occasionally (or use PIM, Chapter 10).

MFA protects you against 99.9% of identity-based attacks but it’s not un-phishable. Stronger alternatives include biometrics such as Windows Hello for Business (WHFB) and 2FA hardware keys which bring you closer to the ultimate in identity security: passwordless.

Legacy Authentication

However, it’s not enough to enable MFA for all administrators and users, the bad guys can still get in with no MFA prompt in sight. The reason is that Office 365 still supports legacy protocols that don’t support modern authentication / MFA. You need to disable these; you can’t just turn them off, you need to check if there are legitimate applications / workflows / scripts that use any of them. Go to aad.portal.azure.com, login as a Global Administrator, click Azure Active Directory – Monitoring – Sign-in logs. Change the time to last one month, and click Add filters, then click Client app and then None Selected, in the drop-down pick all 13 checkboxes under Legacy Authentication Clients and click Apply.

Filtering Azure AD Sign-in logs for legacy authentication

Filtering Azure AD Sign-in logs for legacy authentication

This will show you all the logins over the last month that used any of the legacy protocols. If you get a lot of results, add a filter for Status and add Success to filter out password stuffing attacks that failed. Make sure you check the four different tabs for interactive / non-interactive, service principals and managed identity sign-ins.

You’ll now need to investigate the logins. In my experience there will be some users who are using Android / Apple mail on smartphones; point them to the free Outlook app instead (Apple mail can be configured to use modern authentication). There’s also likely to be line-of-business (LOB) applications and printers / scanners that send emails via Office 365, so you’ll need updates for these. Alternatively, you can use another email service for these such as smtp2go.

Once you have eliminated all legitimate legacy authentication protocol usage you can disable it in two ways, it’s best to use both. Start by creating a Conditional Access policy based on the new template to block it, also go to admin.microsoft.com, Settings – Org settings – Services – Modern authentication and turn off basic authentication protocols.

Disable legacy authentication protocols in the M365 Admin Center

Disable legacy authentication protocols in the M365 Admin Center

Break Glass accounts

Create at least one, preferably two break glass accounts, also known as emergency access accounts. These accounts are exempted from MFA, all CA policies and PIM (see below) and have very long (40 characters+), complex passwords. They’re only used if AAD MFA is down, for example, to gain access to your tenant to temporarily disable MFA or a similar setting, depending on the outage.

A second part to this is that you want to be notified if these accounts are ever used. One way to do this is to send your Azure AD sign-in logs to Azure Monitor (also known as Log Analytics), with instructions here. Another option is to use Microsoft Sentinel (which is built on top of Log Analytics) and create an Analytics rule.

Microsoft Sentinel alert rule when a Break Glass account is used

Microsoft Sentinel alert rule when a Break Glass account is used

Security Defaults

If yours is a very small business, with few requirements for flexibility, the easiest way to set up Azure AD with MFA for everyone, plus several other security features enabled, is to turn on Security Defaults. Note that you can’t have break-glass accounts or other service accounts with Security Defaults as there’s no way to configure exceptions. Go to Properties for your Azure AD tenant and scroll to the bottom, and click on Manage Security defaults, here you can enable and disable it.

Privileged Identity Management

It’s worth investing in Azure Active Directory (AAD) Premium P2 for your administrator’s accounts and enabling Privileged Identity Management (PIM). This means their accounts are ordinary user accounts who are eligible to elevate their privileges to whatever administrator type they are assigned (see Chapter 10).

If you’re not using PIM, create dedicated admin accounts in AAD only. Don’t sync these accounts from on-premises but enforce MFA and strong passwords. Since they won’t be used for day-to-day work, they won’t require an M365 license.

Password Protection

After MFA, your second most important step is banning bad passwords. You’re probably aware that we’ve trained users to come up with bad passwords over the last few decades with “standard” policies (at least 8 characters, uppercase, lowercase, special character and numbers) which results in P@ssw0rd1 and when they’re forced to change it every 30 days, P@ssw0rd2. Both NIST in the US and GHCQ in the UK now recommends allowing (but not enforcing) the use of upper / lowercase etc., but not mandating frequent password changes and instead of checking the password at the time of creation against a list of known, common bad passwords and blocking those. In Microsoft’s world that’s called Password protection which is enabled for cloud accounts by default. There’s a global list of about 2000 passwords (and their variants) that Microsoft maintains, based on passwords they find in dumps, and you should add (up to 1000) company-specific words (brands, locations, C-suite people’s names, local sports teams, etc.) for your organization.

You find Password protection in the AAD portal – Security – Authentication Methods.

Password protection settings

Password protection settings

Remember, you don’t have to add common passwords to the list, they’re already managed by Microsoft, just add company / region specific words that your staff are likely to use.

If you’re syncing accounts from Active Directory on-premises to AAD, you should also extend Password protection to your DCs. It involves the installation of an agent on each DC, a proxy agent, and a reboot of each DC.

Continuous Access Evaluation

This feature has been in preview for quite some time but is now in general availability. Before Continuous Access Evaluation (CAE), when you disabled a user’s account, or they changed location (from the office to a public Wi-Fi for example) it could be up to one hour before their state was re-evaluated and new policies applied, or they were blocked from accessing services. With CAE, this time is much shorter, in most cases in the order of a few minutes. It’s turned on by default for all tenants (unless you were part of the preview and intentionally disabled it). Another benefit of CAE is that tokens are now valid for 28 hours, letting people keep working during a shorter Azure AD outage. You can disable CAE in a CA policy, but it’s not recommended.

Conditional Access policies

We’ve mentioned Conditional Access (CA) policies several times already as it’s a crucial component of strong identity security and Zero Trust. Unlike other recommendations, there isn’t a one size fit all set of CA policies we can give you, however (at a minimum) you should have policies for:

  • Require MFA for admins (see MFA above)
  • Require MFA for users (see MFA above)
  • Require MFA for Azure management
  • Block legacy authentication (see MFA above)
  • Require compliant or Hybrid AAD joined device for admins
  • Require compliant or Hybrid AAD joined device for users
  • Block access to M365 from outside your country
  • Require MFA for risky sign-ins (if you have AAD Premium P2)
  • Require password change for high-risk users (if you have AAD Premium P2)

This is all going to be a lot easier going forward with the new policy templates for identity and devices. Go to Azure AD – Security – Conditional Access – New policy – Create a new policy from templates. Another step to take is to create a system for managing the lifecycle of policies and there’s an API for backing up and updating policies, that you can access in several ways, including PowerShell. There’s even a tutorial to set up a backup system using a Logic App.

Conditional Access policy templates for identity

Conditional Access policy templates for identity

A common question is if there’s a priority when policies are evaluated and there isn’t, they’re all processed together for a particular sign-in, from a specific device and location to an individual application. If there are multiple policies with different controls (MFA + compliant device), all controls must be fulfilled for access. And if there are conflicting policies with different access (block vs grant), block access will win.

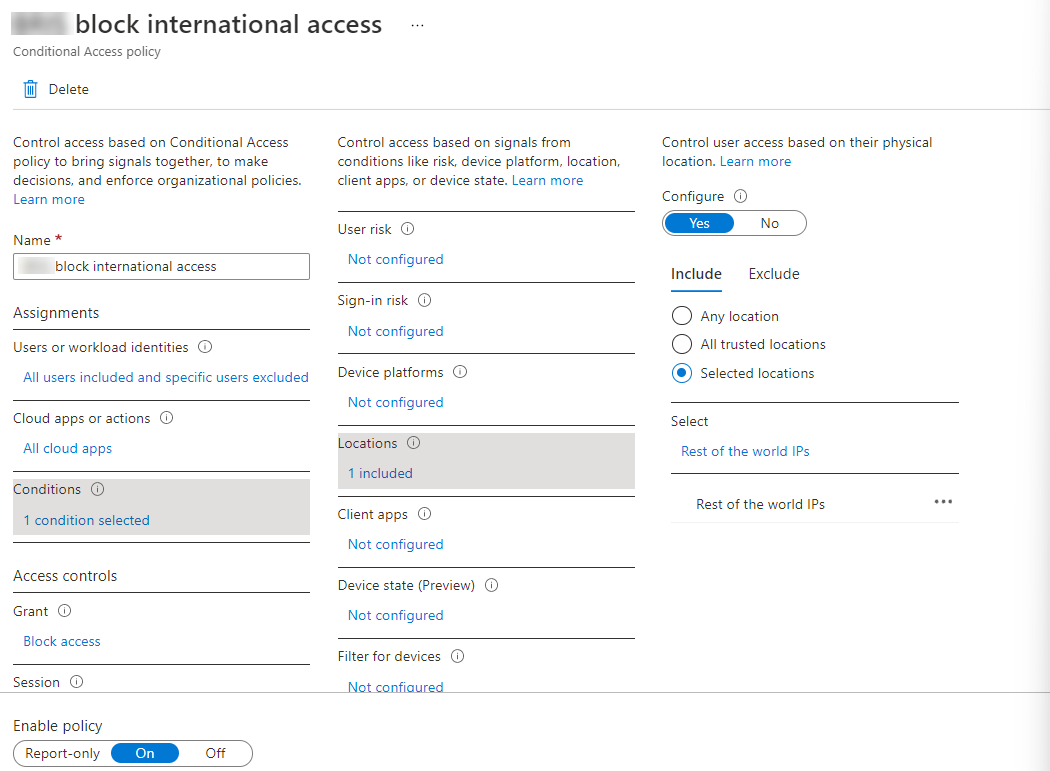
To get you started, here are the step-by-step instructions for a policy blocking access to M365 from outside your country, appropriate for most small and medium businesses that only operate in one or a few countries. Keep in mind that travelling staff may be caught out by this so make sure you align with business objectives and be aware that this won’t stop every attack as a VPN or TOR exit node can make it appear as if the attacker is in your country, but it’s one extra step they must take. Remember, you don’t have to run faster than the Fancy Bear, just faster than other companies around you.

Start by going to Azure AD – Security – Conditional Access – Named locations and click +Countries location and call the location Blocked countries. Leave Determine location by IP address, a new feature is using GPS location from the Microsoft Authenticator app which will be more accurate once all your users are using Azure AD MFA (and therefore can be located via GPS). Click the box next to Name to select all countries, then find the one(s) that you need to allow login from and click Create.

Creating a Named Location for a Conditional Access Policy

Creating a Named Location for a Conditional Access Policy

Go to Azure AD – Security – Conditional Access – New policy – Create new policy and name your policy with a name that clearly defines what the policy does and adheres to your naming standard. Click on All Users… and Include All users and Exclude your Break Glass accounts.

Click on No cloud apps… and select All cloud apps. Select 0 conditions… and click Not configured under Locations. Pick Selected locations under Include and select your newly created location. Finally, under Access controls – Grant, click 0 controls selected and then Block access.

CA policies can be either in Report-only mode where you can look at reports of what they would have blocked and control they would have enforced, or they can be turned on / off. Report-only can be handy to make sure you don’t get fired for accidentally locking everyone out but turn this policy on as soon as possible.

Conditional Access policy to block logins from outside Australia

Conditional Access policy to block logins from outside Australia

A common question is, how can I control how often users are prompted for MFA or signing in again? While it might be counterintuitive, the default in Azure AD is a rolling windows of 90 days. Remember, if you change a user’s password, block non-compliant devices, or disable an account (plus any number of other CA policies you have in place that might affect the security posture of the session), it’ll automatically require new authentications. Don’t prompt the users for authentication when nothing has changed because if you do it too frequently, they’re more likely to approve a malicious login.

Branding Log-on Pages

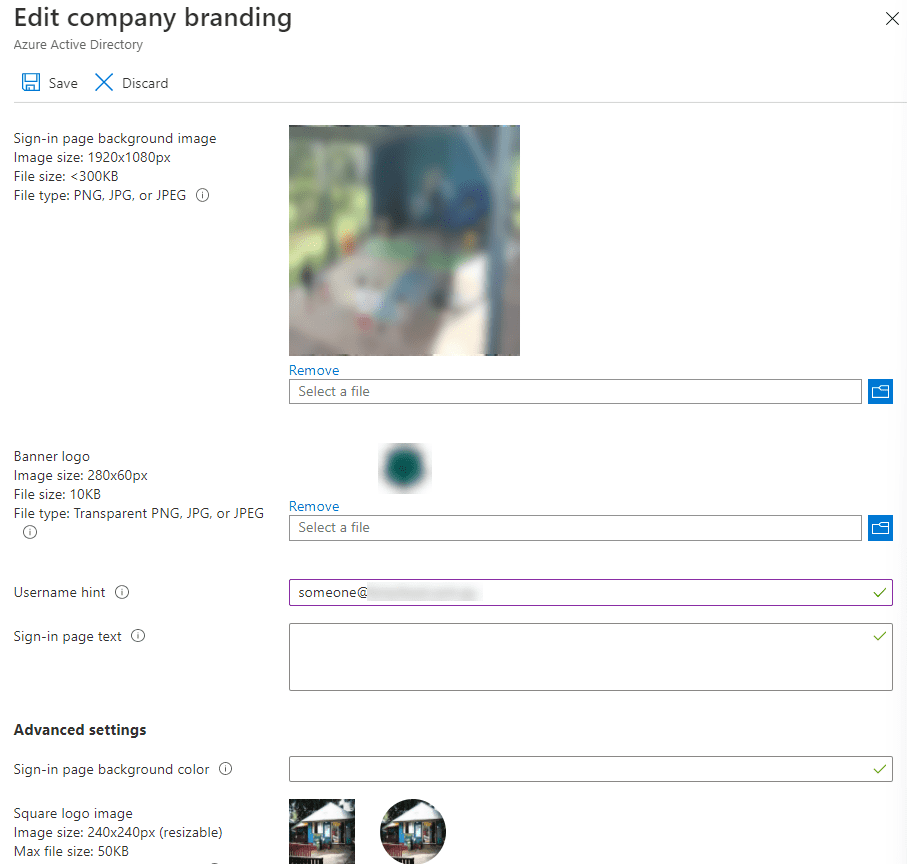
While in the Azure AD portal, click on Company branding and add a company-specific Sign-in page background image (1920x1080px) and a Banner logo (280x60px). Note that these files have to be small (300 KB and 10 KB respectively) so you may have to do some fancy compression. This isn’t just a way to make users feel at home when they see a login page, in most cases when attackers send phishing emails to harvest credentials, they’ll send users to a fake login page that looks like the generic Office 365 one, not your custom one which is another clue that should alert your users to the danger. Also – Windows Autopilot doesn’t work unless you have customized AAD branding.

Edit Azure AD Company Branding images

Edit Azure AD Company Branding images

Self Service Password Reset

The benefit of Self Service Password Reset (SSPR) is to lower the load on your help desk to manage password resets for users. Once enabled, users must register various ways of being identified when they’re resetting their password, mobile app notification/code, email (non-Office 365), mobile/office phone call, security questions (not available to administrators, plus you can create custom questions). If you are synchronizing user accounts from AD to Azure AD, take care in setting up SSPR as the passwords must be written back to AD from the cloud once changed.

Configuring Self Service Password Reset in Azure AD

Configuring Self Service Password Reset in Azure AD

Unified Auditing

Not restricted to security but nevertheless, a fundamental building block is auditing across Microsoft 365. Go to the Microsoft 365 Defender portal and find Audit in the left-hand menu (it’s almost at the end). If for some reason unified auditing isn’t enabled in your tenant a yellow banner will give you a button to turn it on (it’s on by default for new tenants). Once enabled, click the Audit retention policies tab, and create a policy for your tenant. You want to ensure that you have logs to investigate if there’s a breach and you want them kept for as long as possible.

With Business Premium you get a maximum of 90 days of retention and Microsoft 365 E5 gives you one year, but you want to make sure to create a policy to set this, rather than rely on the default policy (which you can’t see). Give the policy a name, a description and add all the record types, one by one. This policy will now apply to all users (including new ones that are created) for all activities. Only use the Users option when you want to have a specific policy for a particular user. Give the policy a priority, 1 is the highest and 10,000 is the lowest.

Create an audit retention policy for maximum retention

Create an audit retention policy for maximum retention

Integrating applications into Azure AD

One of the most powerful but often overlooked features (at least in SMBs) is the ability to use Azure AD to publish applications to your users. Users can go to myapps.microsoft.com (or office.com) and see tiles for all applications they have access to. But there’s more to that story. Say, for example, you have a shared, corporate Twitter account that a few executives and marketing staff should have access to. Instead of sharing a password amongst them all and having to remember to reset it if someone leaves the organization, you can create a security group in AAD, add the relevant users, link Twitter to the group and they’ll automatically have access – without knowing the password to the account. There are a lot more actions you can take here to simplify access and secure management of applications, here’s more information.

Azure AD Connect

If you’re synchronizing accounts from Active Directory to Azure Active Directory (AAD), check the configuration of AAD Connect and make sure you’re not replicating an entire domain or forest to AAD. There’s no reason that service accounts etc. should be exposed in both directories, start the AAD Connect wizard on the server where it’s installed and double-check that only relevant OUs are synchronized. One other thing to note here is the fact that any machine running Azure AD Connect should be treated with the same care (in terms of security) as a domain controller. This is because AAD Connect requires the same level of access as AD itself and has the ability to read password hashes. Making sure security best practices for access, patching, etc. are followed to the letter for the system running AAD connect is critically important.

The M365 Identity Checklist

Work through the Identity checklist.
 
Enable MFA for administrators
Enable MFA for users
Create cloud-only administrator accounts for privileged users / occasional administrators
Disable app passwords
(Configure trusted IPs)
Disable text message MFA
Disable phone call MFA
Remember MFA trusted devices 90 days
Train staff in using MFA correctly
Use Windows Hello where possible
Use FIDO2 / 2FA keys where possible
Investigate legacy authentication protocol usage in AAD Sign-in logs
Block legacy authentication with CA Policy
Block legacy authentication in M365 Admin Center
Create two Break glass accounts and exempt from MFA, CA Policies etc.
Configure alerting if a Break glass account is used
Enable Security Defaults in AAD (consider the limitations)
Enable PIM (AAD Premium P2) for all admin users
Add organization-specific words to Password protection
Deploy Password protection in AD on-premises
CA Policy Require MFA for admins
CA Policy Require MFA for users
CA Policy Require MFA for Azure management
CA Policy Block legacy authentication
CA Policy Require compliant or Hybrid AAD joined device for admins
CA Policy Require compliant or Hybrid AAD joined device for users
CA Policy Block access to M365 from outside your country
Require MFA for risky sign-ins [Only for E5)
Require password change for high-risk users [Only for E5)
Create custom branding logos and text in Azure AD
Enable and configure Self Service Password Reset, including password writeback
Check that Unified Auditing is enabled
Define audit retention policies (90 or 365 days)
Integrate applications into Azure AD

Download the Excel template to use with your team >

Go Further than Identity to Protect your M365 Tenant

There you have it, all the most important steps to take to make sure your users’ identities are kept secure, and therefore your tenant and its data also safeguarded. Keen to learn and do more?

The Microsoft 365 Security Checklist has another nine chapters of security recommendations each with its own checklist for:

  • Email
  • Teams
  • SharePoint
  • Applications
  • Endpoint Manager
  • Information Protection
  • Secure Score
  • Business Premium
  • Microsoft 365 Enterprise E5

Download the full Microsoft 365 Security Checklist eBook and checklist template >

Source :
https://www.altaro.com/microsoft-365/identity-checklist-m365-tenant/

How to Protect VMware ESXi Hosts from Ransomware Attacks

Exactly how vulnerable is VMware infrastructure to Ransomware?

Historically and like most malware, ransomware has been targeting Windows operating systems primarily. However, cases of Linux and MacOS being infected are being seen as well. Attackers are being more proficient and keep evolving in their attacks by targeting critical infrastructure components leading to ransomware attacks on VMware ESXi. In this article, you’ll learn how Ransomware targets VMware infrastructure and what you can do to protect yourself.

What is Ransomware?

Ransomware are malicious programs that work by taking the user’s data hostage in exchange for a hefty ransom.

There are essentially 2 types of Ransomware (arguably 3):

  • Crypto Ransomware: Encrypts files so that the user cannot access them. This is the one we are dealing with in this blog.
  • Locker Ransomware: Lock the user out of his computer by encrypting system files.
  • Scareware: Arguably a third type of ransomware that is actually a fake as it only locks the screen by displaying the ransom page. Scanning the system with an Antivirus LiveCD will get rid of it quite easily.

A user computer on the corporate network is usually infected through infected USB drives or social engineering techniques such as phishing emails and shady websites. Another occurrence includes attacking a remote access server publicly exposed through brute-force attacks.

The malware then uses a public key to encrypt the victim’s data, which can span to mapped network drives as well. After which the victim is asked to make a payment to the attacker using bitcoin or some other cryptocurrency in exchange for the private key to unlock the data, hence the term Ransomware. If the victim doesn’t pay in time, the data will be lost forever.

As you can imagine, authorities advise against paying the ransom as there is no guaranty the bad actor will deliver on his end of the deal so you may end up paying the big bucks and not recover your data at all.

Can Ransomware affect VMware?

While infecting a Windows computer may yield a reward if the attacker gets lucky, chances are the OS will simply be reinstalled, no ransom is paid and the company will start tightening security measures. Game over for the bad guys.

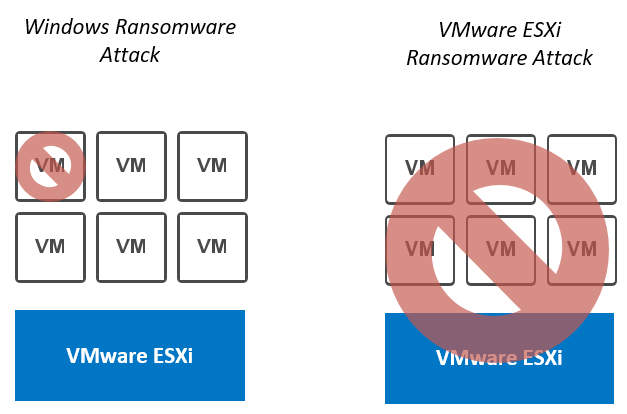
Rather than burning bridges by locking a user’s workstation, they now try to make a lateral move from the infected workstation and target critical infrastructure components such as VMware ESXi. That way they hit a whole group of servers at once.

VMware ESXi ransomware impact all the VMs running on the hypervisor

VMware ESXi ransomware impact all the VMs running on the hypervisor”

From the standpoint of an attacker, infesting a vSphere host, or any hypervisor for that matter, is an “N birds, 1 stone” type of gig. Instead of impacting one workstation or one server, all the virtual machines running on the host become unavailable. Such an attack will wreak havoc in any enterprise environment!

How does a Ransomware Attack Work?

In the case of targeted attacks, the bad actor works to gain remote access to a box in the local network (LAN), usually a user computer, and then make a lateral move to access the management subnet and hit critical infrastructure components such as VMware ESXi.

There are several ways a ransomware attack on VMware ESXi can happen but reports have described the following process.

The ransomware attack on VMware ESXi described in this blog is broken down into 5 stages

The ransomware attack on VMware ESXi described in this blog is broken down into 5 stages”

Stage 1: Access local network

Gaining access to the LAN usually goes either of 2 ways:

  • A malware is downloaded in a phishing email or from a website. It can also come from an infected USB stick.
  • The attacker performs a Brute force attack against a remote access server exposed to the internet. This seems more unusual as it involves more resources and knowledge of the target. Brute force attacks are also often caught by DDoS protection mechanisms.
Ransomware spread through malicious email attachments, websites, USB sticks

Ransomware spread through malicious email attachments, websites, USB sticks”

Stage 2: Escalate privileges

Once the attacker has remote access to a machine on the local network, be it a workstation or a remote desktop server, he will try to escalate privileges to open doors for himself.

Several reports mentioned attackers leveraging CVE-2020-1472 which is a vulnerability in how the Netlogon secure channel connections are done. The attacker would use the Netlogon Remote Protocol (MS-NRPC) to connect to a domain controller and gain domain administrator access.

Stage 3: Access management network

Once the bad actors have domain administrator privileges, they can already deal a large amount of damage to the company. In the case of a ransomware attack on VMware ESXi, they will use it to gain access to machines on the management network, in which the vCenter servers and vSphere ESXi servers live.

Note that they might even skip this step if the company made the mistake to give user workstations access to the management network.

Stage 4: VMware ESXi vulnerabilities

When the attackers are in the management network, you can only hope that all the components in your infrastructure have the latest security patches installed and strong password policies. At this point, they are the last line of defense, unless a zero-day vulnerability is being leveraged in which case there isn’t much you can do about it.

Several remote code execution vulnerabilities have been exploited over the last year or so against VMware ESXi servers and vCenter servers.

The two critical vulnerabilities that give attackers access to vSphere hosts relate to the Service Location Protocol (SLP) used by vSphere to discover devices on the same network. By sending malicious SLP commands, the attacker can execute remote code on the host.

  • CVE-2019-5544: Heap overwrite issue in the OpenSLP protocol in VMware ESXi.
  • CVE-2020-3992: Use-after-free issue in the OpenSLP protocol in VMware ESXi.
  • CVE-2021-21985: Although no attack mentions it, we can assume the vCenter Plug-in vulnerability discovered in early 2021 can be a vector of attack as well. Accessing vSphere hosts is fairly easy once the vCenter is compromised.

They can then enable SSH to obtain interactive access and sometimes even change the root password or SSH keys of the hosts.

Note that the attacker may not even need to go through all that trouble if he manages to somehow recover valid vCenter of vSphere credentials. For instance, if they are stored in the web browser or retrieved from the memory of the infected workstation.

Stage 5: Encrypt datastore and request ransom

Now that the attacker has access to the VMware ESXi server, he will go through the following steps to lock your environment for good.

  • Uninstall Fault Domain Manager or fdm (HA agent) used to reboot VMs in case of failure.
  • Shut down all the virtual machines.
  • Encrypt all virtual machine files using an ELF executable, derived from an encrypting script that targets Linux machines. This file is usually named svc-new and stored in /tmp.
  • Write a ransom file to the datastore for the administrator to find.

Note that there are variations of the ransomware attack on VMware ESXi, which themselves are ever-evolving. Meaning the steps described above represent one way things can happen but your mileage may very well vary.

How to protect yourself from ransomware attacks on VMware ESXi

If you look online for testimonies, you will find that the breach never comes from a hooded IT mastermind in an ill-lit room that goes through your firewalls by frantically typing on his keyboard like in the movies.

The reality is nowhere near as exciting. 9 times out of 10, it will be an infected attachment in a phishing email or a file downloaded on a shady website. This is most often the doing of a distracted user that didn’t check the link and executed the payload without thinking twice.

Ensure at least the following general guidelines are being enforced in your environment to establish a first solid line of defense:

VMware environment-related recommendations

  • If you need to open internet access on your vCenter, enforce strong edge firewall rules and proxy access to specific domains. Do not expose vCenter on the internet!!! (Yes, it’s been done).
  • Avoid installing third party vCenter plugins.
  • Enable Secure Boot and vSphere Trust Authority on vSphere hosts.
  • Set VMware ESXi shell and SSH to manual start and stop.
  • Don’t use the same password on all the hosts and out-of-band cards.

Some recommend not to add Active Directory as an Identity Source in vCenter Server. While this certainly removes a vector of attack, configuring Multi-Factor Authentication also mitigates this risk.

Industry standards

  • Educate your users and administrators through educational campaigns.
  • Ensure the latest security patches are installed as soon as possible on all infrastructure components as well as backups servers, workstations…
  • Segregate the management subnets from other subnets.
  • Connect to the management network through a jump server. It is critical that the jump server must:
    • Be secured and up to date
    • Accessible only through Multifactor authentication (MFA)
    • Must only allow a specific IP range.
  • Restrict network access to critical resources only to trained administrators.
  • Active Directory:
    • Ensure AD is secured and users/admins are educated on phishing attacks.
    • Apply least privilege policy.
    • Use dedicated and named accounts.
    • Enforce strong password policies.
    • Segregate Admin and Domain admin accounts on AD.
    • Log out users on inactivity on Remote Desktop Servers.
  • Don’t save your infrastructure password in the browser.
  • Use Multi-Factor Authentication (MFA) where possible, at least on admin accounts.
  • Forward infrastructure logs to a Syslog server for trail auditing.
  • Ensure all the workstations and servers have a solid antivirus with regularly updated definitions.

Where do backups fit in all this?

While there are decryption tools out there, they will not always work. In fact, they almost never will.

Restoring from backup is essentially the only way known to date that you can use to recover from a ransomware attack on VMware ESXi. You can use Altaro VM Backup to ensure your environment is protected.

Because attackers know this well, they will try to take down the backup infrastructure and erase all the files so your only option left is to pay the ransom. Which, as mentioned previously, is no guaranty that you get your files back.

Because of it, it is paramount to ensure your backup infrastructure is protected and secure by following best practices:

  • Avoid Active Directory Domain integration or use multi-factor authentication (MFA).
  • Do not use the same credentials for access to the VMware and Backup infrastructures.
  • Test your backups regularly.
  • Keep the backup infrastructure on a dedicated network. Also called Network Air-Gap.
  • Sufficient backup retention to avoid backing up infected data.
  • Maintain offsite read-only backups (air gap).

You can also check our dedicated blog for more best practice recommendations: Ransomware: Best Practices for Protecting Backups.

NIST controls for data integrity (National Institute of Standards and Technology)

VMware documents solutions for combatting ransomware by incorporating the National Institute of Standards and Technology (NIST) controls specific to data integrity. You can find VMware’s recommendations and implementation of the NIST in this dedicated document:

National Institute of Standards and Technology logo

National Institute of Standards and Technology logo”

The NIST framework is broken down into 5 functions:

In the VMware document linked above, you will find Detect, Protect and Respond recommendations that apply to various environments such as private cloud, hybrid cloud or end-user endpoints.

So How Worried Should I be?

Ransomware have always been one of the scary malware as they can deal a great amount of damage to a company, up to the point of causing some of them to go into bankruptcy. However, let us not get overwhelmed by these thoughts as you are not powerless against them. It is always best to act than to react.

In fact, there is no reason for your organization to get hit by a ransomware as long as you follow all the security best practices and you don’t cut corners. It might be tempting at some point to add an ALLOW ALL/ALL firewall rule to test something, give a user or service account full admin rights, patch a server into an extra VLAN or whatever action you know for a fact would increase your security officer’s blood pressure. In such a case, even if there is a 99.9% chance things are fine, think of the consequences it could have on the company as a whole should you hit that 0.1% lurking in the back.

If you are reading this and you have any doubts regarding the security of your infrastructure, run a full audit of what is currently in place and draw a plan to bring it into compliance with the current industry best practices as soon as possible. In any case, patch your systems as soon as possible, especially if you are behind!

Source :
https://www.altaro.com/vmware/esxi-hosts-ransomware-attacks/

Password Security and the Internet of Things (IoT)

The Internet of Things (IoT) is here, and we’re using it for everything from getting instant answers to random trivia questions to screening visitors at the door. According to Gartner, we were expected to use more than 25 billion internet-connected devices by the end of 2021. But as our digital lives have become more convenient, we might not yet have considered the risks involved with using IoT devices.

How can you keep yourself secure in today’s IoT world, where hackers aim to outsmart your smart home? First we’ll look at how hackers infiltrate the IoT, and then we’ll look at what you can do right now to make sure the IoT is working for you – not against you.

How hackers are infiltrating the Internet of Things

While we’ve become comfortable asking voice assistants to give us the weather forecast while we prep our dinners, hackers have been figuring out how to commandeer our IoT devices for cyber attacks. Here are just a few examples of how cyber criminals are already infiltrating the IoT.

Gaining access to and control of your camera

Have you ever seen someone with a sticker covering the camera on their laptop or smartphone? There’s a reason for that. Hackers have been known to gain access to these cameras and spy on people. This has become an even more serious problem in recent years, as people have been relying on videoconferencing to safely connect with friends and family, participate in virtual learning, and attend telehealth appointments during the pandemic. Cameras now often come with an indicator light that lets you know whether they’re being used. It’s a helpful protective measure, but not a failsafe one.

Using voice assistants to obtain sensitive information

According to Statista, 132 million Americans used a digital voice assistant once a month in 2021. Like any IoT gadget, however, they can be vulnerable to attack. According to Ars Technica, academic researchers have discovered that the Amazon Echo can be forced to take commands from itself, which opens the door to major mischief in a smart home. Once an attacker has compromised an Echo, they can use it to unlock doors, make phone calls and unauthorized purchases, and control any smart home appliances that the Echo manages.

Many bad actors prefer the quiet approach, however, slipping in undetected and stealing information. They can piggyback on a voice assistant’s privileged access to a victim’s online accounts or other IoT gadgets and make off with any sensitive information they desire. With the victim being none the wiser, the attackers can use that information to commit identity fraud or stage even more ambitious cyber crimes.

Hacking your network and launching a ransomware attack

Any device that is connected to the internet, whether it’s a smart security system or even a smart fridge, can be used in a cyber attack. Bad actors know that most people aren’t keeping their IoT gadgets’ software up to date in the same way they do their computers and smartphones, so they take advantage of that false sense of security. Once cyber criminals have gained access to an IoT device, they can go after other devices on the same network. (This is because most home networks are designed to trust devices that are already connected to them.) When these malicious actors are ready, they can launch a ransomware attack that brings your entire digital life to a halt – unless you agree to fork over a hefty sum in bitcoin, that is.

Using bots to launch a DDOS attack

Although most people never notice it, hackers can and do infect IoT devices with malware en masse, gaining control over them in the process. Having turned these zombie IoT devices into bots, the hackers then collectively use them to stage what’s called a botnet attack on their target of choice. This form of assault is especially popular for launching distributed denial of service (DDOS) attacks, in which all the bots in a botnet collectively flood a target with network requests until it buckles and goes offline.

How you can keep your Internet of Things gadgets safe from hackers

So how can you protect your IoT devices from these determined hackers? Fortunately, you can take back control by becoming just a little more cyber smart. Here are a few ways to keep your IoT gadgets safe from hackers:

  • Never use the default settings on your IoT devices. Although IoT devices are designed to be plug-and-play so you can start enjoying them right away, their default settings are often not nearly as secure as they should be. With that in mind, set up a unique username and strong password combination before you start using any new IoT technology. While you’re at it, see if there’s an option to encrypt the traffic to and from your IoT device. If there is, turn it on.
  • Keep your IoT software up to date. Chances are, you regularly install the latest software updates on your computer and phone. Hackers are counting on you to leave your IoT gadgets unpatched, running outdated software with vulnerabilities they can exploit, so be sure to keep the software on your IoT devices up to date as well.
  • Practice good password hygiene. We all slip into bad password habits from time to time – it’s only human – but they put our IoT security at risk. With this in mind, avoid re-using passwords and be sure to set unique, strong passwords on each of your IoT devices. Update those passwords from time to time, too. Don’t store your passwords in a browser, and don’t share them via email. A password manager can help you securely store and share your passwords, so hackers never have a chance to snatch them.
  • Use secure, password-protected WiFi. Cyber criminals are notorious for sneaking onto open, insecure WiFi networks. Once they’re connected, they can spy on any internet activity that happens over those networks, steal login credentials, and launch cyber attacks if they feel like it. For this reason, make sure that you and your IoT devices only use secure, password-protected WiFi.
  • Use multi-factor authentication as an extra layer of protection. Multi-factor authentication (MFA), gives you extra security on top of all the other measures we mentioned above. It asks you to provide one more credential, or factor, in addition to a password to confirm you are who you say you are. If you have MFA enabled and a hacker tries to log in as you, you’ll get a notification that a login attempt is in progress. Whenever you have the option to enable MFA on any account or technology, take advantage of it.

Protect your Internet of Things devices with smart password security

The IoT is making our lives incredibly convenient, but that convenience can be a little too seductive at times. It’s easy to forget that smart home devices, harmless-looking and helpful as they are, can be targeted in cyber attacks just like our computers and phones. Hackers are counting on you to leave your IoT gadgets unprotected so they can use them to launch damaging attacks. By following these smart IoT security tips, you can have the best of both worlds, enjoying your smart life and better peace of mind at the same time.

Learn how LastPass Premium helps you strengthen your password security.

Source :
https://blog.lastpass.com/2022/08/password-security-and-the-iot/

Staying Safe With QR Codes

QR codes link the offline to the online. What started as a way to streamline manufacturing in the automotive industry is now a widespread technology helping connect the physical world to digital content. And as the world embraced remote, no-touch solutions during the Covid pandemic, QR codes became especially popular. QR codes offer convenience and immediacy for businesses and consumers, but cybercriminals also take advantage of them. Here’s what you need to know about QR codes and how to stay safe when using them. 

Why QR codes? 

Due to their size and structure, the two-dimensional black and white barcodes we call QR codes are very versatile. And since most people carry a smartphone everywhere, they can quickly scan QR codes with their phone’s camera. Moreover, since QR codes are relatively easy to program and accessible for most smartphone users, they can be an effective communication tool. 

They also have many uses. For example, QR codes may link to a webpage, start an app or file download, share contact information, initiate a payment, and more. Covid forced businesses to be creative with touchless experiences, and QR codes provide a convenient way to transform a physical touchpoint into a digital interaction. During Covid, QR codes became a popular way to look at restaurant menus, communicate Covid policies, check in for an appointment, and view marketing promotions, among other scenarios.  

As a communication tool, QR codes can transmit a lot of information from one person to another, making it easy for someone to take action online and interact further with digital content.  

What hackers do with QR codes 

QR codes are inherently secure, and no personally identifiable information (PII) is transmitted while you’re scanning them. However, the tricky part about QR codes is that you don’t know what information they contain until you scan them. So just looking at the QR code won’t tell you if it’s entirely trustworthy or not. 

For example, cybercriminals may try to replace or sticker over a QR code in a high-traffic, public place. Doing so can trick people into scanning a malicious QR code. Or, hackers might send malicious QR codes digitally by email, text, or social media. The QR code scam might target a specific individual, or cybercriminals may design it to attract as many scans as possible from a large number of people. 

Once scanned, a malicious QR code may take you to a phishing website, lead you to install malware on your device, redirect a payment to the wrong account, or otherwise compromise the security of your private information.  

In the same way that cybercriminals try to get victims to click phishing links in email or social media, they lure people into scanning a QR code. These bad actors may be after account credentials, financial information, PII, or even company information. With that information, they can steal your identity or money or even break into your employer’s network for more valuable information (in other words, causing a data breach). 

QR code best practices for better security 

For the most part, QR code best practices mirror the typical security precautions you should take on social media and elsewhere in your digital life. However, there are also a few special precautions to keep in mind regarding QR codes. 

Pay attention to context. Where is the code available? What does the code claim to do (e.g., will it send you to a landing page)? Is there someone you can ask to confirm the purpose of the QR code? Did someone send it unprompted? Is it from a business or individual you’ve never heard of? Just like with phishing links, throw it out when in doubt. 

Look closely at the code. Some codes may have specific colors or branding to indicate the code’s purpose and destination. Many codes are generic black and white designs, but sometimes there are clues about who made the code. 

Check the link before you click. If you scan the QR code and a link appears, double-check it before clicking. Is it a website URL you were expecting? Is it a shortened link that masks the full URL? Is the webpage secure (HTTPS)? Do you see signs of a phishing attack (branding is slightly off, strange URL, misspelled words, etc.)? If it autogenerates an email or text message, who is the recipient and what information is it sending them? If it’s a payment form, who is receiving the payment? Read carefully before taking action. 

Practice password security. Passwords and account logins remain one of the top targets of cyber attacks. Stolen credentials give cybercriminals access to valuable personal and financial information. Generate every password for every account with a random password generator, ideally built into a password manager for secure storage and autofill. Following password best practices ensures one stolen password results in minimal damage. 

Layer with MFA. Adding multi-factor authentication to logins further protects against phishing attacks that steal passwords. With MFA in place, a hacker still can’t access an account after using a stolen password. By requiring additional login data, MFA can prevent cybercriminals from gaining access to personal or business accounts. 

QR codes remain a popular marketing and communication tool. They’re convenient and accessible, so you can expect to encounter them occasionally. Though cyber attacks via QR codes are less common, you should still stay vigilant for signs of phishing and social engineering via QR codes. To prevent and mitigate attacks via QR codes, start by building a solid foundation of digital security with a trusted password manager

Source :
https://blog.lastpass.com/2022/08/staying-safe-with-qr-codes/

The Psychological Impact of Cyber Attacks

“Luck favors the prepared,” as the saying goes. The maxim is true in cyber security, too. We all know about data breaches. We know they’re alarmingly common; more common than ever, if you can believe it. We know they can be costly, time-consuming, and disruptive. And yet, what do we know of mentally and emotionally preparing for an attack to happen to us?  

A cyber attack can have a tremendous negative psychological impact, the effects of which victims can feel for weeks and months. Understanding the emotions you might feel during and after an attack can help you better prepare for and handle a cyber attack if/when it happens to you. Here’s what you need to know about the potential psychological impact of cyber attacks and what to do in advance so you can deal with one calmly and rationally. 

During a cyber attack 

Cyber attacks can happen suddenly. For example, you might get a random text or email about new account activity or a changed password. A service might inform you of a money transfer you didn’t approve, a purchase you didn’t make, or an account change you weren’t expecting. Or the next time you try to log in to an account, you find yourself locked out. Or your data is suddenly gone and held hostage by a cyber-criminal demanding a ransom. Or you just hung up the phone with someone who claimed to be tech support, and now you’re watching someone else control your computer without your consent. 

No matter how it happens, panic often sets in once you find yourself suffering a cyber attack. It’s common to feel intense fear; fear for what will happen to your money and your personal information and the unknown impact the attack will have on your life. You might panic about what to do, how to regain control, and how to get help. You might feel violated, like someone has invaded your personal space and upended your sense of safety. In some ways, a cyber attack can feel like the digital equivalent of being robbed, with a corresponding wave of anxiety and dread. 

Anxiety, panic, fear, and frustration – even intense anger – are common emotional responses when experiencing a cyber attack. While expected, these emotions can paralyze you and prolong or worsen a cyber attack. The combination of not knowing what to do and being paralyzed with fear can keep you from taking quick, effective action against a cyber attack. Preparing in advance can help you move through these intense emotions and respond productively.  

During an attack, your focus should be on regaining control of the situation. Do you still have access to the account/device under attack? Immediately change passwords, remove unauthorized locations, notify customer service, check all security settings and do everything you can to lock out access to any third parties while beefing up security (including enabling two-factor authentication). On a trusted device (e.g., not a compromised device), change passwords for other high-value accounts like email, banking/financial, and social media. A password manager can help you change passwords quickly to new, random ones. You need to act fast while staying focused on the actions most likely to stop or at least slow down an attack. 

Immediately after an attack 

At some point, the attack will be over. Either you shut down the attack or the attackers “win,” and you find yourself dealing with the aftermath. Regardless, the emotional and mental impact may continue. A cyber attack can leave you with tough questions despite the initial relief when the immediate threat is over. 

Self-pity and rumination are typical responses in the immediate wake of an attack. Why me? Did I draw their attention? Did I make a mistake? Why was my data/money/account/device worth stealing? Could I have done something different to prevent it? What if I had done x or y? Are they going to strike again? And on and on. You might find yourself overthinking and overanalyzing everything leading up to the attack. You might obsess over your actions during the attack and criticize yourself excessively for what you did or didn’t do. 

Again, all of the above are understandable responses to a cyber attack. But these negative emotions can drag you down. If you’re mentally stuck, you’ll struggle to clean up after the attack and prepare for future incidents.  

After an attack, your focus should be on analyzing how the attack happened and closing those “gaps” in your cyber security. Scan your devices for malware and change passwords. Turn on two-factor authentication, remove unknown and unused apps/browser extensions/software/files, and review the security settings for important accounts like email and financials. If the cybercriminals stole money, you’d need to follow any options for recourse against theft. You might also need to cancel a card, close an account, or freeze your credit to prevent further abuse. In sum, your goal immediately after an attack is over should be to identify weaknesses in your online security and eliminate or minimize them to prevent further problems. 

Long-term impact 

Unfortunately, negative emotions can persist weeks and months after a cyber attack, especially when the attack results in the theft of data, money, or other personal property. You’ll likely feel embarrassed about what happened, maybe even ashamed. You may worry about what others think if they find out the details. Sometimes, workplace security mistakes can lead to loss of employment, which can devastate one’s mental and physical wellbeing. 

Avoidance is common, too; if you feel uncomfortable thinking about the cyber attack, you might use your discomfort as an excuse to avoid improving your cyber security. Ignoring your feelings, though, can keep you from processing what happened and doing what you must to ensure it doesn’t happen again. 

Will it happen again? Apprehension is understandable in the wake of a cyber attack. You’ve been through a roller coaster of emotions, and the attack has forever shattered your sense of digital safety. Anxiety and worry about future attacks are normal but use those feelings as motivation to improve your cyber security strategy. There is never a “done” when it comes to cyber security. Hackers are constantly evolving their methods, and your cyber security strategy needs to keep up.  

How to minimize psychological distress 

Whether or not you’ve been the victim of a cyber attack, there are things you can do to stop or minimize future attacks. Building a solid foundation of cyber security requires doing the basics well. It’s not hard, but it takes a little time and commitment to improving your digital practices. The good news is that once you make these changes, you’ll find they can improve your online experience and help you feel better prepared for cyber attacks.  

Prioritize good password hygiene. Weak, reused, guessable passwords contribute to account takeovers and online theft. Replace passwords with generated ones that are genuinely random and strong enough to withstand cracking. Enable two-factor authentication wherever it’s available; some two-factor apps make it easier to log in to an account. 

Safeguard accounts with a password manager. password manager stores credentials for your online accounts, enters your info when you need to log in, and ensures every password is unique and random. It simplifies strong password security and takes the hassle out of logging in.  

Keep a clean machine. Don’t click random links. Don’t download strange attachments. Don’t install unverified apps and extensions. Don’t give strangers your login information, SSN, or other data. Don’t answer the phone for “tech support” – no tech support or police department or bank will ever call you to deal with a “security issue” or “software problem.”  

Stay cyber aware. Watch for suspicious online account activity and take action at the first sign of something strange. Turn on account alerts to your phone or email. Enable dark web monitoring and follow up immediately on publicized data breaches. Know the signs of phishing and social engineering attacks, and scrutinize every text/email/phone call/social media message for signs of fraud.  

Seek support and professional advice. You don’t have to suffer alone. Like other traumatic life events, a therapist or other qualified mental health professional can help you process after you’re the victim of cybercrime. When necessary, digital forensics and information security professionals can also help investigate and resolve a digital crime. Don’t hesitate to seek personal and professional support when needed. 

Cybercriminals like to go after easy targets. Building a solid foundation with cyber security basics can prevent cyber attacks by making it too difficult or costly for criminals to go after your accounts. It can also buy you time to react immediately when an attack starts.  

Cyber attacks can cause intense, paralyzing emotions. The more you educate yourself and prepare in advance, the more likely you are to work around those emotions during and after an attack. Don’t just assume you’ll deal with it and figure everything out in the moment. Do the work now to prepare so you’re not overwhelmed mentally by a cyber attack. Getting started with a password manager will help you build stronger, more effective online security habits. When you feel confident handling a cybersecurity incident, you’ll minimize the psychological impact of these scary events and more effectively navigate the challenges they can bring. 

Source :
https://blog.lastpass.com/2022/08/the-psychological-impact-of-cyber-attacks/

How to fix a windows blue screen of death (BSOD)

In this article, we take a look at the computing world’s arch nemesis – the ‘blue screen of death’. But is it as bad as you think? Here we share how the BSOD can actually help you get back online quicker

We’ve all been there. You’re in the middle of typing a document or watching a movie and a sea of blue descends upon your screen. It may be iconic, but it’s possibly the most frustrating thing since dial-up. So exactly what is the Windows blue screen of death? And how has it evolved over the years?

Simply put, BSOD is a sign that all is not well with your computer.

Microsoft first introduced the BSOD in Windows 95. The original iteration primarily offered some cryptic words alluding to the issue, but not a lot more. When Windows 2000 was launched, the BSOD had also evolved to include a list of troubleshooting ideas that users could try to identify and fix the issue. Fast-forward to Windows XP, and users receive yet more advice on the BSOD, providing error codes you could Google for more information. Windows 8 saw the addition of an emoji – the ‘sad face’ to demonstrate empathy with how the user would feel after having their session rudely interrupted. And that’s largely where things have stayed…until now.

The blue screen of death in Windows 11

The introduction of Windows 11 saw a major transformation as the BSOD turned black to coincide with its logon and shut-down screens.

Or at least it was black for a few months. In a patch that was released not long after the black screen of death was introduced, Microsoft said:

We changed the screen color to blue when a device stops working or a stop error occurs as in previous versions of Windows.

While it wasn’t made clear what was going on or why the outcome is still the same – all is not well with your computer. Putting colors to one side, let’s consider what the BSOD is trying to tell you:

Error code: this typically starts with ‘0x’ and can tell an IT professional exactly what the issue is.

Stop code: similar to the error code, the stop code makes it a little easier to start identifying what the type of fault is, for example, ‘CRITICAL_PROCESS_DIED’.

QR code: introduced in Windows 8, the QR code directs you straight to the right support page.

Memory dump: Windows 11 introduced a new feature, which automatically generates a file named ‘minidump’ following a crash to help IT professionals establish the root cause.

So what should you do when faced with the BSOD?

It may sound cliché, but turn your computer off and on again. This usually resets the PC and sorts out whatever caused the device to crash. However, if the problem persists, reboot your PC into Safe Mode and try the following fixes:

How to boot into Safe Mode

  • Reboot your PC.
  • When you see the Windows Logo, reboot it again.
  • Repeat this step two more times, and it should place you in the automatic repair environment.
  • Click Advanced options > Troubleshoot > Advanced options > Startup Settings.
  • Click Restart.
  • Once the system has rebooted, press F4 to enable Safe Mode.

Fix 1: run Windows Memory Diagnostic Tool

  • In the Search box type ‘Windows Memory Diagnostic’.
  • Click Restart now and check for problems (recommended).
  • Wait for the system to reboot and the tests to complete.
  • Restart the PC to check whether the problem is fixed.

Fix 2: update device drivers

  • Press Windows X and select Device Manager.
  • Choose a device category and select the drivers.
  • Right-click on the Driver and open Properties.
  • Navigate to the Driver tab and click Update Driver.
  • Update the driver.
  • Restart the PC to check whether the problem is fixed.

Once done, restart your system to check if the BSOD error is gone. 

Fix 3: run SFC scan 

  • Run Command Prompt utility as Administrator.
  • In the command prompt window, type SFC/scannow and press Enter.
  • Wait until the process is complete, and restart the PC to check whether the problem is fixed.

Fix 4: scan PC for malware

  • Open System Settings.
  • Go to Update & Security > Windows Security > Virus & threat protection.
  • Go to Windows security and select virus and threat protection.
  • If the Windows Defender antivirus program detects any virus, follow the instructions to remove it from your system.

Fix 5: perform a system restore

  • In the Windows Search box, type Create a restore point to open it.
  • Under System Protection, click System Restore.
  • Click Next > Next and select the restore point.
  • Click Scan for affected programs.
  • The process will scan for the programs, apps, and files that will be affected due to this process.
  • Once complete, click Next > Finish to end it.

Potential causes for the BSOD

Perhaps the most annoying thing about the BSOD is its unpredictability since it can appear at any time without warning. However, intelligence gathered from Microsoft suggests there are times when users are more prone to encounter the nasty interruption:

Recent computer changes: it’s common for new programs, hardware, and system updates to trigger the BSOD. If this occurs simply roll back the changes made.

Hard drive space: when the hard disk has less than 15% of its capacity free, it increases the likelihood of an incident.

Malware and viruses: if the master boot record becomes infected, start the PC in Safe Mode and perform a full scan using the antivirus software.

Hardware driver updates: already Windows 11 is notorious for triggering the BSOD after rolling out updates, like KB5012643 and KB5013943.

Recover data after a Blue Screen of Death with Ontrack

If your machine is not recoverable following the BSOD, Ontrack can help. The industry leader in data recovery, we have 35 years of experience, performed 600k+ recoveries, and have a 90% success rate.

If data can be stored on it, we can recover it any time, anywhere – and we tailor our data recovery services to suit customers ranging from home users to large enterprises.

Source :
https://www.ontrack.com/en-us/blog/how-to-fix-a-windows-blue-screen-of-death-(bsod)

Exit mobile version