It’s easy to think high-tech companies have a security advantage over other older, more mature industries. Most are unburdened by 40 years of legacy systems and software. They draw some of the world’s youngest, brightest digital natives to their ranks, all of whom consider cybersecurity issues their entire lives.
Perhaps it is due to their familiarity with technology that causes them to overlook SaaS security configurations. During the last Christmas holiday season, Slack had some private code stolen from its GitHub repository. According to Slack, the stolen code didn’t impact production, and no customer data was taken.
Still, the breach should serve as a warning sign to other tech companies. Stolen tokens allowed threat actors to access the GitHub instance and download the code. If this type of attack can happen to Slack on GitHub, it can happen to any high-tech company. Tech companies must take SaaS security seriously to prevent resources from leaking or being stolen.
Slack’s misfortune with GitHub wasn’t the first time a GitHub breach occurred. Back in April, a stolen OAuth token from Heroku and Travis CI-maintained OAuth applications were stolen, leading to an attacker downloading data from dozens of private code repositories.
MailChimp, a SaaS app used to manage email campaigns, experienced three breaches over 12 months spanning 2022-23. Customer data was stolen by threat actors, who used that data in attacks against cryptocurrency companies.
SevenRooms had over 400 GB of sensitive data stolen from its CRM platform, PayPal notified customers in January that unauthorized parties accessed accounts using stolen login credentials, and Atlassian saw employee data and corporate data exposed in a February breach.
Clearly, tech companies aren’t immune to data breaches. Protecting their proprietary code, customer data, and employee records that are stored within SaaS applications should be a top priority.
A strong SaaS posture is important for any company, but it is particularly important for organizations that store their proprietary code in SaaS applications. This code is especially tempting to threat actors, who would like nothing more than to monetize their efforts and ransom the code back to its creators.
Tech companies also tend to rely on a large number and mix of SaaS applications, from collaboration platforms to sales and marketing tools, legal and finance, data warehouses, cybersecurity solutions, and many more – making it even more challenging to secure the entire stack.
Tech employees heavily depend on SaaS apps to do their day-to-day work; this requires security teams to strictly govern identities and their access. Moreover, these users tend to log into their SaaS apps through different devices to maintain efficiency, which may pose a risk to the organization based on the device’s level of hygiene. On top of this, tech employees tend to connect third-party applications to the core stack without thinking twice, granting these apps high risk scopes.
The high-tech industry is known for periods of hyper-growth, followed by downsizing. Over the past few months, we’ve seen Facebook, Google, Amazon, Microsoft, LinkedIn, Shopify and others announce layoffs.
Deprovisioning employees from SaaS applications is a critical element in data security. While much of the offboarding of employees is automated, SaaS applications that are not connected to the company directory don’t automatically revoke access. Even those applications that are connected may have admin accounts that are outside the company’s SSO. While the primary SSO account may be disconnected, the user’s admin access through the app’s login screen is often accessible.
At the same time, the industry is ripe with mergers and acquisition announcements. As a result of M&As, the acquiring company needs to create a baseline for SaaS security and monitor all SaaS stacks of merged or acquired companies, while enabling business continuity. Whether the hyper growth is organic or through an M&A, organizations need to be able to ensure access is right-sized for their users, at scale and rapidly.
The majority of data breaches impacting tech companies stem from stolen credentials and tokens. The threat actor enters the system through the front door, using valid credentials of the user.
Identity Threat Detection and Response (ITDR) picks up suspicious events that would otherwise go unnoticed. An SSPM (SaaS Security Posture Management) solution with threat detection engines in place will alert when there is an Indicator of Compromise (IOC). These IOCs are based on cross-referencing of activities such as user geolocation, time, frequency, recurring attempts to login, excessive activities and more.
Maintaining a high SaaS security posture is challenging for high tech companies, who may mistakenly believe they are equipped and well trained to prevent SaaS attacks. SaaS Security Posture Management is essential to preventing SaaS breaches, while an SSPM with ITDR capabilities will go a long way toward ensuring that your SaaS data is secure.
This tutorial will help you in disabling cloud-based clipboard (WIN+V) history feature in Windows 10. Once you follow the steps given in this guide, you’ll be able to prevent or restrict Windows 10 as well as other users from enabling cloud-clipboard feature from Settings and accessing your copied data from cloud-clipboard fly-out.
Newer versions of Windows 10 come with new cloud-based Clipboard feature which allows users to copy and paste multiple items from the clipboard. Users can copy multiple items to the new clipboard and then they can select and paste desired copied items from cloud-clipboard to anywhere they want such as Notepad, MS Word, etc.
The new cloud-based clipboard can be used by pressing WIN+V keys together. To copy items you need to use the good old Ctrl+C hotkey but to paste the copied text from new cloud-based clipboard, you need to use the new WIN+V keyboard shortcut.
When you press WIN+V keys together to access cloud-clipboard, Windows 10 launches the new cloud-based clipboard fly-out as shown in following screenshot:
To paste an item, you need to click on the item and it’ll be immediately pasted at current cursor position in your program window.
Users can enable/disable cloud-clipboard using Windows 10 Settings app. Open Settings app (WIN+I) and go to System -> Clipboard section. Now you can turn on/off Clipboard History option to allow/disallow Windows 10 from copying items to new cloud-clipboard as shown in following screenshot:
We posted a detailed tutorial reviewing cloud-based clipboard feature at following link:
Although it’s a good feature but many Windows 10 users may not like the new cloud-clipboard feature and they may want to disable or deactivate it due to privacy and security reasons.
In this tutorial, we’ll tell you how to permanently disable cloud-clipboard feature in Windows 10 so that no one can access your copied data by pressing WIN+V hotkey.
Once deactivated or disabled, when anyone will try to open Settings -> System -> Clipboard page in your Windows 10 device, he’ll notice that Clipboard History option is grayed out i.e. disabled and he can’t change it. So users will be unable to activate or enable cloud-clipboard feature without your permission. Also a message “Some of these settings are hidden or managed by your organization” will be displayed at the top of the page as shown in following screenshot:
If anyone will try to press WIN+V hotkey in Notepad or any other program to access cloud-clipboard feature, the new clipboard fly-out will open blank or empty. Windows 10 will no longer store your copied items to cloud-clipboard.
Following methods will help you in disabling cloud-clipboard feature in Windows 10 operating system:
METHOD 1: Using Group Policy Editor
1. Press WIN+R keys together to launch RUN dialog box. Now type gpedit.msc and press Enter. It’ll open Group Policy Editor.
2. Now go to:
Computer Configuration -> Administrative Templates -> System -> OS Policies
3. In right-side pane, look for following options:
Allow Clipboard History
Allow Clipboard synchronization across devices
4. Double-click on both options one by one and set both of them to Disabled.
That’s it. It’ll permanently disable cloud-clipboard feature in Windows 10.
PS: In future, if you decide to restore default settings and restore cloud-clipboard feature, set the above mentioned options to Not Configured again in Group Policy Editor.
METHOD 2: Using Registry Editor
If you are using Home edition of Windows, you’ll not be able to run gpedit.msc command because this edition doesn’t come with Group Policy Editor.
If you can’t use or don’t want to use Group Policy Editor, you can take help of Registry Editor for the same task. Just follow these simple steps:
1. Press WIN+R keys together to launch RUN dialog box. Now type regedit and press Enter. It’ll open Registry Editor.
3. In right-side pane, right-click on empty area and select New -> DWORD (32-bit) Value option. Set the new DWORD name as AllowClipboardHistory and keep its value to 0
Again right-click on empty area and select New -> DWORD (32-bit) Value option. Set the new DWORD name as AllowCrossDeviceClipboard and keep its value to 0
4. Close Registry Editor. You may need to restart your computer to take effects.
That’s it. It’ll completely disable cloud-clipboard feature in Windows 10.
PS: In future, if you decide to restore default settings and restore cloud-clipboard feature, delete the DWORD values created in above mentioned steps from Registry Editor.
About the author: Vishal Gupta (also known as VG) has been awarded with Microsoft MVP (Most Valuable Professional) award. He holds Masters degree in Computer Applications (MCA). He has written several tech articles for popular newspapers and magazines and has also appeared in tech shows on various TV channels.
Keeping up with your email inbox can be a daunting task. It’s easy to get bogged down in long, rambling messages or get overwhelmed by a million unimportant emails and miss the important information buried within. Fortunately, there’s a solution that can help.
With Zapier and OpenAI’s GPT-3, summarizing your email’s essential details has never been easier. With just a few clicks, you can automatically get a summary for each email in Slack or a handy daily digest that includes all the critical info you need from each email all in one go.
In this article, we’ll walk you through the steps of setting up this powerful Zap—our word for Zapier’s automated workflows. Whether you’re a busy professional or simply seeking to optimize your process, this tutorial will help you streamline your email management and stay on top of your inbox.
Looking for GPT-4? GPT-4 may be available with our OpenAI integration in the future. In the meantime, users with a paid subscription to ChatGPT Plus can access GPT-4 via our ChatGPT integration now—allowing you to add ChatGPT-powered conversations into apps like Slack.
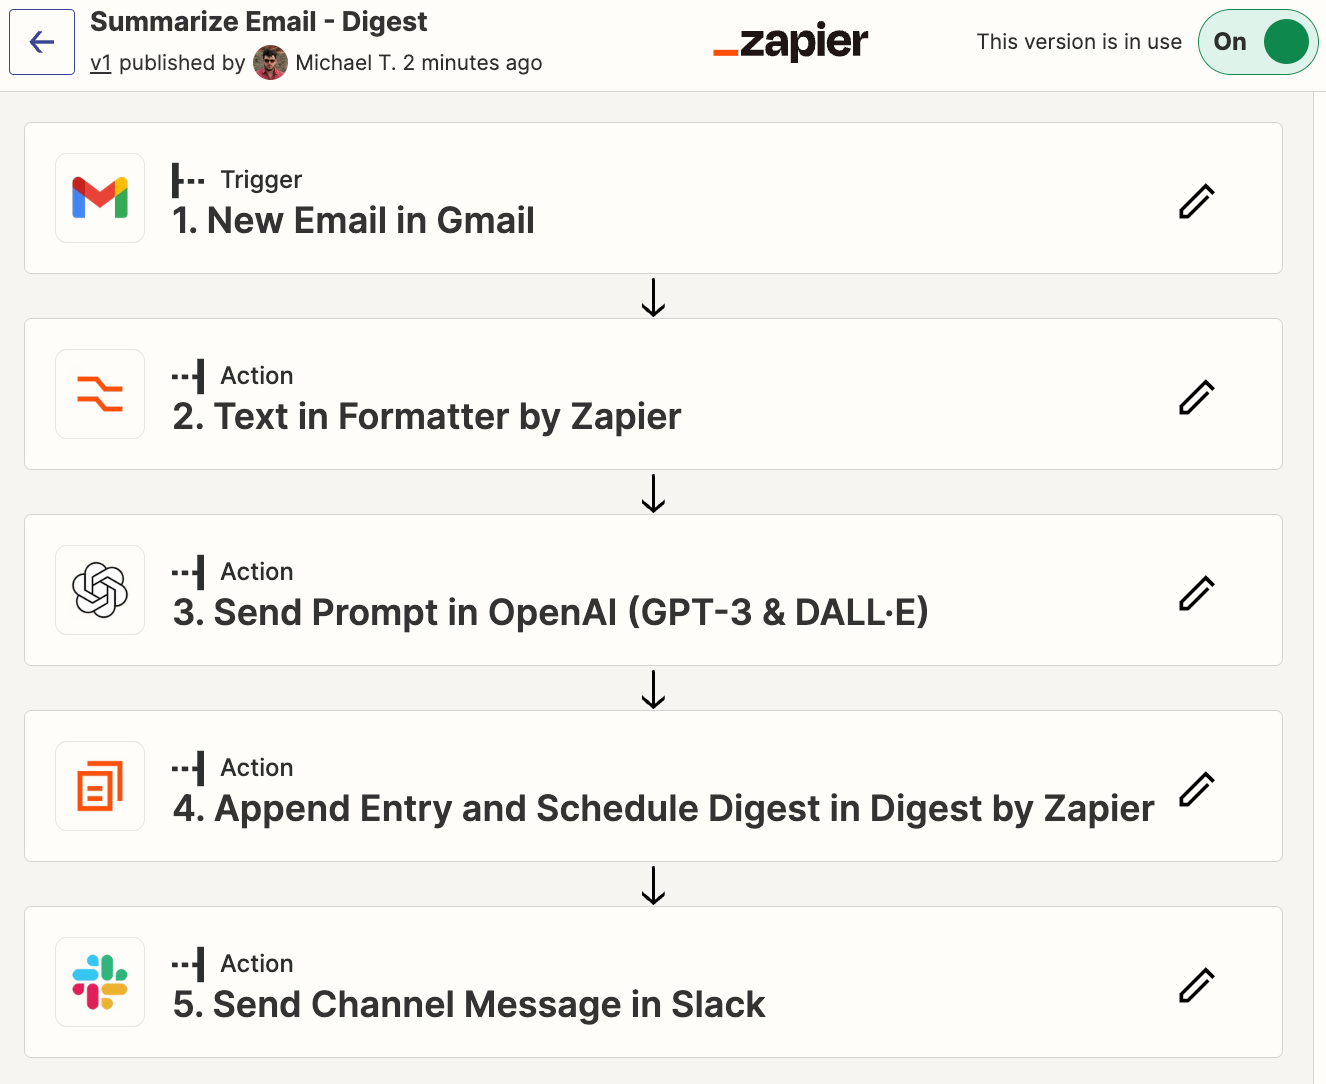
How it works
For this project, we’ll be using OpenAI’s GPT-3 to summarize our emails, and then we’ll send the summaries to Slack.
If you’d like to start with a template, click on the Zap template below to go to the Zap editor. You’ll need to create a Zapier account if you don’t already have one. Then, follow the directions below to set up your Zap.
Get an OpenAI-generated email summary in Slack for new Gmail emails
Alternatively, if you prefer to receive the notifications as a daily digest rather than individually, we’ll walk through how you can use Digest by Zapier for this purpose.
If you’d like to go the digest route, you can start with the following Zap template:
Get an AI-generated daily digest of your emails in Slack
Gmail, Digest by Zapier, Formatter by Zapier, OpenAI (GPT-3, DALL·E, Whisper), Slack
Gmail + Digest by Zapier + Formatter by Zapier + 2 moreMore details
Before we begin developing our Zap, you’ll also need an OpenAI account if you don’t already have one. Go to platform.openai.com to sign up for your account. You’ll also need a free Slack account, which you can sign up for at www.slack.com.
Are you ready to build this yourself? Let’s get started!
New to Zapier? It’s a tool that helps anyone connect apps and automate workflows—without any complicated code. Sign up for free.
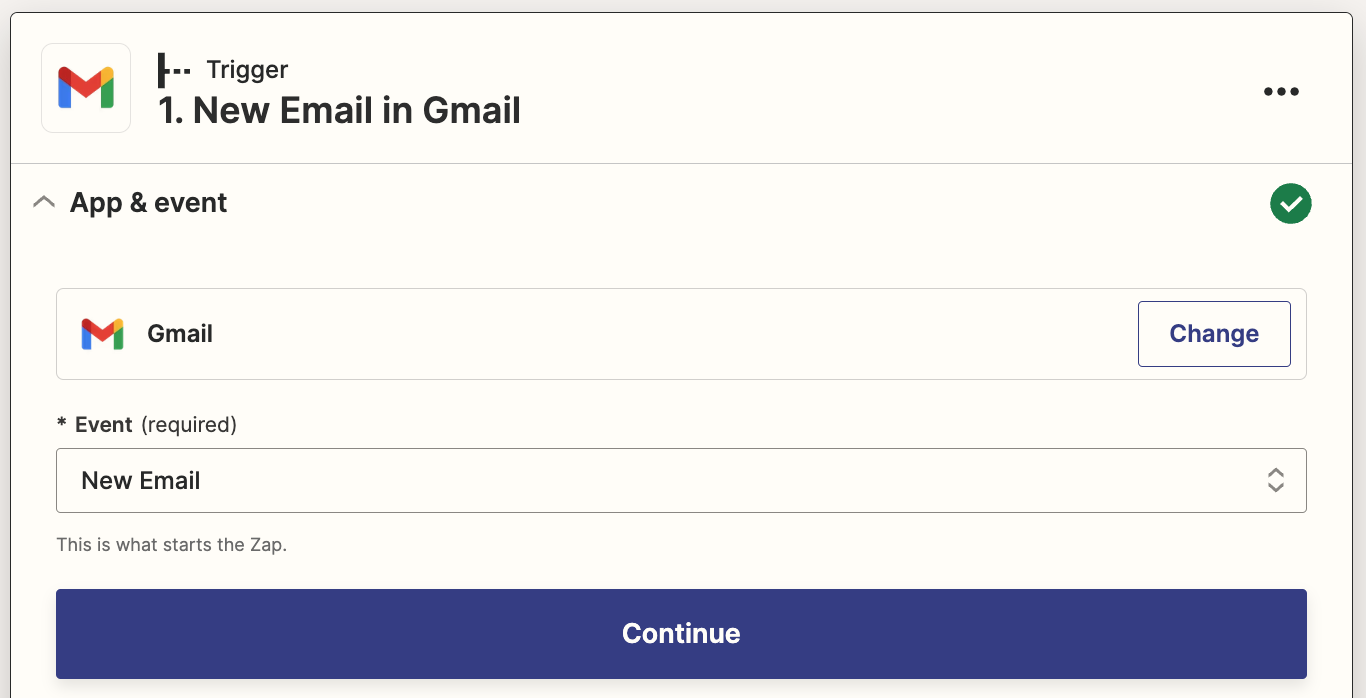
Step 1: Set up your Gmail trigger step
Head over to Zapier, and click the Create Zap button to create a new Zap.
Search for and select Gmail for the trigger app and New Email in Gmail for the trigger event (if you’re using the Zap template, these will already be selected for you).
Next, connect your Gmail account if you haven’t already connected it to Zapier.
In the Label/Mailbox field, select INBOX. You can optionally leave this blank to trigger for all emails. But since that will also trigger for sent messages and drafts, INBOX is the best choice unless you do heavy email filtering/labeling to remove emails from your inbox.
Click Test Trigger, and you should see a recent email from your inbox, as shown below:
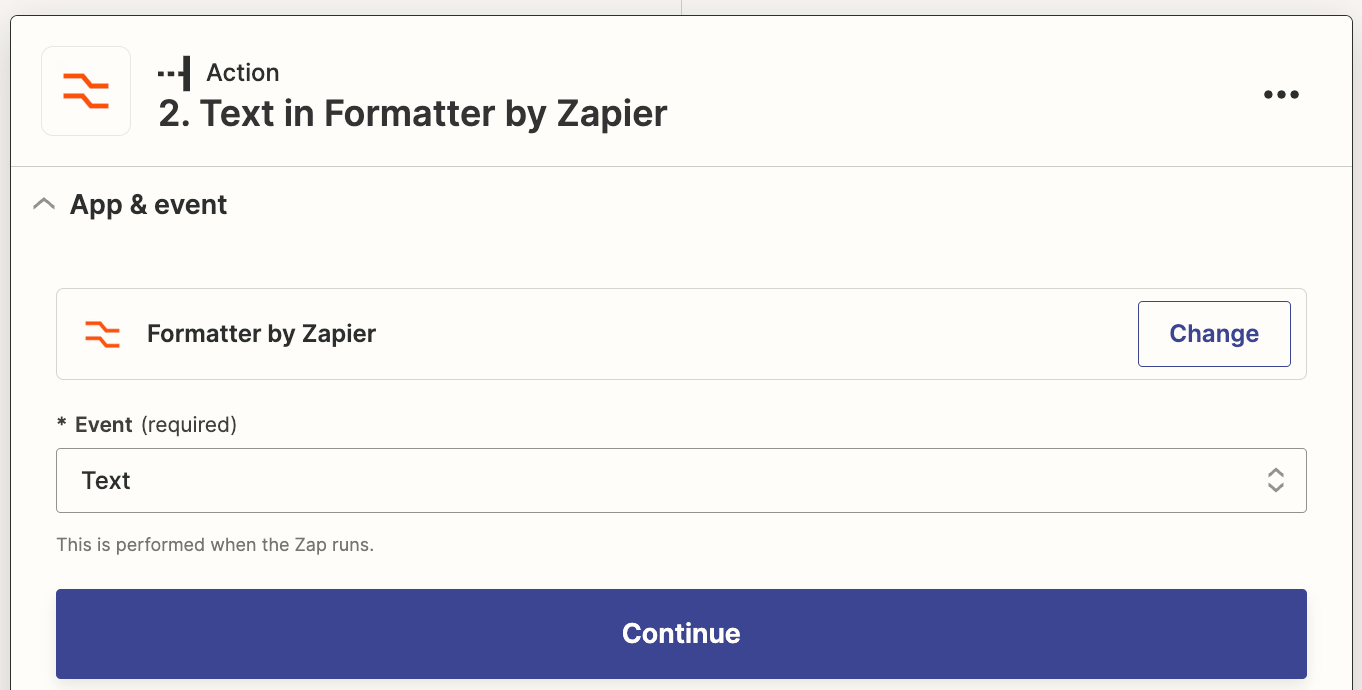
Step 2: Set up a formatter step to truncate your email
Currently, GPT-3 only allows you to send a limited amount of data to summarize, so we’ll need to truncate our email to make sure we don’t exceed this limit. In the future, OpenAI plans to develop new models with higher limits, or possibly no limits, but for now, this is a necessary step.
Click the + symbol beneath your Gmail trigger, then search for and select Formatter by Zapier for the action app and Text for the event.
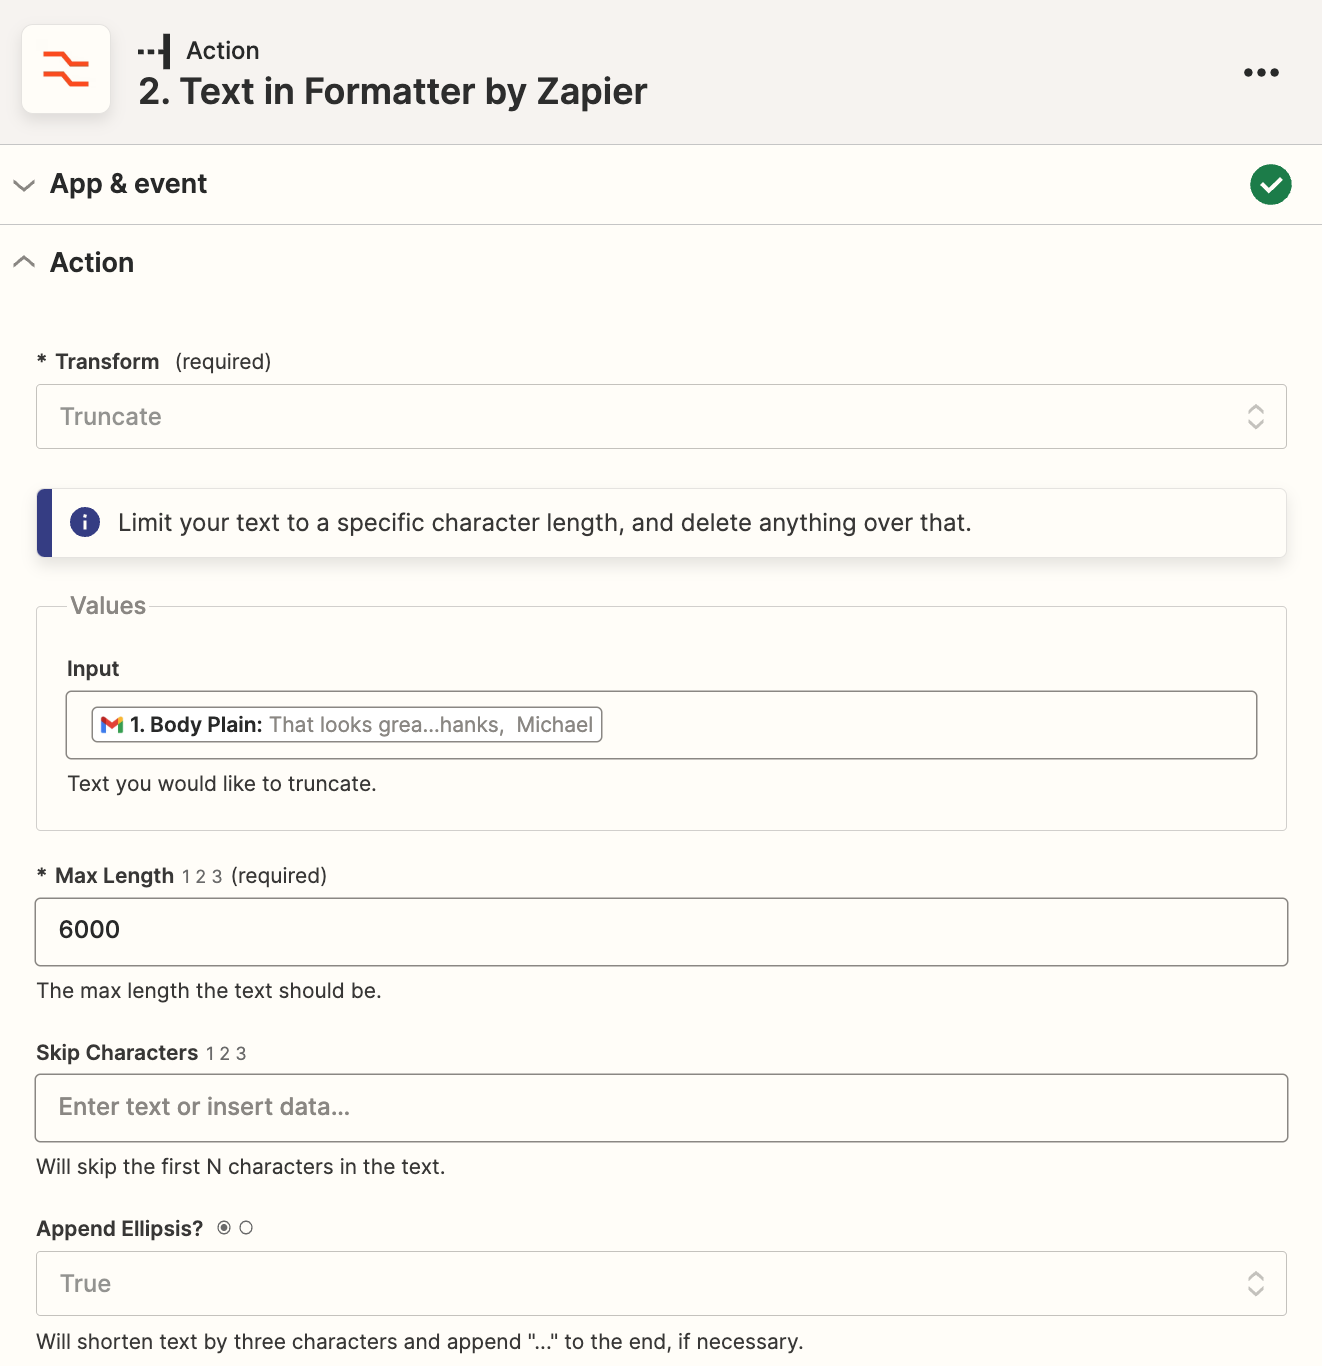
Select Truncate as your transform action. Click in the Input field, and select Body Plain from the data dropdown from your Gmail trigger—this contains the plain-text body of the email.
In the Max Length field, enter 6000, and then select True for the Append Ellipsis option. Here’s what your complete action step should look like:
This 6000-character truncation means that if the email is shorter than 6000 characters, we’ll keep the entire thing, but if it’s longer, we’ll only keep the first 6000. 6000 characters is quite long, but I do often see emails that go over this limit. Most commonly, this will be longer newsletters or long back-and-forth email threads, as Gmail will include the entire thread in the body that Zapier receives. Because Gmail processes their email threads in reverse chronological order, this truncation will keep the most recent emails in the thread.
Next, click Test Action to ensure everything is working properly. Next, we’ll set up our prompt to send to OpenAI.
Step 3: Set up your OpenAI email summary prompt
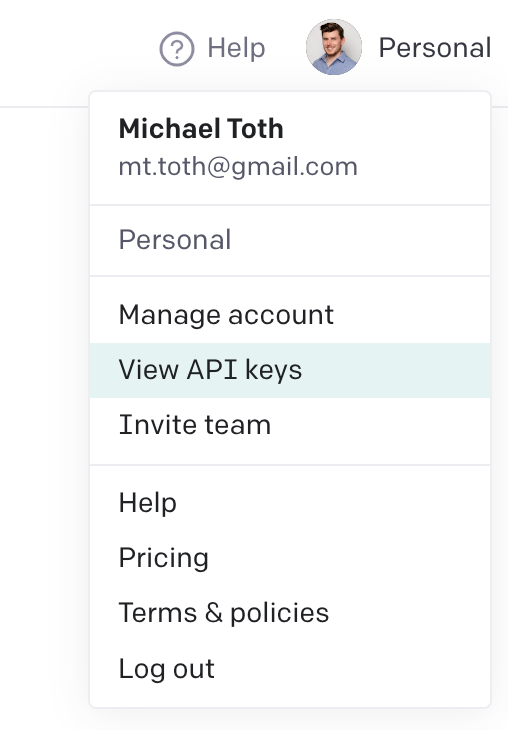
If you haven’t set up your Zapier connection to OpenAI, you’ll have to do that now. To start, head back over to platform.openai.com to log into your account. At the top right of the page, click on your profile icon and click View API Keys:
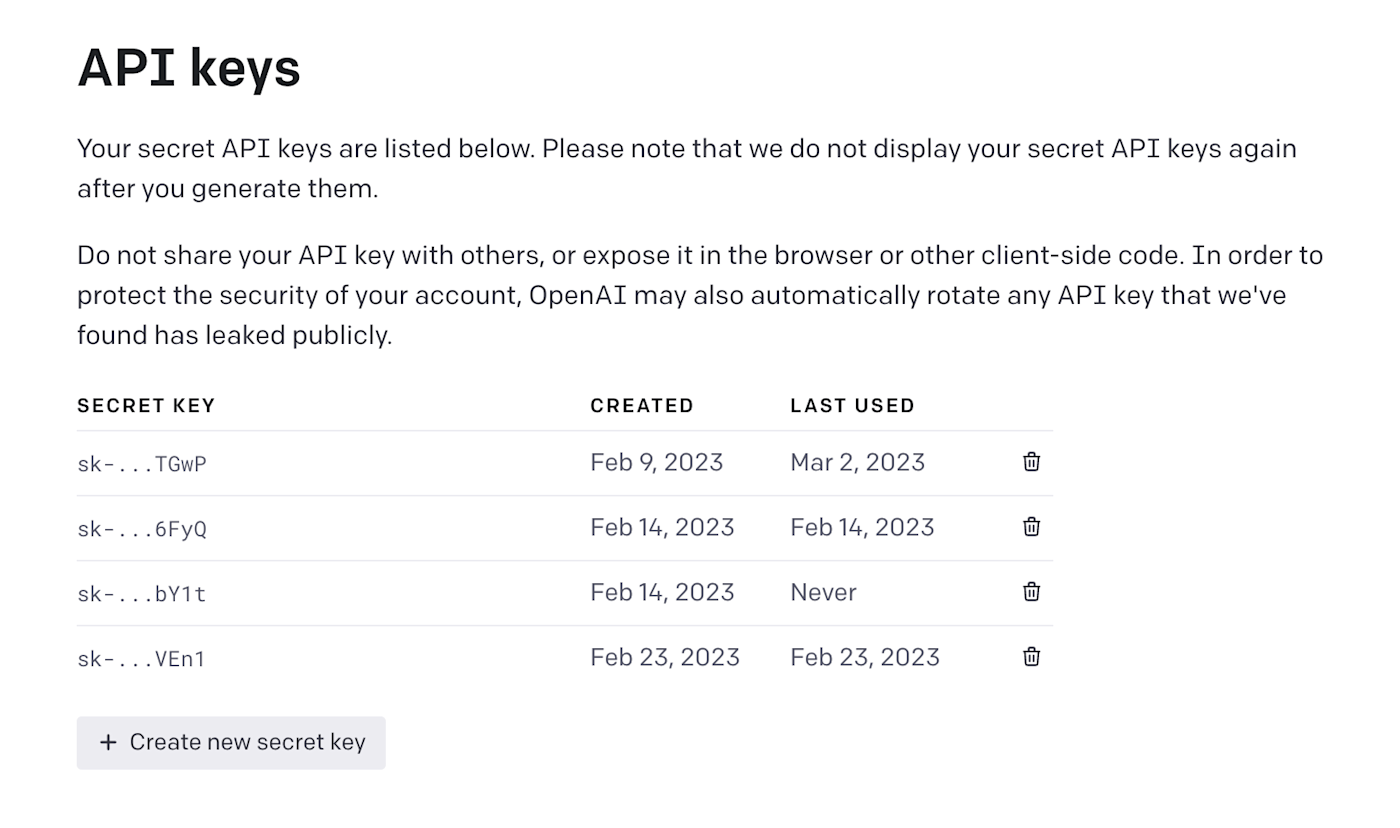
From that page, click on the + Create new secret key button to generate a new API key. You’ll need this key to connect to your OpenAI account within Zapier. Copy this key and store it somewhere safe!
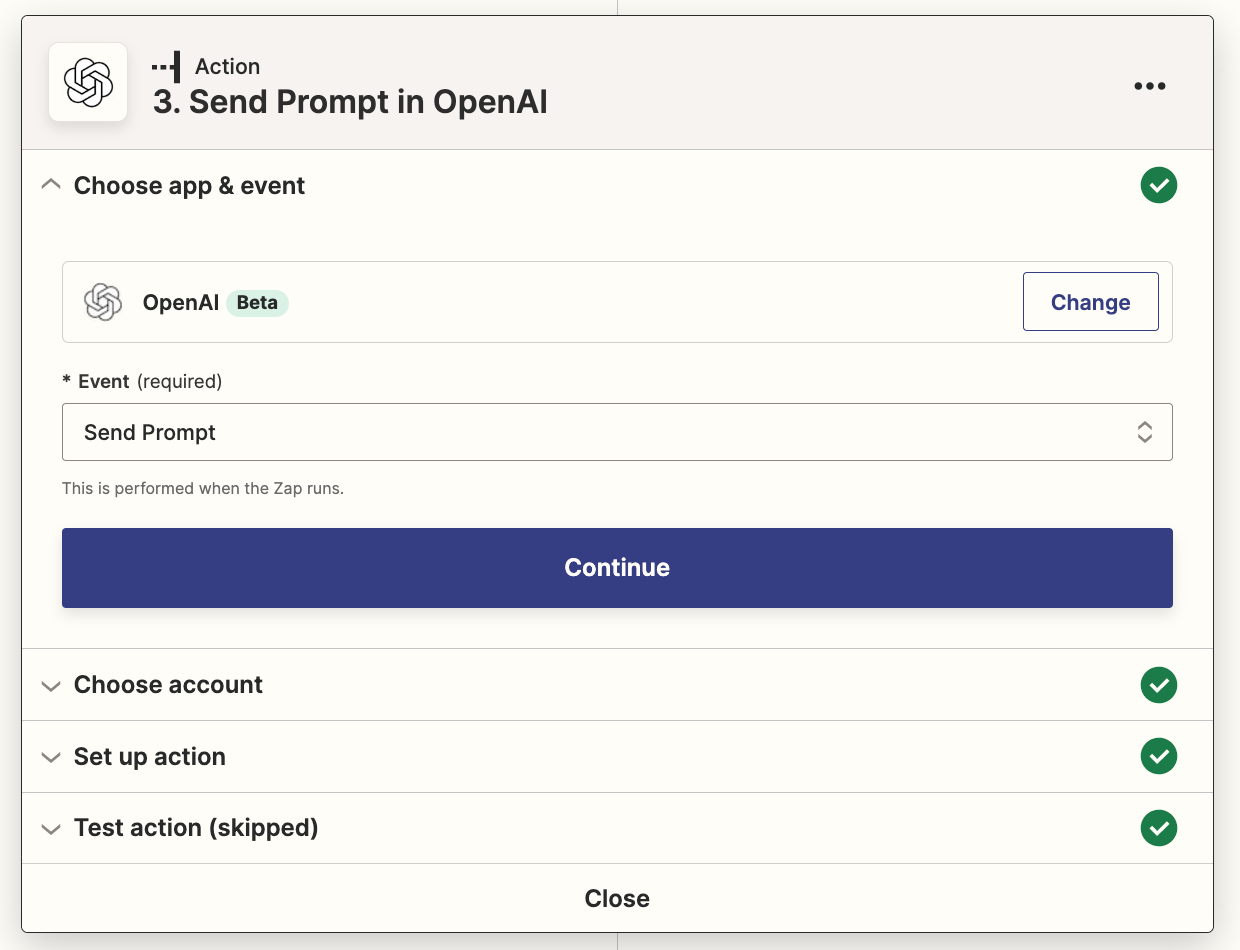
Head back over to Zapier and add a new action step at the bottom of your Zap. Search for the OpenAI app and choose the Send Prompt event:
Click on Choose account, and set up a new account by providing the API key you just generated in OpenAI. If you already have set up your account connection, simply select your existing account.
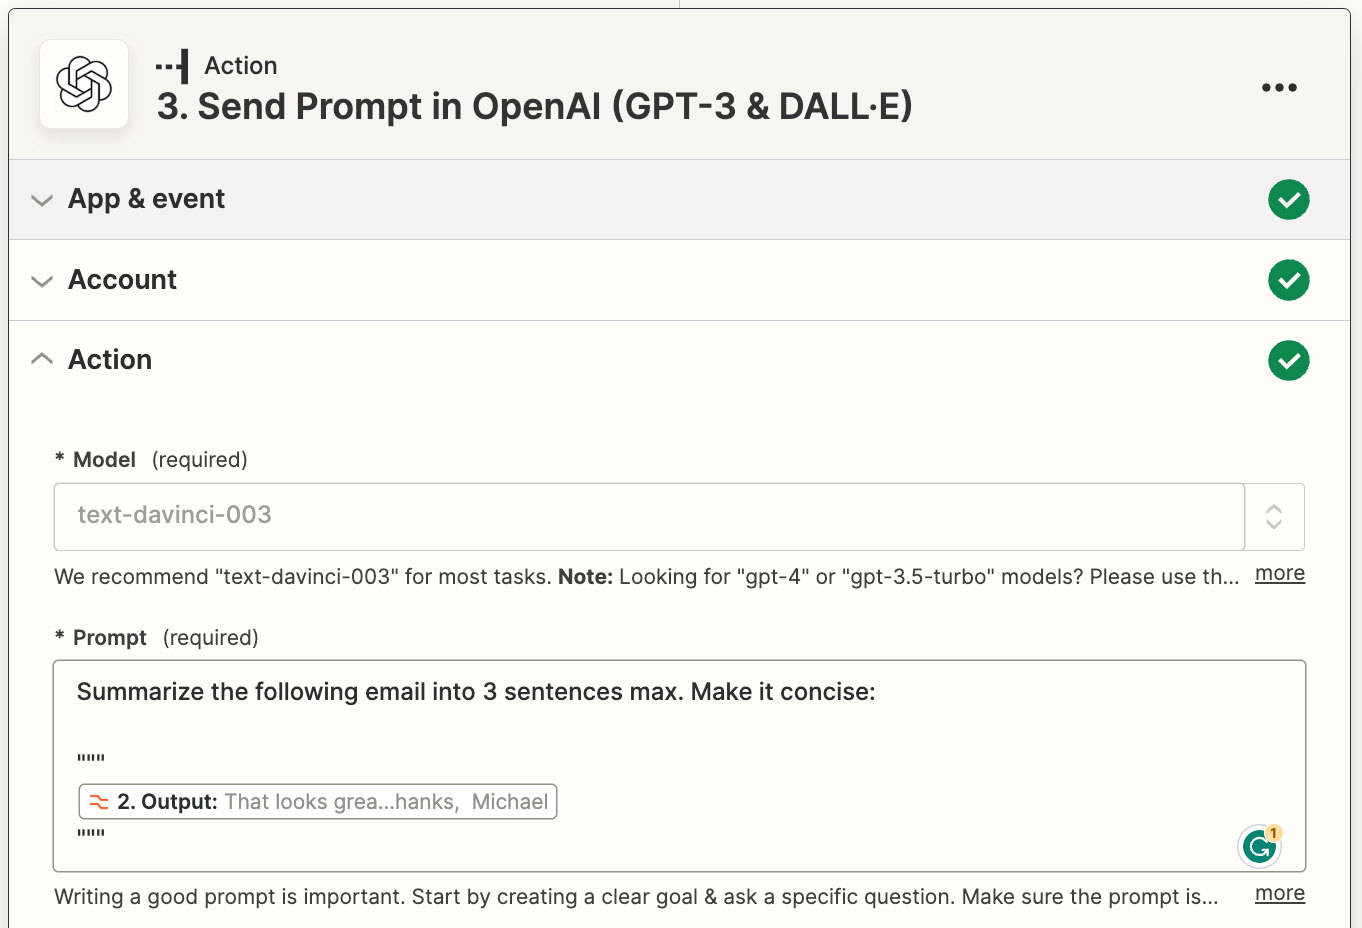
Head to the Set up action section to set up the prompt we’ll be sending over to OpenAI. In the Prompt field, copy and paste the following:
Summarize the following email into 3 sentences max. Make it concise:
"""
<Output from Formatter by Zapier>
"""
Replace the bracketed content with the Output variable from your Formatter by Zapier step by selecting Output from the Insert Data dropdown.
The triple quotes help GPT-3 to understand where the email starts and stops.
If you want, you can give more specific instructions for the summary depending on your use case. For example, if you’re using this for your work email, you might provide information about your role at your company and the type of information that is or isn’t important to you. You might also consider providing additional context about the services or products your company offers so that GPT-3 can incorporate some of those details into the summary. For now, we’ll keep it simple with the prompt I show above.
You can leave all of the other fields for this step set to their default values.
Click Test Action to send the email over to OpenAI. Review the summary and make sure everything looks okay.
If you want to get a notification in Slack for each email you receive, continue to the next step.
If you want to get a daily digest of all of your emails, skip ahead.
Get notifications for each email step 4: Set up your Slack message
Next, we’ll set up the action step that will send the email summary back to you in a Slack message. This could also be set up to send as an email or SMS if you prefer, but we’ll be using Slack for this example.
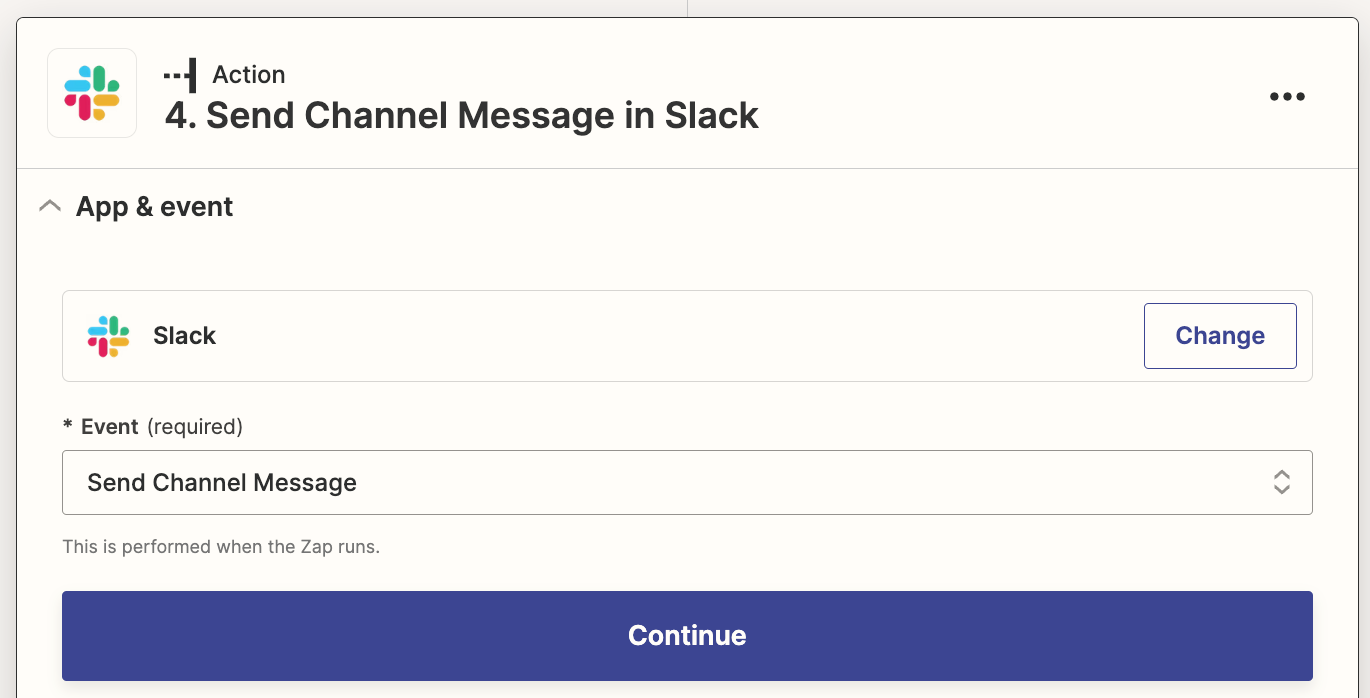
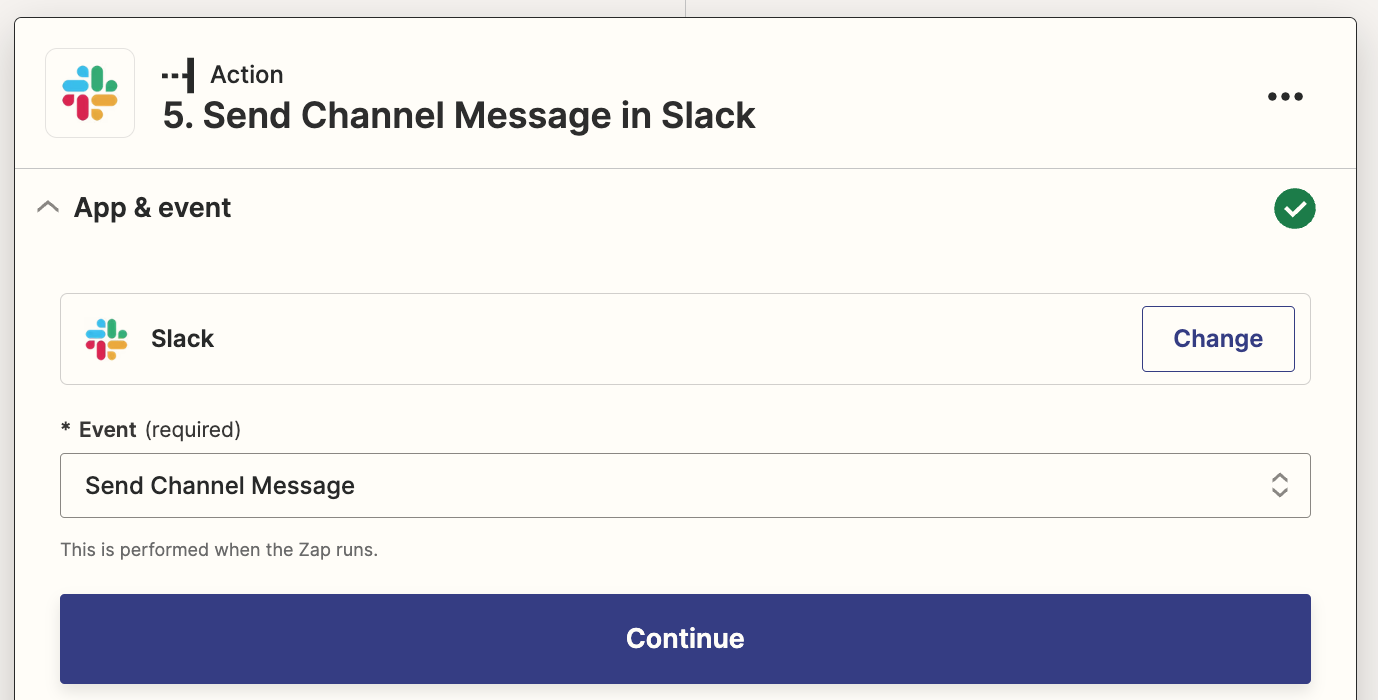
Add a fourth action step and search for the Slackapp. Select the Send Channel Message event.
Connect your Slack account if you haven’t already connected it to Zapier.
Next, we’ll set up the action step. Select the Slack channel you want these messages to be sent to. I created a new channel called email-summaries for this purpose.
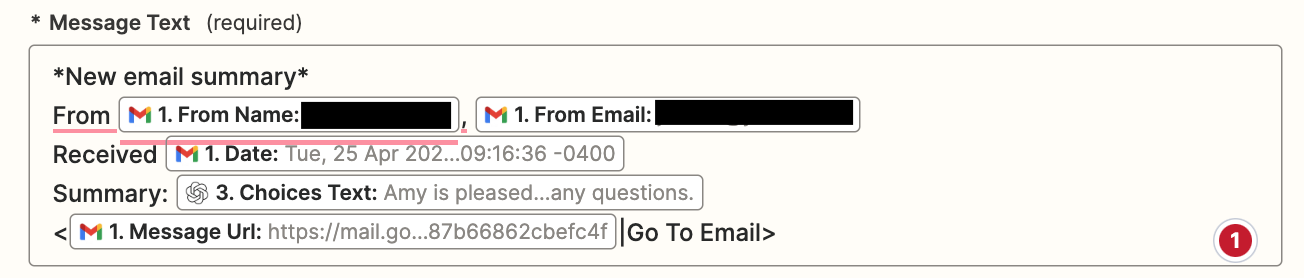
In the Message Text field, copy and paste the following, replacing the bracketed content with data from your previous Zap steps, which you can select from the Insert Data dropdown:
*New email summary*
From {Gmail From Name}, {Gmail From Email}
Received {Gmail Date}
Summary: {OpenAI Choices Text}
<{Gmail Message URL}|Go To Email>
Your Message Text field should look like the following image when complete:
This will create a message in Slack that includes the sender name and email address, the date and time the email was received, the summary generated by OpenAI, and a link to open the email directly in Gmail for easy responding.
Switch the Include a link to this Zap? field to No and leave the remaining fields as is.
Next, click Test Action to send the summary message to your Slack channel and make sure everything is working properly. If everything looks good, you’re now ready to use your Zap.
Get a daily digest step 4: Set up your digest entries
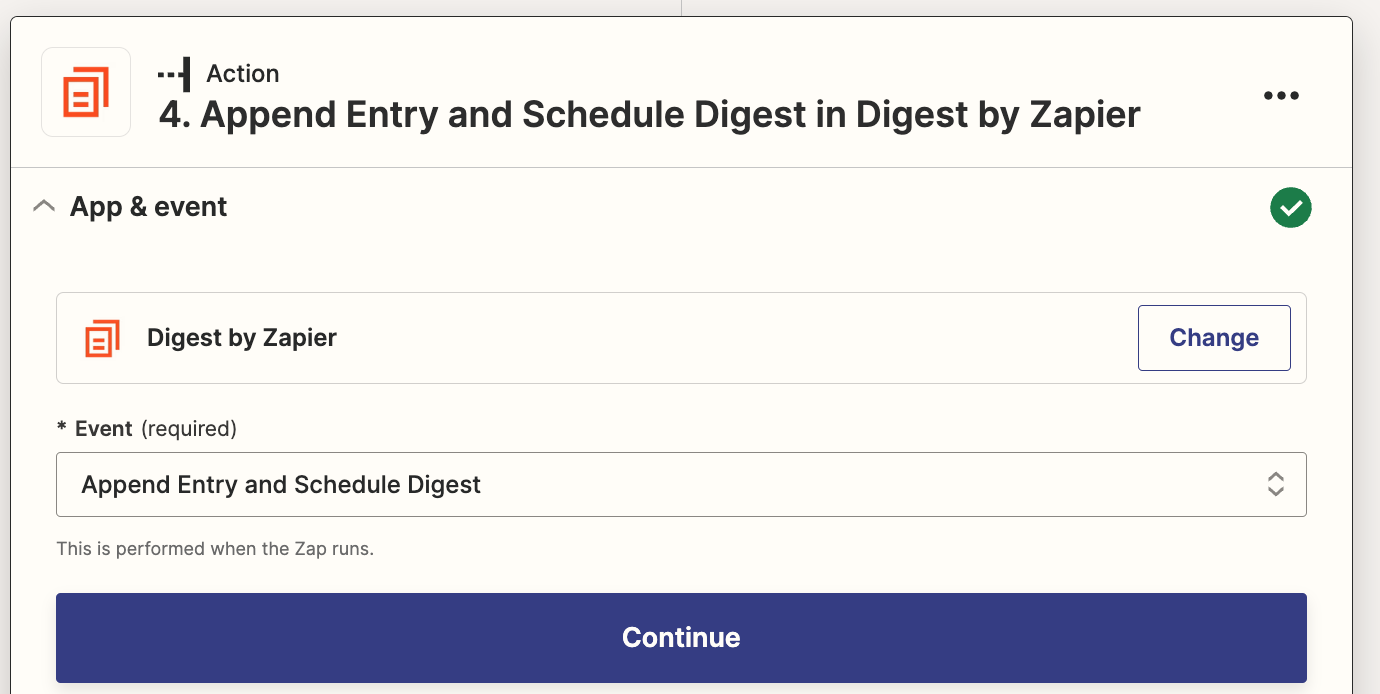
If the idea of receiving instant notifications for every email you receive sounds too distracting, the daily digest is an ideal solution for you. Instead of setting up a Slack notification for the fourth step, we can use a built-in Zapier tool called Digest by Zapier to store up the email summaries throughout the day and then release them to us all at once at a designated time.
Add a new action step to the bottom of your Zap. Select Digest by Zapier for your action app and Append Entry and Schedule Digest for your action event.
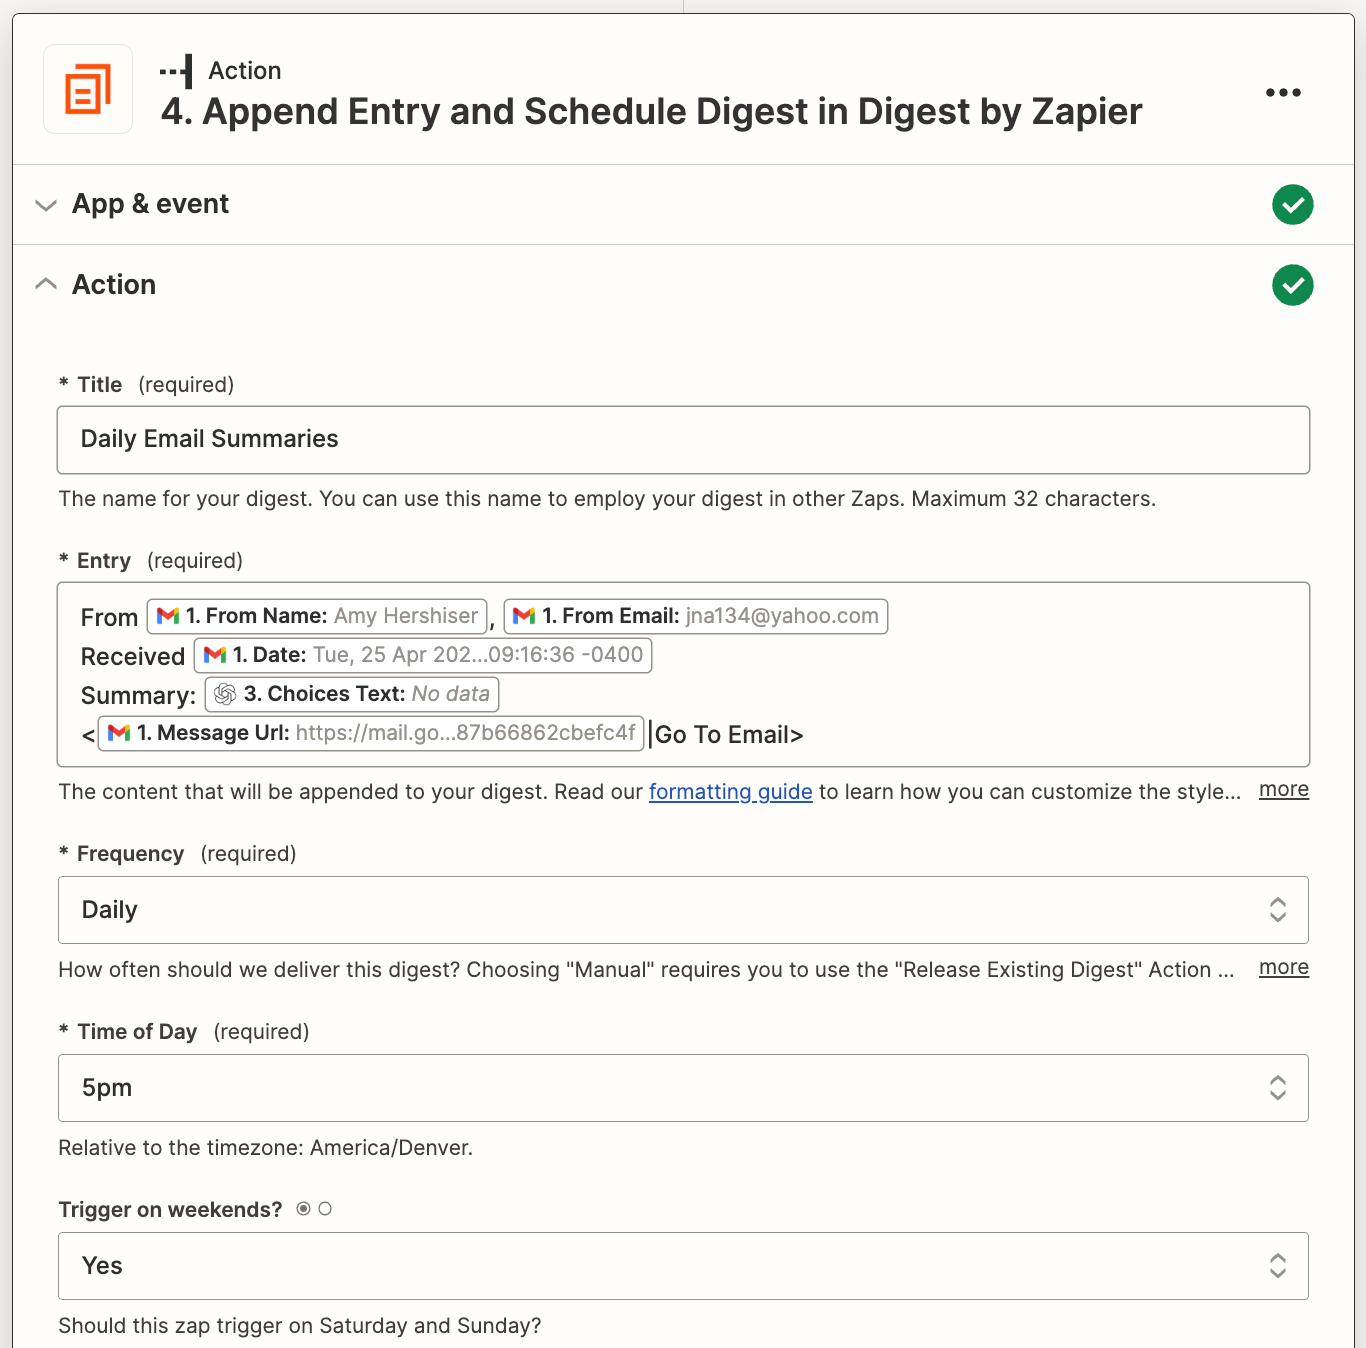
Navigate to the Action section and give your digest a descriptive title like Daily Email Summaries.
For the Entry field, simply copy and paste the copy below. Then replace the bracketed content with the variables from the prior steps by selecting them from the Insert Data dropdown.
From {Gmail From Name}, {Gmail From Email}
Received {Gmail Date}
Summary: {OpenAI Choices Text}
<{Gmail Message URL}|Go To Email>
For the Frequency field, select Daily, and for the Time of Day field, choose when you’d like to receive the digest. Your completed action step should look like this:
Click Test Action to add an entry to your digest and make sure your action step is set up correctly.
Get a daily digest step 5: Set up the Slack action to release your daily digest
Finally, we’ll set up the action step that will release your daily digest and send all of the email summaries to you in a Slack message. This digest message will automatically send at the Time of Day you specified in the prior action step.
Add an action step and search for the Slackapp. Select the Send Channel Message event.
Click on the Actionsection. As before, select the channel you want these messages to be sent to. I created a new channel called email-summaries for this purpose.
In the Message Text field, copy and paste the following, replacing the bracketed content with the data received from your previous digest step by selecting them from the insert Data dropdown:
*You received {Digest Count} emails today*
{Current Digest}
Your Message Text field should look like the following image when complete:
This will create a message in Slack that includes the total number of emails received and the digest with all of the email summaries that were created throughout the day, formatted as we specified in the prior step.
Switch the Include a link to this Zap? field to No and leave the remaining fields as is.
Next, click Test Action to send the summary digest to your Slack Channel and make sure everything is working properly. If everything looks right, you’re now ready to use your Zap!
Putting it all together
Whether you’re a busy professional or simply looking to optimize your email management process, setting up either of these workflows can help streamline your day and keep you on top of your inbox. Give it a try and see the difference it can make!
Would you like to learn how to configure a group policy to copy files to remote computers? In this tutorial, we will show you how to copy files using a GPO.
• Windows 2012 R2 • Windows 2016 • Windows 2019 • Windows 10 • Windows 7
Equipment list
The following section presents the list of equipment used to create this tutorial.
There was a time when security awareness training was informal, short, and focused on simple things like using complex passwords. Well, it transpires that keeping these on a post-it note under your keyword or in a text file is in fact not a safe practice.
This was when cyber threats from hackers were the work of people with expert skills, and at worst resulted in your computer getting infected with a virus, causing a brief interruption to your working day. Fast forward to the modern reality of the dark web where you can literally shop around and choose the method in which you want to carry out a targeted attack.
Added to that are the near-constant cyber-attacks, where we can see an increase in phishing in the below graph from the Cyber Security Report 2023.
Attackers are not slowing down and always finding new, harmful ways to compromise businesses. The efforts therefore to stay ahead and protect organizations must continue, and one of those is to introduce security awareness training. There is significant evidence that security awareness training is more than just essential. A recent Remote Management Survey by Hornetsecurity showed in fact that 1 in 3 organizations do not provide any kind of cybersecurity awareness training to remote employees.
A reliance solely on an organization’s security function for detection and prevention is no longer sufficient. Employees must be armed with security awareness training to become foot soldiers in this war, and I’ll explain the reasons why.
1. Protects Sensitive Data
Security awareness training helps employees understand the importance of protecting sensitive information and the consequences of a data breach. Protecting sensitive data helps to ensure cyber security and maintain the confidentiality, integrity, and availability of your information systems.
Using security awareness services, users are educated to understand how and why sensitive data needs to be protected and can help prevent unauthorized access and data breaches. This security awareness software in turn protects the organization’s reputation and financial well-being, as well as protects the personal information of customers and employees.
Sensitive data is essentially confidential information such as financial records and personally identifiable information (PII) and, depending on the nature of the organization, could also include trade secrets or proprietary information considered commercially sensitive.
Theft and subsequent compromise of sensitive data is very common and a highly prized target during security or data breaches. In IBM’s “Cost of a data breach report 2022” we can see the year-on-year cost of a data breach is going in the wrong direction!
Through a cyber security training program, users become aware of the legal and ethical obligations they have to safeguard it from unauthorized access, disclosure, or misuse. Arming your users with security awareness training provides the knowledge and skills necessary how to handle sensitive information and significantly reduces the risk of a data or security breach.
2. Fosters a Sustainable Security Culture
Creating and fostering a culture of security within the organization is a fundamental step in raising awareness of security threats and practices for mitigating them.
Regular security awareness training promotes a security culture within an organization, making security a priority for all employees. You might have heard the catchphrase “security is everyone’s responsibility.” There’s a lot of truth to that.
Through a security awareness training program, employees benefit by learning and becoming aware of the roles and responsibilities and shifting their mindset from “that’s someone else’s problem” to “that’s my problem.”
Providing security awareness training empowers them to take responsibility and notice and report anything out of the ordinary. This can extend from information security things like phishing scams and emails to physical security and being able to identify or report someone suspicious lurking in the office or tailgating when entering the premises!
A security-conscious workforce brings about a culture where users are more likely to take proactive steps to protect their sensitive data and report suspicious activity.
3. Detects and Prevents Insider Threats
Security awareness training can help identify and prevent potential insider threats, such as employees who may be intentionally or unintentionally compromising the security of an organization, and here is why cybersecurity awareness training is important.
Insider threats refer to security breaches that are caused by a person who has authorized access to an organization’s systems, network, and data. Although only employees are commonly considered, it includes anyone who has access to the organization’s systems like vendors or contractors.
Theft of sensitive information, sabotage of systems, using security credentials, and unauthorized access to confidential data are also examples of insider threats. These threats can significantly impact the organization like financial loss, reputational damage, and even legal liabilities.
4. Increases Employee Engagement
By educating employees on the importance of security threats within and towards it, organizations can increase employee engagement and buy-in to security initiatives.
Engaged employees are more likely to feel like they have a vested interest in the success of their organization, thereby creating a sense of loyalty and responsibility towards it. Ultimately resulting in overall better security practices and reducing the risk of security breaches.
Increased employee engagement through security awareness training can result in employee retention, an often overlooked benefit. When employees leave an organization, they often take away with them potentially institutional sensitive information especially if an employee has a role within the security function of that organization, as their departure could create a security gap and therefore a security risk.
Although most organizations have a defined security policy, in reality, the only time an employee reads this is when they initially join and are required to read this part of their onboarding as a compliance exercise. By being and feeling more engaged, you’re likely to see better compliance with and understanding of security policies and procedures.
Understanding why these policies are necessary and how they contribute to the organization’s overall security reduces the risk of accidental or intentional security breaches.
5. Education on Security Threats and How to Mitigate Them
Educating employees on security threats and how to mitigate them is crucial to maintaining a strong cybersecurity posture within an organization.
Employees who don’t work in a security-related role are often unaware of the plethora of security threats their organization faces every day. Incorporating education of security threats in a security awareness training program is an effective method to “enlist” employees as “soldiers” in this perpetual war.
Time is often of the essence when it comes to recognizing an IT security threat. For example, if a user who has not undergone a security awareness training program opens a malicious link, then realizes this, they are less likely to understand the significance of how quickly they must act on this information and report this.
Employees who understand the impact posed by security threats are more likely to make better decisions armed with this education.
6. Reduces Human Error
Employees are less likely to make costly security mistakes if they have received training on identifying and responding to security threats. Human error is a common cause of security incidents and one of the most common methods attackers use to infiltrate a network.
As you will have been, whenever there is a data breach, along with significant reputational damage, the financial cost is often significant. Assessing the cost and worth of implementing these security measures and awareness training is easily outweighed by the savings in not.
7. Supports Incident Response
Security awareness training equips employees with the knowledge and skills to respond effectively to security incidents, reducing the impact and recovery time of such incidents.
In an organization’s cyber security incident response plan, it will include and detail the roles and responsibilities for everyone in the organization. In the event of a security incident, it is important for all members of the organization to understand their roles and responsibilities in responding to the incident.
A security awareness program will help to educate people who are involved in being able to respond in the face of a security incident adequately and more quickly. Educated users are also more likely to recognize the signs of a security incident and report is prompt, which can help the incident response team take action more quickly.
The ability of an organization to respond in such a manner that minimizes the impact can be the difference between “getting owned” and mitigating a potential disaster.
To keep up to date with the latest security best practices, become a member of theHornetsecurity blog now (it’s free).
Summary
The importance and benefits of security awareness training programs should not be underestimated for how organizations combat cybersecurity threats. Organizations can no longer think of cyber security awareness training as a maybe when they plan and strategize on how to improve cyber security posture, it’s essential.
In this digital age, many options and methods exist in which a cyber security awareness training program can be delivered, both online and in person. Hornetsecurity is one such place that offers a cyber security awareness training service.
FAQs
What is security awareness training?
Security awareness training is a kind of training that helps people learn about different security risks and how to keep themselves safe from them. Hornetsecurity provides security awareness training to help people become more aware and knowledgeable about security risks and how to protect themselves. By implementing proper security awareness training in your company, your employees will be able to recognize and avoid potential dangers.
Why is security awareness important?
Security awareness training is important to ensure the safety of sensitive data, and protecting against cyber threats is critical in today’s digital age. We at Hornetsecurity provide one-of-a-kind security awareness training that mainly focuses on creating a user-centric experience for employees better to understand the importance of security measures and procedures. With our training, you can rest assured that your systems and confidential information are secure.
What are the types of security awareness?
Our security expertise distinguishes 4 main types of security awareness training:
Classroom training (lecture-based training)
Video training
Cloud training
Simulation training
How often should security awareness training be conducted?
At Hornetsecurity, the Awareness Engine is the technological heart of our Security Awareness Service. It offers the following:
Everyone to have the right amount of training;
Each user receives as much training as necessary and as little as possible;
Demand-driven roll out of relevant e-training content;
Booster option for users who need more intensive e-training;
Layer 3 adoption is the process of adopting a UniFi device to a remote UniFi Network Application. This is only recommended for advanced users, or those adopting devices to the UniFi Cloud Console.
We highly recommend that users refer to Device Adoption for standard device adoption.
L3 Adoption Methods
For layer 3 adoption, your UniFi Network Application and connected devices must have internet access.
UniFi Network Mobile App
The Cloud Console can leverage your UniFi Network Mobile App (iOS / Android) to provide the easiest L3 adoption experience.
Refer to our UniFi Device LED Status guide to ensure the device is in a factory-default state.
Connect your mobile device to the same local network as your UniFi device.
Open your UniFi Network Mobile App and connect to site you want to adopt your device.
Your device should appear for adoption.
DHCP Option 43
This option leverages your DHCP server to inform your UniFi device of the location of your remote Network Application host. Those with a UniFi Gateway can easily accomplish this by entering the IP address of the remote Network Application in Option 43 Application Host Address field located in the Network Settings.
For those using a third-party gateway or DHCP server, we recommend consulting your manufacturer’s documentation to learn more.
DNS
You’ll need to configure your DNS server to resolve ‘unifi’ to your remote UniFi Network Application host.
There are two methods of specifying the Network Application host:
The UniFi device will now show up for adoption and can be treated as a standard L2 adoption.
Migrating From Another Network Application
A Layer 3 migration is useful for moving devices from a current Network application to a new Cloud Console. See Backups and Migration for more information.
Recovery Mode is a last-resort solution to recover an unresponsive UniFi device, often resulting from power loss occurring at the same time as an update. Only use Recovery Mode if you are unable to perform a standard factory reset.
Note: UniFi Power Backup can prevent unexpected power losses from occurring.
The following UniFi devices support Recovery Mode:
Dream Machine, Dream Machine Pro & Dream Wall
Access Points (all models)
Cloud KeyCloud Key Gen2+
Cameras
USW Flex Mini
Before Considering Recovery Mode
If you are considering Recovery Mode, first check two key points:
Reboot your UniFi device. If this resolves your symptoms, no further actions are required.
Factory reset your UniFi device. If you have cloud backups, you can easily restore your settings after factory resetting. If a factory reset works, no further actions are required.
Performing a Device Recovery
Dream Machine, Dream Machine Pro & Dream Wall
Download the most recent firmware for your device, found here.
Completely power-off the UniFi device and unplug it from its power source.
Press and hold the Reset button and then reconnect it to the power source.
Continue holding the Reset button for 5 seconds, or until the display (in supported models) indicates Recovery Mode.
Connect an Ethernet cable from your computer to the first LAN port (Port 1). This is usually the port nearest to the top left corner.
Note: Connect to the Dream Wall via Port 18, not Port 1.
Configure a static IP address on your computer in the 192.168.1.0/24 range (for example, 192.168.1.11).
Windows Client
Navigate to the Windows 10 Network connections
Settings > Network & Internet > Status > Change Adapter Option
Modify the IPv4 settings of the Ethernet adapter
Ethernet Adapter > Properties > Internet Protocol Version 4 (TCP/IPv4) > Propertie
Select the option to manually enter an IP address and add the following information:
IP address: 192.168.1.11
Subnet mask: 255.255.255.0
Default gateway: <blank>
DNS servers: <blank>
macOS Client
Navigate to the mac OS Network connections.
System Preferences > Networks > Ethernet Adapter
Select to manually enter an IP address and add the following information:
IP Address: 192.168.1.11
Subnet Mask: 255.255.255.0
Router: <blank>
DNS server: <blank>
In a web browser, navigate to http://192.168.1.30 to access the Recovery Mode UI.
Note: The Recovery Mode UI is accessible via HTTP only (not HTTPS). Your browser may try to redirect your session to HTTPS. Use a different browser if necessary.
Select Firmware Update > Choose and browse your computer for the previously downloaded firmware (.bin) image file.
Wait for the upgrade process to complete and reboot the device afterwards.
Access Points
Download the most recent firmware for your device, found here.
Connect your AP and computer to the same network or VLAN, either through a PoE switch or by connecting the computer directly to the network (data) port on the PoE adapter.
Press and hold the Reset button, and connect your computer to the available ethernet port of the AP.
Continue holding the Reset button until the LED flashes white, blue, off as indicated in our LED Status Guide. This indicates your device is ready for TFTP Recovery and you can release the button.
Set a static IP address on your computer to communicate with the AP, which has a default IP address of 192.168.1.20. The following is an example configuration:
Use TFTP to move the firmware from your computer to your AP. There are various programs and methods for accomplishing this. Here are two methods for your reference.
Windows
Use the built-in TFTP command line tool, or a separate program such as Tftpd64 or pumpKIN.
Select the downloaded firmware image and transfer it to the AP.
macOS and Linux
Open Terminal
Enter TFTP mode by entering the command:tftp
Once in TFTP, paste the following commands and hit enter.connect 192.168.1.20 binary rexmt 1 timeout 60 put /path/to/firmware_name.bin
The file transfer will begin. The firmware will upgrade and the device will automatically reboot once it has finished. Do not reboot it yourself.
Cloud Key
Cloud Key Gen2, Gen2 Plus
Download the most recent firmware for your device, found here.
Power off the system.
Press and hold the Reset button and then connect it to the power source.
Continue holding the Reset button for 10 seconds, until the LED flashes blue and white. The LCD screen on the front panel will also read “RECOVERY MODE.”
Open your browser and type the IP address for the Cloud Key, visible on the device’s screen.
Note: The IP address comes from your DHCP server. If it has not been assigned an IP address, you can try the fallback: 192.168.1.30.
Run the “Check Filesystem” to try searching for and repairing any problems with your storage disk that may cause system issues.
Restore the firmware you downloaded in step (1). Note that this will also factory reset your device.
The LED will flash white while upgrading and turn into a steady white when it is complete.
If your device fails again, this is a sign that you should replace your storage disk.
Cloud Key (Gen1)
Download the most recent firmware for your device, found here.
Power off the system.
Press and hold the Reset button and then connect it to the power source.
Continue holding the Reset button for 10 seconds, until the LED flashes blue and white.
Open your browser and type the IP address for the Cloud Key.
Note: The IP address comes from your DHCP server. If it has not been assigned an IP address, you can try the fallback: 192.168.1.30.
If your Cloud Key does have an IP address assigned by the DHCP server, the fallback IP will not work.
User Tip: If you don’t know your Cloud Key’s IP address, you can use thearp -a SSH command, or software such as nmap to find the IP address.
You will be taken to the Recovery Mode screen. From here you can reset, reboot, power off and most importantly upload an updated firmware bin file.
Upload the firmware you downloaded in step (1).
Once it is uploaded, reboot the Cloud Key to complete the firmware upgrade.
The LED will flash white while upgrading and turn into a steady white when it is complete.
Cameras
Unplug the PoE cable from the camera.
Press and hold the Reset button, then reconnect the camera to its PoE cable.
Continue holding the Reset button for at least 10 seconds, or until you see the LED flash 3 times rapidly.
Release the Reset button.
The device will automatically reboot to an older firmware.
To update to more recent firmware:
Find your specific camera model at our Downloads page using the left hand menu.
Copy the .bin file link of the firmware.
Use that link to upload it via the webUI of the camera, in System Settings.
Alternatively, adopt the camera to your NVR to perform an upgrade via the NVR-hosted UniFi Video user interface.
USW Flex Mini
Prepare a web server (see below*).
Set the server/computer’s IP to a static 192.168.1.99.
The method to set a static IP on a computer varies from platform to platform. Find instructions in your product’s documentation (Windows, macOS or Ubuntu/Linux).
Download the most recent firmware for your device, found here.
Rename the binary to fwupdate.bin and place it in the directory that was created earlier (webserver).
Power off the switch by unplugging it from its power source.
Press and hold the Reset button and then connect it to the power source.
Continue holding the Reset button for 10 seconds, until the LED flashes blue, white, off.
The USW-Flex-Mini should be updated.
* The first step in the recovery process is to prepare a web server. See below for a walkthrough on your operating system: Windows, macOS and Ubuntu/Debian.
Prepare a Web Server on Windows
Download Python for Windows (Executable Installer) here.
Open the downloaded file and make sure you select Add Python x.x to PATH during installation.
After the Python installation open Command Prompt as Administrator and confirm that Python is installed correctly with the command below: python -V
Create a directory for the web server by running the commands below: mkdir c:\webserver cd c:\webserver
5. Start the Python web server on port 80. Note that the version of Python can be found with the command from step 3:
After the Python installation open Terminal and confirm that Python is installed correctly with the command below: python -V
Create a directory for the web server by running the commands below: cd ~ mkdir webserver cd webserver
Start the Python web server on port 80. Note that the version of Python can be found with the command from step 2:
Python 3.x: python -m http.server 80
Python 2.x: python -m SimpleHTTPServer 80
Prepare a Web Server on Ubuntu/Debian
Install Python on your machine with the commands below: sudo apt-get update && sudo apt-get install python3
After the Python installation open a terminal and confirm that Python is installed correctly with the command below: python_version=$(dpkg -l | grep “^ii” | awk ‘/python/{print$2}’ | grep “^python[0-9].[0-9]$” | head -n1) sudo “${python_version}” -V
Create a directory for the web server by running the commands below: cd ~ mkdir webserver cd webserver
Start the Python web server on port 80. Note that the version of Python can be found with the command from step 2:
Running the UniFi Network application on Windows operating systems can be done using two methods:
Launcher – UniFi Network application runs in the foreground (default).
Windows Service – UniFi Network application runs in the background (advanced).
NOTES & REQUIREMENTS:
Applicable to the latest UniFi Network application versions for Windows.
This article applies to UniFi applications that are installed on Windows Desktop (Windows 10 / 11) and not Windows Server versions.
Make sure to allow the ports used by the UniFi application through the Windows Firewall. See the UniFi Network – Required Ports Reference article for more information.
Setting up a new UniFi Network application as a service
ATTENTION:
The latest versions of the UniFi Network application (7.3) requires Java 11.
Previous versions (7.2) use Java 8.
Install only the x64 Java release and only one version of Java.
1. If a previous UniFi Network application is running on the system, download a backup file and then close the launcher.
2. Download the latest UniFi Network application from the Download page and run the setup.
3. You will be prompted to install Java 11. Select the following options and download the x64 .msi file for Windows:
Package Type: JRE
Version: 11
CRITICAL:
If the JAVA_HOME variable is not set correctly, the service installation will not be successful.
If you are experiencing issues with the Java 11 installer or the variable, then remove the other/older Java versions that are present on the system.
3. Run the install, and set the Set JAVA_HOME variable to Will be installed on local hard drive.
CLI: Open an administrative Windows Command Prompt (CMD) window.
5. Change the directory to the location of UniFi installation.
cd "%UserProfile%\Ubiquiti UniFi\"
6. Once in the root of the UniFi folder, run the following command to install the service:
java -jar lib\ace.jar installsvc
7. Wait for the installation to complete, indicated by the Complete Installation log message.
8. Start the service with the command below:
java -jar lib\ace.jar startsvc
9. Open a browser and navigate to the application’s IP address or https://localhost:8443.
Upgrading an existing UniFi Network application as a service
1. Download a backup file of the UniFi Network application.
CLI: Open an administrative Windows Command Prompt (CMD) window.
2. Change the directory to the location of UniFi installation.
cd "%UserProfile%\Ubiquiti UniFi\"
3. Once in the root of the UniFi folder, issue the following to uninstall the service:
java -jar lib\ace.jar uninstallsvc
4. Wait for the service uninstall process to complete.
Note that this article is only applicable to advanced users with the self-hosted UniFi Network Servers installed on a Windows/macOS/Linux machine. We generally recommend using a UniFi OS Host for the best experience. Visit UI.com to learn more.
This article describes what the system.properties file is used for, and how to edit it.
Introduction
The system.properties file defines system-wide parameters for the UniFi Network Server. It is found within <unifi.base> in the data folder. Some advanced use-cases include:
Manual override of the Application IP Interface (the address to which Devices send inform packets).
Advanced Database adjustments.
Port Assignments, for purposes of the UniFi Network application communicating with Managed Devices, redirecting Guest Portal traffic, etc.
WARNING: Before editing the file, remember to create a backup of your system. It is also necessary to stop the application before performing any change in the file to avoid errors after changes are made.
Thesystem.properties file can be edited directly via any text editor. Keep in mind that lines preceded by hash-tags (#) exist as comments and are non-operational. Make edits at the bottom of the file. After changing this file, you’ll need to manually trigger provisioning on each site in order to make these effective.
Note:The file is created when UniFi Network runs successfully. If you cannot find the file within the <unifi_base>, create it by running UniFi Network.
Manually Specify the IP Interface for UniFi Network Application Communication
If a UniFi Host has multiple IP interfaces, the following configuration can manually set the exact IP interface that adopted APs should communicate to the Network application:
system_ip=a.b.c.d # the IP devices should be talking to for inform
Advanced Database Configuration
Below are advanced database configurations that most users will never need. Note: We do not perform tests on these configurations, they are enabled for the convenience of database experts. One possible usage scenario is where few people run their application on a NAS, which has a smaller footprint than a normal server, hence there’s a need to reduce the required resources.
unifi.db.nojournal=false    # disable mongodb journaling
unifi.db.extraargs          # extra mongod args
The configuration below is used to facilitate UniFi Network application installation. Again, most users will never need to set this. When the is_default is set to true, the application will start with factory default configuration. For normal, everyday users, an uninstallation and then fresh re-installation is recommended over this.
is_default=true
From the UniFi Network application you can configure the auto-backup frequency, amount of backups to store, time of backup, etc. At the time of writing this, you cannot change the storage location via the application. We do have a variable in the system.properties if you wish to change the storage location. Currently, the default points to:
1. For Cloud Key: /data/autobackup (where SD card is mounted as /data by default) 2. For software installs: {data.dir}/backup/autobackup
autobackup.dir=/some/path
HSTS can be enabled, but should only be done by advanced system administrators who are familiar with it. If you run into issues, you likely will need to clear your browser’s cache after disabling this and restarting the service. To enable HSTS support add the following:
NOTE: Currently no characters after the custom line(s) are allowed. This includes spaces, pound/sharp signs/comments, etc.
SMTP Related Settings
By default, SMTPS validates certificates and will reject self-signed or untrusted certificates. If your mail server uses an untrusted certificate, you must disable certificate verification with the following:
smtp.checkserveridentity=false
Starting with UniFi Network version 6.1, STARTTLS is opportunistically enabled by default; e.g. will be used if the server announces support for it, and will require a trusted certificate. If using a self-signed or untrusted certificate, you must disable STARTTLS by setting the following:
smtp.starttls_enabled=false
This only controls whether STARTTLS will be used if the server supports it. To force its use, see: starttls_required.
With UniFi Network version 6.1 and newer, STARTTLS is opportunistically enabled by default, but only required if using port 587. This behavior can be overridden by setting smtp.starttls_required=true to force the use of STARTTLS on ports other than 587, or to make STARTTLS optional on port 587, set it to false.
If smtp.starttls_enabled=false is set, the starttls_required value has no impact.
This article only applies to advanced users running UniFi on their own Windows/macOS/Linux machine, to help diagnose and optimize self-hosted UniFi Network Servers running under a high load. We generally recommend using a UniFi OS Host for the best experience. Visit UI.com to learn more.
Notes & Requirements:
Ensure you are running the latest version of UniFi Network, found here.
This article describes advanced configuration options and should only be attempted by advanced users.
Create a backup prior to following the instructions in this article. See UniFi – Backups and Migration for more information.
Caution must be taken when self-hosting a UniFi Network Server if there are hundreds of UniFi devices connected across multiple sites. This increased system load may lead to performance degradation if certain things are not optimized.
Symptom: High CPU Usage
One of the most important metrics to monitor is the CPU usage of the UniFi Host. High CPU usage is the first indication that there is an issue. Unfortunately there is no easy solve for this, and merely increasing the CPU is not always the answer.
Allocating Additional Memory
Before increasing the RAM allocation on your machine, first try increasing the `XMX` and `XMS` options. By default, the UniFi Network application has these set to 1GB. The following lines set the xmx and xms to values to 2GB (2048MB):
unifi.xmx=2048
unifi.xms=2048
The changes above would increase the memory that the UniFi Network application is allowed to consume from 1 to 2GB. Before moving to a machine with more CPU resources, it is recommended to max out the available memory on that machine with the above settings to see if CPU usage decreases.
If 2GB is not sufficient, administrators may want to raise the limit to 4, 8, 16, or even 32GB depending on the scale. In this case it would simply be increasing the value above in increments of 1024, i.e. 4 GB= 4096.
Note: The jstat -gcutil Java command can be used to check whether the memory allocation is sufficient on your machine. See the Oracle documentation for more information.
Increase Mongo WiredTiger Engine Cache
If you already increased the UniFi Network application memory settings to at least 4GB (xmx), you may need to also change the default Mongo WiredTiger engine cache. By default the UniFi Network Application uses:
db.mongo.wt.cache_size=256
On UniFi Network version 6.5.13 and above you can change this setting or let Mongo pick the default value by using:
If increasing memory does not solve the problem, administrators may consider also adding this line to the system.properties file:
unifi.G1GC.enabled=true
This enables a new Java Garbage Collector that can help optimize performance. However, if after these changes high CPU usage does continue after memory increase, a larger machine with more CPU cores and more memory to handle the workload may be necessary.
Changing Mongo Version/Engine
In persistent cases, administrators may consider updating MongoDB version to 3.2+ with WiredTiger as storage engine, as a means of better scaling their UniFi Network deployment. See the following links for instructions:
All devices work by communicating to UniFi Network. These regular inform messages are referred to as “heartbeats”. By default, the application can handle 200 simultaneous device connections so heartbeats shouldn’t be missed unless thousands of devices are being managed. The number of simultaneous inform messages that can be processed can be set in the system.properties file by adding the following lines and adjusting the values to best suit your needs. It does not matter where these lines are added in the file.
The default value is 200 and the max_keep_alive_requests value should always be lower than than num_thread. Try adjusting up from there. An increase in device stability should be seen, and by pushing the configuration out to other devices, become even more stable.
Database Connection Tuning
When running a large UniFi installation, it may be desired to run an external Mongo cluster to be able to scale the database independently from the UniFi Network application. Discussion on that can be found here on our Community Beta forum. If high CPU usage is seen on the Mongo process, it can indicate the need of a bigger box or the need to separate the mongodb process as mentioned above. Once that is done, the following can be tuned to see if it results in better application performance:
This results in 500 threads that can be waiting for a Mongo connection. So keep in mind that more threads can mean higher CPU usage because the CPU has to context-switch between threads. It may allow for higher DB throughput, but only if the Mongo process is able to consume more CPU to serve requests faster.