Yoast SEO 19.3: Schema improvements, new word complexity assessment

Something has to be readable for machines and humans to understand it, right? Easy-to-read content has a greater chance of success as more people tend to understand it quickly. The same goes for machines — search engines rely on structured data to help them understand the meaning of your pages. In Yoast SEO 19.3, we’re bringing readability improvements to both humans and machines.

Schema structured data in Yoast SEO 19.3

You probably know the importance of structured data — search engines use it to grasp your content. They use those insights to determine if your content is valid for a rich result, visually highlighting it in the search results. But schema does other things as well.

A better way to handle images in the schema

In Yoast SEO 19.3, we’re improving how we handle images in our schema. If you want the proper pictures to show on your different output channels, you must be sure that search engines can find the right ones. We’ve changed the way we handled this.

At first, we relied on the OpenGraph image and Twitter image. The thing is, these often contain text to help them stand out on social media. On Google Discover, text on an image is not helpful and might hinder the performance of your post. Now, we output the textless featured image as the initial image for search engines to use. The main benefit is that services like Google Discover can use the right image — making your content shine! It increases the chance that your content will do well on Google Discover.

More robust handling of the webpage’s schema id

Yoast SEO comes with a thorough structured data implementation. From the start, we’ve been advocating using the id to tie all the different parts of a site together in one schema graph. In Yoast SEO 19.3, we’re improving how we handle the @id of the main schema WebPage node to be just the permalink for the current page. Doing this makes it easier for other plugins to build on our work.

Read our schema developer documentation to learn about our schema philosophy and best practices.

Yoast SEO Premium: New word complexity assessment to grade content

The readability analysis in Yoast SEO helps you to write content that is easy to read and quick to understand. We see excellent readability as a fundamental human right online. Sometimes, people accuse us of dumbing down content, but we like to turn that around — by making your content easier to read, you open it up for a lot more people.

For years, we used the Flesch Reading Easy score to give you a sense of how difficult a text would be to understand for users of different levels. This reading score works well, but it’s hard to make it more actionable. We’re introducing a new word complexity analysis that scans your content to see if you use too many complex words in your text.

Go Premium and get access to all our features!

Premium comes with lots of features and free access to our SEO courses!

Get Yoast SEO Premium »Only €99 EUR / year (ex VAT)

Word complexity is in beta and English only for now

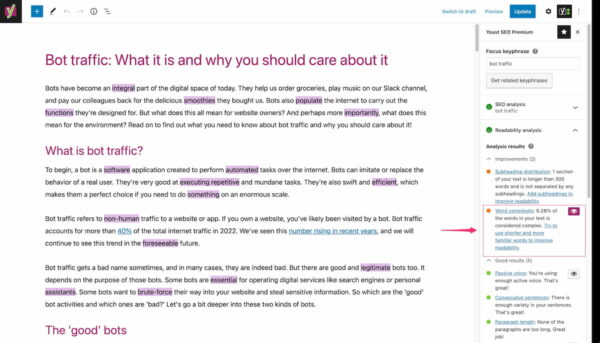
One of the advantages of the complex word assessment is that it’s actionable. We can mark words that are complex according to our definition. The words we recognize as complex are, for the most part, complicated words that you might want to reconsider. By marking them in the text, you can easily change these to a more common alternative.

Of course, some words aren’t that difficult, but we still highlight them. Also, you might be in a situation where your keyphrase is considered a complex word. In rare cases, you might get a bit of duality in the feedback. That is one of the reasons we’re releasing the word complexity feature in Yoast SEO Premium beta and for English only.

The word complexity feature can highlight difficult words in your text

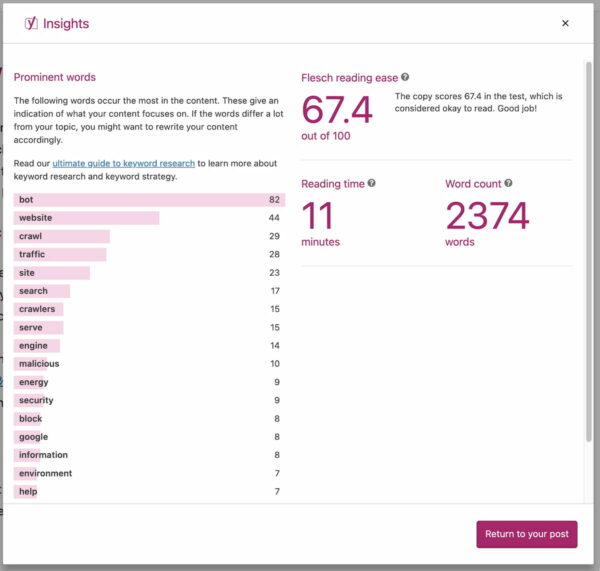
Flesch Reading Ease score moved to Insights tab

In Yoast SEO 19.3, you’ll notice that the Flesch Reading Ease score is no longer available in the readability section as it’s been replaced by the word complexity feedback. We haven’t removed it, but we’ve moved it to the Insights tab. Here, you’ll find the score and some other excellent insights into your content, like the word count, reading time, and the prominent words feature.

In the Yoast SEO Insights tab, you can find more information about your article

Enhancement to the crawl settings

The past two releases of Yoast SEO Premium saw the introduction and expansion of our new crawl settings. With these crawl settings, you can get better control over what search engines crawl and don’t crawl on your site. This is designed to help you decrease the baggage that WordPress comes with out of the box.

We’re not done with the crawl settings because we have many ideas to improve and expand these. In Yoast SEO Premium 18.9, we’re improving the handling of RSS feeds. We now add canonical HTTP headers from RSS feeds to their parent URLs (for instance, your homepage or specific categories or tags), so the feeds are less likely to appear in search results.

Update now to Yoast SEO 19.3

This is just a sampling of the changes and fixes to Yoast SEO 19.3. We have structured data updates, a new word complexity assessment in Yoast SEO Premium 18.9, improvements to the crawl settings, and more. Go download it now!

Source :
https://yoast.com/yoast-seo-july-12-2022/

Spectre and Meltdown Attacks Against OpenSSL

The OpenSSL Technical Committee (OTC) was recently made aware of several potential attacks against the OpenSSL libraries which might permit information leakage via the Spectre attack.1 Although there are currently no known exploits for the Spectre attacks identified, it is plausible that some of them might be exploitable.

Local side channel attacks, such as these, are outside the scope of our security policy, however the project generally does introduce mitigations when they are discovered. In this case, the OTC has decided that these attacks will not be mitigated by changes to the OpenSSL code base. The full reasoning behind this is given below.

The Spectre attack vector, while applicable everywhere, is most important for code running in enclaves because it bypasses the protections offered. Example enclaves include, but are not limited to:

The reasoning behind the OTC’s decision to not introduce mitigations for these attacks is multifold:

  • Such issues do not fall under the scope of our defined security policy. Even though we often apply mitigations for such issues we do not mandate that they are addressed.
  • Maintaining code with mitigations in place would be significantly more difficult. Most potentially vulnerable code is extremely non-obvious, even to experienced security programmers. It would thus be quite easy to introduce new attack vectors or fix existing ones unknowingly. The mitigations themselves obscure the code which increases the maintenance burden.
  • Automated verification and testing of the attacks is necessary but not sufficient. We do not have automated detection for this family of vulnerabilities and if we did, it is likely that variations would escape detection. This does not mean we won’t add automated checking for issues like this at some stage.
  • These problems are fundamentally a bug in the hardware. The software running on the hardware cannot be expected to mitigate all such attacks. Some of the in-CPU caches are completely opaque to software and cannot be easily flushed, making software mitigation quixotic. However, the OTC recognises that fixing hardware is difficult and in some cases impossible.
  • Some kernels and compilers can provide partial mitigation. Specifically, several common compilers have introduced code generation options addressing some of these classes of vulnerability:
    • GCC has the -mindirect-branch-mfunction-return and -mindirect-branch-register options
    • LLVM has the -mretpoline option
    • MSVC has the /Qspectre option

  1. Nicholas Mosier, Hanna Lachnitt, Hamed Nemati, and Caroline Trippel, “Axiomatic Hardware-Software Contracts for Security,” in Proceedings of the 49th ACM/IEEE International Symposium on Computer Architecture (ISCA), 2022.

Posted by OpenSSL Technical Committee May 13th, 2022 12:00 am

Source :
https://www.openssl.org/blog/blog/2022/05/13/spectre-meltdown/

Prepare for a New Cryptographic Standard to Protect Against Future Quantum-Based Threats

The National Institute of Standards and Technology (NIST) has announced that a new post-quantum cryptographic standard will replace current public-key cryptography, which is vulnerable to quantum-based attacks. Note: the term “post-quantum cryptography” is often referred to as “quantum-resistant cryptography” and includes, “cryptographic algorithms or methods that are assessed not to be specifically vulnerable to attack by either a CRQC [cryptanalytically relevant quantum computer] or classical computer.” (See the National Security Memorandum on Promoting United States Leadership in Quantum Computing While Mitigating Risks to Vulnerable Cryptographic Systems for more information).

Although NIST will not publish the new post-quantum cryptographic standard for use by commercial products until 2024, CISA and NIST strongly recommend organizations start preparing for the transition now by following the Post-Quantum Cryptography Roadmap, which includes:

  • Inventorying your organization’s systems for applications that use public-key cryptography.
  • Testing the new post-quantum cryptographic standard in a lab environment; however, organizations should wait until the official release to implement the new standard in a production environment.
  • Creating a plan for transitioning your organization’s systems to the new cryptographic standard that includes:
    • Performing an interdependence analysis, which should reveal issues that may impact the order of systems transition;
    • Decommissioning old technology that will become unsupported upon publication of the new standard; and
    • Ensuring validation and testing of products that incorporate the new standard.
  • Creating acquisition policies regarding post-quantum cryptography. This process should include:
    • Setting new service levels for the transition.
    • Surveying vendors to determine possible integration into your organization’s roadmap and to identify needed foundational technologies.
  • Alerting your organization’s IT departments and vendors about the upcoming transition.
  • Educating your organization’s workforce about the upcoming transition and providing any applicable training.

For additional guidance and background, CISA and NIST strongly encourage users and administrators to review:

Altaro VM Backup’s Services Explained

Altaro VM Backup has a number of services, handing different types of operations and in certain cases it’s important to know the role of a specific service.

Below you can find an extensive list of each service’s responsibility.

Services on the Altaro VM Backup Console


The list below can also be used for services running on an Altaro Offsite Server machine only.

Display Name                          Description
Altaro VM Backup EngineManagement of backup schedules and configuration
Altaro VM Backup Deduplication ServicePerforms deduplication of data during backup operations
Altaro Offsite Server 6Altaro Offsite Server for v5 & v6 Offsite Copies
Altaro Offsite Server 8Altaro Offsite Server for Offsite Copies
Altaro Offsite Server 8 ControllerProvides an interface between the Offsite Server Management Console UI and the Altaro Offsite Server
Altaro VM Backup API ServiceEnables a RESTful API interface to Altaro VM Backup
Altaro VM Backup Hyper-V Host Agent – N1Facilitates backup and restore operations for Virtual machines on a Hyper-V Host and/or a VMware Host using VDDK 5.5
Altaro VM Backup Hyper-V Host Agent – N2Facilitates backup and restore operations for Virtual machines on a VMware Host using VDDK 6.5 & 6.7
Altaro VM Backup ControllerProvides an interface between the Management Console UI and the Altaro VM Backup Service

Services on a Hyper-V Host added to Altaro VM Backup

DisplayName                          Description
Altaro VM Backup Hyper-V Host Agent – N1Facilitates backup and restore operations for Virtual machines on a Hyper-V Host and/or a VMware Host using VDDK 5.5
Altaro VM Backup Hyper-V Host Agent – N2Facilitates backup and restore operations for Virtual machines on a VMware Host using VDDK 6.5 & 6.7
Altaro Offsite Server 6Altaro Offsite Server for v5 & v6 Offsite Copies
Altaro Offsite Server 8Altaro Offsite Server for Offsite Copies

Source :
https://help.altaro.com/hc/en-us/articles/4416906020625-Altaro-VM-Backup-s-Services-Explained

Best Practices for setting up Altaro VM Backup

This best practice guide goes through the Altaro VM Backup features explaining their use and the optimal way to configure them in order to make the best use out of the software.

You will need to adapt this to your specific environment, especially depending on how much resources you have available, however this guide takes you through the most important configurations that are often overlooked too.

Setting up the Altaro VM Backup Management Console

The Altaro VM Backup Management Console can be utilised to add and manage multiple hosts in one console. However these hosts must be in the same LAN and at the same physical site (same building). Setups with multiple physical sites must have an instance of Altaro VM Backup at each site.

To manage these multiple installations, you can utilise the ‘Central Monitoring Console’ where you’ll be able to monitor as well as manage these Altaro VM Backup installations remotely.

A single Altaro VM Backup instance can manage both Hyper-V & VMware hosts.

For optimal results, Altaro runs some maintenance specific tasks using (multiple) single threaded operations. For this reason installing on a machine which has a CPU with a higher single thread performance would yield better results than installing on a machine which has a CPU with more cores and lower single thread performance.

Thus for the fastest results, installing Altaro VM Backup on a machine with a higher single thread CPU speed would be best.

Backup Locations

Make sure Opportunity Locks (Oplocks) are disabled if the backup location is a NAS.

If your backup location is a Windows machine, the equivalent to Oplocks is: Set-SmbServerConfiguration -EnableLeasing 0

Run the above command via Powershell.

Offsite Copies

With Altaro VM Backup, you are provided with the functionality of an Offsite Copy Location, which is a redundant/secondary copy of your backups. You can even backup your VM’s to 2 different offsite copy locations for further redundancy of your data, so you can pick a cloud location as well as an Altaro Offsite Server for instance.

There are multiple options for setting this up:

  • You can choose a Physical Drive connected to the management console (the best practice for offsites is to have them located in another building/location).
  • Drive Rotation/Swap which allows you to set up a pool of drives/network paths.
  • A Network Path (LAN Only) or else to an offsite location via a WAN/VPN/Internet connection, which is an ideal tool for Disaster Recovery purposes. Please note that the latter situation (non-LAN) requires use of the Altaro Offsite Server
  • Backup to Microsoft AzureAmazon S3 or Wasabi.

Setting up an offsite copy location is as crucial as setting up backups to a primary location. Apart from the obvious reason that you’ll have a redundant set of backups to restore from, should the local backups become unusable due to disk corruption or other disk failures. Having a secondary copy of your backup sets also allows you to keep a broader history for your VM backups on your secondary location and you’ll be able to go further back when restoring if required.

Deduplication

Altaro VM Backup makes use of Augmented In-line Deduplication. Enabling this is highly recommended and is done from the ‘Advanced Settings’ screen as this will essentially ensure that any common data blocks across virtual machines are only written to the backup location once. This helps by saving a considerable amount of space and also makes backups much quicker since common information is only transferred once.

Boot From Backup

The Boot From Backup drive feature comes along with 2 options, either ‘Verification Mode’ or ‘Recovery Mode’. This is a very good option for getting your RTO down since you’re able to boot up the VM immediately from a backup location and start a restore in the background as well.

However it’s very important that if you are planning to do this, you’ll need a fast backup location that can handle the I/O of a booted VM that’s essentially going into production. Please note that when the VM has finished restoring, it’s suggested to restart the restored VM as soon as you get a chance in order to switch to the restored drives, which would have faster I/O throughput.

Notifications

E-mail notifications are a simple and effective method of monitoring the backup status, yet it’s often overlooked. Setting up these notifications will provide you with a quick overview of the status over your of your backup jobs, hence – you won’t need to login into the Altaro Management console every day to confirm the backup status.

This way you’ll be alerted of any backup failures, allowing you to address said issues before the next backup schedule. Thereby ensuring that you always have a restorable backup point; so as a general best practice, always monitor your backup notifications.

Master Encryption Key

The Master Encryption Key in Altaro is utilised to encrypt the backups using AES 256-bit. It’s used if you choose to encrypt the local backups from the ‘Advanced Settings’ screen, while if you’re configuring offsite copies it must be used as offsite copies must be encrypted.

Altaro VM Backup will require the encryption key upon restoring, so it’s critical that you either remember it or take note of it in a secure password manager as there is no method of recovery for the master encryption key.

Scheduled Test Drills

Altaro VM Backup has the ability to run manual or automated verification of your backup data. This allows you to run scheduled verification jobs that will check the integrity of your backups on your backup location, or schedule full VM restores so that you can actually boot up the VM and confirm that everything works as expected. The VM will be restored with the NIC disabled so as to avoid IP conflicts with the production machine as well.

Failure of storage devices is not uncommon, therefore scheduling test drills is strongly advised for added peace-of-mind. Full instructions on configuring test drills.

Other General Best Practices

  • Backups and production VM’s should not be placed on the same drive.
  • Make sure Opportunity Locks (Oplocks) are disabled if the backup location is a NAS.
  • Backups should not be placed on a drive where an OS is running.
  • Altaro uses the drive it’s installed on as temporary storage and will require a small amount of free space (varying according to the size of the VMs being backed up).
  • Keep at least 10% of the backup location free.
  • The main Altaro VM Backup installation should not be installed on a machine that is also a domain controller (DC).
  • Directories/files inside the Altaro backup folder should not be tampered with, deleted or moved.
  • Do not take snapshots DFSR databases: “Snapshots aren’t supported by the DFSR database or any other Windows multi-master databases. This lack of snapshot support includes all virtualization vendors and products. DFSR doesn’t implement USN rollback quarantine protection like Active Directory Domain Services.” Source. 

Best Practices for Replication

Exclude Page File from Backup

As you’re aware Altaro VM Backup will take note of all changes since the last backup and transfer over all of the blocks that changed to the backup location. The page file will be changing very often and potentially causing your replication jobs to take longer.

Therefore, excluding the page file from backup equals, less transferred changes and as a result the replication jobs takes less time. This can be done by placing the page file onto a separate VHDX/VMDK file from the VM itself and then you can follow the steps here, in order to exclude the VHDX/VMDK file.

High Disk IO and Hypervisor Performance

Replication needs to make use of CDP (Continuous Data Protection), in order to take a backup every couple of minutes/hours, which makes Replication possible.

It’s important to note however that you should only enable high-frequency CDP (15 minutes or less) on VM’s that you really need to. This will ensure that the VM’s you really need to will be able to achieve the selected maximum frequency and in order not to have an impact your Hypervisor’s performance.

Source :
https://help.altaro.com/hc/en-us/articles/4416921650577-Best-Practices-for-setting-up-Altaro-VM-Backup

How to relocate the Altaro temporary files

Altaro VM Backup will create temporary files during backup operations and by default the location for these files is on the C: drive.

If you’d like to move the location of this temporary directory, please see according to which version you’re running below:

7.6 and newer

To do so, you can follow these steps:

  1. Ensure you are running at least 7.6.14. If not, update to the latest version from here
  2. Firstly, create a folder named “Overrides” in this path: C:\ProgramData\Altaro\AltaroBackupProfile
    If you’d like to move the temp files on the Altaro Offsite Server, create a folder named “Overrides” in this path: C:\ProgramData\Altaro\AltaroOffsiteServerProfile
  3. Then create a text file named “OverrideTempFolder.txt” inside the newly created folder
  4.  In the text file enter the path where you wish to store Altaro’s temp files, for example:{ “TempFolderPathOverride”:”E:\\Temp\\Altaro” }Ensure this location exists & that you use a double backslash as a separator (like above)
  5. Restart all Altaro services and on next Operation, the Altaro temporary files will now be stored in the above directory

7.5 and older

To do so, you can follow these steps:

  1. Ensure you are running at least version 5.0.97
  2. Firstly, create a folder named “Overrides” in this path: C:\ProgramData\Altaro\AltaroBackupProfile
    If you’d like to move the temp files on the Altaro Offsite Server, create a folder named “Overrides” in this path: C:\ProgramData\Altaro\AltaroOffsiteServerProfile
  3. Then create a text file named “OverrideTempFolder.txt” inside the newly created folder
  4.  In the text file enter the path where you wish to store Altaro’s temp files, for example: “E:\AltaroTemp” (without quotes) — ensure this location exists
  5. Restart all Altaro services and on next Operation, the Altaro temporary files will now be stored in the above directory

Tips

  • ProgramData is a hidden folder by default
  • Ensure that the file extension is showing, or you might end up with a file named “OverrideTempFolder.txt.txt”
  • Ensure there are no spaces at the end of the path and no extra line breaks in the text file

    Source :
    https://help.altaro.com/hc/en-us/articles/4416899962001

Which Altaro directories do I need to exclude from AntiVirus software?

If you are running an AntiVirus software or a file-scanning software, we do recommend excluding a couple of directories used by Altaro in order to ensure that it’s operation remains undisrupted.

We do recommend excluding the following:

  • all onsite backup drive directories
  • all offsite backup drive directories
  • C:\ProgramData\Altaro on the Altaro Management and on the Hyper-V hosts
  • C:\Program Files\Altaro on the Altaro Management and on the Hyper-V hosts

Also, if you relocated the Altaro temporary files ensure to exclude that directory as well.

Source :
https://help.altaro.com/hc/en-us/articles/4416905883409-Which

Altaro Dealing with “Windows Error 64” and “Windows Error 59”

PROBLEM

The backup fails with a one of the following errors:

  • “Windows Error 64: The specified network name is no longer available.”
  • “Windows Error 59: An unexpected network error occurred.”

CAUSE

There’s a number of reasons that can very easily cause networks issues which will result in a failed backup pointing to a Windows Error 64 or 59. Mainly it could be down to potential hardware failures/issues or even configuration of network devices for that matter.

Aside from that, firewalls, other traffic on the line or other software could be causing load on the network or even on the storage device itself, that might be going over timeouts or maximum retransmission limits.

Sending backups over an unreliable connection such as a VPN/WAN connection can also result in such a failure, unless using the Altaro Offsite Server tool for offsite copies.

Timeouts from specific NAS boxes when using domain credentials can also be causing such disconnections.

SOLUTION

There are numerous, distinct solutions applicable for backups failing with this error, seeing as it could be occurring for a number of reasons.

  • If you’re using a NAS as a backup location, it’s recommended that you utilise the credentials of the NAS box itself, even if it’s connected to Active Directory. The reason behind this, being that certain NAS’s have a timeout period associated for connections connected via domain credentials, so it could be the cause for the backup failure.
  • In addition to that this also doubles as a security measure in order to protect against Crypto-malware.
  • Another point to keep in mind if you’re using a NAS box, is to check whether the particular model you’re using has a sleep/standby option that could be causing such backup failure.
  • If you have other storage media available, try taking backups to this location, as the previous location may be experiencing hardware or software issues that may only present themselves during backup times. This will serve as a definite confirmation if the issue is with the previously configured location as well as a temporary solution.
  • If the backup location you have configured is going over an unreliable network, such a VPN/WAN connection, please note that this is not supported. This would only be supported if you’re making use of the Altaro Offsite Server which is only applicable for offsite copies and not primary backups.
  • If you’re using a backup device, such as a NAS which supports connections via iSCSI it’s recommended to set up the backup location this way. Devices connected via iSCSI usually perform better and in turn offer increased performance.
  • If the backup device is connected to a different switch to the backup server then it’s best to connect it to the same switch and re-test.
  • It’s recommended to change the network cables that the backup device and the backup server are connected with; additionally changing the ports on the switch would also be suggested.
  • Make sure Opportunity Locks (Oplocks) are disabled if the backup location is a NAS
  • If your backup location is a Windows machine, the equivalent to Oplocks is: Set-SmbServerConfiguration -EnableLeasing 0

    Run the above command via Powershell.
  • It’s also a good idea to reboot the backup device as well as the backup server to clear any open connections and refresh the devices.

    SessTimeout
    Key:HKLM\SYSTEM\CurrentControlSet\Services\LanmanWorkstation\Parameters\
    DWORD: SessTimeoutThe value entered here should be in seconds. You can try entering a value of 300 seconds (5 minutes) or 600 seconds (10 minutes). The default for this is 1 minute.
    This will increase the time the backup server waits for a response before the connection is aborted.

    TcpMaxDataRetransmissions
    Key:HKLM\SYSTEM\CurrentControlSet\Services\Tcpip\Parameters
    DWORD: TcpMaxDataRetransmissions
    The value entered here will reflect the number of retries. The default number for this is 5.This will increase the number of tries the TCP retransmission mechanism will attempt to transmit data before the connection is aborted.
  • If the above does not help and you’re still experiencing issues, it’s recommended to temporarily disable any firewalls and antivirus products on the backup server, the hosts and the backup device. This applies for both software and hardware firewalls.

Source :
https://help.altaro.com/hc/en-us/articles/4416921704081-Dealing-w

Microsoft finds Raspberry Robin worm in hundreds of Windows networks

Microsoft says that a recently spotted Windows worm has been found on the networks of hundreds of organizations from various industry sectors.

The malware, dubbed Raspberry Robin, spreads via infected USB devices, and it was first spotted in September 2021 by Red Canary intelligence analysts.

Cybersecurity firm Sekoia also observed it using QNAP NAS devices as command and control servers (C2) servers in early November [PDF], while Microsoft said it found malicious artifacts linked to this worm created in 2019.

Redmond’s findings align with those of the Red Canary’s Detection Engineering team, which also detected this worm on the networks of multiple customers, some of them in the technology and manufacturing sectors.

Although Microsoft observed the malware connecting to addresses on the Tor network, the threat actors are yet to exploit the access they gained to their victims’ networks.

This is in spite of the fact that they could easily escalate their attacks given that the malware can bypass User Account Control (UAC) on infected systems using legitimate Windows tools.

Microsoft shared this info in a private threat intelligence advisory shared with Microsoft Defender for Endpoint subscribers and seen by BleepingComputer.

Raspberry Robin worm infection flow
Raspberry Robin worm infection flow (Red Canary)

Abuses Windows legitimate tools to infect new devices

As already mentioned, Raspberry Robin is spreading to new Windows systems via infected USB drives containing a malicious .LNK file.

Once the USB device is attached and the user clicks the link, the worm spawns a msiexec process using cmd.exe to launch a malicious file stored on the infected drive.

It infects new Windows devices, communicates with its command and control servers (C2), and executes malicious payloads using several legitimate Windows utilities:

  • fodhelper (a trusted binary for managing features in Windows settings),
  • msiexec (command line Windows Installer component),
  • and odbcconf (a tool for configuring ODBC drivers).

“While msiexec.exe downloads and executes legitimate installer packages, adversaries also leverage it to deliver malware,” Red Canary researchers explained.

“Raspberry Robin uses msiexec.exe to attempt external network communication to a malicious domain for C2 purposes.”

Security researchers who spotted Raspberry Robin in the wild are yet to attribute the malware to a threat group and are still working on finding its operators’ end goal.

However, Microsoft has tagged this campaign as high-risk, given that the attackers could download and deploy additional malware within the victims’ networks and escalate their privileges at any time.

Source :
https://www.bleepingcomputer.com/news/security/microsoft-finds-raspberry-robin-worm-in-hundreds-of-windows-networks/

Microsoft Defender adds network protection for Android, iOS devices

Microsoft has introduced a new Microsoft Defender for Endpoint (MDE) feature in public preview to help organizations detect weaknesses affecting Android and iOS devices in their enterprise networks.

After enabling the new Mobile Network Protection feature on Android and iOS devices you want to monitor, the enterprise endpoint security platform will provide protection and notifications when it detects rogue Wi-Fi-related threats and rogue certificates (the primary attack vector for Wi-Fi networks).

Threats it can spot include rogue hardware such as Hak5 Wi-Fi Pineapple devices which both pen-testers and cybercriminals can use to capture data shared within the network.

MDE will also alert users to switch networks if it spots a suspicious or unsecured network and push notifications when it discovers open Wi-Fi networks.

While the feature is enabled by default on mobile devices, Microsoft also provides detailed info on configuring network protection on Android and iOS devices via the Microsoft Endpoint Manager Admin center.

“As the world continues to make sense of the digital transformation, networks are becoming increasingly complex and provide a unique avenue for nefarious activity if left unattended,” the company said this week.

“To combat this, Microsoft offers a mobile network protection feature in Defender for Endpoint that helps organizations identify, assess, and remediate endpoint weaknesses with the help of robust threat intelligence.”

Disable MDE Network Protection
Disabling MDE Network Protection (Microsoft)

Cross-platform endpoint security platform

This is part of a broader effort to expand Defender for Endpoint’s capabilities across all major platforms to allow security teams to defend network endpoints via a single, unified security solution.

In February, MDE on iOS was updated with zero-touch onboarding capability allowing admins to silently and automatically install Defender for Endpoint on enrolled devices.

One month later, Microsoft announced that threat and vulnerability management support for Android and iOS reached general availability in Microsoft Defender for Endpoint.

Android and iOS vulnerability management lets admins decrease mobile endpoints’ surface attack and, in the process, increase their organization’s resilience against incoming attacks.

“With this new cross-platform coverage, threat and vulnerability management capabilities now support all major device platforms across the organization – spanning workstations, servers, and mobile devices,” Microsoft said.

Earlier this month, Redmond also said that a new MDE feature allows admins to “contain” unmanaged Windows devices on their network if they were compromised or are suspected to be compromised to block malware and attackers from abusing them to move laterally through the network.

Source :
https://www.bleepingcomputer.com/news/microsoft/microsoft-defender-adds-network-protection-for-android-ios-devices/

Exit mobile version