SSL Certificates are a great way to increase the security of your hostname because they add an extra layer of security for you and anyone that visits your hostname. Learn the benefits of adding an SSL Certificate to your Free, Enhanced Dynamic DNS or Plus Managed DNS hostname.
What is an SSL Certificate? SSL stands for Secure Socket Layer. This means that your hostname is given a secure connection between it, the Internet browser, and the webserver. This allows websites to transmit private data online, without the worry of it being stolen. You can tell when a website has an SSL certificate enabled, when the HTTP in the URL ends with an S, making it an HTTPS. Example: https://www.noip.com.
What are the advantages of adding an SSL Certificate to your Free, Enhanced Dynamic DNS or Plus Managed DNS hostname?
Encryption and Verification
This is the biggest benefit of adding an SSL certificate to your hostname. The extra layer of encryption shows that your hostname is safe for people to visit. All of your visitor’s data will now be transmitted over an encrypted connection to the hostname and others won’t be able to see what is being sent.
The SSL Certificate also checks that the information it receives is coming from the expected domain. So, if your customer sends personal or private information, the SSL Certificate guarantees it is being sent to the secure site, and not to a potentially malicious one.
Ensures Data Integrity
A website that doesn’t have an SSL Certificate enabled sends data in a plain text format. This means that all of the data that is being sent between the server and the browser can be easily read. If a hacker were to gain access to your domain and then change the information being presented on your hostname, this is an example of domain spoofing.
Domain spoofing happens when a hacker gains access to the information on a website and then changes it before it gets sent to the browser for the user. When this happens, the user is typically not even aware they are visiting a compromised website. When an SSL certificate is enabled on the hostname, this becomes much harder as the data is not sent in plain text, but is sent in an encrypted, unreadable format.
Gains Your Users Trust
When you use an SSL Certificate, your hostname shows up with an HTTPS and a lock icon, signifying the hostname is secure. This helps users feel safe when they are on your hostname and makes them feel comfortable if you are asking them to enter sensitive information, like credit cards, or Social Security numbers.
Our Free Dynamic DNS, Enhanced Dynamic DNS and Plus Managed DNS accounts both come with 1 Free TrustCor Standard DV SSL Certificate. Additional SSL Certificates can be purchased and start at just $19.99 per year. You can learn more about each SSL Certificate and how you can add one today here.
A few months ago, we announced that all Enhanced Dynamic DNS subscriptions now include one TrustCor Standard DV SSL Certificate. Well, to finish the year off with a bang, we are here with another announcement!
We now include one TrustCor Standard DV SSL Certificate with every Free Dynamic DNS, Enhanced Dynamic DNS and Plus Managed DNS service. We know that having a secure hostname is important to you and now you can install an SSL on any hostnames managed by No-IP for free!
Our Enhanced Dynamic DNS and Plus Managed DNS customers are eligible to create a TrustCor Standard DV SSL Certificate at any time. Free Dynamic DNS accounts are eligible to create a certificate on an active hostname after their account has been active for at least 30 days.
What are SSL Certificates?
An SSL certificate allows internet connections between two systems to be authenticated and encrypted. This allows people to connect to your server and send information without anyone in the middle being able to see what is being sent. Most browsers will display a security warning to your site’s visitors if you do not have a valid certificate installed.
Why is a TrustCor Standard DV SSL Certificates (Included with No-IP Free Dynamic DNS) better than a different free SSL Certificate solution?
Our free TrustCor Standard DV SSL Certificates are valid for a year, but can be easily reissued. Free SSL Certificates from others require validation once every 90 days.
Domain Validation is automated and happens instantly. No more waiting around for your domain to be verified. Other solutions can take days and are not automated with No-IP.
TXT Record automatically added for domain validation.
Very rapid time to issue and validate (typically within 20 minutes).
Strongest SSL encryption using SHA-2 algorithms and 2048-bit RSA keys.
Not currently a No-IP customer? Let us introduce ourselves to you.
We are a Dynamic DNS and Managed DNS company that has been around since 1999. We have over 30 million customers, all around the world who utilize our services for remote accessing devices in a simple and secure way that eliminates the need to use third-party cloud services.
We offer a Free Dynamic DNS service that millions of customers use daily to access their devices from anywhere. Whether it is checking in on a loved one via a remote security camera, accessing a computer remotely, or even running a game server to play games with friends and family safely, No-IP has a remote access solution that works! To learn more about our Free Dynamic DNS, check out our Remote Access and sign up for your Free Dynamic DNS account now.
A VMware vSphere environment includes many components to deliver business-critical workloads and services. However, there is a feature of today’s modern VMware vSphere infrastructure that is arguably underutilized – the VMware Content Library. Nevertheless, it can be a powerful tool that helps businesses standardize the workflow using files, templates, ISO images, vApps, scripts, and other resources to deploy and manage virtual machines. So how can organizations manage resources across sites with the VMware Content Library?
What is the VMware Content Library?
Most VI admins will agree with multiple vCenter Servers in the mix, managing files, ISOs, templates, vApps, and other resources can be challenging. For example, have you ever been working on one cluster and realized you didn’t have the ISO image copied to a local datastore that is accessible, and you had to “sneakernet” the ISO where you could mount and install it? What about virtual machine templates? What if you want to have the virtual machine templates in one vCenter Server environment available to another vCenter Server environment?
The VMware Content Library is a solution introduced in vSphere 6.0 that allows customers to keep their virtual machine resources synchronized in one place and prevent the need for manual updates to multiple templates and copying these across between vCenter Servers. Instead, administrators can create a centralized repository using the VMware Content Library from which resources can be updated, shared, and synchronized between environments.
Using the VMware Content Library, you essentially create a container that can house all of the important resources used in your environment, including VM-specific objects like templates and other files like ISO image files, text files, and other file types.
The VMware Content Library stores the content as a “library item.” Each VMware Content Library can contain many different file types and multiple files. VMware gives the example of the OVF file that you can upload to your VMware Content Library. As you know, the OVF file is a bundle of multiple files. However, when you upload the OVF template, you will see a single library entry.
VMware has added some excellent new features to the VMware Content Library features in the past few releases. These include the ability to add OVF security policies to a content library. The new OVF security policy was added in vSphere 7.0 Update 3. It allows implementing strict validation for deploying and updating content library items and synchronizing templates. One thing you can do is make sure a trusted certificate signs the templates. To do this, you can deploy a signing certificate for your OVFs from a trusted CA to your content library.
Another recent addition to the VMware Content Library functionality introduced in vSphere 6.7 Update 1 is uploading a VM template type directly to the VMware Content Library. Previously, VM templates were converted to an OVF template type. Now, you can work directly with virtual machine templates in the VMware Content Library.
VMware Content Library types
VMware Content Library enables managing resources across sites using two different types of content libraries. These include the following:
Local Content Library – A local content library is a VMware Content Library used to store and manage content residing in a single vCenter Server environment. Suppose you work in a single vCenter Server environment and want to have various resources available across all your ESXi hosts to deploy VMs, vAPPs, install from ISO files, etc. In that case, the local content library allows doing that. With the local content library, you can choose to Publish the local content library. When you publish the Content Library, you are making it available to be subscribed to or synchronized.
Subscribed Content Library – The other type of Content Library is the subscribed content library. When you add a subscribed VMware Content Library type, you are essentially downloading published items from a VMware Content Library type that has published items as mentioned in the Local Content Library section. In this configuration, you are only a consumer of the VMware Content Library that someone else has published. It means when creating the Content Library, the publish option was configured. You can’t add templates and other items to the subscribed VMware Content Library type as you can only synchronize the content of the subscribed Content Library with the content of the published Content Library.
With a subscribed library, you can choose to download all the contents of the published Content Library immediately once the subscribed Content Library is created. You can also choose to download only the metadata for items in the published Content Library and download the entire contents of the items you need. You can think of this as a “files on-demand” type feature that only downloads the resources when these are required.
Below is an example of the screen when configuring a content library that allows creating either a Local Content Library or the Subscribed Content Library:
Choosing the content library type
Create a local or subscription Content Library in vSphere 7
Creating a new VMware Content Library is a relatively straightforward and intuitive process you can accomplish in the vSphere Client. Let’s step through the process to create a new VMware Content Library. We will use the vSphere Web Client to manage and configure the Content Library Settings.
Using the vSphere Web Client to manage the Content Library
First, click the upper left-hand “hamburger” menu in the vSphere Client. You will see the option Content Libraries directly underneath the Inventory menu when you click the menu.
Choosing the Content Libraries option to create a manage Content Libraries
Under the Content Libraries screen, you can Create new Content Libraries.
Creating a new Content Library in the vSphere Client
It will launch the New Content Library wizard. In the Name and Location screen, name the new VMware Content Library.
New Content Library name and location
On the Configure content library step, you configure the content library type, including configuring a local content library or a subscribed content library. Under the configuration for Local content library, you can Enable publishing. If publishing is enabled, you can also enable authentication.
Configuring the Content Library type
When you configure publishing and authentication, you can configure a password on the content library.
Step 3 is the Apply security policy step. It allows applying the OVF default policy to protect and enforce strict validation while importing and synchronizing OVF library items.
Choosing to apply the OVF default policy
The VMware Content Library needs to have a storage location that will provide the storage for the content library itself. First, select the datastore you want to use for storing your content library. The beauty of the content library is that it essentially publishes and shares the items in the content library itself, even though they may be housed on a particular datastore.
Select the storage to use for storing items in the VMware Content Library
Finally, we are ready to complete the creation of the Content Library. Click Finish.
Finishing the creation of the VMware Content Library
Once the VMware Content Library is created, you can see the details of the library, including the Publication section showing the Subscription URL.
Viewing the settings of a newly created VMware Content Library
As a note. If you click the Edit Settings hyperlink under the Publication settings pane, you can go in and edit the settings of the Content Library, including the publishing options, authentication, changing the authentication password, and applying a security policy.
Editing the settings of a VMware Content Library
Creating a subscribed VMware Content Library
As we mentioned earlier, configuring a subscribed content library means synchronizing items from a published content library. In the New Content Library configuration wizard, you choose the Subscribed content library option to synchronize with a published content library. Then, enter the subscription URL for the published content library when selected. As shown above, this URL is found in the settings of the published content library.
You will need to also place a check in the Enable authentication setting if the published content library was set up with authentication. Then, enter the password configured for the published content library. Also, note the configuration for downloading content. As detailed earlier, you can choose to synchronize items immediately, meaning the entire content library will be fully downloaded. Or, you can select when needed, which acts as a “files on demand” configuration that only downloads the resources when needed.
Configuring the subscribed content library
Choose the storage for the subscribed Content Library.
Add storage for the subscribed VMware Content Library
Ready to complete adding a new subscribed VMware Content Library. Click Finish.
Ready to complete adding a subscribed VMware Content Library
Interestingly, you can add a subscribed VMware Content Library that is subscribed to the same published VMware Content Library on the same vCenter Server.
Published and subscribed content library on the same vCenter Server
What is Check-In/Check-Out?
A new feature included with VMware vSphere 7 is versioning with the VMware Content Library. So often, with virtual machine templates, these are frequently changed, updated, and configured. As a result, it can be easy to lose track of the changes made, the user making the modifications, and track the changes efficiently.
Now, VMware vSphere 7 provides visibility into the changes made to virtual machine templates with a new check-in/check-out process. This change embraces DevOps workflows with a way for IT admins to check in and check out virtual machine templates in and out of the Content Library.
Before the new check-in/check-out feature, VI admins might use a process similar to the following to change a virtual machine template:
Convert a virtual machine template to a virtual machine
Place a snapshot on the converted template to machine VM
Make whatever changes are needed to the VM
Power the VM off and convert it back to a template
Re-upload the VM template back to the Content Library
Delete the old template
Internally notify other VI admins of the changes
Now, VI admins can use a new capability in vSphere 7.0 and higher to make changes to virtual machine templates more seamlessly and track those changes effectively.
Clone as template to Library
The first step is to house the virtual machine template in the Content Library. Right-click an existing virtual machine to use the new functionality and select Clone as Template to Library.
Clone as Template to Library functionality to use the check-in and check-out feature
As a note, if you see the Clone to Library functionality instead of Clone as Template to Library, it means you have not converted the VM template to a virtual machine. If you right-click a VM template, you only get the Clone to Library option. If you select Clone to Template, it only allows cloning the template in a traditional way to another template on a datastore.
Right-clicking and cloning a VM template only gives the option to Clone to Library
Continuing with the Clone to Library process, you will see the Clone to Template in Library dialog box open. Select either New template or Update the existing template.
Clone to Template in Library
In the vCenter Server tasks, you will see the process begin to Upload files to a Library and Transfer files.
Uploading a virtual machine template to the Content Library
When you right-click a virtual machine and not a virtual machine template, you will see the additional option of Clone as Template to Library.
Clone as Template to Library
It then brings up a more verbose wizard for the Clone Virtual Machine To Template process. The first screen is the Basic information where you define the Template type (can be OVF or VM Template), the name of the template, notes, and select a folder for the template.
Configuring basic information for the clone virtual machine to template process
On the Location page, you select the VMware Content Library you want to use to house the virtual machine template.
Select the VMware Content Library to house the virtual machine template
Select a compute resource to house your cloned VM template.
Select the compute resource for the virtual machine template
Select the storage for the virtual machine template.
Select storage to house the VM template
Finish the Clone Virtual Machine to Template process.
Finish the clone of the virtual machine to template in the VMware Content Library
If you navigate to the Content Library, you will see the template listed under the VM Templates in the Content Library.
Viewing the VM template in the Content Library
Checking templates in and out
If you select the radio button next to the VM template, the Check Out VM From This Template button will appear to the right.
Launching the Check out VM from this template
When you click the button, it will launch the Check out VM from VM Template wizard. First, name the new virtual machine that will be created in the check-out process.
Starting the Check out VM from VM template
Select the compute resource to house the checked-out virtual machine.
Selecting a compute resource
Review and finish the Check out VM from VM template process. You can select to power on VM after check out.
Review and Finish the Check out VM from VM Template
The checked-out virtual machine will clone from the existing template in the Content Library. Also, you will see an audit trail of the check-outs from the Content Library. You are directed to Navigate to the checked-out VM to make updates. Note you then have the button available to Check In VM to Template.
Virtual machine template is checked out and deployed as a virtual machine in inventory
If you navigate to the Inventory view in the vSphere Client, you will see the machine has a tiny blue dot in the lower left-hand corner of the virtual machine icon.
Viewing the checked-out VM template as a virtual machine in vSphere inventory
After making one small change, such as changing the virtual network the virtual machine is connected to, we see the option appear to Check In VM to Template.
Check In VM to Template
It will bring up the Check In VM dialog box, allowing you to enter notes and then click the Check In button.
Check In the VM
We see the audit trail of changes reflected in the Content Library with the notes we entered in the Check in notes.
Virtual machine template checked back in with the notes entered in the check-in process
You will also see a new Versioning tab displayed when you view the virtual machine template in the inventory view.
Viewing the versioning of a virtual machine template in the inventory view
VMware Content Library Roles
There are various privileges related to Content Library privileges. VMware documents the following privileges that can be assigned to a custom VMware Content Library Role.
Privilege Name
Description
Required On
Content library.Add library item
Allows addition of items in a library.
Library
Content library.Add root certificate to trust store
Allows addition of root certificates to the Trusted Root Certificates Store.
vCenter Server
Content library.Check in a template
Allows checking in of templates.
Library
Content library.Check out a template
Allows checking out of templates.
Library
Content library.Create a subscription for a published library
Allows creation of a library subscription.
Library
Content library.Create local library
Allows creation of local libraries on the specified vCenter Server system.
vCenter Server
Content library.Create or delete a Harbor registry
Allows creation or deletion of the VMware Tanzu Harbor Registry service.
vCenter Server for creation. Registry for deletion.
Content library.Create subscribed library
Allows creation of subscribed libraries.
vCenter Server
Content library.Create, delete or purge a Harbor registry project
Allows creation, deletion, or purging of VMware Tanzu Harbor Registry projects.
Registry
Content library.Delete library item
Allows deletion of library items.
Library. Set this permission to propagate to all library items.
Content library.Delete local library
Allows deletion of a local library.
Library
Content library.Delete root certificate from trust store
Allows deletion of root certificates from the Trusted Root Certificates Store.
vCenter Server
Content library.Delete subscribed library
Allows deletion of a subscribed library.
Library
Content library.Delete subscription of a published library
Allows deletion of a subscription to a library.
Library
Content library.Download files
Allows download of files from the content library.
Library
Content library.Evict library item
Allows eviction of items. The content of a subscribed library can be cached or not cached. If the content is cached, you can release a library item by evicting it if you have this privilege.
Library. Set this permission to propagate to all library items.
Content library.Evict subscribed library
Allows eviction of a subscribed library. The content of a subscribed library can be cached or not cached. If the content is cached, you can release a library by evicting it if you have this privilege.
Library
Content library.Import Storage
Allows a user to import a library item if the source file URL starts with ds:// or file://. This privilege is disabled for content library administrator by default. Because an import from a storage URL implies import of content, enable this privilege only if necessary and if no security concern exists for the user who performs the import.
Library
Content library.Manage Harbor registry resources on specified compute resource
Allows management of VMware Tanzu Harbor Registry resources.
Compute cluster
Content library.Probe subscription information
This privilege allows solution users and APIs to probe a remote library’s subscription info including URL, SSL certificate, and password. The resulting structure describes whether the subscription configuration is successful or whether there are problems such as SSL errors.
Library
Content library.Publish a library item to its subscribers
Allows publication of library items to subscribers.
Library. Set this permission to propagate to all library items.
Content library.Publish a library to its subscribers
Allows publication of libraries to subscribers.
Library
Content library.Read storage
Allows reading of content library storage.
Library
Content library.Sync library item
Allows synchronization of library items.
Library. Set this permission to propagate to all library items.
Content library.Sync subscribed library
Allows synchronization of subscribed libraries.
Library
Content library.Type introspection
Allows a solution user or API to introspect the type support plug-ins for the content library service.
Library
Content library.Update configuration settings
Allows you to update the configuration settings.
Library
No vSphere Client user interface elements are associated with this privilege.
Content library.Update files
Allows you to upload content into the content library. Also allows you to remove files from a library item.
Library
Content library.Update library
Allows updates to the content library.
Library
Content library.Update library item
Allows updates to library items.
Library. Set this permission to propagate to all library items.
Content library.Update local library
Allows updates of local libraries.
Library
Content library.Update subscribed library
Allows you to update the properties of a subscribed library.
Library
Content library.Update subscription of a published library
Allows updates of subscription parameters. Users can update parameters such as the subscribed library’s vCenter Server instance specification and placement of its virtual machine template items.
Library
Content library.View configuration settings
Allows you to view the configuration settings.
Library
No vSphere Client user interface elements are associated with this privilege.
Advanced Content Library settings
Several advanced configuration settings are configurable with the VMware Content Library. You can get to these by navigating to Content Libraries > Advanced.
This setting enables automatic synchronization of subscribed content libraries.
Library Auto Sync Refresh Interval (minutes)
The Interval between two consequent automatic synchronizations of the subscribed content library. This interval is measured in minutes.
Library Auto Sync Setting Refresh Interval (seconds)
This is the Interval after which the refresh interval for the automatic synchronization settings of the subscribed library will be updated if it has been changed. It is measured in seconds. A change in the refresh interval requires a restart of vCenter Server.
Library Auto Sync Start Hour
This setting refers to the time of day when the automatic synchronization of a subscribed content library begins
Library Auto Sync Stop Hour
This setting refers to the time of day when the automatic synchronization of a subscribed content library stops. Automatic synchronization stops until the start hour.
Library Maximum Concurrent Sync Items
The maximum number of items concurrently synchronizing for each subscribed library.
Max concurrent NFC transfers per ESX host
The maximum concurrent NFC transfers per ESXi host limit
Maximum Bandwidth Consumption
The bandwidth usage threshold. It is measured in Mbps across all transfers where 0 means unlimited bandwidth.
Maximum Number of Concurrent Priority Transfers
The Concurrent transfer limit for priority files. Tranfers are queued if the bandwidth limit is exceeded. This threadpool is used only to transfer priority objects. For example, if you change the concurrent transfer limit for priority files, such as OVF, you must restart vCenter Server.
Maximum Number of Concurrent Transfers
Concurrent transfer limit. When exceeded, the transfers are queued. If you change the concurrent transfer limit, it requires a restart of vCenter Server.
To properly protect your VMware environment, use Altaro VM Backup to securely backup and replicate your virtual machines. We work hard perpetually to give our customers confidence in their VMware backup strategy.
To keep up to date with the latest VMware best practices, become a member of the VMware DOJO now (it’s free).
Wrapping up
The VMware Content Library provides a centralized repository that allows keeping required file resources, virtual machine templates, ISO images vApps, and other files synchronized and available across the vSphere datacenter. In vSphere 7, the Content Library allows organizations to have a better way to keep up with and track changes to virtual machine templates. Using the new check-in/check-out process, VI admins can track changes made with each check-out and ensure these are documented and synchronized back to the Content Library.
It effectively provides a solution to remove the need to copy files between ESXi hosts or vSphere clusters and have what you need to install guest operating systems or deploy virtual machine templates. In addition, the subscribed Content Library allows synchronizing vCenter Server content libraries so that many other vCenter Servers can take advantage of the files already organized in the published Content Library.
The VMware Content Library is one of the more underutilized tools in the VI admin’s toolbelt that can bring about advantages in workflow, efficiency, and time spent finding and organizing files for deploying VMs and OS’es. In addition, the recent feature additions and improvements, such as check-ins/check-outs, have provided a more DevOps approach to tracking and working with deployment resources.
After gaining access via RDP, all three threat actors encrypted files, in an investigation complicated by event log clearing and backups. 3 attackers, 2 weeks – 1 entry point.
In May 2022, an automotive supplier was hit with three separate ransomware attacks. All three threat actors abused the same misconfiguration – a firewall rule exposing Remote Desktop Protocol (RDP) on a management server – but used different ransomware strains and tactics.
The first ransomware group, identified as Lockbit, exfiltrated data to the Mega cloud storage service, used Mimikatz to extract passwords, and distributed their ransomware binary using PsExec.
The second group, identified as Hive, used RDP to move laterally, before dropping their ransomware just two hours after the Lockbit threat actor.
As the victim restored data from backups, an ALPHV/BlackCat affiliate accessed the network, installed Atera Agent (a legitimate remote access tool) to establish persistence, and exfiltrated data. Two weeks after the Lockbit and Hive attacks, the threat actor distributed their ransomware, and cleared Windows Event Logs. Sophos’ Rapid Response (RR) team investigated, and found several files which had been encrypted multiple times – as many as five in some instances.
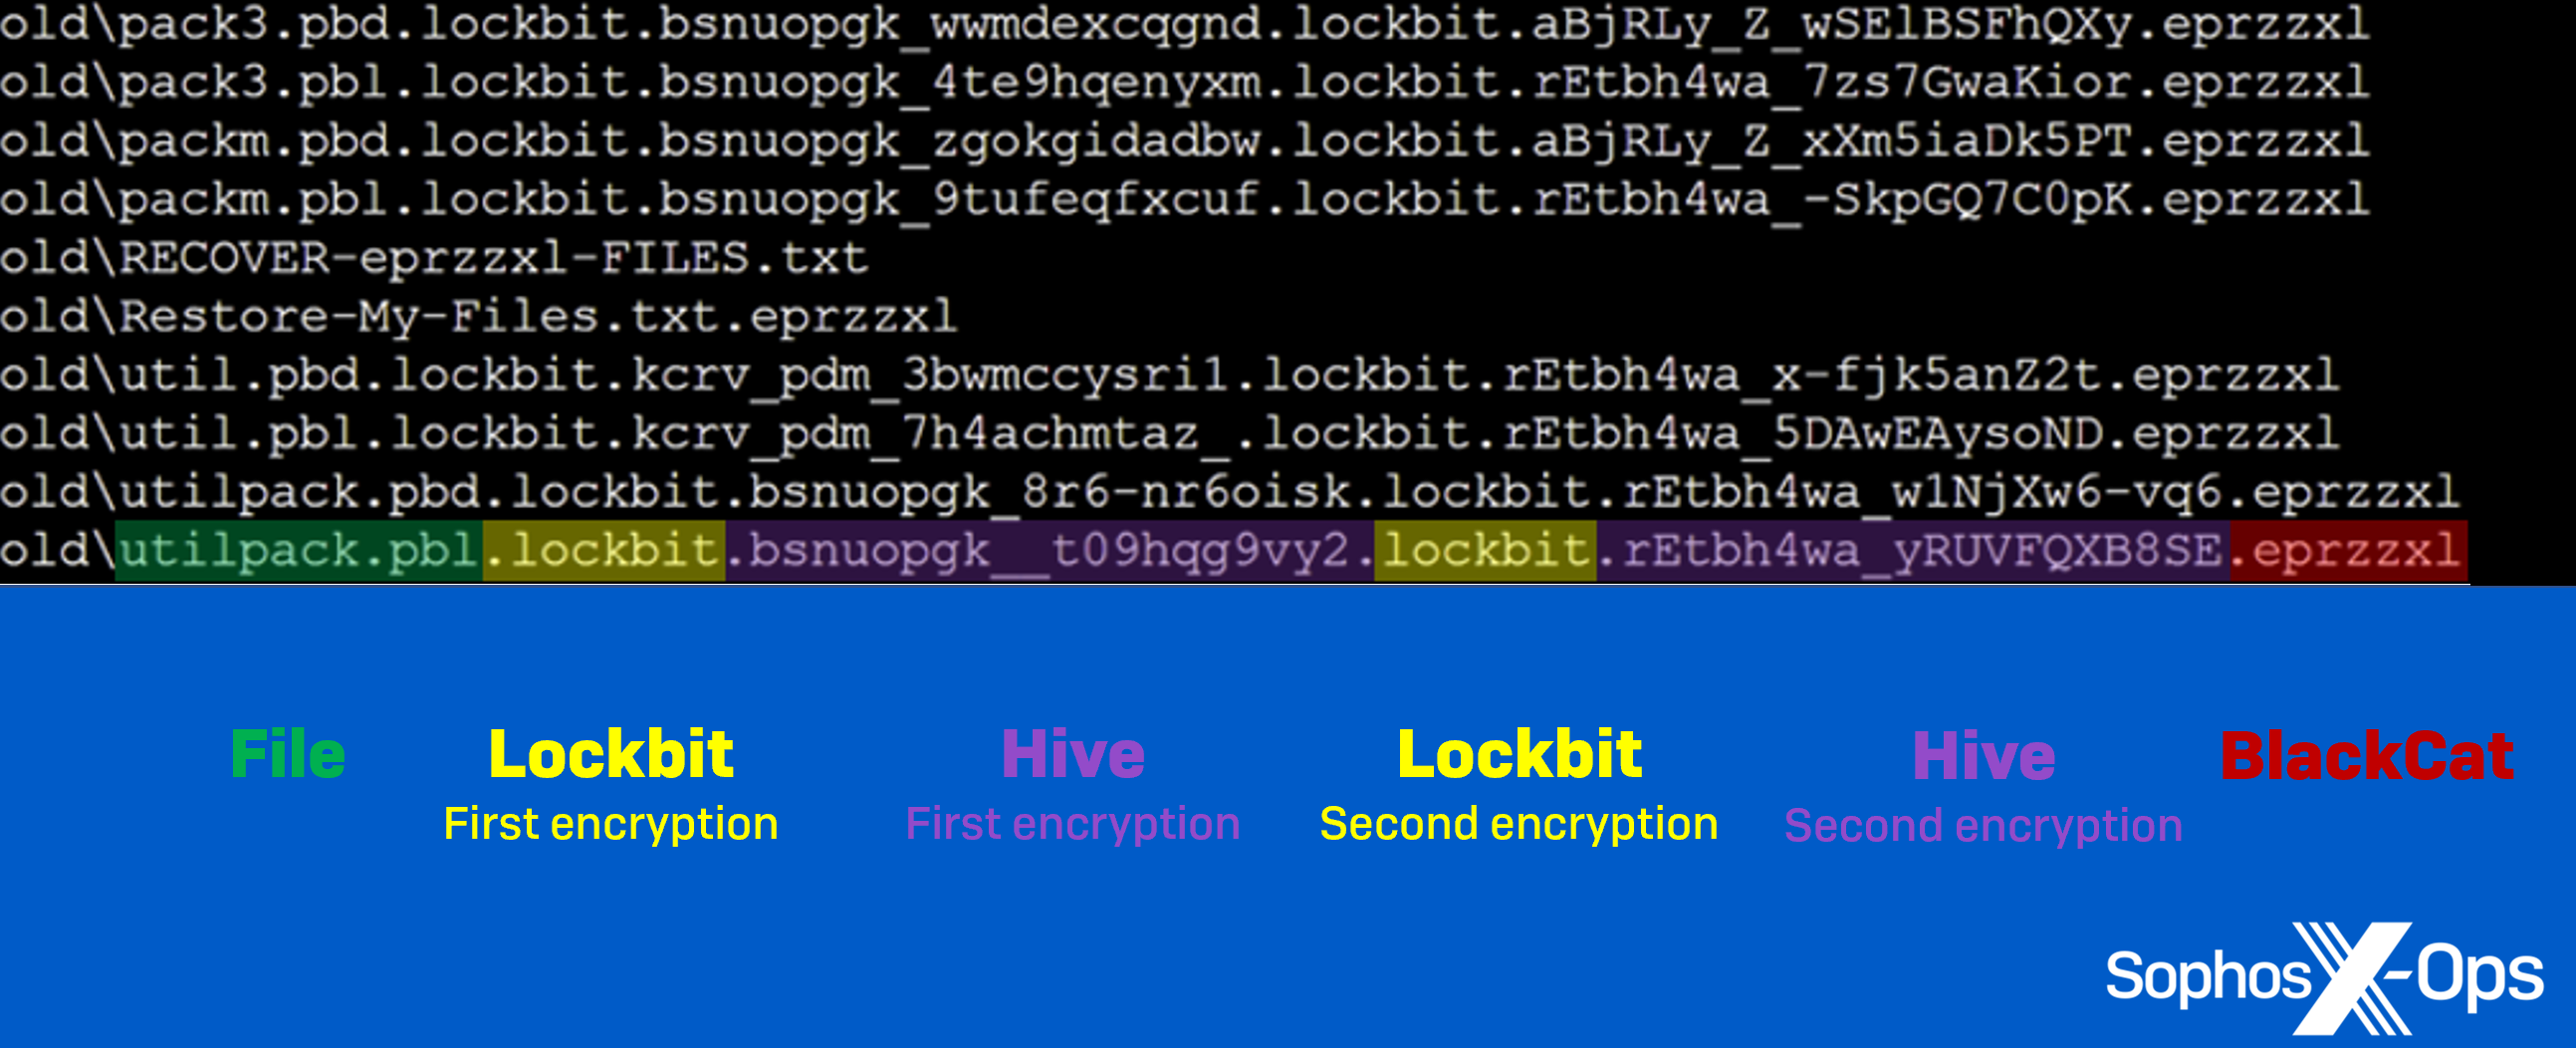
Figure 1: Files which had been encrypted five times – twice each by Lockbit and Hive, and once by ALPHV/BlackCat
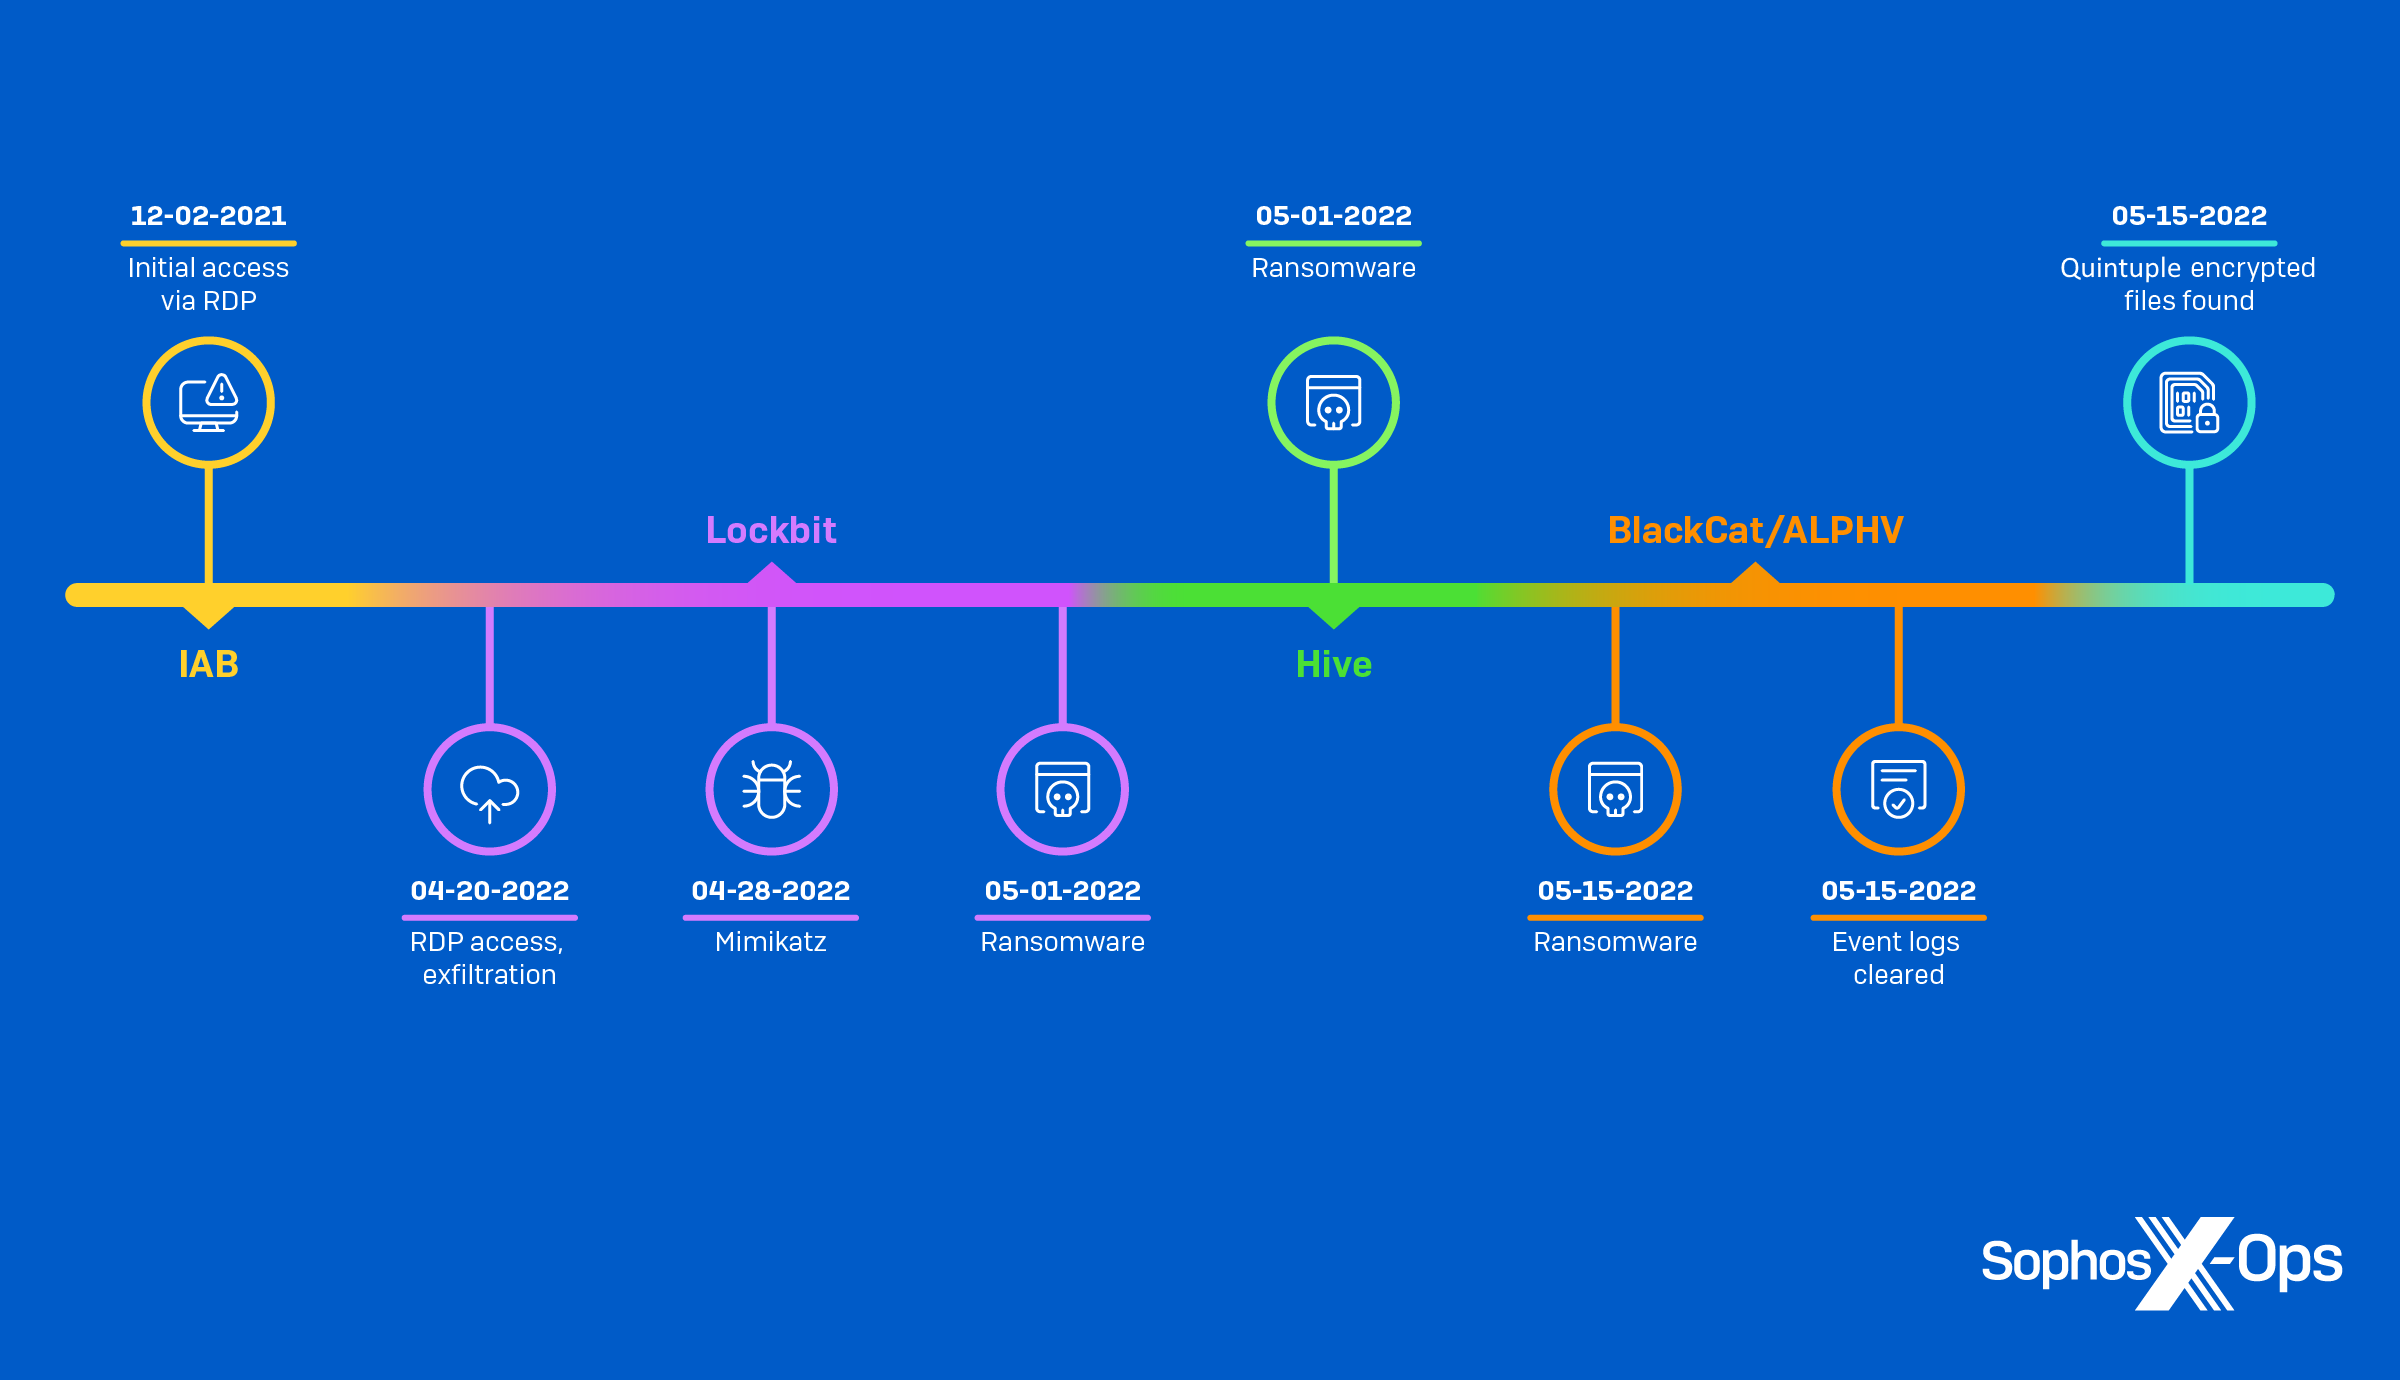
Figure 2: The multi-attacker timeline discovered by Sophos X-Ops
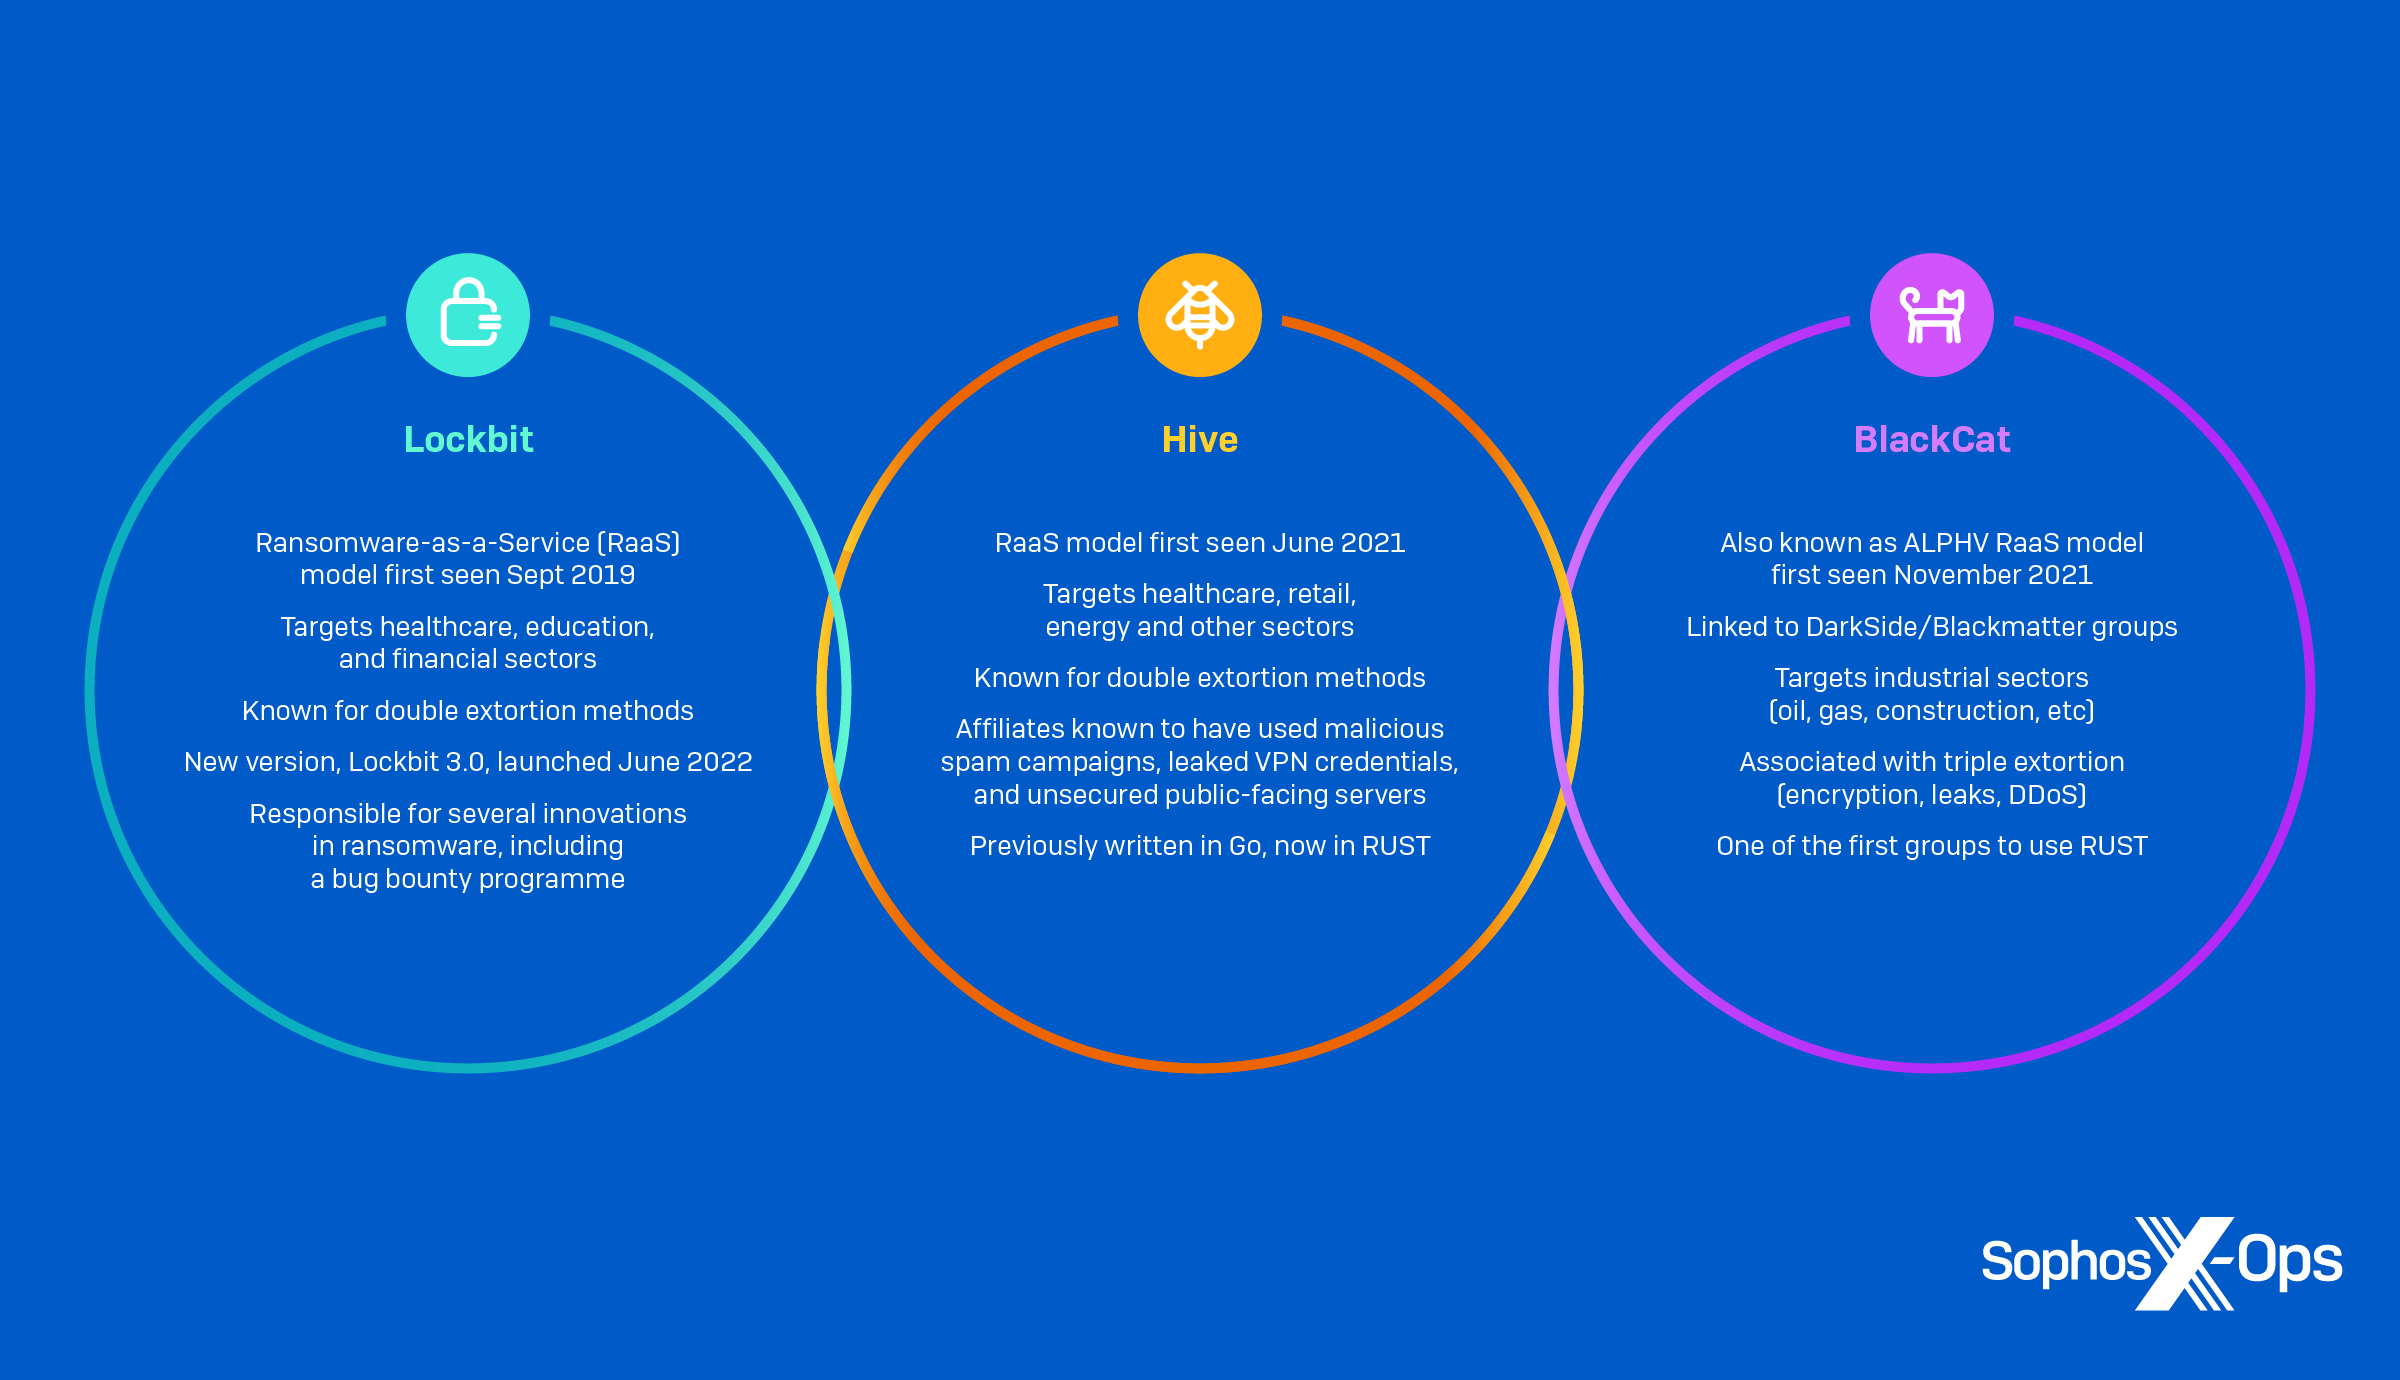
Figure 3: A brief overview of the three ransomware groups that consecutively attacked one organization
While the attacks took place in May, we discovered that a threat actor established an RDP session on the organization’s domain controller, way back in December 2021. This might have been an initial access broker (IAB) – an attacker who finds vulnerable systems and sells access to them on criminal marketplaces – or an early scouting mission by one of the three threat actors.
Either way, in mid-April 2022, a Lockbit affiliate gained RDP access to the organization’s corporate environment through an exposed management server.
Next, the threat actor moved laterally to a domain controller and other hosts, and began exfiltrating data to the Mega cloud storage service, as well as executing two PowerShell scripts: sharefinder.ps1 (to gather information about connected domain network shares) and invoke-mimikatz.ps1 (to extract passwords from LSASS, the Local Security Authority Subsystem Service).
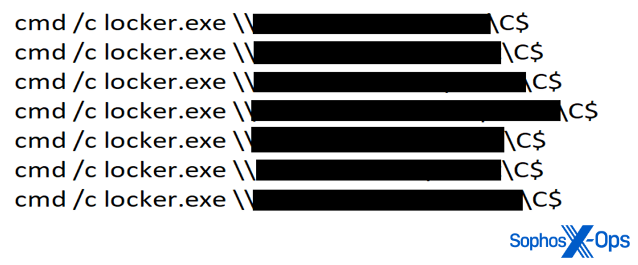
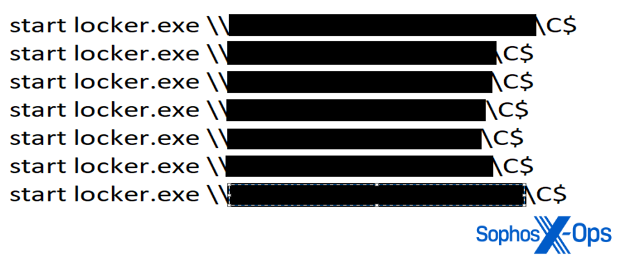
On May 1st, the Lockbit affiliate created two batch scripts (1.bat and 2.bat) to distribute the ransomware binaries LockBit_AF51C0A7004B80EA.exe and Locker.exe across the network, via PsExec.
Figure 4: 1.bat script
Figure 5: 2.bat script
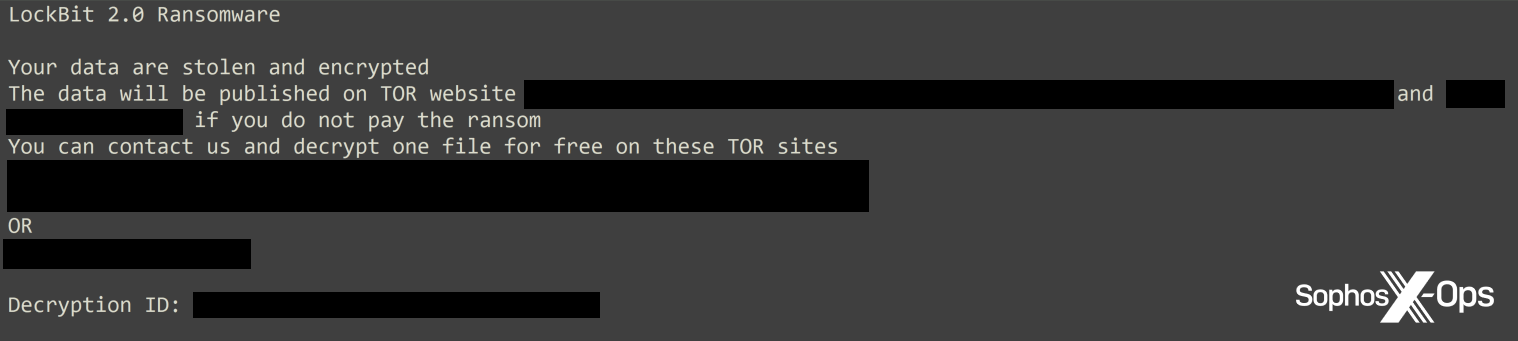
Upon execution, the ransomware encrypted files on nineteen hosts and dropped ransom notes entitled Restore-My-Files.txt.
Figure 6: The Lockbit ransom note
Two hours later, while the Lockbit threat actor was still encrypting files, a Hive ransomware affiliate gained access to the network via the same exposed RDP server and used RDP to move laterally to other hosts.
Hive used legitimate software (PDQ Deploy) already installed on the network to distribute its ransomware binary windows_x32_encrypt.exe. This tactic, known as ‘living off the land’, is popular among threat actors – particularly ransomware actors – as it has a small footprint and is less likely to be detected than downloading malicious tools.
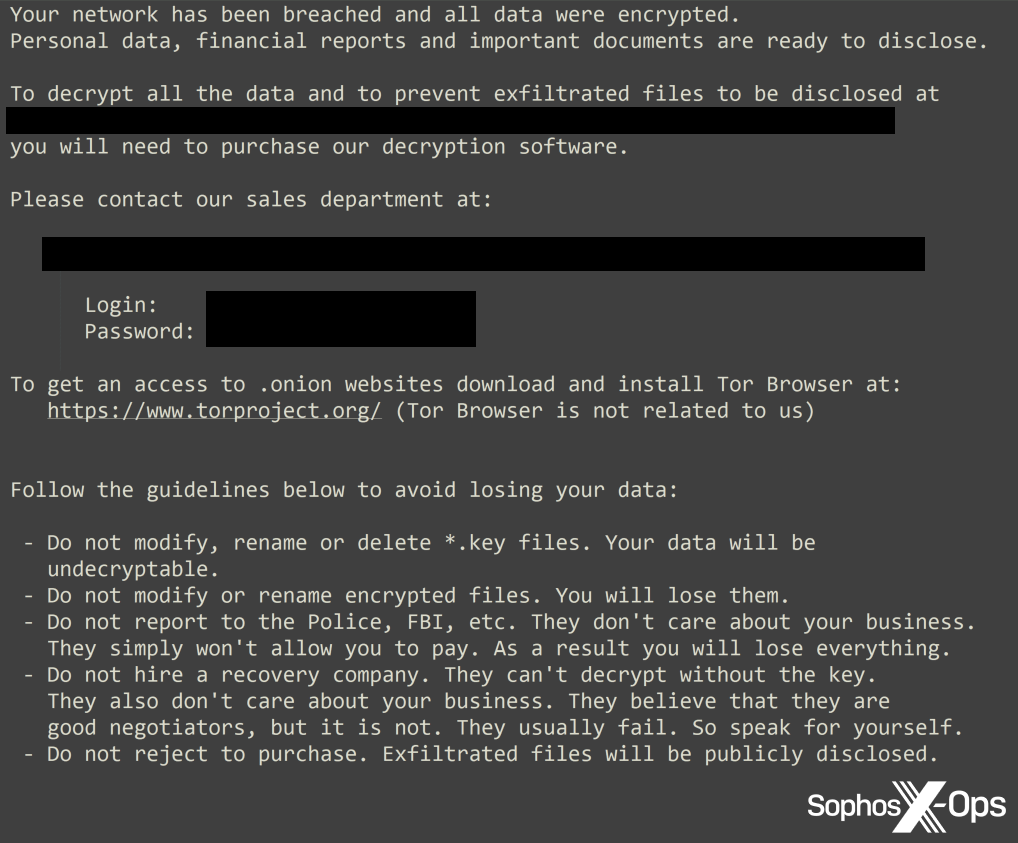
Hive’s ransomware binary encrypted files on sixteen hosts and dropped a further ransom note, HOW_TO_DECRYPT.txt, on impacted devices.
Figure 7: The Hive ransom note
At this point, the organization’s IT team restored most of the infected systems to April 30, the day before the Lockbit threat actor began to encrypt files. From an investigative perspective, this meant some crucial evidence was lost. But the attacks were not over yet.
Only a day after that system restore, an ALPHV/BlackCat affiliate arrived, making RDP connections to domain controllers, file servers, application servers, and other hosts – all from the same management server exploited by Lockbit and Hive.
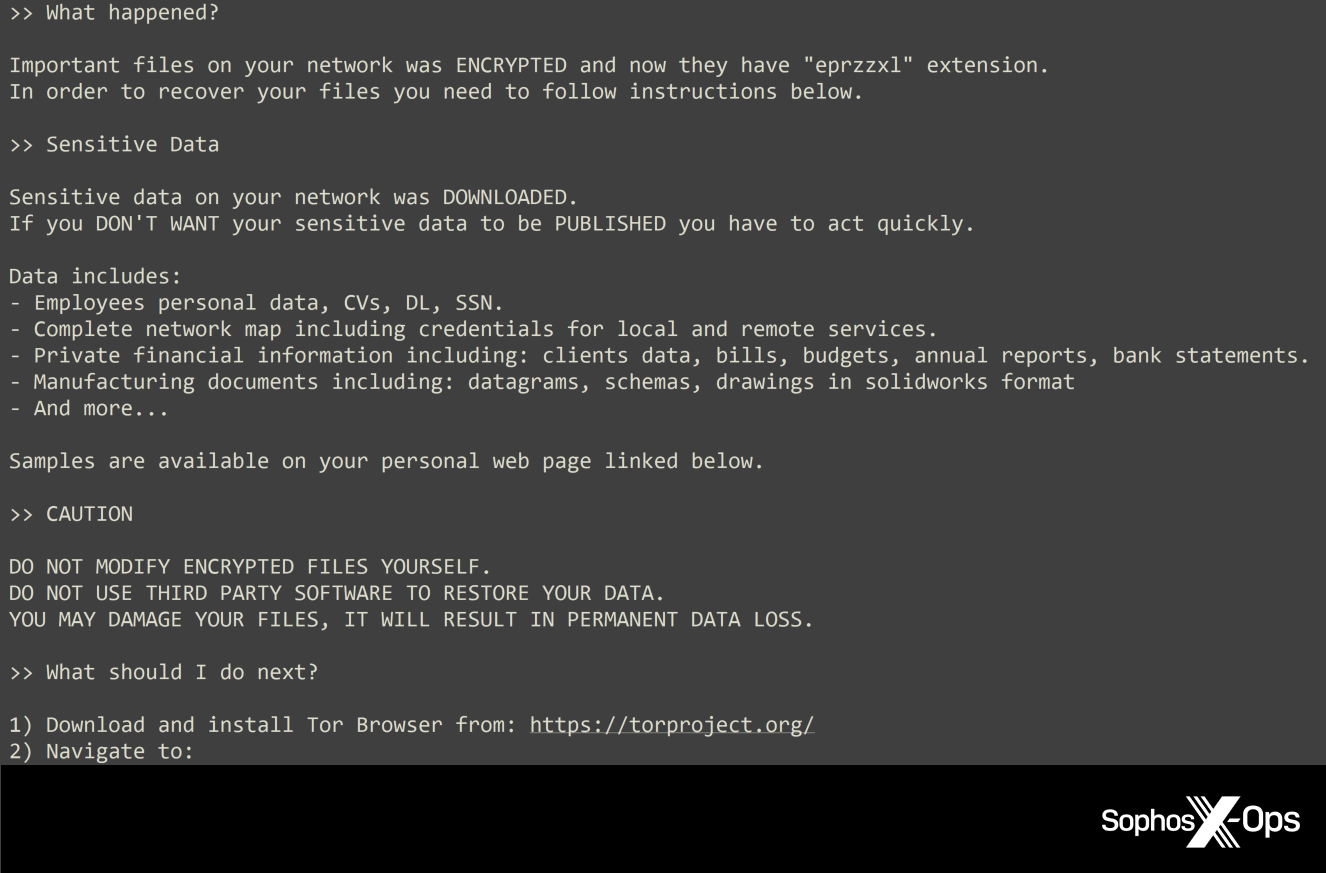
The ALPHV/BlackCat threat actor exfiltrated data to Mega over the course of a week, and established persistence by installing a backdoor: a legitimate remote access tool named Atera Agent. On May 15th – two weeks after the Lockbit and Hive attacks – the ALPHV/BlackCat affiliate used the credentials of a compromised user to drop ransomware binaries fXXX.exe and fXXXX.exe on six hosts, leaving a ransom note titled RECOVER-eprzzxl-FILES.txt in every folder.
Figure 8: The ALPHV/BlackCat ransom note
Based on analysis from SophosLabs researchers, these binaries not only encrypted files but also deleted volume shadow copies and Windows Event logs. This further complicated our subsequent investigation, as the ALPHV/BlackCat actor erased not only logs relating to their attack, but also those relating to the attacks by Lockbit and Hive.
It’s not clear why Lockbit and ALPHV/BlackCat deployed two ransomware binaries, but one possible reason is fault tolerance: If one executable is detected or blocked, or fails to encrypt, the second might act as a back-up.
Key features of the BlackCat ransomware binaries
The two BlackCat ransomware binaries, fXXX.exe and fXXXX.exe, have the following functionality:
Encrypt files and add the extension .eprzzxl
Collect Universally Unique IDs (UUIDs) from the impacted devices:
wmic csproduct get UUID
Enable Remote to Local and Remote to Remote symbolic link evaluations that allow easy access to files and folders in remote locations:
fsutil behavior set SymlinkEvaluation R2L:1
fsutil behavior set SymlinkEvaluation R2R:1
Modify a registry key to allow the maximum number of network requests by remote processes:
Disable Windows automatic repair on the impacted device
bcdedit /set {default} recoveryenabled No
Clear Windows Event logs
cmd.exe /c for /F \"tokens=*\" %1 in ('wevtutil.exe el') DO wevtutil.exe cl \"%1\"
The aftermath
After the dust had settled, Sophos’ RR team found files that had been encrypted by all three ransomware groups. In fact, as shown in the screenshot below, some files had even been encrypted five times! Because the Hive attack started 2 hours after Lockbit, the Lockbit ransomware was still running – so both groups kept finding files without the extension signifying that they were encrypted.
Figure 9: An example of quintuple-encrypted files
However, despite all three ransomware groups being known for ‘double extortion’ techniques (where, in addition to encrypting files, threat actors threaten to publish the victim’s data if the ransom is not paid), no information was published on any of the groups’ leak sites.
Several things complicated this investigation. The system restoration, BlackCat’s log-wiping, and a lack of DHCP logging all contrived to make piecing together the attacks extremely difficult. Despite these challenges, Sophos’ Rapid Response team was able to gather and analyze the evidence left behind.
When it comes to defense, there are two elements: proactive (following security best practices to minimize the risk of being attacked), and reactive (how to recover quickly and safely if an attack does happen).
Patch and investigate. Keep Windows and other software up to date (and consider setting up some vulnerability alerts, and monitoring in-the-know sources, to get a head start on breaking news about new bugs). This also means double-checking that patches have been installed correctly and are in place for critical systems like internet-facing machines or domain controllers. Patching early is the best way to avoid being compromised in the future – but it doesn’t mean that you haven’t already been attacked. It’s always worth investigating to ensure that your organization wasn’t breached prior to patching. Threat actors may leave backdoors (which may include the installation of legitimate software) or introduce new vulnerabilities, either deliberately or inadvertently, so this is a key thing for responders to look for to reduce the likelihood of a second attack.
Lock down accessible services. Perform scans of your organization’s network from the outside and identify and lock down the ports commonly used by VNC, RDP, or other remote-access tools. If a machine needs to be reachable using a remote management tool, put that tool behind a VPN or zero-trust network access solution that uses MFA as part of its login. It’s also worth remembering that attacks can happen more than once; if an access point remains open, other threat actors are likely to find and exploit it.
Practice segmentation and zero-trust. Separate critical servers from each other and from workstations by putting them into separate VLANs as you work towards a zero-trust network model.
Set and enforce strong passwords and multifactor authentication (MFA). Strong passwords serve as one of the first lines of defense. Passwords should be unique or complex and never re-used. This is easier to do if you provide staff with a password manager that can store their credentials. But even strong passwords can be compromised. Any form of multifactor authentication is better than none for securing access to critical resources such as e-mail, remote management tools, and network assets.
Inventory your assets and accounts. Unprotected and unpatched devices in the network increase risk and create a situation where malicious activities could pass unnoticed. It is vital to have a current inventory of all connected computers and IoT devices. Use network scans and physical checks to locate and catalog them.
Install layered protection to block attackers at as many points as possible. Extend that security to all endpoints that you allow onto your network.
But once threat actors are inside a network, there’s not much that can be done to ‘stop the bleeding’ without having comprehensive Incident Response and remediation plans, and taking immediate action. We’ve written a series of articles called ‘Hindsight security: Actions breach victims wish they had taken sooner’, which includes advice on securing RDP, enforcing MFA, setting up an incident response plan, and more. You can also request a copy of the Sophos Incident Response Guide here.
IOCs
Sophos X-Ops has posted IOCs relating to the Lockbit, Hive, and BlackCat attacks covered in this report on our Github repository.
Insufficiently protected open ports can put your IT environment at serious risk. Threat actors often seek to exploit open ports and their applications through spoofing, credential sniffing and other techniques. For example, in 2017, cybercriminals spread WannaCry ransomware by exploiting an SMB vulnerability on port 445. Other examples include the ongoing campaigns targeting Microsoft’s Remote Desktop Protocol (RDP) service running on port 3389.
Read on to learn more about the security risks linked to ports, vulnerable ports that need your attention and ways to enhance the security of open ports.
A Refresher on Ports
Ports are logical constructs that identify a specific type of network service. Each port is linked to a specific protocol, program or service, and has a port number for identification purposes. For instance, secured Hypertext Transfer Protocol (HTTPS) messages always go to port 443 on the server side, while port 1194 is exclusively for OpenVPN.
The most common transport protocols that have port numbers are Transmission Control Protocol (TCP) and User Datagram Protocol (UDP). TCP is a connection-oriented protocol with built-in re-transmission and error recovery. UDP is a connectionless protocol that doesn’t recover or correct errors in messages; it’s faster and has less network overhead traffic than TCP. Both TCP and UDP sit at the transport layer of the TCP/IP stack and use the IP protocol to address and route data on the internet. Software and services are designed to use TCP or UDP, depending on their requirements.
TCP and UDP ports are in one of these three states:
Open — The port responds to connection requests.
Closed — The port is unreachable, indicating that there is no corresponding service running.
Filtered — The firewall is monitoring traffic and blocking certain connection requests to the port.
Security Risks Linked to Ports
Numerous incidents have demonstrated that open ports are most vulnerable to attack when the services listening to them are unpatched or insufficiently protected or misconfigured, which can lead to compromised systems and networks. In these cases, threat actors can use open ports to perform various cyberattacks that exploit the lack of authentication mechanisms in the TCP and UDP protocols. One common example is spoofing, where a malicious actor impersonates a system or a service and sends malicious packets, often in combination with IP spoofing and man-in-the-middle-attacks. The campaign against RDP Pipe Plumbing is one of the latest to employ such a tactic. In addition, ports that have been opened on purpose (for instance, on a web server) can be attacked via that port using application-layer attacks such as SQL injection, cross-site request forgery and directory traversal.
Another common technique is the denial of service (DoS) attack, most frequently used in the form of distributed denial of service (DDoS), where attackers send massive numbers of connection requests from various machine to the service on the target in order to deplete its resources.
Vulnerable Ports that Need Your Attention
Any port can be targeted by threat actors, but some are more likely to fall prey to cyberattacks because they commonly have serious shortcomings, such as application vulnerabilities, lack of two-factor authentication and weak credentials.
Here are the most vulnerable ports regularly used in attacks:
Ports 20 and 21 (FTP)
Port 20 and (mainly) port 21 are File Transfer Protocol (FTP) ports that let users send and receive files from servers.
FTP is known for being outdated and insecure. As such, attackers frequently exploit it through:
Brute-forcing passwords
Anonymous authentication (it’s possible to log into the FTP port with “anonymous” as the username and password)
Cross-site scripting
Directory traversal attacks
Port 22 (SSH)
Port 22 is for Secure Shell (SSH). It’s a TCP port for ensuring secure access to servers. Hackers can exploit port 22 by using leaked SSH keys or brute-forcing credentials.
Port 23 (Telnet)
Port 23 is a TCP protocol that connects users to remote computers. For the most part, Telnet has been superseded by SSH, but it’s still used by some websites. Since it’s outdated and insecure, it’s vulnerable to many attacks, including credential brute-forcing, spoofing and credential sniffing.
Port 25 (SMTP)
Port 25 is a Simple Mail Transfer Protocol (SMTP) port for receiving and sending emails. Without proper configuration and protection, this TCP port is vulnerable to spoofing and spamming.
Port 53 (DNS)
Port 53 is for Domain Name System (DNS). It’s a UDP and TCP port for queries and transfers, respectively. This port is particularly vulnerable to DDoS attacks.
Ports 137 and 139 (NetBIOS over TCP) and 445 (SMB)
Server Message Block (SMB) uses port 445 directly and ports 137 and 139 indirectly. Cybercriminals can exploit these ports through:
Using the EternalBlue exploit, which takes advantage of SMBv1 vulnerabilities in older versions of Microsoft computers (hackers used EternalBlue on the SMB port to spread WannaCry ransomware in 2017)
Capturing NTLM hashes
Brute-forcing SMB login credentials
Ports 80, 443, 8080 and 8443 (HTTP and HTTPS)
HTTP and HTTPS are the hottest protocols on the internet, so they’re often targeted by attackers. They’re especially vulnerable to cross-site scripting, SQL injections, cross-site request forgeries and DDoS attacks.
Ports 1433,1434 and 3306 (Used by Databases)
These are the default ports for SQL Server and MySQL. They are used to distribute malware or are directly attacked in DDoS scenarios. Quite often, attackers probe these ports to find unprotected database with exploitable default configurations.
Port 3389 (Remote Desktop)
This port is used in conjunction with various vulnerabilities in remote desktop protocols and to probe for leaked or weak user authentication. Remote desktop vulnerabilities are currently the most-used attack type; one example is the BlueKeep vulnerability.
Tips for Strengthening the Security of Open Ports
Luckily, there are ways to enhance the security of open ports. We highly recommend the following six strategies:
1. Patch firewalls regularly.
Your firewall is the gatekeeper to all the other systems and services in your network. Patching keeps your firewalls up to date and repairs vulnerabilities and flaws in your firewall system that cybercriminals could use to gain full access to your systems and data.
2. Check ports regularly.
You should also regularly scan and check your ports. There are three main ways to do this:
Command-line tools — If you have the time to scan and check ports manually, use command-line tools to spot and scan open ports. Examples include Netstat and Network Mapper, both of which can be installed on a wide range of operating systems, including Windows and Linux.
Port scanners — If you want faster results, consider using a port scanner. It’s a computer program that checks if ports are open, closed or filtered. The process is simple: The scanner transmits a network request to connect to a specific port and captures the response.
Vulnerability scanning tools — Solutions of this type can also be used to discover ports that are open or configured with default passwords.
Track service configuration changes.
Many services on your network connect to various ports, so it is important to monitor the running states of installed services and continuously track changes to service configuration settings. Services can be vulnerable when they are unpatched or misconfigured.
Using Netwrix Change Tracker, you can harden your systems by tracking unauthorized changes and other suspicious activities. In particular, it provides the following functionality:
Actionable alerting about configuration changes
Automatic recording, analyzing, validating and verifying of every change
Real-time change monitoring
Constant application vulnerability monitoring
4. Use IDP and IPS tools.
Intrusion detection systems (IDS) and intrusion prevention systems (IPS) can help you prevent attackers from exploiting your ports. They monitor your network, spot possible cybersecurity incidents, log information about them and report the incidents to security administrators. IPS complements your firewalls by identifying suspicious incoming traffic and logging and blocking the attack.
5. Use SSH Keys.
Another option is to use SSH keys. These access credentials are more secure than passwords because decrypting SSH is very difficult, if not impossible. There are two types of SSH keys:
Private or identity keys, which identify users and give them access
Public or authorized keys, which determine who can access your system
You can use public-key cryptographic algorithms and key generation tools to create SSH keys.
6. Conduct penetration tests and vulnerability assessments.
Consider conducting penetration tests and vulnerability assessments to protect your ports. Although both of these techniques are used to spot vulnerabilities in IT infrastructure, they are quite different. Vulnerability scans only identify and report vulnerabilities, while penetration tests exploit security gaps to determine how attackers can gain unauthorized access to your system.
FAQs
What is an open port vulnerability?
An open port vulnerability is a security gap caused by an open port. Without proper configuration and protection, attackers can use open ports to access your systems and data.
Which ports are most vulnerable?
Certain ports and their applications are more likely to be targeted because they often have weaker credentials and defenses. Common vulnerable ports include:
FTP (20, 21)
SSH (22)
Telnet (23)
SMTP (25)
DNS (53)
NetBIOS over TCP (137, 139)
SMB (445)
HTTP and HTTPS (80, 443, 8080, 8443)
Ports 1433, 1434 and 3306
Remote desktop (3389)
Is port 80 a security risk?
Port 80 isn’t inherently a security risk. However, if you leave it open and don’t have the proper configurations in place, attackers can easily use it to access your systems and data. Unlike port 443 (HTTPS), port 80 is unencrypted, making it easy for cybercriminals to access, leak and tamper with sensitive data.
There’s a very good reason why AWS remains a leader in cloud computing. While many providers describe themselves as “customer obsessed,” few come close to our long-time partner in the lengths it goes to earn and retain the trust of its customers.
AWS starts with the customer and works backwards. That means the vast majority of its feature enhancements and new services are directly driven from their input. The latest is Amazon GuardDuty Malware Protection.
This threat detection tool, which will work closely with Trend Micro cloud solutions, will provide another valuable layer of defense in our fight against a shared adversary.
Shining a light on an expanding attack surface
Spurred by a drive for greater cost efficiency and business agility, global organizations are migrating to the cloud in droves. Gartner predicts the worldwide market for public cloud services will reach almost $495bn this year, and grow by over 21% in 2023. In this environment, security remains a persistent concern for cloud builders, because if not properly managed, investments can increase the digital attack surface.
According to recent Trend Micro research, many global organizations are already struggling to securely manage their cloud assets. We found that 73% of IT and business leaders are concerned with the size of their attack surface, and 43% claim it is “spiralling out of control.” Cloud is the area where most respondents say they have least insight. They want their cloud providers to do more—for example by building enhanced detection into their systems, to complement third-party tools.
That’s part of the reason why AWS built Amazon GuardDuty Malware Protection was built. This new feature is triggered by detection of known malicious signatures across the cloud network. Based on this detection, the service scans the associated Amazon EBS storage environment for malware and reports any findings to AWS Security Hub. Open APIs from here link to products like Trend Micro Cloud One to enhance existing detection and response efforts.
Better together
Trend Micro and AWS have been working closely together for over a decade now, and this latest announcement represents another exciting stage in the journey. Customers will welcome AWS native threat detection as a complement to their Trend Micro Cloud One capabilities, delivering a comprehensive range of features to secure the hybrid cloud. Once they add the AWS tool to our virtual patching, vulnerability scanning, lateral movement detection, posture management and other capabilities, joint customers will have a powerful set of integrated offerings to deliver simple, all-in-one cloud security and compliance.
In addition, this move from AWS validates our XDR strategy, which is focused on using as many data sources as possible to enhance detection and response. The bottom line is that security takes a village. Customers, cloud providers and security vendors have a shared responsibility to work together as the threat landscape continues to evolve. That’s what we’ll continue to do, expanding and deepening our strategic partnerships with AWS and other providers in a collective effort to make the digital world safer.
Ransomware is a kind of malware used by cybercriminals to stop users from accessing their systems or files; the cybercriminals then threaten to leak, destroy or withhold sensitive information unless a ransom is paid.
Ransomware attacks can target either the data held on computer systems (known as locker ransomware) or devices (crypto-ransomware). In both instances, once a ransom is paid, threat actors typically provide victims with a decryption key or tool to unlock their data or device, though this is not guaranteed.
Oliver Pinson-Roxburgh, CEO of Defense.com, the all-in-one cybersecurity platform, shares knowledge and advice in this article on how ransomware works, how damaging it can be, and how your business can mitigate ransomware attacks from occurring.
What does a ransomware attack comprise?
There are three key elements to a ransomware attack:
Access
In order to deploy malware to encrypt files and gain control, cybercriminals need to initially gain access to an organization’s systems.
Trigger
The attackers have control of the data as soon as the malicious software is activated. The data is encrypted and no longer accessible by the targeted organization.
Demand
The victims will receive an alert that their data is encrypted and cannot be accessed until a ransom is paid.
Big business for cybercriminals
The motives of cybercriminals deploying malware may vary but the end goal is typically that of financial gain.
What is the cost of being targeted by ransomware?
The average pay-out from ransomware attacks has risen from $312,000/£260,000 in 2020 to $570,000/£476,000 in 2021 – an increase of 83%. One report also showed that 66% of organisations surveyed were victims of ransomware attacks in 2021, nearly double that of 2020 (37%). This highlights the need for businesses to understand the risks and implement stronger defenses to combat the threats.
Ransomware continues to rank amongst the most common cyberattacks in 2022, due to its lucrative nature and fairly low level of effort required from the perpetrators. This debilitating attack causes an average downtime of 3 weeks and can have major repercussions for an organization, for its finances, operations and reputation.
Because there is no guarantee that cybercriminals will release data after a ransom is paid, it is crucial to protect your data and keep offline backups of your files. It’s also very important to proactively monitor and protect entry points that a hacker may exploit, to reduce the possibility of being targeted in the first place.
Who is at risk of being a target of ransomware?
In the past, cybercriminals have typically targeted high-profile organizations, large corporations and government agencies with ransomware. This is known as ‘big game hunting’ and works on the premise that these companies are far more likely to pay higher ransoms and avoid unwanted scrutiny from the media and public. Certain organizations, such as hospitals, are higher-value targets because they are far more likely to pay a ransom and to do so quickly because they need access to important data urgently.
However, ransomware groups are now shifting their focus to smaller businesses, in response to increased pressure from law enforcement who are cracking down on well-known ransomware groups such as REvil and Conti. Smaller companies are seen as easy targets that may lack effective cybersecurity defenses to prevent a ransomware attack, making it easier to penetrate and exploit them.
Ultimately, threat actors are opportunists and will consider most organizations as targets, regardless of their size. If a cybercriminal notices a vulnerability, the company is fair game.
How is ransomware deployed?
Phishing attacks
The most common delivery method of ransomware is via phishing attacks. Phishing is a form of social engineering and is an effective method of attack as it relies on deceit and creating a sense of urgency. Threat actors trick employees into opening suspicious attachments in emails and this is often achieved by imitating either senior-level employees or other trusted figures of authority.
Malvertising
Malicious advertising is another tactic used by cybercriminals to deploy ransomware, where ad space is purchased and infected with malware that is then displayed on trusted and legitimate websites. Once the ad is clicked, or even in some cases when a user accesses a website that’s hosting malware, that device is infected by malware that scans the device for vulnerabilities to exploit.
Exploiting vulnerable systems
Ransomware can also be deployed by exploiting unpatched and outdated systems, as was the case in 2017, when a security vulnerability in Microsoft Windows, EternalBlue (MS17-010), led to the global WannaCry ransomware attack that spread to over 150 countries.
It was the biggest cyberattack to hit the NHS: it cost £92m in damages plus the added costs of IT support restoring data and systems affected by the attack, and it directly impacted patient care through cancelled appointments.
Four key methods to defend your business against ransomware
It is crucial that businesses are aware of how a ransomware attack may affect their organization, and how they can prevent cybercriminals from breaching their systems and holding sensitive data to ransom. Up to 61% of organizations with security teams consisting of 11–25 employees are said to be most concerned about ransomware attacks.
The NHS could have avoided being impacted by the WannaCry ransomware attack in 2017 by heeding warnings and migrating away from outdated software, ensuring strategies were in place to strengthen their security posture.
It’s essential that your business takes a proactive approach to cybersecurity by implementing the correct tools to help monitor, detect, and mitigate suspicious activity across your network and infrastructure. This will reduce the number and impact of data breaches and cyberattacks.
Defense.com recommend these four fundamental tactics to help prevent ransomware attacks and stay one step ahead of the hackers:1 — Training
Cybersecurity awareness training is pivotal for businesses of all sizes as it helps employees to spot potentially malicious emails or activity.
Social engineering tactics, such as phishing and tailgating, are common and successful due to human error and employees not spotting the risks. It’s vital for employees to be vigilant around emails that contain suspicious links or contain unusual requests to share personal data, often sent by someone pretending to be a senior-level employee.
Security training also encourages employees to query visitors to your offices to prevent ransomware attacks via physical intrusion.
Implementing cybersecurity awareness training will help your business routinely educate and assess your employees on fundamental security practices, ultimately creating a security culture to reduce the risk of data breaches and security incidents.2 — Phishing simulators
These simulator tools support your security awareness training by delivering fake but realistic phishing emails to employees. Understanding how prone your staff are to falling for a real cybercriminal’s tactics allows you to fill gaps in their training.
When you combine phishing simulators with security training, your organization can lessen the chance of falling victim to a ransomware attack. The combination of training and testing puts you in a better position to prevent the cunning attempts of cybercriminals to infiltrate your IT systems and plant malware.3 — Threat monitoring
You can make your business less of a target for cybercriminals by actively monitoring potential threats. Threat Intelligence is a threat monitoring tool that collates data from various sources, such as penetration tests and vulnerability scans, and uses this information to help you defend against potential malware and ransomware attacks. This overview of your threat landscape shows which areas are most at risk of a cyberattack or a data breach.
Being proactive ensures you stay one step ahead of hackers and by introducing threat monitoring tools to your organization, you ensure any suspicious behaviour is detected early for remediation.4 — Endpoint protection
Endpoint protection is key to understanding which of your assets are vulnerable, to help protect them and repel malware attacks like ransomware. More than just your typical antivirus software, endpoint protection offers advanced security features that protect your network, and the devices on it, against threats such as malware and phishing campaigns.
Anti-ransomware capabilities should be included in endpoint protection so it can effectively prevent attacks by monitoring suspicious behaviour such as file changes and file encryption. The ability to isolate or quarantine any affected devices can also be a very useful feature for stopping the spread of malware.
In summary
With ransomware groups continually looking for vulnerabilities to exploit, it’s important that businesses develop robust strategies to prevent ransomware threats: ensure your staff takes regular security awareness training, set up threat monitoring tools to detect and alert you of vulnerabilities, and implement endpoint protection to protect your devices across your network.
Following the above guidelines will increase your chances of safeguarding your business against ransomware attacks that could cost your organization a substantial amount of money and reputational damage.
Defense.com believes world-class cyber protection should be accessible to all companies, regardless of size. For more information, visit Defense.com.
Although there is a greater awareness of cybersecurity threats than ever before, it is becoming increasingly difficult for IT departments to get their security budgets approved. Security budgets seem to shrink each year and IT pros are constantly being asked to do more with less. Even so, the situation may not be hopeless. There are some things that IT pros can do to improve the chances of getting their security budgets approved.
Presenting the Problem in a Compelling Way
If you want to get your proposed security budget approved, you will need to present security problems in a compelling way. While those who are in charge of the organization’s finances are likely aware of the need for good security, they have probably also seen enough examples of “a security solution in search of a problem” to make them skeptical of security spending requests. If you want to persuade those who control the money, then you will need to convince them of three things:
You are trying to protect against a real issue that presents a credible threat to the organization’s wellbeing.
Your proposed solution will be effective and that it isn’t just a “new toy for the IT department to play with”
Your budget request is both realistic and justified.
Use Data to Your Advantage
One of the best ways to convince those who are in charge that there is a credible cyber threat against the organization is to provide them with quantifiable metrics. Don’t resort to gathering statistics from the Internet. Your organization’s financial staff is probably smart enough to know that most of those statistics are manufactured by security companies who are trying to sell a product or service. Instead, gather your own metrics from inside your organization by using tools that are freely available for download.
Specops for example, offers a free Password Auditor that can generate reports demonstrating the effectiveness of your organization’s password policy and existing password security vulnerabilities. This free tool can also help you to identify other vulnerabilities, such as accounts that are using passwords that are known to have been leaked or passwords that do not adhere to compliance standards or industry best practices.
Example of Specops Password Auditor results in an Active Directory environment
Of course, this is just one of the many free security tools that are available for download. In any case, it is important to use metrics from within your own organization to demonstrate the fact that the security problem that you are trying to solve is real.
Highlight What a Solution Would Do
Once you demonstrate the problem to those who are in charge of the organization’s finances, do not make the mistake of leaving them guessing as to how you are planning on solving the problem. Be prepared to clearly explain what tools you are planning on using, and how those tools will solve the problem that you have demonstrated.
It’s a good idea to use visuals to demonstrate the practicality of your proposed solution. Be sure to explain how the problem is solved in non-technical language and enhance your argument with examples that are specific to your organization.
Estimated Time of Implementation and Seeing Results
We have probably all heard horror stories of IT projects that have gone off the rails. Organizations sometimes spend millions of dollars and invest years of planning into IT projects that never ultimately materialize. That being the case, it is important to set everyone’s mind at ease by showing them exactly how long it will take to get your proposed solution up and running and then how much additional time will be needed in order to achieve the desired result.
When you are making these projections, be careful to be realistic and not to make promises based on an overly ambitious implementation schedule. You should also be prepared to explain how you arrived at your projection. Keep in mind upcoming projects, company-wide goals, and fiscal year ideals when factoring in timing.
Demonstrate the Estimated Savings
Although security is of course a concern for most organizations, those who are in charge of an organization’s finances typically want to see some sort of return on investment. As such, it is important to consider how your proposed solution might save the company money. A few ideas might include:
Saving the IT department time, thereby reducing the number of overtime hours worked
Avoiding a regulatory penalty that could cost the organization a lot of money
Bringing down insurance premiums because data is being better protected
Of course, these are just ideas. Every situation is different, and you will need to consider how your security project can produce a return on investment given your own unique circumstances. It is important to include a cost-saving element for clarity sake, even if it is citing the average cost of a data breach in your industry.
Show You’ve Done Your Homework with a Pricing Comparison
As you pitch your proposed solution, stakeholders are almost certain to ask whether there might be a less expensive product that would accomplish your objectives. As such, it’s important to spend some time researching the solutions offered by competing vendors. Here are a few things that you should be prepared to demonstrate:
The total cost for implementing each potential solution (this may include licensing, labor, support, and hardware costs)
Why you are proposing a particular solution even if it is not the least expensive
If your solution is the least expensive, then be prepared to explain what you might be giving up by using the cheapest vendor.
What each vendor offers relative to the others
A Few Quick Tips
As you make your budgetary pitch, keep in mind that those to whom you are presenting likely have a limited understanding of IT concepts. Avoid using unnecessary technical jargon and be prepared to clearly explain key concepts, but without sounding condescending in the process.
It’s also smart to anticipate any questions that may be asked of you and have answers to those questions ready to go. This is especially true if there is a particular question that makes you a little bit uncomfortable.
Present your information clearly, confidently, and in a concise manner (I.e., make it quick!) so you can make your case without wasting time.
New survey reveals lack of staff, skills, and resources driving smaller teams to outsource security.
As business begins its return to normalcy (however “normal” may look), CISOs at small and medium-size enterprises (500 – 10,000 employees) were asked to share their cybersecurity challenges and priorities, and their responses were compared the results with those of a similar survey from 2021.
Here are the 5 key things we learned from 200 responses:
1 — Remote Work Has Accelerated the Use of EDR Technologies
In 2021, 52% of CISOs surveyed were relying on endpoint detection and response (EDR) tools. This year that number has leapt to 85%. In contrast, last year 45% were using network detection and response (NDR) tools, while this year just 6% employ NDR. Compared to 2021, double the number of CISOs and their organizations are seeing the value of extended detection and response (XDR) tools, which combine EDR with integrated network signals. This is likely due to the increase in remote work, which is more difficult to secure than when employees work within the company’s network environment.
2 — 90% of CISOs Use an MDR Solution
There is a massive skills gap in the cybersecurity industry, and CISOs are under increasing pressure to recruit internally. Especially in small security teams where additional headcount is not the answer, CISOs are turning to outsourced services to fill the void. In 2021, 47% of CISOs surveyed relied on a Managed Security Services Provider (MSSP), while 53% were using a managed detection and response (MDR) service. This year, just 21% are using an MSSP, and 90% are using MDR.
3 — Overlapping Threat Protection Tools are the #1 Pain Point for Small Teams
The majority (87%) of companies with small security teams struggle to manage and operate their threat protection products. Among these companies, 44% struggle with overlapping capabilities, while 42% struggle to visualize the full picture of an attack when it occurs. These challenges are intrinsically connected, as teams find it difficult to get a single, comprehensive view with multiple tools.
4 — Small Security Teams Are Ignoring More Alerts
Small security teams are giving less attention to their security alerts. Last year 14% of CISOs said they look only at critical alerts, while this year that number jumped to 21%. In addition, organizations are increasingly letting automation take the wheel. Last year, 16% said they ignore automatically remediated alerts, and this year that’s true for 34% of small security teams.
5 — 96% of CISOs Are Planning to Consolidate Security Platforms
Almost all CISOs surveyed have consolidation of security tools on their to-do lists, compared to 61% in 2021. Not only does consolidation reduce the number of alerts – making it easier to prioritize and view all threats – respondents believe it will stop them from missing threats (57%), reduce the need for specific expertise (56%), and make it easier to correlate findings and visualize the risk landscape (46%). XDR technologies have emerged as the preferred method of consolidation, with 63% of CISOs calling it their top choice.
The OpenSSL Technical Committee (OTC) was recently made aware of several potential attacks against the OpenSSL libraries which might permit information leakage via the Spectre attack.1 Although there are currently no known exploits for the Spectre attacks identified, it is plausible that some of them might be exploitable.
Local side channel attacks, such as these, are outside the scope of our security policy, however the project generally does introduce mitigations when they are discovered. In this case, the OTC has decided that these attacks will not be mitigated by changes to the OpenSSL code base. The full reasoning behind this is given below.
The Spectre attack vector, while applicable everywhere, is most important for code running in enclaves because it bypasses the protections offered. Example enclaves include, but are not limited to:
The reasoning behind the OTC’s decision to not introduce mitigations for these attacks is multifold:
Such issues do not fall under the scope of our defined security policy. Even though we often apply mitigations for such issues we do not mandate that they are addressed.
Maintaining code with mitigations in place would be significantly more difficult. Most potentially vulnerable code is extremely non-obvious, even to experienced security programmers. It would thus be quite easy to introduce new attack vectors or fix existing ones unknowingly. The mitigations themselves obscure the code which increases the maintenance burden.
Automated verification and testing of the attacks is necessary but not sufficient. We do not have automated detection for this family of vulnerabilities and if we did, it is likely that variations would escape detection. This does not mean we won’t add automated checking for issues like this at some stage.
These problems are fundamentally a bug in the hardware. The software running on the hardware cannot be expected to mitigate all such attacks. Some of the in-CPU caches are completely opaque to software and cannot be easily flushed, making software mitigation quixotic. However, the OTC recognises that fixing hardware is difficult and in some cases impossible.
Some kernels and compilers can provide partial mitigation. Specifically, several common compilers have introduced code generation options addressing some of these classes of vulnerability:
GCC has the -mindirect-branch, -mfunction-return and -mindirect-branch-register options
LLVM has the -mretpoline option
MSVC has the /Qspectre option
Nicholas Mosier, Hanna Lachnitt, Hamed Nemati, and Caroline Trippel, “Axiomatic Hardware-Software Contracts for Security,” in Proceedings of the 49th ACM/IEEE International Symposium on Computer Architecture (ISCA), 2022.↩
Posted by OpenSSL Technical Committee May 13th, 2022 12:00 am


