You have the possibility to restrict remote access to your device by using the Block and Allowlist feature in the TeamViewer full version and the TeamViewer Host.
You can find the feature easily by clicking in your TeamViewer full version on the Gear icon (⚙) in the upper right corner of the TeamViewer (Classic) application, then Security ➜ Block and Allowlist.
Let´s begin with the difference between a blocklist and an allowlist.
This article applies to all TeamViewer (Classic) users.
What is a Blocklist?
The Blocklist generally lets you prevent certain partners or devices from establishing a connection to your computer. TeamViewer accounts or TeamViewer IDs on the blocklist cannot connect to your computer.
📌Note: You will still be able to set up outgoing TeamViewer sessions with partners on the blocklist.
What is an Allowlist?
If you add TeamViewer accounts to the Allowlist, only these accounts will be able to connect to your computer. The possibility of a connection to your computer through other TeamViewer accounts or TeamViewer IDs will be denied
If you have joined a company profile with your TeamViewer account, you can also place the entire company profile on the Allowlist. Thus only the TeamViewer accounts that are part of the company profile can access this device.
📌Note: To work with a company profile you will need a TeamViewer Premium or Corporate license
How to set up a Blocklist?
If you would like to deny remote access to your device to specific persons or TeamViewer IDs, we recommend setting up a Blocklist.
You can find the feature easily by clicking in your TeamViewer full version on the Gear icon (⚙) in the upper right corner of the TeamViewer (Classic) application, then Security ➜ Block and Allowlist ➜ Click on Configure…
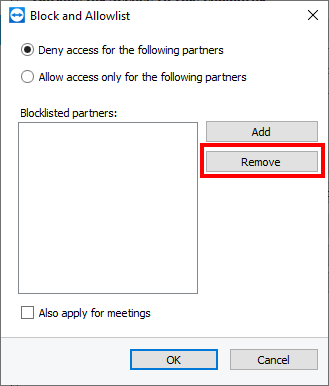
A new window will open. Activate the first option Deny access for the following partners and click on Add
📌Note: If you activate the Also apply for meetings check box, these settings will also be applied to meetings. Contacts from your blocklist are excluded from being able to join your meetings.
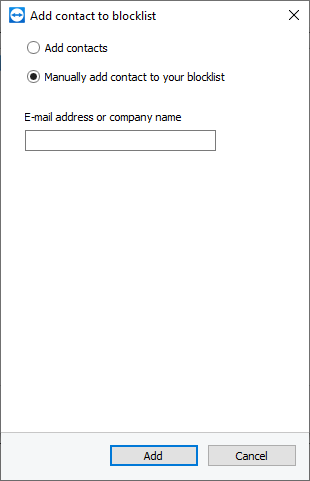
After clicking on Add, you can either choose partners saved on your Computers & Contacts list or add TeamViewer IDs/contacts manually to your blocklist.
How to set up an Allowlist?
If you would like to allow only specific TeamViewer accounts or TeamViewer IDs remote access to your device, we recommend setting up an Allowlist.
You can find the feature easily by clicking in your TeamViewer full version on the Gear icon (⚙) in the upper right corner of the TeamViewer (Classic) application, then Security ➜ Block and Allowlist ➜ Click on Configure…
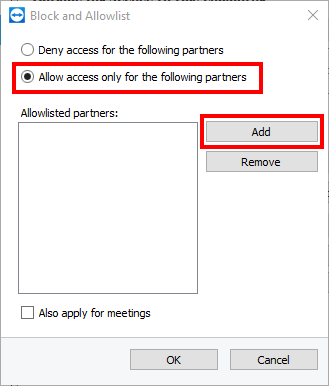
A new window will open. Activate the second option Allow access only for the following partners and click on Add
📌Note: If you activate the Also apply for meetings check box, these settings will also be applied to meetings. Only contacts from your allowlist will then be able to join your meetings.
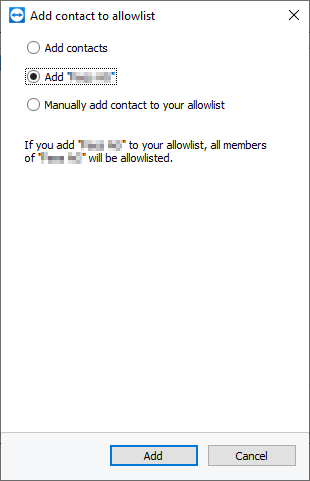
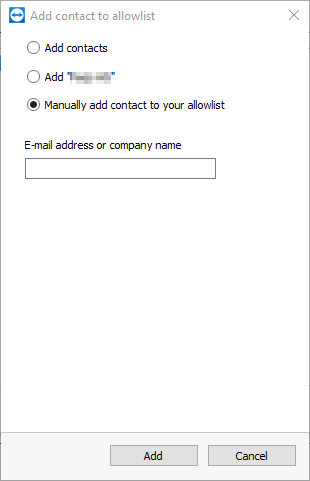
After clicking on Add, you can either choose partners saved on your Computers & Contacts list, add TeamViewer IDs/contacts manually to your blocklist, or add the whole company you are part of (only visible if you are part of a company profile).
How to delete blocklisted/allowlisted partners?
If you no longer wish to have certain partners block or allowlisted, you can easily remove them from the list.
To do so navigate in your TeamViewer full version to the Gear icon (⚙) in the upper right corner of the TeamViewer (Classic) application, then Security ➜ Block and Allowlist ➜ Click on Configure… and choose whether you would like to remove partners from the Blocklist or from the Allowlist by choosing either Deny access for the following partners (Blocklist) or Allow access only for the following partner (Allowlist). Now click on the partners you would like to remove and finally click Remove ➜ OK
📌Note: You can choose multiple partners at once by pressing CTRG when clicking on the different partners.
This article provides a step-by-step guide to activating Two-factor authentication for connections (also known as TFA for connections).This feature enables you to allow or deny connections via push notifications on a mobile device.
This article applies to all Windows users using TeamViewer (Classic) 15.17 (and newer) and macOS and Linux users in version 15.22 (and newer).
What is Two-factor authentication for connections?
TFA for connections offers an extra layer of protection to desktop computers.
When enabled, connections to that computer need to be approved using a push notification sent to specific mobile devices.
Enabling Two-factor authentication for connections and adding approval devices
Windows and Linux:
1. In the TeamViewer (Classic) application, click the gear icon at the top right menu.
2. Click on the Security tab on the left.
3. You will find the Two-factor authentication for connections section at the bottom.
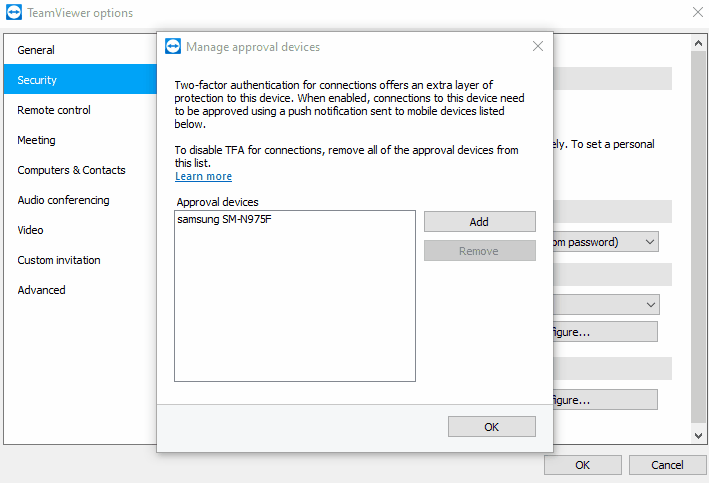
4. Click on Configure… to open the list of approval devices.
5. To add a new mobile device to receive the push notifications, click Add.
6. You will now see a QR code that needs to be scanned by your mobile device.
Below please find a step-by-step gif for Windows, Linux, and macOS:
Windows
Linux
macOS
7. On the mobile device, download and install the TeamViewer Remote Control app:
8. In the TeamViewer Remote Control app, go to Settings → TFA for connections.
9. You will see a short explanation and the option to open the camera to scan the QR code.
10. Tap on Scan QR code and you will be asked to give the TeamViewer app permission to access the camera.
11. After permission is given, the camera will open. Point the camera at the QR code on the desktop computer (see Step 6 above).
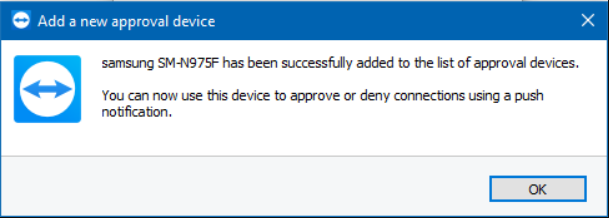
12. The activation will happen automatically, and a success message will be displayed.
13. The new device is now included in the list of approval devices.
14. From now on, any connection to this desktop computer will need to be approved using a push notification.
📌 Note:TFA for connections cannot be remotely disabled if the approval device is not accessible. Due to this, we recommend setting up an additional approval device as a backup.
Removing approval devices
1. Select an approval device from the list and click Remove or the X.
2. You will be asked to confirm the action.
3. By clicking Remove again, the mobile device will be removed from the list of approval devices and won’t receive any further push notifications.
4. If the Approval devices list is empty, Two-factor authentication for connections will be completely disabled.
Below please find a step by step gif for Windows, Linux and macOS:
▹ Windows:
▹ Linux:
▹ macOS:
Remote connections when Two-factor authentication for connections is enabled
TFA for connections does not replace any existing authentication method. When enabled, it adds an extra security layer against unauthorized access.
When connecting to a desktop computer protected by TFA for connections, a push notification will be sent to all of the approval devices.
You can either:
accept/deny the connection request via the system notification:
accept/deny the connection request by tapping the TeamViewer notification. It will lead to you the following screen within the TeamViewer application to accept/deny the connection:
Multiple approval devices
All approval devices in the list will receive a push notification.
The first notification that is answered on any of the devices will be used to allow or deny the connection.
TeamViewer offers the possibility to activate Account Recovery based on the zero-trust principle.
This is a major security enhancement for your TeamViewer account and a unique offering on the market.
This article applies to all users.
What is Zero Knowledge Account Recovery
In cases where you cannot remember your TeamViewer Account credentials, you click on I forgot my password, which triggers an email with a clickable link that leads you to the option of resetting your password.
The regular reset process leads you to a page where you can set a new password for your account.
The Zero Knowledge Account Recovery acts as another layer of security for this process as the reset process requires you to enter the unique 64 characters Zero Knowledge Account Recovery Code for your account to prove your identity. Important to note is that this happens without any intervention and knowledge of the TeamViewer infrastructure.
Activate Zero Knowledge Account Recover
To activate Zero Knowledge Account Recovery please follow the steps below:
2. Click Edit profile under your profile name (upper right corner).
3. Go to Security in the left menu
4. Click the Activate Zero knowledge account recovery button
📌 Note: The password recovery code is a unique 64 characters code that allows you to regain access if you forgot your password. It is absolutely essential that you print/download your recovery code and keep this in a secure place.
⚠ IMPORTANT: Without the recovery code you won’t be able to recover your account. Access to your account will be irreversibly lost. The data is encrypted with the key and you are the only owner of this key. TeamViewer has no access to it.
5. A PopUp window appears sharing the above information. Click on Generate Recovery Code to proceed.
6. The Recovery Code is shown. You have to download or print the code as well as you tick the check box confirming that you acknowledge and understand that if you lose your zero knowledge account recovery code, you won’t be able to recover your password and you will lose access to your account forever
⚠ Do not tick the box unless you understand the meaning.
7. Once you either downloaded or printed the recovery code and ticked the acknowledge box, you can activate the Zero knowledge account recovery by clicking Activate.
Deactivate Zero Knowledge Account Recovery
To deactivate Zero Knowledge Account Recovery please follow the steps below:
2. Click Edit profile under your profile name (upper right corner).
3. Go to Security in the left menu
4. Click the Deactivate Zero knowledge account recovery button
5. A PopUp appears. You have to tick the check box confirming that you acknowledge and understand that if you will be deactivating your zero knowledge account recovery
6. Click Deactivate to deactivate the Zero Knowledge Account recovery for your TeamViewer Account.
Reset your password
To reset your password for your TeamViewer account, please follow the steps below: (More info here: Reset account password)
TeamViewer is designed to connect easily to remote computers without any special firewall configurations being necessary.
This article applies to all users in all licenses.
In the vast majority of cases, TeamViewer will always work if surfing on the internet is possible. TeamViewer makes outbound connections to the internet, which are usually not blocked by firewalls.
However, in some situations, for example in a corporate environment with strict security policies, a firewall might be set up to block all unknown outbound connections, and in this case, you will need to configure the firewall to allow TeamViewer to connect out through it.
TeamViewer ‘s Ports
These are the ports that TeamViewer needs to use.
TCP/UDP Port 5938
TeamViewer prefers to make outbound TCP and UDP connections over port 5938 – this is the primary port it uses, and TeamViewer performs best using this port. Your firewall should allow this at a minimum.
TCP Port 443
If TeamViewer can’t connect over port 5938, it will next try to connect over TCP port 443.
However, our mobile apps running on iOS and Windows Mobile don’t use port 443.
📌Note: port 443 is also used by our custom modules which are created in the Management Console. If you’re deploying a custom module, eg. through Group Policy, then you need to ensure that port 443 is open on the computers to which you’re deploying. Port 443 is also used for a few other things, including TeamViewer (Classic) update checks.
TCP Port 80
If TeamViewer can’t connect over port 5938 or 443, then it will try on TCP port 80. The connection speed over this port is slower and less reliable than ports 5938 or 443, due to the additional overhead it uses, and there is no automatic reconnection if the connection is temporarily lost. For this reason port 80 is only used as a last resort.
Our mobile apps running on Windows Mobile don’t use port 80. However, our iOS and Android apps can use port 80 if necessary.
Windows Mobile
Our mobile apps running on Windows Mobile can only connect out over port 5938. If the TeamViewer app on your mobile device won’t connect and tells you to “check your internet connection”, it’s probably because this port is being blocked by your mobile data provider or your WiFi router/firewall.
Destination IP addresses
The TeamViewer software makes connections to our master servers located around the world. These servers use a number of different IP address ranges, which are also frequently changing. As such, we are unable to provide a list of our server IPs. However, all of our IP addresses have PTR records that resolve to *.teamviewer.com. You can use this to restrict the destination IP addresses that you allow through your firewall or proxy server.
Having said that, from a security point-of-view this should not really be necessary – TeamViewer only ever initiates outgoing data connections through a firewall, so it is sufficient to simply block all incoming connections on your firewall and only allow outgoing connections over port 5938, regardless of the destination IP address.
Your site needs to have a defined structure because, without it, it’ll just be a random collection of pages and blog posts. Your users need this structure to navigate on your site, to click from one page to another. Google also uses the structure of your site to determine what content is important and what is less relevant. This guide tells you everything you need to know about site structure.
Site structure refers to organizing and arranging a website’s pages and content. It defines the information hierarchy within the site and serves as a roadmap for search engine crawlers. A well-structured site facilitates easy navigation, enhances user experience, and helps search engines like Google understand and effectively index the site’s content. This, in turn, can improve the site’s performance by making it easier for users to find and engage with the content. Ultimately, an optimized site structure helps achieve higher rankings, more traffic, and better conversion rates.
Importance for usability
The structure of your website significantly impacts the experience for your visitors (UX). If visitors can’t find the products and information they’re looking for, they’ll not likely become regular visitors or customers. In other words, you should help them navigate your site. A good site structure will help with this.
Navigating should be easy. You need to categorize and link your posts and products so they are easy to find. New visitors should be able to grasp what you’re writing about or selling instantly.
Importance of your site structure for SEO
A solid site structure vastly improves your chances of ranking in search engines. There are three main reasons for this:
a. It helps Google ‘understand’ your site
The way you structure your site will give Google vital clues about where to find the most valuable content on your site. It helps search engines understand what your site is mainly about or what you’re selling. A decent site structure also enables search engines to find and index content quickly. A good structure should, therefore, lead to a higher ranking in Google.
b. It prevents you from competing with yourself
On your site, you might have blog posts that are quite similar. If, for example, you write a lot about SEO, you could have multiple blog posts about site structure, each covering a different aspect. Consequently, Google won’t be able to tell which of these pages is the most important, so you’ll be competing with your content for high rankings. You should let Google know which page you think is most important. You need a good internal linking and taxonomy structure to do this, so all those pages can work for you instead of against you.
c. It deals with changes on your website
The products you sell in your shop will likely evolve. So does the content you’re writing. You probably add new product lines as old stock sells out. Or you write new articles that make old ones redundant. You don’t want Google to show outdated products or deleted blog posts, so you need to deal with these kinds of changes in the structure of your site.
Are you struggling with setting up your site’s structure? Don’t know the best strategy to link from one post to another? Check out our Site structure training, part of the Yoast SEO academy. Access to Yoast SEO academy is included in the price of Yoast SEO Premium. Before you know it, you’ll be able to improve your rankings by creating the best structure for your site!
How to set up the structure of your site
So, how do you construct a solid site structure? First, we’ll look at an ideal site structure and then explain how to achieve this for your site.
What’s an ideal site structure?
Let’s start by looking at an ideal situation: How should you organize your site if you’re starting from scratch? We think a well-organized website looks like a pyramid with several levels:
Homepage
Categories (or sections)
Subcategories (only for larger sites)
Individual pages and posts
The homepage should be at the top. Then, you have some sections or category pages beneath it. You should be able to file your content under one of these categories. You can divide these sections or categories into subcategories if your site is larger. Beneath your categories or subcategories are your pages and posts.
An ideal site structure looks like a pyramid. On top, you’ll find the homepage and, right below, the main sections or categories, possibly followed by subcategories. On the ground, you’ll find all the individual posts and pages.
Your homepage
On top of the pyramid is the homepage. Your homepage should act as a navigation hub for your visitors. This means, amongst others, that you should link to your most important pages from your homepage. By doing this:
Your visitors are more likely to end up on the pages you want them to end up on;
You show Google that these pages are important.
Further down this article, we’ll help you determine which pages are essential to your business.
Beware not to link too many pages from your homepage, which will cause clutter. And a cluttered homepage doesn’t guide your visitors anywhere. If you want to optimize your homepage further, you can do many other things. Read our article on homepage SEO to find out what.
Navigation
In addition to having a well-structured homepage, it’s also important to create a clear navigation path on your site. Your site-wide navigation consists of two main elements: the menu and the breadcrumbs.
The menu
First, let’s take a look at the menu. The website menu is the most common aid for navigation on your website, and you want to make the best possible use of it. Visitors use your menu to find things on your website. It helps them understand the structure of your website. That’s why the main categories on your site should all have a place in the menu on your homepage.
Furthermore, putting everything in just one menu is not always necessary. If you have a big site with lots of categories, this may clutter your website and makes your main menu a poor reflection of the rest of your site. Where it makes sense, creating a second menu is perfectly fine.
For instance, eBay has one menu at the top of the page – also called the top bar menu – and, in addition to that, a main menu. This top bar menu links to important pages that aren’t categories in the shop, like pages that relate to the visitor’s account on the site. The main menu reflects the most important product categories on eBay.
eBay has multiple ways to start navigating from the homepage
Finally, just like on your homepage, you shouldn’t add too many links to your menu. They will become less valuable for your users and search engines if you do.
Adding breadcrumbs to your pages can make your site’s structure even clearer. Breadcrumbs are clickable links, usually at the top of a page or post. Breadcrumbs reflect the structure of your site. They help visitors determine where they are on your site. They improve your site’s user experience and SEO, as you can read in our guide on breadcrumbs.
You can use one of the many breadcrumb plugins for your WordPress site. You can also use our Yoast SEO plugin, as we’ve implemented a breadcrumb functionality in our plugin as well.
Taxonomies
WordPress uses so-called taxonomies to group content; other CMSs have similar systems. The word ‘taxonomy’ is a fancy term for a group of things — website pages, in this case — that have something in common. This is convenient because people looking for more information on the same topic can find similar articles more easily. You can group content in different ways. The default taxonomies in WordPress are categories and tags.
Categories
You should divide your site’s blog posts or products into several categories. If these categories grow too big, you should divide these categories into subcategories to clear things up again. For example, if you have a clothing store and sell shoes, you can divide this category into subcategories: ‘boots’, ‘heels’, and ‘flats’. These subcategories contain products, in this case, shoes, of that specific type.
Adding this hierarchy and categorizing your pages helps your user and Google make sense of every page you write. Add your main categories to your site’s menu when implementing your category structure.
Your site’s structure will also benefit from adding tags. The difference between a category and a tag mostly concerns structure. Categories are hierarchical: you can have subcategories and even sub-subcategories. Tags, however, don’t have that hierarchy. Tags say: “Hey, this article or product has a certain property that might interest a visitor.” Think of it like this: categories are the table of contents of your website, and tags are the index. A tag for the online clothing store mentioned above could be a brand, for instance, Timberlands.
Try not to create too many tags. You’re not structuring anything if you add a new unique tag to every post or article. Ensure each tag is used at least twice, and your tags group articles that genuinely belong together.
Some WordPress themes display tags with each post, but some don’t. Ensure your tags are available to visitors somewhere, preferably at the bottom of your article or in the sidebar. Google isn’t the only one that likes tags: they are useful for visitors wanting to read more about the same topic.
Site structure is all about grouping and linking the content on your site. Until now, we mostly discussed so-called classifying links: links on your homepage, navigation, and taxonomies. On the other hand, contextual links are internal links within the copy on your pages that refer to other pages within your site. For a link to be contextual, the page you link to should be relevant for someone reading the current page. If you look at the previous paragraph, for instance, we link to a post about tagging, so people can learn more about it if they’re interested.
Your most important pages are often very relevant to mention on several pages across your site, so you’ll link to them most often. Just remember that not only the page you’re linking to is relevant, the context of the link is important as well.
Google uses the context of your links to gather information about the page you’re linking to. It always uses the anchor text (or link text) to understand what the page you’re linking to is about. But the anchor text isn’t the only thing Google looks at. Nowadays, it also considers the content around the link to gather extra information. Google is becoming better at recognizing related words and concepts. Adding links from a meaningful context allows Google to value and rank your pages properly. Yoast SEO Premium makes internal linking a breeze by automatically suggesting relevant content from your site to link to.
Contextual linking for blogs
For blogs, you should write extensively on the topics you want to rank for. You should write some main articles — your cornerstone articles — and write various posts about subtopics of that topic. Then link from these related posts to your cornerstone articles and from the cornerstone articles back to related posts. In this way, you’ll ensure that your most important pages have both the most and most relevant links.
The following metaphor might help you understand this principle:
Imagine you’re looking at a map of a state or country. You’ll probably see many small towns and some bigger cities. All towns and cities will be interconnected somehow. You’ll notice that small towns often have roads leading to the big cities. Those cities are your cornerstones, receiving the most links. The small towns are your posts on more specific topics. Some roads (links) lead to these smaller towns, but not as much as the big cities.
Contextual internal linking works differently on an online store with very few to no pages that are exclusively meant to inform. You don’t explore a specific topic on your product pages: you’re selling a product. Therefore, on product pages, you mostly want to keep people on a page and convince them to buy the product. Consequently, contextual linking is far less prominent in this context. You generally shouldn’t add contextual links to your product descriptions because it could lead to people clicking away from the page.
There are just a couple of meaningful ways of adding contextual links to the product pages for your ecommerce SEO:
link from a product bundle page to the individual products
a ‘related items’ or ‘compare with similar items’ section
a ‘customers also bought’ section
a ‘product bundles’ or ‘frequently bought together’ section.
Landing pages are the pages you want your audience to find when they search for specific keywords you’ve optimized for. For instance, we want people who search for ‘free SEO training’ to end up on the page about our free training called ‘SEO for beginners’. You need to approach the content of your most important landing pages differently than your regular pages.
Here, we’ll discuss two types of landing pages: cornerstone pages and product landing pages. They’re both pages you’d like people to land on from the search engines, but they require quite a different approach. But first, we’ll shortly go into search intent because you have to know what your audience is really looking for.
Search intent
When setting up your site structure, you must consider search intent. It’s about what you think people are looking for when they enter a query into a search engine. What do people want to find? And: what do they expect to find?
Consider different possibilities in search intent, as you might want to cater to different types on your site. Are people just looking for an answer to a question or a definition? Are they comparing products before purchase? Or are they intending to buy something right away? This is often reflected in the type of query they make. You can also use Google’s search results to create great content that fits someone’s needs.
When you have an idea of the search intent, ensuring your landing page fits your audience’s search intent is essential. Pages can answer multiple search intents, but you need a clear view of at least your most important pages.
Cornerstone articles are the most important informational articles on your website. Their focus is to provide the best and most complete information on a particular topic; their main goal is not to sell products.
Because of this focus, we usually think of blogs when discussing cornerstone content. Of course, that doesn’t mean it can only be a blog post. All different kinds of websites have cornerstone articles! Rule of thumb: if an article brings everything you know about a broad topic together, it’s a cornerstone content article.
Product landing pages significantly differ from cornerstone articles. The latter are lengthy, whereas product landing pages shouldn’t be that long. Rather than complete articles, they should be focused. These pages only need to show what your visitors need to know to be convinced. They don’t need to hold all the information.
You want to rank with these pages, meaning they need content. Enough content for Google to understand what the page is about and what keyword it should rank for. Where cornerstone articles could be made up of thousands of words, a couple of hundred could be enough for product landing pages. The main focus of the content should be on your products.
Structuring or restructuring your content doesn’t always have high priority in everything you have to do. Especially when you blog a lot or add other content regularly, it might feel like a chore. Although it isn’t always fun, you must do it, or your website might become messy. To prevent that from happening, you need to fix your site structure and keep an eye on it while adding new content. Site structure should be part of your long-term SEO strategy.
Evaluate your menu
When your business goal or website changes, your menu must also change. Planning things visually will pay off when you start thinking about restructuring your site. Make a flowchart.
Start with your new menu one or two levels deep and see if you can fit in more pages you have created over the years. You’ll find that some pages are still valid but don’t seem relevant to your menu anymore. No problem, just be sure to link to them on related pages and in your sitemaps so that Google and your visitors can still find these pages. The flowchart will also show you any gaps in the site structure.
Creating an overview of your categories, subcategories, and products or posts will also help you to rethink your site’s taxonomy. This could be a simple spreadsheet, but you can use more visual tools like LucidChart or MindNode.
Do your product categories and subcategories provide a logical overview of your product range or your posts and pages? Perhaps you’ve noticed somewhere down the line that one category has been far more successful than others, or you wrote many blog posts on one subject and very few on others.
If one category grows much larger than others, your site’s pyramid could be thrown off balance. Think about splitting this category into different categories. But, if some product lines end up much smaller than others, you might want to merge them. Don’t forget to redirect the ones you delete.
If you have built your HTML sitemap manually, update that sitemap after changing your site structure. In the far more likely event you have an XML sitemap, re-submit it to Google Search Console.
You might be able to update and republish some outdated articles to make them relevant again. If an article is outdated, but no one reads it anyway, you might delete it. This could clean up your site nicely.
What you should know, in that case, is that you should never delete a page or article without thinking. If Google cannot find the page, it serves your user a 404 error page. Both the search engine and your visitor will see this error message saying the page doesn’t exist, and that is a bad experience and, thus, bad for your SEO.
Be smart about this! You need to redirect the URL of the page you’re deleting properly so your user (and Google) lands on a different page that is relevant to them. That could even improve your SEO!
Got some old content to clean up on your site? Sort out hidden pages and dead ends in four easy steps with our orphaned content SEO workout, available in Yoast SEO Premium.
Avoid keyword cannibalization
Your website is about a specific topic, which could be quite broad or rather specific. While adding content, you should be aware of keyword cannibalization. If you optimize your articles for keywords that are all too similar, you’ll be devouring your chances of ranking in Google. If you optimize different articles for similar key terms, you’ll be competing with yourself, making both pages rank lower.
You’ll have some work to do if you suffer from keyword cannibalization. In short, you should research the performance of your content and probably merge and redirect some of it. When merging posts, we recommend creating a new draft by cloning one of the original posts with the free Yoast Duplicate Post plugin. This allows you to work on your merged post without making these changes to a live post. Read the guide by Joost to learn more about keyword cannibalization and how to fix it.
Internal linking with Yoast SEO
Feeling a bit overwhelmed by all this advice? Yoast SEO has some handy tools to make internal linking so much easier.
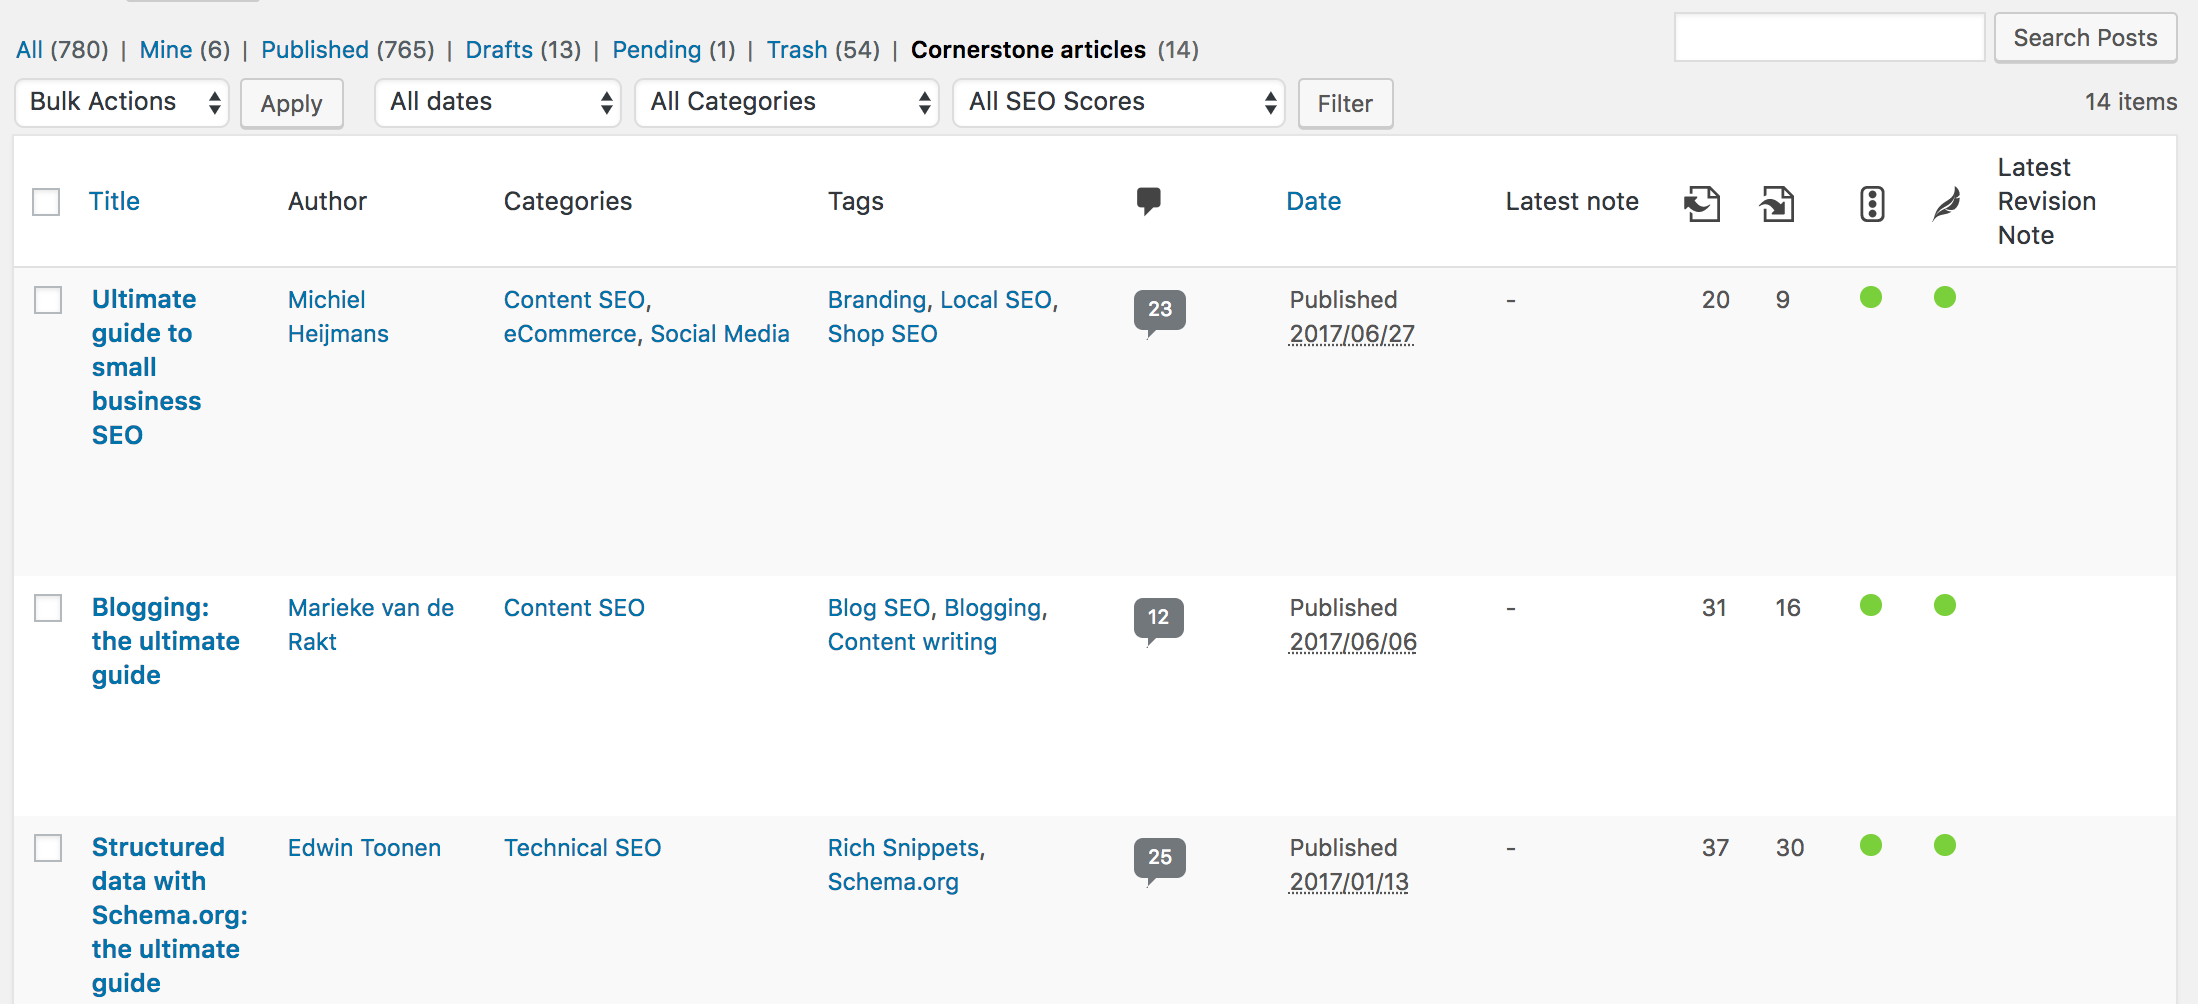
Yoast SEO’s text link counter visualizes your links so you can optimize them. It shows the internal links in a post and the internal links to a post. This tool can enhance your site structure by improving the links between your related posts. Make sure your cornerstones get the most (relevant) links! You can identify your cornerstones by finding them in the column with the pyramid icon.
Quickly see which posts have internal links pointing to them with the text link counter in Yoast SEO
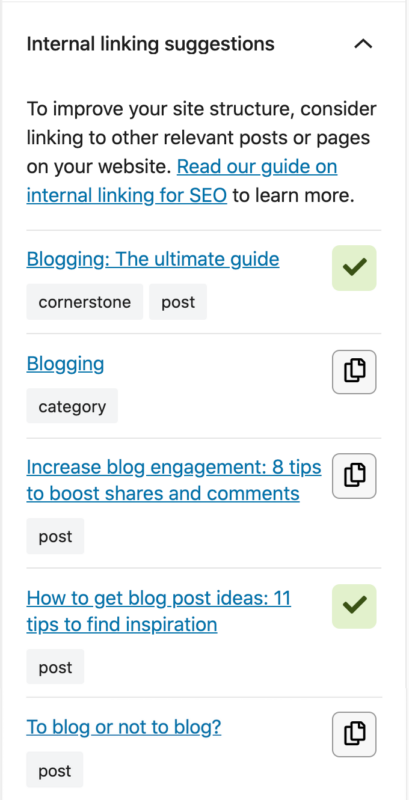
Yoast SEO Premium helps you with your internal linking as well. Our internal linking suggestions tool will show you which articles are related to the one you’re writing, so you can easily link to them: just by dragging the link into your editor!
The internal linking suggestions even include other content types
Moreover, our tool allows you to indicate which articles you consider cornerstone content on your site. Those articles will be shown at the top of the internal linking suggestions. You’ll never forget to link to them again.
As we have seen, there are several reasons why site structure is important. A good site structure helps both your visitors and Google navigate your site. It makes it easier to implement changes and prevents competing with your content. So use the tips and pointers in this guide to check and improve your site structure. That way, you’ll stay on top and keep your website from growing out of control!
Want to improve your site structure but don’t know where to start? Get Yoast SEO Premium and get loads of helpful tools and guidance, including free access to Yoast SEO Academy, our Site structure training, and our SEO workouts!
Marieke was head of strategy and former CEO at Yoast. After the sale of Yoast to Newfold Digital in 2021 she is no longer active at Yoast in 2023. Marieke, together with her husband Joost, actively invests in and advises several startups through their company Emilia Capital.
In SEO, there are on-page factors and off-page factors. On-page SEO factors are aspects of your website that you can optimize for better search rankings. It’s about improving things like your technical set-up, your content, and how user-friendly your site is. In this post, we’ll explain all about on-page SEO and how it differs from off-page SEO, and we’ll talk about some on-page optimizations that can help you to rank better.
On-page and off-page SEO: what’s the difference?
Every SEO strategy is focused on ranking as high as possible in the search engines. To do this, we all try to design and develop a website that Google’s algorithm — and people! — will love. That’s basically what SEO is about. The factors in Google’s algorithm can be divided into two categories that will determine the ranking of your website: on-page factors and off-page factors.
On-page SEO factors all have to do with elements on your website. For instance, things you work on to improve your E-E-A-T also fall in this category. Some of the most important on-page SEO factors are:
Your site set-up and technical features, site speed in particular
The quality of your content and use of keywords
How do you use additional media, such as images and videos
Your site structure and internal linking
Structured data and search appearance
Your URL structure
User experience
Meanwhile, off-page SEO looks at what happens away from your website. Some off-page SEO factors include:
Relevant links from other websites leading to your site
Social media activity
Business and map listings
External marketing activities
Pro tip: Find out more about on-page SEO with our front-end SEO inspector! You can use the front-end inspector tool in Yoast SEO Premium to explore the SEO data, metadata and schema output for pages on your site. It’s a great way to get to grips with your on-page SEO.
Importance of on-page SEO
On-page SEO consists of all the elements of SEO that you have control over. If you own a website, you can control the technical issues and the quality of your content. We believe you should be able to tackle all of these factors as they’re in your own hands. Remember: if you create an excellent website, it will start ranking.
Focusing on on-page SEO will also increase the chance that your off-page SEO strategy will be successful. Link building with a crappy site is very tough. Nobody wants to link to poorly written articles or sites that don’t work correctly.
How to optimize on-page SEO factors
1. Make sure search engines can crawl and index your site
If you’re unfamiliar with crawlability and indexing, here’s a quick explanation of what it is and what it has to do with Google. To show your page in the search results, Google must first know about that page. It has to be indexed by Google, meaning that this page has been stored in their index. And for that to be possible, you must ensure you’re not blocking Google from indexing your post or your whole site. So check if you’re not unintentionally doing that (we still see this happening!), and ensure your site is indexed.
Although this isn’t technically a ranking factor, getting your site into the search results requires it, so we thought it should be included here.
2. Invest time in creating quality content based on solid keyword research
Why do you think people visit your site? Most likely because it contains the information they’re looking for. Therefore it’s essential to write excellent content that corresponds with their needs. Search engines like Google also read your text. Which site ranks highest for a specific search term is primarily based on a website’s content. That’s why your content should be informative, easy to read, and focused on the right keywords that your audience uses.
Aside from creating quality content, you must remove or remedy low-quality pages. So-called thin content can harm your SEO. Take time to find these pages and do something with them occasionally to keep your content in good shape.
A significant on-page ranking factor is site speed. Users don’t want to wait for pages to load, so Google tends to rank fast-loading sites higher. If you’re unsure how fast (or slow) your site is, check out your Core Web Vital scores using the report in Google Search Console. This helpful tool will point out areas where your site speed can be improved so you know what to work on.
If you’re tech-savvy, you can probably handle this on your own. If you’re unsure where to start, our Technical SEO training can help you.
4. Get your site structure and internal linking right
A good site structure helps Google (and users) understand your site and navigate your content. And when it comes to making that site structure, internal linking is the way to do it. Firstly, you must channel many internal links to your most important content. We call those pages cornerstone content. Secondly, you should tidy up pages that aren’t getting many (if any) internal links. Those pages are what we refer to as orphaned content. It would be best if you decided whether to improve those pages and add more internal links pointing to them or remove them altogether.
Yoast SEO Premium has two SEO workouts to help you improve your site structure and internal linking. Using the workouts can help you to make big improvements quickly, so give them a go!
5. Optimize your use of images and videos
You’ll want to include images on your site to make it attractive, and maybe some videos too. Doing that wrong can harm your SEO, but doing it correctly comes with some SEO benefits.
High-quality images are usually large files that can slow your site down, and that’s a problem. Using smaller image files and giving them descriptive names, captions, and alt tags will favor your SEO. Plus, there are additional benefits. For one, you’ll make your site more accessible, so it’s helpful for a wider audience. And for another thing, you’ll have a chance of your images ranking in the Google Image search results. Read more about these topics in our posts about image SEO and alt tags.
Adding videos to your site is a bit more complicated than images. And ranking your videos on Google (or YouTube) comes with its own set of challenges. We’ve got a great series of posts all about video SEO, if you’d like to learn more about optimizing in this area. There’s also a dedicated Yoast Video SEO plugin, if you’re serious about getting your videos ranking.
6. Create a persuasive search appearance
How your site looks in the search results is vital for SEO. While the search results aren’t part of your site, the things you do to optimize your search appearance are. Therefore, we consider SEO titles, meta descriptions, and structured data part of on-page SEO.
Optimize your SEO title and meta description, and then add structured data for results that stand out
Optimizing the text for your search snippets is fairly straightforward. Adding structured data can be trickier. Good to know: Yoast SEO can help with all these tasks. With checks and previews to help you, getting your SEO titles and meta descriptions right couldn’t be easier. And when it comes to structured data, Yoast does all the hard work for you — all you need to do is select the content type and fill in the blanks.
7. Make your URLs SEO-friendly
A well-crafted URL structure helps your on-page SEO — it’s like giving your web pages a good road map. Think of it as a friendly address that guides search engines and invites users to explore your content. Creating SEO-friendly URLs makes it easier for humans and search engines to understand what your page is all about. Opt for concise and descriptive URLs that include relevant keywords, as they provide a clear signpost. A clean and organized URL structure enhances navigation, making it easier for everyone to understand your website. Don’t forget to keep it short and readable.
8. Design an excellent user experience
The last thing we want to mention is user experience. Simply put, users need to understand your website easily. They should be able to find what they want in a heartbeat. They should know where to click and how to navigate through your site. And your site should be fast! A beautifully designed website is nice, but you should make it your top priority to create a user-friendly website first.
If you want to learn more about combining SEO and UX to get more people to your site, we’d advise you to look at our other articles on user experience. Or check out our all-around SEO training course.
To conclude
We’ve talked about the most important on-page SEO factors. First, ensure that your website works correctly and that your technical SEO is up to par. Secondly, create content that is user-centered and focused on the right keywords. Thirdly, work on the usability and speed of your site to help users and search engines around your website.
As these factors are all a part of your site, you can work on them to ensure your on-page SEO is top-notch! That being said, do remember to also work on your off-page SEO. Although you may not have total control over these factors, you can still put some effort into creating that exposure on other sites too!
This post explains everything you need to know about cornerstone content – or evergreen content, as it’s also known. You’ll learn what it is, why it’s important for SEO, how to write this kind of content and how you should link from your posts to your cornerstone articles.
What is cornerstone content?
Cornerstone content is the core of your website. It consists of the best, most important articles on your site; the pages or posts you want to rank highest in the search engines. Cornerstone articles are usually relatively long, informative articles, combining insights from different blog posts and covering everything that’s important about a certain topic.
Their focus is to provide the best and most complete information on a particular topic, rather than to sell products. Still, they should reflect your business or communicate your mission perfectly.
Cornerstone content can be either a blog post or a page. But whichever they are, you should make sure they’re very well written, update them often, and aim to get them to rank for your most competitive keywords.
Why are cornerstone articles so important for SEO?
Cornerstone content plays a significant role in any SEO strategy. It can be hard to rank for search terms that are very popular, but a cornerstone approach can help you tackle those competitive search terms. If you write a lot of pages on similar subjects, you need to tell Google which of them is the most important. If you don’t, you’ll be eating away your own chances to rank well in the search results. Providing the correct internal link structure between your posts tells Google which article is the most important.
Link structure for cornerstones
Cornerstone articles should have a prominent place on your website. Ideally, someone should be able to click straight from your homepage to your cornerstone articles. Also, all your other posts about similar topics should link back to their corresponding cornerstone article, so its importance is clear from your site structure. As your site develops, you will write tons of new blog posts approaching that topic from other angles, each one linking back to your cornerstone article. This internal linking structure will increase the chance of your cornerstone content pages ranking in Google searches.
The following metaphor might help you understand this principle: imagine you’re looking at a map of a state or country. Small towns and big cities will all be interconnected somehow. But the big cities will have many more roads leading towards them than the small towns. Those cities are your cornerstones, receiving the most links. The small towns are your posts on more specific topics. There are some roads (links) leading to them, but not as many as to the big cities.
A more concrete example: at Yoast, we write a lot of different posts about SEO copywriting, each looking at a different aspect of SEO copywriting. The cornerstone article for this topic is the ultimate guide to SEO Copywriting, and whenever we write a new post on SEO copywriting, we add a link to that cornerstone article. In doing so, I’ll make clear to Google that the ultimate guide is the most important article about SEO Copywriting on our site, thereby increasing its chances to rank.
Which articles are my cornerstones?
Choose your cornerstones carefully. Think of the four or five pages you would like someone to read when they first visit your website. These articles should be the cornerstones of your site. Which articles are most important to you? Which are the most complete and authoritative? Do these target the keywords you most want to rank for?
It might be tempting to think of your homepage as a cornerstone article, but that’s not really what your homepage does. Although it does have lots of links leading back to it, content-wise it doesn’t really do what a cornerstone should do. A cornerstone article should target a specific topic, with lots of in-depth content talking about that topic. Your homepage will be much more general than this, so it doesn’t give you the same opportunity to rank for your target keywords. That being said, of course, it is important to spend time optimizing your homepage.
If your website is enormous, you’ll have more cornerstones than if your website is small. You’ll probably write about more than one topic, so be sure to choose a cornerstone article from each category.
Give your cornerstones extra attention
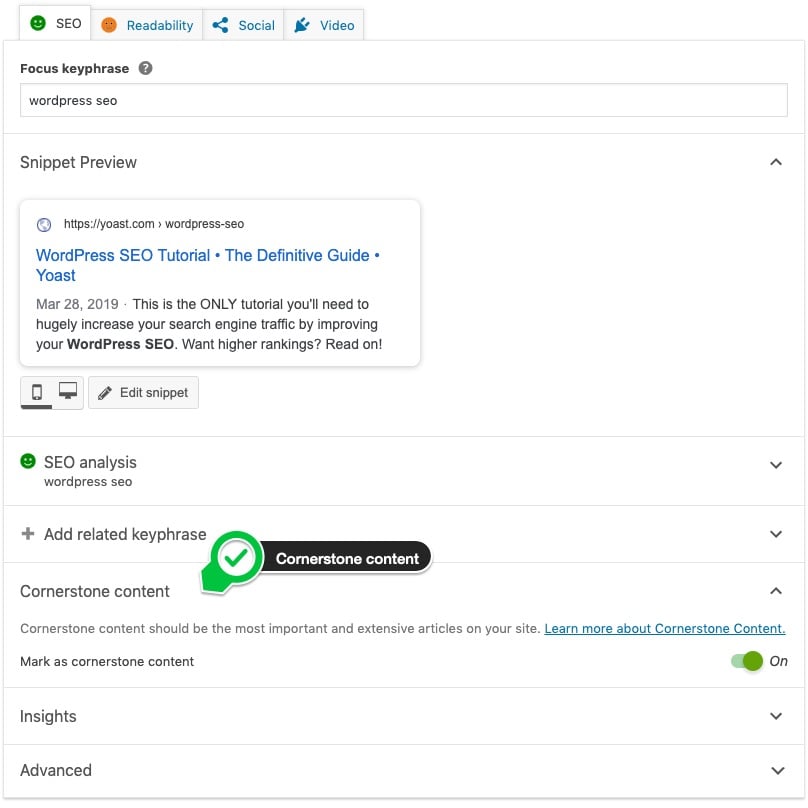
The concept of cornerstone content is so important, that our Yoast SEO for WordPress plugins and Yoast SEO for Shopify app include an option to indicate whether or not a page is cornerstone content. If you mark pages as cornerstone content, Yoast SEO helps you write kick-ass content and build a solid internal linking structure.
In the classic editor, the Yoast meta box has a Cornerstone content toggle. The block editor has one in the sidebar
Marking your cornerstone articles means you can create a list of them in your post overview, so you can easily work on improving them. And, most importantly, the link suggestion tool in Yoast SEO Premium will give priority to the articles that you mark as cornerstone content, so you’ll never forget to link to your best article on a certain topic if you write about something related.
Optimizing your cornerstones with Yoast SEO
Yoast SEO offers a specific cornerstone content analysis that helps you optimize your cornerstone content. Yoast SEO for WordPress also includes a text link counter, and – in Premium – even internal linking suggestions, in which cornerstone articles get priority over other posts.
If you really want to make your cornerstone articles great, you need specific content analysis for cornerstones. Content marked as cornerstone will be judged more strictly than usual on SEO and readability in the content analysis, as you want this article to be longer, have excellent content, keep the reader’s attention and rank high. Read how this analysis helps you optimize your cornerstones in Yoast SEO for WordPress and Yoast SEO for Shopify.
Text link counter
With Yoast SEO for WordPress you can filter your cornerstone articles in the post overview to see how many internal links a post has pointing to it and how many posts it links to. This text link counter is extremely useful because you can see at a glance if your cornerstone content has enough links from other, related posts:
Internal linking suggestions
Yoast SEO Premium has an internal linking feature. We analyze what you write and use the most prominent words in your text to determine which articles are related – and therefore which you should link to. Cornerstone articles are treated differently in our calculation of internal linking suggestions because they are more important and have a higher value. To give these articles more prominence, we place the cornerstone articles at the top of the list of the internal linking suggestions. That makes it much easier for you to link to your critical articles.
5 steps to a killer cornerstone approach
Ideally, you should do extensive keyword research, which will help you to produce really awesome, long, informative and beautifully written cornerstone articles. But what if you don’t have that much time? And what if you’ve already written tons of articles? Follow these five steps to make killer cornerstone content.
Step 1: Think about your keywords
You have to decide on the essential keywords you want to rank for. Your cornerstone articles should be optimized for the ‘head’ or most competitive keywords, so be sure to carry out some keyword research.
Step 2: Choose the best post
Go through the posts that are optimized for keywords surrounding the most important keywords. Which post do you think is the best? That’ll be your cornerstone from now on!
Step 3: Rewrite it
Rewrite your cornerstone article. Make it awesome and SEO-friendly. As cornerstone articles are usually lengthy, pay extra attention to readability. Make sure you use plenty of headings. An index at the beginning of a long cornerstone article is also a great idea. Expand your article and make sure it’s totally up to date. And don’t forget to rewrite and update that article regularly.
Step 4: Optimize your other posts on long tail variants
The other blog posts about similar topics as your cornerstone article should be optimized for long tail variants of the ‘head’ keyword you’re attacking in your cornerstone article.
Step 5: Linking from tail to head
You have to tell Google that your new cornerstone article is the most important article on that topic on your site. Don’t forget to link from all the long tail articles to your cornerstone article!
Quick wins!
In real life, perhaps you do not have the time to develop such an elaborate structure. Still, writing an article about a specific topic often leads to inspiration to write an article about a similar topic. You should then try to optimize this second post for a slightly different focus keyword and link these posts internally.
Every time you write a post, you should think about similar posts you have written and link to these. Do you already have an important article about this, even though it is not entirely awesome yet? If you use Yoast SEO Premium, keep an eye on the internal linking tool to see what comes up.
Also, make sure you set up the right linking structure. This does not take a lot of your time and could really help to rank your most important article. Take a look at all the posts on the topic you have already written about and add links to your most important article from all of your (less awesome) posts about that specific topic. You can use the Yoast text link counter to regularly check if there are enough internal links to your important articles.
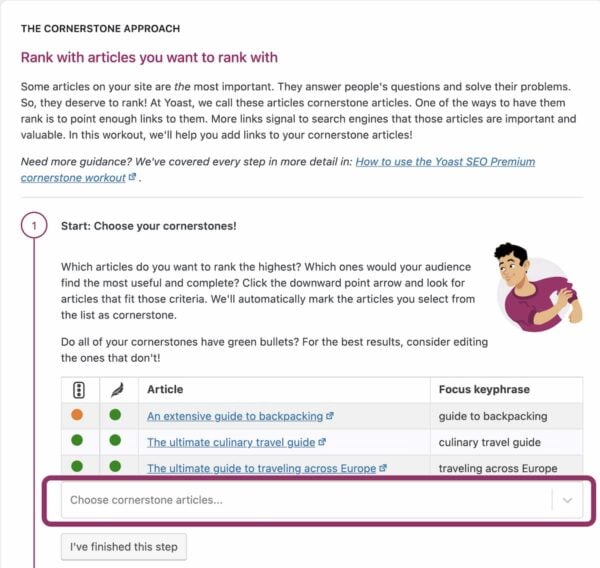
Do our SEO workout: the cornerstone content approach
Want to build a fantastic cornerstone content strategy in WordPress? Do our SEO workout: the cornerstone content approach to quickly power up your internal linking. With the workout, you’ll get all the guidance you need to make sure that your most important articles have enough internal links pointing to them. You can find the tools you need right there in the workout — all you need to do is follow the steps. Give it a go!
The first step in the cornerstone content SEO workout in Yoast SEO Premium
Yoast’s plans for cornerstone content
Site structure is important for SEO. Having a solid site structure means both search engines and visitors can easily navigate your site to find what they want. To help you achieve this, we are continually working on many more features in Yoast SEO that’ll improve the structure of your website.
A factory reset is useful for a creating fresh setup of a UniFi Console, or device that was already configured in a managed state.
Restoring with the Reset Button
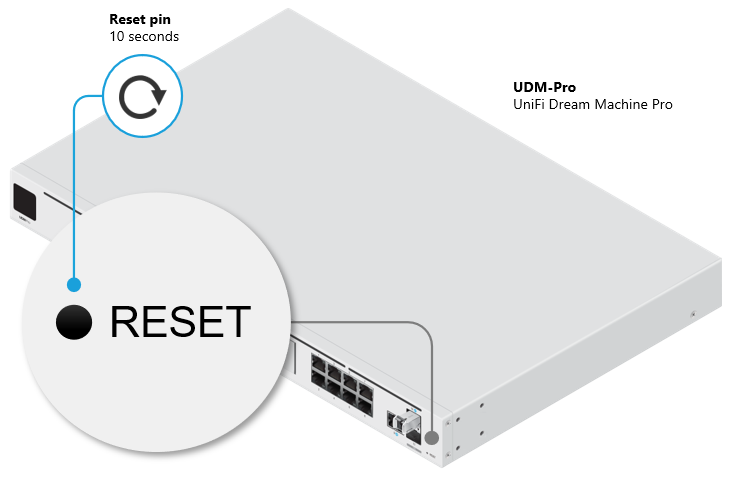
All UniFi devices have a Reset button. You can return a device to a factory-default state by holding this for 5-10 seconds (depending on the device), or until the LEDs indicate the restore has begun. Your device must remain powered during this process.
UniFi PoE Adapters also have a Reset button that can be used if the actual device is mounted and out of reach.
Example: The diagram below illustrates how to locate this button on the UDM Pro.
Restoring From Your UniFi Application
UniFi Devices
All UniFi devices can be restored to their factory defaults via their respective web or mobile applications. This is located in the Manage section of a device’s settings. Depending on the application, this may be referred to as Forget (UniFi Network) or Unmanage (UniFi Protect).
Selecting this option will unmanage the device from your UniFi Console and restore the device to a factory default state.
UniFi Consoles
A UniFi Console admin with Owner privileges has the ability to restore their console using the “Factory Reset” button located in the UniFi OS System settings.
Frequently Asked Questions
Why does my device still appear in my application after I restored it using the physical Reset button?
Why does my device say “Managed by Other”?
This will occur if the device was managed by another instance of a UniFi application. This includes cases where the UniFi Console (e.g., Dream Machine Pro, or Cloud Key) was factory restored, because the UniFi device still considers itself as being managed by the ‘old’ application console, prior to restoration.
There are several options to resolve this:
Restore the UniFi Console from a backup in which the device was already managed.
Factory restore the UniFi device and then re-adopt it.
Reassign the device using the UniFi Network mobile app. Note: This can only be done by the account owner and requires them to have previously signed into the mobile app while the device was managed.
Note: If you are self-hosting the Network application, you should only ever download the UniFi software on a single machine which will act as the UniFi Console. Some users mistakenly download this multiple times because they believe it is a requirement to manage their Network Application from other devices, but this is actually creating a completely new instance. To manage your network from another device, you can type in the IP address of the UniFi Console while connected to the same local network. Alternatively, you can enable Remote Access to manage your network anywhere. See Connecting to UniFi to learn more.
Why is my UniFi Device not factory restoring?
Ensure that your device remains powered on during the restoration process, otherwise it will not occur.
It is also possible that you held the button for too short of a time (resulting in a reboot), or too long of a time (resulting in entering TFTP Recovery Mode). Refer to our UniFi Device LED Status guide for more information.
In this article, we’re going to show you how to use ChatGPT to write a blog post. If you’re new to using AI content generators, don’t worry. We will be walking you through the entire process step-by-step.
ChatGPT is a game-changer for marketers and bloggers—in fact, pretty much anyone that does anything online, in fact, ChatGPT can even help you brainstorm. And although it might sound like AI will take everyone’s jobs, we should embrace AI technology and use it to create better content more quickly.
Before we jump into this topic, it’s worth noting here that it is highly likely that OpenAI will be adding a digital watermark to content generated by ChatGPT.
If you intend to publish this content online, you should either rewrite the output in your own words or use a more comprehensive AI writing tool like Jasper to write or rewrite the paragraphs for you, based on the outline and ideas generated by ChatGPT (and check out our thoughts on the future of white-collar work in the age of AI here)
Writing a blog post is somewhere ChatGPT can excel. But the thing is, it won’t simply produce the perfect blog post at the click of a button. ChatGPT needs detailed instructions to produce good content.
And of course, when it comes to creativity and original ideas, you will still need to add a human touch.
That being said, ChatGPT can be used for pretty much every part of the writing process when guided carefully by a human writer.
Often, blog articles are relatively short and focused pieces that center primarily around one topic. Because of this, Chat GPT will happily suffice for short blog posts on simple topics.
However, a higher standard can often be achieved by augmenting the process with Jasper’s AI writing capabilities.
Here’s how to use ChatGPT to write a blog post.
BRAINSTORM TOPICS AND TITLE IDEAS
Chat GPT has emerged as a useful brainstorming tool. It’s becoming increasingly popular with bloggers and copywriters to help them with writer’s block.
It offers a quick and convenient way of generating relevant topics and title suggestions. To get started, you must create a free account with OpenAI. There is a paid version available, too—ChatGPT Plus.
In this guide, we’re going to be using the free version, but you can use either.
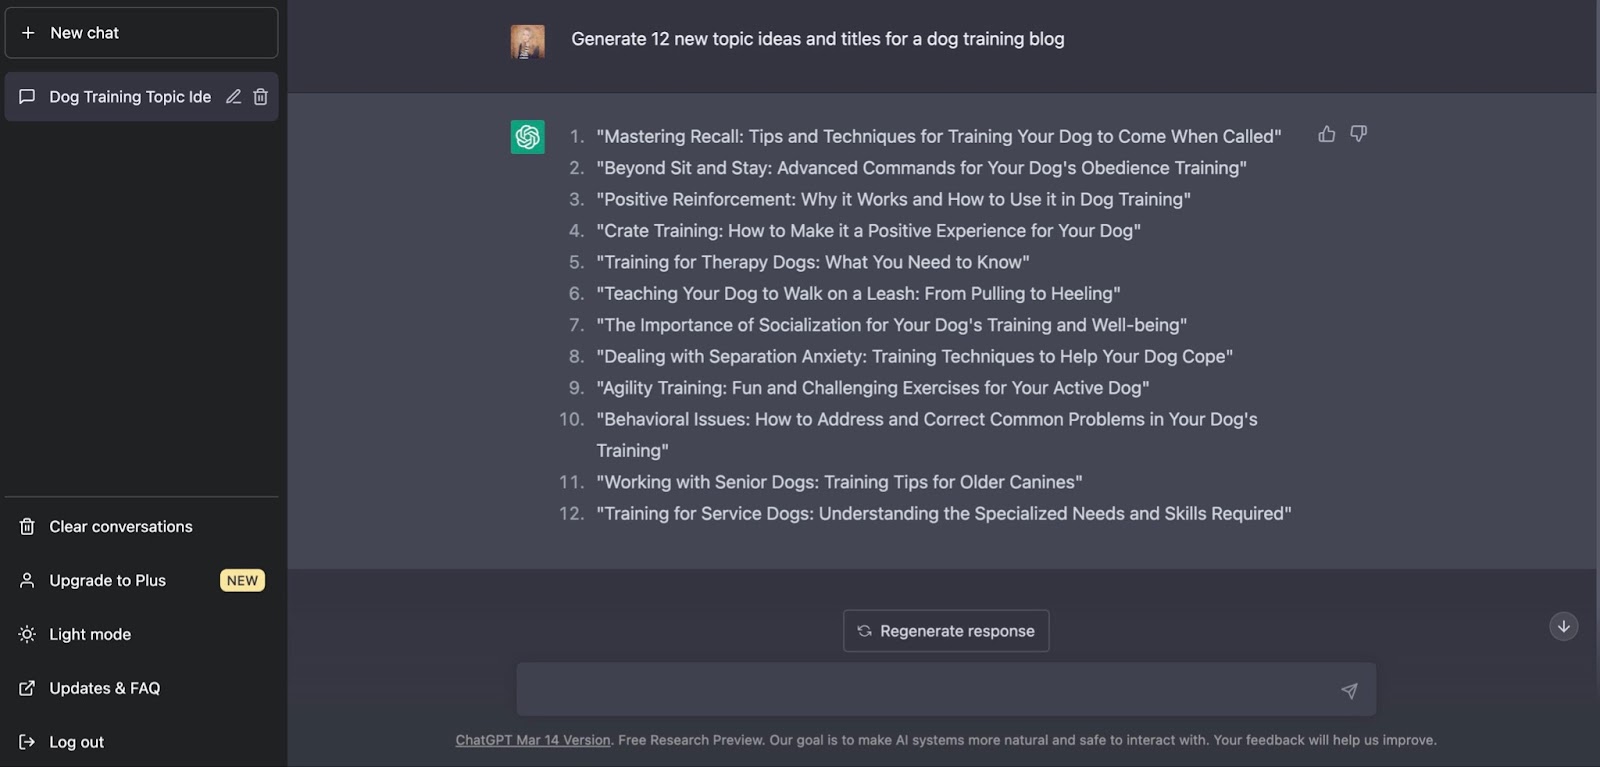
Once you’re signed in, you can enter a prompt in the chat box at the bottom of the page. For example: “Generate 12 new topic ideas and titles for a dog training blog.”
If you’re happy with the generated text, you can move on to the next step. Alternatively, you can also ask ChatGPT to regenerate the response for more ideas.
USE CHATGPT TO HELP YOU WRITE A SOLID OUTLINE
Once you have established a topic, the next step is to use ChatGPT to write an outline for your blog post.
Doing this manually can be a time-consuming process. But the good news is, ChatGPT will make it a lot easier.
It will provide you with a detailed outline which you can then edit or add to yourself with your own ideas.
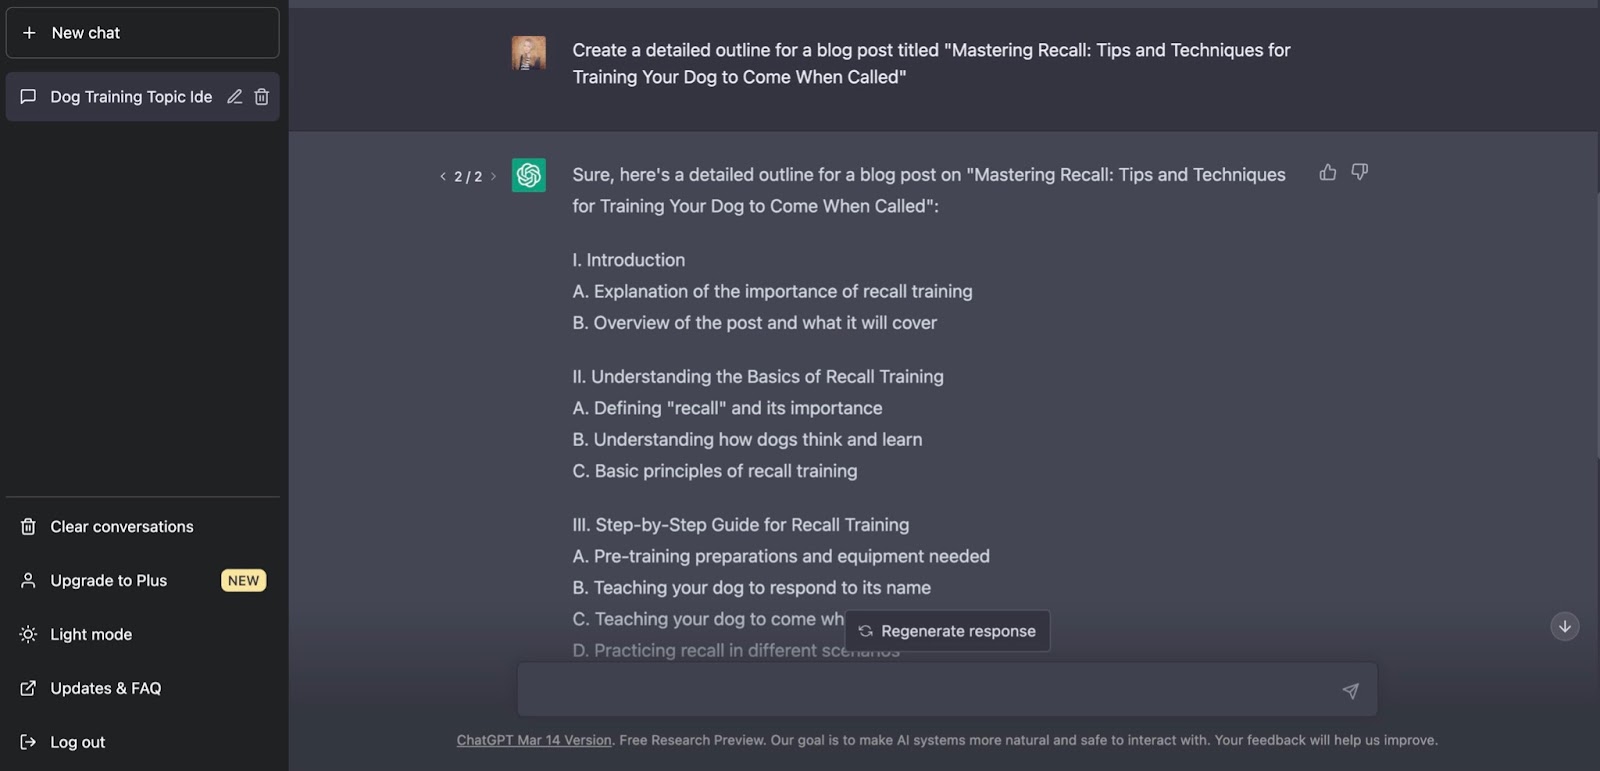
First, you will need to enter your command into ChatGPT.
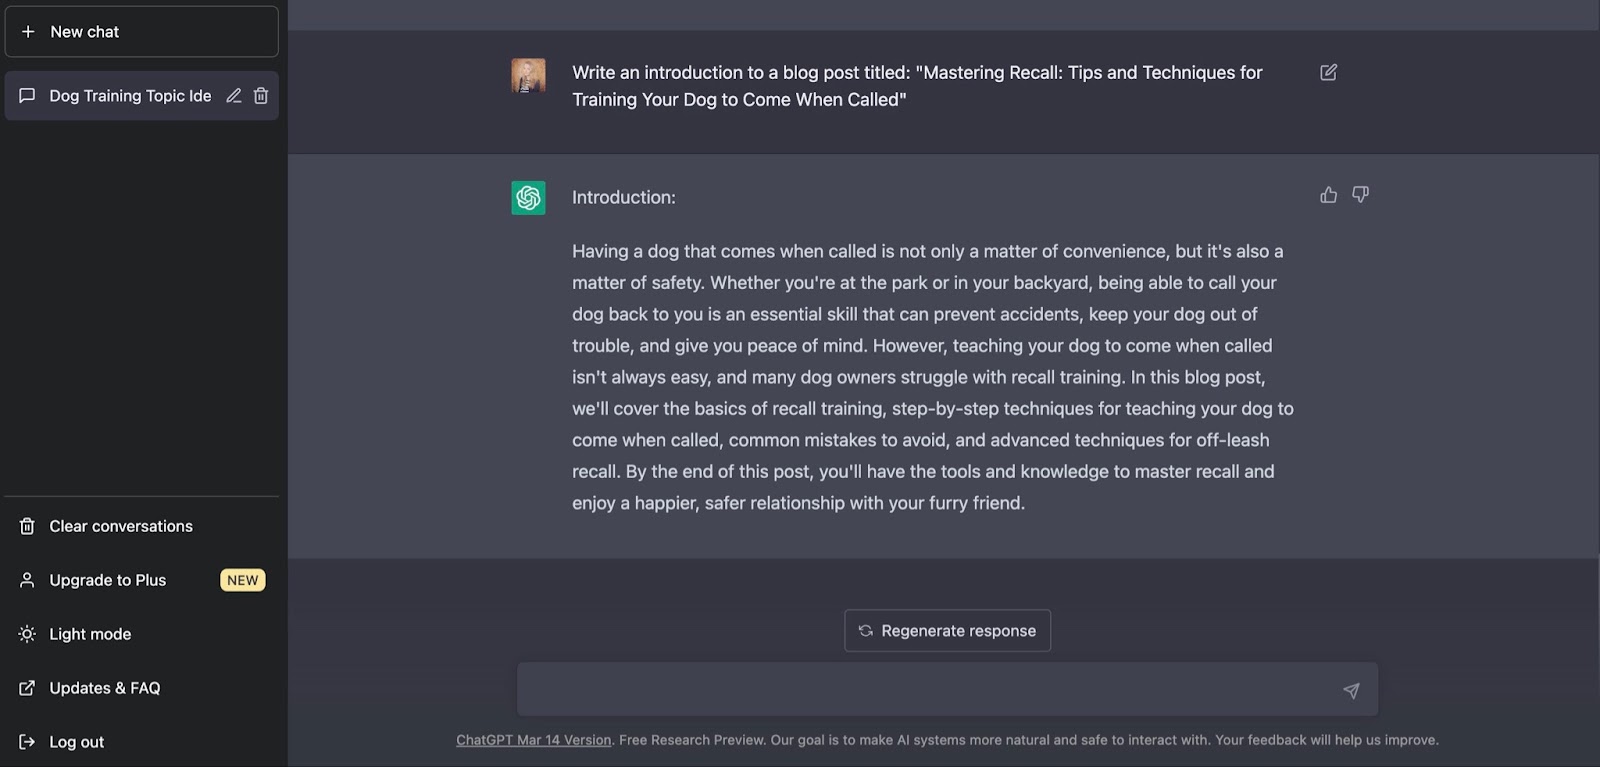
Command example: Create a detailed outline for a blog post titled “Mastering Recall: Tips and Techniques for Training Your Dog to Come When Called”.
ChatGPT will then provide you with a detailed outline that you can tweak as needed.
Now that you’ve got an outline, you can either use ChatGPT, or another tool like Jasper to create content for each section of your blog post.
HOW TO USE CHATGPT TO HELP WRITE EACH SECTION OF YOUR BLOG POST
If you want to use ChatGPT to write a blog post, you’re going to need to break down what you want into different sections and categories. That way, you can ask ChatGPT to write each section for you as you go.
After that, you can piece them all together at the end to create a long-form blog post you can publish.
If you’re writing a shorter piece of content of up to 500 words, then technically, you could just ask it to write a whole blog post in one go.
However, in general, breaking this down into sections is the best way to go about this. This will ensure that the topic is covered thoroughly and in the appropriate order.
Doing this is also essential if you want to create long-form content.
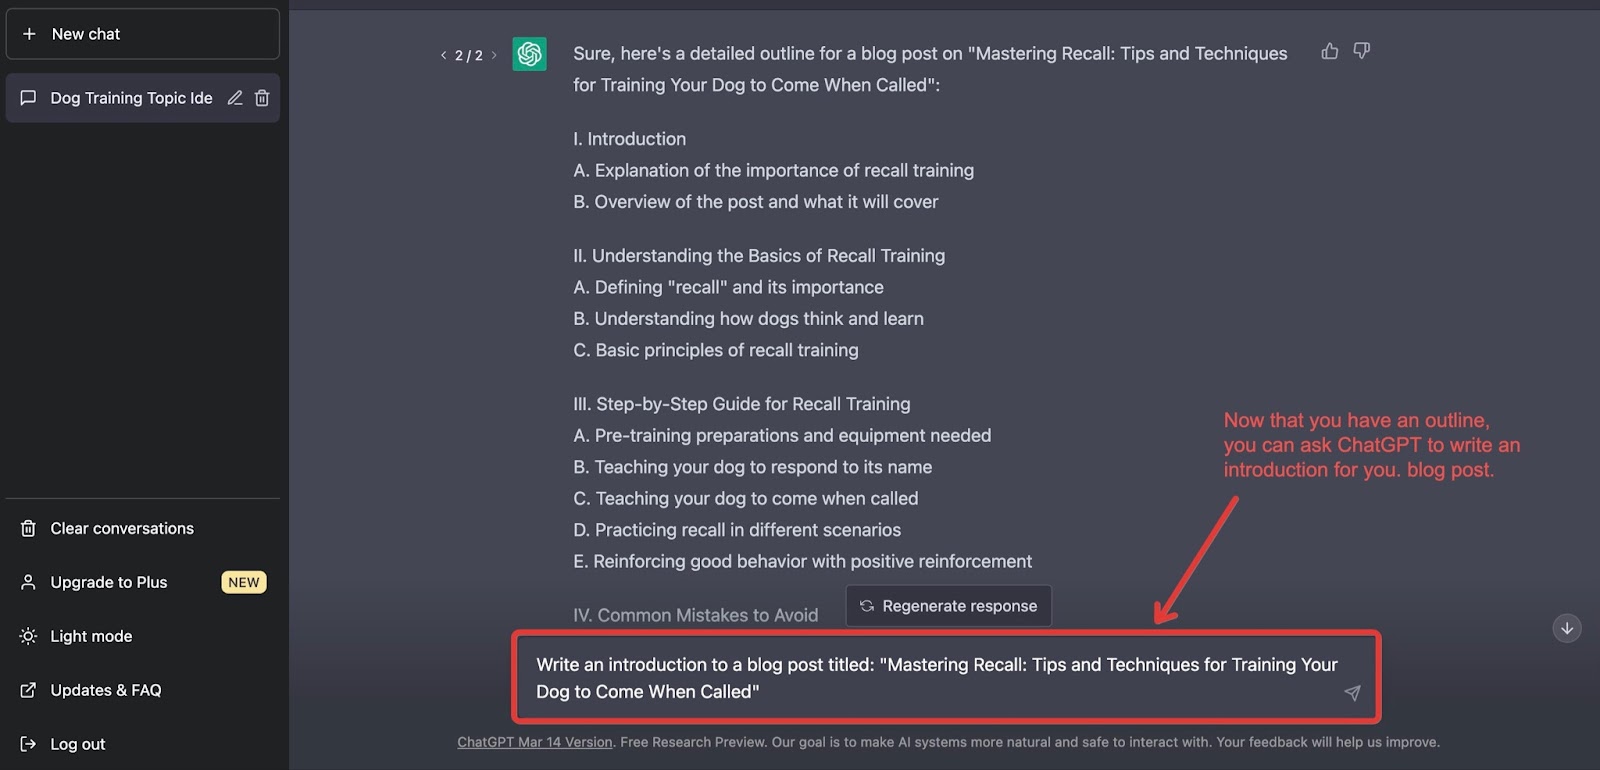
ASK CHATGPT TO WRITE YOUR INTRODUCTION
A strong start to any blog post is a must. This is why you want to start by asking ChatGPT to write your introduction for you.
Ask ChatGPT to write an introduction to your blog post.
Example prompt:
Write an introduction for a blog post titled “Mastering Recall: Tips and Techniques for Training Your Dog to Come When Called”.
And here’s what ChatGPT generated based on that prompt:
As you can see, it has done a pretty good job in just a few seconds.
You can now tweak this introduction if required. This is a good time to add your own expertise and introduce yourself as an authority on the topic.
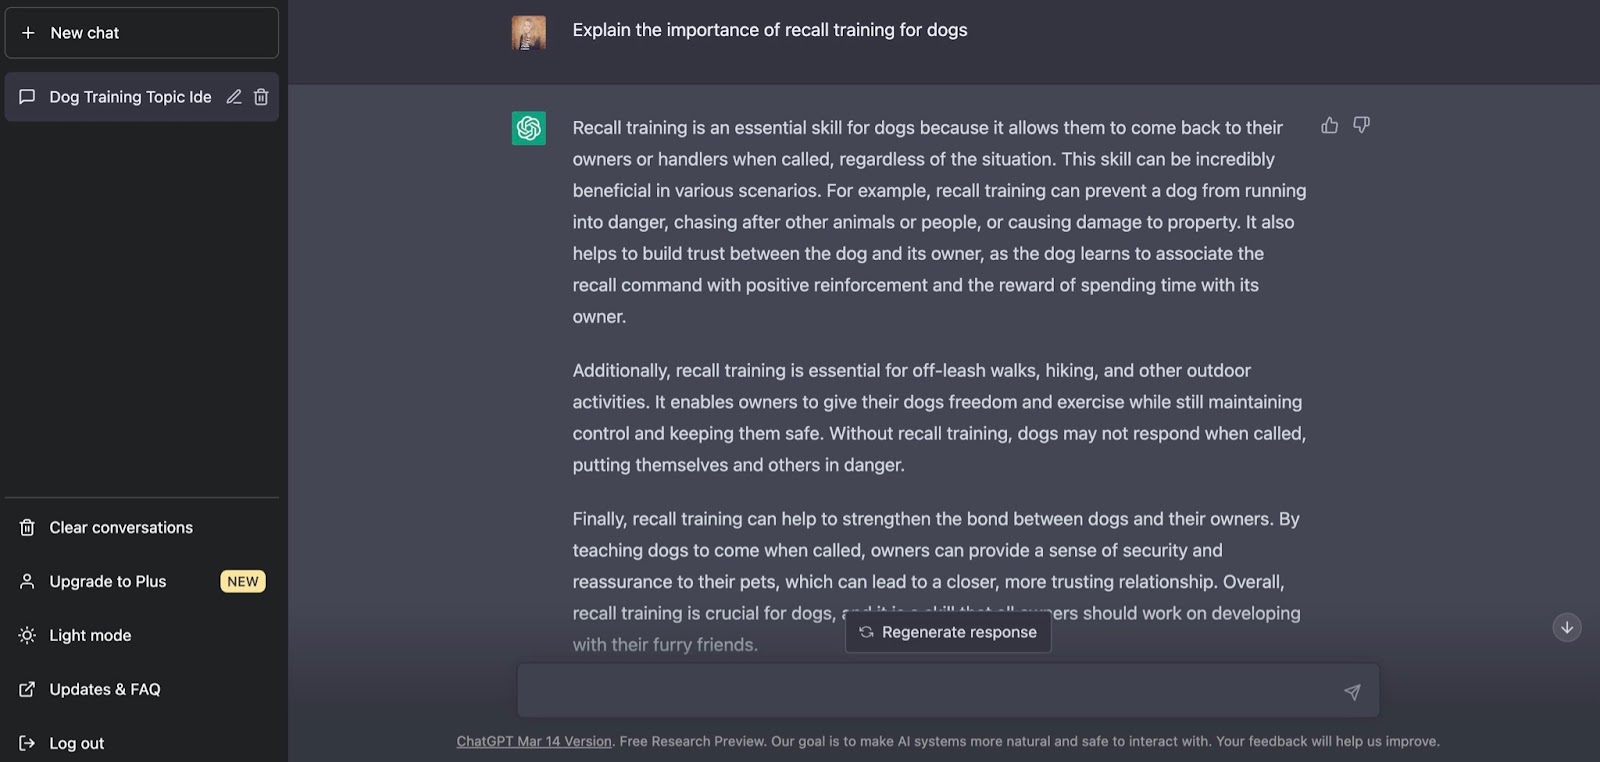
ENTER EACH SUBHEADING IN CHATGPT AS A QUESTION
The next step is to create content for each subheading detailed in your outline.
ChatGPT is designed to be an AI chatbot rather than exclusively an article writer. Because of this, it works well if you enter your prompts as questions.
If you make the headings within your article a question, then you can ask GPT to answer this question for you. Then you can use the answer it generates as a basis for each paragraph of your blog post.
So for the first subheading, “Explanation of the importance of recall training”, you would enter a prompt of “Explain the importance of recall training for dogs”.
ChatGPT will then respond to this prompt, providing another section of your blog post.
Note: If you intend to publish this content online, you should either rewrite the output in your own words. You could also use a more comprehensive tool like Jasper to write or rewrite the paragraphs for you, based on the outline created by ChatGPT.
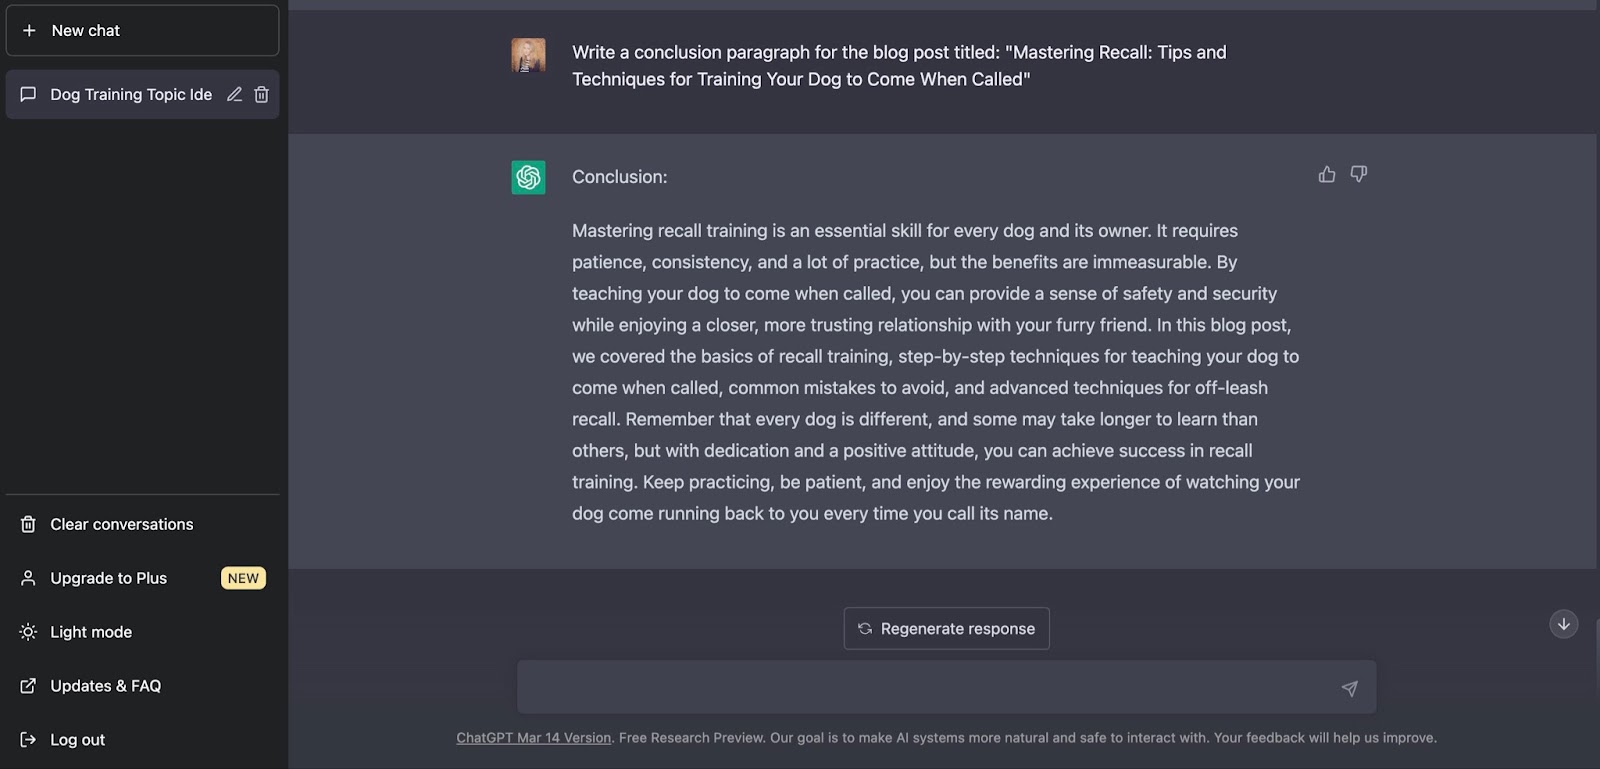
Ending any blog post on a high is a great idea. Once you are certain your blog post has thoroughly covered the topic at hand, it’s time to close things off.
Simply ask ChatGPT to create a conclusion based on the topic you’re already writing about. You can even go one step further and ask it to include things like a call to action or next steps.
You might want to change things a little to ensure your brand and/or name is mentioned. However, asking ChatGPT to write you a conclusion paragraph gives you a solid starting point.
When you start by asking ChatGPT to write you a conclusion, it will tell you that it needs to know the topic of the blog and the main points you have mentioned in the post, so it can conclude your blog post accurately.
REVIEW AND EDIT YOUR BLOG POST
Just because ChatGPT (or indeed any AI writing software) has created a post for you, that doesn’t mean you should use it as it is. It’s important to thoroughly review and edit the content. Make sure that it reads well and keeps in line with your existing brand voice.
Most people won’t respond well to content they think has been auto-generated, so putting across your voice and ensuring that it sounds in line with the rest of your content is essential.
This is something that you should be double-checking in the review stage of your blog post.
FACT-CHECKING
ChatGPT’s knowledge generally ends in the latter part of 2021. This means that some of the facts it gives may be outdated and, therefore, inaccurate.
Before you publish a post, while you’re reviewing it, you should make sure that any facts mentioned are accurate and edit them if they’re not.
It’s all well and good having a well-written article, but if the information within it is inaccurate, it could destroy any trust you have built with your readers or audience.
Instead, spend some time checking all of the facts for yourself. This way, you can be sure that the content you are putting out there is going to be well received by its intended audience.
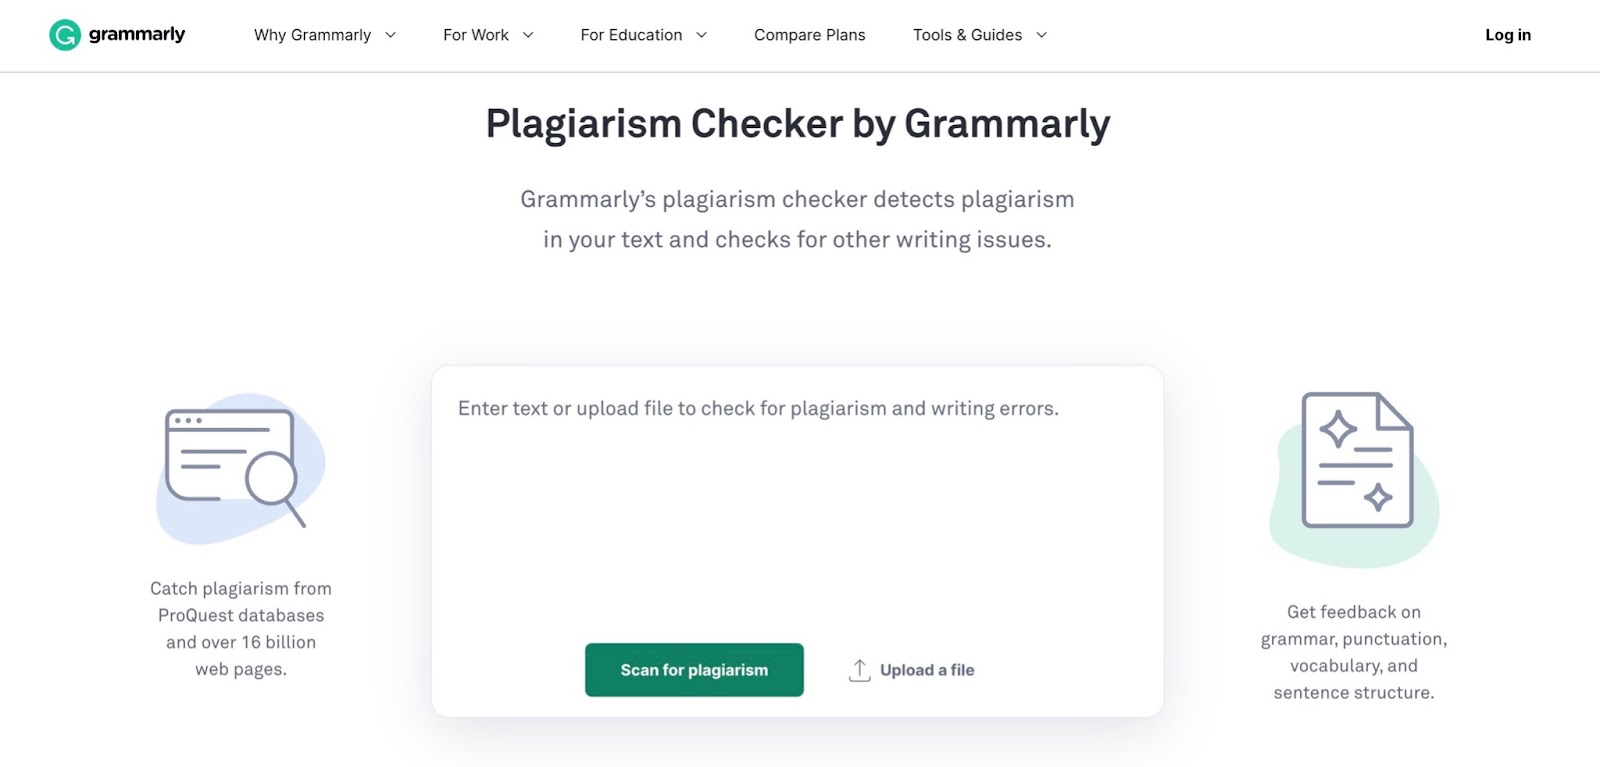
CHECK FOR PLAGIARISM WITH GRAMMARLY
While your text should be unique when generated with ChatGPT, that’s not always true. It’s always a good idea to double-check it. Grammarly is a popular free tool for checking spelling and grammar in written content, and it has a built-in plagiarism checker.
It’s worth spending a couple of minutes copying and pasting your AI-generated content into Grammarly’s Plagiarism Checker just to give it the once over before it goes live.
Overall, ChatGPT is a super useful tool for digital marketers and bloggers to have as part of their content creation toolkit.
You can use it for everything from blog writing to writing a meta description and even generating social media captions. It can also be used for keyword research and to help you generate new keyword ideas.
The main thing to bear in mind is that it’s likely that content generated with ChatGPT is watermarked or soon will be.
This means that Google and other search engines, along with AI content detection tools like Originality.ai, will usually be able to tell if your content is AI-generated.
However, that doesn’t mean you should dismiss ChatGPT altogether. But it does mean you need to be savvy and do what you can to get the most out of the tool.
Teaming up ChatGPT with other tools like Jasper can be a great way to get the most out of your content marketing efforts. This can also help you to get around the potential ‘Watermarking’ issues that you may come across in the future with Chat GPT.
ChatGPT isn’t really designed for long-form content writing, so you probably won’t use it to create entire blog posts in one go. However, there’s nothing to say that facility won’t come in the future. And there are already awesome courses like AI for blogging that are helping students profit from this new technology.
What it does is offer a quick and easy way to get blog post ideas, expand on ideas you already have, and even get an idea of what other people might be writing about within your niche.
You can then use the information you have gathered from ChatGPT in Jasper to create a unique, high-quality long-form blog post that you would be proud to publish on your platform.
Small and medium-sized businesses (SMBs) are increasingly becoming targets for cyber attacks. According to Verizon, about 61 percent of SMBs reported at least one cyber attack in 2021. Worse, Joe Galvin, chief research officer at Vistage, reported that about 60 percent of small businesses fold within six months of a cyber attack.
To protect your network from potential threats, you need a reliable and effective firewall solution. This tool will act as the first line of defense against unauthorized access and can help prevent malicious attacks from infiltrating a business’s network.
We reviewed the top SMB firewall solutions to help you determine the best one for your business.
Founded in 2018, Perimeter 81 is a cloud and network security company that provides organizations with a secure and unified platform for accessing and managing their applications and data.
It provides many security solutions, including firewall as a service (FWaaS), secure web gateway (SWG), zero trust network access (ZTNA), malware protection, software-defined perimeter, VPN-alternative and secure access service edge (SASE) capabilities, to ensure that data is secure and accessible to authorized personnel. It also provides centralized management and user access monitoring, enabling organizations to monitor and control user activity across the network.
Perimeter 81 provides granular access control policies that enable organizations to define and enforce access rules for their network resources based on the user’s identity, device type, and other contextual factors—making it easy for employees to access the company’s resources without compromising security.
Pricing
Pricing plans
Minimum users
Cost per month, plus gateway cost
Cost per year, plus gateway cost
Cloud firewall
Agentless application access
Device posture check
Essential
10
$10 per user, plus $50 per month per gateway
$8 per user, plus $40 per month per gateway
No
2 applications
No
Premium
10
$12 per user, plus $50 per month per gateway
$15 per user, plus $40 per month per gateway
10 policies
10 applications
3 profiles
Premium Plus
20
$16 per user, plus $50 per month per gateway
$20 per user, plus $40 per month per gateway
100 policies
100 applications
20 profiles
Enterprise
50
Custom quotes
Custom quotes
Unlimited
Unlimited
Unlimited
Features
Identity-based access for devices and users.
Network segmentation.
OS and application-level security and mutual TLS encryption.
Enable traffic encryption enforcement, 2FA, Single Sign-On, DNS filtering, and authentication.
Pros
Provides visibility into the company network.
Allows employee access from on-premise.
Automatic Wi-Fi security.
30-day money-back guarantee.
Cons
Low and mid-tiered plans lack phone support.
Limited support for Essential, Premium, and Premium Plus.
pfSense
Best open-source-driven firewall
pfSense is an open-source firewall/router network security solution based on FreeBSD. Featuring firewall, router, VPN, and DHCP servers, pfSense is a highly customizable tool that can be used in various network environments, from small home networks to large enterprise networks.
The tool supports multiple WAN connections, failover and load balancing, and traffic shaping, which can help optimize network performance. pfSense can be used on computers, network appliances, and embedded systems to provide a wide range of networking services.
Pricing
pfSense pricing varies based on your chosen medium—cloud, software, or hardware appliances.
For pfSense cloud:
pfSense on AWS: Pricing starts from $0.01 per hour to $0.40 per hour.
pfSense on Azure: Pricing starts from $0.08 per hour to $0.24 per hour.
The tool’s open-source version support is limited to community or forum. It lacks remote login support, private login support, a private support portal, email, telephone, and tickets.
Complex initial setup for inexperienced users.
Comodo Free Firewall
Best for Windows PCs
Comodo Firewall is a free firewall software designed to protect computers from unauthorized access and malicious software by monitoring all incoming and outgoing network traffic.
The firewall features packet filtering, intrusion detection and prevention, and application control. It also includes a “sandbox” feature that allows users to run potentially risky applications in a protected environment without risking damage to the underlying system.
The software works seamlessly with other Comodo products, such as Comodo Antivirus and Comodo Internet Security.
Pricing
Comodo is free to download and use. The vendor recommends adding its paid antivirus product (Comodo Internet Security Pro) to its firewall for added security. The antivirus costs $29.99 per year for one PC or $39.99 per year for three PCs.
Features
Auto sandbox technology.
Cloud-based behavior analysis.
Cloud-based allowlisting.
Supports all Windows OS versions since Windows XP (Note: Windows 11 support forthcoming).
Website filtering.
Virtual desktop.
Pros
Monitors in/out connections.
Learn user behavior to deliver personalized protection.
Real-time malware protection.
Cons
Lacks modern user interface.
Pop-up notifications—some users may find the frequent alerts generated by the software annoying and intrusive.
ManageEngine Firewall Analyzer
Best for log, policy, and firewall configuration management
It provides real-time visibility into network activity and helps organizations identify network threats, malicious traffic, and policy violations. It supports various firewalls, including Cisco ASA, Palo Alto, Juniper SRX, Check Point, SonicWall, and Fortinet.
Firewall Analyzer helps monitor network security, analyze the security posture of the network, and ensure compliance with security policies. It also provides reports, dashboards, and automated alerting to ensure the network remains secure.
Pricing
The amount you will pay for this tool depends on the edition you choose and the number of devices in your organization.
You can download the enterprise edition’s 30-day free trial to test-run it and learn more about its capabilities. It’s available in two versions: Windows OS or Linux. You can also download it for mobile devices, including iPhone devices and Android phones or tablets.
Standard Edition: Starts at $395 per device, up to 60 devices.
Professional Edition: Starts at $595 per device, up to 60 devices.
Enterprise Edition: Starts at $8,395 for 20 devices, up to 1,200 devices.
Regulatory compliance with standards such as ISO, PCI-DSS, NERC-CIP, SANS, and NIST.
Network behavioral anomaly alert.
Security reports for viruses, attacks, spam, denied hosts, and event summaries.
Historical configuration change tracking.
Bandwidth report for live bandwidth, traffic analyzer, URL monitor, and employee internet usage.
Compatible with over 70 firewall versions.
Pros
Excellent technical support.
Users praise its reporting capability.
In-depth auditing with aggregated database entries capability.
VPN and security events analysis.
Cons
Complex initial setup.
Users reported that the tool is occasionally slow.
Fortinet FortiGate
Best for hybrid workforces
Fortinet FortiGate is a network security platform that offers a broad range of security and networking services for enterprises of all sizes. It provides advanced threat protection, secure connectivity, and secure access control. It also provides advanced firewall protection, application control, and web filtering.
Business owners can use Fortinet’s super-handy small business product selector to determine the best tool for their use cases.
Small and mid-sized businesses may find the following FortiGate’s model suitable for their needs:
IPS
NGFW
Threat Protection
Interfaces
Series
FortiGate 80F
1.4 Gbps
1 Gbps
900 Mbps
Multiple GE RJ45 | Variants with PoE, DSL,3G4G, WiFi and/or storage
Multiple GE RJ45 | Variants with internalstorage | WiFi variants
FG-60F, FG-61F, FWF-60F, and FWF-61F
FortiGate 40F
1 Gbps
800 Mbps
600 Mbps
Multiple GE RJ45 | WiFi variants
FG-40F, FG-40F-3G4G, FWF-40F, FWF-40F-3G4G
Fortinet FortiGate is compatible with several operating systems and can easily be integrated into existing networks.
Pricing
Unfortunately, Fortinet doesn’t publish their prices. Reseller prices start around $335 for the FortiGate 40F with no support. Contact Fortinet’s sales team for quotes.
Features
Offers AI-powered security services, including web, content, and device security, plus advanced tools for SOC/NOC.
Continuous risk assessment.
Threat protection capability.
Pros
Top-rated firewall by NSS Labs.
Intrusion prevention.
Cons
According to user reviews, the CLI is somewhat complex.
Complex initial setup.
SonicWall TZ400 Security Firewall
Best for advanced threat protection
The SonicWall TZ400 is a mid-range, enterprise-grade security firewall designed to protect small to midsize businesses. It supports up to 150,000 maximum connections, 6,000 new connections per second, and 7×1-Gbe.
The TZ400 features 1.3 Gbps firewall inspection throughput, 1.2 Gbps application inspection throughput, 900 Mbps IPS throughput, 900 Mbps VPN throughput, and 600 Mbps threat prevention throughput.
Pricing
This product’s pricing is not available on the Sonicwall website. However, resellers such as CDW, Staples, and Office Depot typically sell it in the $1,000–$1,500 range. You can request a quote for your particular use case directly from Sonicwall.
Fast performance with gigabit and multi-gigabit Ethernet interfaces.
Protects against intrusion, malware, and ransomware.
High-performance IPS, VPN, and threat prevention throughput.
Efficient firewall inspection and application inspection throughput.
Cons
Support can be improved.
It can be difficult to configure for inexperienced users.
Cisco Meraki MX68
Best for small branches with up to 50 users
The Cisco Meraki MX68 is a security appliance designed for SMBs. It’s part of the Cisco Meraki MX series of cloud-managed security appliances that provide network security, content filtering, intrusion prevention, and application visibility and control.
The MX68 is equipped with advanced security features such as a stateful firewall, VPN, and intrusion prevention system (IPS) to protect your network from cyber attacks. The MX68 has a variety of ports and interfaces, including LAN and WAN ports and a USB port for 3G/4G failover. It also supports multiple WAN uplinks, providing redundancy and failover options to ensure your network remains online and available.
Pricing
The Cisco Meraki MX68 pricing isn’t listed on the company’s website, but resellers typically list it starting around $640. You can request a demo, free trial, or quotes by contacting the Cisco sales team.
Features
Centralized management via web-based dashboard or API.
Intrusion detection and prevention (IDS/IPS).
Next-generation layer 7 firewalls and content filtering.
SSL decryption/inspection, data loss prevention (DLP), and cloud access security broker (CASB).
Instant wired failover with added 3G/4G failover via a USB modem.
Pros
Remote browser isolation, granular app control, and SaaS tenant restrictions.
Support for native IPsec or Cisco AnyConnect remote client VPN.
Provides unified management for security, SD-WAN, Wi-Fi, switching, mobile device management (MDM), and internet of things (IoT)
Cons
The license cost is somewhat high.
Support can be improved.
Sophos XGS Series
Best for remote workers
Sophos XGS Series Desktop is a range of network security appliances designed to provide comprehensive protection for SMBs. These appliances combine several security technologies, including firewall, intrusion prevention, VPN, web filtering, email filtering, and application control, to provide a robust and integrated security solution.
Here’s a comparison table of the Sophos XGS series firewalls:
Firewall
TLS inspection
IPS
IPSEC VPN
NGFW
Firewall IMIX
Threat protection
Latency (64 byte UDP)
XGS Desktop Models
3,850 Mbps
375 Mbps
1,200 Mbps
3,000 Mbps
700 Mbps
3,000 Mbps
280 Mbps
6 µs
XGS 107 / 107w
7,000 Mbps
420 Mbps
1,500 Mbps
4,000 Mbps
1,050 Mbps
3,750 Mbps
370 Mbps
6 µs
XGS 116 / 116w
7,700 Mbps
650 Mbps
2,500 Mbps
4,800 Mbps
2,000 Mbps
4,500 Mbps
720 Mbps
8 µs
126/126w
10,500 Mbps
800 Mbps
3,250 Mbps
5,500 Mbps
2,500 Mbps
5,250 Mbps
900 Mbps
8 µs
136/136w
11,500 Mbps
950 Mbps
4,000 Mbps
6,350 Mbps
3,000 Mbps
6,500 Mbps
1,000 Mbps
8 µs
The Sophos XGS Series Desktop appliances are available in several models with varying performance capabilities, ranging from entry-level models suitable for small offices to high-performance models suitable for large enterprises. They are designed to be easy to deploy and manage, with a user-friendly web interface and centralized management capabilities.
Pricing
Sophos doesn’t advertise the pricing for their XGS Series Desktop appliances online, but they typically retail starting at about $520 from resellers.
Potential customers are encouraged to request a free trial and pricing information by filling out a form on the “Get Pricing” page of their website.
Features
Centralized management and reporting.
Wireless, SD-WAN, application aware routing, and traffic shaping capability.
SD-WAN orchestration.
Advanced web and zero-day threat protection.
Pros
Zero-touch deployment.
Lateral movement protection.
Users find the tool scalable.
Cons
Performance limitations.
Support can be improved.
Protectli Vault – 4 Port
Best for building your own OPNsense or pfSense router and firewall
The Protectli Vault is a small form-factor network appliance designed to act as a firewall, router, or other network gateway. The 4-Port version has four gigabit Intel Ethernet NIC ports, making it ideal for SMB or home networks.
The device is powered by a low-power Intel processor and can run a variety of open-source firewall and router operating systems, such as pfSense, OPNsense, or Untangle. It comes with 8GB DDR3 RAM and up to 32GB DDR4 RAM.
The Protectli Vault is designed to be fanless, silent, and compact, making it ideal for use in the home or office environments where noise and space may be an issue. It’s also designed to be energy-efficient, consuming only a few watts of power, which can save businesses considerable amounts of money on energy costs over time.
Pricing
The amount you will pay for this tool depends on the model you select and your desired configuration. The rates below are starting prices; your actual rate may vary based on your configuration. Note that all these items ship free to U.S. addresses.
VP2410 – 4x 1G Port Intel J4125: Starts at $329.
VP2420 – 4x 2.5G Port Intel J6412: Starts at $379.
FW4B – 4x 1G Port Intel J3160: Starts at $269.
FW4C – 4x 2.5G Port Intel J3710: Starts at $289.
Features
Solid-state and fanless tool.
Provides 2.5 GB ports unit.
AES-NI, VPN, and coreboot options.
Pros
A 30-day money-back guarantee.
Transparent pricing.
Coreboot support.
CPU supports AES-NI.
Cons
Steep learning curve.
OPNSense
Best for flexibility
OPNsense is a free and open-source firewall and routing platform based on the FreeBSD OS. It was forked from the popular pfSense and m0n0wall project in 2014 and was officially released in January 2015.
OPNsense provides a modular design that allows users to easily add or remove functionality based on their needs.
OPNsense is popular among IT professionals and network administrators who need a flexible and customizable firewall and routing platform that they can tailor to their specific needs. It’s also a good choice for small businesses and home users who want to improve their networks’ security without spending a lot of money on commercial solutions.
VPN (site-to-site and road warrior, IPsec, OpenVPN, and legacy PPTP support).
Built-in reporting and monitoring tools, including RRD Graphs.
Pros
Free, open source.
Traffic shaper.
Support for plugins.
Multi-language support, including English, Czech, Chinese, French, German, Italian, Japanese, Portuguese, Russian, and Spanish.
Cons
Reporting capability can be improved.
The interface can be improved.
Key features of SMB firewalls
Firewalls designed for SMBs share many of the same characteristics as their enterprise-grade cousins—such as firewall rule and policy configuration, content filtering, reporting and analytics—while placing additional emphasis on affordability and ease of use.
Firewall rules and policies
Administrators should be able to set up firewall rules and policies that control traffic flow and block or permit traffic based on various criteria, such as source/destination IP addresses, ports, and protocols.
These rules and policies can be used to control the types of applications, services, and data that are allowed to traverse the network, as well as create restrictions on access.
Firewall rules and policies are essential to the security of a network, as they provide the first line of defense against malicious attacks.
Content filtering
Content filtering is the process of blocking or restricting certain types of content from entering or leaving a network. It can be used to block websites, applications, or data that may contain malicious or unwanted content, such as malware, viruses, or pornographic material.
Content filtering is typically implemented using a combination of hardware and software solutions. Hardware solutions, such as routers and switches, can be configured to block certain types of traffic or data or to restrict access to certain websites or applications. Software solutions, such as firewall rules and policies, can also be used to block or restrict certain types of content.
Reporting and analytics
Reporting and analytics are essential for any business network, as they provide important insights into the health and security of the network. Firewall reporting and analytics features allow network administrators to identify trends, detect potential threats, and analyze the performance of the network over time.
Reporting and analytics can also be used to identify any areas of the network that may be vulnerable to attack, as well as identify any areas where the network may not be performing optimally.
Affordability
For SMBs, affordability is a key factor when it comes to purchasing a firewall. SMB firewalls are typically more affordable than enterprise firewalls and can be purchased for as little as a few hundred dollars, so it is important to consider your budget when selecting a firewall.
Some SMB firewalls offer additional features for a fee, so consider what features are necessary for your network and the ones you can do without, as this will help you decide on the most cost-effective firewall solution. At the same time, be careful not to cut corners—your business’s data is too important to be insufficiently protected.
Ease of use and support
For SMBs, finding a firewall solution that is easy to use and has good support is essential. Firewalls should be easy to configure and manage so the network administrator can quickly and easily make changes as needed.
Additionally, good support should be available for any issues or questions that arise. This support should include an online knowledge base and access to technical support staff that can assist with any questions or problems, ideally 24/7.
How to choose the best SMB firewall software for your business
When shopping for the best SMB firewall software for your business, look for software that offers the features you need, easy installation and management, scalability to grow with your business, minimal impact on network performance, and an affordable price.
It’s also important to choose a vendor with a good reputation in the industry, backed up by positive reviews and customer feedback.
Frequently asked questions (FAQs)
What is an SMB firewall?
An SMB firewall is a type of network security device that is designed specifically for small and medium-sized businesses. It’s used to protect networks from unauthorized access, malicious attacks, and other security threats.
What features should I look for in an SMB firewall?
Above all you need a solution with a strong security profile. Look for specific security measures such as:
Intrusion prevention
Content filtering
Malware protection
Application control
Traffic shaper
Other factors to consider include ease of management, scalability, and cost.
Do small businesses need a firewall?
Yes, small businesses need a firewall. It provides an essential layer of network security that helps protect against unauthorized access, malware, and other security threats. Without a firewall, small businesses are vulnerable to attacks that could compromise sensitive data, cause network downtime, and damage their reputation.
How much does a firewall cost for SMBs?
The cost of an SMB firewall can vary widely depending on the features, capabilities, and brand of the firewall. Generally, SMB firewalls can range in price from a few hundred to several thousand dollars.
How many firewalls do you need for a small business?
The number of firewalls needed for a small business will depend on the size and complexity of the network. In many cases, a single firewall may be sufficient to protect the entire network. However, in larger networks, it may be necessary to deploy multiple firewalls to provide adequate protection.
Factors such as network segmentation, geographic location, and compliance requirements may also influence the number of firewalls needed. It’s best to consult with a network security expert to determine the appropriate number of firewalls for your small business.
Methodology
We analyzed dozens of SMB firewall software and narrowed down our list to the top ten. We gathered primary data—including pricing details, features, support, and more—from each tool provider’s website, as well as third-party reviews. We selected each software based on five key data points: security, ease of use, affordability, quality of service, and user satisfaction.
Bottom line: Choosing an SMB firewall
The solutions we evaluated are some of the best SMB firewalls currently available on the market. They are designed to provide SMBs with advanced security features, easy management, and scalability at affordable rates.