A factory reset is useful for a creating fresh setup of a UniFi Console, or device that was already configured in a managed state.
Restoring with the Reset Button
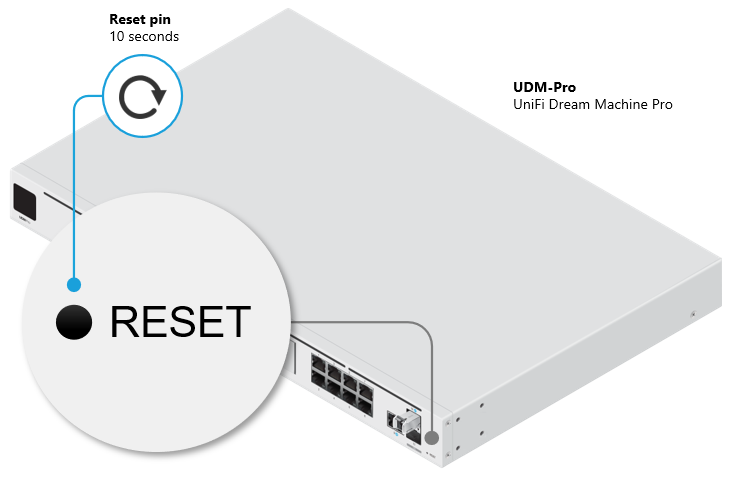
All UniFi devices have a Reset button. You can return a device to a factory-default state by holding this for 5-10 seconds (depending on the device), or until the LEDs indicate the restore has begun. Your device must remain powered during this process.
UniFi PoE Adapters also have a Reset button that can be used if the actual device is mounted and out of reach.
Example: The diagram below illustrates how to locate this button on the UDM Pro.
Restoring From Your UniFi Application
UniFi Devices
All UniFi devices can be restored to their factory defaults via their respective web or mobile applications. This is located in the Manage section of a device’s settings. Depending on the application, this may be referred to as Forget (UniFi Network) or Unmanage (UniFi Protect).
Selecting this option will unmanage the device from your UniFi Console and restore the device to a factory default state.
UniFi Consoles
A UniFi Console admin with Owner privileges has the ability to restore their console using the “Factory Reset” button located in the UniFi OS System settings.
Frequently Asked Questions
Why does my device still appear in my application after I restored it using the physical Reset button?
Why does my device say “Managed by Other”?
This will occur if the device was managed by another instance of a UniFi application. This includes cases where the UniFi Console (e.g., Dream Machine Pro, or Cloud Key) was factory restored, because the UniFi device still considers itself as being managed by the ‘old’ application console, prior to restoration.
There are several options to resolve this:
- Restore the UniFi Console from a backup in which the device was already managed.
- Factory restore the UniFi device and then re-adopt it.
- Reassign the device using the UniFi Network mobile app.
Note: This can only be done by the account owner and requires them to have previously signed into the mobile app while the device was managed.
Note: If you are self-hosting the Network application, you should only ever download the UniFi software on a single machine which will act as the UniFi Console. Some users mistakenly download this multiple times because they believe it is a requirement to manage their Network Application from other devices, but this is actually creating a completely new instance. To manage your network from another device, you can type in the IP address of the UniFi Console while connected to the same local network. Alternatively, you can enable Remote Access to manage your network anywhere. See Connecting to UniFi to learn more.
Why is my UniFi Device not factory restoring?
Ensure that your device remains powered on during the restoration process, otherwise it will not occur.
It is also possible that you held the button for too short of a time (resulting in a reboot), or too long of a time (resulting in entering TFTP Recovery Mode). Refer to our UniFi Device LED Status guide for more information.


