Active Directory Tools and Management Software (2022 Update)

A list of the best Active Directory tools to help you simplify and automate Microsoft Active Directory management tasks.

The native Windows Administrative Tools are missing many features that administrators need to effectively do their jobs. Things like bulk operations and automation are just not possible with the Active Directory users and computer consoles.

The good news is there are many useful Active Directory Tools to choose from that can help you manage domain users, groups, and computers, generate reports, find security weaknesses, and more.

Check it out:

1. AD Bulk User Import

bulk user import tool

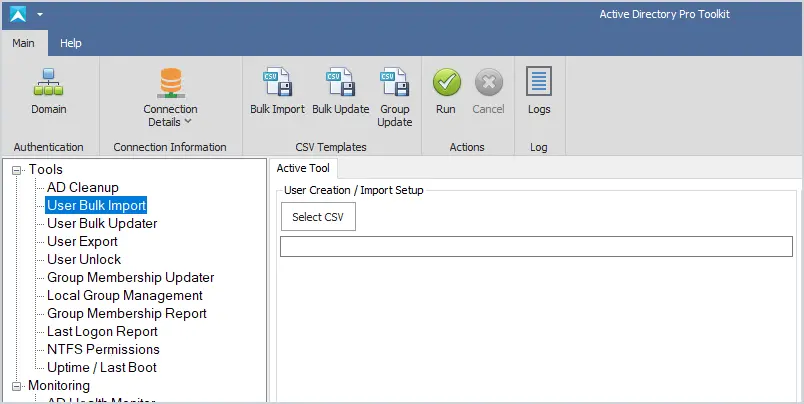
The Bulk Import tool makes it easy to import new user accounts into Active Directory from CSV. Includes a CSV template, sets multiple user attributes, and adds users to groups during the import. Automate the creation of new user accounts and simplify the user account provisioning process.

Key Features

  • Easily bulk import new accounts
  • Includes a CSV template
  • Logs the import process
  • Add users to groups during the import process

2. Active Directory Explorer

active directory explorer

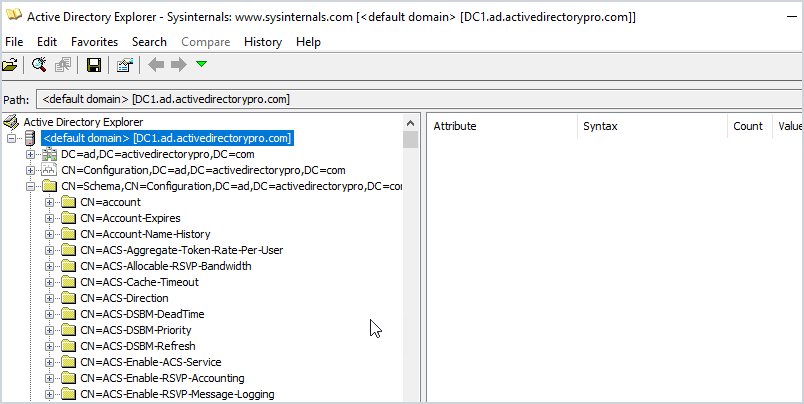
Active Directory Explorer is a browser to navigate the AD database, objects, permissions, and schema objects within Active Directory. The interface is similar to Active Directory users and computers but allows you to view advanced settings. This is not a tool you would use on a daily basis, this would be used for very specific tasks such as viewing an object’s attributes and security sessions.

Another neat feature is the ability to save a snapshot of the AD database. You can then load it for offline viewing and explore it like it was a live database. Again not a common use case.

Key Features

  • Easily explore the Active Directory database
  • View all object attributes
  • View the Active Directory Schema
  • Take a snapshot of the Database and view offline

3. Adaxes

adaxes

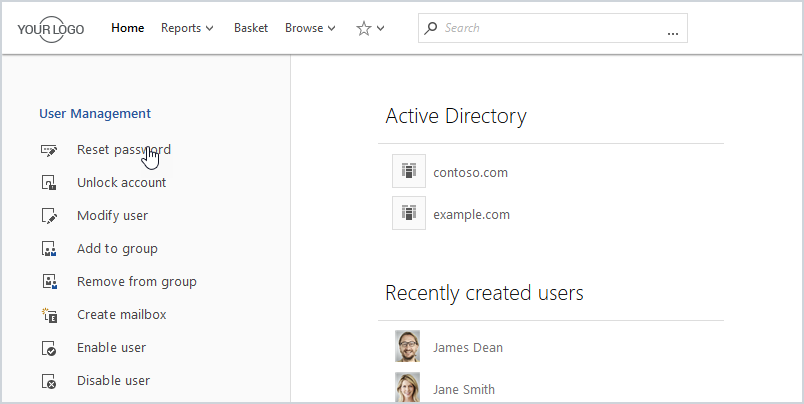
Adaxes is a premium product that automates many AD management tasks, like user provisioning, assigning permissions, creating mailboxes, delegation, and much more. All management tasks are done from a web interface and can be accessed from laptops, tablets, and phones. The web interface is fully customizable so you can view just want you to need. Also includes a user self service portal and a password self service portal.

Key Features

  • Roles based access control
  • Fully automate AD tasks
  • Web interface

4. User Export Tool

user export tool

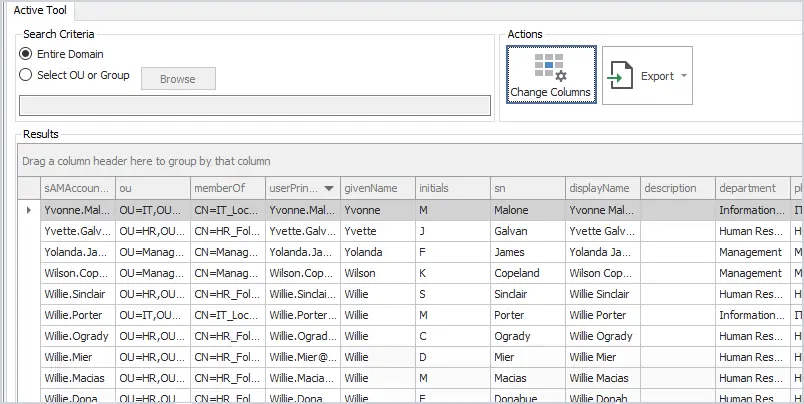
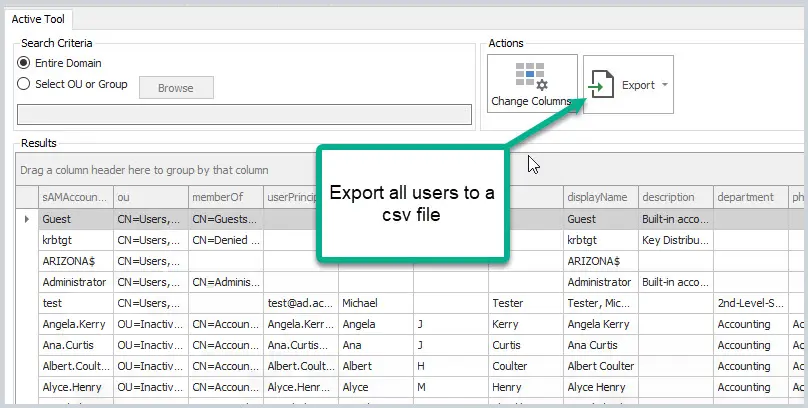
The user export tool lets you export all uses plus all common user fields to a CSV. Over 40 user fields can be added to the export by clicking the change columns button. This is a great tool if you need a report of all users, the groups they are a member of, OU, and more.

Key Features

  • Find users TRUE last logon date from all domain controllers
  • Export report to a CSV file
  • Filter and search columns
  • Easy to report on OUs or groups

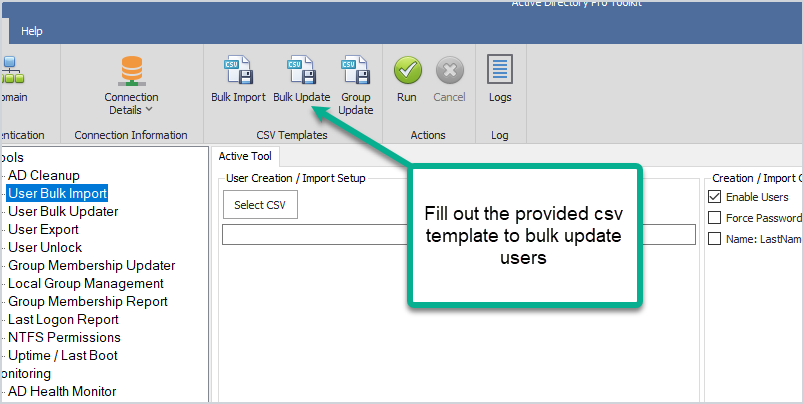
5. Bulk User Updater

bulk updater

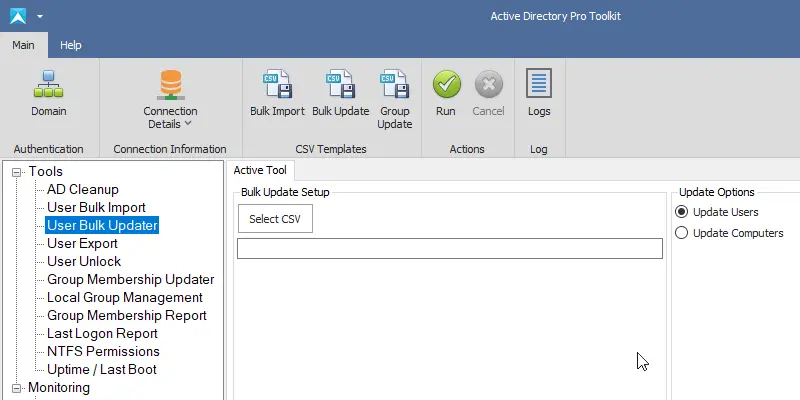
This tool lets you bulk update user account properties from CSV file. Some popular use cases are bulk updating user’s proxyaddresses, employeeid, addresses, manager, addresses, state, country, and so on.

All changes are sent to a log file which lets you keep track of changes and check for errors. This is a very popular tool!

Key Features

  • Bulk update user account properties
  • Includes CSV template
  • Logs changes and errors
  • Saves a lot of time

6. AD Cleanup Tool

ad cleanup tool

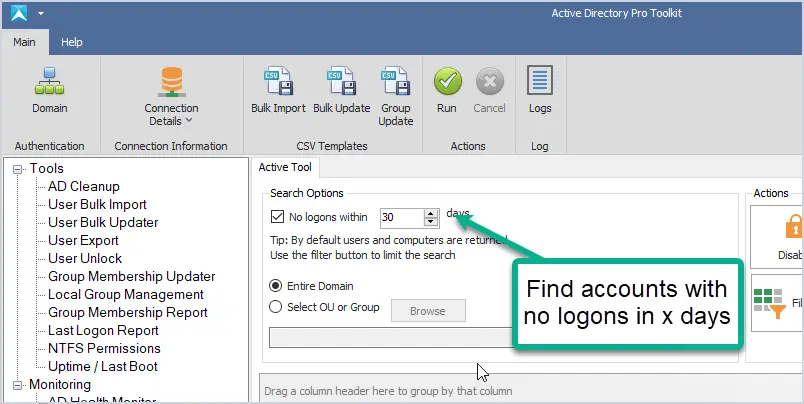
The AD Cleanup tool searches your domain for stale and inactive user accounts based on the account’s lastlogon attribute. You can also find disabled, expired, accounts that have never been used and empty groups.

It is recommended to run a cleanup process on your domain at least once a month, this tool can help simplify that cleanup process and secure your domain.

Key Features

  • Quickly find old user and computer accounts
  • Limit the scope to OUs and groups
  • Bulk move and disable old accounts
  • Find all expired user accounts

7. SolarWinds Server & Application Monitor

solarwinds sam

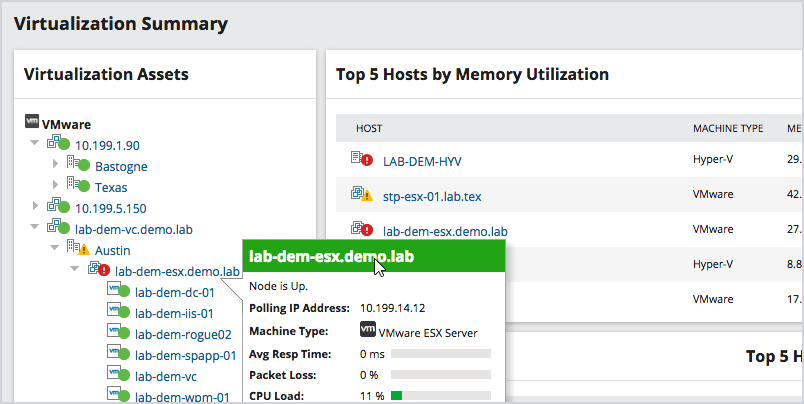
This utility was designed to Monitor Active Directory and other critical services like Azure, DNS, and DHCP. It will quickly spot domain controller issues, replication, performance issues with cloud services, failed logon attempts, and much more.

This is a premium tool that has a big price tag but it’s an incredible product. You can monitor all resources including applications, hardware, processes, and cloud systems. Everything is accessed from a single web console, you can get email alerts based on various thresholds.

Key Features

  • Customizable dashboard
  • Email alerts
  • 1200 out of box templates
  • Diagnose AD replication issues
  • Monitor account logins

SolarWinds Server Monitor provides a fully functional 30-day free trial.

8. Active Directory Health Monitor

ad heatlh monitor

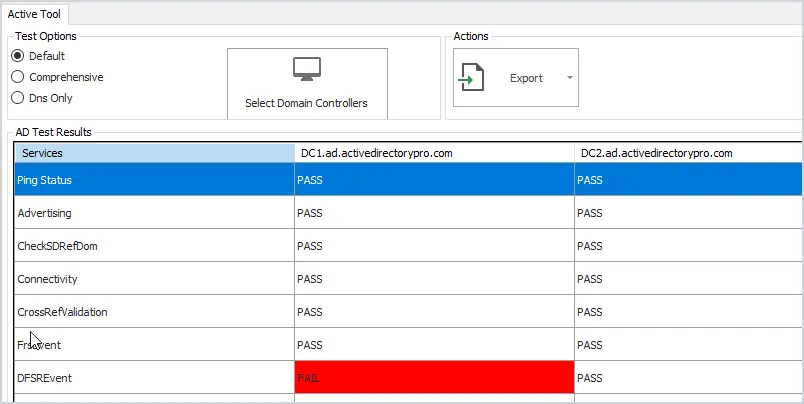
If you want a simple tool to monitor your Active Directory services then this is a great tool.

Check the health of your domain controllers with this easy to use tool. Runs 27 health checks on your servers to check for critical errors. Click on any failed test to quickly see the details.

Also includes an option to test DNS and check event logs for critical events.

Key Features

  • Quickly check domain controller health
  • Check DNS health
  • Very easy to use
  • Export report to csv file

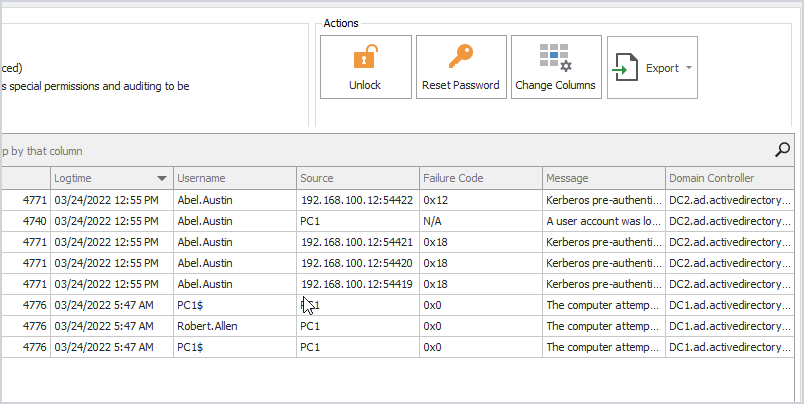
9. User Unlock and Lockout Troubleshooter

troubleshoot account lockouts

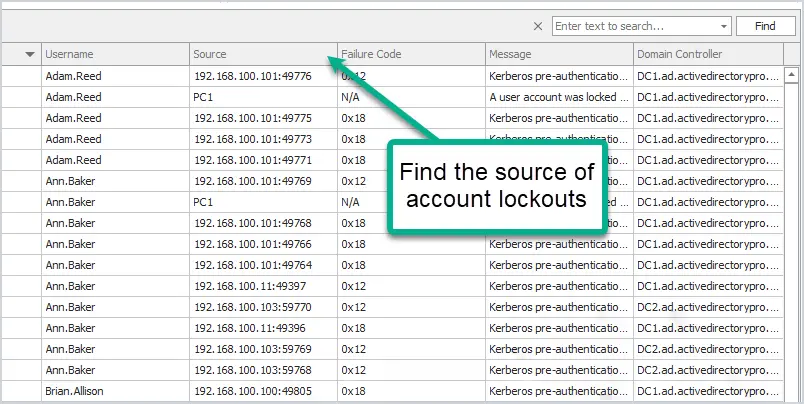
Find all locked users with the click of a button. Unlock, reset passwords or show advanced details like the source of the lockout and more. To pull the source computer you need to have auditing enabled, check the administrator guide for how to enable this.

Key Features

  • Find the source of account lockouts
  • Fast and easy to use
  • Unlock multiple accounts at once
  • Reset and unlock accounts from a single interface

10. Bulk Group Membership Updater

group membershi updater

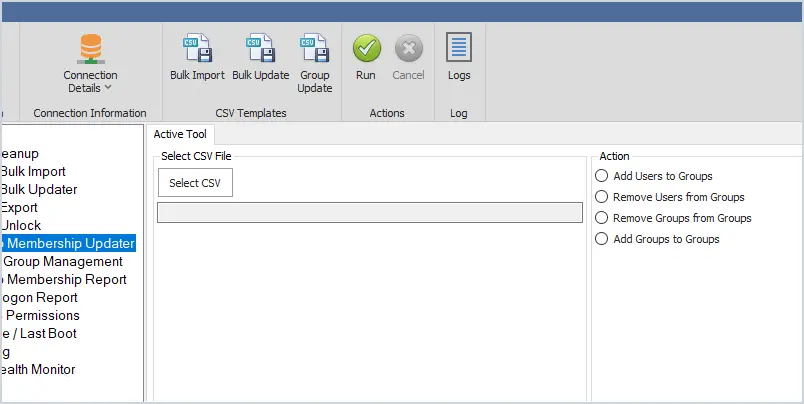
Bulk add or remove users to Active Directory groups. You can bulk add users to a single group or multiple groups all at once. Very easy to use and saves a lot of time. Just add the users to the CSV template and the name of the group or groups you want to add them to.

Key Features

  • Easily bulk add users to groups
  • Bulk remove users from groups
  • Add groups to groups

11. Last Logon Reporter

user last logon reporter

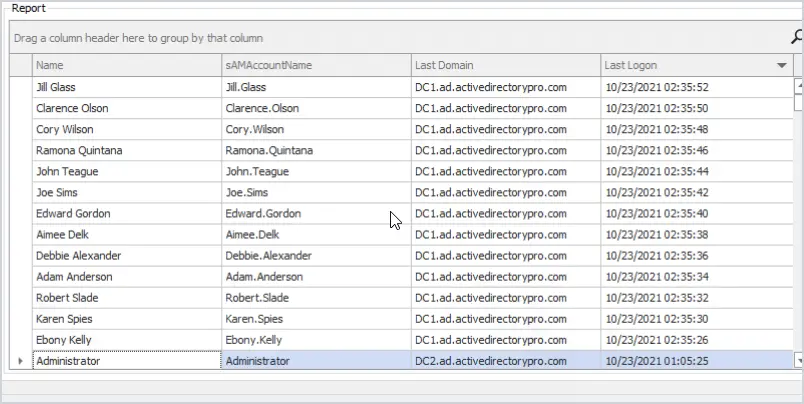
The last logon reporter will get the user’s TRUE last logon time from all domain controllers in your domain. You can limit the search to the entire domain, organizational unit, or groups.

12. AD FastReporter

ad fast reporter

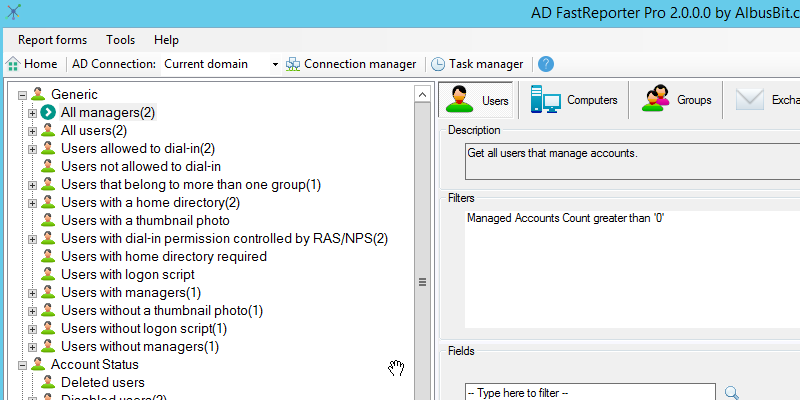
AD FastReporter has a large list of pre-built reports to pick from. Report on users, computers, groups, contacts, printers, group policy objects, and organizational units. Very easy to use but does have an older style interface.

Here is a small example of the reports you can run:

  • All users
  • Deleted Users
  • Users with a home directory
  • users without logon script
  • All computers
  • All domain controllers
  • Computers created in the last 30 days
  • Users created in the last 30 days

13. Local Group Report

local group manager

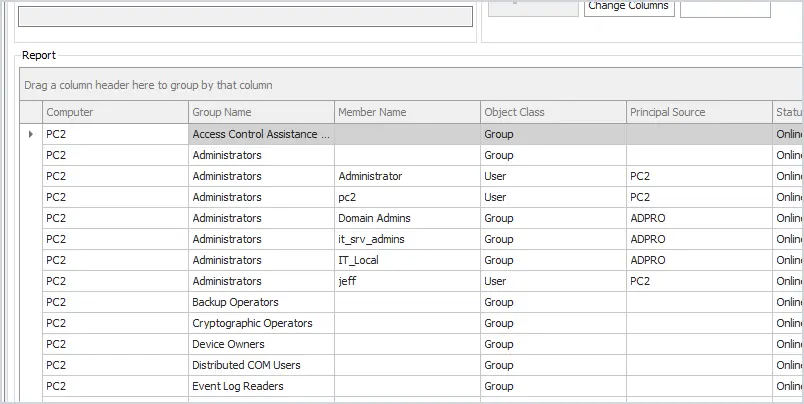
This tool gets the local groups and group members on remote computers. You can quickly sort or filter the groups to get a list of all users and groups that have local administrator rights.

Click here to watch a demo.

Key Features

  • Easily get group membership on remote computers
  • Quickly find how as administrator rights
  • Filter for any group or member

14. Group Membership Report Tool

get users group membership

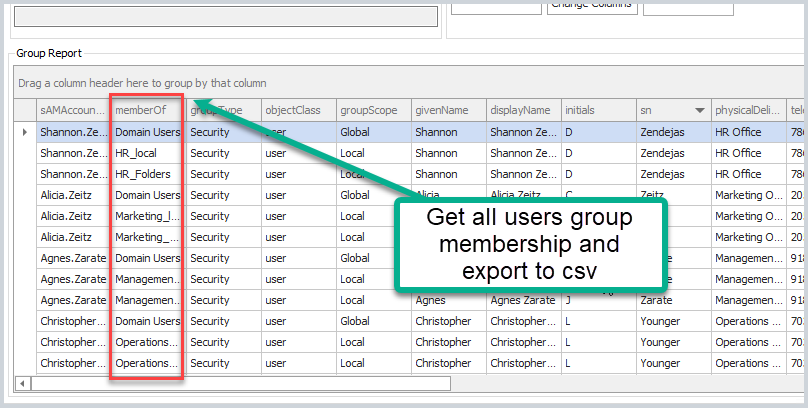
Report and export group membership has never been easier, select from the entire domain, groups, or organizational unit. This tool also helps to find nested security groups.

Key Features

  • The fastest way to get all domain gruops and group membership
  • Export report to a CSV
  • Limit scope to an OU or group

15. Dovestones AD Reporting

dovestones ad reporting

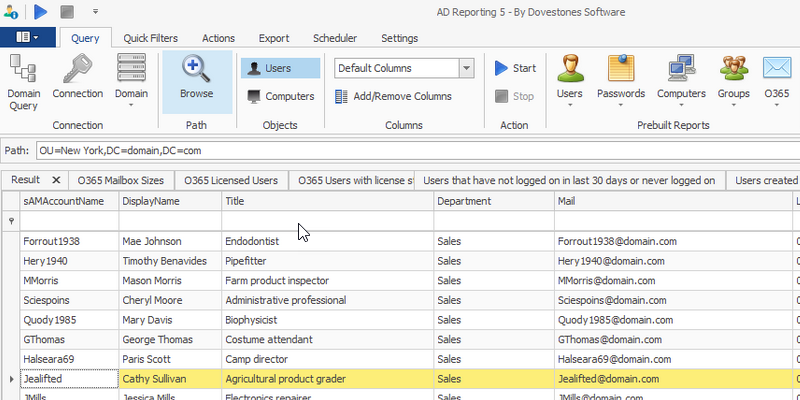
Dovestones AD Reporting tool contains a large number of pre built reports. You can customize the report by selecting user attributes and defining which users to export.

16. Computer Uptime Report

computer uptime

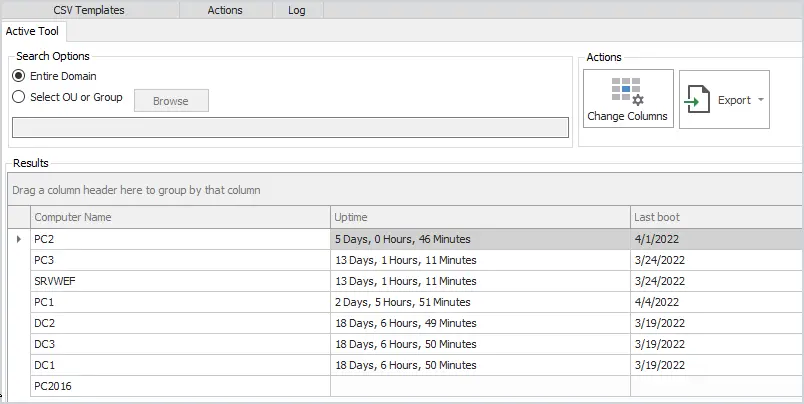
Get the uptime and last boot of remote computers. Report on the entire domain or select from an OU or group.

Very helpful during maintenance days to verify if computers have rebooted.

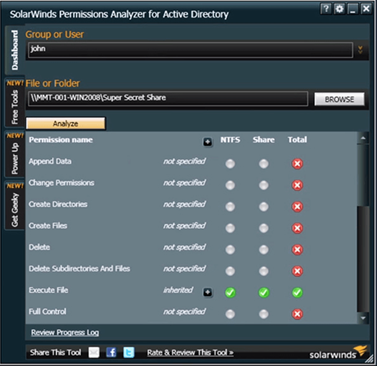
17. SolarWinds Permissions Analyzer

solarwinds permissions analyer

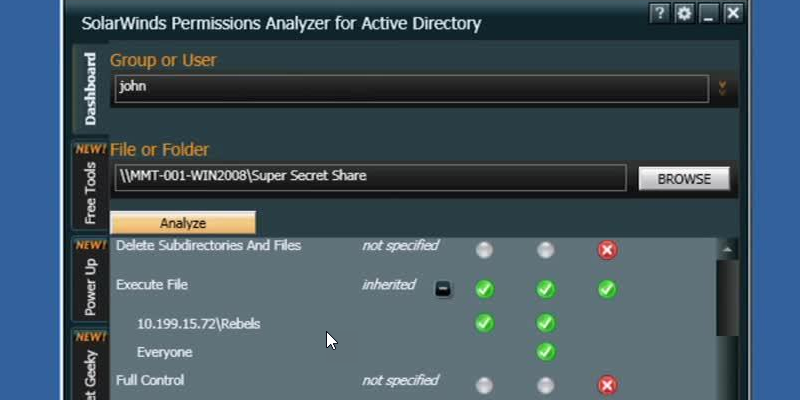
This FREE tool lets you get instant visibility into user and group permissions. Quickly check user or group permissions for files, network, and folder shares.

Analyze user permissions based on an individual user or group membership.

Download Free Tool

18. NTFS Permissions Reporter

ntfs permissions tool

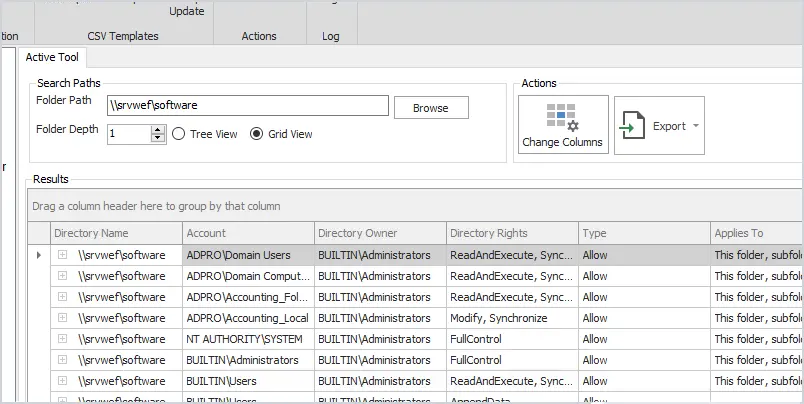
The NTFS permissions tool will report folder security for local, remote, and UNC folder permissions. The grid view comes with a powerful filter so you can search and limit the results to find specific permissions such as Active Directory groups.

19. Windows PowerShell

Windows PowerShell is a very powerful tool that can automate many Active Directory and Windows tasks. The problem is it can be complex to learn some of the advanced functions. With that said there are plenty of cmdlets that can be used in a single line of code to do some pretty cool things in Windows.

  • Create new user account: New-Aduser
  • Create computer account: New-ADComputer
  • Create a security group: New-ADGroup
  • Create a organizational unit: New-ADOrganizationalUnit
  • Get domain details: Get-ADDomin
  • Get domain password policy: Get-ADDefaultDomainPasswordPolicy
  • Get group policy: get-GPO -all
  • Get all services: get-service
  • Find locked user accounts: Search-ADAccount -LockedOut

20. Windows sysinternals

windows sysinternals

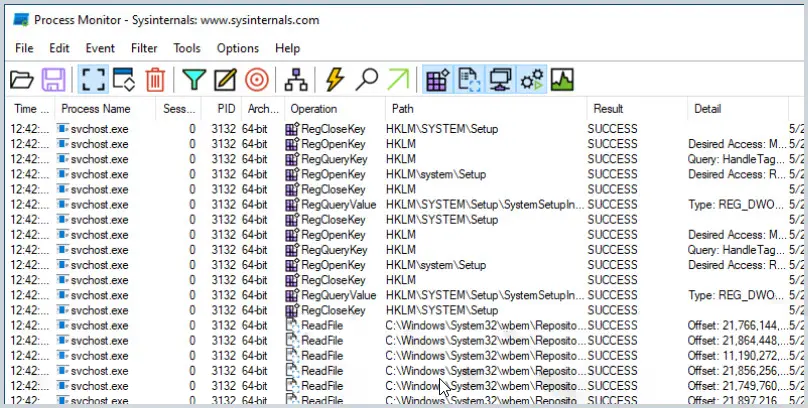
The Sysinternals is a suite of small GUI programs and command line utilities designed to troubleshoot and diagnose your Windows systems and applications. They are all portable, which means you don’t need to install them, you can just run the exe or commands with no installation required.

These utilities were created way back in 1996 by Mark Russinovich and then later acquired by Microsoft. There are a bunch of tools included I will list some of the popular ones.

  • Process Monitor – Shows real time file system, registry and process activity.
  • PsExec – Lets you execute programs on a remote system
  • PsKill – Kill local and remote processes
  • Sysmon – Logs system activity about process creations, network connection and changes to files
  • Psinfo – Shows info about a local or remote computer

All-in-one Active Directory Toolkit

Our AD Pro Toolkit includes 12 Active Directory tools in a single interface.

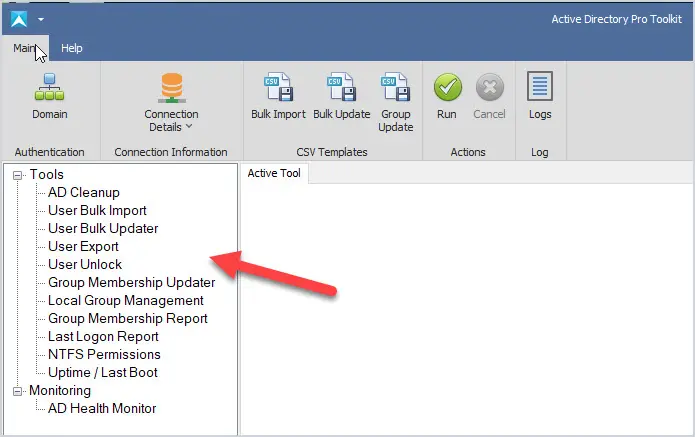
Tools included in the AD Pro Toolkit:

  • Bulk User Import
  • Bulk User Updater
  • AD Cleanup Tool
  • Last Logon Reporter
  • User Export to CSV
  • Unlock and Account Troubleshooter
  • Group Reporter
  • Group Management Tool
  • NTFS Permissions Report
  • Local Group Management
  • AD Health Monitor
  • Uptime last boot

Download a Free trial of the AD Pro Toolkit

What are the benefits of Active Directory Tools?

The main benefit is it will save you time and make managing Active Directory easier. One of the most popular tasks of working with Active Directory is to create new user accounts. The built-in tools provide no options for bulk importing new accounts so it becomes very time-consuming. With the AD Pro Toolkit you can easily bulk import, bulk update, and disable user accounts.

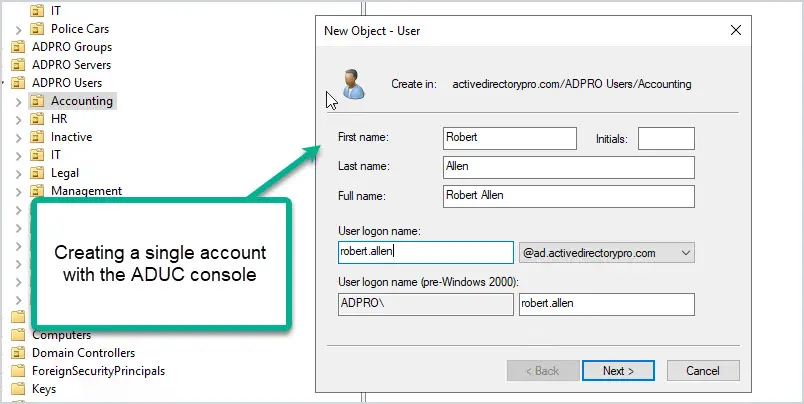
Below is a picture of how you would create an account with the built-in (ADUC) Active Directory Users and Computers console. Everything has to be manually entered and you have to go back and add users to groups.

Using Active Directory tools like the AD Bulk Import tool, you can bulk import thousands of accounts at once. Plus you can automatically set user accounts fields and add users to groups. Let me show you how easy it is.

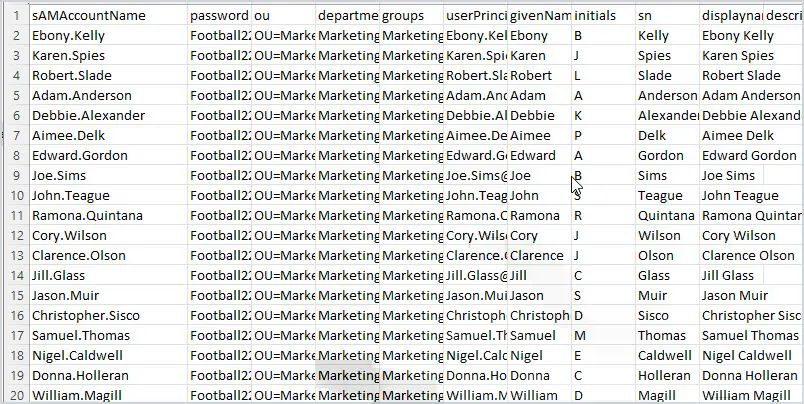
Step 1: Fill out the provided CSV template.

The template includes all the common user fields you need to create a new account. Just fill out what you need and save the file.

Step 2: Import new account

With this tool just select your CSV file and click run. This will import all of the account information from the CSV and automatically bulk create new Active Directory user accounts.

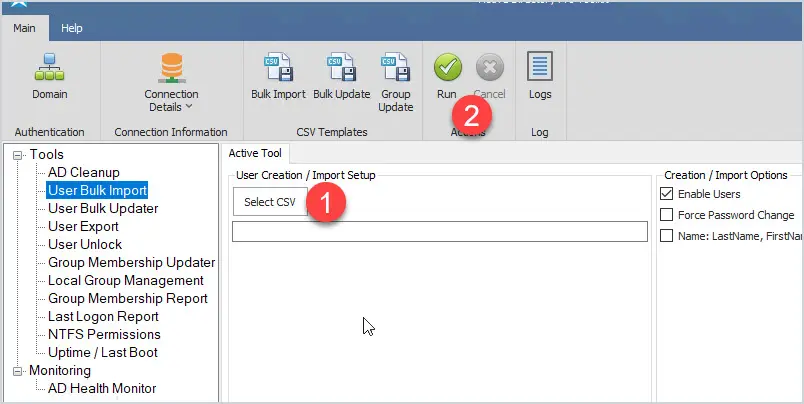
You can watch the import process and when complete you have a log file of the import.

You will at some point be asked to export users to a CSV and again there is no easy built in option for this. When I was an administrator at a large organization I would get this request at least once a week and it was a pain. When I developed the user export tool this process became so easy I was able to have other staff members take it over.

The above picture is from the user export tool. This tool lets you easily export all users from the entire domain, an OU, or a group.

The ease of use is another benefit as many people don’t have time to learn PowerShell. PowerShell is a great tool and can do many things but it can be complex and time-consuming to learn. The AD Pro Toolkit has a very simple interface and you can start using it right away to perform many advanced tasks in your domain.

Frequently Asked Questions

Below are questions and answers regarding the AD Pro Toolkit.

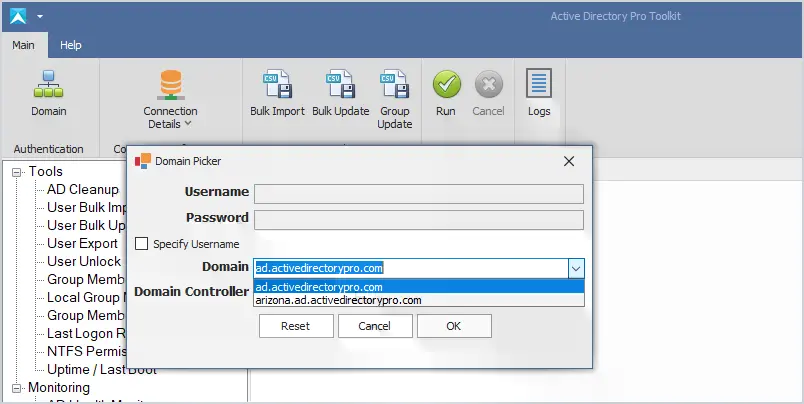
Does the AD Pro Tool support multiple domains?

Yes. It will auto-detect your domains based on current credentials. You can click the domain button to change authentication and connect to other domains or domain controllers.

Do you have a tool to help with account lockouts?

Yes, the user unlock tool can quickly display all locked users and the source of the lockout.

What is required to use the toolkit?

To create and bulk modify users you will need these rights in your Active Directory domain. This is often done by putting your account in the domain administrator group but can also be done by delegating these rights. Some tools like the last logon reporter, export, and group membership require no special permissions.

Do I need to know PowerShell or scripting?

No. All tools are very easy to use and require no scripting or PowerShell experience.

Is there a way to bulk update the manager, telephone numbers, and other user fields?

Yes, this is exactly what the bulk updater tool was created for. You can easily bulk update from a large list of user fields.

Can I bulk export or import on a scheduled task?

We are working on this right now. AD Cleanup, bulk import, update, and export tools will include an option to run on a scheduled task or from a script.

I was just hired and Active Directory is a mess. Can the Pro toolkit help?

The AD Cleanup tool can help you find old user and computer accounts and bulk disable or move them. We have many customers that use this tool to cleanup their domain environments.

Source :
https://activedirectorypro.com/tools/

How to Deploy a Domain Controller in Azure

In this guide, I will demonstrate how to deploy a domain controller in Azure.

Deploying a Domain Controller in Azure can be used to add additional Domain Controllers to your on-premises environment. It’s also an easy way to create an Active Directory test lab.

Note: The VM I create in this demo is for testing, the settings are not optimal for a production domain controller. If you want to deploy a Domain Controller in Azure for production you will need to determine the right settings for your organization, such as VM size (CPU, Mem), redundancy options, disks, and network settings, all of which will increase the cost.

Tip #1: For a production DC, DO NOT give it a public IP or allow public inbound ports.

Tip #2: To add an azure domain controller to your on-premises environment you will need a VPN tunnel from your network to Azure. I will go over this in a separate guide.

Tip #3: For production, the Azure virtual network must not overlap your on-premises network. For testing, it doesn’t matter (assuming you will not be connecting to your on-premises network).

Let’s get started.

Part 1: Create a Virtual Machine

If you don’t have an Azure account you can create one for free. Microsoft gives you a $200 Azure credit for 30 days. This is plenty of credits to create several VMs and use other Azure resources.

Step 1. Sign in to your azure portal, https://portal.azure.com

Step 2. Click on “Virtual machines”

select virtual machines

Step 3. Click on Create and select “Azure virtual machine”

Step 4. Enter basic information for the new VM

  • Subscription: Select the subscription you want to use for the VM.
  • Resource group: Select an existing or create a new resource group.
  • Virtual machine name: Give your VM a name.
  • Region: Choose your region, you typically want a region that is close to you.
  • Availability options: This is for redundancy and will ensure your VMs are still running if one Azure data center has a failure. You want this for production VMs. I’m just creating a test VM so I’ll choose “No infrastructure redundancy required.”
  • Security Type: I’ll choose Standard.
  • Image: Pick the OS you want to use, I’ll pick “Windows Server 2019 Datacenter”.
  • Size: You will need to determine the size of VM you need. For testing reasons, I’ll choose a small VM to keep costs low.
  • Username and password: This will be the administrator account for the VM.
  • Public inbound ports: For production, you want this set to “none”. For testing, I’ll leave RDP open.
  • Licensing: If you have an existing license you can use select the box, this can save money on each VM.

Here is a screenshot of the Basics settings for my VM.

virtual machine basic settings

Now click Next to go to the Disks page.

Step 5. Enter disk details for the VM.

Determine the disk type to use, for testing I use the standard HDD.

virtual machine disk settings

Click next to go to networking.

Step 6. Network settings

  • Virtual network: Select an existing or create a new virtual network.
  • Subnet: Select or create a subnet.

You create a virtual network and then use subnetting to segment the address space. For example, I’m using the 10.1.0.0/16 address space then I segment 10.1.10.0/24 (256 addresses) with subnetting. I’ll use the 10.1.10.0/24 subnet block for my servers.

virtual machine create virtual network
  • Public IP: A public IP will be added automatically. For testing, this is OK, for production set this to none.
  • NIC network security group: This is s stateful firewall for your virtual network. I’ll choose standard.
  • Public inbound ports: For production, you want to select none. For testing, you can use RDP to access the VM.
virtual machine network inbound ports

Click next to “Management”

Step 7: Management Settings

The only thing I want to point out on this page is the “Auto-shutdown” option. For testing with Azure, this is a great feature to help save costs. You get charged for the VM running even if you are not using it. I’m not going to be using this test domain controller 24/7 so I’ll have it auto shut down at 7:00 PM each night. Do not do this for a production domain controller.

virtual machine auto shutdown

Step 8: Click Review + create

Microsoft will validate your settings and show any warnings or settings that were missed. You will also get a cost estimate but keep in mind it is just an estimate.

When ready click the “Create” button to create the VM.

You will get a progress page so you can watch the status of the deployment. It took about 5 minutes for my VM to be created.

Part 2: Configure VM with Static IP Addresses

Domain controllers need a static IP address and the DNS pointing to itself. For on-premises DCs you would just go into the NIC settings and manually configure the IP settings. With Azure VMs it’s recommended to set this at the Virtual Network Interface.

Go to VM Networking settings.

In the right-hand menu for your VM under settings click on “Networking”.

Now click on the Network Interface for the VM (You will have a different name).

Next click on “IP Configurations” in the left menu under settings.

Next click on “ipconfig1” under IP configurations.

Change the IP from “Dynamic” to “Static” and enter the IP address you want the domain controller to have, it must be an IP from the subnet you assigned to your virtual network. I’ll give my DC the IP address 10.1.10.10.

Click “Save”. The network interface will be restarted to set the IP address.

Go back to the Network Interface and click on “DNS servers”.

Set the DNS server to the IP address of the domain controller.

Now on the VM, your server should be configured with the settings from above. Below I run ipconfig /all to verify my IP settings.

Part 3: Install Active Directory Domain Services

With a VM created and the IP settings configured we can move forward with installing Active Directory on the server. If you have installed ADDS before this is not new, it’s the same as installing it on an on-premises server.

Go to the server manager and click on “Add roles and features”

Before you begin – click “Next”.

Installation type – select “role based” and click “Next”.

Server Selection – select the hostname of your server and click “Next”.

Server Roles – select “Active Directory Domain Services”.

You will get a pop-up to add additional features. Click “Add Features”.

Click “Next”.

Features – no features need to be added so click “Next”.

AD DS – Click “Next”.

Confirmation – Click “Install”.

The installation will start.

When finished click the yellow icon in the upper right corner and click on “Promote this server to a domain controller”.

Deployment Configuration

I’m creating a new domain so I’m going to pick “Add a new forest”. If you’re adding another DC to your existing domain you would pick the first option “Add a domain controller to an existing domain”.

Domain Controller Options

For a new test domain, the default settings are good. Add a DSRM password and click next.

DNS Options

Click next on this screen.

Additional Options

Enter a NetBIOS name and click “Next”

Paths

I always leave these as default settings

Review Options

Review your settings and click “Next”

Prerequisites Check

If the Prerequisites pass click on “Install”

When done installing the server will reboot and will now be a domain controller.

domain controller install completed.

Nice work. If you followed along you should now have a domain controller running in the Azure cloud.

You can now deploy additional Azure VMs and connect them to this domain controller. You can also use this domain controller to add additional DCs to your on-premises environment.

Part 4: Additional Settings and Tips

Here are a few additional settings and tips I recommend.

  1. You will need to create a new site in Active Directory Sites & Services with the new subnet.
  2. You should adjust the domain controller DNS settings for redundancy.
  3. A VPN tunnel is required from your on-premises network to Azure.
  4. If you are testing and use a public IP with open ports (RDP 3389), then I recommend using fake/dummy data in Active Directory. Their server might get comprised due to the internet exposure so don’t use real data such as real usernames and passwords.
  5. You can use the Azure firewall to limit access to the VM from your IP address.
  6. Use Bastion for secure remote connectivity.
  7. Explore the many options that Azure has to offer, it’s very impressive everything it has to offer.

Do you plan to use domain controllers running in Azure? Let me know in the comments below.

Resources

Recommended Tool: Permissions Analyzer for Active Directory

This FREE tool lets you get instant visibility into user and group permissions and allows you to quickly check user or group permissions for files, network, and folder shares.

You can analyze user permissions based on an individual user or group membership.

This is a Free tool, download your copy here.

8 thoughts on “How to Deploy a Domain Controller in Azure”

Source :
https://activedirectorypro.com/deploy-domain-controller-azure/

Active Directory Ports Used Client to Server

Active Directory ports used

In this post, I will explore the TCP and UDP ports used by Active Directory from client to server.

I will use WireShark and a series of tests to determine what ports are used.

Tests I’ll be running:

  • Ports Used When a User Logs into a Computer
  • Ports used when running gpupdate
  • Ports used when joining a computer to the domain
  • Ports Used When Rebooting

Test Environment:

  • Server 2022 with IP 192.168.100.10 (Active Directory Server)
  • Windows 10 Pro with IP 192.168.100.20
  • Wireshark is installed on the Active Directory server
  • The Active Directory server is a default install

Ports Used by Active Directory Between Client and Server

This section is a summary of the ports used in all the tests.

TCP 135 Microsoft RPC Mapper

TCP 135 Microsoft RPC Mapper
  • Description: Port 135 is a critical client/server port. This port is used by many Microsoft services and should not be blocked by a firewall. First the client connects to the RPC mapper service (port 135) and asks the mapper what port a given service is listening on (which will be a dynamic port range… see below). The RPC mapper responds to the client with the port and then the client connects to that port. You can see this in the above screenshot.
  • Firewall: Allow between client and server. Port 135 should not be exposed to the internet.

TCP/UDP 49152 – 65535 RPC Dynamic Ports

rpc dynamic port range
  • Description: The dynamic port range is used by various server applications. RPC dynamic port allocation instructs the RPC program to use a particular random port in the range configured for TCP and UDP, based on the implementation of the operating system used. The RPC mapper (port 135) is used to connect clients to services running on these dynamic ports.
  • Firewall: Allow between client and server. This port range should not be exposed to the internet.

we recommend that you reconfigure the firewalls to allow traffic between servers in the dynamic port range of 49152 through 65535. This range is in addition to well-known ports that are used by services and applications.

https://docs.microsoft.com/en-US/troubleshoot/windows-server/networking/default-dynamic-port-range-tcpip-chang

TCP 88 Kerberos

tcp 88 kerberos ports
  • Description: Kerberos is an authentication protocol that authenticates requests between a client and server in a secure manner. This is Microsoft Window’s default authentication method for domain-joined devices.
  • Firewall: Allow between client and server. Port should not be exposed to the internet.

TCP 389 LDAP

tcp 389 ldap ports
  • Description: LDAP is a directory access protocol. This protocol is used to search, add/delete, authenticate and modify data in a Directory Server such as Active Directory.
  • Firewall: Allow between client and server. Port should not be exposed to the internet.

UDP 53 DNS

udp 53 dns ports
  • Description: DNS is a critical service used to map IP addresses to host names. This is a critical service used by clients to locate resource records in the domain and lookup external domain names.
  • Firewall: Allow between client and server. If DNS is running on your Active Directory server I do not recommend exposing it to the internet.

TCP 445 SMB

tcp 445 server message blocks
  • Description: Server message blocks (SMB protocol) is a client-to-server communication protocol used for accessing files, printers, and data on a network. This port is used during startup to get GPO information, it is also used when running the gpupdate command.
  • Firewall: Allow between client and server. Do not expose this port to the internet.

Ports Used When a User Logs into a Domain-Joined Computer

In this example, I will log into computer PC1 (192.168.100.20) and capture the network packets from the domain controller.

Here is a conversation view of the TCP/UDP ports used. This is traffic sent from the client to the domain controller and destination ports.

ports used when logging in

Here is a summary of the destination ports used by the client.

  • TCP 88 (Kerberos)
  • TCP 135 (Microsoft RPC)
  • TCP 389 (LDAP)
  • TCP 445 (Microsoft DS)
  • TCP 49668 (RPC for LSA, SAM, NetLogon) – This starts with a request to port 135
  • UDP 53 (DNS)
  • UDP 389 (LDAP)

Ports Used When Running Gpupdate

While logged into the client PC I will run the gpupdate command to see what ports are used.

Results below. It Looks like TCP port 445 is used the most when running a gpupdate.

ports used running gpupdate

Ports Used When Joining a Computer to The Domain

This looked similar to the other packet captures.

TCP 88 (Kerberos)
TCP 135 (Microsoft RPC)
TCP 389 (LDAP)
TCP 445 (Microsoft DS)
TCP 49668 (RPC for LSA, SAM, NetLogon) – This starts with a request to port 135
UDP 53 (DNS)

Ports Used When Rebooting

Nothing new, I see the same ports used when compared to the other packet captures.

Hopefully, this guide helps you to understand the ports used between a client and an Active Directory server. Keep in mind this test was a default domain controller install with no additional services running, the more services you install the more ports that may be used.

Resources:

Recommended Tool: Permissions Analyzer for Active Directory

This FREE tool lets you get instant visibility into user and group permissions and allows you to quickly check user or group permissions for files, network, and folder shares.

You can analyze user permissions based on an individual user or group membership.

This is a Free tool, download your copy here.

1 thought on “Active Directory Ports Used Client to Server”

Source :
https://activedirectorypro.com/active-directory-ports-used-client-to-server/

Change IP Address on Domain Controller

In this post, I will demonstrate how to change the IP address on a domain controller.

Before you change the IP address it is very important to run through a checklist. Any changes to a domain controller can disrupt services and impact business operations. See my checklist below.

For this demonstration, I have the following settings.

  • DC1, IP Address 192.168.100.10
  • DC2, IP Address 192.168.100.11
  • DC3, IP Address 192.168.100.12

I’m going to change the IP on DC2 to 192.168.100.15. If you are changing to a different subnet there are additional things to consider that I go over in the checklist.

Pre-Change Checklist

I recommend reviewing each item on this checklist before making changes. I’ve migrated many domain controllers from small to large networks and these steps have been a lifesaver. If you do this often you will probably come up with your own checklist.

Do You Have Multiple Domain Controllers?

It is best practice to have multiple domain controllers and backup Active Directory for disaster recovery reasons. I do not recommend making major changes to domain controllers if you have a single domain controller. If you have multiple DCs and the change breaks the server you can still operate from a secondary DC.

You can get a list of all domain controllers in your domain with this command:

Get-ADDomainController -filter * | select hostname, domain, forest

Check FSMO Roles

Does the DC hold any FSMO roles? Easily check with this command:

netdom query fsmo

Below you can see all my FSMO roles are on DC1.

To help avoid disruption to authentication services you could move the FSMO roles to another domain controller that is on the same site. Keep in mind you would need to move any services that are manually configured to the server.

I’m making changes to DC2 which has no FSMO roles running on it.

Check Installed Roles and Features

I recommend checking what services are running on the server, you don’t want to change the IP and then have something break because you didn’t know it was a DHCP server or a web server.

  • Check the control panel for installed software
  • Check the installed roles and features

You can quickly check the installed roles and features with this command:

Get-WindowsFeature | Where-Object {$_. installstate -eq "installed"}

Below you can see my DC2 server has some critical services running on it including DHCP and DNS. I’ll need to consider this when changing IP addresses.

Find Devices Pointing to the Domain Controller with Wireshark

Wireshark can help you identify what systems are pointing to your domain controller for various services like DNS, DHCP, and so on. This might be the most important pre-change step.

Useful Wireshark filters:

  • dns
  • dhcp
  • ldap
  • DCERPC

Here is an example:

The packet capture shows that system 192.168.100.22 is using DC2 for DNS. I’ve done a large migration of domain controllers before and used Wireshark to help identify systems that are still pointing to old domain controllers. From experience, you will probably be surprised at how many systems are hardcoded to your DCS.

Check Domain Controller Health

You need to check that your domain controller is healthy before making the change. Any issues could result in replication issues, DNS issues, and so on. I’ve got a complete guide on how to use dcdiag its actually very easy to use. Just open the command prompt on your server and run the command.

dcdiag

Check The Health of DNS

By default, dcdiag does not test DNS. Use this command to run a complete test on DNS.

dcdiag /test:dns /v

Make sure the server passes all tests and the name resolution SRV record is registered.

Run Best Practice Analyzer

The best practice analyzer can find configuration issues according to Microsoft best practices. The BPA tool is not always accurate so you need to double check its findings. Also, any errors or warnings do not mean your migration will fail. It can just help you find any major misconfigurations according to Microsoft best practices.

Here is a scan from my DC2.

I’ve got a warning that the loopback address is not included on the ethernet adapter settings. The best practice is to point the preferred DNS server to another DNS server (not itself).

Here is an example of how it should be configured:

My DC2 IP address is 192.168.100.11. You can see I set the preferred DNS to another domain controller (DC1) and the alternate is set to the loopback address. This is Microsoft’s best practice.

Again any warnings or errors the best practice analyzer finds doesn’t mean your migration will fail. But to help avoid any potential migration issues I recommend running this tool and reviewing the scan results. It might even fix some issues you weren’t aware of.

Are You Changing Subnets?

If you will be changing to a new subnet then consider the following:

  • If the server also runs DHCP you will need to update the helper address on your switch or firewall.
  • Add the new subnet to Active Directory sites and services.

Check Firewall Rules

Are there any firewall rules that will need to be updated? This could be your network firewall and windows based firewalls. I typically have rules on the network firewall that limit network access for critical servers like domain controllers. I would need to update the firewall rules to permit traffic to the new DC IP.

Plan & Schedule the IP Change

I recommend making this type of change during your maintenance window. No matter how much you prepare for changes there is always a potential for something going wrong. You need to have a maintenance window to allow time to resolve any issues. Don’t forget to communicate these changes with your team ahead of time.

How to Change the IP Address of a Domain Controller:

Here are the steps to changing the IP Address on a domain controller.

  1. Log on locally to the server (console access, don’t RDP or use remote access).
  2. Change NIC TCP/IP settings
    1. Change IP Address
    2. Change subnet mask (if required)
    3. Change Default gateway (if required)
    4. Preferred DNS server (should point to another DC in the same site)
    5. Alternate DNS server (should be the loopback address 127.0.0.1)
  3. After changing the IP run ipconfig /flushdns to remove local cache
  4. Run ipconfig /registerdns to ensure the new IP is registered by the DNS server
  5. Run dcdiag /fix to ensure service records are registered.

Video Tutorial

https://youtube.com/watch?v=4R942B54cEE%3Ffeature%3Doembed

Done. Nice work!

Post Change Checklist:

  • Update DHCP settings if DC server is also DNS server
  • If subnet address changed then make sure AD Sites and services is updated
  • Update clients that use static ip address
  • Update other DCs nic settings (if needed)
  • Run commands dcdiag and dcdiag /test:dns /v to check for issues.
  • Verify DNS is working, you can do this with nslookup.
  • Test authenticating to the DC. You can do this by manually settings a client IP DNS settings to the IP of the DC or using PowerShell and specify the authentication server.
  • Continue to monitor old IP with wireshark – This can be done by a span port or assign the DCs old IP to a computer with wireshark installed. This is useful to help find systems that are still using the old IP of the DC.
  • Update firewall rules if needed.
  • If a client system is having issues try to flush the local dns cache with ipconfig /flushdns command
  • Changing the IP address on the DC should not effect any shares on the server as long as DNS is updated.

Summary

In this post, I showed you how to change the IP address on a domain controller. I also showed you a checklist I go through before changing the IP address. Authentication, DNS, and DHCP services are critical so it’s very important to plan and review as much as you can before making changes to these critical services. Also, all organizations and networks are different so over time you may have a different checklist than mine.

Recommended Tool: Permissions Analyzer for Active Directory

This FREE tool lets you get instant visibility into user and group permissions and allows you to quickly check user or group permissions for files, network, and folder shares.

You can analyze user permissions based on an individual user or group membership.

This is a Free tool, download your copy here.

2 thoughts on “Change IP Address on Domain Controller”

Source :
https://activedirectorypro.com/change-ip-address-on-domain-controller/

Threat landscape for industrial automation systems for H1 2022

H1 2022 in numbers

Geography

  • In H1 2022, malicious objects were blocked at least once on 31.8% of ICS computers globally.Percentage of ICS computers on which malicious objects were blocked
  • For the first time in five years of observations, the lowest percentage in the ‎first half of the year was observed in March.‎ During the period from January to March, the percentage of attacked ICS computers decreased by 1.7 p.p.Percentage of ICS computers on which malicious objects were blocked, January – June 2020, 2021, and 2022
  • Among regions, the highest percentage of ICS computers on which malicious objects were blocked was observed in Africa (41.5%). The lowest percentage (12.8%) was recorded in Northern Europe.Percentage of ICS computers on which malicious objects were blocked, in global regions
  • Among countries, the highest percentage of ICS computers on which malicious objects were blocked was recorded in Ethiopia (54.8%) and the lowest (6.8%) in Luxembourg.15 countries and territories with the highest percentage of ICS computers on which malicious objects were blocked, H1 202210 countries and territories with the lowest percentage of ICS computers on which malicious objects were blocked, H1 2022

Threat sources

  • The main sources of threats to computers in the operational technology infrastructure of organizations are internet (16.5%), removable media (3.5%), and email (7.0%).Percentage of ICS computers on which malicious objects from different sources were blocked

Regions

  • Among global regions, Africa ranked highest based on the percentage of ICS computers on which malware was blocked when removable media was connected.Regions ranked by percentage of ICS computers on which malware was blocked when removable media was connected, H1 2022
  • Southern Europe leads the ranking of regions by percentage of ICS computers on which malicious email attachments and phishing links were blocked.Regions ranked by percentage of ICS computers on which malicious email attachments and phishing links were blocked, H1 2022

Industry specifics

  • In the Building Automation industry, the percentage of ICS computers on which malicious email attachments and phishing links were blocked (14.4%) was twice the average value for the entire world (7%).Percentage of ICS computers on which malicious email attachments and phishing links were blocked, in selected industries
  • In the Oil and Gas industry, the percentage of ICS computers on which threats were blocked when removable media was connected (10.4%) was 3 times the average percentage for the entire world (3.5%).Percentage of ICS computers on which threats were blocked when removable media was connected
  • In the Oil and Gas industry, the percentage of ICS computers on which malware was blocked in network folders (1.2%) was twice the world average (0.6%).Percentage of ICS computers on which threats were blocked in network folders

Diversity of malware

  • Malware of different types from 7,219 families was blocked on ICS computers in H1 2022.Percentage of ICS computers on which the activity of malicious objects from different categories was prevented

Ransomware

  • In H1 2022, ransomware was blocked on 0.65% of ICS computers. This is the highest percentage for any six-month reporting period since 2020.Percentage of ICS computers on which ransomware was blocked
  • The highest percentage of ICS computers on which ransomware was blocked was recorded in February (0.27%) and the lowest in March (0.11%). The percentage observed in February was the highest in 2.5 years of observations.Percentage of ICS computers on which ransomware was blocked, January – June 2022
  • East Asia (0.95%) and the Middle East (0.89%) lead the ransomware-based ranking of regions. In the Middle East, the percentage of ICS computers on which ransomware was blocked per six-month reporting period has increased by a factor of 2.5 since 2020.Regions ranked by percentage of ICS computers on which ransomware was blocked, H1 2022
  • Building Automation leads the ranking of industries based on the percentage of ICS computers attacked by ransomware (1%).Percentage of ICS computers on which ransomware was blocked, in selected regions, H1 2022

Malicious documents

  • Malicious documents (MSOffice+PDF) were blocked on 5.5% of ICS computers. This is 2.2 times the percentage recorded in H2 2021. Threat actors distribute malicious documents via phishing emails and actively use such emails as the vector of initial computer infections.Percentage of ICS computers on which malicious documents (MSOffice+PDF) were blocked
  • In the Building Automation industry, the percentage of ICS computers on which malicious office documents were blocked (10.5%) is almost twice the global average.Percentage of ICS computers on which malicious office documents (MSOffice+PDF) were blocked, in selected industries

Spyware

  • Spyware was blocked on 6% of ICS computers. This percentage has been growing since 2020.Percentage of ICS computers on which spyware was blocked
  • Building Automation leads the ranking of industries based on the percentage of ICS computers on which spyware was blocked (12.9%).Percentage of ICS computers on which spyware was blocked, in selected industries

Malware for covert cryptocurrency mining

  • The percentage of ICS computers on which malicious cryptocurrency miners were blocked continued to rise gradually.Percentage of ICS computers on which malicious cryptocurrency miners were blocked
  • Building Automation also leads the ranking of selected industries by percentage of ICS computers on which malicious cryptocurrency miners were blocked.Percentage of ICS computers on which malicious cryptocurrency miners were blocked, in selected industries

The full text of the report has been published on the Kaspersky ICS CERT website.

Source :
https://securelist.com/threat-landscape-for-industrial-automation-systems-for-h1-2022/107373/

SaaS vs PaaS vs IaaS: What’s the Difference & How to Choose

Companies are increasingly using Cloud services to support their business processes. But which types of Cloud services are there, and what is the difference? Which kind of Cloud service is most suitable for you? Do you want to be unburdened or completely in control? Do you opt for maximum cost savings, or do you want the entire arsenal of possibilities and top performance? Can you still see the forest for the trees? In this article and in the next, I describe several different Cloud services, what the differences and features are and what exactly you need to pay attention to.

Let’s start with the definition of Cloud computing. This is the provision of services using the internet (Cloud). Think of storage, software, servers, databases etc. Depending on the type of service and the service that is offered (think of license management or data storage), you can divide these services into categories. Examples are IaaS (Infrastructure as a Service), PaaS (Platform as a Service), SaaS (Software as a Service), etc. These services are provided by a cloud provider. Whether this is Microsoft (Azure), Amazon (AWS), or another vendor (Google, Alibaba, Oracle, etc.), each vendor offers Cloud services that fall under one of the categories of Cloud services that we are about to discuss.

One feature of Cloud computing is that you pay according to the usage and the service you purchase. For example, for SaaS, you pay for the software’s license and support. This also means that if you buy a SaaS service (e.g., Office 365) and don’t use it, you will still be charged. At the same time, if you purchase storage with IaaS, for example, you only pay for the amount of storage you use, possibly supplemented with additional services such as backup, etc.

Sometimes Cloud services complement each other; think, for example, of DaaS (Database as a Service), where a database is offered via the Cloud. Often you need an application server and other infrastructure to read data from this database. These usually run in a Landing Zone, purchased from an IaaS service. But some services can also be standalone, for example, SaaS (Office 365).

Each Cloud service has specific characteristics. Sometimes it requires little or no (technical) knowledge, but it can also be challenging to manage and use the services according to best practices. This often depends on the degree to which you want to see yourself in control. If you want an application from the Cloud where you are completely relieved of all worries, this requires little technical knowledge from the user or the administrator. But if you want maximum control, then IaaS gives you an enormous range of possibilities. In this article, you can read what you need to consider.

It is advisable to think beforehand about what your requirements and wishes are precisely and whether this fits in with the service you want to purchase. If you wish to use an application in the Cloud but use many custom settings, this is often not possible. If you don’t want to be responsible for updating and backing up an application and use little or no customization, a SaaS can be very interesting. Also, look at how a service fits into your business process. Does it offer possibilities for automation, reporting, or disaster recovery? Are there possibilities to temporarily allocate extra resources in case of peak demand (horizontal or vertical scaling up), and what guarantees does the supplier offer with this service? Think of RPO / RTO and accessibility of the service desk in case of a calamity.

Let’s get started quickly!

IaaS (Infrastructure as a Service)

One of the best-known Cloud services is undoubtedly IaaS. For many companies, this is often their first introduction to a Cloud service. You rent the infrastructure from a cloud provider. For example, the network infrastructure, virtual servers (including operations system), and storage. A feature of IaaS is that you have complete control – Both on the management side and how you can deploy resources (requests). This can be done in various automated ways (Powershell, IaC, DevOps pipelines, etc.) and via the classic management interface that all providers offer. Things that are often not possible with a PaaS service are possible with an IaaS service. You have complete control. In principle, you can set up a complete server environment (all services are available for this), but you do have the benefits of the Cloud, such as scalability and pay per use or per resource.

IaaS therefore, most resembles an on-premise implementation. You often see this used in combination with the use of virtual servers. Critical here is a good investigation into the possible limitations, for example, I/O, so that the performance can be different in practice than in a traditional local environment. You are responsible for arranging security and backup. The advantage is that you have an influence on the choice of technology used. You can customize the setup according to your needs and wishes. You can standardize the configuration to your organization. Deployment can be complex, and you are forced to make your own choices, so some expertise is needed.

PaaS (Platform as a Service)

PaaS stands for Platform as a service and goes further than IaaS. You get a platform where you can do the configuration yourself. When you use a PaaS service, the vendor takes care of the sub-layer (IaaS) and the operating system and middleware. So you sacrifice something in terms of control and capabilities. PaaS services are ideal for developers, web and application builders. After all, you can quickly make an environment available. Using it means you no longer have to worry about the infrastructure, operating system, and middleware. This is taken care of by the supplier based on best practices. This also offers security advantages, as you do not have to think about patching and upgrading these things that are now done by the vendor.

Another advantage is that you can entirely focus on what you want to do and not on managing the environment. You can also easily purchase additional services and quickly scale them up or down. When you are finished, you can remove and stop the resources, so you have no more costs.

However, do take into account the use of existing software. Not all existing software is suitable to function in a PaaS environment; for example, in a PaaS environment, you do not have full access (after all, the vendor is responsible). Also, not all CPU power and memory are allocated to the Cloud application. This is because it is often hosted on a shared platform, so other applications (and databases) may use the same resources. As for the database, you have the same advantages and disadvantages as with DBaaS.

SaaS (Software as a Service)

This is probably a service you’ve been using for a while. In short, you take applications through the Cloud on a subscription basis. The provider is responsible for managing the infrastructure, patches, and updates. A SaaS solution is ready for use immediately, and you directly benefit from the added value, such as fast scaling up and down and paying per use. Examples are Office365, Sharepoint online, SalesForce, Exact Online, Dropbox, etc.

Unlike IaaS and PaaS, where there is still a lot of freedom, and you have to set everything up yourself, with SaaS however, it is immediately clear what you are buying and what you will get. With this service, you are relieved of most of your worries. The vendor is responsible for all updates, patches, development, and more. You cannot make any updates or changes to the software with this service.

Many companies use one or more SaaS services often even within companies, there is a distinction. For example, each department within a company has its specific applications and associated SaaS services. With this service, you only pay for what you need, including the licenses. These licenses can easily be scaled up or down.

It is interesting for many companies to work with SAAS solutions. It is particularly interesting for start-ups, small companies and freelancers because you only purchase what you use, you don’t have unnecessarily high start-up costs, and you don’t have to worry about the maintenance of the software.

But SAAS can also be a perfect solution for larger companies. For example, if you hire extra staff for specific periods, you can quickly get these people working with the software they need. You buy several additional licenses, and you can stop this when the temporary staff leaves.

How can Vembu help you?

BDRSuite, is a comprehensive Backup & DR solution designed to protect your business-critical data across Virtual (VMware, Hyper-V), Physical Servers (Windows, Linux), SaaS (Microsoft 365, Google Workspace), AWS EC2 Instances, Endpoints (Windows, Mac) and Applications & Databases (MS Active Directory, MS Exchange, MS Outlook, SharePoint, MS SQL, MySQL).

To protect your workloads running on SaaS (Microsoft 365Google Workspace), try out a full-featured 30-days Free Trial of the latest version of BDRSuite.

Source :
https://www.vembu.com/blog/saas-vs-paas-vs-iaas-whats-the-difference-how-to-choose/

Teaming in Azure Stack HCI

As we’re deprecating the vSwitch attached to an LBFO team, this article introduces a new tool for converting your LBFO team to a SET team. To download this tool, run the following command or see the end of this article.

Install-Module Convert-LBFO2SET​

Windows Server currently has two inbox teaming mechanisms with two very different purposes. In this article, we’ll describe several reasons why you should use Switch Embedded Teaming (SET) for Azure Stack HCI scenarios and we’ll discuss several long-held teaming myths – We’d love to hear your feedback in the comments below. Let’s get started!

In Windows Server 2012 we released LBFO as an inbox teaming mechanism, with many customers leveraging this technology to provide load-balancing and fail-over between network adapters. Since then, the rise of software-defined storage and software defined networking has brought performance and compatibility challenges to the forefront (outlined in this article) with the LBFO architecture that required a change in direction.

This new direction is called Switch Embedded Teaming (SET) and was introduced in Windows Server 2016. SET is available when Hyper-V is installed on any Server OS (Windows Server 2016 and higher) and Windows 10 version 1809 (and higher). You’re not required to run virtual machines to use SET, but the Hyper-V role must be installed.

In summary, LBFO is our older teaming technology that will not see future investment, is not compatible with numerous advanced capabilities, and has been exceeded in both performance and stability by our new technology (SET). We’d like to discuss why you should move off LBFO for virtualized and cloud scenarios. Let’s dig into this paragraph a bit.

LBFO is our older teaming technology that will not see future investment

thumbnail image 1 of blog post titled 


							Teaming in Azure Stack HCI

With the intent to bring software-defined technologies like SDNv2 and containers to Windows Server, it became clear that we needed an alternative teaming solution and so we set off creating SET, circa 2014. Simultaneously reaching feature parity and stability with LBFO took time; several early adopters of SET will remember some of these pains. However, SET’s stability, performance, and features have now far surpassed LBFO.

All new features released since Windows Server 2016 (see below) were developed and tested with SET in mind – This includes all Azure Stack HCI solutions you may have purchased; Azure Stack HCI is not tested or certified with LBFO. This is largely due to development simplicity and testing; without driving too far into unimportant details, LBFO teams adapters inside NDIS which is a large and complex component – its roots date back to Windows 95 (of course updated considerably since then). If your system has a NIC, you’re using NDIS. In the picture shown above, each component below the vSwitch was part of NDIS.

The size and complexity of scenarios included in NDIS made for very complex testing requirements that were only compounded by virtualized and software-defined technologies that considerably hampered feature innovation. You might think that this is just a Microsoft problem, but really this affects NIC vendor driver development time and stability as well.

All-in-all, we’re not focusing on LBFO much these days, particularly as software-defined Windows Server networking scenarios become more exotic with the rise of containers, software-defined networking, and much more. There’s a faster, more stable, and performant teaming solution, called Switch Embedded Teaming.

LBFO is not compatible with several advanced capabilities

Here’s a smattering of scenarios and features that are supported with SET but NOT LBFO:

Windows Admin Center – WAC is the de facto management tool for Windows Server and Azure Stack HCI, with millions of nodes under management. You can create and manage a SET team for a single host, or deploy a SET team to multiple hosts with the new Cluster Creation UI we released to help you deploy Azure Stack HCI solutions at Microsoft Ignite this year (watch the sessiontry it out, and give us feedback).

LBFO is not available for configuration in Windows Admin Center.

RDMA Teaming – Only SET can team RDMA adapters. RDMA is used for example with Storage Spaces Direct (S2D) which requires a reliable high bandwidth, low latency network connection between each node. High-bandwidth? Low Latency? That’s RDMA’s bag so it is the recommended pattern with S2D. Reliability? That’s SET’s claim-to-fame so these two are a logical pairing.

Guest RDMA: SET supports RDMA into a virtual machine. This doesn’t work with LBFO for two reasons:

  • RDMA adapters cannot be teamed with LBFO both host adapters and virtual adapters.
  • RDMA uses SMB multichannel which requires multiple adapters to balance traffic across. Since you can’t assign a vNIC to pNIC affinity with LBFO, neither the SMB nor non-SMB traffic can be made highly available.

Guest Teaming is a strange one; you could add multiple virtual NICs to a Hyper-V VM; inside the VM, you could use LBFO to team the virtual NICs. However, you cannot affinitize a virtual NIC (vNIC) to a physical NIC (pNIC), so it’s possible that both vNICs added in the VM are sending and receiving traffic out of the same pNIC. If that pNIC fails, you lose both of your virtual NICs. 

SET allows you to map each vNIC to a pNIC to ensure that they don’t overlap, ensuring that a Guest Team is able to survive an adapter outage.

Microsoft Software Defined Networking – (SDN) was first released in its modern form in Windows Server 2016 and requires a virtual switch extension called the Virtual Filtering Platform (VFP). VFP is the brains behind SDN, the same extension that runs our public cloud, Azure. VFP can only be added to a SET team.

This means that any of the SDN features (which are included with a Datacenter Edition license) like the Software Load Balancer, Gateways, Distributed Firewall (ACLs), and our modern network QoS capability are also unavailable if you’re using LBFO.

Container Networking – Containers relies on a service called the Host Network Service (HNS). HNS also leverages VFP and as mentioned in the SDN section, VFP can only be added to a Switch Embedded Team (SET). For more information on Container Networking, please see this link.

Virtual Machine Multi-Queues – VMMQ is a critical performance feature for Azure Stack HCI. VMMQ allows you to assign multiple VMQs to the same virtual NIC without which, you rely on expensive software spreading operations (the OS spreads packets across multiple CPUs without hardware (NIC) assistance) that greatly increases CPU utilization on the host, reducing the number of virtual machines you can run.

Moreover, if your vNIC doesn’t get a VMQ, all traffic is processed by the default queue. With SET you can assign multiple VMQs to the default queue which can be shared as needed by any vNIC allowing more VMs to get the bandwidth they need.

In this video, you can see the performance (throughput) benefits of Switch Embedded Teaming over that of LBFO.  The video demonstrates a 2x throughput improvement with SET over LBFO, while consuming ~10% additional CPU (a result of double the throughput).

Azure Stack HCI: SET vs LBFO performance

Dynamic VMMQ –  d.VMMQ won’t work either. Dynamic VMMQ is an intelligent queue scheduling algorithm for VMMQ that recognizes when CPU cores are overworked by network traffic and reassigns that network traffic processing to other cores automatically so your workloads (e.g. VMs, applications, etc.) can run without competing for processor time.

Here’s an example of some of the benefits of Dynamic VMMQ. In the video, you can see the host, spending CPU resources processing packets for a specific virtual NIC. When a competing workload begins on the system (which would prevent the virtual NIC from reaching maximum performance), we automatically tune the system by moving one of the workloads to an available processor.

Dynamic VMMQ - Dynamic Tuning

RSC in the vSwitch is an acceleration that coalesces segments destined for the same virtual NIC into a larger segment.

Outbound network traffic is slimmed to fit into the mtu size of the physical network (default of ~1500 bytes). However, inbound traffic can be coalesced into one big segment. That one big segment takes far less processing than multiple small segments, so once traffic is received by the host, we can combine them and deliver several segments to the vNIC all at once. SET was made aware of RSC coalescing and supports this acceleration as of Windows Server 2019.

We’re continuing to improve this feature for even better performance in the next version of Windows Server and Azure Stack HCI by enabling RSC in the vSwitch to extend over the VMBus. In the video below, we show one VM sending traffic to another VM with the improved acceleration disabled – This is using only the original Windows Server 2019, RSC in the vSwitch capabilities. 

Next we enable the Windows Server vNext improvements; throughput is improved by ~17 Gbps while CPU resourcing is reduced by approximately 12% (20 cores on the system). This type of traffic pattern is specifically valuable for container scenarios that reside on the same host.

Azure Stack HCI: RSC over vSwitch (and VMBus)

LBFO has been exceeded in both performance and stability by SET

Note: Guest RDMA, RSC in the vSwitch, VMMQ, and Dynamic VMMQ belong in this category as well.

Certified Azure Stack and Azure Stack HCI solutions test only SET

If all that wasn’t enough, both Microsoft and our partners validate and certify their solutions on SET, not LBFO. If you bought a certified Azure Stack HCI solution from one of our partners OR a standard or premium logo’d NIC, it was tested and validated with Switch Embedded Teaming. That means all certification tests where run with SET.

Link Aggregation Control Protocol (LACP)

thumbnail image 2 of blog post titled 


							Teaming in Azure Stack HCI

Ok, so this one is a little counter-intuitive. LACP, allows for port-channels or switch-dependent teams to send traffic to the host over more than one physical port simultaneously.

For native hosts this means that every port in the port-channel can send traffic simultaneously – for the system on the right with 2 x 50 Gbps NICs, it looks like one big pipe with a native host potentially receiving 100 Gbps. Naturally, you’d expect that this capability could extend to virtual NICs as well.

But things change with virtualization. When the traffic gets to the host, the NICs need to interrupt multiple, independent processors to exceed what a single CPU core can process – This is what VMMQ does, and as mentioned, VMMQ does not work with LBFO.

LBFO limits you to a single VMQ and despite having (in the picture) 100 Gbps of inbound bandwidth, you would only receive about 5 Gbps per virtual NIC (or up to ~20 Gbps per vNIC at the painful expense of OS-based software spreading that could be used for running virtual machine workloads).

thumbnail image 3 of blog post titled 


							Teaming in Azure Stack HCI

With SET, switch-independent teaming, and the hardware assistance of VMMQ and enough CPUs in the system, you could receive all 100 Gbps of data into the host.

In summary, LACP provides no throughput benefits for Azure Stack HCI scenarios, incurs higher CPU consumption, and cannot auto-tune the system to avoid competition between workloads for virtualized scenarios (Dynamic VMMQ).

Asymmetric Adapters

While we’re myth-busting, let’s talk about adapter symmetry which describes the length to which adapters have the same make, model, speed, and configuration – SET requires adapter symmetry for Microsoft support. Usually the easiest way to identify this symmetry is by the device Interface Description (with PowerShell, use Get-NetAdapter). If the interface description matches (with exception of the unique number given to each adapter e.g. Intel NIC #1, Intel NIC #2, etc.) then the adapters are symmetric.

Prior to Windows Server 2016, conventional wisdom stated that you should use different NICs with different drivers in a team. The thinking was that if one driver had an issue, another team member would survive, and the team would remain up. This is a common benefit customers cite in favor of LBFO: it supports asymmetric adapters.

However, two drivers mean twice as many things can go wrong in fact increasing the likelihood of a problem. Instead, a properly designed infrastructure with symmetric adapters are far more stable in our review of customer support cases. As a result, support for asymmetric teams are no longer a differentiator for LBFO nor do we recommend it for Azure Stack HCI scenarios where reliability is the #1 requirement.

LBFO for management adapters

Some customers I’ve worked with have asked if they should use LBFO for management adapters when the vSwitch is not attached – Our recommendation is to always use SET whenever available. A management adapter’s goal in life is to be stable and we see less support cases with SET.

To be clear, if the adapter is not attached to a virtual switch, LBFO is acceptable however, you should endeavor to use SET whenever possible due to the support reasons outlined in this article.

vSwitch on LBFO Deprecation Status

Recently, we publicly announced our plans to deprecate the use of LBFO with the Hyper-V virtual switch. Moving forward, and due to the various reasons outlined in this article, we have decided to block the binding of the vSwitch on LBFO.

Prior to upgrading from Windows Server 2019 to vNext or if you have a fresh install of vNext, you will need to convert any LBFO teams to a SET team if it’s attached to a Hyper-V virtual switch. To make this simpler, we’re releasing a tool (available on the PowerShell gallery) called Convert-LBFO2SET.

You can install this tool using the command:

Install-Module Convert-LBFO2SET

Or for disconnected systems:

Save-Module Convert-LBFO2SET -Path C:\SomeFolderPath

Please see the wiki for instructions on how to use the tool however here’s an example where we convert a system with 10 host vNICs, 10 generation 1 VMs, and 10 generation 2 VMs. 

Azure Stack HCI: Convert your LBFO team to SET with Convert LBFO2SET

Summary

LBFO remains our teaming solution if you are running your workloads on bare metal servers. If however, you are running virtualized or cloud scenarios like Azure Stack HCI, you should give Switch Embedded Teaming serious consideration. As we’ve described in this article, SET has been the Microsoft recommended teaming solution and focus since Windows Server 2016 as it brings better performance, stability, and feature support compared to LBFO.

Are there other questions you have about SET and LBFO? Please submit your questions in the comments below!

Thanks for reading,

Dan “All SET for Azure Stack HCI” Cuomo

Source :
https://techcommunity.microsoft.com/t5/networking-blog/teaming-in-azure-stack-hci/ba-p/1070642

Create and manage a Switch Embedded Teaming

What is Hyper-V Switch Embedded Teaming?

With Windows Server 2016, Microsoft brings us a new NIC (network interface card) teaming solution called Switch Embedded Teaming (SET). It is only available on servers running Windows Server 2016 with the Hyper-V role installed and is not backwards compatible.

SET allows us to group up to eight physical NICs to create one or more vNICs. Microsoft’s reasoning behind this is SET is best used for NICs 10 GB or bigger. SET only supports switch independent mode to make setup easy for us to configure. You can either plug all physical NICs into one physical switch or multiple physical switches if they are in the same subnet. Connecting the SET Team to multiple physical switches can give you extra redundancy.

Due to SET’s integration with the Hyper-V Virtual Switch, you are unable to use SET Teaming inside a virtual machine (VM). SET Teaming does not present the team interface to the VM, so you can utilize LBFO (load-balancing failover) Teaming inside a VM by adding additional vNICs to the VM.

Which NICS can I use?

If your NICS have passed the Windows Hardware Qualification and Logo (WHQL) test, then you can use them to create your SET Team. SET does require all NICs that are part of a SET Team to be identical. This means that they are from the same manufacturer, are the same model and have the same firmware and driver. You can only have up to eight NICs in one SET Team.

One good thing about SET teams is that you can configure Remote Direct Memory Access (RDMA) per vNIC. This means you can create multiple vNICS for your SET Team. You can configure a vNIC for storage and enable RDMA on it. You could then create another vNIC for management traffic and not enable RDMA. This is good for hyperconverged solutions.

SET compatibility with Windows Server

SET is compatible with the following networking technologies found in Windows Server 2016.

  • Datacentre bridging (DCB)
  • Hyper-V Network Virtualization — NV-GRE and VxLAN are both supported in Windows Server 2016.
  • Receive-side Checksum offloads (IPv4, IPv6, TCP) — These are only supported if at least one of the SET Team members support them.
  • Remote Direct Memory Access (RDMA)
  • Single root I/O virtualization (SR-IOV)
  • Transmit-side Checksum offloads (IPv4, IPv6, TCP) — These are only supported if all the SET team members support them.
  • Virtual Machine Queues (VMQ)
  • Virtual Receive Side Scaling (RSS)

SET is not compatible with the following networking technologies in Windows Server 2016.

  • 1X authentication
  • IPsec Task Offload (IPsecTO)
  • QoS in host or native operating systems
  • Receive side coalescing (RSC)
  • Receive side scaling (RSS)
  • TCP Chimney Offload
  • Virtual Machine QoS (VM-QoS)

SET modes and settings

When you first create a SET Team, you are unable to configure a team name and you are unable to set NICS to standby like you can with the NIC Teaming in Windows Server 2012 r2. In fact, with SET Teams all NICS are always active.

Another difference between SET Teams and LBFO (load balanced fail over) teams is that with NIC teaming you had a choice of three different teaming modes. SET only gives you one choice: Switch Independent. Switch Independent mode means the physical switch or switches are unaware of the SET Team and do not determine how to distribute the network traffic.

There are two team properties that need to be configured when you create a SET Team. They are:

  • Member adapters
  • Load balancing mode

Member adapters

As stated earlier in this post, when you are creating a SET Team, you must use up to eight identical NICS. You can create your SET Switch with just one NIC to start, but any new members must be identical.

Load Balancing mode

There are two Load Balancing distribution modes for SET Teams. They are:

  • Hyper-V Port
  • Dynamic

Hyper-V port

When using Hyper-V port mode for SET Teams, VMs are connected to a port on the Hyper-V Switch. This is just like a physical server would be connected to a port on a physical switch. The Hyper-V Virtual Switch port and the VM’s MAC address are used to divide the network traffic between the SET Team members.

If you use Switch Embedded Teaming with Packet Direct, you must use the Switch Independent Teaming mode and the Hyper-V port load balancing mode.

With this teaming mode, any adjacent switches will always see a VM’s MAC address on a given port. This allows the switch to distribute the ingress load (the traffic coming into the Hyper-V host from the switch) to the port where the MAC address is located. Hyper-V port mode is very useful when you utilize Virtual Machine Queues (VMQs) because a queue can be placed on the NIC where the traffic is expected to arrive.

Hyper-V port mode is not the best if you are only hosting a few VMs due to it not being granular enough to achieve a well-balanced distribution. This mode also limits each VM to the bandwidth that’s available on a single NIC.

Dynamic

When using the Dynamic port mode for SET Teams, all outbound loads are distributed using a hash of the TCP Ports and IP addresses. Dynamic Port mode also rebalances loads in real time to allow outbound flow to move between each SET Team member.

For inbound loads, all traffic is distributed in the same way as the Hyper-V port mode. Outbound loads use flowlets to dynamically balance. A flowlet is the portion of a TCP flow between two naturally occurring breaks. When the dynamic port mode detects a flowlet boundary, it will automatically rebalance the flow to another member of the SET Team, if appropriate. It is known that in some uncommon circumstances dynamic port mode may rebalance flows that do not contain any flowlets. Due to this, the affinity between a Team member and the TCP flow can change as the traffic is balanced.

Creating and managing a SET Team

Although it is recommended that you use Microsoft Virtual Machine Manager (VMM) to configure SET Teams, not every company has this. That’s where PowerShell comes in.

In the following section, we will be go through the process of creating a SET Team, adding and removing NICs to a SET team, changing the Load Balancing Mode and removing a SET team.

Create a SET Team

You can only create a SET Team at the same NIC that is used for a Hyper-V Virtual Switch. To create a SET Team with one NIC use the following PowerShell code in an elevated PowerShell window:

New-VMSwitch -Name "SET Team" -NetAdapterName "NIC 1" -EnableEmbeddedTeaming $true


You can change SET Team to any name you need, as well as adapter name NIC 1, to the name of your NIC. This can be done by using the following PowerShell command:

Get-NetAdapter


You should have a list of all your adapters. The first column is Name. This is the name of your network adapter that you need to use for the -NetAdapterName.

To create a SET Team with more than one NIC, you can use the following PowerShell command in an elevated PowerShell window:

New-VMSwitch -Name "SET Team" -NetAdapterName "NIC 1","NIC 2"


Notice when adding more than one NIC you don’t need to add the -EnableEmbeddedTeaming because it is assumed by Windows PowerShell when the argument to -NetAdapterName is an array of NICs.

Adding and removing SET Team members

The only way to add or remove SET Team members is to use the SET-VMSwitchTeam command. You basically name the SET switch and which adapters you want to be in it. Let’s say you have created your SET switch with NIC 1 and NIC 2, and now you want to remove NIC 2 and add NIC 3:

Set-VMSwitchTeam -Name SET Team -NetAdapterName "NIC 1","NIC 3"


If you now need to remove NIC 1, you can use the following command:

Set-VMSwitchTeam -Name "SET Team" -NetAdapterName "NIC 3"


To add NIC 2 back in to the SET Team, you can use the following command:

Set-VMSwitchTeam -Name "SET Team" -NetAdapterName "NIC 3","NIC 2"
 

Change the Load Balancing Mode

To change the Load Balancing Mode between the two mentioned above, you can use the following PowerShell command (just Change Dynamic to HyperVPort):

Set-VMSwitchTeam -Name "SET Team" -LoadBalancingAlgorithm Dynamic


To view which Load Balancing Mode you currently have:

Get-VMSwitchTeam -Name "SET Team" | FL
 

Remove a SET Team

The only way to remove a SET Team is by removing the Hyper-V Virtual switch completely:

Remove-VMSwitch "SET Team"


Now you have learned how to create, manage and remove a SET switch. Hopefully, you will find this post beneficial and helpful. If you have any questions, leave a comment.

See more:

Exit mobile version