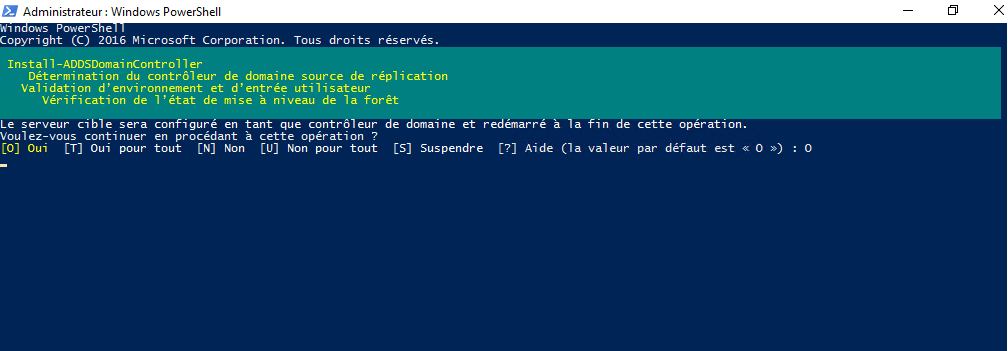
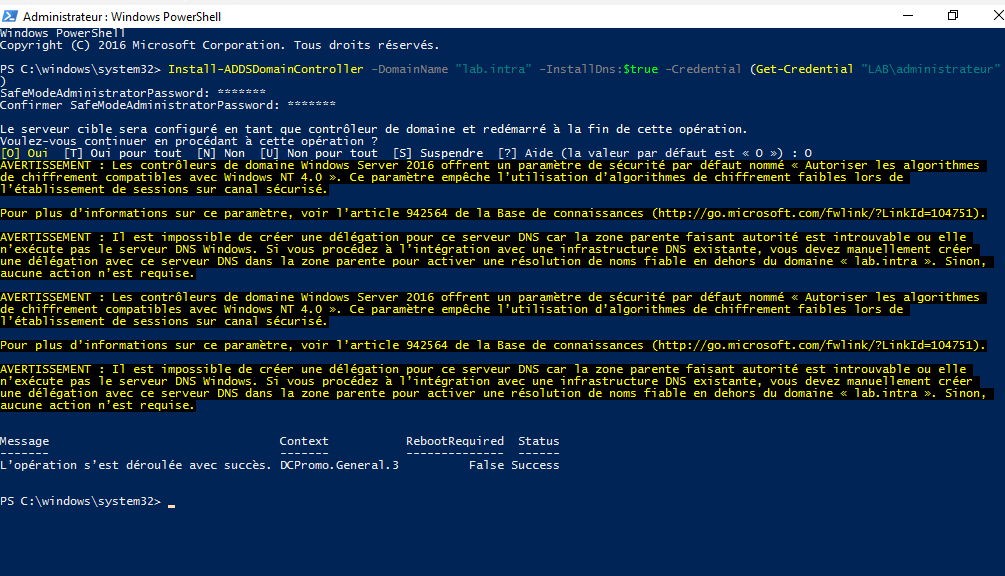
Enter the password of the account passed as a parameter in the login window, then in the Powershell console enter the password of the directory recovery mode and confirm the promotion as a domain controller.
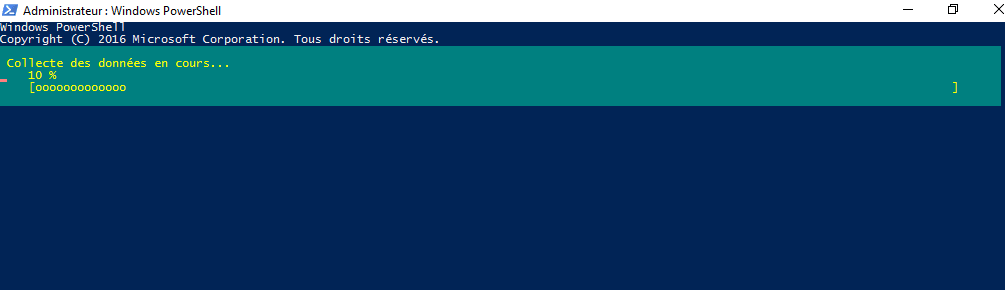
Wait during the promotion operation ….
After the operation completes, the following message appears and the server restarts.
At reboot the server is domain control.
Complements
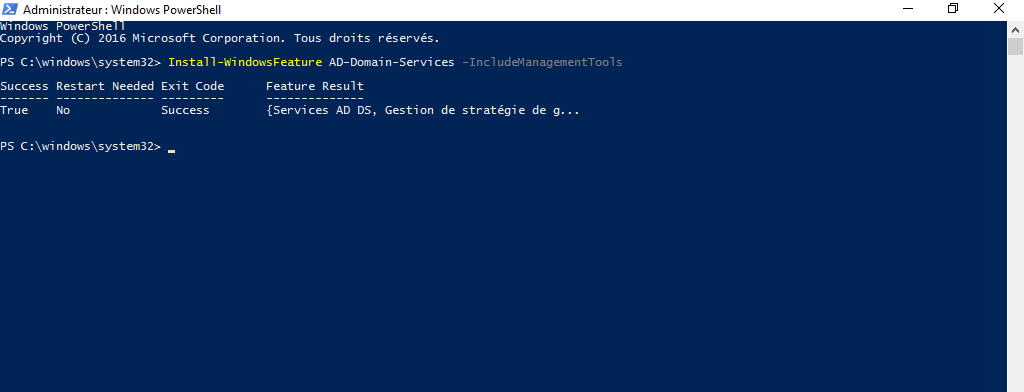
There are 3 different Powershell commands that allow promotion as a domain control. Each of the commands is to be used in a particular case:
Install-ADDSForest : which is used for creating a new Active Directory forest.
It renames a computer name to a specified new name.
Syntax:
Rename-Computer
[-ComputerName <String>]
[-PassThru]
[-DomainCredential <PSCredential>]
[-LocalCredential <PSCredential>]
[-NewName]<String>
[-Force]
[-Restart]
[-WsmanAuthentication <String>]
[-WhatIf]
[-Confirm]
[<CommonParameters>]
Parameters:
-ComputerName
Parameter renames the remote computer in PowerShell. The default is the local computer.
To rename a remote computer, specify the IP address, the domain name of the remote computer, or the NetBIOS name.
To specify the local computer name, use localhost, dot (.).
-NewName
It specifies a new name for a computer. This parameter is mandatory to rename a computer. The name may contain alphanumeric, hyphens (-).
-Restart
It specifies restart is required after the computer is renamed. Restart is required to reflect the changes.
-DomainCredential
It specifies a user account that has permission to connect to a remote computer in the domain and renames a computer joined in the domain with explicit credentials.
Use Domain\User or use the Get-Credential cmdlet to get user credentials.
-Force
The Force parameter forces the command to execute without user confirmation.
Let’s understand rename-computer cmdlet in PowerShell with examples.
Rename a Local Computer
To rename a local computer, use the rename-computer cmdlet in PowerShell as below
Rename-Computer -NewName “IN-CORP101” -Restart
In the above PowerShell, rename-computer renames a local computer name to IN-CORP101 specified by the NewName parameter. It will restart the local computer to reflect the change after the computer rename.
Rename a Remote computer
To rename a remote computer, use rename-computer cmdlet in PowerShell as below
In the above PowerShell script, rename-computer cmdlet renames a remote computer name. ComputerName parameter specify remote computer name and NewName parameter specify a new name for the computer.
After the computer is renamed, the remote computer will restart to reflect changes.
PowerShell Rename a Computer on Domain
To rename a computer on the domain, the user must have permission to connect to the domain. For explicit credentials, use Get-Credential cmdlet in PowerShell.
Let’s rename the computer on the domain using the rename-computer cmdlet in PowerShell.
In the above PowerShell script, Rename-Computer cmdlet renames a remote computer joined on a domain.
ComputerName specifies the remote computer name, NewName parameter specifies a new name for the computer.
DomainCredential parameter specify domain user ShellGeek\Admin who has permission to connect to the domain computer and rename a computer on the domain.
Conclusion
I hope the above article to rename a computer in PowerShell will help you to rename a local computer or remote computer.
Rename-Computer cmdlet in PowerShell doesn’t have a parameter that takes the input value and returns ComputerChangeInfo an object if you specify -PassThru a parameter else return does not return any value.
You can find more topics about PowerShell Active Directory commands and PowerShell basics on the ShellGeek home page.CategoriesPowerShell TipsTagsrename-computer
In a large organization, its very quite common to have many domain and child domain names. While performing task automation for set of computers in domain, its best practice to get domain name of a computer.
In this article, I will explain how to get domain name using PowerShell script and command line (CMD)
Get-WmiObject class in PowerShell management library find the domain name for computer and wmic command-line utility to get domain name using command line (cmd)
Let’s understand how to get domain name in PowerShell and command line with below examples.
In the above PowerShell script, Get-WmiObject gets the WMI classes in the root\cimv2 namespace of computer and uses Win32_ComputerSystem to get computer system information.
Second command select Name and Domain name of a computer.
Output of above command to get domain name of a computer as below
PowerShell Get Domain Name
Using Get-AdDomainController to get domain name
PowerShell Get-AdDomainController cmdlet in Active Directory get one or more domain controllers based on search criteria.
You can get domain name of a computer in active directory using PowerShell Get-AdDomainController cmdlet as below
Migration is the act of moving your UniFi devices from one host device to another. This is useful when:
You are replacing your UniFi OS Console with a new one of the same model.
You are upgrading your UniFi OS Console to a different model (e.g., a UDM to a UDM Pro).
You are offloading devices to a dedicated UniFi OS Console (e.g., moving cameras from a Cloud Key or UDM to a UNVR).
You are moving from a self-hosted Network application to a UniFi OS Console.
Note: This is not meant to be used as a staging file for setting up multiple applications on different hosts.
Types of Backups
UniFi OS Backups
UniFi OS backup files contain your entire system configuration, including your UniFi OS Console, user, application, and device settings. Assuming Remote Access is enabled, UniFi OS Cloud backups are created weekly by default. You can also generate additional Cloud backups or download localized backups at any time.
UniFi OS backups are useful when:
Restoring a prior system configuration after making network changes.
Migrating all applications to a new UniFi OS Console that is the same model as the original.
Note: Backups donot include data stored on an HDD, such as recorded Protect camera footage.
Application Backups
Each UniFi application allows you to back up and export its configuration. Application backups contain settings and device configurations specific to the respective application.
Application backups are useful when:
You want to restore a prior application configuration without affecting your other applications.
You want to migrate a self-hosted Network application to a UniFi OS Console.
You want to migrate your devices between two different UniFi OS Console models.
You need to back up a self-hosted Network application.
Note: Backups donot include data stored on an HDD, such as recorded Protect camera footage.
UniFi OS Console Migration
UniFi OS backups also allow you to restore your system configuration should you ever need to replace your console with one ofthesame model.
To do so:
First, ensure that you have already generated a Cloud backup, or downloaded a local backup. If not, please do so in your UniFi OS Settings.
Replace your old UniFi OS Console with the new one. All other network connections should remain unchanged.
Restore your system configuration on the new UniFi OS Console using the backup file. This can be done either during the initial setup or afterwards in your UniFi OS settings.
Note: Currently, UniFi OS backups cannot be used to perform cross-console migrations, but this capability will be added in a future update.
If you are migrating between two different console models, you will need to restore each application’s configuration with their respective backups. Please note, though, that these file(s) will not include UniFi OS users or settings.
See below for more information on using the configuration backups during migrations.
Migrating UniFi Network
Before migrating, we recommend reviewing your Device Authentication Credentials found in your Network application’s System Settings. These can be used to recover adopted device(s) if the migration is unsuccessful.
Standard Migration
This is used when all devices are on the same Layer 2 network (i.e., all devices are on the same network/VLAN as the management application’s host device).
Note: If you are a home user managing devices in a single location and have not used the set-inform command or other advanced Layer 3 adoption methods, this is most likely the method for you.
Download the desired backup file (*.unf) from your original Network application’s System Settings.
Ensure that your new Network application is up to date. Backups cannot be used to restore older application versions.
Replace your old UniFi OS Console with the new one. All other network connections should remain unchanged.
Restore the backup file in the Network application’s System Settings.
Ensure that all devices appear as online in the new application. If they do not, you can try Layer 3 adoption, or factory-reset and readopt your device(s) to the new Network application.
If a device continues to appear as Managed by Other, click on it to open its properties panel, then use its Device Authentication Credentials (from the original Network application’s host device) to perform an Advanced Adoption.
Migrating Applications That Manage Layer 3 Devices
This method is for users that have performed Layer 3 device adoption (i.e., devices are on a different network/VLAN than the application’s host device). This may also be useful when migrating to a Network application host that is NOT also a gateway.
Download the desired backup file (*.unf) from your original Network application’s System Settings.
Enable the Override Inform Host field on the original Network application’s host device, then enter the IP address of the new host device. This will tell your devices where they should establish a connection in order to be managed. Once entered, all devices in the old application should appear as Managed by Other.
Note: When migrating to a Cloud Console, you can copy the Inform URL from the Cloud Console’s dashboard. Be aware that you will need to remove the initial http:// and the ending :8080/inform.
Ensure that your new Network application is up to date. Backups cannot be used to restore older application versions.
Restore the backup file in the Network application’s System Settings.
Ensure that all devices appear as online in the new application. If they do not, you can try Layer 3 adoption, or factory-reset and readopt your device(s) to the new application.
If a device continues to appear as Managed by Other, click on it to open its properties panel, then use its Device Authentication Credentials (from the original Network application’s host) to perform an Advanced Adoption.
Exporting Individual Sites from a Multi-Site Host
Certain Network application hosts (e.g., Cloud Key, Cloud Console, self-hosted Network applications) can manage multiple sites. Site exportation allows you to migrate specific sites from one multi-site host to another. To do so:
Click Export Site in your Network application’s System Settings to begin the guided walkthrough.
Select the device(s) you wish to migrate to your new Network application.
Enter the Inform URL of your new host. This will tell your devices where they should establish a connection in order to be managed. Once entered, all devices in the old application should appear as Managed by Other in the new one.
Note: When migrating to a Cloud Console, you can copy the Inform URL from the Cloud Console’s dashboard. Be aware that you will need to remove the initial http:// and the ending :8080/inform.
Go to your new Network application and select Import Site from the Site switcher located in the upper-left corner of your dashboard.
Note: You may need to enable Multi-Site Management in your System Settings.
Ensure that all devices appear as online in the new application. If they do not, you try Layer 3 adoption, or factory-reset and readopt your device(s) to the new application.
If a device continues to appear as Managed by Other, click on it to open its properties panel, then use its Device Authentication Credentials (from the original Network application’s host) to perform an Advanced Adoption.
Migrating UniFi Protect
We recommend saving your footage with the Export Clips function before migrating. Although we provide HDD migration instructions, it is not an officially supported procedure due to nuances in the RAID array architecture.
Standard Migration
Download the desired backup file (*.zip) from the original Protect application’s settings.
Ensure that your new Protect application is up to date. Backups cannot be used to restore older application firmware.
Replace your old UniFi OS Console with the new one. All other camera connections should remain unchanged.
Restore the backup file in the Protect application’s settings.
HDD Migration
Full HDD migration is not officially supported; however, some users have been able to perform successful migrations by ensuring consistent ordering when ejecting and reinstalling drives into their new console to preserve RAID arrays.
Note: This is only possible if both UniFi OS Consoles are the same model.
Remove the HDDs from the old console. Record which bay each one was installed in, but do not install them in the new console yet.
Turn on the new console and complete the initial setup wizard. Do not restore a Protect application or Cloud backup during initial setup!
Upgrade the new console and its Protect application to a version that is either the same or newer than the original console.
Shut down the new console, and then install the HDDs in the same bays as the original console.
Turn on the new console again. The Protect application should start with its current configuration intact, and all exported footage should be accessible.
My Hyper-V host is Server 2012 R2. I have a virtual machine (Server 2012 R2) with a checkpoint. When I right click on the checkpoint, there is no “Delete checkpoint… ” option. I need to delete this checkpoint so that it is merged with the parent VHDX. What is the best method for doing this?
– Question from social.technet.microsoft.com
Have you ever encountered the situation where your Hyper-V cannot delete checkpoint because of “Delete” option missing? Right-clicking on the Hyper-V checkpoint, there are only “Settings”, “Export”, “Rename” and “Help” options left, why would this happen?
There are many reasons may cause Hyper-V snapshot delete option not available, such as connection error with the host, or a backup toolfailure. The most likely scenario is that the checkpoint created by a third-party tool was not deleted properly by the same tool.
More specifically, the checkpoints and associated .AVHDX files should be merged and deleted at the end of a backup – only the newer .AVHDX files should be kept. However, sometimes the checkpoints may be corrupted because the VM is in a locked or backed up state, or some other reason is preventing the deletion and merging. In this case, you may find the delete option missing, and Hyper-V cannot delete this checkpoint.
How to fix this? I will provide you 3 proven solutions, you can try them one by one. *They also work for cleaning up after a failed Hyper-V checkpoint.
How to solve Hyper-V cannot delete checkpoint (3 solutions)
When you are unable to delete checkpoint in Hyper-V, you can first try some regular troubleshooting means. If they cannot solve this issue, don’t worry, there are still some alternatives can help you delete Hyper-V checkpoint properly. I will cover all of them below.
Solution 1. Troubleshooting steps that you should try first
Before taking other measures, you can try some simple ways in Hyper-V Manager to see if you can make snapshot removal work. That is:
Right-click on the host name in Hyper-V Manager and select Refresh.
Close and restart the Hyper-V Manager.
Highlight the target checkpoint and use the [Delete] key on the keyboard. It should pop up a window confirming whether to delete the checkpoint or not.
If none of these ways can help, then you may need to try delete checkpoint Hyper-V with PowerShell.
Solution 2. Properly delete Hyper-V checkpoint with PowerShell
Hyper-V PowerShell module is a bundle of cmdlets for creating, configuring and managing Microsoft Hyper-V hosts and virtual machines. It can be more a time efficient method than using GUI. You can use it remove any Hyper-V checkpoint that has no delete option.
Launch Windows PowerShell as administrator on the Hyper-V host, input and execute the following command to delete the checkpoint:
Once the command succeeded, you can see the merge progress for the particular VM. It may take some time depending on the snapshot size. After that, you should be able to modify the virtual machine configuration again.
If this method still cannot delete your Hyper-V checkpoint, turn to the next one.
Solution 3. Export and import Hyper-V VM to resolve checkpoint cannot delete
You can try Hyper-V export VM and import as suggested by some other users, which are also said can be used to solve the problem.
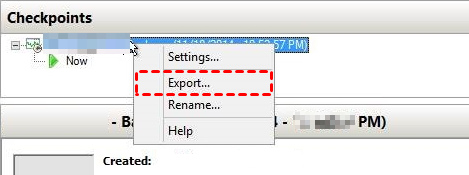
1. Launch Hyper-V Manager. Right-click on the name of the target checkpoint, and select Export…
2. In the pop-up window, click Browse to specify a network share as the storage destination to the exported files. And then click Export.
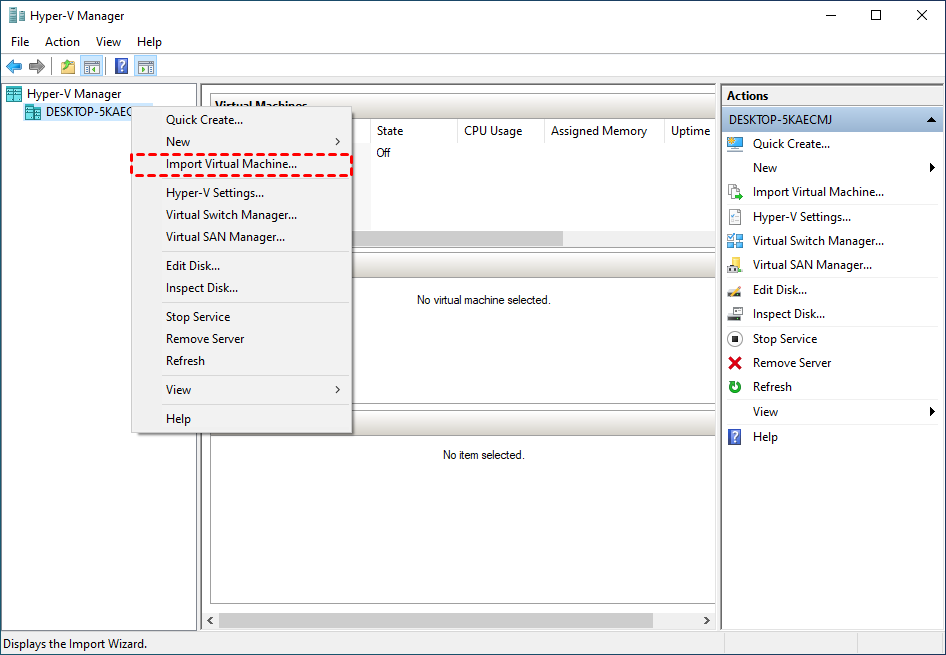
3. Right-click on the host name and select Import Virtual Machine… Click Next on the pop-up wizard.
4. On Locate Folder page, click Browse… to specify the folder containing the exported VM files. Click Next to continue.
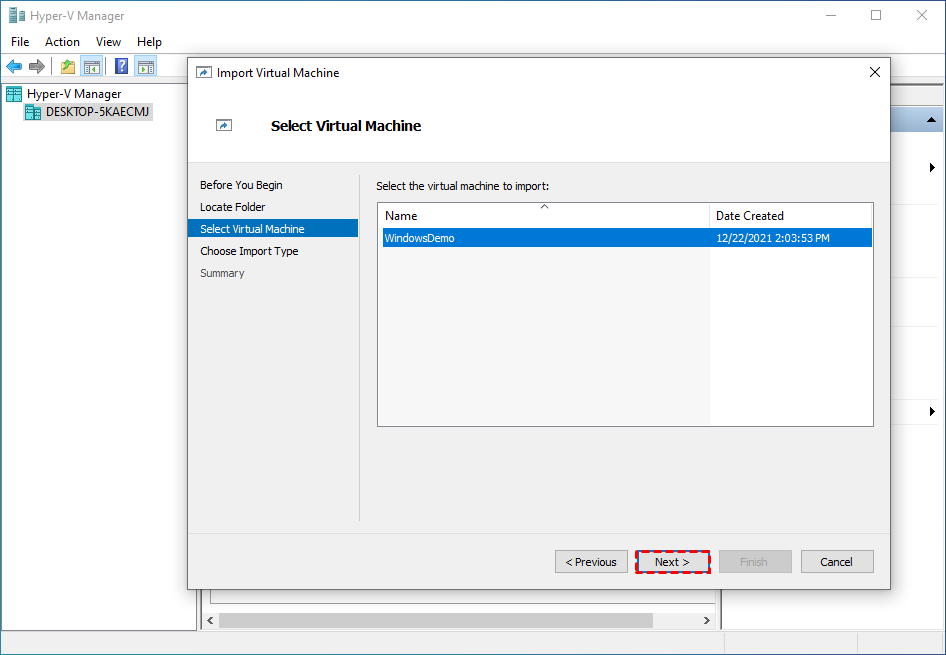
5. On Select Virtual Machine page, select the virtual machine to import, then click Next.
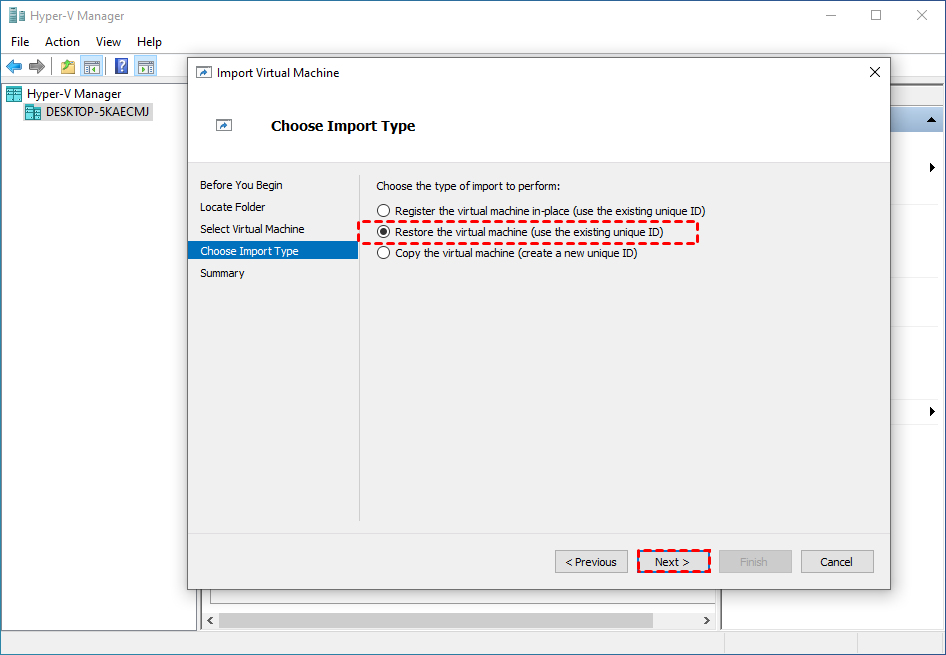
4. On Choose Import Type page, choose the type of import to perform:
Register the virtual machine in-place (use the existing unique ID): use the exported files in-place, and when the import has completed, the export files become the running state files and can’t be removed. The ID will be the same as the exported one.
Restore the virtual machine (use the existing unique ID): restore the VM to the specified or default location, with the same ID as the exported one. When the import has completed, the exported files remain intact and can be removed or imported again.
Copy the virtual machine (create a new unique ID): restore the VM to the specified or default location, and create a new unique ID. Which means the exported files remain intact and can be removed or imported again, and you can import the VM to the same host multiple times.
Click Next to continue.
5. Choose the second or the third option, the wizard will add 2 more pages for selecting storage.
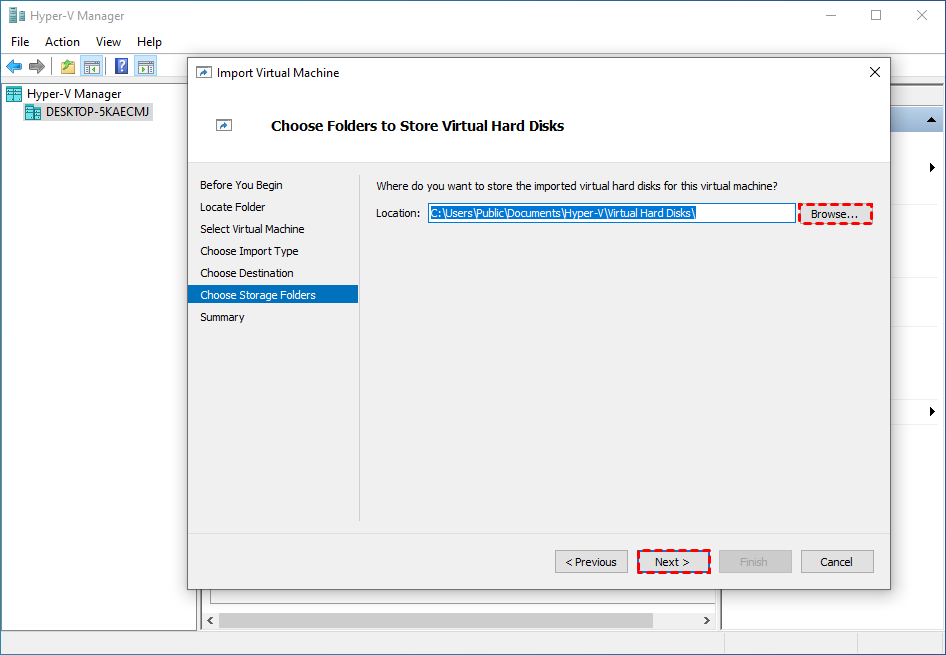
On Choose Destination page, you can check Store the virtual machine in a different location option, and click Browse… to specify Virtual machine configuration folder, Checkpoint store, and Smart paging folder. Leave the option unchecked the wizard will import the files to default Hyper-V folders. Then click Next.
6. On Choose Storage Folders page, you can click Browse… to specify where you want to store the imported virtual hard disks for this VM, or leave the default location unchanged. Then click Next.
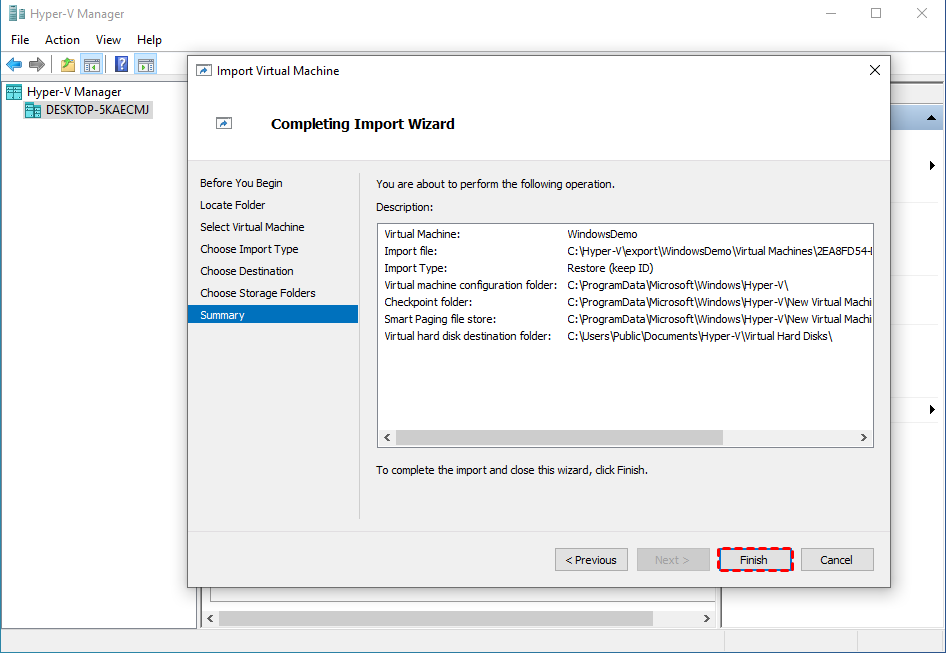
7. On Summary page, review the settings and click Finish to start restore.
Furthere reading: FAQ about Hyper-V delete checkpoint
The above describes how to solve the problem that the delete option disappears and the hyper-v checkpoint cannot be deleted. Besides, many users may have some other confusion about checkpoints. I have compiled some common questions and their answers here.
Q: Where are checkpoints stored on a Hyper-V host?
In general, the default location for storing checkpoint configuration files is:
And the default locations for storing AVHDX files (checkpoint storages) are:
Windows Server 2012R2 / Windows 8.1: C:UsersPublicDocumentsHyper-VVirtual Hard Disks
Windows Server 2012 / Windows 8: C:ProgramDataMicrosoftWindowsHyper-VNew Virtual MachineVirtual Hard Disks
Q: Can you directly delete checkpoint files (.avhdx)?
Whenever a checkpoint is deleted, Hyper-V merges the .vhdx and .avhdx files automatically, and the .avhdx files should be removed from the disk after the Hyper-V checkpoint merging process is complete. So a proper checkpoint deletion does not result in data loss.
It’s not a good idea to delete the .avhdx file in VM folder directly, because it may cause the checkpoint tree to fail.
The normal steps to delete a checkpoint is:
Open the Hyper-V Manager -> Select the virtual machine for which you need to remove checkpoints -> Locate the Checkpoints tab -> Right-click on the desired checkpoint -> click “Delete Checkpoint”. If asked to confirm the action, make sure the checkpoint is correct and click “Delete” again.
Note if you need to delete all subsequent checkpoints, right-click the earliest checkpoint and click “Delete Checkpoint Subtree”.
If you find some orphaned Hyper-V AVHDX files in the VM folder, but no snapshots on that VM, this may be because incomplete deletion or merging, you can refer to: delete Hyper-V AVHDX file without checkpoints.
Q: Hyper-V checkpoint delete vs merge
A checkpoint is any new change or save between the old state and the present, it stops writing to the actual disk and writes to the change disk.
Once you are satisfied and delete the checkpoint, the changes are written back/merged to the actual disk and are write enabled again. Therefore, deleting a checkpoint and merging a checkpoint are actuallythe same thing.
If you don’t want the changes, you just need to revert them and any changes since the checkpoint will be deleted.
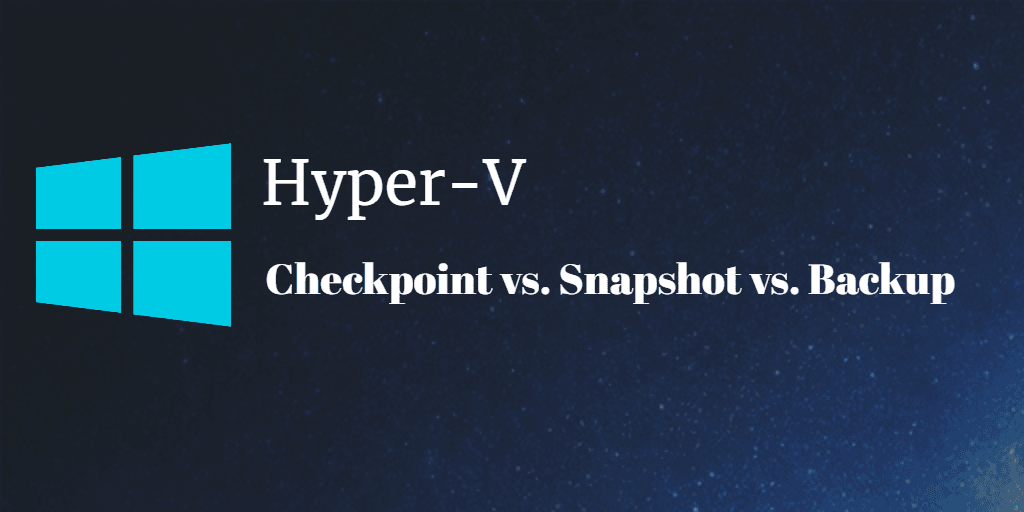
Q: Can Hyper-V checkpoints be used as regular backup means?
The answer is NO. VM snapshot and backup are different from each other. Microsoft’s Hyper-V checkpoint is not a replacement of backup.
When you create a backup, you are creating a copy of your virtual machine. It stores complete data of VM. Backups in Hyper-V can be used to restore a whole VM and do not affect the performance.
When you create a checkpoint, you are creating a differencing disk based on the original virtual machine hard disk. If the original disk is damaged, the child disk is easy to be lost or damaged as well. All changes made after the checkpoint are re-directed to the child disk and leaves the original virtual machine disk read-only.
Meanwhile, checkpoints are running out of the memory of disk with a rapid speed, which will gradually to the poor performance of your virtual machines.
In short, Hyper-V checkpoint is just a secure “undo” button. If you want to test something quickly and restore the VM to a stable state, checkpoint in Hyper-V is convenient and fast to execute the process. But, if you want long-term and independent protection for VMs, you still need to find effective Hyper-V backup solution.
Better option for long-term protection: Image-based VM backup
As mentioned above, if you are looking for long-term data protection and the ability to quickly restore VMs to a usable state in the event of a disaster, then you are more suited to an image-based VM backup solution.
Here I’d like to introduce you AOMEI Cyber Backup, this free Hyper-V backup solution is designed to protect virtual machines from any data threats, whether you are using Hyper-V in Microsoft Windows Server 2022 / 2019 / 2016 / 2012 R2, Microsoft Windows 11 / 10 / 8 / 8.1 or Hyper-V Server 2019 / 2016 / 2012 R2.
You can use the software to simplify Hyper-V backup and management. If offers you the following benefits:
Easy-to-use: User-friendly interface to complete backup and restore process based on several clicks. Perpetual Free: No time limit for AOMEI Cyber Backup Free Edition to protect up to multiple virtual machines. Auto Backup Schedule: Schedule backups for multiple VMs at once and auto run it without powering off VMs. Centralized Management: Create and manage Hyper-V VM backups from the central console without installing Agent on each VM. Flexible Backup Strategy: Flexibly tracking data and store backups to different storages. Role Assignment: allows one administrator to create sub-accounts with limited privileges.
Please hit the button below to download and use AOMEI Cyber Backup for free:
*You can choose to install this VM backup software on either Windows or Linux system.
3 easy steps to perform free VM backup:
1. Open AOMEI Cyber Backup web client, and access to Source Device >> Hyper-V >> Add Hyper-V to bind your Hyper-V host, then enter the required information and click Confirm.
2. Access to Backup Task >> Create New Task to configure your Hyper-V backup task. In the opened wizard, you can select Hyper-V virtual machines to back up, the storages to save the backups.
Also, you can configure Schedule to select backup method as full / incremental backup, and specify the backup frequency on basis of daily / weekly / monthly to automatically run the Hyper-V backup task.
3. Start Backup: click Start Backup and select Add the schedule and start backup now, or Add the schedule only.
When completing the Hyper-V backup solution, you can monitor the backing up process on the main interface, and you can also check the Backup Log to see if there are any errors that result in your backup failure.
When you want to Restore a VM from the backup, you can select any backup version from the history, and Restore to original location easily.
✍While the Free Edition covers most of the VM backup needs, you can also upgrade to enjoy:
Backup Cleanup: Specify retention policy to delete old VM backups automatically, thus saving storage space.
Restore to new location: Make a clone of a virtual machine in the same or another datastore/host, without reinstalling or configuring a new VM.
Summary
If you find your Hyper-V snapshot no delete option, I summarized several ways to solve the problem Hyper-V cannot delete checkpoint in this article. Hope it could be helpful to you.
Besides this, you may encounter some other issues, such as Hyper-V VM running slow, stuck at restoring or saved state, Hyper-V VM no internet, failed to change state, etc. To prevent your virtual machines from getting all kinds of errors and eventual crashes, it’s always recommended to back up your VMs that are loaded with important data.
In this guide, I’ll show you how to deploy the open source time tracking app Kimai in a Docker container. Kimai is free, browser-based (so it’ll work on mobile devices), and is extremely flexible for just about every use case.
It has a stopwatch feature where you can start/stop/pause a worklog timer. Then, it accumulates the total into daily, weekly, monthly or yearly reports, which can be exported or printed as invoices.
It supports single or multi users, so you can even track time for your entire department. All statistics are visible on a beautiful dashboard, which makes historical time-tracking a breeze.
Why use Kimai Time Tracker?
For my scenario, I am salaried at work. However, since I’m an IT Manager, I often find myself working after hours or on weekends to patch servers, reboot systems, or perform system and infrastructure upgrades. Normally, I use a pen and paper or a notetaking app to track overtime, although this is pretty inefficent. Sometimes I forget when I started or stopped, or if I’ve written down the time on a notepade at home, I can’t view that time at work.
And when it comes to managing a team of others who also perform after hours maintenance, it becomes even harder to track their total overtime hours.
Over the past few weeks, I stumbled across Kimai and really love all the features. Especially when I can spin it up in a docker or docker compose container!
In this tutorial, we will be installing Kimai for 1 user using standard Docker run commands. Other users can be added from the webui after initial setup.
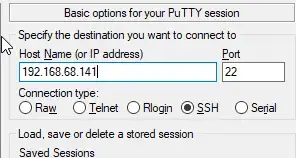
Step 1: SSH into your Docker Host
Open Putty and SSH into your server that is running docker and docker compose.
Step 2: Create Kimai Database container
Enter the command below to create a new database to use with Kimai. You can copy and paste into Putty by right-clicking after copy, or CTRL+SHIFT+V into other ssh clients.
Next, start the Kimai container using the already created database. If you look at the Kimai github page, you’ll notice that this isn’t the same command as what shows there.
Here’s the original command (which I’m not using):
And here’s my command. I had to explicitly add TRUSTED_HOSTS, the ADMINMAIL and ADMINPASS, and change the ${HOSTNAME} to the IP address of your docker host. Otherwise, I wasn’t able to access Kimai from other computers on my local network.
Green = change port here if already in use
Red = Add the IP address of your docker host
Orange = Manually specifying the admin email and password. This is what you’ll use to log in with.
Note that 8 characters is the minimum for the password.
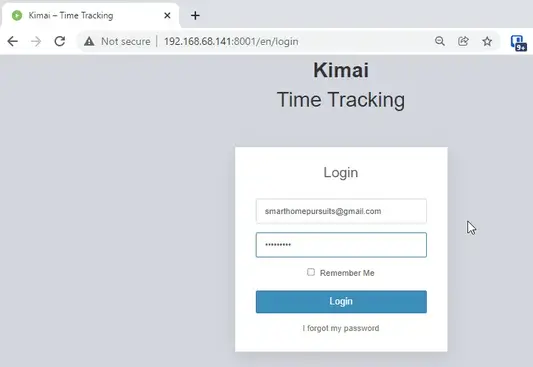
Step 4: Log In via Web Browser
Next, Kimai should now be running!
To check, you can go to your http://dockerIP:8001 in a web browser (192.168.68.141:8001)
Then simply log in with the credentials you created.
Step 5: Basic Setup
This app is extremely powerful and customizeable, so I won’t be going over all the available options since everyone has different needs.
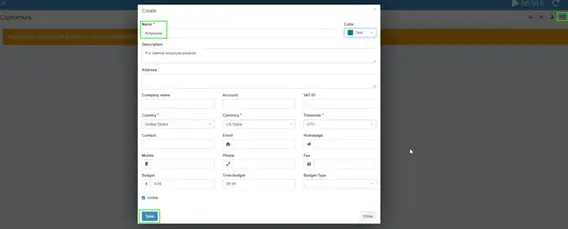
Like I mentioned earlier, I’m using Kimai for overtime tracking only, so the first step for me is to create a new “customer”.
Create a Customer
This is sort of unintuitive, but you need to create a customer before you can start tracking time to a project. I’m creating a generic “Employee” customer.
Click Customers on the left sidebar, then click the + button in the top right corner.
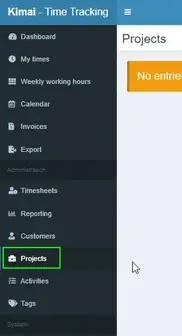
Create A Project
Click Projects on the left sidebar:
Then click the + button in the top right corner.
Add a name, choose the customer you just created, and then choose a date range.
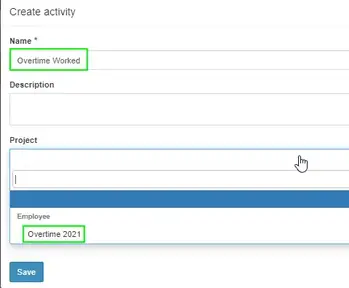
Create An Activity
Click Activity on the left, then create an activity. I’m calling mine Overtime Worked and assigning it to the Project “Overtime 2021” I just created.
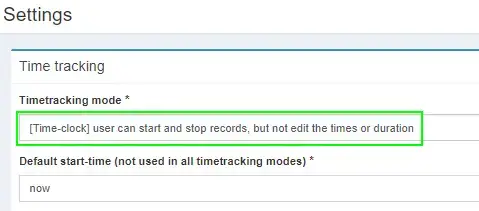
Step 6: Change “Timetracking Mode” to Time-clock
Click Settings. Under Timetracking mode, change it to Time-Clock. This will let you click the Play button to start/stop time worked vs having to manually enter start and stop times.
Step 7: Start Tracking Time!
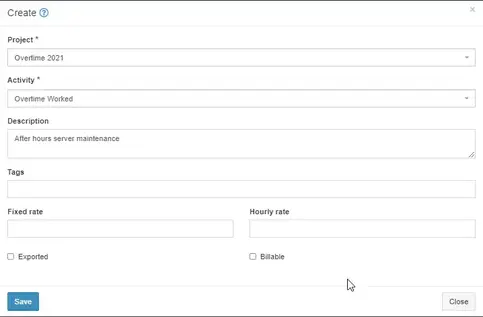
To start tracking time, simply click the timer widget in the top right corner.
A screen will pop up asking you what project and activity you want to apply the time to.
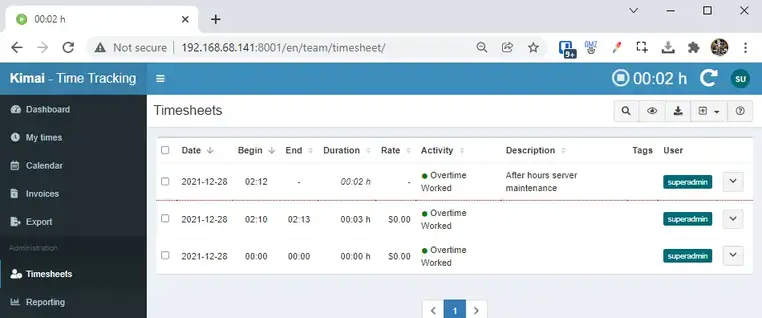
The selfhosted stopwatch will start tracking time right after. You can then view the timesheets for yourself under the My Times section or for all users under the Timesheets or Reporting tabs.
Wrapping Up
Hopefully this guide helped you get Kimai installed and setup! If you have any questions, feel free to let me know in the comments below and I’ll do my best to help you out.
My Homelab Equipment
Here is some of the gear I use in my Homelab. I highly recommend each of them.
In this guide, I’m going to show you how to make Google Chrome the default browser using Group Policy (GPO). This guide applies to Windows Server 2012,2016,2019, 2022 as well as Windows 8/10/11.
To do this, there are several steps you’ll need to do. It’s not as simple as just creating a GPO and applying it to a target computer.
This guide assumes you’ve already implemented Google Chrome Enterprise and are already managing Google Chrome browsers at an enterprise level. If not, follow step 1 first.
Step 1: (Optional) Import Google Chrome .ADMX Template Files
Extract it once download and expand the subfolder Configuration.
In the “adm” folder, find your language (en-US) and copy the chrome.adm file to your desktop.
In the admx folder, find your language again (en-US), and copy the chrome.adml file to your desktop.
Next, RDP to your Domain Controller. Copy those two extracted files to the desktop of your DC.
Browse to C:\Windows\PolicyDefinitions and drag the chrome.admx.
In C:\Windows\PolicyDefinitions\en-US\folder, drag the chrome.adml file.
Now that you’ve copied in the necessary Group Policy files to manage your Google Chrome browsers, install Chrome Enterprise from here.
I used PDQ Deploy to push this out to all computers, but for testing you can simply install it on your PC.
Step 2: Create a new Group Policy Object
Log into your Domain Controller and open Group Policy Management. Right-click Group Policy Objects > New. Give it a helpful name like “Chrome Default Browser”.
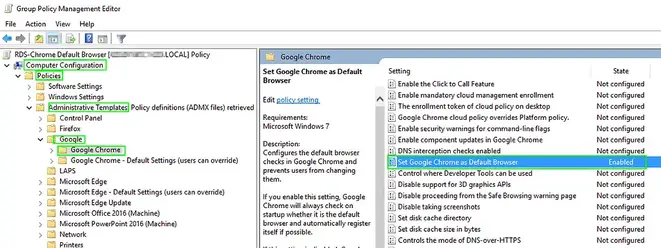
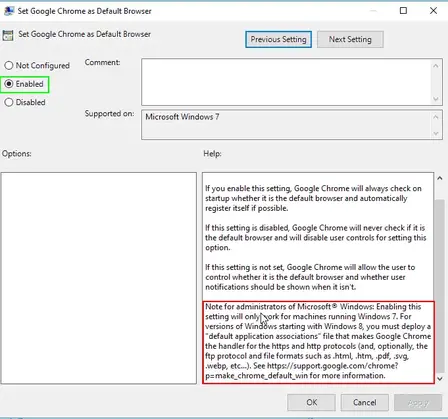
Right-click the new policy > Edit. Then expand Computer Configuration > Policies > Administrative Templates > Google > Google Chrome. Double-click that and switch to Enabled.
You’ll notice in the Help section of the GPO that this will only work for Windows 7. For Windows 8-10, you will need to define a file associates XML file.
Step 3: Deploy File Associations File
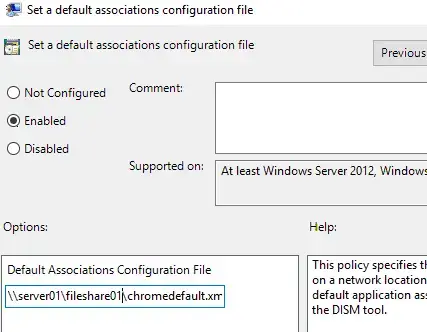
The next step is to download a “default file associations” sample file, place it on a network share, and then configure another group policy.
You can either place the file in a network share available by everyone. Or, you could also use Powershell or PDQ Deploy/SCCM to push this file to a certain location on everyone’s computer.
For this example, I put the file in a network share like this: \\server01\fileshare01\chromedefault.xml
Step 4: Edit Chrome Browser GPO to include path to XML
Next, open up Group Policy Management from your DC again. Edit your new “Chrome Default Browser” policy.
Navigate to Computer Configuration > Policies > Administrative Templates > Windows Components > File Explorer.
Locate the “Set a default associations configuration file” policy. Edit it, and use the path from step 3.
Click Apply and OK once complete.
Step 5: Update GPO and Test
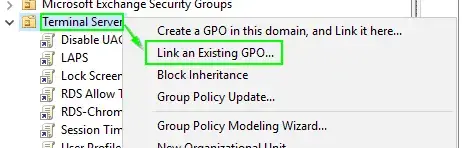
Next, you need to apply this GPO to a target OU or computer. I always recommend moving a test computer from Active Directory Users & Computers into a test OU to prevent breaking any production systems.
Locate the OU > right-click > Link an existing GPO > Choose the new “Chrome Default Browser” GPO.
Once the computer has been moved into the test OU, and you’ve applied the policy to that same OU, run the following command on the command to update the policy:
gpupdate /force
Then, sign out. The default browser will not be switched until after you log out.
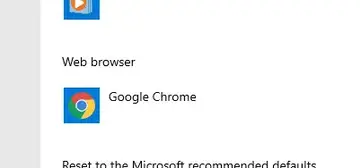
To confirm it’s working properly, search Windows for “Default Apps” on your computer and switch it to Edge. Then, sign out and sign back in. If all goes well – you can open Default Apps again and successfully see that it has switched your default web browser to Google Chrome!
Wrapping Up
Hopefully this guide helped you force change the default web browser to Google Chrome for your company!
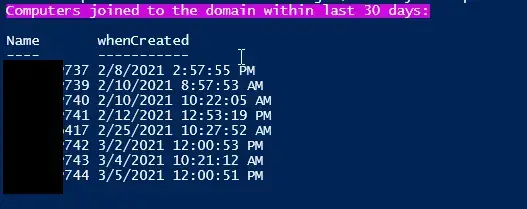
If you’ve been looking for a Powershell script to find the most recent computers that have been joined to your Active Directory domain, then you’re in luck.
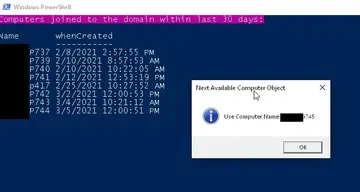
This Powershell script is super simple and is only a few lines of code long. I’ve also paired it with my Next In Line Computer Name Script. We have a standard naming convention when joining computer objects to the domain: company abbreviations, then append a number.
When this script runs, it will output computers that have been joined to the domain within the last 30 days. You can of course change the number to anything you like.
Powershell Script To Filter by Join Date / When Computer Account Was Created
If you have the same naming convention we do, then you could obviously just look at the last joined object and create xxxxxxx745 as the next object. However, if you’d like to take it a step further and have it display a box that visually tells you which computer name to use, then follow this guide. (It’s as simple as creating a text file called number.txt and adding the number of the last computer object you joined to the domain.)
If you’ve set that up, then here is the script you could use instead. On the last line, just append your computer prefix in place of the xxxx’s.
[void][Reflection.Assembly]::LoadWithPartialName('Microsoft.VisualBasic')

$NotifyUser = {
    [Microsoft.VisualBasic.Interaction]::MsgBox(
        ($args -join ' '), #Notification
        [Microsoft.VisualBasic.MsgBoxStyle]::Information,
        "Next Available Computer Object" #TitleBar
    )
}

[int](get-content "\\fileshare\IT\Scripts\New Hire-Computer\number.txt") + 1 | out-file "\\fileshare\IT\Scripts\New Hire-Computer\number.txt"
$Value = Get-content "\\fileshare\IT\Scripts\New Hire-Computer\number.txt"
$recently = [DateTime]::Today.AddDays(-30)
Write-Host -BackgroundColor Magenta Computers joined to the domain within last 30 days:
Get-ADComputer -Filter 'WhenCreated -ge $recently' -Properties whenCreated | Format-Table Name,whenCreated -Autosize -Wrap

&$NotifyUser Use Computer Name: xxxxxxx$Value
My Homelab Equipment
Here is some of the gear I use in my Homelab. I highly recommend each of them.
FQDN: cloudgmsams.sonicwall.com Zero Touch FQDN: cloudttams.global.sonicwall.com IP: 213.244.188.168, 213.244.188.188
For AWS-FRA Colo
FQDN: cscmafra.sonicwall.com Zero Touch FQDN: cscmafratt.global.sonicwall.com, cscmafratta.global.sonicwall.com IP: 18.197.234.66, 18.197.234.59
SonicWall NSM:
For Oregon AWS Colo
FQDN: nsm-uswest.sonicwall.com (Use it in GMS settings under Administration Page) Zero Touch FQDN: nsm-uswest-zt.sonicwall.com (Use it in ZeroTouch Settings under Diag page) IP: 13.227.130.81, 13.227.130.63, 3.227.130.69, 13.227.130.12, 52.39.29.75, 44.233.105.101, 44.227.248.206
For AWS-FRA Colo
FQDN: nsm-eucentral.sonicwall.com (Use it in GMS settings under Administration Page) Zero Touch FQDN: nsm-eucentral-zt.sonicwall.com (Use it in ZeroTouch Settings under Diag page) IP: 13.227.130.70, 13.227.130.69, 13.227.130.15, 13.227.130.92, 18.156.16.24, 18.157.240.148, 3.127.176.56
Microsoft announced today that a future Microsoft Edge update would permanently disable the Internet Explorer 11 desktop web browser on some Windows 10 systems in February.
This comes after a previous warning from June 15, the day Internet Explorer reached its end of support, when the company told customers that the legacy web browser would get disabled via a Windows update.
“The out-of-support Internet Explorer 11 (IE11) desktop application is scheduled to be permanently disabled on certain versions of Windows 10 devices on February 14, 2023, through a Microsoft Edge update, not a Windows update as previously communicated,” Redmond said on Friday.
“All remaining devices that have not already been redirected from IE11 to Microsoft Edge are scheduled to be redirected with the Microsoft Edge update scheduled for February 14, 2023.”
Enterprise admins are advised to transition from IE11 to Microsoft Edge with IE mode and remove IE visual references from the Start Menu and the Windows taskbar with the Disable IE policy before February 14 to avoid “business disruption at scale when users lose access to IE11-dependent applications.”
Next year’s May non-security preview release and the June Windows monthly security update are also designed to remove them in environments where admins will not act before IE11 gets permanently disabled.
BleepingComputer previously reported that Internet Explorer would redirect users to the new Chromium-based Microsoft Edge when launching the Internet Explorer 11 desktop applications.
Starting in October 2020, IE11 has been automatically launching Microsoft Edge when visiting incompatible sites. The list of incompatible sites (managed by Microsoft) contains 7,562 domains belonging to a long list of high-profile online platforms and services, including Facebook, Instagram, Google Drive, Microsoft Teams, Twitter, and many others.
During the redirection process, users’ data (including settings, passwords, and favorites) will be imported into Microsoft Edge to make the switch easier.
Internet Explorer still around for some time
Even though officially retired from multiple Windows 10 versions on the semi-annual channel (SAC) servicing channel and not shipping with Windows 11, IE11 will still be available on Windows 7 ESU, Windows 8.1, and versions of Windows 10 LTSC client, IoT, and Server.
The web browser will continue receiving technical support and security updates on systems running these Windows versions for the lifecycle of the Windows version it runs on.
Microsoft has been urging customers to switch to Microsoft Edge with IE mode for years as it enables backward compatibility and will be supported through at least 2029—you can learn more about IE mode and how to make the switch in this getting started guide.
To enable IE mode in Microsoft Edge, you have to go to edge://settings/defaultbrowser, toggle on the ‘Allow sites to be reloaded in Internet Explorer‘ option, and restart the browser.