If you’re heading out of the office on a well-deserved vacation, are you certain the security controls you have in place will let you rest easy while you’re away? More importantly – do you have the right action plan in place for a seamless return?
Whether you’re on the way out of – or back to – the office, our Security Validation Checklist can help make sure your security posture is in good shape.
1. Check the logs and security events of your key critical systems. Stay up-to-date on recent activities. Check for changes – and attempted changes – and any potential indicators of compromise. Planning to be gone for longer than a week? Designate a team member to perform a weekly review in your absence, reducing the chances of a critical event going undetected.
2. Check for any new security vulnerabilities that were identified on your vacation. Use your preferred scanning tool or check one of the regularly updated databases, such as CVE Details.
3. Investigate failures of critical components and the reasons behind them. If remediation is needed, create an action plan to address the immediate issues and prevent repeated failures in the future.
4. Review whether there were any key changes to your products and their corresponding security controls. While now isn’t the time to implement major changes to your EDR, SIEM system, or other corresponding solutions, do make sure you’re aware of any updates that were made in your absence. Once you’re back – and able to monitor the impact on your overall security posture – you can make larger-scale changes to your controls.
5. Check with HR for any relevant changes. Did any new employees join the company and therefore need access to specific systems? Conversely, did any employees leave and need their credentials revoked? Were there any other incidents or red flags that require your attention?
6. Be aware of new business orientations. Did the organization introduce any new services or products that expanded the potential attack surface? For instance, did a new website or mobile app go live, or was a new version of a software product rolled out? Make sure your team is up to speed on the latest changes.
7.Check your password policies. Password policies shouldn’t be dependent on your vacation status, but as you work through this security checklist, take the opportunity to make sure policies are appropriately protecting the organization. Consider reviewing length, complexity, and special character requirements, as well as expiration and re-use policies.
8.Review firewall configurations . With many security experts recommending a review of firewall configurations every three to six months, now is an opportune time for an audit. Review network traffic filtering rules, configuration parameters, and authorized administrators – among other configurations – to make sure you’re using the appropriate configurations
There are plenty of tools that can help work through this checklist – but do you have all the resources needed to make sure everything will be addressed?
If you need help automating and standardizing your processes – or making sure critical vulnerabilities aren’t slipping through the cracks – Automated Security Validation can help. With real-time visibility, complete attack surface management, and actual exploitation measures – not just simulations – it provides what you need to rest easy while you’re away. And when you get back? Risk-based remediation plans help you create your roadmap for keeping your organization protected.
When you’re back, we’ve got your back. To learn more about protecting your security posture with Automated Security Validation, request a demo of the Pentera platform.
Securing a Microsoft 365 tenant must start with identity.
Protecting identities is a fundamental part of Zero Trust and it’s the first “target” that most attackers look for. We used to say that attackers hack their way in, now we say they log in, using bought, found or stolen/phished credentials. This article will show you why MFA is so important and how to implement advanced security features in Azure AD such as PIM, Password protection, Conditional Access policies (also a strong part of Zero Trust), auditing and more.
Below is the first chapter from our free Microsoft 365 Security Checklist eBook. The Microsoft 365 Security Checklist shows you all the security settings and configurations you need to know for each M365 license to properly secure your environment. Download the full eBook and checklist spreadsheet.
Multi-Factor Authentication
It should be no surprise that we start with identity, it’s the new security perimeter or the new firewall and having a strong identity equals strong security. The first step to take here is implementing Multi Factor Authentication (MFA). It’s free for all Office / Microsoft tenants. If you want to use Conditional Access (CA) to enforce it (rather than just enabling users “in bulk”), you need Azure AD Premium P1+ licensing. A username and a simple password are no longer adequate (it never was, we just never had a simple, affordable, easy to use alternative) to protect your business.
Hand-in-hand with MFA you need user training. If your business is relying on users doing the right thing when they get the prompt on their phone – they MUST also know that if they get a prompt when they’re NOT logging in anywhere, they must click Block / No / Reject.
To enable MFA on a per-user basis, go to aad.portal.azure.com, login as an administrator, click Azure Active Directory – Security – MFA and click on the blue link “Additional cloud-based MFA settings”.
Additional MFA settings
There are two parts (tabs) on this page, “service settings” where you should disable app passwords (a workaround for legacy clients that don’t support MFA, shouldn’t be necessary in 2022), add trusted public IP addresses (so that users aren’t prompted when they’re in the corporate office – we and Microsoft recommend not using this setting), disabling Call and Text message to phone and remember MFA on trusted devices setting (1-365 days), Microsoft recommends either using CA policies to manage Sign-In frequency or setting this to 90 days. Phone call / text message MFA are not strong authentication methods and should not be used unless there’s no other choice.
On the user’s tab you can enable MFA for individual users or click bulk update and upload a CSV file with user accounts.
If you have AAD Premium P1, it’s better to use a CA policy to enforce MFA, it’s more flexible and the MFA settings page will eventually be retired.
Enforcing MFA with a Conditional Access Policy
A few words of caution, enabling MFA for all your administrators is a given today. Seriously, if you aren’t requiring every privileged account to use MFA (or 2FA / passwordless, see below), stop reading and go and do that right now. Yes, it’s an extra step and yes, you’ll get push back but there’s just no excuse – it’s simply unprofessional and you don’t belong in IT if you’re not using it. For what it is worth, I’ve been using Azure MFA for over seven years and require it for administrators at my clients – no exceptions.
Enabling MFA for all users is also incredibly important but takes some planning. You may have some users who refuse to run the Microsoft Authenticator app on their personal phone – ask for it to be put in their hiring contract. You need to train them as to why MFA is being deployed, what to do, both for authentic logins and malicious ones. Furthermore, you need to have a smooth process for enrolling new users and offboarding people who are leaving.
You should also strongly consider creating separate (cloud only) accounts for administrators. They don’t require a license and it separates the day-to-day work of a person who only performs administrative actions in your tenant occasionally (or use PIM, Chapter 10).
MFA protects you against 99.9% of identity-based attacks but it’s not un-phishable. Stronger alternatives include biometrics such as Windows Hello for Business (WHFB) and 2FA hardware keys which bring you closer to the ultimate in identity security: passwordless.
Legacy Authentication
However, it’s not enough to enable MFA for all administrators and users, the bad guys can still get in with no MFA prompt in sight. The reason is that Office 365 still supports legacy protocols that don’t support modern authentication / MFA. You need to disable these; you can’t just turn them off, you need to check if there are legitimate applications / workflows / scripts that use any of them. Go to aad.portal.azure.com, login as a Global Administrator, click Azure Active Directory – Monitoring – Sign-in logs. Change the time to last one month, and click Add filters, then click Client app and then None Selected, in the drop-down pick all 13 checkboxes under Legacy Authentication Clients and click Apply.
Filtering Azure AD Sign-in logs for legacy authentication
This will show you all the logins over the last month that used any of the legacy protocols. If you get a lot of results, add a filter for Status and add Success to filter out password stuffing attacks that failed. Make sure you check the four different tabs for interactive / non-interactive, service principals and managed identity sign-ins.
You’ll now need to investigate the logins. In my experience there will be some users who are using Android / Apple mail on smartphones; point them to the free Outlook app instead (Apple mail can be configured to use modern authentication). There’s also likely to be line-of-business (LOB) applications and printers / scanners that send emails via Office 365, so you’ll need updates for these. Alternatively, you can use another email service for these such as smtp2go.
Once you have eliminated all legitimate legacy authentication protocol usage you can disable it in two ways, it’s best to use both. Start by creating a Conditional Access policy based on the new template to block it, also go to admin.microsoft.com, Settings – Org settings – Services – Modern authentication and turn off basic authentication protocols.
Disable legacy authentication protocols in the M365 Admin Center
Break Glass accounts
Create at least one, preferably two break glass accounts, also known as emergency access accounts. These accounts are exempted from MFA, all CA policies and PIM (see below) and have very long (40 characters+), complex passwords. They’re only used if AAD MFA is down, for example, to gain access to your tenant to temporarily disable MFA or a similar setting, depending on the outage.
A second part to this is that you want to be notified if these accounts are ever used. One way to do this is to send your Azure AD sign-in logs to Azure Monitor (also known as Log Analytics), with instructions here. Another option is to use Microsoft Sentinel (which is built on top of Log Analytics) and create an Analytics rule.
Microsoft Sentinel alert rule when a Break Glass account is used
Security Defaults
If yours is a very small business, with few requirements for flexibility, the easiest way to set up Azure AD with MFA for everyone, plus several other security features enabled, is to turn on Security Defaults. Note that you can’t have break-glass accounts or other service accounts with Security Defaults as there’s no way to configure exceptions. Go to Properties for your Azure AD tenant and scroll to the bottom, and click on Manage Security defaults, here you can enable and disable it.
Privileged Identity Management
It’s worth investing in Azure Active Directory (AAD) Premium P2 for your administrator’s accounts and enabling Privileged Identity Management (PIM). This means their accounts are ordinary user accounts who are eligible to elevate their privileges to whatever administrator type they are assigned (see Chapter 10).
If you’re not using PIM, create dedicated admin accounts in AAD only. Don’t sync these accounts from on-premises but enforce MFA and strong passwords. Since they won’t be used for day-to-day work, they won’t require an M365 license.
Password Protection
After MFA, your second most important step is banning bad passwords. You’re probably aware that we’ve trained users to come up with bad passwords over the last few decades with “standard” policies (at least 8 characters, uppercase, lowercase, special character and numbers) which results in P@ssw0rd1 and when they’re forced to change it every 30 days, P@ssw0rd2. Both NIST in the US and GHCQ in the UK now recommends allowing (but not enforcing) the use of upper / lowercase etc., but not mandating frequent password changes and instead of checking the password at the time of creation against a list of known, common bad passwords and blocking those. In Microsoft’s world that’s called Password protection which is enabled for cloud accounts by default. There’s a global list of about 2000 passwords (and their variants) that Microsoft maintains, based on passwords they find in dumps, and you should add (up to 1000) company-specific words (brands, locations, C-suite people’s names, local sports teams, etc.) for your organization.
You find Password protection in the AAD portal – Security – Authentication Methods.
Password protection settings
Remember, you don’t have to add common passwords to the list, they’re already managed by Microsoft, just add company / region specific words that your staff are likely to use.
If you’re syncing accounts from Active Directory on-premises to AAD, you should also extend Password protection to your DCs. It involves the installation of an agent on each DC, a proxy agent, and a reboot of each DC.
Continuous Access Evaluation
This feature has been in preview for quite some time but is now in general availability. Before Continuous Access Evaluation (CAE), when you disabled a user’s account, or they changed location (from the office to a public Wi-Fi for example) it could be up to one hour before their state was re-evaluated and new policies applied, or they were blocked from accessing services. With CAE, this time is much shorter, in most cases in the order of a few minutes. It’s turned on by default for all tenants (unless you were part of the preview and intentionally disabled it). Another benefit of CAE is that tokens are now valid for 28 hours, letting people keep working during a shorter Azure AD outage. You can disable CAE in a CA policy, but it’s not recommended.
Conditional Access policies
We’ve mentioned Conditional Access (CA) policies several times already as it’s a crucial component of strong identity security and Zero Trust. Unlike other recommendations, there isn’t a one size fit all set of CA policies we can give you, however (at a minimum) you should have policies for:
Require MFA for admins (see MFA above)
Require MFA for users (see MFA above)
Require MFA for Azure management
Block legacy authentication (see MFA above)
Require compliant or Hybrid AAD joined device for admins
Require compliant or Hybrid AAD joined device for users
Block access to M365 from outside your country
Require MFA for risky sign-ins (if you have AAD Premium P2)
Require password change for high-risk users (if you have AAD Premium P2)
This is all going to be a lot easier going forward with the new policy templates for identity and devices. Go to Azure AD – Security – Conditional Access – New policy – Create a new policy from templates. Another step to take is to create a system for managing the lifecycle of policies and there’s an API for backing up and updating policies, that you can access in several ways, including PowerShell. There’s even a tutorial to set up a backup system using a Logic App.
Conditional Access policy templates for identity
A common question is if there’s a priority when policies are evaluated and there isn’t, they’re all processed together for a particular sign-in, from a specific device and location to an individual application. If there are multiple policies with different controls (MFA + compliant device), all controls must be fulfilled for access. And if there are conflicting policies with different access (block vs grant), block access will win.
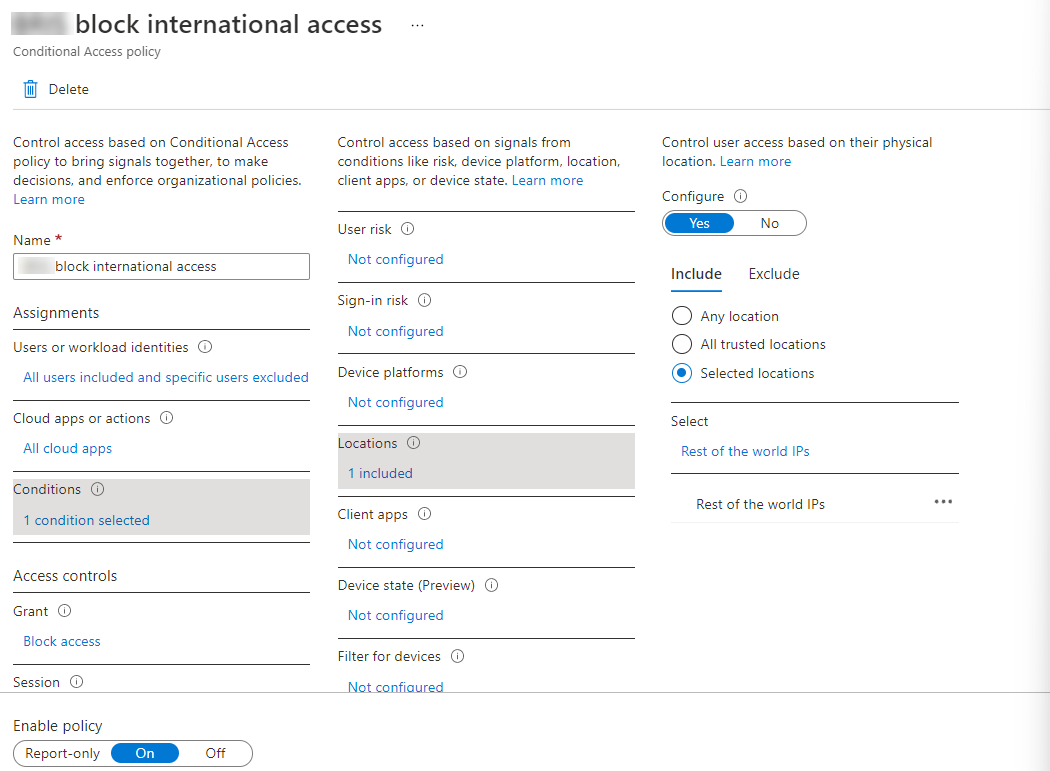
To get you started, here are the step-by-step instructions for a policy blocking access to M365 from outside your country, appropriate for most small and medium businesses that only operate in one or a few countries. Keep in mind that travelling staff may be caught out by this so make sure you align with business objectives and be aware that this won’t stop every attack as a VPN or TOR exit node can make it appear as if the attacker is in your country, but it’s one extra step they must take. Remember, you don’t have to run faster than the Fancy Bear, just faster than other companies around you.
Start by going to Azure AD – Security – Conditional Access – Named locations and click +Countries location and call the location Blocked countries. Leave Determine location by IP address, a new feature is using GPS location from the Microsoft Authenticator app which will be more accurate once all your users are using Azure AD MFA (and therefore can be located via GPS). Click the box next to Name to select all countries, then find the one(s) that you need to allow login from and click Create.
Creating a Named Location for a Conditional Access Policy
Go to Azure AD – Security – Conditional Access – New policy – Create new policy and name your policy with a name that clearly defines what the policy does and adheres to your naming standard. Click on All Users… and Include All users and Exclude your Break Glass accounts.
Click on No cloud apps… and select All cloud apps. Select 0 conditions… and click Not configured under Locations. Pick Selected locations under Include and select your newly created location. Finally, under Access controls – Grant, click 0 controls selected and then Block access.
CA policies can be either in Report-only mode where you can look at reports of what they would have blocked and control they would have enforced, or they can be turned on / off. Report-only can be handy to make sure you don’t get fired for accidentally locking everyone out but turn this policy on as soon as possible.
Conditional Access policy to block logins from outside Australia
A common question is, how can I control how often users are prompted for MFA or signing in again? While it might be counterintuitive, the default in Azure AD is a rolling windows of 90 days. Remember, if you change a user’s password, block non-compliant devices, or disable an account (plus any number of other CA policies you have in place that might affect the security posture of the session), it’ll automatically require new authentications. Don’t prompt the users for authentication when nothing has changed because if you do it too frequently, they’re more likely to approve a malicious login.
Branding Log-on Pages
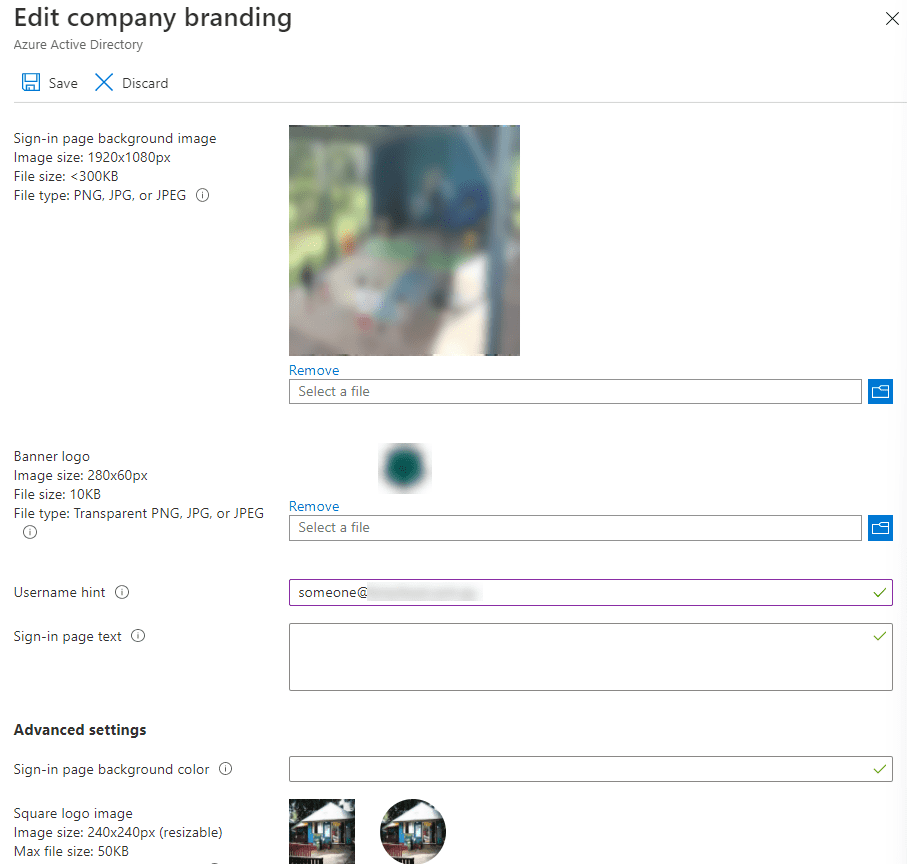
While in the Azure AD portal, click on Company branding and add a company-specific Sign-in page background image (1920x1080px) and a Banner logo (280x60px). Note that these files have to be small (300 KB and 10 KB respectively) so you may have to do some fancy compression. This isn’t just a way to make users feel at home when they see a login page, in most cases when attackers send phishing emails to harvest credentials, they’ll send users to a fake login page that looks like the generic Office 365 one, not your custom one which is another clue that should alert your users to the danger. Also – Windows Autopilot doesn’t work unless you have customized AAD branding.
Edit Azure AD Company Branding images
Self Service Password Reset
The benefit of Self Service Password Reset (SSPR) is to lower the load on your help desk to manage password resets for users. Once enabled, users must register various ways of being identified when they’re resetting their password, mobile app notification/code, email (non-Office 365), mobile/office phone call, security questions (not available to administrators, plus you can create custom questions). If you are synchronizing user accounts from AD to Azure AD, take care in setting up SSPR as the passwords must be written back to AD from the cloud once changed.
Configuring Self Service Password Reset in Azure AD
Unified Auditing
Not restricted to security but nevertheless, a fundamental building block is auditing across Microsoft 365. Go to the Microsoft 365 Defender portal and find Audit in the left-hand menu (it’s almost at the end). If for some reason unified auditing isn’t enabled in your tenant a yellow banner will give you a button to turn it on (it’s on by default for new tenants). Once enabled, click the Audit retention policies tab, and create a policy for your tenant. You want to ensure that you have logs to investigate if there’s a breach and you want them kept for as long as possible.
With Business Premium you get a maximum of 90 days of retention and Microsoft 365 E5 gives you one year, but you want to make sure to create a policy to set this, rather than rely on the default policy (which you can’t see). Give the policy a name, a description and add all the record types, one by one. This policy will now apply to all users (including new ones that are created) for all activities. Only use the Users option when you want to have a specific policy for a particular user. Give the policy a priority, 1 is the highest and 10,000 is the lowest.
Create an audit retention policy for maximum retention
Integrating applications into Azure AD
One of the most powerful but often overlooked features (at least in SMBs) is the ability to use Azure AD to publish applications to your users. Users can go to myapps.microsoft.com (or office.com) and see tiles for all applications they have access to. But there’s more to that story. Say, for example, you have a shared, corporate Twitter account that a few executives and marketing staff should have access to. Instead of sharing a password amongst them all and having to remember to reset it if someone leaves the organization, you can create a security group in AAD, add the relevant users, link Twitter to the group and they’ll automatically have access – without knowing the password to the account. There are a lot more actions you can take here to simplify access and secure management of applications, here’s more information.
Azure AD Connect
If you’re synchronizing accounts from Active Directory to Azure Active Directory (AAD), check the configuration of AAD Connect and make sure you’re not replicating an entire domain or forest to AAD. There’s no reason that service accounts etc. should be exposed in both directories, start the AAD Connect wizard on the server where it’s installed and double-check that only relevant OUs are synchronized. One other thing to note here is the fact that any machine running Azure AD Connect should be treated with the same care (in terms of security) as a domain controller. This is because AAD Connect requires the same level of access as AD itself and has the ability to read password hashes. Making sure security best practices for access, patching, etc. are followed to the letter for the system running AAD connect is critically important.
The M365 Identity Checklist
Work through the Identity checklist.
Enable MFA for administrators
Enable MFA for users
Create cloud-only administrator accounts for privileged users / occasional administrators
Disable app passwords
(Configure trusted IPs)
Disable text message MFA
Disable phone call MFA
Remember MFA trusted devices 90 days
Train staff in using MFA correctly
Use Windows Hello where possible
Use FIDO2 / 2FA keys where possible
Investigate legacy authentication protocol usage in AAD Sign-in logs
Block legacy authentication with CA Policy
Block legacy authentication in M365 Admin Center
Create two Break glass accounts and exempt from MFA, CA Policies etc.
Configure alerting if a Break glass account is used
Enable Security Defaults in AAD (consider the limitations)
Enable PIM (AAD Premium P2) for all admin users
Add organization-specific words to Password protection
Deploy Password protection in AD on-premises
CA Policy Require MFA for admins
CA Policy Require MFA for users
CA Policy Require MFA for Azure management
CA Policy Block legacy authentication
CA Policy Require compliant or Hybrid AAD joined device for admins
CA Policy Require compliant or Hybrid AAD joined device for users
CA Policy Block access to M365 from outside your country
Require MFA for risky sign-ins [Only for E5)
Require password change for high-risk users [Only for E5)
Create custom branding logos and text in Azure AD
Enable and configure Self Service Password Reset, including password writeback
Go Further than Identity to Protect your M365 Tenant
There you have it, all the most important steps to take to make sure your users’ identities are kept secure, and therefore your tenant and its data also safeguarded. Keen to learn and do more?
The Microsoft 365 Security Checklist has another nine chapters of security recommendations each with its own checklist for:
Exactly how vulnerable is VMware infrastructure to Ransomware?
Historically and like most malware, ransomware has been targeting Windows operating systems primarily. However, cases of Linux and MacOS being infected are being seen as well. Attackers are being more proficient and keep evolving in their attacks by targeting critical infrastructure components leading to ransomware attacks on VMware ESXi. In this article, you’ll learn how Ransomware targets VMware infrastructure and what you can do to protect yourself.
What is Ransomware?
Ransomware are malicious programs that work by taking the user’s data hostage in exchange for a hefty ransom.
There are essentially 2 types of Ransomware (arguably 3):
Crypto Ransomware: Encrypts files so that the user cannot access them. This is the one we are dealing with in this blog.
Locker Ransomware: Lock the user out of his computer by encrypting system files.
Scareware: Arguably a third type of ransomware that is actually a fake as it only locks the screen by displaying the ransom page. Scanning the system with an Antivirus LiveCD will get rid of it quite easily.
A user computer on the corporate network is usually infected through infected USB drives or social engineering techniques such as phishing emails and shady websites. Another occurrence includes attacking a remote access server publicly exposed through brute-force attacks.
The malware then uses a public key to encrypt the victim’s data, which can span to mapped network drives as well. After which the victim is asked to make a payment to the attacker using bitcoin or some other cryptocurrency in exchange for the private key to unlock the data, hence the term Ransomware. If the victim doesn’t pay in time, the data will be lost forever.
As you can imagine, authorities advise against paying the ransom as there is no guaranty the bad actor will deliver on his end of the deal so you may end up paying the big bucks and not recover your data at all.
Can Ransomware affect VMware?
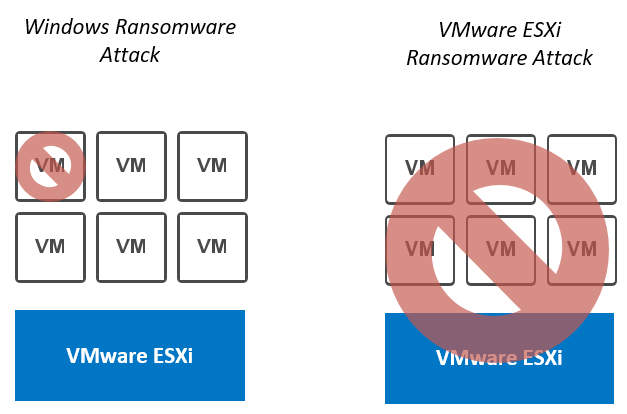
While infecting a Windows computer may yield a reward if the attacker gets lucky, chances are the OS will simply be reinstalled, no ransom is paid and the company will start tightening security measures. Game over for the bad guys.
Rather than burning bridges by locking a user’s workstation, they now try to make a lateral move from the infected workstation and target critical infrastructure components such as VMware ESXi. That way they hit a whole group of servers at once.
“VMware ESXi ransomware impact all the VMs running on the hypervisor”
From the standpoint of an attacker, infesting a vSphere host, or any hypervisor for that matter, is an “N birds, 1 stone” type of gig. Instead of impacting one workstation or one server, all the virtual machines running on the host become unavailable. Such an attack will wreak havoc in any enterprise environment!
How does a Ransomware Attack Work?
In the case of targeted attacks, the bad actor works to gain remote access to a box in the local network (LAN), usually a user computer, and then make a lateral move to access the management subnet and hit critical infrastructure components such as VMware ESXi.
There are several ways a ransomware attack on VMware ESXi can happen but reports have described the following process.
“The ransomware attack on VMware ESXi described in this blog is broken down into 5 stages”
Stage 1: Access local network
Gaining access to the LAN usually goes either of 2 ways:
A malware is downloaded in a phishing email or from a website. It can also come from an infected USB stick.
The attacker performs a Brute force attack against a remote access server exposed to the internet. This seems more unusual as it involves more resources and knowledge of the target. Brute force attacks are also often caught by DDoS protection mechanisms.
“Ransomware spread through malicious email attachments, websites, USB sticks”
Stage 2: Escalate privileges
Once the attacker has remote access to a machine on the local network, be it a workstation or a remote desktop server, he will try to escalate privileges to open doors for himself.
Several reports mentioned attackers leveraging CVE-2020-1472 which is a vulnerability in how the Netlogon secure channel connections are done. The attacker would use the Netlogon Remote Protocol (MS-NRPC) to connect to a domain controller and gain domain administrator access.
Stage 3: Access management network
Once the bad actors have domain administrator privileges, they can already deal a large amount of damage to the company. In the case of a ransomware attack on VMware ESXi, they will use it to gain access to machines on the management network, in which the vCenter servers and vSphere ESXi servers live.
Note that they might even skip this step if the company made the mistake to give user workstations access to the management network.
Stage 4: VMware ESXi vulnerabilities
When the attackers are in the management network, you can only hope that all the components in your infrastructure have the latest security patches installed and strong password policies. At this point, they are the last line of defense, unless a zero-day vulnerability is being leveraged in which case there isn’t much you can do about it.
Several remote code execution vulnerabilities have been exploited over the last year or so against VMware ESXi servers and vCenter servers.
The two critical vulnerabilities that give attackers access to vSphere hosts relate to the Service Location Protocol (SLP) used by vSphere to discover devices on the same network. By sending malicious SLP commands, the attacker can execute remote code on the host.
CVE-2019-5544: Heap overwrite issue in the OpenSLP protocol in VMware ESXi.
CVE-2020-3992: Use-after-free issue in the OpenSLP protocol in VMware ESXi.
CVE-2021-21985: Although no attack mentions it, we can assume the vCenter Plug-in vulnerability discovered in early 2021 can be a vector of attack as well. Accessing vSphere hosts is fairly easy once the vCenter is compromised.
They can then enable SSH to obtain interactive access and sometimes even change the root password or SSH keys of the hosts.
Note that the attacker may not even need to go through all that trouble if he manages to somehow recover valid vCenter of vSphere credentials. For instance, if they are stored in the web browser or retrieved from the memory of the infected workstation.
Stage 5: Encrypt datastore and request ransom
Now that the attacker has access to the VMware ESXi server, he will go through the following steps to lock your environment for good.
Uninstall Fault Domain Manager or fdm (HA agent) used to reboot VMs in case of failure.
Shut down all the virtual machines.
Encrypt all virtual machine files using an ELF executable, derived from an encrypting script that targets Linux machines. This file is usually named svc-new and stored in /tmp.
Write a ransom file to the datastore for the administrator to find.
Note that there are variations of the ransomware attack on VMware ESXi, which themselves are ever-evolving. Meaning the steps described above represent one way things can happen but your mileage may very well vary.
How to protect yourself from ransomware attacks on VMware ESXi
If you look online for testimonies, you will find that the breach never comes from a hooded IT mastermind in an ill-lit room that goes through your firewalls by frantically typing on his keyboard like in the movies.
The reality is nowhere near as exciting. 9 times out of 10, it will be an infected attachment in a phishing email or a file downloaded on a shady website. This is most often the doing of a distracted user that didn’t check the link and executed the payload without thinking twice.
Ensure at least the following general guidelines are being enforced in your environment to establish a first solid line of defense:
VMware environment-related recommendations
If you need to open internet access on your vCenter, enforce strong edge firewall rules and proxy access to specific domains. Do not expose vCenter on the internet!!! (Yes, it’s been done).
Set VMware ESXi shell and SSH to manual start and stop.
Don’t use the same password on all the hosts and out-of-band cards.
Some recommend not to add Active Directory as an Identity Source in vCenter Server. While this certainly removes a vector of attack, configuring Multi-Factor Authentication also mitigates this risk.
Industry standards
Educate your users and administrators through educational campaigns.
Ensure the latest security patches are installed as soon as possible on all infrastructure components as well as backups servers, workstations…
Segregate the management subnets from other subnets.
Connect to the management network through a jump server. It is critical that the jump server must:
Be secured and up to date
Accessible only through Multifactor authentication (MFA)
Must only allow a specific IP range.
Restrict network access to critical resources only to trained administrators.
Ensure AD is secured and users/admins are educated on phishing attacks.
Apply least privilege policy.
Use dedicated and named accounts.
Enforce strong password policies.
Segregate Admin and Domain admin accounts on AD.
Log out users on inactivity on Remote Desktop Servers.
Don’t save your infrastructure password in the browser.
Use Multi-Factor Authentication (MFA) where possible, at least on admin accounts.
Forward infrastructure logs to a Syslog server for trail auditing.
Ensure all the workstations and servers have a solid antivirus with regularly updated definitions.
Where do backups fit in all this?
While there are decryption tools out there, they will not always work. In fact, they almost never will.
Restoring from backup is essentially the only way known to date that you can use to recover from a ransomware attack on VMware ESXi. You can use Altaro VM Backup to ensure your environment is protected.
Because attackers know this well, they will try to take down the backup infrastructure and erase all the files so your only option left is to pay the ransom. Which, as mentioned previously, is no guaranty that you get your files back.
Because of it, it is paramount to ensure your backup infrastructure is protected and secure by following best practices:
Avoid Active Directory Domain integration or use multi-factor authentication (MFA).
Do not use the same credentials for access to the VMware and Backup infrastructures.
NIST controls for data integrity (National Institute of Standards and Technology)
VMware documents solutions for combatting ransomware by incorporating the National Institute of Standards and Technology (NIST) controls specific to data integrity. You can find VMware’s recommendations and implementation of the NIST in this dedicated document:
“National Institute of Standards and Technology logo”
The NIST framework is broken down into 5 functions:
In the VMware document linked above, you will find Detect, Protect and Respond recommendations that apply to various environments such as private cloud, hybrid cloud or end-user endpoints.
So How Worried Should I be?
Ransomware have always been one of the scary malware as they can deal a great amount of damage to a company, up to the point of causing some of them to go into bankruptcy. However, let us not get overwhelmed by these thoughts as you are not powerless against them. It is always best to act than to react.
In fact, there is no reason for your organization to get hit by a ransomware as long as you follow all the security best practices and you don’t cut corners. It might be tempting at some point to add an ALLOW ALL/ALL firewall rule to test something, give a user or service account full admin rights, patch a server into an extra VLAN or whatever action you know for a fact would increase your security officer’s blood pressure. In such a case, even if there is a 99.9% chance things are fine, think of the consequences it could have on the company as a whole should you hit that 0.1% lurking in the back.
If you are reading this and you have any doubts regarding the security of your infrastructure, run a full audit of what is currently in place and draw a plan to bring it into compliance with the current industry best practices as soon as possible. In any case, patch your systems as soon as possible, especially if you are behind!
The Internet of Things (IoT) is here, and we’re using it for everything from getting instant answers to random trivia questions to screening visitors at the door. According to Gartner, we were expected to use more than 25 billion internet-connected devices by the end of 2021. But as our digital lives have become more convenient, we might not yet have considered the risks involved with using IoT devices.
How can you keep yourself secure in today’s IoT world, where hackers aim to outsmart your smart home? First we’ll look at how hackers infiltrate the IoT, and then we’ll look at what you can do right now to make sure the IoT is working for you – not against you.
How hackers are infiltrating the Internet of Things
While we’ve become comfortable asking voice assistants to give us the weather forecast while we prep our dinners, hackers have been figuring out how to commandeer our IoT devices for cyber attacks. Here are just a few examples of how cyber criminals are already infiltrating the IoT.
Gaining access to and control of your camera
Have you ever seen someone with a sticker covering the camera on their laptop or smartphone? There’s a reason for that. Hackers have been known to gain access to these cameras and spy on people. This has become an even more serious problem in recent years, as people have been relying on videoconferencing to safely connect with friends and family, participate in virtual learning, and attend telehealth appointments during the pandemic. Cameras now often come with an indicator light that lets you know whether they’re being used. It’s a helpful protective measure, but not a failsafe one.
Using voice assistants to obtain sensitive information
According to Statista, 132 million Americans used a digital voice assistant once a month in 2021. Like any IoT gadget, however, they can be vulnerable to attack. According to Ars Technica, academic researchers have discovered that the Amazon Echo can be forced to take commands from itself, which opens the door to major mischief in a smart home. Once an attacker has compromised an Echo, they can use it to unlock doors, make phone calls and unauthorized purchases, and control any smart home appliances that the Echo manages.
Many bad actors prefer the quiet approach, however, slipping in undetected and stealing information. They can piggyback on a voice assistant’s privileged access to a victim’s online accounts or other IoT gadgets and make off with any sensitive information they desire. With the victim being none the wiser, the attackers can use that information to commit identity fraud or stage even more ambitious cyber crimes.
Hacking your network and launching a ransomware attack
Any device that is connected to the internet, whether it’s a smart security system or even a smart fridge, can be used in a cyber attack. Bad actors know that most people aren’t keeping their IoT gadgets’ software up to date in the same way they do their computers and smartphones, so they take advantage of that false sense of security. Once cyber criminals have gained access to an IoT device, they can go after other devices on the same network. (This is because most home networks are designed to trust devices that are already connected to them.) When these malicious actors are ready, they can launch a ransomware attack that brings your entire digital life to a halt – unless you agree to fork over a hefty sum in bitcoin, that is.
Using bots to launch a DDOS attack
Although most people never notice it, hackers can and do infect IoT devices with malware en masse, gaining control over them in the process. Having turned these zombie IoT devices into bots, the hackers then collectively use them to stage what’s called a botnet attack on their target of choice. This form of assault is especially popular for launching distributed denial of service (DDOS) attacks, in which all the bots in a botnet collectively flood a target with network requests until it buckles and goes offline.
How you can keep your Internet of Things gadgets safe from hackers
So how can you protect your IoT devices from these determined hackers? Fortunately, you can take back control by becoming just a little more cyber smart. Here are a few ways to keep your IoT gadgets safe from hackers:
Never use the default settings on your IoT devices. Although IoT devices are designed to be plug-and-play so you can start enjoying them right away, their default settings are often not nearly as secure as they should be. With that in mind, set up a unique username and strong password combination before you start using any new IoT technology. While you’re at it, see if there’s an option to encrypt the traffic to and from your IoT device. If there is, turn it on.
Keep your IoT software up to date. Chances are, you regularly install the latest software updates on your computer and phone. Hackers are counting on you to leave your IoT gadgets unpatched, running outdated software with vulnerabilities they can exploit, so be sure to keep the software on your IoT devices up to date as well.
Practice good password hygiene. We all slip into bad password habits from time to time – it’s only human – but they put our IoT security at risk. With this in mind, avoid re-using passwords and be sure to set unique, strong passwords on each of your IoT devices. Update those passwords from time to time, too. Don’t store your passwords in a browser, and don’t share them via email. A password manager can help you securely store and share your passwords, so hackers never have a chance to snatch them.
Use secure, password-protected WiFi. Cyber criminals are notorious for sneaking onto open, insecure WiFi networks. Once they’re connected, they can spy on any internet activity that happens over those networks, steal login credentials, and launch cyber attacks if they feel like it. For this reason, make sure that you and your IoT devices only use secure, password-protected WiFi.
Use multi-factor authentication as an extra layer of protection. Multi-factor authentication (MFA), gives you extra security on top of all the other measures we mentioned above. It asks you to provide one more credential, or factor, in addition to a password to confirm you are who you say you are. If you have MFA enabled and a hacker tries to log in as you, you’ll get a notification that a login attempt is in progress. Whenever you have the option to enable MFA on any account or technology, take advantage of it.
Protect your Internet of Things devices with smart password security
The IoT is making our lives incredibly convenient, but that convenience can be a little too seductive at times. It’s easy to forget that smart home devices, harmless-looking and helpful as they are, can be targeted in cyber attacks just like our computers and phones. Hackers are counting on you to leave your IoT gadgets unprotected so they can use them to launch damaging attacks. By following these smart IoT security tips, you can have the best of both worlds, enjoying your smart life and better peace of mind at the same time.
Learn how LastPass Premium helps you strengthen your password security.
QR codes link the offline to the online. What started as a way to streamline manufacturing in the automotive industry is now a widespread technology helping connect the physical world to digital content. And as the world embraced remote, no-touch solutions during the Covid pandemic, QR codes became especially popular. QR codes offer convenience and immediacy for businesses and consumers, but cybercriminals also take advantage of them. Here’s what you need to know about QR codes and how to stay safe when using them.
Why QR codes?
Due to their size and structure, the two-dimensional black and white barcodes we call QR codes are very versatile. And since most people carry a smartphone everywhere, they can quickly scan QR codes with their phone’s camera. Moreover, since QR codes are relatively easy to program and accessible for most smartphone users, they can be an effective communication tool.
They also have many uses. For example, QR codes may link to a webpage, start an app or file download, share contact information, initiate a payment, and more. Covid forced businesses to be creative with touchless experiences, and QR codes provide a convenient way to transform a physical touchpoint into a digital interaction. During Covid, QR codes became a popular way to look at restaurant menus, communicate Covid policies, check in for an appointment, and view marketing promotions, among other scenarios.
As a communication tool, QR codes can transmit a lot of information from one person to another, making it easy for someone to take action online and interact further with digital content.
What hackers do with QR codes
QR codes are inherently secure, and no personally identifiable information (PII) is transmitted while you’re scanning them. However, the tricky part about QR codes is that you don’t know what information they contain until you scan them. So just looking at the QR code won’t tell you if it’s entirely trustworthy or not.
For example, cybercriminals may try to replace or sticker over a QR code in a high-traffic, public place. Doing so can trick people into scanning a malicious QR code. Or, hackers might send malicious QR codes digitally by email, text, or social media. The QR code scam might target a specific individual, or cybercriminals may design it to attract as many scans as possible from a large number of people.
Once scanned, a malicious QR code may take you to a phishing website, lead you to install malware on your device, redirect a payment to the wrong account, or otherwise compromise the security of your private information.
In the same way that cybercriminals try to get victims to click phishing links in email or social media, they lure people into scanning a QR code. These bad actors may be after account credentials, financial information, PII, or even company information. With that information, they can steal your identity or money or even break into your employer’s network for more valuable information (in other words, causing a data breach).
Pay attention to context. Where is the code available? What does the code claim to do (e.g., will it send you to a landing page)? Is there someone you can ask to confirm the purpose of the QR code? Did someone send it unprompted? Is it from a business or individual you’ve never heard of? Just like with phishing links, throw it out when in doubt.
Look closely at the code. Some codes may have specific colors or branding to indicate the code’s purpose and destination. Many codes are generic black and white designs, but sometimes there are clues about who made the code.
Check the link before you click. If you scan the QR code and a link appears, double-check it before clicking. Is it a website URL you were expecting? Is it a shortened link that masks the full URL? Is the webpage secure (HTTPS)? Do you see signs of a phishing attack (branding is slightly off, strange URL, misspelled words, etc.)? If it autogenerates an email or text message, who is the recipient and what information is it sending them? If it’s a payment form, who is receiving the payment? Read carefully before taking action.
Practice password security. Passwords and account logins remain one of the top targets of cyber attacks. Stolen credentials give cybercriminals access to valuable personal and financial information. Generate every password for every account with a random password generator, ideally built into a password manager for secure storage and autofill. Following password best practices ensures one stolen password results in minimal damage.
Layer with MFA. Adding multi-factor authentication to logins further protects against phishing attacks that steal passwords. With MFA in place, a hacker still can’t access an account after using a stolen password. By requiring additional login data, MFA can prevent cybercriminals from gaining access to personal or business accounts.
QR codes remain a popular marketing and communication tool. They’re convenient and accessible, so you can expect to encounter them occasionally. Though cyber attacks via QR codes are less common, you should still stay vigilant for signs of phishing and social engineering via QR codes. To prevent and mitigate attacks via QR codes, start by building a solid foundation of digital security with a trusted password manager.
“Luck favors the prepared,” as the saying goes. The maxim is true in cyber security, too. We all know about data breaches. We know they’re alarmingly common; more common than ever, if you can believe it. We know they can be costly, time-consuming, and disruptive. And yet, what do we know of mentally and emotionally preparing for an attack to happen to us?
A cyber attack can have a tremendous negative psychological impact, the effects of which victims can feel for weeks and months. Understanding the emotions you might feel during and after an attack can help you better prepare for and handle a cyber attack if/when it happens to you. Here’s what you need to know about the potential psychological impact of cyber attacks and what to do in advance so you can deal with one calmly and rationally.
During a cyber attack
Cyber attacks can happen suddenly. For example, you might get a random text or email about new account activity or a changed password. A service might inform you of a money transfer you didn’t approve, a purchase you didn’t make, or an account change you weren’t expecting. Or the next time you try to log in to an account, you find yourself locked out. Or your data is suddenly gone and held hostage by a cyber-criminal demanding a ransom. Or you just hung up the phone with someone who claimed to be tech support, and now you’re watching someone else control your computer without your consent.
No matter how it happens, panic often sets in once you find yourself suffering a cyber attack. It’s common to feel intense fear; fear for what will happen to your money and your personal information and the unknown impact the attack will have on your life. You might panic about what to do, how to regain control, and how to get help. You might feel violated, like someone has invaded your personal space and upended your sense of safety. In some ways, a cyber attack can feel like the digital equivalent of being robbed, with a corresponding wave of anxiety and dread.
Anxiety, panic, fear, and frustration – even intense anger – are common emotional responses when experiencing a cyber attack. While expected, these emotions can paralyze you and prolong or worsen a cyber attack. The combination of not knowing what to do and being paralyzed with fear can keep you from taking quick, effective action against a cyber attack. Preparing in advance can help you move through these intense emotions and respond productively.
During an attack, your focus should be on regaining control of the situation. Do you still have access to the account/device under attack? Immediately change passwords, remove unauthorized locations, notify customer service, check all security settings and do everything you can to lock out access to any third parties while beefing up security (including enabling two-factor authentication). On a trusted device (e.g., not a compromised device), change passwords for other high-value accounts like email, banking/financial, and social media. A password manager can help you change passwords quickly to new, random ones. You need to act fast while staying focused on the actions most likely to stop or at least slow down an attack.
Immediately after an attack
At some point, the attack will be over. Either you shut down the attack or the attackers “win,” and you find yourself dealing with the aftermath. Regardless, the emotional and mental impact may continue. A cyber attack can leave you with tough questions despite the initial relief when the immediate threat is over.
Self-pity and rumination are typical responses in the immediate wake of an attack. Why me? Did I draw their attention? Did I make a mistake? Why was my data/money/account/device worth stealing? Could I have done something different to prevent it? What if I had done x or y? Are they going to strike again? And on and on. You might find yourself overthinking and overanalyzing everything leading up to the attack. You might obsess over your actions during the attack and criticize yourself excessively for what you did or didn’t do.
Again, all of the above are understandable responses to a cyber attack. But these negative emotions can drag you down. If you’re mentally stuck, you’ll struggle to clean up after the attack and prepare for future incidents.
After an attack, your focus should be on analyzing how the attack happened and closing those “gaps” in your cyber security. Scan your devices for malware and change passwords. Turn on two-factor authentication, remove unknown and unused apps/browser extensions/software/files, and review the security settings for important accounts like email and financials. If the cybercriminals stole money, you’d need to follow any options for recourse against theft. You might also need to cancel a card, close an account, or freeze your credit to prevent further abuse. In sum, your goal immediately after an attack is over should be to identify weaknesses in your online security and eliminate or minimize them to prevent further problems.
Long-term impact
Unfortunately, negative emotions can persist weeks and months after a cyber attack, especially when the attack results in the theft of data, money, or other personal property. You’ll likely feel embarrassed about what happened, maybe even ashamed. You may worry about what others think if they find out the details. Sometimes, workplace security mistakes can lead to loss of employment, which can devastate one’s mental and physical wellbeing.
Avoidance is common, too; if you feel uncomfortable thinking about the cyber attack, you might use your discomfort as an excuse to avoid improving your cyber security. Ignoring your feelings, though, can keep you from processing what happened and doing what you must to ensure it doesn’t happen again.
Will it happen again? Apprehension is understandable in the wake of a cyber attack. You’ve been through a roller coaster of emotions, and the attack has forever shattered your sense of digital safety. Anxiety and worry about future attacks are normal but use those feelings as motivation to improve your cyber security strategy. There is never a “done” when it comes to cyber security. Hackers are constantly evolving their methods, and your cyber security strategy needs to keep up.
How to minimize psychological distress
Whether or not you’ve been the victim of a cyber attack, there are things you can do to stop or minimize future attacks. Building a solid foundation of cyber security requires doing the basics well. It’s not hard, but it takes a little time and commitment to improving your digital practices. The good news is that once you make these changes, you’ll find they can improve your online experience and help you feel better prepared for cyber attacks.
Prioritize good password hygiene. Weak, reused, guessable passwords contribute to account takeovers and online theft. Replace passwords with generated ones that are genuinely random and strong enough to withstand cracking. Enable two-factor authentication wherever it’s available; some two-factor apps make it easier to log in to an account.
Safeguard accounts with a password manager. A password manager stores credentials for your online accounts, enters your info when you need to log in, and ensures every password is unique and random. It simplifies strong password security and takes the hassle out of logging in.
Keep a clean machine. Don’t click random links. Don’t download strange attachments. Don’t install unverified apps and extensions. Don’t give strangers your login information, SSN, or other data. Don’t answer the phone for “tech support” – no tech support or police department or bank will ever call you to deal with a “security issue” or “software problem.”
Stay cyber aware. Watch for suspicious online account activity and take action at the first sign of something strange. Turn on account alerts to your phone or email. Enable dark web monitoring and follow up immediately on publicized data breaches. Know the signs of phishing and social engineering attacks, and scrutinize every text/email/phone call/social media message for signs of fraud.
Seek support and professional advice. You don’t have to suffer alone. Like other traumatic life events, a therapist or other qualified mental health professional can help you process after you’re the victim of cybercrime. When necessary, digital forensics and information security professionals can also help investigate and resolve a digital crime. Don’t hesitate to seek personal and professional support when needed.
Cybercriminals like to go after easy targets. Building a solid foundation with cyber security basics can prevent cyber attacks by making it too difficult or costly for criminals to go after your accounts. It can also buy you time to react immediately when an attack starts.
Cyber attacks can cause intense, paralyzing emotions. The more you educate yourself and prepare in advance, the more likely you are to work around those emotions during and after an attack. Don’t just assume you’ll deal with it and figure everything out in the moment. Do the work now to prepare so you’re not overwhelmed mentally by a cyber attack. Getting started with a password manager will help you build stronger, more effective online security habits. When you feel confident handling a cybersecurity incident, you’ll minimize the psychological impact of these scary events and more effectively navigate the challenges they can bring.
With its new SonicWave 641 and SonicWave 681 access points, SonicWall has combined the security and performance benefits of Wi-Fi 6 with our simplified management and industry-leading TCO.
Organizations are evolving — some more quickly, others more reluctantly. But over the past three years, the pace of change for everyone has accelerated to hyperspeed.
In early 2020, very few people could have foreseen the changes that were about to be unleashed on the world. And even fewer could have successfully predicted the long-term impact that COVID-19 would have on the way the world’s eight billion people live and work.
Prior to the pandemic, only about 2% of employees worked remotely. By May 2020, that number had risen to 70%, according to the Society for Human Resource Management. This pivot was possible because organizations were able to adjust their infrastructure to meet new working demands — and wireless technology played an important part in this solution.
The importance of wireless technology goes far beyond simply enabling employees to work remotely. According to a study, 87% of organizations believe that adopting advanced wireless capabilities can be a competitive advantage, because it allows them to innovate and increase agility. And 86% of networking executives believe advanced wireless will soon transform their organization.
But wireless technology impacts more than just how we work: It has changed the way we shop, watch movies, listen to music, navigate in our cars, or spend time with family and friends (some of whom may be a half a world away). And every one of us expects a good experience every single time we use wireless. That’s a tall order, especially given the sheer number of existing devices and the ever-growing amount of bandwidth being consumed.
The need for high-performing, secure wireless technology has never been greater — and Wi-Fi 6 is a massive next step toward this reality. SonicWall’s SonicWave 641 and SonicWave 681 access points provide the combination of performance and security that we all demand.
What is Wi-Fi 6?
Wi-Fi 6, also known as 802.11ax, is the successor to 802.11ac Wave 2, or Wi-Fi 5. While the primary goal of Wi-Fi 6 is to enhance throughput in complex environments, there are additional benefits:
OFDMA’s multi-user support can make Wi-Fi 6 access points more efficient than Wi-Fi 5’s single-user OFDM. This results in lower latency.
Wi-Fi 6 utilizes WPA3, which provides advanced security features to enable more robust authentication.
BSS coloring marks traffic on a shared frequency to determine if it can be used. The result is less interference and more consistent service in complex environments.
Target Wake Time (TWT) allows devices to determine how often to wake to send or receive data, improving battery life.
Wi-Fi 6’s multi-user, multiple input, multiple output (or MU-MIMO) supports multiple users within a single network environment. This allows multiple users to upload and download data at the same time, resulting in less wait time and faster network speed.
Some of these features are designed to improve performance, while some are designed to improve security. Any one of them can make a positive difference in an organization’s wireless network. Combined, however, the feature improvements provided by Wi-Fi 6 can create a significant wireless network advancement for any organization.
SonicWave 641 and SonicWave 681
SonicWall’s SonicWave 641 and SonicWave 681 are Wi-Fi 6 access points that deliver wireless performance and security that are superior to the 802.11ac standard.
But there are additional benefits available with the SonicWave 641 and SonicWave 681, such as SonicWall Capture Security Center, a scalable cloud security management system that helps you control assets and defend your entire network against cyberattacks.
SonicWave 600 series APs also integrate with Wireless Network Manager, an intuitive centralized network management system that leverages the cloud to make it easy to manage complex wireless and security environments with a single-pane-of-glass management portal.
WiFi Planner is a site-survey tool that allows you to optimally design and deploy a wireless network to get maximum coverage with the fewest number of APs, resulting in a lower TCO.
And the SonicExpress mobile app allows you to easily register and use the Wireless Network Manager to set up, manage and monitor SonicWall wireless appliances.
A strong wireless network is not a “nice to have” — it’s a necessity. What today’s organizations require is the high performance and security of the SonicWave 641 and SonicWave 681 access points.
To learn more about the SonicWave 641 and SonicWave 681 access points, as well as SonicWall’s entire wireless portfolio, visit www.sonicwall.com/wireless.
While you probably aren’t headed back to school this fall, that doesn’t mean it’s not a great time to hit the books.
August 9 is National Book Lovers Day. While there’s really no bad time for a good book, we know it’s often hard to find space in your schedule to stop and read. If this is you, we’ve put together ten compelling reasons to get back into the habit — including two that were released just this past year.
Women Know Cyber: 100 Fascinating Females Fighting Cybercrime Steve Morgan, 2019 Women are still underrepresented in cybersecurity, but their numbers — as well as their mark on the industry — is growing. This book outlines the contributions of 100 women from every corner of cybersecurity, including government digital forensics, corporate risk assessment, law and more, and argues that encouraging and recruiting women will be key to closing the cybersecurity skills gap.
American Kingpin: The Epic Hunt for the Criminal Mastermind Behind the Silk Road Nick Bilton, 2018 Detailing the saga of the notorious Dark Web destination for hacking tools, drugs, forged passports and more, “American Kingpin: The Epic Hunt for the Criminal Mastermind Behind the Silk Road” is endlessly compelling. It follows founder Ross Ulbricht on his journey from boy-next-door programmer, to head of a sprawling illegal empire, to fugitive and captive, and tracks the growth and legacy of the Silk Road.
The Wires of War: Technology and the Global Struggle for Power (Oct 12 2021) Jacob Helberg, October 2021 There’s a high-stakes global cyberwar brewing between Western democracies and authoritarian regimes — and the latter have a major advantage. Author Jacob Helberg headed efforts to combat misinformation and foreign influence at Google from 2016 to 2020, and “The Wires of War” draws upon this experience to expose the various means used to destabilize nations. In it, he explains why we’re fighting enemies of freedom both over the information we receive and how we receive it, as well as what’s at stake if democratic nations lose this war.
Click Here to Kill Everybody: Security and Survival in a Hyperconnected World Bruce Schneier, 2018 As we’ve detailed numeroustimesbefore, smart devices aren’t necessarily, well, smart. As the world increases its reliance on internet-connected devices, author Bruce Schneier argues, the risks from bad actors will continue to increase in tandem — and if cybersecurity measures don’t keep up, the results could be fatal.
This Is How They Tell Me The World Ends Nicole Perlroth, 2021 For years, the U.S. government became a major collector of zero-days. But when that cache was compromised, these vulnerabilities fell into the hands of cybercriminals and hostile nations. In her book, “This Is How They Tell Me the World Ends,” author Nicole Perlroth gives a journalistic account of how these vulnerabilities could endanger our democracy, our infrastructure and our lives.
Inside Jobs: Why Insider Risk Is the Biggest Cyber Threat You Can’t Ignore Joe Payne, Jadee Hanson, Mark Wojtasiak, 2020 While greater access and collaboration are necessary for modern organizations, they bring with them greater risk — not just from cybercriminals, but also from employees and business partners. “Inside Jobs: Why Insider Risk is the Biggest Cyber Threat You Can’t Ignore” details the main types of insider risk, and provides ways to combat them without hampering productivity.
The Art of Invisibility: The World’s Most Famous Hacker Teaches You How to Be Safe in the Age of Big Brother and Big Data Kevin Mitnick, 2019 Kevin Mitnick was once the FBI’s most wanted hacker. In his recent book, “The Art of Invisibility,” he uses what he learned through years of successfully sneaking into networks to offer readers tips on how to be invisible in a world where privacy is a vanishing commodity: everything from smart Wi-Fi usage, password protection and more. While you may already be familiar with some of the guidance offered, Mitnik’s experience, as well as his account of how we got here in the first place, make this well worth a read.
The Smartest Person in the Room: The Root Cause and New Solution for Cybersecurity Christian Espinoza, 2021 Having the best cybersecurity tools to protect your organization is only one piece of the puzzle. In “The Smartest Person in the Room,” cybersecurity expert Christian Espinosa outlines the extent to which your cybersecurity team impacts your ability to protect your organization — and offers ways to help upskill even your most intelligent employees.
Cybersecurity Is Everybody’s Business: Solve the Security Puzzle for Your Small Business and Home Scott N. Schober, 2019 Not all cybersecurity professionals work in a SOC or safeguard huge enterprises — many work to defend millions of small organizations or home offices. If this is you (or someone you know), you know how challenging it can be to find cybersecurity information geared to your security environment. In his most recent book, “Hacked Again” author Scott Schober explains why small businesses are becoming cybercriminals’ biggest targets, and what they can do to protect against threats like identity theft, phishing and ransomware.
The U.S. Cybersecurity and Infrastructure Security Agency (CISA) on Monday added a security flaw impacting Palo Alto Networks PAN-OS to its Known Exploited Vulnerabilities Catalog, based on evidence of active exploitation.
The high-severity vulnerability, tracked as CVE-2022-0028 (CVSS score: 8.6), is a URL filtering policy misconfiguration that could allow an unauthenticated, remote attacker to carry out reflected and amplified TCP denial-of-service (DoS) attacks.
“If exploited, this issue would not impact the confidentiality, integrity, or availability of our products,” Palo Alto Networks said in an alert. “However, the resulting denial-of-service (DoS) attack may help obfuscate the identity of the attacker and implicate the firewall as the source of the attack.
The weakness impacts the following product versions and has been addressed as part of updates released this month –
PAN-OS 10.2 (version < 10.2.2-h2)
PAN-OS 10.1 (version < 10.1.6-h6)
PAN-OS 10.0 (version < 10.0.11-h1)
PAN-OS 9.1 (version < 9.1.14-h4)
PAN-OS 9.0 (version < 9.0.16-h3), and
PAN-OS 8.1 (version < 8.1.23-h1)
The networking equipment maker said it discovered the vulnerability after being notified that susceptible firewall appliances from different vendors, including Palo Alto Networks, were being used as part of an attempted reflected denial-of-service (RDoS) attack.
In light of active exploitation, customers of affected products are advised to apply the relevant patches to mitigate potential threats. Federal Civilian Executive Branch (FCEB) agencies are mandated to update to the latest version by September 12, 2022.
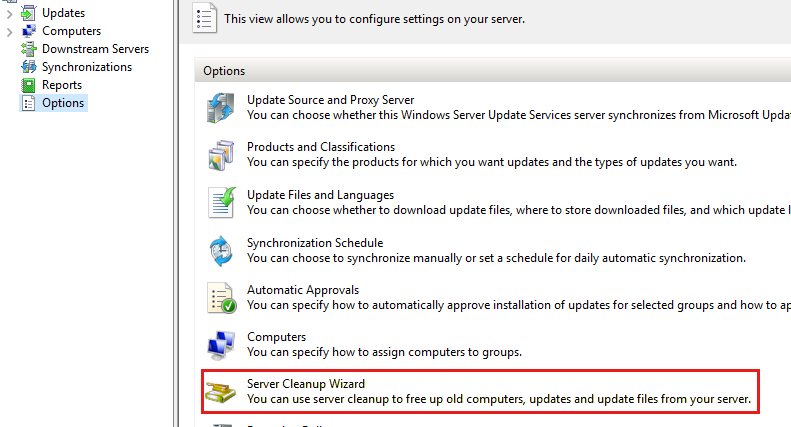
This article addresses some common questions about WSUS maintenance for Configuration Manager environments.
Original product version: Windows Servers, Windows Server Update Services, Configuration Manager Original KB number: 4490644
Introduction
Questions are often along the lines of How should I properly run this maintenance in a Configuration Manager environment, or How often should I run this maintenance. It’s not uncommon for conscientious Configuration Manager administrators to be unaware that WSUS maintenance should be run at all. Most of us just set up WSUS servers because it’s a prerequisite for a software update point (SUP). Once the SUP is set up, we close the WSUS console and pretend it doesn’t exist. Unfortunately, it can be problematic for Configuration Manager clients, and the overall performance of the WSUS/SUP server.
With the understanding that this maintenance needs to be done, you’re wondering what maintenance you need to do and how often you need to be doing it. The answer is that you should perform monthly maintenance. Maintenance is easy and doesn’t take long for WSUS servers that have been well maintained from the start. However, if it has been some time since WSUS maintenance was done, the cleanup may be more difficult or time consuming the first time. It will be much easier or faster in subsequent months.
Maintain WSUS while supporting Configuration Manager current branch version 1906 and later versions
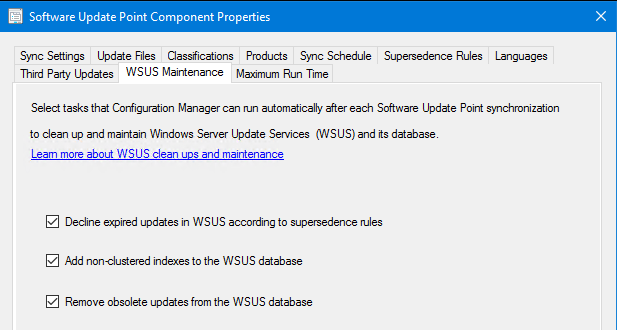
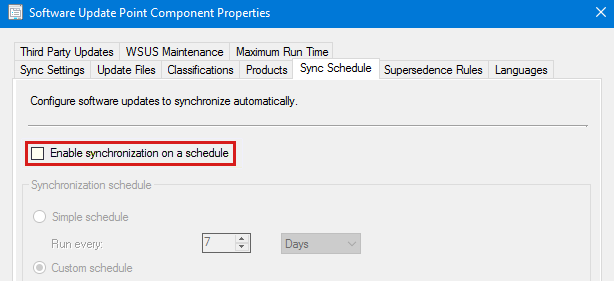
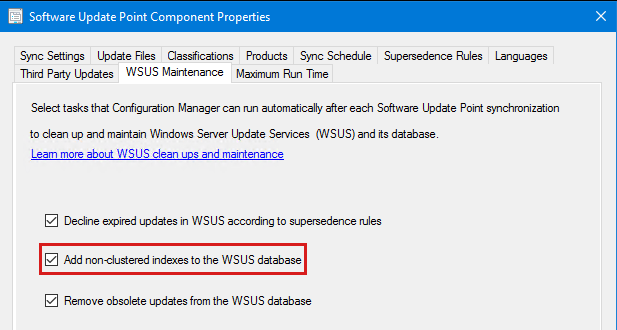
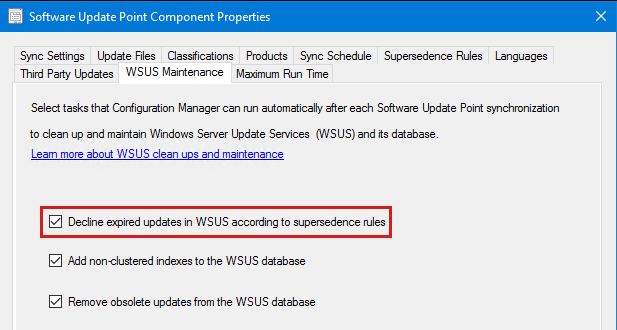
If you are using Configuration Manager current branch version 1906 or later versions, we recommend that you enable the WSUS Maintenance options in the software update point configuration at the top-level site to automate the cleanup procedures after each synchronization. It would effectively handle all cleanup operations described in this article, except backup and reindexing of WSUS database. You should still automate backup of WSUS database along with reindexing of the WSUS database on a schedule.
For more information about software update maintenance in Configuration Manager, see Software updates maintenance.
Before you start the maintenance process, read all of the information and instructions in this article.
When using WSUS along with downstream servers, WSUS servers are added from the top down, but should be removed from the bottom up. When syncing or adding updates, they go to the upstream WSUS server first, then replicate down to the downstream servers. When performing a cleanup and removing items from WSUS servers, you should start at the bottom of the hierarchy.
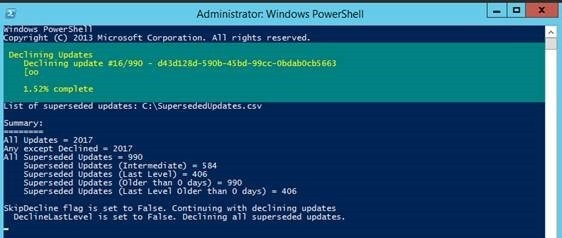
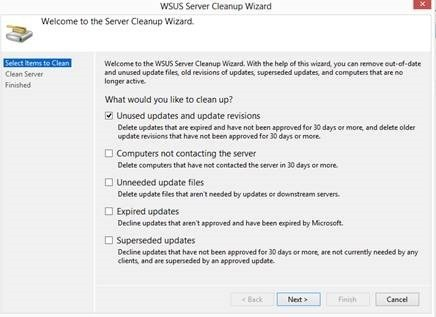
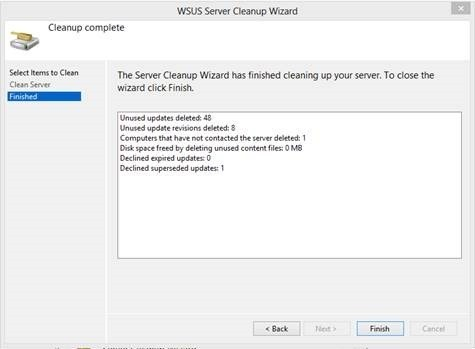
WSUS maintenance can be performed simultaneously on multiple servers in the same tier. When doing so, ensure that one tier is done before moving onto the next one. The cleanup and reindex steps described below should be run on all WSUS servers, regardless of whether they are a replica WSUS server or not. For more information about determining if a WSUS server is a replica, see Decline superseded updates.
Ensure that SUPs don’t sync during the maintenance process, as it may cause a loss of some work already done. Check the SUP sync schedule and temporarily set it to manual during this process.
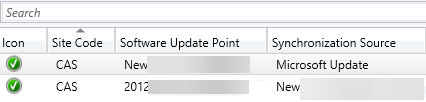
If you have multiple SUPs of the primary site or central administration sit (CAS) which don’t share the SUSDB, consider the WSUS server that syncs with the first SUP on the site as residing in a tier below the site. For example, my CAS site has two SUPs:
The one named New syncs with Microsoft Update, it would be my top tier (Tier1).
The server named 2012 syncs with New, and it would be considered in the second tier. It can be cleaned up at the same time I would do all my other Tier2 servers, such as my primary site’s single SUP.
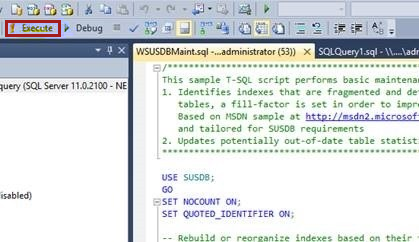
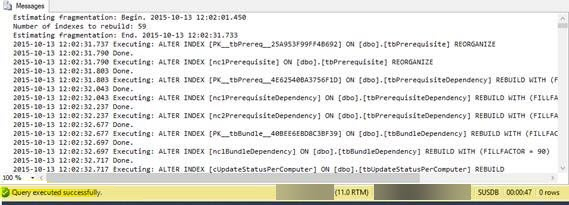
Perform WSUS maintenance
The basic steps necessary for proper WSUS maintenance include:
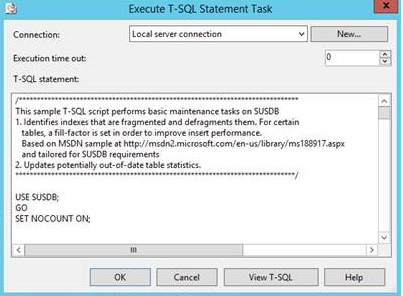
Back up the WSUS database (SUSDB) by using the desired method. For more information, see Create a Full Database Backup.
Create custom indexes
This process is optional but recommended, it greatly improves performance during subsequent cleanup operations.
If you are using Configuration Manager current branch version 1906 or a later version, we recommend that you use Configuration Manager to create the indexes. To create the indexes, configure the Add non-clustered indexes to the WSUS database option in the software update point configuration for the top-most site.
If you use an older version of Configuration Manager or standalone WSUS servers, follow these steps to create custom indexes in the SUSDB database. For each SUSDB, it’s a one-time process.
Make sure that you have a backup of the SUSDB database.
Use SQL Management Studio to connect to the SUSDB database, in the same manner as described in the Reindex the WSUS database section.
Run the following script against SUSDB, to create two custom indexes:SQLCopy-- Create custom index in tbLocalizedPropertyForRevision USE [SUSDB] CREATE NONCLUSTERED INDEX [nclLocalizedPropertyID] ON [dbo].[tbLocalizedPropertyForRevision] ( [LocalizedPropertyID] ASC )WITH (PAD_INDEX = OFF, STATISTICS_NORECOMPUTE = OFF, SORT_IN_TEMPDB = OFF, DROP_EXISTING = OFF, ONLINE = OFF, ALLOW_ROW_LOCKS = ON, ALLOW_PAGE_LOCKS = ON) ON [PRIMARY] -- Create custom index in tbRevisionSupersedesUpdate CREATE NONCLUSTERED INDEX [nclSupercededUpdateID] ON [dbo].[tbRevisionSupersedesUpdate] ( [SupersededUpdateID] ASC )WITH (PAD_INDEX = OFF, STATISTICS_NORECOMPUTE = OFF, SORT_IN_TEMPDB = OFF, DROP_EXISTING = OFF, ONLINE = OFF, ALLOW_ROW_LOCKS = ON, ALLOW_PAGE_LOCKS = ON) ON [PRIMARY] If custom indexes have been previously created, running the script again results in an error similar to the following one:Msg 1913, Level 16, State 1, Line 4 The operation failed because an index or statistics with name ‘nclLocalizedPropertyID’ already exists on table ‘dbo.tbLocalizedPropertyForRevision’.
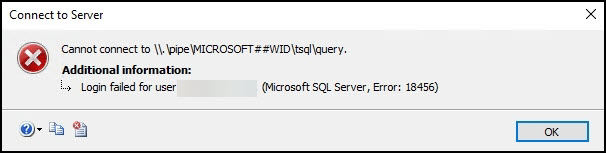
The steps to connect to SUSDB and perform the reindex differ, depending on whether SUSDB is running in SQL Server or Windows Internal Database (WID). To determine where SUSDB is running, check value of the SQLServerName registry entry on the WSUS server located at the HKEY_LOCAL_MACHINE\Software\Microsoft\Update Services\Server\Setup subkey.
If the value contains just the server name or server\instance, SUSDB is running on a SQL Server. If the value includes the string ##SSEE or ##WID in it, SUSDB is running in WID, as shown:
If SUSDB was installed on WID
If SUSDB was installed on WID, SQL Server Management Studio Express must be installed locally to run the reindex script. Here’s an easy way to determine which version of SQL Server Management Studio Express to install:
For Windows Server 2012 or later versions:
Go to C:\Windows\WID\Log and find the error log that contains the version number.
Go to C:\Windows\SYSMSI\SSEE\MSSQL.2005\MSSQL\LOG and open up the last error log with Notepad. At the top, there will be a version number (for example 9.00.4035.00 x64). Look up the version number in How to determine the version, edition and update level of SQL Server and its components. This version number tells you what Service Pack level it’s running. Include the SP level when searching the Microsoft Download Center for SQL Server Management Studio Express.
After installing SQL Server Management Studio Express, launch it, and enter the server name to connect to:
If the OS is Windows Server 2012 or later versions, use \\.\pipe\MICROSOFT##WID\tsql\query.
If the OS is older than Windows Server 2012, enter \\.\pipe\MSSQL$MICROSOFT##SSEE\sql\query.
For WID, if errors similar to the following occur when attempting to connect to SUSDB using SQL Server Management Studio (SSMS), try launching SSMS using the Run as administrator option.
If SUSDB was installed on SQL Server
If SUSDB was installed on full SQL Server, launch SQL Server Management Studio and enter the name of the server (and instance if needed) when prompted.
Tip
Alternatively, a utility called sqlcmd can be used to run the reindex script. For more information, see Reindex the WSUS Database.
Running the script
To run the script in either SQL Server Management Studio or SQL Server Management Studio Express, select New Query, paste the script in the window, and then select Execute. When it’s finished, a Query executed successfully message will be displayed in the status bar. And the Results pane will contain messages related to what indexes were rebuilt.
Decline superseded updates
Decline superseded updates in the WSUS server to help clients scan more efficiently. Before declining updates, ensure that the superseding updates are deployed, and that superseded ones are no longer needed. Configuration Manager includes a separate cleanup, which allows it to expire superseded updates based on specified criteria. For more information, see the following articles:
The following SQL query can be run against the SUSDB database, to quickly determine the number of superseded updates. If the number of superseded updates is higher than 1500, it can cause various software update related issues on both the server and client sides.
SQLCopy
-- Find the number of superseded updates
Select COUNT(UpdateID) from vwMinimalUpdate where IsSuperseded=1 and Declined=0
If you are using Configuration Manager current branch version 1906 or a later version, we recommend that you automatically decline the superseded updates by enabling the Decline expired updates in WSUS according to supersedence rules option in the software update point configuration for the top-most site.
When you use this option, you can see how many updates were declined by reviewing the WsyncMgr.log file after the synchronization process finishes. If you use this option, you don’t need to use the script described later in this section (either by manually running it or by setting up as task to run it on a schedule).
If you are using standalone WSUS servers or an older version of configuration Manager, you can manually decline superseded updates by using the WSUS console. Or you can run this PowerShell script. Then, copy and save the script as a Decline-SupersededUpdatesWithExclusionPeriod.ps1 script file.
Note
This script is provided as is. It should be fully tested in a lab before you use it in production. Microsoft makes no guarantees regarding the use of this script in any way. Always run the script with the -SkipDecline parameter first, to get a summary of how many superseded updates will be declined.
If Configuration Manager is set to Immediately expire superseded updates (see below), the PowerShell script can be used to decline all superseded updates. It should be done on all autonomous WSUS servers in the Configuration Manager/WSUS hierarchy.
You don’t need to run the PowerShell script on WSUS servers that are set as replicas, such as secondary site SUPs. To determine whether a WSUS server is a replica, check the Update Source settings.
If updates are not configured to be immediately expired in Configuration Manager, the PowerShell script must be run with an exclusion period that matches the Configuration Manager setting for number of days to expire superseded updates. In this case, it would be 60 days since SUP component properties are configured to wait two months before expiring superseded updates:
The following command lines illustrate the various ways that the PowerShell script can be run (if the script is being run on the WSUS server, LOCALHOST can be used in place of the actual SERVERNAME):
Running the script with a -SkipDecline and -ExclusionPeriod 60 to gather information about updates on the WSUS server, and how many updates could be declined:
Running the script with -ExclusionPeriod 60, to decline superseded updates older than 60 days:
The output and progress indicators are displayed while the script is running. Note the SupersededUpdates.csv file, which will contain a list of all updates that are declined by the script:
After superseded updates have been declined, for best performance, SUSDB should be reindexed again. For related information, see Reindex the WSUS database.
Run the WSUS Server Cleanup Wizard
WSUS Server Cleanup Wizard provides options to clean up the following items:
Unused updates and update revisions (also known as Obsolete updates)
Computers not contacting the server
Unneeded update files
Expired updates
Superseded updates
In a Configuration Manager environment, Computers not contacting the server and Unneeded update files options are not relevant because Configuration Manager manages software update content and devices, unless either the Create all WSUS reporting events or Create only WSUS status reporting events options are selected under Software Update Sync Settings. If you have one of these options configured, you should consider automating the WSUS Server Cleanup to perform cleanup of these two options.
If you are using Configuration Manager current branch version 1906 or a later version, enabling the Decline expired updates in WSUS according to supersedence rules option handles declining of Expired updates and Superseded updates based on the supersedence rules that are specified in Configuration Manager. Enabling the Remove obsolete updates from the WSUS database option in Configuration Manager current branch version 1906 handles the cleanup of Unused updates and update revisions (Obsolete updates). It’s recommended to enable these options in the software update point configuration on the top-level site to allow Configuration Manager to clean up the WSUS database.
If you’ve never cleaned up obsolete updates from WSUS database before, this task may time out. You can review WsyncMgr.log for more information, and manually run the SQL script that is specified in HELP! My WSUS has been running for years without ever having maintenance done and the cleanup wizard keeps timing out once, which would allow subsequent attempts from Configuration Manager to run successfully. For more information about WSUS cleanup and maintenance in Configuration Manager, see the docs.
For standalone WSUS servers, or if you are using an older version of Configuration Manager, it is recommended that you run the WSUS Cleanup wizard periodically. If the WSUS Server Cleanup Wizard has never been run and the WSUS has been in production for a while, the cleanup may time out. In that case, reindex with step 2 and step 3 first, then run the cleanup with only the Unused updates and update revisions option checked.
If you have never run WSUS Cleanup wizard, running the cleanup with Unused updates and update revisions may require a few passes. If it times out, run it again until it completes, and then run each of the other options one at a time. Lastly make a full pass with all options checked. If timeouts continue to occur, see the SQL Server alternative in HELP! My WSUS has been running for years without ever having maintenance done and the cleanup wizard keeps timing out. It may take multiple hours or days for the Server Cleanup Wizard or SQL alternative to run through completion.
The WSUS Server Cleanup Wizard runs from the WSUS console. It is located under Options, as shown here:
After it reports the number of items it has removed, the cleanup finishes. If you do not see this information returned on your WSUS server, it is safe to assume that the cleanup timed out. In that case, you will need to start it again or use the SQL alternative.
After superseded updates have been declined, for best performance, SUSDB should be reindexed again. See the Reindex the WSUS database section for related information.
Troubleshooting
HELP! My WSUS has been running for years without ever having maintenance done and the cleanup wizard keeps timing out
There are two different options here:
Reinstall WSUS with a fresh database. There are a number of caveats related to this, including length of initial sync, and full client scans against SUSDB, versus differential scans.
Ensure you have a backup of the SUSDB database, then run a reindex. When that completes, run the following script in SQL Server Management Studio or SQL Server Management Studio Express. After it finishes, follow all of the above instructions for running maintenance. This last step is necessary because the spDeleteUpdate stored procedure only removes unused updates and update revisions.
DECLARE @var1 INT
DECLARE @msg nvarchar(100)

CREATE TABLE #results (Col1 INT)
INSERT INTO #results(Col1) EXEC spGetObsoleteUpdatesToCleanup

DECLARE WC Cursor
FOR
SELECT Col1 FROM #results

OPEN WC
FETCH NEXT FROM WC
INTO @var1
WHILE (@@FETCH_STATUS > -1)
BEGIN SET @msg = 'Deleting' + CONVERT(varchar(10), @var1)
RAISERROR(@msg,0,1) WITH NOWAIT EXEC spDeleteUpdate @localUpdateID=@var1
FETCH NEXT FROM WC INTO @var1 END

CLOSE WC
DEALLOCATE WC

DROP TABLE #results
Running the Decline-SupersededUpdatesWithExclusionPeriod.ps1 script times out when connecting to the WSUS server, or a 401 error occurs while running
If errors occur when you attempt to use the PowerShell script to decline superseded updates, an alternative SQL script can be run against SUDB.
If Configuration Manager is used along with WSUS, check Software Update Point Component Properties > Supersedence Rules to see how quickly superseded updates expire, such as immediately or after X months. Make a note of this setting.
Use SQL Server Management Studio to connect to SUSDB.
Run the following query. The number 90 in the line that includes DECLARE @thresholdDays INT = 90 should correspond with the Supersedence Rules from step 1 of this procedure, and the correct number of days that aligns with the number of months that is configured in Supersedence Rules. If this is set to expire immediately, the value in the SQL query for @thresholdDays should be set to zero.SQLCopy-- Decline superseded updates in SUSDB; alternative to Decline-SupersededUpdatesWithExclusionPeriod.ps1 DECLARE @thresholdDays INT = 90 -- Specify the number of days between today and the release date for which the superseded updates must not be declined (i.e., updates older than 90 days). This should match configuration of supersedence rules in SUP component properties, if ConfigMgr is being used with WSUS. DECLARE @testRun BIT = 0 -- Set this to 1 to test without declining anything. -- There shouldn't be any need to modify anything after this line. DECLARE @uid UNIQUEIDENTIFIER DECLARE @title NVARCHAR(500) DECLARE @date DATETIME DECLARE @userName NVARCHAR(100) = SYSTEM_USER DECLARE @count INT = 0 DECLARE DU CURSOR FOR SELECT MU.UpdateID, U.DefaultTitle, U.CreationDate FROM vwMinimalUpdate MU JOIN PUBLIC_VIEWS.vUpdate U ON MU.UpdateID = U.UpdateId WHERE MU.IsSuperseded = 1 AND MU.Declined = 0 AND MU.IsLatestRevision = 1 AND MU.CreationDate < DATEADD(dd,-@thresholdDays,GETDATE()) ORDER BY MU.CreationDate PRINT 'Declining superseded updates older than ' + CONVERT(NVARCHAR(5), @thresholdDays) + ' days.' + CHAR(10) OPEN DU FETCH NEXT FROM DU INTO @uid, @title, @date WHILE (@@FETCH_STATUS > - 1) BEGIN SET @count = @count + 1 PRINT 'Declining update ' + CONVERT(NVARCHAR(50), @uid) + ' (Creation Date ' + CONVERT(NVARCHAR(50), @date) + ') - ' + @title + ' ...' IF @testRun = 0 EXEC spDeclineUpdate @updateID = @uid, @adminName = @userName, @failIfReplica = 1 FETCH NEXT FROM DU INTO @uid, @title, @date END CLOSE DU DEALLOCATE DU PRINT CHAR(10) + 'Attempted to decline ' + CONVERT(NVARCHAR(10), @count) + ' updates.'
To check progress, monitor the Messages tab in the Results pane.
What if I find out I needed one of the updates that I declined?
If you decide you need one of these declined updates in Configuration Manager, you can get it back in WSUS by right-clicking the update, and selecting Approve. Change the approval to Not Approved, and then resync the SUP to bring the update back in.
If the update is no longer in WSUS, it can be imported from the Microsoft Update Catalog, if it hasn’t been expired or removed from the catalog.
Automating WSUS maintenance
Note
If you are using Configuration Manager version1906 or a later version, automate the cleanup procedures by enabling the WSUS Maintenance options in the software update point configuration of the top-level site. These options handle all cleanup operations that are performed by the WSUS Server Cleanup Wizard. However, you should still automatically back up and reindex the WSUS database on a schedule.
WSUS maintenance tasks can be automated, assuming that a few requirements are met first.
If you have never run WSUS cleanup, you need to do the first two cleanups manually. Your second manual cleanup should be run 30 days from your first since it takes 30 days for some updates and update revisions to age out. There are specific reasons for why you don’t want to automate until after your second cleanup. Your first cleanup will probably run longer than normal. So you can’t judge how long this maintenance will normally take. The second cleanup is a much better indicator of what is normal for your machines. This is important because you need to figure out about how long each step takes as a baseline (I also like to add about 30-minutes wiggle room) so that you can determine the timing for your schedule.
If you have downstream WSUS servers, you will need to perform maintenance on them first, and then do the upstream servers.
To schedule the reindex of the SUSDB, you will need a full version of SQL Server. Windows Internal Database (WID) doesn’t have the capability of scheduling a maintenance task though SQL Server Management Studio Express. That said, in cases where WID is used you can use the Task Scheduler with SQLCMD mentioned earlier. If you go this route, it’s important that you don’t sync your WSUS servers/SUPs during this maintenance period! If you do, it’s possible your downstream servers will just end up resyncing all of the updates you just attempted to clean out. I schedule this overnight before my AM sync, so I have time to check on it before my sync runs.
Setting up the WSUS Cleanup task in Task Scheduler
Note
As mentioned previously, if you are using Configuration Manager current branch version 1906 or a later version, automate the cleanup procedures by enabling the WSUS Maintenance options in the software update point configuration of the top-level site. For standalone WSUS servers or older versions of Configuration Manager, you can continue to use the following steps.
The Weekend Scripter blog post mentioned in the previous section contains basic directions and troubleshooting for this step. However, I’ll walk you through the process in the following steps.
Open Task Scheduler and select Create a Task. On the General tab, set the name of the task, the user that you want to run the PowerShell script as (most people use a service account). Select Run whether a user is logged on or not, and then add a description if you wish.
Under the Actions tab, add a new action and specify the program/script you want to run. In this case, we need to use PowerShell and point it to the PS1 file we want it to run. You can use the WSUS Cleanup script. This script performs cleanup options that Configuration Manager current branch version 1906 doesn’t do. You can uncomment them if you are using standalone WSUS or an older version of Configuration Manager. If you would like a log, you can modify the last line of the script as follows:PowerShellCopy[reflection.assembly]::LoadWithPartialName("Microsoft.UpdateServices.Administration") | out-null $wsus = [Microsoft.UpdateServices.Administration.AdminProxy]::GetUpdateServer(); $cleanupScope = new-object Microsoft.UpdateServices.Administration.CleanupScope; # $cleanupScope.DeclineSupersededUpdates = $true # Performed by CM1906 # $cleanupScope.DeclineExpiredUpdates = $true # Performed by CM1906 # $cleanupScope.CleanupObsoleteUpdates = $true # Performed by CM1906 $cleanupScope.CompressUpdates = $true $cleanupScope.CleanupObsoleteComputers = $true $cleanupScope.CleanupUnneededContentFiles = $true $cleanupManager = $wsus.GetCleanupManager(); $cleanupManager.PerformCleanup($cleanupScope) | Out-File C:\WSUS\WsusClean.txt; You’ll get an FYI/warning in Task Scheduler when you save. You can ignore this warning.
On the Triggers tab, set your schedule for once a month or on any schedule you want. Again, you must ensure that you don’t sync your WSUS during the entire cleanup and reindex time.
Set any other conditions or settings you would like to tweak as well. When you save the task, you may be prompted for credentials of the Run As user.
You can also use these steps to configure the Decline-SupersededUpdatesWithExclusionPeriod.ps1 script to run every three months. I usually set this script to run before the other cleanup steps, but only after I have run it manually and ensured it completed successfully. I run at 12:00 AM on the first Sunday every three months.
Setting up the SUSDB reindex for WID using SQLCMD and Task Scheduler
Schedule this task to start about 30 minutes after you expect your cleanup to finish running. My cleanup is running at 1:00 AM every first Sunday. It takes about 30 minutes to run and I am going to give it another 30 minutes before starting my reindex. It means I would schedule this task for every first Sunday at 2:00 AM, as shown here:
Select the action to Start a program. In the Program/script box, type the following command. The file specified after the -i parameter is the path to the SQL script you saved in step 1. The file specified after the -o parameter is where you would like the log to be placed. Here’s an example:"C:\Program Files\Microsoft SQL Server\110\Tools\Binn\SQLCMD.exe" -S \\.\pipe\Microsoft##WID\tsql\query -i C:\WSUS\SUSDBMaint.sql -o c:\WSUS\reindexout.txt
You’ll get a warning, similar to the one you got when creating the cleanup task. Select Yes to accept the arguments, and then select Finish to apply:
You can test the script by forcing it to run and reviewing the log for errors. If you run into issues, the log will tell you why. Usually if it fails, the account running the task doesn’t have appropriate permissions or the WID service isn’t started.
Setting up a basic Scheduled Maintenance Task in SQL for non-WID SUSDBs
Note
You must be a sysadmin in SQL Server to create or manage maintenance plans.
Open SQL Server Management Studio and connect to your WSUS instance. Expand Management, right-click Maintenance Plans, and then select New Maintenance Plan. Give your plan a name.
Select subplan1 and then ensure your Toolbox is in context:
Drag and drop the task Execute T-SQL Statement Task:
Right-click it and select Edit. Copy and paste the WSUS reindex script, and then select OK:
Schedule this task to run about 30 minutes after you expect your cleanup to finish running. My cleanup is running at 1:00 AM every first Sunday. It takes about 30 minutes to run, and I am going to give it another 30 minutes before starting reindex. It means I would schedule this task to run every first Sunday at 2:00 AM.
While creating the maintenance plan, consider adding a backup of the SUSDB into the plan as well. I usually back up first, then reindex. It may add more time to the schedule.
Putting it all together
When running it in a hierarchy, the WSUS cleanup run should be done from the bottom of the hierarchy up. However, when using the script to decline superseded updates, the run should be done from the top down. Declining superseded updates is really a type of addition to an update rather than a removal. You’re actually adding a type of approval in this case.
Since a sync can’t be done during the actual cleanup, it’s suggested to schedule/complete all tasks overnight. Then check on their completion via the logging the following morning, before the next scheduled sync. If something failed, maintenance can be rescheduled for the next night, once the underlying issue is identified and resolved.
These tasks may run faster or slower depending on the environment, and timing of the schedule should reflect that. Hopefully they are faster since my lab environment tends to be a bit slower than a normal production environment. I am a bit aggressive on the timing of the decline scripts. If Tier2 overlaps Tier3 by a few minutes, it will not cause a problem because my sync isn’t scheduled to run.
Not syncing keeps the declines from accidentally flowing into my Tier3 replica WSUS servers from Tier2. I did give myself extra time between the Tier3 decline and the Tier3 cleanup since I definitely want to make sure the decline script finishes before running my cleanup.
It brings up a common question: Since I’m not syncing, why shouldn’t I run all of the cleanups and reindexes at the same time?
The answer is that you probably could, but I wouldn’t. If my coworker across the globe needs to run a sync, with this schedule I would minimize the risk of orphaned updates in WSUS. And I can schedule it to rerun to completion the next night.
Time
Tier
Tasks
12:00 AM
Tier1-Decline
12:15 AM
Tier2-Decline
12:30 AM
Tier3-Decline
1:00 AM
Tier3 WSUS Cleanup
2:00 AM
Tier3 Reindex
Tier2 WSUS Cleanup
3:00 AM
Tier1-Cleanup
Tier2 Reindex
4:00 AM
Tier1 Reindex
Note
If you’re using Configuration Manager current branch version 1906 or a later version to perform WSUS Maintenance, Configuration Manager performs the cleanup after synchronization using the top-down approach. In this scenario, you can schedule the WSUS database backup and reindexing jobs to run before the configured sync schedule without worrying about any of the other steps, because Configuration Manager will handle everything else.
For more information about SUP maintenance in Configuration Manager, see the following articles: