Any organization that handles sensitive data must be diligent in its security efforts, which include regular pen testing. Even a small data breach can result in significant damage to an organization’s reputation and bottom line.
There are two main reasons why regular pen testing is necessary for secure web application development:
Security: Web applications are constantly evolving, and new vulnerabilities are being discovered all the time. Pen testing helps identify vulnerabilities that could be exploited by hackers and allows you to fix them before they can do any damage.
Compliance: Depending on your industry and the type of data you handle, you may be required to comply with certain security standards (e.g., PCI DSS, NIST, HIPAA). Regular pen testing can help you verify that your web applications meet these standards and avoid penalties for non-compliance.
Many organizations, big and small, have once a year pen testing cycle. But what’s the best frequency for pen testing? Is once a year enough, or do you need to be more frequent?
The answer depends on several factors, including the type of development cycle you have, the criticality of your web applications, and the industry you’re in.
Agile development cycles are characterized by short release cycles and rapid iterations. This can make it difficult to keep track of changes made to the codebase and makes it more likely that security vulnerabilities will be introduced.
If you’re only testing once a year, there’s a good chance that vulnerabilities will go undetected for long periods of time. This could leave your organization open to attack.
To mitigate this risk, pen testing cycles should align with the organization’s development cycle. For static web applications, testing every 4-6 months should be sufficient. But for web applications that are updated frequently, you may need to test more often, such as monthly or even weekly.
Any system that is essential to your organization’s operations should be given extra attention when it comes to security. This is because a breach of these systems could have a devastating impact on your business. If your organization relies heavily on its web applications to do business, any downtime could result in significant financial losses.
For example, imagine that your organization’s e-commerce site went down for an hour due to a DDoS attack. Not only would you lose out on potential sales, but you would also have to deal with the cost of the attack and the negative publicity.
To avoid this scenario, it’s important to ensure that your web applications are always available and secure.
Non-critical web applications can usually get away with being tested once a year, but business-critical web applications should be tested more frequently to ensure they are not at risk of a major outage or data loss.
If all your web applications are internal, you may be able to get away with pen testing less frequently. However, if your web applications are accessible to the public, you must be extra diligent in your security efforts.
Web applications accessible to external traffic are more likely to be targeted by attackers. This is because there is a greater pool of attack vectors and more potential entry points for an attacker to exploit.
Customer-facing web applications also tend to have more users, which means that any security vulnerabilities will be exploited more quickly. For example, a cross-site scripting (XSS) vulnerability in an external web application with millions of users could be exploited within hours of being discovered.
To protect against these threats, it’s important to pen test customer-facing web applications more frequently than internal ones. Depending on the size and complexity of the application, you may need to pen test every month or even every week.
Certain industries are more likely to be targeted by hackers due to the sensitive nature of their data. Healthcare organizations, for example, are often targeted because of the protected health information (PHI) they hold.
If your organization is in a high-risk industry, you should consider conducting pen testing more frequently to ensure that your systems are secure and meet regulatory compliance. This will help protect your data and reduce the chances of a costly security incident.
You Don’t Have Internal Security Operations or a Pen testing Team#
This might sound counterintuitive, but if you don’t have an internal security team, you may need to conduct pen testing more frequently.
Organizations that don’t have dedicated security staff are more likely to be vulnerable to attacks.
Without an internal security team, you will need to rely on external pen testers to assess your organization’s security posture.
Depending on the size and complexity of your organization, you may need to pen test every month or even every week.
During a merger or acquisition, there is often a lot of confusion and chaos. This can make it difficult to keep track of all the systems and data that need to be secured. As a result, it’s important to conduct pen testing more frequently during these times to ensure that all systems are secure.
M&A also means that you are adding new web applications to your organization’s infrastructure. These new applications may have unknown security vulnerabilities that could put your entire organization at risk.
In 2016, Marriott acquired Starwood without being aware that hackers had exploited a flaw in Starwood’s reservation system two years earlier. Over 500 million customer records were compromised. This placed Marriott in hot water with the British watchdog ICO, resulting in 18.4 million pounds in fines in the UK. According to Bloomberg, there is more trouble ahead, as the hotel giant could “face up to $1 billion in regulatory fines and litigation costs.”
To protect against these threats, it’s important to conduct pen testing before and after an acquisition. This will help you identify potential security issues so they can be fixed before the transition is complete.
While periodic pen testing is important, it is no longer enough in today’s world. As businesses rely more on their web applications, continuous pen testing becomes increasingly important.
There are two main types of pen testing: time-boxed and continuous.
Traditional pen testing is done on a set schedule, such as once a year. This type of pen testing is no longer enough in today’s world, as businesses rely more on their web applications.
Continuous pen testing is the process of continuously scanning your systems for vulnerabilities. This allows you to identify and fix vulnerabilities before they can be exploited by attackers. Continuous pen testing allows you to find and fix security issues as they happen instead of waiting for a periodic assessment.
Continuous pen testing is especially important for organizations that have an agile development cycle. Since new code is deployed frequently, there is a greater chance for security vulnerabilities to be introduced.
Pen testing as a service models is where continuous pen testing shine. Outpost24’s PTaaS (Penetration-Testing-as-a-Service) platform enables businesses to conduct continuous pen testing with ease. The Outpost24 platform is always up-to-date with an organization’s latest security threats and vulnerabilities, so you can be confident that your web applications are secure.
Manual and automated pen testing: Outpost24’s PTaaS platform combines manual and automated pen testing to give you the best of both worlds. This means you can find and fix vulnerabilities faster while still getting the benefits of expert analysis.
Provides comprehensive coverage: Outpost24’s platform covers all OWASP Top 10 vulnerabilities and more. This means that you can be confident that your web applications are secure against the latest threats.
Is cost-effective: With Outpost24, you only pay for the services you need. This makes it more affordable to conduct continuous pen testing, even for small businesses.
Regular pen testing is essential for secure web application development. Depending on your organization’s size, industry, and development cycle, you may need to revise your pen testing schedule.
Once-a-year pen testing cycle may be enough for some organizations, but for most, it is not. For business-critical, customer-facing, or high-traffic web applications, you should consider continuous pen testing.
Outpost24’s PTaaS platform makes it easy and cost-effective to conduct continuous pen testing. Contact us today to learn more about our platform and how we can help you secure your web applications.
Found this article interesting? Follow us on Twitter and LinkedIn to read more exclusive content we post.
The windows Update CLI commands are useful for troubleshooting Windows Update errors. And they are helpful when you need to automate the windows update tasks. In newer versions of windows, the WUAUCLT command has been deprecated and replaced with the usoclient. In this article we have included the options and syntax for using wuault, usoclient, and powershell to detect and install windows updates
WUAUCLT
The windows update command utility in windows is: WUAUCLT. This stands for Windows Update Automatic Update Client. This client has been deprecated in windows 10 and server 2016. Howeve,r it is still available through windows 7 and server 2012R2.
Below is a list of arguments you can pass to the WUAUCLT commands and a short explanation of what each argument does. Search:
Command
Description
/DetectNow
Detect and download updates that are available (will vary by system settings)
/ReportNow
Tell the client to report its status back to the WSUS server
/RunHandlerComServer
/RunStoreAsComServer
/ShowSettingsDialog
Show Windows Update settings dialog
/ShowWindowsUpdate
Shows the windows update dialog box or web page (depending on windows version)
/ResetAuthorization
when an update check occurs a cookie is stored that prevents a new update or check for 1 hour. So, you should use this to delete this cookie
/ResetEulas
Resets the accepted EULA’s
/ShowWU
Shows the windows update dialog on windows vista and above. Opens Windows update on XP
/SelfUpdateManaged
Scan for windows updates using WSUS
/SelfUpdateUnmanaged
Triggers a windows update scan using the windows update website
/ShowOptions
Open the windows update settings window
/ShowFeaturedOptInDialog
Show Opt-In dialog for featured updates
/DemoUI
Show the icons for windows update
/ShowFeaturedUpdates
Open windows update dialog and shows the featured updates
/ShowWUAutoScan
/UpdateNow
Install updates now
Showing 1 to 17 of 17 entries
Examples
See below for some examples of running the wuauclt. All examples should be run from an elevated/administrative command prompt
If all you want to do is detect and install updates right now, you would run:
Wuauclt /dectectnow /updatenow
If it is refusing to install, you can run:
Wuauclt /resetauthorization
If you want to have the client report its status back to the WSUS server, you would run:
Wuauclt /reportnow
Powershell
Powershell will give you the most flexibility in installing windows updates. The other methods are fine for simply downloading and installing all updates. However, with the powershell cmdlets you can do things like get a list of updates, search for updates with a specific word in them, then only install those updates.
**Note, I usually only reboot if required. For that reason, I don’t like to use the AutoReboot flag.
Check if a reboot is required
Get-wurebootstatus
List available updates on Microsoft Update
Get-WUInstall –MicrosoftUpdate –ListOnly
USOClient
The USO client is new to windows 10 and Server 2016. This replaces the wuauclt command in these Operating systems. I would recommend using powershell instead of this client when you are doing automation, since it will work on newer and older clients. However, this client is very simple to use. and is useful for one-off purposes. See the table below for all of the command arguments: Show 102550100 entriesSearch:
In a previous article, I showed you how to install Active Directory (AD), the first domain controller (DC) in a new forest and domain, using Server Manager in Windows Server 2019. But if you’re not afraid of the command line, there’s a much quicker way to get Active Directory up and running in Windows Server. In this article, I’ll show you how to configure AD using PowerShell.
There are two steps to installing AD in Windows Server 2019. The first is to install the Active Directory Domain Services (AD DS) server role. The second step is to configure your server as a domain controller. An AD domain must have at least one DC. Your server will be the first DC in a new AD forest and domain.
To complete the instructions below, you will need to have an account with administrator privileges in Windows Server 2019. I will also assume that you are using Windows Server 2019 with the Desktop Experience role installed. If you are using Server Core, the instructions vary a little but are more or less the same.
Active Directory prerequisites
Before you install your first domain controller in the new AD domain, there are a couple of things you should do to prepare the server. While it’s not absolutely necessary, I recommend giving the computer a name that makes it easy to identify. For example, I usually call the first domain controller in a new domain DC1. Secondly, you’ll need to set a static IP address and configure the network adapter’s DNS server.
Let’s start by renaming the server.
Log in to Windows Server 2019 as an administrator.
Open the Start menu and click the Windows PowerShell
In the PowerShell window, run the command below and press ENTER. Replace ‘DC1’ with the name that you would like to use for your domain controller.
Rename-Computer -NewName DC1
Restart the server.
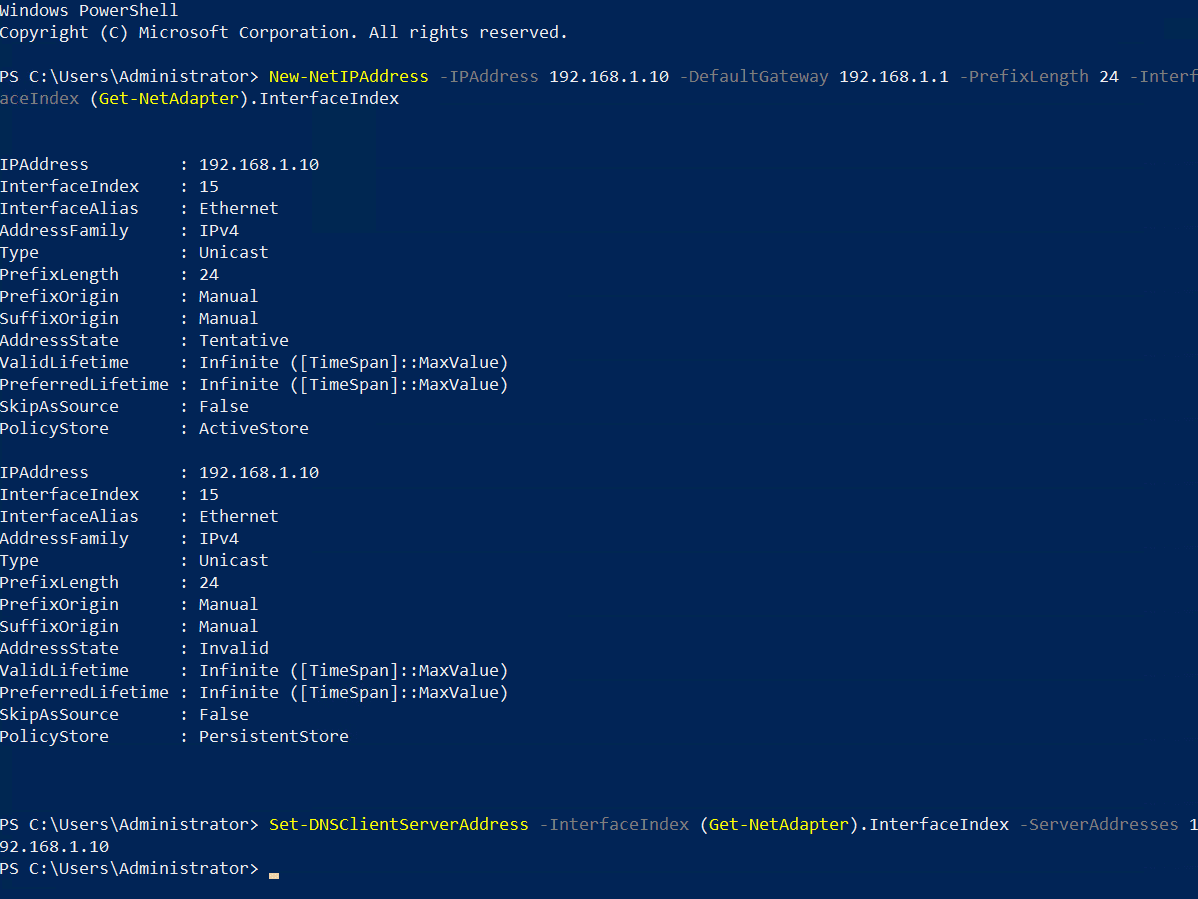
Once the server has rebooted, we can configure the network adapter. Your DC will need to communicate with other devices on the local network, so it’s important to speak to whoever oversees your network and get them to provide you with a static IP address that isn’t already in use. On my network, I will assign a static IP address of 192.168.1.10/24 and the default gateway is 192.168.1.1.
Log in to Windows Server 2019 as an administrator.
Open the Start menu and click the Windows PowerShell
In the PowerShell window, run the New-NetIPAddress command below and press ENTER. Replace the values for IPAddress, DefaultGateway, and PrefixLength to those provided by your network administrator.
The above command is designed to work on servers that have only one network adapter installed. If you have more than one adapter, you’ll need to enter the interface number instead of (Get-NetAdapter).InterfaceIndex. You can get the interface index number (ifIndex) for each adapter using Get-NetAdapter.
Now configure the adapter’s DNS settings. We’ll set the preferred DNS server to be our domain controller’s IP address because the domain controller will also perform the function of DNS server for the domain. So, replace 192.168.1.10 with the same IP address you configured for the adapter. Run Set-DNSClientServerAddress as shown, and press ENTER.
Again, the command is designed to work on servers that have only one network adapter installed. If you have more than one adapter, you’ll need to enter the interface number instead of (Get-NetAdapter).InterfaceIndex.
How to Install Active Directory in Windows Server 2019 Using PowerShell (Image Credit: Russell Smith)
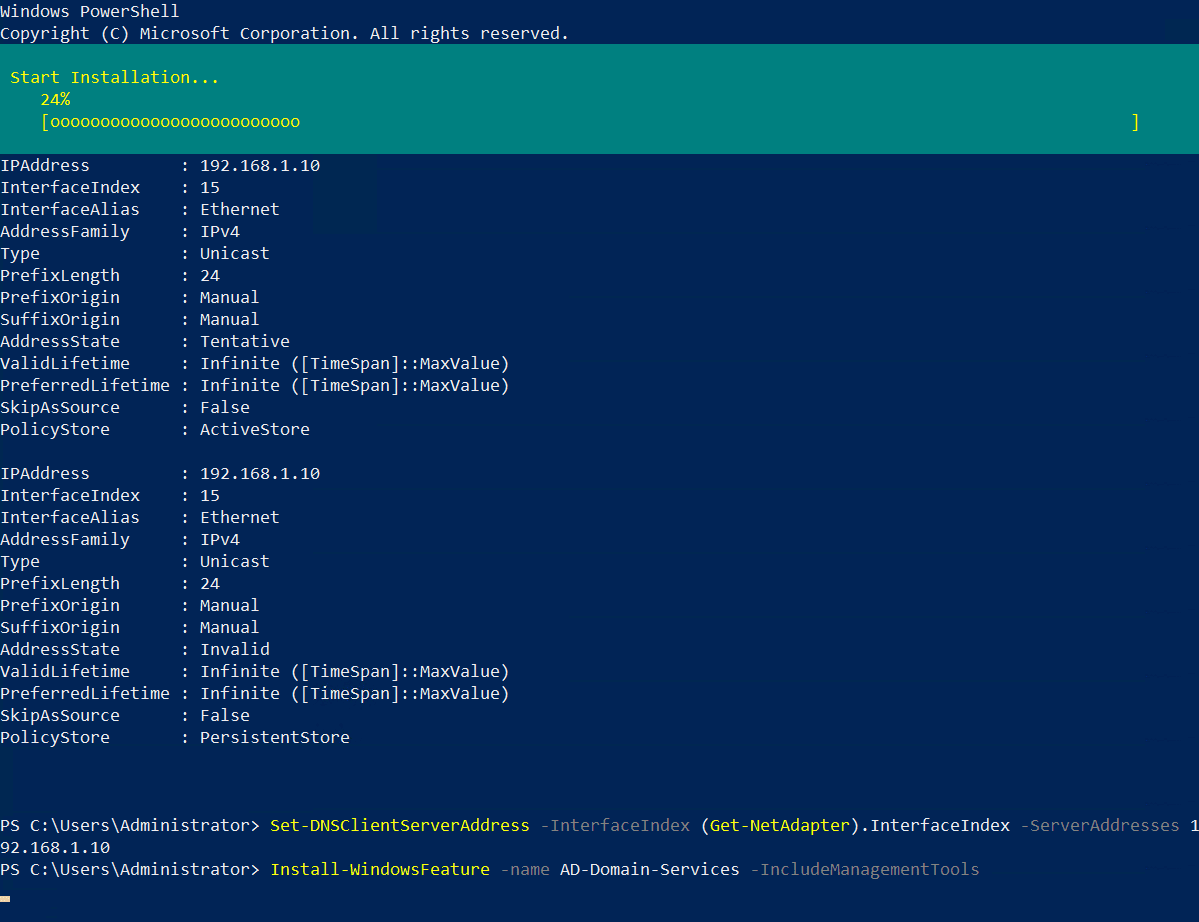
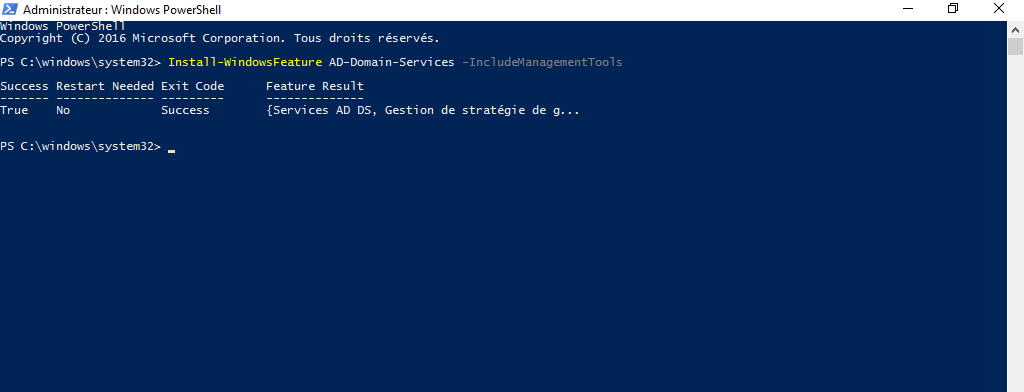
Install the Active Directory Domain Services role
The next step is to install the AD DS server role. It’s easy to do using the Install-WindowsFeature cmdlet as shown below. If you are using Server Core, remove the -IncludeManagementTools parameter.
How to Install Active Directory in Windows Server 2019 Using PowerShell (Image Credit: Russell Smith)
Once the AD DS server role is installed, you’ll get a message in the PowerShell window. The Success column should read True.
How to Install Active Directory in Windows Server 2019 Using PowerShell (Image Credit: Russell Smith)
Configure the first domain controller in a new Active Directory forest
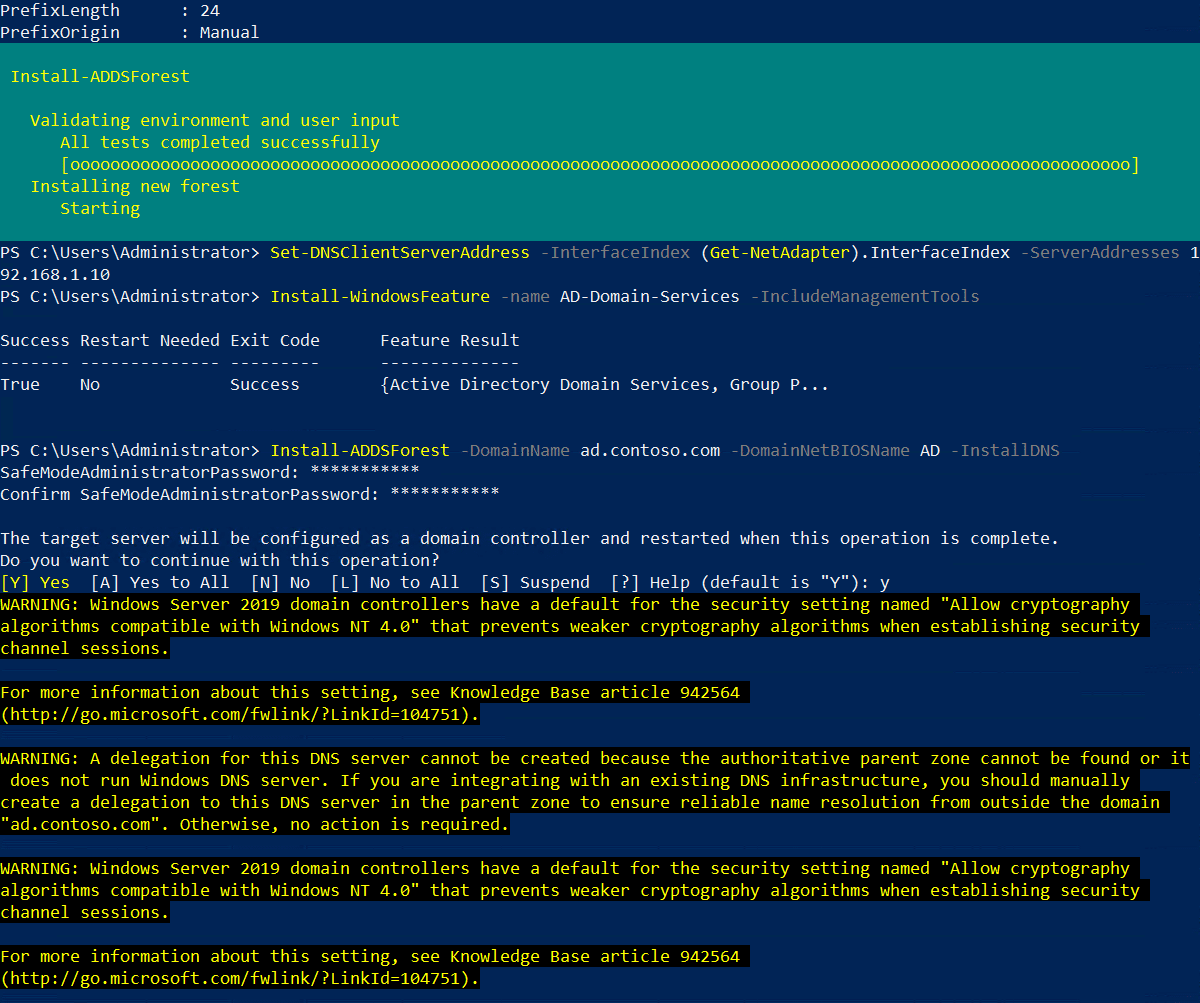
Before you continue, you should decide on a Fully Qualified Domain Name (FQDN) for your new domain. I’m going to use ad.contoso.com in this example. Where ‘ad’ is the name of my new domain and contoso.com is the top-level domain (TLD). You should make sure that you own the public TLD. In this example, I should own the contoso.com domain name. AD in the FQDN defines my internal DNS namespace for Active Directory.
To configure Windows Server 2019 as a domain controller, run Install-ADDSForest as shown in the example below. Replace ad.contoso.com with your chosen FQDN. DomainNetBIOSName is usually set to the part of your FQDN that identifies your internal AD DNS namespace. So, the part that comes to the left of the first period. In this case, ‘ad’.
Install-ADDSForest -DomainName ad.contoso.com -DomainNetBIOSName AD -InstallDNS
You should note that Install-ADDSForest is only used when you are installing the first domain controller in a new AD forest. Install-ADDSDomain and Install-ADDSDomainController are used respectively to create a new domain in an existing forest and install a new DC in an existing AD domain.
DomainName and DomainNetBIOSName are the only two compulsory parameters for the Install-ADDSForest cmdlet. If you want to explore what other options you can configure, run the command line below:
Get-Help Install-ADDSForest
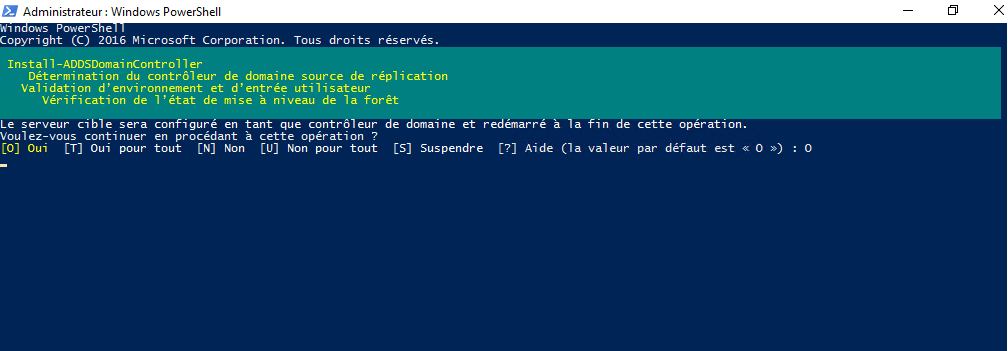
When you run the Install-ADDSForest cmdlet, you’ll be prompted to enter a password for Directory Services Restore Mode (DSRM). Or Safe Mode password as it’s sometimes referred to. Enter a password and confirm it when prompted.
You’ll then see a message:
The target server will be configured as a domain controller and restarted when this operation is complete.
Do you want to continue with this operation?
Type y in the PowerShell window and press ENTER to confirm that you want to configure the server as a domain controller.
How to Install Active Directory in Windows Server 2019 Using PowerShell (Image Credit: Russell Smith)
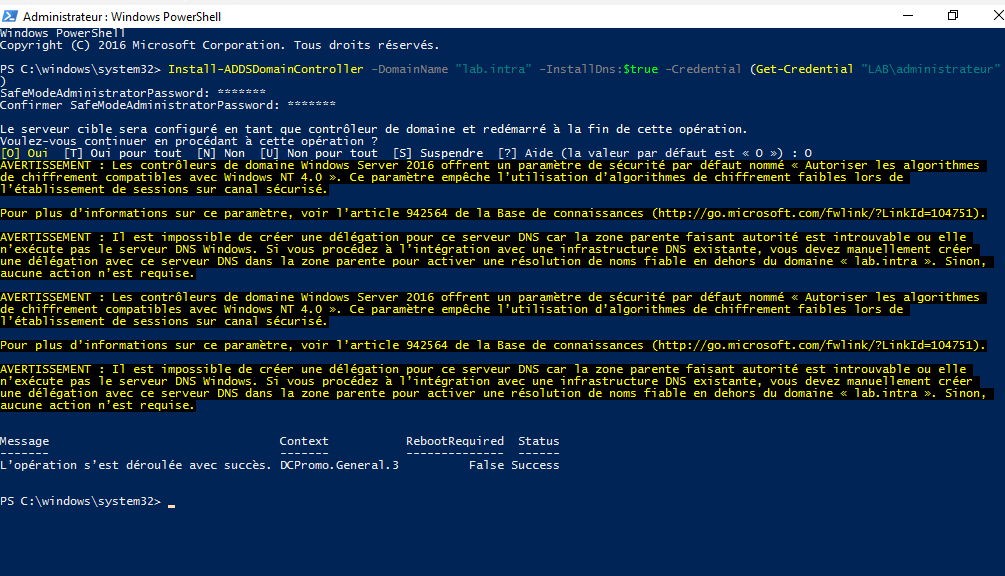
As AD is configured, you’ll see some yellow warnings appear in the PowerShell window. They are normal and you can safely ignore them. The server will automatically reboot. Once Windows Server has rebooted, you will need to log in with the domain administrator account. The domain administrator account is assigned the same password as the built-in administrator account.
On the sign-in page, type administrator in the User name field. Type the password for the administrator account, which is the same as the password for the previous built-in administrator account, and press ENTER.
How to Install Active Directory in Windows Server 2019 Using PowerShell (Image Credit: Russell Smith)
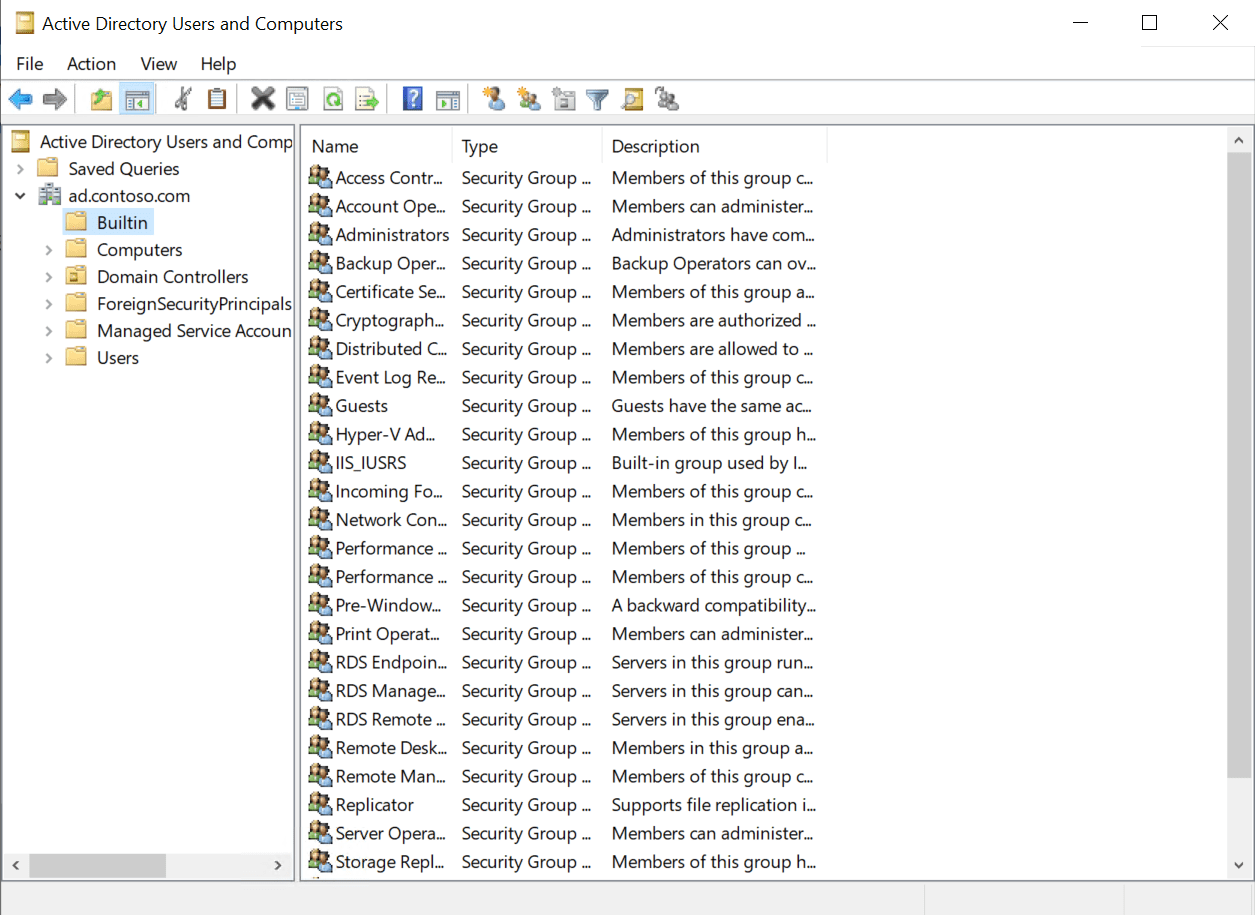
And that is it! You are now logged in to your AD domain’s first domain controller. You can access Server Manager from the Start menu. In Server Manager, click the Tools menu and then select Active Directory Users and Computers to start managing your domain.
In this tutorial dedicated to Active Directory and security, I will give you some tips to harden the level of security in order to be less vulnerable to attacks.
The different configuration points, which will be discussed, simply allow attacks to be made more difficult and longer internally, in no way will they guarantee that you are invulnerable.
What you need to know is that your first ally is time, the more “difficult” and longer it will be, the more likely you are that the attacker(s) will move on.
Before applying the settings, they should be tested in a restricted environment so as not to create more problems, especially on Active Directory environments that are several years old.
In order to “protect” against Man-in-the-middle (MITM) attacks, it is possible to activate the signature on SMB protocol exchanges.
SMB signing works with SMBv2 and SMBv3.
The configuration of the signature can be done:
at the client level
at the server level
From the moment one of the two negotiates the signature, the SMB flow will be signed.
The configuration is done at the level of group policies: Computer configuration / Windows settings / Security settings / Security options. The two parameters to activate:
Microsoft network client: digitally sign communications (always)
Microsoft network server: digitally sign communications (always)
Again, I advise you to test on a few computers before applying this to your entire fleet, for my part, I had problems with RDS servers in terms of access to shares.
Network Security: Restrict NTLM: NTLM authentication in this domain
The NTLM configuration allows quite a bit of flexibility in terms of configuring it and adding exceptions.
Disable LLMNR and NBT-NS
LLMNR (Link-Local Multicast Name Resolution) and NBT-NS (Netbios Name Service) are two broadcast/multicast name resolution “protocols” that are enabled by default, they are used when dns name resolution fails.
If you use Wireshark type software to listen to the network, you will see that there is a lot of LLMNR and NBT-NS traffic.
The main danger of LLMNR and NBT-NS is that it is easy to send a false response with another computer in order to retrieve an NTLM hash of the requesting client.
Below are screenshots of the responder which allows you to respond to LLMNR and NBT-NS requests
Listen
Now we will see how to deactivate LLMNR and NBT-NS
Disable LLMNR
Good news, LLMNR is disabled by group policy in configuring the DNS client of computers.
To disable LLMNR, you must enable the Disable multicast name resolution setting located at: Computer Configuration / Administrative Templates / Network / DNS Client.
After applying the GPO on the computers in the domain, they will no longer use LLMNR.
If you have non-domain computers, it will be necessary to do this on them.
Disable NBT-NS
Here it gets a little complicated because NBT-NS is configured at the NIC level and there is no applicable group policy. The good news is that for client computers (mainly workstations), it is possible to do this by an option on the DHCP server.
At the options level (extended or server), option 001 Microsoft Options for disabling NetBios must be configured in the Microsoft Windows 2000 Option vendor class. The value 0x2 must be entered to disable NBT-NS.
For computers that are not in automatic addressing, Netbios must be disabled on the network card(s).
Open network card properties.
Select Internet Protocol Version 4 (TCP/IPv4) and click Properties.
From the General tab, click on Advanced.
Go to the WINS tab, and select Disable NetBIOS over TCP/IP.
Close the different ones by validating the configuration.
It is possible to disable Netbios by GPO using a PowerShell script run at startup.
It is also important to follow some simple “hygiene” rules:
Limit privileged account usage (domain admins)
Do not use domain admin accounts on workstations
Update servers and computers regularly
Update applications (Web server, database, etc.)
Make sure you have up-to-date antivirus
Learn about security bulletins
Regarding the last point that I will address, it is passwords, for domain administrator accounts, privileged long passwords (20 to 30 characters) which will take much longer to be “brute-forced” than an 8-character password even with complexity.
Enter the password of the account passed as a parameter in the login window, then in the Powershell console enter the password of the directory recovery mode and confirm the promotion as a domain controller.
Wait during the promotion operation ….
After the operation completes, the following message appears and the server restarts.
At reboot the server is domain control.
Complements
There are 3 different Powershell commands that allow promotion as a domain control. Each of the commands is to be used in a particular case:
Install-ADDSForest : which is used for creating a new Active Directory forest.
It renames a computer name to a specified new name.
Syntax:
Rename-Computer
[-ComputerName <String>]
[-PassThru]
[-DomainCredential <PSCredential>]
[-LocalCredential <PSCredential>]
[-NewName]<String>
[-Force]
[-Restart]
[-WsmanAuthentication <String>]
[-WhatIf]
[-Confirm]
[<CommonParameters>]
Parameters:
-ComputerName
Parameter renames the remote computer in PowerShell. The default is the local computer.
To rename a remote computer, specify the IP address, the domain name of the remote computer, or the NetBIOS name.
To specify the local computer name, use localhost, dot (.).
-NewName
It specifies a new name for a computer. This parameter is mandatory to rename a computer. The name may contain alphanumeric, hyphens (-).
-Restart
It specifies restart is required after the computer is renamed. Restart is required to reflect the changes.
-DomainCredential
It specifies a user account that has permission to connect to a remote computer in the domain and renames a computer joined in the domain with explicit credentials.
Use Domain\User or use the Get-Credential cmdlet to get user credentials.
-Force
The Force parameter forces the command to execute without user confirmation.
Let’s understand rename-computer cmdlet in PowerShell with examples.
Rename a Local Computer
To rename a local computer, use the rename-computer cmdlet in PowerShell as below
Rename-Computer -NewName “IN-CORP101” -Restart
In the above PowerShell, rename-computer renames a local computer name to IN-CORP101 specified by the NewName parameter. It will restart the local computer to reflect the change after the computer rename.
Rename a Remote computer
To rename a remote computer, use rename-computer cmdlet in PowerShell as below
In the above PowerShell script, rename-computer cmdlet renames a remote computer name. ComputerName parameter specify remote computer name and NewName parameter specify a new name for the computer.
After the computer is renamed, the remote computer will restart to reflect changes.
PowerShell Rename a Computer on Domain
To rename a computer on the domain, the user must have permission to connect to the domain. For explicit credentials, use Get-Credential cmdlet in PowerShell.
Let’s rename the computer on the domain using the rename-computer cmdlet in PowerShell.
In the above PowerShell script, Rename-Computer cmdlet renames a remote computer joined on a domain.
ComputerName specifies the remote computer name, NewName parameter specifies a new name for the computer.
DomainCredential parameter specify domain user ShellGeek\Admin who has permission to connect to the domain computer and rename a computer on the domain.
Conclusion
I hope the above article to rename a computer in PowerShell will help you to rename a local computer or remote computer.
Rename-Computer cmdlet in PowerShell doesn’t have a parameter that takes the input value and returns ComputerChangeInfo an object if you specify -PassThru a parameter else return does not return any value.
You can find more topics about PowerShell Active Directory commands and PowerShell basics on the ShellGeek home page.CategoriesPowerShell TipsTagsrename-computer
In a large organization, its very quite common to have many domain and child domain names. While performing task automation for set of computers in domain, its best practice to get domain name of a computer.
In this article, I will explain how to get domain name using PowerShell script and command line (CMD)
Get-WmiObject class in PowerShell management library find the domain name for computer and wmic command-line utility to get domain name using command line (cmd)
Let’s understand how to get domain name in PowerShell and command line with below examples.
In the above PowerShell script, Get-WmiObject gets the WMI classes in the root\cimv2 namespace of computer and uses Win32_ComputerSystem to get computer system information.
Second command select Name and Domain name of a computer.
Output of above command to get domain name of a computer as below
PowerShell Get Domain Name
Using Get-AdDomainController to get domain name
PowerShell Get-AdDomainController cmdlet in Active Directory get one or more domain controllers based on search criteria.
You can get domain name of a computer in active directory using PowerShell Get-AdDomainController cmdlet as below
Migration is the act of moving your UniFi devices from one host device to another. This is useful when:
You are replacing your UniFi OS Console with a new one of the same model.
You are upgrading your UniFi OS Console to a different model (e.g., a UDM to a UDM Pro).
You are offloading devices to a dedicated UniFi OS Console (e.g., moving cameras from a Cloud Key or UDM to a UNVR).
You are moving from a self-hosted Network application to a UniFi OS Console.
Note: This is not meant to be used as a staging file for setting up multiple applications on different hosts.
Types of Backups
UniFi OS Backups
UniFi OS backup files contain your entire system configuration, including your UniFi OS Console, user, application, and device settings. Assuming Remote Access is enabled, UniFi OS Cloud backups are created weekly by default. You can also generate additional Cloud backups or download localized backups at any time.
UniFi OS backups are useful when:
Restoring a prior system configuration after making network changes.
Migrating all applications to a new UniFi OS Console that is the same model as the original.
Note: Backups donot include data stored on an HDD, such as recorded Protect camera footage.
Application Backups
Each UniFi application allows you to back up and export its configuration. Application backups contain settings and device configurations specific to the respective application.
Application backups are useful when:
You want to restore a prior application configuration without affecting your other applications.
You want to migrate a self-hosted Network application to a UniFi OS Console.
You want to migrate your devices between two different UniFi OS Console models.
You need to back up a self-hosted Network application.
Note: Backups donot include data stored on an HDD, such as recorded Protect camera footage.
UniFi OS Console Migration
UniFi OS backups also allow you to restore your system configuration should you ever need to replace your console with one ofthesame model.
To do so:
First, ensure that you have already generated a Cloud backup, or downloaded a local backup. If not, please do so in your UniFi OS Settings.
Replace your old UniFi OS Console with the new one. All other network connections should remain unchanged.
Restore your system configuration on the new UniFi OS Console using the backup file. This can be done either during the initial setup or afterwards in your UniFi OS settings.
Note: Currently, UniFi OS backups cannot be used to perform cross-console migrations, but this capability will be added in a future update.
If you are migrating between two different console models, you will need to restore each application’s configuration with their respective backups. Please note, though, that these file(s) will not include UniFi OS users or settings.
See below for more information on using the configuration backups during migrations.
Migrating UniFi Network
Before migrating, we recommend reviewing your Device Authentication Credentials found in your Network application’s System Settings. These can be used to recover adopted device(s) if the migration is unsuccessful.
Standard Migration
This is used when all devices are on the same Layer 2 network (i.e., all devices are on the same network/VLAN as the management application’s host device).
Note: If you are a home user managing devices in a single location and have not used the set-inform command or other advanced Layer 3 adoption methods, this is most likely the method for you.
Download the desired backup file (*.unf) from your original Network application’s System Settings.
Ensure that your new Network application is up to date. Backups cannot be used to restore older application versions.
Replace your old UniFi OS Console with the new one. All other network connections should remain unchanged.
Restore the backup file in the Network application’s System Settings.
Ensure that all devices appear as online in the new application. If they do not, you can try Layer 3 adoption, or factory-reset and readopt your device(s) to the new Network application.
If a device continues to appear as Managed by Other, click on it to open its properties panel, then use its Device Authentication Credentials (from the original Network application’s host device) to perform an Advanced Adoption.
Migrating Applications That Manage Layer 3 Devices
This method is for users that have performed Layer 3 device adoption (i.e., devices are on a different network/VLAN than the application’s host device). This may also be useful when migrating to a Network application host that is NOT also a gateway.
Download the desired backup file (*.unf) from your original Network application’s System Settings.
Enable the Override Inform Host field on the original Network application’s host device, then enter the IP address of the new host device. This will tell your devices where they should establish a connection in order to be managed. Once entered, all devices in the old application should appear as Managed by Other.
Note: When migrating to a Cloud Console, you can copy the Inform URL from the Cloud Console’s dashboard. Be aware that you will need to remove the initial http:// and the ending :8080/inform.
Ensure that your new Network application is up to date. Backups cannot be used to restore older application versions.
Restore the backup file in the Network application’s System Settings.
Ensure that all devices appear as online in the new application. If they do not, you can try Layer 3 adoption, or factory-reset and readopt your device(s) to the new application.
If a device continues to appear as Managed by Other, click on it to open its properties panel, then use its Device Authentication Credentials (from the original Network application’s host) to perform an Advanced Adoption.
Exporting Individual Sites from a Multi-Site Host
Certain Network application hosts (e.g., Cloud Key, Cloud Console, self-hosted Network applications) can manage multiple sites. Site exportation allows you to migrate specific sites from one multi-site host to another. To do so:
Click Export Site in your Network application’s System Settings to begin the guided walkthrough.
Select the device(s) you wish to migrate to your new Network application.
Enter the Inform URL of your new host. This will tell your devices where they should establish a connection in order to be managed. Once entered, all devices in the old application should appear as Managed by Other in the new one.
Note: When migrating to a Cloud Console, you can copy the Inform URL from the Cloud Console’s dashboard. Be aware that you will need to remove the initial http:// and the ending :8080/inform.
Go to your new Network application and select Import Site from the Site switcher located in the upper-left corner of your dashboard.
Note: You may need to enable Multi-Site Management in your System Settings.
Ensure that all devices appear as online in the new application. If they do not, you try Layer 3 adoption, or factory-reset and readopt your device(s) to the new application.
If a device continues to appear as Managed by Other, click on it to open its properties panel, then use its Device Authentication Credentials (from the original Network application’s host) to perform an Advanced Adoption.
Migrating UniFi Protect
We recommend saving your footage with the Export Clips function before migrating. Although we provide HDD migration instructions, it is not an officially supported procedure due to nuances in the RAID array architecture.
Standard Migration
Download the desired backup file (*.zip) from the original Protect application’s settings.
Ensure that your new Protect application is up to date. Backups cannot be used to restore older application firmware.
Replace your old UniFi OS Console with the new one. All other camera connections should remain unchanged.
Restore the backup file in the Protect application’s settings.
HDD Migration
Full HDD migration is not officially supported; however, some users have been able to perform successful migrations by ensuring consistent ordering when ejecting and reinstalling drives into their new console to preserve RAID arrays.
Note: This is only possible if both UniFi OS Consoles are the same model.
Remove the HDDs from the old console. Record which bay each one was installed in, but do not install them in the new console yet.
Turn on the new console and complete the initial setup wizard. Do not restore a Protect application or Cloud backup during initial setup!
Upgrade the new console and its Protect application to a version that is either the same or newer than the original console.
Shut down the new console, and then install the HDDs in the same bays as the original console.
Turn on the new console again. The Protect application should start with its current configuration intact, and all exported footage should be accessible.
During the fall of 2022, a few friends and I took a road trip from Chicago, IL to Washington, DC to attend a cybersecurity conference and (try) to take a break from our usual computer work.
While we were visiting the University of Maryland, we came across a fleet of electric scooters scattered across the campus and couldn’t resist poking at the scooter’s mobile app. To our surprise, our actions caused the horns and headlights on all of the scooters to turn on and stay on for 15 minutes straight.
When everything eventually settled down, we sent a report over to the scooter manufacturer and became super interested in trying to more ways to make more things honk. We brainstormed for a while, and then realized that nearly every automobile manufactured in the last 5 years had nearly identical functionality. If an attacker were able to find vulnerabilities in the API endpoints that vehicle telematics systems used, they could honk the horn, flash the lights, remotely track, lock/unlock, and start/stop vehicles, completely remotely.
At this point, we started a group chat and all began to work with the goal of finding vulnerabilities affecting the automotive industry. Over the next few months, we found as many car-related vulnerabilities as we could. The following writeup details our work exploring the security of telematic systems, automotive APIs, and the infrastructure that supports it.
Findings Summary
During our engagement, we found the following vulnerabilities in the companies listed below:
Kia, Honda, Infiniti, Nissan, Acura
Fully remote lock, unlock, engine start, engine stop, precision locate, flash headlights, and honk vehicles using only the VIN number
Fully remote account takeover and PII disclosure via VIN number (name, phone number, email address, physical address)
Ability to lock users out of remotely managing their vehicle, change ownership
For Kia’s specifically, we could remotely access the 360-view camera and view live images from the car
Mercedes-Benz
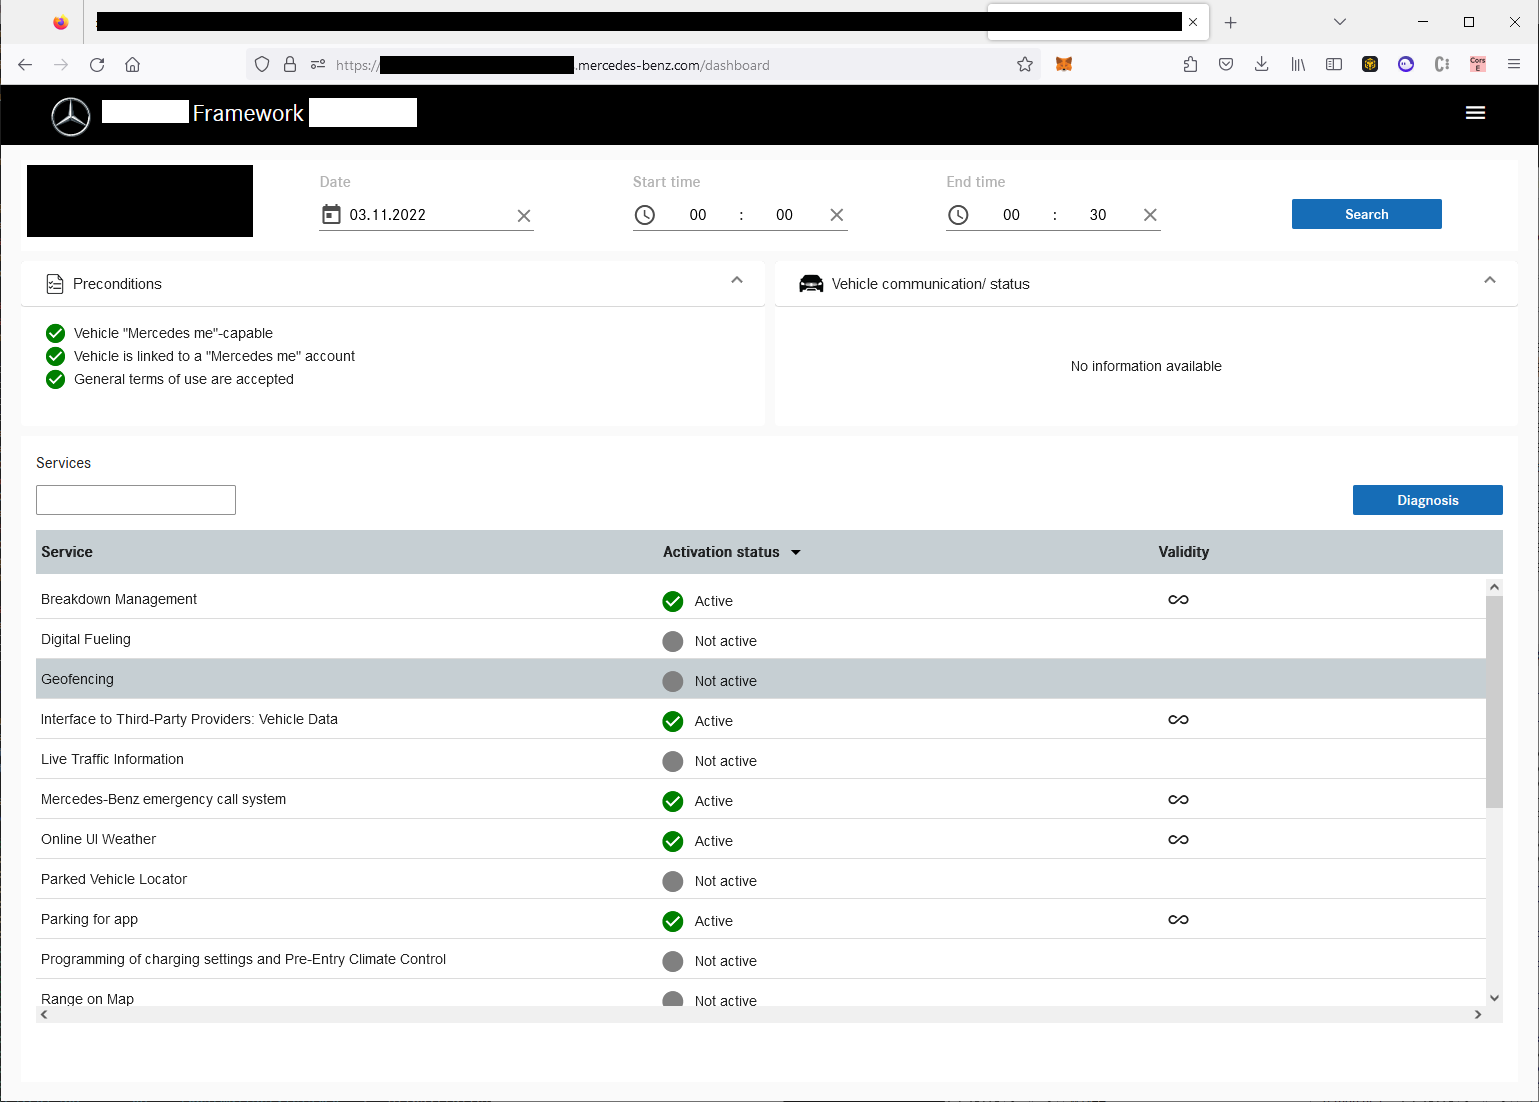
Access to hundreds of mission-critical internal applications via improperly configured SSO, including…
Multiple Github instances behind SSO
Company-wide internal chat tool, ability to join nearly any channel
SonarQube, Jenkins, misc. build servers
Internal cloud deployment services for managing AWS instances
Internal Vehicle related APIs
Remote Code Execution on multiple systems
Memory leaks leading to employee/customer PII disclosure, account access
Hyundai, Genesis
Fully remote lock, unlock, engine start, engine stop, precision locate, flash headlights, and honk vehicles using only the victim email address
Fully remote account takeover and PII disclosure via victim email address (name, phone number, email address, physical address)
Ability to lock users out of remotely managing their vehicle, change ownership
BMW, Rolls Royce
Company-wide core SSO vulnerabilities which allowed us to access any employee application as any employee, allowed us to…
Access to internal dealer portals where you can query any VIN number to retrieve sales documents for BMW
Access any application locked behind SSO on behalf of any employee, including applications used by remote workers and dealerships
Ferrari
Full zero-interaction account takeover for any Ferrari customer account
IDOR to access all Ferrari customer records
Lack of access control allowing an attacker to create, modify, delete employee “back office” administrator user accounts and all user accounts with capabilities to modify Ferrari owned web pages through the CMS system
Ability to add HTTP routes on api.ferrari.com (rest-connectors) and view all existing rest-connectors and secrets associated with them (authorization headers)
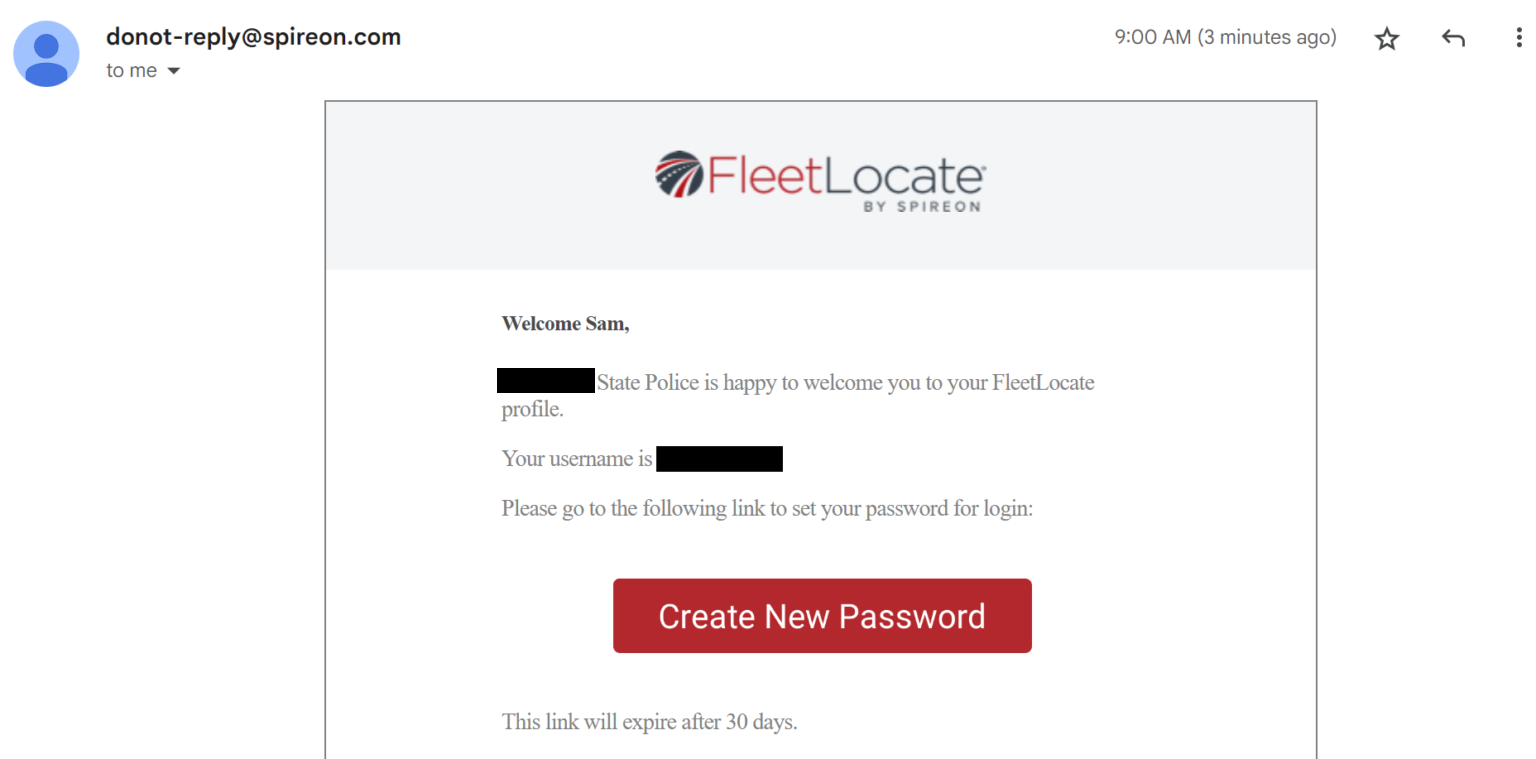
Spireon
Multiple vulnerabilities, including:
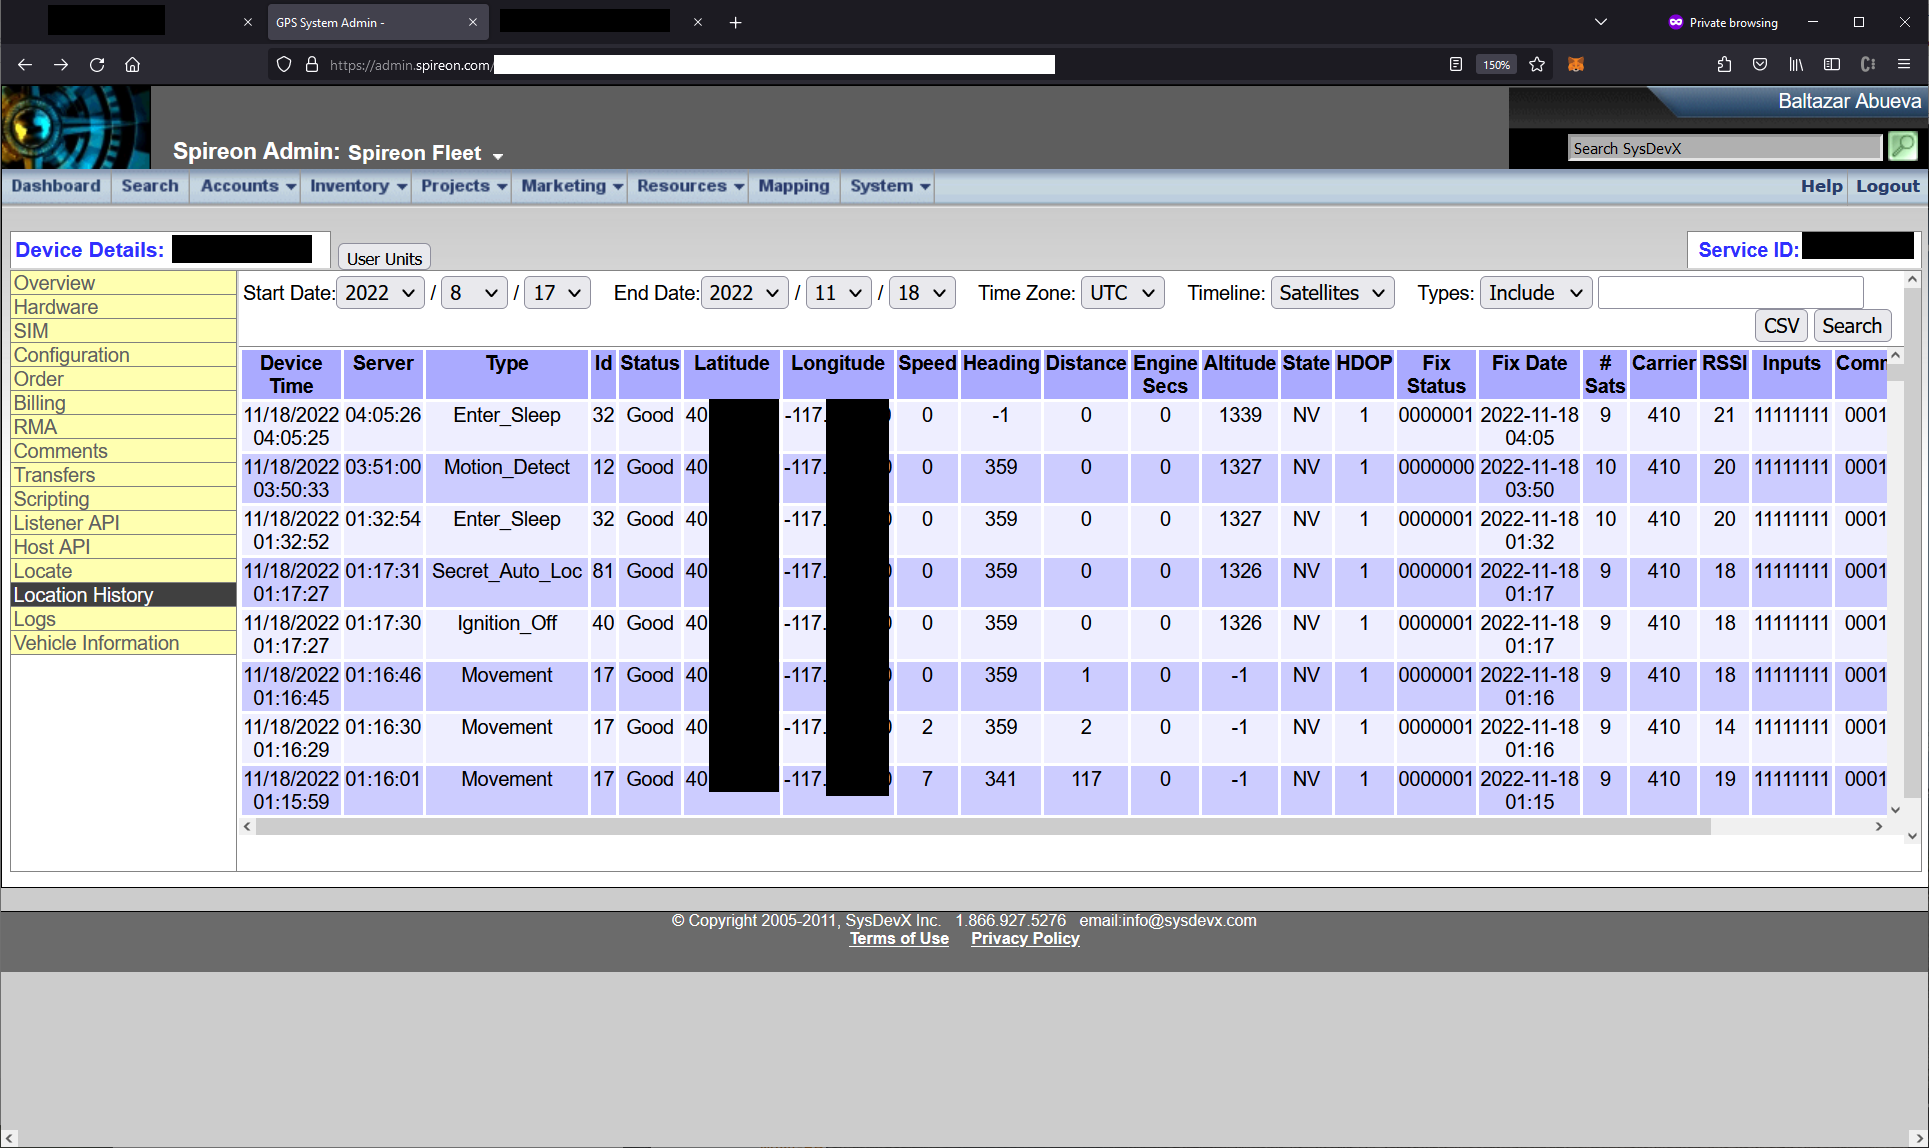
Full administrator access to a company-wide administration panel with ability to send arbitrary commands to an estimated 15.5 million vehicles (unlock, start engine, disable starter, etc.), read any device location, and flash/update device firmware
Remote code execution on core systems for managing user accounts, devices, and fleets. Ability to access and manage all data across all of Spireon
Ability to fully takeover any fleet (this would’ve allowed us to track & shut off starters for police, ambulances, and law enforcement vehicles for a number of different large cities and dispatch commands to those vehicles, e.g. “navigate to this location”)
Full administrative access to all Spireon products, including the following…
1.2 million user accounts (end user accounts, fleet managers, etc.)
Ford
Full memory disclosure on production vehicle Telematics API discloses
Discloses customer PII and access tokens for tracking and executing commands on vehicles
Discloses configuration credentials used for internal services related to Telematics
Ability to authenticate into customer account and access all PII and perform actions against vehicles
Customer account takeover via improper URL parsing, allows an attacker to completely access victim account including vehicle portal
Reviver
Full super administrative access to manage all user accounts and vehicles for all Reviver connected vehicles. An attacker could perform the following:
Track the physical GPS location and manage the license plate for all Reviver customers (e.g. changing the slogan at the bottom of the license plate to arbitrary text)
Update any vehicle status to “STOLEN” which updates the license plate and informs authorities
Access all user records, including what vehicles people owned, their physical address, phone number, and email address
Access the fleet management functionality for any company, locate and manage all vehicles in a fleet
Porsche
Ability to send retrieve vehicle location, send vehicle commands, and retrieve customer information via vulnerabilities affecting the vehicle Telematics service
Toyota
IDOR on Toyota Financial that discloses the name, phone number, email address, and loan status of any Toyota financial customers
Jaguar, Land Rover
User account IDOR disclosing password hash, name, phone number, physical address, and vehicle information
SiriusXM
Leaked AWS keys with full organizational read/write S3 access, ability to retrieve all files including (what appeared to be) user databases, source code, and config files for Sirius
Vulnerability Writeups
(1) Full Account Takeover on BMW and Rolls Royce via Misconfigured SSO
While testing BMW assets, we identified a custom SSO portal for employees and contractors of BMW. This was super interesting to us, as any vulnerabilities identified here could potentially allow an attacker to compromise any account connected to all of BMWs assets.
For instance, if a dealer wanted to access the dealer portal at a physical BMW dealership, they would have to authenticate through this portal. Additionally, this SSO portal was used to access internal tools and related devops infrastructure.
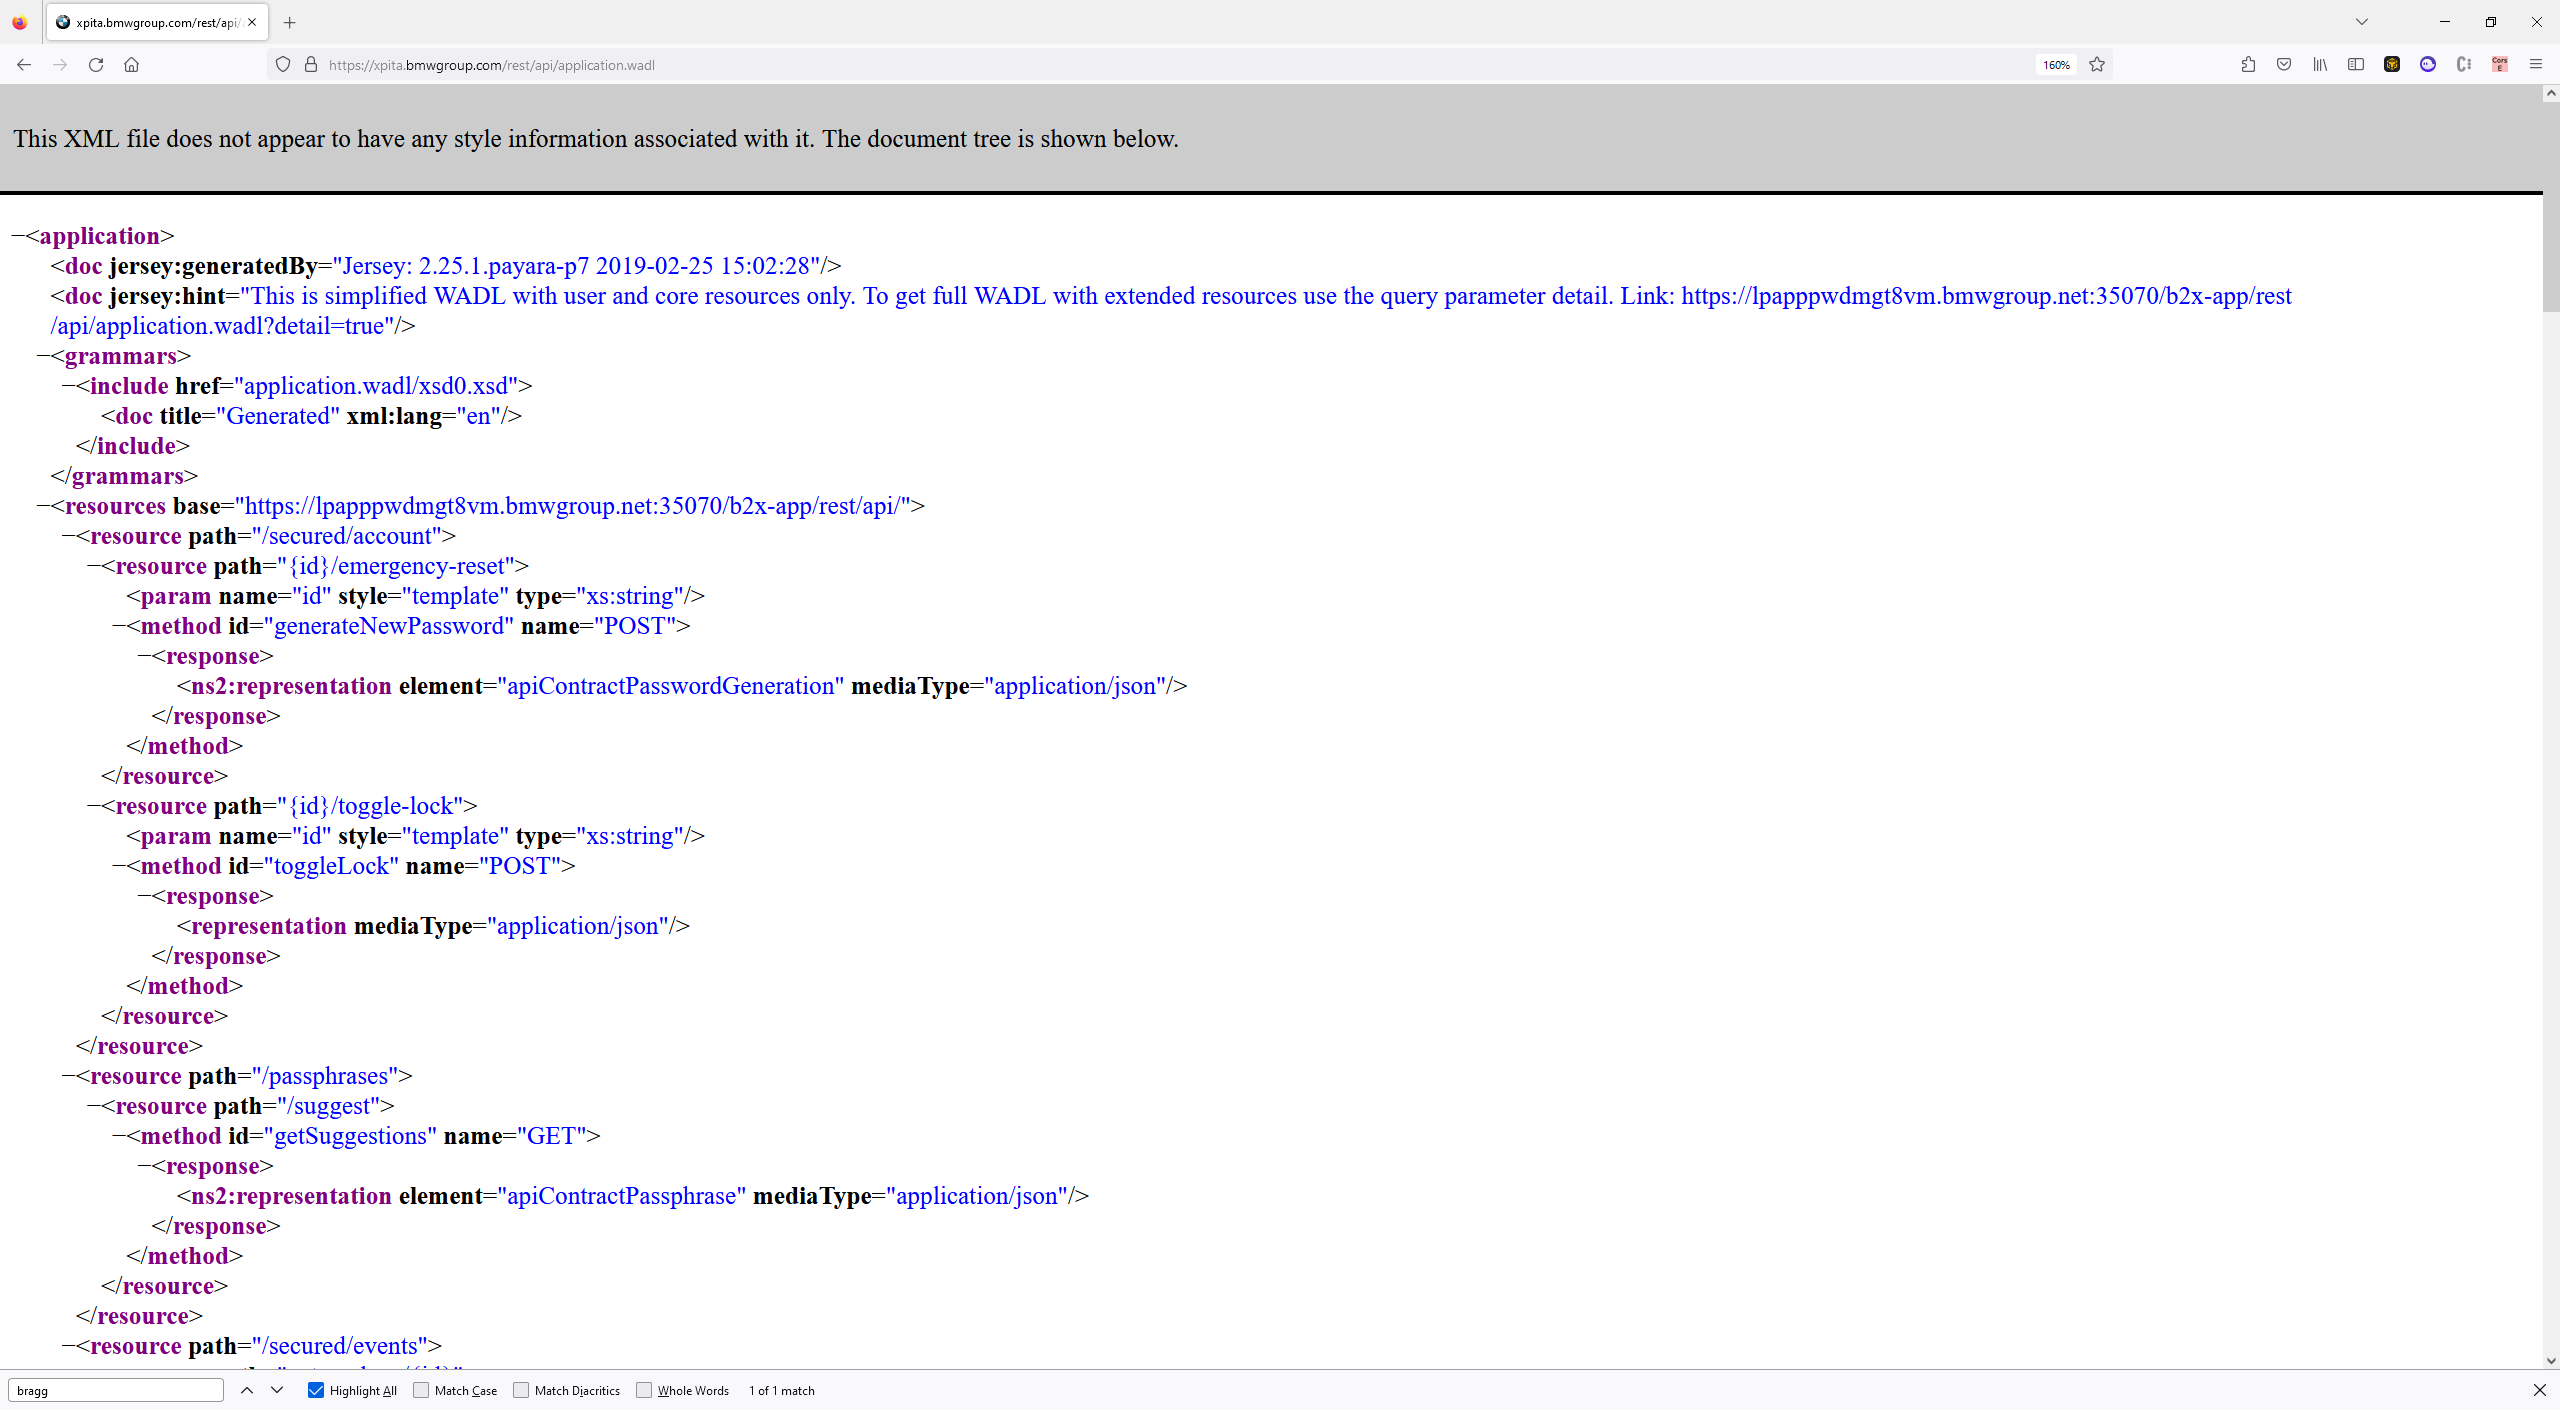
The first thing we did was fingerprint the host using OSINT tools like gau and ffuf. After a few hours of fuzzing, we identified a WADL file which exposed API endpoints on the host via sending the following HTTP request:
GET /rest/api/application.wadl HTTP/1.1
Host: xpita.bmwgroup.com
The HTTP response contained all available REST endpoints on the xpita host. We began enumerating the endpoints and sending mock HTTP requests to see what functionality was available.
One immediate finding was that we were able to query all BMW user accounts via sending asterisk queries in the user field API endpoint. This allowed us to enter something like “sam*” and retrieve the user information for a user named “sam.curry” without having to guess the actual username.
HTTP Request
GET /reset/api/users/example* HTTP/1.1
Host: xpita.bmwgroup.com
HTTP Response
HTTP/1.1 200 OK
Content-type: application/json

{“id”:”redacted”,”firstName”:”Example”,”lastName”:”User”,”userName”:”example.user”}
Once we found this vulnerability, we continued testing the other accessible API endpoints. One particularly interesting one which stood out immediately was the “/rest/api/chains/accounts/:user_id/totp” endpoint. We noticed the word “totp” which usually stood for one-time password generation.
When we sent an HTTP request to this endpoint using the SSO user ID gained from the wildcard query paired with the TOTP endpoint, it returned a random 7-digit number. The following HTTP request and response demonstrate this behavior:
HTTP Request
GET /rest/api/chains/accounts/unique_account_id/totp HTTP/1.1
Host: xpita.bmwgroup.com
HTTP Response
HTTP/1.1 200 OK
Content-type: text/plain

9373958
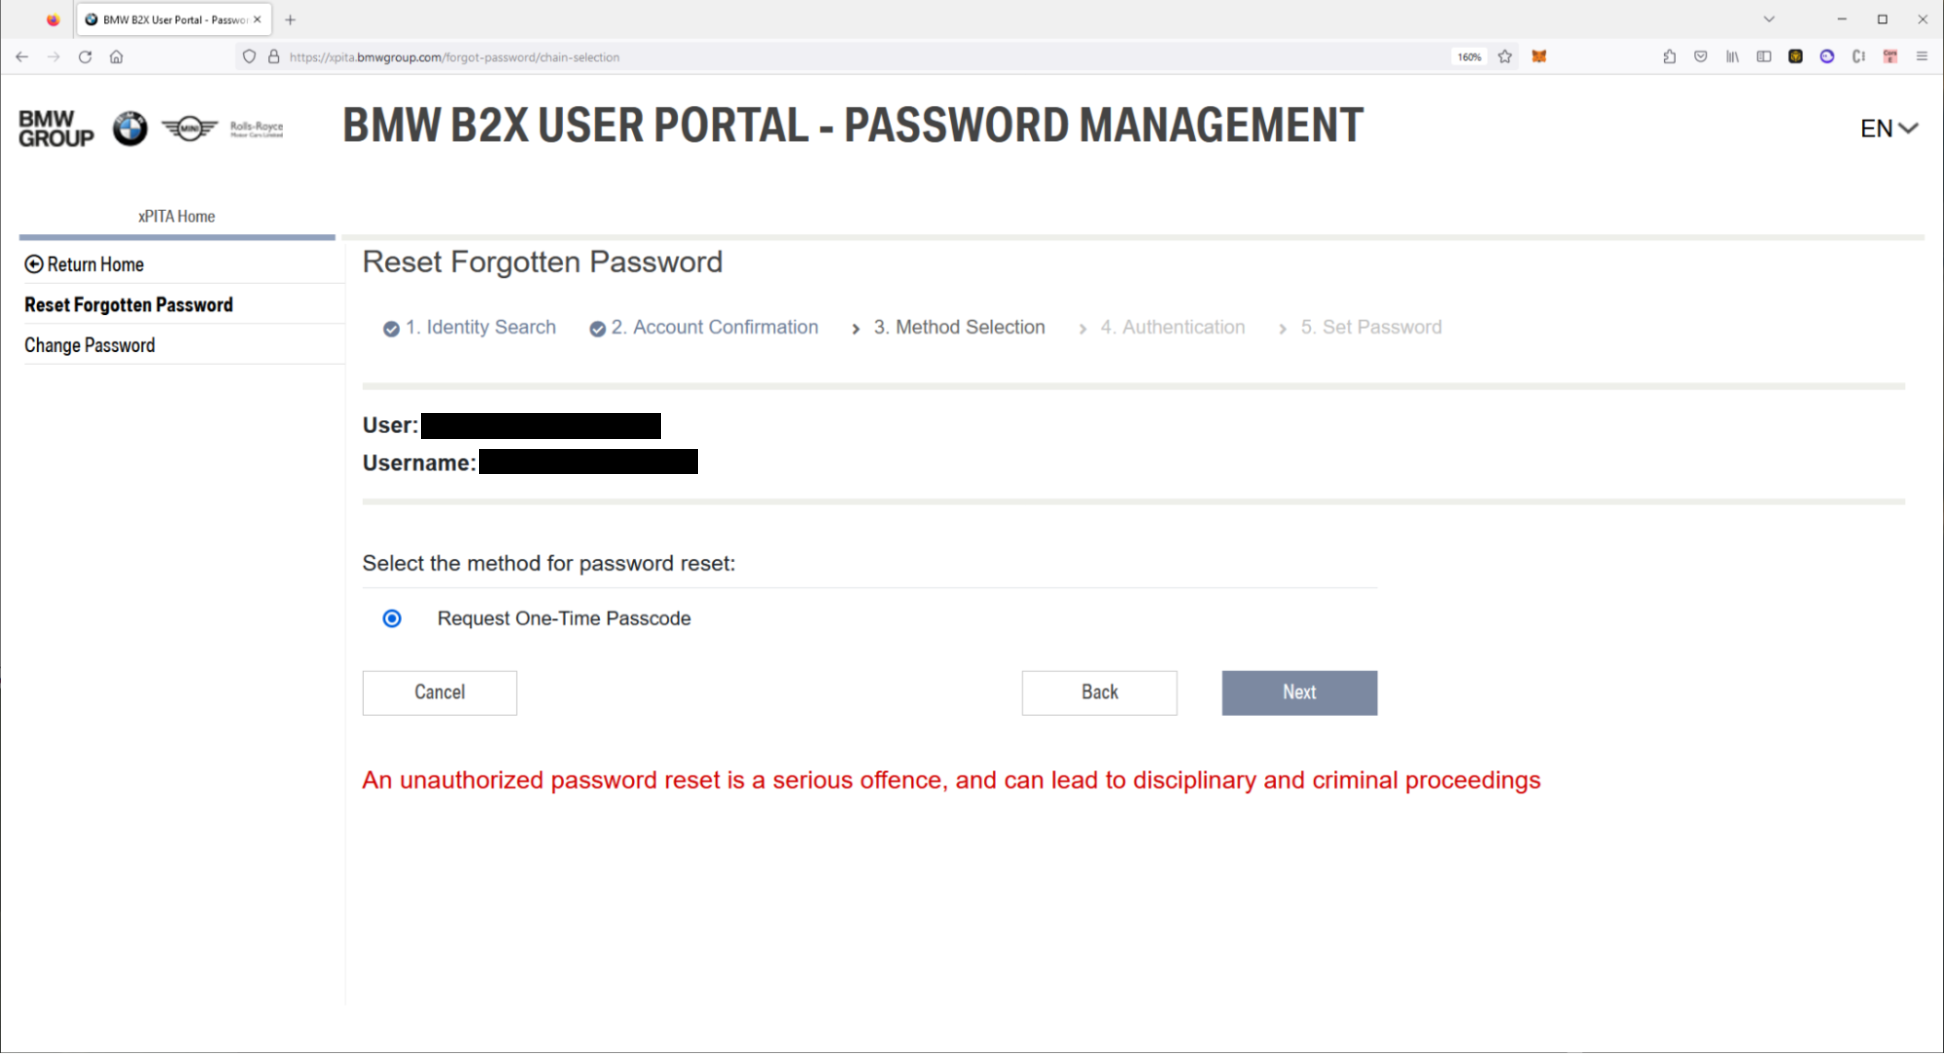
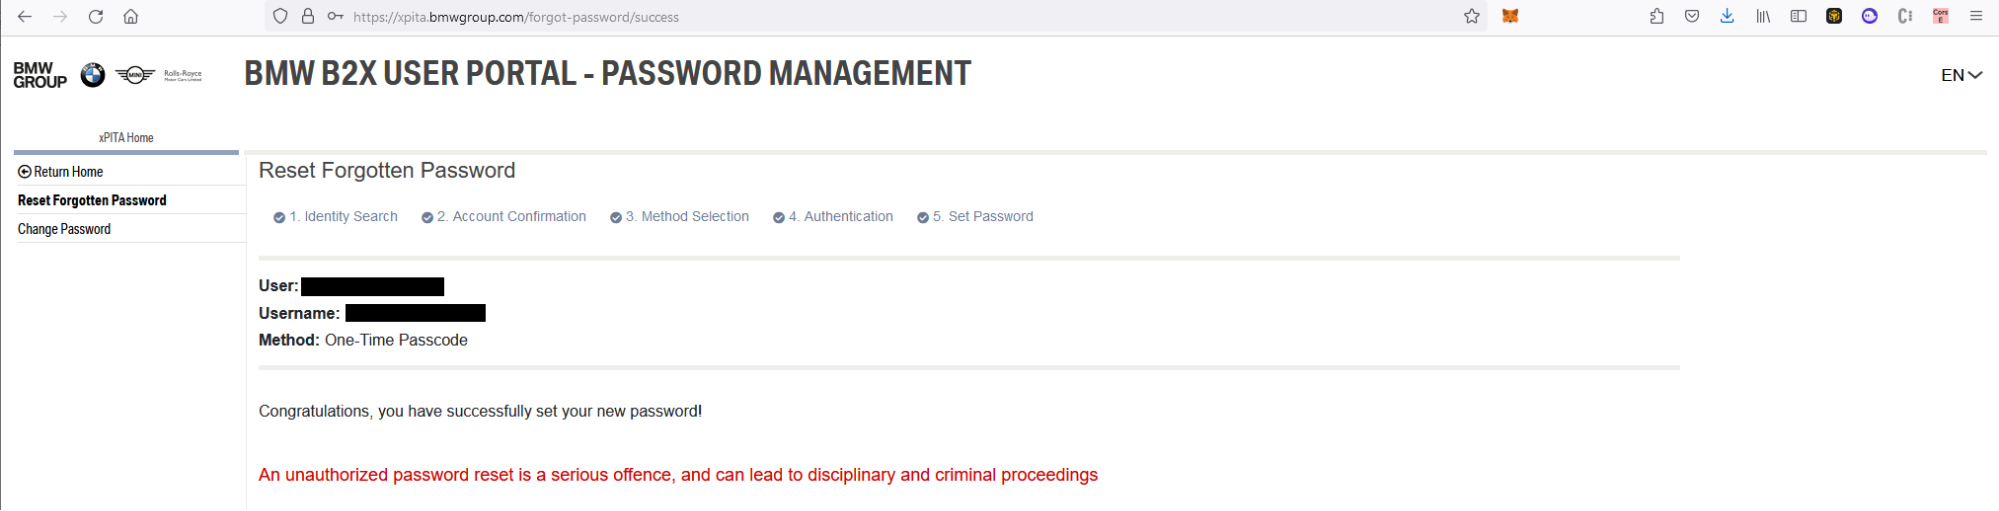
For whatever reason, it appeared that this HTTP request would generate a TOTP for the user’s account. We guessed that this interaction worked with the “forgot password” functionality, so we found an example user account by querying “example*” using our original wildcard finding and retrieving the victim user ID. After retrieving this ID, we initiated a reset password attempt for the user account until we got to the point where the system requested a TOTP code from the user’s 2FA device (e.g. email or phone).
At this point, we retrieved the TOTP code generated from the API endpoint and entered it into the reset password confirmation field.
It worked! We had reset a user account, gaining full account takeover on any BMW employee and contractor user.
At this point, it was possible to completely take over any BMW or Rolls Royce employee account and access tools used by those employees.
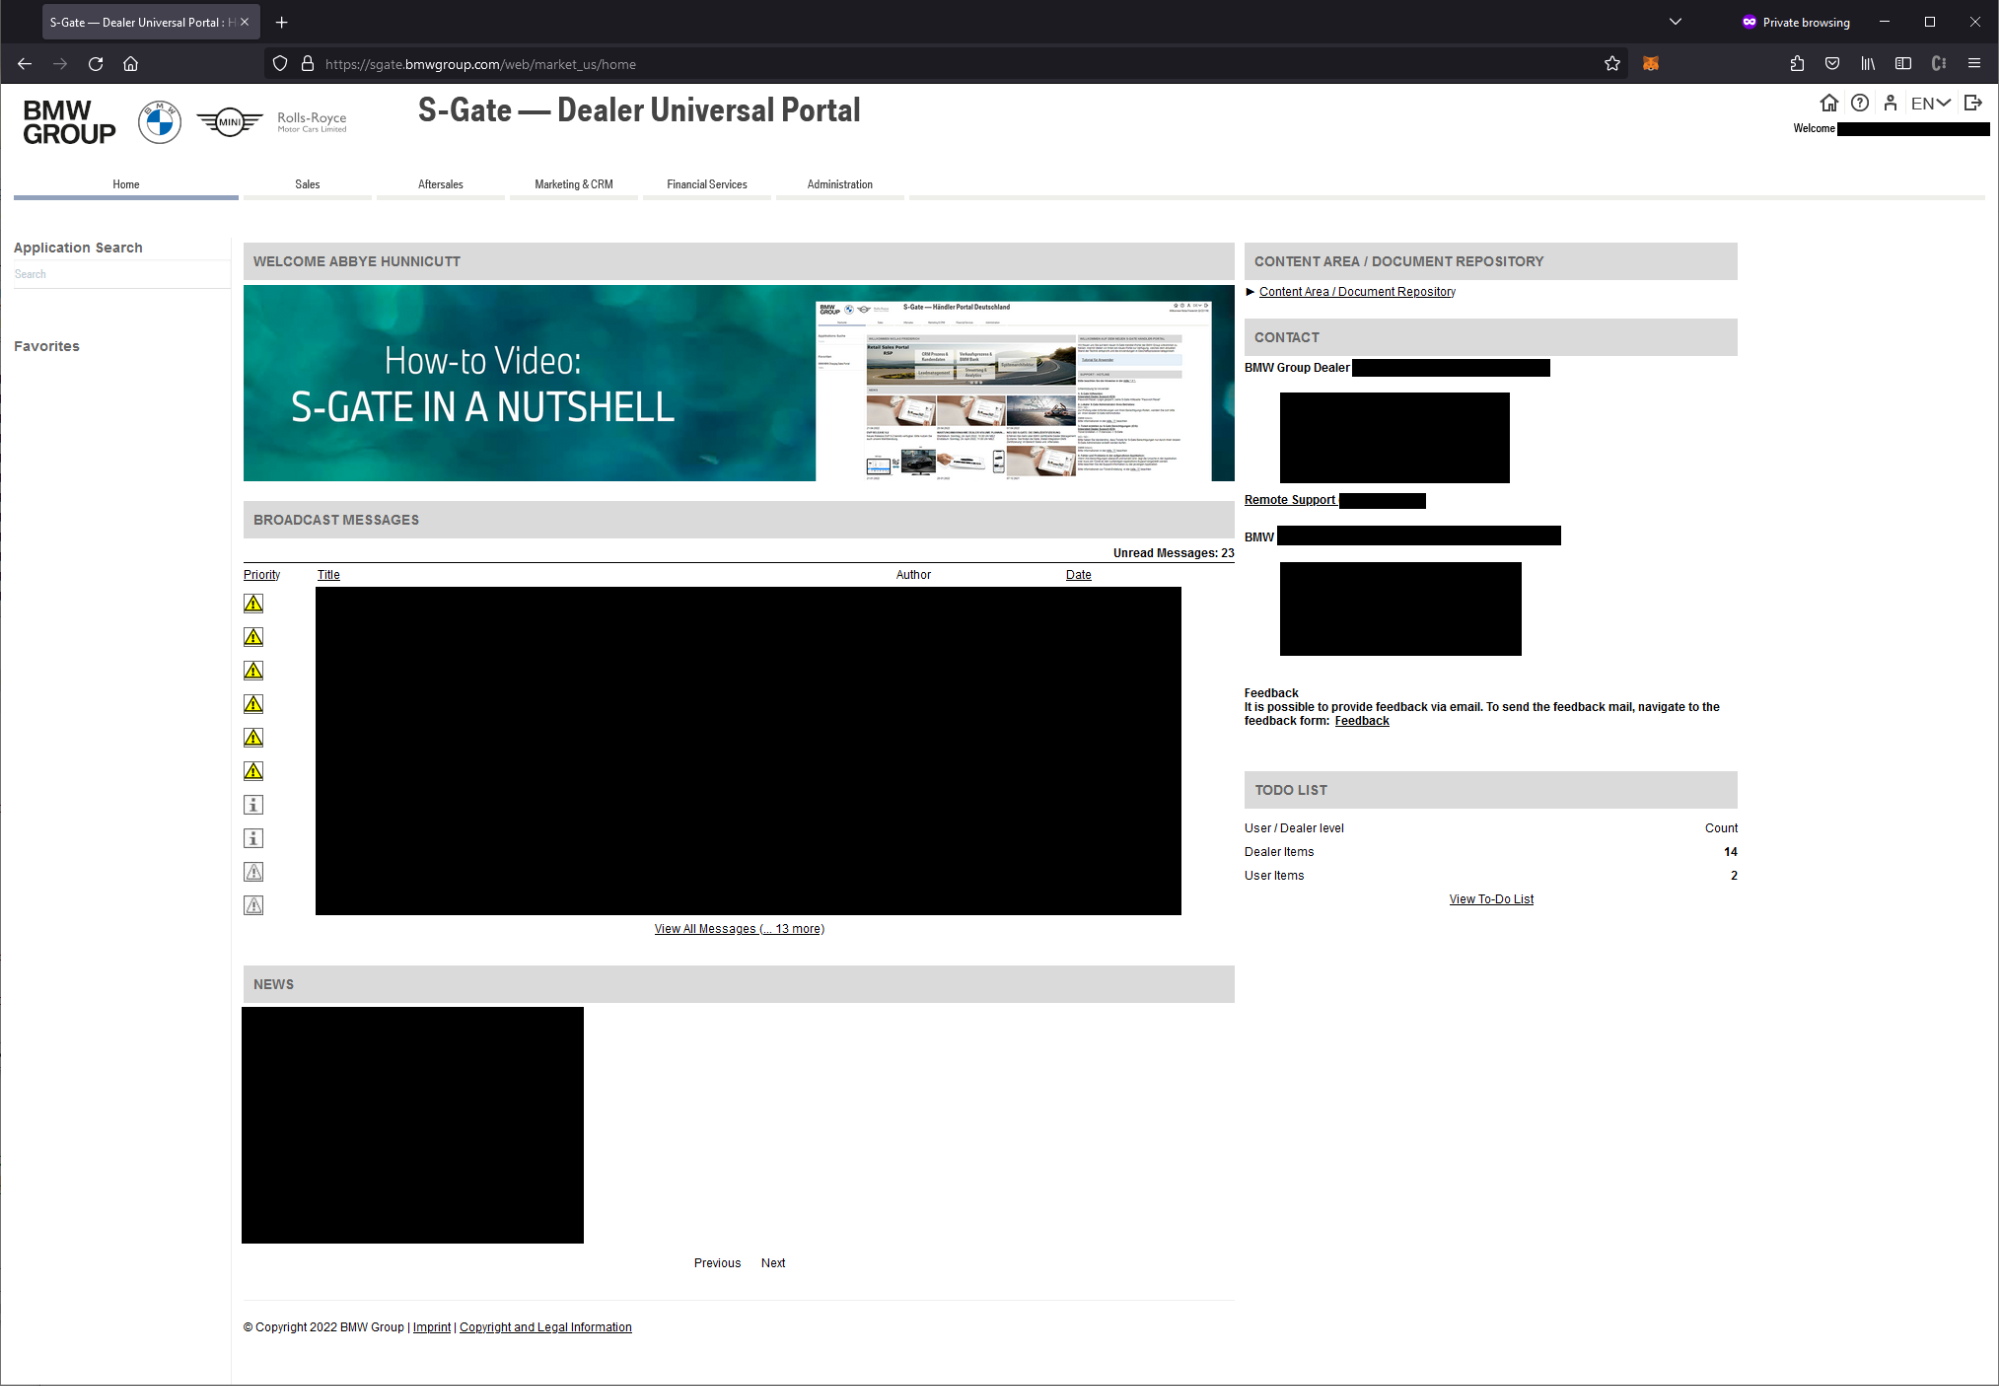
To demonstrate the impact of the vulnerability, we simply Googled “BMW dealer portal” and used our account to access the dealer portal used by sales associates working at physical BMW and Rolls Royce dealerships.
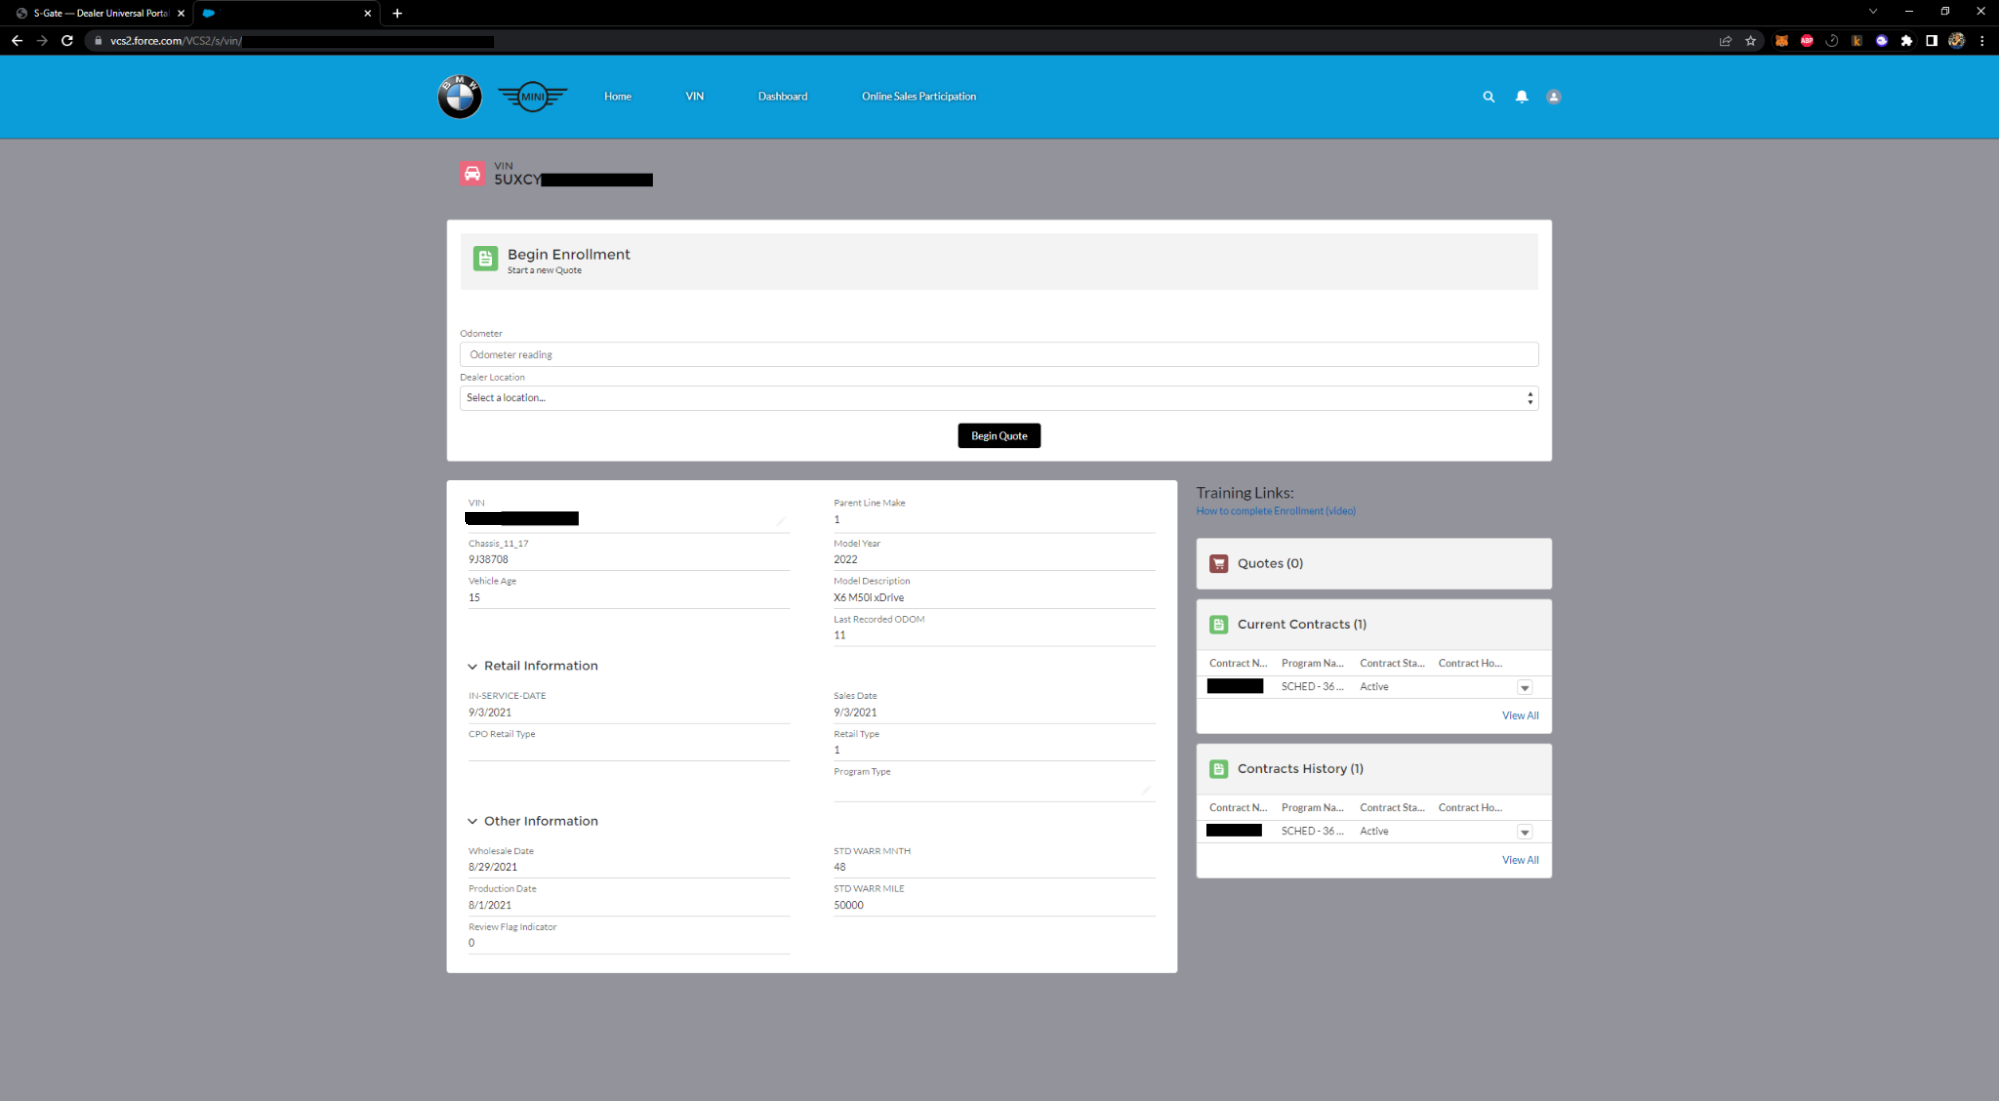
After logging in, we observed that the demo account we took over was tied to an actual dealership, and we could access all of the functionality that the dealers themselves had access to. This included the ability to query a specific VIN number and retrieve sales documents for the vehicle.
With our level of access, there was a huge amount of functionality we could’ve performed against BMW and Rolls Royce customer accounts and customer vehicles. We stopped testing at this point and reported the vulnerability.
The vulnerabilities reported to BMW and Rolls Royce have since been fixed.
(2) Remote Code Execution and Access to Hundreds of Internal Tools on Mercedes-Benz and Rolls Royce via Misconfigured SSO
Early in our testing, someone in our group had purchased a Mercedes-Benz vehicle and so we began auditing the Mercedes-Benz infrastructure. We took the same approach as BMW and began testing the Mercedes-Benz employee SSO.
We weren’t able to find any vulnerabilities affecting the SSO portal itself, but by exploring the SSO website we observed that they were running some form of LDAP for the employee accounts. Based on our high level understanding of their infrastructure, we guessed that the individual employee applications used a centralized LDAP system to authenticate users. We began exploring each of these websites in an attempt to find a public registration so we could gain SSO credentials to access, even at a limited level, the employee applications.
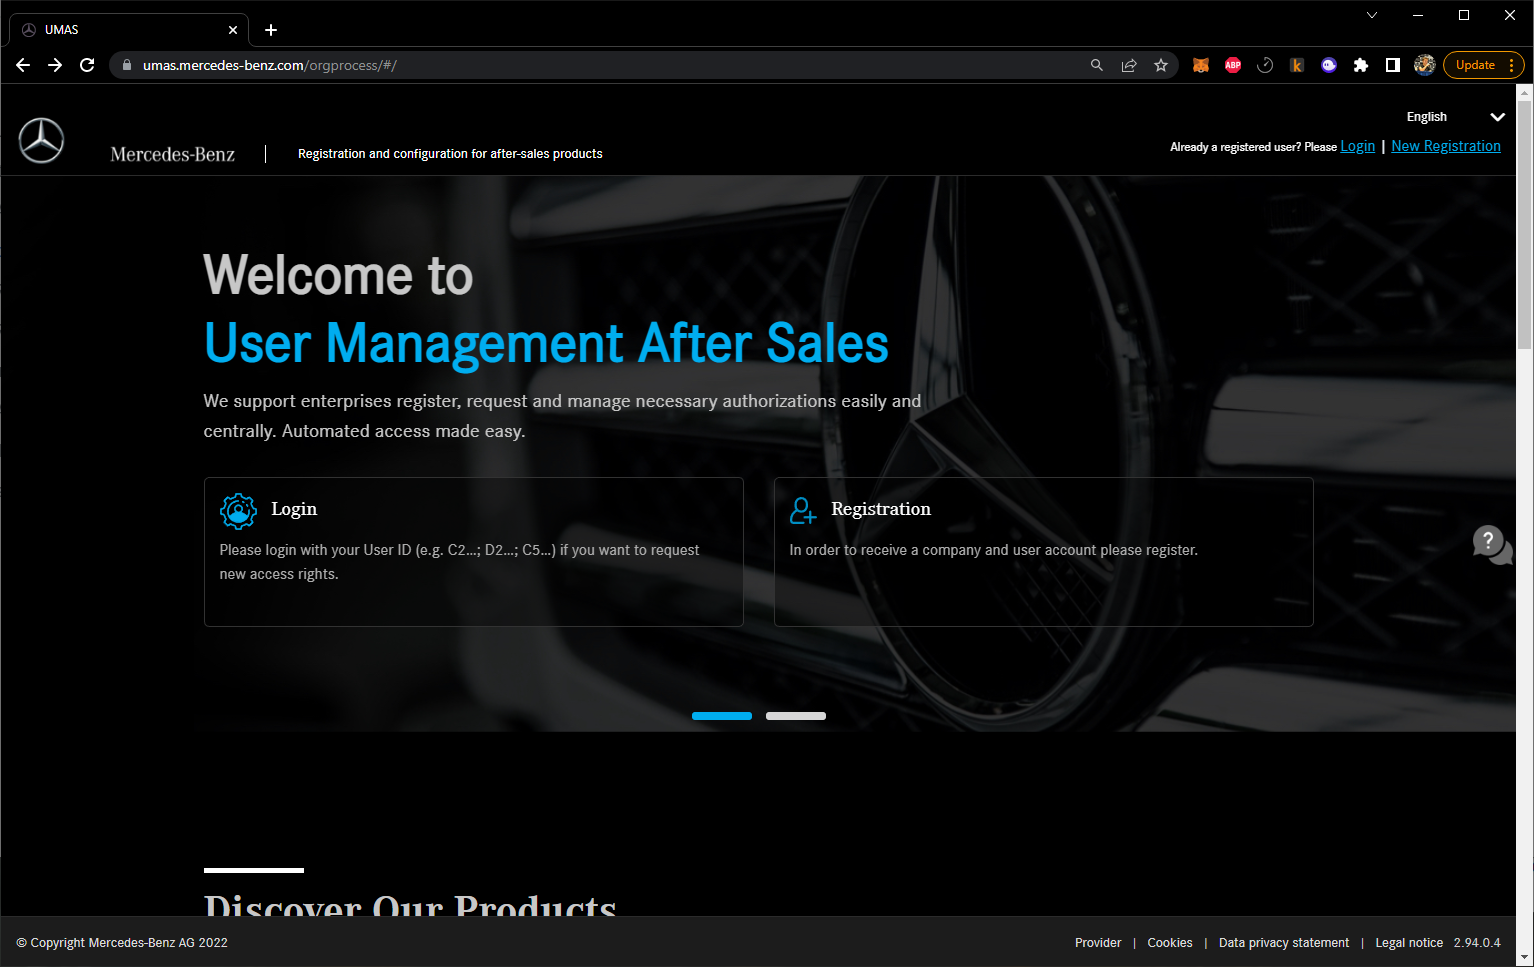
After fuzzing random sites for a while, we eventually found the “umas.mercedes-benz.com” website which was built for vehicle repair shops to request specific tools access from Mercedes-Benz. The website had public registration enabled as it was built for repair shops and appeared to write to the same database as the core employee LDAP system.
We filled out all the required fields for registration, created a user account, then used our recon data to identify sites which redirected to the Mercedes-Benz SSO. The first one we attempted was a pretty obvious employee tool, it was “git.mercedes-benz.com”, short for Github. We attempted to use our user credentials to sign in to the Mercedes-Benz Github and saw that we were able to login. Success!
The Mercedes-Benz Github, after authenticating, asked us to set up 2FA on our account so we could access the app. We installed the 2FA app and added it to our account, entered our code, then saw that we were in. We had access to “git.mercedes-benz.com” and began looking around.
After a few minutes, we saw that the Github instance had internal documentation and source code for various Mercedes-Benz projects including the Mercedes Me Connect app which was used by customers to remotely connect to their vehicles. The internal documentation gave detailed instructions for employees to follow if they wanted to build an application for Mercedes-Benz themselves to talk to customer vehicles and the specific steps one would have to take to talk to customer vehicles.
At this point, we reported the vulnerability, but got some pushback after a few days of waiting on an email response. The team seemed to misunderstand the impact, so they asked us to demonstrate further impact.
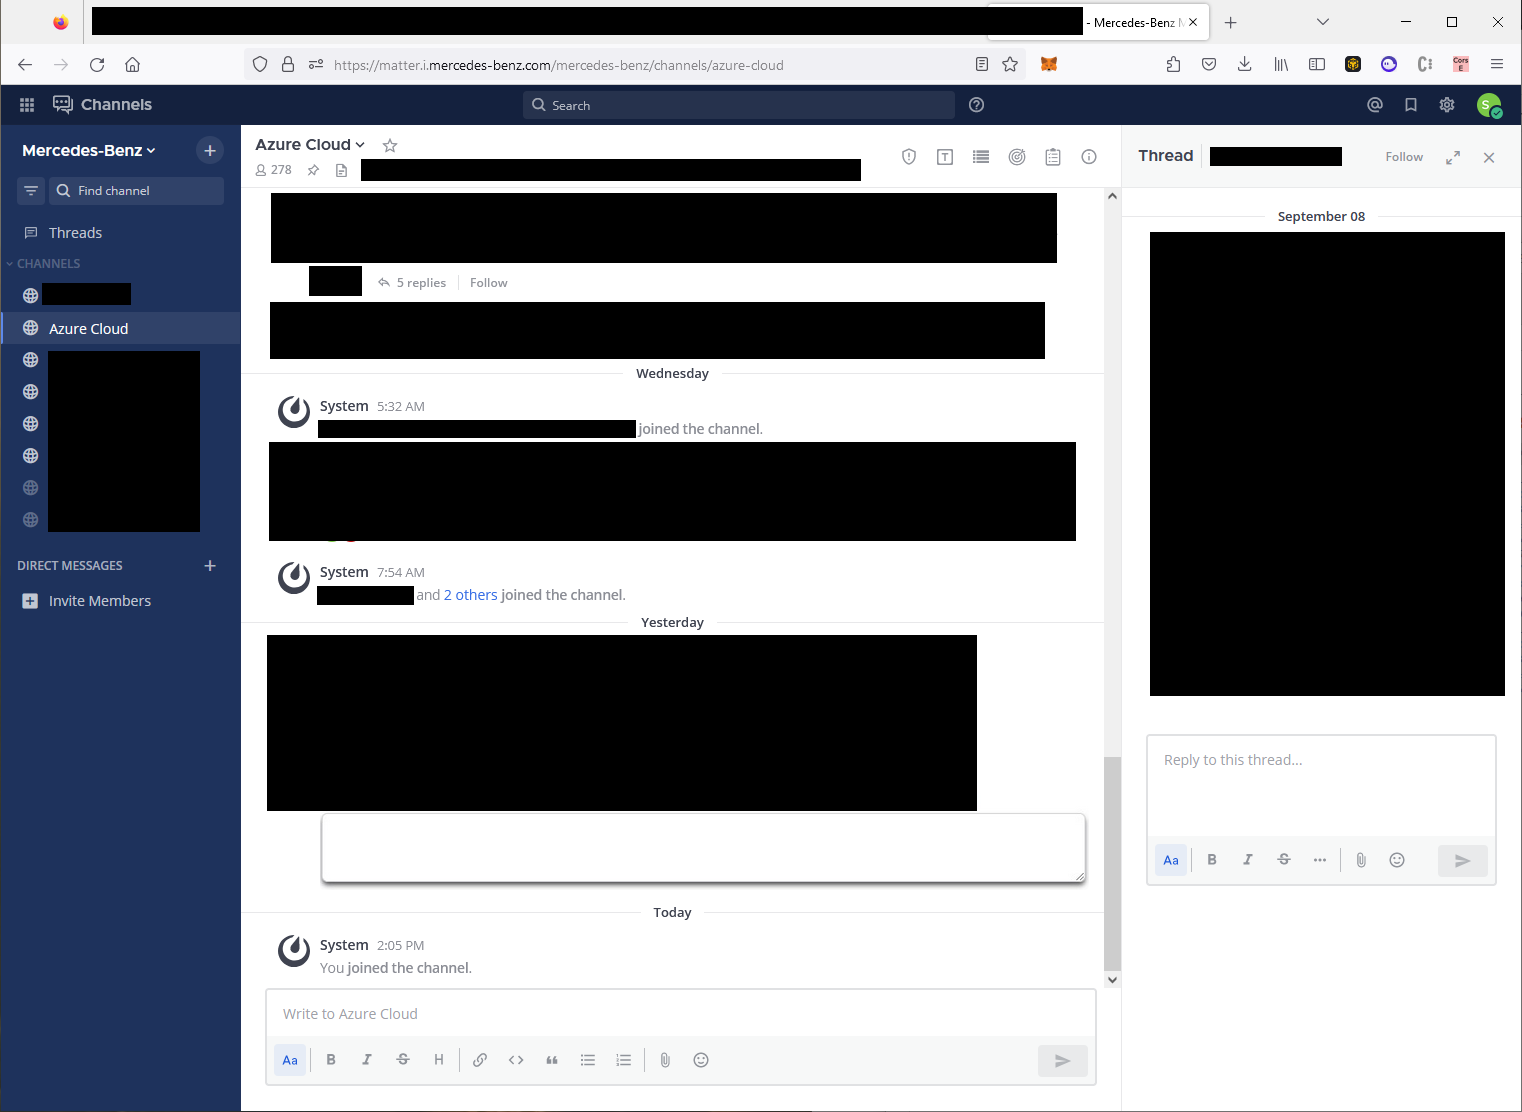
We used our employee account to login to numerous applications which contained sensitive information and achieved remote code execution via exposed actuators, spring boot consoles, and dozens of sensitive internal applications used by Mercedes-Benz employees. One of these applications was the Mercedes-Benz Mattermost (basically Slack). We had permission to join any channel, including security channels, and could pose as a Mercedes-Benz employee who could ask whatever questions necessary for an actual attacker to elevate their privileges across the Benz infrastructure.
To give an overview, we could access the following services:
Multiple employee-only Githubs with sensitive information containing documentation and configuration files for multiple applications across the Mercedes-Benz infrastructure
Spring boot actuators which lead to remote code execution, information disclosure, on sensitive employee and customer facing applications Jenkins instances
AWS and cloud-computing control panels where we could request, manage, and access various internal systems
XENTRY systems used to communicate with customer vehicles
Internal OAuth and application-management related functionality for configuring and managing internal apps
Hundreds of miscellaneous internal services
(3) Full Account Takeover on Ferrari and Arbitrary Account Creation allows Attacker to Access, Modify, and Delete All Customer Information and Access Administrative CMS Functionality to Manage Ferrari Websites
When we began targeting Ferrari, we mapped out all domains under the publicly available domains like “ferrari.com” and browsed around to see what was accessible. One target we found was “api.ferrari.com”, a domain which offered both customer facing and internal APIs for Ferrari systems. Our goal was to get the highest level of access possible for this API.
We analyzed the JavaScript present on several Ferrari subdomains that looked like they were for use by Ferrari dealers. These subdomains included `cms-dealer.ferrari.com`, `cms-new.ferrari.com` and `cms-dealer.test.ferrari.com`.
One of the patterns we notice when testing web applications is poorly implemented single sign on functionality which does not restrict access to the underlying application. This was the case for the above subdomains. It was possible to extract the JavaScript present for these applications, allowing us to understand the backend API routes in use.
When reverse engineering JavaScript bundles, it is important to check what constants have been defined for the application. Often these constants contain sensitive credentials or at the very least, tell you where the backend API is, that the application talks to.
For this application, we noticed the following constants were set:
From the above constants we can understand that the base API URL is `https://api.ferrari.com/cms/dws/back-office/` and a potential API key for this API is `REDACTED`.
Digging further into the JavaScript we can look for references to `apiUrl` which will inform us as to how this API is called and how the API key is being used. For example, the following JavaScript sets certain headers if the API URL is being called:
})).url.startsWith(x.a.apiUrl) && !["/back-office/dealers", "/back-office/dealer-settings", "/back-office/locales", "/back-office/currencies", "/back-office/dealer-groups"].some(t => !!e.url.match(t)) && (e = (e = e.clone({
                                    headers: e.headers.set("Authorization", "" + (s || void 0))
                                })).clone({
                                    headers: e.headers.set("x-api-key", "" + a)
                                }));
All the elements needed for this discovery were conveniently tucked away in this JavaScript file. We knew what backend API to talk to and its routes, as well as the API key we needed to authenticate to the API.
Within the JavaScript, we noticed an API call to `/cms/dws/back-office/auth/bo-users`. When requesting this API through Burp Suite, it leaked all of the users registered for the Ferrari Dealers application. Furthermore, it was possible to send a POST request to this endpoint to add ourselves as a super admin user.
While impactful, we were still looking for a vulnerability that affected the broader Ferrari ecosystem and every end user. Spending more time deconstructing the JavaScript, we found some API calls were being made to `rest-connectors`:
The following request unlocked the final piece in the puzzle. Sending the following request revealed a treasure trove of API credentials for Ferrari: :
GET /cms/dws/back-office/rest-connector-models HTTP/1.1
To explain what this endpoint’s purpose was: Ferrari had configured a number of backend APIs that could be communicated with by hitting specific paths. When hitting this API endpoint, it returned this list of API endpoints, hosts and authorization headers (in plain text).
This information disclosure allowed us to query Ferrari’s production API to access the personal information of any Ferrari customer. In addition to being able to view these API endpoints, we could also register new rest connectors or modify existing ones.
HTTP Request
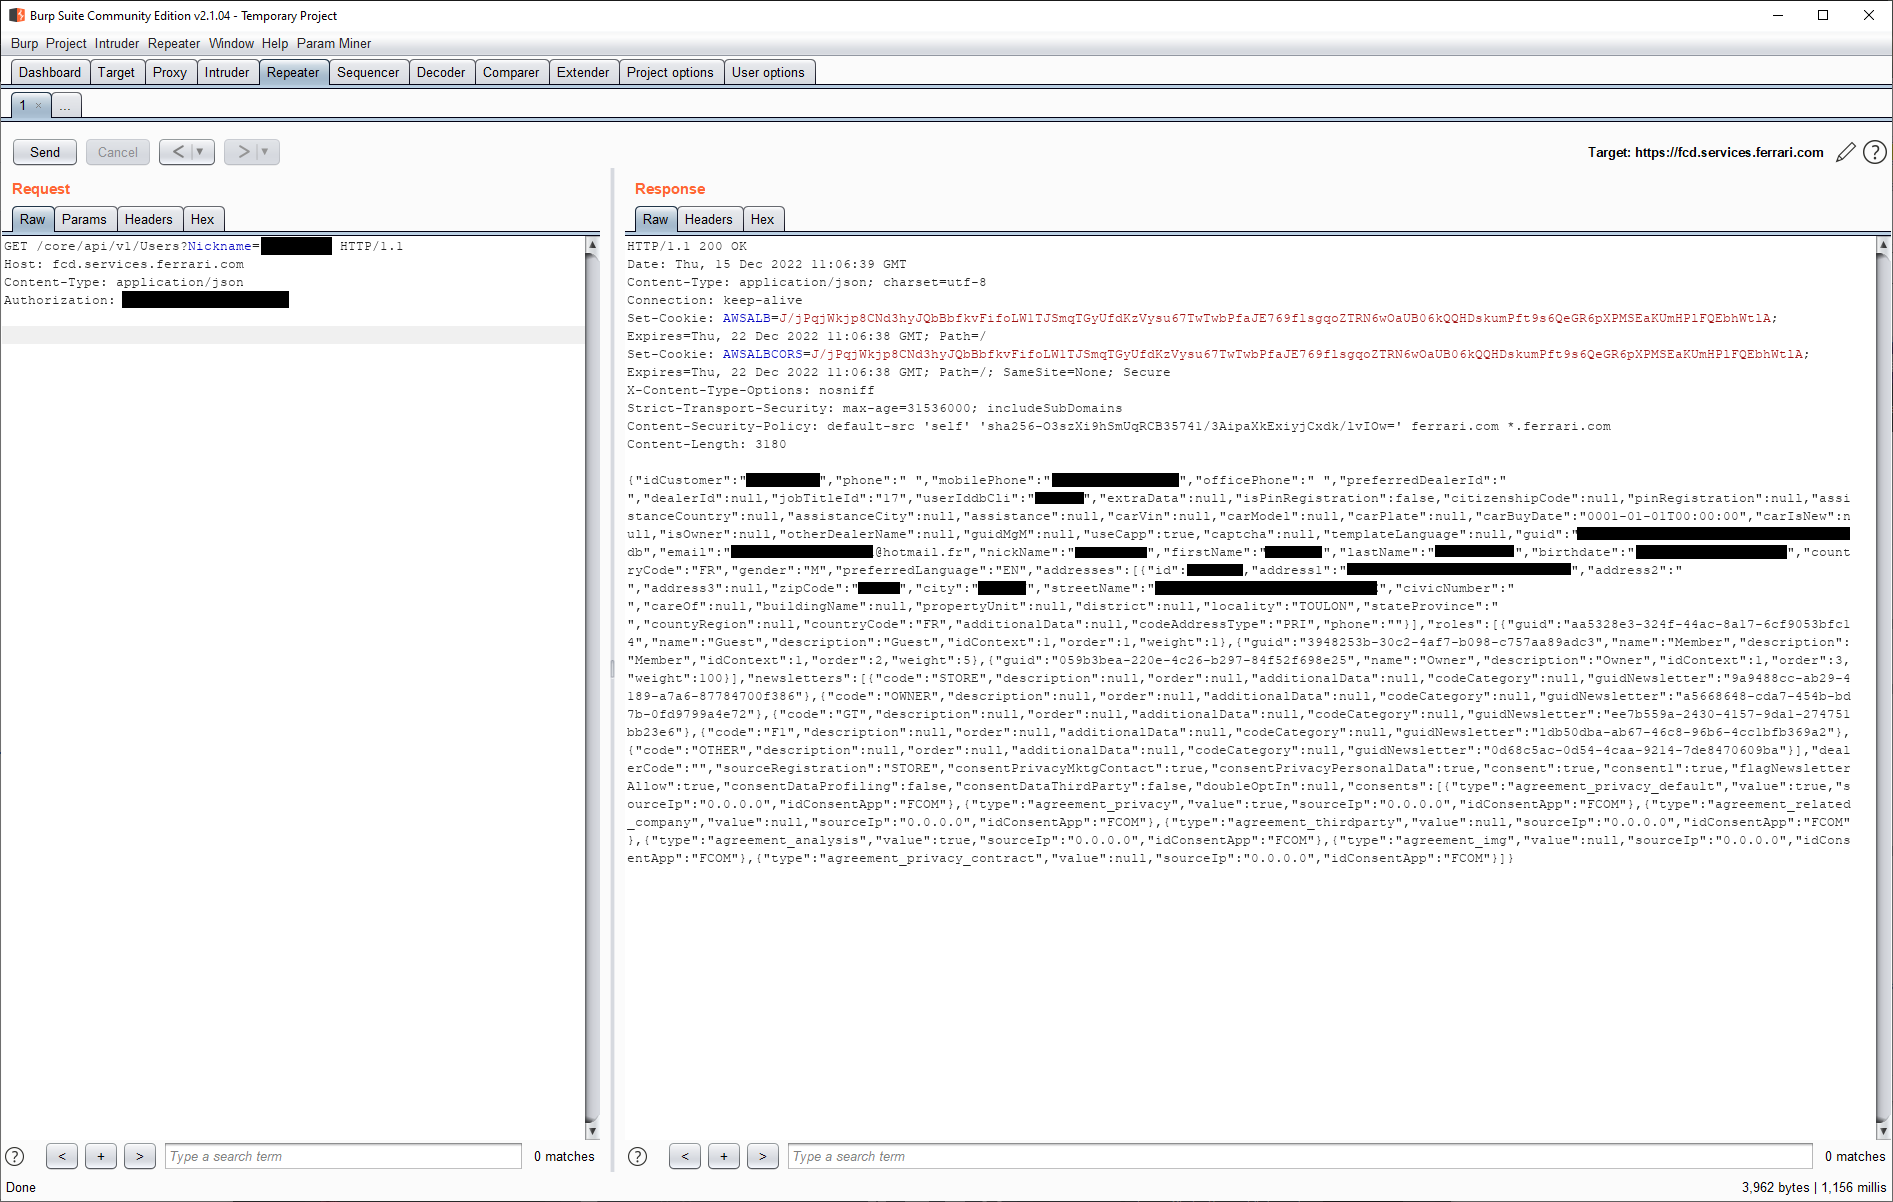
GET /core/api/v1/Users?email=ian@ian.sh HTTP/1.1
Host: fcd.services.ferrari.com
HTTP Response
HTTP/1.1 200 OK
Content-type: application/json

…"guid":"2d32922a-28c4-483e-8486-7c2222b7b59c","email":"ian@ian.sh","nickName":"ian@ian.sh","firstName":"Ian","lastName":"Carroll","birthdate":"1963-12-11T00:00:00"…
The API key and production endpoints that were disclosed using the previous staging API key allowed an attacker to access, create, modify, and delete any production user account. It additionally allowed an attacker to query users via email address or nickname.
Additionally, an attacker could POST to the “/core/api/v1/Users/:id/Roles” endpoint to edit their user roles, setting themselves to have super-user permissions or become a Ferrari owner.
This vulnerability would allow an attacker to access, modify, and delete any Ferrari customer account with access to manage their vehicle profile.
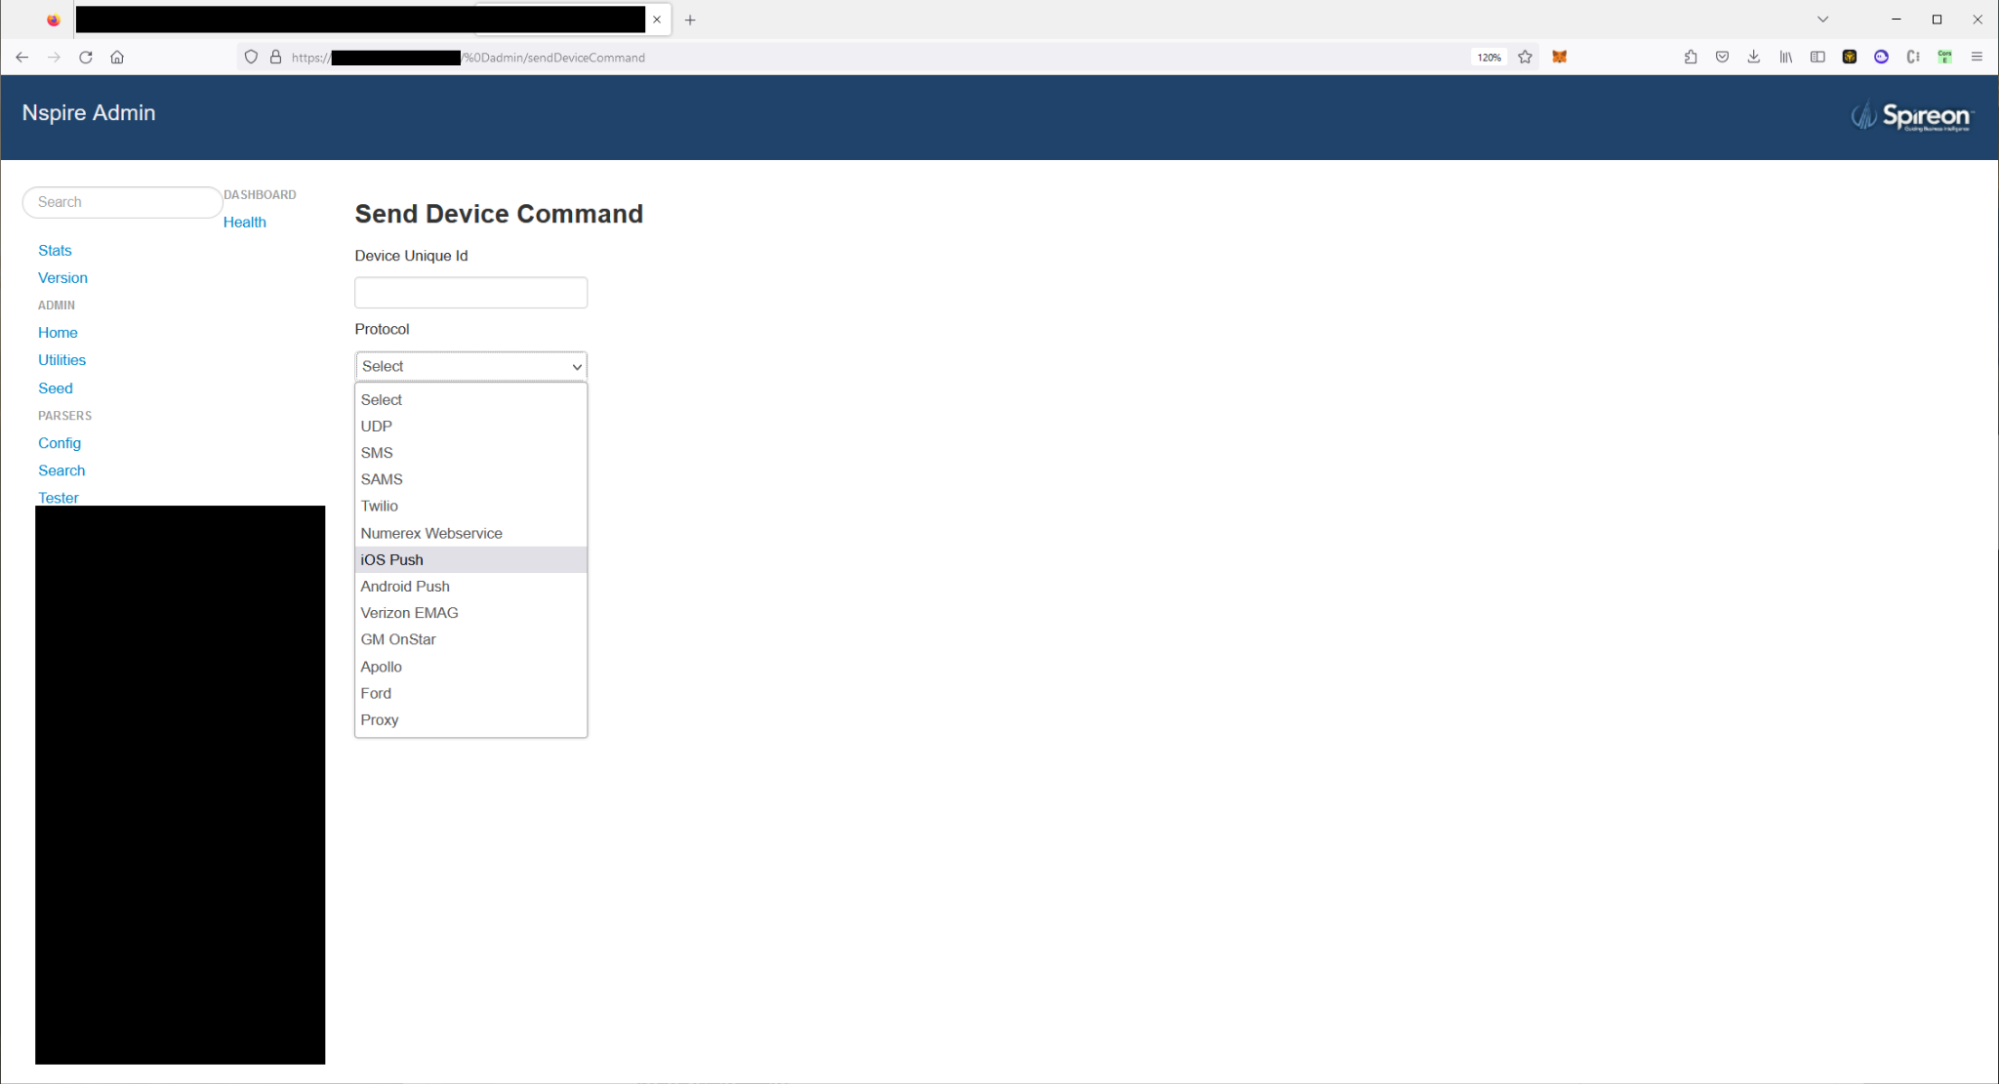
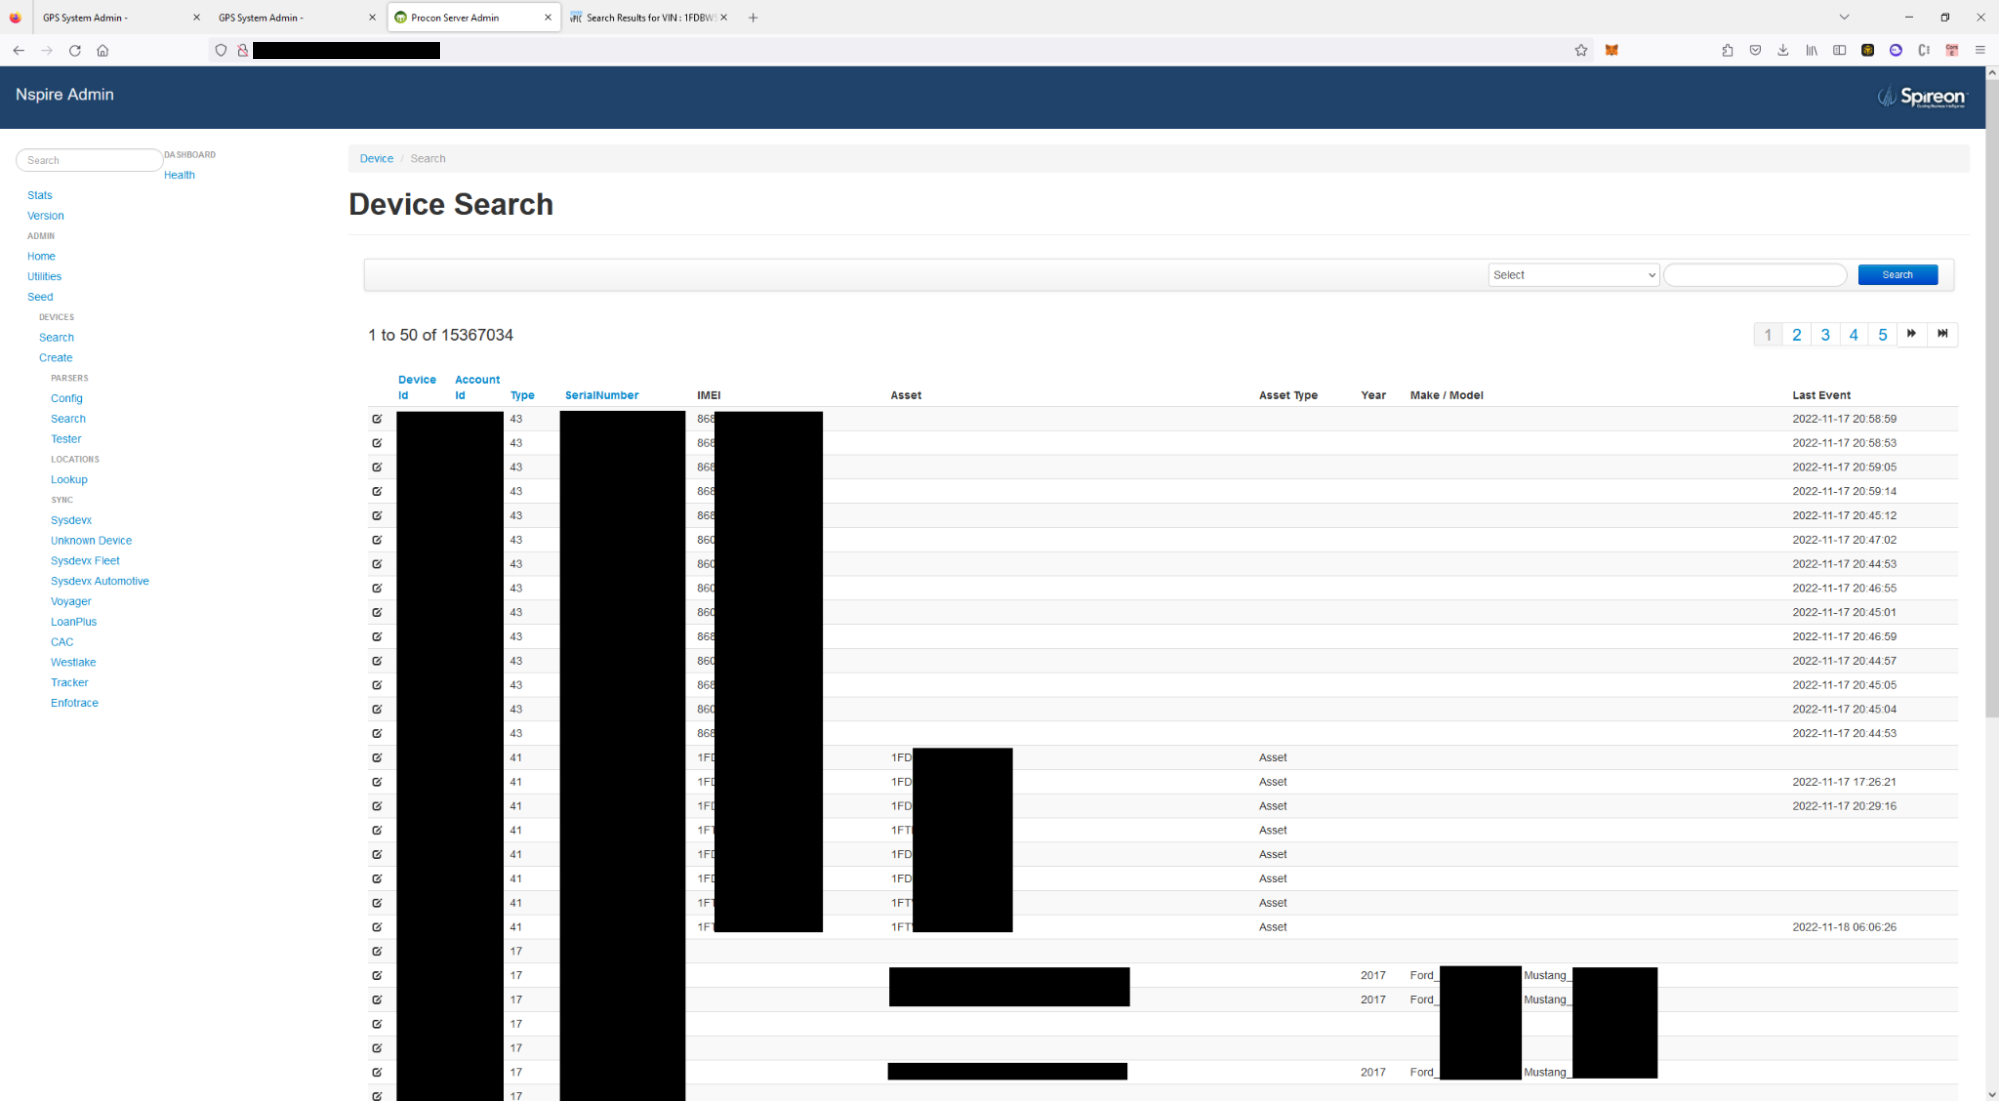
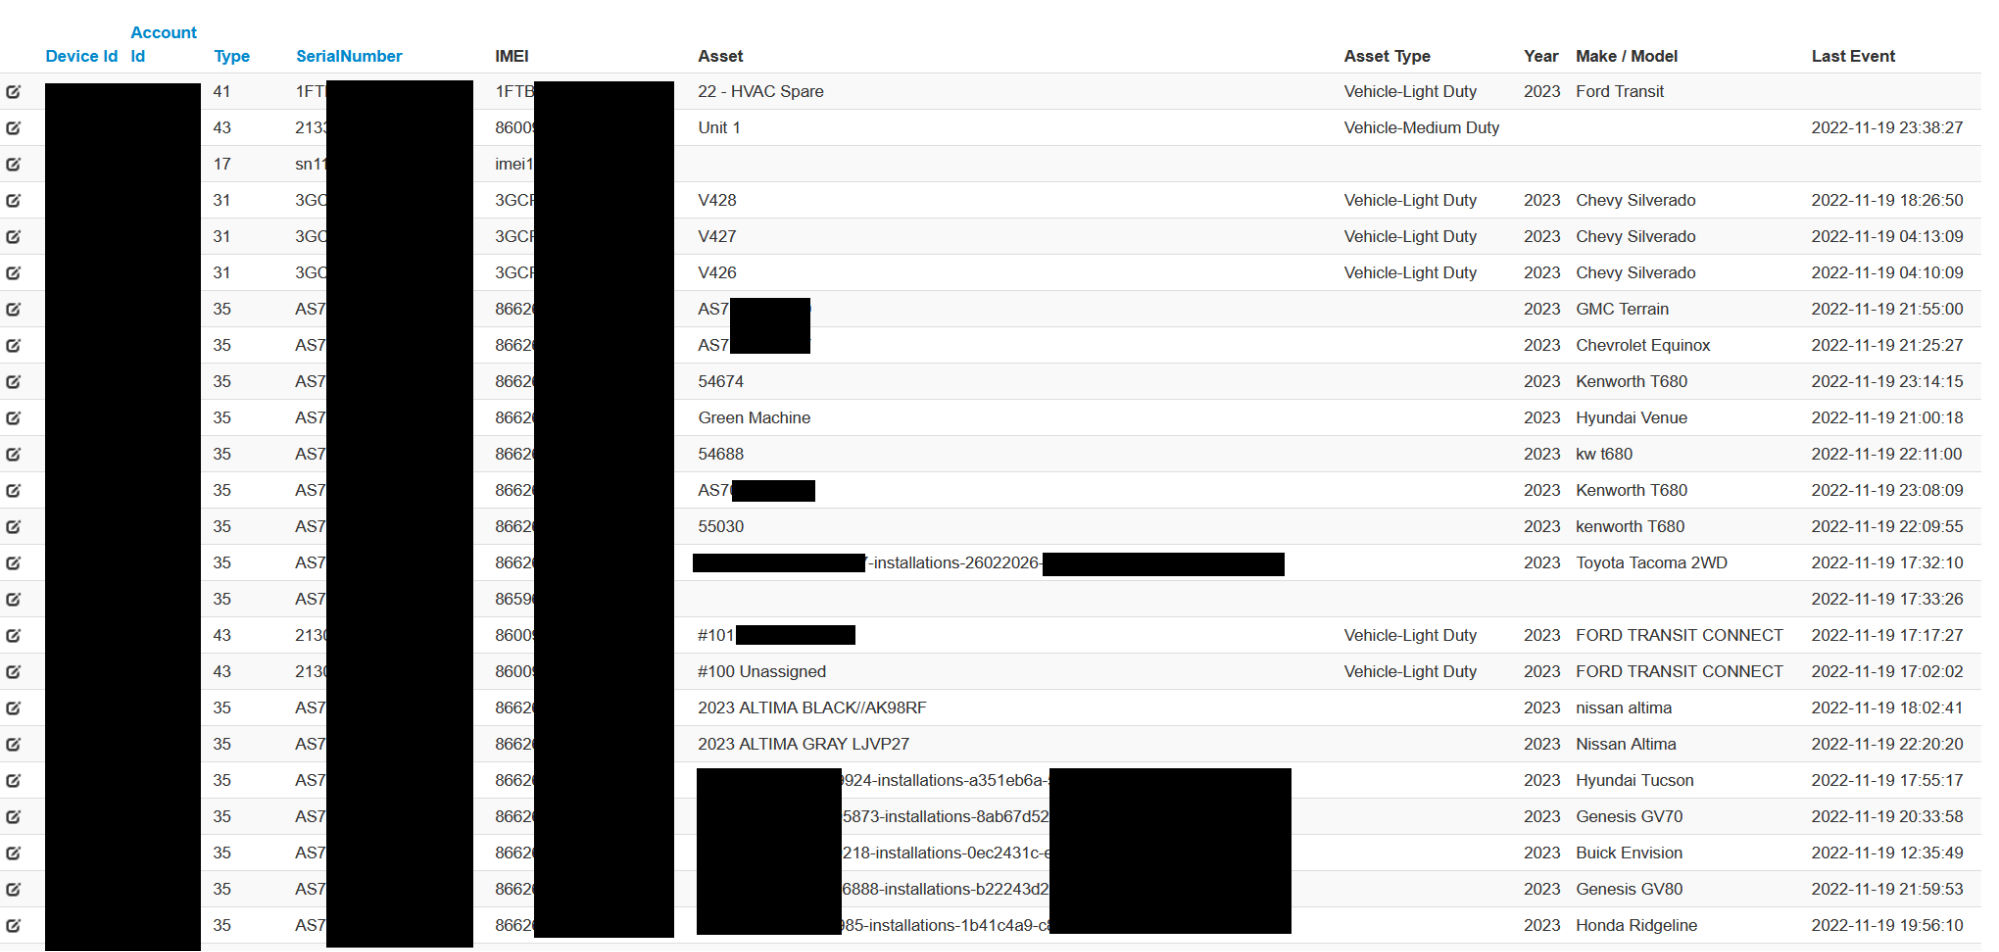
(4) SQL Injection and Regex Authorization Bypass on Spireon Systems allows Attacker to Access, Track, and Send Arbitrary Commands to 15 million Telematics systems and Additionally Fully Takeover Fleet Management Systems for Police Departments, Ambulance Services, Truckers, and Many Business Fleet Systems
When identifying car-related targets to hack on, we found the company Spireon. In the early 90s and 2000s, there were a few companies like OnStar, Goldstar, and FleetLocate which were standalone devices which were put into vehicles to track and manage them. The devices have the capabilities to be tracked and receive arbitrary commands, e.g. locking the starter so the vehicle cannot start.
Sometime in the past, Spireon had acquired many GPS Vehicle Tracking and Management Companies and put them under the Spireon parent company.
We read through the Spireon marketing and saw that they claimed to have over 15 million connected vehicles. They offered services directly to customers and additionally many services through their subsidiary companies like OnStar.
We decided to research them as, if an attacker were able to compromise the administration functionality for these devices and fleets, they would be able to perform actions against over 15 million vehicles with very interesting functionalities like sending a cities police officers a dispatch location, disabling vehicle starters, and accessing financial loan information for dealers.
Our first target for this was very obvious: admin.spireon.com
The website appeared to be a very out of date global administration portal for Spireon employees to authenticate and perform some sort of action. We attempted to identify interesting endpoints which were accessible without authorization, but kept getting redirected back to the login.
Since the website was so old, we tried the trusted manual SQL injection payloads but were kicked out by a WAF that was installed on the system
We switched to a much simpler payload: sending an apostrophe, seeing if we got an error, then sending two apostrophes and seeing if we did not get an error. This worked! The system appeared to be reacting to sending an odd versus even number of apostrophes. This indicated that our input in both the username and password field was being passed to a system which could likely be vulnerable to some sort of SQL injection attack.
For the username field, we came up with a very simple payload:
victim' #
The above payload was designed to simply cut off the password check from the SQL query. We sent this HTTP request to Burp Suite’s intruder with a common username list and observed that we received various 301 redirects to “/dashboard” for the username “administrator” and “admin”.
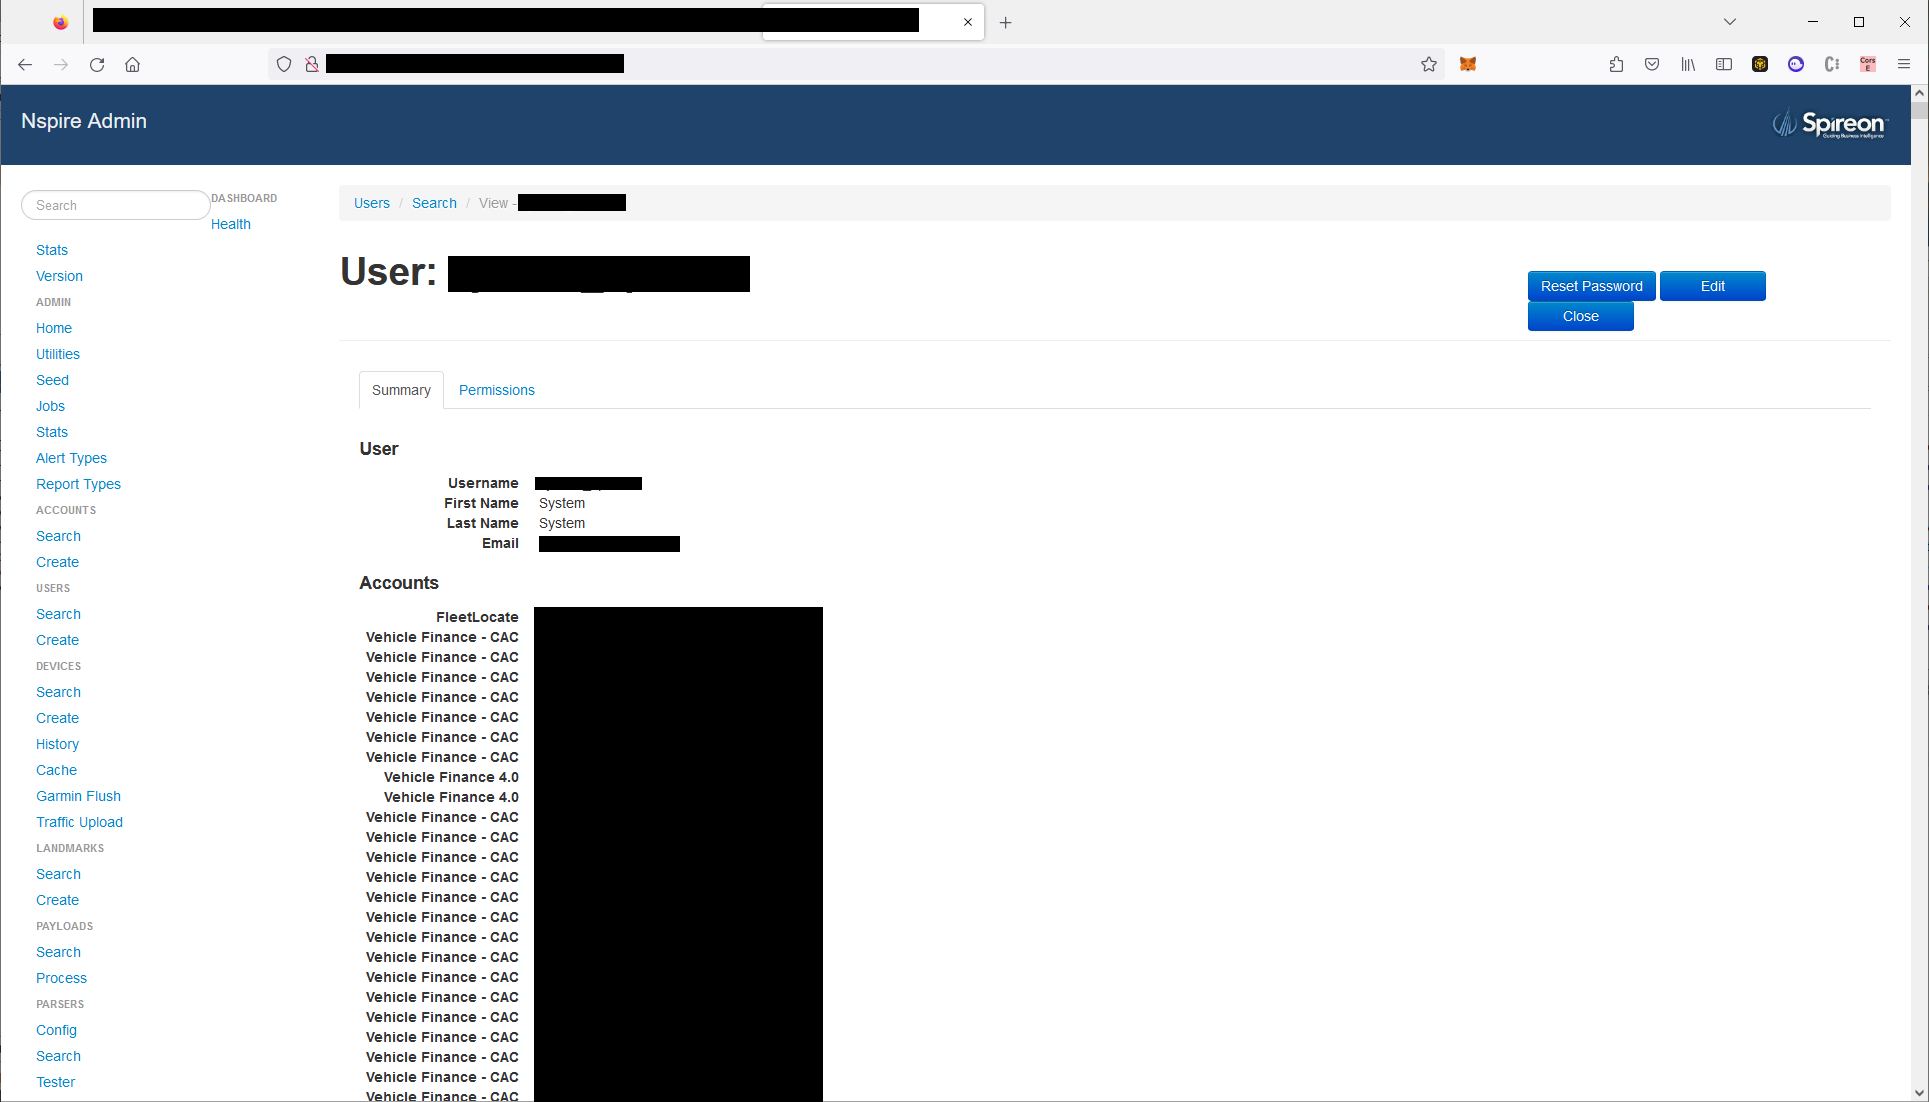
After manually sending the HTTP request using the admin username, we observed that we were authenticated into the Spireon administrator portal as an administrator user. At this point, we browsed around the application and saw many interesting endpoints.
The functionality was designed to manage Spireon devices remotely. The administrator user had access to all Spireon devices, including those of OnStar, GoldStar, and FleetLocate. We could query these devices and retrieve the live location of whatever the devices were installed on, and additionally send arbitrary commands to these devices. There was additional functionality to overwrite the device configuration including what servers it reached out to download updated firmware.
Using this portal, an attacker could create a malicious Spireon package, update the vehicle configuration to call out to the modified package, then download and install the modified Spireon software.
At this point, an attacker could backdoor the Spireon device and run arbitrary commands against the device.
Since these devices were very ubiquitous and were installed on things like tractors, golf carts, police cars, and ambulances, the impact of each device differed. For some, we could only access the live GPS location of the device, but for others we could disable the starter and send police and ambulance dispatch locations.
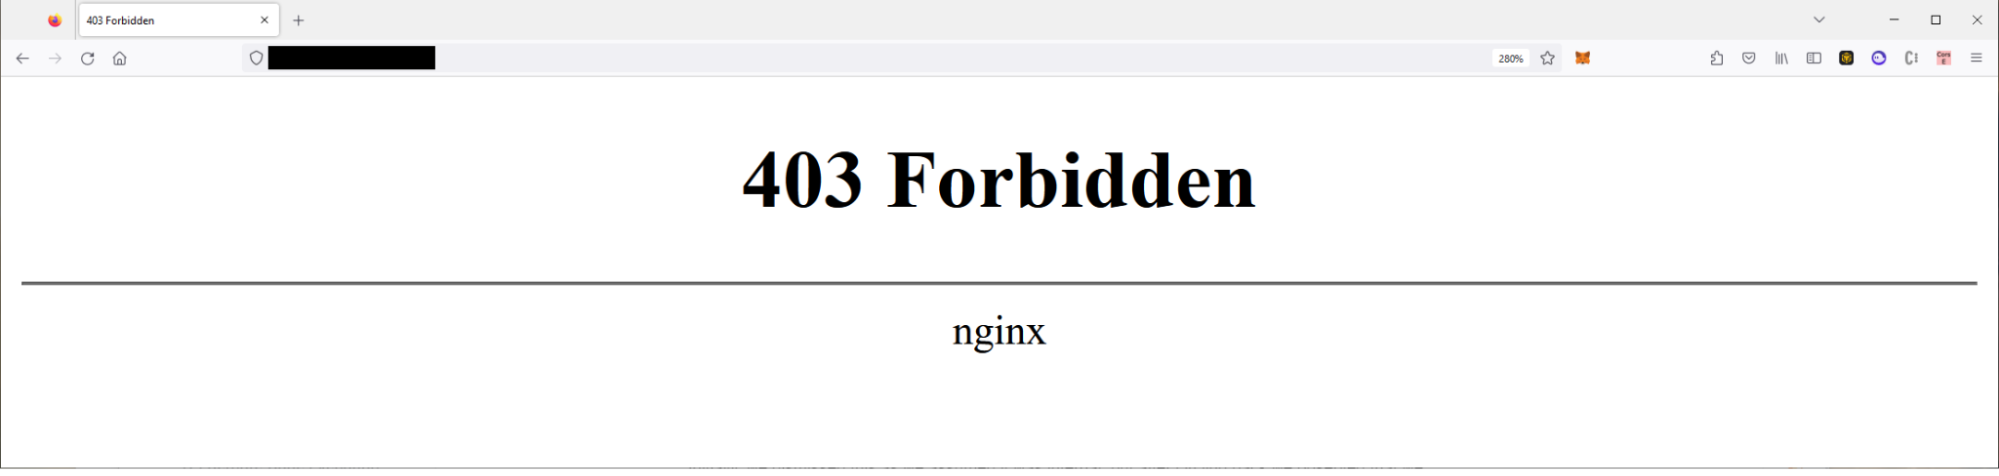
We reported the vulnerability immediately, but during testing, we observed an HTTP 500 error which disclosed the API URL of the backend API endpoint that the “admin.spireon.com” service reached out to. Initially, we dismissed this as we assumed it was internal, but after circling back we observed that we could hit the endpoint and it would trigger an HTTP 403 forbidden error.
Our goal now was seeing if we could find some sort of authorization bypass on the host and what endpoints were accessible. By bypassing the administrator UI, we could directly reach out to each device and have direct queries for vehicles and user accounts via the backend API calls.
We fuzzed the host and eventually observed some weird behavior:
By sending any string with “admin” or “dashboard”, the system would trigger an HTTP 403 forbidden response, but would return 404 if we didn’t include this string. As an example, if we attempted to load “/anything-admin-anything” we’d receive 403 forbidden, while if we attempted to load “/anything-anything” it would return a 404.
We took the blacklisted strings, put them in a list, then attempted to enumerate the specific endpoints with fuzzing characters (%00 to %FF) stuck behind the first and last characters.
During scanning, we saw that the following HTTP requests would return a 200 OK response:
GET /%0dadmin
GET /%0ddashboard
Through Burp Suite, we sent the HTTP response to our browser and observed the response: it was a full administrative portal for the core Spireon app. We quickly set up a match and replace rule to modify GET /admin and GET /dashboard to the endpoints with the %0d prefix.
After setting up this rule, we could browse to “/admin” or “/dashboard” and explore the website without having to perform any additional steps. We observed that there were dozens of endpoints which were used to query all connected vehicles, send arbitrary commands to connected vehicles, and view all customer tenant accounts, fleet accounts, and customer accounts. We had access to everything.
At this point, a malicious actor could backdoor the 15 million devices, query what ownership information was associated with a specific VIN, retrieve the full user information for all customer accounts, and invite themselves to manage any fleet which was connected to the app.
For our proof of concept, we invited ourselves to a random fleet account and saw that we received an invitation to administrate a US Police Department where we could track the entire police fleet.
(5) Mass Assignment on Reviver allows an Attacker to Remotely Track and Overwrite the Virtual License Plates for All Reviver Customers, Track and Administrate Reviver Fleets, and Access, Modify, and Delete All User Information
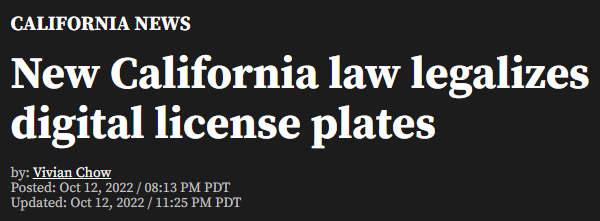
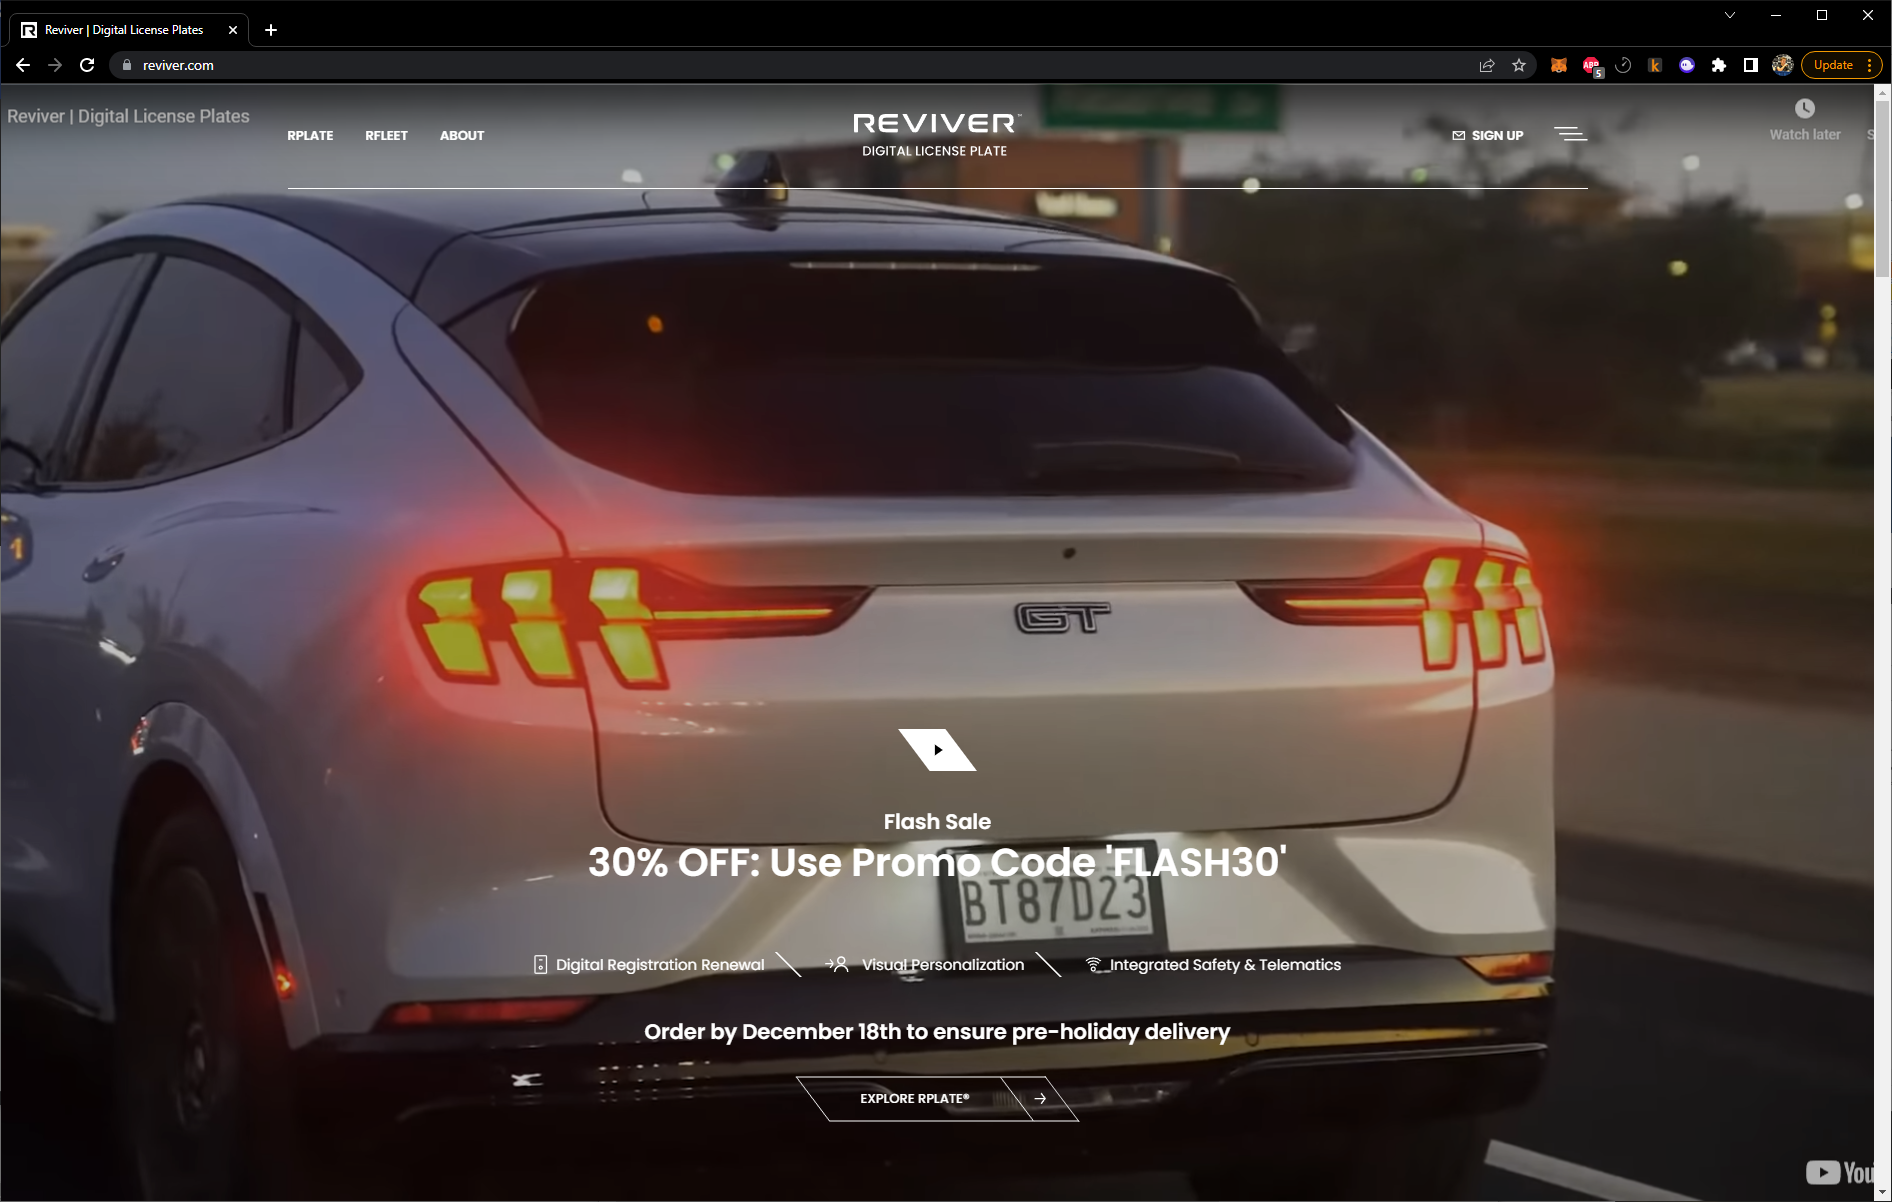
In October, 2022, California announced that it had legalized digital license plates. We researched this for a while and found that most, if not all of the digital license plates, were done through a company called Reviver.
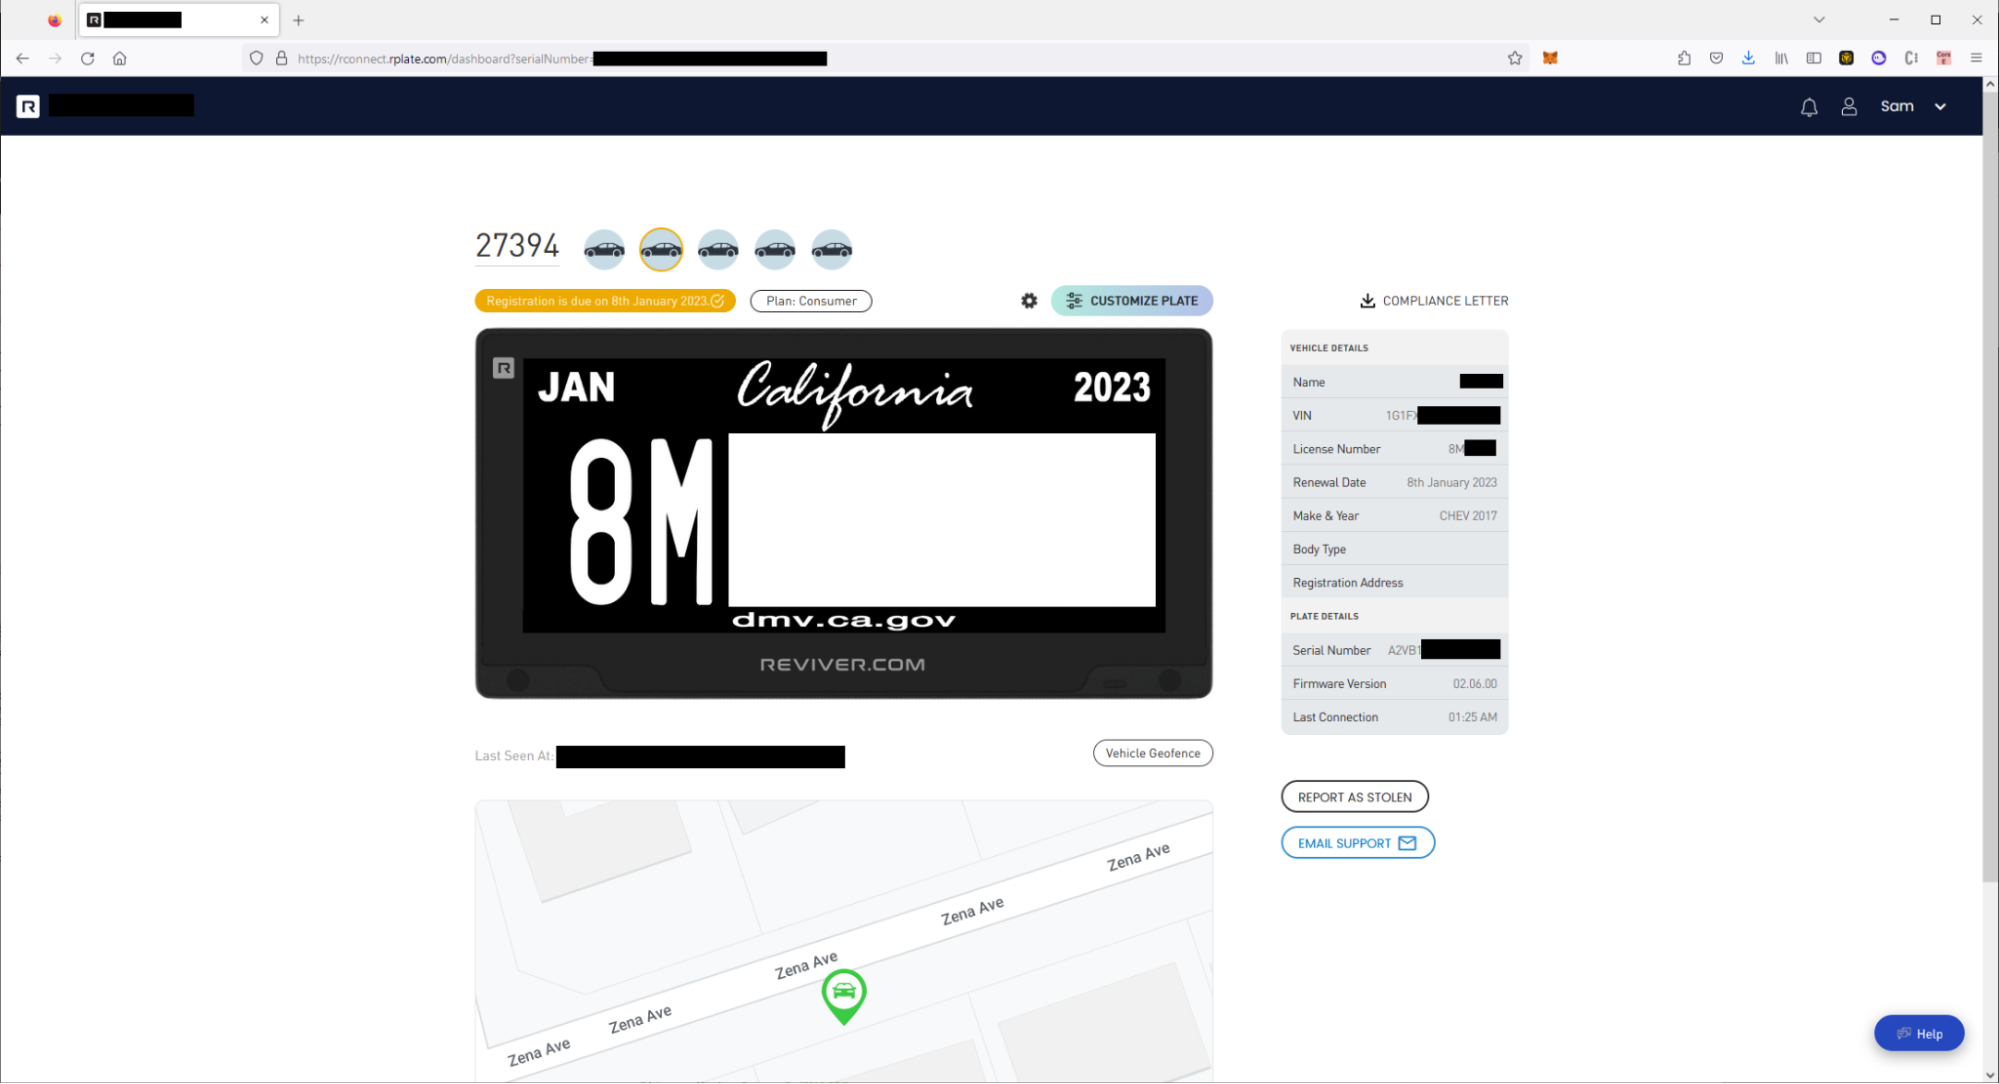
If someone wanted a digital license plate, they’d buy the virtual Reviver license plate which included a SIM card for remotely tracking and updating the license plate. Customers who uses Reviver could remotely update their license plates slogan, background, and additionally report if the car had been stolen via setting the plate tag to “STOLEN”.
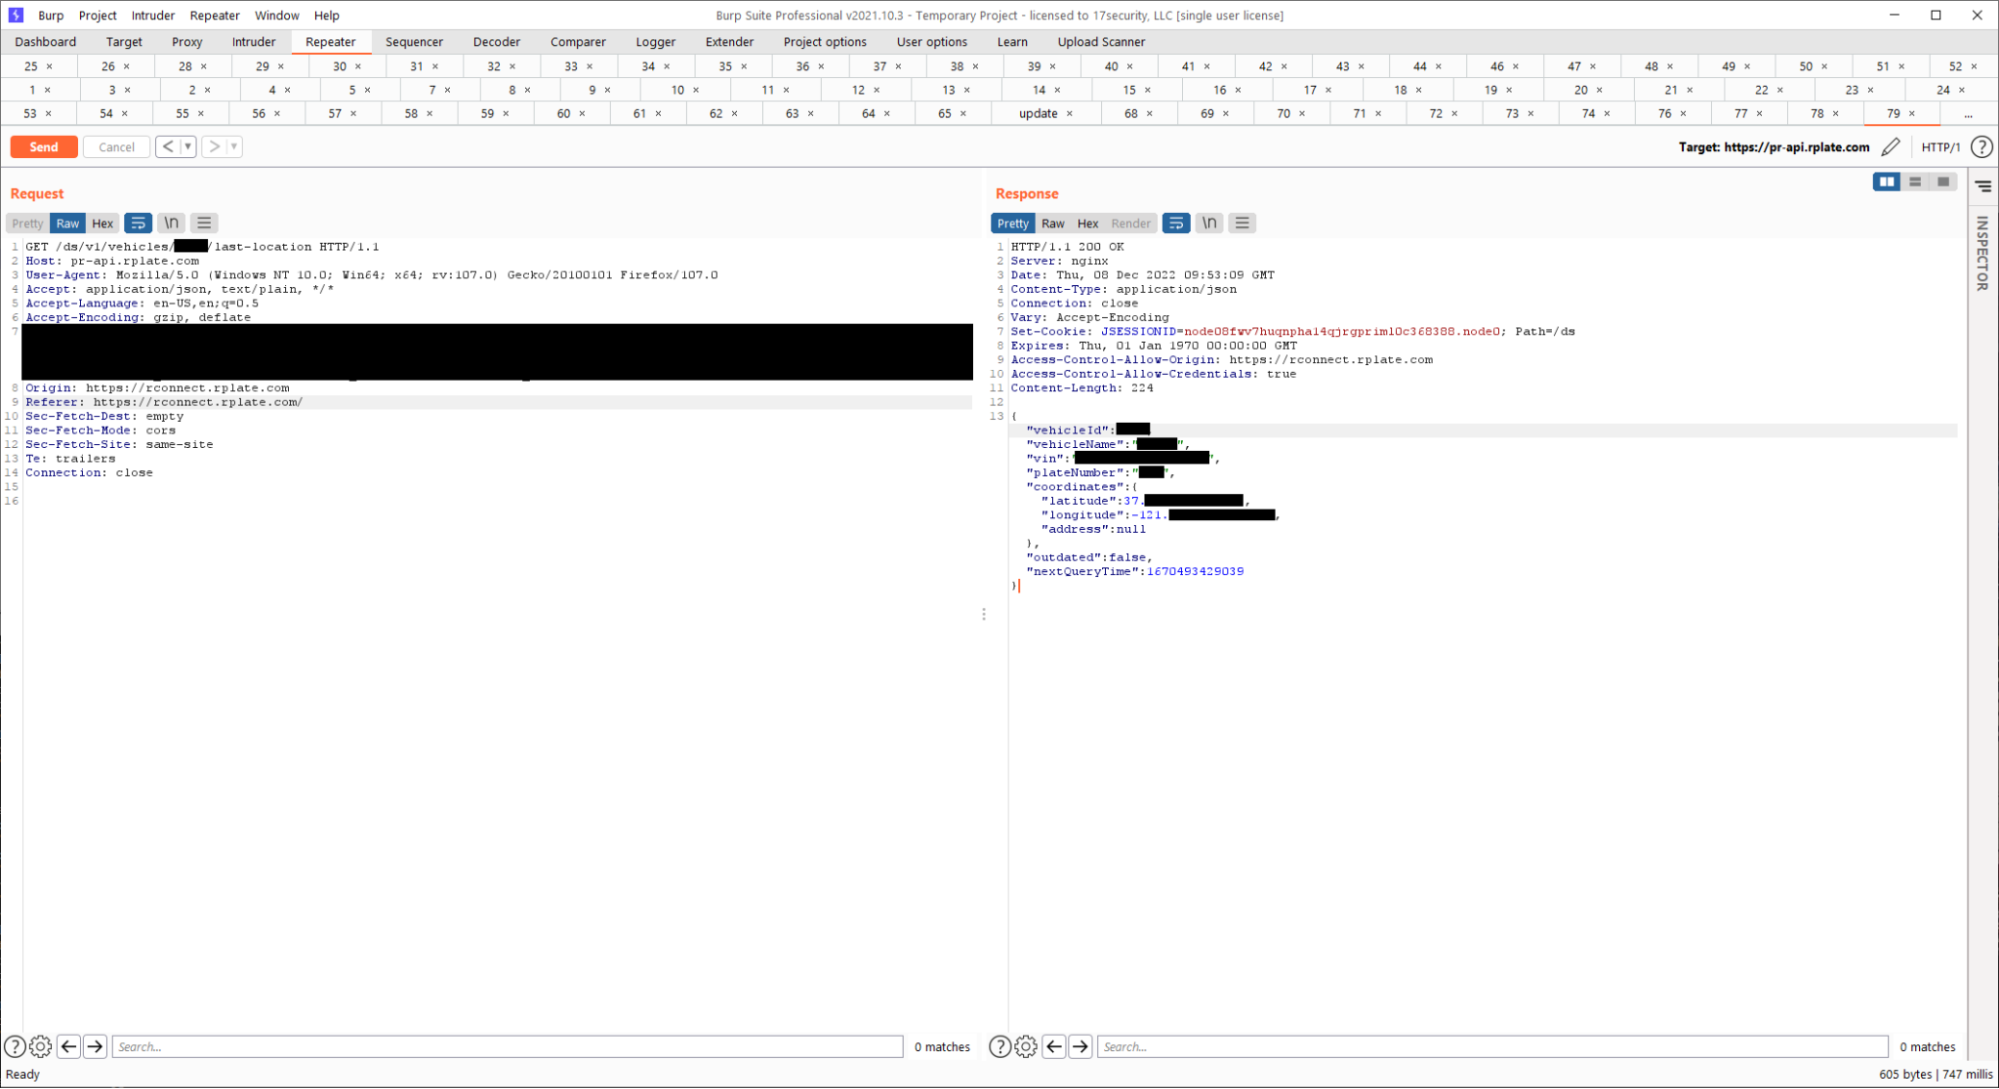
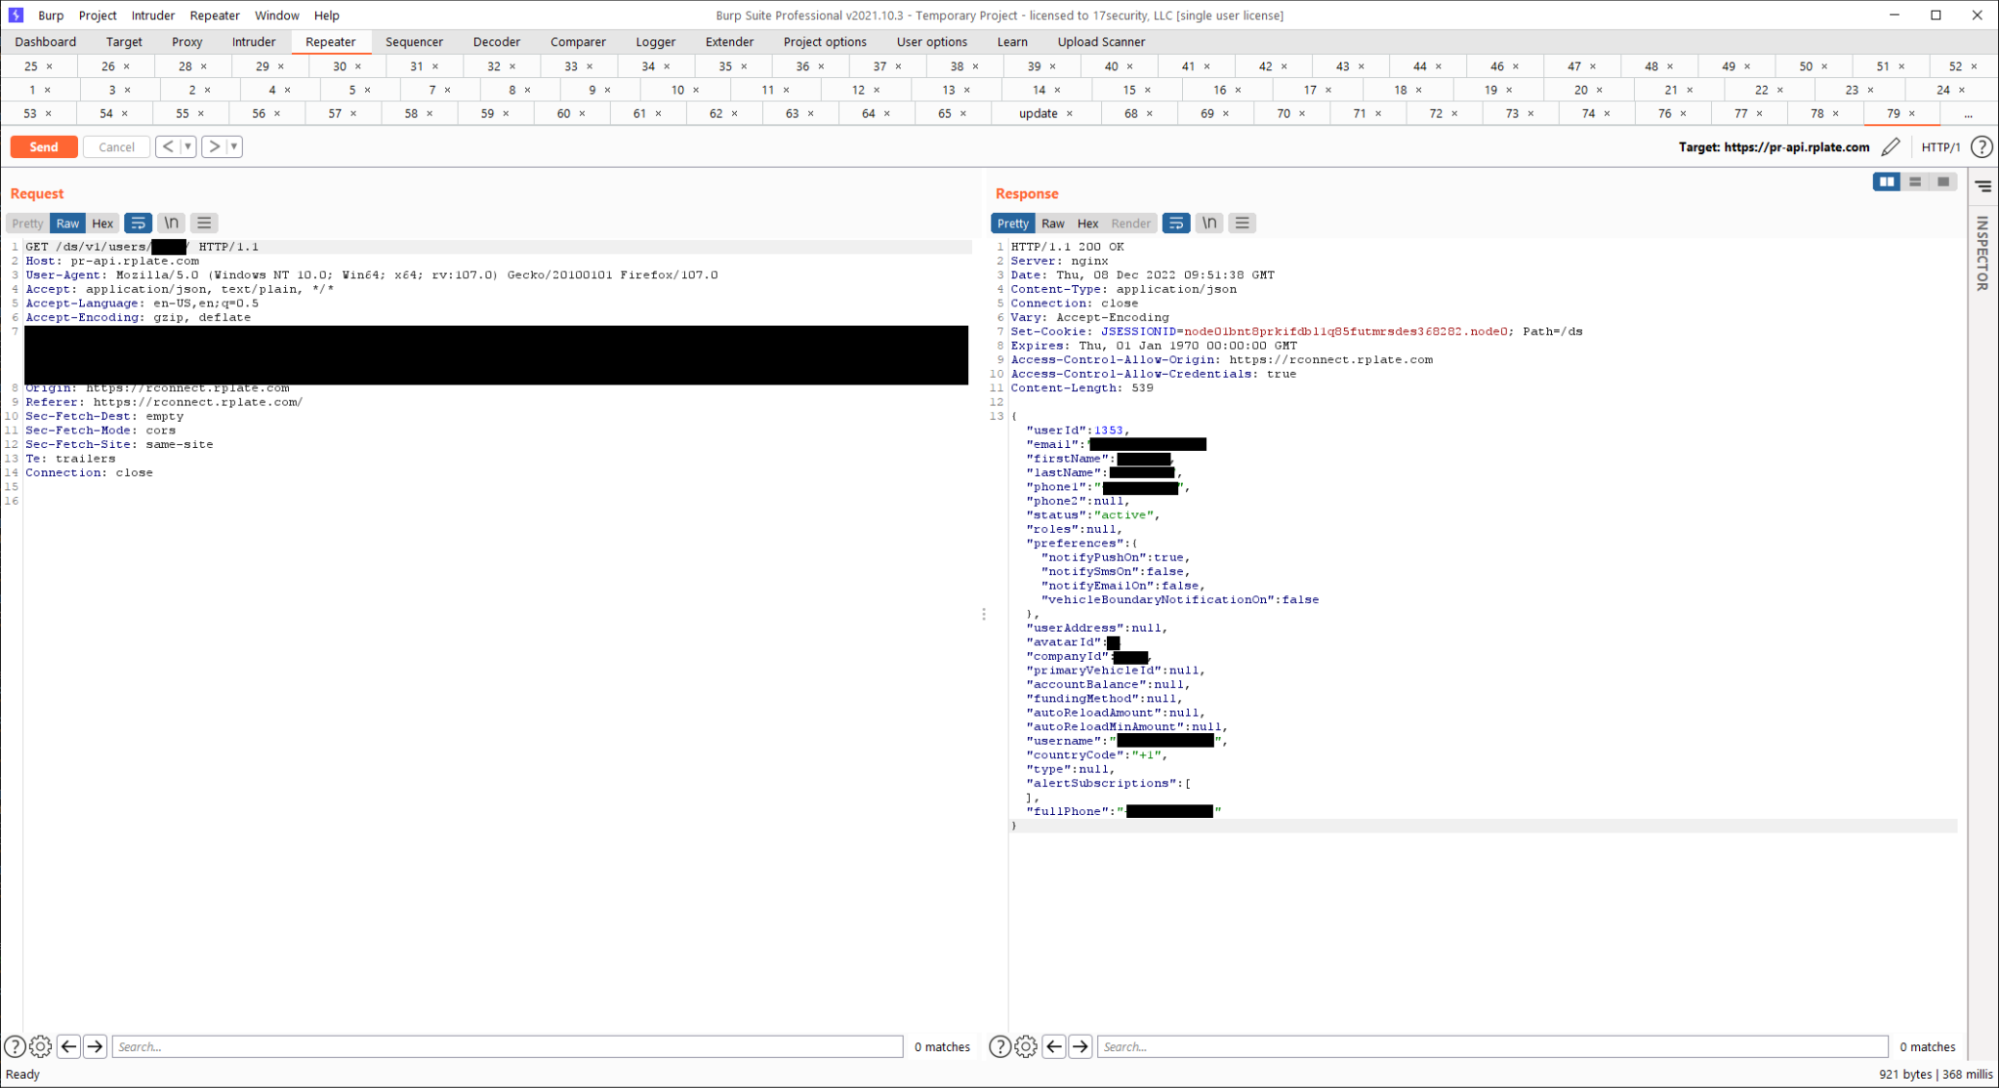
Since the license plate could be used to track vehicles, we were super interested in Reviver and began auditing the mobile app. We proxied the HTTP traffic and saw that all API functionality was done on the “pr-api.rplate.com” website. After creating a user account, our user account was assigned to a unique “company” JSON object which allowed us to add other sub-users to our account.
The company JSON object was super interesting as we could update many of the JSON fields within the object. One of these fields was called “type” and was default set to “CONSUMER”. After noticing this, we dug through the app source code in hopes that we could find another value to set it to, but were unsuccessful.
At this point, we took a step back and wondered if there was an actual website we could talk to versus proxying traffic through the mobile app. We looked online for a while before getting the idea to perform a reset password on our account which gave us a URL to navigate to.
Once we opened the password reset URL, we observed that the website had tons of functionality including the ability to administer vehicles, fleets, and user accounts. This was super interesting as we now had a lot more API endpoints and functionality to access. Additionally, the JavaScript on the website appeared to have the names of the other roles that our user account could be (e.g. specialized names for user, moderator, admin, etc.)
We queried the “CONSUMER” string in the JavaScript and saw that there were other roles that were defined in the JavaScript. After attempting to update our “role” parameter to the disclosed “CORPORATE” role, we refreshed out profile metadata, then saw that it was successful! We were able to change our roles to ones other than the default user account, opening the door to potential privilige escalation vulnerabilities.
It appeared that, even though we had updated our account to the “CORPORATE” role, we were still receiving authorization vulnerabilities when logging into the website. We thought for a while until realizing that we could invite users to our modified account which had the elevated role, which may then grant the invited users the required permissions since they were invited via an intended way versus mass assigning an account to an elevated role.
After inviting a new account, accepting the invitation, and logging into the account, we observed that we no longer received authorization errors and could access fleet management functionality. This meant that we could likely (1) mass assign our account to an even higher elevated role (e.g. admin), then (2) invite a user to our account which would be assigned the appropriate permissions.
This perplexed us as there was likely some administration group which existed in the system but that we had not yet identified. We brute forced the “type” parameter using wordlists until we noticed that setting our group to the number “4” had updated our role to “REVIVER_ROLE”. It appeared that the roles were indexed to numbers, and we could simply run through the numbers 0-100 and find all the roles on the website.
The “0” role was the string “REVIVER”, and after setting this on our account and re-inviting a new user, we logged into the website normally and observed that the UI was completely broken and we couldn’t click any buttons. From what we could guess, we had the administrator role but were accessing the account using the customer facing frontend website and not the appropriate administrator frontend website. We would have to find the endpoints used by administrators ourselves.
Since our administrator account theoretically had elevated permissions, our first test was simply querying a user account and seeing if we could access someone else’s data: this worked!
We could take any of the normal API calls (viewing vehicle location, updating vehicle plates, adding new users to accounts) and perform the action using our super administrator account with full authorization.
At this point, we reported the vulnerability and observed that it was patched in under 24 hours. An actual attacker could remotely update, track, or delete anyone’s REVIVER plate. We could additionally access any dealer (e.g. Mercedes-Benz dealerships will often package REVIVER plates) and update the default image used by the dealer when the newly purchased vehicle still had DEALER tags.
The Reviver website also offered fleet management functionality which we had full access to.
(6) Full Remote Vehicle Access and Full Account Takeover affecting Hyundai and Genesis
This vulnerability was written up on Twitter and can be accessed on the following thread:
The premise of this article’s headline is nonsense, sure, but it isn’t clickbait—I promise.
You’re almost certainly here because you searched for “best productivity apps.” I understand that impulse. You want to get more done in less time, which is about as universal a feeling as humans can have at work. The problem: productivity is deeply personal, and the words “productivity tools” mean a lot of different things to different people. What works for you may or may not work for me, which is why—after over a decade of writing about productivity software—I don’t really believe there are objectively “best” productivity apps.
I do, however, think there are categories of tools that can help you become a better version of yourself. Some of them work better for more people than others, and not everyone needs an app from every category. Knowing what kinds of apps exist, and what you should look for in an app, is more important than knowing what the “best” app in that category is.
Having said that, you’re here for software recommendations, not my personal reflections on the nature of productivity. So I’m going to go over the main kinds of productivity apps I think most humans who use electronic devices at work should know about. I’ll explain why I think each category is important, point to an app or two that I think will work well for most people, then offer links to other options if you want to learn more.
Just remember: the specific app doesn’t matter. The best productivity app is the one that works best for you. The most important thing is having a system. Sound good? Let’s jump in.
All of our best apps roundups are written by humans who’ve spent much of their careers using, testing, and writing about software. We spend dozens of hours researching and testing apps, using each app as it’s intended to be used and evaluating it against the criteria we set for the category. We’re never paid for placement in our articles from any app or for links to any site—we value the trust readers put in us to offer authentic evaluations of the categories and apps we review. For more details on our process, read the full rundown of how we select apps to feature on the Zapier blog.
We all have things we need to do—at work and in the rest of our lives. The worst place you could store those things, in my opinion, is in your mind. It’s just stressful: you’ll remember, at random moments, that there’s something you were supposed to be doing, and that memory will result in panic. Writing down everything you need to do allows you to make a plan, and (crucially) means you don’t have to panic.
Not everyone benefits from a dedicated to-do list app—some of the most productive people I know prefer sticky notes, email inboxes, or even spreadsheets. I think that’s great, so long as you have some place to record the things you need to do.
I think that Todoist, shown above, is a great to-do list app for most people. It’s easy to use but also offers a lot of features. It can also be installed on basically any device you can imagine, meaning your to-do list is always available. It allows you to assign due dates to tasks, sort tasks by project, or even view a project using a Kanban board. You don’t have to worry about those features if you don’t want to, though, which is why I think it’s a great starting point for someone who needs a to-do list.
If Todoist doesn’t work for you, though, check out our list of the best to-do list apps—it’s got a wide variety of recommendations. I, personally, use TickTick because I like how easy it is to add tasks, and I also can’t stop saying good things about Things for sheer simplicity on Apple devices. Find a tool you like—and that you remember to actually open. There’s nothing less useful than an app full of tasks you never look at.
Once you’ve picked your to-do list app, make the most of it with automation, so you can easily add tasks that come in by email, team chat apps, project management tools, or notes. Read more about automating your to-do list.
There are only so many hours in the day, unfortunately, which means you have to budget them. A calendar is how you do that. You could use a paper wall calendar, sure, but a calendar app lets you invite other people to an event. Also, in a world where so many meetings are virtual, calendar apps give you a useful place to store the link to your Zoom call.
I think that Google Calendar, shown above, is the right calendar app for most people—particularly people who already use Gmail. Google Calendar is easy to load on any device, lets you see your calendar in several different views, and makes it easy to invite anyone else to any event or meeting you happen to plan. I could writemultiplearticlesonGoogle Calendar features (and I have). This app does everything any other app can do, and more, all while being pretty easy to use.
If Google Calendar doesn’t work for you, though, check out our list of the best calendar apps for more options. Microsoft Outlook is a solid alternative, as is the Calendar app that comes with all Apple devices.
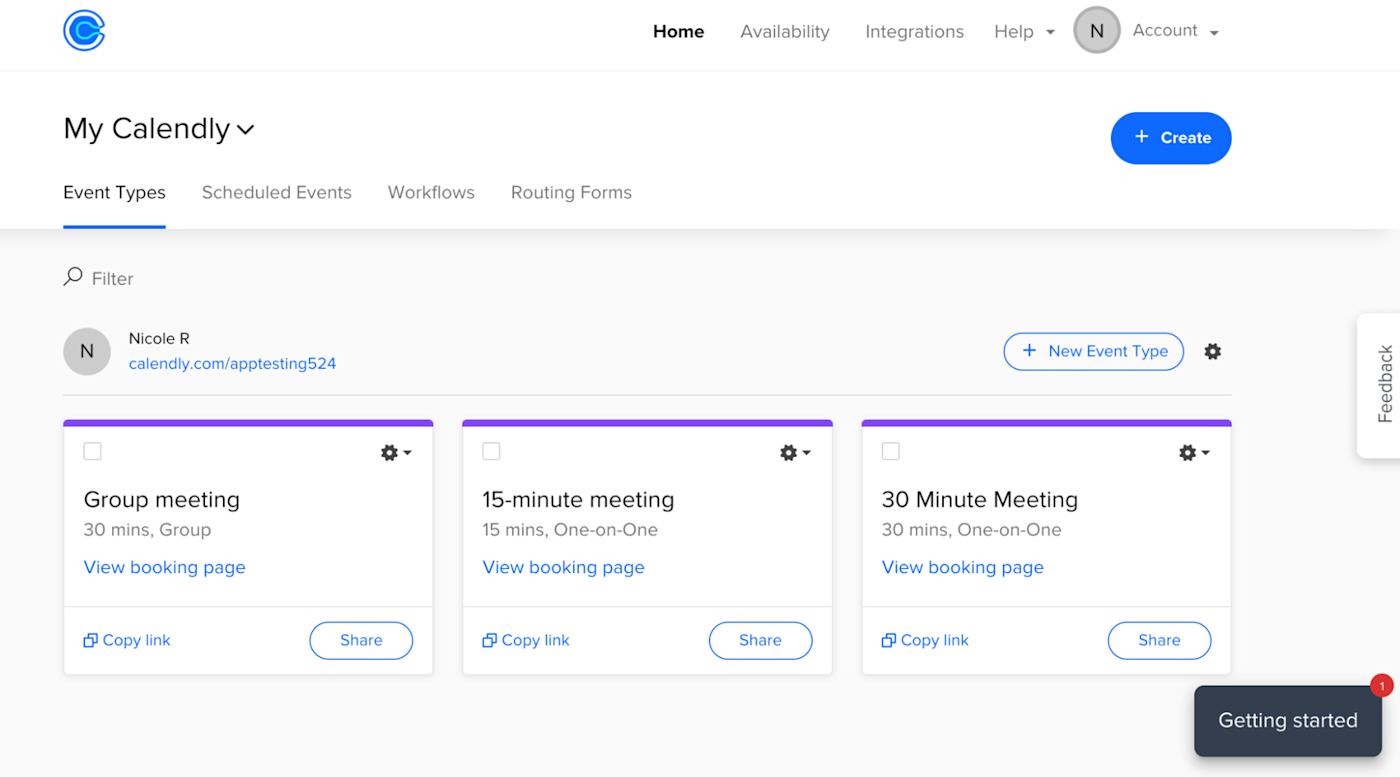
I’d also consider looking into some kind of meeting scheduling app. These apps let anyone sign up for appointments with you, which is particularly useful if you have a meeting-heavy calendar. Calendly, shown below, is a solid option, with a lot of customizability and the ability to sync with Google Calendar. You can check out our list of the best meeting schedulers for a more complete rundown of Calendly and other options.
Once you choose a calendar app, take it to the next level. With automation, you can do things like automatically turn calendar events into tasks on your to-do list or use forms to create calendar events. Here’s how you can bring context to your calendar by connecting other apps.
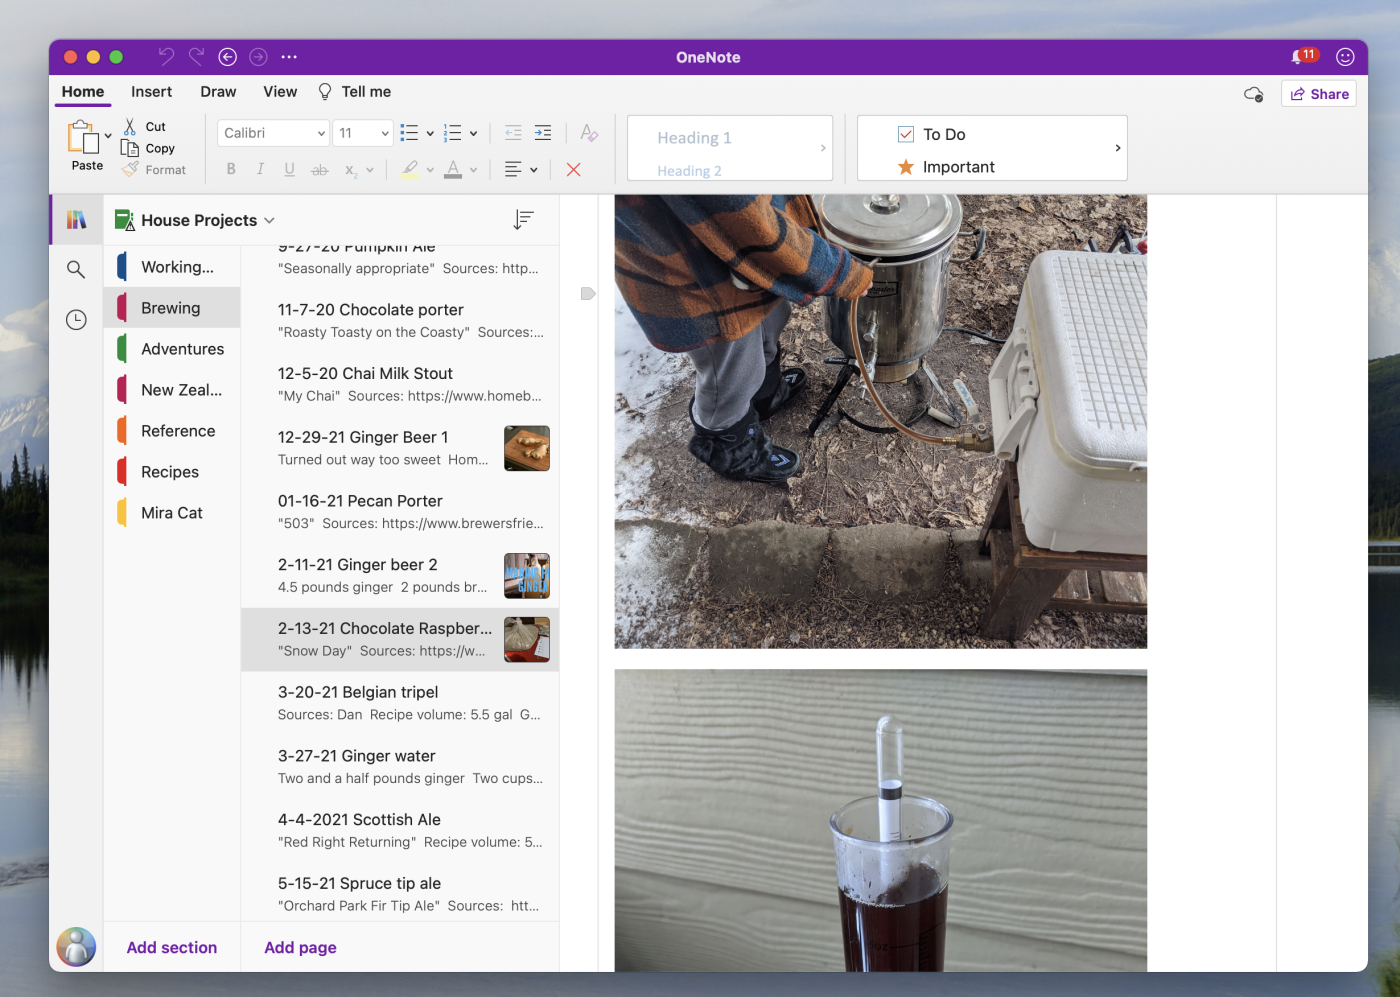
I’m constantly taking notes: before and during meetings; while researching an article; while brewing beer. And I think most people have some class of information they’ll need to reference later that doesn’t quite meet the threshold of a “document.” Who wants a sprawling series of folders with all of that information?
This, to me, is what note-taking apps are for: quickly writing things down so you can read them later and (hopefully) follow up. They also work well as a personal journal, or a place to store files related to a particular project.
OneNote, above, is probably the note-taking app most people should try first. It’s free—so long as you don’t run out of OneDrive storage—and it gives you all kinds of ways to organize notes, from notebooks to sections to sub-headers. It also has powerful search, which includes the scanned contents of any images or PDFs you might drop in a note.
But OneNote isn’t the only option. You should check out our list of the best note-taking apps for more choices. If you loved Evernote back in the day, you should check out Joplin, which is a completely free and open source replacement for that app. And I personally love Obsidian, which turns your notes into an entire database, complete with internal links and an extensive plugin collection. There are a lot of good choices out there—find something that lets you write things down and dig them up later.
I’ve never tried to work in the middle of an amusement park, but I imagine it would be distracting. The internet is worse. Everything you could possibly imagine is available, all delivered by brilliant engineers who are doing everything they can to keep you looking at more and more and more of it. It’s understandable if you have trouble getting stuff done in that context, which is why apps that block distractions are so helpful.
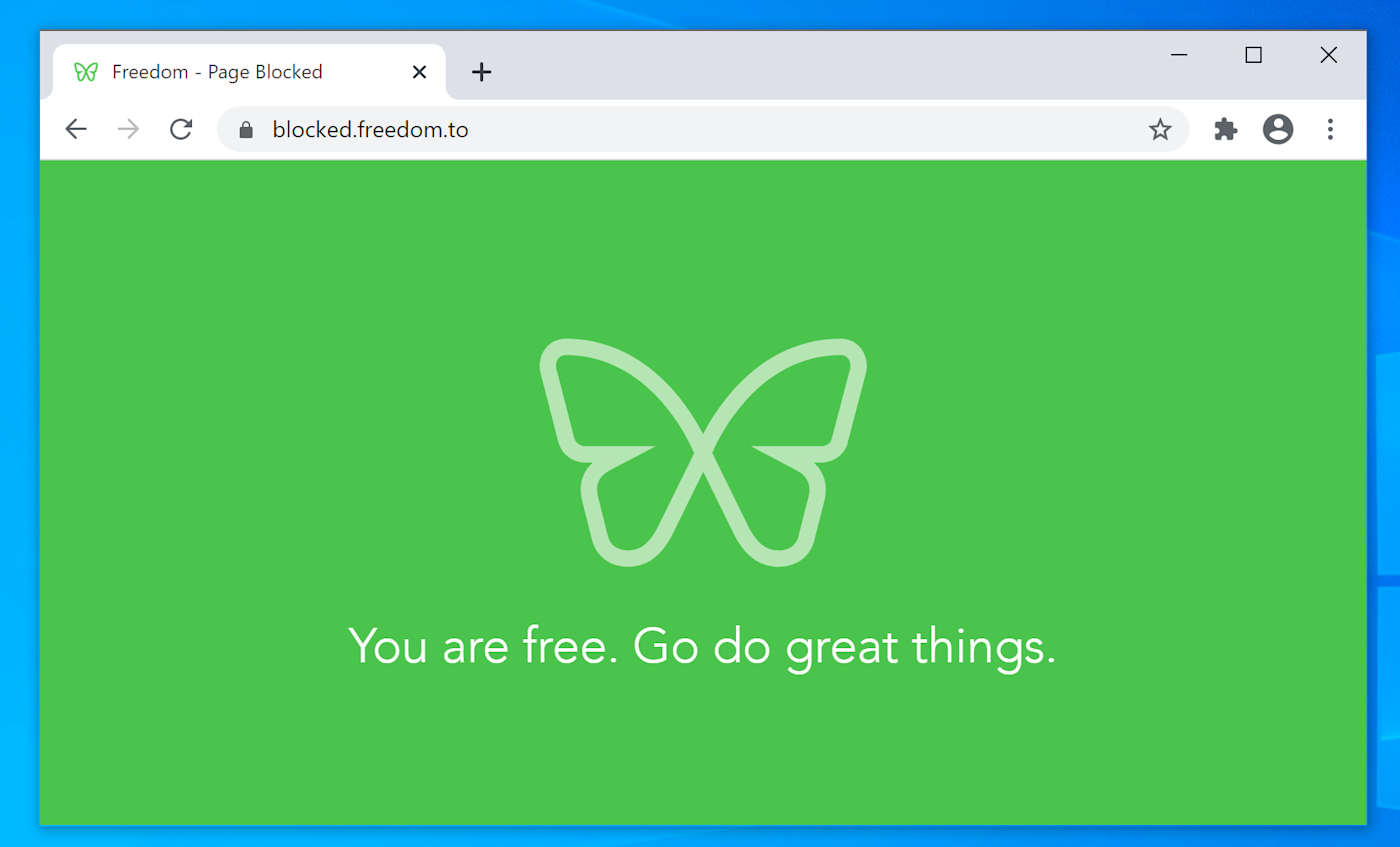
Freedom is a great tool for the job. It runs on every platform and can block distractions—both websites and apps—on all of your devices. That means you can’t, for example, block Twitter on your computer only to pick up your phone and look at it there. With Freedom, you can set up multiple block lists, then start timers for any of them.
I personally love Serene, which combines distraction blocking with a sort of to-do list. You say what you want to do and how long it will take, then you start a distraction-free session to work on it. There’s also Cold Turkey Blocker, which can optionally prevent you from changing the time settings on your computer as a way of working around the block you set up. You’ve got more choices, though, particularly if you’re a Mac user. Check out our list of the best distraction blockers to learn more.
Remember: the internet is distracting on purpose. There’s no shame in using a tool to build discipline.
My dentist tells me I should brush my teeth twice a day, and I believe him, but I tended to only brush at night. I used a habit tracker to change that.
These applications might sound similar to a to-do list, but they’re very different. You can’t add individual tasks to a habit tracker—only recurring ones. The idea is to set an intention to do something regularly, then keep track of how often you regularly do it. Eventually, you have a streak going, which psychologically motivates you to keep it up until the habit becomes second nature. Don’t laugh—it works.
We recommend checking out Streaks, shown above, for iPhone and HabitNow, below, for Android. These apps both live on your phone, which is the place you’re most likely to look. They both let you create a list of habits you’d like to build, then remind you about that intention. They also both show you your progress in various ways.
They’re not the only options, however; check out our list of the best habit tracker apps for more ideas. Also keep in mind that some to-do lists have habit-tracking capabilities built right in. I, personally, use TickTick‘s built-in habit tracker—I love it. And some people use a paper calendar for tracking a simple habit—just add an X every day you stick to your habit.
I’d love to read articles or watch YouTube videos all day. We all would. Sometimes, though, you have to do something else—even though your friend just sent you a really, really interesting article. That’s where read-it-later apps come in. They let you quickly save something you intend to read, so that you can come back to it when you have time.
I think that Pocket, above, is the app of choice in this class. It’s free to use, offers extensions for every major browser, and also has great mobile versions that sync your articles for offline reading. There’s even built-in support for highlighting, then reviewing your highlights later.
Instapaper is a close second, and it even lets you send articles to your Kindle. These aren’t your only choices, though—check out our list of the best read-it-later apps for some more options. It’s also worth noting that some people use bookmarking apps or even note-taking apps for the same purpose, and that’s great—they both make it easy to save things for future reference.
Automate the process of saving articles by connecting your read-it-later app to Zapier. Here are some ideas to get you started.
Whether it’s for a quick presentation or troubleshooting a problem, sometimes recording what’s on your screen and sharing it just makes life easier. Screen recording tools are perfect for this, allowing you to quickly record your screen, your voice, and even your face if you have a webcam.
Loom is a great first tool to check out in this category. It’s easy to set up, works on all major platforms, and makes it really simple to share recordings. You can even add your face, via a webcam, to the recording.
I personally use Zappy, which was originally an internal tool used by Zapier. It’s honestly the best screenshot tool I’ve ever used, and it’s free—if you use a Mac, it’s worth a try. Check out our list of the best screen recording tools for more options, and keep in mind you can actually record your screen without any software, if you don’t mind managing the file yourself.
Want to share your screen in real-time? You need a screen sharing tool (Zoom works pretty well, surprisingly).
Other productivity tools worth checking out
This article could go on forever. There’s no end to great software out there, and I love writing about it. I think the above categories should save you all kinds of time—and take up plenty of your time to set up—but here are a few other suggestions if you’re feeling particularly motivated.
Password managers, like LastPass or 1Password, help you generate random passwords for all of your different services without the need for memorization. This is great for security, but it also makes logging in to stuff faster. Here’s a list of the best password managers.
Mobile scanning apps, like Microsoft Lens, let you scan documents using your phone while also digitizing any text using optical character recognition (OCR). Check out our list of the best mobile scanning OCR apps for more choices.
Time tracking apps, like Toggl Track, are great for keeping track of how long projects take and making sure you’re not spending too much time on the wrong things. Take a look at our list of the best time tracking apps to find the right one for you.
Mind mapping software, like Coggle, helps you map the connections between different ideas while you’re brainstorming. Here are our picks for the best mind mapping software.
AI software, like OpenAI, could make all kinds of tasks easier in the future. It’s early, granted, but I already find it useful when I’m in the brainstorming phase of a project—I can ask the bot to generate ideas.
Once you have apps set up in some of these categories, you can take the whole productivity thing even further. Automation software like ours at Zapier connects all the other apps you use, with workflows you can build yourself—no code required. Like the tools above, Zapier won’t solve every problem you have, but it’s a great way to connect tools that otherwise don’t integrate well—which means you can use the best tools for you, as opposed to the tools that happen to play nice together. And it’s not limited to productivity—eventually, you’ll find yourself automating even your most business-critical workflows.
Plus, if you sign up for Zapier, we’ll be able to write more useful articles like this one. Here are five things you should automate today to get started.
This post was originally published in September 2018 by Matthew Guay. The most recent update was in December 2022.