Open Port Vulnerabilities List

Insufficiently protected open ports can put your IT environment at serious risk. Threat actors often seek to exploit open ports and their applications through spoofing, credential sniffing and other techniques. For example, in 2017, cybercriminals spread WannaCry ransomware by exploiting an SMB vulnerability on port 445. Other examples include the ongoing campaigns targeting Microsoft’s Remote Desktop Protocol (RDP) service running on port 3389.

Handpicked related content:

Read on to learn more about the security risks linked to ports, vulnerable ports that need your attention and ways to enhance the security of open ports.

A Refresher on Ports

Ports are logical constructs that identify a specific type of network service. Each port is linked to a specific protocol, program or service, and has a port number for identification purposes. For instance, secured Hypertext Transfer Protocol (HTTPS) messages always go to port 443 on the server side, while port 1194 is exclusively for OpenVPN.

The most common transport protocols that have port numbers are Transmission Control Protocol (TCP) and User Datagram Protocol (UDP). TCP is a connection-oriented protocol with built-in re-transmission and error recovery. UDP is a connectionless protocol that doesn’t recover or correct errors in messages; it’s faster  and has less network overhead traffic than TCP. Both TCP and UDP sit at the transport layer of the TCP/IP stack and use the IP protocol to address and route data on the internet. Software and services are designed to use TCP or UDP, depending on their requirements.

TCP and UDP ports are in one of these three states:

  • Open — The port responds to connection requests.
  • Closed — The port is unreachable, indicating that there is no corresponding service running.
  • Filtered — The firewall is monitoring traffic and blocking certain connection requests to the port.

Security Risks Linked to Ports

Numerous incidents have demonstrated that open ports are most vulnerable to attack when the services listening to them are unpatched or insufficiently protected or misconfigured, which can lead to compromised systems and networks. In these cases, threat actors can use open ports to perform various cyberattacks that exploit the lack of authentication mechanisms in the TCP and UDP protocols. One common example is spoofing, where a malicious actor impersonates a system or a service and sends malicious packets, often in combination with IP spoofing and man-in-the-middle-attacks. The campaign against RDP Pipe Plumbing is one of the latest to employ such a tactic. In addition, ports that have been opened on purpose (for instance, on a web server) can be attacked via that port using application-layer attacks such as SQL injection, cross-site request forgery and directory traversal.

Another common technique is the denial of service (DoS) attack, most frequently used in the form of distributed denial of service (DDoS), where attackers send massive numbers of connection requests from various machine to the service on the target in order to deplete its resources.

Vulnerable Ports that Need Your Attention

Any port can be targeted by threat actors, but some are more likely to fall prey to cyberattacks because they commonly have serious shortcomings, such as application vulnerabilities, lack of two-factor authentication and weak credentials.

Here are the most vulnerable ports regularly used in attacks:

Ports 20 and 21 (FTP)

Port 20 and (mainly) port 21 are File Transfer Protocol (FTP) ports that let users send and receive files from servers.

FTP is known for being outdated and insecure. As such, attackers frequently exploit it through:

  • Brute-forcing passwords
  • Anonymous authentication (it’s possible to log into the FTP port with “anonymous” as the username and password)
  • Cross-site scripting
  • Directory traversal attacks

Port 22 (SSH)

Port 22 is for Secure Shell (SSH). It’s a TCP port for ensuring secure access to servers. Hackers can exploit port 22 by using leaked SSH keys or brute-forcing credentials.

Port 23 (Telnet)

Port 23 is a TCP protocol that connects users to remote computers. For the most part, Telnet has been superseded by SSH, but it’s still used by some websites. Since it’s outdated and insecure, it’s vulnerable to many attacks, including credential brute-forcing, spoofing and credential sniffing.

Port 25 (SMTP)

Port 25 is a Simple Mail Transfer Protocol (SMTP) port for receiving and sending emails. Without proper configuration and protection, this TCP port is vulnerable to spoofing and spamming.

Port 53 (DNS)

Port 53 is for Domain Name System (DNS). It’s a UDP and TCP port for queries and transfers, respectively. This port is particularly vulnerable to DDoS attacks.

Ports 137 and 139 (NetBIOS over TCP) and 445 (SMB)

Server Message Block (SMB) uses port 445 directly and ports 137 and 139 indirectly. Cybercriminals can exploit these ports through:

  • Using the EternalBlue exploit, which takes advantage of SMBv1 vulnerabilities in older versions of Microsoft computers (hackers used EternalBlue on the SMB port to spread WannaCry ransomware in 2017)
  • Capturing NTLM hashes
  • Brute-forcing SMB login credentials

Ports 80, 443, 8080 and 8443 (HTTP and HTTPS)

HTTP and HTTPS are the hottest protocols on the internet, so they’re often targeted by attackers. They’re especially vulnerable to cross-site scripting, SQL injections, cross-site request forgeries and DDoS attacks.

Ports 1433,1434 and 3306 (Used by Databases)

These are the default ports for SQL Server and MySQL. They are used to distribute malware or are directly attacked in DDoS scenarios. Quite often, attackers probe these ports to find unprotected database with exploitable default configurations.

Port 3389 (Remote Desktop)

This port is used in conjunction with various vulnerabilities in remote desktop protocols and to probe for leaked or weak user authentication. Remote desktop vulnerabilities are currently the most-used attack type; one example is the BlueKeep vulnerability.

Tips for Strengthening the Security of Open Ports

Luckily, there are ways to enhance the security of open ports. We highly recommend the following six strategies:

1. Patch firewalls regularly.

Your firewall is the gatekeeper to all the other systems and services in your network. Patching keeps your firewalls up to date and repairs vulnerabilities and flaws in your firewall system that cybercriminals could use to gain full access to your systems and data.

2. Check ports regularly.

You should also regularly scan and check your ports. There are three  main ways to do this:

  • Command-line tools — If you have the time to scan and check ports manually, use command-line tools to spot and scan open ports. Examples include Netstat and Network Mapper, both of which can be installed on a wide range of operating systems, including Windows and Linux.
  • Port scanners — If you want faster results, consider using a port scanner. It’s a computer program that checks if ports are open, closed or filtered. The process is simple: The scanner transmits a network request to connect to a specific port and captures the response.
  • Vulnerability scanning tools — Solutions of this type can also be used to discover ports that are open or configured with default passwords.
  1. Track service configuration changes.

Many services on your network connect to various ports, so it is important to monitor the running states of installed services and continuously track changes to service configuration settings. Services can be vulnerable when they are unpatched or misconfigured.

Using Netwrix Change Tracker, you can harden your systems by tracking unauthorized changes and other suspicious activities. In particular, it provides the following functionality:

  • Actionable alerting about configuration changes
  • Automatic recording, analyzing, validating and verifying of every change
  • Real-time change monitoring
  • Constant application vulnerability monitoring

4. Use IDP and IPS tools.

Intrusion detection systems (IDS) and intrusion prevention systems (IPS) can help you prevent attackers from exploiting your ports. They monitor your network, spot possible cybersecurity incidents, log information about them and report the incidents to security administrators. IPS complements your firewalls by identifying suspicious incoming traffic and logging and blocking the attack.

5. Use SSH Keys.

Another option is to use SSH keys. These access credentials are more secure than passwords because decrypting SSH is very difficult, if not impossible. There are two types of SSH keys:

  • Private or identity keys, which identify users and give them access
  • Public or authorized keys, which determine who can access your system

You can use public-key cryptographic algorithms and key generation tools to create SSH keys.

6. Conduct penetration tests and vulnerability assessments.

Consider conducting penetration tests and vulnerability assessments to protect your ports. Although both of these techniques are used to spot vulnerabilities in IT infrastructure, they are quite different. Vulnerability scans only identify and report vulnerabilities, while penetration tests exploit security gaps to determine how attackers can gain unauthorized access to your system.

FAQs

What is an open port vulnerability?

An open port vulnerability is a security gap caused by an open port. Without proper configuration and protection, attackers can use open ports to access your systems and data.

Which ports are most vulnerable?

Certain ports and their applications are more likely to be targeted because they often have weaker credentials and defenses. Common vulnerable ports include:

  • FTP (20, 21)
  • SSH (22)
  • Telnet (23)
  • SMTP (25)
  • DNS (53)
  • NetBIOS over TCP (137, 139)
  • SMB (445)
  • HTTP and HTTPS (80, 443, 8080, 8443)
  • Ports 1433, 1434 and 3306
  • Remote desktop (3389)

Is port 80 a security risk?

Port 80 isn’t inherently a security risk. However, if you leave it open and don’t have the proper configurations in place, attackers can easily use it to access your systems and data. Unlike port 443 (HTTPS), port 80 is unencrypted, making it easy for cybercriminals to access, leak and tamper with sensitive data.

Source :
https://blog.netwrix.com/2022/08/04/open-port-vulnerabilities-list/

Announcing Public Preview of Update management center

We are excited to announce the Public Preview of the Update management center (UMC), the next iteration of the Azure Automation Update Management solution. In addition to zero onboarding steps, and no dependency on Azure Automation and Log Analytics, you also get new capabilities such as flexible scheduling options and on-demand assessments that help you manage a patch workflow that is best suited for your needs. 

Ongoing management of operating system and application patches is critical in order to ensure your machines remain secure and meet compliance policies. With the increasing size of IT estates today, this could be a complex process. UMC eases this process of managing and automating patching of Windows and Linux Operating systems. It provides a consolidated view to centrally manage the process of patching on Azure virtual machines and devices in on-premises or other public clouds (via Azure Arc). It facilitates you to assess and install patches on a single VM or at scale. 

What’s new in the UMC? 

  • The “overview” tab offers a wide range of filters, charts and categories and provides a unified view of patching status of all Windows and Linux machines on Azure and Azure Arc-enabled servers. 
  • UMC leverages native functionality on Azure Compute and Azure Arc for Servers platform to provide a zero-step onboarding with no dependency on Log Analytics or Azure Automation, simplifying the user experience.  
  • UMC offers granular access control at individual resource level instead of that at Automation account and Log Analytics workspace level. It allows RBAC and roles based of ARM in Azure, enabling fine grained control on who can manage, assess and update a machine in Azure. 
  • The enhanced flexibility in UMC allows deployment of patches on a flexible schedule. UMC provides on-demand assessment and installation of patches, customizable scheduled patching, periodic assessment, and offers patching methods such as automatic VM guest patching in Azure, hotpatch or custom maintenance schedules and more. 

Getting Started 

You can find the Update management solution in the “updates” option on your Azure VMs or Azure Arc-enabled servers. 

thumbnail image 1 of blog post titled 


							Announcing Public Preview of Update management center

You can also navigate to the Update management center using the search bar on the Azure portal. The overview tab for UMC enables you to view the patching compliance and status for all your Azure and Non-Azure machines. You can use the filters on top to drill down to a specific set of machines, view a breakdown of machines and their statuses based on multiple categories, and identify the machines that are non-compliant to quickly take corrective action. The “No updates data” status tells you the count of machines that have not been assessed in the past 7 days or do not have Periodic assessment setup. 

thumbnail image 2 of blog post titled 


							Announcing Public Preview of Update management center

The machines tab shows the list of all VMs under a given subscription. You can access the features of UMC from the menu on the top. Broadly, “Check for updates” allows you to assess updates on-demand while “One-time update” allows to install patches on-demand. The Scheduled updates and Updates Settings options allow you to enable customised patching schedules. 

thumbnail image 3 of blog post titled 


							Announcing Public Preview of Update management center

Overall, Update management center offers an easy to use one-stop location for all operating system and application patching scenarios for a single VM or VMs at scale. 

Overall, Update management center offers an easy to use one-stop location for all operating system and application patching scenarios for a single VM or VMs at scale. 

What’s next in UMC? 

  • Extend patch management to all Azure supported distros & OSes, and all Arc workloads such as Azure Arc-enabled private clouds. 
  • Provide additional controls for configuration of patching workflows and orchestration of patch schedules.  

Stay tuned for more announcements! 

Additional Resources 

Google Delays Blocking 3rd-Party Cookies in Chrome Browser Until 2024

Google on Wednesday said it’s once again delaying its plans to turn off third-party cookies in the Chrome web browser from late 2023 to the second half of 2024.

“The most consistent feedback we’ve received is the need for more time to evaluate and test the new Privacy Sandbox technologies before deprecating third-party cookies in Chrome,” Anthony Chavez, vice president of Privacy Sandbox, said.

In keeping this in mind, the internet and ad tech giant said it’s taking a “deliberate approach” and extending the testing window for its ongoing Privacy Sandbox initiatives prior to phasing out third-party cookies.

Cookies are pieces of data planted on a user’s computer or other device by the web browser as a website is accessed, with third-party cookies fueling much of the digital advertising ecosystem and its ability to track users across different sites to show targeted ads.

Privacy Sandbox is Google’s umbrella term for a set of technologies that aim to improve users’ privacy across the web and Android by limiting cross-site and cross-app tracking and offering improved, safer alternatives to serve interest-based ads.

CyberSecurity

While Google had originally planned to roll out the feature in early 2022, it revised the timeline in June 2021, pushing its proposal to transition from third-party cookies over a three-month period, starting in mid-2023 and ending in late 2023.

“It’s become clear that more time is needed across the ecosystem to get this right,” the company noted at the time.

3rd-Party Cookies in Chrome

The second extension comes as Google announced Topics API as a replacement for FLoC (short for Federated Learning of Cohorts) in January 2022, following it up with a developer preview of Privacy Sandbox for Android in May.

In February 2022, the U.K. Competition and Markets Authority (CMA) formally accepted commitments from Google over how it develops the technology, pointing out the need to flesh out Privacy Sandbox such that it promotes competition and supports publishers to raise revenue from ads while also safeguarding consumer privacy.

CyberSecurity

Under the new plan, Privacy Sandbox trials are expected to be expanded to users globally next month, with the number of users included in the tests ramped up throughout the rest of the year and into 2023.

Google also emphasized that users will be shown a prompt to manage their participation, adding it intends to make the APIs generally available by Q3 2023, with third-party cookie support tentatively dropped in H2 2024.

The CMA, for its part, acknowledged today that it’s aware of “alternative proposals being developed by third-parties,” and that it’s “working with the [Information Commissioner’s Office] to better understand their viability and likely impacts.”

Source :
https://thehackernews.com/2022/07/google-delays-blocking-3rd-party.html

LockBit Ransomware Abuses Windows Defender to Deploy Cobalt Strike Payload

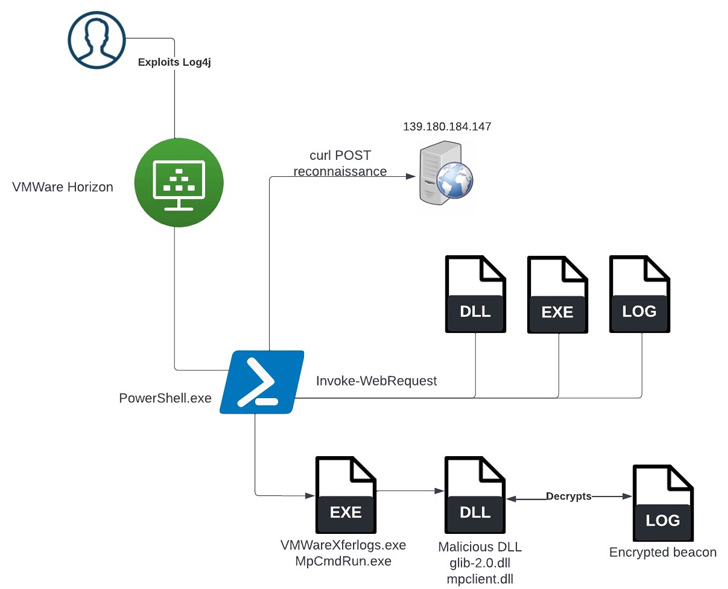
A threat actor associated with the LockBit 3.0 ransomware-as-a-service (RaaS) operation has been observed abusing the Windows Defender command-line tool to decrypt and load Cobalt Strike payloads.

According to a report published by SentinelOne last week, the incident occurred after obtaining initial access via the Log4Shell vulnerability against an unpatched VMware Horizon Server.

“Once initial access had been achieved, the threat actors performed a series of enumeration commands and attempted to run multiple post-exploitation tools, including Meterpreter, PowerShell Empire, and a new way to side-load Cobalt Strike,” researchers Julio Dantas, James Haughom, and Julien Reisdorffer said.

CyberSecurity

LockBit 3.0 (aka LockBit Black), which comes with the tagline “Make Ransomware Great Again!,” is the next iteration of the prolific LockBit RaaS family that emerged in June 2022 to iron out critical weaknesses discovered in its predecessor.

It’s notable for instituting what’s the first-ever bug bounty for a RaaS program. Besides featuring a revamped leak site to name-and-shame non-compliant targets and publish extracted data, it also includes a new search tool to make it easier to find specific victim data.

LockBit Ransomware

The use of living-off-the-land (LotLtechniques by cyber intruders, wherein legitimate software and functions available in the system are used for post-exploitation, is not new and is usually seen as an attempt to evade detection by security software.

Earlier this April, a LockBit affiliate was found to have leveraged a VMware command-line utility called VMwareXferlogs.exe to drop Cobalt Strike. What’s different this time around is the use of MpCmdRun.exe to achieve the same goal.

MpCmdRun.exe is a command-line tool for carrying out various functions in Microsoft Defender Antivirus, including scanning for malicious software, collecting diagnostic data, and restoring the service to a previous version, among others.

CyberSecurity

In the incident analyzed by SentinelOne, the initial access was followed by downloading a Cobalt Strike payload from a remote server, which was subsequently decrypted and loaded using the Windows Defender utility.

“Tools that should receive careful scrutiny are any that either the organization or the organization’s security software have made exceptions for,” the researchers said.

“Products like VMware and Windows Defender have a high prevalence in the enterprise and a high utility to threat actors if they are allowed to operate outside of the installed security controls.”

The findings come as initial access brokers (IABs) are actively selling access to company networks, including managed service providers (MSPs), to fellow threat actors for profit, in turn offering a way to compromise downstream customers.

In May 2022, cybersecurity authorities from Australia, Canada, New Zealand, the U.K., and the U.S. warned of attacks weaponizing vulnerable managed service providers (MSPs) as an “initial access vector to multiple victim networks, with globally cascading effects.”

“MSPs remain an attractive supply chain target for attackers, particularly IABs,” Huntress researcher Harlan Carvey said, urging companies to secure their networks and implement multi-factor authentication (MFA).

Source :
https://thehackernews.com/2022/08/lockbit-ransomware-abuses-windows.html

Microsoft starts blocking Office macros by default, once again

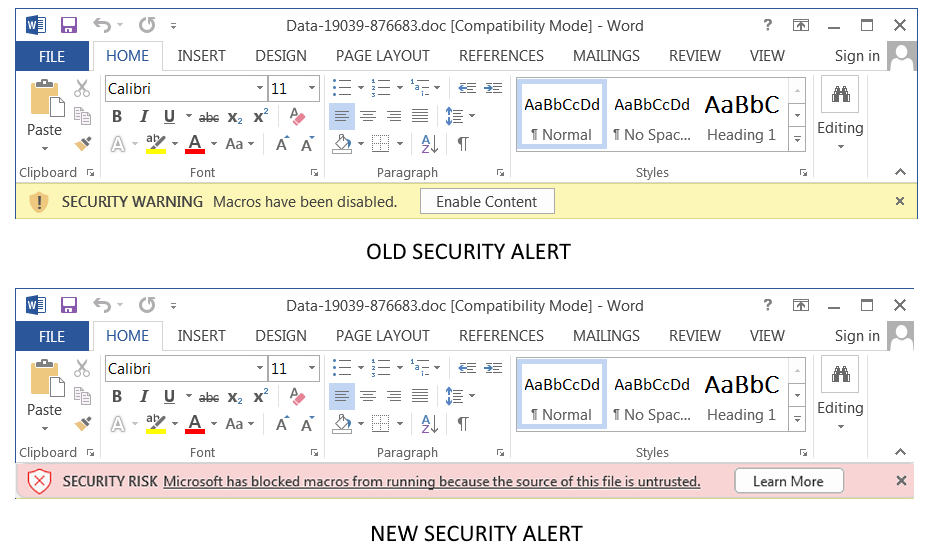
Microsoft announced today that it resumed the rollout of VBA macro auto-blocking in downloaded Office documents after temporarily rolling it back earlier this month following user feedback.

The change comes after the company improved its user and admin support documentation to make it easier to understand the available options when a macro is blocked.

“Based on our review of customer feedback, we’ve made updates to both our end user and our admin documentation to make clearer what options you have for different scenarios,” Microsoft explained in a new update in the Microsoft 365 message center.

“For example, what to do if your users have files on SharePoint or files on a network share.”

End users can find more information on the next steps after macros are blocked in a downloaded Office document on the A potentially dangerous macro has been blocked support page. IT admins can find dedicated documentation on the Macros from the Internet will be blocked by default in Office page.

“If you ever enabled or disabled the Block macros from running in Office files from the Internet policy, your organization will not be affected by this change,” Microsoft added.

Microsoft Office users who want automatic Office macro auto-blocking enabled and don’t want to wait for the rollout to reach their systems can read our easy-to-follow tutorial on how to auto-block macros in Microsoft Office docs from the Internet using group policies.

Mockup of new Office macros security alert
Mockup of new Office macros security alert (BleepingComputer)

Rolled back due to negative user feedback

This announcement comes after Redmond backtracked on a decision made earlier this year to make it harder to enable Office VBA macros in docs downloaded from the Internet in several Microsoft Office apps (Access, Excel, PowerPoint, Visio, and Word) for customers in the Current Channel (Preview).

The new feature meant that a popular distribution method for malware would effectively be killed since VBA macros embedded in malicious Office documents have been, for a very long time, one of the easiest methods for threat actors to push various malware families in phishing attacks.

The company announced in February 2022 that Microsoft Office would automatically block VBA macros in all downloaded documents after a rollout stage between April and June.

However, as BleepingComputer first reported in early July, soon after the new feature went live for customers last month, Microsoft suddenly and without any real explanation said that this change would be rolled back.

While Microsoft revealed alerted admins in an M365 message center update, it didn’t make a public announcement and updated the original notification several days later to say it was just a temporary rollback.

Redmond pinned this rollback on negative user feedback. Although Microsoft didn’t share more info, users have reported they didn’t know how to re-enable macros after they were automatically blocked because they couldn’t find the Unblock button. In contrast, others found it burdensome to unblock each downloaded Office document multiple times daily.

Source :
https://www.bleepingcomputer.com/news/microsoft/microsoft-starts-blocking-office-macros-by-default-once-again/

Microsoft Teams outage also takes down Microsoft 365 services

What initially started like a minor Microsoft Teams outage has also taken down multiple Microsoft 365 services with Teams integration, including Exchange Online, Windows 365, and Office Online.

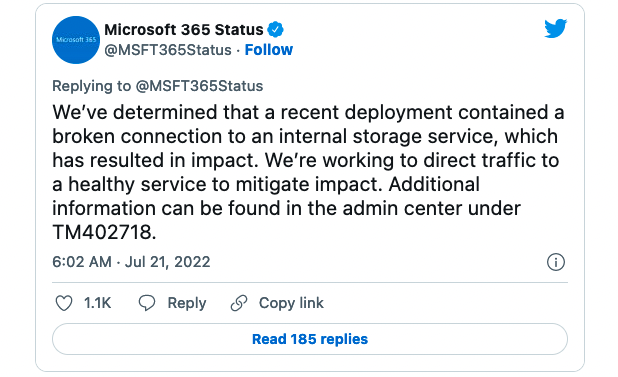
“We’ve received reports of users being unable to access Microsoft Teams or leverage any features,” the company revealed on its official Microsoft 365 Status Twitter account more than 8 hours ago.

Two hours later, Redmond said the issue causing the connection problems was a recent deployment that featured a broken connection to an internal storage service.

However, Teams was not the only product impacted by the outage since users also began reporting failures to connect to various Microsoft 365 services.

Microsoft confirmed the issues saying that the subsequent Microsoft 365 outage only affected services that came with Teams integration.

“We’ve identified downstream impact to multiple Microsoft 365 services with Teams integration, such as Microsoft Word, Office Online and SharePoint Online,” Microsoft explained.

Microsoft Teams outage tweet

As the company further detailed on its Microsoft 365 Service health status page, affected customers experienced issues with one or more of the following services:

  • Microsoft Teams (Access, chat, and meetings)
  • Exchange Online (Delays sending mail)
  • Microsoft 365 Admin center (Inability to access)
  • Microsoft Word within multiple services (Inability to load)
  • Microsoft Forms (Inability to use via Teams)
  • Microsoft Graph API (Any service relying on this API may be affected)
  • Office Online (Microsoft Word access issues)
  • SharePoint Online (Microsoft Word access issues)
  • Project Online (Inability to access)
  • PowerPlatform and PowerAutomate (Inability to create an environment with a database)
  • Autopatches within Microsoft Managed Desktop
  • Yammer (Impact to Yammer experiments)
  • Windows 365 (Unable to provision Cloud PCs)

After redirecting traffic to a healthy service to mitigate the impact, Redmond said its telemetry indicates that Microsoft Teams functionality started to recover.

“Service availability has mostly recovered with only a few service features still requiring attention,” Microsoft added on the service health status page and on Twitter two hours ago, at 4 AM EST.

“We’ll continue to monitor the service as new regions enter business hours to ensure the service health does not fluctuate while the remaining actions are completed.”

Source :
https://www.bleepingcomputer.com/news/microsoft/microsoft-teams-outage-also-takes-down-microsoft-365-services/

How to set up proxy server on Windows 11

On Windows 11, you can set up a proxy server quite easily. A proxy server is a service that works as a man-in-the-middle between the computer and the internet. When using this feature, the requests you make to websites and other services will be handled by the proxy instead.

Usually, you’d see a proxy configuration in organizations and schools, but anyone can set up a proxy server because of its benefits. Using a proxy helps save data usage and reduce bandwidth use because web requests are cached in the server and then served again when the user requests the same content.

It can increase your privacy by hiding the IP address of the client making an internet request. It can improve security by blocking malicious traffic and logging users’ activities. It can also block sites, by using rules, a company can stop users from accessing social networks and other websites, and much more.

In this guide, you will learn three ways to set up a proxy server on your Windows 11 device without the need for third-party tools. (Just to be clear, in this guide, we’re setting proxy settings to connect to a server, not to set up the actual proxy server.)

Configure proxy server on Windows 11

The following instructions will apply to Ethernet and Wi-Fi network connections, but these settings won’t work during a VPN session.

To enable automatic configuration for proxy server on Windows 11, use these steps:

  1. Open Settings on Windows 11.
  2. Click on Network & Internet.
  3. Click the Proxy tab.
  4. Turn on the Automatically detect settings toggle switch to set up a proxy server on Windows 11.Enable automatic proxy detection

Once you complete the steps, Windows 11 will automatically detect the settings using the Web Proxy Auto-Discovery Protocol (WPAD). Organizations and schools typically use this option to automatically configure or change the proxy settings to computers connected to their networks.

If you do not want the computer to detect settings automatically, or you are trying to set up a proxy server manually, you need to turn off the Automatically detect settings toggle switch.

Configure proxy through script on Windows 11

It is also possible to configure a proxy server automatically using the setup script option on Windows 11.

To configure a proxy server using a script, use these steps:

  1. Open Settings.
  2. Click on Network & Internet.
  3. Click the Proxy tab.
  4. Under the “Automatic proxy setup” section, click the “Set up” button for the “Use setup script” setting.Windows 11 use setup script
  5. Turn on the Use setup script toggle switch.
  6. Confirm the address of the script (or .pac file).Proxy script address
  7. Click the Save button.

After you complete the steps, Windows 11 will load the proxy configuration from the specified file.

Configure automatic proxy with manual configuration on Windows 11

To set up proxy server settings manually on Windows 11, use these steps:

  1. Open Settings.
  2. Click on Network & Internet.
  3. Click the Proxy tab.
  4. Under the “Manual proxy setup” section, click the “Set up” button for the “Use a proxy server” setting.Windows 11 setup proxy server manually
  5. Turn on the “Use a proxy server” toggle switch.
  6. In the “Proxy IP address” setting, confirm the address that connects to the proxy server.Proxy manual configuration
  7. In the “Port” setting, confirm the port number required for the proxy to work.
  8. Check the “Don’t use the proxy server for local (intranet) addresses” option.
  9. (Optional) Confirm the addresses that will bypass the proxy in the available section.Quick note: You need to specify these addresses using a semicolon (;) to separate each entry. You can use an asterisk as a wildcard if you have multiple addresses from the same domain. For example, *.website.com will match all the addresses in the asterisk part, including forums.website.comdocs.website.com, etc.
  10. Click the Save button.

Once you complete the steps, the proxy will be configured and the network traffic will automatically pass through the proxy server. However, it is also possible to specify a list of addresses that will not use the proxy.

Source :
https://pureinfotech.com/setup-proxy-server-windows-11/

Install updates manually on Windows 11 in six different ways

On Windows 11, a cumulative update (or quality update) is a service patch that Microsoft rolls out proactively to fix bugs, enhance security, and improve system performance. Although updates download automatically through Windows Update, sometimes it may still be necessary to install a specific patch manually.

For instance, after a new installation of Windows 11 or if the computer hasn’t been connected to the internet for some time. If Windows Update isn’t working, it might be necessary to install an update manually to fix the problem. A specific driver needs an update, or you want to upgrade to a newer version of Windows.

Regardless of the reason, Windows 11 has at least four ways to update the system using the Windows Update settings, manual download, Command Prompt, and PowerShell.

Microsoft offers three main types of updates (quality, optional, and feature updates). “Quality updates” are available every month with security and non-security fixes, improvements, and features (occasionally). “Optional updates” are not critical but necessary, and they include drivers and product updates. Finally, “feature updates” are meant to upgrade the device to a newer version (for example, Windows 11 22H2).

In this guide, you will learn six ways to install updates on Windows 11.

Install updates on Windows 11 with Windows Update

To install Windows 11 updates manually with Windows Update, use these steps:

  1. Open Settings on Windows 11.
  2. Click on Windows Update.
  3. Click the Check for updates button.Windows 11 check and install updates
  4. (Optional) Click the Download and install option to apply a preview of an upcoming update of Windows 11.Quick note: Optional updates usually include non-security changes that Microsoft plans to release in the next Patch Tuesday rollout.
  5. Click the Restart now button.

Once you complete the steps, if an update is available, it will download and install automatically on Windows 11.

Install updates on Windows 11 with Microsoft Update Catalog

To download and install an update manually on Windows 11, use these steps:

  1. Open Microsoft Update Catalog website.
  2. Search for the knowledge base number of the update – for example, KB5015814.Quick tip: If you do not know the latest update reference number, you can check the update history tracker.
  3. Click the Download button for the update to install on Windows 11.Microsoft Update Catalog downloadQuick note: The page usually lists two versions, including ARM64 and x64. Unless you have an ARM-based device, you need to download the x64 version of the cumulative update.
  4. Click the link to download the .msu package to your computer.
  5. Click the Close button.
  6. Double-click the .msu file to launch the installer.
  7. Click the Yes button to install the update on Windows 11.
  8. Click the Restart now button.

After you complete the steps, the cumulative update will apply to Windows 11.

Install updates on Windows 11 with Command Prompt

Windows 11 doesn’t have a Command Prompt tool to check and download updates. However, you can use commands to install update packages manually.

To install Windows 11 updates with Command Prompt, use these steps:

  1. Open Microsoft Update Catalog website.
  2. Search for the knowledge base number of the update – for example, KB5015814.
  3. Click the Download button for the cumulative update you want to install.Microsoft Update Catalog download
  4. Click the link to download the .msu package.
  5. Click the Close button.
  6. Open Start.
  7. Search for Command Prompt, right-click the top result, and select the Run as administrator option.
  8. Type the following command to install a new update on Windows 11 and press Enter:wusa c:\PATH\TO\UPDATE.msu /quiet /norestartIn the command, update the path with the location and name of the .msu update package. This example installs the KB5015814 update:wusa c:\Users\USERACCOUNT\Downloads\windows10.0-kb5015814-x64.msu /quiet /norestartCommand Prompt install Windows 11 update
  9. Type the following command to confirm the update was installed correctly and press Enter:wmic qfe list brief /format:table
  10. Type the following command to restart the device and press Enter:shutdown /r /t 00

After you complete the steps, the quality update will install quietly, and the computer will restart to finish applying the changes on Windows 11.

Install updates on Windows 11 with PowerShell

Alternatively, you can also install a PowerShell module to download and install updates on Windows 11.

To install Windows 11 updates with PowerShell, use these steps:

  1. Open Start.
  2. Search for PowerShell, right-click the top result, and select the Run as administrator option.
  3. Type the following command to install the PowerShell module to update Windows 11 and press Enter:Install-Module PSWindowsUpdatePowerShell install PSWindowUpdate
  4. Type Y to accept and press Enter.
  5. Type A to accept and install the module and press Enter.
  6. Type the following command to allow scripts to run on PowerShell and press Enter:Set-ExecutionPolicy RemoteSigned
  7. Type the following command to import the installed module and press Enter:Import-Module PSWindowsUpdatePowerShell import module
  8. Type the following command to check for Windows 11 updates with PowerShell and press Enter:Get-WindowsUpdate
  9. Type the following command to select, download, and install a specific update and press Enter:Install-WindowsUpdate -KBArticleID KBNUMBERIn the command, make sure to replace KBNUMBER with the update number you want to install. This example downloads and applies the KB5015814 update for Microsoft Defender:Install-WindowsUpdate -KBArticleID KB5015814 PowerShell install Windows 11 updates
  10. Type A to confirm the installation and press Enter.
  11. (Optional) Type the following command to download and install all available updates and press Enter:Install-WindowsUpdateQuick note: When using this command, you will be applying system updates as well as optional updates that may include driver updates.
  12. Type A to confirm the installation and press Enter.
  13. Type Y to confirm the restart and press Enter (if applicable).
  14. (Optional) Type the following command to view a list of previously installed updates and press Enter:Get-WUHistory

Once you complete the steps, the Windows 11 updates will download and install on your device.

Install optional updates on Windows 11

On Windows 11, optional updates are not critical, but they may be necessary for other functionalities. Typically, these updates are available for Microsoft and other products, feature updates, and third-party drivers (such as printers, cameras, network adapters, graphics cards, and Bluetooth peripherals).

To install optional updates on Windows 11, use these steps:

  1. Open Settings.
  2. Click on Windows Update.
  3. Click the Advanced options tab.
  4. Under the “Additional options” section, click the Optional updates setting.Optional updates
  5. Click the category to see the optional updates – for example, Driver updates.
  6. Check the optional updates to install on Windows 11.Windows 11 install optional updates
  7. Click the Download and install button.

After you complete the steps, Windows Update will install the packages on your computer.

Install feature updates on Windows 11

Feature updates refer to new versions of Windows 11 that bring new changes and features. These updates are optional, and you must install them manually unless the current release of Windows 11 is reaching the end of service, in which case the feature update will install automatically.

To install a feature update on Windows 11, use these steps:

  1. Open Settings.
  2. Click on Windows Update.
  3. Click on Check for updates button (if applicable).
  4. Click the Download and Install now button.Windows 11 install feature update
  5. Click the Restart now button.

In addition to Windows Update, you can also install feature updates using the Installation Assistant or the official ISO file to perform an in-place upgrade.

Source :
https://pureinfotech.com/install-updates-manually-windows-11/

How to install ChromeOS Flex on any laptop

ChromeOS Flex is a lightweight operating system from Google, which you can install on Windows, Mac, and Linux computers with older hardware, such as an old laptop or desktop computer. The operating system is based on Linux which uses web apps and the Chrome browser as the main interface.

The operating system also gives you security protection from threats such as malware and ransomware, and users will get a fast and modern work environment with background updates reducing downtime while boosting productivity.

Although Google offers many Chromebooks from different manufacturers that come preloaded with ChromeOS, the company now provides the ChromeOS Flex variant to give old computers a second life, especially for devices not compatible with Windows 11.

This guide will teach you the steps to install ChromeOS Flex on an old Windows-based computer.

ChromeOS Flex system requirements

Although Google only supports specific devices, you can still install the operating system on virtually any hardware as long as it meets the minimum requirements:

  • Processor: Intel or AMD x86-64-bit.
  • Memory: 4GB.
  • Storage: 16GB.

The requirements to run ChromeOS Flex are minimal, but Google says that processors and graphics made before 2010 may result in a poor user experience.

Aside from system requirements, you will also need a USB flash drive of at least 8GB to create the installation media.

Create ChromeOS Flex USB flash media

To create a ChromeOS Flex installation media, connect a USB flash drive of 8GB, and use these steps:

  1. Open Chromebook Recovery Utility page on Chrome.
  2. Click the Add to Chrome button.
  3. Click the Add extension button.
  4. Click the Extension button and select the Chromebook Recovery Utility extension.Chrome Recovery Utility
  5. Click the Get started button.
  6. Select the Google ChromeOS Flex option.
  7. Select the ChromeOS Flex option.
  8. Click the Continue button.
  9. Select the USB flash media from the list.Select USB create Chrome OS Flex media
  10. Click the Continue button.
  11. Click the Create now button.Create Chrome OS Flex media
  12. Click the Done button.

Once you complete the steps, you can proceed with the clean installation of ChromeOS Flex.

Install ChromeOS Flex

To install ChromeOS Flex on a Windows device, use these steps:

  1. Start the laptop with the ChromeOS Flex USB.Quick note: If the computer can’t boot from USB, you may need to update the BIOS/UEFI settings. This process usually requires pressing one of the function keys (F1, F2, F3, F10, or F12), the ESC, or the Delete key. For more accurate instructions, visit your PC manufacturer’s support website.
  2. Click the Get Started button.Chrome OS Flex get started
  3. Select the “Try it first” option.Chrome OS Flex install setupQuick note: In this guide, we’ll use the “Try it first” option, but if you plan to dedicate the device to the operating system, select the “Install CloudReady 2.0” option.
  4. Click the Next button.
  5. Select the wireless network.
  6. Confirm the Wi-Fi password.Chrome OS Flex connect to W-Fi
  7. Click the Connect button.
  8. Click the Accept and continue button.
  9. Select the You option to create an account.CChrome OS Flex create account
  10. Click the Next button.
  11. Confirm your Gmail account.Confirm Gmail account
  12. Click the Next button.
  13. Confirm the account password.
  14. Click the Next button.
  15. Complete the account verification.
  16. Click the Next button.
  17. Click the Accept and continue button.Chrome OS Flex sync settings

After you complete the steps, the operating system will install on the computer.

If you are ready for Windows again, you can use these steps to reinstall Windows 11 or Windows 10.

Source :
https://pureinfotech.com/install-chrome-os-flex/

How to reset Windows Update components on Windows 10

Windows Update is an essential component of Windows 10, as it provides the ability to download and install the latest updates with bug fixes, security patches, and drivers. Also, it is the mechanism to download new feature updates and preview builds. However, there will be times when your device may not download or install updates because of a specific error message, Windows Update not connecting to the Microsoft servers and other problems.

Typically, users may encounter this type of problem when the Windows Update agent-related services stop working, Windows 10 has an issue with the update cache, or some components get corrupted. You can reset Windows Update on Windows 10 to fix most problems in these situations.

In this guide, you will learn the steps to reset the Windows Update components using the “Windows Update Troubleshooter” utility. Also, you will learn the instructions to use Command Prompt to fix Windows Update manually to get security patches, drivers, and features downloading again on your computer. However, before using the Command Prompt option, make sure to use the instructions to install the most recent update manually, Service Stack Update (SSU), and repair system files first. 

How to reset Windows Update using Troubleshooter tool

To reset Windows Update using the troubleshooter, use these steps:

  1. Download the Windows Update Troubleshooter from Microsoft.
  2. Double-click the WindowsUpdateDiagnostic.diagcab file to run the troubleshooter.
  3. Select the Windows Update option.
  4. Click the Next button.Windows Update TroubleshooterWindows Update Troubleshooter
  5. Click the Try troubleshooting as an administrator option (if applicable). Re-select the option and click the Next button again.
  6. Click the Close button.
  7. Open Windows Update Troubleshooter again.
  8. Select the Windows Networking Diagnostics option to resolve any networking issues preventing updates from downloading.
  9. Click the Next button.
  10. Click the Close button.
  11. Restart the computer.

Once the computer restarts, try to update Windows 10 one more time, and now it should work as expected.

How to fix Windows Update installing latest update manually

To install an update manually, which can help to fix problems with Windows Update on Windows 10, use these steps:

  1. Open the Windows 10 update history website.
  2. In the left pane, browse the latest update for your version of Windows 10 and note the update’s KB number.Quick tip: You can check your current version on Settings > System > About, and under the “Windows Specifications” section, confirm the version information.
  3. Open the Microsoft Update Catalog website.
  4. Search for the knowledge base (KB) number of the update.Download Windows Update manuallyDownload Windows Update manually
  5. Download the update for the version of Windows 10 that you have (32-bit (x86) or 64-bit (x64)).
  6. Double-click the file to install the update.
  7. Restart the computer.

Once you complete the steps, the device should have the latest update installed. The update should have also fixed the problem with Windows Update. You can check by clicking the Check for updates button on the Windows Update settings page.

How to fix Windows Update installing latest Servicing Stack Update (SSU)

To make sure the computer has the most recent Servicing Stack Update to fix Windows Update problems, use these steps:

  1. Open Settings.
  2. Click on System.
  3. Click on About.
  4. Under the “System type” section, check whether you have the 32-bit or 64-bit version of Windows 10.Windows 10 architecture settingsWindows 10 architecture settings
  5. Open the Microsoft Update Catalog website.
  6. Download the most recent Servicing Stack Update for the version you have (32-bit (x86) or 64-bit (x64)).
  7. Double-click the file to install the update.
  8. Restart your computer.

After you restart the computer, you should now be able to download and install the update using the Settings app.

How to fix Windows Update repairing corrupted system files

To repair system files using the Deployment Image Servicing and Management (DISM) and System File Checker (SFC) tools to fix Windows Update problems, use these steps:

  1. Open Start.
  2. Search for Command Prompt, right-click the top result, and select the Run as administrator option.
  3. Type the following DISM command to repair corrupted system files and press Enter:dism.exe /Online /Cleanup-image /Restorehealth
  4. Type the following SFC command to repair system files and press Enter:sfc /scannowWindows Update dism and sfc repairWindows Update dism and sfc repair

After you complete the steps, the Windows Update components should start working again, and you can check for updates again to verify.

How to reset Windows Update using Command Prompt

To reset Windows Update manually using Command Prompt on Windows 10, use these steps:

  1. Open Start.
  2. Search for Command Prompt, right-click the top result, and select the Run as administrator option.
  3. Type the following commands to stop the Background Intelligent Transfer Service (BITS), Windows Update service, and Cryptographic service, and press Enter on each line:net stop bits net stop wuauserv net stop appidsvc net stop cryptsvcStop Windows Update servicesStop Windows Update servicesQuick tip: You may need to run the command more than once until you see the message that the service has stopped successfully.
  4. Type the following command to delete all the qmgr*.dat files created by BITS from your PC. and press Enter:Del “%ALLUSERSPROFILE%\Application Data\Microsoft\Network\Downloader\*.*”Reset Windows Update commandsReset Windows Update commands
  5. Type Y to confirm the deletion.
  6. Type the following commands to clear the Windows Update cache to allow Windows 10 to re-download the updates, instead of using the files already downloaded on the system that might be damaged and press Enter on each line:rmdir %systemroot%\SoftwareDistribution /S /Q rmdir %systemroot%\system32\catroot2 /S /QQuick tip: We use the remove directory rmdir command with the /S option to delete the specified directory and all subdirectories within the main folder, and the /Q option deletes directories quietly without confirmation. If you get the message “The process cannot access the file because it is being used by another process,” then repeat step No. 1 and try again, as one of the services might have restarted unexpectedly.
  7. Type the following commands to reset the BITS and Windows Update services to their default security descriptor, and press Enter on each line:sc.exe sdset bits D:(A;;CCLCSWRPWPDTLOCRRC;;;SY)(A;;CCDCLCSWRPWPDTLOCRSDRCWDWO;;;BA)(A;;CCLCSWLOCRRC;;;AU)(A;;CCLCSWRPWPDTLOCRRC;;;PU) sc.exe sdset wuauserv D:(A;;CCLCSWRPWPDTLOCRRC;;;SY)(A;;CCDCLCSWRPWPDTLOCRSDRCWDWO;;;BA)(A;;CCLCSWLOCRRC;;;AU)(A;;CCLCSWRPWPDTLOCRRC;;;PU)
  8. Type the following command to move to the System32 folder and press Enter:cd /d %windir%\system32
  9. Type the following commands to register all the corresponding BITS and Windows Update DLL files on the Registry and press Enter on each line:regsvr32.exe /s atl.dll regsvr32.exe /s urlmon.dll regsvr32.exe /s mshtml.dll regsvr32.exe /s shdocvw.dll regsvr32.exe /s browseui.dll regsvr32.exe /s jscript.dll regsvr32.exe /s vbscript.dll regsvr32.exe /s scrrun.dll regsvr32.exe /s msxml.dll regsvr32.exe /s msxml3.dll regsvr32.exe /s msxml6.dll regsvr32.exe /s actxprxy.dll regsvr32.exe /s softpub.dll regsvr32.exe /s wintrust.dll regsvr32.exe /s dssenh.dll regsvr32.exe /s rsaenh.dll regsvr32.exe /s gpkcsp.dll regsvr32.exe /s sccbase.dll regsvr32.exe /s slbcsp.dll regsvr32.exe /s cryptdlg.dll regsvr32.exe /s oleaut32.dll regsvr32.exe /s ole32.dll regsvr32.exe /s shell32.dll regsvr32.exe /s initpki.dll regsvr32.exe /s wuapi.dll regsvr32.exe /s wuaueng.dll regsvr32.exe /s wuaueng1.dll regsvr32.exe /s wucltui.dll regsvr32.exe /s wups.dll regsvr32.exe /s wups2.dll regsvr32.exe /s wuweb.dll regsvr32.exe /s qmgr.dll regsvr32.exe /s qmgrprxy.dll regsvr32.exe /s wucltux.dll regsvr32.exe /s muweb.dll regsvr32.exe /s wuwebv.dllQuick note: The regsvr32 helps to register “.DLL” files as command components in the Registry, and we use the /S option to specify the tool to run the command silently without prompting additional messages.
  10. Type the following commands to reset the network configurations that might be part of the problem (but do not restart your computer just yet), and press Enter on each line:netsh winsock reset netsh winsock reset proxyReset network adapter on Windows 10Reset network adapter on Windows 10
  11. Type the following commands to restart the BITS, Windows Update, and Cryptographic services, and press Enter on each line:net start bits net start wuauserv net start appidsvc net start cryptsvc
  12. Restart the computer.

Once you complete the steps, Windows Update should have reset, and it should be working again on your Windows 10 device.

You can also use the above instructions to fix the update problems when Surface Pro 8, Pro 7, Laptop 4, Studio, or any other Surface cannot seem to download a new firmware update.

Source :
https://pureinfotech.com/reset-windows-update-windows-10-fix-downloads-installs/

Exit mobile version