The five-day job: A BlackByte ransomware intrusion case study

July 6, 2023

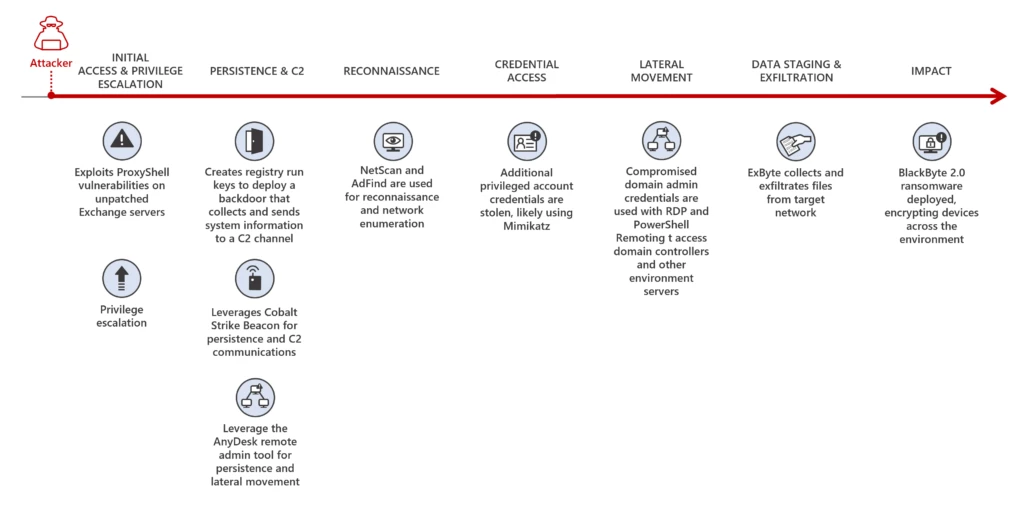
As ransomware attacks continue to grow in number and sophistication, threat actors can quickly impact business operations if organizations are not well prepared. In a recent investigation by Microsoft Incident Response (previously known as Microsoft Detection and Response Team – DART) of an intrusion, we found that the threat actor progressed through the full attack chain, from initial access to impact, in less than five days, causing significant business disruption for the victim organization.

Our investigation found that within those five days, the threat actor employed a range of tools and techniques, culminating in the deployment of BlackByte 2.0 ransomware, to achieve their objectives. These techniques included:

  • Exploitation of unpatched internet-exposed Microsoft Exchange Servers
  • Web shell deployment facilitating remote access
  • Use of living-off-the-land tools for persistence and reconnaissance
  • Deployment of Cobalt Strike beacons for command and control (C2)
  • Process hollowing and the use of vulnerable drivers for defense evasion
  • Deployment of custom-developed backdoors to facilitate persistence
  • Deployment of a custom-developed data collection and exfiltration tool
BlackByte 2.0 ransomware attack chain by order of stages: initial access and privilege escalation, persistence and command and control, reconnaissance, credential access, lateral movement, data staging and exfiltration, and impact.
Figure 1. BlackByte 2.0 ransomware attack chain

In this blog, we share details of our investigation into the end-to-end attack chain, exposing security weaknesses that the threat actor exploited to advance their attack. As we learned from Microsoft’s tracking of ransomware attacks and the cybercriminal economy that enables them, disrupting common attack patterns could stop many of the attacker activities that precede ransomware deployment. This case highlights that common security hygiene practices go a long way in preventing, identifying, and responding to malicious activity as early as possible to mitigate the impact of ransomware attacks. We encourage organizations to follow the outlined mitigation steps, including ensuring that internet-facing assets are up to date and configured securely. We also share indicators of compromise, detection details, and hunting guidance to help organizations identify and respond to these attacks in their environments.  

Forensic analysis

Initial access and privilege escalation

To obtain initial access into the victim’s environment, the threat actor was observed exploiting the ProxyShell vulnerabilities CVE-2021-34473, CVE-2021-34523, and CVE-2021-31207 on unpatched Microsoft Exchange Servers. The exploitation of these vulnerabilities allowed the threat actor to:

  • Attain system-level privileges on the compromised Exchange host
  • Enumerate LegacyDN of users by sending Autodiscover requests, including SIDs of users
  • Construct a valid authentication token and use it against the Exchange PowerShell backend
  • Impersonate domain admin users and create a web shell by using the New-MailboxExportRequest cmdlet
  • Create web shells to obtain remote control on affected servers

The threat actor was observed operating from the following IP to exploit ProxyShell and access the web shell:

  • 185.225.73[.]244

Persistence

Backdoor

After gaining access to a device, the threat actor created the following registry run keys to run a payload each time a user signs in:

Registry keyValue nameValue data
HKEY_CURRENT_USER\Software\Microsoft\Windows\CurrentVersion\Run  MsEdgeMsErundll32 C:\Users\user\Downloads\api-msvc.dll,Default  
HKEY_CURRENT_USER\Software\Microsoft\Windows\CurrentVersion\Run  MsEdgeMsErundll32 C:\temp\api-msvc.dll,Default  
HKEY_CURRENT_USER\Software\Microsoft\Windows\CurrentVersion\Run  MsEdgeMsErundll32 C:\systemtest\api-system.png,Default

The file api-msvc.dll (SHA-256: 4a066569113a569a6feb8f44257ac8764ee8f2011765009fdfd82fe3f4b92d3e) was determined to be a backdoor capable of collecting system information, such as the installed antivirus products, device name, and IP address. This information is then sent via HTTP POST request to the following C2 channel:

  • hxxps://myvisit[.]alteksecurity[.]org/t

The organization was not using Microsoft Defender Antivirus, which detects this malware as Trojan:Win32/Kovter!MSR, as the primary antivirus solution, and the backdoor was allowed to run.

An additional file, api-system.png, was identified to have similarities to api-msvc.dll. This file behaved like a DLL, had the same default export function, and also leveraged run keys for persistence.

Cobalt Strike Beacon

The threat actor leveraged Cobalt Strike to achieve persistence. The file sys.exe (SHA-256: 5f37b85687780c089607670040dbb3da2749b91b8adc0aa411fd6280b5fa7103), detected by Microsoft Defender Antivirus as Trojan:Win64/CobaltStrike!MSR, was determined to be a Cobalt Strike Beacon and was downloaded directly from the file sharing service temp[.]sh:

  • hxxps://temp[.]sh/szAyn/sys.exe

This beacon was configured to communicate with the following C2 channel:

  • 109.206.243[.]59:443

AnyDesk

Threat actors leverage legitimate remote access tools during intrusions to blend into a victim network. In this case, the threat actor utilized the remote administration tool AnyDesk, to maintain persistence and move laterally within the network. AnyDesk was installed as a service and was run from the following paths:

  • C:\systemtest\anydesk\AnyDesk.exe
  • C:\Program Files (x86)\AnyDesk\AnyDesk.exe
  • C:\Scripts\AnyDesk.exe

Successful connections were observed in the AnyDesk log file ad_svc.trace involving anonymizer service IP addresses linked to TOR and MULLVAD VPN, a common technique that threat actors employ to obscure their source IP ranges.

Reconnaissance

We found the presence and execution of the network discovery tool NetScan being used by the threat actor to perform network enumeration using the following file names:

  • netscan.exe (SHA-256:1b9badb1c646a19cdf101ac4f6fdd23bc61eaab8c9f925eb41848cea9fd0738e)
  • netapp.exe (SHA-256:1b9badb1c646a19cdf101ac4f6fdd23bc61eaab8c9f925eb41848cea9fd0738e)

Additionally, execution of AdFind (SHA-256: f157090fd3ccd4220298c06ce8734361b724d80459592b10ac632acc624f455e), an Active Directory reconnaissance tool, was observed in the environment.

Credential access

Evidence of likely usage of the credential theft tool Mimikatzwas also uncovered through the presence of a related log file mimikatz.log. Microsoft IR assesses that Mimikatz was likely used to attain credentials for privileged accounts.

Lateral movement

Using compromised domain admin credentials, the threat actor used Remote Desktop Protocol (RDP) and PowerShell remoting to obtain access to other servers in the environment, including domain controllers.

Data staging and exfiltration

In one server where Microsoft Defender Antivirus was installed, a suspicious file named explorer.exe was identified, detected as Trojan:Win64/WinGoObfusc.LK!MT, and quarantined. However, because tamper protection wasn’t enabled on this server, the threat actor was able to disable the Microsoft Defender Antivirus service, enabling the threat actor to run the file using the following command:

explorer.exe P@$$w0rd

After reverse engineering explorer.exe, we determined it to be ExByte, a GoLang-based tool developed and commonly used in BlackByte ransomware attacks for collection and exfiltration of files from victim networks. This tool is capable of enumerating files of interest across the network and, upon execution, creates a log file containing a list of files and associated metadata. Multiple log files were uncovered during the investigation in the path:

  • C:\Exchange\MSExchLog.log

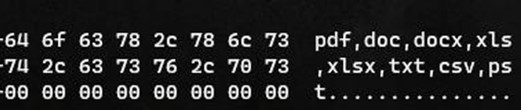
Analysis of the binary revealed a list of file extensions that are targeted for enumeration.

Figure-2.-Binary-analysis-showing-file-extensions-enumerated-by-explorer.exe_
Figure 2. Binary analysis showing file extensions enumerated by explorer.exe

Forensic analysis identified a file named data.txt that was created and later deleted after ExByte execution. This file contained obfuscated credentials that ExByte leveraged to authenticate to the popular file sharing platform Mega NZ using the platform’s API at:

  • hxxps://g.api.mega.co[.]nz
Figure 3. Binary analysis showing explorer.exe functionality for connecting to file sharing service MEGA NZ

We also determined that this version of Exbyte was crafted specifically for the victim, as it contained a hardcoded device name belonging to the victim and an internal IP address.

ExByte execution flow

Upon execution, ExByte decodes several strings and checks if the process is running with privileged access by reading \\.\PHYSICALDRIVE0:

  • If this check fails, ShellExecuteW is invoked with the IpOperation parameter RunAs, which runs explorer.exe with elevated privileges.

After this access check, explorer.exe attempts to read the data.txt file in the current location:

  • If the text file doesn’t exist, it invokes a command for self-deletion and exits from memory:
C:\Windows\system32\cmd.exe /c ping 1.1.1.1 -n 10 > nul & Del <PATH>\explorer.exe /F /Q
  • If data.txt exists, explorer.exe reads the file, passes the buffer to Base64 decode function, and then decrypts the data using the key provided in the command line. The decrypted data is then parsed as JSON below and fed for login function:
{    “a”:”us0”,    “user”:”<CONTENT FROM data.txt>”}

Finally, it forms a URL for sign-in to the API of the service MEGA NZ:

  • hxxps://g.api.mega.co[.]nz/cs?id=1674017543

Data encryption and destruction

On devices where files were successfully encrypted, we identified suspicious executables, detected by Microsoft Defender Antivirus as Trojan:Win64/BlackByte!MSR, with the following names:

  • wEFT.exe
  • schillerized.exe

The files were analyzed and determined to be BlackByte 2.0 binaries responsible for encryption across the environment. The binaries require an 8-digit key number to encrypt files.

Two modes of execution were identified:

  • When the -s parameter is provided, the ransomware self-deletes and encrypts the machine it was executed on.
  • When the -a parameter is provided, the ransomware conducts enumeration and uses an Ultimate Packer Executable (UPX) packed version of PsExec to deploy across the network. Several domain admin credentials were hardcoded in the binary, facilitating the deployment of the binary across the network.

Depending on the switch (-s or -a), execution may create the following files:

  • C:\SystemData\M8yl89s7.exe (UPX-packed PsExec with a random name; SHA-256: ba3ec3f445683d0d0407157fda0c26fd669c0b8cc03f21770285a20b3133098f)
  • C:\SystemData\wEFT.exe (Additional BlackByte binary)
  • C:\SystemData\MsExchangeLog1.log (Log file)
  • C:\SystemData\rENEgOtiAtES (A vulnerable (CVE-2019-16098) driver RtCore64.sys used to evade detection by installed antivirus software; SHA-256: 01aa278b07b58dc46c84bd0b1b5c8e9ee4e62ea0bf7a695862444af32e87f1fd)
  • C:\SystemData\iHu6c4.ico (Random name – BlackBytes icon)
  • C:\SystemData\BB_Readme_file.txt (BlackByte ReadMe file)
  • C:\SystemData\skip_bypass.txt (Unknown)

BlackByte 2.0 ransomware capabilities

Some capabilities identified for the BlackByte 2.0 ransomware were:

  • Antivirus bypass
    • The file rENEgOtiAtES created matches RTCore64.sys, a vulnerable driver (CVE-2049-16098) that allows any authenticated user to read or write to arbitrary memory
    • The BlackByte binary then creates and starts a service named RABAsSaa calling rENEgOtiAtES, and exploits this service to evade detection by installed antivirus software
  • Process hollowing
    • Invokes svchost.exe, injects to it to complete device encryption, and self-deletes by executing the following command:
      • cmd.exe /c ping 1.1.1.1 -n 10 > Nul & Del “PATH_TO_BLACKBYTE” /F /Q
  • Modification / disabling of Windows Firewall
    • The following commands are executed to either modify existing Windows Firewall rules, or to disable Windows Firewall entirely:
      • cmd /c netsh advfirewall set allprofiles state off
      • cmd /c netsh advfirewall firewall set rule group=”File and Printer Sharing” new enable=Yes
      • cmd /c netsh advfirewall firewall set rule group=”Network Discovery” new enable=Yes
  • Modification of volume shadow copies
    • The following commands are executed to destroy volume shadow copies on the machine:
      • cmd /c vssadmin Resize ShadowStorge /For=B:\ /On=B:\ /MaxSize=401MB
      • cmd /c vssadmin Resize ShadowStorage /For=B:\ /On=B:\ /MaxSize=UNBOUNDED
  • Modification of registry keys/values
    • The following commands are executed to modify the registry, facilitating elevated execution on the device:
      • cmd /c reg add HKLM\SOFTWARE\Microsoft\Windows\CurrentVersion\Policies\System /v LocalAccountTokenFilterPolicy /t REG_DWORD /d 1 /f
      • cmd /c reg add HKLM\SOFTWARE\Microsoft\Windows\CurrentVersion\Policies\System /v EnableLinkedConnections /t REG_DWORD /d 1 /f
      • cmd /c reg add HKLM\\SYSTEM\\CurrentControlSet\\Control\\FileSystem /v LongPathsEnabled /t REG_DWORD /d 1 /f
  • Additional functionality
    • Ability to terminate running services and processes
    • Ability to enumerate and mount volumes and network shares for encryption
    • Perform anti-forensics technique timestomping (sets the file time of encrypted and ReadMe file to 2000-01-01 00:00:00)
    • Ability to perform anti-debugging techniques

Recommendations

To guard against BlackByte ransomware attacks, Microsoft recommends the following:

  • Ensure that you have a patch management process in place and that patching for internet-exposed devices is prioritized; Understand and assess your cyber exposure with advanced vulnerability and configuration assessment tools like Microsoft Defender Vulnerability Management
  • Implement an endpoint detection and response (EDR) solution like Microsoft Defender for Endpoint to gain visibility into malicious activity in real time across your network
  • Ensure antivirus protections are updated regularly by turning on cloud-based protection and that your antivirus solution is configured to block threats
  • Enable tamper protection to prevent components of Microsoft Defender Antivirus from being disabled
  • Block inbound traffic from IPs specified in the indicators of compromise section of this report
  • Block inbound traffic from TOR exit nodes
  • Block inbound access from unauthorized public VPN services
  • Restrict administrative privileges to prevent authorized system changes

Conclusion

BlackByte ransomware attacks target organizations that have infrastructure with unpatched vulnerabilities.  As outlined in the Microsoft Digital Defense Report, common security hygiene practices, including keeping systems up to date, could protect against 98% of attacks.

As new tools are being developed by threat actors, a modern threat protection solution like Microsoft 365 Defender is necessary to prevent and detect the multiple techniques used in the attack chain, especially where the threat actor attempts to evade or disable specific defense mechanisms. Hunting for malicious behavior should be performed regularly in order to detect potential attacks that could evade detections, as a complementary activity for continuous monitoring from security tools alerts and incidents.

To understand how Microsoft can help you secure your network and respond to network compromise, visit https://aka.ms/MicrosoftIR.

Microsoft 365 Defender detections

Microsoft Defender Antivirus

Microsoft Defender Antivirus detects this threat as the following malware:

  • Trojan:Win32/Kovter!MSR
  • Trojan:Win64/WinGoObfusc.LK!MT
  • Trojan:Win64/BlackByte!MSR
  • HackTool:Win32/AdFind!MSR
  • Trojan:Win64/CobaltStrike!MSR

Microsoft Defender for Endpoint

The following alerts might indicate threat activity related to this threat. Note, however, that these alerts can be also triggered by unrelated threat activity.

  • ‘CVE-2021-31207’ exploit malware was detected
  • An active ‘NetShDisableFireWall’ malware in a command line was prevented from executing.
  • Suspicious registry modification.
  • ‘Rtcore64’ hacktool was detected
  • Possible ongoing hands-on-keyboard activity (Cobalt Strike)
  • A file or network connection related to a ransomware-linked emerging threat activity group detected
  • Suspicious sequence of exploration activities
  • A process was injected with potentially malicious code
  • Suspicious behavior by cmd.exe was observed
  • ‘Blackbyte’ ransomware was detected

Microsoft Defender Vulnerability Management

Microsoft Defender Vulnerability Management surfaces devices that may be affected by the following vulnerabilities used in this threat:

  • CVE-2021-34473
  • CVE-2021-34523
  • CVE-2021-31207
  • CVE-2019-16098

Hunting queries

Microsoft 365 Defender

Microsoft 365 Defender customers can run the following query to find related activity in their networks:

ProxyShell web shell creation events

DeviceProcessEvents| where ProcessCommandLine has_any ("ExcludeDumpster","New-ExchangeCertificate") and ProcessCommandLine has_any ("-RequestFile","-FilePath")

Suspicious vssadmin events

DeviceProcessEvents| where ProcessCommandLine has_any ("vssadmin","vssadmin.exe") and ProcessCommandLine has "Resize ShadowStorage" and ProcessCommandLine has_any ("MaxSize=401MB"," MaxSize=UNBOUNDED")

Detection for persistence creation using Registry Run keys

DeviceRegistryEvents | where ActionType == "RegistryValueSet" | where (RegistryKey has @"Microsoft\Windows\CurrentVersion\RunOnce" and RegistryValueName == "MsEdgeMsE")      or (RegistryKey has @"Microsoft\Windows\CurrentVersion\RunOnceEx" and RegistryValueName == "MsEdgeMsE")    or (RegistryKey has @"Microsoft\Windows\CurrentVersion\Run" and RegistryValueName == "MsEdgeMsE")| where RegistryValueData startswith @"rundll32"| where RegistryValueData endswith @".dll,Default"| project Timestamp,DeviceId,DeviceName,ActionType,RegistryKey,RegistryValueName,RegistryValueData

Microsoft Sentinel

Microsoft Sentinel customers can use the TI Mapping analytics (a series of analytics all prefixed with ‘TI map’) to automatically match the malicious domain indicators mentioned in this blog post with data in their workspace. If the TI Map analytics are not currently deployed, customers can install the Threat Intelligence solution from the Microsoft Sentinel Content Hub to have the analytics rule deployed in their Sentinel workspace. More details on the Content Hub can be found here:  https://learn.microsoft.com/azure/sentinel/sentinel-solutions-deploy

Microsoft Sentinel also has a range of detection and threat hunting content that customers can use to detect the post exploitation activity detailed in this blog in addition to Microsoft 365 Defender detections list above.

Indicators of compromise

The table below shows IOCs observed during our investigation. We encourage our customers to investigate these indicators in their environments and implement detections and protections to identify past related activity and prevent future attacks against their systems.

IndicatorTypeDescription
4a066569113a569a6feb8f44257ac8764ee8f2011765009fdfd82fe3f4b92d3eSHA-256api-msvc.dll (Backdoor installed through RunKeys)
5f37b85687780c089607670040dbb3da2749b91b8adc0aa411fd6280b5fa7103SHA-256sys.exe (Cobalt Strike Beacon)
01aa278b07b58dc46c84bd0b1b5c8e9ee4e62ea0bf7a695862444af32e87f1fdSHA-256rENEgOtiAtES (Vulnerable driver RtCore64.sys created by BlackByte binary)
ba3ec3f445683d0d0407157fda0c26fd669c0b8cc03f21770285a20b3133098fSHA-256[RANDOM_NAME].exe (UPX Packed PsExec created by BlackByte binary)
1b9badb1c646a19cdf101ac4f6fdd23bc61eaab8c9f925eb41848cea9fd0738eSHA-256“netscan.exe”, “netapp.exe (Netscan network discovery tool)
f157090fd3ccd4220298c06ce8734361b724d80459592b10ac632acc624f455eSHA-256AdFind.exe (Active Directory information gathering tool)
hxxps://myvisit[.]alteksecurity[.]org/tURLC2 for backdoor api-msvc.dll
hxxps://temp[.]sh/szAyn/sys.exeURLDownload URL for sys.exe
109.206.243[.]59IP AddressC2 for Cobalt Strike Beacon sys.exe
185.225.73[.]244IP AddressOriginating IP address for ProxyShell exploitation and web shell interaction

NOTE: These indicators should not be considered exhaustive for this observed activity.

Appendix

File extensions targeted by BlackByte binary for encryption:

.4dd.4dl.accdb.accdc.accde.accdr.accdt.accft
.adb.ade.adf.adp.arc.ora.alf.ask
.btr.bdf.cat.cdb.ckp.cma.cpd.dacpac
.dad.dadiagrams.daschema.db.db-shm.db-wal.db3.dbc
.dbf.dbs.dbt.dbv. dbx. dcb. dct. dcx
. ddl. dlis. dp1. dqy. dsk. dsn. dtsx. dxl
. eco. ecx. edb. epim. exb. fcd. fdb. fic
. fmp. fmp12. fmpsl. fol.fp3. fp4. fp5. fp7
. fpt. frm. gdb. grdb. gwi. hdb. his. ib
. idb. ihx. itdb. itw. jet. jtx. kdb. kexi
. kexic. kexis. lgc. lwx. maf. maq. mar. masmav
. mdb. mpd. mrg. mud. mwb. myd. ndf. nnt
. nrmlib. ns2. ns3. ns4. nsf. nv. nv2. nwdb
. nyf. odb. ogy. orx. owc. p96. p97. pan
. pdb. pdm. pnz. qry. qvd. rbf. rctd. rod
. rodx. rpd. rsd. sas7bdat. sbf. scx. sdb. sdc
. sdf. sis. spg. sql. sqlite. sqlite3. sqlitedb. te
. temx. tmd. tps. trc. trm. udb. udl. usr
. v12. vis. vpd. vvv. wdb. wmdb. wrk. xdb
. xld. xmlff. abcddb. abs. abx. accdw. and. db2
. fm5. hjt. icg. icr. kdb. lut. maw. mdn
. mdt       

Shared folders targeted for encryption (Example: \\[IP address]\Downloads):

UsersBackupVeeamhomeshome
mediacommonStorage ServerPublicWeb
ImagesDownloadsBackupDataActiveBackupForBusinessBackups
NAS-DCDCBACKUPDirectorFilesshare 

File extensions ignored:

.ini.url.msilog.log.ldf.lock.theme.msi
.sys.wpx.cpl.adv.msc.scr.key.ico
.dll.hta.deskthemepack.nomedia.msu.rtp.msp.idx
.ani.386.diagcfg.bin.mod.ics.com.hlp
 .spl.nls.cab.exe.diagpkg.icl.ocx.rom
.prf.thempack.msstyles.icns.mpa.drv.cur.diagcab
.cmd.shs      

Folders ignored:

windowsbootprogram files (x86)windows.oldprogramdata
intelbitdefendertrend microwindowsappsappdata
application datasystem volume informationperflogsmsocache 

Files ignored:

bootnxtntldrbootmgrthumbs.db
ntuser.datbootsect.bakautoexec.baticoncache.db
bootfont.bin   

Processes terminated:

teracopyteamviewernsservicensctrluranium
processhackerprocmonpestudioprocmon64x32dbg
x64dbgcff explorerprocexppslisttcpview
tcpvcondbgviewrammaprammap64vmmap
ollydbgautorunsautorunsscfilemonregmon
idaqidaq64immunitydebuggerwiresharkdumpcap
hookexplorerimportrecpetoolslordpesysinspector
proc_analyzersysanalyzersniff_hitwindbgjoeboxcontrol
joeboxserverresourcehackerfiddlerhttpdebuggerdumpit
rammaprammap64vmmapagntsvccntaosmgr
dbeng50dbsnmpencsvcinfopathisqlplussvc
mbamtraymsaccessmsftesqlmspubmydesktopqos
mydesktopservicemysqldmysqld-ntmysqld-optNtrtscan
ocautoupdsocommocssdonenoteoracle
outlookPccNTMonpowerpntsqbcoreservicesql
sqlagentsqlbrowsersqlservrsqlwritersteam
synctimetbirdconfigthebatthebat64thunderbird
tmlistenvisiowinwordwordpadxfssvccon
zoolz    

Services terminated:

CybereasonRansomFreevnetdbpcdSamSsTeraCopyService
msftesqlnsServiceklvssbridge64vapiendpointShMonitor
SmcinstSmcServiceSntpServicesvcGenericHostSwi_
TmCCSFtmlistenTrueKeyTrueKeySchedulerTrueKeyServiceHelper
WRSVCMcTaskManagerOracleClientCache80mfefirewbengine
mfemmsRESvcmfevtpsacsvrSAVAdminService
SepMasterServicePDVFSServiceESHASRVSDRSVCFA_Scheduler
KAVFSKAVFS_KAVFSGTkavfsslpklnagentmacmnsvc
masvcMBAMServiceMBEndpointAgentMcShieldaudioendpointbuilder
AntivirusAVPDCAgentbedbgEhttpSrv
MMSekrnEPSecurityServiceEPUpdateServicentrtscan
EsgShKernelmsexchangeadtopologyAcrSch2SvcMSOLAP$TPSAMAIntel(R) PROSet Monitoring
msexchangeimap4ARSMunistoresvc_1af40aReportServer$TPSMSOLAP$SYSTEM_BGC
W3SvcMSExchangeSRSReportServer$TPSAMAZoolz 2 ServiceMSOLAP$TPS
aphidmonitorserviceSstpSvcMSExchangeMTAReportServer$SYSTEM_BGCSymantec System Recovery
UI0DetectMSExchangeSAMSExchangeISReportServerMsDtsServer110
POP3SvcMSExchangeMGMTSMTPSvcMsDtsServerIisAdmin
MSExchangeESEraserSvc11710Enterprise Client ServiceMsDtsServer100NetMsmqActivator
stc_raw_agentVSNAPVSSPDVFSServiceAcrSch2SvcAcronis
CASAD2DWebSvcCAARCUpdateSvcMcAfeeavpsusDLPAgentService
mfewcBMR Boot ServiceDefWatchccEvtMgrccSetMgr
SavRoamRTVsc screenconnectransomsqltelemetrymsexch
vncteamviewermsolapveeambackup
sqlmemtasvsssophossvc$
mepocswuauserv   

Drivers that Blackbyte can bypass:

360avflt.sys360box.sys360fsflt.sys360qpesv.sys5nine.cbt.sys
a2acc.sysa2acc64.sysa2ertpx64.sysa2ertpx86.sysa2gffi64.sys
a2gffx64.sysa2gffx86.sysaaf.sysaalprotect.sysabrpmon.sys
accessvalidator.sysacdriver.sysacdrv.sysadaptivaclientcache32.sysadaptivaclientcache64.sys
adcvcsnt.sysadspiderdoc.sysaefilter.sysagentrtm64.sysagfsmon.sys
agseclock.sysagsyslock.sysahkamflt.sysahksvpro.sysahkusbfw.sys
ahnrghlh.sysaictracedrv_am.sysairship-filter.sysajfsprot.sysalcapture.sys
alfaff.sysaltcbt.sysamfd.sysamfsm.sysamm6460.sys
amm8660.sysamsfilter.sysamznmon.sysantileakfilter.sysantispyfilter.sys
anvfsm.sysapexsqlfilterdriver.sysappcheckd.sysappguard.sysappvmon.sys
arfmonnt.sysarta.sysarwflt.sysasgard.sysashavscan.sys
asiofms.sysaswfsblk.sysaswmonflt.sysaswsnx.sysaswsp.sys
aszfltnt.sysatamptnt.sysatc.sysatdragent.sysatdragent64.sys
aternityregistryhook.sysatflt.sysatrsdfw.sysauditflt.sysaupdrv.sys
avapsfd.sysavc3.sysavckf.sysavfsmn.sysavgmfi64.sys
avgmfrs.sysavgmfx64.sysavgmfx86.sysavgntflt.sysavgtpx64.sys
avgtpx86.sysavipbb.sysavkmgr.sysavmf.sysawarecore.sys
axfltdrv.sysaxfsysmon.sysayfilter.sysb9kernel.sysbackupreader.sys
bamfltr.sysbapfecpt.sysbbfilter.sysbd0003.sysbddevflt.sys
bdfiledefend.sysbdfilespy.sysbdfm.sysbdfsfltr.sysbdprivmon.sys
bdrdfolder.sysbdsdkit.sysbdsfilter.sysbdsflt.sysbdsvm.sys
bdsysmon.sysbedaisy.sysbemk.sysbfaccess.sysbfilter.sys
bfmon.sysbhdrvx64.sysbhdrvx86.sysbhkavka.sysbhkavki.sys
bkavautoflt.sysbkavsdflt.sysblackbirdfsa.sysblackcat.sysbmfsdrv.sys
bmregdrv.sysboscmflt.sysbosfsfltr.sysbouncer.sysboxifier.sys
brcow_x_x_x_x.sysbrfilter.sysbrnfilelock.sysbrnseclock.sysbrowsermon.sys
bsrfsflt.sysbssaudit.sysbsyaed.sysbsyar.sysbsydf.sys
bsyirmf.sysbsyrtm.sysbsysp.sysbsywl.sysbwfsdrv.sys
bzsenspdrv.sysbzsenth.sysbzsenyaradrv.syscaadflt.syscaavfltr.sys
cancelsafe.syscarbonblackk.syscatflt.syscatmf.syscbelam.sys
cbfilter20.syscbfltfs4.syscbfsfilter2017.syscbfsfilter2020.syscbsampledrv.sys
cdo.syscdrrsflt.syscdsgfsfilter.syscentrifyfsf.syscfrmd.sys
cfsfdrvcgwmf.syschange.syschangelog.syschemometecfilter.sys
ciscoampcefwdriver.sysciscoampheurdriver.sysciscosam.sysclumiochangeblockmf.syscmdccav.sys
cmdcwagt.syscmdguard.syscmdmnefs.syscmflt.syscode42filter.sys
codex.sysconduantfsfltr.syscontainermonitor.syscpavfilter.syscpavkernel.sys
cpepmon.syscrexecprev.syscrncache32.syscrncache64.syscrnsysm.sys
cruncopy.syscsaam.syscsaav.syscsacentr.syscsaenh.sys
csagent.syscsareg.syscsascr.syscsbfilter.syscsdevicecontrol.sys
csfirmwareanalysis.syscsflt.syscsmon.syscssdlp.sysctamflt.sys
ctifile.sysctinet.sysctrpamon.sysctx.syscvcbt.sys
cvofflineflt32.syscvofflineflt64.syscvsflt.syscwdriver.syscwmem2k64.sys
cybkerneltracker.syscylancedrv64.syscyoptics.syscyprotectdrv32.syscyprotectdrv64.sys
cytmon.syscyverak.syscyvrfsfd.syscyvrlpc.syscyvrmtgn.sys
datanow_driver.sysdattofsf.sysda_ctl.sysdcfafilter.sysdcfsgrd.sys
dcsnaprestore.sysdeepinsfs.sysdelete_flt.sysdevmonminifilter.sysdfmfilter.sys
dgedriver.sysdgfilter.sysdgsafe.sysdhwatchdog.sysdiflt.sys
diskactmon.sysdkdrv.sysdkrtwrt.sysdktlfsmf.sysdnafsmonitor.sys
docvmonk.sysdocvmonk64.sysdpmfilter.sysdrbdlock.sysdrivesentryfilterdriver2lite.sys
drsfile.sysdrvhookcsmf.sysdrvhookcsmf_amd64.sysdrwebfwflt.sysdrwebfwft.sys
dsark.sysdsdriver.sysdsfemon.sysdsflt.sysdsfltfs.sys
dskmn.sysdtdsel.sysdtpl.sysdwprot.sysdwshield.sys
dwshield64.syseamonm.syseaseflt.syseasyanticheat.syseaw.sys
ecatdriver.sysedevmon.sysednemfsfilter.sysedrdrv.sysedrsensor.sys
edsigk.syseectrl.syseetd32.syseetd64.syseeyehv.sys
eeyehv64.sysegambit.sysegfilterk.sysegminflt.sysegnfsflt.sys
ehdrv.syselock2fsctldriver.sysemxdrv2.sysenigmafilemondriver.sysenmon.sys
epdrv.sysepfw.sysepfwwfp.sysepicfilter.sysepklib.sys
epp64.sysepregflt.syseps.sysepsmn.sysequ8_helper.sys
eraser.sysesensor.sysesprobe.sysestprmon.sysestprp.sys
estregmon.sysestregp.sysestrkmon.sysestrkr.syseventmon.sys
evmf.sysevscase.sysexcfs.sysexprevdriver.sysfailattach.sys
failmount.sysfam.sysfangcloud_autolock_driver.sysfapmonitor.sysfarflt.sys
farwflt.sysfasdriverfcnotify.sysfcontrol.sysfdrtrace.sys
fekern.sysfencry.sysffcfilt.sysffdriver.sysfildds.sys
filefilter.sysfileflt.sysfileguard.sysfilehubagent.sysfilemon.sys
filemonitor.sysfilenamevalidator.sysfilescan.sysfilesharemon.sysfilesightmf.sys
filesystemcbt.sysfiletrace.sysfile_monitor.sysfile_protector.sysfile_tracker.sys
filrdriver.sysfim.sysfiometer.sysfiopolicyfilter.sysfjgsdis2.sys
fjseparettifilterredirect.sysflashaccelfs.sysflightrecorder.sysfltrs329.sysflyfs.sys
fmdrive.sysfmkkc.sysfmm.sysfortiaptfilter.sysfortimon2.sys
fortirmon.sysfortishield.sysfpav_rtp.sysfpepflt.sysfsafilter.sys
fsatp.sysfsfilter.sysfsgk.sysfshs.sysfsmon.sys
fsmonitor.sysfsnk.sysfsrfilter.sysfstrace.sysfsulgk.sys
fsw31rj1.sysgagsecurity.sysgbpkm.sysgcffilter.sysgddcv.sys
gefcmp.sysgemma.sysgeprotection.sysggc.sysgibepcore.sys
gkff.sysgkff64.sysgkpfcb.sysgkpfcb64.sysgofsmf.sys
gpminifilter.sysgroundling32.sysgroundling64.sysgtkdrv.sysgumhfilter.sys
gzflt.syshafsnk.syshbflt.syshbfsfltr.syshcp_kernel_acq.sys
hdcorrelatefdrv.syshdfilemon.syshdransomoffdrv.syshdrfs.sysheimdall.sys
hexisfsmonitor.syshfileflt.syshiofs.syshmpalert.syshookcentre.sys
hooksys.syshpreg.syshsmltmon.syshsmltwhl.syshssfwhl.sys
hvlminifilter.sysibr2fsk.sysiccfileioad.sysiccfilteraudit.sysiccfiltersc.sys
icfclientflt.sysicrlmonitor.sysiderafilterdriver.sysielcp.sysieslp.sys
ifs64.sysignis.sysiguard.sysiiscache.sysikfilesec.sys
im.sysimffilter.sysimfilter.sysimgguard.sysimmflex.sys
immunetprotect.sysimmunetselfprotect.sysinisbdrv64.sysino_fltr.sysintelcas.sys
intmfs.sysinuse.sysinvprotectdrv.sysinvprotectdrv64.sysionmonwdrv.sys
iothorfs.sysipcomfltr.sysipfilter.sysiprotect.sysiridiumswitch.sys
irongatefd.sysisafekrnl.sysisafekrnlmon.sysisafermonisecureflt.sys
isedrv.sysisfpdrv.sysisirmfmon.sysisregflt.sysisregflt64.sys
issfltr.sysissregistry.sysit2drv.sysit2reg.sysivappmon.sys
iwdmfs.sysiwhlp.sysiwhlp2.sysiwhlpxp.sysjdppsf.sys
jdppwf.sysjkppob.sysjkppok.sysjkpppf.sysjkppxk.sys
k7sentry.syskavnsi.syskawachfsminifilter.syskc3.syskconv.sys
kernelagent32.syskewf.syskfac.syskfileflt.syskisknl.sys
klam.sysklbg.sysklboot.syskldback.syskldlinf.sys
kldtool.sysklfdefsf.sysklflt.sysklgse.sysklhk.sys
klif.sysklifaa.sysklifks.sysklifsm.sysklrsps.sys
klsnsr.sysklupd_klif_arkmon.syskmkuflt.syskmnwch.syskmxagent.sys
kmxfile.syskmxsbx.sysksfsflt.sysktfsfilter.sysktsyncfsflt.sys
kubwksp.syslafs.syslbd.syslbprotect.syslcgadmon.sys
lcgfile.syslcgfilemon.syslcmadmon.syslcmfile.syslcmfilemon.sys
lcmprintmon.sysldsecdrv.syslibwamf.syslivedrivefilter.sysllfilter.sys
lmdriver.syslnvscenter.syslocksmith.syslragentmf.syslrtp.sys
magicbackupmonitor.sysmagicprotect.sysmajoradvapi.sysmarspy.sysmaxcryptmon.sys
maxproc64.sysmaxprotector.sysmbae64.sysmbam.sysmbamchameleon.sys
mbamshuriken.sysmbamswissarmy.sysmbamwatchdog.sysmblmon.sysmcfilemon32.sys
mcfilemon64.sysmcstrg.sysmearwfltdriver.sysmessage.sysmfdriver.sys
mfeaack.sysmfeaskm.sysmfeavfk.sysmfeclnrk.sysmfeelamk.sys
mfefirek.sysmfehidk.sysmfencbdc.sysmfencfilter.sysmfencoas.sys
mfencrk.sysmfeplk.sysmfewfpk.sysminiicpt.sysminispy.sys
minitrc.sysmlsaff.sysmmpsy32.sysmmpsy64.sysmonsterk.sys
mozycorpfilter.sysmozyenterprisefilter.sysmozyentfilter.sysmozyhomefilter.sysmozynextfilter.sys
mozyoemfilter.sysmozyprofilter.sysmpfilter.sysmpkernel.sysmpksldrv.sys
mpxmon.sysmracdrv.sysmrxgoogle.sysmscan-rt.sysmsiodrv4.sys
msixpackagingtoolmonitor.sysmsnfsflt.sysmspy.sysmssecflt.sysmtsvcdf.sys
mumdi.sysmwac.sysmwatcher.sysmwfsmfltr.sysmydlpmf.sys
namechanger.sysnanoavmf.sysnaswsp.sysndgdmk.sysneokerbyfilter
netaccctrl.sysnetaccctrl64.sysnetguard.sysnetpeeker.sysngscan.sys
nlcbhelpi64.sysnlcbhelpx64.sysnlcbhelpx86.sysnlxff.sysnmlhssrv01.sys
nmpfilter.sysnntinfo.sysnovashield.sysnowonmf.sysnpetw.sys
nprosec.sysnpxgd.sysnpxgd64.sysnravwka.sysnrcomgrdka.sys
nrcomgrdki.sysnregsec.sysnrpmonka.sysnrpmonki.sysnsminflt.sys
nsminflt64.sysntest.sysntfsf.sysntguard.sysntps_fa.sys
nullfilter.sysnvcmflt.sysnvmon.sysnwedriver.sysnxfsmon.sys
nxrmflt.sysoadevice.sysoavfm.sysoczminifilter.sysodfsfilter.sys
odfsfimfilter.sysodfstokenfilter.sysoffsm.sysomfltlh.sysosiris.sys
ospfile_mini.sysospmon.sysparity.syspassthrough.syspath8flt.sys
pavdrv.syspcpifd.syspctcore.syspctcore64.syspdgenfam.sys
pecfilter.sysperfectworldanticheatsys.syspervac.syspfkrnl.syspfracdrv.sys
pgpfs.syspgpwdefs.sysphantomd.sysphdcbtdrv.syspkgfilter.sys
pkticpt.sysplgfltr.sysplpoffdrv.syspointguardvista64f.syspointguardvistaf.sys
pointguardvistar32.syspointguardvistar64.sysprocmon11.sysproggerdriver.syspsacfileaccessfilter.sys
pscff.syspsgdflt.syspsgfoctrl.syspsinfile.syspsinproc.sys
psisolator.syspwipf6.syspwprotect.syspzdrvxp.sysqdocumentref.sys
qfapflt.sysqfilter.sysqfimdvr.sysqfmon.sysqminspec.sys
qmon.sysqqprotect.sysqqprotectx64.sysqqsysmon.sysqqsysmonx64.sys
qutmdrv.sysranpodfs.sysransomdefensexxx.sysransomdetect.sysreaqtor.sys
redlight.sysregguard.sysreghook.sysregmonex.sysrepdrv.sys
repmon.sysrevefltmgr.sysreveprocprotection.sysrevonetdriver.sysrflog.sys
rgnt.sysrmdiskmon.sysrmphvmonitor.sysrpwatcher.sysrrmon32.sys
rrmon64.sysrsfdrv.sysrsflt.sysrspcrtw.sysrsrtw.sys
rswctrl.sysrswmon.sysrtologon.sysrtw.sysruaff.sys
rubrikfileaudit.sysruidiskfs.sysruieye.sysruifileaccess.sysruimachine.sys
ruiminispy.sysrvsavd.sysrvsmon.sysrw7fsflt.sysrwchangedrv.sys
ryfilter.sysryguard.syssafe-agent.syssafsfilter.syssagntflt.sys
sahara.syssakfile.syssakmfile.syssamflt.syssamsungrapidfsfltr.sys
sanddriver.syssanta.syssascan.syssavant.syssavonaccess.sys
scaegis.sysscauthfsflt.sysscauthiodrv.sysscensemon.sysscfltr.sys
scifsflt.syssciptflt.syssconnect.sysscred.syssdactmon.sys
sddrvldr.syssdvfilter.sysse46filter.syssecdodriver.syssecone_filemon10.sys
secone_proc10.syssecone_reg10.syssecone_usb.syssecrmm.syssecufile.sys
secure_os.syssecure_os_mf.syssecurofsd_x64.syssefo.syssegf.sys
segiraflt.syssegmd.syssegmp.syssentinelmonitor.sysserdr.sys
serfs.syssfac.syssfavflt.syssfdfilter.syssfpmonitor.sys
sgresflt.sysshdlpmedia.sysshdlpsf.syssheedantivirusfilterdriver.syssheedselfprotection.sys
shldflt.syssi32_file.syssi64_file.syssieflt.syssimrep.sys
sisipsfilefiltersk.sysskyamdrv.sysskyrgdrv.sysskywpdrv.sys
slb_guard.syssld.syssmbresilfilter.syssmdrvnt.syssndacs.sys
snexequota.syssnilog.syssnimg.syssnscore.syssnsrflt.sys
sodatpfl.syssoftfilterxxx.syssoidriver.syssolitkm.syssonar.sys
sophosdt2.syssophosed.syssophosntplwf.syssophossupport.sysspbbcdrv.sys
spellmon.sysspider3g.sysspiderg3.sysspiminifilter.sysspotlight.sys
sprtdrv.syssqlsafefilterdriver.syssrminifilterdrv.syssrtsp.syssrtsp64.sys
srtspit.sysssfmonm.sysssrfsf.sysssvhook.sysstcvsm.sys
stegoprotect.sysstest.sysstflt.sysstkrnl64.sysstoragedrv.sys
strapvista.sysstrapvista64.syssvcbt.sysswcommfltr.sysswfsfltr.sys
swfsfltrv2.sysswin.syssymafr.syssymefa.syssymefa64.sys
symefasi.syssymevent.syssymevent64x86.syssymevnt.syssymevnt32.sys
symhsm.syssymrg.syssysdiag.syssysmon.syssysmondrv.sys
sysplant.sysszardrv.sysszdfmdrv.sysszdfmdrv_usb.sysszedrdrv.sys
szpcmdrv.systaniumrecorderdrv.systaobserveflt.systbfsfilt.systbmninifilter.sys
tbrdrv.systdevflt.systedrdrv.systenrsafe2.systesmon.sys
tesxnginx.systesxporter.systffregnt.systfsflt.systgfsmf.sys
thetta.systhfilter.systhreatstackfim.systkdac2k.systkdacxp.sys
tkdacxp64.systkfsavxp.systkfsavxp64.systkfsft.systkfsft64.sys
tkpcftcb.systkpcftcb64.systkpl2k.systkpl2k64.systksp2k.sys
tkspxp.systkspxp64.systmactmon.systmcomm.systmesflt.sys
tmevtmgr.systmeyes.systmfsdrv2.systmkmsnsr.systmnciesc.sys
tmpreflt.systmumh.systmums.systmusa.systmxpflt.sys
topdogfsfilt.systrace.systrfsfilter.systritiumfltr.systrpmnflt.sys
trufos.systrustededgeffd.systsifilemon.systss.syststfilter.sys
tstfsredir.syststregredir.systsyscare.systvdriver.systvfiltr.sys
tvmfltr.systvptfile.systvspfltr.systwbdcfilter.systxfilefilter.sys
txregmon.sysuamflt.sysucafltdriver.sysufdfilter.sysuncheater.sys
upguardrealtime.sysusbl_ifsfltr.sysusbpdh.sysusbtest.sysuvmcifsf.sys
uwfreg.sysuwfs.sysv3flt2k.sysv3flu2k.sysv3ift2k.sys
v3iftmnt.sysv3mifint.sysvarpffmon.sysvast.sysvcdriv.sys
vchle.sysvcmfilter.sysvcreg.sysveeamfct.sysvfdrv.sys
vfilefilter.sysvfpd.sysvfsenc.sysvhddelta.sysvhdtrack.sys
vidderfs.sysvintmfs.sysvirtfile.sysvirtualagent.sysvk_fsf.sys
vlflt.sysvmwvvpfsd.sysvollock.sysvpdrvnt.sysvradfil2.sys
vraptdef.sysvraptflt.sysvrarnflt.sysvrbbdflt.sysvrexpdrv.sys
vrfsftm.sysvrfsftmx.sysvrnsfilter.sysvrsdam.sysvrsdcore.sys
vrsdetri.sysvrsdetrix.sysvrsdfmx.sysvrvbrfsfilter.sysvsepflt.sys
vsscanner.sysvtsysflt.sysvxfsrep.syswats_se.syswbfilter.sys
wcsdriver.syswdcfilter.syswdfilter.syswdocsafe.syswfp_mrt.sys
wgfile.syswhiteshield.syswindbdrv.syswindd.syswinfladrv.sys
winflahdrv.syswinfldrv.syswinfpdrv.syswinload.syswinteonminifilter.sys
wiper.syswlminisecmod.syswntgpdrv.syswraekernel.syswrcore.sys
wrcore.x64.syswrdwizfileprot.syswrdwizregprot.syswrdwizscanner.syswrdwizsecure64.sys
wrkrn.syswrpfv.syswsafefilter.syswscm.sysxcpl.sys
xendowflt.sysxfsgk.sysxhunter1.sysxhunter64.sysxiaobaifs.sys
xiaobaifsr.sysxkfsfd.sysxoiv8x64.sysxomfcbt8x64.sysyahoostorage.sys
yfsd.sysyfsd2.sysyfsdr.sysyfsrd.syszampit_ml.sys
zesfsmf.syszqfilter.syszsfprt.syszwasatom.syszwpxesvr.sys
zxfsfilt.syszyfm.syszzpensys.sys  

Further reading

For the latest security research from the Microsoft Threat Intelligence community, check out the Microsoft Threat Intelligence Blog: https://aka.ms/threatintelblog.

To get notified about new publications and to join discussions on social media, follow us on Twitter at https://twitter.com/MsftSecIntel.

Source :
https://www.microsoft.com/en-us/security/blog/2023/07/06/the-five-day-job-a-blackbyte-ransomware-intrusion-case-study/

8 Essential Tips for Data Protection and Cybersecurity in Small Businesses

Michelle Quill — June 6, 2023

Small businesses are often targeted by cybercriminals due to their lack of resources and security measures. Protecting your business from cyber threats is crucial to avoid data breaches and financial losses.

Why is cyber security so important for small businesses?

Small businesses are particularly in danger of cyberattacks, which can result in financial loss, data breaches, and damage to IT equipment. To protect your business, it’s important to implement strong cybersecurity measures.

Here are some tips to help you get started:

One important aspect of data protection and cybersecurity for small businesses is controlling access to customer lists. It’s important to limit access to this sensitive information to only those employees who need it to perform their job duties. Additionally, implementing strong password policies and regularly updating software and security measures can help prevent unauthorized access and protect against cyber attacks. Regular employee training on cybersecurity best practices can also help ensure that everyone in the organization is aware of potential threats and knows how to respond in the event of a breach.

When it comes to protecting customer credit card information in small businesses, there are a few key tips to keep in mind. First and foremost, it’s important to use secure payment processing systems that encrypt sensitive data. Additionally, it’s crucial to regularly update software and security measures to stay ahead of potential threats. Employee training and education on cybersecurity best practices can also go a long way in preventing data breaches. Finally, having a plan in place for responding to a breach can help minimize the damage and protect both your business and your customers.

Small businesses are often exposed to cyber attacks, making data protection and cybersecurity crucial. One area of particular concern is your company’s banking details. To protect this sensitive information, consider implementing strong passwords, two-factor authentication, and regular monitoring of your accounts. Additionally, educate your employees on safe online practices and limit access to financial information to only those who need it. Regularly backing up your data and investing in cybersecurity software can also help prevent data breaches.

Small businesses are often at high risk of cyber attacks due to their limited resources and lack of expertise in cybersecurity. To protect sensitive data, it is important to implement strong passwords, regularly update software and antivirus programs, and limit access to confidential information.

It is also important to have a plan in place in case of a security breach, including steps to contain the breach and notify affected parties. By taking these steps, small businesses can better protect themselves from cyber threats and ensure the safety of their data.

Tips for protecting your small business from cyber threats and data breaches are crucial in today’s digital age. One of the most important steps is to educate your employees on cybersecurity best practices, such as using strong passwords and avoiding suspicious emails or links.

It’s also important to regularly update your software and systems to ensure they are secure and protected against the latest threats. Additionally, implementing multi-factor authentication and encrypting sensitive data can add an extra layer of protection. Finally, having a plan in place for responding to a cyber-attack or data breach can help minimize the damage and get your business back on track as quickly as possible.

Small businesses are attackable to cyber-attacks and data breaches, which can have devastating consequences. To protect your business, it’s important to implement strong cybersecurity measures. This includes using strong passwords, regularly updating software and systems, and training employees on how to identify and avoid phishing scams.

It’s also important to have a data backup plan in place and to regularly test your security measures to ensure they are effective. By taking these steps, you can help protect your business from cyber threats and safeguard your valuable data.

To protect against cyber threats, it’s important to implement strong data protection and cybersecurity measures. This can include regularly updating software and passwords, using firewalls and antivirus software, and providing employee training on safe online practices. Additionally, it’s important to have a plan in place for responding to a cyber attack, including backing up data and having a designated point person for handling the situation.

In today’s digital age, small businesses must prioritize data protection and cybersecurity to safeguard their operations and reputation. With the rise of remote work and cloud-based technology, businesses are more vulnerable to cyber attacks than ever before. To mitigate these risks, it’s crucial to implement strong security measures for online meetings, advertising, transactions, and communication with customers and suppliers. By prioritizing cybersecurity, small businesses can protect their data and prevent unauthorized access or breaches.

Here are 8 essential tips for data protection and cybersecurity in small businesses.

8 Essential Tips for Data Protection and Cybersecurity in Small Businesses

1. Train Your Employees on Cybersecurity Best Practices

Your employees are the first line of defense against cyber threats. It’s important to train them on cybersecurity best practices to ensure they understand the risks and how to prevent them. This includes creating strong passwords, avoiding suspicious emails and links, and regularly updating software and security systems. Consider providing regular training sessions and resources to keep your employees informed and prepared.

2. Use Strong Passwords and Two-Factor Authentication

One of the most basic yet effective ways to protect your business from cyber threats is to use strong passwords and two-factor authentication. Encourage your employees to use complex passwords that include a mix of letters, numbers, and symbols, and to avoid using the same password for multiple accounts. Two-factor authentication adds an extra layer of security by requiring a second form of verification, such as a code sent to a mobile device, before granting access to an account. This can help prevent unauthorized access even if a password is compromised.

3. Keep Your Software and Systems Up to Date

One of the easiest ways for cybercriminals to gain access to your business’s data is through outdated software and systems. Hackers are constantly looking for vulnerabilities in software and operating systems, and if they find one, they can exploit it to gain access to your data. To prevent this, make sure all software and systems are kept up-to-date with the latest security patches and updates. This includes not only your computers and servers but also any mobile devices and other connected devices used in your business. Set up automatic updates whenever possible to ensure that you don’t miss any critical security updates.

4. Use Antivirus and Anti-Malware Software

Antivirus and anti-malware software are essential tools for protecting your small business from cyber threats. These programs can detect and remove malicious software, such as viruses, spyware, and ransomware before they can cause damage to your systems or steal your data. Make sure to install reputable antivirus and anti-malware software on all devices used in your business, including computers, servers, and mobile devices. Keep the software up-to-date and run regular scans to ensure that your systems are free from malware.

5. Backup Your Data Regularly

One of the most important steps you can take to protect your small business from data loss is to back up your data regularly. This means creating copies of your important files and storing them in a secure location, such as an external hard drive or cloud storage service. In the event of a cyber-attack or other disaster, having a backup of your data can help you quickly recover and minimize the impact on your business. Make sure to test your backups regularly to ensure that they are working properly and that you can restore your data if needed.

6. Carry out a risk assessment

Small businesses are especially in peril of cyber attacks, making it crucial to prioritize data protection and cybersecurity. One important step is to assess potential risks that could compromise your company’s networks, systems, and information. By identifying and analyzing possible threats, you can develop a plan to address security gaps and protect your business from harm.

For Small businesses making data protection and cybersecurity is a crucial part. To start, conduct a thorough risk assessment to identify where and how your data is stored, who has access to it, and potential threats. If you use cloud storage, consult with your provider to assess risks. Determine the potential impact of breaches and establish risk levels for different events. By taking these steps, you can better protect your business from cyber threats

7. Limit access to sensitive data

One effective strategy is to limit access to critical data to only those who need it. This reduces the risk of a data breach and makes it harder for malicious insiders to gain unauthorized access. To ensure accountability and clarity, create a plan that outlines who has access to what information and what their roles and responsibilities are. By taking these steps, you can help safeguard your business against cyber threats.

8. Use a firewall

For Small businesses, it’s important to protect the system from cyber attacks by making data protection and reducing cybersecurity risk. One effective measure is implementing a firewall, which not only protects hardware but also software. By blocking or deterring viruses from entering the network, a firewall provides an added layer of security. It’s important to note that a firewall differs from an antivirus, which targets software affected by a virus that has already infiltrated the system.

Small businesses can take steps to protect their data and ensure cybersecurity. One important step is to install a firewall and keep it updated with the latest software or firmware. Regularly checking for updates can help prevent potential security breaches.

Conclusion

Small businesses are particularly vulnerable to cyber attacks, so it’s important to take steps to protect your data. One key tip is to be cautious when granting access to your systems, especially to partners or suppliers. Before granting access, make sure they have similar cybersecurity practices in place. Don’t hesitate to ask for proof or to conduct a security audit to ensure your data is safe.

Source :
https://onlinecomputertips.com/support-categories/networking/tips-for-cybersecurity-in-small-businesses/

Introducing the Cloudflare Radar Internet Quality Page

23/06/2023

Internet connections are most often marketed and sold on the basis of “speed”, with providers touting the number of megabits or gigabits per second that their various service tiers are supposed to provide. This marketing has largely been successful, as most subscribers believe that “more is better”. Furthermore, many national broadband plans in countries around the world include specific target connection speeds. However, even with a high speed connection, gamers may encounter sluggish performance, while video conference participants may experience frozen video or audio dropouts. Speeds alone don’t tell the whole story when it comes to Internet connection quality.

Additional factors like latency, jitter, and packet loss can significantly impact end user experience, potentially leading to situations where higher speed connections actually deliver a worse user experience than lower speed connections. Connection performance and quality can also vary based on usage – measured average speed will differ from peak available capacity, and latency varies under loaded and idle conditions.

The new Cloudflare Radar Internet Quality page

A little more than three years ago, as residential Internet connections were strained because of the shift towards working and learning from home due to the COVID-19 pandemic, Cloudflare announced the speed.cloudflare.com speed test tool, which enabled users to test the performance and quality of their Internet connection. Within the tool, users can download the results of their individual test as a CSV, or share the results on social media. However, there was no aggregated insight into Cloudflare speed test results at a network or country level to provide a perspective on connectivity characteristics across a larger population.

Today, we are launching these long-missing aggregated connection performance and quality insights on Cloudflare Radar. The new Internet Quality page provides both country and network (autonomous system) level insight into Internet connection performance (bandwidth) and quality (latencyjitter) over time. (Your Internet service provider is likely an autonomous system with its own autonomous system number (ASN), and many large companies, online platforms, and educational institutions also have their own autonomous systems and associated ASNs.) The insights we are providing are presented across two sections: the Internet Quality Index (IQI), which estimates average Internet quality based on aggregated measurements against a set of Cloudflare & third-party targets, and Connection Quality, which presents peak/best case connection characteristics based on speed.cloudflare.com test results aggregated over the previous 90 days. (Details on our approach to the analysis of this data are presented below.)

Users may note that individual speed test results, as well as the aggregate speed test results presented on the Internet Quality page will likely differ from those presented by other speed test tools. This can be due to a number of factors including differences in test endpoint locations (considering both geographic and network distance), test content selection, the impact of “rate boosting” by some ISPs, and testing over a single connection vs. multiple parallel connections. Infrequent testing (on any speed test tool) by users seeking to confirm perceived poor performance or validate purchased speeds will also contribute to the differences seen in the results published by the various speed test platforms.

And as we announced in April, Cloudflare has partnered with Measurement Lab (M-Lab) to create a publicly-available, queryable repository for speed test results. M-Lab is a non-profit third-party organization dedicated to providing a representative picture of Internet quality around the world. M-Lab produces and hosts the Network Diagnostic Tool, which is a very popular network quality test that records millions of samples a day. Given their mission to provide a publicly viewable, representative picture of Internet quality, we chose to partner with them to provide an accurate view of your Internet experience and the experience of others around the world using openly available data.

Connection speed & quality data is important

While most advertisements for fixed broadband and mobile connectivity tend to focus on download speeds (and peak speeds at that), there’s more to an Internet connection, and the user’s experience with that Internet connection, than that single metric. In addition to download speeds, users should also understand the upload speeds that their connection is capable of, as well as the quality of the connection, as expressed through metrics known as latency and jitter. Getting insight into all of these metrics provides a more well-rounded view of a given Internet connection, or in aggregate, the state of Internet connectivity across a geography or network.

The concept of download speeds are fairly well understood as a measure of performance. However, it is important to note that the average download speeds experienced by a user during common Web browsing activities, which often involves the parallel retrieval of multiple smaller files from multiple hosts, can differ significantly from peak download speeds, where the user is downloading a single large file (such as a video or software update), which allows the connection to reach maximum performance. The bandwidth (speed) available for upload is sometimes mentioned in ISP advertisements, but doesn’t receive much attention. (And depending on the type of Internet connection, there’s often a significant difference between the available upload and download speeds.) However, the importance of upload came to the forefront in 2020 as video conferencing tools saw a surge in usage as both work meetings and school classes shifted to the Internet during the COVID-19 pandemic. To share your audio and video with other participants, you need sufficient upload bandwidth, and this issue was often compounded by multiple people sharing a single residential Internet connection.

Latency is the time it takes data to move through the Internet, and is measured in the number of milliseconds that it takes a packet of data to go from a client (such as your computer or mobile device) to a server, and then back to the client. In contrast to speed metrics, lower latency is preferable. This is especially true for use cases like online gaming where latency can make a difference between a character’s life and death in the game, as well as video conferencing, where higher latency can cause choppy audio and video experiences, but it also impacts web page performance. The latency metric can be further broken down into loaded and idle latency. The former measures latency on a loaded connection, where bandwidth is actively being consumed, while the latter measures latency on an “idle” connection, when there is no other network traffic present. (These specific loaded and idle definitions are from the device’s perspective, and more specifically, from the speed test application’s perspective. Unless the speed test is being performed directly from a router, the device/application doesn’t have insight into traffic on the rest of the network.) Jitter is the average variation found in consecutive latency measurements, and can be measured on both idle and loaded connections. A lower number means that the latency measurements are more consistent. As with latency, Internet connections should have minimal jitter, which helps provide more consistent performance.

Our approach to data analysis

The Internet Quality Index (IQI) and Connection Quality sections get their data from two different sources, providing two different (albeit related) perspectives. Under the hood they share some common principles, though.

IQI builds upon the mechanism we already use to regularly benchmark ourselves against other industry players. It is based on end user measurements against a set of Cloudflare and third-party targets, meant to represent a pattern that has become very common in the modern Internet, where most content is served from distribution networks with points of presence spread throughout the world. For this reason, and by design, IQI will show worse results for regions and Internet providers that rely on international (rather than peering) links for most content.

IQI is also designed to reflect the traffic load most commonly associated with web browsing, rather than more intensive use. This, and the chosen set of measurement targets, effectively biases the numbers towards what end users experience in practice (where latency plays an important role in how fast things can go).

For each metric covered by IQI, and for each ASN, we calculate the 25th percentile, median, and 75th percentile at 15 minute intervals. At the country level and above, the three calculated numbers for each ASN visible from that region are independently aggregated. This aggregation takes the estimated user population of each ASN into account, biasing the numbers away from networks that source a lot of automated traffic but have few end users.

The Connection Quality section gets its data from the Cloudflare Speed Test tool, which exercises a user’s connection in order to see how well it is able to perform. It measures against the closest Cloudflare location, providing a good balance of realistic results and network proximity to the end user. We have a presence in 285 cities around the world, allowing us to be pretty close to most users.

Similar to the IQI, we calculate the 25th percentile, median, and 75th percentile for each ASN. But here these three numbers are immediately combined using an operation called the trimean — a single number meant to balance the best connection quality that most users have, with the best quality available from that ASN (users may not subscribe to the best available plan for a number of reasons).

Because users may choose to run a speed test for different motives at different times, and also because we take privacy very seriously and don’t record any personally identifiable information along with test results, we aggregate at 90-day intervals to capture as much variability as we can.

At the country level and above, the calculated trimean for each ASN in that region is aggregated. This, again, takes the estimated user population of each ASN into account, biasing the numbers away from networks that have few end users but which may still have technicians using the Cloudflare Speed Test to assess the performance of their network.

The new Internet Quality page includes three views: Global, country-level, and autonomous system (AS). In line with the other pages on Cloudflare Radar, the country-level and AS pages show the same data sets, differing only in their level of aggregation. Below, we highlight the various components of the Internet Quality page.

Global

The top section of the global (worldwide) view includes time series graphs of the Internet Quality Index metrics aggregated at a continent level. The time frame shown in the graphs is governed by the selection made in the time frame drop down at the upper right of the page, and at launch, data for only the last three months is available. For users interested in examining a specific continent, clicking on the other continent names in the legend removes them from the graph. Although continent-level aggregation is still rather coarse, it still provides some insight into regional Internet quality around the world.

Further down the page, the Connection Quality section presents a choropleth map, with countries shaded according to the values of the speed, latency, or jitter metric selected from the drop-down menu. Hovering over a country displays a label with the country’s name and metric value, and clicking on the country takes you to the country’s Internet Quality page. Note that in contrast to the IQI section, the Connection Quality section always displays data aggregated over the previous 90 days.

Country-level

Within the country-level page (using Canada as an example in the figures below), the country’s IQI metrics over the selected time frame are displayed. These time series graphs show the median bandwidth, latency, and DNS response time within a shaded band bounded at the 25th and 75th percentile and represent the average expected user experience across the country, as discussed in the Our approach to data analysis section above.

Below that is the Connection Quality section, which provides a summary view of the country’s measured upload and download speeds, as well as latency and jitter, over the previous 90 days. The colored wedges in the Performance Summary graph are intended to illustrate aggregate connection quality at a glance, with an “ideal” connection having larger upload and download wedges and smaller latency and jitter wedges. Hovering over the wedges displays the metric’s value, which is also shown in the table to the right of the graph.

Below that, the Bandwidth and Latency/Jitter histograms illustrate the bucketed distribution of upload and download speeds, and latency and jitter measurements. In some cases, the speed histograms may show a noticeable bar at 1 Gbps, or 1000 ms (1 second) on the latency/jitter histograms. The presence of such a bar indicates that there is a set of measurements with values greater than the 1 Gbps/1000 ms maximum histogram values.

Autonomous system level

Within the upper-right section of the country-level page, a list of the top five autonomous systems within the country is shown. Clicking on an ASN takes you to the Performance page for that autonomous system. For others not displayed in the top five list, you can use the search bar at the top of the page to search by autonomous system name or number. The graphs shown within the AS level view are identical to those shown at a country level, but obviously at a different level of aggregation. You can find the ASN that you are connected to from the My Connection page on Cloudflare Radar.

Exploring connection performance & quality data

Digging into the IQI and Connection Quality visualizations can surface some interesting observations, including characterizing Internet connections, and the impact of Internet disruptions, including shutdowns and network issues. We explore some examples below.

Characterizing Internet connections

Verizon FiOS is a residential fiber-based Internet service available to customers in the United States. Fiber-based Internet services (as opposed to cable-based, DSL, dial-up, or satellite) will generally offer symmetric upload and download speeds, and the FiOS plans page shows this to be the case, offering 300 Mbps (upload & download), 500 Mbps (upload & download), and “1 Gig” (Verizon claims average wired speeds between 750-940 Mbps download / 750-880 Mbps upload) plans. Verizon carries FiOS traffic on AS701 (labeled UUNET due to a historical acquisition), and in looking at the bandwidth histogram for AS701, several things stand out. The first is a rough symmetry in upload and download speeds. (A cable-based Internet service provider, in contrast, would generally show a wide spread of download speeds, but have upload speeds clustered at the lower end of the range.) Another is the peaks around 300 Mbps and 750 Mbps, suggesting that the 300 Mbps and “1 Gig” plans may be more popular than the 500 Mbps plan. It is also clear that there are a significant number of test results with speeds below 300 Mbps. This is due to several factors: one is that Verizon also carries lower speed non-FiOS traffic on AS701, while another is that erratic nature of in-home WiFi often means that the speeds achieved on a test will be lower than the purchased service level.

Traffic shifts drive latency shifts

On May 9, 2023, the government of Pakistan ordered the shutdown of mobile network services in the wake of protests following the arrest of former Prime Minister Imran Khan. Our blog post covering this shutdown looked at the impact from a traffic perspective. Within the post, we noted that autonomous systems associated with fixed broadband networks saw significant increases in traffic when the mobile networks were shut down – that is, some users shifted to using fixed networks (home broadband) when mobile networks were unavailable.

Examining IQI data after the blog post was published, we found that the impact of this traffic shift was also visible in our latency data. As can be seen in the shaded area of the graph below, the shutdown of the mobile networks resulted in the median latency dropping about 25% as usage shifted from higher latency mobile networks to lower latency fixed broadband networks. An increase in latency is visible in the graph when mobile connectivity was restored on May 12.

Bandwidth shifts as a potential early warning sign

On April 4, UK mobile operator Virgin Media suffered several brief outages. In examining the IQI bandwidth graph for AS5089, the ASN used by Virgin Media (formerly branded as NTL), indications of a potential problem are visible several days before the outages occurred, as median bandwidth dropped by about a third, from around 35 Mbps to around 23 Mbps. The outages are visible in the circled area in the graph below. Published reports indicate that the problems lasted into April 5, in line with the lower median bandwidth measured through mid-day.

Submarine cable issues cause slower browsing

On June 5, Philippine Internet provider PLDT Tweeted an advisory that noted “One of our submarine cable partners confirms a loss in some of its internet bandwidth capacity, and thus causing slower Internet browsing.” IQI latency and bandwidth graphs for AS9299, a primary ASN used by PLDT, shows clear shifts starting around 06:45 UTC (14:45 local time). Median bandwidth dropped by half, from 17 Mbps to 8 Mbps, while median latency increased by 75% from 37 ms to around 65 ms. 75th percentile latency also saw a significant increase, nearly tripling from 63 ms to 180 ms coincident with the reported submarine cable issue.

Conclusion

Making network performance and quality insights available on Cloudflare Radar supports Cloudflare’s mission to help build a better Internet. However, we’re not done yet – we have more enhancements planned. These include making data available at a more granular geographical level (such as state and possibly city), incorporating AIM scores to help assess Internet quality for specific types of use cases, and embedding the Cloudflare speed test directly on Radar using the open source JavaScript module.

In the meantime, we invite you to use speed.cloudflare.com to test the performance and quality of your Internet connection, share any country or AS-level insights you discover on social media (tag @CloudflareRadar on Twitter or @radar@cloudflare.social on Mastodon), and explore the underlying data through the M-Lab repository or the Radar API.

Watch on Cloudflare TV

https://customer-rhnwzxvb3mg4wz3v.cloudflarestream.com/debcbed2114d086c870059ac604eca49/iframe?preload=true&poster=https%3A%2F%2Fcustomer-rhnwzxvb3mg4wz3v.cloudflarestream.com%2Fdebcbed2114d086c870059ac604eca49%2Fthumbnails%2Fthumbnail.jpg%3Ftime%3D1s%26height%3D600

We protect entire corporate networks, help customers build Internet-scale applications efficiently, accelerate any website or Internet applicationward off DDoS attacks, keep hackers at bay, and can help you on your journey to Zero Trust.

Visit 1.1.1.1 from any device to get started with our free app that makes your Internet faster and safer.

To learn more about our mission to help build a better Internet, start here. If you’re looking for a new career direction, check out our open positions.

 Discuss on Hacker News

Source :
https://blog.cloudflare.com/introducing-radar-internet-quality-page/

Content Delivery Networks (CDNs)

  • Article
  • 02/17/2023
  • 7 contributors

Feedback

In this article

  1. What exactly is a CDN?
  2. How do CDNs make services work faster?
  3. The Microsoft 365 CDN
  4. Other Microsoft CDNs

Show 11 more

This article applies to Microsoft 365 Enterprise.

CDNs help keep Microsoft 365 fast and reliable for end users. Cloud services like Microsoft 365 use CDNs to cache static assets closer to the browsers requesting them to speed up downloads and reduce perceived end user latency. The information in this topic will help you learn about Content Delivery Networks (CDNs) and how they’re used by Microsoft 365.

What exactly is a CDN?

A CDN is a geographically distributed network consisting of proxy and file servers in datacenters connected by high-speed backbone networks. CDNs are used to reduce latency and load times for a specified set of files and objects in a web site or service. A CDN may have many thousands of endpoints for optimal servicing of incoming requests from any location.

CDNs are commonly used to provide faster downloads of generic content for a web site or service such as Javascript files, icons and images, and can also provide private access to user content such as files in SharePoint Online document libraries, streaming media files, and custom code.

CDNs are used by most enterprise cloud services. Cloud services like Microsoft 365 have millions of customers downloading a mix of proprietary content (such as emails) and generic content (such as icons) at one time. It’s more efficient to put images everyone uses, like icons, as close to the user’s computer as possible. It isn’t practical for every cloud service to build CDN datacenters that store this generic content in every metropolitan area, or even in every major Internet hub around the world, so some of these CDNs are shared.

How do CDNs make services work faster?

Downloading common objects like site images and icons over and over again can take up network bandwidth that can be better used for downloading important personal content, like email or documents. Because Microsoft 365 uses an architecture that includes CDNs, the icons, scripts, and other generic content can be downloaded from servers closer to client computers, making the downloads faster. This means faster access to your personal content, which is securely stored in Microsoft 365 datacenters.

CDNs help to improve cloud service performance in several ways:

  • CDNs shift part of the network and file download burden away from the cloud service, freeing up cloud service resources for serving user content and other services by reducing the need to serve requests for static assets.
  • CDNs are purpose built to provide low-latency file access by implementing high performance networks and file servers, and by leveraging updated network protocols such as HTTP/2 with highly efficient compression and request multiplexing.
  • CDN networks use many globally distributed endpoints to make content available as close as possible to users.

The Microsoft 365 CDN

The built-in Microsoft 365 Content Delivery Network (CDN) allows Microsoft 365 administrators to provide better performance for their organization’s SharePoint Online pages by caching static assets closer to the browsers requesting them, which helps to speed up downloads and reduce latency. The Microsoft 365 CDN uses the HTTP/2 protocol for improved compression and download speeds.

 Note

The Microsoft 365 CDN is only available to tenants in the Production (worldwide) cloud. Tenants in the US Government, China and Germany clouds do not currently support the Microsoft 365 CDN.

The Microsoft 365 CDN is composed of multiple CDNs that allow you to host static assets in multiple locations, or origins, and serve them from global high-speed networks. Depending on the kind of content you want to host in the Microsoft 365 CDN, you can add public origins, private origins or both.

Microsoft 365 CDN conceptual diagram.

Content in public origins within the Microsoft 365 CDN is accessible anonymously, and can be accessed by anyone who has URLs to hosted assets. Because access to content in public origins is anonymous, you should only use them to cache non-sensitive generic content such as Javascript files, scripts, icons and images. The Microsoft 365 CDN is used by default for downloading generic resource assets like the Microsoft 365 client applications from a public origin.

Private origins within the Microsoft 365 CDN provide private access to user content such as SharePoint Online document libraries, sites and proprietary images. Access to content in private origins is secured with dynamically generated tokens so it can only be accessed by users with permissions to the original document library or storage location. Private origins in the Microsoft 365 CDN can only be used for SharePoint Online content, and you can only access assets through redirection from your SharePoint Online tenant.

The Microsoft 365 CDN service is included as part of your SharePoint Online subscription.

For more information about how to use the Microsoft 365 CDN, see Use the Microsoft 365 content delivery network with SharePoint Online.

To watch a series of short videos that provide conceptual and HOWTO information about using the Microsoft 365 CDN, visit the SharePoint Developer Patterns and Practices YouTube channel.

Other Microsoft CDNs

Although not a part of the Microsoft 365 CDN, you can use these CDNs in your Microsoft 365 tenant for access to SharePoint development libraries, custom code and other purposes that fall outside the scope of the Microsoft 365 CDN.

Azure CDN

 Note

Beginning in Q3 2020, SharePoint Online will begin caching videos on the Azure CDN to support improved video playback and reliability. Popular videos will be streamed from the CDN endpoint closest to the user. This data will remain within the Microsoft Purview boundary. This is a free service for all tenants and it does not require any customer action to configure.

You can use the Azure CDN to deploy your own CDN instance for hosting custom web parts, libraries and other resource assets, which allows you to apply access keys to your CDN storage and exert greater control over your CDN configuration. Use of the Azure CDN isn’t free, and requires an Azure subscription.

For more information on how to configure an Azure CDN instance, see Quickstart: Integrate an Azure storage account with Azure CDN.

For an example of how the Azure CDN can be used to host SharePoint web parts, see Deploy your SharePoint client-side web part to Azure CDN.

For information about the Azure CDN PowerShell module, see Manage Azure CDN with PowerShell.

Microsoft Ajax CDN

Microsoft’s Ajax CDN is a read-only CDN that offers many popular development libraries including jQuery (and all of its other libraries), ASP.NET Ajax, Bootstrap, Knockout.js, and others.

To include these scripts in your project, simply replace any references to these publicly available libraries with references to the CDN address instead of including it in your project itself. For example, use the following code to link to jQuery:

HTMLCopy

<script src=https://ajax.aspnetcdn.com/ajax/jquery-2.1.1.js> </script>

For more information about how to use the Microsoft Ajax CDN, see Microsoft Ajax CDN.

How does Microsoft 365 use content from a CDN?

Regardless of what CDN you configure for your Microsoft 365 tenant, the basic data retrieval process is the same.

  1. Your client (a browser or Office client application) requests data from Microsoft 365.
  2. Microsoft 365 either returns the data directly to your client or, if the data is part of a set of content hosted by the CDN, redirects your client to the CDN URL.a. If the data is already cached in a public origin, your client downloads the data directly from the nearest CDN location to your client.b. If the data is already cached in a private origin, the CDN service checks your Microsoft 365 user account’s permissions on the origin. If you have permissions, SharePoint Online dynamically generates a custom URL composed of the path to the asset in the CDN and two access tokens, and returns the custom URL to your client. Your client then downloads the data directly from the nearest CDN location to your client using the custom URL.
  3. If the data isn’t cached at the CDN, the CDN node requests the data from Microsoft 365 and then caches the data for time after your client downloads the data.

The CDN figures out the closest datacenter to the user’s browser and, using redirection, downloads the requested data from there. CDN redirection is quick, and can save users a lot of download time.

How should I set up my network so that CDNs work best with Microsoft 365?

Minimizing latency between clients on your network and CDN endpoints is the key consideration for ensuring optimal performance. You can use the best practices outlined in Managing Microsoft 365 endpoints to ensure that your network configuration permits client browsers to access the CDN directly rather than routing CDN traffic through central proxies to avoid introducing unnecessary latency.

You can also read Microsoft 365 Network Connectivity Principles to understand the concepts behind optimizing Microsoft 365 network performance.

Is there a list of all the CDNs that Microsoft 365 uses?

The CDNs in use by Microsoft 365 are always subject to change and in many cases there are multiple CDN partners configured in the event one is unavailable. The primary CDNs used by Microsoft 365 are:

CDNCompanyUsageLink
Microsoft 365 CDNMicrosoft AzureGeneric assets in public origins, SharePoint user content in private originsMicrosoft Azure CDN
Azure CDNMicrosoftCustom code, SharePoint Framework solutionsMicrosoft Azure CDN
Microsoft Ajax CDN (read only)MicrosoftCommon libraries for Ajax, jQuery, ASP.NET, Bootstrap, Knockout.js etc.Microsoft Ajax CDN

What performance gains does a CDN provide?

There are many factors involved in measuring specific differences in performance between data downloaded directly from Microsoft 365 and data downloaded from a specific CDN, such as your location relative to your tenant and to the nearest CDN endpoint, the number of assets on a page that are served by the CDN, and transient changes in network latency and bandwidth. However, a simple A/B test can help to show the difference in download time for a specific file.

The following screenshots illustrate the difference in download speed between the native file location in Microsoft 365 and the same file hosted on the Microsoft Ajax Content Delivery Network. These screenshots are from the Network tab in the Internet Explorer 11 developer tools. These screenshots show the latency on the popular library jQuery. To bring up this screen, in Internet Explorer, press F12 and select the Network tab, which is symbolized with a Wi-Fi icon.

Screenshot of F12 Network.

This screenshot shows the library uploaded to the master page gallery on the SharePoint Online site itself. The time it took to upload the library is 1.51 seconds.

Screenshot of load time 1.51s.

The second screenshot shows the same file delivered by Microsoft’s CDN. This time the latency is around 496 milliseconds. This is a large improvement and shows that a whole second is shaved off the total time to download the object.

Screenshot of load times in 469 ms.

Is my data safe?

We take great care to protect the data that runs your business. Data stored in the Microsoft 365 CDN is encrypted both in transit and at rest, and access to data in the Microsoft 365 SharePoint CDN is secured by Microsoft 365 user permissions and token authorization. Requests for data in the Microsoft 365 SharePoint CDN must be referred (redirected) from your Microsoft 365 tenant or an authorization token won’t be generated.

To ensure that your data remains secure, we recommend that you never store user content or other sensitive data in a public CDN. Because access to data in a public CDN is anonymous, public CDNs should only be used to host generic content such as web script files, icons, images and other non-sensitive assets.

 Note

3rd party CDN providers may have privacy and compliance standards that differ from the commitments outlined by the Microsoft 365 Trust Center. Data cached through the CDN service may not conform to the Microsoft Data Processing Terms (DPT), and may be outside of the Microsoft 365 Trust Center compliance boundaries.

For in-depth information about privacy and data protection for Microsoft 365 CDN providers, visit the following:

How can I secure my network with all these 3rd party services?

Using an extensive set of partner services allows Microsoft 365 to scale and meet availability requirements and enhance the user experience when using Microsoft 365. The 3rd party services Microsoft 365 leverages include both certificate revocation lists; such as crl.microsoft.com or sa.symcb.com, and CDNs; such as r3.res.outlook.com. Every CDN FQDN generated by Microsoft 365 is a custom FQDN for Microsoft 365. If you’re sent to a FQDN at the request of Microsoft 365, you can be assured that the CDN provider controls the FQDN and the underlying content at that location.

For customers that want to segregate requests destined for a Microsoft 365 datacenter from requests that are destined for a 3rd party, we’ve written up guidance on Managing Microsoft 365 endpoints.

Is there a list of all the FQDNs that leverage CDNs?

The list of FQDNs and how they leverage CDNs change over time. Refer to our published Microsoft 365 URLs and IP address ranges page to get up to date on the latest FQDNs that leverage CDNs.

You can also use the Microsoft 365 IP Address and URL Web service to request the current Microsoft 365 URLs and IP address ranges formatted as CSV or JSON.

Can I use my own CDN and cache content on my local network?

We’re continually looking for new ways to support our customers’ needs and are currently exploring the use of caching proxy solutions and other on-premises CDN solutions.

Although it isn’t a part of the Microsoft 365 CDN, you can also use the Azure CDN for hosting custom web parts, libraries and other resource assets, which allows you to apply access keys to your CDN storage and exert greater control over your CDN configuration. Use of the Azure CDN isn’t free, and requires an Azure subscription. For more information on how to configure an Azure CDN instance, see Quickstart: Integrate an Azure storage account with Azure CDN.

I’m using Azure ExpressRoute for Microsoft 365, does that change things?

Azure ExpressRoute for Microsoft 365 provides a dedicated connection to Microsoft 365 infrastructure that is segregated from the public internet. This means that clients will still need to connect over non-ExpressRoute connections to connect to CDNs and other Microsoft infrastructure that isn’t explicitly included in the list of services supported by ExpressRoute. For more information about how to route specific traffic such as requests destined for CDNs, see Implementing ExpressRoute for Microsoft 365.

Can I use CDNs with SharePoint Server on-premises?

Using CDNs only makes sense in a SharePoint Online context and should be avoided with SharePoint Server. This is because all of the advantages around geographic location don’t hold true if the server is located on-premises or geographically close anyway. Additionally, if there’s a network connection to the servers where it’s hosted, then the site may be used without an Internet connection and therefore can’t retrieve the CDN files. Otherwise, you should use a CDN if there’s one available and stable for the library and files you need for your site.

See also

Microsoft 365 Network Connectivity Principles

Assessing Microsoft 365 network connectivity

Managing Microsoft 365 endpoints

Microsoft 365 URLs and IP address ranges

Use the Microsoft 365 content delivery network with SharePoint Online

Microsoft Trust Center

Tune Microsoft 365 performance

Source :
https://learn.microsoft.com/en-us/microsoft-365/enterprise/content-delivery-networks?view=o365-worldwide

Microsoft Office 365 URLs and IP address ranges

  • Article
  • 06/29/2023

In this article

  1. Exchange Online
  2. SharePoint Online and OneDrive for Business
  3. Skype for Business Online and Microsoft Teams
  4. Microsoft 365 Common and Office Online
  5. Related Topics

Office 365 requires connectivity to the Internet. The endpoints below should be reachable for customers using Office 365 plans, including Government Community Cloud (GCC).

Office 365 Worldwide (+GCC) | Office 365 operated by 21 Vianet | Office 365 U.S. Government DoD | Office 365 U.S. Government GCC High |

NotesDownloadUse
Last updated: 06/29/2023 – RSS. Change Log subscriptionDownload: all required and optional destinations in one JSON formatted list.Use: our proxy PAC files

Start with Managing Office 365 endpoints to understand our recommendations for managing network connectivity using this data. Endpoints data is updated as needed at the beginning of each month with new IP Addresses and URLs published 30 days in advance of being active. This cadence allows for customers who don’t yet have automated updates to complete their processes before new connectivity is required. Endpoints may also be updated during the month if needed to address support escalations, security incidents, or other immediate operational requirements. The data shown on this page below is all generated from the REST-based web services. If you’re using a script or a network device to access this data, you should go to the Web service directly.

Endpoint data below lists requirements for connectivity from a user’s machine to Office 365. For detail on IP addresses used for network connections from Microsoft into a customer network, sometimes called hybrid or inbound network connections, see Additional endpoints for more information.

The endpoints are grouped into four service areas representing the three primary workloads and a set of common resources. The groups may be used to associate traffic flows with a particular application, however given that features often consume endpoints across multiple workloads, these groups can’t effectively be used to restrict access.

Data columns shown are:

  • ID: The ID number of the row, also known as an endpoint set. This ID is the same as is returned by the web service for the endpoint set.
  • Category: Shows whether the endpoint set is categorized as OptimizeAllow, or Default. This column also lists which endpoint sets are required to have network connectivity. For endpoint sets that aren’t required to have network connectivity, we provide notes in this field to indicate what functionality would be missing if the endpoint set is blocked. If you’re excluding an entire service area, the endpoint sets listed as required don’t require connectivity.You can read about these categories and guidance for their management in New Office 365 endpoint categories.
  • ER: This is Yes if the endpoint set is supported over Azure ExpressRoute with Office 365 route prefixes. The BGP community that includes the route prefixes shown aligns with the service area listed. When ER is No, this means that ExpressRoute is not supported for this endpoint set.Some routes may be advertised in more than one BGP community, making it possible for endpoints within a given IP range to traverse the ER circuit, but still be unsupported. In all cases, the value of a given endpoint set’s ER column should be respected.
  • Addresses: Lists the FQDNs or wildcard domain names and IP address ranges for the endpoint set. Note that an IP address range is in CIDR format and may include many individual IP addresses in the specified network.
  • Ports: Lists the TCP or UDP ports that are combined with listed IP addresses to form the network endpoint. You may notice some duplication in IP address ranges where there are different ports listed.

 Note

Microsoft has begun a long-term transition to providing services from the cloud.microsoft namespace to simplify the endpoints managed by our customers. If you are following existing guidance for allowing access to required endpoints as listed below, there’s no further action required from you.

Exchange Online

IDCategoryERAddressesPorts
1Optimize
Required
Yesoutlook.office.com, outlook.office365.com
13.107.6.152/31, 13.107.18.10/31, 13.107.128.0/22, 23.103.160.0/20, 40.96.0.0/13, 40.104.0.0/15, 52.96.0.0/14, 131.253.33.215/32, 132.245.0.0/16, 150.171.32.0/22, 204.79.197.215/32, 2603:1006::/40, 2603:1016::/36, 2603:1026::/36, 2603:1036::/36, 2603:1046::/36, 2603:1056::/36, 2620:1ec:4::152/128, 2620:1ec:4::153/128, 2620:1ec:c::10/128, 2620:1ec:c::11/128, 2620:1ec:d::10/128, 2620:1ec:d::11/128, 2620:1ec:8f0::/46, 2620:1ec:900::/46, 2620:1ec:a92::152/128, 2620:1ec:a92::153/128
TCP: 443, 80
UDP: 443
2Allow
Optional
Notes: POP3, IMAP4, SMTP Client traffic
Yes*.outlook.office.com, outlook.office365.com, smtp.office365.com
13.107.6.152/31, 13.107.18.10/31, 13.107.128.0/22, 23.103.160.0/20, 40.96.0.0/13, 40.104.0.0/15, 52.96.0.0/14, 131.253.33.215/32, 132.245.0.0/16, 150.171.32.0/22, 204.79.197.215/32, 2603:1006::/40, 2603:1016::/36, 2603:1026::/36, 2603:1036::/36, 2603:1046::/36, 2603:1056::/36, 2620:1ec:4::152/128, 2620:1ec:4::153/128, 2620:1ec:c::10/128, 2620:1ec:c::11/128, 2620:1ec:d::10/128, 2620:1ec:d::11/128, 2620:1ec:8f0::/46, 2620:1ec:900::/46, 2620:1ec:a92::152/128, 2620:1ec:a92::153/128
TCP: 587, 993, 995, 143
8Default
Required
No*.outlook.com, autodiscover.<tenant>.onmicrosoft.comTCP: 443, 80
9Allow
Required
Yes*.protection.outlook.com
40.92.0.0/15, 40.107.0.0/16, 52.100.0.0/14, 52.238.78.88/32, 104.47.0.0/17, 2a01:111:f400::/48, 2a01:111:f403::/48
TCP: 443
10Allow
Required
Yes*.mail.protection.outlook.com
40.92.0.0/15, 40.107.0.0/16, 52.100.0.0/14, 104.47.0.0/17, 2a01:111:f400::/48, 2a01:111:f403::/48
TCP: 25

SharePoint Online and OneDrive for Business

IDCategoryERAddressesPorts
31Optimize
Required
Yes*.sharepoint.com
13.107.136.0/22, 40.108.128.0/17, 52.104.0.0/14, 104.146.128.0/17, 150.171.40.0/22, 2603:1061:1300::/40, 2620:1ec:8f8::/46, 2620:1ec:908::/46, 2a01:111:f402::/48
TCP: 443, 80
32Default
Optional
Notes: OneDrive for Business: supportability, telemetry, APIs, and embedded email links
Nossw.live.com, storage.live.comTCP: 443
33Default
Optional
Notes: SharePoint Hybrid Search – Endpoint to SearchContentService where the hybrid crawler feeds documents
No*.search.production.apac.trafficmanager.net, *.search.production.emea.trafficmanager.net, *.search.production.us.trafficmanager.netTCP: 443
35Default
Required
No*.wns.windows.com, admin.onedrive.com, officeclient.microsoft.comTCP: 443, 80
36Default
Required
Nog.live.com, oneclient.sfx.msTCP: 443, 80
37Default
Required
No*.sharepointonline.com, spoprod-a.akamaihd.netTCP: 443, 80
39Default
Required
No*.svc.msTCP: 443, 80

Skype for Business Online and Microsoft Teams

IDCategoryERAddressesPorts
11Optimize
Required
Yes13.107.64.0/18, 52.112.0.0/14, 52.122.0.0/15, 2603:1063::/39UDP: 3478, 3479, 3480, 3481
12Allow
Required
Yes*.lync.com, *.teams.microsoft.com, teams.microsoft.com
13.107.64.0/18, 52.112.0.0/14, 52.122.0.0/15, 52.238.119.141/32, 52.244.160.207/32, 2603:1027::/48, 2603:1037::/48, 2603:1047::/48, 2603:1057::/48, 2603:1063::/39, 2620:1ec:6::/48, 2620:1ec:40::/42
TCP: 443, 80
13Allow
Required
Yes*.broadcast.skype.com, broadcast.skype.com
13.107.64.0/18, 52.112.0.0/14, 52.122.0.0/15, 52.238.119.141/32, 52.244.160.207/32, 2603:1027::/48, 2603:1037::/48, 2603:1047::/48, 2603:1057::/48, 2603:1063::/39, 2620:1ec:6::/48, 2620:1ec:40::/42
TCP: 443
15Default
Required
No*.sfbassets.comTCP: 443, 80
16Default
Required
No*.keydelivery.mediaservices.windows.net, *.streaming.mediaservices.windows.net, mlccdn.blob.core.windows.netTCP: 443
17Default
Required
Noaka.msTCP: 443
18Default
Optional
Notes: Federation with Skype and public IM connectivity: Contact picture retrieval
No*.users.storage.live.comTCP: 443
19Default
Optional
Notes: Applies only to those who deploy the Conference Room Systems
Noadl.windows.comTCP: 443, 80
22Allow
Optional
Notes: Teams: Messaging interop with Skype for Business
Yes*.skypeforbusiness.com
13.107.64.0/18, 52.112.0.0/14, 52.122.0.0/15, 52.238.119.141/32, 52.244.160.207/32, 2603:1027::/48, 2603:1037::/48, 2603:1047::/48, 2603:1057::/48, 2603:1063::/39, 2620:1ec:6::/48, 2620:1ec:40::/42
TCP: 443
27Default
Required
No*.mstea.ms, *.secure.skypeassets.com, mlccdnprod.azureedge.netTCP: 443
127Default
Required
No*.skype.comTCP: 443, 80
167Default
Required
No*.ecdn.microsoft.comTCP: 443
180Default
Required
Nocompass-ssl.microsoft.comTCP: 443

Microsoft 365 Common and Office Online

IDCategoryERAddressesPorts
41Default
Optional
Notes: Microsoft Stream
No*.microsoftstream.comTCP: 443
43Default
Optional
Notes: Microsoft Stream 3rd party integration (including CDNs)
Nonps.onyx.azure.netTCP: 443
44Default
Optional
Notes: Microsoft Stream – unauthenticated
No*.azureedge.net, *.media.azure.net, *.streaming.mediaservices.windows.netTCP: 443
45Default
Optional
Notes: Microsoft Stream
No*.keydelivery.mediaservices.windows.netTCP: 443
46Allow
Required
Yes*.officeapps.live.com, *.online.office.com, office.live.com
13.107.6.171/32, 13.107.18.15/32, 13.107.140.6/32, 52.108.0.0/14, 52.244.37.168/32, 2603:1063:2000::/38, 2620:1ec:c::15/128, 2620:1ec:8fc::6/128, 2620:1ec:a92::171/128, 2a01:111:f100:2000::a83e:3019/128, 2a01:111:f100:2002::8975:2d79/128, 2a01:111:f100:2002::8975:2da8/128, 2a01:111:f100:7000::6fdd:6cd5/128, 2a01:111:f100:a004::bfeb:88cf/128
TCP: 443, 80
47Default
Required
No*.office.netTCP: 443, 80
49Default
Required
No*.onenote.comTCP: 443
50Default
Optional
Notes: OneNote notebooks (wildcards)
No*.microsoft.comTCP: 443
51Default
Required
No*cdn.onenote.netTCP: 443
53Default
Required
Noajax.aspnetcdn.com, apis.live.net, officeapps.live.com, www.onedrive.comTCP: 443
56Allow
Required
Yes*.auth.microsoft.com, *.msftidentity.com, *.msidentity.com, account.activedirectory.windowsazure.com, accounts.accesscontrol.windows.net, adminwebservice.microsoftonline.com, api.passwordreset.microsoftonline.com, autologon.microsoftazuread-sso.com, becws.microsoftonline.com, ccs.login.microsoftonline.com, clientconfig.microsoftonline-p.net, companymanager.microsoftonline.com, device.login.microsoftonline.com, graph.microsoft.com, graph.windows.net, login.microsoft.com, login.microsoftonline.com, login.microsoftonline-p.com, login.windows.net, logincert.microsoftonline.com, loginex.microsoftonline.com, login-us.microsoftonline.com, nexus.microsoftonline-p.com, passwordreset.microsoftonline.com, provisioningapi.microsoftonline.com
20.20.32.0/19, 20.190.128.0/18, 20.231.128.0/19, 40.126.0.0/18, 2603:1006:2000::/48, 2603:1007:200::/48, 2603:1016:1400::/48, 2603:1017::/48, 2603:1026:3000::/48, 2603:1027:1::/48, 2603:1036:3000::/48, 2603:1037:1::/48, 2603:1046:2000::/48, 2603:1047:1::/48, 2603:1056:2000::/48, 2603:1057:2::/48
TCP: 443, 80
59Default
Required
No*.hip.live.com, *.microsoftonline.com, *.microsoftonline-p.com, *.msauth.net, *.msauthimages.net, *.msecnd.net, *.msftauth.net, *.msftauthimages.net, *.phonefactor.net, enterpriseregistration.windows.net, policykeyservice.dc.ad.msft.netTCP: 443, 80
64Allow
Required
Yes*.compliance.microsoft.com, *.protection.office.com, *.security.microsoft.com, compliance.microsoft.com, defender.microsoft.com, protection.office.com, security.microsoft.com
13.107.6.192/32, 13.107.9.192/32, 52.108.0.0/14, 2620:1ec:4::192/128, 2620:1ec:a92::192/128
TCP: 443
66Default
Required
No*.portal.cloudappsecurity.comTCP: 443
67Default
Optional
Notes: Security and Compliance Center eDiscovery export
No*.blob.core.windows.netTCP: 443
68Default
Optional
Notes: Portal and shared: 3rd party office integration. (including CDNs)
Nofirstpartyapps.oaspapps.com, prod.firstpartyapps.oaspapps.com.akadns.net, telemetryservice.firstpartyapps.oaspapps.com, wus-firstpartyapps.oaspapps.comTCP: 443
69Default
Required
No*.aria.microsoft.com, *.events.data.microsoft.comTCP: 443
70Default
Required
No*.o365weve.com, amp.azure.net, appsforoffice.microsoft.com, assets.onestore.ms, auth.gfx.ms, c1.microsoft.com, dgps.support.microsoft.com, docs.microsoft.com, msdn.microsoft.com, platform.linkedin.com, prod.msocdn.com, shellprod.msocdn.com, support.microsoft.com, technet.microsoft.comTCP: 443
71Default
Required
No*.office365.comTCP: 443, 80
72Default
Optional
Notes: Azure Rights Management (RMS) with Office 2010 clients
No*.cloudapp.netTCP: 443
73Default
Required
No*.aadrm.com, *.azurerms.com, *.informationprotection.azure.com, ecn.dev.virtualearth.net, informationprotection.hosting.portal.azure.netTCP: 443
75Default
Optional
Notes: Graph.windows.net, Office 365 Management Pack for Operations Manager, SecureScore, Azure AD Device Registration, Forms, StaffHub, Application Insights, captcha services
No*.sharepointonline.com, dc.services.visualstudio.com, mem.gfx.ms, staffhub.msTCP: 443
78Default
Optional
Notes: Some Office 365 features require endpoints within these domains (including CDNs). Many specific FQDNs within these wildcards have been published recently as we work to either remove or better explain our guidance relating to these wildcards.
No*.microsoft.com, *.msocdn.com, *.onmicrosoft.comTCP: 443, 80
79Default
Required
Noo15.officeredir.microsoft.com, officepreviewredir.microsoft.com, officeredir.microsoft.com, r.office.microsoft.comTCP: 443, 80
83Default
Required
Noactivation.sls.microsoft.comTCP: 443
84Default
Required
Nocrl.microsoft.comTCP: 443, 80
86Default
Required
Nooffice15client.microsoft.com, officeclient.microsoft.comTCP: 443
89Default
Required
Nogo.microsoft.comTCP: 443, 80
91Default
Required
Noajax.aspnetcdn.com, cdn.odc.officeapps.live.comTCP: 443, 80
92Default
Required
Noofficecdn.microsoft.com, officecdn.microsoft.com.edgesuite.netTCP: 443, 80
93Default
Optional
Notes: ProPlus: auxiliary URLs
No*.virtualearth.net, c.bing.net, excelbingmap.firstpartyapps.oaspapps.com, ocos-office365-s2s.msedge.net, peoplegraph.firstpartyapps.oaspapps.com, tse1.mm.bing.net, wikipedia.firstpartyapps.oaspapps.com, www.bing.comTCP: 443, 80
95Default
Optional
Notes: Outlook for Android and iOS
No*.acompli.net, *.outlookmobile.comTCP: 443
96Default
Optional
Notes: Outlook for Android and iOS: Authentication
Nologin.windows-ppe.netTCP: 443
97Default
Optional
Notes: Outlook for Android and iOS: Consumer Outlook.com and OneDrive integration
Noaccount.live.com, login.live.comTCP: 443
105Default
Optional
Notes: Outlook for Android and iOS: Outlook Privacy
Nowww.acompli.comTCP: 443
114Default
Optional
Notes: Office Mobile URLs
No*.appex.bing.com, *.appex-rf.msn.com, c.bing.com, c.live.com, d.docs.live.net, directory.services.live.com, docs.live.net, partnerservices.getmicrosoftkey.com, signup.live.comTCP: 443, 80
116Default
Optional
Notes: Office for iPad URLs
Noaccount.live.com, auth.gfx.ms, login.live.comTCP: 443, 80
117Default
Optional
Notes: Yammer
No*.yammer.com, *.yammerusercontent.comTCP: 443
118Default
Optional
Notes: Yammer CDN
No*.assets-yammer.comTCP: 443
121Default
Optional
Notes: Planner: auxiliary URLs
Nowww.outlook.comTCP: 443, 80
122Default
Optional
Notes: Sway CDNs
Noeus-www.sway-cdn.com, eus-www.sway-extensions.com, wus-www.sway-cdn.com, wus-www.sway-extensions.comTCP: 443
124Default
Optional
Notes: Sway
Nosway.com, www.sway.comTCP: 443
125Default
Required
No*.entrust.net, *.geotrust.com, *.omniroot.com, *.public-trust.com, *.symcb.com, *.symcd.com, *.verisign.com, *.verisign.net, apps.identrust.com, cacerts.digicert.com, cert.int-x3.letsencrypt.org, crl.globalsign.com, crl.globalsign.net, crl.identrust.com, crl3.digicert.com, crl4.digicert.com, isrg.trustid.ocsp.identrust.com, mscrl.microsoft.com, ocsp.digicert.com, ocsp.globalsign.com, ocsp.msocsp.com, ocsp2.globalsign.com, ocspx.digicert.com, secure.globalsign.com, www.digicert.com, www.microsoft.comTCP: 443, 80
126Default
Optional
Notes: Connection to the speech service is required for Office Dictation features. If connectivity is not allowed, Dictation will be disabled.
Noofficespeech.platform.bing.comTCP: 443
147Default
Required
No*.office.com, www.microsoft365.comTCP: 443, 80
152Default
Optional
Notes: These endpoints enables the Office Scripts functionality in Office clients available through the Automate tab. This feature can also be disabled through the Office 365 Admin portal.
No*.microsoftusercontent.comTCP: 443
153Default
Required
No*.azure-apim.net, *.flow.microsoft.com, *.powerapps.com, *.powerautomate.comTCP: 443
156Default
Required
No*.activity.windows.com, activity.windows.comTCP: 443
158Default
Required
No*.cortana.aiTCP: 443
159Default
Required
Noadmin.microsoft.comTCP: 443, 80
160Default
Required
Nocdn.odc.officeapps.live.com, cdn.uci.officeapps.live.comTCP: 443, 80
184Default
Required
No*.cloud.microsoft, *.static.microsoftTCP: 443, 80

 Note

For recommendations on Yammer IP addresses and URLs, see Using hard-coded IP addresses for Yammer is not recommended on the Yammer blog.

Additional endpoints not included in the Office 365 IP Address and URL Web service

Managing Office 365 endpoints

General Microsoft Stream endpoints

Monitor Microsoft 365 connectivity

Root CA and the Intermediate CA bundle on the third-party application system

Client connectivity

Content delivery networks

Microsoft Azure IP Ranges and Service Tags – Public Cloud

Microsoft Azure IP Ranges and Service Tags – US Government Cloud

Microsoft Azure IP Ranges and Service Tags – China Cloud

Microsoft Public IP Space

Service Name and Transport Protocol Port Number Registry

Source :
https://docs.microsoft.com/en-us/office365/enterprise/urls-and-ip-address-ranges

All about the TeamViewer company profile

By JeanK

Last Updated: 

A TeamViewer company profile allows the ability within the TeamViewer Management Console to manage user permissions and access centrally.

Company admins can add existing users to the license and create new TeamViewer accounts. Both will allow users to log into any TeamViewer application and license the device so they may make connections.

Before starting

It is highly recommended to utilize a Master Account for a company profile, which will be the account that manages all licenses and users.

Please see the following article: Using a Master Account for the TeamViewer Management Console

This article applies to TeamViewer customers with a Premium, Corporate, or Tensor plan.

Benefits of a company profile

Managing users as the company administrator of a company profile also gives access to:

Licensing

Each company profile must have one TeamViewer Core multi-user license activated; this license can be combined with other licenses of the TeamViewer product family (e.g., Assist AR, Remote Management, IoT, etc. ), but cannot be combined with another TeamViewer Core license.

📌Note: If a company admin attempts to activate a second TeamViewer license, they will need to choose between keeping the existing license or replacing it with the new license.

image.png

📌Note: In some cases (with older company profiles and an active perpetual license), multiple core TeamViewer licenses may be activated to one company profile. One subscription license may be added to an existing perpetual license for such company profiles.

License management

Through the TeamViewer Management Console, company admins can manage the licensing of their users directly, including:

  • Assign/un-assign the license to various members of the company profile.
  • Reserve one or more channels for specific teams or persons via Channel Groups.

💡Hint: To ensure the license on your company profile best matches your use case, we highly recommend reaching out to our TeamViewer licensing experts. You may find local numbers here.


How to create a company profile

To create a company profile, please follow the instructions below:

  1. Log into the Management Console
  2. On the left-hand side, under the Company header, select User management
  3. In the text box provided, enter the desired company name and click Create.
    • 📌Note: The name of a company profile must be unique and cannot be re-used. If another company profile already uses a name, an error will appear, requesting another name be used instead. 
  4. Once the company profile is created, User management will load with the user that created the company profile as a company administrator.

How to add a new user

To add a new user, please follow the instructions below:

  1. Under User management, click the icon of a person with a + sign. Click on Add user.
  2. On the General tab, add the user’s name and email address and enter a password for the user and click Add user.
    • 💡Hint: Other settings for the user can be adjusted under Advanced, Licenses, and Permissions.
  3. The user will now appear under the User management tab. An email is sent to the user with instructions on activating their account.
    • 📌Note: If the user does not activate their account via email, they will receive an error that the account has not yet been activated when trying to sign in.

How to add an existing user

Users that already have an existing TeamViewer account can request to join a company profile using a few simple steps:

  1. Under User management, click the icon of a person with a + sign. Select Add existing account.
  2. A pop-up will appear, including a URL. Please send this URL to the user you want to add: https://login.teamviewer.com/cmd/joincompany
  3. Once the user opens the link within a browser, they must sign in with their TeamViewer account. Once logged in, they will be prompted to enter the email address of the company administrator. Once completed, they must tick the box I allow to transfer my account and click Join Company.
  4. The company admin will receive a join request via email. The user will appear in user management, where the company admin can approve or decline the addition of the user to the company profile

📌Notes:

  • Every user that joins a company profile will be informed that the company admin will take over full management of their account, including the ability to connect to and control all their devices. It is recommended never to join a company profile the user does not know or fully trust.
  • A user can only be part of one company profile.

How to set user permissions

Users of a company profile have multiple options that can be set by the current company admin, including promoting other users to administrator or company administrator. Permissions are set for each user individually. To access user permissions:

  1. In the User management tab, hovering the cursor over the desired user’s account will produce a three-dots menu (⋮) to the far right of the account. Click this menu and select Edit user from the drop-down.
  2. Once in Edit user, select the Permissions tab. Overall permissions for the account can be changed using the drop-down under the Role header.
image.png

Four options are available:

  • Company administrator: Can make changes to company settings, other administrator accounts, and user accounts.
  • User administrator: Can make changes to other user accounts but cannot change company settings or company administrator accounts.
  • Member: Cannot change the company profile or other users.
  • Customized permissions: The company admin sets permissions for each aspect of the account.

Once the appropriate role is selected, click Save in the window’s upper-left corner.

📌Note: Changes to user permissions are automatic once saved.

How to remove/deactivate/delete users

Along with adding new or existing accounts, company admins can remove, deactivate, or even delete users from the company profile.

📌Note: A current company admin of that license can only remove a TeamViewer account currently connected to a company profile. TeamViewer Customer Support is unable to remove any account from a company profile.

To remove, deactivate or delete an account, please follow the instructions below:

  1. In the User management tab, hovering the cursor over the desired user’s account will produce a three-dots menu (⋮) to the far right of the account. In the drop-down menu that appears are the three options
  2. Select Delete accountRemove user or Deactivate user.
image.png

Consequences of deleting an account

When an account is deleted, the account is not only removed from the company profile but deleted from TeamViewer altogether. The user can no longer use the account or access any information associated with it as it no longer exists.

📌Note: When an account is deleted, the email address associated with the account can be re-used to create a new TeamViewer account.

image.png

When a TeamViewer account is deleted from a company profile:

  • Connection reports, custom modules, and TeamViewer/Remote management policies will be transferred to the current company admin.
  • Web API Tokens for the deleted user are logged out, and their company functionality is removed
  • License activations are removed from the deleted user’s account
  • Shared groups from the deleted user’s account are deleted.

Once the company admin checks the box to confirm that this process cannot be undone, the Delete account button becomes available. Once pressed, the account is deleted.

📌Note: Deletion of any TeamViewer account deletion is irreversible. Only a new account can be created after deletion. All user data will be lost.

Remove user

When an account is removed, the account is removed from the company profile and reverted to a free TeamViewer account. The account is reverted to a free account, and the user is still able to log in with the account. All information associated with the account is still accessible.

When an account is removed from a company profile:

  • Connection reports, custom modules, and TeamViewer /Remote management policies will be transferred to the current company admin.
  • Contacts in the contact book are transferred to the current company admin
  • Web API Tokens for the user’s account are logged out and their company functionality is removed
  • License activations are removed from the user’s account

📌Note: Groups & devices in the Computers & Contacts of the removed user’s account are not affected. Any groups shared also will remain shared.

Once the company admin checks the box to confirm that this process cannot be undone, the Remove user button becomes available. Once pressed, the account is removed from the company profile and reverted to a free TeamViewer account.

📌Note: Once a user account is removed from the current company profile, it can request to join another company profile.

Deactivate user

When an account is deactivated, the account is reverted to inactive. The deactivated account is still associated with the company profile but cannot be used to log into TeamViewer on a free or licensed device. The account is rendered completely unusable.

📌Note: When an account is deactivated, the email address associated with the account cannot be used to create a new free TeamViewer account.

💡Hint: To view inactivated users within the company profile, select the drop-down menu under User Status and check the box for Inactive. All inactive users will now appear in user management.

How to reactivate inactive users

When Deactivate user is selected, the account disappears from user management. They are, however, still a part of the Company Profile and can be reactivated back to the license instantly at any time.

image.png
  1. To view inactivated users within the company profile, select the menu under User Status and check the box for Inactive. All inactive users will now appear in user management.
  2. Once the user is located, hover the cursor over the account. Select the three-dots menu (⋮) to the right of the user’s account and select Activate user
  3. The user’s original permissions status is reverted, and the account can again be used with any TeamViewer device.
image.png

Troubleshooting

Below you will find answers to some common issues encountered when interacting with a company profile.

▹User(s) on a company profile show a free license

In some cases, older users on a company profile may appear as ‘free’ users, especially after upgrading or changing a license. The company admin can resolve this:

  1. Log in to the TeamViewer Management Console under https://login.teamviewer.com
  2. Click Company administration on the left-hand side:
  3. Select the Licenses tab and locate the license. Hovering the cursor over the license will produce a three-dots menu (⋮). Click the menu and select Assign from the drop-down.
  4. The users who show ‘free’ will appear in Unassigned. Select the desired users and click the Add button at the bottom of the page.
image.png

📌Note: Affected users should log out and then back in to see the licensing changes.

▹Your account is already associated with a company 

If a user who is already associated with one company profile attempts to join another company profile, the following pop-up will appear:

image.png

The user’s account must be removed from the current company profile to resolve this. The steps required vary depending on whether it is their active or expired company profile or if they are associated with a company profile created by another account.

SCENARIO 1: As company administrator of an active company profile

If a user who created a company profile wishes to delete the company profile associated with their account, they will need to perform the following steps:

  1. Log in to the TeamViewer Management Console under https://login.teamviewer.com
  2. Click User Management in the upper left corner 
  3. Remove all other accounts: Before deleting a company profile, the company admin must remove all other accounts. Perform these steps for each user on the company profile
  4. Remove the company admin account: Once all other accounts have been removed, the company admin will remove their account. This will delete the company profile altogether
  5. The user is immediately logged out and can now follow the process to add their account to an existing company profile

SCENARIO 2: As company administrator of an expired company profile

In some cases, the user may have created a company profile on an older license that is no longer used or active. In such cases, the company profile will appear as expired in the Management Console.

In such cases, it is still possible to delete the company profile:

  1. Log in to the TeamViewer Management Console under https://login.teamviewer.com
  2. Click Company administration on the left-hand side.
  3. On the General tab, select Delete company.
  4. A pop-up will appear confirming the request to delete the company profile. Check the box at the bottom to validate, and select Delete company.

SCENARIO 3: The account is a member of a company profile

📌Note: Only a company administrator can remove a user from their company profile – not even TeamViewer can remove a user from a company profile, regardless of the request’s origin.

If the user is a member of another company profile, they will need to contact the company admin of that license to request removal.

Once removed, they can then request to join the correct company profile.

Source :
https://community.teamviewer.com/English/kb/articles/3573-all-about-the-teamviewer-company-profile

Teamviewer Block and allowlist

By .Carol.fg.

Last Updated: 

You have the possibility to restrict remote access to your device by using the Block and Allowlist feature in the TeamViewer full version and the TeamViewer Host.

You can find the feature easily by clicking in your TeamViewer full version on the Gear icon (⚙) in the upper right corner of the TeamViewer (Classic) application, then Security ➜ Block and Allowlist.

Let´s begin with the difference between a blocklist and an allowlist.

This article applies to all TeamViewer (Classic) users.

What is a Blocklist?

The Blocklist generally lets you prevent certain partners or devices from establishing a connection to your computer. TeamViewer accounts or TeamViewer IDs on the blocklist cannot connect to your computer.

📌Note: You will still be able to set up outgoing TeamViewer sessions with partners on the blocklist.

What is an Allowlist?

If you add TeamViewer accounts to the Allowlist, only these accounts will be able to connect to your computer. The possibility of a connection to your computer through other TeamViewer accounts or TeamViewer IDs will be denied

If you have joined a company profile with your TeamViewer account, you can also place the entire company profile on the Allowlist. Thus only the TeamViewer accounts that are part of the company profile can access this device.

📌Note: To work with a company profile you will need a TeamViewer Premium or Corporate license


How to set up a Blocklist?

If you would like to deny remote access to your device to specific persons or TeamViewer IDs, we recommend setting up a Blocklist.

You can find the feature easily by clicking in your TeamViewer full version on the Gear icon (⚙) in the upper right corner of the TeamViewer (Classic) application, then Security ➜ Block and Allowlist ➜ Click on Configure…

A new window will open. Activate the first option Deny access for the following partners and click on Add 

Blocklist_01.png

📌Note: If you activate the Also apply for meetings check box, these settings will also be applied to meetings. Contacts from your blocklist are excluded from being able to join your meetings.

After clicking on Add, you can either choose partners saved on your Computers & Contacts list or add TeamViewer IDs/contacts manually to your blocklist.

Blocklist_02.png
Blocklist_03.PNG

How to set up an Allowlist?

If you would like to allow only specific TeamViewer accounts or TeamViewer IDs remote access to your device, we recommend setting up an Allowlist.

You can find the feature easily by clicking in your TeamViewer full version on the Gear icon (⚙) in the upper right corner of the TeamViewer (Classic) application, then Security ➜ Block and Allowlist ➜ Click on Configure…

A new window will open. Activate the second option Allow access only for the following partners and click on Add 

image.png

📌Note: If you activate the Also apply for meetings check box, these settings will also be applied to meetings. Only contacts from your allowlist will then be able to join your meetings.

After clicking on Add, you can either choose partners saved on your Computers & Contacts list, add TeamViewer IDs/contacts manually to your blocklist, or add the whole company you are part of (only visible if you are part of a company profile). 

image.png
image.png
image.png


How to delete blocklisted/allowlisted partners?

If you no longer wish to have certain partners block or allowlisted, you can easily remove them from the list.

To do so navigate in your TeamViewer full version to the Gear icon (⚙) in the upper right corner of the TeamViewer (Classic) application, then Security ➜ Block and Allowlist ➜ Click on Configure… and choose whether you would like to remove partners from the Blocklist or from the Allowlist by choosing either Deny access for the following partners (Blocklist) or Allow access only for the following partner (Allowlist). Now click on the partners you would like to remove and finally click Remove  OK

image.png

📌Note: You can choose multiple partners at once by pressing CTRG when clicking on the different partners.

Learn more about how you can benefit from a Master Allowlist: Why Master Allowlists are So Effective to Secure Customers

Source :
https://community.teamviewer.com/English/kb/articles/29739-block-and-allowlist

Teamviewer Two-Factor Authentication for connections

By .Carol.fg.

Last Updated: 

This article provides a step-by-step guide to activating Two-factor authentication for connections (also known as TFA for connections). This feature enables you to allow or deny connections via push notifications on a mobile device.

This article applies to all Windows users using TeamViewer (Classic) 15.17 (and newer) and macOS and Linux users in version 15.22 (and newer).

What is Two-factor authentication for connections?

TFA for connections offers an extra layer of protection to desktop computers.

When enabled, connections to that computer need to be approved using a push notification sent to specific mobile devices. 

Enabling Two-factor authentication for connections and adding approval devices

Windows and Linux:

1. In the TeamViewer (Classic) application, click the gear icon at the top right menu.

2. Click on the Security tab on the left.

3. You will find the Two-factor authentication for connections section at the bottom.

4. Click on Configure… to open the list of approval devices.

5. To add a new mobile device to receive the push notifications, click Add.

6. You will now see a QR code that needs to be scanned by your mobile device.

Below please find a step-by-step gif for Windows, Linux, and macOS:

Windows

TFA for connections.gif

Linux

Linux add new device.gif

macOS

MAC1_community.gif

7. On the mobile device, download and install the TeamViewer Remote Control app:

a. Android

📌Note: This feature is only available on Android 6.0 or higher.

b. iOS

8. In the TeamViewer Remote Control app, go to Settings → TFA for connections.

9. You will see a short explanation and the option to open the camera to scan the QR code.

image.png

10. Tap on Scan QR code and you will be asked to give the TeamViewer app permission to access the camera.

11. After permission is given, the camera will open. Point the camera at the QR code on the desktop computer (see Step 6 above).

12. The activation will happen automatically, and a success message will be displayed. 

image.png

13. The new device is now included in the list of approval devices.

image.png

14. From now on, any connection to this desktop computer will need to be approved using a push notification.

📌 Note: TFA for connections cannot be remotely disabled if the approval device is not accessible. Due to this, we recommend setting up an additional approval device as a backup.

Removing approval devices

1. Select an approval device from the list and click Remove or the X.

2. You will be asked to confirm the action.

3. By clicking Remove again, the mobile device will be removed from the list of approval devices and won’t receive any further push notifications.

4. If the Approval devices list is empty, Two-factor authentication for connections will be completely disabled.

Below please find a step by step gif for Windows, Linux and macOS:

▹ Windows:

Removing approval devices[1).gif

▹ Linux:

linux remove device.gif

▹ macOS:

MAC2_community.gif

Remote connections when Two-factor authentication for connections is enabled

TFA for connections does not replace any existing authentication method. When enabled, it adds an extra security layer against unauthorized access.

When connecting to a desktop computer protected by TFA for connections, a push notification will be sent to all of the approval devices.

You can either:

  • accept/deny the connection request via the system notification:
image.png
  • accept/deny the connection request by tapping the TeamViewer notification. It will lead to you the following screen within the TeamViewer application to accept/deny the connection:
image.png

Multiple approval devices

All approval devices in the list will receive a push notification. 

The first notification that is answered on any of the devices will be used to allow or deny the connection.

Source :
https://community.teamviewer.com/English/kb/articles/108791-two-factor-authentication-for-connections

Teamviewer Zero Knowledge Account Recovery

By .Carol.fg.

Last Updated: 

TeamViewer offers the possibility to activate Account Recovery based on the zero-trust principle.  

This is a major security enhancement for your TeamViewer account and a unique offering on the market. 

This article applies to all users.

What is Zero Knowledge Account Recovery 

In cases where you cannot remember your TeamViewer Account credentials, you click on I forgot my password, which triggers an email with a clickable link that leads you to the option of resetting your password.  

The regular reset process leads you to a page where you can set a new password for your account.

The Zero Knowledge Account Recovery acts as another layer of security for this process as the reset process requires you to enter the unique 64 characters Zero Knowledge Account Recovery Code for your account to prove your identity. Important to note is that this happens without any intervention and knowledge of the TeamViewer infrastructure. 

Activate Zero Knowledge Account Recover

To activate Zero Knowledge Account Recovery please follow the steps below: 

1. Log in with your TeamViewer account at login.teamviewer.com

2. Click Edit profile under your profile name (upper right corner). 

3. Go to Security in the left menu 

4. Click the Activate Zero knowledge account recovery button

image.png

📌 Note: The password recovery code is a unique 64 characters code that allows you to regain access if you forgot your password. It is absolutely essential that you print/download your recovery code and keep this in a secure place.

⚠ IMPORTANT: Without the recovery code you won’t be able to recover your account. Access to your account will be irreversibly lost. The data is encrypted with the key and you are the only owner of this key. TeamViewer has no access to it.

5. A PopUp window appears sharing the above information. Click on Generate Recovery Code to proceed. 

6. The Recovery Code is shown. You have to download or print the code as well as you tick the check box confirming that you acknowledge and understand that if you lose your zero knowledge account recovery code, you won’t be able to recover your password and you will lose access to your account forever

image.png

⚠ Do not tick the box unless you understand the meaning.

7. Once you either downloaded or printed the recovery code and ticked the acknowledge box, you can activate the Zero knowledge account recovery by clicking Activate.

Deactivate Zero Knowledge Account Recovery 

To deactivate Zero Knowledge Account Recovery please follow the steps below: 

1. Log in with your TeamViewer account at login.teamviewer.com

2. Click Edit profile under your profile name (upper right corner). 

3. Go to Security in the left menu 

4. Click the Deactivate Zero knowledge account recovery button

image.png

5. A PopUp appears. You have to tick the check box confirming that you acknowledge and understand that if you will be deactivating your zero knowledge account recovery

image.png

6. Click Deactivate to deactivate the Zero Knowledge Account recovery for your TeamViewer Account.

Reset your password

To reset your password for your TeamViewer account, please follow the steps below: (More info here: Reset account password)

1. Go to https://login.teamviewer.com/LogOn#lost-password 

2. Type in your email to the form, confirm you´re not a robot and click Change password

image.png

3. You´ll get the following notification:

image.png

4. Check your email inbox for an email from TeamViewer and click the button within the email

5. You´ll get to a page where you are asked to fill in your Zero Knowledge Account Recovery Code and a new password:

image.png

6. Confirm the chosen password by inserting it again and finish the process by clicking OK

Source :
https://community.teamviewer.com/English/kb/articles/108862-zero-knowledge-account-recovery

Ports used by TeamViewer

By Ying_Q

Last Updated: 

TeamViewer is designed to connect easily to remote computers without any special firewall configurations being necessary.

This article applies to all users in all licenses.

In the vast majority of cases, TeamViewer will always work if surfing on the internet is possible. TeamViewer makes outbound connections to the internet, which are usually not blocked by firewalls.

However, in some situations, for example in a corporate environment with strict security policies, a firewall might be set up to block all unknown outbound connections, and in this case, you will need to configure the firewall to allow TeamViewer to connect out through it.

TeamViewer ‘s Ports

These are the ports that TeamViewer needs to use.

TCP/UDP Port 5938

TeamViewer prefers to make outbound TCP and UDP connections over port 5938 – this is the primary port it uses, and TeamViewer performs best using this port. Your firewall should allow this at a minimum.

TCP Port 443

If TeamViewer can’t connect over port 5938, it will next try to connect over TCP port 443.

However, our mobile apps running on iOS and Windows Mobile don’t use port 443.

📌Note: port 443 is also used by our custom modules which are created in the Management Console. If you’re deploying a custom module, eg. through Group Policy, then you need to ensure that port 443 is open on the computers to which you’re deploying. Port 443 is also used for a few other things, including TeamViewer (Classic) update checks.

TCP Port 80

If TeamViewer can’t connect over port 5938 or 443, then it will try on TCP port 80. The connection speed over this port is slower and less reliable than ports 5938 or 443, due to the additional overhead it uses, and there is no automatic reconnection if the connection is temporarily lost. For this reason port 80 is only used as a last resort.

Our mobile apps running on Windows Mobile don’t use port 80. However, our iOS and Android apps can use port 80 if necessary.

Windows Mobile

Our mobile apps running on Windows Mobile can only connect out over port 5938. If the TeamViewer app on your mobile device won’t connect and tells you to “check your internet connection”, it’s probably because this port is being blocked by your mobile data provider or your WiFi router/firewall.

Destination IP addresses

The TeamViewer software makes connections to our master servers located around the world. These servers use a number of different IP address ranges, which are also frequently changing. As such, we are unable to provide a list of our server IPs. However, all of our IP addresses have PTR records that resolve to *.teamviewer.com. You can use this to restrict the destination IP addresses that you allow through your firewall or proxy server.

 Having said that, from a security point-of-view this should not really be necessary – TeamViewer only ever initiates outgoing data connections through a firewall, so it is sufficient to simply block all incoming connections on your firewall and only allow outgoing connections over port 5938, regardless of the destination IP address.

Ports Used per Operating System

image.png

Source :
https://community.teamviewer.com/English/kb/articles/4139-ports-used-by-teamviewer