How to Completely Uninstall Apps on Mac

Most people don’t realize it, but when you uninstall apps on Mac, they almost always leave behind what is commonly referred to as “leftovers”. These leftovers are files that were required by the app or program to function when it was installed, but now it’s been removed, they are merely taking up valuable storage space on your Mac. Over time, as you use your Mac and install and uninstall various apps, these leftovers can really begin to pile up — eventually significantly slowing down your Mac.

Fortunately, there are several ways that you can remove these leftovers during the uninstallation process, and in this article, we will show you three of them. They vary slightly in complexity, but if you’re looking for the absolute easiest way possible, you’ll want to skip to number 2!

1. Uninstall programs using Finder


This method is one that most people are completely comfortable using, but with a slight twist.

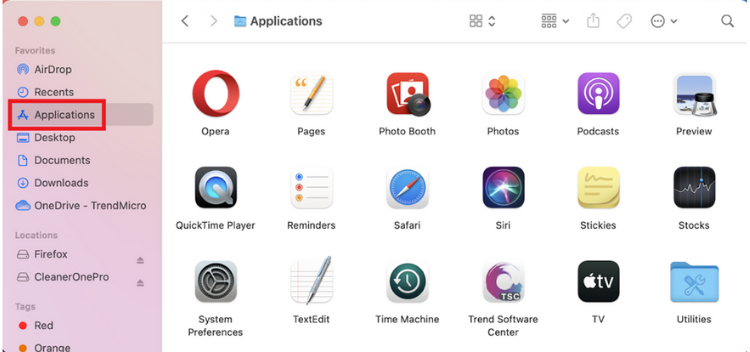
1. Open Finder and select Applications.

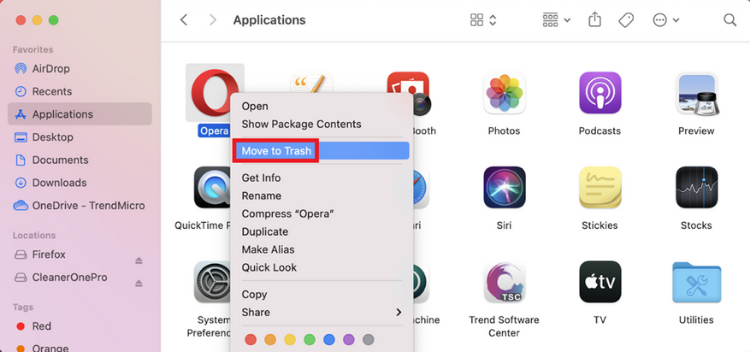
2. Locate the app you want to delete and right-click on it. Select Move to Trash.

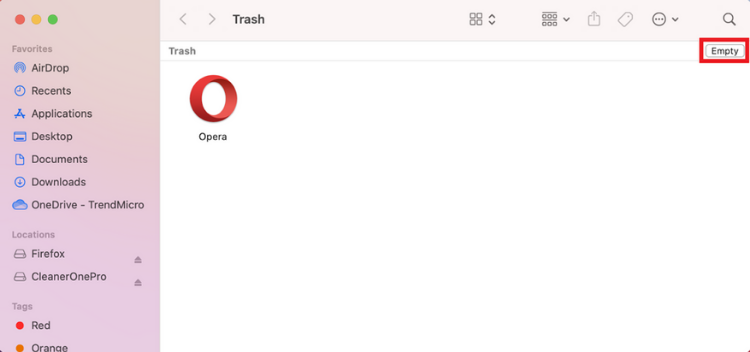
3. Open Trash by clicking on its icon on the Dock. Select Empty.

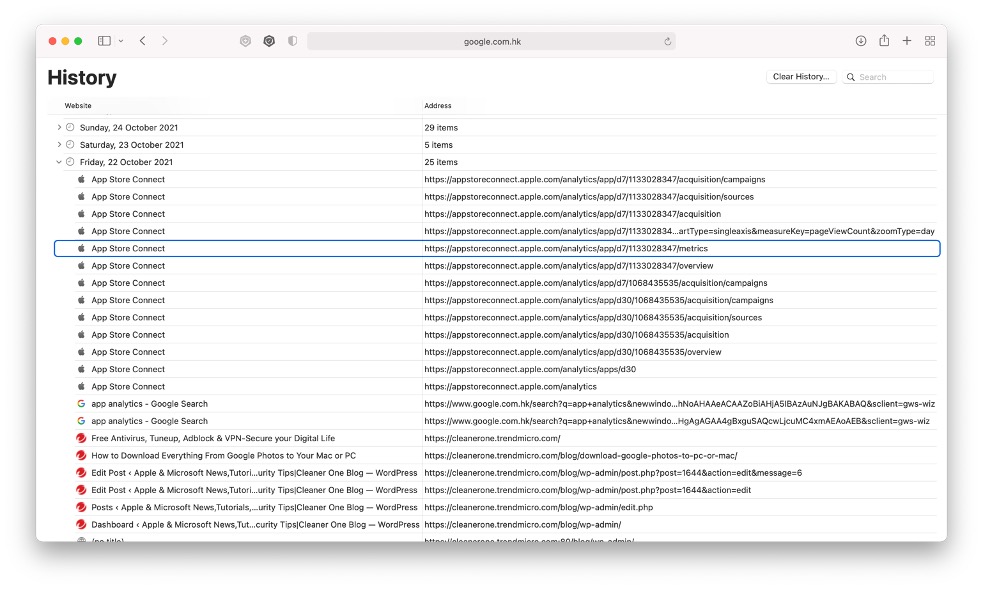
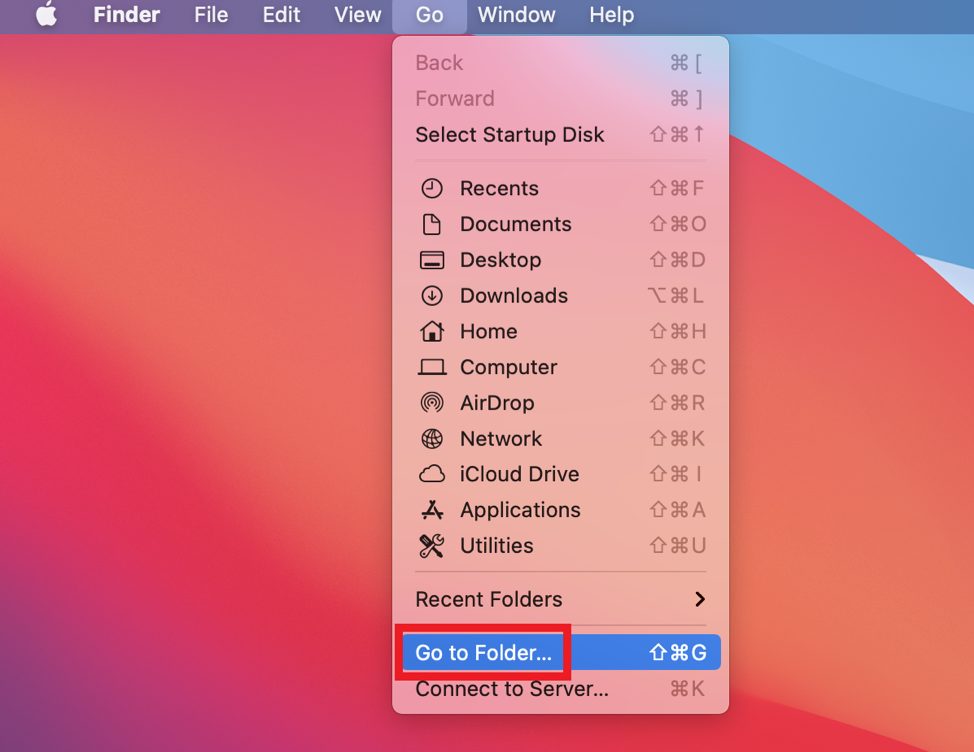
4. Now here’s how to delete the leftovers. In Finder, select Go > Go to Folder.

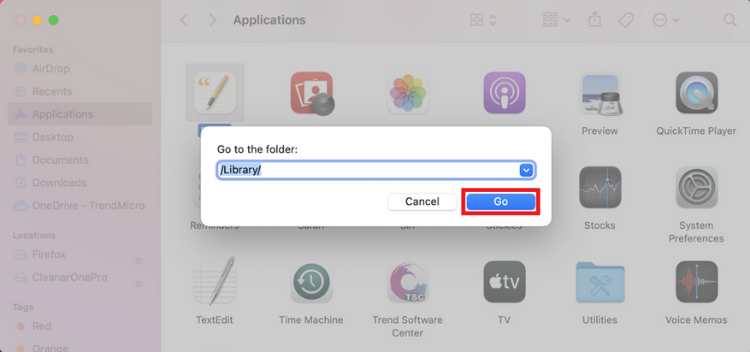
5. Type “/Library/” in the search box and select Go.

6. Type the removed app’s name into the search box. Right-click on any of its associated files and select Move to Trash. After you’ve removed all the leftover files, empty the Trash folder once again.

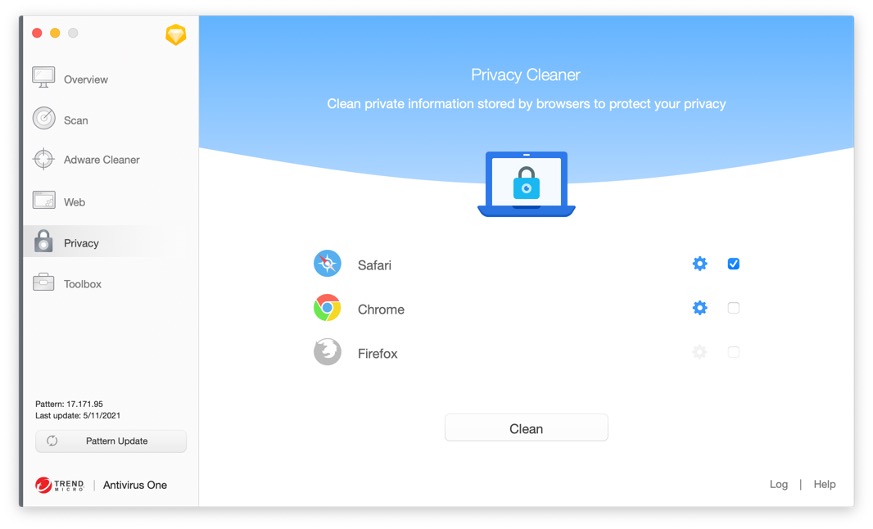
2. Automatically remove apps using Cleaner One Pro (the easy way!)


One of the great features of Cleaner One Pro is its ability to completely remove apps, including any leftovers, with the click of a button. It really couldn’t be any easier!

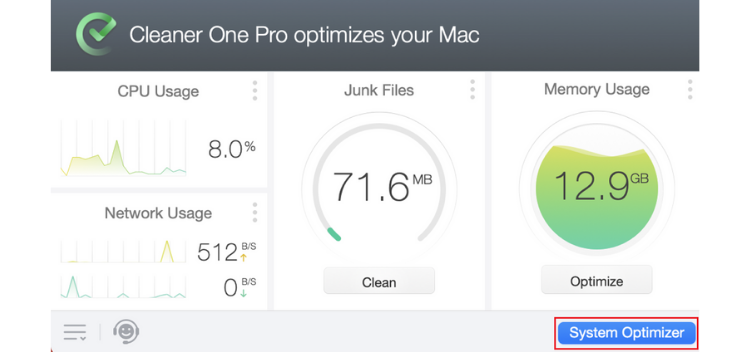
1. Open Cleaner One Pro and select System Optimizer.

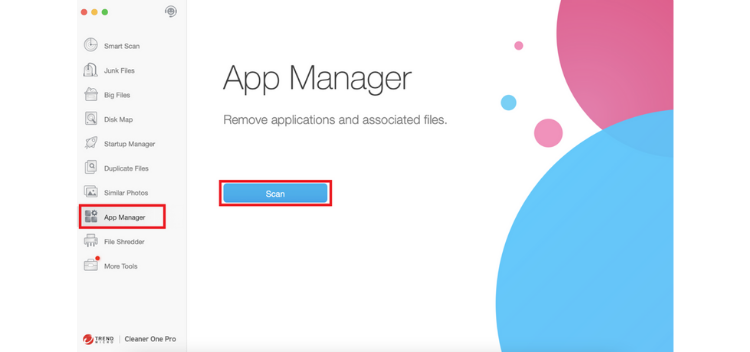
2. Select App Manager > Scan.

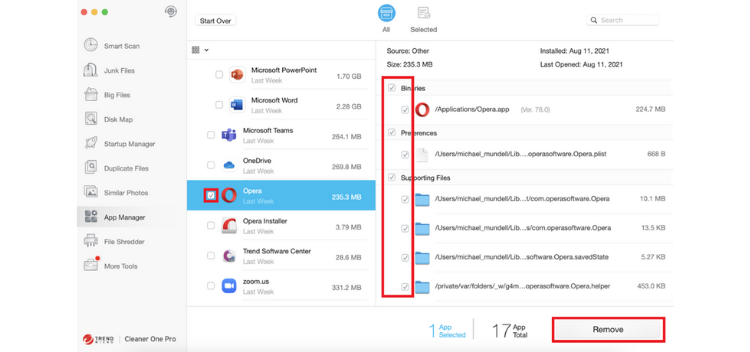
3. Hit the checkbox to the left of the app you wish to completely remove. Verify that all the checkboxes next to the app’s associated files are selected and click on Remove.

Compared to the other options that are available for completely removing apps (like the two mentioned in this article), there is no more straightforward method than using Cleaner One Pro . To read more about Cleaner One Pro and all its other excellent features, click here.

3. Delete apps using Terminal


For most people, this method will be overly technical and come with too much risk, but it does work.

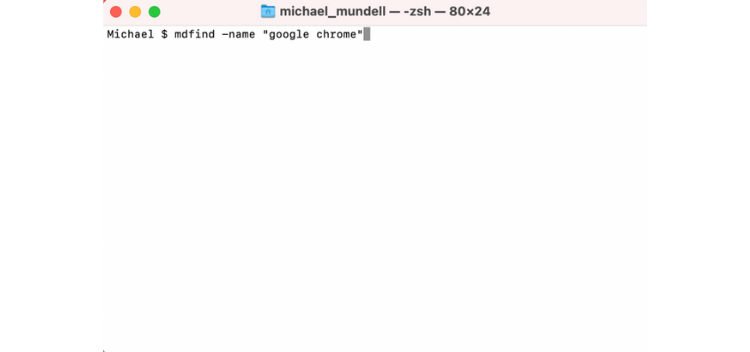
1. Open Terminal and type mdfind -name “application name” and press Enter. For example, if you wanted to remove Google Chrome, you would type mdfind -name “google chrome”.

2. This will return all files associated with the name of the app, but it doesn’t mean you should delete them all. If you are using this method of uninstallation, you should have a pretty good idea of what you’re looking for, but in general, you should be searching for .app files, .plist files, settings and preferences, caches, and other accessory files.

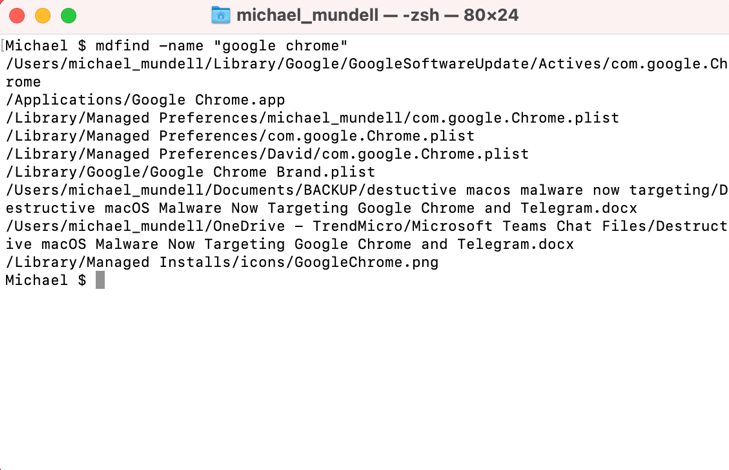
3. Once you have located the files you wish to remove, you can do so using the rm command by typing “sudo rm -rif ~” + the directory and file name. For example, “sudo rm -rif ~/Library/Managed Installs/icons/GoogleChrome.png”. Please note, the rn command is irreversible, so please exercise caution.

Consistency is key


Whichever method you opt to use, you’ll be doing your Mac a big favor in the long run. By removing all the associated files every time you remove an app, your Mac isn’t going to eventually get bogged down by them. Trust us, after your Mac is still running super quick in years to come, you’ll be glad you took our advice!

Source :
https://news.trendmicro.com/2021/09/03/how-to-completely-uninstall-apps-on-mac/

Fix the ‘This PC can’t run Windows 11’ Error: How to enable TPM and Secure Boot

Tried to upgrade your PC to Windows 11, but run into the dreaded ‘This PC can’t run Windows 11’ error message? Don’t give up, it could be because your system doesn’t have two security settings turned on: Secure Boot and TPM 2.0. 

Trend Micro Windows 11 Upgrade Helper checks eight aspects of your computer, and perhaps most crucially, which TPM version it is running. Windows 11 requires TPM 2.0, so if your PC is not currently running or is not capable of running TPM 2.0, Windows 11 Upgrade Helper will let you know.Get Windows 11 Upgrade Helper

What are TPM and Secure Boot?

Trusted Platform Module (TPM) is a technology designed to provide hardware-based, security-related functions. A TPM chip is a secure crypto-processor that is designed to carry out cryptographic operations. The chip includes multiple physical security mechanisms to make it tamper-resistant. Malicious software isn’t able to tamper with the security functions of the TPM, either.

Secure Boot is a feature from the latest Unified Extensible Firmware Interface (UEFI). It offers another layer of protection against potential malware infections. It can detect when boot loaders or key operating system files are being tampered with by malware and actively block them before they can infect the system. Both TPM and Secure Boot offer unique ways of strengthening the protection of Windows 11.

Is my device capable of TPM 2.0 and Secure Boot?

To check if your device has Secure Boot, you can follow these steps:
1. In the Windows search box, type “System Information” and open the System Information app.

Fix the 'This PC can't run Windows 11' Error: How to enable TPM and Secure Boot

2. Select System Summary, and in the panel on the right side, look for “Secure Boot State”.

Fix the 'This PC can't run Windows 11' Error: How to enable TPM and Secure Boot

3. The value indicates the status of Secure Boot. “On” means it is turned on, “Off” means it is disabled, and “Unsupported” means your hardware does not support Secure Boot.

To check if your device has TPM, follow the steps below:

1. In the Windows search box, type “tpm.msc” and click Open.

Fix the 'This PC can't run Windows 11' Error: How to enable TPM and Secure Boot

2. Under Status, if you see “The TPM is ready for use”, you know that the TPM is present and available. If you see the message “Compatible TPM cannot be found”, it means that either your computer cannot find the TPM or that it has been disabled in the BIOS or UEFI.

Fix the 'This PC can't run Windows 11' Error: How to enable TPM and Secure Boot

You can also check if your device is using TPM 2.0 through Device Manager. Here’s how to do so:

1. Right-click on the Windows Start menu icon located in the lower left of your screen, then select Device Manager.

Fix the 'This PC can't run Windows 11' Error: How to enable TPM and Secure Boot

2. Select Security Devices from the list and it will show you what TPM chip you have. If it says Trusted Platform Module 2.0, you are good to go.

Fix the 'This PC can't run Windows 11' Error: How to enable TPM and Secure Boot

How to enable TPM and Secure Boot

To enable TPM and Secure Boot, you need to restart your computer to access the BIOS settings. After restarting, at the boot screen, press your computer’s BIOS access key. The most common BIOS access keys are DEL and F2. Here’s a reference for popular PC and motherboard brands and their BIOS access keys:

Fix the 'This PC can't run Windows 11' Error: How to enable TPM and Secure Boot

In the example below, we show you how to enable TPM on an ASUS TUF Gaming Z490-PLUS [WI-FI] motherboard, but the instructions will almost certainly differ depending on which brand of PC or motherboard you have.

1. At the UEFI BIOS Utility screen, press F7 to access Advanced Mode.

Fix the 'This PC can't run Windows 11' Error: How to enable TPM and Secure Boot

2. Click the “Advanced” tab and select “PCH-FW Configuration”.

Fix the 'This PC can't run Windows 11' Error: How to enable TPM and Secure Boot

3. Alongside “TPM Device Selection”, select “Enable Firmware TPM”.

Fix the 'This PC can't run Windows 11' Error: How to enable TPM and Secure Boot

To enable Secure Boot, in the “Boot” tab, follow the steps below:

1. Select “Secure Boot”.

Fix the 'This PC can't run Windows 11' Error: How to enable TPM and Secure Boot

2. Select “OS Type” and beside it, select “Windows UEFI Mode”.

Fix the 'This PC can't run Windows 11' Error: How to enable TPM and Secure Boot

3. Go to the “Exit” tab to save the changes and restart the computer. TPM and Secure Boot will be enabled after the restart.

What can I do if I don’t have a TPM chip?

Your device may have a TPM chip, but you need to update your BIOS to have access to it. Please contact your PC or motherboard manufacturer to learn more about how to enable TPM on your device.

You could also buy a TPM module online, but you must know which TPM module is compatible with your motherboard. You also need to install the module onto the motherboard, which might not be an easy task — especially if you don’t have any experience in working with motherboards. If you would like to go down this route, we advise that you contact a technician or take it to a local PC repair shop.

Alternatively, you could upgrade to a new computer.

What’s the most convenient way to check if I can upgrade to Windows 11?

There are tools created that can help you assess if your computer is ready for Windows 11. One of those tools is Trend Micro Windows 11 Upgrade Helper .

Fix the 'This PC can't run Windows 11' Error: How to enable TPM and Secure Boot

Trend Micro Windows 11 Upgrade Helper can check if your computer meets all the requirements for Windows 11. You can talk to Premium Support Service if you need assistance in making your computer Windows 11 ready, too.Get Windows 11 Upgrade Helper

Source :
https://news.trendmicro.com/2021/10/04/fix-the-this-pc-cant-run-windows-11-error-how-to-enable-tpm-and-secure-boot/

How to Clear Browsing History on Safari on iPhone & Mac

Your browsing history is a vital piece of information that can define your personality, your drives, and your likes and dislikes. That’s why third parties love to collect this information for targeted advertising and, sometimes, malicious activities.

To prevent others from collecting your browsing history, make it a habit to delete it now and then. Here’s some simple steps on how to delete browsing history on your Safari browser.

For Mac

1. Open your Safari App and click History on the top menu options.
2. Click Clear History. A pop-up menu will appear and you can choose how far back you want to clear your browsing history.

How to Clear Browsing History on Safari on iPhone and Mac_1110_

You can also clear specific safari browsing history:

  • In Safari, press Command-Yor select History > Show All History.
  • From the long list, click once on a history item to select it.
  • Right-click to bring up a menu, then choose Delete.
How to Clear Browsing History on Safari on iPhone and Mac_1110_

Manually clearing search and browsing history from your safari can be tedious. However, there is also an automatic solution you can try: Antivirus One , from Trend Micro.

The privacy cleaner feature in Antivirus One can help you clean sensitive browsing information to protect your privacy. Here, you can select Safari and then click the “Clean” button to remove all browsing info in a few seconds.

How to Clear Browsing History on Safari on iPhone and Mac_1110_

For iPhone

1. Go to Settings and click Safari.

How to Clear Browsing History on Safari on iPhone and Mac_1110_

2. Tap “Clear History and Website Data”.

How to Clear Browsing History on Safari on iPhone and Mac_1110_

This will remove history, cookies, and browsing data from Safari.

How to Clear Browsing History on Safari on iPhone and Mac_1110_

If this article has been of use and/or interest to you, please do SHARE with friends and family — and remember to give Antivirus One a go.Get Antivirus One

Source :
https://news.trendmicro.com/2021/11/10/how-to-clear-browsing-history-on-safari-on-iphone-mac/

How to Remove Bing on Chrome, Firefox, and Edge

Users have been complaining that the search engine, Bing, loads as the default instead of Google. Annoying, but don’t fret! We’ve put together a simple guide on how to get rid of Bing and restore your preferred search engine.

On Google Chrome

1. Open Google Chrome and click the 3-dots menu.
2. Select More Tools, then choose Extensions.

3. Remove any Bing Extensions you see.
4. Go back to the Menu, then select Settings.

5. Look for Search Engine and click it.

6. On the right side, choose your preferred Search Engine (Google, Yahoo, DuckDuckGo or Ecosia).
7. Restart Google Chrome.  If it still uses Bing as your search engine, we suggest resetting or reinstalling Chrome.

On Mozilla Firefox

1. Open Mozilla Firefox and click the hamburger menu (3 horizontal lines).
2. Select Add-ons and themes.

3. Choose Extensions on the left side, then remove any Bing extensions you see.

4. Go back to the Menu, then select Settings.
5. On the left side, click Search and look for the Default Search Engine section on the right side.

6. Choose your preferred Search Engine (Google, Amazon.com, DuckDuckGo or Wikipedia).
7. Restart Firefox. If it still uses Bing as your search engine, we suggest resetting or reinstalling Firefox.

On Microsoft Edge

1. Open Microsoft Edge.
2. Click the 3-dots menu on the upper right corner, then select Settings.

3. Select View Advance Settings and click the Change search engine button.

4. Choose your preferred Search Engine then click the Set as default button.

We hope this short guide has helped you get things back to normal! If you’ve found it a useful article, please do SHARE with friends and family.

Source :
https://news.trendmicro.com/2021/11/17/how-to-remove-bing-on-chrome-firefox-and-edge/

Top 10 Most Used Search Engines & Tips for Browsing

In the modern world, searching for information is simple. There’s no need to go from one library to another, flipping through numerous pages, or checking the table of contents before you get to what you’re looking for. Simply typing words on the internet will give you limitless results — all you need to do is narrow them down.

What is a Search Engine?

If you need to find something, like a website or page that contains your needed information, you’ll need to go and visit a search engine page to query keywords.

A search engine is a program or application that checks, hunts, and searches the web for sites based on keywords. It uses these keywords and returns pages that are connected to what you have typed.

Search engines use web crawlers or web spiders to catalog the World Wide Web. These crawling bots are used for indexing contents. They will scan, check, assess and inspect site pages and their information across the web.

Notable Search Engines and Their Brief Histories

Archie — During the 1990s, the very first search engine arrived, named Archie. Its purpose was to search FTP sites to create indexes of files that are downloadable.

Veronica and Jughead — Created around 1992/93, they both searched file names and titles in Gopher index systems.

Infoseek — In 1994, Webmasters would submit and provide a page in real-time with this program.

Yahoo Search — Also created in 1994, it created a collection of favorable web pages with description of each website.

LooksmartExcite and AltaVista — These search engines were created in 1995 and tried to compete with Yahoo.

Backrub — Created around 1996, Google’s initial project, Backrub, was a search engine that utilized backlinks for searches. It ranked pages depending on citations from other sites.

Ask Jeeves — Started in 1996, this search engine used human editors that tried to match search queries.

Google — Officially launched in 1998.

MSN Search — Relied on three different search engines: Looksmart, Overture and Inktomi.

Snap — A somewhat complex search engine, released in 2005, that shows search volumes, revenues and advertisers.

Bing — Rebranded name for MSN/Live Search.

Schema.Org — In 2011, Microsoft, Google and Yahoo collaborated to create Schema.org to create structured internet data.

Top 10 Most Used Search Engines

The following list contains the top ten from across the world:

1. Google:“Just google it” is a ubiquitous expression nowadays. Google is the most popular across all search engines — even more than all others combined. According to statistics, around 78% of desktops and laptops uses Google.

2. Yahoo: In the past, Yahoo had competed with Google. But as the years went on, Yahoo users had declined significantly. Now it is mostly used as a backup search engine in case the dominant one is down.

3. Bing: Microsoft Bing (or just Bing) is owned by Microsoft. Its origin came from MSN Search and Windows Live Search. This search engine is proud of its ‘decision’ engine which provides suggestions on the sides.

4. AOL Search: Known before as American Online Search. This search engine is used mostly by older people accustomed to AOL.

5. Duck Duck Go: Some say that Duck Duck Go is for and by Hipsters. But the main reason users choose this search engine is that it does not track search history and avoids spammy websites.

6. Baidu: This search engine is the 3rd largest out there. Baidu dominates the Chinese market and is the first choice in China. This engine has a sophisticated online censorship system since there’s many restrictions in its operating region.

7. Yandex: If Baidu has China as its market, then Yandex has the Russian market.

8. Ask: Its origin is the older “Ask Jeeves”. Since it could not compete with Google, it’s now powered by Google — if you can’t beat ‘em, join ‘em!

9. Naver: South Korea is another huge tech and communications market with its own search engine, Naver.

10.Seznam: The search engine popular in the Czech Republic and C. Europe.

And some honorable mentions:

  • Ecosia — Donates surplus income to organizations that plant trees.
  • Dogpile — Shows results from the top 3 search engines (Google, Bing and Baidu).
  • Gigablast — An open-source search engine.
  • Qwant — A popular, EU-based search engine.

Tips For Using Search Engines

Search engines are brilliant tools to immediately get the information we want. However, since search engines generally do not have much security capability, you should invest in a security product to provide and efficient browsing.

1. Install the Maximum Security tool bar to prevent you from visiting malicious websites.

You can install the Trend Micro Maximum Security toolbar service, which warns you of security risks relevant to the websites you visit.

When you search online, it monitors and rates websites in search engines such as Google, Bing, Baidu, and Yahoo. The Trend Micro Toolbar provides Page Ratings that show if the page is safesuspiciousdangeroustrusted or untested.

  • A Mac User? No problem. Trend Micro Antivirus for Mac has the same toolbar feature to protect your online activity.

2. Install AdBlock One to stop annoying ads.

In addition, be sure to also use AdBlock One for Safari. This app stops annoying online ads from bothering you and helps load web pages faster — a significant boost in securing and improving your digital life.

Without AdBlock One

With AdBlock One

Get AdBlock OneIt’s free

If you’ve found this article an interesting and/or useful read, please do SHARE with family and friends.

Source :
https://news.trendmicro.com/2021/11/25/top-10-most-used-search-engines-tips-for-browsing/

How to Transfer Photos From iPhone to Mac

Eventually, if you’re shutter-happy enough, you’ll need to transfer your iPhone’s photos to your Mac to save the precious space on your mobile device. Simply sending a few photos as an email attachment is fine for a small number of photos, but in this article, we share several easier and more convenient ways of exporting your iPhone’s photos to your Mac.

Transfer Photos from iPhone to Mac with a USB Cable

Connecting your device using a Lightning-to-USB cable is the most common way of transferring pictures from an iPhone to a Mac. Below are several ways you can do this using a few different apps.

How to Use Finder to Transfer Photos from iPhone to Mac

Starting with macOS Catalina, there is no iTunes. However, you can easily sync your iPhone with your Mac using Finder. Here’s how to do it:

1. Connect your iPhone to your Mac with a Lightning-to-USB cable.
2. Open Finder. Your iPhone should appear in Finder’s sidebar under Locations.

Sync Pictures_20220221_1

3. In the sidebar, select your iPhone. If prompted, confirm that you trust your iPhone.
4. Click Get Started.

Sync Pictures_20220221_2

5. At the top of the window, click Photos and then check the Sync photos to your device from: box.

Sync Pictures_20220221_3

6. Use the drop-down menu to choose the folder or app on your iPhone that you want to sync photos from.
7. Use the checkboxes at the bottom of the window to choose whether you want to sync all your photos and albums or only selected albums.
8. Click Apply.

Sync Pictures_20220221_4

How to Use the Photos App to Transfer Photos from iPhone to Mac

Below are instructions on how to transfer photos from iPhone to Mac using the Photos app:

1. Connect your iPhone to Mac using a Lightning-to-USB cable.
2. Once prompted, confirm that you are using a trusted device. You will only need to do this if you haven’t synced your photos using this method before.
3. Open the Photos app on your Mac if it doesn’t automatically open.
4. In the sidebar, select your iPhone.

Sync Pictures_20220221_5

5. In the upper menu of the Photos app, choose Import.
6. Click Import All New Photos, or select the photos you need and click Import Selected.

Sync Pictures_20220221_6

Use Image Capture to Transfer Photos from iPhone to Mac

Another method for transferring photos from your iPhone to your Mac involves using the native Image Capture app. This method lets you quickly and easily download your photos to a folder of your choice.

It is primarily intended for use with digital cameras and scanners, but it can also be used with iPhones with no issue.

1. Connect your iPhone to your Mac using a Lightning-to-USB cable and allow access to the device when prompted.
2. Open Image Capture on your Mac.
3. In the sidebar, select your iPhone under the Devices category.
4. At the bottom of the window, use the Import To drop-down menu to choose the location to save your pictures.

Sync Pictures_20220221_7

5. Select the pictures you want to import and click the Download button, or if you want to transfer all your photos, click Download All.

Transfer Photos from iPhone to Mac wirelessly

There are several options for transferring photos even if you don’t have a Lightning-to-USB cable. Here they are:

Use AirDrop to Transfer Photos from iPhone to Mac

AirDrop works great for transferring photos between your iPhone and Mac, and vice versa. Please ensure both devices are connected to the same Wi-Fi network and no more than around 30 feet from each other.

1. First, make sure your Mac is discoverable by everyone. Open Finder on your Mac, click Go in the menu bar, and select AirDrop. A Finder window will open with the AirDrop icon at the bottom.

Sync Pictures_20220221_8

2. Make sure that Everyone is selected under the Allow me to be discovered by: drop-down menu.
3. On your iPhone, open the Photos app and select the pictures you want to transfer.
4. Tap the Share button and select AirDrop.

Sync Pictures_20220221_9

5. Select the device you want to transfer your photos to and click Done. Depending on your Mac’s settings, you may be asked where you want to save the photos.

Use iCloud to Transfer Photos from iPhone to Mac

iCloud lets you synchronize your photos between your iPhone and Mac. Because the two devices will be regularly synchronized, this method is very efficient.

1. Make sure to sign in to your Apple ID on your iPhone and Mac and that they are both connected to Wi-Fi.
2. On your iPhone, go to Settings > Your Apple ID > iCloud > Photos.
3. Enable the slider next to iCloud Photos.

Sync Pictures_20220221_10

4. On your Mac, go to the Apple menu and select System Preferences.
5. For macOS Catalina or later (Big Sur and Monterey), go to iCloud or Apple, then choose iCloud.
6. Check the boxes next to iCloud Drive and Photos.

Sync Pictures_20220221_11

Note: remember to switch off sync after transferring if you want to delete photos on your iPhone and keep them on your Mac because as long as sync is enabled, any changes you make to photos on one device will automatically be synced to the other.

Got lots of duplicates?

Transferring photos to your Mac is a great way to reclaim some of the precious storage space on your iPhone, but if you’ve got lots of duplicate photos, you’re going to have a nightmare of a time sorting through them on your Mac. Fortunately, Cleaner One Pro is on hand to help out!

Cleaner One Pro makes the time-consuming process of finding and removing similar photos and duplicate files a thing of the past! Simply run a quick scan on your Mac to detect and remove everything hogging storage space.

Sync Pictures_20220221_COP
Sync Pictures_20220221_COP_2

Source :
https://news.trendmicro.com/2022/02/22/how-to-transfer-photos-from-iphone-to-mac/

Urgent Update Released for Zero-Day Chrome & Edge Vulnerability

Updates for both Google Chrome and Microsoft Edge have been released which address the critical CVE-2022-1096 zero-day exploit. If you use either of these web browsers, you should install the update immediately.

What we know so far

The high severity vulnerability — referred to as CVE-2022-1096 — stems from a newly-discovered “type confusion” issue with V8, Google’s open-source JavaScript engine that powers both Google Chrome and Microsoft Edge. The vulnerability, which affects Windows, Mac, and Linux, could allow hackers to hijack people’s web browsers and embed malicious code.

Although it didn’t elaborate, in a short blog post addressing the issue, Google stated that a known exploit currently exists in the wild, although it is not clear how many people have already been affected or how damaging this exploit is.

The vulnerability also affects Microsoft’s Chromium-based web browser Edge in the same way.

What you need to do

You can stay protected from this vulnerability by ensuring your web browser is updated to the latest version. For Google Chrome, this is version 99.0.4844.84 and for Microsoft Edge, it is version 99.0.1150.55.

To check if you have the latest version installed, within one of the web browsers, click the three vertical dots in the top right-hand corner > Settings > About Chrome/About Microsoft Edge. If you don’t already have the latest version installed, you will be presented with the option to download and install it.

How to help the online community

Due to Google remaining tight-lipped about the severity of the known exploit, the level of harm it could cause to potential victims is as yet unclear. To limit the fallout, we all need to do our part in spreading the word — especially when considering how easy it is to install the latest update and guarantee protection. If you found this article helpful and you would like to see that others are protected, please consider sharing this post.

Source :
https://news.trendmicro.com/2022/03/30/urgent-update-chrome-edge-zero-day/

CISA Warns of Active Exploitation of Critical Spring4Shell Vulnerability

The U.S. Cybersecurity and Infrastructure Security Agency (CISA) on Monday added the recently disclosed remote code execution (RCE) vulnerability affecting the Spring Framework, to its Known Exploited Vulnerabilities Catalog based on “evidence of active exploitation.”

The critical severity flaw, assigned the identifier CVE-2022-22965 (CVSS score: 9.8) and dubbed “Spring4Shell”, impacts Spring model–view–controller (MVC) and Spring WebFlux applications running on Java Development Kit 9 and later.

“Exploitation requires an endpoint with DataBinder enabled (e.g., a POST request that decodes data from the request body automatically) and depends heavily on the servlet container for the application,” Praetorian researchers Anthony Weems and Dallas Kaman noted last week.

Although exact details of in-the-wild abuse remain unclear, information security company SecurityScorecard said “active scanning for this vulnerability has been observed coming from the usual suspects like Russian and Chinese IP space.”

Similar scanning activities have been spotted by Akamai and Palo Alto Networks’ Unit42, with the attempts leading to the deployment of a web shell for backdoor access and to execute arbitrary commands on the server with the goal of delivering other malware or spreading within the target network.

“During the first four days after the vulnerability outbreak, 16% of the organizations worldwide were impacted by exploitation attempts,” Check Point Research said, adding it detected 37,000 Spring4Shell-related attacks over the weekend.

Microsoft 365 Defender Threat Intelligence Team also chimed in, stating it has been “tracking a low volume of exploit attempts across our cloud services for Spring Cloud and Spring Core vulnerabilities.”

According to statistics released by Sonatype, potentially vulnerable versions of the Spring Framework account for 81% of the total downloads from Maven Central repository since the issue came to light on March 31.

Cisco, which is actively investigating its line-up to determine which of them may be impacted by the vulnerability, confirmed that three of its products are affected –

  • Cisco Crosswork Optimization Engine
  • Cisco Crosswork Zero Touch Provisioning (ZTP), and
  • Cisco Edge Intelligence

VMware, for its part, also has deemed three of its products as vulnerable, offering patches and workarounds where applicable –

  • VMware Tanzu Application Service for VMs
  • VMware Tanzu Operations Manager, and
  • VMware Tanzu Kubernetes Grid Integrated Edition (TKGI)

“A malicious actor with network access to an impacted VMware product may exploit this issue to gain full control of the target system,” VMware said in the advisory.

Also added by CISA to the catalog are two zero-day flaws patched by Apple last week (CVE-2022-22674 and CVE-2022-22675) and a critical shortcoming in D-Link routers (CVE-2021-45382) that has been actively weaponized by the Beastmode Mirai-based DDoS campaign.

Pursuant to the Binding Operational Directive (BOD) issued by CISA in November 2021, Federal Civilian Executive Branch (FCEB) agencies are required to remediate the identified vulnerabilities by April 25, 2022.

Source :
https://thehackernews.com/2022/04/cisa-warns-of-active-exploitation-of.html

Hackers Breach Mailchimp Email Marketing Firm to Launch Crypto Phishing Scams

Email marketing service Mailchimp on Monday revealed a data breach that resulted in the compromise of an internal tool to gain unauthorized access to customer accounts and stage phishing attacks.

The development was first reported by Bleeping Computer.

The company, which was acquired by financial software firm Intuit in September 2021, told the publication that it became aware of the incident on March 26 when it became aware of a malicious party accessing the customer support tool.

“The incident was propagated by an external actor who conducted a successful social engineering attack on Mailchimp employees, resulting in employee credentials being compromised,” Siobhan Smyth, Mailchimp’s chief information security officer, was quoted as saying.

Although Mailchimp stated it acted quickly to terminate access to the breached employee account, the siphoned credentials were used to access 319 MailChimp accounts and further export the mailing lists pertaining to 102 accounts.

The unidentified actor is also believed to have gained access to API keys for an unspecified number of customers, which the company said have been disabled, preventing the attackers from abusing the API keys to mount email-based phishing campaigns.

In the wake of the break-in, the company is also recommending customers to enable two-factor authentication to secure their accounts from takeover attacks.

The acknowledgment comes as cryptocurrency wallet company Trezor on Sunday said it’s investigating a potential security incident stemming from an opt-in newsletter hosted on Mailchimp after the actor repurposed the stolen data to send rogue emails claiming that the company had experienced a security incident.

The fraudulent email, which came with a supposed link to download an updated version of the Trezor Suite hosted on what’s actually a phishing site, prompted unsuspecting recipients to connect their wallets and enter the seed phrase on the trojanized lookalike application, allowing the adversary to transfer the funds to a wallet under their control.

“This attack is exceptional in its sophistication and was clearly planned to a high level of detail,” Trezor explained. “The phishing application is a cloned version of Trezor Suite with very realistic functionality, and also included a web version of the app.”

“Mailchimp have confirmed that their service has been compromised by an insider targeting crypto companies,” Trezor later tweeted. “We have managed to take the phishing domain [trezor.us] offline,” warning its users to refrain from opening any emails from the company until further notice.

The American company hasn’t so far clarified on whether the attack was carried out by an “insider.” It’s also unclear at this stage how many other cryptocurrency platforms and financial institutions are impacted by the incident.

A second confirmed casualty of the breach is Decentraland, a 3D virtual world browser-based platform, which on Monday disclosed that its “newsletter subscribers’ email addresses were leaked in a Mailchimp data breach.”

Source :
https://thehackernews.com/2022/04/hackers-breach-mailchimp-email.html

VMware Releases Critical Patches for New Vulnerabilities Affecting Multiple Products

VMware has released security updates to patch eight vulnerabilities spanning its products, some of which could be exploited to launch remote code execution attacks.

Tracked from CVE-2022-22954 to CVE-2022-22961 (CVSS scores: 5.3 – 9.8), the issues impact VMware Workspace ONE Access, VMware Identity Manager, VMware vRealize Automation, VMware Cloud Foundation, and vRealize Suite Lifecycle Manager.

Five of the eight bugs are rated Critical, two are rated Important, and one is rated Moderate in severity. Credited with reporting all the vulnerabilities is Steven Seeley of Qihoo 360 Vulnerability Research Institute.

The list of flaws is below –

  • CVE-2022-22954 (CVSS score: 9.8) – Server-side template injection remote code execution vulnerability affecting VMware Workspace ONE Access and Identity Manager
  • CVE-2022-22955 & CVE-2022-22956 (CVSS scores: 9.8) – OAuth2 ACS authentication bypass vulnerabilities in VMware Workspace ONE Access
  • CVE-2022-22957 & CVE-2022-22958 (CVSS scores: 9.1) – JDBC injection remote code execution vulnerabilities in VMware Workspace ONE Access, Identity Manager, and vRealize Automation
  • CVE-2022-22959 (CVSS score: 8.8) – Cross-site request forgery (CSRF) vulnerability in VMware Workspace ONE Access, Identity Manager, and vRealize Automation
  • CVE-2022-22960 (CVSS score: 7.8) – Local privilege escalation vulnerability in VMware Workspace ONE Access, Identity Manager and vRealize Automation, and
  • CVE-2022-22961 (CVSS score: 5.3) – Information disclosure vulnerability impacting VMware Workspace ONE Access, Identity Manager and vRealize Automation

Successful exploitation of the aforementioned weaknesses could allow a malicious actor to escalate privileges to root user, gain access to the hostnames of the target systems, and remotely execute arbitrary code, effectively allowing full takeover.

“This critical vulnerability should be patched or mitigated immediately,” VMware said in an alert. “The ramifications of this vulnerability are serious.”

While the virtualization services provider noted that it has not seen any evidence that the vulnerabilities have been exploited in the wild, it’s highly recommended to apply the patches to remove potential threats.

“Workarounds, while convenient, do not remove the vulnerabilities, and may introduce additional complexities that patching would not,” the company cautioned.

Source :
https://thehackernews.com/2022/04/vmware-releases-critical-patches-for.html

Exit mobile version