Discover the six endpoint security measures that can help mitigate the risk of a ransomware attack.
With 66% of organizations hit by attacks last year, ransomware remains one of greatest cyber threats to organizations across the globe.
The barrier to entry for would-be ransomware actors is now lower than ever, largely due to the seismic shift to the ‘as-a-service’ model that has put advanced threat tactics into the hands of nearly any criminal that wants them. Furthermore, as cyber defenses continue to get stronger, ransomware operators have evolved their approaches in an attempt to bypass today’s advanced protection technologies, abusing legitimate IT tools and even learning new programming languages to evade detection.
Endpoint protection remains one of the most effective ways to defend your devices from ransomware, but it must configured properly to deliver optimum protection. In our recently updated report Endpoint Best Practices to Block Ransomware, and in this article, we share practical endpoint security tips to help elevate your ransomware defenses.
1.Turn on all policies and ensure all features are enabled
Policies are designed to stop specific threats. Regularly checking that all protection options are enabled ensures your endpoints are protected against current and emerging ransomware.
Sophos customers managing their endpoint protection through Sophos Central benefit from the “Account Health Check” tool, which automatically assesses your account configuration to identify potential security gaps and guides you in how to optimize protection. You can learn more about this feature here.
2.Regularly review your exclusions
Exclusions prevent trustworthy directories and file types from being scanned for malware. They are sometimes used to reduce system delays and minimize the risk of false-positive security alerts. Over time, a growing list of excluded directories and file types can impact many people across a network. Malware that manages to make its way into excluded directories — perhaps accidentally moved by a user — will likely succeed. Regularly check your list of exclusions within your threat protection settings and limit the number of exclusions.
3.Enable multi-factor authentication (MFA)
MFA provides an additional layer of security after the first factor, which is often a password. Enabling MFA across your applications is critical for all users who have access to your security console. Doing so ensures access to your endpoint protection solution is secure and not prone to accidental or deliberate attempts to change your settings that can otherwise leave your endpoint devices vulnerable to attacks. MFA is also critical to secure RDP.
4.Ensure every endpoint is protected and up to date
Check your devices regularly to find out if they’re protected and up to date. A device not functioning correctly may not be protected and could be vulnerable to a ransomware attack. Endpoint security tools often provide this telemetry. An IT hygiene maintenance program is also helpful for regularly checking for any potential IT issues.
5.Maintain good IT hygiene
Regularly evaluating your IT hygiene ensures your endpoints and the software installed on them run at peak efficiency. It also mitigates your cybersecurity risk and can save you time when you remediate future incidents.
6.Proactively hunt for active adversaries across your network
In today’s threat landscape, malicious actors are more cunning than ever, often deploying legitimate tools and stolen credentials to avoid detection. To identify and stop these attacks, it’s essential to proactively hunt for advanced threats and active adversaries. Once found, you also need to be able to take appropriate actions to quickly stop them. Tools such as extended detection and response (XDR) enable security analysts to conduct threat hunting and neutralization. Organizations with these technologies should take full advantage of them.
Many organizations struggle to maintain round-the-clock coverage to defend against advanced ransomware attacks — that’s why managed detection and response (MDR) services are key. MDR services provide 24/7 threat hunting delivered by experts who specialize in detecting and responding to cyberattacks that technology solutions alone cannot prevent. They also provide the highest level of protection against advanced, human-led ransomware attacks. To learn more on the benefits of MDR, read our article here.
To explore these best practices in greater detail and to learn how Sophos security solutions elevate your ransomware protection, download our whitepaper here.
Learn More
Sophos Endpoint reduces the attack surface and prevents attacks from running. It combines anti-exploit, anti-ransomware, deep learning AI, and control technology to stop attacks before they impact your systems. It integrates powerful extended detection and response (XDR) with automated detections and investigations, so you can minimize the time to detect and respond to threats.
When the headlines focus on breaches of large enterprises like the Optus breach, it’s easy for smaller businesses to think they’re not a target for hackers. Surely, they’re not worth the time or effort?
Unfortunately, when it comes to cyber security, size doesn’t matter.
Assuming you’re not a target leads to lax security practices in many SMBs who lack the knowledge or expertise to put simple security steps in place. Few small businesses prioritise cybersecurity, and hackers know it. According to Verizon, the number of smaller businesses being hit has climbed steadily in the last few years – 46% of cyber breaches in 2021 impacted businesses with fewer than 1,000 employees.
Securing any business doesn’t need to be complex or come with a hefty price tag. Here are seven simple tips to help the smaller business secure their systems, people and data.
Every organisation has anti-virus on their systems and devices, right? Unfortunately, business systems such as web servers get overlooked all too often. It’s important for SMBs to consider all entry points into their network and have anti-virus deployed on every server, as well as on employees’ personal devices.
Hackers will find weak entry points to install malware, and anti-virus software can serve as a good last-resort backstop, but it’s not a silver bullet. Through continuous monitoring and penetration testing you can identify weaknesses and vulnerabilities before hackers do, because it’s easier to stop a burglar at the front door than once they’re in your home.
Your perimeter is exposed to remote attacks because it’s available 24/7. Hackers constantly scan the internet looking for weaknesses, so you should scan your own perimeter too. The longer a vulnerability goes unfixed, the more likely an attack is to occur. With tools like Autosploit and Shodan readily available, it’s easier than ever for attackers to discover internet facing weaknesses and exploit them.
Even organisations that cannot afford a full-time, in-house security specialist can use online services like Intruder to run vulnerability scans to uncover weaknesses.
Intruder is a powerful vulnerability scanner that provides a continuous security review of your systems. With over 11,000 security checks, Intruder makes enterprise-grade scanning easy and accessible to SMBs.
Intruder will promptly identify high-impact flaws, changes in the attack surface, and rapidly scan your infrastructure for emerging threats.
Your attack surface is made up of all the systems and services exposed to the internet. The larger the attack surface, the bigger the risk. This means exposed services like Microsoft Exchange for email, or content management systems like WordPress can be vulnerable to brute-forcing or credential-stuffing, and new vulnerabilities are discovered almost daily in such software systems. By removing public access to sensitive systems and interfaces which don’t need to be accessible to the public, and ensuring 2FA is enabled where they do, you can limit your exposure and greatly reduce risk.
A simple first step in reducing your attack surface is by using a secure virtual private network (VPN). By using a VPN, you can avoid exposing sensitive systems directly to the internet whilst maintaining their availability to employees working remotely. When it comes to risk, prevention is better than cure – don’t expose anything to the internet unless it’s absolutely necessary!
New vulnerabilities are discovered daily in all kinds of software, from web browsers to business applications. Just one unpatched weakness could lead to full compromise of a system and a breach of customer data; as TalkTalk discovered when 150,000 of its private data records were stolen.
According to a Cyber Security Breaches Survey, businesses that hold electronic personal data of their customers are more likely than average to have had breaches. Patch management is an essential component of good cyber hygiene, and there are tools and services to help you check your software for any missing security patches.
Ransomware is on the increase. In 2021, 37% of businesses and organisations were hit by ransomware according to research by Sophos. Ransomware encrypts any data it can access, rendering it unusable, and can’t be reversed without a key to decrypt the data.
Data loss is a key risk to any business either through malicious intent or a technical mishap such as hard disk failure, so backing up data is always recommended. If you back up your data, you can counter attackers by recovering your data without needing to pay the ransom, as systems affected by ransomware can be wiped and restored from an unaffected backup without the attacker’s key.
Cyber attackers often rely on human error, so it’s vital that staff are trained in cyber hygiene so they recognise risks and respond appropriately. The Cyber Security Breaches Survey 2022 revealed that the most common types of breaches were staff receiving fraudulent emails or phishing attacks (73%), followed by people impersonating the organisation in emails or online (27%), viruses, spyware and malware (12%), and ransomware (4%).
Increasing awareness of the benefits of using complex passwords and training staff to spot common attacks such as phishing emails and malicious links, will ensure your people are a strength rather than a vulnerability.
Cyber security measures should always be appropriate to the organisation. For example, a small business which handles banking transactions or has access to sensitive information such as healthcare data should employ far more stringent security processes and practices than a pet shop.
That’s not to say a pet shop doesn’t have a duty to protect customer data, but it’s less likely to be a target. Hackers are motivated by money, so the bigger the prize the more time and effort will be invested to achieve their gains. By identifying your threats and vulnerabilities with a tool like Intruder, you can take appropriate steps to mitigate and prioritize which risks need to be addressed and in which order.
Attacks on large companies dominate the news, which feeds the perception that SMBs are safe, when the opposite is true. Attacks are increasingly automated, so SMBs are just as vulnerable targets as larger enterprises, more so if they don’t have adequate security processes in place. And hackers will always follow the path of least resistance. Fortunately, that’s the part Intruder made easy…
Intruder is a cyber security company that helps organisations reduce their attack surface by providing continuous vulnerability scanning and penetration testing services. Intruder’s powerful scanner is designed to promptly identify high-impact flaws, changes in the attack surface, and rapidly scan the infrastructure for emerging threats. Running thousands of checks, which include identifying misconfigurations, missing patches, and web layer issues, Intruder makes enterprise-grade vulnerability scanning easy and accessible to everyone. Intruder’s high-quality reports are perfect to pass on to prospective customers or comply with security regulations, such as ISO 27001 and SOC 2.
Intruder offers a 14-day free trial of its vulnerability assessment platform. Visit their website today to take it for a spin!
Found this article interesting? Follow us on Twitter and LinkedIn to read more exclusive content we post.
Wordfence 7.8.0 is out! A huge thanks to our quality assurance team, our team of developers and our ops team for planning, implementing and releasing Wordfence 7.8.0. This release has several fixes to make Wordfence even more robust, and includes a fundamental change in the way our signup works.
Since our launch in 2012, the signup flow for Wordfence has not required you to leave your own WordPress installation and come to our website. We briefly required this, but removed it 10 days after launch.
Wordfence has grown to a community of over 4 million active websites and a very large number of paying customers. Wordfence is now downloaded over 30,000 times every day. Today we spend a huge amount of money on providing the services that our free and paid community needs to stay secure. Privacy laws have also changed profoundly since 2012.
Scaling up our operations has required us to get better at capacity planning, which means knowing how many installations we’re getting, how many are bots or spam, who is communicating with our servers during a scan, and whether it is a real website running Wordfence, a nulled plugin or someone simply using our resources to power something unrelated to Wordfence.
Privacy laws have also added the need for us to be able to communicate with our free customers to alert them to privacy policy and terms of use changes.
This has required us to adjust our signup flow to match other popular plugins out there, like Akismet. Many customers may find this is a clearer signup workflow because we no longer need to shoehorn a complex user experience into a set of modals on a site where we don’t control presentation.
This change will not disrupt any of our existing free or paid customers. If you have a free API key that Wordfence automatically fetched when you installed it, that key will remain valid and your site will continue uninterrupted. If you have a paid Wordfence API key, your key will continue to work without disruption. We are not requiring any existing customers to visit our site to install a new key.
The only users this affects are new free Wordfence installations. The installation process is quite simple. You install Wordfence and are directed to our site. You can choose a paid or free option. If you choose the paid option, you’ll go through our checkout process as usual. If you choose free, we’ll email you your key. The email includes a button that you can click to automatically take you back to your site where your key will be automatically installed. The email also includes your Wordfence key in case you need to manually install it.
A side benefit of this new process is that our free customers will now have a record of their API key in their email inbox for future reference.
We’re including the full changelog for Wordfence 7.8.0 below. You’ll notice that we’ve mentioned that additional WooCommerce support is on its way, so keep an eye out for that.
Thanks for choosing Wordfence!
Mark Maunder – Wordfence Founder & CEO.
Wordfence 7.8.0 Changelog
Change: Updated Wordfence registration workflow
For new installations of Wordfence, registering for a new license key now occurs on wordfence.com instead of within the plugin interface. Allows us to provide a more complete signup experience for our free and paid customers. Also allows us to do better capacity planning.
Improvement: Added feedback when login form is submitted with 2FA
When logging in with two-factor authentication, the “Log In” button is now disabled during processing, so that it is clear the button was clicked. Sometimes on slower sites, it was hard to tell whether the login was going through, leading users to click more than once.
Fix: Restored click support on login button when using 2FA with WooCommerce
Clicking the “Log In” button after entering a 2FA code on a WooCommerce site was no longer working, while pressing “Enter” still worked. Both methods now work as expected. Additional support for WooCommerce is coming in the near future.
Fix: Corrected display issue with reCAPTCHA score history graph
The reCAPTCHA score history graph was sometimes displayed larger than intended when switching tabs. It now has a set size, so that it does not become unusually large.
Fix: Prevented errors on PHP caused by corrupted login timestamps
One Wordfence user reported an error on PHP 8, and upon investigation, we found that a timestamp for some user records contained invalid data instead of the expected timestamp. We don’t expect this to occur on other sites, but in case another plugin had modified the value, we now check the value before formatting it as a timestamp.
Fix: Prevented deprecation notices on PHP 8.2 related to dynamic properties
Future versions of PHP will no longer allow use of variables on an object unless they are previously declared. This is still allowed even in PHP 8.2, but PHP 8.2 can log a warning about the upcoming change, so Wordfence has been updated to declare a few variables where necessary, before using them.
Microsoft Hyper-V Server is a free version of Windows hypervisor that can be used to run virtual machines. In this guide, we’ll look at how to install and configure Microsoft Hyper-V Server 2019 (this guide also applies to Hyper-V Server 2016).
Microsoft announced that they won’t not be releasing a Hyper-V Server 2022 version. This is because they are currently focusing on another strategic product, Azure Stack HCI.
Hyper-V Server 2019 is suitable for those who don’t want to pay for a hardware virtualization operating system. The Hyper-V has no restrictions and is completely free. Key benefits of Microsoft Hyper-V Server:
Support of all popular OSs. There are no compatibility problems. All Windows and modern Linux and FreeBSD operating systems support Hyper-V;
A lot of different ways to backup virtual machines: simple scripts, open-source software, free and commercial versions of popular backup programs;
Although Hyper-V Server doesn’t have a Windows Server GUI (graphical management interface), you can manage it remotely using a standard Hyper-V Manager console or Windows Admin Center web interface;
Hyper-V Server is based on a popular Windows Server platform, familiar and easy to work with;
You can install Hyper-V on a pseudoRAID, for example, Inter RAID controller, or Windows software RAID;
You do not need to license your hypervisor, it is suitable for VDI or Linux VMs;
Low hardware requirements. Your processor must support software virtualization (Intel-VT or VMX by Intel, AMD-V/ SVM by AMD) and second-level address translation (SLAT) (Intel EPT or AMD RV). These processor options must be enabled in BIOS/UEFI/nested host. You can find full system requirements on the Microsoft website;
It is recommended to install Hyper-V on hosts with at least 4 GB RAM.
Do not confuse a Windows Server 2022/2019/2016 (Full GUI or Server Core edition) with the Hyper-V role installed with Free Microsoft Hyper-V Server 2019/2016. These are different products.
It is worth to note that if you are using a free hypervisor, you are still responsible for licensing your virtual machines. You can run any number of VMs running any open-source OS, like Linux, but you have to license your Windows virtual machines. If you are using Windows Server as a guest OS, you must license it by the number of physical cores on your Hyper-V host. See more details on Windows Server licensing in a virtual environment here.
What’s New in Microsoft Hyper-V Server 2019?
Let’s consider the new Hyper-V Server 2019 features in brief:
Added support for Shielded Virtual Machines for Linux;
VM configuration version 9.0 (with hibernation support);
ReFS deduplication support;
Core App Compatibility: the ability to run additional graphic management panels in the Hyper-V server console;
After clicking on the “Continue” button, a short registration form will appear. Fill in your data and select the language of the OS to be installed. Wait till the Hyper-V image download is over. The .iso file size is about 3 GB.
Installing Microsoft Hyper-V Server is identical to installing Windows 10/11 on a desktop computer. Just boot your server (computer) from the bootable USB flash drive with the Microsoft Hyper-V Server installation image (the easiest way to burn the ISO image to a USB drive is to use the Rufus tool). Then follow the instructions of the Windows setup wizard.
Manage Hyper-V Server Basic Settings Using Sconfig
After the installation, the system will prompt you to change the administrator password. Change it, and you will get to the hypervisor console.
Please note that Hyper-V Server does not have a familiar Windows GUI. You will have to configure most settings through the command line.
There are two windows on the desktop — the standard command prompt and the sconfig.cmd script window. You can use this script to perform the initial configuration of your Hyper-V server. Enter the number of the menu item you are going to work with in the “Enter number to select an option:” line.
The first menu item allows you to join your server to an AD domain or a workgroup;
Set a hostname for your Hyper-V Server;
Create a local administrator user (another account, besides the built-in administrator account). I’d like to note that when you enter the local administrator password, the cursor stays in the same place. However, the password and its confirmation are successfully entered;
Enable remote access to your server. Thus, you will be able to manage it using Server Manager, MMC consoles, and PowerShell, connect via RDP, check its availability using ping or tracert;
Configure Windows Update. Select one of the three modes:
Automatic (automatic update download and installation)
DownloadOnly (only download without installation)
Manual (the administrator decides whether to download or install the updates)
Download and install the latest Windows security updates.
Configure your network adapter settings. By default, your server receives the IP address from the DHCP server. It is better to configure the static IP address here;
Set the date and time of your system.
Configure the telemetry. The Hyper-V won’t allow you to disable it completely. Select the mode you want.
You can also configure the date, time, and time zone using the following command:
control timedate.cpl
Regional settings:
control intl.cpl
These commands will open standard Windows consoles.
Note! If you accidentally close all windows and see the black Hyper-V screen, press Ctrl+Shift+Esc to start the Task Manager (this keyboard shortcut works in an RDP session as well). You can use Task Manager to start the command prompt or the Hyper-V configuration tool (click File -> Run Task -> cmd.exe or sconfig.cmd).
How to Remotely Manage Hyper-V Server 2019?
To conveniently manage Free Hyper-V Server 2019 from the graphic interface, you can use:
Windows Admin Center – a web-based console;
Hyper-V Manager — can be installed both on Windows Server and Windows 10/11 desktop computers.
To manage the Hyper-V Server 2016/2019, you will need a computer running x64 Windows 10/11 Pro or Enterprise edition.
Remotely Manage a Non-Domain Hyper-V Server with Hyper-V Manager
Let’s look at how to remotely connect to a Hyper-V Server host from another Windows computer using the Hyper-V Manager console. In this article, we assume that you have a Hyper-V Server and a Windows 10 computer in the same workgroup.
First, make settings on the Hyper-V Server. Start the PowerShell console (powershell.exe) and run the following commands:
Enable-PSRemoting
Enable-WSManCredSSP -Role server
Answer YES to all questions. Thus you will configure the automatic startup of the WinRM service and enable remote management rules in your firewall.
Now let’s move on to setting up the Windows 10 or 11 client computer that you will use to manage your Hyper-V Server host.
The Hyper-V server must be accessible by its hostname. In the domain network, it must correspond to the A-record on the DNS server. In a workgroup environment, you will have to create the A record manually on your local DNS or add it to the hosts file (C:\Windows\System32\drivers\etc\hosts) on a client computer. In our case, it looks like this:
192.168.13.55 HV19
You can add an entry to the hosts file using PowerShell:
If the account you are using on a client computer differs from the Hyper-V administrator account (and it should be so), you will have to explicitly save your credentials used to connect to the Hyper-V server to the Windows Credential Manager. To do it, run this command:
Now you need to install the Hyper-V Manager console in Windows. Open the Programs and Features snap-in and go to Turn Windows Features on or off. In the next window, find Hyper-V, and check Hyper-V GUI Management Tools to install it.
Also, you can install the Hyper-V Manager snap-in on Windows 10/11 using PowerShell:
Run the Hyper-V Manager snap-in (virtmgmt.msc), right-click Hyper-V Manager and select Connect to Server. Specify the name of your Hyper-V Server.
Now you can manage Hyper-V Server settings, and create and manage virtual machines from the graphical console.
Managing Hyper-V Server with Windows Admin Center
You can use the Windows Admin Center (WAC) to remotely manage a Hyper-V Server host. WAC is a web-based console and dashboard to manage Windows Server, Server Core, and Hyper-V Server hosts.
Enable the rules to allow SMB connections in Windows Defender Firewall on the Hyper-V Server:
Set-NetFirewallRule -DisplayGroup "File and Printer Sharing" -Enabled true -PassThru
Now you need to download (https://aka.ms/WACDownload) and install the Windows Admin Center agent on your Hyper-V host. Download WindowsAdminCenter2110.2.msi on any Windows computer. You can copy the installation MSI file to the Hyper-V Server using a remote SMB connection to the administrative share C$. Run the following command on your Windows client device:
Win+R -> \\192.168.13.55\C$ and enter the Hyper-V administrator password. Create a folder and copy the MSI file to the Hyper-V Server host.
Now run the WAC installation from the Hyper-V console:
Next, I will look at some ways to manage Hyper-V Server settings using PowerShell
Configuring Hyper-V Server 2019 Host with PowerShell
You can configure Hyper-V Server settings using PowerShell. There are over 238 cmdlets available in the Hyper-V module for managing Hyper-V hosts and VMs.
Get-Command –Module Hyper-V | Measure-Object
Configure the automatic start of the PowerShell console (instead of cmd.exe) after logon.
Now, when you log into the server, a PowerShell prompt will appear.
How to Configure Hyper-V Server 2019 Network Settings with PowerShell?
If you have not set the network settings using sconfig.cmd, you configure them through PowerShell. Using Get-NetIPConfiguration cmdlet, you can view the current IP configuration of network interfaces.
Use PowerShell to assign a static IP address, netmask, default gateway, and DNS server addresses. You can get the network adapter index (InterfaceIndex) from the output of the previous cmdlet.
We will use a separate partition on a physical disk to store Hyper-V files (virtual machine files and iso files). View the list of physical disks on your server.
Get-Disk
Create a new partition of the largest possible size on the drive and assign the drive letter D: to it. Use the DiskNumber from Get-Disk results.
New-Partition -DiskNumber 0 -DriveLetter D –UseMaximumSize
Then format the partition to NTFS and specify its label:
Format-Volume -DriveLetter D -FileSystem NTFS -NewFileSystemLabel "VMStorage"
Create a directory where you will store virtual machine settings and vhdx files using the New-Item cmdlet:
New-Item -Path "D:\HyperV\VHD" -Type Directory
Create D:\ISO folder to store OS installation ISO images (distros):
New-Item -Path D:\ISO -ItemType Directory
In order to create a shared network folder, use the New-SmbShare cmdlet. Grant full access permissions to the local server administrators group:
New-SmbShare -Path D:\ISO -Name ISO -Description "OS Distributives" -FullAccess "BUILTIN\Administrators"
For more information on the basic configuration of Hyper-V Server and Windows Server Core from the command line, see this article.
Configure Hyper-V Server Host Settings with PowerShell
List current Hyper-V Server host settings using this command:
Get-VMHost | Format-List
By default, Hyper-V stores virtual machine configuration files and virtual disks on the same partition where your operating system is installed. It is recommended to store VM files on a separate drive (partition). You can change the default VM folder path with this command:
Create an external switch connected to the physical NIC of the Hyper-V server. Your virtual machines will access the physical network through this network adapter.
Check the SR-IOV (Single-Root Input/Output (I/O) Virtualization) support:
Get-NetAdapterSriov
Get the list of connected network adapters:
Get-NetAdapter | where {$_.status -eq "up"}
Bind your virtual switch to the network adapter and enable SR-IOV support if it is available.
Hint. You won’t be able to enable or disable SR-IOV support after creating the vswitch. You will have to recreate the switch to change this parameter.
In this guide, I will show you how to deploy Dell SupportAssist using SCCM (ConfigMgr). We’ll get the latest version of the Dell SupportAssist tool, create an application in SCCM, and then deploy it to our computers.
According to Dell, the SupportAssist is an automated proactive and predictive support solution for computers and tablets. SupportAssist also evaluates the health of your servers, storage, and networking devices to eliminate downtime before it even starts.
When you purchase brand-new laptops and desktop computers from Dell, SupportAssist is already preinstalled. SupportAssist is installed on most Dell PCs with Windows 10 and Windows 11. You can find it by searching for “SupportAssist” in your Windows start menu. Home users can use the Dell SupportAssist tool to update drivers, including the system BIOS, and resolve problems.
Configuration Manager is the best choice for Dell SupportAssist deployment on multiple computers. You can deploy the Dell Support Assist to client computers and allows users to install it via Software Center. An added advantage of Dell SupportAssist deployment using SCCM is Dell provides .msi installer for application deployment for enterprises.
If you are using Configuration Manager to manage Dell laptops, you can use the application model to deploy Dell SupportAssist software to client computers using SCCM. The application can also be added to a task sequence, which lets you use the bare-metal deployment scenarios to install Dell SupportAssist on new laptops.
Let’s understand what exactly is the Dell SupportAssist tool and identify its features. The SupportAssist by Dell is the smart technology, available on your PC that will keep it running like new by removing viruses, detecting issues, optimizing settings and telling you when you need to make updates.
With SupportAssist tool, you can perform the following
Update your drivers and applications for peak PC performance
Remove virus and malware infested files before then can harm your system.
Scan your PCs hardware to find issues and deliver proactive and predictive support.
Clean files, tune performance, and adjust network settings to optimize speed, storage space and stability.
The Dell SupportAssist also has an OS Recovery environment that enables you to diagnose hardware issues, repair your computer, back up your files, or restore your computer to its factory state. The Dell Support Assist OS Recovery is only available on certain Dell laptops with a Microsoft Windows 10/11 operating system that was installed by Dell.
Download Dell SupportAssist MSI Installer
Dell provides the .msi installer for SupportAssist and the same installer can be used for deployment with SCCM. You can download the Dell SupportAssist .msi installer from the following direct download link. Note that this is an offline installer and will include all the installation files without having the system connect to internet to download further files.
Along with Dell SupportAssist msi installer, I recommend you to download a logo for the application. We will assign this logo to the Dell SupportAssist application in SCCM. Copy both the installer and logo to a separate folder on SCCM server or shared folder. We will reference the same folder when we create the Dell SupportAssist application in ConfigMgr.
Each MSI installer has a unique product code and this can be seen under the installer properties. Configuration Manager uses the product to detect if the Dell SupportAssist application already exists on system. If you are curious to know the detection method for Dell SupportAssist application, SCCM basically uses the MSI product code: {E0659C89-D276-4B77-A5EC-A8F2F042E78F} of the installer.
After you have created the Dell Support Assist application in SCCM, go to the Application deployment properties and switch to Detection Method tab. Here you can see the detection method used for Dell SupportAssist application. We see the MSI product code being used for the application detection.
Dell SupportAssist Detection Method
Create Dell SupportAssist Application in SCCM
Let’s create a new application for the Dell SupportAssist in SCCM.
Launch the Configuration Manager console.
Go to Software Library > Overview > Application Management.
Right-click Applications and select Create Application.
Create Dell SupportAssist Application in SCCM
On the General window, select Automatically detect information about this application from installation files. The application type should be Windows Installer (*.msi file) and specify the location of the Dell SupportAssist msi file. Click Next.
Create Dell SupportAssist Application in SCCM
With MSI installers, the Configuration Manager can import information such as product code, install commands, uninstall commands, detection methods etc. In the below screenshot, we see the product information has been populated from Dell SupportAssist MSI installer and imported into SCCM.
Application name: Dell SupportAssist
Publisher:
Software version:

Deployment type name: Dell SupportAssist - Windows Installer (*.msi file)
Product Code: {E0659C89-D276-4B77-A5EC-A8F2F042E78F}
Installation behavior: Install for system

Content location: \\corpcm\Sources\Applications\SupportAssist\
Number of files: 2
Content files:
dellSA_logo.jpg
SupportAssistx64-3.10.4.18.msi
Create Dell SupportAssist Application in SCCM
In the General Information tab, enter the basic information about the Dell Support Assist application. For example, you can specify the application name, publisher details, software version etc. The details that you specify here will be displayed to users when the Dell SupportAssist application is selected in Software Center.
The Configuration Manager also populates the silent installation command for Dell SupportAssist from the .msi installer. You may modify the existing command and add additional parameters supported for .msi installation.
Silent Command Line for Dell SupportAssist installation = msiexec /i "SupportAssistx64-3.10.4.18.msi" /q
Create Dell SupportAssist Application in SCCM
Review the Support Assist application settings on Summary window and click Next. On the Completion tab, click Close button to exit the create application wizard.
Create Dell SupportAssist Application in SCCM
This completes the steps to create application for Dell SupportAssist in SCCM. After this step, the application will appear in the Application node of Configuration Manager console.
Specify an Icon for Dell SupportAssist Application
Configuration Manager lets you specify a logo for Application via the Application Properties and this logo appears along with the application in Software Center. If you are looking to customize software center, use the following guide to customize software center appearance and branding. Assigning an application logo is not mandatory, but it helps users identify the application quickly in Software Center.
The newly created Dell SupportAssist application is located in Software Library\Overview\Application Management\Applications of Configuration Manager console. Right-click on Dell SupportAssist application and select Properties.
Specify an Icon for Dell SupportAssist Application
In the Application properties window, choose the Software Center tab. Click on Browse and select an icon for Dell SupportAssist and click Apply and OK.
Specify an Icon for Dell SupportAssist Application
Deploy Dell SupportAssist using SCCM | ConfigMgr
In this section, we will look at the steps to deploy the Dell SupportAssist using SCCM (ConfigMgr). The deploy software wizard contains steps where you can distribute the content to DP’s along with the application deployment.
When you perform Dell SupportAssist deployment using SCCM, you deploy it either to a device collection or user collection. Typically, applications are deployed to device collections, and we will use the same approach here. You can create device collections for Windows 10 and Windows 11 computers using the following guides.
Once the device collections are ready, you can deploy the application using the deploy software wizard. To deploy the Dell SupportAssist application, launch the Configuration Manager console. Navigate to Software Library\Overview\Application Management\Applications. Right-click Dell SupportAssist application and select Deploy.
Deploy Dell SupportAssist using SCCM
On the General page of Deploy Software Wizard, click Browse and select a device collection to which you want to deploy the Support Assist application. Click Next.
Deploy Dell SupportAssist using SCCM
On the Content page, click Add button and specify the distribution points to which you would like to distribute the Dell Support Assist application content. You may also select distribution point groups when you have numerous distribution points. Click Next to continue.
On the Scheduling tab, you can specify the schedule for the deployment. If you want to deploy the application as soon as possible, then don’t configure anything under Scheduling. Click Next.
Dell SupportAssist Deployment using SCCM
Specify the user experience settings for the application deployment. For user notifications, select the option “Display in Software Center and show all notifications“. Click Next to continue.
Deploy Dell SupportAssist using SCCM User Experience Settings
In the Alerts tab, click Next. Review all the Dell SupportAssist deployment settings on Summary tab and click Next. On the Completion window, click Close.
The Dell SupportAssist application is now distributed to the select distribution points and the client machines should now have the application listed in the Software Center. This completes the steps for Dell SupportAssist deployment with Configuration Manager.
Deploy Dell SupportAssist using SCCM Completion
Test Dell SupportAssist Deployment on Client Computers
After you have created the Dell SupportAssist application and deployed it to device collection, it’s time to test the deployment on devices. Log in to a client computer, and launch the Software center. Click on the Applications tab and select Dell SupportAssist application. To install the application, click the Install button.
Test Dell SupportAssist Deployment on Client Computers
The Dell Support Assist application is now downloaded from the local distribution point server for installation. The installation commands specified during the application creation are executed. You can monitor the application installation process by reviewing the AppEnforce.log located on the client computer.
To locate the AppEnforce.log file and other important files, refer to the SCCM Log files which contains all the log files for troubleshooting issues.
“Matched exit code 0 to a Success entry in the exit codes table” confirms that the Dell Support Assist application has been installed successfully on the computer. The uninstall command that we specified during application packaging should also work fine.
+++ Starting Install enforcement for App DT "Dell SupportAssist - Windows Installer (*.msi file)" ApplicationDeliveryType - ScopeId_67D9092A-81B2-464F-8F38-4D634303C416/DeploymentType_ccf9c1b2-8d31-4cab-87e9-56c700d64d52, Revision - 1, ContentPath - C:\Windows\ccmcache\2, Execution Context - System
    Performing detection of app deployment type Dell SupportAssist - Windows Installer (*.msi file)(ScopeId_67D9092A-81B2-464F-8F38-4D634303C416/DeploymentType_ccf9c1b2-8d31-4cab-87e9-56c700d64d52, revision 1) for system.
    Prepared working directory: C:\Windows\ccmcache\2
Found executable file msiexec with complete path C:\Windows\system32\msiexec.exe
    Prepared command line: "C:\Windows\system32\msiexec.exe" /i "SupportAssistx64-3.10.4.18.msi" /q /qn
Valid MSI Package path = C:\Windows\ccmcache\2\SupportAssistx64-3.10.4.18.msi
    Advertising MSI package [C:\Windows\ccmcache\2\SupportAssistx64-3.10.4.18.msi] to the system.
    Executing Command line: "C:\Windows\system32\msiexec.exe" /i "SupportAssistx64-3.10.4.18.msi" /q /qn with user context
    Working directory C:\Windows\ccmcache\2
    Post install behavior is BasedOnExitCode	AppEnforce
    Waiting for process 3896 to finish.  Timeout = 120 minutes
    Process 3896 terminated with exitcode: 0
    Looking for exit code 0 in exit codes table.
    Matched exit code 0 to a Success entry in exit codes table
Test Dell SupportAssist Deployment on Client Computers
If you plan to keep your existing on-prem exchange server then it can be used / utilized as a SMTP Relay server. Else, if you plan to decommission the exchange server for good, you can utilize Office365 as a SMTP Relay server to relay the emails.
There are three ways to setup SMTP Relay in Office 365:
SMTP Auth client Submission
Direct Send
Office 365 SMTP Relay
I recommend using either Office 365 SMTP Relay method or Direct Send method to configure SMTP Relay in Office 365. Please refer to the section Direct Send vs Office 365 SMTP Relay which will help you decide which one to use for your organization.
Below are some suggestions which can help you choose between Office 365 SMTP Relay and Direct Send method.
📌 Direct Send Method does not work if you want to send the email to External recipients for example any Gmail, Yahoo, Hotmail email address. Direct End method can send an email to External recipients if the External Organization is also using Office 365 to host the mailboxes.
📌If your requirement is to send emails to Internal and any External domain recipients then choose Office 365 SMTP Relay Method.
1.SMTP Auth client Submission Method
Below are the Pre-requisites for using SMTP Auth client submission method to configure SMTP relay in Office365:
A Licensed Office365 User Mailbox is required.
SMTP AUTH must be enabled for Mailbox which will be used to send the emails.
Device must support TLS 1.2 or above (Please check the vendor documentation to confirm this).
If your authentication policy disables basic authentication for SMTP, clients cannot use the SMTP AUTH protocol. Microsoft will disable Basic authentication for all new and existing tenants starting from 1st Oct 2022. Therefore, this is my least recommended option for configuration of SMTP relay in Office 365.
Direct Send vs Office 365 SMTP Relay
Direct Send method and Office 365 SMTP Relay method both use MX Endpoint of your domain to configure SMTP Relay. Both can be used when your environment has SMTP AUTH disabled.
Use Direct Send when you need to send messages to recipients in your own organization who have mailboxes in Office 365. Direct send will not work if you want to send email to External email address (Gmail, yahoo, hotmail etc.). However, If the external recipient mailboxes are also hosted on Office 365, it will work fine.
Direct Send does not require your device or application to have a static IP address to configure it. However, Static IP address is recommended so that an SPF record can be created for your domain. The SPF record helps avoid your messages being flagged as spam.
Direct Send and Office 365 Relay both does not require your device to Support TLS.
Source:Microsoft. How Direct Send Works ?
Featues
Direct Send
Office 365 SMTP Relay
Send to Internal Users
Yes
Yes
Send to External Users
No (Yes, for external recipients having Office365 Mailboxes)
Yes
Network Port Requirement
Port 25
Port 25
TLS Requirement
Optional
Optional
Requires Authentication
None
Device / Printer / Application must have Static IP address assigned.
2.Configure SMTP Relay in Office 365 using Direct Send method
In the previous section of this blog post, I have explianed the difference between Direct Send and Office 365 SMTP Relay method. If Direct Send meets your requirements and you do not have any requirements for sending an email to External recipients like Gmail, yahoo, hotmail etc. You can follow below steps to configure it.
1. Find MX Endpoint of your Domain
To find the MX Endpoint of your domain, You need to follow below steps:
Click on your organization domain name. For example: techpress.net.
Click on DNS records Tab.
You can find MX Endpoint on DNS records tab. Click on it to Open.
You will find the MX Endpoint under Points to address or value column. Click on it to copy it on a notepad.
The format of the MX Endpoint is yourdomain-com.mail.protection.outlook.com
Locate MX Endpoint of your domain from Microsoft 365 admin center
2. Find the Static IP Address of the Device or Application [Optional]
As Microsoft Recommends to use Static IP Address for Direct Send Method but its not mandatory. If your Device or Application is not using a static IP address, make sure you assign a static IP address and then note down the IP Address of the device on a notepad. We will add static IP address of the device in your domain’s SPF record.
3. Update SPF Record [Optional]
This is also an optional step but highly recommended by Microsoft. Updating SPF record with Static IP Address of your Device or Application will help to avoid your emails being marked as SPAM. SPF records identifies which servers are allowed to send emails on behalf of the your domain.
Example:
Device / Printer IP Address: 10.20.1.56
Currently configured SPF record: v=spf1 include:spf.protection.outlook.com -all
Add your Device / Application IP Address in the SPF record as below:
4. Configure your Device / Application for Direct Send SMTP Relay
Last and final step is to configure your Device / Application and add SMTP relay details so that Device / Application can send emails using the Direct Send SMTP Relay. In our Example, we will be using a Printer to configure Direct Send. Let’s see which SMTP settings needs to be configured on the Printer.
If you want to configure SMTP Relay for a device other than your printer, You can still use below SMTP details to configure it.
SMTP Server
Port
TLS
UserName
Password
MX Endpoint
For Example: <yourdomain>-<domain extension.mail.protection.outlook.com
25
Not Required (Recommendation is to enable if this option is available)
Any Email Address of your domain. This user does not require a mailbox. For example: myscanner@techpress.net
Not required (you can turn off SMTP Authentication)
Example:
I have captured a screenshot of one of my Printers to show you how to configure Direct Send. You can use the same settings to configure Direct Send on any other device as well. This screenshot is just for your reference:
Office 365 SMTP Relay Direct Send method Configuration on Konika Minolta printer
5. Create Bypass Spam Filtering Rule [Optional]
This step is optional and you do not need to create a bypass SPAM Filtering rule in Exchange Online. You have updated SPF record with your device IP address which should avoid the emails sent from your device to be marked as SPAM.
If your emails are still going into the SPAM folder. You can create a SPAM Bypass rule in office365 for the email ID which you have used to send the email from on the device.
Login to Exchange online management portal
Click on Mail flow -> Rule -> Create a Rule.
Create SPAM Bypass rule for the Device IP on Exchange Admin Center
3. Configure using Office 365 SMTP Relay Method
Source: Microsoft. Office 365 SMTP Relay Method – How it Works?
Direct Send method has limitations of sending the emails to external recipients. However, Office 365 SMTP Relay does not have that kind of limitation in place. You can use Office 365 SMTP Relay Method to send the email to any External recipient. Let’s check the steps to configure Office 365 Relay on your Device.
1. Find Public IP Address of the Device or Application
First thing you need to do is to find the public IP address of the Device or Application. If your device is not assigned with a Public IP and is using Dynamic IP address, Please update it to use Static IP Address. Copy the IP address in a notepad. We will need this IP Address while configuring a Connector in Exchange Online.
2. Create a Connector on Exchange Admin Center
Next step is to create a connector on Exchange Admin Center. Please follow below steps to create a connector:
On Add a Connector Page. Select Connection from Your organization’s email server and Connection to Office 365 and click on Next to proceed.
Create a new connector on Exchange Admin Center for configuration of SMTP Relay
Provide a Connector Name and Description. Click on Next to Proceed.
Provide a Name and Description of the Connector
On Authenticating sent email page. Select the option “By verifying that the IP address of the sending server matches one of the following addresses, which belongs exclusively to your organization“.
Add your Device / Application IP Addresses into the list. Add all Device’s IP addresses which you want to configure for Office 365 SMTP Relay. For example, In my organization I have 3 Printers which I want to configure for SMTP Relay. Therefore I have added the IP addresses of those 3 printers here.
Add Printer IP Addresses in Authenticating sent email
On Review connector page, you can review the connector configuration and click on Create connector to create this Connector.
Review Connector page on Exchange Admin Center
3. Update SPF Record
Now you need to update the SPF record and add all the Device IP’s in the SPF record which you added in the connector created on Exchange Admin Center.
Example:
Device / Printer IP Addresses: 10.1.20.122, 10.2.1.11 and 10.2.5.89.
Currently configured SPF record: v=spf1 include:spf.protection.outlook.com -all
Add your Device / Application IP Addresses in the SPF record as below:
Click on your organization domain name. For example: techpress.net.
Click on DNS records Tab.
You can find MX Endpoint on DNS records pag. Click on it to Open.
You will find the MX Record under Points to address or value column. Click on it to copy it on a notepad.
The format of the MX Endpoint is yourdomain-com.mail.protection.outlook.com
Locate MX Endpoint of your domain from Microsoft 365 admin center
5. Configure your Device / Application for Office 365 SMTP Relay
Last and final step is to configure your Device / Application and add SMTP relay details so that Device / Application can send emails using the Office 365 SMTP Relay.
SMTP Server
Port
TLS
UserName
Password
MX Endpoint
For Example: <yourdomain>-<domain extension.mail.protection.outlook.com
25
Not Required (Recommendation is to enable if this option is available)
Any Email Address of your domain. This user does not require a mailbox. For example: myscanner@techpress.net
Not required (you can turn off SMTP Authentication)
6. Create SPAM Bypass rule [Optional]
Please refer to the section of Configuration of SMTP Relay using Direct Send method where the steps to create SPAM bypass rule is given. This is an optional troubleshooting step and can be used in case the emails are being marked as SPAM.
Troubleshooting Office 365 SMTP Relay
Now we have setup Office 365 SMTP Relay. In case of any issues in email delivery, you can use below steps to troubleshoot.
Check SMTP AUTH at organization level
You can use below command to check SMTP AUTH at organization level. As we are not using SMTP client submission method, SMTP AUTH should be disabled.
Get-CASMailbox "Sonia Neil " | fl SmtpClientAuthenticationDisabled
Copy
If you see the output of the command as SmtpClientAuthenticationDisabled: That means this setting is controlled by the corresponding SmtpClientAuthenticationDisabled parameter on the Set-TransportConfig cmdlet for the whole organization.
Test Port 25 using Telnet
If you are facing any issues in email delivery then you can verify if Port 25 is opened or blocked on the Firewall. If Port 25 is blocked then you may need to ask the Network admin to open it for the device IP which is sending emails. You can follow below steps to test Port 25 via Telnet.
Launch Command Prompt on a PC (IP of the PC should be in the same subnet as Device / Printer / Application)
Type Command telnet <MX EndPoint> 25 and press Enter.
(If telnet command is not recognized on the Windows 10 or Windows 11 PC. The Please first Install Telnet Client by going to Start menu -> Type “Turn Windows featured on or off” and find Telnet Client, Select it and click OK).
Install Telnet Client on Windows
Once Telnet is installed on your Windows device. You can open a command prompt and type below command to test if Port 25 is opened or not.
Telnet <your MX endpoint> 25
Test Port 25 using Telnet
Once you enter on the above command, you should get a response from the server. Which means that Port 25 is opened.
Test Port 25 using Telnet
Send a Test email using Telnet
If you want to check the email delivery then you can use the Telnet command and send a test email. This test can confirm if there are any issues in email delivery. You can follow below steps to test a test email using telnet.
Login on a computer in the same subnet as the Device / Printer / Application.
Open Command prompt as administrator.
Type command Telnet <your MX endpoint> 25.
Send a Test email using Telnet
You will get a response back after press enter on the Telnet command. On Telnet Console Type below commands:
ehlo
mail from – Type from email address
rcpt to – Type recipient email address to send a test email.
If the recipient receives this test email then there is no issue witth email delivery.
ehlo
MAIL FROM:<myscanner@techpress.net>
250 2.1.0 Sender OK
RCPT TO:<internal email ID>
250 2.1.5 Recipient OK
DATA
354 Start mail input; end with <CRLF>.<CRLF>
SUBJECT:Hello World

This is a test message

Thanks,
John A.

. <Dot to end the email>
Copy
Check if ISP Public IP Address is banned
When you are sending an email using Telnet and if you get a message saying that your sending IP is banned. Then you need to unblock / remove your IP from banned list so that Devices on your network can send email.
Check if ISP Public IP Address is banned using Telnet
To remove your ISP Public IP Address from banned list, you need to login on https://senders.office.com and type your email ID and ISP Public IP Address of your organization. Follow the instuctions on the site to get your IP De-listed. This may take from 30 minutes to couple of hours to unblock your IP.
After you get your IP De-listed from https://senders.office.com. Try to send an email using Telnet again. This time if your IP is successfully de-listed, the recipient should receive the email.
Check if ISP Public IP Address is banned using Telnet
Test email has been received successfully.
Test email received using Telnet
Delisting / Unblock of ISP Public IP on Spamhaus.org
When you are sending an email using Telnet and if you get a message saying that service unavailable, Client host <your ISP Public IP address> blocked using Spamhaus. You need to visit the URL https://www.spamhaus.org/query/ip/<ISP Public IP Address> to get your IP De-listed.
Delisting / Unblock of ISP Public IP on Spamhaus.org
How to unblock your ISP Public IP on spamhaus.org
Please follow below steps to unblock your ISP Public IP from spamhaus.org.
Once you land on https://www.spamhaus.org/query/ip/<ISP Public IP Address> site. Click on Show details and then click on “I am running my own mail server“.
Delisting / Unblock of ISP Public IP on Spamhaus.org
Select I am running my own mail server and clicon on Next steps.
Delisting / Unblock of ISP Public IP on Spamhaus.org
Complete the form for unblocking your ISP Public IP. Provide a Name, Email Address and Provide details regarding the issue. Once you complete this form. click on Submit button.
Delisting / Unblock of ISP Public IP on Spamhaus.org
Form has been submitted. You can now wait for email verification link from Spamhaus.org.
Delisting / Unblock of ISP Public IP on Spamhaus.org
Below is the email I received to verify my email address. Click on the link in the email for Email Verification.
Delisting / Unblock of ISP Public IP on Spamhaus.org
Delisting has been successful. You can now try to use Telnet to send a test email to confirm email delivery issue has been rectifed. You can also check the Device / Printer / application to confirm if its able to send the email now.
Delisting / Unblock of ISP Public IP on Spamhaus.org
Conclusion
In this blog post, we have seem how to setup SMTP Relay in Office 365. There are three ways to configure it. But the most recommended option is Office 365 SMTP Relay Method. Second best method is Direct Send method which can be used if you do not have the requirements to send the emails to External recipients like gmail, yahoo etc.
Third method which is least recommended is SMTP Auth Submisson method. As It requires a licensed mailbox and SMTP AUTH to be enabled for that mailbox. There is a cost associated with licensed mailbox and Microsoft does not recommend SMTP AUTH to be enabled.
We have also see the troubleshooting steps in case of email delivery issues. These troubleshooting steps helped me fixed issues while working on Office 365 relay for Multiple clients.
[German]Since Monday, October 17, 2022, many Metro stores worldwide have been struggling with severe IT problems. I had already suspected a cyber attack on the Metro Group in a post and I had reports from Austria, from France as well as comments from German Metro customers as well as employees. However, a cyber attack remained unconfirmed so far. Now Metro AG has confirmed such an attack to heise – and on its website.
Advertising
Metro Group with IT problems
I had already reported about the IT problems at Metro Group in the blog post Cyber attack on Metro AG or just a IT break down? Austria, France, German (and more countries?) affected. Since Monday, October 17, 2022, Metro wholesales stores have been struggling with massive IT problems. No invoices or daily passes could be issued and online orders had also disappeared, Metro customers reported. A blog reader had provided me with the following photo of a Metro notice board.
Notification about IT disruption at a Metro wholesale store
The suspicion of a cyber attack has not been confirmed by company spokespersons till today (October 21, 2022). But I have had reports from German blog readers, reporting IT issues since days and some people told me, it’s a cyber attack as a root cause.
Not only Austria and France are affected, but Metro AG worldwide. In Germany, too, the same problem has existed since last Monday. No more stock or prices can be updated or checked in the store. The checkout system is still working but also sluggishly, resulting in long lines. If you want to reserve something digitally, that doesn’t work either.
One reader noted that from what he observed, the IT problems have been going on since Friday afternoon (October 14, 2022). A reader informed me on Facebook that their email systems had delivered a 442 connection Failed-Error when communicating with the Metro mail system last Monday. By the afternoon of October 19, 2022, communication with the Metro Group email system was working again – so something is happening.
Advertising
Metro confirms cyber attack
First a speaker from Metro AG confired to German IT magazine heise a cyber attack on it’s IT systems. After searching the Metro AG site today, I finally found the following statement. It says (translated in English):
Metro cyber attack confirmation (addenum: here is an English version)
T-Security Incident at METRO
METRO/MAKRO is currently experiencing a partial IT infrastructure outage for several technical services. METRO’s IT team, together with external experts, immediately launched a thorough investigation to determine the cause of the service disruption. The latest results of the analysis confirm a cyber attack on METRO systems as the cause of the IT infrastructure outage. METRO AG has informed all relevant authorities about the incident and will of course cooperate with them in every possible way.
During the operation of METRO stores and the regular availability of services, disruptions and delays may occur. The teams in the stores have quickly set up offline systems to process payments. Online orders via the web app and online store are being processed, but there may be individual delays here as well.
We will continue to analyze and monitor the situation intensively and provide updates if necessary. METRO sincerely apologizes for any inconvenience this incident may cause to customers and business partners.
So they confirmed just a cyber attack, but stay tight lipped about the details. No information, whether it’s a ransomware infection nor about a possible attack vector.
Metro AG is a listed group of wholesale companies (for purchases in the gastronomy sector). Headquartered in Düsseldorf, the group employs more than 95,000 people in 681 stores worldwide, most of them in Germany. In Germany, the company mainly operates the Metro wholesale stores. Sales are 24.8 billion euros (2020).
Port Trunking, also known as LACP (Link Aggregation Control Protocol), allows you to combine multiple LAN interfaces for increased bandwidth and load balancing for multiple clients. It also provides failover capabilities to maintain network connectivity if a network port fails.
802.3ad (Dynamic Link Aggregation) is the No.5 mode according to the IEEE 802.3ad specification. It uses a complex algorithm to aggregate adapters by speed and duplex settings to provide load balancing and fault tolerance but requires a switch that supports IEEE 802.3ad with LACP mode properly configured.
Note: Your switch must support 802.3ad. Note: A NAS with multiple LAN ports is required.
Follow these steps to set up your NAS.
Log into the NAS as an administrator. Go to “Main Menu” > “Network & Virtual Switch” > “Interfaces”. Click “Port Trunking”.
Click “Add” from the pop-up window.
Select the network interfaces to use and select 802.3ad for the Port Trunking Mode.
Click the settings button beside 802.3ad.
Select a HASH policy for 802.3ad: The default setting is “layer 2 (MAC)“. This is compatible with every switch but only offers load balancing by MAC address. We recommend using “Layer 2+3 (MAC+IP)” for greater performance but you will need to check that your switch supports it.
Click “Apply” to finish.
Test Results:
The test results of before and after Port Trunking is as follows.
A Gigabit Ethernet Network
One user downloading a large video file from the NAS:
One user uploading a large video file to the NAS:
Two users downloading a large video file from the NAS at the same time: The throughput of the NAS reaches 108~110 MB/s (downloading):
Two users upload a large video file to the NAS at the same time: The throughput of NAS reaches 102~104 MB/s (uploading):
Aggregating two Gigabit Ethernet Networks on the NAS
One user downloads a large video file from the NAS:
One user uploads a large video file to the NAS:
Two users download a large video file from the NAS at the same time: The throughput of NAS reaches 210~223 MB/s (downloading):
Two users upload a large video file to the NAS at the same time: The throughput of NAS reaches 200~210 MB/s (uploading):
As displayed by the test results, Port Trunking can increase bandwidth on a QNAP NAS . But please note the following:
Port Trunking cannot break the speed limit of a single Ethernet device, but it offers a sufficient amount of bandwidth for multiple users connecting at the same time. For example, if two 1Gb NICs are used for Port Trunking, the aggregated network bandwidth will be increased to 2Gb, but the network speed will remain 1Gb.
Available system resources and the maximum read/write speeds of the storage devices on the NAS will greatly influence the overall bandwidth.
Last modified date: 2022-10-05 Applicable Products QTS QuTS hero SED Usage Can I use different types of SEDs to create a SED secure storage pool? Yes, you can use different types of SEDs in the same SED secure storage pool.
Can I use SEDs in a normal storage pool? Yes, normal storage pools can contain SEDs. However, the SEDs would function as regular disks without self-encryption.
When creating a normal storage pool, make sure the option Create SED secure storage pool is deselected.
If I use SEDs in a normal storage pool, will the pool be locked after the NAS restarts? No, the system does not lock normal storage pools when the NAS restarts. SEDs in a normal storage pool function as regular disks without self-encryption.
Only SED secure storage pools are locked after the NAS restarts (unless the setting Auto unlock on startup is enabled).
SED Status Why is my SED’s disk status “Unlocked” even though I never activated its self-encrypting function? In QTS versions earlier than 5.0.1 and QuTS hero versions earlier than h5.0.1, only SEDs of the type TCG Opal are supported.
Starting from QTS 5.0.1 and QuTS hero h5.0.1, TCG Enterprise SEDs are also supported.
If you used any TCG Enterprise SEDs to create a normal storage pool when your NAS was running QTS versions earlier than 5.0.1 or QuTS hero versions earlier than h5.0.1, and then later upgraded your operating system to QTS 5.0.1 (or later) or QuTS hero h5.0.1 (or later), the NAS will now indicate their disk status as “Unlocked”. This does not affect the status or performance of the storage pool, and the SEDs will continue to function as regular disks.
If a TCG Enterprise SED has never been used in a storage pool, and the disk status has changed to “Unlocked” after you upgraded the NAS operating system to QTS 5.0.1 (or later) or QuTS hero h5.0.1 (or later), you can use the SED Erase function to reset the disk to factory default, and then activate self-encryption on the disk by setting an encryption password.
Resetting to Factory Default What can I do if I cannot find the PSID on my SED? SEDs usually have a PSID (physical secure ID) labeled on the disk. If you cannot find the PSID on the disk, please contact the disk manufacturer for assistance.
Why doesn’t the PSID work when I try to reset my SED? If you are unable to reset your SED to factory default using its PSID (physical secure ID), please contact the disk manufacturer for technical assistance.
If the disk manufacturer is unable to help you reset the SED, you can still use the SED as a regular disk.
A self-encrypting drive (SED) is a drive with encryption hardware built into the drive controller. SEDs automatically encrypt all data as it is written to the drive and decrypt all data as it is read from the drive. Data stored on SEDs are always fully encrypted by a data encryption key, which is stored on the drive’s hardware and cannot be accessed by the host operating system or unauthorized users. The encryption key can also be encrypted by a user-specified encryption password that allows the SED to be locked and unlocked.
Because encryption and decryption are handled by the drive, accessing data on SEDs does not require any extra CPU resources from the host device. Data on SEDs also become inaccessible if the SEDs are physically stolen or lost. For these reasons, SEDs are widely preferred for storing sensitive information.
You can use SEDs to create SED secure storage pools in QTS and QuTS hero, and SED secure static volumes in QTS. You can also use SEDs to create regular storage pools or volumes, but the self-encrypting function on the SEDs would remain deactivated.
Why Use SEDs?
Data storage security is an extremely important matter for many enterprises and organizations, especially when they store personal data such as credit card information and identity card numbers, or industry secrets such as product blueprints and intellectual property.
If a data leak occurs, the enterprise or organization can face serious consequences. Apart from sensitive information being exposed, a data leak can also result in customer and client damages, revenue loss, and legal penalties.
Because SEDs use hardware-based full disk encryption, both the encryption and decryption processes occur in the disk hardware. This separation from the host operating system makes hardware encryption more secure than software encryption. Moreover, unlike software encryption, hardware encryption does not require extra CPU resources. If a SED is physically stolen or lost, it becomes practically impossible to obtain intelligible information from the SED.
For these reasons, SEDs are often a specified data security requirement in bidding processes for government agencies, health care institutions, and financial and banking services.
SED Types
QNAP categorizes SED types according to the industry-standard specifications defined by the Trusted Computing Group (TCG). Supported SED types are listed in the following table.
To check the SED type of an installed SED, go to Storage & Snapshots > Storage > Disks/VJBOD and click a SED.
SED Type
Supported
TCG Opal
Yes
TCG Enterprise
Yes, in QTS 5.0.1 (or later) and QuTS hero h5.0.1 (or later)
SED Storage Creation
You can use SEDs to create SED secure storage pools in QTS and QuTS hero, and SED secure static volumes in QTS. For details, see the corresponding QNAP operating system user guide.
Action
Details
Create a SED secure storage pool in QTS
The latest version of the QTS User Guide is available at https://www.qnap.com/go/doc/qts/.You can find the relevant topic by searching “self-encrypting drives”.
Create a SED secure static volume in QTS
Create a SED secure storage pool in QuTS hero
The latest version of the QuTS hero User Guide is available at https://www.qnap.com/go/doc/quts-hero/.You can find the relevant topic by searching “self-encrypting drives”.
SED Management
SED Storage Pool and Static Volume Actions
To perform the following actions, go to Storage & Snapshots > Storage > Storage/Snapshots, select a SED pool or volume, click Manage, then select Actions > SED Settings.
Action
Description
Change SED Pool PasswordChange SED Volume Password
Change the encryption password.Warning:Remember this password. If you forget the password, the pool or volume will become inaccessible and all data will be unrecoverable.You can also enable Auto unlock on startup.This setting enables the system to automatically unlock and mount the SED pool or volume whenever the NAS starts, without requiring the user to enter the encryption passwordWarning:Enabling this setting can result in unauthorized data access if unauthorized personnel are able to physically access the NAS.Tip:In some earlier versions of QTS and QuTS hero, this setting is known as Save encryption key.
Lock
Lock the pool or volume. All volumes/shared folders, LUNs, snapshots, and data in the pool or volume will be inaccessible until it is unlocked.
Unlock
Unlock a locked SED pool or volume. All volumes/shared folders, LUNs, snapshots, and data in the pool or volume will become accessible.
Disable SED Security
Remove the encryption password and disable the ability to lock and unlock the pool or volume.
Enable SED Security
Add an encryption password and enable the ability to lock and unlock the pool or volume.
Removing a Locked SED Storage Pool or Static Volume
Go to Storage & Snapshots > Storage > Storage/Snapshots.
Select a locked SED storage pool or static volume.Note:Static volumes are only available in QTS.
Click Manage, and then click Remove.The Removal Wizard window opens.
Select a removal option.OptionDescriptionUnlock and remove pool, data, and saved keyThis option unlocks the SED disks in the storage pool or static volume, and then deletes all data. The storage pool or static volume is removed from the system.You must enter the encryption password.Remove pool without unlocking itThis option removes the storage pool or static volume without unlocking the disks. The SED disks cannot be used again until you perform one of the following actions:
Unlock the disks. Go to Disks/VJBOD, click Recover, and then select Attach and Recover Storage Pool.
Erase the disks using SED erase.
Click Apply.
The system removes the locked SED storage pool or static volume.
Migrating a SED Secure Storage Pool to a New NAS
The following requirements apply when migrating a storage pool to a new NAS.
The two NAS devices must both be running QTS, or both be running QuTS hero. Migration between QTS and QuTS hero is not possible.
The version of QTS or QuTS hero running on the new NAS must be the same or newer than the version running on the original NAS.
On the original NAS, go to Storage & Snapshots > Storage > Storage/Snapshots.
Select a SED secure storage pool.
Click Manage.The Storage Pool Management window opens.
Click Action, and then select Safely Detach Pool.A confirmation message appears.
Click Yes.The storage pool status changes to Safely Detaching…. After the system has finished detaching the pool, it disappears from Storage & Snapshots.
Remove the drives containing the storage pool from the NAS.
Install the drives in the new NAS.
On the new NAS, go to Storage & Snapshots > Storage > Disks/VJBOD .
Click Recover, and then select Attach and Recover Storage Pool.A confirmation message appears.
Enter the encryption password.You must enter this password if you are using self-encrypted drives (SEDs) with encryption activated.
Click Attach.The system scans the disks and detects the storage pool.
Click Apply.
The storage pool appears in Storage & Snapshots on the new NAS.
Erasing a Disk Using SED Erase
SED Erase erases all of the data on a locked or unlocked SED disk and removes the encryption password.
Go to Storage & Snapshots > Storage > Disks/VJBOD.
Select a SED disk.
Click Actions, and then select SED Erase.The SED Erase window opens.
Enter the disk’s Physical Security ID (PSID).Tip:The PSID can usually be found on the disk label.If you cannot find the PSID, contact the disk manufacturer.
Click Apply.
The system erases all data on the SED.
SED Status
To view the status of a SED, go to Storage & Snapshots > Storage > Disks/VJBOD and click an installed SED.
SED Status
Description
Uninitialized
The SED is uninitialized. Drive encryption is deactivated.
Unlocked
The SED is initialized and unlocked. Drive encryption is activated. Data on the SED is encrypted and accessible.
Locked
The SED is initialized and locked. Drive encryption is activated. Data on the SED is encrypted and inaccessible.
Blocked
The SED is blocked for security reasons. The drive cannot be initialized.Note:To unblock the SED, reinsert the disk or erase the disk using SED Erase. For details, see Erasing a Disk Using SED Erase.
Glossary
Gloss
Definition
Auto unlock on startup
Setting that allows the system to automatically unlock a SED secure storage pool or SED secure static volume after the NAS restarts
Encryption key
A unique, randomized cryptographic string physically stored within the hardware in self-encrypting drives (SEDs) for encrypting data written to the drive and decrypting data as it is read from the drive
Encryption password
A user-defined password for locking and unlocking a SED secure storage pool or static volume
PSID (Physical Secure ID)
A unique key usually labeled on a self-encrypting drive (SED) for resetting the drive to factory default
SED Erase
Storage & Snapshots function for erasing all data on a self-encrypting drive (SED) and removing the encryption password
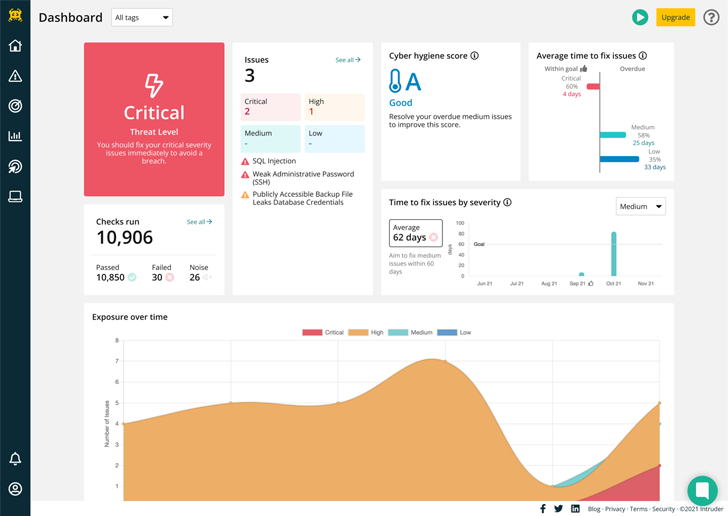
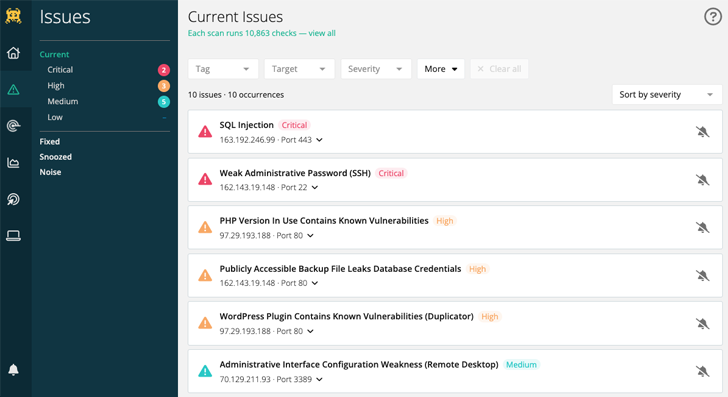
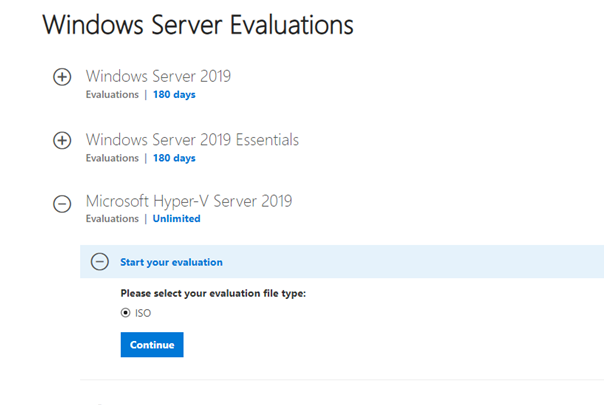

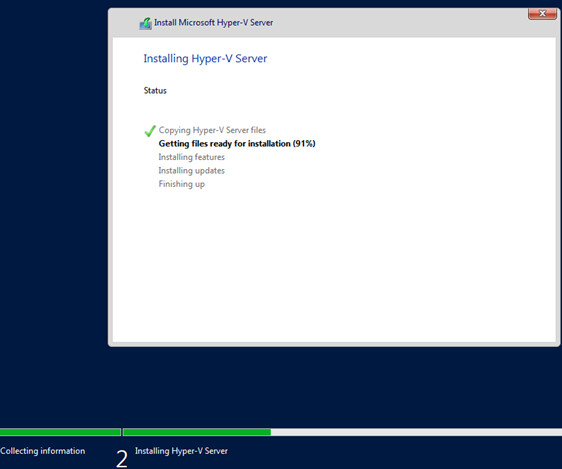


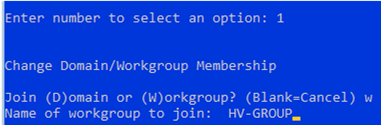
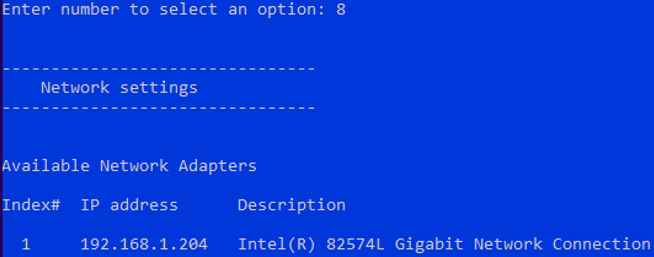
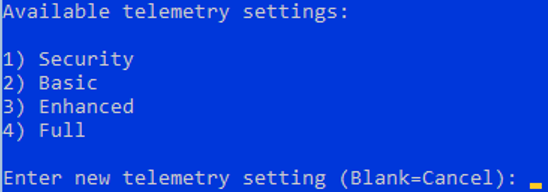
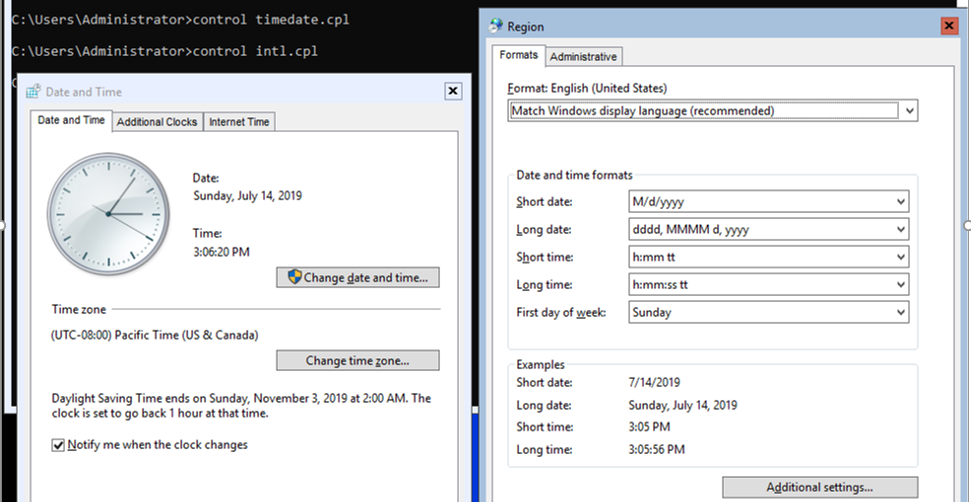

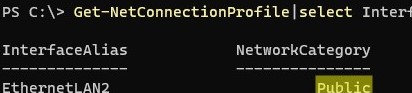
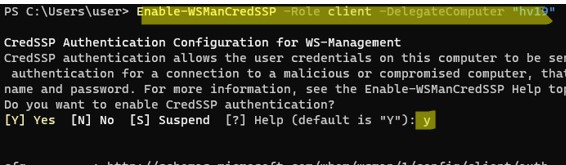
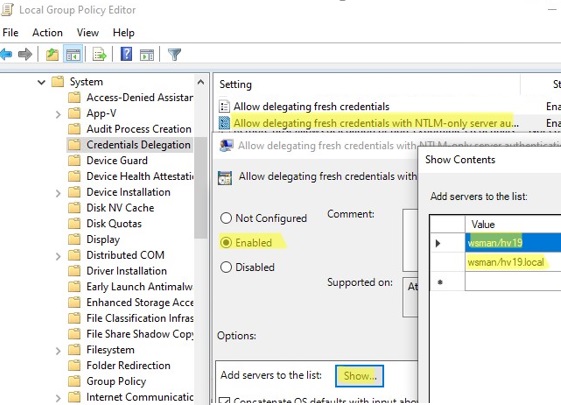
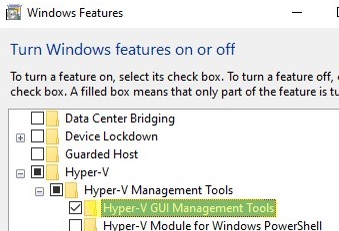
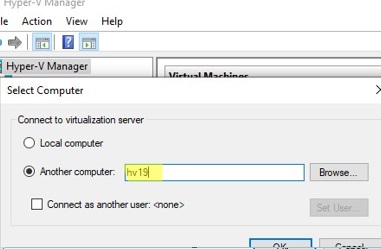
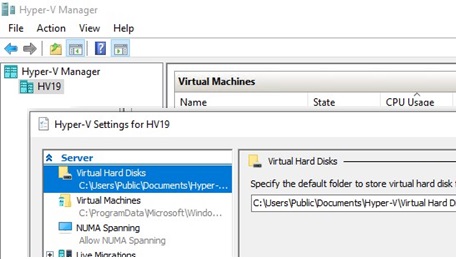
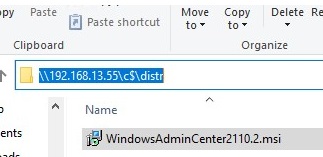
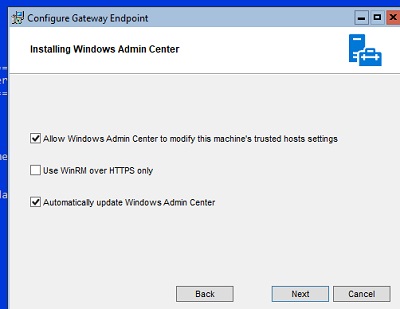
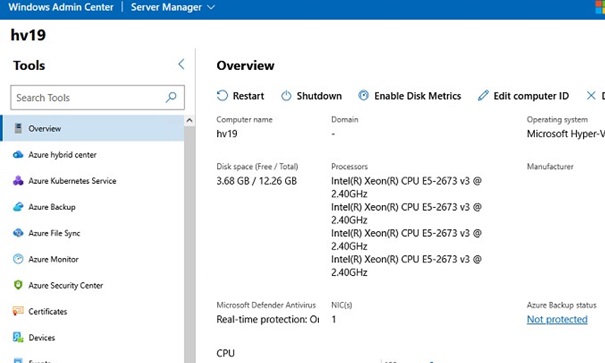
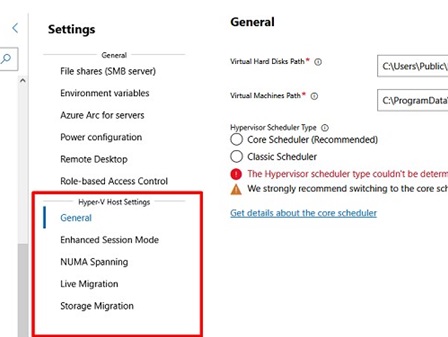
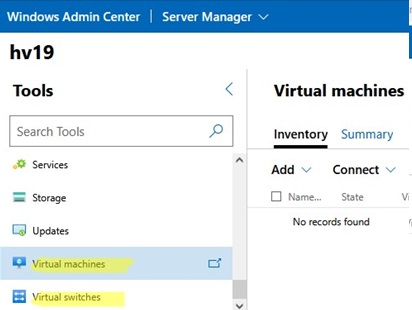

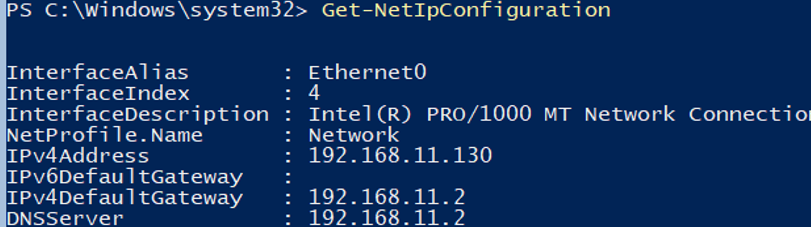
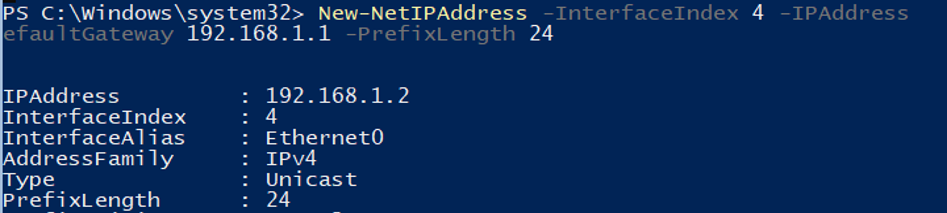
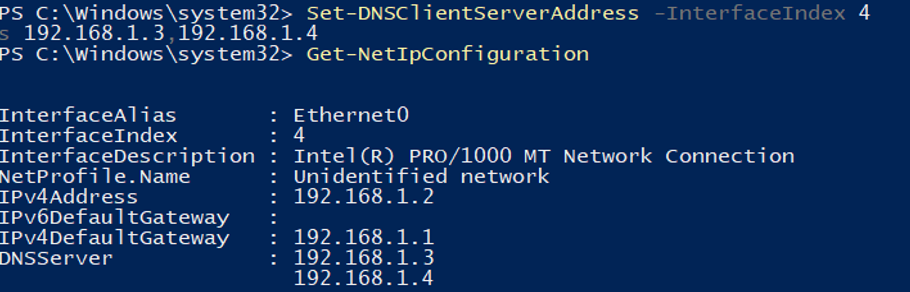


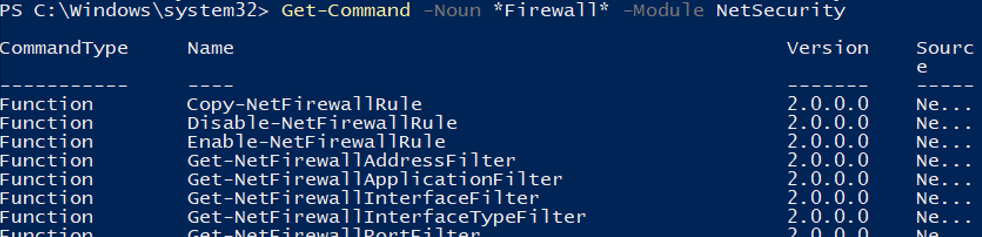


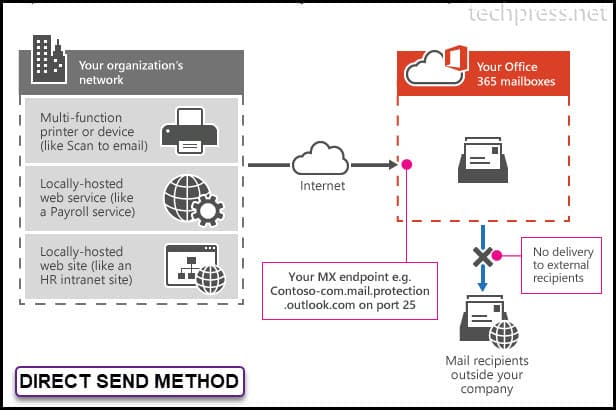
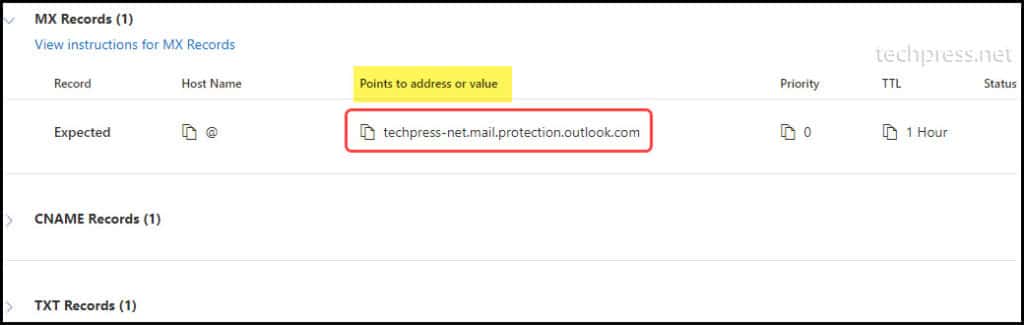
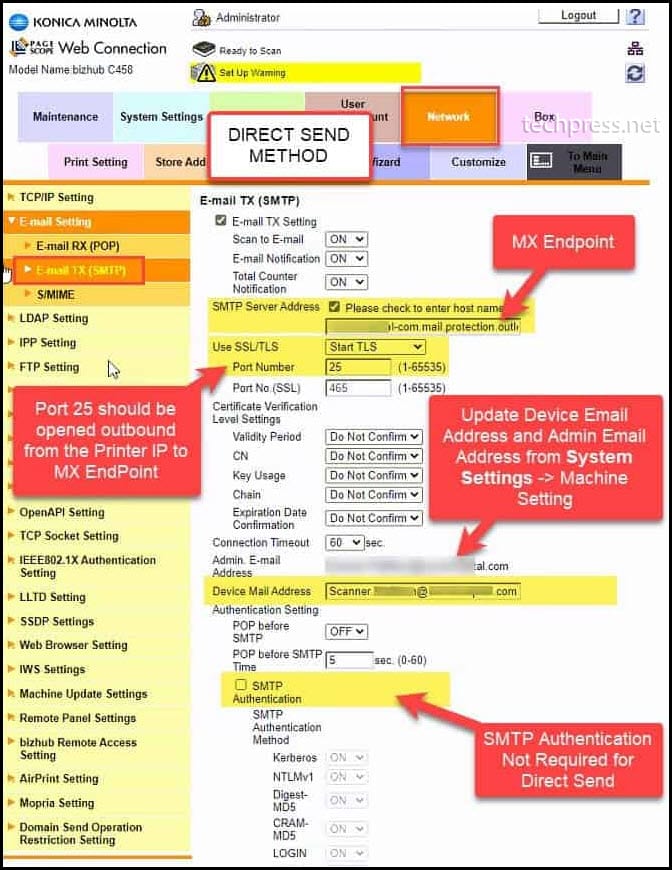
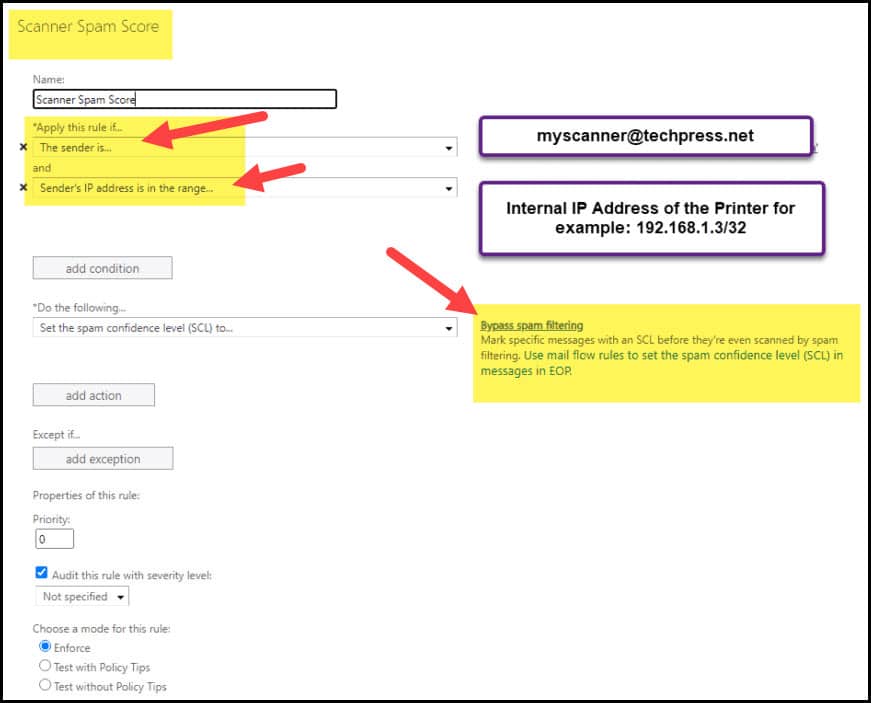
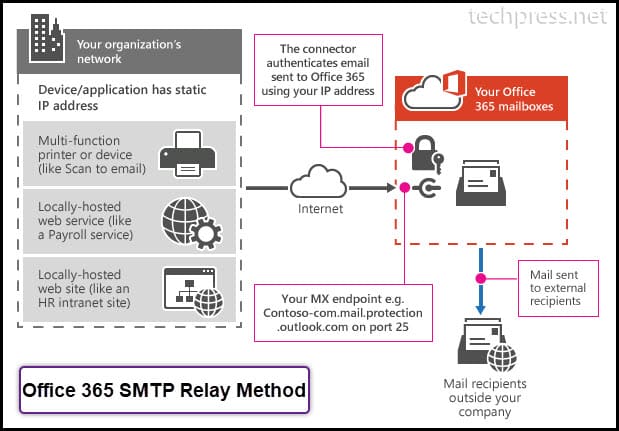
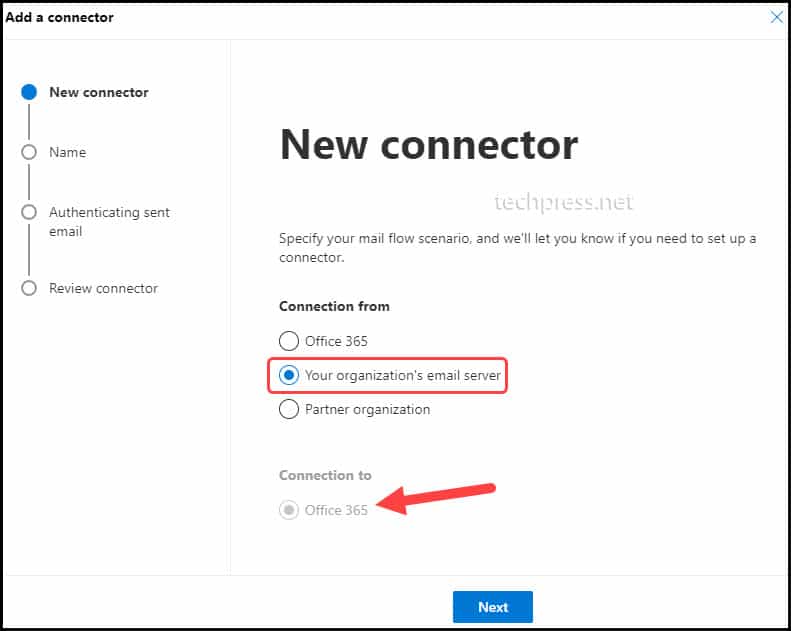
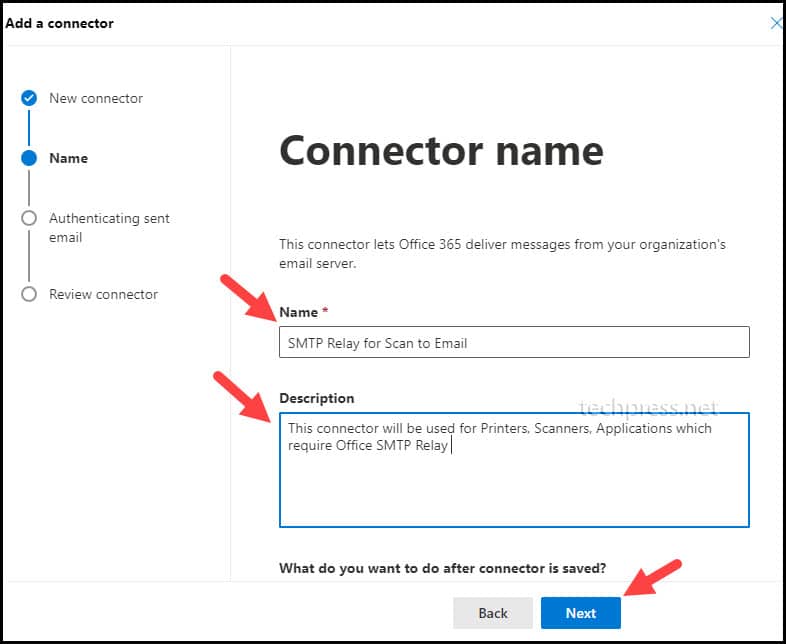
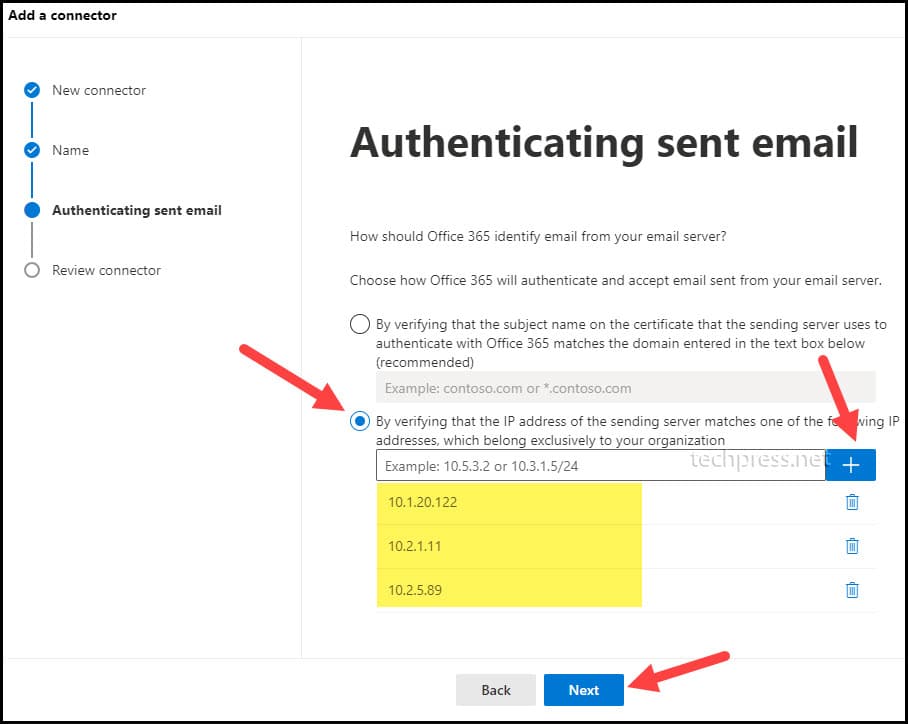
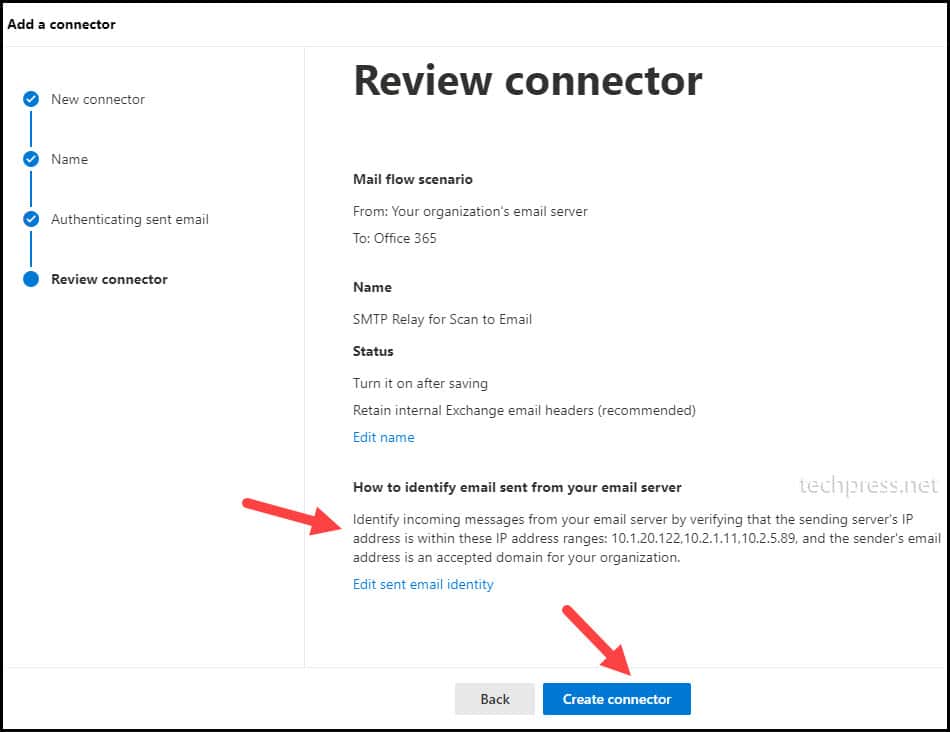
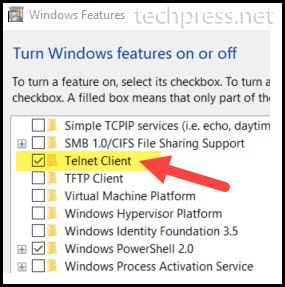


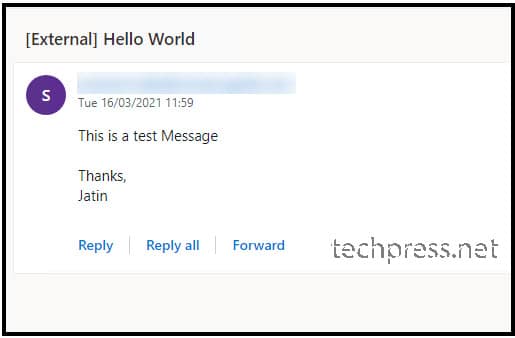
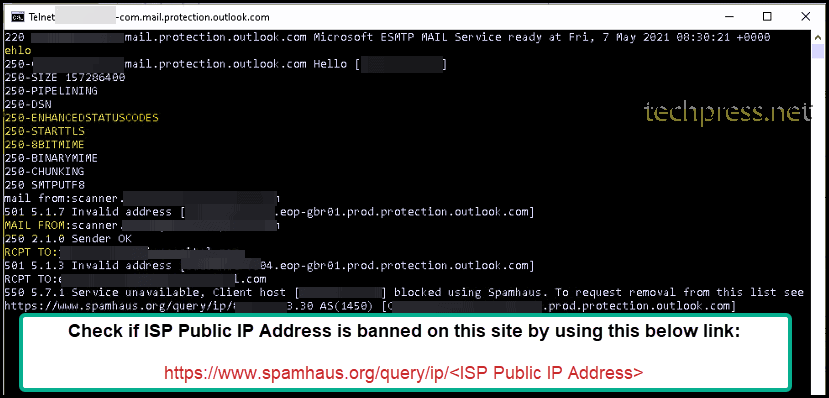

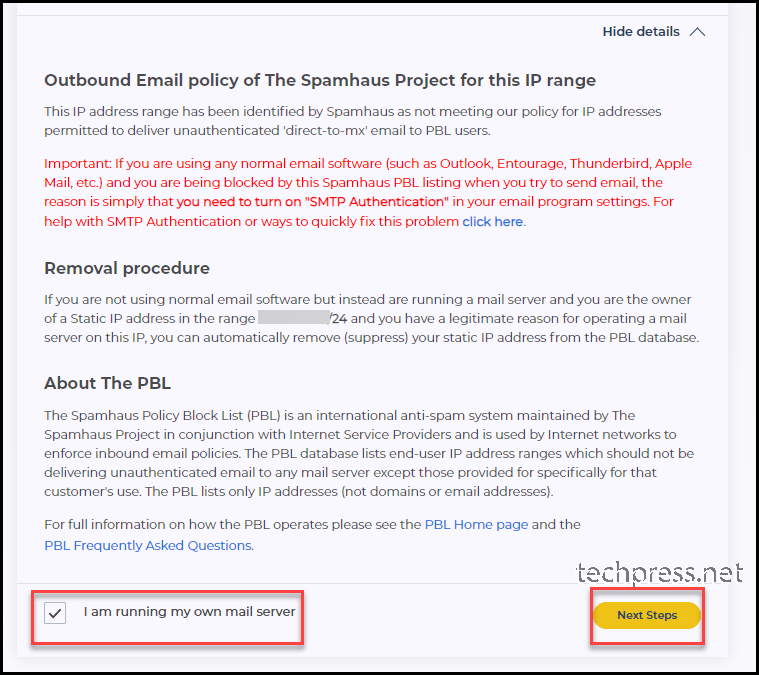
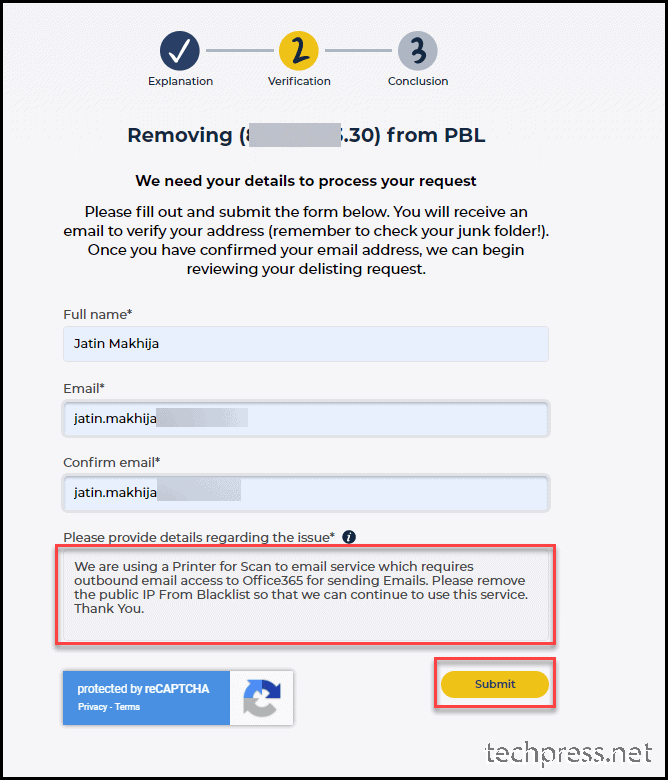

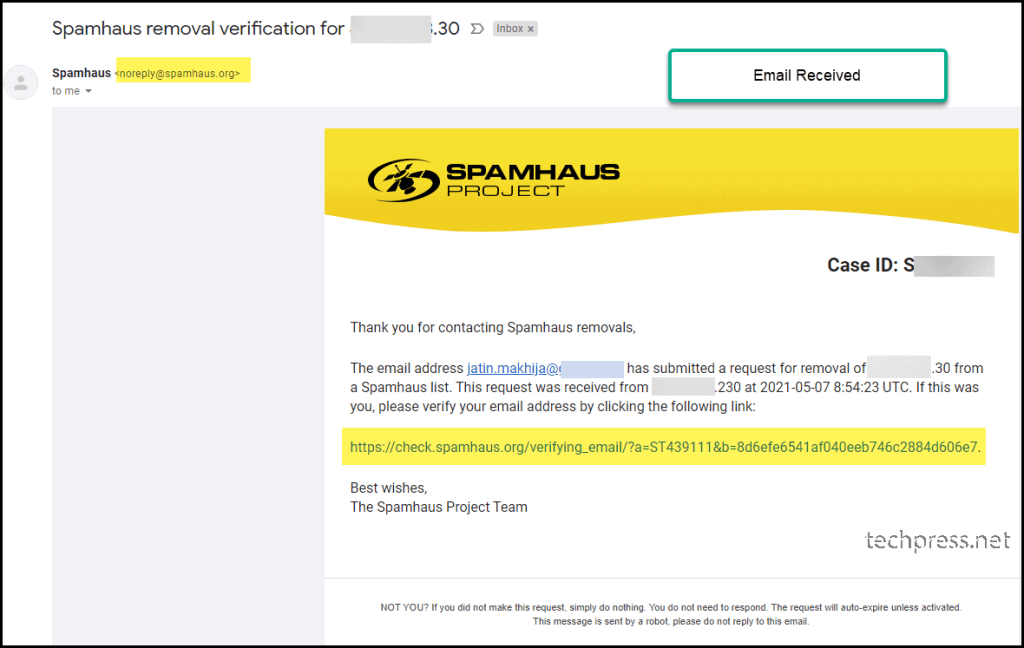
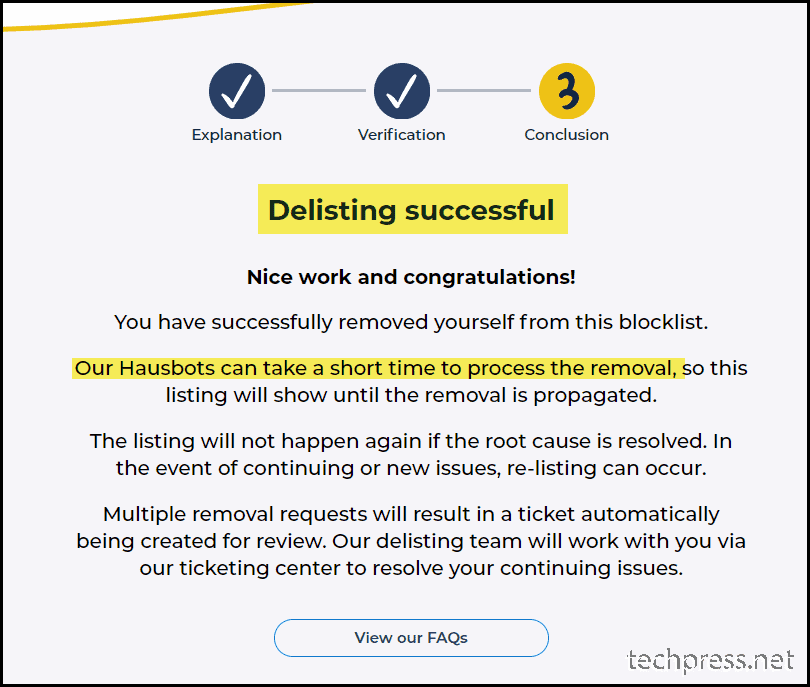


 A confirmation message appears.
 If you cannot find the PSID, contact the disk manufacturer.