In this guide, I will show you how to deploy Dell SupportAssist using SCCM (ConfigMgr). We’ll get the latest version of the Dell SupportAssist tool, create an application in SCCM, and then deploy it to our computers.
According to Dell, the SupportAssist is an automated proactive and predictive support solution for computers and tablets. SupportAssist also evaluates the health of your servers, storage, and networking devices to eliminate downtime before it even starts.
When you purchase brand-new laptops and desktop computers from Dell, SupportAssist is already preinstalled. SupportAssist is installed on most Dell PCs with Windows 10 and Windows 11. You can find it by searching for “SupportAssist” in your Windows start menu. Home users can use the Dell SupportAssist tool to update drivers, including the system BIOS, and resolve problems.
Configuration Manager is the best choice for Dell SupportAssist deployment on multiple computers. You can deploy the Dell Support Assist to client computers and allows users to install it via Software Center. An added advantage of Dell SupportAssist deployment using SCCM is Dell provides .msi installer for application deployment for enterprises.
If you are using Configuration Manager to manage Dell laptops, you can use the application model to deploy Dell SupportAssist software to client computers using SCCM. The application can also be added to a task sequence, which lets you use the bare-metal deployment scenarios to install Dell SupportAssist on new laptops.
Recommended Article: Deploy Windows 11 22H2 using SCCM | Configuration Manager
What is Dell SupportAssist Tool?
Let’s understand what exactly is the Dell SupportAssist tool and identify its features. The SupportAssist by Dell is the smart technology, available on your PC that will keep it running like new by removing viruses, detecting issues, optimizing settings and telling you when you need to make updates.
With SupportAssist tool, you can perform the following
- Update your drivers and applications for peak PC performance
- Remove virus and malware infested files before then can harm your system.
- Scan your PCs hardware to find issues and deliver proactive and predictive support.
- Clean files, tune performance, and adjust network settings to optimize speed, storage space and stability.
The Dell SupportAssist also has an OS Recovery environment that enables you to diagnose hardware issues, repair your computer, back up your files, or restore your computer to its factory state. The Dell Support Assist OS Recovery is only available on certain Dell laptops with a Microsoft Windows 10/11 operating system that was installed by Dell.
Download Dell SupportAssist MSI Installer
Dell provides the .msi installer for SupportAssist and the same installer can be used for deployment with SCCM. You can download the Dell SupportAssist .msi installer from the following direct download link. Note that this is an offline installer and will include all the installation files without having the system connect to internet to download further files.
Along with Dell SupportAssist msi installer, I recommend you to download a logo for the application. We will assign this logo to the Dell SupportAssist application in SCCM. Copy both the installer and logo to a separate folder on SCCM server or shared folder. We will reference the same folder when we create the Dell SupportAssist application in ConfigMgr.
Recommended Article: How to Import Dell CAB Drivers into SCCM
Dell SupportAssist .MSI Install and Uninstall Commands
If you want to manually install the Dell SupportAssist using command line, you can download the .msi installer and install it with following commands.
The Dell SupportAssist silent install command is as follows:
msiexec /i "SupportAssistx64-3.10.4.18.msi" /q
To uninstall the Dell SupportAssist silently using command line, run the below command.
msiexec /x {E0659C89-D276-4B77-A5EC-A8F2F042E78F} /qEach MSI installer has a unique product code and this can be seen under the installer properties. Configuration Manager uses the product to detect if the Dell SupportAssist application already exists on system. If you are curious to know the detection method for Dell SupportAssist application, SCCM basically uses the MSI product code: {E0659C89-D276-4B77-A5EC-A8F2F042E78F} of the installer.
After you have created the Dell Support Assist application in SCCM, go to the Application deployment properties and switch to Detection Method tab. Here you can see the detection method used for Dell SupportAssist application. We see the MSI product code being used for the application detection.

Create Dell SupportAssist Application in SCCM
Let’s create a new application for the Dell SupportAssist in SCCM.
- Launch the Configuration Manager console.
- Go to Software Library > Overview > Application Management.
- Right-click Applications and select Create Application.

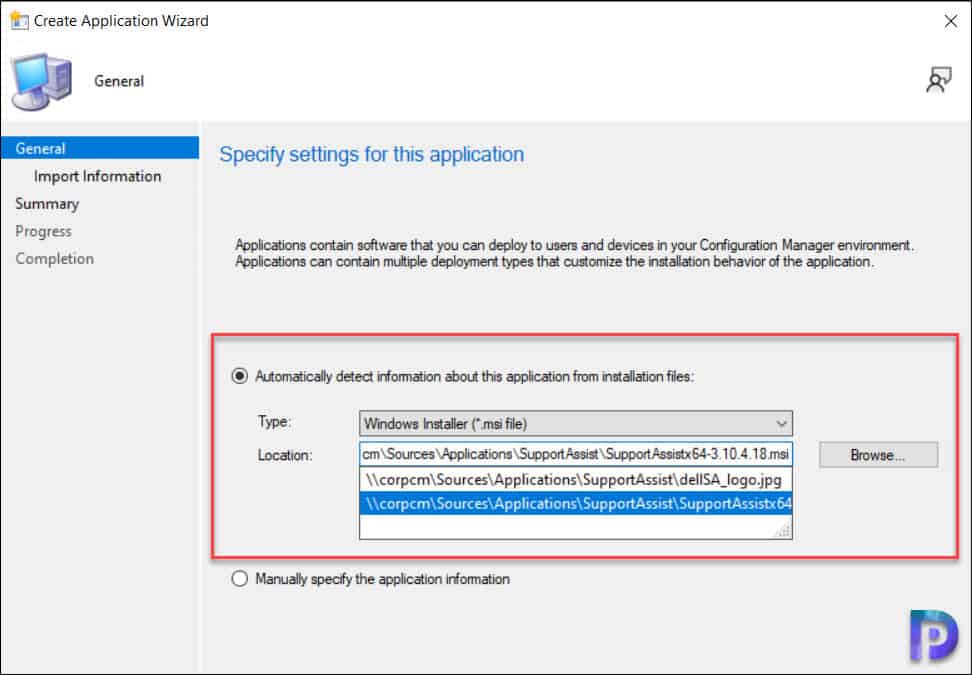
On the General window, select Automatically detect information about this application from installation files. The application type should be Windows Installer (*.msi file) and specify the location of the Dell SupportAssist msi file. Click Next.

With MSI installers, the Configuration Manager can import information such as product code, install commands, uninstall commands, detection methods etc. In the below screenshot, we see the product information has been populated from Dell SupportAssist MSI installer and imported into SCCM.
Application name: Dell SupportAssist
Publisher:
Software version:

Deployment type name: Dell SupportAssist - Windows Installer (*.msi file)
Product Code: {E0659C89-D276-4B77-A5EC-A8F2F042E78F}
Installation behavior: Install for system

Content location: \\corpcm\Sources\Applications\SupportAssist\
Number of files: 2
Content files:
dellSA_logo.jpg
SupportAssistx64-3.10.4.18.msi
In the General Information tab, enter the basic information about the Dell Support Assist application. For example, you can specify the application name, publisher details, software version etc. The details that you specify here will be displayed to users when the Dell SupportAssist application is selected in Software Center.
The Configuration Manager also populates the silent installation command for Dell SupportAssist from the .msi installer. You may modify the existing command and add additional parameters supported for .msi installation.
Silent Command Line for Dell SupportAssist installation = msiexec /i "SupportAssistx64-3.10.4.18.msi" /q

Review the Support Assist application settings on Summary window and click Next. On the Completion tab, click Close button to exit the create application wizard.

This completes the steps to create application for Dell SupportAssist in SCCM. After this step, the application will appear in the Application node of Configuration Manager console.
Specify an Icon for Dell SupportAssist Application
Configuration Manager lets you specify a logo for Application via the Application Properties and this logo appears along with the application in Software Center. If you are looking to customize software center, use the following guide to customize software center appearance and branding. Assigning an application logo is not mandatory, but it helps users identify the application quickly in Software Center.
The newly created Dell SupportAssist application is located in Software Library\Overview\Application Management\Applications of Configuration Manager console. Right-click on Dell SupportAssist application and select Properties.

In the Application properties window, choose the Software Center tab. Click on Browse and select an icon for Dell SupportAssist and click Apply and OK.

Deploy Dell SupportAssist using SCCM | ConfigMgr
In this section, we will look at the steps to deploy the Dell SupportAssist using SCCM (ConfigMgr). The deploy software wizard contains steps where you can distribute the content to DP’s along with the application deployment.
When you perform Dell SupportAssist deployment using SCCM, you deploy it either to a device collection or user collection. Typically, applications are deployed to device collections, and we will use the same approach here. You can create device collections for Windows 10 and Windows 11 computers using the following guides.
- Create Windows 11 device collection in SCCM
- Create Windows 10 device collection in Configuration Manager
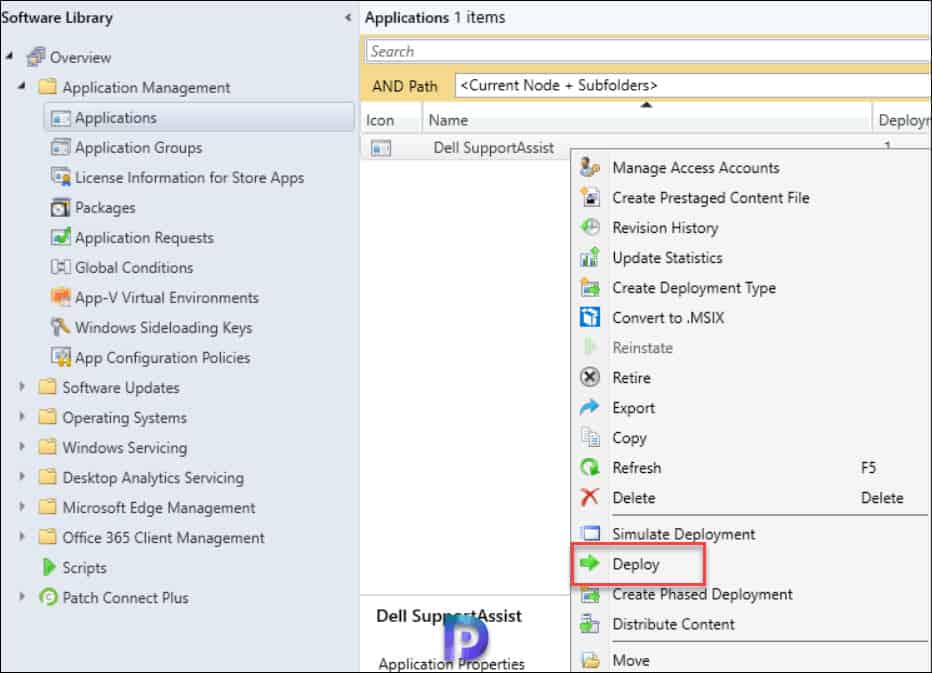
Once the device collections are ready, you can deploy the application using the deploy software wizard. To deploy the Dell SupportAssist application, launch the Configuration Manager console. Navigate to Software Library\Overview\Application Management\Applications. Right-click Dell SupportAssist application and select Deploy.

On the General page of Deploy Software Wizard, click Browse and select a device collection to which you want to deploy the Support Assist application. Click Next.

On the Content page, click Add button and specify the distribution points to which you would like to distribute the Dell Support Assist application content. You may also select distribution point groups when you have numerous distribution points. Click Next to continue.

On the Deployment Settings window, specify the settings to control the deployment. Select the Action as Install and Purpose as Available. Learn the difference between Available and Required deployment in SCCM. Click Next.

On the Scheduling tab, you can specify the schedule for the deployment. If you want to deploy the application as soon as possible, then don’t configure anything under Scheduling. Click Next.

Specify the user experience settings for the application deployment. For user notifications, select the option “Display in Software Center and show all notifications“. Click Next to continue.

In the Alerts tab, click Next. Review all the Dell SupportAssist deployment settings on Summary tab and click Next. On the Completion window, click Close.
The Dell SupportAssist application is now distributed to the select distribution points and the client machines should now have the application listed in the Software Center. This completes the steps for Dell SupportAssist deployment with Configuration Manager.

Test Dell SupportAssist Deployment on Client Computers
After you have created the Dell SupportAssist application and deployed it to device collection, it’s time to test the deployment on devices. Log in to a client computer, and launch the Software center. Click on the Applications tab and select Dell SupportAssist application. To install the application, click the Install button.

The Dell Support Assist application is now downloaded from the local distribution point server for installation. The installation commands specified during the application creation are executed. You can monitor the application installation process by reviewing the AppEnforce.log located on the client computer.
To locate the AppEnforce.log file and other important files, refer to the SCCM Log files which contains all the log files for troubleshooting issues.
“Matched exit code 0 to a Success entry in the exit codes table” confirms that the Dell Support Assist application has been installed successfully on the computer. The uninstall command that we specified during application packaging should also work fine.
+++ Starting Install enforcement for App DT "Dell SupportAssist - Windows Installer (*.msi file)" ApplicationDeliveryType - ScopeId_67D9092A-81B2-464F-8F38-4D634303C416/DeploymentType_ccf9c1b2-8d31-4cab-87e9-56c700d64d52, Revision - 1, ContentPath - C:\Windows\ccmcache\2, Execution Context - System
    Performing detection of app deployment type Dell SupportAssist - Windows Installer (*.msi file)(ScopeId_67D9092A-81B2-464F-8F38-4D634303C416/DeploymentType_ccf9c1b2-8d31-4cab-87e9-56c700d64d52, revision 1) for system.
    Prepared working directory: C:\Windows\ccmcache\2
Found executable file msiexec with complete path C:\Windows\system32\msiexec.exe
    Prepared command line: "C:\Windows\system32\msiexec.exe" /i "SupportAssistx64-3.10.4.18.msi" /q /qn
Valid MSI Package path = C:\Windows\ccmcache\2\SupportAssistx64-3.10.4.18.msi
    Advertising MSI package [C:\Windows\ccmcache\2\SupportAssistx64-3.10.4.18.msi] to the system.
    Executing Command line: "C:\Windows\system32\msiexec.exe" /i "SupportAssistx64-3.10.4.18.msi" /q /qn with user context
    Working directory C:\Windows\ccmcache\2
    Post install behavior is BasedOnExitCode	AppEnforce
    Waiting for process 3896 to finish.  Timeout = 120 minutes
    Process 3896 terminated with exitcode: 0
    Looking for exit code 0 in exit codes table.
    Matched exit code 0 to a Success entry in exit codes table

Source :
https://www.prajwaldesai.com/deploy-dell-supportassist-using-sccm/