In the last year, over a billion new Android phones were activated. Ready to join the fun, but not sure which phone is best for you? Consider one that’s loaded with the best of Google, that can fold to fit in your pocket or fit your budget, or has a camera that can capture any shot. Regardless of which phone you choose, making the switch from iPhone to Android has never been easier.
Starting today, support for the Switch to Android app on iOS is rolling out to all Android 12 phones, so you can move over some important information from your iPhone to your new Android seamlessly. Once you’ve got your new Android phone, follow our easy setup instructions to go through the data transfer process. You’ll be prompted to connect your old iPhone with your new Android phone either with your iPhone cable or wirelessly via the new Switch to Android app. The instructions will walk you through how to easily transfer your data like your contacts, calendars and photos over to your new phone.
Once you’re all set up, you can get started on your new Android device by checking out our favorite features.
Express yourself in new ways: With the Messages app and Gboard, it’s easy and enjoyable to send messages — especially between friends who use Android. Group chats, high-quality photo and video sharing, read receipts and emoji reactions are all available thanks to RCS, and thousands of emoji mashup stickers are there to help you express your feelings. (Rest assured, your iPhone friends will still receive your messages as well.)
Video chat with anyone, anywhere: If your friends and family have Google accounts, it’s easier than ever to video chat with Google Meet on Android. Or if you prefer FaceTime, you can still use that in the latest version of Chrome. Or with apps like WhatsApp in Google Play, you can chat with whomever you like for free around the globe. Android has so many options, it’s easy to stay connected with those that matter to you the most.
Tune into your favorite music: Catch up on the latest hits with your preferred streaming service available on Android. And if you had previously purchased and downloaded music on your iPhone, your music will transfer over to your Android phone, as long as it’s digital rights management (DRM)-free. Your purchases and downloaded content from Apple Music will still be accessible on your new Android device by downloading the Apple Music app.
Your favorite apps and more: With Google Play, you’ll find the apps you already use and love, and quickly start to discover so many more. Looking to plan an outdoorsy getaway? Hipcamp will help you book your next camping spot, Skyview Lite will be your stargazing guide to the sky, and AllTrails will help you find a hike that’s perfect for you and your friends. A summer of fun made possible with your new Android.
A privacy-first approach: On your new phone, your data is proactively protected by Android. Android helps defeat bad apps, malware, phishing and spam, and helps keep you one step ahead of threats. Messages, for example, helps protect people against 1.5 billion spam messages per month. Android also provides timely recommendations, like prompting you to select your location-sharing preferences when opening an app to help you make the best decisions for your privacy. Read more about how to keep your data private and secure.
More devices that work better together: Choose from a wide variety of Chromebooks, Wear OS smartwatches, Google TV devices and Fast Pair supported headphones, like Pixel Buds, that work better together with your phone. In fact, some of your Apple products will still work with your Android device, like AirPods.
Get more done with Google apps and services: Traveling on vacation and can’t read the local signs? Scan the text for instant translation so you can get to your destination quickly. Editing a Google Doc on your laptop, but need to finish on the go? You can easily keep work going on your Android phone, too. Google prides itself on being helpful, and the best of Google is built into Android phones.
Share music, photos and more across devices: Nearby Share lets you easily share music, photos and other files between your nearby Android and Chrome OS devices. To share content like photos and videos with non-Android devices, you can easily use sharing built into Google Photos or several other apps that allow you to share with friends and family and keep them in an organized memory bank for the future.
Customize your Home screen with Android Widgets:Widgets are helpful additions to any Home screen, putting the information that’s most important to you right at your fingertips. There will soon be 35 Google widgets available on Android, so whether you want to have easy access to Google Maps’ real-time traffic predictions or have translations at the ready so you can communicate with family and friends, Android is there to make your life a little easier.
Technology that’s useful for everyone: Everyone has their own way of using their devices. That’s why we build accessible features and products that work for the various ways people want to experience the world. Whether you want to use your device without ever needing the screen using TalkBack, or you want to take what’s being said out loud and create a real-time transcript with Live Transcribe, Android has you covered when and how you need it.
And that’s not all. Between our major annual updates, we’re always adding new features to Android.
Strong, unique passwords are key to helping keep your personal information secure online. That’s why Google Password Manager can help you create, remember and autofill passwords on your computer or phone: on the web in Chrome, and in your favorite Android and iOS apps.
Today we’ve started rolling out a number of updates that help make the experience easier to use, with even stronger protections built in.
A consistent look and feel, across web and apps
We’re always grateful for feedback, and many of you have shared that managing passwords between Chrome and Android has been confusing at times: “It’s the same info in both places, so why does it look so different?” With this release, we’re rolling out a simplified and unified management experience that’s the same in Chrome and Android settings. If you have multiple passwords for the same sites or apps, we’ll automatically group them. And for your convenience, you can create a shortcut on your Android home screen to access your passwords with a single tap.
You can now add a shortcut to Google Password Manager to your Android homescreen.
More powerful password protections
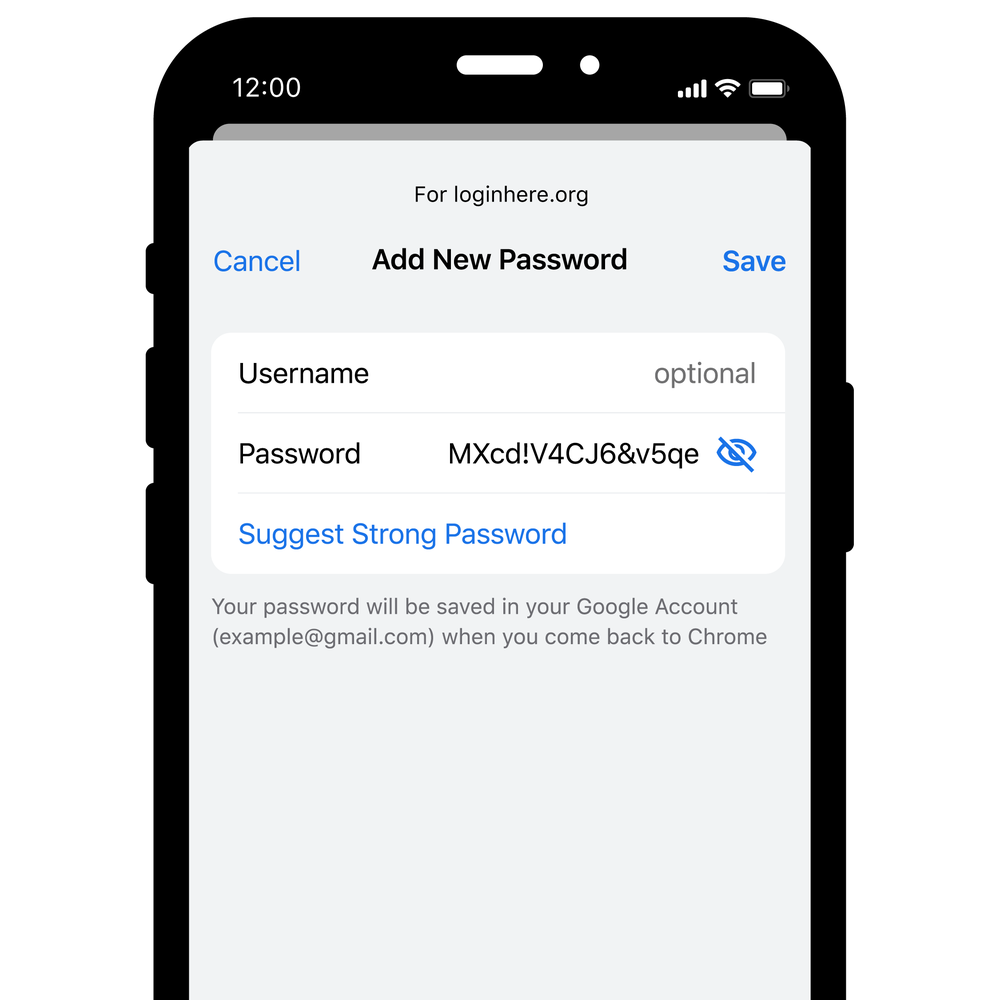
Google Password Manager can create unique, strong passwords for you across platforms, and helps ensure your passwords aren’t compromised as you browse the web. We’re constantly working to expand these capabilities, which is why we’re giving you the ability to generate passwords for your iOS apps when you set Chrome as your autofill provider.
You can now create strong passwords on your computer or mobile, on any operating system.
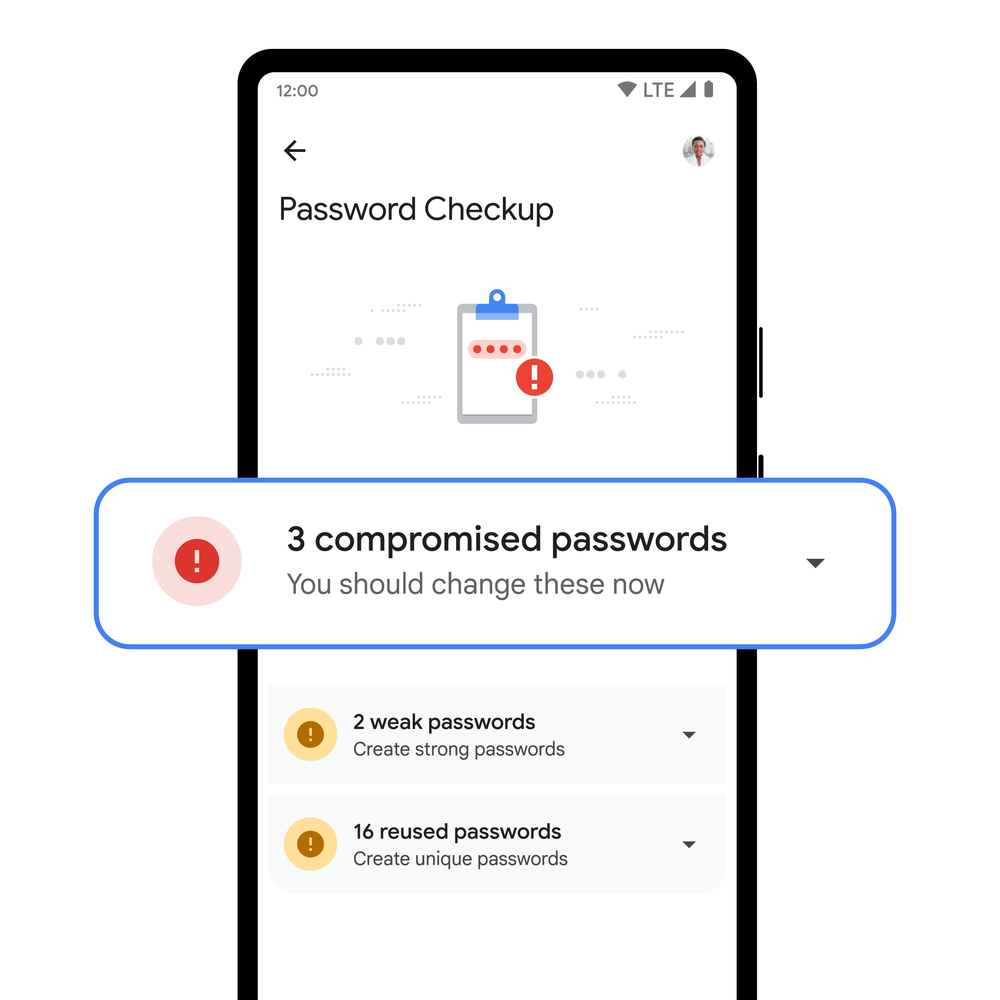
Chrome can automatically check your passwords when you enter them into a site, but you can have an added layer of confidence by checking them in bulk with Password Checkup. We’ll now flag not only compromised credentials, but also weak and re-used passwords on Android. If Google warns you about a password, you can now fix them without hassle with our automated password change feature on Android.
For your peace of mind, Password Checkup on Android can flag compromised, weak and reused passwords.
To help protect even more people, we’re expanding our compromised password warnings to all Chrome users on Android, Chrome OS, iOS, Windows, MacOS and Linux.
Simplified access and password management
Google built its password manager to stay out of your way — letting you save passwords when you log in, filling them when you need them and ensuring they aren’t compromised. However, you might want to add your passwords to the app directly, too. That’s why, due to popular demand, we’re adding this functionality to Google Password Manager on all platforms.
Adding your passwords directly is now possible on all platforms.
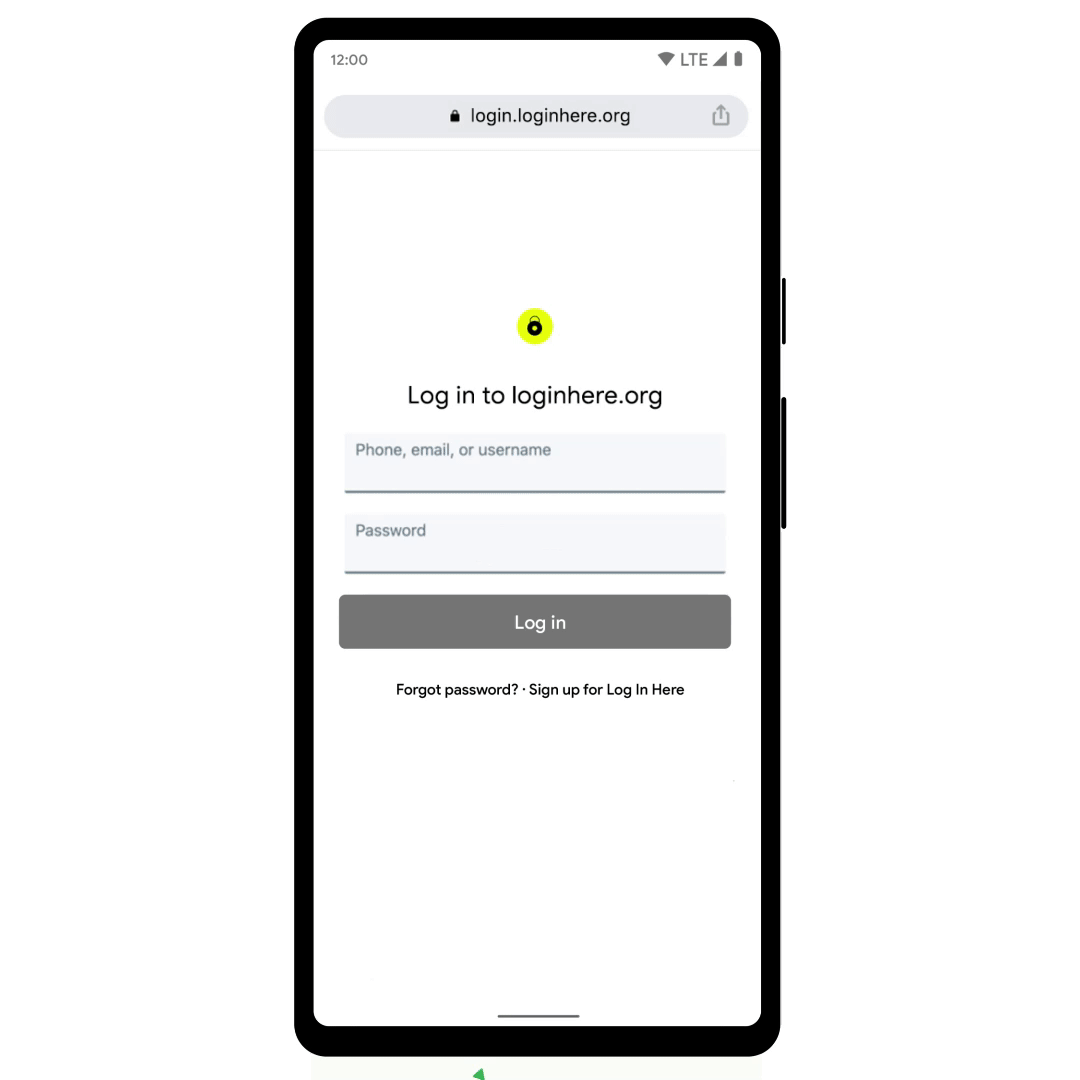
In 2020, we announced Touch-to-Fill to help you fill your passwords in a convenient and recognizable way. We’re now bringing Touch-to-Login to Chrome on Android to make logging in even quicker by allowing you to securely log in to sites directly from the overlay at the bottom of your screen.
Touch-to-Login signs you in directly from a recognizable overlay.
Many of these features were developed at the Google Safety Engineering Center (GSEC), a hub of privacy and security experts based in Munich, so Guten Tag from the team! Of course, our efforts to create a safer web are a truly global effort – from our early work on 2-step verification, to our future investments in technologies like passkeys – and these updates that we are rolling out over the next months are an important part of that work.
But reliable recognition isn’t just about the big things — done well, even the smallest details of your WordPress website can help it stand out from the crowd and attract customer notice. This is the role of the favorite icon or “favicon” that’s used in web browser tabs, bookmarks, and on mobile devices as the app image for your site.
Not sure how favicons work or how to get them up and running on your site? We’ve got you covered with our functional guide to favicons — what they are, why they matter, and how to enable them in WordPress.
The official WordPress support page defines a favicon as “an icon associated with a particular website or web page.” This description doesn’t do the term justice — in fact, favicons are everywhere and are intrinsically associated with your brand.
Let’s take a closer look at how favicons look and why they matter below.
WordPress Favicon Size
The typical size of a WordPress favicon is 512 x 512 pixels. These icons are stored as .ico files in the root directory of your WordPress server.
But what does a favicon look like in real life? For a quick example, take a look at the browser tab of this webpage if you’re on a desktop or the area just under the address bar on your mobile device. Notice anything? That orange symbol with lines and circles is HubSpot’s favicon — and it shows up anytime you’re on our site.
In most cases, favicons are the same as brand logos scaled down to fit web and mobile browsers. Where this isn’t possible — such as cases where your logo is too complex or detailed — site owners typically opt for similar color schemes and thematic elements to ensure brand consistency.
Once you start seeing favicons you can’t unsee them; from webpages to tabs to bookmarks and mobile applications, the icon you choose for your favicon is inextricably linked to your site and your brand — so make sure you choose wisely.
Why Favicons Matter
Favicons are the visual currency of your brand. They’re everywhere — from browsers to bookmarks to mobile apps — and become an integral part of your site’s overall branding strategy.
As result, effective favicon design and deployment offers three broad benefits:
Improved Brand Recognition
Think of your favicon like your calling card — the icon needs to be simple, recognizable and consistent. The more places your favicon appears, the better, since this makes it easy for users to connect your WordPress site with your icon image.
Consistency is also key as users open multiple browser tabs and the available space for text descriptions naturally shrinks. Open enough tabs and all that’s left is — you guessed it — room for the favicon.
Increased Consumer Confidence
While visitors may not be able to define what a favicon is or how it works, these icons are inherently familiar. So familiar, in fact, that sites without favicons often stand out from the crowd for all the wrong reasons.
Much like relevant social media content and secure site connections, favicons are critical to boosting consumer confidence in the products or services you offer on your site.
Integrated Mobile Consistency
The impact of mobile devices can’t be ignored, with smartphones and tablets now outpacing desktops as the primary means of consumer online interaction. Favicons make it possible to ensure your brand easily translates to mobile — when users create website bookmarks on mobile home screens, your favicon stands in for the link.
Favicon Creation Guidelines
Not sure how to get started creating your site’s favicon? Let’s break down some best-practice guidelines.
1. Get the size right.
As noted above, favicons are typically 512 x 512 pixels in size. While it’s possible to use a larger WordPress favicon size, the platform will often ask you to crop the image down.
2. Keep it simple.
While it’s possible to add background colors and other customization to your favicon, keeping it simple is often the best choice. Here, simplicity includes opting for transparency over background colors and keeping the number of foreground colors in your favicon to one or two at most.
Ideally, your favicon will look almost identical to your brand’s logo — if that’s not possible, try to pull elements from your logo such as shapes or color schemes that help tie in your new favicon.
3. Choose wisely.
Site owners can update their favicon at any time, but it’s a good idea to keep the number of changes to a minimum. Here’s why: If users see a different favicon every time they log on to your website, they won’t have an opportunity to associate a specific image with your brand.
Bottom line? Better to go without a favicon until you find one that works for your site and that you don’t plan on changing.
How to Enable WordPress Favicons
To get your favicon up and running on your WordPress site, you’ve got three options:
Use the Site Icon feature
Install a favicon plugin
Upload the new favicon yourself
Let’s break down each method in more detail.
1. Use the site icon feature.
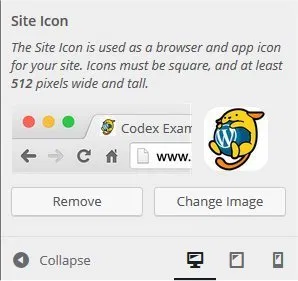
As of WordPress version 4.3, the content management system (CMS) includes a Site Icon function that enables favicons. Simply prepare your image file — which can be a .jpeg, .ico, .gif or .png file — and head to the Administration page of your WordPress Site.
Next, click on “Appearance” and then “Customize”, then click “Site Identity.” Now, click “Select Image” under the Site Icon subheading and upload the file you’ve prepared. You should see a screen like this:
If you like the favicon you’ve created, no further action is required. If not, you can easily remove the file or upload a new image.
2. Install a favicon plugin.
You can also use a plugin — such as Favicon by RealFaviconGenerator — to create and deploy your favicon. This must-have WordPress plugin not only lets you customize your favicon but also ensures that multiple versions are created to satisfy the requirements of different operating systems and device versions.
As long as the image you upload to the plugin is at least 70 x 70 pixels, the RealFaviconGenerator will take care of the rest.
3. Upload the new favicon yourself.
If you’d rather do the legwork yourself, you can create and upload your own favicon to your WordPress site.
First, create an image that’s at least 16 x 16 pixels and is saved as a .ico file. Then, use an FTP client to upload this file to the main folder of your current WordPress theme — typically the same place as your wp-admin and wp-content folders.
While this should display your favicon in most web browsers, some older browser versions will require you to edit WordPress header HTML code. The result? DIY favicons aren’t recommended unless you’re familiar with more technical WordPress functions.
Final Favicon Thoughts
Whie favicons form only a small part of your WordPress website build, they’re critical for website recognition. Consistent and clear favicons make it easy for visitors to remember your site and carry this mental connection across desktop, tablet, and mobile devices.
Google this week announced that new warnings added in the Google Workspace Alert Center will keep administrators notified of critical and sensitive configuration changes.
Previously known as G Suite, Google Workspace provides secure collaboration and productivity tools for enterprises of all sizes. Accessible from anywhere in Google Workspace, the Alert Center delivers real-time security alerts and insights, to help admins mitigate threats such as phishing and malware.
With the new alerts in place, admins will also receive notifications whenever select changes are made to their Google Workspace configurations.
Specifically, warnings will be displayed when the primary admin is changed, when the password for a super admin account has been reset, and when changes are made to SSO profiles – when a third-party SSO profile has been added, updated, or deleted for the organization.
“These additional intelligent alerts will closely monitor several sensitive actions, making it easier for admins to stay on top of high-risk changes to their environment and potentially malicious actions being taken by bad actors,” Google explains.
An email notification containing key details on the event will be delivered to admins and super admins for each alert. The security investigation tool will allow admins to further investigate the reported incident.
The alerts and their associated email notifications are enabled by default and cannot be turned off.
The new capability is rolling out to all Google Workspace customers, including legacy G Suite Basic and Business customers, and is expected to become visible for everyone in the next couple of weeks.
Earlier this year, Google boosted malware and phishing protections in Workspace with updated comment notifications that now also include the commenter’s email address, so that users can better assess the legitimacy of the message.
Cybersecurity firm Checkmarx has published details on a high-severity vulnerability in the Amazon Photos Android application that could have allowed malicious apps to steal an Amazon access token.
With more than 50 million downloads, Amazon Photos offers cloud storage, allowing users to store photos and videos at their original quality, as well as to print and share photos, and to display them on multiple Amazon devices.
In November 2021, Checkmarx researchers identified an issue in the application that could have leaked the Amazon access token to malicious applications on the user’s device, potentially exposing the user’s personal information. The bug was addressed in December 2021.
The leaked Amazon access token is used for user authentication across Amazon APIs, including some that contain personal information such as names, addresses, and emails. Through the Amazon Drive API, for example, the attacker could access the user’s files, Checkmarx says.
The issue, the researchers explain, resided in a misconfigured component that was “exported in the app’s manifest file, thus allowing external applications to access it.”
The issue resulted in the access token being sent in the header of a HTTP request, but the most important aspect was the fact that an attacker could control the server receiving this request.
“The activity is declared with an intent-filter used by the application to decide the destination of the request containing the access token. Knowing this, a malicious application installed on the victim’s phone could send an intent that effectively launches the vulnerable activity and triggers the request to be sent to a server controlled by the attacker,” Checkmarx notes.
The leaked token could provide the attacker with access to all of the user information available through the Amazon API. Using the Amazon Drive API, the attacker could access users’ files and read, re-write, or delete their contents.
The researchers also explain that the access token could have allowed anyone to modify files and erase their history, to prevent recovery, or could have completely deleted files and folders from the user’s Amazon Drive account.
“With all these options available for an attacker, a ransomware scenario was easy to come up with as a likely attack vector. A malicious actor would simply need to read, encrypt, and re-write the customer’s files while erasing their history,” the researchers say.
The vulnerability might have had a wider impact, given that the potentially affected APIs that the researchers identified represent only a small subset of the entire Amazon ecosystem, Checkmarx also notes.
At Wordfence our business is to secure over 4 million WordPress websites and keep them secure. My background is in network operations, and then I transitioned into software development because my ops role was at a scale where I found myself writing a lot of code. This led me to founding startups, and ultimately into starting the cybersecurity business that is Wordfence. But I’ve maintained that ops perspective, and when I think about securing a network, I tend to think of ports.
You can find a rather exhaustive list of TCP and UDP ports on Wikipedia, but for the sake of this discussion let’s focus on a few of the most popular ports:
20 and 21 – FTP
22 – SSH
23 – (Just kidding. You better not be running Telnet)
25 – Email via SMTP
53 – DNS
80 – Unencrypted Web
110 – POP3 (for older email clients)
443 – Web encrypted via TLS
445 – Active Directory or SMB sharing
993 – IMAP (for email clients)
3306 – MySQL
6378 – Redis
11211 – Memcached
If you run your eye down this list, you’ll notice something interesting. The options available to you for services to run on most of these ports are quite limited. Some of them are specific to a single application, like Redis. Others, like SMTP, provide a limited number of applications, either proprietary or open-source. In both cases, you can change the configuration of the application, but it’s rare to write a custom application on one of those ports. Except port 443.
In the case of port 443 and port 80, you have a limited range of web servers listening on those ports, but users are writing a huge range of bespoke applications on port 443, and have a massive selection of applications that they can host on that port. Everything from WordPress to Drupal to Joomla, and more. There are huge lists of Content Management Systems.
Not only do you have a wide range of off-the-shelf web applications that you can run on port 443 or (if you’re silly) port 80, but you also have a range of languages they might be coded in, or in which you can code your own web application. Keep in mind that the web server, in this case, is much like an SSH or IMAP server in that it is listening on the port and handling connections, but the difference is that it is handing off execution to these languages, their various development frameworks, and ultimately the application that a developer has written to handle the incoming request.
With SSH, SMTP, FTP, IMAP, MySQL, Redis and most other services, the process listening on the port is the process that handles the request. With web ports, the process listening on the port delegates the incoming connection to another application, usually written in another language, running at the application layer, that is part of the extremely large and diverse ecosystem of web applications.
This concept in itself – that the applications listening on the web ports are extremely diverse and either home-made or selected from a large and diverse ecosystem – presents unique security challenges. In the case of, say, Redis, you might worry about running a secure version of Redis and making sure it is not misconfigured. In the case of a web server, you may have 50 application instances written in two languages from five different vendors all on the same port, which all need to be correctly configured, have their patch levels maintained, and be written using secure coding practices.
As if that doesn’t make the web ports challenging enough, they are also, for the most part, public. Putting aside internal websites for the moment, perhaps the majority of websites derive their value from making services available to users on the Internet by being public-facing. If you consider the list of ports I have above, or in the Wikipedia article I linked to, many of those ports are only open on internal networks or have access to them controlled if they are external. Web ports for public websites, by their very nature, must be publicly accessible for them to be useful. There are certain public services like SMTP or DNS, but as I mentioned above, the server that is listening on the port is the server handling the request in these cases.
A further challenge when securing websites is that often the monetary and data assets available to an attacker when compromising a website are greater than the assets they may gain compromising a corporate network. You see this with high volume e-commerce websites where a small business is processing a large number of web-based e-commerce transactions below $100. If the attacker compromises their corporate network via leaked AWS credentials, they may gain access to the company bank account and company intellectual property, encrypt the company’s data using ransomware, or perhaps even obtain customer PII. But by compromising the e-commerce website, they can gain access to credit card numbers in-flight, which are far more tradeable, and where the sum of available credit among all cards is greater than all the assets of the small business, including the amount of ransom that business might be able to pay.
Let’s not discount breaches like the 2017 Equifax breach that compromised 163 million American, British and Canadian citizen’s records. That was extremely valuable to the attackers. But targets like this are rare, and the Web presents a target-rich environment. Which is the third point I’d like to make in this post. While an organization may run a handful of services on other ports, many companies – with hosting providers in particular – run a large number of web applications. And an individual or company is far more likely to have a service running on a web port than any other port. Many of us have websites, but how many of us run our own DNS, SMTP, Redis, or another service listening on a port other than 80 or 443? Most of us who run websites also run MySQL on port 3306, but that port should not be publicly accessible if configured correctly.
That port 443 security is different has become clear to us at Wordfence over the years as we have tracked and cataloged a huge number of malware variants, web vulnerabilities, and a wide range of tactics, techniques, and procedures (TTP) that attackers targeting web applications use. Most of these have no relationship with the web server listening on port 443, and nearly all of them have a close relationship with the web application that the web server hands off control to once communication is established.
My hope with this post has been to catalyze a different way of thinking about port 443 and that other insecure port (80) we all hopefully don’t use. Port 443 is not just another service. It is, in fact, the gateway to a whole new universe of programming languages, dev frameworks, and web applications.
In the majority of cases, the gateway to that new universe is publicly accessible.
Once an attacker passes through that gateway, a useful way to think about the web applications hosted on the server is that each application is its own service that needs to have its patch level maintained, needs to be configured correctly, and should be removed if it is not in use to reduce the available attack surface.
If you are a web developer you may already think this way, and if anything, you may be guilty of neglecting services on ports other than port 80 or 443. If you are an operations engineer, or an analyst working in a SOC protecting an enterprise network, you may be guilty of thinking about port 443 as just another port you need to secure.
Think of port 443 as a gateway to a new universe that has no access control, with HTTPS providing easy standardized access, and with a wide range of diverse services running on the other side, that provide an attacker with a target and asset-rich environment.
—
Footnote: We will be exhibiting at Black Hat in Las Vegas this year at booth 2514 between the main entrance and Innovation City. Our entire team of over 30 people will be there. We’ll have awesome swag, as always. Come and say hi! Our team will also be attending DEF CON immediately after Black Hat.
Written by Mark Maunder – Founder and CEO of Wordfence.
If you’re like me, you often find yourself feeling like there’s not enough time in the day—and by often, I mean pretty much every day. When there’s no time to waste and you have to nail down your priorities, adding structure and consistency becomes a necessity. That’s where time blocking apps are an excellent way to manage your schedule: they force you to plan out every minute of your day.
Connect your time-tracking app to your other tools
Some time blocking apps work better for people who are more visual, while others are better for those who need more organization. Some apps are geared towards solopreneurs and freelancers, while others are designed for folks who work as part of a corporate team. That’s why I spent several weeks testing dozens of time blocking apps—to figure out which ones were the best for which people.
Whatever your reason for time blocking, one of the time blocking calendars here should speak to you and your needs.
Time blocking is a time management technique where you schedule how you’ll spend your time during every minute of every day. Each task you need to complete gets time scheduled on your calendar, so you can make sure you have the bandwidth for every to-do list item.
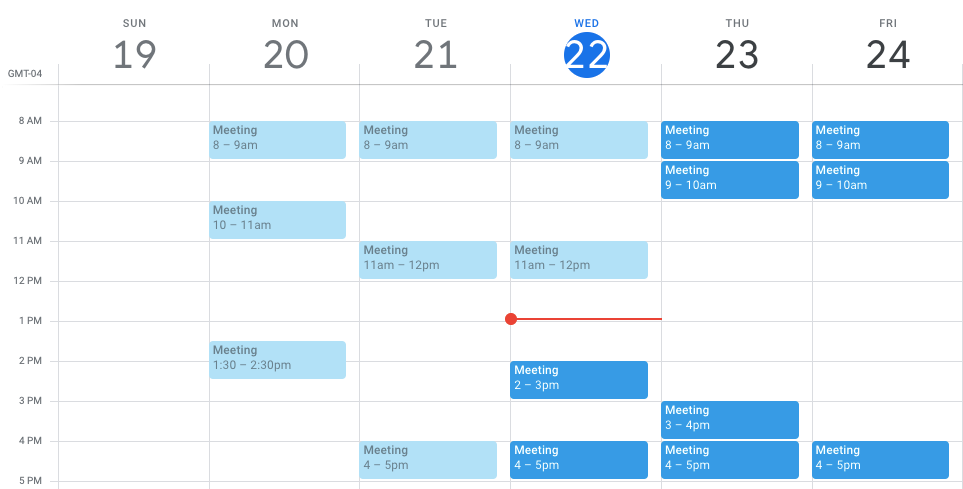
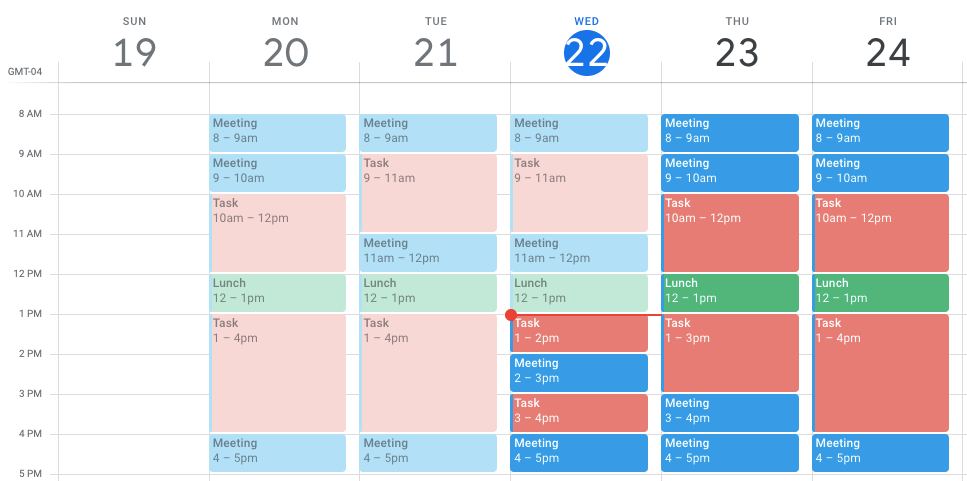
Most people’s work calendars look like this:
Your meetings are there, and the rest of your time is just assumed to be open. A time blocked calendar, meanwhile, fills in all of those gaps:
Time blocking as a time management technique was popularized by Cal Newport, author of Deep Work. Newport says he dedicates 10-20 minutes every evening to time blocking his schedule for the next day, but when you choose to block your time and create your schedule depends on what works best for you. You might create your schedule every day when you get to work, at the end of every work day for the next day, or at the beginning of each week for the rest of the week.
Additionally, you can approach the time blocking method in a couple of different ways. You might schedule time blocks for specific tasks around your meetings and other commitments, or you might choose to schedule time specifically for meetings and other commitments.
For example, instead of accepting meeting invites for whenever people send them, you may block off Monday, Wednesday, and Friday for working on tasks and leave Tuesday and Thursday open for people to schedule meetings. Then, you can break those big sections for Monday, Wednesday, and Friday down into specific tasks—daily or weekly, based on your priorities.
Scheduling time for tasks forces you to think about how long each task is going to take you to complete, which, over time, can help you form more realistic estimates.
What makes a great time blocking app?
How we evaluate and test apps
All of our best apps roundups are written by humans who’ve spent much of their careers using, testing, and writing about software. We spend dozens of hours researching and testing apps, using each app as it’s intended to be used and evaluating it against the criteria we set for the category. We’re never paid for placement in our articles from any app or for links to any site—we value the trust readers put in us to offer authentic evaluations of the categories and apps we review. For more details on our process, read the full rundown of how we select apps to feature on the Zapier blog.
You could just use your calendar app to time block your schedule, or even a sheet of paper, but dedicated time blocking tools make the process a lot easier. Here are the criteria I used to determine the best time blocking software:
Integration with your current calendar. Being able to sync a calendar with a time blocking planner saves time and helps keep schedules error-free, so this is a must-have.
Ease of use. Some apps are just downright hard to figure out, so it was essential that my picks had a simple, intuitive interface that was easy to navigate.
Calendar and tasks in one place. No one wants to deal with having their projects and to-dos scattered in too many places. The purpose of a time-blocking app should be to simplify, which means being able to find and review your tasks in a central place.
Customization. While the ability to customize features like colors, themes, lists, alerts, and notifications is of varying importance, I chose apps that I felt provided enough flexibility to fit most people’s day-to-day needs.
Integration with other tools. Integrating your time block planner with your calendar is just the standard, but integration with other apps and tools is a wonderful cherry on top.
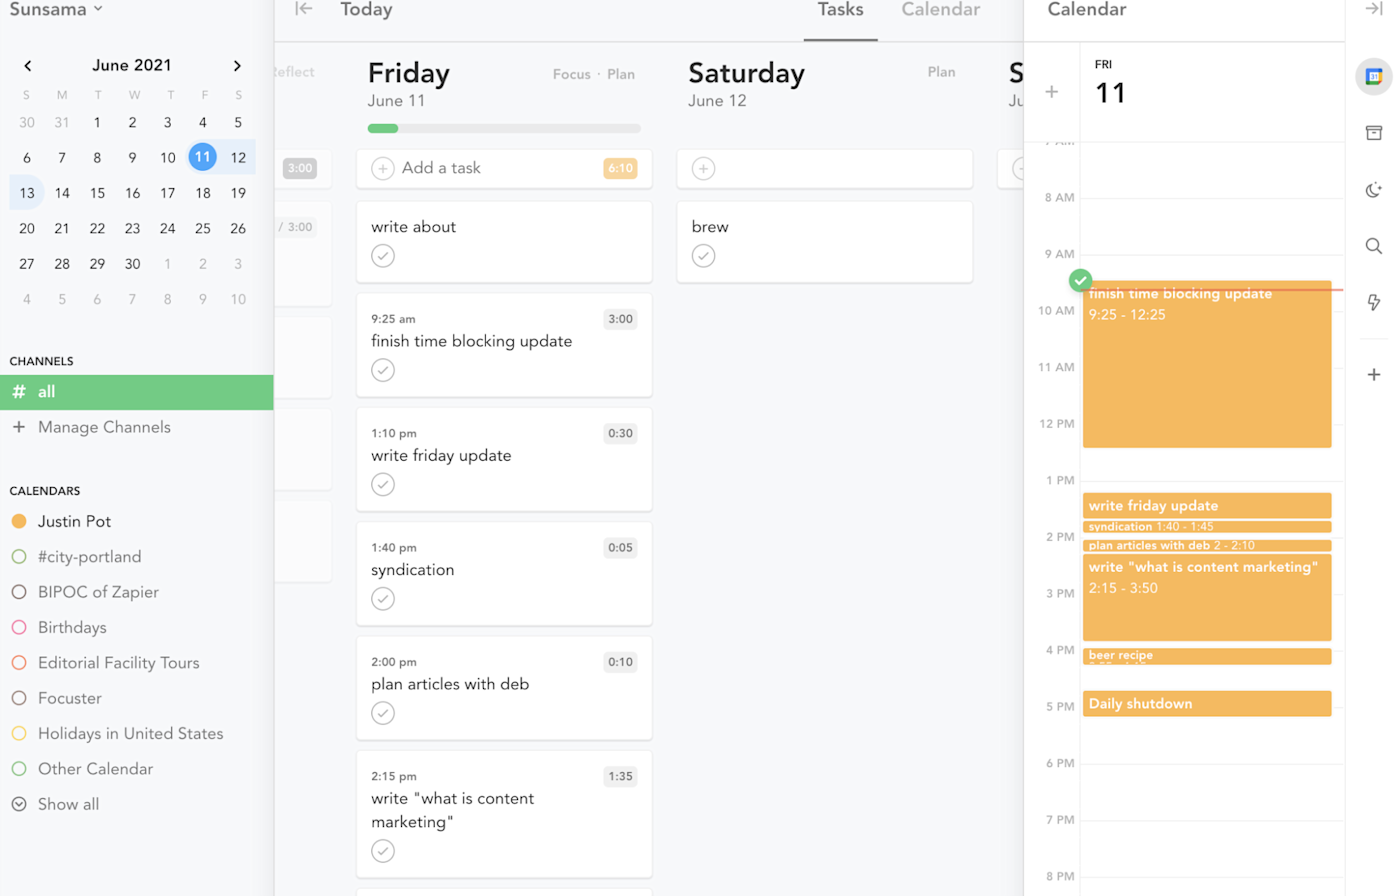
Sunsama is by far the best-designed app on this list. The app wastes no space, and after setting it up, you’ll immediately understand how to use it. There’s a task list, sorted by date, and there’s a sidebar with a calendar. You can flip this around if you want, but either way, it’s quick to drag tasks over to your calendar, making it convenient to jot down all your duties for the day and then focus on planning them all out accordingly.
Another neat feature is the ability to properly categorize all your tasks. Most time blocking apps have some kind of tagging aspect, but Sunsama takes it a little further with what they call contexts and channels. Contexts are essentially overarching categories, like Work or Personal. Within those categories, you can create sub-categorizations, like Focus Time, Creative Time, or Family Time to further drill down the organization of tasks.
Where Sunsuma really stands out is how it helps you plan out your day. Sign on in the morning, and you’ll be asked which tasks you have to work on, how long you think they are, and when you want to do them all. It really makes the process of blocking your day painless, and there’s even support for sending a summary of your plan for the day over to Slack in a single click. When nearing the end of your day, Sunsama will prompt you to jot down what you finished that day and what you didn’t get to, which I found a nice way to regroup before logging off.
The app is full of little touches like this, and the result is that time blocking your daily to-do list feels easier here than in any app we tested. And integrations with Trello, Gmail, GitHub, and Jira mean you can drag tasks over from a variety of apps. Google and Outlook calendars are both supported. The main downside: there’s no free plan.
Sunsama pricing: Starts at $20/month. No free version, though there is a 14-day free trial.
If you’re looking for a Sunsama alternative, try Timepage. It’s not a traditional time blocking app, but the sleek interface and added features, like weather reports and RSVP reminders, make it a worthy option.
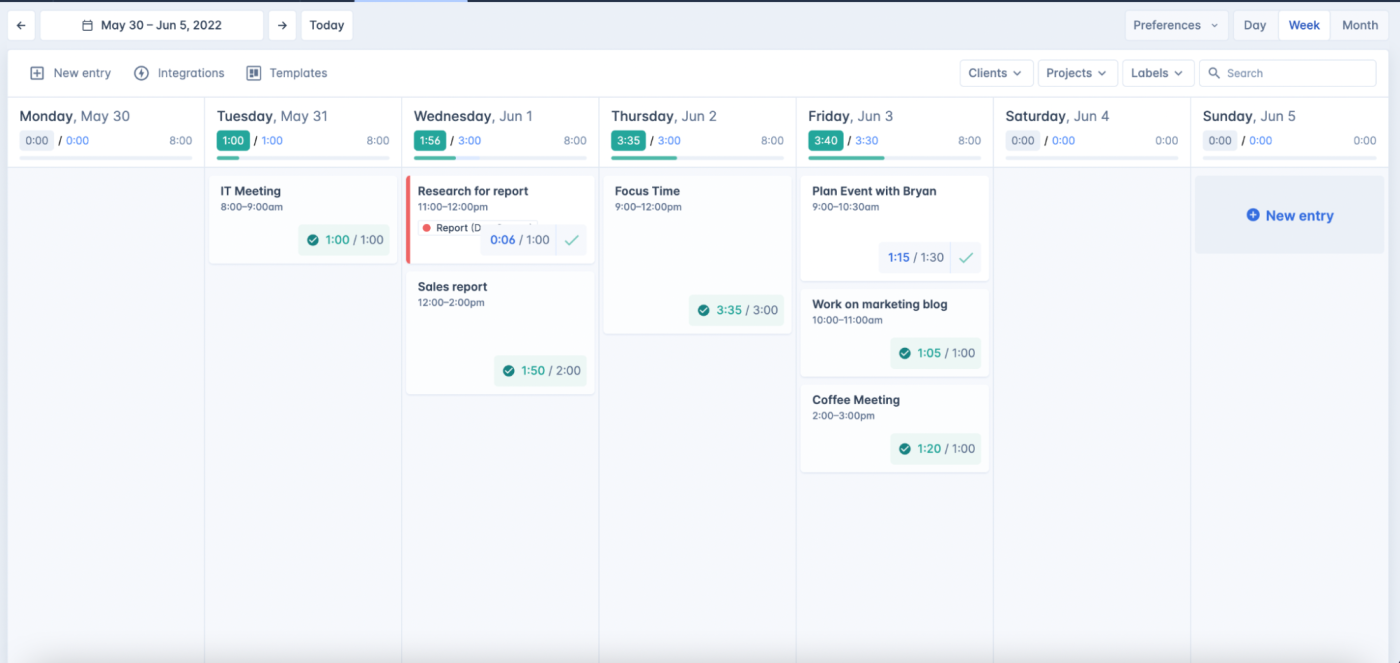
HourStack is well-suited for teamwork, with the ability to add multiple users and manage an entire team’s workflow. But it also works well as a task tracker app for individual professionals who just want to keep track of their work, monitor how much time is spent on each task, and block time out to focus.
You start by blocking time for the day/week. Then, when you’re ready to start on each task, click the task, and select Start to initiate a timer. When you’re finished working on the task, you can complete it if it’s finished, or if you run out of time, you can roll the task over to work on it again later. In the Reports section, you’ll see detailed metrics for the time estimated and spent on each task. And as bonus, you can integrate HourStack with Google Sheets to export all your insights, which is very useful when you need to present or share your time spent with people who don’t use HourStack. I also personally loved how visual the platform was—you can see all your tasks and events for the week as cards on your dashboard (Sunsama actually does this similarly, too).
HourStack will pull events from Google Calendar and Outlook 365, but it doesn’t add those events directly onto your HourStack calendar. Instead, you’ll see them in a sidebar on the right side of the screen and can drag and drop them onto your HourStack calendar.
The main downside to HourStack is that it doesn’t have a place to keep a to-do list. Instead, you’re mostly using your calendar to capture your to-dos. But it does have native integrations with apps like Trello, Todoist, and Asana, so you can see your to-dos from another app within HourStack to plan and schedule in one place. There are also integrations with HubSpot, GitHub, and Google Sheets—plus basically every other app, thanks to HourStack’s Zapier integrations, which let you do things like automatically adding new calendar events to your HourStack calendar and vice versa.
Add new Google Calendar events to your HourStack week
HourStack Pricing: 14-day free trial. Personal plan starts at $9/month.
Timely is an HourStack alternative that also allows you to track billable projects within a team. One of the biggest differences is the lack of an actual timer—instead, it uses a Memory app to track time automatically, which is nice, especially if you’re working on other projects in the background.
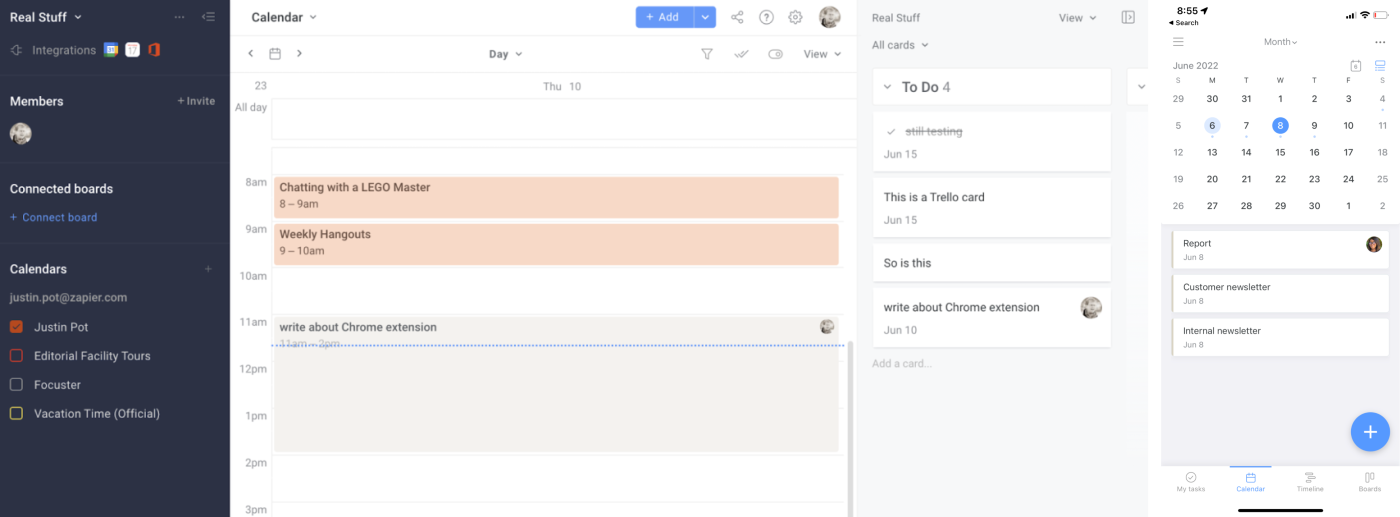
If you use Trello or Jira as your to-do list or project management tool, Planyway lets you block time on your calendar using those tasks.
You can easily create and place all your tasks into your pre-created Trello lists (or create new lists within Planyway), and then just drag and drop them onto the Planyway calendar. Connect your existing calendar, and you’ll see those same tasks or events with the rest of your schedule. The app did take a bit of time to think about integrating with my Google Calendar, but after a few refreshes, it wound up working just fine.
Planyway also gives you the option to connect it to your Google, Outlook, or Apple calendar, so you can see your calendar appointments in context. On its Free and Basic plans, Planyway supports one-way syncing: you can see your Planyway cards in your calendar using an iCal URL, but you can’t see your calendar events in Planyway. Two-way syncing that keeps both calendars in sync is available on the Pro plan.
Planyway Pricing: The Free plan includes one-way calendar syncing; from $3.99/month for the Pro plan that includes two-way calendar syncing and recurring tasks.
TickTick Premium lets you compile your tasks in a to-do list and then block time for those tasks on your calendar. But TickTick offers a feature that the others don’t: a Pomodoro timer. So if you want to combine time blocking with the Pomodoro Technique—or if you’re looking for the best task management app with built-in time blocking—TickTick Premium may be the best option for you.
Adding tasks to your calendar in TickTick isn’t as simple as it is in some of the other apps. Instead of dragging and dropping tasks onto your calendar, you have to take a few steps. While adding a task, you can use natural language processing to add a due date—for example, you could type “walk the dog tomorrow.” Do that, and your task will have a due date. If you forget, that’s ok: you can edit a task and select a due date. It will then show up on your calendar as an all-day event—you can drag it to whatever time you want.
TickTick can also pull events from your existing calendar and display them on your TickTick calendar; or you can set it up to push TickTick events to your main calendar. You can’t manage calendar appointments in TickTick, though—the appointments from your calendar are basically only there for reference. But it’s enough to plan your day.
Another neat feature to take advantage of is the Eisenhower Matrix. The name may sound a little intimidating, but it’s actually very simple. You can use the matrix to organize your tasks according to Urgent & Important, Urgent & Unimportant, Not Urgent & Important, and Not Urgent & Unimportant. This system essentially provides a way to properly prioritize and tag your tasks with a simple drag and drop. As someone who can get overwhelmed with the number of tasks on my plate, being able to see a visual representation of my tasks prioritized was a huge help.
You can integrate TickTick with thousands of apps using Zapier’s TickTick integrations. This is great for adding tasks to your calendar or pulling in tasks from other apps like Gmail or Slack.
Create TickTick tasks from new saved Slack messages
TickTick Pricing: The free TickTick product doesn’t include a calendar view; from $2.79/month for TickTick Premium that includes the calendar view and RSS feeds to and from third-party calendars.
Best free time blocking app for Apple users (and hyper-scheduling)
Sorted^3 is the self-proclaimed app for hyper-schedulers—and as someone who self-identifies that way, I’d absolutely agree.
Sorted^3 has an excellent onboarding flow. When you sign up, you’ll be immediately directed to a tutorial showing you how to use app shortcuts and other unique features, like Magic Select (more on that in a bit). While the amount of information may seem overwhelming at first, it does a superb job of guiding you through all the features that are available to you as you start using them.
On the hyper-categorization front, there’s a tab for lists that has sections for errands, notes, links, and groceries, so you can put any tasks or information that you want to store for later—but you can also schedule out any tasks from the lists as well.
Back to Magic Select. This feature lets you quickly highlight multiple items in your schedule. This means you can delete, recategorize, retag, or reschedule multiple tasks without too much effort. Surprisingly, out of all the other apps I tested, none had this feature.
You’ll also get an auto-scheduling feature. You can add all your tasks to the schedule section, assign a certain period of time for each one, and then let Sorted^3 do the heavy lifting of blocking out time for all your tasks. You can even add an automatic buffer period between tasks, and you’re able to move things around after they’ve been scheduled.
Sorted^3 also has some nice Apple-specific features. For example, you can sync to iCloud and can take advantage of Siri to plan out tasks.
Sorted^3 pricing: Free; PRO version is $14.99
SkedPal also has great auto-scheduling capabilities, and it’s worth a look if you like the idea of Sorted^3 but don’t use Apple devices. SkedPal’s time map feature allows you to throw a task into a category, like Focus Time or Weekends, and then automatically schedules it within that task category.
Do you need a time block app?
You might decide that you don’t need a dedicated app for time blocking, and that’s fine. Here are some other ideas:
We included TickTick in the list above, but some of the other best to-do list apps also have basic time blocking features, including Any.do and Todoist.
Honestly, any of the best calendar apps could work for calendar blocking. Just add your tasks as calendar appointments.
Serene is a distraction blocking app that also works great for planning your day. It’s not exactly a time blocking app, but might be better for some people.
Also worth noting: if you already have a great to-do list app and a great calendar app, you could just connect the two using Zapier.
Google Calendar + Jira Software ServerMore details
But if you want everything in one app, one of the tools in this list should do the trick. Each app offers a free plan or free trial, so you can try them all and pick the one that works best for you.
Yes, you need to turn shortcuts on. If you try these Gmail shortcuts without turning them on first, you’ll be slamming that C key into the void. So if you think your Gmail keyboard shortcuts aren’t working, try this first.
To turn on Gmail shortcuts:
Click the Settings gear in the top-right corner, then See all settings.
Scroll down to the Keyboard shortcuts section, and choose the Keyboard shortcuts on option.
Scroll to the bottom, and click Save Changes.
Congrats! You can use all of Gmail’s shortcuts now—here are the ones you should start using right away.
1. Browse through your emails
Prefer using keyboard navigation over mouse? Flip through the email threads in your inbox using K to go to the previous email and J to go to the next email.
Press Enter / return to open the selected thread. Then:
Press U to go back to your inbox.
Press ]or[ to archive the message and go to the previous or next message.
Press # to delete the message.
Press Shift+Uto mark the message as unread.
2. Jump between categories
Gmail also has “jumping” shortcuts that instantly take you to your desired inbox category. Use the following combos to visit different categories:
Main inbox: G + I
Starred conversations: G+S
Snoozed conversations: G+B
Sent messages: G+T
Drafts: G + D
All mail: G + A
If you like to use Google Tasks and Gmail together, you can even go to the Tasks window by pressing G + K.
3. Compose new emails
Here’s a universal and easy-to-remember one: composing a new message. Press C, and the trusty New Message window will pop up.
4. Add CC and BCC
When you open a compose window, it keeps the CC and BCC options nestled for you to click and add fields for them. Add those fields instantly using the Gmail shortcut Ctrl / command + Shift + C(CC) or Ctrl / command + Shift + B (BCC).
How to create a Gmail shortcut
You can change your Gmail shortcut keys to better suit your workflow. Here’s how to customize Gmail shortcuts:
Go back into the main settings menu you used to turn on shortcuts, then click the Advanced tab.
Find Custom Keyboard Shortcuts and choose Enable. Gmail will send you back to your inbox.
When you visit the main settings menu again, you’ll see a new tab titled Keyboard Shortcuts.
Click that tab, and you’ll get a menu where you can customize your shortcuts as much as you’d like.
Do more with Gmail
Want to go even further? Here’s a list of every Gmail shortcut, courtesy of Google itself. And here are a few more guides to make you a Gmail power user:
I’m pretty much always thinking about the prospect of starting an eCommerce business. I like my job, but I do not enjoy labor, and the siren songs of any number of passive income streams call to me daily. Tragically, however, I am not cut out for entrepreneurship. I spent a few years freelancing full-time in my early 20s, and I nearly bankrupted myself—I just never did any work.
If you’re thinking about diving into eCommerce entrepreneurship, you should have a clear and thorough understanding of exactly what it takes to be successful as an online seller. So before you start loading up on craft resin or earring hooks, read on to find out exactly what it takes to start an eCommerce business.
Pros and cons of running an eCommerce store
You don’t have to search very far to see what it is that draws people to the idea of starting their own eCommerce business. No micromanaging supervisors to answer to or fat cat executives living off of the fruits of your labor, and without any physical assets or locations, you can go wherever you want and still run your operation.
In short, many people are drawn to eCommerce selling because they think it’s their key to freedom. To those people, I say: au contraire. In many ways, eCommerce sellers are more limited than regular employees.
Sure, I may have to answer to my manager, but if I mess something up, there’s no chance of her requesting a refund on my last paycheck or claiming the work I emailed her got irretrievably lost. I may not make my own hours, but since my salary is fixed, I can take days off knowing that there’s no chance of it impacting how much money I make. You need to decide for yourself whether the benefits of launching an eCommerce business outweigh the risks of flying without the safety net of job security to fall back on.
How to tell if eCommerce is right for you
In the same way that some kids are terrible at homework but are great test-takers, there are some personalities that do thrive under the pressure of relying on their business’s success for their survival. When it comes to employment vs. entrepreneurship, there is no objectively better, more flexible, more independent choice—there’s just what works better for you.
Here’s a quick self-screener you can use to determine if you’re cut out for online selling:
Do you like what you do? This is something you’re going to be spending hours on, day in and day out—and you’re going to have to work really hard to get your business off the ground. Unlike traditional small business owners, you won’t have a staff, coworkers, or a physical workplace; it’s just going to be you, likely in your home, making the thing you sell. If you’re not truly passionate about your product, you’ll be miserable within a few weeks, tops.
Are you self-disciplined? It’s not easy being your own boss, especially in an industry as isolating as eCommerce. Many other small businesses don’t have this problem—I taught piano lessons for a period of time and didn’t have a boss then, but knowing that my students were relying on me to be prepared for their lessons still kept me accountable. It’s a lot easier to stay motivated when you’re interacting with customers or a small staff.
Do you have a lot of commitments? Anyone who has ever tried to work remotely from their parents’ house can tell you that, for whatever reason, people simply do not perceive solo work on a computer as “real work,” so if you want to run a successful online store, you need strong boundaries and a close relationship with the word “no.”
Can you take on the financial risk?Starting a store on the side while you stay in a day job is one thing, but if you’re making a complete leap to entrepreneurship, you need to be able to get by for a few months or even a year without much income. If you have lots of debt or a family to feed, this might not be the career for you.
Provided you’ve given it some thought and you’re ready to make the leap—or if you’re starting your business part-time until it takes off—you’re ready to get started on launching your business.
Choose an eCommerce business model
When I think of small eCommerce businesses, I think primarily of some of my favorite niche Etsy shops selling things like taxidermied squid jewelry and D&D dice with real mushrooms inside. (I am a very fun person to know at Christmas.)
But eCommerce selling includes far more than traditional consumer retail. Depending on your needs, you may find that one of these alternatives suits you best:
Dropshipping: Dropshipping is a type of eCommerce business where you sell products without carrying any inventory. When a customer places an order on your site, you simply contact the supplier (or have the order sent automatically) and have them ship the product directly to the customer. Dropshipping is a popular eCommerce business model because you don’t need to spend a lot of money up front.
Print on demand: Print on demand is similar to dropshipping, but instead of shipping products from a supplier, you have your products printed and shipped by a print-on-demand service. This type of eCommerce business is often used for selling custom-printed products like t-shirts, mugs, and stationery.
Retail arbitrage:Retail arbitrage is the process of buying products from brick-and-mortar stores and selling them online at a higher price. This type of eCommerce business can be profitable, but it requires a bit more work than dropshipping or print on demand. You also need to identify a product niche that allows you to do this profitably, where you can be confident that customers won’t just go to the original source to make their purchase at a lower price.
Wholesaling: Wholesaling is a type of eCommerce business where you sell products in bulk to retailers. The benefit of wholesaling is that you can get discounts on the products you purchase, which allows you to sell them at a higher price and still make a profit. But this requires a large initial investment since you’ll need to stock inventory in bulk quantities.
Subscriptions: Subscription eCommerce businesses sell products or services on a recurring basis, most commonly in the form of a monthly box of curated products (or, in my dog’s case, a monthly delivery of different home-style baked treats). But there are other types of subscription businesses, such as online courses and members-only clubs.
What business model you choose will also rely heavily on the product market you want to target, since not all models will work with all types of products. Naturally, dropshipping won’t work to sell hand-knitted sweaters, while very few people are likely to buy a subscription for artisan coffee tables. The other thing that will help you decide what products to sell is your chosen target market.
A broad target market is the kiss of death for a budding eCommerce entrepreneur. There are over 9.1 million eCommerce retailers in the world, 2.5 million of which are located in the United States. Do you want to compete with between 2.5 and 9.1 million businesses? I didn’t think so.
When you choose a product market, you’re isolating a part of this larger market of retailers that you want to compete within. The more specific your product market is, the fewer competitors you have; the fewer competitors you have, the more likely you are to succeed. In eCommerce, the most successful sellers home in on extremely small, highly specific product markets—also called micro-markets or niches.
How to find your eCommerce niche
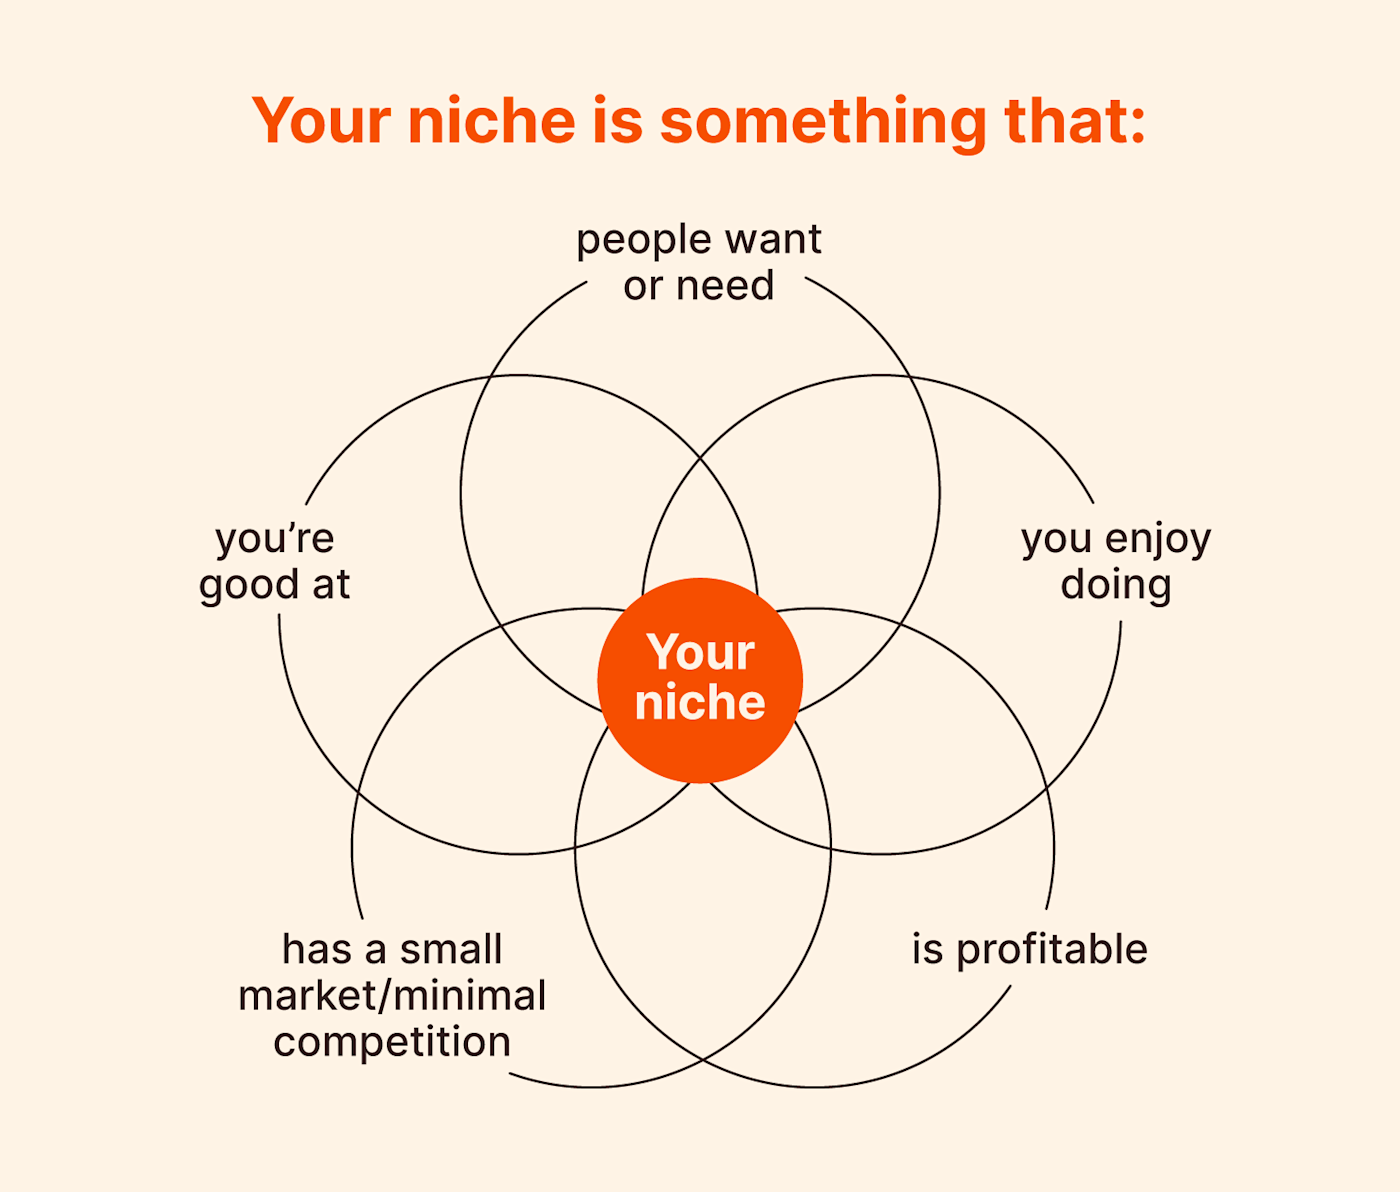
A product niche is a very small sliver of a product market that is both large enough to contain a robust customer audience but small enough that it doesn’t contain many competitors. The best way to identify your niche is to start with a product market and whittle it down from there.
To choose a product market to start with target products that:
You’re capable of creating (at high quality)
You enjoy creating (even at scale)
Have a small market/minimal competition
People want or need
Are profitable
Let’s break down each of these characteristics in detail.
Pick something you’re good at
It’s perhaps the most obvious of the five characteristics listed, but it still bears mentioning: when starting an eCommerce business, choose something that you can do or make well. If you choose something extremely unique and specific that no one else is doing, you may be fooled into believing the lack of competition will make up for poor quality. But the moment you gain some popularity, if someone else can create your product better than you can, your business will be dead in the water.
Pick something you like
Choose something you enjoy making, looking at, and thinking about. More importantly, choose something you won’t hate after the tenth, fiftieth, hundredth, or thousandth time you’ve sold it. Selling can be tedious work, especially if you make your products yourself. Don’t build your business around a product market only to find that you can’t stand working in it.
Pick a small market with limited competition
eCommerce sellers can’t use the same logic and strategy that regular companies do to choose their target markets. You’re one person, with one person’s resources and power—if you try to enter a market where you’re competing with full-sized companies and brands, you’ll be out-marketed and out-maneuvered every time.
Be specific: instead of lawn services, target the market for environmentally sustainable lawn care in one finite geographical location. Instead of publishing eBooks on finance, publish eBooks on investing for American women ages 18-24. Keep narrowing it down until you’ve found your product niche (more on that later).
Pick something people want or need
This is just common sense: you need to sell something that people will actually buy. Even the biggest brands still mess this up every once in a while (looking at you, Colgate-brand frozen dinners and the Bristol-Myers Squibb nightmare that was the “Touch of Yogurt” shampoo). Don’t wait until after you’ve launched your product to try to match it to a potential customer market. Do your research, and narrow down your target customer’s pains and gains, or the problems they need to solve and the enjoyable things they want to enhance. Make sure there’s a large enough demographic of people who are in the market for what you can provide.
Pick something profitable
There’s no surefire way to guarantee that a product or business will be profitable, but with some thorough research, you can certainly strengthen your odds. Ideally, you want to choose a product market with a strong balance between a large potential customer base and a small number of competitors. You’re also more likely to succeed if your product is truly unique in some way—if you offer a feature or element that no other competitor offers. Keep narrowing down your market until you’ve found your unique niche.
Narrowing down your product niche
Once you’ve identified a promising product market, you can start adding details to whittle your target market down to a target niche.
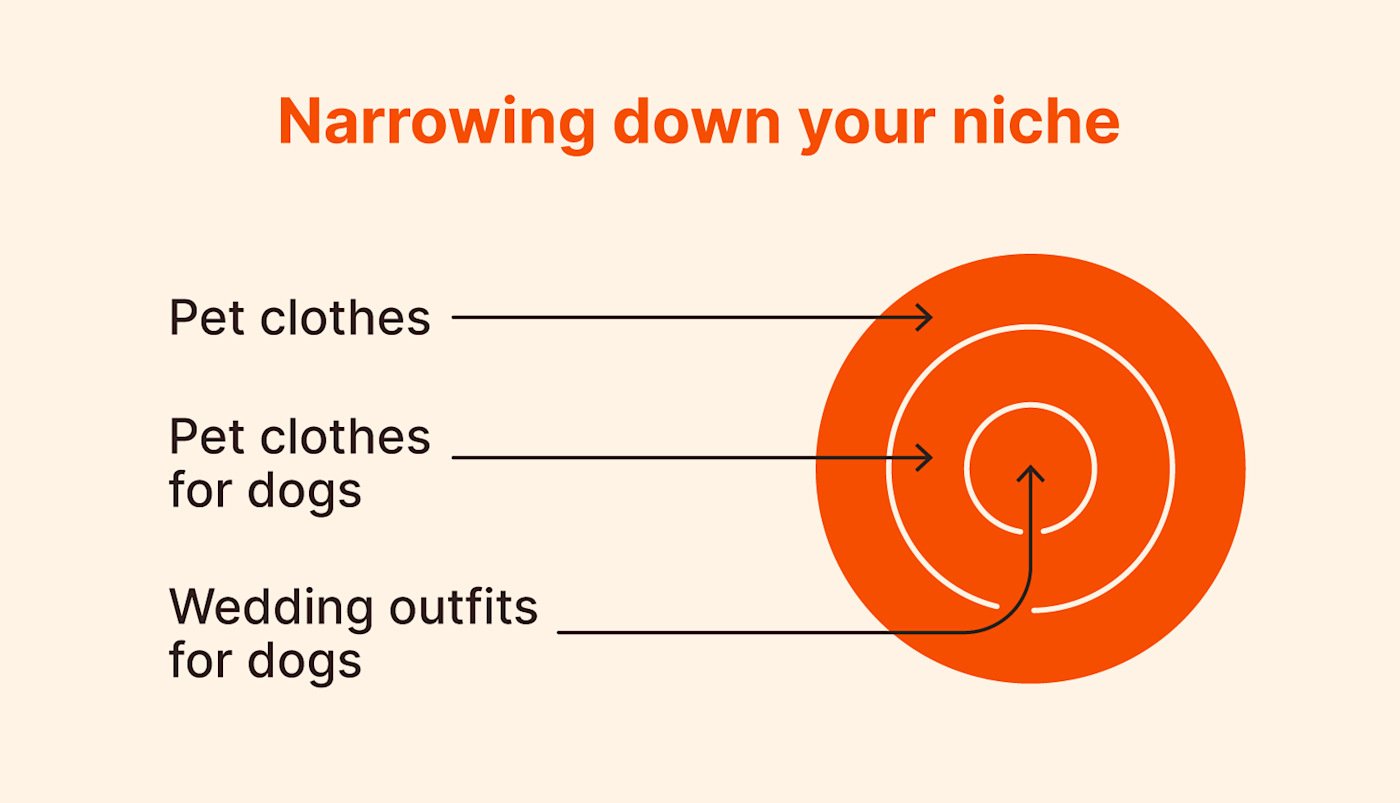
For example, let’s say that you make clothes in your free time, and you’re interested in figuring out how to turn that into an eCommerce business opportunity. In the broadest sense, you want to target the clothing industry, but since this is an extremely saturated market—meaning that it contains many, many competitors—it’s not one where you’re likely to succeed as an individual eCommerce seller.
You need to find a more unique product category within the larger framework of the clothing industry. One good choice might be pet clothes, since there are far fewer designers and retailers in the pet fashion industry than the human one. But “pet clothes” is still a pretty broad category, so you might narrow it further to pet clothes that are specifically for dogs.
When solo eCommerce selling was still a burgeoning market, handmade dog clothes may have been a narrow enough niche to pursue since there were so few non-corporate sellers and even fewer online marketplaces where sellers could compete. But today, you’ll want to get even more specific—perhaps by focusing on dog clothes for specific occasions, like weddings and engagements.
That’s as far as I’m taking this example, but if I were actually launching this business, I’d probably drill down even further just to really make sure that I had my unique micro-market cornered. I might narrow it down by size, theme, or even specific clothing items until I hit on my ultimate niche: floral-themed wedding bow ties for small and medium dogs. (Though there’s truly no limit to how far you drill down your niche—until, perhaps, you reach CelebriDucks levels of specificity.)
Your niche isn’t a permanent designation—if your product does well in your corner of the market, you’ll have more capital to invest in better marketing, audience targeting tools, and maybe even an employee or two. The more your company grows, the more resources and power you have to capture a larger market share.
Set up your store
You’ve found your market, honed your niche, picked your product, and you’re ready to start generating inventory and selling it to your customers. It’s time to choose a platform and set up your eCommerce store.
Choose an eCommerce platform
Talk about a crowded market—there are a ton of different platforms you can use to create a store online. You also don’t necessarily need your own online storefront; you can sell on marketplaces, crowdfunding sites, or a number of other eCommerce alternatives. If you do go with an eCommerce platform, here are a few different guides and comparisons that can help you find the right site for your business:
The platforms above fall into one of two categories, each with different setup requirements.
A standard website builder (like Wix, Weebly, Squarespace, or WordPress) will allow you to create an entire website, only part of which needs to be dedicated to your actual store’s functions. If eCommerce selling is only part of your business plan—for example, if you’re a professional photographer who sells prints and posters as a side hustle—you would want your site to be dedicated to your store as well as pages housing biographical information, your professional portfolio, booking information, recordings of photography classes or talks you’ve given, online course signups, and anything else that pertains to your career.
If your primary goal is eCommerce selling, you’re better off opting for a purpose-built eCommerce platform like Shopify or WooCommerce. Both platforms are capable of many of the same features as a general website builder, like adding about pages, forms, image displays, and blogs. These platforms also grant you access to more advanced features and integrations designed specifically for eCommerce sites, which can help supercharge your selling and help your store gain momentum early on.
Ready to build your store? Check out these step-by-step guides to building your store in the platform you want:
With your eCommerce shop all set up, it’s time to throw everything you’ve got into making sure that it succeeds. You can’t wait for your customers to come to you—you need to go out and find, reach, and convert your target audience.
Target inbound sales leads
Inbound sales strategies are designed to draw people to you, instead of the other way around—think search optimization (SEO), paid search, social media, email marketing campaigns, and content marketing.
Explore potential sales strategies in more detail with these guides:
As a small business owner, your plate is going to be full most of the time (frankly, it will often be full-on, Thanksgiving-style overflowing). If you want to keep up with it all, you need to learn to be efficient about using what you already have and drawing multiple marketing materials out of one asset.
For example:
Get into the habit of snapping and recording your day-to-day processes and behind-the-scenes moments, so you always have material for social and website visuals.
If you’re researching a topic, if it’s related to your business, consider adding an extra step to turn your research into a marketing email or SEO post.
Whenever you design a new marketing asset—an email layout, an Instagram Story, a blog structure—aim to turn it into a template that you can use again, instead of starting from scratch on your next asset.
Marketing as a small business owner is a “work smarter, not harder” game. Get as much mileage as you possibly can out of everything you create, and you’ll free up time and attention that would be better spent on business strategy and growing your company.
Automate as much as possible
There are lots of opportunities to automate parts of the eCommerce process. Invest time in setting up automations at the outset, and you’ll save far more time and energy avoiding unnecessary busywork once your store gets off the ground.
In fact, most of the risks specific to eCommerce entrepreneurship come down to the fact that it’s an overwhelming amount of work for one person to handle, so automating as much of your workload as possible can materially increase the likelihood of your business’s success.
Here are a few guides on the kinds of automation that work best for eCommerce and how to set them up:
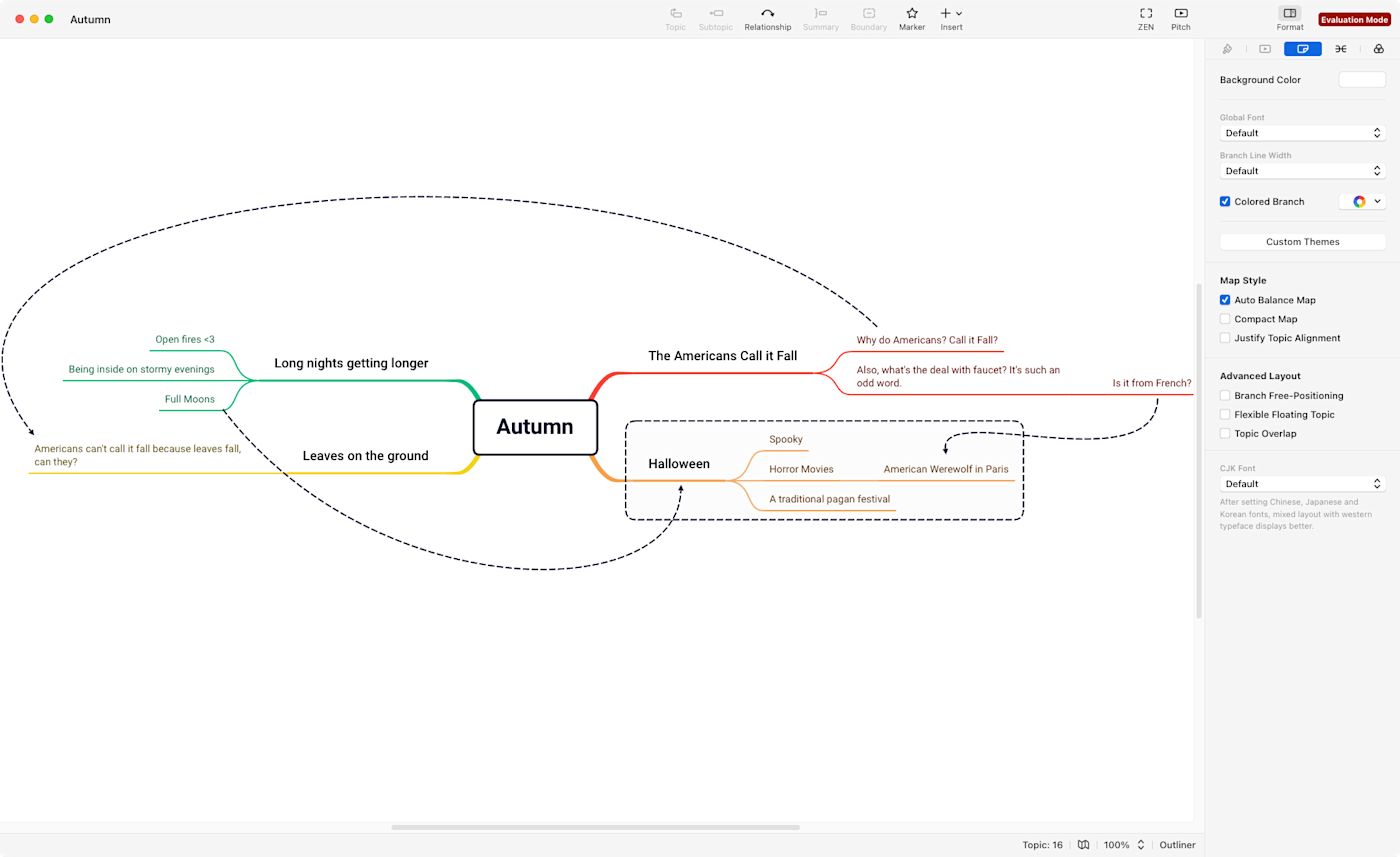
Mind mapping is a creative way to brainstorm and find connections between different ideas. Done right, it’s a great way to come up with new ideas and solutions to tricky problems, outline an article or presentation, and generally just get your thoughts in order.
Use automation to support brainstorming, delegation, and communication
I do most of my mind mapping digitally—and even when I don’t, I often recreate a paper mind map online so that I can have it safely stored and easily searched. (It’s a weird hybrid approach, but it works for me.)
Over the past several years of updating this list, I’ve tested close to 50 different mind map tools, many multiple times as they’ve been updated and added new features. I’ve also made dozens of mind maps myself, both on paper and digitally. Pen and paper set a very high bar to clear, but these are the five best mind mapping apps that manage to clear it.
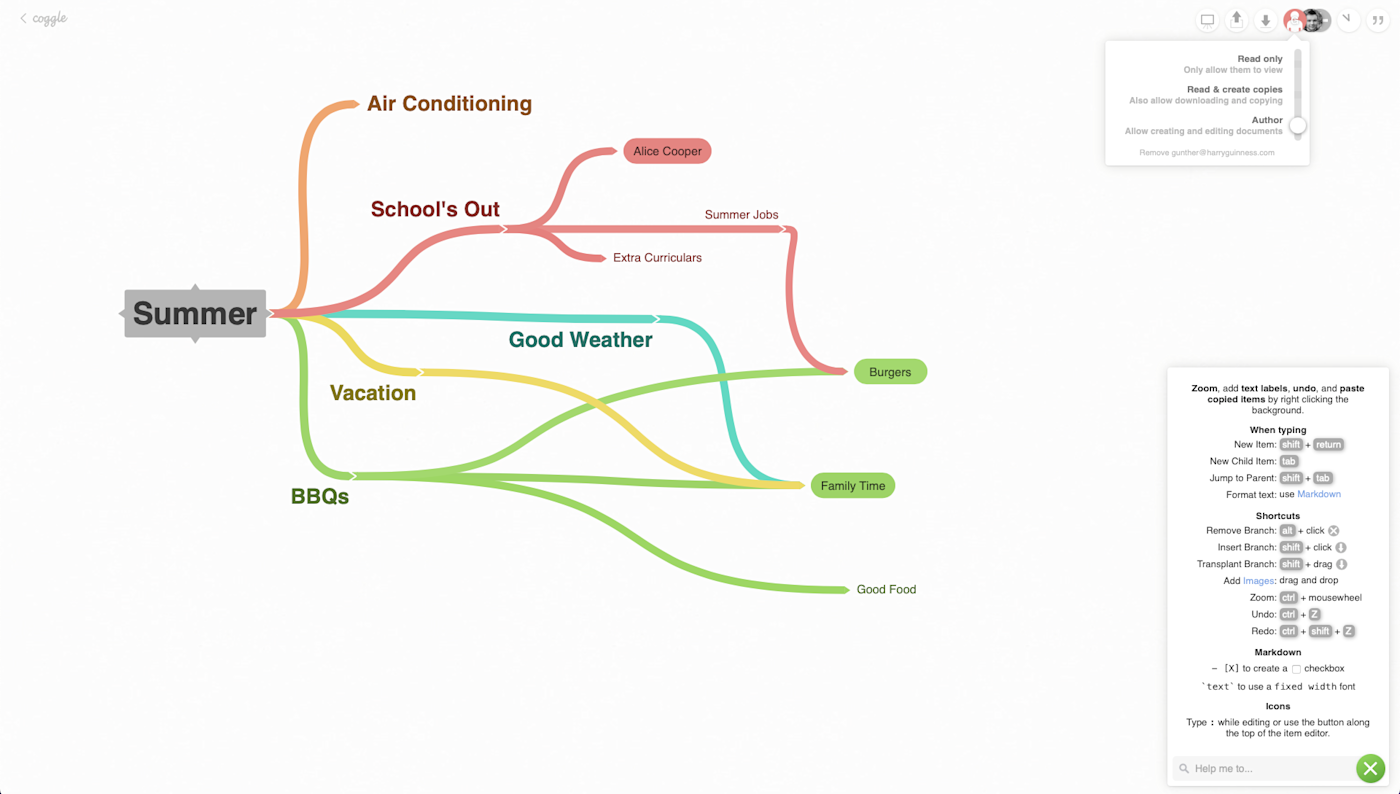
Traditionally, a mind map is done with a pen (or, ideally, loads of colored pens) and paper. You start by writing a central idea or theme in the middle of a blank sheet of paper. Then the fun starts: around your central theme, you create “nodes” connected by lines, each with its own related idea or theme. For example, if the central theme was “Summer” (say, for a marketing campaign), the first five or so nodes might be “Good weather,” “BBQs,” “Vacation,” “Air conditioning,” and “School’s out.”
From each node, you then repeat the process, drilling deeper into the different concepts. “BBQs” might lead to “Family time,” “Good food,” and “Burgers.” “School’s out” could lead to “Summer jobs,” “Extracurriculars,” and “Alice Cooper.”
Some ideas will also connect back to other ideas. “Family time” could also link to “Good weather” and “Vacation.” “Burgers” could link to “Summer jobs.” But by getting all these branching concepts down on paper, you can start to see the relationships between different things and generate new ideas. Who’d have thought before we started brainstorming that Alice Cooper flipping burgers at a family BBQ (or maybe in a fast food joint?) could make for a killer summer ad?
What makes for great mind map software?
How we evaluate and test apps
All of our best apps roundups are written by humans who’ve spent much of their careers using, testing, and writing about software. We spend dozens of hours researching and testing apps, using each app as it’s intended to be used and evaluating it against the criteria we set for the category. We’re never paid for placement in our articles from any app or for links to any site—we value the trust readers put in us to offer authentic evaluations of the categories and apps we review. For more details on our process, read the full rundown of how we select apps to feature on the Zapier blog.
Mind mapping with a sheet of paper and a pen is an incredibly intuitive and natural way to work. You just start drawing and go from there with almost nothing in your way.
It does have its downsides, though. Unless you have a gigantic whiteboard knocking around, you’re limited to a fairly small piece of paper. It’s not searchable, and you can’t easily undo things or make edits. And, worst of all, if you lose your mind map, you don’t have a backup. So even though pen-and-paper mind mapping is delightful, it might be worth considering a mind map app.
While each mind mapping tool on this list has its own unique benefits, they all meet at least the following criteria:
It’s actually a mind mapping app. A lot of drawing, diagramming, and flowchart apps are marketed as mind map apps—but they aren’t. While you could make a mind map in them, you could also use PowerPoint, Photoshop, or MS Paint. You could even get a key and carve a mind map into your computer screen. Just because something can be used to make a mind map, doesn’t mean it should or that it will do it well. These more general-purpose apps tend to lack the features that make creating a mind map digitally as easy as possible, like automatically linking nodes, brainstorming modes that let you get a lot of concepts down quickly, and search. For an app to make this list, we dug past the marketing and made sure it was designed from the ground up for brainstorming, not for drawing or creating professional diagrams or charts.
It gets out of the way. Mind mapping with a pen and paper is a joy. No app is ever going to be quite as intuitive, but it should come as close as possible. After a short learning period to get up to speed, you shouldn’t have to stop and think to create a node, or dig through menus to connect two ideas. The app should just fade into the background—the same way your web browser does.
It offers an unlimited canvas. A digital mind map tool should have a practically unlimited canvas size, so you can make a mind map as big as you can conceive of, connecting huge numbers of ideas if you want. Using an app is all about overcoming the analog downsides, not reinforcing them.
It allows you to attach files. Sometimes you need more than a few words to fully illustrate a concept—and doodling is a big part of analog mind mapping. For an app to make this list, you need to be able to attach images, videos, documents, web pages, and other assorted extras to your mind maps.
It allows you to save and export. You can’t easily edit, save, or share your paper mind maps, so one of the big reasons to go digital is that you can. The best mind map software lets you come back to a mind map later and change it up, save it, and export it in different formats, so you can send it to your colleagues, classmates, or anyone else.
This is my third year keeping this list updated, so I’m very familiar with all our top picks—plus all the apps that come close to breaking into this list but just fall short. To test each mind map app, I use it. I start with some silly concept and just mind map away to see how it works and feels. (I’m always comparing things back to both paper and the other apps.) If it’s nice to use and ticks all the boxes, it goes on a shortlist to be considered for inclusion. If it’s awkward, gets in the way, or doesn’t have a key feature, I leave it off the list (though all the testing notes get added to an increasingly complex spreadsheet, so I can check if things improve next year). From that shortlist, I pull out the best of the best. So, here are the five best mind mapping apps.
Best mind mapping software for beginners and occasional use
Coggle is, in many ways, the mind map maker to beat. It’s fast, intuitive, and easy to use (with great keyboard shortcuts)—even though it’s only available through your web browser. Perhaps best of all, Coggle is free for up to three private mind maps. As long as you save your mind maps as PDFs, plain text documents, or images, you can delete your old drafts and basically have unlimited free mind mapping. If you’re only looking to use a digital option every few months, it’s practically perfect.
The moment you start a diagram in Coggle, you’ll see the central node of a new mind map. From there, you can create new nodes by clicking on the plus sign or—if you want a faster experience—tapping the tab key. There’s a handy cheatsheet of all the keyboard shortcuts in the bottom-right corner of the app, and it’s worth learning to use them.
Coggle is packed with thoughtful touches. One of my favorite features is that you can format your mind map items and messages with Markdown, so you can get as fancy as you need to while adding your text, images, and links to the canvas. There’s also collaboration built in. If you want to bounce some ideas off a colleague, you can go ahead and add them to your mind map, carry on a conversation in the messages sidebar, or go into full-screen presentation mode to take a step back and do more high-level ideation.
In short, for occasional mind mapping (whether on your own or with colleagues), Coggle nails it, and it’s your best option s for free mind mapping software. Its paid offering is also great, but for $60/year, you can get other mind mapping apps that work natively rather than just through a web browser.
Coggle pricing: Free for up to three private diagrams; $5/month for unlimited private diagrams and extra mind mapping tools (like additional shapes and color control).
Best mind mapping software for collaborating with a team
MindMeister is one of the best collaborative mind mapping tools out there. It’s a little less intuitive to use than Coggle, and some features—like exporting your mind maps as a PDF or image, or attaching images and videos—are limited to paid plans, so it’s a less enticing option for solo mind mappers. For teams, though, its collaboration features are great: you can add team members and guests to your mind map, leave comments for each other, and otherwise work together to brainstorm or present ideas.
It also has a sleek modern interface and plenty of customization options (including some more corporate layouts). Plus, it automatically aligns your nodes, which makes it easy to create great-looking mind maps that won’t look out of place in a meeting room.
MindMeister is owned by the same people that make MeisterTask, a web-based, kanban-style project management app. The two tools are integrated, so you can turn your brainstorm session into an actionable project, assigning individual items on a mind map to members of your team, tracking task progress, and syncing it all with your other project boards inside MeisterTask—which even integrates with Zapier.
MindMeister pricing: Free for the Basic plan that includes up to three mind maps and real-time collaboration. From $4.99/month for the Personal plan that includes unlimited mind maps, file attachments, and PDF exports.
Best mind mapping software for a modern mind mapping approach
Ayoa is the follow-up to one of our previous mind mapping picks, iMindMap. It was created by Chris Griffiths, a mind mapping expert and author who has collaborated with Tony Buzan, the man responsible for popularizing mind mapping in the 1970s. Put simply, it’s got a serious mind mapping pedigree—and it shows.
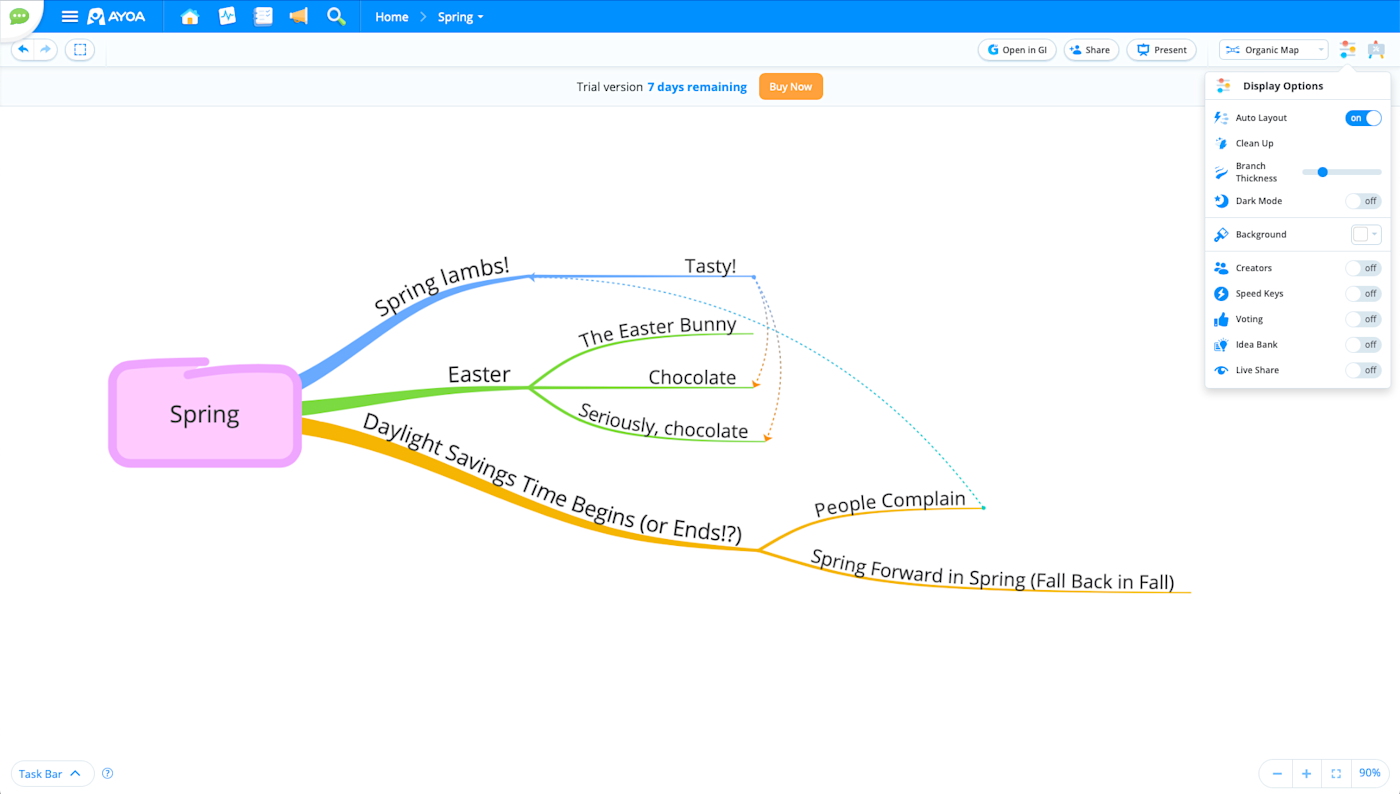
Open Ayoa, create a Mind Map, and you have a choice of making an Organic Map, a Speed Map, a Radial Map, or a Capture Map—though you can also change between them at any time with a dropdown menu. (You can also make a Whiteboard or Task Board if you’re doing some more corporate-style brainstorming, though these features are limited to the more expensive plans.)
The Organic Map is the most traditional and mimics the kind of thing you’d draw with a pen and paper. You aren’t confined to just putting words in boxes. Instead, you’re encouraged to label the swooshing, Sharpie-like branches that connect different ideas. It’s a much more natural process than a lot of the other apps.
A Speed Map is similar, but with a stripped-down setup designed for rapid brainstorming. You’re almost forced to use keyboard shortcuts, like Tab for a new child branch and Enter for a new sibling branch, as the buttons to do the same are hidden away unless you deliberately click on a node. It’s great when you want to ideate quickly.
A Radial Map is a totally modern approach to mind mapping. Instead of nodes and lines, every idea becomes part of a series of concentric circles. A peripheral segment of your central idea becomes the center of its own circle of ideas as you move outward. It’s mind mapping that’s moving beyond the limits of what can even be imagined with paper.
A Capture Map is a blank canvas that allows you to quickly add ideas, whether they’re related or not. They float around the page as little thought bubbles. You can then connect them and turn your rough outline into an Organic Map, Speed Map, or Radial Map.
And Ayoa isn’t just limited to basic (and not-so-basic) mind mapping. The chat, real-time collaboration, whiteboard, and task management features make it ideal if you’re part of a small team looking to realize your ideas. It’s also designed to be accessible to neurodiverse people. Ayoa is under rapid development, so it’s worth keeping an eye on their roadmap to see what features are coming down the line. When we reviewed this app two years ago, the whiteboard features didn’t exist. Last year, they were worth mentioning. Now, they’re so good that Ayoa almost made our list of best whiteboard apps.
This year’s surprise feature addition was GenerateIdeas.ai—an AI-powered brainstorming tool (though it’s only available on the most expensive Ultimate tier). Click Open in GI, then right-click on any node and select Ideas, Questions, or Explain, and it will come up with up to four related concepts. I found it was a little too willing to dive into controversial concepts like weight loss (a problem with many AI-powered tools). Using “Spring” as a test bed, I quickly generated ideas like “go for a morning jog” and “chocolate Easter eggs,” which, when the AI expanded on them, led to suggestions like “go for a morning jog to lose weight” and “develop a healthier chocolate to help with weight loss.” Keep this in mind if you’re going to use it in your workplace.
Ayoa pricing: Mind Map plan for $6.95/user/month with all mind mapping features. The Pro plan for $13/user/month adds whiteboards and other advanced features.
Most mind mapping apps are web apps, and if there’s a native app available, it’s really just a shell for the web app. It’s fine if you want the collaboration, sharing, and other features you get with an online service, but what if you just want a simple way to brainstorm by yourself?
MindNode, a native Mac, iPhone, and iPad app, is perfect for Apple users (and when I’m in a big mind mapping buzz, it’s my go-to app). Start a new map on one device and it instantly syncs to your other devices using iCloud. The app is just as easy to use (and as powerful) whether you prefer to tap the plus icon to add a new node on your iPhone or click it on your Mac. And since it’s a fully native app, no internet connection? No problem.
MindNode also has a load of other features that will keep you happy if you’re deep in Apple’s ecosystem, like a Quick Entry dialog in the Menu Bar on your Mac, Widgets for the Home screen or Notification Center, a Watch app, Apple Pencil support, and integration with popular to-do apps Apple Reminders, Things, and OmniFocus. Select any node, and click Add Task to turn it into a to-do item. Or click the share menu and Export to Things (or OmniFocus), and your mind map will get converted into a project in your chosen app with all your to-dos ready to be checked off. It’s a great brainstorming app that lets you turn a brainstorming session into something actionable.
MindNode pricing: Free limited Mac and iOS app; $2.49/month for MindNode Plus with image support, tasks, themes, and styling options.
Best mind mapping software for personal brainstorming
If you just make mind maps by yourself and don’t need to constantly brainstorm with other people, then a lot of the tools we’ve looked at are overkill. A lot of development time goes into supporting real-time collaboration, versioning, and the like. With XMind, however, all that same dev energy goes straight into making mind mapping nicer, faster, and easier.
While XMind is available on the web (if you have mind maps stored in a cloud storage provider like Dropbox or Google Drive), its native apps are what shine. It’s available on Windows, macOS, iOS, Android, and even Linux. If you need something cross-platform so you and your family (or professional team) can all use the same app, even if you aren’t collaborating in real-time, it’s hard to beat.
While it’s subjective, I also feel that XMind makes the nicest mind maps by default. It’s got a slightly hand-drawn style that I wish I could mimic with a pen and paper. It’s professional enough for the office (especially if you use the built-in Pitch mode), but also nice enough that you’ll want to use it by choice.
Otherwise, XMind hits all the marks you’d expect from a mind mapping app. It’s intuitive to use whether you rely on keyboard shortcuts, a touch screen, or clicking buttons with a mouse. There are enough customization options and themes that you can make your mind maps how you like.
Really, the biggest downside is that, at ~$7/month, it’s expensive for one person—especially when you consider all the features it lacks compared to, say, Ayoa or MindMeister. If a nice solo offline experience is more important than the most features for the money, then it’s easy to recommend. On the other hand, if you’re not mind mapping that often or need to work in a more deliberate way with other people, it’s probably not for you.
XMind pricing:$39.99 for 6 months (or $59.99 annually) for up to five desktops and five mobile devices.
If you’re wary of subscription fees and want something for personal use, SimpleMind is a solid XMind alternative. It’s available from €24.99 for Windows or macOS (€44.99 for both), $9.99 for iOS, and $8.49 for Android.
Do you need a mind mapping app?
Mind mapping can be a great way to generate and connect ideas, but unless you do it all the time, you probably don’t need a dedicated mind map creator—or at least not a paid one. Because, when it comes down to it, mind mapping software is just brainstorming software—and you can brainstorm pretty much anywhere. If you want a compromise, Coggle is a great place to start for free mind map software, since the free plan is pretty generous.
Also, reconsider the pen-and-paper method. It’s really hard to beat—which is why there are so many mind mapping apps available and so few on our list—and you can always take a photo of it to save it or share it. It’s not as tech-y as an app, but it works if you don’t make mind maps all the time as part of your job, or even in your personal life.