Recognition is crucial for your website to succeed. From creating a great logo to developing key messaging and delivering great content, the easier it is for visitors to recognize your brand, the better the chances they’ll remember your site and make the move from content curiosity to sales conversion.
But reliable recognition isn’t just about the big things — done well, even the smallest details of your WordPress website can help it stand out from the crowd and attract customer notice. This is the role of the favorite icon or “favicon” that’s used in web browser tabs, bookmarks, and on mobile devices as the app image for your site.
Not sure how favicons work or how to get them up and running on your site? We’ve got you covered with our functional guide to favicons — what they are, why they matter, and how to enable them in WordPress.
Grow Your Business With HubSpot’s Tools for WordPress Websites
If you would rather follow along with a video, here’s a walkthrough created by Elegant Themes:
What is a WordPress Favicon?
The official WordPress support page defines a favicon as “an icon associated with a particular website or web page.” This description doesn’t do the term justice — in fact, favicons are everywhere and are intrinsically associated with your brand.
Let’s take a closer look at how favicons look and why they matter below.
WordPress Favicon Size
The typical size of a WordPress favicon is 512 x 512 pixels. These icons are stored as .ico files in the root directory of your WordPress server.
But what does a favicon look like in real life? For a quick example, take a look at the browser tab of this webpage if you’re on a desktop or the area just under the address bar on your mobile device. Notice anything? That orange symbol with lines and circles is HubSpot’s favicon — and it shows up anytime you’re on our site.
In most cases, favicons are the same as brand logos scaled down to fit web and mobile browsers. Where this isn’t possible — such as cases where your logo is too complex or detailed — site owners typically opt for similar color schemes and thematic elements to ensure brand consistency.
Once you start seeing favicons you can’t unsee them; from webpages to tabs to bookmarks and mobile applications, the icon you choose for your favicon is inextricably linked to your site and your brand — so make sure you choose wisely.
Why Favicons Matter
Favicons are the visual currency of your brand. They’re everywhere — from browsers to bookmarks to mobile apps — and become an integral part of your site’s overall branding strategy.
As result, effective favicon design and deployment offers three broad benefits:
Improved Brand Recognition
Think of your favicon like your calling card — the icon needs to be simple, recognizable and consistent. The more places your favicon appears, the better, since this makes it easy for users to connect your WordPress site with your icon image.
Consistency is also key as users open multiple browser tabs and the available space for text descriptions naturally shrinks. Open enough tabs and all that’s left is — you guessed it — room for the favicon.
Increased Consumer Confidence
While visitors may not be able to define what a favicon is or how it works, these icons are inherently familiar. So familiar, in fact, that sites without favicons often stand out from the crowd for all the wrong reasons.
Much like relevant social media content and secure site connections, favicons are critical to boosting consumer confidence in the products or services you offer on your site.
Integrated Mobile Consistency
The impact of mobile devices can’t be ignored, with smartphones and tablets now outpacing desktops as the primary means of consumer online interaction. Favicons make it possible to ensure your brand easily translates to mobile — when users create website bookmarks on mobile home screens, your favicon stands in for the link.
Favicon Creation Guidelines
Not sure how to get started creating your site’s favicon? Let’s break down some best-practice guidelines.
1. Get the size right.
As noted above, favicons are typically 512 x 512 pixels in size. While it’s possible to use a larger WordPress favicon size, the platform will often ask you to crop the image down.
2. Keep it simple.
While it’s possible to add background colors and other customization to your favicon, keeping it simple is often the best choice. Here, simplicity includes opting for transparency over background colors and keeping the number of foreground colors in your favicon to one or two at most.
Ideally, your favicon will look almost identical to your brand’s logo — if that’s not possible, try to pull elements from your logo such as shapes or color schemes that help tie in your new favicon.
3. Choose wisely.
Site owners can update their favicon at any time, but it’s a good idea to keep the number of changes to a minimum. Here’s why: If users see a different favicon every time they log on to your website, they won’t have an opportunity to associate a specific image with your brand.
Bottom line? Better to go without a favicon until you find one that works for your site and that you don’t plan on changing.
How to Enable WordPress Favicons
To get your favicon up and running on your WordPress site, you’ve got three options:
- Use the Site Icon feature
- Install a favicon plugin
- Upload the new favicon yourself
Let’s break down each method in more detail.
1. Use the site icon feature.
As of WordPress version 4.3, the content management system (CMS) includes a Site Icon function that enables favicons. Simply prepare your image file — which can be a .jpeg, .ico, .gif or .png file — and head to the Administration page of your WordPress Site.
Next, click on “Appearance” and then “Customize”, then click “Site Identity.” Now, click “Select Image” under the Site Icon subheading and upload the file you’ve prepared. You should see a screen like this:
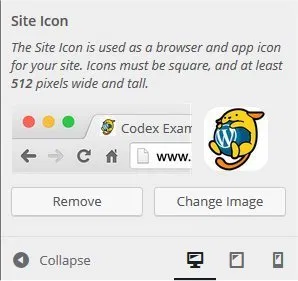
If you like the favicon you’ve created, no further action is required. If not, you can easily remove the file or upload a new image.
2. Install a favicon plugin.
You can also use a plugin — such as Favicon by RealFaviconGenerator — to create and deploy your favicon. This must-have WordPress plugin not only lets you customize your favicon but also ensures that multiple versions are created to satisfy the requirements of different operating systems and device versions.
As long as the image you upload to the plugin is at least 70 x 70 pixels, the RealFaviconGenerator will take care of the rest.
3. Upload the new favicon yourself.
If you’d rather do the legwork yourself, you can create and upload your own favicon to your WordPress site.
First, create an image that’s at least 16 x 16 pixels and is saved as a .ico file. Then, use an FTP client to upload this file to the main folder of your current WordPress theme — typically the same place as your wp-admin and wp-content folders.
While this should display your favicon in most web browsers, some older browser versions will require you to edit WordPress header HTML code. The result? DIY favicons aren’t recommended unless you’re familiar with more technical WordPress functions.
Final Favicon Thoughts
Whie favicons form only a small part of your WordPress website build, they’re critical for website recognition. Consistent and clear favicons make it easy for visitors to remember your site and carry this mental connection across desktop, tablet, and mobile devices.
Source :
https://blog.hubspot.com/website/wordpress-favicon#:~:text=WordPress%20Favicon%20Size&text=These%20icons%20are%20stored%20as,directory%20of%20your%20WordPress%20server.