The Ultimate Guide to Password Best Practices: Guarding Your Digital Identity

Dirk Schrader
Published: November 14, 2023
Updated: November 24, 2023

In the wake of escalating cyber-attacks and data breaches, the ubiquitous advice of “don’t share your password” is no longer enough. Passwords remain the primary keys to our most important digital assets, so following password security best practices is more critical than ever. Whether you’re securing email, networks, or individual user accounts, following password best practices can help protect your sensitive information from cyber threats.

Read this guide to explore password best practices that should be implemented in every organization — and learn how to protect vulnerable information while adhering to better security strategies.

The Secrets of Strong Passwords

A strong password is your first line of defense when it comes to protecting your accounts and networks. Implement these standard password creation best practices when thinking about a new password:

  • Complexity: Ensure your passwords contain a mix of uppercase and lowercase letters, numbers, and special characters. It should be noted that composition rules, such as lowercase, symbols, etc. are no longer recommended by NIST — so use at your own discretion.
  • Length: Longer passwords are generally stronger — and usually, length trumps complexity. Aim for at least 6-8 characters.
  • Unpredictability: Avoid using common phrases or patterns. Avoid using easily guessable information like birthdays or names. Instead, create unique strings that are difficult for hackers to guess.

Handpicked related content:

Combining these factors makes passwords harder to guess. For instance, if a password is 8 characters long and includes uppercase letters, lowercase letters, numbers and special characters, the total possible combinations would be (26 + 26 + 10 + 30)^8. This astronomical number of possibilities makes it exceedingly difficult for an attacker to guess the password.

Of course, given NIST’s updated guidance on passwords, the best approach to effective password security is using a password manager — this solution will not only help create and store your passwords, but it will automatically reject common, easy-to-guess passwords (those included in password dumps). Password managers greatly increase security against the following attack types.

Password-Guessing Attacks

Understanding the techniques that adversaries use to guess user passwords is essential for password security. Here are some of the key attacks to know about:

Brute-Force Attack

In a brute-force attack, an attacker systematically tries every possible combination of characters until the correct password is found. This method is time-consuming but can be effective if the password is weak.

Strong passwords help thwart brute force attacks because they increase the number of possible combinations an attacker must try, making it unlikely they can guess the password within a reasonable timeframe.

Dictionary Attack

A dictionary attack is a type of brute-force attack in which an adversary uses a list of common words, phrases and commonly used passwords to try to gain access.

Unique passwords are essential to thwarting dictionary attacks because attackers rely on common words and phrases. Using a password that isn’t a dictionary word or a known pattern significantly reduces the likelihood of being guessed. For example, the string “Xc78dW34aa12!” is not in the dictionary or on the list of commonly used passwords, making it much more secure than something generic like “password.”

Dictionary Attack with Character Variations

In some dictionary attacks, adversaries also use standard words but also try common character substitutions, such as replacing ‘a’ with ‘@’ or ‘e’ with ‘3’. For example, in addition to trying to log on using the word “password”, they might also try the variant “p@ssw0rd”.

Choosing complex and unpredictable passwords is necessary to thwart these attacks. By using unique combinations and avoiding easily guessable patterns, you make it challenging for attackers to guess your password.

How Password Managers Enhance Security

Password managers are indispensable for securely storing and organizing your passwords. These tools offer several key benefits:

  • Security: Password managers store passwords and enter them for you, eliminating the need for users to remember them all. All users need to remember is the master password for their password manager tool. Therefore, users can use long, complex passwords as recommended by best practices without worrying about forgetting their passwords or resorting to insecure practices like writing passwords down or reusing the same password for multiple sites or applications.
  • Password generation: Password managers can generate a strong and unique password for user accounts, eliminating the need for individuals to come up with them.
  • Encryption: Password managers encrypt password vaults, ensuring the safety of data — even if it is compromised.
  • Convenience: Password managers enable users to easily access passwords across multiple devices.

When selecting a password manager, it’s important to consider your organization’s specific needs, such as support for the platforms you use, price, ease of use and vendor breach history. Conduct research and read reviews to identify the one that best aligns with your organization’s requirements. Some noteworthy options include Netwrix Password Secure, LastPass, Dashlane, 1Password and Bitwarden.

How Multifactor Authentication (MFA) Adds an Extra Layer of Security

Multifactor authentication strengthens security by requiring two or more forms of verification before granting access. Specifically, you need to provide at least two of the following authentication factors:

  • Something you know: The classic example is your password.
  • Something you have: Usually this is a physical device like a smartphone or security token.
  • Something you are: This is biometric data like a fingerprint or facial recognition.

MFA renders a stolen password worthless, so implement it wherever possible.

Password Expiration Management

Password expiration policies play a crucial role in maintaining strong password security. Using a password manager that creates strong passwords also has an influence on password expiration. If you do not use a password manager yet, implement a strategy to check all passwords within your organization; with a rise in data breaches, password lists (like the known rockyou.txt and its variations) used in brute-force attacks are constantly growing. The website haveibeenpawned.com offers a service to check whether a certain password has been exposed. Here’s what users should know about password security best practices related to password expiration:

  • Follow policy guidelines: Adhere to your organization’s password expiration policy. This includes changing your password when prompted and selecting a new, strong password that meets the policy’s requirements.
  • Set reminders: If your organization doesn’t enforce password expiration via notifications, set your own reminders to change your password when it’s due. Regularly check your email or system notifications for prompts.
  • Avoid obvious patterns: When changing your password, refrain from using variations of the previous one or predictable patterns like “Password1,” “Password2” and so on.
  • Report suspicious activity: If you notice any suspicious account activity or unauthorized password change requests, report them immediately to your organization’s IT support service or helpdesk.
  • Be cautious with password reset emails: Best practice for good password security means being aware of scams. If you receive an unexpected email prompting you to reset your password, verify its authenticity. Phishing emails often impersonate legitimate organizations to steal your login credentials.

Password Security and Compliance

Compliance standards require password security and password management best practices as a means to safeguard data, maintain privacy and prevent unauthorized access. Here are a few of the laws that require password security:

  • HIPAA (Health Insurance Portability and Accountability Act): HIPAA mandates that healthcare organizations implement safeguards to protect electronic protected health information (ePHI), which includes secure password practices.
  • PCI DSS (Payment Card Industry Data Security Standard): PCI DSS requires organizations that handle payment card data on their website to implement strong access controls, including password security, to protect cardholder data.
  • GDPR (General Data Protection Regulation): GDPR requires organizations that store or process the data of EU residents to implement appropriate security measures to protect personal data. Password security is a fundamental aspect of data protection under GDPR.
  • FERPA (Family Educational Rights and Privacy Act): FERPA governs the privacy of student education records. It includes requirements for securing access to these records, which involves password security.

Organizations subject to these compliance standards need to implement robust password policies and password security best practices. Failure to do so can result in steep fines and other penalties.

There are also voluntary frameworks that help organizations establish strong password policies. Two of the most well known are the following:

  • NIST Cybersecurity Framework: The National Institute of Standards and Technology (NIST) provides guidelines and recommendations, including password best practices, to enhance cybersecurity.
  • ISO 27001: ISO 27001 is an international standard for information security management systems (ISMSs). It includes requirements related to password management as part of its broader security framework.

Password Best Practices in Action

Now, let’s put these password security best practices into action with an example:

Suppose your name is John Doe and your birthday is December 10, 1985. Instead of using “JohnDoe121085” as your password (which is easily guessable), follow these good password practices:

  • Create a long, unique (and unguessable) password, such as: “M3an85DJ121!”
  • Store it in a trusted password manager.
  • Enable multi-factor authentication whenever available.

10 Password Best Practices

If you are looking to strengthen your security, follow these password best practices:

  • Remove hints or knowledge-based authentication: NIST recommends not using knowledge-based authentication (KBA), such as questions like “What town were you born in?” but instead, using something more secure, like two-factor authentication.
  • Encrypt passwords: Protect passwords with encryption both when they are stored and when they are transmitted over networks. This makes them useless to any hacker who manages to steal them.
  • Avoid clear text and reversible forms: Users and applications should never store passwords in clear text or any form that could easily be transformed into clear text. Ensure your password management routine does not use clear text (like in an XLS file).
  • Choose unique passwords for different accounts: Don’t use the same, or even variations, of the same passwords for different accounts. Try to come up with unique passwords for different accounts.
  • Use a password management: This can help select new passwords that meet security requirements, send reminders of upcoming password expiration, and help update passwords through a user-friendly interface.
  • Enforce strong password policies: Implement and enforce strong password policies that include minimum length and complexity requirements, along with a password history rule to prevent the reuse of previous passwords.
  • Update passwords when needed: You should be checking and – if the results indicate so – updating your passwords to minimize the risk of unauthorized access, especially after data breaches.
  • Monitor for suspicious activity: Continuously monitor your accounts for suspicious activity, including multiple failed login attempts, and implement account lockouts and alerts to mitigate threats.
  • Educate users: Conduct or partake in regular security awareness training to learn about password best practices, phishing threats, and the importance of maintaining strong, unique passwords for each account.
  • Implement password expiration policies: Enforce password expiration policies that require password changes at defined circumstances to enhance security.

How Netwrix Can Help

Adhering to password best practices is vital to safeguarding sensitive information and preventing unauthorized access.

Netwrix Password Secure provides advanced capabilities for monitoring password policies, detecting and responding to suspicious activity and ensuring compliance with industry regulations. With features such as real-time alerts, comprehensive reporting and a user-friendly interface, it empowers organizations to proactively identify and address password-related risks, enforce strong password policies, and maintain strong security across their IT environment.

Conclusion

In a world where cyber threats are constantly evolving, adhering to password management best practices is essential to safeguard your digital presence. First and foremost, create a strong and unique password for each system or application — remember that using a password manager makes it much easier to adhere to this critical best practice. In addition, implement multifactor authentication whenever possible to thwart any attacker who manages to steal your password. By following the guidelines, you can enjoy a safer online experience and protect your valuable digital assets.

Dirk Schrader

Dirk Schrader is a Resident CISO (EMEA) and VP of Security Research at Netwrix. A 25-year veteran in IT security with certifications as CISSP (ISC²) and CISM (ISACA), he works to advance cyber resilience as a modern approach to tackling cyber threats. Dirk has worked on cybersecurity projects around the globe, starting in technical and support roles at the beginning of his career and then moving into sales, marketing and product management positions at both large multinational corporations and small startups. He has published numerous articles about the need to address change and vulnerability management to achieve cyber resilience.

Source :
https://blog.netwrix.com/2023/11/15/password-best-practices/

What are webhooks?

A simple guide to connecting web apps with webhooks

By Matthew Guay · September 20, 2022

what-are-webhooks primary img

You might have seen webhooks mentioned in your apps’ settings and wondered if they’re something you should use. The answer, in a nutshell, is probably yes.

Webhooks are one way that apps can send automated messages or information to other apps. It’s how PayPal tells your accounting app when your clients pay you, how Twilio routes phone calls to your number, and how WooCommerce can notify you about new orders in Slack.

They’re a simple way your online accounts can “speak” to each other and get notified automatically when something new happens. In many cases, you’ll need to know how to use webhooks if you want to automatically push data from one app to another.

Let’s break it down, learn how to speak webhook, and get your favorite apps to talk to each other.

Here’s what we’ll cover:

What are webhooks?

Example SMS message with a sender, receiver, and message

There are two ways your apps can communicate with each other to share information: polling and webhooks. As one of our customer champion’s friends has explained it: polling is like knocking on your friend’s door and asking if they have any sugar (aka information), but you have to go and ask for it every time you want it. Webhooks are like someone tossing a bag of sugar at your house whenever they buy some. You don’t have to ask—they just automatically punt it over every time it’s available.

Automate your way forward with Zapier

Sign up

Webhooks are automated messages sent from apps when something happens. They have a message—or payload—and are sent to a unique URL—essentially the app’s phone number or address. Webhooks are almost always faster than polling, and require less work on your end.

They’re much like SMS notifications. Say your bank sends you an SMS when you make a new purchase. You already told the bank your phone number, so they knew where to send the message. They type out “You just spent $10 at NewStore” and send it to your phone number +1-234-567-8900. Something happened at your bank, and you got a message about it. All is well.

Webhooks work the same way.

Example webhook data

Take another look at our example message about a new order. Bob opened your store’s website, added $10 of paper to his shopping cart, and checked out. Boom, something happened, and the app needs to tell you. Time for the webhook.

Wait: who’s the app gonna call? Just like you need to tell the bank your phone number before they can text you, for webhooks, you need to tell the originating app—your eCommerce store, in this case—the webhook URL of the receiving app, the app where you want the data to be sent.

Say you want to make an invoice for this new order. The app that creates this invoice is on the receiving end—it’s the app that needs the order data.

Automate workflows that drive success

Learn from expert Zapier users, receive personalized support, and find ways to scale your impact at our free user conference.

Register for ZapConnect

You’d first open your invoice app, make an invoice template, and copy its webhook URL—something like yourapp.com/data/12345. Then open your eCommerce store app, and add that URL to its webhook settings. That URL is your invoice app’s phone number, essentially. If another app pings that URL (or if you enter the URL in your browser’s address bar), the app will notice that someone is trying to send it data.

Ok. Back to the order. Your eCommerce store got the order and knows it needs to send the details to yourapp.com/data/12345. It then writes the order in a serialization format. The simplest of those formats is called “form-encoded”, and means your customer’s order would look something like this:

Customer=bob&value=10.00&item=paper

Now your eCommerce store needs to send the message. The simplest way to send data to a webhooks URL is with an HTTP GET request. Literally, that means to add the data to the URL and ping the URL (or enter it in your browser’s address bar). The same way you can open Zapier’s about page by typing /about after zapier.com, your apps can send messages to each other by tagging extra text with a question mark on the end of a website address. Here’s the full GET request for our order:

https://yourapp.com/data/12345?Customer=bob&value=10.00&item=paper

Deep inside your invoice app, something dings and says “You’ve got mail!” and the app gets to work, making a new invoice for Bob’s $10 paper order. That’s webhooks in action.

Remember when you had to check your email to see if you had new messages—and how freeing push email (“You’ve got mail!”) was? That’s what webhooks are for your apps. They don’t have to check for new info anymore. Instead, when something happens, they can push the data to each other and not waste their time checking and waiting.

→ Ready to start using webhooks? Jump ahead to skip the geeky details—or keep reading to learn more about the terms you’ll often see used with webhooks.


That’s the simple version. Technically, webhooks are “user-defined callbacks made with HTTP” according to Jeff Lindsay, one of the first people to conceptualize webhooks. Webhooks are data and executable commands sent from one app to another over HTTP instead of through the command line in your computer, formatted in XML, JSON, or form-encoded serialization. They’re called webhooks since they’re software hooks—or functions that run when something happens—that work over the web. And they’re typically secured through obscurity—each user of an application gets a unique, random URL to send webhook data to—though they can optionally be secured with a key or signature.

Webhooks typically are used to connect two different applications. When an event happens on the trigger application, it serializes data about that event and sends it to a webhook URL from the action application—the one you want to do something based on the data from the first application. The action application can then send a callback message, often with an HTTP status code like 302 to let the trigger application know if the data was received successfully or 404 if not.

Webhooks are similar to APIs—but simpler. An API is a full language for an app with functions or calls to add, edit, and retrieve data. The difference is, with an API, you have to do the work yourself. If you build an application that connects to another with an API, your application will need to have ways to ask the other app for new data when it needs it. Webhooks, on the other hand, are for one specific part of an app, and they’re automated. You might have a webhook just for new contacts—and whenever a new contact is added, the application will push the data to the other application’s webhooks URL automatically. It’s a simple, one-to-one connection that runs automatically.

How to use webhooks

Video Thumbnail

You know the lingo, understand how apps can message each other with webhooks, and can even figure out what the serialized data means. You speak webhook.

It’s time to use it. The best way to make sure you understand how webhooks work is to test it out, try making your own webhooks, and see if they work. Or, you can jump ahead and just drop your webhook URL into an app to share data—after all, you don’t have to know how to make webhooks to use them.

Here are the resources you need:

Test webhooks with RequestBin and Postman

The quickest way to learn is to experiment—and it’s best to experiment with something you can’t break. With webhooks, there are two great tools for that: RequestBin (owned by Pipedream) and Postman.

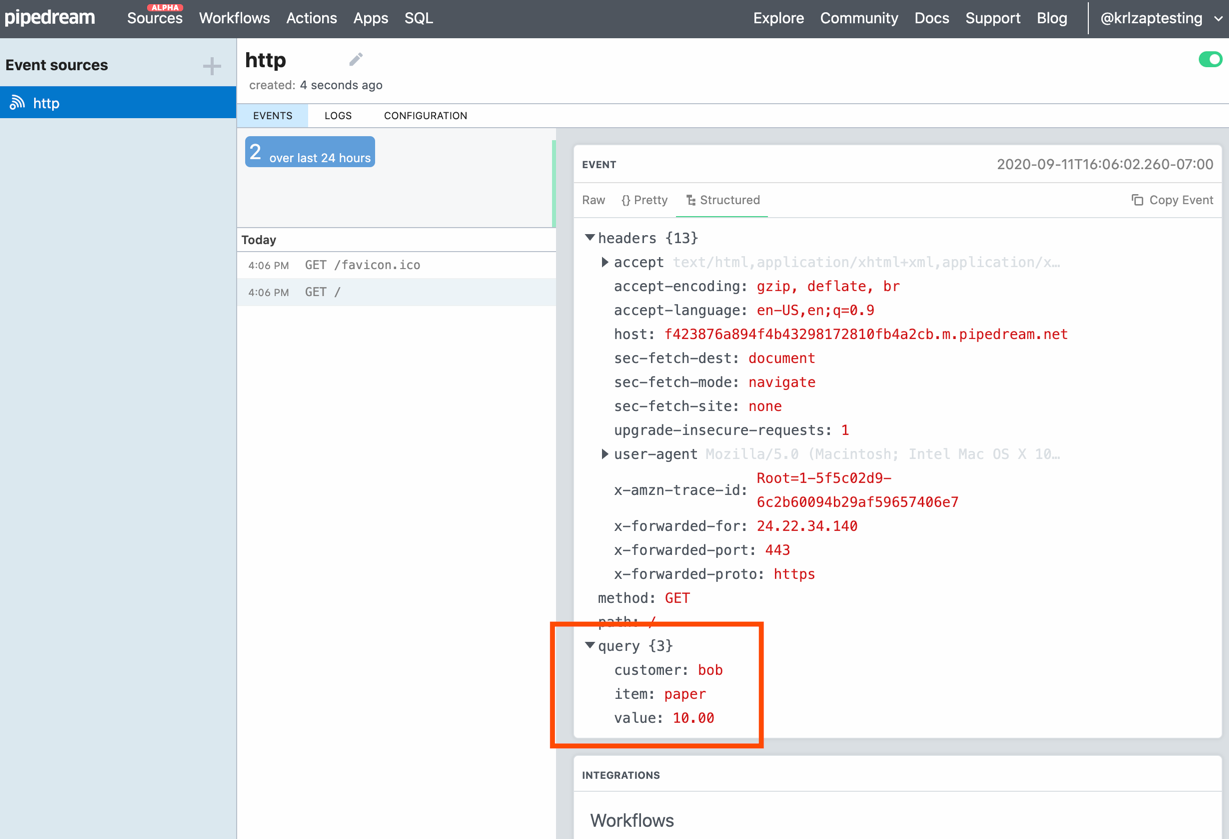
How data appears in Requestbin

How data appears in Requestbin

RequestBin lets you create a webhooks URL and send data to it to see how it’s recognized. Go to RequestBin, click Create a RequestBin, then copy the URL it gives you.You’ll need to have a Pipedream account (created with Google or GitHub) before you can view and use a URL.

Now, serialize some data in form encoded style—or copy our example form copy above. Open a new tab, paste your RequestBin URL in the URL bar, add a ? to the end, then paste your serialized data. You’ll end up with something like this:

https://requestbin.com/19uynve1?customer=bob&value=10.00&item=paper

Press enter in your browser’s address bar, and you’ll get a simple message back: success:true. Refresh your RequestBin tab, and you’ll see the data listed at the bottom as in the screenshot above.

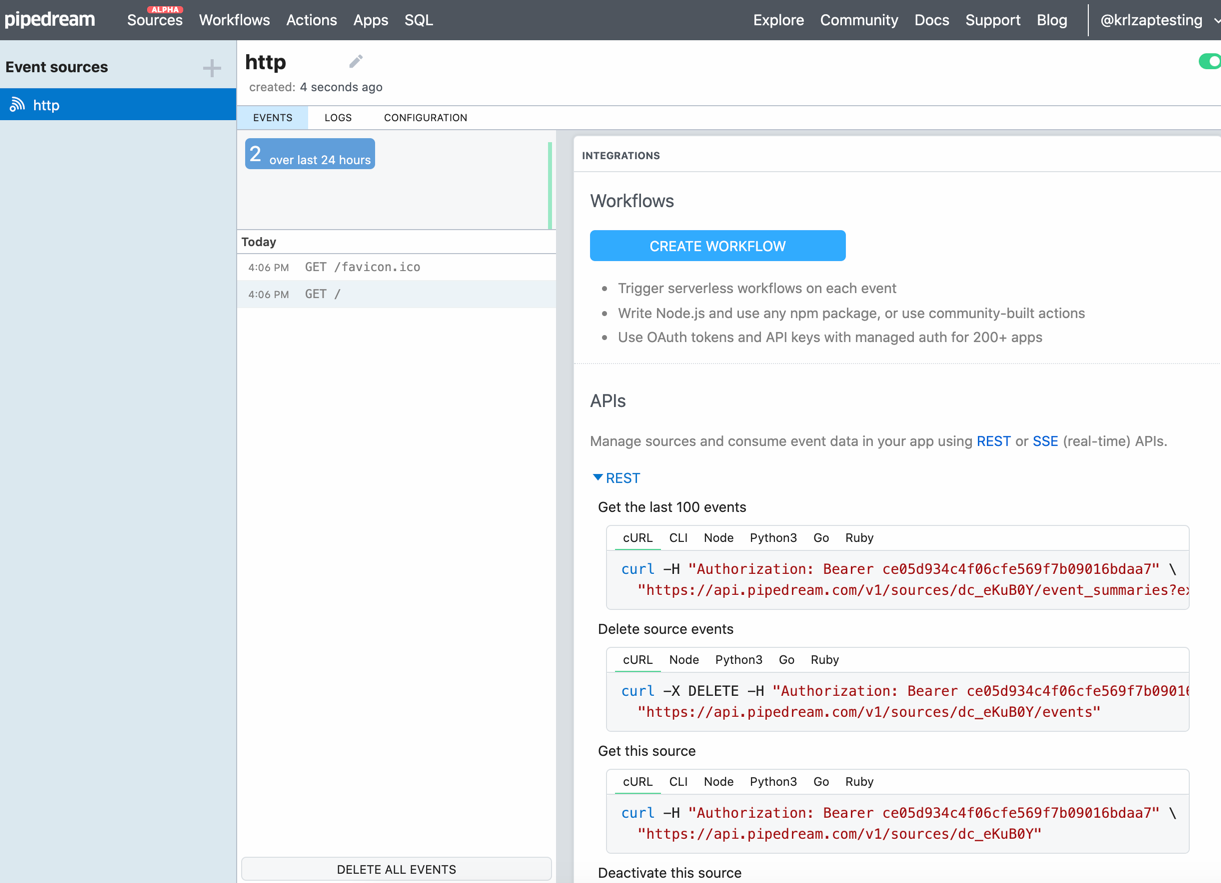
Click REST under INTEGRATIONS to see the data.

Click REST under INTEGRATIONS to see the data.

You can then try sending POST requests in Terminal or from your own app’s code, if you’d like, using RequestBin’s sample code. That’s a bit more complex—but gives you a way to play with JSON or XML encoding, too.

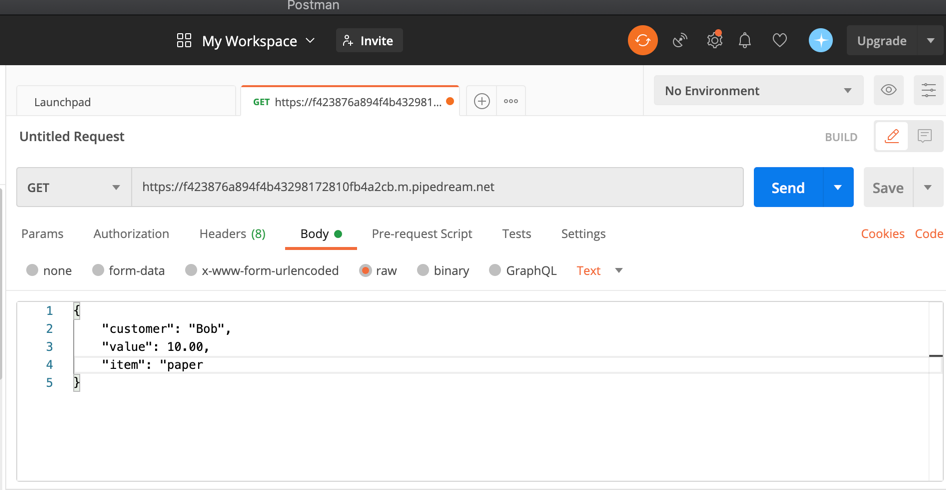
The setup in Postman

The setup in Postman

Or, use another app for that. The app Postman lets you make custom HTTP requests for an easy way to send customized data to a webhooks URL. Enter the URL, then choose the HTTP request method you want to use (GET, POST, PUT, etc), and add the body data. That’ll let you send far more detailed requests to your webhook URL without having to use more code.

Add webhooks to your apps

Testing webhooks and serializing data by hand is tricky—as is copying and pasting data from your apps. Let’s skip both, and just get our apps talking to each other.

We’re using WordPress-powered form tool Gravity Forms and document template-builder app WebMerge as the examples here—but the same general idea works in most other apps that support webhooks. Here’s essentially what you need to do:

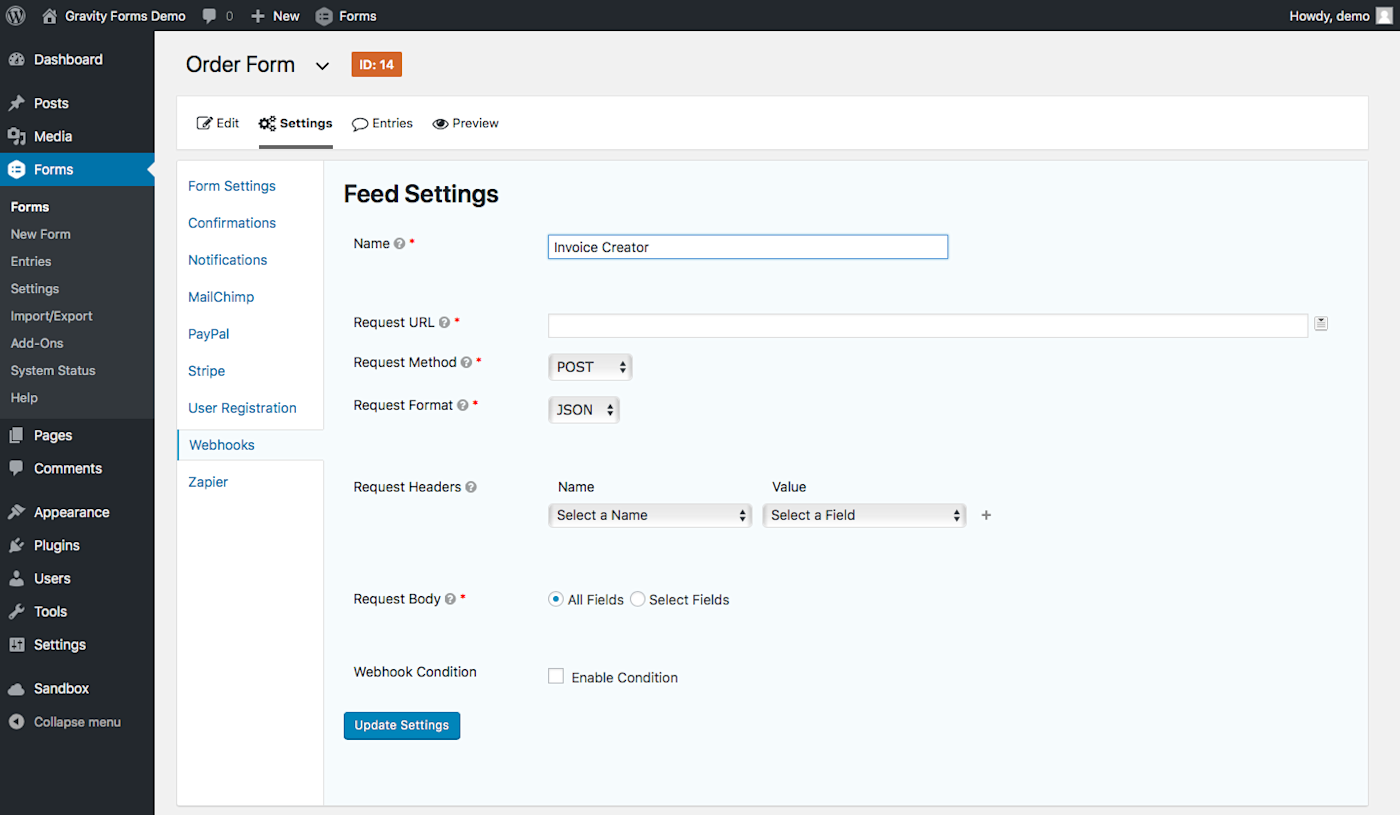
Gravity Forms Webhook data

Open your form’s Webhook settings in Gravity Forms

First, enable webhooks in your app if they’re not already and open the webhooks settings (in Gravity Forms, for instance, you need to install an add-on; in Active Campaign or WooCommerce, you’ll find webhooks under the app’s default settings). Your app might have one set of webhook settings for the entire app—or, often, it’ll have a specific webhook for each form, document, or other items the app maintains.

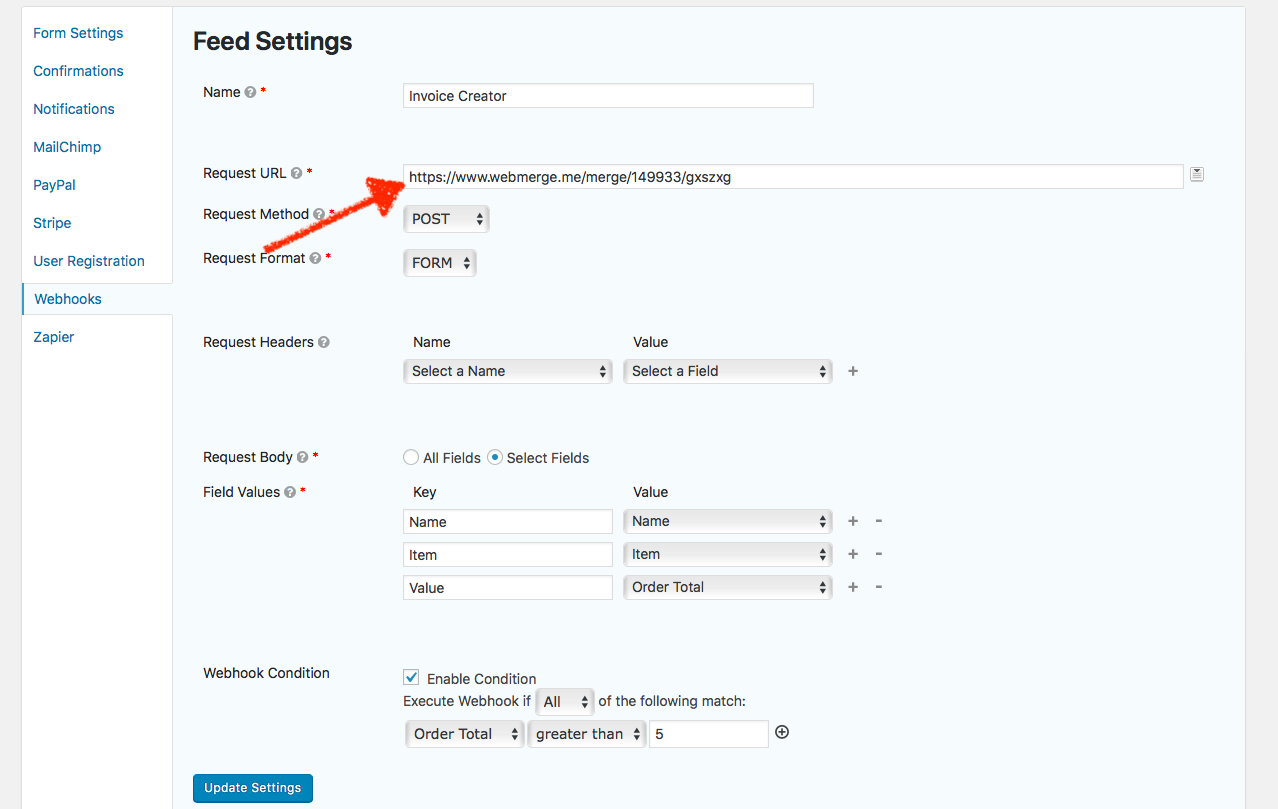
We want the data to come from Gravity Forms, so we’ll open the Webhooks settings under the form we want to use. That gives us a URL field (this lets us tell Gravity Forms where we want to send the data) and options to specify the webhook HTTP request method (how to send the data).

WebMerge webhook

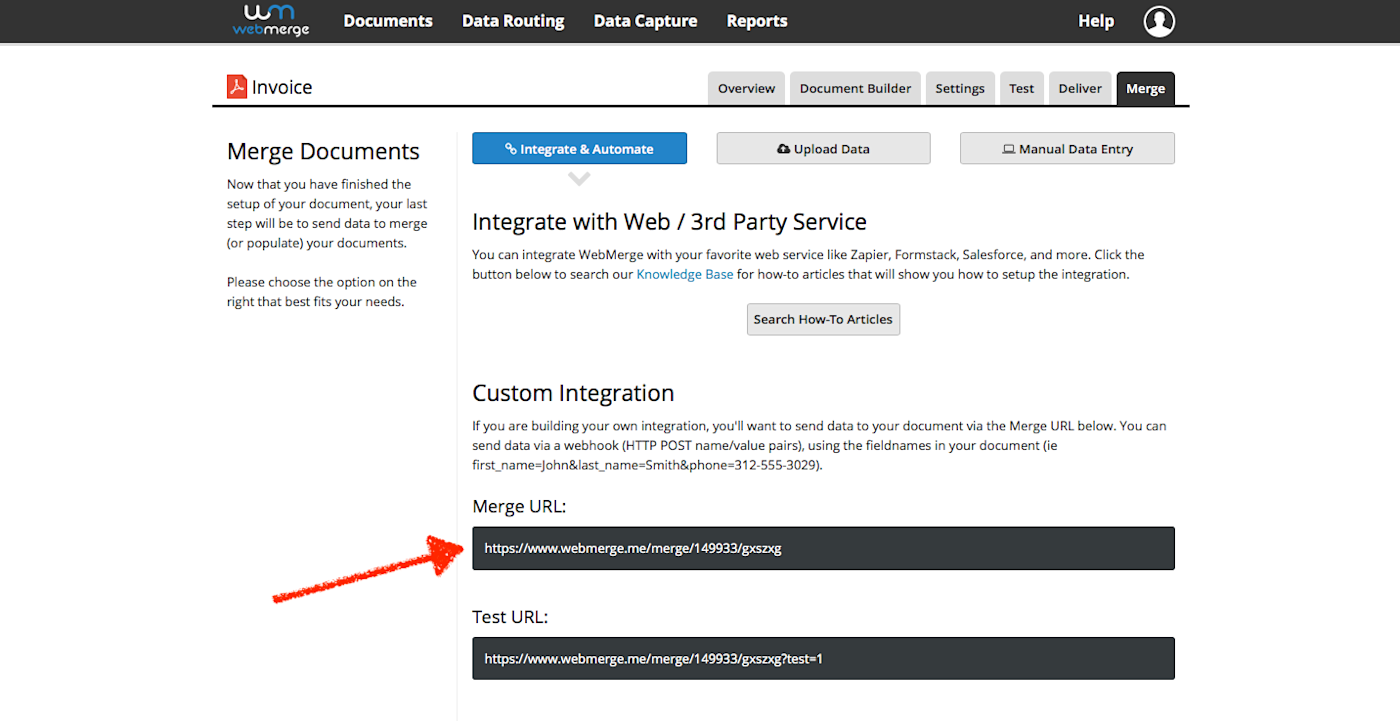
Each WebMerge document template has a unique webhook URL.

Now let’s get that URL from the app that will receive the data—WebMerge, in this case. In WebMerge, each document has its own “merge URL”—and it wants the data in form encoded serialization, as you can tell from the ampersands in the example data. Copy the merge URL—or whatever URL your app offers, as it may have a different name.

Tip: You’ll often find webhook URLs and related settings under the “integration”, “webhook”, or “workflow” settings, depending on your app.

Add webhooks URL to Gravity Forms

Add the webhooks URL to your trigger app so it can share data when something happens

Finally, go back to your trigger app—Gravity Forms in our case—and paste the webhook URL in Gravity Forms’ URL field. You may also be able to set the correct request method and the specific field values to ensure only the data you want is sent, and is shared with the same variable names as the receiving app uses. Save the settings, and you’re good to go.

The next time someone fills out our form that Bob ordered 10.00 of paper, Gravity Forms will send the data to WebMerge’s URL as https://www.webmerge.me/merge/149933/gxszxg?Name=Bob&Item=Paper&Value=10.00 and WebMerge will turn that into a complete invoice.


PayPal IPN

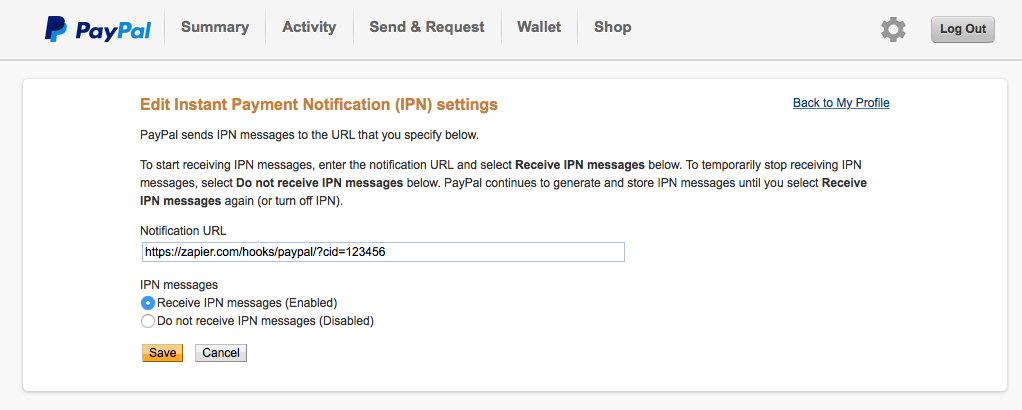
PayPal IPN is very similar to webhooks—and you can add a webhook URL to PayPal to get payment notifications

Once you start using webhooks, you’ll notice them (or similar links) everywhere, in places you never thought they’d show up. PayPal, for instance, uses Instant Payment Notifications or IPNs to send notifications whenever you receive a payment. Have an app that you’d like to do something whenever you get a PayPal payment? Add its webhooks URL to PayPal’s IPN settings and that app will get a message the next time you get money.

Or take TwimletsTwilio‘s simple apps to forward calls, record voicemail messages, start a conference call, and more. To, say, forward a call, you’ll add a familiar, webhook-style Twimlet address like http://twimlets.com/forward?PhoneNumber=415-555-1212 to your Twilio phone number settings. Want to build your own phone-powered app, or notify another app when a new call comes in? Put your webhook URL in Twilio’s settings instead.

They might go by different names, but once you notice places where apps offer to send notifications to a unique link, you’ll often have found somewhere else webhooks can work. Now that you know how to use webhooks, you can use them to make software do whatever you want.

Use webhooks in any app with Zapier

Many apps on Zapier use webhooks behind the scenes already. You may not realize it, since Zapier apps generally handle all the actual setup for you. If you come across an app that offers webhooks as an option, you can use a webhooks step in a Zap to set that up yourself using what you’ve learned about webhooks. Note: Webhooks by Zapier is a built-in tool only available to Zapier users on a paid plan or during their trial period.

Copy Webhooks URL from Zapier

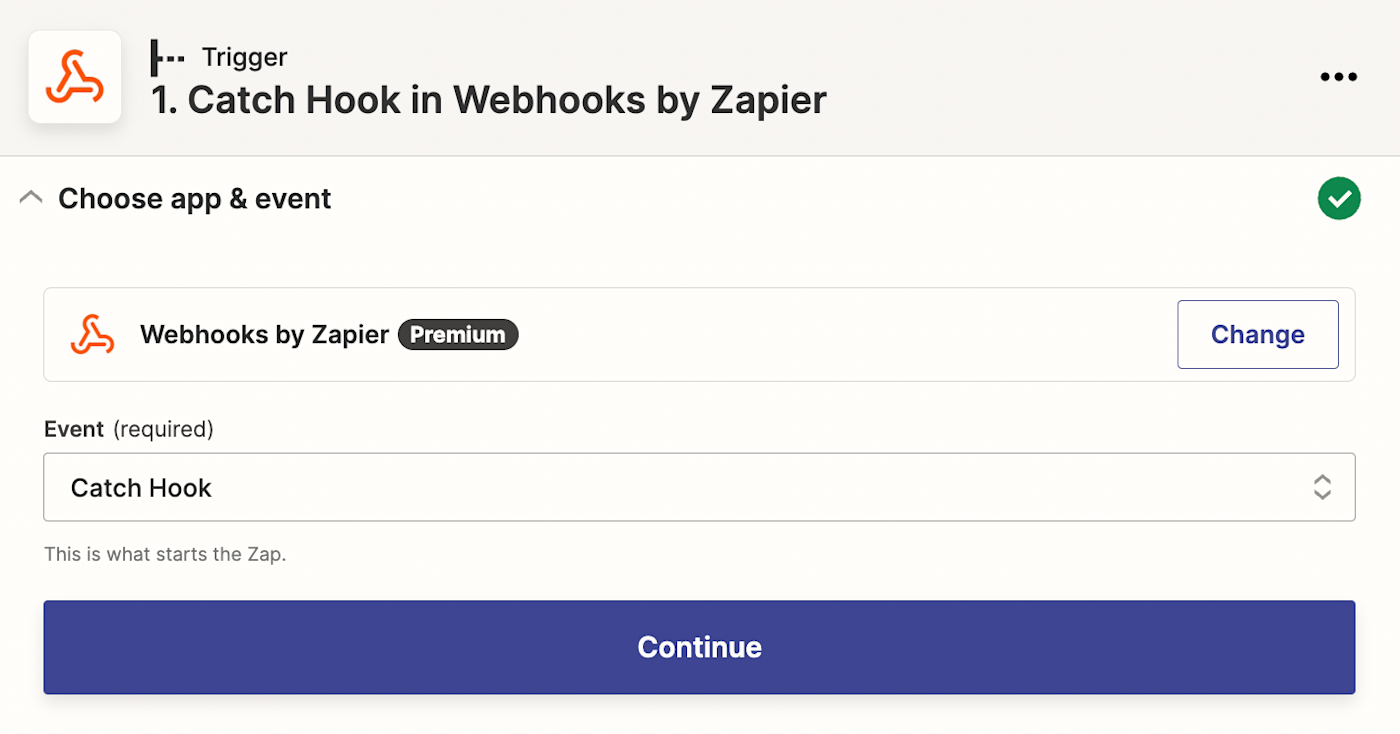
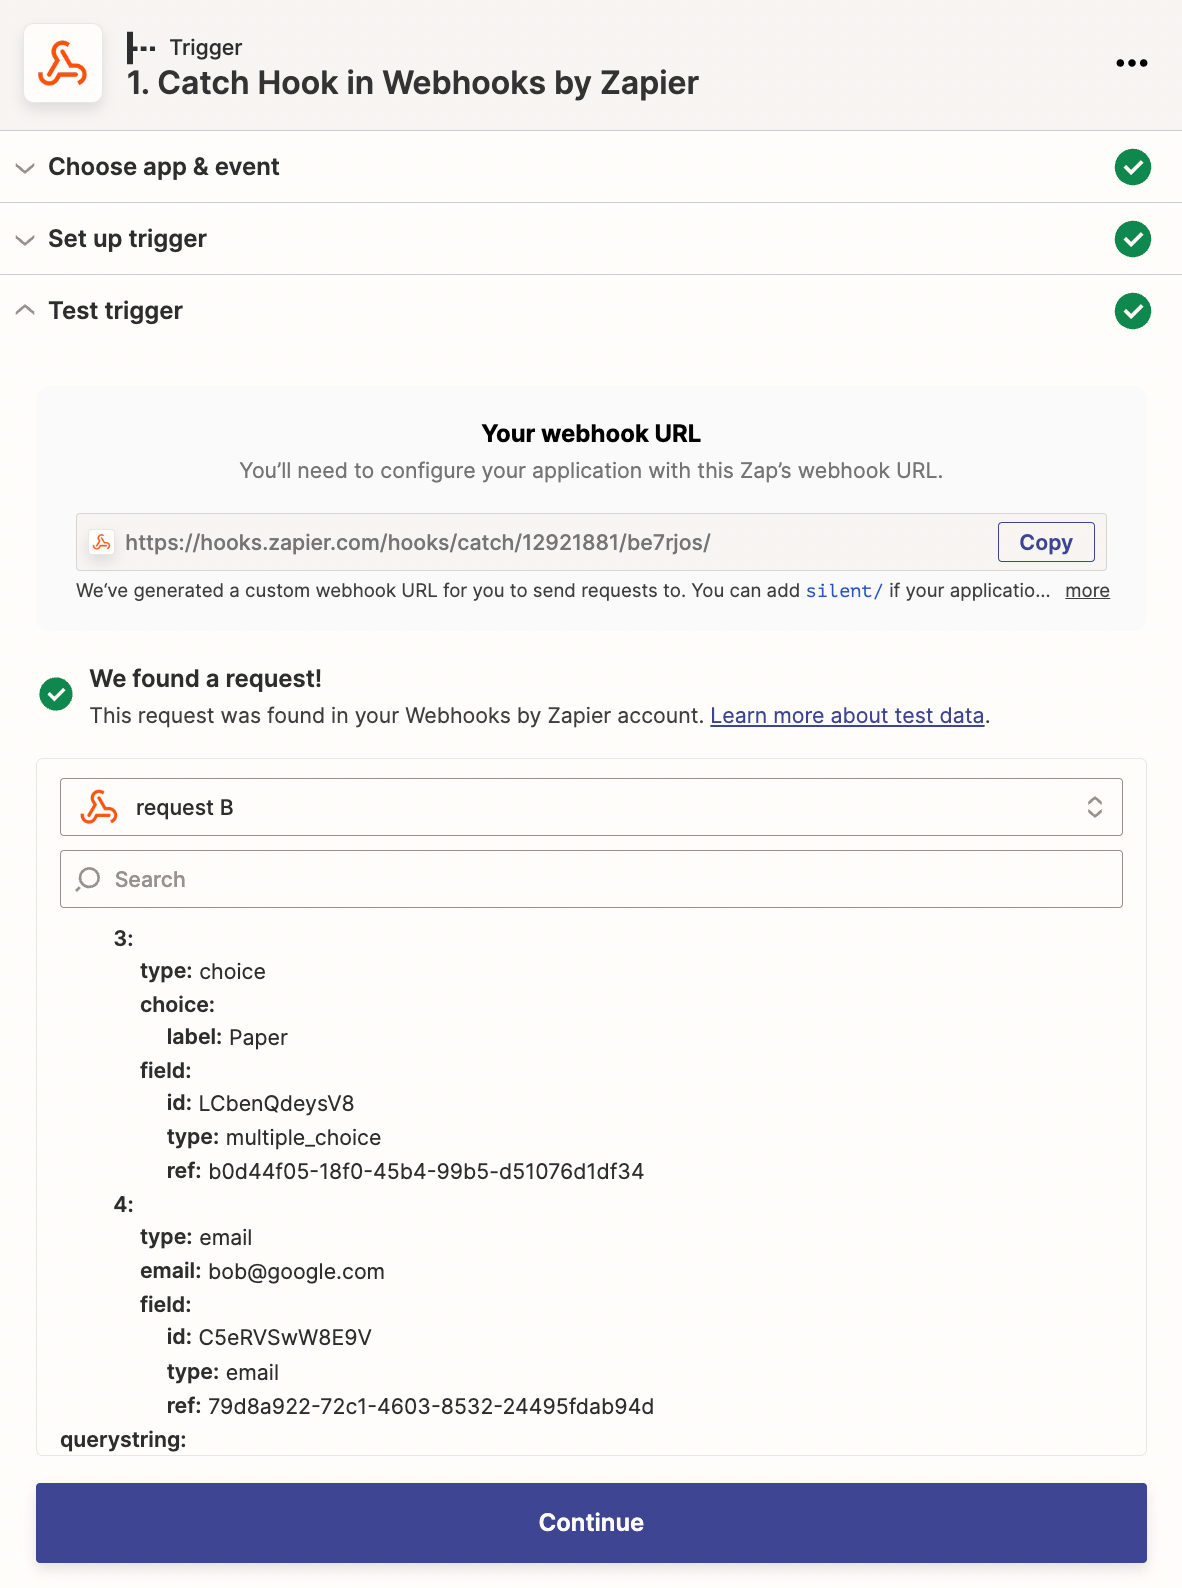
Say you have an app that can send data to a webhooks URL. To connect it to other apps, you’ll make a new Zap—what we call Zapier’s automated app workflows—and choose Webhooks by Zapier as the trigger app. Select Catch Hook, which can receive a GET, POST, or PUT request from another app. Zapier will give you a unique webhooks URL—copy that, then add it to your app’s webhooks URL field in its settings.

GET requests ask the server for data. POST requests send data to a computer. PUSH requests ask the server for specific data, typically to update it.

Test webhooks in Zapier

Zapier will parse each serialized item from your webhook data

Then have your app test the URL, or perhaps just add a new item (a new form entry, contact, or whatever thing your app makes) to have your app send the data to the webhook. Test the webhook step in Zapier, and you’ll see data from the webhook listed in Zapier.

Use webhooks in action app in Zapier

You can add each data item from your webhook to another app in Zapier

Now you can use that data in another app. Select the action app—the app you want to send data to. You’ll see form fields to add data to that app. Click in the field where you want to add webhooks data and select it from the dropdown. Test your Zap and it’s now ready to use. Now the next time your trigger app sends data to the webhook, Zapier will automatically add it to the action app you selected.


Zapier webhook action

Zapier can send any data you want to a webhooks URL

The reverse works as well. Want to send data from one app to another via webhooks? Zapier can turn the data from the trigger app into a serialized list and send it to any webhooks URL you want.

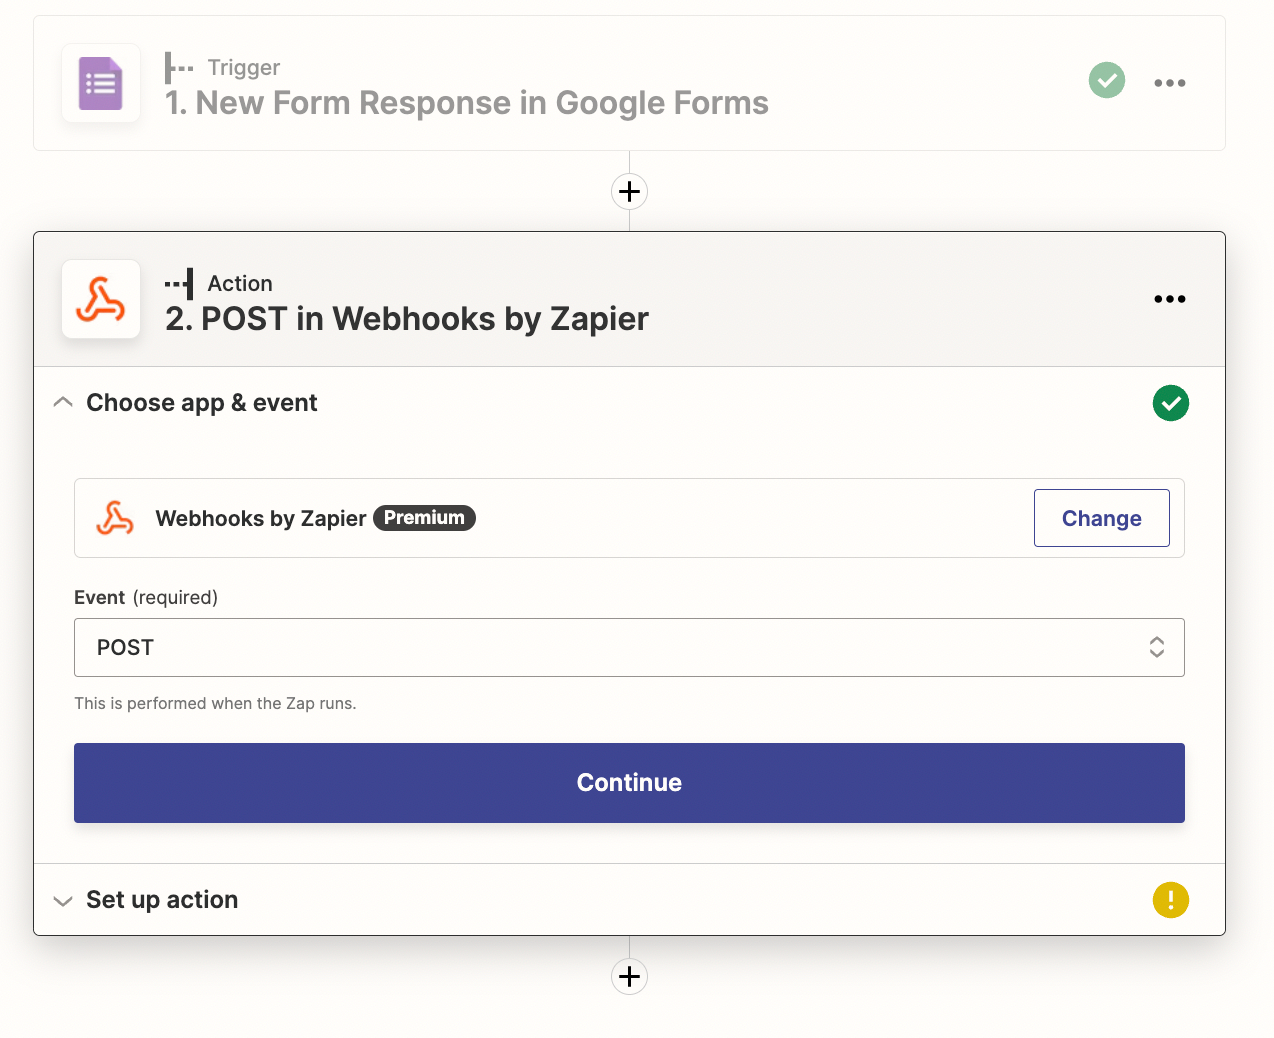
First, select the trigger app you want to send data from, and set it up in Zapier as normal. Then select Webhooks as the action app, and choose how you want to send the data (POST is typically the best option for most webhook integrations).

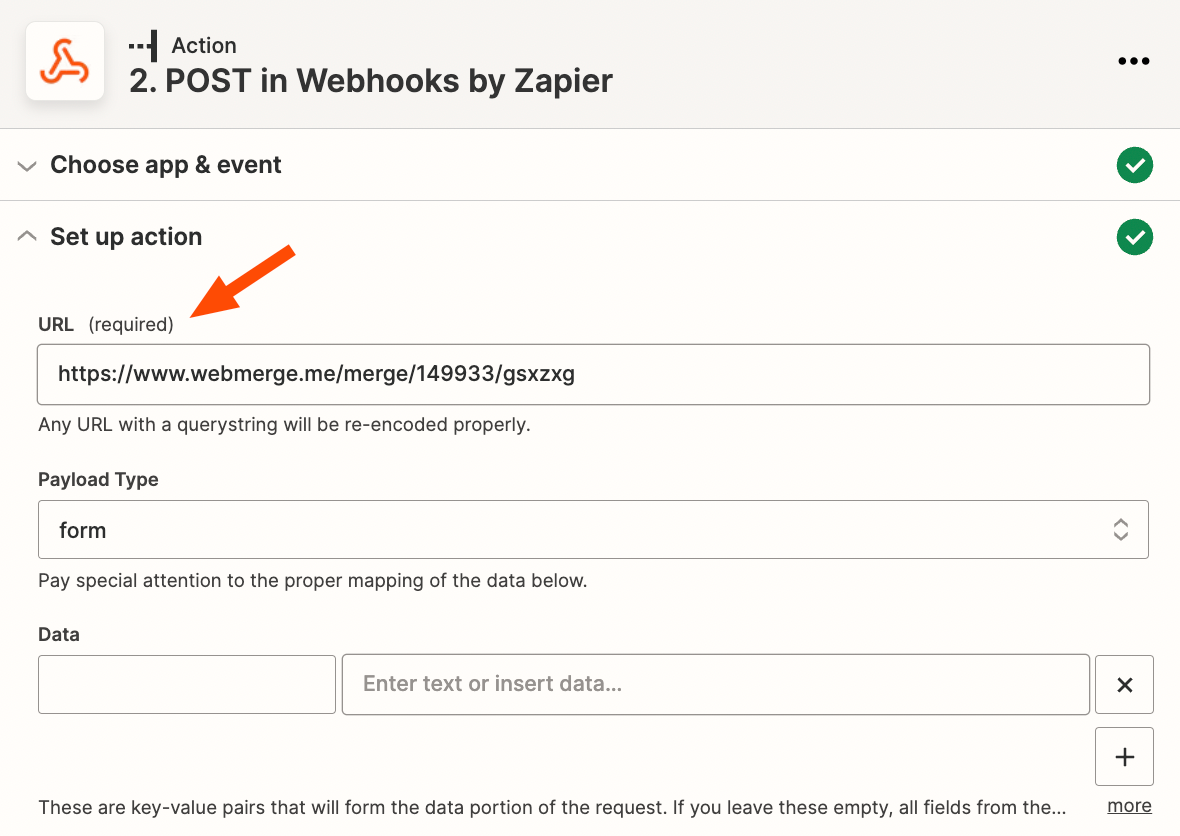
Finally, paste the webhooks URL from the app you want to receive the data into the URL field in Zapier’s webhook settings. You can choose how to serialize the data (form or JSON are typically best). Zapier will then automatically send all of the data from your trigger app to the webhook—or you can set the specific data variables from the Data fields below.

Zapier send data to webhook URL

You can specify how Zapier serializes your data and choose the specific data it sends to your webhook

You’re now ready to use your Zap. Now whenever something new happens in your trigger app, Zapier will copy the data and send it to your other app’s webhooks URL.


Webhooks are one of the best ways to connect apps that wouldn’t otherwise work with Zapier. Have a Mac or iPhone app that doesn’t connect with Zapier? Using Alfred or Siri Shortcuts—plus a Zapier Webhooks URL—you can connect them to your Zapier workflows. Here’s how:

Or, automate any other app that uses webhooks with Zapier’s webhook integrations or use one of these popular Zap templates to get started quickly:

Add info to a Google Sheet from new Webhook POST requests

Try it

  • Google Sheets logo
  • Webhooks by Zapier logo

Google Sheets, Webhooks by Zapier

Google Sheets + Webhooks by ZapierMore details

Send webhooks with new items in RSS feeds

Try it

  • RSS by Zapier logo
  • Webhooks by Zapier logo

RSS by Zapier, Webhooks by Zapier

RSS by Zapier + Webhooks by ZapierMore details

POST new Facebook Lead Ads to a webhook

Try it

  • Facebook Lead Ads logo
  • Webhooks by Zapier logo

Facebook Lead Ads, Webhooks by Zapier

Facebook Lead Ads + Webhooks by ZapierMore details

Send emails with new caught webhooks

Try it

  • Email by Zapier logo
  • Webhooks by Zapier logo

Email by Zapier, Webhooks by Zapier

Email by Zapier + Webhooks by ZapierMore details

POST new user tweets to a webhook

Try it

  • Twitter logo
  • Webhooks by Zapier logo

Twitter, Webhooks by Zapier

Twitter + Webhooks by ZapierMore details


Time to start using webhooks

Ok, you’ve got this. Armed with your newfound knowledge about webhooks and their confusing terminology, you’re ready to start using them in your work. Poke around your favorite web apps’ advanced settings and see if any of them support webhooks. Think through how you could use them—then give it a shot.

And bookmark this article. Next time you read something about a GET request needing to make an HTTP callback, or see a URL with ?name=bob&value=10 and such at the end, you’ll know what it actually means.

Further Reading: Want to learn more about webhooks? Read up on our Webhooks documentation page for all the details.

Source :
https://zapier.com/blog/what-are-webhooks/

Top 4 Things to Know About GA4 — Whiteboard Friday

In this week’s Whiteboard Friday, Dana brings you some details on the exciting new world of Google Analytics 4. Watch and learn how to talk about it when clients and coworkers are intimidated by the move.https://fast.wistia.net/embed/iframe/bmdz65umai?videoFoam=true

whiteboard outlining four insights into GA4

Click on the whiteboard image above to open a high resolution version in a new tab!

Video Transcription

Hi, my name is Dana DiTomaso. I’m President at Kick Point. And I am here today at MozCon 2022 to bring you some details on the exciting world of Google Analytics 4, which I know all of you are like, “Ugh, I don’t want to learn about analytics,” which is totally fair. I also did not want to learn about analytics.

And then I kind of learned about it whether I liked it or not. And you should, too, unfortunately. 

So I think the biggest thing about the move from Universal Analytics to GA4 is that people are like they log in and everything looks different. “I don’t like it.” And then they leave. And I agree the user interface in GA4 leaves a lot to be desired. I don’t think there’s necessarily been a lot of good education, especially for those of us who aren’t analysts on a day-to-day basis.

We’re not all data scientists. I’m not a data scientist. I do marketing. So what I’m hoping is I can tell you the things you should know about GA4 on just a basic sort of level, so that you have a better vocabulary to talk about it when people are horrified by the move to GA4, which is inevitable. It’s going to happen. You’ve got to get it on your site starting basically immediately, if you don’t already have it. So I started out with three things, and then I realized there was a fourth thing. So you get a bonus, exciting bonus, but we’ll start with the first three things. 

1. It’s different

So the first thing it’s different, which I know is obvious. Yes, of course, Dana it’s different. But it’s different. Okay, so in Universal Analytics, there were different types of hits that could go into analytics, which is where hits came from originally as a metric that people talked about. So, for example, in Universal Analytics, you could have a pageview, or you could have a transaction, or you could have an event.

And those were all different types of hits. In GA4, everything is an event. There is a pageview event. There is a transaction event. There is, well, an event event. I mean, you name the events whatever you want. And because of that, it’s actually a lot better way to report on your data.

So, for example, one of the things that I know people always wanted to be able to report on in Universal Analytics is what pages did people see and how did that relate to conversion rate. And that was really tricky because a pageview was something that was at the hit scope level, which means it was just like the individual thing that happened, whereas conversion rate is a session scoped thing.

So you couldn’t mash together a hit scope thing with pageview with conversion rate, which is session scoped. They just didn’t combine together unless you did some fancy blending stuff in Data Studio. And who’s got time for that? So now in GA4, because everything is an event, you have a lot more freedom with how you can slice and dice and interpret your data and figure out what pages do people engage with before they actually converted, or what was that path, not just the landing page, but the entire user journey on their path to conversion. So that part is really exciting. 

2. Engagement rate is not reverse bounce rate

Second thing, engagement rate is a new metric in GA4. They do have bounce rate. They did recently announce it. I’m annoyed at it, so we’re going to talk about this a little bit. Engagement rate is not reverse bounce rate. But it is in GA4.

So in Universal Analytics, bounce rate was a metric that people reported on all the time, even though they shouldn’t have. I hate bounce rate so much. Just picture like a dumpster fire GIF right now across your screen. I hate bounce rate. And why I hate bounce rate is it’s so easily faked. Let’s say, for example, your boss says to you, “Hey, you know what, the bounce rate on our site is too high. Could you fix it?”

You’re like, “Oh, yeah, boss. Totally.” And then what you do is whenever somebody comes on your website, you send what’s called an interactive event off to Google Analytics at the same time. And now you have a 0% bounce rate. Congratulations. You got a raise because you made it up. Bounce rate could absolutely be faked, no question. And so when we moved over to GA4, originally there was no bounce rate.

There was engagement rate. Engagement rate has its own issues, but it’s not measuring anything similar to what bounce rate was. Bounce rate in UA was an event didn’t happen. It didn’t matter if you spent an hour and a half on the page reading it closely. If you didn’t engage in an event that was an interactive event, that meant that you were still counted as a bounce when you left that page.

Whereas in GA4, an engage session is by default someone spending 10 seconds with that tab, that website open, so active in their browser, or they visited two pages, or they had a conversion. Now this 10-second rule I think is pretty short. Ten seconds is not necessarily a lot of time for someone to be engaged with the website.

So you might want to change that. It’s under the tagging settings in your data stream. So if you go to Admin and then you click on your data stream and you go to more tagging settings and then you go to session timeouts, you can change it in there. And I would recommend playing around with that and seeing what feels right to you. Now GA4 literally just as I’m filming this has announced bounce rate, which actually it is reverse engagement rate. Please don’t use it.

Instead, think about engagement rate, which I think is a much more usable metric than bounce rate was in UA. And I’m kind of excited that bounce rate in UA is going away because it was [vocalization]. 

3. Your data will not match

All right. So next thing, your data is not going to match. And this is stressful because you’ve been reporting on UA data for years, and now all of a sudden it’s not going to match and people will be like, “But you said there were 101 users, and today you’re saying there were actually 102. What’s the problem?”

So, I mean, if you have that kind of dialogue with your leadership, you really need to have a conversation about the idea of accuracy in analytics, as in it isn’t, and error and everything else. But I mean, really the data is going to be different, and sometimes it’s a lot different. It’s not just a little bit different. And it’s because GA4 measures stuff differently than UA did. There is a page on Google Analytics Help, which goes into it in depth. But here are some of the highlights that I think you should really know sort of off the top of your head when you’re talking to people about this. 

Pageviews and unique pageviews

So first thing, a pageview metric, which we’re all familiar with, in Universal Analytics, this was all pageviews, including repeats. In GA4, same, pageview is pageview. Great.

So far so good. Then we had unique pageviews in Universal Analytics, which was only single views per session. So if I looked at the homepage and then I went to a services page and I went back to the homepage, I would have two pageviews of the homepage for pageview. I would have one pageview of the homepage in unique pageviews. That metric does not exist in GA4. So that is something to really watch for is that if you were used to reporting on unique pageviews, that is gone.

So I recommend now changing your reports to sort of like walk people through this comfort level of getting them used to the fact they’re not going to get unique pageviews anymore. Or you can implement something that I talk about in another one of my Whiteboard Fridays about being able to measure the percentage of people who are reloading tabs and tab hoarders. You could work that into this a little bit.

Users

Okay. Next thing is users. Users is really I think a difficult topic for a lot of people to get their heads around because they think, oh, user, that means that if I’m on my laptop and then I go to my mobile device, obviously I am one user. You’re usually not, unfortunately. You don’t necessarily get associated across multiple devices. Or if you’re using say a privacy- focused browser, like Safari, you may not even be associated in the same device, which kind of sucks.

The real only way you can truly measure if someone is a user across multiple sessions is if you have a login on your website, which not everybody does. A lot of B2B sites don’t have logins. A lot of small business sites don’t have logins. So users is already kind of a sketchy metric. And so unfortunately it’s one that people used to report on a lot in Universal Analytics.

So in Universal Analytics, users was total users, new versus returning. In GA4, it’s now active users. What is an active user? The documentation is a little unclear on how Google considers an active user. So I recommend reading that in depth. Just know that this is going to be different. You never should have been reporting on new versus returning users anyway, unless you had a login on your site because it was such a sketchy, bad metric, but I don’t think a lot of people knew how bad it was.

It’s okay. Just start changing your reports now so that when you have to start using GA4, on July 1, 2023, for real UA is done, then at least it’s not so much of a shock when you do make that transition. 

Sessions

So one other thing to think about as well with the changes is sessions. So in Universal Analytics, a session was the active use of a site, so you’re clicking on stuff.

It had a 30-minute timeout. And you may have heard never to use UTM tags on internal links on your website. And the reason why is because if someone clicked on an internal link on your website that had UTMs on it, your session would reset. And so you would have what’s called session breaking, where all of a sudden you would have a session that basically started in the middle of your website with a brand-new campaign and source and medium and completely detached from the session that they just had.

They would be a returning user though. That’s great. You shouldn’t have been reporting that anyway. Whereas in GA4 instead, now there’s an event because, remember, everything is an event now. There is an event that is called session start. And so that records when, well, the session starts. And then there’s also a 30-minute timeout, but there is no UTM reset.

Now that doesn’t mean that you should go out there and start using UTMs on internal links. I still don’t think it’s a great idea, but it’s not necessarily going to break things the way that it used to. So you can now see where did someone start on my site by looking at the session start event. I don’t know if it’s necessarily 100% reliable. We’ve seen situations where if you’re using consent management tools, for example, like a cookie compliance tool, you can have issues with sessions starting and whatnot.

So just keep that in mind is that it’s not necessarily totally foolproof, but it is a really interesting way to see where people started on the site in a way that you could not do this before. 

4. Use BigQuery

So bonus, bonus before we go. All right, the fourth thing that I think you should know about GA4, use BigQuery. There’s a built-in BigQuery export under the settings for GA4. Use it.

The reason why you should use it is: (a) the reports in GA4 are not great, the default reports, they kind of suck; (b) even the explorations are a bit questionable, like you can’t really format them to look nice at all. So what I’m saying to people is don’t really use the reports inside GA4 for any sort of useful reporting purposes. It’s more like an ad hoc reporting. But even then, I would still turn to BigQuery for most of my reporting needs.

And the reason why is because GA4 has some thresholding applied. So you don’t necessarily get all the data out of GA4 when you’re actually looking at reports in it. And this happened to me actually just this morning before I recorded this Whiteboard Friday. I was looking to see how many people engaged with the form on our website, and because it was a relatively low number, it said zero.

And then I looked at the data in BigQuery and it said 12. That amount could be missing from the reports in GA4, but you can see it in BigQuery, and that’s because of the thresholding that’s applied. So I always recommend using the BigQuery data instead of the GA4 data. And in Google Data Studio, if that’s what you use for your reporting tool, the same issue applies when you use GA4 as a data source.

You have the same thresholding problems. So really just use BigQuery. And you don’t need to know BigQuery. All you need to do is get the data going into BigQuery and then open up Google Data Studio and use that BigQuery table as your data source. That’s really all you need to know. No SQL required. If you want to learn it, that’s neat.

I don’t even know it that well yet. But it is not something you have to know in order to report well on GA4. So I hope that you found this helpful and you can have a little bit more of a better dialogue with your team and your leadership about GA4. I know it seems rushed. It’s rushed. Let’s all admit it’s rushed, but I think it’s going to be a really good move. I’m really excited about the new kinds of data and the amounts of data that we can capture now in GA4.

It really frees us from like the category action label stuff that we were super tied to in Universal Analytics. We can record so much more interesting data now on every event. So I’m excited about that. The actual transition itself might be kind of painful, but then a year from now, we’ll all look back and laugh, right? Thank you very much.

Video transcription by Speechpad.com

About Dana DiTomaso —

Dana is a partner at Kick Point, where she applies marketing into strategies to grow clients’ businesses, in particular to ensure that digital and traditional play well together. With her deep experience in digital, Dana can separate real solutions from wastes of time (and budget).

Source :
https://moz.com/blog/top-things-to-know-about-ga4-whiteboard-friday

Technology Partnerships: What They Look Like and Why They’re Important

A 2022 GoTo study says that 95% of companies plan to consolidate their tech tools in the next year. One way to respond to this downscaling is to seek out technology partnerships.

After all, companies with more robust features will be in the best position to solve customer problems. And those relationships can also lead to increased brand awareness, lead generation, and more.

Are you ready to capitalize on this opportunity?

Download Now: Business Startup Kit [Free Templates]

Keep reading, or use the links to jump to the section you’re looking for.

What Are Technology Partnerships?

Technology partnerships help organizations implement and optimize their technical systems. These partners are tech companies that work together to build products like apps, integrations, and plugins.

Types of Technology Partnerships

There are many different kinds of technical partnerships. Also, because these partnerships are often long-term, they often shift over time.

For example, what begins as a technical partnership may also become a marketing, channel, or strategic partnership.

Integrations, apps, and other technologies are often significant investments for a business. So, even shorter technical partnerships may shift to other types of partnerships so the time and resources lead to positive ROI.

App Development

App development partnerships create custom web and mobile applications. They may also involve placing a new app in an existing marketplace or app store.

When developing this partnership it’s important to review:

  • App portfolios
  • Customer and partner testimonials
  • Project management, especially for tight timelines
  • Security
  • Reliability

Integrations

Integration partnerships develop integrations between two popular products. They might also create new product integrations for a powerful product. For example, this marketplace offers integrations built specifically for HubSpot.

Integration partners aren’t just about improving or expanding great technical products. They’re about combining the potential of two different tools or services. Then the focus shifts to communicating that offer to customers who need them.

It takes time to build successful integrations. It’s also important for partners to outline expectations for data sharing, launch, and marketing early on.

Marketplaces or App Stores

These tech partnerships can be a huge support to your business. They can make your apps and integrations easy to find and understand. This is especially important for new or complex products.

For example, say you’re on the Apple marketplace, looking for an app for your phone that lets you update your blog. There are many details in the marketplace that can help you decide which app is right for you. This includes:

  • Product descriptions
  • Keywords
  • Customer ratings
  • Reviews
  • Images and videos

These partnerships aren’t just about placing your app in the marketplace or building a marketplace for your product. They’re about creating a community. It’s about figuring out the values of your users and making it easy for them to find what they’re looking for.

Plugins, Add-Ons, and Extensions

Technology partnerships for add-ons can expand and improve your product for specific customers. They can also give you a chance to improve a product you already love. These tech partnerships can be a time and cost-effective way to add more functionality to a website or product.

Other Channels for Tech Partnerships

While the focus of a technical partnership is usually on tech, it’s important to remember why your business is seeking this out.

For example, if your business is trying to improve brand awareness, a new app in all the top app stores can:

  • Increase brand visibility
  • Link potential customers to your site
  • Offer new platforms for promotion and referrals

This means that most technical partnerships will involve other partnerships between your companies. These are some of the most common additions when you take on a tech partner.

Strategy

When embarking on a partnership, strategic teams will often work together in other ways that improve both companies.

This might include working together long-term on:

  • Growth strategies
  • Product development
  • Supply chain
  • Financial investments
  • Licensing
  • Charitable work

Media

After your company invests in new tech, they’ll want a plan to share the news. Media partnerships can bring positive press and traffic to both partners. They can also add credibility to your business, open new revenue streams, or offer chances to experiment.

Affiliates

Affiliate partnerships are another way to spread the word about a new tech offering. Combining the power of both partners’ affiliate programs can make it simple for you to genuinely share:

  • New testimonials
  • Product walkthroughs
  • Feature highlights

This can speed up the rate of users adding your new app or plugin. It also doubles the potential for word-of-mouth marketing for your newest release.

Marketing

Co-marketing is another typical extension of a healthy technical partnership. Marketing partnerships can help drive lead generation, brand awareness, and product adoption for both partners.

These are just a few of the many ways you can choose to market with your tech partner:

  • Co-branding
  • Content marketing
  • Sponsorships
  • Product placement

Benefits of Technology Partnerships

There are many ways tech partnerships can help your business grow. They can help shorten your sales process, improve your customer experience, and better meet user needs. But partnerships are often demanding. They take time, and can also distract your team from core goals and benchmarks.

So, how do you know if a tech partnership is the right next step for your business?

Grows word-of-mouth and brand awareness.

Is your company struggling with brand recognition? If so, a technology partnership is a great way to build awareness.

They can increase discovery and how often new customers try your products and services. Connecting with a brand your customers’ trust can also increase word-of-mouth recommendations. It helps you build brand loyalty.

Improves lead generation.

Adding new technology and channels to your business isn’t the only way that a partnership can improve lead gen opportunities. Second-party data from trusted partners can give your company a powerful lead pipeline.

Leads from tech partners are also a great way to improve lead insights and increase qualified leads for your sales team.

Increases customer referrals.

Many technical partners pursue a referral or marketing relationship before beginning to work on new tech. This is because great tech partners should also be great referral partners.

Do you want them to casually mention your product in calls? Add feature highlights to email newsletters? Or do you want them to send new customers directly to your business?

Whatever way you decide to approach it, referrals can be a huge win. Customer referrals can also come with useful data that your business can use to grow or adjust course.

Helps expand your partner network.

While just one tech partner can make a big difference to your business, it can also be a first step toward building a partner network. With more technological partners you can continue to improve reach and performance. These partnerships can also lower acquisition costs and help you keep up with industry shifts.

A larger tech network can also help you improve customer retention. When customers select you, they’re also choosing your partners. That web of connections can help you make sure they stick with your business as you grow.

To make every tech partner a member of your new partner network, think about creating a great partner experience. Develop a welcome kit and onboarding. Add an app to manage your partners. Make it easy for your new tech partners to connect with other relevant team members.

How to Build and Maintain Technology Partnerships

You may already have a lot of partner experience, but there are a few ways that tech partnerships are unique. Whether you’re looking for a refresher or connecting for the first time, these are some useful first steps.

1. Reach out to internal teams for suggestions.

Many teams work remotely, so it may be tough to listen for partner ideas in the company kitchen. Instead, join relevant Slack or Teams channels. These spaces can give you a sense of the tools your employees use or recommend. They can also help you get a sense of granular customer issues that new technology can fix.

Another option is to set up a series of quick one-on-ones with members of your team. Think about what departments may be familiar with a product. Then, ask about products or companies they like and why.

You may also want to do some customer outreach. Listen for integrations or apps that prospects and customers request. It’s also a good idea to check out:

  • Feedback from your customer service team
  • Social media posts and comments
  • Online customer groups

2. Figure out your tech requirements and timeline.

The more prepared your team is for a partnership, the more successful it will be. Most companies will start with a technical competencies assessment. This may include:

  • API availability
  • Team size
  • Developer capabilities

You’ll also want to revisit your customer journey map and buyer persona tech stack.

Next, draft a template scope of work that outlines your ideal relationship and deliverables. You’ll edit and update this document with each partner. That said, it’s useful to get a clear sense of your priorities before you start talking to potential partners.

Finally, outline your ideal timeline. Some technical partnerships take just 45 days to execute a plan, while others might take three to five years. The timeline will depend on your business needs, the scope or statement of work, and potential roadblocks.

3. Do your research.

With a full set of data and ideas in hand, it’s time to start researching potential partners. At this point, you want to find technology partners that can do more than the minimum tech work.

This research can help you find partners who fit your goals for:

  • Culture alignment
  • Brand visibility
  • Innovation
  • Customer expectations
  • Trust
  • Mutual needs and benefits

A foundation of shared values and goals can help set new partnerships up for long-term growth.

4. Reach out to potential technology partners.

You may need to reach out directly to potential partners if you’re just starting out. As you develop your network, you may find other channels for partnerships and partner referrals.

To further entice new partners, create a one-sheet that summarizes your offer. You’ll also want to create a pitch deck with statistics, analysis, and other details that show high-level partners your value offer.

Check out these tips from HubSpot leaders for how they find new partnerships.

5. Outline expectations and goals.

Partnerships can be complex, and technology partnerships are no different. It’s not unusual for developer teams to run into unexpected challenges that can throw a project off course. This makes outlining expectations in advance essential.

Before you begin even simple projects, create a clear shared document. This outline might include:

  • Key team leaders
  • Revenue goals
  • Approval processes
  • Other partnership expectations, like co-marketing
  • Sales targets
  • Data sharing
  • Support needs

Besides tactical documents, it’s also a good idea to sketch out cultural goals for your tech partnerships. This integration partners example from HubSpot shows some of the values you’ll want to share with your partners.

6. Decide how you will measure success together.

Measuring success can be easy to put off until a project launches. But it’s a good idea to outline the data your teams will use to calculate the value of your partnership, both individually and together.

While partners may share some critical data points, most businesses will come to the partnership with their own processes and data criteria. If this isn’t addressed in the early stages of the partnership, both teams could end up missing the data they need.

This is also a good time to figure out when partners will come together for check-ins. This schedule can help both teams be proactive in maintaining the partnership.

What Makes a Great Technology Partnership

As you begin your first technology partnership, it’s useful to create systems and processes to make sure your combined efforts lead to great results. These are some tips that help tech partners thrive.

1. A Systematized Collaboration Process

Have your new technology partner walk you through their collaboration process, giving some examples of how they’ve successfully partnered with other businesses.

Establish a communication process that works with both organizations’ processes. Learn each other’s working styles and where the skill and resource gaps are. Based on this information, you can determine the best allocation of project resources, and create repeatable processes that will apply across all projects and partnerships.

2. Flexibility

Not to contradict my previous point, but it’s still extremely important to stay flexible. Also, try to shift your approach when necessary. No two projects will be the same, and no two companies work the same way.

As the project gets underway and you start to make changes, be sure your partner offers the flexibility you need and can quickly respond to change.

It’s also advantageous to find a partner that understands your sales process. This helps bridge the gap between what your sales team can offer to prospects and what is possible to deploy within the technology platform.

3. Partners Involved in the Planning Stage

Finally, you are ready to start planning! Be sure to include every important member of your project in the early stages. For example, if you brought in agency partners with expertise in content or design be sure to include them in the planning stages. If you miss this important step it can hurt the final project, which can negatively impact your ability to benefit from your partnership.

4. Established Project Governance

Do this step as early as possible. Before you plan or launch your first project, establish the organizational structure, decision-making hierarchy, and communication process. These decisions will guide the project execution methodology for you and your partners.

Establishing this early will also keep the project moving forward. Try setting up a chart of what information is important for what people and which decisions require input from who. This will prevent you from bringing in executives before their input is relevant. It will also help you make sure that the right people are there for important strategic decisions.

5. A Central Depository of Resources

Poor resource management is in the top three challenges for businesses according to a 2020 Wellingtone report. For you and your partners to do your best possible work, you both need access to important data, content, and other resources.

As team members access project information (specifications, plans, roadmaps, etc.) during co-development, these docs need to be version controlled and well managed. Creating a single source for everyone involved to pull from will ensure everyone is on the same page.

6. Clear Project Goals and Benchmarks

As you plan out the project’s overall strategy and roadmap, set specific goals and benchmarks for every team as the project moves forward — especially if it’s a longer project. Without benchmarks and delivery schedules that allow everyone to see positive progress, it can be easy for a project to fall off the rails.

7. Full Transparency

As your project gets underway, transparency will be your greatest asset. Make sure the partner — and any relevant team members — get an invite to strategy, design, and planning meetings to get their complete input.

Not only does this help us get closer to their final vision, but it also prevents the need for major revisions when you learn you’ve gone too far off scope or that your fancy new web design won’t work with the CMS your technology partner chose.

8. Efficient Meetings

In his first year as Microsoft CEO, Satya Nadella repeatedly told employees that it’s okay to skip meetings they were invited to if they don’t really need to be there. As a proponent of efficiency, he knows going to unnecessary meetings only slows down the development process.

When you set up the project governance, make it clear who should be involved in what meetings as the project moves forward. Also, make sure the meetings have a clear purpose and agenda. Projects with several different companies involved work best when executives have input throughout the process.

9. Documented Best Practices

When working with a technology partner you will likely come across creative solutions to a wide variety of problems.

As you find glitches and bugs to fix that will help keep your projects on track, document these practices for future learning.

10. An Effective Exit Strategy

While my first tip suggests creating a long-lasting relationship with your technology partner, my last tip is to prepare for when it ends. Whether your partnership ends with the conclusion of the project or under less-than-ideal circumstances, having an agreed plan in place will help make the transition smoother.

Agree on what information the partner will need to send to you and what they’ll need for a complete off-boarding to make sure you have everything you need to keep the project moving forward.

Technology Partnership Examples

Google Cloud and Splunk

Technology partnerships example: Google and Splunk

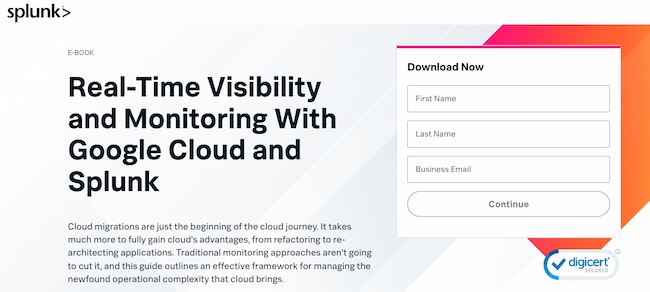
The Google Cloud and Splunk partnership makes it easier for companies to make data-driven decisions. It helps companies access and analyze data at scale. Integrations from this partnership also include AI and machine learning for processing and using data.

Why this is a good tech partnership example: This technology partnership gives both businesses a boost with advanced data sharing. For example, customers using the Splunk Cloud also enjoy Google Cloud’s AI, security, and networking. Google benefits from Splunk’s data visualization capabilities. Splunk was already working with AWS, so it also offers a competitive benefit.

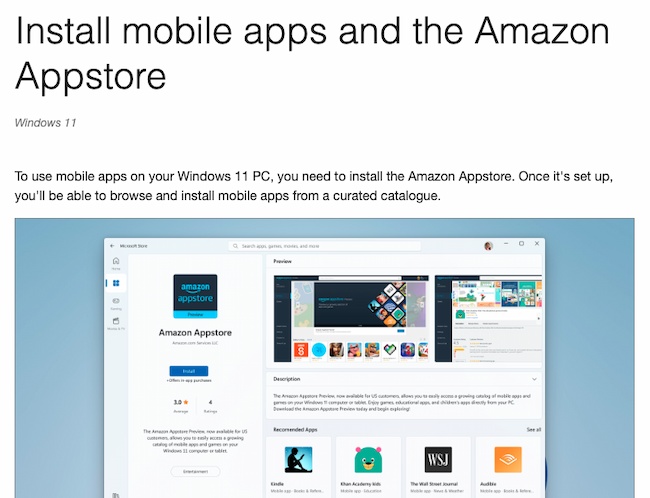
Amazon Appstore and Microsoft

Technology partnerships example: Amazon Appstore and Microsoft

This partnership gives Appstore developers access to an audience of millions. At the same time, it gives Microsoft a chance to highlight the advanced mobile app functionality of Windows 11.

Why this is a good technical partnership example: These two major companies working together cement brand awareness. Their partnership increases mentions in the news and offers new and exciting options for customers.

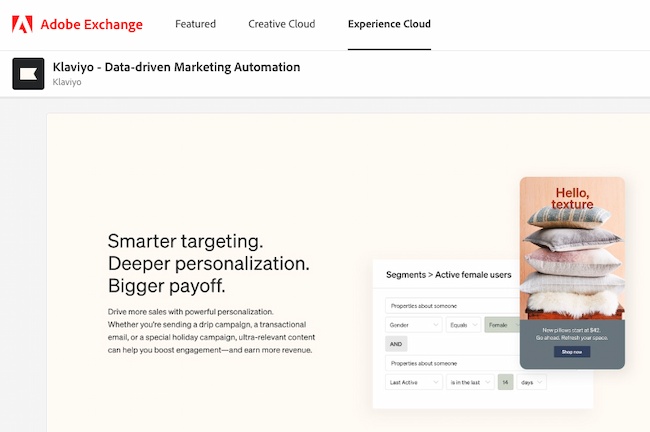
Adobe and Klaviyo

Technology partnerships example: Adobe and Klaviyo

Adobe’s ecommerce platform, Magento, has a range of apps for online store owners. Klaviyo helps ecommerce stores turn customer data into insights for email personalization.

Why this is a good tech partnership example: This partnership expands Magento’s authority with a popular app for ecommerce stores. It also encourages current store owners on platforms like Shopify who might be hesitant to try Magento. At the same time, it exposes Klaviyo’s brand to long-time Magento users.

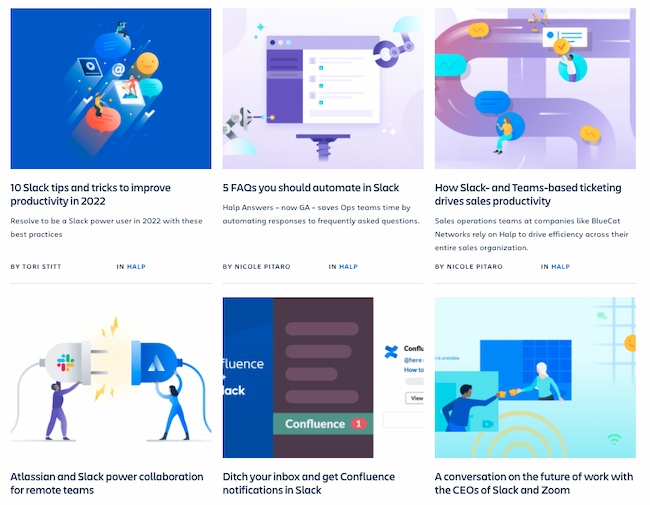
Atlassian and Slack

Technology partnerships example: Atlassian and Slack

The Atlassian/Slack partnership includes 10+ product integrations. This includes Slack apps for Jira Cloud, Halp, Confluence Cloud, and BitBucket Cloud.

These tools work together to help teams collaborate better.

Why this is a good technical partnership example: The members of this partnership went from competitors to partners, and don’t shy away from the challenges of that overlap. Instead, they’ve built many tools to better support customers and created robust co-marketing.

Can tech partnerships boost your business?

If they’re done right, technology partnerships can help your business grow into the company of your dreams. They can add tools, support, capital, and exposure to new audiences.

But to make it work, you need to pursue these relationships in a way that feels right for you and your team. So, dig into some research and talk to your people. Prepare your deck and put yourself out there. Then, see what your business can be.

Originally published Sep 13, 2022 7:00:00 AM, updated September 13 2022

Source :
https://blog.hubspot.com/sales/technology-partnerships

5 Ways to Figure Out What to Sell on Amazon

With over 300 million active customers on Amazon, it’s no wonder you want to sell a product on the internet’s most visited ecommerce website. Fortunately, choosing what to sell on Amazon, and how to sell it, isn’t as hard as you might think. In fact, most of your research can be done for free on the site itself.

To ensure you choose a low-risk, high-return product to sell on Amazon, we’ve created this guide. Keep reading to learn about top-selling items, what you should sell, and how to conduct research to ensure whatever you’re selling is a safe bet on the ecommerce giant.

Download Now: Ecommerce Conversion Rate Calculator

Top Selling Items on Amazon

First, for inspiration, let’s take a look at some of the top-selling products on Amazon.

Amazon itself curates a list of current best-sellers, ranging from toys to books to video games —and the list is updated hourly. Here are some of the top product categories:

1. Home & Kitchen

what to sell on amazon example: home and kitchen products

Given the wide range of products that fall within Home & Kitchen — appliances, furniture, décor, and more — it’s no wonder that 32% of sellers on Amazon opt to sell in this category. Plus, it’s a pretty booming industry with global retail sales of home and household appliances amounting to $448 billion dollars in 2021.

It’s important to note that because Home & Kitchen is so popular it may be more difficult for new sellers to find success in this category. So, if you’re considering breaking into this market, make sure you have a product that is high quality and serves a specific niche.

2. Clothing, Shoes & Jewelry

what to sell on amazon example: clothes, shoes, and jewelry products

It should be no surprise that Clothing, Shoes, & Jewelry is one of Amazon’s top product categories. After all, the ecommerce platform holds a nearly 35% share of all apparel sold online, making it one of the best-selling online fashion retailers. Specifically, Amazon shoppers prefer casual clothing over luxury apparel, with their top brands being Hanes and Amazon Essentials.

It’s important to note that this category can get a bit oversaturated, so it’s critical you ensure you’re able to offer something unique. People don’t turn to Amazon for expensive brand items — instead, they look for discounts. So, if you’re thinking of selling clothes, shoes, and jewelry, make sure your product is high quality and low price.

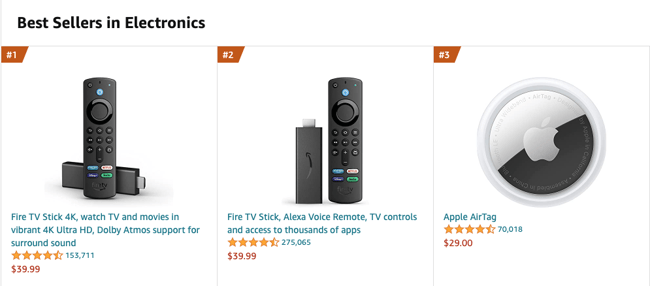
3. Electronics

what to sell on amazon example: electronics

From computers and TVs to surveillance systems and wearable technology, consumers are always looking for the latest in tech — especially when they are online shopping. In fact, almost half of all computer and electronics sales occur online.

Amazon consistently displays impressive prices on some of the world’s most popular electronics, so it makes sense that consumers often buy from the platform. This could be a promising category to consider as a third-party seller if you’re able to buy electronics in bulk.

4. Beauty & Personal Care

what to sell on amazon: beauty and personal care products

Though the Beauty & Personal Care industry experienced a 15% decrease in global sales in 2020, don’t underestimate its significance and resilience. The market bounced back with a revenue increase of nearly $3 billion in 2021 and is expected to continue to grow.

The Beauty & Personal Care category includes everything from makeup and skincare to fragrances and hair products. Even though there is quite a bit of competition in this market with 23% of third-party sellers listing items, those who specialize in creating handmade cosmetics may really excel in this category.

Of course, like anything, the more popular the product category, the more intense the competition. It’s important you find your niche to ensure you’re not competing with the 300,000 other search results for “white t-shirt.”

Before we get to what to sell on Amazon, let’s discuss how much it costs.

What does it cost to sell on Amazon?

Amazon offers two selling plans: Professional and Individual. The Professional selling plan costs $39.99 per month, plus per-item selling fees, which vary by category. Alternatively, the Individual selling plan allows you to pay $0.99 per item sold plus other selling fees, which vary by category. The Individual selling plan doesn’t have a monthly subscription fee, so if you plan to sell less than 40 items, this is likely the smarter choice.

You’ll want to do your research on shipping costs and Amazon seller fees, so you know how much you’ll need to spend depending on your item. This information can help you narrow your decision — for instance, a two-to-three pound item will be lightweight and easy to ship, which can help lower your shipping fees.

Along with weight, you’ll want to consider products that aren’t easily breakable when you’re transporting them.

Additionally, most products on Amazon vary between $10 and $50, so you’ll want to choose items you can sell for relatively cheap while still making a profit.

How to Know What to Sell on Amazon

Once you’ve determined you’re willing to pay shipping costs — and that your product likely falls within a fair price range — it’s time to figure out what you want to sell. Here are five methods that can help you narrow down your search:

1. Manually conduct research on Amazon.com.

To manually research popular products on Amazon, you’ll want to start with Amazon’s best-selling items in a certain category. From there, you’ll start exploring that category’s sub-categories and narrow down on a niche.

When you check out Amazon’s best-sellers list, you might also look at the “Customers also bought” section to get ideas for similar products.

Once you make a list of items, check Google keyword planner to see whether those products have search volume, which indicates a level of demand. Alternatively, you could use Sellerapp’s product intelligence tool specifically for Amazon. Sellerapp offers a seven-day free trial, which allows you to begin investigating popular products on Amazon via keywords to further narrow your list.

2. Use a chrome extension to research products in a niche market.

There are two popular chrome extensions to help you conduct keyword research on Amazon: Jungle Scout and Unicorn Smasher.

Jungle Scout shows you monthly sales volumes on products and displays products with low competition. It allows you to save products to track them over time. Undoubtedly, Jungle Scout’s analytics can help you quickly and efficiently narrow down on a product or an industry in which you could excel. However, Jungle Scout is relatively pricey, particularly if you’re just starting out.

Unicorn Smasher is Jungle Scout’s free alternative. While the data isn’t as accurate as Jungle Scout, and it lacks some of Jungle Scout’s sophisticated features, it’s nonetheless a helpful free option to gather estimated monthly sales and estimated monthly sales revenue for Amazon products.

Some other popular product research extensions include:

3. Find a gap in the market.

You can find gaps by using one of the previously mentioned chrome extensions to research products with high monthly sales volume and low competition. However, you might also come across a gap on Amazon through a simple organic search.

For instance, when I search “perfume” there are over 30,000 results, but when I search “natural vegan amber perfume” there are only 247.

This is a simplified example, but sometimes you need to narrow down your product search to find a place to make an impact on Amazon. Plenty of people are already selling perfume, but there might be a certain scent, style, or feature that is missing on the site.

amazon search example for perfume
amazon search example for natural vegan amber perfume

Alternatively, you can find a gap in the market by reading customer reviews in your product market niche. Even if there are plenty of products similar to yours already, you might find that customers are unsatisfied with the current brands and want something you can provide.

4. Find products that don’t have too much competition.

If you’re trying to sell a product that currently has 100,000 search results, it’s likely going to be very difficult to stand out against the competition and achieve the sales you want. Fortunately, it’s relatively easy to find a niche within a larger market that has less competition, which ensures your product is more easily found by searchers. Best of all, those searchers are likely more willing to buy your product, since they needed to search for a more specific keyword.

For instance, let’s say you want to sell cookbooks. The search term “Cookbooks” has over 70,000 results.

Alternatively, the search term “Cookbooks for instant pot cooking” has only 3,000 results. Not only is your product more likely to become a best-seller in this category, but it’s a more targeted keyword. If someone searches “Cookbooks” they could mean anything from “Kids cookbooks” to “Holiday cookbooks.” If someone searches “Cookbooks for instant pot cooking,” however, they’re more likely to be satisfied with your product.

5. Search for categories with at least three results with Best Sellers Rank (BSR).

Amazon’s Best Sellers Rank (BSR) reflects both recent and historical sales of an item. A high BSR indicates that the product is in-demand, which is critical to know as a seller.

If you find just one product in a category with a high BSR, and none of the other items are best-sellers, it could be an indication that a single product is dominating the market. Instead, you want to target product categories that feature multiple items with a high BSR because it signifies demand in that area and allows room for your product to succeed.

For instance, let’s say you want to sell sports products, but you find “basketball” has only one item with a high BSR. However, upon further research, you find “football” as a category has multiple best-selling products on the first page.

As a new seller, I would prioritize selling footballs over basketballs since this research demonstrates a user’s willingness to peruse different footballs before purchasing one.

best selling footballs on amazon

What to Sell on Amazon

Undoubtedly, you can obtain an impressive profit from selling products on Amazon, but it’s critical you’re able to offer unique, budget-friendly products with minimal competition to truly succeed on the site.

Over-saturation on the platform proves it’s more difficult than ever to stand out, so it’s not smart to sell on Amazon for the sake of selling on Amazon. Instead, you want to ensure you’re truly able to offer something of value.

If you have a product in mind, follow the tips above to refine your strategy and find a niche segment within a larger demographic. If you don’t have a product in mind, start with the basics: what are the most-searched keywords on Amazon, and which products are most successful?

Once you have a list based on keyword research, consider similar products the user might find more compelling or useful than the ones currently listed on Amazon.

Editor’s note: This post was originally published in March 2019 and has been updated for comprehensiveness.

Originally published Sep 13, 2022 7:00:00 AM, updated September 13 2022


Source :
https://blog.hubspot.com/marketing/what-to-sell-on-amazon

Top 5 Content Optimization Tools for SEO

It is necessary to use content optimization tools to rank higher on SERPs. Optimizing your blog content and web pages using the SEO content optimizer is vital to the success of your content SEO strategy because you need to keep an eye on your competitors. In this post, let’s learn with seobase what content optimization is and what the best content optimization tools are.

What Is Content Optimization?

Understanding and improving content performance to interact with audience intentions is crucial to getting the number of clicks and traffic you aim for. Getting a higher ranking in search engine results pages (SERPs) and improving the readability of the content is not a simple process but is also not impossible. Now, many content optimization tools facilitate the content optimization process.

Here are some things that you need to optimize your content to address them:

  • Customer Needs: your content needs to adapt to the customer’s changed needs. 
  • Search Intent: your content should be optimized to meet user intent 
  • Competitors: it’s a risk of falling behind if your content is not optimized. 
  • Search Engine Updates: static content will lose relevance as search engine updates make a piece of content irrelevant.
  • Market Trends: your content needs to stay current if you want to rank above your competitors.

Top 10 Content Optimization Tools For SEO

Searching for specific content may take a long time to arrive at valuable and helpful content. Here comes your role; you have to work to benefit your audience and not make them spend a lot of time getting some information. Dozens of content optimization tools are available on the market to help you write quality content on your blog or landing pages. seobase listed the 5 best content optimization tools you can use to research, identify, and optimize content for your blog or web pages right now.

content optimization solutions

Sign up to our blog to stay tuned about the latest industry news.Subscribe

Google Search Console

Google Search Console (GSC) is a great free tool to analyze SERPs performance of your site and content. Moreover, it contains cutting-edge features helping you know page speed, and structured data could impact your online performance. Furthermore, you can define the user intent and be aware of the organic traffic with impression and click data of specific queries. 

However, you can’t filter multiple search query terms to determine keyword cannibalization or misspellings quickly. In addition, it doesn’t display a complete SEO backlink profile. Here are a few says GSC to optimize your content marketing strategy: 

  • Keyword For Each Page.
  • Content Popularity.
  • Find Content Gaps.
  • Customer Search Intent.

seobase SEO Tools

seobase serves 15,000+ satisfied customers globally. Leaders of many industries rely on seobase for rank tracking and SERPs analysis. You can create your search tracking in seconds and get daily updates on how your website performs across search engines. 

Furthermore, you can track desktop and mobile platforms to get a full picture of your site’s performance. All of seobase SEO tools will allow you to create a quality piece of content. You can explore your target keywords and use them to optimize your content to meet the audience’s needs. Here are some of the seobase SEO content tools and features: 

  • Keyword explorer tool
  • SERP checker tool
  • Rank Tracker tool
  • Site profiler tool
  • Backlink checker tool

content optimization solutions

Grammarly

Content marketers need to create a quality piece of content to drive organic traffic and rank high on SERPs. However, that content must be readable to engage with the target audience, Grammarly offers this. 

Grammarly is one of the most critical content optimization solutions. Grammarly makes content optimization much more manageable by offering detailed, real-time suggestions for improving content quality. The content optimizer doesn’t miss any spelling or grammar errors unless it fixes them immediately.

It offers you edits and suggestions using AI support to improve your choice of words and the context and tone of the content. As a content optimizer for search engine algorithms, Grammarly uses contextual cues and typing tone as ranking factors.

Hemingway Editor

Hemingway Editor helps you write better content and drive traffic and more website visitors. It is a free online tool to see if it has everything you need to make high-quality content. 

The tool allows you to find the common grammatical issues and sentence structure that can distract your readers. In addition, it enhances the readability level. 

The Hemingway Editor is such an efficient content optimization tool. However, it lacks a widget for Chrome and Safari. As a result, you must copy/paste your content manually to the online or desktop program to check it. 

The Editor tool is AI-powered, but it only uses a handful of grammar choices when grading your content, so you could be missing other mistakes if you depend only on this tool. The tool doesn’t offer suggestions on how to fix the problem for the errors highlighted by the tool. This can be disturbing when you need to resolve issues quickly.

Google Docs

Google Docs is not the first content optimization tool that comes to your mind when you think about content optimization solutions. However, it offers features like a word processor, spreadsheets, and forms so you can communicate with your team and keep your projects on track.

Content marketers always seek the easiest way to manage multiple projects at once. Sometimes the content creators need to keep a list of dozens of topics to expand or manage writers. Google Docs gives content writers what they need exactly to help them and their teams to produce optimized content.

Conclusion

Choosing the best content optimization tools suitable for growing your business and making the most of your marketing budget is not impossible, but it is challenging. You can always stay informed of previously published content by using Google Search Console and other tools to get actual performance metrics. seobase provides you with the necessary SEO content optimization solutions to improve the content that you publish on your website.

Related Articles

How To Optimize Your Content In SEO?

What Are Search Engines, and How Do They Work?

6 Ways to use Rank Tracker for SEO

On-page SEO for Beginners

Website SEO Optimization for alternative search engines

Source :
https://seobase.com/top-5-content-optimization-tools-for-seo/

How to Do Niche Keyword Research?

SEO Niche keywords research is your way to attract your audience. The niche keywords are the particular long-tail keywords related to a specific industry. You can find your best niche keywords list using the best online SEO niche search tool. Do you know how valuable for your SEO plan to tailor your pay-per-click campaigns to niche keywords list and not just general and trending terms? It is challenging for general or short tail keywords to rank on the first page on search engines such as Google, especially on a new site.

When starting to manage a new venture, it can be challenging to predict the impact of a new research campaign on your industry niche. As a result, searching niche keywords is the perfect solution to avoid any risks that may occur and affect your growth.

In this post, seobase presents how to research keywords for a niche using the niche research tools and how to find a niche keywords list. 

Use a seobase Keyword Research Tool to Find Niche Keywords

Choosing an adequate and effective niche search tool is just as important and valuable as determining and choosing your SEO niche. Let’s say you decided to create a site that provides SEO services like seobase. In this case, you may have already decided that your website targets the SEO niche.

It may not matter much how much you know about the SEO industry, whether with a high level of experience or a lack of knowledge. This means that understanding which keywords will be profitable for you early on can be quite a challenge.

Since your website is a rookie site, you don’t have much historical data to use as an indicator of future performance. The seobase Keyword Explorer Tool is the ideal and most effective niche search tool for the initial niche keywords research and creating a niche keywords list.

Take advantage of the seobase Keyword Explorer Tool features, learn how to find niche keywords, and try to create an extensive niche keywords list. It may include forms of SEO niche keywords that you may not be able to come up with on your own, but the tool does.

how to research keywords for a niche

Refine Your Niche Keyword List

You need to realize that the niche keywords list you take from niche research tools is just suggestions. So it’s critical to find a compelling way to refine your niche keyword research list. There are several ways to refine your SEO niche keywords list when adding a keyword or URL: 

  • Your keyword list should be as specific to your website’s SEO niche.
  • Choose the relevant niche keywords for your industry. 
  • Don’t include keywords to use on your content randomly.
  • It would help you find the lowest difficulty keywords on a rookie website. 

The niche keywords list is a vital SEO factor that you need to use carefully to not target the wrong audience. See How to Find Best SEO Keywords: The Complete Guide

niche keywords

Sign up to our blog to stay tuned about the latest industry news.Subscribe

Determine How Competitive Your Keywords Are

As we mentioned in the previous step, you have to know how difficult it is for niche keywords to SEO. Analyze how competitive each keyword you have in the niche keywords list. 

Your key to ranking on search engines always starts with using the least difficult keywords.

Don’t choose the most difficult niche keywords because they have a high volume. If you think about it this way, it can be difficult if not impossible to arrange.

If you choose less difficult niche keywords, even if they are only at volume 10, the ten visits you will get per month and counting all the keywords you will use over the month, the total clicks and visits will ultimately be rewarding.

how to research keywords for a niche

Niche Keyword Research: Conclusion

Successful keyword targeting requires constant monitoring and modification, especially niche keyword research. It is essential to know that niche research tools return a keyword does not mean that you will be able to rank on search engines necessarily.

The traffic you send from search engines will not end up converting just because you used the niche keywords list. However, SEO checkpoints are well implemented to get optimum results. Moreover, you can use the SEO services of the seobase platform.

Source :
https://seobase.com/how-to-do-niche-keyword-research/

How to Promote Your Blog Without Social Media?

How to promote your blog without social media? The best way to boost your blog traffic is by using SEO (search engine optimization) techniques. This includes writing great content that people will want to read, creating high-quality images for your posts, and making sure your site loads quickly. However, you need to prompt your blog to attract more visitors and increase the traffic and clicks. Most webmasters ask themselves, how do I get people to read my blog? The answer is straightforward: you can follow the next few tips and get a boosted blog. In this post, seobase will explain how to promote your blog without social media, how to get your blog noticed, and how to get traffic to your website without social media.

Comment and Engage With Other Blogs.

There are compelling methods to get boosted blogs without using social media. Commenting and engaging with other blogs is key to getting your blog noticed. Some web admins create their website blogs and overlook that community is essential to achieve their goals from this post. 

One of the most effective ways to promote your blog without social media you can do is to visit and read other bloggers’ content, and to boost your blog’s traffic is to comment and engage with other blogs. In this step all you need to do in this step is to visit other blogs and comment. As a result, your fellow bloggers might also return the favor to your blog website. You can do this through commenting on other blogs, sharing links to them on social media, or even asking questions on forums.

how to get traffic to your website without social media

Write Authentic Blog Content.

To promote your blog posts without social media, you need to know some more creative ideas; one of them is unique content. Writing unique and authentic content will attract the readers. Catchy headlines and optimized blogging content will attract the most readers to your blog. Attracting more readers increases traffic, clicks, and converts to customers. Also, do not overlook including the right keywords. Learn how to set a successful SEO keyword strategy.

If you want to write authentic blog content, you need to think about what you would say to a friend who was writing a similar post. This will help you avoid sounding too much like everyone else. When you start writing, build the content structure so that readers can find answers to their queries and do not have to leave your site quickly or look for another blog that answers their queries and questions. To learn how to promote your blog without social media with unique content, check the new content ideas

Sign up to our blog to stay tuned about the latest industry news.Subscribe

Share Your Blog Posts on Pinterest.

Suppose you don’t use the social media platforms or even if you don’t have social media yet to support your content promotion. Here’s a vital and valuable tip to follow regarding how to get traffic to your website without social media; you can share your posts on Pinterest to get boosted blog. 

Just make sure you use the right hashtags and keywords so people can find your content easily. On Pinterest, users engage in niche topics; this will help you to get your blog noticed to increase your website position and rank #1 on Google SERPs. No worries, there are plenty of places to promote your blog without social media. 

get your blog noticed

Write Guest Posts.

If you write guest posts to get boosted blog, you will not only gain exposure for your own website, but you will also help others by sharing their work. This is one of the easiest ways to generate new business leads and get people to read my blog. As a result, you will get traffic to your website without social media. 

If you’re following the guest post way to get your blog noticed and promote your blog without social media, you may face only one problem; getting people from your guest post to your website is a bit challenging. According to Backlinko, one industry study found that the average guest post brings in only 50 visitors. To solve this problem, you need to use the Guest Post Bonuses. With a Guest Post Bonus, you give the readers and webmasters motivation to make them visit your website. Read Why Everyone Ignores Your Guest Post Outreach Email.

Start a Podcast.

A podcast is an audio show that usually records interviews with experts in various fields. You can record these yourself or use services such as Blubrry.com. Once your episodes are ready, you need to find a platform to host them. Several options are available, including iTunesSoundCloudStitcherGoogle Play Music, and more.

The podcast may be one of the best places to promote your blog. The podcast bonus strategy is similar to the Guest Post Bonus strategy discussed above. Instead of creating a reward for each guest post, you can create a set of bonuses for each podcast you go to as a guest. 

Furthermore, you can inform about these rewards through email campaigns. But how does this strategy start? Follow these steps to implement a successful podcast strategy:

  • First, create content that your podcast listeners will care about.
  • Then, assign podcast rewards to what you’ll talk about in the podcast.
  • After that, play it by the podcast host.
  • Finally, host your rewards section landing page at a URL that’s easy to remember and write.

boosted blog

How to Promote Your Blog Without Social Media: Conclusion.

Blogging without social media is not very popular, and not many bloggers follow it. However, it is a very successful strategy by which you can get a boosted blog. There are a lot of places to promote your blog that no one has visited yet. The competition in blogging social media marketing is tough and fierce. Despite its outstanding results, it takes a lot of time and effort to get a high ranking on Google.

So, at some point, you have to find alternative ways and know how to get traffic to your website without social media and how to promote an article or blog without social media. seobase always offers solutions to make it easier to rank on Google for websites. However, always remember to make your blog SEO optimized. You can use the best online SEO tools from seobase to constantly improve your blogs, measure your SEO strategy‘s success and effectiveness, and make your blog posts Google Algerismths friendly.

Source :
https://seobase.com/how-to-promote-your-blog-without-social-media/

SEO Checkpoints Best Practices Guide 2022

The SEO checkpoints best practices are crucial for your website’s ranking on SERPs. Implementing this blog post SEO checklist wouldn’t take so much time; however, it would lead you to achieve your SEO goals. 15 min SEO daily to make sure you are on the right track is your best option to get a higher rank. First, let’s refresh our memory with the SEO meaning, then we can discuss the best practices of the SEO checkpoints in detail.  

SEO is an acronym for (Search engine optimization), a set of activities we do to create good content and design the website. It also includes defining the business strategy and how to produce content to gain a better position in Google search results and attract more visitors to the site.

The term SEO may broaden to include another definition: Search Engine Optimization (SEO) is optimizing your online content so that a search engine likes to display it as a higher result for searches around a particular keyword. In this post, seobase will explain SEO checklist best practices in simplified detail to the most critical SEO checkpoints, daily SEO tracking, monthly SEO tasks and show you some ideal ways to achieve advanced results in search engines. 

How to Use This SEO Checklist?

We have divided the SEO checkpoints best practices into main points to facilitate their explanation. Therefore, we will separately focus on each SEO component in the following few lines. Here are the leading SEO components checkpoints:

  • Basic SEO Checklist
  • Technical SEO Checklist
  • Keyword Research Checklist
  • Content Checklist
  • On-page SEO Checklist
  • Link Building Checklist

To set a successful SEO strategy, you should focus on the above SEO checkpoints best practices and carefully apply them to your website. This SEO checklist best practices work for e-commerce stores, local businesses, and affiliate sites.

seo components
  • Basic SEO Checkpoints Best Practices

Set up Google Search Console. 

Google offers free Google Search Console services to track your site’s organic search performance. The importance of this tool is that it shows you the effectiveness of the detailed SEO plan, and it is a reliable service since the Google search engine provides it.

You can find on GSC:

  • The keywords you rank for,
  • Your ranking positions,
  • Your website errors.

In addition, you can submit your sitemaps successfully to get the best and most accurate results. 

Sign up to our blog to stay tuned about the latest industry news.Subscribe

Set up Bing Webmaster Tools. 

This step is similar to what is applied to Google, but this time to Bing. Setting up the Bing Webmaster Tools is essential for implementing a successful SEO plan.

Set up seobase online SEO Tools.

You can use seobase best online SEO tool to get the best results on search engines and improve your rankings. seobase provides webmasters with the most powerful SEO tools to facilitate the implantation of their SEO strategy and make it easier to achieve their SEO goals in the long term. Here are a few key SEO tools from seobase:

Set up Google Analytics.

Also, Google offers an additional free service, Google Analytics, which is essential because it shows how many people visit your site, how they found it, and how they interact with it. 

You can link Google Search Console with Google Analytics to see Search Console data in Analytics.

Install an SEO plugin.

You can skip this step if you’re using a different website platform like Shopify. This step is for WordPress users. If you are using WordPress, you should install an additional SEO plugin. These plugins help you organize your sitemaps and place the proper meta tags. Despite the importance of these tools, you do not need more than one tool only.

Here are some tools you can choose from to install in WordPress: 

Create and submit a sitemap.

We’ve already mentioned that the GSC tool enables you to set your sitemaps to get accurate data. In addition, it is essential to fine-tune your Sitemaps because they are the link between search engines and the main content on your site. Sitemaps tell search engines where to find content on your website so that their spiders can easily crawl and index your pages. You can use the seobase Site Profiler tool to get a certain answer confirming that your website can be crawled and indexed.

Usually, you can find your sitemap at one of these URLs:

  • /sitemap.xml
  • /sitemap_index.xml
  • /sitemap

For more information about the crawl and index process, read How Google Search organizes information.

Create a robots.txt file.

Creating a robots.txt file is an essential step on your SEO checklist; if checks, you can improve your SEO performance. But what is a robots.txt file? Robots.txt is a text file; its job is to direct search engines to where they can crawl and where they are not allowed to. 

A robots.txt file may be necessary if you do not want search engines to crawl a specific section of your website that does not have the required SEO factors, to not affect the SEO checklist of your website.

You can check your robots.txt file; all you have to do is write your domain name and robots.txt like this; yourdomain.com/robots.txt. 

If you see a text file, you already have a robots.txt file. If not, search Google for “robots.txt generator” to create one, or you can ask for help from a professional SEO company.

Now, after performing all of the above steps, you just got the basic SEO checklist best practices done. Let’s move to the next level of your SEO strategy, the technical SEO checklist. 

  • Technical SEO Checkpoints Best Practices

Implementing technical SEO checkpoints best practices helps you create reliable bases and ensure your site can be crawled and indexed. As a result, your website will rank higher than any other website in your industry on SERPs. 

Here are the primary and most common technical SEO checkpoints best practices to follow.

Make sure your site is crawlable and indexable.

Google does not index any page or content its spiders have not crawled. So it is crucial to check that Google spiders have accessed your content constantly. You can do this through Google Search Console to search for any warnings or exceptions related to robots.txt files.

Many webmasters confuse indexing and crawling, although they are two completely different processes. The crawled pages do not have to be indexed by Google. If you found a ‘noindex’ meta tag for bots or an x-robots tag on the page, indexing will not be possible. You can conduct a live test on GSC to find your indexing issues. If during live testing, indexing issues were detected with the URL, then you can request indexing from Google. Also, Google will inform you about noindexed URLs in the Coverage report.

The good news is that you also can get this information using the seobase Site Profiler tool. The tool will give you a detailed report for your site audit, including this information. 

Make sure you’re using HTTPs.

It is important to use HTTPS as it is an exemplary security standard and will protect the data of your visitors. This is even more important if you require passwords or payment information, then using HTTPS is a must.

If you don’t use HTTPS, it’s time to migrate now. First, ensure your site sits on HTTPS by checking your browser’s URL bar. If you see a “padlock” sign on the left side of the URL, then you’re using HTTPS. If you don’t see this sign, you are not.

Http urls for seo

Check for duplicate versions of your site in Google’s Index.

You may face a severe SEO issue if you allow Google to index more than one version of your website. 

For example, you see that these links listed below are all the same and will not make a big difference or cause a glitch, but it is entirely different from the point of view of search engines:

  • https://www.domain.com
  • https://domain.com
  • http://www.domain.com
  • https://domain.com

Don’t let Google get distracted by all those links, and make sure only one format is indexed. It can lead to crawling, indexing, and security issues.

All other versions should redirect 301 to your main domain, and you can check for duplicate versions of your site in Google’s index by entering each variant into your browser bar. If you’ve set up redirects without issue, you’re good. But if you still find that you can access many versions, you must redirect immediately.

Check your site speed.

Since 2010, PageSpeed has been an important ranking factor on search engines for desktop. Since 2018, it has been included as a vital ranking factor on search engines for mobile.

If you think of it from the user’s point of view, it is tedious and frustrating if you go to a site to search for the information you need and it takes you a lot of time to load; Google also adopts this point of view. Therefore, if you slow site speed, Google does not consider this site worthy of ranking on the first page because it does not improve the user experience.

You can use tools like PageSpeed Insights. Also, you can use the seobase Site Profiler tool to give you deep insights about your PageSpeed and a whole site audit report to see how fast your web page loads. 

Make sure your site is mobile-friendly.

There is no doubt that we are in a speedy era; many searches are done through mobile. So having a mobile-friendly website is more important than ever; it is no longer optional.

Check your site’s mobile-friendliness by using Google’s mobile-friendly testing tool. seobase Site Profiler tool gives you an excellent chance to check if your website is mobile-friendly.  

Install an image compression plugin.

One of the most underrated factors on the SEO checklist is images. Compressing images and reducing the size of image files improves page speed. As a result, it will enhance your chances of ranking high on search engines.

For WordPress users, there are plenty of plugins available for that. For example, you can use one of the best free WordPress SEO tools, ShortPixel. It allows you to compress up to 100 images/month for free. 

Furthermore,  you can use Tinypng to compress images in general and use them on other platforms.

Fix broken pages (Broken Internal and Outbound Links.)

Broken links do not provide the best user experience and break the transfer of the domain authority DA to your site. The best way to find broken links on your website is to conduct a backlink audit or audit your site thoroughly. You can use Site Profiler and Backlink Checker tools from seobase to get the best results.

Fix duplicate content issues.

If you’re targeting e-commerce SEO, probably you’ll find duplicated content issues; it is very common in e-commerce SEO because of the faceted navigation. Make sure you don’t have any duplicate content on your website. 

You can fix this SEO issue by canonicalizing the affected URLs where necessary.

  • Keyword Research SEO Checkpoints Best Practices

 This part of the seobase SEO checklist guide is primarily directed at SEO content writers. Applying the following SEO checkpoints to your content will boost your search engine rankings. Choosing the right keyword is your key to reaching the audience, but all your efforts will be in vain if your content is not SEO-equipped. Follow the next few tips to get your website at the top of the first search engine results pages (SERPs). 

Explore your primary keyword.

The right keywords allow you to reach your goal easily. However, using improper or consistent SEO keywords with your content may be reason enough to distract search engines. In addition, the main keyword will refer to different subjects; thus, the search engine will see that your site is not trustworthy enough to appear on the first page because it does not provide a good user experience.

How do you know the best keyword to focus on?

Do frequent keyword research to target the main keywords you can rank by on the SERPs, but you should also ensure that you target the best keyword each time you post new content. Also, you can find the right keywords using the seobase keyword explorer tool.

Assess search intent. 

If your page doesn’t align with the search intent, your chances of ranking are tiny to none.

So how do you assess search intent?

After finding the primary keyword, look at the ranked pages on Google SERPs for your primary keyword.

Check the URLs and titles of the top-ranking results, for example, if a user searches for “SEO checkpoints best practices.” Given the researcher’s intention, it is clear that he wants to know the primary points that must be applied to obtain the best SEO results. If the user searches for “SEO,” it is likely that he wants to get an SEO service provider.

Assess your chances of ranking on Google to enhance your SEO checkpoints best practices.

Investigating the difficulty of the keywords you use helps you prioritize your chances of ranking on search engines. Use the seobse keyword explorer tool to find out the SEO difficulty of keywords. If you are a beginner, you can use low or medium-difficulty keywords to be able to compete.

Also, check the results for the things that may suggest a hard keyword to crack, like high-quality backlinks and high topical relevance of the top-ranking sites, etc.

Research what people want to know.

Suppose a user searches for an “SEO Checklist.” You can see from analyzing search intent that people are looking for specific practical steps to implement. However, you should ask yourself a couple of vital questions; 

What other questions do they have? 

What other information fits your content to include?

You can find the answer to your questions in Google’s “People Also Ask” box. 

Also, you can use a content ideas generator to find new subjects to write about. Finally, using the keywords explorer tool gives you a good insight into your query.

Source :
https://seobase.com/seo-checkpoints-best-practices-guide-2022/

Your Guide to WordPress Favicons

Recognition is crucial for your website to succeed. From creating a great logo to developing key messaging and delivering great content, the easier it is for visitors to recognize your brand, the better the chances they’ll remember your site and make the move from content curiosity to sales conversion.

But reliable recognition isn’t just about the big things — done well, even the smallest details of your WordPress website can help it stand out from the crowd and attract customer notice. This is the role of the favorite icon or “favicon” that’s used in web browser tabs, bookmarks, and on mobile devices as the app image for your site.

Not sure how favicons work or how to get them up and running on your site? We’ve got you covered with our functional guide to favicons — what they are, why they matter, and how to enable them in WordPress.

Grow Your Business With HubSpot’s Tools for WordPress Websites

If you would rather follow along with a video, here’s a walkthrough created by Elegant Themes:

https://youtube.com/watch?v=B4pmaGumOWY%3Ffeature%3Doembed

What is a WordPress Favicon?

The official WordPress support page defines a favicon as “an icon associated with a particular website or web page.” This description doesn’t do the term justice — in fact, favicons are everywhere and are intrinsically associated with your brand.

Let’s take a closer look at how favicons look and why they matter below. 

WordPress Favicon Size

The typical size of a WordPress favicon is 512 x 512 pixels. These icons are stored as .ico files in the root directory of your WordPress server.

But what does a favicon look like in real life? For a quick example, take a look at the browser tab of this webpage if you’re on a desktop or the area just under the address bar on your mobile device. Notice anything? That orange symbol with lines and circles is HubSpot’s favicon — and it shows up anytime you’re on our site.

In most cases, favicons are the same as brand logos scaled down to fit web and mobile browsers. Where this isn’t possible — such as cases where your logo is too complex or detailed — site owners typically opt for similar color schemes and thematic elements to ensure brand consistency.

Once you start seeing favicons you can’t unsee them; from webpages to tabs to bookmarks and mobile applications, the icon you choose for your favicon is inextricably linked to your site and your brand — so make sure you choose wisely.

Why Favicons Matter

Favicons are the visual currency of your brand. They’re everywhere — from browsers to bookmarks to mobile apps — and become an integral part of your site’s overall branding strategy.

As result, effective favicon design and deployment offers three broad benefits:

Improved Brand Recognition

Think of your favicon like your calling card — the icon needs to be simple, recognizable and consistent. The more places your favicon appears, the better, since this makes it easy for users to connect your WordPress site with your icon image.

Consistency is also key as users open multiple browser tabs and the available space for text descriptions naturally shrinks. Open enough tabs and all that’s left is — you guessed it — room for the favicon.

Increased Consumer Confidence

While visitors may not be able to define what a favicon is or how it works, these icons are inherently familiar. So familiar, in fact, that sites without favicons often stand out from the crowd for all the wrong reasons.

Much like relevant social media content and secure site connections, favicons are critical to boosting consumer confidence in the products or services you offer on your site.

Integrated Mobile Consistency

The impact of mobile devices can’t be ignored, with smartphones and tablets now outpacing desktops as the primary means of consumer online interaction. Favicons make it possible to ensure your brand easily translates to mobile — when users create website bookmarks on mobile home screens, your favicon stands in for the link.

Favicon Creation Guidelines

Not sure how to get started creating your site’s favicon? Let’s break down some best-practice guidelines.

1. Get the size right.

As noted above, favicons are typically 512 x 512 pixels in size. While it’s possible to use a larger WordPress favicon size, the platform will often ask you to crop the image down.

2. Keep it simple.

While it’s possible to add background colors and other customization to your favicon, keeping it simple is often the best choice. Here, simplicity includes opting for transparency over background colors and keeping the number of foreground colors in your favicon to one or two at most.

Ideally, your favicon will look almost identical to your brand’s logo — if that’s not possible, try to pull elements from your logo such as shapes or color schemes that help tie in your new favicon.

3. Choose wisely.

Site owners can update their favicon at any time, but it’s a good idea to keep the number of changes to a minimum. Here’s why: If users see a different favicon every time they log on to your website, they won’t have an opportunity to associate a specific image with your brand.

Bottom line? Better to go without a favicon until you find one that works for your site and that you don’t plan on changing.

How to Enable WordPress Favicons

To get your favicon up and running on your WordPress site, you’ve got three options:

  1. Use the Site Icon feature
  2. Install a favicon plugin
  3. Upload the new favicon yourself

Let’s break down each method in more detail.

1. Use the site icon feature.

As of WordPress version 4.3, the content management system (CMS) includes a Site Icon function that enables favicons. Simply prepare your image file — which can be a .jpeg, .ico, .gif or .png file — and head to the Administration page of your WordPress Site.

Next, click on “Appearance” and then “Customize”, then click “Site Identity.” Now, click “Select Image” under the Site Icon subheading and upload the file you’ve prepared. You should see a screen like this:

Using site icon feature in WordPress dashboard to create favicon

If you like the favicon you’ve created, no further action is required. If not, you can easily remove the file or upload a new image.

2. Install a favicon plugin.

You can also use a plugin — such as Favicon by RealFaviconGenerator — to create and deploy your favicon. This must-have WordPress plugin not only lets you customize your favicon but also ensures that multiple versions are created to satisfy the requirements of different operating systems and device versions.

As long as the image you upload to the plugin is at least 70 x 70 pixels, the RealFaviconGenerator will take care of the rest.

3. Upload the new favicon yourself.

If you’d rather do the legwork yourself, you can create and upload your own favicon to your WordPress site.

First, create an image that’s at least 16 x 16 pixels and is saved as a .ico file. Then, use an FTP client to upload this file to the main folder of your current WordPress theme — typically the same place as your wp-admin and wp-content folders.

While this should display your favicon in most web browsers, some older browser versions will require you to edit WordPress header HTML code. The result? DIY favicons aren’t recommended unless you’re familiar with more technical WordPress functions.

Final Favicon Thoughts

Whie favicons form only a small part of your WordPress website build, they’re critical for website recognition. Consistent and clear favicons make it easy for visitors to remember your site and carry this mental connection across desktop, tablet, and mobile devices.

Source :
https://blog.hubspot.com/website/wordpress-favicon#:~:text=WordPress%20Favicon%20Size&text=These%20icons%20are%20stored%20as,directory%20of%20your%20WordPress%20server.