Small businesses are often targeted by cybercriminals due to their lack of resources and security measures. Protecting your business from cyber threats is crucial to avoid data breaches and financial losses.
Why is cyber security so important for small businesses?
Small businesses are particularly in danger of cyberattacks, which can result in financial loss, data breaches, and damage to IT equipment. To protect your business, it’s important to implement strong cybersecurity measures.
Here are some tips to help you get started:
One important aspect of data protection and cybersecurity for small businesses is controlling access to customer lists. It’s important to limit access to this sensitive information to only those employees who need it to perform their job duties. Additionally, implementing strong password policies and regularly updating software and security measures can help prevent unauthorized access and protect against cyber attacks. Regular employee training on cybersecurity best practices can also help ensure that everyone in the organization is aware of potential threats and knows how to respond in the event of a breach.
When it comes to protecting customer credit card information in small businesses, there are a few key tips to keep in mind. First and foremost, it’s important to use secure payment processing systems that encrypt sensitive data. Additionally, it’s crucial to regularly update software and security measures to stay ahead of potential threats. Employee training and education on cybersecurity best practices can also go a long way in preventing data breaches. Finally, having a plan in place for responding to a breach can help minimize the damage and protect both your business and your customers.
Small businesses are often exposed to cyber attacks, making data protection and cybersecurity crucial. One area of particular concern is your company’s banking details. To protect this sensitive information, consider implementing strong passwords, two-factor authentication, and regular monitoring of your accounts. Additionally, educate your employees on safe online practices and limit access to financial information to only those who need it. Regularly backing up your data and investing in cybersecurity software can also help prevent data breaches.
Small businesses are often at high risk of cyber attacks due to their limited resources and lack of expertise in cybersecurity. To protect sensitive data, it is important to implement strong passwords, regularly update software and antivirus programs, and limit access to confidential information.
It is also important to have a plan in place in case of a security breach, including steps to contain the breach and notify affected parties. By taking these steps, small businesses can better protect themselves from cyber threats and ensure the safety of their data.
Tips for protecting your small business from cyber threats and data breaches are crucial in today’s digital age. One of the most important steps is to educate your employees on cybersecurity best practices, such as using strong passwords and avoiding suspicious emails or links.
It’s also important to regularly update your software and systems to ensure they are secure and protected against the latest threats. Additionally, implementing multi-factor authentication and encrypting sensitive data can add an extra layer of protection. Finally, having a plan in place for responding to a cyber-attack or data breach can help minimize the damage and get your business back on track as quickly as possible.
Small businesses are attackable to cyber-attacks and data breaches, which can have devastating consequences. To protect your business, it’s important to implement strong cybersecurity measures. This includes using strong passwords, regularly updating software and systems, and training employees on how to identify and avoid phishing scams.
It’s also important to have a data backup plan in place and to regularly test your security measures to ensure they are effective. By taking these steps, you can help protect your business from cyber threats and safeguard your valuable data.
To protect against cyber threats, it’s important to implement strong data protection and cybersecurity measures. This can include regularly updating software and passwords, using firewalls and antivirus software, and providing employee training on safe online practices. Additionally, it’s important to have a plan in place for responding to a cyber attack, including backing up data and having a designated point person for handling the situation.
In today’s digital age, small businesses must prioritize data protection and cybersecurity to safeguard their operations and reputation. With the rise of remote work and cloud-based technology, businesses are more vulnerable to cyber attacks than ever before. To mitigate these risks, it’s crucial to implement strong security measures for online meetings, advertising, transactions, and communication with customers and suppliers. By prioritizing cybersecurity, small businesses can protect their data and prevent unauthorized access or breaches.
Here are 8 essential tips for data protection and cybersecurity in small businesses.
1. Train Your Employees on Cybersecurity Best Practices
Your employees are the first line of defense against cyber threats. It’s important to train them on cybersecurity best practices to ensure they understand the risks and how to prevent them. This includes creating strong passwords, avoiding suspicious emails and links, and regularly updating software and security systems. Consider providing regular training sessions and resources to keep your employees informed and prepared.
2. Use Strong Passwords and Two-Factor Authentication
One of the most basic yet effective ways to protect your business from cyber threats is to use strong passwords and two-factor authentication. Encourage your employees to use complex passwords that include a mix of letters, numbers, and symbols, and to avoid using the same password for multiple accounts. Two-factor authentication adds an extra layer of security by requiring a second form of verification, such as a code sent to a mobile device, before granting access to an account. This can help prevent unauthorized access even if a password is compromised.
3. Keep Your Software and Systems Up to Date
One of the easiest ways for cybercriminals to gain access to your business’s data is through outdated software and systems. Hackers are constantly looking for vulnerabilities in software and operating systems, and if they find one, they can exploit it to gain access to your data. To prevent this, make sure all software and systems are kept up-to-date with the latest security patches and updates. This includes not only your computers and servers but also any mobile devices and other connected devices used in your business. Set up automatic updates whenever possible to ensure that you don’t miss any critical security updates.
4. Use Antivirus and Anti-Malware Software
Antivirus and anti-malware software are essential tools for protecting your small business from cyber threats. These programs can detect and remove malicious software, such as viruses, spyware, and ransomware before they can cause damage to your systems or steal your data. Make sure to install reputable antivirus and anti-malware software on all devices used in your business, including computers, servers, and mobile devices. Keep the software up-to-date and run regular scans to ensure that your systems are free from malware.
5. Backup Your Data Regularly
One of the most important steps you can take to protect your small business from data loss is to back up your data regularly. This means creating copies of your important files and storing them in a secure location, such as an external hard drive or cloud storage service. In the event of a cyber-attack or other disaster, having a backup of your data can help you quickly recover and minimize the impact on your business. Make sure to test your backups regularly to ensure that they are working properly and that you can restore your data if needed.
6. Carry out a risk assessment
Small businesses are especially in peril of cyber attacks, making it crucial to prioritize data protection and cybersecurity. One important step is to assess potential risks that could compromise your company’s networks, systems, and information. By identifying and analyzing possible threats, you can develop a plan to address security gaps and protect your business from harm.
For Small businesses making data protection and cybersecurity is a crucial part. To start, conduct a thorough risk assessment to identify where and how your data is stored, who has access to it, and potential threats. If you use cloud storage, consult with your provider to assess risks. Determine the potential impact of breaches and establish risk levels for different events. By taking these steps, you can better protect your business from cyber threats
7. Limit access to sensitive data
One effective strategy is to limit access to critical data to only those who need it. This reduces the risk of a data breach and makes it harder for malicious insiders to gain unauthorized access. To ensure accountability and clarity, create a plan that outlines who has access to what information and what their roles and responsibilities are. By taking these steps, you can help safeguard your business against cyber threats.
8. Use a firewall
For Small businesses, it’s important to protect the system from cyber attacks by making data protection and reducing cybersecurity risk. One effective measure is implementing a firewall, which not only protects hardware but also software. By blocking or deterring viruses from entering the network, a firewall provides an added layer of security. It’s important to note that a firewall differs from an antivirus, which targets software affected by a virus that has already infiltrated the system.
Small businesses can take steps to protect their data and ensure cybersecurity. One important step is to install a firewall and keep it updated with the latest software or firmware. Regularly checking for updates can help prevent potential security breaches.
Conclusion
Small businesses are particularly vulnerable to cyber attacks, so it’s important to take steps to protect your data. One key tip is to be cautious when granting access to your systems, especially to partners or suppliers. Before granting access, make sure they have similar cybersecurity practices in place. Don’t hesitate to ask for proof or to conduct a security audit to ensure your data is safe.
Internet connections are most often marketed and sold on the basis of “speed”, with providers touting the number of megabits or gigabits per second that their various service tiers are supposed to provide. This marketing has largely been successful, as most subscribers believe that “more is better”. Furthermore, many national broadband plans in countries around the world include specific target connection speeds. However, even with a high speed connection, gamers may encounter sluggish performance, while video conference participants may experience frozen video or audio dropouts. Speeds alone don’t tell the whole story when it comes to Internet connection quality.
Additional factors like latency, jitter, and packet loss can significantly impact end user experience, potentially leading to situations where higher speed connections actually deliver a worse user experience than lower speed connections. Connection performance and quality can also vary based on usage – measured average speed will differ from peak available capacity, and latency varies under loaded and idle conditions.
The new Cloudflare Radar Internet Quality page
A little more than three years ago, as residential Internet connections were strained because of the shift towards working and learning from home due to the COVID-19 pandemic, Cloudflare announced the speed.cloudflare.com speed test tool, which enabled users to test the performance and quality of their Internet connection. Within the tool, users can download the results of their individual test as a CSV, or share the results on social media. However, there was no aggregated insight into Cloudflare speed test results at a network or country level to provide a perspective on connectivity characteristics across a larger population.
Today, we are launching these long-missing aggregated connection performance and quality insights on Cloudflare Radar. The new Internet Quality page provides both country and network (autonomous system) level insight into Internet connection performance (bandwidth) and quality (latency, jitter) over time. (Your Internet service provider is likely an autonomous system with its own autonomous system number (ASN), and many large companies, online platforms, and educational institutions also have their own autonomous systems and associated ASNs.) The insights we are providing are presented across two sections: the Internet Quality Index (IQI), which estimates average Internet quality based on aggregated measurements against a set of Cloudflare & third-party targets, and Connection Quality, which presents peak/best case connection characteristics based on speed.cloudflare.com test results aggregated over the previous 90 days. (Details on our approach to the analysis of this data are presented below.)
Users may note that individual speed test results, as well as the aggregate speed test results presented on the Internet Quality page will likely differ from those presented by other speed test tools. This can be due to a number of factors including differences in test endpoint locations (considering both geographic and network distance), test content selection, the impact of “rate boosting” by some ISPs, and testing over a single connection vs. multiple parallel connections. Infrequent testing (on any speed test tool) by users seeking to confirm perceived poor performance or validate purchased speeds will also contribute to the differences seen in the results published by the various speed test platforms.
And as we announced in April, Cloudflare has partnered with Measurement Lab (M-Lab) to create a publicly-available, queryable repository for speed test results. M-Lab is a non-profit third-party organization dedicated to providing a representative picture of Internet quality around the world. M-Lab produces and hosts the Network Diagnostic Tool, which is a very popular network quality test that records millions of samples a day. Given their mission to provide a publicly viewable, representative picture of Internet quality, we chose to partner with them to provide an accurate view of your Internet experience and the experience of others around the world using openly available data.
Connection speed & quality data is important
While most advertisements for fixed broadband and mobile connectivity tend to focus on download speeds (and peak speeds at that), there’s more to an Internet connection, and the user’s experience with that Internet connection, than that single metric. In addition to download speeds, users should also understand the upload speeds that their connection is capable of, as well as the quality of the connection, as expressed through metrics known as latency and jitter. Getting insight into all of these metrics provides a more well-rounded view of a given Internet connection, or in aggregate, the state of Internet connectivity across a geography or network.
The concept of download speeds are fairly well understood as a measure of performance. However, it is important to note that the average download speeds experienced by a user during common Web browsing activities, which often involves the parallel retrieval of multiple smaller files from multiple hosts, can differ significantly from peak download speeds, where the user is downloading a single large file (such as a video or software update), which allows the connection to reach maximum performance. The bandwidth (speed) available for upload is sometimes mentioned in ISP advertisements, but doesn’t receive much attention. (And depending on the type of Internet connection, there’s often a significant difference between the available upload and download speeds.) However, the importance of upload came to the forefront in 2020 as video conferencing tools saw a surge in usage as both work meetings and school classes shifted to the Internet during the COVID-19 pandemic. To share your audio and video with other participants, you need sufficient upload bandwidth, and this issue was often compounded by multiple people sharing a single residential Internet connection.
Latency is the time it takes data to move through the Internet, and is measured in the number of milliseconds that it takes a packet of data to go from a client (such as your computer or mobile device) to a server, and then back to the client. In contrast to speed metrics, lower latency is preferable. This is especially true for use cases like online gaming where latency can make a difference between a character’s life and death in the game, as well as video conferencing, where higher latency can cause choppy audio and video experiences, but it also impacts web page performance. The latency metric can be further broken down into loaded and idle latency. The former measures latency on a loaded connection, where bandwidth is actively being consumed, while the latter measures latency on an “idle” connection, when there is no other network traffic present. (These specific loaded and idle definitions are from the device’s perspective, and more specifically, from the speed test application’s perspective. Unless the speed test is being performed directly from a router, the device/application doesn’t have insight into traffic on the rest of the network.) Jitter is the average variation found in consecutive latency measurements, and can be measured on both idle and loaded connections. A lower number means that the latency measurements are more consistent. As with latency, Internet connections should have minimal jitter, which helps provide more consistent performance.
Our approach to data analysis
The Internet Quality Index (IQI) and Connection Quality sections get their data from two different sources, providing two different (albeit related) perspectives. Under the hood they share some common principles, though.
IQI builds upon the mechanism we already use to regularly benchmark ourselves against other industry players. It is based on end user measurements against a set of Cloudflare and third-party targets, meant to represent a pattern that has become very common in the modern Internet, where most content is served from distribution networks with points of presence spread throughout the world. For this reason, and by design, IQI will show worse results for regions and Internet providers that rely on international (rather than peering) links for most content.
IQI is also designed to reflect the traffic load most commonly associated with web browsing, rather than more intensive use. This, and the chosen set of measurement targets, effectively biases the numbers towards what end users experience in practice (where latency plays an important role in how fast things can go).
For each metric covered by IQI, and for each ASN, we calculate the 25th percentile, median, and 75th percentile at 15 minute intervals. At the country level and above, the three calculated numbers for each ASN visible from that region are independently aggregated. This aggregation takes the estimated user population of each ASN into account, biasing the numbers away from networks that source a lot of automated traffic but have few end users.
The Connection Quality section gets its data from the Cloudflare Speed Test tool, which exercises a user’s connection in order to see how well it is able to perform. It measures against the closest Cloudflare location, providing a good balance of realistic results and network proximity to the end user. We have a presence in 285 cities around the world, allowing us to be pretty close to most users.
Similar to the IQI, we calculate the 25th percentile, median, and 75th percentile for each ASN. But here these three numbers are immediately combined using an operation called the trimean — a single number meant to balance the best connection quality that most users have, with the best quality available from that ASN (users may not subscribe to the best available plan for a number of reasons).
Because users may choose to run a speed test for different motives at different times, and also because we take privacy very seriously and don’t record any personally identifiable information along with test results, we aggregate at 90-day intervals to capture as much variability as we can.
At the country level and above, the calculated trimean for each ASN in that region is aggregated. This, again, takes the estimated user population of each ASN into account, biasing the numbers away from networks that have few end users but which may still have technicians using the Cloudflare Speed Test to assess the performance of their network.
Navigating the Internet Quality page
The new Internet Quality page includes three views: Global, country-level, and autonomous system (AS). In line with the other pages on Cloudflare Radar, the country-level and AS pages show the same data sets, differing only in their level of aggregation. Below, we highlight the various components of the Internet Quality page.
Global
The top section of the global (worldwide) view includes time series graphs of the Internet Quality Index metrics aggregated at a continent level. The time frame shown in the graphs is governed by the selection made in the time frame drop down at the upper right of the page, and at launch, data for only the last three months is available. For users interested in examining a specific continent, clicking on the other continent names in the legend removes them from the graph. Although continent-level aggregation is still rather coarse, it still provides some insight into regional Internet quality around the world.
Further down the page, the Connection Quality section presents a choropleth map, with countries shaded according to the values of the speed, latency, or jitter metric selected from the drop-down menu. Hovering over a country displays a label with the country’s name and metric value, and clicking on the country takes you to the country’s Internet Quality page. Note that in contrast to the IQI section, the Connection Quality section always displays data aggregated over the previous 90 days.
Country-level
Within the country-level page (using Canada as an example in the figures below), the country’s IQI metrics over the selected time frame are displayed. These time series graphs show the median bandwidth, latency, and DNS response time within a shaded band bounded at the 25th and 75th percentile and represent the average expected user experience across the country, as discussed in the Our approach to data analysis section above.
Below that is the Connection Quality section, which provides a summary view of the country’s measured upload and download speeds, as well as latency and jitter, over the previous 90 days. The colored wedges in the Performance Summary graph are intended to illustrate aggregate connection quality at a glance, with an “ideal” connection having larger upload and download wedges and smaller latency and jitter wedges. Hovering over the wedges displays the metric’s value, which is also shown in the table to the right of the graph.
Below that, the Bandwidth and Latency/Jitter histograms illustrate the bucketed distribution of upload and download speeds, and latency and jitter measurements. In some cases, the speed histograms may show a noticeable bar at 1 Gbps, or 1000 ms (1 second) on the latency/jitter histograms. The presence of such a bar indicates that there is a set of measurements with values greater than the 1 Gbps/1000 ms maximum histogram values.
Autonomous system level
Within the upper-right section of the country-level page, a list of the top five autonomous systems within the country is shown. Clicking on an ASN takes you to the Performance page for that autonomous system. For others not displayed in the top five list, you can use the search bar at the top of the page to search by autonomous system name or number. The graphs shown within the AS level view are identical to those shown at a country level, but obviously at a different level of aggregation. You can find the ASN that you are connected to from the My Connection page on Cloudflare Radar.
Exploring connection performance & quality data
Digging into the IQI and Connection Quality visualizations can surface some interesting observations, including characterizing Internet connections, and the impact of Internet disruptions, including shutdowns and network issues. We explore some examples below.
Characterizing Internet connections
Verizon FiOS is a residential fiber-based Internet service available to customers in the United States. Fiber-based Internet services (as opposed to cable-based, DSL, dial-up, or satellite) will generally offer symmetric upload and download speeds, and the FiOS plans page shows this to be the case, offering 300 Mbps (upload & download), 500 Mbps (upload & download), and “1 Gig” (Verizon claims average wired speeds between 750-940 Mbps download / 750-880 Mbps upload) plans. Verizon carries FiOS traffic on AS701 (labeled UUNET due to a historical acquisition), and in looking at the bandwidth histogram for AS701, several things stand out. The first is a rough symmetry in upload and download speeds. (A cable-based Internet service provider, in contrast, would generally show a wide spread of download speeds, but have upload speeds clustered at the lower end of the range.) Another is the peaks around 300 Mbps and 750 Mbps, suggesting that the 300 Mbps and “1 Gig” plans may be more popular than the 500 Mbps plan. It is also clear that there are a significant number of test results with speeds below 300 Mbps. This is due to several factors: one is that Verizon also carries lower speed non-FiOS traffic on AS701, while another is that erratic nature of in-home WiFi often means that the speeds achieved on a test will be lower than the purchased service level.
Traffic shifts drive latency shifts
On May 9, 2023, the government of Pakistan ordered the shutdown of mobile network services in the wake of protests following the arrest of former Prime Minister Imran Khan. Our blog post covering this shutdown looked at the impact from a traffic perspective. Within the post, we noted that autonomous systems associated with fixed broadband networks saw significant increases in traffic when the mobile networks were shut down – that is, some users shifted to using fixed networks (home broadband) when mobile networks were unavailable.
Examining IQI data after the blog post was published, we found that the impact of this traffic shift was also visible in our latency data. As can be seen in the shaded area of the graph below, the shutdown of the mobile networks resulted in the median latency dropping about 25% as usage shifted from higher latency mobile networks to lower latency fixed broadband networks. An increase in latency is visible in the graph when mobile connectivity was restored on May 12.
Bandwidth shifts as a potential early warning sign
On April 4, UK mobile operator Virgin Media suffered several brief outages. In examining the IQI bandwidth graph for AS5089, the ASN used by Virgin Media (formerly branded as NTL), indications of a potential problem are visible several days before the outages occurred, as median bandwidth dropped by about a third, from around 35 Mbps to around 23 Mbps. The outages are visible in the circled area in the graph below. Published reports indicate that the problems lasted into April 5, in line with the lower median bandwidth measured through mid-day.
Submarine cable issues cause slower browsing
On June 5, Philippine Internet provider PLDTTweeted an advisory that noted “One of our submarine cable partners confirms a loss in some of its internet bandwidth capacity, and thus causing slower Internet browsing.” IQI latency and bandwidth graphs for AS9299, a primary ASN used by PLDT, shows clear shifts starting around 06:45 UTC (14:45 local time). Median bandwidth dropped by half, from 17 Mbps to 8 Mbps, while median latency increased by 75% from 37 ms to around 65 ms. 75th percentile latency also saw a significant increase, nearly tripling from 63 ms to 180 ms coincident with the reported submarine cable issue.
Conclusion
Making network performance and quality insights available on Cloudflare Radar supports Cloudflare’s mission to help build a better Internet. However, we’re not done yet – we have more enhancements planned. These include making data available at a more granular geographical level (such as state and possibly city), incorporating AIM scores to help assess Internet quality for specific types of use cases, and embedding the Cloudflare speed test directly on Radar using the open source JavaScript module.
In the meantime, we invite you to use speed.cloudflare.com to test the performance and quality of your Internet connection, share any country or AS-level insights you discover on social media (tag @CloudflareRadar on Twitter or @radar@cloudflare.social on Mastodon), and explore the underlying data through the M-Lab repository or the Radar API.
Visit 1.1.1.1 from any device to get started with our free app that makes your Internet faster and safer.
To learn more about our mission to help build a better Internet, start here. If you’re looking for a new career direction, check out our open positions.
CDNs help keep Microsoft 365 fast and reliable for end users. Cloud services like Microsoft 365 use CDNs to cache static assets closer to the browsers requesting them to speed up downloads and reduce perceived end user latency. The information in this topic will help you learn about Content Delivery Networks (CDNs) and how they’re used by Microsoft 365.
What exactly is a CDN?
A CDN is a geographically distributed network consisting of proxy and file servers in datacenters connected by high-speed backbone networks. CDNs are used to reduce latency and load times for a specified set of files and objects in a web site or service. A CDN may have many thousands of endpoints for optimal servicing of incoming requests from any location.
CDNs are commonly used to provide faster downloads of generic content for a web site or service such as Javascript files, icons and images, and can also provide private access to user content such as files in SharePoint Online document libraries, streaming media files, and custom code.
CDNs are used by most enterprise cloud services. Cloud services like Microsoft 365 have millions of customers downloading a mix of proprietary content (such as emails) and generic content (such as icons) at one time. It’s more efficient to put images everyone uses, like icons, as close to the user’s computer as possible. It isn’t practical for every cloud service to build CDN datacenters that store this generic content in every metropolitan area, or even in every major Internet hub around the world, so some of these CDNs are shared.
How do CDNs make services work faster?
Downloading common objects like site images and icons over and over again can take up network bandwidth that can be better used for downloading important personal content, like email or documents. Because Microsoft 365 uses an architecture that includes CDNs, the icons, scripts, and other generic content can be downloaded from servers closer to client computers, making the downloads faster. This means faster access to your personal content, which is securely stored in Microsoft 365 datacenters.
CDNs help to improve cloud service performance in several ways:
CDNs shift part of the network and file download burden away from the cloud service, freeing up cloud service resources for serving user content and other services by reducing the need to serve requests for static assets.
CDNs are purpose built to provide low-latency file access by implementing high performance networks and file servers, and by leveraging updated network protocols such as HTTP/2 with highly efficient compression and request multiplexing.
CDN networks use many globally distributed endpoints to make content available as close as possible to users.
The Microsoft 365 CDN
The built-in Microsoft 365 Content Delivery Network (CDN) allows Microsoft 365 administrators to provide better performance for their organization’s SharePoint Online pages by caching static assets closer to the browsers requesting them, which helps to speed up downloads and reduce latency. The Microsoft 365 CDN uses the HTTP/2 protocol for improved compression and download speeds.
Note
The Microsoft 365 CDN is only available to tenants in the Production (worldwide) cloud. Tenants in the US Government, China and Germany clouds do not currently support the Microsoft 365 CDN.
The Microsoft 365 CDN is composed of multiple CDNs that allow you to host static assets in multiple locations, or origins, and serve them from global high-speed networks. Depending on the kind of content you want to host in the Microsoft 365 CDN, you can add public origins, private origins or both.
Content in public origins within the Microsoft 365 CDN is accessible anonymously, and can be accessed by anyone who has URLs to hosted assets. Because access to content in public origins is anonymous, you should only use them to cache non-sensitive generic content such as Javascript files, scripts, icons and images. The Microsoft 365 CDN is used by default for downloading generic resource assets like the Microsoft 365 client applications from a public origin.
Private origins within the Microsoft 365 CDN provide private access to user content such as SharePoint Online document libraries, sites and proprietary images. Access to content in private origins is secured with dynamically generated tokens so it can only be accessed by users with permissions to the original document library or storage location. Private origins in the Microsoft 365 CDN can only be used for SharePoint Online content, and you can only access assets through redirection from your SharePoint Online tenant.
The Microsoft 365 CDN service is included as part of your SharePoint Online subscription.
Although not a part of the Microsoft 365 CDN, you can use these CDNs in your Microsoft 365 tenant for access to SharePoint development libraries, custom code and other purposes that fall outside the scope of the Microsoft 365 CDN.
Azure CDN
Note
Beginning in Q3 2020, SharePoint Online will begin caching videos on the Azure CDN to support improved video playback and reliability. Popular videos will be streamed from the CDN endpoint closest to the user. This data will remain within the Microsoft Purview boundary. This is a free service for all tenants and it does not require any customer action to configure.
You can use the Azure CDN to deploy your own CDN instance for hosting custom web parts, libraries and other resource assets, which allows you to apply access keys to your CDN storage and exert greater control over your CDN configuration. Use of the Azure CDN isn’t free, and requires an Azure subscription.
Microsoft’s Ajax CDN is a read-only CDN that offers many popular development libraries including jQuery (and all of its other libraries), ASP.NET Ajax, Bootstrap, Knockout.js, and others.
To include these scripts in your project, simply replace any references to these publicly available libraries with references to the CDN address instead of including it in your project itself. For example, use the following code to link to jQuery:
For more information about how to use the Microsoft Ajax CDN, see Microsoft Ajax CDN.
How does Microsoft 365 use content from a CDN?
Regardless of what CDN you configure for your Microsoft 365 tenant, the basic data retrieval process is the same.
Your client (a browser or Office client application) requests data from Microsoft 365.
Microsoft 365 either returns the data directly to your client or, if the data is part of a set of content hosted by the CDN, redirects your client to the CDN URL.a. If the data is already cached in a public origin, your client downloads the data directly from the nearest CDN location to your client.b. If the data is already cached in a private origin, the CDN service checks your Microsoft 365 user account’s permissions on the origin. If you have permissions, SharePoint Online dynamically generates a custom URL composed of the path to the asset in the CDN and two access tokens, and returns the custom URL to your client. Your client then downloads the data directly from the nearest CDN location to your client using the custom URL.
If the data isn’t cached at the CDN, the CDN node requests the data from Microsoft 365 and then caches the data for time after your client downloads the data.
The CDN figures out the closest datacenter to the user’s browser and, using redirection, downloads the requested data from there. CDN redirection is quick, and can save users a lot of download time.
How should I set up my network so that CDNs work best with Microsoft 365?
Minimizing latency between clients on your network and CDN endpoints is the key consideration for ensuring optimal performance. You can use the best practices outlined in Managing Microsoft 365 endpoints to ensure that your network configuration permits client browsers to access the CDN directly rather than routing CDN traffic through central proxies to avoid introducing unnecessary latency.
Is there a list of all the CDNs that Microsoft 365 uses?
The CDNs in use by Microsoft 365 are always subject to change and in many cases there are multiple CDN partners configured in the event one is unavailable. The primary CDNs used by Microsoft 365 are:
CDN
Company
Usage
Link
Microsoft 365 CDN
Microsoft Azure
Generic assets in public origins, SharePoint user content in private origins
There are many factors involved in measuring specific differences in performance between data downloaded directly from Microsoft 365 and data downloaded from a specific CDN, such as your location relative to your tenant and to the nearest CDN endpoint, the number of assets on a page that are served by the CDN, and transient changes in network latency and bandwidth. However, a simple A/B test can help to show the difference in download time for a specific file.
The following screenshots illustrate the difference in download speed between the native file location in Microsoft 365 and the same file hosted on the Microsoft Ajax Content Delivery Network. These screenshots are from the Network tab in the Internet Explorer 11 developer tools. These screenshots show the latency on the popular library jQuery. To bring up this screen, in Internet Explorer, press F12 and select the Network tab, which is symbolized with a Wi-Fi icon.
This screenshot shows the library uploaded to the master page gallery on the SharePoint Online site itself. The time it took to upload the library is 1.51 seconds.
The second screenshot shows the same file delivered by Microsoft’s CDN. This time the latency is around 496 milliseconds. This is a large improvement and shows that a whole second is shaved off the total time to download the object.
Is my data safe?
We take great care to protect the data that runs your business. Data stored in the Microsoft 365 CDN is encrypted both in transit and at rest, and access to data in the Microsoft 365 SharePoint CDN is secured by Microsoft 365 user permissions and token authorization. Requests for data in the Microsoft 365 SharePoint CDN must be referred (redirected) from your Microsoft 365 tenant or an authorization token won’t be generated.
To ensure that your data remains secure, we recommend that you never store user content or other sensitive data in a public CDN. Because access to data in a public CDN is anonymous, public CDNs should only be used to host generic content such as web script files, icons, images and other non-sensitive assets.
Note
3rd party CDN providers may have privacy and compliance standards that differ from the commitments outlined by the Microsoft 365 Trust Center. Data cached through the CDN service may not conform to the Microsoft Data Processing Terms (DPT), and may be outside of the Microsoft 365 Trust Center compliance boundaries.
For in-depth information about privacy and data protection for Microsoft 365 CDN providers, visit the following:
Learn more about Microsoft 365 privacy and data protection at the Microsoft Trust Center
Learn more about Azure privacy and data protection at the Azure Trust Center
How can I secure my network with all these 3rd party services?
Using an extensive set of partner services allows Microsoft 365 to scale and meet availability requirements and enhance the user experience when using Microsoft 365. The 3rd party services Microsoft 365 leverages include both certificate revocation lists; such as crl.microsoft.com or sa.symcb.com, and CDNs; such as r3.res.outlook.com. Every CDN FQDN generated by Microsoft 365 is a custom FQDN for Microsoft 365. If you’re sent to a FQDN at the request of Microsoft 365, you can be assured that the CDN provider controls the FQDN and the underlying content at that location.
For customers that want to segregate requests destined for a Microsoft 365 datacenter from requests that are destined for a 3rd party, we’ve written up guidance on Managing Microsoft 365 endpoints.
Is there a list of all the FQDNs that leverage CDNs?
The list of FQDNs and how they leverage CDNs change over time. Refer to our published Microsoft 365 URLs and IP address ranges page to get up to date on the latest FQDNs that leverage CDNs.
Can I use my own CDN and cache content on my local network?
We’re continually looking for new ways to support our customers’ needs and are currently exploring the use of caching proxy solutions and other on-premises CDN solutions.
Although it isn’t a part of the Microsoft 365 CDN, you can also use the Azure CDN for hosting custom web parts, libraries and other resource assets, which allows you to apply access keys to your CDN storage and exert greater control over your CDN configuration. Use of the Azure CDN isn’t free, and requires an Azure subscription. For more information on how to configure an Azure CDN instance, see Quickstart: Integrate an Azure storage account with Azure CDN.
I’m using Azure ExpressRoute for Microsoft 365, does that change things?
Azure ExpressRoute for Microsoft 365 provides a dedicated connection to Microsoft 365 infrastructure that is segregated from the public internet. This means that clients will still need to connect over non-ExpressRoute connections to connect to CDNs and other Microsoft infrastructure that isn’t explicitly included in the list of services supported by ExpressRoute. For more information about how to route specific traffic such as requests destined for CDNs, see Implementing ExpressRoute for Microsoft 365.
Can I use CDNs with SharePoint Server on-premises?
Using CDNs only makes sense in a SharePoint Online context and should be avoided with SharePoint Server. This is because all of the advantages around geographic location don’t hold true if the server is located on-premises or geographically close anyway. Additionally, if there’s a network connection to the servers where it’s hosted, then the site may be used without an Internet connection and therefore can’t retrieve the CDN files. Otherwise, you should use a CDN if there’s one available and stable for the library and files you need for your site.
Office 365 requires connectivity to the Internet. The endpoints below should be reachable for customers using Office 365 plans, including Government Community Cloud (GCC).
Start with Managing Office 365 endpoints to understand our recommendations for managing network connectivity using this data. Endpoints data is updated as needed at the beginning of each month with new IP Addresses and URLs published 30 days in advance of being active. This cadence allows for customers who don’t yet have automated updates to complete their processes before new connectivity is required. Endpoints may also be updated during the month if needed to address support escalations, security incidents, or other immediate operational requirements. The data shown on this page below is all generated from the REST-based web services. If you’re using a script or a network device to access this data, you should go to the Web service directly.
Endpoint data below lists requirements for connectivity from a user’s machine to Office 365. For detail on IP addresses used for network connections from Microsoft into a customer network, sometimes called hybrid or inbound network connections, see Additional endpoints for more information.
The endpoints are grouped into four service areas representing the three primary workloads and a set of common resources. The groups may be used to associate traffic flows with a particular application, however given that features often consume endpoints across multiple workloads, these groups can’t effectively be used to restrict access.
Data columns shown are:
ID: The ID number of the row, also known as an endpoint set. This ID is the same as is returned by the web service for the endpoint set.
Category: Shows whether the endpoint set is categorized as Optimize, Allow, or Default. This column also lists which endpoint sets are required to have network connectivity. For endpoint sets that aren’t required to have network connectivity, we provide notes in this field to indicate what functionality would be missing if the endpoint set is blocked. If you’re excluding an entire service area, the endpoint sets listed as required don’t require connectivity.You can read about these categories and guidance for their management in New Office 365 endpoint categories.
ER: This is Yes if the endpoint set is supported over Azure ExpressRoute with Office 365 route prefixes. The BGP community that includes the route prefixes shown aligns with the service area listed. When ER is No, this means that ExpressRoute is not supported for this endpoint set.Some routes may be advertised in more than one BGP community, making it possible for endpoints within a given IP range to traverse the ER circuit, but still be unsupported. In all cases, the value of a given endpoint set’s ER column should be respected.
Addresses: Lists the FQDNs or wildcard domain names and IP address ranges for the endpoint set. Note that an IP address range is in CIDR format and may include many individual IP addresses in the specified network.
Ports: Lists the TCP or UDP ports that are combined with listed IP addresses to form the network endpoint. You may notice some duplication in IP address ranges where there are different ports listed.
Note
Microsoft has begun a long-term transition to providing services from the cloud.microsoft namespace to simplify the endpoints managed by our customers. If you are following existing guidance for allowing access to required endpoints as listed below, there’s no further action required from you.
Default Optional Notes: Some Office 365 features require endpoints within these domains (including CDNs). Many specific FQDNs within these wildcards have been published recently as we work to either remove or better explain our guidance relating to these wildcards.
Default Optional Notes: Connection to the speech service is required for Office Dictation features. If connectivity is not allowed, Dictation will be disabled.
No
officespeech.platform.bing.com
TCP: 443
147
Default Required
No
*.office.com, www.microsoft365.com
TCP: 443, 80
152
Default Optional Notes: These endpoints enables the Office Scripts functionality in Office clients available through the Automate tab. This feature can also be disabled through the Office 365 Admin portal.
A TeamViewer company profile allows the ability within the TeamViewer Management Consoleto manage user permissions and access centrally.
Company admins can add existing users to the license and create new TeamViewer accounts. Both will allow users to log into any TeamViewer application and license the device so they may make connections.
Before starting
It is highly recommended to utilize a Master Account for a company profile, which will be the account that manages all licenses and users.
Each company profile must have one TeamViewer Core multi-userlicense activated; this license can be combined with other licenses of the TeamViewer product family (e.g., Assist AR, Remote Management, IoT, etc. ), but cannot be combined with another TeamViewer Core license.
📌Note: If a company admin attempts to activate a second TeamViewer license, they will need to choose between keeping the existing license or replacing it with the new license.
📌Note: In some cases (with older company profiles and an active perpetual license), multiple core TeamViewer licenses may be activated to one company profile. One subscription license may be added to an existing perpetual license for such company profiles.
License management
Through the TeamViewer Management Console, company admins can manage the licensing of their users directly, including:
Assign/un-assign the license to various members of the company profile.
Reserve one or more channels for specific teams or persons via Channel Groups.
💡Hint: To ensure the license on your company profile best matches your use case, we highly recommend reaching out to our TeamViewer licensing experts.You may find local numbers here.
How to create a company profile
To create a company profile, please follow the instructions below:
On the left-hand side, under the Company header, select User management
In the text box provided, enter the desired company name and click Create.
📌Note: The name of a company profile must be unique and cannot be re-used. If another company profile already uses a name, an error will appear, requesting another name be used instead.
Once the company profile is created, User management will load with the user that created the company profile as a company administrator.
How to add a new user
To add a new user, please follow the instructions below:
Under User management, click the icon of a person with a + sign. Click on Add user.
On the General tab, add the user’s name and email address and enter a password for the user and click Add user.
💡Hint: Other settings for the user can be adjusted under Advanced, Licenses, and Permissions.
The user will now appear under the User management tab. An email is sent to the user with instructions on activating their account.
📌Note: If the user does not activate their account via email, they will receive an error that the account has not yet been activated when trying to sign in.
How to add an existing user
Users that already have an existing TeamViewer account can request to join a company profile using a few simple steps:
Under User management, click the icon of a person with a + sign. Select Add existing account.
Once the user opens the link within a browser, they must sign in with their TeamViewer account. Once logged in, they will be prompted to enter the email address of the company administrator. Once completed, they must tick the box I allow to transfer my account and click Join Company.
The company admin will receive a join request via email. The user will appear in user management, where the company admin can approve or decline the addition of the user to the company profile
📌Notes:
Every user that joins a company profile will be informed that the company admin will take over full management of their account, including the ability to connect to and control all their devices. It is recommended never to join a company profile the user does not know or fully trust.
A user can only be part of one company profile.
How to set user permissions
Users of a company profile have multiple options that can be set by the current company admin, including promoting other users to administrator or company administrator. Permissions are set for each user individually. To access user permissions:
In the User management tab, hovering the cursor over the desired user’s account will produce a three-dots menu (⋮) to the far right of the account. Click this menu and select Edit user from the drop-down.
Once in Edit user, select the Permissions tab. Overall permissions for the account can be changed using the drop-down under the Role header.
Four options are available:
Company administrator: Can make changes to company settings, other administrator accounts, and user accounts.
User administrator: Can make changes to other user accountsbut cannot change company settings or company administrator accounts.
Member: Cannot change the company profile or other users.
Customized permissions: The company admin sets permissions for each aspect of the account.
Once the appropriate role is selected, click Save in the window’s upper-left corner.
📌Note: Changes to user permissions are automatic once saved.
How to remove/deactivate/delete users
Along with adding new or existing accounts, company admins can remove, deactivate, or even delete users from the company profile.
📌Note: A current company admin of that license can only remove a TeamViewer account currently connected to a company profile. TeamViewer Customer Support is unable to remove any account from a company profile.
To remove, deactivate or delete an account, please follow the instructions below:
In the User management tab, hovering the cursor over the desired user’s account will produce a three-dots menu (⋮) to the far right of the account. In the drop-down menu that appears are the three options
Select Delete account, Remove user or Deactivate user.
Consequences of deleting an account
When an account is deleted, the account is not only removed from the company profile but deleted from TeamViewer altogether. The user can no longer use the account or access any information associated with it as it no longer exists.
📌Note: When an account is deleted, the email address associated with the account can be re-used to create a new TeamViewer account.
When a TeamViewer account is deleted from a company profile:
Connection reports, custom modules, and TeamViewer/Remote management policies will be transferred to the current company admin.
Web API Tokens for the deleted user are logged out, and their company functionality is removed
License activations are removed from the deleted user’s account
Shared groups from the deleted user’s account are deleted.
Once the company admin checks the box to confirm that this process cannot be undone, the Delete account button becomes available. Once pressed, the account is deleted.
📌Note: Deletion of any TeamViewer account deletion is irreversible. Only a new account can be created after deletion. All user data will be lost.
Remove user
When an account is removed, the account is removed from the company profile and reverted to a free TeamViewer account. The account is reverted to a free account, and the user is still able to log in with the account. All information associated with the account is still accessible.
When an account is removed from a company profile:
Connection reports, custom modules, and TeamViewer /Remote management policies will be transferred to the current company admin.
Contacts in the contact bookare transferred to the current company admin
Web API Tokens for the user’s account are logged out and their company functionality is removed
License activations are removed from the user’s account
📌Note: Groups & devices in the Computers & Contacts of the removed user’s account are not affected. Any groups shared also will remain shared.
Once the company admin checks the box to confirm that this process cannot be undone, the Remove user button becomes available. Once pressed, the account is removed from the company profile and reverted to a free TeamViewer account.
📌Note: Once a user account is removed from the current company profile, it can request to join another company profile.
Deactivate user
When an account is deactivated, the account is reverted to inactive. The deactivated account is still associated with the company profile but cannot be used to log into TeamViewer on a free or licensed device. The account is rendered completely unusable.
📌Note: When an account is deactivated, the email address associated with the account cannot be used to create a new free TeamViewer account.
💡Hint: To view inactivated users within the company profile, select the drop-down menu under User Status and check the box for Inactive. All inactive users will now appear in user management.
How to reactivate inactive users
When Deactivate user is selected, the account disappears from user management. They are, however, still a part of the Company Profile and can be reactivated back to the license instantly at any time.
To view inactivated users within the company profile, select the menu under User Status and check the box for Inactive. All inactive users will now appear in user management.
Once the user is located, hover the cursor over the account. Select the three-dots menu (⋮) to the right of the user’s account and select Activate user
The user’s original permissions status is reverted, and the account can again be used with any TeamViewer device.
Troubleshooting
Below you will find answers to some common issues encountered when interacting with a company profile.
▹User(s) on a company profile show a free license
In some cases, older users on a company profile may appear as ‘free’ users, especially after upgrading or changing a license. The company admin can resolve this:
Click Company administration on the left-hand side:
Select the Licenses tab and locate the license. Hovering the cursor over the license will produce a three-dots menu (⋮). Click the menu and select Assign from the drop-down.
The users who show ‘free’ will appear in Unassigned. Select the desired users and click the Add button at the bottom of the page.
📌Note: Affected users should log out and then back in to see the licensing changes.
▹Your account is already associated with a company
If a user who is already associated with one company profile attempts to join another company profile, the following pop-up will appear:
The user’s account must be removed from the current company profile to resolve this. The steps required vary depending on whether it is their active or expired company profile or if they are associated with a company profile created by another account.
SCENARIO 1: As company administrator of an active company profile
If a user who created a company profile wishes to delete the company profile associated with their account, they will need to perform the following steps:
Remove all other accounts: Before deleting a company profile, the company admin must remove all other accounts. Perform these steps for each user on the company profile
Remove the company admin account: Once all other accounts have been removed, the company admin will remove their account. This will delete the company profile altogether
The user is immediately logged out and can now follow the process to add their account to an existing company profile
SCENARIO 2: As company administrator of an expired company profile
In some cases, the user may have created a company profile on an older license that is no longer used or active. In such cases, the company profile will appear as expired in the Management Console.
In such cases, it is still possible to delete the company profile:
Click Company administration on the left-hand side.
On the General tab, select Delete company.
A pop-up will appear confirming the request to delete the company profile. Check the box at the bottom to validate, and select Delete company.
SCENARIO 3: The account is a member of a company profile
📌Note: Only a company administrator can remove a user from their company profile – not even TeamViewer can remove a user from a company profile, regardless of the request’s origin.
If the user is a member of another company profile, they will need to contact the company admin of that license to request removal.
Once removed, they can then request to join the correct company profile.
You have the possibility to restrict remote access to your device by using the Block and Allowlist feature in the TeamViewer full version and the TeamViewer Host.
You can find the feature easily by clicking in your TeamViewer full version on the Gear icon (⚙) in the upper right corner of the TeamViewer (Classic) application, then Security ➜ Block and Allowlist.
Let´s begin with the difference between a blocklist and an allowlist.
This article applies to all TeamViewer (Classic) users.
What is a Blocklist?
The Blocklist generally lets you prevent certain partners or devices from establishing a connection to your computer. TeamViewer accounts or TeamViewer IDs on the blocklist cannot connect to your computer.
📌Note: You will still be able to set up outgoing TeamViewer sessions with partners on the blocklist.
What is an Allowlist?
If you add TeamViewer accounts to the Allowlist, only these accounts will be able to connect to your computer. The possibility of a connection to your computer through other TeamViewer accounts or TeamViewer IDs will be denied
If you have joined a company profile with your TeamViewer account, you can also place the entire company profile on the Allowlist. Thus only the TeamViewer accounts that are part of the company profile can access this device.
📌Note: To work with a company profile you will need a TeamViewer Premium or Corporate license
How to set up a Blocklist?
If you would like to deny remote access to your device to specific persons or TeamViewer IDs, we recommend setting up a Blocklist.
You can find the feature easily by clicking in your TeamViewer full version on the Gear icon (⚙) in the upper right corner of the TeamViewer (Classic) application, then Security ➜ Block and Allowlist ➜ Click on Configure…
A new window will open. Activate the first option Deny access for the following partners and click on Add
📌Note: If you activate the Also apply for meetings check box, these settings will also be applied to meetings. Contacts from your blocklist are excluded from being able to join your meetings.
After clicking on Add, you can either choose partners saved on your Computers & Contacts list or add TeamViewer IDs/contacts manually to your blocklist.
How to set up an Allowlist?
If you would like to allow only specific TeamViewer accounts or TeamViewer IDs remote access to your device, we recommend setting up an Allowlist.
You can find the feature easily by clicking in your TeamViewer full version on the Gear icon (⚙) in the upper right corner of the TeamViewer (Classic) application, then Security ➜ Block and Allowlist ➜ Click on Configure…
A new window will open. Activate the second option Allow access only for the following partners and click on Add
📌Note: If you activate the Also apply for meetings check box, these settings will also be applied to meetings. Only contacts from your allowlist will then be able to join your meetings.
After clicking on Add, you can either choose partners saved on your Computers & Contacts list, add TeamViewer IDs/contacts manually to your blocklist, or add the whole company you are part of (only visible if you are part of a company profile).
How to delete blocklisted/allowlisted partners?
If you no longer wish to have certain partners block or allowlisted, you can easily remove them from the list.
To do so navigate in your TeamViewer full version to the Gear icon (⚙) in the upper right corner of the TeamViewer (Classic) application, then Security ➜ Block and Allowlist ➜ Click on Configure… and choose whether you would like to remove partners from the Blocklist or from the Allowlist by choosing either Deny access for the following partners (Blocklist) or Allow access only for the following partner (Allowlist). Now click on the partners you would like to remove and finally click Remove ➜ OK
📌Note: You can choose multiple partners at once by pressing CTRG when clicking on the different partners.
This article provides a step-by-step guide to activating Two-factor authentication for connections (also known as TFA for connections).This feature enables you to allow or deny connections via push notifications on a mobile device.
This article applies to all Windows users using TeamViewer (Classic) 15.17 (and newer) and macOS and Linux users in version 15.22 (and newer).
What is Two-factor authentication for connections?
TFA for connections offers an extra layer of protection to desktop computers.
When enabled, connections to that computer need to be approved using a push notification sent to specific mobile devices.
Enabling Two-factor authentication for connections and adding approval devices
Windows and Linux:
1. In the TeamViewer (Classic) application, click the gear icon at the top right menu.
2. Click on the Security tab on the left.
3. You will find the Two-factor authentication for connections section at the bottom.
4. Click on Configure… to open the list of approval devices.
5. To add a new mobile device to receive the push notifications, click Add.
6. You will now see a QR code that needs to be scanned by your mobile device.
Below please find a step-by-step gif for Windows, Linux, and macOS:
Windows
Linux
macOS
7. On the mobile device, download and install the TeamViewer Remote Control app:
8. In the TeamViewer Remote Control app, go to Settings → TFA for connections.
9. You will see a short explanation and the option to open the camera to scan the QR code.
10. Tap on Scan QR code and you will be asked to give the TeamViewer app permission to access the camera.
11. After permission is given, the camera will open. Point the camera at the QR code on the desktop computer (see Step 6 above).
12. The activation will happen automatically, and a success message will be displayed.
13. The new device is now included in the list of approval devices.
14. From now on, any connection to this desktop computer will need to be approved using a push notification.
📌 Note:TFA for connections cannot be remotely disabled if the approval device is not accessible. Due to this, we recommend setting up an additional approval device as a backup.
Removing approval devices
1. Select an approval device from the list and click Remove or the X.
2. You will be asked to confirm the action.
3. By clicking Remove again, the mobile device will be removed from the list of approval devices and won’t receive any further push notifications.
4. If the Approval devices list is empty, Two-factor authentication for connections will be completely disabled.
Below please find a step by step gif for Windows, Linux and macOS:
▹ Windows:
▹ Linux:
▹ macOS:
Remote connections when Two-factor authentication for connections is enabled
TFA for connections does not replace any existing authentication method. When enabled, it adds an extra security layer against unauthorized access.
When connecting to a desktop computer protected by TFA for connections, a push notification will be sent to all of the approval devices.
You can either:
accept/deny the connection request via the system notification:
accept/deny the connection request by tapping the TeamViewer notification. It will lead to you the following screen within the TeamViewer application to accept/deny the connection:
Multiple approval devices
All approval devices in the list will receive a push notification.
The first notification that is answered on any of the devices will be used to allow or deny the connection.
TeamViewer offers the possibility to activate Account Recovery based on the zero-trust principle.
This is a major security enhancement for your TeamViewer account and a unique offering on the market.
This article applies to all users.
What is Zero Knowledge Account Recovery
In cases where you cannot remember your TeamViewer Account credentials, you click on I forgot my password, which triggers an email with a clickable link that leads you to the option of resetting your password.
The regular reset process leads you to a page where you can set a new password for your account.
The Zero Knowledge Account Recovery acts as another layer of security for this process as the reset process requires you to enter the unique 64 characters Zero Knowledge Account Recovery Code for your account to prove your identity. Important to note is that this happens without any intervention and knowledge of the TeamViewer infrastructure.
Activate Zero Knowledge Account Recover
To activate Zero Knowledge Account Recovery please follow the steps below:
2. Click Edit profile under your profile name (upper right corner).
3. Go to Security in the left menu
4. Click the Activate Zero knowledge account recovery button
📌 Note: The password recovery code is a unique 64 characters code that allows you to regain access if you forgot your password. It is absolutely essential that you print/download your recovery code and keep this in a secure place.
⚠ IMPORTANT: Without the recovery code you won’t be able to recover your account. Access to your account will be irreversibly lost. The data is encrypted with the key and you are the only owner of this key. TeamViewer has no access to it.
5. A PopUp window appears sharing the above information. Click on Generate Recovery Code to proceed.
6. The Recovery Code is shown. You have to download or print the code as well as you tick the check box confirming that you acknowledge and understand that if you lose your zero knowledge account recovery code, you won’t be able to recover your password and you will lose access to your account forever
⚠ Do not tick the box unless you understand the meaning.
7. Once you either downloaded or printed the recovery code and ticked the acknowledge box, you can activate the Zero knowledge account recovery by clicking Activate.
Deactivate Zero Knowledge Account Recovery
To deactivate Zero Knowledge Account Recovery please follow the steps below:
2. Click Edit profile under your profile name (upper right corner).
3. Go to Security in the left menu
4. Click the Deactivate Zero knowledge account recovery button
5. A PopUp appears. You have to tick the check box confirming that you acknowledge and understand that if you will be deactivating your zero knowledge account recovery
6. Click Deactivate to deactivate the Zero Knowledge Account recovery for your TeamViewer Account.
Reset your password
To reset your password for your TeamViewer account, please follow the steps below: (More info here: Reset account password)
TeamViewer is designed to connect easily to remote computers without any special firewall configurations being necessary.
This article applies to all users in all licenses.
In the vast majority of cases, TeamViewer will always work if surfing on the internet is possible. TeamViewer makes outbound connections to the internet, which are usually not blocked by firewalls.
However, in some situations, for example in a corporate environment with strict security policies, a firewall might be set up to block all unknown outbound connections, and in this case, you will need to configure the firewall to allow TeamViewer to connect out through it.
TeamViewer ‘s Ports
These are the ports that TeamViewer needs to use.
TCP/UDP Port 5938
TeamViewer prefers to make outbound TCP and UDP connections over port 5938 – this is the primary port it uses, and TeamViewer performs best using this port. Your firewall should allow this at a minimum.
TCP Port 443
If TeamViewer can’t connect over port 5938, it will next try to connect over TCP port 443.
However, our mobile apps running on iOS and Windows Mobile don’t use port 443.
📌Note: port 443 is also used by our custom modules which are created in the Management Console. If you’re deploying a custom module, eg. through Group Policy, then you need to ensure that port 443 is open on the computers to which you’re deploying. Port 443 is also used for a few other things, including TeamViewer (Classic) update checks.
TCP Port 80
If TeamViewer can’t connect over port 5938 or 443, then it will try on TCP port 80. The connection speed over this port is slower and less reliable than ports 5938 or 443, due to the additional overhead it uses, and there is no automatic reconnection if the connection is temporarily lost. For this reason port 80 is only used as a last resort.
Our mobile apps running on Windows Mobile don’t use port 80. However, our iOS and Android apps can use port 80 if necessary.
Windows Mobile
Our mobile apps running on Windows Mobile can only connect out over port 5938. If the TeamViewer app on your mobile device won’t connect and tells you to “check your internet connection”, it’s probably because this port is being blocked by your mobile data provider or your WiFi router/firewall.
Destination IP addresses
The TeamViewer software makes connections to our master servers located around the world. These servers use a number of different IP address ranges, which are also frequently changing. As such, we are unable to provide a list of our server IPs. However, all of our IP addresses have PTR records that resolve to *.teamviewer.com. You can use this to restrict the destination IP addresses that you allow through your firewall or proxy server.
Having said that, from a security point-of-view this should not really be necessary – TeamViewer only ever initiates outgoing data connections through a firewall, so it is sufficient to simply block all incoming connections on your firewall and only allow outgoing connections over port 5938, regardless of the destination IP address.
At Fastly we often highlight our powerful POPs and modern architecture when asked how we’re different, and better than the competition. Today we’re excited to give you another peek under the hood at the kind of innovation we can achieve on a modern network that is fully software-defined.
This past February, Fastly delivered a new record of 81.9 Tbps of traffic during the Super Bowl, and absolutely no one had to do anything with egress policies to manage that traffic over the course of the event thanks to Autopilot. Autopilot is our new zero-touch egress traffic engineering automation system, and because it was running, no manual interventions were required even for this record-breaking day of service. This means that for the first time ever at Fastly we set a new traffic record for the Fastly network while reducing the number of people who were needed to manage it. (And we notably reduced that number all the way to zero.) It took a lot of people across different Fastly teams, working incredibly hard, to improve the self-managing capabilities of our network, and the result is a network with complete automation that can react quickly and more frequently to failures, congestion, and performance degradation with zero manual intervention.
Autopilot brings many benefits to Fastly, but it is even better for our customers who can now be even more confident in our ability to manage events like network provider failures or DDoS attacks and unexpected traffic spikes — all while maintaining a seamless and unimpacted experience for their end users. Let’s look at how we got here, and just how well Autopilot works. (Oh, but if you’re not a customer yet, get in touch or get started with our free tier. This is the network you want to be on.)
Getting to this result required a lot of effort over several years. Exactly three years ago, we shared how we managed the traffic during the 2020 Super Bowl. At that time, an earlier generation of our traffic engineering automation would route traffic around common capacity bottlenecks while requiring operators to deal with only the most complex cases. That approach served us well for the traffic and network footprint we had three years ago, but it still limited our ability to scale our traffic and network footprint because, while we had reduced human involvement, people were still required to deal reactively with capacity. This translates to hiring and onboarding becoming a bottleneck of its own as we would need to scale the number of network operators at least at the same rate of the expansion of our network. On top of that, while we can prepare and be effective during a planned event like a Super Bowl, human neurophysiology is not always at its peak performance when woken up in the middle of the night to deal with unexpected internet weather events.
Achieving Complete automation with Autopilot and Precision Path
The only way forward was to remove humans from the picture entirely. This single improvement allows us to scale easily while also greatly improving our handling of capacity and performance issues. Manual interventions have a cost. They require a human to reason about the problem at hand and make a decision. This cannot be performed infinite times, so that requires us to preserve energy and only act when the problem is large enough to impact customer performance. It also means that when a human-driven action is taken, it normally moves a larger amount of traffic to avoid having to deal with the same issue again soon, and to minimize the amount of human interventions needed.
A modern CDN gives you huge improvements in caching, SEO, performance, conversions, & more.
With complete automation the cost of making an action is virtually 0, allowing very frequent micro-optimizations whenever small issues occur, or are about to occur. The additional precision and reactivity provided by full automation makes it possible to safely run links at higher utilization and rapidly move traffic around as necessary.
Figure: Egress interface traffic demand over capacity. Multiple interfaces had a demand that exceeded three times the physical capacity available during the Super Bowl, triggering automated traffic engineering overrides, which enabled continued efficient delivery without negative consequences to the network.
The graph above shows an example where Autopilot detected traffic demand exceeding physical link capacity. During the Super Bowl this demand exceeded 3 times the available capacity in some cases. Without Autopilot the peaks in traffic demand would have overwhelmed those links, requiring a lot of human intervention to prevent failure, but then to manage all of the downstream impacts of those interventions in order to get the network operating at top efficiency again. With Autopilot the network deflected traffic onto secondary paths automatically and we were able to deliver the excess demand without any performance degradation.
This post sheds light on the systems we built to scale handling large traffic events without any operator intervention.
Technical problem
Figure – Fastly POP is interconnected to the Internet via multiple peers and transit providers
The Fastly network of Points of Presence (POPs) is distributed across the world. Each POP is “multihomed”, i.e., it is interconnected to the Internet via a number of different networks, which are either peers or transit providers, for capacity and reliability purposes. With multiple routing options available, the challenge is how to select the best available path. We need to ensure that we pick the best performing route (in any given moment), and quickly move traffic away from paths experiencing failures or congestion.
Network providers use a protocol called Border Gateway Protocol (BGP) to exchange information about the reachability of Internet destinations. Fastly consumes BGP updates from its neighbors, and learns which neighbor can be used to deliver traffic to a given destination. However, BGP has several limitations. First, it is not capacity or performance aware: it can only be used to communicate whether an Internet destination can be reached or not, but not whether there is enough capacity to deliver the desired amount of traffic or what the throughput or latency would be for that delivery. Second, BGP is slow at reacting to remote failures: if a failure on a remote path occurs, it typically takes minutes for updates to be propagated, during which time blackholes and loops may occur.
Solving these problems without creating new ones is challenging, especially when operating at the scale of tens of Terabits per second (Tbps) of traffic. In fact, while it is desirable to rapidly route around failures, we need to be careful in those processes as well because rerouting large amounts of traffic erroneously can move traffic away from a well performing path onto a worse performing one and create congestion downstream as a result of our action, resulting in poor user experience. In other words, if decisions are not made carefully, some actions that are taken to reduce congestion will actually increase it instead – sometimes significantly.
Fastly’s solution to the problem is to use two different control systems that operate at different timescales to ensure we rapidly route around failures while keeping traffic on most performing paths.
The first system, which operates at a timescale of tens of milliseconds (to make a few round trips), monitors the performance of each TCP connection between Fastly and end users. If the connection fails to make forward progress for a few round trip times it reroutes that individual connection onto alternate paths until it resumes progress. This is the system underlying our Precision Path product for protecting connections between Fastly and end users, and it makes sure we rapidly react to network failures by surgically rerouting individual flows that are experiencing issues on these smaller timescales.
The second system, internally named Autopilot, operates over a longer timescale. Every minute it estimates the residual capacity of our links and the performance of network paths collected via network measurements. It uses that information to ensure traffic is allocated to links in order to optimize performance and prevent links from becoming congested. This system has a slower reaction time, but makes a more informed decision based on several minutes of high resolution network telemetry data. Autopilot ensures that large amounts of traffic can be moved confidently without downstream negative effects.
These two systems working together, make it possible to rapidly reroute struggling flows onto working paths and periodically adjust our overall routing configuration with enough data to make safe decisions. These systems operate 24/7 but had a particularly prominent role during the Super Bowl where they rerouted respectively 300 Gbps and 9 Tbps of traffic which would have otherwise been delivered over faulty, congested or underperforming paths.
This approach to egress traffic engineering using systems operating at different timescales to balance reactivity, accuracy, and safety of routing decisions is the first of its type in the industry to the best of our knowledge. In the remainder of this blog post, we are going to cover how both systems work but we’ll need to first make a small digression to explain how we route traffic out of our POPs, which is unusual and another approach where we’re also industry leaders.
Figure – Amount of traffic (absolute and percentage of total traffic) delivered by Precision Path and Autopilot respectively during the Super Bowl
Fastly network architecture
Figure – Fastly POP architecture
A typical Fastly POP comprises a layer of servers that are interconnected with all peers and transit providers via a tier of network switches. The typical approach to build an edge cloud POP consists in using network routers, which have a large enough memory to store the entire Internet routing table. In contrast, Fastly started designing a routing architecture that pushed all routes to end hosts in order to build a more cost-effective network, but we quickly realized and embraced the powerful capabilities that this architecture made possible. Endpoints that have visibility into the performance of flows now also have the means to influence their routing. This is one of the key reasons Fastly’s networking capabilities, programmability, flexibility, and ease of use continue to exceed the competition.
Here’s how our routing architecture works: Both switches and servers run routing daemons, which are instances of the BIRD Internet Routing Daemon with some proprietary patches applied to it. The daemons running on switches learn all routes advertised by our transits and peers. However, instead of injecting those routes in the routing table of the switches, they propagate them down to the servers which will then inject them into their routing tables. To make it possible for servers to then route traffic to the desired transit or peer, we use the Multiprotocol Label Switching (MPLS) protocol. We populate each switch with an entry in their MPLS lookup table (Label Forwarding Information Base [LFIB]) per each egress port and we tag all BGP route announcements propagated down to the servers with a community encoding the MPLS label that is used to route that traffic. The servers use this information to populate their routing table and use the appropriate label to route traffic out of the POP. We discuss this more at length in a scientific paper we published at USENIX NSDI ‘21.
Quickly routing around failures with Precision Path
Our approach of pushing all routes to the servers, giving endpoints the ability to reroute based on transport and application-layer metrics, made it possible to build Precision Path. Precision Path works on a timeframe of tens of milliseconds to reroute individual flows in cases of path failures and severe congestion. It’s great at quickly routing away from failures happening right in the moment, but it’s not aware or able to make decisions about proactively selecting the best path. Precision Path is good at steering away from trouble, but not zooming out and getting a better overall picture to select an optimized new route. The technology behind our precision path product is discussed in this blog post and, more extensively in this peer-reviewed scientific paper, but here’s a brief explanation.
Figure – Precision path rerouting decision logic for connections being established (left) and connections already established (right).
This system is a Linux kernel patch that monitors the health status of individual TCP connections. When a connection fails to make forward progress for some Round Trip Time (RTT), indicating a potential path failure, it is rerouted onto a randomly chosen alternate path until it resumes forward progress. Being able to make per-flow rerouting decisions is made possible by our host-based routing architecture where servers select routes of outgoing traffic by applying MPLS labels. End hosts can move traffic rapidly on a per-flow granularity because they have both visibility into the progress of connections, and the means to change network route selection. This system is remarkably effective at rapidly addressing short-lived failures and performance degradation that operators or any other telemetry-driven traffic engineering would be too slow to address. The downside is that this system only reacts to severe performance degradations that are already visible in the data plane and moves traffic onto randomly selected alternate paths, just to select non-failing paths, but they might not be the best and most optimal paths.
Making more informed long-term routing decision with Autopilot
Autopilot complements the limitations of Precision Path because it’s not great at responding as quickly, but it makes more informed decisions based on knowledge of which paths are able to perform better, or are currently less congested. Rather than just moving traffic away from a failed path (like Precision Path), it moves larger amounts of traffic *toward* better parts of a network. Autopilot has not been presented before today, and we are excited to detail it extensively in this post.
Autopilot is a controller that receives network telemetry signals from our network such as packet samples, link capacity, RTT, packet loss measurements, and availability of routes for each given destination. Every minute, the Autopilot controller collects network telemetry, uses it to project per-egress interface traffic demand without override paths, and makes decisions to reroute traffic onto alternate paths if one or more links are about to reach full capacity or if the currently used path for a given destination is underperforming its alternatives.
Figure – Autopilot architecture diagram
Autopilot’s architecture is comprised of three components (shown above):
A route manager, which peers with each switch within a POP and receives all route updates the switch received from its neighbors over a BGP peering session. The route manager provides an API that allows consumers to know what routes are available for a given destination prefix. The route manager also offers the ability to inject route overrides via its API. This is executed by announcing a BGP route update to the switch with a higher local preference value than routes learned from other peers and transit providers. This new route announcement will win the BGP tie-breaking mechanism and be inserted into servers’ routing tables and used to route traffic.
A telemetry collector, which receives sFlow packet samples from all the switches of a POP which allow an estimation of the volume of traffic broken down by destination interface and destination prefix as well as latency and packet loss measurements for all the traffic between Fastly POPs over all available providers from servers.
A controller, which consumes (every minute) the latest telemetry data (traffic volumes and performance) as well as all routes available for the prefixes currently served by the POP, and then computes whether to inject a BGP route override to steer traffic over alternate paths.
Making Precision Path and Autopilot work together
One challenge of having multiple control systems operating on the same inputs and outputs is having them work collaboratively to select the overall best options rather than compete with each other. Trying to select the best option from the limited vantage point of each separate optimization process could actually lead to additional disruption and do more harm than good. To the best of our knowledge, we are the first in the industry using this multi-timescale approach to traffic engineering.
The key challenge here is that once a flow is being rerouted by Precision Path, it no longer responds to BGP routing changes, including those triggered by Autopilot. As a result, Autopilot needs to account for the amount of traffic currently controlled by Precision Path in its decisions. We addressed this problem in two ways: first we tuned Precision Path to minimize the amount of traffic it reroutes, and by making that traffic observable by Autopilot so that it can be factored into Autopilot decisions.
When we first deployed Precision Path, we fine-tuned its configuration to minimize false positives. False positives would result in traffic being rerouted away from an optimal path that is temporarily experiencing a small hiccup, and onto longer paths with worse performance, which could in turn lead to a worse degradation by impacting the performance of affected TCP connections. We reported extensively on our tuning experiments in this paper. However, this is not enough, because even if we make the right decision at the time of rerouting a connection, the originally preferred path may recover a few minutes after the reroute, and this is typically what happens when BGP eventually catches up with the failure and withdraws routes through the failed path. To make sure we reroute connections back onto the preferred path when recovered, Precision Path probes the original path every five minutes after the first reroute, and if the preferred path is functional, it moves the connection back onto it. This mechanism is particularly helpful for long-lived connections, such as video streaming, which would otherwise be stuck on a backup path for their entire lifetime. This also minimizes the amount of traffic that Autopilot cannot control, giving it more room to maneuver.
The problem of making the amount of traffic routed by Precision Path visible to Autopilot is trickier. As we discuss earlier in this post, Autopilot learns the volume of traffic sent over each interface from sFlow packet samples emitted by switches. These samples report, among other things, over what interface the packets were sent to and which MPLS label it carried but do not report any information about how that MPLS label was applied. Our solution was to create a new set of alternate MPLS labels for our egress ports and allocate them for exclusive usage by Precision Path. This way, by looking up an MPLS label in our IP address management database, we can quickly find out if that packet was routed according to BGP path selection or according to Precision Path rerouting. We expose this information to the Autopilot controller which treats Precision Path as “uncontrollable”, i.e., traffic that will not move away from its current path even if the preferred route for its destination prefix is updated.
Making automation safe
Customers trust us with their business to occupy a position as a middleman between their services and their users, and we take that responsibility very seriously. While automating network operations allows for a more seamless experience for our customers, we also want to provide assurances to its reliability. We design all our automation with safety and operability at its core. Our systems fail gracefully when issues occur and are built so that network operators can always step in and override their behaviors using routing policy adjustments. The last aspect is particularly important because it allows operators to use tools and techniques learned in environments without automation and apply them here. Minimizing cognitive overhead by successfully automating more and more of the problem is particularly important to reduce the amount of time needed to solve problems when operating under duress. These are some of the approaches we used to make our automation safe and operable:
Standard operator tooling: both Precision Path and Autopilot can be controlled using standard network operator tools and techniques.
Precision Path can be disabled on individual routes by injecting a specific BGP community on an individual route announcement, which is a very common task that network engineers typically perform for a variety of reasons. Precision Path can also be disabled on an individual TCP session by setting a specific forwarding mark on the socket, which makes it possible to run active measurements without Precision Path kicking in and polluting results.
Autopilot route reselection is based on BGP best path selection, i.e., it will try to reroute traffic onto the second best path according to BGP best path selection. As a result, operators can influence which path Autopilot will fail over to by applying BGP policy changes such as altering MED or local pref values, and this is also a very common technique.
Finally, data about whether connections were routed on paths selected by precision path or autopilot is collected by our network telemetry systems, which allows us to reconstruct what happens
Data quality auditing: We audit the quality of data fed into our automation and have configured our systems to avoid executing any change if input data is inconsistent. In the case of Autopilot, for example, we compare egress flow estimation collected via packet samples against an estimation collected via interface counters, and if they diverge beyond a given threshold it means at least one of the estimations must be wrong, and we do not apply any change. The graph below shows the difference between those two estimations during the Super Bowl on one North American POP.
Figure – Difference between link utilization estimates obtained via interface counters and packet samples. The +/- 5% thresholds represent the acceptable margins of error
What-if analysis and control groups: in addition to monitoring input data we also audit the decisions made by systems and step in to correct them if they misbehave. Precision Path uses treatment and control groups. We randomly select a small percentage of connections to be part of a control group for which Precision Path is disabled and then monitor their performance compared to the others where precision path is enabled. If control connections perform better than treatment connections our engineering team is alerted, and steps in to investigate and remediate. Similarly, in Autopilot, before deploying a configuration change to our algorithm, we run it in “shadow” mode where the new algorithm makes decisions, but they are not applied to the network. The new algorithm will only be deployed if it performs at least as well as the one that is currently running.
Fail-static: when a failure occurs at any component of our systems, rather than failing close or open, they fail static, i.e., leave the network in the last known working configuration and alert our engineering team to investigate the problem.
Conclusions
This blog post is a view into how Fastly automates egress traffic engineering to make sure our customers’ traffic reaches their end users reliably. We continue to innovate and push the boundaries of what is possible while maintaining a focus on performance that is unrivaled. If you are thinking that you want your traffic to be handled by people who are not only experts, but also care this much, now is a great time to get in touch. Or if you’re thinking you want to be a part of innovation like this, check out our open listings here: https://www.fastly.com/about/careers/current-openings.
Open Source Software
The automation built into our network was made possible by open source technology. Open source is a part of Fastly’s heritage — we’re built on it, contribute to it, and open source our own projects whenever we can. What’s more, we’ve committed $50 million in free services to Fast Forward, to give back to the projects that make the internet, and our products, work. To make our large network automation possible, we used:
goBGP – BGP routing daemon library, used to build the Autopilot route collector/injector
BIRD – BGP routing daemon running on our switches and servers.
We did our best to contribute back to the community by submitting to their maintainers improvements and bug fixes that we implemented as part of our work. We are sending our deepest gratitude to the people that created these projects. If you’re an open source maintainer or contributor and would like to explore joining Fast Forward, reach out here.
Lorenzo Saino is a director of engineering at Fastly, where he leads the teams responsible for building the systems that control and optimize Fastly’s network infrastructure. During his tenure at Fastly, he built systems solving problems related to load balancing, distributed health checking, routing resilience, traffic engineering and network telemetry. Before joining Fastly he received a PhD from University College London. His thesis investigated design issues in networked caching systems.
Jeremiah Millay is a Principal Engineer on the Network Systems team at Fastly where he spends most of his time focused on network automation and writing software with the goal of improving network operations at Fastly. Prior to Fastly he spent a number of years as a Network Engineer for various regional internet service providers.
Paolo Alvarado is a Senior Manager of Technical Operations at Fastly. Paolo has over 10 years of experience working with content delivery networks in customer-facing and behind-the-scenes roles. Paolo joined Fastly to help build out the Fastly Tokyo office before moving into network operations. Currently, he manages a team of Network and System Operation engineers to meet the challenges of building and running a large scale network.
VP of Engineering leading Network Systems Organization
Hossein Lotfi is VP of Engineering leading Network Systems Organization at Fastly. Hossein has over 20 years of experience building networks and large-scale systems ranging from startups to hyper-scale cloud infrastructure. He has scaled multiple engineering organizations geared towards rapid, novel innovation development and innovations that are informed and inspired by deep involvement with the operational challenges of global scale systems. At Fastly, Hossein is responsible for building reliable, cost-effective, and low-latency systems to connect Fastly with end-users and customer infrastructures. The Network Systems Organization teams include Kernel, DataPath (XDP), L7 Load Balancing, TLS Termination, DDoS Defence, Network Architecture, Network Modeling and Provisioning Systems, Traffic Engineering, Network Telemetry, DNS, Hardware Engineering, Pre-Production Testing and Fastly’s Edge Delivery platform.


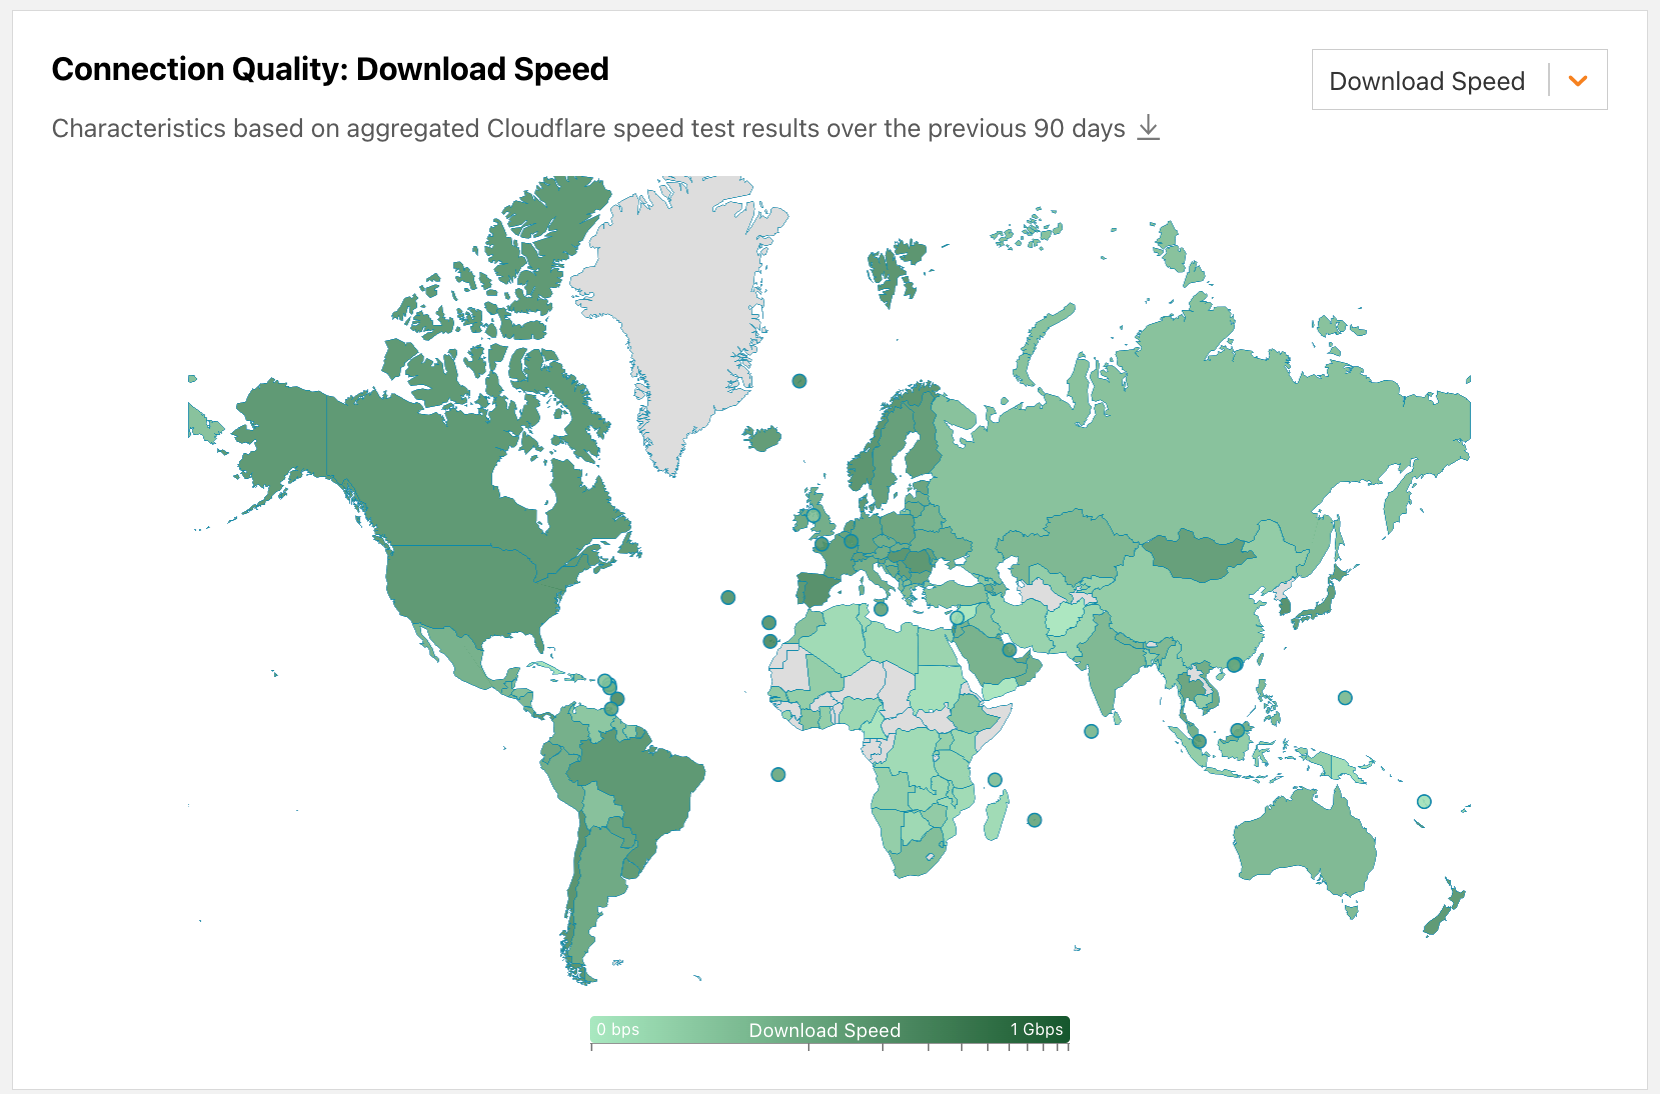
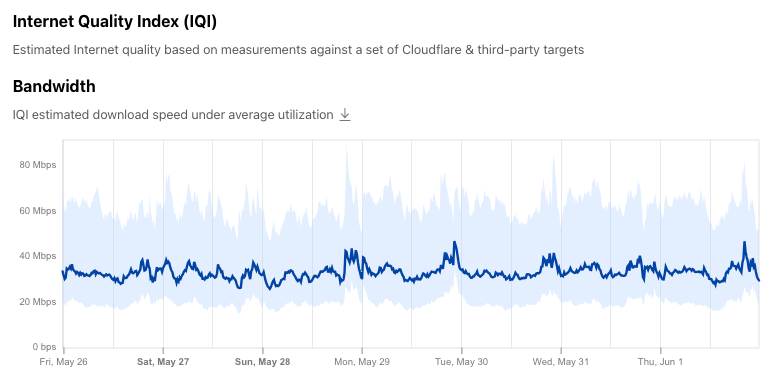
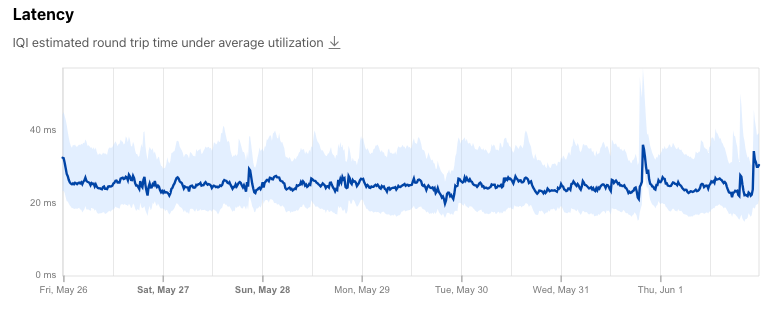

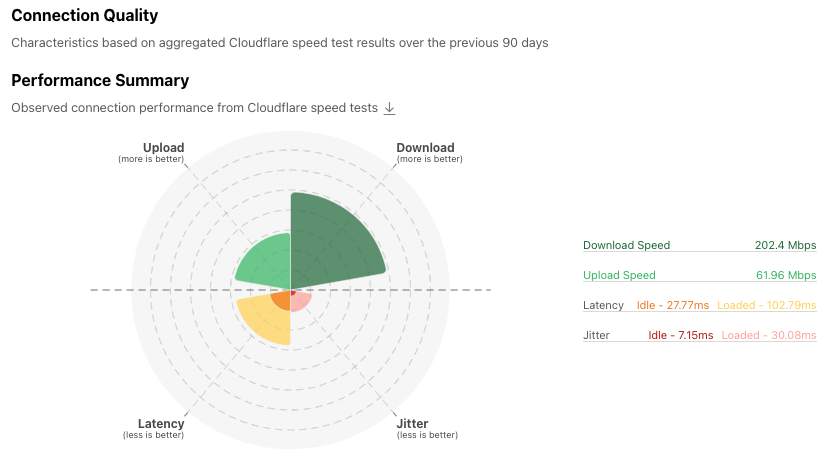

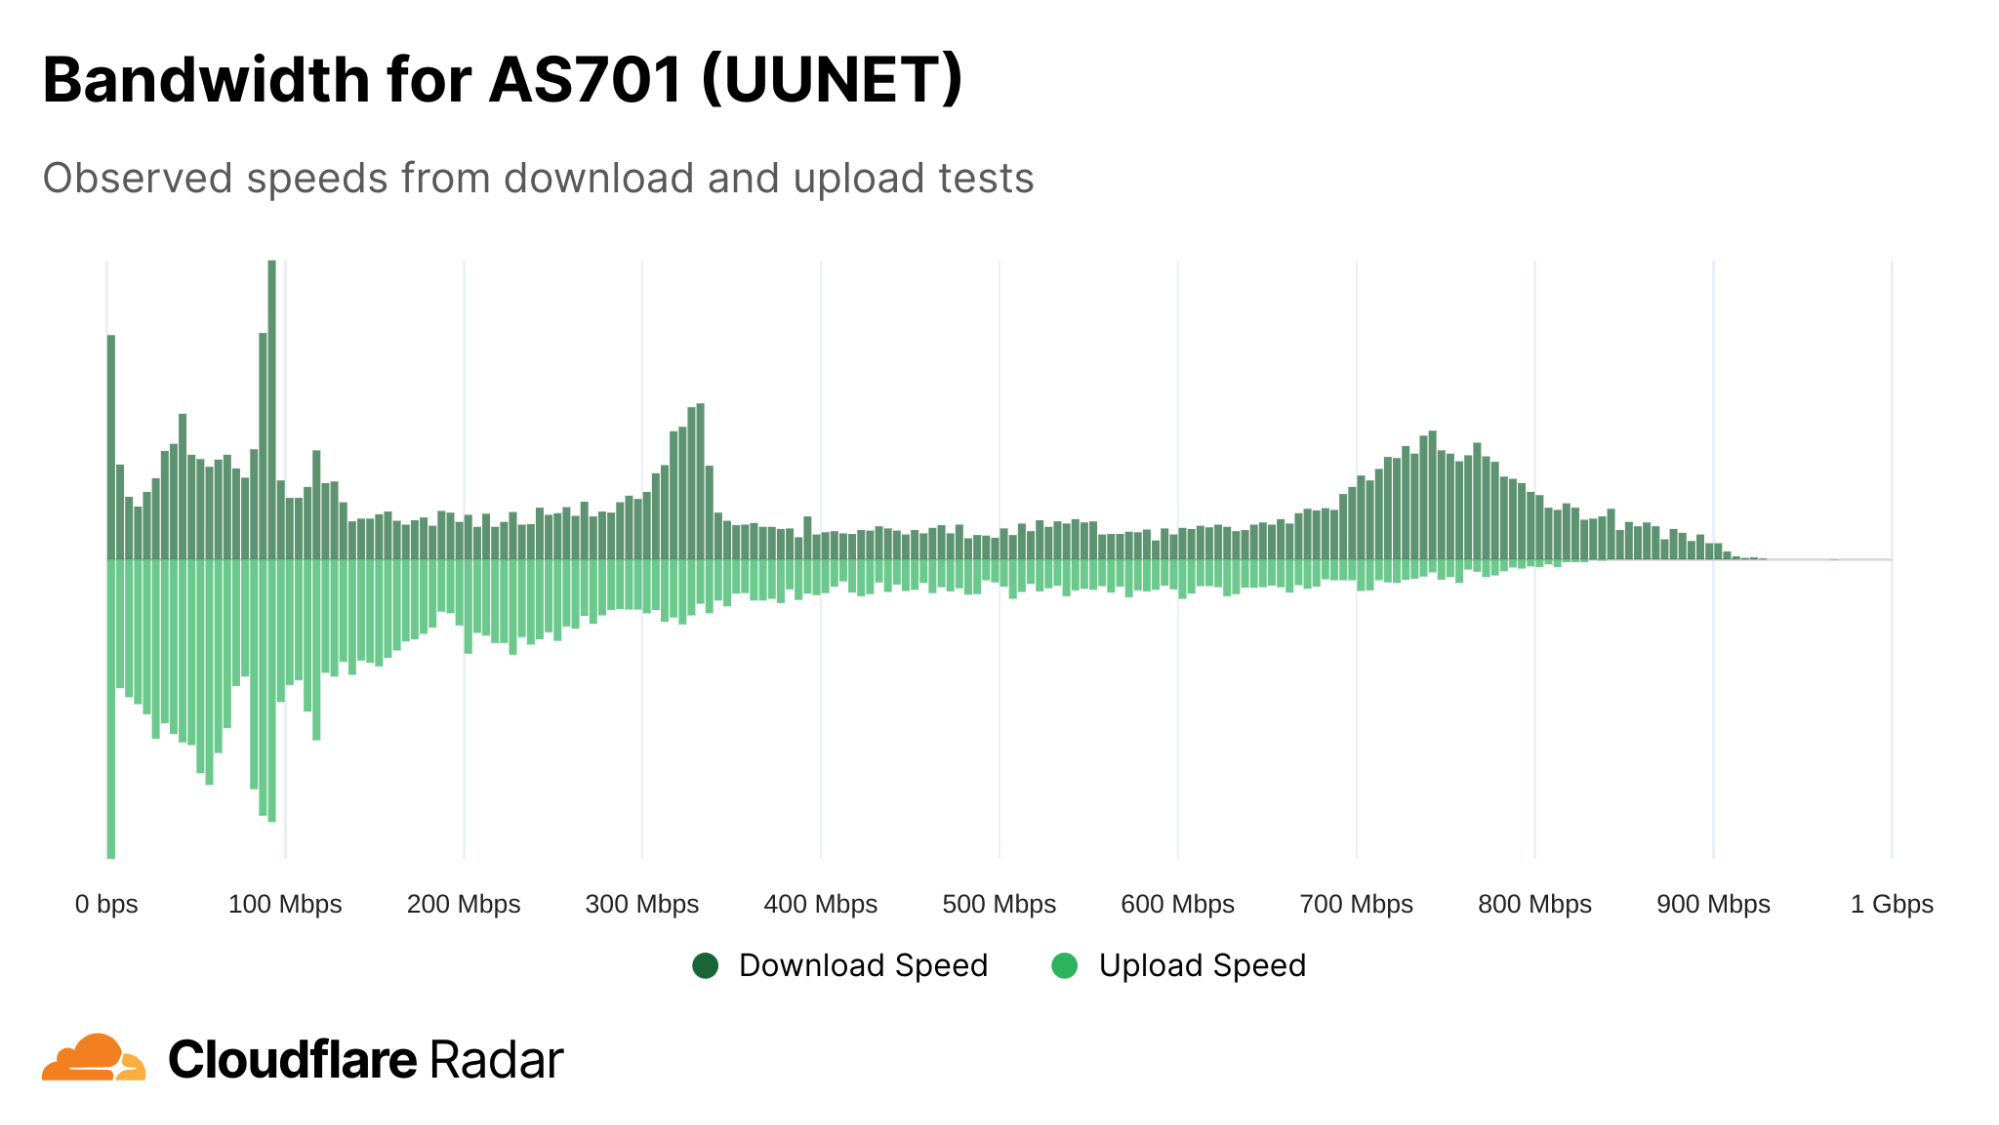

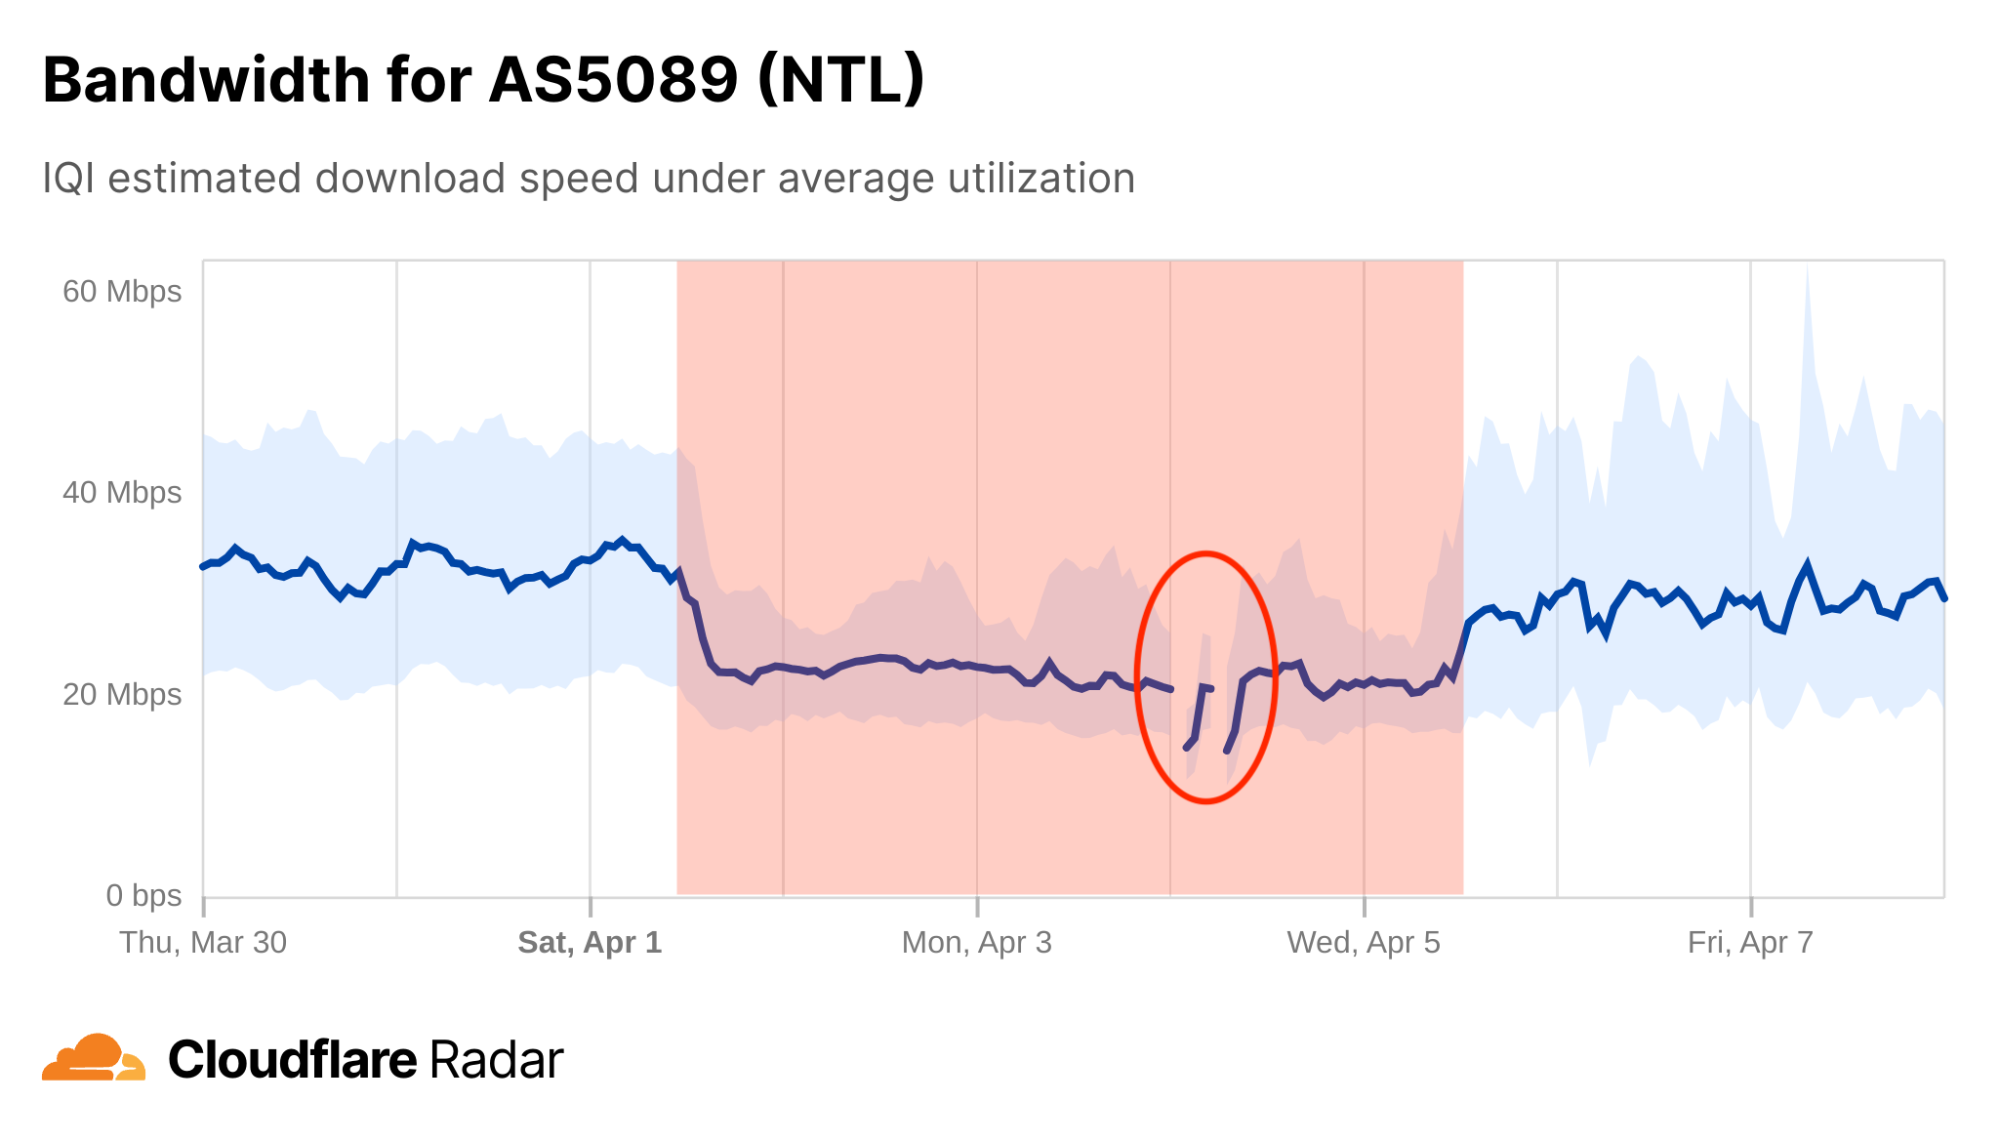

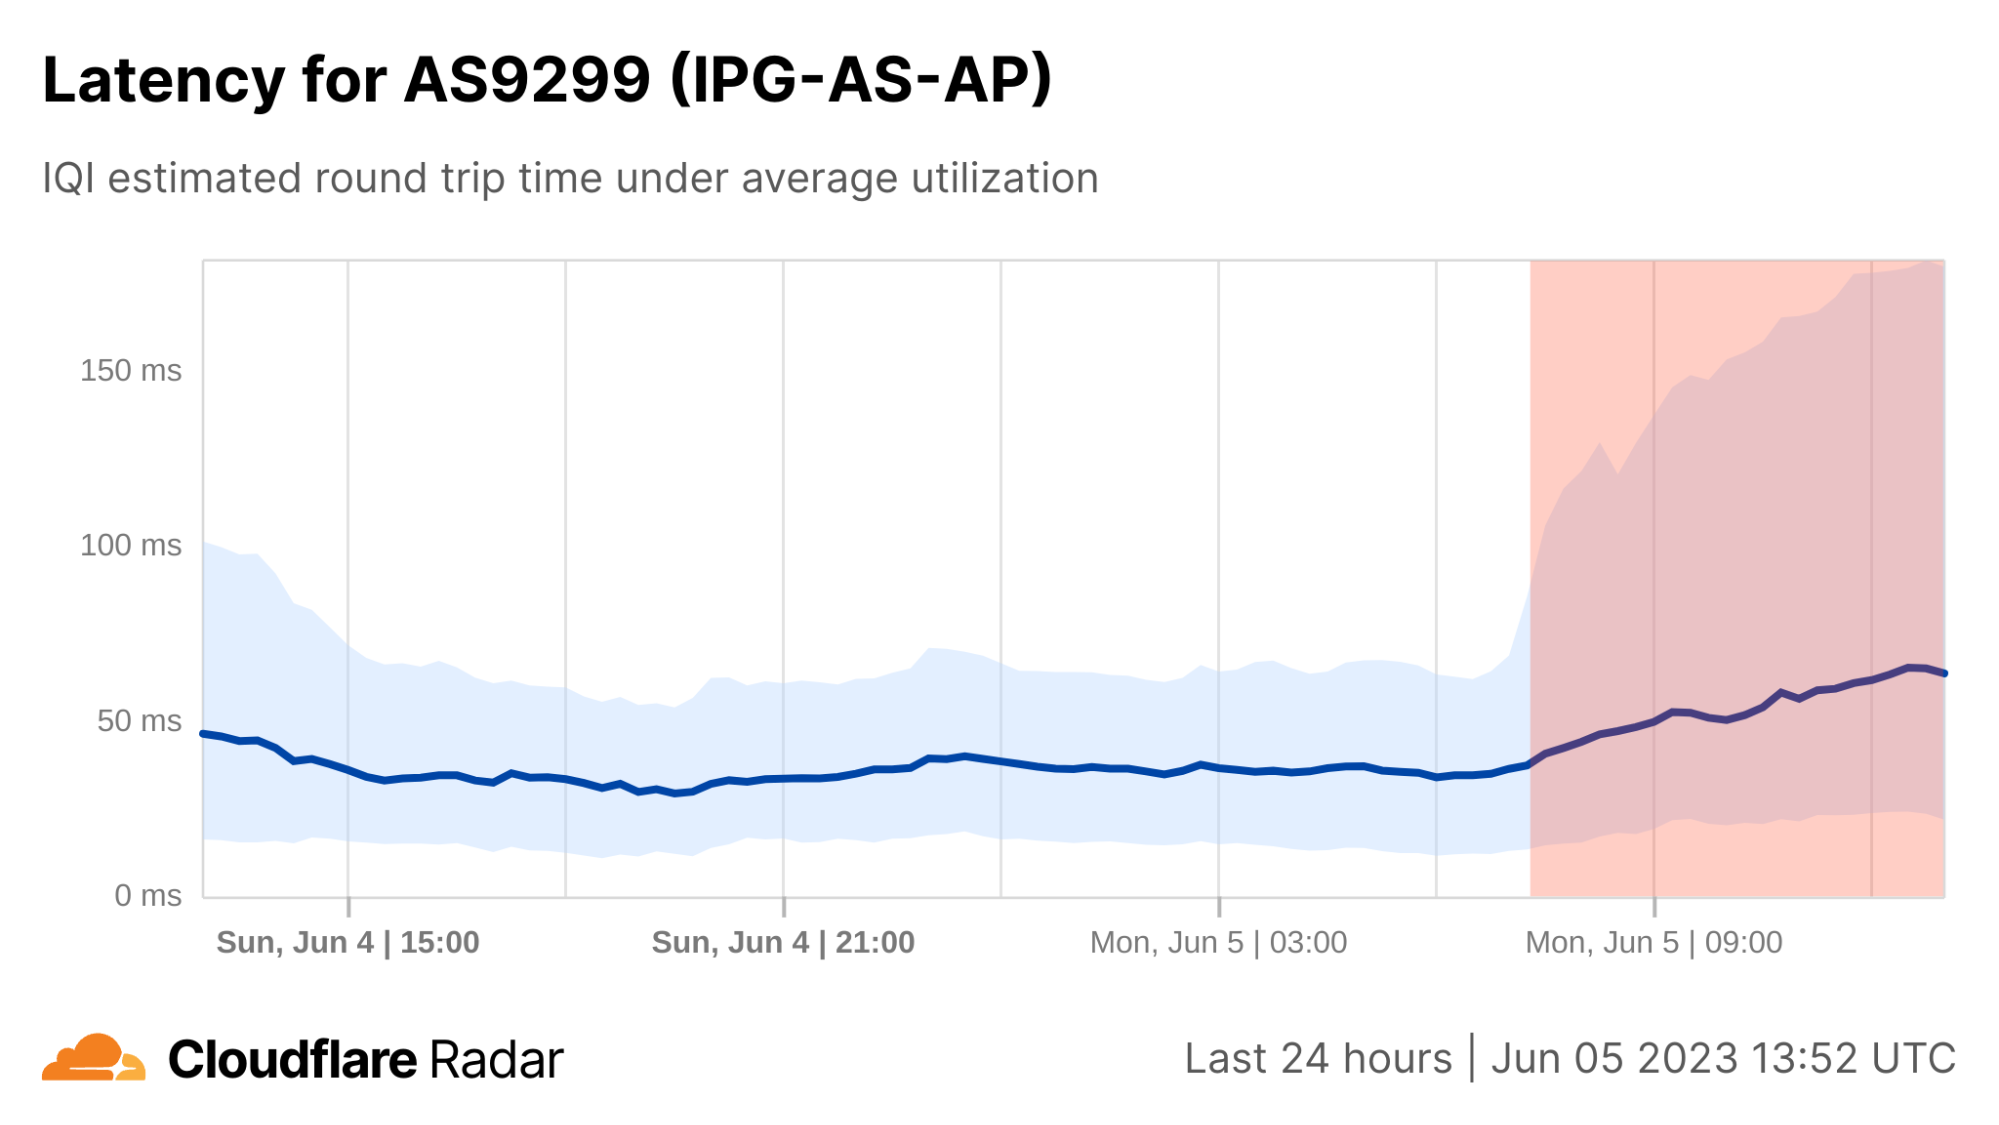

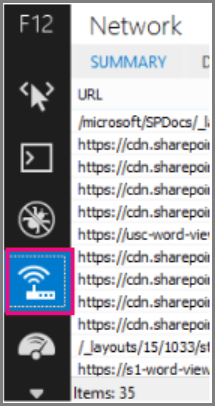


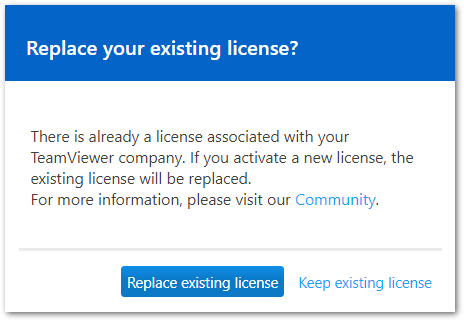


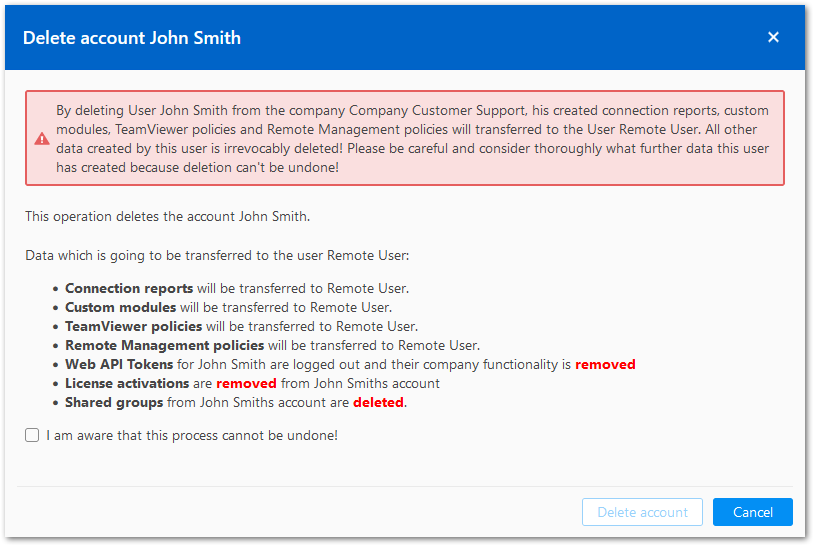


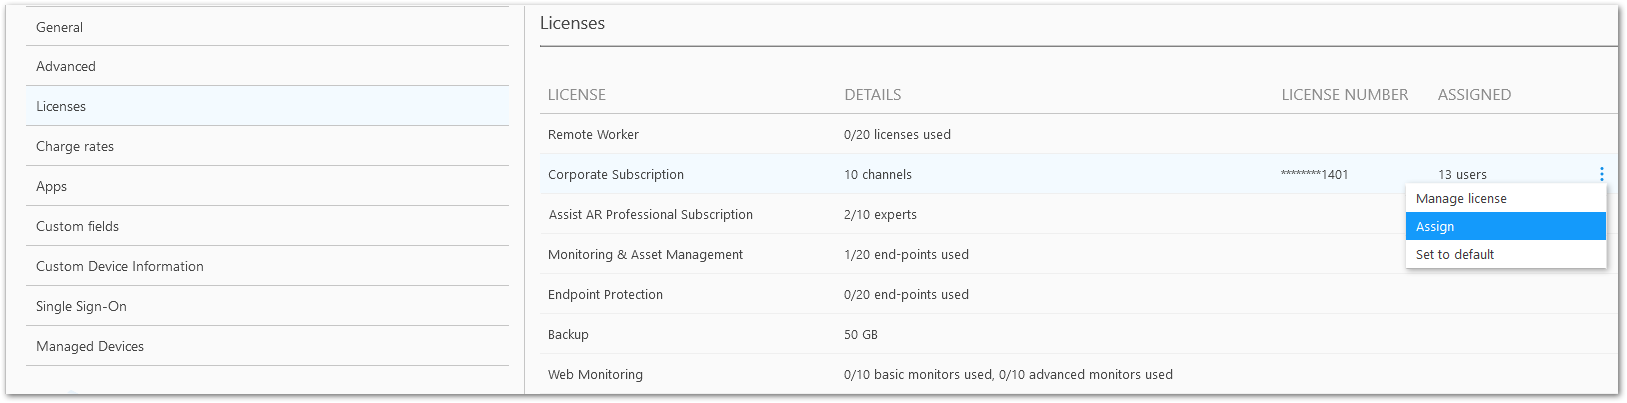


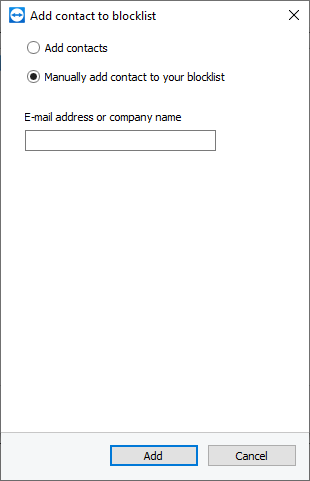
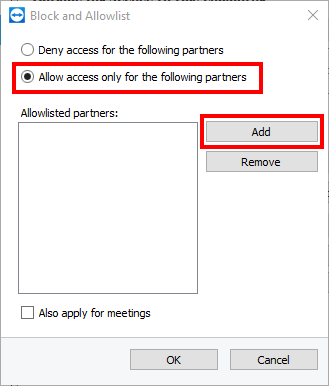

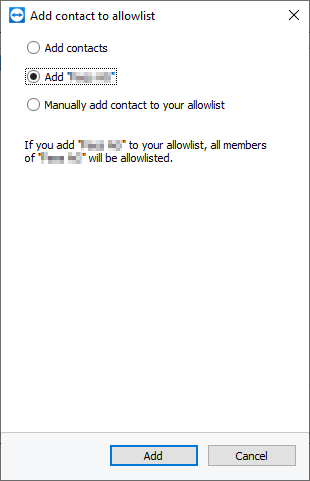
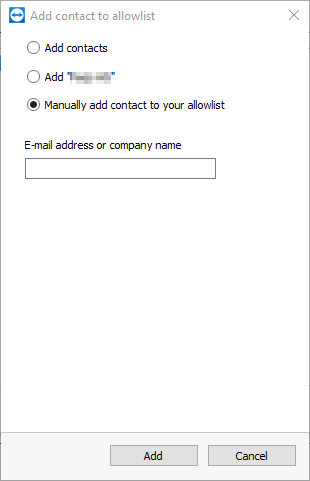
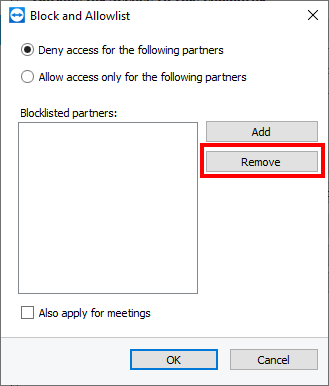


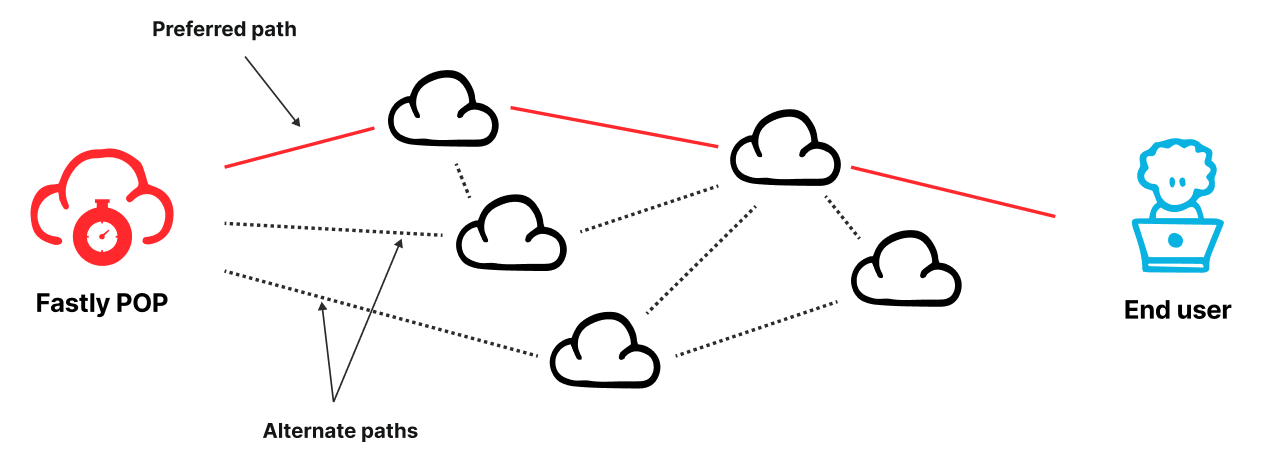
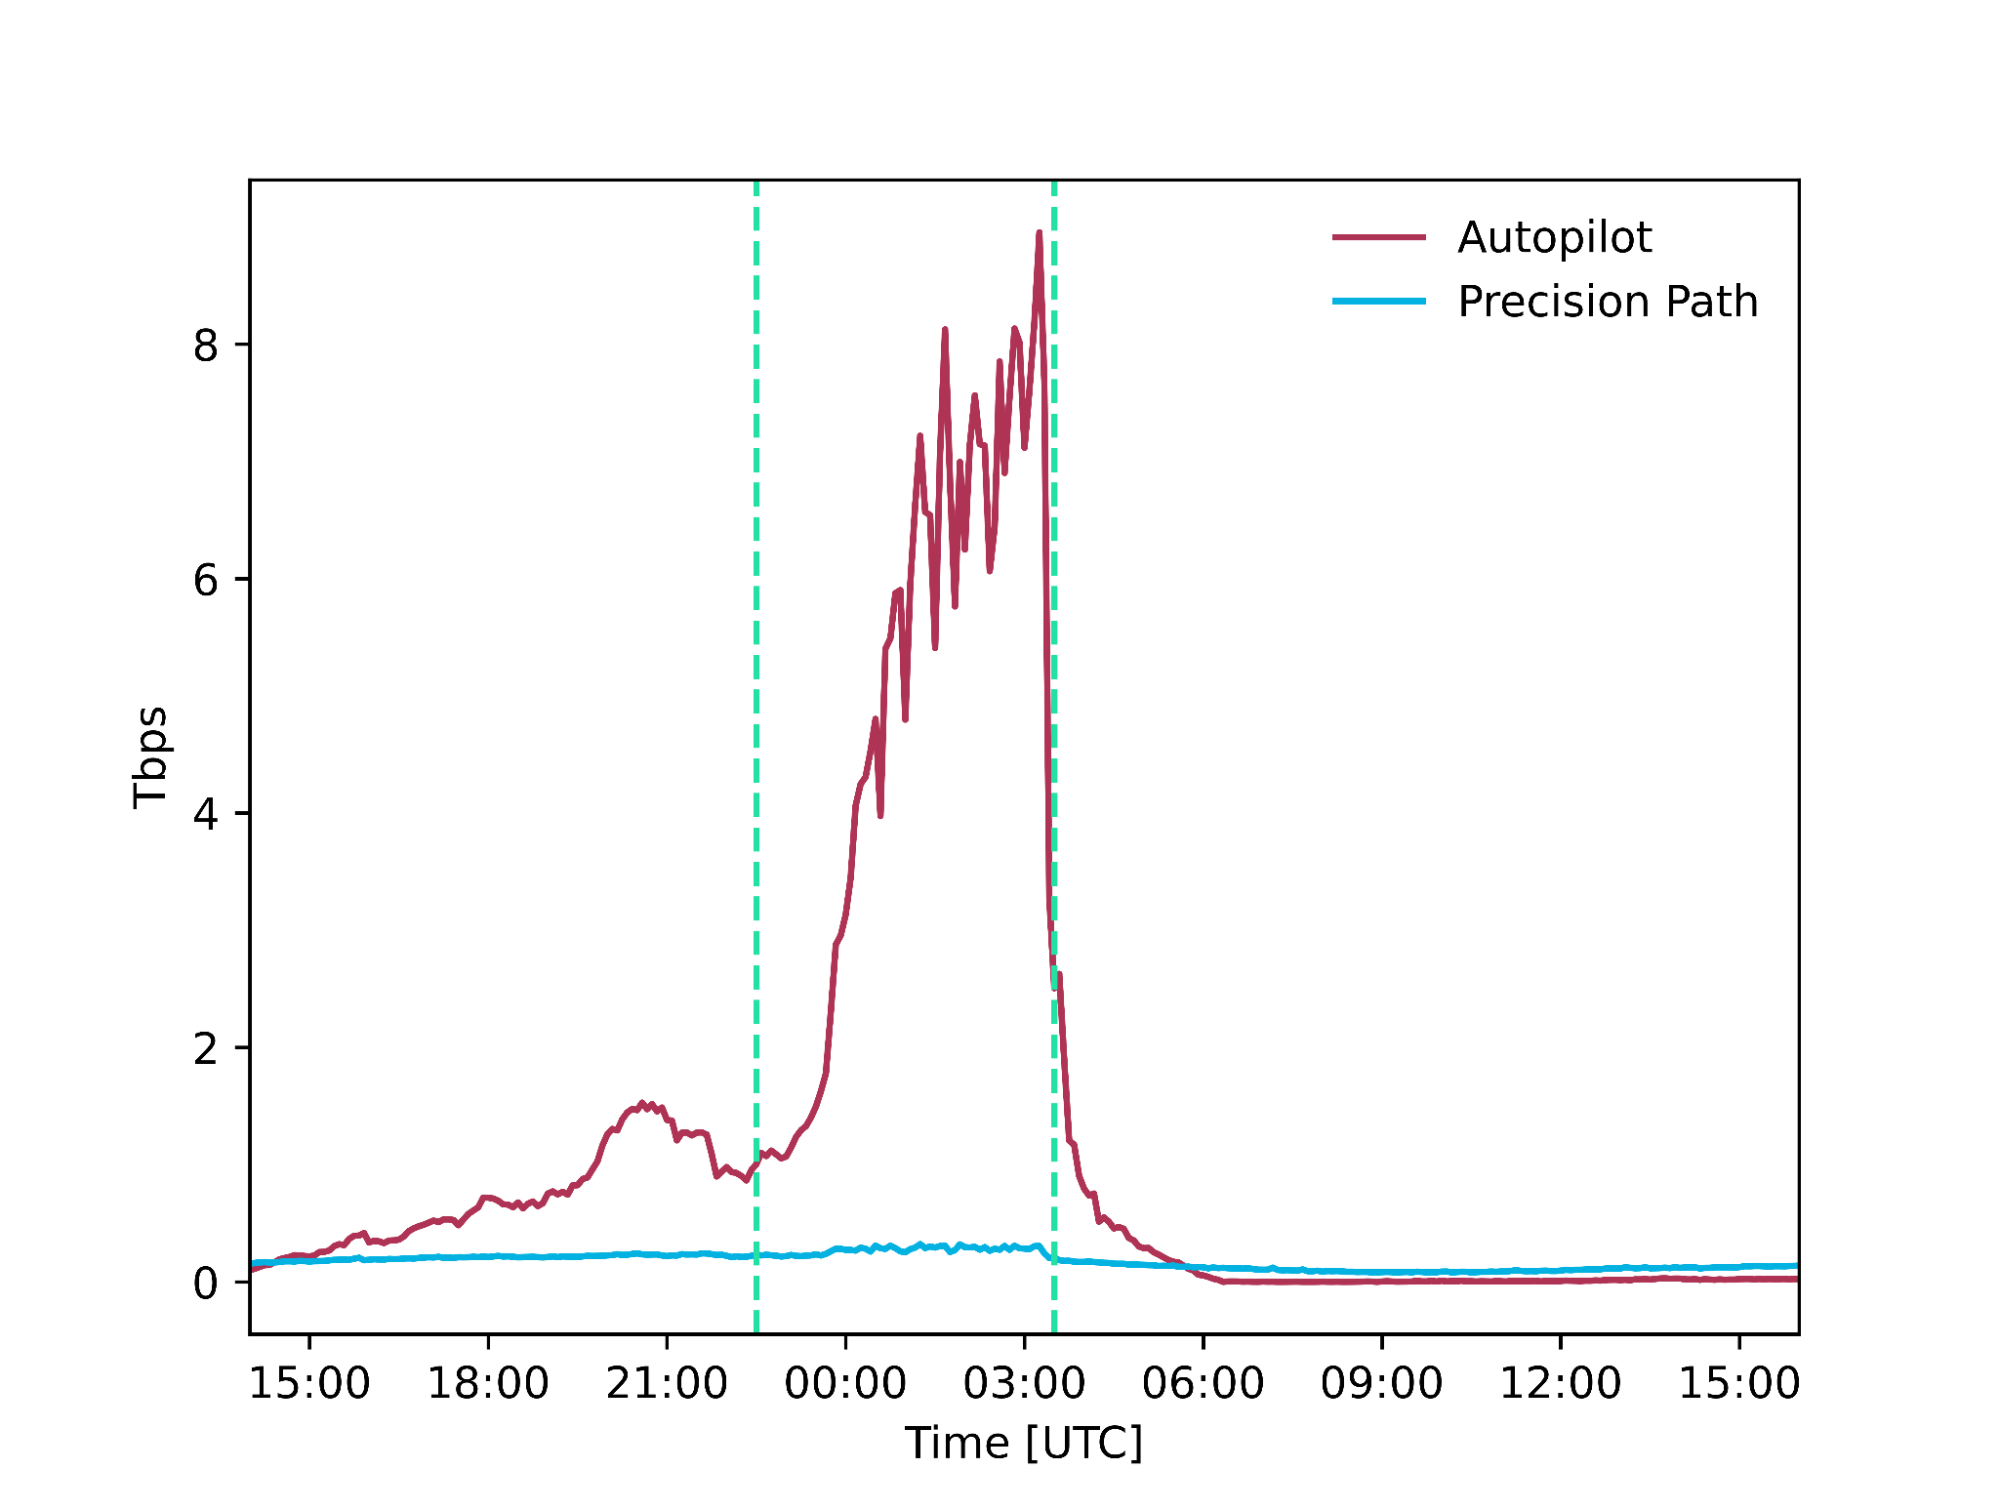
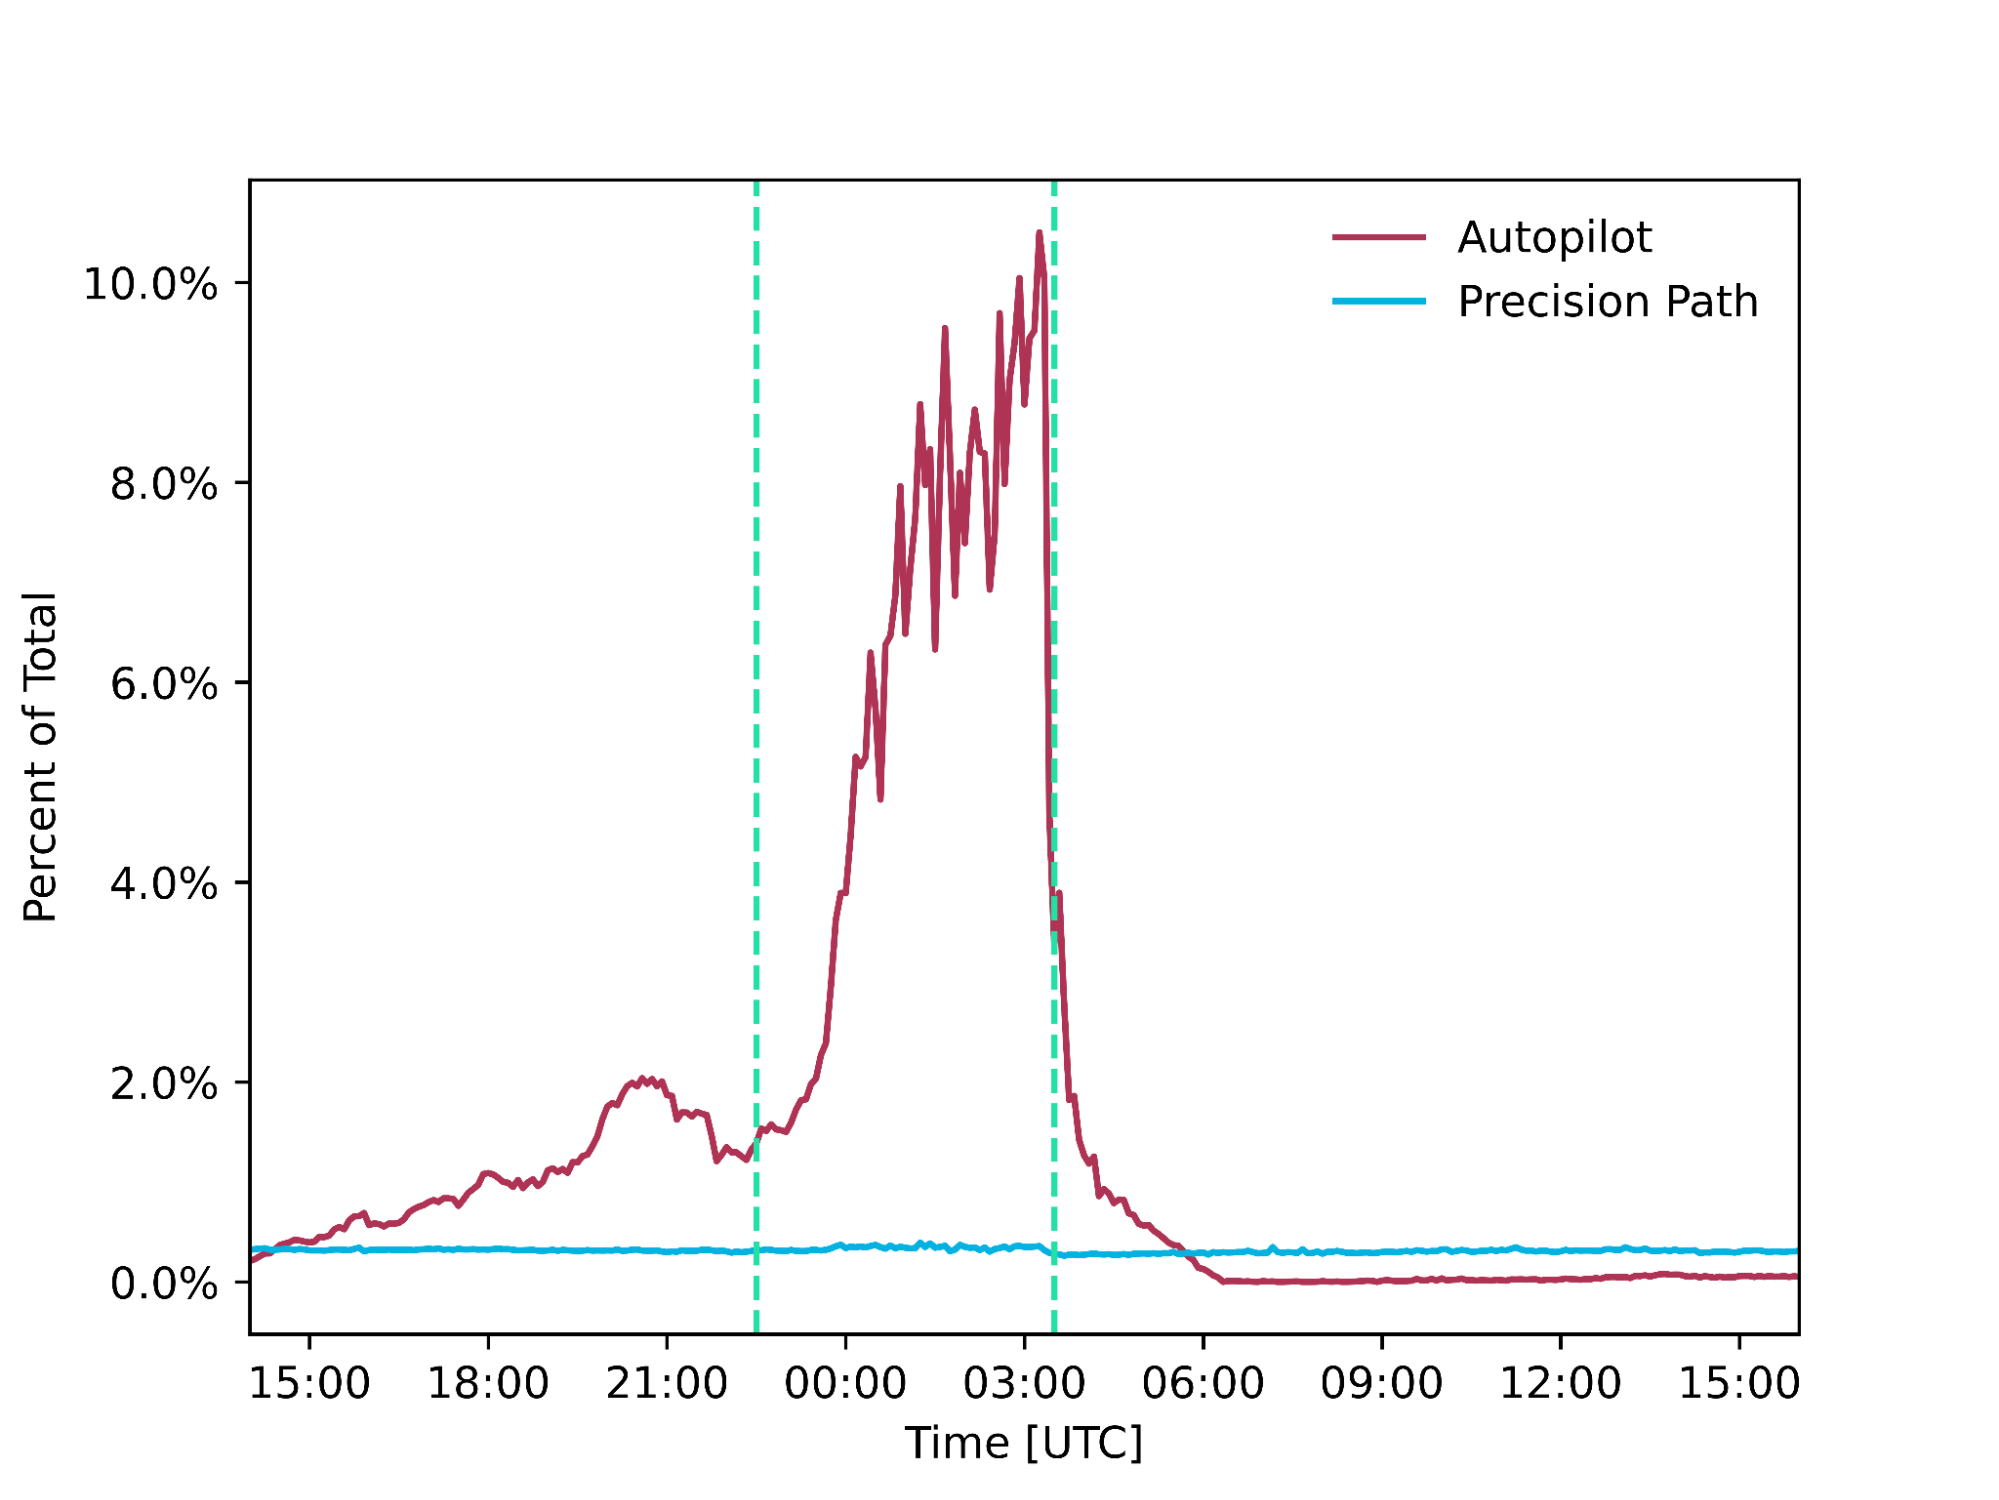
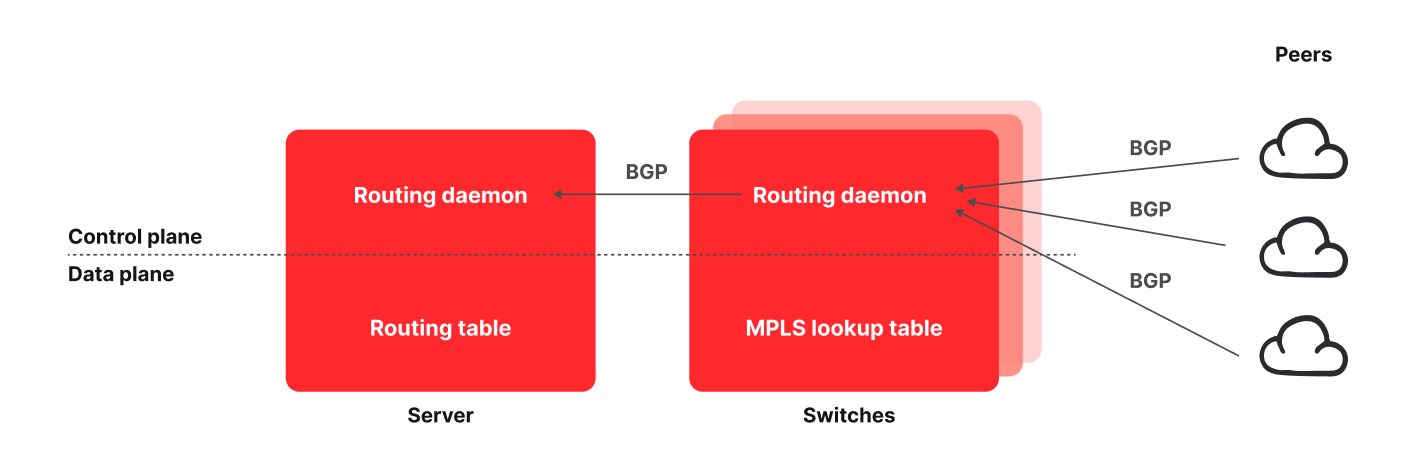
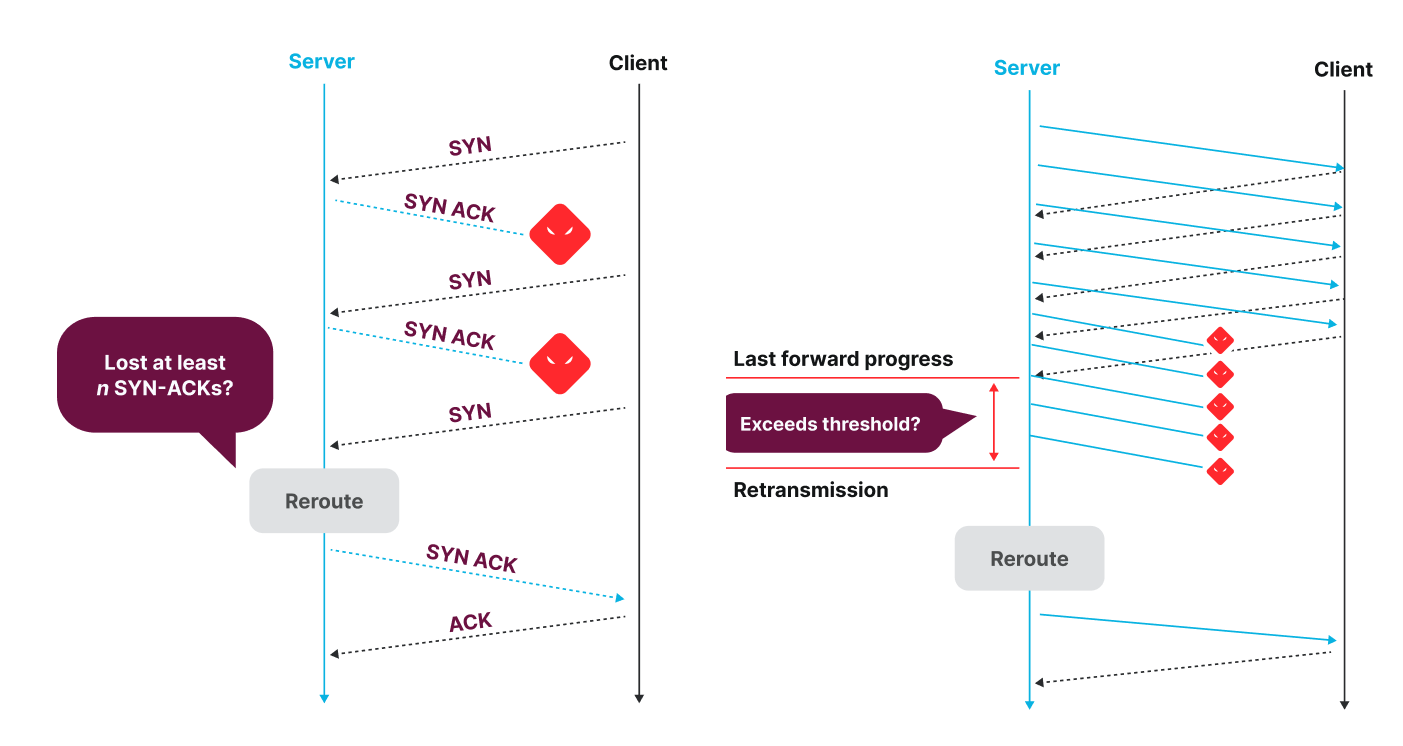
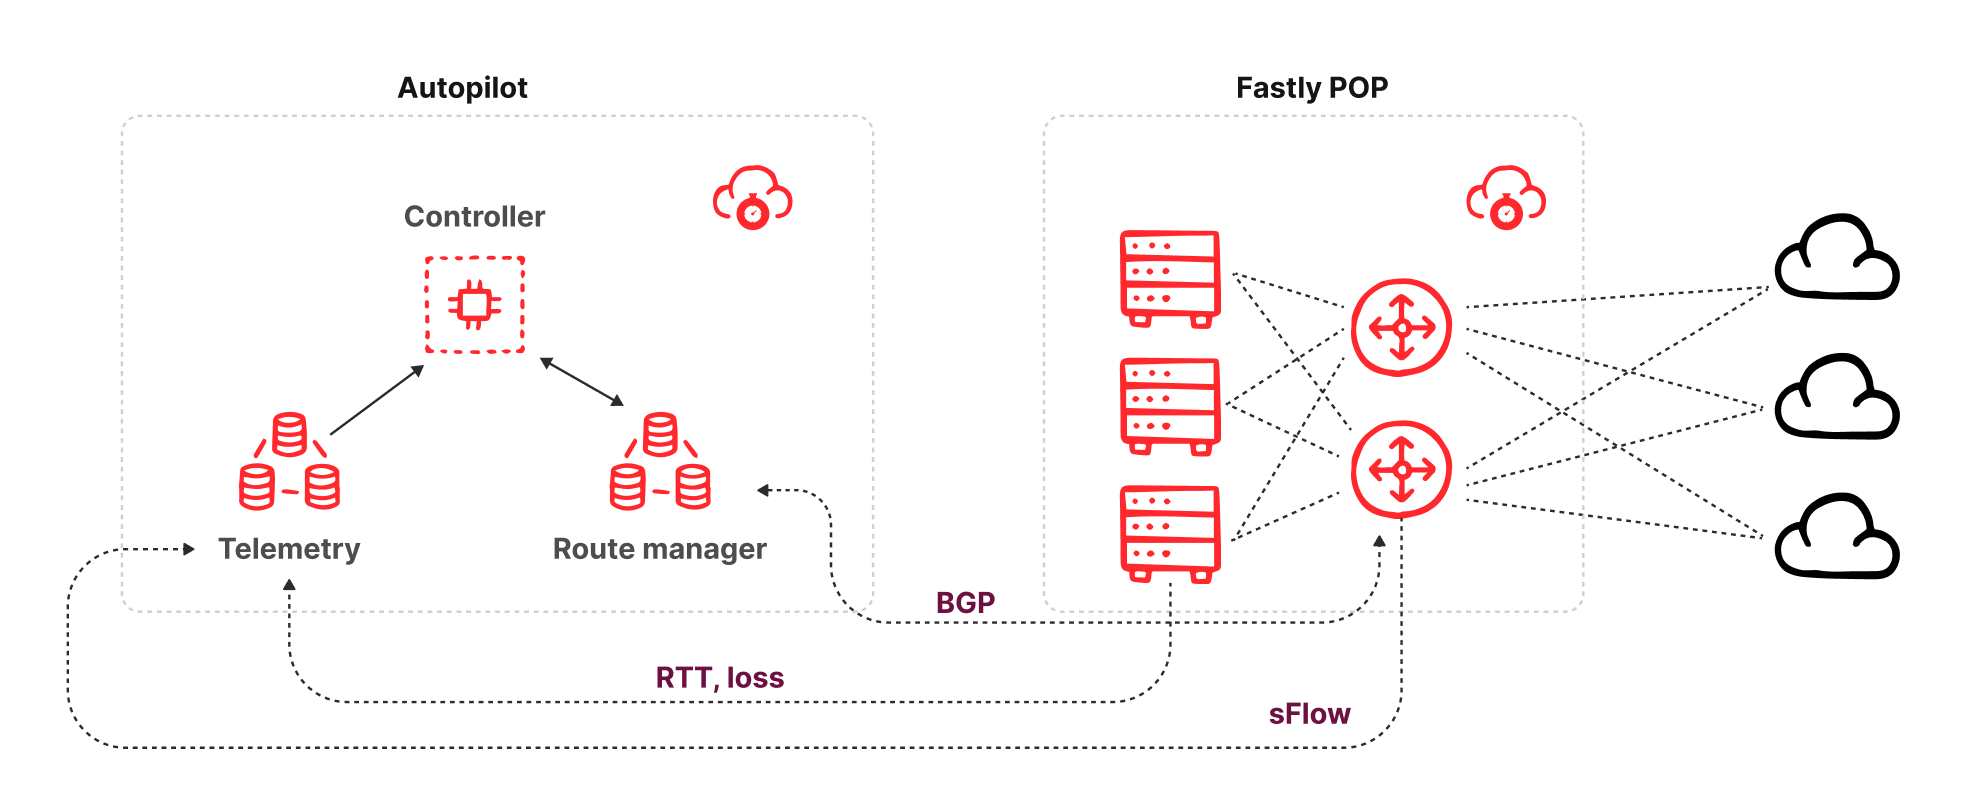
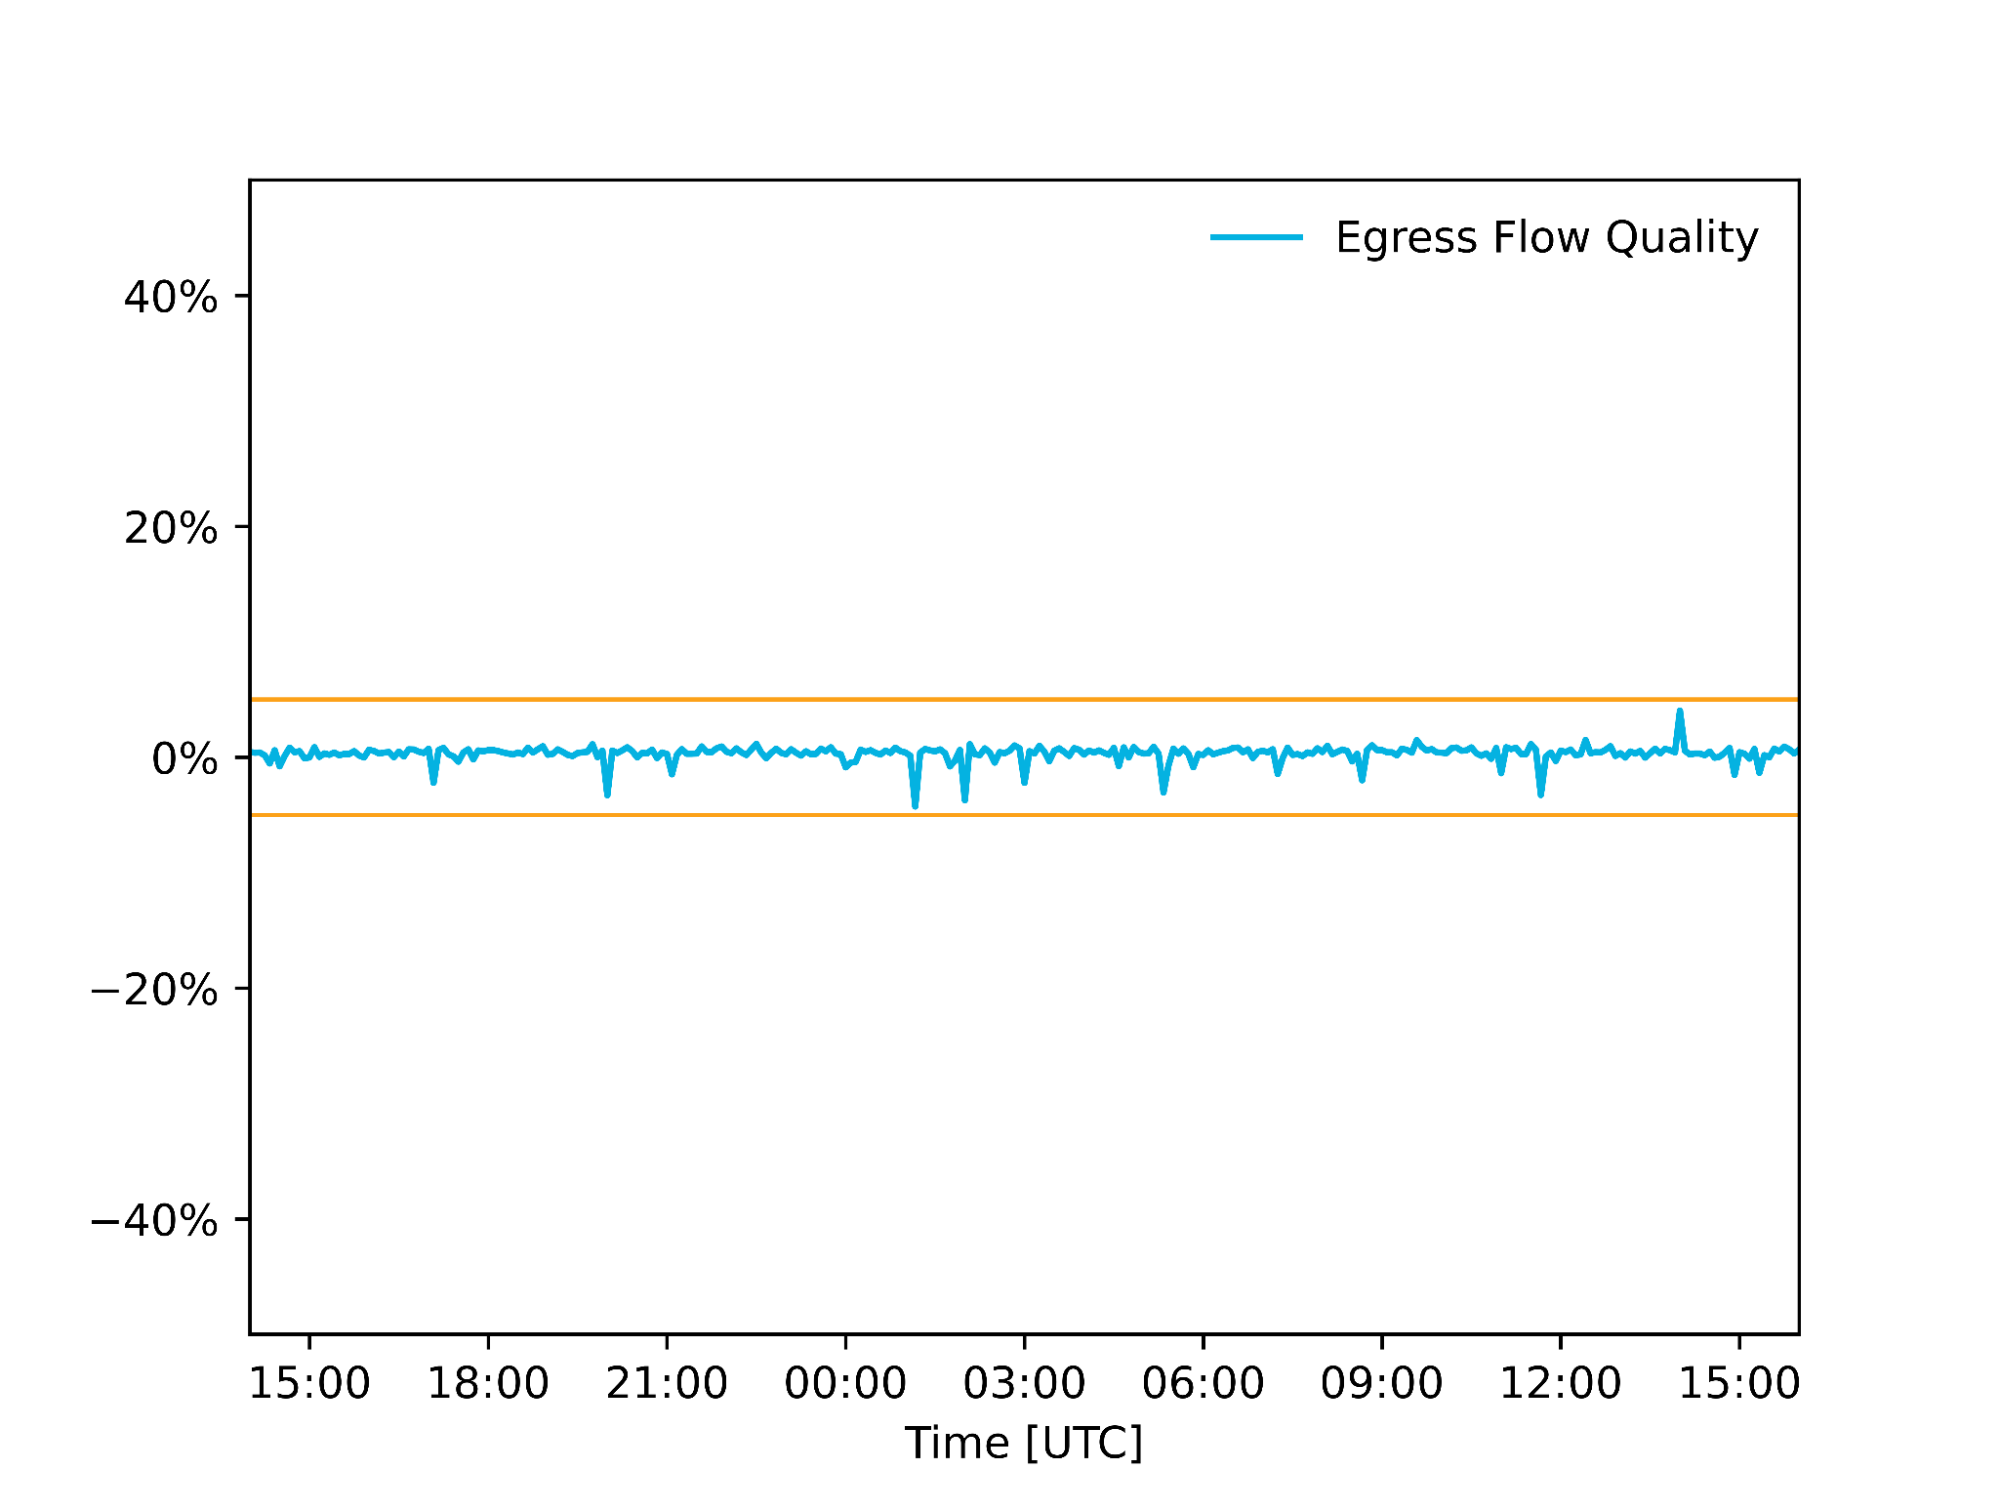