How to Allow Multiple RDP Sessions on Windows 10 and 11

June 30, 2023 

Remote users can connect to their Windows 10 and 11 computers through the Remote Desktop Services (RDP). All you need to do is enable Remote Desktop, grant the user RDP access permissions, and connect to the computer using any remote desktop client. However, the number of concurrent RDP sessions is limited in desktop versions of Windows. Only one active Remote Desktop user session is allowed.

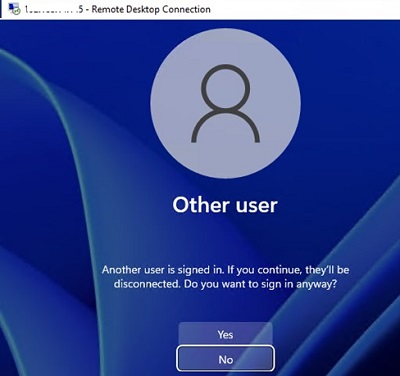
A warning will appear asking you to disconnect the first user’s session if you try to establish a second RDP connection.

Another user is signed in. If you continue, they’ll be disconnected. Do you want to sign in anyway?
windows11 dosnt allow multiple rdp - Another user is signed in. If you continue, they’ll be disconnected. Do you want to sign in anyway?

Contents:

Number of Concurrent RDP Connections on Windows

There are a number of restrictions on the use of Remote Desktop Services in all desktop versions of Windows 10 and 11:

  1. Only Windows Professional and Enterprise editions can accept remote desktop connections. RDP access is not allowed to Home/Single Language Windows editions;
  2. Only one simultaneous RDP connection is available. Attempting to start a second RDP session will prompt the user to end the active session;
  3. If the user is working at the computer console (locally), their local session is disconnected (locked) when they make a remote RDP connection. The remote RDP session will also be terminated if the user logs into Windows from the computer’s console.

The number of concurrent RDP connections on Windows is actually a license limitation. Microsoft prohibits the creation of a workstation-based Terminal RDP server for multiple users to work simultaneously.

If your tasks require the deployment of a terminal server, Microsoft suggests purchasing Windows Server (allows two simultaneous RDP connections by default). If you need more concurrent user sessions, you will need to purchase RDS CALs, install, and configure the Remote Desktop Session Host (RDSH) role or deploy an RDS farm.

Technically, any version of Windows with sufficient RAM and CPU resources can support dozens of remote user sessions simultaneously. On average, an RDP user session requires 150-200MB of memory (excluding running apps). This means that the maximum number of concurrent RDP sessions is limited only by the available resources of the computer.

In this article, we are going to show you three ways to remove the limit on the number of concurrent RDP connections in Windows 10 and 11:

  • RDP Wrapper
  • Modifying the termsrv.dll file
  • Upgrading Windows 10/11 edition to Enterprise for virtual desktops (multi-session)

Note. Any modifications to the operating system that are described in this article are considered a violation of the Windows License Agreement and may be used at your own risk.

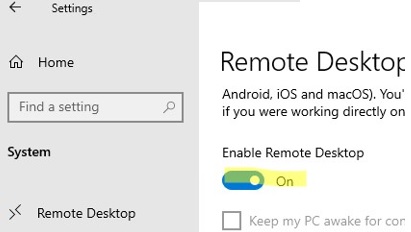
Before you proceed, make sure that the Remote Desktop protocol is enabled in Windows.

  • Go to Settings -> System —Remote Desktop -> Enable Remote Desktop;
  • Or use the classic Control Panel: run the command SystemPropertiesRemote and check the option Allow remote connection to this computer.

Find out how to enable and configure Remote Desktop on Windows.

RDP Wrapper: Enable Multiple RDP Sessions on Windows

The RDP Wrapper Library OpenSource project allows you to enable multiple RDP sessions on Windows 10/11 without replacing the termsrv.dll file. This tool acts as a layer between SCM (Service Control Manager) and the Remote Desktop Services. The RDP wrapper doesn’t make any changes to the termsrv.dll file, it simply loads the termsrv with the modified settings.

Thus, the RDPWrap will work even in the case of termsrv.dll file update. It allows you not to be afraid of Windows updates.

Important. Before installing the RDP Wrapper, it is important to make that you are using the original (unpatched) version of the termsrv.dll file. Otherwise, RDP Wrapper may become unstable or not start at all.

You can download the RDP Wrapper from the GitHub repository https://github.com/binarymaster/rdpwrap/releases (the latest available version of the RDP Wrapper Library is v1.6.2). The project hasn’t been updated since 2017, but it can be used in all new builds of Windows 10 and 11. To use the wrapper on modern versions of Windows, simply update the rdpwrap.ini configuration file.

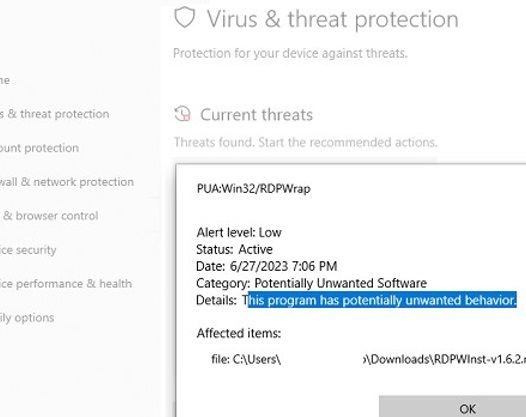
RDP Wrapper is detected as a potentially dangerous program by most antivirus scanners.  For example, it is classified as PUA:Win32/RDPWrap (Potentially Unwanted Software) with a low threat level by the built-in Microsoft Defender antivirus. If your antivirus settings are blocking the RDP Wrapper from starting, you will need to add it to the exceptions.

rdpwrap detected as potentially unwanted software

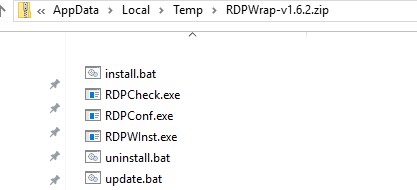
The RDPWrap-v1.6.2.zip archive contains some files:

  • RDPWinst.exe — used to install/uninstall an RDP wrapper library;
  • RDPConf.exe — RDP Wrapper configuration tool;
  • RDPCheck.exe —an RDP check tool (Local RDP Checker);
  • install.bat, uninstall.bat, update.bat — batch files to install, uninstall, and update RDP Wrapper.
RDPWrap-v1.6.2 install files

To install RDPWrap, run the install.bat file as an administrator. The program is installed in the C:\Program Files\RDP Wrapper directory.

installing install RDP Wrapper Library in windows 10

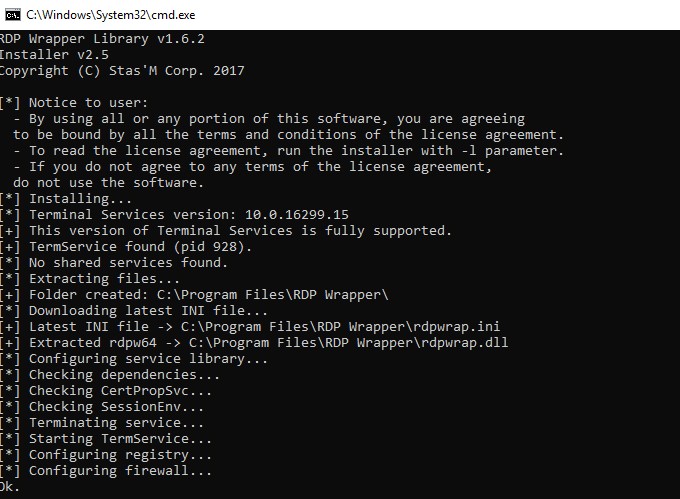
Run RDPConfig.exe when the installation is complete.

windows 10: rdp wrapper not supported issue

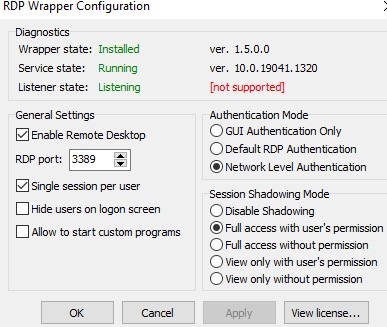
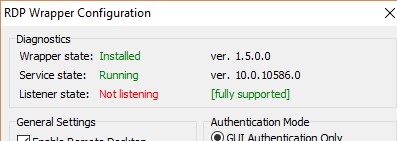
Most likely, immediately after installation, the tool will show that the RDP wrapper is running (Installed, Running, Listening), but not working. Note the red [not supported] warning. It reports that this version of Windows 10 22H2 (ver. 10.0.19041.1949) is not supported by the RDPWrapper.

This is because the rdpwrap.ini configuration file does not contain settings for your Windows version (build). +

✅ Download the latest version of rdpwrap.ini here https://raw.githubusercontent.com/sebaxakerhtc/rdpwrap.ini/master/rdpwrap.ini

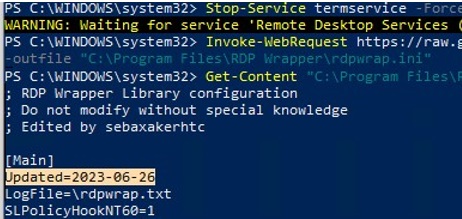
Manually copy the contents of this page into the C:\Program Files\RDP Wrapper\rdpwrap.ini file. Or download the INI file using the PowerShell cmdlet Invoke-WebRequest (you must first stop the Remote Desktop service):

Stop-Service termservice -Force
Invoke-WebRequest https://raw.githubusercontent.com/sebaxakerhtc/rdpwrap.ini/master/rdpwrap.ini -outfile "C:\Program Files\RDP Wrapper\rdpwrap.ini"

update rdpwrap.ini file

You can create a scheduled task to check for changes to rdpwrap.ini and update it automatically.

This screenshot shows that the latest version of the rdpwrap.ini file (Updated=2023-06-26) is used on the computer.

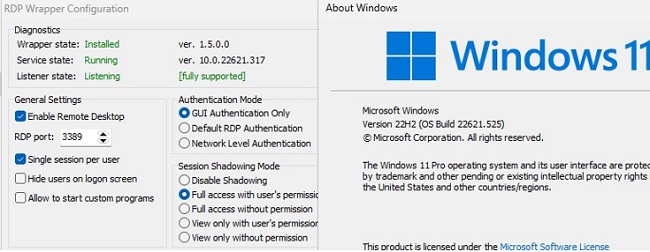
Restart your computer and run the RDPConfig.exe tool. Check that all items in the Diagnostics section are green and that the [Fully supported] message is displayed. The RDP wrapper started successfully on Windows 11 22H2 in my case.

rdpwrapper on windows11

Now try to establish several concurrent RDP sessions with this computer under different user accounts (use your favorite RDP client: mstsc.exe, RDCMan, mRemoteNG, etc).

You can use saved RDP credentials to connect to a remote computer.

You can check that two (or more) RDP sessions are active on the computer at the same time by using the command:

qwinsta

rdp-tcp#0         user1                 1  Active
rdp-tcp#1         user2                 2  Active
qwinsta: list active rdp sessions
multiple RDP sessions on Windows 10

The RDPWrap tool is supported in all Windows editions, so you can build your own terminal (RDS) server on any Windows device. So you can turn any version of Windows client into a full-featured terminal server.

The following options are available in the RDP Wrapper:

You can set limits on the duration of RDP user sessions using the Group Policy. This allows idle user sessions to be automatically disconnected.

RDP Wrapper Not Working on Windows

In some cases, the RDP Wrapper may not work as you expect it to and you may not be able to use more than one RDP connection on Windows.

The termsrv.dll file version can be updated during Windows Updates installation. If the description for your version of Windows is missing from the rdpwrap.ini file, then the RDP Wrapper will not be able to apply the necessary settings. In this case, the status [not supported]. will be displayed in the RDP Wrapper Configuration window.

✅ In this case, you must update the rdpwrap.ini file as described above.

If RDP Wrapper does not work after updating the rdpwrap.ini file, try to open the rdpwrap.ini file and look for the section for your version of Windows.

How to understand if your Windows version is supported in rdpwrapper config?

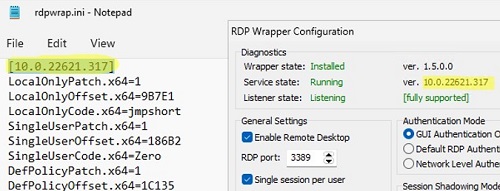
The screenshot below shows that for my version of Windows 11 (10.0.22621.317) there are two sections of settings:

[10.0.22621.317]
...
[10.0.22621.317-SLInit]
...
update rdpwrap.ini after installing windows updates

If there is no section in the rdpwrap configuration file for your version of Windows, try searching the web for the rdpwrap.ini file. Add the configuration settings you found to the end of the file.

If RDP Wrapper does not work after you install security updates or upgrade the Windows build, check that there is no Listener state: Not listening warning in the RDPWrap Diagnostics section.

rdp wrapper not listening

Try updating the rdpwrap.ini file, and then reinstalling the rdpwrapper service:

rdpwinst.exe -u
rdpwinst.exe -i

It can happen that when you try to make a second RDP connection as a different user, you will get an error message:

The number of connections to this computer is limited and all connections are in use right now. Try connecting later or contact your system administrator.
Windows 10 RDP warning:The number of connections to this computer is limited and all connections are in use right now

In this case, you can use the local Group Policy Editor (gpedit.msc) to enable the “Limit number of connections” option under Computer Configuration -> Administrative Templates -> Windows Components -> Remote Desktop Services -> Remote Desktop Session Host -> Connections section. Increase the ‘RD maximum connection allowed’ value to 999999.

group policy: Limit the number of rdp connections

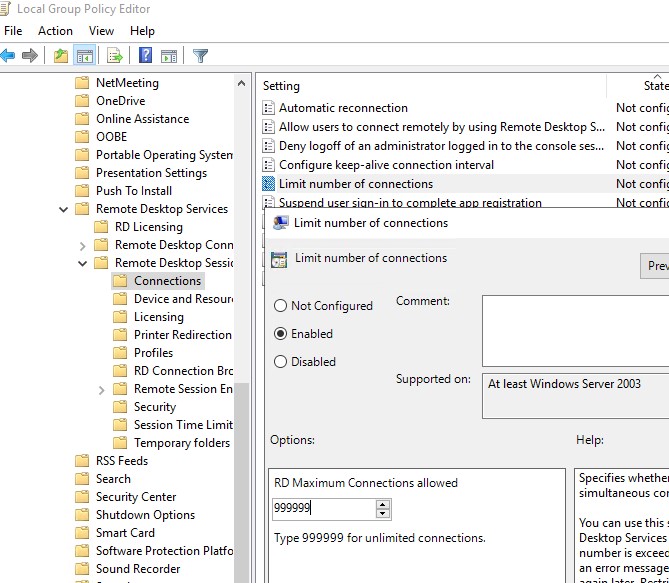
Restart your computer to update the local Group Policy and apply the settings.

Patch the Termsrv.dll to Enable Multiple Remote Desktop Sessions

To remove the limit on the number of concurrent RDP user connections in Windows without using rdpwrapper, you can replace the original termsrv.dll file. This is the main library file used by the Remote Desktop Service. The file is located in the C:\Windows\System32 directory.

It is advisable to make a backup copy of the termsrv.dll file before editing or replacing it. This will help you to revert to the original version of the file if necessary. Open an elevated command prompt and run the command:

copy c:\Windows\System32\termsrv.dll termsrv.dll_backup

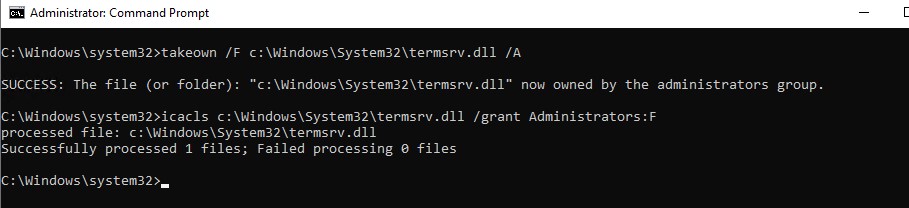
Then you need to take ownership of the termsrv.dll file. To change a file’s owner from TrustedInstaller to the local Administrators group, use the command:

takeown /F c:\Windows\System32\termsrv.dll /A

SUCCESS: The file (or folder): c:\Windows\System32\termsrv.dll now owned by the administrators group

Now use the icacls.exe tool to grant Full Control permissions to the termsrv.dll file for the local Administrators group:

icacls c:\Windows\System32\termsrv.dll /grant Administrators:F

processed file: c:\Windows\System32\termsrv.dll Successfully processed 1 files; Failed processing 0 files.
termsrv.dll takeown and grant access permissions

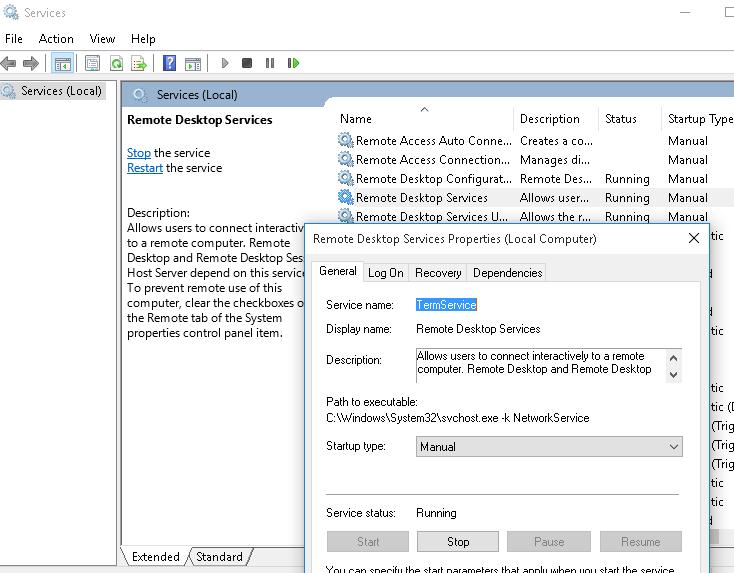
Now you need to stop the Remote Desktop service (TermService) using the services.msc console or with the command:

net stop TermService

It also stops the Remote Desktop Services UserMode Port Redirector service.

Stop TermService

Run the winver command or the following PowerShell command to find your Windows build number:

Get-ComputerInfo | select WindowsProductName, WindowsVersion

In my case, Windows 10 build 22H2 is installed.

Then open the termsrv.dll file using any HEX editor (for example, Tiny Hexer). Depending on the build of Windows you are using, you will need to find and replace the string according to the table below:

Windows buildFind the stringReplace with
Windows 11 22H239 81 3C 06 00 00 0F 84 75 7A 01 00    B8 00 01 00 00 89 81 38 06 00 00 90 
Windows 10 22H239 81 3C 06 00 00 0F 84 85 45 01 00
Windows 11 21H2 (RTM)39 81 3C 06 00 00 0F 84 4F 68 01 00
Windows 10 x64 21H239 81 3C 06 00 00 0F 84 DB 61 01 00
Windows 10 x64 21H139 81 3C 06 00 00 0F 84 2B 5F 01 00
Windows 10 x64 20H239 81 3C 06 00 00 0F 84 21 68 01 00
Windows 10 x64 200439 81 3C 06 00 00 0F 84 D9 51 01 00
Windows 10 x64 190939 81 3C 06 00 00 0F 84 5D 61 01 00
Windows 10 x64 190339 81 3C 06 00 00 0F 84 5D 61 01 00
Windows 10 x64 180939 81 3C 06 00 00 0F 84 3B 2B 01 00 
Windows 10 x64 18038B 99 3C 06 00 00 8B B9 38 06 00 00 
Windows 10 x64 170939 81 3C 06 00 00 0F 84 B1 7D 02 00 

Tiny Hexer cannot edit termsvr.dll file directly from the system32 folder. Copy it to your desktop and replace the original file after modifying it.

For example, my build of Windows 10 x64 is 22H2 19045.2006 (termsrv.dll file version is 10.0.19041.1949). Open the termsrv.dll file in Tiny Hexer, then find the text:

39 81 3C 06 00 00 0F 84 75 7A 01 00

and replace it with:

B8 00 01 00 00 89 81 38 06 00 00 90

Tiny Hexer Editor

Save the file and start the TermService.

If something goes wrong and you experience some problems with the Remote Desktop service, stop the service and replace the modified termsrv.dll file with the original version:

copy termsrv.dll_backup c:\Windows\System32\termsrv.dll

To avoid manually editing the termsrv.dll file with a HEX editor, you can use the following PowerShell script to automatically patch the termsrv.dll file. The PowerShell script code is available in my GitHub repository at the following link:

https://github.com/maxbakhub/winposh/blob/main/termsrv_rdp_patch.ps1

This script was written for the Windows PowerShell version and does not work in modern PowerShell Core.

👍 The advantage of the method of enabling multiple RDP sessions in Windows 10 or 11 by replacing the termsrv.dll file is that antivirus software will not react to it (unlike RDPWrap, which is detected by many antivirus products as a malware/hack tool/trojan).

👎The disadvantage of this is that you will have to manually edit the file each time you update the Windows build (or if the monthly cumulative patches update the version of termsrv.dll).

Multiple Concurrent RDP Connections in Windows 10 Enterprise Multi-session

Microsoft has recently released a special edition of the operating system called Windows Enterprise Multi-Session (Previously known as Windows 10 Enterprise for Remote Sessions and Windows 10 Enterprise for Virtual Desktops)

The key feature of this edition is that it supports multiple concurrent RDP user sessions out of the box. Although the Windows multi-session edition is only allowed to be run in Azure VMs, you can install this edition on an on-premises network and use that computer as a terminal server (even though this would be against Microsoft’s licensing policies).

The Enterprise Multi-Session edition is available for both Windows 10 and Windows 11.

Next up, we’re going to show you how to upgrade a Windows 10 Pro edition to Windows 10 Enterprise for Virtual Desktop and use it for multiple RDP users simultaneously.

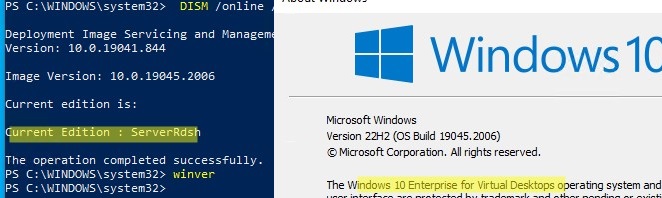
Open a command prompt and check your current edition of Windows (Professional in this example):

DISM /online /Get-CurrentEdition

dism: check windows edition

Upgrade your edition of Windows 10 from Pro to Enterprise with the command:

changepk.exe /ProductKey NPPR9-FWDCX-D2C8J-H872K-2YT43

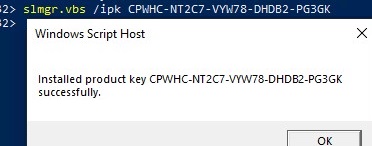
Now install the GVLK key for Windows 10 Enterprise for Remote Sessions:

slmgr.vbs /ipk CPWHC-NT2C7-VYW78-DHDB2-PG3GK

upgrade windows pro to enterprise multi-session

Check that your edition of Windows 10 has now changed to ServerRdsh (Windows 10 Enterprise for Virtual Desktops).

windows 10 enterprise for virtual desktops

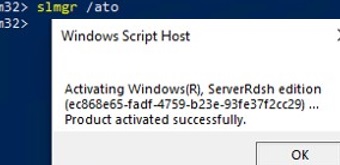
Activate your copy of Windows 10 Enterprise Multi-Session edition on your KMS server:

slmgr /skms kms-srv.woshub.local:1688
slmgr /ato

active windows 10 enterprise on kms

See the Key Management Service (KMS) Activation FAQ.

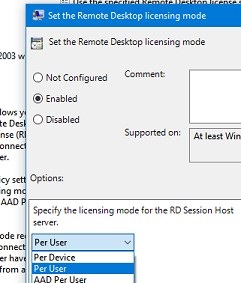
Open the Local GPO Editor (gpedit.msc) and enable Per-User licensing mode in the Set the Remote Desktop licensing mode  (Computer Configuration -> Policies -> Administrative Templates -> Windows Components -> Remote Desktop Services -> Remote Desktop Session Host -> Licensing).

GPO: set per-user remote desktop license mode

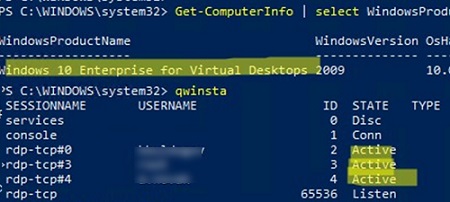
You must restart Windows after activation. Now try connecting to the computer using RDP with different user accounts. As you can see, Windows 10 Enterprise multi-session supports simultaneous RDP connections right out of the box.

Get-ComputerInfo | select WindowsProductName, WindowsVersion, OsHardwareAbstractionLayer

Windows 10 Enterprise for Virtual Desktops 2009           10.0.19041.2728

qwinsta

multiple rdp connections on windows 10 enterprise multisession

In this article, we have looked at a number of ways to get rid of the limit on the number of concurrent RDP user connections and run a free terminal server on desktop versions of Windows 10/11. Each method has its own advantages and disadvantages. Which one you choose is up to you.

Source :
https://woshub.com/how-to-allow-multiple-rdp-sessions-in-windows-10/

The five-day job: A BlackByte ransomware intrusion case study

July 6, 2023

As ransomware attacks continue to grow in number and sophistication, threat actors can quickly impact business operations if organizations are not well prepared. In a recent investigation by Microsoft Incident Response (previously known as Microsoft Detection and Response Team – DART) of an intrusion, we found that the threat actor progressed through the full attack chain, from initial access to impact, in less than five days, causing significant business disruption for the victim organization.

Our investigation found that within those five days, the threat actor employed a range of tools and techniques, culminating in the deployment of BlackByte 2.0 ransomware, to achieve their objectives. These techniques included:

  • Exploitation of unpatched internet-exposed Microsoft Exchange Servers
  • Web shell deployment facilitating remote access
  • Use of living-off-the-land tools for persistence and reconnaissance
  • Deployment of Cobalt Strike beacons for command and control (C2)
  • Process hollowing and the use of vulnerable drivers for defense evasion
  • Deployment of custom-developed backdoors to facilitate persistence
  • Deployment of a custom-developed data collection and exfiltration tool
BlackByte 2.0 ransomware attack chain by order of stages: initial access and privilege escalation, persistence and command and control, reconnaissance, credential access, lateral movement, data staging and exfiltration, and impact.
Figure 1. BlackByte 2.0 ransomware attack chain

In this blog, we share details of our investigation into the end-to-end attack chain, exposing security weaknesses that the threat actor exploited to advance their attack. As we learned from Microsoft’s tracking of ransomware attacks and the cybercriminal economy that enables them, disrupting common attack patterns could stop many of the attacker activities that precede ransomware deployment. This case highlights that common security hygiene practices go a long way in preventing, identifying, and responding to malicious activity as early as possible to mitigate the impact of ransomware attacks. We encourage organizations to follow the outlined mitigation steps, including ensuring that internet-facing assets are up to date and configured securely. We also share indicators of compromise, detection details, and hunting guidance to help organizations identify and respond to these attacks in their environments.  

Forensic analysis

Initial access and privilege escalation

To obtain initial access into the victim’s environment, the threat actor was observed exploiting the ProxyShell vulnerabilities CVE-2021-34473, CVE-2021-34523, and CVE-2021-31207 on unpatched Microsoft Exchange Servers. The exploitation of these vulnerabilities allowed the threat actor to:

  • Attain system-level privileges on the compromised Exchange host
  • Enumerate LegacyDN of users by sending Autodiscover requests, including SIDs of users
  • Construct a valid authentication token and use it against the Exchange PowerShell backend
  • Impersonate domain admin users and create a web shell by using the New-MailboxExportRequest cmdlet
  • Create web shells to obtain remote control on affected servers

The threat actor was observed operating from the following IP to exploit ProxyShell and access the web shell:

  • 185.225.73[.]244

Persistence

Backdoor

After gaining access to a device, the threat actor created the following registry run keys to run a payload each time a user signs in:

Registry keyValue nameValue data
HKEY_CURRENT_USER\Software\Microsoft\Windows\CurrentVersion\Run  MsEdgeMsErundll32 C:\Users\user\Downloads\api-msvc.dll,Default  
HKEY_CURRENT_USER\Software\Microsoft\Windows\CurrentVersion\Run  MsEdgeMsErundll32 C:\temp\api-msvc.dll,Default  
HKEY_CURRENT_USER\Software\Microsoft\Windows\CurrentVersion\Run  MsEdgeMsErundll32 C:\systemtest\api-system.png,Default

The file api-msvc.dll (SHA-256: 4a066569113a569a6feb8f44257ac8764ee8f2011765009fdfd82fe3f4b92d3e) was determined to be a backdoor capable of collecting system information, such as the installed antivirus products, device name, and IP address. This information is then sent via HTTP POST request to the following C2 channel:

  • hxxps://myvisit[.]alteksecurity[.]org/t

The organization was not using Microsoft Defender Antivirus, which detects this malware as Trojan:Win32/Kovter!MSR, as the primary antivirus solution, and the backdoor was allowed to run.

An additional file, api-system.png, was identified to have similarities to api-msvc.dll. This file behaved like a DLL, had the same default export function, and also leveraged run keys for persistence.

Cobalt Strike Beacon

The threat actor leveraged Cobalt Strike to achieve persistence. The file sys.exe (SHA-256: 5f37b85687780c089607670040dbb3da2749b91b8adc0aa411fd6280b5fa7103), detected by Microsoft Defender Antivirus as Trojan:Win64/CobaltStrike!MSR, was determined to be a Cobalt Strike Beacon and was downloaded directly from the file sharing service temp[.]sh:

  • hxxps://temp[.]sh/szAyn/sys.exe

This beacon was configured to communicate with the following C2 channel:

  • 109.206.243[.]59:443

AnyDesk

Threat actors leverage legitimate remote access tools during intrusions to blend into a victim network. In this case, the threat actor utilized the remote administration tool AnyDesk, to maintain persistence and move laterally within the network. AnyDesk was installed as a service and was run from the following paths:

  • C:\systemtest\anydesk\AnyDesk.exe
  • C:\Program Files (x86)\AnyDesk\AnyDesk.exe
  • C:\Scripts\AnyDesk.exe

Successful connections were observed in the AnyDesk log file ad_svc.trace involving anonymizer service IP addresses linked to TOR and MULLVAD VPN, a common technique that threat actors employ to obscure their source IP ranges.

Reconnaissance

We found the presence and execution of the network discovery tool NetScan being used by the threat actor to perform network enumeration using the following file names:

  • netscan.exe (SHA-256:1b9badb1c646a19cdf101ac4f6fdd23bc61eaab8c9f925eb41848cea9fd0738e)
  • netapp.exe (SHA-256:1b9badb1c646a19cdf101ac4f6fdd23bc61eaab8c9f925eb41848cea9fd0738e)

Additionally, execution of AdFind (SHA-256: f157090fd3ccd4220298c06ce8734361b724d80459592b10ac632acc624f455e), an Active Directory reconnaissance tool, was observed in the environment.

Credential access

Evidence of likely usage of the credential theft tool Mimikatzwas also uncovered through the presence of a related log file mimikatz.log. Microsoft IR assesses that Mimikatz was likely used to attain credentials for privileged accounts.

Lateral movement

Using compromised domain admin credentials, the threat actor used Remote Desktop Protocol (RDP) and PowerShell remoting to obtain access to other servers in the environment, including domain controllers.

Data staging and exfiltration

In one server where Microsoft Defender Antivirus was installed, a suspicious file named explorer.exe was identified, detected as Trojan:Win64/WinGoObfusc.LK!MT, and quarantined. However, because tamper protection wasn’t enabled on this server, the threat actor was able to disable the Microsoft Defender Antivirus service, enabling the threat actor to run the file using the following command:

explorer.exe P@$$w0rd

After reverse engineering explorer.exe, we determined it to be ExByte, a GoLang-based tool developed and commonly used in BlackByte ransomware attacks for collection and exfiltration of files from victim networks. This tool is capable of enumerating files of interest across the network and, upon execution, creates a log file containing a list of files and associated metadata. Multiple log files were uncovered during the investigation in the path:

  • C:\Exchange\MSExchLog.log

Analysis of the binary revealed a list of file extensions that are targeted for enumeration.

Figure-2.-Binary-analysis-showing-file-extensions-enumerated-by-explorer.exe_
Figure 2. Binary analysis showing file extensions enumerated by explorer.exe

Forensic analysis identified a file named data.txt that was created and later deleted after ExByte execution. This file contained obfuscated credentials that ExByte leveraged to authenticate to the popular file sharing platform Mega NZ using the platform’s API at:

  • hxxps://g.api.mega.co[.]nz
Figure 3. Binary analysis showing explorer.exe functionality for connecting to file sharing service MEGA NZ

We also determined that this version of Exbyte was crafted specifically for the victim, as it contained a hardcoded device name belonging to the victim and an internal IP address.

ExByte execution flow

Upon execution, ExByte decodes several strings and checks if the process is running with privileged access by reading \\.\PHYSICALDRIVE0:

  • If this check fails, ShellExecuteW is invoked with the IpOperation parameter RunAs, which runs explorer.exe with elevated privileges.

After this access check, explorer.exe attempts to read the data.txt file in the current location:

  • If the text file doesn’t exist, it invokes a command for self-deletion and exits from memory:
C:\Windows\system32\cmd.exe /c ping 1.1.1.1 -n 10 > nul & Del <PATH>\explorer.exe /F /Q
  • If data.txt exists, explorer.exe reads the file, passes the buffer to Base64 decode function, and then decrypts the data using the key provided in the command line. The decrypted data is then parsed as JSON below and fed for login function:
{    “a”:”us0”,    “user”:”<CONTENT FROM data.txt>”}

Finally, it forms a URL for sign-in to the API of the service MEGA NZ:

  • hxxps://g.api.mega.co[.]nz/cs?id=1674017543

Data encryption and destruction

On devices where files were successfully encrypted, we identified suspicious executables, detected by Microsoft Defender Antivirus as Trojan:Win64/BlackByte!MSR, with the following names:

  • wEFT.exe
  • schillerized.exe

The files were analyzed and determined to be BlackByte 2.0 binaries responsible for encryption across the environment. The binaries require an 8-digit key number to encrypt files.

Two modes of execution were identified:

  • When the -s parameter is provided, the ransomware self-deletes and encrypts the machine it was executed on.
  • When the -a parameter is provided, the ransomware conducts enumeration and uses an Ultimate Packer Executable (UPX) packed version of PsExec to deploy across the network. Several domain admin credentials were hardcoded in the binary, facilitating the deployment of the binary across the network.

Depending on the switch (-s or -a), execution may create the following files:

  • C:\SystemData\M8yl89s7.exe (UPX-packed PsExec with a random name; SHA-256: ba3ec3f445683d0d0407157fda0c26fd669c0b8cc03f21770285a20b3133098f)
  • C:\SystemData\wEFT.exe (Additional BlackByte binary)
  • C:\SystemData\MsExchangeLog1.log (Log file)
  • C:\SystemData\rENEgOtiAtES (A vulnerable (CVE-2019-16098) driver RtCore64.sys used to evade detection by installed antivirus software; SHA-256: 01aa278b07b58dc46c84bd0b1b5c8e9ee4e62ea0bf7a695862444af32e87f1fd)
  • C:\SystemData\iHu6c4.ico (Random name – BlackBytes icon)
  • C:\SystemData\BB_Readme_file.txt (BlackByte ReadMe file)
  • C:\SystemData\skip_bypass.txt (Unknown)

BlackByte 2.0 ransomware capabilities

Some capabilities identified for the BlackByte 2.0 ransomware were:

  • Antivirus bypass
    • The file rENEgOtiAtES created matches RTCore64.sys, a vulnerable driver (CVE-2049-16098) that allows any authenticated user to read or write to arbitrary memory
    • The BlackByte binary then creates and starts a service named RABAsSaa calling rENEgOtiAtES, and exploits this service to evade detection by installed antivirus software
  • Process hollowing
    • Invokes svchost.exe, injects to it to complete device encryption, and self-deletes by executing the following command:
      • cmd.exe /c ping 1.1.1.1 -n 10 > Nul & Del “PATH_TO_BLACKBYTE” /F /Q
  • Modification / disabling of Windows Firewall
    • The following commands are executed to either modify existing Windows Firewall rules, or to disable Windows Firewall entirely:
      • cmd /c netsh advfirewall set allprofiles state off
      • cmd /c netsh advfirewall firewall set rule group=”File and Printer Sharing” new enable=Yes
      • cmd /c netsh advfirewall firewall set rule group=”Network Discovery” new enable=Yes
  • Modification of volume shadow copies
    • The following commands are executed to destroy volume shadow copies on the machine:
      • cmd /c vssadmin Resize ShadowStorge /For=B:\ /On=B:\ /MaxSize=401MB
      • cmd /c vssadmin Resize ShadowStorage /For=B:\ /On=B:\ /MaxSize=UNBOUNDED
  • Modification of registry keys/values
    • The following commands are executed to modify the registry, facilitating elevated execution on the device:
      • cmd /c reg add HKLM\SOFTWARE\Microsoft\Windows\CurrentVersion\Policies\System /v LocalAccountTokenFilterPolicy /t REG_DWORD /d 1 /f
      • cmd /c reg add HKLM\SOFTWARE\Microsoft\Windows\CurrentVersion\Policies\System /v EnableLinkedConnections /t REG_DWORD /d 1 /f
      • cmd /c reg add HKLM\\SYSTEM\\CurrentControlSet\\Control\\FileSystem /v LongPathsEnabled /t REG_DWORD /d 1 /f
  • Additional functionality
    • Ability to terminate running services and processes
    • Ability to enumerate and mount volumes and network shares for encryption
    • Perform anti-forensics technique timestomping (sets the file time of encrypted and ReadMe file to 2000-01-01 00:00:00)
    • Ability to perform anti-debugging techniques

Recommendations

To guard against BlackByte ransomware attacks, Microsoft recommends the following:

  • Ensure that you have a patch management process in place and that patching for internet-exposed devices is prioritized; Understand and assess your cyber exposure with advanced vulnerability and configuration assessment tools like Microsoft Defender Vulnerability Management
  • Implement an endpoint detection and response (EDR) solution like Microsoft Defender for Endpoint to gain visibility into malicious activity in real time across your network
  • Ensure antivirus protections are updated regularly by turning on cloud-based protection and that your antivirus solution is configured to block threats
  • Enable tamper protection to prevent components of Microsoft Defender Antivirus from being disabled
  • Block inbound traffic from IPs specified in the indicators of compromise section of this report
  • Block inbound traffic from TOR exit nodes
  • Block inbound access from unauthorized public VPN services
  • Restrict administrative privileges to prevent authorized system changes

Conclusion

BlackByte ransomware attacks target organizations that have infrastructure with unpatched vulnerabilities.  As outlined in the Microsoft Digital Defense Report, common security hygiene practices, including keeping systems up to date, could protect against 98% of attacks.

As new tools are being developed by threat actors, a modern threat protection solution like Microsoft 365 Defender is necessary to prevent and detect the multiple techniques used in the attack chain, especially where the threat actor attempts to evade or disable specific defense mechanisms. Hunting for malicious behavior should be performed regularly in order to detect potential attacks that could evade detections, as a complementary activity for continuous monitoring from security tools alerts and incidents.

To understand how Microsoft can help you secure your network and respond to network compromise, visit https://aka.ms/MicrosoftIR.

Microsoft 365 Defender detections

Microsoft Defender Antivirus

Microsoft Defender Antivirus detects this threat as the following malware:

  • Trojan:Win32/Kovter!MSR
  • Trojan:Win64/WinGoObfusc.LK!MT
  • Trojan:Win64/BlackByte!MSR
  • HackTool:Win32/AdFind!MSR
  • Trojan:Win64/CobaltStrike!MSR

Microsoft Defender for Endpoint

The following alerts might indicate threat activity related to this threat. Note, however, that these alerts can be also triggered by unrelated threat activity.

  • ‘CVE-2021-31207’ exploit malware was detected
  • An active ‘NetShDisableFireWall’ malware in a command line was prevented from executing.
  • Suspicious registry modification.
  • ‘Rtcore64’ hacktool was detected
  • Possible ongoing hands-on-keyboard activity (Cobalt Strike)
  • A file or network connection related to a ransomware-linked emerging threat activity group detected
  • Suspicious sequence of exploration activities
  • A process was injected with potentially malicious code
  • Suspicious behavior by cmd.exe was observed
  • ‘Blackbyte’ ransomware was detected

Microsoft Defender Vulnerability Management

Microsoft Defender Vulnerability Management surfaces devices that may be affected by the following vulnerabilities used in this threat:

  • CVE-2021-34473
  • CVE-2021-34523
  • CVE-2021-31207
  • CVE-2019-16098

Hunting queries

Microsoft 365 Defender

Microsoft 365 Defender customers can run the following query to find related activity in their networks:

ProxyShell web shell creation events

DeviceProcessEvents| where ProcessCommandLine has_any ("ExcludeDumpster","New-ExchangeCertificate") and ProcessCommandLine has_any ("-RequestFile","-FilePath")

Suspicious vssadmin events

DeviceProcessEvents| where ProcessCommandLine has_any ("vssadmin","vssadmin.exe") and ProcessCommandLine has "Resize ShadowStorage" and ProcessCommandLine has_any ("MaxSize=401MB"," MaxSize=UNBOUNDED")

Detection for persistence creation using Registry Run keys

DeviceRegistryEvents | where ActionType == "RegistryValueSet" | where (RegistryKey has @"Microsoft\Windows\CurrentVersion\RunOnce" and RegistryValueName == "MsEdgeMsE")      or (RegistryKey has @"Microsoft\Windows\CurrentVersion\RunOnceEx" and RegistryValueName == "MsEdgeMsE")    or (RegistryKey has @"Microsoft\Windows\CurrentVersion\Run" and RegistryValueName == "MsEdgeMsE")| where RegistryValueData startswith @"rundll32"| where RegistryValueData endswith @".dll,Default"| project Timestamp,DeviceId,DeviceName,ActionType,RegistryKey,RegistryValueName,RegistryValueData

Microsoft Sentinel

Microsoft Sentinel customers can use the TI Mapping analytics (a series of analytics all prefixed with ‘TI map’) to automatically match the malicious domain indicators mentioned in this blog post with data in their workspace. If the TI Map analytics are not currently deployed, customers can install the Threat Intelligence solution from the Microsoft Sentinel Content Hub to have the analytics rule deployed in their Sentinel workspace. More details on the Content Hub can be found here:  https://learn.microsoft.com/azure/sentinel/sentinel-solutions-deploy

Microsoft Sentinel also has a range of detection and threat hunting content that customers can use to detect the post exploitation activity detailed in this blog in addition to Microsoft 365 Defender detections list above.

Indicators of compromise

The table below shows IOCs observed during our investigation. We encourage our customers to investigate these indicators in their environments and implement detections and protections to identify past related activity and prevent future attacks against their systems.

IndicatorTypeDescription
4a066569113a569a6feb8f44257ac8764ee8f2011765009fdfd82fe3f4b92d3eSHA-256api-msvc.dll (Backdoor installed through RunKeys)
5f37b85687780c089607670040dbb3da2749b91b8adc0aa411fd6280b5fa7103SHA-256sys.exe (Cobalt Strike Beacon)
01aa278b07b58dc46c84bd0b1b5c8e9ee4e62ea0bf7a695862444af32e87f1fdSHA-256rENEgOtiAtES (Vulnerable driver RtCore64.sys created by BlackByte binary)
ba3ec3f445683d0d0407157fda0c26fd669c0b8cc03f21770285a20b3133098fSHA-256[RANDOM_NAME].exe (UPX Packed PsExec created by BlackByte binary)
1b9badb1c646a19cdf101ac4f6fdd23bc61eaab8c9f925eb41848cea9fd0738eSHA-256“netscan.exe”, “netapp.exe (Netscan network discovery tool)
f157090fd3ccd4220298c06ce8734361b724d80459592b10ac632acc624f455eSHA-256AdFind.exe (Active Directory information gathering tool)
hxxps://myvisit[.]alteksecurity[.]org/tURLC2 for backdoor api-msvc.dll
hxxps://temp[.]sh/szAyn/sys.exeURLDownload URL for sys.exe
109.206.243[.]59IP AddressC2 for Cobalt Strike Beacon sys.exe
185.225.73[.]244IP AddressOriginating IP address for ProxyShell exploitation and web shell interaction

NOTE: These indicators should not be considered exhaustive for this observed activity.

Appendix

File extensions targeted by BlackByte binary for encryption:

.4dd.4dl.accdb.accdc.accde.accdr.accdt.accft
.adb.ade.adf.adp.arc.ora.alf.ask
.btr.bdf.cat.cdb.ckp.cma.cpd.dacpac
.dad.dadiagrams.daschema.db.db-shm.db-wal.db3.dbc
.dbf.dbs.dbt.dbv. dbx. dcb. dct. dcx
. ddl. dlis. dp1. dqy. dsk. dsn. dtsx. dxl
. eco. ecx. edb. epim. exb. fcd. fdb. fic
. fmp. fmp12. fmpsl. fol.fp3. fp4. fp5. fp7
. fpt. frm. gdb. grdb. gwi. hdb. his. ib
. idb. ihx. itdb. itw. jet. jtx. kdb. kexi
. kexic. kexis. lgc. lwx. maf. maq. mar. masmav
. mdb. mpd. mrg. mud. mwb. myd. ndf. nnt
. nrmlib. ns2. ns3. ns4. nsf. nv. nv2. nwdb
. nyf. odb. ogy. orx. owc. p96. p97. pan
. pdb. pdm. pnz. qry. qvd. rbf. rctd. rod
. rodx. rpd. rsd. sas7bdat. sbf. scx. sdb. sdc
. sdf. sis. spg. sql. sqlite. sqlite3. sqlitedb. te
. temx. tmd. tps. trc. trm. udb. udl. usr
. v12. vis. vpd. vvv. wdb. wmdb. wrk. xdb
. xld. xmlff. abcddb. abs. abx. accdw. and. db2
. fm5. hjt. icg. icr. kdb. lut. maw. mdn
. mdt       

Shared folders targeted for encryption (Example: \\[IP address]\Downloads):

UsersBackupVeeamhomeshome
mediacommonStorage ServerPublicWeb
ImagesDownloadsBackupDataActiveBackupForBusinessBackups
NAS-DCDCBACKUPDirectorFilesshare 

File extensions ignored:

.ini.url.msilog.log.ldf.lock.theme.msi
.sys.wpx.cpl.adv.msc.scr.key.ico
.dll.hta.deskthemepack.nomedia.msu.rtp.msp.idx
.ani.386.diagcfg.bin.mod.ics.com.hlp
 .spl.nls.cab.exe.diagpkg.icl.ocx.rom
.prf.thempack.msstyles.icns.mpa.drv.cur.diagcab
.cmd.shs      

Folders ignored:

windowsbootprogram files (x86)windows.oldprogramdata
intelbitdefendertrend microwindowsappsappdata
application datasystem volume informationperflogsmsocache 

Files ignored:

bootnxtntldrbootmgrthumbs.db
ntuser.datbootsect.bakautoexec.baticoncache.db
bootfont.bin   

Processes terminated:

teracopyteamviewernsservicensctrluranium
processhackerprocmonpestudioprocmon64x32dbg
x64dbgcff explorerprocexppslisttcpview
tcpvcondbgviewrammaprammap64vmmap
ollydbgautorunsautorunsscfilemonregmon
idaqidaq64immunitydebuggerwiresharkdumpcap
hookexplorerimportrecpetoolslordpesysinspector
proc_analyzersysanalyzersniff_hitwindbgjoeboxcontrol
joeboxserverresourcehackerfiddlerhttpdebuggerdumpit
rammaprammap64vmmapagntsvccntaosmgr
dbeng50dbsnmpencsvcinfopathisqlplussvc
mbamtraymsaccessmsftesqlmspubmydesktopqos
mydesktopservicemysqldmysqld-ntmysqld-optNtrtscan
ocautoupdsocommocssdonenoteoracle
outlookPccNTMonpowerpntsqbcoreservicesql
sqlagentsqlbrowsersqlservrsqlwritersteam
synctimetbirdconfigthebatthebat64thunderbird
tmlistenvisiowinwordwordpadxfssvccon
zoolz    

Services terminated:

CybereasonRansomFreevnetdbpcdSamSsTeraCopyService
msftesqlnsServiceklvssbridge64vapiendpointShMonitor
SmcinstSmcServiceSntpServicesvcGenericHostSwi_
TmCCSFtmlistenTrueKeyTrueKeySchedulerTrueKeyServiceHelper
WRSVCMcTaskManagerOracleClientCache80mfefirewbengine
mfemmsRESvcmfevtpsacsvrSAVAdminService
SepMasterServicePDVFSServiceESHASRVSDRSVCFA_Scheduler
KAVFSKAVFS_KAVFSGTkavfsslpklnagentmacmnsvc
masvcMBAMServiceMBEndpointAgentMcShieldaudioendpointbuilder
AntivirusAVPDCAgentbedbgEhttpSrv
MMSekrnEPSecurityServiceEPUpdateServicentrtscan
EsgShKernelmsexchangeadtopologyAcrSch2SvcMSOLAP$TPSAMAIntel(R) PROSet Monitoring
msexchangeimap4ARSMunistoresvc_1af40aReportServer$TPSMSOLAP$SYSTEM_BGC
W3SvcMSExchangeSRSReportServer$TPSAMAZoolz 2 ServiceMSOLAP$TPS
aphidmonitorserviceSstpSvcMSExchangeMTAReportServer$SYSTEM_BGCSymantec System Recovery
UI0DetectMSExchangeSAMSExchangeISReportServerMsDtsServer110
POP3SvcMSExchangeMGMTSMTPSvcMsDtsServerIisAdmin
MSExchangeESEraserSvc11710Enterprise Client ServiceMsDtsServer100NetMsmqActivator
stc_raw_agentVSNAPVSSPDVFSServiceAcrSch2SvcAcronis
CASAD2DWebSvcCAARCUpdateSvcMcAfeeavpsusDLPAgentService
mfewcBMR Boot ServiceDefWatchccEvtMgrccSetMgr
SavRoamRTVsc screenconnectransomsqltelemetrymsexch
vncteamviewermsolapveeambackup
sqlmemtasvsssophossvc$
mepocswuauserv   

Drivers that Blackbyte can bypass:

360avflt.sys360box.sys360fsflt.sys360qpesv.sys5nine.cbt.sys
a2acc.sysa2acc64.sysa2ertpx64.sysa2ertpx86.sysa2gffi64.sys
a2gffx64.sysa2gffx86.sysaaf.sysaalprotect.sysabrpmon.sys
accessvalidator.sysacdriver.sysacdrv.sysadaptivaclientcache32.sysadaptivaclientcache64.sys
adcvcsnt.sysadspiderdoc.sysaefilter.sysagentrtm64.sysagfsmon.sys
agseclock.sysagsyslock.sysahkamflt.sysahksvpro.sysahkusbfw.sys
ahnrghlh.sysaictracedrv_am.sysairship-filter.sysajfsprot.sysalcapture.sys
alfaff.sysaltcbt.sysamfd.sysamfsm.sysamm6460.sys
amm8660.sysamsfilter.sysamznmon.sysantileakfilter.sysantispyfilter.sys
anvfsm.sysapexsqlfilterdriver.sysappcheckd.sysappguard.sysappvmon.sys
arfmonnt.sysarta.sysarwflt.sysasgard.sysashavscan.sys
asiofms.sysaswfsblk.sysaswmonflt.sysaswsnx.sysaswsp.sys
aszfltnt.sysatamptnt.sysatc.sysatdragent.sysatdragent64.sys
aternityregistryhook.sysatflt.sysatrsdfw.sysauditflt.sysaupdrv.sys
avapsfd.sysavc3.sysavckf.sysavfsmn.sysavgmfi64.sys
avgmfrs.sysavgmfx64.sysavgmfx86.sysavgntflt.sysavgtpx64.sys
avgtpx86.sysavipbb.sysavkmgr.sysavmf.sysawarecore.sys
axfltdrv.sysaxfsysmon.sysayfilter.sysb9kernel.sysbackupreader.sys
bamfltr.sysbapfecpt.sysbbfilter.sysbd0003.sysbddevflt.sys
bdfiledefend.sysbdfilespy.sysbdfm.sysbdfsfltr.sysbdprivmon.sys
bdrdfolder.sysbdsdkit.sysbdsfilter.sysbdsflt.sysbdsvm.sys
bdsysmon.sysbedaisy.sysbemk.sysbfaccess.sysbfilter.sys
bfmon.sysbhdrvx64.sysbhdrvx86.sysbhkavka.sysbhkavki.sys
bkavautoflt.sysbkavsdflt.sysblackbirdfsa.sysblackcat.sysbmfsdrv.sys
bmregdrv.sysboscmflt.sysbosfsfltr.sysbouncer.sysboxifier.sys
brcow_x_x_x_x.sysbrfilter.sysbrnfilelock.sysbrnseclock.sysbrowsermon.sys
bsrfsflt.sysbssaudit.sysbsyaed.sysbsyar.sysbsydf.sys
bsyirmf.sysbsyrtm.sysbsysp.sysbsywl.sysbwfsdrv.sys
bzsenspdrv.sysbzsenth.sysbzsenyaradrv.syscaadflt.syscaavfltr.sys
cancelsafe.syscarbonblackk.syscatflt.syscatmf.syscbelam.sys
cbfilter20.syscbfltfs4.syscbfsfilter2017.syscbfsfilter2020.syscbsampledrv.sys
cdo.syscdrrsflt.syscdsgfsfilter.syscentrifyfsf.syscfrmd.sys
cfsfdrvcgwmf.syschange.syschangelog.syschemometecfilter.sys
ciscoampcefwdriver.sysciscoampheurdriver.sysciscosam.sysclumiochangeblockmf.syscmdccav.sys
cmdcwagt.syscmdguard.syscmdmnefs.syscmflt.syscode42filter.sys
codex.sysconduantfsfltr.syscontainermonitor.syscpavfilter.syscpavkernel.sys
cpepmon.syscrexecprev.syscrncache32.syscrncache64.syscrnsysm.sys
cruncopy.syscsaam.syscsaav.syscsacentr.syscsaenh.sys
csagent.syscsareg.syscsascr.syscsbfilter.syscsdevicecontrol.sys
csfirmwareanalysis.syscsflt.syscsmon.syscssdlp.sysctamflt.sys
ctifile.sysctinet.sysctrpamon.sysctx.syscvcbt.sys
cvofflineflt32.syscvofflineflt64.syscvsflt.syscwdriver.syscwmem2k64.sys
cybkerneltracker.syscylancedrv64.syscyoptics.syscyprotectdrv32.syscyprotectdrv64.sys
cytmon.syscyverak.syscyvrfsfd.syscyvrlpc.syscyvrmtgn.sys
datanow_driver.sysdattofsf.sysda_ctl.sysdcfafilter.sysdcfsgrd.sys
dcsnaprestore.sysdeepinsfs.sysdelete_flt.sysdevmonminifilter.sysdfmfilter.sys
dgedriver.sysdgfilter.sysdgsafe.sysdhwatchdog.sysdiflt.sys
diskactmon.sysdkdrv.sysdkrtwrt.sysdktlfsmf.sysdnafsmonitor.sys
docvmonk.sysdocvmonk64.sysdpmfilter.sysdrbdlock.sysdrivesentryfilterdriver2lite.sys
drsfile.sysdrvhookcsmf.sysdrvhookcsmf_amd64.sysdrwebfwflt.sysdrwebfwft.sys
dsark.sysdsdriver.sysdsfemon.sysdsflt.sysdsfltfs.sys
dskmn.sysdtdsel.sysdtpl.sysdwprot.sysdwshield.sys
dwshield64.syseamonm.syseaseflt.syseasyanticheat.syseaw.sys
ecatdriver.sysedevmon.sysednemfsfilter.sysedrdrv.sysedrsensor.sys
edsigk.syseectrl.syseetd32.syseetd64.syseeyehv.sys
eeyehv64.sysegambit.sysegfilterk.sysegminflt.sysegnfsflt.sys
ehdrv.syselock2fsctldriver.sysemxdrv2.sysenigmafilemondriver.sysenmon.sys
epdrv.sysepfw.sysepfwwfp.sysepicfilter.sysepklib.sys
epp64.sysepregflt.syseps.sysepsmn.sysequ8_helper.sys
eraser.sysesensor.sysesprobe.sysestprmon.sysestprp.sys
estregmon.sysestregp.sysestrkmon.sysestrkr.syseventmon.sys
evmf.sysevscase.sysexcfs.sysexprevdriver.sysfailattach.sys
failmount.sysfam.sysfangcloud_autolock_driver.sysfapmonitor.sysfarflt.sys
farwflt.sysfasdriverfcnotify.sysfcontrol.sysfdrtrace.sys
fekern.sysfencry.sysffcfilt.sysffdriver.sysfildds.sys
filefilter.sysfileflt.sysfileguard.sysfilehubagent.sysfilemon.sys
filemonitor.sysfilenamevalidator.sysfilescan.sysfilesharemon.sysfilesightmf.sys
filesystemcbt.sysfiletrace.sysfile_monitor.sysfile_protector.sysfile_tracker.sys
filrdriver.sysfim.sysfiometer.sysfiopolicyfilter.sysfjgsdis2.sys
fjseparettifilterredirect.sysflashaccelfs.sysflightrecorder.sysfltrs329.sysflyfs.sys
fmdrive.sysfmkkc.sysfmm.sysfortiaptfilter.sysfortimon2.sys
fortirmon.sysfortishield.sysfpav_rtp.sysfpepflt.sysfsafilter.sys
fsatp.sysfsfilter.sysfsgk.sysfshs.sysfsmon.sys
fsmonitor.sysfsnk.sysfsrfilter.sysfstrace.sysfsulgk.sys
fsw31rj1.sysgagsecurity.sysgbpkm.sysgcffilter.sysgddcv.sys
gefcmp.sysgemma.sysgeprotection.sysggc.sysgibepcore.sys
gkff.sysgkff64.sysgkpfcb.sysgkpfcb64.sysgofsmf.sys
gpminifilter.sysgroundling32.sysgroundling64.sysgtkdrv.sysgumhfilter.sys
gzflt.syshafsnk.syshbflt.syshbfsfltr.syshcp_kernel_acq.sys
hdcorrelatefdrv.syshdfilemon.syshdransomoffdrv.syshdrfs.sysheimdall.sys
hexisfsmonitor.syshfileflt.syshiofs.syshmpalert.syshookcentre.sys
hooksys.syshpreg.syshsmltmon.syshsmltwhl.syshssfwhl.sys
hvlminifilter.sysibr2fsk.sysiccfileioad.sysiccfilteraudit.sysiccfiltersc.sys
icfclientflt.sysicrlmonitor.sysiderafilterdriver.sysielcp.sysieslp.sys
ifs64.sysignis.sysiguard.sysiiscache.sysikfilesec.sys
im.sysimffilter.sysimfilter.sysimgguard.sysimmflex.sys
immunetprotect.sysimmunetselfprotect.sysinisbdrv64.sysino_fltr.sysintelcas.sys
intmfs.sysinuse.sysinvprotectdrv.sysinvprotectdrv64.sysionmonwdrv.sys
iothorfs.sysipcomfltr.sysipfilter.sysiprotect.sysiridiumswitch.sys
irongatefd.sysisafekrnl.sysisafekrnlmon.sysisafermonisecureflt.sys
isedrv.sysisfpdrv.sysisirmfmon.sysisregflt.sysisregflt64.sys
issfltr.sysissregistry.sysit2drv.sysit2reg.sysivappmon.sys
iwdmfs.sysiwhlp.sysiwhlp2.sysiwhlpxp.sysjdppsf.sys
jdppwf.sysjkppob.sysjkppok.sysjkpppf.sysjkppxk.sys
k7sentry.syskavnsi.syskawachfsminifilter.syskc3.syskconv.sys
kernelagent32.syskewf.syskfac.syskfileflt.syskisknl.sys
klam.sysklbg.sysklboot.syskldback.syskldlinf.sys
kldtool.sysklfdefsf.sysklflt.sysklgse.sysklhk.sys
klif.sysklifaa.sysklifks.sysklifsm.sysklrsps.sys
klsnsr.sysklupd_klif_arkmon.syskmkuflt.syskmnwch.syskmxagent.sys
kmxfile.syskmxsbx.sysksfsflt.sysktfsfilter.sysktsyncfsflt.sys
kubwksp.syslafs.syslbd.syslbprotect.syslcgadmon.sys
lcgfile.syslcgfilemon.syslcmadmon.syslcmfile.syslcmfilemon.sys
lcmprintmon.sysldsecdrv.syslibwamf.syslivedrivefilter.sysllfilter.sys
lmdriver.syslnvscenter.syslocksmith.syslragentmf.syslrtp.sys
magicbackupmonitor.sysmagicprotect.sysmajoradvapi.sysmarspy.sysmaxcryptmon.sys
maxproc64.sysmaxprotector.sysmbae64.sysmbam.sysmbamchameleon.sys
mbamshuriken.sysmbamswissarmy.sysmbamwatchdog.sysmblmon.sysmcfilemon32.sys
mcfilemon64.sysmcstrg.sysmearwfltdriver.sysmessage.sysmfdriver.sys
mfeaack.sysmfeaskm.sysmfeavfk.sysmfeclnrk.sysmfeelamk.sys
mfefirek.sysmfehidk.sysmfencbdc.sysmfencfilter.sysmfencoas.sys
mfencrk.sysmfeplk.sysmfewfpk.sysminiicpt.sysminispy.sys
minitrc.sysmlsaff.sysmmpsy32.sysmmpsy64.sysmonsterk.sys
mozycorpfilter.sysmozyenterprisefilter.sysmozyentfilter.sysmozyhomefilter.sysmozynextfilter.sys
mozyoemfilter.sysmozyprofilter.sysmpfilter.sysmpkernel.sysmpksldrv.sys
mpxmon.sysmracdrv.sysmrxgoogle.sysmscan-rt.sysmsiodrv4.sys
msixpackagingtoolmonitor.sysmsnfsflt.sysmspy.sysmssecflt.sysmtsvcdf.sys
mumdi.sysmwac.sysmwatcher.sysmwfsmfltr.sysmydlpmf.sys
namechanger.sysnanoavmf.sysnaswsp.sysndgdmk.sysneokerbyfilter
netaccctrl.sysnetaccctrl64.sysnetguard.sysnetpeeker.sysngscan.sys
nlcbhelpi64.sysnlcbhelpx64.sysnlcbhelpx86.sysnlxff.sysnmlhssrv01.sys
nmpfilter.sysnntinfo.sysnovashield.sysnowonmf.sysnpetw.sys
nprosec.sysnpxgd.sysnpxgd64.sysnravwka.sysnrcomgrdka.sys
nrcomgrdki.sysnregsec.sysnrpmonka.sysnrpmonki.sysnsminflt.sys
nsminflt64.sysntest.sysntfsf.sysntguard.sysntps_fa.sys
nullfilter.sysnvcmflt.sysnvmon.sysnwedriver.sysnxfsmon.sys
nxrmflt.sysoadevice.sysoavfm.sysoczminifilter.sysodfsfilter.sys
odfsfimfilter.sysodfstokenfilter.sysoffsm.sysomfltlh.sysosiris.sys
ospfile_mini.sysospmon.sysparity.syspassthrough.syspath8flt.sys
pavdrv.syspcpifd.syspctcore.syspctcore64.syspdgenfam.sys
pecfilter.sysperfectworldanticheatsys.syspervac.syspfkrnl.syspfracdrv.sys
pgpfs.syspgpwdefs.sysphantomd.sysphdcbtdrv.syspkgfilter.sys
pkticpt.sysplgfltr.sysplpoffdrv.syspointguardvista64f.syspointguardvistaf.sys
pointguardvistar32.syspointguardvistar64.sysprocmon11.sysproggerdriver.syspsacfileaccessfilter.sys
pscff.syspsgdflt.syspsgfoctrl.syspsinfile.syspsinproc.sys
psisolator.syspwipf6.syspwprotect.syspzdrvxp.sysqdocumentref.sys
qfapflt.sysqfilter.sysqfimdvr.sysqfmon.sysqminspec.sys
qmon.sysqqprotect.sysqqprotectx64.sysqqsysmon.sysqqsysmonx64.sys
qutmdrv.sysranpodfs.sysransomdefensexxx.sysransomdetect.sysreaqtor.sys
redlight.sysregguard.sysreghook.sysregmonex.sysrepdrv.sys
repmon.sysrevefltmgr.sysreveprocprotection.sysrevonetdriver.sysrflog.sys
rgnt.sysrmdiskmon.sysrmphvmonitor.sysrpwatcher.sysrrmon32.sys
rrmon64.sysrsfdrv.sysrsflt.sysrspcrtw.sysrsrtw.sys
rswctrl.sysrswmon.sysrtologon.sysrtw.sysruaff.sys
rubrikfileaudit.sysruidiskfs.sysruieye.sysruifileaccess.sysruimachine.sys
ruiminispy.sysrvsavd.sysrvsmon.sysrw7fsflt.sysrwchangedrv.sys
ryfilter.sysryguard.syssafe-agent.syssafsfilter.syssagntflt.sys
sahara.syssakfile.syssakmfile.syssamflt.syssamsungrapidfsfltr.sys
sanddriver.syssanta.syssascan.syssavant.syssavonaccess.sys
scaegis.sysscauthfsflt.sysscauthiodrv.sysscensemon.sysscfltr.sys
scifsflt.syssciptflt.syssconnect.sysscred.syssdactmon.sys
sddrvldr.syssdvfilter.sysse46filter.syssecdodriver.syssecone_filemon10.sys
secone_proc10.syssecone_reg10.syssecone_usb.syssecrmm.syssecufile.sys
secure_os.syssecure_os_mf.syssecurofsd_x64.syssefo.syssegf.sys
segiraflt.syssegmd.syssegmp.syssentinelmonitor.sysserdr.sys
serfs.syssfac.syssfavflt.syssfdfilter.syssfpmonitor.sys
sgresflt.sysshdlpmedia.sysshdlpsf.syssheedantivirusfilterdriver.syssheedselfprotection.sys
shldflt.syssi32_file.syssi64_file.syssieflt.syssimrep.sys
sisipsfilefiltersk.sysskyamdrv.sysskyrgdrv.sysskywpdrv.sys
slb_guard.syssld.syssmbresilfilter.syssmdrvnt.syssndacs.sys
snexequota.syssnilog.syssnimg.syssnscore.syssnsrflt.sys
sodatpfl.syssoftfilterxxx.syssoidriver.syssolitkm.syssonar.sys
sophosdt2.syssophosed.syssophosntplwf.syssophossupport.sysspbbcdrv.sys
spellmon.sysspider3g.sysspiderg3.sysspiminifilter.sysspotlight.sys
sprtdrv.syssqlsafefilterdriver.syssrminifilterdrv.syssrtsp.syssrtsp64.sys
srtspit.sysssfmonm.sysssrfsf.sysssvhook.sysstcvsm.sys
stegoprotect.sysstest.sysstflt.sysstkrnl64.sysstoragedrv.sys
strapvista.sysstrapvista64.syssvcbt.sysswcommfltr.sysswfsfltr.sys
swfsfltrv2.sysswin.syssymafr.syssymefa.syssymefa64.sys
symefasi.syssymevent.syssymevent64x86.syssymevnt.syssymevnt32.sys
symhsm.syssymrg.syssysdiag.syssysmon.syssysmondrv.sys
sysplant.sysszardrv.sysszdfmdrv.sysszdfmdrv_usb.sysszedrdrv.sys
szpcmdrv.systaniumrecorderdrv.systaobserveflt.systbfsfilt.systbmninifilter.sys
tbrdrv.systdevflt.systedrdrv.systenrsafe2.systesmon.sys
tesxnginx.systesxporter.systffregnt.systfsflt.systgfsmf.sys
thetta.systhfilter.systhreatstackfim.systkdac2k.systkdacxp.sys
tkdacxp64.systkfsavxp.systkfsavxp64.systkfsft.systkfsft64.sys
tkpcftcb.systkpcftcb64.systkpl2k.systkpl2k64.systksp2k.sys
tkspxp.systkspxp64.systmactmon.systmcomm.systmesflt.sys
tmevtmgr.systmeyes.systmfsdrv2.systmkmsnsr.systmnciesc.sys
tmpreflt.systmumh.systmums.systmusa.systmxpflt.sys
topdogfsfilt.systrace.systrfsfilter.systritiumfltr.systrpmnflt.sys
trufos.systrustededgeffd.systsifilemon.systss.syststfilter.sys
tstfsredir.syststregredir.systsyscare.systvdriver.systvfiltr.sys
tvmfltr.systvptfile.systvspfltr.systwbdcfilter.systxfilefilter.sys
txregmon.sysuamflt.sysucafltdriver.sysufdfilter.sysuncheater.sys
upguardrealtime.sysusbl_ifsfltr.sysusbpdh.sysusbtest.sysuvmcifsf.sys
uwfreg.sysuwfs.sysv3flt2k.sysv3flu2k.sysv3ift2k.sys
v3iftmnt.sysv3mifint.sysvarpffmon.sysvast.sysvcdriv.sys
vchle.sysvcmfilter.sysvcreg.sysveeamfct.sysvfdrv.sys
vfilefilter.sysvfpd.sysvfsenc.sysvhddelta.sysvhdtrack.sys
vidderfs.sysvintmfs.sysvirtfile.sysvirtualagent.sysvk_fsf.sys
vlflt.sysvmwvvpfsd.sysvollock.sysvpdrvnt.sysvradfil2.sys
vraptdef.sysvraptflt.sysvrarnflt.sysvrbbdflt.sysvrexpdrv.sys
vrfsftm.sysvrfsftmx.sysvrnsfilter.sysvrsdam.sysvrsdcore.sys
vrsdetri.sysvrsdetrix.sysvrsdfmx.sysvrvbrfsfilter.sysvsepflt.sys
vsscanner.sysvtsysflt.sysvxfsrep.syswats_se.syswbfilter.sys
wcsdriver.syswdcfilter.syswdfilter.syswdocsafe.syswfp_mrt.sys
wgfile.syswhiteshield.syswindbdrv.syswindd.syswinfladrv.sys
winflahdrv.syswinfldrv.syswinfpdrv.syswinload.syswinteonminifilter.sys
wiper.syswlminisecmod.syswntgpdrv.syswraekernel.syswrcore.sys
wrcore.x64.syswrdwizfileprot.syswrdwizregprot.syswrdwizscanner.syswrdwizsecure64.sys
wrkrn.syswrpfv.syswsafefilter.syswscm.sysxcpl.sys
xendowflt.sysxfsgk.sysxhunter1.sysxhunter64.sysxiaobaifs.sys
xiaobaifsr.sysxkfsfd.sysxoiv8x64.sysxomfcbt8x64.sysyahoostorage.sys
yfsd.sysyfsd2.sysyfsdr.sysyfsrd.syszampit_ml.sys
zesfsmf.syszqfilter.syszsfprt.syszwasatom.syszwpxesvr.sys
zxfsfilt.syszyfm.syszzpensys.sys  

Further reading

For the latest security research from the Microsoft Threat Intelligence community, check out the Microsoft Threat Intelligence Blog: https://aka.ms/threatintelblog.

To get notified about new publications and to join discussions on social media, follow us on Twitter at https://twitter.com/MsftSecIntel.

Source :
https://www.microsoft.com/en-us/security/blog/2023/07/06/the-five-day-job-a-blackbyte-ransomware-intrusion-case-study/

How to Disable NTLM Authentication in Windows Domain

February 28, 2023

NTLM (NT LAN Manager) is a legacy Microsoft authentication protocol that dates back to Windows NT. Although Microsoft introduced the more secure Kerberos authentication protocol back in Windows 2000, NTLM (mostly NTLMv2) is still widely used for authentication on Windows domain networks. In this article, we will look at how to disable the NTLMv1 and NTLMv2 protocols, and switch to Kerberos in an Active Directory domain.

Contents:

The key NTLMv1 problems:

  • weak encryption;
  • storing password hash in the memory of the LSA service, which can be extracted from Windows memory in plain text using various tools (such as Mimikatz) and used for further attacks using pass-the-has scripts;
  • the lack of mutual authentication between a server and a client, leading to data interception and unauthorized access to resources (some tools such as Responder can capture NTLM data sent over the network and use them to access the network resources);
  • and other vulnerabilities.

Some of these have been in the next version NTLMv2 which uses more secure encryption algorithms and allows to prevent of common NTLM attacks. NTLMv1 and LM authentication protocols are disabled by default starting with Windows 7 and Windows Server 2008 R2.

How to Enable NTLM Authentication Audit Logging?

Before completely disabling NTLM in a domain and switching to Kerberos, it is a good idea to ensure that there are no applications in the domain that require and use NTLM auth. There may be legacy devices or services on your network that still use NTLMv1 authentication instead of NTLMv2 (or Kerberos).

To track accounts or apps that use NTLM authentication, you can enable audit logging policies on all computers using GPO. Open the Default Domain Controller Policy, navigate to the Computer Configuration -> Windows Settings -> Security Settings -> Local Policies -> Security Options section, find and enable the Network Security: Restrict NTLM: Audit NTLM authentication in this domain policy and set its value to Enable all.

Network Security: Restrict NTLM: Audit NTLM authentication in this domain

In the same way, enable the following policies in the Default Domain Policy:

  • Network Security: Restrict NTLM: Audit Incoming NTLM Traffic – set its value to Enable auditing for domain accounts
  • Network security: Restrict NTLM: Outgoing NTLM traffic to remote servers: set Audit all
Network Security: Restrict NTLM: Audit Incoming NTLM Traffic

Once these policies are enabled, events related to the use of NTLM authentication will appear in the Application and Services Logs-> Microsoft -> Windows -> NTLM section of the Event Viewer.

You can analyze the events on each server or collect them to the central Windows Event Log Collector.

You need to search for the events from the source Microsoft-Windows-Security-Auditing with the Event ID 4624 – “An Account was successfully logged on“. Note the information in the “Detailed Authentication Information” section. If there is NTLM in the Authentication Package value, then the NTLM protocol was used to authenticate this user.

Look at the value of Package Name (NTLM only). This line shows which protocol (LM, NTLMv1, or NTLMv2) was used for authentication. So you need to identify any servers/applications that are using the legacy protocol.

eventid 4624 source Microsoft-Windows-Security-Auditing ntlm usage

Also, if NTLM is used for authentication instead of Kerberos, Event ID 4776 will appear in the log:

The computer attempted to validate the credentials for an account
Authentication Package: MICROSOFT_AUTHENTICATION_PACKAGE_V1_0

For example, to search for all NTLMv1 authentication events on all domain controllers, you can use the following PowerShell script:

$ADDCs = Get-ADDomainController -filter
$Now = Get-Date
$Yesterday = $Now.AddDays(-1)
$NewOutputFile = "c:\Events\$($Yesterday.ToString('yyyyddMM'))_AD_NTLMv1_events.log"
function GetEvents($DC){
Write-Host "Searching log on " $DC.HostName
$Events = Get-EventLog "Security" -After $Yesterday.Date -Before $Now.Date -ComputerName $DC.HostName -Message "*NTLM V1*" -instanceid 4624
foreach($Event in $Events){
Write-Host $DC.HostName $Event.EventID $Event.TimeGenerated
Out-File -FilePath $NewOutputFile -InputObject "$($Event.EventID), $($Event.MachineName), $($Event.TimeGenerated), $($Event.ReplacementStrings),($Event.message)" -Append
}
}
foreach($DC in $ADDCs){GetEvents($DC)}

Once you have identified the users and applications that use NTLM in your domain, try switching them to use Kerberos (possibly using SPN). To use Kerberos authentication, some applications need to be slightly reconfigured (Kerberos Authentication in IISConfigure different browsers for Kerberos authenticationCreate a Keytab File Using Kerberos Auth). From my own experience, I see that even large commercial products are still using NTLM instead of Kerberos, some products require updates or configuration changes. The idea is to identify which applications use NTLM authentication, and now you have a way to identify that software and devices.

Small open-source products, old models of various network scanners (which store scans in shared network folders), some NAS devices and other old hardware, legacy software and operating systems are likely to have authentication problems when NTLMv1 is disabled.

Those apps that cannot use Kerberos can be added to the exceptions. This allows them to use NTLM authentication even if it is disabled at the domain level. To do it, the Network security: Restrict NTLM: Add server exceptions for NTLM authentication in this domain policy is used. Add the names of the servers (NetBIOS names, IP addresses, or FQDN), on which NTLM authentication can be used, to the list of exceptions as well. Ideally, this exception list should be empty. You can use the wildcard character *.

GPO: Network security: Restrict NTLM: Add server exceptions for NTLM authentication in this domain

To use Kerberos authentication in an application, you must specify the DNS name of the server, instead of its IP address. If you specify an IP address when connecting to your resources, NTLM authentication will be used.

Configuring Active Directory to Force NTLMv2 via GPO

Before completely disabling NTLM in an AD domain, it is recommended that you first disable its more vulnerable version, NTLMv1. The domain administrator needs to make sure that their network does not allow the use of NTLM or LM for authentication, as in some cases an attacker can use special requests to get a response to an NTLM/LM request.

You can set the preferred authentication type using the domain GPO. Open the Group Policy Management Editor (gpmc.msc) and edit the Default Domain Controllers Policy. Go to the GPO section Computer Configurations -> Policies -> Windows Settings -> Security Settings -> Local Policies -> Security Options and find the policy Network Security: LAN Manager authentication level.

Network Security: LAN Manager authentication level - disable ntlm v1 and lm

There are 6 options to choose from in the policy settings::

  • Send LM & NTLM responses;
  • Send LM & NTLM responses – use NTLMv2 session security if negotiated;
  • Send NTLM response only;
  • Send NTLMv2 response only;
  • Send NTLMv2 response only. Refuse LM;
  • Send NTLMv2 response only. Refuse LM& NTLM.

The NTLM authentication options are listed in the order of their security improvement. By default, Windows 7 and later operating systems use the option Send NTLMv2 response only. If this option is enabled, client computers use NTLMv2 authentication, but AD domain controllers accept LM, NTLM, and NTLMv2 requests.

NTLMv2 can be used where the Kerberos protocol has failed and for some operations (for example, managing local groups and accounts on the domain-joined computers) or in workgroups.

You can change the policy value to the most secure option 6 : “Send NTLMv2 response only. Refuse LM & NTLM”. This policy causes domain controllers to reject LM and NTLM requests as well.

You can also disable NTLMv1 through the registry. To do this, create a DWORD parameter with the name LmCompatibilityLevel with a value between 0 and 5 under the registry key HKEY_LOCAL_MACHINE\SYSTEM\CurrentControlSet\Control\Lsa. Value 5 corresponds to the policy option “Send NTLMv2 response only. Refuse LM NTLM”.

Make sure that the Network security: Do not store LAN Manager hash value on next password change policy is enabled in the same GPO section. It is enabled by default starting with Windows Vista / Windows Server 2008 and prevents the creation of an LM hash.

Network security: Do not store LAN Manager hash value on next password change

Once you have ensured that you are not using NTLMv1, you can go further and try to disable NTLMv2. NTLMv2 is a more secure authentication protocol but loses significantly to Kerberos in terms of security (although there are fewer vulnerabilities in NTLMv2 than in the NTLMv1, but there is still a chance of capturing and reusing data, as well as it doesn’t support mutual authentication).

The main risk of disabling NTLM is the potential use of legacy or misconfigured applications that may still be using NTLM authentication. If this is the case, they will need to be updated or specially configured to switch to Kerberos.

If you have a Remote Desktop Gateway server on your network, you will need to make an additional configuration to prevent clients from connecting using NTLMv1. Create a registry entry:

REG add "HKLM\Software\Microsoft\Windows NT\CurrentVersion\TerminalServerGateway\Config\Core" /v EnforceChannelBinding /t REG_DWORD /d 1 /f

Restrict NTLM Completely and Use Kerberos Authentication in an AD

To check how authentication works in different applications in a domain without using NTLM, you can add the accounts of the required users to the Protected Users domain group (it is available since the Windows Server 2012 R2 release). Members of this security group can only authenticate using Kerberos (NTLM, Digest Authentication, or CredSSP are not allowed). This allows you to verify that Kerberos user authentication is working correctly in different apps.

Then you can completely disable NTLM on the Active Directory domain using the Network Security: Restrict NTLM: NTLM authentication in this domain policy.

The policy has 5 options:

  • Disable: the policy is disabled (NTLM authentication is allowed in the domain);
  • Deny for domain accounts to domain servers: the domain controllers reject NTLM authentication attempts for all servers under the domain accounts, and the “NTLM is blocked” error message is displayed;
  • Deny for domain accounts: the domain controllers are preventing NTLM authentication attempts for all domain accounts, and the “NTLM is blocked” error appears;
  • Deny for domain servers: NTLM authentication requests are denied for all servers unless the server name is on the exception list in the “Network security: Restrict NTLM: Add server exceptions for NTLM authentication in this domain” policy;
  • Deny all: the domain controllers block all NTLM requests for all domain servers and accounts.
GPO: Network Security: Restrict NTLM: NTLM authentication in this domain

Although NTLM is now disabled on the domain, it is still used to process local logins to computers (NTLM is always used for local user logons).

You can also disable incoming and outgoing NTLM traffic on domain computers using separate Default Domain Policy options:

  • Network security: Restrict NTLM: Incoming NTLM traffic = Deny all accounts
  • Network security: Restrict NTLM: Outgoing NTLM traffic to remote servers = Deny all

After enabling auditing, Event Viewer will also display EventID 6038 from the LsaSRV source when using NTLM for authentication:

Microsoft Windows Server has detected that NTLM authentication is presently being used between clients and this server. This event occurs once per boot of the server on the first time a client uses NTLM with this server.
NTLM is a weaker authentication mechanism. Please check:
Which applications are using NTLM authentication?
Are there configuration issues preventing the use of stronger authentication such as Kerberos authentication?
If NTLM must be supported, is Extended Protection configured?
eventid 6038 from lsasrv source: NTLM authentication is presently being used between clients and this server

You can check that Kerberos is used for user authentication with the command:

klist sessions

klist session - check authentication protocol used

This command shows that all users are Kerberos-authenticated (except the built-in local Administrator, who is always authenticated using NTLM).

If you are experiencing a lot of user account lockout events after disabling NTLM, take a close look at the events with ID 4771 (Kerberos pre-authentication failed). Check the Failure Code in the error description. This will indicate the reason and source of the lock.

To further improve Active Directory security, I recommend reading these articles:


Source :
https://woshub.com/disable-ntlm-authentication-windows/

8 Essential Tips for Data Protection and Cybersecurity in Small Businesses

Michelle Quill — June 6, 2023

Small businesses are often targeted by cybercriminals due to their lack of resources and security measures. Protecting your business from cyber threats is crucial to avoid data breaches and financial losses.

Why is cyber security so important for small businesses?

Small businesses are particularly in danger of cyberattacks, which can result in financial loss, data breaches, and damage to IT equipment. To protect your business, it’s important to implement strong cybersecurity measures.

Here are some tips to help you get started:

One important aspect of data protection and cybersecurity for small businesses is controlling access to customer lists. It’s important to limit access to this sensitive information to only those employees who need it to perform their job duties. Additionally, implementing strong password policies and regularly updating software and security measures can help prevent unauthorized access and protect against cyber attacks. Regular employee training on cybersecurity best practices can also help ensure that everyone in the organization is aware of potential threats and knows how to respond in the event of a breach.

When it comes to protecting customer credit card information in small businesses, there are a few key tips to keep in mind. First and foremost, it’s important to use secure payment processing systems that encrypt sensitive data. Additionally, it’s crucial to regularly update software and security measures to stay ahead of potential threats. Employee training and education on cybersecurity best practices can also go a long way in preventing data breaches. Finally, having a plan in place for responding to a breach can help minimize the damage and protect both your business and your customers.

Small businesses are often exposed to cyber attacks, making data protection and cybersecurity crucial. One area of particular concern is your company’s banking details. To protect this sensitive information, consider implementing strong passwords, two-factor authentication, and regular monitoring of your accounts. Additionally, educate your employees on safe online practices and limit access to financial information to only those who need it. Regularly backing up your data and investing in cybersecurity software can also help prevent data breaches.

Small businesses are often at high risk of cyber attacks due to their limited resources and lack of expertise in cybersecurity. To protect sensitive data, it is important to implement strong passwords, regularly update software and antivirus programs, and limit access to confidential information.

It is also important to have a plan in place in case of a security breach, including steps to contain the breach and notify affected parties. By taking these steps, small businesses can better protect themselves from cyber threats and ensure the safety of their data.

Tips for protecting your small business from cyber threats and data breaches are crucial in today’s digital age. One of the most important steps is to educate your employees on cybersecurity best practices, such as using strong passwords and avoiding suspicious emails or links.

It’s also important to regularly update your software and systems to ensure they are secure and protected against the latest threats. Additionally, implementing multi-factor authentication and encrypting sensitive data can add an extra layer of protection. Finally, having a plan in place for responding to a cyber-attack or data breach can help minimize the damage and get your business back on track as quickly as possible.

Small businesses are attackable to cyber-attacks and data breaches, which can have devastating consequences. To protect your business, it’s important to implement strong cybersecurity measures. This includes using strong passwords, regularly updating software and systems, and training employees on how to identify and avoid phishing scams.

It’s also important to have a data backup plan in place and to regularly test your security measures to ensure they are effective. By taking these steps, you can help protect your business from cyber threats and safeguard your valuable data.

To protect against cyber threats, it’s important to implement strong data protection and cybersecurity measures. This can include regularly updating software and passwords, using firewalls and antivirus software, and providing employee training on safe online practices. Additionally, it’s important to have a plan in place for responding to a cyber attack, including backing up data and having a designated point person for handling the situation.

In today’s digital age, small businesses must prioritize data protection and cybersecurity to safeguard their operations and reputation. With the rise of remote work and cloud-based technology, businesses are more vulnerable to cyber attacks than ever before. To mitigate these risks, it’s crucial to implement strong security measures for online meetings, advertising, transactions, and communication with customers and suppliers. By prioritizing cybersecurity, small businesses can protect their data and prevent unauthorized access or breaches.

Here are 8 essential tips for data protection and cybersecurity in small businesses.

8 Essential Tips for Data Protection and Cybersecurity in Small Businesses

1. Train Your Employees on Cybersecurity Best Practices

Your employees are the first line of defense against cyber threats. It’s important to train them on cybersecurity best practices to ensure they understand the risks and how to prevent them. This includes creating strong passwords, avoiding suspicious emails and links, and regularly updating software and security systems. Consider providing regular training sessions and resources to keep your employees informed and prepared.

2. Use Strong Passwords and Two-Factor Authentication

One of the most basic yet effective ways to protect your business from cyber threats is to use strong passwords and two-factor authentication. Encourage your employees to use complex passwords that include a mix of letters, numbers, and symbols, and to avoid using the same password for multiple accounts. Two-factor authentication adds an extra layer of security by requiring a second form of verification, such as a code sent to a mobile device, before granting access to an account. This can help prevent unauthorized access even if a password is compromised.

3. Keep Your Software and Systems Up to Date

One of the easiest ways for cybercriminals to gain access to your business’s data is through outdated software and systems. Hackers are constantly looking for vulnerabilities in software and operating systems, and if they find one, they can exploit it to gain access to your data. To prevent this, make sure all software and systems are kept up-to-date with the latest security patches and updates. This includes not only your computers and servers but also any mobile devices and other connected devices used in your business. Set up automatic updates whenever possible to ensure that you don’t miss any critical security updates.

4. Use Antivirus and Anti-Malware Software

Antivirus and anti-malware software are essential tools for protecting your small business from cyber threats. These programs can detect and remove malicious software, such as viruses, spyware, and ransomware before they can cause damage to your systems or steal your data. Make sure to install reputable antivirus and anti-malware software on all devices used in your business, including computers, servers, and mobile devices. Keep the software up-to-date and run regular scans to ensure that your systems are free from malware.

5. Backup Your Data Regularly

One of the most important steps you can take to protect your small business from data loss is to back up your data regularly. This means creating copies of your important files and storing them in a secure location, such as an external hard drive or cloud storage service. In the event of a cyber-attack or other disaster, having a backup of your data can help you quickly recover and minimize the impact on your business. Make sure to test your backups regularly to ensure that they are working properly and that you can restore your data if needed.

6. Carry out a risk assessment

Small businesses are especially in peril of cyber attacks, making it crucial to prioritize data protection and cybersecurity. One important step is to assess potential risks that could compromise your company’s networks, systems, and information. By identifying and analyzing possible threats, you can develop a plan to address security gaps and protect your business from harm.

For Small businesses making data protection and cybersecurity is a crucial part. To start, conduct a thorough risk assessment to identify where and how your data is stored, who has access to it, and potential threats. If you use cloud storage, consult with your provider to assess risks. Determine the potential impact of breaches and establish risk levels for different events. By taking these steps, you can better protect your business from cyber threats

7. Limit access to sensitive data

One effective strategy is to limit access to critical data to only those who need it. This reduces the risk of a data breach and makes it harder for malicious insiders to gain unauthorized access. To ensure accountability and clarity, create a plan that outlines who has access to what information and what their roles and responsibilities are. By taking these steps, you can help safeguard your business against cyber threats.

8. Use a firewall

For Small businesses, it’s important to protect the system from cyber attacks by making data protection and reducing cybersecurity risk. One effective measure is implementing a firewall, which not only protects hardware but also software. By blocking or deterring viruses from entering the network, a firewall provides an added layer of security. It’s important to note that a firewall differs from an antivirus, which targets software affected by a virus that has already infiltrated the system.

Small businesses can take steps to protect their data and ensure cybersecurity. One important step is to install a firewall and keep it updated with the latest software or firmware. Regularly checking for updates can help prevent potential security breaches.

Conclusion

Small businesses are particularly vulnerable to cyber attacks, so it’s important to take steps to protect your data. One key tip is to be cautious when granting access to your systems, especially to partners or suppliers. Before granting access, make sure they have similar cybersecurity practices in place. Don’t hesitate to ask for proof or to conduct a security audit to ensure your data is safe.

Source :
https://onlinecomputertips.com/support-categories/networking/tips-for-cybersecurity-in-small-businesses/

Change Your Windows Folder Colors and Icons

Cindy Thomas — June 19, 2023

As you probably know, Windows keeps your files into folders that can also contain subfolders. By using folders, you can keep your computer organized by placing files of certain types in their own folders, such as files for a school project or sales meeting. And of course you can create these folders and subfolders as needed and copy or move your files in and out of them.

You have probably also noticed that all of these folders look the same with the exception of the Windows user folders for Documents, Downloads, Pictures and so on as seen below.

Windows User Folders

Another thing that will affect how your folders look is the view that you have applied to them. You can set your folder views to show them as a list or as icons of various sizes. When you use one of the icon views, you might see a file preview icon on the folder based on what types of files are in the folder itself. This icon can also change when you add or remove files from the folder. Empty folders will not have any file preview icons on them.

Windows Folders

If you are looking for some extra customization, then you can try out the free Folder Marker software which will allow you to apply colors to specific folders as well as custom icons. Once you download and install the software, you can apply color and icon changes by either adding folders to the main interface or by using the new right click context menu item that you will now have on your computer.

Folder Marker Software
Change Your Windows Folder Colors and Icons

If you use the first method where you add or drag folders into the app itself, any changes you make will be applied to all folders in the list so you might want to use the right click method to apply changes to single folders.

If you would rather apply a custom icon to your folder rather than change its color, then you can do so from the Main tab in the app or simply by clicking the icon you like from the right click menu. The User Icons section is used to add your own custom icons if you happen to know how to create those.

Change Your Windows Folder Colors and Icons

The image below shows the same folders with some colors and icons applied to them. As you can see, they stand out much better than they did before the changes were made. If you were to move or copy a folder to a new location, its color or custom icon will stay with it so you don’t need to worry about having to change its appearance again.

Change Your Windows Folder Colors and Icons

If you change your mind and what to revert a folder back to its original look, you can do so by right clicking on it and choosing the Restore Default option. To revert all of your changes, you can open the app itself and then go to the Action menu and click on Rollback All Changes.

As you can see, Folder Marker is easy to use and is a quick way to customize your Windows folders and can really help with your file management tasks. You can download the program from their website here.

Source :
https://onlinecomputertips.com/support-categories/windows/change-your-windows-folder-colors-and-icons/

Export Your Google Sites Website to Your Computer

Preston Mason — January 12, 2023

Everyone who uses a computer knows that Google has a service or an app for just about anything you think of. And for those who want an easy way to create websites, they also have their free online website creation tool called Google Sites which doesn’t require any coding skills or HTML knowledge to use. But if you want to backup your website, you will notice that there is no option to do so. In this article, we will show you how to export your google sites website to your computer.

If you are using traditional website development tools or software, you would generally be working on your individual HTML files and also be backing them up as needed. But with Google Sites, you are working within the Sites interface online and your website it stored in your Google Drive account.

The Backup Process

When you go to your Google Drive account and find your website, you will see that it appears as a single file just like a document or spreadsheet would appear. Then if you right click on it, there is no download option like you would see for other files.

Google Drive right click options

To backup your Sites website, you will first need to make a copy of it within your Google Drive account and move to a different folder. Within Drive, click on the New button and then choose New folder. Name this folder something like Website Backup or whatever you would like.

Next, go to your website file in Drive, right click it and then choose the Make a copy option. This will make a copy of your website in the same location and will add copy of in front of the existing name.

Google Drive file right click options make a copy

You can then drag the copy to your new folder or right click on the copy and choose the Move to option and then choose your new folder. You can also move your original website file to this new folder if you don’t want to make the copy for the backup.

Using Google Takeout

After this copy is created, you can go to the Google Takeout website and just make sure you are logged in with the same Google account that you use for your website. Then the first thing you want to do is click on Deselect all since all of the checkboxes will be selected by default.

Google Takeout website

Then scroll down the list and look for Drive (not Classic Sites) and check the box and then click on All Drive data included.

Google Takeout website

Next you will uncheck the box that says Include all files and folders in Drive and check only the box next to the folder name that contains your website file and click OK.

Export Your Google Sites Website to Your Computer

Then you will need to scroll to the bottom of the page and click on the button that says Next step. Now you will be able to configure the export to either send a download link to your email address or add your backup to your Drive, OneDrive, Dropbox or Box account. I prefer the email option.

You can also setup this backup as a one time export or have it be exported every 2 months for the next year. For the export file type you can choose between zip and tgz file formats. If you have a really large website then the export will be split into 2GB files but your website is most likely much smaller than 2GB.

Once you have everything set correctly, you can click on the Create export button.

Export Your Google Sites Website to Your Computer

You will then be shown an export progress screen telling you that your will be sent an email when the export is complete. Even though it says it can possibly take days to complete, its usually fairly quick and might only take a few minutes.

Export Your Google Sites Website to Your Computer

Once you receive the email, you can click on the Download your files button or the Mange exports button to be taken back to the Google Takeout website to download your files.

Export Your Google Sites Website to Your Computer
Google Takeout Mange Exports

After you download the zip file, you can then extract it and navigate to the location of your website files.

Export Your Google Sites Website to Your Computer

Source :
https://onlinecomputertips.com/support-categories/software/export-your-google-sites-website-to-your-computer/

Tailing Big Head Ransomware’s Variants, Tactics, and Impact

By: Ieriz Nicolle Gonzalez, Katherine Casona, Sarah Pearl Camiling
July 07, 2023

We analyze the technical details of a new ransomware family named Big Head. In this entry, we discuss the Big Head ransomware’s similarities and distinct markers that add more technical details to initial reports on the ransomware.

Reports of a new ransomware family and its variant named Big Head emerged in May, with at least two variants of this family being documented. Upon closer examination, we discovered that both strains shared a common contact email in their ransom notes, leading us to suspect that the two different variants originated from the same malware developer. Looking into these variants further, we  uncovered a significant number of versions of this malware. In this entry, we go deeper into the routines of these variants, their similarities and differences, and the potential impact of these infections when abused for attacks.

Analysis

In this section, we go expound on the three samples of Big Head we found, as well as their distinct functions and routines. While we continue to investigate and track this threat, we also highly suspect that all three samples of the Big Head ransomware are distributed via malvertisement as fake Windows updates and fake Word installers.

First sample

fig1-big-head-ransomware-variants-tactics-impact-worldwind-stealer-neshta
Figure 1. The infection routine of the first Big Head ransomware sample

The first sample of Big Head ransomware (SHA256: 6d27c1b457a34ce9edfb4060d9e04eb44d021a7b03223ee72ca569c8c4215438, detected by Trend Micro as Ransom.MSIL.EGOGEN.THEBBBC) featured a .NET compiled binary file. This binary checks the mutex name 8bikfjjD4JpkkAqrz using CreateMutex and terminates itself if the mutex name is found.

fig2-big-head-ransomware-variants-tactics-impact-worldwind-stealer-neshta
Figure 2. Calling CreateMutex function
fig3-big-head-ransomware-variants-tactics-impact-worldwind-stealer-neshta
Figure 3. MTX value “8bikfjjD4JpkkAqrz”

The sample also has a list of configurations containing details related to the installation process. It specifies various actions such as creating a registry key, checking the existence of a file and overwriting it if necessary, setting system file attributes, and creating an autorun registry entry. These configuration settings are separated by the pipe symbol “|” and are accompanied by corresponding strings that define the specific behavior associated with each action.

fig4-big-head-ransomware-variants-tactics-impact-worldwind-stealer-neshta
Figure 4. List of configurations

The format that the malware adheres to in terms of its behavior upon installation is as follows:

[String ExeName] [bool StartProcess] [bool CheckFileExists] [bool SetSystemAttribute] [String FilePath] [bool SetRegistryKey] [None]

Additionally, we noted the presence of three resources that contained data resembling executable files with the “*.exe” extension:

  • 1.exe drops a copy of itself for propagation. This is a piece of ransomware that checks for the extension “.r3d” before encrypting and appending the “.poop” extension.
  • Archive.exe drops a file named teleratserver.exe, a Telegram bot responsible for establishing communication with the threat actor’s chatbot ID.
  • Xarch.exe drops a file named BXIuSsB.exe, a piece of ransomware that encrypts files and encodes file names to Base64. It also displays a fake Windows update to deceive the victim into thinking that the malicious activity is a legitimate process.

These binaries are encrypted, rendering their contents inaccessible without the appropriate decryption mechanism.

fig5-big-head-ransomware-variants-tactics-impact-worldwind-stealer-neshta
Figure 5. Three resources found in the main sample
fig6-big-head-ransomware-variants-tactics-impact-worldwind-stealer-neshta
Figure 6. The encrypted content of one of the files located within the resource section (“1.exe”)

To extract the three binaries from the resources, the malware employs AES decryption with the electronic codebook (ECB) mode. This decryption process requires an initialization vector (IV) for proper decryption.

It is also noteworthy that the decryption key used is derived from the MD5 hash of the mutex 8bikfjjD4JpkkAqrz. This mutex is a hard-coded string value wherein its MD5 hash is used to decrypt the three binaries 1.exe, archive.exe, and Xarch.exe. It is important to note that the MTX value and the encrypted resources are different per sample.

We manually decrypted the content within each binary by exclusively utilizing the MD5 hash of the mutant name. Once this step was completed, we proceeded with the AES decryption to decrypt the encrypted resource file. 

fig7-big-head-ransomware-variants-tactics-impact-worldwind-stealer-neshta
Figure 7. Code for decrypting the three binaries (top) and the decrypted binary file that came from the parent file (bottom)

The following table shows the details of the binaries dropped by the decrypted malware using the MTX value 8bikfjjD4JpkkAqrz. These three binaries exhibit similarities with the parent sample in terms of code structure and binary extraction:

File nameBytesDropped file
1.exe2334881.exe
archive.exe12843536teleratserver.exe
Xarch.exe65552BXIuSsB.exe
fig8-big-head-ransomware-variants-tactics-impact-worldwind-stealer-neshta
Figure 8. 1.exe (left), teleratserver.exe (middle), and BXIuSsB.exe (right)

Binaries

This section details the binaries dropped, as identified from the previous table, and the first binary, 1.exe, was dropped by the parent sample.

            1.      Binary: 1.exe
                    Bytes: 222224
                    MTX value that was used to decrypt this file: 2AESRvXK5jbtN9Rvh

Initially, the file will hide the console window by using WinAPI ShowWindow with SW_HIDE (0). The malware will create an autorun registry key, which allows it to execute automatically upon system startup. Additionally, it will make a copy of itself, which it will save as discord.exe in the <%localappdata%> folder in the local machine.

fig9-big-head-ransomware-variants-tactics-impact-worldwind-stealer-neshta
Figure 9. ShowWindow API code hides the window of the current process (top) and the creation of the registry key and drops a copy of itself as “discord.exe” (bottom)

The Big Head ransomware checks for the victim’s ID in %appdata%\ID. If the ID exists, the ransomware verifies the ID and reads the content. Otherwise, it creates a randomly generated 40-character string and writes it to the file %appdata%\ID as a type of infection marker to identify its victims.

fig10-big-head-ransomware-variants-tactics-impact-worldwind-stealer-neshta
Figure 10. Randomly generating the 40-character string ID (top) and file named ID saved in the “<%appdata%>” folder (bottom)

The observed behavior indicates that files with the extension “.r3d” are specifically targeted for encryption using AES, with the key derived from the SHA256 hash of “123” in cipher block chaining (CBC) mode. As a result, the encrypted files end up having the “.poop” extension appended to them.

fig11-big-head-ransomware-variants-tactics-impact-worldwind-stealer-neshta
Figure 11. The malware checks for the extension that contains “.r3d” before encrypting and appending the ”.poop” extension (top) and the file encryption process when the file extension “.r3d” exists (bottom).

In this file, we also observed how the ransomware deletes its shadow copies. The command used to delete shadow copies and backups, which is also used to disable the recovery option is as follows:

/c vssadmin delete shadows /all /quiet & wmic shadowcopy delete & bcdedit /set {default} bootstatuspolicy ignoreallfailures & bcdedit /set {default} recoveryenabled no & wbadmin delete catalog -quiet

It drops the ransom note on the desktop, subdirectories, and the %appdata% folder. The Big Head ransomware also changes the wallpaper of the victim’s machine. 

fig12-big-head-ransomware-variants-tactics-impact-worldwind-stealer-neshta
Figure 12. Ransom note of the “1.exe” binary
fig13-big-head-ransomware-variants-tactics-impact-worldwind-stealer-neshta
Figure 13. The wallpaper that appears on the victim’s machine

Lastly, it will execute the command to open a browser and access the malware developer’s Telegram account at hxxps[:]//t[.]me/[REDACTED]_69. Our analysis showed no particular action or communication being exchanged with this account in addition to the redirection.

        2.     Binary: teleratserver.exe
                Bytes: 12832480
                MTX value that was used to decrypt this file: OJ4nwj2KO3bCeJoJ1

Teleratserver is a 64-bit Python-compiled binary that acts as a communication channel between the threat actor and the victim via Telegram. It accepts the commands “start”, “help”, “screenshot”, and “message”.

fig14-big-head-ransomware-variants-tactics-impact-worldwind-stealer-neshta
Figure 14. Decompiled Python script from the binary

    3.      Binary: BXIuSsB.exe
             Bytes: 54288
             MTX value that was used to decrypt this file: gdmJp5RKIvzZTepRJ

The malware displays a fake Windows Update UI to deceive the victim into thinking that the malicious activity is a legitimate software update process, with the percentage of progress in increments of 100 seconds.

fig15-big-head-ransomware-variants-tactics-impact-worldwind-stealer-neshta
Figure 15. The code responsible for fake update (left) and the fake update shown to the user (right)

The malware terminates itself if the user’s system language matches the  Russian, Belarusian, Ukrainian, Kazakh, Kyrgyz, Armenian, Georgian, Tatar, and Uzbek country codes. The malware also disables the Task Manager to prevent users from terminating or investigating its process.

fig16-big-head-ransomware-variants-tactics-impact-worldwind-stealer-neshta
Figure 16. The “KillCtrlAltDelete” command responsible for disabling the Task Manager

The malware drops a copy of itself in the hidden folder <%temp%\Adobe> that it created, then creates an entry in the RunOnce registry key, ensuring that it will only run once at the next system startup.

fig17-big-head-ransomware-variants-tactics-impact-worldwind-stealer-neshta
Figure 17. Creation of AutoRun registry

The malware also randomly generates a 32-character key that will later be used to encrypt files. This key will then be encrypted using RSA-2048 with a hard-coded public key.

The ransomware then drops the ransom note that includes the encrypted key.

fig18-big-head-ransomware-variants-tactics-impact-worldwind-stealer-neshta
Figure 18. The ransom note

The malware avoids the directories that contain the following substrings:

  • WINDOWS or Windows
  • RECYCLER or Recycler
  • Program Files
  • Program Files (x86)
  • Recycle.Bin or RECYCLE.BIN
  • TEMP or Temp
  • APPDATA or AppData
  • ProgramData
  • Microsoft
  • Burn

By excluding these directories from its malicious activities, the malware reduces the likelihood of being detected by security solutions installed in the system and increases its chances of remaining undetected and operational for a longer duration. The following are the extensions that the Big Head ransomware encrypts:

“.mdf”, “.db”, “.mdb”, “.sql”, “.pdb”, “.pdb”, “.pdb”, “.dsk”, “.fp3”, “.fdb”, “.accdb”, “.dbf”, “.crd”, “.db3”, “.dbk”, “.nsf”, “.gdb”, “.abs”, “.sdb”, “.sdb”, “.sdb”, “.sqlitedb”, “.edb”, “.sdf”, “.sqlite”, “.dbs”, “.cdb”, “.cdb”, “.cdb”, “.bib”, “.dbc”, “.usr”, “.dbt”, “.rsd”, “.myd”, “.pdm”, “.ndf”, “.ask”, “.udb”, “.ns2”, “.kdb”, “.ddl”, “.sqlite3”, “.odb”, “.ib”, “.db2”, “.rdb”, “.wdb”, “.tcx”, “.emd”, “.sbf”, “.accdr”, “.dta”, “.rpd”, “.btr”, “.vdb”, “.daf”, “.dbv”, “.fcd”, “.accde”, “.mrg”, “.nv2”, “.pan”, “.dnc”, “.dxl”, “.tdt”, “.accdc”, “.eco”, “.fmp”, “.vpd”, “.his”, “.fid”

The malware also terminates the following processes:

“taskmgr”, “sqlagent”, “winword”, “sqlbrowser”, “sqlservr”, “sqlwriter”, “oracle”, “ocssd”, “dbsnmp”, “synctime”, “mydesktopqos”, “agntsvc.exeisqlplussvc”, “xfssvccon”, “mydesktopservice”, “ocautoupds”, “agntsvc.exeagntsvc”, “agntsvc.exeencsvc”, “firefoxconfig”, “tbirdconfig”, “ocomm”, “mysqld”, “sql”, “mysqld-nt”, “mysqld-opt”, “dbeng50”, “sqbcoreservice”

The malware renames the encrypted files using Base64. We observed the malware using the LockFile function which encrypts files by renaming them and adding a marker. This marker serves as an indicator to determine whether a file has been encrypted. Through further examination, we saw the function checking for the marker inside the encrypted file. When decrypted, the marker can be matched at the end of the encrypted file.

fig19-big-head-ransomware-variants-tactics-impact-worldwind-stealer-neshta
Figure 19. The LockFile function
fig20-big-head-ransomware-variants-tactics-impact-worldwind-stealer-neshta
Figure 20. Checking for the marker “###” (top) and finding the marker at the end of the encrypted file (bottom)

The malware targets the following languages and region or local settings of the current user’s operating system as listed in the following:

“ar-SA”, “ar-AE”, “nl-BE”, “nl-NL”, “en-GB”, “en-US”, “en-CA”, “en-AU”, “en-NZ”, “fr-BE”, “fr-CH”, “fr-FR”, “fr-CA”, “fr-LU”, “de-AT”, “de-DE”, “de-CH”, “it-CH”, “it-IT”, “ko-KR”, “pt-PT”, “es-ES”, “sv-FI”, “sv-SE”, “bg-BG”, “ca-ES”, “cs-CZ”, “da-DK”, “el-GR”, “en-IE”, “et-EE”, “eu-ES”, “fi-FI”, “hu-HU”, “ja-JP”, “lt-LT”, “nn-NO”, “pl-PL”, “ro-RO”, “se-FI”, “se-NO”, “se-SE”, “sk-SK”, “sl-SI”, “sv-FI”, “sv-SE”, “tr-TR”

The ransomware checks for strings like VBOX, Virtual, or VMware in the disk enumeration registry to determine whether the system is operating within a virtual environment. It also scans for processes that contain the following substring: VBox, prl_(parallel’s desktop), srvc.exe, vmtoolsd.

fig21-big-head-ransomware-variants-tactics-impact-worldwind-stealer-neshta
Figure 21. Checking for virtual machine identifiers (top) and processes (bottom)

The malware identifies specific process names associated with virtualization software to determine if the system is running in a virtualized environment, allowing it to adjust its actions accordingly for better success or evasion. It can also proceed to delete recovery backup available by using the following command line:

vssadmin delete shadows /all /quiet & bcdedit.exe /set {default} recoveryenabled no & bcdedit.exe /set {default} bootstatuspolicy ignoreallfailures

After deleting the backup, regardless of the number available, it will proceed to delete itself using the SelfDelete() function. This function initiates the execution of the batch file, which will delete the malware executable and the batch file itself.

fig22-big-head-ransomware-variants-tactics-impact-worldwind-stealer-neshta
Figure 22. SelfDelete function

Second sample

The second sample of the Big Head ransomware we observed (SHA256: 2a36d1be9330a77f0bc0f7fdc0e903ddd99fcee0b9c93cb69d2f0773f0afd254, detected by Trend as Ransom.MSIL.EGOGEN.THEABBC) exhibits both ransomware and stealer behaviors.

fig23-big-head-ransomware-variants-tactics-impact-worldwind-stealer-neshta
Figure 23. The infection routine of the second sample of the Big Head ransomware

The main file drops and executes the following files:

  • %TEMP%\runyes.Crypter.bat
  • %AppData%\Roaming\azz1.exe
  • %AppData%\Roaming\Microsoft\Windows\Start Menu\Programs\Startup\Server.exe

The ransomware activities are carried out by runyes.Crypter.bat and azz1.exe, while Server.exe is responsible for collecting information for stealing.

The file runyes.Crypter.bat drops a copy of itself and Cipher.psm1 and then executes the following command to begin encryption:

cmd  /c powershell -executionpolicy bypass -win hidden -noexit -file cry.ps1

The malware employs the AES algorithm to encrypt files and adds the suffix “.poop69news@[REDACTED]” to the encrypted files. It specifically targets files with the following extensions:

*.aif ,*.cda ,*.mid ,*.midi ,*.mp3 ,*.mpa ,*.ogg ,*.wav ,*.wma ,*.wpl ,*.7z ,*.arj ,*.deb ,*.pkg ,*.rar ,*.rpm ,*.tar ,*.gz ,*.z ,*.zip ,*.bin ,*.dmg ,*.iso ,*.toas ,*.vcd ,*.csv  ,*.dat ,*.db ,*.dbf ,*.log ,*.mdb ,*.sav ,*.sql ,*.tar ,*.xml ,*.email ,*.eml ,*.emlx ,*.msg ,*.oft ,*.ost ,*.pst ,*.vcf ,*.apk ,*.bat ,*.bin ,*.cgi ,*.pl ,*.com ,*.exe ,*.gadget ,*.jar ,*.msi ,*.py ,*.wsf ,*.fnt ,*.fon ,*.otf ,*.ttf ,*.ai ,*.bmp ,*.gif ,*.ico ,*.jpeg ,*.jpg ,*.png ,*.ps ,*.psd ,*.svg ,*.tif ,*.tiff ,*.asp ,*.aspx ,*.cer ,*.cfm ,*.cgi ,*.pl ,*.css ,*.htm ,*.html ,*.js ,*.jsp ,*.part ,*.php ,*.py ,*.rss ,*.xhtml ,*.key ,*.odp ,*.pps ,*.ppt ,*.pptx ,*.c ,*.class ,*.cpp ,*.cs ,*.h ,*.java ,*.pl ,*.sh ,*.swift ,*.vb ,*.ods ,*.xls ,*.xlsm ,*.xlsx ,*.bak ,*.cab ,*.cfg ,*.cpl ,*.cur ,*.dll ,*.dmp ,*.drv ,*.icns ,*.icoini ,*.lnk ,*.msi ,*.sys ,*.tmp ,*.3g2 ,*.3gp ,*.avi ,*.flv ,*.h264 ,*.m4v ,*.mkv ,*.mov ,*.mp4 ,*.mpg ,*.mpeg ,*.rm ,*.swf ,*.vob ,*.wmv ,*.doc ,*.docx ,*.odt ,*.pdf ,*.rtf ,*.tex ,*.txt ,*.wpd ,*.ps1 ,*.cmd ,*.vbs ,*.vmxf ,*.vmx ,*.vmsd ,*.vmdk ,*.nvram ,*.vbox

The file azz1.exe, which is also involved in other ransomware activities, establishes a registry entry at <HKCU\Software\Microsoft\Windows\CurrentVersion\Run>. This entry ensures the persistence of a copy of itself. It also drops a file containing the victim’s ID and a ransom note:

fig24-big-head-ransomware-variants-tactics-impact-worldwind-stealer-neshta
Figure 24. The ransom note for the second sample of the Big Head ransomware

Like the first sample, the second sample also changes the victim’s desktop wallpaper. Afterward, it will open the URL hxxps[:]//github[.]com/[REDACTED]_69 using the system’s default web browser. As of this writing, the URL is no longer available.

Other variants of this ransomware used the dropper azz1.exe as well, although the specific file might differ in each binary. Meanwhile, Server.exe, which we have identified as the WorldWind stealer, collects the following data:

  • Browsing history of all available browsers
  • List of directories
  • Replica of drivers
  • List of running processes
  • Product key
  • Networks
  • Screenshot of the screen after running the file

Third sample

The third sample (SHA256: 25294727f7fa59c49ef0181c2c8929474ae38a47b350f7417513f1bacf8939ff, detected by Trend as Ransom.MSIL.EGOGEN.YXDEL) includes a file infector we identified as Neshta in its chain.

fig25-big-head-ransomware-variants-tactics-impact-worldwind-stealer-neshta
Figure 25. The infection routine of the third sample of the Big Head ransomware

Neshta is a virus designed to infect and insert its malicious code into executable files. This malware also has a characteristic behavior of dropping a file called directx.sys, which contains the full path name of the infected file that was last executed. This behavior is not commonly observed in most types of malware, as they typically do not store such specific information in their dropped files.

Incorporating Neshta into the ransomware deployment can also serve as a camouflage technique for the final Big Head ransomware payload. This technique can make the piece of malware appear as a different type of threat, such as a virus, which can divert the prioritization of security solutions that primarily focus on detecting ransomware.

Notably, the ransom note and wallpaper associated with this binary are different from the ones previously mentioned.

fig26-big-head-ransomware-variants-tactics-impact-worldwind-stealer-neshta
Figure 26. Wallpaper (top) and ransom note (bottom) used in the victim’s machine post infection

The Big Head ransomware exhibits unique behaviors during the encryption process, such as displaying the Windows update screen as it encrypts files to deceive users and effectively locking them out of their machines, renaming the encrypted files using Base64 encoding to provide an extra layer of obfuscation, and as a whole making it more challenging for users to identify the original file names and types of encrypted files. We also noted the following significant distinctions among the three versions of the Big Head ransomware:

  • The first sample incorporates a backdoor in its infection chain.
  • The second sample employs a trojan spy and/or info stealer.
  • The third sample utilizes a file infector. 

Threat actor

The ransom note clearly indicates that the malware developer utilizes both email and Telegram for communication with their victims. Upon further investigation with the given Telegram username, we were directed to a YouTube account.

The account on the platform is relatively new, having joined on April 19, 2023, With a total of 12 published videos as of this writing. This YouTube channel showcases demonstrations of the piece of malware the cybercriminals have. We also noted that in a pinned comment on each of their videos, they explicitly state their username on Telegram. 

fig27-big-head-ransomware-variants-tactics-impact-worldwind-stealer-neshta
Figure 27. A new YouTube account with a number of videos featuring pieces of malware (top) and a Telegram username pinned in the comments section for all videos (bottom)

While we suspect that this actor engages in transactions on Telegram, it is worth noting that the YouTube name “aplikasi premium cuma cuma” is a phrase in Bahasa that translates to “premium application for free.” While it is possible, we can only speculate on any connection between the ransomware and the countries that use the said language.

Insights

Aside from the specific email address to tie all the samples of the Big Head ransomware together, the ransom notes from the samples have the same bitcoin wallet and drops the same files. Looking at the samples altogether, we can see that all the routines have the same structure in the infection process that it follows once the ransomware infects a system.

The malware developers mention in the comment section of their YouTube videos that they have a “new” Telegram account, indicative of an old one previously used. We also checked their Bitcoin wallet history and found transactions made in 2022. While we’re unaware of what those transactions are, the history implies that these cybercriminals are not new at this type of threats and attacks, although they might not be sophisticated actors as a whole.

The discovery of the Big Head ransomware as a developing piece of malware prior to the occurrence of any actual attacks or infections can be seen as a huge advantage for security researchers and analysts. Analysis and reporting of the variants provide an opportunity to analyze the codes, behaviors, and potential vulnerabilities. This information can then be used to develop countermeasures, patch vulnerabilities, and enhance security systems to mitigate future risks.

Moreover, advertising on YouTube without any evidence of “successful penetrations or infections” might seem premature promotional activities from a non-technical perspective. From a technical point of view, these malware developers left recognizable strings, used predictable encryption methods, or implementing weak or easily detectable evasion techniques, among other “mistakes.”

However, security teams should remain prepared given the malware’s diverse functionalities, encompassing stealers, infectors, and ransomware samples. This multifaceted nature gives the malware the potential to cause significant harm once fully operational, making it more challenging to defend systems against, as each attack vector requires separate attention.

Indicators of Compromise (IOCs)

You can download the IOCs here

Tailing Big Head Ransomware’s Variants, Tactics, and Impact

Indicators of Compromise (IOCs)

Filename				SHA256									Detection			Description
Read Me First!.txt			Ransom note
1.exe 					6d27c1b457a34ce9edfb4060d9e04eb44d021a7b03223ee72ca569c8c4215438	Ransom.MSIL.EGOGEN.THEBBBC 	First sample
1.exe 					226bec8acd653ea9f4b7ea4eaa75703696863841853f488b0b7d892a6be3832a	Ransom.MSIL.EGOGEN.YXDFE	
123yes.exe 				ff900b9224fde97889d37b81855a976cddf64be50af280e04ce53c587d978840	Ransom.MSIL.EGOGEN.YXDEO	
archive.exe 				cf9410565f8a06af92d65e118bd2dbaeb146d7e51de2c35ba84b47cfa8e4f53b	Ransom.MSIL.EGOGEN.YXDFZ	
azz1.exe, discord.exe 			1c8bc3890f3f202e459fb87acec4602955697eef3b08c93c15ebb0facb019845	Ransom.MSIL.EGOGEN.YXDEW	
BXIuSsB.exe 				64246b9455d76a094376b04a2584d16771cd6164db72287492078719a0c749ab	Ransom.MSIL.EGOGEN.YXDEL	
ConsoleApp2.exe 			0dbfd3479cfaf0856eb8a75f0ad4fccb5fd6bd17164bcfa6a5a386ed7378958d	Ransom.MSIL.EGOGEN.YXDEW	
cry.ps1 				6698f8ffb7ba04c2496634ff69b0a3de9537716cfc8f76d1cfea419dbd880c94	Ransom.PS1.EGOGEN.YXDFV	
Cipher.psm1, 													Ransom.PS1.EGOGEN.YXDFZ	
discord.exe 				b8e456861a5fb452bcf08d7b37277972a4a06b0a928d57c5ec30afa101d77ead	Ransom.MSIL.EGOGEN.YXDEL	
discord.exe 				6b3bf710cf4a0806b2c5eaa26d2d91ca57575248ff0298f6dee7180456f37d2e	Ransom.MSIL.EGOGEN.YXDEL	
docx.Crypter.bat, runyes.Crypter.bat 	6b771983142c7fa72ce209df8423460189c14ec635d6235bf60386317357428a	Ransom.BAT.EGOGEN.YXDFZ 	
event-stream.exe 			627b920845683bd7303d33946ff52fb2ea595208452285457aa5ccd9c01c3b0a	HackTool.Win32.EventStream.A	
l.bat 					40d11a20bd5ca039a15a0de0b1cb83814fa9b1d102585db114bba4c5895a8a44	Ransom.BAT.EGOGEN.YXDFZ	
Locker.ps1 				159fbb0d04c1a77d434ce3810d1e2c659fda0a5703c9d06f89ee8dc556783614	Ransom.PS1.EGOGEN.YXDEL	
locker.ps1 				9aa38796e0ce4866cff8763b026272eb568fa79d8a147f7d61824752ad6d8f09	Ransom.PS1.EGOGEN.YXDFZ	
program.exe 				39caec2f2e9fda6e6a7ce8f22e29e1c77c8f1b4bde80c91f6f78cc819f031756	Ransom.MSIL.EGOGEN.YXDEP	
Prynts.exe 				1ada91cb860cd3318adbb4b6fd097d31ad39c2718b16c136c16407762251c5db	TrojanSpy.MSIL.STORMKITTY.D	
r.pyw 					be6416218e2b1a879e33e0517bcacaefccab6ad2f511de07eebd88821027f92d	Ransom.Python.EGOGEN.YXDFZ 	
Server.exe 				9a7889147fa53311ba7ec8166c785f7a935c35eba4a877c1313a8d2e80e3230d	TrojanSpy.MSIL.WORLDWIND.A	Dropped WorldWind Stealer
Server.exe  				f6a2ec226c84762458d53f5536f0a19e34b2a9b03d574ae78e89098af20bcaa3	PE_NESHTA.A	
sfchost.exe, 12.exe 			1942aac761bc2e21cf303e987ef2a7740a33c388af28ba57787f10b1804ea38e	Ransom.MSIL.EGOGEN.YXDEL	
slam.exe 				f354148b5f0eab5af22e8152438468ae8976db84c65415d3f4a469b35e31710f	Ransom.MSIL.EGOGEN.YXDE4	
ssissa.Crypter.bat  			037f9434e83919506544aa04fecd7f56446a7cc65ee03ac0a11570cf4f607853	Ransom.BAT.EGOGEN.YXDFZ	
svchost.com 				980bac6c9afe8efc9c6fe459a5f77213b0d8524eb00de82437288eb96138b9a2	PE_NESHTA.A-O	
teleratserver.exe 			603fcc53fd7848cd300dad85bef9a6b80acaa7984aa9cb9217cdd012ff1ce5f0	Backdoor.WIn64.TELERAT.A	
Xarch.exe     				bcf8464d042171d7ecaada848b5403b6a810a91f7fd8f298b611e94fa7250463	Ransom.MSIL.EGOGEN.YXDEV	
XarchiveOutput.exe			64aac04ffb290a23ab9f537b1143a4556e6893d9ff7685a11c2c0931d978a931	Ransom.MSIL.EGOGEN.YXDEV	
Xatput.exe 				f59c45b71eb62326d74e83a87f821603bf277465863bfc9c1dcb38a97b0b359d	Ransom.MSIL.EGOGEN.YXDEV	
Xserver.exe 				2a36d1be9330a77f0bc0f7fdc0e903ddd99fcee0b9c93cb69d2f0773f0afd254	Ransom.MSIL.EGOGEN.THEABBC	Second sample
Xsput.exe 				66bb57338bec9110839dc9a83f85b05362ab53686ff7b864d302a217cafb7531	Ransom.MSIL.EGOGEN.YXDEV	
Xsuut.exe 				806f64fda529d92c16fac02e9ddaf468a8cc6cbc710dc0f3be55aec01ed65235	Ransom.MSIL.EGOGEN.YXDEV	
Xxut.exe 				9c1c527a826d16419009a1b7797ed20990b9a04344da9c32deea00378a6eeee2	Ransom.MSIL.EGOGEN.YXDEO 	
iXZAF					40e5050b894cb70c93260645bf9804f50580050eb131e24f30cb91eec9ad1a6e	Ransom.MSIL.EGOGEN.THFBIBC	
XBtput.exe 				25294727f7fa59c49ef0181c2c8929474ae38a47b350f7417513f1bacf8939ff	Ransom.MSIL.EGOGEN.YXDEL	Third sample
XBtput2.exe 				dcfa0fca8c1dd710b4f40784d286c39e5d07b87700bdc87a48659c0426ec6cb6	Ransom.MSIL.EGOGEN.YXDEO	

Source :
https://www.trendmicro.com/it_it/research/23/g/tailing-big-head-ransomware-variants-tactics-and-impact.html

Part 2: Rethinking cache purge with a new architecture

21/06/2023

In Part 1: Rethinking Cache Purge, Fast and Scalable Global Cache Invalidation, we outlined the importance of cache invalidation and the difficulties of purging caches, how our existing purge system was designed and performed, and we gave a high level overview of what we wanted our new Cache Purge system to look like.

It’s been a while since we published the first blog post and it’s time for an update on what we’ve been working on. In this post we’ll be talking about some of the architecture improvements we’ve made so far and what we’re working on now.

Cache Purge end to end

We touched on the high level design of what we called the “coreless” purge system in part 1, but let’s dive deeper into what that design encompasses by following a purge request from end to end:

Step 1: Request received locally

An API request to Cloudflare is routed to the nearest Cloudflare data center and passed to an API Gateway worker. This worker looks at the request URL to see which service it should be sent to and forwards the request to the appropriate upstream backend. Most endpoints of the Cloudflare API are currently handled by centralized services, so the API Gateway worker is often just proxying requests to the nearest “core” data center which have their own gateway services to handle authentication, authorization, and further routing. But for endpoints which aren’t handled centrally the API Gateway worker must handle authentication and route authorization, and then proxy to an appropriate upstream. For cache purge requests that upstream is a Purge Ingest worker in the same data center.

Step 2: Purges tested locally

The Purge Ingest worker evaluates the purge request to make sure it is processible. It scans the URLs in the body of the request to see if they’re valid, then attempts to purge the URLs from the local data center’s cache. This concept of local purging was a new step introduced with the coreless purge system allowing us to capitalize on existing logic already used in every data center.

By leveraging the same ownership checks our data centers use to serve a zone’s normal traffic on the URLs being purged, we can determine if those URLs are even cacheable by the zone. Currently more than 50% of the URLs we’re asked to purge can’t be cached by the requesting zones, either because they don’t own the URLs (e.g. a customer asking us to purge https://cloudflare.com) or because the zone’s settings for the URL prevent caching (e.g. the zone has a “bypass” cache rule that matches the URL). All such purges are superfluous and shouldn’t be processed further, so we filter them out and avoid broadcasting them to other data centers freeing up resources to process more legitimate purges.

On top of that, generating the cache key for a file isn’t free; we need to load zone configuration options that might affect the cache key, apply various transformations, et cetera. The cache key for a given file is the same in every data center though, so when we purge the file locally we now return the generated cache key to the Purge Ingest worker and broadcast that key to other data centers instead of making each data center generate it themselves.

Step 3: Purges queued for broadcasting

purge request to small colo, ingest worker sends to queue worker in T1

Once the local purge is done the Purge Ingest worker forwards the purge request with the cache key obtained from the local cache to a Purge Queue worker. The queue worker is a Durable Object worker using its persistent state to hold a queue of purges it receives and pointers to how far along in the queue each data center in our network is in processing purges.

The queue is important because it allows us to automatically recover from a number of scenarios such as connectivity issues or data centers coming back online after maintenance. Having a record of all purges since an issue arose lets us replay those purges to a data center and “catch up”.

But Durable Objects are globally unique, so having one manage all global purges would have just moved our centrality problem from a core data center to wherever that Durable Object was provisioned. Instead we have dozens of Durable Objects in each region, and the Purge Ingest worker looks at the load balancing pool of Durable Objects for its region and picks one (often in the same data center) to forward the request to. The Durable Object will write the purge request to its queue and immediately loop through all the data center pointers and attempt to push any outstanding purges to each.

While benchmarking our performance we found our particular workload exhibited a “goldilocks zone” of throughput to a given Durable Object. On script startup we have to load all sorts of data like network topology and data center health–then refresh it continuously in the background–and as long as the Durable Object sees steady traffic it stays active and we amortize those startup costs. But if you ask a single Durable Object to do too much at once like send or receive too many requests, the single-threaded runtime won’t keep up. Regional purge traffic fluctuates a lot depending on local time of day, so there wasn’t a static quantity of Durable Objects per region that would let us stay within the goldilocks zone of enough requests to each to keep them active but not too many to keep them efficient. So we built load monitoring into our Durable Objects, and a Regional Autoscaler worker to aggregate that data and adjust load balancing pools when we start approaching the upper or lower edges of our efficiency goldilocks zone.

Step 4: Purges broadcast globally

multiple regions, durable object sends purges to fanouts in other regions, fanout sends to small colos in their region

Once a purge request is queued by a Purge Queue worker it needs to be broadcast to the rest of Cloudflare’s data centers to be carried out by their caches. The Durable Objects will broadcast purges directly to all data centers in their region, but when broadcasting to other regions they pick a Purge Fanout worker per region to take care of their region’s distribution. The fanout workers manage queues of their own as well as pointers for all of their region’s data centers, and in fact they share a lot of the same logic as the Purge Queue workers in order to do so. One key difference is fanout workers aren’t Durable Objects; they’re normal worker scripts, and their queues are purely in memory as opposed to being backed by Durable Object state. This means not all queue worker Durable Objects are talking to the same fanout worker in each region. Fanout workers can be dropped and spun up again quickly by any metal in the data center because they aren’t canonical sources of state. They maintain queues and pointers for their region but all of that info is also sent back downstream to the Durable Objects who persist that data themselves, reliably.

But what does the fanout worker get us? Cloudflare has hundreds of data centers all over the world, and as we mentioned above we benefit from keeping the number of incoming and outgoing requests for a Durable Object fairly low. Sending purges to a fanout worker per region means each Durable Object only has to make a fraction of the requests it would if it were broadcasting to every data center directly, which means it can process purges faster.

On top of that, occasionally a request will fail to get where it was going and require retransmission. When this happens between data centers in the same region it’s largely unnoticeable, but when a Durable Object in Canada has to retry a request to a data center in rural South Africa the cost of traversing that whole distance again is steep. The data centers elected to host fanout workers have the most reliable connections in their regions to the rest of our network. This minimizes the chance of inter-regional retries and limits the latency imposed by retries to regional timescales.

The introduction of the Purge Fanout worker was a massive improvement to our distribution system, reducing our end-to-end purge latency by 50% on its own and increasing our throughput threefold.

Current status of coreless purge

We are proud to say our new purge system has been in production serving purge by URL requests since July 2022, and the results in terms of latency improvements are dramatic. In addition, flexible purge requests (purge by tag/prefix/host and purge everything) share and benefit from the new coreless purge system’s entrypoint workers before heading to a core data center for fulfillment.

The reason flexible purge isn’t also fully coreless yet is because it’s a more complex task than “purge this object”; flexible purge requests can end up purging multiple objects–or even entire zones–from cache. They do this through an entirely different process that isn’t coreless compatible, so to make flexible purge fully coreless we would have needed to come up with an entirely new multi-purge mechanism on top of redesigning distribution. We chose instead to start with just purge by URL so we could focus purely on the most impactful improvements, revamping distribution, without reworking the logic a data center uses to actually remove an object from cache.

This is not to say that the flexible purges haven’t benefited from the coreless purge project. Our cache purge API lets users bundle single file and flexible purges in one request, so the API Gateway worker and Purge Ingest worker handle authorization, authentication and payload validation for flexible purges too. Those flexible purges get forwarded directly to our services in core data centers pre-authorized and validated which reduces load on those core data center auth services. As an added benefit, because authorization and validity checks all happen at the edge for all purge types users get much faster feedback when their requests are malformed.

Next steps

While coreless cache purge has come a long way since the part 1 blog post, we’re not done. We continue to work on reducing end-to-end latency even more for purge by URL because we can do better. Alongside improvements to our new distribution system, we’ve also been working on the redesign of flexible purge to make it fully coreless, and we’re really excited to share the results we’re seeing soon. Flexible cache purge is an incredibly popular API and we’re giving its refresh the care and attention it deserves.

We protect entire corporate networks, help customers build Internet-scale applications efficiently, accelerate any website or Internet applicationward off DDoS attacks, keep hackers at bay, and can help you on your journey to Zero Trust.

Visit 1.1.1.1 from any device to get started with our free app that makes your Internet faster and safer.

To learn more about our mission to help build a better Internet, start here. If you’re looking for a new career direction, check out our open positions.

Source :
https://blog.cloudflare.com/rethinking-cache-purge-architecture/

Part 1: Rethinking Cache Purge, Fast and Scalable Global Cache Invalidation

14/05/2022

There is a famous quote attributed to a Netscape engineer: “There are only two difficult problems in computer science: cache invalidation and naming things.” While naming things does oddly take up an inordinate amount of time, cache invalidation shouldn’t.

In the past we’ve written about Cloudflare’s incredibly fast response times, whether content is cached on our global network or not. If content is cached, it can be served from a Cloudflare cache server, which are distributed across the globe and are generally a lot closer in physical proximity to the visitor. This saves the visitor’s request from needing to go all the way back to an origin server for a response. But what happens when a webmaster updates something on their origin and would like these caches to be updated as well? This is where cache “purging” (also known as “invalidation”) comes in.

Customers thinking about setting up a CDN and caching infrastructure consider questions like:

  • How do different caching invalidation/purge mechanisms compare?
  • How many times a day/hour/minute do I expect to purge content?
  • How quickly can the cache be purged when needed?

This blog will discuss why invalidating cached assets is hard, what Cloudflare has done to make it easy (because we care about your experience as a developer), and the engineering work we’re putting in this year to make the performance and scalability of our purge services the best in the industry.

What makes purging difficult also makes it useful

(i) Scale
The first thing that complicates cache invalidation is doing it at scale. With data centers in over 270 cities around the globe, our most popular users’ assets can be replicated at every corner of our network. This also means that a purge request needs to be distributed to all data centers where that content is cached. When a data center receives a purge request, it needs to locate the cached content to ensure that subsequent visitor requests for that content are not served stale/outdated data. Requests for the purged content should be forwarded to the origin for a fresh copy, which is then re-cached on its way back to the user.

This process repeats for every data center in Cloudflare’s fleet. And due to Cloudflare’s massive network, maintaining this consistency when certain data centers may be unreachable or go offline, is what makes purging at scale difficult.

Making sure that every data center gets the purge command and remains up-to-date with its content logs is only part of the problem. Getting the purge request to data centers quickly so that content is updated uniformly is the next reason why cache invalidation is hard.  

(ii) Speed
When purging an asset, race conditions abound. Requests for an asset can happen at any time, and may not follow a pattern of predictability. Content can also change unpredictably. Therefore, when content changes and a purge request is sent, it must be distributed across the globe quickly. If purging an individual asset, say an image, takes too long, some visitors will be served the new version, while others are served outdated content. This data inconsistency degrades user experience, and can lead to confusion as to which version is the “right” version. Websites can sometimes even break in their entirety due to this purge latency (e.g. by upgrading versions of a non-backwards compatible JavaScript library).

Purging at speed is also difficult when combined with Cloudflare’s massive global footprint. For example, if a purge request is traveling at the speed of light between Tokyo and Cape Town (both cities where Cloudflare has data centers), just the transit alone (no authorization of the purge request or execution) would take over 180ms on average based on submarine cable placement. Purging a smaller network footprint may reduce these speed concerns while making purge times appear faster, but does so at the expense of worse performance for customers who want to make sure that their cached content is fast for everyone.

(iii) Scope
The final thing that makes purge difficult is making sure that only the unneeded web assets are invalidated. Maintaining a cache is important for egress cost savings and response speed. Webmasters’ origins could be knocked over by a thundering herd of requests, if they choose to purge all content needlessly. It’s a delicate balance of purging just enough: too much can result in both monetary and downtime costs, and too little will result in visitors receiving outdated content.

At Cloudflare, what to invalidate in a data center is often dictated by the type of purge. Purge everything, as you could probably guess, purges all cached content associated with a website. Purge by prefix purges content based on a URL prefix. Purge by hostname can invalidate content based on a hostname. Purge by URL or single file purge focuses on purging specified URLs. Finally, Purge by tag purges assets that are marked with Cache-Tag headers. These markers offer webmasters flexibility in grouping assets together. When a purge request for a tag comes into a data center, all assets marked with that tag will be invalidated.

With that overview in mind, the remainder of this blog will focus on putting each element of invalidation together to benchmark the performance of Cloudflare’s purge pipeline and provide context for what performance means in the real-world. We’ll be reviewing how fast Cloudflare can invalidate cached content across the world. This will provide a baseline analysis for how quick our purge systems are presently, which we will use to show how much we will improve by the time we launch our new purge system later this year.

How does purge work currently?

In general, purge takes the following route through Cloudflare’s data centers.

  • A purge request is initiated via the API or UI. This request specifies how our data centers should identify the assets to be purged. This can be accomplished via cache-tag header(s), URL(s), entire hostnames, and much more.
  • The request is received by any Cloudflare data center and is identified to be a purge request. It is then routed to a Cloudflare core data center (a set of a few data centers responsible for network management activities).
  • When a core data center receives it, the request is processed by a number of internal services that (for example) make sure the request is being sent from an account with the appropriate authorization to purge the asset. Following this, the request gets fanned out globally to all Cloudflare data centers using our distribution service.
  • When received by a data center, the purge request is processed and all assets with the matching identification criteria are either located and removed, or marked as stale. These stale assets are not served in response to requests and are instead re-pulled from the origin.
  • After being pulled from the origin, the response is written to cache again, replacing the purged version.

Now let’s look at this process in practice. Below we describe Cloudflare’s purge benchmarking that uses real-world performance data from our purge pipeline.

Benchmarking purge performance design

In order to understand how performant Cloudflare’s purge system is, we measured the time it took from sending the purge request to the moment that the purge is complete and the asset is no longer served from cache.  

In general, the process of measuring purge speeds involves: (i) ensuring that a particular piece of content is cached, (ii) sending the command to invalidate the cache, (iii) simultaneously checking our internal system logs for how the purge request is routed through our infrastructure, and (iv) measuring when the asset is removed from cache (first miss).

This process measures how quickly cache is invalidated from the perspective of an average user.

  • Clock starts
    As noted above, in this experiment we’re using sampled RUM data from our purge systems. The goal of this experiment is to benchmark current data for how long it can take to purge an asset on Cloudflare across different regions. Once the asset was cached in a region on Cloudflare, we identify when a purge request is received for that asset. At that same instant, the clock started for this experiment. We include in this time any retrys that we needed to make (due to data centers missing the initial purge request) to ensure that the purge was done consistently across our network. The clock continues as the request transits our purge pipeline  (data center > core > fanout > purge from all data centers).  
  • Clock stops
    What caused the clock to stop was the purged asset being removed from cache, meaning that the data center is no longer serving the asset from cache to visitor’s requests. Our internal logging measures the precise moment that the cache content has been removed or expired and from that data we were able to determine the following benchmarks for our purge types in various regions.  

Results

We’ve divided our benchmarks in two ways: by purge type and by region.

We singled out Purge by URL because it identifies a single target asset to be purged. While that asset can be stored in multiple locations, the amount of data to be purged is strictly defined.

We’ve combined all other types of purge (everything, tag, prefix, hostname) together because the amount of data to be removed is highly variable. Purging a whole website or by assets identified with cache tags could mean we need to find and remove a multitude of content from many different data centers in our network.

Secondly, we have segmented our benchmark measurements by regions and specifically we confined the benchmarks to specific data center servers in the region because we were concerned about clock skews between different data centers. This is the reason why we limited the test to the same cache servers so that even if there was skew, they’d all be skewed in the same way.  

We took the latency from the representative data centers in each of the following regions and the global latency. Data centers were not evenly distributed in each region, but in total represent about 90 different cities around the world:  

  • Africa
  • Asia Pacific Region (APAC)
  • Eastern Europe (EEUR)
  • Eastern North America (ENAM)
  • Oceania
  • South America (SA)
  • Western Europe (WEUR)
  • Western North America (WNAM)

The global latency numbers represent the purge data from all Cloudflare data centers in over 270 cities globally. In the results below, global latency numbers may be larger than the regional numbers because it represents all of our data centers instead of only a regional portion so outliers and retries might have an outsized effect.

Below are the results for how quickly our current purge pipeline was able to invalidate content by purge type and region. All times are represented in seconds and divided into P50, P75, and P99 quantiles. Meaning for “P50” that 50% of the purges were at the indicated latency or faster.  

Purge By URL

P50P75P99
AFRICA0.95s1.94s6.42s
APAC0.91s1.87s6.34s
EEUR0.84s1.66s6.30s
ENAM0.85s1.71s6.27s
OCEANIA0.95s1.96s6.40s
SA0.91s1.86s6.33s
WEUR0.84s1.68s6.30s
WNAM0.87s1.74s6.25s
GLOBAL1.31s1.80s6.35s

Purge Everything, by Tag, by Prefix, by Hostname

P50P75P99
AFRICA1.42s1.93s4.24s
APAC1.30s2.00s5.11s
EEUR1.24s1.77s4.07s
ENAM1.08s1.62s3.92s
OCEANIA1.16s1.70s4.01s
SA1.25s1.79s4.106s
WEUR1.19s1.73s4.04s
WNAM0.9995s1.53s3.83s
GLOBAL1.57s2.32s5.97s

A general note about these benchmarks — the data represented here was taken from over 48 hours (two days) of RUM purge latency data in May 2022. If you are interested in how quickly your content can be invalidated on Cloudflare, we suggest you test our platform with your website.

Those numbers are good and much faster than most of our competitors. Even in the worst case, we see the time from when you tell us to purge an item to when it is removed globally is less than seven seconds. In most cases, it’s less than a second. That’s great for most applications, but we want to be even faster. Our goal is to get cache purge to as close as theoretically possible to the speed of light limit for a network our size, which is 200ms.

Intriguingly, LEO satellite networks may be able to provide even lower global latency than fiber optics because of the straightness of the paths between satellites that use laser links. We’ve done calculations of latency between LEO satellites that suggest that there are situations in which going to space will be the fastest path between two points on Earth. We’ll let you know if we end up using laser-space-purge.

Just as we have with network performance, we are going to relentlessly measure our cache performance as well as the cache performance of our competitors. We won’t be satisfied until we verifiably are the fastest everywhere. To do that, we’ve built a new cache purge architecture which we’re confident will make us the fastest cache purge in the industry.

Our new architecture

Through the end of 2022, we will continue this blog series incrementally showing how we will become the fastest, most-scalable purge system in the industry. We will continue to update you with how our purge system is developing  and benchmark our data along the way.

Getting there will involve rearchitecting and optimizing our purge service, which hasn’t received a systematic redesign in over a decade. We’re excited to do our development in the open, and bring you along on our journey.

So what do we plan on updating?

Introducing Coreless Purge

The first version of our cache purge system was designed on top of a set of central core services including authorization, authentication, request distribution, and filtering among other features that made it a high-reliability service. These core components had ultimately become a bottleneck in terms of scale and performance as our network continues to expand globally. While most of our purge dependencies have been containerized, the message queue used was still running on bare metals, which led to increased operational overhead when our system needed to scale.

Last summer, we built a proof of concept for a completely decentralized cache invalidation system using in-house tech – Cloudflare Workers and Durable Objects. Using Durable Objects as a queuing mechanism gives us the flexibility to scale horizontally by adding more Durable Objects as needed and can reduce time to purge with quick regional fanouts of purge requests.

In the new purge system we’re ripping out the reliance on core data centers and moving all that functionality to every data center, we’re calling it coreless purge.

Here’s a general overview of how coreless purge will work:

  • A purge request will be initiated via the API or UI. This request will specify how we should identify the assets to be purged.
  • The request will be routed to the nearest Cloudflare data center where it is identified to be a purge request and be passed to a Worker that will perform several of the key functions that currently occur in the core (like authorization, filtering, etc).
  • From there, the Worker will pass the purge request to a Durable Object in the data center. The Durable Object will queue all the requests and broadcast them to every data center when they are ready to be processed.
  • When the Durable Object broadcasts the purge request to every data center, another Worker will pass the request to the service in the data center that will invalidate the content in cache (executes the purge).

We believe this re-architecture of our system built by stringing together multiple services from the Workers platform will help improve both the speed and scalability of the purge requests we will be able to handle.

Conclusion

We’re going to spend a lot of time building and optimizing purge because, if there’s one thing we learned here today, it’s that cache invalidation is a difficult problem but those are exactly the types of problems that get us out of bed in the morning.

If you want to help us optimize our purge pipeline, we’re hiring.

We protect entire corporate networks, help customers build Internet-scale applications efficiently, accelerate any website or Internet applicationward off DDoS attacks, keep hackers at bay, and can help you on your journey to Zero Trust.

Visit 1.1.1.1 from any device to get started with our free app that makes your Internet faster and safer.

To learn more about our mission to help build a better Internet, start here. If you’re looking for a new career direction, check out our open positions.

Source :
https://blog.cloudflare.com/part1-coreless-purge/

All the way up to 11: Serve Brotli from origin and Introducing Compression Rules

23/06/2023

Throughout Speed Week, we have talked about the importance of optimizing performance. Compression plays a crucial role by reducing file sizes transmitted over the Internet. Smaller file sizes lead to faster downloads, quicker website loading, and an improved user experience.

Take household cleaning products as a real world example. It is estimated “a typical bottle of cleaner is 90% water and less than 10% actual valuable ingredients”. Removing 90% of a typical 500ml bottle of household cleaner reduces the weight from 600g to 60g. This reduction means only a 60g parcel, with instructions to rehydrate on receipt, needs to be sent. Extrapolated into the gallons, this weight reduction soon becomes a huge shipping saving for businesses. Not to mention the environmental impact.

This is how compression works. The sender compresses the file to its smallest possible size, and then sends the smaller file with instructions on how to handle it when received. By reducing the size of the files sent, compression ensures the amount of bandwidth needed to send files over the Internet is a lot less. Where files are stored in expensive cloud providers like AWS, reducing the size of files sent can directly equate to significant cost savings on bandwidth.

Smaller file sizes are also particularly beneficial for end users with limited Internet connections, such as mobile devices on cellular networks or users in areas with slow network speeds.

Cloudflare has always supported compression in the form of Gzip. Gzip is a widely used compression algorithm that has been around since 1992 and provides file compression for all Cloudflare users. However, in 2013 Google introduced Brotli which supports higher compression levels and better performance overall. Switching from gzip to Brotli results in smaller file sizes and faster load times for web pages. We have supported Brotli since 2017 for the connection between Cloudflare and client browsers. Today we are announcing end-to-end Brotli support for web content: support for Brotli compression, at the highest possible levels, from the origin server to the client.

If your origin server supports Brotli, turn it on, crank up the compression level, and enjoy the performance boost.

Brotli compression to 11

Brotli has 12 levels of compression ranging from 0 to 11, with 0 providing the fastest compression speed but the lowest compression ratio, and 11 offering the highest compression ratio but requiring more computational resources and time. During our initial implementation of Brotli five years ago, we identified that compression level 4 offered the balance between bytes saved and compression time without compromising performance.

Since 2017, Cloudflare has been using a maximum compression of Brotli level 4 for all compressible assets based on the end user’s “accept-encoding” header. However, one issue was that Cloudflare only requested Gzip compression from the origin, even if the origin supported Brotli. Furthermore, Cloudflare would always decompress the content received from the origin before compressing and sending it to the end user, resulting in additional processing time. As a result, customers were unable to fully leverage the benefits offered by Brotli compression.

Old world

With Cloudflare now fully supporting Brotli end to end, customers will start seeing our updated accept-encoding header arriving at their origins. Once available customers can transfer, cache and serve heavily compressed Brotli files directly to us, all the way up to the maximum level of 11. This will help reduce latency and bandwidth consumption. If the end user device does not support Brotli compression, we will automatically decompress the file and serve it either in its decompressed format or as a Gzip-compressed file, depending on the Accept-Encoding header.

Full end-to-end Brotli compression support

End user cannot support Brotli compression

Customers can implement Brotli compression at their origin by referring to the appropriate online materials. For example, customers that are using NGINX, can implement Brotli by following this tutorial and setting compression at level 11 within the nginx.conf configuration file as follows:

brotli on;
brotli_comp_level 11;
brotli_static on;
brotli_types text/plain text/css application/javascript application/x-javascript text/xml 
application/xml application/xml+rss text/javascript image/x-icon 
image/vnd.microsoft.icon image/bmp image/svg+xml;

Cloudflare will then serve these assets to the client at the exact same compression level (11) for the matching file brotli_types. This means any SVG or BMP images will be sent to the client compressed at Brotli level 11.

Testing

We applied compression against a simple CSS file, measuring the impact of various compression algorithms and levels. Our goal was to identify potential improvements that users could experience by optimizing compression techniques. These results can be seen in the following table:

TestSize (bytes)% Reduction of original file (Higher % better)
Uncompressed response (no compression used)2,747
Cloudflare default Gzip compression (level 8)1,12159.21%
Cloudflare default Brotli compression (level 4)1,11059.58%
Compressed with max Gzip level (level 9)1,12159.21%
Compressed with max Brotli level (level 11)90966.94%

By compressing Brotli at level 11 users are able to reduce their file sizes by 19% compared to the best Gzip compression level. Additionally, the strongest Brotli compression level is around 18% smaller than the default level used by Cloudflare. This highlights a significant size reduction achieved by utilizing Brotli compression, particularly at its highest levels, which can lead to improved website performance, faster page load times and an overall reduction in egress fees.

To take advantage of higher end to end compression rates the following Cloudflare proxy features need to be disabled.

  • Email Obfuscation
  • Rocket Loader
  • Server Side Excludes (SSE)
  • Mirage
  • HTML Minification – JavaScript and CSS can be left enabled.
  • Automatic HTTPS Rewrites

This is due to Cloudflare needing to decompress and access the body to apply the requested settings. Alternatively a customer can disable these features for specific paths using Configuration Rules.

If any of these rewrite features are enabled, your origin can still send Brotli compression at higher levels. However, we will decompress, apply the Cloudflare feature(s) enabled, and recompress on the fly using Cloudflare’s default Brotli level 4 or Gzip level 8 depending on the user’s accept-encoding header.

For browsers that do not accept Brotli compression, we will continue to decompress and send Gzipped responses or uncompressed.

Implementation

The initial step towards implementing Brotli from the origin involved constructing a decompression module that could be integrated into Cloudflare software stack. It allows us to efficiently convert the compressed bits received from the origin into the original, uncompressed file. This step was crucial as numerous features such as Email Obfuscation and Cloudflare Workers Customers, rely on accessing the body of a response to apply customizations.

We integrated the decompressor into  the core reverse web proxy of Cloudflare. This integration ensured that all Cloudflare products and features could access Brotli decompression effortlessly. This also allowed our Cloudflare Workers team to incorporate Brotli Directly into Cloudflare Workers allowing our Workers customers to be able to interact with responses returned in Brotli or pass through to the end user unmodified.

Introducing Compression rules – Granular control of compression to end users

By default Cloudflare compresses certain content types based on the Content-Type header of the file. Today we are also announcing Compression Rules for our Enterprise Customers to allow you even more control on how and what Cloudflare will compress.

Today we are also announcing the introduction of Compression Rules for our Enterprise Customers. With Compression Rules, you gain enhanced control over Cloudflare’s compression capabilities, enabling you to customize how and which content Cloudflare compresses to optimize your website’s performance.

For example, by using Cloudflare’s Compression Rules for .ktx files, customers can optimize the delivery of textures in webGL applications, enhancing the overall user experience. Enabling compression minimizes the bandwidth usage and ensures that webGL applications load quickly and smoothly, even when dealing with large and detailed textures.

Alternatively customers can disable compression or specify a preference of how we compress. Another example could be an Infrastructure company only wanting to support Gzip for their IoT devices but allow Brotli compression for all other hostnames.

Compression rules use the filters that our other rules products are built on top of with the added fields of Media Type and Extension type. Allowing users to easily specify the content you wish to compress.

Deprecating the Brotli toggle

Brotli has been long supported by some web browsers since 2016 and Cloudflare offered Brotli Support in 2017. As with all new web technologies Brotli was unknown and we gave customers the ability to selectively enable or disable BrotlI via the API and our UI.

Now that Brotli has evolved and is supported by all browsers, we plan to enable Brotli on all zones by default in the coming months. Mirroring the Gzip behavior we currently support and removing the toggle from our dashboard. If browsers do not support Brotli, Cloudflare will continue to support their accepted encoding types such as Gzip or uncompressed and Enterprise customers will still be able to use Compression rules to granularly control how we compress data towards their users.

The future of web compression

We’ve seen great adoption and great performance for Brotli as the new compression technique for the web. Looking forward, we are closely following trends and new compression algorithms such as zstd as a possible next-generation compression algorithm.

At the same time, we’re looking to improve Brotli directly where we can. One development that we’re particularly focused on is shared dictionaries with Brotli. Whenever you compress an asset, you use a “dictionary” that helps the compression to be more efficient. A simple analogy of this is typing OMW into an iPhone message. The iPhone will automatically translate it into On My Way using its own internal dictionary.

OMW
OnMyWay

This internal dictionary has taken three characters and morphed this into nine characters (including spaces) The internal dictionary has saved six characters which equals performance benefits for users.

By default, the Brotli RFC defines a static dictionary that both clients and the origin servers use. The static dictionary was designed to be general purpose and apply to everyone. Optimizing the size of the dictionary as to not be too large whilst able to generate best compression results. However, what if an origin could generate a bespoke dictionary tailored to a specific website? For example a Cloudflare-specific dictionary would allow us to compress the words and phrases that appear repeatedly on our site such as the word “Cloudflare”. The bespoke dictionary would be designed to compress this as heavily as possible and the browser using the same dictionary would be able to translate this back.

new proposal by the Web Incubator CG aims to do just that, allowing you to specify your own dictionaries that browsers can use to allow websites to optimize compression further. We’re excited about contributing to this proposal and plan on publishing our research soon.

Try it now

Compression Rules are available now! With End to End Brotli being rolled out over the coming weeks. Allowing you to improve performance, reduce bandwidth and granularly control how Cloudflare handles compression to your end users.

Watch on Cloudflare TV

https://customer-rhnwzxvb3mg4wz3v.cloudflarestream.com/f1c71fdb05263b5ec3077e6e7acdb7e2/iframe?preload=true&poster=https%3A%2F%2Fcustomer-rhnwzxvb3mg4wz3v.cloudflarestream.com%2Ff1c71fdb05263b5ec3077e6e7acdb7e2%2Fthumbnails%2Fthumbnail.jpg%3Ftime%3D1s%26height%3D600

We protect entire corporate networks, help customers build Internet-scale applications efficiently, accelerate any website or Internet applicationward off DDoS attacks, keep hackers at bay, and can help you on your journey to Zero Trust.

Visit 1.1.1.1 from any device to get started with our free app that makes your Internet faster and safer.

To learn more about our mission to help build a better Internet, start here. If you’re looking for a new career direction, check out our open positions.

Source :
https://blog.cloudflare.com/this-is-brotli-from-origin/

Exit mobile version