Hardening changes in DCOM were required for CVE-2021-26414. Therefore, we recommended that you verify if client or server applications in your environment that use DCOM or RPC work as expected with the hardening changes enabled.
To address the vulnerability described in CVE-2021-26414, you must install updates released September 14, 2021 or later and enable the registry key described below in your environment. We recommended that you complete testing in your environment and enable these hardening changes as soon as possible. If you find issues during testing, you must contact the vendor for the affected client or server software for an update or workaround before early 2022.
Note We recommend that you update your devices to the latest security update available to take advantage of the advanced protections from the latest security threats.
Timeline
Update release
Behavior change
June 8, 2021
Hardening changes disabled by default but with the ability to enable them using a registry key.
June 14, 2022
Hardening changes enabled by default but with the ability to disable them using a registry key.
March 14, 2023
Hardening changes enabled by default with no ability to disable them. By this point, you must resolve any compatibility issues with the hardening changes and applications in your environment.
Registry setting to enable or disable the hardening changes
During the timeline phases in which you can enable or disable the hardening changes for CVE-2021-26414, you can use the following registry key:
Value Name: “RequireIntegrityActivationAuthenticationLevel”
Type: dword
Value Data: default = 0x00000000 means disabled. 0x00000001 means enabled. If this value is not defined, it will default to enabled.
Note You must enter Value Data in hexadecimal format.
Important You must restart your device after setting this registry key for it to take effect.
Note Enabling the registry key above will make DCOM servers enforce an Authentication-Level of RPC_C_AUTHN_LEVEL_PKT_INTEGRITY or higher for activation.
Note This registry value does not exist by default; you must create it. Windows will read it if it exists and will not overwrite it.
New DCOM error events
To help you identify the applications that might have compatibility issues after we enable DCOM security hardening changes, we added new DCOM error events in the System log; see the tables below. The system will log these events if it detects that a DCOM client application is trying to activate a DCOM server using an authentication level that is less than RPC_C_AUTHN_LEVEL_PKT_INTEGRITY. You can trace to the client device from the server-side event log and use client-side event logs to find the application.
Server events
Event ID
Message
10036
“The server-side authentication level policy does not allow the user %1\%2 SID (%3) from address %4 to activate DCOM server. Please raise the activation authentication level at least to RPC_C_AUTHN_LEVEL_PKT_INTEGRITY in client application.”(%1 – domain, %2 – user name, %3 – User SID, %4 – Client IP Address)
Client events
Event ID
Message
10037
“Application %1 with PID %2 is requesting to activate CLSID %3 on computer %4 with explicitly set authentication level at %5. The lowest activation authentication level required by DCOM is 5(RPC_C_AUTHN_LEVEL_PKT_INTEGRITY). To raise the activation authentication level, please contact the application vendor.”
10038
“Application %1 with PID %2 is requesting to activate CLSID %3 on computer %4 with default activation authentication level at %5. The lowest activation authentication level required by DCOM is 5(RPC_C_AUTHN_LEVEL_PKT_INTEGRITY). To raise the activation authentication level, please contact the application vendor.”(%1 – Application Path, %2 – Application PID, %3 – CLSID of the COM class the application is requesting to activate, %4 – Computer Name, %5 – Value of Authentication Level)
Availability
These error events are only available for a subset of Windows versions; see the table below.
Late evening, on September 6, 2022, the Wordfence Threat Intelligence team was alerted to the presence of a vulnerability being actively exploited in BackupBuddy, a WordPress plugin we estimate has around 140,000 active installations. This vulnerability makes it possible for unauthenticated users to download arbitrary files from the affected site which can include sensitive information.
After reviewing historical data, we determined that attackers started targeting this vulnerability on August 26, 2022, and that we have blocked 4,948,926 attacks targeting this vulnerability since that time.
The vulnerability affects versions 8.5.8.0 to 8.7.4.1, and has been fully patched as of September 2, 2022 in version 8.7.5. Due to the fact that this is an actively exploited vulnerability, we strongly encourage you to ensure your site has been updated to the latest patched version 8.7.5 which iThemes has made available to all site owners running a vulnerable version regardless of licensing status.
All Wordfence customers, including Wordfence Premium, Wordfence Care, Wordfence Response, and Wordfence Free users, have been, and will continue to be, protected against any attackers trying to exploit this vulnerability due to the Wordfence firewall’s built-in directory traversal and file inclusion firewall rules. Wordfence Premium, Care, & Response, customers receive enhanced protection as attackers heavily targeting the vulnerability are blocked by the IP Blocklist.
The BackupBuddy plugin for WordPress is designed to make back-up management easy for WordPress site owners. One of the features in the plugin is to store back-up files in multiple different locations, known as Destinations, which includes Google Drive, OneDrive, and AWS just to name a few. There is also the ability to store back-up downloads locally via the ‘Local Directory Copy’ option. Unfortunately, the method to download these locally stored files was insecurely implemented making it possible for unauthenticated users to download any file stored on the server.
More specifically the plugin registers an admin_init hook for the function intended to download local back-up files and the function itself did not have any capability checks nor any nonce validation. This means that the function could be triggered via any administrative page, including those that can be called without authentication (admin-post.php), making it possible for unauthenticated users to call the function. The back-up path is not validated and therefore an arbitrary file could be supplied and subsequently downloaded.
Due to this vulnerability being actively exploited, and its ease of exploitation, we are sharing minimal details about this vulnerability.
Indicators of Compromise
The Wordfence firewall has blocked over 4.9 million exploit attempts targeting this vulnerability since August 26, 2022, which is the first indication we have that this vulnerability was being exploited. We are seeing attackers attempting to retrieve sensitive files such as the /wp-config.php and /etc/passwd file which can be used to further compromise a victim.
The top 10 Attacking IP Addresses are as follows:
195.178.120.89 with 1,960,065 attacks blocked
51.142.90.255 with 482,604 attacks blocked
51.142.185.212 with 366770 attacks blocked
52.229.102.181 with 344604 attacks blocked
20.10.168.93 with 341,309 attacks blocked
20.91.192.253 with 320,187 attacks blocked
23.100.57.101 with 303,844 attacks blocked
20.38.8.68 with 302,136 attacks blocked
20.229.10.195 with 277,545 attacks blocked
20.108.248.76 with 211,924 attacks blocked
A majority of the attacks we have observed are attempting to read the following files:
/etc/passwd
/wp-config.php
.my.cnf
.accesshash
We recommend checking for the ‘local-download’ and/or the ‘local-destination-id’ parameter value when reviewing requests in your access logs. Presence of these parameters along with a full path to a file or the presence of ../../ to a file indicates the site may have been targeted for exploitation by this vulnerability. If the site is compromised, this can suggest that the BackupBuddy plugin was likely the source of compromise.
Conclusion
In today’s post, we detailed a zero-day vulnerability being actively exploited in the BackupBuddy plugin that makes it possible for unauthenticated attackers to steal sensitive files from an affected site and use the information obtained in those files to further infect a victim. This vulnerability was patched yesterday and we strongly recommend updating to the latest version of the plugin, currently version 8.7.5, right now since this is an actively exploited vulnerability.
All Wordfence customers, including Wordfence Premium, Wordfence Care, Wordfence Response, and Wordfence Free users, have been, and will continue to be, protected against any attackers trying to exploit this vulnerability due to the Wordfence firewall’s built-in directory traversal and file inclusion firewall rules.
If you believe your site has been compromised as a result of this vulnerability or any other vulnerability, we offer Incident Response services via Wordfence Care. If you need your site cleaned immediately, Wordfence Response offers the same service with 24/7/365 availability and a 1-hour response time. Both these products include hands-on support in case you need further assistance.
If you know a friend or colleague who is using this plugin on their site, we highly recommend forwarding this advisory to them to help keep their sites protected, as this is a serious vulnerability that is actively being exploited in the wild.
We will continue to monitor the situation and follow up as more information becomes available.
Actions to take today to mitigate cyber threats from ransomware:
• Prioritize and remediate known exploited vulnerabilities. • Train users to recognize and report phishing attempts. • Enable and enforce multifactor authentication.
Note: This joint Cybersecurity Advisory (CSA) is part of an ongoing #StopRansomware effort to publish advisories for network defenders that detail various ransomware variants and ransomware threat actors. These #StopRansomware advisories include recently and historically observed tactics, techniques, and procedures (TTPs) and indicators of compromise (IOCs) to help organizations protect against ransomware. Visit stopransomware.gov to see all #StopRansomware advisories and to learn more about other ransomware threats and no-cost resources.
The Federal Bureau of Investigation (FBI), the Cybersecurity and Infrastructure Security Agency (CISA), and the Multi-State Information Sharing and Analysis Center (MS-ISAC) are releasing this joint CSA to disseminate IOCs and TTPs associated with Vice Society actors identified through FBI investigations as recently as September 2022. The FBI, CISA, and the MS-ISAC have recently observed Vice Society actors disproportionately targeting the education sector with ransomware attacks.
Over the past several years, the education sector, especially kindergarten through twelfth grade (K-12) institutions, have been a frequent target of ransomware attacks. Impacts from these attacks have ranged from restricted access to networks and data, delayed exams, canceled school days, and unauthorized access to and theft of personal information regarding students and staff. The FBI, CISA, and the MS-ISAC anticipate attacks may increase as the 2022/2023 school year begins and criminal ransomware groups perceive opportunities for successful attacks. School districts with limited cybersecurity capabilities and constrained resources are often the most vulnerable; however, the opportunistic targeting often seen with cyber criminals can still put school districts with robust cybersecurity programs at risk. K-12 institutions may be seen as particularly lucrative targets due to the amount of sensitive student data accessible through school systems or their managed service providers.
The FBI, CISA, and the MS-ISAC encourage organizations to implement the recommendations in the Mitigations section of this CSA to reduce the likelihood and impact of ransomware incidents.
Download the PDF version of this report: pdf, 521 KB
Technical Details
Note:This advisory uses the MITRE ATT&CK® for Enterprise framework, version 11. See MITRE ATT&CK for Enterprise for all referenced tactics and techniques.
Vice Society is an intrusion, exfiltration, and extortion hacking group that first appeared in summer 2021. Vice Society actors do not use a ransomware variant of unique origin. Instead, the actors have deployed versions of Hello Kitty/Five Hands and Zeppelin ransomware, but may deploy other variants in the future.
Vice Society actors likely obtain initial network access through compromised credentials by exploiting internet-facing applications [T1190]. Prior to deploying ransomware, the actors spend time exploring the network, identifying opportunities to increase accesses, and exfiltrating data [TA0010] for double extortion–a tactic whereby actors threaten to publicly release sensitive data unless a victim pays a ransom. Vice Society actors have been observed using a variety of tools, including SystemBC, PowerShell Empire, and Cobalt Strike to move laterally. They have also used “living off the land” techniques targeting the legitimate Windows Management Instrumentation (WMI) service [T1047] and tainting shared content [T1080].
Vice Society actors have been observed exploiting the PrintNightmare vulnerability (CVE-2021-1675 and CVE-2021-34527 ) to escalate privileges [T1068]. To maintain persistence, the criminal actors have been observed leveraging scheduled tasks [T1053], creating undocumented autostart Registry keys [T1547.001], and pointing legitimate services to their custom malicious dynamic link libraries (DLLs) through a tactic known as DLL side-loading [T1574.002]. Vice Society actors attempt to evade detection through masquerading their malware and tools as legitimate files [T1036], using process injection [T1055], and likely use evasion techniques to defeat automated dynamic analysis [T1497]. Vice Society actors have been observed escalating privileges, then gaining access to domain administrator accounts, and running scripts to change the passwords of victims’ network accounts to prevent the victim from remediating.
Indicators of Compromise (IOCs)
Email Addresses
v-society.official@onionmail[.]org
ViceSociety@onionmail[.]org
OnionMail email accounts in the format of [First Name][Last Name]@onionmail[.]org
Vice Society have used malicious files that create component task schedule objects, which are often mean to register a specific task to autostart on system boot. This facilitates recurring execution of their code.
Vice Society actors may directly side-load their payloads by planting their own DLL then invoking a legitimate application that executes the payload within that DLL. This serves as both a persistence mechanism and a means to masquerade actions under legitimate programs.
Vice Society actors may attempt to manipulate features of the files they drop in a victim’s environment to mask the files or make the files appear legitimate.
Vice Society artifacts have been analyzed to reveal the ability to inject code into legitimate processes for evading process-based defenses. This tactic has other potential impacts, including the ability to escalate privileges or gain additional accesses.
Vice Society actors are known for double extortion, which is a second attempt to force a victim to pay by threatening to expose sensitive information if the victim does not pay a ransom.
Vice Society actors have encrypted data on target systems or on large numbers of systems in a network to interrupt availability to system and network resources.
Vice Society actors run a script to change passwords of victims’ email accounts.
Mitigations
The FBI and CISA recommend organizations, particularly the education sector, establish and maintain strong liaison relationships with the FBI Field Office in their region and their regional CISA Cybersecurity Advisor. The location and contact information for FBI Field Offices and CISA Regional Offices can be located at www.fbi.gov/contact-us/field-offices and www.cisa.gov/cisa-regions, respectively. Through these partnerships, the FBI and CISA can assist with identifying vulnerabilities to academia and mitigating potential threat activity. The FBI and CISA further recommend that academic entities review and, if needed, update incident response and communication plans that list actions an organization will take if impacted by a cyber incident.
The FBI, CISA, and the MS-ISAC recommend network defenders apply the following mitigations to limit potential adversarial use of common system and network discovery techniques and to reduce the risk of compromise by Vice Society actors:
Preparing for Cyber Incidents
Maintain offline backups of data, and regularly maintain backup and restoration. By instituting this practice, the organization ensures they will not be severely interrupted, and/or only have irretrievable data.
Ensure all backup data is encrypted, immutable (i.e., cannot be altered or deleted), and covers the entire organization’s data infrastructure. Ensure your backup data is not already infected.
Review the security posture of third-party vendors and those interconnected with your organization. Ensure all connections between third-party vendors and outside software or hardware are monitored and reviewed for suspicious activity.
Implement listing policies for applications and remote access that only allow systems to execute known and permitted programs under an established security policy.
Document and monitor external remote connections. Organizations should document approved solutions for remote management and maintenance, and immediately investigate if an unapproved solution is installed on a workstation.
Implement a recovery plan to maintain and retain multiple copies of sensitive or proprietary data and servers in a physically separate, segmented, and secure location (i.e., hard drive, storage device, the cloud).
Refrain from requiring password changes more frequently than once per year unless a password is known or suspected to be compromised. Note: NIST guidance suggests favoring longer passwords instead of requiring regular and frequent password resets. Frequent password resets are more likely to result in users developing password “patterns” cyber criminals can easily decipher.
Require administrator credentials to install software.
Require phishing-resistant multifactor authentication for all services to the extent possible, particularly for webmail, virtual private networks, and accounts that access critical systems.
Review domain controllers, servers, workstations, and active directories for new and/or unrecognized accounts.
Audit user accounts with administrative privileges and configure access controls according to the principle of least privilege.
Implement time-based access for accounts set at the admin level and higher. For example, the Just-in-Time (JIT) access method provisions privileged access when needed and can support enforcement of the principle of least privilege (as well as the Zero Trust model). This is a process where a network-wide policy is set in place to automatically disable admin accounts at the Active Directory level when the account is not in direct need. Individual users may submit their requests through an automated process that grants them access to a specified system for a set timeframe when they need to support the completion of a certain task.
Protective Controls and Architecture
Segment networks to prevent the spread of ransomware. Network segmentation can help prevent the spread of ransomware by controlling traffic flows between—and access to—various subnetworks and by restricting adversary lateral movement.
Identify, detect, and investigate abnormal activity and potential traversal of the indicated ransomware with a networking monitoring tool. To aid in detecting the ransomware, implement a tool that logs and reports all network traffic, including lateral movement activity on a network. Endpoint detection and response (EDR) tools are particularly useful for detecting lateral connections as they have insight into common and uncommon network connections for each host.
Install, regularly update, and enable real time detection for antivirus software on all hosts.
Secure and closely monitor remote desktop protocol (RDP) use.
Limit access to resources over internal networks, especially by restricting RDP and using virtual desktop infrastructure. If RDP is deemed operationally necessary, restrict the originating sources and require MFA to mitigate credential theft and reuse. If RDP must be available externally, use a VPN, virtual desktop infrastructure, or other means to authenticate and secure the connection before allowing RDP to connect to internal devices. Monitor remote access/RDP logs, enforce account lockouts after a specified number of attempts to block brute force campaigns, log RDP login attempts, and disable unused remote access/RDP ports.
Vulnerability and Configuration Management
Keep all operating systems, software, and firmware up to date. Timely patching is one of the most efficient and cost-effective steps an organization can take to minimize its exposure to cybersecurity threats. Organizations should prioritize patching of vulnerabilities on CISA’s Known Exploited Vulnerabilities catalog.
Disable unusedports.
Consider adding an email banner to emails received from outside your organization.
Disable hyperlinks in received emails.
Disable command-line and scripting activities and permissions. Privilege escalation and lateral movement often depend on software utilities running from the command line. If threat actors are not able to run these tools, they will have difficulty escalating privileges and/or moving laterally.
Ensure devices are properly configured and that security features are enabled.
Disable ports and protocols that are not being used for a business purpose (e.g., RDP Transmission Control Protocol Port 3389).
Restrict Server Message Block (SMB) Protocol within the network to only access servers that are necessary, and remove or disable outdated versions of SMB (i.e., SMB version 1). Threat actors use SMB to propagate malware across organizations.
REFERENCES
Stopransomware.gov is a whole-of-government approach that gives one central location for ransomware resources and alerts.
The FBI is seeking any information that can be shared, to include boundary logs showing communication to and from foreign IP addresses, a sample ransom note, communications with Vice Society actors, Bitcoin wallet information, decryptor files, and/or a benign sample of an encrypted file.
The FBI, CISA, and the MS-ISAC strongly discourage paying ransom as payment does not guarantee victim files will be recovered. Furthermore, payment may also embolden adversaries to target additional organizations, encourage other criminal actors to engage in the distribution of ransomware, and/or fund illicit activities. Regardless of whether you or your organization have decided to pay the ransom, the FBI and CISA urge you to promptly report ransomware incidents to a local FBI Field Office, or to CISA at report@cisa.gov or (888) 282-0870. SLTT government entities can also report to the MS-ISAC (SOC@cisecurity.org or 866-787-4722).
DISCLAIMER
The information in this report is being provided “as is” for informational purposes only. The FBI, CISA, and the MS-ISAC do not endorse any commercial product or service, including any subjects of analysis. Any reference to specific commercial products, processes, or services by service mark, trademark, manufacturer, or otherwise, does not constitute or imply endorsement, recommendation, or favoring by the FBI, CISA, or the MS-ISAC.
One month from today, we’re going to start to turn off basic auth for specific protocols in Exchange Online for customers who use them.
Since our first announcement nearly three years ago, we’ve seen millions of users move away from basic auth, and we’ve disabled it in millions of tenants to proactively protect them.
We’re not done yet though, and unfortunately usage isn’t yet at zero. Despite that, we will start to turn off basic auth for several protocols for tenants not previously disabled.
Starting October 1st, we will start to randomly select tenants and disable basic authentication access for MAPI, RPC, Offline Address Book (OAB), Exchange Web Services (EWS), POP, IMAP, Exchange ActiveSync (EAS), and Remote PowerShell. We will post a message to the Message Center 7 days prior, and we will post Service Health Dashboard notifications to each tenant on the day of the change.
We will not be disabling or changing any settings for SMTP AUTH.
If you have removed your dependency on basic auth, this will not affect your tenant or users. If you have not (or are not sure), check the Message Center for the latest data contained in the monthly usage reports we have been sending monthly since October 2021. The data for August 2022 will be sent within the first few days of September.
What If You Are Not Ready for This Change?
We recognize that unfortunately there are still many tenants unprepared for this change. Despite multiple blog posts, Message Center posts, interruptions of service, and coverage via tweets, videos, conference presentations and more, some customers are still unaware this change is coming. There are also many customers aware of the deadline who simply haven’t done the necessary work to avoid an outage.
Our goal with this effort has only ever been to protect your data and accounts from the increasing number of attacks we see that are leveraging basic auth.
However, we understand that email is a mission-critical service for many of our customers and turning off basic auth for many of them could potentially be very impactful.
One-Time Re-Enablement
Today we are announcing an update to our plan to offer customers who are unaware or are not ready for this change.
When we turn off basic auth after October 1st, all customers will be able to use the self-service diagnostic to re-enable basic auth for any protocols they need, once per protocol. Details on this process are below.
Once this diagnostic is run, basic auth will be re-enabled for those protocol(s). Selected protocol(s) will stay enabled for basic auth use until end of December 2022. During the first week of calendar year 2023, those protocols will be disabled for basic auth use permanently, and there will be no possibility of using basic auth after that.
Avoiding Disruption
If you already know you need more time and wish to avoid the disruption of having basic auth disabled you can run the diagnostics during the month of September, and when October comes, we will not disable basic for protocol(s) you specify. We will disable basic for any non-opted-out protocols, but you will be able to re-enable them (until the end of the year) by following the steps below if you later decide you need those too.
In other words – if you do not want basic for a specific protocol or protocols disabled in October, you can use the same self-service diagnostic in the month of September. Details on this process below.
Diagnostic Options
Thousands of customers have already used the self-service diagnostic we discussed in earlier blog posts (here and here) to re-enable basic auth for a protocol that had been turned off, or to tell us not to include them in our proactive protection expansion program. We’re using this same diagnostic again, but the workflow is changing a little.
Today, we have archived all prior re-enable and opt-out requests. If you have previously opted out or re-enabled basic for some protocol, you’ll need to follow the steps below during the month of September to indicate you want us to leave something enabled for basic auth after Oct 1.
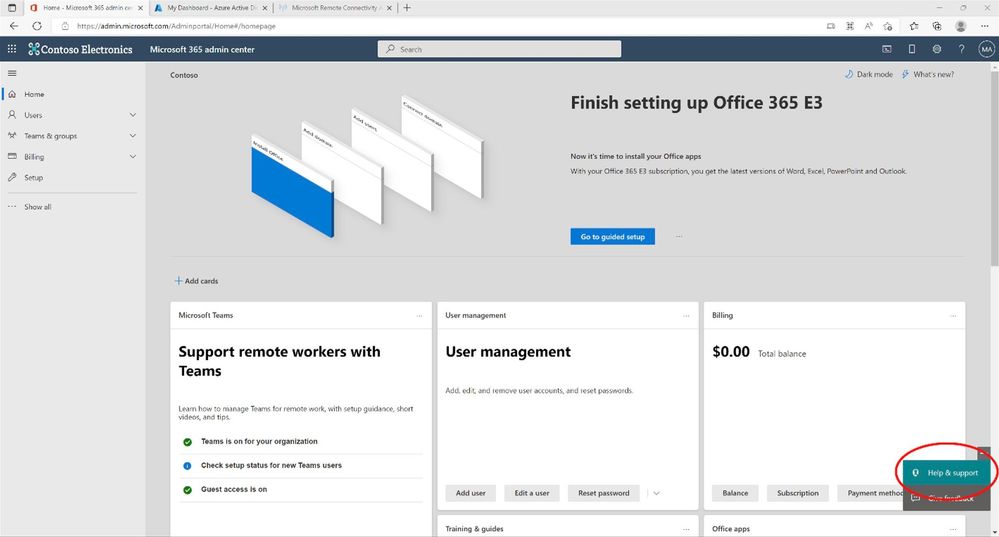
To invoke the self-service diagnostic, you can go directly to the basic auth self-help diagnostic by simply clicking on this button (it’ll bring up the diagnostic in the Microsoft 365 admin center if you’re a tenant Global Admin):
Or you can open the Microsoft 365 admin center and click the green Help & support button in the lower right-hand corner of the screen.
When you click the button, you enter our self-help system. Here you can enter the phrase “Diag: Enable Basic Auth in EXO”
Customers with tenants in the Government Community Cloud (GCC) are unable to use the self-service diagnostic covered here. Those tenants may opt out by following the process contained in the Message Center post sent to their tenant today. If GCC customers need to re-enable a protocol following the Oct 1st deadline they will need to open a support ticket.
Opting Out
During the month of September 2022, the diagnostic will offer only the option to opt-out. By submitting your opt-out request during September, you are telling us that you do not want us to disable basic for a protocol or protocols during October. Please understand we will be disabling basic auth for all tenants permanently in January 2023, regardless of their opt-out status.
The diagnostic will show a version of the dialog below, and you can re-run it for multiple protocols. It might look a bit different if some protocols have already been disabled. Note too that protocols are not removed from the list as you opt-out but rest assured (unless you receive an error) we will receive the request.
Re-Enabling Basic for protocols
Starting October 1, the diagnostic will only allow you to re-enable basic auth for a protocol that it was disabled for.
If you did not opt-out during September, and we disabled basic for a protocol you later realize you need, you can use this to re-enable it.
Within an hour (usually much sooner) after you run the diagnostics and ask us to re-enable basic for a protocol, basic auth will start to work again.
At this point, we have to remind you that by re-enabling basic for a protocol, you are leaving your users and data vulnerable to security risks, and that we have customers suffering from basic auth-based attacks every single day (but you know that already).
Starting January 1, 2023, the self-serve diagnostic will no longer be available, and basic auth will soon thereafter be disabled for all protocols.
Summary of timelines and actions
Please see the following flow chart to help illustrate the changes and actions that you might need to take:
Blocking Basic Authentication Yourself
If you re-enable basic for a protocol because you need some extra time and then afterward no longer need basic auth you can block it yourself instead of waiting for us to do it in January 2023. The quickest and most effective way to do this is to use Authentication Policies which block basic auth connections at the first point of contact to Exchange Online.
Just go into the Microsoft 365 admin center, navigate to Settings, Org Settings, Modern Authentication and uncheck the boxes to block basic for all protocols you no longer need (these checkboxes will do nothing once we block basic for a protocol permanently, and we’ll remove them some time after January 2023).
Reporting Web Service Endpoint
For those of you using the Reporting Web Service REST endpoint to get access to Message Tracking Logs and more, we’re also announcing today that this service will continue to have basic auth enabled until Dec 31st for all customers, no opt-out or re-enablement is required. And, we’re pleased to be able to provide the long-awaited guidance for this too right here.
EOP/SCC PowerShell
Basic authentication will remain enabled until Dec 31st, 2022. Customers need to migrate to certificate based authentication. Follow the Instructions here: App-only authentication
One Other Basic Authentication Related Update
We’re adding a new capability to Microsoft 365 to help our customers avoid the risks posed by basic authentication. This new feature changes the default behavior of Office applications to block sign-in prompts using basic authentication. With this change, if users try to open Office files on servers that only use basic authentication, they won’t see any basic authentication sign-in prompts. Instead, they’ll see a message that the file has been blocked because it uses a sign-in method that may be insecure.
Office Team is looking for customers to opt-in to their Private Preview Program for this feature. Please send them an email if you are interested in signing up: basicauthdeprmailer@microsoft.com.
Summary
This effort has taken three years from initial communication until now, and even that has not been enough time to ensure that all customers know about this change and take all necessary steps. IT and change can be hard, and the pandemic changed priorities for many of us, but everyone wants the same thing: better security for their users and data.
Our customers are important to us, and we do not want to see them breached, or disrupted. It’s a fine balance but we hope this final option will allow the remaining customers using Basic auth to finally get rid of it.
The end of 2022 will see us collectively reach that goal, to Improve Security – Together.
The Recovery Mode User Interface (UI) is a special interface for UniFi OS Consoles (UDMP, UNVR, etc.) and gateways used to recover from various failure modes (indicated on the LCM screen of that device). From the Recovery Mode, you can perform the following actions:
Reset to Factory Defaults: Completely reset the device. Note this will also wipe out any stored backup files.
Reboot: Restart the device and re-load the existing configuration.
Power-off: Initiate a software shutdown on the device, after which you can safely remove the power cable.
Check Filesystems: Check the integrity of the file system.
Firmware Update: Upload a previously downloaded firmware image (.bin) file in order to upgrade the firmware.
You should only resort to using recovery mode if you are prompted by the LCM screen found on your device.
Performing a Device Recovery
Download the most recent firmware for your device. You can find information on our latest releases here.
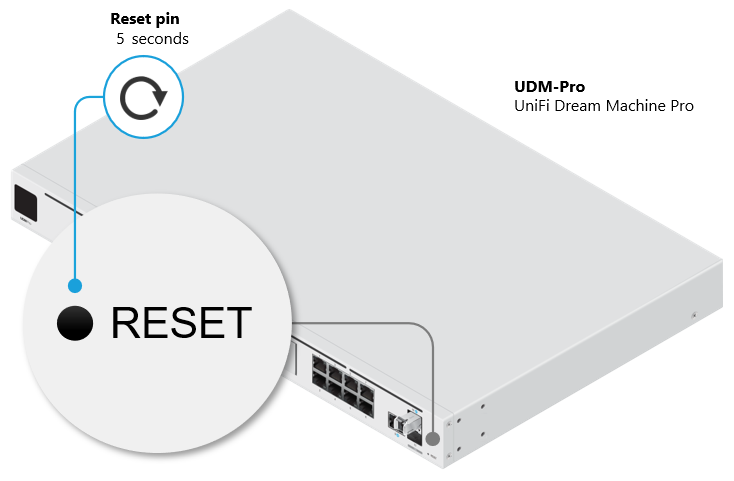
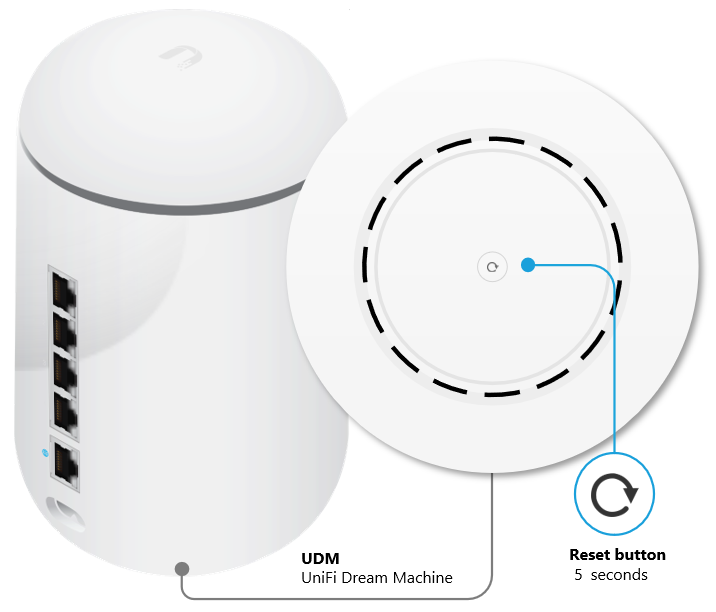
Completely power-off the UniFi device and unplug it from its power source.
Press and hold the reset button and then power on the device by connecting it to the power source once again.
Keep the reset button pressed for about 5 seconds. After some time the display (in supported models) will indicate that the gateway is in Recovery Mode.
Connect an Ethernet cable from your computer to the first LAN port (port 1) on the UniFi gateway.
Note: Port 1 is always the first one. Either the top port, or the top left corner one, depending on the layout of your device’s ports.
Configure a static IP address on your computer in the 192.168.1.0/24 range (for example 192.168.1.11). Windows ClientmacOS clientNote: If a wireless adapter is enabled and connected to another network it could conflict with the connection to the UniFi device. Disable the wireless adapter if necessary.
Open a compatible web browser navigate to http://192.168.1.30 to access the Recovery Mode UI.
Note: The Recovery Mode UI is accessible via HTTP only and not HTTPS. It is possible that your browser will automatically try to redirect your session to HTTPS. Make sure to navigate to the http://192.168.1.30 address and use a different browser if necessary.
Select Firmware Update > Choose and browse your computer for the previously download firmware (.bin) image file.
Wait for the upgrade process to complete and reboot the device afterwards.
We do not recommend using SSH unless instructed by one of our Support Engineers as part of advanced troubleshooting. Inexperienced users risk making changes that may degrade network performance, or even worse, completely break your deployment. Proceed with caution.
Requirements
1. You are connected to the same local network as the device/console you plan to connect with via SSH. This may consist of using a laptop connected to the same WiFi network, or hardwired directly to the device.
2. SSH is enabled. UniFi Network devices and UniFi OS Consoles have independent SSH settings.
UniFi OS Consoles – Following setup, SSH is automatically disabled. It must be enabled in your UniFi OS System Settings.
UniFi Network Devices – Following setup, SSH is automatically enabled. The credentials consist of a random string of characters.
3. The device you are using has a command line interface (CLI) capable of establishing a Secure Shell (SSH) connection. Linux and macOS devices can use their native terminal. Windows OS requires PowerShell or PuTTY.
Establishing an SSH Connection
The format of the command used to establish an SSH connection is as follows:
ssh <username>@<ip-address>
The <username> for UniFi OS Consoles (UDM Pro / UNVR / Cloud Key) and UniFi Gateways (UXG Pro) is always ‘root’. For example, a Dream Machine Pro (gateway) with an IP address of 192.168.1.1 can be accessed as follows:
ssh root@192.168.1.1
Note: The UXG will use <username> = ‘root’, but the <password> will be the shared password set in your UniFi Network Application.
Default Credentials
Prior to setup/adoption, devices have a set of default credentials.
We recommend that most users enable automatic updates. Doing so allows you to specify when your UniFi deployment automatically checks for and installs updates.
UniFi OS Console and application update preferences can be configured in your UniFi OS Settings. Please note, though, that self-hosted UniFi Network applications do not offer automatic updating.
UniFi Network device update preferences are set in your Network application’s System Settings. Devices managed by other UniFi applications are automatically updated within their respective applications.
Manually Update UniFi Devices via Web Application
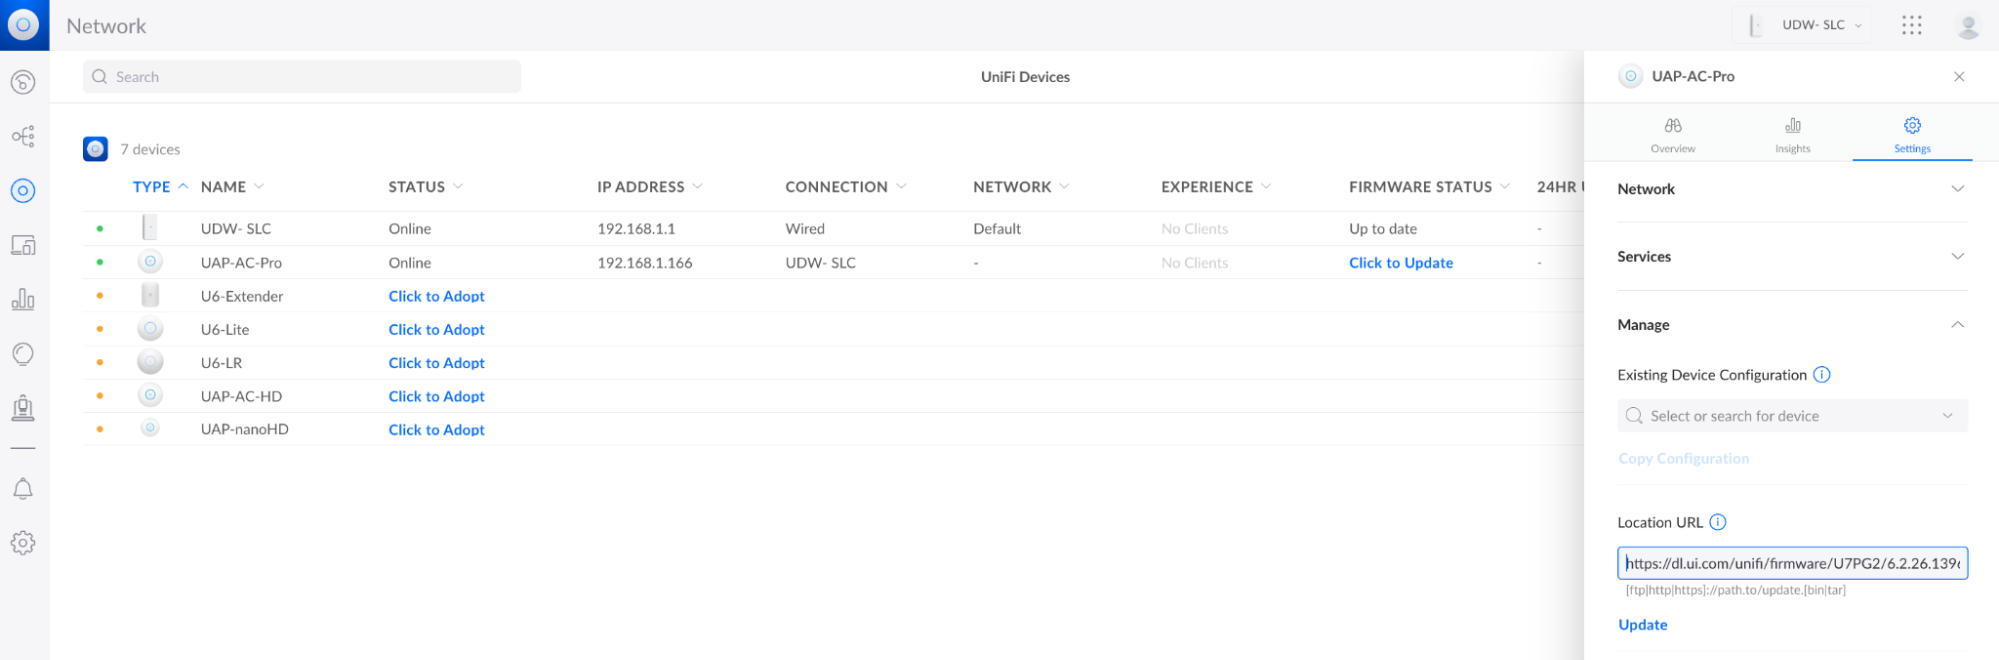
Updating via the Device Property Panel
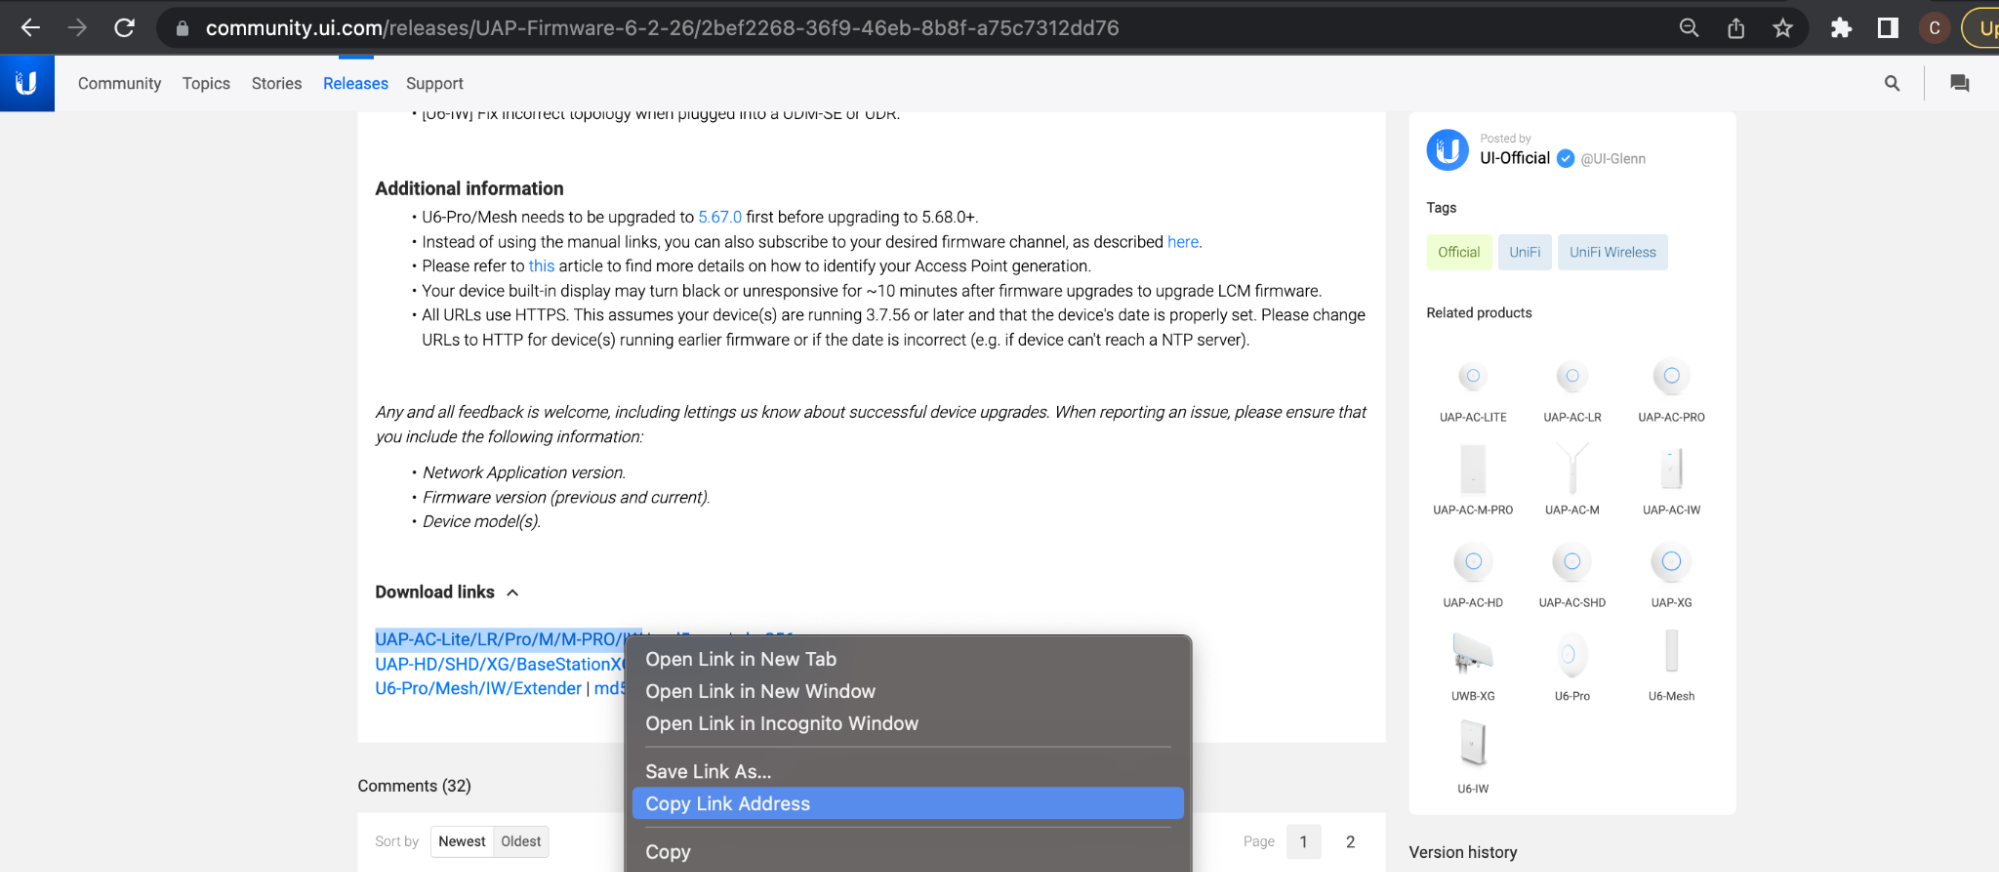
Use Case: You want to try Early Access firmware releases for specific devices, or you want to return to an official release after trying an EA release.
2. Paste the link in the address bar found in the Settings tab of the device’s properties panel.
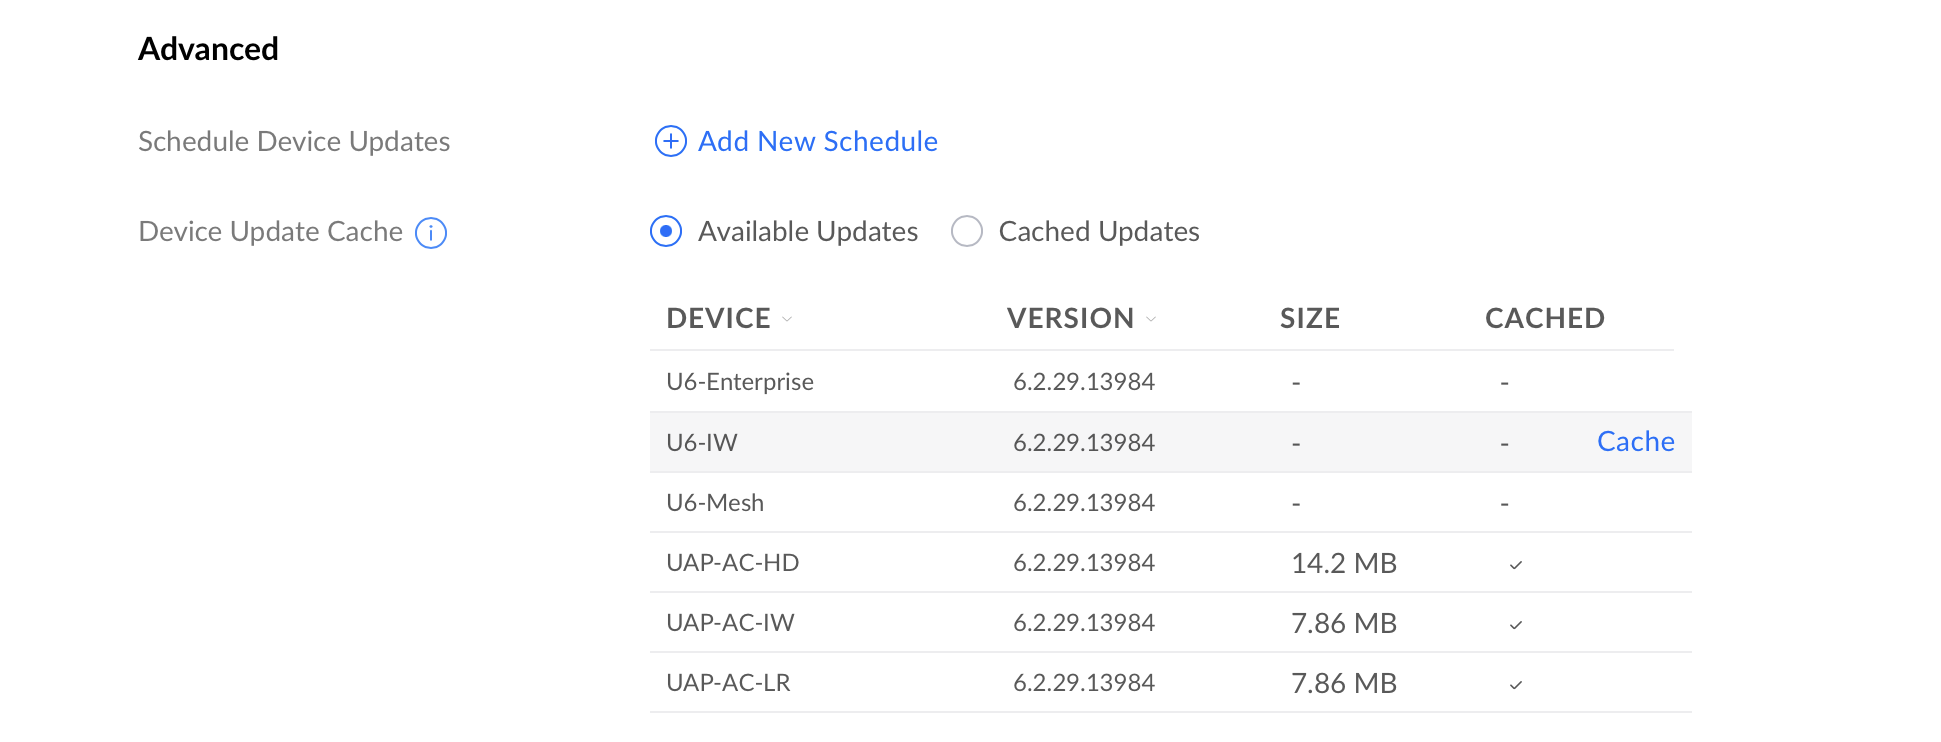
Updating via Your Network Cache
Use Case: You prefer to download and store updates in your Network application so they can be used by other devices, as opposed to downloading multiple, device-specific files from the internet. This is an ideal solution for reducing bandwidth within high-volume networks that host a large number of similar UniFi devices. It is also suitable for the advanced users who disable internet access on their UniFi device’s management network.
Device updates can be cached in your Network application’s System Settings. Once an update is cached, you can open to your UniFi Devices page and click Update Available.
Note: The Cache link will appear when you hover your cursor over an update.
Updating via SSH
Note: SSH updating is not a typical or recommended method. It is only prescribed to work around specific scenarios, such as when:
Prior traditional update attempts have failed. A successful SSH update will help verify if initial failures resulted from incorrect network configuration. For more details, see Troubleshooting Device Updates.
Your UniFi Network device is not being discovered or cannot be adopted because it has been preloaded with outdated firmware.
Your UniFI OS Console cannot be set up because it has been preloaded with an outdated version of UniFi OS.
Run the following command:upgrade paste_download_link_here Exupgrade https://dl.ui.com/unifi/firmware/UAL6/5.60.1.12923/BZ.mt7621_5.60.1+12923.210416.1641.bin
Use the following SCP command to copy the file into the /tmp folder of your device. This requires a compatible SCP application (e.g., Terminal on macOS and Linux, PuTTY/PowerShell on Windows).scp /folder_path/firmwarefile.bin <user>@<IP of device>:/tmp/fwupdate.binExscp /Users/alexpro/Desktop/BZ.mt7621_5.60.1+12923.210416.1641.bin Alex@192.168.1.219:/tmp/fwupdate.bin
Run the following command:ubnt-upgrade paste_download_link_here Exubnt-upgrade https://fw-download.ubnt.com/data/udm/7675-udmpro-1.12.22-36b5213eaa2446aca8486f0b51e64cd3.bin
Use the following SCP command to copy the file into the /mnt/data folder of your device. This requires a compatible SCP application (e.g., Terminal on macOS and Linux, PuTTY/PowerShell on Windows).scp /folder_path/firmwarefile.bin <user>@<IP of device>:/mnt/data/fwupdate.binExscp /Users/alexpro/Desktop/7675-udmpro-1.12.22-36b5213eaa2446aca8486f0b51e64cd3.bin Alex@192.168.1.219:/mnt/data/fwupdate.bin
Run the following command:ubnt-systool fwupdate paste_download_link_here Exubnt-systool fwupdate https://fw-download.ubnt.com/data/unifi-dream/dd49-UDR-2.4.10-cd3afa000ebf4a4fb15374481539961c.bin
UCK G2, UCK G2 Plus, UDM SE, UDR, UDW, UNVR, UNVR Pro (No Internet)
Use the following SCP command to copy the file into the /tmp folder of your device. This requires a compatible SCP application (e.g., Terminal on macOS and Linux, PuTTY/PowerShell on Windows).scp /folder_path/firmwarefile.bin <user>@<IP of device>:/tmp/fwupdate.binExscp /Users/alexpro/Desktop/dd49-UDR-2.4.10-cd3afa000ebf4a4fb15374481539961c.bin
Use the following SCP command to copy the file into the /home/<user> folder of your USG. This requires a compatible SCP application (e.g., Terminal on macOS and Linux, PuTTY/PowerShell on Windows).scp /folder_path/upgrade.tar <user>@<IP of device>:/home/<user>/upgrade.tarExscp /Users/alexpro/Desktop/upgrade.tar Alex@192.168.1.1:/home/Alex/upgrade.tar
Store the new application version on your device using the download link:curl -o “/tmp/unifi_sysvinit_all.deb” <network application link.deb>Excurl -o “/tmp/unifi_sysvinit_all.deb” https://dl.ui.com/unifi/6.2.26-a79cb15f05/unifi_sysvinit_all.deb
Once downloaded, install the new version:apt-get install -y /tmp/unifi_sysvinit_all.deb
Following installation, remove the downloaded file:rm /tmp/unifi_sysvinit_all.deb
Updating Devices in a Broken State
In rare occurrences, a device may stop functioning. UniFi APs may be updated using our TFTP Recovery. This should only be used if your AP completely stops functioning as a last resort prior to submitting an RMA. UniFi OS Consoles and gateways my be updated using Recovery Mode. This should only be used if prompted on your device’s LCM screen.
It may be necessary to provide support files to our team when troubleshooting issues. These contain detailed logs and information about what is happening with your UniFi system. Although sensitive information is generally removed, we do not recommend sharing these publicly.
There are two support files to be aware of:
UniFi OS Support File: This contains logs related to your UniFi OS Console, the installed applications, your adopted UniFi devices, and the client devices connected. Navigating to unifi.ui.com (or signing in locally via IP address) > select your UniFi OS Console > Console Settings > Download Support File. Note that it will have a *.tgz extension.
UniFi Network Support File: This only contains information about your UniFi Network application, your adopted UniFi Network devices, and the connected clients. This should only be used if you are self-hosting the UniFi Network application on a Windows, macOS or Linux machine. Navigate to your UniFi Network Application > Settings > System > Download Network Support File. Note that it will have a *.supp extension.
Advanced
If the UOS Console or UniFi applications are inaccessible and you are not able to download the support file, you can download the logs by following these instructions. Please note, our support engineer will provide detailed information on which of the following will be required for troubleshooting.
1. SSH into the machine: ssh root@192.168.1.1
Note: If you need to change your SSH password, do so in the UniFi OS Settings, by navigating to unifi.ui.com (or signing in locally via IP address) > select your UniFi OS Console > Settings > System.
2. Create ZIP files for the logs. The commands’ format will be: tar -zcvf <file name> <folders path>.
UniFi OS logs: tar -zcvf unifi-core-logs.tar.gz /data/unifi-core/logs/
UniFi local portal (ULP) logs: tar -zcvf ulp-go-logs.tar.gz /data/ulp-go/log/
UniFi Network logs:
For UniFi Dream Machine consoles:tar -zcvf unifi-logs.tar.gz /data/unifi/logs/
For UniFi Cloud Key Gen2 consoles:tar -zcvf unifi-logs.tar.gz /usr/lib/unifi/logs
UniFi Protect logs:
Without external disks: tar -zcvf unifi-protect-logs.tar.gz /data/unifi-protect/logs/
With external disks: tar -zcvf unifi-protect-logs.tar.gz /srv/unifi-protect/logs/
UniFi Talk logs:
tar -zcvf unifi-talk-logs.tar.gz /var/log/unifi-talk/
tar -zcvf unifi-talk-base-logs.tar.gz /var/log/unifi-base/
tar -zcvf unifi-talk-freeswitch-logs.tar.gz /var/log/freeswitch/
UniFi Connect logs: tar -zcvf unifi-connect-logs.tar.gz /data/unifi-connect/log/
System logs:
ubnt-systool support /tmp/system
tar zcvf system.tar.gz /tmp/system
3. Open a new terminal window and run the SCP command to copy the logs from the UniFi OS Console and onto your computer (or system).
Note: The period (.) in the path variable means it will be copied onto the currently opened directory in the terminal. And the asterisk (*) stands for “all”. So the following command will copy everything with the extension tar.gz (i.e. all the logs you prepared in Step 2).
scp root@192.168.1.1:/root/\*.gz .
4. Close both terminal windows to close the sessions.
If other logs are needed, our support agent will guide you and provide the necessary commands.
This article provides the steps to update the UniFi Network application to the current stable release on a Debian or Ubuntu system via APT (Advanced Package Tool). If you run into issues following the process described in this article, please take a look at the scripts provided in this Community post that includes UniFi Network software installation on Ubuntu 18.04 and 16.04 and Debian 8/9.
In order to update the UniFi Network application via APT, it is necessary to create source files or edit lines in an existing sources.list file with Linux text editors: vi or nano. The repo structure should be permanent, but if there are any changes they will be pointed out in the UniFi Network software version release posts, found in the Release section of the Community.
Before upgrading the UniFi Network application, make sure that you have backed up the UniFi Network Database. You will need to make sure that the user has sudo permissions. For more information about adding a user to sudo list, see this Debian article.
UniFi Network APT Steps
1. Install required packages before you begin with the following command:
2. Use the following command to add a new source list:
echo 'deb https://www.ui.com/downloads/unifi/debian stable ubiquiti' | sudo tee /etc/apt/sources.list.d/100-ubnt-unifi.list
Click to copy
3. Add the GPG Keys. To add the GPG Keys use one of the two methods described below (Method A is recommended). When using the commands below, it is assumed you have sudo and wget installed, more information about sudo can be found here, and wgethere.
User Tip: For Ubuntu 18.04, run the following commands before installing UniFi in step 4.
4. Install and upgrade the UniFi Network application.
Note: On some Distributions, it’s possible an incompatible Java release can be installed during this step. We recommend running the following command before proceeding with this step, to restrict Ubuntu from automatically installing Java 11. If you wish to undo this later, replace “hold” with “unhold”.
sudo apt-mark hold openjdk-11-*
Install and upgrade the UniFi Network application with the following command:
5. This step may not be required, depending on the Linux distro you have. If your distro does not come with MongoDB, and it’s not available in their repo, then please see the MongoDB installation guide. You can find the latest installation guide for Ubuntu here, and Debian here. We recommend at least MongoDB 2.6.10. Some users have changed the backend to use MongoDB 3 successfully too.
6. The UniFi Network application should now be accessible at the computer’s configured local or public IP address, by typing that IP address in a browser’s navigation bar (Chrome is recommended). If it is not launching, use the following command: sudo service unifi start.
Other helpful commands are:
To stop the UniFi service: sudo service unifi stop
To restart the UniFi service: sudo service unifi restart
To see the status of UniFi service: sudo service unifi status
We strongly recommend staying with the stable release, but for those users who wish to do otherwise, click here to expand and see possible suite names, as well as code names in the table within.
Log Files Location
Log files will be essential for any troubleshooting you might perform. Find them here:
/usr/lib/unifi/logs/server.log
/usr/lib/unifi/logs/mongod.log
If your application is running on a Unix/Linux based system, then you will require superuser (sudo) privileges to access these log files.
User Notes & Tips
These notes have been added thanks to user collaboration. Click to expand.
We recommend hosting your Network Application on a UniFi OS Console for the most seamless updating experience. In addition to providing the ability to toggle automatic Network Application updates, you can also initiate manual updates through the GUI.
Updating the Network Application
Updating your Network Application is very similar to the initial setup. You can download the latest version here.
You will be required to close any running instances of the Network Application prior to the installation. Do not worry, your network will still continue to function as normal (devices will remain connected with internet access, and traffic will continue to be routed).
After executing the file, the setup wizard will guide you through the process of updating your application. We always recommend downloading a backup file, found in your System Settings.
Note: macOS users may be required to move the downloaded file into the Applications folder, or right-click > open the file in order to begin the installation.
(Advanced) Updating via CLI on Linux-hosted Applications
It is also possible to use APT for managing updates on Debian and Ubuntu based installations. You may refer to this article for more details. This should only be attempted by users with appropriate knowledge of Linux.