Microsoft on Thursday disclosed that it addressed a pair of issues with the Azure Database for PostgreSQL Flexible Server that could result in unauthorized cross-account database access in a region.
“By exploiting an elevated permissions bug in the Flexible Server authentication process for a replication user, a malicious user could leverage an improperly anchored regular expression to bypass authentication to gain access to other customers’ databases,” Microsoft Security Response Center (MSRC) said.
New York City-based cloud security company Wiz, which uncovered the flaws, dubbed the exploit chain “ExtraReplica.” Microsoft said it mitigated the bug within 48 hours of disclosure on January 13, 2022.
Specifically, it relates to a case of privilege escalation in the Azure PostgreSQL engine to gain code execution and a cross-account authentication bypass by means of a forged certificate, allowing an attacker to create a database in the target’s Azure region and exfiltrate sensitive information.
In other words, successful exploitation of the critical flaws could have enabled an adversary to gain unauthorized read access to other customers’ PostgreSQL databases, effectively circumventing tenant isolation.
Wiz traced the privilege escalation to a bug stemming as a result of modifications introduced in the PostgreSQL engine to harden its privilege model and add new features. The name ExtraReplica comes from the fact that the exploit leverages a PostgreSQL feature that permits copying database data from one server to another, i.e., “replicating” the database.
The Windows maker described the security vulnerability as affecting PostgreSQL Flexible Server instances deployed using the public access networking option, but stressed that it did not find evidence of the flaw being actively exploited and that no customer data was accessed.
“No action is required by customers,” MSRC said. “In order to further minimize exposure, we recommend that customers enable private network access when setting up their Flexible Server instances.”
You’ve been asked for a Vulnerability Assessment Report for your organisation and for some of you reading this article, your first thought is likely to be “What is that?”
Worry not. This article will answer that very question as well as why you need a Vulnerability Assessment Report and where you can get one from.
As it’s likely the request for such a report came from an important source such as the Board, a partner, a client or an auditor, there isn’t a moment to waste. So let’s drive straight in.
What is a Vulnerability Assessment Report and why do you need one?
A Vulnerability Assessment Report is simply a document that illustrates how you are managing your organisation’s vulnerabilities. It’s important because, with tens of thousands of new technology flaws being discovered every year, you need to be able to prove that your organisation does its best to avoid attack if you want to be trusted by partners and customers.
A best security practice recommended by governments across the world, a vulnerability assessment is an automated review process that provides insights into your current security state. The vulnerability assessment report is the outcome of this review. Used as a roadmap to a better state of security preparedness, it lays out the unique risks your organisation is up against due to the technology you use, and reveals how best to overcome them with minimal disruption to your core business strategy and operations.
The help it provides is clear but why do you need one? As mentioned above, it’s likely you were asked for a Vulnerability Assessment Report by the Board, a partner, a client or an auditor as each of these groups needs reassurance that you’re on top of any weaknesses in your infrastructure. Here’s why:
— Customers need to trust you
Weaknesses in your IT systems could affect your customers’ operations. With supply chain attacks on the rise, a vulnerability in a single company could leave the whole range of organizations paralysed, as demonstrated by the infamous SolarWinds hack last year.
It doesn’t matter how small your business is; if your customers will be entrusting you with any of their data, they may wish for a Vulnerability Assessment Report first to confirm that your IT security practices are tiptop.
— The Board wants a better understanding of the business’ risk
Cyber security is a growing concern across many businesses, so chances are your board members want to take a better grip of their risk, before the lack of insights into vulnerabilities is turned into a much more serious business problem. With ransomware attacks regularly making headlines, having proper vulnerability management in place and presenting an “all clear” report, can give your business heads that needed peace of mind.
— Your auditors are checking for compliance
Many of the regulatory or compliance frameworks related to security and privacy, like SOC2, HIPAA, GDPR, ISO 27001, and PCI DSS, advise or outright require regular compliance scans and reporting, so if the request for a vulnerability assessment report was made by your auditor, it is likely to be for compliance purposes.
— Your CFO is renewing your cyber insurance
It could be the case that your insurance provider is seeking a vulnerability assessment report as part of the underwriting process. If you don’t want to run the risk of being denied your insurance payment or wouldn’t like to see your premiums rise, then you could benefit from supplying these reports regularly.
How often do you need to produce a vulnerability assessment report?
Regularly. Think of it like vulnerability scanning: For maximum efficacy, you need to conduct regular, if not constant, comprehensive evaluations of your entire technology stack, otherwise you could miss something that could bring your business to a costly halt.
Cybercriminals do not stop searching until they find something they can take advantage of. You need to scan your systems continuously and have up to date reporting to reflect your vigilance as and when it’s needed.
Modern vulnerability scanning solutions, like Intruder, will give you a cyber hygiene score which enables you to track the progress of your vulnerability management efforts over time, proving that your security issues are being continuously resolved in good time.
A vulnerability assessment report from Intruder, to provide evidence to your customers or regulators that a vulnerability scanning process is in place.
What should be included in a vulnerability assessment report?
Unfortunately, there isn’t a one size fits all report. While the contents are generally the number of vulnerabilities detected in your systems at a point in time, your different stakeholders will require varying levels of detail. Even for compliance purposes, vulnerability assessment reporting requirements can differ.
As a good rule of thumb, we recommend building an Executive Report containing graph views and composite cyber hygiene scores for the Board and C-Suite that clue them in on where they stand at any given moment. And for your IT team, their report needs greater detail such as how to apply the correct solutions to existing problems and sidestep subsequent mistakes.
Where can you get a Vulnerability Assessment Report from?
Ensuring your Vulnerability Assessment Reports contain all the elements and information your stakeholders require can take a lot of work and expertise; which can distract your security teams from other activities that will keep your organisation secure. That is why it’s recommended to choose an external provider to produce your reports.
Before you start comparing individual vendors, make sure you have a solid understanding of your technical environment and of the specific outcomes that the vulnerability assessment should present. This is because vulnerability assessment tools are not built the same; they check for different types of weaknesses, so you need to choose the solution that best suits your requirements. Consider the features and checks you’ll require, as well as the industry standards you need to follow and your budget.
Two key elements to consider relate to reporting: firstly, how flexible the assessment provider will be with how much detail is presented (particularly if you need to present data to different audiences); and secondly, how clearly the results are communicated. Scanning results can be overwhelming but the right vendor will demystify complex security data to grant you a clear, jargon-free understanding of the risks you face.
At Intruder, reports are designed to be well-understood, whilst also maintaining all the technical detail required by IT managers and DevOps teams. Whether you’re a massive enterprise or a fledgling startup, you can generate rapid reports, create compliance paper trails, stay secure, and communicate with employees and potential investors. Intruder offers a free trial of its software, which you can activate here. Get vulnerability assessment reporting in place now.
It’s possible you’ve read somewhere or someone gave you the following advice: a bigger SSD is faster. That is correct. If you take a specific SSD drive model and compare its 250 GB size variant to the 1 TB variant, the bigger one will be faster.
Again, I can’t stress this enough: we’re talking about the same model from the same manufacturer – only the size differs.
In this whole idea, we’re talking about comparing something like the Kingston A400 240 GB model to the Kingston A400 960 GB model. In this example, even the manufacturer stats about 100 MB/s faster write performance.
Ok, but why is a bigger SSD faster?
To put it simply, a bigger SSD has more NAND chips ranks and more channels that they can use in parallel. This leads to faster data transfer. This is a lame simplified explanation.
This of course, varies from manufacturer to manufacturer and that is because there are different controllers out there, different things a manufacturer can do in the SSD’s firmware and so on. But usually, you’ll see a measurable difference between the low capacity drives and the higher capacity ones.
Consider the DRAM Cache
The way an SSD uses its cache is by placing data in this lower-latency area, called the cache, so future requests for that data can occur much faster. These caches are usually of two types: DRAM Cache or SLC Cache.
Fast SSDs, usually have a DRAM cache. The controller of the SSD actually has this dynamic random-access memory (DRAM). Do not confuse this with the SLC cache.
Why would you care? Well, bigger SSDs have a bigger DRAM cache. Just check Samsung’s datasheet for the 870 EVO – on page 3 you’ll see the 1TB, 2TB, and 4TB have bigger and bigger DRAM caches than the 250/500GB drives.
that is the DRAM cache. Its an additional chip!
DRAM Cache and SLC Cache are completely different animals. Yes they both do the ‘cache’ action. They both have the purpose of accelerating the drive’s speed, but the cost and logic are different.
A DRAM cache is basically a separate chip in the PCB of your SSD. This DRAM chip is responsible for the work in your SSD, just as your system RAM is responsible for the operation of your PC. It temporarily stores data for the purpose of accelerating processing.
And because of the temporary storage function of the DRAM cache, many read and write processes can directly use the data in this cache – and it is a lot faster than starting from the beginning.
When we’re talking about the SLC cache, it is not a separate chip. Because it is called a cache and it is not really a true SLC NAND Flash chip, but a part of the space in the TLC or QLC’s NAND Flash IC, it simulates the SLC writing method. It simulates it as in it writes only 1 bit of data in each cell. This does improve the read/write performance of the SSD. But not as long or as much as a DRAM cache.
But! For an SSD without a DRAM cache, just a SLC Cache, the speeds will drop dramatically after that cache is exhausted from sequential writes – thye drop to the original value of the TLC NAND Flash. For these types of SSDs, without a DRAM cache, usually the indicated read/write speed in the tech specs are measured using the SLC Cache. (the test does not get to saturate the SLC cache and the average speed is higher. But if it were to be really tested, we’d see lower numbers once the SLC Cache can’t keep up)
The bottom line is: a drive without a DRAM Cache will not be able to sustain those advertised speeds for long.
Plus, a bigger DRAM Cache means you can abuse that drive more. By abusing, I mean giving it heavy workloads like a lot of writes/reads at once.
My 2cents? Never buy a DRAM-less SSD. SSDs that have a DRAM cache are so cheap nowadays it does not make sense to trade off the performance. Heck, I’ve seen DRAM-less SSDs a couple of bucks more expensive than the ones with a DRAM cache. I don’t know why.
How to tell if that SSD has a DRAM cache?
Just look up the datasheet on the manufacturer’s website. PCpartpicker also sometimes lists this specification in the Cache column.
If I’m in a hurry, if the manufacturer does not say anything about the DRAM cache, I will assume it has none. If I really want to know, just Google some review of that model.
TBW – total bytes written
A specification where bigger drives win again, as they allow for more writes before failure.
To be fair, a normal gamer/user will probably never saturate this even if we’re talking about a small drive. It takes a lot of work to actually write so much data and usually… you’ll probably want to upgrade to a bigger or faster drive before your old SSD will fial.
Nonetheless, it is worth mentioning that the TBW figure is also bigger in a bigger SSD.
Always try to buy bigger and with DRAM Cache
Enough said. Spending a little more for a bigger drive with a DRAM cache is always worth it. Always!
Examples of popular SSDs that do have a DRAM cache:
Do note that the list above is not complete. I’m sure I’ve missed some. Those are just some popular drives that I can actually recommend if you are looking for suggestions on what to buy – and always strive to get the biggest capacity you can afford!
Final thoughts
If there is something to remember from this whole article is this: buy as big as your budget allows you and always buy an SSD that has a DRAM Cache. These two ideas will guarantee that you’ll not be disappointed with your new SSD.
Buying a hard disk used to be quite easy. Now we have stuff like CMR vs SMR drives, manufacturers not being completely clear in their product showcase pages, and so on.
TLDR: To keep things short, you should strive to buy a CMR drive because SMR drives, while they work just fine, are usually slower in every typical individual test carried by a lot of people out there. SMR drives are slower as their method of writing data aims for storage density, and one of the drawbacks of this goal is speed.
And before we continue, yes, even if manufacturers have developed firwmare that optimize the read and write performance for SMR drives, they are still not that great as a CMR drive.
Tip: some great benchmarks for hard disk drives are: Crystal Disk Mark, ATTO Disk Benchmark, HD Tune, and even PCMark has some storage benchmarks.
CMR or PMR drives – how they work
CMR comes from Conventional Magnetic Recording. It is also known as PMR that comes from Perpendicular Magnetic Recording.
The way CMR works is by aligning the poles of the magnetic elements, which represent bits of data perpendicularly to the surface of the disk. The magnetic tracks are written side-by-side without overlapping.
a great image explanation from Synology for CMR / PMR drives
And because the write head is usually quite large in comparison to the read head, HDD manufacturers aim to shrinking the size of the write head – or do it as much as possible.
SMR – how do these drives work?
Shingled Magnetic Recording, or SMR, is an extension to PMR. It basically offers improved density. And this happens because rather than writing each magnetic track without overlapping, SMR overlaps each new track with part of the previous track. One way to think about it is by comparing it to the shingles on a roof.
a great image explanation from Synology for SMR drives
By overalapping the tracks, write heads become a lot thinner, and we get a bigger areal density.
CMR vs SMR drives – why does it actually matter?
In short, because you want the best performance for your dollar.
But to get a little bit more technical, regardless of whether an HDD uses CMR or SMR when some new data is written on the drive, the tracks are fully readable without performance impact.
So we have a pretty good read speed, right? No matter what we choose? Right? Kind of. Not really. Well, it depends on how you use the drive.
But! On an SMR drive, when any data is edited or overwritten, the write head will not overwrite data on the existing magnetic track. It will write the new data on an empty area of the disk. While the original track with the old data will temporarily sit put. Then, when the SMR HDD becomes idle, it will enter a ‘reorganization mode’, where the old bits of data on the original track are being erased and made available for future use.
This reorganization procedure must occur and makes idle time essential on an SMR drive. If you hit the respective SMR drive hard with write and read operations, it won’t get to do this in a fast way, and the drive will have to write new data and reorganize stuff at the same time. This causes an impact on the overall read and write performance of the drive.
How can I tell if the HDD I want to buy is SMR or CMR?
Some manufacturers make it easy, some not so much. But basically, searching with something like ‘product code SMR or CMR’ on Google will lead you to a good result most of the time.
Now, Western Digital, on their homepage in the shop section, actually lists CMR or SMR for their drives in the ‘Full Specifications’ area, at the Recording Technology specification. Neat!
For Seagate, however, you have to go to the product page, and download the PDF datasheet. Oh well, I guess it works.
Here’s a breakdown of what is what usually, at least for the common models. Please, search online or on the manufacturer’s website in case the below data becomes outdated.It was last looked up in 29.01.2022, on the manufacturers’ websites, just so you know.
But if you get an amazing price, and you know that hard drive will not get a lot of writes, edits, and deletions… well, it might make sense since the actual heavy usage of erasing,editing and writing data is causing the ‘slowness’. Like if you were to just fill it up with movies and that’s it. Those movies will not get edited, deleted or anything – they will just be read when you watch them. I guess – thinking about selfhosting something like Plex or Nextcloud… or a DIY NAS. I’d still opt for a CMR drive – what kind of discount are we talking about, to be fair? 10% is not worth it in my opinion.
Closing thoughts
Basically, aim for a CMR drive. And if you are new to the whole computer parts upgrade or stuff… don’t stress if you are buying a NAS drive for your desktop PC. It does not matter, it will work the same – maybe even last longer!
Hard disk buying is now as tedious as buying another component, I guess – one more thing to look for besides the usual specifications. I do hope that testing, developing, and working with diverse methods and technologies of storing data will eventually lead to manufacturers developing more performant and higher density hard disks. Just imagine a 100 TB HDD! That would be insane.
I hope this article helped you figure out what you need – an SMR or a CMR drive and why it matters.
Coca-Cola, the world’s largest soft drinks maker, has confirmed in a statement to BleepingComputer that it is aware of the reports about a cyberattack on its network and is currently investigating the claims.
The American beverage giant has started to investigate after the Stormous gang said that it successfully breached some of the company’s servers and stole 161GB of data.
Stormous announcing the victimization of Coca Cola
The threat actors listed a cache of the data for sale on their leak site, asking 1.65 Bitcoin, currently converted to around $64,000.
Coca-Cola listing on Stormous leak site
Among the files listed, there are compressed documents, text files with admin, emails, and passwords, account and payment ZIP archives, and other type of sensitive information.
Who is Stormous
Although they claim to be a ransomware group, there is no indication at this time that they are deploying file-encrypting malware on their victim networks.
Closer to a data extortion group, Stormous has stated that they would take action against hacker attacks against Russia in the wake of the invasion into Ukraine.
Stormous message
This is the first time Stormous has posted a stolen data set. Last week, the gang asked their followers to vote on who should be their next victim.
The attack promised denial-of-service, hacking, leaking of software source code and client data. Coca-Cola won the poll with 72% of the votes. The gang said that it took them only a few days to breach the company.
Poll held on the Stormous Telegram
Coca-Cola and the other victim choices in Stormous’ poll show anti-Western stance. Previously, the group claimed Epic Games as their victim.
They announced that they stole 200 gigabytes of data and details of 33 million users of Epic store and games. However, there has been no confirmation about the legitimacy of the data, so Stormous’ reputation about these claims has yet to be established.
Coca-Cola has not confirmed that their data was stolen. The company told BleepingComputer that it is currently collaborating with law enforcement and that the investigation into the alleged Stormous attack has not revealed a negative impact yet.
Google on Tuesday officially began rolling out a new “Data safety” section for Android apps on the Play Store to highlight the type of data being collected and shared with third-parties.
“Users want to know for what purpose their data is being collected and whether the developer is sharing user data with third parties,” Suzanne Frey, Vice President of product for Android security and privacy, said. “In addition, users want to understand how app developers are securing user data after an app is downloaded.”
The transparency measure, which is built along the lines of Apple’s “Privacy Nutrition Labels,” was first announced by Google nearly a year ago, in May 2021.
The Data safety section, which will show up against every app listing on the digital storefront, presents a unified view of what data is being collected, for what purpose it’s being used, and how it’s handled, while also highlighting what data is being shared with third-parties.
On top of that, the labels can also show an “app’s security practices, like encryption of data in transit and whether users can ask for data to be deleted,” Frey noted, in addition to validating those practices against security standards such as the Mobile Application Security Verification Standard (MASVS).
The feature is expected to be gradually made available to all users, while giving app developers a deadline of July 20, 2022 to complete the section and keep them updated should they change the apps’ functionality or data handling methods.
That said, Data safety is expected to face similar concerns to that of Apple’s in that the system is built entirely on an honor system, which requires app developers to be truthful and clear-cut about what they do with the data, and not list inaccurate labels.
Apple has since said that it would routinely audit labels for accuracy, thereby ensuring that the labels are reliable and don’t give users a false sense of security about the data being collected and shared.
Google, last year, had said that it intends to institute a mechanism in place that requires developers to furnish accurate information, and that it will mandate them to fix misrepresentations should it identify instances of policy violations.
While the search giant has explicitly stated that its app review process is not designed to certify the accuracy and completeness of the data safety declarations provided by third-party app developers, it’s outlining strong measures to handle such transgressions.
The company is warning that it will be taking suitable enforcement measures when it identifies a deviation from the information provided in the section. Failing to ensure compliance can result in blocked updates or removal from Google Play.
“When Google becomes aware of a discrepancy between your app behavior and your declaration, we may take appropriate action, including enforcement action,” the company said in an updated support article.
Readers of this blog won’t need much convincing that today’s digital threat landscape is complex and formidable. Where I expect to find more skepticism is around the prospect of a quick, simple, yet powerful security upgrade to your existing infrastructure.
You’re not wrong to be skeptical.
It’s exceedingly rare when two security technologies, from two different vendors, actually strengthen one another. Much more often the opposite is true, when a lack of identity continuity allows security vulnerabilities and usability barriers to take root in the small gaps between disparate identity systems.
But that’s what makes Daon’s new partnership with Broadcom Software, and our native integration with Symantec SiteMinder, so noteworthy. It really is a fast, simple, affordable way to make SiteMinder even better at what it already does so well—protecting the applications that your business relies on.
Authentication is nice, but is it enough?
SiteMinder has always been highly effective at ensuring that only users with the right identity credentials can gain access to your applications. It manages multiple types of authentication credentials and flow, applying the appropriate mechanism to balance security and convenience.
But in today’s world of ubiquitous password breaches, intercepted OTPs, and stolen devices, there is a quite reasonable and growing level of concern around the inviolability of those very credentials.
At any point along the user journey, how are we to be sure that the identity credentials meant for “Jane” are still, and solely, in her possession?
The Strengths & Weaknesses of Multifactor Authentication
Two-factor authentication solutions like Symantec VIP that utilize multifactor credentials and contextual risk analysis are a critical step in strengthening the authentication process and providing greater confidence that users are who they claim to be.
But this classic model of authentication—including even the strongest, most secure biometric authentication factors like fingerprint authentication—has a limitation. Authenticating that a user’s fingerprint matches the fingerprint on file does not, in itself, prove that the fingerprint belongs to a legitimate user (e.g., Jane). What if the person who submitted the original reference fingerprint was not actually Jane? Or what if someone other than Jane gains access to her account through other means and then changes the reference fingerprint to match their own?
A fast, simple, affordable way to make SiteMinder even better at what it already does so well—protecting the applications that your business relies on.
Consumer biometric authentication tools like TouchID and FaceID are plagued by this vulnerability. On an iPhone or Android phone, you can circumvent the biometric security with a simple password, then proceed in seconds to replace all the biometric reference data on that device. What seemed at first glance like robust biometric security is in fact nothing more than an elaborate password proxy.
And there’s a second problem, too.
As Katie Deighton recently wrote in The Wall Street Journal, “Consumers who use two-factor authentication are finding that changing a phone number or neglecting to write down recovery codes can leave them inadvertently locked out of online accounts.”
When authentication becomes too dependent on a trusted device, genuine SiteMinder users who lose a device, have a device stolen, or change to a new device may find themselves suddenly unable to access their SiteMinder-protected applications.
Introducing Daon Identity Proofing
Real-time identity proofing is the next step in the evolution of authentication. It requires a biometric factor (your face) that can be easily verified against a trusted source document (your government-issued photo ID)—something that’s readily available to users but that cannot be altered without detection.
With ID in hand, a user can quickly snap some photos of the document’s front and back, and then a selfie. In seconds, machine learning algorithms will verify the document, match the selfie to the document image, and use “liveness detection” to prevent spoofing with a photo or video recording. Voilà—the user is authenticated as if they’d presented their credentials to you in person, but with the convenience that digital users have come to expect from all their online interactions. What’s more, this capability can be easily implemented into your Symantec SiteMinder environment through a simple, standards-based OIDC interface.
Your Path Forward
We couldn’t be more delighted that Broadcom Software chose to partner with Daon to bring this powerful capability to SiteMinder users everywhere. Broadcom Software selected us because we’ve been the global leader in biometric identity assurance for over two decades—chosen to secure over a billion identities around the world, performing more than 250 million authentications each day, and trusted by iconic international brands like American Airlines, Hyatt, PNC, Experian, Carnival, and hundreds more.
I hope you’ll watch the short video below for some additional information, and when you’re ready, we invite you to come learn just how easy and affordable biometric identity proofing can be by visiting us here.
Do you want to use Google Search Console to grow your website traffic?
Google Search Console is a powerful free tool created by Google to help website owners understand how Google sees their website. Unfortunately, most businesses don’t know how to effectively use the full power of Google Search Console to increase their website traffic.
In this article, we will show you how to properly use Google Search Console to improve your website SEO and get more visitors.
What is Google Search Console?
Google Search Console is a free tool offered by Google to help website owners monitor and maintain their site’s presence in Google search results.
It provides essential marketing data that you need to start tracking from day one. It also alerts you about errors, security issues, and indexing problems that may affect your website’s search rankings.
You can use all this information in your WordPress SEO strategy to increase your website traffic.
The sad part is that most businesses don’t utilize the full power of Google Search Console because most of them think that just adding their website to Google Search Console is enough.
There’s so much more that you can do with the tool.
If you’re not leveraging all of the powerful features that Google Search Console offers, then you’re missing out.
Luckily, we’re here to help. We have created this ultimate Google Search Console guide to help you grow your website like a Pro.
Note: Since this is a comprehensive guide, we have added a table of contents for easier navigation.
If you haven’t already done so, then you need to go ahead and add your website to Google Search Console. It is really simple and will only take a few minutes.
You’ll be asked to sign in using a Google / Gmail account. Once logged in, you will need to enter your website URL.
Google Search Console offers 2 methods for site verification, including domain name or URL prefix. We recommend using the URL Prefix method as it provides more flexibility.
Do remember that Google considers HTTP and HTTPS as two different protocols. It also considers https://www.example.com and https://example.com as two different websites.
You’ll need to make sure that you enter the correct URL of your website.
If you are unsure, then simply login to your WordPress admin area and go to Settings » General page. There you will see your website’s URL in the site address field.
After entering your website address, click on the ‘Continue’ button.
Next, you will be asked to verify ownership of your website. There are several ways to do that, but we will show the HTML tag method because it is the easiest one.
Click on the HTML tag to expand it and then copy the code inside it.
Next, you’ll need to add the code to your WordPress website so that Google can verify the ownership. However, this requires coding, which can be tricky for beginners.
Upon activation, you can go to AIOSEO » General Settings page and then click the ‘Webmaster Tools’ tab. Next, select the ‘Google Search Console’ option under Webmaster Tools Verification.
After that, go ahead and enter the code you copied earlier from Google Search Console into the ‘Google Verification Code’ box.
Don’t forget to click on the ‘Save Changes’ button to store your changes.
You can now go back to Google Search Console settings and click on the ‘Verify’ button.
Google Search Console will now look for the HTML tag in your website code and show you a success message.
That’s all. You have successfully added your site to Google Search Console. You can now click on the ‘Go to Property’ link to visit your Google Search Console dashboard.
Note: if Google Search Console cannot verify your website after you have added the code in Insert Headers and Footer plugin, then you need to make sure to clear your WordPress cache and try again.
2. Adding an XML Sitemap
An XML sitemap is a way for website owners to tell search engines about all the pages that exist on their website. It also tells search engines which links on your website are more important than others.
Adding an XML sitemap to your website helps search engines better crawl your website. While it doesn’t give you a boost in search rankings, it can definitely help search engines index your content more efficiently.
The best part is that if you installed All in One SEO (AIOSEO) in the first step, then the plugin automatically adds an XML sitemap to your site.
To see the sitemap, you can head over to All in One SEO » Sitemaps and make sure that the toggle for ‘Enable Sitemap’ is switched on.
The plugin will automatically generate an XML sitemap for your website, and you can find it at the URL that looks like this:
http://example.com/sitemap_index.xml
Don’t forget to replace example.com with your own domain name. You can now submit this URL in Google Search Console.
Next, head over to the Google Search Console dashboard and then click on the ‘Sitemaps’ option from the left column. After that, you can paste the URL and click the ‘Submit’ button.
Google Search Console will now check your sitemap and use it to improve your website’s crawling. You can go through our guide on how to add a sitemap page in WordPress for more details.
3. Connect Google Search Console to Google Analytics
Connecting Google Search Console to your Google Analytics account helps you analyze search console data in Google Analytics. This provides you with a new perspective on your top-performing content and keywords.
If you haven’t already done so, then you will need to install Google Analytics on your WordPress website.
We recommend using MonsterInsights for that. It is the best Google Analytics plugin for WordPress, and it will automatically show your top keywords from Google Search Console in your WordPress admin area.
To connect Google Search Console to your Analytics account, you need to head over to Google Analytics dashboard for your website. From the bottom left corner of the screen, click on the ‘Admin’ button.
Google Analytics will now switch to the admin view. From here, you need to click on the ‘Property Settings’ section and then click on the ‘Adjust Search Console’ button.
On the next screen, you need to click on the Add button to select your website.
Analytics will now take you to the Google Search Console website showing you the list of all websites you have added to the search console. Select the property you want to link to Google Analytics from the dropdown menu.
After that, you’ll need to select the Google Analytics property you’d like to connect with Search Console and click the ‘Continue’ button.
You’ll now see a popup window showing that you’ve successfully connected Google Analytics and Search Console.
That’s all. You have successfully connected your Google Search Console data to your Analytics account. You can go back to the Google Analytics Search Console settings page to see the connected Search Console and click the ‘Save’ button.
You can now view the newly unclocked Search Console reports in your Google Analytics account under Acquisition reports. It also helps unlock keywords not provided in Google Analytics.
The first report you will find there is the ‘landing pages’ report.
For each landing page, you’ll see the impressions (number of times a page appeared in search results), clicks, click-through rate (CTR), and average position in the search results. Combined with that page’s analytics parameters like bounce rate, sessions, and pages per session.
Clicking a landing page will show you the actual keywords that brought users to this landing page.
Next, you can Switch to the ‘Countries’ report, and you will see countries listed in the same order. This helps in creating content and geolocation marketing campaigns for people from different regions.
The devices report will show you how your site performed in desktop, mobile, and tablet search results.
Next, Queries are the most important of all reports among this data. It shows you the keyword data missing from your Google Analytics reports. You can see which search terms are driving traffic to your site.
4. Finding and Fixing Search Indexing Issues
The most helpful feature of Google Search Console is that you can troubleshoot indexing errors.
These errors can affect your search rankings by stopping the search engine from crawling and indexing the pages on your website.
You can easily locate these errors under the Coverage report.
It shows you which pages from your website are indexed by Google and which pages resulted in an error or a warning.
Next, scroll down, and you will see the detailed list of all the errors. Clicking on a link will open the detailed view, where you will also find the link to learn more about the error and how to fix it.
Following are a few common indexing errors you may see:
404 error – This error means that the crawler followed a URL and saw a 404 error.
Soft 404 error – This error occurs when the crawler sees a 404 error page, but the page’s status code is sending a 200 (success) message to the browser.
Server error – This means that your website server timed out or didn’t respond. This could happen if your website were under heavy traffic, was under maintenance, or unavailable for any other reason.
Not followed – This error occurs when Google is not able to follow a content type. This could be a flash, javascript, iframe, or other resources that the crawler cannot fetch.
Now let’s take a look at how to fix some of these crawl errors.
5. Fixing 404 Errors in Google Search Console
First, you need to keep in mind that not all 404 errors are equal. You can safely ignore some of them and only fix those that are actually an error.
For example, if you deleted a blog post and don’t want to redirect users to a newer post, then it is ok to let Google see a 404 error page. Google will eventually deindex that page if it keeps seeing the 404 error.
However, the reason Google wants you to look at those 404 errors is that you may not be aware of them. For example, you accidentally deleted something or forgot to redirect users to the new updated version.
Simply click on the error in the Index Coverage report, and it will show you all the pages displaying that error. Carefully review the pages and if you see a page that shouldn’t be there, then copy its URL and open it in a new browser window.
If you see a 404 error page in your browser, then this means that you need to fix this page.
Now, if it is a page that no longer exists but you have a newer or similar version of it, then you would want to redirect users to that page. See our guide on how to set up redirects in WordPress.
However, sometimes 404 errors may occur due to a misconfiguration in WordPress permalink structure. To fix this, simply visit Settings » Permalinks and then click on the ‘Save Changes’ button without changing anything.
6. Fixing Soft 404 Errors in Google Search Console
Soft 404 errors are a bit tricky to troubleshoot.
Basically, these errors occur when the Google bot sees what looks like a 404 error document instead of content. However, your server is sending a 200 (success) code. Normally, your server sends a 200 success code when a page is displayed without an error or redirect.
To resolve soft 404 errors, go ahead and click on the errors in the Coverage report to view the list of affected pages.
Now, you need to open the page in a new browser tab to see what’s happening. If the page displays correctly, then you can safely ignore the error.
On the other hand, if the page is showing a 404 error document, then you may want to investigate further.
Start by clicking the ‘Submitted URL seems to be a Soft 404’ link from the Coverage report. Next, you can open the link in a new tab to check if it’s not a false alarm.
If the page is valid and you want it to appear in the search results, then simply click the ‘VALIDATE FIX’ button. Google will then recrawl the page and change the status error.
If the WordPress search function causes the soft 404 errors you are seeing, then the easiest solution is to stop the Google bot from crawling search URLs.
To do that you need to add the following lines to your robots.txt file.
123
User-agent: *Disallow: /?s=Disallow: /search/
Usually, Google Bot doesn’t crawl search URLs. However, some spammers might try to spam Google search console reports by linking to search URLs with random strings. This way, they hope you will see their link in your Search Console report and click on it.
If the affected URLs are not searched queries, then you may want to redirect them to a proper page on your site.
7. Fixing Server Error in Google Search Console
Server Errors in Google Search Console are caused by a number of reasons. The most common of them is when your server times out during a crawl, throws an unexpected error or does not appear to be online.
Use the ‘URL inspection’ tool to make sure that the affected URL is working.
If it is working, then you can ignore the error. If you are on a reliable WordPress hosting provider, then most server errors would disappear automatically.
However, if you can confirm the error by visiting the URL, then there are several things you can do to fix it. See our list of most common WordPress errors guide to find a fix for the specific error message you are seeing.
8. Finding and Fixing Security Issues
Security issues not only stop Google from crawling your website, but they could also cause a sudden drop in search traffic. Google may temporarily remove affected pages, show a warning to users, and drop a page’s ranking.
Security issues will be highlighted on the overview screen as you login to your Google Search Console account. The most common security issue is websites affected by malware and trojans.
While security issues are automatically triggered, manual actions are the penalties that are imposed by human staff from the Google Search team after a careful review. If a manual action is taken against your website, then this is pretty significant and can immediately take away all your search traffic.
These manual actions usually occur when a website is involved in illegal activities, spamming, and other fraudulent or fishy activities.
Clicking on the Manual Actions link will show you the actions in your search console report. You will also find detailed information about the issue that triggered it and how to clean it up.
Once you have removed the objectionable content, you can click on the request review button. Your website will now be reviewed and reconsidered by the Google Search team, and they can decide on removing the penalty.
10. Using Google Search Console To Grow Traffic
Now that we have covered the technical bits, let’s get to the fun part of growing your website traffic by utilizing the data available in Search Console.
Google Search Console helps you uncover keyword data, find out your top-performing keywords, and discover hundreds of potential keywords where you can easily rank and get more traffic.
We will also look at links and how to use them to improve search rankings.
Ready? Let’s get started.
11. Mining Keyword Data in Google Search Console
Keywords are the search terms users type in search engines to find information.
Marketers and website owners can optimize their content to target desired keywords and improve their chances of appearing on top in search results.
Previously, keyword data was available in website stats and analytics reports in Google Analytics. However, Google encrypted that information in 2013 when they switched to HTTPS.
As a result, if you try to view search queries in Google Analytics, you’ll most likely see ‘not provided’ keywords. A simple solution to this issue is connecting Google Analytics with Search Console.
You can also view the keyword data in your Google Search Console reports.
It gives you a full view of the keywords your website is ranking for, average position, clicks, and impressions (number of times your site appears for that keyword).
You can see this information in your Google Search Console reports under the ‘Performance’ tab.
On the top, you will see a graph of your website’s performance in search results. Below that, you will see the keywords data, which you can filter by position, impression, and click-through rate.
You can sort this data by clicking on any column or using the filter option to narrow down the results.
You can also switch to the Pages tab to see the performance of your pages in search results.
Clicking on any page in the list will filter the results for that page. You can then switch to the ‘Queries’ tab to see the keywords that bring the traffic to that particular page.
Now that we have covered how to browse and view this data, let’s see how actually to use this in your SEO and content planning.
12. Finding Low-hanging Keywords That You Can Easily Rank
A lot of your pages may be ranking on page 2 or 3 of Google search results for different keywords. These are the keywords that you can quickly work on to rank higher and get more traffic.
Let’s find out those keywords.
In your Performance report, click on the filter icon and then select the ‘Position’ option. Next, you’ll be looking for keywords where the average position is higher than 7.
Search Console will now only show the keywords where your site appears on an average position of 7 or higher. Now, click twice on the position column to sort the list in ascending order.
As you scroll down, you will find tons of keywords that rank between 7 and 30. All these keywords are low-hanging fruits where you can easily rank higher.
To view more results, scroll to the bottom and select a higher number for ‘Rows per page.’
When choosing the keywords to work on, you would want to choose keywords based on their number of impressions. Higher impressions mean more search traffic for those keywords.
To do that, you can export the data in CSV format and then open it in spreadsheet software.
Now that you have mined the low-hanging keywords with higher impressions, the question is how do you improve your rankings for those keywords?
Here are some tips to help you improve your rankings for those keywords.
1. Improve the content by adding more useful information
The #1 reason your page isn’t ranking for a keyword is that Google finds other content more valuable. To counter that, you need to review your article or blog post and add helpful content.
Look at the articles ranking on top five positions for that keyword and cover all the information that your article is missing in more detail.
We are not saying that you should just add more text to it. You need to make it more useful, informative, and comprehensive.
2. Evaluate On-page SEO
Use All in One SEO (AIOSEO) to improve the on-page SEO score for that article. It gives practical tips on improving a page by analyzing the content, keyword density, title, readability, links, and more.
You can also check out our guide on the SEO audit checklist to boost your rankings.
3. Increase time users spend on that page
Google considers it a success when users click on a search result and spend time viewing it. This means your content needs to be highly engaging and instantly provide users with the information they were looking for.
Here are some crazy simple things you can do to increase user engagement.
Use images – users find images much easier to look at than text. Adding more images makes it easier for users to scan the information and keeps them engaged.
Use videos – Videos are the most engaging form of content available. Adding video to a page significantly increases the time users spend viewing that page.
Make text more readable – Use smaller paragraphs, lots of white space, simpler sentences, and keep your style casual and conversational. All these things make reading easier for users.
Links play an important role in WordPress SEO. Search engines use them as a metric to determine how important a page is and where it should rank in search results.
The Links report in Google Search helps you see your website’s performance in terms of links.
It shows you external links, internal links, top linking sites, and top linking text. More importantly, it shows top linking sites, how often they link to your site, and how many pages they link to.
Let’s see how you can use these reports to get more backlinks, improve internal links, and boost your rankings.
14. Getting More Backlinks from Third-Party Websites
Search console shows third-party websites that have linked to your site in the ‘Top linking sites’ report. You can expand the report by clicking on the ‘More’ link at the bottom.
If you click on a domain name to expand the report, you will see all the pages they have linked to. Next, click on each page to get the exact URL linked to that particular page.
You can now use this data to get more backlinks for your site. Simply visit the website and see how they have linked to you. After that, see what other content they have where your site can be linked from.
Next, simply reach out to the website via email or contact form on their website.
First, thank them for linking to your article and then politely mention that they may want to include a link to an article of yours.
Now, this direct approach may not always work. In that case, you need to be creative. You can offer them to write a guest post for their blog, leave comments on their articles, follow them on social media, or retweet their articles.
Repeat the process for all important external links on your website. With consistent effort, you can get proper backlinks without spending any money.
15. Improving Internal Links to Boost Rankings
It is harder to get third-party websites to link to your content. However, it is way easier to link to your own content from your own site. This practice is called internal linking.
Internal linking helps search engines understand the context and relationships among different pages on your website. It also helps them understand which pages are important based on how often you have linked to them.
This is why you should make internal linking a habit when writing new content on your website or blog.
Now let’s see how to use the links reports in Search Console to help you build internal links.
In Google Search Console, click on the Links report and then click on the ‘More’ link under the ‘Internal Links’ column. The report shows how often you have linked to other pages on your site.
Go ahead and click the filter icon and then select the ‘Target page’ option.
Search Console will now show you how many pages are linking to this page. You can now compare it with other pages and see whether pages with more internal links are ranking higher than posts with many internal links.
If that’s the case, then go ahead and start adding internal links to pages that you want to rank higher. Make sure you are only linking to the article when it makes sense. Adding links where they don’t make sense would create a bad user experience.
16. Using Core Web Vitals in Search Console
Did you know that Google now considers your website loading speed as a ranking factor?
In 2020, Google introduced Core Web Vitals that measures how fast your website is and help the search engine measure your site’s user experience.
In Google Search Console, you can view the ‘Core Web Vitals’ report under the Experience menu on your left. It provides a complete report about your site’s speed score for mobile and desktop.
The best part is that you also get recommendations on how to improve your Core Web Vitals score and improve your site’s load time.
Rich snippets or schema markup allows Google to display additional information in its search results. These include star ratings, prices, reviews, and more.
Rich snippets make your page more noticeable in the search results. As a result, you get more clicks and website traffic.
Many WordPress themes automatically include some basic structured data. If you publish recipes, run a reviews site, or an online store, then rich snippets can give your site an SEO boost.
Google Search Console makes it very easy to find pages that are displaying rich snippets. It also shows the type of rich snippets for your website.
You can view them by going to ‘Overview’ and then scrolling down to the ‘Enhancements’ section.
The real useful part is that the report allows you to quickly look at pages that have errors while displaying rich snippets so that you can fix them.
18. Using Search Console to Improve Mobile Usability
Nearly 63% of all Google searches in the United States come from mobile devices. That’s why Google gives an SEO bump to mobile-friendly websites in the search results.
Google has a Mobile-Friendly test tool that allows you to quickly examine a page. The Mobile Usability report in Search Console tells you how Google sees your entire website in mobile performance.
If you see errors on this page, then this means that these issues may affect your site’s rankings.
To see the affected pages, you can scroll down to the ‘Details’ section and click on the error.
Poorly coded WordPress themes or plugins cause most mobile usability issues. The easiest way to fix those issues is by using a better responsive WordPress theme.
19. Use URL Inspection Tool in Search Console
The URL Inspection tool in Google Search Console provides information about a page if it’s on Google search results or not.
You can check the status of a page and also request Google to recrawl a page. To start, simply enter a URL in the top search bar.
Google Search Console will then show you the status of the page is indexed by Google. If it’s not indexed, then you’ll see a message saying ‘URL is not on Google.’
You can click the ‘Requesting Indexing’ button and request Google to manually fetch the page from your website.
Besides that, you can scroll down and see more details in the ‘Coverage’ report. It will show information about sitemaps, crawl history, and indexing.
You can also live test a URL and see if there is an indexable version available. If there is, then simply click the ‘Request Indexing’ option.
20. Removing URLs from Google Search
So far, we have focused on using Search Console to get your content indexed and improve rankings in Google Search. However, sometimes you may want to remove content from Google Search as well.
One way to do this is to add a noindex meta tag to the page you want to remove from search results. However, depending on how often Google crawls your website, this could take some time before your page actually disappears from search results.
Search Console’s Remove URL tool allows you to request a URL to be removed from the search results. Simply click on ‘Removals’ under Index in the menu on your left.
Now click on the ‘New Request’ button, and a popup window will appear. Go ahead and enter the URL you want to remove, select whether you want to remove this URL only or with this prefix, and click the ‘Next’ button.
Google will now block the URL from its search results for about six months. You can add as many URLs as you want and see them in the Removals section in the Search Console.
21. Adding Users to Access Google Search Console
If you have a marketing team or you have hired someone to help you with SEO, then those users may need access to Google search console data.
Search Console allows you to easily add users and give them access to view all reports without sharing your Google account credentials with them.
To add a new user, simply click on the Settings » Users and permissions option under Property settings and then click on ‘Add User’ button.
Next, you need to provide the user’s valid Google account email address and select permission to grant them.
There are two types of permission levels. The full permission level will give them access to everything, including the ability to add new users. Restricted permissions will allow them to view the data but not add new users.
After choosing a permission level, click on the ‘Add’ button to save your changes.
The user you added will now receive an email notification, so they can login and view Google Search Console data for your website.
Helpful Resources
Following helpful resources on WPBeginner will help you further improve your website’s performance in search engines.
Ultimate WordPress SEO Guide – Our complete step by step WordPress SEO guide will walk you through complete WordPress SEO setup like a pro.
WordPress Performance Guide – Step by step guide to improve your WordPress speed and performance for higher search rankings and better user experience.
WordPress Security Guide – Keep your WordPress site secure with this complete WordPress security guide for beginners.
Tracking User Engagement – This guide helps you learn how to track user activity on your website and use it to plan your growth strategy.
Convert visitors into Customers – If you run an online store, then this guide will show you how to convert search traffic into paying customers.
WordPress security is a topic of huge importance for every website owner. Google blacklists around 10,000+ websites every day for malware and around 50,000 for phishing every week.
If you are serious about your website, then you need to pay attention to the WordPress security best practices. In this guide, we will share all the top WordPress security tips to help you protect your website against hackers and malware.
While WordPress core software is very secure, and it’s audited regularly by hundreds of developers, there is a lot that can be done to keep your site secure.
At WPBeginner, we believe that security is not just about risk elimination. It’s also about risk reduction. As a website owner, there’s a lot that you can do to improve your WordPress security (even if you’re not tech savvy).
We have a number of actionable steps that you can take to protect your website against security vulnerabilities.
To make it easy, we have created a table of content to help you easily navigate through our ultimate WordPress security guide.
A hacked WordPress site can cause serious damage to your business revenue and reputation. Hackers can steal user information, passwords, install malicious software, and can even distribute malware to your users.
Worst, you may find yourself paying ransomware to hackers just to regain access to your website.
In March 2016, Google reported that more than 50 million website users have been warned about a website they’re visiting may contain malware or steal information.
Furthermore, Google blacklists around 20,000 websites for malware and around 50,000 for phishing each week.
If your website is a business, then you need to pay extra attention to your WordPress security.
Similar to how it’s the business owners responsibility to protect their physical store building, as an online business owner it is your responsibility to protect your business website.
WordPress is an open source software which is regularly maintained and updated. By default, WordPress automatically installs minor updates. For major releases, you need to manually initiate the update.
WordPress also comes with thousands of plugins and themes that you can install on your website. These plugins and themes are maintained by third-party developers which regularly release updates as well.
These WordPress updates are crucial for the security and stability of your WordPress site. You need to make sure that your WordPress core, plugins, and theme are up to date.
The most common WordPress hacking attempts use stolen passwords. You can make that difficult by using stronger passwords that are unique for your website. Not just for WordPress admin area, but also for FTP accounts, database, WordPress hosting account, and your custom email addresses which use your site’s domain name.
Many beginners don’t like using strong passwords because they’re hard to remember. The good thing is that you don’t need to remember passwords anymore. You can use a password manager. See our guide on how to manage WordPress passwords.
Another way to reduce the risk is to not give anyone access to your WordPress admin account unless you absolutely have to. If you have a large team or guest authors, then make sure that you understand user roles and capabilities in WordPress before you add new user accounts and authors to your WordPress site.
Your WordPress hosting service plays the most important role in the security of your WordPress site. A good shared hosting provider like Bluehost or Siteground take the extra measures to protect their servers against common threats.
Here is how a good web hosting company works in the background to protect your websites and data.
They continuously monitor their network for suspicious activity.
All good hosting companies have tools in place to prevent large scale DDOS attacks
They keep their server software, php versions, and hardware up to date to prevent hackers from exploiting a known security vulnerability in an old version.
They have ready to deploy disaster recovery and accidents plans which allows them to protect your data in case of major accident.
On a shared hosting plan, you share the server resources with many other customers. This opens the risk of cross-site contamination where a hacker can use a neighboring site to attack your website.
Using a managed WordPress hosting service provides a more secure platform for your website. Managed WordPress hosting companies offer automatic backups, automatic WordPress updates, and more advanced security configurations to protect your website
We recommend WPEngine as our preferred managed WordPress hosting provider. They’re also the most popular one in the industry. (See our special WPEngine coupon).
We know that improving WordPress security can be a terrifying thought for beginners. Especially if you’re not techy. Guess what – you’re not alone.
We have helped thousands of WordPress users in hardening their WordPress security.
We will show you how you can improve your WordPress security with just a few clicks (no coding required).
If you can point-and-click, you can do this!
Install a WordPress Backup Solution
Backups are your first defense against any WordPress attack. Remember, nothing is 100% secure. If government websites can be hacked, then so can yours.
Backups allow you to quickly restore your WordPress site in case something bad was to happen.
There are many free and paid WordPress backup plugins that you can use. The most important thing you need to know when it comes to backups is that you must regularly save full-site backups to a remote location (not your hosting account).
We recommend storing it on a cloud service like Amazon, Dropbox, or private clouds like Stash.
Based on how frequently you update your website, the ideal setting might be either once a day or real-time backups.
Thankfully this can be easily done by using plugins like UpdraftPlus or BlogVault. They are both reliable and most importantly easy to use (no coding needed).
Upon activation, you need to go to the Sucuri menu in your WordPress admin. The first thing you will be asked to do is Generate a free API key. This enables audit logging, integrity checking, email alerts, and other important features.
The next thing, you need to do is click on the ‘Hardening’ tab from the settings menu. Go through every option and click on the “Apply Hardening” button.
These options help you lock down the key areas that hackers often use in their attacks. The only hardening option that’s a paid upgrade is the Web Application Firewall which we will explain in the next step, so skip it for now.
We have also covered a lot of these “Hardening” options later in this article for those who want to do it without using a plugin or the ones that require additional steps such as “Database Prefix change” or “Changing the Admin Username”.
After the hardening part, the default plugin settings are good enough for most websites and don’t need any changes. The only thing we recommend customizing is ‘Email Alerts’.
The default alert settings can clutter your inbox with emails. We recommend receiving alerts for key actions like changes in plugins, new user registration, etc. You can configure the alerts by going to Sucuri Settings » Alerts.
This WordPress security plugin is very powerful, so browse through all the tabs and settings to see all that it does such as Malware scanning, Audit logs, Failed Login Attempt tracking, etc.
Enable Web Application Firewall (WAF)
The easiest way to protect your site and be confident about your WordPress security is by using a web application firewall (WAF).
A website firewall blocks all malicious traffic before it even reaches your website.
DNS Level Website Firewall – These firewall route your website traffic through their cloud proxy servers. This allows them to only send genuine traffic to your web server.
Application Level Firewall – These firewall plugins examine the traffic once it reaches your server but before loading most WordPress scripts. This method is not as efficient as the DNS level firewall in reducing the server load.
The best part about Sucuri’s firewall is that it also comes with a malware cleanup and blacklist removal guarantee. Basically if you were to be hacked under their watch, they guarantee that they will fix your website (no matter how many pages you have).
This is a pretty strong warranty because repairing hacked websites is expensive. Security experts normally charge $250 per hour. Whereas you can get the entire Sucuri security stack for $199 per year.
Sucuri is not the only DNS level firewall provider out there. The other popular competitor is Cloudflare. See our comparison of Sucuri vs Cloudflare (Pros and Cons).
SSL (Secure Sockets Layer) is a protocol which encrypts data transfer between your website and users browser. This encryption makes it harder for someone to sniff around and steal information.
Once you enable SSL, your website will use HTTPS instead of HTTP, you will also see a padlock sign next to your website address in the browser.
SSL certificates were typically issued by certificate authorities, and their prices start from $80 to hundreds of dollars each year. Due to added cost, most website owners opted to keep using the insecure protocol.
To fix this, a non-profit organization called Let’s Encrypt decided to offer free SSL Certificates to website owners. Their project is supported by Google Chrome, Facebook, Mozilla, and many more companies.
If your hosting company does not offer one, then you can purchase one from Domain.com. They have the best and most reliable SSL deal in the market. It comes with a $10,000 security warranty and a TrustLogo security seal.
WordPress Security for DIY Users
If you do everything that we have mentioned thus far, then you’re in a pretty good shape.
But as always, there’s more that you can do to harden your WordPress security.
Some of these steps may require coding knowledge.
Change the Default “admin” username
In the old days, the default WordPress admin username was “admin”. Since usernames make up half of login credentials, this made it easier for hackers to do brute-force attacks.
Thankfully, WordPress has since changed this and now requires you to select a custom username at the time of installing WordPress.
However, some 1-click WordPress installers, still set the default admin username to “admin”. If you notice that to be the case, then it’s probably a good idea to switch your web hosting.
Since WordPress doesn’t allow you to change usernames by default, there are three methods you can use to change the username.
Create a new admin username and delete the old one.
WordPress comes with a built-in code editor which allows you to edit your theme and plugin files right from your WordPress admin area. In the wrong hands, this feature can be a security risk which is why we recommend turning it off.
You can easily do this by adding the following code in your wp-config.php file.
By default, WordPress allows users to try to login as many time as they want. This leaves your WordPress site vulnerable to brute force attacks. Hackers try to crack passwords by trying to login with different combinations.
This can be easily fixed by limiting the failed login attempts a user can make. If you’re using the web application firewall mentioned earlier, then this is automatically taken care of.
However, if you don’t have the firewall setup, then proceed with the steps below.
Two-factor authentication technique requires users to log in by using a two-step authentication method. The first one is the username and password, and the second step requires you to authenticate using a separate device or app.
Most top online websites like Google, Facebook, Twitter, allow you to enable it for your accounts. You can also add the same functionality to your WordPress site.
First, you need to install and activate the Two Factor Authentication plugin. Upon activation, you need to click on the ‘Two Factor Auth’ link in WordPress admin sidebar.
Next, you need to install and open an authenticator app on your phone. There are several of them available like Google Authenticator, Authy, and LastPass Authenticator.
We recommend using LastPass Authenticator or Authy because they both allow you to back up your accounts to the cloud. This is very useful in case your phone is lost, reset, or you buy a new phone. All your account logins will be easily restored.
We will be using the LastPass Authenticator for the tutorial. However, instructions are similar for all auth apps. Open your authenticator app, and then click on the Add button.
You will be asked if you’d like to scan a site manually or scan the bar code. Select the scan bar code option and then point your phone’s camera on the QRcode shown on the plugin’s settings page.
That’s all, your authentication app will now save it. Next time you log in to your website, you will be asked for the two-factor auth code after you enter your password.
Simply open the authenticator app on your phone and enter the code you see on it.
By default, WordPress uses wp_ as the prefix for all tables in your WordPress database. If your WordPress site is using the default database prefix, then it makes it easier for hackers to guess what your table name is. This is why we recommend changing it.
Normally, hackers can request your wp-admin folder and login page without any restriction. This allows them to try their hacking tricks or run DDoS attacks.
You can add additional password protection on a server-side level, which will effectively block those requests.
Directory browsing can be used by hackers to find out if you have any files with known vulnerabilities, so they can take advantage of these files to gain access.
Directory browsing can also be used by other people to look into your files, copy images, find out your directory structure, and other information. This is why it is highly recommended that you turn off directory indexing and browsing.
You need to connect to your website using FTP or cPanel’s file manager. Next, locate the .htaccess file in your website’s root directory. If you cannot see it there, then refer to our guide on why you can’t see .htaccess file in WordPress.
After that, you need to add the following line at the end of the .htaccess file:
XML-RPC was enabled by default in WordPress 3.5 because it helps connecting your WordPress site with web and mobile apps.
Because of its powerful nature, XML-RPC can significantly amplify the brute-force attacks.
For example, traditionally if a hacker wanted to try 500 different passwords on your website, they would have to make 500 separate login attempts which will be caught and blocked by the login lockdown plugin.
But with XML-RPC, a hacker can use the system.multicall function to try thousands of password with say 20 or 50 requests.
This is why if you’re not using XML-RPC, then we recommend that you disable it.
There are 3 ways to disable XML-RPC in WordPress, and we have covered all of them in our step by step tutorial on how to disable XML-RPC in WordPress.
Tip: The .htaccess method is the best one because it’s the least resource intensive.
If you’re using the web-application firewall mentioned earlier, then this can be taken care of by the firewall.
Logged in users can sometimes wander away from screen, and this poses a security risk. Someone can hijack their session, change passwords, or make changes to their account.
This is why many banking and financial sites automatically log out an inactive user. You can implement similar functionality on your WordPress site as well.
You will need to install and activate the Inactive Logout plugin. Upon activation, visit Settings » Inactive Logout page to configure plugin settings.
Simply set the time duration and add a logout message. Don’t forget to click on the save changes button to store your settings.
Adding a security question to your WordPress login screen makes it even harder for someone to get unauthorized access.
You can add security questions by installing the WP Security Questions plugin. Upon activation, you need to visit Settings » Security Questions page to configure the plugin settings.
If you have a WordPress security plugin installed, then those plugins will routinely check for malware and signs of security breaches.
However, if you see a sudden drop in website traffic or search rankings, then you may want to manually run a scan. You can use your WordPress security plugin, or use one of these malware and security scanners.
Running these online scans is quite straight forward, you just enter your website URLs and their crawlers go through your website to look for known malware and malicious code.
Now keep in mind that most WordPress security scanners can just scan your website. They cannot remove the malware or clean a hacked WordPress site.
This brings us to the next section, cleaning up malware and hacked WordPress sites.
Many WordPress users don’t realize the importance of backups and website security until their website is hacked.
Cleaning up a WordPress site can be very difficult and time consuming. Our first advice would be to let a professional take care of it.
Hackers install backdoors on affected sites, and if these backdoors are not fixed properly, then your website will likely get hacked again.
Allowing a professional security company like Sucuri to fix your website will ensure that your site is safe to use again. It will also protect you against any future attacks.
As small business owners, it’s critical that we protect our digital and financial identity because failure to do so can lead to significant losses. Hackers and criminals can use your identity to steal your website domain name, hack your bank accounts, and even commit crime that you can be liable for.
There were 4.7 million identity theft and credit card fraud incidents reported to the Federal Trade Commission (FTC) in 2020.
They offer device & wifi network protection through their free VPN (virtual private network) which secures your internet connection with military-grade encryption wherever you are. This is great for when you’re traveling or connecting to your WordPress admin from a public place like Starbucks, so you can work online safely and privately.
Their dark web monitoring service constantly monitors the dark web using artificial intelligence and alert you if your passwords, social security number, and bank accounts have been compromised.
This allows you to act faster and better protect your digital identity.
That’s all, we hope this article helped you learn the top WordPress security best practices as well as discover the best WordPress security plugins for your website.
Today is Microsoft’s April 2022 Patch Tuesday, and with it comes fixes for two zero-day vulnerabilities and a total of 119 flaws.
Microsoft has fixed 119 vulnerabilities (not including 26 Microsoft Edge vulnerabilities) with today’s update, with ten classified as Critical as they allow remote code execution.
The number of bugs in each vulnerability category is listed below:
CVE-2022-26904 – Windows User Profile Service Elevation of Privilege Vulnerability
The publicly exposed zero-day is a privilege elevation bug discovered by CrowdStrike and the US National Security Agency (NSA).
CVE-2022-24521 – Windows Common Log File System Driver Elevation of Privilege Vulnerability
Now that Microsoft has issued patches for these vulnerabilities, it should be expected for threat actors to analyze the vulnerabilities to learn how to exploit them.
Therefore, it is strongly advised to install today’s security updates as soon as possible.
Recent updates from other companies
Other vendors who released updates in April 2022 include:
Below is the complete list of resolved vulnerabilities and released advisories in the April 2022 Patch Tuesday updates. To access the full description of each vulnerability and the systems that it affects, you can view the full report here.

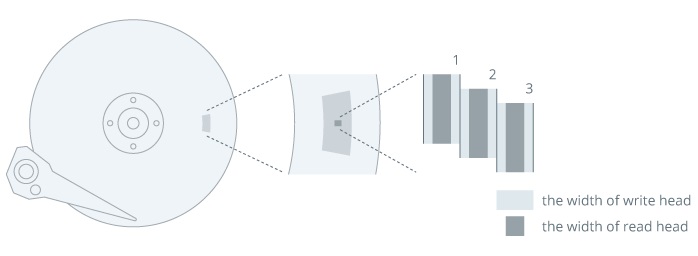
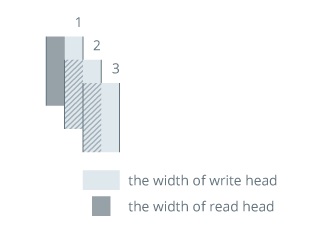
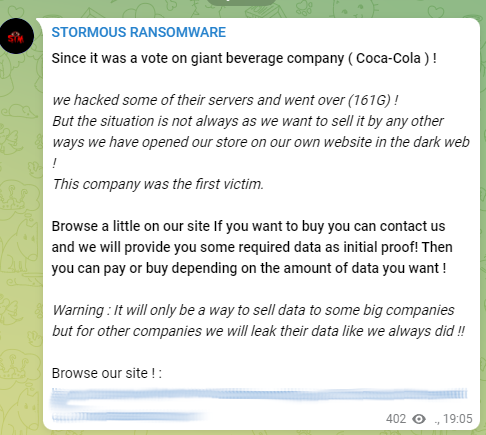
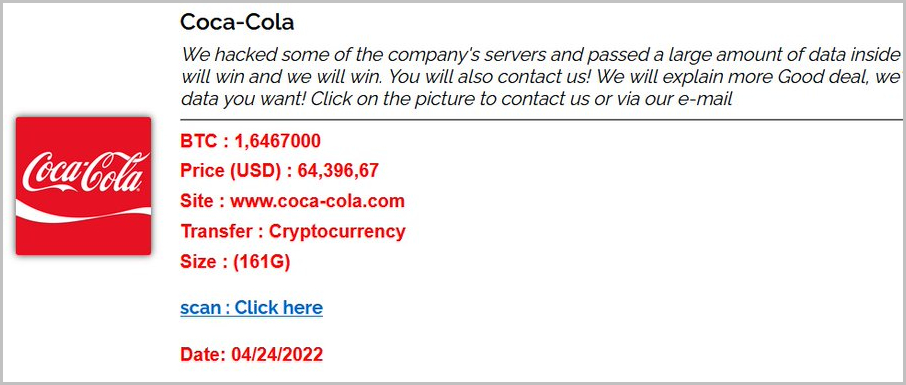

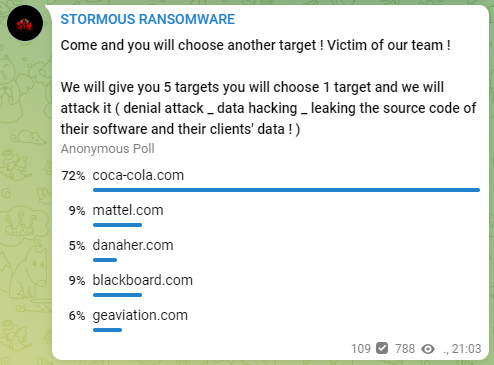

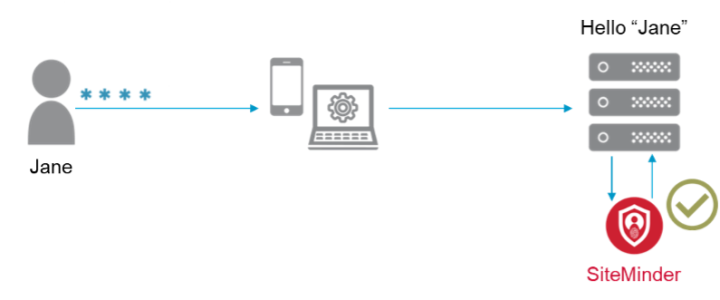
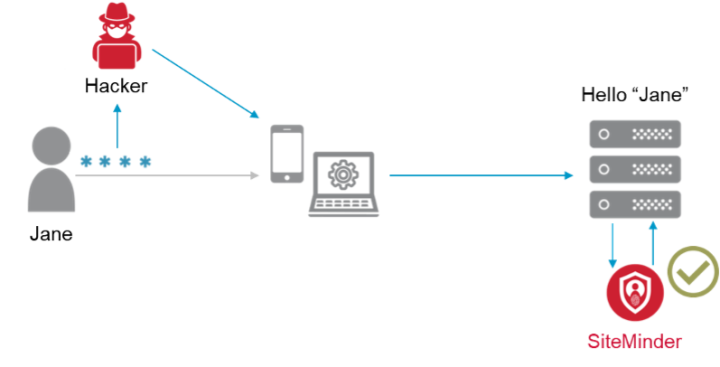


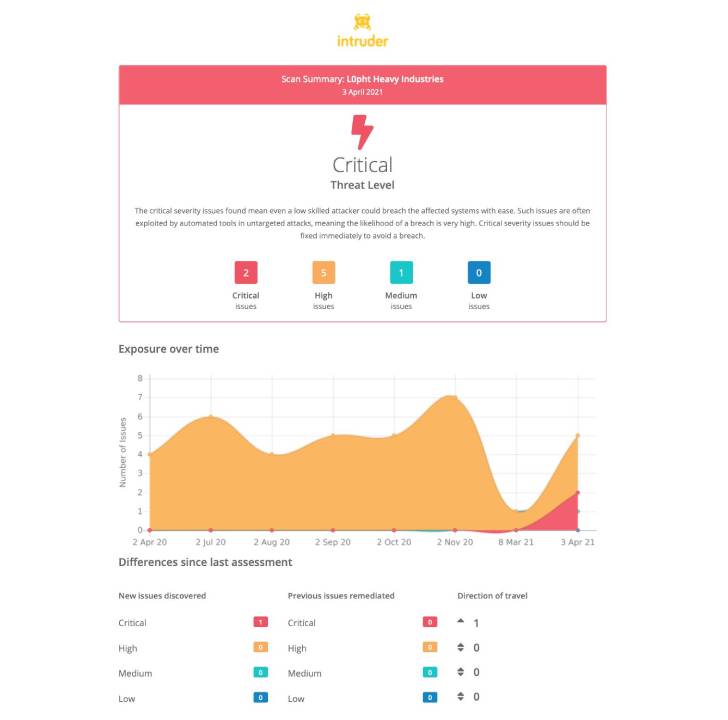