In this tutorial dedicated to Active Directory and security, I will give you some tips to harden the level of security in order to be less vulnerable to attacks.
The different configuration points, which will be discussed, simply allow attacks to be made more difficult and longer internally, in no way will they guarantee that you are invulnerable.
What you need to know is that your first ally is time, the more “difficult” and longer it will be, the more likely you are that the attacker(s) will move on.
Before applying the settings, they should be tested in a restricted environment so as not to create more problems, especially on Active Directory environments that are several years old.
- Disable SMBv1 support
- Enable signing on the SMB protocol
- Disable LM and NTLMv1 authentication
- Disable LLMNR and NBT-NS
- Some additional tracks
Disable SMBv1 support
One of the first points is to disable support for the SMBv1 protocol on all computers (servers and client workstations).
Since Windows 10 and Windows Server 2019, SMBv1 support is disabled by default.
To find out if the SMBv1 protocol is enabled, use the following command:
Get-SmbServerConfiguration | Select EnableSMB1Protocol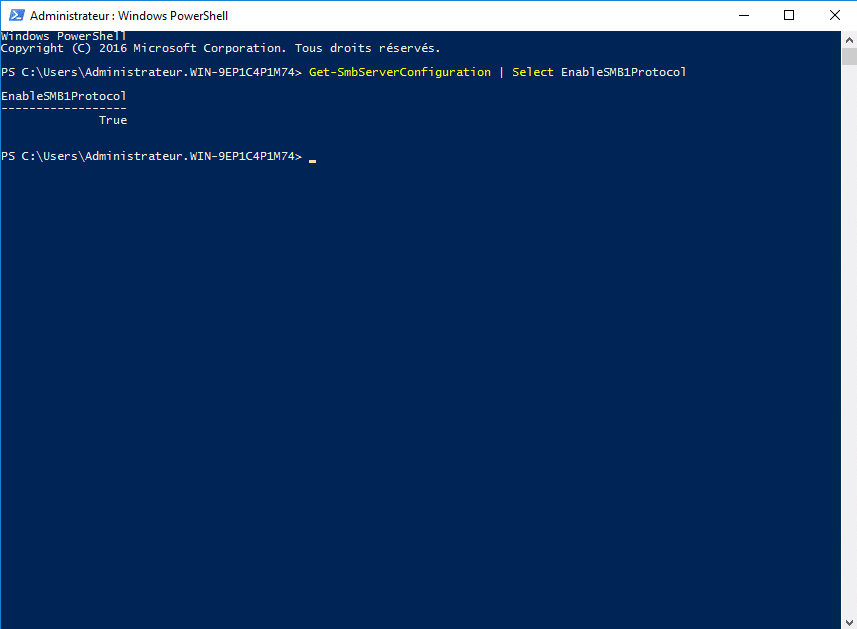
Before disabling SMBv1, it is possible to check if it is still used on a server.
To do this, use the command below:
Get-SmbSession | Select-Object -Property ClientComputerName, ClientUserName, DialectThis command returns the device IP address, username, and SMB version used to access the shares.
If you have “old” equipment (copiers, scanners …), it is possible that they do not support a higher version of SMB.
It is also possible to enable SMBv1 access auditing:
Set-SmbServerConfiguration -AuditSmb1Access $trueOnce activated, you must search for events with ID 3000 in the log: Microsoft-Windows-SMBServer\Audit.
To disable the SMBv1 protocol, there are several solutions.
Disable the SMBv1 protocol, this solution is effective immediately and does not require a restart (Windows 8.1 / Server 2012R2 or newer):
Set-SmbServerConfiguration -EnableSMB1Protocol $falseTo disable the SMBv1 protocol on later versions of Windows (7, Vista, Server 2008 and Server 2008R2), modify the registry:
Set-ItemProperty -Path "HKLM:\SYSTEM\CurrentControlSet\Services\LanmanServer\Parameters" SMB1 -Type DWORD -Value 0 -ForceTo take an account a restart is necessary.
For Windows 8.1 / Server 2012R2, it is also possible to uninstall the SMBv1 protocol support, here a restart is necessary:
Disable-WindowsOptionalFeature -Online -FeatureName SMB1ProtocolI also wrote a tutorial on disabling SMBv1 protocol (Server/Client) by group policy: https://rdr-it.com/en/gpo-disabled-smbv1/
Enable signing on the SMB protocol
In order to “protect” against Man-in-the-middle (MITM) attacks, it is possible to activate the signature on SMB protocol exchanges.
SMB signing works with SMBv2 and SMBv3.
The configuration of the signature can be done:
- at the client level
- at the server level
From the moment one of the two negotiates the signature, the SMB flow will be signed.
The configuration is done at the level of group policies: Computer configuration / Windows settings / Security settings / Security options. The two parameters to activate:
- Microsoft network client: digitally sign communications (always)
- Microsoft network server: digitally sign communications (always)
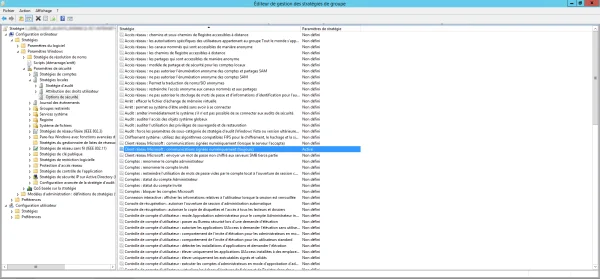
Again, I advise you to test on a few computers before applying this to your entire fleet, for my part, I had problems with RDS servers in terms of access to shares.
For more information I invite you to read this page : https://docs.microsoft.com/fr-fr/windows/security/threat-protection/security-policy-settings/microsoft-network-client-digitally-sign-communications-always.
Disable LM and NTLMv1 authentication
Still in the “old” protocols, it is necessary to disable the LM and NTLMv1 protocols which have password hashes that are very easy to brute force.
Once again, deactivation can be done by group policy at: Computer Configuration / Windows Settings / Security Settings / Security Options
You need to configure the parameter: Network Security: LAN Manager Authentication Level.
To do this, check Define this policy parameter and select: Send NTLM version 2 responses only\Refuse LM and NTLM
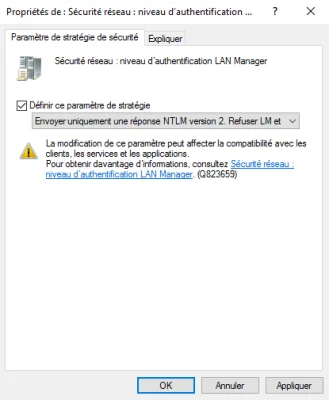
This setting is in an ideal world, if NTLMv1 should still be used, use this setting to disable LM: Only send NTLMv2 responses\Refuse LM
If you must use this parameter, NTLMv1 HASHes can still circulate on the network and are vulnerable to brute force attacks faster than NTLMv2.
It is possible to audit NTLM traffic by enabling settings to identify where NTMLv1 is being used
- Network Security: Restrict NTLM: Audit Incoming NTLM Traffic
- Network Security: Restrict NTLM: NTLM authentication in this domain
The NTLM configuration allows quite a bit of flexibility in terms of configuring it and adding exceptions.
Disable LLMNR and NBT-NS
LLMNR (Link-Local Multicast Name Resolution) and NBT-NS (Netbios Name Service) are two broadcast/multicast name resolution “protocols” that are enabled by default, they are used when dns name resolution fails.
If you use Wireshark type software to listen to the network, you will see that there is a lot of LLMNR and NBT-NS traffic.
The main danger of LLMNR and NBT-NS is that it is easy to send a false response with another computer in order to retrieve an NTLM hash of the requesting client.
Below are screenshots of the responder which allows you to respond to LLMNR and NBT-NS requests

Now we will see how to deactivate LLMNR and NBT-NS
Disable LLMNR
Good news, LLMNR is disabled by group policy in configuring the DNS client of computers.
To disable LLMNR, you must enable the Disable multicast name resolution setting located at: Computer Configuration / Administrative Templates / Network / DNS Client.
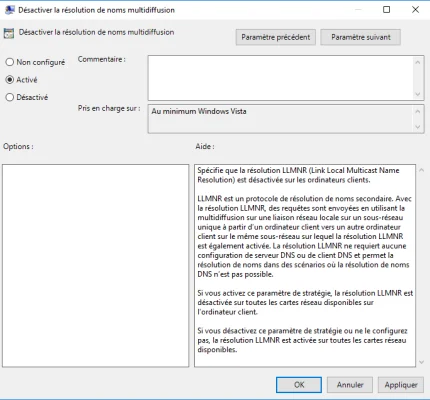
After applying the GPO on the computers in the domain, they will no longer use LLMNR.
If you have non-domain computers, it will be necessary to do this on them.
Disable NBT-NS
Here it gets a little complicated because NBT-NS is configured at the NIC level and there is no applicable group policy. The good news is that for client computers (mainly workstations), it is possible to do this by an option on the DHCP server.
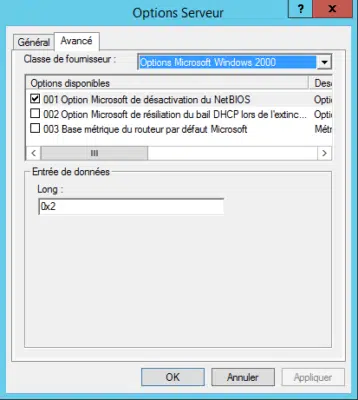
At the options level (extended or server), option 001 Microsoft Options for disabling NetBios must be configured in the Microsoft Windows 2000 Option vendor class. The value 0x2 must be entered to disable NBT-NS.
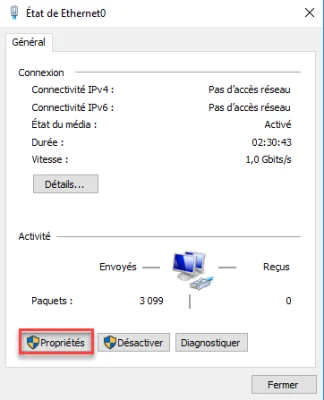
For computers that are not in automatic addressing, Netbios must be disabled on the network card(s).
Open network card properties.
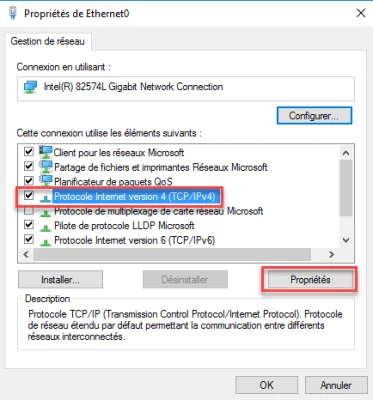
Select Internet Protocol Version 4 (TCP/IPv4) and click Properties.
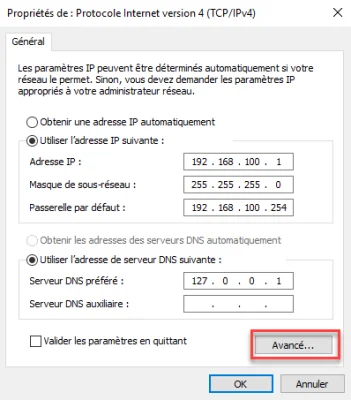
From the General tab, click on Advanced.
Go to the WINS tab, and select Disable NetBIOS over TCP/IP.
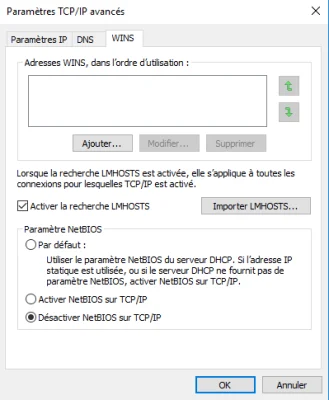
Close the different ones by validating the configuration.
It is possible to disable Netbios by GPO using a PowerShell script run at startup.
Here is the script:
ps-disable-netbios.ps1 248 Bytes
1234
# Get network cards
$regkey = "HKLM:SYSTEM\CurrentControlSet\services\NetBT\Parameters\Interfaces"
# Disable Netbios on each
Get-ChildItem $regkey |foreach { Set-ItemProperty -Path "$regkey\$($_.pschildname)" -Name NetbiosOptions -Value 2 -Verbose}
Some additional tracks
Here are some additional tips:
- Deploy LAPS on computers and servers in order to have different local administrator passwords.
- Sign your DNS zone (DNSSEC)
- Regularly audit privileged accounts.
It is also important to follow some simple “hygiene” rules:
- Limit privileged account usage (domain admins)
- Do not use domain admin accounts on workstations
- Update servers and computers regularly
- Update applications (Web server, database, etc.)
- Make sure you have up-to-date antivirus
- Learn about security bulletins
Regarding the last point that I will address, it is passwords, for domain administrator accounts, privileged long passwords (20 to 30 characters) which will take much longer to be “brute-forced” than an 8-character password even with complexity.
Don’t forget to audit your Active Directory for free with Ping Castle.CategoriesActive DirectoryTagsActive Directory, Security
Source :
https://rdr-it.com/en/active-directory-harden-the-security-of-your-environment/