There are three different types of camera zone settings you can use:
MotionZones, which tell the camera to recognize motion in specific zones and trigger certain actions, e.g. record footage and create Motion Detections for you to review later
PrivacyZones, which let you block out certain areas on the video recordings
SmartDetection (AI and G4 camera series), which let you create Events for certain types of motion, e.g. when the camera detects a person
Set up motion zones
Motion zones are specific zones where the camera will detect and record motion.
To trigger and record motion events and also trigger motion alerts, the camera recording settings must be set to Always or Detections.
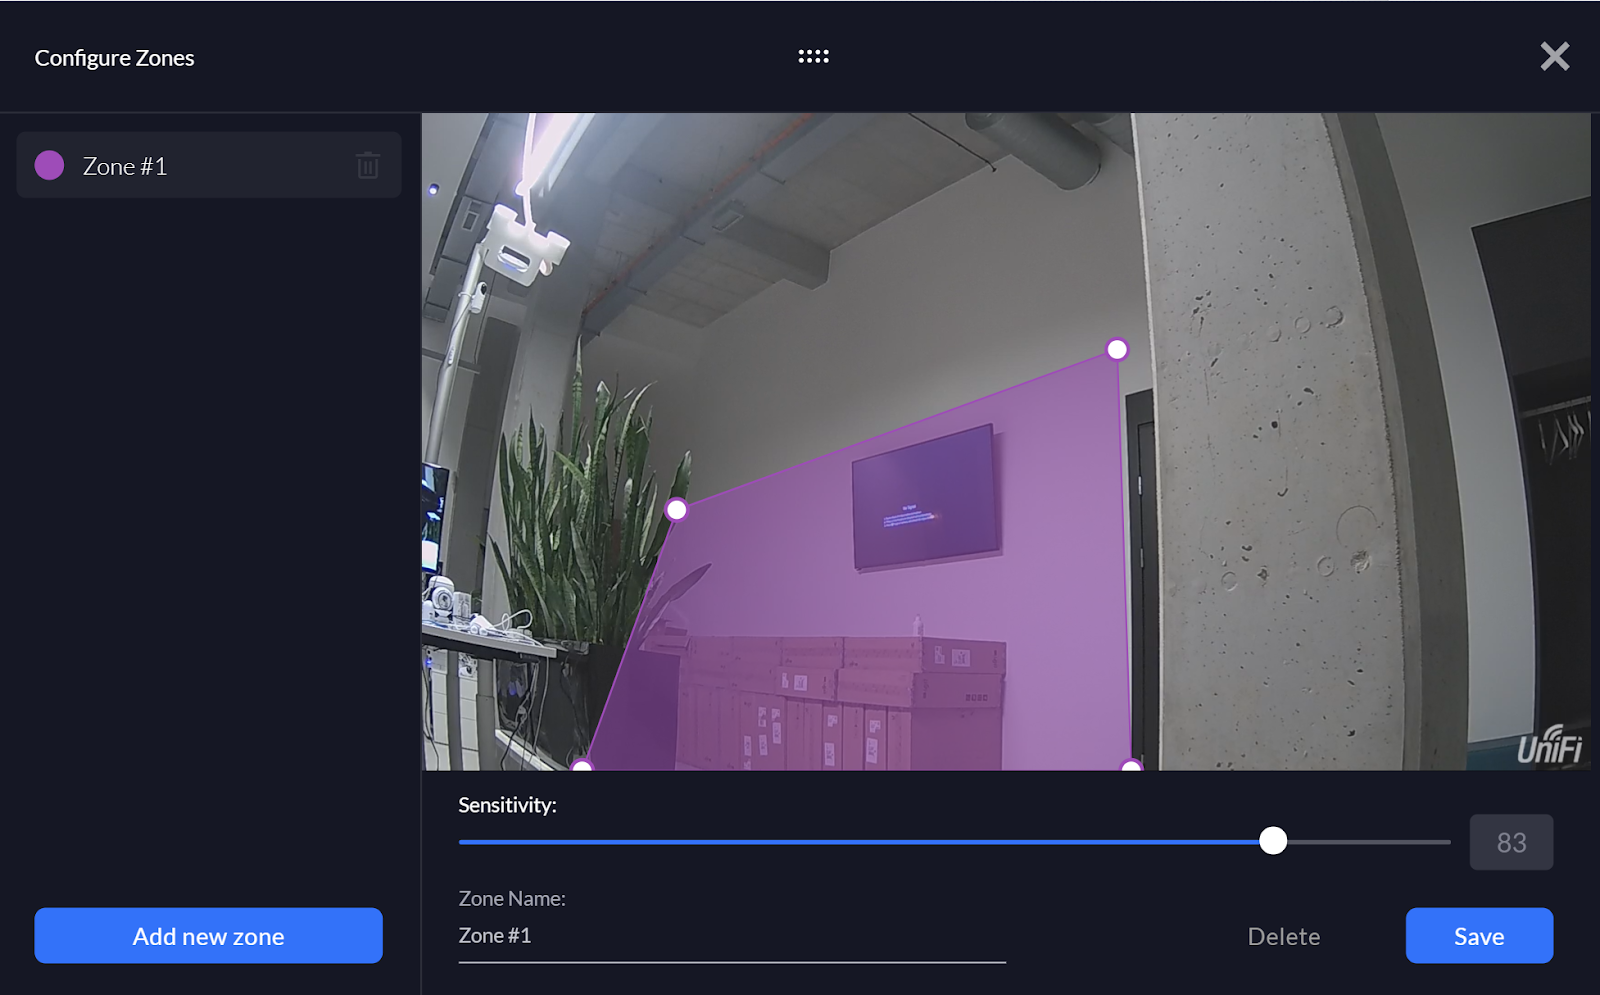
Go to the Devices section and select the desired camera.
On the right side panel, select Zones > Expand Motion Zones > Add Motion Zone.
Create the Motion Zone by clicking on the four corners of its perimeter. You can further adjust the corners by dragging them with your cursor.
Adjust the zone’s detection sensitivity based on your camera’s surroundings using the slider node below the feed window.”
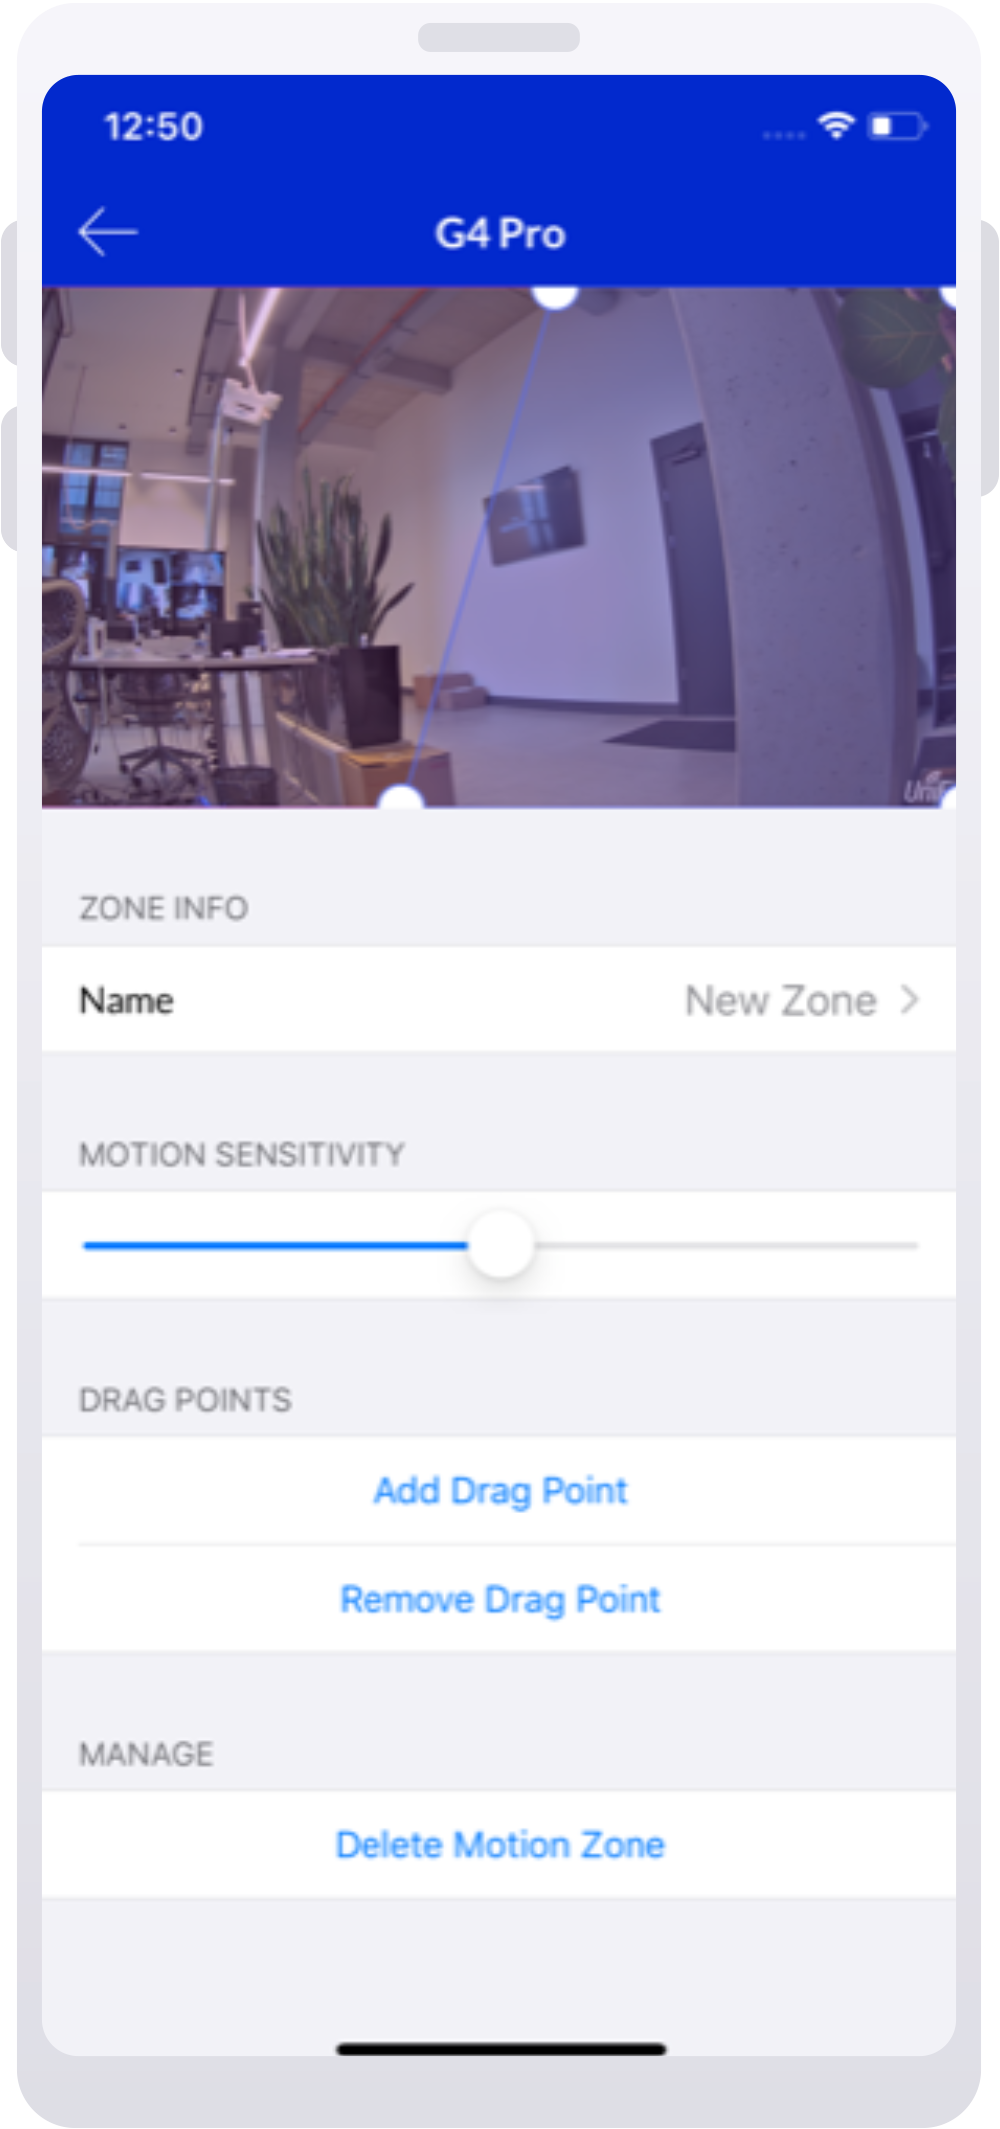
To set up a motion zone on the mobile app:
Select the desired camera on the home screen.
Tap on the Settings icon in the upper-right corner of your screen, then select Motion Zones > Add Motion Zone.
Create the Motion Zone by clicking on the four corners of its perimeter. You can further adjust the corners by dragging them with your cursor.
Adjust the zone’s detection sensitivity based on your camera’s surroundings using the slider node below the feed window.
Please note that adjusting the recording setting to Never disables motion detection recording and alerts.
When setting up zones, you can adjust the zone sensitivity. Setting a higher value will make your camera more sensitive, making it more likely to detect and log more subtle motions (e.g., small object movements).
If you’re getting an increased amount of motion events due to minor movements such as moving branches, decrease zone sensitivity to prevent excessive minor motion event logging.
Set up Smart Detection zones
Smart Detection Zones create events when specific motions are detected (e.g., a person’s movement).
Currently Smart Detection zones only supports person detection, meaning that you will only be notified when this specific motion event occurs.
The Smart Detection feature is only available for G4 and AI series cameras, except for G4 Instant.
To set up Smart Detection zones:
Go to Devices > Propertiespanel > Recordings and enable Person detection.
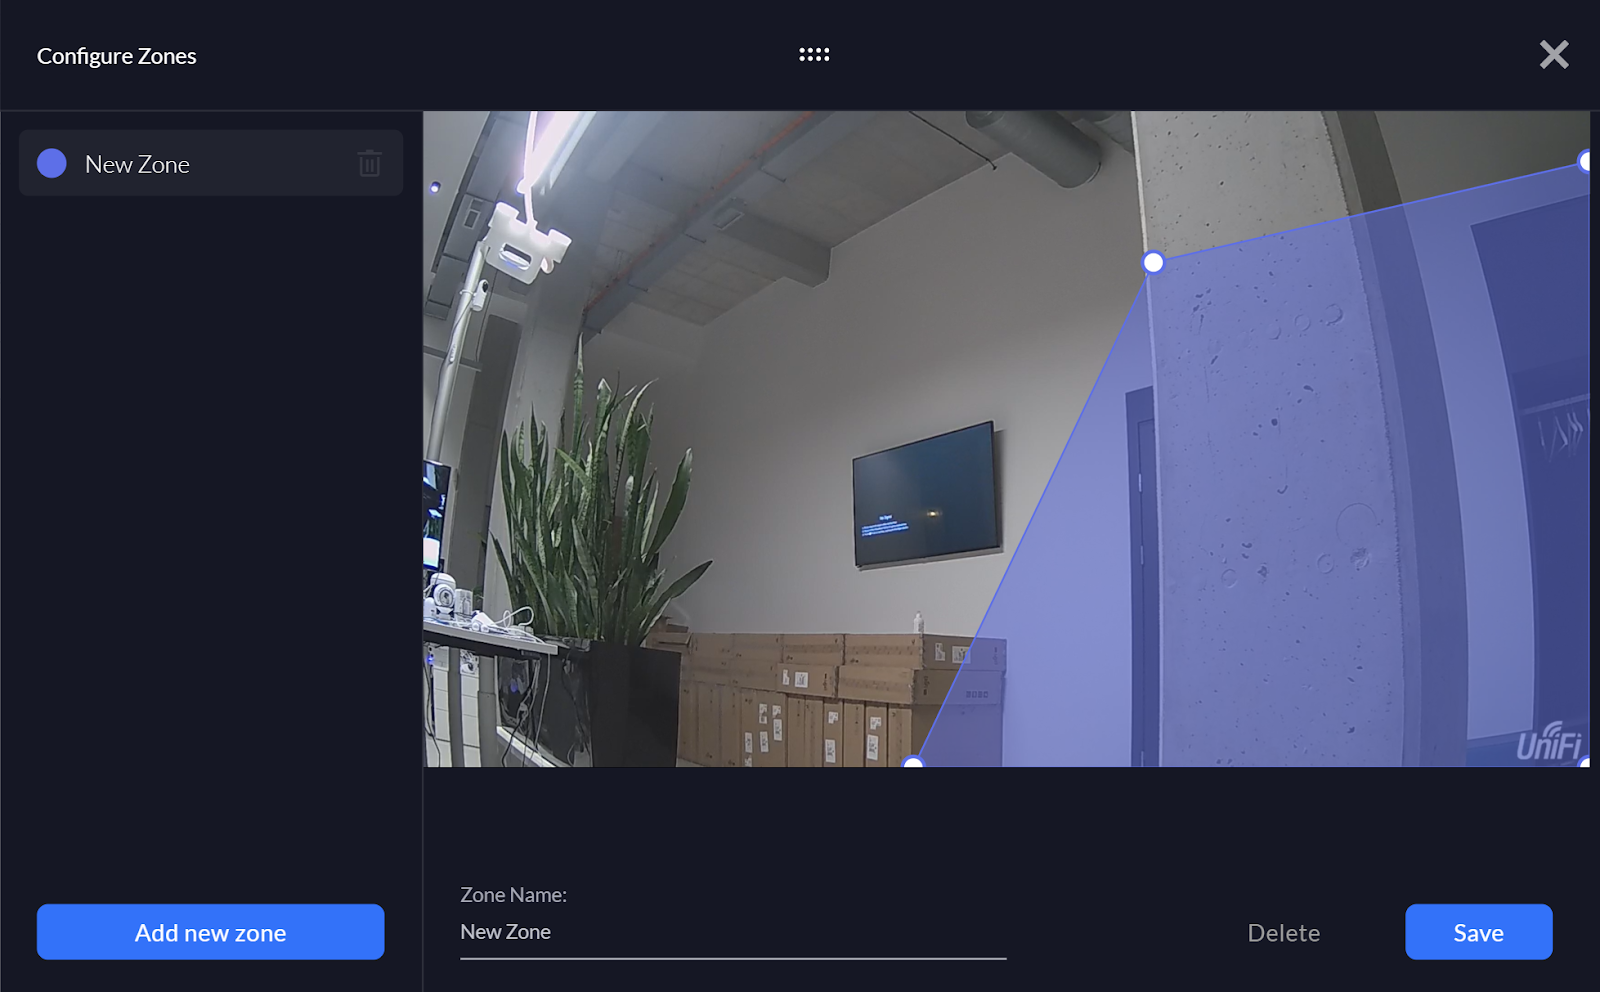
Go to the Zones section, click Add new zone, and name it.
Create the Smart Detection Zone by clicking on the four corners of its perimeter. You can further adjust the corners by dragging them with your cursor.
Adjust the zone’s detection sensitivity based on your camera’s surroundings using the slider node below the feed window.
Set up privacy zones
You can set privacy zones for each of your cameras, which block live playback and recordings of content within the specified area. Instead, you will see a blacked-out image.
To set up a privacy zone on the web application:
Go to the Devices section and select the desired camera.
On the right side panel, select Zones > Expand Privacy Zones > Add Privacy Zone.
Create the Privacy Zone by clicking on the four corners of its perimeter. You can further adjust the corners by dragging them with your cursor.
To set up a privacy zone on the mobile app:
Select the desired camera on the home screen.
Tap on the Settings icon in the upper-right corner of your screen, then select Privacy Zones > Add Privacy Zone.
Create the Privacy Zone by clicking on the four corners of its perimeter. You can further adjust the corners by dragging them with your cursor.
The UniFi Protect mobile and web applications allow you to view live and recorded footage as well as adjust the image and video playback quality.
Live View
By default, the video bitrate of your cameras is automatically reduced during prolonged periods of low motion frequency in order to reduce storage utilization. You may choose a specific resolution by changing the Viewer Quality to Low or High on the Protect web application by hovering over the Live View, or on the mobile app within the Live View’s specific settings.
Note: If your bandwidth is limited, you may experience unstable playback while viewing a high quality live feed.
Recordings and Detections
Your recording’s duration and quality will depend on the camera’s Recording Mode. The When to Record setting can be set to Always, Never or Detections. Image quality and frame rate can be adjusted using the Recording Quality setting.
Note that:
A higher frame rate will give you smoother video playback while a lower frame rate will ensure better picture quality.
Recording with higher image quality will require more storage space than lower quality ones.
You can download the Detection clips from the mobile app by tapping the Share icon > Export clip, or from the web application by selecting the detection and clicking the Download icon.
Adjust the Camera Picture Settings
Most image quality issues can be resolved by adjusting the camera picture settings, which are specific to each camera and found within Devices > select a camera > Settings.
The camera’s image is dull, dark, or distorted
To correct imagery that appears dark, dull, or distorted:
Open the camera’s settings and select Adjust Camera Picture.
Adjust the Brightness, Contrast, and Hue settings for the camera.
Note: There is no definite way of setting this for all cameras in any environment. Try adjusting these settings to achieve the desired image quality outcome.
The camera recording quality is low
To improve a camera’s recording quality, open its Recording Mode settings and increase the Frame Rate and Image Quality settings as described above.
The camera’s image is harshly lit
Harsh lighting creates a strong contrast that can make it difficult to see smaller, finer details in your live feeds and recordings. To resolve this, try enabling the HDR feature (or WDR depending on the camera model) in the Camera Picture settings.
The camera is out of focus (G3 Pro, G4 Pro, G4 PTZ cameras only)
If your G3 Pro, G4 Pro, or G4 PTZ cameras appear to be out of focus:
Make sure there are no objects between the camera and its focal point that may affect its ability to auto-focus.
Try manually setting the focal point with the Focus Camera Picture setting.
The camera isn’t switching to Night (IR) Mode
If your cameras are not switching to Night (IR) mode, or are rapidly alternating between Night and Day Mode, verify that:
Each camera’s infrared setting is set to Auto.
There are no external light sources, such as ambient lights in front of a camera, affecting integrated light sensors.
There are no obstructions near the front of the camera. Obstructions can cause the camera’s infrared light to reflect back at its sensor, causing it to switch back and forth between Night and Day Modes.
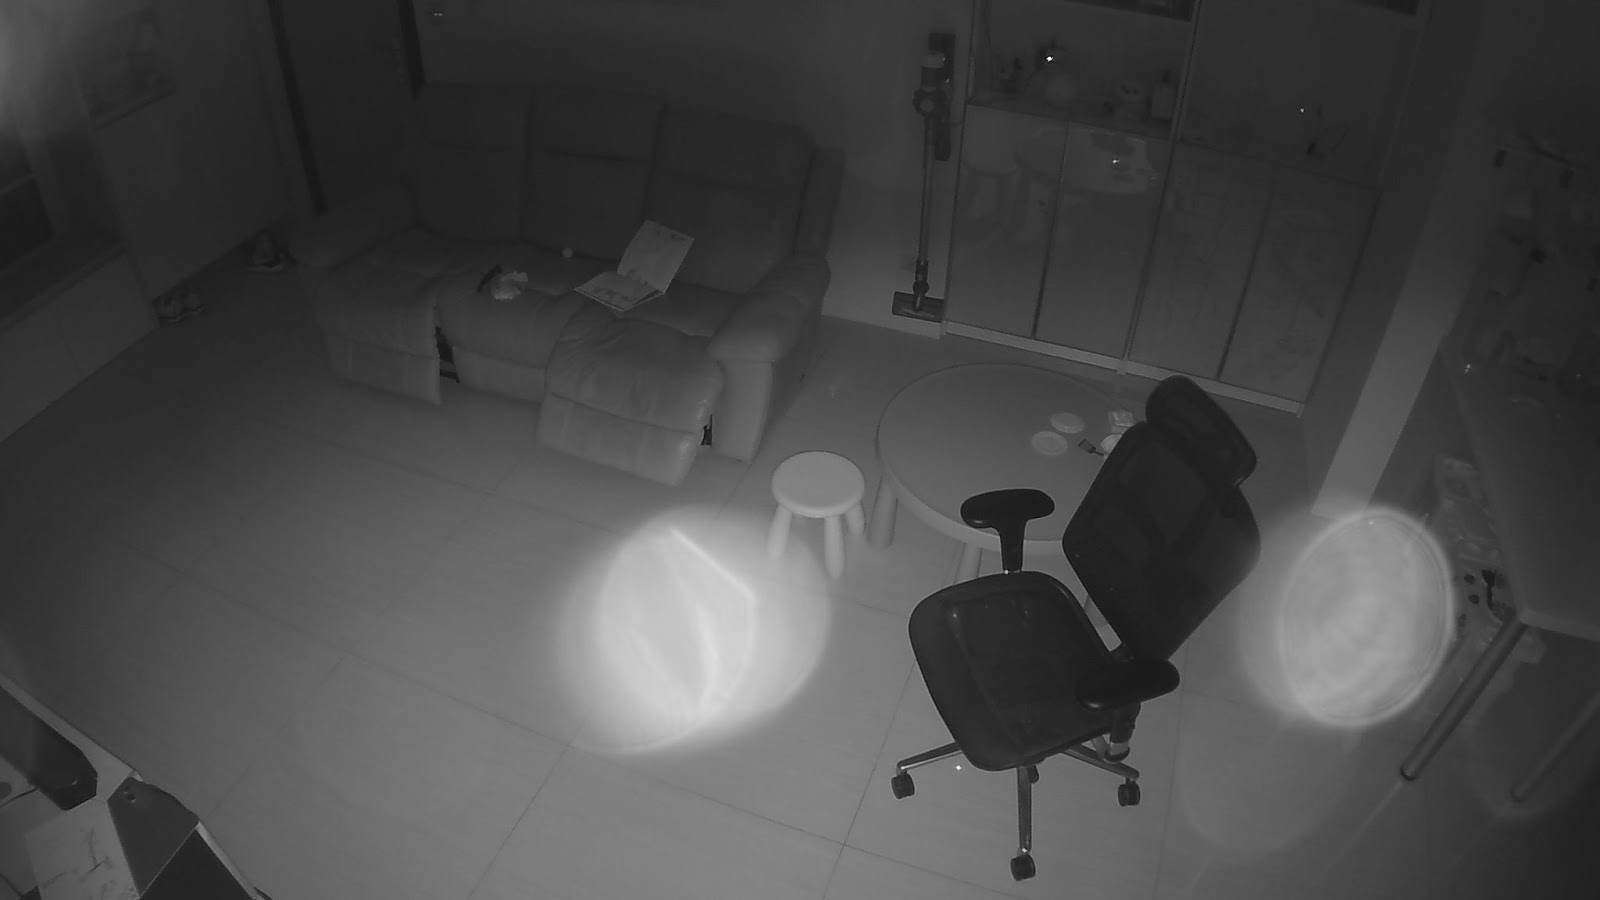
Night (IR) Mode imagery is blurry
If your Night (IR) Mode imagery is blurry:
Carefully clean your camera’s lens or dome using a soft cloth and isopropyl alcohol. The alcohol’s concentration should not exceed 70%; otherwise, you risk damaging its surface. Be sure to remove all residue to prevent unwanted reflections.
Ensure that no obstructions near the camera’s lens are causing IR reflections.
(For Dome cameras) Make sure that the dome cover is tightly secured to the lens housing. The rubber gasket should be firmly fastened to the dome’s surface and the dome should be in the locked position.
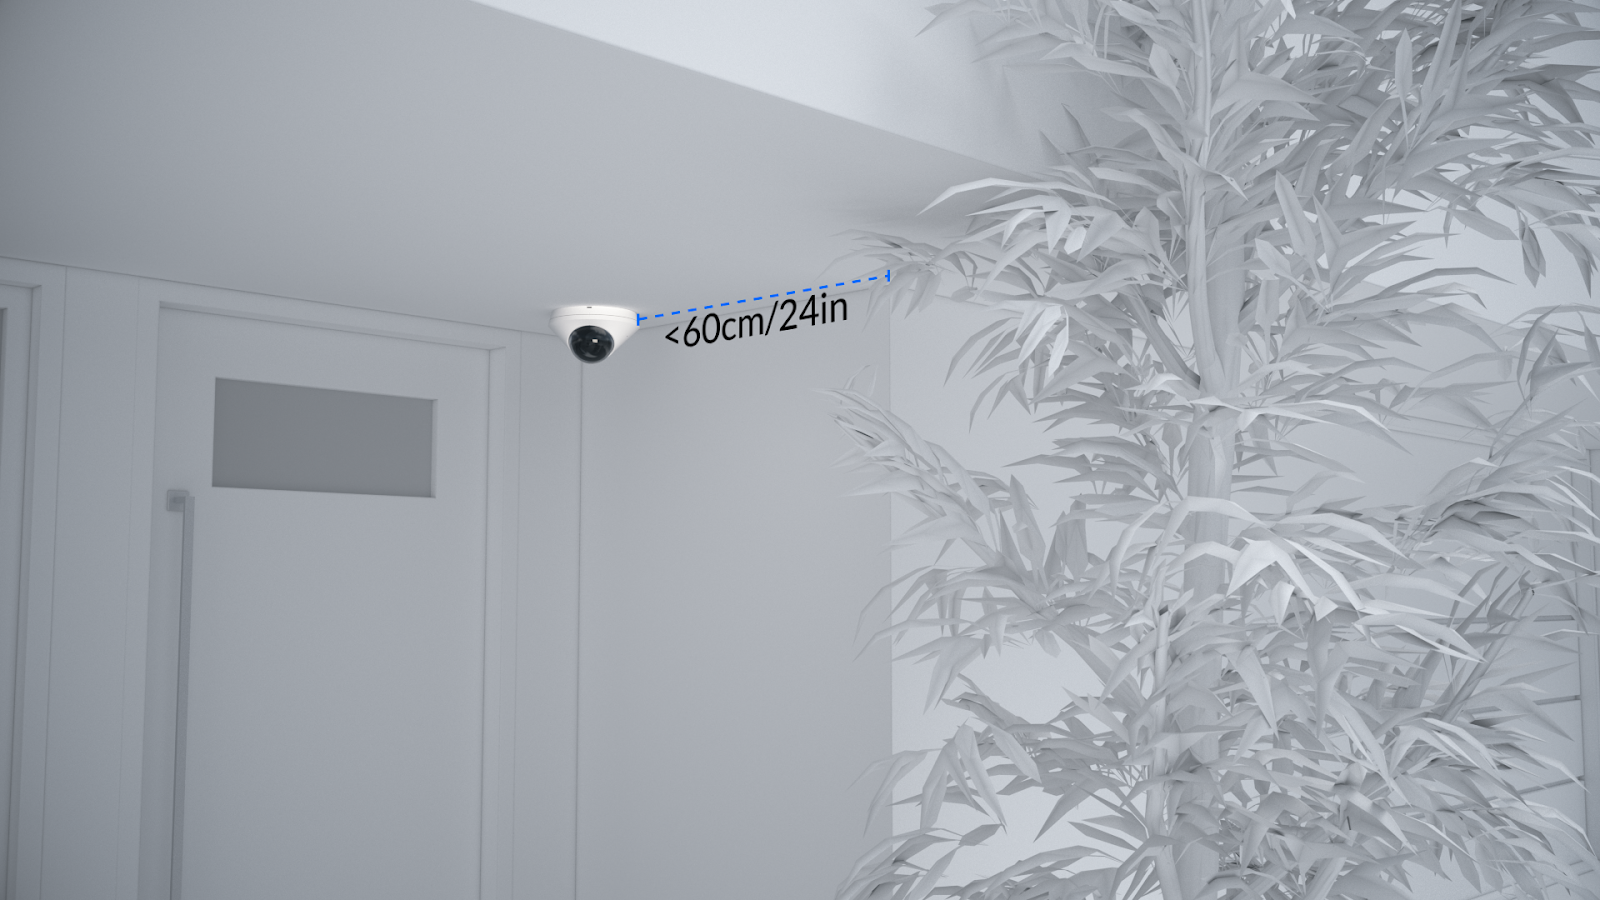
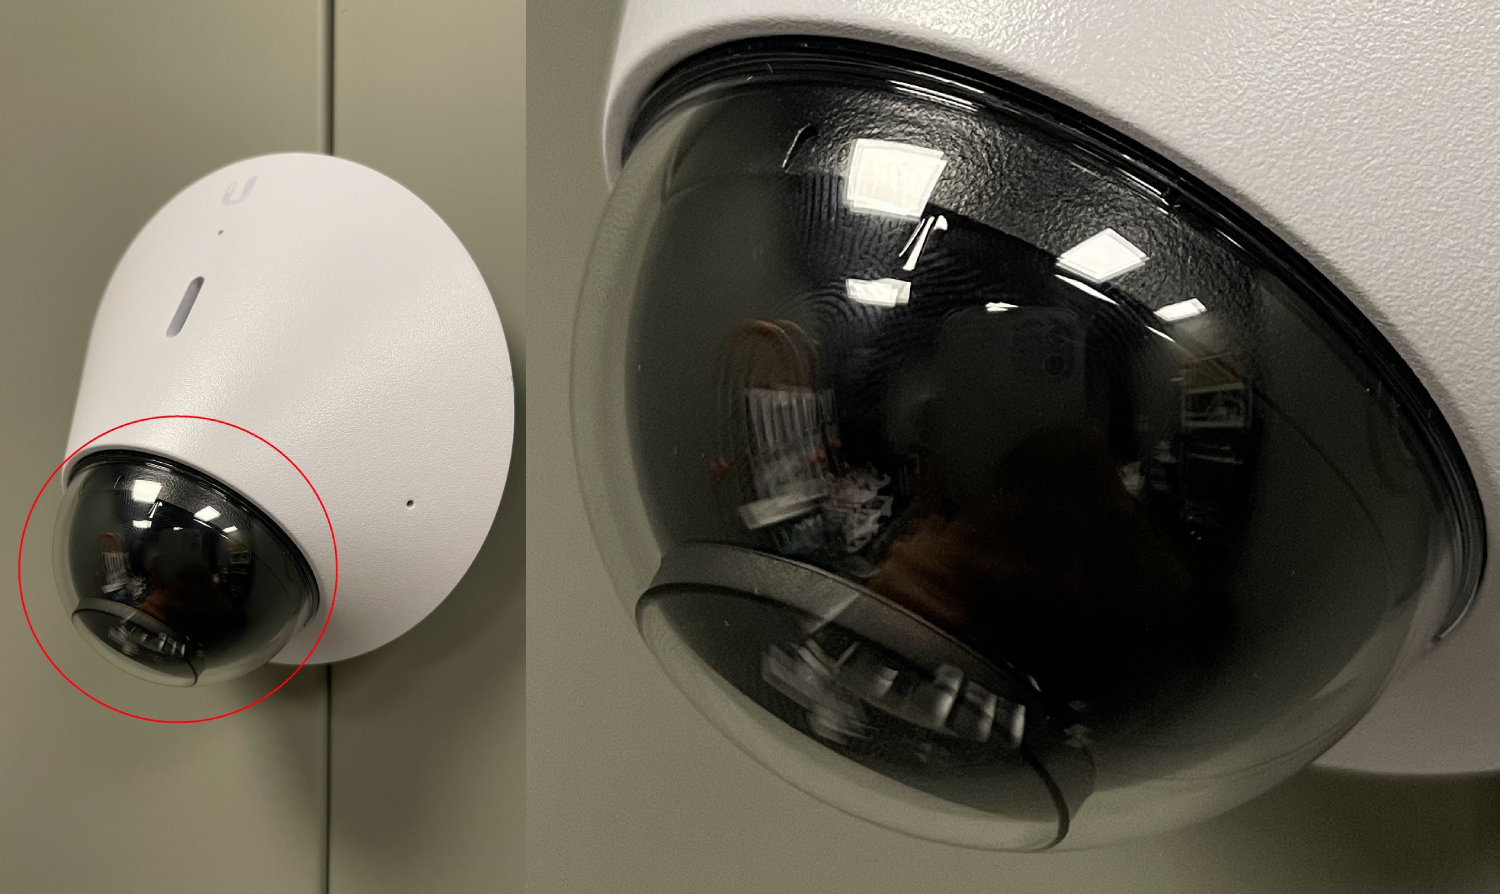
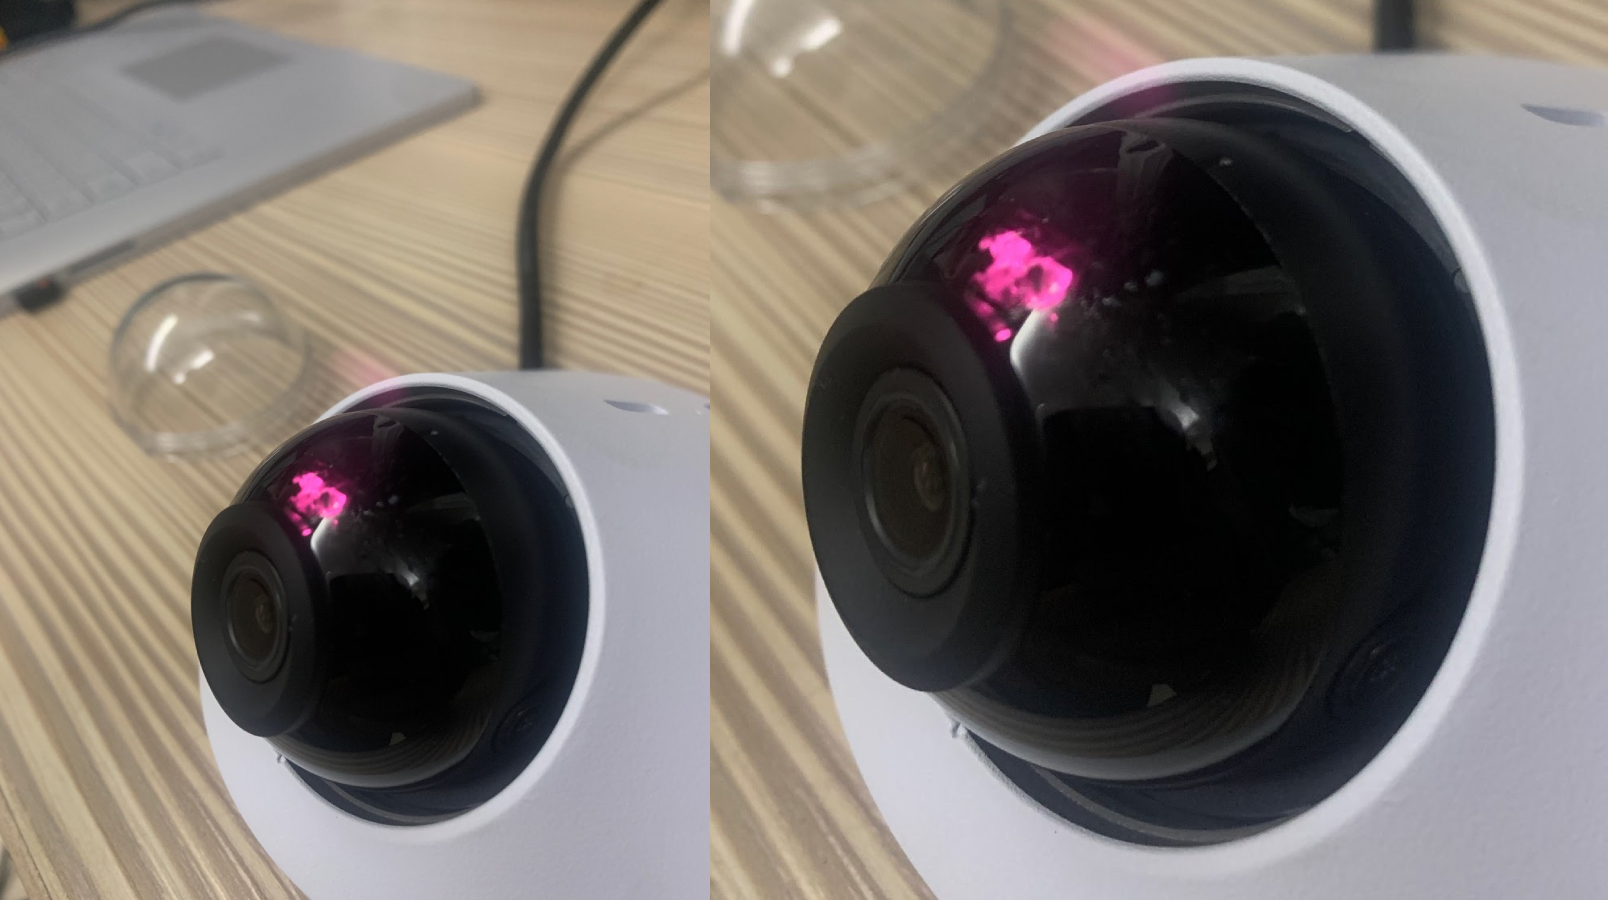
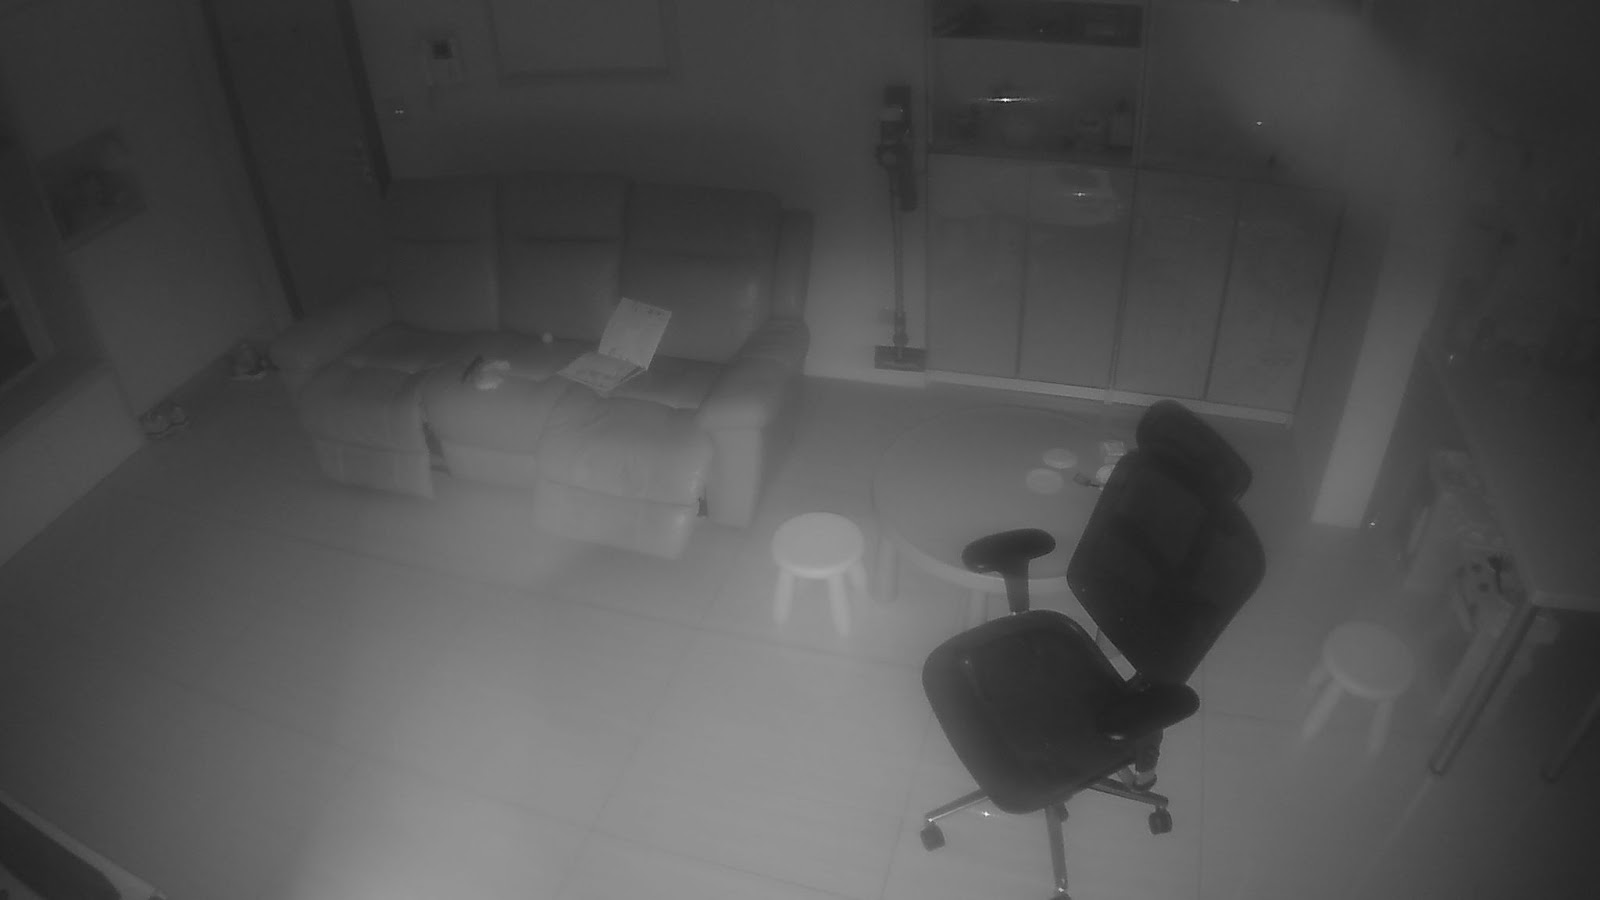
The G4 Dome camera is equipped with infrared LEDs to give it night vision. However, some factors may cause these LEDs to produce glares on the camera’s feed. The most common causes of glaring and poor resolution are:
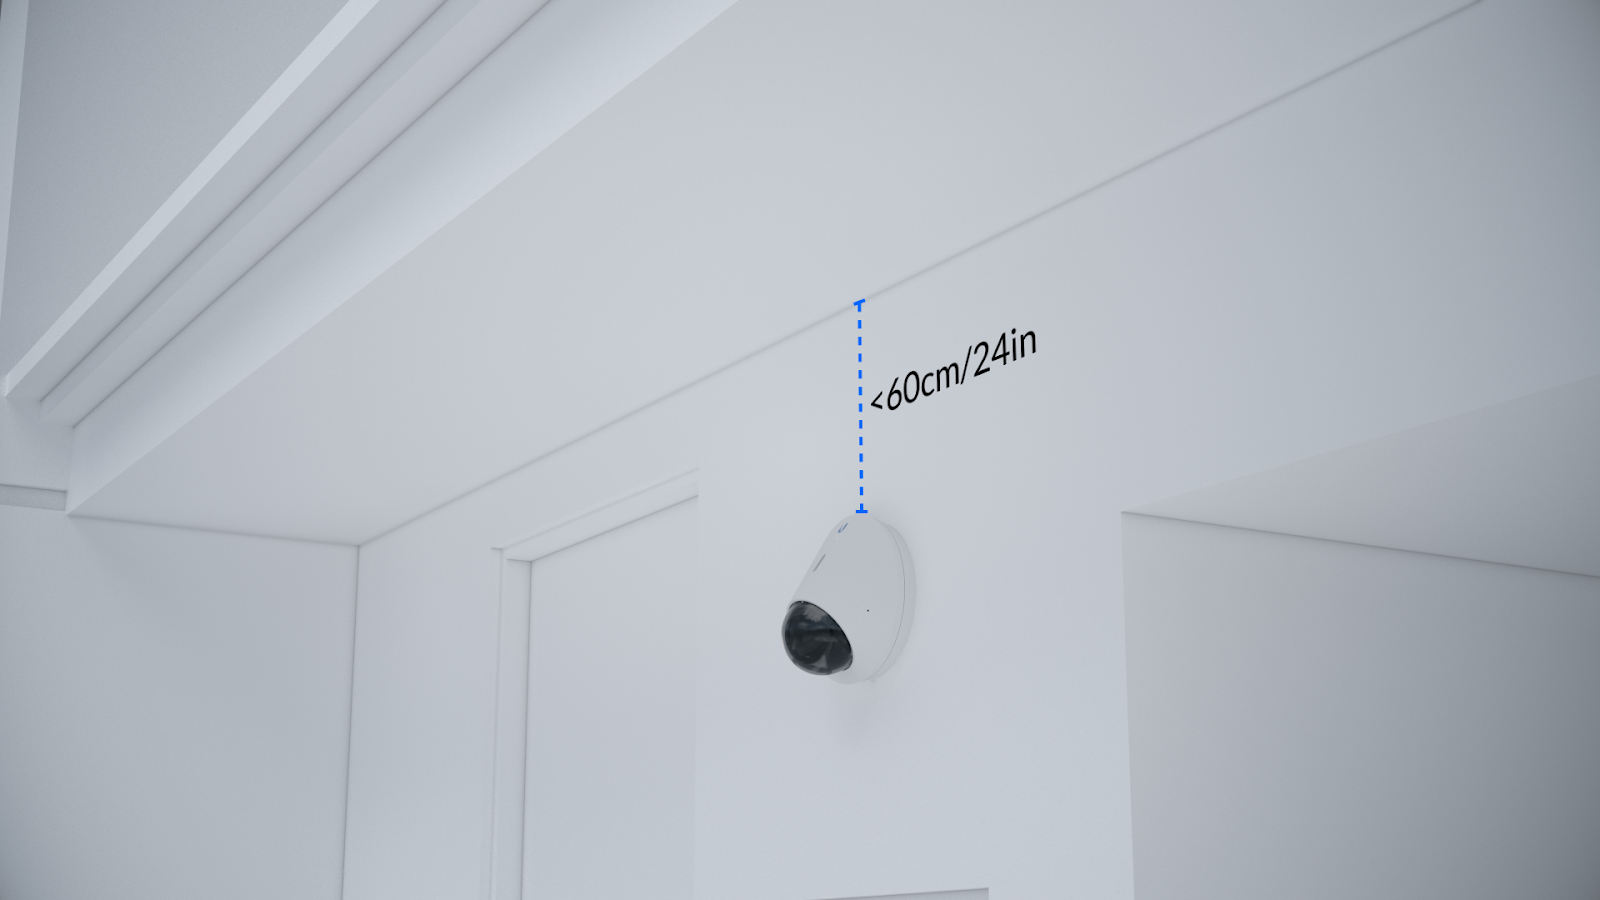
Per its installation guide, the G4 Dome should be installed at least 60 centimeters (cm), or 24 inches, away from neighboring walls and the ceiling. If nearby objects or fixtures, such as a wall corner or overhang, are closer than that, they may reflect infrared light into the camera and create a glare.
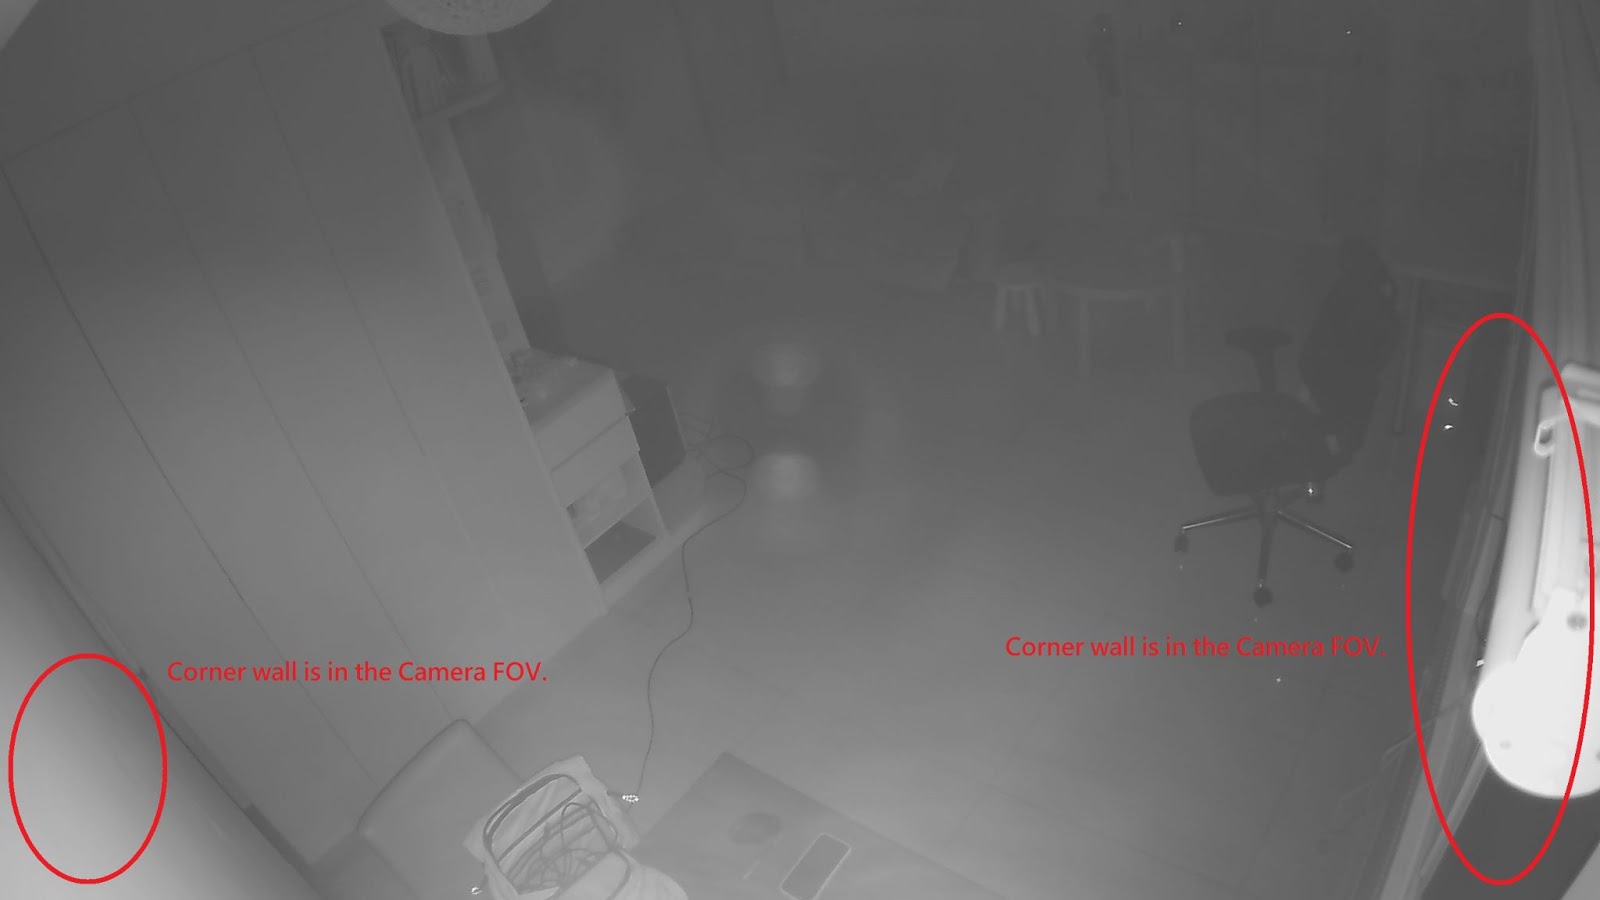
Ceiling-mounting near a wall corner
Below, you can see how mounting the G4 Dome to the ceiling with objects in the foreground can result in poor image quality.
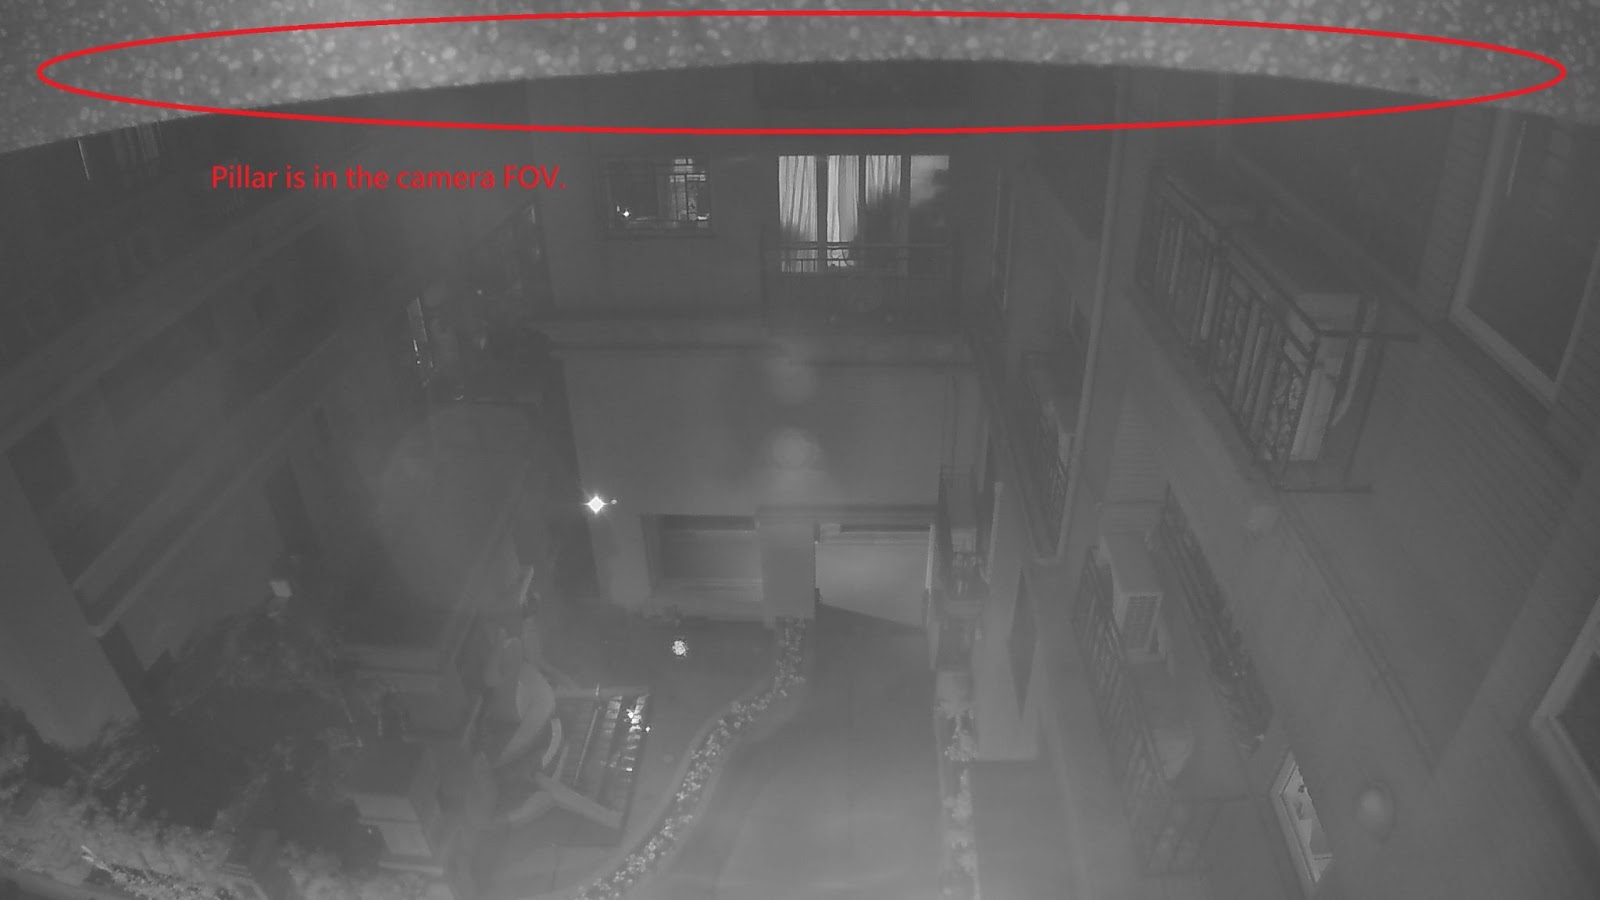
Ceiling-mounting near overhangs
The camera below is too close to the pillar so it appears in the camera’s field of view (FoV).
Wall-mounting too close to the ceiling
The camera below doesn’t have at least 60 cm of separation from the ceiling and its image quality is diminished as a result.
Residue on the bubble cover or lens
While installing the G4 Dome, its lens and bubble cover may collect dust, oil stains, and fingerprints. This can also occur if you wipe the lens or bubble cover incorrectly.
If there is residue on the G4 Dome’s lens or bubble cover, clean them with either lens wipes, a lens cloth with a lens cleaning solution, or a soft cleaning cloth and rubbing alcohol. Continue to do this periodically to prevent distorted image quality due to dirty lens and cover surfaces.
Oil stains or fingerprints on the bubble cover or lens
When oil stains stick to the bubble cover or lens, the infrared lights become diffused by the foggy surface.
The image below shows the camera’s bubble cover marked with fingerprints.
The image below shows a lens with oil stains.
Below, you can see how image quality with a clean bubble cover is markedly better than that of an oil-stained equivalent.
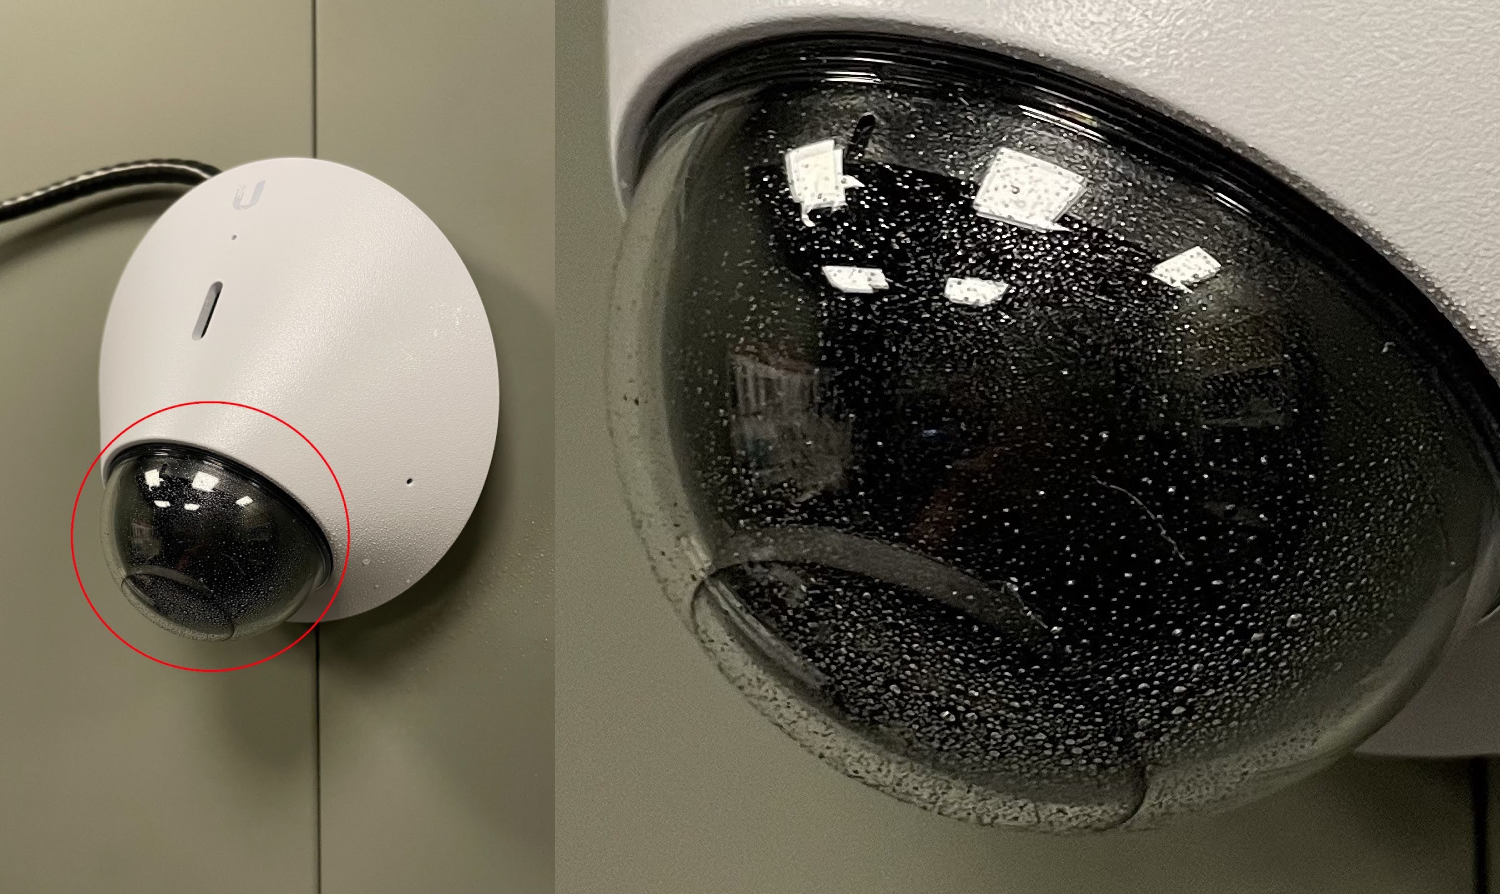
Moisture droplets on the bubble cover
When moisture droplets stick to the bubble cover, the camera’s infrared lights become scattered by the trapped moisture, like in the example directly below.
To avoid reduced image quality due to moisture droplets, wipe the bubble cover’s exterior with a lens cloth.
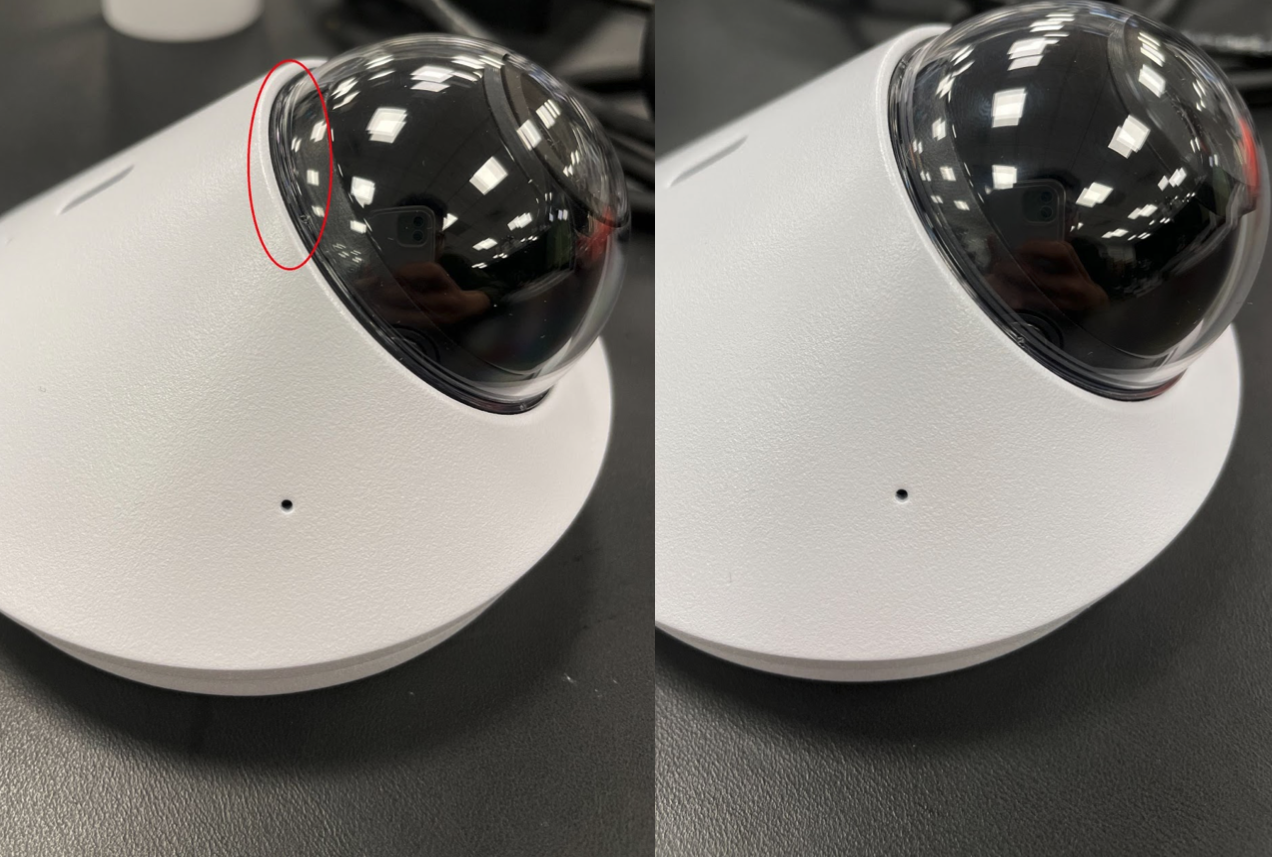
Bubble cover not properly locked in place
The G4 Dome’s removable bubble cover has a locking mechanism to ensure an airtight seal. When the bubble cover is not attached properly, the camera’s infrared lights can be reflected back into its lens.
To mount the bubble cover correctly:
Align the small indentations on the cover and camera.
Rotate the cover clockwise to securely fasten its rubber lining. The sealing strips should not be visible.
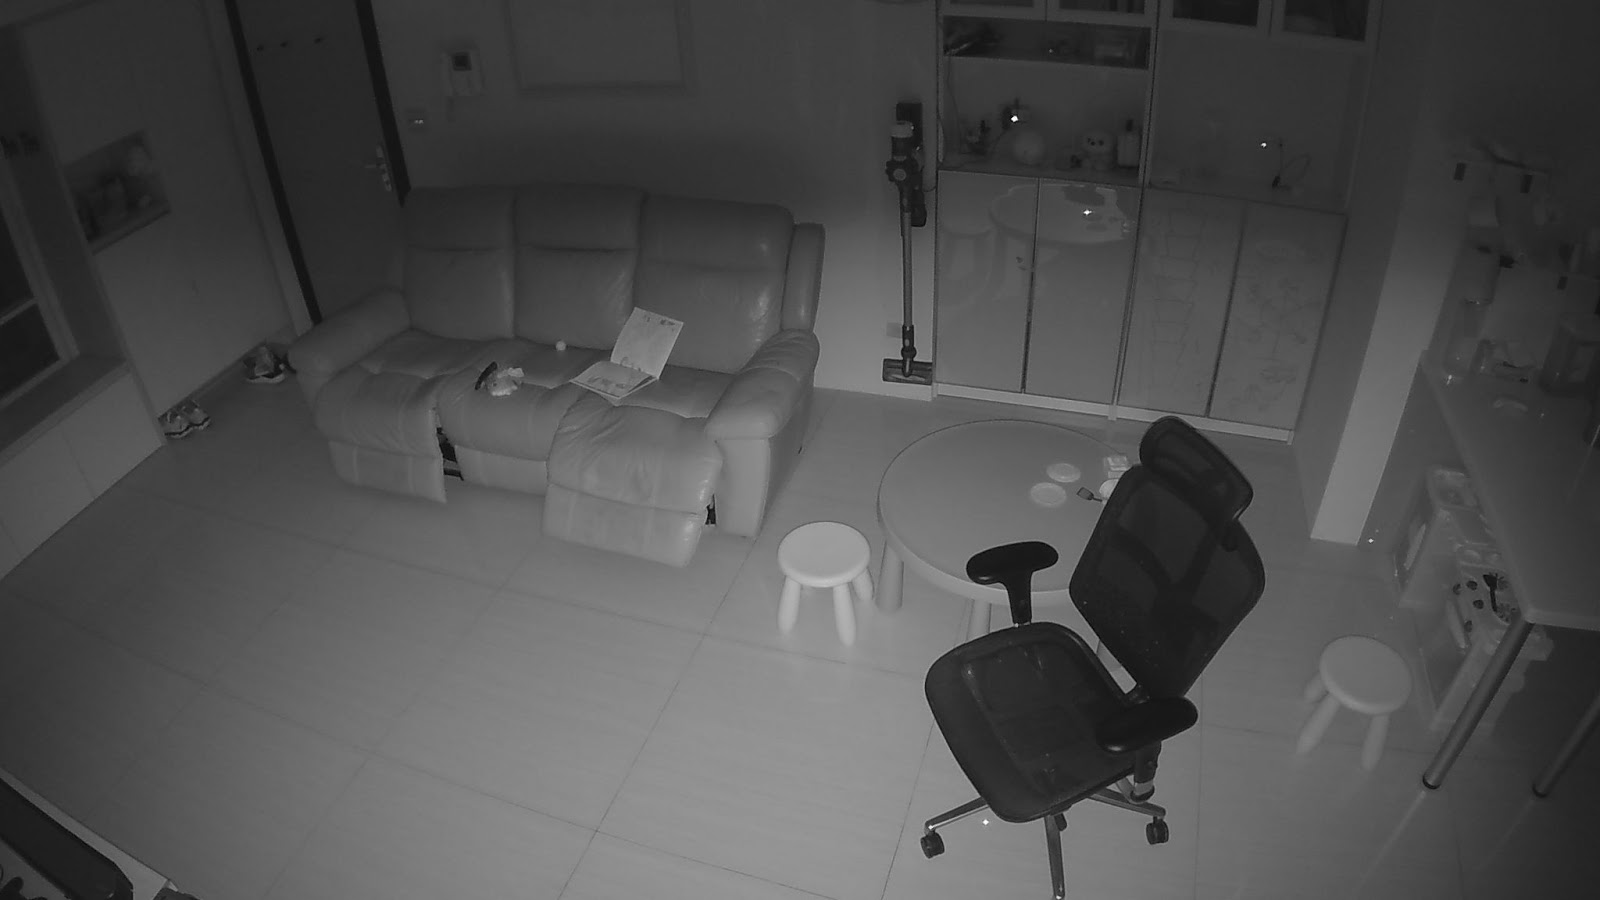
The example images below show the G4 Dome when its bubble cover is properly attached (left), and when it’s not (right).
Here, you can see the G4 Dome’s image quality when its bubble cover is properly attached.
Here, you can see how its image quality is greatly reduced by an incorrectly attached cover.
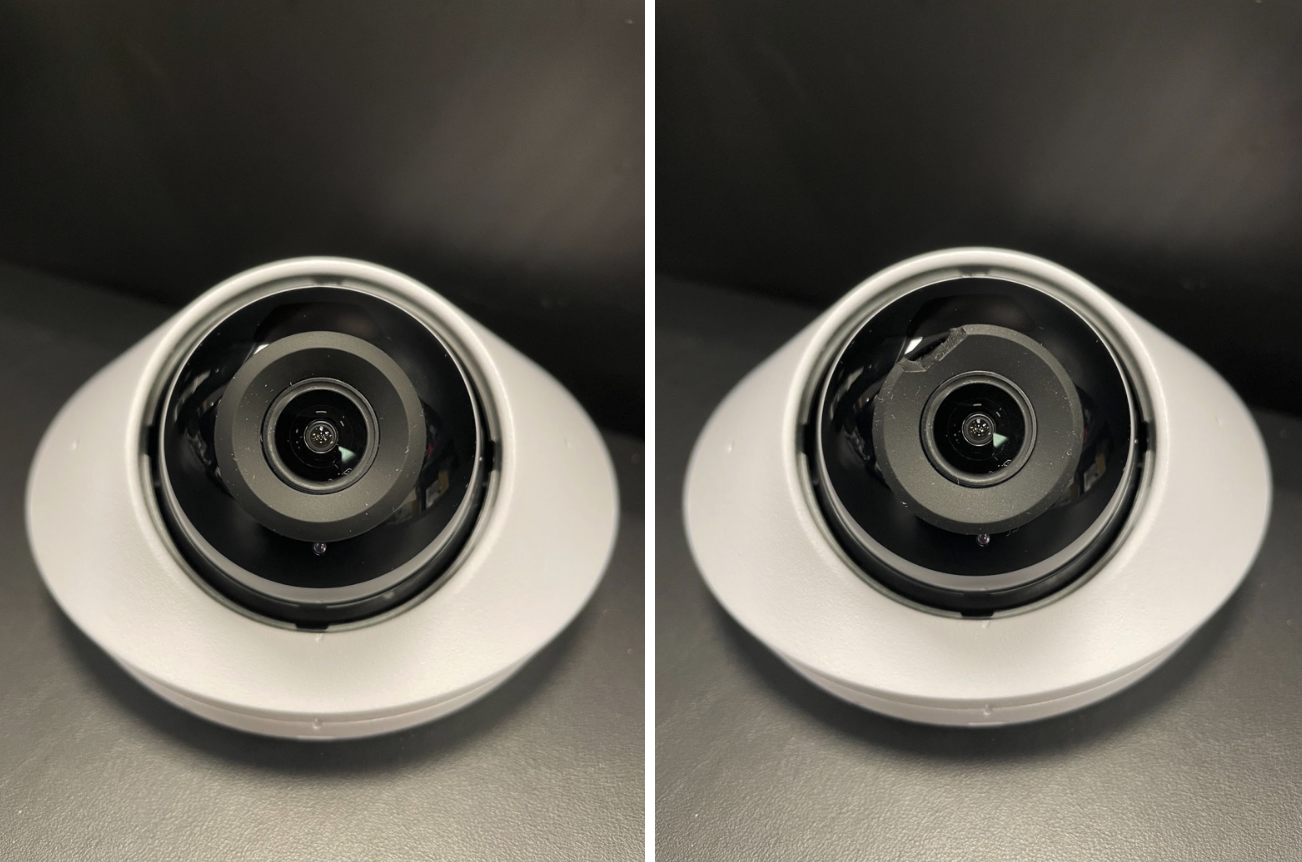
The rubber seal surrounding the lens is damaged
When the rubber seal surrounding the lens is damaged, infrared light can leak in and distort the camera feed.
The images below show a normal seal (left) and a damaged one (right).
This article describes how to access your UniFi Protect application locally or remotely, the factors that create access issues, and how to solve said issues.
Note: Remote access must be enabled in your Protect application. It is enabled by default.
To enable Remote Access in your UniFi Protect application:
Access the UniFi OS Console hosting Protect via its IP address.
If you don’t know your UniFi OS Console’s IP address , use the WiFiman app (iOS / Android ) to locate it on your WiFi network.
Log in to your Ubiquiti SSO account.
Go to the System Settings > Advanced menu, and enable the Remote Access toggle.
Identifying issues
To identify potential reasons for Protect connectivity issues:
Try accessing your UniFi OS Console locally by entering its IP address in your web browser, or remotely via Protect web application (unifi.ui.com ) or mobile app.
Use different mobile devices, ideally running different operating systems (iOS, Android).
Use different supported browsers, such as Chrome, Firefox, or Safari, on different computers.
Connect to different client locations, such as:
A local network with the same subnet as the Protect application.
A mobile carrier network via a mobile device or tethering.
A remote network, such as a workplace or public WiFi network.
Have multiple users, ideally with different system roles, attempt to access the Protect application.
Note: Note your observations. They may be helpful if you need to contact our technical support team.
My camera streams load slowly or buffer frequently
To identify potential reasons for slow stream loading and/or frequent buffering:
Check the stability of network connection:
Perform a speed test using the Wifiman app while connected to the same network as your UniFi OS Console. UniFi Protect should perform well with a network connection better than 5 Mbps and decently with a connection of at least 2.5 Mbps. Below this, performance may suffer.
Ensure that your computer or mobile network is not limiting bandwidth:
A VPN could be preventing client devices from making a peer-to-peer connection with your UniFi OS Console, meaning that all data is first relayed through Ubiquiti’s Remote Management Service—leading to diminished performance. If so, disable the VPN.
Check if there’s a subnet conflict where the UniFi OS Console is on a different subnet than the client, but still on LAN. If the client needs to reach your UniFi OS Console’s subnet but doesn’t have a route, it will hit the gateway (the local router), which knows how to route to the UniFi OS Console. If a VPN is enabled and there’s a configured route on the VPN that goes to another network with the same subnet, it will override.
Inspect your UniFi OS Console’s performance data by making sure you haven’t exceeded its maximum supported camera limit . If so, streaming performance will be diminished.
Check your computer’s CPU utilization. A lower-specialization computer may not be capable of playing back multiple video streams. If the CPU utilization is nearing 100%, try playing back fewer video streams (e.g., fewer cameras on the live view matrix).
I can access Protect locally but not remotely
If you can’t access the Protect application remotely:
Check if Remote Access is enabled:
If it is enabled , try disabling it and enabling again.
Visit status.ui.com to see if there are any issues with Ubiquiti’s Remote Management Service currently being resolved.
I can’t access Protect from the mobile app
If you can’t access Protect from the mobile app:
Verify that the UniFi Protect mobile app is updated to the latest version.
Ensure that the UniFi Protect mobile app is not restricted from accessing WiFi or cellular data:
For iOS devices , go to the Settings > Cellular Data menu and make sure UniFi Protect is toggled on.
For Android devices , go to the Settings > WiFi & Internet > Data Usage > Cellular Data Usage menu, select UniFi Protect, and make sure WiFi and cellular data are not disabled in the App data usage section.
Disable VPN if one is enabled since some VPNs may block WebRTC connectivity, which is used by Protect.
For Android devices with VPN enabled , try disabling the Private DNS in the Settings > WiFi & Internet > Private DNS menu. On some WiFi and mobile carrier networks, certain Private DNS providers such as CloudFlare’s 1.1.1.1 may interfere with WebRTC.
Disable or remove any third-party security or privacy apps that may interfere with network connectivity.
Force-quit the mobile app and open it again.
Uninstall the mobile app, reinstall, and open it.
I can’t access Protect from my web browser
If you’re having trouble accessing Protect from a web browser, but you can connect with the mobile app or a web browser on a different network, there may be an issue with your network configuration. For more information, see the Advanced troubleshooting processes section.
If you have a UniFi Cloud Key Gen2 Plus (UCK G2 Plus) updated to Version 2.0.24 running Protect application Version 1.14.0 or higher , it operates via UniFi OS and, therefore, can be accessed remotely at unifi.ui.com , not protect.ui.com.
If your Cloud Key’s firmware is up to date and can see the Protect application at unifi.ui.com but can’t access it , check if Remote Access is enabled. The recent firmware upgrade might have disabled Remote Access functionality. Follow the steps in the How to connect to UniFi Protect section.
I can’t access Protect on a specific browser
Browser-specific access failures are most often caused by third-party software, such as a browser extension or an application on the host computer.
Common extensions, software, and other features known to cause issues include:
uBlock Origin
Privacy Badger
WebRTC Leak Prevent
Various VPN services, such as Tunnelbear
Ad or traffic blockers that interfere with WebRTC connectivity used by UniFi Protect
To troubleshoot browser issues:
Disable all suspected third-party security or privacy-related browser extensions and software.
If you can now access Protect , re-enable the extensions and software, one at a time, and test your Protect access after each one. This will help you identify the inhibiting software.
(For Chrome only ) Disable the feature flag, Anonymize local IPs exposed by WebRTC :
Copy and paste the following into your address bar: chrome://flags/#enable-webrtc-hide-local-ips-with-mdns
Select Disabled , then restart Chrome.
Once you’ve found the inhibiting software, leave it disabled or uninstall it. If it’s essential, however, contact the developer’s support team for further guidance on how to configure it so it doesn’t prevent Protect access.
I’m a new user and see a No Controllers Detected notification
If you’re a new user signing in via unifi.ui.com or the Protect mobile app and the UniFi OS Console that hosts your Protect application isn’t appearing , make sure that your user permissions include remote access to the UniFi OS Console. For more information on creating users, see UniFi Protect – Add and manage users .
In some cases, a new user can accept a Protect application invitation, log in to their Ubiquiti account via web browser, initially see their UniFi OS Console, then receive a No Controllers Detected notification.
If you’re a new user and see a No Controllers Detected notification after trying to access Protect web application :
Make sure that your UniFi OS Console and Protect application versions are up to date.
Make sure that you have permission to remotely access the UniFi Protect application. For more information, see UniFi Protect – Add and manage users .
Verify that you are a verified and active user by going to unifi.ui.com , clicking on your UniFi OS Console, navigating to the Users menu, and checking your user status.
If this doesn’t resolve the issue , delete the custom users and user roles created, reboot the UniFi OS Console, and recreate the users:
Log in to your UniFi OS Console from the Owner account.
Go to unifi.ui.com , click on your UniFi OS Console, navigate to the Users menu, and delete all custom users and user groups.
Click on the dot grid icon in the top-right corner of the dashboard, navigate to Protect > Roles , and delete all custom user roles.
Click on the dot grid icon in the top-right corner of the dashboard, click the Settings > Advanced tab on the left side of the following screen, and click Restart Device .
Once the device reboots, log in again with the Owner account and recreate all desired users, groups, and roles.
Advanced troubleshooting processes
Check if a WebRTC connection can be established
UniFi Protect uses WebRTC technology to establish connections between your UniFi OS Console and client devices through NAT and firewalls, such as a UniFi gateway, without requiring explicit port forwarding or the revision of firewall rules.
Typically, you won’t need to make any changes to your network, device, or client configurations in order to access Protect locally or remotely.
However, to establish a WebRTC connection needed to access Protect, both networks (i.e., the one that your Protect application connects to and the one that your client device(s) connect to) must meet these requirements:
Reliable access to Internet and DNS service
Adequate bandwidth for basic connectivity and video transfer
Outbound TCP connection capability on Port 443
Outbound UDP connection capability on Ports 0–65535
Note: Port forwarding is not required for TCP or UDP connectivity.
A firewall configured to accept solicited, inbound UDP traffic
No network security appliances (e.g., IPS) or services blocking WebRTC (e.g., STUN or DTLS)
No gateways configured to use Symmetric NAT, which either block peer-to-peer connections, force the use of a relay server (i.e., TURN), or cause said relay to fail
Note: For more information on the technical aspects of WebRTC, please visit webrtc.org .
Troubleshooting WebRTC connection issues caused by Symmetric NAT
Symmetric NAT , while uncommon, can cause issues when establishing WebRTC and other peer-to-peer connections because it does not maintain a 1:1 port mapping ratio for established connections, causing them to fail.
If that happens, WebRTC will attempt to connect via a relay server (i.e., TURN), which will result in either diminished connection quality or outright connection failure.
If you are behind a Symmetric NAT , you can either:
Establish a VPN connection between the client and Protect; or
Configure your router to a mode other than Symmetric NAT, such as Cone NAT.
The UniFi OS Console hosting your UniFi Protect application will automatically detect and log Symmetric NAT on its side but will be unable to determine the NAT type on the clients’ side.
If you suspect Symmetrical NAT on the console-side connection:
Execute the following command: grep -Ri “symmetric” /srv/unifi-protect/logs
Any results will confirm that the connection failed due to Symmetric NAT.
Troubleshooting issues with a particular network
If you identify connectivity problems within a particular network , focus your troubleshooting efforts there. For example, if you can connect to your business’s Protect deployment from home, but not while at a friend’s house, focus on troubleshooting the latter network.
If you can’t access Protect from any remote location , focus first on the application’s on-site network.
In both cases:
Verify that the UniFi OS Console hosting Protect and all client device(s) have a stable internet connection, including a valid gateway IP and DNS servers. Some DNS providers are known to cause problems, such as 1.1.1.1. Try changing it to Google’s 8.8.8.8.
Verify that selected DNS servers properly resolve the following domains:
Device.svc.ubnt.com
Device.amplifi.com
Global.stun.twilio.com
Global.turn.twilio.com
Review your firewall configuration to ensure it meets the requirements listed in the Check if a WebRTC connection can be established section. If you’ve configured custom firewall rules, try disabling them temporarily to test.
Remove any port forwards for UniFi Protect that may have been configured incorrectly.
Disable any network-level security appliance or service rules intended to block WebRTC’s internal protocols, STUN or DTLS. If you are using a UniFi gateway , the UniFi Intrusion Prevention System (IPS) does not require a specific configuration to prevent WebRTC connectivity blockage.
Wordfence 7.7.0 has just been released and as usual, it includes several awesome enhancements and updates for our security conscious WordPress publishers and e-commerce websites. This post goes into a little more detail on each change we’ve included. We don’t usually post additional detail like this, and we thought we’d give it a try, and make it a routine if the community approves.
This is based on the official Wordfence 7.7.0 changelog, which is included below. The format I’ve used here is the changelog entry as a heading and some detail on what the entry means and some background where applicable.
Improvement: Added configurable scan resume functionality to prevent scan failures on sites with intermittent connectivity issues
We’ve added “scan resume” functionality which is configurable and will prevent security scan failures on sites that might have intermittent connectivity issues. As you know Wordfence runs on over 4 million websites on over 12,000 unique networks, and to say that we run in a range of environments and configurations is an understatement. Our quality assurance team has an oversized influence on the product, and this is one more way they have made Wordfence even more robust in version 7.7.0.
Improvement: Added new scan result for vulnerabilities found in plugins that do not have patched versions available via WordPress.org
This adds a scan result for plugins that have a vulnerability and are still present in the official WordPress plugin repository, and where there is no fix available. The usual course of action is that the plugin team will disable a plugin in the repository that has a known vulnerability, where the vulnerability has not been fixed yet. In some cases, this doesn’t happen, and this scan result is designed to deal with this unusual case. This change will also allow plugins that are not provided through wordpress.org to be flagged as vulnerable if there is no update available.
Improvement: Implemented stand-alone MMDB reader for IP address lookups to prevent plugin conflicts and support additional PHP versions
We use the Maxmind database internally for location lookups. Our code was using the Maxmind PHP library to perform these lookups. Maxmind stopped supporting older PHP versions a while ago, but many of our customers are still on those old versions. We have also found that other WordPress plugins may use a different version of the Maxmind library, which can lead to conflicts. So we’ve rolled our own stand-alone MMDB reader to resolve both of these issues. We now support older PHP versions than the official Maxmind library, and you won’t see any conflicts if another plugin is using the Maxmind library.
Improvement: Added option to disable looking up IP address locations via the Wordfence API
By default Wordfence contacts our servers to perform an IP address location lookup. This is just the way the plugin was originally engineered (by me actually) to try to move as much processing to our own servers and reduce resource usage on our customer websites. Some of our customers prefer that lookup to happen locally, so we’ve provided that option. The default is still to do the lookup on our servers, but you have the option to enable local lookups. The one downside of enabling this feature is that you’ll only get country-level lookups.
Improvement: Prevented successful logins from resetting brute force counters
Another design decision I made early on is that a successful login on a WordPress website would reset our brute-force login counters to zero. This made sense because if a real user makes multiple login failures and then succeeds, clearly they’re the real user and we should reset our counters so that their next failure doesn’t lock them out. Well, an unintended side effect of this is that a threat actor can register an account on WordPress websites with open registration, and sign in, and that would reset brute force counters to zero, so they can keep trying to guess that admin account’s password. We’ve fixed this by removing the reset that occurs on successful login.
Improvement: Clarified IPv6 diagnostic
We found that a message on our diagnostics page caused users to think they need to fix something related to IPv6. So we clarified the message to prevent our customers from going on wild goose chases trying to fix something that doesn’t need fixing.
Improvement: Included maximum number of days in live traffic option text
This is also a clarification. The maximum amount of data in live traffic that we store is 30 days. This wasn’t clear and some users would enter a larger number of days, expecting to see more than 30 days of data. We’ve fixed this user interface issue to make it clear.
Fix: Made timezones consistent on firewall page
When the page showing firewall activity loaded more results, they’d be in UTC time instead of your correct timezone. Oops! We fixed that little issue.
Fix: Added “Use only IPv4 to start scans” option to search
We have the ability to search your Wordfence options page which is super useful. This option was not included in the search, so we fixed that.
Fix: Prevented deprecation notices on PHP 8.1 when emailing the activity log
PHP 8.1 provides notices that a function has been deprecated if a developer (like us) is using an older function call. We were in this case, and PHP 8.1 was rightfully complaining about it. So we switched to a more modern version of the same code.
Fix: Prevented warning on PHP 8 related to process owner diagnostic
On our diagnostics page, if a hosting provider has restricted an account from seeing its own username, our customers would see a warning that you can’t access an array offset on a boolean. We fixed that.
Fix: Prevented PHP Code Sniffer false positive related to T_BAD_CHARACTER
We use PHP code sniffer to look for things that are incompatible between versions. We were getting a false positive when using this internal tool, so we fixed that. This change is really for the benefit of our engineering team.
Fix: Removed unsupported beta feed option
A long time ago when there was fire in the sky and the seas were boiling, we launched the first version of the Wordfence firewall. Because we wanted to test out new rules, and some of our users were brave enough to try the new stuff, we included this option. We would release beta firewall rules and malware signatures, and our brave testing community would try them out first by enabling this option. We do all our testing internally now and the firewall code and rule syntax has become extremely robust, so we don’t do these kinds of releases anymore. So we removed this configuration option.
Below I’ve included the short version of the changelog that you’ll see on WordPress.org. You’re most welcome to post your comments and questions below. Keep in mind that support questions are best posted via our official support channels, but if you’d like to chat about this post, comment below and a member of the team or I will reply if needed.
Regards,
Mark Maunder – Wordfence Founder & CEO
Wordfence 7.7.0 – OCTOBER 3, 2022
Improvement: Added configurable scan resume functionality to prevent scan failures on sites with intermittent connectivity issues
Improvement: Added new scan result for vulnerabilities found in plugins that do not have patched versions available via WordPress.org
Improvement: Implemented stand-alone MMDB reader for IP address lookups to prevent plugin conflicts and support additional PHP versions
Improvement: Added option to disable looking up IP address locations via the Wordfence API
Improvement: Prevented successful logins from resetting brute force counters
Improvement: Clarified IPv6 diagnostic
Improvement: Included maximum number of days in live traffic option text
Fix: Made timezones consistent on firewall page
Fix: Added “Use only IPv4 to start scans” option to search
Fix: Prevented deprecation notices on PHP 8.1 when emailing the activity log
Fix: Prevented warning on PHP 8 related to process owner diagnostic
Fix: Prevented PHP Code Sniffer false positive related to T_BAD_CHARACTER
Considered one of the most beginner-friendly programming languages, PHP continues to introduce tremendous changes with each of its updates. Embracing the change, this blog is focused on the steps to upgrade to PHP 8.0 on a WordPress website.
Previously, PHP 7’s speed optimization update helped a lot with gaining higher rankings on the SERPs. Carrying the legacy forward, PHP surprised its enthusiasts with a release of PHP 8.0 back in November 2020, which brought a list of new features that revolutionized the way programmers worked.
PHP 8 lets you write concise code and build more exemplary applications with exciting changes and improvements to the earlier RFCs. Considering the new improvements, it would be a crime not to upgrade your current PHP version to PHP 8.0 on your WordPress site.
Before we jump towards the steps to upgrade your PHP version to PHP 8 on WordPress, we will give a brief PHP 8.0 overview to help you get acquainted with the update.
PHP 8.0 – An Overview
PHP (an acronym for Hypertext Preprocessor) is a popular open-source scripting language used by coders worldwide for web and application development. This high-level programming language is easy to learn, hence preferred by starters and novice coders. Still, it is also complex enough to cater to the needs of a professional programmer.
PHP 8.0 is the latest update of PHP and has come up with new features, functions, and methods to facilitate the developers and provide the best user experience.
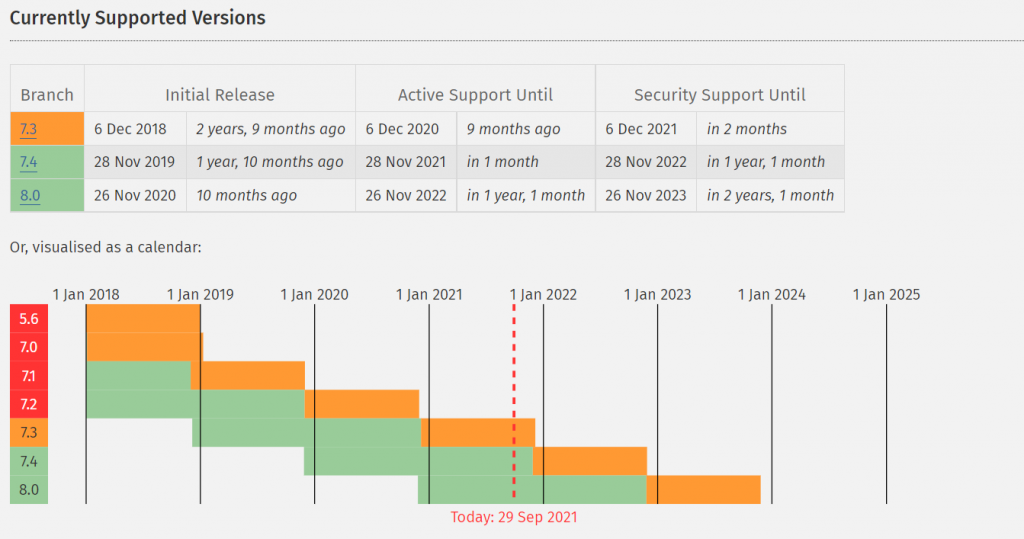
Previously, PHP had released 7.4 in November 2019, ending the support of PHP 7.1. The later version, 7.2, was also discontinued with the release of 8.0. Currently, PHP supports only 7.3, 7.4, and 8.0 versions.
Managed WordPress Hosting Starting From $10/Month
Experience Faster WordPress Themes’ Performance & Constant Availability on Cloudways.
With every update come compatibility issues. If you want to have a hassle-free PHP 8.0 experience, we recommend opting for the latest WordPress version or going with at least 5.6 or any later versions.
Are you running your website on an older WordPress version but are skeptical about upgrading in fear of getting errors? Don’t worry; you can test your website via a staging environment and proceed with upgrading your live website safely to a newer WordPress version.
If you get any errors in the staging environment, then we’d recommend getting the help of a professional WordPress developer to diagnose and debug the errors before you move ahead with the update.
PHP 8 – Themes & Plugins Compatibility
Discomforts accompany every change; similar is the case with PHP 8. While PHP 8 offers extensive features to support its users and provide them with an ideal user experience, it brings the themes and plugins incompatibility issues.
PHP isn’t the player to be blamed here, as the themes and plugins should be updated to work with the latest software versions. If your favorite and irreplaceable plugin or theme is making problems with PHP 8, then try out the following solutions.
Rollback to the previous PHP version. (A boring option)
Contact the theme or plugin’s support team and inform them about the compatibility issues to boost the optimal user experience with the latest versions of both.
PHP 8 on WordPress: Installation Prerequisites
Before upgrading to PHP 8.0, it’s wise to check the current PHP version that your WordPress site is running.
Using an older version? You can upgrade the PHP version to enjoy the new features and improvements. But not so fast! Remember, safety always comes first. When we talk about security, we consider the “what ifs.”
What if your site is not compatible with the latest version, and you end up losing or corrupting your data in the process. Nope, you don’t want that.
Don’t lose hope; you can create a clone of your website to test it on the latest version.
If the clone website works smoothly after upgrading to PHP 8.0, you can move ahead with updating your actual site. This portion will list out the steps to create a clone website to test it under PHP 8.
Clone a Website via Your Web Hosting Provider
Fortunately, managed WordPress hosting solutions like Cloudways allow the users to create their site’s duplicate without dealing with any complexities. Follow the steps below to create your website’s clone via Cloudways.
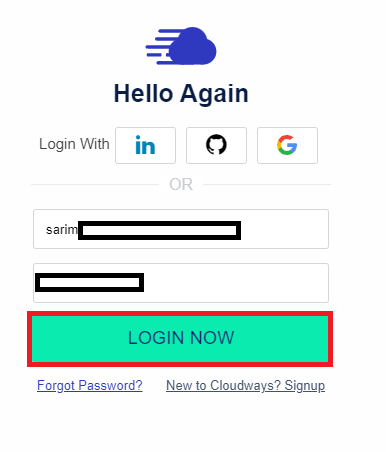
Log in to Cloudways with your credentials.
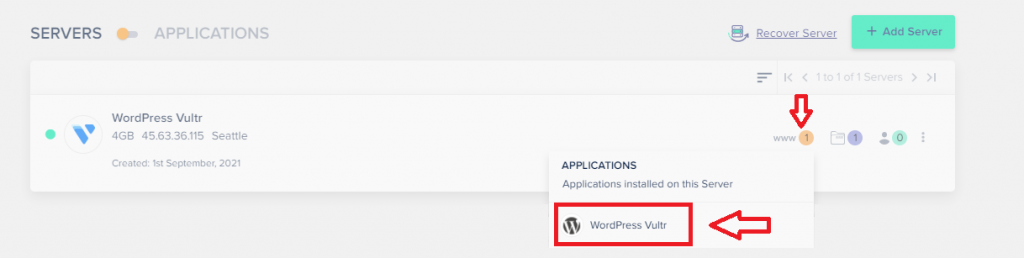
Select your server, and click the application that you want to clone.
Navigate to the bottom, and you will see an orange circle, click it.
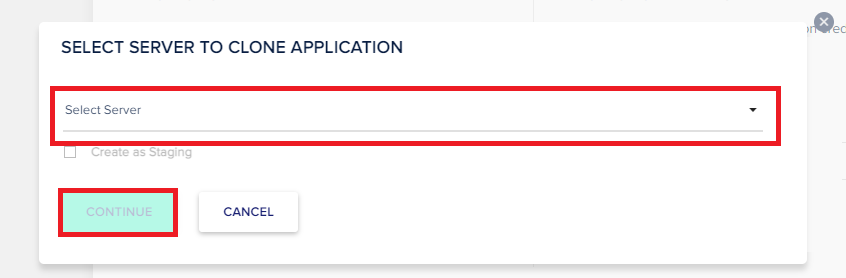
Click Clone App/Create Staging from the pop-up.
Select your preferred server, then click Continue.
You will be asked to wait for a few minutes, during which Cloudways will copy your entire website. Now, you are good to experiment on the clone.
Note:Clone App and Create as Staging are different functionalities. Clicking Clone App will only clone your website. Whereas, Create as Staging will sync the live and staged applications to allow you to perform Push/Pull actions on both the replica and live versions.
How to Update PHP in WordPress to PHP 8.0 on Cloudways
Cloudways announced its availability of PHP 8 earlier this year, maintaining its reputation of being the early bird to accept the latest updates. Want to update your PHP version on Cloudways? Follow the easy steps below to upgrade your current PHP version to PHP 8.0.
Note:Cloudways recommends keeping a backup of your server before upgrading to a newer PHP version. Keeping a backup will help you restore your application if you feel the need to revert to your previous PHP version anytime in the future.
Log in with Cloudways
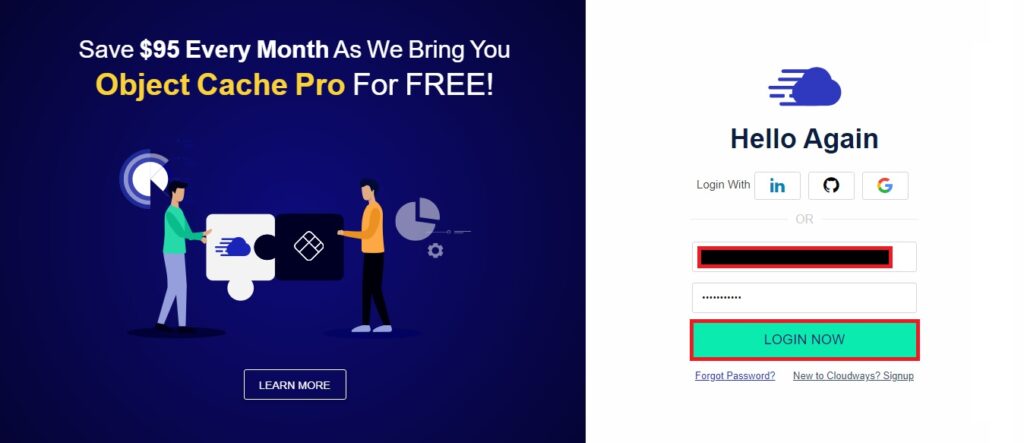
Signup on Cloudways. Already have a Cloudways account? Log in with your credentials.
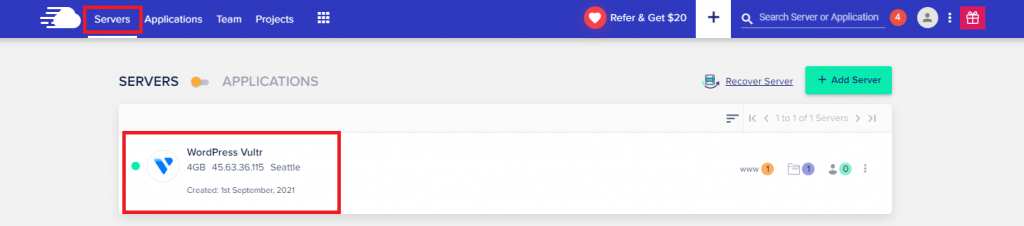
Select Server
Click on Servers. Select, and click the server of your choice.
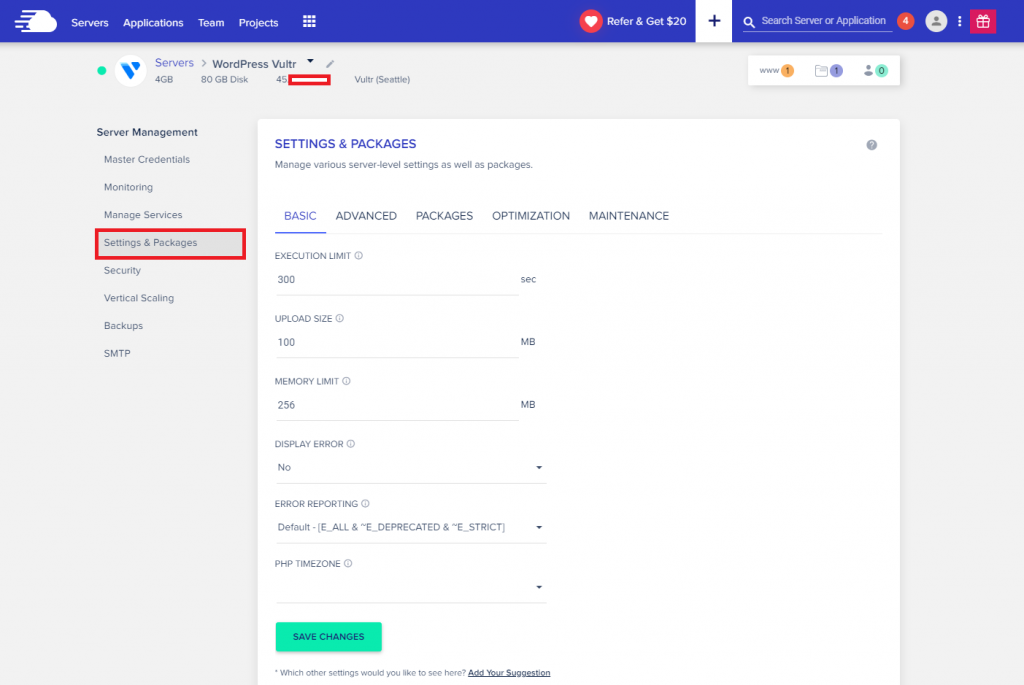
Select Settings & Packages
Click on Settings & Packages on the left side.
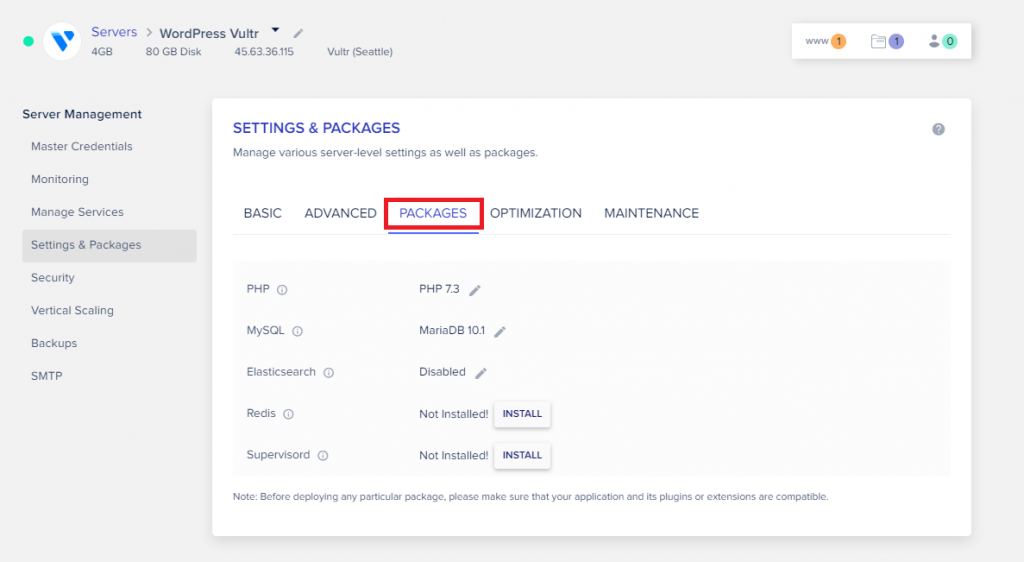
Click on the Packages tab.
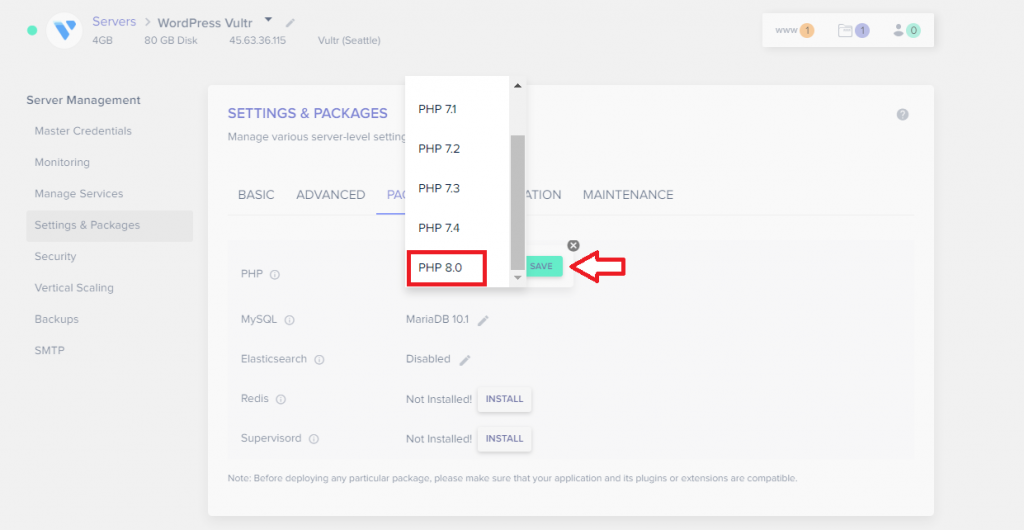
Upgrade your PHP version
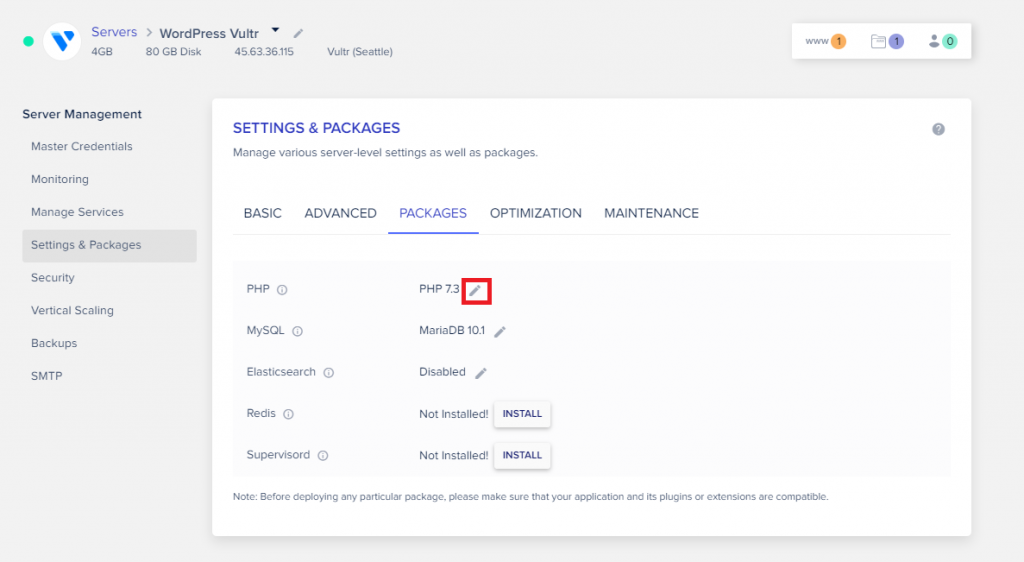
Click the edit sign next to your current PHP version.
Select PHP 8.0 from the drop-down, and click Save.
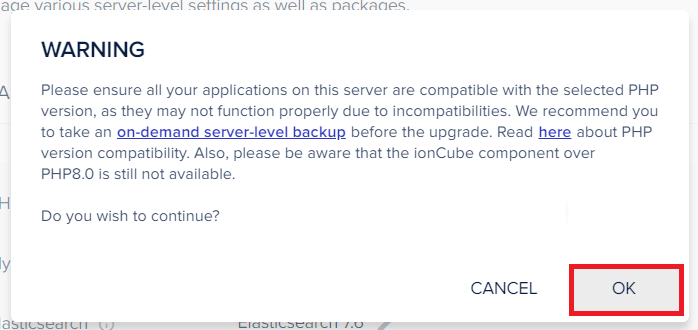
The setup will prompt you with a warning to ensure if your application is compatible with the selected PHP version. If yes, then click OK.
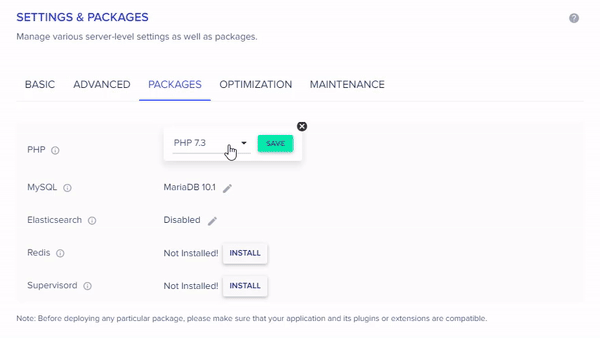
The setup will take a few minutes to finish, and it will notify you once the update is done. After getting the notification, you can enjoy working with PHP 8.
PHP Supported Versions on WordPress
WordPress supports the following seven PHP versions ranging from PHP 5.6 to the latest version 8.0.
PHP 5.6
PHP 7.0
PHP 7.1
PHP 7.2
PHP 7.3
PHP 7.4
PHP 8.0
Note:Keep in mind that you won’t receive any PHP security updates if you are not using the latest PHP version. We recommend using the 8.0 PHP version.
What Is Holding Back Users From Updating to PHP 8.0?
The major reason that’s holding back users from upgrading to PHP 8 is the incompatibility of their favorite themes and plugins with PHP 8.
That said, every savvy user would like to enjoy the latest PHP features and RFC improvements. Anyone who wants to stay back and keep working with the legacy software would abstain from upgrading their PHP version.
Using the latest PHP versions allows for better and easier development of new features and also facilitates maintenance. Even if some of the themes and plugins are not working on PHP 8.0, they will eventually be updated.
Why Should You Upgrade to PHP 8?
Imagine using an outdated image editing tool for making logos or editing photos. While the world has moved to the latest version and is saving time and getting better quality and performance with the latest edition, you are still doing it the old way. Not really a smart decision, right?
Similarly, why would anyone abstain from upgrading to a newer PHP version when the new upgrade is specifically introduced to bring ease to the user’s end. You should definitely upgrade to PHP 8 if you want to benefit from the latest features, get better error handling, improved RFCs, and optimizations.
PHP 8 will remain in support till November 2022, and its security support will extend till November 2023. This longevity makes this newest version a lot more trustworthy and secure than the previous versions.
Most of the popular WordPress plugins and themes have accepted PHP 8 and are now compatible with it.
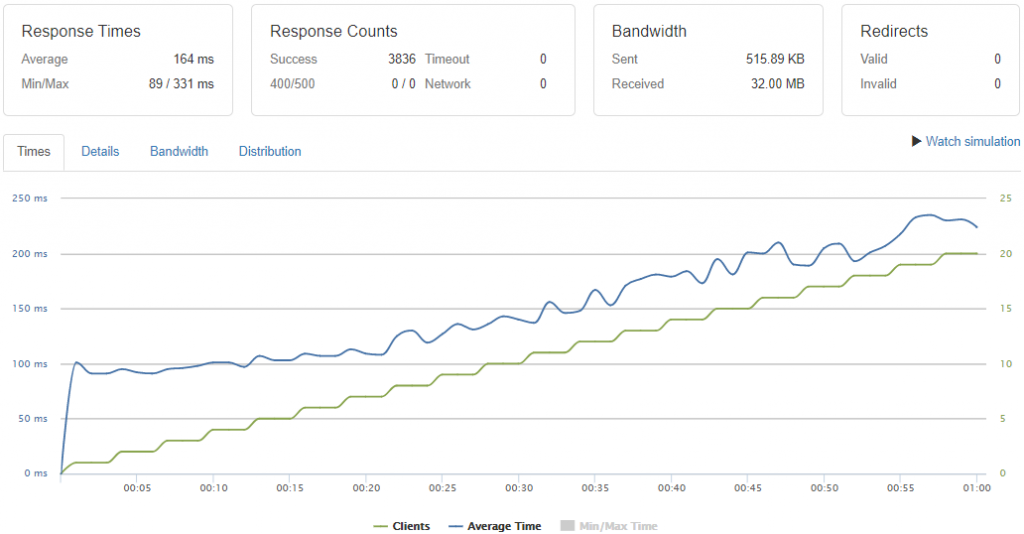
We ran a loader test to check PHP 8’s performance on the Cloudways server, and deduced the following results:
The average response time for the same WordPress website is 164 ms, and total success response counts are 3836.
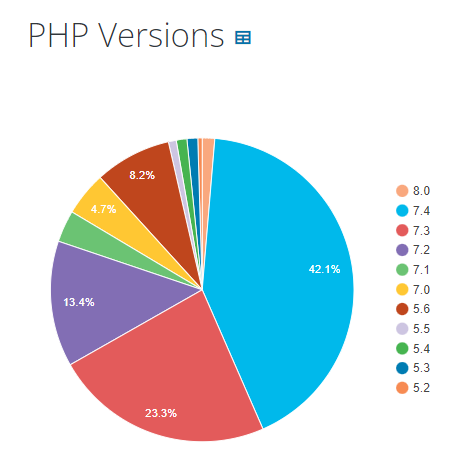
Sadly, only 1.3% of the WordPress sites are using PHP 8.0. As per our experience, WordPress delivers the best performance with PHP 8.0 and gives better speeds than the previous PHP versions. It’s a good practice to use the latest versions, so the number of people migrating from 7.4 to 8.0 is gradually increasing with time.
PHP has worked on the issues reported by the users in the previous versions, and the latest version is free from many recurring problems and has introduced new features.
To enjoy the services at their full potential, you will have to upgrade to the newest WordPress PHP version, as the older versions may eventually fade out or will be declined by most themes and plugins.
Disadvantages of Using Older PHP Versions on WordPress
All PHP versions before 7.3 have reached their end of life, and it is advised to upgrade to the latest version if you are using any of the older versions, as it will make you vulnerable to unpatched security errors. Even 7.4 will reach the end of life on 28 Nov 2022.
Why would you risk your website to security vulnerabilities when you can easily upgrade to the latest version and enjoy the new improvements and features?
Also, ensure that you opt for a secure WordPress hosting provider to safeguard your sites from malicious traffic, DDoS attacks, and malware.
Using older PHP versions won’t only provide security issues but also will affect your website’s performance.
Which sane person compromises performance in this competitive era, where everyone is following the best practices to boost their site’s performance and gain their user’s attention?
Improve your website’s performance and security by halting the usage of older PHP versions, and upgrade your WordPress website’s PHP version to 8.0 to maximize safety and performance.
Final Thoughts
This blog covers PHP 8’s compatibility with WordPress and the steps to upgrade your PHP version to 8.0. The information shared in this guide will help you make the right decision to upgrade to PHP 8.0 on your WordPress site and enjoy the benefits of the newest update.
Ranging from the supported versions, disadvantages of using the old PHP version, and the reasons to upgrade to 8.0; we have tried to cover it all. Still, if any questions are popping up in your head, please feel free to comment with your queries; and we will answer all of them ASAP.
Yes, WordPress can use PHP 8, and it is recommended to use PHP 8.0 with WordPress 5.6 or higher version for compatibility and better performance. If you are using an older WordPress version, you can test your site with WordPress 5.6 in a staging environment. If you don’t experience any issues, then upgrade your live WordPress site to enjoy using PHP 8.0 on WordPress.
Is WordPress compatible with PHP 8?
Yes, WordPress is compatible with PHP 8.0. However, only WordPress 5.6 or higher versions are compatible with PHP 8. If you are using an older WordPress version, you can upgrade it to at least 5.6 to enjoy using PHP 8.
Should I upgrade to PHP 8?
Yes, if you want to benefit from the latest features, better error handling, improved RFCs, and optimizations, you should upgrade your PHP version to PHP 8.
What version of PHP should I use for WordPress?
We recommend using PHP 8.0 with WordPress if you are using at least WordPress 5.6. The oldest PHP version that we recommend using with WordPress is PHP 7.3.
If your website’s PHP version Because PHP is not the same as the PHP version in your backup, it may cause issues with the proper operation of your website and with some applications. This is more common when migrating from PHP 5 to PHP 7.
We recommend that users regularly backup their WordPress sites or network of sites. You can also use the All-in-One WP Migration plugin extensions to set up automatic backups. Make sure your plugin version is always up to date. In most cases, the PHP update will have no effect on WordPress or popular plugins or themes. However, it is possible that some plugins, themes, or other functionalities will cease to function.
Set the WP_DEBUG constant to true in your wp-config.php file to see all errors, warnings, and notes generated by the website during execution. This will assist you in locating any problems.
If your install is stuck at “restoring X% files,” “restoring database,” or “activating mu-plugins”
1. Leave the plugin running for another 15 minutes while it is on “Restoring database.” 2. After 15 minutes, open another tab and attempt to login to wp-admin using the exported site’s WP Admin username and password. 3. Save the permalinks structure twice by going to settings -> permalinks. Your website should now be successfully migrated.
If it isn’t and you receive a 500 error, please edit your wp-config.php file and set WP_DEBUG to true, then refresh the page to see an error. This may assist you in determining the problem, or you can share the error with the Servmask support team for assistance.
Could it be my server settings?
Memory limit needs to be at 256M, max_execution_time to 500, and mysql.connect_timeout to 400. You can find these settings by uploading this file. (https://www.dropbox.com/s/ize8t2k4nww5iq7/phpinfo.php?dl=0) in wp-content of your imported site and then open http://YOURDOMAINNAME.COM/wp-content/phpinfo.php. (tip – use Ctr F search the data that you get)
In this article, we are going to start by describing what the Windows Firewall feature is and what it is used for. This information will then allow you to enable and manage the Windows Firewall on your Windows PC or laptop. We will cover all the different versions of the Windows operating system that are currently supported by the Secure Remote Worker Validation Tool.
Lets first describe what a firewall actually is.
What is a firewall?
A firewall can be either a physical hardware device, software-based application that you install on your PC, or in the case of the Windows Firewall, an integrated feature of the operating system that is designed to protect your PC against the attack of malicious files. The firewall checks information and data sent across the internet or other networks to your PC. If the firewall detects that the information may contain malicious files then it will block them from reaching your PC, therefore protecting your PC from that threat. Equally, it can prevent you PC sending malicious content to other PCs.
Windows Firewall is an integrated firewall solution that is part of the Windows operating system. In this article, we are going to configure the Windows Firewall to work with Secure Remote Worker. In the following sections, we are going to discuss the process for each of the different version of the Windows operating, starting with Windows 10.
Important configuration note:
You should only have one software firewall solution installed at any one time. If you install additional security software on your PC that also has its own software-based firewall solution, then you will need to disable this if you are to use the Windows Firewall solution.
Enabling the firewall on Windows 10 devices
In this section, we are going to describe the process for enabling the Windows Firewall feature on Windows 10. Follow the steps below to work through the process of enabling the firewall:
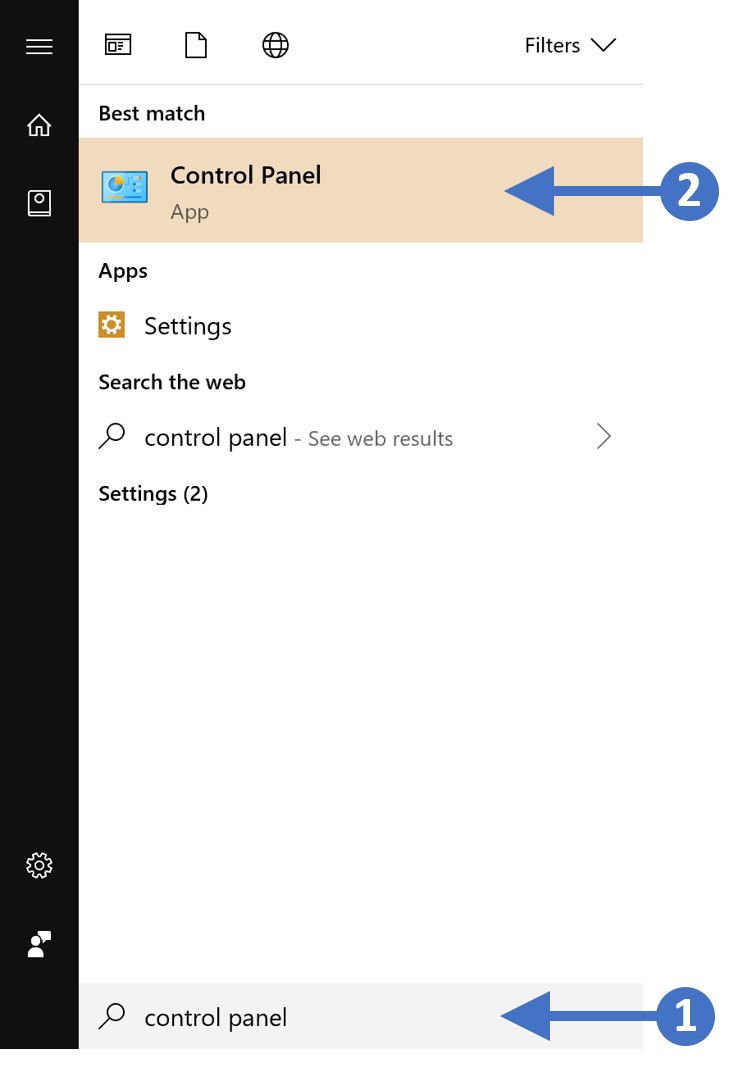
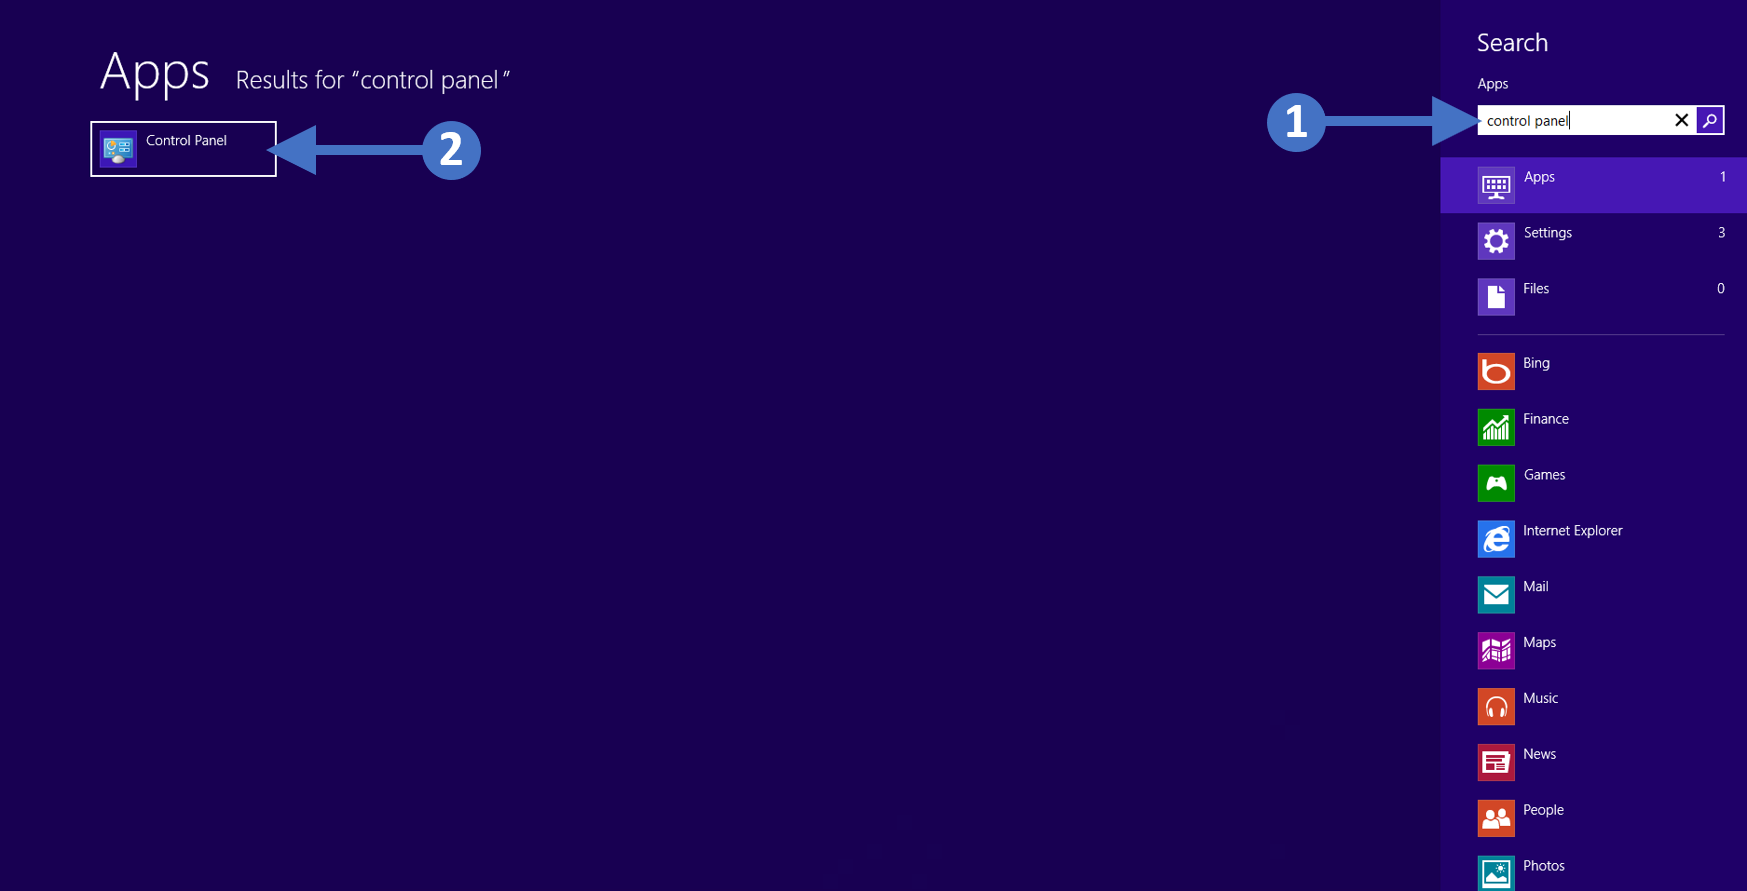
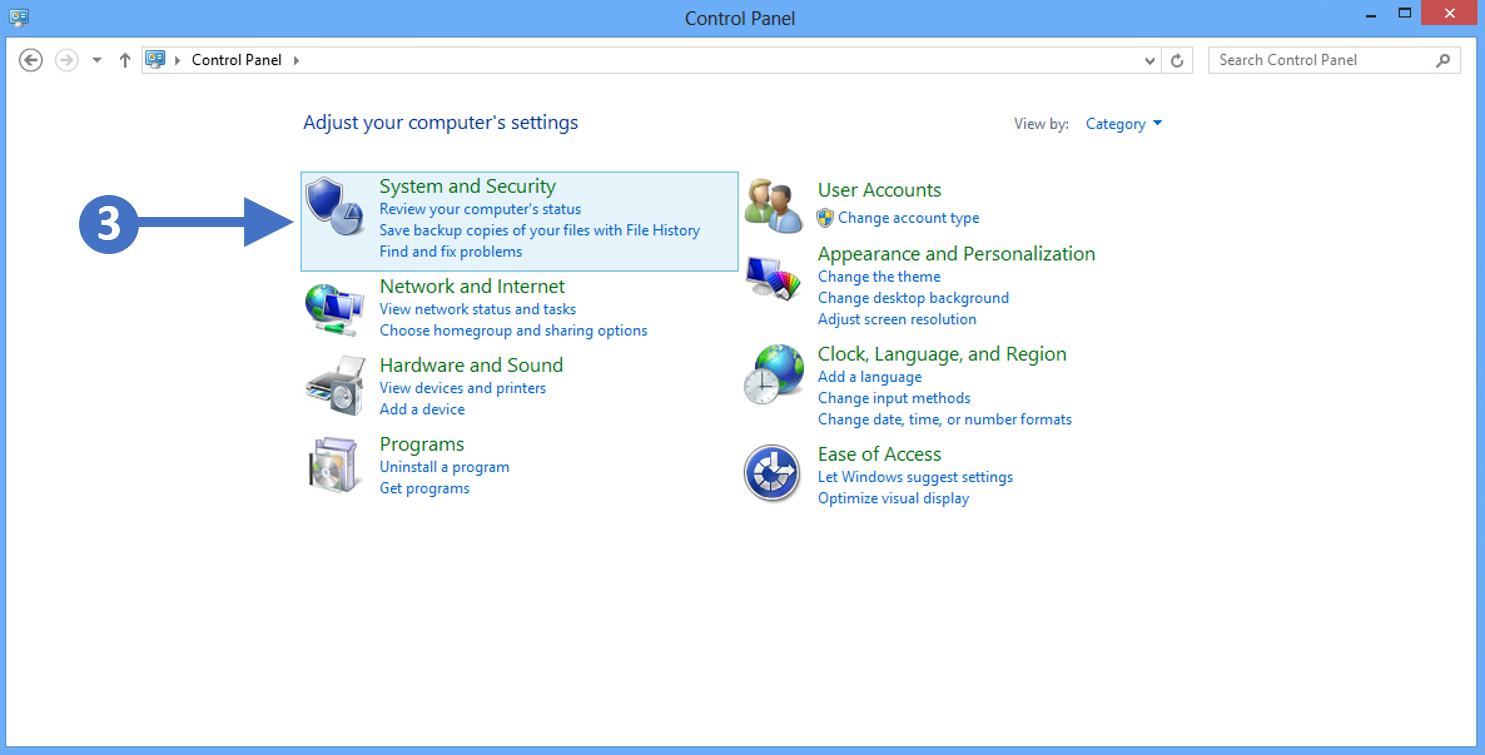
Press the Windows key on your keyboard and then start to type in “control panel” in the search box highlighted (1). You will then see the Control Panel App appear at the top of the list as the best match, highlighted (2). Click on the Control Panel App to launch it as shown in the following screenshot:
Click to Zoom
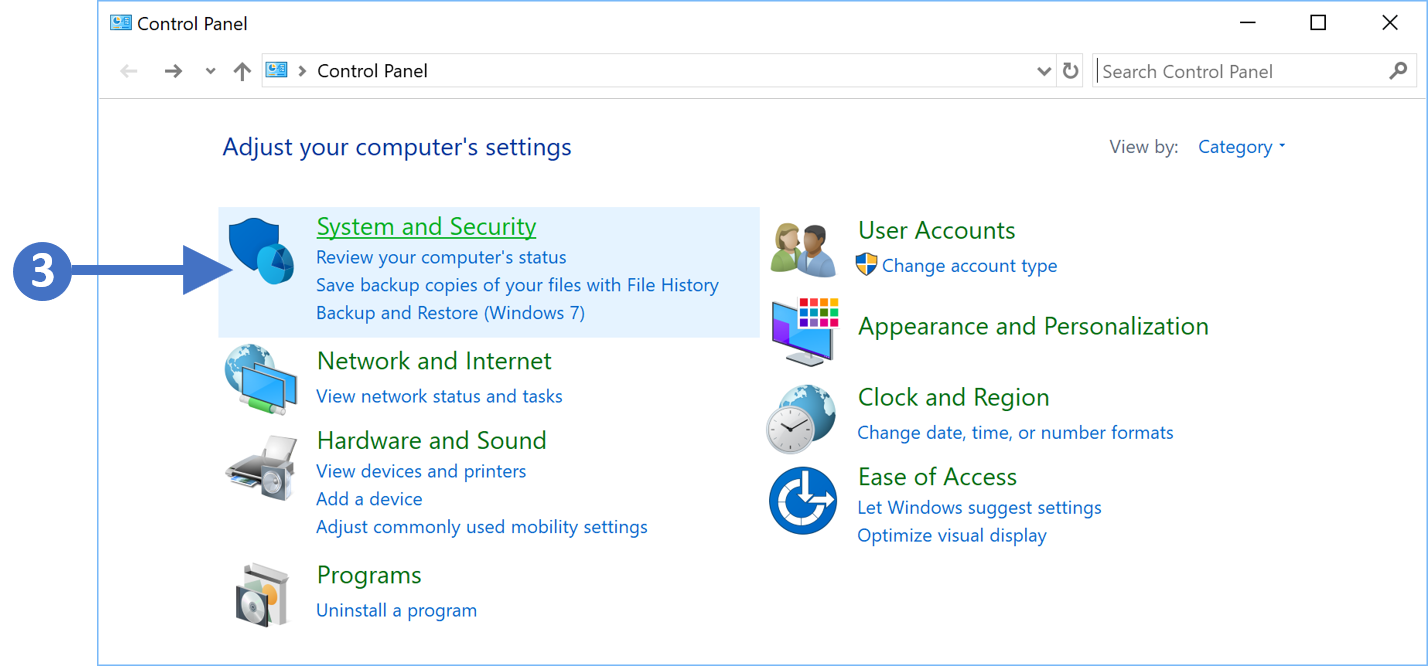
2. You will now see the Control Panel as shown in the following screenshot:
Click to Zoom
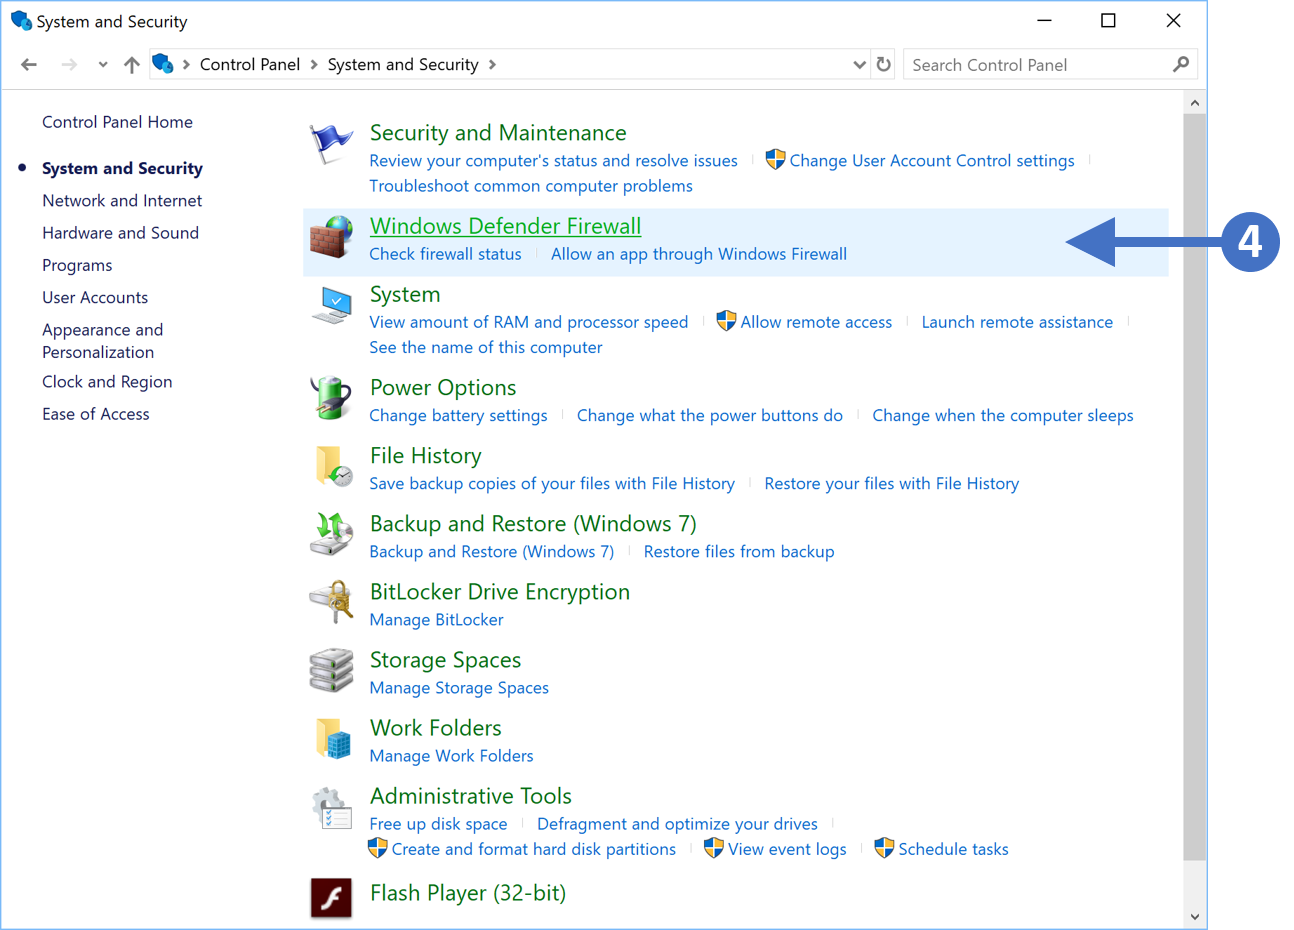
3. Now click on System and Security as highlighted (3) in the screenshot above.
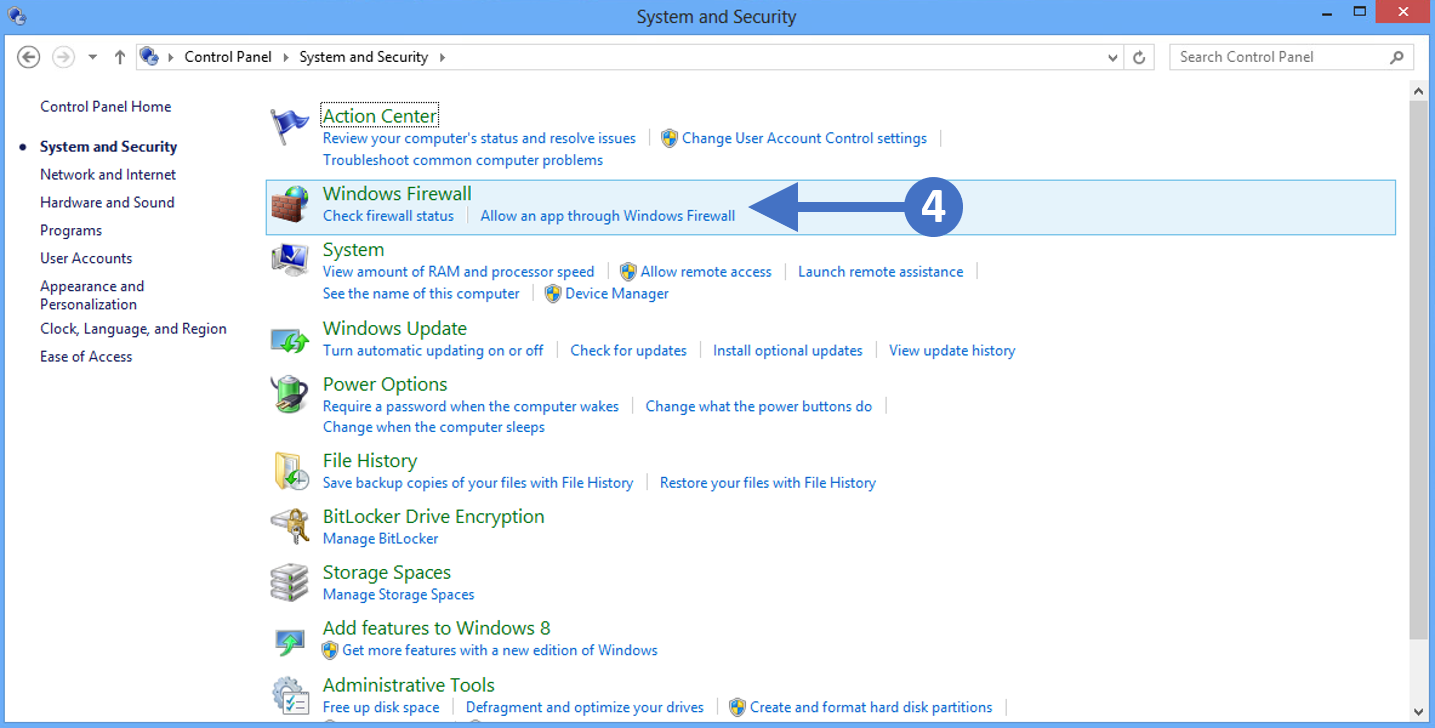
4. You will now see the System and Security configuration options as shown in the following screenshot:
Click to Zoom
5. Click on Windows Defender Firewall as highlighted (4) in the above screenshot.
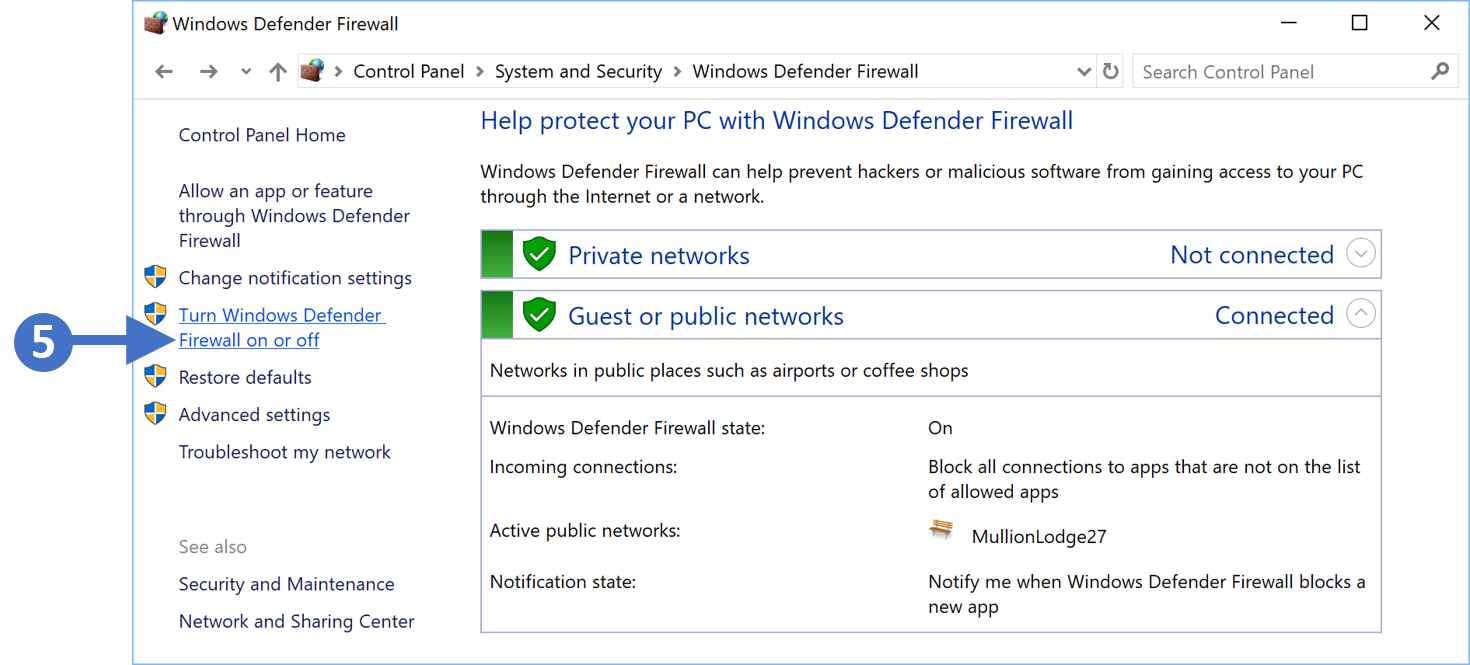
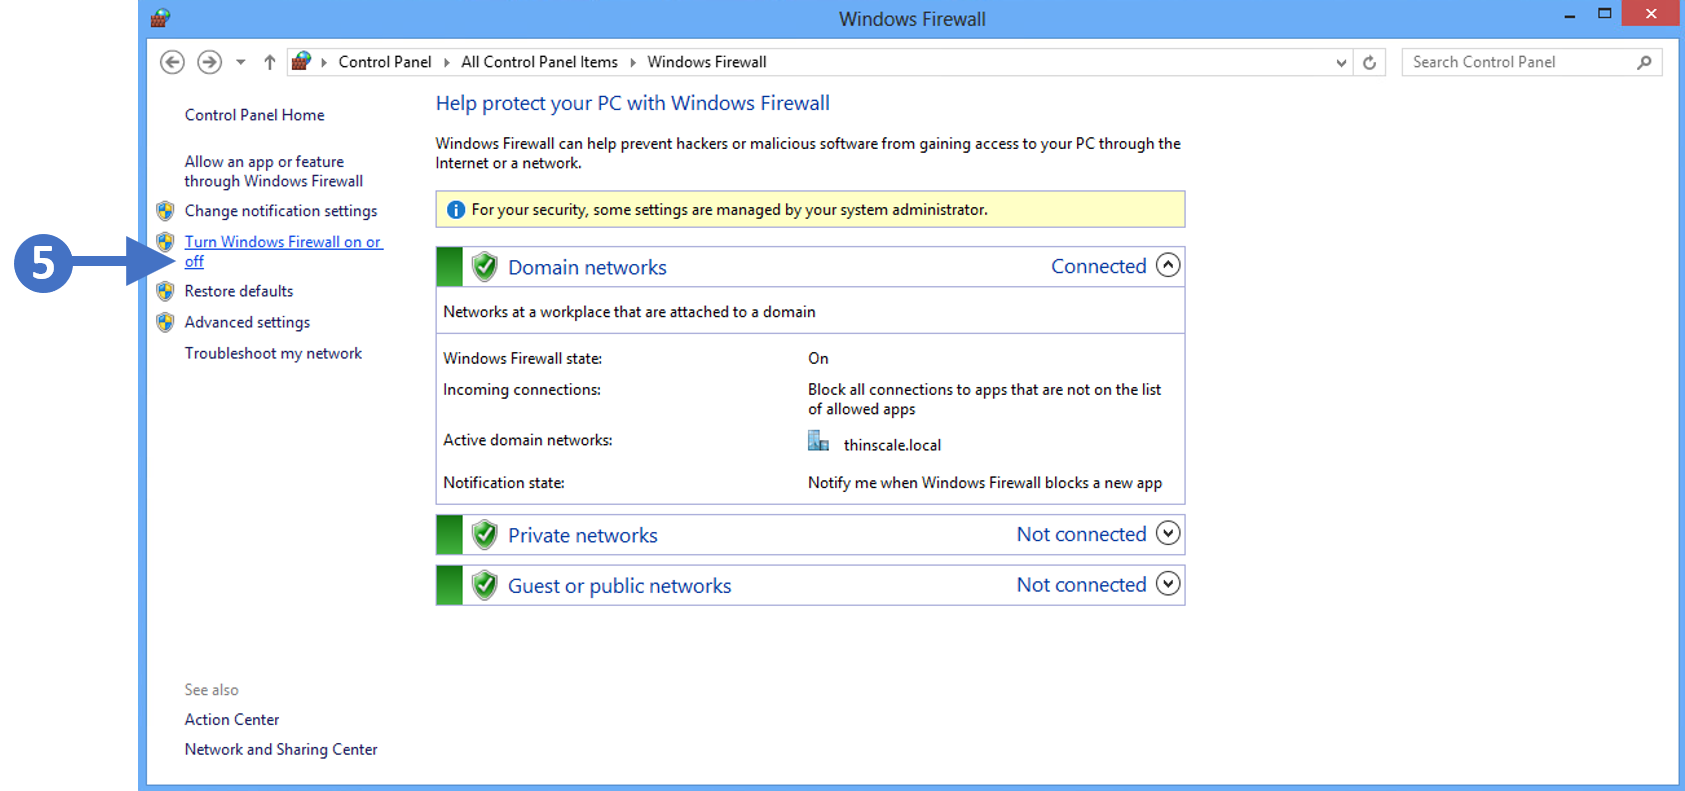
6. You will now see the Windows Defender Firewall configuration screen as shown in the following screenshot:
Click to Zoom
7. Click on Turn Windows Defender Firewall on or off as highlighted (5) in the above screenshot.
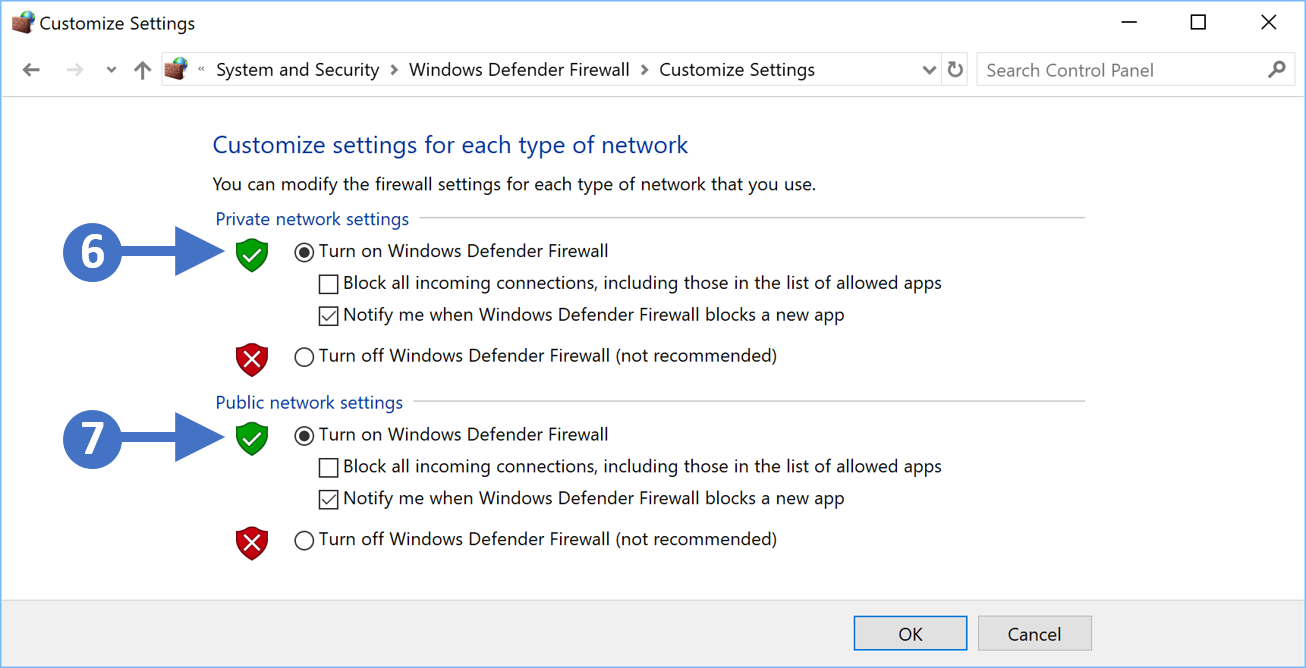
8. You will now see the Customize settings for each type of network as shown in the following screenshot:
Click to Zoom 9. First, enable the firewall for private networks. To do this click the radio button for Turn on Windows Defender Firewall under the Private network settings section as highlighted (6) in the previous screenshot.
10. Next, enable the firewall for public networks. To do this click the radio button for Turn on Windows Defender Firewallunder the Publicnetwork settings section as highlighted (7) in the previous screenshot.
11. The other thing to configure is to make sure that you check the box for Notify me when Windows Defender Firewall blocks a new app for both network settings, so Public and Private. This means that you will be notified when something potentially malicious is blocked.
12. Finally, once configured, click the OK button to close the configuration window, and then click the red X button in the top right-hand corner to close the control panel.
You have now successfully enabled the Windows Firewall for Windows 10 operating systems.
Enabling the firewall on Windows 8.1 devices
In this section, we are going to describe the process for enabling the Windows Firewall feature on Windows 10. Follow the steps below to work through the process of enabling the firewall:
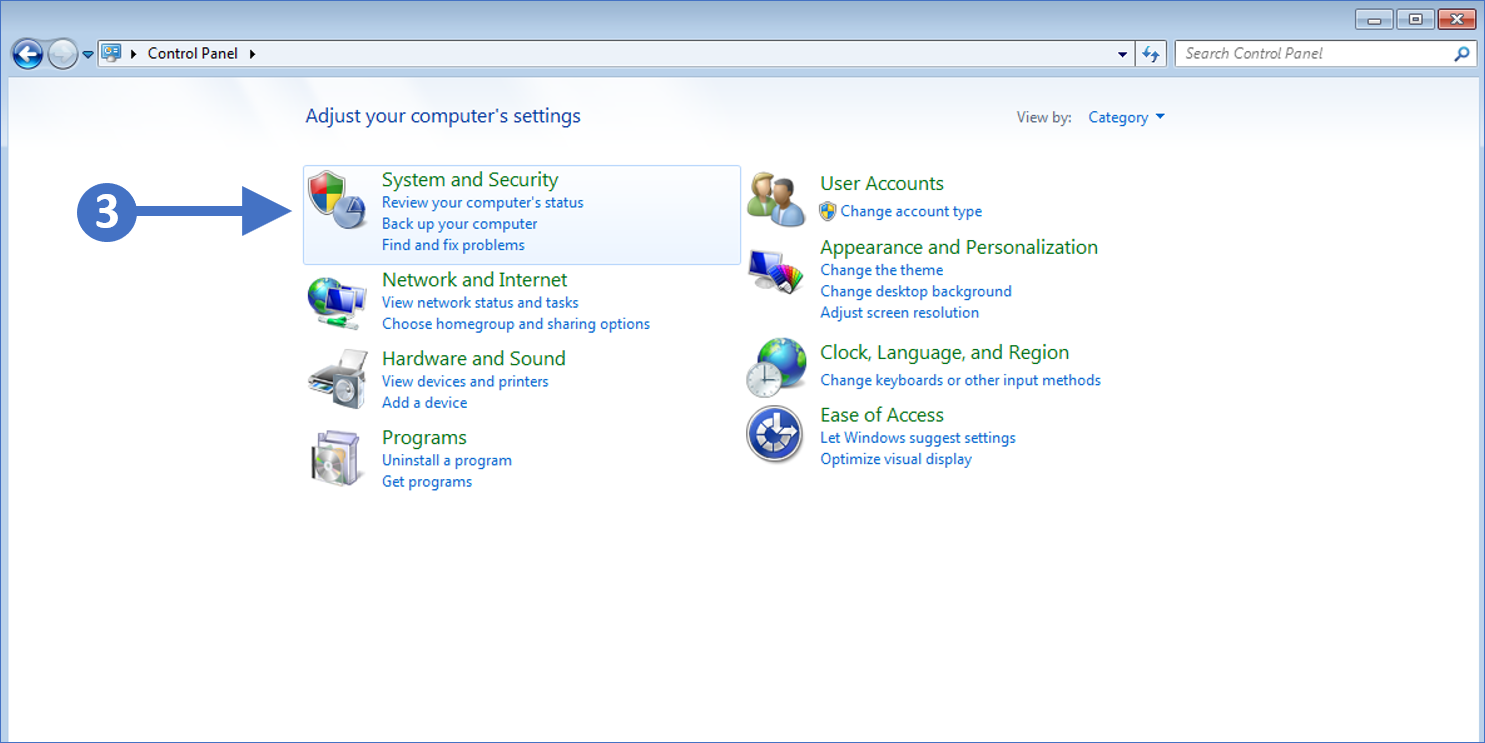
1. Press the Windows key on your keyboard and then start to type in “control panel” in the search box highlighted (1). You will then see the Control Panel icon appear at the top left of the screen in the Results section, highlighted (2). Double click on the Control Panel icon to launch it as shown in the following screenshot:
Click to Zoom
2. You will now see the Control Panel as shown in the following screenshot:
Click to Zoom
3. Now click on System and Security as highlighted (3) in the screenshot above.
4. You will now see the System and Security configuration options as shown in the following screenshot:
Click to Zoom
5. Click on Windows Firewall as highlighted (4) in the above screenshot.
6. You will now see the Windows Firewall configuration screen as shown in the following screenshot:
Click to Zoom
7. Click on Turn Windows Firewall on or off as highlighted (5) in the above screenshot.
8. You will now see the Customize settings for each type of network as shown in the following screenshot:
Click to Zoom
9. First, enable the firewall for domain networks. To do this click the radio button for Turn on Windows Defender Firewall under the Domainnetwork settings section as highlighted (6) in the previous screenshot.
10. Next, enable the firewall for private networks. To do this click the radio button for Turn on Windows Defender Firewall under the Privatenetwork settings section as highlighted (7) in the previous screenshot.
11. The final one to enable is the firewall for public networks. To do this click the radio button for Turn on Windows Defender Firewall under the Publicnetwork settings section as highlighted (8) in the previous screenshot.
12. The other thing to configure is to make sure that you check the box for Notify me when Windows Firewall blocks a new app for domain settings, public settings, and private settings. This means that you will be notified when something potentially malicious is blocked.
13. Finally, once configured, click the OK button to close the configuration window, and then click the red X button in the top right-hand corner to close the control panel.
You have now successfully enabled the Windows Firewall for Windows 8.x operating systems.
Enabling the firewall on Windows 7 devices
In this section, we are going to describe the process for enabling the Windows Firewall feature on Windows 7. Follow the steps below to work through the process of enabling the firewall:
1. Press the Windows key on your keyboard and then start to type in “control panel” in the search box highlighted (1). You will then see the Control Panel icon appear at the top of the screen under Programs(1), highlighted (2). Double click on the Control Panel icon to launch it as shown in the following screenshot:
Click to Zoom
2. You will now see the Control Panel as shown in the following screenshot:
Click to Zoom
3. Now click on System and Security as highlighted (3) in the screenshot above.
4. You will now see the System and Security configuration options as shown in the following screenshot:
Click to Zoom
5. Click on Windows Firewall as highlighted (4) in the above screenshot.
6. You will now see the Windows Firewall configuration screen as shown in the following screenshot:
Click to Zoom
7. Click on Turn Windows Firewall on or off as highlighted (5) in the above screenshot.
8. You will now see the Customize settings for each type of network as shown in the following screenshot:
Click to Zoom
9. First, enable the firewall for domain networks. To do this click the radio button for Turn on Windows Defender Firewall under the Domainnetwork location settings section as highlighted (6) in the previous screenshot.
10. Next, enable the firewall for private networks. To do this click the radio button for Turn on Windows Defender Firewallunder the Home or work (private)network location settings section as highlighted (7) in the previous screenshot.
11. The final one to enable is the firewall for public networks. To do this click the radio button for Turn on Windows Defender Firewallunder the Publicnetwork location settings section as highlighted (8) in the previous screenshot.
12. The other thing to configure is to make sure that you check the box for Notify me when Windows Firewall blocks a new program for domain settings, public settings, and private settings. This means that you will be notified when something potentially malicious is blocked.
13. Finally, once configured, click the OK button to close the configuration window, and then click the red X button in the top right-hand corner to close the control panel.
You have now successfully enabled the Windows Firewall for Windows 7 operating systems.
In case you do not wish to utilize the “Secure Browser”, instead, you want to use the “Edge Chromium” browser, then the “Secure Browser” URL management will not apply to Chrome or Edge browsers setup as Local Applications.
In this case, please follow the following steps:
In the profile go to Computer Settings | Additional Registry Values
Add the link you want to “Allow” or “Deny”
To “Block” all URL’s within “Edge Chromium” use the following registry key:
A simple guide to connecting web apps with webhooks
By Matthew Guay · September 20, 2022
You might have seen webhooks mentioned in your apps’ settings and wondered if they’re something you should use. The answer, in a nutshell, is probably yes.
Webhooks are one way that apps can send automated messages or information to other apps. It’s how PayPal tells your accounting app when your clients pay you, how Twilio routes phone calls to your number, and how WooCommerce can notify you about new orders in Slack.
They’re a simple way your online accounts can “speak” to each other and get notified automatically when something new happens. In many cases, you’ll need to know how to use webhooks if you want to automatically push data from one app to another.
Let’s break it down, learn how to speak webhook, and get your favorite apps to talk to each other.
There are two ways your apps can communicate with each other to share information: polling and webhooks. As one of our customer champion’s friends has explained it: polling is like knocking on your friend’s door and asking if they have any sugar (aka information), but you have to go and ask for it every time you want it. Webhooks are like someone tossing a bag of sugar at your house whenever they buy some. You don’t have to ask—they just automatically punt it over every time it’s available.
Webhooks are automated messages sent from apps when something happens. They have a message—or payload—and are sent to a unique URL—essentially the app’s phone number or address. Webhooks are almost always faster than polling, and require less work on your end.
They’re much like SMS notifications. Say your bank sends you an SMS when you make a new purchase. You already told the bank your phone number, so they knew where to send the message. They type out “You just spent $10 at NewStore” and send it to your phone number +1-234-567-8900. Something happened at your bank, and you got a message about it. All is well.
Webhooks work the same way.
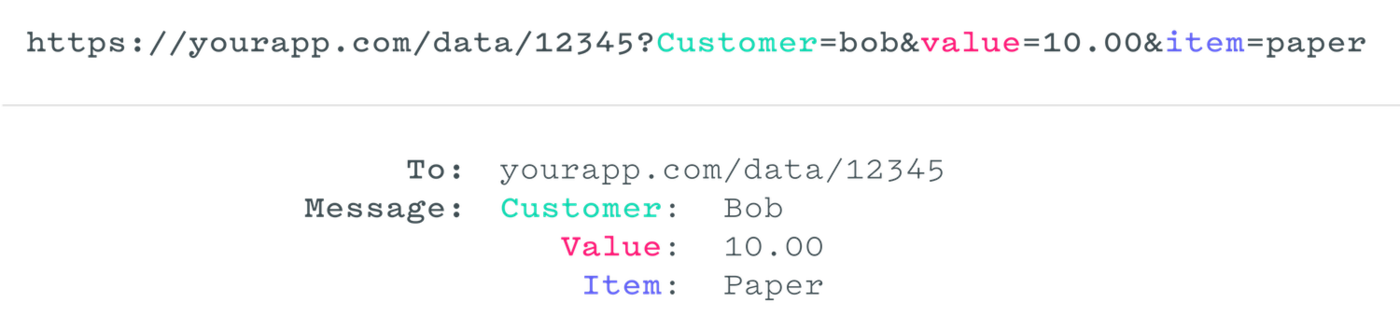
Take another look at our example message about a new order. Bob opened your store’s website, added $10 of paper to his shopping cart, and checked out. Boom, something happened, and the app needs to tell you. Time for the webhook.
Wait: who’s the app gonna call? Just like you need to tell the bank your phone number before they can text you, for webhooks, you need to tell the originating app—your eCommerce store, in this case—the webhook URL of the receiving app, the app where you want the data to be sent.
Say you want to make an invoice for this new order. The app that creates this invoice is on the receiving end—it’s the app that needs the order data.
Automate workflows that drive success
Learn from expert Zapier users, receive personalized support, and find ways to scale your impact at our free user conference.
You’d first open your invoice app, make an invoice template, and copy its webhook URL—something like yourapp.com/data/12345. Then open your eCommerce store app, and add that URL to its webhook settings. That URL is your invoice app’s phone number, essentially. If another app pings that URL (or if you enter the URL in your browser’s address bar), the app will notice that someone is trying to send it data.
Ok. Back to the order. Your eCommerce store got the order and knows it needs to send the details to yourapp.com/data/12345. It then writes the order in a serialization format. The simplest of those formats is called “form-encoded”, and means your customer’s order would look something like this:
Customer=bob&value=10.00&item=paper
Now your eCommerce store needs to send the message. The simplest way to send data to a webhooks URL is with an HTTP GET request. Literally, that means to add the data to the URL and ping the URL (or enter it in your browser’s address bar). The same way you can open Zapier’s about page by typing /about after zapier.com, your apps can send messages to each other by tagging extra text with a question mark on the end of a website address. Here’s the full GET request for our order:
Deep inside your invoice app, something dings and says “You’ve got mail!” and the app gets to work, making a new invoice for Bob’s $10 paper order. That’s webhooks in action.
Remember when you had to check your email to see if you had new messages—and how freeing push email (“You’ve got mail!”) was? That’s what webhooks are for your apps. They don’t have to check for new info anymore. Instead, when something happens, they can push the data to each other and not waste their time checking and waiting.
→ Ready to start using webhooks? Jump ahead to skip the geeky details—or keep reading to learn more about the terms you’ll often see used with webhooks.
That’s the simple version. Technically, webhooks are “user-defined callbacks made with HTTP” according to Jeff Lindsay, one of the first people to conceptualize webhooks. Webhooks are data and executable commands sent from one app to another over HTTP instead of through the command line in your computer, formatted in XML, JSON, or form-encoded serialization. They’re called webhooks since they’re software hooks—or functions that run when something happens—that work over the web. And they’re typically secured through obscurity—each user of an application gets a unique, random URL to send webhook data to—though they can optionally be secured with a key or signature.
Webhooks typically are used to connect two different applications. When an event happens on the trigger application, it serializes data about that event and sends it to a webhook URL from the action application—the one you want to do something based on the data from the first application. The action application can then send a callback message, often with an HTTP status code like 302 to let the trigger application know if the data was received successfully or 404 if not.
Webhooks are similar to APIs—but simpler. An API is a full language for an app with functions or calls to add, edit, and retrieve data. The difference is, with an API, you have to do the work yourself. If you build an application that connects to another with an API, your application will need to have ways to ask the other app for new data when it needs it. Webhooks, on the other hand, are for one specific part of an app, and they’re automated. You might have a webhook just for new contacts—and whenever a new contact is added, the application will push the data to the other application’s webhooks URL automatically. It’s a simple, one-to-one connection that runs automatically.
How to use webhooks
You know the lingo, understand how apps can message each other with webhooks, and can even figure out what the serialized data means. You speak webhook.
It’s time to use it. The best way to make sure you understand how webhooks work is to test it out, try making your own webhooks, and see if they work. Or, you can jump ahead and just drop your webhook URL into an app to share data—after all, you don’t have to know how to make webhooks to use them.
Here are the resources you need:
Test webhooks with RequestBin and Postman
The quickest way to learn is to experiment—and it’s best to experiment with something you can’t break. With webhooks, there are two great tools for that: RequestBin (owned by Pipedream) and Postman.
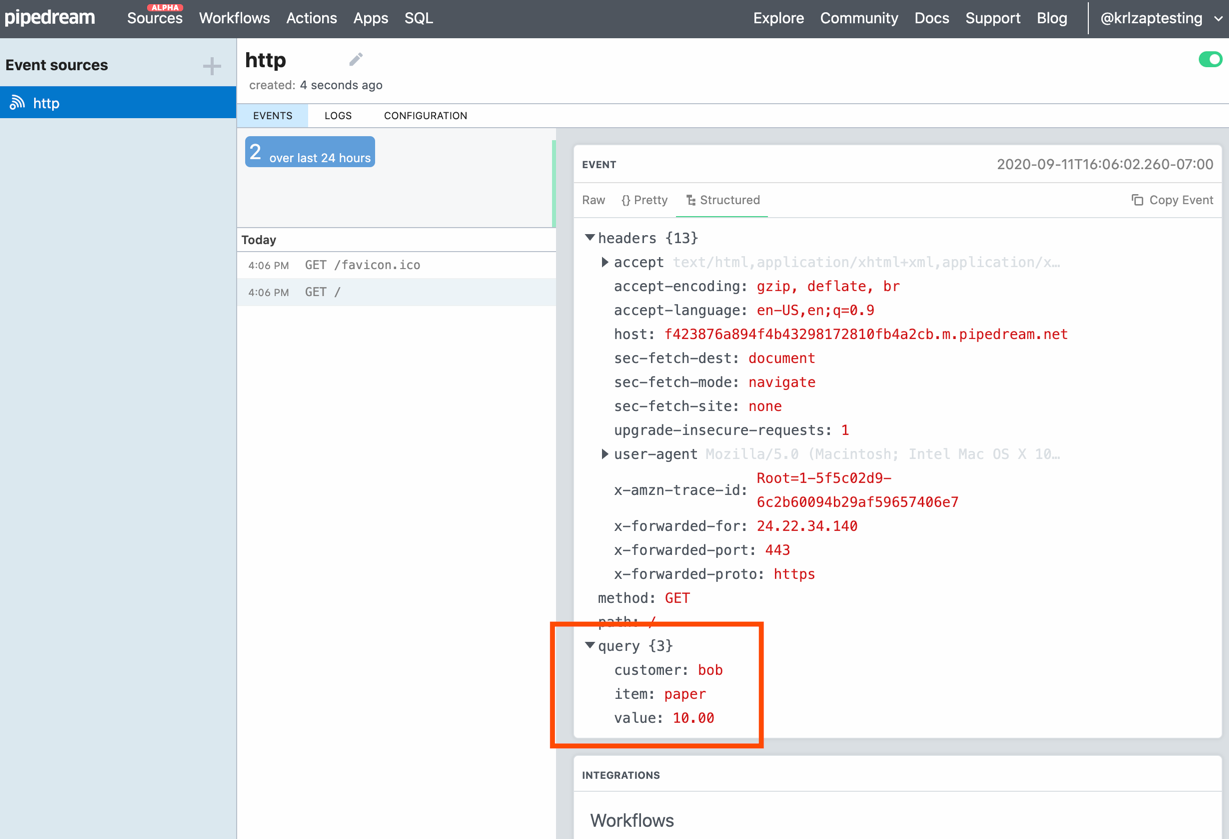
How data appears in Requestbin
RequestBin lets you create a webhooks URL and send data to it to see how it’s recognized. Go to RequestBin, click Create a RequestBin, then copy the URL it gives you.You’ll need to have a Pipedream account (created with Google or GitHub) before you can view and use a URL.
Now, serialize some data in form encoded style—or copy our example form copy above. Open a new tab, paste your RequestBin URL in the URL bar, add a ? to the end, then paste your serialized data. You’ll end up with something like this:
Press enter in your browser’s address bar, and you’ll get a simple message back: success:true. Refresh your RequestBin tab, and you’ll see the data listed at the bottom as in the screenshot above.
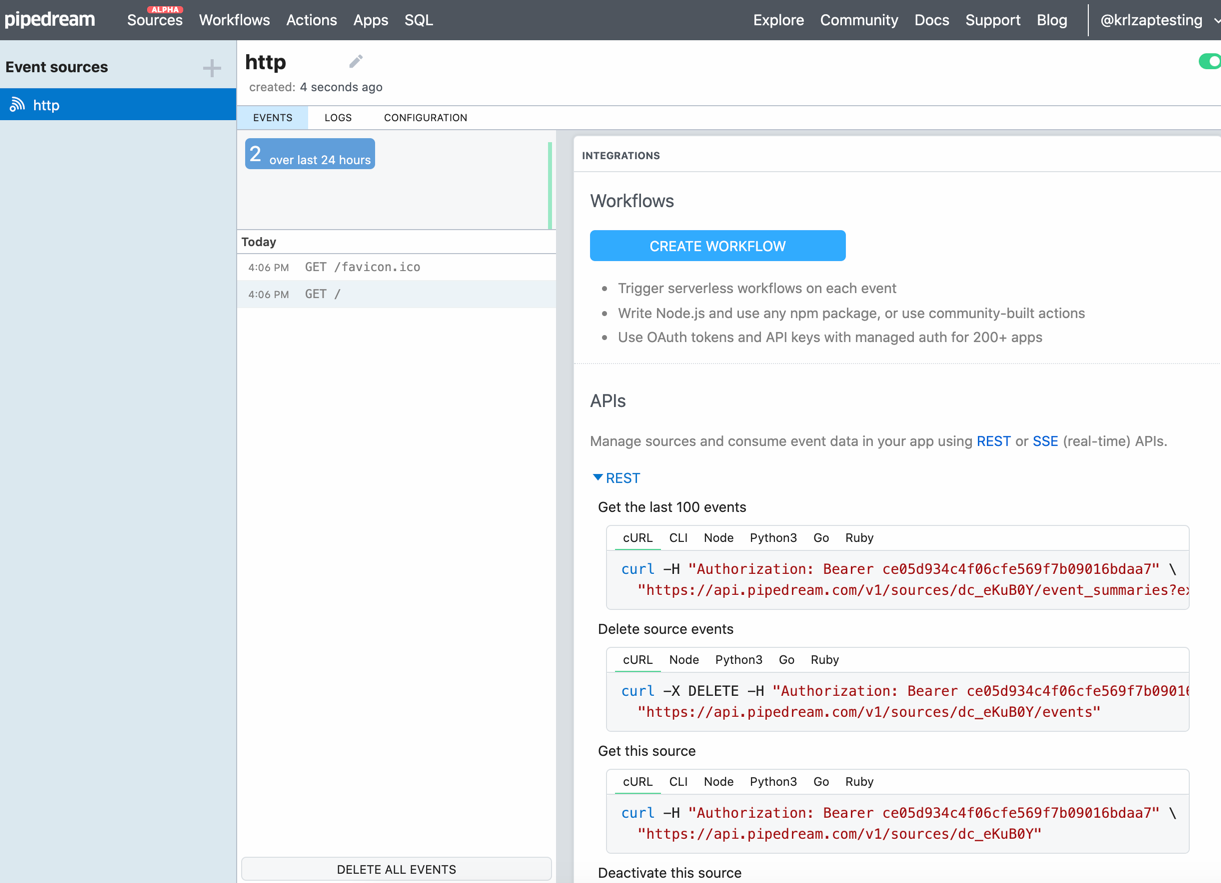
Click REST under INTEGRATIONS to see the data.
You can then try sending POST requests in Terminal or from your own app’s code, if you’d like, using RequestBin’s sample code. That’s a bit more complex—but gives you a way to play with JSON or XML encoding, too.
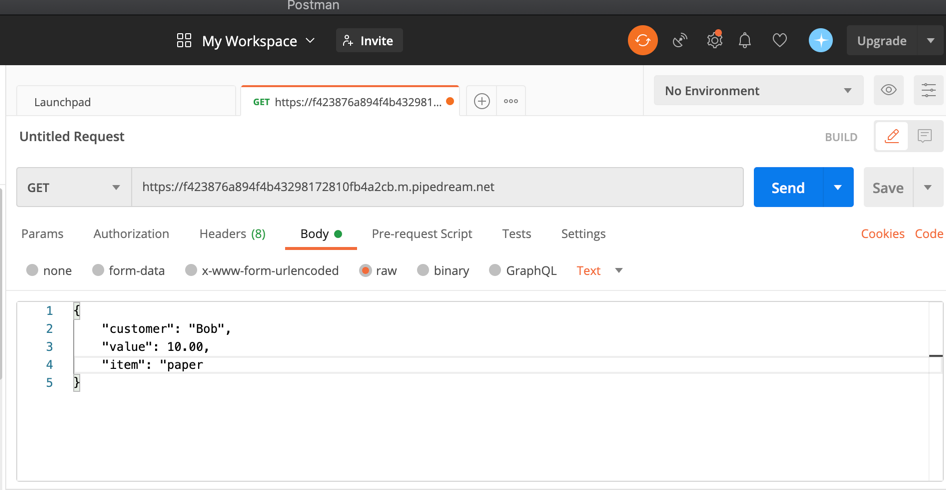
The setup in Postman
Or, use another app for that. The app Postman lets you make custom HTTP requests for an easy way to send customized data to a webhooks URL. Enter the URL, then choose the HTTP request method you want to use (GET, POST, PUT, etc), and add the body data. That’ll let you send far more detailed requests to your webhook URL without having to use more code.
Add webhooks to your apps
Testing webhooks and serializing data by hand is tricky—as is copying and pasting data from your apps. Let’s skip both, and just get our apps talking to each other.
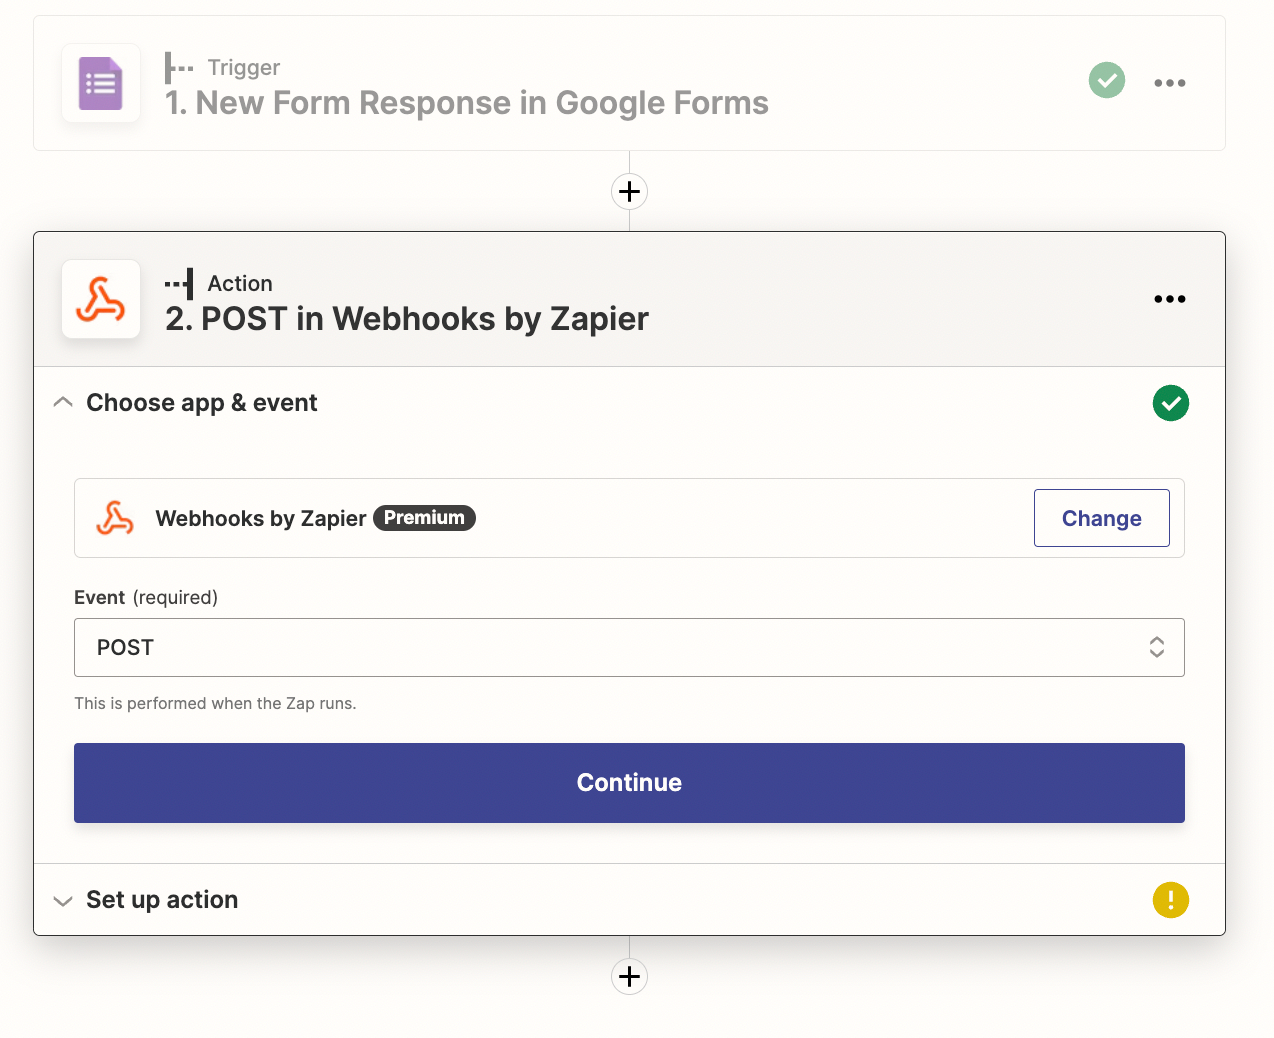
We’re using WordPress-powered form tool Gravity Forms and document template-builder app WebMerge as the examples here—but the same general idea works in most other apps that support webhooks. Here’s essentially what you need to do:
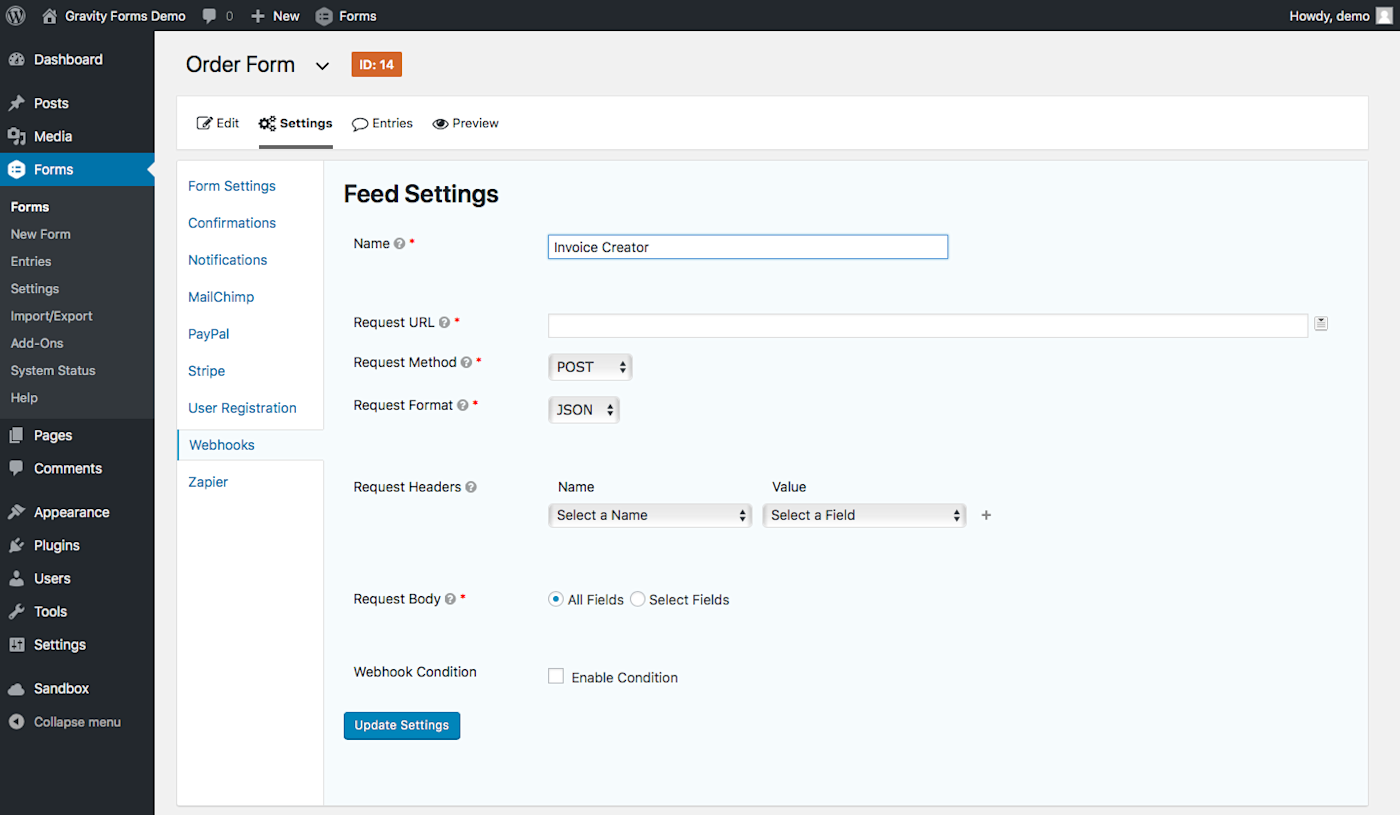
Open your form’s Webhook settings in Gravity Forms
First, enable webhooks in your app if they’re not already and open the webhooks settings (in Gravity Forms, for instance, you need to install an add-on; in Active Campaign or WooCommerce, you’ll find webhooks under the app’s default settings). Your app might have one set of webhook settings for the entire app—or, often, it’ll have a specific webhook for each form, document, or other items the app maintains.
We want the data to come from Gravity Forms, so we’ll open the Webhooks settings under the form we want to use. That gives us a URL field (this lets us tell Gravity Forms where we want to send the data) and options to specify the webhook HTTP request method (how to send the data).
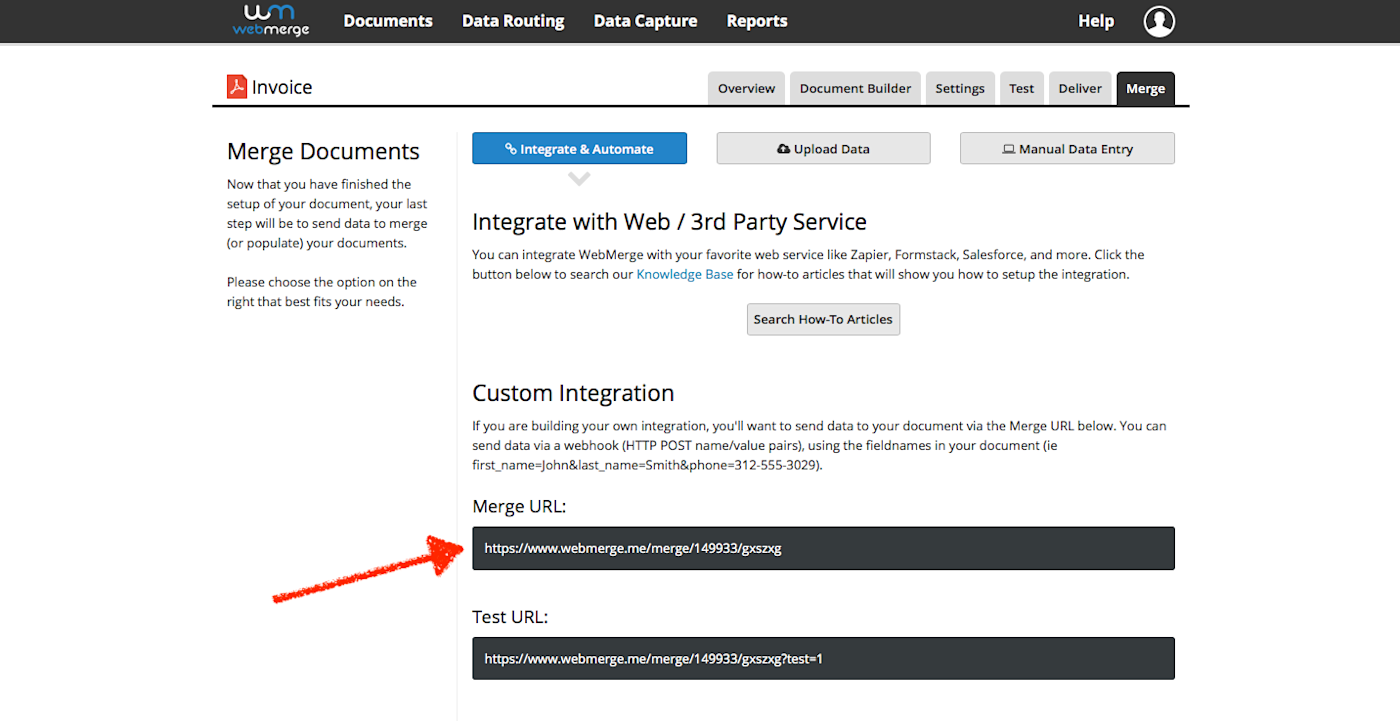
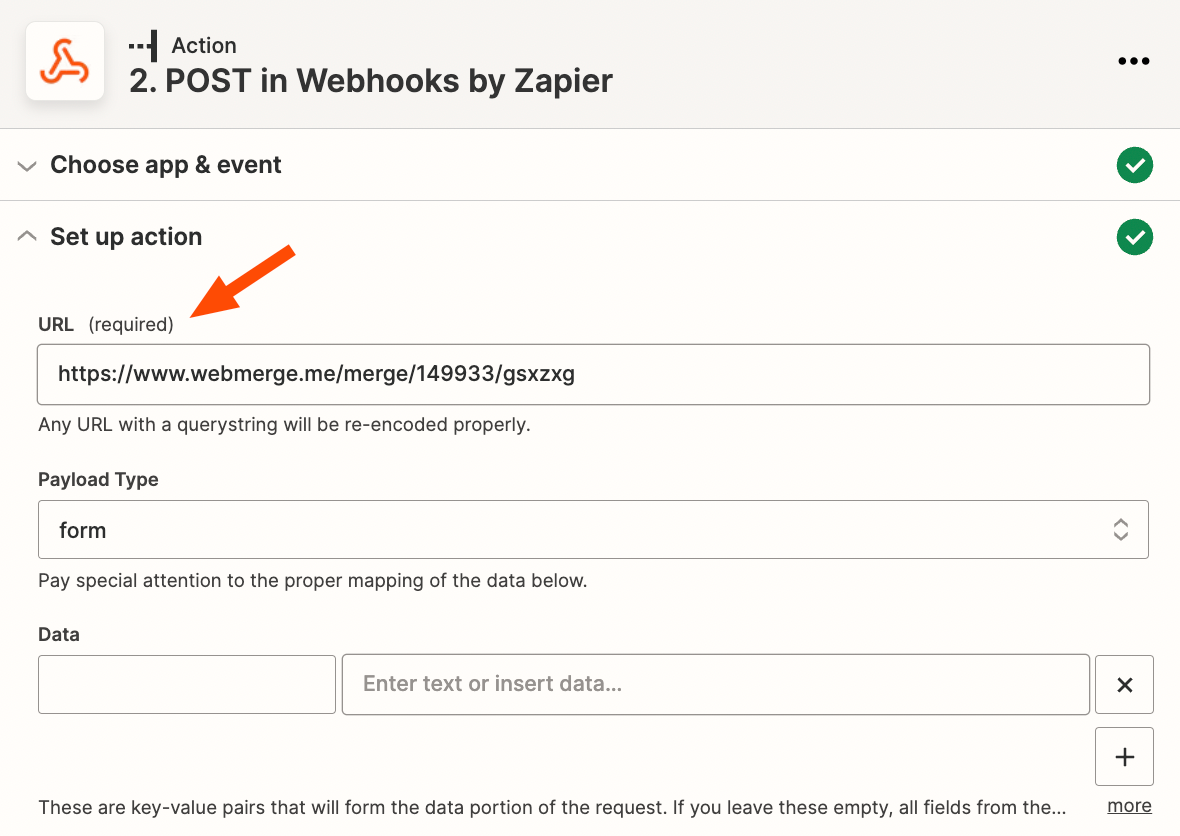
Each WebMerge document template has a unique webhook URL.
Now let’s get that URL from the app that will receive the data—WebMerge, in this case. In WebMerge, each document has its own “merge URL”—and it wants the data in form encoded serialization, as you can tell from the ampersands in the example data. Copy the merge URL—or whatever URL your app offers, as it may have a different name.
Tip: You’ll often find webhook URLs and related settings under the “integration”, “webhook”, or “workflow” settings, depending on your app.
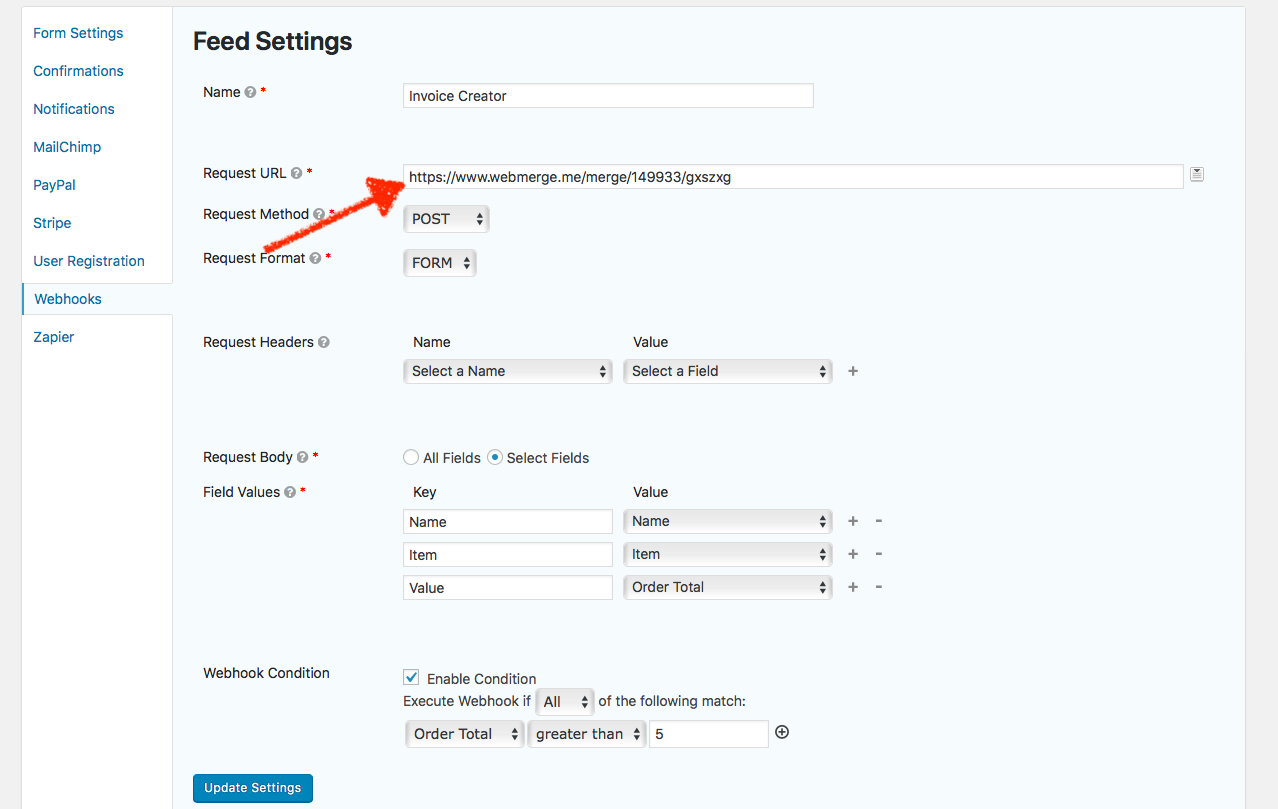
Add the webhooks URL to your trigger app so it can share data when something happens
Finally, go back to your trigger app—Gravity Forms in our case—and paste the webhook URL in Gravity Forms’ URL field. You may also be able to set the correct request method and the specific field values to ensure only the data you want is sent, and is shared with the same variable names as the receiving app uses. Save the settings, and you’re good to go.
The next time someone fills out our form that Bob ordered 10.00 of paper, Gravity Forms will send the data to WebMerge’s URL as https://www.webmerge.me/merge/149933/gxszxg?Name=Bob&Item=Paper&Value=10.00 and WebMerge will turn that into a complete invoice.
PayPal IPN is very similar to webhooks—and you can add a webhook URL to PayPal to get payment notifications
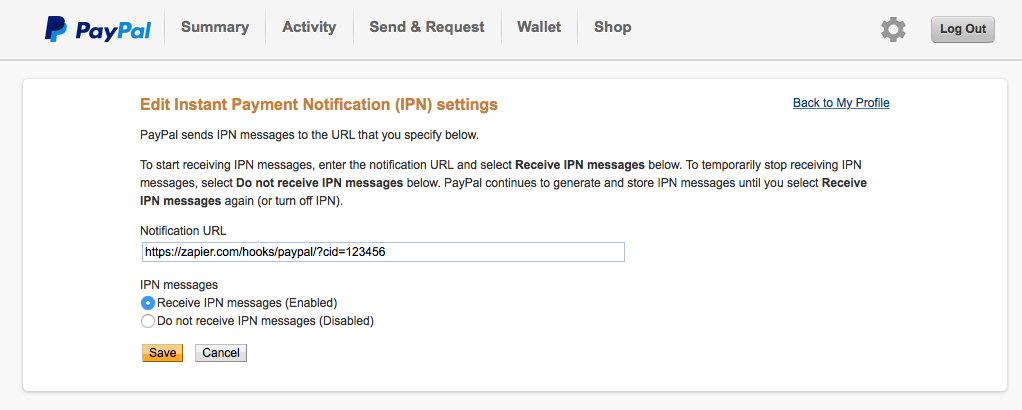
Once you start using webhooks, you’ll notice them (or similar links) everywhere, in places you never thought they’d show up. PayPal, for instance, uses Instant Payment Notifications or IPNs to send notifications whenever you receive a payment. Have an app that you’d like to do something whenever you get a PayPal payment? Add its webhooks URL to PayPal’s IPN settings and that app will get a message the next time you get money.
Or take Twimlets, Twilio‘s simple apps to forward calls, record voicemail messages, start a conference call, and more. To, say, forward a call, you’ll add a familiar, webhook-style Twimlet address like http://twimlets.com/forward?PhoneNumber=415-555-1212 to your Twilio phone number settings. Want to build your own phone-powered app, or notify another app when a new call comes in? Put your webhook URL in Twilio’s settings instead.
They might go by different names, but once you notice places where apps offer to send notifications to a unique link, you’ll often have found somewhere else webhooks can work. Now that you know how to use webhooks, you can use them to make software do whatever you want.
Use webhooks in any app with Zapier
Many apps on Zapier use webhooks behind the scenes already. You may not realize it, since Zapier apps generally handle all the actual setup for you. If you come across an app that offers webhooks as an option, you can use a webhooks step in a Zap to set that up yourself using what you’ve learned about webhooks. Note: Webhooks by Zapier is a built-in tool only available to Zapier users on a paid plan or during their trial period.
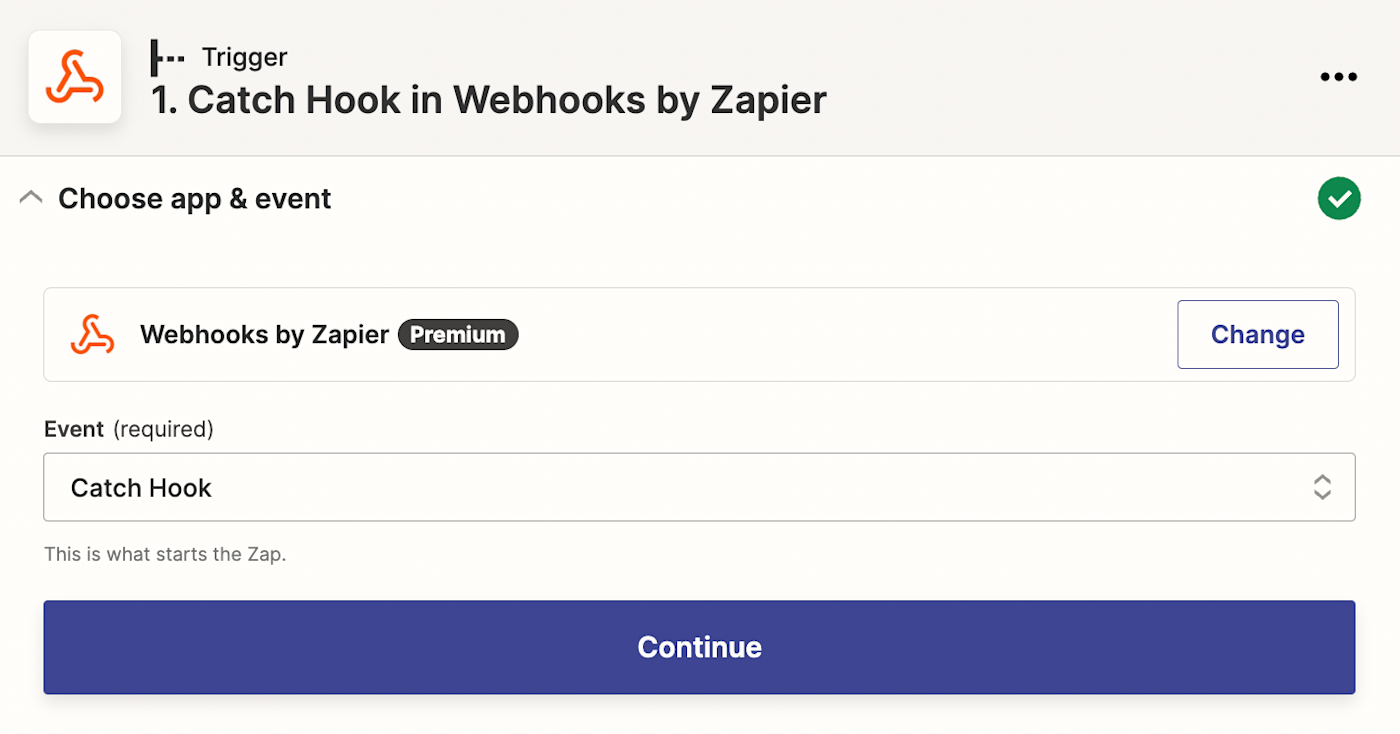
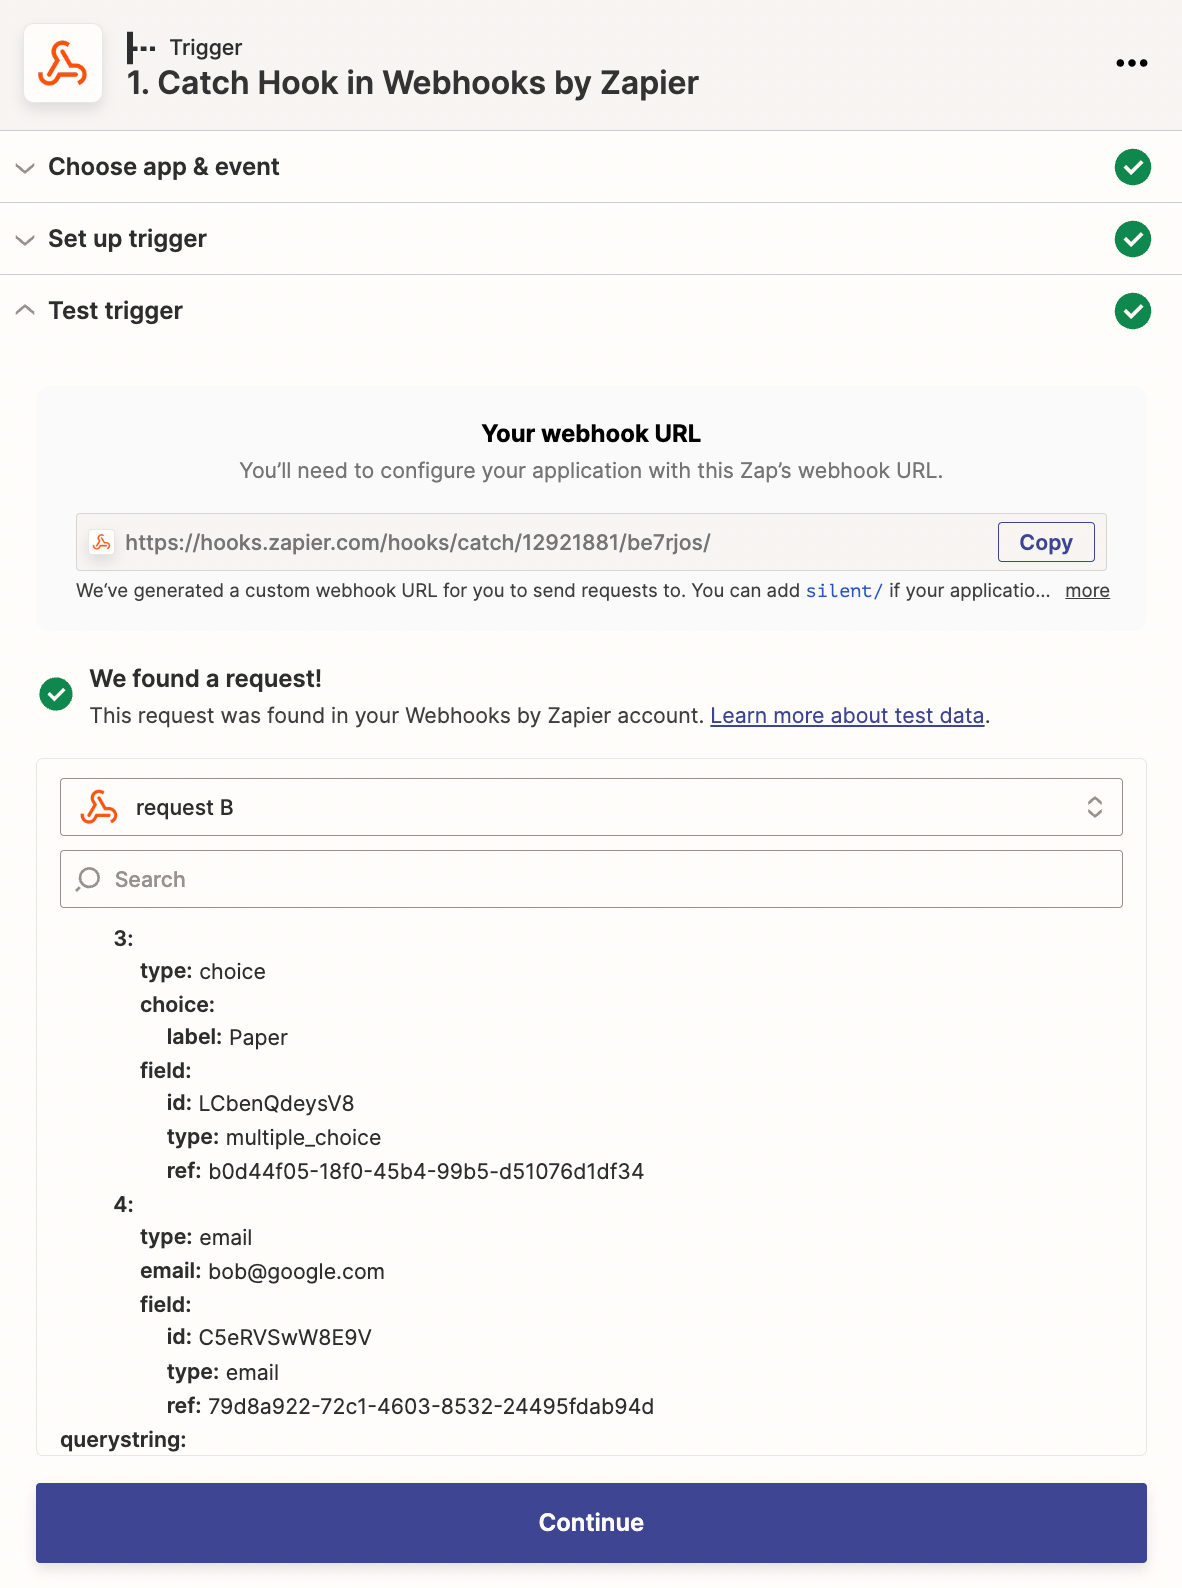
Say you have an app that can send data to a webhooks URL. To connect it to other apps, you’ll make a new Zap—what we call Zapier’s automated app workflows—and choose Webhooks by Zapier as the trigger app. Select Catch Hook, which can receive a GET, POST, or PUT request from another app. Zapier will give you a unique webhooks URL—copy that, then add it to your app’s webhooks URL field in its settings.
GET requests ask the server for data. POST requests send data to a computer. PUSH requests ask the server for specific data, typically to update it.
Zapier will parse each serialized item from your webhook data
Then have your app test the URL, or perhaps just add a new item (a new form entry, contact, or whatever thing your app makes) to have your app send the data to the webhook. Test the webhook step in Zapier, and you’ll see data from the webhook listed in Zapier.
You can add each data item from your webhook to another app in Zapier
Now you can use that data in another app. Select the action app—the app you want to send data to. You’ll see form fields to add data to that app. Click in the field where you want to add webhooks data and select it from the dropdown. Test your Zap and it’s now ready to use. Now the next time your trigger app sends data to the webhook, Zapier will automatically add it to the action app you selected.
Zapier can send any data you want to a webhooks URL
The reverse works as well. Want to send data from one app to another via webhooks? Zapier can turn the data from the trigger app into a serialized list and send it to any webhooks URL you want.
First, select the trigger app you want to send data from, and set it up in Zapier as normal. Then select Webhooks as the action app, and choose how you want to send the data (POST is typically the best option for most webhook integrations).
Finally, paste the webhooks URL from the app you want to receive the data into the URL field in Zapier’s webhook settings. You can choose how to serialize the data (form or JSON are typically best). Zapier will then automatically send all of the data from your trigger app to the webhook—or you can set the specific data variables from the Data fields below.
You can specify how Zapier serializes your data and choose the specific data it sends to your webhook
You’re now ready to use your Zap. Now whenever something new happens in your trigger app, Zapier will copy the data and send it to your other app’s webhooks URL.
Webhooks are one of the best ways to connect apps that wouldn’t otherwise work with Zapier. Have a Mac or iPhone app that doesn’t connect with Zapier? Using Alfred or Siri Shortcuts—plus a Zapier Webhooks URL—you can connect them to your Zapier workflows. Here’s how:
Ok, you’ve got this. Armed with your newfound knowledge about webhooks and their confusing terminology, you’re ready to start using them in your work. Poke around your favorite web apps’ advanced settings and see if any of them support webhooks. Think through how you could use them—then give it a shot.
And bookmark this article. Next time you read something about a GET request needing to make an HTTP callback, or see a URL with ?name=bob&value=10 and such at the end, you’ll know what it actually means.