Computer numerical controls (CNCs) are machines used to produce products in a factory setting. They have been in use for many years, and in the last decade, their use has become more widespread due to increased connectivity. This increased connectivity has made them more software-dependent and therefore more vulnerable to attacks. This vulnerability is due to the heterogeneity of technologies used in factories and the lack of awareness among users of how to best secure these systems.
This three-part blog series explores the risks associated with CNC machines. We performed a security evaluation on four representative vendors and analyzed technological developments that satisfy the Industry 4 .0 paradigm while conducting practical attacks against real-world installations.
For our research, we picked vendors that are:
Are geographically distributed (that is, with headquarters and subsidiaries spread across the world) and resell on a global scale.
Have been on the market for decades.
Have a large, estimated size, for example, with a total annual revenue of at least a billion US dollars.
Use technologies widely adopted in the domain and present in different manufacturing sectors.
Understanding numerical control machines
A machine tool is a device that uses cutting tools to remove material from a workpiece. This process, called machining, results in the desired geometry of the workpiece. Machining is a subtractive process, meaning that the material is removed from the original geometry to create the desired shape.
Numerical control (NC) is a technology that allows machines to be controlled by computers. This technology has revolutionized machine tools, making them more accurate and allowing for greater flexibility in their use. NC machine tools are now widely used in production systems and can be used on other types of machines, such as lasers and bending machines.
Basic concepts
To facilitate the understanding of what we discovered in our research, we introduce some basic concepts related to the use of machine tools:
Figure 1. Parts of a CNC machine
Numerical control. The NC is the most critical element of the machine, as it controls the entire process. This system includes visual programming functions to speed up the setup of production cycles. Additionally, the NC is always equipped with a human-machine interface (HMI) to facilitate operator interaction with control.
Programming. Initially developed in the 1950s, G-code (aka RS-274) is the predominant programming language in the world of machine tools. It is presented as a series of instructions initialized by a letter address, which follow one another on successive lines separated by paragraph breaks; each of these lines is called a “block.” Each letter address specifies the type of movement or function called by the user in that part of the program.
Parametric programming. Parametric programming is a way to make programs that are adjustable to different values. This is done by using variables that the user can input, and then the program will change based on those values. This is used in machine tools to help with things like feedback and closed-loop controls between production systems.
Single step. This allows for running the work program one line of code at a time. In this way, the operator can check the correspondence of executed code to the best possible working conditions and determine if intervention by modification is necessary.
Feed hold. The “feed hold” function is mainly used to check the correct execution of complex features by inspecting the work area before proceeding with further steps in the process. In fact, chips coming from the removal of the material being processed could be deposited in work areas or on measuring probes, potentially invalidating the measurements, or inducing defects downstream of the machining if they are not removed.
Tools. The machining process is a manufacturing technique that uses an element called a tool to remove excess material from a raw piece. The tool cutting is made possible by the relative speed between the manufacturing part and the cutting tool edge, also known as the cutting speed or surface speed. In addition to this parameter, the feed rate (speed of tool moving along workpiece) also affects chip removal process. Many types of tools are available depending on the type of processing needed.
Evaluating vendors
For all vendors that we included in our research scope, we conducted an equal evaluation of their machines:
The “Industry 4.0–ready” technologies are interfaces and related protocols used by machines in smart environments to transmit information outwards, towards centralized systems like production data for better management or cost reduction; they also enable remote management such that an operator can change the executed program without needing local access.
We identified potential vulnerabilities in the exposed services using automated scanners like Nessus. These included known or misconfigurations that could pose as dangerous, which we ignored to focus on domain-specific abuse cases for CNC interfaces instead.
We then went deep into the CNC-specific technologies previously identified, by analyzing the risks of abuses and conducting practical attacks on the controllers. For this, we developed attack tools that exploited the weaknesses we identified in the domain-specific interfaces with the aid of proprietary APIs we got access to.
We collected evidence of our concerns and collaborated with vendors to suggest mitigations. All evidence came from tests we conducted on real-world installations, but we also used simulators for preliminary testing or when the machines were not immediately available.
Now that we have established a better understanding of numerical control machines and their basic concepts, we will further explore the vendors we chose for this research in part two of the series. There, we’ll discuss how we evaluated vendors and what we discovered during our research.
When the headlines focus on breaches of large enterprises like the Optus breach, it’s easy for smaller businesses to think they’re not a target for hackers. Surely, they’re not worth the time or effort?
Unfortunately, when it comes to cyber security, size doesn’t matter.
Assuming you’re not a target leads to lax security practices in many SMBs who lack the knowledge or expertise to put simple security steps in place. Few small businesses prioritise cybersecurity, and hackers know it. According to Verizon, the number of smaller businesses being hit has climbed steadily in the last few years – 46% of cyber breaches in 2021 impacted businesses with fewer than 1,000 employees.
Securing any business doesn’t need to be complex or come with a hefty price tag. Here are seven simple tips to help the smaller business secure their systems, people and data.
Every organisation has anti-virus on their systems and devices, right? Unfortunately, business systems such as web servers get overlooked all too often. It’s important for SMBs to consider all entry points into their network and have anti-virus deployed on every server, as well as on employees’ personal devices.
Hackers will find weak entry points to install malware, and anti-virus software can serve as a good last-resort backstop, but it’s not a silver bullet. Through continuous monitoring and penetration testing you can identify weaknesses and vulnerabilities before hackers do, because it’s easier to stop a burglar at the front door than once they’re in your home.
Your perimeter is exposed to remote attacks because it’s available 24/7. Hackers constantly scan the internet looking for weaknesses, so you should scan your own perimeter too. The longer a vulnerability goes unfixed, the more likely an attack is to occur. With tools like Autosploit and Shodan readily available, it’s easier than ever for attackers to discover internet facing weaknesses and exploit them.
Even organisations that cannot afford a full-time, in-house security specialist can use online services like Intruder to run vulnerability scans to uncover weaknesses.
Intruder is a powerful vulnerability scanner that provides a continuous security review of your systems. With over 11,000 security checks, Intruder makes enterprise-grade scanning easy and accessible to SMBs.
Intruder will promptly identify high-impact flaws, changes in the attack surface, and rapidly scan your infrastructure for emerging threats.
Your attack surface is made up of all the systems and services exposed to the internet. The larger the attack surface, the bigger the risk. This means exposed services like Microsoft Exchange for email, or content management systems like WordPress can be vulnerable to brute-forcing or credential-stuffing, and new vulnerabilities are discovered almost daily in such software systems. By removing public access to sensitive systems and interfaces which don’t need to be accessible to the public, and ensuring 2FA is enabled where they do, you can limit your exposure and greatly reduce risk.
A simple first step in reducing your attack surface is by using a secure virtual private network (VPN). By using a VPN, you can avoid exposing sensitive systems directly to the internet whilst maintaining their availability to employees working remotely. When it comes to risk, prevention is better than cure – don’t expose anything to the internet unless it’s absolutely necessary!
New vulnerabilities are discovered daily in all kinds of software, from web browsers to business applications. Just one unpatched weakness could lead to full compromise of a system and a breach of customer data; as TalkTalk discovered when 150,000 of its private data records were stolen.
According to a Cyber Security Breaches Survey, businesses that hold electronic personal data of their customers are more likely than average to have had breaches. Patch management is an essential component of good cyber hygiene, and there are tools and services to help you check your software for any missing security patches.
Ransomware is on the increase. In 2021, 37% of businesses and organisations were hit by ransomware according to research by Sophos. Ransomware encrypts any data it can access, rendering it unusable, and can’t be reversed without a key to decrypt the data.
Data loss is a key risk to any business either through malicious intent or a technical mishap such as hard disk failure, so backing up data is always recommended. If you back up your data, you can counter attackers by recovering your data without needing to pay the ransom, as systems affected by ransomware can be wiped and restored from an unaffected backup without the attacker’s key.
Cyber attackers often rely on human error, so it’s vital that staff are trained in cyber hygiene so they recognise risks and respond appropriately. The Cyber Security Breaches Survey 2022 revealed that the most common types of breaches were staff receiving fraudulent emails or phishing attacks (73%), followed by people impersonating the organisation in emails or online (27%), viruses, spyware and malware (12%), and ransomware (4%).
Increasing awareness of the benefits of using complex passwords and training staff to spot common attacks such as phishing emails and malicious links, will ensure your people are a strength rather than a vulnerability.
Cyber security measures should always be appropriate to the organisation. For example, a small business which handles banking transactions or has access to sensitive information such as healthcare data should employ far more stringent security processes and practices than a pet shop.
That’s not to say a pet shop doesn’t have a duty to protect customer data, but it’s less likely to be a target. Hackers are motivated by money, so the bigger the prize the more time and effort will be invested to achieve their gains. By identifying your threats and vulnerabilities with a tool like Intruder, you can take appropriate steps to mitigate and prioritize which risks need to be addressed and in which order.
Attacks on large companies dominate the news, which feeds the perception that SMBs are safe, when the opposite is true. Attacks are increasingly automated, so SMBs are just as vulnerable targets as larger enterprises, more so if they don’t have adequate security processes in place. And hackers will always follow the path of least resistance. Fortunately, that’s the part Intruder made easy…
Intruder is a cyber security company that helps organisations reduce their attack surface by providing continuous vulnerability scanning and penetration testing services. Intruder’s powerful scanner is designed to promptly identify high-impact flaws, changes in the attack surface, and rapidly scan the infrastructure for emerging threats. Running thousands of checks, which include identifying misconfigurations, missing patches, and web layer issues, Intruder makes enterprise-grade vulnerability scanning easy and accessible to everyone. Intruder’s high-quality reports are perfect to pass on to prospective customers or comply with security regulations, such as ISO 27001 and SOC 2.
Intruder offers a 14-day free trial of its vulnerability assessment platform. Visit their website today to take it for a spin!
Found this article interesting? Follow us on Twitter and LinkedIn to read more exclusive content we post.
Wordfence 7.8.0 is out! A huge thanks to our quality assurance team, our team of developers and our ops team for planning, implementing and releasing Wordfence 7.8.0. This release has several fixes to make Wordfence even more robust, and includes a fundamental change in the way our signup works.
Since our launch in 2012, the signup flow for Wordfence has not required you to leave your own WordPress installation and come to our website. We briefly required this, but removed it 10 days after launch.
Wordfence has grown to a community of over 4 million active websites and a very large number of paying customers. Wordfence is now downloaded over 30,000 times every day. Today we spend a huge amount of money on providing the services that our free and paid community needs to stay secure. Privacy laws have also changed profoundly since 2012.
Scaling up our operations has required us to get better at capacity planning, which means knowing how many installations we’re getting, how many are bots or spam, who is communicating with our servers during a scan, and whether it is a real website running Wordfence, a nulled plugin or someone simply using our resources to power something unrelated to Wordfence.
Privacy laws have also added the need for us to be able to communicate with our free customers to alert them to privacy policy and terms of use changes.
This has required us to adjust our signup flow to match other popular plugins out there, like Akismet. Many customers may find this is a clearer signup workflow because we no longer need to shoehorn a complex user experience into a set of modals on a site where we don’t control presentation.
This change will not disrupt any of our existing free or paid customers. If you have a free API key that Wordfence automatically fetched when you installed it, that key will remain valid and your site will continue uninterrupted. If you have a paid Wordfence API key, your key will continue to work without disruption. We are not requiring any existing customers to visit our site to install a new key.
The only users this affects are new free Wordfence installations. The installation process is quite simple. You install Wordfence and are directed to our site. You can choose a paid or free option. If you choose the paid option, you’ll go through our checkout process as usual. If you choose free, we’ll email you your key. The email includes a button that you can click to automatically take you back to your site where your key will be automatically installed. The email also includes your Wordfence key in case you need to manually install it.
A side benefit of this new process is that our free customers will now have a record of their API key in their email inbox for future reference.
We’re including the full changelog for Wordfence 7.8.0 below. You’ll notice that we’ve mentioned that additional WooCommerce support is on its way, so keep an eye out for that.
Thanks for choosing Wordfence!
Mark Maunder – Wordfence Founder & CEO.
Wordfence 7.8.0 Changelog
Change: Updated Wordfence registration workflow
For new installations of Wordfence, registering for a new license key now occurs on wordfence.com instead of within the plugin interface. Allows us to provide a more complete signup experience for our free and paid customers. Also allows us to do better capacity planning.
Improvement: Added feedback when login form is submitted with 2FA
When logging in with two-factor authentication, the “Log In” button is now disabled during processing, so that it is clear the button was clicked. Sometimes on slower sites, it was hard to tell whether the login was going through, leading users to click more than once.
Fix: Restored click support on login button when using 2FA with WooCommerce
Clicking the “Log In” button after entering a 2FA code on a WooCommerce site was no longer working, while pressing “Enter” still worked. Both methods now work as expected. Additional support for WooCommerce is coming in the near future.
Fix: Corrected display issue with reCAPTCHA score history graph
The reCAPTCHA score history graph was sometimes displayed larger than intended when switching tabs. It now has a set size, so that it does not become unusually large.
Fix: Prevented errors on PHP caused by corrupted login timestamps
One Wordfence user reported an error on PHP 8, and upon investigation, we found that a timestamp for some user records contained invalid data instead of the expected timestamp. We don’t expect this to occur on other sites, but in case another plugin had modified the value, we now check the value before formatting it as a timestamp.
Fix: Prevented deprecation notices on PHP 8.2 related to dynamic properties
Future versions of PHP will no longer allow use of variables on an object unless they are previously declared. This is still allowed even in PHP 8.2, but PHP 8.2 can log a warning about the upcoming change, so Wordfence has been updated to declare a few variables where necessary, before using them.
Microsoft Hyper-V Server is a free version of Windows hypervisor that can be used to run virtual machines. In this guide, we’ll look at how to install and configure Microsoft Hyper-V Server 2019 (this guide also applies to Hyper-V Server 2016).
Microsoft announced that they won’t not be releasing a Hyper-V Server 2022 version. This is because they are currently focusing on another strategic product, Azure Stack HCI.
Hyper-V Server 2019 is suitable for those who don’t want to pay for a hardware virtualization operating system. The Hyper-V has no restrictions and is completely free. Key benefits of Microsoft Hyper-V Server:
Support of all popular OSs. There are no compatibility problems. All Windows and modern Linux and FreeBSD operating systems support Hyper-V;
A lot of different ways to backup virtual machines: simple scripts, open-source software, free and commercial versions of popular backup programs;
Although Hyper-V Server doesn’t have a Windows Server GUI (graphical management interface), you can manage it remotely using a standard Hyper-V Manager console or Windows Admin Center web interface;
Hyper-V Server is based on a popular Windows Server platform, familiar and easy to work with;
You can install Hyper-V on a pseudoRAID, for example, Inter RAID controller, or Windows software RAID;
You do not need to license your hypervisor, it is suitable for VDI or Linux VMs;
Low hardware requirements. Your processor must support software virtualization (Intel-VT or VMX by Intel, AMD-V/ SVM by AMD) and second-level address translation (SLAT) (Intel EPT or AMD RV). These processor options must be enabled in BIOS/UEFI/nested host. You can find full system requirements on the Microsoft website;
It is recommended to install Hyper-V on hosts with at least 4 GB RAM.
Do not confuse a Windows Server 2022/2019/2016 (Full GUI or Server Core edition) with the Hyper-V role installed with Free Microsoft Hyper-V Server 2019/2016. These are different products.
It is worth to note that if you are using a free hypervisor, you are still responsible for licensing your virtual machines. You can run any number of VMs running any open-source OS, like Linux, but you have to license your Windows virtual machines. If you are using Windows Server as a guest OS, you must license it by the number of physical cores on your Hyper-V host. See more details on Windows Server licensing in a virtual environment here.
What’s New in Microsoft Hyper-V Server 2019?
Let’s consider the new Hyper-V Server 2019 features in brief:
Added support for Shielded Virtual Machines for Linux;
VM configuration version 9.0 (with hibernation support);
ReFS deduplication support;
Core App Compatibility: the ability to run additional graphic management panels in the Hyper-V server console;
After clicking on the “Continue” button, a short registration form will appear. Fill in your data and select the language of the OS to be installed. Wait till the Hyper-V image download is over. The .iso file size is about 3 GB.
Installing Microsoft Hyper-V Server is identical to installing Windows 10/11 on a desktop computer. Just boot your server (computer) from the bootable USB flash drive with the Microsoft Hyper-V Server installation image (the easiest way to burn the ISO image to a USB drive is to use the Rufus tool). Then follow the instructions of the Windows setup wizard.
Manage Hyper-V Server Basic Settings Using Sconfig
After the installation, the system will prompt you to change the administrator password. Change it, and you will get to the hypervisor console.
Please note that Hyper-V Server does not have a familiar Windows GUI. You will have to configure most settings through the command line.
There are two windows on the desktop — the standard command prompt and the sconfig.cmd script window. You can use this script to perform the initial configuration of your Hyper-V server. Enter the number of the menu item you are going to work with in the “Enter number to select an option:” line.
The first menu item allows you to join your server to an AD domain or a workgroup;
Set a hostname for your Hyper-V Server;
Create a local administrator user (another account, besides the built-in administrator account). I’d like to note that when you enter the local administrator password, the cursor stays in the same place. However, the password and its confirmation are successfully entered;
Enable remote access to your server. Thus, you will be able to manage it using Server Manager, MMC consoles, and PowerShell, connect via RDP, check its availability using ping or tracert;
Configure Windows Update. Select one of the three modes:
Automatic (automatic update download and installation)
DownloadOnly (only download without installation)
Manual (the administrator decides whether to download or install the updates)
Download and install the latest Windows security updates.
Configure your network adapter settings. By default, your server receives the IP address from the DHCP server. It is better to configure the static IP address here;
Set the date and time of your system.
Configure the telemetry. The Hyper-V won’t allow you to disable it completely. Select the mode you want.
You can also configure the date, time, and time zone using the following command:
control timedate.cpl
Regional settings:
control intl.cpl
These commands will open standard Windows consoles.
Note! If you accidentally close all windows and see the black Hyper-V screen, press Ctrl+Shift+Esc to start the Task Manager (this keyboard shortcut works in an RDP session as well). You can use Task Manager to start the command prompt or the Hyper-V configuration tool (click File -> Run Task -> cmd.exe or sconfig.cmd).
How to Remotely Manage Hyper-V Server 2019?
To conveniently manage Free Hyper-V Server 2019 from the graphic interface, you can use:
Windows Admin Center – a web-based console;
Hyper-V Manager — can be installed both on Windows Server and Windows 10/11 desktop computers.
To manage the Hyper-V Server 2016/2019, you will need a computer running x64 Windows 10/11 Pro or Enterprise edition.
Remotely Manage a Non-Domain Hyper-V Server with Hyper-V Manager
Let’s look at how to remotely connect to a Hyper-V Server host from another Windows computer using the Hyper-V Manager console. In this article, we assume that you have a Hyper-V Server and a Windows 10 computer in the same workgroup.
First, make settings on the Hyper-V Server. Start the PowerShell console (powershell.exe) and run the following commands:
Enable-PSRemoting
Enable-WSManCredSSP -Role server
Answer YES to all questions. Thus you will configure the automatic startup of the WinRM service and enable remote management rules in your firewall.
Now let’s move on to setting up the Windows 10 or 11 client computer that you will use to manage your Hyper-V Server host.
The Hyper-V server must be accessible by its hostname. In the domain network, it must correspond to the A-record on the DNS server. In a workgroup environment, you will have to create the A record manually on your local DNS or add it to the hosts file (C:\Windows\System32\drivers\etc\hosts) on a client computer. In our case, it looks like this:
192.168.13.55 HV19
You can add an entry to the hosts file using PowerShell:
If the account you are using on a client computer differs from the Hyper-V administrator account (and it should be so), you will have to explicitly save your credentials used to connect to the Hyper-V server to the Windows Credential Manager. To do it, run this command:
Now you need to install the Hyper-V Manager console in Windows. Open the Programs and Features snap-in and go to Turn Windows Features on or off. In the next window, find Hyper-V, and check Hyper-V GUI Management Tools to install it.
Also, you can install the Hyper-V Manager snap-in on Windows 10/11 using PowerShell:
Run the Hyper-V Manager snap-in (virtmgmt.msc), right-click Hyper-V Manager and select Connect to Server. Specify the name of your Hyper-V Server.
Now you can manage Hyper-V Server settings, and create and manage virtual machines from the graphical console.
Managing Hyper-V Server with Windows Admin Center
You can use the Windows Admin Center (WAC) to remotely manage a Hyper-V Server host. WAC is a web-based console and dashboard to manage Windows Server, Server Core, and Hyper-V Server hosts.
Enable the rules to allow SMB connections in Windows Defender Firewall on the Hyper-V Server:
Set-NetFirewallRule -DisplayGroup "File and Printer Sharing" -Enabled true -PassThru
Now you need to download (https://aka.ms/WACDownload) and install the Windows Admin Center agent on your Hyper-V host. Download WindowsAdminCenter2110.2.msi on any Windows computer. You can copy the installation MSI file to the Hyper-V Server using a remote SMB connection to the administrative share C$. Run the following command on your Windows client device:
Win+R -> \\192.168.13.55\C$ and enter the Hyper-V administrator password. Create a folder and copy the MSI file to the Hyper-V Server host.
Now run the WAC installation from the Hyper-V console:
Next, I will look at some ways to manage Hyper-V Server settings using PowerShell
Configuring Hyper-V Server 2019 Host with PowerShell
You can configure Hyper-V Server settings using PowerShell. There are over 238 cmdlets available in the Hyper-V module for managing Hyper-V hosts and VMs.
Get-Command –Module Hyper-V | Measure-Object
Configure the automatic start of the PowerShell console (instead of cmd.exe) after logon.
Now, when you log into the server, a PowerShell prompt will appear.
How to Configure Hyper-V Server 2019 Network Settings with PowerShell?
If you have not set the network settings using sconfig.cmd, you configure them through PowerShell. Using Get-NetIPConfiguration cmdlet, you can view the current IP configuration of network interfaces.
Use PowerShell to assign a static IP address, netmask, default gateway, and DNS server addresses. You can get the network adapter index (InterfaceIndex) from the output of the previous cmdlet.
We will use a separate partition on a physical disk to store Hyper-V files (virtual machine files and iso files). View the list of physical disks on your server.
Get-Disk
Create a new partition of the largest possible size on the drive and assign the drive letter D: to it. Use the DiskNumber from Get-Disk results.
New-Partition -DiskNumber 0 -DriveLetter D –UseMaximumSize
Then format the partition to NTFS and specify its label:
Format-Volume -DriveLetter D -FileSystem NTFS -NewFileSystemLabel "VMStorage"
Create a directory where you will store virtual machine settings and vhdx files using the New-Item cmdlet:
New-Item -Path "D:\HyperV\VHD" -Type Directory
Create D:\ISO folder to store OS installation ISO images (distros):
New-Item -Path D:\ISO -ItemType Directory
In order to create a shared network folder, use the New-SmbShare cmdlet. Grant full access permissions to the local server administrators group:
New-SmbShare -Path D:\ISO -Name ISO -Description "OS Distributives" -FullAccess "BUILTIN\Administrators"
For more information on the basic configuration of Hyper-V Server and Windows Server Core from the command line, see this article.
Configure Hyper-V Server Host Settings with PowerShell
List current Hyper-V Server host settings using this command:
Get-VMHost | Format-List
By default, Hyper-V stores virtual machine configuration files and virtual disks on the same partition where your operating system is installed. It is recommended to store VM files on a separate drive (partition). You can change the default VM folder path with this command:
Create an external switch connected to the physical NIC of the Hyper-V server. Your virtual machines will access the physical network through this network adapter.
Check the SR-IOV (Single-Root Input/Output (I/O) Virtualization) support:
Get-NetAdapterSriov
Get the list of connected network adapters:
Get-NetAdapter | where {$_.status -eq "up"}
Bind your virtual switch to the network adapter and enable SR-IOV support if it is available.
Hint. You won’t be able to enable or disable SR-IOV support after creating the vswitch. You will have to recreate the switch to change this parameter.
In this article, I will show you how to enable Hibernate mode in Windows 11 using different methods. We will explore different methods to turn on hibernate mode which includes Intune, Registry, Group Policy, Command Prompt and Control Panel.
In Windows, the Hibernate mode allows you to completely shut down your computer while conserving your work, allowing you to immediately resume where you left off the next time you turn on your computer.
Hibernate mode is similar to Sleep mode in Windows. The primary difference is that in Hibernate mode, the documents, and apps that are currently open are saved to a file on your hard disk rather than in RAM as in Sleep mode. Hibernate mode consumes less power than Sleep mode which is a big advantage. However, it can use gigabytes of disk space.
When you use Hibernate mode, your work is saved in a hidden file named hiberfil.sys. This hiberfil.sys file is responsible for managing computer hibernation, helping your computer restart from the hibernate power state. Although hiberfil.sys is a hidden and protected system file, it is safe to delete it if you do not wish to employ Windows’ power-saving capabilities.
According to Microsoft, use hibernation when you know that you won’t use your laptop or tablet for an extended period and won’t have an opportunity to charge the battery during that time. Windows 11 doesn’t come with hibernate mode enabled by default. You have to manually enable it from Windows settings.
Why is the Hibernate option missing on Windows 11 PC?
When you install Windows 11 or upgrade from Windows 10 to Windows 11, you’ll notice that the Hibernate option is missing from the Power options menu. This is by design and Microsoft allows users to use the Sleep option instead of Hibernate. Although, the hibernate option is not enabled on your Windows 11 PC, you can turn it on or off when required.
There are multiple ways that you can use to turn on the hibernate mode in Windows 11. Some of these methods include:
Turn on the hibernate mode using Control Panel.
Activate the hibernate mode using Command Prompt.
Use Windows Registry to enable the hibernate mode in Windows 11.
Enable Hibernate option using Intune on Windows 11 endpoints.
Deploy GPO to enable or disable the Hibernate option.
I will cover all the methods in this post that will help you turn on the hibernate mode in Windows 11.
Method 1: Turn on Hibernate Mode in Windows 11 from Control Panel
The method is easiest and recommended way to enable the hibernate option in Windows 11 is using control panel. Select Search on the taskbar, type ‘control panel‘, and select it from the results. When the control panel launches, select System and Security.
Control Panel – System and Security
In the Power Options section, select Change what the power buttons do.
Select Power Button options
By default, the option to enable Hibernate is greyed out because the changes that you make here applies to all your power plans. Select Change settings that are currently unavailable.
Turn on Hibernate Mode in Windows 11 from Control Panel
In the Shutdown settings section, select Hibernate. This allows the Hibernate Mode to show up on the Power Menu. Click on Save changes to complete the process.
Turn on Hibernate Mode in Windows 11 from Control Panel
To verify if the hibernate option is enabled, click on Start and select the Power button. The option for hibernate mode should be available.
Windows 11 Hibernate Option in Power Menu
To disable the hibernate option, click start and launch the control panel. Click System and Security and in the Power Options section, select Change what the power buttons do. Select Change settings that are currently unavailable. In the Shutdown settings section, uncheck the Hibernate option and click Save changes. This will immediately disable the hibernate option from Windows 11 power options.
Method 2: Use Command Prompt to Turn on Hibernate mode in Windows 11
Command Prompt in Windows lets you run manage Windows Power plans on a Windows PC. You can also use Windows Terminal instead of command prompt to perform the same tasks. Enabling the Hibernate mode using command prompt is effortless.
In the Windows Start Menu, type Command Prompt in the text box and hit enter.
From the search results, run Command Prompt as administrator.
Run the command “powercfg.exe /hibernate on” to enable the Hibernate mode on Windows 11.
Use Command Prompt to Turn on Hibernate mode in Windows 11
To disable the hibernate mode using command prompt, run the command “powercfg.exe /hibernate off” and this will turn off the Hibernate mode on Windows 11.
Note: You cannot enable Hibernation on a VM when the firmware doesn’t support it. You will encounter the following error. Hibernation failed with the following error: The request is not supported. The following items are preventing hibernation on this system. The system firmware does not support hibernation.
You can also use Windows Registry to enable the hibernate mode on Windows devices if the previous methods don’t have the desired results. Press the Windows+R key to bring up the Run dialog box. Type in Regedit and press OK to open the Windows Registry Editor.
In the Registry editor, navigate to HKEY_LOCAL_MACHINE\SYSTEM\CurrentControlSet\Control\Power. Here you should find the HibernateEnabled registry setting and the value of the setting lets you enable or disable the hibernate mode in Windows 11.
HibernateEnabled = 1 – The value 1 indicates the Hibernate option is enabled.
HibernateEnabled = 0 – The value 0 indicates the Hibernate option is disabled.
Use Windows Registry to Enable Hibernate Mode
On the right panel, double-click on HibernateEnabled. This will bring up the Edit DWORD Value box. Change the value to 1 to enable hibernate mode and click OK.
Enable Hibernate Mode in Windows 11 using Registry
After making the above modifications to the registry, restart the computer. Once restarted, you will find that hibernate mode is enabled on your system when you access the Start Menu.
Method 4: Enable Hibernate Mode using Intune via Settings Catalog
The Intune Settings Catalog policy makes it easier for MEM Admins to add, configure, customize and manage device and user policy settings. With Intune, you can deploy a policy setting to Show hibernate in the power options menu. You can also configure power options using Intune.
Create a new Intune Configuration profile and define the settings to turn on hibernate mode.
On Windows ConfigurationProfiles window, select Create Profile. On the Create a Profile window, select Platform as Windows 10 and later. Select profile type as Settings Catalog. Click Create. On the Basics tab, specify the name of the profile to Enable Hibernate Mode on Windows Devices, and you may add a profile description. Click Next.
Enable Hibernate Mode using Intune
On the Configuration Settings section, under Settings Catalog, click Add Settings.
Enable Hibernate Mode using Intune
On the Settings picker window, type “Hibernate” in the search box and click on Search. From the search results, select Power. Enable the option “Allow Hibernate“. This policy setting decides if hibernate on the machine is allowed or not. Supported values: 0 – Disable hibernate. 1 (default) – Allow hibernate.
Turn on Allow Hibernate
Next, on the same page, select Administrative Templates\Windows Components\File Explorer. Now enable the setting “Show hibernate in the power options menu“.
Show hibernate in the power options menu: Shows or hides hibernate from the power options menu. If you enable this policy setting, the hibernate option will be shown in the Power Options menu (as long as it is supported by the machine’s hardware). If you disable this policy setting, the hibernate option will never be shown in the Power Options menu. If you do not configure this policy setting, users will be able to choose whether they want hibernate mode to show through the Power Options Control Panel.
Enable Hibernate Mode using Intune
On the Configuration Settings tab, ensure the following two settings are enabled:
Show hibernate in the power options menu
Allow hibernate
Click Next to continue.
Turn on hibernate mode using Intune
In Intune, Scope tags determine which objects admins can see. On the Scope tags section, you specify scope tags. Click Next. On the Assignments tab, specify the groups to which you want to target this policy. Click Next.
On the Review+Create tab, review all the settings defined to enable hibernate on Windows 11 and select Create. After you create a device configuration policy in Intune, a notification appears “Policy created successfully“.
You must wait for the Intune Policy to apply to the targeted groups and once the devices check-in with the Intune service they will receive your profile settings. You can also force sync Intune policies on your computers. Once the policy applies to the devices, you can verify if the hibernate option shows by clicking the start menu and selecting the power button. This completes the steps to enable hibernate mode in Windows 11 using Intune.
Turn on hibernate mode using Intune
Method 5: Enable or Disable Hibernate Mode using Group Policy
Group Policy is a fast and effective way to configure Hibernate on multiple PCs. When you want to turn on hibernate mode for multiple Windows 11 PCs, GPO is the best choice for administrators.
With GPO, you enable the hibernate mode and even disable it when it’s not required. Here are the steps to enable hibernate option in Group Policy:
On your domain controller, launch the Group Policy Management console.
Create a new Group Policy Object and name it “Enable Hibernate Mode“
Right-click on “Enable Hibernate Mode” and select Edit. This will bring up Group Policy Management Editor.
Navigate to Computer Configuration > Administrator Templates > Windows Components > File Explorer.
On the right pane, double-click the setting “Show hibernate in the power options menu” and set it to Enabled.
Enable or Disable Hibernate Mode using Group Policy
Ensure the GPO is linked to a OU or you may link it to entire domain to apply the settings for all computers. Wait for the GPO to refresh on the remote computers. Alternatively, you can force a GP Update through Command Prompt by running the command GPUpdate /force. The hibernate option show now show up on Power options menu.
To disable the hibernate mode in Windows 11, double-click the setting “Show hibernate in the power options menu” and set it to Disabled.
This article lists all the Windows 11 build numbers, Windows 11 version numbers, and release date details. The Windows 11 build numbers are frequently updated, and this article will also be updated frequently.
As per Microsoft, Windows 11 will have an annual feature update cadence. Windows 11 feature updates will be released in the second half of the calendar year. The new updates will come with 24 months of support for Home, Pro, Pro for Workstations, and Pro Education editions. For the Enterprise and Education editions, there are 36 months of support.
Microsoft has released two significant updates since the launch of Windows 11, namely 21H2 and 22H2. The newest version is 22H2, also referred to as the Windows 11 2022 update. Eligible devices should get the Windows 11 22H2 update via Windows Update.
Windows 11’s build number follows a standard format, which I will go into more detail about in one of the topics. If you’re seeking information on the Windows 11 version history, I’ve covered nearly all the updates in this article.
Windows 11 will be offered as a free upgrade to eligible Windows 10 devices using a phased and measured approach with a focus on quality. The latest version of Windows 11 is version 22H2, and the update is also offered to customers via Windows Update. Listed below are some guides that will help you upgrade to Windows 11 in production.
The build number shows the specific build of operating system that you are running. Every Windows operating system gets assigned with a unique build number. The build number of Windows 11 changes whenever there is a new version released.
For example, the Windows 11 versions 21H2 and 22H2 have the following build numbers.
Windows 11 Version 22H2 (original release) – The OS build number is 22621.
Windows 11 Version 21H2 (original release) – The OS build number is 22000.
There are many ways to find the build number of the Windows 11 OS, and this is the quickest method. Right-click on Start and select Run. In the Run box, type “winver” and press enter. This will bring up the About Windows pop-up, and here you can see the version and OS build of Windows 11.
For example, in the below screenshot, the “About Windows” shows Windows 11 version as 21H2 and OS build 22000.978. Click OK to close the window.
Windows 11 Versions | Windows 11 Build Numbers – About Windows 11
How to Find Windows 11 Version and Installed Edition
To find the Windows 11 version, build number and edition, perform these steps:
Click Start and type “About Your PC” in the search box and launch it.
On About your PC window, scroll-down and look for Windows Specifications.
Under Windows Specifications, you can find the Edition, Version, OS Build and installation date of Windows 11.
Windows 11 22H2 Build Number
Windows 11 Major Minor Build Rev Details
If you notice the Windows 11 build number, it is represented in a particular format. In this section, I will explain about the Windows 11 major, minor, build, and rev in a bit more detail. Let’s pick the Windows 11 22H2 build number 10.0.22621.521 as an example.
The build number of Windows 11 22H2 original release is 10.0.22621.521. The below table explains how a build number is composed of and the version details.
Name
Build Details
Major
10
Minor
0
Build
22621
Rev
521
Windows 11 Versions and Windows 11 Build Numbers Explained
Note: For every new version of Windows 11 released, the build number is incremented. This build number remains the same for that version however only the Rev value changes as the new updates released for that Windows 11 version. This means for Windows 11 22H2, the build number will remain the same which is “22621” whereas the Rev value is incremented with every update.
Windows 11 Servicing Timeline
Windows 11 will receive monthly quality updates, including security and non-security updates, and a yearly release of new versions. To continue receiving support from Microsoft, users should always install the most recent version before the current version is no longer supported.
Windows 11 Enterprise, Education, IoT Enterprise editions will have servicing timeline of 36 months from the release date. Whereas Windows 11 Pro, Home, Pro Education will have servicing timeline of 24 months from the actual release date.
The servicing timeline for Windows 11 version 22H2 is detailed below, along with the start and end dates for support.
Windows 11 22H2 Edition
Servicing Timeline
Date Available
Retirement Date
Windows 11 22H2 Enterprise Windows 11 22H2 Education Windows 11 22H2 IoT Enterprise
36 months from release date
Sep 20, 2022
Oct 14, 2025
Windows 11 22H2 Pro Windows 11 22H2 Pro Education Windows 11 22H2 Pro for Workstations Windows 11 22H2 Home
24 months from release date
Sep 20, 2022
Oct 8, 2024
Windows 11 22H2 Servicing Timeline
The servicing timeline for Windows 11 version 21H2 is detailed below, along with the start and end dates for support.
Windows 11 22H1 Edition
Servicing Timeline
Date Available
Retirement Date
Windows 11 21H2 Enterprise Windows 11 21H2 Education Windows 11 21H2 IoT Enterprise
36 months from release date
Oct 4, 2021
Oct 8, 2024
Windows 11 21H2 Pro Windows 11 21H2 Pro Education Windows 11 21H2 Pro for Workstations Windows 11 21H2 Home
24 months from release date
Oct 4, 2021
Oct 10, 2023
Windows 11 21H2 Servicing Timeline
Windows 11 Build Numbers and Windows 11 Versions
The below table lists the Windows 11 build numbers and Windows 11 version numbers (production release) along with the release dates. When new versions of Windows 11 are released, they are added to the table.
In this guide, I will show you how to deploy Dell SupportAssist using SCCM (ConfigMgr). We’ll get the latest version of the Dell SupportAssist tool, create an application in SCCM, and then deploy it to our computers.
According to Dell, the SupportAssist is an automated proactive and predictive support solution for computers and tablets. SupportAssist also evaluates the health of your servers, storage, and networking devices to eliminate downtime before it even starts.
When you purchase brand-new laptops and desktop computers from Dell, SupportAssist is already preinstalled. SupportAssist is installed on most Dell PCs with Windows 10 and Windows 11. You can find it by searching for “SupportAssist” in your Windows start menu. Home users can use the Dell SupportAssist tool to update drivers, including the system BIOS, and resolve problems.
Configuration Manager is the best choice for Dell SupportAssist deployment on multiple computers. You can deploy the Dell Support Assist to client computers and allows users to install it via Software Center. An added advantage of Dell SupportAssist deployment using SCCM is Dell provides .msi installer for application deployment for enterprises.
If you are using Configuration Manager to manage Dell laptops, you can use the application model to deploy Dell SupportAssist software to client computers using SCCM. The application can also be added to a task sequence, which lets you use the bare-metal deployment scenarios to install Dell SupportAssist on new laptops.
Let’s understand what exactly is the Dell SupportAssist tool and identify its features. The SupportAssist by Dell is the smart technology, available on your PC that will keep it running like new by removing viruses, detecting issues, optimizing settings and telling you when you need to make updates.
With SupportAssist tool, you can perform the following
Update your drivers and applications for peak PC performance
Remove virus and malware infested files before then can harm your system.
Scan your PCs hardware to find issues and deliver proactive and predictive support.
Clean files, tune performance, and adjust network settings to optimize speed, storage space and stability.
The Dell SupportAssist also has an OS Recovery environment that enables you to diagnose hardware issues, repair your computer, back up your files, or restore your computer to its factory state. The Dell Support Assist OS Recovery is only available on certain Dell laptops with a Microsoft Windows 10/11 operating system that was installed by Dell.
Download Dell SupportAssist MSI Installer
Dell provides the .msi installer for SupportAssist and the same installer can be used for deployment with SCCM. You can download the Dell SupportAssist .msi installer from the following direct download link. Note that this is an offline installer and will include all the installation files without having the system connect to internet to download further files.
Along with Dell SupportAssist msi installer, I recommend you to download a logo for the application. We will assign this logo to the Dell SupportAssist application in SCCM. Copy both the installer and logo to a separate folder on SCCM server or shared folder. We will reference the same folder when we create the Dell SupportAssist application in ConfigMgr.
Each MSI installer has a unique product code and this can be seen under the installer properties. Configuration Manager uses the product to detect if the Dell SupportAssist application already exists on system. If you are curious to know the detection method for Dell SupportAssist application, SCCM basically uses the MSI product code: {E0659C89-D276-4B77-A5EC-A8F2F042E78F} of the installer.
After you have created the Dell Support Assist application in SCCM, go to the Application deployment properties and switch to Detection Method tab. Here you can see the detection method used for Dell SupportAssist application. We see the MSI product code being used for the application detection.
Dell SupportAssist Detection Method
Create Dell SupportAssist Application in SCCM
Let’s create a new application for the Dell SupportAssist in SCCM.
Launch the Configuration Manager console.
Go to Software Library > Overview > Application Management.
Right-click Applications and select Create Application.
Create Dell SupportAssist Application in SCCM
On the General window, select Automatically detect information about this application from installation files. The application type should be Windows Installer (*.msi file) and specify the location of the Dell SupportAssist msi file. Click Next.
Create Dell SupportAssist Application in SCCM
With MSI installers, the Configuration Manager can import information such as product code, install commands, uninstall commands, detection methods etc. In the below screenshot, we see the product information has been populated from Dell SupportAssist MSI installer and imported into SCCM.
Application name: Dell SupportAssist
Publisher:
Software version:

Deployment type name: Dell SupportAssist - Windows Installer (*.msi file)
Product Code: {E0659C89-D276-4B77-A5EC-A8F2F042E78F}
Installation behavior: Install for system

Content location: \\corpcm\Sources\Applications\SupportAssist\
Number of files: 2
Content files:
dellSA_logo.jpg
SupportAssistx64-3.10.4.18.msi
Create Dell SupportAssist Application in SCCM
In the General Information tab, enter the basic information about the Dell Support Assist application. For example, you can specify the application name, publisher details, software version etc. The details that you specify here will be displayed to users when the Dell SupportAssist application is selected in Software Center.
The Configuration Manager also populates the silent installation command for Dell SupportAssist from the .msi installer. You may modify the existing command and add additional parameters supported for .msi installation.
Silent Command Line for Dell SupportAssist installation = msiexec /i "SupportAssistx64-3.10.4.18.msi" /q
Create Dell SupportAssist Application in SCCM
Review the Support Assist application settings on Summary window and click Next. On the Completion tab, click Close button to exit the create application wizard.
Create Dell SupportAssist Application in SCCM
This completes the steps to create application for Dell SupportAssist in SCCM. After this step, the application will appear in the Application node of Configuration Manager console.
Specify an Icon for Dell SupportAssist Application
Configuration Manager lets you specify a logo for Application via the Application Properties and this logo appears along with the application in Software Center. If you are looking to customize software center, use the following guide to customize software center appearance and branding. Assigning an application logo is not mandatory, but it helps users identify the application quickly in Software Center.
The newly created Dell SupportAssist application is located in Software Library\Overview\Application Management\Applications of Configuration Manager console. Right-click on Dell SupportAssist application and select Properties.
Specify an Icon for Dell SupportAssist Application
In the Application properties window, choose the Software Center tab. Click on Browse and select an icon for Dell SupportAssist and click Apply and OK.
Specify an Icon for Dell SupportAssist Application
Deploy Dell SupportAssist using SCCM | ConfigMgr
In this section, we will look at the steps to deploy the Dell SupportAssist using SCCM (ConfigMgr). The deploy software wizard contains steps where you can distribute the content to DP’s along with the application deployment.
When you perform Dell SupportAssist deployment using SCCM, you deploy it either to a device collection or user collection. Typically, applications are deployed to device collections, and we will use the same approach here. You can create device collections for Windows 10 and Windows 11 computers using the following guides.
Once the device collections are ready, you can deploy the application using the deploy software wizard. To deploy the Dell SupportAssist application, launch the Configuration Manager console. Navigate to Software Library\Overview\Application Management\Applications. Right-click Dell SupportAssist application and select Deploy.
Deploy Dell SupportAssist using SCCM
On the General page of Deploy Software Wizard, click Browse and select a device collection to which you want to deploy the Support Assist application. Click Next.
Deploy Dell SupportAssist using SCCM
On the Content page, click Add button and specify the distribution points to which you would like to distribute the Dell Support Assist application content. You may also select distribution point groups when you have numerous distribution points. Click Next to continue.
On the Scheduling tab, you can specify the schedule for the deployment. If you want to deploy the application as soon as possible, then don’t configure anything under Scheduling. Click Next.
Dell SupportAssist Deployment using SCCM
Specify the user experience settings for the application deployment. For user notifications, select the option “Display in Software Center and show all notifications“. Click Next to continue.
Deploy Dell SupportAssist using SCCM User Experience Settings
In the Alerts tab, click Next. Review all the Dell SupportAssist deployment settings on Summary tab and click Next. On the Completion window, click Close.
The Dell SupportAssist application is now distributed to the select distribution points and the client machines should now have the application listed in the Software Center. This completes the steps for Dell SupportAssist deployment with Configuration Manager.
Deploy Dell SupportAssist using SCCM Completion
Test Dell SupportAssist Deployment on Client Computers
After you have created the Dell SupportAssist application and deployed it to device collection, it’s time to test the deployment on devices. Log in to a client computer, and launch the Software center. Click on the Applications tab and select Dell SupportAssist application. To install the application, click the Install button.
Test Dell SupportAssist Deployment on Client Computers
The Dell Support Assist application is now downloaded from the local distribution point server for installation. The installation commands specified during the application creation are executed. You can monitor the application installation process by reviewing the AppEnforce.log located on the client computer.
To locate the AppEnforce.log file and other important files, refer to the SCCM Log files which contains all the log files for troubleshooting issues.
“Matched exit code 0 to a Success entry in the exit codes table” confirms that the Dell Support Assist application has been installed successfully on the computer. The uninstall command that we specified during application packaging should also work fine.
+++ Starting Install enforcement for App DT "Dell SupportAssist - Windows Installer (*.msi file)" ApplicationDeliveryType - ScopeId_67D9092A-81B2-464F-8F38-4D634303C416/DeploymentType_ccf9c1b2-8d31-4cab-87e9-56c700d64d52, Revision - 1, ContentPath - C:\Windows\ccmcache\2, Execution Context - System
    Performing detection of app deployment type Dell SupportAssist - Windows Installer (*.msi file)(ScopeId_67D9092A-81B2-464F-8F38-4D634303C416/DeploymentType_ccf9c1b2-8d31-4cab-87e9-56c700d64d52, revision 1) for system.
    Prepared working directory: C:\Windows\ccmcache\2
Found executable file msiexec with complete path C:\Windows\system32\msiexec.exe
    Prepared command line: "C:\Windows\system32\msiexec.exe" /i "SupportAssistx64-3.10.4.18.msi" /q /qn
Valid MSI Package path = C:\Windows\ccmcache\2\SupportAssistx64-3.10.4.18.msi
    Advertising MSI package [C:\Windows\ccmcache\2\SupportAssistx64-3.10.4.18.msi] to the system.
    Executing Command line: "C:\Windows\system32\msiexec.exe" /i "SupportAssistx64-3.10.4.18.msi" /q /qn with user context
    Working directory C:\Windows\ccmcache\2
    Post install behavior is BasedOnExitCode	AppEnforce
    Waiting for process 3896 to finish.  Timeout = 120 minutes
    Process 3896 terminated with exitcode: 0
    Looking for exit code 0 in exit codes table.
    Matched exit code 0 to a Success entry in exit codes table
Test Dell SupportAssist Deployment on Client Computers
This article explains how you can disable Cortana in Windows 11 using different methods. You can disable the Cortana in Windows 11 or even uninstall it if you don’t use it.
Cortana in a cloud-based assistant by Microsoft that assists users with voice commands. Cortana in Windows has a chat-based UI that gives you the ability to interact using typed or spoken natural language queries.
In the latest update to Cortana in Windows, you can search for documents and compose quick emails. You can also invoke the app using the wake word “Cortana.” Cortana can also launch Alexa app on Windows 10 (if it’s already installed).
Note that you must sign in with your Microsoft account to use Cortana app. To learn about Cortana in detail, refer to the Microsoft documentation on Cortana.
Here are some of the things you can do with Cortana in Windows 11:
Calendar and Schedule Assistance – Check your calendar, know the meeting schedule etc.
Meeting Help – Join Teams meetings, find what’s the next meeting is and with whom, book a meeting with your colleague in the organization etc.
Find out about people in your organization – Cortana can help you learn about people in your organization
Make lists and set reminders and alarms – You can ask Cortana to create a new list or add something to a list you already have
Launch Apps – With voice commands, the Cortana can launch the apps installed on your Windows. For example, you can launch Word app, Calculator etc.
Get definitions and quick answers
Get weather and news updates – You can get the weather information and new updates using Cortana. This is very similar to news and interests widget that offers a quick overview of key headlines and weather information relevant to you.
Cortana App in Windows 11
Why Disable Cortana in Windows 11?
If Cortana is so useful, then why disable it? The answer is not all the Windows users like Cortana because it’s not accurate all the time and the app consumes a lot of system resources.
In addition, most users can simply work without using Cortana in daily routine. If you open Microsoft Store and read the Cortana app reviews, the users have expressed concerns about this app. The Cortana app in Microsoft Store has an overall rating of 1.8/5 which doesn’t seem good.
Plus Cortana collects your personal information, search history, email information and stores it on cloud which for some users is not ok.
In Windows 11, Cortana is still present, but it’s no longer part of the first boot experience. However, in Windows 11, you can turn off Cortana if you don’t like it or even uninstall it completely.
There are multiple ways to disable Cortana in Windows 11. This article covers different methods to temporarily or permanently disable Cortana as well as fully uninstall Cortana from Windows 11.
To summarize, we will use the following methods to disable the Cortana in Windows 11:
Using Windows 11 Settings
Using Task Manager in Windows 11
Disable Cortana using Group Policy
Use PowerShell commands to disable Cortana
Intune or Microsoft Endpoint Manager
Configuration Manager
Method 1 – Turn off Cortana from Windows 11 Settings
You can turn off the Cortana from Windows 11 settings with following steps. Click Start and launch the Windows 11 Settings app. You can use the shortcut command Win+I to directly launch the settings app.
From the list of settings, select Apps and then select Apps & Features.
Turn off Cortana from Windows 11 Settings
On the Apps & Features window, you should find all the apps installed on Windows 11. From the App list, search for Cortana app. Once the Cortana app appears in the listing, click on the vertical dots and select Advanced Options.
Turn off Cortana from Windows 11 Settings
The advanced options for Cortana displays additional settings to manage the app. Under Runs at log-in, turn off the Cortana. By moving the slider to off, you disable Cortana in Windows 11.
Note that the above step temporarily disables the Cortana app in Windows 11. The user can manually turn on the Cortana app whenever required.
Turn off Cortana from Windows 11 Settings
Method 2 – Disable Cortana using Task Manager on Windows 11
In Windows 11, you can quickly disable Cortana using the task manager:
On Windows 11, use the shortcut keys Ctrl+Shift+Esc to launch the task manager.
When the task manager opens, click the Startup tab.
From the list of start up apps, click the Cortana app and select Disable button.
You may also right-click Cortana and choose the Disable option.
Disable Cortana using Task Manager on Windows 11
Method 3 – Disable the Cortana from Registry Editor
You can permanently disable Cortana in Windows 11 by editing the registry. Before you modify the registry, either create a system restore point or backup the entire registry.
Launch the Registry editor on Windows 11 by running the command regedit. Once the registry editor opens, go to the following registry path.
If you don’t find the Windows Search key, you must create a new key. Let’s start by creating a new key under Windows and name it as Windows Search.
Right click Windows Search key and select New > DWORD (32-bit) Value.
Disable Cortana in Windows 11 from Registry Editor
Enter the value name as AllowCortana and the value data is 0. By setting the AllowCortana value to 0, you disable Cortana in Windows 11. Click OK to save the changes.
Disable Cortana in Windows 11 from Registry Editor
After making the above changes to registry, restart Windows 11 PC. Log in to Windows 11 PC and launch the Cortana app. You should see the following message “Cortana is disabled. To use Cortana you need to get permission from your administrator“. This confirms the Cortana app is disabled on Windows 11.
Cortana is disabled
Method 4 – Disable Cortana using Group Policy (GPO)
You can disable Cortana permanently in Windows 11 using Group Policy. The Group Policy method is useful when you want to disable the Cortana access on domain joined Windows 11 PCs.
When you want to disable Cortana on multiple Windows 11 computers that are joined to an Active Directory domain, the group policy is the best option.
Before you create a GPO to disable Cortana, have few devices for testing purpose. It is not recommended deploying a GPO directly to production servers and workstations.
Let’s create a new GPO to disable Cortana in Windows 11. Log in to a domain controller or a member server installed with GPMC. Launch the Group Policy Management Tools from Server Manager > Tools.
Once the Group Policy Management console is launched, expand the domain and right-click Group Policy Objects and select New.
Note: We are going to create a new GPO which should then be linked to an OU later.
Disable Cortana in Windows 11 using Group Policy
Specify the GPO name as Disable Cortana or something similar and click OK.
Disable Cortana in Windows 11 using Group Policy
In the Group Policy Management editor, navigate to following settings Computer Configuration > Administrative Templates > Windows Components > Search.
From the list of policy settings, right-click the setting named “Allow Cortana” and select Edit. The Allow Cortana policy settings include:
This policy setting specifies whether Cortana is allowed on the device.
If you enable or don’t configure this setting, Cortana will be allowed on the device. If you disable this setting, Cortana will be turned off.
When Cortana is off, users will still be able to use search to find things on the device.
Set Allow Cortana to Disabled. With the selected setting, you disable the Cortana on Windows 11. Click Apply and OK.
Disable Cortana in Windows 11 using Group Policy
After following the above steps, in the GPMC console, right-click the OU that you want to target the GPO and select Link an existing GPO and select the Disable Cortana GPO.
Once you have linked the GPO to a OU or to an entire domain, the computers will download the policy based on the Group Policy refresh interval. The Group Policy refresh interval for computers policy lets you specify how much the actual update interval varies.
The above PowerShell cmd uninstalls the Cortana from Windows 11 for all users.
Uninstall Cortana in Windows 11 using PowerShell
Note: You don’t have to reboot the computer after uninstalling Cortana.
Method 6 – Disable Cortana using Intune (MEM)
Using Intune, you can easily disable Cortana on Windows 11 managed PCs using Configuration Profiles. The Intune Catalog settings lets you define the settings to disable the Cortana access on Windows 10 and Windows 11 devices.
Let’s see how to disable Cortana using Intune. First sign-in to the Intune Portal (Microsoft Endpoint Manager admin center). Go to Devices > Windows > Configuration Profiles. Select Create Profile.
Disable Cortana using Intune – Create Configuration Profile
When you create a profile in Intune, you specify the Platform and Profile Type. In this example, select the Platform as Windows 10 and later and Profile Type as Settings Catalog. Click Create.
Disable Cortana using Intune – Create Configuration Profile
On Create Profile Basics tab in Intune portal, enter the name of the profile to “Disable Cortana Access” or “Turn off Cortana“. Enter a brief description about the profile and click Next.
Create Profile – Name
On the Configuration Settings tab, we will use settings catalog in Intune to define the settings to turn off Cortana. Select +Add Settings.
Create Profile – Configuration Settings
The Settings picker window gives you an option to search for the correct keywords or terms related to settings. Enter the search term as “Cortana” and click Search button.
From the list of search results, click the Experience category and now select the Setting name – Allow Cortana.
Settings Picker – Cortana Experience
Allow Cortana – Specifies whether Cortana is allowed on the device. If you enable or don’t configure this setting, Cortana is allowed on the device. If you disable this setting, Cortana is turned off. When Cortana is off, users will still be able to use search to find items on the device.
By default, the Allow Cortana setting is set to “Allow“. To disable the Cortana on Windows 10 and Windows 11 devices, set the Allow Cortana setting to “Block“. By setting the Allow Cortana to Block, you disable the Cortana on endpoints.
Click Next to continue.
Disable Cortana using Intune
On the Assignments tab, click Add Groups to include the group of devices on which you want to disable Cortana. Click Next to continue.
Turn Off Cortana Access – Assignments
Scope tags are optional, but you may define them if required. I am going to skip and click Next.
Turn Off Cortana Access – Scope Tags
On the Review + Create tab, take a final look at the settings that you defined so far. If it’s all good, click Create.
Turn Off Cortana Access – Review and Create
After you create the policy, a notification will appear automatically in the top right-hand corner with a message. Policy Created – “Disable Configure Access” created successfully. The policy is also shown in the Configuration profiles list along with other profiles.
After you deploy the policy, the assigned groups will receive the profile settings once the devices check-in with the Intune service.
To monitor the Intune policy assignment, from the list of Configuration Profiles, select the policy and here you can check the device and user check in status. If you click View Report, additional details are displayed.
Monitor Intune Policy Assignment
Once the devices receive the policy settings from Intune, log in to one of the devices and launch Cortana. Now you should see Cortana is disabled message. This confirms that you can disable the Cortana access using Intune on your Windows devices.
Cortana is disabled
How To Reinstall Cortana App in Windows 11
If you have uninstalled Cortana app from Windows 11 using any of the above methods and want to reinstall it, the process is simple.
To reinstall the Cortana app, launch the Microsoft Store app in Windows 11. Search for Cortana app in Microsoft Store and click Get. The latest Cortana app will be downloaded and installed on the Windows 11 PC.
How To Reinstall Cortana App in Windows 11
Conclusion
Disabling the Cortana from Windows 11 is optional. If you are not going to use Cortana app, you can easily disable it with any of the methods covered in this post.
Microsoft doesn’t want you to disable Cortana. You used to be able to turn off Cortana in Windows 10, but Microsoft removed that easy toggle switch in the Anniversary Update. But you can still disable Cortana via a registry hack or group policy setting. This transforms the Cortana box into a “Search Windows” tool for local application and file searches.
Cortana has become increasingly restrictive since Windows 10’s release. It was previously updated to ignore your default web browser. Cortana now always launches the Microsoft Edge browser and only uses Bing when you search. If that sounds like something you wouldn’t want to use, here’s how to turn it off.
Home Users: Disable Cortana via the Registry
If you have Windows 10 Home, you’ll have to edit the Windows Registry to make these changes. You can also do it this way if you have Windows 10 Professional or Enterprise, but just feel more comfortable working in the Registry as opposed to Group Policy Editor. (If you have Pro or Enterprise, though, we recommend using the easier Group Policy Editor, as described in the next section.
Standard warning: Registry Editor is a powerful tool and misusing it can render your system unstable or even inoperable. This is a pretty simple hack and as long as you stick to the instructions, you shouldn’t have any problems. That said, if you’ve never worked with it before, consider reading about how to use the Registry Editor before you get started. And definitely back up the Registry (and your computer!) before making changes.
You should also make a System Restore point before continuing. Windows will probably do this automatically when you install the Anniversary Update, but it couldn’t hurt to make one manually–that way, if something goes wrong, you can always roll back.
Then, open the Registry Editor by pressing Windows+R on your keyboard, typing “regedit” into the box, and pressing Enter.
Navigate to the following key in the left sidebar:
If you don’t see a “Windows Search” key (folder) below the Windows folder, right-click the Windows folder and select New > Key. Name it “Windows Search”.
Right-click the “Windows Search” key (folder) in the left pane and select New > DWORD (32-bit) Value.
Name the value “AllowCortana”. Double-click it and set the value to “0”.
You can now close the registry editor. You’ll have to sign out and sign back in or restart your computer before the change takes effect.
To undo your change and restore Cortana in the future, you can just return here, locate the “AllowCortana” value, and delete it or set it to “1”.
Download Our One-Click Registry Hack
Rather than editing the registry yourself, you can download our Disable Cortana registry hack. Just open the downloaded .zip file, double-click the “Disable Cortana.reg” file, and agree to add the information to your registry. We’ve also included an “Enable Cortana.reg” file if you’d like to undo the change and re-enable Cortana later.
You’ll have to sign out and sign back in–or restart your computer–before the change will take effect.
These .reg files just change the same registry settings we outlined above. If you’d like to see what this or any other .reg file will do before you run it, you can right-click the file .reg and select “Edit” to open it in Notepad. You can easily make your own Registry hacks.
Pro and Enterprise Users: Disable Cortana via Group Policy
If you’re using Windows 10 Professional or Enterprise, the easiest way to disable Cortana is by using the Local Group Policy Editor. It’s a pretty powerful tool, so if you’ve never used it before, it’s worth taking some time to learn what it can do. Also, if you’re on a company network, do everyone a favor and check with your admin first. If your work computer is part of a domain, it’s also likely that it’s part of a domain group policy that will supersede the local group policy, anyway.
You should also make a System Restore point before continuing. Windows will probably do this automatically when you install the Anniversary Update, but it couldn’t hurt to make one manually–that way, if something goes wrong, you can always roll back.
First, launch the group policy editor by pressing Windows + R, typing “gpedit.msc” into the box, and pressing Enter.
Navigate to Computer Configuration > Administrative Templates > Windows Components > Search.
Locate the “Allow Cortana” setting in the right pane and double-click it.
Set the Allow Cortana option to “Disabled” and then click “OK”.
You can now close the group policy editor. You’ll have to sign out and sign back in–or restart your PC–for this change to take effect.
To re-enable Cortana, return here, double-click the “Enable Cortana” setting, and change it to “Not Configured” or “Enabled”.
By default, only members of the Domain Admins group have the remote RDP access to the Active Directory domain controllers‘ desktop. In this article we’ll show how to grant RDP access to domain controllers for non-admin user accounts without granting administrative privileges.
Many of you can quite reasonably ask: why would ordinary domain users should have access to the DC desktop? Indeed, in small or middle size infrastructures, when several administrators with the privileges of domain admins maintain them, you’ll hardly need this. In most cases, delegating some administrative permissions in Active Directory or using PowerShell Just Enough Administration (JEA) is sufficient.
However, in large corporate networks maintained by many administrators, it may become necessary to grant RDP access to the DC (usually to branch office DC’s or RODC) for different server admin groups, monitoring team, on-duty administrators, or other technical staffs. Also, from time to time some of the third-party services, not managed by the domain administrators, are deployed on the DC, and there’s a need to maintain these services.
Tip. Microsoft doesn’t recommend to install the Active Directory Domain Services and Remote Desktop Service role (terminal server) on a single server. If there is only one physical server, on which you want to deploy both DC and RDS, you’d better use virtualization, since Microsoft virtualization licensing policy allows you to run two virtual servers under the same Windows Server Standard license.
To Sign in Remotely, You Need the Rights to Sign in through Remote Desktop Services
After the server has been promoted to the domain controller, you cannot manage local users and groups from the Computer Management mmc snap-in. When you try to open Local Users and Groups (lusrmgr.msc) console, the following error appears:
The computer xxx is a domain controller. This snip-in cannot be used on a domain controller. Domain accounts are managed with the Active Directory Users and Computers snap-in.
As you can see, there are no local groups on the domain controller. Instead of the local group Remote Desktop Users, the DC uses the built-in domain group Remote Desktop Users (located in the Builtin container). You can manage this group from the ADUC console or from the command prompt on the DC.
Display the members of the domain group Remote Desktop Users on the domain controller using the command:
net localgroup "Remote Desktop Users"
As you can see, it is empty. Add a domain user it-pro to it (in our example, it-pro is a regular domain user without administrative privileges):
net localgroup "Remote Desktop Users" /add corp\it-pro
Make sure that the user is added to this group:
net localgroup "Remote Desktop Users"
You can also verify that the user is now a member of the Remote Desktop Users domain group using the ADUC (dsa.msc) snap-in.
However, even after that, a user still cannot connect to the DC via Remote Desktop with the error:
To sign in remotely, you need the right to sign in through Remote Desktop Services. By default members of the Administrators group have this right. If the group you’re in does not have the right, or if the right has been removed from the Administrators group, you need to be granted the right manually.
Group Policy: Allow Log on through Remote Desktop Services
To allow a domain user or group a remote RDP connection to Windows, you must grant it the SeRemoteInteractiveLogonRight privileges. By default, only members of the Administrators group have this right. You can grant this permission using the Allow log on through Remote Desktop Services policy.
In Windows 2003 and older this policy is called Allow log on through terminal services.
To allow remote connection to the domain controllers for members of the Remote Desktop Users group you need to change the settings of this policy on your domain controller:
Launch the Local Group Policy Editor (gpedit.msc);
Go to the GPO section Computer Configuration -> Windows settings -> Security Settings -> Local policies -> User Rights Assignment;
Find the policy Allow log on through Remote Desktop Services;After the server is promoted to the DC, only the Administrators group (these are Domain Admins) remains in this local policy.
Edit the policy, add the domain group Remote Desktop Users (like this: domainname\Remote Desktop Users), or directly the domain user, or a group (domain\CA_Server_Admins) to it;
Note that the group that you added to the Allow log on through Remote Desktop Services policy should not be present in the “Deny log on through Remote Desktop Services” policy , because it has a higher priority (check the article Restricting Network Access under local accounts). In addition, if you are restricting the list of computers on which users can log on, you need to add the DC name to the properties of the AD account (LogonWorkstations user attribute).
Note. To allow a user to log on to the DC locally (via the server console), you must add the account or group to the policy “Allow log on locally”. By default, this permission is allowed for the following domain groups:
Backup Operators
Administrators
Print Operators
Server Operators
Account Operators
It is better to create a new security group in the domain, for example, AllowLogonDC and add user accounts to it that need remote access to the DC. If you want to allow access to all AD domain controllers at once, instead of editing of the Local Policy on each DC, it’s better to add a the user group to the Default Domain Controllers Policy using the GPMC.msc console (change the policy settings in the same section: Computer Configuration\Windows Settings\Security Settings\Local Policies\User Rights Assignment -> Allow log on through Remote Desktop Services).
Warning. If you change the Default Domain Controllers Policy, don’t forget to add the domain/enterprise administrator groups to the policy Allow log on through Remote Desktop Services, otherwise they will lose remote access to the DCs.
Now the users (groups) you added to the policy will be able to connect to the AD domain controllers via RDP.
If you need to grant non-administrator users the permissions to start/stop certain services on a DC, use the following guide.
The Requested RDP Session Access is Denied
In some cases, when connecting via RDP to a domain controller, an error may appear:
The requested session access is denied.
If you are connecting to the DC under a non-admin user account, this could be due to two problems:
You are trying to connect to the server console (using the mstsc /admin mode). This connection mode is only allowed for administrators. Try to connect to the server using mstsc.exe client in normal RDP mode (without /admin option);
The server may already have two active RDP sessions (by default, you can’t use more than two simultaneously RDP sessions on Windows Server without RDS role). You cannot log off other users without administrator permissions. You need to wait for the administrators to release one of the sessions.
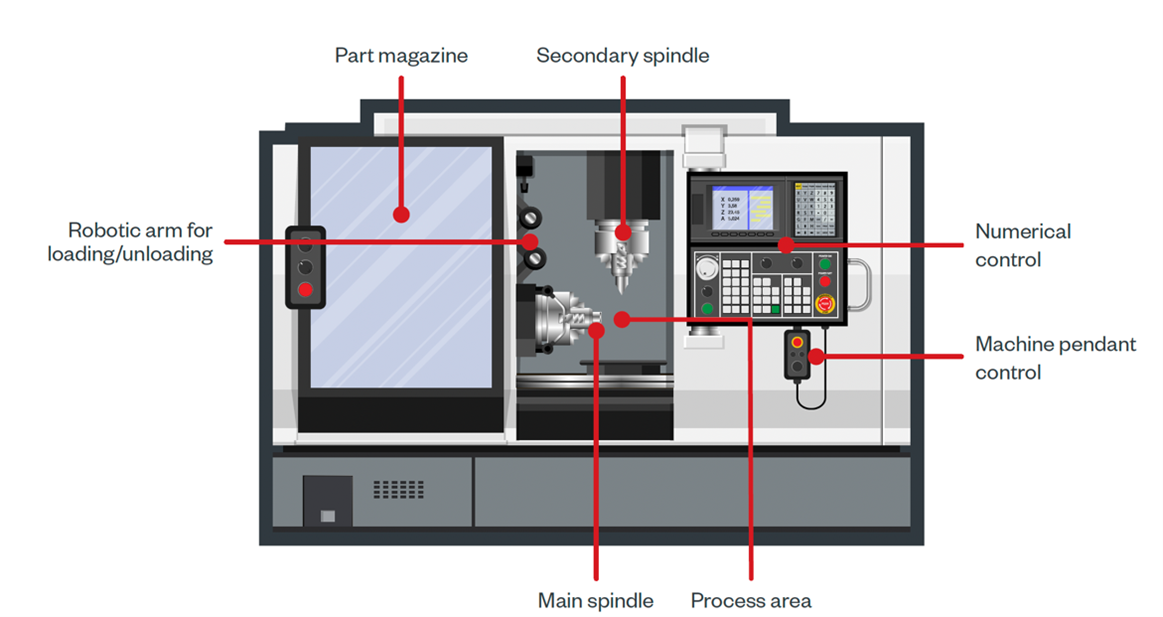
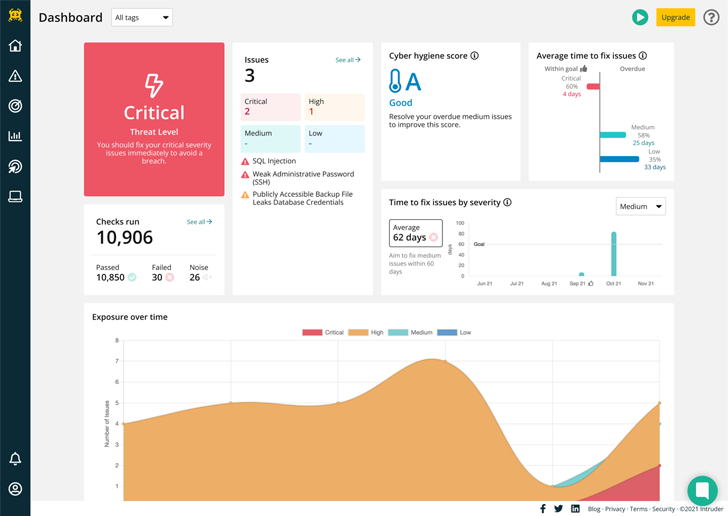
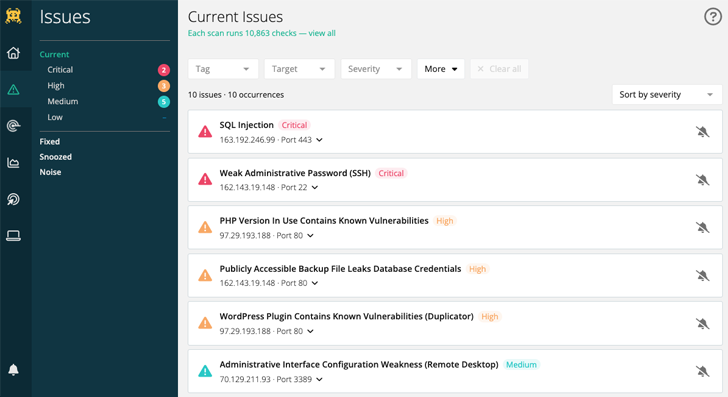
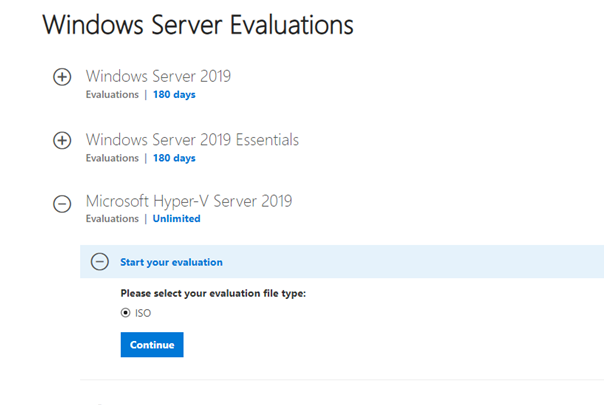

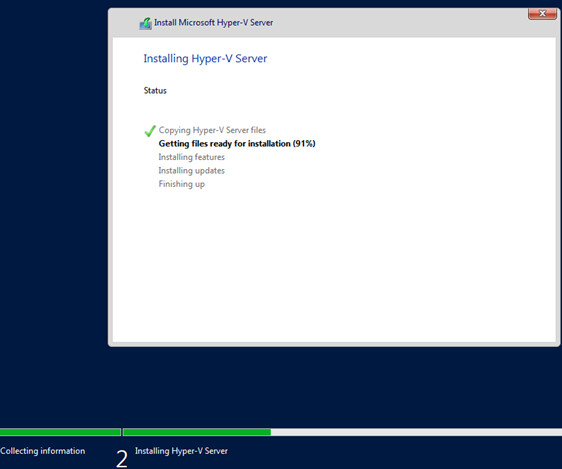


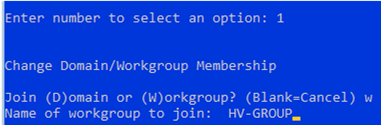
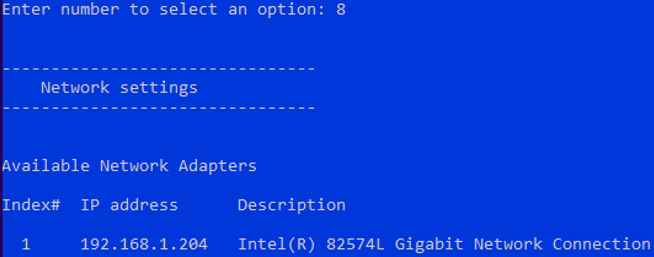
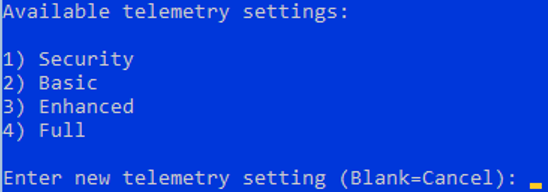
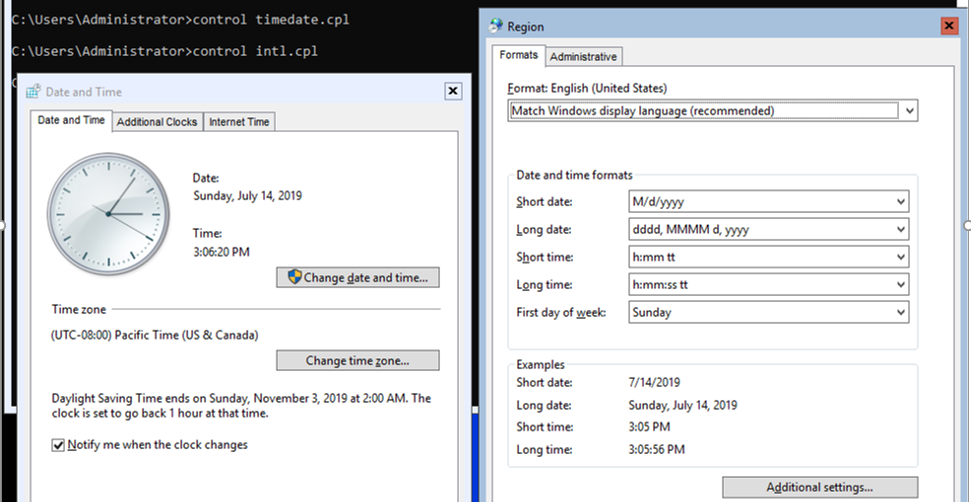

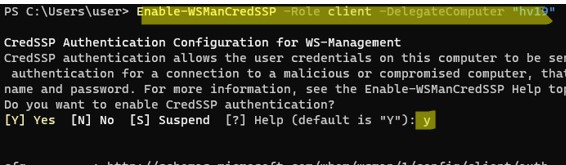
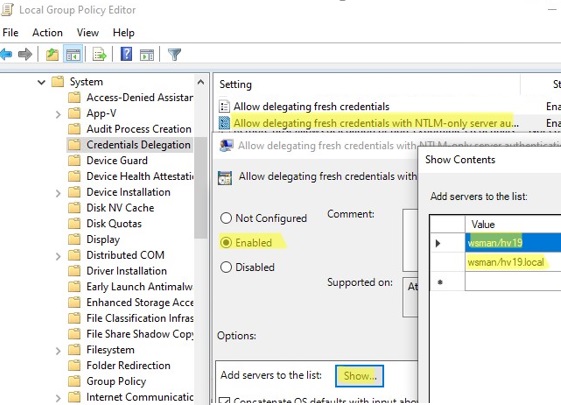
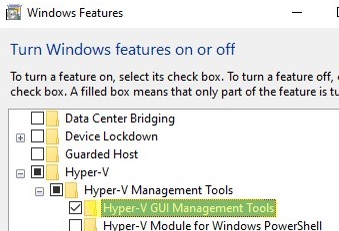
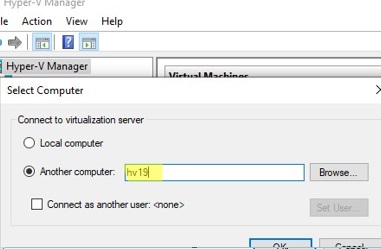
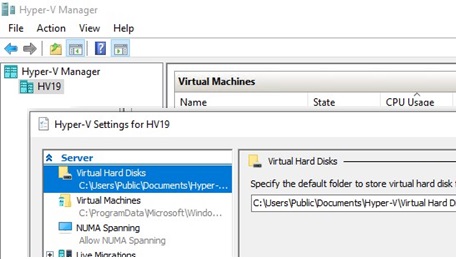
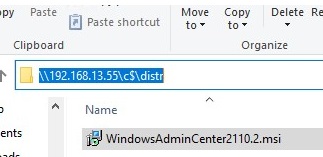
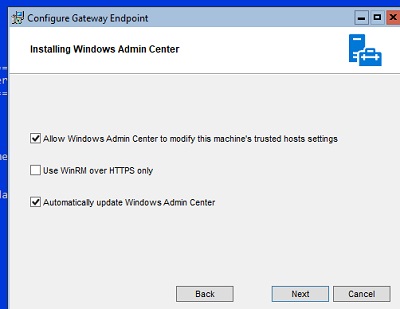
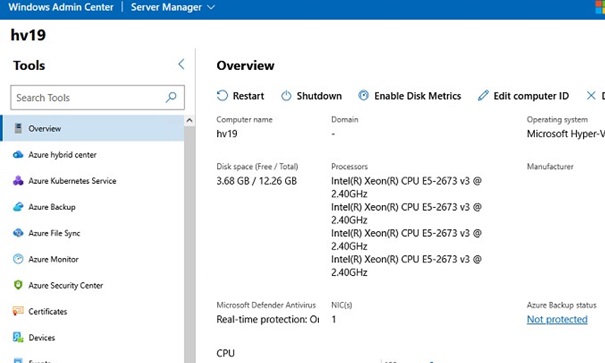
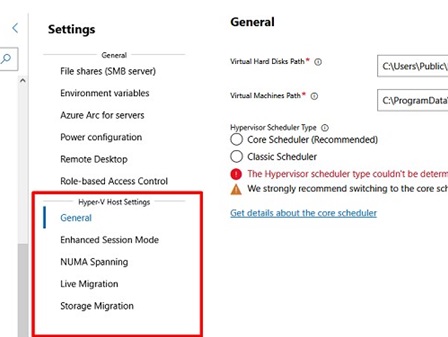
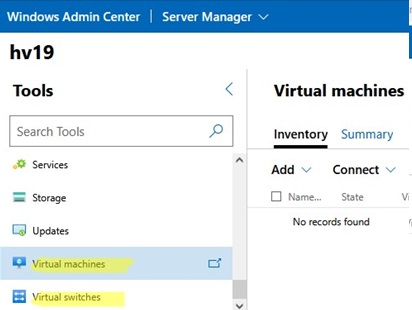

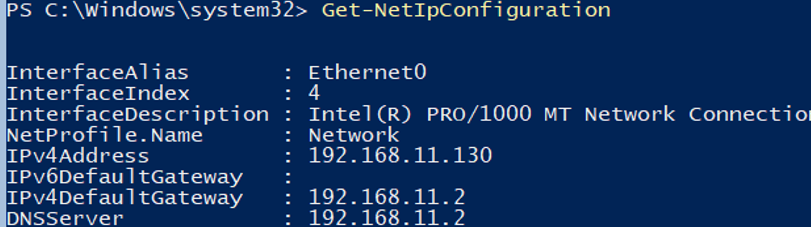
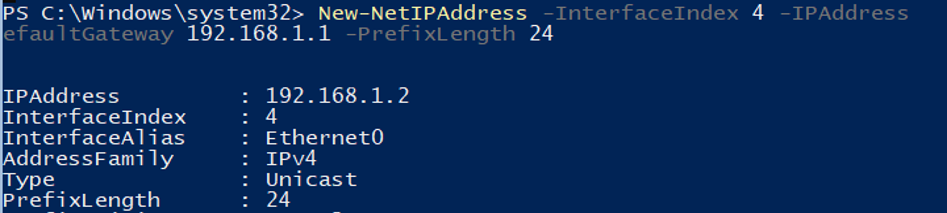
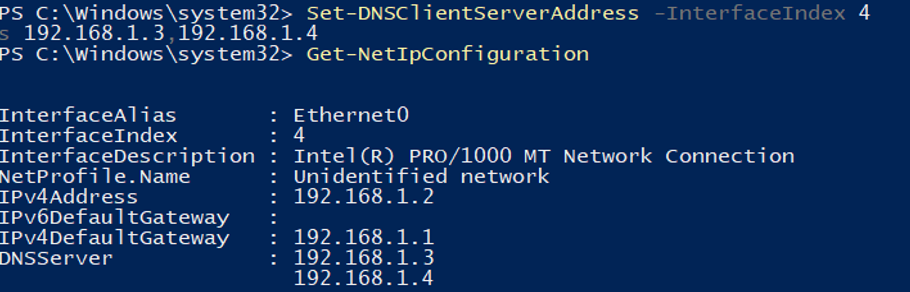


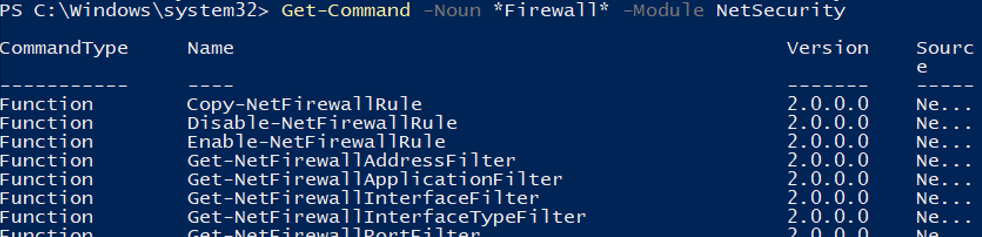


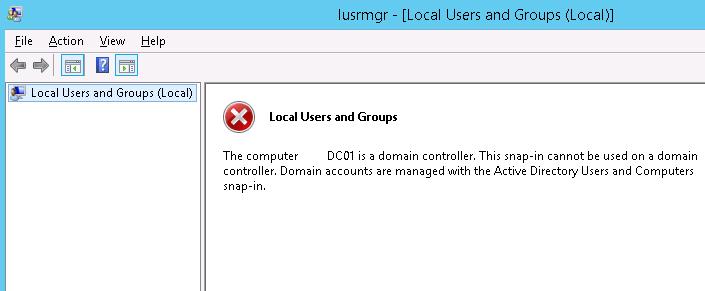

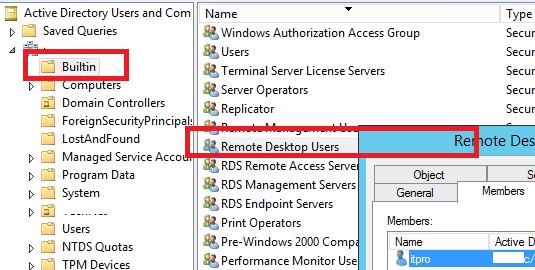

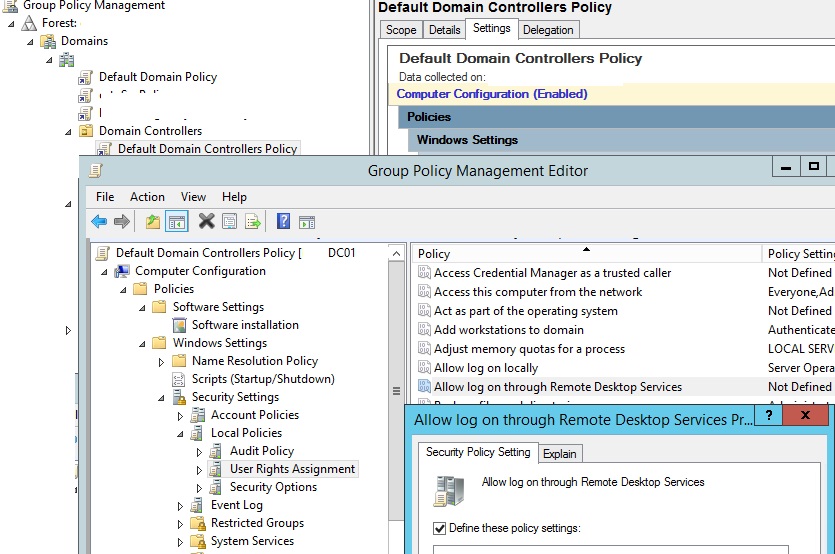

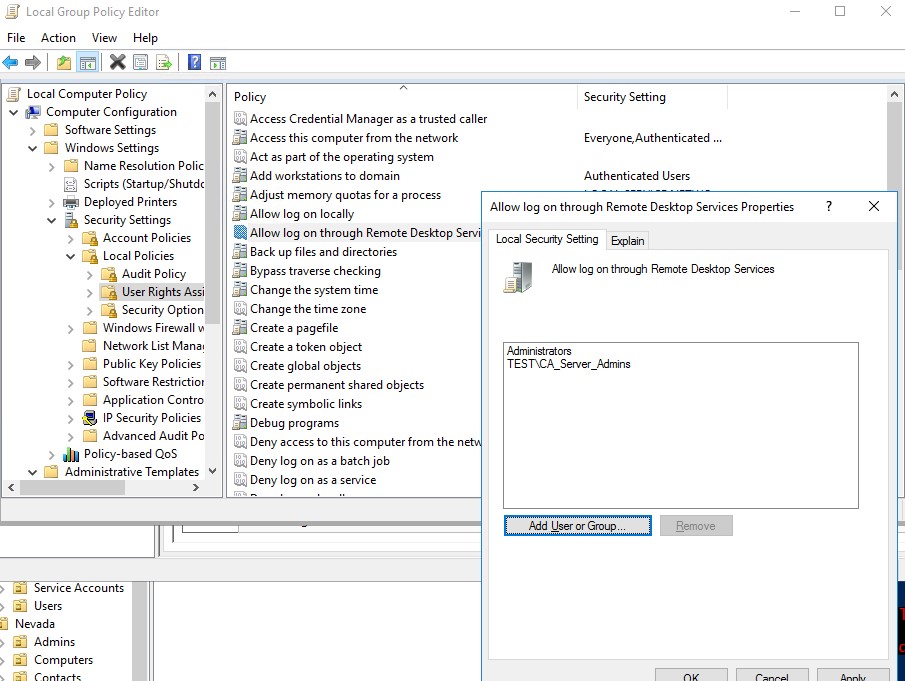