Microsoft: New malware uses Windows bug to hide scheduled tasks

Microsoft has discovered a new malware used by the Chinese-backed Hafnium hacking group to maintain persistence on compromised Windows systems by creating and hiding scheduled tasks.

The Hafnium threat group has previously targeted US defense companies, think tanks, and researchers in cyberespionage attacks.

It is also one of the state-sponsored groups linked by Microsoft to last year’s global scale exploitation of the ProxyLogon zero-day flaws impacting all supported Microsoft Exchange versions.

Persistence via Windows registry value removal

“As Microsoft continues to track the high-priority state-sponsored threat actor HAFNIUM, new activity has been uncovered that leverages unpatched zero-day vulnerabilities as initial vectors,” the Microsoft Detection and Response Team (DART) said.

“Further investigation reveals forensic artifacts of the usage of Impacket tooling for lateral movement and execution and the discovery of a defense evasion malware called Tarrask that creates ‘hidden’ scheduled tasks, and subsequent actions to remove the task attributes, to conceal the scheduled tasks from traditional means of identification.”

This hacking tool, dubbed Tarrask, uses a previously unknown Windows bug to hide them from “schtasks /query” and Task Scheduler by deleting the associated Security Descriptor registry value.

The threat group used these “hidden” scheduled tasks to maintain access to the hacked devices even after reboots by re-establishing dropped connections to command-and-control (C2) infrastructure.

While the Hafnium operators could have removed all on-disk artifacts, including all registry keys and the XML file added to the system folder to delete all traces of their malicious activity, it would have removed persistence across restarts.

Deleting Security Descriptor to hide a scheduled task
Deleting Security Descriptor to hide a scheduled task (Microsoft)

How to defend against Tarrask attacks

The “hidden” tasks can only be found upon closer manual inspection of the Windows Registry if you look for scheduled tasks without an SD (security descriptor) Value within their Task Key.

Admins can also enable the Security.evtx and the Microsoft-Windows-TaskScheduler/Operational.evtx logs to check for key events linked to tasks “hidden” using Tarrask malware.

Microsoft also recommends enabling logging for ‘TaskOperational’ within the Microsoft-Windows-TaskScheduler/Operational Task Scheduler log and monitoring for outbound connections from critical Tier 0 and Tier 1 assets.

“The threat actors in this campaign used hidden scheduled tasks to maintain access to critical assets exposed to the internet by regularly re-establishing outbound communications with C&C infrastructure,” DART added.

“We recognize that scheduled tasks are an effective tool for adversaries to automate certain tasks while achieving persistence, which brings us to raising awareness about this oft-overlooked technique.”

Source :
https://www.bleepingcomputer.com/news/security/microsoft-new-malware-uses-windows-bug-to-hide-scheduled-tasks/

Fix the ‘This PC can’t run Windows 11’ Error: How to enable TPM and Secure Boot

Tried to upgrade your PC to Windows 11, but run into the dreaded ‘This PC can’t run Windows 11’ error message? Don’t give up, it could be because your system doesn’t have two security settings turned on: Secure Boot and TPM 2.0. 

Trend Micro Windows 11 Upgrade Helper checks eight aspects of your computer, and perhaps most crucially, which TPM version it is running. Windows 11 requires TPM 2.0, so if your PC is not currently running or is not capable of running TPM 2.0, Windows 11 Upgrade Helper will let you know.Get Windows 11 Upgrade Helper

What are TPM and Secure Boot?

Trusted Platform Module (TPM) is a technology designed to provide hardware-based, security-related functions. A TPM chip is a secure crypto-processor that is designed to carry out cryptographic operations. The chip includes multiple physical security mechanisms to make it tamper-resistant. Malicious software isn’t able to tamper with the security functions of the TPM, either.

Secure Boot is a feature from the latest Unified Extensible Firmware Interface (UEFI). It offers another layer of protection against potential malware infections. It can detect when boot loaders or key operating system files are being tampered with by malware and actively block them before they can infect the system. Both TPM and Secure Boot offer unique ways of strengthening the protection of Windows 11.

Is my device capable of TPM 2.0 and Secure Boot?

To check if your device has Secure Boot, you can follow these steps:
1. In the Windows search box, type “System Information” and open the System Information app.

Fix the 'This PC can't run Windows 11' Error: How to enable TPM and Secure Boot

2. Select System Summary, and in the panel on the right side, look for “Secure Boot State”.

Fix the 'This PC can't run Windows 11' Error: How to enable TPM and Secure Boot

3. The value indicates the status of Secure Boot. “On” means it is turned on, “Off” means it is disabled, and “Unsupported” means your hardware does not support Secure Boot.

To check if your device has TPM, follow the steps below:

1. In the Windows search box, type “tpm.msc” and click Open.

Fix the 'This PC can't run Windows 11' Error: How to enable TPM and Secure Boot

2. Under Status, if you see “The TPM is ready for use”, you know that the TPM is present and available. If you see the message “Compatible TPM cannot be found”, it means that either your computer cannot find the TPM or that it has been disabled in the BIOS or UEFI.

Fix the 'This PC can't run Windows 11' Error: How to enable TPM and Secure Boot

You can also check if your device is using TPM 2.0 through Device Manager. Here’s how to do so:

1. Right-click on the Windows Start menu icon located in the lower left of your screen, then select Device Manager.

Fix the 'This PC can't run Windows 11' Error: How to enable TPM and Secure Boot

2. Select Security Devices from the list and it will show you what TPM chip you have. If it says Trusted Platform Module 2.0, you are good to go.

Fix the 'This PC can't run Windows 11' Error: How to enable TPM and Secure Boot

How to enable TPM and Secure Boot

To enable TPM and Secure Boot, you need to restart your computer to access the BIOS settings. After restarting, at the boot screen, press your computer’s BIOS access key. The most common BIOS access keys are DEL and F2. Here’s a reference for popular PC and motherboard brands and their BIOS access keys:

Fix the 'This PC can't run Windows 11' Error: How to enable TPM and Secure Boot

In the example below, we show you how to enable TPM on an ASUS TUF Gaming Z490-PLUS [WI-FI] motherboard, but the instructions will almost certainly differ depending on which brand of PC or motherboard you have.

1. At the UEFI BIOS Utility screen, press F7 to access Advanced Mode.

Fix the 'This PC can't run Windows 11' Error: How to enable TPM and Secure Boot

2. Click the “Advanced” tab and select “PCH-FW Configuration”.

Fix the 'This PC can't run Windows 11' Error: How to enable TPM and Secure Boot

3. Alongside “TPM Device Selection”, select “Enable Firmware TPM”.

Fix the 'This PC can't run Windows 11' Error: How to enable TPM and Secure Boot

To enable Secure Boot, in the “Boot” tab, follow the steps below:

1. Select “Secure Boot”.

Fix the 'This PC can't run Windows 11' Error: How to enable TPM and Secure Boot

2. Select “OS Type” and beside it, select “Windows UEFI Mode”.

Fix the 'This PC can't run Windows 11' Error: How to enable TPM and Secure Boot

3. Go to the “Exit” tab to save the changes and restart the computer. TPM and Secure Boot will be enabled after the restart.

What can I do if I don’t have a TPM chip?

Your device may have a TPM chip, but you need to update your BIOS to have access to it. Please contact your PC or motherboard manufacturer to learn more about how to enable TPM on your device.

You could also buy a TPM module online, but you must know which TPM module is compatible with your motherboard. You also need to install the module onto the motherboard, which might not be an easy task — especially if you don’t have any experience in working with motherboards. If you would like to go down this route, we advise that you contact a technician or take it to a local PC repair shop.

Alternatively, you could upgrade to a new computer.

What’s the most convenient way to check if I can upgrade to Windows 11?

There are tools created that can help you assess if your computer is ready for Windows 11. One of those tools is Trend Micro Windows 11 Upgrade Helper .

Fix the 'This PC can't run Windows 11' Error: How to enable TPM and Secure Boot

Trend Micro Windows 11 Upgrade Helper can check if your computer meets all the requirements for Windows 11. You can talk to Premium Support Service if you need assistance in making your computer Windows 11 ready, too.Get Windows 11 Upgrade Helper

Source :
https://news.trendmicro.com/2021/10/04/fix-the-this-pc-cant-run-windows-11-error-how-to-enable-tpm-and-secure-boot/

How to Remove Bing on Chrome, Firefox, and Edge

Users have been complaining that the search engine, Bing, loads as the default instead of Google. Annoying, but don’t fret! We’ve put together a simple guide on how to get rid of Bing and restore your preferred search engine.

On Google Chrome

1. Open Google Chrome and click the 3-dots menu.
2. Select More Tools, then choose Extensions.

3. Remove any Bing Extensions you see.
4. Go back to the Menu, then select Settings.

5. Look for Search Engine and click it.

6. On the right side, choose your preferred Search Engine (Google, Yahoo, DuckDuckGo or Ecosia).
7. Restart Google Chrome.  If it still uses Bing as your search engine, we suggest resetting or reinstalling Chrome.

On Mozilla Firefox

1. Open Mozilla Firefox and click the hamburger menu (3 horizontal lines).
2. Select Add-ons and themes.

3. Choose Extensions on the left side, then remove any Bing extensions you see.

4. Go back to the Menu, then select Settings.
5. On the left side, click Search and look for the Default Search Engine section on the right side.

6. Choose your preferred Search Engine (Google, Amazon.com, DuckDuckGo or Wikipedia).
7. Restart Firefox. If it still uses Bing as your search engine, we suggest resetting or reinstalling Firefox.

On Microsoft Edge

1. Open Microsoft Edge.
2. Click the 3-dots menu on the upper right corner, then select Settings.

3. Select View Advance Settings and click the Change search engine button.

4. Choose your preferred Search Engine then click the Set as default button.

We hope this short guide has helped you get things back to normal! If you’ve found it a useful article, please do SHARE with friends and family.

Source :
https://news.trendmicro.com/2021/11/17/how-to-remove-bing-on-chrome-firefox-and-edge/

Deep Dive on Microsoft 365 Defender

The best way to protect a business of any size today against cyber risks is with an integrated suite of tools. Microsoft 365 Defender is one such service that we’ll look at in this article.

For many years the conventional wisdom, especially in larger organizations, was to buy best of breed solutions for each area. So, you ended up with the “best” (defining the “best” solution is hard, and changes quite quickly) email hygiene solution, the best anti-malware solution, the best firewall etc. And because none of them natively integrated with each other, and manual integration is hard and time-consuming, you ended up with multiple consoles and multiple data silos where low fidelity signals were ignored, while they could actually have told you about a breach in progress if you’d been able to correlate those individual low severity signals between each of the systems. A way to solve this issue is via Security Orchestration and Automation Response (SOAR) solutions that act as a “glue” between each product. Another is to buy an already integrated suite of tools such as Microsoft 365 Defender. The promise is eXtended Detection and Response (XDR), which is an extension of Endpoint Detection and Response (EDR) to indicate that not only endpoints but all systems are included in the protection and response.

Microsoft 365 Defender Main Dashboard

Microsoft 365 Defender Main Dashboard

Name changes

In late 2020, Microsoft changed the names of nearly all of their security products so if you’re used to hearing about Advanced Threat Protection (ATP) or Microsoft Threat Protection (MTP), those have all been replaced. There’s now Microsoft 365 Defender which is the umbrella term for the Defenders in M365, as well as a unified console. There’s also Microsoft Defender for Identity (formerly Azure ATP), Microsoft Defender for Office 365 (formerly Office 365 Advanced Threat Protection), Defender for Endpoint (formerly Microsoft Windows Defender, then Microsoft Defender).

These products all tie into Microsoft 365 Defender (M365D) and are commonly abbreviated MDI, MDO and MDE. Microsoft’s Cloud App Security Broker (CASB) was renamed to Defender for Cloud Apps (MDCA?) at the Ignite conference in November 2021, it was previously known as Cloud App Security (MCAS). This makes a whole lot of sense as it’s part of the Defender family and can feed logs into the unified console.

Whilst not strictly a security product, and not bearing the Defender moniker, Azure Active Directory (AAD) and its security features also tie strongly into Microsoft 365 Defender.

There’s also Azure Defender for your IaaS and PaaS workloads in Azure, which also changed its name at Ignite in November 2021 to Microsoft Defender for Cloud. Also, separate from all of these security products but eminently capable of working with all of them is Azure Sentinel – a cloud-based Security Information and Event Management (SIEM).

Meet the Defenders

We have deep-dive articles on MDI, MDO and MDE here in the M365 Dojo but understanding what each of them does is crucial to understanding how Microsoft 365 Defender ties them all together.

MDI is a cloud-based service that monitors your on-premises Active Directory for specific indicators of compromised identities and attacker operations. Anytime an attacker gains a foothold in your organization, one of their first goals is to move laterally and elevate privileges, preferably reaching Domain Dominance. This last stage, where your entire on-premises identity infrastructure is completely under the criminal’s control, takes on average 48 hours. MDI relies on agents on your Domain Controllers (DCs) or if your security team can’t stomach that, a member server that receives forwarded event log data from each DC and catches network traffic using port mirroring. MDI will catch attacker activity during five phases: ReconnaissanceCompromised credentialsLateral movementDomain dominance and Exfiltration. Because MDI is laser-focused on AD (and AD Federation Services ADFS, after the Solarwinds attacks), it produces high fidelity alerts with very specific data to catch and contain miscreants on your network. Examples of attacks detected include Account enumeration reconnaissance, AS-REP Roasting, Identity theft (pass-the-hash), Skeleton Key attack and Data exfiltration over SMB and many, many others.

Threat and Vulnerability Management dashboard

MDO is all about providing advanced protection for your Office Online workloads. So, after incoming emails and attachments have been scanned by Exchange Online Protection (EOP) which includes three AV engines to provide a base level of protection if an attachment has never been seen before it’ll be opened in a VM and automatically inspected for malicious behaviour to catch zero-day attacks. MDO also looks at every URL in emails to see if they lead to compromised sites. It also provides time-of-click scanning as attackers will frequently compromise a benign website, send out their emails with links that won’t raise flags as they’re delivered (since the site isn’t displaying malicious indications at this point), then activate the malicious payload on the website. By checking the link atthe time of actually clicking on it, MDO provides stronger protection for your end-users. MDO comes in two flavours, plan 1 covers the above features, whereas plan 2 adds Threat Trackers (intelligence on current attacks in the wild), Threat Explorer (also known as Explorer, shows you recent threats in your tenant), Automated Investigation and Response (AIR) and Attack simulation training (to train your users to recognize dangerous phishing emails).

MDE on the other hand is a full-fledged EDR and anti-malware solution for your endpoints, including Windows, MacOS, Android, iOS and Linux. On Windows there’s no agent to deploy, it’s simply a matter of activating the bits already in the OS through onboarding, either with a script or Configuration Manager, Intune, or Group Policy at scale. Apart from local and cloud-based Machine Learning (ML) models to identify new threats, MDE also offers AIR and a complete Threat and Vulnerability Management (TVM) solution.

Threat and Vulnerability Management dashboard

TVM inventories all software installed on your endpoints (Windows 8.1, 10 (1709+), 11 and Windows Server 2008R2+, MacOS and Linux) and compares against known software vulnerabilities. Using signals such as the risk of the vulnerability being exploited, the number of devices in your organization where it’s installed and the usage of the application it’ll give you a prioritized list of programs to upgrade. As this is often a task for the endpoint/desktop team rather than the security team, there’s built-in functionality to create a task in Intune with links to the relevant upgrades etc.

Until recently there was only one version of MDE, but in August 2021 Microsoft announced a new version called Plan 1, while the full-featured version became Plan 2. Plan 1 is in preview and brings Next-generation protection (anti-malware/virus), Attack surface reduction, Manual response actions, Centralized management, Security reports and API access. Plan 2 adds Device discovery, TVM as above, AIR, Advanced hunting, full EDR and Microsoft Threat Experts (MTE). This last one is a managed SOC service by Microsoft which gives you two services, targeted attack notifications where analysts have identified an ongoing attack in your environment and access to experts on-demand to help your SOC if you need them.

At the Ignite 2021 conference, these two siblings (Plan 1 & Plan 2) were joined by a cousin, Microsoft Defender for Business which will (it’s “coming to preview soon”) protect your Windows, macOS, iOS, and Android endpoints for up to 300 users in a business. Unlike Plan 1, it comes with TVM, and AIR and full EDR so the only things that are missing are Linux support, MTE and advanced hunting. It’ll be available as part of Microsoft 365 Business Premium or as a standalone license at $3 per user per month. It’ll also integrate with Microsoft 365 Lighthouse.

A common misunderstanding is between MDE and the built-in security features that every Windows 10 user can take advantage of Microsoft Defender Security Center and Microsoft Defender Antivirus. These basic protection features are used by MDE, but it adds many advanced features on top as outlined above.

There are good alternatives to Microsoft’s services, if you’re looking for email hygiene, archiving / journaling, zero-day protection and email continuity even if Exchange Online is unavailable, plus optional backup, 365 Total Protection is excellent.

Microsoft 365 Defender

MDE used to have its own portal, separate from other security products (securitycenter.windows.com) and while it’s still there it comes with a banner strongly suggesting redirecting users to the main M365 Defender portal (security.microsoft.com). MDI’s previous portal is completely retired and its functionality was moved into the Defender for Cloud Apps portal quite some time ago and MDO is already housed in the M365 Defender portal. The work to integrate MDI into the main Microsoft 365 Defender portal is extensive and is likely to take some time. There’s more to the integration than just a single portal, although that’s a good start.

If you are using MCAS, you can integrate its telemetry into Microsoft 365 Defender.

First, there’s a unified alerts queue, so you’re not looking in one place for an email threat that might have snuck past your mail filtering, and in another place for endpoints where that same email attachment might have been opened, it’s all in the same place. The same goes for the unified user page, a user account is an object in MDI (AD) but also an entity in MDO (has a mailbox, OneDrive for Business storage etc.) and of course an object in MDE on whatever devices they’re logged in to.

The unified investigation page is my favourite, the ability to see details of automated actions (AIR) along with options to further investigate myself is very powerful, especially as it spans all the different Defenders. By popular demand, there’s also an email entity page that lets you investigate suspicious emails, including previewing them if they’re stored in an Exchange online mailbox.

Email entity page

Email entity page

There are two ways of controlling access to M365 Defender data using RBAC, either using built-in Azure AD roles or if you want to control access very granularly in a large environment, using Custom role access.

You don’t need to have all the different Defenders enabled to take advantage of M365 Defender, as soon as you enable one workload it works, as you add more services, more of the portal will light up.

Do you like to Hunt?

The coolest benefit of the integration however is the ability to do advanced hunting across all the data flowing into Microsoft 365 Defender. This is a sign of a mature security organization where it’s not all about dealing with alerts and incidents raised by the security systems but where there’s also time for an analyst to say, “I wonder if that attack against a company similar to us last week could have hit us too – let me grab the Indicators of Compromise (IOCs) and look through our logs”. All Microsoft security products rely on Kusto Query Language (KQL) with a similar syntax to SQL for searching through large amounts of security log data and the ability to look in one query over email data (MDO), identity data (MDI), endpoint processes and actions (MDE) as well as third party cloud service logs (MCAS) is incredibly powerful.

There’s a new Advanced Hunting UI, recently released, which offers tabs for each query you’re working with and feedback on the performance of each query run.

Here I’m looking to see if any suspicious PowerShell activity was launched within 30 minutes of a known malicious email being received in the last 7 days.

Advanced Hunting in Microsoft 365 Defender

Advanced Hunting in Microsoft 365 Defender

If you find events of interest during hunting, you can now use them to create an incident or add them as alerts to an existing incident. You can also bring in external data into hunting queries from lists of IP addresses, accounts etc.

Microsoft 365 Defender also offers a Secure Score across identities, devices and apps, giving you an overview of where you have strong controls in place and areas where you can improve your tenant’s overall security posture.

Microsoft 365 Defender Secure Score

Microsoft 365 Defender Secure Score

There’s also a unified view of Alerts and Incidents, actions taken by AIR and reports for endpoints, emails, identity, and overall security.

Alternative Solutions

While Microsoft 365 Defender is a comprehensive security solution it’s not the only game in town. There are many other providers that offer various solutions for email hygiene that integrate neatly with Exchange Online and provide features Microsoft doesn’t. There are also services for email continuity (when Exchange Online is down), encryption of sensitive data, long term archiving of emails for compliance, signature services, backup of Office 365 data and many other EDR and XDR solutions on the market. One reason for choosing a different provider is the perceived conflict of interest when Microsoft is both providing the collaboration platform and the security services on top. Another reason could be to pick a best of breed solution for a particular threat – just make sure the integration to the rest of the security stack you need is available.

Conclusion

The power of an integrated suite that looks for malicious activity across email, identity and endpoints cannot be underestimated. There are a few things to keep in mind, however: Microsoft 365 Defender is focused on Microsoft 365 (it’s in the name) but most organizations have many other platforms and services to secure and monitor which is where a SIEM like Azure Sentinel comes into play. It can ingest data from Microsoft 365 Defender and many other Microsoft services, along with 100+ third-party data sources for a true single view of your digital estate. There’s also bi-directional synchronization between them so if you close an incident in Microsoft 365 Defender, it closes in Azure Sentinel and vice versa. Log retention is only 30 days in Microsoft 365 Defender whereas Azure Sentinel gives you 90 days for free, with several different options for storing security log data for longer.

Secondly, most features in the Defender family require Microsoft 365 E5 licensing (or M365 E3 plus add-ons) which isn’t cheap, especially in medium to large organizations. There’s definitely a conversation to be had about the role of Microsoft providing the platforms and then charging extra on top for the advanced security features, rather than just ensuring that the platform itself has the required security in place. An alternative is a trusted third-party solution such as Hornet Security’s 365 Total Protection which is also considerably more cost-effective.

Source :
https://www.altaro.com/microsoft-365/deep-dive-m365-defender/

OneDrive for Business: Tips and Tricks for High-Performing Admins

This article focuses on administration and management exclusively for OneDrive for Business. We will cover advice and best practices from my extensive experience working with service ideal for system admins and those actively working with it on a daily basis.

What is Microsoft OneDrive?

Microsoft has two different, but similar services called OneDrive, both of which offer cloud file storage for users. A free version of OneDrive is available to everyone and is often called the “consumer” version. The business version is “OneDrive for Business” and requires a subscription to Microsoft 365 or Office 365. Both look a lot alike but are managed very differently. To add to the mix, Microsoft often refers to OneDrive for Business as simply “OneDrive” in their documentation and even in the UI.
Note: I may refer to OneDrive instead of OneDrive for Business from time to time in this article for the sake of brevity, but I always mean OneDrive for Business unless otherwise stated.

OneDrive for Business has company-wide administration in mind. A service administrator can control the deployment of the synchronization app, network performance, and many other settings. With OneDrive (consumer), there is no management framework. The individual using the service controls their settings.

Where Should Users Save Files?

OneDrive for Business makes it very easy to share files with others, but if you find yourself sharing lots of files, it is recommended to use Teams or SharePoint instead. Teams and SharePoint are simply better for collaboration. For example, with OneDrive, you can’t check-in and check-out a document. Also, in Teams, any document you upload to Teams is available to the entire Team by default, whereas documents you upload to OneDrive are private by default. Also, in Teams, a conversation about a document is shared in a Teams channel rather than via email. The general guidance is if you are working on a file without others involved use OneDrive for Business. If you need others involved, use a more collaborative service – Teams or SharePoint.

OneDrive for Business uses SharePoint Online as Service

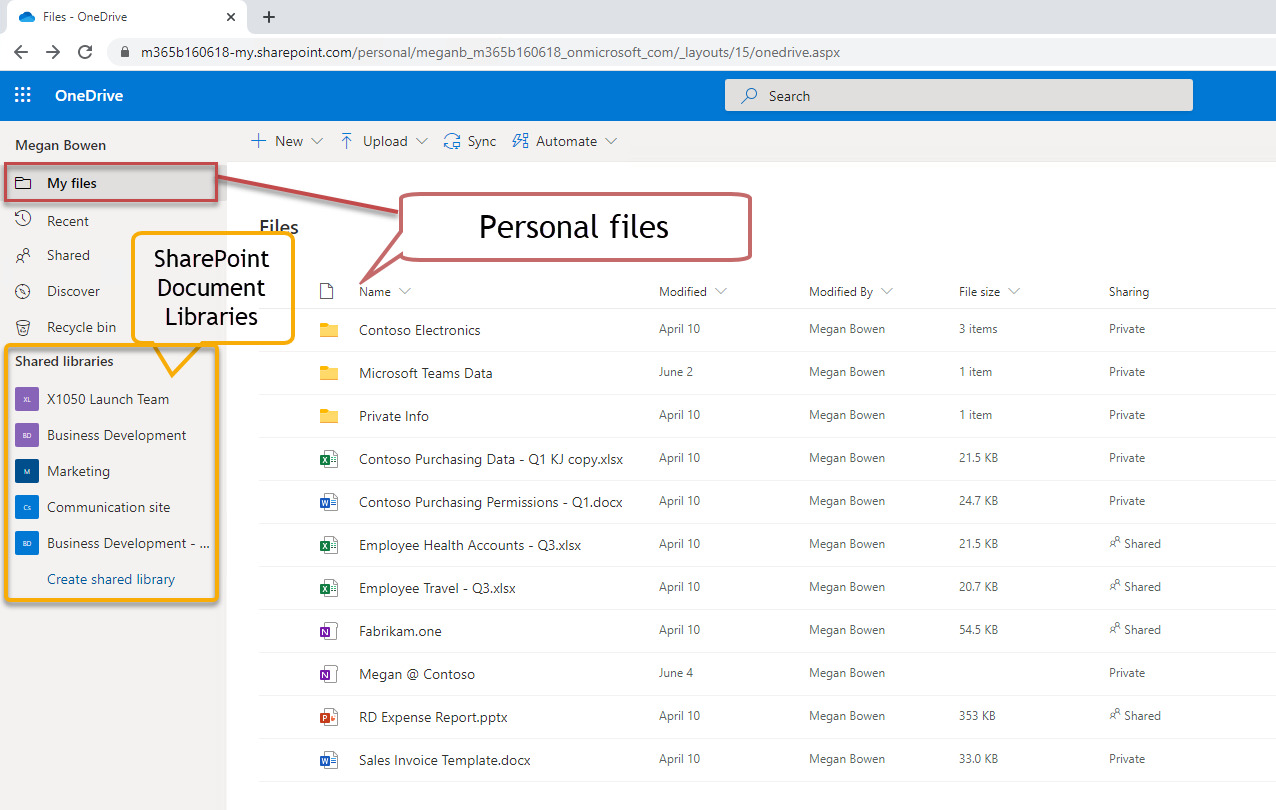
As the service administrator, one of the most important concepts to master is that OneDrive for Business is a special purpose SharePoint document library created automatically for every user in your company. When a user is assigned an Office 365 or Microsoft 365 license, the services automatically create a personal OneDrive for Business document library.

The URL for OneDrive for Business is formatted as follows:

https://<company base name>-my.sharpoint.com/personal/<user-id>

OneDrive For Business SharePoint Library

The landing page (shown above) for OneDrive for Business shows “My Files” which are your files. You can also navigate from here to any SharePoint asset, including SharePoint Document Libraries, files hosted for Teams, or other SharePoint content.

Now that you know OneDrive for Business is using SharePoint under the hood, the following guidance makes sense:

To manage the OneDrive sharing settings for your organization, use the Sharing page of the new SharePoint admin center, instead of the Sharing page in the OneDrive admin center. It lets you manage all the settings and latest features in one place.

In this way, settings related to file sharing on SharePoint are aligned with those for OneDrive for Business (and Teams, which also uses SharePoint as a file store). OneDrive picks up many features from SharePoint, such as the ability to do File RestoresRestore a previous version of file, and synchronize files to your desktop.

Easy Anonymous Access

One main reason OneDrive for Business is well-liked is that it’s so easy to share a document with anyone. You can send someone a URL to a document and relax. It just works, and you won’t hear the dreaded “I can’t open the document” (which is all too common and a huge productivity sink).

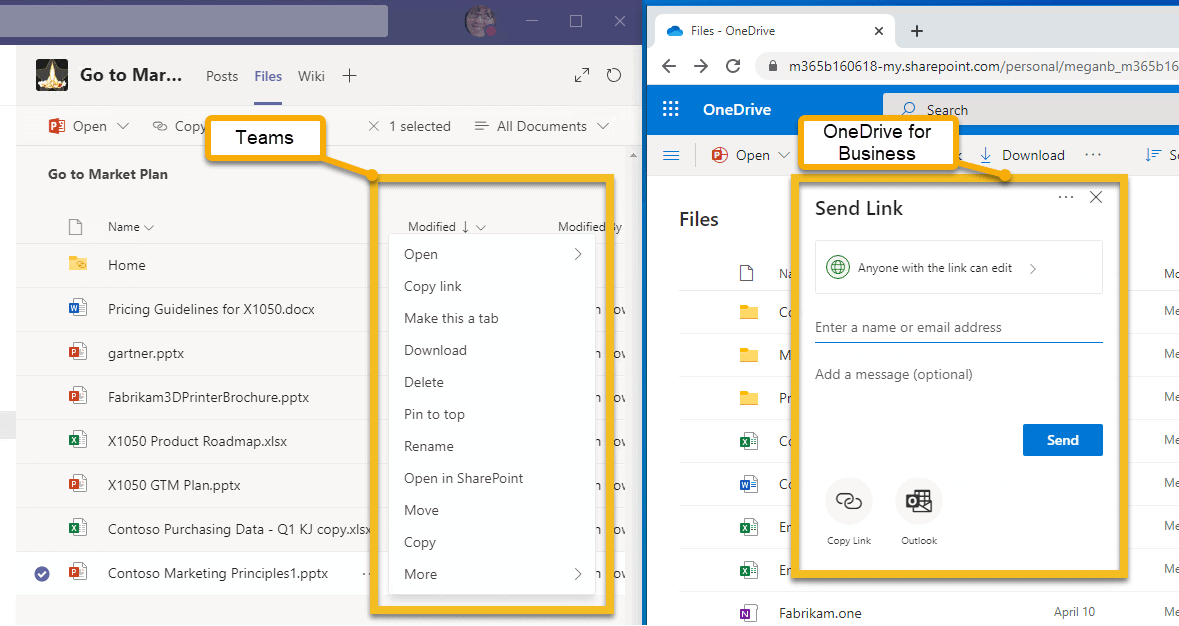
The screenshot below exemplifies my point. What’s being shown is the side-by-side sharing experience in Teams vs. OneDrive. Take note! There is no Share option in Teams. You can copy the link to the file, but you must know if the user you send it to has rights to view the document in the Teams library. In OneDrive for Business, however, there is a Share option that allows you to send a URL to anyone. This is called Anonymous Access and is one of the primary reasons users share from OneDrive rather than Teams.

OneDrive For Business, Microsoft Teams

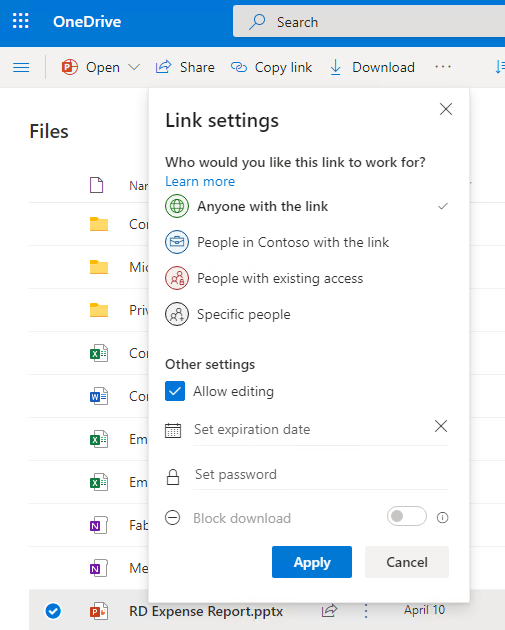
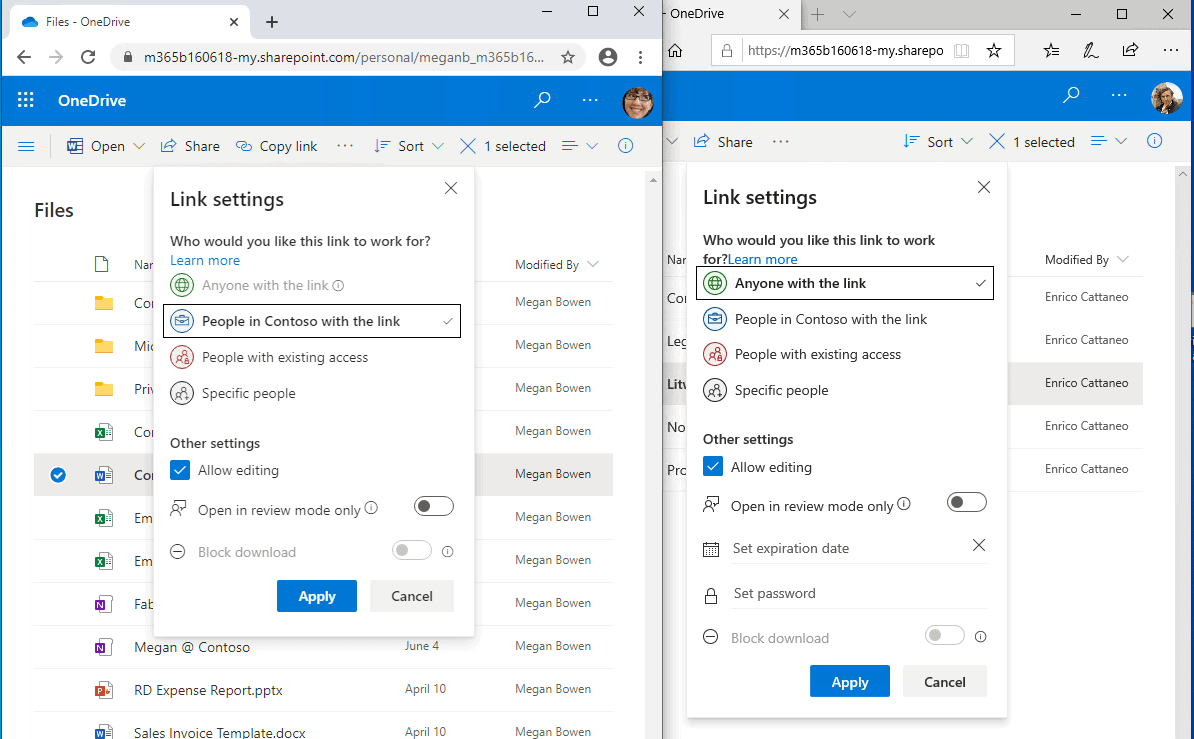
Also, in OneDrive, if you click on Anyone with the link can edit, you can further refine the Sharing options.

OneDrive For Business Sharing Options

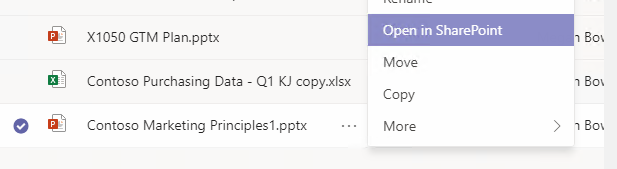
As a side note, users frustrated by Teams’ lack of sharing controls can easily open a document or folder in SharePoint instead of Teams (as shown below). In SharePoint, you can share the file with anyone just like in OneDrive. There’s no need to copy a file in Teams to OneDrive to share anonymously. Just open it in SharePoint instead!

SharePoint Document Sharing

<>Controlling Default Permissions

Many businesses prefer to control who can open company documents. You can change the default settings in the OneDrive administration center, but let’s follow Microsoft’s advice to use SharePoint administration instead.

OneDrive SharePoint Admin Center

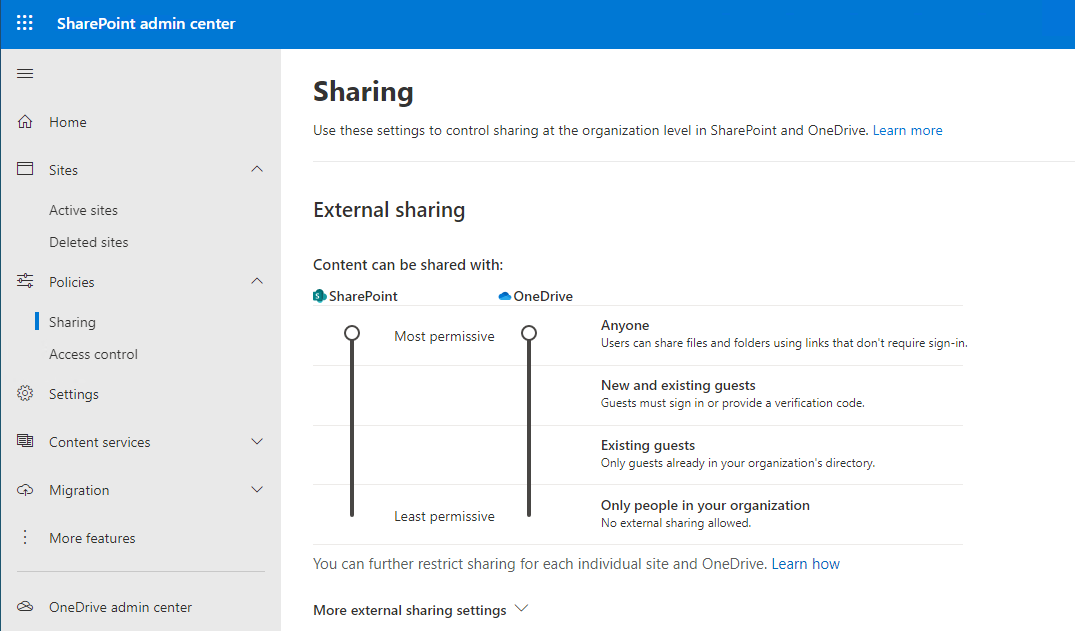
There are separate controls for External Sharing for SharePoint and OneDrive, ranging from Only people in your Organization to Anyone. However, what a static snapshot does not reveal is that the OneDrive settings cannot be more permissive than SharePoint. If you lower the permission on SharePoint, the permission also lowers on OneDrive. OneDrive can be more restrictive than SharePoint but never less restrictive. Since SharePoint hosts OneDrive files, this makes sense.

These settings are company-wide. Let users know before you make changes to global settings that cause changes in expected behavior. You WILL hear from them, and it generally won’t be a happy face emoji.

When guest users are needed, as they frequently are, consider securing the environment with the guidance provided by Microsoft in the documentation page titled Create a secure guest sharing environment.

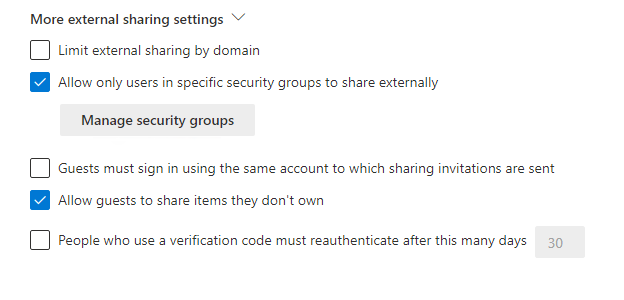
Savvy admins can control sharing using options available when you click on More external sharing settings on the same screen shown above:

OneDrive SharePoint External Sharing Settings

The option Limit external sharing by domain lets you allow or deny sharing to a particular domain. This can be a great way to go when you want to constrain sharing to a specific set of partners or external resources.

Allow only users in specific security groups to share externally lets you control who can share files with people outside your organization. A security group is an Azure AD object that is generally a collection of users and other groups. After populating the security group with users, you can assign permissions and policies to the group, such as granting the group access to a SharePoint site, a mailbox, or forcing members of the group to use 2-factor authentication.

Consider the following scenario. Marketing is involved with a lot of external sharing, so we want to enable sharing for members of Marketing but deny everyone else, AND we don’t want to have to make adjustments every time someone moves into or out of marketing.

To illustrate how this can be achieved with security groups, I created a security group in Azure AD named Marketing-Org and added four users. As employees come and go, members of marketing are added to and removed from this group. (If you haven’t created security groups in Azure AD, it’s straightforward.)

Next, (shown below) I created another security group called External-Sharing.

Azure AD External Sharing

Security groups can have other security groups as members! By adding Marketing-Org to External-Sharing, the users in Marketing-Org automatically inherit External-Org permissions and policies

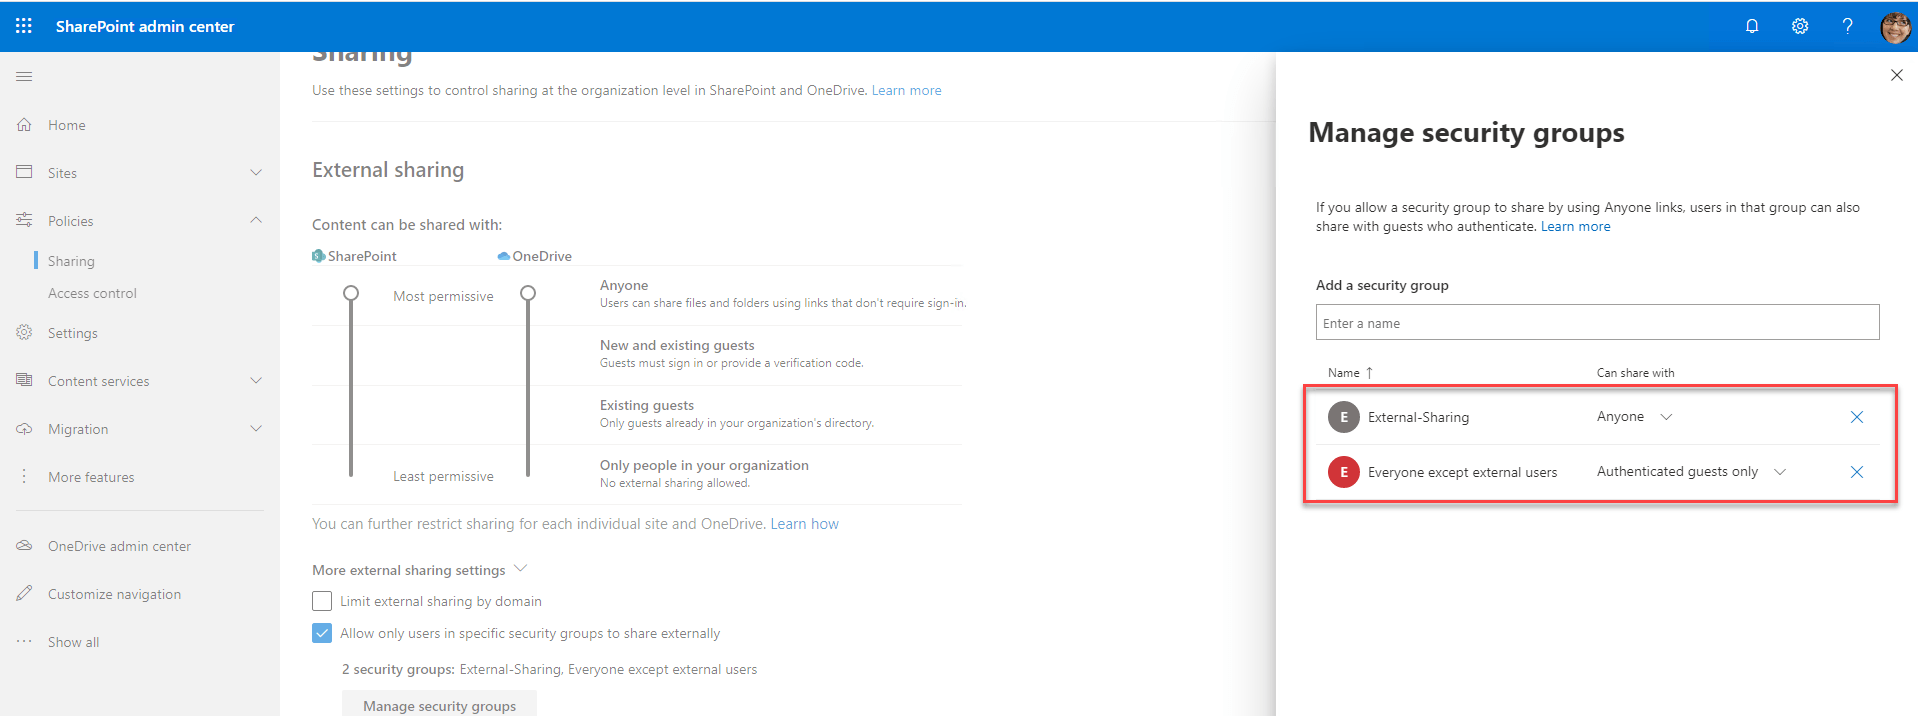
After that, I assigned the sharing permissions to the External-Org group. Returning to the SharePoint admin center Policies->Sharing->More external sharing settings-> Allow only users in specific security groups to share externally. Then, by clicking on Manage Security Groups (shown below)I added the External-Sharing group and set them so they can share with Anyone. To limit the ability of everyone else, I added the built-in security group Everyone except external users and set them to share with Authenticated guests only.

SharePoint Admin Center Manage Security Groups

In this way, everyone in the company can only share with authenticated guests, whereas only the members of External-Sharing can share with anyone.

The screenshot below shows the result. The user on the left is not a member of the External-Sharing group (the Anyone option is grey and cannot be selected). However, the user on the right can.

OneDrive For Business External Sharing

Once configured, effective administrators can manage membership of the security groups using PowerShell with the Add-AzureADGroupMember and associated cmdlets.

Storage space per user

Most Microsoft 365 and Office 365 plans come with 1TB of storage per user for OneDrive. If there are more than 5 users on a plan, 1TB can be increased by administrators to 5TB. You can even go to 25TB on a user-by-user basis by filing a support ticket with Microsoft.

To increase the storage limit for all users, browse to the OneDrive administration console, and select Storage. Change the setting from 1024 to the new limit. Shown below is updating the limit to 5TB. There are no additional charges for the increase in capacity.

OneDrive For Business Storage Limit

A global or SharePoint admin can change storage quotas with PowerShell after you connect to SharePoint using the SharePoint Online Management Shell and run the following command:

Set-SPOSite -Identity <user’s OneDrive URL> -StorageQuota <quota>.

You have to construct the OneDrive URL from the company name and user name, as mentioned earlier. Then, find the user name from the list of active users in the Office or Microsoft 365 admin center.

For <Quota>, enter a number between 1024 (1MB is the minimum) and 5242880 (for 5 TB). Values are rounded up. 1TB is 1048576.

As of this writing, OneDrive allows files up to 100GB.

Request Files

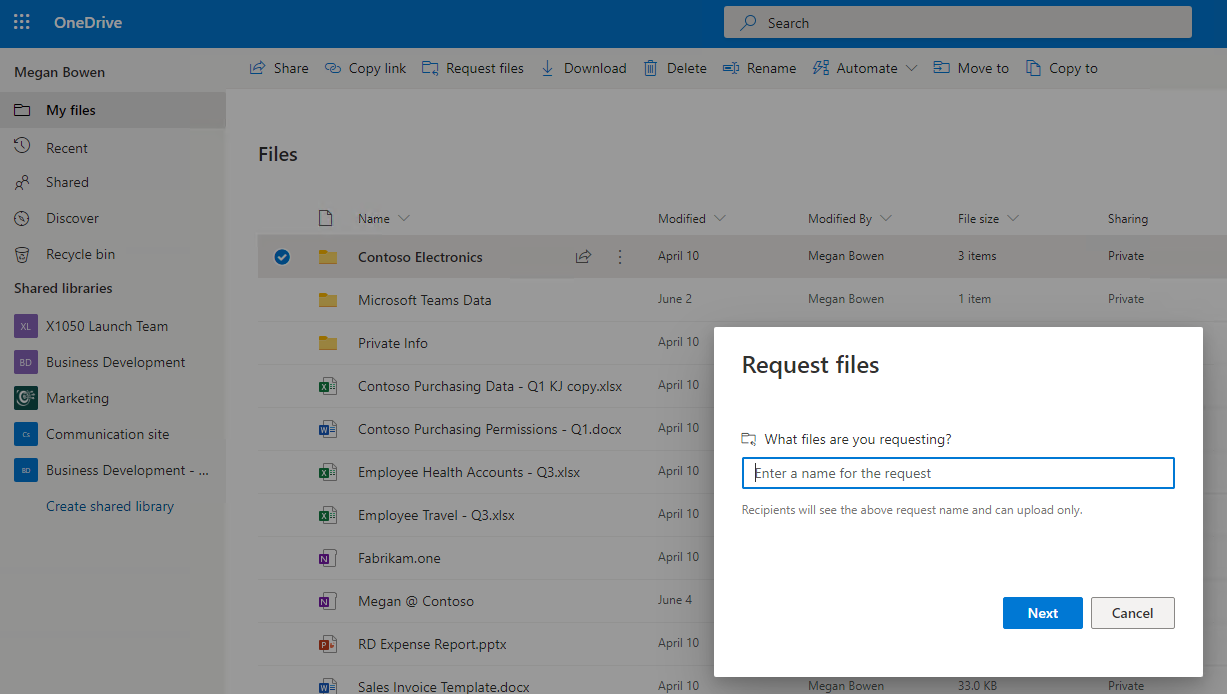
In some scenarios, you may want to collect files from others, rather than send files to others. OneDrive for Business makes this easy with the Request Files feature. With this feature, users can send an email asking others to upload content to a specific folder.

To set up a request files email, in the OneDrive UI, select a folder, click on the ellipses (…), and click Request files. You will see a window similar to the one shown below.

OneDrive For Business Request Files

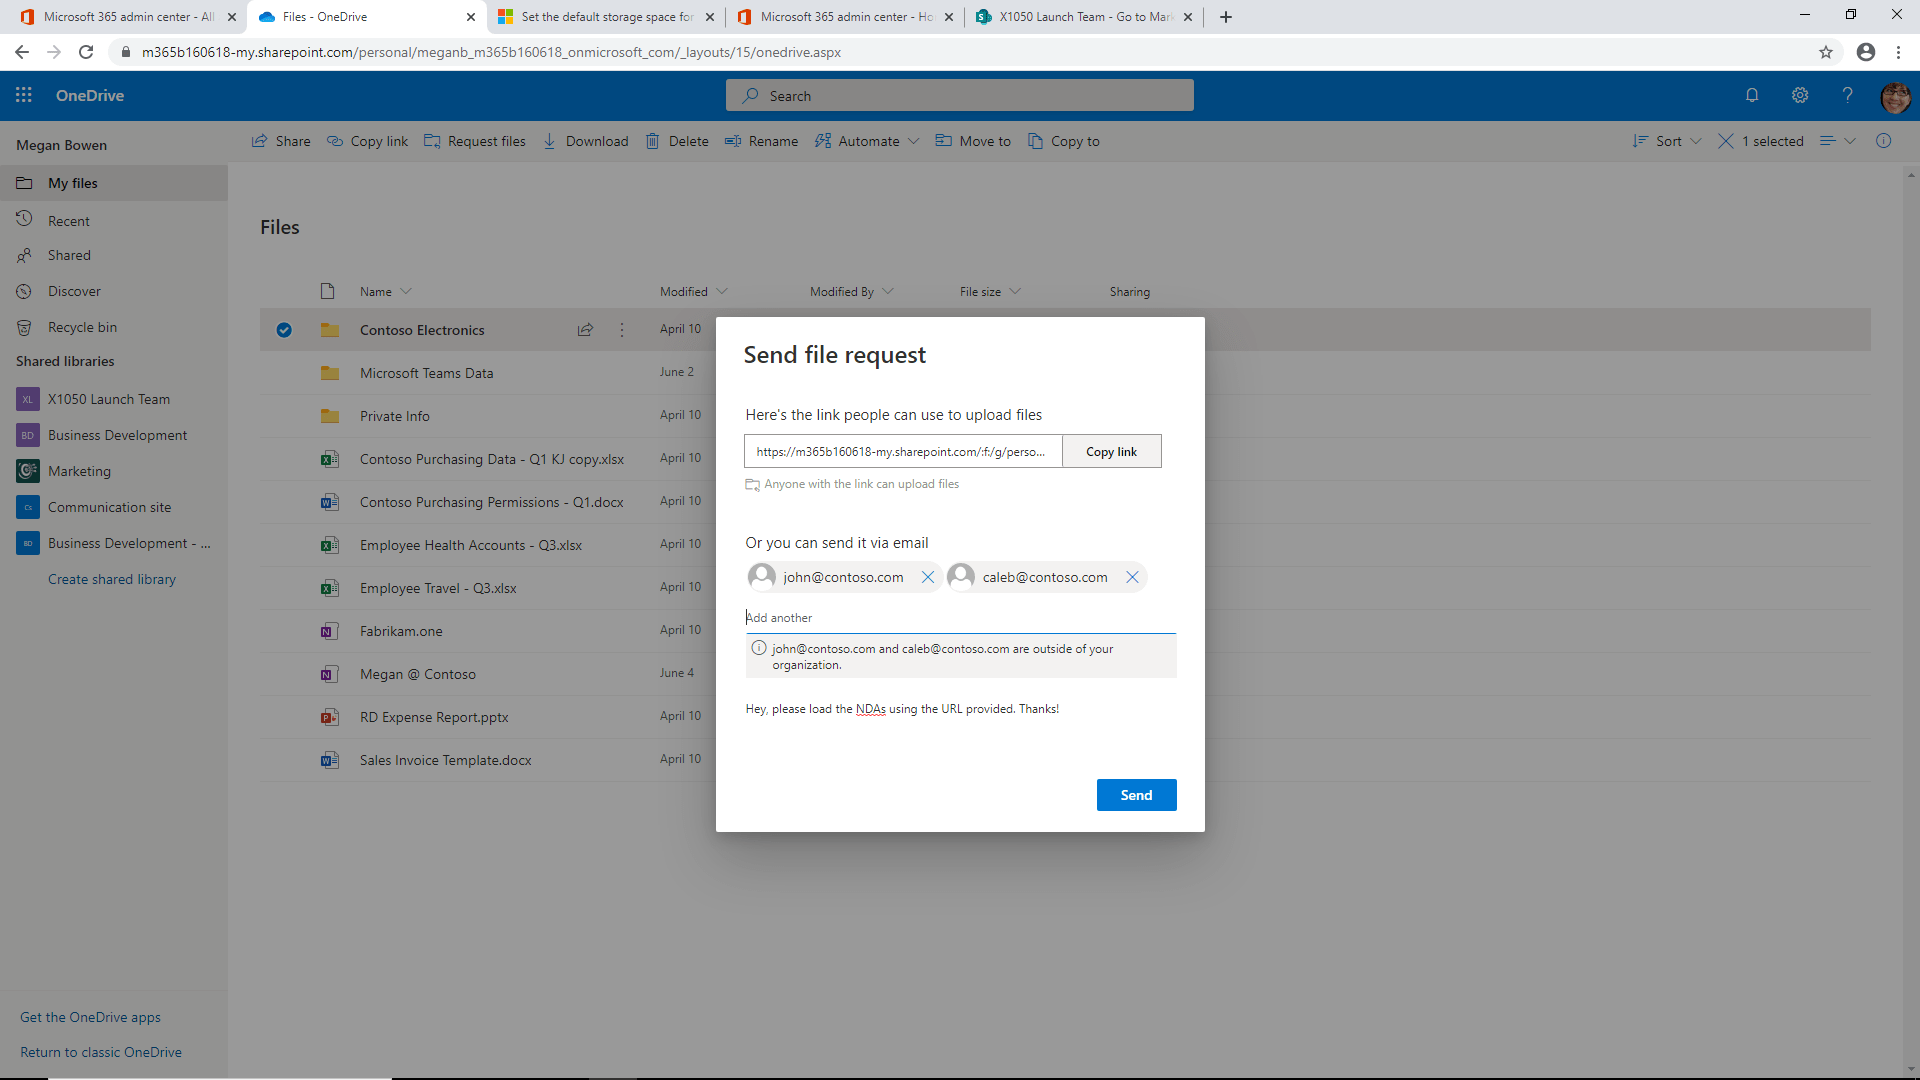
After clicking Next, you will see the Send file request window:

OneDrive For Business Send File Request

The email sent by this form provides a URL for uploading content to the OneDrive for Business folder. Request files is a great way to collect and concentrate needed files into a single location for processing. That said, you need to make sure to enable uploads for the folder locations in the request.

Of course, a savvy administrator is thinking, “Hmm, does this provide a way for these users to upload content forever to this location?”

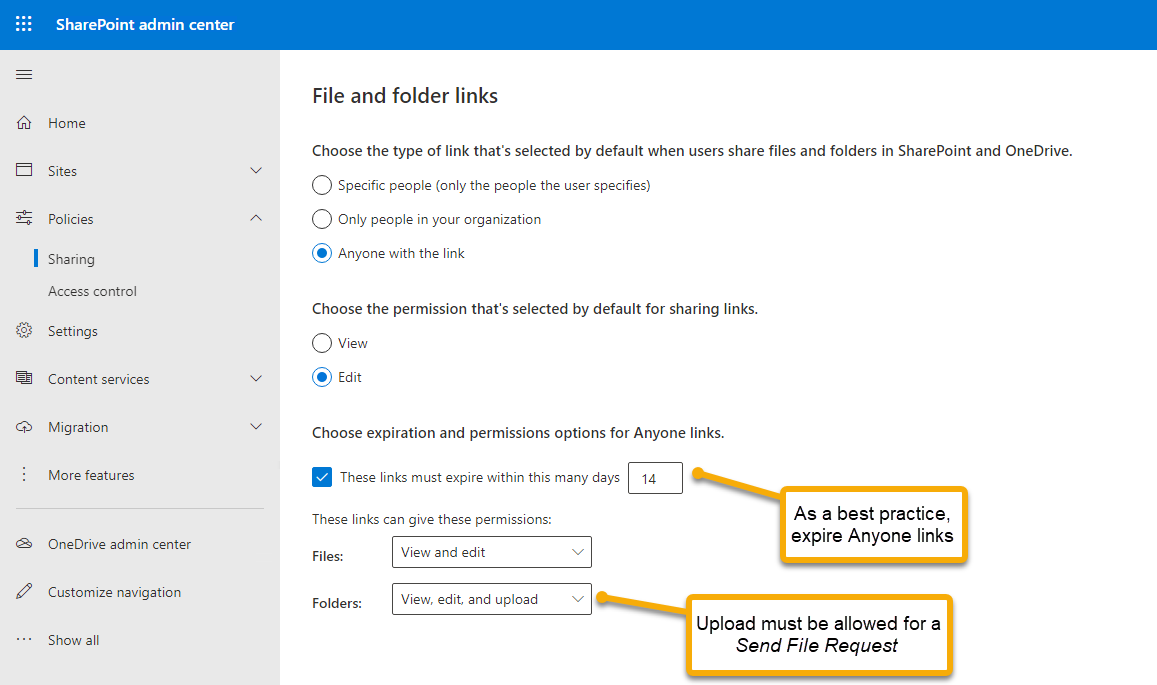
Shown below is the SharePoint admin center for Policies, Sharing.

SharePoint Admin Center Policies Sharing

With these settings, you can put some boundaries around the ability to upload files to location access given in the Request files invitation. These settings apply to anonymous links sent from OneDrive and SharePoint as well. As a best practice, if you permit users to send links to Anyone, which is enabled by default, you should expire those links. Otherwise, over a period of years, there can be hundreds or thousands of URLs that provide access to your content making access control distressingly challenging or impossible without disabling anonymous access altogether.

Folders must be set to View, edit, and upload as shown above to allow users to upload files in response to a file request.

Synchronization

One of the main features of OneDrive for Business is the ability to synchronize files from a user’s PC or laptop with OneDrive. With the synch service running, users can work on files locally, and the changes are sent to the cloud. Also, well-known folder locations such as Documents can be synchronized, ensuring essential documents are both local and in the cloud. You can easily sync Teams File Repositories as well as SharePoint Document Libraries.

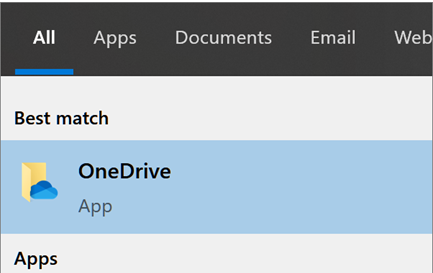
The synchronization service is part of Windows 10, so you do not generally need to download it individually. Users can install the service by clicking Start and typing OneDrive.

One Drive For Business App Windows 10
OneDrive For Business Sign In

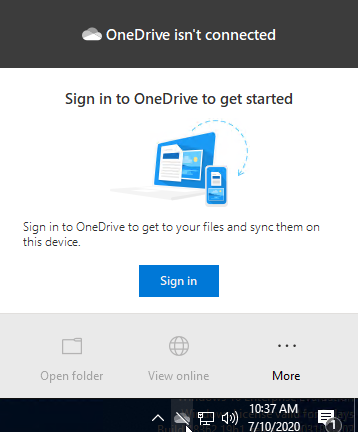
Click on the OneDrive app to launch the setup. OneDrive is then accessible in the taskbar as the cloud icon (shown before logging in, below).

Alternatively, users can enable the client by logging into onedrive.microsoft.com and clicking Sync.

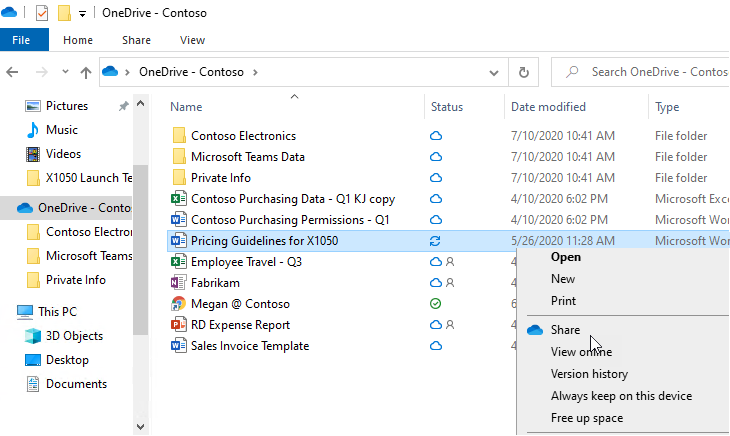
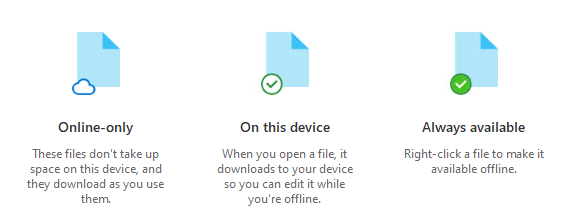
When installed, users can enjoy the integration of OneDrive with Windows File Explorer. A OneDrive location is visible in the File listing. The OneDrive file listing is unique as you can see if a file is in the cloud (cloud icon), local and in the cloud (checkmark), or synchronizing (arrows). Also, when you right-click on a file in the OneDrive folder, you can Share a file, View online, and check the version history.

OneDrive Windows File Explorer

Pay particular attention to the following icons. Shown below is a screenshot from one that appears during the installation of the OneDrive client.

OneDrive Client Installation

TAKE NOTE – File on demand enabled by default!

Imagine this scenario. You are working on an important project with several others. A Teams site is used for collaboration. You’re headed out for an important meeting with your clients, and a colleague posts several important files to Teams. You’ve installed the sync client, and you’re headed off to the airport, so you think “no worries, I’ve got them synced to my laptop, and I can view them in flight.” Aloft, you open your laptop and see there is a cloud icon next to files. Clicking on a file, it’s not accessible. What happened?

What happened is the Files On-Demand is enabled by default.

Files On-Demand marks content that appears in the cloud as cloud-only. A file added to a Teams File Repository will not automatically sync locally. It’s not available offline until you open the file, or set the file or folder to Always keep on this device. Optionally, you could also disable Files On-Demand, which we’ll get to in a minute.

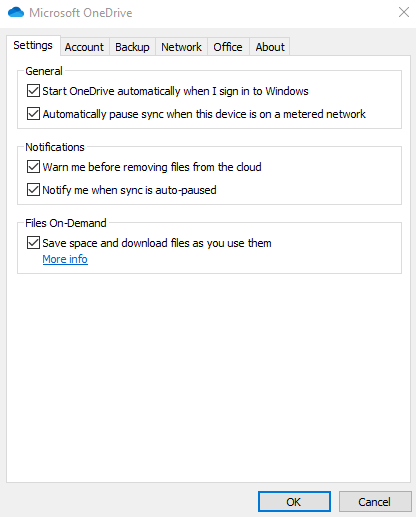
For an important file or folder, right-click in Windows Explorer and select Always keep on this device. Users can also disable Files On-Demand in the OneDrive client by opening the client and clicking More->Settings->Settings, then clear the checkbox that reads Files On-Demand.

Microsoft OneDrive Files On-Demand

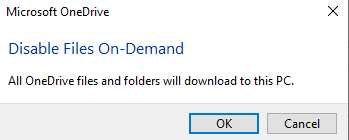
When you clear the checkbox, a pop-up message says that, indeed, the files will download to your PC instead of being cloud-only.

Microsoft OneDrive Disable Files On-Demand

Be advised that as the message above states, if your files in OneDrive for Business take up, say, 1TB, then that 1TB will be downloaded to your PC. Local storage needs to allow for this. Also, administrators need to consider the impact on bandwidth should you disable Files On-Demand for many users at the same time.

As an alternative, consider instructing users to mark files and folders they want to always be available offline “Always available on this device” using Windows File Explorer as previously discussed. Then you can keep Files On-Demand enabled to preserve bandwidth as only the designated files and folder will be permanently synched, while those you open, will be temporarily synched. All others will reside in the cloud.

Using Policy

For small businesses, administrators can manage OneDrive for Business effectively with the OneDrive for Business administration console. Larger organizations will be interested in using policy. The policy system for Microsoft and Office 365 is considered the most efficient way to manage many settings including those for OneDrive for Business. Policy-based administration provides administrators control, scale, repeatability, and flexibility.

Policy automation can be a complicated topic and breaks into different scenarios depending on your network architecture and configuration. For those with on-premise Active Directory environments, you manage policy via SCCM or Azure AD Domain Services.

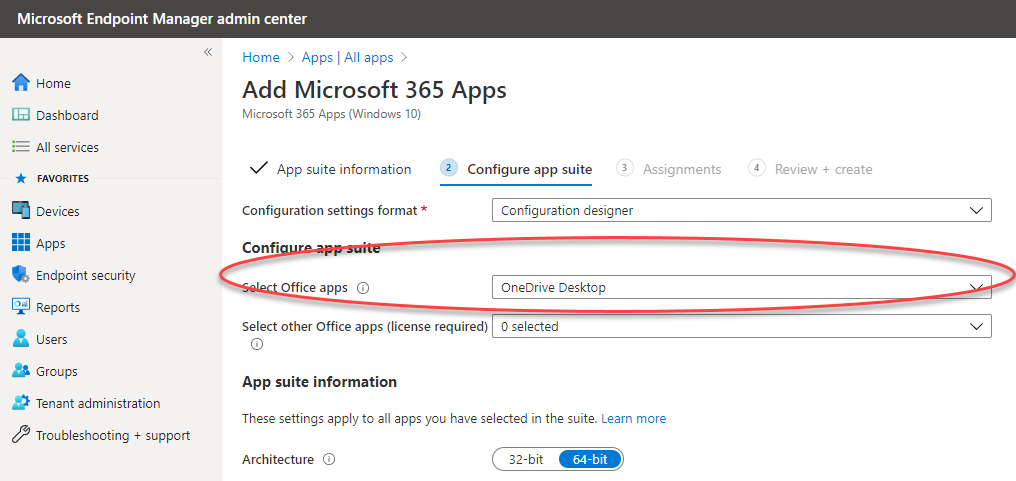
If your environment is cloud-only (meaning, you are not using domain controllers locally), using Microsoft’s InTune service lets you deploy the OneDrive sync service to desktops using the Microsoft Endpoint Manager admin center.

Microsoft Endpoint Manager admin center.

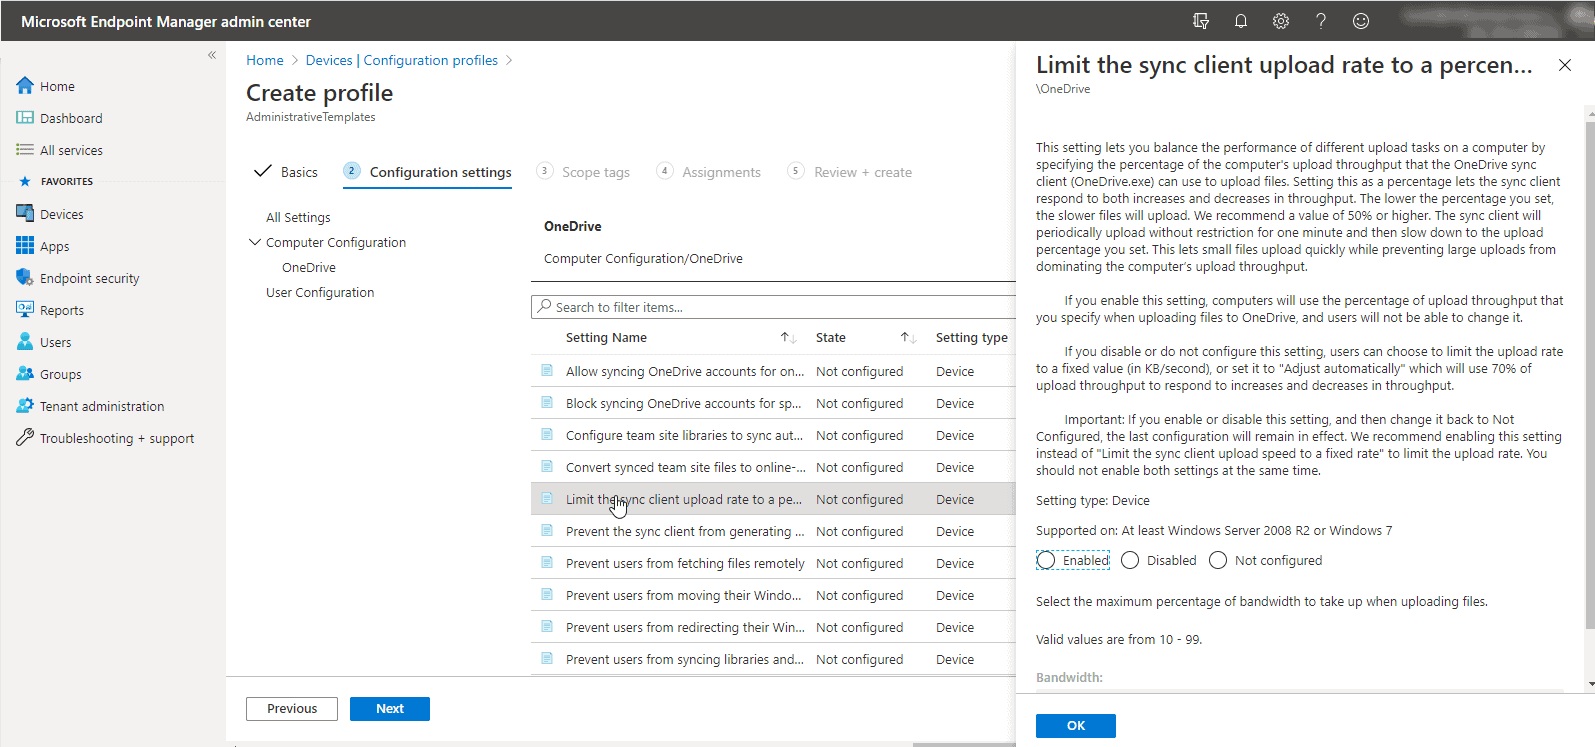
You can also create and apply profiles to users that control OneDrive behavior. Shown below is a policy profile limiting the client upload rate to a percentage of available bandwidth. This one of many possible settings to control OneDrive policies in Microsoft Endpoint Manager.

OneDrive policies in Microsoft Endpoint Manager

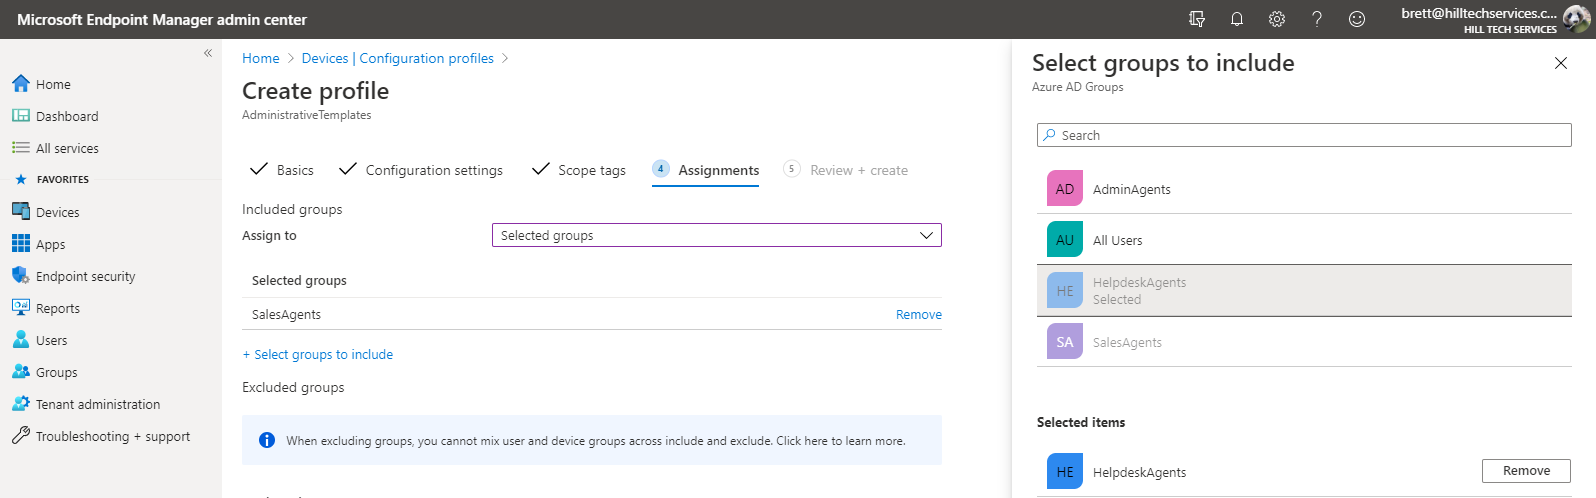
Previously, you saw how you can limit sharing with anonymous users to members of a specific security group. Similarly, you can apply different policy profiles to different security groups.

Microsoft EndPoint Manager Security Groups

In this way, you manage the behavior of OneDrive and many other aspects of your cloud service by membership in security groups. It’s easy to imagine uses for this practice with a group for New Hires, Legal-Review-Team, Alliance Partners, Vendors, or other typical roles with differing needs in a busy organization.

Network Impact

In regards to OneDrive, you want to be thoughtful about bandwidth consumption in your company, especially on the initial deployment of OneDrive for Business. More than one company has had issues with essential business services becoming sluggish when hundreds or even thousands of newly deployed OneDrive for Business sync clients start downloading content at the same time. Files On-Demand, as discussed earlier, helps significantly to reduce the initial bandwidth hit as files located in the cloud are not automatically downloaded to clients when enabled.

Known folder moves (discussed next) can also impact network performance by automatically uploading users’ local folders to the cloud when the client is deployed.

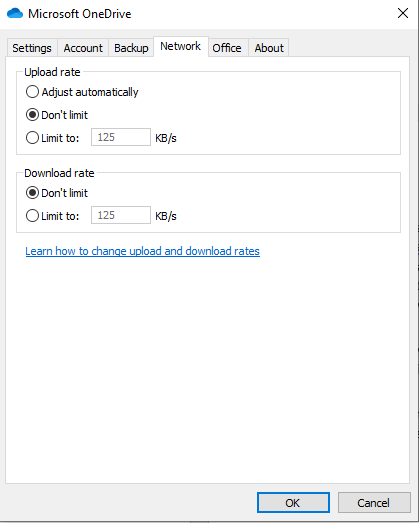
To help manage network impacts, the OneDrive sync client has bandwidth controls built-in. For a small business, you may want to adjust these settings on each users’ system. Right-click on the OneDrive for Business sync client, then click Settings->Network to see the settings.

Microsoft OneDrive Sync Client

In a larger business, you can use policy to push the desired settings, including the ability to mark OneDrive network traffic with QoS settings.

Known Folder Moves

Finally, a feature called Known Folder Moves is of keen interest to administrators as it can help reduce support desk calls and ease users’ transitions to new computers when replaced or upgraded.

As you probably know, specific folders in Windows, such as Documents, Desktop, and Pictures, and others are unique. These are “known folders” as they are in the same location in the file system on every Windows operating system.

OneDrive includes a feature where known folder locations are synced to OneDrive for Business. When a user needs a file in one of these locations and their PC is not available, they can access it from any device, including a mobile device that has an internet connection. Also, when a user moves to a new PC or laptop, all the previous documents, images, and important files are online and can easily be synched back to the new device.

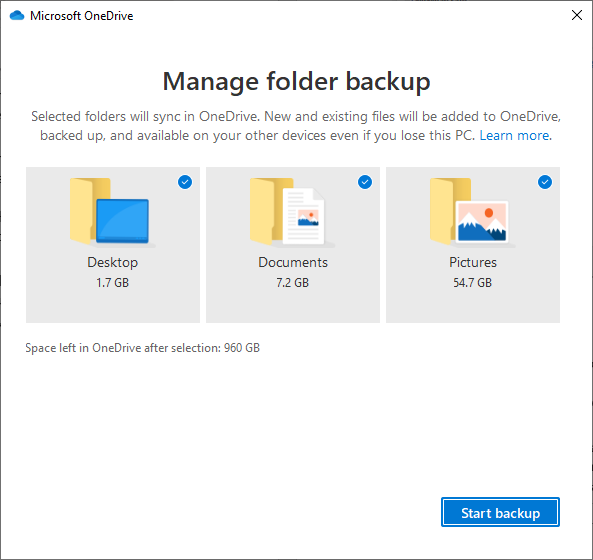
Known Folder Moves can be enabled in the sync client by clicking on Setting->Backup->Manage Backup.

Microsoft OneDrive Known Folder Moves

Of course, you can also use policy with the methods previously discussed. Should you decide to roll this out, be mindful of bandwidth impacts and network performance,all that content will be uploaded to the cloud.

Summary

OneDrive for Business is an exceptionally useful service. In this article, we’ve discussed many of the key considerations, benefits, best practices, and capabilities of OneDrive for Business so you can effectively manage the service for users. A capable administrator will understand the business use cases for sharing as well as the network impact of OneDrive for Business, and be familiar with how to administer the service including using policy to enforce the desired settings for your Business.

When set up, users will enjoy cloud access to essential files, including their Desktop, Document, Pictures, Team sites, and other files of importance, allowing them to share content quickly and work locally or collaboratively.

Of course, Microsoft is continuously updating OneDrive for Business, so as a last tip, bookmark the Microsoft official OneDrive blog to keep up-to-date.

Source :
https://www.altaro.com/microsoft-365/onedrive-business-tips-tricks/

The Real Cost of Microsoft 365 Revealed

Estimating the real cost of a technology solution for a business can be challenging. There are obvious costs as well as many intangible costs that should be taken into account.

For on-premises solutions, people tend to include licensing and support maintenance contract costs, plus server hardware and virtualization licensing costs. For Software as a Service (SaaS) cloud solutions, it seems like it should be easier since there’s no hardware component, just the monthly cost per licensed user but this simplification can be misleading.

In this article we’re going to look at the complete picture of the cost of Microsoft 365 (formerly Office 365), how choices you as an administrator make can directly influence costs, and how you can help your business maximize the investment in OneDrive, SharePoint, Exchange Online and other services.

The Differences Between Office 365 & Microsoft 365

As covered in our article about the death of Office 2019 there are naming changes afoot in the Office ecosystem. The personal Office 365 subscriptions have changed and are now called Microsoft 365 Family (up to six people) and Personal along with the Office 365 Business SKUs, that top out at 300 users, has also been renamed. The new SKUs are Microsoft 365 Business Basic, Apps, Standard, and Premium.

There’s no reason to believe that this name change won’t eventually extend to the Enterprise SKUs but until it does, from a licensing cost perspective it’s important to separate the two. Office 365 E1, E3 and E5 gives you the well-known “Office” applications, either web-based or on your device, along with SharePoint Online, Exchange Online and OneDrive for Business in the cloud backend.

Microsoft 365 F3, E3 and E5, on the other hand, includes everything from Microsoft 365 plus Azure Active Directory Premium features (identity security), Enterprise Mobility & Security (EMS) / Intune for Mobile Device Management (MDM) and Mobile Application Management (MAM) along with Windows 10 Enterprise.

Comparing M365 plans

Comparing M365 plans

So, a decision that needs to be looked at early when you’re looking to optimize your cloud spend is whether your business is under 300 users and likely to stay that way for the next few years. If that’s the case you should definitely look at the M365 Business SKUs as they may fulfil your business needs, especially as Microsoft recently added several security features from AAD Premium P1 to M365 Business.

If you’re close to 300, expecting to grow or already larger, you’re going to have to pick from the Enterprise offerings. The next question is then, what’s the business need – do you just need to replace your on-premises Exchange and SharePoint servers with the equivalent cloud-based offerings? Or is your business looking to manage corporate-issued mobile devices (smartphones and tablets) with MDM or protect data on employee-owned devices? The latter is known as Bring Your Own Device (BYOD), sometimes called Bring Your Own Disaster. If you have those needs (and no other MDM in place today), the inclusion of Intune in M365 might be the clincher. If on the other hand, you need to protect your on-premises Active Directory (AD) against attacks using Azure Advanced Threat Protection (AATP) or inspect, understand and manage your users’ cloud usage through Microsoft Cloud App Security (MCAS) you’ll also need M365 E5, rather than just O365.

Microsoft 365 Cloud app security dashboard

Cloud app security dashboard

The difference is substantial, outfitting 1000 users with O365 E3 will cost you $ 240,000 per year, whereas moving up to M365 E3 will cost you $ 384,000. And springing for the whole enchilada with every security feature available in M365 E5 will cost you $ 684,000, nearly 3X the cost of O365 E3. Thus, you need to know what your business needs and tailor the subscriptions accordingly (see below for picking individual services to match business requirements).

Note that if you’re in the education sector you have different options (O365 A1, A3, and A5 along with M365 A1, A3, and A5) that are roughly equivalent to the corresponding Enterprise offerings but less costly. And charities/not-for-profits have options as well for both O365 and M365M365 Business Premium is free for up to 10 users for charities and $ 5 per month for additional users.

A la carte Instead of Bundles

There are two ways to optimize your subscription spend in O365 / M365. Firstly, you can mix licenses to suit the different roles of workers in your business. For instance, the sales staff in your retail chain stores are assigned O365 E1 licenses ($8 / month) because they only need web access to email and documents, the administrative staff in head office use O365 E3 ($20 / month) and the executive suite and other high-value personnel use the full security features in E5 ($35 / month). Substitute M365 F3, E3, and E5 in that example if you need the additional features in M365.

Secondly, you don’t have to use the bundles that are encapsulated in the E3, E5, etc. SKUs, and you can instead pick exactly the standalone services you need to meet your business needs. Maybe some users only need Exchange Online whereas other users only need Project Online. The breakdown of exactly what features are available across all the different plans and standalone services is beyond the scope of this article but the O365 and M365 service descriptions are the best places to start investigating.

Excerpt from the O365 Service Description

Excerpt from the O365 Service Description

And if you’re a larger business (500 users+) you’re not going to pay list prices and instead these licenses will probably be part of a larger, multi-year, enterprise agreement with substantial discounts.

If You Hate Change

If you want to stay on-premises Exchange Server 2019 is available (only runs on Windows Server 2019), as is SharePoint Server 2019 and you can even buy the “boxed” version of Office 2019 with Word, Excel, etc. with no links to the cloud whatsoever. This is an option that moves away from the monthly subscription cost of M365 (there’s no way to “buy” M365 outright) and back to the traditional way of buying software packages every 2-5 years. Be aware that these on-premises products do NOT offer the same rich features that O365 / M365 provides, whether it’s the super-tight integration between Exchange Online and SharePoint Online, cloud-only services like Microsoft Teams that build on top of the overall O365 fabric or AI-powered design suggestions in the O365 versions of Word or PowerPoint. There’s no doubt that Microsoft’s focus is on cloud services, these are updated with new features on a daily basis, instead of every few years. If your business is looking to digitally transform, towards tech intensity (two recent buzzwords in IT with a kernel of truth in them) using on-premises servers and boxed software licensing is NOT going to get you there. But if you want to keep going like you always have, it’s an option.

And if you’re looking at this from a personal point of view, a free Microsoft account through Outlook.com does give you access to Office Online: Word, Excel, and PowerPoint in a browser. There’s even a free version of Microsoft Teams available.

Transforming your Business

There’s a joke going around at the moment about the Covid-19 pandemic bringing digital transformation to many businesses in weeks that would have taken years to achieve without it. There’s no doubt that adopting the power of cloud services has the power to truly change how you run your business for the better. A good example is moving internal communication from email to Teams, including voice and video calls and perhaps even replacing a phone system with cloud-based phone plans.

But these business improvements depend on the actual adoption of these new tools. And that requires a mindset shift for everyone. Start with your IT department, if they still see M365 as just cloud-hosted versions of their old on-premises servers they’re missing the much bigger picture of the integrated platform that O365 has become. Examples include services such as Data Loss Prevention (DLP), unified labeling and automatic encryption/protection of documents and data, and unified audit logging that spans ALL the workloads. So, make sure you get them on board with seeing O365 as a technology tool to transform the business, not just a place to store emails and documents in OneDrive. And adding M365 unlocks massive security benefits, enabling zero-trust (incredibly important as everyone is working from home), identity-based perimeters, and cloud usage controls. But if your IT or security folks aren’t on board with truly adopting these tools, they’re not going to make you any more secure. Here’s free IT administrator training for them.

Finally, you’re going to have to bring all the end-users on board with a good Adoption and Change Management (ACM) program, helping everyone understand these new services and what they can do to make their working lives better. This includes training but make sure you look to short, interactive, video-based modules that can be applied just when the user needs coaching on a particular tool, not long classroom-based sessions.

And all of that, for all the different departments, isn’t a once-off when you migrate to O365, it’s an ongoing process because the other superpower of the cloud is that it changes and improves ALL the time. This means you’ll need to assign someone to track the changes that are coming/in preview and ensure that the ones that really matter to your business are understood and adopted. The first place to look is the Microsoft 365 Message Center in the portal where you can also sign up for regular emails with summaries of what’s coming. Another good source is the Office 365 Weekly Blog.

M365 portal Message Center

M365 portal Message Center

To help you track your usage and adoption of the different services in O365 there is a usage analytics integration with PowerBI. Use this information to firstly see where adoption can be improved and take steps to help users with those services and secondly to identify services and tools that your business isn’t using and perhaps don’t need, giving you options for changing license levels to optimize your subscription spend.

PowerBI Offie 365 Usage Analytics

PowerBI O365 Usage Analytics (courtesy of Microsoft)

Closing Notes

There’s another factor to consider as you’re moving from on-premises servers to Microsoft 365 and that’s the changing tasks of your IT staff. Instead of swapping broken hard drives in servers these people now need to be able to manage cloud services and automation with PowerShell and most importantly, see how these cloud services can be adopted to improve business outcomes.

A further potential cost to take into account is backup. Microsoft keeps four copies of your data, in at least two datacentres so they’re not going to lose it but if you need the ability to “go back in time” and see what a mailbox or SharePoint library looked like nine months ago, for instance, you’ll need a third-party backup service, further adding to your monthly cost.

And that’s part of the overall cost of using O365 or M365, training staff, adopting new features, different tasks for administrators and managing change requires people and resources, in other words, money. And that’s got to be factored into the overall cost using Microsoft 365, it’s not just the monthly license cost.

The final question is of course – is it worth it? Speaking as an IT consultant with clients (including a K-12 school with 100 students) who recently moved EVERYONE to work and study from home, supported by O365, Teams, and other cloud services, the answer is a resounding yes! There’s no way we could have managed that transition with only on-premises infrastructure to fall back on.

Source :
https://www.altaro.com/microsoft-365/real-cost-m365/

New Dell BIOS Bugs Affect Millions of Inspiron, Vostro, XPS, Alienware Systems

Five new security weaknesses have been disclosed in Dell BIOS that, if successfully exploited, could lead to code execution on vulnerable systems, joining the likes of firmware vulnerabilities recently uncovered in Insyde Software’s InsydeH2O and HP Unified Extensible Firmware Interface (UEFI).

Tracked as CVE-2022-24415, CVE-2022-24416, CVE-2022-24419, CVE-2022-24420, and CVE-2022-24421, the high-severity vulnerabilities are rated 8.2 out of 10 on the CVSS scoring system.

“The active exploitation of all the discovered vulnerabilities can’t be detected by firmware integrity monitoring systems due to limitations of the Trusted Platform Module (TPM) measurement,” firmware security company Binarly, which discovered the latter three flaws, said in a write-up.

“The remote device health attestation solutions will not detect the affected systems due to the design limitations in visibility of the firmware runtime.”

All the flaws relate to improper input validation vulnerabilities affecting the System Management Mode (SMM) of the firmware, effectively allowing a local authenticated attacker to leverage the system management interrupt (SMI) to achieve arbitrary code execution.

System Management Mode refers to a special-purpose CPU mode in x86 microcontrollers that’s designed for handling system-wide functions like power management, system hardware control, thermal monitoring, and other proprietary manufacturer-developed code.

Whenever one of these operations is requested, a non-maskable interrupt (SMI) is invoked at runtime, which executes SMM code installed by the BIOS. Given that SMM code executes at the highest privilege level and is invisible to the underlying operating system, the method makes it ripe for abuse to deploy persistent firmware implants.

A number of Dell products, including Alienware, Inspiron, Vostro line-ups, and Edge Gateway 3000 Series, are impacted, with the Texas-headquartered PC manufacturer recommending customers to upgrade their BIOS at the “earliest opportunity.”

“The ongoing discovery of these vulnerabilities demonstrate what we describe as ‘repeatable failures’ around the lack of input sanitation or, in general, insecure coding practices,” Binarly researchers said.

“These failures are a direct consequence of the complexity of the codebase or support for legacy components that get less security attention, but are still widely deployed in the field. In many cases, the same vulnerability can be fixed over multiple iterations, and still, the complexity of the attack surface leaves open gaps for malicious exploitation.”

Source :
https://thehackernews.com/2022/03/new-dell-bios-bugs-affect-millions-of.html

Microsoft rolling out new endpoint security solution for SMBs

Microsoft says its new endpoint security solution for small and medium-sized businesses (SMBs) known as Microsoft Defender for Business has hit general availability.

It has started rolling out to new and existing Microsoft 365 Business Premium customers worldwide starting today, March 1st.

Microsoft Defender for Business helps companies with up to 300 employees defend against cybersecurity threats, including malware, phishing, and ransomware in environments with Windows, macOS, iOS, and Android devices.

It comes with simplified client configuration via a wizard-driven setup, and it enables all recommended security policies out-of-the-box, making it easy to use even by organizations without dedicated security teams.

In November, Microsoft announced this new security solution at Microsoft Ignite 2021 in response to a 300% increase in ransomware attacks in the previous year, with more than 50% of them directly affecting SMBs, according to US Secretary of Homeland Security Alejandro Mayorkas.

Defender for Business began rolling out in preview worldwide in December when Microsoft also announced that it would be available as a standalone license directly from Microsoft and Microsoft Partner Cloud Solution Provider (CSP) channels at $3 per user per month.https://www.youtube.com/embed/umhUNzMqZto

Key features bundled with the Microsoft Defender for Business security suite include:

  • Simplified deployment and management for IT administrators who may not have the expertise to address today’s evolving threat landscape.
  • Next-generation antivirus protection and endpoint detection and response to detect and respond to sophisticated attacks with behavioral monitoring.
  • Automated investigation and remediation to help customers react quickly to threats.
  • Threat and vulnerability management proactively alerts users to weaknesses and misconfigurations in software.
  • Microsoft 365 Lighthouse integration with Microsoft Defender for Business for IT service providers to view security events across customers, with additional capabilities coming.

You can get Defender for Business as part of Microsoft 365 Business Premium and will not require onboarding or offboarding devices from Microsoft Defender for Endpoint P1 or P2.

“Defender for Business will be rolled out to existing Microsoft 365 Business Premium customers in the next few weeks. There is no action or additional transactions required and it will show up in the Microsoft 365 Defender portal under the section, Endpoints,” Microsoft said.

“Defender for Business will also be offered as a standalone solution and will be coming later this year. You can continue to preview the standalone solution by signing up at https://aka.ms/MDB-Preview.”

Source :
https://www.bleepingcomputer.com/news/microsoft/microsoft-rolling-out-new-endpoint-security-solution-for-smbs/

Use an eSIM to get a cellular data connection on your Windows PC

Windows 10 and Windows 11
An eSIM lets you connect to the Internet over a cellular data connection. With an eSIM, you don’t need to get a SIM card from your mobile operator, and you can quickly switch between mobile operators and data plans.

For example, you might have one cellular data plan for work, and a different plan with another mobile operator for personal use. If you travel, you can get connected in more places by finding mobile operators with plans in that area.

Here’s what you’ll need:

  • A PC running Windows 10, Version 1703 or later. To see which version of Windows 10 your device uses, select the Start  button, then select Settings  > System  > About .
  • A PC with an eSIM in it. Here’s how you can tell if your PC has an eSIM:
    1. Select the Start  button, then select Settings  > Network & Internet  > Cellular .
    2. On the Cellular screen, look for a link near the bottom of the page that says Manage eSIM profiles. If that link appears, your PC has an eSIM.

      Manage eSIM profiles

Note: Some devices have both an eSIM and physical SIM card. If you don’t see Manage eSIM profiles but you do see Use this SIM for cellular data at the top of the Cellular settings screen, select the other SIM from the drop-down box, and then see if the Manage eSIM profiles link appears.

To add an eSIM profile

You’ll need to add an eSIM profile to get an Internet connection using cellular data.

If you have a PC from your organization, an eSIM profile might already be added to your PC. If you select Manage eSIM profiles and see an eSIM profile for a mobile operator you expect to find, you can skip this procedure and go to the next one to get connected.

  1. Select the Start  button, then select Settings  > Network & Internet  > Cellular Manage eSIM profiles.
  2. Under eSIM profiles, select Add a new profile.
  3. To search for available profiles or use an activation code you have from your mobile operator, do one of the following:
    • Search for available profiles
      1. Select Search for available profiles > Next.
      2. When a profile you want to use is found, select Download.
      3. Enter the confirmation code from your mobile operator in the corresponding box, then select Download.
      4. After the profile is downloaded and installed, select Continue to find other profiles you might want and then repeat the previous steps.
      5. Select Close when you have downloaded the profiles you want.
    • Use an activation code you have from your mobile operator
      1. Select Let me enter an activation code I have from my mobile operator > Next.
      2. If you have a QR code to scan for the activation code, choose which camera to use on your PC, and then scan the QR code.
      3. The activation code should appear in the corresponding Activation code box. Select Next.
      4. For the dialog box that asks Do you want to download this profile?, enter the confirmation code from your mobile operator into the corresponding box, and then select Download.
      5. Select Close.
  4. Optional: To give the profile a friendly name (for example, Work or Personal) to help you remember it, select the profile, select Edit name, type a name you’ll remember, and then select Save.

To connect to cellular data using an eSIM profile

  1. Select the Start  button, then select Settings  > Network & Internet  > Cellular  > Manage eSIM profiles.
  2. Under eSIM profiles, select the profile you want, and then select Use.
  3. Select Yes for This will use cellular data from your data plan and may incur charges. Do you want to continue?
    You’ll be connected to a cellular data network and ready to go.

To switch between profiles

If you have more than one profile installed on your PC, you can switch between profiles to use a different mobile operator and data plan.

  1. Select the Start  button, then select Settings  > Network & Internet  > Cellular  > Manage eSIM profiles.
  2. Under eSIM profiles, select the profile you want to stop using, and then select Stop using.
  3. Select Yes for You’ll be disconnected from this cellular network. Continue?
  4. Select the different profile you want to use, then select Use.

To delete a profile

If you don’t want to use a profile anymore, you can delete it from your PC. If you delete the profile and want to add it again later, you’ll need to download the profile again and might need to contact your mobile operator.

  1. Select the Start  button, then select Settings  > Network & Internet  > Cellular  > Manage eSIM profiles.
  2. Under eSIM profiles, select the profile to delete, and then select Delete.
  3. At the prompt that warns you that the profile will be permanently deleted, select Yes.

Note: If you have a PC from your organization, you might not be able to delete an eSIM profile because of a policy that’s set by your organization.

Source :
https://support.microsoft.com/en-us/windows/use-an-esim-to-get-a-cellular-data-connection-on-your-windows-pc-0e255714-f8be-b9ef-9e84-f75b05ed98a3#WindowsVersion=Windows_10

Microsoft Windows 10 optional updates fix performance problems introduced last month

Optional updates for Windows 10 and Windows 11 released in January have fixed performance problems when playing games, using the operating system, or even opening folders in File Explorer.

With the January 2022 updates, Microsoft introduced numerous bugs breaking LT2P VPN connections, causing domain controller reboots, and preventing Hyper-V from working.

Microsoft later released out-of-band updates to fix these issues, whose fixes were also rolled into the optional preview updates.

However, these optional updates seem to have fixed more than the reported bugs, as they are also resolving significant performance issues caused by the January updates.

Recent Windows updates caused performance hits

After installing the January 2022 KB5009543 update, Windows 10 users began to notice that Windows suffered from severe performance issues.

These performance issues included slow boots and slow response times when opening the Start Menu, launching apps, playing games, and performing pretty much all of the basic functions of the operating system. In general, Windows felt “laggy” after installing the updates.

“Prior to the update, it took maybe 2 minutes for my laptop to boot to the home screen. It now takes close to a half hour. I’m frustrated to the point where I’m now planning to disable updates and uninstall this update,” a user named Ninja_Bobcat posted on Reddit.

“This update has ruined my laptop in games, namely warzone and apex. Goes to 0 fps and huge stutters everywhere,” another person posted.

“My computer is incredibly slow after KB5009543 security update and KB5008876 windows update. It takes about 3 minutes for my computer to boot and maybe 2-3 minutes to open a tab on chrome. Absolutely killed my computer,” said a third Windows 10 user.

BleepingComputer replicated these performance issues after installing the January 2022 KB5009543 update on multiple laptops.

The good news is that BleepingComputer found that installing the optional KB5009596 preview update released late last month fixed these newly introduced performance issues.

Windows 10 KB5009596 optional update

However, as these updates are optional, many users will not know to install them. Thus, their performance issues will continue until the mandatory February 2022 Patch Tuesday updates are installed, which will include these fixes.

Windows users can install the optional updates by going into Settings, clicking on Windows Update, and manually performing a ‘Check for Updates.’

As this is an optional update, you will need to install the KB5009596 by clicking on the ‘Download and install’ link.

Windows 11 issues were fixed as well

Not to be outdone by Windows 10, Windows 11 has also been dealing with performance issues within File Explorer.

Users found that it was slow to switch between folders, browse folders, or select files when using File Explorer.

However, the optional Windows 11 KB5008353 cumulative update preview has resolved these issues, with users reporting that File Explorer is back to normal.

“I honestly lost hope because this issue has been there since I upgraded to Win11, other users were claiming it was solved but it wasn’t the case for everyone. However, this update seems to have fixed this issue for good amongst others of course,” a Windows 11 user posted on Reddit.

BleepingComputer has not been able to replicate the performance issues on Windows 11 to test the fix.

BleepingComputer has also reached out to Microsoft with further questions about what has been fixed but has not received a reply as of yet.

Source :
https://www.bleepingcomputer.com/news/microsoft/windows-10-optional-updates-fix-performance-problems-introduced-last-month/

Exit mobile version