VMware Security Solutions Advisories VMSA-2021-0002

Advisory ID: VMSA-2021-0002
CVSSv3 Range: 5.3-9.8
Issue Date: 2021-02-23
Updated On: 2021-02-23 (Initial Advisory)
CVE(s): CVE-2021-21972, CVE-2021-21973, CVE-2021-21974
Synopsis: VMware ESXi and vCenter Server updates address multiple security vulnerabilities (CVE-2021-21972, CVE-2021-21973, CVE-2021-21974)

1. Impacted Products
  • VMware ESXi
  • VMware vCenter Server (vCenter Server)
  • VMware Cloud Foundation (Cloud Foundation)
2. Introduction

Multiple vulnerabilities in VMware ESXi and vSphere Client (HTML5) were privately reported to VMware. Updates are available to remediate these vulnerabilities in affected VMware products.

3a. VMware vCenter Server updates address remote code execution vulnerability in the vSphere Client (CVE-2021-21972)

Description

The vSphere Client (HTML5) contains a remote code execution vulnerability in a vCenter Server plugin. VMware has evaluated the severity of this issue to be in the Critical severity range with a maximum CVSSv3 base score of 9.8.

Known Attack Vectors

A malicious actor with network access to port 443 may exploit this issue to execute commands with unrestricted privileges on the underlying operating system that hosts vCenter Server. 

Resolution

To remediate CVE-2021-21972 apply the updates listed in the ‘Fixed Version’ column of the ‘Response Matrix’ below to affected deployments.

Workarounds

Workarounds for CVE-2021-21972 have been listed in the ‘Workarounds’ column of the ‘Response Matrix’ below.

Additional Documentation

None.

Notes

The affected vCenter Server plugin for vROPs is available in all default installations. vROPs does not need be present to have this endpoint available. Follow the workarounds KB to disable it.

Acknowledgements

VMware would like to thank Mikhail Klyuchnikov of Positive Technologies for reporting this issue to us.

Response Matrix:

ProductVersionRunning OnCVE IdentifierCVSSv3SeverityFixed VersionWorkaroundsAdditional Documentation
vCenter Server7.0AnyCVE-2021-219729.8Critical 7.0 U1cKB82374None
vCenter Server6.7AnyCVE-2021-219729.8Critical 6.7 U3lKB82374None
vCenter Server6.5AnyCVE-2021-219729.8Critical 6.5 U3nKB82374None

Impacted Product Suites that Deploy Response Matrix 3a Components:

ProductVersionRunning OnCVE IdentifierCVSSv3SeverityFixed VersionWorkaroundsAdditional Documentation
Cloud Foundation (vCenter Server)4.xAnyCVE-2021-219729.8Critical 4.2KB82374None
Cloud Foundation (vCenter Server)3.xAnyCVE-2021-219729.8Critical 3.10.1.2KB82374None
3b. ESXi OpenSLP heap-overflow vulnerability (CVE-2021-21974)

Description

OpenSLP as used in ESXi has a heap-overflow vulnerability. VMware has evaluated the severity of this issue to be in the Important severity range with a maximum CVSSv3 base score of 8.8.

Known Attack Vectors

A malicious actor residing within the same network segment as ESXi who has access to port 427 may be able to trigger the heap-overflow issue in OpenSLP service resulting in remote code execution.

Resolution

To remediate CVE-2021-21974 apply the updates listed in the ‘Fixed Version’ column of the ‘Response Matrix’ below to affected deployments.

Workarounds

Workarounds for CVE-2021-21974 have been listed in the ‘Workarounds’ column of the ‘Response Matrix’ below.

Additional Documentation

None.

Notes

[1] Per the Security Configuration Guides for VMware vSphere, VMware now recommends disabling the OpenSLP service in ESXi if it is not used. For more information, see our blog posting: https://blogs.vmware.com/vsphere/2021/02/evolving-the-vmware-vsphere-security-configuration-guides.html

[2] KB82705 documents steps to consume ESXi hot patch asynchronously on top of latest VMware Cloud Foundation (VCF) supported ESXi build. 

Acknowledgements

VMware would like to thank Lucas Leong (@_wmliang_) of Trend Micro’s Zero Day Initiative for reporting this issue to us.

Response Matrix:

ProductVersionRunning OnCVE IdentifierCVSSv3SeverityFixed VersionWorkaroundsAdditional Documentation
[1] ESXi7.0AnyCVE-2021-219748.8Important ESXi70U1c-17325551KB76372None
[1] ESXi6.7AnyCVE-2021-219748.8Important ESXi670-202102401-SGKB76372None
[1] ESXi6.5AnyCVE-2021-219748.8Important ESXi650-202102101-SGKB76372None

Impacted Product Suites that Deploy Response Matrix 3b Components:

ProductVersionRunning OnCVE IdentifierCVSSv3SeverityFixed VersionWorkaroundsAdditional Documentation
[1] Cloud Foundation (ESXi)4.xAnyCVE-2021-219748.8Important 4.2KB76372None
[1] Cloud Foundation (ESXi)3.xAnyCVE-2021-219748.8Important [2] KB82705KB76372None
3c. VMware vCenter Server updates address SSRF vulnerability in the vSphere Client (CVE-2021-21973)

Description

The vSphere Client (HTML5) contains an SSRF (Server Side Request Forgery) vulnerability due to improper validation of URLs in a vCenter Server plugin. VMware has evaluated the severity of this issue to be in the Moderate severity range with a maximum CVSSv3 base score of 5.3.

Known Attack Vectors

A malicious actor with network access to port 443 may exploit this issue by sending a POST request to vCenter Server plugin leading to information disclosure.

Resolution

To remediate CVE-2021-21973 apply the updates listed in the ‘Fixed Version’ column of the ‘Response Matrix’ below to affected deployments.

Workarounds

Workarounds for CVE-2021-21973 have been listed in the ‘Workarounds’ column of the ‘Response Matrix’ below.

Additional Documentation

None.

Notes

The affected vCenter Server plugin for vROPs is available in all default installations. vROPs does not need be present to have this endpoint available. Follow the workarounds KB to disable it.

Acknowledgements

VMware would like to thank Mikhail Klyuchnikov of Positive Technologies for reporting this issue to us.

Response Matrix:

ProductVersionRunning OnCVE IdentifierCVSSv3SeverityFixed VersionWorkaroundsAdditional Documentation
vCenter Server7.0AnyCVE-2021-219735.3Moderate 7.0 U1cKB82374None
vCenter Server6.7AnyCVE-2021-219735.3Moderate 6.7 U3lKB82374None
vCenter Server6.5AnyCVE-2021-219735.3Moderate 6.5 U3nKB82374None

Impacted Product Suites that Deploy Response Matrix 3c Components:

ProductVersionRunning OnCVE IdentifierCVSSv3SeverityFixed VersionWorkaroundsAdditional Documentation
Cloud Foundation (vCenter Server)4.xAnyCVE-2021-219735.3Moderate 4.2KB82374None
Cloud Foundation (vCenter Server)3.xAnyCVE-2021-219735.3Moderate 3.10.1.2KB82374None
4. References

VMware ESXi 7.0 ESXi70U1c-17325551
https://my.vmware.com/group/vmware/patch
https://docs.vmware.com/en/VMware-vSphere/7.0/rn/vsphere-esxi-70u1c.html

VMware ESXi 6.7 ESXi670-202102401-SG
https://my.vmware.com/group/vmware/patch
https://docs.vmware.com/en/VMware-vSphere/6.7/rn/esxi670-202102001.html

VMware ESXi 6.5 ESXi650-202102101-SG
https://my.vmware.com/group/vmware/patch
https://docs.vmware.com/en/VMware-vSphere/6.5/rn/esxi650-202102001.html

VMware vCloud Foundation 4.2
Downloads and Documentation:
https://docs.vmware.com/en/VMware-Cloud-Foundation/4.2/rn/VMware-Cloud-Foundation-42-Release-Notes.html


VMware vCloud Foundation 3.10.1.2
Downloads and Documentation:
https://docs.vmware.com/en/VMware-Cloud-Foundation/3.10.1/rn/VMware-Cloud-Foundation-3101-Release-Notes.html


vCenter Server 7.0.1 Update 1
Downloads and Documentation:
https://my.vmware.com/web/vmware/downloads/details?downloadGroup=VC70U1C&productId=974
https://docs.vmware.com/en/VMware-vSphere/7.0/rn/vsphere-vcenter-server-70u1c-release-notes.html

vCenter Server 6.7 U3l
Downloads and Documentation:
https://my.vmware.com/web/vmware/downloads/details?downloadGroup=VC67U3L&productId=742&rPId=57171
https://docs.vmware.com/en/VMware-vSphere/6.7/rn/vsphere-vcenter-server-67u3l-release-notes.html

vCenter Server 6.5 U3n
Downloads and Documentation:
https://my.vmware.com/web/vmware/downloads/details?downloadGroup=VC65U3N&productId=614&rPId=60942
https://docs.vmware.com/en/VMware-vSphere/6.5/rn/vsphere-vcenter-server-65u3n-release-notes.html

Mitre CVE Dictionary Links:
https://cve.mitre.org/cgi-bin/cvename.cgi?name=CVE-2021-21972
https://cve.mitre.org/cgi-bin/cvename.cgi?name=CVE-2021-21973
https://cve.mitre.org/cgi-bin/cvename.cgi?name=CVE-2021-21974

FIRST CVSSv3 Calculator:
CVE-2021-21972: https://www.first.org/cvss/calculator/3.1#CVSS:3.1/AV:N/AC:L/PR:N/UI:N/S:U/C:H/I:H/A:H
CVE-2021-21973: https://www.first.org/cvss/calculator/3.1#CVSS:3.1/AV:N/AC:L/PR:N/UI:N/S:U/C:L/I:N/A:N
CVE-2021-21974: https://www.first.org/cvss/calculator/3.1#CVSS:3.1/AV:A/AC:L/PR:N/UI:N/S:U/C:H/I:H/A:H

5. Change Log

2021-02-23 VMSA-2021-0002
Initial security advisory.

6. Contact

E-mail list for product security notifications and announcements:

https://lists.vmware.com/cgi-bin/mailman/listinfo/security-announce

This Security Advisory is posted to the following lists:  

security-announce@lists.vmware.com  

bugtraq@securityfocus.com  

fulldisclosure@seclists.org 

E-mail: security@vmware.com

PGP key at:

https://kb.vmware.com/kb/1055

VMware Security Advisories

https://www.vmware.com/security/advisories

VMware Security Response Policy

https://www.vmware.com/support/policies/security_response.html

VMware Lifecycle Support Phases

https://www.vmware.com/support/policies/lifecycle.html

VMware Security & Compliance Blog  

https://blogs.vmware.com/security

Twitter

Source :
https://www.vmware.com/security/advisories/VMSA-2021-0002.html

Is Once-Yearly Pen Testing Enough for Your Organization?

Any organization that handles sensitive data must be diligent in its security efforts, which include regular pen testing. Even a small data breach can result in significant damage to an organization’s reputation and bottom line.

There are two main reasons why regular pen testing is necessary for secure web application development:

  • Security: Web applications are constantly evolving, and new vulnerabilities are being discovered all the time. Pen testing helps identify vulnerabilities that could be exploited by hackers and allows you to fix them before they can do any damage.
  • Compliance: Depending on your industry and the type of data you handle, you may be required to comply with certain security standards (e.g., PCI DSS, NIST, HIPAA). Regular pen testing can help you verify that your web applications meet these standards and avoid penalties for non-compliance.

How Often Should You Pentest?#

Many organizations, big and small, have once a year pen testing cycle. But what’s the best frequency for pen testing? Is once a year enough, or do you need to be more frequent?

The answer depends on several factors, including the type of development cycle you have, the criticality of your web applications, and the industry you’re in.

You may need more frequent pen testing if:

You Have an Agile or Continuous Release Cycle#

Agile development cycles are characterized by short release cycles and rapid iterations. This can make it difficult to keep track of changes made to the codebase and makes it more likely that security vulnerabilities will be introduced.

If you’re only testing once a year, there’s a good chance that vulnerabilities will go undetected for long periods of time. This could leave your organization open to attack.

To mitigate this risk, pen testing cycles should align with the organization’s development cycle. For static web applications, testing every 4-6 months should be sufficient. But for web applications that are updated frequently, you may need to test more often, such as monthly or even weekly.

Your Web Applications Are Business-Critical#

Any system that is essential to your organization’s operations should be given extra attention when it comes to security. This is because a breach of these systems could have a devastating impact on your business. If your organization relies heavily on its web applications to do business, any downtime could result in significant financial losses.

For example, imagine that your organization’s e-commerce site went down for an hour due to a DDoS attack. Not only would you lose out on potential sales, but you would also have to deal with the cost of the attack and the negative publicity.

To avoid this scenario, it’s important to ensure that your web applications are always available and secure.

Non-critical web applications can usually get away with being tested once a year, but business-critical web applications should be tested more frequently to ensure they are not at risk of a major outage or data loss.

Your Web Applications Are Customer-Facing#

If all your web applications are internal, you may be able to get away with pen testing less frequently. However, if your web applications are accessible to the public, you must be extra diligent in your security efforts.

Web applications accessible to external traffic are more likely to be targeted by attackers. This is because there is a greater pool of attack vectors and more potential entry points for an attacker to exploit.

Customer-facing web applications also tend to have more users, which means that any security vulnerabilities will be exploited more quickly. For example, a cross-site scripting (XSS) vulnerability in an external web application with millions of users could be exploited within hours of being discovered.

To protect against these threats, it’s important to pen test customer-facing web applications more frequently than internal ones. Depending on the size and complexity of the application, you may need to pen test every month or even every week.

You Are in a High-Risk Industry#

Certain industries are more likely to be targeted by hackers due to the sensitive nature of their data. Healthcare organizations, for example, are often targeted because of the protected health information (PHI) they hold.

If your organization is in a high-risk industry, you should consider conducting pen testing more frequently to ensure that your systems are secure and meet regulatory compliance. This will help protect your data and reduce the chances of a costly security incident.

You Don’t Have Internal Security Operations or a Pen testing Team#

This might sound counterintuitive, but if you don’t have an internal security team, you may need to conduct pen testing more frequently.

Organizations that don’t have dedicated security staff are more likely to be vulnerable to attacks.

Without an internal security team, you will need to rely on external pen testers to assess your organization’s security posture.

Depending on the size and complexity of your organization, you may need to pen test every month or even every week.

You Are Focused on Mergers or Acquisitions#

During a merger or acquisition, there is often a lot of confusion and chaos. This can make it difficult to keep track of all the systems and data that need to be secured. As a result, it’s important to conduct pen testing more frequently during these times to ensure that all systems are secure.

M&A also means that you are adding new web applications to your organization’s infrastructure. These new applications may have unknown security vulnerabilities that could put your entire organization at risk.

In 2016, Marriott acquired Starwood without being aware that hackers had exploited a flaw in Starwood’s reservation system two years earlier. Over 500 million customer records were compromised. This placed Marriott in hot water with the British watchdog ICO, resulting in 18.4 million pounds in fines in the UK. According to Bloomberg, there is more trouble ahead, as the hotel giant could “face up to $1 billion in regulatory fines and litigation costs.”

To protect against these threats, it’s important to conduct pen testing before and after an acquisition. This will help you identify potential security issues so they can be fixed before the transition is complete.

The Importance of Continuous Pen Testing#

While periodic pen testing is important, it is no longer enough in today’s world. As businesses rely more on their web applications, continuous pen testing becomes increasingly important.

There are two main types of pen testing: time-boxed and continuous.

Traditional pen testing is done on a set schedule, such as once a year. This type of pen testing is no longer enough in today’s world, as businesses rely more on their web applications.

Continuous pen testing is the process of continuously scanning your systems for vulnerabilities. This allows you to identify and fix vulnerabilities before they can be exploited by attackers. Continuous pen testing allows you to find and fix security issues as they happen instead of waiting for a periodic assessment.

Continuous pen testing is especially important for organizations that have an agile development cycle. Since new code is deployed frequently, there is a greater chance for security vulnerabilities to be introduced.

Pen testing as a service models is where continuous pen testing shine. Outpost24’s PTaaS (Penetration-Testing-as-a-Service) platform enables businesses to conduct continuous pen testing with ease. The Outpost24 platform is always up-to-date with an organization’s latest security threats and vulnerabilities, so you can be confident that your web applications are secure.

  • Manual and automated pen testing: Outpost24’s PTaaS platform combines manual and automated pen testing to give you the best of both worlds. This means you can find and fix vulnerabilities faster while still getting the benefits of expert analysis.
  • Provides comprehensive coverage: Outpost24’s platform covers all OWASP Top 10 vulnerabilities and more. This means that you can be confident that your web applications are secure against the latest threats.
  • Is cost-effective: With Outpost24, you only pay for the services you need. This makes it more affordable to conduct continuous pen testing, even for small businesses.

The Bottom Line#

Regular pen testing is essential for secure web application development. Depending on your organization’s size, industry, and development cycle, you may need to revise your pen testing schedule.

Once-a-year pen testing cycle may be enough for some organizations, but for most, it is not. For business-critical, customer-facing, or high-traffic web applications, you should consider continuous pen testing.

Outpost24’s PTaaS platform makes it easy and cost-effective to conduct continuous pen testing. Contact us today to learn more about our platform and how we can help you secure your web applications.

Found this article interesting? Follow us on Twitter  and LinkedIn to read more exclusive content we post.

Source :
https://thehackernews.com/2023/01/is-once-yearly-pen-testing-enough-for.html
Ubiquiti UniFi – Backups and Migration

Migration is the act of moving your UniFi devices from one host device to another. This is useful when:

  • You are replacing your UniFi OS Console with a new one of the same model.
  • You are upgrading your UniFi OS Console to a different model (e.g., a UDM to a UDM Pro).
  • You are offloading devices to a dedicated UniFi OS Console (e.g., moving cameras from a Cloud Key or UDM to a UNVR).
  • You are moving from a self-hosted Network application to a UniFi OS Console.

Note: This is not meant to be used as a staging file for setting up multiple applications on different hosts.

Types of Backups

UniFi OS Backups

UniFi OS backup files contain your entire system configuration, including your UniFi OS Console, user, application, and device settings. Assuming Remote Access is enabled, UniFi OS Cloud backups are created weekly by default. You can also generate additional Cloud backups or download localized backups at any time. 

UniFi OS backups are useful when:

  • Restoring a prior system configuration after making network changes.
  • Migrating all applications to a new UniFi OS Console that is the same model as the original.

Note: Backups do not include data stored on an HDD, such as recorded Protect camera footage.

Application Backups

Each UniFi application allows you to back up and export its configuration. Application backups contain settings and device configurations specific to the respective application.

Application backups are useful when:

  • You want to restore a prior application configuration without affecting your other applications.
  • You want to migrate a self-hosted Network application to a UniFi OS Console.
  • You want to migrate your devices between two different UniFi OS Console models.
  • You need to back up a self-hosted Network application.

Note: Backups do not include data stored on an HDD, such as recorded Protect camera footage.

UniFi OS Console Migration

UniFi OS backups also allow you to restore your system configuration should you ever need to replace your console with one of the same model.

To do so:

  1. First, ensure that you have already generated a Cloud backup, or downloaded a local backup. If not, please do so in your UniFi OS Settings.
  2. Replace your old UniFi OS Console with the new one. All other network connections should remain unchanged.
  3. Restore your system configuration on the new UniFi OS Console using the backup file. This can be done either during the initial setup or afterwards  in your UniFi OS settings.

Note: Currently, UniFi OS backups cannot be used to perform cross-console migrations, but this capability will be added in a future update.

If you are migrating between two different console models, you will need to restore each application’s configuration with their respective backups. Please note, though, that these file(s) will not include UniFi OS users or settings. 

See below for more information on using the configuration backups during migrations.

Migrating UniFi Network

Before migrating, we recommend reviewing your Device Authentication Credentials found in your Network application’s System Settings. These can be used to recover adopted device(s) if the migration is unsuccessful.

Standard Migration

This is used when all devices are on the same Layer 2 network (i.e., all devices are on the same network/VLAN as the management application’s host device). 

Note: If you are a home user managing devices in a single location and have not used the set-inform command or other advanced Layer 3 adoption methods, this is most likely the method for you.

  1. Download the desired backup file (*.unf) from your original Network application’s System Settings
  2. Ensure that your new Network application is up to date. Backups cannot be used to restore older application versions.
  3. Replace your old UniFi OS Console with the new one. All other network connections should remain unchanged.
  4. Restore the backup file in the Network application’s System Settings.
  5. Ensure that all devices appear as online in the new application. If they do not, you can try Layer 3 adoption, or factory-reset and readopt your device(s) to the new Network application.

    If a  device continues to appear as Managed by Other, click on it to open its properties panel, then use its Device Authentication Credentials (from the original Network application’s host device) to perform an Advanced Adoption.

Migrating Applications That Manage Layer 3 Devices

This method is for users that have performed Layer 3 device adoption (i.e., devices are on a different network/VLAN than the application’s host device). This may also be useful when migrating to a Network application host that is NOT also a gateway.

  1. Download the desired backup file (*.unf) from your original Network application’s System Settings
  2. Enable the Override Inform Host field on the original Network application’s host device, then enter the IP address of the new host device. This will tell your devices where they should establish a connection in order to be managed. Once entered, all devices in the old application should appear as Managed by Other.

    Note: When migrating to a Cloud Console, you can copy the Inform URL from the Cloud Console’s dashboard. Be aware that you will need to remove the initial http:// and the ending :8080/inform
  3. Ensure that your new Network application is up to date. Backups cannot be used to restore older application versions.
  4. Restore the backup file in the Network application’s System Settings.
  5. Ensure that all devices appear as online in the new application. If they do not, you can try Layer 3 adoption, or factory-reset and readopt your device(s) to the new application.

    If a device continues to appear as Managed by Other, click on it to open its properties panel, then use its Device Authentication Credentials (from the original Network application’s host) to perform an Advanced Adoption.

Exporting Individual Sites from a Multi-Site Host

Certain Network application hosts (e.g., Cloud Key, Cloud Console, self-hosted Network applications) can manage multiple sites. Site exportation allows you to migrate specific sites from one multi-site host to another. To do so:

  1. Click Export Site in your Network application’s System Settings to begin the guided walkthrough.
  2. Select the device(s) you wish to migrate to your new Network application.
  3. Enter the Inform URL of your new host. This will tell your devices where they should establish a connection in order to be managed. Once entered, all devices in the old application should appear as Managed by Other in the new one.

    Note: When migrating to a Cloud Console, you can copy the Inform URL from the Cloud Console’s dashboard. Be aware that you will need to remove the initial http:// and the ending :8080/inform.
  4. Go to your new Network application and select Import Site from the Site switcher located in the upper-left corner of your dashboard.

    Note: You may need to enable Multi-Site Management in your System Settings.
  5. Ensure that all devices appear as online in the new application. If they do not, you try Layer 3 adoption, or factory-reset and readopt your device(s) to the new application.

    If a device continues to appear as Managed by Other, click on it to open its properties panel, then use its Device Authentication Credentials (from the original Network application’s host) to perform an Advanced Adoption.

Migrating UniFi Protect

We recommend saving your footage with the Export Clips function before migrating. Although we provide HDD migration instructions, it is not an officially supported procedure due to nuances in the RAID array architecture. 

Standard Migration

  1. Download the desired backup file (*.zip) from the original Protect application’s settings. 
  2. Ensure that your new Protect application is up to date. Backups cannot be used to restore older application firmware.
  3. Replace your old UniFi OS Console with the new one. All other camera connections should remain unchanged.
  4. Restore the backup file in the Protect application’s settings.

HDD Migration

Full HDD migration is not officially supported; however, some users have been able to perform successful migrations by ensuring consistent ordering when ejecting and reinstalling drives  into their new console to preserve RAID arrays.

Note: This is only possible if both UniFi OS Consoles are the same model.

  1. Remove the HDDs from the old console. Record which bay each one was installed in, but do not install them in the new console yet.
  2. Turn on the new console and complete the initial setup wizard. Do not restore a Protect application or Cloud backup during initial setup!
  3. Upgrade the new console and its Protect application to a version that is either the same or newer than the original console.
  4. Shut down the new console, and then install the HDDs in the same bays as the original console.
  5. Turn on the new console again. The Protect application should start with its current configuration intact, and all exported footage should be accessible.

Source :
https://help.ui.com/hc/en-us/articles/360008976393-UniFi-Backups-and-Migration

Ubiquiti UniFi Protect – G4 Doorbell Wiring Diagrams

We recommend installing the G4 Doorbell with the standard wiring of one G4 Doorbell, one chime and one transformer (or the G4 Doorbell Power Supply, available on the US store only); or no chime with the chime function disabled.

More complex installations are supported, but correct wiring may depend on deployment-specific characteristics not covered in these diagrams. Any advanced configurations should be conducted by a qualified electrician.

Before you begin the wiring process, separate the G4 Doorbell wires into left and right as shown in the images below.

mceclip9.png
mceclip10.png

One G4 Doorbell and one transformer

mceclip3.png

Warning: If there is no chime present, you must disable the chime function during setup to avoid damaging the device.

One G4 Doorbell, one transformer and one chime

mceclip4.png

One G4 Doorbell, one doorbell, one transformer and one chime

mceclip5.png

Two G4 Doorbells, one transformer and one chime

mceclip6.png

Two G4 Doorbells, two transformers and one chime

mceclip7.png

One G4 Doorbell, one transformer and two chimes

mceclip8.png

Source :
https://help.ui.com/hc/en-us/articles/4999240734103-UniFi-Protect-G4-Doorbell-Wiring-Diagrams

How To Install Kimai Time Tracking App in Docker

In this guide, I’ll show you how to deploy the open source time tracking app Kimai in a Docker container. Kimai is free, browser-based (so it’ll work on mobile devices), and is extremely flexible for just about every use case.

It has a stopwatch feature where you can start/stop/pause a worklog timer. Then, it accumulates the total into daily, weekly, monthly or yearly reports, which can be exported or printed as invoices.

It supports single or multi users, so you can even track time for your entire department. All statistics are visible on a beautiful dashboard, which makes historical time-tracking a breeze.


Why use Kimai Time Tracker?

For my scenario, I am salaried at work. However, since I’m an IT Manager, I often find myself working after hours or on weekends to patch servers, reboot systems, or perform system and infrastructure upgrades. Normally, I use a pen and paper or a notetaking app to track overtime, although this is pretty inefficent. Sometimes I forget when I started or stopped, or if I’ve written down the time on a notepade at home, I can’t view that time at work.

And when it comes to managing a team of others who also perform after hours maintenance, it becomes even harder to track their total overtime hours.

Over the past few weeks, I stumbled across Kimai and really love all the features. Especially when I can spin it up in a docker or docker compose container!

If you don’t have Docker installed, follow this guide: https://smarthomepursuits.com/how-to-install-docker-ubuntu/

If you don’t have Docker-Compose installed, follow this guide: https://smarthomepursuits.com/how-to-install-portainer-with-docker-in-ubuntu-20-04/

In this tutorial, we will be installing Kimai for 1 user using standard Docker run commands. Other users can be added from the webui after initial setup.


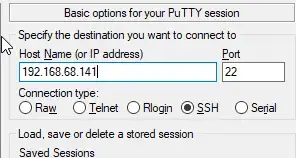
Step 1: SSH into your Docker Host

Open Putty and SSH into your server that is running docker and docker compose.


Step 2: Create Kimai Database container

Enter the command below to create a new database to use with Kimai. You can copy and paste into Putty by right-clicking after copy, or CTRL+SHIFT+V into other ssh clients.

sudo docker run --rm --name kimai-mysql \
    -e MYSQL_DATABASE=kimai \
    -e MYSQL_USER=kimai \
    -e MYSQL_PASSWORD=kimai \
    -e MYSQL_ROOT_PASSWORD=kimai \
    -p 3399:3306 -d mysql

Step 3: Start Kimai

Next, start the Kimai container using the already created database. If you look at the Kimai github page, you’ll notice that this isn’t the same command as what shows there.

Here’s the original command (which I’m not using):

docker run --rm --name kimai-test -ti -p 8001:8001 -e DATABASE_URL=mysql://kimai:kimai@${HOSTNAME}:3399/kimai kimai/kimai2:apache

And here’s my command. I had to explicitly add TRUSTED_HOSTS, the ADMINMAIL and ADMINPASS, and change the ${HOSTNAME} to the IP address of your docker host. Otherwise, I wasn’t able to access Kimai from other computers on my local network.

  • Green = change port here if already in use
  • Red = Add the IP address of your docker host
  • Orange = Manually specifying the admin email and password. This is what you’ll use to log in with.
  • Blue = Change to docker host IP address
sudo docker run --rm --name kimai -ti -p 8001:8001 -e TRUSTED_HOSTS=192.168.68.141,localhost,127.0.0.1 -e ADMINMAIL=example@gmail.com -e ADMINPASS=8charpassword -e DATABASE_URL=mysql://kimai:kimai@192.168.68.141:3399/kimai kimai/kimai2:apache

Note that 8 characters is the minimum for the password.


Step 4: Log In via Web Browser

Next, Kimai should now be running!

To check, you can go to your http://dockerIP:8001 in a web browser (192.168.68.141:8001)

Then simply log in with the credentials you created.


Step 5: Basic Setup

This app is extremely powerful and customizeable, so I won’t be going over all the available options since everyone has different needs.

Like I mentioned earlier, I’m using Kimai for overtime tracking only, so the first step for me is to create a new “customer”.

Create a Customer

This is sort of unintuitive, but you need to create a customer before you can start tracking time to a project. I’m creating a generic “Employee” customer.

Click Customers on the left sidebar, then click the + button in the top right corner.

Create A Project

Click Projects on the left sidebar:

Then click the + button in the top right corner.

Add a name, choose the customer you just created, and then choose a date range.

Create An Activity

Click Activity on the left, then create an activity. I’m calling mine Overtime Worked and assigning it to the Project “Overtime 2021” I just created.


Step 6: Change “Timetracking Mode” to Time-clock

Click Settings. Under Timetracking mode, change it to Time-Clock. This will let you click the Play button to start/stop time worked vs having to manually enter start and stop times.


Step 7: Start Tracking Time!

To start tracking time, simply click the timer widget in the top right corner.

A screen will pop up asking you what project and activity you want to apply the time to.

The selfhosted stopwatch will start tracking time right after. You can then view the timesheets for yourself under the My Times section or for all users under the Timesheets or Reporting tabs.


Wrapping Up

Hopefully this guide helped you get Kimai installed and setup! If you have any questions, feel free to let me know in the comments below and I’ll do my best to help you out.


My Homelab Equipment

Here is some of the gear I use in my Homelab. I highly recommend each of them.

The full list of server components I use can be found on my Equipment List page.

Source :
https://smarthomepursuits.com/how-to-install-kimai-time-tracking-app-in-docker/

The 12 Most Impactful Internet Outages

An internet outage can have major consequences for a digital business, especially when it happens during peak usage times and on holidays. Outages can lead to revenue loss, complaints, and customer churn. 

Of course, internet outages regularly impact companies across all verticals, including some of the largest internet companies in the world. And they can happen when you least expect them. 

Read on to learn about some of the most impactful internet outages to date and some steps you can take to keep your business out of harm’s way.

Historical Internet Outages You Need to Know About 

1. Amazon Web Services 

Amazon Web Services (AWS) experienced a major outage in December 2021, lasting for several hours. The outage impacted operations for many leading businesses, including Netflix, Disney, Spotify, DoorDash, and Venmo. 

Amazon blames the outage on an automation error causing multiple systems to act abnormally. The outage also prevented users from accessing some cloud services. 

This outage proved the largest and safest cloud providers are also susceptible to downtime.

2. Facebook 

Facebook as well suffered a major outage in 2021, leaving billions of users unable to access its services, including its main social network, Instagram, and WhatsApp. 

According to Facebook, the cause of the outage was a configuration change on its backbone routers responsible for transmitting traffic across its data centers. The outage lasted roughly six hours, an eternity for a social network.

3. Fastly 

Cloud service provider Fastly had its network go down in June 2021, taking down several sizeable global news websites, including the New York Times and CNN. It also impacted retailers like Target and Amazon, and several other organizations.

The outage resulted from a faulty software update, stemming from a misconfiguration, causing disruptions across multiple servers.  

4. British Airways 

British Airways experienced a massive IT failure in 2017 during one of the busiest travel weekends in the United Kingdom. 

This event created a nightmare scenario for the organization and its customers. Altogether, it grounded 672 flights and stranded tens of thousands of customers.

According to the company, the outage ensued when an engineer disconnected the data center’s power supply. A massive power surge came next, bringing the business’s network down in the process.

5. Google

Google had a major service outage in 2020. It only lasted about forty-five minutes, but it still impacted users worldwide. 

Services including Gmail, YouTube, and Google Calendar all crashed. So did Google Home apps. The outage also impacted third-party applications using Google for authentication.

The issue happened due to inadequate storage capacity for the company’s authentication services.

6.  Dyn

Undoubtedly, one of the biggest distributed denial of service (DDoS) attacks in history occurred in 2016 against Dyn, which was a major backbone provider.

The attack occurred in three waves, overwhelming the company’s servers. As a result, many internet users were unable to access partnering platforms like Twitter, Spotify, and Netflix. 

7. Verizon Fios

Verizon had a major internet outage in January 2021, which disrupted tens of thousands of customers along the East Coast.

While the internet outage lasted only about an hour, Verizon experienced a sharp drop in traffic volume. Naturally, many customers complained about the loss of service. 

At first, the company reported the incident was the result of someone cutting fiber cables. However, it was unrelated and turned out to be a “software issue” during routine network maintenance activities. 

8. Microsoft 

Another major internet outage occurred at Microsoft when its Azure service went under in December 2021. Azure’s Active Directory service crashed for about ninety minutes. 

Compared to some other outages, this one was relatively small. Nonetheless, it prevented users from signing in to Microsoft services such as Office 365. Although applications remained online, users couldn’t access them, making this a major productivity killer for many organizations worldwide.

9. Comcast

There was an internet outage at Comcast in November 2021, which happened when its San Francisco backbone shut down for about two hours.

Following the outage, a broader issue occurred, spanning multiple U.S. cities, including hubs like Philadelphia and Chicago. Several thousand customers lost service, leaving them unable to access basic network functionality during the height of the pandemic. 

10. Akamai Edge DNS

Akamai, a global content delivery provider, experienced an outage with its DNS service in 2021. The Akamai outage resulted from a faulty software configuration update activating a bug in its Secure Edge Content Delivery Network. 

In a similar fashion to other attacks against service providers, Akamai’s outage caused widespread damage. Other websites—including American Airlines, Fox News, and Steam—all experienced performance issues following the incident.

11. Cox Communications

Cox Communications reported a major internet outage in March 2022, impacting nearly seven thousand customers in the Las Vegas region. 

The problem resulted from an NV Energy backhoe damaging a transmission line and triggering a power event. The surge caused a cable modem to reset, and many customers tried to reconnect simultaneously. As a result, it took several hours for service to resume. 

12.  Slack

The recent Slack outage in  January 2021 created havoc for distributed workers who rely on the platform for communication and collaboration. 

The platform’s outage impacted organizations across the US, UK, Germany, Japan, and India, with interruptions occurring for about two and a half hours. Slack says the issue came from scaling problems on the AWS Transit Gateway, which couldn’t accommodate a spike in traffic. 

Best Practices for Avoiding Internet Outages

At the end of the day, there’s nothing you can do to prevent outages entirely, especially if your business relies on multiple third-party systems. Eventually, your company or a partner will experience some level of service disruption.   It’s best to plan for them and, where possible, enable systems to ‘fail gracefully.’ 

As part of your resiliency planning, here are some steps to mitigate damage, maximize uptime, and keep your organization safe, along with some best practices to help you avoid disruptions from network and connectivity issues. 

Set Up a Backup Internet Solution

It’s impossible to protect your business from local internet outages completely. They can stem from issues like local construction, service disruptions, and more. 

Consider setting up a backup internet solution as a workaround, so you never lose connectivity. For example, you may choose to combine broadband with a wireless failover solution.

Consider a Multi-Cloud Strategy

If your business is in the cloud, it’s a good idea to explore a multi-cloud strategy. By spreading your workloads across multiple cloud providers, you can prevent cloud service disruptions from knocking your digital applications offline. This approach can also improve uptime and resiliency.

Use Website Performance and Availability Monitoring

One of the best ways to protect your business is to use website performance and availability monitoring. It provides real-time visibility into how end users are interacting with and experiencing your website.

A robust website performance and availability monitoring solution can provide actionable insights into the health and stability of your website. As a result, you can track uptime and performance over time and troubleshoot issues when they occur.

The Pingdom Approach to Website Performance Monitoring

SolarWinds® Pingdom® provides real-time and historical end-user experience monitoring, giving your team deep visibility from a single pane of glass. With Pingdom, it’s possible to protect against the kind of outages helping your company make headlines for the wrong reasons.

When you’re ready to jump in, try Pingdom by requesting a free trial today

This post was written by Justin Reynolds. Justin is a freelance writer who enjoys telling stories about how technology, science, and creativity can help workers be more productive. In his spare time, he likes seeing or playing live music, hiking, and traveling.

Source :
https://www.pingdom.com/outages/internet-outages-the-12-most-impactful/

LockBit 3.0 ‘Black’ attacks and leaks reveal wormable capabilities and tooling

Reverse-engineering reveals close similarities to BlackMatter ransomware, with some improvements

A postmortem analysis of multiple incidents in which attackers eventually launched the latest version of LockBit ransomware (known variously as LockBit 3.0 or ‘LockBit Black’), revealed the tooling used by at least one affiliate. Sophos’ Managed Detection and Response (MDR) team has observed both ransomware affiliates and legitimate penetration testers use the same collection of tooling over the past 3 months.

Leaked data about LockBit that showed the backend controls for the ransomware also seems to indicate that the creators have begun experimenting with the use of scripting that would allow the malware to “self-spread” using Windows Group Policy Objects (GPO) or the tool PSExec, potentially making it easier for the malware to laterally move and infect computers without the need for affiliates to know how to take advantage of these features for themselves, potentially speeding up the time it takes them to deploy the ransomware and encrypt targets.

A reverse-engineering analysis of the LockBit functionality shows that the ransomware has carried over most of its functionality from LockBit 2.0 and adopted new behaviors that make it more difficult to analyze by researchers. For instance, in some cases it now requires the affiliate to use a 32-character ‘password’ in the command line of the ransomware binary when launched, or else it won’t run, though not all the samples we looked at required the password.

We also observed that the ransomware runs with LocalServiceNetworkRestricted permissions, so it does not need full Administrator-level access to do its damage (supporting observations of the malware made by other researchers).

Most notably, we’ve observed (along with other researchers) that many LockBit 3.0 features and subroutines appear to have been lifted directly from BlackMatter ransomware.

Is LockBit 3.0 just ‘improved’ BlackMatter?

Other researchers previously noted that LockBit 3.0 appears to have adopted (or heavily borrowed) several concepts and techniques from the BlackMatter ransomware family.

We dug into this ourselves, and found a number of similarities which strongly suggest that LockBit 3.0 reuses code from BlackMatter.

Anti-debugging trick

Blackmatter and Lockbit 3.0 use a specific trick to conceal their internal functions calls from researchers. In both cases, the ransomware loads/resolves a Windows DLL from its hash tables, which are based on ROT13.

It will try to get pointers from the functions it needs by searching the PEB (Process Environment Block) of the module. It will then look for a specific binary data marker in the code (0xABABABAB) at the end of the heap; if it finds this marker, it means someone is debugging the code, and it doesn’t save the pointer, so the ransomware quits.

After these checks, it will create a special stub for each API it requires. There are five different types of stubs that can be created (randomly). Each stub is a small piece of shellcode that performs API hash resolution on the fly and jumps to the API address in memory. This adds some difficulties while reversing using a debugger.

Screenshot of disassembler code
LockBit’s 0xABABABAB marker

SophosLabs has put together a CyberChef recipe for decoding these stub shellcode snippets.

Output of a CyberChef recipe
The first stub, as an example (decoded with CyberChef)

Obfuscation of strings

Many strings in both LockBit 3.0 and BlackMatter are obfuscated, resolved during runtime by pushing the obfuscated strings on to the stack and decrypting with an XOR function. In both LockBit and BlackMatter, the code to achieve this is very similar.

Screenshot of disassembler code
BlackMatter’s string obfuscation (image credit: Chuong Dong)

Georgia Tech student Chuong Dong analyzed BlackMatter and showed this feature on his blog, with the screenshot above.

Screenshot of disassembler code
LockBit’s string obfuscation, in comparison

By comparison, LockBit 3.0 has adopted a string obfuscation method that looks and works in a very similar fashion to BlackMatter’s function.

API resolution

LockBit uses exactly the same implementation as BlackMatter to resolve API calls, with one exception: LockBit adds an extra step in an attempt to conceal the function from debuggers.

Screenshot of disassembler code
BlackMatter’s dynamic API resolution (image credit: Chuong Dong)

The array of calls performs precisely the same function in LockBit 3.0.

Screenshot of disassembler code
LockBit’s dynamic API resolution

Hiding threads

Both LockBit and BlackMatter hide threads using the NtSetInformationThread function, with the parameter ThreadHideFromDebugger. As you probably can guess, this means that the debugger doesn’t receive events related to this thread.

Screenshot of disassembler code
LockBit employs the same ThreadHideFromDebugger feature as an evasion technique

Printing

LockBit, like BlackMatter, sends ransom notes to available printers.

Screenshot of disassembler code
LockBit can send its ransom notes directly to printers, as BlackMatter can do

Deletion of shadow copies

Both ransomware will sabotage the infected computer’s ability to recover from file encryption by deleting the Volume Shadow Copy files.

LockBit calls the IWbemLocator::ConnectServer method to connect with the local ROOT\CIMV2 namespace and obtain the pointer to an IWbemServices object that eventually calls IWbemServices::ExecQuery to execute the WQL query.

Screenshot of disassembler code
BlackMatter code for deleting shadow copies (image credit: Chuong Dong)

LockBit’s method of doing this is identical to BlackMatter’s implementation, except that it adds a bit of string obfuscation to the subroutine.

Screenshot of disassembler code
LockBit’s deletion of shadow copies

Enumerating DNS hostnames

Both LockBit and BlackMatter enumerate hostnames on the network by calling NetShareEnum.

Screenshot of disassembler code
BlackMatter calls NetShareEnum() to enumerate hostnames… (image credit: Chuong Dong)

In the source code for LockBit, the function looks like it has been copied, verbatim, from BlackMatter.

Screenshot of disassembler code
…as does LockBit

Determining the operating system version

Both ransomware strains use identical code to check the OS version – even using the same return codes (although this is a natural choice, since the return codes are hexadecimal representations of the version number).

Screenshot of disassembler code
BlackMatter’s code for checking the OS version (image credit: Chuong Dong)
Screenshot of disassembler code
LockBit’s OS enumeration routine

Configuration

Both ransomware contain embedded configuration data inside their binary executables. We noted that LockBit decodes its config in a similar way to BlackMatter, albeit with some small differences.

For instance, BlackMatter saves its configuration in the .rsrc section, whereas LockBit stores it in .pdata

Screenshot of disassembler code
BlackMatter’s config decryption routine (image credit: Chuong Dong)

And LockBit uses a different linear congruential generator (LCG) algorithm for decoding.

Screenshot of disassembler code
LockBit’s config decryption routine

Some researchers have speculated that the close relationship between the LockBit and BlackMatter code indicates that one or more of BlackMatter’s coders were recruited by LockBit; that LockBit bought the BlackMatter codebase; or a collaboration between developers. As we noted in our white paper on multiple attackers earlier this year, it’s not uncommon for ransomware groups to interact, either inadvertently or deliberately.

Either way, these findings are further evidence that the ransomware ecosystem is complex, and fluid. Groups reuse, borrow, or steal each other’s ideas, code, and tactics as it suits them. And, as the LockBit 3.0 leak site (containing, among other things, a bug bounty and a reward for “brilliant ideas”) suggests, that gang in particular is not averse to paying for innovation.

LockBit tooling mimics what legitimate pentesters would use

Another aspect of the way LockBit 3.0’s affiliates are deploying the ransomware shows that they’re becoming very difficult to distinguish from the work of a legitimate penetration tester – aside from the fact that legitimate penetration testers, of course, have been contracted by the targeted company beforehand, and are legally allowed to perform the pentest.

The tooling we observed the attackers using included a package from GitHub called Backstab. The primary function of Backstab is, as the name implies, to sabotage the tooling that analysts in security operations centers use to monitor for suspicious activity in real time. The utility uses Microsoft’s own Process Explorer driver (signed by Microsoft) to terminate protected anti-malware processes and disable EDR utilities. Both Sophos and other researchers have observed LockBit attackers using Cobalt Strike, which has become a nearly ubiquitous attack tool among ransomware threat actors, and directly manipulating Windows Defender to evade detection.

Further complicating the parentage of LockBit 3.0 is the fact that we also encountered attackers using a password-locked variant of the ransomware, called lbb_pass.exe , which has also been used by attackers that deploy REvil ransomware. This may suggest that there are threat actors affiliated with both groups, or that threat actors not affiliated with LockBit have taken advantage of the leaked LockBit 3.0 builder. At least one group, BlooDy, has reportedly used the builder, and if history is anything to go by, more may follow suit.

LockBit 3.0 attackers also used a number of publicly-available tools and utilities that are now commonplace among ransomware threat actors, including the anti-hooking utility GMER, a tool called AV Remover published by antimalware company ESET, and a number of PowerShell scripts designed to remove Sophos products from computers where Tamper Protection has either never been enabled, or has been disabled by the attackers after they obtained the credentials to the organization’s management console.

We also saw evidence the attackers used a tool called Netscan to probe the target’s network, and of course, the ubiquitous password-sniffer Mimikatz.

Incident response makes no distinction

Because these utilities are in widespread use, MDR and Rapid Response treats them all equally – as though an attack is underway – and immediately alerts the targets when they’re detected.

We found the attackers took advantage of less-than-ideal security measures in place on the targeted networks. As we mentioned in our Active Adversaries Report on multiple ransomware attackers, the lack of multifactor authentication (MFA) on critical internal logins (such as management consoles) permits an intruder to use tooling that can sniff or keystroke-capture administrators’ passwords and then gain access to that management console.

It’s safe to assume that experienced threat actors are at least as familiar with Sophos Central and other console tools as the legitimate users of those consoles, and they know exactly where to go to weaken or disable the endpoint protection software. In fact, in at least one incident involving a LockBit threat actor, we observed them downloading files which, from their names, appeared to be intended to remove Sophos protection: sophoscentralremoval-master.zip and sophos-removal-tool-master.zip. So protecting those admin logins is among the most critically important steps admins can take to defend their networks.

For a list of IOCs associated with LockBit 3.0, please see our GitHub.

Acknowledgments

Sophos X-Ops acknowledges the collaboration of Colin Cowie, Gabor Szappanos, Alex Vermaning, and Steeve Gaudreault in producing this report.

Source :
https://news.sophos.com/en-us/2022/11/30/lockbit-3-0-black-attacks-and-leaks-reveal-wormable-capabilities-and-tooling/

Best Practices for Securing Your Network from Ransomware

Discover the seven network security measures that can help mitigate the risk of a ransomware attack.

66% of organizations were hit by ransomware last year* demonstrating that adversaries have become considerably more capable at executing attacks at scale than ever before. 

Modern attacks leverage legitimate IT tools such as Remote Desktop Protocol (RDP) to gain access to networks, making initial detection notoriously difficult. The root of the problem is that there’s too much implicit trust in the use of these tools which has repeatedly proven unwise.  

Implementing robust network security measures is a sure-fire way to mitigate this risk. In our new whitepaper, Best Practices for Securing Your Network from Ransomware, and in this article, we share practical network security tips to help elevate your ransomware protection. 

1. Micro-segment your network

Micro-segmenting allows you to limit the lateral movement of threats. One way to achieve this is to create small zones or VLANs and connect them via managed switches and a firewall to apply anti-malware and IPS protection between segments. This lets you identify and block threats attempting to move laterally across your network. 

2. Replace remote-access VPN with a Zero Trust Network Access solution (ZTNA)

ZTNA is the modern replacement for remote-access VPN. It eliminates the inherent trust and broad access that VPN provides, instead using the principles of Zero Trust: trust nothing, verify everything. To learn more about the benefits of ZTNA over VPN, read our article here

3. Implement the strongest possible protection

Always deploy the highest level of protection on your firewall, endpoints, servers, mobile devices, and remote access tools. In particular: 

  • Ensure your firewall has TLS 1.3 inspection, next-gen IPS, and streaming DPI with machine learning and sandboxing for protection from the latest zero-day threats 
  • Ensure your endpoints have modern next-gen protection capabilities to guard against credential theft, exploits, and ransomware 

4. Reduce the surface area of cyberattacks

We recommend that you review your firewall rules and eliminate any remote access or RDP system access through VPN, NAT, or port-forwarding, and ensure that any traffic flows are properly protected. Eliminating exposure from remote access goes a long way in reducing the number of in-roads for attackers to launch ransomware attacks. 

5. Keep your firmware and software patched and up-to-date 

This is important for both your network infrastructure (such as your firewall or remote-access software or clients) and your systems given that every update includes important security patches for previously discovered vulnerabilities.  

6. Use multi-factor authentication (MFA)

Ensure your network operates on a zero-trust model where every user and device has to continually earn trust by verifying their identity. Also, enforce a strong password policy and consider adopting authentication solutions like Windows Hello for Business.  

7. Instantly respond to cyberattacks

Use automation technologies and human expertise to accelerate cyber incident response and remediation. Ensure your network security infrastructure helps you automatically respond to active attacks so you can isolate a compromised host before it can cause serious damage.  

An increasingly popular way to achieve this is via a managed detection and response (MDR) service. MDR is a fully managed, 24/7 service delivered by experts who specialize in detecting and responding to cyberattacks that technology solutions alone cannot prevent.  To learn more on the benefits of MDR, read our article here. 

Learn more

To explore these best practices in greater detail and to learn how Sophos network security solutions elevate your ransomware protection, download our whitepaper here

Sophos provides everything you need to fully secure your network from attacks, including firewalls, ZTNA, switches, wireless, remote-edge devices, messaging protection, MDR, next-gen endpoint protection, EDR and XDR. Plus, everything’s managed via a single cloud management console — Sophos Central — and works together to deliver Synchronized Security and cross-product threat detection and response. 

For more information and to discuss how Sophos can help you, speak with one of our advisors or visit www.sophos.com today. 

* The State of Ransomware 2022, Sophos

Source :
https://news.sophos.com/en-us/2022/11/28/best-practices-for-securing-your-network-from-ransomware/

Industry 4.0: CNC Machine Security Risks Part 3

In this final installation of our three-part blog series, we lay out countermeasures that enterprises can do to protect their machines. We’ll also discuss our responsible disclosure as well as the feedback we got from the vendors we evaluated.

Countermeasures

We found that only two of the four vendors analyzed support authentication. Neither of them has authentication enabled by default, which leaves the machines vulnerable to attacks by malicious users. Enabling authentication is essential for protecting Industry 4.0 features from abuse.

Resource access control systems are important for reducing the impact of attacks. Many technologies allow access to all a controller’s resources, which can be dangerous. A correct approach is to adopt resource access control systems that grant limited access. This will help to ensure that only authorized users have access to the controller’s resources and that these resources are protected from unauthorized access.

When it comes to integrators and end users, we suggest these countermeasures:

  • Context-aware industrial intrusion prevention and detection systems (IPS/IDSs): These devices, which have recently seen a surge in popularity in the catalogues of security vendors, are equipped with network engines that can capture real-time traffic associated with industrial protocols to detect attacks.
  • Network segmentation: Correct network architecting is of great importance. As our research has revealed, all the tested machines expose interfaces that could be abused by miscreants.
  • Correct patching: Modern CNC machines are equipped with full-fledged operating systems and complex software, which might inevitably contain security vulnerabilities. This was indeed the case with the machines that we tested.

Responsible Disclosure

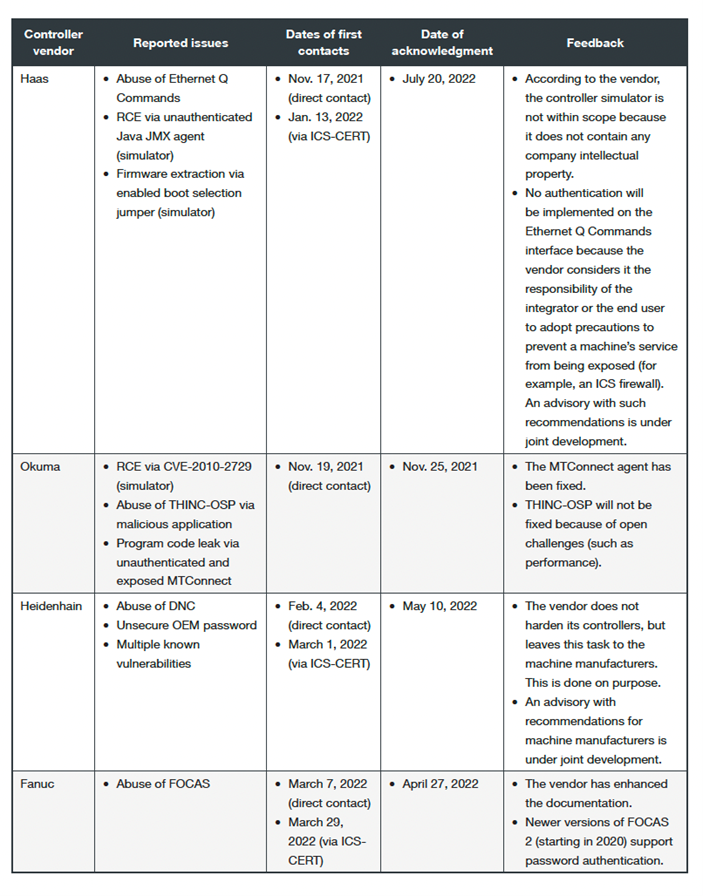
We contacted the affected vendors while tackling controllers sequentially, with our first contact in November 2021 and the last one in March 2022. The Industrial Control Systems Cyber Emergency Response Team (ICS CERT) at Cybersecurity & Infrastructure Security Agency extended invaluable help during the discussion which we are grateful for.

disclosure-process
Table 1. A summary of our responsible disclosure process

As of this writing, all four vendors have replied to our concerns and most of them have addressed, to varying degrees, our findings in a reasonable time frame. More importantly, all of them have expressed interest in our research and have decided to improve either their documentation or their communication efforts with their machine manufacturers, with the final effort of offering end users more secure solutions.

To learn more about the security risks faced by CNC machines, download our comprehensive report here.

Source :
https://www.trendmicro.com/en_us/research/22/l/cnc-machine-security-risks-part-3.html

Industry 4.0: CNC Machine Security Risks Part 2

In part one, we discussed what numerical control machines do and their basic concepts. These concepts are important to understand the machines better, offering a wider view of their operations. We also laid out how we evaluated the chosen vendors for our research.

For this blog, we will continue discussing our evaluated vendors and highlighting findings that we discovered during our research.

Haas

haas-simulator
Figure 1. The Haas simulator we used for preliminary testing (left) and the Haas CNC machine (Super Mini Mill 2) by Celada we used for verification (right)

Haas was the first vendor we focused on because of the fast availability of its controller. We began our analysis by conducting port scanning on the controller simulator and identifying the protocols exposed by the controller. After that, we evaluated the options with which an attacker could abuse the protocols to perform attacks aimed at the security of the machine and verified these attacks in practice on a real-world machine installation.

Okuma

okuma-simulator
Figure 2. The Okuma simulator we used for the development of the malicious application and during the initial testing

Okuma stands out in the market of CNC controllers for one interesting feature: the modularity of its controller. While the vendor offers in the device’s simplest form a tiny controller, it also provides a mechanism, called THINC API, to highly customize the functionalities of the controller. With this technology, any developer can implement a program that, once installed, runs in the context of the controller, in the form of an extension. This approach is very similar to how a mobile application, once installed, can extend a smartphone’s functionalities.

Heidenhain

the-hardford-5a-65e-machine
Figure 3. The Hartford 5A-65E machine, running on a Heidenhain TNC 640 controller, that we used in our experiments at Celada

In the spirit of the Industry 4.0 paradigm, Heidenhain offers the Heidenhain DNC interface to integrate machines on modern, digital shop floors. Among the many scenarios, Heidenhain DNC enables the automatic exchange of data with machine and production data acquisition (MDA/PDA) systems, higher level enterprise resource planning (ERP) and manufacturing execution systems (MESs), inventory management systems, computer-aided design and manufacturing (CAD/CAM) systems, production activity control systems, simulation tools, and tool management systems

In our evaluation, we had access to the library provided by Heidenhain to the integrators to develop interfaces for the controller. The manufacturer provides this library, called RemoTools SDK,35 to selected partners only.

Fanuc

the-yasuda-ymc
Figure 4. The Yasuda YMC 430 + RT10 machine, running on a Fanuc controller, that we used in our experiments at the Polytechnic University of Milan

Like Heidenhain, Fanuc offers an interface, called FOCAS,36 for the integration of CNC machines in smart network environments. Even though this technology offers a restricted set of remote-call possibilities compared with the other vendors’ (that is, a limited number of management features), our experiments showed that a miscreant could potentially conduct attacks like damage, DoS, and hijacking.

What we found

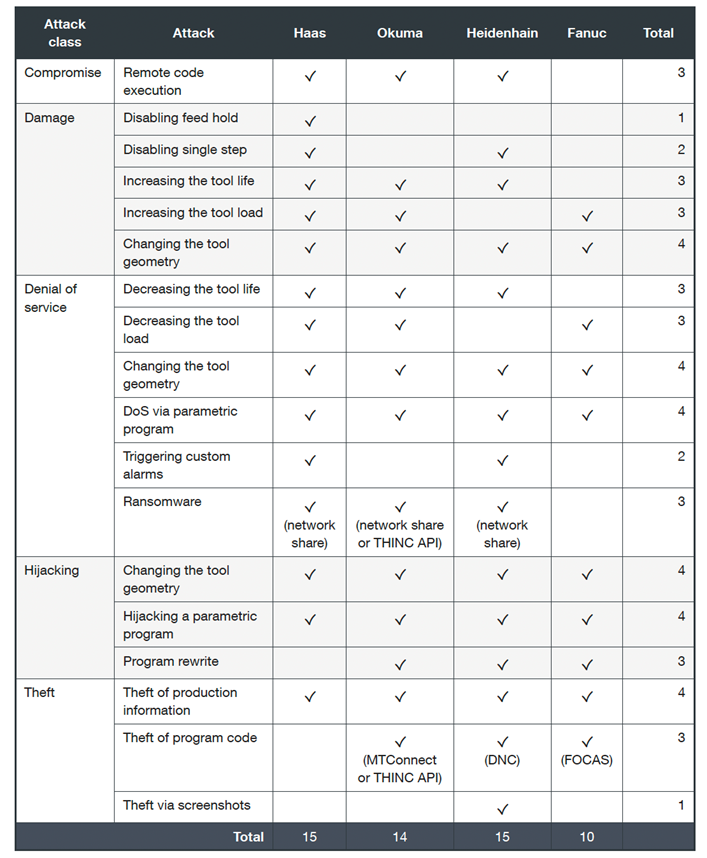
As our evaluation identified 18 different attacks (or variations), we grouped them into five classes: compromise, damage, and denial of service (DoS):

summary-of-the-attack
Table 1. A summary of the attacks we identified in our research

Controller manufacturers like Haas, Okuma, and Heidenhain have been found to have a similar number of issues, around 15. Fanuc had 10 confirmed attacks. Unfortunately, our research shows that this domain lacks awareness concerning security and privacy. This creates serious and compelling problems.

The need for automation-facing features like remote configuration of tool geometry or parametric programming with values determined by networked resources is becoming more common in manufacturing.

With these findings, we determined countermeasures that enterprises can do to mitigate such risks, which we’ll discuss in our final installation. In the last part, we’ll also discuss our responsible disclosure process.

Source :
https://www.trendmicro.com/en_us/research/22/l/cnc-machine-security-risks-part-2.html