A zero-day flaw in the latest version of a WordPress premium plugin known as WPGateway is being actively exploited in the wild, potentially allowing malicious actors to completely take over affected sites.
Tracked as CVE-2022-3180 (CVSS score: 9.8), the issue is being weaponized to add a malicious administrator user to sites running the WPGateway plugin, WordPress security company Wordfence noted.
“Part of the plugin functionality exposes a vulnerability that allows unauthenticated attackers to insert a malicious administrator,” Wordfence researcher Ram Gall said in an advisory.
WPGateway is billed as a means for site administrators to install, backup, and clone WordPress plugins and themes from a unified dashboard.
The most common indicator that a website running the plugin has been compromised is the presence of an administrator with the username “rangex.”
Additionally, the appearance of requests to “//wp-content/plugins/wpgateway/wpgateway-webservice-new.php?wp_new_credentials=1” in the access logs is a sign that the WordPress site has been targeted using the flaw, although it doesn’t necessarily imply a successful breach.
Wordfence said it blocked over 4.6 million attacks attempting to take advantage of the vulnerability against more than 280,000 sites in the past 30 days.
Further details about the vulnerability have been withheld owing to active exploitation and to prevent other actors from taking advantage of the shortcoming. In the absence of a patch, users are recommended to remove the plugin from their WordPress installations until a fix is available.
The development comes days after Wordfence warned of in-the-wild abuse of another zero-day flaw in a WordPress plugin called BackupBuddy.
The disclosure also arrives as Sansec revealed that threat actors broke into the extension license system of FishPig, a vendor of popular Magento-WordPress integrations, to inject malicious code that’s designed to install a remote access trojan called Rekoobe.
A number of firmware security flaws uncovered in HP’s business-oriented high-end notebooks continue to be left unpatched in some devices even months after public disclosure.
Binarly, which first revealed details of the issues at the Black Hat USA conference in mid-August 2022, said the vulnerabilities “can’t be detected by firmware integrity monitoring systems due to limitations of the Trusted Platform Module (TPM) measurement.”
Firmware flaws can have serious implications as they can be abused by an adversary to achieve long-term persistence on a device in a manner that can survive reboots and evade traditional operating system-level security protections.
The high-severity weaknesses identified by Binarly affect HP EliteBook devices and concern a case of memory corruption in the System Management Mode (SMM) of the firmware, thereby enabling the execution of arbitrary code with the highest privileges –
Three of the bugs (CVE-2022-23930, CVE-2022-31640, and CVE-2022-31641) were notified to HP in July 2021, with the remaining three vulnerabilities (CVE-2022-31644, CVE-2022-31645, and CVE-2022-31646) reported in April 2022.
It’s worth noting that CVE-2022-23930 is also one of the 16 security flaws that were previously flagged this February as impacting several enterprise models from HP.
SMM, also called “Ring -2,” is a special-purpose mode used by the firmware (i.e., UEFI) for handling system-wide functions such as power management, hardware interrupts, or other proprietary original equipment manufacturer (OEM) designed code.
Shortcomings identified in the SMM component can, therefore, act as a lucrative attack vector for threat actors to perform nefarious activities with higher privileges than that of the operating system.
Although HP has released mitigations to address the flaws in March and August, the vendor has yet to push the patches for all impacted models, potentially exposing customers to the risk of cyberattacks.
“In many cases, firmware is a single point of failure between all the layers of the supply chain and the endpoint customer device,” Binarly said, adding, “fixing vulnerabilities for a single vendor is not enough.”
“As a result of the complexity of the firmware supply chain, there are gaps that are difficult to close on the manufacturing end since it involves issues beyond the control of the device vendors.”
The disclosure also arrives as the PC maker last week rolled out fixes for a privilege escalation flaw (CVE-2022-38395, CVSS score: 8.2) in its Support Assistant troubleshooting software.
“It is possible for an attacker to exploit the DLL hijacking vulnerability and elevate privileges when Fusion launches the HP Performance Tune-up,” the company noted in an advisory.
Release Date: Sept. 13, 2022 CVE Identifier(s): CVE-2022- 40139 through CVE-2022-40144 Platform(s): Windows CVSS 3.0 Score(s): 5.5 – 8.2 Severity Rating(s): Medium – High
Trend Micro has released a new Service Pack for Trend Micro Apex One (On Premise) and Critical Patches for Apex One as a Service (SaaS) that resolve multiple vulnerabilities in the product.
Please note – Trend Micro has observed at least one active attempt of potential attacks against at least one of these vulnerabilities in the wild (ITW) – details below. Customers are strongly encouraged to update to the latest versions as soon as possible.
Affected Version(s)
Product
Affected Version(s)
Platform
Language(s)
Apex One
2019 (On-prem) SaaS
Windows Windows
English English
Solution
Trend Micro has released the following solutions to address the issue:
These are the minimum recommended version(s) of the patches and/or builds required to address the issue. Trend Micro highly encourages customers to obtain the latest version of the product if there is a newer one available than the one listed in this bulletin.
* Please note that some of the vulnerabilities listed below were addressed in earlier monthly SaaS updates, but Trend Micro recommends that Apex One as a Service customers are always on the latest available build to ensure all issues are properly resolved.
Customers are encouraged to visit Trend Micro’s Download Center to obtain prerequisite software (such as Service Packs) before applying any of the solutions above.
Vulnerability Details
CVE-2022-40139: Improper Validation of Rollback Mechanism Components RCE Vulnerability CVSSv3: 7.2: AV:N/AC:L/PR:H/UI:N/S:U/C:H/I:H/A:H Improper validation of some components used by the rollback mechanism in Trend Micro Apex One and Trend Micro Apex One as a Service clients could allow a Apex One server administrator to instruct affected clients to download an unverified rollback package, which could lead to remote code execution.
Please note: an attacker must first obtain Apex One server administration console access in order to exploit this vulnerability.
ITW Alert: Trend Micro has observed at least one active attempt of potential exploitation of this vulnerability in the wild.
CVE-2022-40140: Origin Validation Error Denial-of-Service Vulnerability ZDI-CAN-16314 CVSSv3: 5.5: AV:L/AC:L/PR:L/UI:N/S:U/C:N/I:N/A:H An origin validation error vulnerability in Trend Micro Apex One and Apex One as a Service could allow a local attacker to cause a denial-of-service on affected installations.
Please note: an attacker must first obtain the ability to execute low-privileged code on the target system in order to exploit this vulnerability.
CVE-2022-40141: Information Disclosure Vulnerability CVSSv3: 5.6: AV:N/AC:H/PR:N/UI:N/S:U/C:L/I:L/A:L A vulnerability in Trend Micro Apex One and Apex One as a Service could allow an attacker to intercept and decode certain communication strings that may contain some identification attributes of a particular Apex One server.
CVE-2022-40142: Agent Link Following Local Privilege Escalation Vulnerability ZDI-CAN-16691 CVSSv3: 7.8: AV:L/AC:L/PR:L/UI:N/S:U/C:H/I:H/A:H A security link following local privilege escalation vulnerability in Trend Micro Apex One and Trend Micro Apex One as a Service agents could allow a local attacker to create a writable folder in an arbitrary location and escalate privileges on affected installations.
Please note: an attacker must first obtain the ability to execute low-privileged code on the target system in order to exploit this vulnerability.
CVE-2022-40143: Link Following Local Privilege Escalation Vulnerability ZDI-CAN-16435 CVSSv3: 7.3: AV:L/AC:L/PR:L/UI:R/S:U/C:H/I:H/A:H A link following local privilege escalation vulnerability in Trend Micro Apex One and Trend Micro Apex One as a Service servers could allow a local attacker to abuse an insecure directory that could allow a low-privileged user to run arbitrary code with elevated privileges.
Please note: an attacker must first obtain the ability to execute low-privileged code on the target system in order to exploit this vulnerability.
CVE-2022-40144: Login Authentication Bypass Vulnerability JVN#36454862 CVSSv3: 8.2: AV:N/AC:L/PR:N/UI:N/S:U/C:L/I:N/A:H A vulnerability in Trend Micro Apex One and Trend Micro Apex One as a Service could allow an attacker to bypass the product’s login authentication by falsifying request parameters on affected installations.
Mitigating Factors
Exploiting these type of vulnerabilities generally require that an attacker has access (physical or remote) to a vulnerable machine. In addition to timely application of patches and updated solutions, customers are also advised to review remote access to critical systems and ensure policies and perimeter security is up-to-date.
However, even though an exploit may require several specific conditions to be met, Trend Micro strongly encourages customers to update to the latest builds as soon as possible.
Acknowledgement
Trend Micro would like to thank the following individuals for responsibly disclosing these issues and working with Trend Micro to help protect our customers:
Companies are increasingly using Cloud services to support their business processes. But which types of Cloud services are there, and what is the difference? Which kind of Cloud service is most suitable for you? Do you want to be unburdened or completely in control? Do you opt for maximum cost savings, or do you want the entire arsenal of possibilities and top performance? Can you still see the forest for the trees? In this article and in the next, I describe several different Cloud services, what the differences and features are and what exactly you need to pay attention to.
Let’s start with the definition of Cloud computing. This is the provision of services using the internet (Cloud). Think of storage, software, servers, databases etc. Depending on the type of service and the service that is offered (think of license management or data storage), you can divide these services into categories. Examples are IaaS (Infrastructure as a Service), PaaS (Platform as a Service), SaaS (Software as a Service), etc. These services are provided by a cloud provider. Whether this is Microsoft (Azure), Amazon (AWS), or another vendor (Google, Alibaba, Oracle, etc.), each vendor offers Cloud services that fall under one of the categories of Cloud services that we are about to discuss.
One feature of Cloud computing is that you pay according to the usage and the service you purchase. For example, for SaaS, you pay for the software’s license and support. This also means that if you buy a SaaS service (e.g., Office 365) and don’t use it, you will still be charged. At the same time, if you purchase storage with IaaS, for example, you only pay for the amount of storage you use, possibly supplemented with additional services such as backup, etc.
Sometimes Cloud services complement each other; think, for example, of DaaS (Database as a Service), where a database is offered via the Cloud. Often you need an application server and other infrastructure to read data from this database. These usually run in a Landing Zone, purchased from an IaaS service. But some services can also be standalone, for example, SaaS (Office 365).
Each Cloud service has specific characteristics. Sometimes it requires little or no (technical) knowledge, but it can also be challenging to manage and use the services according to best practices. This often depends on the degree to which you want to see yourself in control. If you want an application from the Cloud where you are completely relieved of all worries, this requires little technical knowledge from the user or the administrator. But if you want maximum control, then IaaS gives you an enormous range of possibilities. In this article, you can read what you need to consider.
It is advisable to think beforehand about what your requirements and wishes are precisely and whether this fits in with the service you want to purchase. If you wish to use an application in the Cloud but use many custom settings, this is often not possible. If you don’t want to be responsible for updating and backing up an application and use little or no customization, a SaaS can be very interesting. Also, look at how a service fits into your business process. Does it offer possibilities for automation, reporting, or disaster recovery? Are there possibilities to temporarily allocate extra resources in case of peak demand (horizontal or vertical scaling up), and what guarantees does the supplier offer with this service? Think of RPO / RTO and accessibility of the service desk in case of a calamity.
Let’s get started quickly!
IaaS (Infrastructure as a Service)
One of the best-known Cloud services is undoubtedly IaaS. For many companies, this is often their first introduction to a Cloud service. You rent the infrastructure from a cloud provider. For example, the network infrastructure, virtual servers (including operations system), and storage. A feature of IaaS is that you have complete control – Both on the management side and how you can deploy resources (requests). This can be done in various automated ways (Powershell, IaC, DevOps pipelines, etc.) and via the classic management interface that all providers offer. Things that are often not possible with a PaaS service are possible with an IaaS service. You have complete control. In principle, you can set up a complete server environment (all services are available for this), but you do have the benefits of the Cloud, such as scalability and pay per use or per resource.
IaaS therefore, most resembles an on-premise implementation. You often see this used in combination with the use of virtual servers. Critical here is a good investigation into the possible limitations, for example, I/O, so that the performance can be different in practice than in a traditional local environment. You are responsible for arranging security and backup. The advantage is that you have an influence on the choice of technology used. You can customize the setup according to your needs and wishes. You can standardize the configuration to your organization. Deployment can be complex, and you are forced to make your own choices, so some expertise is needed.
PaaS (Platform as a Service)
PaaS stands for Platform as a service and goes further than IaaS. You get a platform where you can do the configuration yourself. When you use a PaaS service, the vendor takes care of the sub-layer (IaaS) and the operating system and middleware. So you sacrifice something in terms of control and capabilities. PaaS services are ideal for developers, web and application builders. After all, you can quickly make an environment available. Using it means you no longer have to worry about the infrastructure, operating system, and middleware. This is taken care of by the supplier based on best practices. This also offers security advantages, as you do not have to think about patching and upgrading these things that are now done by the vendor.
Another advantage is that you can entirely focus on what you want to do and not on managing the environment. You can also easily purchase additional services and quickly scale them up or down. When you are finished, you can remove and stop the resources, so you have no more costs.
However, do take into account the use of existing software. Not all existing software is suitable to function in a PaaS environment; for example, in a PaaS environment, you do not have full access (after all, the vendor is responsible). Also, not all CPU power and memory are allocated to the Cloud application. This is because it is often hosted on a shared platform, so other applications (and databases) may use the same resources. As for the database, you have the same advantages and disadvantages as with DBaaS.
SaaS (Software as a Service)
This is probably a service you’ve been using for a while. In short, you take applications through the Cloud on a subscription basis. The provider is responsible for managing the infrastructure, patches, and updates. A SaaS solution is ready for use immediately, and you directly benefit from the added value, such as fast scaling up and down and paying per use. Examples are Office365, Sharepoint online, SalesForce, Exact Online, Dropbox, etc.
Unlike IaaS and PaaS, where there is still a lot of freedom, and you have to set everything up yourself, with SaaS however, it is immediately clear what you are buying and what you will get. With this service, you are relieved of most of your worries. The vendor is responsible for all updates, patches, development, and more. You cannot make any updates or changes to the software with this service.
Many companies use one or more SaaS services often even within companies, there is a distinction. For example, each department within a company has its specific applications and associated SaaS services. With this service, you only pay for what you need, including the licenses. These licenses can easily be scaled up or down.
It is interesting for many companies to work with SAAS solutions. It is particularly interesting for start-ups, small companies and freelancers because you only purchase what you use, you don’t have unnecessarily high start-up costs, and you don’t have to worry about the maintenance of the software.
But SAAS can also be a perfect solution for larger companies. For example, if you hire extra staff for specific periods, you can quickly get these people working with the software they need. You buy several additional licenses, and you can stop this when the temporary staff leaves.
How can Vembu help you?
BDRSuite, is a comprehensive Backup & DR solution designed to protect your business-critical data across Virtual (VMware, Hyper-V), Physical Servers (Windows, Linux), SaaS (Microsoft 365, Google Workspace), AWS EC2 Instances, Endpoints (Windows, Mac) and Applications & Databases (MS Active Directory, MS Exchange, MS Outlook, SharePoint, MS SQL, MySQL).
In Always On availability groups, the availability mode is a replica property that determines whether a given availability replica can run in synchronous-commit mode. For each availability replica, the availability mode must be configured for either synchronous-commit mode, asynchronous-commit, or configuration only mode. If the primary replica is configured for asynchronous-commit mode, it does not wait for any secondary replica to write incoming transaction log records to disk (to harden the log). If a given secondary replica is configured for asynchronous-commit mode, the primary replica does not wait for that secondary replica to harden the log. If both the primary replica and a given secondary replica are both configured for synchronous-commit mode, the primary replica waits for the secondary replica to confirm that it has hardened the log (unless the secondary replica fails to ping the primary replica within the primary’s session-timeout period).
Note
If primary’s session-timeout period is exceeded by a secondary replica, the primary replica temporarily shifts into asynchronous-commit mode for that secondary replica. When the secondary replica reconnects with the primary replica, they resume synchronous-commit mode.
Supported Availability Modes
Always On availability groups supports three availability modes-asynchronous-commit mode, synchronous-commit mode, and configuration only mode as follows:
Asynchronous-commit mode is a disaster-recovery solution that works well when the availability replicas are distributed over considerable distances. If every secondary replica is running under asynchronous-commit mode, the primary replica does not wait for any of the secondary replicas to harden the log. Rather, immediately after writing the log record to the local log file, the primary replica sends the transaction confirmation to the client. The primary replica runs with minimum transaction latency in relation to a secondary replica that is configured for asynchronous-commit mode. If the current primary is configured for asynchronous commit availability mode, it will commit transactions asynchronously for all secondary replicas regardless of their individual availability mode settings.For more information, see Asynchronous-Commit Availability Mode, later in this topic.
Synchronous-commit mode emphasizes high availability over performance, at the cost of increased transaction latency. Under synchronous-commit mode, transactions wait to send the transaction confirmation to the client until the secondary replica has hardened the log to disk. When data synchronization begins on a secondary database, the secondary replica begins applying incoming log records from the corresponding primary database. As soon as every log record has been hardened, the secondary database enters the SYNCHRONIZED state. Thereafter, every new transaction is hardened by the secondary replica before the log record is written to the local log file. When all the secondary databases of a given secondary replica are synchronized, synchronous-commit mode supports manual failover and, optionally, automatic failover.For more information, see Synchronous-Commit Availability Mode, later in this topic.
Configuration only mode applies to availability groups that are not on a Windows Server Failover Cluster. A replica in configuration only mode does not contain user data. In configuration only mode, the replica master database stores availability group configuration metadata. For more information see Availability group with configuration only replica.
The following illustration shows an availability group with five availability replicas. The primary replica and one secondary replica are configured for synchronous-commit mode with automatic failover. Another secondary replica is configured for synchronous-commit mode with only planned manual failover, and two secondary replicas are configured for asynchronous-commit mode, which supports only forced manual failover (typically called forced failover).
The synchronization and failover behavior between two availability replicas depends on the availability mode of both replicas. For example, for synchronous commit to occur, both the current primary replica and the secondary replica in question must be configured for synchronous commit. Likewise, for automatic failover to occur, both replicas need to be configured for automatic failover. Therefore, the behavior for the illustrated deployment scenario above can be summarized in the following table, which explores the behavior with each potential primary replica:
Current Primary Replica
Automatic Failover Targets
Synchronous-Commit Mode Behavior With
Asynchronous-Commit Mode Behavior With
Automatic failover possible
01
02
02 and 03
04
Yes
02
01
01 and 03
04
Yes
03
01 and 02
04
No
04
01, 02, and 03
No
Typically, Node 04 as an asynchronous-commit replica, is deployed in a disaster recovery site. The fact that Nodes 01, 02, and 03 remain at asynchronous-commit mode after failing over to Node 04 helps prevent potential performance degradation in your availability group due to high network latency between the two sites.
Asynchronous-Commit Availability Mode
Under asynchronous-commit mode, the secondary replica never becomes synchronized with the primary replica. Though a given secondary database might catch up to the corresponding primary database, any secondary database could lag behind at any point. Asynchronous-commit mode can be useful in a disaster-recovery scenario in which the primary replica and the secondary replica are separated by a significant distance and where you do not want small errors to impact the primary replica or in situations where performance is more important than synchronized data protection. Furthermore, since the primary replica does not wait for acknowledgements from the secondary replica, problems on the secondary replica never impact the primary replica.
An asynchronous-commit secondary replica attempts to keep up with the log records received from the primary replica. But asynchronous-commit secondary databases always remain unsynchronized and are likely to lag somewhat behind the corresponding primary databases. Typically the gap between an asynchronous-commit secondary database and the corresponding primary database is small. But the gap can become substantial if the server hosting the secondary replica is over loaded or the network is slow.
The only form of failover supported by asynchronous-commit mode is forced failover (with possible data loss). Forcing failover is a last resort intended only for situations in which the current primary replica will remain unavailable for an extended period and immediate availability of primary databases is more critical than the risk of possible data loss.The failover target must be a replica whose role is in the SECONDARY or RESOLVING state. The failover target transitions to the primary role, and its copies of the databases become the primary database. Any remaining secondary databases, along with the former primary databases, once they become available, are suspended until you manually resume them individually. Under asynchronous-commit mode, any transaction logs that the original primary replica had not yet sent to the former secondary replica are lost. This means that some or all of the new primary databases might be lacking recently committed transactions. For more information on how forced failover works and on best practices for using it, see Failover and Failover Modes (Always On Availability Groups).
Synchronous-Commit Availability Mode
Under synchronous-commit availability mode (synchronous-commit mode), after being joined to an availability group, a secondary database catches up to the corresponding primary database and enters the SYNCHRONIZED state. The secondary database remains SYNCHRONIZED as long as data synchronization continues. This guarantees that every transaction that is committed on a given primary database has also been committed on the corresponding secondary database. When every secondary database on a given secondary replica is synchronized, the synchronization-health state of the secondary replica as a whole is HEALTHY.
Once all of its databases are synchronized, a secondary replica enters the HEALTHY state. The synchronized secondary replica will remain healthy unless one of the following occurs:
A network or computer delay or glitch causes the session between the secondary replica and primary replica to timeout. NoteFor information about the session-time property of availability replicas, see Overview of Always On Availability Groups (SQL Server).
You suspend a secondary database on the secondary replica. The secondary replica ceases to be synchronized, and its synchronization-health state is marked as NOT_HEALTHY. The secondary replica cannot become healthy again until the suspended secondary database is either resumed and resynchronized or removed from the availability group.
You add a primary database the availability group. Previously synchronized secondary replicas enter the NOT_HEALTHY synchronization-health state. This state indicates that at least one database is in the NOT SYNCHRONIZING synchronization state. A given secondary replica cannot be HEALTHY again until a corresponding secondary database has been prepared on the replica, has been joined to the availability group, and has become synchronized with the new primary database.
You change the primary replica or the secondary replica to asynchronous-commit availability mode. After changing to asynchronous-commit mode, the secondary replica will remain in the HEALTHY synchronization-health state as long as data synchronization continues. However, if only the primary replica is changed to asynchronous-commit mode, the synchronous-commit secondary replica will enter the PARTIALLY_HEALTHY synchronization-health state. This state indicates that at least one database is in the SYNCHRONIZING synchronization state, but none of the databases are in the NOT SYNCHRONIZING state.
You change any secondary replica to synchronous-commit availability mode. This causes that secondary replica to be marked as in the PARTIALLY_HEALTHY synchronization-health state until all of its databases are in the SYNCHRONIZED synchronization state.
Under the synchronous-commit mode, after a secondary replica joins the availability group and establishes a session with the primary replica, the secondary replica writes incoming log records to disk (hardens the log) and sends a confirmation message to the primary replica. Once the hardened log on the secondary database has caught up the end of log on the primary database, the state of the secondary database is set to SYNCHRONIZED. The time required for synchronization depends essentially on how far the secondary database was behind the primary database at the start of the session (measured by the number of log records initially received from the primary replica), the work load on the primary database, and the speed of the computer of the server instance that hosts the secondary replica.
Synchronous operation is maintained in the following manner:
On receiving a transaction from a client, the primary replica writes the log for the transaction to the transaction log and concurrently sends the log record to the secondary replicas.
Once a log record is written to the transaction log of the primary database, the transaction can be undone only if there is a failover at this point to a secondary that did not receive the log. The primary replica waits for confirmation from the synchronous-commit secondary replica.
The secondary replica hardens the log and returns an acknowledgement to the primary replica.
On receiving the confirmation from the secondary replica, the primary replica finishes the commit processing and sends a confirmation message to the client. NoteIf a synchronous-commit secondary replica times out without confirming that it has hardened the log, the primary marks that secondary replica as failed. The connected state of the secondary replica changes to DISCONNECTED, and the primary replica stops waiting for confirmation from the secondary replica. This behavior ensures that a failed synchronous-commit secondary replica does not prevent hardening of the transaction log on the primary replica.
Synchronous-commit mode protects your data by requiring the data to be synchronized between two places, at the cost of somewhat increasing the latency of the transaction.
Synchronous-Commit Mode with Only Manual Failover
When these replicas are connected and the database is synchronized, manual failover is supported. If the secondary replica goes down, the primary replica is unaffected. The primary replica runs exposed if no SYNCHRONIZED replicas exist (that is, without sending data to any secondary replica). If the primary replica is lost, the secondary replicas enter the RESOLVING state, but the database owner can force a failover to the secondary replica (with possible data loss). For more information, see Failover and Failover Modes (Always On Availability Groups).
Synchronous-Commit Mode with Automatic Failover
Automatic failover provides high availability by ensuring that the database is quickly made available again after the loss of the primary replica. To configure an availability group for automatic failover, you need to set both the current primary replica and at least one secondary replica to synchronous-commit mode with automatic failover. You can have up to three automatic failover replicas.
Furthermore, for an automatic failover to be possible at a given time, this secondary replica must be synchronized with the primary replica (that is, the secondary databases are all synchronized), and the Windows Server Failover Clustering (WSFC) cluster must have quorum. If the primary replica becomes unavailable under these conditions, automatic failover occurs. The secondary replica switches to the role of primary, and it offers its database as the primary database. For more information, see the “Automatic Failover ” section of the Failover and Failover Modes (Always On Availability Groups) topic.
Implementing read-only access to secondary replicas is useful if your read-only workloads can tolerate some data latency. In situations where data latency is unacceptable, consider running read-only workloads against the primary replica.
The primary replica sends log records of changes on primary database to the secondary replicas. On each secondary database, a dedicated redo thread applies the log records. On a read-access secondary database, a given data change does not appear in query results until the log record that contains the change has been applied to the secondary database and the transaction has been committed on primary database.
This means that there is some latency, usually only a matter of seconds, between the primary and secondary replicas. In unusual cases, however, for example if network issues reduce throughput, latency can become significant. Latency increases when I/O bottlenecks occur and when data movement is suspended. To monitor suspended data movement, you can use the Always On Dashboard or the sys.dm_hadr_database_replica_states dynamic management view.
A 2022 GoTo study says that 95% of companies plan to consolidate their tech tools in the next year. One way to respond to this downscaling is to seek out technology partnerships.
After all, companies with more robust features will be in the best position to solve customer problems. And those relationships can also lead to increased brand awareness, lead generation, and more.
Technology partnerships help organizations implement and optimize their technical systems. These partners are tech companies that work together to build products like apps, integrations, and plugins.
Types of Technology Partnerships
There are many different kinds of technical partnerships. Also, because these partnerships are often long-term, they often shift over time.
For example, what begins as a technical partnership may also become a marketing, channel, or strategic partnership.
Integrations, apps, and other technologies are often significant investments for a business. So, even shorter technical partnerships may shift to other types of partnerships so the time and resources lead to positive ROI.
App Development
App development partnerships create custom web and mobile applications. They may also involve placing a new app in an existing marketplace or app store.
When developing this partnership it’s important to review:
App portfolios
Customer and partner testimonials
Project management, especially for tight timelines
Security
Reliability
Integrations
Integration partnerships develop integrations between two popular products. They might also create new product integrations for a powerful product. For example, this marketplace offers integrations built specifically for HubSpot.
Integration partners aren’t just about improving or expanding great technical products. They’re about combining the potential of two different tools or services. Then the focus shifts to communicating that offer to customers who need them.
It takes time to build successful integrations. It’s also important for partners to outline expectations for data sharing, launch, and marketing early on.
Marketplaces or App Stores
These tech partnerships can be a huge support to your business. They can make your apps and integrations easy to find and understand. This is especially important for new or complex products.
For example, say you’re on the Apple marketplace, looking for an app for your phone that lets you update your blog. There are many details in the marketplace that can help you decide which app is right for you. This includes:
Product descriptions
Keywords
Customer ratings
Reviews
Images and videos
These partnerships aren’t just about placing your app in the marketplace or building a marketplace for your product. They’re about creating a community. It’s about figuring out the values of your users and making it easy for them to find what they’re looking for.
Plugins, Add-Ons, and Extensions
Technology partnerships for add-ons can expand and improve your product for specific customers. They can also give you a chance to improve a product you already love. These tech partnerships can be a time and cost-effective way to add more functionality to a website or product.
Other Channels for Tech Partnerships
While the focus of a technical partnership is usually on tech, it’s important to remember why your business is seeking this out.
For example, if your business is trying to improve brand awareness, a new app in all the top app stores can:
Increase brand visibility
Link potential customers to your site
Offer new platforms for promotion and referrals
This means that most technical partnerships will involve other partnerships between your companies. These are some of the most common additions when you take on a tech partner.
Strategy
When embarking on a partnership, strategic teams will often work together in other ways that improve both companies.
This might include working together long-term on:
Growth strategies
Product development
Supply chain
Financial investments
Licensing
Charitable work
Media
After your company invests in new tech, they’ll want a plan to share the news. Media partnerships can bring positive press and traffic to both partners. They can also add credibility to your business, open new revenue streams, or offer chances to experiment.
Affiliates
Affiliate partnerships are another way to spread the word about a new tech offering. Combining the power of both partners’ affiliate programs can make it simple for you to genuinely share:
New testimonials
Product walkthroughs
Feature highlights
This can speed up the rate of users adding your new app or plugin. It also doubles the potential for word-of-mouth marketing for your newest release.
Marketing
Co-marketing is another typical extension of a healthy technical partnership. Marketing partnerships can help drive lead generation, brand awareness, and product adoption for both partners.
These are just a few of the many ways you can choose to market with your tech partner:
There are many ways tech partnerships can help your business grow. They can help shorten your sales process, improve your customer experience, and better meet user needs. But partnerships are often demanding. They take time, and can also distract your team from core goals and benchmarks.
So, how do you know if a tech partnership is the right next step for your business?
Grows word-of-mouth and brand awareness.
Is your company struggling with brand recognition? If so, a technology partnership is a great way to build awareness.
They can increase discovery and how often new customers try your products and services. Connecting with a brand your customers’ trust can also increase word-of-mouth recommendations. It helps you build brand loyalty.
Improves lead generation.
Adding new technology and channels to your business isn’t the only way that a partnership can improve lead gen opportunities. Second-party data from trusted partners can give your company a powerful lead pipeline.
Leads from tech partners are also a great way to improve lead insights and increase qualified leads for your sales team.
Increases customer referrals.
Many technical partners pursue a referral or marketing relationship before beginning to work on new tech. This is because great tech partners should also be great referral partners.
Do you want them to casually mention your product in calls? Add feature highlights to email newsletters? Or do you want them to send new customers directly to your business?
Whatever way you decide to approach it, referrals can be a huge win. Customer referrals can also come with useful data that your business can use to grow or adjust course.
Helps expand your partner network.
While just one tech partner can make a big difference to your business, it can also be a first step toward building a partner network. With more technological partners you can continue to improve reach and performance. These partnerships can also lower acquisition costs and help you keep up with industry shifts.
A larger tech network can also help you improve customer retention. When customers select you, they’re also choosing your partners. That web of connections can help you make sure they stick with your business as you grow.
To make every tech partner a member of your new partner network, think about creating a great partner experience. Develop a welcome kit and onboarding. Add an app to manage your partners. Make it easy for your new tech partners to connect with other relevant team members.
How to Build and Maintain Technology Partnerships
You may already have a lot of partner experience, but there are a few ways that tech partnerships are unique. Whether you’re looking for a refresher or connecting for the first time, these are some useful first steps.
1. Reach out to internal teams for suggestions.
Many teams work remotely, so it may be tough to listen for partner ideas in the company kitchen. Instead, join relevant Slack or Teams channels. These spaces can give you a sense of the tools your employees use or recommend. They can also help you get a sense of granular customer issues that new technology can fix.
Another option is to set up a series of quick one-on-ones with members of your team. Think about what departments may be familiar with a product. Then, ask about products or companies they like and why.
You may also want to do some customer outreach. Listen for integrations or apps that prospects and customers request. It’s also a good idea to check out:
Feedback from your customer service team
Social media posts and comments
Online customer groups
2. Figure out your tech requirements and timeline.
The more prepared your team is for a partnership, the more successful it will be. Most companies will start with a technical competencies assessment. This may include:
API availability
Team size
Developer capabilities
You’ll also want to revisit your customer journey map and buyer persona tech stack.
Next, draft a template scope of work that outlines your ideal relationship and deliverables. You’ll edit and update this document with each partner. That said, it’s useful to get a clear sense of your priorities before you start talking to potential partners.
Finally, outline your ideal timeline. Some technical partnerships take just 45 days to execute a plan, while others might take three to five years. The timeline will depend on your business needs, the scope or statement of work, and potential roadblocks.
3. Do your research.
With a full set of data and ideas in hand, it’s time to start researching potential partners. At this point, you want to find technology partners that can do more than the minimum tech work.
This research can help you find partners who fit your goals for:
Culture alignment
Brand visibility
Innovation
Customer expectations
Trust
Mutual needs and benefits
A foundation of shared values and goals can help set new partnerships up for long-term growth.
4. Reach out to potential technology partners.
You may need to reach out directly to potential partners if you’re just starting out. As you develop your network, you may find other channels for partnerships and partner referrals.
To further entice new partners, create a one-sheet that summarizes your offer. You’ll also want to create a pitch deck with statistics, analysis, and other details that show high-level partners your value offer.
Partnerships can be complex, and technology partnerships are no different. It’s not unusual for developer teams to run into unexpected challenges that can throw a project off course. This makes outlining expectations in advance essential.
Before you begin even simple projects, create a clear shared document. This outline might include:
Key team leaders
Revenue goals
Approval processes
Other partnership expectations, like co-marketing
Sales targets
Data sharing
Support needs
Besides tactical documents, it’s also a good idea to sketch out cultural goals for your tech partnerships. This integration partners example from HubSpot shows some of the values you’ll want to share with your partners.
6. Decide how you will measure success together.
Measuring success can be easy to put off until a project launches. But it’s a good idea to outline the data your teams will use to calculate the value of your partnership, both individually and together.
While partners may share some critical data points, most businesses will come to the partnership with their own processes and data criteria. If this isn’t addressed in the early stages of the partnership, both teams could end up missing the data they need.
This is also a good time to figure out when partners will come together for check-ins. This schedule can help both teams be proactive in maintaining the partnership.
What Makes a Great Technology Partnership
As you begin your first technology partnership, it’s useful to create systems and processes to make sure your combined efforts lead to great results. These are some tips that help tech partners thrive.
1. A Systematized Collaboration Process
Have your new technology partner walk you through their collaboration process, giving some examples of how they’ve successfully partnered with other businesses.
Establish a communication process that works with both organizations’ processes. Learn each other’s working styles and where the skill and resource gaps are. Based on this information, you can determine the best allocation of project resources, and create repeatable processes that will apply across all projects and partnerships.
2. Flexibility
Not to contradict my previous point, but it’s still extremely important to stay flexible. Also, try to shift your approach when necessary. No two projects will be the same, and no two companies work the same way.
As the project gets underway and you start to make changes, be sure your partner offers the flexibility you need and can quickly respond to change.
It’s also advantageous to find a partner that understands your sales process. This helps bridge the gap between what your sales team can offer to prospects and what is possible to deploy within the technology platform.
3. Partners Involved in the Planning Stage
Finally, you are ready to start planning! Be sure to include every important member of your project in the early stages. For example, if you brought in agency partners with expertise in content or design be sure to include them in the planning stages. If you miss this important step it can hurt the final project, which can negatively impact your ability to benefit from your partnership.
4. Established Project Governance
Do this step as early as possible. Before you plan or launch your first project, establish the organizational structure, decision-making hierarchy, and communication process. These decisions will guide the project execution methodology for you and your partners.
Establishing this early will also keep the project moving forward. Try setting up a chart of what information is important for what people and which decisions require input from who. This will prevent you from bringing in executives before their input is relevant. It will also help you make sure that the right people are there for important strategic decisions.
5. A Central Depository of Resources
Poor resource management is in the top three challenges for businesses according to a 2020 Wellingtone report. For you and your partners to do your best possible work, you both need access to important data, content, and other resources.
As team members access project information (specifications, plans, roadmaps, etc.) during co-development, these docs need to be version controlled and well managed. Creating a single source for everyone involved to pull from will ensure everyone is on the same page.
6. Clear Project Goals and Benchmarks
As you plan out the project’s overall strategy and roadmap, set specific goals and benchmarks for every team as the project moves forward — especially if it’s a longer project. Without benchmarks and delivery schedules that allow everyone to see positive progress, it can be easy for a project to fall off the rails.
7. Full Transparency
As your project gets underway, transparency will be your greatest asset. Make sure the partner — and any relevant team members — get an invite to strategy, design, and planning meetings to get their complete input.
Not only does this help us get closer to their final vision, but it also prevents the need for major revisions when you learn you’ve gone too far off scope or that your fancy new web design won’t work with the CMS your technology partner chose.
8. Efficient Meetings
In his first year as Microsoft CEO, Satya Nadella repeatedly told employees that it’s okay to skip meetings they were invited to if they don’t really need to be there. As a proponent of efficiency, he knows going to unnecessary meetings only slows down the development process.
When you set up the project governance, make it clear who should be involved in what meetings as the project moves forward. Also, make sure the meetings have a clear purpose and agenda. Projects with several different companies involved work best when executives have input throughout the process.
9. Documented Best Practices
When working with a technology partner you will likely come across creative solutions to a wide variety of problems.
As you find glitches and bugs to fix that will help keep your projects on track, document these practices for future learning.
10. An Effective Exit Strategy
While my first tip suggests creating a long-lasting relationship with your technology partner, my last tip is to prepare for when it ends. Whether your partnership ends with the conclusion of the project or under less-than-ideal circumstances, having an agreed plan in place will help make the transition smoother.
Agree on what information the partner will need to send to you and what they’ll need for a complete off-boarding to make sure you have everything you need to keep the project moving forward.
Technology Partnership Examples
Google Cloud and Splunk
The Google Cloud and Splunk partnership makes it easier for companies to make data-driven decisions. It helps companies access and analyze data at scale. Integrations from this partnership also include AI and machine learning for processing and using data.
Why this is a good tech partnership example: This technology partnership gives both businesses a boost with advanced data sharing. For example, customers using the Splunk Cloud also enjoy Google Cloud’s AI, security, and networking. Google benefits from Splunk’s data visualization capabilities. Splunk was already working with AWS, so it also offers a competitive benefit.
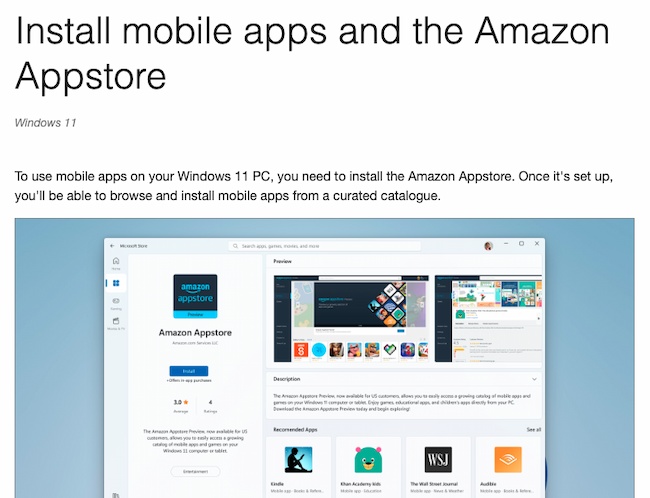
Amazon Appstore and Microsoft
This partnership gives Appstore developers access to an audience of millions. At the same time, it gives Microsoft a chance to highlight the advanced mobile app functionality of Windows 11.
Why this is a good technical partnership example: These two major companies working together cement brand awareness. Their partnership increases mentions in the news and offers new and exciting options for customers.
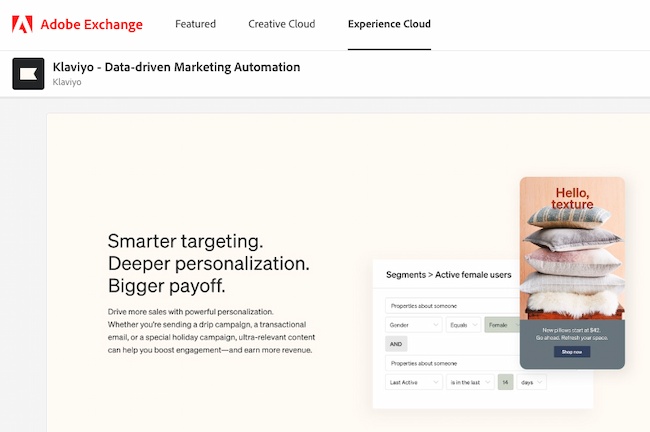
Adobe and Klaviyo
Adobe’s ecommerce platform, Magento, has a range of apps for online store owners. Klaviyo helps ecommerce stores turn customer data into insights for email personalization.
Why this is a good tech partnership example: This partnership expands Magento’s authority with a popular app for ecommerce stores. It also encourages current store owners on platforms like Shopify who might be hesitant to try Magento. At the same time, it exposes Klaviyo’s brand to long-time Magento users.
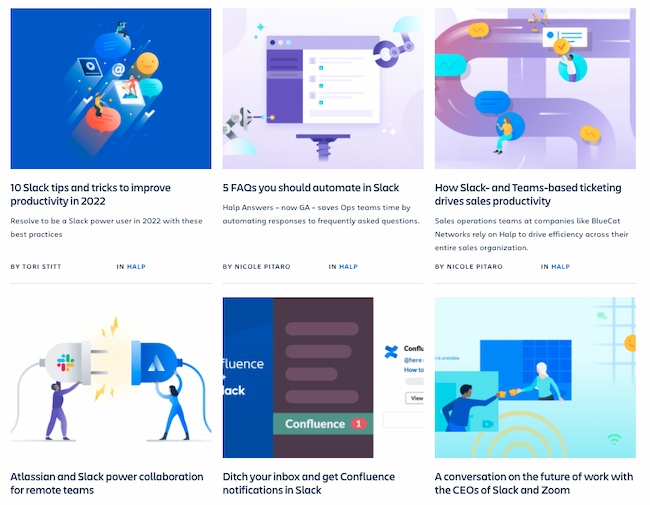
Atlassian and Slack
The Atlassian/Slack partnership includes 10+ product integrations. This includes Slack apps for Jira Cloud, Halp, Confluence Cloud, and BitBucket Cloud.
These tools work together to help teams collaborate better.
Why this is a good technical partnership example: The members of this partnership went from competitors to partners, and don’t shy away from the challenges of that overlap. Instead, they’ve built many tools to better support customers and created robust co-marketing.
Can tech partnerships boost your business?
If they’re done right, technology partnerships can help your business grow into the company of your dreams. They can add tools, support, capital, and exposure to new audiences.
But to make it work, you need to pursue these relationships in a way that feels right for you and your team. So, dig into some research and talk to your people. Prepare your deck and put yourself out there. Then, see what your business can be.
Originally published Sep 13, 2022 7:00:00 AM, updated September 13 2022
With over 300 million active customers on Amazon, it’s no wonder you want to sell a product on the internet’s most visited ecommerce website. Fortunately, choosing what to sell on Amazon, and how to sell it, isn’t as hard as you might think. In fact, most of your research can be done for free on the site itself.
To ensure you choose a low-risk, high-return product to sell on Amazon, we’ve created this guide. Keep reading to learn about top-selling items, what you should sell, and how to conduct research to ensure whatever you’re selling is a safe bet on the ecommerce giant.
Given the wide range of products that fall within Home & Kitchen — appliances, furniture, décor, and more — it’s no wonder that 32% of sellers on Amazon opt to sell in this category. Plus, it’s a pretty booming industry with global retail sales of home and household appliances amounting to $448 billion dollars in 2021.
It’s important to note that because Home & Kitchen is so popular it may be more difficult for new sellers to find success in this category. So, if you’re considering breaking into this market, make sure you have a product that is high quality and serves a specific niche.
2. Clothing, Shoes & Jewelry
It should be no surprise that Clothing, Shoes, & Jewelry is one of Amazon’s top product categories. After all, the ecommerce platform holds a nearly 35% share of all apparel sold online, making it one of the best-selling online fashion retailers. Specifically, Amazon shoppers prefer casual clothing over luxury apparel, with their top brands being Hanes and Amazon Essentials.
It’s important to note that this category can get a bit oversaturated, so it’s critical you ensure you’re able to offer something unique. People don’t turn to Amazon for expensive brand items — instead, they look for discounts. So, if you’re thinking of selling clothes, shoes, and jewelry, make sure your product is high quality and low price.
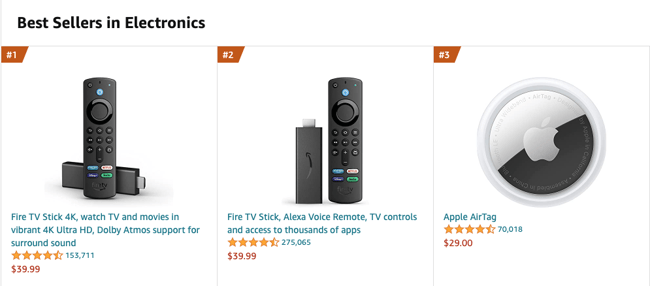
3. Electronics
From computers and TVs to surveillance systems and wearable technology, consumers are always looking for the latest in tech — especially when they are online shopping. In fact, almost half of all computer and electronics sales occur online.
Amazon consistently displays impressive prices on some of the world’s most popular electronics, so it makes sense that consumers often buy from the platform. This could be a promising category to consider as a third-party seller if you’re able to buy electronics in bulk.
4. Beauty & Personal Care
Though the Beauty & Personal Care industry experienced a 15% decrease in global sales in 2020, don’t underestimate its significance and resilience. The market bounced back with a revenue increase of nearly $3 billion in 2021 and is expected to continue to grow.
The Beauty & Personal Care category includes everything from makeup and skincare to fragrances and hair products. Even though there is quite a bit of competition in this market with 23% of third-party sellers listing items, those who specialize in creating handmade cosmetics may really excel in this category.
Of course, like anything, the more popular the product category, the more intense the competition. It’s important you find your niche to ensure you’re not competing with the 300,000 other search results for “white t-shirt.”
Before we get to what to sell on Amazon, let’s discuss how much it costs.
What does it cost to sell on Amazon?
Amazon offers two selling plans: Professional and Individual. The Professional selling plan costs $39.99 per month, plus per-item selling fees, which vary by category. Alternatively, the Individual selling plan allows you to pay $0.99 per item sold plus other selling fees, which vary by category. The Individual selling plan doesn’t have a monthly subscription fee, so if you plan to sell less than 40 items, this is likely the smarter choice.
You’ll want to do your research on shipping costs and Amazon seller fees, so you know how much you’ll need to spend depending on your item. This information can help you narrow your decision — for instance, a two-to-three pound item will be lightweight and easy to ship, which can help lower your shipping fees.
Along with weight, you’ll want to consider products that aren’t easily breakable when you’re transporting them.
Additionally, most products on Amazon vary between $10 and $50, so you’ll want to choose items you can sell for relatively cheap while still making a profit.
How to Know What to Sell on Amazon
Once you’ve determined you’re willing to pay shipping costs — and that your product likely falls within a fair price range — it’s time to figure out what you want to sell. Here are five methods that can help you narrow down your search:
1. Manually conduct research on Amazon.com.
To manually research popular products on Amazon, you’ll want to start with Amazon’s best-selling items in a certain category. From there, you’ll start exploring that category’s sub-categories and narrow down on a niche.
When you check out Amazon’s best-sellers list, you might also look at the “Customers also bought” section to get ideas for similar products.
Once you make a list of items, check Google keyword planner to see whether those products have search volume, which indicates a level of demand. Alternatively, you could use Sellerapp’s product intelligence tool specifically for Amazon. Sellerapp offers a seven-day free trial, which allows you to begin investigating popular products on Amazon via keywords to further narrow your list.
2. Use a chrome extension to research products in a niche market.
There are two popular chrome extensions to help you conduct keyword research on Amazon: Jungle Scout and Unicorn Smasher.
Jungle Scout shows you monthly sales volumes on products and displays products with low competition. It allows you to save products to track them over time. Undoubtedly, Jungle Scout’s analytics can help you quickly and efficiently narrow down on a product or an industry in which you could excel. However, Jungle Scout is relatively pricey, particularly if you’re just starting out.
Unicorn Smasher is Jungle Scout’s free alternative. While the data isn’t as accurate as Jungle Scout, and it lacks some of Jungle Scout’s sophisticated features, it’s nonetheless a helpful free option to gather estimated monthly sales and estimated monthly sales revenue for Amazon products.
Some other popular product research extensions include:
You can find gaps by using one of the previously mentioned chrome extensions to research products with high monthly sales volume and low competition. However, you might also come across a gap on Amazon through a simple organic search.
For instance, when I search “perfume” there are over 30,000 results, but when I search “natural vegan amber perfume” there are only 247.
This is a simplified example, but sometimes you need to narrow down your product search to find a place to make an impact on Amazon. Plenty of people are already selling perfume, but there might be a certain scent, style, or feature that is missing on the site.
Alternatively, you can find a gap in the market by reading customer reviews in your product market niche. Even if there are plenty of products similar to yours already, you might find that customers are unsatisfied with the current brands and want something you can provide.
4. Find products that don’t have too much competition.
If you’re trying to sell a product that currently has 100,000 search results, it’s likely going to be very difficult to stand out against the competition and achieve the sales you want. Fortunately, it’s relatively easy to find a niche within a larger market that has less competition, which ensures your product is more easily found by searchers. Best of all, those searchers are likely more willing to buy your product, since they needed to search for a more specific keyword.
For instance, let’s say you want to sell cookbooks. The search term “Cookbooks” has over 70,000 results.
Alternatively, the search term “Cookbooks for instant pot cooking” has only 3,000 results. Not only is your product more likely to become a best-seller in this category, but it’s a more targeted keyword. If someone searches “Cookbooks” they could mean anything from “Kids cookbooks” to “Holiday cookbooks.” If someone searches “Cookbooks for instant pot cooking,” however, they’re more likely to be satisfied with your product.
5. Search for categories with at least three results with Best Sellers Rank (BSR).
Amazon’s Best Sellers Rank (BSR) reflects both recent and historical sales of an item. A high BSR indicates that the product is in-demand, which is critical to know as a seller.
If you find just one product in a category with a high BSR, and none of the other items are best-sellers, it could be an indication that a single product is dominating the market. Instead, you want to target product categories that feature multiple items with a high BSR because it signifies demand in that area and allows room for your product to succeed.
For instance, let’s say you want to sell sports products, but you find “basketball” has only one item with a high BSR. However, upon further research, you find “football” as a category has multiple best-selling products on the first page.
As a new seller, I would prioritize selling footballs over basketballs since this research demonstrates a user’s willingness to peruse different footballs before purchasing one.
What to Sell on Amazon
Undoubtedly, you can obtain an impressive profit from selling products on Amazon, but it’s critical you’re able to offer unique, budget-friendly products with minimal competition to truly succeed on the site.
Over-saturation on the platform proves it’s more difficult than ever to stand out, so it’s not smart to sell on Amazon for the sake of selling on Amazon. Instead, you want to ensure you’re truly able to offer something of value.
If you have a product in mind, follow the tips above to refine your strategy and find a niche segment within a larger demographic. If you don’t have a product in mind, start with the basics: what are the most-searched keywords on Amazon, and which products are most successful?
Once you have a list based on keyword research, consider similar products the user might find more compelling or useful than the ones currently listed on Amazon.
Editor’s note: This post was originally published in March 2019 and has been updated for comprehensiveness.
Originally published Sep 13, 2022 7:00:00 AM, updated September 13 2022
On September 8, 2022, the Wordfence Threat Intelligence team became aware of an actively exploited zero-day vulnerability being used to add a malicious administrator user to sites running the WPGateway plugin. We released a firewall rule to Wordfence Premium, Wordfence Care, and Wordfence Response customers to block the exploit on the same day, September 8, 2022.
Sites still running the free version of Wordfence will receive the same protection 30 days later, on October 8, 2022. The Wordfence firewall has successfully blocked over 4.6 million attacks targeting this vulnerability against more than 280,000 sites in the past 30 days.
The WPGateway plugin is a premium plugin tied to the WPGateway cloud service, which offers its users a way to setup and manage WordPress sites from a single dashboard. Part of the plugin functionality exposes a vulnerability that allows unauthenticated attackers to insert a malicious administrator.
We obtained a current copy of the plugin on September 9, 2022, and determined that it is vulnerable, at which time we contacted the plugin vendor with our initial disclosure. We have reserved vulnerability identifier CVE-2022-3180 for this issue.
As this is an actively exploited zero-day vulnerability, and attackers are already aware of the mechanism required to exploit it, we are releasing this public service announcement (PSA) to all of our users. We are intentionally withholding certain details to prevent further exploitation. As a reminder, an attacker with administrator privileges has effectively achieved a complete site takeover.
Indicators of compromise
If you are working to determine whether a site has been compromised using this vulnerability, the most common indicator of compromise is a malicious administrator with the username of rangex.
If you see this user added to your dashboard, it means that your site has been compromised.
Additionally, you can check your site’s access logs for requests to //wp-content/plugins/wpgateway/wpgateway-webservice-new.php?wp_new_credentials=1
If these requests are present in your logs, they indicate that your site has been attacked using an exploit targeting this vulnerability, but do not necessarily indicate that it has been successfully compromised.
Conclusion
In today’s post, we detailed a zero-day vulnerability being actively exploited in the WPGateway plugin.
Wordfence Premium, Wordfence Care, and Wordfence Response customers received a firewall rule on September 8, 2022, protecting against this vulnerability, while sites still using the free version of Wordfence will receive the same protection 30 days later, on October 8, 2022.
If you have the WPGateway plugin installed, we urge you to remove it immediately until a patch is made available and to check for malicious administrator users in your WordPress dashboard.
If you know a friend or colleague who is using this plugin on their site, we highly recommend forwarding this advisory to them to help keep their sites protected, as this is a serious vulnerability that is actively being exploited in the wild. Please help make the WordPress community aware of this issue.
If you believe your site has been compromised as a result of this vulnerability or any other vulnerability, we offer Incident Response services via Wordfence Care. If you need your site cleaned immediately, Wordfence Response offers the same service with 24/7/365 availability and a 1-hour response time. Both these products include hands-on support in case you need further assistance.
Our investigation is ongoing, and we will provide more information in an additional blog post when it becomes available.
Special thanks to Threat Intelligence Lead Chloe Chamberland for spotting this exploit in the wild.
It’s been a few months in the making, but it’s finally here – our most exciting release (yet again!) of Shield Security for WordPress.
This release is absolutely packed with goodies and our headline feature – integration with CrowdSec – deserves an article all to itself.
Here you’ll discover all the exciting things we’ve packed into ShieldPRO v16 and why you should be upgrading as soon as it’s out.
Let’s dig into all the new goodies…
#1 Partnership with CrowdSec for Crowd-Sourced IP Intelligence
This is, to our mind, one of the most exciting developments for WordPress security for a very long time.
We’ve wanted to achieve this level of protection against bots for years, as we firmly believe that good WordPress security starts with intelligent blocking malicious IP addresses.
Shield does an effective job of this already with its automatic block list system, but we’ve now achieved group intelligence so all WordPress sites running on Shield will benefit from the experiences of all the other websites running Shield.
IP Blocking has been a part of ShieldPRO, practically from the outset. It’s core to our WordPress security philosophy.
With such a long-standing feature, you can imagine that the knowledge and experience used to create that original system isn’t as thorough as it is today. We’ve come a long way, I can promise you.
This release, spurred on by the new CrowdSec integration, sees the much-needed overhaul of our IP management system. It’s smarter and more versatile, and altogether much faster!
Shield must lookup a visitor’s IP address on every single request to a WordPress site. If we can improve the speed of that lookup, we improve Shield performance overall.
#3 Improved UI
Shield has a number of different subsystems, many of which are related. The scan results page is linked to the scanner configuration page, for example.
To-date when you wanted to view any section of the plugin, it would reload the entire page. We’ve done some work to reduce full page reloads so that you can stay “where you are” while viewing the contents of another page.
In particular we’re referring to “Configuration” pages. Links to such areas will now open in an overlay, letting you keep your current page active while you review and adjust settings.
Another UI enhancement is a new title bar across every page of the plugin, letting you see more clearly where you are, along with important links to help resources.
This title bar also includes our brand new “super search box”…
#4 Shield’s Super Search Box
We mentioned UI improvements already, but this deserves a section all to itself.
To say Shield is a large plugin is understating it. There are many options pages, as well tools, tables, data, and charts etc.
Finding your way around can be a bit tricky. Since we built it, we know it inside out. But for everyone that uses it as a tool to protect their sites, it’s not always obvious where to go to find the “thing” you need.
No longer!
With Shield’s “Super Search Box”, you can find almost anything you need, and jump directly to it. Currently you can search for:
Specific configuration options
Tools such as Import/Export, Admin Notes, Debug
Logs such as Activity Logs and Traffic Logs
IP Rules
IP addresses – it’ll open a popup to review the data Shield holds on any particular IP
External links such as Shield’s homepage, Facebook page, helpdesk, crowdsec etc.
We’ll develop this a bit more over time as we get feedback from you on what you’d like to see in there.
#5 Lighter, Faster Scan Results Display
Shield’s scans can turn up a lot of results and some customers have reported trouble on some servers with limited resources.
We’ve redesigned how the scan results are built, so it’s faster and lighter on both your browser and the WordPress server.
#6 Improved Human SPAM Detection
After working with a customer on some issues she faced with Human SPAM, we’ve developed enhancements to how Shield will detect repeated human spam comments.
For example, a SPAMer may post a comment and trigger our human SPAM scanner. But then they’ll fire off more comments which might bypass the same scanner. We’ll now use previous SPAM detections by Shield to inform future comments, too.
We also squashed a bug where Shield wasn’t properly honouring the “disallowed keywords” option built into WordPress itself.
#7 Custom Activity Logs and Events
Shield covers a lot of areas when it comes to monitoring events that happen on a WordPress site. But we typically don’t cover 3rd party plugins.
So, based on the feedback from a number of interested customers, we’ve added the ability for any PHP developer to add custom events to Shield’s Activity Logs.
When might you find that useful?
You could, for example, track WooCommerce orders, or you could be facing a particularly menacing visitor that repeats an undesireable action on your site that’s not covered by Shield, and decide to block their IP.
You can do whatever you want with this, though you should always take care when allocating offenses to actions as you may inadvertently block legitimate users.
#8 All-New Guided Setup Wizard
When first installing a platform like Shield Security for WordPress, it can be a little overwhelming. Shield is a large plugin, with many features, tools and options.
We’ve had a “Welcome Wizard” in Shield for a while, but it was a little rough around the edges. For this release we decided to revamp it and provide a new guided setup wizard, helping newcomers get up-to-speed more quickly.
Anyone can access the Guided Setup from the Super Search Box (search: “Wizard”), or from the Shield > Tools menu.
A Change To Minimum Supported WordPress Version
We try to make Shield Security as backward-compatible as possible, while it makes sense to do so.
However, this means that our code development and testing must reflect this and means that the burden of support increases the farther back we support older versions.
Our Telemetry data suggests that there are no WordPress sites below version 4.7 running the Shield plugin. Of course, we can only go on what data has been sent to us. But we have to draw the line somewhere, and with Shield v16, we’re drawing the line at WordPress 4.7.
As more data comes through and time marches on, we’ll gradually increase our minimum requirements so we strongly suggest you keep your WordPress sites, and hosting platforms as up-to-date as possible.
Comments, Feedback and Suggestions
A lot of work has gone into this release that will, we hope, improve security for all users by making it much easier to see what’s going on and what areas need improved. The Security Rules Engine is one of our most exciting developments to-date and we can hardly wait to get the first iteration into your hands and start further development on it.
As always, we welcome your thoughts and feedback so please do feel free to leave your comments and suggestions below.
ShieldPRO 16.1.0 for WordPress is a major release packed with many changes and improvements, including UI enhancement, adding integration with CrowdSec and the ability to permanently block IP any much more.
This guide outlines what have been added/removed, changed, or improved and what fixes we’ve made.
Firstly, we’re going to explain what major changes are made and which options you’d need to review.
With the CrowdSec integration, your WordPress sites will have access to intelligence about malicious IP addresses before they’ve ever accessed your website. (This intelligence will have already been gathered for you by other websites.)
This reduces that “window” available to malicious bots to zero.
The settings can be found under the IP Blocking section:
There are 2 options available
CrowdSec IP Blocking – how Shield should block requests from IP addresses found on CrowdSec’s list of malicious IP addresses.
CrowdSec Enroll ID – link site to your CrowdSec console by providing your Enroll ID.
There is now the option to log custom events to Shield’s Activity Log. It’s impossible that Shield can log every possibly event for every plugin and scenario, so you can now add logging for all your desired site events. This is an advanced option and will require professional software development experience to implement.
Logging: App Password Creation
Shield now captures creation of new Application Passwords in the Activity Log.
Shield’s Super Search Box
This search box will look for almost anything you need and provide you with links directly to the item in question.
Currently you can search for:
Specific configuration options
Tools such as Import/Export, Admin Notes, Debug
Logs such as Activity Logs and Traffic Logs
IP Rules
IP addresses – it’ll open a popup in-situ to review the data Shield holds on any particular IP
External links such as Shield’s homepage, Facebook page, helpdesk, CrowdSec etc.
The Super Search Box is accessible and visible from every page inside the plugin.
For whitelisted IP addresses, there are no restrictions for the user related with that IP whatsoever – none of the setting will apply to that IP, including the hiding login URL.
We added a special notice for a user with a whitelisted IP:
Changes
Change 1: Improved UI
We’ve done some work to reduce full page reloads so that you can stay “where you are” while viewing the contents of another page.
In particular we’re referring to “Options/Configuration” pages. Links to such areas will now open in an overlay, letting you keep your current page active while you review and adjust settings.
Example
Also, IP analysis dialog now opens in an overlay, for example:
Another UI enhancement is a new top title bar across every page of the plugin, letting you see more clearly where you are and with some important links to help and other resources.
Example
Change 2: Completely New IP Rules and Blocking Engine
This release, spurred on by our CrowdSec integration, sees the much-needed overhaul of our IP management system. It’s smarter and more versatile and altogether much faster.
We also made some UI enhancements on the Management & Analysis section:
“Manage IP” section is renamed to “IP Rules”
IP blocking and bypass list are merged and a new table is used now
IP Analysis dialog is now separated and can be loaded for each IP directly from within IP Rules, Activity Log, and Traffic Log. Example, loading from within IP Rules:
“Reset” option added into the IP analysis dialog
Manual adding IP to the block or bypass list is merged now and can be accessed from within “Add New IP” option:
Manually or auto blocked IP can be now permanently blocked
You can do this by manually adding IP to the block list or directly from within IP analysis dialog
Change 3: Improved Build Custom Charts option
The Shield event(s) are now displayed in a form of list. Selecting desired events is much easier now.
Improvements
For 16.1.0 release we’ve made the following improvements
Improved and Faster Scan Results Display
We’ve redesigned how the scan results are built so it’s faster and lighter on your browser and on the server itself.
Eliminated errors and slow processing when displaying scan results pages for large datasets. Shield now uses highly optimised queries to request only the records required to display the current table page.
Improved Human SPAM Detection We’ve added some enhancements on how Shield will detect repeated human spam comments.
We also squashed a bug where Shield wasn’t properly honouring the “disallowed keywords” option built into WordPress itself.
A change to minimum supported WordPress version: 4.7 Based on Shield telemetry data, we’re pushing our minimum supported WordPress version up to 4.7. We’ll continue to push this upwards as usage data suggests it make sense to do so.
Protection Against Unauthorised Deactivation The Security Admin feature that protects against unauthorised deactivation has been further strengthened with offenses.
Shield Navigation Bar Shield offer a much better navbar on the dashboard with built-in search, helpdesk links and updates.
Removed Options
For 16.1.0 release we removed the following options
Auto Block Expiration (under Config > IP Blocking section) we removed “1 minute” option.
Leading Schema Firewall Rule This rules flags too many false positives for members.
Fixes
For 16.1.0 release we’ve made various fixes
Mitigate a fatal error caused by the latest wpForo plugin passing NULL to locale filters.
Bug when specifying a particular list when adding/removing an IP address using WP-CLI.
Shield no longer attempts to solve the issue of invalid ‘from’ email addresses on a WordPress site.